OttLite 490G59 Instrucciones de operación
- Tipo
- Instrucciones de operación

OttLite LED Flip Light
Lampe pliable à DEL OttLite
Lámpara con convertor OttLite LED
49039C 49080C 49021C 490009 490G59 49000C 459PN9
490WBC 49008C 49090C 471CMC 471KTC 471TUC 47147C
OttLite LED Flip Light
Lampe pliable à DEL OttLite
Lámpara con convertor OttLite LED
49039C 49080C 49021C 490009 490G59 49000C 459PN9
490WBC 49008C 49090C 471CMC 471KTC 471TUC 47147C
CDO-006 ACDL133 INS150169 REV050415
CDO-006 ACDL133 INS150169 REV050415
CONGRATULATIONS!
You’ve purchased the nest in natural lighting
technology with your new OttLite® product.
PRODUCT REGISTRATION FORM
Please complete the enclosed Product
Registration Form and return it today by mail,
or register online by going to:
OttLite.com/warranty.
1. Remove product from the package.
2. Install three (3) AAA batteries (not included)
per BATTERY INSTALLATION/REPLACEMENT
section.
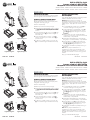
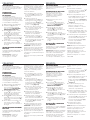
3. To turn the light ON, ip open cover (A). This
will release switch (B) and turn the light on
automatically.
4. To turn the light OFF, close the cover (A)
until it is secured in place and switch (B) is
pushed down.
5. To attach to a belt or strap, hold open clip
(E) and slide the light over the belt or strap.
BATTERY INSTALLATION/
REPLACEMENT
Your OttLite® LED Flip Light is powered by 3 AAA
batteries. Batteries are not included.
Warning: Keep away from children. If
swallowed, promptly see doctor. Do not install
backwards, charge, put in re or mix with other
battery types – may explode or leak causing
injury.
1. To install batteries, make sure cover (A) is
closed and the light is facing down.
2. Open the battery compartment cover (C)
by sliding it away from the bottom of the
light (Figure 1), then swing the cover open
(Figure 2).
3. Using a clean dry cloth, wipe the battery
contacts and also the contacts on the inside
of the battery compartment.
4. Install the 3 AAA batteries as indicated by
the graphic inside the battery compartment.
5. Swing battery cover (C) down then push
it toward the bottom of the light to engage
tabs (D) (Figure 3) and fully close.
6. Test battery installation by briey turning on
the light.
Notice: Only replace batteries as a
simultaneous set and do not mix with older
batteries. Remove batteries if consumed or if
the light has not been in use for a long period
of time.
Enjoy your OttLite® LED Flip Light!
CONGRATULATIONS!
You’ve purchased the nest in natural lighting
technology with your new OttLite® product.
PRODUCT REGISTRATION FORM
Please complete the enclosed Product
Registration Form and return it today by mail,
or register online by going to:
OttLite.com/warranty.
1. Remove product from the package.
2. Install three (3) AAA batteries (not included)
per BATTERY INSTALLATION/REPLACEMENT
section.
3. To turn the light ON, ip open cover (A). This
will release switch (B) and turn the light on
automatically.
4. To turn the light OFF, close the cover (A)
until it is secured in place and switch (B) is
pushed down.
5. To attach to a belt or strap, hold open clip
(E) and slide the light over the belt or strap.
BATTERY INSTALLATION/
REPLACEMENT
Your OttLite® LED Flip Light is powered by 3 AAA
batteries. Batteries are not included.
Warning: Keep away from children. If
swallowed, promptly see doctor. Do not install
backwards, charge, put in re or mix with other
battery types – may explode or leak causing
injury.
1. To install batteries, make sure cover (A) is
closed and the light is facing down.
2. Open the battery compartment cover (C)
by sliding it away from the bottom of the
light (Figure 1), then swing the cover open
(Figure 2).
3. Using a clean dry cloth, wipe the battery
contacts and also the contacts on the inside
of the battery compartment.
4. Install the 3 AAA batteries as indicated by
the graphic inside the battery compartment.
5. Swing battery cover (C) down then push
it toward the bottom of the light to engage
tabs (D) (Figure 3) and fully close.
6. Test battery installation by briey turning on
the light.
Notice: Only replace batteries as a
simultaneous set and do not mix with older
batteries. Remove batteries if consumed or if
the light has not been in use for a long period
of time.
Enjoy your OttLite® LED Flip Light!
ENGLISH
ENGLISH
E
C
D
Figure/Imagen 3
Figure/Imagen 1
Figure/Imagen 2
A
B
E
C
D
Figure/Imagen 3
Figure/Imagen 1
Figure/Imagen 2
A
B

FÉLICITATIONS!
Vous avez fait l’achat de la plus
innovatrice technologie naturelle et
de renom en éclairage avec votre
produit OttLite®.
FORMULAIRE
D’ENREGISTREMENT
DE PRODUIT
Compléter le formulaire
d’enregistrement qui est inclus pour
votre produit et nous le retourner dès
aujourd’hui par le retour du courrier,
ou enregistrez-vous en ligne en allant
à : www.OttLite.com/warranty.
1. Retirer la lampe de l’emballage.
2. Installer trois (3) AAA piles
(non incluses) tel qu’indiqué
dans la section INSTALLATION/
REMPLACEMENT DES PILES.
3. Pour ALLUMER la lampe, ouvrez
le rabat (A). Ceci déclenchera
l’interrupteur (B) et allumera
automatiquement la lampe.
4. Pour ÉTEINDRE la lampe, fermer le
rabat (A) jusqu’à ce qu’il soit bien
en place et que l’interrupteur (B)
soit abaissé.
5. Pour la xer à une ceinture ou à
une sangle, ouvrir le clip (E) et
glisser la lampe sur la ceinture ou
la sangle.
INSERTION/REMPLACEMENT
DES PILES
Votre Lampe pliable à DEL OttLite® est
alimentée par trois piles AAA. Piles
non incluses.
Avertissement : Garder hors
de la portée des enfants. En
cas d’ingestion, consulter
immédiatement un médecin. Ne pas
installer à l’envers, charger, jeter au
feu ou utiliser avec d’autres types
de piles - il existerait alors un risque
d’explosion ou de fuite pouvant
causer des brûlures.
1. Pour installer les piles, s’assurer
que le rabat (A) est fermé et que
le devant de la lampe fait face
vers le bas.
2. Ouvrir le couvercle du
compartiment des piles (F) en le
faisant glisser tout en l’éloignant
du bas de la lampe (Figure1),
puis faire basculer le couvercle en
position ouvert (Figure2).
3. À l’aide d’un chiffon propre et
sec, essuyer les contacts des piles
et les contacts à l’intérieur du
compartiment des piles.
4. Installer les 3 piles AAA tel
qu’indiqué sur le diagramme à
l’intérieur du compartiment.
5. Faire basculer le couvercle du
compartiment des piles (C) vers
le bas. Poussez-le ensuite vers le
bas de la lampe an d’enclencher
les languettes (D) et le fermer
complètement.
6. Tester l’installation des piles en
allumant brièvement la lampe.
CONSIGNE : Il est important de
remplacer toutes les piles en même
temps et de ne pas mélanger de
nouvelles et d’anciennes piles. Jeter
les piles si elles sont déchargées ou
si la lampe n’a pas été utilisée depuis
longtemps.
Protez de votre Lampe pliable à DEL
Ottlite® !
¡FELICITACIONES!
You’ve purchased the nest in natural
lighting technology with your new
OttLite® product.
FORMULARIO DE REGISTRO
Por favor, llene el Formulario
de Registro de Producto anexo
y envíelo por correo hoy mismo,
o regístrese en línea visitando:
OttLite.com/warranty.
1. Remueva el producto de su
embalaje.
2. Coloque tres (3) baterías AAA
(no se incluyen) de acuerdo con
la sección de INSTALACIÓN Y
RETIRO DE LAS BATERÍAS.
3. Para encender la luz, abra la
cubierta (A). Ésto activará el
interruptor (B) y encenderá la luz
automáticamente.
4. Para apagar la luz, cierre la
cubierta (A) hasta que este ja en
su lugar y el interruptor (B) quede
presionado.
5. Para sujetar la lámpara a una
correa o cinta, presione el clip (E)
y deslice la unidad por la correa
o cinta.
INSTALACIÓN Y RETIRO DE
LAS BATERÍAS
Su Lámpara con covertor OttLite LED
utiliza tres baterías AAA. Las baterías
no vienen incluidas.
Advertencia: Mantenga las baterías
fuera del alcance de los niños. Vea
a un médico inmediatamente si
se ingieren. No las instale al revés,
recarge, tire al fuego o mezcle
con otros tipos de baterías, ya que
podrían explotar o gotear, causando
daños.
1. Para instalar las baterías,
asegúrese de que la cubierta (A)
esté cerrada y que la lámpara
apunte hacia abajo.
2. Abra el compartimiento de las
baterías (C) deslizando la tapa en
dirección opuesta a la parte
inferior de la lámpara (Imagen 1),
y abriéndola como se indica en la
(Imagen 2).
3. Con una toalla limpia y seca,
limpie los contactos de las
baterías y también los contactos
dentro del compartimiento.
4. Instale las tres baterías AAA como
indica la gráca dentro dentro del
compartimiento de las baterías.
5. Cierre la tapa del compartimiento
de la batería (C) y deslícela hacia
la parte inferior de la lámpara
para encajar las lengüetas (D) y
cerrar el compartimiento.
6. Pruebe la luz enciendo
brevemente la lámpara.
NOTA: Reemplace las tres baterías
a la vez y no las mezcle con otras
baterías viejas. Remplace las
baterías al agotarse o si no ha
utilizado la lámpara por un periodo
prolongado de tiempo.
¡Disfrute su Lámpara con covertor
OttLite LED!
FRANÇAIS
FRANÇAIS
ESPAÑOL
ESPAÑOL
Transcripción de documentos
OttLite LED Flip Light Lampe pliable à DEL OttLite Lámpara con convertor OttLite LED 49039C 49080C 49021C 490009 490G59 49000C 459PN9 490WBC 49008C 49090C 471CMC 471KTC 471TUC 47147C ENGLISH A CONGRATULATIONS! You’ve purchased the finest in natural lighting technology with your new OttLite ® product. PRODUCT REGISTRATION FORM B E Warning: Keep away from children. If swallowed, promptly see doctor. Do not install backwards, charge, put in fire or mix with other battery types – may explode or leak causing injury. 1. Remove product from the package. 1. To install batteries, make sure cover (A) is closed and the light is facing down. 2. Open the battery compartment cover (C) by sliding it away from the bottom of the light (Figure 1), then swing the cover open (Figure 2). 3. To turn the light ON, flip open cover (A). This will release switch (B) and turn the light on automatically. Figure/Imagen 1 4. To turn the light OFF, close the cover (A) until it is secured in place and switch (B) is pushed down. 5. To attach to a belt or strap, hold open clip (E) and slide the light over the belt or strap. D Your OttLite ® LED Flip Light is powered by 3 AAA batteries. Batteries are not included. Please complete the enclosed Product Registration Form and return it today by mail, or register online by going to: OttLite.com/warranty. 2. Install three (3) AAA batteries (not included) per BATTERY INSTALLATION/REPLACEMENT section. C BATTERY INSTALLATION/ REPLACEMENT 3. Using a clean dry cloth, wipe the battery contacts and also the contacts on the inside of the battery compartment. 4. Install the 3 AAA batteries as indicated by the graphic inside the battery compartment. 5. Swing battery cover (C) down then push it toward the bottom of the light to engage tabs (D) (Figure 3) and fully close. 6. Test battery installation by briefly turning on the light. Figure/Imagen 2 Notice: Only replace batteries as a simultaneous set and do not mix with older batteries. Remove batteries if consumed or if the light has not been in use for a long period of time. Figure/Imagen 3 Enjoy your OttLite ® LED Flip Light! CDO-006 ACDL133 INS150169 REV050415 OttLite LED Flip Light Lampe pliable à DEL OttLite Lámpara con convertor OttLite LED 49039C 49080C 49021C 490009 490G59 49000C 459PN9 490WBC 49008C 49090C 471CMC 471KTC 471TUC 47147C ENGLISH A CONGRATULATIONS! You’ve purchased the finest in natural lighting technology with your new OttLite ® product. PRODUCT REGISTRATION FORM B E Warning: Keep away from children. If swallowed, promptly see doctor. Do not install backwards, charge, put in fire or mix with other battery types – may explode or leak causing injury. 1. Remove product from the package. 1. To install batteries, make sure cover (A) is closed and the light is facing down. 2. Open the battery compartment cover (C) by sliding it away from the bottom of the light (Figure 1), then swing the cover open (Figure 2). 3. To turn the light ON, flip open cover (A). This will release switch (B) and turn the light on automatically. Figure/Imagen 1 4. To turn the light OFF, close the cover (A) until it is secured in place and switch (B) is pushed down. 5. To attach to a belt or strap, hold open clip (E) and slide the light over the belt or strap. D Your OttLite ® LED Flip Light is powered by 3 AAA batteries. Batteries are not included. Please complete the enclosed Product Registration Form and return it today by mail, or register online by going to: OttLite.com/warranty. 2. Install three (3) AAA batteries (not included) per BATTERY INSTALLATION/REPLACEMENT section. C BATTERY INSTALLATION/ REPLACEMENT 3. Using a clean dry cloth, wipe the battery contacts and also the contacts on the inside of the battery compartment. 4. Install the 3 AAA batteries as indicated by the graphic inside the battery compartment. 5. Swing battery cover (C) down then push it toward the bottom of the light to engage tabs (D) (Figure 3) and fully close. 6. Test battery installation by briefly turning on the light. Figure/Imagen 2 Figure/Imagen 3 Notice: Only replace batteries as a simultaneous set and do not mix with older batteries. Remove batteries if consumed or if the light has not been in use for a long period of time. Enjoy your OttLite ® LED Flip Light! CDO-006 ACDL133 INS150169 REV050415 FranÇais FÉLICITATIONS! Vous avez fait l’achat de la plus innovatrice technologie naturelle et de renom en éclairage avec votre produit OttLite ®. FORMULAIRE D’ENREGISTREMENT DE PRODUIT Compléter le formulaire d’enregistrement qui est inclus pour votre produit et nous le retourner dès aujourd’hui par le retour du courrier, ou enregistrez-vous en ligne en allant à : www.OttLite.com/warranty. 1. Retirer la lampe de l’emballage. 2. Installer trois (3) AAA piles (non incluses) tel qu’indiqué dans la section INSTALLATION/ REMPLACEMENT DES PILES. 3. Pour ALLUMER la lampe, ouvrez le rabat (A). Ceci déclenchera l’interrupteur (B) et allumera automatiquement la lampe. 4. Pour ÉTEINDRE la lampe, fermer le rabat (A) jusqu’à ce qu’il soit bien en place et que l’interrupteur (B) soit abaissé. 5. Pour la fixer à une ceinture ou à une sangle, ouvrir le clip (E) et glisser la lampe sur la ceinture ou la sangle. INSERTION/REMPLACEMENT DES PILES Votre Lampe pliable à DEL OttLite ® est alimentée par trois piles AAA. Piles non incluses. Avertissement : Garder hors de la portée des enfants. En cas d’ingestion, consulter EspaÑol immédiatement un médecin. Ne pas installer à l’envers, charger, jeter au feu ou utiliser avec d’autres types de piles - il existerait alors un risque d’explosion ou de fuite pouvant causer des brûlures. 1. Pour installer les piles, s’assurer que le rabat (A) est fermé et que le devant de la lampe fait face vers le bas. 2. Ouvrir le couvercle du compartiment des piles (F) en le faisant glisser tout en l’éloignant du bas de la lampe (Figure 1), puis faire basculer le couvercle en position ouvert (Figure 2). 3. À l’aide d’un chiffon propre et sec, essuyer les contacts des piles et les contacts à l’intérieur du compartiment des piles. 4. Installer les 3 piles AAA tel qu’indiqué sur le diagramme à l’intérieur du compartiment. 5. Faire basculer le couvercle du compartiment des piles (C) vers le bas. Poussez-le ensuite vers le bas de la lampe afin d’enclencher les languettes (D) et le fermer complètement. 6. Tester l’installation des piles en allumant brièvement la lampe. Consigne : Il est important de remplacer toutes les piles en même temps et de ne pas mélanger de nouvelles et d’anciennes piles. Jeter les piles si elles sont déchargées ou si la lampe n’a pas été utilisée depuis longtemps. Profitez de votre Lampe pliable à DEL Ottlite ® ! FranÇais FÉLICITATIONS! Vous avez fait l’achat de la plus innovatrice technologie naturelle et de renom en éclairage avec votre produit OttLite ®. FORMULAIRE D’ENREGISTREMENT DE PRODUIT Compléter le formulaire d’enregistrement qui est inclus pour votre produit et nous le retourner dès aujourd’hui par le retour du courrier, ou enregistrez-vous en ligne en allant à : www.OttLite.com/warranty. 1. Retirer la lampe de l’emballage. 2. Installer trois (3) AAA piles (non incluses) tel qu’indiqué dans la section INSTALLATION/ REMPLACEMENT DES PILES. 3. Pour ALLUMER la lampe, ouvrez le rabat (A). Ceci déclenchera l’interrupteur (B) et allumera automatiquement la lampe. 4. Pour ÉTEINDRE la lampe, fermer le rabat (A) jusqu’à ce qu’il soit bien en place et que l’interrupteur (B) soit abaissé. 5. Pour la fixer à une ceinture ou à une sangle, ouvrir le clip (E) et glisser la lampe sur la ceinture ou la sangle. INSERTION/REMPLACEMENT DES PILES Votre Lampe pliable à DEL OttLite ® est alimentée par trois piles AAA. Piles non incluses. Avertissement : Garder hors de la portée des enfants. En cas d’ingestion, consulter ¡FELICITACIONES! You’ve purchased the finest in natural lighting technology with your new OttLite ® product. FORMULARIO DE REGISTRO Por favor, llene el Formulario de Registro de Producto anexo y envíelo por correo hoy mismo, o regístrese en línea visitando: OttLite.com/warranty. 1. Remueva el producto de su embalaje. 2. Coloque tres (3) baterías AAA (no se incluyen) de acuerdo con la sección de INSTALACIÓN Y RETIRO DE LAS BATERÍAS. 3. Para encender la luz, abra la cubierta (A). Ésto activará el interruptor (B) y encenderá la luz automáticamente. 4. Para apagar la luz, cierre la cubierta (A) hasta que este fija en su lugar y el interruptor (B) quede presionado. 5. Para sujetar la lámpara a una correa o cinta, presione el clip (E) y deslice la unidad por la correa o cinta. INSTALACIÓN Y RETIRO DE LAS BATERÍAS Su Lámpara con covertor OttLite LED utiliza tres baterías AAA. Las baterías no vienen incluidas. Advertencia: Mantenga las baterías fuera del alcance de los niños. Vea a un médico inmediatamente si se ingieren. No las instale al revés, recarge, tire al fuego o mezcle con otros tipos de baterías, ya que podrían explotar o gotear, causando daños. 1. Para instalar las baterías, asegúrese de que la cubierta (A) esté cerrada y que la lámpara apunte hacia abajo. 2. Abra el compartimiento de las baterías (C) deslizando la tapa en dirección opuesta a la parte inferior de la lámpara (Imagen 1), y abriéndola como se indica en la (Imagen 2). 3. Con una toalla limpia y seca, limpie los contactos de las baterías y también los contactos dentro del compartimiento. 4. Instale las tres baterías AAA como indica la gráfica dentro dentro del compartimiento de las baterías. 5. Cierre la tapa del compartimiento de la batería (C) y deslícela hacia la parte inferior de la lámpara para encajar las lengüetas (D) y cerrar el compartimiento. 6. Pruebe la luz enciendo brevemente la lámpara. NOTA: Reemplace las tres baterías a la vez y no las mezcle con otras baterías viejas. Remplace las baterías al agotarse o si no ha utilizado la lámpara por un periodo prolongado de tiempo. ¡Disfrute su Lámpara con covertor OttLite LED! EspaÑol immédiatement un médecin. Ne pas installer à l’envers, charger, jeter au feu ou utiliser avec d’autres types de piles - il existerait alors un risque d’explosion ou de fuite pouvant causer des brûlures. 1. Pour installer les piles, s’assurer que le rabat (A) est fermé et que le devant de la lampe fait face vers le bas. 2. Ouvrir le couvercle du compartiment des piles (F) en le faisant glisser tout en l’éloignant du bas de la lampe (Figure 1), puis faire basculer le couvercle en position ouvert (Figure 2). 3. À l’aide d’un chiffon propre et sec, essuyer les contacts des piles et les contacts à l’intérieur du compartiment des piles. 4. Installer les 3 piles AAA tel qu’indiqué sur le diagramme à l’intérieur du compartiment. 5. Faire basculer le couvercle du compartiment des piles (C) vers le bas. Poussez-le ensuite vers le bas de la lampe afin d’enclencher les languettes (D) et le fermer complètement. 6. Tester l’installation des piles en allumant brièvement la lampe. Consigne : Il est important de remplacer toutes les piles en même temps et de ne pas mélanger de nouvelles et d’anciennes piles. Jeter les piles si elles sont déchargées ou si la lampe n’a pas été utilisée depuis longtemps. Profitez de votre Lampe pliable à DEL Ottlite ® ! ¡FELICITACIONES! You’ve purchased the finest in natural lighting technology with your new OttLite ® product. FORMULARIO DE REGISTRO Por favor, llene el Formulario de Registro de Producto anexo y envíelo por correo hoy mismo, o regístrese en línea visitando: OttLite.com/warranty. 1. Remueva el producto de su embalaje. 2. Coloque tres (3) baterías AAA (no se incluyen) de acuerdo con la sección de INSTALACIÓN Y RETIRO DE LAS BATERÍAS. 3. Para encender la luz, abra la cubierta (A). Ésto activará el interruptor (B) y encenderá la luz automáticamente. 4. Para apagar la luz, cierre la cubierta (A) hasta que este fija en su lugar y el interruptor (B) quede presionado. 5. Para sujetar la lámpara a una correa o cinta, presione el clip (E) y deslice la unidad por la correa o cinta. INSTALACIÓN Y RETIRO DE LAS BATERÍAS Su Lámpara con covertor OttLite LED utiliza tres baterías AAA. Las baterías no vienen incluidas. Advertencia: Mantenga las baterías fuera del alcance de los niños. Vea a un médico inmediatamente si se ingieren. No las instale al revés, recarge, tire al fuego o mezcle con otros tipos de baterías, ya que podrían explotar o gotear, causando daños. 1. Para instalar las baterías, asegúrese de que la cubierta (A) esté cerrada y que la lámpara apunte hacia abajo. 2. Abra el compartimiento de las baterías (C) deslizando la tapa en dirección opuesta a la parte inferior de la lámpara (Imagen 1), y abriéndola como se indica en la (Imagen 2). 3. Con una toalla limpia y seca, limpie los contactos de las baterías y también los contactos dentro del compartimiento. 4. Instale las tres baterías AAA como indica la gráfica dentro dentro del compartimiento de las baterías. 5. Cierre la tapa del compartimiento de la batería (C) y deslícela hacia la parte inferior de la lámpara para encajar las lengüetas (D) y cerrar el compartimiento. 6. Pruebe la luz enciendo brevemente la lámpara. NOTA: Reemplace las tres baterías a la vez y no las mezcle con otras baterías viejas. Remplace las baterías al agotarse o si no ha utilizado la lámpara por un periodo prolongado de tiempo. ¡Disfrute su Lámpara con covertor OttLite LED!-
 1
1
-
 2
2


OttLite 490G59 Instrucciones de operación
- Tipo
- Instrucciones de operación
en otros idiomas
- français: OttLite 490G59 Mode d'emploi
- English: OttLite 490G59 Operating instructions
Artículos relacionados
-
OttLite 290G59 Instrucciones de operación
-
-
-
-
-
-
-
-
-