Silvercrest 298375 El manual del propietario
- Categoría
- Cafeteras
- Tipo
- El manual del propietario

IAN 298375
ESPRESSO MACHINE
CAFETERA ESPRESSO SEM 1100 B4
ESPRESSO MACHINE
Operating instructions CAFETERA ESPRESSO
Instrucciones de uso

US - EN Operating instructions Page 1
US - ES Instrucciones de uso Página 29
Before reading, unfold the page containing the illustrations and familiarize yourself with all functions of the
device.
Antes de empezar a leer abra la página que contiene las imágenes y, en seguida, familiarícese con todas
las funciones del dispositivo.

A
B
w
q
0
9
8
7
2
1
e
t
r
zu i o
p
6543

SEM 1100 B4 US-EN │ 1 ■
Table of Contents
Introduction .......................................2
Warning types .....................................2
Safety instructions ..................................3
Additional safety instructions ....................................4
Important cord information .....................................6
Intended use .......................................7
Items supplied .....................................8
Unpacking ........................................8
Technical specifications ..............................8
Appliance description ...............................9
Temperature display ...............................10
First use ..........................................11
Operation ........................................12
Filling the water reservoir .................................... 12
Heating after a long time of inactivity / during first use .............. 12
Heating up before every use .................................. 14
Preparing espresso ......................................... 15
Preparing cappuccino ....................................... 17
Tips for the milk froth ........................................ 19
Cleaning and maintenance ..........................20
Cleaning the milk frother ..................................... 20
Cleaning the brew head ..................................... 21
Cleaning the accessories .................................... 22
Cleaning the appliance ...................................... 22
Descaling the appliance ..................................... 22
Storage ..........................................24
Troubleshooting ...................................24
Disposal .........................................26
3 year limited warranty ............................27
Distributor ........................................28
IB_298375_SEM1100B4_LB9.indb 1 13.12.17 16:37

SEM 1100 B4
■ 2 │ US-EN
Introduction
Congratulations on the purchase of your new appliance.
You have clearly decided in favor of a quality product. The oper-
ating instructions are part of this product. They contain important
information about safety, usage, and disposal. Before using the
product, please familiarize yourself with all operating and safety
instructions. Use the product only as described and for the spec-
ified range of applications. In addition, please pass these docu-
ments on, together with the product, to any future owner.
Warning types
The following warning types are used in these operating instruc-
tions:
This is the safety alert symbol. It is used to alert you to
potential injury hazards. Obey all safety messages that
follow this symbol to avoid possible injury and death.
DANGER indicates a hazardous situation that, if not avoided,
will result in death or serious injury.
WARNING indicates a hazardous situation that, if not avoided,
could result in death or serious injury.
CAUTION indicates a hazardous situation that, if not avoided,
could result in minor or moderate injury.
NOTICE indicates information that is considered important, but
not hazardous (e. g. messages related to property damage).
IB_298375_SEM1100B4_LB9.indb 2 13.12.17 16:37

SEM 1100 B4 US-EN │ 3 ■
Safety instructions
This section contains important safety instructions for using the ap-
pliance. This appliance complies with statutory safety regulations.
Improper use may result in personal injury and property damage.
IMPORTANT SAFETY INSTRUCTIONS
When using electrical appliances, basic safety precautions
should always be followed, including the following:
1. READ ALL INSTRUCTIONS BEFORE USE.
2. Do not touch hot surfaces. Use handles or knobs.
3. To protect against electric shock, do not immerse cord, plugs
or the appliance in water or other liquids.
4. Close supervision is necessary when any appliance is used
by or near children.
5. Unplug the appliance from the outlet when not in use and
before cleaning. Allow to cool before putting on or taking
off parts and before cleaning the appliance.
6. Do not operate any appliance with a damaged cord or plug
or after the appliance malfunctions or has been damaged in
any manner. Return the appliance to the nearest authorized
service provider for examination, repair or adjustment.
7. The use of accessory attachments not recommended by the
appliance manufacturer may result in fire, electric shock, or
injury to persons.
8. Do not use the appliance outdoors.
9. Do not let cord hang over the edge of table or counter, or
touch hot surfaces.
10. Do not place on or near a gas or electric burner, or in a
heated oven.
IB_298375_SEM1100B4_LB9.indb 3 13.12.17 16:37

SEM 1100 B4
■ 4 │ US-EN
11. To disconnect the appliance, turn the control to "OFF", then
pull the plug from the wall outlet.
12. Do not use the appliance for anything other than its intended
use.
13. Scalding may occur if the lid is removed during the brewing
cycles.
SAVE THESE INSTRUCTIONS
FOR HOUSEHOLD USE ONLY.
Additional safety instructions
► If any liquid gets into the housing, unplug the appliance
immediately and have it repaired by a qualified technician.
► Risk of burns! During use, some parts become very hot!
► Hot vapor plumes are formed when the product is in use.
Take care to ensure that you do not scald yourself!
Keep a safe distance away from the steam.
► Do not attempt to open the housing of the appliance.
This is unsafe and invalidates the warranty.
► Before changing accessories or other parts that are in motion
during operation, the appliance must be turned off and dis-
connected from the power supply.
IB_298375_SEM1100B4_LB9.indb 4 13.12.17 16:37

SEM 1100 B4 US-EN │ 5 ■
► Do not use the appliance in direct sunlight or near appliances
generating heat!
► Defective components must always be replaced with original
replacement parts. Compliance with safety requirements can
only be guaranteed if original replacement parts are used.
► Protect the appliance from moisture and penetration of liquids.
► Protect the appliance against knocks, dust, chemicals, ex-
treme temperatures, etc. and keep it away from sources of
heat (ovens, radiators).
► Do not use an external timer switch or a separate remote
control system to operate the appliance.
► Do not operate the appliance in rooms where the tempera-
tures are below or around 0 °C. If the water in the pipes or
the water reservoir freezes, the appliance could be damaged.
Repairs to the appliance during the warranty period may only
be carried out by a customer service department authorized by
the manufacturer, otherwise no warranty claims can be consid-
ered for subsequent damage.
IB_298375_SEM1100B4_LB9.indb 5 13.12.17 16:37

SEM 1100 B4
■ 6 │ US-EN
Important cord information
This appliance has a polarized plug (one blade is wider than the
other). To reduce the risk of electric shock, there is only one way
this plug is intended to fit into a polarized outlet. If the plug does
not completely fit into the outlet, reverse the plug. If it still does not
fit, contact a qualified electrician. Do not attempt to modify the
plug in any way.
A short power supply cord (or detachable power supply cord)
should be used to reduce the risk resulting from becoming
entangled in, or tripping over a longer cord.
Longer detachable power supply cords or extensions cords may
be used if they are used carefully.
If a longer detachable power supply cord or extension cord is
used:
1) The marked electrical rating of the cord set or extension cord
should be at least as great as the electrical rating of the appli-
ance;
2) The cord should be arranged so that it will not drape over the
countertop or table where it can be pulled on by children or
tripped over unintentionally; and
3) If the appliance has a grounded plug, the cord set or extension
cord should also be a grounded 3-wire cord.
IB_298375_SEM1100B4_LB9.indb 6 13.12.17 16:37

SEM 1100 B4 US-EN │ 7 ■
Intended use
The appliance is designed exclusively for the preparation of
espresso/cappuccino and for frothing milk.
This appliance is intended solely for use in private households.
It is not suitable for commercial use!
This appliance is only intended for private use in enclosed, dry
spaces. It must not be used outdoors.
Use the appliance only with the original accessories.
Risk from improper use!
Risks may arise if the appliance is used for unintended purposes
and/or other types of use.
► Use the appliance exclusively for its intended purposes.
► Observe the procedures described in these operating instructions.
Claims of any kind for damage resulting from improper use,
incompetent repairs, unauthorized modifications, or the use of
non-approved spare parts will not be accepted. The operator
alone bears liability.
IB_298375_SEM1100B4_LB9.indb 7 13.12.17 16:37

SEM 1100 B4
■ 8 │ US-EN
Items supplied
The items supplied are:
▯ Espresso Machine
▯ Filter basket holder
▯ Large espresso filter basket
▯ Small espresso filter basket
▯ Measuring spoon with tamping tool
▯ Short operating instructions
▯ Operating instructions
Unpacking
1) Remove all parts of the appliance and these operating instruc-
tions from the box.
2) Remove all packaging material and any protective wrapping
or stickers.
3) Clean all components as described in the section "Cleaning
and maintenance". Ensure that all parts are completely dry.
Check the package for completeness and signs of visible dam-
age. If the delivery is incomplete or damage has occurred as
a result of defective packaging or during transport, contact the
customer service hotline (see "3 year limited warranty" section).
Technical specifications
Voltage 120 V ~, 60Hz
Power consumption 1100 W
Pump pressure approx. 1.5 MPa (15 bar)
IB_298375_SEM1100B4_LB9.indb 8 13.12.17 16:37

SEM 1100 B4 US-EN │ 9 ■
Appliance description
Figure A:
1 On/Off switch
2 Temperature indicator
3 "Espresso" button
4 "Steam" button
5 Green heating-up control light
6 Storage space
7 Steam control
8 Handle
9 Water reservoir
0 Milk frother
q Drip grate
w Drip tray
e Opening for the red float
r Brew head
t Red control light
Figure B:
z Portafilter
u Filter basket holder
i Large espresso filter basket
o Small espresso filter basket
pMeasuring spoon with tamping tool
IB_298375_SEM1100B4_LB9.indb 9 13.12.17 16:37

SEM 1100 B4
■ 10 │ US-EN
Temperature display
The temperature indicator 2 indicates how much the appliance
has heated up.
As soon as you turn the appliance on, it starts heating up until the
pointer is approximately in the middle between 176 °F (80 °C)
and " ".
When the pointer reaches the red portion of the scale, the
temperature is high enough to prepare an espresso. The green
heating-up control light 5 lights up.
If you press the "Steam" button 4, the green heating-up control
light 5turns off, and the appliance continues heating up until it
reaches the range on the scale between " " and " ".
Once the pointer reaches the range between " " and " ", the
temperature is high enough to produce steam. The green heating-
up control light 5 lights up.
IB_298375_SEM1100B4_LB9.indb 10 13.12.17 16:37

SEM 1100 B4 US-EN │ 11 ■
First use
1) Clean the filter basket holder u, the measuring spoon p, the
espresso filter basket i o, the drip grate q and the water
reservoir 9 as described in the section "Maintenance and
Care".
2) Place the appliance on a level and heat-resistant surface.
Ensure that a power socket is in the vicinity.
3) Insert the drip grate q so that the red float e can protrude
through the hole in the drip grate q.
4) Place the filter basket holder u in the appliance by inserting
the "INSERT" mark, which is located next to the brew head r,
into the appliance and then turning it clockwise until the handle
of the filter basket holder u is facing the front (marking "
LOCK").
5) Insert the plug into a power socket.
6) Proceed as follows before the first use, so as to clean the internal
pipelines: Allow sufficient water for about 5 cups of espresso
(about 3.38 fl oz [100 ml]) to flow through the appliance.
Refer to the section "Operation".
7) Let the appliance generate steam for about 30 seconds.
Refer to the section "Operation".
When using the appliance for the first time, it is possible that you
can hear the pump working, even though no water is coming out
of the appliance. If this is the case, turn the steam control 7 in the
direction of the "+", so that the air can escape from the pipes of
the appliance (the "Steam" button 4 is pressed). After approx.
20 seconds the air will have escaped, the noises disappear and
water flows from the appliance.
IB_298375_SEM1100B4_LB9.indb 11 13.12.17 16:37

SEM 1100 B4
■ 12 │ US-EN
Operation
Both the "Espresso" 3 and the "Steam" 4 buttons engage
when pressed in. If the button is pressed again, it is released.
Filling the water reservoir
Use only fresh drinking water for making espresso/cappuccino.
1) Pull the water reservoir 9 out and fill it with water:
Fill it with water to at least the Min marking.
Never fill it past the Max marking.
2) Push the water reservoir 9 back into the appliance.
Ensure that the hose is inside the water reservoir 9.
Heating after a long time of inactivity / during first use
If you have not used it for some time, preheat the appliance as
follows:
1) Fill the water reservoir 9 with tap water.
2) Place either the large i or the small espresso filter basket o
inside the filter basket holder u:
–Make sure that the small indentation on the large ior
small espresso filter basket o is located above the indenta-
tion on the filter basket holder u when inserted.
IB_298375_SEM1100B4_LB9.indb 12 13.12.17 16:37

SEM 1100 B4 US-EN │ 13 ■
–Then turn the large i or small espresso filter basket o
slightly to ensure it cannot fall out.
► Wait until the espresso filter basket io has cooled down
before taking it out!
► In order to remove the espresso filter baskets io from the fil-
ter basket holder u, turn the inserted espresso filter basketi
o until the indentation on the espresso filter basket io
is located directly above the indentation on the filter basket
holder u.
You can now remove the espresso filter basket io.
3) Place the filter basket holder u in the appliance by inserting
the "INSERT" mark, which is located at the side of the appli-
ance, into the appliance and then turning it clockwise until the
handle of the filter basket holder u is facing the front (marking
" LOCK").
4) Place a cup under the filter basket holder u.
5) Close the steam control 7 (turn it as far as it will go in the
direction of the "-" symbol).
6) Turn the appliance on with the On/Off switch 1.
7) The red control light t lights up. After a short time, the pointer
in the temperature indicator 2 will begin to rise.
8) As soon as the green heating-up control light 5 lights up,
press the "Espresso" button 3. Allow the water to flow for
about 1 minute.
IB_298375_SEM1100B4_LB9.indb 13 13.12.17 16:37

SEM 1100 B4
■ 14 │ US-EN
You may need to empty the cup in between. Interrupt the process
by pressing the "Espresso" button 3. Empty the cup and press
the "Espresso" button 3 again so that water flows through the
appliance.
9) After about 1 minute, stop the pump by pressing the
"Espresso" button 3 again.
10) Wait until the green heating-up control light 5 lights up again.
The warming-up is concluded. You can now prepare espresso.
Heating up before every use
Before you can prepare an espresso or cappuccino, the appliance
must be heated up.
1) Turn the appliance on using the On/Off switch 1. The red
control light t lights up. Neither the "Espresso" 3 nor
the "Steam" 4 buttons should be pressed. Ensure that the
steam control 7 is turned towards "-" as far as possible.
2) Place the filter basket holder u in the appliance by inserting
the "INSERT" mark, which is located at the side of the appli-
ance, into the appliance and then turning it clockwise until the
handle of the filter basket holder u is facing the front (marking
" LOCK").
3) Press the "Espresso" button 3 so that the appliance draws
water from the water reservoir 9. As soon as water starts
exiting the openings in the filter basket holder, press the
"Espresso" button 3 again to stop the pump.
4) Wait until the green heating-up control light 5 lights up.
5) Press the "Espresso" button 3 again and allow hot water to
flow through for 20 seconds before stopping the pump again.
The preheating process is completed. You can now make an
espresso/cappuccino.
IB_298375_SEM1100B4_LB9.indb 14 13.12.17 16:37

SEM 1100 B4 US-EN │ 15 ■
Preparing espresso
Always ensure that the espresso filter basket i o is clean and
free of coffee powder residues.
1) When the appliance is heated up:
To prepare an espresso, place the small espresso filter basket
o into the filter basket holder u.To prepare two espressos,
place the large espresso filter basket i into the filter basket
holder u.
2) Fill the small espresso filter basket o with espresso powder
up to the Max marking. This corresponds to approx. 0.25 oz
(7 g) of powder or a level measuring spoon p.
Or:
Fill the large espresso filter basket i with espresso powder up
to the Max marking. This equates to about 0.25 oz + 0.25 oz
(7g + 7g) of powder or two level measuring spoons p.
3) Tamp down the espresso powder using the tamping tool on the
measuring spoon p. Add more espresso powder, if required,
until the espresso filter basket io is full up to the Max
marking. Tamp the coffee powder down once again.
Tamping of the coffee powder is an essential process for the
preparation of an espresso. If the espresso powder is compacted
very strongly, the espresso runs through more slowly and more
crema is generated. If the espresso powder is not as strongly
compacted, the espresso runs through more quickly and it creates
very little crema.
4) Place the filter basket holder u in the appliance at the "INSERT"
mark, then turn it clockwise until the handle of the filter basket
holder u is facing the front (marking " LOCK").
IB_298375_SEM1100B4_LB9.indb 15 13.12.17 16:37

SEM 1100 B4
■ 16 │ US-EN
5) Place one (or two) cup(s) under the filter basket holder
openings. We recommend that you rinse the cups out with
hot water beforehand, so that the espresso does not cool so
quickly. You can place the cups onto the storage space 6.
6) As soon as the green heating-up control light 5 lights up,
you can press down the "Espresso" button 3.
The espresso flows into the cup(s).
Never remove the filter basket holder u while the
espresso is coming out!
The resulting spray of hot espresso would lead to injury!
► Always check to make sure that the "Espresso" button 3
is not pressed before removing the filter basket holder u.
7) Once the cups are filled up to the required amount (about
0.68 fl oz [20 ml] per cup), press the "Espresso" button
3 to stop the water being pumped through.
You can now drink the espresso.
8) Turn the appliance off with the On/Off switch 1.
9) After every use, remove the used espresso powder from the
espresso filter basket i o. Remove the filter basket hold-
eru from the appliance. To do this, fold the portafilter z
upwards so that the espresso filter basket i o cannot fall
out of the filter basket holder u. Now empty the espresso
filter basket io by turning the filter basket holder u and
the blocked espresso filter basket io over and knocking
the espresso powder out. Always dispose of the espresso
powder in an environmentally friendly manner, e.g. with the
organic waste.
IB_298375_SEM1100B4_LB9.indb 16 13.12.17 16:37

SEM 1100 B4 US-EN │ 17 ■
► Clean the brew head r (where the hot water comes out) after
each use. See also the section "Maintenance and Care".
► Empty the drip tray w regularly, at the latest when the red
float e is visible in the hole of the drip grate q.
Preparing cappuccino
Be careful when working with steam for the milk froth
production!
The hot steam or hot splashes can lead to injuries!
► Always operate the steam control 7 slowly.
1) Fill a container for frothing (preferably made of stainless steel)
to one third with cold milk.
2) Ensure that the steam control 7 is closed (turn it as far as it
will go in the direction "-").
3) Push the milk frother 0 out to the side. Always hold it by the
handle 8.
4) Press the "Steam" button 4. Wait until the green heating-up
control light 5 lights up.
5) Hold an empty container under the milk frother 0. Slowly turn
the steam control 7 in the direction "+". Pressurized water/
spray is released from the nozzle. This cleans the nozzle and
the water circuit inside the appliance.
6) Wait 15 seconds and turn the steam control 7 towards "-"
until no more steam comes out of the nozzle. Pour out the
water in the container.
7) Now hold the frothing container in your hand to feel the milk
temperature and guide the nozzle of the milk frother 0 gently
into the milk. Hold the frothing container at a slight angle.
8) Slowly turn the steam control 7 in the direction "+".
IB_298375_SEM1100B4_LB9.indb 17 13.12.17 16:37

SEM 1100 B4
■ 18 │ US-EN
9) Move the frothing container around in a circular motion while
keeping the tip of the nozzle under the surface of the milk:
deep enough that the milk does not spray out, but shallow
enough to create a thick froth. Done properly, a deep buzzing
sound is audible.
10) As the milk froth rises, push the nozzle deeper into the milk to
froth up the next "layer" and to avoid a burnt taste in the froth.
11) Finally, insert the nozzle completely and close the steam
control 7 approximately halfway, so that the milk is heated.
Hold the frothing container at a slight angle, so that the milk
gently swirls around while it is being stirred with the nozzle.
12) Once the milk froth has reached the desired consistency and
temperature, turn the steam control 7 to off (up to the stop in
the direction of the "-").
13) Now you can remove the nozzle from the milk.
14) Press the "Steam" button 4.
For the preparation of cappuccino, always use bigger cups than
for espresso to leave space for the frothed milk.
15) When preparing cappuccino, proceed exactly as you would for
an espresso (see section "Preparing espresso": the preheating
is no longer necessary).
Allow the water to flow through for about twice as long as an
espresso (about 1.4 fl oz [40 ml]).
16) Turn the appliance off with the On/Off switch 1.
17) Now add the frothed milk into the previously prepared
espresso. The cappuccino is now ready. You can add sugar or
sprinkle it with cocoa powder according to taste.
Always clean the milk frother 0 after every use. See also the
section "Maintenance and Care".
IB_298375_SEM1100B4_LB9.indb 18 13.12.17 16:37

SEM 1100 B4 US-EN │ 19 ■
Tips for the milk froth
■ Generally, any type of milk can be frothed, including soy and
rice milk.
However, some types of milk can only be frothed to a certain
extent.
■ Low fat or skimmed milk does not burn as easily as whole
milk, however, a too low fat content adds to the possibility that
the milk will not be well frothed. Therefore use milk with a fat
content of 3.5% or 1.5%, if possible.
■ Well-cooled milk can be better frothed than less cold milk.
For the best results, use milk at a temperature of about 45 °F
(7 °C).
■ Do not froth the milk a second time, otherwise it may burn.
■ Allow frothed milk to stand for about 30 seconds before you
pour it over the espresso. This allows the larger bubbles to
burst; the still liquid milk sinks to the bottom. You can then pour
the fine froth onto the espresso.
IB_298375_SEM1100B4_LB9.indb 19 13.12.17 16:37

SEM 1100 B4
■ 20 │ US-EN
Cleaning and maintenance
► Before cleaning the appliance, disconnect the power plug from
the power outlet! There is a risk of electric shock!
► Always allow the appliance to cool down before you start to
clean it. Risk of burns!
► NEVER immerse the appliance in water or any other
liquid!
Cleaning the milk frother
Clean the milk frother after every use. Otherwise, germs could form.
Do not use abrasive or aggressive cleaning materials.
They may damage the surfaces.
1) Place an empty container under the milk frother 0.
2) Immediately after use, turn the steam control 7 to the "+"
position and allow the steam to escape for a few seconds.
3) Turn the steam control 7 off (as far as it will go in the direc-
tion ("-"), turn the appliance off and remove the plug from the
power socket.
4) Allow the nozzle to cool down.
5) Pull the casing of the milk frother 0 off (Figure 1) and clean it
thoroughly in warm water.
6) Wipe the nozzle under the casing with a damp cloth. If nec-
essary, add a small amount of mild detergent onto the cloth.
After cleaning with detergent, always wipe it off with a cloth
moistened with clean water. Ensure that there is no detergent
residue left on the nozzle.
IB_298375_SEM1100B4_LB9.indb 20 13.12.17 16:37

SEM 1100 B4 US-EN │ 21 ■
7) Push the casing back onto the nozzle (Figure 1).
Figure 1
Cleaning the brew head
Clean the brew head r after each use:
1) After you have prepared the espresso/cappuccino and
removed the filter basket holder u, wipe the entire surface of
the brew head r with a moistened cloth to remove all powder
residues.
2) Replace the filter basket holder u without the espresso filters
i o.
3) Place an empty cup under the filter basket holder u and press
the "Espresso" button 3 down until it clicks. Water flows
out of the brew head r rinsing out the remaining powder
residue.
4) After about 20 seconds, press the "Espresso" button 3
again and turn the appliance off with the On/Off switch 1.
5) Remove the filter basket holder u again.
IB_298375_SEM1100B4_LB9.indb 21 13.12.17 16:37

SEM 1100 B4
■ 22 │ US-EN
Cleaning the accessories
1) Clean the filter basket holder u, the two espresso filter baskets
i o, water reservoir 9, the measuring spoon p and the
drip grate q in warm water.
If you put detergent into the water, it may effect the taste of the
espresso. If the stains can only be removed with detergent, always
rinse the items afterwards with lots of clean water.
2) Dry all parts well.
3) The drip tray w is suitable for cleaning in the dish-
washer. However, always remove the red float from the
drip tray w before cleaning:
–To do this, remove the stoppers attached to the two retaining
bars to the side of the float.
–Pull the float from the retaining bars.
–Clean the float and stoppers.
–After cleaning the drip tray w, push the cleaned float back
onto the retaining bars and replace the stoppers.
Cleaning the appliance
Clean the appliance with a damp cloth. If necessary, use a little
detergent on the cloth.
Ensure that the appliance is completely dry before the next use.
Descaling the appliance
Descale the appliance regularly. The appliance should be des-
caled after about 1-2 months (at approx. 4 espresso preparations
per day). Descale the milk frother once a month if used regularly.
Depending on the hardness of the water in your area, this figure
may differ.
For descaling, use a commercially available descaler for espresso
machines.
Proceed as described in the instructions for usage of the descaler.
IB_298375_SEM1100B4_LB9.indb 22 13.12.17 16:37

SEM 1100 B4 US-EN │ 23 ■
If you do not have any descaling products, you can use citric acid
and proceed as follows:
1) Fill the water reservoir 9 to the MAX marking.
2) Dissolve 2 tablespoons (about 1.1 oz [30 grams]) of citric
acid (available in drugstores or specialty stores) in the water.
3) Replace the water reservoir 9 into the appliance.
4) Turn on the appliance using the On/Off switch 1. The steam
control 7 is closed.
5) Insert the filter basket holder u without the espresso filter
baskets i o back into the appliance and place a cup under
the filter basket holder u.
6) As soon as the green heat-up indicator light 5 lights up, press
the "Espresso" button 3 until it clicks.
7) Allow around 2 cups (approx. 8.5 fl oz [250 ml]) of water to
run through and then stop the process by pressing the "Espres-
so" button 3 again.
8) Hold a container under the milk frother 0.
9) Press the "Steam" button 4 down so that it clicks into place
and wait until the green heat-up control light 5 lights up.
Slowly turn the steam control 7 to the position "+".
Allow the appliance to create steam for about 2 minutes.
10) After 2 minutes, close the steam control 7, then press the
"Steam" button 4 again so that no more steam is generated.
11) Let the scaling agent take effect for about 15 minutes.
12) Repeat steps 6 - 11 three times.
13) Then press the "Espresso" button 3 down until it clicks, and
let the water run through until the water reservoir 9 is empty.
14) Rinse the water reservoir 9 with clean water and then fill it
with clean water up to the Max marking.
15) Press the "Espresso" button 3 down until it clicks into place
and wait until the green heat-up control light 5 lights up.
16) Allow the water to run through.
17) Repeat steps 14 - 16 three times.
IB_298375_SEM1100B4_LB9.indb 23 13.12.17 16:37

SEM 1100 B4
■ 24 │ US-EN
18) Refill the water reservoir 9 with water.
19) Push in the "Steam" button 4 so that it clicks into place.
20) Hold a container under the milk frother 0 and slowly turn
the steam control button 7 to the position "+" as soon as the
green heating-up control light 5 lights up.
21) After about 1 minute, close the steam control 7 (turn it in the
direction of the "-" until it stops), press the "Steam" button 4
again and turn off the appliance.
Storage
■ Store the cleaned appliance in a clean, dust-free, and dry
location.
Troubleshooting
Malfunction Cause Solution
The espresso no
longer flows out.
• The espresso powder is
too moist and/or com-
pressed too tightly.
• Re-prepare the espres-
so without compress-
ing the powder as
firmly;
if necessary, use new
powder.
• No water in the water
reservoir 9.
• Fill the water reser-
voir9with water.
• The holes of the filter
basket holder openings
are blocked.
• Clean the filter
basket holder u.
The espresso drips
over the edges of
the filter basket
holderu, not from
the openings.
• The filter basket holder
u is not correctly
inserted.
• Insert the filter basket
holder u correctly.
• The filter basket holder
openings are blocked.
• Clean the filter
basket holder u.
• There are espresso
powder residues on
the edges of the filter
basket holder u.
• Clean the espresso
powder residues from
the edges of the filter
basket holder u.
IB_298375_SEM1100B4_LB9.indb 24 13.12.17 16:37

SEM 1100 B4 US-EN │ 25 ■
Malfunction Cause Solution
The espresso is
cold.
• The appliance was not
preheated.• Preheat the appliance.
• The green heating-up
control light 5 is not
lit yet.
• Wait until the green
heating-up control
light 5 lights up.
• The cups were not pre-
warmed.• Pre-warm the cups.
The pump is unusu-
ally noisy.
• The water reservoir 9
is empty.
• Fill the water reser-
voir9 with water.
The crema is too
light (the espresso
runs out of the filter
basket holder u
quickly).
• Not enough espresso
powder.
• Use more espresso
powder.
• The espresso powder is
too coarsely ground.
• Use only espresso
powder that is spe-
cially prepared for
espresso.
The crema is too
dark (the espresso
runs out of the filter
basket holder u
slowly).
• Too much espresso
powder.
• Use less espresso
powder.
• The powder is too fine-
ly ground or moist.
• Use only espresso
powder that is spe-
cially prepared for
espresso.
• The filter basket is
blocked.• Clean the filter basket.
The milk does not
froth.
• The milk is not cold
enough.
• Use milk from the
refrigerator.
• The milk frother 0 is
dirty.
• Clean the milk frother
0.
IB_298375_SEM1100B4_LB9.indb 25 13.12.17 16:37

SEM 1100 B4
■ 26 │ US-EN
Disposal
Electrical appliances may not be thrown away as part of normal
household trash. If you can no longer use your electrical appli-
ance, dispose of it in accordance with the legal provisions appli-
cable in your state. This will ensure that old electrical appliances
are recycled and environmental pollution is kept to a minimum.
Further information about disposal is available on the Internet at
www.epa.gov.
The packaging is made of environmentally friendly
materials that can be disposed of at your local recy-
cling center.
Note the marking on the different packaging materials
and separate them as necessary. The packaging
materials are marked with abbreviations (b) and
numbers (a) with the following meanings:
–1–7: Plastics
–20–22: Paper and cardboard
–80–98: Composites
IB_298375_SEM1100B4_LB9.indb 26 13.12.17 16:37

SEM 1100 B4 US-EN │ 27 ■
3 year limited warranty
What does this warranty cover?
The warranty covers:
▯ Damage, breakage or inoperability due to defect.
▯ Damage not caused by normal wear and tear or failure to follow
the safety and maintenance instructions provided in the user
manual.
What is not covered by the warranty?
The warranty does not cover damage caused by:
▯ Normal wear and tear of the product, including fragile parts
(such as switches, glass, etc.);
▯ Improper use or transport;
▯ Disregarding safety and maintenance instructions;
▯ Accidents or acts of nature (e.g. lightning, fire, water, etc.);
▯ Tampering with the product (such as removing cover, unscrewing
screws etc.)
Consequential and incidental damages are also not covered under
this warranty. However, some states do not allow the exclusion or
limitation of incidental or consequential damages, so this limitation
or exclusion may not apply to you.
What is the period of coverage and warranty resolution?
The warranty is for 3 years from the date of purchase.
At our discretion, product will either be refunded or replaced.
What will we not do?
We will not:
▯ Start a new warranty period upon product exchange;
▯ Repair product.
IB_298375_SEM1100B4_LB9.indb 27 13.12.17 16:37

SEM 1100 B4
■ 28 │ US-EN
How to process the warranty?
To initiate, please:
▯ Call customer service at 1 (844) 543-5872
▯ Visit the Website Customer Service Platform at
www.lidl.com/contact-us
or
▯ Visit a LIDL store for further assistance
To ensure the quickest warranty return process, please have the
following available:
▯ The original sales receipt that includes the date purchased;
▯ The product and manual in the original package;
▯ A statement of the problem.
What must you do to keep the warranty in effect?
▯ Retain the original receipt;
▯ Follow all product instructions;
▯ Do not repair or modify the product.
How does state law relate to this warranty?
This warranty gives you specific legal rights, and you may also have
other rights which vary from state to state. All implied warranties
are limited by the duration and terms of this warranty. Some states
do not allow limitations on how long an implied warranty lasts, so
the above limitation may not apply to you.
Distributor
LIDL US LLC.
ARLINGTON
VA 22202
IB_298375_SEM1100B4_LB9.indb 28 13.12.17 16:37

SEM 1100 B4 US-ES │ 29 ■
Contenido
Introducción ......................................30
Tipos de advertencias ..............................30
Instrucciones de seguridad ..........................31
Instrucciones de seguridad adicionales ......................... 32
Información importante sobre el cable .......................... 34
Uso previsto ......................................35
Componentes incluidos .............................36
Desempaque .....................................36
Especificaciones técnicas ............................36
Descripción del dispositivo ..........................37
Pantalla de temperatura ............................38
Primer uso ........................................39
Operación ........................................40
Llenado del depósito de agua ................................ 40
Calentamiento después de un tiempo largo de
inactividad o durante el primer uso ............................. 40
Calentamiento antes de cada uso ............................. 43
Preparación de espresso ..................................... 44
Preparación de cappuccino .................................. 46
Sugerencias para espuma de leche ............................ 48
Limpieza y mantenimiento ..........................49
Limpieza del espumador de leche ............................. 49
Limpieza de la cabeza de infusión ............................. 51
Limpieza de los accesorios ................................... 52
Limpieza del dispositivo ..................................... 52
Eliminación de sarro del dispositivo ............................ 53
Almacenamiento ..................................55
Solución de problemas .............................55
Eliminación .......................................57
Garantía limitada de 3 años .........................58
Importador .......................................59
IB_298375_SEM1100B4_LB9.indb 29 13.12.17 16:37

SEM 1100 B4
■ 30 │ US-ES
Introducción
Felicidades por la compra de su nuevo dispositivo.
Evidentemente ha optado por adquirir un producto de calidad. El
instructivo de uso es parte de este producto. Contiene información
importante sobre seguridad, uso y eliminación. Antes de usar
el producto, familiarícese con todas las instrucciones de uso y
seguridad. Use el producto solamente como se describe y para la
variedad de aplicaciones especificadas. Asimismo, conserve estos
documentos y entréguelos, junto con el producto, a todo futuro
propietario.
Tipos de advertencias
Los siguientes tipos de advertencias se usan en este instructivo de
operación:
Este es el símbolo de alerta de seguridad. Se usa para
alertarle sobre peligros de lesiones potenciales. Obedez-
ca todos los mensajes de seguridad a continuación de
este símbolo para prevenir posibles lesiones y la muerte.
PELIGRO indica una situación peligrosa que, si no se evita, provo-
cará la muerte o lesiones graves.
ADVERTENCIA indica una situación peligrosa que, si no se evita,
podría provocar la muerte o lesiones graves.
PRECAUCIÓN indica una situación peligrosa que, si no se evita,
podría provocar lesiones leves o moderadas.
AVISO indica información que se considera importante, pero no
está relacionada con peligro (por ejemplo, mensajes relacionados
con daños materiales).
IB_298375_SEM1100B4_LB9.indb 30 13.12.17 16:37

SEM 1100 B4 US-ES │ 31 ■
Instrucciones de seguridad
Esta sección contiene instrucciones de seguridad importantes
para el uso del dispositivo. Este dispositivo cumple con las normas
de seguridad legales. El uso inadecuado puede provocar lesiones
personales y daños materiales.
INSTRUCCIONES DE SEGURIDAD
IMPORTANTES
Al usar dispositivos eléctricos, siempre deben observarse
precauciones básicas de seguridad como las siguientes:
1. LEA TODAS LAS INSTRUCCIONES ANTES DEL USO.
2. No toque las superficies calientes. Use asas o perillas.
3. Para protegerse contra descargas eléctricas, no sumerja el
cable, enchufe o el dispositivo en agua u otros líquidos.
4. Se requiere supervisión cercana cuando cualquier dispositivo
sea usado por o cerca de niños.
5. Desenchufe el dispositivo de la toma eléctrica cuando no lo
use y antes de limpiarlo. Deje que se enfríe antes de colocar
o retirar partes, y antes de limpiar el dispositivo.
6. No opere ningún dispositivo con el cable o clavija dañados
o después de que el mismo haya fallado o haya sido dañado
de alguna manera. Devuelva el dispositivo al proveedor de
servicios autorizado más cercano para que lo revise, repare
o ajuste.
7. El uso de accesorios no recomendados por el fabricante del
dispositivo puede provocar un incendio, descargas eléctricas
o lesiones a las personas.
8. No use el dispositivo en exteriores.
9. No permita que el cable cuelgue sobre el borde de una
mesa o barra, o que toque superficies calientes.
IB_298375_SEM1100B4_LB9.indb 31 13.12.17 16:37

SEM 1100 B4
■ 32 │ US-ES
10. No lo coloque sobre o cerca de un quemador de gas o
eléctrico, o en un horno caliente.
11. Para desconectar el dispositivo, coloque el control en la
posición "OFF" (APAGADO) y desenchufe la clavija de la
toma de corriente.
12. No use el dispositivo para ningún otro fin que no sea el
previsto.
13. Pueden ocurrir escaldaduras si la tapa se retira durante los
ciclos de preparación.
CONSERVE ESTE INSTRUCTIVO
EXCLUSIVO PARA USO DOMÉSTICO.
Instrucciones de seguridad adicionales
► Si algún líquido penetra en la carcasa, desenchufe de in-
mediato el dispositivo y pida a un técnico calificado que lo
repare.
► ¡Riesgo de quemaduras! ¡Algunas partes pueden calentarse
demasiado durante el uso!
► Cuando se usa el producto, se forman columnas de vapor.
¡Tenga cuidado para no quemarse con el vapor! Manténga-
se a una distancia segura del vapor.
► No intente abrir la carcasa del dispositivo. Esto es inseguro y
anula la garantía.
► Antes de cambiar cualquier accesorio o partes que se mue-
ven durante el funcionamiento, el dispositivo debe estar
apagado y desconectado de la fuente de alimentación.
IB_298375_SEM1100B4_LB9.indb 32 13.12.17 16:37

SEM 1100 B4 US-ES │ 33 ■
► ¡No use el dispositivo bajo la luz directa del sol o cerca de
dispositivos que generan calor!
► Los componentes defectuosos siempre deben reemplazarse
por refacciones originales. El cumplimiento de los requisitos
de seguridad solo puede garantizarse si se usan refacciones
originales.
► Proteja el dispositivo contra la humedad y la penetración de
líquidos.
► Proteja el dispositivo contra golpes, polvo, químicos, tempera-
turas extremas, etc. y manténgalo alejado de fuentes de calor
como hornos o radiadores.
► No use un temporizador externo o un sistema de control
remoto independiente para operar el dispositivo.
► No use el dispositivo en espacios donde las temperaturas son
inferiores o alrededor de 0 °C. Si el agua en los tubos o en
el depósito se congela, el dispositivo podría dañarse.
Solamente el departamento de servicio al cliente autorizado
por el fabricante debe reparar el dispositivo durante el periodo
de garantía; de lo contrario, ninguna reclamación de garantía
se tomará en cuenta para daños posteriores.
IB_298375_SEM1100B4_LB9.indb 33 13.12.17 16:37

SEM 1100 B4
■ 34 │ US-ES
Información importante sobre el cable
Este dispositivo tiene una clavija polarizada (una patilla es más
ancha que la otra). Para reducir el riesgo de descargas eléctricas,
solo hay una manera en que esta clavija puede introducirse en un
contacto polarizado. Si la clavija no se introduce por completo
en el contacto, inviértala. Si aun así no se introduce, póngase en
contacto con un electricista calificado. No intente modificar la
clavija de ningún modo.
Deberá usarse un cable de alimentación corto (o un cable de
corriente desprendible) para reducir el riesgo que resulta de
enredarse o tropezarse con un cable largo.
Pueden usarse cables de alimentación largos desprendibles o
extensiones si se usan con cuidado.
Si se usa un cable de alimentación más largo desprendible o una
extensión:
1) Las características eléctricas marcadas en el juego de cable
o extensión deberán ser por lo menos similares a las del
dispositivo;
2) El cable deberá ser tendido de tal manera que no cuelgue
sobre la barra o mesa donde pueda ser jalado por niños o
con el que pueda tropezarse involuntariamente; y
3) Si el dispositivo tiene un enchufe de tipo aterrizado, el juego
de cable o extensión también deberá ser un cable de tres
hilos de tipo aterrizado.
IB_298375_SEM1100B4_LB9.indb 34 13.12.17 16:37

SEM 1100 B4 US-ES │ 35 ■
Uso previsto
Este dispositivo está diseñado exclusivamente para preparar café
espresso y cappuccino y para formar espuma de leche.
Este dispositivo está diseñado exclusivamente para uso en hogares
privados.
¡No es adecuado para uso comercial!
Este dispositivo está diseñado exclusivamente para uso particular
en espacios cerrados y secos. No debe usarse al aire libre.
Opere el dispositivo solamente con los accesorios originales
incluidos.
¡Riesgos debido al uso inadecuado!
Pueden surgir riesgos si el dispositivo se utiliza para fines no
previstos u otros tipos de uso.
► Use el dispositivo exclusivamente para sus fines previstos.
► Siga los procedimientos descritos en este instructivo de uso.
No se aceptará ningún tipo de reclamación por el uso inadecuado,
reparaciones incompetentes, modificaciones no autorizadas, o
el uso de refacciones no autorizadas. El operador será la única
persona responsable.
IB_298375_SEM1100B4_LB9.indb 35 13.12.17 16:37

SEM 1100 B4
■ 36 │ US-ES
Componentes incluidos
Los componentes incluidos son:
▯ Cafetera Espresso
▯ Soporte de la canastilla para filtro
▯ Canastilla grande para filtro de espresso
▯ Canastilla pequeña para filtro de espresso
▯ Cuchara medidora con utensilio compactador
▯ Instructivo de uso rápido
▯ Instructivo de operación
Desempaque
1) Retire todas las partes del dispositivo y este instructivo de uso
de la caja.
2) Retire el material de empaque y cualquier película protectora.
3) Limpie todos los componentes como se describe en la sección
"Limpieza y mantenimiento". Asegúrese de que todas las partes
estén completamente secas.
Verifique que el paquete esté completo y no muestre signos
visibles de daño. Si la entrega está incompleta o dañada debido
al empaque defectuoso o durante el transporte, póngase en
contacto con la línea directa de Servicio al Cliente (consulte la
sección "Garantía limitada de 3 años").
Especificaciones técnicas
Voltaje 120V ~, 60Hz
Consumo de energía 1100W
Presión de la bomba aprox. 1.5 MPa (15 bar)
IB_298375_SEM1100B4_LB9.indb 36 13.12.17 16:37

SEM 1100 B4 US-ES │ 37 ■
Descripción del dispositivo
Figura A:
1 Interruptor de encendido/apagado
2 Indicador de temperatura
3 Botón "Espresso"
4 Botón "Vapor"
5 Luz de control de calentamiento color verde
6 Espacio para guardar
7 Control del vapor
8 Asa
9 Depósito de agua
0 Espumador de leche
q Rejilla de goteo
w Bandeja de goteo
e Abertura para flotador rojo
r Cabezal de infusión
t Luz de control roja
Figura B:
z Portafiltro
u Soporte de la canastilla para filtro
i Canastilla grande para filtro de espresso
o Canastilla pequeña para filtro de espresso
pCuchara medidora con utensilio compactador
IB_298375_SEM1100B4_LB9.indb 37 13.12.17 16:37

SEM 1100 B4
■ 38 │ US-ES
Pantalla de temperatura
El indicador de temperatura 2 indica cuánto se ha calentado el
dispositivo.
En cuanto se enciende el dispositivo, comienza a calentarse hasta
que el puntero está aproximadamente en medio entre 176 °F
(80 °C) y " ".
Cuando el puntero llega a la parte roja de la escala, la tempera-
tura es suficientemente alta para preparar un espresso. La luz de
control de calentamiento color verde 5 se ilumina.
Si presiona el botón "Vapor" 4, la luz de control de calenta-
miento color verde 5se apaga, y el dispositivo continúa calen-
tándose hasta que llega al rango de la escala entre " " y " ".
Una vez que el puntero llega al rango entre " " y " ", la tem-
peratura es suficientemente alta para producir vapor. La luz de
control de calentamiento color verde 5 se ilumina.
IB_298375_SEM1100B4_LB9.indb 38 13.12.17 16:37

SEM 1100 B4 US-ES │ 39 ■
Primer uso
1) Limpie el soporte de la canastilla para filtro u, la cuchara me-
didora p, la canastilla para filtro de espresso i o, la rejilla
de goteo q y el depósito de agua 9 como se describe en la
sección "Mantenimiento y cuidado".
2) Coloque el dispositivo sobre una superficie nivelada y resistente
al calor. Asegúrese de que haya una toma de corriente cerca.
3) Inserte la rejilla de goteo q de manera que el flotador rojo e
pueda sobresalir por el orificio de la rejilla de goteo q.
4) Coloque el soporte de la canastilla para el filtro u en el
dispositivo insertando la marca "INSERT", que está junto a
la cabeza de infusión r, en el dispositivo y luego girándolo
en el sentido de las manecillas del reloj hasta que el asa del
soporte de la canastilla para el filtro u quede en el frente
(marca " LOCK").
5) Inserte la clavija en una toma de corriente.
6) Proceda de la siguiente manera antes del primer uso, para
limpiar las tuberías internas:
Permita que fluya suficiente agua para aproximadamente
5 tazas de espresso (aproximadamente 3.38 fl oz [100 ml])
a través del dispositivo. Consulte la sección "Operación".
7) Deje que el dispositivo genere vapor durante unos 30 segundos.
Consulte la sección "Operación".
Cuando use el dispositivo por primera vez, es posible que escuche
trabajar la bomba, aun cuando no salga agua del dispositivo.
En este caso, gire el control del vapor 7 en dirección del signo
"+", de manera que el aire escape de los tubos del dispo sitivo (se
presiona el botón "Vapor" 4). Después de unos 20 segundos,
el aire habrá escapado, los ruidos desaparecen y el agua fluye
del dispositivo.
IB_298375_SEM1100B4_LB9.indb 39 13.12.17 16:37

SEM 1100 B4
■ 40 │ US-ES
Operación
Los botones "Espresso" 3 y "Vapor" 4 se fijan al presio-
narlos. Si se presionan nuevamente, se liberan.
Llenado del depósito de agua
Use solamente agua potable para beber para preparar espresso
o cappuccino.
1) Retire el depósito de agua 9 y llénelo:
Llénelo con agua por lo menos hasta la marca Min.
Nunca lo llene más de la marca Max.
2) Presione para volver a colocar el depósito de agua 9 en el
dispositivo. Asegúrese de que la manguera quede dentro del
depósito de agua 9.
Calentamiento después de un tiempo largo de inactividad
o durante el primer uso
Si no ha usado del dispositivo durante algún tiempo, caliéntelo
de la siguiente manera:
1) Llene el depósito de agua 9 con agua potable.
2) Coloque ya sea la canastilla grande i o la canastilla peque-
ñao para filtro de espresso dentro del soporte de la canastilla
para filtro u:
– Asegúrese de que la muesca pequeña en la canastilla
grande io en la canastilla pequeña o para filtro de
espresso quede encima de la muesca en el soporte para
canastilla del filtro u cuando la inserte.
IB_298375_SEM1100B4_LB9.indb 40 13.12.17 16:37

SEM 1100 B4 US-ES │ 41 ■
– Después gire ligeramente la canastilla grande i o la
canastilla pequeña o para filtro de espresso para asegu-
rarse de que no se caiga.
► ¡Espere hasta que la canastilla para filtro de espresso i o
se haya enfriado antes de sacarla!
► Para retirar las canastillas para filtro de espresso i o del so-
porte de la canastilla para filtro u, gire la canastilla insertada
para filtro de espresso i o hasta que la muesca en la canas-
tilla para filtro de espresso i o quede directamente arriba
de la muesca en el soporte de la canastilla para filtro u.
Ahora puede retirar la canastilla para filtro de espressoio.
IB_298375_SEM1100B4_LB9.indb 41 13.12.17 16:37

SEM 1100 B4
■ 42 │ US-ES
3) Coloque el soporte de la canastilla para el filtro u en el
dispositivo insertando la marca "INSERT", que está en un lado
del dispositivo, en el dispositivo y luego girándolo en sentido
de las manecillas del reloj hasta que el asa del soporte de
la canastilla para el filtro u quede en el frente (marca "
LOCK").
4) Coloque una taza debajo del soporte de la canastilla para el
filtro u.
5) Cierre el control de vapor 7 (gírela hasta el tope en la direc-
ción del símbolo "-").
6) Encienda el dispositivo con el interruptor de encendido y
apagado 1.
7) La luz de control roja t se enciende. Después de un tiempo
corto, el puntero del indicador de temperatura 2 comenzará
a subir.
8) Una vez que la luz de control de calentamiento de color
verde 5 se ilumine, presione el botón "Espresso" 3.
Permita que el agua fluya aproximadamente 1 minuto.
Es probable que necesite vaciar la taza durante este tiempo.
Presione el botón "Espresso" 3 para interrumpir el proceso.
Vacíe la taza y presione el botón "Espresso" 3 nuevamente
de manera que el agua fluya a través del dispositivo.
9) Después de 1 minuto, presione el botón "Espresso" 3
nuevamente para detener la bomba.
10) Espere hasta que la luz de control de calentamiento de color
verde 5 se ilumine nuevamente.
El calentamiento ha concluido. Ahora puede preparar espresso.
IB_298375_SEM1100B4_LB9.indb 42 13.12.17 16:37

SEM 1100 B4 US-ES │ 43 ■
Calentamiento antes de cada uso
Para poder preparar espresso o cappuccino, el dispositivo debe
calentarse.
1) Encienda el dispositivo con el interruptor de encendido y apa-
gado 1. La luz de control roja t se enciende. No deberá
presionar el botón "Espresso" 3 ni el botón "Vapor" 4.
Asegúrese de que el control de vapor 7 se gire hacia "-" la
mayor distancia posible.
2) Coloque el soporte de la canastilla para el filtro u en el
dispositivo insertando la marca "INSERT", que está en un lado
del dispositivo, en el dispositivo y luego girándolo en sentido
de las manecillas del reloj hasta que el asa del soporte de
la canastilla para el filtro u quede en el frente (marca "
LOCK").
3) Presione el botón "Espresso" 3 de manera que el dispo-
sitivo extraiga agua del depósito de agua 9. Una vez que
el agua comience a salir por las aberturas del soporte de la
canastilla para el filtro, presione el botón "Espresso" 3
nuevamente para detener la bomba.
4) Espere hasta que la luz de control de calentamiento de color
verde 5 se ilumine.
5) Presione el botón "Espresso" 3 nuevamente y permita que
el agua caliente fluya durante 20 segundos antes de detener
nuevamente la bomba.
El proceso de precalentamiento está completo. Ahora puede
preparar espresso o cappuccino.
IB_298375_SEM1100B4_LB9.indb 43 13.12.17 16:37

SEM 1100 B4
■ 44 │ US-ES
Preparación de espresso
Asegúrese siempre de que la canastilla para el filtro de espres-
so i o esté limpia y sin residuos de polvo de café.
1) Cuando el dispositivo esté caliente:
Para preparar espresso, coloque la canastilla pequeña para
filtro de espresso o en el soporte de la canastilla para filtro u.
Para preparar dos espressos, coloque la canastilla grande
para filtro de espresso i en el soporte de la canastilla para
filtro u.
2) Llene la canastilla pequeña para filtro de espresso o con
polvo de espresso hasta la marca Max. Esto corresponde
aprox. a 0.25 oz (7 g) de polvo o a una cuchara medidora
a ras p.
O bien:
Llene la canastilla grande para filtro de espresso i con polvo
de espresso hasta la marca Max. Esto equivale aproximada-
mente a 0.25 oz + 0.25 oz (7g + 7g) de polvo o a dos
cucharas medidoras a ras p.
3) Compacte el polvo de espresso con el utensilio compac-
tador sobre la cuchara medidora p. Agregue más polvo
de espresso, si es necesario, hasta que la canastilla para
el filtro io esté llena hasta la marca Max. Compacte
nuevamente el polvo de café.
La compactación del polvo de café es un paso esencial para
preparar un espresso. Si el polvo de espresso se compacta
muy fuertemente, el espresso fluye con mayor lentitud y se ge-
nera más crema. Si el polvo de espresso no está compactado
de una manera muy fuerte, el espresso fluye con más rapidez
y crea muy poca crema.
IB_298375_SEM1100B4_LB9.indb 44 13.12.17 16:37

SEM 1100 B4 US-ES │ 45 ■
4) Coloque el soporte de la canastilla para el filtro u en el
dispositivo en la marca "INSERT", y luego gírelo en sentido de
las manecillas del reloj hasta que el asa del soporte de la ca-
nastilla para el filtro u quede en el frente (marca " LOCK").
5) Coloque una o dos tazas debajo de las aberturas del soporte
de la canastilla para el filtro. Recomendamos que enjuague las
tazas con agua antes para que el espresso no se enfríe tan rápi-
do. Puede colocar las tazas en el espacio para guardarlas 6.
6) Una vez que la luz de control de calentamiento de color verde
5 se ilumine, puede presionar el botón "Espresso" 3. El
espresso fluye hacia la taza o tazas.
¡Nunca retire el soporte de la canastilla para el filtro u
mientras el espresso está saliendo!
¡La aspersión resultante de espresso caliente puede causar lesiones!
► Revise siempre para asegurarse de que el botón "Espresso"
3 no se presione antes de retirar el soporte de la canastilla
para el filtro u.
7) Una vez que las tazas estén llenas a la cantidad necesaria
(aproximadamente 0.68 fl oz [20 ml] por taza), presione el
botón "Espresso" 3 para detener el agua que está siendo
bombeada.
Ahora puede tomarse el espresso.
8) Apague el dispositivo con el interruptor de encendido
y apagado 1.
9) Después de cada uso, retire el polvo de espresso usado de
la canastilla para el filtro de espresso i o. Retire el soporte
de la canastilla para el filtro u del dispositivo. Para hacer
esto, pliegue el portafiltro z hacia arriba de manera que la
canastilla para el filtro de espresso i o no pueda caerse del
sujetador de la canastilla del filtro u.
IB_298375_SEM1100B4_LB9.indb 45 13.12.17 16:37

SEM 1100 B4
■ 46 │ US-ES
Ahora vacíe la canastilla para el filtro de espresso io vol-
teando el soporte de la canastilla para el filtro u y la canas-
tilla para el filtro de espresso iobloqueada y golpeando
para sacar el polvo de espresso. Deseche siempre el polvo de
espresso de una manera que no dañe el medio ambiente; por
ejemplo, con los desechos orgánicos.
► Limpie el cabezal de infusión r (por donde sale el agua
caliente) después de cada uso. También consulte "Manteni-
miento y cuidado".
► Vacíe la bandeja de goteo w regularmente, al menos cuan-
do el flotador rojo e sea visible en el orificio de la rejilla de
goteo q.
Preparación de cappuccino
¡Tenga cuidado cuando trabaje con vapor para producir
espuma de la leche!
¡El vapor caliente o las salpicaduras calientes pueden causar
lesiones!
► Opere siempre el sistema de control de vapor 7 lentamente.
1) Llene un recipiente para formar espuma (de preferencia de
acero inoxidable) hasta un tercio con leche fría.
2) Asegúrese de que el control de vapor 7 esté cerrado (gírelo
la mayor distancia posible en la dirección "-").
3) Empuje el espumador de leche 0 hacia un lado. Sosténgalo
siempre del asa 8.
4) Presione el botón "Vapor" 4. Espere hasta que la luz de
control de calentamiento de color verde 5 se ilumine.
IB_298375_SEM1100B4_LB9.indb 46 13.12.17 16:37

SEM 1100 B4 US-ES │ 47 ■
5) Sostenga un recipiente vacío debajo del espumador de leche
0. Gire lentamente el control de vapor 7 en la dirección
"+". Se libera agua o aspersión a presión por la boquilla.
Esto limpia la boquilla y el circuito del agua en el interior del
dispositivo.
6) Espere 15 segundos y gire el control de vapor 7 hacia "-"
hasta que deje de salir vapor de la boquilla. Vierta el agua en
el recipiente.
7) Ahora sostenga el recipiente espumador con la mano para
sentir la temperatura de la leche y guíe la boquilla del espu-
mador de leche 0 con cuidado hacia la leche. Sostenga el
recipiente espumador ligeramente inclinado.
8) Gire lentamente el control de vapor 7 en la dirección "+".
9) Mueva el recipiente espumador en círculos mientras mantiene
la punta de la boquilla sumergida en la leche, lo suficiente
para que la leche no salpique, pero no tan profundo como
para crear una espuma gruesa. Cuando se hace correctamen-
te, se escucha un sonido zumbante profundo.
10) A medida que la espuma de leche sube, introduzca la
boquilla más en la leche para hacer espuma de la siguiente
"capa" y para evitar que se forme un sabor a quemado de la
espuma.
11) Por último, introduzca completamente la boquilla y cierre el
control de vapor 7 aproximadamente a la mitad, de manera
que la leche se caliente. Sostenga el recipiente espumador
ligeramente inclinado, de manera que la leche se arremoline
suavemente mientas se agita con la boquilla.
12) Una vez que la espuma de leche ha alcanzado la consisten-
cia y temperatura deseadas, gire el control de vapor 7 a la
posición apagada (hasta el tope en la dirección de "-").
13) Ahora puede retirar la boquilla de la leche.
14) Presione el botón "Vapor" 4.
IB_298375_SEM1100B4_LB9.indb 47 13.12.17 16:37

SEM 1100 B4
■ 48 │ US-ES
Para preparar cappuccino, use siempre tazas más grandes que
para espresso para dejar espacio para la leche espumada.
15) Cuando prepare cappuccino, proceda exactamente como lo
haría para espresso (vea la sección "Preparación de espresso":
el precalentamiento ya no es necesario).
Deje que el agua fluya el doble que para un espresso (aproxi-
madamente 1.4 fl oz [40 ml]).
16) Apague el dispositivo con el interruptor de encendido y apa-
gado 1.
17) Ahora agregue la leche espumada al espresso preparado
previamente. El cappuccino está listo ahora. Puede agregar
azúcar o espolvorearlo con polvo de cacao al gusto.
Limpie siempre el espumador 0 después de cada uso.
También consulte "Mantenimiento y cuidado".
Sugerencias para espuma de leche
■ En general, cualquier tipo de leche puede espumarse, inclu-
yendo la de soya y de arroz.
Sin embargo, algunos tipos de leche solo pueden espumarse
hasta cierto grado.
■ La leche con bajo contenido de grasa o la leche desnatada
no se quema tan fácilmente como la leche entera; sin em-
bargo, un contenido de grasa demasiado bajo aumenta la
posibilidad de que la leche no forme buena espuma. Por lo
tanto, use leche con un contenido de grasa de 3.5% o 1.5%,
si es posible.
■ La leche bien enfriada puede espumarse mejor que la leche
que está menos fría. Para obtener los mejores resultados, use
leche a una temperatura de aproximadamente 45 °F (7 °C).
■ No espume la leche una segunda vez; ya que podría quemarse.
IB_298375_SEM1100B4_LB9.indb 48 13.12.17 16:37

SEM 1100 B4 US-ES │ 49 ■
■ Permita que la leche espumada repose durante unos 30
segundos antes de agregarla al espresso. Esto permite que las
burbujas grandes estallen; la leche líquida inmóvil se hunde al
fondo. Entonces puede verter la espuma fina al espresso.
Limpieza y mantenimiento
► ¡Antes de limpiar el dispositivo, desconecte la clavija de la
toma de corriente! ¡Existe el riesgo de descarga eléctrica!
► Permita que el dispositivo se enfríe antes de limpiarlo. ¡Riesgo
de quemaduras!
► ¡NUNCA sumerja el dispositivo en agua o cualquier otro
líquido!
Limpieza del espumador de leche
Limpie el espumador de leche después de cada uso. Si no lo
hace, podrían formarse gérmenes.
No use materiales de limpieza abrasivos o agresivos.
Estos pueden dañar las superficies.
1) Coloque un recipiente vacío debajo del espumador de leche 0.
2) Inmediatamente después del uso, gire el control de vapor 7 a
la posición "+" y permita que el vapor escape durante algunos
segundos.
3) Gire el control de vapor 7 para apagarlo (toda la distancia
posible en la dirección "-"), apague el dispositivo y desconecte
la clavija de la toma de corriente.
4) Permita que la boquilla se enfríe.
IB_298375_SEM1100B4_LB9.indb 49 13.12.17 16:37

SEM 1100 B4
■ 50 │ US-ES
5) Retire la carcasa del espumador de leche 0 (Figura 1) y
límpiela profusamente con agua tibia.
6) Limpie la boquilla debajo de la carcasa con una tela húmeda.
Si es necesario, agregue un poco de detergente moderado a
la tela. Después de limpiar con detergente, frótela siempre con
una tela humedecida con agua limpia. Asegúrese de no dejar
residuo de detergente en la boquilla.
7) Vuelva a colocar la carcasa sobre la boquilla (Figura 1).
Figura 1
IB_298375_SEM1100B4_LB9.indb 50 13.12.17 16:37

SEM 1100 B4 US-ES │ 51 ■
Limpieza de la cabeza de infusión
Limpie el cabezal de infusión r después de cada uso:
1) Una vez que haya preparado el espresso o cappuccino y
retirado el soporte de la canastilla para el filtro u, limpie la
superficie completa del cabezal de infusión r con una tela
humedecida para remover todos los residuos de polvo.
2) Vuelva a colocar el sujetador de la canasta para el filtro u
sin los filtros para espresso i o.
3) Coloque una taza vacía debajo del soporte de la canastilla
para el filtro u y presione el botón "Espresso" 3 hasta
que haga clic. El agua sale del cabezal de infusión r y
enjuaga el resto del residuo de polvo.
4) Después de 20 segundos, presione el botón "Espresso" 3
nuevamente y apague el dispositivo con el botón de encendido
y apagado 1.
5) Retire nuevamente el soporte de la canastilla para el filtro u.
IB_298375_SEM1100B4_LB9.indb 51 13.12.17 16:37

SEM 1100 B4
■ 52 │ US-ES
Limpieza de los accesorios
1) Lave el soporte de la canastilla para el filtro u, las dos canasti-
llas para el filtro de espresso i o, el depósito de agua 9, la
cuchara medidora p y la rejilla de goteo q en agua caliente.
Si agrega detergente al agua, puede afectar el sabor del
espresso. Si las manchas solo pueden eliminarse con detergente,
enjuague siempre las partes con agua limpia abundante.
2) Seque bien todas las partes.
3) La bandeja de goteo w es adecuada para lavarse en
máquina lavaplatos. Sin embargo, siempre retire el
flotador rojo de la bandeja de goteo w antes de
limpiar:
– Para hacer esto, retire los topes que están fijos en las dos
barras de retención en el lado del flotador.
– Extraiga el flotador de las barras de retención.
– Limpie el flotador y los topes.
– Después de limpiar la bandeja de goteo w, presione el
flotador limpio nuevamente hacia las barras de retención
y vuelva a colocar los topes.
Limpieza del dispositivo
Limpie el dispositivo con una tela humedecida. Si es necesario,
use un poco de detergente en la tela.
Asegúrese de que el dispositivo esté completamente seco antes
del siguiente uso.
IB_298375_SEM1100B4_LB9.indb 52 13.12.17 16:37

SEM 1100 B4 US-ES │ 53 ■
Eliminación de sarro del dispositivo
Elimine el sarro del dispositivo regularmente. El sarro debe elimi-
narse del dispositivo aproximadamente después de 1 o 2 meses
(alrededor de 4 preparaciones de espresso al día). Elimine el
sarro del espumador de leche una vez al mes si lo usa regular-
mente. Dependiendo de la dureza del agua en su área, esta cifra
puede diferir.
Para eliminar el sarro, use un eliminador comercial para máquinas
de espresso.
Proceda como se describa en las instrucciones de uso del elimina-
dor de sarro.
Si no tiene ningún producto para eliminar el sarro, puede usar
ácido cítrico y proceder de la siguiente manera:
1) Llene el depósito de agua 9 hasta la marca MAX.
2) Disuelva 2 cucharadas (aproximadamente 1.1 oz [30 gramos])
de ácido cítrico (se vende en farmacias o tiendas especializa-
das) en el agua.
3) Vuelva a colocar el depósito de agua 9 en el dispositivo.
4) Encienda el dispositivo con el interruptor de encendido y
apagado 1. El control de vapor 7 está cerrado.
5) Coloque el soporte de la canastilla para el filtro u sin las
canastillas para el filtro de espresso i o nuevamente en
el dispositivo y coloque una taza debajo del soporte de la
canastilla para el filtro u.
6) Una vez que la luz de control de calentamiento de color
verde5 se ilumine, presione el botón "Espresso" 3 hasta
que haga clic.
7) Permita que fluyan aproximadamente 2 tazas (alrededor de
8.5 fl oz [250 ml]) de agua y entonces detenga el proceso
al volver a presionar el botón "Espresso" 3.
8) Sostenga el recipiente debajo del espumador de leche 0.
IB_298375_SEM1100B4_LB9.indb 53 13.12.17 16:37

SEM 1100 B4
■ 54 │ US-ES
9) Presione el botón "Vapor" 4 hasta que haga clic en su
lugar y espere hasta que la luz de control de calentamiento
de color verde 5 se ilumine. Gire lentamente el control
de vapor 7 a la posición "+". Permita que el dispositivo cree
vapor durante unos 2 minutos.
10) Después de 2 minutos, cierre el control de vapor 7, y presione
el botón "Vapor" 4 nuevamente de manera que deje de
generarse vapor.
11) Deje que el eliminador de escamas surta efecto durante
aproximadamente 15 minutos.
12) Repita los pasos 6 a 11 tres veces.
13) Luego presione el botón "Espresso" 3 hasta que haga clic,
y deje que el agua fluya hasta que el depósito de agua 9
quede vacío.
14) Enjuague el depósito de agua 9 con agua limpia y luego
llénelo con agua limpia hasta la marca Max.
15) Presione el botón "Espresso" 3 hasta que haga clic en su
lugar y espere hasta que la luz de control de calentamiento
de color verde 5 se ilumine.
16) Permita que el agua fluya.
17) Repita los pasos 14 a 16 tres veces.
18) Vuelva a llenar el depósito de agua 9.
19) Presione el botón "Vapor" 4 hasta que haga clic en su
lugar.
20) Sostenga un recipiente debajo del espumador de leche 0 y
gire lentamente el botón del control del vapor 7 a la posición
"+" tan pronto como la luz de control de calentamiento 5 se
ilumine.
21) Después de 1 minuto, cierre el control de vapor 7 (gírelo en
la dirección "-" hasta el tope), presione el botón "Vapor" 4
nuevamente y apague el dispositivo.
IB_298375_SEM1100B4_LB9.indb 54 13.12.17 16:37

SEM 1100 B4 US-ES │ 55 ■
Almacenamiento
■ Guarde el dispositivo limpio en un lugar limpio, sin polvo y
seco.
Solución de problemas
Problema Causa Solución
El espresso ha
dejado de salir.
• El polvo del espresso
está demasiado húmedo
o sumamente compac-
tado.
• Vuelva a preparar
el espresso sin com-
pactar el polvo con
demasiada firmeza;
si es necesario, use
nuevo polvo.
• No hay agua en el depó-
sito de agua 9.
• Llene al depósito de
agua9.
• Los orificios del soporte
de la canastilla para el
filtro están obstruidos.
• Limpie el soporte de
la canastilla para el
filtro u.
El espresso gotea
por las orillas
del soporte de la
canastilla para el
filtrou, no por las
aberturas.
• El soporte de la canas-
tilla para el filtro u no
está insertado correcta-
mente.
• Inserte correctamen-
te el soporte de la
canastilla para el
filtro u.
• Las aberturas del soporte
de la canastilla para el
filtro están obstruidas.
• Limpie el soporte de
la canastilla para el
filtro u.
• Hay residuos de polvo
de espresso en las orillas
del soporte de la canasti-
lla para el filtro u.
• Limpie los residuos
de polvo de espres-
so de las orillas
del soporte de la
canastilla para el
filtro u.
IB_298375_SEM1100B4_LB9.indb 55 13.12.17 16:37

SEM 1100 B4
■ 56 │ US-ES
Problema Causa Solución
El espresso está
frío.
• El dispositivo no se
precalentó.
• Precaliente el dispo-
sitivo.
• La luz de control de
calentamiento de color
verde 5 no se ha ilumi-
nado.
• Espere hasta que
la luz de control de
calentamiento de
color verde 5 se
ilumine.
• Las tazas no se precalen-
taron.
• Precaliente las
tazas.
La bomba hace un
ruido inusual.
• El depósito de agua 9
está vacío.
• Llene al depósito
de agua9.
La crema es de-
masiado clara (el
espresso sale del
soporte de la ca-
nastilla para el filtro
u muy rápido).
• No hay suficiente polvo
de espresso.
• Use más polvo de
espresso.
• El polvo de espresso
está molido demasiado
grueso.
• Use solamente
polvo de espresso
que esté preparado
especialmente para
espresso.
La crema es dema-
siado oscura (el
espresso sale del
soporte de la ca-
nastilla para el filtro
u muy lento).
• Demasiado polvo de
espresso.
• Use menos polvo
de espresso.
• El polvo está molido de-
masiado fino o húmedo.
• Use solamente
polvo de espresso
que esté preparado
especialmente para
espresso.
• La canastilla para el filtro
está obstruida.
• Limpie la canastilla
para el filtro.
La leche no hace
espuma.
• La leche no está suficien-
temente fría.
• Use leche refrige-
rada.
• El espumador de leche
0 está sucio.
• Limpie el espuma-
dor de leche 0.
IB_298375_SEM1100B4_LB9.indb 56 13.12.17 16:37

SEM 1100 B4 US-ES │ 57 ■
Eliminación
Los dispositivos no deben desecharse como parte de la basura
doméstica normal. Si ya no puede usar su dispositivo eléctrico,
elimínelo de conformidad con las disposiciones legales aplicables
en su estado. Esto asegura que los dispositivos eléctricos usados
sean reciclados y la contaminación ambiental se mantenga a un
nivel mínimo. Puede encontrar más información sobre la elimina-
ción de desechos en Internet en www.epa.gov.
Los materiales de empaque están hechos de mate-
riales que no dañan el medio ambiente y que puede
desechar en su centro de reciclaje local.
Observe las marcas en los diferentes materiales de
empaque y sepárelos según sea necesario. Los
materiales de empaquetado están marcados con
abreviaturas (a) y números (b) con los siguientes
significados:
– 1–7: Plásticos
– 20–22: Papel y cartón
– 80–98: Materiales compuestos
IB_298375_SEM1100B4_LB9.indb 57 13.12.17 16:37

SEM 1100 B4
■ 58 │ US-ES
Garantía limitada de 3 años
Lo que cubre la presente garantía
La garantía incluye:
▯ Daños, quebraduras o incapacidad para funcionar debido a
defectos.
▯ Daños que no hayan sido causados por el desgaste propio del
uso o por no seguir las instrucciones de seguridad y mantención
incluidas en el manual para el usuario.
Lo que no cubre esta garantía
La garantía no cubre daños causados por:
▯ El desgaste propio del uso del producto, incluidas las partes
frágiles (como interruptores, piezas de vidrio, etc.).
▯ Uso o transporte no indicado del producto.
▯ Desatención a las instrucciones de seguridad y mantención.
▯ Accidentes o causas de fuerza mayor (e.g. relámpagos, incendio,
inundación, etc.).
▯ Manipulación mal intencionada del producto (retirar la cubierta,
tornillos, etc.).
La presente garantía tampoco cubre daños indirectos o emergentes.
Sin embargo algunos estados no permiten la exclusión o limitación
de daños indirectos o emergentes, por lo que dicha exclusión o
limitación pudiera no aplicarse en su caso.
Período de cobertura y resolución de la garantía
La garantía es válida por 3 años a partir de la fecha de compra.
La empresa, según lo estime conveniente, devolverá el dinero o
repondrá el producto.
La empresa no:
▯ Dará inicio a un nuevo período de garantía al hacerse el cambio
del producto.
▯ Reparará el producto.
IB_298375_SEM1100B4_LB9.indb 58 13.12.17 16:37

SEM 1100 B4 US-ES │ 59 ■
¿Cómo se tramita la garantía?
Recomendamos que primero usted:
▯ Llame al Servicio de atención al cliente al 1 (844) 543-5872.
▯ Visite el Portal de atención al cliente en
www.lidl.com/contact-us
▯ Visite una de nuestras tiendas LIDL en caso de cualquier inquietud.
A fin de acelerar el trámite de la garantía, tenga a bien contar con
lo siguiente:
▯ Recibo de venta original que incluya la fecha de compra.
▯ Producto y manual en su empaque original.
▯ Descripción del problema.
¿Qué debe hacer usted para mantener la garantía vigente?
▯ Guardar el recibo original.
▯ Seguir todas las instrucciones para el uso del producto.
▯ No realizar ninguna reparación ni alteración al producto.
¿De qué manera influyen las leyes estatales con esta
garantía?
La presente garantía le otorga derechos legales específicos, y
pudiera usted contar con otros derechos los cuales varían de un
estado a otro. Todas las garantías implícitas se encuentran limitadas
a la duración y términos de la presente garantía. Algunos estados
no permiten limitaciones al período de tiempo y términos de la
garantía implícita, por lo que dichas limitaciones pudieran no
aplicarse en su caso.
Importador
LIDL US LLC.
ARLINGTON
VA 22202
IB_298375_SEM1100B4_LB9.indb 59 13.12.17 16:37

IAN 298375
LIDL US LLC.
ARLINGTON
VA 22202
Made in /Hecho en: China
Last Information Update · Estado de las informaciones:
12 / 2017 · Ident.-No.: SEM1100B4-112017-2
9
-
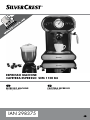 1
1
-
 2
2
-
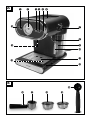 3
3
-
 4
4
-
 5
5
-
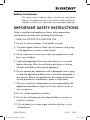 6
6
-
 7
7
-
 8
8
-
 9
9
-
 10
10
-
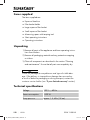 11
11
-
 12
12
-
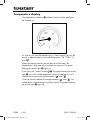 13
13
-
 14
14
-
 15
15
-
 16
16
-
 17
17
-
 18
18
-
 19
19
-
 20
20
-
 21
21
-
 22
22
-
 23
23
-
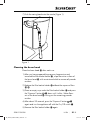 24
24
-
 25
25
-
 26
26
-
 27
27
-
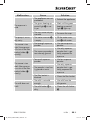 28
28
-
 29
29
-
 30
30
-
 31
31
-
 32
32
-
 33
33
-
 34
34
-
 35
35
-
 36
36
-
 37
37
-
 38
38
-
 39
39
-
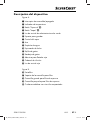 40
40
-
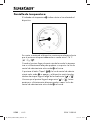 41
41
-
 42
42
-
 43
43
-
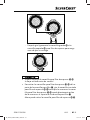 44
44
-
 45
45
-
 46
46
-
 47
47
-
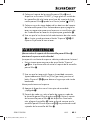 48
48
-
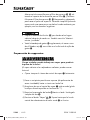 49
49
-
 50
50
-
 51
51
-
 52
52
-
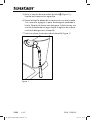 53
53
-
 54
54
-
 55
55
-
 56
56
-
 57
57
-
 58
58
-
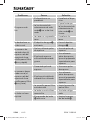 59
59
-
 60
60
-
 61
61
-
 62
62
-
 63
63


Silvercrest 298375 El manual del propietario
- Categoría
- Cafeteras
- Tipo
- El manual del propietario
en otros idiomas
- English: Silvercrest 298375 Owner's manual
Otros documentos
-
 Mr. Coffee ECMP40 Manual de usuario
-
 Mr. Coffee ECM21 Manual de usuario
-
 Mr. Coffee ES series Manual de usuario
-
 Mr. Coffee BVMC-ECM22 Manual de usuario
-
KitchenAid 5KES2102EMS0 El manual del propietario
-
-
 Mr. Coffee ECMPl Manual de usuario
-
 Mr. Coffee BVMC-ECMP55 Manual de usuario
-
Bella Steam Espresso Maker El manual del propietario
-
West Bend 55109 Manual de usuario


