Sony PK-MD1 Guía de instalación
- Categoría
- Altavoces
- Tipo
- Guía de instalación

JP FR NL IT SE AR
GB ES DE PT CT
Before attaching the CMT-MD1 to the
bracket or the stand, please read this
manual thoroughly and retain it for
future reference.
The wall hanging bracket and AV
stand are designed specifically for
Sony’s CMT-MD1. Also refer to the
CMT-MD1 instruction manual.
Caution on the use of the
wall hanging bracket
The component system CMT-MD1
(7.8 kg) and this bracket (2.0 kg)
have a combined weight of 9.8 kg.
Therefore, for safety reasons, this
bracket should be attached
securely to a wall made from
materials capable of supporting a
load of 50 kg or more.
Preparations
• The screws used to attach the
bracket to a wall are not supplied.
Users should obtain screws that
suit the materials of the wall to
which the bracket is to be attached.
• Reinforce the wall, if necessary, so
that it can support 50 kg.
• If the CMT-MD1 is to be used with
speakers attached, press the
speaker cord into the groove on the
bottom of the unit. Do not press
the power cord into the groove.
Note
If you attach the unit to the bracket,
make sure the left and right speakers
are both attached or both detached.
Attaching one speaker without the
other may cause the unit to drop and
injure someone.
Using the Wall Hanging
Bracket
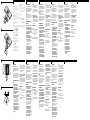
1 Attach the wall hanging bracket
to a wall with six screws (not
supplied). (See Fig. A.)
2 Attach the plate to the bottom
of the CMT-MD1 with two
supplied screws (⊕ 3 × 14 mm).
(See Fig. B.)
3 Use a hexagonal wrench (14 mm,
not supplied) to attach the plate
to the wall hanging bracket.
(See Fig. C.)
Specifications
(The wall hanging bracket)
Dimensions Approx. 120 × 230 × 230 mm
(4
3
⁄4 × 9
1
⁄8 × 9
1
⁄8 inches) (w/
h/d)
Mass Approx. 2.0 kg (4 lb 7 oz)
Supplied accessory
⊕ 3 × 14 mm screws (2)
Design and specifications are subject to
change without notice.
Avant de fixer la CMT-MD1 sur
l’équerre ou le socle, veuillez lire
attentivement cette notice. Rangez-la
dans un endroit sûr pour pouvoir la
retrouver en cas de besoin.
L’équerre murale et le socle AV sont
exclusivement destinés à la chaîne
CMT-MD1 Sony. Veuillez consulter
également le mode d’emploi de la
chaîne CMT-MD1.
Attention lors de l’utilisation
de l’équerre murale
Le poids combiné de la chaîne
CMT-MD1 (7,8 kg) et de l’équerre
murale (2,0 kg) est de 9,8 kg. Pour
la sécurité, il est important que les
matériaux du mur auquel sera fixée
l’équerre murale puissent
supporter une charge de 50 kg ou
plus et que la fixation soit solide.
Avant l’installation
• Les vis pour la fixation de l’équerre
murale au mur ne sont pas
fournies. L’utilisateur doit s’assurer
que les vis utilisées conviennent
aux matériaux du mur auquel
l’équerre sera fixée.
• Au besoin, renforcez le mur. Il doit
pouvoir supporter 50 kg.
• Si vous prévoyez d’utiliser la
CMT-MD1 avec les enceintes
fixées, enfoncez les cordons
d’enceinte dans les gorges sous
l’appareil. N’enfoncez pas le
cordon d’alimentation secteur dans
la gorge.
Remarque
Installez les deux enceintes ou n’en
installez aucune lorsque vous utilisez
l’équerre murale. Si vous n’en installiez
qu’une seule, la chaîne ne serait pas
équilibrée et risquerait de tomber.
Utilisation de l’équerre
murale
1 Fixez l’équerre murale au mur
avec six vis (non fournis).
(Voyez fig. A.)
2 Fixez la plaque sous la CMT-MD1
avec deux vis fournies (⊕ 3 ×
14 mm). (Voyez fig. B.)
3 À l’aide d’une clé hexagonale
(14 mm, non fournie), fixez la
plaque à l’équerre murale.
(Voyez fig. C.)
Spécifications
(Equerre murale)
Dimensions Environ 120 × 230 × 230 mm
(4
3
⁄4 × 9
1
⁄8 × 9
1
⁄8 pouces)
(l × h × p)
Poids Environ 2,0 kg (4 li. 7 on.)
Accessoires fournis
Vis ⊕ 3 × 14 mm (2)
La conception et les spécifications sont
susceptibles d’être modifiées sans préavis.
Antes de instalar el CMT-MD1 en la
ménsula en el soporte, lea
completamente este manual y
guárdelo como referencia para el
futuro.
La ménsula de montaje en la pared y
el soporte audiovisual se han
diseñado específicamente para el
CMT-MD1 de Sony. Consulte
también el manual de instrucciones
del CMT-MD1.
Precaución para el uso de la
ménsula de montaje en la pared
El sistema de componentes
CMT-MD1 (7,8 kg) y la ménsula
(2,0 kg) tiene un peso combinado
de 9,8 kg. Por lo tanto, por razones
de seguridad, esta ménsula deberá
ser fijada firmemente ea una pared
construida con materiales capaces
de soportar un peso de 50 kg o más.
Preparativos
• Los tornillos utilizados para fijar la
ménsula a la pared no se incluyen.
El usuario deberá obtener unos
tornillos apropiados para el
material con que esté construida la
pared a la que vaya a fijar la
ménsula.
• En caso necesario refuerce la pared
para que pueda soportar 50 kg.
• Si el CMT-MD1 va a ser utilizado
con los altavoces instalados,
introduzca los cables de altavoces
en la ranura de la parte inferior de
la unidad. No introduzca el cable
de alimentación en la ranura.
Nota
Si se instala la unidad en la ménsula,
asegúrese de que los altavoces
izquierdo y derecho están ambos
instalados o ambos están sin instalar. Si
sólo se instala un altavoz sin el otro, la
unidad correrá el riesgo de caerse y
herir a alguien.
Utilización de la ménsula
de montaje en la pared
1 Fije la ménsula de montaje en la
pared a una pared con seis
tornillos (no suministrados).
(Consulte la figura A.)
2 Sujete la chapa a la parte inferior
del CMT-MD1 con dos tornillos
incluidos (⊕ 3 × 14 mm) (Consulte
la figura B.)
3 Utilice una llave hexagonal
(14 mm, no suministrada) para
sujetar la placa a la ménsula de
montaje en la pared. (Consulte la
figura
C
.)
Especificaciones
(Ménsula de montaje en la pared)
Dimensiones Aproximadamente 120 × 230
× 230 mm (an × al × prf)
Peso Aproximadamente 2,0 kg
Accesorios suministrados
Tornillos ⊕ 3 × 14 mm (2)
El diseño y las especificaciones están
sujetos a cambio sin previo aviso.
Gelieve deze handleiding zorgvuldig
te lezen alvorens de CMT-MD1 aan
deze ophangbeugel of op de
standaard te installeren. Bewaar de
handleiding voor latere naslag.
Deze ophangbeugel en de AV
staander zijn speciaal ontworpen
voor het installeren van Sony’s
CMT-MD1. Raadpleeg ook de
gebruiksaanwijzing van de
CMT-MD1.
Kies een stevige wand voor
de ophangbeugel
Het CMT-MD1
componentensysteem (7,8 kg) en
deze ophangbeugel (2,0 kg) hebben
een gecombineerd gewicht van
9,8 kg. Omwille van de veiligheid
dient u deze ophangbeugel stevig
te bevestigen aan een wand die in
staat is een gewicht van 50 kg of
meer te ondersteunen.
Voorbereidingen
• De schroeven voor het bevestigen
van de ophangbeugel aan de wand
zijn niet bijgeleverd. De gebruiker
dient schroeven aan te schaffen die
geschikt zijn voor het materiaal van
de wand waaraan u de
ophangbeugel bevestigt.
• Indien nodig, verstevigt u de wand
zodat deze een gewicht van 50 kg
kan ondersteunen.
• Als u de CMT-MD1 wilt gebruiken
met de luidsprekers eraan
bevestigd, druk dan het
luidsprekersnoer in de groef aan de
onderzijde van het apparaat. Druk
het netsnoer niet in de groef.
Opmerking
Laat zowel de linker als de rechter
luidspreker aan het apparaat bevestigd
of verwijder beide luidsprekers
wanneer u de ophangbeugel gebruikt.
Als slechts één van de luidsprekers
eraan is bevestigd, zal het apparaat niet
in evenwicht zijn en kan het vallen.
Installeren van de
ophangbeugel
1 Bevestig de ophangbeugel aan
de wand met behulp van zes
schroeven (niet bijgeleverd).
(Zie Afb. A.)
2 Bevestig de plaat met de twee
bijgeleverde schroeven
(⊕ 3 × 14 mm) aan de onderzijde
van de CMT-MD1. (Zie Afb. B.)
3 Gebruik een inbussleutel (14 mm,
niet bijgeleverd) om de plaat aan
de ophangbeugel te bevestigen.
(Zie Afb. C.)
Technische gegevens
(Wandophangbeugel)
Afmetingen ca. 120 × 230 × 230 mm
(b/h/d)
Gewicht ca. 2,0 kg
Bijgeleverde accessoires
⊕ 3 × 14 mm schroeven (2)
Ontwerp en specificaties onder
voorbehoud van wijzigingen zonder
voorafgaande kennisgeving.
Bitte lesen Sie diese Anleitung vor
der Installation des CMT-MD1 an den
Wandhalter oder Ständer
aufmerksam durch, und bewahren
Sie sie für spätere Bezugnahme auf.
Dieser Wandhalter und der AV-
Ständer sind speziell für die
Installation des Modells CMT-MD1
von Sony vorgesehen. Nehmen Sie
auch Bezug auf die
Bedienungsanleitung des CMT-MD1.
Vorsicht beim Gebrauch des
Wandhalters
Das Komponentensystem
CMT-MD1 (7,8 kg) und dieser
Halter (2,0 kg) wiegen zusammen
9,8 kg. Aus Sicherheitsgründen
muß daher dieser Halter
einwandfrei an eine Wand
montiert werden, die in der Lage
ist, ein Gewicht von mindestens
50 kg zu tragen.
Vorbereitungen
• Die für die Befestigung des Halters an
einer Wand benötigten Schrauben
sind nicht im Lieferumfang enthalten.
Der Benutzer ist verantwortlich für
die Beschaffung von Schrauben, die
für das Material der Wand, an
welcher der Halter angebracht
werden soll, geeignet sind.
• Gegebenenfalls muß die Wand
verstärkt werden, so daß sie ein
Gewicht von 50 kg tragen kann.
• Wenn das Gerät CMT-MD1 mit
angebrachten Lautsprechern
verwendet werden soll, verlegen
Sie die Lautsprecherkabel in den
Rillen an der Unterseite des
Gerätes. Verlegen Sie nicht das
Netzkabel in einer der Rillen.
Hinweis
Bei Verwendung des Wandhalters muß
das Gerät entweder mit beiden
Lautsprechern oder ohne Lautsprecher
angebracht werden. Wenn nur einer
der Lautsprecher angebracht ist, ist das
Gerät nicht im Gleichgewicht und
könnte herunterfallen.
Verwendung des
Wandhalters
1 Montieren Sie den Wandhalter
mit sechs Schrauben (nicht
mitgeliefert) an eine Wand.
(Siehe Abb. A.)
2 Befestigen Sie die Platte mit den
zwei mitgelieferten Schrauben
(⊕ 3 × 14 mm) an der Unterseite
des CMT-MD1. (Siehe Abb. B.)
3 Befestigen Sie die Platte mit
einem Sechskant-Stiftschlüssel
(14 mm, nicht mitgeliefert) am
Wandhalter. (Siehe Abb. C.)
Technische Daten
(Wandhalter)
Abmessungen
ca. 120 × 230 × 230 mm
(B/H/T)
Gewicht ca. 2,0 kg
Mitgeliefertes Zubehör
⊕ 3 × 14-mm-Schrauben (2)
Änderungen des Designs und der
technischen Daten vorbehalten.
Antes de fixar o CMT-MD1 em um
dos dois suportes, leia o manual
completamente e guarde-o para
futuras referências.
O suporte de parede e o suporte AV
são desenhados especialmente para
instalação do CMT-MD1 da Sony.
Refira-se também ao manual de
instruções do CMT-MD1.
Precaução sobre o uso do
suporte de parede
O sistema do componente
CMT-MD1 (7,8 kg) e este suporte
(2,0 kg) têm um peso combinado
de 9,8 kg. Assim sendo, por razões
de segurança, este suporte deve ser
afixado seguramente a uma parede
feita de materiais capazes de
aguentar uma carga de 50 kg ou
mais.
Preparações
• Os parafusos usados para afixar o
suporte na parede não são
fornecidos. O usuário deve obter
parafusos adequados ao material
da parede na qual o suporte será
afixado.
• Se necessário, reforce a parede de
forma que a mesma possa aguentar
50 kg.
• Se for usar o CMT-MD1 com os
altifalantes instalados, pressione a
cabo do altifalante no encaixe da
parte inferior do aparelho. Não
pressione o cabo de alimentação no
encaixe.
Nota
Se fixar a unidade no suporte,
certifique-se de instalar os altifalantes
da esquerda e da direita ou de remover
os dois. Se instalar apenas um
altifalante, sem o outro, o aparelho
poderá cair e ferir alguém.
Utilização do suporte de
parede
1 Prenda o suporte numa parede
usando seis parafusos (não
fornecidos). (Veja a fig. A.)
2 Prenda a base na parte inferior
do CMT-MD1 usando dois
parafusos (⊕ 3 × 14 mm)
fornecidos. (Veja a fig. B.)
3 Use uma chave sextavada (de
14 mm, não fornecida) para
afixar a base no suporte de
parede. (Veja a fig.
C
.)
Especificações
(suporte de parede)
Dimensões Aprox. 120 × 230 × 230 mm
(l × a × p)
Peso Aprox. 2,0 kg
Acessórios fornecidos
Dois (2) parafusos ⊕ 3 × 14 mm
Os desenhos e especificações estão
sujeitos a mudanças sem aviso prévio.
Prima di applicare il CMT-MD1 alla
mensola o al supporto, leggere
completamente questo manuale e
conservarlo per eventuali riferimenti
in futuro.
La mensola sospesa a muro e il
supporto AV sono progettati
appositamente per il CMT-MD1
Sony. Fare riferimento anche al
manuale di istruzioni del CMT-MD1.
Precauzione per l’uso della
mensola sospesa a muro
Il sistema a componenti CMT-MD1
(7,8 kg) e questa mensola (2,0 kg)
unitamente hanno un peso
complessivo di 9,8 kg. Perciò, per
ragioni di sicurezza, questa
mensola deve essere fissata
saldamente ad un muro fatto di
materiale in grado di sostenere un
peso di 50 kg o più.
Preparativi
• Le viti usate per fissare la mensola
ad un muro non sono fornite. Gli
utenti devono procurarsi delle viti
adatte al materiale del muro a cui
la mensola deve essere fissata.
• Rinforzare il muro, se è necessario,
in modo che possa sostenere un
peso di 50 kg.
• Se il CMT-MD1 deve essere usato
con i diffusori applicati, spingere il
cavo del diffusore nella scanalatura
sulla parte inferiore dell’unità. Non
spingere il cavo di alimentazione
nella scanalatura.
Nota
Se si applica l’unità alla mensola,
assicurarsi che i diffusori sinistro e
destro siano entrambi applicati o
entrambi staccati. Se si applica solo un
diffusore senza l’altro, l’unità potrebbe
cadere e ferire qualcuno.
Uso della mensola
sospesa a muro
1 Fissare la mensola sospesa a
muro ad una parete con sei viti
(non fornite). (Vedere la fig. A.)
2 Fissare la piastra sulla parte
inferiore del CMT-MD1 con le
due viti in dotazione (⊕ 3 ×
14 mm). (Vedere la fig.B.)
3 Usare una chiave esagonale
(14 mm, non fornita) per fissare
la piastra alla mensola sospesa a
muro. (Vedere la fig.C.)
Dati tecnici
(Mensola sospesa a muro)
Dimensioni Circa 120 × 230 × 230 mm
(L/A/P)
Peso Circa 2,0 kg
Accessori forniti
Viti da ⊕ 3 × 14 mm (2)
Dati tecnici e formato sono soggetti a
modifiche senza preavviso.
Läs noggrant igenom denna
bruksanvisning innan du fäster
CMT-MD1 på monteringsfästet eller
stativet, och spara den sedan för
framtida bruk.
Väggmonteringsfästet och A/V-
stativet är specialdesignade för Sony
CMT-MD1. Se även
bruksanvisningen till CMT-MD1.
Observera angående
väggmonteringsfästet
Stereoanläggningen CMT-MD1
(7,8 kg) och monteringsfästet
(2,0 kg) väger tillsammans
9,8 kg. Av säkerhetsskäl måste
monteringsfästet skruvas stadigt
fast i en vägg av material som tål en
belastning på över 50 kg.
Förberedelser
• Inga skruvar medföljer för att
skruva fast monteringsfästet i
väggen. Köp skruvar som passar
materialet i väggen där
monteringsfästet ska skruvas fast.
• Förstärk vid behov väggen så att
den kan bära upp 50 kg.
• Om CMT-MD1 ska användas med
högtalare monterade så tryck in
högtalarkabeln i spåret på
apparatens undersida. Tryck inte in
nätkabeln i spåret.
Anmärkning
Montera antingen både höger och
vänster högtalare eller ta av båda
högtalarna när monteringsfästet
används. Om bara en högtalare är
monterad kommer apparaten i obalans
och kan eventuellt ramla ned.
Montering med hjälp av
väggmonteringsfästet
1 Skruva fast väggmonterings-
fästet i väggen med sex skruvar
(medföljer ej). (Se Fig. A.)
2 Sätt fast plattan på undersidan
av CMT-MD1 med de två
medföljande skruvarna
(⊕ 3 × 14 mm). (Se Fig. B.)
3 Fäst plattan i väggmonterings-
fästet med hjälp av en
sexkantsnyckel (14 mm,
medföljer ej). (Se Fig.
C
.)
Tekniska data
(Väggmonteringsfästet)
Yttermått Ca. 120 × 230 × 230 mm
(b/h/d)
Vikt Ca. 2,0 kg
Medföljande tillbehör
⊕ 3 × 14 mm skruvar (2)
Rätt till ändringar förbehålles.
3-865-338-01(1)
Accessory Kit for CMT-MD1
Installation Guides
Guides d’installation
Guías de instalación
Richtlijnen voor installatie
Einbauanweisungen
Guide di installazione
Guias para instalação
Monteringsföreskrifter
PK-MD1
Sony Corporation © 1998 Printed in China
A
B
C
CMT-MD1
CMT-MD1
CMT-MD1(7.8kg)
(2.0kg) 9.8kg
50kg
•
• 50kg
• CMT-MD1
1 6
A
2 2
⊕
3
14mm CMT-MD1
B
3 14mm,
C
( )
120 230 230mm
2.0kg
⊕
3 14mm 2

JP FR NL IT SE AR
GB ES DE PT CT
Preparations
If the CMT-MD1 is to be used with
speakers attached, press the speaker
cord and the power cord into the
groove on the bottom of the unit.
Note
If you attach the unit to the stand, make
sure the left and right speakers are both
attached or both detached. Attaching one
speaker without the other may cause the
unit to tip over and injure someone.
Mounting the Unit on the
Stand
1 After removing the screw
securing the base plate to the
stand, pass the power cord
through the hole in the base
plate (
A
-1) and then attach the
base plate to the bottom of the
CMT-MD1 with two supplied
screws (
A
-2).
2 Pass the power cord through the
stand and then insert the base
plate into the stand (
B
).
Make sure that the side with the slot
on the stand and the rear panel of
the unit face the same direction.
3 Adjust the angle of the stand so
that the screw hole on the base
plate aligns with the slot on the
stand. Then reattach the screw
removed in step 1 and tighten it
to secure the base plate to the
stand (
C
).
Note
For safety reasons, make sure the base
plate is securely fastened to the stand
with the screw. If you attempt to lift
the unit without the screw fastened
fully, the stand will drop off and
possibly cause an injury.
4 Pass the power cord through the
groove on the bottom of the
stand (
D
).
If the stand is set up without passing
the power cord through the groove,
the weight of the unit may damage
the power cord, which could lead to
electric shock or fire.
Specifications
(AV stand)
Dimensions Approx. 192 × 80 × 215 mm
(7
5
⁄8 × 3
1
⁄4 × 8
1
⁄2 inches) (w/
h/d)
Mass Approx. 750 g (1 lb 10 oz)
Supplied accesory
⊕ 3 × 14 mm screws (2)
Design and specifications are subject to
change without notice.
Remarque
Par mesure de sécurité, verrrouillez
toujours la plaque de base au socle
avec une vis. Le socle risquerait
autrement de tomber et de blesser
quelqu’un lorsque vous soulevez la
chaîne si la vis n’est pas fermement
serrée.
4 Faites passer le cordon
d’alimentation secteur dans la
gorge au fond du socle (
D
).
Le cordon risquerait autrement
d’être endommagé par le poids de la
chaîne et de causer une électrocution
ou un incendie.
Spécifications
(Socle AV)
Dimensions Environ 192 × 80 × 215 mm
(7
5
⁄8 × 3
1
⁄4 × 8
1
⁄2 pouces)
(l/h/p)
Poids Environ 750 g (1 li. 10 on.)
Accessoires fournis
Vis ⊕ 3 × 14 mm (2)
La conception et les spécifications sont
susceptibles d’être modifiées sans préavis.
Avant l’installation
Si vous prévoyez d’utiliser la chaîne
CMT-MD1 avec les enceintes fixées,
enfoncez les cordons d’enceinte et le
cordon d’alimentation secteur dans
les gorges sous l’appareil.
Remarque
Installez les deux enceintes ou n’en
installez aucune lorsque vous utilisez le
socle. Si vous n’en installiez qu’une seule,
la chaîne risquerait de tomber et de
blesser quelqu’un.
Installation de la chaîne
sur le socle
1 Après le retrait de la vis fixant la
plaque de base au socle, passez
le cordon d’alimentation dans le
trou dans la plaque de base (
A
-
1), puis fixez la plaque de base
sous le CMT-MD1 avec les deux
vis fournies (
A
-2).
2 Faites passer le cordon
d’alimentation secteur dans le
socle, puis introduisez la plaque
de base dans le socle (
B
).
Vérifiez que le côté avec la fente sur
le socle et le panneau arrière de
l’appareil sont orientés dans la
même direction.
3 Ajustez l’angle du socle de sorte
que le trou à vis de la plaque de
base soit aligné sur la fente du
socle. Puis réinsérez la vis retirée
à l’étape 1 et serrez-la
fermement pour fixer la plaque
de base au socle (
C
).
Nota
Para su seguridad, asegúrese de fijar la
placa de base en el soporte con el
tornillo. Si se trata de levantar la
unidad sin haber atornillado
completamente el tornillo, el soporte se
caerá y podrá herir a alguien.
4 Pase el cable de alimentación a
través de la ranura de la parte
inferior del soporte (
D
).
Si coloca el soporte sin haber pasado
el cable de alimentación por la
ranura, el peso de la unidad puede
dañar el cable de alimentación y
podrá ocasionar una descarga
eléctrica o un incendio.
Especificaciones
(Soporte audiovisual)
Dimensiones Aproximadamente 192 × 80 ×
215 mm (an × al × prf)
Peso Aproximadamente 750 g
Accesorios suministrados
Tornillos ⊕ 3 × 14 mm (2)
El diseño y las especificaciones están
sujetos a cambio sin previo aviso.
Preparativos
Si el CMT-MD1 va a ser utilizado
cono los altavoces instalados,
introduzca los cables de los altavoces
y de alimentación en la ranura de la
parte inferior de la unidad.
Nota
Cuando instale la unidad en el soporte,
asegúrese de que los altavoces izquierdo
y derecho están ambos instalados o
ambos están sin instalar. Si sólo se instala
un altavoz sin el otro, la unidad correrá el
riesgo de caerse y herir a alguien.
Para instalar la unidad en
el soporte
1 Después de quitar el tornillo que
asegura la placa de base al
soporte, pase el cable de
alimentación a través del orificio
en la placa de base en (
A
-1) e
instale la placa de base en la
parte inferior del CMT-MD1 con
dos tornillos (
A
-2).
2 Pase el cable de alimentación a
través del soporte e inserte la
placa de base en el soporte (
B
).
Asegúrese de que el lado que tiene la
ranura en el soporte y el panel
trasero de la unidad miran en el
mismo sentido.
3 Ajuste el ángulo del soporte de
tal forma que el orificio de
tornillo en la placa de base
queda alineado con la ranura en
el soporte. Vuelva a instalar el
tornillo quitado en el paso 1 y
apriete para asegurar la placa de
base al soporte (
C
).
3 Richten Sie den Winkel des
Ständers so aus, daß das
Gewinde im Fuß mit dem Schlitz
im Ständer ausgerichtet ist.
Setzen Sie dann die in Schritt 1
gelöste Schraube ein, und
sichern Sie den Fuß am Ständer
(
C
).
Hinweis
Aus Sicherheitsgründen, sichern Sie
das Gerät unbedingt mit der Schraube
am Ständer. Falls das Gerät
hochgehoben wird, ohne daß es mit der
Schraube gesichert ist, kann der
Ständer herunterfallen und
Verletzungen verursachen.
4 Verlegen Sie das Netzkabel in
der Rille an der Unterseite des
Ständers (
D
).
Falls das Netzkabel nicht in der Rille
des Ständers verlegt wird, kann es
durch das Gewicht des Gerätes
beschädigt werden, was zu einem
elektrischen Schlag oder Brand
führen könnte.
Technische Daten
(AV-Ständer)
Abmessungen ca. 192 × 80 × 215 mm
(B/H/T)
Gewicht ca. 750 g
Mitgeliefertes Zubehör
⊕ 3 × 14-mm-Schrauben (2)
Änderungen des Designs und der
technischen Daten vorbehalten.
Vorbereitungen
Wenn das Gerät CMT-MD1 mit
angebrachten Lautsprechern
verwendet werden soll, verlegen Sie
die Lautsprecherkabel und das
Netzkabel in den Rillen an der
Unterseite des Gerätes.
Hinweis
Bei Verwendung des Ständers muß das
Gerät entweder mit beiden Lautsprechern
oder ohne Lautsprecher angebracht
werden. Wenn nur einer der Lautsprecher
angebracht ist, kann der Ständer
umkippen und möglicherweise
Verletzungen verursachen.
Montage des Gerätes auf
dem Ständer
1 Lösen Sie die Schraube, die den
Fuß im Ständer sichert, und
führen Sie das Netzkabel durch
die Öffnung im Fuß (
A
-1).
Sichern Sie dann den Fuß mit den
zwei mitgelieferten Schrauben
am Boden des CMT-MD1 (
A
-2).
2 Führen Sie das Netzkabel durch
den das Ständer, und setzen Sie
dann den Fuß in den Ständer
(
B
).
Sorgen Sie dafür, daß der Schlitz im
Ständer und die Rückwand der
Einheit in die gleiche Richtung
weisen.
Preparações
Se for usar o CMT-MD1 com os
altifalantes instalados, pressione a
cabo dos altifalantes e o cabo de
alimentação no encaixe da parte
inferior do aparelho.
Nota
Se fixar a unidade no suporte, certifique-
se de instalar os altifalantes da esquerda e
da direita ou de remover os dois. Se
instalar apenas um altifalante, sem o
outro, o aparelho poderá cair e ferir
alguém.
Instalação do aparelho
no suporte
1 Depois de remover o parafuso
que fixa a placa de base no
suporte, passe o cabo de
alimentação pelo orifício da
placa de base (
A
-1) e fixe a
placa de base na parte inferior
do CMT-MD1, usando dois
parafusos fornecidos (
A
-2).
2 Passe o cabo de alimentação pelo
suporte e então introduza a base
no suporte (
B
).
Certifique-se de que o lado do
suporte com uma ranhura e o painel
traseiro da unidade estejam na
mesma direcção.
3 Ajuste o ângulo do suporte de
tal modo que o buraco do
parafuso na placa de base fique
alinhado com a ranhura do
suporte. Então, volte a fixar o
parafuso removido no passo 1 e
aperte-o para firmar a placa de
base no suporte (
C
).
Nota
Por medida de segurança, certifique-se
de que a base esteja bem fixa ao
suporte com o parafuso. Se tentar
levantar o aparelho sem que o parafuso
esteja bem apertado, o suporte cairá e
poderá causar ferimentos.
4 Passe o cabo de alimentação
através do encaixe na parte
inferior do suporte (
D
).
Se o suporte é instalado sem que o
cabo de alimentação seja passado
pelo encaixe, o peso do aparelho
poderá danificar o cabo de
alimentação, com risco de choque
eléctrico ou incêndio.
Especificações
(suporte AV)
Dimensões Aprox. 192 × 80 × 215 mm
(l × a × p)
Peso Aprox. 750 g
Acessórios fornecidos
Dois (2) parafusos ⊕ 3 × 14 mm
Os desenhos e especificações estão
sujeitos a mudanças sem aviso prévio.
Voorbereidingen
Als u de CMT-MD1 wilt gebruiken
met de luidsprekers eraan bevestigd,
druk dan het luidsprekersnoer en het
netsnoer in de groef aan de
onderzijde van het apparaat.
Opmerking
Laat zowel de linker als de rechter
luidspreker aan het apparaat bevestigd of
verwijder beide luidsprekers wanneer u
de staander gebruikt. Als slechts één van
de luidsprekers eraan is bevestigd, kan
het apparaat omkantelen en mogelijk
verwondingen veroorzaken.
Het apparaat op de
staander monteren
1 Verwijder de schroef waarmee
de steunplaat op de staander is
bevestigd, leid het netsnoer door
de opening in de steunplaat (
A
-
1) en bevestig dan de
steunplaat aan de onderzijde van
de CMT-MD1 met behulp van de
twee bijgeleverde schroeven (
A
-
2).
2 Leid het netsnoer door de
staanderbuis en bevestig de
steunplaat op de staander (
B
).
De kant van de staander met de sleuf
erin dient aan de achterkant van het
apparaat te komen.
3 Verstel de staander zo dat de
schroefopening in de steunplaat
samenvalt met de sleuf in de
staander. Steek dan de schroef
die u in stap 1 hebt verwijderd in
deze opening en draai hem
stevig aan om de steunplaat aan
de staander vast te zetten (
C
).
Opmerking
Voor uw veiligheid dient u te zorgen
dat de steunplaat stevig met de schroef
aan de staander is vastgezet. Als u het
apparaat optilt zonder dat de schroef
stevig vast zit, kan de staander eraf
vallen en mogelijk verwonding
veroorzaken.
4 Breng het netsnoer aan in de
groef aan de onderzijde van de
staander (
D
).
Als de staander wordt geïnstalleerd
zonder dat het netsnoer in de groef
is geplaatst, kan het netsnoer door
het gewicht van het apparaat
beschadigd raken, hetgeen een
elektrische schok of brand kan
veroorzaken.
Technische gegevens
(AV staander)
Afmetingen ca. 192 × 80 × 215 mm
(b/h/d)
Gewicht ca. 750 g
Bijgeleverde accessoires
⊕ 3 × 14 mm schroeven (2)
Ontwerp en specificaties onder
voorbehoud van wijzigingen zonder
voorafgaande kennisgeving.
Preparativi
Se il CMT-MD1 deve essere usato con
i diffusori applicati, spingere il cavo
del diffusore e il cavo di
alimentazione nella scanalatura sulla
parte inferiore dell’unità.
Nota
Se si applica l’unità al supporto,
assicurarsi che i diffusori sinistro e destro
siano entrambi applicati o entrambi
staccati. Se si applica un solo diffusore
senza l’altro, l’unità potrebbe
capovolgersi e ferire qualcuno.
Montaggio dell’unità sul
supporto
1 Dopo aver rimosso la vite che
fissa la piastra base al supporto,
far passare il cavo di
alimentazione attraverso il foro
nella piastra base (
A
-1) e poi
fissare la piastra base sulla parte
inferiore del CMT-MD1 con le
due viti in dotazione (
A
-2).
2 Far passare il cavo di alimenta-
zione attraverso il supporto e poi
inserire la piastra base nel
supporto (
B
).
Assicurarsi che il lato con la fessura
sul supporto e il pannello posteriore
dell’apparecchio siano orientati nella
stessa direzione.
3 Regolare l’angolazione del
supporto in modo che il foro vite
sulla piastra base sia allineato
con la fessura sul supporto.
Quindi riapplicare la vite rimossa
al punto 1 e serrarla per fissare la
piastra base al supporto (
C
).
Nota
Per la sicurezza, assicurarsi che la
piastra base sia saldamente fissata al
supporto con la vite. Se si tenta di
sollevare l’unità senza che la vite sia
serrata completamente, il supporto
potrebbe staccarsi con il rischio di
lesioni.
4 Far passare il cavo di
alimentazione attraverso la
scanalatura sulla parte inferiore
del supporto (
D
).
Se il supporto viene installato senza
aver fatto passare il cavo di
alimentazione attraverso la
scanalatura, il peso dell’unità può
danneggiare il cavo di alimentazione
e ciò potrebbe causare scosse
elettriche o un incendio.
Dati tecnici
(Supporto AV)
Dimensioni Circa 192 × 80 × 215 mm
(L/A/P)
Peso Circa 750 g
Accessori forniti
Viti da ⊕ 3 × 14 mm (2)
Dati tecnici e formato sono soggetti a
modifiche senza preavviso.
Förberedelser
Om CMT-MD1 ska användas med
högtalare monterade så tryck in
högtalarkabeln och nätkabeln i spåret
på apparatens undersida.
Anmärkning
Montera antingen både höger och vänster
högtalare eller ta av båda högtalarna när
stativet används. Om bara en högtalare är
monterad kan apparaten falla omkull och
eventuellt orsaka personskador.
Montering av apparaten
på stativet
1 Skruva loss skruven som håller
fast bottenplattan i stativet, dra
nätkabeln genom hålet i
bottenplattan (
A
-1) och fäst
sedan bottenplattan på
undersidan av CMT-MD1 med de
två medföljande skruvarna (
A
-
2).
2 Dra nätkabeln genom stativröret
och skjut sedan i bottenplattan i
stativet (B).
Kontrollera att sidan med springan
på stativet och anläggningens
bakpanel är vända åt samma håll.
3 Justera stativets vinkel så att
skruvhålet i bottenplattan
hamnar mitt för springan i
stativet. Skruva sedan fast den
skruv som skruvades loss i steg 1
igen, och dra åt den så att
bottenplattan sitter stadigt fast i
stativet (
C
).
Anmärkning
Kontrollera för säkerhets skull att
bottenplattan sitter ordentligt fast i
stativet med hjälp av skruven. Om du
försöker lyfta anläggningen och
skruven inte är ordentligt åtdragen,
ramlar stativet av, vilket eventuellt kan
leda till personskador.
4 Dra nätkabeln genom spåret på
stativets undersida (D).
Om stativet ställs upp utan att
nätkabeln är dragen genom spåret
kommer stativets vikt komma att
skada nätkabeln, vilket kan leda till
elektriska stötar eller brand.
Tekniska data
(A/V-stativet)
Yttermått Ca. 192 × 80 × 215 mm
(b/h/d)
Vikt Ca. 750 g
Medföljande tillbehör
⊕ 3 × 14 mm skruvar (2)
Rätt till ändringar förbehålles.
CMT-MD1
1
A
-
1
2 CMT-MD1
A
-
2
2
B
3
1
C
A
B
C
D
1
2
4
D
(AV )
192 80 215mm
750g
⊕
3 14mm 2
Transcripción de documentos
JP FR NL IT SE AR 3-865-338-01(1) Accessory Kit for CMT-MD1 取扱説明書 Installation Guides Guides d’installation Guías de instalación Richtlijnen voor installatie Einbauanweisungen Guide di installazione Guias para instalação Monteringsföreskrifter ☆ ☆ このブラケットとスタンドは、ソニー製 のCMT-MD1を設置するための専用スタ ンドです。CMT-MD1の取扱説明書もあ わせてご覧ください。 安全に使っていただくために PK-MD1 Sony Corporation © 1998 Printed in China A C M T - M D 1 ( 7 . 8 k g ) とブラケット (2.0kg)をあわせた重さは9.8kg にな ります。安全のため、必ず50kg 以上 の重さに耐えられる材質の壁に、ビ スでしっかり固定してください。 準備 • ブラケット取り付け用のビスは付属 していません。取り付ける壁の材質 にあったビスを購入してください。 • 50kg 以上の重さに耐えられない壁に 取り付ける場合は、必ず壁を補強し てください。 • CMT-MD1 にスピーカーを取り付け けるときは、本体の底面の溝にス ピーカーコードをはめ込んでくださ い。電源コードは、はめ込まないで ください。 B スピーカーは左右両方を取り付けるか、 両方をはずしてスタンドをお使いくださ い。スピーカー片方だけを取り付ける と、本体が落ちて壊れたり、けがの原因 になることがあります。 ブラケットの取り付けかた 1 2 3 ブラケットをビス6 本 (市販) で壁に取 り付ける。 (図A参照) プレートを付属のビス2本 (⊕ 3× 14mm)でCMT-MD1本体の底面に取 (図B参照) り付ける。 プレートを六角レンチ (14mm, 市販) (図C参 でブラケットに取り付ける。 照) 主な仕様 The wall hanging bracket and AV stand are designed specifically for Sony’s CMT-MD1. Also refer to the CMT-MD1 instruction manual. Caution on the use of the wall hanging bracket The component system CMT-MD1 (7.8 kg) and this bracket (2.0 kg) have a combined weight of 9.8 kg. Therefore, for safety reasons, this bracket should be attached securely to a wall made from materials capable of supporting a load of 50 kg or more. Preparations • The screws used to attach the bracket to a wall are not supplied. Users should obtain screws that suit the materials of the wall to which the bracket is to be attached. • Reinforce the wall, if necessary, so that it can support 50 kg. • If the CMT-MD1 is to be used with speakers attached, press the speaker cord into the groove on the bottom of the unit. Do not press the power cord into the groove. Avant de fixer la CMT-MD1 sur l’équerre ou le socle, veuillez lire attentivement cette notice. Rangez-la dans un endroit sûr pour pouvoir la retrouver en cas de besoin. L’équerre murale et le socle AV sont exclusivement destinés à la chaîne CMT-MD1 Sony. Veuillez consulter également le mode d’emploi de la chaîne CMT-MD1. Attention lors de l’utilisation de l’équerre murale Le poids combiné de la chaîne CMT-MD1 (7,8 kg) et de l’équerre murale (2,0 kg) est de 9,8 kg. Pour la sécurité, il est important que les matériaux du mur auquel sera fixée l’équerre murale puissent supporter une charge de 50 kg ou plus et que la fixation soit solide. (ウォールハンギングブラケット) 最大外形寸法 (幅×高さ×奥行き) 約120×230×230mm 質量 約2.0kg 付属品 ビス (⊕ 3×14mm) (2) 仕様および外観は、改良のため予告なく変更 することがありますが、ご了承ください。 GB Before attaching the CMT-MD1 to the bracket or the stand, please read this manual thoroughly and retain it for future reference. C ご注意 設置する前に、この取扱説明書をよく お読みのうえ、製品を安全にお使いく ださい。お読みになったあとは、いつ でも見られるところに必ず保管してく ださい。 Remarque Installez les deux enceintes ou n’en installez aucune lorsque vous utilisez l’équerre murale. Si vous n’en installiez qu’une seule, la chaîne ne serait pas équilibrée et risquerait de tomber. Utilisation de l’équerre murale 1 Fixez l’équerre murale au mur avec six vis (non fournis). (Voyez fig. A.) 2 Fixez la plaque sous la CMT-MD1 avec deux vis fournies (⊕ 3 × 14 mm). (Voyez fig. B.) 3 À l’aide d’une clé hexagonale (14 mm, non fournie), fixez la plaque à l’équerre murale. (Voyez fig. C.) Spécifications (Equerre murale) Avant l’installation • Les vis pour la fixation de l’équerre murale au mur ne sont pas fournies. L’utilisateur doit s’assurer que les vis utilisées conviennent aux matériaux du mur auquel l’équerre sera fixée. • Au besoin, renforcez le mur. Il doit pouvoir supporter 50 kg. • Si vous prévoyez d’utiliser la CMT-MD1 avec les enceintes fixées, enfoncez les cordons d’enceinte dans les gorges sous l’appareil. N’enfoncez pas le cordon d’alimentation secteur dans la gorge. Dimensions Environ 120 × 230 × 230 mm (4 3⁄4 × 9 1⁄8 × 9 1⁄8 pouces) (l × h × p) Poids Environ 2,0 kg (4 li. 7 on.) Accessoires fournis Vis ⊕ 3 × 14 mm (2) La conception et les spécifications sont susceptibles d’être modifiées sans préavis. If you attach the unit to the bracket, make sure the left and right speakers are both attached or both detached. Attaching one speaker without the other may cause the unit to drop and injure someone. Using the Wall Hanging Bracket 1 Attach the wall hanging bracket to a wall with six screws (not supplied). (See Fig. A.) 2 Attach the plate to the bottom of the CMT-MD1 with two supplied screws (⊕ 3 × 14 mm). (See Fig. B.) 3 Use a hexagonal wrench (14 mm, not supplied) to attach the plate to the wall hanging bracket. (See Fig. C.) Antes de instalar el CMT-MD1 en la ménsula en el soporte, lea completamente este manual y guárdelo como referencia para el futuro. La ménsula de montaje en la pared y el soporte audiovisual se han diseñado específicamente para el CMT-MD1 de Sony. Consulte también el manual de instrucciones del CMT-MD1. Precaución para el uso de la ménsula de montaje en la pared El sistema de componentes CMT-MD1 (7,8 kg) y la ménsula (2,0 kg) tiene un peso combinado de 9,8 kg. Por lo tanto, por razones de seguridad, esta ménsula deberá ser fijada firmemente ea una pared construida con materiales capaces de soportar un peso de 50 kg o más. Specifications (The wall hanging bracket) Dimensions Approx. 120 × 230 × 230 mm (4 3⁄4 × 9 1⁄8 × 9 1⁄8 inches) (w/ h/d) Mass Approx. 2.0 kg (4 lb 7 oz) Supplied accessory ⊕ 3 × 14 mm screws (2) Design and specifications are subject to change without notice. Preparativos • Los tornillos utilizados para fijar la ménsula a la pared no se incluyen. El usuario deberá obtener unos tornillos apropiados para el material con que esté construida la pared a la que vaya a fijar la ménsula. • En caso necesario refuerce la pared para que pueda soportar 50 kg. • Si el CMT-MD1 va a ser utilizado con los altavoces instalados, introduzca los cables de altavoces en la ranura de la parte inferior de la unidad. No introduzca el cable de alimentación en la ranura. Deze ophangbeugel en de AV staander zijn speciaal ontworpen voor het installeren van Sony’s CMT-MD1. Raadpleeg ook de gebruiksaanwijzing van de CMT-MD1. Kies een stevige wand voor de ophangbeugel Het CMT-MD1 componentensysteem (7,8 kg) en deze ophangbeugel (2,0 kg) hebben een gecombineerd gewicht van 9,8 kg. Omwille van de veiligheid dient u deze ophangbeugel stevig te bevestigen aan een wand die in staat is een gewicht van 50 kg of meer te ondersteunen. Voorbereidingen • De schroeven voor het bevestigen van de ophangbeugel aan de wand zijn niet bijgeleverd. De gebruiker dient schroeven aan te schaffen die geschikt zijn voor het materiaal van de wand waaraan u de ophangbeugel bevestigt. • Indien nodig, verstevigt u de wand zodat deze een gewicht van 50 kg kan ondersteunen. • Als u de CMT-MD1 wilt gebruiken met de luidsprekers eraan bevestigd, druk dan het luidsprekersnoer in de groef aan de onderzijde van het apparaat. Druk het netsnoer niet in de groef. Opmerking Laat zowel de linker als de rechter luidspreker aan het apparaat bevestigd of verwijder beide luidsprekers wanneer u de ophangbeugel gebruikt. Als slechts één van de luidsprekers eraan is bevestigd, zal het apparaat niet in evenwicht zijn en kan het vallen. Installeren van de ophangbeugel 1 Bevestig de ophangbeugel aan de wand met behulp van zes schroeven (niet bijgeleverd). (Zie Afb. A.) 2 Bevestig de plaat met de twee bijgeleverde schroeven (⊕ 3 × 14 mm) aan de onderzijde van de CMT-MD1. (Zie Afb. B.) 3 Gebruik een inbussleutel (14 mm, niet bijgeleverd) om de plaat aan de ophangbeugel te bevestigen. (Zie Afb. C.) Technische gegevens (Wandophangbeugel) Afmetingen ca. 120 × 230 × 230 mm (b/h/d) Gewicht ca. 2,0 kg Bijgeleverde accessoires ⊕ 3 × 14 mm schroeven (2) Ontwerp en specificaties onder voorbehoud van wijzigingen zonder voorafgaande kennisgeving. ES Note Gelieve deze handleiding zorgvuldig te lezen alvorens de CMT-MD1 aan deze ophangbeugel of op de standaard te installeren. Bewaar de handleiding voor latere naslag. DE Nota Si se instala la unidad en la ménsula, asegúrese de que los altavoces izquierdo y derecho están ambos instalados o ambos están sin instalar. Si sólo se instala un altavoz sin el otro, la unidad correrá el riesgo de caerse y herir a alguien. Bitte lesen Sie diese Anleitung vor der Installation des CMT-MD1 an den Wandhalter oder Ständer aufmerksam durch, und bewahren Sie sie für spätere Bezugnahme auf. 1 Fije la ménsula de montaje en la Dieser Wandhalter und der AVStänder sind speziell für die Installation des Modells CMT-MD1 von Sony vorgesehen. Nehmen Sie auch Bezug auf die Bedienungsanleitung des CMT-MD1. pared a una pared con seis tornillos (no suministrados). (Consulte la figura A.) 2 Sujete la chapa a la parte inferior del CMT-MD1 con dos tornillos incluidos (⊕ 3 × 14 mm) (Consulte la figura B.) 3 Utilice una llave hexagonal (14 mm, no suministrada) para sujetar la placa a la ménsula de montaje en la pared. (Consulte la figura C.) Vorsicht beim Gebrauch des Wandhalters Das Komponentensystem CMT-MD1 (7,8 kg) und dieser Halter (2,0 kg) wiegen zusammen 9,8 kg. Aus Sicherheitsgründen muß daher dieser Halter einwandfrei an eine Wand montiert werden, die in der Lage ist, ein Gewicht von mindestens 50 kg zu tragen. Utilización de la ménsula de montaje en la pared Especificaciones (Ménsula de montaje en la pared) Dimensiones Aproximadamente 120 × 230 × 230 mm (an × al × prf) Peso Aproximadamente 2,0 kg Accesorios suministrados Tornillos ⊕ 3 × 14 mm (2) El diseño y las especificaciones están sujetos a cambio sin previo aviso. Vorbereitungen • Die für die Befestigung des Halters an einer Wand benötigten Schrauben sind nicht im Lieferumfang enthalten. Der Benutzer ist verantwortlich für die Beschaffung von Schrauben, die für das Material der Wand, an welcher der Halter angebracht werden soll, geeignet sind. • Gegebenenfalls muß die Wand verstärkt werden, so daß sie ein Gewicht von 50 kg tragen kann. Prima di applicare il CMT-MD1 alla mensola o al supporto, leggere completamente questo manuale e conservarlo per eventuali riferimenti in futuro. La mensola sospesa a muro e il supporto AV sono progettati appositamente per il CMT-MD1 Sony. Fare riferimento anche al manuale di istruzioni del CMT-MD1. Precauzione per l’uso della mensola sospesa a muro Il sistema a componenti CMT-MD1 (7,8 kg) e questa mensola (2,0 kg) unitamente hanno un peso complessivo di 9,8 kg. Perciò, per ragioni di sicurezza, questa mensola deve essere fissata saldamente ad un muro fatto di materiale in grado di sostenere un peso di 50 kg o più. Preparativi • Le viti usate per fissare la mensola ad un muro non sono fornite. Gli utenti devono procurarsi delle viti adatte al materiale del muro a cui la mensola deve essere fissata. • Rinforzare il muro, se è necessario, in modo che possa sostenere un peso di 50 kg. • Se il CMT-MD1 deve essere usato con i diffusori applicati, spingere il cavo del diffusore nella scanalatura sulla parte inferiore dell’unità. Non spingere il cavo di alimentazione nella scanalatura. Nota Se si applica l’unità alla mensola, assicurarsi che i diffusori sinistro e destro siano entrambi applicati o entrambi staccati. Se si applica solo un diffusore senza l’altro, l’unità potrebbe cadere e ferire qualcuno. Uso della mensola sospesa a muro 1 Fissare la mensola sospesa a muro ad una parete con sei viti (non fornite). (Vedere la fig. A.) 2 Fissare la piastra sulla parte inferiore del CMT-MD1 con le due viti in dotazione (⊕ 3 × 14 mm). (Vedere la fig.B.) 3 Usare una chiave esagonale (14 mm, non fornita) per fissare la piastra alla mensola sospesa a muro. (Vedere la fig.C.) Dati tecnici (Mensola sospesa a muro) Dimensioni Circa 120 × 230 × 230 mm (L/A/P) Peso Circa 2,0 kg Accessori forniti Viti da ⊕ 3 × 14 mm (2) Dati tecnici e formato sono soggetti a modifiche senza preavviso. PT • Wenn das Gerät CMT-MD1 mit angebrachten Lautsprechern verwendet werden soll, verlegen Sie die Lautsprecherkabel in den Rillen an der Unterseite des Gerätes. Verlegen Sie nicht das Netzkabel in einer der Rillen. Hinweis Bei Verwendung des Wandhalters muß das Gerät entweder mit beiden Lautsprechern oder ohne Lautsprecher angebracht werden. Wenn nur einer der Lautsprecher angebracht ist, ist das Gerät nicht im Gleichgewicht und könnte herunterfallen. Verwendung des Wandhalters 1 Montieren Sie den Wandhalter mit sechs Schrauben (nicht mitgeliefert) an eine Wand. (Siehe Abb. A.) 2 Befestigen Sie die Platte mit den zwei mitgelieferten Schrauben (⊕ 3 × 14 mm) an der Unterseite des CMT-MD1. (Siehe Abb. B.) 3 Befestigen Sie die Platte mit einem Sechskant-Stiftschlüssel (14 mm, nicht mitgeliefert) am Wandhalter. (Siehe Abb. C.) Technische Daten (Wandhalter) Abmessungen ca. 120 × 230 × 230 mm (B/H/T) Gewicht ca. 2,0 kg Mitgeliefertes Zubehör ⊕ 3 × 14-mm-Schrauben (2) Änderungen des Designs und der technischen Daten vorbehalten. Antes de fixar o CMT-MD1 em um dos dois suportes, leia o manual completamente e guarde-o para futuras referências. O suporte de parede e o suporte AV são desenhados especialmente para instalação do CMT-MD1 da Sony. Refira-se também ao manual de instruções do CMT-MD1. Precaução sobre o uso do suporte de parede O sistema do componente CMT-MD1 (7,8 kg) e este suporte (2,0 kg) têm um peso combinado de 9,8 kg. Assim sendo, por razões de segurança, este suporte deve ser afixado seguramente a uma parede feita de materiais capazes de aguentar uma carga de 50 kg ou mais. Preparações • Os parafusos usados para afixar o suporte na parede não são fornecidos. O usuário deve obter parafusos adequados ao material da parede na qual o suporte será afixado. • Se necessário, reforce a parede de forma que a mesma possa aguentar 50 kg. • Se for usar o CMT-MD1 com os altifalantes instalados, pressione a cabo do altifalante no encaixe da parte inferior do aparelho. Não pressione o cabo de alimentação no encaixe. Läs noggrant igenom denna bruksanvisning innan du fäster CMT-MD1 på monteringsfästet eller stativet, och spara den sedan för framtida bruk. Väggmonteringsfästet och A/Vstativet är specialdesignade för Sony CMT-MD1. Se även bruksanvisningen till CMT-MD1. Observera angående väggmonteringsfästet Stereoanläggningen CMT-MD1 (7,8 kg) och monteringsfästet (2,0 kg) väger tillsammans 9,8 kg. Av säkerhetsskäl måste monteringsfästet skruvas stadigt fast i en vägg av material som tål en belastning på över 50 kg. Förberedelser • Inga skruvar medföljer för att skruva fast monteringsfästet i väggen. Köp skruvar som passar materialet i väggen där monteringsfästet ska skruvas fast. • Förstärk vid behov väggen så att den kan bära upp 50 kg. • Om CMT-MD1 ska användas med högtalare monterade så tryck in högtalarkabeln i spåret på apparatens undersida. Tryck inte in nätkabeln i spåret. Anmärkning Montera antingen både höger och vänster högtalare eller ta av båda högtalarna när monteringsfästet används. Om bara en högtalare är monterad kommer apparaten i obalans och kan eventuellt ramla ned. Montering med hjälp av väggmonteringsfästet 1 Skruva fast väggmonteringsfästet i väggen med sex skruvar (medföljer ej). (Se Fig. A.) 2 Sätt fast plattan på undersidan av CMT-MD1 med de två medföljande skruvarna (⊕ 3 × 14 mm). (Se Fig. B.) 3 Fäst plattan i väggmonteringsfästet med hjälp av en sexkantsnyckel (14 mm, medföljer ej). (Se Fig. C.) Tekniska data (Väggmonteringsfästet) Ca. 120 × 230 × 230 mm (b/h/d) Vikt Ca. 2,0 kg Medföljande tillbehör ⊕ 3 × 14 mm skruvar (2) Yttermått Rätt till ändringar förbehålles. CT ☆ Nota Se fixar a unidade no suporte, certifique-se de instalar os altifalantes da esquerda e da direita ou de remover os dois. Se instalar apenas um altifalante, sem o outro, o aparelho poderá cair e ferir alguém. Utilização do suporte de parede 1 Prenda o suporte numa parede usando seis parafusos (não fornecidos). (Veja a fig. A.) 2 Prenda a base na parte inferior do CMT-MD1 usando dois parafusos (⊕ 3 × 14 mm) fornecidos. (Veja a fig. B.) 3 Use uma chave sextavada (de 14 mm, não fornecida) para afixar a base no suporte de parede. (Veja a fig. C.) Especificações (suporte de parede) Aprox. 120 × 230 × 230 mm (l × a × p) Peso Aprox. 2,0 kg Acessórios fornecidos Dois (2) parafusos ⊕ 3 × 14 mm Dimensões Os desenhos e especificações estão sujeitos a mudanças sem aviso prévio. ☆ ☆ ☆ ☆ JP A 準備 CMT-MD1 にスピーカーを取り付ける ときは、本体の底面の溝にスピーカー コードと電源コードをはめ込んでくだ さい。 ご注意 スピーカーは左右両方を取り付けるか、両 方をはずしてスタンドをお使いください。 スピーカー片方だけを取り付けると、本体 が倒れて壊れたり、けがの原因になること があります。 1 2 スタンドの取り付けかた 1 B 2 スタンドとプレートを固定している ビスを取りはずしたあと、プレートの 穴に電源コードを通し (A - 1 )、付属 のビス2本でCMT-MD1本体の底面に プレートを取り付ける (A-2) 。 FR 4 電源コードをスタンド底面の溝に通 す (D) 。 電源コードを溝に通さないままスタ ンドを置くと、本体の重みで電源コー ドが破損し、感電や発火の原因になる ことがあります。 主な仕様 (AVスタンド) 最大外形寸法 (幅×高さ×奥行き) 約192×80×215mm 質量 約750g 付属品 ビス (⊕ 3×14mm) (2) 仕様および外観は、改良のため予告なく変更 することがありますが、ご了承ください。 スタンドの筒に電源コードを通し、 プレートを差し込む(B) 。 スタンド筒後面のスリットからプ レートのビス穴が見えるように位置 を合わせ、手順1ではずしたビスをと めて固定する (C) 。 Note If you attach the unit to the stand, make sure the left and right speakers are both attached or both detached. Attaching one speaker without the other may cause the unit to tip over and injure someone. Mounting the Unit on the Stand 1 After removing the screw D securing the base plate to the stand, pass the power cord through the hole in the base plate (A-1) and then attach the base plate to the bottom of the CMT-MD1 with two supplied screws (A-2). 2 Pass the power cord through the stand and then insert the base plate into the stand (B). Make sure that the side with the slot on the stand and the rear panel of the unit face the same direction. 3 Adjust the angle of the stand so that the screw hole on the base plate aligns with the slot on the stand. Then reattach the screw removed in step 1 and tighten it to secure the base plate to the stand (C). 1 Après le retrait de la vis fixant la plaque de base au socle, passez le cordon d’alimentation dans le trou dans la plaque de base (A1), puis fixez la plaque de base sous le CMT-MD1 avec les deux vis fournies (A-2). 2 Faites passer le cordon d’alimentation secteur dans le socle, puis introduisez la plaque de base dans le socle (B). 4 Faites passer le cordon d’alimentation secteur dans la gorge au fond du socle (D). Le cordon risquerait autrement d’être endommagé par le poids de la chaîne et de causer une électrocution ou un incendie. Spécifications (Socle AV) Dimensions Environ 192 × 80 × 215 mm (7 5⁄8 × 3 1⁄4 × 8 1⁄2 pouces) (l/h/p) Poids Environ 750 g (1 li. 10 on.) Accessoires fournis Vis ⊕ 3 × 14 mm (2) La conception et les spécifications sont susceptibles d’être modifiées sans préavis. For safety reasons, make sure the base plate is securely fastened to the stand with the screw. If you attempt to lift the unit without the screw fastened fully, the stand will drop off and possibly cause an injury. 4 Pass the power cord through the groove on the bottom of the stand (D). If the stand is set up without passing the power cord through the groove, the weight of the unit may damage the power cord, which could lead to electric shock or fire. Specifications (AV stand) Dimensions Approx. 192 × 80 × 215 mm (7 5⁄8 × 3 1⁄4 × 8 1⁄2 inches) (w/ h/d) Mass Approx. 750 g (1 lb 10 oz) Supplied accesory ⊕ 3 × 14 mm screws (2) Design and specifications are subject to change without notice. Preparativos Si el CMT-MD1 va a ser utilizado cono los altavoces instalados, introduzca los cables de los altavoces y de alimentación en la ranura de la parte inferior de la unidad. Nota Cuando instale la unidad en el soporte, asegúrese de que los altavoces izquierdo y derecho están ambos instalados o ambos están sin instalar. Si sólo se instala un altavoz sin el otro, la unidad correrá el riesgo de caerse y herir a alguien. Para instalar la unidad en el soporte 1 Después de quitar el tornillo que asegura la placa de base al soporte, pase el cable de alimentación a través del orificio en la placa de base en (A-1) e instale la placa de base en la parte inferior del CMT-MD1 con dos tornillos (A-2). 2 Pase el cable de alimentación a través del soporte e inserte la placa de base en el soporte (B). Asegúrese de que el lado que tiene la ranura en el soporte y el panel trasero de la unidad miran en el mismo sentido. 3 Ajuste el ángulo del soporte de tal forma que el orificio de tornillo en la placa de base queda alineado con la ranura en el soporte. Vuelva a instalar el tornillo quitado en el paso 1 y apriete para asegurar la placa de base al soporte (C). Als u de CMT-MD1 wilt gebruiken met de luidsprekers eraan bevestigd, druk dan het luidsprekersnoer en het netsnoer in de groef aan de onderzijde van het apparaat. Opmerking Laat zowel de linker als de rechter luidspreker aan het apparaat bevestigd of verwijder beide luidsprekers wanneer u de staander gebruikt. Als slechts één van de luidsprekers eraan is bevestigd, kan het apparaat omkantelen en mogelijk verwondingen veroorzaken. Het apparaat op de staander monteren 1 Verwijder de schroef waarmee de steunplaat op de staander is bevestigd, leid het netsnoer door de opening in de steunplaat (A1) en bevestig dan de steunplaat aan de onderzijde van de CMT-MD1 met behulp van de twee bijgeleverde schroeven (A2). 2 Leid het netsnoer door de staanderbuis en bevestig de steunplaat op de staander (B). Opmerking Voor uw veiligheid dient u te zorgen dat de steunplaat stevig met de schroef aan de staander is vastgezet. Als u het apparaat optilt zonder dat de schroef stevig vast zit, kan de staander eraf vallen en mogelijk verwonding veroorzaken. 4 Breng het netsnoer aan in de groef aan de onderzijde van de staander (D). Als de staander wordt geïnstalleerd zonder dat het netsnoer in de groef is geplaatst, kan het netsnoer door het gewicht van het apparaat beschadigd raken, hetgeen een elektrische schok of brand kan veroorzaken. Technische gegevens (AV staander) Afmetingen ca. 192 × 80 × 215 mm (b/h/d) Gewicht ca. 750 g Bijgeleverde accessoires ⊕ 3 × 14 mm schroeven (2) Ontwerp en specificaties onder voorbehoud van wijzigingen zonder voorafgaande kennisgeving. 3 Verstel de staander zo dat de Para su seguridad, asegúrese de fijar la placa de base en el soporte con el tornillo. Si se trata de levantar la unidad sin haber atornillado completamente el tornillo, el soporte se caerá y podrá herir a alguien. 4 Pase el cable de alimentación a través de la ranura de la parte inferior del soporte (D). Si coloca el soporte sin haber pasado el cable de alimentación por la ranura, el peso de la unidad puede dañar el cable de alimentación y podrá ocasionar una descarga eléctrica o un incendio. Vorbereitungen Hinweis Hinweis Montage des Gerätes auf dem Ständer (Soporte audiovisual) 1 Lösen Sie die Schraube, die den Dimensiones Aproximadamente 192 × 80 × 215 mm (an × al × prf) Peso Aproximadamente 750 g Accesorios suministrados Tornillos ⊕ 3 × 14 mm (2) El diseño y las especificaciones están sujetos a cambio sin previo aviso. 3 Richten Sie den Winkel des Wenn das Gerät CMT-MD1 mit angebrachten Lautsprechern verwendet werden soll, verlegen Sie die Lautsprecherkabel und das Netzkabel in den Rillen an der Unterseite des Gerätes. Especificaciones Fuß im Ständer sichert, und führen Sie das Netzkabel durch die Öffnung im Fuß (A-1). Sichern Sie dann den Fuß mit den zwei mitgelieferten Schrauben am Boden des CMT-MD1 (A-2). 2 Führen Sie das Netzkabel durch den das Ständer, und setzen Sie dann den Fuß in den Ständer (B). Sorgen Sie dafür, daß der Schlitz im Ständer und die Rückwand der Einheit in die gleiche Richtung weisen. Se il CMT-MD1 deve essere usato con i diffusori applicati, spingere il cavo del diffusore e il cavo di alimentazione nella scanalatura sulla parte inferiore dell’unità. Nota Se si applica l’unità al supporto, assicurarsi che i diffusori sinistro e destro siano entrambi applicati o entrambi staccati. Se si applica un solo diffusore senza l’altro, l’unità potrebbe capovolgersi e ferire qualcuno. Montaggio dell’unità sul supporto 1 Dopo aver rimosso la vite che fissa la piastra base al supporto, far passare il cavo di alimentazione attraverso il foro nella piastra base (A-1) e poi fissare la piastra base sulla parte inferiore del CMT-MD1 con le due viti in dotazione (A-2). 2 Far passare il cavo di alimentazione attraverso il supporto e poi inserire la piastra base nel supporto (B). Nota Per la sicurezza, assicurarsi che la piastra base sia saldamente fissata al supporto con la vite. Se si tenta di sollevare l’unità senza che la vite sia serrata completamente, il supporto potrebbe staccarsi con il rischio di lesioni. 4 Far passare il cavo di alimentazione attraverso la scanalatura sulla parte inferiore del supporto (D). Se il supporto viene installato senza aver fatto passare il cavo di alimentazione attraverso la scanalatura, il peso dell’unità può danneggiare il cavo di alimentazione e ciò potrebbe causare scosse elettriche o un incendio. Dati tecnici (Supporto AV) Dimensioni Circa 192 × 80 × 215 mm (L/A/P) Peso Circa 750 g Accessori forniti Viti da ⊕ 3 × 14 mm (2) Dati tecnici e formato sono soggetti a modifiche senza preavviso. Assicurarsi che il lato con la fessura sul supporto e il pannello posteriore dell’apparecchio siano orientati nella stessa direzione. Aus Sicherheitsgründen, sichern Sie das Gerät unbedingt mit der Schraube am Ständer. Falls das Gerät hochgehoben wird, ohne daß es mit der Schraube gesichert ist, kann der Ständer herunterfallen und Verletzungen verursachen. 4 Verlegen Sie das Netzkabel in der Rille an der Unterseite des Ständers (D). Falls das Netzkabel nicht in der Rille des Ständers verlegt wird, kann es durch das Gewicht des Gerätes beschädigt werden, was zu einem elektrischen Schlag oder Brand führen könnte. Technische Daten (AV-Ständer) Abmessungen ca. 192 × 80 × 215 mm (B/H/T) Gewicht ca. 750 g Mitgeliefertes Zubehör ⊕ 3 × 14-mm-Schrauben (2) Änderungen des Designs und der technischen Daten vorbehalten. Preparações Se for usar o CMT-MD1 com os altifalantes instalados, pressione a cabo dos altifalantes e o cabo de alimentação no encaixe da parte inferior do aparelho. Nota Se fixar a unidade no suporte, certifiquese de instalar os altifalantes da esquerda e da direita ou de remover os dois. Se instalar apenas um altifalante, sem o outro, o aparelho poderá cair e ferir alguém. Instalação do aparelho no suporte 1 Depois de remover o parafuso que fixa a placa de base no suporte, passe o cabo de alimentação pelo orifício da placa de base (A-1) e fixe a placa de base na parte inferior do CMT-MD1, usando dois parafusos fornecidos (A-2). 2 Passe o cabo de alimentação pelo suporte e então introduza a base no suporte (B). Certifique-se de que o lado do suporte com uma ranhura e o painel traseiro da unidade estejam na mesma direcção. 3 Ajuste o ângulo do suporte de tal modo que o buraco do parafuso na placa de base fique alinhado com a ranhura do suporte. Então, volte a fixar o parafuso removido no passo 1 e aperte-o para firmar a placa de base no suporte (C). Förberedelser Om CMT-MD1 ska användas med högtalare monterade så tryck in högtalarkabeln och nätkabeln i spåret på apparatens undersida. Anmärkning Montera antingen både höger och vänster högtalare eller ta av båda högtalarna när stativet används. Om bara en högtalare är monterad kan apparaten falla omkull och eventuellt orsaka personskador. Montering av apparaten på stativet 1 Skruva loss skruven som håller fast bottenplattan i stativet, dra nätkabeln genom hålet i bottenplattan (A-1) och fäst sedan bottenplattan på undersidan av CMT-MD1 med de två medföljande skruvarna (A2). 2 Dra nätkabeln genom stativröret och skjut sedan i bottenplattan i stativet (B). AR Anmärkning Kontrollera för säkerhets skull att bottenplattan sitter ordentligt fast i stativet med hjälp av skruven. Om du försöker lyfta anläggningen och skruven inte är ordentligt åtdragen, ramlar stativet av, vilket eventuellt kan leda till personskador. 4 Dra nätkabeln genom spåret på stativets undersida (D). Om stativet ställs upp utan att nätkabeln är dragen genom spåret kommer stativets vikt komma att skada nätkabeln, vilket kan leda till elektriska stötar eller brand. Tekniska data (A/V-stativet) Ca. 192 × 80 × 215 mm (b/h/d) Vikt Ca. 750 g Medföljande tillbehör ⊕ 3 × 14 mm skruvar (2) Yttermått Rätt till ändringar förbehålles. Kontrollera att sidan med springan på stativet och anläggningens bakpanel är vända åt samma håll. 3 Justera stativets vinkel så att skruvhålet i bottenplattan hamnar mitt för springan i stativet. Skruva sedan fast den skruv som skruvades loss i steg 1 igen, och dra åt den så att bottenplattan sitter stadigt fast i stativet (C). PT Ständers so aus, daß das Gewinde im Fuß mit dem Schlitz im Ständer ausgerichtet ist. Setzen Sie dann die in Schritt 1 gelöste Schraube ein, und sichern Sie den Fuß am Ständer (C). Bei Verwendung des Ständers muß das Gerät entweder mit beiden Lautsprechern oder ohne Lautsprecher angebracht werden. Wenn nur einer der Lautsprecher angebracht ist, kann der Ständer umkippen und möglicherweise Verletzungen verursachen. Preparativi supporto in modo che il foro vite sulla piastra base sia allineato con la fessura sul supporto. Quindi riapplicare la vite rimossa al punto 1 e serrarla per fissare la piastra base al supporto (C). DE Nota SE 3 Regolare l’angolazione del schroefopening in de steunplaat samenvalt met de sleuf in de staander. Steek dan de schroef die u in stap 1 hebt verwijderd in deze opening en draai hem stevig aan om de steunplaat aan de staander vast te zetten (C). ES Note Voorbereidingen IT De kant van de staander met de sleuf erin dient aan de achterkant van het apparaat te komen. que le trou à vis de la plaque de base soit aligné sur la fente du socle. Puis réinsérez la vis retirée à l’étape 1 et serrez-la fermement pour fixer la plaque de base au socle (C). GB If the CMT-MD1 is to be used with speakers attached, press the speaker cord and the power cord into the groove on the bottom of the unit. Installation de la chaîne sur le socle Par mesure de sécurité, verrrouillez toujours la plaque de base au socle avec une vis. Le socle risquerait autrement de tomber et de blesser quelqu’un lorsque vous soulevez la chaîne si la vis n’est pas fermement serrée. 3 Ajustez l’angle du socle de sorte 安全のため、スタンド筒後面のビスは必 ずとめてください。とめないまま本体を持 ち上げると、スタンドが抜け落ち、けがの 原因になることがあります。 Preparations Installez les deux enceintes ou n’en installez aucune lorsque vous utilisez le socle. Si vous n’en installiez qu’une seule, la chaîne risquerait de tomber et de blesser quelqu’un. Remarque Vérifiez que le côté avec la fente sur le socle et le panneau arrière de l’appareil sont orientés dans la même direction. ご注意 C Si vous prévoyez d’utiliser la chaîne CMT-MD1 avec les enceintes fixées, enfoncez les cordons d’enceinte et le cordon d’alimentation secteur dans les gorges sous l’appareil. Remarque スタンドの筒にスリットのある方が 後面になります。 3 Avant l’installation NL CT Nota Por medida de segurança, certifique-se de que a base esteja bem fixa ao suporte com o parafuso. Se tentar levantar o aparelho sem que o parafuso esteja bem apertado, o suporte cairá e poderá causar ferimentos. 4 Passe o cabo de alimentação através do encaixe na parte inferior do suporte (D). Se o suporte é instalado sem que o cabo de alimentação seja passado pelo encaixe, o peso do aparelho poderá danificar o cabo de alimentação, com risco de choque eléctrico ou incêndio. Especificações (suporte AV) Dimensões Aprox. 192 × 80 × 215 mm (l × a × p) Peso Aprox. 750 g Acessórios fornecidos Dois (2) parafusos ⊕ 3 × 14 mm Os desenhos e especificações estão sujeitos a mudanças sem aviso prévio. ☆ ☆ ☆ ☆-
 1
1
-
 2
2


Sony PK-MD1 Guía de instalación
- Categoría
- Altavoces
- Tipo
- Guía de instalación
En otros idiomas
- français: Sony PK-MD1 Guide d'installation
- italiano: Sony PK-MD1 Guida d'installazione
- English: Sony PK-MD1 Installation guide
- Deutsch: Sony PK-MD1 Installationsanleitung
- Nederlands: Sony PK-MD1 Installatie gids
- português: Sony PK-MD1 Guia de instalação
- svenska: Sony PK-MD1 Installationsguide
- 日本語: Sony PK-MD1 インストールガイド