Korg SV-2 Guía del usuario
- Categoría
- Instrumentos musicales
- Tipo
- Guía del usuario

© KORG Italy 2020. All rights reserved PART NUMBER: MAN0010143
Address
KORG ITALY SpA
Via Cagiata, 85
60027 Osimo (AN)
Italy
Web
www.korg.com
MAN0010143
3M
Quick Guide
Prise en main
Schnellstart
Guida rapida
Guía Rápida
电子琴 用户手册

The lightning flash with arrowhead
symbol within an equilateral trian-
gle, is intended to alert the user to
the presence of uninsulated “dan-
gerous voltage” within the prod-
uct’s enclosure that may be of suf-
ficient magnitude to constitute a risk of electric
shock to persons.
Le symbole d’éclair dans un triangle équi latéral
est destiné à avertir l’utilisateur de la présence
d’une tension dangereuse non isolée au sein du
produit. Cette tension est suffisante pour consti-
tuer un risque d’électrocution.
Der Blitz in einem gleichwinkligen Dreieck bedeu-
tet, dass das Gerät nicht isolierte Spannungen
erzeugt, die einen Stromschlag verursachen kön-
nen.
La freccia all’interno di un triangolo equilate-
ro avverte l’utente che all’interno del prodotto
sono presenti elementi “con tensione elettrica
pericolosa”, dall’intensità sufficiente a indurre
uno shock elettrico alle persone.
El símbolo del rayo significa que existen vol-
tajes peligrosos y sin aislar en el interior de la
unidad, que pueden ser de magnitud suficiente
para constituir un riesgo de electrocución para
las personas.
在等边三角形内带箭头的闪电标志旨在提醒用户,
产品的机壳内存在无绝缘的“危险电压”,足以对
人身构成触电危险。
The exclamation point within an
equilateral triangle is intended to
alert the user to the presence of im-
portant operating and maintenance
(servicing) instructions in the litera-
ture accompanying the product.
Le point d’exclamation dans un triangle équila-
téral avertit l’utilisateur de la présence d’impor-
tantes consignes de manipulation ou d’entretien
dans la documentation accompagnant ce pro-
duit.
Das Ausrufezeichen in einem gleichwinkli-
gen Dreieck soll den Anwender auf wichtige
Bedienhinweise aufmerksam machen, die in der
beiliegenden Dokumentation enthalten sind.
Il punto esclamativo all’interno di un triango-
lo equilatero avverte l’utente della presenza di
importanti istruzioni relative al funzionamento
e alla manutenzione nella documentazione che
accompagna il prodotto.
El signo de admiración indica al usuario que exis-
ten instrucciones de funcionamiento y manteni-
miento importantes en el manual que acompaña
al producto.
在等边三角形内带惊叹号的标志是提醒用户,设备
附带的文件资料内有重要的操作和维护说明。
This symbol is intended to identify
Class II equipment with functional
earthing (grounding).
Ce symbole désigne du matériel de
classe II à double isolation (fonction-
nelle et matérielle).
Dieses Symbol weist auf ein Gerät der Schutz-
klasse II mit Funktionserde hin.
Questo simbolo identifica i dispositivi di Classe II
predisposti con la messa a terra.
Este símbolo se utiliza para identificar equipo
Class II que dispone de toma de tierra funcional.
左边标志识别带功能性接地的等级II设备。
この記号は、機能接地接続を備えているクラスⅡ機
器であることを示すもので す。

|1
English
ENGLISH

2| English
Important safety instructions
1. Read these instructions.
2. Keep these instructions.
3. Heed all warnings.
4. Follow all instructions.
5. Do not use this apparatus near water.
6. Clean only with dry cloth.
7. Do not block any ventilation openings. Install
in accordance with the manufacturer’s in-
structions.
8. Do not install near any heat sources such as
radiators, heat registers, stoves, or other ap-
paratus (including amplifiers) that produce
heat.
9. Do not defeat the safety purpose of the po-
larized or grounding-type plug. A polarized
plug has two blades with one wider than the
other. A grounding type plug has two blades
and a third grounding prong. The wide blade
or the third prong are provided for your safe-
ty. If the provided plug does not fit into your
outlet, consult an electrician for replacement
of the obsolete outlet.
10. Protect the power cord from being walked on
or pinched particularly at plugs, convenience
receptacles, and the point where they exit
from the apparatus.
11. Only use attachments/accessories specified
by the manufacturer.
12. Use only with the cart, stand, tripod, brack-
et, or table specified by the manufacturer, or
sold with the apparatus. When a cart is used,
use caution when moving the cart/apparatus
combination to avoid injury from tip-over.
13. Unplug this apparatus during lightning
storms or when unused for long periods of
time.
14. Refer all servicing to qualified service per-
sonnel. Servicing is required when the appa-
ratus has been damaged in any way, such as
power-supply cord or plug is damaged, liquid
has been spilled or objects have fallen into
the apparatus, the apparatus has been ex-
posed to rain or moisture, does not operate
normally, or has been dropped.
▪ The ventilation should not be impeded by
covering the ventilation openings with items,
such as newspapers, table-cloths, curtains,
etc.
▪ No naked flame sources, such as lighted can-
dles, should be placed on the apparatus.
▪ Do not install this equipment in a confined
space such as a box for the conveyance or
similar unit.
▪ WARNING – This apparatus shall be connect-
ed to a mains socket outlet with a protective
earthing connection.
▪ Turning off the standby switch does not com-
pletely isolate this product from the power
line, so remove the plug from the socket if
not using it for extended periods of time,
or before cleaning. Please ensure that the
mains plug or appliance couple remains
readily accessible.
▪ Mains powered apparatus shall not be ex-
posed to dripping or splashing and that no
objects filled with liquids, such as vases, shall
be placed on the apparatus.
▪ Install this product near the wall socket and
keep the power plug easily accessible.
▪ The marking plate is located at the bottom
of the instrument. The model number, serial
number, power requirements, etc., are locat-
ed on this plate.
Serial number
Please record the model number, serial num-
ber, and date of purchase below. Keep this
manual, as use these information as a record
of your purchase.
Model ________________________________
Serial No. _____________________________
Purchase Date ________________________

|3
English
Precautions
Automatic power-off
To avoid wasting power, and to extend the life of
the valve, SV-2 will by default automatically en-
ter standby mode after two hours of non-active
use (playing, pressing buttons or moving knobs).
Please save any edited data before taking a pro-
longed pause.
Replacing the valve
Valves, like light bulbs, have a indeterminate
lifespan. When the valve fails, please contact
an Authorized KORG Service Center to re-
place it. DO NOT TRY TO REPLACE THE VALVE
YOURSELF, as you risk seriously damaging the
instrument and risk receiving an electric shock.
In addition, this action will void the warranty.
Data handling
Data in memory may sometimes be lost due to
improper use. Be sure to save important data
to the supplied Editor/Librarian software. KORG
will not be responsible for damages caused by
data loss.
Cleaning
If the exterior becomes dirty, wipe it with a
clean, dry cloth. Do not use liquid cleaners such
as benzene or thinner, or cleaning compounds
or flammable polishes.
Trademarks
Acrobat and PDF are registered trademarks of
Adobe Systems Incorporated. Mac and iOS are
registered trademarks of Apple, Inc. Android is a
trademark of Google Inc. MS-DOS and Windows are
registered trademarks of Microsoft Corporation.
All other trademarks or registered trademarks
are the property of their respective holders.
Disclaimer
The information contained in this manual have
been carefully revised and checked through.
Due to our constant efforts to improve our prod-
ucts, the specifications might differ to those
in the manual. KORG is not responsible for any
differences found between the specifications
and the contents of the instruction manual – all
specifications being subject to change without
prior notice.
Liability
KORG products are manufactured under strict
specifications and voltages required by each
country. These products are warranted by the
KORG distributor only in each country. Any
KORG product not sold with a warranty card or
carrying a serial number disqualifies the prod-
uct sold from the manufacturer’s/distributor’s
warranty and liability. This requirement is for
your own protection and safety.
Service and user’s assistance
For service, please contact your nearest
Authorized KORG Service Center. For more in-
formation on KORG products, and to find soft-
ware and accessories for your keyboard, please
contact your local Authorized KORG distributor.
For up-to-date information, please point your
web browser to our web site.
Keep your keyboard up-to-date
Your instrument can be constantly updated as
new versions of the operating system are re-
leased by KORG. You can download the operat-
ing system from our web site. Please, read the
instructions supplied with the operating system.

4| English
Table of Contents
Introduction ........................................................5
Welcome aboard! .......................................................5
Before starting to play… .................................................5
Controls and connections .............................................7
Front panel ............................................................7
Rear panel .............................................................8
Turning the SV-2 on ..................................................11
Turning the power on and off ............................................11
Adjusting the master volume ........................................... 12
Listening to the demos ................................................. 12
Playing the sounds ..................................................13
What do we mean by ‘sound’? ........................................... 13
Factory and favorite sounds ............................................ 13
Selecting the factory sounds ........................................... 14
Selecting the favorite sounds ........................................... 15
The sounds ........................................................... 16
Using the effects ...................................................21
The effects ........................................................... 21
Saving the changes to a sound ..........................................22
Advanced settings ..................................................23
The advanced settings buttons ..........................................23
Transposing ..........................................................23
Changing the touch sensitivity ..........................................25
The Local Off .........................................................26
Don’t panic! ...........................................................26
Calibrating the pedals ..................................................27
Locking the control panel ..............................................28
Factory restore of all settings ...........................................28
Specifications ......................................................29

Introduction |5
English
Introduction
Welcome aboard!
Many thanks, and congratulation on purchasing the KORG SV-2 Stage
Vintage Piano. We’re sure it’ll give you countless hours of great vintage pia-
no and keyboard tones that will feel as good as they sound!
To maximize your chances of enjoying a long and happy relationship with
your SV-2, please read this manual at least once, and (as they say), “use the
product as directed”. Keep the manual for future reference after you’ve read
it; you’ll want to re-read it later at some point to pick up cool tips you may
have missed the first time around.
This guide refers to both the 88- and 73-keys versions of the SV-2, and to the
versions with and without integrated speakers. There is no other difference
between the four instruments, apart for the keybed length, the speakers
(and the weight!).
Before starting to play…
What’s in the box
After you buy your SV-2, please check all the following items are included in
the package. If some of them are missing, immediately contact your KORG
dealer.
▪ SV-2 Stage Vintage Piano
▪ Quick Guide (the one you are reading now)
▪ Music stand
▪ KORG DS-2H damper pedal (supporting half-pedalling)
▪ Standard IEC AC power cable

6| English
What you can download
Point your web browser to our web site (www.korg.com), to download the
SV-2 Editor software, a MIDI driver, up-to-date software, various support ma-
terials, and the complete User Manual.
What you can add
After having purchased SV-2, you might want to add these other fine options:
▪ The elegant KORG ST-SV1 keyboard stand, recommended for safety and
comfort, perfectly matching your piano design.
▪ One of the sturdy pedals and footswitches from the KORG catalogue, like the
DS-1H damper, the PS-1 and PS-3 footswitches, the EXP-2 foot controller, the
XVP-10 or XVP-20 volume/expression pedals.
▪ Our practical and robust CB-SV carrying bag.
Contacts
Your KORG dealers not only deliver this instrument, but also carry hardware
and software accessories, as well as useful information on how to use these
products. Ask them for any help you should eventually need.
Our international web site is www.korg.com. A list of all KORG Distributors
can be found in our dedicated web page (www.korg.com/us/corporate/dis-
tributors/).

Controls and connections |7
English
Controls and connections
Front panel
The front panel is where you access your SV-2 controls.
3
2
1
2
1 Control panel
This strip contains the buttons, knobs and the other controls of the piano.
2 Speakers (only SV2-73S and SV2-88S)
In the models with integrated speakers, this is where the sound comes from.
3 HEADPHONES jack (stereo)
Connect a pair of headphones to this connector ( ). You can use head-
phones with an impedance of 16-200 Ohms (50 Ohms suggested). When
connecting the headphones, the integrated speakers are automatically de-
activated.
Adjust the output level with the MASTER VOLUME knob.

8| English
Rear panel
The back panel is where you can find most of the connections.
1
2
3 4 5 6 7 8
1 AC IN POWER connector
Connect the included IEC power cable here.
2 MUSIC STAND holes
A music stand comes standard with your SV-2. Insert its legs into these two
dedicated holes.
3 USB DEVICE connector
Use this connector to connect a computer for sequencing (this doubles the
MIDI ports), or for using the SV-2 Editor software for fine editing. Before
using this connector, please install on your Windows PC the KORG USB-MIDI
Driver (the relevant instructions are provided together with the MIDI Driver,
that can be downloaded from our web site).
For the latest information on OS support, please see our dedicated web page
(https://www.korg.com/support/os/).
4 SPEAKERS ON/OFF switch (only models with integrated speakers)
Use this switch to turn the integrated speakers on or off.
5 PEDAL jacks (DAMPER, 1, 2)
Connect the supplied KORG DS-2H pedal, or the optional DS-1H, to the
DAMPER jack. This jack always operates as a damper pedal.

Controls and connections |9
English
Connect a footswitch (like the optional KORG PS-1 or PS-3) to the PEDAL 1
jack. The footswitch can operate as a sostenuto pedal, or as a rotary slow/
fast switch (when the rotary effect is selected).
Connect a footswitch (like the optional KORG PS-1 or PS-3) or a volume/ex-
pression pedal (like the optional KORG XVP-10, XVP-20, EXP-2) to the PEDAL
2 jack. The footswitch operates as a soft pedal. The volume/expression pedal
operates as a volume control (this is the default setting) or as a wah filter
control (when the wah effect is selected). To control the wah effect turn the
Auto/Pedal LED on in the PRE FX section (Pedal mode).
While the KORG DS-2H pedal comes already calibrated, the volume/expres-
sion pedal usually requires calibration to make use of the full range of values.
Calibration can also be used to choose a footswitch polarity. To calibrate the
pedals (and set their polarity), see “Calibrating the pedals” on page 27.
6 MIDI connectors (IN, OUT)
By using MIDI you can control the SV-2 from a sequencer, or control an ex-
ternal MIDI device from the SV-2. When using the SV-2 to control an external
MIDI device, or to record into a sequencer, press the LOCAL OFF button to
turn its LED on; this disconnects the keyboard from the internal sounds (but
not from MIDI).
MIDI OUT transmits MIDI data. Use it when you want to control a connected
external MIDI device or computer. Use a standard MIDI cable to connect it to
the MIDI IN connector of the other device.
MIDI IN receives MIDI data. Use it when you want to control the SV-2 from a
connected external MIDI device or computer. Use a standard MIDI cable to
connect it to the MIDI OUT connector of the other device.
7 INPUT jacks (L/MONO, R/MONO)
Connect a line-level source, like a keyboard/synthesizer, a CD or audio play-
er, to these jacks. For mono connections, use either of them.
8 OUTPUT jacks (L/MONO, R/MONO)
These are analog output jacks, available either in 1/4” unbalanced jacks, or
XLR balanced jacks. Either use the unbalanced 1/4” jacks for shorter run, or
the XLR balanced jacks for longer runs, like when playing on stage. In any
case, they are perfect replica the one of the other.
If you need mono output, connect either of the MONO 1/4” jacks. XLR jacks
cannot be used for mono output.
HINT: XLR balanced outputs are recommended whenever possible.
WARNING: If you connect the XLR jacks to a mixer or similar device, be sure to turn
off the phantom power of that device. The SV-2 might be damaged if you fail to do so.

10| English
VOX
Synthesizer, etc.
MIDI
IN OUT
OUTPUT
OUTPUT INPUT AUX/LINE IN INPUT/LINE IN
INPUT/LINE IN INPUT/LINE IN
Computer
USB cable
USB
Volume/
Expression
pedal
Footswitch 2
(Sostenuto
pedal)
Footswitch 1
(Soft pedal)
PHONES
Headphones
Damper pedal
(supplied)
Power
AC IN
CD/audio player, etc.
Amplifier
Audio system
Mixer, recorder, etc.
Powered monitors
Audio
interface
(only SV2-73S
and SV2-88S)

Turning the SV-2 on |11
English
Turning the SV-2 on
Turning the power on and off
1 Connect the included IEC power cable to the POWER connector on the back
of the instrument.
2 Connect the power plug to an AC power outlet.
3 Press and release the POWER switch in the control panel to turn the instru-
ment on. The valve will light up and start warming up. After a few seconds,
the instrument will turn on.
The SV-2 contains a 12AX7 (ECC83) valve (“vacuum tube”).
WARNING: The valve cover or the valve may break if either is subjected to impact.
If the valve cover breaks, please have it replaced. Failure to replace a damaged valve
cover may lead to the valve itself becoming damaged.
NOTE: When you turn on your KORG SV-2, you may notice a brief flash in the tube.
This is a characteristic of certain tubes we use and if it occurs, it only happens when
your SV-2 is turned on and the tube is not yet warm. This does not affect the perfor-
mance of either the tube or the SV-2.
4 To turn the instrument off, keep the POWER switch pressed for about one
second.

12| English
Adjusting the master volume
You can set the overall volume of the SV-2.
▪ Turn the MASTER VOLUME knob clockwise to increase the volume, count-
er-clockwise to decrease it.
This knob controls the overall volume of the instrument, both of the integrat-
ed speakers, the Left and Right outputs, and the Headphones jack.
WARNING: Always keep the volume at a comfortable level. Excessive volume may
cause permanent hearing damage.
Listening to the demos
Listen to the built-in demo songs to appreciate the power of the SV-2. There
are several demo songs to choose from.
1 Press the TRANSPOSE and LOCAL OFF buttons together. Their LEDs will
start blinking.
2 At this point, if you wait a few seconds all the demo songs will be played back.
3 Otherwise, you can select one of the available demo songs. There is one
demo for each of the factory sounds.
▪ Use the TYPE and VARIATION knobs in the SOUND section to select a demo
song.
▪ You can press the VARIATION knob, to make its LED turn green, and listen to
a second bank of demo songs. Press the VARIATION knob again to turn its
LED orange again, and return to the first bank.
You can select any demo even after the automatic playback has started.
4 Adjust the listening volume with the MASTER VOLUME knob.
5 Stop the demo by pressing the TRANSPOSE and LOCAL OFF buttons again.

Playing the sounds |13
English
Playing the sounds
What do we mean by ‘sound’?
In SV-2, a sound is a ‘timbre’ or a set of timbres that can be heard when you
play the keyboard. Each sound can be made of up to three ‘programs’, each
one with a different timbre or a set of accessory ‘noises’, like the mechanics
of the keyboard, hammer-slap, etc. One or two layers can be added to the
main program, and be heard as a second or third timbre mixing with the
main timbre. Take for example the case of the universally known “piano plus
strings” sound: there are a program of piano, one of piano noises, one of
strings.
Main, Layers 1, 2
Main, Layer (1)
Split
There are sounds where the keyboard is split in two halves, with one or two
programs on the right half. The third program is moved to the left half, and
can be used to play an accompaniment (an upright bass, a synth pad, or the
like).
Main, Layers 1, 2
Main, Layer (1)
Split
Factory and favorite sounds
SV-2 has 72 factory sounds, and every one of these sounds can be “custom
tweaked” using just the knobs on the front panel. You can then save the
changes into the 64 FAVORITES locations of favorite sounds. (More detailed
editing can be performed using the SV-2 Editor software).
Please note that, in general, going from one sound to another happens with
a smooth transition, so that you can keep the notes pressed and hear the
new sound only at the next note change. However, if one of the sounds has
the amplification section turned on and makes use of the valve, this is not
possible.

14| English
Selecting the factory sounds
How to select a sound
The SOUND section is where you can select the factory sounds.
1 Use the TYPE knob of the SOUND section to select a base type of sound
(one of six).
2 Use the VARIATION knob of the SOUND section to select one of the varia-
tions of the base sound (one of six). Notice that the LED next to the knobs
lights up to show the selected sound and variation.
3 Press the VARIATION knob to select the second bank of variations (the LED
color will change to green). Use the same VARIATION knob to select one of
the variations in the second bank (one of six).
4 When you want to return to the first bank of variations, press the VARIATION
knob again (the LED color will return orange again).

Playing the sounds |15
English
Selecting the favorite sounds
How to select a favorite sound
The FAVORITES section is where you can select the favorite sounds, con-
taining your own custom sounds.
1 To select a favorite sound in the current bank, press the corresponding
FAVORITES (1-8) button.
If you want to see which bank is selected, press the TYPE knob and see
which FAVORITES (A-H) button is blinking. Press it again to exit from the
bank select mode (or wait until it turn off).
2 To select a favorite in a different bank, press the TYPE knob. The current-
ly selected bank is shown by the FAVORITES (A-H) button that is blinking.
Press the FAVORITES (A-H) button corresponding to the bank to be select-
ed. Then press the FAVORITES (1-8) button corresponding to the favorite to
be selected.
How to return to the latest selected factory sound
After having selected a favorite sound, you can select a factory sound again,
by using the procedure seen above.
However, you can immediately jump to the latest selected factory sound.
Press the VARIATION knob in the SOUND section to select it.

16| English
The sounds
The following table contains the names and a brief description of each of the
included sounds.
When the name of the sound is a straight one (like “MK I Suitcase”) it is a
simple sound extended to the full keyboard. When it has an ‘&’ in the middle
(like “FM Piano & Pad”), it is made of a main program an one or two layers.
When it has a ‘/’ in the middle (like “Pad/Mini Lead”), the keyboard is splitted
between different programs.
Factory sounds
You can select a factory sound from an external MIDI device by sending to
SV-2 a Control Change #00 message with a value of 0, a Control Change #32
message with a value of 0, then a Program Change (PC) message to select
the sound.
Sound Var PC Notes
EP 1 (Vintage)
MK I Suitcase A1 0 Two versions of the iconic MK I, a must-have for any
keyboard player.
MK I Stage B1 6
MK II Suitcase A2 1 Two flavors of the magnificent MK II, in the portable
and the heavier versions.
MK II Stage B2 7
MK V Stage A3 2 The MK V Stage (the only one that went in produc-
tion), well known for its bell-like sound.
MK V Bright B3 8
Dyno EP A4 3 The typical Dyno Piano sound, perfect for ballads in
the soft version, ready for a solo in the bright one.
Dyno EP Bright B4 9
Wurly A5 4 The standard punchy sound of Wurly metal reeds. The
pop sound of the ’60s and the ’70s.
Wurly Classic B5 10
Wurly Dark A6 5 A darker and a brighter version of the Wurly.
Wurly Bright B6 11
EP 2 (Various)
FM Piano 1 A1 12 The FM electric piano sound that made the ’80s. As
heard in countless records at the beginning of the
digital music age.
FM Piano 3 B1 18
FM Piano 2 A2 13
FM Piano & Pad B2 19 The FM piano + layered pad is another staple of the
era.

Playing the sounds |17
English
Sound Var PC Notes
Pianet T A3 14 The Pianet, the German electro-mechanical vintage
keys. The euro version of the electric piano.
Pianet N B3 20
Hybrid Piano A4 15 Hybrid combinations of pianos, to explore new piano
soundscapes.
Hybrid Tine B4 21
Wurly & Strings A5 16 Different combinations of electric pianos and strings.
Choose between reeds and FM.
FM & Strings B5 22
MK II & Pad A6 17 Different combinations of electric pianos and pads.
Again, choose between tines and FM.
FM & Pad B6 23
Piano 1 (Acoustic)
German Grand A1 24 The king of the acoustic pianos — the German grand so
universally beloved by classical, jazz and pop pianists.
German Classic B1 30
Italian Grand A2 25 The Italian grand piano, a finest choice for the classi-
cal and jazz repertoire.
Italian Bright B2 31
Japanese Grand A3 26 Another must-have — a Japanese grand, preferred by
many classical, jazz and pop artists.
Japanese Bright B3 32
Austrian Grand A4 27 The Austrian emperor’s grand — a milestone for classi-
cal programs, and the preferred by some jazz artists.
Austrian Classic B4 33
Japanese Upright A5 28 A big Japanese upright piano, with a very resonant
sound.
Upright Bright B5 34 An intimate, yet bright piano sound, frequently used
by popular pop bands.
German Upright A6 29 This is the distinctive, mellower sound of a German
upright piano.
Rock Piano B6 35 An aggressive upright for rock and rockabilly tunes.
Piano 2 (Various)
Electric Grand A1 36 Electro-acoustic piano produced in the ’70s, with a
unique mellow sound very popular within gigging mu-
sicians.
German Mono B1 42 A mono version of the German grand.
KORG M1 Piano A2 37 The KORG piano heritage. From the popular M1 synth
workstation that made an era, and from our pioneeris-
tic SG-1D digital piano.
KORG SG-1D B2 43
Digital Piano A3 38 An innovative, accurate and expressive piano sound,
created in the late ’80s with a popular digital key-
board/synthesizer.
Electra Piano B3 44 A popular electronic piano from the ’70s, used by
many famous classic rock and prog-rock musicians.

18| English
Sound Var PC Notes
Tack Piano A4 39 Tack and Honky-Tonk pianos, to enjoy rag-time and
stride genres.
Honky-Tonk B4 45
Piano & Strings A5 40 Layered piano and strings or pad. Perfect for evoca-
tive ambient music.
Piano & Pad B5 46
Piano & Synth A6 41 Layers of piano and synth or brass. Two mixes calling
back to the age of the fusion jazz.
Piano & Brass B6 47
Clavier
Clav AC A1 48 The classic electric clavichord, two flavors with mics
in phase.
Clav AD B1 54
Clav BC A2 49 Two different configurations of the Clavi registers,
with mics in reversed phase and an edgier sound.
Clav BD B2 55
Harpsichord A3 50 Back to late-Renaissance and Baroque with the grand-
pa of the piano. Standard 8” and 8”+4” double octave
registrations.
Harpsichord Oct. B3 56
Perc. Organ A4 51 True classic electro-mechanical organ emulation, with
percussion, in a clean and a distorted version.
Rock Organ B4 57
Jazz Organ A5 52 Jazz registration of the classic electro-mechanical
organ.
Vox Organ B5 58 A perfect emulation of “Connie”, the VOX Continental
transistor organ.
Church Organ A6 53 The full power of a majestic pipe organ.
Pipe Organ B6 59 Softer and emotional registrations of a pipe organ, for
the more meditative moments.
Other
Full Strings A1 60 Two different flavors of classical strings sounds.
Classic Strings B1 66
Tape Strings A2 61 The synthetic Mello strings from the ’70s.
Strings & Voices B2 67 Real strings with added voices.
Warm Pad A3 62 Dark and bright version of the typical synth pads.
Bright Pad B3 68
Orchestra A4 63 A powerful orchestral Tutti.
Pizzicato & Glock B4 69 Pizzicato orchestral strings and glockenspiel.
Brass A5 64 A real brass section.
Synth Brass B5 70 The synth brass counterpart.
Pad/Mini Lead A6 65 Two solo synths playing on top of a soft synth pad.
Pad/SynthLead B6 71

Playing the sounds |19
English
Favorite sounds
You can select a favorite sound from an external MIDI device by sending to
SV-2 a Control Change #00 message with a value of 0, a Control Change #32
message with a value of 64, then a Program Change (PC) message to select
the sound.
Sound Pos PC
Demo Shop
German Grand A1 0
Italian Grand A2 1
EP MK II A3 2
Wurly A4 3
Clav A5 4
FM Piano A6 5
Piano & Strings A7 6
Bass/EP A8 7
Piano
German Grand B1 8
Italian Grand B2 9
Japanese Grand B3 10
Austrian Grand B4 11
Japan Upright B5 12
German Upright B6 13
Rock Piano B7 14
Tack Piano B8 15
Electric Pno
EP MK I C1 16
EP MK II C2 17
EP MK V C3 18
Dyno EP C4 19
Wurly Amp C5 20
Wurly Tremolo C6 21
FM Piano C7 22
Hybrid EP C8 23
Sound Pos PC
Claviers
Clav AC D1 24
Clav BC D2 25
Perc. Organ D3 26
Jazz Organ D4 27
Church Organ D5 28
KORG M1 Piano D6 29
Electric Grand D7 31
Harpsichord D8 32
Layer
Piano & Strings E1 32
Piano & Pad E2 33
Piano & EP E3 34
Piano & Vibes E4 35
MK II & Pad E5 36
Strings & Pad E6 37
Piano & FM E7 38
FM & Strings E8 39
Split
Ac. Bass/Piano F1 40
El. Bass/Piano&Str F2 41
Fretless/EP F3 42
Slap/EP F4 43
Slap/Clav F5 44
EP Bass/Vox Organ F6 45
Jazz Piano Trio F7 46
Organ Dual Manual F8 47

20| English
Sound Pos PC
Other
Full Strings G1 48
Strings Octave G2 49
Orchestra Tutti G3 50
Brass G4 51
Warm Pad G5 52
Synth Brass G6 53
Pad/SynLead G7 54
Synth Bass G8 55
Sound Pos PC
Legacy SV1
SV1 Grand Piano 1 H1 56
SV1 Grand Piano 2 H2 57
SV1 Tine EP Amp H3 58
SV1 Reed EP1 H4 59
SV1 Clav AC H5 60
SV1 Clk.Tonewheel H6 61
SV1 Full Strings H7 62
SV1 Synth Brass H8 63

Using the effects |21
English
Using the effects
The effects
You can select the various effects and amp models by turning the corre-
sponding TYPE knobs. You can change the effect settings by using the
DEPTH, INTENSITY, SPEED, DRIVE knobs. If you press the knob, the original
value of the parameter will be recalled. Deeper editing can be done through
the SV-2 Editor software.
Effects and the amp simulation can also be turned on or off by pressing the
corresponding On/Off button. Changes can be saved, together with a sound,
into one of the FAVORITES locations.
Experiment with the various controls, and listen to what you can do with the
various effects.
SIGNAL ROUTING
EQ PRE FX
MODULATION AMBIENT TOTAL FX
Stereo Limiter
Stereo Mastering Limiter
OUTPUTS
SOUND
PRE AMP
VOLUME VOLUME POWER
AT T.
PROGR
LVL
POWER AMP
VALVE
CABINET NR

22| English
Saving the changes to a sound
If you like the sound you just created by exploring through the knob posi-
tions, save it as a favorite sound.
1 Press the TYPE knob to see which bank of favorites sounds is selected.
The currently selected bank is shown by the FAVORITES (A-H) button that
is blinking.
2 If you want to select a different bank, press the FAVORITES (A-H) button
corresponding to the bank to be selected.
3 Keep pressed the FAVORITES (1-8) button corresponding to the favorite
where you want to save your settings, until its LED starts blinking.
4 Press the same button again, to confirm saving.
If you do not want to save the changes, just wait a few seconds until the but-
ton’s LED turns off, without pressing any button.
HINT: Use the favorite banks to organize the sounds in separate sets, for example a
different set for a particular style or show.
NOTE: The favorite sound is written over the previous contents of that location. The
favorite sound that was in that location will be erased.
NOTE: If you switch to a different sound or turn off the power without storing the
sound and effects you edited, your changes will be lost.

Advanced settings |23
English
Advanced settings
The advanced settings buttons
The group of buttons named TRANSPOSE, LOCAL OFF, TOUCH and
FUNCTION give access to a series of advanced features that you may need
to adapt the piano to your habits.
The FUNCTION button gives access to several advanced settings, that may
help you personalize your experience with the instrument. Please check the
User Manual for more information on its functions.
Transposing
In some cases, a song may be written in a difficult key (e.g., many black keys),
or you may wish to shift the pitch to match another instrument or vocalist. In
such cases, you can transpose (shift the pitch) so that you can use an easier
fingering, or use the same familiar fingering to play at a different pitch. This
is called the Transpose function.
For example if you transpose upward by one semitone, playing the notes
shown at the lower left will produce the pitches shown at the right.
Turning transposition on or off
1 Press the TRANSPOSE button to turn the transposition on. If a transposition
has already been set, the LED of this button will turn on, otherwise it will
remain dark.
2 Press the TRANSPOSE button again to turn transposition off. The LED will
go dark.

24| English
Setting the transposition interval
1 Keep the TRANSPOSE button pressed for about one second, until its LED
starts blinking.
2 Press the note corresponding to the desired transposition. Transposition will
be activated, and the LED will stay on.
-12
C3
0 +12
C5
Key Effect
C3 – B3 12 – 1 semitones below
C4 (Middle C) Standard pitch
C#4 – C5 1 – 12 semitones higher
If no note is played after some seconds, the transpose programming will end.
3 Press the TRANSPOSE button again to turn transposition off. The LED will
turn off.
NOTE: When the instrument is turned off, transposing is reset.

Advanced settings |25
English
Changing the touch sensitivity
The keyboard sensitivity, or touch, can be programmed.
1 Press the TOUCH button.
After you press this button, its LED starts blinking. Also, the FAVORITE button
corresponding to the selected touch curve starts blinking.
2 Press the FAVORITE button corresponding to the desired touch curve.
3 Press the TOUCH button to confirm and return to the normal operations.
Favorite # Touch Curve Note
1 Normal Normal piano touch.
2 Soft 1 Loud notes can be produced even by playing lightly.
3 Soft 2
4 Medium 1 Loud notes can be produced by playing normally.
5 Medium 2
6 Hard 1 Loud notes can be produced only by playing very hard.
7 Hard 2
8 Fixed Fixed dynamic. Use the SV-2 Editor to choose the desired
dynamic level.
This is the diagram of the touch curves:
Playing strength
Soft
Str
ong
Strong
( )
No
te
loudness
Soft
Hard
Normal/Medium

26| English
The Local Off
You can turn the Local Off function on or off.
▪ Press the LOCAL OFF button to turn its LED on.
When you turn the LED of this button on, the keyboard is disconnected from
the internal sounds. By playing the keyboard, you cannot hear any sound
from the internal tone generator. However, notes continue to be sent to the
MIDI OUT port (or the USB port), and can be received by a computer.
The computer sends them back again to the SV-2’s MIDI IN port (or the USB
port), and then to the internal tone generator. This routing allows you to re-
cord and play at the same time, without duplicate notes.
▪ Press the LOCAL OFF button to turn its LED off.
When you turn the LED of this button off, the keyboard can play the internal
sounds.
NOTE: When the instrument is turned off, local off is reset.
Don’t panic!
In case MIDI notes remain stuck for problems in MIDI communication, keep
the EQUALIZER’s section On/Off button pressed until the stuck notes are
silenced. This is commonly called the MIDI Panic function.

Advanced settings |27
English
Calibrating the pedals
You can calibrate the pedals connected to the DAMPER, PEDAL 1 and PEDAL
2 connectors in the back panel. By calibrating a pedal, you let the SV-2 un-
derstand its polarity and the full range of values sent.
1 Connect all pedals to be calibrated to the SV-2. Remember that DAMPER
expects the included KORG DS-2H damper pedal (or, as an alternative, the
optional DS-1H, or any footswitch pedal), PEDAL 1 expects a footswitch ped-
al, and PEDAL 2 can be used to connect either a footswitch or a volume/
expression pedal.
2 Set any volume/expression-type pedal to its lowest setting.
3 Turn the SV-2 off.
4 Keep the Auto/Pedal button pressed, and turn the SV-2 on.
5 When the Auto/Pedal LED starts to flash, release the button.
If you do nothing in the next few seconds, the Auto/Pedal LED will turn off,
and the SV-2 will complete the start-up sequence.
6 While the Auto/Pedal LED is flashing, press the button again. SV-2 enters
calibration mode.
7 Now calibrate PEDAL 1 (a footswitch). Completely depress the pedal, then
release it. When you have finished calibrating the pedal connected to the
PEDAL 1 jack, FAVORITES button #1 will turn on.
8 Then, calibrate PEDAL 2. The procedure is different, depending on the use
of a footswitch or a volume/expression pedal:
▪ If you connected a footswitch, completely depress it, then release it.
▪ If you connected a volume/expression pedal, push it all the way forward to
its maximum position.
When you have finished calibrating the pedal connected to the PEDAL 2
jack, FAVORITES button #2 will turn on.
9 Finally calibrate the DAMPER pedal. Completely depress the pedal, then
release it. When you have finished calibrating the pedal connected to the
DAMPER jack, FAVORITES button #3 will turn on.
10 When finished calibrating:
▪ If you calibrated all three pedals connected, SV-2 automatically exits calibra-
tion mode and continue the start-up sequence.
▪ If you calibrated only one or two pedals, press the Auto/Pedal button again
to exit calibration mode and continue the start-up sequence.

28| English
Locking the control panel
We have shown you how to change the sounds and effects. Now we will tell
you how to prevent to make any change! This can be useful if you want to
avoid inadvertently changing the settings while playing.
1 Press the TOUCH and FUNCTION buttons together to lock the control panel.
Their LEDs will start blinking.
The only controls that will remain accessible are the MASTER VOLUME knob
and the POWER switch.
2 Press either the TOUCH or FUNCTION button to unlock the control panel.
NOTE: When the instrument is turned off, locking is reset.
Factory restore of all settings
After making several changes, you might want to restore the original, fac-
tory status of the SV-2 (including the favorite sounds and global settings):
1 Turn the instrument off.
2 Keep the FUNCTION button pressed.
3 Without releasing the FUNCTION button, turn the instrument on.
4 When its LED starts flashing, release the FUNCTION button.
5 Press the FUNCTION button again to confirm the restore operation.
6 At the end, all settings will be reset.

Specifications |29
English
Specifications
Specifications SV-2
Keyboard
Keys SV2-73/SV2-73S: 73 keys / SV2-88/SV2-88S: 88 keys.
Velocity sensitive KORG RH3 (Real Weighted, Hammer Action 3)
Touch selection Eight curves
Tuning Master Transpose, Master Tuning, Tuning curves
Sounds
Sound generation EDS-X (Enhanced Definition Synthesis – eXpanded)
Polyphony 128 notes (max)
Multitimbricity Layer, Split
Factory sounds 72 factory sounds (6 base sounds x 2 sets of 6 variations)
Favorite sounds 64 favorite sounds (8 banks x 8 variations) for saving customized
settings
Effects
Equalizer Bass, Mid, Treble
Pre FX Red Compressor, Treble Boost, U-Vibe, Vibrato, Tremolo, VOX
Wah (with auto and pedal control)
Amp Models Clean, Twin, Tweed, AC30, Boutique, Organ. Cabinet models in-
cluding the Valve Reactor Technology with a 12AX7 (ECC83) valve
Modulation FX Classic Chorus, Black Chorus, Orange Phaser, Small Phaser, MX
Flanger, Rotary (slow/fast also with pedal control)
Ambient Room, Plate, Hall, Spring, Tape Echo, Stereo Delay (with tap tem-
po)
Total FX Stereo Mastering Limiter, Stereo Limiter
Other Controls
Volume Master Volume Knob
Panel Switches Transpose, Local Off, Touch, Function
Demo 72 demo songs, one for each factory sound
Connections
MIDI In / Out
Headphones 1 (on the front panel)
Audio outputs L, R (2 x XLR, Balanced)
L/Mono, R/Mono (2 x 1/4” Jack, Unbalanced)
Audio inputs L/Mono, R/Mono (2 x 1/4” Jack, Unbalanced)

30| English
USB USB 2.0 Hi-Speed, Type B connector (doubles the MIDI interface)
Damper pedal KORG DS-2H, supplied
Pedal 1 Footswitch (like KORG PS-1, PS-3)
Pedal 2 Volume/expression (like KORG XVP-10, XVP-20, EXP-2) or
footswitch (like KORG PS-1, PS-3)
Amplification
Speakers 2 x 2.5” with 2 x 3” passive radiator
Amplification power 2 x 15W
Physical
Power supply Internal switching adapter, AC 100~240V, 50-60Hz
Power consumption Models without integrated speakers: 16 Watt
Models with integrated speakers: 25 Watt
Dimensions (W x D x H)
(excluding music stand)
SV2-73/SV2-73S: 45.00 x 13.66 x 6.18 inch (1143 x 347 x 157 mm)
SV2-88/SV2-88S: 53.39 x 13.66 x 6.18 inch (1356 x 347 x 157 mm)
Weight
(excluding music stand)
SV2-73: 37.92 lbs (17.2 kg) / SV2-73S: 40.34 lbs (18.3 kg)
SV2-88: 44.86 lbs (20.35 kg) / SV2-88S: 47.29 lbs (21.45 kg)
Other
Included accessories Power cable, Quick Guide, music stand, damper pedal (KORG DS-
2H)
Optional accessories ST-SV1 piano stand, DS-1H damper pedal, XVP-10, XVP-20, EXP-2,
volume/expression pedals, PS-1, PS-3 footswitch pedal, CB-SV
carrying bag.
Specifications are subject to change without notice due to continuous product
development and improvement.
Amplification developed in cooperation with K-ARRAY.

Specifications |31
English
IMPORTANT NOTICE TO CONSUMERS
This product has been manufactured accord-
ing to strict specifications and voltage re-
quirements that are applicable in the country
in which it is intended that this product should
be used. If you have purchased this product
via the internet, through mail order, and/or
via a telephone sale, you must verify that this
product is intended to be used in the country
in which you reside.
WARNING: Use of this product in any country
other than that for which it is intended could
be dangerous and could invalidate the manu-
facturer’s or distributor’s warranty.
Please also retain your receipt as proof of
purchase otherwise your product may be dis-
qualified from the manufacturer’s or distribu-
tor’s warranty.
NOTICE REGARDING DISPOSAL (EU ONLY)
If this symbol is shown on the product,
manual, battery, or package, you must
dispose of it in the correct manner to
avoid harm to human health or dam-
age to the environment. Contact your
local administrative body for details
on the correct disposal method. If
the battery contains heavy metals in
excess of the regulated amount, a chemical
symbol is displayed below the symbol on the
battery or battery package.
In case of electromagnetic radiations a tem-
porary deterioration of the quality of audio
performances may occur. A deterioration
that might arise can be a sound signal emit-
ted. This will stop when the electromagnetic
disturbance ceases.
THE FCC REGULATION WARNING (FOR USA)
This equipment has been tested and found
to comply with the limits for a Class B digi-
tal device, pursuant to Part 15 of the FCC
Rules. These limits are designed to provide
reasonable protection against harmful in-
terference in a residential installation. This
equipment generates, uses, and can radiate
radio frequency energy and, if not installed
and used in accordance with the instructions,
may cause harmful interference to radio com-
munications. However, there is no guarantee
that interference will not occur in a particu-
lar installation. If this equipment does cause
harmful interference to radio or television re-
ception, which can be determined by turning
the equipment off and on, the user is encour-
aged to try to correct the interference by one
or more of the following measures:
• Reorient or relocate the receiving antenna.
• Increase the separation between the equip-
ment and receiver.
• Connect the equipment into an outlet on a
circuit different from that to which the receiv-
er is connected.
• Consult the dealer or an experienced radio/
TV technician for help.
If items such as cables are included with this
equipment, you must use those included
items.
Unauthorized changes or modification to this
system can void the user’s authority to oper-
ate this equipment.
DECLARATION OF CONFORMITY (FOR USA)
Responsible Party: KORG USA INC.
Address: 316 SOUTH SERVICE ROAD, MELVILLE
Telephone: 1-631-390-6500
Equipment Type: STAGE VINTAGE PIANO
Model: SV2-73, SV2-73S, SV2-88, SV2-88S
This device complies with Part 15 of FCC Rules.
Operation is subject to the following two con-
ditions: (1) This device may not cause harmful
interference, and (2) this device must accept
any interference received, including interfer-
ence that may cause undesired operation.
PERCHLORATE (CALIFORNIA, USA ONLY)
Perchlorate Material – special handling may
apply. See
www.dtsc.ca.gov/hazardouswaste/
perchlorate

32| English

|1
Français
FRANÇAIS

2 Français
Consignes importantes de sécurité
1. Lisez ces consignes.
2.
Conservez ces consignes.
3.
Tenez compte de tous les avertissements.
4.
Suivez toutes les instructions.
5.
N’utilisez pas ce produit à proximité d’eau.
6.
Nettoyez le produit avec un chiffon sec uniquement.
7.
N’obstruez aucun orifice d’aération. Installez le
produit conformément aux consignes du fabricant.
8.
Ne l’installez pas à proximité de sources de chaleur
comme des radiateurs, des bouches d’air chaud,
des poêles ou d’autres appareils générateurs de
chaleur (amplificateurs compris).
9.
Ne supprimez pas la sécurité offerte par la fiche
polarisée ou dotée d’une broche de terre. Une
fiche polarisée dispose de deux lames dont une
plus large que l’autre. Une fiche avec broche de
terre dispose de deux lames (ou broches) et d’une
broche de terre. La lame plus large ou la troisième
broche est conçue pour votre sécurité. Si la fiche
fournie ne s’adapte pas à votre prise de courant,
consultez un électricien pour faire remplacer cette
ancienne prise.
10.
Protégez le cordon d’alimentation pour éviter qu’il
ne soit piétiné ou abîmé notamment au niveau des
fiches, des rallonges et au point de connexion du
produit.
11.
Utilisez exclusivement des fixations ou accessoires
spécifiés par le fabricant.
12.
Utilisez cet appareil exclusivement avec un cha-
riot, stand, pied, support ou table du type spéci-
fié par le constructeur ou livré avec l’appareil. Si
vous utilisez un chariot, soyez prudent lors de son
déplacement afin d’éviter que le produit ne bas-
cule et ne blesse quelqu’un.
13.
Débranchez cet appareil en cas d’orage ou s’il doit
rester inutilisé durant une période assez longue.
14.
Pour tout dépannage ou entretien, veuillez consul-
ter un service ou un technicien qualifié. Il est impé-
ratif de faire appel à un technicien qualifié si l’ap-
pareil a été endommagé d’une quelconque façon,
notamment, si le cordon d’alimentation ou la fiche
est endommagée, si du liquide s’est renversé ou si
des objets sont tombés dans l’appareil, si l’appareil
a été exposé à la pluie ou à l’humidité, s’il ne fonc-
tionne plus normalement ou s’il est tombé.
▪
N’entravez pas la ventilation en obstruant les ori-
fices prévus à cet effet avec des journaux, nappes,
rideaux etc.
▪
Evitez de déposer des sources à flamme nue, telles
que des bougies, sur l’instrument.
▪
N’installez pas ce produit dans un espace confiné
comme un flightcase ou autre meuble de ce type.
▪
AVERTISSEMENT – Ce produit doit être branché
à une prise secteur disposant d’une connexion de
sécurité à la terre.
▪
L’interrupteur n’isole pas complètement le produit
de la source de courant. Débranchez donc la fiche
de la prise secteur si le produit doit rester inutilisé
durant un certain temps ou avant de le nettoyer.
Veillez à maintenir un accès facile à la prise sec-
teur ou au connecteur de l’appareil.
▪
Un produit branché au secteur ne peut pas être
exposé à des gouttes ou des éclaboussures. Ne
placez aucun conteneur de liquide (vase, verre)
sur le produit.
▪
Installez ce produit à proximité de la prise de cou-
rant en laissant un accès facile à la prise d’alimen-
tation.
▪
La plaque d’identification est située sous l’instru-
ment. Elle indique le numéro du modèle, le numéro
de série, les spécifications électriques etc.
Numéro de série
Veuillez noter le numéro de modèle, le
numéro de série et la date d’achat ci-des-
sous. Conservez ce manuel et utilisez ces
données pour tracer votre achat.
Modèle ________________________________
N° de série _____________________________
Date d’achat ___________________________

|3
Français
Précautions
Coupure d’alimentation automatique
Pour économiser l’énergie et allonger la durée
de vie de la lampe, le SV-2 se met automatique-
ment en veille après deux heures d’inactivité
(ni jeu ni pression sur un bouton ni action d’une
commande). Sauvegardez donc vos change-
ments avant de faire une pause assez longue.
Remplacer la lampe
Les lampes, comme les ampoules d’éclairage,
ont une durée de vie limitée. Quand la lampe
fait défaut, contactez un centre de service
après-vente agréé KORG pour la remplacer.
N’ESSAYEZ PAS DE REMPLACER LA LAMPE
VOUS-MEME car vous risquez d’endommager
sérieusement l’instrument et de vous électrocu-
ter. De plus, cette opération annule la garantie.
Gestion des données
Les données de la mémoire peuvent parfois être
perdues suite à une utilisation incorrecte. Veil-
lez à sauvegarder les données auxquelles vous
tenez avec le logiciel d’édition et d’archivage.
KORG décline toute responsabilité pour des
dommages résultant de la perte de données.
Entretien
Nettoyez le boîtier de l’instrument avec un chif-
fon propre et sec. Ne vous servez pas d’agents
de nettoyage liquides tels que du benzène ou du
diluant, ni de nettoyants inflammables.
Marques commerciales
Acrobat et PDF sont des marques déposées de
Adobe Systems Incorporated. Mac et iOS sont
des marques déposées de Apple Inc. Android
est une marque commerciale de Google Inc.
MS-DOS et Windows sont des marques déposées
de Microsoft Corporation. Les autres marques
commerciales ou déposées sont la propriété de
leur détenteur respectif.
Rejet de responsabilité
Les informations fournies dans ce mode d’em-
ploi ont été soigneusement relues et vérifiées.
Notre quête permanente d’amélioration de nos
produits peut cependant entraîner des diffé-
rences entre les caractéristiques du produit et
celles figurant dans le mode d’emploi. KORG
décline toute responsabilité pour toute diffé-
rence entre les caractéristiques du produit et le
contenu du mode d’emploi. Les caractéristiques
sont susceptibles d’être modifiées sans avis pré-
alable.
Responsabilité
Les produits KORG sont fabriqués conformé-
ment aux caractéristiques strictes et aux tension
en vigueur dans chaque pays. Ces produits ne
sont garantis par le distributeur KORG que dans
le pays pour lequel ils sont fabriqués. Tout pro-
duit KORG vendu sans carte de garantie ou sans
numéro de série ne bénéficie pas de la garantie
et n’engage pas la responsabilité du fabricant/
du distributeur. Cette clause est mise en œuvre
pour votre propre protection et sécurité.
Service après-vente et assistance à l’utilisateur
Pour tout entretien, veuillez contacter le service
après-vente KORG agréé le plus proche. Si vous
souhaitez plus d’informations sur les produits
KORG ou pour savoir où trouver les logiciels
et accessoires pour votre instrument, adres-
sez-vous à votre distributeur KORG agréé. Pour
obtenir les informations les plus récentes, veuil-
lez vous rendre sur notre site web.
Gardez votre clavier à jour
Votre instrument peut être mis à jour avec les
nouvelles versions du système d’exploitation
proposées par KORG. Vous pouvez télécharger
le système d’exploitation de notre site web.
Veuillez lire les instructions accompagnant le
système d’exploitation.

4 Français
Sommaire
Introduction ........................................................5
Bienvenue à bord! ......................................................5
Avant de commencer… ..................................................5
Contrôle et connexion ................................................7
Panneau avant .........................................................7
Panneau arrière ........................................................8
Mise sous tension du SV-2 ............................................11
Mise sous/hors tension ..................................................11
Réglage du volume global .............................................. 12
Ecouter les démonstrations ............................................. 12
Jouer avec les sons .................................................14
Qu’appelons-nous ‘son’? ............................................... 14
Sons d’usine et sons favoris ............................................ 14
Sélection des sons d’usine .............................................. 15
Sélection des sons favoris .............................................. 16
Les sons .............................................................. 17
Utiliser les effets ...................................................22
Les effets .............................................................22
Sauvegarder les changements d’un son ..................................23
Réglages avancés .................................................. 24
Boutons pour réglages avancés .........................................24
Transposition .........................................................24
Régler la sensibilité du clavier au toucher ................................26
Fonction ‘Local Off’ ....................................................27
Pas de panique! .......................................................27
Calibrage des pédales ..................................................28
Verrouiller le panneau avant ............................................29
Rétablir tous les réglages d’usine ........................................29
Fiche technique ................................................... 30

Introduction |5
Français
Introduction
Bienvenue à bord!
Merci et félicitations pour votre acquisition du KORG SV-2 Stage Vintage
Piano. Nous sommes certains qu’il vous procurera d’innombrables heures
de plaisir et des sons de piano vintage inégalés!
Pour profiter au mieux de votre SV-2, veuillez lire ce manuel au moins une
fois et (comme il est coutume de le dire) “suivre les recommandations qui
y sont faites…” Après l’avoir lu, conservez ce manuel pour toute référence
ultérieure; en le relisant, vous (re)découvrirez des trucs et astuces que vous
aviez oubliés depuis la première lecture.
Ce mode d’emploi s’applique aux versions à 88 et 73 touches du SV-2 ainsi
qu’aux versions avec et sans haut-parleurs intégrés. La seule différence
entre ces quatre instruments est la longueur du clavier et les haut-parleurs
(ainsi que le poids!).
Avant de commencer…
Contenu du carton
Après avoir acheté votre SV-2, veuillez vérifier si tous les éléments suivants
se trouvent dans l’emballage. Si l’un d’entre eux devait manquer, contactez
immédiatement votre revendeur KORG.
▪ SV-2 Stage Vintage Piano
▪ Prise en main (le document que vous avez entre les mains)
▪ Pupitre
▪ Pédale de maintien KORG DS-2H (progressive)
▪ Câble d’alimentation CA IEC standard

6 Français
Téléchargements
Rendez-vous sur notre site web (www.korg.com) pour télécharger le logiciel
SV-2 Editor, un pilote MIDI, des mises à jour, divers outils et le mode d’emploi
complet.
Options
Après l’achat du SV-2, vous pouvez y ajouter les options suivantes:
▪ L’élégant pied de clavier KORG ST-SV1, recommandé pour votre sécurité et
votre confort, parfaitement adapté à votre piano.
▪ Une des pédales ou un des commutateurs au pied robustes de KORG, comme
la pédale Damper DS-1H, les commutateurs au pied PS-1 et PS-3, le contrôleur
EXP-2, la pédale de volume/d’expression XVP-10 ou XVP-20.
▪ La housse pratique et robuste CB-SV.
Contacts
Votre revendeur KORG favori propose non seulement ce clavier mais aussi
toute une série d’accessoires matériels et logiciels ainsi que des informa-
tions sur la façon d’utiliser ces produits. N’hésitez pas à le contacter si vous
avez besoin d’aide.
Notre site web international est www.korg.com. Vous trouverez une liste de
tous les distributeurs KORG sur notre site web (www.korg.com/us/corpo-
rate/distributors/).

Contrôle et connexion |7
Français
Contrôle et connexion
Panneau avant
Le panneau avant rassemble les boutons et commandes du SV-2.
3
2
1
2
1 Panneau de commandes
Cette bande contient les boutons et commandes du piano.
2 Haut-parleurs (SV2-73S et SV2-88S uniquement)
Pour les modèles pourvus de haut-parleurs, c’est là que ces derniers se
trouvent.
3 Prise pour casque (stéréo)
Branchez un casque à cette prise ( ). Utilisez un casque ayant une impé-
dance de 16~200Ω (50Ω de préférence). Quand vous branchez un casque,
les haut-parleurs internes sont automatiquement désactivés.
Réglez le niveau de sortie avec la commande MASTER VOLUME.

8 Français
Panneau arrière
La face arrière rassemble la plupart des prises.
1
2
3 4 5 6 7 8
1 Prise d’alimentation
Branchez ici le câble d’alimentation IEC fourni.
2 Orifices pour pupitre
Votre SV-2 est livré avec un pupitre. Insérez ses pieds dans ces deux orifices.
3 Prise USB DEVICE
Cette prise permet de brancher un ordinateur pouvant servir de séquenceur (la
prise a alors le même rôle que les prises MIDI) ou permettant d’utiliser le logiciel
“SV-2 Editor” afin d’approfondir l’édition des sons. Avant d’utiliser cette prise,
installez le pilote “KORG USB-MIDI Driver” (les instructions nécessaires sont
fournies avec le pilote MIDI que vous pouvez télécharger de notre site web).
Pour avoir les infos les plus récentes sur le système d’exploitation, voyez
notre page web dédiée (https://www.korg.com/support/os/).
4
Commutateur SPEAKERS ON/OFF (modèles avec haut-parleurs uniquement)
Utilisez ce commutateur pour activer/couper les haut-parleurs internes.
5 Prises PEDAL (DAMPER, 1, 2)
Branchez la pédale fournie KORG DS-2H ou la pédale optionnelle DS-1H à la prise
DAMPER. Cette prise est réservée à la fonction de pédale forte (“damper”).
Branchez un commutateur au pied tel que le KORG PS-1 ou PS-3 en option à la
prise PEDAL 1. Il peut servir de pédale sostenuto (tonale) ou de commutateur
alternant les vitesses lente et rapide de l’effet “Rotary” (quand il est sélectionné).

Contrôle et connexion |9
Français
Branchez un commutateur au pied (tel que le KORG PS-1 ou PS-3 en option)
ou une pédale de volume/expression (comme la KORG XVP-10, XVP-20 ou
EXP-2 en option) à la prise PEDAL 2. Le commutateur au pied sert de pédale
douce. La pédale de volume/expression sert de commande de volume
(réglage par défaut) ou de filtre wah (quand l’effet wah est sélectionné). Pour
piloter l’effet wah, allumez le témoin Auto/Pedal dans la section PRE FX
(mode “Pedal”).
Alors que la pédale KORG DS-2H est déjà calibrée, la pédale de volume/
expression nécessite un calibrage pour pouvoir exploiter toute la plage de
réglage. Le calibrage permet aussi de sélectionner la polarité d’un com-
mutateur au pied. Pour calibrer les pédales (et régler leur polarité), voyez
“Calibrage des pédales” à la page 28.
6 Prises MIDI (IN, OUT)
Via MIDI, vous pouvez piloter le SV-2 à partir d’un séquenceur ou piloter un
dispositif MIDI externe à partir du SV-2. Quand vous utilisez le SV-2 pour pilo-
ter un dispositif MIDI externe ou pour enregistrer sur séquenceur, appuyez
sur le bouton LOCAL OFF afin d’allumer son témoin. Vous déconnectez ainsi
le clavier du générateur de sons interne (mais pas des prises MIDI).
MIDI OUT transmet des données MIDI. Servez-vous de cette prise pour bran-
cher un appareil MIDI ou un ordinateur. Branchez un câble MIDI standard
pour relier cette prise à la prise MIDI IN de l’autre appareil.
MIDI IN reçoit des données MIDI. Servez-vous de cette prise pour piloter le
SV-2 à partir d’un appareil MIDI externe ou un ordinateur. Branchez un câble
MIDI standard pour relier cette prise à la prise MIDI OUT de l’autre appareil.
7 Prises INPUT (L/MONO, R/MONO)
Branchez une source de niveau ligne à ces prises (un clavier, un synthétiseur,
un lecteur CD ou fichiers audio, par exemple). Pour une connexion mono,
utilisez l’une ou l’autre prise.
8 Prises OUTPUT (L/MONO, R/MONO)
Ces sorties analogiques sont disponibles sous forme de prises asymétriques
jacks 6,3mm ou de prises symétriques XLR. Utilisez les prises asymétriques
jacks 6,3mm pour des connexions courtes et les prises symétriques XLR
pour des connexions plus longues (sur scène, par exemple). Pour le reste,
elles ont exactement le même rôle.
S’il vous faut une sortie mono, utilisez uniquement la prise pour jack 6,3mm
MONO. Les prises XLR ne peuvent pas être utilisées pour une sortie mono.
ASTUCE: Privilégiez, si possible, les sorties symétriques XLR.
AVERTISSEMENT: Si vous branchez les prises XLR à une console de mixage ou un
dispositif similaire, n’oubliez pas de couper l’alimentation fantôme de ce dispositif.
Faute de quoi, vous risquez d’endommager le SV-2.

10 Français
VOX
Synthétiseur etc.
MIDI
IN OUT
OUTPUT
OUTPUT INPUT AUX/LINE IN INPUT/LINE IN
INPUT/LINE IN INPUT/LINE IN
Ordinateur
Câble USB
USB
Pédale de
volume/d’ex-
pression
Commutateur
au pied 2
(Pédale soste-
nuto)
Commuta-
teur au pied 1
(Pédale
douce)
PHONES
Casque
Pédale Damper
(fournie)
Alimentation
Entrée d’alimentation
Lecteur CD/audio
Amplificateur
Chaîne audio
Console de mixage, enregistreur etc.
Enceintes actives
Interface
audio
(SV2-73S et
SV2-88S
uniquement)

Mise sous tension du SV-2 |11
Français
Mise sous tension du SV-2
Mise sous/hors tension
1 Branchez le câble d’alimentation IEC fourni à la prise d’alimentation en face
arrière de l’instrument.
2 Branchez le câble d’alimentation à une prise secteur.
3 Pressez et relâchez le commutateur d’alimentation pour mettre l’instrument
sous tension. La lampe s’allume et commence à chauffer. Après quelques
secondes, l’instrument se met sous tension.
Le SV-2 contient une lampe (“valve”) 12AX7 (ECC83).
Avertissement: Evitez tout impact sur le hublot ou la lampe pour éviter de l’endom-
mager. Si le hublot de la lampe est cassé, faites-le immédiatement réparer pour ne
pas endommager la lampe.
Remarque: Lors de la première mise sous tension du KORG SV-2, vous apercevrez
éventuellement un bref éclair dans la lampe. Cela n’a aucune incidence sur le fonc-
tionnement ou la durée de vie de la lampe ni du SV-2.
4 Pour mettre l’instrument hors tension, maintenez le commutateur d’alimen-
tation enfoncé environ une seconde.

12 Français
Réglage du volume global
Vous pouvez régler le volume global du SV-2.
▪ Tournez la commande MASTER VOLUME dans le sens des aiguilles d’une
montre pour augmenter le volume et dans le sens inverse pour le diminuer.
Cette commande règle le volume global de l’instrument, à savoir le volume
des deux haut-parleurs intégrés, des sorties droite et gauche ainsi que de la
prise casque.
AVERTISSEMENT: Maintenez toujours le volume à un niveau confortable. Un volume
excessif peut entraîner une perte auditive irrémédiable.
Ecouter les démonstrations
Ecoutez les morceaux de démonstration internes pour apprécier la puissance
du SV-2. Vous avez le choix entre plusieurs morceaux de démonstration.
1 Appuyez simultanément sur les boutons TRANSPOSE et LOCAL OFF. Leur
témoin se met à clignoter.
2 Si vous attendez alors quelques secondes, tous les morceaux de démonstra-
tion sont reproduits successivement.
3 Sinon, vous pouvez choisir un des morceaux de démonstration disponibles.
Il y a une démonstration pour chaque son d’usine.
▪ Choisissez un des morceaux de démonstration avec les commandes TYPE et
VARIATION de la section SOUND.
▪ Vous pouvez appuyer sur la commande VARIATION pour allumer son témoin
en vert et écouter une seconde banque de morceaux de démonstration.
Appuyez de nouveau sur la commande VARIATION pour rallumer son témoin
en orange et retourner à la première banque.

Mise sous tension du SV-2 |13
Français
Vous pouvez sélectionner n’importe quelle démonstration après le démar-
rage de la lecture automatique.
4 Réglez le volume avec la commande MASTER VOLUME.
5 Arrêtez la démonstration en appuyant à nouveau sur les boutons TRANS-
POSE et LOCAL OFF.

14 Français
Jouer avec les sons
Qu’appelons-nous ‘son’?
Sur le SV-2, un son est produit par un ou plusieurs “timbres” audibles lorsque
vous jouez sur le clavier. Chaque son peut être constitué de un, deux ou trois
“programmes”, comportant chacun un timbre différent ou un ensemble de
“bruits” comme les bruits mécaniques du clavier, la frappe des marteaux
etc. Le programme principal peut comporter une ou deux couches (“Layer”)
supplémentaires avec un deuxième ou troisième timbre s’ajoutant au timbre
principal. Prenons par exemple le son bien connu de “piano avec cordes”:
il cumule un programme de piano, un programme de bruits de piano et un
programme de cordes.
Main, Layers 1, 2
Main, Layer (1)
Split
Pour certains sons, le clavier est divisé en deux avec un ou deux programmes
assigné(s) à la partie droite. Le troisième programme est assigné à la par-
tie gauche et permet de jouer un accompagnement (une contrebasse, une
nappe de synthé etc.).
Main, Layers 1, 2
Main, Layer (1)
Split
Sons d’usine et sons favoris
Le SV-2 a 72 sons d’usine et chacun de ces sons peuvent être modifiés
comme bon vous semble avec les commandes en façade. Vous pouvez
ensuite sauvegarder votre nouveau son dans une des 64 mémoires FAVO-
RITES contenant vos sons favoris. (Vous pouvez modifier votre son de façon
plus approfondie avec le logiciel “SV-2 Editor”).
En général, la transition entre deux sons est fluide: vous pouvez maintenir
les touches enfoncées et n’entendre le nouveau son qu’au changement de
note suivant. Cependant, si la section d’amplification est activée pour l’un
des sons et exploite la lampe, cette transition fluide n’est pas possible.

Jouer avec les sons |15
Français
Sélection des sons d’usine
Sélection d’un son
La section SOUND permet de sélectionner les sons d’usine.
1 Utilisez la commande TYPE de la section SOUND pour sélectionner un des
six sons de base.
2 Utilisez la commande VARIATION de la section SOUND pour sélectionner
une des six variations du son de base. Les témoins correspondant au son et
à la variation choisis, situés à côté des commandes, s’allument.
3 Appuyez sur la commande VARIATION pour accéder à une seconde banque
de variations (le témoin devient vert). Tournez la commande VARIATION
pour choisir une des six variations de la deuxième banque.
4 Si vous voulez retourner à la première banque de six variations, appuyez de
nouveau sur la commande VARIATION (le témoin redevient orange).

16 Français
Sélection des sons favoris
Sélection d’un son favoris
La section FAVORITES permet de sélectionner vos sons favoris et person-
nalisés.
1 Pour sélectionner un son favori dans la banque sélectionnée, appuyez sur le
bouton FAVORITES (1~8) correspondant.
Pour savoir quelle banque est sélectionnée, appuyez sur la commande TYPE
et voyez quel bouton FAVORITES (A~H) clignote. Pressez-la de nouveau pour
quitter le mode de sélection de banque (ou attendez que le bouton s’éteigne).
2 Pour choisir un son favori dans une autre banque, appuyez sur la commande
TYPE. La banque actuellement sélectionnée est indiquée par le bouton cli-
gnotant FAVORITES (A~H). Appuyez sur le bouton FAVORITES (A~H) cor-
respondant à la banque souhaitée. Appuyez ensuite sur le bouton FAVO-
RITES (1~8) correspondant au son favori souhaité.
Retour immédiat au dernier son d’usine sélectionné
Après avoir sélectionné un son favori, vous pouvez resélectionner un son
d’usine en utilisant la procédure ci-dessus.
Cependant, il existe un raccourci pour retrouver le son d’usine sélectionné en
dernier lieu. Appuyez sur la commande VARIATION dans la section SOUND
pour le sélectionner.

Jouer avec les sons |17
Français
Les sons
Le tableau suivant contient les noms des sons proposés, accompagnés d’une
brève description.
Quand le nom d’un son est en une seule partie (comme “MK I Suitcase”),
c’est un son simple qui s’applique à tout le clavier. Quand il y a un ‘&’ au
centre (comme “FM Piano & Pad”), il est constitué d’un programme principal
et d’une ou deux couches. Quand il y a un ‘/’ au centre (comme “Pad/Mini
Lead”), le clavier est partagé entre différents programmes.
Sons d’usine
Vous pouvez sélectionner un son d’usine à partir d’un dispositif MIDI en
envoyant au SV-2 une commande de contrôle CC00 avec la valeur “0”, une
commande de contrôle CC32 avec la valeur “0” et enfin un message de chan-
gement de programme (PC) pour sélectionner le son.
Son Var. PC Remarques
EP 1 (Vintage)
MK I Suitcase A1 0 Deux versions du légendaire MK I, un incontournable
pour un claviériste.
MK I Stage B1 6
MK II Suitcase A2 1 Deux déclinaisons du superbe MK II, en version por-
table et une autre plus lourde.
MK II Stage B2 7
MK V Stage A3 2 Le MK V Stage (le seul à atteindre le stade de la produc-
tion), bien connu pour ses sonorités tintinnabulantes.
MK V Bright B3 8
Dyno EP A4 3 Le son de piano Dyno typique, idéal pour les ballades
dans la version douce et prêt pour un solo dans la ver-
sion brillante.
Dyno EP Bright B4 9
Wurly A5 4 Son standard et punchy des lames métalliques d’un
Wurly. Le son pop des décennies 1960 et ‘70.
Wurly Classic B5 10
Wurly Dark A6 5 Une version plus sombre et plus brillante du Wurly.
Wurly Bright B6 11
EP 2 (Various)
FM Piano 1 A1 12 Le son de piano électrique FM des années 1980. Il se
retrouve sur d’innombrables albums du début de l’ère
musicale numérique.
FM Piano 3 B1 18
FM Piano 2 A2 13
FM Piano & Pad B2 19 Le piano FM + nappe de synthé est un autre classique
de l’époque.

18 Français
Son Var. PC Remarques
Pianet T A3 14 Le Pianet, le clavier électromécanique vintage alle-
mand. La version européenne du piano électrique.
Pianet N B3 20
Hybrid Piano A4 15 Combinaisons de pianos hybrides pour explorer de
nouveaux paysages sonores pianistiques.
Hybrid Tine B4 21
Wurly & Strings A5 16 Différentes combinaisons de pianos électriques et de
cordes. Vous avez le choix entre les lames métalliques
et la FM.
FM & Strings B5 22
MK II & Pad A6 17 Différentes combinaisons de pianos électriques et de
nappes. Ici encore, vous avez le choix entre les lames
métalliques et la FM.
FM & Pad B6 23
Piano 1 (Acoustique)
German Grand A1 24 Le roi des pianos acoustiques – le piano à queue alle-
mand universellement plébiscité par les pianistes clas-
siques, jazz et pop.
German Classic B1 30
Italian Grand A2 25 Piano à queue italien – un choix parfait pour les réper-
toires classique et jazz.
Italian Bright B2 31
Japanese Grand A3 26 Un autre incontournable – le piano à queue japonais
de prédilection de nombreux artistes classiques, jazz
et pop.
Japanese Bright B3 32
Austrian Grand A4 27 L’empereur autrichien des pianos à queue – un jalon
pour les programmes classiques et l’instrument favori
de certains artistes jazz.
Austrian Classic B4 33
Japanese Upright A5 28 Un grand piano droit japonais au son très résonnant.
Upright Bright B5 34 Un son de piano droit intime mais brillant, fréquem-
ment utilisé par des groupes pop.
German Upright A6 29 Son plus doux et très reconnaissable d’un piano droit
allemand.
Rock Piano B6 35 Un son de piano droit agressif pour musique rock et
rockabilly.
Piano 2 (Various)
Electric Grand A1 36 Piano électro-acoustique de la fin des années 1970 au
son très doux qui plaisait beaucoup aux musiciens de
scène.
German Mono B1 42 Une version mono du piano à queue allemand.
KORG M1 Piano A2 37 Le son de piano KORG traditionnel. Il vient du fameux
synthétiseur M1 qui a marqué son époque et se trouve
aussi dans notre piano numérique d’avant-garde SG-1D.
KORG SG-1D B2 43
Digital Piano A3 38 Un son de piano innovant, précis et expressif créé à
la fin des années 1980 avec un clavier/synthétiseur
numérique très populaire.

Jouer avec les sons |19
Français
Son Var. PC Remarques
Electra Piano B3 44 Piano électronique très populaire dans les années 1970
et utilisé par tous les grands musiciens rock et rock
progressif.
Tack Piano A4 39 Pianos à punaises et bastringues pour rag-time ou boo-
gie-woogie.
Honky-Tonk B4 45
Piano & Strings A5 40 Superpositions de piano et de cordes ou de nappe.
Idéales pour musique d’ambiance.
Piano & Pad B5 46
Piano & Synth A6 41 Superpositions de piano et synthé ou cuivres. Deux
mélanges évoquant l’époque du fusion jazz.
Piano & Brass B6 47
Clavier
Clav AC A1 48 Clavicorde électrique classique: deux déclinaisons
avec des micros en phase.
Clav AD B1 54
Clav BC A2 49 Deux configurations différentes des registres Clavi,
avec micros en inversion de phase et un son plus tran-
chant.
Clav BD B2 55
Harpsichord A3 50 Retour à la fin de la Renaissance et du baroque avec
l’aïeul du piano. Jeux standard 8” et double (principal
et octave) 8”+4”.
Harpsichord Oct. B3 56
Perc. Organ A4 51 Véritable émulation électromécanique classique, avec
percussion, en versions claire et saturée.
Rock Organ B4 57
Jazz Organ A5 52 Jeu jazz d’un orgue électromécanique classique.
Vox Organ B5 58 Parfaite émulation de “Connie”, l’orgue à transistors
VOX Continental.
Church Organ A6 53 Toute la puissance d’un majestueux orgue à tuyaux.
Pipe Organ B6 59 Des jeux plus doux et intimes d’un orgue à tuyaux pour
moments méditatifs.
Other
Full Strings A1 60 Deux variantes de sons de cordes classiques.
Classic Strings B1 66
Tape Strings A2 61 Les cordes synthétiques “Mello” des années 1970.
Strings & Voices B2 67 Cordes réelles et voix.
Warm Pad A3 62 Versions sombre et brillante de nappes de synthé
caractéristiques.
Bright Pad B3 68
Orchestra A4 63 Un puissant Tutti orchestral.
Pizzicato & Glock B4 69 Cordes orchestrales pizzicato et glockenspiel.
Brass A5 64 Véritable section de cuivres.

20 Français
Son Pos PC
Demo Shop
German Grand A1 0
Italian Grand A2 1
EP MK II A3 2
Wurly A4 3
Clav A5 4
FM Piano A6 5
Piano & Strings A7 6
Bass/EP A8 7
Piano
German Grand B1 8
Italian Grand B2 9
Japanese Grand B3 10
Austrian Grand B4 11
Japan Upright B5 12
German Upright B6 13
Rock Piano B7 14
Tack Piano B8 15
Electric Pno
EP MK I C1 16
EP MK II C2 17
Son Pos PC
EP MK V C3 18
Dyno EP C4 19
Wurly Amp C5 20
Wurly Tremolo C6 21
FM Piano C7 22
Hybrid EP C8 23
Claviers
Clav AC D1 24
Clav BC D2 25
Perc. Organ D3 26
Jazz Organ D4 27
Church Organ D5 28
KORG M1 Piano D6 29
Electric Grand D7 31
Harpsichord D8 32
Layer
Piano & Strings E1 32
Piano & Pad E2 33
Piano & EP E3 34
Piano & Vibes E4 35
MK II & Pad E5 36
Son Var. PC Remarques
Synth Brass B5 70 Cuivres de synthétiseur.
Pad/Mini Lead A6 65 Deux synthés solo jouant sur une nappe de synthé
douce.
Pad/SynthLead B6 71
Sons favoris
Vous pouvez sélectionner un son favori à partir d’un dispositif MIDI en
envoyant au SV-2 une commande de contrôle CC00 avec la valeur “0”, une
commande de contrôle CC32 avec la valeur “64” et enfin un message de
changement de programme (PC) pour sélectionner le son.

Jouer avec les sons |21
Français
Son Pos PC
Strings & Pad E6 37
Piano & FM E7 38
FM & Strings E8 39
Split
Ac. Bass/Piano F1 40
El. Bass/Piano&Str F2 41
Fretless/EP F3 42
Slap/EP F4 43
Slap/Clav F5 44
EP Bass/Vox Organ F6 45
Jazz Piano Trio F7 46
Organ Dual Manual F8 47
Other
Full Strings G1 48
Strings Octave G2 49
Son Pos PC
Orchestra Tutti G3 50
Brass G4 51
Warm Pad G5 52
Synth Brass G6 53
Pad/SynLead G7 54
Synth Bass G8 55
Legacy SV1
SV1 Grand Piano 1 H1 56
SV1 Grand Piano 2 H2 57
SV1 Tine EP Amp H3 58
SV1 Reed EP1 H4 59
SV1 Clav AC H5 60
SV1 Clk.Tonewheel H6 61
SV1 Full Strings H7 62
SV1 Synth Brass H8 63

22 Français
Utiliser les effets
Les effets
Vous pouvez sélectionner divers effets et modèles d’amplis avec les com-
mandes TYPE. Vous pouvez modifier les réglages de l’effet avec les com-
mandes DEPTH, INTENSITY, SPEED et DRIVE. Si vous appuyez sur la com-
mande, le réglage original du paramètre est rétabli. Pour une édition plus
pointue, utilisez le logiciel “SV-2 Editor”.
Les effets et le modèle d’ampli peuvent être activés/coupés d’une pression
sur le bouton On/Off correspondant. Vous pouvez ensuite sauvegarder vos
changements et le nouveau son dans une des mémoires FAVORITES.
Faites des essais en actionnant les commandes pour écouter ce que vous
pouvez faire avec les divers effets.
SIGNAL ROUTING
EQ PRE FX
MODULATION AMBIENT TOTAL FX
Stereo Limiter
Stereo Mastering Limiter
OUTPUTS
SOUND
PRE AMP
VOLUME VOLUME POWER
AT T.
PROGR
LVL
POWER AMP
VALVE
CABINET NR

Utiliser les effets |23
Français
Sauvegarder les changements d’un son
Si vous aimez le son que vous venez de créer en jouant avec les commandes,
sauvegardez-le comme son favori.
1 Appuyez sur la commande TYPE pour voir quelle banque de sons favoris est
sélectionnée.
La banque actuellement sélectionnée est indiquée par le bouton clignotant
FAVORITES A~H.
2 Pour choisir une autre banque, appuyez sur le bouton FAVORITES (A-H) cor-
respondant à la banque souhaitée.
3 Pour sauvegarder votre son, maintenez le bouton FAVORITES 1~8 corres-
pondant à la mémoire voulue jusqu’à ce que le témoin se mette à clignoter.
4 Appuyez de nouveau sur le même bouton pour confirmer la sauvegarde.
Pour renoncer à sauvegarder vos réglages, attendez quelques secondes que
le témoin s’éteigne sans appuyer sur le moindre bouton.
ASTUCE: Utilisez les banques “Favorite” pour agencer vos sons selon un style de
musique particulier ou en vue d’un concert.
Remarque: Le nouveau son favori remplace le son qui occupait cette mémoire. L’an-
cien son favori est supprimé.
Remarque: Si vous sélectionnez un autre son ou si vous mettez l’appareil hors ten-
sion sans sauvegarder vos réglages de son et d’effets, ceux-ci sont perdus.

24 Français
Réglages avancés
Boutons pour réglages avancés
Le groupe des boutons TRANSPOSE, LOCAL OFF, TOUCH et FUNCTION
donne accès à toute une série de fonctions avancées permettant d’adapter
le piano à vos habitudes de jeu.
Avec le bouton FUNCTION, vous pouvez accéder à des paramètres permet-
tant de personnaliser l’instrument. Veuillez lire le mode d’emploi pour en
savoir plus sur ces fonctions.
Transposition
Il peut arriver qu’un morceau soit écrit dans une tonalité difficile (impliquant
de nombreuses altérations) ou que vous souhaitiez adapter la hauteur à celle
d’un autre instrument ou d’un chanteur. Dans ce cas, vous pouvez transpo-
ser le clavier afin de pouvoir jouer comme vous en avez l’habitude mais à
une hauteur différente. C’est ce que nous appelons la fonction “Transpose”.
Après une transposition vers le haut d’un demi-ton, le fait de jouer les notes
de la portée gauche produit les notes de la portée droite.
Activer ou couper la transposition
1 Appuyez sur le bouton TRANSPOSE pour activer la transposition. S’il y a
déjà transposition, le témoin de ce bouton est allumé. Sinon, il est éteint.
2 Appuyez de nouveau sur le bouton TRANSPOSE pour couper la transposi-
tion. Le témoin s’éteint.

Réglages avancés |25
Français
Réglage de l’intervalle de transposition
1 Maintenez le bouton TRANSPOSE enfoncé une seconde, jusqu’à ce que son
témoin se mette à clignoter.
2 Appuyez sur la note correspondant à la transposition voulue: La transposi-
tion est activée et le témoin reste allumé.
-12
C3
0 +12
C5
Tonalité Effet
C3~B3 Transposition de 12~1 demi-tons vers le bas
C4 (Do central) Hauteur de référence (diapason)
C#4~C5 Transposition de 1~12 demi-tons vers le haut
Si aucune note n’est jouée dans les secondes qui suivent, la transposition
est annulée.
3 Appuyez de nouveau sur le bouton TRANSPOSE pour couper la transposi-
tion. Le témoin s’éteint.
Remarque: Quand vous mettez l’instrument hors tension, la transposition est cou-
pée.

26 Français
Régler la sensibilité du clavier au toucher
Vous pouvez régler la sensibilité du clavier (la courbe de réponse à votre jeu).
1 Appuyez sur le bouton TOUCH.
Le témoin de ce bouton clignote. Le témoin du bouton FAVORITE correspon-
dant à la courbe de réponse au toucher en vigueur se met à clignoter.
2 Appuyez sur le bouton FAVORITE correspondant à la courbe de réponse au
toucher souhaitée.
3 Appuyez sur le bouton TOUCH pour confirmer votre choix et retrouver le
mode de fonctionnement normal.
Mémoire
Favorite
Courbe de
toucher
Explication
1 Normal Réponse normale d’un clavier de piano.
2 Soft 1 Un toucher doux suffit pour produire des notes fortes.
3 Soft 2
4 Medium 1 Un toucher normal permet de produire des notes fortes.
5 Medium 2
6 Hard 1 Il faut jouer très fort pour produire des notes fortes.
7 Hard 2
8 Fixed Dynamique fixe. Utilisez le logiciel SV-2 Editor pour choisir
la dynamique.
Le schéma ci-dessous indique les courbes de réponse au toucher:
( )
Fort
Fort
Normal/Medium
Doux
Doux
Doux Fort
Force du jeu
Volume de
la note

Réglages avancés |27
Français
Fonction ‘Local Off’
Vous pouvez activer et couper la fonction ‘Local Off’.
▪ Appuyez sur le bouton LOCAL OFF pour allumer le témoin.
Quand le témoin de ce bouton est allumé, le clavier est débranché du géné-
rateur de sons internes. En jouant sur le clavier, vous n’entendez plus les
sons du générateur de sons interne. Cependant, les données de notes conti-
nuent à être transmises à la prise MIDI OUT (ou USB) et peuvent être reçues
par un ordinateur.
L’ordinateur les renvoie à la prise MIDI IN du SV-2 (ou à sa prise USB) puis
au générateur de sons interne. Ce routage vous permet d’enregistrer et de
jouer simultanément sans produire de notes doubles.
▪ Appuyez sur le bouton LOCAL OFF pour éteindre son témoin.
Quand le témoin de ce bouton est éteint, le clavier est débranché du généra-
teur de sons internes.
Remarque: Quand vous mettez l’instrument hors tension, la fonction “Local Off” est
initialisée.
Pas de panique!
Si des notes MIDI sont produites en continu suite à des problèmes de com-
munication MIDI, gardez le bouton On/Off de la section EQUALIZER enfoncé
jusqu’à ce que les notes “coincées” soient coupées. C’est ce que nous appe-
lons la fonction “MIDI Panic”.

28 Français
Calibrage des pédales
Vous pouvez calibrer les pédales branchées aux prises DAMPER, PEDAL 1 et
PEDAL-2 en face arrière. En calibrant une pédale, vous permettez au SV-2 de
détecter sa polarité et la plage complète des valeurs transmises.
1 N’oubliez pas ceci: la prise DAMPER attend la pédale de maintien KORG
DS-2H fournie (ou la pédale optionnelle DS-1H voire un commutateur au pied),
la prise PEDAL 1 attend un commutateur au pied et la prise PEDAL 2 peut
accueillir un commutateur au pied ou une pédale de volume/d’expression.
2 Amenez la pédale de volume/d’expression sur son réglage le plus bas.
3 Mettez le SV-2 hors tension.
4 Maintenez le bouton Auto/Pedal enfoncé et mettez le SV-2 sous tension.
5 Quand le témoin du bouton Auto/Pedal se met à clignoter, relâchez le bou-
ton.
Si vous ne faites rien dans les secondes qui suivent, le témoin Auto/Pedal
s’éteint et le SV-2 poursuit la séquence de démarrage.
6 Tant que le témoin Auto/Pedal clignote, appuyez de nouveau sur le bouton.
Le SV-2 passe en mode de calibrage.
7 Calibrez la pédale branchée à la prise PEDAL 1 (un commutateur au pied).
Enfoncez complètement la pédale puis relâchez-la. Quand la pédale bran-
chée à la prise PEDAL 1 est calibrée, le bouton FAVORITES 1 s’allume.
8 Calibrez ensuite la pédale branchée à la prise PEDAL 2. La procédure dépend
du type de pédale: commutateur au pied ou pédale de volume/d’expression:
▪ Si c’est un commutateur au pied, enfoncez-le complètement puis relâchez-le.
▪ Si c’est une pédale d’expression, enfoncez-la à bout de course vers l’avant
(position maximum).
Quand la pédale branchée à la prise PEDAL 2 est calibrée, le bouton FAVO-
RITES 2 s’allume.
9 Calibrez enfin la pédale DAMPER. Enfoncez complètement la pédale puis
relâchez-la. Quand la pédale branchée à la prise DAMPER est calibrée, le
bouton FAVORITES 3 s’allume.
10 Quand le calibrage est terminé:
▪ Si vous avez calibré les trois pédales branchées, le SV-2 quitte automatique-
ment le mode de calibrage et poursuit la procédure de démarrage.
▪ Si vous n’avez calibré qu’une ou deux pédales, appuyez de nouveau sur le
bouton Auto/Pedal pour quitter le mode de calibrage et poursuivre la pro-
cédure de démarrage.

Réglages avancés |29
Français
Verrouiller le panneau avant
Nous vous avons montré comment changer les sons et les effets. Nous allons
maintenant vous expliquer comment éviter tout changement! Cela peut être
pratique pour éviter de changer des réglages par inadvertance durant le jeu.
1 Appuyez simultanément sur les boutons TOUCH et FUNCTION sur le pan-
neau avant. Leur témoin se mettent à clignoter.
Les seuls contrôleurs encore accessibles sont la commande MASTER
VOLUME et le commutateur d’alimentation.
2 Appuyez sur le bouton TOUCH ou FUNCTION pour déverrouiller le panneau
avant.
Remarque: Quand vous mettez l’instrument hors tension, le verrouillage est annulé.
Rétablir tous les réglages d’usine
Après avoir effectué divers changements, vous souhaitez peut-être retrou-
ver les réglages d’usine du SV-2 (y compris les sons favoris d’usine et les
réglages globaux).
1 Mettez l’instrument hors tension.
2 Maintenez le bouton FUNCTION enfoncé.
3 Sans relâcher le bouton FUNCTION, mettez l’instrument sous tension.
4 Quand son témoin se met à clignoter, relâchez le bouton FUNCTION.
5 Appuyez de nouveau sur le bouton FUNCTION pour confirmer l’initialisation
des réglages.
6 Tous les réglages sont initialisés.

30 Français
Fiche technique
Fiche technique SV-2
Clavier
Touches SV2-73/SV2-73S: 73 touches/SV2-88/SV2-88S: 88 touches.
Sensibilité au toucher, KORG RH3 (Real Weighted, Hammer Action
3)
Réponse au toucher 8 courbes
Accordage Transposition, diapason, courbes d’accordage
Sons
Générateur de sons EDS-X (Enhanced Definition Synthesis – eXpanded)
Polyphonie 128 notes (max.)
Multitimbralité Superposition et partage du clavier
Sons d’usine 72 sons d’usine (6 sons de base x 2 séries de 6 variations)
Sons favoris 64 sons favoris (8 banques x 8 variations) pour la sauvegarde de
réglages personnalisés
Effets
Equalizer Bass, Mid, Treble
Pre FX Red Compressor, Treble Boost, U-Vibe, Vibrato, Tremolo, VoxWah
(avec pilotage par pédale)
Modèles d’amplis Clean, Twin, Tweed, AC30, Boutique, Organ Amp. Modèles d’en-
ceinte intégrant la technologie Valve Reactor avec une lampe
12AX7 (ECC83)
Modulation Classic Chorus, Black Chorus, Orange Phaser, Small Phaser, FX
Flanger, Rotary (pilotage de vitesse lente/rapide)
Ambient Room, Plate, Hall, Spring, Tape Echo, Stereo Delay (avec Tap
Tempo)
Total FX Limiteur de mastérisation stéréo, limiteur stéréo
Autres contrôleurs
Volume Commande Master Volume
Commutateurs en
façade
Transpose, Local Off, Touch, Function
Démonstration 72 morceaux de démonstration, un par son d’usine
Connexions
MIDI IN/OUT
Casque 1 (en face avant)

Fiche technique |31
Français
Sorties audio L, R (2 x XLR, symétriques)
L/Mono, R/Mono (2 x jacks 6,3mm, asymétriques)
Entrées audio L/Mono, R/Mono (2 x jacks 6,3mm, asymétriques)
USB Prise USB 2.0 Hi-Speed de type B (joue aussi le rôle d’interface
MIDI)
Damper Pedal KORG DS-2H (fournie), DS-1H (option)
Pedal 1 Commutateur au pied (KORG PS-1, PS-3 p.ex.)
Pedal 2 Pédale de volume/expression (KORG XVP-10, XVP-20 ou EXP-2
p.ex.) ou commutateur au pied (KORG PS-1, PS-3 p.ex.)
Amplification
Haut-parleurs 2 x 2,5” avec 2 x radiateur passif 3”
Puissance
d’amplification
2 x 15W
Données physiques
Alimentation Adaptateur à commutation interne, CA100~240V, 50-60Hz
Consommation
électrique
Modèles sans haut-parleurs intégrés: 16W
Modèles avec haut-parleurs intégrés: 25W
Dimensions (L x P x H):
(sans pupitre)
SV2-73/SV2-73S: 1143 x 347 x 157 mm (45.00 x 13.66 x 6.18 inch)
SV2-88/SV2-88S: 1356 x 347 x 157 mm (53.39 x 13.66 x 6.18 inch)
Poids (sans pupitre) SV2-73: 17,2 kg (37.92 lbs) / SV2-73S: 18,3 kg (40.34 lbs)
SV2-88: 20,35 kg (44.86 lbs) / SV2-88S: 21,45 kg (47.29 lbs)
Divers
Accessoires fournis Câble d’alimentation, Guide de prise en main, Pupitre, Pédale de
maintien (KORG DS-2H)
Options Pied de piano ST-SV1, pédale Damper DS-1H, XVP-10, XVP-20, EXP-
2, Commutateur au pied PS-1, PS-3, Sac de transport CB-SV.
Les caractéristiques et l’aspect du produit sont susceptibles d’être modifiés sans
avis préalable pour y apporter des améliorations.
Amplification conçue en collaboration avec K-ARRAY.

32 Français
REMARQUE IMPORTANTE À L’ATTENTION
DES CONSOMMATEURS
Ce produit a été fabriqué selon des spécifi-
cations et des caractéristiques de tension
strictes en vigueur dans le pays dans lequel
l’appareil est censé être utilisé. Si vous
avez acheté ce produit par internet, par
vente par correspondance et/ou par vente
téléphonique, assurez-vous que ce produit
est conçu pour fonctionner dans le pays où
vous résidez.
AVERTISSEMENT: L’utilisation de ce produit
dans tout autre pays que celui pour lequel
il est conçu peut être dangereuse et peut
entraîner l’annulation de la garantie du fabri-
cant ou du distributeur.
Conservez également votre reçu comme
preuve d’achat pour pouvoir bénéficier de la
garantie du fabricant ou du distributeur.
REMARQUE CONCERNANT LA MISE AU
REBUT (UE UNIQUEMENT)
Si ce symbole apparaît sur le pro-
duit, le manuel, la batterie (les piles)
ou l’emballage, vous devez mettre
le produit au rebut de façon appro-
priée pour éviter de nuire à la santé
humaine ou à l’environnement. Con-
tactez les autorités locales pour con-
naître la procédure adéquate de mise
au rebut. Si la teneur en métaux lourds de la
batterie excède la limite autorisée, un sym-
bole chimique est ajouté sous le pictogramme
représentant une poubelle à roulettes barrée
figurant sur la batterie ou son emballage.
En cas de radiations électromagnétiques, la qual-
ité audio peut être temporairement dégradée.
Cette dégradation peut, par exemple, générer
un signal sonore. Celui-ci s’arrête dès que les
interférences électromagnétiques cessent.
RÉGLEMENTATION FCC (ÉTATS-UNIS)
This equipment has been tested and found
to comply with the limits for a Class B digital
device, pursuant to Part 15 of the FCC Rules.
These limits are designed to provide reason-
able protection against harmful interference
in a residential installation. This equipment
generates, uses, and can radiate radio fre-
quency energy and, if not installed and used
in accordance with the instructions, may
cause harmful interference to radio commu-
nications. However, there is no guarantee
that interference will not occur in a particu-
lar installation. If this equipment does cause
harmful interference to radio or television
reception, which can be determined by turn-
ing the equipment off and on, the user is
encouraged to try to correct the interference
by one or more of the following measures:
• Reorient or relocate the receiving antenna.
• Increase the separation between the equip-
ment and receiver.
• Connect the equipment into an outlet on
a circuit different from that to which the
receiver is connected.
• Consult the dealer or an experienced radio/
TV technician for help.
If items such as cables are included with this
equipment, you must use those included
items.
Unauthorized changes or modification to this
system can void the user’s authority to oper-
ate this equipment.
WICHTIGER HINWEIS FÜR ANWENDER
Dieses Instrument wurde unter strenger
Beachtung der Vorgaben und Spannungsan-
forderungen im jeweiligen Auslieferungsland
hergestellt. Wenn Sie das Instrument über
das Internet, per Postversand und/oder tele-
fonischer Bestellung erworben haben, müs-
sen Sie überprüfen, ob es für die Verwendung
am Einsatzort geeignet ist.
WARNUNG: Die Verwendung dieses Instru-
ments in einem anderen Land als dem, für
welches es bestimmt ist, kann gefährlich sein
und die Garantie des Herstellers oder Ver-
triebs hinfällig werden lassen.
Bitte bewahren Sie die Quittung als Kaufbeleg
auf, da das Produkt sonst von der Garantie
des Herstellers oder Vertriebs ausgeschlos-
sen werden kann.

|1
Deutsch
DEUTSCH

2| Deutsch
Wichtige Sicherheitshinweise
1. Lesen Sie sich diese Hinweise durch.
2.
Bewahren Sie diese Hinweise auf.
3.
Befolgen Sie alle Warnungen.
4.
Führen Sie alle Anweisungen aus.
5.
Verwenden Sie das Instrument niemals in der
Nähe von Wasser.
6.
Reinigen Sie es nur mit einem trockenen Tuch.
7. Versperren Sie niemals die Lüftungsschlitze.
Stellen Sie das Gerät nur den Herstelleran-
weisungen entsprechend auf.
8.
Stellen Sie das Instrument niemals in die Nähe von
Wärmequellen wie Heizkörper, Öfen bzw. Geräte
(darunter auch Verstärker), die ausgesprochen
heiß werden.
9.
Versuchen Sie niemals, die Erdung des Netzkabels
zu umgehen. Ein polarisierter (englischer) Ste-
cker weist zwei unterschiedlich breite Stifte auf.
Ein geerdeter Stecker ist hingegen mit drei Stif-
ten versehen. Der Erdungsstift dient Ihrer Sicher-
heit. Wenn der beiliegende Stecker nicht in Ihre
Steckdose passt, bitten Sie einen Elektriker, diese
zu ersetzen.
10.
Sorgen Sie dafür, dass das Netzkabel nicht
gequetscht wird und dass man nicht darüber stol-
pern kann.
11.
Verwenden Sie nur Halter und Ständer, die aus-
drücklich vom Hersteller empfohlen werden.
12.
Verwenden Sie nur Wagen, Ständer, Halte- run-
gen usw., die vom Hersteller vertrieben oder emp-
fohlen werden. Bei Verwendung eines Wagens ist
darauf zu achten, dass er während des Transports
nicht umkippt.
13.
Lösen Sie im Falle eines Gewitters oder wenn das
Instrument längere Zeit nicht verwendet werden
soll, den Netzanschluss.
14.
Überlassen Sie alle Wartungsarbeiten einem qua-
lifizierten und befugten Techniker. Das ist z.B. not-
wendig, wenn das Instrument Schäden aufweist
(z.B. beschädigtes Netzkabel, Eintritt von Flüssig-
keit oder Fremdkörpern, wenn das Instrument im
Regen gestanden hat), sich nicht erwartungsge-
mäß verhält oder hingefallen ist.
▪
Die Ventilationsöffnungen dürfen auf keinen Fall
mit einem Tuch, einer Zeitung, einer Gardine usw.
versperrt werden, weil es sonst zu einem Hit-
zestau kommt.
▪
Stellen Sie keine offenen Feuerquellen wie z.B.
Kerzen auf das Instrument.
▪
Während des Betriebs darf sich das Instrument
niemals in einem teilweise oder vollständig
geschlossenen Flightcase, Rack o.ä. befinden.
▪
WARNUNG – Dieses Gerät darf nur an eine geer-
dete Steckdose angeschlossen werden.
▪
Selbst wenn Sie das Instrument ausschalten, ist es
weiterhin mit dem Stromnetz verbunden. Es kann
daher nicht schaden, den Netzanschluss zu lösen,
wenn Sie es über einen längeren Zeitraum nicht
verwenden bzw. es reinigen möchten. Wählen Sie
immer eine Steckdose, die Sie problemlos errei-
chen können.
▪
Ein netzgespeistes Instrument darf niemals
Regen- oder Wassertropfen ausgesetzt werden.
Außerdem darf man keine Flüssigkeitsbehälter
wie Vasen usw. auf das Instrument stellen.
▪
Stellen Sie das Instrument nach Möglichkeit in die
Nähe der Steckdose und sorgen Sie dafür, dass
man letztere problemlos erreicht.
▪
Das Typenschild befindet sich an der Unter-
seite des Instruments. Dieses Schild erwähnt die
Modellbezeichnung, die Seriennummer, die Stro-
manforderungen usw.
Seriennummer
Bitte tragen Sie unten die Modellbezeich-
nung, Seriennummer und das Kaufdatum
ein. Bewahren Sie die Bedienungsanleitung
auf, um im Fall der Fälle auf diese Angaben
zugreifen zu können.
Modell ________________________________
Seriennummer _________________________
Kaufdatum _____________________________

|3
Deutsch
Vorsichtsmaßnahmen
Energiesparfunktion
Im Hinblick auf einen energieschonenden
Betrieb schaltet sich das SV-2 bei Nichtver-
wendung (wenn man nicht spielt, keinen Taster
drückt usw.) nach 2 Stunden automatisch aus.
Daher sollten Sie alle wichtigen Daten vor jeder
längeren Spielpause speichern.
Auswechseln der Röhre
Die Lebensdauer einer Röhre lässt sich (wie
bei einer Glühbirne) nicht vorhersagen. Eine
defekte Röhre darf nur von einer anerkann-
ten KORG-Kundendienststelle ausgewech-
selt werden. ERSETZEN SIE DIE RÖHRE NIE-
MALS SELBST, weil Sie das Instrument dadurch
einerseits beschädigen und andererseits einen
Stromschlag erleiden können. Außerdem wird
dann der Garantieanspruch hinfällig.
Handhabung von Daten
Die gespeicherten Daten können bei falscher
Bedienung gelöscht werden. Daten, die Sie
nicht verlieren möchten, müssen Sie unbedingt
mit dem beiliegenden Editor/Archivierungspro-
gramm extern sichern. KORG haftet nicht für
Schäden, die auf den Verlust von Daten zurück-
zuführen sind.
Reinigung
Schmutz usw. darf nur mit einem trockenen
Tuch entfernt werden. Verwenden Sie niemals
flüssige Reinigungsmittel wie Waschbenzin, Ver-
dünner, Lösungsmittel oder brennbare Polier-
mittel.
Warenzeichen
Acrobat und PDF sind eingetragene Warenzei-
chen der Adobe Systems Incorporated. Mac und
iOS sind eingetragene Warenzeichen der Apple
Inc. Android ist ein Warenzeichen der Google
Inc. MS-DOS und Windows sind eingetragene
Warenzeichen der Microsoft Corporation. Alle
anderen erwähnten Firmen- und Produktnamen
sind Warenzeichen oder eingetragene Warenzei-
chen der betreffenden Eigentümer.
Haftungsausschluss
Die in dieser Bedienungsanleitung erwähnten
Informationen wurden mehrmals überprüft. Da
wir unsere Produkte aber fortwährend weiter-
entwickeln, stimmen eventuell nicht alle tech-
nischen Daten mit den hier erwähnten Angaben
überein. KORG haftet nicht für Unterschiede
zwischen der Produktbestückung und der beilie-
genden Dokumentation. Änderungen der tech-
nischen Daten bleiben jederzeit ohne Vorankün-
digung vorbehalten.
Haftung
KORG-Produkte werden unter strengen Aufla-
gen für die Netzspannung im Auslieferungsland
hergestellt. Eine Garantie auf diese Produkte
wird daher nur vom KORG-Vertrieb des jeweili-
gen Landes gewährt. KORG-Produkte, die ohne
eine solche Garantie verkauft werden bzw. keine
Seriennummer aufweisen, sind von der Her-
steller- und Vertriebsgarantie ausgeschlossen.
Diese Auflage dient Ihrer eigenen Sicherheit.
Wartung und Kundendienst
Überlassen Sie alle Reparaturarbeiten grund-
sätzlich einer von KORG anerkannten Kunden-
dienststelle. Ausführliche Informationen über
KORG-Produkte sowie Software und Zubehör für
Ihr Instrument bekommen Sie beim KORG-Händ-
ler in Ihrer Nähe. Aktuelle Informationen finden
Sie auf unserer Webpage.
Halten Sie Ihr Keyboard auf dem neuesten
Stand
Das Betriebssystem dieses Instruments kann
mit neueren (von KORG freigegebenen) Versi-
onen aktualisiert werden. Neue Systemversio-
nen finden Sie auf unserer Webpage. Hinweise
zum Laden des neuen Betriebssystems werden
gemeinsam mit den Daten in Netz gestellt.

4| Deutsch
Inhalt
Vorweg .............................................................5
Willkommen an Bord! ...................................................5
Bevor Sie anfangen zu spielen… ..........................................5
Bedienelemente und Anschlüsse .......................................7
Frontplatte ............................................................7
Rückseite ..............................................................8
Einschalten des SV-2 .................................................11
Ein-/Ausschalten .......................................................11
Regeln der allgemeinen Lautstärke ...................................... 12
Anhören der Demosongs ............................................... 12
Spielen der Sounds .................................................14
Was ist mit ‘Sounds’ gemeint? .......................................... 14
Werks- und ‘Favorite’-Sounds ........................................... 14
Anwahl der Werks-Sounds .............................................. 15
Anwahl von Klangfavoriten ............................................. 16
Die Sounds ........................................................... 17
Verwendung der Effekte .............................................22
Die Effekte ............................................................22
Speichern der Einstellungen ............................................23
Weiter führende Einstellungen. . . . . . . . . . . . . . . . . . . . . . . . . . . . . . . . . . . . . . . 24
Weiter führende Einstellungen ..........................................24
Transposition .........................................................24
Ändern des Anschlagverhaltens .........................................26
Die ‘Local Off’-Funktion ................................................27
Keine Panik! ..........................................................27
Kalibrieren der Pedale .................................................28
Sperren des Bedienfeldes ..............................................29
Laden der Werkseinstellungen ..........................................29
Technische Daten .................................................. 30

Vorweg |5
Deutsch
Vorweg
Willkommen an Bord!
Vielen Dank für Ihre Entscheidung zu einem KORG SV-2 Stage Vintage Piano.
Wir sind uns ziemlich sicher, dass Sie hiermit über alle legendären Piano- und
Keyboard-Sounds verfügen, die nicht nur fantastisch klingen, sondern sich
auch authentisch verhalten!
Da Sie bestimmt längerfristig mit dem SV-2 arbeiten möchten, sollten Sie
sich diese Anleitung vollständig durchlesen, um bei der Bedienung alles rich-
tig zu machen. Nach der Lektüre heben Sie sie für die spätere Bezugnahme
am besten auf.
An dieser Stelle möchten wir darauf hinweisen, dass sich die Anleitung auf
das SV-2 mit 88er- und 73er-Tastatur mit bzw. ohne eingebaute Lautspre-
cher bezieht. Mit Ausnahme der längeren Tastatur, der Lautsprecher und
des höheren Gewichts gibt es keine Unterschiede zwischen den vier Ausfüh-
rungen.
Bevor Sie anfangen zu spielen…
Lieferumfang
Zum Lieferumfang des SV-2 gehören folgende Dinge. Bitte überprüfen Sie
zunächst, ob Sie alles bekommen haben. Falls etwas fehlt, wenden Sie sich
bitte umgehend an Ihren KORG-Händler.
▪ SV-2 Stage Vintage Piano
▪ Schnellstart-Anleitung (das Dokument, das Sie gerade lesen)
▪ Notenpult
▪ KORG DS-2H Dämpferpedal (stufenlos)
▪ Standard IEC-Netzkabel

6| Deutsch
Inhalte zum Herunterladen
Surfen Sie mit Ihrem Webbrowser zu unserer Website (www.korg.com), um
sich die SV-2 Editor Software, den MIDI-Treiber, aktuelle Software und Bedie-
nungsanleitungen herunterzuladen.
Praktisches Sonderzubehör
Für das SV-2 ist auch praktisches Zubehör erhältlich:
▪ Ein elegantes KORG ST-SV1 Stativ, das perfekt zum Design des Instruments
passt und diesem einen sicheren Halt bietet.
▪ Robuste Pedale und Fußtaster von KORG wie das DS-1H Dämpferpedal, die
Fußtaster PS-1 und PS-3, das EXP-2 Pedal, ein XVP-10 oder XVP-20 Volu-
men-/Expression-Pedal.
▪ Und natürlich die robuste CB-SV Tragetasche.
Kontakt
Ein anerkannter KORG-Händler ist nicht nur für Sie da, wenn Sie ein Instru-
ment kaufen möchten, sondern hilft Ihnen auch gerne mit wertvollen Tipps
und weiterem Zubehör sowie praktischer Software. Sprechen Sie ihn einfach
darauf an.
Die Adresse unserer internationalen Webpage lautet www.korg.com. Auf
unserer Webpage (www.korg.com/us/corporate/distributors/) finden Sie
eine Übersicht aller KORG-Vertriebsstellen.

Bedienelemente und Anschlüsse |7
Deutsch
Bedienelemente und Anschlüsse
Frontplatte
Sämtliche Bedienelemente des SV-2 befinden sich auf der Frontplatte.
3
2
1
2
1 Bedienfeld
Hier finden Sie die Taster, Regler und anderen Bedienelemente des Pianos.
2 Lautsprecher (nur SV2-73S und SV2-88S)
Bei den Ausführungen mit eingebauten Lautsprechern sorgen diese für den
akustisch erlebbaren Klang.
3 Kopfhörerbuchse (stereo)
Bei Bedarf können Sie hier einen Kopfhörer anschließen ( ). Der Kopf-
hörer muss eine Impedanz von 16~200Ω haben (idealerweise 50Ω). Beim
Anschließen eines Kopfhörers werden die internen Lautsprecher automa-
tisch stummgeschaltet.
Der Pegel wird mit dem MASTER VOLUME-Regler eingestellt.

8| Deutsch
Rückseite
Die meisten Anschlüsse befinden sich auf der Rückseite.
1
2
3 4 5 6 7 8
1 Anschluss für das Netzkabel
Schließen Sie hier das beiliegende IEC-Netzkabel an.
2 Aussparungen für das Notenpult
Zum Lieferumfang des SV-2 gehört ein Notenpult. Dessen Füße müssen Sie
in diese beiden Aussparungen schieben.
3 USB DEVICE-Anschluss
Diesen Port können Sie mit Ihrem Computer verbinden, um letzteren als
Sequenzer zu verwenden (der Port hat die gleiche Funktion wie die MIDI-Buch-
sen) bzw. um mit der SV-2 Editor Software arbeiten zu können. Vor der Ver-
wendung dieses Ports müssen Sie den KORG USB–MIDI-Treiber installieren
(Bedienhinweise und den Treiber finden Sie auf unserer
Webpage
).
Aktuelle Informationen über die unterstützten Betriebssysteme finden Sie
auf unserer einschlägigen Webseite (https://www.korg.com/support/os/).
4
SPEAKERS ON/OFF-Schalter (nur bei Ausführungen mit Lautsprechern)
Hiermit kann man die Lautsprecher ein- oder ausschalten.
5 PEDAL-Buchsen (DAMPER, 1, 2)
An die DAMPER-Buchse muss das beiliegende KORG DS-2H Pedal (bzw. ein
optionaler DS-1 Fußtaster) angeschlossen werden. Dieser/s kann nur für
Dämpferzwecke genutzt werden.
Schließen Sie einen optionalen KORG PS-1 oder PS-3 Fußtaster an die PEDAL
1-Buchse an. Dieser kann als Sostenutopedal oder Slow/Fast-Schalter für den
„Rotary“-Effekt (sofern gewählt) fungieren.

Bedienelemente und Anschlüsse |9
Deutsch
An die PEDAL 2-Buchse kann ein optionaler KORG PS-1 oder PS-3 Fußtaster
bzw. ein Volumen-/Expression-Pedal (KORG XVP-10, XVP-20, EXP-2) ange-
schlossen werden. Wenn Sie hier einen Fußtaster anschließen, fungiert er
als Leisepedal. Das Volumen-/Expression-Pedal erlaubt das Regeln der Laut-
stärke (Vorgabe), kann aber alternativ zum Steuern des Wah-Effekts genutzt
werden. Die Wah-Funktion ist nur belegt, wenn Sie den Auto/Pedal-Taster in
der PRE FX-Sektion aktivieren (Pedal-Modus).
Das KORG DS-2H Pedal ist ab Werk bereits einsatzbereit. Ein Volumen-/
Expression-Pedal muss man aber kalibrieren, um den kompletten Regelweg
nutzen zu können. Mit der Kalibrierungsfunktion kann ferner die Fußtaster-
polarität eingestellt werden. Unter „Kalibrieren der Pedale” auf S. 28
erfahren Sie, wie man die Pedale kalibriert (und ihre Polarität einstellt).
6 MIDI-Buchsen (IN, OUT)
Über seine MIDI-Buchsen kann das SV-2 mit einem Sequenzer oder einem
externen Instrument verbunden werden. Wenn Sie das SV-2 als Steuerquelle
für einen Sequenzer oder einen externen Klangerzeuger verwenden möch-
ten, aktivieren Sie am besten den LOCAL OFF-Taster. Dann wird die interne
Klangerzeugung nämlich nicht mehr angesteuert.
Die MIDI OUT-Buchse sendet MIDI-Daten zur Außenwelt. Das ist z.B. notwen-
dig, wenn Sie ein externes Instrument ansteuern möchten. Verbinden Sie sie
über ein MIDI-Kabel mit der MIDI IN-Buchse des externen Geräts.
Die MIDI IN-Buchse empfängt MIDI-Daten. Diese benötigen Sie, wenn das
SV-2 von einem externen Gerät aus angesteuert werden soll. Verbinden Sie
sie über ein MIDI-Kabel mit der MIDI OUT-Buchse des externen Geräts.
7 INPUT-Buchsen (L/MONO, R/MONO)
An diese Buchsen kann eine Signalquelle mit Line-Pegel (Keyboard/Synthesi-
zer, CD- oder Musik-Player usw.) angeschlossen werden. Für eine Mono-Ver-
bindung brauchen Sie nur eine von beiden anzuschließen.
8 OUTPUT-Buchsen (L/MONO, R/MONO)
Diese analogen Ausgänge sind als unsymmetrische 6,3mm- und symmetri-
sche XLR-Buchsen ausgeführt. Bei Verwendung kurzer Kabel können Sie die
6,3mm-Buchsen wählen. Wenn Sie lange Kabel benutzen, entscheiden Sie
sich am besten für die symmetrischen XLR-Ausgänge. Beide Buchsenpaare
geben dieselben Signale aus.
Wenn das externe Gerät mono ist, brauchen Sie nur eine MONO-Buchse
(6,3mm) anzuschließen. Die XLR-Buchsen eignen sich dagegen nicht für eine
Mono-Verbindung.
Tipp: Verwenden Sie nach Möglichkeit immer die symmetrischen XLR-Ausgänge.
Warnung: Wenn Sie die XLR-Buchsen an ein Mischpult o.ä. anschließen möchten,
muss die Phantomspeisung jenes Geräts deaktiviert sein. Andernfalls könnte das
SV-2 beschädigt werden.

10| Deutsch
VOX
Synthesizer usw.
MIDI
IN OUT
OUTPUT
OUTPUT INPUT AUX/LINE IN INPUT/LINE IN INPUT/LINE IN INPUT/LINE IN
Computer
USB-Kabel
USB
Volumen-/
Schwellpedal
Fußtaster 2
(Sostenutopedal)
Fußtaster 1
(Leisepedal)
PHONES
Kopfhörer
Dämpferpedal
(liegt bei)
Netzschalter
Netzeingang
CD/Musik-Spieler usw.
Verstärker
Audio-Anlage
Mischpult, Recorder usw.
Aktivboxen
Audio-
schnittstelle
(nur beim SV-273SP
und SV-288SP)

Einschalten des SV-2 |11
Deutsch
Einschalten des SV-2
Ein-/Ausschalten
1 Schließen Sie das IEC-Kabel an die Netzkabelbuchse auf der Rückseite des
Instruments an.
2 Verbinden Sie das andere Ende des Netzkabels mit einer Steckdose.
3 Drücken Sie den Netzschalter im Bedienfeld, um das Instrument einzuschal-
ten. Die Röhre leuchtet und glüht vor. Wenige Sekunden später ist das Inst-
rument einsatzbereit.
Das SV-2 enthält eine 12AX7 (ECC83) Röhre.
Warnung: Auf das Röhrenfenster bzw. die Röhre sollte man niemals schlagen, weil es
bzw. sie sonst zerbricht. Wenn das Röhrenfenster beschädigt ist, muss es so schnell
wie möglich ausgewechselt werden, weil sonst eventuell auch die Röhre beschädigt
wird.
Anmerkung: Bei der ersten Inbetriebnahme des KORG SV-2 bemerken Sie eventuell
einen kurzen Blitz in der Röhre. Das ist ein typisches Merkmal bestimmter Röhren,
die wir verwenden. In der Regel tritt es nur beim Einschalten des SV-2 auf, wenn die
Röhre noch kalt ist. Dieses Phänomen beeinträchtigt weder die Funktion noch die
Lebensdauer der Röhre bzw. des SV-2.
4 Um das Instrument auszuschalten, halten Sie den Netzschalter mindestens
eine Sekunde gedrückt.

12| Deutsch
Regeln der allgemeinen Lautstärke
Die allgemeine Lautstärke des SV-2 kann wunschgemäß eingestellt werden.
▪ Drehen Sie den MASTER VOLUME-Regler nach rechts, um den Pegel zu
erhöhen bzw. nach links, um ihn zu verringern.
Mit diesem Regler stellt man die allgemeine Lautstärke des Instruments ein,
d.h. der eingebauten Lautsprecher, der L/R-Ausgänge und der Kopfhörer-
buchse.
Warnung: Hüten Sie sich vor einer übertrieben hohen Lautstärke. Bei einem hohen
Schallpegel können Sie sich einen bleibenden Hörschaden zuziehen.
Anhören der Demosongs
Am besten hören Sie sich zunächst die Demosongs Ihres SV-2 an. Es stehen
mehrere Stücke zur Verfügung.
1 Drücken Sie den TRANSPOSE- und LOCAL OFF-Taster gleichzeitig. Die bei-
den Dioden beginnen zu blinken.
2 Wenn Sie jetzt keinen weiteren Taster mehr drücken, werden alle Demo-
songs der Reihe nach abgespielt.
3 Sie können aber auch gezielt einen Demosong wählen. Für alle Werks-Sounds
steht ein Demosong zur Verfügung.
▪ Wählen Sie mit dem TYPE- und VARIATION-Regler (SOUND-Sektion) den
gewünschten Demosong.
▪ Drücken Sie den VARIATION-Regler, um die zweite Demosong-Bank zu wäh-
len. Drücken Sie den VARIATION-Regler erneut, damit seine Diode wieder
orange leuchtet, um zur ersten Bank zurückzukehren.

Einschalten des SV-2 |13
Deutsch
Nach Starten der automatischen Demo kann man jederzeit einen anderen
Song wählen.
4 Stellen Sie den Wiedergabepegel mit dem MASTER VOLUME-Regler ein.
5 Drücken Sie den TRANSPOSE- und LOCAL OFF-Taster gleichzeitig, um die
Demowiedergabe anzuhalten.

14| Deutsch
Spielen der Sounds
Was ist mit ‘Sounds’ gemeint?
Die Sounds des SV-2 beruhen auf einem oder mehreren „Timbres“, die man
u.a. über die Tastatur ansteuern kann. Pro Sound können bis zu 3 „Pro-
grams“ zum Einsatz kommen, die nicht unbedingt eine Klangfarbe, sondern
auch mechanische Geräusche (Klopfen der Tastatur, Auftreffen der Hämmer
auf die Saiten usw.) erzeugen können. Ein Program kann aus zwei oder drei
Ebenen bestehen, deren Klangfarben wunschgemäß gemischt werden kön-
nen. Ein bekanntes Beispiel ist ein Klavier-Sound mit hinzugefügten Strei-
chern: Hierfür verwendet das Instrument einen Klavier-, einen Klavierge-
räusch- und einen Streicherklang.
Main, Layers 1, 2
Main, Layer (1)
Split
In anderen Fällen wird die Tastatur in zwei Hälften geteilt. Der rechten Hälfte
können bei Bedarf zwei Programs zugeordnet werden. Das dritte Program
kann in der linken Tastaturhälfte gespielt und für die Begleitung genutzt
werden (Kontrabass, Synthesizerteppich usw.).
Main, Layers 1, 2
Main, Layer (1)
Split
Werks- und ‘Favorite’-Sounds
Das SV-2 enthält 72 Werks-Sounds, die man mit den frontseitigen Bedienele-
menten jederzeit nachjustieren kann. Die so erstellten Sounds lassen sich
in den 64 FAVORITES-Speichern sichern. (Mit der „SV-2 Editor“ Software
können noch viel mehr Parameter editiert werden.)
In der Regel erfolgt die Umschaltung von einem gewählten Sound zum
nächsten stufenlos: Wenn man z.B. eine Taste gedrückt hält, während man
einen anderen Sound wählt, wird die betreffende Note weiterhin mit dem
vorigen Klang abgespielt. Bei Sounds, welche die Röhre ansprechen, funk-
tioniert dies allerdings nicht, wenn die Röhre für den nächsten Sound ausge-
schaltet werden muss.

Spielen der Sounds |15
Deutsch
Anwahl der Werks-Sounds
Arbeitsweise für die Klanganwahl
In der SOUND-Sektion können die Werks-Sounds gewählt werden.
1 Wählen Sie mit dem TYPE-Regler der SOUND-Sektion den Basisklang (davon
gibt es 6).
2 Wählen Sie mit dem VARIATION-Regler der SOUND-Sektion eine der 6 Vari-
ationen dieses Klangs. Die LED-Kränze der Regler zeigen jeweils an, welcher
Klang und welche Variation gewählt sind.
3 Drücken Sie den VARIATION-Regler, um auf eine zweite Bank zuzugreifen:
Seine Diode leuchtet jetzt grün. Wählen Sie mit dem VARIATION-Regler eine
der 6 Variationen der zweiten Bank.
4 Um zur ersten Bank zurückzukehren, drücken Sie den VARIATION-Regler
erneut (seine Diode leuchtet wieder orange).

16| Deutsch
Anwahl von Klangfavoriten
Verfahren für die Favorite-Klanganwahl
In der FAVORITES-Sektion können die „Favorite“-Sounds, darunter Ihre
eigenen Kreationen, gewählt werden.
1 Um einen Favorite-Sound zu wählen, drücken Sie einen FAVORITES (1~8)-Tas-
ter.
Um zu überprüfen, welche Bank gewählt ist, drücken Sie den TYPE-Regler:
Achten Sie jetzt darauf, welcher FAVORITES (A~H)-Taster leuchtet. Drücken
Sie ihn erneut, um den Bankwahlmodus zu verlassen (oder warten Sie, bis
die Diode erlischt).
2 Um einen Favoriten in einer anderen Bank zu wählen, drücken Sie den
TYPE-Regler. Die aktuell gewählte Bank erkennen Sie an der Farbe, in
welcher der FAVORITES (A~H)-Taster leuchtet: Drücken Sie den FAVO-
RITES (A~H)-Taster der gewünschten Bank. Drücken Sie den FAVORITES
(1~8)- Taster des gewünschten Favorite-Speichers.
Rückkehr zum zuletzt gewählten Werksklang
Nach Anwahl eines Favorite-Klangs kann man mit dem oben beschriebenen
Verfahren zu einem Werks-Sound zurückkehren.
Der zuletzt verwendete Werks-Sound kann zudem blitzschnell aufgerufen
werden: Drücken Sie den VARIATION-Regler der SOUND-Sektion.

Spielen der Sounds |17
Deutsch
Die Sounds
Nachstehend finden Sie eine bündige Beschreibung der vorhandenen Klang-
farben.
Ein Name ohne Zusätze (wie „MK I Suitcase“) bedeutet, dass nur ein Sound
über den gesamten Tonumfang gespielt werden kann. Bezeichnungen mit
einem „&“ (wie „FM Piano & Pad“) verweisen auf einen Haupt-Sound und
eine oder zwei zusätzliche Klangfarben. Das „/“-Symbol (wie bei „Pad/Mini
Lead“) verweist auf einen Split.
Werksklänge
Die Werksklänge können auch via MIDI aufgerufen werden, indem man einen
CC00-Steuerbefehl mit dem Wert „0“, einen CC32-Befehl mit dem Wert „0“
und eine MIDI-Programmnummer (PC) zum SV-2 überträgt.
Klang Var. PC Anmerkungen
EP 1 (Vintage)
MK I Suitcase A1 0 Zwei Versionen des unerreichten MK I, von dem Key-
boarder bis heute träumen.
MK I Stage B1 6
MK II Suitcase A2 1 Zwei Versionen des überragenden MK II: Die tragbare
und die schwere Ausführung.
MK II Stage B2 7
MK V Stage A3 2 Das MK V Stage (die einzige jemals gebaute Ausfüh-
rung), beliebt wegen seines glockigen Sounds.
MK V Bright B3 8
Dyno EP A4 3 Der typische Dyno-Pianoklang für Balladen. Die hellere
Version ist vor allem für Soli gedacht.
Dyno EP Bright B4 9
Wurly A5 4 Der kernige Sound der Wurly-Metallzungen. Er hat die
Popmusik der 1960er und ‘70er geprägt.
Wurly Classic B5 10
Wurly Dark A6 5 Eine dumpfere Version des Wurly.
Wurly Bright B6 11
EP 2 (Various)
FM Piano 1 A1 12 Das FM-basierte E-Piano, das in den 1980ern angesagt
war. Man kennt es von unzähligen Hits der frühen Digi-
tal-Ära.
FM Piano 3 B1 18
FM Piano 2 A2 13
FM Piano & Pad B2 19 FM-Piano mit einem Synthesizerteppich – auch dieser
Sound wurde rauf und runter gespielt.

18| Deutsch
Klang Var. PC Anmerkungen
Pianet T A3 14 Das Pianet aus Deutschland wurde weltweit gerne
eingesetzt. Dies war die europäische Antwort auf das
E-Piano.
Pianet N B3 20
Hybrid Piano A4 15 Hybride Pianokombinationen mit neuen Geschmacks-
richtungen.
Hybrid Tine B4 21
Wurly & Strings A5 16 Mehrere E-Piano + Streicher-Kombinationen. Wahl-
weise mit Wurly oder in FM-Ausführung.
FM & Strings B5 22
MK II & Pad A6 17 Mehrere E-Piano + Pad-Kombinationen. Wieder wahl-
weise mit Stimmstäben oder in FM-Ausführung.
FM & Pad B6 23
Piano 1 (Akustisch)
German Grand A1 24 Der deutsche Flügel, den man in der Klassik, im Jazz
und in der Popmusik antrifft.
German Classic B1 30
Italian Grand A2 25 Ein italienischer Flügel – perfekt für Klassik und Jazz.
Italian Bright B2 31
Japanese Grand A3 26 Auch dieser japanische Flügel zählt in Klassik-, Jazz-
und Popkreisen zu den ganz Großen.
Japanese Bright B3 32
Austrian Grand A4 27 Der beliebte österreichische Flügel für Klassik und so
manchen Jazzmusiker.
Austrian Classic B4 33
Japanese Upright A5 28 Ein großes japanisches Klavier mit einem entspre-
chend voluminösen Sound.
Upright Bright B5 34 Sein inniger und zugleich heller Sound wird oft und
gerne in der Popmusik verwendet.
German Upright A6 29 Dieser runde Klang stammt von einem beliebten deut-
schen Klavier.
Rock Piano B6 35 Ein zupackender Klavierklang, perfekt für Rock- und
Rockabilly-Songs.
Piano 2 (Various)
Electric Grand A1 36 Ein elektro-akustisches Klavier aus den späten 1970ern
mit einem herrlich runden Klang, den Live-Musiker
damals bevorzugten.
German Mono B1 42 Mono-Version des deutschen Flügels.
KORG M1 Piano A2 37 Der beliebte KORG-Pianoklang. Er stammt vom erfolg-
reichen M1 Synthesizer, der eine ganze Generation
prägte und auch im wegweisenden SG-1D Digital-Piano
enthalten war.
KORG SG-1D B2 43
Digital Piano A3 38 Ein innovatives, sehr exakt ansprechendes Piano, das
Ende der 1980er in einem Digital-Keyboard/Synthesi-
zer auf sich aufmerksam machte.

Spielen der Sounds |19
Deutsch
Klang Var. PC Anmerkungen
Electra Piano B3 44 Ein in den späten 1970ern beliebtes E-Piano, das in der
„klassischen“ und melodischen Rockszene zum Einsatz
kam.
Tack Piano A4 39 Reißnagel- und Honky-Tonk-Pianos für zünftigen
Ragtime und Stride.
Honky-Tonk B4 45
Piano & Strings A5 40 Layer mit einem Piano und einem Streicher- oder Pad-
Sound. Perfekt für Ambient-Musik.
Piano & Pad B5 46
Piano & Synth A6 41 Layer bestehend aus Klavier/Piano und Synthesizer
oder Bläsern. Zwei Geschmacksrichtungen für einge-
fleischte Fusion-Fans.
Piano & Brass B6 47
Clavier
Clav AC A1 48 Das klassische E-Clavichord – zwei Versionen mit
gleichphasigen Mikrofonen.
Clav AD B1 54
Clav BC A2 49 Zwei Clavi-Registeranordnungen mit gegenphasigen
Mikrofonen für einen kantigeren Sound.
Clav BD B2 55
Harpsichord A3 50 Der Vorgänger des Klaviers aus der Renaissance- und
Barockzeit: 8” (Standard) und 8”+4” (oktavierte Regis-
trierung).
Harpsichord Oct. B3 56
Perc. Organ A4 51 Eine authentische elektromechanische Emulation mit
Percussion – einmal „clean“, einmal verzerrt.
Rock Organ B4 57
Jazz Organ A5 52 Jazz-Registrierung der klassischen Sinustonorgel.
Vox Organ B5 58 Die perfekte „Connie“-Emulation der VOX Continental
Transistororgel.
Church Organ A6 53 Eine majestätische Kirchenorgel.
Pipe Organ B6 59 Rundere Registrierungen einer Pfeifenorgel für etwas
ruhigere Momente.
Other
Full Strings A1 60 Zwei Versionen des klassischen Streicher-Sounds.
Classic Strings B1 66
Tape Strings A2 61 Die synthetischen „Mello“-Streicher aus den 1970ern.
Strings & Voices B2 67 Echte Streicher mit einem Chor.
Warm Pad A3 62 Runde und helle Version eine Synthesizerteppichs.
Bright Pad B3 68
Orchestra A4 63 Druckvolles Orchester-Tutti.
Pizzicato & Glock B4 69 Pizzicato-Streicher und Glockenspiel.
Brass A5 64 Ein echter Blechbläsersatz.

20| Deutsch
Klang Var. PC Anmerkungen
Synth Brass B5 70 Synthesizer-Bläser.
Pad/Mini Lead A6 65 Zwei Solo-Synthesizer im Zusammenspiel mit einem
runden Synthi-Teppich.
Pad/SynthLead B6 71
Favorite-Sounds
Auch die Favorite-Sounds können via MIDI aufgerufen werden, indem man
einen CC00-Steuerbefehl mit dem Wert „0“, einen CC32-Befehl mit dem
Wert „64“ und eine MIDI-Programmnummer (PC) zum SV-2 überträgt.
Klang Pos PC
Demo Shop
German Grand A1 0
Italian Grand A2 1
EP MK II A3 2
Wurly A4 3
Clav A5 4
FM Piano A6 5
Piano & Strings A7 6
Bass/EP A8 7
Piano
German Grand B1 8
Italian Grand B2 9
Japanese Grand B3 10
Austrian Grand B4 11
Japan Upright B5 12
German Upright B6 13
Rock Piano B7 14
Tack Piano B8 15
Electric Pno
EP MK I C1 16
EP MK II C2 17
EP MK V C3 18
Klang Pos PC
Dyno EP C4 19
Wurly Amp C5 20
Wurly Tremolo C6 21
FM Piano C7 22
Hybrid EP C8 23
Claviers
Clav AC D1 24
Clav BC D2 25
Perc. Organ D3 26
Jazz Organ D4 27
Church Organ D5 28
KORG M1 Piano D6 29
Electric Grand D7 31
Harpsichord D8 32
Layer
Piano & Strings E1 32
Piano & Pad E2 33
Piano & EP E3 34
Piano & Vibes E4 35
MK II & Pad E5 36
Strings & Pad E6 37
Piano & FM E7 38

Spielen der Sounds |21
Deutsch
Klang Pos PC
FM & Strings E8 39
Split
Ac. Bass/Piano F1 40
El. Bass/Piano&Str F2 41
Fretless/EP F3 42
Slap/EP F4 43
Slap/Clav F5 44
EP Bass/Vox Organ F6 45
Jazz Piano Trio F7 46
Organ Dual Manual F8 47
Other
Full Strings G1 48
Strings Octave G2 49
Orchestra Tutti G3 50
Klang Pos PC
Brass G4 51
Warm Pad G5 52
Synth Brass G6 53
Pad/SynLead G7 54
Synth Bass G8 55
Legacy SV1
SV1 Grand Piano 1 H1 56
SV1 Grand Piano 2 H2 57
SV1 Tine EP Amp H3 58
SV1 Reed EP1 H4 59
SV1 Clav AC H5 60
SV1 Clk.Tonewheel H6 61
SV1 Full Strings H7 62
SV1 Synth Brass H8 63

22| Deutsch
Verwendung der Effekte
Die Effekte
Mit den TYPE-Reglern können Sie das jeweils benötigte Effekt- und Ver-
stärkermodell wählen. Die wichtigsten Effektparameter lassen sich mit den
Reglern DEPTH, INTENSITY, SPEED und DRIVE einstellen. Um wieder den
zuletzt gespeicherten Wert für einen Parameter aufzurufen, braucht man
den betreffenden Regler nur zu drücken. Mit der „SV-2 Editor“ Software kön-
nen noch zahlreiche weitere Parameter editiert werden.
Mit dem zugehörigen On/Off-Taster kann man die Effekte und die Verstär-
kersimulation bei Bedarf ein-/ausschalten. Änderungen, die Ihnen gefallen,
können in den FAVORITES-Speichern gesichert werden.
Experimentieren Sie mit den einzelnen Bedienelementen, um die vielfältigen
Möglichkeiten zu entdecken.
SIGNAL ROUTING
EQ PRE FX
MODULATION AMBIENT TOTAL FX
Stereo Limiter
Stereo Mastering Limiter
OUTPUTS
SOUND
PRE AMP
VOLUME VOLUME POWER
AT T.
PROGR
LVL
POWER AMP
VALVE
CABINET NR

Verwendung der Effekte |23
Deutsch
Speichern der Einstellungen
Wenn Sie beim Schrauben auf einen Sound stoßen, den Sie behalten möch-
ten, können Sie ihn in einem Favorite-Speicher sichern.
1 Drücken Sie den TYPE-Regler, um nachzuschauen, welche Favorite-Bank
momentan gewählt ist.
Die aktuell gewählte Bank erkennen Sie am blinkenden FAVORITES A~H.
2 Um die Einstellungen in einer anderen Bank zu speichern, drücken Sie den
FAVORITES (A~H)-Taster der gewünschten Bank.
3 Halten Sie den FAVORITES 1~8-Taster des gewünschten Zielspeichers so
lange gedrückt, bis seine Diode anfängt zu blinken.
4 Drücken Sie den Taster erneut, um den Speichervorgang zu bestätigen.
Wenn Sie die Einstellungen doch nicht speichern möchten, warten Sie ein-
fach, bis die Diode wieder erlischt.
Tipp: Die Favorite-Bänke könnten auch für eine logische Einteilung Ihrer Sounds (z.B.
nach Projekt) genutzt werden.
Anmerkung: Beim Sichern werden die Einstellungen des gewählten Favorite-Spei-
chers überschrieben. Der zuvor im gewählten Zielspeicher gesicherte Sound wird
überschrieben.
Anmerkung: Wenn Sie vor dem Sichern der Einstellungen einen anderen Speicher
wählen bzw. das Instrument ausschalten, gehen die Änderungen wieder verloren!

24| Deutsch
Weiter führende Einstellungen
Weiter führende Einstellungen
Die Taster TRANSPOSE, LOCAL OFF, TOUCH und FUNCTION bieten Zugriff
auf praktische Funktionen für die Verwendung des Instruments.
Mit dem FUNCTION-Taster hat man Zugriff auf mehrere Parameter, die eine
Personalisierung des Instruments erlauben. Weitere Informationen hierzu
finden Sie in der Bedienungsanleitung.
Transposition
Bestimmte Stücke verwenden eine schwierige Tonart (mit vielen schwarzen
Tasten). Und bestimmte Sänger wünschen sich ab und zu eine andere Tonart.
Statt dann Ihren Fingersatz zu ändern, können Sie die Tastatur „verschie-
ben“, um weiterhin in der vertrauten Tonart zu spielen, während die Noten in
der „richtigen“ Tonart erklingen. Das nennen wir die „Transpose“-Funktion.
Beispiel: Wenn Sie die Tastatur einen Halbton höher transponieren, können
Sie die links gezeigten Noten spielen, während die rechts gezeigten Noten
ausgegeben werden.
Ein-/Ausschalten der Transposition
1 Drücken Sie den TRANSPOSE-Taster erneut, um die Transposition auszu-
schalten. Wenn bereits ein Transpositionsintervall eingestellt wurde, leuch-
tet die Diode dieses Tasters. Andernfalls aber nicht.
2 Drücken Sie den TRANSPOSE-Taster erneut, um die Transposition auszu-
schalten. Die Diode erlischt.

Weiter führende Einstellungen |25
Deutsch
Einstellen des Transpositionsintervalls
1 Halten Sie den TRANSPOSE-Taster ±1 Sekunde gedrückt, bis seine Diode zu
blinken beginnt.
2 Drücken Sie die Taste des gewünschten Transpositionsintervalls. Die Trans-
position wird aktiviert und die Diode leuchtet weiterhin.
-12
C3
0 +12
C5
Tonart Effekt
C3~B3 12~1 Halbtöne tiefer
C4 (mittleres C) Normale Tonhöhe
C#4~C5 1~12 Halbtöne höher
Wenn Sie mit dem Drücken einer Taste zu lange warten, wird die Transposi-
tion wieder deaktiviert.
3 Drücken Sie den TRANSPOSE-Taster erneut, um die Transposition auszu-
schalten. Die Diode erlischt.
Anmerkung: Beim Ausschalten wird die Transposition wieder zurückgestellt.

26| Deutsch
Ändern des Anschlagverhaltens
Die Ansprache der Tastatur auf Anschlagvariationen kann geändert werden.
1 Drücken Sie den TOUCH-Taster.
Wenn Sie den Taster drücken, beginnt seine Diode zu blinken. Der FAVO RITE-
Taster der momentan gewählten Anschlagkurve beginnt zu blinken.
2 Drücken Sie den FAVORITE-Taster der gewünschten Anschlagkurve.
3 Drücken Sie den TOUCH-Taster, um die Einstellung zu bestätigen und in den
Normalbetrieb zurückzukehren.
Favorite-
Speicher
Anschlag-
kurve
Erklärung
1 Normal Normale Klavieransprache
2 Soft 1 Selbst mit relativ leichtem Anschlag kann man schon
laut spielen.
3 Soft 2
4 Medium 1 Bereits bei normalem Anschlag erklingen die Noten
lauter.
5 Medium 2
6 Hard 1 Laute Noten erfordern einen relativ harten Anschlag.
7 Hard 2
8 Fixed Feste Anschlagwerte. Mit „SV-2 Editor“ kann die
gewünschte Ansprache programmiert werden.
Grafisch sehen die Anschlagkurven so aus:
( )
Hart
Hart
Leicht
Leicht
Leicht Hart
Anschlagkraft
Normale/Medium
Notenpegel

Weiter führende Einstellungen |27
Deutsch
Die ‘Local Off’-Funktion
Die „Local Off“-Funktion kann man ein- oder ausschalten.
▪ Drücken Sie den LOCAL OFF-Taster (die Diode muss leuchten).
Wenn die Diode dieses Tasters leuchtet, ist die Tastatur nicht mehr direkt
mit der Klangerzeugung verbunden. Was Sie auf der Tastatur spielen, wird
von der Klangerzeugung also nicht mehr wiedergegeben. Die betreffenden
Notenbefehle werden aber weiterhin zur MIDI OUT-Buchse (oder dem USB-
Port) übertragen und folglich vom angeschlossenen Computer empfangen.
Der Computer gibt die empfangenen Befehle postwendend wieder an die
MIDI IN-Buchse (oder den USB-Port) des SV-2 aus. Mit diesem Signalweg ist
sichergestellt, dass die Klangerzeugung jede Note nur ein Mal wiedergibt.
▪ Drücken Sie den LOCAL OFF-Taster (die Diode muss erlöschen).
Wenn die Diode dieses Tasters nicht leuchtet, ist die Tastatur mit der Klan-
gerzeugung verbunden.
Anmerkung: Beim Einschalten wird die „Local Off“-Funktion zurückgestellt.
Keine Panik!
Falls es bei Verwendung der MIDI-Funktionen zu Notenhängern kommt, kön-
nen Sie diese mit dem On/Off-Taster der EQUALIZER-Sektion wieder aus-
schalten. Das nennen wir die „MIDI Panic“-Funktion.

28| Deutsch
Kalibrieren der Pedale
Die an die DAMPER-, PEDAL 1 und PEDAL-2Buchsen angeschlossenen
Pedale können kalibriert werden. Erst nach der Kalibrierung „kennt“ das
SV-2 nämlich die Polarität und den Regelweg des Pedals.
1 Schließen Sie alle Pedale, die Sie kalibrieren möchten, an das SV-2 an. An
DAMPER muss das beiliegende KORG DS-2H Dämpferpedal (oder ein opti-
onaler DS-1H Fußtaster usw.) angeschlossen werden. PEDAL 1 ist für einen
Fußtaster gedacht. An PEDAL 2 kann man wahlweise einen Fußtaster oder
ein Volumen-/Schwellpedal anschließen.
2 Stellen Sie das Schwellpedal auf den Mindestwert.
3 Schalten Sie das SV-2 aus.
4 Halten Sie den Auto/Pedal-Taster gedrückt, während Sie das SV-2 wieder
einschalten.
5 Geben Sie den Auto/Pedal-Taster wieder frei, wenn seine Diode zu blinken
beginnt.
Wenn Sie dann mehrere Sekunden nichts tun, erlischt die Auto/Pedal-Diode
und das SV-2 schaltet sich normal ein.
6 Drücken Sie den Auto/Pedal-Taster erneut, während seine Diode noch blinkt.
Das SV-2 wechselt in den Kalibrierungsmodus.
7 Kalibrieren Sie zuerst PEDAL 1 (Fußtaster). Drücken Sie das Pedal komplett
hinunter und geben Sie es wieder frei. Wenn das an PEDAL 1 angeschlossene
Pedal kalibriert ist, leuchtet der FAVORITES 1-Taster.
8 Kalibrieren Sie anschließend PEDAL 2. Hier richtet sich die Vorgehensweise
danach, ob Sie einen Fußtaster oder ein Schwellpedal angeschlossen haben:
▪ Im Falle eines Fußtasters müssen Sie ihn komplett hinunter drücken und wie-
der freigeben.
▪ Wenn Sie ein Schwellpedal angeschlossen haben, müssen Sie es ganz hinun-
ter drücken (Vollgas).
Wenn das an PEDAL 2 angeschlossene Pedal kalibriert ist, leuchtet der
FAVORITES 2-Taster.
9 Kalibrieren Sie schließlich das DAMPER-Pedal. Drücken Sie das Pedal kom-
plett hinunter und geben Sie es wieder frei. Wenn das an DAMPER ange-
schlossene Pedal kalibriert ist, leuchtet der FAVORITES 3-Taster.
10 Nach der Kalibrierung:
▪ Nach der Kalibrierung aller drei Pedale verlässt das SV-2 diesen Modus wie-
der und schaltet sich erneut ein.

Weiter führende Einstellungen |29
Deutsch
▪ Wenn Sie nur ein oder zwei Pedale kalibriert haben, drücken Sie den Auto/
Pedal-Taster erneut, um den Kalibrierungsmodus zu verlassen und das Inst-
rument normal einzuschalten.
Sperren des Bedienfeldes
Bisher haben wir Ihnen gezeigt, wie man die Sounds und Effekte editieren
kann. Jetzt möchten wir erklären, wie man die Bedienelemente sperrt! Das
kann nämlich praktisch sein, um unerwünschte Einstellungsänderungen zu
verhindern.
1 Drücken Sie den TOUCH- und FUNCTION-Taster im Bedienfeld, um letzteres
zu sperren. Die beiden Dioden beginnen zu blinken.
Jetzt sind nur noch der MASTER VOLUME-Regler und der Netzschalter
belegt.
2 Drücken Sie entweder den TOUCH- oder den FUNCTION-Taster im Bedien-
feld, um es wieder freizuschalten.
Anmerkung: Beim Einschalten des Instruments wird die Sperre deaktiviert.
Laden der Werkseinstellungen
Vielleicht möchten Sie das SV-2 irgendwann wieder in seinen ursprünglichen
Zustand versetzen, indem Sie die Werkseinstellungen laden. Verfahren Sie
dann folgendermaßen:
1 Schalten Sie das Instrument aus.
2 Halten Sie den FUNCTION-Taster gedrückt.
3 Halten Sie den FUNCTION-Taster weiterhin gedrückt, während Sie das Inst-
rument wieder einschalten.
4 Geben Sie den FUNCTION-Taster frei, wenn seine Diode zu blinken beginnt.
5 Drücken Sie den FUNCTION-Taster erneut, um den Ladebefehl zu bestäti-
gen.
6 Die Werkseinstellungen werden wiederhergestellt.

30| Deutsch
Technische Daten
Technische Daten SV-2
Tastatur
Tasten SV2-73/SV2-73S: 73 Tasten/SV2-88/SV2-88S: 88 Tasten
anschlagdynamisch, KORG RH3 (Real Weighted, Hammer Action
3)
Anschlagverhalten 8 Kurven
Stimmung Transposition, Gesamtstimmung, Stimmungskurven
Klangfarben
Klangerzeugung EDS-X (Enhanced Definition Synthesis – eXpanded)
Polyphonie 128 Noten (max.)
Multitimbralität Layer, Split
Werksklänge 72 Werks-Sounds (6 Basisklänge x 2 Sätze mit je 6 Variationen)
Favorite-Sounds 64 Favorite-Speicher (8 Bänke x 8 Variationen) für Eigenkreati-
onen
Effekte
Equalizer Bass, Mid, Treble
Pre FX Red Compressor, Treble Boost, U-Vibe, Vibrato, Tremolo, VoxWah
(mit Pedalsteuerung)
Verstärkermodelle Clean, Twin, Tweed, AC30, Boutique, Organ Amp. Boxenmodelle
mit Valve Reactor-Technologie und einer 12AX7 (ECC83) Röhre
Modulation Classic Chorus, Black Chorus, Orange Phaser, Small Phaser, FX
Flanger, Rotary (mit Slow/Fast-Steuerung)
Ambient Room, Plate, Hall, Spring, Tape Echo, Stereo Delay (mit Tap Tempo)
Total FX Stereo Mastering-Limiter, Stereo-Limiter
Andere Bedienelemente
Lautstärke Master Volume-Regler
Frontseitige Taster Transpose, Local Off, Touch, Function
Demo 72 Demosongs, einer je Werks-Sound
Anschlüsse
MIDI IN/OUT
Kopfhörer 1 Buchse (Vorderseite)
Audio-Ausgänge L, R (2 x XLR, symmetrisch)
L/Mono, R/Mono (2 x 6,3mm-Klinke, unsymmetrisch)
Audio-Eingänge L/Mono, R/Mono (2 x 6,3mm-Klinke, unsymmetrisch)

Technische Daten |31
Deutsch
USB USB 2.0 Hi-Speed B-Port (fungiert auch als MIDI-Schnittstelle)
Damper Pedal KORG DS-2H, liegt bei
Pedal 1 Fußtaster (z.B. KORG PS-1, PS-3)
Pedal 2 Volumen-/Schwellpedal (z.B. KORG XVP-10, XVP-20, EXP-2) bzw.
Fußtaster (z.B. KORG PS-1, PS-3)
Verstärkung
Lautsprecher 2 x 2,5” mit 2x 3”-Passivreflektoren
Verstärkerleistung 2 x 15W
Andere Werte
Stromversorgung Internes Universal-Netzteil, 100~240V Wechselstrom, 50-60Hz
Leistungsaufnahme Modelle ohne integrierte Lautsprecher: 16W
Modelle mit integrierte Lautsprecher: 25W
Abmessungen (B x T x H)
(ohne Notenpult)
SV2-73/SV2-73S: 1143 x 347 x 157 mm (45.00 x 13.66 x 6.18 inch)
SV2-88/SV2-88S: 1356 x 347 x 157 mm (53.39 x 13.66 x 6.18 inch)
Gewicht (ohne
Notenpult)
SV2-73: 17,2 kg (37.92 lbs) / SV2-73S: 18,3 kg (40.34 lbs)
SV2-88: 20,35 kg (44.86 lbs) / SV2-88S: 21,45 kg (47.29 lbs)
Vermischtes
Lieferumfang Netzkabel, Schnellstart-Anleitung, Notenpult, Dämpferpedal
(KORG DS-2H)
Sonderzubehör ST-SV1 Pianostativ, DS-1H Dämpferpedal, XVP-10, XVP-20, EXP-2
Volumen-/Schwellpedal, PS-1, PS-3 Fußtaster, CB-SV Tragetasche
Änderungen der Ausführung und technischen Daten ohne vorherige Ankündi-
gung vorbehalten.
Die Verstärkung wurde in Zusammenarbeit mit K-ARRAY entwickelt.

32| Deutsch
HINWEIS ZUR ENTSORGUNG (nur für die EU)
Dieses Symbol auf dem Gerät selbst,
in der Bedienungsanleitung, auf
der Batterie oder der Verpackung
bedeutet, dass das Produkt den örtli-
chen Bestimmungen entsprechend
entsorgt werden muss, um weder
die Umwelt, noch die Gesundheit zu
belasten. Bitte erkundigen Sie sich
bei der zuständigen Stelle nach den in Ihrer
Gegend geltenden Entsorgungsvorschriften.
Wenn die Batterie mehr Schwermetall enthält
als erlaubt, befindet sich unter der durchge-
strichenen Mülltonne auf der Batterie oder
ihrer Verpackung ein Chemiesymbol.
Elektromagnetischer Strahlungen können sich
nachteilig auf die Audiowiedergabe auswirken.
In bestimmten Fällen führt dies zur Ausgabe
eines unerwünschten Signals. Diese Phänomen
verschwindet jedoch, sobald die elektromagnet-
ischen Störung behoben wird.
WARNUNG DER ‘FCC’-VERORDNUNG (für
die USA)
This equipment has been tested and found
to comply with the limits for a Class B digital
device, pursuant to Part 15 of the FCC Rules.
These limits are designed to provide reason-
able protection against harmful interference
in a residential installation. This equipment
generates, uses, and can radiate radio fre-
quency energy and, if not installed and used
in accordance with the instructions, may
cause harmful interference to radio commu-
nications. However, there is no guarantee
that interference will not occur in a particu-
lar installation. If this equipment does cause
harmful interference to radio or television
reception, which can be determined by turn-
ing the equipment off and on, the user is
encouraged to try to correct the interference
by one or more of the following measures:
• Reorient or relocate the receiving antenna.
• Increase the separation between the equip-
ment and receiver.
• Connect the equipment into an outlet on
a circuit different from that to which the
receiver is connected.
• Consult the dealer or an experienced radio/
TV technician for help.
If items such as cables are included with this
equipment, you must use those included
items.
Unauthorized changes or modification to this
system can void the user’s authority to oper-
ate this equipment.

|1
Italiano
ITALIANO

2| Italiano
Avvertenze sulla sicurezza
1.
Leggete le istruzioni.
2.
Conservate le istruzioni in un luogo sicuro.
3.
Rispettate scrupolosamente le avvertenze.
4.
Seguite tutte le istruzioni.
5.
Non utilizzate il prodotto in prossimità dell’acqua.
6.
Per la pulizia, usate solo un panno asciutto.
7.
Evitate di ostruire le prese di aerazione, e instal-
late il dispositivo secondo le direttive fornite dal
produttore.
8.
Non collocate il prodotto in prossimità di fonti di
calore, come per esempio radiatori, termocon-
vettori, stufe e qualsiasi altro apparato (come per
esempio amplificatori) in grado di generare calore.
9.
Non tentate di modificare una spina polarizzata o
con polo di messa a terra. Una spina polarizzata ha
una lama più larga dell’altra. Una spina con messa
a terra ha due poli di conduzione e uno di messa
a terra. La lama più larga e il terzo polo sono ele-
menti di sicurezza. Nel caso in cui la spina fornita
non sia adatta alla presa di corrente, contattare un
elettricista qualificato per la sostituzione.
10.
Evitate di sottoporre a calpestio o piegare eccessi-
vamente il cavo di alimentazione elettrico, special-
mente in prossimità dello strumento o della presa
di corrente.
11.
Utilizzate esclusivamente gli accessori e le opzioni
consigliati dal produttore.
12.
Usate solo il carrello, supporto, treppiede, staffa
o tavolo indicato dal costruttore, o venduto con il
prodotto. Prestate particolare attenzione nell’uso
dei carrelli, per evitare incidenti e danni fisici a
cose e/o persone durante gli spostamenti.
13.
Scollegate lo strumento dalla presa elettrica du-
rante i temporali o qualora non ne prevediate l’uti-
lizzo per un certo periodo di tempo.
14.
Affidate qualsiasi tipo di manutenzione al persona-
le specializzato. Gli interventi di controllo dovreb-
bero essere richiesti nel caso in cui si accerti una
qualsiasi anomalia dell’unità, dovuto per esempio
al danneggiamento del cavo di alimentazione o
della spina di corrente, a eventuali urti con altri og-
getti, alla penetrazione di liquidi all’interno dell’u-
nità, all’esposizione dello strumento alla pioggia o
all’umidità e qualsiasi altra causa che ne impedisca
il corretto funzionamento.
▪
Non impedite la corretta ventilazione ostruendo
le aperture di aerazione con oggetti quali giornali,
tovaglie, tende, ecc.
▪
Non collocate sul prodotto fiamme libere, ad esem-
pio candele accese.
▪
Non installate il prodotto in uno spazio limitato,
come ad esempio un contenitore per il trasporto
o unità simili.
▪
ATTENZIONE – Quest’apparato deve essere col-
legato a una presa di corrente dotata di messa a
terra.
▪
Lo spegnimento dell’unità non ne determina un
completo isolamento dalla rete elettrica, per cui
è consigliabile estrarre la spina dalla presa di cor-
rente prima della pulizia o qualora non si preveda
l’uso dello strumento per un periodo di tempo pro-
lungato. Custodite il cavo di alimentazione in un
luogo sicuro.
▪
Impedite qualsiasi contatto tra gli apparati elettrici
e l’acqua o altri tipi di liquido. Non collocate reci-
pienti contenenti acqua sopra o nelle immediate
vicinanze dell’apparato.
▪
Installate il prodotto vicino a una presa di corrente
elettrica, e custodite il cavo di alimentazione in un
luogo facilmente accessibile.
▪
La placca di identificazione è posta sul fondo dello
strumento, e riporta informazioni relative a nume-
ro di serie, requisiti di alimentazione, ecc.
Numero di serie
Trascrivete qui di seguito il nome del mo-
dello, il numero di serie e la data di acquisto.
Conservate il presente manuale con queste in-
formazioni come prova dell’avvenuto acquisto.
Modello ______________________________
Numero di serie _______________________
Data di acquisto _______________________

|3
Italiano
Precauzioni
Spegnimento automatico
Per evitare sprechi di energia, e per prolungare
la durata della valvola, SV-2 entrerà automati-
camente in modalità standby dopo due ore di
funzionamento senza attività (suonare, pressio-
ne dei pulsanti o movimento delle manopole). Vi
preghiamo di salvare tutti i dati modificati prima
di una pausa prolungata.
Sostituzione della valvola
Le valvole, come le lampadine, hanno una dura-
ta impossibile da determinare in anticipo. Se la
valvola non funziona più, contattate un Centro
di Assistenza Autorizzato KORG per sostituirla.
NON CERCATE DI SOSTITUIRE LA VALVOLA DA
SOLI, perché rischiereste di danneggiare se-
riamente lo strumento e di prendere la scossa.
Inoltre, questa operazione farebbe decadere la
garanzia.
Gestione dei dati
I dati in memoria potrebbero andar persi in caso
di uso non corretto. Accertatevi di salvare i dati
importanti con il software SV-2 Editor fornito in
dotazione. KORG non è responsabile dei danni
causati dalla perdita di dati.
Pulizia
Se la superficie esterna si sporca, pulitela con
un panno pulito e asciutto. Non utilizzate deter-
genti liquidi contenenti benzene o diluenti, né
detergenti o lucidanti infiammabili.
Marchi registrati
Acrobat e PDF sono marchi registrati di Adobe
Systems Incorporated. Mac e iOS sono marchi
registrati di Apple, Inc. Android è un marchio
di Google Inc. MS-DOS e Windows sono marchi
registrati di Microsoft Corporation. Tutti gli altri
marchi e marchi registrati sono proprietà dei ri-
spettivi proprietari.
Clausola esonerativa
Le informazioni contenute in questo manuale
sono state attentamente riviste e controllate.
Dato il nostro costante impegno a migliorare i
nostri prodotti, le specifiche potrebbero differi-
re da quelle contenute nel manuale. KORG non si
assume responsabilità per eventuali differenze
tra le specifiche e il contenuto del manuale di
istruzioni – le specifiche sono soggette a cam-
biamento senza preavviso.
Garanzia
I prodotti KORG sono realizzati in accordo alle
più severe specifiche e ai requisiti elettrici pre-
visti dalle normative di ciascun paese. Questi
prodotti sono garantiti esclusivamente dal di-
stributore KORG del paese specifico. Qualsiasi
prodotto KORG venduto senza certificato di
garanzia o senza numero di serie non è coperto
dalla garanzia e non rientra nella responsabilità
del produttore/distributore. Questa norma ga-
rantisce la vostra protezione e sicurezza.
Servizio e assistenza per l’utente
Per l’assistenza, contattate il più vicino centro
di assistenza autorizzato KORG. Per maggiori
informazioni sui prodotti KORG e per trovare
software e accessori compatibili con il vostro
strumento, contattate il distributore autorizzato
KORG a voi più vicino. Per informazioni aggior-
nate, visitate il nostro sito web.
Tenete lo strumento aggiornato
Il vostro strumento può essere aggiornato quan-
do KORG rilascia una nuova versione del sistema
operativo. Potete scaricare il sistema operativo
dal nostro sito web. Leggete attentamente le
istruzioni fornite con il sistema operativo.

4| Italiano
Sommario
Introduzione ........................................................5
Benvenuti a bordo! .....................................................5
Prima di iniziare a suonare… .............................................5
Controlli e connessioni ...............................................7
Pannello frontale .......................................................7
Pannello posteriore .....................................................8
Accendere SV-2 ....................................................12
Accensione e spegnimento ............................................. 12
Regolare il volume generale ............................................ 13
Ascoltare le demo ..................................................... 13
Usare i suoni .......................................................14
Cosa intendiamo per “suono”? .......................................... 14
Suoni di fabbrica e preferiti ............................................. 14
Selezionare i suoni di fabbrica .......................................... 15
Selezionare i suoni preferiti ............................................. 16
I suoni ................................................................ 17
Usare gli effetti .....................................................22
Gli effetti .............................................................22
Passare a un suono o effetto diverso durante una modifica ................23
Salvare le modifiche in un suono ........................................23
Impostazioni avanzate ............................................. 24
I pulsanti per le impostazioni avanzate ...................................24
Trasposizione .........................................................24
Cambiare la risposta al tocco ...........................................26
Il Local Off ............................................................27
Niente panico! .........................................................27
Calibrare i pedali ......................................................28
Bloccare il pannello di controllo .........................................29
Ripristinare le impostazioni di fabbrica ...................................29
Specifiche tecniche ................................................ 30

Introduzione |5
Italiano
Introduzione
Benvenuti a bordo!
Grazie, e congratulazioni per avere acquistato il pianoforte vintage da pal-
co KORG SV-2! Siamo certi che questo strumento vi farà vivere momenti di
grande musica, grazie ai suoi magnifici suoni di pianoforte e tastiere vintage.
Siamo certi che lo vivrete in perfetta armonia!
Per usare al meglio e il più a lungo possibile il vostro nuovo SV-2, vi preghia-
mo di leggere questo manuale almeno una volta, e (come si dice), di “osser-
vare le istruzioni”. Conservate il manuale per rileggerlo in seguito; potreste
trovarvi consigli utili che vi erano sfuggiti alla prima lettura.
Questo manuale riguarda sia la versione ad 88 che quella a 73 tasti dell’SV-2,
e sia le versioni con che quelle senza altoparlanti integrati. Non c’è altra dif-
ferenza tra i quattro strumenti, a parte la lunghezza della tastiera, i diffusori
(e naturalmente il peso!).
Prima di iniziare a suonare…
Cosa c’è nella scatola
Dopo avere acquistato l’SV-2, controllate che nell’imballo siano presenti i
seguenti elementi. Se ne dovesse mancare qualcuno, contattate immediata-
mente il vostro rivenditore KORG.
▪ SV-2 Stage Vintage Piano
▪ Guida rapida (quella che state leggendo in questo momento)
▪ Leggio
▪ Pedale damper KORG DS-2H (con supporto del “mezzo pedale”)
▪ Cavo di alimentazione in standard IEC

6| Italiano
Cosa si può scaricare
Dal nostro sito web (www.korg.com) potete scaricare il software SV-2 Editor,
il driver MIDI, il software aggiornato, vari materiali di supporto e il manuale
di istruzioni completo.
Cosa si può aggiungere
Dopo avere acquistato SV-2, potreste voler aggiungere questi accessori op-
zionali di grande utilità:
▪ L’elegante supporto per tastiere KORG ST-SV1, raccomandato per sicurezza
e praticità, e perfettamente in linea con il design del vostro pianoforte.
▪ Uno dei robusti pedali continui e interruttori a pedale del catalogo KORG,
come il pedale damper DS-1H, gli interruttori a pedale PS-1 e PS-3, il pedale
continuo EXP-2, i pedali di volume/espressione XVP-10 e XVP-20.
▪ La nostra pratica e robusta borsa da trasporto CB-SV.
Contatti
Il vostro rivenditore di fiducia KORG non si limita a vendere un prodotto, ma
può anche fornirvi accessori hardware e software, e può aiutarvi ad usare al
meglio questo strumento. Rivolgetevi a lui per qualsiasi tipo di aiuto possiate
avere bisogno.
Il nostro sito web internazionale è www.korg.com. Un elenco di tutti i distri-
butori KORG è consultabile nella pagina web dedicata (www.korg.com/us/
corporate/distributors/).

Controlli e connessioni |7
Italiano
Controlli e connessioni
Pannello frontale
Dal pannello frontale si accede ai controlli di SV-2.
3
2
1
2
1 Pannello di controllo
Questa barra contiene i pulsanti, le manopole e gli altri controlli del piano-
forte.
2 Altoparlanti (solo SV2-73S e SV2-88S)
Nei modelli con altoparlanti integrati, il suono esce da queste aperture.
3 Uscita CUFFIE (stereo)
Collegate le cuffie a questo connettore ( ). È possibile utilizzare cuffie con
impedenza di 16-200 Ohm (50 Ohm consigliati). Quando si collegano le cuf-
fie, gli altoparlanti integrati vengono automaticamente disattivati.
Regolate il livello di uscita con la manopola MASTER VOLUME.

8| Italiano
Pannello posteriore
Il pannello posteriore contiene la maggior parte delle connessioni.
1
2
3 4 5 6 7 8
1 Connettore AC IN POWER
Collegate a questo ricettacolo il cavo di alimentazione in standard IEC fornito
di serie.
2 Fori per LEGGIO MUSICALE
Il leggio musicale è fornito di serie con SV-2. Inserite le gambe del leggio in
questi due fori dedicati.
3 Connettore USB DEVICE
Utilizzate questo connettore per collegare un computer per l’uso di un se-
quencer (come duplicato delle porte MIDI), o per utilizzare il software SV-2
Editor per la modifica dei parametri più avanzati. Prima di utilizzare questo
connettore, in Windows occorre installare il software KORG USB-MIDI Driver
(le relative istruzioni sono fornite insieme al driver, che può essere scaricato
dal nostro sito web).
Per informazioni aggiornate sul supporto dei sistemi operativi, vi preghiamo
di consulatere la pagina web dedicata (https://www.korg.com/support/os/).
4
Interruttore SPEAKERS ON/OFF (solo modelli con altoparlanti integrati)
Utilizzate questo interruttore per attivare o disattivare gli altoparlanti inte-
grati.

Controlli e connessioni |9
Italiano
5 Connettori PEDAL (DAMPER, 1, 2)
Collegate il pedale KORG DS-2H fornito in dotazione (o il pedale opzionale
DS-1H) al connettore DAMPER. Il pedale collegato a questo connettore fun-
ziona sempre come pedale damper (altrimenti detto “di risonanza” o “del
forte”).
Collegate al connettore PEDAL 1 un interruttore a pedale (come i pedali
opzionali KORG PS-1 o PS-3). L’interruttore a pedale può funzionare come
pedale di sostenuto o come interruttore lento/veloce del rotore (quando è
selezionato l’effetto di rotary).
Collegate al connettore PEDAL 2 un interruttore a pedale (come il pedale
opzionale KORG PS-1 o PS-3) o un pedale di volume/espressione continuo
(come i pedali opzionali KORG XVP-10, XVP-20, EXP-2). L’interruttore a peda-
le funziona come pedale “una corda”. Il pedale di volume/espressione funzio-
na come controllo del volume (questa è l’impostazione predefinita) o come
controllo del filtro del wah (quando è selezionato l’effetto di wah). Per con-
trollare l’effetto wah occorre far accendere il LED del pulsante Auto/Pedal
nella sezione PRE FX (modalità Pedal).
Mentre il pedale KORG DS2H arriva dalla fabbrica già calibrato, un pedale di
volume/espressione di terze parti di solito deve essere calibrato per poterne
utilizzare l’intera scala di valori. La calibrazione permette inoltre di scegliere
la polarità dell’interruttore a pedale. Per calibrare i pedali (e impostarne la
polarità), vedi “Calibrare i pedali” a pagina 28.
6 Connettori MIDI (IN, OUT)
Il MIDI permette di controllare SV-2 da un sequencer, o, al contrario, di con-
trollare da SV-2 un altro dispositivo MIDI. Quando si utilizza SV-2 per control-
lare un altro dispositivo MIDI o per registrare con un sequencer, premete il
pulsante LOCAL OFF per accenderne il LED; in questo modo la tastiera viene
scollegata dai suoni interni (ma non dal MIDI).
Il MIDI OUT trasmette dati MIDI. Va usato per controllare un altro dispositivo
MIDI o un computer. Usate un cavo MIDI standard per collegare questo con-
nettore al connettore MIDI IN dell’altro dispositivo.
Il MIDI IN riceve i dati MIDI. Va usato per controllare un altro dispositivo MIDI
o un computer. Usate un cavo MIDI standard per collegare questo connettore
al connettore MIDI OUT dell’altro dispositivo.
7 Connettori INPUT (L/MONO, R/MONO)
Collegate a questi connettori una sorgente audio a livello di linea, come una
tastiera/sintetizzatore, un lettore CD o di file audio. Per il collegamento in
mono, utilizzate uno solo degli ingressi.

10| Italiano
8 Connettori OUTPUT (L/MONO, R/MONO)
Uscite audio analogiche, disponibili come connettori a jack non bilanciati da
1/4”, o connettori XLR bilanciati. Usate le uscite sbilanciate da 1/4” per l’uso
con cavi corti, o le uscite bilanciate XLR per cavi più lunghi, per esempio
quando si suona su un palco. In ogni caso, entrambi i tipi di uscita contengo-
no lo stesso segnale audio.
Per il collegamento in mono, utilizzate una sola uscita MONO da 1/4”. Le pre-
se XLR non possono essere utilizzate come uscite mono.
SUGGERIMENTO: È consigliabile usare le uscite bilanciate XLR ogni volta che sia
possibile.
ATTENZIONE: Se collegate le uscite XLR ad un mixer o ad un dispositivo simile ad un
mixer, assicuratevi che l’alimentazione phantom di quel dispositivo sia disattivata. In
caso contrario, SV-2 potrebbe venir danneggiato.

Controlli e connessioni |11
Italiano
VOX
Sintetizzatore, ecc.
MIDI
IN OUT
OUTPUT
OUTPUT INPUT AUX/LINE IN INPUT/LINE IN
INPUT/LINE IN INPUT/LINE IN
Computer
Cavo USB
USB
Pedale di
volume/
espressione
Interruttore a
pedale 2
(pedale del
sostenuto)
Interruttore
a pedale 1
(pedale
‘una corda’)
PHONES
Cuffie
Pedale damper/
risonanza
(di serie)
Alimentazione
Ingresso
alimentazione
Lettore CD/audio ecc.
Amplificatore
Sistema audio
Mixer, registratore, ecc.
Diffusori alimentati
Interfaccia
audio
(solo SV2-73S
e SV2-88S)

12| Italiano
Accendere SV-2
Accensione e spegnimento
1 Collegate il cavo di alimentazione IEC fornito di serie al connettore POWER
situato sul retro dello strumento.
2 Collegate la spina del cavo di alimentazione a una presa di corrente.
3 Per accendere lo strumento, premete e rilasciate l’interruttore POWER si-
tuato nel pannello di controllo. La valvola si illumina e inizia a riscaldarsi.
Dopo alcuni secondi, lo strumento si accende.
SV-2 contiene una valvola 12AX7 (ECC83).
ATTENZIONE: Il coperchio della valvola o la valvola stessa potrebbero rompersi in
caso di urto. Se il coperchio della valvola dovesse rompersi, sostituitelo immediata-
mente. La mancata sostituzione del coperchio della valvola danneggiato può causare
danni alla valvola stessa.
NOTA: Quando l’SV-2 viene acceso, si potrebbe vedere per un istante un lampo nella
valvola. Si tratta del comportamento tipico di alcune delle valvole che utilizziamo,
e può verificarsi quando SV-2 viene acceso con la valvola non ancora calda. Questo
non influisce sulle prestazioni della valvola o dell’SV-2.
4 Per spegnere lo strumento, tenete premuto l’interruttore POWER per circa
un secondo.

Accendere SV-2 |13
Italiano
Regolare il volume generale
È possibile regolare il volume generale di SV-2.
▪ Ruotate la manopola MASTER VOLUME in senso orario per aumentare il
livello del volume, in senso antiorario per diminuirlo.
Questa manopola controlla il volume generale dello strumento, compresi gli
altoparlanti integrati, le uscite audio Left e Right, e l’uscita cuffie.
ATTENZIONE: Tenete sempre il volume a un livello confortevole. Un volume troppo
alto può causare danni permanenti all’udito.
Ascoltare le demo
Ascoltate i brani dimostrativi integrati per apprezzare le qualità di SV-2. Ci
sono diversi brani demo tra cui scegliere.
1 Premete insieme i pulsanti TRANSPOSE e LOCAL OFF. I loro LED iniziano a
lampeggiare.
2 A questo punto, se si attende qualche secondo verranno riprodotti tutti i
brani demo.
3 Altrimenti, si può selezionare uno dei brani demo disponibili. C’è una demo
per ognuno dei suoni di fabbrica.
▪ Usate le manopole TYPE e VARIATION nella sezione SOUND per selezionare
un brano demo.
▪
Potete premere la manopola VARIATION, per far diventare il suo LED verde e
ascoltare un secondo banco di brani demo. Premete nuovamente la manopola
VARIATION per accendere di nuovo il LED arancione e tornare al primo banco.
Potete selezionare qualsiasi demo anche dopo l’inizio della riproduzione au-
tomatica.
4 Regolate il livello di ascolto con la manopola MASTER VOLUME.
5
Arrestate la demo premendo nuovamente i pulsanti TRANSPOSE e LOCAL OFF.

14| Italiano
Usare i suoni
Cosa intendiamo per “suono”?
In SV-2, un suono è un “timbro” o un insieme di timbri che possono essere
uditi quando si suona la tastiera. Ogni suono può essere composto da un
massimo di tre “programmi”, ognuno con un timbro diverso o un insieme di
“rumori” accessori, come la meccanica della tastiera, il colpo del martelletto,
ecc. Uno o due layer possono venire aggiunti al programma principale ed es-
sere uditi come un secondo o terzo timbro che si unisce al timbro principale.
Prendiamo ad esempio il caso del suono “piano più archi”, universalmente
noto: ci sono un programma di piano, uno di rumori di piano, uno di archi.
Main, Layers 1, 2
Main, Layer (1)
Split
Ci sono poi suoni in cui la tastiera è divisa in due metà, con uno o due pro-
grammi nella metà destra. Il terzo programma viene spostato nella metà
sinistra e può essere usato per suonare un accompagnamento (un basso
acustico, un synth pad, o altri suoni).
Main, Layers 1, 2
Main, Layer (1)
Split
Suoni di fabbrica e preferiti
SV-2 contiene 72 suoni factory (di fabbrica), e ognuno di questi suoni può
essere “personalizzato” semplicemente usando le manopole del pannel-
lo frontale. È poi possibile salvare le modifiche nelle 64 locazioni di suoni
FAVORITES (preferiti). (È possibile eseguire modifiche più avanzate utiliz-
zando il software SV-2 Editor).
In genere, il passaggio da un suono all’altro avviene con una transizione con-
tinua, che permette di tenere premute le note e ascoltare il nuovo suono
solo al successivo cambio di nota. Tuttavia, se uno dei suoni ha la sezione di
amplificazione attiva e utilizza la valvola, questo non è possibile.

Usare i suoni |15
Italiano
Selezionare i suoni di fabbrica
Come selezionare un suono
I suoni di fabbrica vengono selezionati nella sezione SOUND.
1 Usate la manopola TYPE della sezione SOUND per selezionare uno dei sei
tipi base di suono.
2 Usate la manopola VARIATION della sezione SOUND per selezionare una
delle sei variazioni del suono di base. Si noti che il LED accanto alle manopole
si illumina per mostrare il tipo di suono e la variazione selezionati.
3 Premete la manopola VARIATION per selezionare il secondo banco di varia-
zioni (il colore del LED diventa verde). Usate la stessa manopola VARIATION
per selezionare una delle sei variazioni nel secondo banco.
4 Quando desiderate tornare al primo banco di variazioni, premete nuovamen-
te la manopola VARIATION (il colore del LED torna di nuovo arancione).

16| Italiano
Selezionare i suoni preferiti
Come selezionare un suono
La sezione FAVORITES contiene i suoni preferiti, cioè i suoni personalizzati
con le modifiche desiderate.
1 Per selezionare un suono preferito nel banco corrente, premete il pulsante
FAVORITES (1-8) corrispondente.
Se desiderate vedere quale banco è selezionato, premete la manopola TYPE
e osservate quale pulsante FAVORITES (A-H) sta lampeggiando. Premetelo
di nuovo per uscire dalla modalità di selezione del banco, o attendete che la
modalità si disattivi da sola.
2 Per selezionare un suono preferito in un altro banco, premete la mano-
pola TYPE. Il banco attualmente selezionato viene mostrato dal pulsante
FAVORITES (A-H) che lampeggia. Premete il pulsante FAVORITES (A-H)
corrispondente al banco da selezionare. Poi premete il pulsante FAVORITES
(1-8) corrispondente al suono preferito da selezionare.
Come tornare all’ultimo suono di fabbrica selezionato
Dopo aver selezionato un suono preferito, è possibile selezionare nuovamen-
te un suono di fabbrica, usando la procedura vista più sopra.
È però possibile anche tornare immediatamente all’ultimo suono di fabbrica
selezionato. Per selezionarlo, premete la manopola VARIATION nella sezio-
ne SOUND.

Usare i suoni |17
Italiano
I suoni
La seguente tabella contiene una breve descrizione dei suoni forniti di serie.
Quando il nome del suono è semplice (come “MK I Suitcase”) si tratta di un
singolo suono esteso a tutta la tastiera. Quando nel nome c’è una ‘&’ (come
in “FM Piano & Pad”), il suono è costituito da un timbro principale più uno
o due timbri sovrapposti. Quando nel nome c’è una ‘/’ (come in “Pad/Mini
Lead”), la tastiera è divisa fra timbri diversi.
Suoni di fabbrica
È possibile selezionare un suono di fabbrica da un dispositivo MIDI esterno
inviando a SV-2 un messaggio di Control Change #00 con valore 0, un mes-
saggio di Control Change #32 con valore 0, infine un messaggio di Program
Change (PC) per selezionare il suono.
Suono Var PC Note
EP 1 (Vintage)
MK I Suitcase A1 0 Due versioni del leggendario MK I, un must per ogni
tastierista.
MK I Stage B1 6
MK II Suitcase A2 1 Due versioni del magnifico MK II, nella versione porta-
tile e in quella più grande.
MK II Stage B2 7
MK V Stage A3 2 L’MK V Stage (unica versione mai entrata in produzio-
ne), celebre per il suo suono squillante.
MK V Bright B3 8
Dyno EP A4 3 Il tipico suono di Dyno Piano, perfetto per le ballad
nella versione morbida, perfetto per gli assoli nella
versione più brillante.
Dyno EP Bright B4 9
Wurly A5 4 La sonorità standard, molto penetrante, delle lamine
metalliche del Wurly. La voce ufficiale del pop degli
anni ’60 e ’70.
Wurly Classic B5 10
Wurly Dark A6 5 Una versione più scura ed una più brillante del Wurly.
Wurly Bright B6 11
EP 2 (Vari)
FM Piano 1 A1 12 Il suono di piano elettrico FM che ha fatto grandi gli
anni ’80. Onnipresente nei dischi prodotti agli albori
della musica digitale.
FM Piano 3 B1 18
FM Piano 2 A2 13
FM Piano & Pad B2 19 Il layer di piano FM + pad è un altro classico dell’epo-
ca.

18| Italiano
Suono Var PC Note
Pianet T A3 14 Il Pianet, classica tastiera elettromeccanica tedesca.
La versione europea del piano elettrico.
Pianet N B3 20
Hybrid Piano A4 15 Ibridazioni di pianoforti, per esplorare nuovi paesaggi
sonori.
Hybrid Tine B4 21
Wurly & Strings A5 16 Varie combinazioni di pianoforti elettrici ed archi.
Potete scegliere tra pianoforte elettrico e pianoforte
in FM.
FM & Strings B5 22
MK II & Pad A6 17 Varie combinazioni di pianoforti elettrici e pad. Anche
in questo caso, la scelta è tra pianoforte elettrico e
pianoforte in FM.
FM & Pad B6 23
Piano 1 (Acustici)
German Grand A1 24 Il re dei pianoforti acustici – il coda tedesco più amato
dai pianisti classici, jazz o pop.
German Classic B1 30
Italian Grand A2 25 Il pianoforte a coda italiano, una scelta eccellente per
il repertorio classico e jazz.
Italian Bright B2 31
Japanese Grand A3 26 Un altro must – un grande pianoforte verticale giap-
ponese, molto amato da più di un artista classico, jazz
o pop.
Japanese Bright B3 32
Austrian Grand A4 27 Il gran coda austriaco, l’imperatore dei pianoforti. Un
punto di riferimento per la musica classica, preferito
anche da numerosi artisti jazz.
Austrian Classic B4 33
Japanese Upright A5 28 Un grande pianoforte verticale giapponese, con la sua
caratteristica, ampia risonanza.
Upright Bright B5 34 Un suono di piano intimo ma brillante, molto amato
nel pop.
German Upright A6 29 Il suono caldo e inconfondibile di un celebre pianofor-
te verticale tedesco.
Rock Piano B6 35 Un verticale aggressivo, adatto al rock e al rockabilly.
Piano 2 (Vari)
Electric Grand A1 36 Pianoforte elettroacustico prodotto negli anni ’70, con
un suono morbido molto apprezzato da chi suona live.
German Mono B1 42 Versione mono del più celebre gran coda tedesco.
KORG M1 Piano A2 37 Due grandi classici KORG. Presi dal celebre sintetizza-
tore/workstation M1, che ha segnato un’epoca, e dal
nostro pianoforte digitale SG-1D, un autentico apripi-
sta.
KORG SG-1D B2 43
Digital Piano A3 38 Suono di pianoforte innovativo e di grande espressivi-
tà, creato alla fine degli anni ’80 con un sintetizzatore
digitale a tastiera molto diffuso.

Usare i suoni |19
Italiano
Suono Var PC Note
Electra Piano B3 44 Pianoforte elettronico molto amato, negli anni ’70, da
numerose celebrità del rock classico e del rock pro-
gressivo.
Tack Piano A4 39 Pianoforti Tack e Honky-Tonk, per suonare rag-time e
stride.
Honky-Tonk B4 45
Piano & Strings A5 40 Combinazione di pianoforte con archi o pad. Perfetto
per la più suggestiva musica ambient.
Piano & Pad B5 46
Piano & Synth A6 41 Combinazione di pianoforte con synth o brass. Due
sonorità che riportano all’epoca del jazz-fusion.
Piano & Brass B6 47
Clavier
Clav AC A1 48 Due versioni con microfoni in fase del classico clavi-
cordo elettrico.
Clav AD B1 54
Clav BC A2 49 Altre due combinazioni di registri di Clavi, stavolta con
microfoni a fase invertita e un suono più tagliente.
Clav BD B2 55
Harpsichord A3 50 L’avo del pianoforte, un salto nel tardo Rinascimento e
nel Barocco. Registri standard 8” e 8”+4” con raddop-
pio all’ottava.
Harpsichord Oct. B3 56
Perc. Organ A4 51 Realistica simulazione del più classico organo elettro-
meccanico, con tanto di percussione, in una versione
pulita ed una distorta.
Rock Organ B4 57
Jazz Organ A5 52 Combinazioni di registri del più classico organo elet-
tromeccanico pensate per il jazz.
Vox Organ B5 58 Perfetta emulazione di “Connie”, l’organo a transistor
VOX Continental.
Church Organ A6 53 Tutta la potenza di un maestoso organo a canne.
Pipe Organ B6 59 Una combinazione di registri di organo a canne più
morbida ed evocativa, per i momenti di meditazione.
Other
Full Strings A1 60 Due varietà di archi classici.
Classic Strings B1 66
Tape Strings A2 61 Gli archi sintetici del Mello, tipici degli anni ’70.
Strings & Voices B2 67 Combinazione di archi reali e coro.
Warm Pad A3 62 Versioni scura e brillante di classici pad sintetici.
Bright Pad B3 68
Orchestra A4 63 Potente Tutti orchestrale.
Pizzicato & Glock B4 69 Pizzicato di orchestra d’archi in combinazione con un
glockenspiel.

20| Italiano
Suono Var PC Note
Brass A5 64 Sezione di ottoni reali.
Synth Brass B5 70 La loro controparte sintetica.
Pad/Mini Lead A6 65 Due sintetizzatori solisti, sopra un morbido tappeto di
pad sintetici.
Pad/SynthLead B6 71
Suoni preferiti
È possibile selezionare un suono preferito da un dispositivo MIDI esterno
inviando a SV-2 un messaggio di Control Change #00 con valore 0, un mes-
saggio di Control Change #32 con valore 64, infine un messaggio di Program
Change (PC) per selezionare il suono.
Suono Pos PC
Demo Shop
German Grand A1 0
Italian Grand A2 1
EP MK II A3 2
Wurly A4 3
Clav A5 4
FM Piano A6 5
Piano & Strings A7 6
Bass/EP A8 7
Piano
German Grand B1 8
Italian Grand B2 9
Japanese Grand B3 10
Austrian Grand B4 11
Japan Upright B5 12
German Upright B6 13
Rock Piano B7 14
Tack Piano B8 15
Electric Pno
EP MK I C1 16
Suono Pos PC
EP MK II C2 17
EP MK V C3 18
Dyno EP C4 19
Wurly Amp C5 20
Wurly Tremolo C6 21
FM Piano C7 22
Hybrid EP C8 23
Claviers
Clav AC D1 24
Clav BC D2 25
Perc. Organ D3 26
Jazz Organ D4 27
Church Organ D5 28
KORG M1 Piano D6 29
Electric Grand D7 31
Harpsichord D8 32
Layer
Piano & Strings E1 32
Piano & Pad E2 33
Piano & EP E3 34

Usare i suoni |21
Italiano
Suono Pos PC
Piano & Vibes E4 35
MK II & Pad E5 36
Strings & Pad E6 37
Piano & FM E7 38
FM & Strings E8 39
Split
Ac. Bass/Piano F1 40
El. Bass/Piano&Str F2 41
Fretless/EP F3 42
Slap/EP F4 43
Slap/Clav F5 44
EP Bass/Vox Organ F6 45
Jazz Piano Trio F7 46
Organ Dual Manual F8 47
Other
Full Strings G1 48
Strings Octave G2 49
Suono Pos PC
Orchestra Tutti G3 50
Brass G4 51
Warm Pad G5 52
Synth Brass G6 53
Pad/SynLead G7 54
Synth Bass G8 55
Legacy SV1
SV1 Grand Piano 1 H1 56
SV1 Grand Piano 2 H2 57
SV1 Tine EP Amp H3 58
SV1 Reed EP1 H4 59
SV1 Clav AC H5 60
SV1 Clk.Tonewheel H6 61
SV1 Full Strings H7 62
SV1 Synth Brass H8 63

22| Italiano
Usare gli effetti
Gli effetti
È possibile selezionare i vari modelli di effetti e amplificatori ruotando le cor-
rispondenti manopole TYPE. Si possono modificare le impostazioni dell’ef-
fetto usando le manopole DEPTH, INTENSITY, SPEED, DRIVE. Se si preme
la manopola, viene richiamato il valore originale del parametro. È possibile
eseguire modifiche più avanzate tramite il software SV-2 Editor.
La simulazione degli effetti e dell’amplificatore può essere attivata o disat-
tivata premendo il corrispondente pulsante On/Off. Le modifiche possono
essere salvate, insieme al suono, in una delle locazioni FAVORITES.
Provate a muovere i vari controlli, e rendetevi conto di cosa si può fare con
i vari effetti.
SIGNAL ROUTING
EQ PRE FX
MODULATION AMBIENT TOTAL FX
Stereo Limiter
Stereo Mastering Limiter
OUTPUTS
SOUND
PRE AMP
VOLUME VOLUME POWER
AT T.
PROGR
LVL
POWER AMP
VALVE
CABINET NR

Usare gli effetti |23
Italiano
Passare a un suono o effetto diverso
durante una modifica
Se si seleziona un effetto diverso in una delle sezioni del pannello, le modifi-
che apportate all’effetto vengono conservate. Quando si torna all’effetto mo-
dificato in precedenza, le modifiche vengono richiamate. (Se volete tornate al
valore originale, premete la manopola del parametro corrispondente).
Al contrario, se si seleziona un altro suono di fabbrica o preferito, tutti i pa-
rametri vengono reimpostati e le modifiche vengono perse.
Salvare le modifiche in un suono
Se vi piace il suono appena creato agendo sulle varie manopole, potete sal-
varlo come suono preferito.
1 Premete la manopola TYPE per vedere quale banco di suoni preferiti è se-
lezionato.
Il banco attualmente selezionato viene mostrato dal pulsante FAVORITES
(A-H) che sta lampeggiando.
2 Se volete scegliere un banco diverso, premete il pulsante FAVORITES (A-H)
corrispondente al banco da selezionare.
3 Tenete premuto il pulsante FAVORITES (1-8) corrispondente al suono pre-
ferito in cui desiderate salvare le impostazioni, fino a quando il suo LED non
inizia a lampeggiare.
4 Premete di nuovo lo stesso pulsante per confermare il salvataggio.
Se non volete salvare le modifiche, aspettate alcuni secondi, senza premere
alcun pulsante, finché il LED del pulsante non si spegne.
SUGGERIMENTO: Usate i banchi di suoni preferiti per organizzare i suoni in set se-
parati, ad esempio un set diverso per un particolare stile o il programma di una par-
ticolare serata.
NOTA: Il suono preferito in precedenza contenuto nella memoria FAVORITE selezio-
nata viene sovrascritto. Il suono preferito che si trovava in quella posizione viene
cancellato.
NOTA: Se passate ad un suono diverso o spegnete lo strumento senza memorizzare
il suono e gli effetti che avete modificato, le modifiche vengono perse.

24| Italiano
Impostazioni avanzate
I pulsanti per le impostazioni avanzate
I pulsanti TRANSPOSE, LOCAL OFF, TOUCH e FUNCTION consentono di ac-
cedere a una serie di funzioni avanzate, che permettono di adattare il piano-
forte alle proprie preferenze.
Il pulsante FUNCTION consente di accedere a diverse impostazioni avanza-
te, che permettono di personalizzare l’esperienza d’uso con lo strumento. Vi
preghiamo di consultare il Manuale di istruzioni per maggiori informazioni
sulle varie funzioni.
Trasposizione
Può capitare che un brano sia scritto in una tonalità difficile (per esempio,
con molte alterazioni), oppure che si debba trasporre l’altezza delle note per
rendere più facile suonare con un altro strumento o con un cantante. In que-
sti casi, si può trasporre lo strumento (cioè cambiare l’altezza delle note) in
modo da usare una diteggiatura più semplice, o che conoscete già. Questa
funzione prende il nome di trasposizione.
Per esempio, se effettuate una trasposizione di un semitono verso l’alto,
suonando le note mostrate qui sotto a sinistra vengono prodotte le note
mostrate a destra.

Impostazioni avanzate |25
Italiano
Attivare o disattivare la trasposizione
1 Premete il tasto TRANSPOSE per attivare la trasposizione. Se è già stata
impostata una trasposizione, il LED di questo pulsante si accende, altrimenti
rimane spento.
2 Premete il tasto TRANSPOSE una seconda volta per disattivare la trasposi-
zione. Il LED si spegne.
Impostare l’intervallo di trasposizione
1 Tenete premuto il pulsante TRANSPOSE per circa un secondo, finché il suo
LED non inizia a lampeggiare.
2 Premete la nota corrispondente alla trasposizione desiderata: La trasposi-
zione viene attivata e il LED rimane acceso.
-12
C3
0 +12
C5
Nota Effetto
C3 – B3 12 – 1 semitoni in basso
C4 (do centrale) Intonazione standard
C#4 – C5 1 – 12 semitoni in alto
Se dopo alcuni secondi non viene premuta nessuna nota, la programmazione
della trasposizione si conclude.
3 Premete il tasto TRANSPOSE una seconda volta per disattivare la trasposi-
zione. Il LED si spegne.
NOTA: Quando si spegne lo strumento, la trasposizione viene azzerata.

26| Italiano
Cambiare la risposta al tocco
È possibile programmare la risposta della tastiera al tocco.
1 Premete il pulsante TOUCH.
Dopo avere premuto il pulsante, il suo LED inizia a lampeggiare. Il pulsante
FAVORITE corrispondente alla curva di dinamica selezionata inizia a lam-
peggiare.
2 Premete il pulsante FAVORITE corrispondente alla curva di dinamica desi-
derata.
3 Premete il pulsante TOUCH per confermare la selezione e tornare al funzio-
namento normale.
Favorite # Curva di di-
namica
Nota
1 Normale Risposta normale.
2 Leggera 1 Si ottiene una dinamica elevata anche suonando piano.
3 Leggera 2
4 Media 1 Si ottiene una dinamica elevata anche suonando in modo
normale.
5 Media 2
6 Dura 1 Si ottiene una dinamica elevata solo suonando molto forte.
7 Dura 2
8 Fissa Dinamica fissa. Usate l’SV-2 Editor per scegliere il livello di
dinamica desiderato.
Questo è il grafico di risposta delle curve di dinamica:
( )
Forza sul tasto
Normale/medio
Forte
Forte
Piano
Piano
Volume

Impostazioni avanzate |27
Italiano
Il Local Off
È possibile attivare o disattivare la funzione Local Off.
▪ Premete il pulsante LOCAL OFF per accenderne il LED.
Quando il LED di questo pulsante è acceso, la tastiera viene scollegata dai
suoni interni. Quando si suona sulla tastiera non si sente nessun suono pro-
venire dal generatore interno. Le note continuano però ad essere inviate
alla porta MIDI OUT (o alla porta USB), e possono essere ricevute da un
computer.
Il computer le invia nuovamente alla porta MIDI IN (o alla porta USB)
dell’SV-2, e di qui al generatore interno. Questo tipo di configurazione per-
mette di registrare e suonare allo stesso tempo senza che le note vengano
duplicate.
▪ Premete il pulsante LOCAL OFF per accenderne il LED.
Quando il LED del pulsante è acceso, la tastiera viene scollegata dai suoni
interni.
NOTA: Quando si spegne lo strumento, il Local Off viene disattivato.
Niente panico!
Se le note dovessero rimanere bloccate per qualche problema di comuni-
cazione MIDI, tenete premuto il pulsante On/Off della sezione EQUALIZER
finché il suono non si interrompe. Questa funzione si chiama MIDI Panic.

28| Italiano
Calibrare i pedali
Potete calibrare i pedali collegati ai connettori DAMPER, PEDAL 1 e PEDAL 2
nel pannello posteriore. Calibrando un pedale, si permette all’SV-2 di capirne
la polarità e ricevere l’intera scala di valori che il pedale può inviare.
1 Collegate tutti i pedali da calibrare all’SV-2. Occorre ricordare che DAMPER
si aspetta di vedere il pedale damper KORG DS-2H fornito di serie (o, in alter-
nativa, il pedale damper DS-1H, o qualsiasi interruttore a pedale), PEDAL 1 si
aspetta un interruttore a pedale e PEDAL 2 può essere utilizzato per colle-
gare un interruttore a pedale o un pedale continuo di volume/espressione.
2
Portate un eventuale pedale di volume/espressione alla sua posizione più bassa.
3 Spegnete l’SV-2.
4 Tenete premuto il pulsante Auto/Pedal e accendete l’SV-2.
5 Quando il LED di Auto/Pedal inizia a lampeggiare, rilasciate il pulsante.
Se non fate niente nei secondi successivi, il LED di Auto/Pedal si spegne e
l’SV-2 si riavvia.
6 Mentre il LED di Auto/Pedal lampeggia, premete di nuovo il pulsante. L’SV-2
entra in modo calibrazione.
7 Ora calibrate PEDAL 1 (un interruttore a pedale). Premete il pedale a fondo e
poi rilasciatelo. Una volta finito di calibrare il pedale collegato al connettore
PEDAL 1, si accende il pulsante FAVORITE #1.
8 Quindi, calibrate PEDAL 2. La procedura è diversa a seconda che si usi un
interruttore a pedale o un pedale di volume/espressione:
▪ Se avete collegato un interruttore a pedale, premetelo sino in fondo e poi
rilasciatelo.
▪ Se avete collegato un pedale di volume/espressione, premetelo tutto in
avanti (portatelo sul valore massimo).
Una volta finito di calibrare il pedale collegato al connettore PEDAL 2, si
accende il pulsante FAVORITE #2.
9 Infine calibrate il pedale DAMPER. Premete il pedale a fondo e poi rilasciate-
lo. Una volta finito di calibrare il pedale collegato al connettore DAMPER, si
accende il pulsante FAVORITE #3.
10 Quando avete finito di calibrare:
▪ Se avete calibrato tutti e tre i pedali, l’SV-2 esce automaticamente dal modo
calibrazione e continua la sequenza di avvio.
▪ Se avete calibrato solo uno o due pedali, premete di nuovo il pulsante Auto/
Pedal per uscire dal modo calibrazione e continuare la sequenza di avvio.

Impostazioni avanzate |29
Italiano
Bloccare il pannello di controllo
Vi abbiamo mostrato come modificare i suoni e gli effetti. Ora vi mostreremo
come evitare qualsiasi modifica! Il blocco del pannello di controllo può esse-
re utile per evitare di cambiare inavvertitamente le impostazioni mentre si
suona.
1 Premete insieme i pulsanti TOUCH e FUNCTION per bloccare il pannello di
controllo. I loro LED iniziano a lampeggiare.
Gli unici controlli che restano accessibili sono la manopola MASTER VOLUME
e l’interruttore POWER.
2 Premete il pulsante TOUCH o FUNCTION per sbloccare il pannello di con-
trollo.
NOTA: Quando si spegne lo strumento, la trasposizione viene azzerata.
Ripristinare le impostazioni di fabbrica
Dopo avere effettuato varie modifiche, potreste voler ripristinare lo stato
originale dell’SV-2 (tra cui i suoni preferiti e le impostazioni globali originali):
1 Spegnete lo strumento.
2 Tenete premuto il pulsante FUNCTION.
3 Senza rilasciare il pulsante FUNCTION, accendete lo strumento.
4 Quando il LED inizia a lampeggiare, rilasciate il pulsante FUNCTION.
5 Premete di nuovo il pulsante FUNCTION per confermare l’operazione di ri-
pristino.
6 Alla fine vengono ripristinate tutte le impostazioni.

30| Italiano
Specifiche tecniche
Specifiche tecniche SV-2
Tastiera
Tasti SV2-73/SV2-73S: 73 tasti / SV2-88/SV2-88S: 88 tasti. KORG
RH3 (Real Weighted, Hammer Action 3) sensibile alla dinamica
Curve di dinamica Otto curve
Intonazione Trasposizione, Intonazione fine, Curve di accordatura
Suoni
Generazione sonora EDS-X (Enhanced Definition Synthesis – eXpanded)
Polifonia 128 note (massimo)
Multitimbricità Sovrapposizione dei timbri, divisione della tastiera
Suoni di fabbrica 72 suoni di fabbrica (6 suoni di base x 2 banchi di 6 variazioni)
Suoni preferiti 64 suoni preferiti (8 banchi x 8 variazioni) per il salvataggio di
impostazioni personalizzate
Effetti
Equalizzatore Bassi, medi, alti
Pre FX Red Compressor, Treble Boost, U-Vibe, Vibrato, Tremolo, VoxWah
(con controllo a pedale)
Modelli di amplificatore Clean, Twin, Tweed, AC30, Boutique, Amplificatore per organo.
Modelli di cabinet, con Valve Reactor Technology e valvola 12AX7
(ECC83)
Effetti di modulazione Classic Chorus, Black Chorus, Orange Phaser, Small Phaser,
Flanger, Rotary (con controllo lento/veloce)
Effetti di ambiente Room, Plate, Hall, Spring, Tape Echo, Stereo Delay (con tap
tempo)
Effetti finali Limiter stereo per mastering, limiter stereo
Altri controlli
Volume Master Volume
Pulsanti del pannello Transpose, Local Off, Touch, Function
Brani dimostrativi 72 brani demo, uno per ogni suono di fabbrica
Connessioni
MIDI In/Out
Cuffie 1 (sotto il pannello frontale]
Uscite audio L, R (2 x XLR, bilanciate)
L/Mono, R/Mono (jack 2 x 1/4 “, sbilanciate)

Specifiche tecniche |31
Italiano
Ingressi audio L/Mono, R/Mono (jack 2 x 1/4 “, sbilanciati)
USB Connettore USB 2.0 Hi-Speed, tipo B (duplica l’interfaccia MIDI)
Pedale del forte/
risonanza (damper)
KORG DS-2H (in dotazione), DS-1H
Pedale 1 Interruttore a pedale (footswitch) (tipo KORG PS-1, PS-3)
Pedale 2 Volume/espressione (tipo KORG XVP-10, XVP-20, EXP-2) o inter-
ruttore a pedale (tipo KORG PS-1, PS-3)
Amplificazione
Diffusori 2 x 2,5” con radiatore passivo 2 x 3”
Potenza di
amplificazione
2 x 15W
Dati fisici
Alimentazione Alimentatore switching interno, CA 100~240V, 50-60Hz
Consumo di energia Modelli senza altoparlanti integrati: 16 Watt
Modelli con altoparlanti integrati: 25 Watt
Dimensioni (L x P x A)
(escluso il leggio)
SV2-73/SV2-73S: 1143 x 347 x 157 mm (45.00 x 13.66 x 6.18 inch)
SV2-88/SV2-88S: 1356 x 347 x 157 mm (53.39 x 13.66 x 6.18 inch)
Peso
(escluso il leggio)
SV2-73: 17,2 kg (37.92 lbs) / SV2-73S: 18,3 kg (40.34 lbs)
SV2-88: 20,35 kg (44.86 lbs) / SV2-88S: 21,45 kg (47.29 lbs)
Altro
Accessori inclusi Cavo di alimentazione, guida rapida, leggio, pedale damper
(KORG DS-2H)
Accessori opzionali Supporto per tastiere ST-SV1, pedale damper DS-1H, pedali di
volume/espressione XVP-10, XVP-20, EXP-2, interruttori a pedale
PS-1, PS-3, borsa per trasporto CB-SV.
A causa del nostro costante impegno a migliorare i prodotti, specifiche tecniche
e aspetto possono variare senza preavviso.
Amplificazione sviluppata in collaborazione con K-ARRAY.

32| Italiano
AVVERTENZE PER IL CONSUMATORE
Il presente prodotto è stato assemblato in
base alle precise norme che regolano le spe-
cifiche tecniche e il voltaggio dei prodotti così
come richiesto da ciascun paese di destina-
zione per il quale ne è prevista la commer-
cializzazione. Se avete acquistato l’unità via
internet o mediante ordine postale/telefoni-
co, siete tenuti ad accertare la conformità del
prodotto ai requisiti di sicurezza richiesti dal
paese nel quale intendete utilizzare lo stru-
mento
ATTENZIONE: L’uso del presente dispositivo
in paesi per i quali non ne è prevista la com-
mercializzazione o vendita potrebbe rivelarsi
pericoloso, e invalidare la garanzia offerta dal
produttore/distributore.
Conservate lo scontrino o la ricevuta come
prova dell’avvenuto acquisto. In mancanza
di questi potrebbe non essere possibile usu-
fruire della garanzia offerta dal produttore/
distributore.
AVVERTENZE SULLO SMALTIMENTO DEI
RIFIUTI (SOLO UE)
Se sul prodotto, nel manuale, sulla
batteria o la confezione sono presenti
i simboli indicati a lato, occorre smalti-
re il prodotto come rifiuto speciale per
evitare danni all’ambiente e problemi
alla salute. Contattate l’amministra-
zione nel vostro comune di residenza
per i dettagli sul corretto smaltimento
del prodotto. Se la batteria contiene metalli
pesanti in eccesso rispetto alla norma, il sim-
bolo chimico è mostrato sotto il simbolo della
batteria o della sua confezione.
In presenza di radiazioni elettromagnetiche,
è possibile che si verifichi un degrado della
qualità audio. Tra i disturbi che possono ve-
rificarsi, è inclusa l'emissione di un segna-
le acustico, che si interromperà al cessare
dell'interferenza elettromagnetica.
AVVERTENZA SULLA NORMATIVA FCC
(solo U.S.A.)
Questo dispositivo è stato testato e trovato
conforme ai limiti imposti per i dispositivi digi-
tali di Classe B, in base a quanto stabilito dalla
Sez. Tali limiti sono stati imposti per fornire
un ragionevole grado di protezione contro le
interferenze nocive in ambito residenziale.
Il presente dispositivo genera, utilizza e può
emettere frequenze radio e, se non installa-
to secondo le istruzioni, può interferire con
le comunicazioni via radio. Tuttavia, non vi è
alcuna garanzia che tali interferenze non si
verifichino ugualmente. Se ciò dovesse acca-
dere, il che può essere accertato spegnendo e
riaccendendo il dispositivo, l’utente è invitato
a mettere in atto una o più delle seguenti con-
tromisure :
• Riorientare l’antenna ricevente.
• Incrementare la distanza tra il dispositivo e
l’apparato ricevente.
• Collegare il dispositivo a una presa di cor-
rente diversa da quella dove è connessa l’u-
nità ricevente.
• Consultare il rivenditore o un tecnico TV/ra-
dio specializzato.
Utilizzare esclusivamente i cavi eventualmen-
te inclusi con il prodotto.
Qualsiasi modifica non autorizzata apportata
al prodotto può invalidare i diritti di utilizzo
dell’acquirente.

|1
Español
ESPAÑOL

2| Español
Instrucciones de seguridad importantes
1. Lea estas instrucciones.
2. Guarde estas instrucciones.
3. Observe todas las advertencias.
4. Siga todas las instrucciones.
5. No utilice este aparato cerca del agua.
6. Limpie solamente con un paño limpio y seco.
7. No bloquee las aberturas de ventilación.
Instale de acuerdo con las instrucciones del
fabricante.
8. No instale cerca de ninguna fuente de calor
tal como radiadores, calefactores, estufas u
otros aparatos (incluyendo amplificadores)
que produzcan calor.
9.
No anule el propósito de seguridad del enchu-
fe polarizado o con toma de tierra. Un enchu-
fe polarizado tiene dos patillas, una más an-
cha que la otra. Un enchufe de tipo conexión
a tierra tiene dos patillas y una tercera clavija
de conexión a tierra. La patilla ancha o la ter-
cera patilla se proporciona para su seguridad.
Si el enchufe proporcionado no encaja en su
toma de corriente, consulte a un electricista
para el reemplazo del enchufe obsoleto.
10. Proteja el cable de alimentación para evitar
que sea pisado o aplastado, especialmente
en los enchufes, receptáculos y el punto don-
de sale del aparato.
11. Utilice únicamente accesorios especificados
por el fabricante.
12.
Use solamente con el carro, soporte, trípode,
repisa o mesa especificado por el fabricante,
o vendido con el aparato. Cuando se utiliza un
carro, tenga cuidado al mover la combinación
carro/aparato para evitar lesiones por vuelco.
13. Desenchufe el aparato durante tormentas
eléctricas o cuando no se use durante largos
períodos de tiempo.
14. Acuda a un Servicio Oficial con personal
de servicio calificado. Se requiere servicio
cuando el aparato ha sido dañado de cual-
quier manera, como cable de alimentación o
enchufe dañados, se ha derramado líquido o
han caído objetos dentro del aparato, el apa-
rato ha sido expuesto a lluvia o humedad, no
funciona normalmente, o se ha caído.
▪ La ventilación no debe ser impedida cubrien-
do las aberturas de ventilación con elemen-
tos como periódicos, manteles, cortinas, etc.
▪ No deben colocarse sobre el aparato fuentes
de llama, como velas encendidas.
▪ No instale este equipo en un espacio cerrado
como una caja para el transporte o unidad
similar.
▪ ADVERTENCIA: este aparato debe ser conec-
tado a un enchufe con una toma de tierra de
protección.
▪ El apagar el interruptor de alimentación no
aísla este producto completamente de la
alimentación así que retire el enchufe de la
toma si no va a usarlo durante períodos pro-
longados de tiempo, o antes de limpiarlo.
Asegúrese de que el enchufe de red sigue
siendo accesible.
▪ No exponga este aparato eléctrico a goteos
ni salpicaduras y evite que entren objetos
o líquidos, no coloque decoraciones tales
como floreros sobre el aparato.
▪ Instale este producto cerca de la toma de red
de la pared y mantenga el enchufe fácilmen-
te accesible.
▪ La placa de información está en la parte in-
ferior del instrumento. El modelo, número de
serie, requisitos de alimentación, etc., están
en dicha placa.
Número de serie
Por favor escriba el modelo, número de serie y
fecha de compra a continuación. Guarde este
manual, y use esta información acerca de su
compra.
Modelo _______________________________
Nº de serie ______________________________
Fecha de Compra _________________________

|3
Español
Precauciones
Apagado automático
Para evitar el desperdicio de energía y pro-
longar la vida útil de la válvula, SV-2 entrará
automáticamente en modo de espera después
de dos horas de uso no activo (interpretación,
pulsación de botones o movimiento de mandos).
Guarde los datos editados antes de realizar una
pausa prolongada.
Reemplazar la válvula
Las válvulas, como las bombillas, tienen una
vida útil indeterminada. Cuando la válvula falle,
póngase en contacto con un centro de servicio
autorizado de KORG para reemplazarla. NO
INTENTE REEMPLAZAR LA VÁLVULA USTED
MISMO, ya que corre el riesgo de dañar grave-
mente el instrumento y arriesgarse a recibir una
descarga eléctrica. Además, esta acción anulará
la garantía.
Gestión de datos
Los datos en la memoria a veces pueden per-
derse debido a un uso inadecuado. Asegúrese
de guardar los datos importantes en el software
Editor/Librería suministrado. KORG no será res-
ponsable de los daños causados por la pérdida
de datos.
Limpieza
Si el exterior se ensucia, límpielo con un paño
limpio y seco. No utilice limpiadores líquidos
como benceno o diluyente, ni compuestos de
limpieza inflamables.
Marcas Registradas
Acrobat y PDF son marcas comerciales registra-
das de Adobe Systems Incorporated. Mac e iOS
son marcas comerciales registradas de Apple,
Inc. Android es una marca comercial de Google
Inc. MS-DOS y Windows son marcas comerciales
registradas de Microsoft Corporation. Todas las
demás marcas comerciales o marcas registra-
das son propiedad de sus respectivos titulares.
Aviso
La información contenida en este manual ha
sido cuidadosamente revisada y verificada.
Debido a nuestros constantes esfuerzos para
mejorar nuestros productos, las especificacio-
nes pueden diferir de las del manual. KORG no
se hace responsable de las diferencias encontra-
das entre las especificaciones y el contenido del
manual de instrucciones – todas las especifica-
ciones están sujetas a cambios sin previo aviso.
Responsabilidad
Los productos KORG se fabrican bajo estric-
tas especificaciones y voltajes requeridos por
cada país. Estos productos están garantizados
por el distribuidor de KORG solo en cada país.
Cualquier producto KORG que no se venda con
una tarjeta de garantía o sin un número de serie
descalifica el producto vendido de la garantía y
responsabilidad del fabricante/distribuidor. Este
requisito es para su propia protección y seguri-
dad.
Servicio y asistencia al usuario
Para servicio, póngase en contacto con el Centro
de Servicio Autorizado KORG más cercano. Para
obtener más información sobre los productos
KORG y para encontrar software y accesorios
para su teclado, póngase en contacto con su
distribuidor autorizado KORG local. Para obte-
ner información actualizada, por favor dirija su
navegador web a nuestro sitio web.
Mantenga su teclado actualizado
Su instrumento se puede actualizar constante-
mente a medida que KORG lanza nuevas versio-
nes del sistema operativo. Puede descargar el
sistema operativo desde nuestro sitio web. Por
favor, lea las instrucciones suministradas con el
sistema operativo.

4| Español
Índice
Introducción ........................................................5
¡Bienvenido a bordo! ....................................................5
Antes de empezar a tocar… ..............................................5
Controles y Conexiones ...............................................7
Panel Frontal ...........................................................7
Panel Posterior ........................................................8
Encender el SV-2 ....................................................11
Encendido y apagado ...................................................11
Ajustar el volumen master .............................................. 12
Escuchar las demos .................................................... 12
Tocar los sonidos ...................................................14
¿Qué significa ‘sonido’? ................................................ 14
Sonidos de Fábrica y Favoritos .......................................... 14
Seleccionar los sonidos de fábrica ....................................... 15
Seleccionar los sonidos favoritos ........................................ 16
Los sonidos ........................................................... 17
Uso de los efectos ..................................................22
Los efectos ...........................................................22
Guardar los cambios en un sonido .......................................23
Ajustes avanzados ................................................. 24
Los botones de ajustes avanzados .......................................24
Transposición .........................................................24
Cambiar la sensibilidad al toque .........................................26
Función Local Off ......................................................27
Inicialización MIDI .....................................................27
Calibración de los pedales ..............................................28
Bloquear el panel de control ............................................29
Inicializar todos los ajustes de Fábrica ...................................29
Especificaciones ................................................... 30

Introducción |5
Español
Introducción
¡Bienvenido a bordo!
Muchas gracias y felicidades por la compra de Korg SV-2 Stage Vintage
Piano. Estamos seguros que estará completamente satisfecho con el instru-
mento y que le proporcionará muchas horas de disfrute musical con sonidos
de piano ¡con una sensación tan buena como su sonido!
Para maximizar sus posibilidades de disfrutar de un uso largo y provechoso
con su SV-2, por favor lea este manual al menos una vez, y (como dicen), “uti-
lice el producto como se indica”. Guarde el manual para futuras referencias
después de leerlo; querrá volver a leerlo más tarde en algún momento para
obtener consejos interesantes que puede haber perdido la primera vez.
Por favor tenga en cuenta que este manual es aplicable tanto a la versión
de 88 Teclas como a la de 73 Teclas de SV-2, y con las versiones con y sin
altavoces integrados. No hay diferencia de funcionamiento entre ambos, a
parte del número de teclas, altavoces (¡y el peso!).
Antes de empezar a tocar…
Contenido de la caja
Tras comprar so SV-2, por favor compruebe todos los elementos. Si falta
alguno, póngase en contacto con su distribuidor KORG de inmediato.
▪ SV-2 Stage Vintage Piano
▪ Guía Rápida (la que está leyendo ahora)
▪ Atril de partituras
▪ Pedal damper KORG DS-2H (soporta medio-pedal)
▪ Cable estándar de alimentación IEC AC

6| Español
Lo que puede descargar
Dirija su navegador web a nuestro sitio web (www.korg.com), para descargar
el software SV-2 Editor, un controlador MIDI, software actualizado, varios
materiales de soporte y el Manual de usuario completo.
Lo que puede añadir
Después de haber comprado el SV-2, es posible que desee agregar estas
otras excelentes opciones:
▪ El elegante soporte de teclado KORG ST-SV1, recomendado por seguridad y
comodidad, que se adapta perfectamente al diseño del piano.
▪ Uno de los robustos pedales y conmutadores de pedal del catálogo KORG,
como el damper DS-1H, los conmutadores de pedal PS-1 y PS-3, el contro-
lador de pedal EXP-2, los pedales de volumen/expresión XVP-10 o XVP-20.
▪ Nuestra práctica y robusta bolsa de transporte CB-SV.
Contactos
Sus distribuidores KORG no solo le entregan este instrumento, sino que tam-
bién ofrecen accesorios de hardware y software, así como información útil
sobre cómo utilizar estos productos. Pídales cualquier ayuda que eventual-
mente necesite.
Nuestro sitio web internacional es www.korg.com. Puede encontrar una lista
de todos los distribuidores de KORG en nuestra página web dedicada (www.
korg.com/us/corporate/distributors/).

Controles y Conexiones |7
Español
Controles y Conexiones
Panel Frontal
El panel frontal es donde se accede a los controles de SV-2.
3
2
1
2
1 Panel de Control
Esta fila contiene los botones, mandos y otros controles del piano.
2 Altavoces (sólo SV2-73S y SV2-88S)
En los modelos con altavoces integrados, de aquí proviene el sonido.
3 Toma de AURICULARES (estéreo)
Conecte un par de auriculares a este conector ( ). Puede usar auriculares
con una impedancia de 16-200 ohmios (se recomiendan 50 ohmios). Al co-
nectar los auriculares, los altavoces integrados se desactivan automática-
mente.
Ajuste el nivel de salida con el mando MASTER VOLUME.

8| Español
Panel Posterior
El panel posterior es donde puede encontrar la mayoría de las conexiones.
1
2
3 4 5 6 7 8
1 Conector AC IN POWER
Conecte el cable de alimentación IEC incluido aquí.
2 Orificios para el Atril de Partituras
Un atril viene de serie con su SV-2. Inserte sus patas en estos dos agujeros
dedicados.
3 Conector USB DEVICE
Use este conector para conectar un ordenador para la secuenciación (esto
duplica los puertos MIDI), o para usar el software SV-2 Editor para una edi-
ción detallada. Antes de usar este conector, instale el controlador KORG
USB-MIDI (las instrucciones relevantes se proporcionan junto con el contro-
lador MIDI, que puede descargarse de nuestro sitio web).
Para obtener la información más reciente sobre el soporte del sistema ope-
rativo, consulte nuestra página web dedicada (https://www.korg.com/su-
pport/os/).
4
Conmutador SPEAKERS ON/OFF (sólo modelos con altavoces integrados)
Use este interruptor para encender o apagar los altavoces integrados.
5 Tomas de PEDAL (DAMPER, 1, 2)
Conecte el pedal KORG DS-2H suministrado, o el opcional DS-1H, a la toma
DAMPER. Esta toma siempre funciona como un pedal damper.

Controles y Conexiones |9
Español
Conecte un conmutador de pedal (como el opcional Korg PS-1 o PS-3) al co-
nector PEDAL 1. El pedal puede funcionar como sostenuto pedal, o como
conmutador deprisa / despacio (cuando se Selecciona el efecto rotatorio.
Conecte un pedal (como el Opcional KORG PS-1 o PS-3) o un pedal de volu-
men/expresión (como el KORG XVP-10, XVP-20, EXP-2 opcionales) al conector
PEDAL 2. El pedal funciona como un pedal soft. El pedal de volumen/expresión
funciona como un control de volumen (este es el ajuste predeterminado) o como
un control de filtro wah (cuando se selecciona el efecto wah). Para controlar el
efecto wah, encienda el LED Auto/Pedal en la sección PRE FX (modo Pedal).
Si bien el pedal KORG DS-2H ya viene calibrado, el pedal de volumen/ex-
presión generalmente requiere calibración para hacer uso de toda la gama
de valores. La calibración también se puede utilizar para elegir una pola-
ridad de pedal. Para calibrar los pedales (y ajustar su polaridad), consulte
“Calibración de los pedales” en la página 28.
6 Conectores MIDI (IN, OUT)
Mediante MIDI puede controlar SV-2 desde un Secuenciador, o bien controlar
otro aparato MIDI desde el SV-2. Cuando use el SV-2 para controlar un apa-
rato MIDI externo, o para grabar en un Secuenciador, pulse el botón LOCAL
OFF para que su LED se ilumine; esto desconecta el teclado de los sonidos
internos, pero no del MIDI.
MIDI OUT transmite datos MIDI. Use este conector cuando desee controlar
un aparato MIDI externo o Secuenciador de ordenador. Use un cable MIDI
para conectarlo al MIDI IN del aparato externo.
MIDI IN recibe datos MIDI. Use este conector cuando desee controlar el SV-1
desde un aparato MIDI externo u ordenador. Use un cable MIDI para conec-
tarlo al MIDI OUT del aparato externo.
7 Tomas INPUT (L/MONO, R/MONO)
Conecte un aparato de nivel de línea, como un Teclado o sintetizador, un CD
o reproductor de música. Para conexiones mono use cualquiera de ellas.
8 Tomas OUTPUT (L/MONO, R/MONO)
Son salidas analógicas, disponibles como 1/4” no balanceados, o XLR balan-
ceados. Use los no balanceados 1/4” para una conexión de corto recorrido, o
los XLR balanceados para una conexión de largo recorrido, como el directo.
El sonido de ambas es el mismo.
Si necesita una conexión mono, use solamente L/MONO 1/4” jack. XLR no se
pueden usar para salida mono.
SUGERENCIA: Las salidas balanceadas XLR se recomiendan siempre que sea posible.
AVISO: Si conecta las tomas XLR a un mezclador o dispositivo similar, asegúrese de
apagar la alimentación phantom de ese dispositivo. El SV-2 podría dañarse si no lo hace.

10| Español
VOX
Sintetizador, etc.
MIDI
IN OUT
OUTPUT
OUTPUT INPUT AUX/LINE IN INPUT/LINE IN
INPUT/LINE IN
INPUT/LINE IN
Ordenador
USB cable
USB
Volumen/
Expresión
pedal
Footswitch 2
(Sostenuto
pedal)
Footswitch 1
(Soft pedal)
AURICULARES
Auriculares
Pedal Damper
(suministrado)
Alimentación
AC IN
CD/reprod. mus., etc.
Amplificador
Sistema Audio
Mezclador, grabador, etc.
Monitores amplificados
Interfaz
Audio
(solo SV2-73S
y SV2-88S)

Encender el SV-2 |11
Español
Encender el SV-2
Encendido y apagado
1 Conecte el cable de alimentación IEC incluido al conector POWER de la par-
te posterior del instrumento.
2 Conecte el enchufe a una toma de corriente de CA.
3 Presione y suelte el interruptor POWER en el panel de control para encender
el instrumento. La válvula se encenderá y comenzará a calentarse. Después
de unos segundos, el instrumento se encenderá.
El SV-2 contiene una VÁLVULA 12AX7 (ECC83).
AVISO: La tapa de la VÁLVULA o la propia VÁLVULA se pueden romper si reciben un
golpe. Si la tapa de la VÁLVULA se rompe, haga que la reemplacen. Si no lo hace se
puede dañar la propia VÁLVULA.
NOTA: Cuando encienda su KORG SV-2, es posible que observe un breve flash en la
válvula. Esta es una característica de ciertas válvulas que utilizamos y si se produce,
sólo ocurre cuando su SV-2 está encendido y la válvula aún no está caliente. Esto no
afecta al rendimiento de la válvula ni del SV-2.
4 Para apagar el instrumento, mantenga pulsado el interruptor POWER duran-
te aproximadamente un segundo.

12| Español
Ajustar el volumen master
Puede ajustar el volumen total del SV-2.
▪ Gire el mando MASTER VOLUME en el sentido de las agujas del reloj para
aumentar el volumen, en sentido contrario a las agujas del reloj para dismi-
nuirlo.
Este mando controla el volumen total del instrumento, tanto los altavoces
integrados, las salidas izquierda y derecha, y la toma de auriculares.
AVISO: Mantenga siempre el volumen a un nivel confortable. El volumen excesivo
puede causar daños auditivos permanentes.
Escuchar las demos
Escuche las canciones de demostración integradas para apreciar el poten-
cial del SV-2. Hay varias canciones de demostración para elegir.
1 Pulse los botones TRANSPOSE y LOCAL OFF simultáneamente. Los LEDs
parpadearán.
2 En este punto, si espera unos segundos todas las canciones de demostración
serán reproducidas.
3 De lo contrario, puede seleccionar una de las canciones de demostración
disponibles. Hay una demostración para cada uno de los sonidos de fábrica.
▪ Utilice los mandos TYPE y VARIATION de la sección SOUND para seleccio-
nar una canción de demostración.
▪ Puede pulsar el mando VARIATION, para encender su LED en verde, y escu-
char un segundo banco de canciones de demostración. Presione el mando
VARIATION de nuevo para volver a poner su LED en naranja, y volver al
primer banco.

Encender el SV-2 |13
Español
▪ Puede seleccionar cualquier demo incluso después de que se haya iniciado
la reproducción automática.
4 Ajuste el volumen de escucha con el mando MASTER VOLUME.
5 Pare la reproducción pulsando los botones TRANSPOSE y LOCAL OFF si-
multáneamente de nuevo.

14| Español
Tocar los sonidos
¿Qué significa ‘sonido’?
En SV-2, un sonido es un ‘timbre’ o un conjunto de timbres que se pueden
escuchar cuando se toca el teclado. Cada sonido puede estar formado por
hasta tres ‘programas’, cada uno con un timbre diferente o un conjunto de
‘ruidos’ accesorios, como la mecánica del teclado, ruido del martillo, etc. Una
o dos capas se pueden añadir al programa principal, y se pueden escuchar
como un segundo o tercer timbre mezclado con el timbre principal. Tomemos
por ejemplo el caso del sonido universalmente conocido “piano plus strings”:
hay un programa de piano, uno de ruidos de piano, uno de cuerdas.
Main, Layers 1, 2
Main, Layer (1)
Split
Hay sonidos donde el teclado se divide en dos mitades, con uno o dos pro-
gramas en la mitad derecha. El tercer programa se mueve a la mitad izquier-
da, y se puede utilizar para reproducir un acompañamiento (un bajo, un pad
de sintetizador, o similar).
Main, Layers 1, 2
Main, Layer (1)
Split
Sonidos de Fábrica y Favoritos
SV-2 tiene 72 sonidos de fábrica, y cada uno de estos sonidos se puede “ajus-
tar a medida” utilizando sólo los mandos del panel frontal. A continuación,
puede guardar los cambios en las 64 ubicaciones FAVORITES de los sonidos
favoritos. (Se puede realizar una edición más detallada utilizando el softwa-
re SV-2 Editor).
Por favor tenga en cuenta que, en general, pasar de un sonido a otro sucede
con una transición suave, por lo que puede mantener las notas presionadas
y escuchar el nuevo sonido sólo en el siguiente cambio de nota. Sin embargo,
si uno de los sonidos tiene la sección de amplificación activada y hace uso de
la válvula, esto no es posible.

Tocar los sonidos |15
Español
Seleccionar los sonidos de fábrica
Cómo seleccionar un sonido
La sección SOUND es donde puede seleccionar los sonidos de fábrica.
1 Utilice el mando TYPE de la sección SOUND para seleccionar un tipo de so-
nido básico (uno de seis).
2 Utilice el mando VARIATION de la sección SOUND para seleccionar una de
las variaciones del sonido básico (una de seis). Observe que el LED junto a
los mandos se ilumina para mostrar el sonido y la variación seleccionados.
3 Pulse el mando VARIATION para seleccionar el segundo banco de variacio-
nes (el color del LED cambiará a verde). Utilice el mismo mando VARIATION
para seleccionar una de las variaciones en el segundo banco (una de seis).
4 Cuando desee volver al primer banco de variaciones, pulse de nuevo el man-
do VARIATION (el color del LED volverá a naranja).

16| Español
Seleccionar los sonidos favoritos
Cómo seleccionar un sonido favorito
La sección FAVORITES es donde puede seleccionar los sonidos favoritos,
que contienen sus propios sonidos personalizados.
1 Para seleccionar un sonido favorito en el banco actual, pulse el botón
FAVORITES (1-8) correspondiente.
Si desea ver qué banco está seleccionado, pulse el mando TYPE y vea qué
botón FAVORITES (A-H) parpadea. Púlselo de nuevo para salir del modo de
selección de banco (o espere hasta que se apague).
2 Para seleccionar un favorito en un banco diferente, pulse el mando TYPE. El
banco seleccionado actualmente se muestra con el botón FAVORITES (A-H)
que parpadea. Pulse el botón FAVORITES (A-H) correspondiente al banco
que desea seleccionar. A continuación, pulse el botón FAVORITES (1-8) co-
rrespondiente al favorito que se va a seleccionar.
Cómo volver al último sonido favorito seleccionado
Después de haber seleccionado un sonido favorito, puede seleccionar un so-
nido de fábrica de nuevo, utilizando el procedimiento visto anteriormente.
Sin embargo, puede saltar inmediatamente al último sonido de fábrica selec-
cionado. Pulse el botón VARIATION en la sección SOUND para seleccionarlo.

Tocar los sonidos |17
Español
Los sonidos
La siguiente tabla contiene los nombres y una breve descripción de cada uno
de los sonidos incluidos.
Cuando el nombre del sonido es normal (como “MK I Suitcase”) es un sonido
simple extendido al teclado completo. Cuando tiene un ‘&’ en el medio (como
“FM Piano & Pad”), se compone de un programa principal con una o dos
capas. Cuando tiene un ‘/’ en el medio (como “Pad/Mini Lead”), el teclado se
divide entre diferentes programas.
Sonidos de Fábrica
Puede seleccionar un sonido de fábrica desde un dispositivo MIDI externo
enviando a SV-2 un mensaje de cambio de control #00 con un valor de 0, un
mensaje de de cambio de control #32 con un valor de 0, y a continuación, un
mensaje de cambio de programa (PC) para seleccionar el sonido.
Sonido Var PC Notas
EP 1 (Vintage)
MK I Suitcase A1 0 Dos versiones del icónico MK I, imprescindible para
cualquier teclista.
MK I Stage B1 6
MK II Suitcase A2 1 Dos versiones del magnífico MK II, en las versiones
portátil y más pesado.
MK II Stage B2 7
MK V Stage A3 2 El MK V Stage (el único que se fabricón), bien conoci-
do por su sonido de tipo campana.
MK V Bright B3 8
Dyno EP A4 3 El típico sonido Dyno Piano, perfecto para baladas en
la versión suave, listo para un solo en la brillante.
Dyno EP Bright B4 9
Wurly A5 4 El sonido potente estándar de las cañas de metal
Wurly. El sonido pop de los años 60 y 70.
Wurly Classic B5 10
Wurly Dark A6 5 Una versión más apagada y otra brillante del Wurly.
Wurly Bright B6 11
EP 2 (Varios)
FM Piano 1 A1 12 El sonido del piano eléctrico FM que marcó los 80. Tal
como se escucha en innumerables discos al comienzo
de la era de la música digital.
FM Piano 3 B1 18
FM Piano 2 A2 13
FM Piano & Pad B2 19 El piano FM + pad en capas es otro elemento básico de
la época.

18| Español
Sonido Var PC Notas
Pianet T A3 14 El Pianet, el teclado electromecánico alemán vintage.
La versión europea del piano eléctrico.
Pianet N B3 20
Hybrid Piano A4 15 Combinaciones híbridas de pianos, para explorar nue-
vos paisajes sonoros de piano.
Hybrid Tine B4 21
Wurly & Strings A5 16 Diferentes combinaciones de pianos eléctricos y cuer-
das. Elija entre cañas de metal y FM.
FM & Strings B5 22
MK II & Pad A6 17 Diferentes combinaciones de pianos eléctricos y pads.
Una vez más, puede elegir entre tines y FM.
FM & Pad B6 23
Piano 1 (Acústico)
German Grand A1 24 El rey de los pianos acústicos, el piano de cola alemán
tan universalmente admirado por los pianistas clási-
cos, jazz y pop.
German Classic B1 30
Italian Grand A2 25 El piano de cola italiano, la mejor opción para el reper-
torio clásico y jazz.
Italian Bright B2 31
Japanese Grand A3 26 Otro imprescindible: un piano de cola japonés, preferi-
do por muchos artistas clásicos, jazz y pop.
Japanese Bright B3 32
Austrian Grand A4 27 El piano de cola austriaco — un hito para música clási-
ca, y el preferido por algunos artistas de jazz.
Austrian Classic B4 33
Japanese Upright A5 28 Un gran piano vertical japonés, con un sonido muy
resonante.
Upright Bright B5 34 Un sonido de piano íntimo, pero brillante, utilizado con
frecuencia por bandas pop.
German Upright A6 29 Este es el sonido distintivo y más suave de un piano
vertical alemán.
Rock Piano B6 35 Un piano vertical agresivo para melodías de rock y
rockabilly.
Piano 2 (Varios)
Electric Grand A1 36 Piano electroacústico producido en los años 70, con
un sonido único y suave muy popular entre los músi-
cos en vivo.
German Mono B1 42 Una versión mono del piando de cola alemán.
KORG M1 Piano A2 37 La herencia del piano KORG. Desde el popular works-
tation sintetizador M1 que marcón una era, y de nues-
tro pionero piano digital SG-1D.
KORG SG-1D B2 43
Digital Piano A3 38 Un sonido de piano innovador, preciso y expresivo,
creado a finales de los 80 con un popular teclado/
sintetizador digital.

Tocar los sonidos |19
Español
Sonido Var PC Notas
Electra Piano B3 44 Un popular piano electrónico de los años 70, utilizado
por muchos músicos famosos de rock clásico y prog-
rock.
Tack Piano A4 39 Pianos Tack y Honky-Tonk, para disfrutar de géneros
de rag-time y stride.
Honky-Tonk B4 45
Piano & Strings A5 40 Piano en capas y cuerdas o pad. Perfecto para evoca-
dora música ambiental.
Piano & Pad B5 46
Piano & Synth A6 41 Capas de piano y sintetizador o metales. Dos mezclas
que nos remontan a la era del fusión jazz.
Piano & Brass B6 47
Claves
Clav AC A1 48 El clásico clavicordio eléctrico, dos versiones con mi-
crófonos en fase.
Clav AD B1 54
Clav BC A2 49 Dos configuraciones diferentes de los registros Clavi,
con micrófonos en fase invertida y un sonido más pe-
netrante.
Clav BD B2 55
Harpsichord A3 50 Vuelta al Renacimiento tardío y Barroco con el abuelo
del piano. Registros estándar de 8” y 8”+4” de doble
octava.
Harpsichord Oct. B3 56
Perc. Organ A4 51 Verdadera emulación electromecánica clásica, con
percusión, en una versión limpia y otra distorsionada.
Rock Organ B4 57
Jazz Organ A5 52 Registro de jazz del clásico órgano electromecánico.
Vox Organ B5 58 Una emulación perfecta de “Connie”, el órgano a tran-
sistores VOX Continental.
Church Organ A6 53 Todo el poder de un majestuoso órgano de tubos.
Pipe Organ B6 59 Registros más suaves y emocionales de un órgano de
tubos, para los momentos más meditativos.
Otros
Full Strings A1 60 Dos sabores diferentes de sonidos de cuerdas clási-
cas.
Classic Strings B1 66
Tape Strings A2 61 Las cuerdas sintéticas Mello de los años 70.
Strings & Voices B2 67 Cuerdas reales con voces añadidas.
Warm Pad A3 62 Versión oscura y brillante de los típicos pads de sinte-
tizador.
Bright Pad B3 68
Orchestra A4 63 Un poderoso Tutti orquestal.
Pizzicato & Glock B4 69 Cuerdas orquestales Pizzicato y glockenspiel.
Brass A5 64 Una sección de metales real.

20| Español
Sonido Pos PC
Demo Shop
German Grand A1 0
Italian Grand A2 1
EP MK II A3 2
Wurly A4 3
Clav A5 4
FM Piano A6 5
Piano & Strings A7 6
Bass/EP A8 7
Piano
German Grand B1 8
Italian Grand B2 9
Japanese Grand B3 10
Austrian Grand B4 11
Japan Upright B5 12
German Upright B6 13
Rock Piano B7 14
Tack Piano B8 15
Electric Pno
EP MK I C1 16
EP MK II C2 17
Sonido Pos PC
EP MK V C3 18
Dyno EP C4 19
Wurly Amp C5 20
Wurly Tremolo C6 21
FM Piano C7 22
Hybrid EP C8 23
Claviers
Clav AC D1 24
Clav BC D2 25
Perc. Organ D3 26
Jazz Organ D4 27
Church Organ D5 28
KORG M1 Piano D6 29
Electric Grand D7 31
Harpsichord D8 32
Layer
Piano & Strings E1 32
Piano & Pad E2 33
Piano & EP E3 34
Piano & Vibes E4 35
MK II & Pad E5 36
Sonido Var PC Notas
Synth Brass B5 70 El contrapunto de metales de sintetizador.
Pad/Mini Lead A6 65 Dos sintetizadores solistas tocando encima de un pad
suave.
Pad/SynthLead B6 71
Sonidos Favoritos
Puede seleccionar un sonido favorito desde un dispositivo MIDI externo en-
viando a SV-2 un mensaje de cambio de control #00 con un valor de 0, un
mensaje de de cambio de control #32 con un valor de 64, y a continuación,
un mensaje de cambio de programa (PC) para seleccionar el sonido.

Tocar los sonidos |21
Español
Sonido Pos PC
Strings & Pad E6 37
Piano & FM E7 38
FM & Strings E8 39
Split
Ac. Bass/Piano F1 40
El. Bass/Piano&Str F2 41
Fretless/EP F3 42
Slap/EP F4 43
Slap/Clav F5 44
EP Bass/Vox Organ F6 45
Jazz Piano Trio F7 46
Organ Dual Manual F8 47
Other
Full Strings G1 48
Strings Octave G2 49
Sonido Pos PC
Orchestra Tutti G3 50
Brass G4 51
Warm Pad G5 52
Synth Brass G6 53
Pad/SynLead G7 54
Synth Bass G8 55
Legacy SV1
SV1 Grand Piano 1 H1 56
SV1 Grand Piano 2 H2 57
SV1 Tine EP Amp H3 58
SV1 Reed EP1 H4 59
SV1 Clav AC H5 60
SV1 Clk.Tonewheel H6 61
SV1 Full Strings H7 62
SV1 Synth Brass H8 63

22| Español
Uso de los efectos
Los efectos
Puede seleccionar los diversos efectos y modelos de amplificador girando los
mandos TYPE correspondientes. Puede cambiar los ajustes de efecto utilizan-
do los mandos DEPTH, INTENSITY, SPEED, DRIVE. Si pulsa el mando, se re-
cuperará el valor original del parámetro. Una edición más detallada se puede
hacer con el software SV-2 Editor.
Los efectos y la simulación de amplificador también se pueden activar o des-
activar pulsando el botón On/Off correspondiente. Los cambios se pueden
guardar, junto con un sonido, en una de las ubicaciones de FAVORITES.
Experimente con los diversos controles, y escuche lo que puede hacer con
los distintos efectos.
SIGNAL ROUTING
EQ PRE FX
MODULATION AMBIENT TOTAL FX
Stereo Limiter
Stereo Mastering Limiter
OUTPUTS
SOUND
PRE AMP
VOLUME VOLUME POWER
AT T.
PROGR
LVL
POWER AMP
VALVE
CABINET NR

Uso de los efectos |23
Español
Guardar los cambios en un sonido
Si le gusta el sonido que acaba de crear explorando con las posiciones de los
mandos, guárdelo como un sonido favorito.
1 Pulse el botón TYPE para ver qué banco de sonidos favoritos está seleccio-
nado.
El banco seleccionado actualmente se muestra mediante el botón FAVORITES
(A-H) que parpadea.
2 Pulse el botón FAVORITES (A-H) correspondiente al banco que desea selec-
cionar.
3 Mantenga pulsado el botón FAVORITES (1-8) correspondiente al favorito
donde desea guardar la configuración, hasta que su LED comience a parpa-
dear.
4 Pulse el mismo botón de nuevo, para confirmar el guardado.
Si no desea guardar los cambios, espere unos segundos hasta que el LED del
botón se apague, sin pulsar ningún botón.
SUGERENCIA: Utilice los bancos favoritos para organizar los sonidos en conjuntos
separados, por ejemplo, un conjunto diferente para un estilo en particular.
SUGERENCIA: El sonido favorito se guarda sobre el contenido anterior de esa ubi-
cación. El sonido favorito que estaba en ese lugar será borrado.
SUGERENCIA: Si cambia a un sonido diferente o apaga el instrumento sin guardar el
sonido y los efectos que ha editado, los cambios se perderán.

24| Español
Ajustes avanzados
Los botones de ajustes avanzados
El grupo de botones llamado TRANSPOSE, LOCAL OFF, TOUCH y FUNCTION
dan acceso a una serie de funciones avanzadas que es posible que necesite
para adaptar el piano a sus necesidades.
El botón FUNCTION da acceso a varios ajustes avanzados, que pueden ayu-
darle a personalizar su experiencia con el instrumento. Consulte el Manual
del usuario para obtener más información sobre sus funciones.
Transposición
En algunos casos, una canción puede estar escrita en una clave difícil (por
ejemplo, muchas teclas negras), o es posible que desee cambiar el tono para
que coincida con otro instrumento o vocalista. En tales casos, puede trans-
poner (cambiar el tono) para que pueda utilizar una digitación más fácil, o
utilizar la misma digitación familiar para tocar en un tono diferente. Esto se
denomina función Transposición.
Por ejemplo, si transpone hacia arriba por un semitono, al tocar las notas
que se muestran en la parte inferior izquierda producirá las notas mostradas
a la derecha.
Activar o desactivar la transposición
1 Pulse el botón TRANSPOSE. Si el teclado ya está transpuesto el LED de este
botón estará iluminado, de lo contrario estará apagado.
2 Pulse de nuevo el botón TRANSPOSE para desactivar la transposición. El
LED se apagará.

Ajustes avanzados |25
Español
Ajustar el intervalo de transposición
1 Mantenga pulsado el botón TRANSPOSE durante aproximadamente un se-
gundo, hasta que su LED comience a parpadear.
2 Pulse la nota correspondiente a la transposición deseada. La transposición
se activará, y el LED permanecerá encendido.
-12
C3
0 +12
C5
Nota Efecto
C3 – B3 12 – 1 semitonos por debajo
C4 (C central) Tono estándar
C#4 – C5 1 – 12 semitonos por encima
Si no se toca ninguna nota durante unos segundos, la programación de
transposición terminará.
3 Pulse el botón TRANSPOSE de nuevo para desactivar la transposición. El
LED se apagará.
NOTA: Cuando el instrumento se apaga, la Transposición se inicializa.

26| Español
Cambiar la sensibilidad al toque
La sensibilidad del teclado, o toque, se puede programar.
1 Pulse el botón TOUCH.
Después de pulsar este botón, su LED comienza a parpadear. Además, el
botón FAVORITE correspondiente a la curva táctil seleccionada comenzará
a parpadear.
2 Pulse el botón FAVORITE correspondiente a la curva de toque deseada.
3 Pulse el botón TOUCH para confirmar y volver al funcionamiento normal.
Favorito # Curva de toque Nota
1 Normal Toque Normal de piano.
2 Soft 1 Un toque suave produce notas fuertes.
3 Soft 2
4 Medium 1 Un toque normal produce notas fuertes.
5 Medium 2
6 Hard 1 Para obtener notas fuertes hay que tocar muy fuerte.
7 Hard 2
8 Fixed Dinámica fija. Para programarla hay que usar el SV-2
Editor para elegir el valor deseado.
Este es el Diagrama de las curvas de toque:
Playing strength
Soft
Str
ong
Strong
( )
No
te
loudness
Soft
Hard
Normal/Medium

Ajustes avanzados |27
Español
Función Local Off
Puede activar o desactivar la función Local Off.
▪ Pulse el botón LOCAL OFF para encender el LED.
Al encender el LED de este botón, el teclado se desconecta de los sonidos
internos. Al tocar el teclado, no se puede escuchar ningún sonido del gene-
rador de tonos interno. Sin embargo, las notas se siguen enviando al puerto
MIDI OUT (o al puerto USB), y pueden ser recibidas por un ordenador.
El ordenador las devuelve de nuevo al puerto MIDI IN del SV-2 (o al puerto
USB) y, a continuación, al generador de tonos interno. Esta ruta le permite
grabar y tocar al mismo tiempo, sin notas duplicadas.
▪ Pulse el botón LOCAL OFF para apagar el LED.
Al apagar el LED de este botón, el teclado puede reproducir los sonidos in-
ternos.
NOTA: Cuando el instrumento se apaga, el local off se restablece.
Inicialización MIDI
En caso de que las notas MIDI permanezcan bloqueadas por problemas en
la comunicación MIDI, mantenga presionada el botón On/Off de la sección
EQUALIZER hasta que las notas bloqueadas se silencien. Esto se llama co-
múnmente la función de inicialización MIDI.

28| Español
Calibración de los pedales
Puede calibrar los pedales conectados a las tomas DAMPER, PEDAL 1 y
PEDAL 2 en el panel posterior. La calibración permite al SV-2 comprender
su polaridad y el rango de valores.
1 Conecte todos los pedales que deben ser calibrados al SV-2. Recuerde que
a la toma DAMPER debe conectar el pedal incluido Korg DS-2H (o, como
alternativa, el DS-1H opcional, o cualquier conmutador de pedal), a la toma
PEDAL 1 debe conectar un conmutador de pedal opcional, y la toma PEDAL
2 se puede usar para conectar un conmutador de pedal o un pedal de volu-
men/expresión.
2 Ajuste el pedal de volumen/expresión si está presente a su ajuste más bajo.
3 Apague el SV-2.
4 Mantenga pulsado el botón Auto/Pedal, y encienda el SV-2.
5 Cuando el LED Auto/Pedal empiece a parpadear, suelte el botón.
Si no hace nada en unos segundos el LED Auto/Pedal se apagará y el SV-2
completará el inicio.
6 Mientras el LED Auto/Pedal está parpadeando, Pulse el botón de nuevo. El
SV-2 entra en modo de calibración.
7 Ahora calibre el PEDAL 1 (un conmutador de pedal). Pulse completamente
el pedal, y después suéltelo. Cuando haya terminado de calibrar el pedal co-
nectado a la toma PEDAL 1, el botón FAVORITES #1 se iluminará.
8 Después, calibre el PEDAL 2. El procedimiento es distinto dependiendo de si
usa un conmutador de pedal o un pedal de volumen/expresión:
▪
Si ha conectado un conmutador de pedal, púlselo completamente y luego suéltelo.
▪ Si ha conectado un pedal de volumen/expresión, púlselo completamente
hasta el máximo.
Cuando haya terminado de calibrar el pedal conectado a la toma PEDAL 2,
el botón FAVORITES #2 se iluminará.
9 Finalmente calibre el pedal DAMPER. Púlselo completamente y luego suélte-
lo. Cuando haya terminado de calibrar el pedal conectado a la toma DAMPER,
el botón FAVORITES #3 se iluminará.
10 Cuando termine de calibrar:
▪ Si ha calibrado los tres pedales conectados, el SV-2 sale automáticamente
del modo de calibración y continúa el inicio.
▪ Si ha calibrado solamente uno o dos pedales, Pulse el botón Auto/Pedal de
nuevo para salir del modo de calibración y seguir la secuencia de inicio.

Ajustes avanzados |29
Español
Bloquear el panel de control
Le hemos mostrado cómo cambiar los sonidos y efectos. ¡Ahora le diremos
cómo evitar hacer cualquier cambio! Esto puede ser útil si desea evitar cam-
biar por error la configuración mientras toca.
1 Presione los botones TOUCH y FUNCTION conjuntamente para bloquear el
panel de control. Sus LED comenzarán a parpadear.
Los únicos controles que seguirán siendo accesibles son el mando MASTER
VOLUME y el interruptor POWER.
2 Pulse el botón TOUCH o FUNCTION para desbloquear el panel de control.
NOTA: Cuando el instrumento se apaga, el bloqueo se desactiva.
Inicializar todos los ajustes de Fábrica
Después de realizar varios cambios, es posible que desee restaurar el estado
original de fábrica del SV-2 (incluidos los sonidos favoritos y la configuración
global):
1 Apague el instrumento.
2 Mantenga pulsado el botón FUNCTION.
3 Sin soltar el botón FUNCTION, encienda el instrumento.
4 Cuando su LED comience a parpadear, suelte el botón FUNCTION.
5 Pulse de nuevo el botón FUNCTION para confirmar la operación de iniciali-
zación.
6 Al final del proceso, todos los ajustes serán inicializados.

30| Español
Especificaciones
Especificaciones SV-2
Teclado
Teclas SV2-73/SV2-73S: 73 Teclas / SV2-88/SV2-88S: 88 Teclas.
Teclado sensible a la Velocidad Korg RH3 (Real Weighted
Hammer Action 3)
Selección de Toque Ocho curvas
Afinación Transposición, Afinación, Curvas de Afinación
Sonidos
Generación de Sonido EDS-X (Enhanced Definition Synthesis – eXpanded)
Polifonía 128 notas (máx)
Multitimbral Capa, División
Sonidos de fábrica 72 sonidos de fábrica (6 sonidos base x 2 sets de 6 variaciones)
Sonidos favoritos 64 sonidos favoritos (8 bancos x 8 variaciones) para guardar
ajustes personalizados
Efectos
Ecualizador Bass, Mid, Treble
Pre FX Red Compressor, Treble Boost, U-Vibe, Vibrato, Tremolo, VoxWah
(con pedal control)
Amp Models Clean, Twin, Tweed, AC30, Boutique, Organ Amp. Cabinet mode-
los Tecnología Valve Reactor con una válvula 12AX7 (ECC83)
Modulation FX Classic Chorus, Black Chorus, Orange Phaser, Small Phaser, FX
Flanger, Rotary (con control lento/rápido)
Ambient Room, Plate, Hall, Spring, Tape Echo, Stereo Delay (con tap tem-
po)
Total FX Stereo Mastering Limiter, Stereo Limiter
Otros Controles
Volumen Mando Master Volume
Conmutadores del Panel Transpose, Local Off, Touch, Function
Demo 72 canciones demo, una por cada sonido de fábrica
Conexiones
MIDI In / Out
Auriculares 1 (en panel frontal)
Salidas de Audio L, R (2 x XLR, Balanceada)
L/Mono, R/Mono (2 x 1/4” Jack, no balanceada)

Especificaciones |31
Español
Entradas de Audio L/Mono, R/Mono (2 x 1/4” Jack, no balanceada)
USB USB 2.0 Hi-Speed, Type B conector (como interfaz MIDI)
Damper pedal KORG DS-2H (incluido), DS-1H
Pedal 1 conmutador de pedal (compatible con Korg KORG PS-1, PS-3)
Pedal 2 Volumen/expresión (compatible con KORG XVP-10, XVP-20, EXP-
2) o conmutador de pedal (compatible con KORG PS-1, PS-3)
Amplificación
Altavoces 2 x 2.5” con radiador pasivo 2 x 3”
Potencia de
Amplificación
2 x 15W
Físicas
Fuente de Alimentación Adaptador interno, AC 100~240V, 50-60Hz
Consumo eléctrico Modelos sin altavoces integrados: 16 Vatios
Models con altavoces integrados: 25 Vatios
Dimensiones (W x D x H)
(sin atril de partituras)
SV2-73/SV2-73S: 1143 x 347 x 157 mm (45.00 x 13.66 x 6.18 inch)
SV2-88/SV2-88S: 1356 x 347 x 157 mm (53.39 x 13.66 x 6.18 inch)
Peso
(sin atril de partituras)
SV2-73: 17,2 kg (37.92 lbs) / SV2-73S: 18,3 kg (40.34 lbs)
SV2-88: 20,35 kg (44.86 lbs) / SV2-88S: 21,45 kg (47.29 lbs)
Otros
Accesorios incluidos Cable de alimentación, Guía Rápida, atril de partituras, damper
pedal (KORG DS-2H)
Accesorios opcionales ST-SV1 soporte de piano, pedal damper DS-1H, pedales volumen/
expresión XVP-10, XVP-20, EXP-2, PS-1, PS-3 conmutador de pe-
dal, bolsa de transporte CB-SV.
Las especificaciones y apariencia están sujetas a cambios sin previo aviso como
consecuencia de mejoras.
Amplificación desarrollada en cooperación con K-ARRAY.

32| Español
AVISO IMPORTANTE A LOS CONSUMIDORES
Este producto ha sido fabricado de acuerdo
a estrictas especificaciones y requerimientos
de voltaje aplicables en el país en el cual este
producto está destinado a ser utilizado. Si ha
adquirido este producto vía internet, a través
de correo, y/o venta telefónica, debe verificar
que este producto está destinado para ser
utilizado en el país en que usted reside.
ADVERTENCIA: El uso de este producto en
cualquier país distinto de aquel para el cual
está destinado podría ser peligroso y podría
invalidar la garantía del fabricante o distribui-
dor.
Por favor conserve su recibo como compro-
bante de compra ya que de lo contrario su
producto podría quedar fuera de la garantía
del fabricante o del distribuidor.
Aviso de reciclaje para la Unión Europea
Si aparece este símbolo en el manual,
batería o paquete, para reducir los da-
ños al medio ambiente, al final de su
vida útil, este producto no debe ser
tirado a la basura normal. Debe ser
llevado a un centro de reciclado apro-
piado de acuerdo con las directivas
europeas que sean aplicables. Si la
batería contiene metales pesados que exce-
dan lo regulado, un símbolo químico aparece
debajo del símbolo en la batería o en el paque-
te de batería.
En caso de radiaciones electromagnéticas puede ocu-
rrir un deterioro temporal de la calidad de prestaciones
de audio. Un deterioro que pudiera surgir puede ser una
señal de sonido emitida. Esto cesará cuando cese la
perturbación electromagnética.
AVISO REGULACIÓN FCC (PARA USA)
Este equipo ha sido probado y cumple con
los límites para un dispositivo digital de clase
B, parte 15 de las reglas de FCC. Estos lími-
tes están diseñados para proporcionar una
protección razonable contra interferencias
perjudiciales en una instalación residencial.
Este equipo genera, utiliza y puede irradiar
energía de radiofrecuencia y, si no se insta-
la y utiliza de acuerdo con las instrucciones,
puede causar interferencia perjudicial a co-
municaciones de radio. Sin embargo, no hay
ninguna garantía de que no ocurrirá interfe-
rencia en una instalación en particular. Si este
equipo causa interferencia dañina a la radio
y televisión, que puede determinarse apagan-
do y encendiendo el equipo, se recomienda al
usuario que intente corregir la interferencia
con una o más de las siguientes medidas:
• Reorientar o reubicar la antena receptora.
• Aumente la separación entre el equipo y el
receptor.
• Conecte el equipo a una toma de corriente
en un circuito distinto al que está conectado
el receptor.
• Consulte al distribuidor o técnico experi-
mentado de radio/TV.
Si hay elementos como cables incluidos con
este equipo, debe incluir dichos elementos.
Los cambios no autorizados o modificación
en este sistema pueden anular la autoridad
del usuario para operar este equipo.
Declaración de CONFORMIDAD (Para USA)
Parte Responsable: KORG USA INC.
Dirección: 316 SOUTH SERVICE ROAD, MELVILLE
Teléfono: 1-631-390-6500
Tipo de Equipo: STAGE VINTAGE PIANO
Modelo: SV2-73, SV2-73S, SV2-88, SV2-88S
Este aparato cumple Part 15 de FCC Rules.
Operación y está sujeto a estas dos condicio-
nes: (1) Este aparato no puede causar interfe-
rencia dañina, y (2) este aparado debe aceptar
cualquier interferencia recibida, incluyendo
interferencia que pueda causar un funciona-
miento no deseado.
PERCHLORATE (CALIFORNIA, USA sólo)
Perchlorate Material – manipulación especial.
Vea www.dtsc.ca.gov/hazardouswaste/
perchlorate.

|1
简体中文
简体中文

2| 简体中文
重要安全说明
1. 请阅读这些说明。
2. 请保存这些说明。
3. 注意所有警告。
4. 请遵循所有说明。
5. 请勿靠近水源使用该设备。
6. 只能用干布清洁。
7. 不要堵塞任何通风口。请按照制造商的说明进
行安装。
8. 请勿安装在任何热源附近,比如电暖气、热风调
节器、炉灶或其他产热的设备(包括放大器)。
9. 请勿破坏极性插头或接地型插头的安全装置。
极性插头有两个插头片,其中一个比较宽。接
地型插头有两个插头片和一个接地插脚。宽片
插脚片或接地插脚起着保障安全的作用。如果
提供的插头与你的插座不匹配,请让电工更换
过时的插座。
10. 请勿踩踏或挤压电源线,尤其是插头、电源插座
以及设备上的电源线出线端。
11. 仅使用厂商指定的附件/配件。
12. 仅使用制造商指定或设备随附的推车、机座、三
角 架 、支 架 或 工 作 台 。使 用 推 车 时 ,请 小 心 移 动
推 车 和 设 备 组 合 ,以 免 翻 倒 造 成 人 身 伤 害 。
13. 长时间不使用本机或雷电天气时,应拔下本机
电源插头。
14. 仅从合格的服务人员处获得服务。本设备有任
何形式的损坏,比如,电源线或插头损坏、液体
泼洒、有异物掉入设备内、设备遭遇雨淋或暴
露在潮湿环境中、运行不正常、或曾跌落等等,
都必需维修。
▪ 通风不应受到阻碍,通风口不得有诸如报纸、
桌 布 、窗 帘 等 物 件 的 遮 盖 。
▪ 不得将点燃的蜡烛等明火源放置在本设备上。
▪ 请勿在局限的空间内使用本机,例如用于运输
的盒子或类似的盒子。
▪ 警告 – 本设备应连接带有接地保护的电源插
座。
▪ 关闭待机开关并不能将本产品从电源线上完全
断开,因此,如果长时间不使用时或在清洁前,
要从插座上拔下插头。请确保电源插头或电器
耦合装置易于接近。
▪ 不要将本产品暴露在有滴漏或溅水的环境中。
不要将花瓶一类盛装液体的物件放置在本产品
上。
▪ 将 此 设 备 安 装 在 壁 式 插 座 附 近 ,保 持 电 源 插 头
方便可用。
▪ 标志牌位于设备的底部。标志牌上列有型号、
序 列 号 、电 源 要 求 等 等 信 息 。
序列号
请在下面写下型号、序列号和购买日期。请保存
好 本 手 册 ,将 这 些 信 息 用 作 您 的 购 买 记 录 。
型号 ______________________________
序列号 _____________________________
购买日期 ___________________________

|3
简体中文
注意事项
自动关机
为了节省电力并延长电子管的使用寿命,默认情况
下,SV‑2在闲置两个小时(播放、按下按钮或移动
旋钮)后会自动进入待机模式。 长时间不用前请
保存所有已编辑的数据。
更换电子管
像灯泡一样,电子管的使用寿命是不确定的。如果
电子管出现故障,请联系KORG授权服务中心进行
更换。请勿自行更换电子管,因为这样可能会严重
损坏乐器并有触电的危险。此外,此操作将使保修
无效。
数据处理
由于使用不当,有时内存中的数据可能会丢失。确保将
重要数据保存到随附的编辑器/音色库软件中。KORG
对因数据丢失造成的损失不承担任何责任。
清洁
如果外表变脏,请用干净的干布擦拭。请勿使用苯
或稀释剂等液体清洁剂或易燃的抛光剂。
商标
Acrobat和PDF是Adobe Systems Incorporated
的注册商标。Mac和iOS是Apple Inc的注册商
标。Android是Google Inc的商标。MS‑DOS和
Windows是MicrosoftCorporation的注册商标。所
有其他商标或注册商标均为其各自所有者的财产。
免责声明
本手册中包含的信息已经过仔细修订和检查。由于
我们不断努力改进产品,因此规格可能与手册中的
有所不同。KORG对规格与使用说明书内容之间的
任何差异不承担责任—所有规格如有更改,恕不另
行通知。
责任
KORG产品是严格按照每个国家/地区要求的规格
和电压制造的。KORG代理商仅负责对相应国家/
地区的产品提供保修。任何未随保修卡一起出售或
未带有序列号的KORG产品,一经售出将失去制造
商/分销商的保修资格。此要求是为了您自己的保
护和安全。
服务和用户协助
如需服务,请联系离您最近的KORG授权服务中
心。有关KORG产品的更多信息以及用于键盘的软
件和附件,请与当地的KORG授权分销商联系。有关
最新信息,请用您的网络浏览器访问我们的网站。
更新键盘
KORG会随着操作系统的新版本不断更新您的乐
器 。您 可 以 从 我 们 的 网站下载操作系统。请阅读操
作系统随附的说明。

4| 简体中文
目录
介绍 .5
欢迎使用! 5
开始演奏之前… 5
控制和接口 .7
前面板 7
后面板 8
开启SV‑2.............................................................11
打开和关闭电源11
调整主音量12
听演示12
播放音色.............................................................13
《音色》是什么意思?13
出厂和喜欢的音色13
选择出厂音色14
选择喜欢的音色15
音色16
使用效果 .21
效果21
将更改保存为音色22
高级设置 .23
高级设置按钮23
移调 23
更改触摸灵敏度25
LocalO功能26
不要惊慌!26
校准踏板27
锁定控制面板28
恢复所有设置的出厂设置 28
产品规格.29

介绍 |5
简体中文
介绍
欢迎使用!
非常感谢并祝贺您购买了KORGSV‑2StageVintagePiano。我们相信,它会带给
您无数小时的优质钢琴和键盘音色,使它们感觉听起来一样好!
为了最大程度地与您的SV‑2建立长期幸福关系的机会,请至少阅读一次本手册,
并(如他们所说)《按照指示使用产品》。阅读手册后,请妥善保存以备将来参
考;您将需要稍后重新阅读,以获取您可能第一次错过的超酷技巧。
本指南同时适用于SV‑2的88键和73键版本,以及带有和不带有集成扬声器的版
本。四种乐器之间除了按键长度、扬声器(以及重量!)之外没有其他区别。
开始演奏之前…
盒子里装了什么
购买SV‑2后,请检查包装中是否包含以下所有物品。如果缺少其中任何内容,请
立即与您的KORG经销商联系。
▪ SV‑2StageVintagePiano
▪ 快速指南(您正在阅读的这本)
▪ 乐谱架
▪ KORGDS‑2H弱音踏板(支持半踏)
▪ 标准IEC交流电源线

6| 简体中文
您可以下载什么
用您的网络浏览器访问我们的网站 (wwwkorgcom),以下载SV‑2 Editor软
件、MIDI驱动程序、最新软件以及各种支持材料以及完整的用户手册。
您可以添加什么
购买SV‑2之后,您可能想添加以下其他不错的选择:
▪ 优雅的KORG ST‑SV1键盘架,推荐用于安全性和舒适性,与您的钢琴设计完美
匹配。
▪ KORG目录中坚固的踏板和脚踏开关之一,例如DS‑1H弱音、PS‑1和PS‑3脚踏
开关、EXP‑2脚踏控制器、XVP‑10或XVP‑20音量/表情踏板或。PEDAL 接口
(DAMPER,1,2)。
▪ 我们实用且坚固的CB‑SV携带袋。
联系方式
您的KORG经销商不仅提供此乐器,还随附硬件和软件配件以及有关如何使用
这些产品的有用信息。有需要随时向他们寻求帮助。
我们的国际网站是wwwkorgcom。所 有 K O R G 发 行 商 的 列 表 可 以 在 我 们 的 专 用
网页(wwwkorgcom/us/corporate/distributors/)中找到。

控制和接口 |7
简体中文
控制和接口
前面板
前面板上是您的SV‑2控件。
3
2
1
2
1 控制面板
该条包含钢琴的按钮、旋钮和其他控件。
2 扬声器(仅SV2-73S和SV2-88S)
在带有集成扬声器的型号中,这就是声音的播放位置。
3 耳机插孔(立体声)
将耳机连接到该接口( )。您可以使用阻抗16~200Ω(建议使用50Ω)的耳机。
连 接 耳 机 时 ,内 置 扬 声 器 将 自 动 关 闭 。
用MASTER VOLUME旋钮调节输出电平。

8| 简体中文
后面板
您可以在背面板上找到大多数接口。
1
2
3 4 5 6 7 8
1 交流电源接头
在此处连接随附的IEC电源线。
2 音乐支架孔
SV‑2是音乐架的标准配置。将其支脚插入这两个专用孔中。
3 USB DEVICE接头
使用此接头连接计算机进行音序(这将 MIDI 端口加倍)或使用SV‑2Editor软件
进行精细编辑。在使用此接头之前,请安装KORGUSB‑MIDI驱动程序(相关说明
与MIDI驱动程序一起提供,可从我们的网站下载)。
注意:有关OS支持的最新信息,请参见我们的专用网页(https://wwwkorg
com/support/os/)。
4 SPEAKERS ON/OFF开关(仅带内置扬声器的型号)
使用此开关可以打开或关闭集成扬声器。
5 PEDAL接口 (DAMPER, 1, 2)
将随附的KORGDS‑2H踏板或者可选的DS‑1连接到DAMPER接口。
该接口始终用作弱音踏板。请记住,DAMPER可连接的包括KORG DS‑2H弱音踏
板(或可以用DS‑1H代替,或任何其他脚踏开关踏板),PEDAL 1需要脚踏板,而
PEDAL2可用于连接脚踏板或音量/表情踏板。

控制和接口 |9
简体中文
连接脚踏开关(如可选的KORG PS‑1或PS‑3)或音量/表情踏板(如可选的KORG
XVP‑10,XVP‑20,EXP‑2)到PEDAL 2插孔。脚踏开关用作柔音踏板。音量/表情踏
板用作音量控制(这是默认设置)或用作哇音过滤器控制(选择了哇音效果时)
。要控制哇音效果,请在PRE FX部分中打开Auto/PedalLED(Pedal模式)。
虽然KORG DS‑2H踏板已经过校准,但通常需要对音量/表情踏板进行校准以利
用所有范围的值。校准还可用于选择脚踏开关极性。要校准踏板(并设置其极
性 ),请 参 见 2 7 页 上 的《 校 准 踏 板 》。
6 MIDI 接头 (IN, OUT)
通过使用 MIDI,您可以从音序器控制SV‑2,也可以从SV‑2控制外部 MIDI 设备。
当使用SV‑2控制外部MIDI设备或录制到音序器中时,按LOCAL OFF按钮打开其
LED;这将使键盘与内部音色(而不是与MIDI)断开连接。
MIDI OUT传输MIDI数据。当您要控制连接的外接MIDI设备或计算机时,请使
用它。使用标准MIDI电缆将其连接到另一台设备的MIDIIN接头。
MIDI IN接收MIDI数据。当您想从连接的外部MIDI设备或计算机控制SV‑2时使
用它。使用标准MIDI电缆将其连接到另一台设备的MIDIOUT接头。
7 INPUT接口 (L/MONO, R/MONO)
将线路级信号源(例如键盘/合成器、CD或音乐播放器)连接到这些插孔。对于
单 声 道 连 接 ,请 使 用 其 中 任 意 一 个 。
8 OUTPUT接口 (L/MONO, R/MONO)
这些是模拟输出插孔,可以在63mm非平衡插孔或XLR平衡插孔中使用。使用
不平衡的63mm插孔进行较短的接线,或者使用XLR平衡的插孔进行较长的接
线,例如在舞台上演奏时。无论如何,它们是彼此完美的复制品。
如果需要单声道输出,请连接任一MONO63mm插孔。XLR插孔不能用于单声
道输出。
提示:建议尽可能使用XLR平衡输出。
警告:如果将XLR插孔连接到调音台或类似设备,请确保关闭该设备的幻像电源。如果不
这样做,可能会损坏SV‑2。

10| 简体中文
VOX
合成器等
MIDI
IN OUT
OUTPUT
OUTPUT INPUT AUX/LINEIN INPUT/LINEIN
INPUT/LINEIN INPUT/LINEIN
电脑
USB电缆
USB
音量/表情踏板
脚踏开关2
(延音踏板)
脚踏开关1
(柔音踏板)
PHONES
头戴耳机
弱音踏板(随附)
电源
交流输入
CD/MP3播放器等
放大器
音响系统
调音台、录音机等
有源监听
音频接口
(仅SV2‑73S和
SV2‑88S)

开启SV‑2 |11
简体中文
开启SV-2
打开和关闭电源
1 将随附的IEC电源线连接到乐器背面的电源接头。
2 将电源线连接到交流电源插座。
3 按下并松开控制面板中的电源开关以打开乐器。电子管将点亮并开始预热。几
秒 钟 后 ,乐 器 将 开 启 。
S V ‑ 2 包 含 一 个 1 2 A X 7 ( E C C 8 3 ) 电 子 管(《 真 空 管 》)。
警告:如果电子管盖或电子管任何一个受到冲击,可能会破裂。如果电子管盖破裂,请更
换它。不更换损坏的电子管盖可能导致电子管本身损坏。
注意:当打开KORG SV‑2时,可能会发现灯管中短暂闪烁。这是我们使用的某些灯管的一
个特征,仅在SV‑2开启且灯管尚未加热时才会发生。这不会影响电子管或SV‑2的
性能。
4 要 关 闭 乐 器 ,请 按 住 电源开关约一秒钟。

12| 简体中文
调整主音量
您可以设置SV‑2的总音量。
▪ 顺时针旋转MASTER VOLUME旋钮增大音量,逆时针旋转减小音量。
该旋钮控制乐器的整体音量,包括集成扬声器、左和右输出以及耳机插孔。
警告:始终将音量保持在舒适的水平。音量过大可能会造成永久性听力损伤。
听演示
收听内置的演示歌曲,欣赏SV‑2的强大功能。有几种演示歌曲可供选择。
1 同时按下TRANSPOSE和LOCAL OFF按钮。它们的LED将开始闪烁。
2 此 时 ,如 果 您 等 待 几 秒 钟 ,将 播 放 所 有 演 示 曲 。
3 否则,您可以选择可用的演示曲之一。每个出厂音色都有一个演示。
▪ 使用SOUND部分中的TYPE和VARIATION旋钮选择演示歌曲。
▪ 您可以按下VARIATION旋钮,使其 LED 变为绿色,并收听第二组演示曲。再次
按下VARIATION旋钮再次将其LED变为橙色,然后返回第一组。
自动回放开始后,您仍然可以选择任意演示。
4 用MASTER VOLUME旋钮调节收听音量。
5 再次按下TRANSPOSE和LOCAL OFF按钮停止演示。

播放音色 |13
简体中文
播放音色
《 音 色 》是 什 么 意 思 ?
在SV‑2中,音色是弹奏键盘时可以听到的《声音》或一组声音。每个音色最多可
以由三个《程序》组成,每个程序具有不同的音色或一组附属的《噪音》,例如键
盘的演奏原理、拍击音等。可以将一层或两层添加到主程序中,并作为与主音色
混合的第二或第三音色来收听。以众所周知的《钢琴加弦乐》音色为例:有一个
钢琴程序、一种钢琴噪音、一种弦乐。
Main, Layers 1, 2
Main, Layer (1)
Split
键盘将音色分为两半,在右半部分有一个或两个程序。第三个程序移至左半部
分,可用于演奏伴奏(大贝司、合成弦乐等)。
Main, Layers 1, 2
Main, Layer (1)
Split
出厂和喜欢的音色
SV‑2具有72出厂音色,并且仅使用前面板上的旋钮就可以对这些音色中的
每一个进行《自定义调整》。然后,您可以将更改保存到最喜欢的音色的
64FAVORITES位置。(可以使用SV‑2Editor软件进行更详细的编辑)。
请注意,通常,从一种音色过渡到另一种音色时会平稳过渡,因此您可以按住音
符并仅在下一个音符更改时听到新的音色。但是,如果其中一种音色打开了放
大部分并使用了电子管,则不可能做到完全平滑过渡。

14| 简体中文
选择出厂音色
如何选择音色
在SOUND部 分 中 ,您 可 以 选 择 出 厂 音 色 。
1 使用SOUND部分的TYPE旋钮选择音色的基本类型(六个)之一。
2 使用SOUND部分的VARIATION旋钮选择基 本音色的变化之一(六个)之一。 请
注意,旋钮旁边的LED亮起以显示所选的音色和变化。
3 按下VARIATION旋钮选择第二组变化(LED 颜色将变为绿色)。 使用相同的
VARIATION旋钮选择第二个库中的一个变化(六个之一)。
4
当您想返回第一组版本时,再次按下VARIATION旋钮(LED颜色将再次变为橙色)。

播放音色 |15
简体中文
选择喜欢的音色
如何选择喜欢的音色
在FAVORITES部分中,您可以选择喜欢的音色,其中包含您自己的自定义音色。
1 要在当前音色组中选择喜欢的音色,请按相应的FAVORITES (1~8)按钮。
如果要查看选择了哪个音色组,请按TYPE旋钮,然后查看哪个FAVORITES
(A~H)按钮闪烁。再按一次退出音色组选择模式(或者等待自行退出)。
2 要选择其他音色组中的收藏夹,请按TYPE旋钮。当前选择的音色组通过闪烁
的FAVORITES(A~H)按钮显示。按下与要选择的音色组相对应的FAVORITES
(A~H)按钮。然后按与要选择的收藏夹相对应的FAVORITES (1~8)按钮。
如何返回到上次选择的出厂音色
选择喜欢的音色后,您可以使用上述步骤再次选择出厂音色。
但是,您可以立即跳到最新选择的出厂音色。按下SOUND部分中的VARIATION
旋钮将其选中。

16| 简体中文
音色
下表包含每个所含音色的名称和简要说明。
当音色的名称是直接给出的(例如《MKISuitcase》)时,它是扩展到整个键盘的
简单音色。当它的中间有一个《&》(例如《FMPiano&Pad》)时,它是由一个主
程序组成的一层或两层。当它的中间有一个《/》(例如《Pad/Mini Lead》)时,
键盘将在不同的程序之间分割。
出厂音色
您可以从外部 MIDI 设备中选择一种出厂音色,方法是将值0的控制变化CC00发
送到SV‑2,然后输入值0的控制变化CC32消息,然后选择程序变更 (PC) 消息以
选择音色。
音色 变量 PC 备注
EP 1 (经典)
MKISuitcase A1 0 标志性的MKI的两个版本,是任何键盘演奏者必备的。
MKIStage B1 6
MKIISuitcase A2 1 便携式版本和配重版本中有两种色彩的MKII。
MKIIStage B2 7
MKVStage A3 2 MK V Stage(唯一已投入生产的),以其类似铃铛的音色
而闻名。
MKVBright B3 8
DynoEP A4 3 典型的 Dyno 钢琴音色,非常适合软音色的民谣,可以在
明亮的音色中独奏。
DynoEPBright B4 9
Wurly A5 4
Wurly金属簧片的标准强劲音色。1960和70年代的流行声。
WurlyClassic B5 10
WurlyDark A6 5 Wurly的更暗和更亮的版本。
WurlyBright B6 11
EP 2 (Various)
FMPiano1 A1 12 1980年代的FM电子钢琴音色。在数字音乐时代开始时听
到过的无数唱片。
FMPiano3 B1 18
FMPiano2 A2 13
FMPiano&Pad B2 19 FM钢琴+分层垫是该时代的另一种主流。
PianetT A3 14 Pianet,德国老式机电键盘。欧版电子钢琴。
PianetN B3 20

播放音色 |17
简体中文
音色 变量 PC 备注
HybridPiano A4 15 钢琴的混合组合,探索新的钢琴音景。
HybridTine B4 21
Wurly&Strings A5 16 电钢琴和琴弦的不同组合。在Wurly和FM之间选择。
FM&Strings B5 22
MKII&Pad A6 17 电子钢琴和弦乐垫的不同组合。同样,可在尖齿和 FM 之
间进行选择。
FM&Pad B6 23
Piano 1 (原声)
GermanGrand A1 24 原声钢琴之王‑古典、爵士和流行钢琴家普遍钟爱的德国
大钢琴。
GermanClassic B1 30
ItalianGrand A2 25 意大利三角钢琴,是古典和爵士乐曲目的最佳选择。
ItalianBright B2 31
JapaneseGrand A3 26 另一个必须拥有的是日本三角钢琴,受到许多古典、爵士
和流行艺术家的青睐。
JapaneseBright B3 32
AustrianGrand A4 27 奥地利皇家三角钢琴–古典音乐节目的里程碑,也是某些
爵士艺术家的首选。
AustrianClassic B4 33
JapaneseUpright A5 28 大 型 日 本 立 式 钢 琴 ,音 色 充 满 共 鸣 。
UprightBright B5 34 流行的流行乐队经常使用的亲切而明亮的钢琴音色。
GermanUpright A6 29 这 是 德 国 立 式 钢 琴 的 独 特 、低 沉 的 音 色 。
RockPiano B6 35 激进的立式钢琴,适合摇滚和摇滚乐曲。
Piano 2 (Various)
ElectricGrand A1 36 1970 年代生产的电声钢琴,其独特的醇厚音色在演奏家
中非常流行。
GermanMono B1 42 德国三角钢琴的单声道版本。
KORGM1Piano A2 37 KORG 钢琴传承。流行的 M1 合成器工作站是我们的开拓
性SG‑1D数字钢琴的开始。
KORGSG‑1D B2 43
DigitalPiano A3 38 1980 年代后期,采用流行的数字键盘/合成器创建了一种
新颖、准确且富有表现力的钢琴音色。
ElectraPiano B3 44 流行于 1970 年代的电子钢琴,许多著名的古典摇滚和前
卫摇滚音乐家都在使用。
TackPiano A4 39 酒吧钢琴,享受雷格泰姆和跨跃演奏风格。
Honky‑Tonk B4 45
Piano&Strings A5 40 分层钢琴和琴弦或弦乐垫。非常适合令人回味的环境音
乐。
Piano&Pad B5 46
Piano&Synth A6 41 钢琴和合成器或铜管的分层。两者的混合可以追溯到融合
爵士乐的时代。
Piano&Brass B6 47

18| 简体中文
音色 变量 PC 备注
Clavier
ClavAC A1 48 经典的电子小鍵琴,具有两个同相话筒的风格。
ClavAD B1 54
ClavBC A2 49
Clavi的两种不同配置,话筒处于反相状态,发出刺耳的音色。
ClavBD B2 55
Harpsichord A3 50 回到文艺复兴晚期的巴洛克钢琴。标准8”和8”+4”双
八度音色。
HarpsichordOct B3 56
PercOrgan A4 51
带有打击乐的真实经典电动仿真,具有纯净和变形的效果。
RockOrgan B4 57
JazzOrgan A5 52 经典电子机械风琴的爵士乐配音。
VoxOrgan B5 58 VOXContinental晶体管风琴《Connie》的完美仿真。
ChurchOrgan A6 53 雄伟的管风琴的全部力量。
PipeOrgan B6 59 在冥想时刻,管风琴的音调更加柔和而动人。
Other
FullStrings A1 60 古典弦乐音色有两种不同的风格。
ClassicStrings B1 66
TapeStrings A2 61 1970年代的合成《Mello》弦乐。
Strings&Voices B2 67 真 实 的 弦 乐 ,加 上 人 声 。
WarmPad A3 62 典型合成器板的暗版和亮版。
BrightPad B3 68
Orchestra A4 63 强大的管弦乐图蒂。
Pizzicato&Glock B4 69 拨奏管弦乐队和钟琴。
Brass A5 64 真正的铜管组。
SynthBrass B5 70 合成铜管的伙伴。
Pad/MiniLead A6 65 两个独奏合成器在软合成器垫上演奏。
Pad/SynthLead B6 71

播放音色 |19
简体中文
喜欢的音色
您可以通过将值0的控制变化CC00发送到SV‑2,从外部MIDI设备中选择喜欢的
音色,然后输入64的控制变化CC32消息,然后选择程序变更(PC)的消息以选择
音色。
音色 变量 PC
Demo Shop
GermanGrand A1 0
ItalianGrand A2 1
EPMKII A3 2
Wurly A4 3
Clav A5 4
FMPiano A6 5
Piano&Strings A7 6
Bass/EP A8 7
Piano
GermanGrand B1 8
ItalianGrand B2 9
JapaneseGrand B3 10
AustrianGrand B4 11
JapanUpright B5 12
GermanUpright B6 13
RockPiano B7 14
TackPiano B8 15
Electric Pno
EPMKI C1 16
EPMKII C2 17
EPMKV C3 18
DynoEP C4 19
WurlyAmp C5 20
WurlyTremolo C6 21
FMPiano C7 22
HybridEP C8 23
Claviers
ClavAC D1 24
音色 变量 PC
ClavBC D2 25
PercOrgan D3 26
JazzOrgan D4 27
ChurchOrgan D5 28
KORGM1Piano D6 29
ElectricGrand D7 31
Harpsichord D8 32
Layer
Piano&Strings E1 32
Piano&Pad E2 33
Piano&EP E3 34
Piano&Vibes E4 35
MKII&Pad E5 36
Strings&Pad E6 37
Piano&FM E7 38
FM&Strings E8 39
Split
AcBass/Piano F1 40
ElBass/Piano&Str F2 41
Fretless/EP F3 42
Slap/EP F4 43
Slap/Clav F5 44
EPBass/VoxOrgan F6 45
JazzPianoTrio F7 46
OrganDualManual F8 47
Other
FullStrings G1 48
StringsOctave G2 49
OrchestraTutti G3 50

20| 简体中文
音色 变量 PC
Brass G4 51
WarmPad G5 52
SynthBrass G6 53
Pad/SynLead G7 54
SynthBass G8 55
Legacy SV1
SV1GrandPiano1 H1 56
音色 变量 PC
SV1GrandPiano2 H2 57
SV1TineEPAmp H3 58
SV1ReedEP1 H4 59
SV1ClavAC H5 60
SV1ClkTonewheel H6 61
SV1FullStrings H7 62
SV1SynthBrass H8 63

使用效果 |21
简体中文
使用效果
效果
您可以通过旋转相应的TYPE旋钮选择各种效果和放大器型号。您可以使用
DEPTH, INTENSITY, SPEED,DRIVE旋钮。如果按下旋钮,将恢复参数的原始
值。可以通过SV‑2Editor软件进行更深入的编辑。
效果和放大器模拟也可以通过按下相应的On/O按 钮 来 打 开 或 关 闭 。更 改 可 以
与音色一起保存到FAVORITES位置之一中。
尝试各种控件,并聆听各种效果可以做什么。
SIGNAL ROUTING
EQ PRE FX
MODULATION AMBIENT TOTAL FX
Stereo Limiter
Stereo Mastering Limiter
OUTPUTS
SOUND
PRE AMP
VOLUME VOLUME POWER
AT T.
PROGR
LVL
POWER AMP
VALVE
CABINET NR

22| 简体中文
将更改保存为音色
如果您喜欢通过浏览旋钮位置而刚创建的音色,请将其另存为喜欢的音色。
1 按下TYPE旋钮,查看选择了哪一组收藏夹音色。
FAVORITES A~H按钮闪烁显示当前选择的音色组。
2 如果要选择其他音色组,按要选择的音色组对应的FAVORITES(A‑H)按钮。
3 按住与您要保存设置的收藏夹相对应的FAVORITES 1~8按钮,直到其LED开始
闪烁。
4 再 次 按 相 同 的 按 钮 ,以 确 认 保 存 。
如果您不想保存更改,只需等待几秒钟直到按钮的 LED 熄灭,而无需按任何按
钮。
提示: 使用收藏夹音色组将音色组织成单独的集合,例如针对特定样式或演出的不同集
合。
注意:最喜欢的音色将覆盖该位置的先前内容。该位置上喜欢的音色将被删除。
注意: 如果您切换到其他音色或关闭电源而没有存储您编辑的音色和效果,则所做的更
改将丢失。

高级设置 |23
简体中文
高级设置
高级设置按钮
按钮组名为TRANSPOSE, LOCAL OFF, TOUCH和FUNCTION可使用一系列高
级功能,您可能需要使钢琴适应自己的习惯。
FUNCTION按钮可用于访问多个高级设置,这些设置可以帮助您个性化使用乐
器的体验。请检查用户手册以获取有关其功能的更多信息。
移调
在某些情况下,歌曲的调可能很难演奏(例如许多黑键),或者您可能希望改
变音高以匹配另一种乐器或歌手。在这种情况下,您可以移调(移动音高),以
便可以使用更轻松的指法或使用相同的熟悉的指法以不同的音高演奏。这称为
Transpose功能。
例如,如果您向上移一个半音,则演奏左边一个音符将产生右边显示的音高。
打开或关闭移调
1 按TRANSPOSE按钮打开移调。如果已经设置了移调,则此按钮的LED将亮起,
否则将保持黑暗。
2 再次按下TRANSPOSE按钮以关闭移调。LED将熄灭。
设定移调间隔
1 按住TRANSPOSE按钮约一秒,直到其LED开始闪烁。
2 按下与所需音调相对应的音符。移调将被激活,并且LED将保持点亮状态。

24| 简体中文
-12
C3
0 +12
C5
键 效果
C3~B3 降低12~1个半音
C4(中央C) 标准音高
C#4~C5 升高1~12个半音
如果几秒钟后没有演奏音符,移调程序将结束。
3 再次按下TRANSPOSE按钮以关闭移调。LED将熄灭。
注意:关闭乐器电源后,移调将重置。

高级设置 |25
简体中文
更改触摸灵敏度
可以设置键盘灵敏度或力度。
1 按下TOUCH按钮。
按下此按钮后,其 LED 开始闪烁。另外,对应于所选触摸曲线的FAVORITE按钮
也开始闪烁。
2 按下与所需触摸曲线相对应的FAVORITE按钮。
3 按下TOUCH按钮确认并返回正常操作。
收藏夹 触摸曲线 说明
1 Normal 普通的钢琴触感。
2 Soft1 即使轻轻弹奏,也可以发出响亮的音符。
3 Soft2
4 Medium1 正常演奏会产生响亮的音符。
5 Medium2
6 Hard1 只有非常用力演奏才能发出响亮的音符。
7 Hard2
8 Fixed 固定动态。使用SV‑2Editor选择所需的动态水平。
这是触摸曲线图:
Playing strength
Soft
Str
ong
Strong
( )
No
te
loudness
Soft
Hard
Normal/Medium
强
弱
弱 强
弹奏力度
音符响度

26| 简体中文
Local O功能
您可以打开或关闭LocalO功能。
▪ 按下LOCAL OFF按钮以打开其LED。
当您打开此按钮的 LED时,键盘与内部音色断开连接。弹奏键盘时,您听不到来
自内部音源的任何音色。但是,音符将继续发送到M I D I O U T 端 口( 或 USB端口)
,并且可以被计算机接收。
计算机将它们再次发送回SV‑2的MIDI IN端 口( 或 USB端口),然后连接到内部
音频发生器。通过此路由,您可以同时录音和播放,而无需重复音符。
▪ 按下LOCAL OFF按钮以关闭其LED。
当您关闭此按钮的LED时关闭,键盘可以播放内部音色。
注意:乐器关闭时,LocalO会复位。
不要惊慌!
如果MIDI音符因MIDI通信问题而卡住,请保持EQUALIZER的区域On/O按钮
按下直到粘滞的音符静音为止。这通常称为MIDIPanic功能。

高级设置 |27
简体中文
校准踏板
您可以校准与后面板上的DAMPER,PEDAL 1和PEDAL‑2接头连接的踏板。通过
校准踏板,您可以让SV‑2了解其极性以及所发送值的整个范围。
1 将所有要校准的踏板连接到SV‑2。请记住,DAMPER可连接的包括KORG DS‑2H
弱音踏板(或任何其他脚踏开关踏板),PEDAL 1需 要 脚 踏 板 ,而 PEDAL 2可用
于连接脚踏板或音量/表情踏板。
2 将任何音量/表情型踏板设置为最低设置。
3 关闭SV‑2。
4 按住Auto/Pedal按钮并打开SV‑2。
5 当Auto/PedalLED开始闪烁时,松开按钮。
如果在接下来的几秒钟内什么也不做,则Auto/PedalLED 将熄灭,SV‑2将会熄
灭完成启动程序。
6 Auto/PedalLED闪烁时,再次按按钮。SV‑2进入校准模式。
7 现在校准PEDAL 1(脚踏开关)。 完全踩下踏板,然后松开。校准连接到
PEDAL 1插孔的踏板后,FAVORITES 1按钮将打开。
8 然 后 ,校 准 PEDAL 2。根据脚踏板或音量/表情踏板的使用,操作步骤有所不
同:
▪ 如果您连接了脚踏开关,请完全按下它,然后松开。
▪ 如果连接了音量/表情踏板,则将其一直向前推至最大位置。
完成校准连接到PEDAL 2插孔的踏板后,FAVORITES 2按钮将打开。
9 最后校准DAMPER踏 板 。完 全 踩 下 踏 板 ,然 后 松 开 。完 成 对 连 接 到 DAMPER插
孔的踏板的校准后,FAVORITES 3按钮将打开。
10 完成校准后:
▪
如果您校准了所有连接的三个踏板,SV‑2将自动退出校准模式并继续启动程序。
▪ 如果仅校准一个或两个踏板,请再次按Auto/Pedal按钮以退出校准模式并继续
启动程序。

28| 简体中文
锁定控制面板
我们已经向您展示了如何更改音色和效果。现在,我们将告诉您如何防止进行
任何更改!如果要避免在播放时无意更改设置,此功能将非常有用。
1
同时按下TOUCH和FUNCTION按钮以锁定控制面板。它们的LED将开始闪烁。
只能访问的控件是MASTER VOLUME旋钮和电源开关。
2 按下TOUCH或FUNCTION按钮来解锁控制面板。
注意:关闭乐器后,锁定将重置。
恢复所有设置的出厂设置
进行了几处更改之后,您可能希望恢复SV‑2的原始出厂状态(包括喜欢的音色和
全局设置):
1 关闭乐器。
2 按住FUNCTION按钮。
3 在不松开FUNCTION按 钮 的 情 况 下 ,打 开 乐 器 。
4 当其LED开始闪烁时,松开FUNCTION按钮。
5 再次按下FUNCTION按钮以确认恢复操作。
6 最 后 ,所 有 设 置 将 被 重 置 。

产品规格 |29
简体中文
产品规格
产品规格 SV-2
键盘
按键
SV2-73/SV2-73S: 73键/SV2-88/SV2-88S: 88键。速度灵敏度, KORG
RH3(RealWeighted,HammerAction3)
触摸选择 八种曲线
调音 移调、微调、调音曲线
音色
音色产生 EDS‑X(EnhancedDenitionSynthesis–eXpanded)
复音 128音(最多)
多音色 多 层 ,拆 分
出厂音色 72出厂音色(6种基本声音x2组6种变化)
喜欢的音色 64喜欢的音色(8个音色库x8种变化)用于保存自定义设置
效果
Equalizer Bass,Mid,Treble
PreFX RedCompressor,TrebleBoost,U‑Vibe,Vibrato,Tremolo,VoxWah(
带踏板控制)
放大器型号 Clean,Twin,Tweed,AC30,Boutique,OrganAmp包括ValveReactor
技术和12AX7(ECC83)电子管的箱体型号
Modulation Classic Chorus, Black Chorus, Orange Phaser, Small Phaser, FX
Flanger,Rotary(具有慢/快控制)
Ambient Room,Plate,Hall,Spring,TapeEcho,StereoDelay(使用拍子速度)
TotalFX 立体声母带限制器,立体声限制器
其他控件
音量 MasterVolume旋钮
面板开关 Transpose,LocalO,Touch,Function
演示 7 2 演 示 歌 曲 ,每 个 出 厂 音 色 一 首
连接
MIDI IN/OUT
头戴耳机 1( 在 前 面 板 上 )
音频输出 L,R(2xXLR,平衡)
L/Mono,R/Mono(2x63mm接口,非平衡)
音频输入 L/Mono,R/Mono(2x63mm接口,非平衡)
USB USB20Hi‑Speed,B型接头(使MIDI接口加倍)

30| 简体中文
DamperPedal KORGDS‑2H,已提供
Pedal1 脚踏开关(例如KORGPS‑1,PS‑3)
Pedal2 音量/表情(例如KORGXVP‑10,XVP‑20,EXP‑2)或脚踏开关(例如KORG
PS‑1,PS‑3)
放大
音箱 2x2,5”和2x3”无源辐射器
放大功率 2x15W
物理
电源供应 内部开关适配器,交流电100~240V,50‑60Hz
耗电量 没 有 放 大 器 的 型 号 :1 6 W
放大器型号:25W
尺寸(宽x深x高)
(乐谱架除外)
SV2-73/SV2-73S:1143x347x157mm(4500x1366x618inch)
SV2-88/SV2-88S:1356x347x157mm(5339x1366x618inch)
重量(不包括乐谱架)
SV2-73:17,2kg(3792lbs)/SV2-73S:18,3kg(4034lbs)
SV2-88:20,35kg(4486lbs)/SV2-88S:21,45kg(4729lbs)
其他
随附配件 电源线,快速指南,乐谱架,弱音踏板(KORGDS‑2H)
可选配件 ST‑SV1钢琴架、DS‑1H弱音踏板、XVP‑10、XVP‑20、EXP‑2音量/表情踏
板、PS‑1、PS‑3脚踏板、CB‑SV携带袋。
规格和外形如有改良,恕不另行通知。
与K‑ARRAY合作开发放大器。

产品规格 |31
简体中文
消费者须知
本产品根据产品预期使用国所适用的严格规范
和电压要求生产。如果你通过互联网、邮购、和/
或电话销售购买本产品,你必须确认该产品适用
于你的所在国。
警告:在本产品预期使用国以外的任何国家中
使用本产品,可能产生危险,并使制造商或经销
商的保修条款无效。
作为购买凭证,请妥善保留你的收据,否则你的
产品可能被取消制造商或经销商的保修资格。
在有电磁辐射的情况下,音频的表现质量可能
会发生暂时恶化。可能出现的恶化可发出声音信
号 。这 在 电 磁 干 扰 终 止 后 即 会 停 止 。

32| 简体中文

|1
日本語
日本語

2| 日本語
安全上のご注意
ご使用になる前に必ずお読みください
ここに記載した注意事項は、製品を安全に正しくご使用いただき、あなたや他の方々への危害や
損害を未然に防ぐためのものです。注意事項は誤った取り扱いで生じる危害や損害の大きさ、ま
たは切迫の程度によって、内容を「警告」、「注意」の2つに分けています。これらは、あなたや他の
方々の安全や機器の保全に関わる重要な内容ですので、よく理解した上で必ずお守りください。
マークについて
製品には下記のマークが表示されています。
マークには次のような意味があります。
このマークは、機器の内部に絶縁されていない「危険な電圧」が存在し、感電の危険が
あることを警告しています。
このマークは注意喚起シンボルであり、取扱説明書などに一般的な注意、警告、危険の
説明が記載されていることを表しています。
火災・感電・人身障害の危険を防止するには
図記号の例
記号は、注意(危険、警告を含む)を示しています。記号の中には、具体的な注意内容
が描かれています。左の図は「一般的な注意、警告、危険」を表しています。
記号は、禁止(してはいけないこと)を示しています。記号の中には、具体的な注意
内容が描かれることがあります。左の図は「分解禁止」を表しています。
記号は、強制(必ず行うこと)を示しています。記号の中には、具体的な注意内容が描か
れることがあります。左の図は「電源プラグをコンセントから抜くこと」を表しています。

安全上のご注意 |3
日本語
以下の指示を守ってください
警告
この注意事項を無視した取り扱いをすると、死亡や重傷を負う可能性があります。
・電源プラグは、必ずAC100Vの電源コンセントに差し込む。
・電源プラグにほこりが付着している場合は、ほこりを拭き取る。
感電やショートの恐れがあります。
・本製品はコンセントの近くに設置し、電源プラグへ容易に手が届くようにする。
・次のような場合には、直ちに電源を切って電源プラグをコンセントから抜く。
○電源コードやプラグが破損したとき
○異物が内部に入ったとき
○製品に異常や故障が生じたとき
修理が必要なときは、お客様相談窓口へ依頼してください。
・本製品を分解したり改造したりしない。
・修理、部品の交換などで、取扱説明書に書かれていること以外は絶対にしない。
・電源コードを無理に曲げたり、発熱する機器に近づけたりしない。また、電源コードの上
に重いものをのせない。
電源コードが破損し、感電や火災の原因になります。
・大音量や不快な程度の音量で長時間使用しない。
大音量で長時間使用すると、難聴になる可能性があります。万一、聴力低下や耳鳴りを感
じたら、専門の医師に相談してください。
・本製品に異物(燃えやすいもの、硬貨、針金など)を入れない。
・温度が極端に高い場所(直射日光の当たる場所、暖房機器の近く、発熱する機器の上な
ど)で使用や保管をしない。
・振動の多い場所で使用や保管をしない。
・ホコリの多い場所で使用や保管をしない。
・風呂場、シャワー室で使用や保管をしない。
・雨天時の野外のように、湿気の多い場所や水滴のかかる場所で、使用や保管をしない。
・本製品の上に、花瓶のような液体が入ったものを置かない。
・本製品に液体をこぼさない。
・濡れた手で本製品を使用しない。

4| 日本語
注意
この注意事項を無視した取り扱いをすると、傷害を負う可能性
または物理的損害が発生する可能性があります。
・正常な通気が妨げられない所に設置して使用する。
・ラジオ、テレビ、電子機器などから十分に離して使用する。
ラジオやテレビ等に接近して使用すると、本製品が雑音を受けて誤動作する場合があり
ます。また、ラジオ、テレビ等に雑音が入ることがあります。
本製品の磁場によってテレビ等の故障の原因になることがあります。
・外装のお手入れは、乾いた柔らかい布を使って軽く拭く。
・電源コードをコンセントから抜き差しするときは、必ず電源プラグを持つ。
・本製品の移動時は、本体とスタンド(別売り)を別にし、必ず2人以上で持ち上げる。
・長時間使用しないときは、電源プラグをコンセントから抜く。
電源スイッチをオフにしても、製品は完全に電源から切断されていません。
・付属の電源コードは他の電気機器で使用しない。
付属の電源コードは本製品専用です。他の機器では使用できません。
・他の電気機器の電源コードと一緒にタコ足配線をしない。
本製品の定格消費電力に合ったコンセントに接続してください。
・スイッチやツマミなどに必要以上の力を加えない。
故障の原因になります。
・外装のお手入れに、ベンジンやシンナー系の液体、コンパウンド質、強燃性のポリッ
シャーを使用しない。
・不安定な場所に置かない。
本製品が落下してお客様がけがをしたり、本製品が破損したりする恐れがあります。
・本製品の上に乗ったり、重いものをのせたりしない。
本製品が落下または損傷してお客様がけがをしたり、本製品が破損したりする恐れがあ
ります。
・地震時は本製品に近づかない。
・本製品に前後方向から無理な力を加えない。
本製品が落下してお客様がけがをしたり、本製品が破損したりする恐れがあります。

安全上のご注意 |5
日本語
ご注意
オ ート・パ ワ ー・オ フ
電力消費を抑え、バルブを長持ちさせるために、演奏
およびボタンやノブの操作を行わない状態が2時間
続くと、SV‑2は初期設定により自動的にスタンバイ・
モードに入ります。編集したデータがある場合は、あ
らかじ め 保 存してから操 作を停止してください。
真空管について
真空管の寿命は一定ではありません。真空管が切
れた場合は、お客様相談窓口へお問い合わせくだ
さい。真空管の交換を含むあらゆる修理や、その他
調整は専門家にご依頼ください。
データの取り扱い
誤 っ た 操 作 等 に よ り 、メ モ リ ー 内 の デ ー タ が 消 え て
し ま う こ と が あ り ま す 。大 切 な デ ー タ は 、あ ら か じ
め付属のエディター/ライブラリアン・ソフトウェアへ
セーブしておいてください。データの消失による損
害については、当社は一切の責任を負いかねますの
でご了承ください。
また、本製品の使用に伴い、メディアに書き込んだ
データの消失、破損などの、お客様に対してなされ
た損害賠償請求に基づく損害については、当社は
一切の責任を負いかねますのでご了承ください。
著作権について
著作権者から許諾を得ていない著作物を、個人、
家庭内、またはその他のこれに準ずる限られた範
囲以外で使用した場合、著作権侵害となり、損害賠
償を含む補償を負う場合があります。
そのような著作物を録音したものはもちろん、著作
物に手を加えて作られたものにも、著作権者の権
利が含まれています。これら成果物の転載、配布な
どは、著作権侵害となります。
著作権侵害によって発生した損害賠償などは、当
社は一切の責任を負いかねます。
本製品に内蔵もしくは同梱されたコンテンツそのも
のを取り出し、または酷似した形態で記録もしくは
録 音して、配布やインターネット上で 公開することは
許されていません。
本 製 品 の コ ン テ ン ツ( 音 色 プ ロ グ ラ ム 、ス タ イ ル ・ デ
ータ、伴奏パターン、MIDIデータ、PCMサンプル・デ
ータ、オーディオ・データ、オペレーティング・システ
ムなど)の著作権は株式会社コルグに有するか、ま
たは株式会社コルグが第三者から使用許諾を受け
ている著作物です。
上記コンテンツを使用して、作品を制作または演奏
し、それらを録音、配布することについては、当社
の許 諾を必 要としません 。
免責条項
本取扱説明書に含まれている情報については細心
の注意を払い、慎重に修正およびチェックが行われ
ています。製品の改善については継続的に取り組ん
でいるため、仕様が取扱説明書の記載とは異なる
可能性があります。すべての仕様は、予告無く変更
することがあり、当社は取扱説明書の内容と仕様
が異なる場合については、一切の責任を負いかねま
すのでご了承ください。
製 品 のアップ デ ート
お手持ちの機器を常に新しいオペレーティング・シ
ステムに更新するアップデート・バージョンは当社
か ら リリ ース さ れ ま す 。オ ペ レ ー ティン グ・シ ス テ ム
は当社のウェブサイトからダウンロードすることが
で き ま す。オ ペ レ ー テ ィ ン グ・シ ス テ ム に つ い て の 説
明事項を読み、その指示に従ってください。
登録商標
すべての製品名および会社名は、各社の商標また
は登 録 商 標 で す。

6| 日本語
目 次
安全上のご注意 . 2
イントロダクション . 7
はじめに7
演奏を始める前に7
各部の名称と機能. 9
フ ロ ント・パ ネ ル 9
リ ア・パ ネ ル 10
SV‑2の電源をオンにする. 13
電 源 のオンとオフを切り替える 13
マ スター・ボ リューム を 調 整 す る 14
デ モ・ソ ン グ を 聴 い て み よ う 14
サウンドを演奏する. 15
「 サ ウ ン ド 」と は 15
ファクトリー・サ ウンドとフェイバ リット・サ ウンド 15
ファクトリー・サ ウンド を 選 択 する 16
フェイバ リット・サ ウンド を 選 択 す る 17
サ ウ ンド・リスト 18
エフェクトを 使 用 する .23
エフェクト 23
変更したサウンドを保存する24
高度な設定 .25
設定ボタン25
トランス ポーズ 25
タッチ感 度の変更27
ローカル・オフ機能28
MIDIの音が止まらないときは28
ペダルのキャリブレーション29
コントロ ール・パ ネ ル の ロック 30
工場出荷時の設定に戻す30
仕様. 31
保 証 規 定( 必 ず お 読 み く だ さ い ) . 33
アフターサービス.34

イントロダクション |7
日本語
イントロダクション
はじめに
この た び は 、コ ル グ・ス テ ー ジ・ビ ン テ ー ジ・ピ アノ S V ‑ 2 を お 買 い上 げ い た だ き まし
て、まことにありがとうございます。SV‑2を使用し、往年のビンテージ・ピアノやビン
テ ー ジ・エ レ クト リ ッ ク・ピ アノ の サ ウ ン ド の 質感を十二分にお楽しみください。
SV‑2を末永くお使いいただくためにも、取扱説明書(クイック・ガイド、ユーザー・マ
ニュアル)をよくお読みになって、正しい方法でご使用ください。読み終わったら、取
扱説明書をお手元に保管しておいてください。後で読み直すと、前回には気づかな
かったヒントが見つかるか もし れません。
このガイドはSV‑2の88鍵と73鍵のスピーカー搭載モデルと非搭載モデルを対象と
しています。鍵盤数、スピーカー、質量を除けば、この4つの製品に違いはありませ
ん。
演奏を始める前に
パッケージに含まれるもの
お買い上げのSV‑2の梱包箱に以下のものが入っていることをお確かめください。
▪ S V ‑ 2 ス テ ー ジ・ビ ン テ ー ジ・ピ アノ
▪ クイック・ガ イド (今お 読 み になって い るも の)
▪ 譜面立て
▪ コルグDS‑2Hダンパー・ペダル(ハーフ・ペダル対応)
▪ 電 源コード

8| 日本語
ダウンロードできるもの
当 社 のウェブ サイトwwwkorgcomへアクセスして、SV‑2 Editorソフトウェア、MIDIド
ライバー、アップデータ、さまざまなサポート情報や、SV‑2ユーザー・マニュアルをダ
ウンロードすることができます。
追加できるもの
S V ‑ 2 を 購 入 し た 後 、以 下 の ア ク セ サ リ ー( 別 売 り )を 追 加 す る こ と が で き ま す 。
▪ コルグS T‑ S V 1キーボード・スタンドは、安定性、快 適さと共 にエレガ ントなデザイン
で、ピアノと完 璧にマッチする最 適なスタンドです。
▪
コルグDS‑1Hダンパー・ペダル、PS‑1とPS‑3ペダル・スイッチ、EXP‑2フット・コントロー
ラー、XVP‑20ボリューム/エクスプレッション・ペダル・ペダル等を追加することができ
ます。
▪ 実用的で丈夫なCB‑SVキャリング・バッグ。

各部の名称と機能 |9
日本語
各部の名称と機能
フ ロ ント・パ ネ ル
SV‑2のコントロールはフロント・パネルで行います。
3
2
1
2
1 コントロール・パネル
この 細 長い帯にボタン、ノブ、そしてピ アノの 各 種コントロール が含まれています。
2 スピーカー (SV2-73SとSV2-88Sのみ)
スピーカー内蔵モデルでは、ここから音が出ます。
3 ヘッドホン端子(ステレオ)
こ の 端 子 に ヘ ッド ホ ン を 接 続 し ま す( )。インピーダンス16〜200Ω(50Ω推奨)の
ヘッド ホン をご 使 用くだ さ い 。ヘッドホン を 接 続 すると 内 蔵 スピーカー は 自 動 的 に オ
フになります。
MASTERVOLUMEノブ で出力レ ベ ルを調 節します。

10| 日本語
リ ア・パ ネ ル
リア・パネルにはさまざな機器を接続するための端子があります。
1
2
3 4 5 6 7 8
1 電源端子
付属の電源コードを接続します。
2 譜面立て用穴
SV‑2には譜面立てを付属しています。譜面立ての足の部分を、2つの専用穴に差し込
んでください。
3 USB DEVICE 端子
この端子は、コンピューターに接続(MIDIポートを兼用)してシーケンサーを使用し
た り 、S V ‑ 2 Editorソフトウェアで詳細な編集をしたりするときに使用します。この端
子を使用するときは、あらかじめコンピューターにKORGUSB‑MIDIドライバーをイン
ストールしてください(MIDIドライバーは当社ウェブサイトからダウンロード すること
が で きます。その際、ドライバー の 説 明 をご 覧くだ さい)。
注意:最新のOS対応状況については、コルグ・ウェブサイトをご覧ください。
https://wwwkorgcom/support/os/
4 SPEAKERS ON/OFF スイッチ (スピーカー内蔵モデルのみ)
このスイッチで内蔵スピーカーのオンとオフを切り替えます。
5 PEDAL 端子 (DAMPER, 1, 2)
付属のコルグDS‑2HまたはDS‑1H(別売り)をDAMPER端子に接続します。ペダル
は、ダンパー・ペダルとして動作します。
フ ット・ス イッ チ( コ ル グ P S ‑ 1 、P S ‑ 3:別 売 り )を PEDAL
1端 子 に 接 続 し ま す 。フ ッ ト ・ス
イッ チ は ソ ス テ ヌ ー ト・ ペ ダ ル と し て 、ま た は ロ ー タ リ ー ・ス ロ ー / フ ァス ト・ス イ ッ チ( ロ
ータリ/エフェクトが 選 択さ れている場 合)として動 作します。

各部の名称と機能 |11
日本語
フット・スイッチ(コルグPS‑1、PS‑3:別売り)、ボリューム/エクスプレッション・ペダル
( コ ル グ X V P ‑ 2 0 、E X P ‑ 2: 別 売 り )を PEDAL 2端 子 に 接 続 し ま す 。フ ッ ト ・ス イ ッ チ は
ソフト・ペダルとして動作します。ボリューム/エクスプレッション・ペダルは、ボリュ
ーム・コントロール(デフォルト設定)として動作します。ワウ・エフェクトが選択され
て い る とき は ワウ・フィル ター・コントロ ー ルとして 動 作しま す。ワウ・エ フェクトをコ
ントロールする 場 合 には、PRE FXセ ク シ ョ ン( P e d a l モ ー ド )の Auto/Pedalのランプ
を点 灯 させます。
コルグDS‑2Hダンパー・ペダルはあらかじめキャリブレーションされています。ボリュ
ーム/エクスプレッション・ペダルは、通常すべての範囲で反応するようにするために
キャリブレーションが必 要となります。フット・スイッチの極性を設 定する場合にもキ
ャリブレーションを行ってください。ペダルのキャリブレーションと極性の設 定につい
ては29 ページ、「ペダルのキャリブレーション」を 参 照してくだ さ い 。
6 MIDI 端子 (IN、OUT)
MIDIを使用すると、シーケンサーからSV‑2をコントロールしたり、SV‑2から外部MIDI
デバイスをコントロールしたりすることができます。SV‑2で外部MIDIデバイスを操
作するとき、またはシーケンサーにレコーディングするときは、LOCAL OFFボタン
を押してランプを点灯させます。これにより内部音源と鍵盤の接続が切断されます
( M I D I 側 か ら で は な く )。
MIDI OUTは、MIDIデータを送信します。接続した外部MIDIデバイスまたはコンピュ
ーターをコントロールするときに使用します。MIDIケーブルを使って他のデバイスの
MIDIIN端子に接続します。
MIDI INは、MIDIデータを受信します。接続した外部MIDIデバイスまたはコンピュー
ターからSV‑2をコントロールするときに使用します。MIDIケーブルを使って他のデバ
イスのMIDIOUT端子に接続します。
7 INPUT 端子 (L/MONO, R/MONO)
キーボード、シンセサイザー、CD、オーディオ・プレーヤーなどライン・レベルの音源
をこれらの端子に接続します。モノラルで接続する場合は、どちらか1つの端子に接
続しま す。
8 OUTPUT 端子 (L/MONO, R/MONO, LEFT, RIGHT)
L/MONO、R/MONO(63mmフォーン端子:アンバランスド)、または
LEFT、RIGHT(XLR端子:バランス)のどちらかを使用できます。短いケーブルを使用
するときは63mmフォーン端子(アンバランスド)を、ステージ演奏などで長いケーブ
ルを使用するときは、XLR端子(バランス)を使用することをお勧めします。どちらを
使 用しても支 障はありません。
モ ノ ラ ル 出 力 が 必 要 な 場 合 は 、ど ち ら か の MONO 63mmフォーン端子へ接続しま
す。XLR端子はモノラル出力に使用することはできません。
ヒント: できるだけLEFT、RIGHT(XLR端子:バランス)を使用することをお勧めします。
警告: 本機のLEFT、RIGHT (XLR端子:バランス)をミキサー等に接続する場合、接続先のフ
ァンタム電源を必ずオフにしてください。本機を破損することがあります。

12| 日本語
VOX
シンセサイザー等
MIDI
IN OUT
OUTPUT
OUTPUT INPUT AUX/LINEIN INPUT/LINEIN
INPUT/LINEIN INPUT/LINEIN
コンピューター
USBケーブル
USB
ボリューム/エク
スプレッション・
ペダル
フットスイッチ2
(ソステヌート・
ペダル)
フットスイッチ1
( ソ フ ト・ペ ダ ル )
PHONES
ヘッド ホ ン
ダ ン パ ー・ペ ダ ル
(付属)
電源
ACIN
オーディオ・プレーヤー等
アンプ
オ ー デ ィ オ・シ ス テ ム
ミキサー、レコーダー等
パワード・モニター
オ ー デ ィ オ・イ
ンターフェイス
(SV2‑73Sと
SV2‑88Sのみ)

SV‑2の電源をオンにする |13
日本語
SV-2の電源をオンにする
電源のオンとオフを切り替える
1 付属の電源ケーブルをリア・パネルの電源端 子 に 接 続します。
2 電 源ケーブルをコンセントに差し込 みます。
電源コードのプラグには、アース端子が付いています。感電と機器の損傷を防ぐた
めに、アース接続を確実に行って、コンセントに接続します。
注意:電源は必ずAC100Vを使用してください。
接地極付きコンセントに接続する場合
接地極付きコンセントに、AC電源コードのプラグをその
まま差し込 んでください。
アース端子付きコンセントに接続する場合
AC電源コードのプラグに、2P‑3P変換器を取り付
けま す。そして、コンセントのアース 端 子 に アース
線を接続し、2P‑3P変換器のプラグを差し込みま
す。
注意:アース接続は、コンセントにプラグを差し込む前
に行ってください。また、アース接続を外すときは、コ
ンセントからプラグを抜いてから行ってください。
3 コントロ ー ル・パ ネ ル の 電源ス イ ッ チ を 押 し て 、電 源 を オ ン に し ま す 。真 空 管 が 点 灯
し 、ウォーミング アップが 始まりま す。数 秒 後 に S V ‑2 が演 奏できるように なりま す。

14| 日本語
SV‑2には、12AX7(ECC83)バルブ(真空管)が搭載されています。
警告: バルブ・カバーやバルブは衝撃により破損することがあります。バルブ・カバーが破
損した場合は、交換してください。破損したバルブ・カバーをそのまま使 用するとバルブ自
体が損傷する恐れがあります。
注意: コルグSV‑2の電源をオンにすると、真空管が一瞬点滅します。これは特定の真空管
の特徴です。SV‑2の電源をオンにした際、真空管がまだ温まっていないときにこの現象が
現れます。これによりその真空管やSV‑2の性能に支障が出ることはありません。
4 SV‑2の電源をオフにするときは、電源スイッチを 約1秒 間 押し ま す。
マスター・ボリュームを調整する
SV‑2の全体の音量を設定します。
MASTER VOLUMEノブを時計回りに回すと音量が上がり、反時計回り
に回すと音 量 が 下がります。
このノブは、内蔵スピーカー、OUTPUT端子とヘッドホン端子の全体の
音量をコントロールします。
警告:音量は常に適切なレベルに保ってください。過剰な音量で音を聞き続けると、永続的
な難聴になる恐れがあります。
デ モ・ソ ン グ を 聴 い て み よ う
S V ‑ 2 の デ モ・ソ ン グ を 聴 い て み ま し ょ う 。い くつ か の デ モ・ソ ン
グを選 択してサウンドを確認してみてください。
1 TRANSPOSEボタンとLOCAL OFFボタンを同時に押します。それぞれのボタンのラン
プが点 滅します。
2 このまま何も操作をしない場合は、すべてのデモ・ソングが順番に再生されます。
3 任意にデモ・ソングを選ぶときは、以下の操作をします。ファクトリー・サウンドごと
にデモ・ソングが用意されています。
▪ SOUNDセクションのTYPEノブと、VARIATIONノブ を 回して選びます。
▪ バンクを切り替えるときは、VARIATIONノブを押します。ノブのランプが緑色に点灯
し 、2 つ め の バ ン ク の デ モ ・ソ ン グ が 選 べ ま す 。も う 一 度 VARIATIONノブを押すとラ
ンプがオレンジ色に点灯し、1つめのバンクに戻ります。
自動再生が開始された後でもデモ・ソングを選択できます。
4 MASTERVOLUMEノブ で 音 量を調 節します。
5 デ モ・ソ ン グ の 再 生 を 停 止 す る と き は 、TRANSPOSEボタンとLOCAL OFFボタンをも
う一 度 押しま す。

サウンドを演奏する |15
日本語
サウンドを 演 奏 する
「 サ ウ ン ド 」と は
SV‑2において、サウンドとは鍵盤を演奏したときに出力される「音色」または「音色の
セット」を意味します。各サウンドは、最 大 3つの「プログラム」で構成され 、それぞれ
が異なる音色や、鍵盤の機構音とハンマーが弦を打つ音といった付随する「ノイズ」
とのセットなどがあります。メインのプログラムに、1つまたは2つのプログラムを重ね
ると、これらの音色がメインの音色とミックスされます(レイヤー)。一 般 的 に 知 ら れ
る「 ピ アノと ス ト リ ン グ ス 」の サ ウ ン ド を 例 に と って み ま し ょ う 。ピ アノ、そ し て ピ アノ の
ノイ ズ 、ス ト リ ン グ ス の プ ロ グ ラ ム で 構 成 さ れ ま す 。
Main, Layers 1, 2
Main, Layer (1)
Split
鍵盤の高音域側と低音域側に異なるプログラムを配置すると、それぞれで異なるサウ
ン ド が 鳴 り ま す( スプ リット)。たとえば高音域側に1つまたは2つのプログラムを使
用し、3つめのプログラムは低音域側で伴奏のために使用するなどもできます(アッ
プ ラ イ ト ・ ベ ー ス 、シ ン セ ・ パ ッ ド な ど )。
Main, Layers 1, 2
Main, Layer (1)
Split
ファクトリー・サウンドとフェイバリット・サウンド
S V ‑ 2 に は 、7 2 個 の ファクトリー・サウンドが 保 存されており、これらのサウンドはフ
ロント・パネルのノブで音色を変化させることができます。気に入った音色に仕上
がったときは 、フェイバリット・サウンドとして64個保存することができます。(SV‑2
Editorソフトウェアを使用することで、詳細なエディットを行うことができます。)
音が出ている途中で、次のサウンドに切り替えたとき、通常、鳴っている音には影響
なく、次に鍵盤を押すと切り替えたサウンドで鳴り、スムーズな移行が行えます。た
だし、AMPLIFIERセクションがオンで、真空管を使 用しているときは例外です。

16| 日本語
ファクトリー・サ ウンド を 選 択 する
ファクトリー・サウンドの選択方法
ファクトリー・サ ウンド は SOUNDセクションで選択します。
1 SOUNDセクションのTYPEノブを回して、サウンド・タイプを選択します(6種類のう
ち 1 つ )。
2 SOUNDセクションのVARIATIONノ ブ を 回 し て 、バ リ エ ー シ ョ ン を 選 択 し ま す( 6 個 の
う ち 1 つ )。
ノブの周りのランプが点灯し、選択したサウンドとバリエーションを示します。
3 VARIATIONノブを押して、バリエーションの2つめのバンクを選択します(ランプの
色 が 緑 色 に 変 わ り ま す )。
VARIATIONノブを回して、2つめのバンクからバリエーションを選択します(6個の
う ち 1 つ )。
4 バリエーションの1つめのバンクへ戻るときは、VARIATIONノブ をもう一 度 押します
(ランプの色がオレンジ色に戻ります)。

サウンドを演奏する |17
日本語
フェイバリット・サウンドを選択する
フェイバリット・サウンドの選択方法
自身がエディットして作成したサウンドなどが含まれるフェイバリット・サウンド
は、FAVORITESセクションで選択します。
1 現 在のバンクからフェイバリット・サウンドを選 択するときは 、該 当するFAVORITES
(1〜8)ボタンを押しま す。
選択したバンクを知りたいときは、TYPEノブ を押して、点滅しているFAVORITES
(A~H)ボタンがどれであるかを確認します。もう一度ノブを押してバンクの選択モー
ドを終了します(またはランプが消灯するまで待ちます)。
2 別 の バ ンク で フェイバ リットを 選 択 するときは 、TYPEノブを押します。現在のバンク
が 、点 滅 す る FAVORITES(A〜H)ボタンで示されます。
選択するバンクに該当するFAVORITES(A〜H)ボタンを押します。
次 に 、選 択 し た い フ ェイバ リ ット に 該 当 す る FAVORITES(1〜8)ボタン を押します。
最後に選択したファクトリー・サウンドに戻る方法
フェイバリット・サウンドを選択した後、前述の方法でファクトリー・サウンドを再び
選択することができます。
または別の方法で、速やかに最後に選択したファクトリー・サウンドへジャンプする
こともで きます。
SOUNDセクションのVARIATIONノブ を押します。

18| 日本語
サ ウ ンド・リスト
内 蔵 サウンドの 名前と簡単な説明を下表に示しま す。
名前に「 & 」が 含まれるもの(「FM Piano & Pad」など)は、2 つ ま た は 3 つ の プログラ
ムが鳴るレイヤーのサウンド で す。名前に「 / 」が 含まれるもの(「Pad/Mini Lead」な
ど)は、鍵盤の上下で異 なるプログラム が鳴るスプ リットのサウンド です。
ファクトリー・サウンド
外部MIDIデバイスからファクトリー・サウンドを切り替えることができます。SV‑2に
MIDIコントロール・チェンジのバンク・セレクトCC#32を値0、CC#00を値0で送信
し 、次 に プ ロ グ ラ ム・ チ ェ ン ジ( 下 記 リ ス ト「 P C 」参 照 )を 送 信 し ま す 。
サウンド Var PC 説明
EP1
MKISuitcase A1 0 代表的 な タイ ン/ト ーン・バ ー 機 構 を 持 つ エレ クトリック・ピ
アノ MKI。2つのバージョンのサウンド
MKIStage B1 6
MKIISuitcase A2 1 格調の高いMKII。2つのバージョンの サウンド
MKIIStage B2 7
MKVStage A3 2 ベルのようなサウンドで知られるMKVStageのサウンド
MKVBright B3 8
DynoEP A4 3 ソフトなバラードや、明 る い ソ ロ に も 向 く 、ポ ピ ュ ラ ー な 改
造 モ デ ル の エ レ クト リ ッ ク・ピ アノ・サウンド
DynoEPBright B4 9
Wurly A5 4 リードのパ ンチの 効 いた スタンダード なサウンド。’60年代
と’7 0 年 代 の ポ ップ・サ ウ ンド
WurlyClassic B5 10
WurlyDark A6 5 リード 機 構 を持 つエ レ クト リ ッ ク・ピ アノ。よ り ダーク、よ り
ブライトな サウンド
WurlyBright B6 11
EP2
FMPiano1 A1 12 ’80年代を代表するF M エ レ クト リ ッ ク・ピ アノ・サ ウ ン ド 。当
時、数 多 くのレコードから聴こえ たサウンド
FMPiano3 B1 18
FMPiano2 A2 13
FMPiano&Pad B2 19 F M ピ アノ + パ ッド・サ ウンド はその時代のもう一つの定番
PianetT A3 14 ドイツの電気式 ビ ン テ ー ジ・キ ーボード です。エレ クトリッ
ク・ピ アノ の ユー ロ・バ ー ジョン
PianetN B3 20
HybridPiano A4 15 新 し い ピ アノ の サ ウ ンド ス ケ ープ。ピ アノ の ハ イ ブ リ ッド な
組み合わせ
HybridTine B4 21

サウンドを演奏する |19
日本語
サウンド Var PC 説明
Wurly&Strings A5 16 エ レ クト リ ッ ク・ピ アノと ストリングスの組み合せ。リードか
FMかを選択
FM&Strings B5 22
MKII&Pad A6 17 エ レ クト リッ ク・ピ アノと パ ッド の 組合せ。タインかFMか
を選択
FM&Pad B6 23
PIANO1
GermanGrand A1 24 ドイツ製の最も有名なグ ラ ン ド・ピ アノ・サ ウンド。クラシッ
ク 、ジ ャ ズ 、ポップ ス な ど に最適
GermanClassic B1 30
ItalianGrand A2 25 イタ リ ア 製 の グ ラ ン ド・ピ アノ・サ ウンド。ク ラ シ ッ ク 、ジ ャ
ズなどに最適
ItalianBright B2 31
JapaneseGrand A3 26 もう一つの 必需品である日 本 製 の グ ラ ン ド・ピ アノ・サウ ン
ド 。ク ラ シ ッ ク 、ジ ャ ズ 、ポップ ス な ど に最適
JapaneseBright B3 32
AustrianGrand A4 27 オ ース ト リ ア 製 の グ ラ ン ド・ピ アノ・ サ ウ ン ド 。ク ラ シ ッ ク 、
ジャズ などに最適
AustrianClassic B4 33
JapaneseUpright A5 28 共鳴音が特徴的な大 型 の 日 本 製 ア ップ ラ イ ト・ピ アノ・サ
ウンド
UprightBright B5 34 ポ ピ ュラ ー な ポップ・バ ンド でよく使 わ れるような、落ち着
き が あ り な が ら も 明 瞭 な ピ アノ・サ ウ ン ド
GermanUpright A6 29
ド イ ツ 製 の ア ップ ラ イト・ピ アノ。特 徴 的 な メロウな サウンド
RockPiano B6 35 ロックとロカビリー に最適なアグ レ ッシ ブ な アップ ラ イト・
ピ アノ・サ ウンド
PIANO2
ElectricGrand A1 36 ’7 0 年 代 に 制 作 さ れ たエレ クトリック・ア コ ース テ ィ ッ ク・ピ
アノ。ギ グ・ミュー ジ シャン の 間 で 人 気 が あった独特なメロ
ウ・サ ウンド
GermanMono B1 42 ドイツ製グランド・ピアノのモノラル・バージョン
KORGM1Piano A2 37 コ ル グ・ピ アノ の遺産。一時代を 築 き 上 げ 、人 気 を 博 し た
M1ミュージック・ワー クステ ー ションと、先駆的なSG‑1Dデ
ジタル・ピアノからのサウンド
KORGSG‑1D B2 43
DigitalPiano A3 38
ポピュラ ーなデ ジタル・キ ーボード/ シン セ サイザーで ’80年代
後 期 に 作 ら れ た 、革 新 的 で緻密な表 現 豊 か な ピ アノ・サ ウ ン ド
ElectraPiano B3 44 ’7 0年代 のポピュラーなエレクトリック・ピ アノ。多くの 有 名
なクラシック・ロックとプログレッシブ・ロックのミュージ
シャン に よって使 用 さ れ たサウンド
TackPiano A4 39 タ ッ ク・ピ アノと ホ ン キ ー トン ク・ピ アノ・サ ウンド。ラグ・タ
イム と ストライド・ジャンル に最適
Honky‑Tonk B4 45
Piano&Strings A5 40 ピ アノと ストリングスま た は パッド のレ イヤ ー・サ ウンド。ア
ン ビ エ ント・ミ ュー ジ ッ クにも向く
Piano&Pad B5 46

20| 日本語
サウンド Var PC 説明
Piano&Synth A6 41 ピ アノと シ ン セ サ イ ザ ー ま た は ブラスのレイヤー・サ ウン
ド。フ ュ ー ジ ョ ン ・ ジ ャ ズ の 時 代 を思い 起こせるミックス
Piano&Brass B6 47
Clavier
ClavAC A1 48 同位相でのクラビ(エレクトリック・クラビコード)サウン
ド
ClavAD B1 54
ClavBC A2 49 逆 相とエッジの 効 いたク ラ ビ・サウンド
ClavBD B2 55
Harpsichord A3 50 ルネッサンス後期とバロック時代の音楽などに適した8”と
8”+4”のハープシコード・サウンド
HarpsichordOct B3 56
PercOrgan A4 51 パーカッションを加えたクリーンとディストーションのトー
ン ホ イー ル・オ ル ガ ン・サ ウンド
RockOrgan B4 57
JazzOrgan A5 52 ジャ ジ ーなト ーン ホ イー ル・オル ガ ン・サ ウ ンド
VoxOrgan B5 58
VOXContinentalConnieトランジスター・オルガン・サ ウンド
ChurchOrgan A6 53 荘 厳 な パ イ プ・オ ル ガ ン・サウ ンド
PipeOrgan B6 59 柔 ら か な( 瞑想的な)パ イ プ・オ ル ガ ン・サ ウンド
Other
FullStrings A1 60
趣の異なるクラシカルな ストリングス・サウンド
ClassicStrings B1 66
TapeStrings A2 61 1970年代のメローなシンセ・ストリング ス・サウンド
Strings&Voices B2 67 ボイスが加わったリアルなストリングス・サウンド
WarmPad A3 62 典 型 的 な シ ン セ・パッド。ダー クとブ ライトな サ ウンド
BrightPad B3 68
Orchestra A4 63 パワフルなオーケストラのトゥッティ
Pizzicato&Glock B4 69 ピチカート奏法のストリングスとグロッケン(鉄琴)による
サウンド
Brass A5 64 リ ア ル な ブ ラ ス・セ ク シ ョ ン・サ ウンド
SynthBrass B5 70 荘 厳で存 在感のシあるンセ・ブ ラ ス・ サ ウ ン ド
Pad/MiniLead A6 65 ソ フトな シ ンセ・パッドとソロ・シ ンセの スプ リット・サ ウ ン
ド
Pad/SynthLead B6 71

サウンドを演奏する |21
日本語
フェイバリット・サウンド
外 部 M I D I デバイス からフェイバリット・サウンド を 切り替えること が で きます。S V ‑2
にMIDIコントロール・チェンジのバンク・セレクトCC#32を値64、CC#00を値0で送
信 し 、次 に プ ロ グ ラ ム・ チ ェ ン ジ( 下 記 リ ス ト「 P C 」参 照 )を 送 信 し ま す 。
サウンド Pos PC
DemoShop
GermanGrand A1 0
ItalianGrand A2 1
EPMKII A3 2
Wurly A4 3
Clav A5 4
FMPiano A6 5
Piano&Strings A7 6
Bass/EP A8 7
Piano
GermanGrand B1 8
ItalianGrand B2 9
JapaneseGrand B3 10
AustrianGrand B4 11
JapanUpright B5 12
GermanUpright B6 13
RockPiano B7 14
TackPiano B8 15
ElectricPno
EPMKI C1 16
EPMKII C2 17
EPMKV C3 18
DynoEP C4 19
WurlyAmp C5 20
WurlyTremolo C6 21
FMPiano C7 22
HybridEP C8 23
サウンド Pos PC
Claviers
ClavAC D1 24
ClavBC D2 25
PercOrgan D3 26
JazzOrgan D4 27
ChurchOrgan D5 28
KORGM1Piano D6 29
ElectricGrand D7 31
Harpsichord D8 32
Layer
Piano&Strings E1 32
Piano&Pad E2 33
Piano&EP E3 34
Piano&Vibes E4 35
MKII&Pad E5 36
Strings&Pad E6 37
Piano&FM E7 38
FM&Strings E8 39
Split
AcBass/Piano F1 40
ElBass/Piano&Str F2 41
Fretless/EP F3 42
Slap/EP F4 43
Slap/Clav F5 44
EPBass/VoxOrgan F6 45
JazzPianoTrio F7 46
OrganDualManual F8 47

22| 日本語
サウンド Pos PC
Other
FullStrings G1 48
StringsOctave G2 49
OrchestraTutti G3 50
Brass G4 51
WarmPad G5 52
SynthBrass G6 53
Pad/SynLead G7 54
SynthBass G8 55
サウンド Pos PC
LegacySV1
SV1GrandPiano1 H1 56
SV1GrandPiano2 H2 57
SV1TineEPAmp H3 58
SV1ReedEP1 H4 59
SV1ClavAC H5 60
SV1ClkTonewheel H6 61
SV1FullStrings H7 62
SV1SynthBrass H8 63

エフェクトを使用する |23
日本語
エフェクトを使 用する
エフェクト
各セクションのTYPEノブを回して、さまざまなエフェクトとアンプ・モデルを選択す
ることが で きます。DEPTH、INTENSITY、SPEED、DRIVEの 各ノブ でエフェクト の 主
だったパラメーターの設 定を変 更できます。ノブを押すと、そのパラメーターの元 の
設定値が呼び出されます。SV‑2 Editorソフトウェアを使用することで、より詳 細にエ
ディットすることができます。
エフェクトとアンプ・シミュレーション機能は、該当するOn/Oボタンを押してオンと
オフを切り替えます。変更内容はサウンドと共にFAVORITESに保存することができ
ます。
さまざまなコントロールを試し、エフェクトでどんな変化が現れるのかを確認してく
ださい。
SIGNAL ROUTING
EQ PRE FX
MODULATION AMBIENT TOTAL FX
Stereo Limiter
Stereo Mastering Limiter
OUTPUTS
SOUND
PRE AMP
VOLUME VOLUME POWER
AT T.
PROGR
LVL
POWER AMP
VALVE
CABINET NR

24| 日本語
変 更したサウンド を 保 存 する
エディットし た 音 色 が 気 に 入った とき は 、そ れ をフェイバ リット・サ ウンドとして保 存
することができます。
1 SOUNDのTYPEノブを押し、フェイバリット・サウンドのどのバンクが選択されてい
るかを 確 認しま す。
現 在 選 択 さ れ て い る バ ン ク が 、点 滅 す る FAVORITES (A〜H)ボタンで示されます。
2 別のバンクを選択するときは、選択するバンクに該当するFAVORITES (A~H)ボタン
を押しま す。
3 フェイバ リット の 保 存 先 とする FAVORITES (1〜8)ボタンを1つ選び、そのボタンを押
したままランプが点滅し始めるまで待ちます。
4 同じボタンをもう一度押し、保存を確認します。
変更内容を保 存しない場合は、どのボタンも押さずに、ボタンのランプが消灯する
まで 数 秒 間 待 ちま す。
ヒント: ギグやプロジェクトごとに、サウンドをフェイバリット・バンクに並べたり、グループ
化したりすることができます。
注意: フェイバ リット・サ ウ ンド を 保 存 す る と、保 存 先 の 元 の フェイバ リット・サ ウ ンド は 上
書きされて消去されます。
注意: エディットしたサウンドやエフェクトを保 存せ ずに、他のサウンドに切り替えるか、電
源をオフにすると、変更内容はすべて失われます。

高度な設定 |25
日本語
高度な設定
設定ボタン
TRANSPOSE、LOCAL OFF、TOUCH、FUNCTIONボ タ ン を 使 用 し て 、S V ‑ 2 を 自 分 の プ
レイ・スタイルに合わせるなどの、さまざまな設定をします。
FUNCTIONボタンを使 用した機 能 の 詳 細 つ い て は 、ユ ー ザ ー ・マ ニ ュ ア ル を 参 照 し て
ください。
トランスポーズ
曲が難しい(例えば、黒鍵が多く使われている)ため、または他の楽器またはボーカ
リストに合わせるためにピッチを変えたいという場合があります。このような場合に
は、キーを変える(移調する)ことによって、黒鍵をあまり使わない指使いや、覚えた
そのままの指使いで演奏することができるようになります。これがトランスポーズ機
能です。
例えば、下図左の楽譜を1半音上げた状態で弾くと、右の楽譜を弾いたかのように
聴こえます。
トランスポーズのオンとオフを切り替える
1 TRANSPOSEボタンを押してトランスポーズ 機 能 を オンにしま す。トランス ポーズ が 設
定されている場合は、このボタンのランプが点灯しています。設定されていない場合
は、ランプは消灯したままです。
2 元のキーに戻すときは、TRANSPOSEボタン を もう 一 度 押してトランス ポーズ 機 能 を
オフにします。ランプが消灯しま す。

26| 日本語
トランスポーズを設定する
1 TRANSPOSEボタン を 約1秒 間 押します。ランプが点 滅します。
2
鍵盤でトランスポーズ先のキーを押します。トランスポーズが設 定され、ランプが点 灯しま
す。
-12
C3
0 +12
C5
鍵盤 エフェクト
C3〜B3 12〜1半音下げる
C4(中央のC) 標準
C#4〜C5 1〜12半音上げる
鍵盤を押さないで数秒経過すると、トランスポーズの設定は終了します。
3 元 のキーに戻 すときは、TRANSPOSEボタンをもう一度押します。ランプが消灯しま
す。
注意: 本 機 の 電 源 を 切 る と 、ト ラ ン ス ポ ー ズ は 解 除 さ れ ま す 。

高度な設定 |27
日本語
タッチ感 度の 変 更
鍵盤を弾く強さによる音量変化の度合いを設定します。
1 TOUCHボタンを押しま す。
このボタンを押した後、ボタンのランプが点滅します。また、選択したタッチ・カーブ
に 該 当するFAV O R I T E ボタン が点 滅します。
2 FAVORITEボタンでタッチ・カーブを選びます。
フェイバリット
タッ チ・カ ーブ
説明
1 N o r m a l( 標 準 ) 普 通 の ピ アノ・タ ッ チ
2 Soft1(ソフト1) 弱く弾いても強音が出せるタッチ
3 Soft2(ソフト2)
4 Medium1(ミディアム1) 普通の強さで弾いても強音が出せるタッチ
5 M e d i u m 2( ミ デ ィア ム 2 )
6 Hard1(ハード1) 強く弾かないと強音が出せないタッチ
7 Hard2(ハード2)
8 Fixed(固定) ダイナミクスは一定 ダイナミクスはS V‑2 Ed ito rで設
定します。
タッチ・カーブは下図のようになります。
Playing strength
Soft
Str
ong
Strong
( )
No
te
loudness
Soft
Hard
Normal/Medium
強
弱
弱 強
打鍵の強さ
音の強弱
3 TOUCHボタンを押してタッチ・カーブ を 確 定します。演奏できる 状 態 に 戻ります。

28| 日本語
ロ ー カ ル・オ フ 機 能
ローカル・オフ機能を無効(ローカル・オン)または有効(ローカル・オフ)にしま
す。
▪ ローカル・オフ:LOCALOFFボタンを押してランプ を点 灯させ ます。
鍵盤と内部音源の接続が切られ、鍵盤を弾いてもSV‑2の音源は鳴りません。このと
き 、M I D I デ ー タ は MIDIOUT端 子( ま た は USB端 子 )か ら 送 信 さ れ ま す 。
コンピューターなどでMIDIデータを受信した場合、エコー・バック(コンピューター
が 受 信 し た M I D I デ ー タ を 、S V ‑ 2 の MIDIIN端子またはUSB端子に送信すること)を設
定したときは、SV‑2をローカル・オフに設定します。これによって、二重に発音するこ
と な く 、演 奏 や レ コ ー デ ィン グ が 行 え ま す 。
▪ ローカル・オン:LOCALOFFボタンを押してランプ を 消 灯 させます。
鍵 盤 を 弾 く と 内 部 音 源 が 鳴 り 、同 時 に M I D I デ ー タ を 送 信 し ま す 。通 常 は ロ ー カ ル ・
オンに設 定します。
注意:本機の電源を切ると、ローカル・オフ機能はリセットされます。
MIDIの音が止まらないときは
MIDI通信でMIDIノートの発音が止まらなくなった場合は、EQUALIZERのセクション
のOn/Oボタンを長押しし、音が止まるまで待ってください。これは一般にMIDIパニ
ックと言 わ れて いま す。

高度な設定 |29
日本語
ペダルのキャリブレーション
DAMPER、PEDAL 1、PEDAL 2端 子に接 続した各ペダルをキャリブレーションしま
す。ペダルをキャリブレーションすることで、SV‑2にその極性と可変範囲を認識させ
ます。
1
キャリブレーションを行うすべてのペダルをSV‑2に接 続します。
DAMPER端子には付属のコルグDS‑2Hダンパー・ペダル(または別のフット・スイッチ
式 の ペ ダ ル )を 、PEDAL
1にはフット・スイッチ式のペダルを接続します。PEDAL
2に
は、フット・スイッチまたはボリューム/エクスプレッション・ペダルを接続します。
2 ボリューム/エクスプレッション・タイプのペダルは、最小値(手前に戻しきる)に設定
します。
3 S V ‑2 の電 源をオフにしま す。
4 Auto/Pedalボタンを押しながら、SV‑2の電源をオンにします。
5 Auto/Pedalボタンのランプが点 滅を始めたら、ボタンから指を離します。
この後、何もしないで数秒経過すると、Auto/Pedalランプが消灯して演奏できる状
態 になります。
6 Auto/Pedalランプが点滅している間に、ボタンをもう一度押します。
SV‑2はキャリブレーション・モードに入ります。
7 PEDAL 1(フット・スイッチ)のキャリブレーションを開始します。ペダルを完全に踏
み込 んで から 離しま す。
PEDAL 1端子に接続したペダルの調整が完了すると、FAVORITES 1ボタンが点 灯し
ます。
8 次にPEDAL2をキャリブレーションします。使 用するフット・スイッチやボリューム /エ
クスプレッション・ペダルによって、手順は異なります。
▪
フット・スイッチを接 続した場合は、ペダルを完全に踏み込 んでから離します。
▪ ボリューム/エクスプレッション・ペダルを接続した場合は、ペダルを最大位置(奥に
踏 み 込 む )に し 。
PEDAL 2端子に接続したペダルの調整が完了すると、FAVORITES 2ボタンが点 灯し
ます。
9 最後にDAMPERペダルをキャリブレーションします。ペダルを完全に踏み込んでか
ら離します。DAMPER端子に接続したペダルの調整が完了すると、FAVORITES 3ボ
タンが点 灯しま す。
10 キャリブレーションを終了します。
▪ 3つのペダルに対してキャリブレーションを行った場 合
自動 的にキャリブレーション・モードが終了し、演奏できる状態になります。
▪
1つまたは2つの ペダルに対してキャリブレーションを行った場合
Auto/Pedalボタンを押すと、キャリブレーション・モードが終了し、演奏できる状態
になります。

30| 日本語
コ ントロ ー ル・パ ネ ル の ロック
こ こ ま で で サ ウ ン ド と エ フ ェクト の 変 更 方 法 を 紹 介 し て き ま し た 。次 は こ の 状 態 を そ
のまま変わらないようにするための方法について説明します。演奏中にセッティング
を不注意で変えてしまわないように、これは役立つ情報です。
1 TOUCHボタンとFUNCTIONボ タ ン を 同 時 に 押 し 、コ ン ト ロ ー ル ・ パ ネ ル を ロ ッ ク し ま
す。それぞ れ のランプが点 滅しま す。
ここでコントロールできるのはMASTER VOLUMEノブと電源スイッチだ け に なりま
す。
2 TOUCHまたはFUNCTIONボタンのどちらかを押すと、コントロール・パネルのロック
が 解 除 さ れ ます。
注意:本機の電源を切ると、ロック機能はリセットされます。
工場出荷時の設定に戻す
S V ‑ 2 は 、工 場 出 荷 時 の 状 態( フ ェ イ バ リ ット・サ ウ ン ド や グ ロ ー バ ル 設 定 を 含 む )に
戻すことができます。
1 本 機 の 電 源を 切ります。
2 FUNCTIONボ タ ン を 押 し な が ら 、本 機 の 電 源 を 入 れ ま す 。
3 ボタンのランプが点滅を始めたら、FUNCTIONボタンから指を離します。
4 FUNCTIONボタン を もう 一 度 押 してリストア 操 作 を 確 定し ま す。
5 これですべての設 定が工場出荷時の設 定に戻ります。

仕様 |31
日本語
仕様
仕様 SV‑2
鍵盤
鍵盤
SV2‑73/SV2‑73S:73鍵、SV2‑88/SV2‑88S:8 8 鍵ベロシティ・センシティ
ブ、コルグRH3(RealWeighted,HammerAction3)
タ ッ チ ・コ ン ト ロ ー ル 8 種 類 の タッ チ・カ ーブ
チューニング トランスポーズ、ファイン・チューニング、チューニング・カーブ
サウンド
音源 EDS‑X(EnhancedDenitionSynthesis–eXpanded)
同時発音数 1 2 8 音( 最 大 )
マルチ レ イ ヤ ー 、ス プ リ ット
ファクトリー・サ ウ ンド
72ファクトリー・サウンド(6ベース・サウンドx2セット6バリエーション)
フェイバ リット・サ ウ ンド 64フェイバリット・サウンド(8バンクx8バリエーション)保存用
エフェクト
イコライザー Bass、Mid、Treble
プ リ・エ フ ェクト Red Compressor、Treble Boost、U‑Vibe、Vibrato、Tremolo、
V o x W a h( ペ ダ ル ・コ ン ト ロ ー ル )
ア ン プ・モ デ ル Clean、Twin、Tweed、AC30、Boutique、OrganAmp
ValveReactor回路—真空管12AX7(ECC83)を含むキャビネット・モデル
モジュレーション Classic Chorus、Black Chorus、Orange Phaser、Small Phaser、FX
Flanger、Rotary(スロウ/ファースト・コントール)
アンビエント
Room、Plate、Hall、Spring、TapeEcho、StereoDelay(タップ・テンポ)
ト ー タ ル ・エ フ ェ クト ス テレ オ・マ スタリング・リミッタ ー 、ス テレ オ・リミッタ ー
その 他のコントロール
ボリューム MASTERVOLUMEノブ
パ ネ ル ・ス イッ チ TRANSPOSE、LOCALOFF、TOUCH、FUNCTION
デモ 72デモ・ソング(ファクトリー・サウンドごとに1曲ずつ)
接続
MIDI I N 、O U T
ヘッドホン HEADPHONES(63mmステレオ・フォーン端子)
オーディオ出 力 L、R(XLR:バランス)
L/MONO、R/MONO(63mmフォーン端子:アンバランスド)
オーディオ入 力 L/MONO、R/MONO(63mmフォーン端子:アンバランスド)
USB USB20Hi‑Speed、タイプBコネクター(MIDIインターフェイスと兼用)

32| 日本語
DamperPedal コ ル グ D S ‑ 2 H( 付 属 )
Pedal1 フット・スイッチ(例:別売りコルグPS‑1、PS‑3)
Pedal2
ボリューム/エクスプレッション(例:別売りコルグXVP‑20、EXP‑2)、また
はフット・スイッチ(例:別売りコルグPS‑1、PS‑3)
アンプ(SV2‑73S、SV2‑88Sのみ)
スピーカー 25インチx2、3インチx2パッシブ・ラジエーター付き
パ ワ ー・ア ン プ 15Wx2
一般
電源 AC100V、50‑60Hz
消費電力 スピーカー非搭載モデル:16W
スピーカー搭載モデル:25W
外形寸法(WxDxH)
(譜面立てを除く)
SV2‑73/SV2‑73S:1,143x347x157mm
SV2‑88/SV2‑88S:1,356x347x157mm
質 量( 譜 面 立 て を 除 く )
SV2‑73:172kg/SV2‑73S:183kg
SV2‑88:2035kg/SV2‑88S:2145kg
その他
付属品
電源コード、クイック・ガイド、譜面立て、ダンパー・ペダル(コルグ DS ‑2H)
ア ク セ サ リ ー( 別 売 り ) ST‑SV1ピアノ・スタンド、DS‑1Hダンパー・ペダル、XVP‑10、XVP‑20、
E X P ‑ 2 ボ リ ュ ー ム / エ ク ス プ レ ッ シ ョ ン・ ペ ダ ル 、P S ‑ 1 、P S ‑ 3 フ ッ ト・ス イ ッ
チ 、C B ‑ S V キ ャ リ ン グ・ バ ッ グ
*仕様および外観は、改良のため予告無く変更することがあります。
K‑ARRAYとの共同開発による信号増幅技術。

保証規定(必ずお読みください) |33
日本語
保証規定(必ずお読みください)
本保証書は、保証期間中に本製品を保証するもので、付属品類(ヘッドホンなど)は保証の対象に
なりません。保証期間内に本製品が故障した場合は、保証規定によって無償修理いたします。
1 本保証書の有効期間はお買い上げ日より1か年です。
2 次の修理等は保証期間内であっても有償となります。
・ 消耗部品(電池、スピーカー、真空管、フェーダーなど)の交換。
・ お取扱い方法が不適当のために生じた故障。
・ 天災(火災、浸水等)によって生じた故障。
・ 故障の原因が本製品以外の他の機器にある場合。
・ 不当な改造、調整、部品交換などにより生じた故障または損傷。
・ 保証書にお買い上げ日、販売店名が未記入の場合、または字句が書き替えられている場合。
・ 本保証書の提示がない場合。
尚、当社が修理した部分が再度故障した場合は、保証期間外であっても、修理した日より3か
月以内に限り無償修理いたします。
3 本保証書は日本国内においてのみ有効です。
This warranty is valid only in Japan.
4 お客様が保証期間中に移転された場合でも、保証は引き続きお使いいただけます。詳しくは、
お客様相談窓口までお問い合わせください。
5 修理、運送費用が製品の価格より高くなることがありますので、あらかじめお客様相談窓口へ
ご相談ください。発送にかかる費用は、お客様の負担とさせていただきます。
6 修理中の代替品、商品の貸し出し等は、いかなる場合においても一切行っておりません。
本製品の故障、または使用上生じたお客様の直接、間接の損害につきましては、弊社は一切の責
任を負いかねますのでご了承ください。
本保証書は、保証規定により無償修理をお約束するためのもので、これよりお客様の法律上の権
利を制限するものではありません。
■お願い
1 保証書に販売年月日等の記入がない場合は無効となります。記入できないときは、お買い上
げ年月日を証明できる領収書等と一緒に保管してください。
2 保証書は再発行致しませんので、紛失しないように大切に保管してください。
コルグSV‑2
保証書
本保証書は、上記の保証規定により無償修理をお約束するものです。
お買い上げ日 年 月 日
販売店名

34| 日本語
アフターサービス
■保証書
本製品には、保証書が添付されています。
お買い求めの際に、販売店が所定事項を記入いたしますので、「お買い上げ日」、「販売店」等
の記入をご確認ください。記入がないものは無効となります。
なお、保証書は再発行致しませんので、紛失しないように大切に保管してください。
■保証期間
お買い上げいただいた日より1年間です。
■保証期間中の修理
保証規定に基づいて修理いたします。詳しくは保証書をご覧ください。
本製品と共に保証書を必ずご持参の上、修理を依頼してください。
■保証期間経過後の修理
修理することによって性能が維持できる場合は、お客様のご要望により、有料で修理させてい
ただきます。ただし、補修用性能部品(電子回路などのように機能維持のために必要な部品)
の入手が困難な場合は、修理をお受けすることができませんのでご了承ください。また、外装
部品(パネルなど)の修理、交換は、類似の代替品を使用することもありますので、あらかじめ
お客様相談窓口へお問い合わせください。
■修理を依頼される前に
故障かな?とお思いになったら、まず取扱説明書をよくお読みのうえ、もう一度ご確認ください。
それでも異常があるときは、お客様相談窓口へお問い合わせください。
■修理時のお願い
修理に出す際は、輸送時の損傷等を防ぐため、ご購入されたときの箱と梱包材をご使用ください。
■ご質問、ご相談について
修理または商品のお取り扱いについてのご質問、ご相談は、お客様相談窓口へお問い合わせく
ださい。
WARNING!
この英文は日本国内で購入された外国人のお客様のための注意事項です。
is Product is only suitable for sale in Japan. Properly qualied service is not available for this
product if purchased elsewhere. Any unauthorised modication or removal of original serial
number will disqualify this product from warranty protection.
お客様相談窓口
PHS等一部の電話ではご利用できません。固定電話または携帯電話からおかけください。
受付時間:月曜〜金曜10:00 〜 17:00(祝祭日、窓口休業日を除く)
サービス・センター:〒168‑0073東京都杉並区下高井戸1‑15‑10
本社:〒206‑0812東京都稲城市矢野口4015‑2 wwwkorgcom


© KORG Italy 2020. All rights reserved PART NUMBER: MAN0010143
Address
KORG ITALY SpA
Via Cagiata, 85
60027 Osimo (AN)
Italy
Web
www.korg.com
MAN0010143
3M
Quick Guide
Prise en main
Schnellstart
Guida rapida
Guía Rápida
电子琴 用户手册
-
 1
1
-
 2
2
-
 3
3
-
 4
4
-
 5
5
-
 6
6
-
 7
7
-
 8
8
-
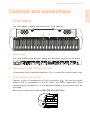 9
9
-
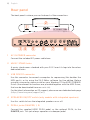 10
10
-
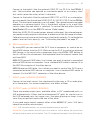 11
11
-
 12
12
-
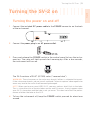 13
13
-
 14
14
-
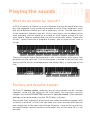 15
15
-
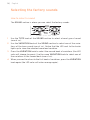 16
16
-
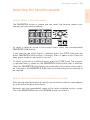 17
17
-
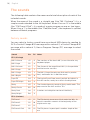 18
18
-
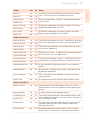 19
19
-
 20
20
-
 21
21
-
 22
22
-
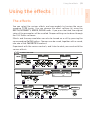 23
23
-
 24
24
-
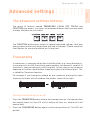 25
25
-
 26
26
-
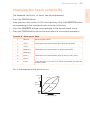 27
27
-
 28
28
-
 29
29
-
 30
30
-
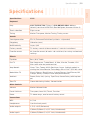 31
31
-
 32
32
-
 33
33
-
 34
34
-
 35
35
-
 36
36
-
 37
37
-
 38
38
-
 39
39
-
 40
40
-
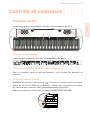 41
41
-
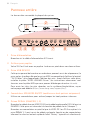 42
42
-
 43
43
-
 44
44
-
 45
45
-
 46
46
-
 47
47
-
 48
48
-
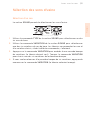 49
49
-
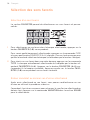 50
50
-
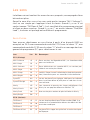 51
51
-
 52
52
-
 53
53
-
 54
54
-
 55
55
-
 56
56
-
 57
57
-
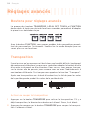 58
58
-
 59
59
-
 60
60
-
 61
61
-
 62
62
-
 63
63
-
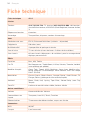 64
64
-
 65
65
-
 66
66
-
 67
67
-
 68
68
-
 69
69
-
 70
70
-
 71
71
-
 72
72
-
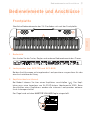 73
73
-
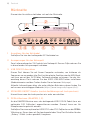 74
74
-
 75
75
-
 76
76
-
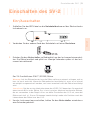 77
77
-
 78
78
-
 79
79
-
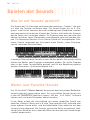 80
80
-
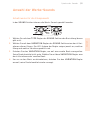 81
81
-
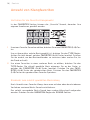 82
82
-
 83
83
-
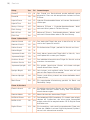 84
84
-
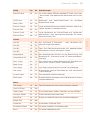 85
85
-
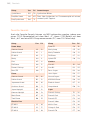 86
86
-
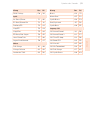 87
87
-
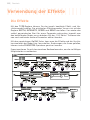 88
88
-
 89
89
-
 90
90
-
 91
91
-
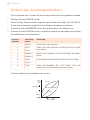 92
92
-
 93
93
-
 94
94
-
 95
95
-
 96
96
-
 97
97
-
 98
98
-
 99
99
-
 100
100
-
 101
101
-
 102
102
-
 103
103
-
 104
104
-
 105
105
-
 106
106
-
 107
107
-
 108
108
-
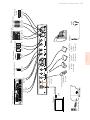 109
109
-
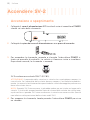 110
110
-
 111
111
-
 112
112
-
 113
113
-
 114
114
-
 115
115
-
 116
116
-
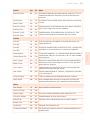 117
117
-
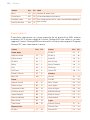 118
118
-
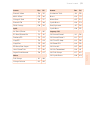 119
119
-
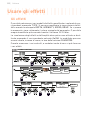 120
120
-
 121
121
-
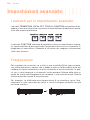 122
122
-
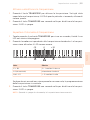 123
123
-
 124
124
-
 125
125
-
 126
126
-
 127
127
-
 128
128
-
 129
129
-
 130
130
-
 131
131
-
 132
132
-
 133
133
-
 134
134
-
 135
135
-
 136
136
-
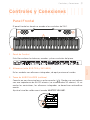 137
137
-
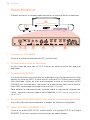 138
138
-
 139
139
-
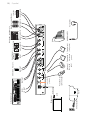 140
140
-
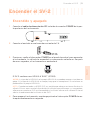 141
141
-
 142
142
-
 143
143
-
 144
144
-
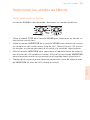 145
145
-
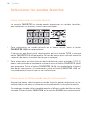 146
146
-
 147
147
-
 148
148
-
 149
149
-
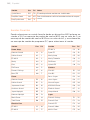 150
150
-
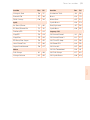 151
151
-
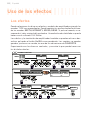 152
152
-
 153
153
-
 154
154
-
 155
155
-
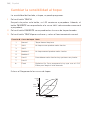 156
156
-
 157
157
-
 158
158
-
 159
159
-
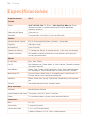 160
160
-
 161
161
-
 162
162
-
 163
163
-
 164
164
-
 165
165
-
 166
166
-
 167
167
-
 168
168
-
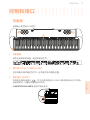 169
169
-
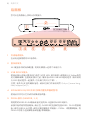 170
170
-
 171
171
-
 172
172
-
 173
173
-
 174
174
-
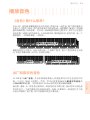 175
175
-
 176
176
-
 177
177
-
 178
178
-
 179
179
-
 180
180
-
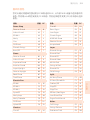 181
181
-
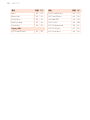 182
182
-
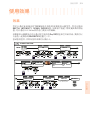 183
183
-
 184
184
-
 185
185
-
 186
186
-
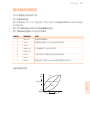 187
187
-
 188
188
-
 189
189
-
 190
190
-
 191
191
-
 192
192
-
 193
193
-
 194
194
-
 195
195
-
 196
196
-
 197
197
-
 198
198
-
 199
199
-
 200
200
-
 201
201
-
 202
202
-
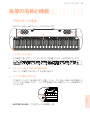 203
203
-
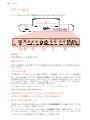 204
204
-
 205
205
-
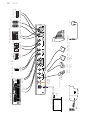 206
206
-
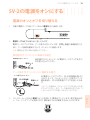 207
207
-
 208
208
-
 209
209
-
 210
210
-
 211
211
-
 212
212
-
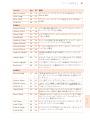 213
213
-
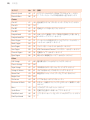 214
214
-
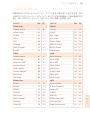 215
215
-
 216
216
-
 217
217
-
 218
218
-
 219
219
-
 220
220
-
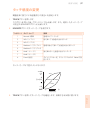 221
221
-
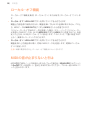 222
222
-
 223
223
-
 224
224
-
 225
225
-
 226
226
-
 227
227
-
 228
228
-
 229
229
-
 230
230


Korg SV-2 Guía del usuario
- Categoría
- Instrumentos musicales
- Tipo
- Guía del usuario
En otros idiomas
- français: Korg SV-2 Mode d'emploi
- italiano: Korg SV-2 Guida utente
- Deutsch: Korg SV-2 Benutzerhandbuch
- 日本語: Korg SV-2 ユーザーガイド
Documentos relacionados
-
Korg SV-2 Manual de usuario
-
-
-
Korg Grandstage El manual del propietario
-
Korg XVP-20 El manual del propietario
-
Korg KROSS 88 MB Guía de inicio rápido
-
Korg KingKORG El manual del propietario
-
Korg Nautilus Guía de inicio rápido
-
Korg XE20SP Guía de inicio rápido
-
Korg EPS-1 El manual del propietario