Barazza 1FFYPI Instrucciones de operación
- Categoría
- Microondas
- Tipo
- Instrucciones de operación

Specifiche tecniche
Technical Specifications
Hoja de Características
Folha de Características
Fiche de caractéristiques
Datenblatt
Gegevensblad
FEEL 1FFYPI
3172891-000 22/04/15 11:53 Página 1

3172891-000 22/04/15 11:53 Página 2

3
ITALIANO
1FFYPI
1 Pannello di comando
2 Guarnizione
3 Resistenza del grill
4 Sonda carne
5 Impugnatura per
l'estrazione dei vassoi
6 Griglia
7 Guide di scorrimento
8 Vassoio per pasticceria
9 Vassoio profondo
10 Interruttore sportello
11 Cerniera
12 Sportello a 3 vetri
13 Uscita dell’aria
di raffreddamento
14 Fissaggio al mobile
15 Schermo del grill
16 Uscita dei fumi
17 Pannello posteriore
18 Luci laterali
19 Ventola
20 Vetro interno grande
11 Funzioni di cottura
12 Indicatore di temperatura
13 Indicatore di temperatura della sonda carne
14 Orologio elettronico
15 Sensore di temperatura
16 Sensore orologio elettronico
17 Sensore
18 Sensore /Funzione di sicurezza
per i bambini
19 Accensione/Spegnimento
10 Luce interna
11 Sensore sonda carne
Pannello di comando
1 2 3 4 5 6
7
8
11 10 9
3172891-000 22/04/15 11:53 Página 3

4
Standard ventilato
Adatto per arrosti e pasticceria. La ventola
distribuisce uniformemente il calore all'interno
del forno riducendo il tempo e la temperatura
di cottura.
Turbo
La ventola distribuisce il calore proveniente da
una resistenza situata nella parte posteriore
del forno. Grazie all'uniformità di temperatura
prodotta, consente di cucinare gli alimenti su
due altezze contemporaneamente.
Pizza
Apposita funzione per la cottura di pizze, torte
salate o dolci ripieni di frutta.
A fuoco lento
Indicata per cucinare carni in salsa, stufati,
ecc... in modo tradizionale, e in generale per
ricette che richiedono una cottura "a fuoco
lento", con tempi di cottura particolarmente
lunghi a bassa temperatura. Per ottenere
risultati ottimali, si consiglia di impiegare
casseruole da forno con coperchio.
Scongelamento
Standard
Si utilizza per dolci e torte in cui il calore ricevuto
deve essere uniforme al fine di ottenere una
consistenza morbida e spugnosa.
Inferiore
Il calore proviene solo dalla parte inferiore del
forno. Adatto per riscaldare piatti o far lievitare
impasti.
Grill e Inferiore
Particolarmente adatta per agli arrosti. Si
utilizza per qualsiasi pezzo di carne,
indipendentemente dalle sue dimensioni.
Grill
Gratinatura e cottura arrosto superficiale.
Consente di dorare lo strato esterno degli
alimenti senza modificarne la parte interna.
Indicato per alimenti come bistecche, costine,
pesce, pane tostato.
Maxigrill
Consente di gratinare superfici più estese
rispetto al Grill, oltre a fornire una maggiore
potenza di gratinatura, per ottenere una
doratura più rapida degli alimenti.
MaxiGrill ventilato
Consente una cottura arrosto uniforme e nel
contempo effettua una doratura superficiale.
Ideale per le grigliate. Adatto in particolar modo
a porzioni di alimenti di grandi dimensioni come
pollame, cacciagione… Si consiglia di collocare
il pezzo di carne sulla griglia del forno e il
vassoio al di sotto, per raccogliere il liquido o i
grassi di cottura.
Attenzione
Durante l'uso della funzione Grill, MaxiGrill o
MaxiGrill ventilata, lo sportello deve essere
tenuto chiuso.
Funzioni del forno
3172891-000 22/04/15 11:53 Página 4

5
ITALIANO
Raccomandazioni per scongelare gli alimenti
La funzione di scongelamento funziona con un
sistema di aria calda su due livelli, il livello HI
per la carne in generale e il livello LO per
pesce, impasti vari e pane. Una volta selezio-
nata la funzione di scongelamento, sul visore
della temperatura è possibile selezionare il
livello HI oppure LO, toccando il sensore e
successivamente i sensori oppure .
• Gli alimenti non dotati di contenitore dovran-
no essere collocati sopra il vassoio del forno
o su un piatto.
• Per scongelare pezzi grandi di carne o pesce,
sistemarli sopra la griglia con un vassoio al
di sotto per raccogliere il liquido.
• La carne e il pesce non hanno bisogno di
essere completamente scongelati per inizia-
re la cottura. Basta che la superficie sia
morbida per poter aggiungere il condimento.
• Una volta scongelati, cucinare sempre gli
alimenti.
• Non ricongelare un alimento scongelato.
Per i tempi di scongelamento e il livello da selezionare, fare riferimento alla tabella seguente:
I tempi indicati nella tabella sono indicativi e il tempo di scongelamento dipenderà dalla tempera-
tura ambiente, dal peso e dal livello di congelamento dell'alimento.
LIVELLO LO
Peso Tempo Peso Tempo
LIVELLO HI
Pane
1
/
2
Kg
1
/
2
Kg
1
/
2
Kg
1 Kg
35 min
25 min
30 min
40 min
1 Kg
1,5 Kg
1
/
2
Kg
1
/
2
Kg
1 Kg
75 min
90 min
40 min
60 min
120 min
Tor ta
Pesce
Pesce
Pollo
Pollo
Braciola grande
Spezzatino
Spezzatino
ALIMENTO
3172891-000 22/04/15 11:53 Página 5

6
Comandi del forno
Regolazione dell’orologio elettronico
Attenzione
L’orologio elettronico dispone di tecnologia
Touch-Control. Per impostarlo basta toccare i
simboli sul vetro con il dito.
La sensibilità del Touch-Control si adatta con-
tinuamente alle condizioni ambientali. Quando
si collega il forno all'alimentazione, verificare
che la superficie del vetro della parte frontale
contenente i comandi sia pulita e libera da
qualsiasi ostacolo.
Se toccando il vetro con il dito, l'orologio non
risponde correttamente, scollegare il forno
dall'alimentazione elettrica e dopo un istante
ricollegarlo. In tal modo i sensori si regoleran-
no in modo automatico e reagiranno nuova-
mente al tocco del dito.
Regolazione dell'orologio elettronico
Una volta collegato il forno, sull’orologio com-
paiono gli indicatori lampeggianti 12:00 e .
Toccando i sensori oppure si può impo-
stare l’ora esatta; successivamente verranno
emessi due beep di seguito che confermano
l'ora scelta.
Per modificare l’ora, toccare più volte il senso-
re dell’orologio fino a quando non lampeg-
gia l’indicatore . Toccando i sensori
oppure è possibile modificare l’ora.
Infine, verranno emessi due beep di seguito
che confermeranno l’avvenuta modifica.
Funzionamento manuale
Una volta regolato l'orologio, il forno è pronto
per essere utilizzato.
1 Toccare il sensore di accensione .
2 Toccare il simbolo della funzione di cottura
selezionata.
3 L’indicatore di temperatura mostrerà
una temperatura predefinita per il tipo di
cottura scelto. Se si desidera modificarla,
basterà toccare il sensore di temperatura
e poi i sensori o per selezionare
la temperatura desiderata.
4 La parte superiore del forno inizierà a riscal-
darsi. Nelle funzioni si
attiverà la funzione di preriscaldamento rapi-
do per alcuni minuti. Una volta raggiunta la
temperatura selezionata, il forno emetterà
un segnale sonoro.
Attenzione: questa funzione di preriscalda-
mento attiva il motore turbo situato sul retro
della parte superiore del forno.
5 Durante il riscaldamento, l’indicatore o lam-
peggia indicando la trasmissione di calore
all’alimento.
6 Per interrompere la cottura, basterà toccare
il sensore di spegnimento .
Attenzione
Al termine della cottura, si noterà che la funzione
di raffreddamento del forno continua a essere
attiva fino a quando l’interno del forno avrà ridot-
to la temperatura.
1 2 3 4 5 6
7
8
11 10 9
3172891-000 22/04/15 11:53 Página 6

7
ITALIANO
Illuminazione del forno
La lampadina interna del forno si accende:
–Quando si apre lo sportello del forno. Dopo un
tempo determinato in cui lo sportello del forno
resta aperto, la luce si spegnerà per ridurre il
consumo di elettricità.
–Quando si seleziona una qualsiasi funzione di
cottura. Trascorso un tempo determinato la luce
si spegne.
Se si desidera accendere la luce durante la cot-
tura basterà toccare il sensore dell’illuminazione
interna . Se si tocca il sensore per un tempo
prolungato, la luce resterà accesa durante tutta
la cottura.
Funzioni dell'orologio elettronico
Durata di cottura: consente di cuocere per il
tempo impostato, trascorso il quale il forno si
spegnerà automaticamente.
Ora di fine cottura: consente di cuocere fino a
un orario definito, trascorso il quale il forno si
spegnerà automaticamente.
Tempo di cottura e fine cottura: consente di
programmare il tempo e l'ora di fine cottura.
Con questa funzione il forno si accenderà auto-
maticamente all'ora necessaria per cuocere
per il tempo impostato (Tempo di cottura) e ter-
minare la cottura in modo automatico all'ora
indicata (Fine cottura).
Allarme acustico: genera un segnale acustico al
termine del tempo impostato, indipendentemen-
te dal fatto che il forno sia acceso o spento.
Funzione di sicurezza per i bambini: blocca il
forno evitando che possa essere messo in fun-
zione da parte di bambini piccoli.
Programmazione dell'allarme acustico
1 Toccare più volte il sensore dell’orologio
fino a quando il simbolo si illuminerà.
2 Selezionare il tempo dopo il quale si desidera
che l'orologio emetta l'allarme acustico toccan-
do i sensori oppure .
3 Saranno emessi due segnali acustici di
seguito, sarà visualizzato il tempo restante
fino all'allarme acustico e il simbolo lam-
peggerà lentamente per indicare che l’allar-
me acustico è programmato.
4 Trascorso il tempo impostato, il forno emet-
terà un allarme acustico e il simbolo lam-
peggerà più rapidamente.
5 Toccare qualsiasi sensore della parte frontale
dei comandi per silenziare il segnale acustico.
In qualsiasi momento è possibile modificare il
tempo impostato toccando più volte il sensore
dell’orologio fino a quando lampeggia il
simbolo e poi toccando i sensori oppu-
re . Saranno emessi due segnali acustici di
seguito a conferma della modifica.
Programmazione del tempo di cottura
1 Toccare il sensore dell’orologio , il simbo-
lo si illuminerà.
2 Selezionare il tempo di cottura toccando i
sensori oppure .
3 Saranno emessi due segnali acustici di
seguito, sarà visualizzato il tempo di cottura
rimanente e il simbolo lampeggerà lenta-
mente per indicare che il forno si spegnerà
automaticamente.
4 Selezionare una funzione e una temperatura
di cottura.
5 Trascorso il tempo di cottura, il forno si spe-
gnerà, sarà emesso un segnale acustico e il
simbolo lampeggerà più rapidamente.
6 Toccare qualsiasi sensore della parte fron-
tale dei comandi per bloccare il segnale
acustico.
In qualsiasi momento è possibile modificare il
tempo impostato toccando il sensore dell’oro-
logio e poi toccando i sensori oppure
. Saranno emessi due segnali acustici di
seguito a conferma della modifica.
3172891-000 22/04/15 11:53 Página 7

8
Programmazione dell'ora di fine cottura
1 Toccare più volte il sensore dell’orologio
fino a quando il simbolo si illuminerà.
2 Selezionare l’ora di fine cottura toccando i
sensori oppure .
3 Saranno emessi due beep di seguito, sarà
visualizzato il tempo di cottura rimanente e
il simbolo lampeggerà lentamente per
indicare che il forno si spegnerà automatica-
mente.
4 Selezionare una funzione e una temperatura
di cottura.
5 Raggiunta l’ora impostata il forno si spegne-
rà, sarà emesso un segnale acustico e il
simbolo lampeggerà più rapidamente.
6 Toccare qualsiasi simbolo della parte frontale
dei comandi per bloccare il segnale acustico.
In qualsiasi momento è possibile modificare
l’ora di fine cottura impostata toccando più volte
il sensore dell’orologio fino a quando lam-
peggia il simbolo e poi toccando i sensori
oppure . Saranno emessi due segnali
acustici di seguito a conferma della modifica.
Questa funzione può essere utilizzata anche se
il forno è già in funzione. A tal fine seguire le
istruzioni indicate a eccezione della numero 4.
Programmazione del tempo di cottura
e dell'ora di fine cottura
11 Toccare il sensore dell’orologio , il sim-
bolo si illuminerà.
12 Selezionare il tempo di cottura toccando i
sensori oppure .
13 Saranno emessi due segnali acustici di
seguito, sarà visualizzato il tempo di cottu-
ra rimanente e il simbolo lampeggerà
lentamente.
14 Toccare più volte il sensore dell’orologio
fino a quando il simbolo si illuminerà.
15 Selezionare l’ora di fine cottura toccando i
sensori oppure .
16 Saranno emessi due beep di seguito, sarà
visualizzata l'ora corrente e il simbolo
resterà illuminato.
17 Selezionare una funzione e una temperatu-
ra di cottura. 1
18 Il forno resterà spento e il simbolo
rimarrà illuminato mentre il simbolo
lampeggerà lentamente. L’orologio mostre-
rà l’ora corrente e la luce interna resterà
spenta. Il forno adesso è programmato.
19 Quando si raggiunge l'ora di inizio cottura,
il forno si accenderà e resterà in funzione
per il tempo impostato. Nel display dell’o-
rologio sarà visualizzato il tempo di cottura
rimanente.
10 Raggiunta l’ora impostata il forno si spe-
gnerà, sarà emesso un segnale acustico e
i simboli e lampeggeranno.
11 Toccare qualsiasi sensore della parte fron-
tale dei comandi per bloccare il segnale
acustico.
Se durante la cottura si desidera modificare
l’ora di fine cottura, toccare più volte il senso-
re dell’orologio fino a quando il simbolo
lampeggerà. A questo punto è possibile
modificare l'ora impostata toccando i sensori
o . Si sentiranno due beep di seguito a
conferma della modifica.
Funzione di sicurezza per i bambini
Blocca il forno evitando che possa essere
messo in funzione da parte di bambini piccoli.
Per attivare questa funzione, toccare il simbo-
lo per un tempo prolungato, sarà emesso
un beep prolungato e saranno visualizzati dei
punti intermittenti intercalati tra le cifre dell’in-
dicatore di temperatura . Il forno a questo
punto è bloccato.
3172891-000 22/04/15 11:53 Página 8

9
ITALIANO
Per disattivare la funzione di sicurezza per i
bambini, toccare per un tempo prolungato il
simbolo fino a quando viene emesso un
segnale acustico lungo.
Attenzione
In caso di interruzione dell'alimentazione elettri-
ca, la programmazione dell'orologio elettronico
sarà cancellata e sull'orologio sarà visualizzata
l'indicazione 12:00. Sarà quindi necessario pro-
cedere a una nuova regolazione e programma-
zione.
Utilizzo della sonda per carne
La sonda per carne misura la temperatura
all’interno dell’arrosto. Quando la sonda rag-
giunge una temperatura precedentemente
selezionata, il forno si scollega automatica-
mente. Cucinando con la sonda per carne
garantiamo un risultato di cottura ottimale indi-
pendentemente dal tipo di carne o dal peso
dell’arrosto.
Come posizionare la sonda per carne?
• Usare esclusivamente la sonda per carne
originale.
• Inserire la sonda prima di iniziare la cottura.
• Infilare la sonda su un lato dell’arrosto affin-
ché la punta raggiunga il centro del pezzo
di carne.
• Inserire completamente la sonda fino
all'impugnatura.
• Si raccomanda di girare l’arrosto a metà cot-
tura; tenerne conto per non avere problemi
con la sonda.
• La punta della sonda non deve toccare l’os-
so o altre zone di grasso. Non deve neanche
toccare zone cave, come può succedere nel
caso del pollame o della selvaggina.
Utilizzo della sonda per carne
• Inserire nel forno l’arrosto preparato con la
sonda per carne.
• Collegare la spina della sonda nella presa
ubicata sul lato superiore sinistro del forno.
• Quando si collega la sonda, sull'indicatore di
temperatura della sonda (3) ubicato sul pan-
nello di comando verrà visualizzato un valore
raccomandato di temperatura (65
o
C).
• Per modificare la temperatura raccomanda-
ta toccare il sensore e poi i sensori
o .
• Si avvertiranno due beep di seguito a con-
ferma della temperatura selezionata.
3172891-000 22/04/15 11:53 Página 9

10
Tabella con valori indicativi di cottura con la sonda per carne
Roast-Beef 35 - 40
o
C AL SANGUE
Roast-Beef 45 - 50
o
C MEDIA COTTURA
Roast-Beef 55 - 60
o
C BEN COTTO
Cosciotto di agnello 65 - 70
o
C
Cosciotto di maiale 80 - 85
o
C
Lombata 65 - 70
o
C
Prosciutto 80 - 85
o
C
Pollo 75 - 80
o
C
Tacchino arrosto 80 - 85
o
C
Temperatura Sonda Osservazioni
• Selezionare una funzione e una temperatura
per la cottura dell'arrosto (consultare le
tabelle di cottura).
• Una volta raggiunta la temperatura selezio-
nata all'interno dell'arrosto, il forno si speg-
nerà e verrà emesso un segnale acustico
per alcuni istanti.
• Toccare qualsiasi sensore della parte fron-
tale dei comandi per bloccare il segnale
acustico.
• L'arrosto è cotto secondo il gusto e pronto
per essere servito.
In qualsiasi momento è possibile modificare
la temperatura selezionata per l'arrosto toc-
cando il sensore e poi i sensori e .
Posizione per il vassoio per pasticceria. Il gan-
cio corto sopra il vassoio.
Impugnatura per l'estrazione dei vassoi
L'impugnatura per l'estrazione dei vassoi viene utilizzata quando serve spostare il vassoio per
verificare lo stato della cottura. Fare riferimento ai disegni. Per maneggiare il vassoio fuori dal
forno usare dei guanti protettivi.
Posizione per il vassoio profondo. Il gancio
lungo sopra il vassoio.
COTTURA
Gancio corto
Gancio lungo
3172891-000 22/04/15 11:53 Página 10

11
ITALIANO
Sostituzione della lampadina del forno
• Smontare i supporti cromati allentando il
dado (E).
• Estrarre la lente del portalampada servendo-
si di un cacciavite.
E
• Sostituire la lampadina.
• Rimontare la lente, verificando che si inseris-
ca nella posizione corretta.
La lampadina da sostituire deve resistere alle
alte temperature (fino a 300 °C); richiedere il
ricambio al servizio di assistenza tecnica.
Attenzione
Per sostituire la lampadina, verificare innanzi-
tutto che il forno sia scollegato dall’alimenta-
zione elettrica.
3172891-000 22/04/15 11:53 Página 11

12
17 Sensor
18 Sensor / Child Safety Function
19 On / Off
10 Inside Light
11 Meat probe sensor
1FFYPI
1 Control Panel
2 Oven Seal
3 Grill Element
4 Meat Probe
5 Tray removing handle
6 Grid tray
7 Telescopic guides
8 Cake tray
9 Deep tray
10 Door switch
11 Hinge
12 Triple glazed door
13 Air outlet
14 Cabinet Mounting
15 Grill Screen
16 Smoke Outlet
17 Back Wall Panel
18 Side lights
19 Fan
20 Full size interior glass
11 Cooking Functions
12 Temperature Indicator
13 Meat probe temperature indicator
14 Electric Clock
15 Temperature Sensor
16 Electric Clock Sensor
Control Panel
1 2 3 4 5 6
7
8
11 10 9
3172891-000 22/04/15 11:53 Página 12

13
ENGLISH
Conventional with Fan
Suitable for roasts and cakes. The fan spreads
the heat evenly throughout the inside of the
oven to reduce cooking time and temperature.
Turbo
The fan spreads the heat coming from an
element located at the back of the oven. As a
result of the evenly distributed temperature,
food can be cooked on two levels at the same
time.
Pizza
Ideal for baking pizzas, pies, and fruit tarts or
sponges.
Slow cooker
Designed to cook casseroles, stews, etc, in
the traditional way, and for all recipes
specifying long cooking times and low heat.
For the best results, we recommend using
covered casserole pans with lids, first making
sure that they can be used in the oven.
Defrosting
Convencional
This function is for use when baking cakes,
where the heat should be even to give a
spongy texture.
Lower Element
Heat only comes from beneath. Suitable for
warming plates or letting dough rise.
Grill and Lower Element
Ideal for roasts. This function can be used with
any size joints of meat.
Grill
Toasting and browning. This function allows
the surface to be cooked without affecting the
inside of the food. Suitable for flat pieces such
as steaks, ribs, fish and toasts.
Maxigrill
For toasting larger surfaces than possible with
the Grill function, in addition to greater
toasting power for faster food browning.
MaxiGrill with Fan
For even roasting and simultaneous surface
browning. Ideal for mixed grills. Perfect for
bulky pieces such as poultry and game. The
meat should be placed on the oven grid with
the tray below to collect meat juices.
Caution
The door must be closed during use with Grill,
MaxiGrill or MaxiGrill with Fan.
Oven Functions
3172891-000 22/04/15 11:53 Página 13

14
Recommendations for Defrosting Food
The defrost function works by means of a
2-level system of hot air. HI is for meats in
general and LO is for fish, cakes, pastries and
bread. When selecting the defrost function,
select HI or LO on the temperature display by
pressing on the temperature sensor and
then the or sensors.
• Unpackaged food should be placed on the
oven tray or on a dish.
• Defrost large pieces of meat or fish by
placing them over the grid with a tray
underneath to collect any liquid.
• Meat and fish do not need to be completely
thawed before cooking. Condiments can be
added once the surface is soft.
• Food should always be cooked after
defrosting.
• Do not refreeze defrosted food.
See the following chart for defrosting times and temperature levels:
The times shown in the chart are a guide. The time needed for defrosting will depend on the
temperature of the room, weight of the food and how frozen it is.
FOOD
LO LEVEL
Weight Time Weight Time
HI LEVEL
Bread
1
/
2
Kg
1
/
2
Kg
1
/
2
Kg
1 Kg
35 mins
25 mins
30 mins
40 mins
1 Kg
1,5 Kg
1
/
2
Kg
1
/
2
Kg
1 Kg
75 mins
90 mins
40 mins
60 mins
120 mins
Cake
Fish
Fish
Chicken
Chicken
Rib steak
Minced meat
Minced meat
3172891-000 22/04/15 11:54 Página 14

15
ENGLISH
Oven Use
Use of the electronic timer
Caution
The electronic clock features Touch-Control
technology. To operate, simply touch the glass
control symbols with your fingertip.
The touch control sensitivity continuously
adapts to changing conditions. Ensure that
the glass front of the control panel is clean
and free of any obstacles when turning on the
oven.
If the clock does not respond correctly when
you touch the glass, you will need to turn off
the oven for a few seconds and then turn it
back on. By doing this, the sensors adjust
automatically and will react once more to
fingertip control.
Setting the Electronic Clock
When turning your oven on, you will see the
clock flashing 12:00 . Set the clock by
touching the or symbols on the glass.
You will hear 2 beeps confirming the time has
been set.
If you want to change the time, touch the clock
sensor until the indicator flashes .
Change the time by touching the or
sensors. The two beeps you hear after that
will confirm the new time has been set.
Manual Operation
After setting the clock, the oven is ready for
use:
1 Press the On sensor .
2 Press on the desired cooking function
symbol.
3 The temperature display will show the
preset temperature for that cooking
function. Press on the temperature sensor
to change it. Select the desired
temperature by pressing on the or
sensors.
4 The top oven cavity will start to heat up.
Functions and will
start the fast preheating function for a few
minutes. The oven will beep when it reaches
the selected temperature.
Caution: this preheating function turns on the
turbo motor at the back of the top oven cavity.
5 During oven heating, the
o
display will flash
to show that the food is being heated.
6 Press on the Off sensor to stop cooking.
Caution
When cooking has finished, you will notice that
oven cooling feature will work until the tempera-
ture inside the oven has been suitably lowered.
1 2 3 4 5 6
7
8
11 10 9
3172891-000 22/04/15 11:54 Página 15

16
Oven Lighting
The inside light will go on:
–When the oven door is open. If the door is not
closed after a certain time, the light will turn off
to reduce power consumption.
–When any cooking function is selected. The light
will turn off after a certain time.
If you want to turn the light on during cooking, just
touch the Oven Light sensor . If you keep your
finger on this sensor for a few seconds, the light
will stay on throughout cooking.
Electronic Clock Functions
Cooking Time: This function allows you to
programme cooking time length, after which the
oven will turn off automatically.
Cooking Stop Time: This function allows you to
programme the time for cooking to stop, after
which the oven will turn off automatically.
Cooking Time and Cooking Stop Time: This
function allows both cooking time length and the
stop time to be programmed. With this function,
the oven switches on automatically at the set
time and operates for the cooking time it has
been programmed for. It switches itself off
automatically at the entered stop time.
Timer Alarm: A beep will go sound when the set
time has finished, whether the oven is on or off.
Child safety: This function locks the oven,
preventing small children from playing with it.
Programming the Timer Alarm
1 Press on the clock sensor several times
until the symbol lights up.
2 Select the length of time after which you
want the alarm to sound by pressing on the
or sensors.
3 You will then hear two beeps, the display will
show the time left before the alarm sounds
and the symbol will flash slowly,
indicating that the timer has been set.
4 Once the programmed time has passed, an
alarm will sound and the symbol will
begin to flash more quickly.
5 Press on any sensor on the control panel to
stop the alarm.
You can change the programmed time
whenever you want by touching the clock
sensor until the symbol flashes, and
then touching the or sensors. The two
beeps you hear after that will confirm the new
time has been set.
Programming Cooking Time
1 Press on the clock sensor . The symbol
will light up.
2 Select the cooking time by pressing the
or sensors.
3 Two consecutive beeps will then sound and
the display will show the remaining cooking
time. The symbol will flash slowly to
indicate that the oven will switch itself
automatically.
4 Select a cooking function and temperature.
5 Once the cooking time is complete, the oven
will turn off, an alarm will sound and the
symbol will flash more quickly.
6 Press on any sensor on the control panel to
stop the alarm.
You can change the programmed time
whenever you want by touching the clock
sensor and then on the or sensors.
The two beeps you hear after that will confirm
the new time has been set.
3172891-000 22/04/15 11:54 Página 16

17
ENGLISH
Programming the Cooking Stop Time
1 Press on the clock sensor several times
until the symbol lights
up.
2 Select the cooking stop time by pressing the
or sensors.
3 Two consecutive beeps will then sound and
the display will show the remaining cooking
time. The symbol will flash slowly to
indicate that the oven will switch itself
automatically.
4 Select a cooking function and temperature.
5 Once it is the set time, the oven will turn off,
an alarm will sound and the symbol will
flash more quickly.
6 Press on any sensor on the control panel to
stop the alarm.
You can change the programmed cooking stop
time at any moment by pressing on the clock
sensor until the symbol flashes and
then by pressing on the or sensors.
The two beeps you hear after that will confirm
the new time has been set.
You can use this function even if you are
already cooking with the oven. If this is the
case, follow all of the above instructions
except No. 4.
Programming Cooking Time and Cooking
Stop Time
11 Press on the clock sensor . The symbol
will light up.
12 Select the cooking time by pressing the
or sensors.
13 Two consecutive beeps will then sound,
and the display will show the remaining
cooking time. The symbol will flash
slowly.
14 Press on the clock sensor several
times until the symbol lights up.
15 Select the cooking stop time by pressing
the or sensors.
16 This will be confirmed by two beeps. The
current time will show on the display and
the symbol will remain lit.
17 Select a cooking function and temperature.
18 The oven will remain off, with the
symbol lit and the symbol flashing
slowly. The clock will show the current time
and the inside light will remain off. The
oven is now programmed.
19 When it is time to start cooking, the oven
will switch on and will operate for the
programmed cooking time. The clock
display will show the remaining cooking
time.
10 Once the set time is reached, the oven will
turn off, an alarm will sound and the
and symbols will flash.
11 Press on any sensor on the control panel
to stop the alarm.
If you wish to change the cooking stop time
while cooking is in progress, press on the
clock sensor until the symbol flashes.
You can then change the cooking stop time by
pressing on the or sensors. The two
beeps you hear after that will confirm the new
time has been set.
Child Safety Function
This function locks the oven, preventing small
children from playing with it. To turn on the
function, press on the
(16) symbol until you
hear a long beep and see several flashing
dots between the digits of the temperature
display . The oven is now locked.
3172891-000 22/04/15 11:54 Página 17

18
To turn off the child lock, keep the (16) symbol
pressed until a long beep sounds.
Caution
In the event of power failure, your electronic
clock timer settings will be erased and 12:00
will flash on the clock display. Reset the clock
and programme again.
Use of the meat probe
The meat probe measures the temperature
inside the roast. When this temperature
reaches a previously set level, the oven will
turn off automatically. Cooking with the meat
probe ensures optimum results for any type of
meat or size of roast.
Placing the meat probe
• Use only the original meat probe.
• Place the probe before roasting begins.
• Insert the probe into the side of the roast so
that the point reaches its centre.
• Insert the entire probe, up to the handle.
• It is recommended to turn the roast over
half-way through cooking. Bear this in mind
when placing the probe to avoid problems
with it later.
• The point of the probe must not be touching
the bone or fatty areas. Also, it should not
be in a hollow area, which could happen with
poultry.
Use of the meat probe
• Put the roast with the probe already in it into
the oven.
• Plug the probe into the socket in the upper
left side of the oven.
• When you plug it in, you will see a
recommended temperature (65
o
C) on the
probe temperature display (3) on the control
panel.
• If you want to change the recommended
temperature, touch the sensor and then
the sensors or .
• You will hear two beeps confirming the new
temperature selected.
3172891-000 22/04/15 11:54 Página 18

19
ENGLISH
Cooking chart: suggested temperatures for cooking with the meat probe.
Roast-Beef 35 - 40
o
C RARE
Roast-Beef 45 - 50
o
C MEDIUM
Roast-Beef 55 - 60
o
C WELL DONE
Leg of lamb 65 - 70
o
C
Ham hock 80 - 85
o
C
Loin of pork 65 - 70
o
C
Roast ham 80 - 85
o
C
Chicken 75 - 80
o
C
Tur key 80 - 85
o
C
COOKING Probe temperature Notes
• Select a function and a temperature for
cooking the roast in the Cooking Chart.
• When the internal temperature of the roast
reaches the selected temperature, the oven
will turn off and an alarm signal will sound
for a few seconds.
• Press on any sensor on the control panel to
stop the alarm.
• The roast is cooked to your taste and ready
to serve.
You can change the selected temperature for
your roast whenever you want by touching the
sensor and then sensors and .
Position for cake tray. The short hook over the
tray.
Tray removing handle
The handle for removing trays is used when you need to slide the shelf out and check what’s
cooking. See drawings. To take the shelf out of the oven, use oven gloves.
Position for deep tray. The long hook over the
tray.
3172891-000 22/04/15 11:54 Página 19

20
Changing the oven light bulb
• Detach the chrome supports by loosening
the screw (E).
• Release the bulb-holder glass cover with a
tool.
E
• Change the bulb.
• Reassemble the glass cover and ensure that
everything fits in the correct position.
The replacement bulb must be resistant to
temperatures up to 300
o
C. You can order one
from Technical Service.
Caution
Make sure the oven is unplugged before
changing the bulb.
3172891-000 22/04/15 11:54 Página 20

21
ESPAÑOL
1FFYPI
1 Frente de Mandos
2 Junta de Horno
3 Resistencia de Grill
4 Sonda de Carne
5 Asa para la extración
de bandejas
6 Parrilla
7 Guías Telescópicas
8 Bandeja Pastelera
9 Bandeja Profunda
10 Interruptor Puerta
11 Bisagra
12 Puerta con 3 cristales
13 Salida de aire de
refrigeración
14 Fijación al Mueble
15 Pantalla de Grill
16 Salida de Humos
17 Panel Trasero
18 Lámparas Laterales
19 Turbina
20 Cristal Interior
de Gran Tamaño
11 Funciones de cocinado
12 Indicador de temperatura
13 Indicador temperatura de la sonda
de carne
14 Reloj electrónico
15 Sensor de temperatura
16 Sensor reloj electrónico
17 Sensor
18 Sensor / Función seguridad niños
19 Puesta en marcha / Apagado
10 Luz interior
11 Sensor sonda de carne
Frontal de Mandos
1 2 3 4 5 6
7
8
11 10 9
3172891-000 22/04/15 11:54 Página 21

22
Convencional con Turbina
Adecuado para asados y pastelería. El
ventilador reparte de forma uniforme el calor
en el interior del horno, reduciendo el tiempo y
la temperatura de cocinado.
Turbo
La turbina reparte el calor que proviene de una
resistencia situada en la parte trasera del
horno. Por la uniformidad de la temperatura
que se produce, permite cocinar en 2 alturas
al mismo tiempo.
Pizza
Especial para cocinar pizzas, empanadas y
pasteles o bizcochos rellenos de fruta.
A fuego lento
Especial para guisar carnes en salsa,
estofados, etc... a la manera tradicional, y en
general, para recetas que requieran ser
cocinadas “a fuego lento“, con tiempos
especialmente largos de cocción y baja
temperatura de cocinado.
Para obtener los mejores resultados, se
recomienda utilizar cazuelas cerradas con
tapa, asegurándose de que sean aptas para
horno.
Descongelación
Convencional
Se usa en bizcochos y tartas en los que el
calor recibido debe ser uniforme y para que
consigan una textura esponjosa.
Solera
Calor sólo desde la parte inferior. Apropiado
para calentar platos o levantar masas de
repostería y afines.
Grill y Solera
Especial para asados. Puede usarse para
cualquier pieza, independiente de su tamaño.
Grill
Gratinado y asado superficial. Permite el
dorado de la capa exterior sin afectar al
interior del alimento. Indicado para piezas
planas como bistec, costillas, pescado,
tostadas.
Maxigrill
Permite el gratinado en mayores superficies
que en Grill, así como una mayor potencia de
gratinado, obteniendo un dorado del alimento
de forma más rápida.
MaxiGrill con Turbina
Permite el asado uniforme al mismo tiempo
que dora superficialmente. Ideal para
parrilladas. Especial para piezas con gran
volumen como aves, caza… Se recomienda
colocar la pieza de carne sobre la parrilla del
horno y la bandeja por debajo, para el
escurrido de jugos.
Atención
Durante el uso de la función Grill, Maxigrill o
MaxiGrill con Turbina la puerta debe
mantenerse cerrada.
Funciones del Horno
3172891-000 22/04/15 11:54 Página 22

23
ESPAÑOL
Recomendaciones para la Descongelación de Alimentos
La descongelación se realiza mediante un sis-
tema de aire caliente en 2 niveles, el nivel HI
para carnes en general y el nivel LO para pes-
cados, repostería y pan. Cuando seleccione la
función descongelación, podrá seleccionar los
niveles HI ó LO en el visualizador de temperatu-
ra, tocando en el sensor y luego en los sen-
sores ó .
• Los alimentos sin envase debe colocarlos
sobre la bandeja del horno o sobre una
fuente.
• Para descongelar piezas grandes de carne o
pescado debe colocarlas sobre la parrilla y
debajo una bandeja para recoger los líquidos.
• Las carnes y pescados no necesitan estar
totalmente descongelados para cocinarlos.
Es suficiente que la superficie esté blanda
para poder añadir los condimentos.
• Siempre se debe cocinar el alimento des-
pués de la descongelación.
• No congelar de nuevo un alimento ya des-
congelado.
Para los tiempos de descongelación y el nivel a seleccionar observe la siguiente tabla:
Los tiempos mostrados en la tabla son una orientación, donde el tiempo de descongelación depen-
derá de la temperatura ambiente, peso del alimento y grado de congelación del alimento.
ALIMENTO
NIVEL LO
Peso Tiempo Peso Tiempo
NIVEL HI
Pan
1
/
2
Kg
1
/
2
Kg
1
/
2
Kg
1 Kg
35 min
25 min
30 min
40 min
1 Kg
1,5 Kg
1
/
2
Kg
1
/
2
Kg
1 Kg
75 min
90 min
40 min
60 min
120 min
Tar ta
Pescado
Pescado
Pollo
Pollo
Chuletón
Carne picada
Carne picada
3172891-000 22/04/15 11:54 Página 23

24
Manejo del Horno
Manejo del reloj electrónico
Atención
Su reloj electrónico incorpora tecnología
Touch-Control. Para manejarlo es suficiente
con tocar los símbolos del cristal con su dedo.
La sensibilidad del touch-control se adapta
continuamente a las condiciones ambienta-
les. Al conectar su horno a la red tenga la pre-
caución que la superficie del cristal del frontal
de mandos esté limpia y libre de cualquier
obstáculo.
Si al tocar el cristal con el dedo, el reloj no
responde correctamente entonces es necesa-
rio que desconecte el horno de la red eléctri-
ca y tras un instante vuelva a conectarlo. De
esta forma los sensores se habrán ajustado
automáticamente y reaccionarán de nuevo al
tocar con el dedo.
Puesta en Hora del Reloj Electrónico
Al conectar su horno, observará que en el reloj
aparecen parpadeando las indicaciones
12:00 y . Tocando en los sensores ó
pondrá el reloj en hora; a continuación escu-
chará dos beep seguidos como confirmación
de la hora elegida.
Si desea modificar la hora, toque varias veces
el sensor reloj hasta que parpadee el indi-
cador . Tocando en los sensores ó
podrá modificar la hora. Finalmente escucha-
rá dos beep seguidos como confirmación del
cambio realizado.
Funcionamiento Manual
Tras poner el reloj en hora, su horno está listo
para cocinar:
1 Toque en el sensor de Puesta en Marcha
.
2 Toque en el símbolo de la función de coci-
nado seleccionada.
3 El indicador de temperatura mostrará
una temperatura prefijada para ese cocina-
do. Si desea modificarla basta con tocar el
sensor de temperatura y luego toque los
sensores ó para seleccionar la tem-
peratura deseada.
4 La cavidad superior del horno empezará a
calentar. En las funciones
se activará la función de precalenta-
miento rápido durante unos minutos.
Cuando llegue a la temperatura selecciona-
da, el horno emitirá una señal acústica.
Atención: con esta función de precalenta-
miento se enciende el motor turbo situado en
el fondo de la cavidad superior del horno.
5 Durante el calentamiento, el indicador
o
par-
padea indicando la transmisión de calor al
alimento.
6 Para parar el cocinado debe tocar el sensor
de Apagado .
Atención
Cuando finalice el cocinado, observará que la
refrigeración de su horno sigue funcionando
hasta que el interior del horno reduzca su tem-
peratura de forma apropiada.
1 2 3 4 5 6
7
8
11 10 9
3172891-000 22/04/15 11:54 Página 24

25
ESPAÑOL
Iluminación del horno
La luz interior del horno se encenderá,
–Al abrir la puerta del horno. Transcurrido un
tiempo sin cerrar la puerta del horno, la luz se
apagará para reducir el consumo eléctrico.
–Cuando se selecciona cualquier función de coci-
nado. Transcurrido un tiempo la luz se apagará.
Si desea encender la luz durante el cocinado
basta con tocar el sensor de Luz Interior . Si
se toca este sensor durante un tiempo prolonga-
do, la luz se mantendrá encendida durante todo
el cocinado.
Funciones del Reloj Electrónico
Duración del cocinado: Permite cocinar durante
un tiempo seleccionado, a continuación el
horno se apagará de forma automática.
Hora de finalización del cocinado: Permite
cocinar hasta una hora establecida, a conti-
nuación el horno se apagará de forma auto-
mática.
Duración y Fin del cocinado: Permite progra-
mar la duración y la hora de finalización del
cocinado. Con esta función el horno se pondrá
en marcha de forma automática a la hora
necesaria para cocinar durante el tiempo
seleccionado (Duración) y finalizando de forma
automática a la hora que haya programado (Fin
del Cocinado).
Avisador: Genera una señal acústica transcu-
rrido el tiempo programado, independiente-
mente que el horno esté en funcionamiento o
apagado.
Seguridad para Niños: Bloquea el horno, evi-
tando la manipulación por parte de niños
pequeños.
Programación del Avisador
1 Toque varias veces el sensor del reloj
hasta que el símbolo se ilumine.
2 Seleccione el tiempo tras el cual desea que el
reloj avise, tocando los sensores ó .
3 Posteriormente sonarán 2 beep seguidos,
se mostrará el tiempo restante hasta que el
reloj avise y el símbolo parpadeará len-
tamente, indicando que el avisador ya está
programado.
4 Transcurrido el tiempo programado, sonará
una señal acústica y el símbolo parpade-
ará más deprisa.
5 Toque cualquier sensor del frontal de man-
dos para detener la señal acústica.
En cualquier momento usted puede modificar
el tiempo seleccionado, tocando varias veces
el sensor del reloj hasta que el símbolo
parpadee y posteriormente tocando los senso-
res ó . A continuación escuchará dos
beep seguidos como confirmación del cambio.
Programación de la Duración del Cocinado
1 Toque el sensor del reloj , el símbolo
se iluminará.
2 Seleccione la duración del cocinado, tocan-
do los sensores ó .
3 Posteriormente sonarán 2 beep seguidos,
se mostrará el tiempo restante de cocinado
y el símbolo parpadeará lentamente, indi-
cando que su horno se apagará de forma
automática.
4 Seleccione una función y una temperatura
de cocinado.
5 Transcurrida la duración del cocinado, el
horno se desconectará, sonará una señal
acústica y el símbolo parpadeará más
deprisa.
6 Toque en cualquier sensor del frontal de
mandos para detener la señal acústica.
En cualquier momento usted puede modificar
el tiempo seleccionado, tocando el sensor
del reloj y posteriormente tocando los sen-
sores ó . A continuación escuchará dos
beep seguidos como confirmación del cambio.
3172891-000 22/04/15 11:54 Página 25

26
Programación de la Hora de Finalización del
Cocinado
1 Toque varias veces el sensor del reloj
hasta que el símbolo se ilumine.
2 Seleccione la hora de finalización del coci-
nado, tocando los sensores ó .
3 Posteriormente sonarán 2 beep seguidos,
se mostrará tiempo restante de cocinado y
el símbolo parpadeará lentamente, indi-
cando que su horno se apagará de forma
automática.
4 Seleccione una función y una temperatura
de cocinado.
5 Alcanzada la hora seleccionada el horno se
desconectará, sonará una señal acústica y
el símbolo parpadeará más deprisa.
6 Toque en cualquier símbolo del frontal de
mandos para detener la señal acústica
En cualquier momento usted puede modificar
la hora de finalización seleccionada, tocando
varias veces el sensor del reloj hasta que
el símbolo parpadee y posteriormente
tocando los sensores ó . A continua-
ción escuchará dos beep seguidos como con-
firmación del cambio.
Puede emplear esta función aunque usted ya
esté cocinando con su horno. Para ello siga
las instrucciones indicadas salvo la número 4.
Programación de la Duración y Fin del
Cocinado
11 Toque el sensor del reloj , el símbolo
se iluminará.
12 Seleccione la duración, tocando los sen-
sores ó .
13 Posteriormente sonarán 2 beep seguidos,
se mostrará el tiempo restante de cocina-
do y el símbolo parpadeará lentamen-
te.
14 Toque varias veces el sensor del reloj
hasta que el símbolo se ilumine.
15 Seleccione la hora de finalización del coci-
nado, tocando los sensores ó .
16 Posteriormente sonarán 2 beep seguidos,
se mostrará la hora actual y el símbolo
permanecerá iluminado.
17 Seleccione una función y una temperatura
de cocinado.
18 El horno permanecerá desconectado, que-
dándose iluminado el símbolo y con el
símbolo parpadeando lentamente. En
la pantalla del reloj verá la hora actual y la
luz interior permanecerá apagada. Su
horno está programado.
19 Cuando se alcance la hora de comienzo
del cocinado, el horno se pondrá en marcha
y se realizará el cocinado durante el tiempo
seleccionado. En la pantalla del reloj se verá
el tiempo restante de cocinado.
10 Alcanzada la hora seleccionada el horno
se desconectará, sonará una señal acústi-
ca y los símbolos y parpadearán.
11 Toque en cualquier sensor del frontal de
mandos para detener la señal acústica.
Si durante el cocinado usted desea modificar
la hora de finalización, toque varias veces el
sensor del reloj hasta que el símbolo
parpadee. En ese momento usted puede
modificar la hora de finalización tocando los
sensores ó . A continuación escuchará
2 beep seguidos como confirmación del cam-
bio.
Función seguridad niños
Bloquea el horno, evitando su manipulación
por parte de niños pequeños. Para activar la
función, toque en el símbolo
(16) de forma
prolongada, a continuación escuchará un
beep prolongado y se verán puntos intermi-
tentes intercalados entre los dígitos del indi-
cador de temperatura . Su horno estará
bloqueado.
Para desactivar la función de seguridad niños,
3172891-000 22/04/15 11:54 Página 26

27
ESPAÑOL
debe tocar de forma prolongada el símbolo
(16 sonando un beep prolongado.
Atención
En caso de un corte de suministro eléctrico,
se borrará toda la programación de su reloj
electrónico y aparecerá parpadeando la indi-
cación 12:00 en el reloj. Deberá ponerlo en
hora y programarlo de nuevo.
Manejo de la sonda de carne
La sonda de carne mide la temperatura en el
interior del asado. Cuando esta temperatura
alcanza un valor previamente seleccionado,
entonces el horno se desconectará automáti-
camente. Al cocinar con la sonda de carne,
aseguramos un resultado óptimo del cocinado
independientemente del tipo de carne o del
peso del asado.
Cómo colocar la sonda de carne
• Utilice solamente la sonda de carne original.
• Coloque la sonda antes de comenzar el
asado.
• Clave la sonda sobre un lateral del asado,
de forma que la punta se quede situada en
el centro del mismo.
• Clave la sonda de forma completa y hasta el
mango.
• Se recomienda dar la vuelta al asado a
mitad de cocinado, luego es necesario tener-
lo en cuenta para no tener dificultades con
la sonda.
• La punta de la sonda no debe tocar el
hueso ni zonas de grasa. Tampoco debe
quedar en zona hueca como puede ocurrir
con el caso de aves.
Utilización de la sonda de carne
• Introduzca en el horno el asado preparado
con la sonda de carne.
• Conecte el enchufe de la sonda en la toma
que se encuentra en el lateral superior
izquierdo del horno.
• Al conectar la sonda verá en el indicador de
temperatura de la sonda (3) situado en el
frontal de mandos, un valor recomendado
de temperatura (65
o
C).
• Si desea modificar la temperatura recomen-
dada entonces toque sobre el sensor y
a continuación toque los sensores ó .
• Posteriormente sonarán dos beep seguidos
como confirmación de la temperatura selec-
cionada.
3172891-000 22/04/15 11:54 Página 27

28
Tabla de valores orientativos de cocinado con la sonda de carne.
Roast-Beef 35 - 40
o
C POCO HECHO
Roast-Beef 45 - 50
o
C AL PUNTO
Roast-Beef 55 - 60
o
C HECHO
Pierna de Ternasco 65 - 70
o
C
Codillo 80 - 85
o
C
Lomo (cinta) 65 - 70
o
C
Jamón 80 - 85
o
C
Pollo 75 - 80
o
C
Pavo asado 80 - 85
o
C
COCINADO Temperatura Sonda Observaciones
• Seleccione una función y una temperatura
para el cocinado de su asado, para ello con-
sulte las Tablas de Cocinado.
• Alcanzada en el interior del asado la tempe-
ratura que usted haya seleccionado, el
horno se apagará y sonará una señal acús-
tica durante unos instantes.
• Toque en cualquier sensor del frontal de
mandos para detener la señal acústica.
• El asado está cocinado a su gusto y listo
para servir.
En cualquier momento usted puede cambiar
la temperatura seleccionada para su asado
tocando en el sensor y posteriormente en
los sensores y
.
Posición para bandeja pastelera. El gancho
corto por encima de la bandeja.
Asa para la Extracción de Bandejas
El asa para la extracción de bandejas se emplea cuando usted necesita desplazar la bandeja en
el momento de comprobar el estado del cocinado. Ver dibujos. Para manipular la bandeja fuera
del horno es necesario el uso de guantes protectores.
Posición para bandeja profunda. El gancho
largo por encima de la bandeja.
3172891-000 22/04/15 11:54 Página 28

29
ESPAÑOL
Cambio de la lámpara del horno
• Desmonte los soportes cromados, soltándo-
los de la tuerca (E).
• Suelte la lente del portalámparas con la
ayuda de una herramienta.
E
• Sustituya la lámpara.
• Monte de nuevo la lente, asegurando que
encaja en posición correcta.
La lámpara a sustituir debe tener una resisten-
cia a la temperatura de hasta 300 °C, solicíte-
la en el servicio de asistencia técnica.
Atención
Para cambiar la lámpara, asegure primero que
el horno está desconectado de la red eléctrica.
3172891-000 22/04/15 11:54 Página 29

30
1FFYPI
1 Painel de Comandos
2 Junta de Forno
3 Resistência do Grill
4 Sonda de carne
5 Asa para a extracção
de tabuleiros
6 Gril
7 Guias Telescópicas
8 Tabuleiro de Pastelaria
9 Tabuleiro Profundo
10 Interruptor Porta
11 Dobradiça
12 Porta com 3 vidros
13 Saída de ar
de refrigeração
14 Fixação ao Móvel
15 Ecrã do Grill
16 Saída de Fumo
17 Painel Traseiro
18 Lâmpadas Laterais
19 Turbina
20 Vidro Interior
de Grande Tamanho
11 Funções de cozinhado
12 Indicador de temperatura
13 Indicador temperatura da sonda de carne
14 Relógio electrónico
15 Sensor de temperatura
16 Sensor relógio electrónico
17 Sensor
18 Sensor / Função segurança crianças
19 Pôr em funcionamento / Desligado
10 Luz interior
11 Sensor sonda de carne
Painel de Comandos
1 2 3 4 5 6
7
8
11 10 9
3172891-000 22/04/15 11:54 Página 30

Convencional com Turbina
Adequado para assados e pastelaria. O
ventilador reparte de forma uniforme o calor
no interior do forno, reduzindo o tempo e a
temperatura de elaboração.
Turbo
A turbina reparte o calor que provém
duma resistência situada na parte traseira do
forno. A uniformidade da temperatura
produzida, permite cozinhar em 2 alturas
simultaneamente.
Pizza
Especial para cozinhar pizzas, empadas e
bolos recheados com fruta.
Em lume lento
Especial para guisar carnes com molho,
estufados, etc... à maneira tradicional, e em
geral, para receitas que necessitem de ser
cozinhadas “em lume lento”, com tempos
especialmente longos e em baixa temperatura
de cozinhado.
Para obter os melhores resultados,
recomenda-se a utilização de caçarolas
fechadas com tampa, verificando que estas
são adequadas para forno.
Descongelação
Convencional
Utiliza-se em bolos em que o calor recebido
deve ser uniforme e para que obtenham uma
textura esponjosa.
Resistência inferior
Calor apenas a partir da parte inferior.
Apropriado para aquecer pratos ou levantar
massas de pastelaria e afins.
Grill e Resistência inferior
Especial para assados. Pode utilizar-se para
qualquer peça, independentemente do seu
tamanho.
Grill
Gratinado e assado superficial. Permite o
dourado da camada exterior sem afectar o
interior do alimento. Indicado para peças lisas
como bifes, costeletas, peixe, tostas
Maxigrill
Permite o gratinado em maiores superfícies
que no Grill, assim como uma maior potência
de gratinado, obtendo um dourado do alimento
de forma mais rápida.
MaxiGrill com Turbina
Permite o assado uniforme ao mesmo tempo
que doura superficialmente. Ideal para
grelhados. Especial para peças de grande
volume como aves, caça… Recomenda
colocar-se a peça de carne sobre a grelha do
forno e o tabuleiro por baixo, para o
escorrimento de sucos e gordura.
Atenção
Durante a utilização da função Grill, MaxiGrill
ou MaxiGrill com Turbina a porta deve
manter-se fechada.
31
PORTUGUÉS
Funções do Forno
3172891-000 22/04/15 11:54 Página 31

32
Recomendações para a Descongelação de Alimentos
A descongelação realiza-se através de um
sistema de ar quente em 2 níveis, o nível HI
para carnes em geral e o nível LO para peixes,
pastelaria e pão. Quando seleccione a função
descongelação, poderá seleccionar os níveis
HI ou LO no visualizador de temperatura,
tocando no sensor de temperatura e
depois nos sensores ou .
• Os alimentos sem embalagem devem ser
colocados sobre o tabuleiro do forno ou
sobre um prato.
• Para descongelar peças grandes de carne ou
peixe deve colocá-las sobre a grelha e por
baixo um tabuleiro para recolher os líquidos.
• As carnes e peixes não necessitam de estar
totalmente descongelados para serem cozi-
nhados. É suficiente que a superfície esteja
mole para poder adicionar os condimentos.
• Deve sempre cozinhar-se o alimento após
descongelação.
• Não congelar novamente um alimento já des-
congelado.
Para os tempos de descongelação e o nível a seleccionar observe a seguinte tabela:
Os tempos apresentados na tabela são uma orientação, onde o tempo de descongelação depen-
derá da temperatura ambiente, peso do alimento e grau de congelação do alimento.
ALIMENTO
NIVEL LO
Peso Tempo Peso Tempo
NIVEL HI
Pão
1
/
2
Kg
1
/
2
Kg
1
/
2
Kg
1 Kg
35 min
25 min
30 min
40 min
1 Kg
1,5 Kg
1
/
2
Kg
1
/
2
Kg
1 Kg
75 min
90 min
40 min
60 min
120 min
Bolo
Peixe
Peixe
Frango
Frango
Costeleta de novilho
Carne picada
Carne picada
3172891-000 22/04/15 11:54 Página 32

33
PORTUGUÉS
Manuseamento do Forno
1 2 3 4 5 6
7
8
11 10 9
Funcionamento Manual
Após colocar o relógio na hora certa, o seu
forno está pronto para cozinhar:
1 Toque no sensor de Pôr em Funcionamento
.
2 Toque no símbolo da função de cozinhado
seleccionada.
3 O indicador de temperatura mostrará
uma temperatura prefixada para esse
cozinhado. Se deseja modificá-la basta
tocar no sensor de temperatura e
depois tocar nos sensores ou para
seleccionar a temperatura desejada.
4 A cavidade superior do forno começara a
aquecer. Nas funções ,
activar-se-á a função de pré-aquecimento
rápido durante uns minutos. Quando
chegue à temperatura seleccionada, o forno
emitirá um sinal sonoro.
Atenção: com esta função de pré-aquecimento
acende-se o motor turbo situado no fundo da
cavidade superior do forno.
5 Durante o aquecimento, o indicador º
piscará indicando a transmissão de calor ao
alimento.
6 Para parar o cozinhado deve tocar no
sensor de Desligado .
Atenção
Quando finalize o cozinhado, observará que
a refrigeração do seu forno continua a funcionar
até que o interior do forno reduza a sua
temperatura de forma apropriada.
Manuseamento do relógio electrónico
Atenção
O seu relógio electrónico incorpora tecnologia
Touch-Control. Para manuseá-lo é suficiente
tocar nos símbolos do vidro com o seu dedo.
A sensibilidade do touch-control adapta-se
continuamente às condições ambientais. Ao
ligar o seu forno à rede tenha a precaução de
verificar que a superfície do vidro do painel de
comandos está limpa e livre de qualquer
obstáculo.
Se ao tocar o vidro com o dedo, o relógio não
responde correctamente então é necessário
que desligue o forno da rede eléctrica e após
um instante volte a ligá-lo. Desta forma os
sensores ajustar-se-ão automaticamente e
responderão de novo ao toque com o dedo.
Colocar a Hora no Relógio Electrónico
Ao ligar o seu forno, observará que no relógio
aparecem a piscar as indicações 12:00 e .
Tocando nos sensores ou colocará o
relógio na hora certa; em seguida escutará
dois beep seguidos como confirmação da
hora escolhida.
Se deseja modificar a hora, toque várias
vezes no sensor do relógio até que pisque
o indicador . Tocando nos sensores ou
poderá modificar a hora. Finalmente
escutará dois beep seguidos como
confirmação da alteração realizada.
3172891-000 22/04/15 11:54 Página 33

34
Iluminação do forno
A luz interior do forno acender-se-á,
–Ao abrir a porta do forno. Decorrido um certo
tempo sem fechar a porta do forno, a luz
apagar-se-á para reduzir o consumo eléctrico.
–Quando se selecciona qualquer função de
cozinhado. Decorrido um certo tempo a luz
apagar-se-á.
Se deseja acender a luz durante o cozinhado
basta tocar no sensor de Luz Interior . Se
se premir este sensor durante um tempo
prolongado, a luz manter-se-á acesa durante todo
o cozinhado.
Funções do Relógio Electrónico
Duração do Cozinhado: Permite cozinhar
durante um tempo seleccionado, acabado esse
tempo o forno desligar-se-á automaticamente.
Hora de Finalização do Cozinhado: Permite
cozinhar até uma hora estabelecida, em
seguida o forno desligar-se-á de forma
automática.
Duração e Fim do Cozinhado: Permite
programar a duração e a hora de finalização do
cozinhado. Com esta função o forno
pôr-se-á em funcionamento de forma
automática à hora necessária para cozinhar
durante o tempo seleccionado (Duração) e
finalizando de forma automática à hora que
lhe tenhamos indicado (Fim do Cozinhado).
Avisador: Gera um sinal sonoro no final do
tempo, para isso não é necessário que o forno
esteja a funcionar.
Segurança para Crianças: Bloqueia o forno,
evitando a manipulação por parte de crianças
pequenas.
Programação do Avisador
1 Toque várias vezes no sensor do relógio
até que o símbolo se ilumine.
2 Seleccione o tempo após o qual deseja que
o relógio avise, tocando nos sensores ou
.
3 Posteriormente soarão 2 beep seguidos,
mostrar-se-á o tempo restante até que o
relógio avise e o símbolo piscará
lentamente, indicando que o avisador já está
programado.
4 Decorrido o tempo programado, soará um
sinal sonoro e o símbolo piscará mais
depressa.
5 Toque qualquer sensor do painel de
comandos para parar o sinal sonoro.
Em qualquer momento pode modificar o tempo
seleccionado, tocando várias vezes no sensor
do relógio até que o símbolo pisque e
posteriormente tocando nos sensores ou
. Em seguida escutará dois beep seguidos
como confirmação da alteração.
Programação da Duração do Cozinhado
1 Toque no sensor do relógio , o símbolo
iluminar-se-á.
2 Seleccione a duração do cozinhado, tocando
nos sensores ou .
3 Posteriormente soarão 2 beep seguidos,
mostrar-se-á o tempo restante de cozinhado
e o símbolo piscará lentamente,
indicando que o seu forno se apagará de
forma automática.
4 Seleccione uma função e uma temperatura
de cozinhado.
5 Decorrida a duração do cozinhado, o forno
desligar-se-á, soará um sinal sonoro e o
símbolo piscará mais depressa.
6 Toque em qualquer sensor do painel de
comandos para parar o sinal sonoro.
Em qualquer momento pode modificar a
hora de finalização seleccionada, tocando
várias vezes no sensor do relógio e
posteriormente tocando nos sensores ou
. Em seguida escutará dois beep seguidos
como confirmação da alteração.
3172891-000 22/04/15 11:54 Página 34

35
PORTUGUÉS
Programação da Hora de Finalização do
Cozinhado
1 Toque várias vezes no sensor do relógio
até que o símbolo se ilumine.
2 Seleccione a hora de finalização do
cozinhado, tocando nos sensores ou .
3 Posteriormente soarão 2 beep seguidos,
mostrar-se-á o tempo restante de cozinhado
e o símbolo piscará lentamente,
indicando que o seu forno se apagará de
forma automática.
4 Seleccione uma função e uma temperatura
de cozinhado.
5 Alcançada a hora seleccionada o forno
desligar-se-á, soará um sinal sonoro e o
símbolo piscará mais depressa.
6 Toque em qualquer símbolo do painel de
comandos para parar o sinal sonoro.
Em qualquer momento pode modificar a hora
de finalização seleccionada, tocando várias
vezes no sensor do relógio até que o
símbolo pisque e posteriormente
tocando nos sensores ou . Em seguida
escutará dois beep seguidos como
confirmação da alteração.
Pode utilizar esta função mesmo que já
esteja a cozinhar com o seu forno. Para tal
siga as instruções indicadas excepto a
número 4.
Programação da Duração e Fim do Cozinhado
11 Toque no sensor do relógio , o símbolo
iluminar-se-á.
12 Seleccione a duração, tocando nos senso-
res ou .
13 Posteriormente soarão 2 beep seguidos,
mostrar-se-á o tempo restante de cozinhado
e o símbolo piscará lentamente.
14 Toque várias vezes no sensor do relógio
até que o símbolo se ilumine.
15 Seleccione a hora de finalização do
cozinhado, tocando nos sensores ou .
16 Posteriormente soarão 2 beep seguidos,
mostrar-se-á a hora actual e o símbolo
permanecerá iluminado.
17 Seleccione uma função e uma temperatura
de cozinhado.
18 O forno permanecerá desligado, ficando
iluminado o símbolo e com o símbolo
a piscar lentamente. No ecrã do
relógio verá a hora actual e a luz interior
permanecerá apagada. O seu forno está
programado.
19 Quando se alcance a hora de início do
cozinhado, o forno colocar-se-á em
funcionamento e realizar-se-á o cozinhado
durante o tempo seleccionado. No ecrã do
relógio ver-se-á o tempo restante de
cozinhado.
10 Alcançada a hora seleccionada o forno
desligar-se-á, soará um sinal sonoro e os
símbolos e piscarão.
11 Toque em qualquer sensor do painel de
comandos para parar o sinal sonoro.
Se durante o cozinhado deseja modificar a
hora de finalização, toque várias vezes no sen-
sor do relógio até que o símbolo pis-
que. Nesse momento pode modificar a hora
de finalização tocando nos sensores
ou . Em seguida escutará 2 beep
seguidos como confirmação da alteração.
Função segurança crianças
Bloqueia o forno, evitando a sua manipulação
por parte de crianças pequenas. Para activar
a função, toque no símbolo
(16) de forma
prolongada, em seguida escutará um beep
prolongado e ver-se-ão pontos intermitentes
intercalados entre os dígitos do indicador de
temperatura . O seu forno estará bloqueado.
3172891-000 22/04/15 11:54 Página 35

36
Para desactivar a função de segurança
crianças, deve tocar de forma prolongada no
símbolo
(16) soando um beep prolongado.
Atenção
Em caso de corte de fornecimento eléctrico,
apagar-se-á toda a programação do seu
relógio electrónico e aparecerá a piscar a
indicação 12:00 no relógio. Deverá colocá-lo
na hora certa e programá-lo novamente.
Manuseamento da sonda de carne
A sonda de carne mede a temperatura no
interior do assado. Quando esta temperatura
alcança um valor previamente seleccionado,
então o forno desligar-se-á automaticamente.
Ao cozinhar com a sonda de carne,
asseguramos um resultado óptimo do
cozinhado independentemente do tipo de
carne ou do peso do assado.
Como colocar a sonda de carne
• Utilize unicamente a sonda de carne
original.
• Coloque a sonda antes de iniciar o assado.
• Enfie a sonda sobre um dos lados do
assado, para que a ponta fique situada no
centro do mesmo.
• Enfie a sonda de forma completa e até ao
cabo.
• Recomenda-se dar a volta ao asado a meio
do cozinhado, logo é necessário tê-lo em
conta para não ter dificuldades com a
sonda.
• A ponta da sonda não deve tocar no osso
nem em zonas de gordura. Tão-pouco deve
ficar em zona oca como pode ocorrer no
caso das aves.
Utilização da sonda de carne
• Introduza no forno o assado preparado com
a sonda de carne.
• Ligue a ficha da sonda na tomada que se
encontra na parte lateral superior esquerda
do forno.
• Ao ligar a sonda verá no indicador de
temperatura da sonda (3) situado no painel
de comandos, um valor recomendado de
temperatura (65
o
C).
• Se deseja modificar a temperatura
recomendada então toque no sensor e
em seguida toque nos sensores ou .
• Posteriormente soarão dois beep seguidos
como confirmação da temperatura
seleccionada.
3172891-000 22/04/15 11:54 Página 36

37
PORTUGUÉS
Tabela de valores de orientação de cozinhado com a sonda de carne.
Roast-Beef 35 - 40
o
C MAL PASSADO
Roast-Beef 45 - 50
o
C NO PONTO
Roast-Beef 55 - 60
o
C BEM PASSADO
Perna de Cordeiro 65 - 70
o
C
Pá 80 - 85
o
C
Lombo de porco 65 - 70
o
C
Perna de porco 80 - 85
o
C
Frango 75 - 80
o
C
Peru assado 80 - 85
o
C
COZINHADO Temperatura Sonda Observações
• Seleccione uma função e uma temperatura
para o cozinhado do seu assado, para tal
consulte as Tabelas de Cozinhado.
• Alcançada no interior do assado a
temperatura que seleccionou, o forno
apagar-se-á e soará um sinal sonoro
durante uns instantes.
• Toque em qualquer sensor do painel de
comandos para parar o sinal sonoro.
• O assado está cozinhado a seu gosto e
pronto a servir.
Em qualquer momento pode alterar a
temperatura seleccionada para o seu asado
tocando no sensor e posteriormente nos
sensores e .
Posição para tabuleiro de pastelaria. O
gancho curto por cima do tabuleiro.
Asa para a Extracção de Tabuleiros
A asa para a extracção de tabuleiros utiliza-se quando necessita deslocar o tabuleiro no
momento de comprovar o estado do cozinhado. Ver desenhos. Para manipular o tabuleiro fora do
forno é necessário a utilização de luvas protectoras.
Gancho curto
Gancho longo
Posição para tabuleiro profundo. O gancho
longo por cima do tabuleiro.
3172891-000 22/04/15 11:54 Página 37

38
Troca da lâmpada do forno
• Desmonte os suportes cromados,
soltando-os da porca (E).
• Solte a lente do porta-lâmpadas com a ajuda
de uma ferramenta.
E
• Substitua a lâmpada.
• Monte de novo a lente, assegurando que a
encaixa na posição correcta.
A lâmpada a substituir deve ter uma
resistência à temperatura até 300 °C,
solicite-a no serviço de assistência técnica.
Atenção
Para trocar a lâmpada, assegure-se primeiro
que o forno está desligado da rede eléctrica.
3172891-000 22/04/15 11:54 Página 38

39
FRANÇAIS
1FFYPI
1 Panneau de comman-
de
2 Joint de four
3 Résistance du grill
4 Sonde à viande
5 Poignée de retrait
des plaques
6 Grille
7 Rails télescopiques
8 Plaque à pâtisserie
9 Plaque creuse
10 Interrupteur porte
11 Charnière
12 Porte 3 vitres
13 Sortie de l’air
de refroidissement
14 Fixation au meuble
15 Écran du grill
16 Sortie des fumées
17 Panneau du fond
18 Ampoules latérales
19 Turbine
20 Vitre intérieure
de grande taille
11 Fonctions de cuisson
12 Indicateur de température
13 Indicateur de température de la sonde à
viande
14 Horloge électronique
15 Sélecteur de température
16 Symbole horloge électronique
17 Symbole
18 Symbole / Fonction sécurité enfants
19 Mise en marche / Arrêt
10 Lumière intérieure
11 Symbole sonde à viande
Panneau frontal de commande
1 2 3 4 5 6
7
8
11 10 9
3172891-000 22/04/15 11:54 Página 39

40
Traditionnel à turbine
Idéal pour les rôtis et les gâteaux. Le
ventilateur répartit la chaleur de façon
uniforme à l’intérieur du four, réduisant le
temps et la température de cuisson.
Turbo
La turbine répartit la chaleur provenant de la
résistance située à l'arrière du four.
L’uniformité de la température générée permet
de cuisiner sur 2 hauteurs en même temps.
Pizza
Spécialement conçu pour la cuisson des
pizzas, tourtes, tartes et gâteaux fourrés aux
fruits.
À feu lent
Spécialement conçu pour cuisiner les viandes
en sauce, à l'étouffée, etc... de manière
traditionnelle, et en général pour les recettes
qui demandent une cuisson « à feu lent », avec
des temps de cuisson particulièrement longs
et des températures basses.
Afin d’obtenir de meilleurs résultats, il est
conseillé d'utiliser des casseroles fermées par
un couvercle, en s'assurant qu'elles puissent
aller au four.
Décongélation
Traditionnel
On l’utilise pour faire des gâteaux ou des
tartes pour lesquels la chaleur de cuisson doit
être uniforme et pour obtenir une texture
spongieuse.
Sole
Chaleur seulement depuis la partie inférieure.
Idéale pour chauffer des plats ou faire lever
des pâtes à gâteaux et autres.
Grill et sole
Spécialement conçus pour les rôtis. Ils
peuvent être utilisés pour tout type de
morceaux, indépendamment de la taille.
Grill
Gratins et rôtis en cuisson superficielle. Il
permet de dorer la couche externe sans
modifier l'intérieur des aliments. Conseillé
pour des morceaux plats tels que le bifteck,
les côtelettes, le poisson, les tartines.
Maxigrill
Il permet de gratiner de plus grandes surfaces
que le grill, à une puissance plus importante,
pour dorer plus rapidement les aliments.
Maxigrill à turbine
Il permet de rôtir de façon uniforme et de dorer
en même temps la surface. Idéal pour les
grillades. Spécialement conçu pour les pièces
de grande taille, comme les volailles, le
gibier... Il est recommandé de disposer la
pièce de viande sur la grille du four et de
placer la plaque en-dessous, pour
l'écoulement du jus.
Attention
Lors de l’utilisation de la fonction grill, maxigrill
ou maxigrill à turbine, la porte doit rester
fermée.
Fonctions du four
3172891-000 22/04/15 11:54 Página 40

41
FRANÇAIS
Recommandations pour la décongélation des aliments
La décongélation se réalise grâce à un
système d'air chaud à 2 niveaux, le niveau HI
pour les viandes en général, et le niveau LO
pour les poissons, les pâtisseries et le pain.
Lorsque la fonction décongélation est
sélectionnée, il est possible de choisir les
niveaux HI ou LO sur l'afficheur de
température, en appuyant sur le symbole
et ensuite sur les symboles ou .
• Les aliments sans emballage doivent être
placés sur la plaque du four ou dans un plat.
• Pour décongeler de grosses pièces de viande
ou de poisson, il faut les disposer sur la
grille et placer une plaque dessous pour récu-
pérer les liquides.
• Les viandes et les poissons n'ont pas besoin
d'être totalement décongelés pour être
cuisinés. Il suffit que la surface soit tendre
pour pouvoir ajouter les condiments.
• Il faut toujours cuisiner l’aliment après l’avoir
décongelé.
• Ne pas recongeler un aliment déjà décongelé.
Pour les temps de décongélation et le niveau à sélectionner, se reporter au tableau suivant:
Les temps sont fournis dans le tableau à titre indicatif, le temps de décongélation dépendra de la
température ambiante, du poids de l'aliment et du degré de congélation de l'aliment.
ALIMENT
NIVEAU LO
Peso Tempo Peso Tempo
NIVEAU HI
Pain
1
/
2
Kg
1
/
2
Kg
1
/
2
Kg
1 Kg
35 min
25 min
30 min
40 min
1 Kg
1,5 Kg
1
/
2
Kg
1
/
2
Kg
1 Kg
75 min
90 min
40 min
60 min
120 min
Tar te
Poisson
Poisson
Poulet
Poulet
Côte
Viande hachée
Viande hachée
3172891-000 22/04/15 11:54 Página 41

42
Fonctionnement du four
1 2 3 4 5 6
7
8
11 10 9
Fonctionnement manuel
Une fois l'horloge réglée, votre four est prêt à
fonctionner:
1 Appuyez sur le symbole de Mise en Marche
.
2 Appuyez sur le symbole de la fonction de
cuisson sélectionnée.
3 L’indicateur de température indiquera une
température préréglée pour cette cuisson. Si
vous souhaitez la modifier, il suffit d'appuyer
sur le symbole de température puis
d'appuyer sur les symboles ou pour
sélectionner la température désirée.
4 La cavité supérieure du four commencera à
chauffer. Avec les fonctions
, la fonction de préchauffage rapide
sera activée pendant quelques minutes.
Lorsque la température sélectionnée est
atteinte, le four émettra un signal sonore.
Attention: avec cette fonction de préchauffage,
le moteur turbo situé au fond de la cavité
supérieure du four s'active.
5 Pendant le chauffage, l'indicateur
o
clignote
pour indiquer la transmission de chaleur à
l'aliment.
6 Pour interrompre la cuisson, il faut appuyer
sur le symbole Arrêt .
Attention
À la fin de la cuisson, vous verrez que le
refroidissement du four continue à fonctionner
jusqu'à ce que l'intérieur du four réduise sa
température de manière appropriée.
Utilisation de l’horloge électronique
Attention
Cette horloge électronique est équipée de la
technologie Touch-Control. Pour l’utiliser, il
suffit d’appuyer sur les symboles représentés
sur la vitre.
La sensibilité du panneau tactile s’adapte
constamment aux conditions ambiantes.
Lorsque vous branchez le four au réseau
électrique, veillez à ce que la surface vitrée de
la façade soit propre et ne présente aucun
obstacle.
Si l’horloge ne répond pas correctement
lorsque vous touchez la vitre avec le doigt, il
faut alors débrancher le four du réseau
électrique puis le rebrancher après un court
instant. Le réglage des capteurs se fait
automatiquement et ces derniers réagiront
lorsque vous toucherez les commandes
tactiles.
Réglage de l'heure sur l'horloge électronique
En allumant le four, vous pourrez voir que
l'horloge clignote sur 12:00 et . Appuyez
sur les symboles ou pour mettre
l'horloge à l'heure. Vous entendrez ensuite
deux bips confirmant le réglage.
Si vous voulez modifier l'heure, appuyez
plusieurs fois sur le symbole de l'horloge
jusqu'à ce que le témoin clignote. En
appuyant sur les symboles ou vous
pourrez modifier l'heure. Vous entendrez
ensuite deux bips consécutifs confirmant la
modification effectuée.
3172891-000 22/04/15 11:54 Página 42

43
FRANÇAIS
Éclairage du four
La lumière à l’intérieur du four s’allumera
–lorsque l'on ouvre la porte du four. Au bout d'un
certain temps sans fermer la porte du four, la
lumière s'éteindra pour réduire la
consommation électrique.
–Lorsque l'on sélectionne une fonction de
cuisson. Au bout d'un moment, la lumière
s'éteindra.
Si vous souhaitez allumer la lumière pendant la
cuisson, il suffit d'appuyer sur le symbole de
lumière intérieure . Si vous appuyez sur le
symbole de manière prolongée, la lumière restera
allumée pendant toute la cuisson.
Fonctions de l’horloge électronique
Durée de cuisson: permet de cuisiner durant un
temps sélectionné, puis, le four s’éteint
automatiquement.
Heure de fin de cuisson: permet de cuisiner
jusqu’à une heure établie, puis, le four s’éteint
automatiquement.
Durée et fin de cuisson: permet de programmer
la durée et l’heure de fin de cuisson. Cette
fonction permet une mise en marche
automatique du four à l'heure choisie, et pour la
durée de cuisson sélectionnée (durée). Le four
s'éteindra automatiquement à l'heure
programmée (fin de cuisson).
Avertisseur: Une fois la durée programmée
écoulée, un signal sonore retentit, que le four
soit allumé ou éteint.
Sécurité enfants: Cette fonction verrouille le
four, ce qui évite que les enfants en bas âge le
manipulent.
Programmation de l'avertisseur
1 Appuyez à plusieurs reprises sur le symbole
de l'horloge jusqu'à ce que le symbole
s'allume.
2 Sélectionnez le temps après lequel vous
souhaitez que l'horloge sonne en appuyant
sur les symboles ou .
3 Il y aura ensuite 2 bips consécutifs indiquant le
temps restant avant que l'horloge ne sonne et
le symbole clignotera lentement, indiquant
que l'avertisseur est bien programmé.
4 Une fois la durée programmée écoulée, un
signal sonore retentira et le symbole
clignotera plus rapidement.
5 Appuyez sur n'importe quel symbole de la
façade pour arrêter le signal sonore.
Vous pouvez modifier le temps sélectionné à
tout moment, en appuyant à plusieurs reprises
sur le symbole de l'horloge jusqu'à ce que
le symbole clignote, puis en appuyant sur
les symboles ou . Vous entendrez
ensuite deux bips consécutifs confirmant la
modification effectuée.
Programmation de la durée de cuisson
1 Appuyez sur le symbole de l'horloge , le
symbole s'allumera.
2 Sélectionnez la durée de cuisson, en appuyant
sur ou .
3 Il y aura ensuite 2 bips consécutifs, indiquant
le temps de cuisson restant, et le symbole
clignotera lentement, indiquant que votre four
s'éteindra automatiquement.
4 Sélectionnez une fonction et une température
de cuisson.
5 Une fois la durée de cuisson écoulée, le four
s’éteindra, l’avertisseur sonore retentira et
le symbole clignotera plus rapidement.
6 Appuyez sur n'importe quel symbole de la
façade pour arrêter le signal sonore.
À tout moment, vous pouvez modifier le temps
sélectionné en appuyant sur le symbole de
l’horloge , et en appuyant ensuite sur les
symboles ou . Vous entendrez ensuite
deux bips consécutifs confirmant la modification
effectuée.
3172891-000 22/04/15 11:54 Página 43

44
Programmation de l'heure de fin de cuisson
1 Appuyez à plusieurs reprises sur le symbole
de l'horloge jusqu'à ce que le symbole
s'allume.
2 Sélectionnez l'heure de fin de la cuisson, en
appuyant sur les symboles ou .
3 Il y aura ensuite 2 bips consécutifs,
indiquant le temps de cuisson restant, et le
symbole clignotera lentement, indiquant
que votre four s'éteindra automatiquement.
4 Sélectionnez une fonction et une température
de cuisson.
5 Une fois l'heure sélectionnée atteinte, le four
s'éteindra, l'avertisseur sonore retentira, et le
symbole clignotera plus rapidement.
6 Appuyez sur n'importe quel symbole de la
façade pour arrêter le signal sonore.
À tout moment, vous pouvez modifier l’heure
de fin sélectionnée, en appuyant à plusieurs
reprises sur le symbole de l'horloge
jusqu'à ce que le symbole clignote, puis
en appuyant sur les symboles ou . Vous
entendrez ensuite deux bips consécutifs
confirmant la modification effectuée.
Vous pouvez utiliser cette fonction même en
cours de cuisson. Il suffit alors de suivre ces
mêmes instructions, à l’exception de l’étape
4.
Programmation de la durée et de la fin de
cuisson
11 Appuyez sur le symbole de l'horloge , le
symbole s'allumera.
12 Sélectionnez la durée, en appuyant sur
ou .
13 Il y aura ensuite 2 bips consécutifs, le
temps de cuisson restant s'affichera et le
symbole clignotera lentement.
14 Appuyez à plusieurs reprises sur le symbole
de l'horloge jusqu'à ce que le symbole
s'allume.
15 Sélectionnez l'heure de fin de la cuisson, en
appuyant sur les symboles ou .
16 Il y aura ensuite 2 bips consécutifs, l’heure
actuelle s’affichera et le symbole
restera allumé.
17 Sélectionnez une fonction et une température
de cuisson.
18 Le four restera éteint, le symbole
allumé, et le symbole clignotera
lentement. L'afficheur de l'horloge
indiquera l'heure actuelle et la lumière
intérieure restera éteinte. Votre four est
programmé.
19 Lorsqu’il est l’heure de lancer la cuisson, le
four se mettra en marche et la cuisson
s’effectuera pendant la durée sélectionnée.
L'afficheur de l'horloge indiquera le temps
de cuisson restant.
10 Une fois l'heure sélectionnée atteinte, le
four s'éteindra, l'avertisseur sonore
retentira, et les symboles et
clignoteront.
11 Appuyez sur n'importe quel symbole de la
façade pour arrêter le signal sonore.
Si au cours de la cuisson, vous voulez
modifier l'heure de fin, appuyez à plusieurs
reprises sur le symbole de l'horloge
jusqu'à ce que le symbole clignote. À ce
moment, vous pouvez modifier l'heure de fin
en appuyant sur les symboles ou . Vous
entendrez ensuite 2 bips confirmant la
modification effectuée.
Fonction sécurité enfants
Cette fonction verrouille le four, ce qui évite
que les enfants en bas âge le manipulent.
Pour activer cette fonction, appuyez sur le
symbole
(16) de manière prolongée, un long
bip retentira et des points clignotants
apparaîtront entre les chiffres de l'indicateur
de température . Votre four est verrouillé.
3172891-000 22/04/15 11:54 Página 44

45
FRANÇAIS
Pour désactiver la fonction de sécurité
enfants, il faut appuyer de manière prolongée
sur le symbole et entendre un bip
prolongé.
Attention
En cas de coupure de courant, toute la
programmation de l’horloge électronique sera
effacée et l'indication 12:00 clignotera sur
l’afficheur de l’horloge. Il vous faudra alors
remettre l'horloge à l’heure et procéder à une
nouvelle programmation.
Utilisation de la sonde à viande
La sonde à viande mesure la température à
l’intérieur du rôti. Lorsque la température
présélectionnée est atteinte, le four s'éteindra
automatiquement. La sonde à viande permet
d’obtenir une cuisson idéale quelque soit le
type de viande ou le poids du rôti.
Comment placer la sonde à viande
• Utilisez seulement la sonde à viande
d’origine.
• Placez la sonde avant de commencer le rôti.
• Insérer la sonde sur un côté du rôti de
manière à ce que la pointe reste au coeur de
celui-ci.
• Insérer complètement la sonde jusqu’au
manche.
• Il est conseillé de retourner le rôti à
mi-cuisson, il faut donc en tenir compte pour
ne pas avoir de problème avec la sonde.
• La pointe de la sonde ne doit toucher ni l'os
ni les parties graisseuses. Elle ne doit pas
non plus être piquée dans une zone vide,
comme cela peut arriver avec des volailles.
Utilisation de la sonde à viande
• Enfournez le rôti préparé avec la sonde à
viande.
• Branchez la fiche de la sonde dans la prise
située sur le côté supérieur gauche du four.
• En branchant la sonde, une température
conseillée (65
o
C) s’affichera sur
l’indicateur de température de la sonde (3),
situé sur la façade.
• Si vous souhaitez modifier la température
conseillée, il suffit d’appuyer sur le symbole
puis sur les symboles ou .
• Il y aura ensuite deux bips consécutifs pour
confirmer la température sélectionnée.
3172891-000 22/04/15 11:54 Página 45

46
Tableau des valeurs indicatives de cuisson avec la sonde à viande.
Roast-Beef 35 - 40
o
C SAIGNANT
Roast-Beef 45 - 50
o
C À POINT
Roast-Beef 55 - 60
o
C BIEN CUIT
Gigot d’agneau 65 - 70
o
C
Épaule 80 - 85
o
C
Filet (longe) 65 - 70
o
C
Jambon 80 - 85
o
C
Poulet 75 - 80
o
C
Dinde rôtie 80 - 85
o
C
CUISSON Température Sonde Observations
• Sélectionnez une fonction et une température
pour la cuisson du rôti, veuillez alors vous
reporter aux tableaux de cuisson.
• Une fois la température présélectionnée
atteinte à l’intérieur du rôti, le four
s’éteindra et un signal sonore retentira
pendant quelques instants.
• Appuyez sur n'importe quel symbole de la
façade pour arrêter le signal sonore.
• Le rôti est cuit selon votre goût et prêt à
être servi.
À tout moment, vous pouvez changer la
température sélectionnée pour le rôti en
appuyant sur le symbole puis sur les
symboles et .
Position pour la plaque à pâtisserie. La pince
courte au-dessus de la plaque.
Poignée de retrait des plaques
La poignée de retrait des plaques est utilisée lorsque vous avez besoin de déplacer la plaque
afin de vérifier l’état de la cuisson. Voir dessins. Il est nécessaire d’utiliser des gants de
protection lorsque vous manipulez la plaque hors du four.
Pince courte
Pince longue
Position pour la plaque creuse. La pince
longue au-dessus de la plaque.
3172891-000 22/04/15 11:54 Página 46

47
FRANÇAIS
Remplacement de l'ampoule du four
• Démontez les supports chromés, en retirant
l'écrou (E).
• Retirez la lentille de la douille à l'aide d'un
outil.
E
• Remplacez l’ampoule.
• Remontez la lentille, en vous assurant
qu’elle est bien emboîtée.
L’ampoule doit avoir une résistance à la
chaleur jusqu’à 300 °C, commandez-la auprès
du service d’assistance technique.
Attention
Avant de remplacer l’ampoule, vérifiez tout
d’abord que le four est bien débranché.
3172891-000 22/04/15 11:54 Página 47

48
1FFYPI
1 Bedienfeld
2 Backofendichtung
3 Grillwiderstand
4 Kerntemperatyurfühler
5 Griff für den
Backblechauszug
6 Rost
7 Teleskopführung
8 Backblech
9 Backblech tief
10 Türschalter
11 Scharnier
12 Tür mit 3
Glasscheiben
13 Kühlluftaustritt
14 Befestigung am
Einbauschrank
15 Grillblech
16 Abzug
17 Rückwand
18 Seitenlampen
19 Ventilator
20 Große
Innenglasscheibe
11 Kochfunktionen
12 Temperaturanzeige
13 Temperaturanzeige der Bratensonde
14 Elektronikuhr
15 Temperatursensor
16 Elektronikuhr-Sensor
17 Sensor
18 Sensor / Kindersicherung
19 Ein-/Ausschalter
10 Innenlicht
11 Bratensonde-Sensor
Bedienfeld
1 2 3 4 5 6
7
8
11 10 9
3172891-000 22/04/15 11:54 Página 48

49
DEUTSCH
Normal mit Umluft
Geeignet für Braten und Gebäck. Der Ventilator
verteilt die Hitze gleichmäßig im Backofen und
verkürzt die Gardauer und -temperatur.
Turbo
Der Ventilator verteilt die Hitze, die von einem
an der Rückseite des Backofens befindlichen
Heizwiderstand erzeugt wird. Durch die
erzeugte gleichmäßige Temperatur ist ein
gleichzeitiges Garen auf zwei Ebenen möglich.
Pizza
Besonders geeignet zum Backen von Pizza,
Pasteten und Gebäck oder Kuchen mit
Obstfüllung.
Niedertemperatur-Garen
Besonders geeignet zum Garen von Fleisch in
Soße, Schmorbraten usw. nach traditioneller
Art und generell für Gerichte, für die eine
Garung bei niedriger Temperatur und über
einen langen Zeitraum empfehlenswert ist.
Um die besten Resultate zu erzielen, wird
empfohlen, backofengeeignete Gefäße mit
Deckel zu verwenden.
Auftauen
Normal
Empfohlen für Kuchen und Torten, die
gleichmäßige Hitze benötigen, um eine luftige
Konsistenz zu erhalten.
Unterhitze
Hitze nur von der Unterseite. Geeignet zum
Anwärmen von Tellern oder zum
Aufgehenlassen von Teig oder ähnlichem.
Grill mit Unterhitze
Besonders für Braten geeignet. Kann für
Gargut beliebiger Größe genutzt werden.
Grill
Gratinieren und Überbacken. Ermöglicht das
Bräunen der Oberfläche, ohne das Innere des
Garguts zu beeinflussen. Empfohlen für
flaches Gargut wie z. B. Beefsteak, Rippchen,
Fisch, Toasts.
Maxigrill
Ermöglicht das Gratinieren von größeren
Oberflächen und mit höherer Leistung als mit
dem Grill, wodurch eine schnellere Bräunung
des Garguts erreicht wird.
MaxiGrill mit Umluft
Ermöglicht gleichzeitig ein gleichmäßiges
Garen und Bräunen der Oberfläche. Ideal zum
Grillen. Besonders für große Stücke wie
Geflügel, Wild usw. Es wird empfohlen, das
Grillgut auf den Rost zu legen und die
Fettpfanne darunter zu positionieren, um
Bratensaft und Fett aufzufangen.
Achtung
Bei Benutzung der Funktionen Grill, MaxiGrill
oder MaxiGrill mit Umluft muss die
Backofentür geschlossen gehalten werden.
Backofenfunktionen
3172891-000 22/04/15 11:54 Página 49

50
Empfehlungen für das Auftauen von Tiefkühlkost
Das Auftauen funktioniert mittels eines
Warmluftsystems in 2 Stufen: Stufe HI für
Fleisch im Allgemeinen und Stufe LO für Fisch,
Gebäck und Brot. Wird die Auftaufunktion
gewünscht, kann man zwischen Stufe HI oder
LO auf der Temperaturanzeige wählen, indem
man den Sensor und danach die Sensoren
oder berührt.
• die Lebensmittel ohne Verpackung auf das
Backblech oder in ein geeignetes Gefäß
gegeben werden.
• Um große Fleisch- oder Fischstücke aufzu-
tauen, müssen diese auf den Rost gelegt
werden, mit dem Backblech darunter, um die
Flüssigkeit aufzufangen.
• Fleisch oder Fisch müssen vor der Garung
nicht komplett aufgetaut werden. Es reicht
aus, wenn die Oberfläche weich genug ist, um
sie zu würzen.
• Die Lebensmittel sollten immer gleich nach
dem Auftauen gegart werden.
• Aufgetaute Lebensmittel nicht nochmals
einfrieren.
Die Auftauzeit und die entsprechende Auftaustufe entnehmen Sie bitte der nachstehenden Tabelle:
Die in der Tabelle angegebenen Zeiten dienen nur zur Orientierung, da die Auftauzeit auch von der
Umgebungstemperatur, dem Gewicht und dem Gefriergrad der Lebensmittel abhängt.
LEBENSMITTEL
STUFE LO
Gewicht Zeit Gewicht Zeit
STUFE HI
Brot
1
/
2
Kg
1
/
2
Kg
1
/
2
Kg
1 Kg
35 min
25 min
30 min
40 min
1 Kg
1,5 Kg
1
/
2
Kg
1
/
2
Kg
1 Kg
75 min
90 min
40 min
60 min
120 min
Kuchen
Fisch
Fisch
Hähnchen
Hähnchen
Kotelett
Hackfleisch
Hackfleisch
3172891-000 22/04/15 11:54 Página 50

51
DEUTSCH
Bedienung des Backofens
1 2 3 4 5 6
7
8
11 10 9
Bedienung der Elektronikuhr
Achtung
Ihre Elektronikuhr verfügt über eine Touch-Control-
Technologie. Zur Bedienung reicht es aus, die
Glas-Symbole mit dem Finger zu berühren.
Die Empfindlichkeit der Touch-Control passt sich
fortwährend den Umgebungsbedingungen an.
Beim Anschließen des Backofens an das
Stromnetz achten Sie bitte darauf, dass die
Glasoberfläche der Vorderseite der
Bedienelemente sauber und frei von jeglichen
Verunreinigungen ist.
Wenn die Uhr beim Berühren des Glases mit
dem Finger nicht richtig reagiert, muss der
Backofen vom Stromnetz getrennt und nach
einem kurzen Moment wieder angeschlossen
werden. Dadurch werden die Sensoren
automatisch justiert und reagieren wieder auf
die Fingerberührung.
Einstellen der Uhrzeit der Elektronikuhr
Wenn Sie den Backofen an das Netz
anschließen, blinken auf der Uhr die Anzeigen
12:00 und . Die Uhrzeit wird eingestellt
durch Berühren der Sensoren oder ;
danach hören Sie zwei aufeinander folgende
Pieptöne zur Bestätigung der gewählten
Uhrzeit.
Zur Änderung der Uhrzeit berühren Sie
mehrmals den Uhrsensor , bis die Anzeige
blinkt. Durch Berührung der Sensoren
oder können Sie die Uhrzeit ändern.
Schließlich hören Sie zwei aufeinander folgende
Pieptöne zur Bestätigung der durchgeführten
Änderung.
Manueller Betrieb
Nachdem die Uhrzeit eingestellt wurde, ist der
Backofen betriebsbereit:
1 Berühren Sie den Start-Sensor .
2 Berühren Sie das gewünschte
Garfunktionssymbol.
3 Auf der Temperaturanzeige erscheint die
für diese Garfunktion voreingestellte Zeit.
Wenn Sie diese ändern möchten, berühren
Sie einfach den Temperatursensor und
danach die Sensoren oder zur
Einstellung der gewünschten Temperatur.
4 Die obere Backofenmulde beginnt sich
aufzuheizen. Bei den Funktionen
wird die schnelle Aufheizfunktion
für einige Minuten aktiviert. Wenn die
gewählte Temperatur erreicht wird, ertönt
ein Signal.
Achtung: Mit dieser Aufheizfunktion wird der
an der Rückseite der oberen Backofenmulde
befindliche Turbomotor gestartet.
5 Während der Heizphase blinkt das Symbol °
und zeigt somit die Hitzeübertragung auf
das Gargut an.
6 Um das Garen zu beenden, berühren Sie
den Aus-Sensor .
Achtung
Nach Beenden des Garvorgangs werden Sie
feststellen, dass die Kühlung des Backofens wei-
terläuft, bis die Temperatur des
Backofeninnenraums eine angemessene
Temperatur erreicht hat.
3172891-000 22/04/15 11:54 Página 51

52
Beleuchtung des Backofens
Das Innenlicht leuchtet auf, wenn
–die Backofentür geöffnet wird. Bleibt die
Backofentür längere Zeit geöffnet, erlöscht das
Licht automatisch, um Strom einzusparen.
– eine Garfunktion eingestellt wird. Nach einiger
Zeit schaltet sich das Licht aus.
Möchten Sie das Licht während des Garvorgangs
einschalten, berühren Sie einfach den
Innenlichtsensor . Wird dieser Sensor länger
berührt, bleibt das Licht während des gesamten
Garvorgangs eingeschaltet.
Funktionen der Elektronikuhr
Garzeit-Dauer: Ermöglicht das Garen während
der gewählten Zeit, danach schaltet sich der
Backofen automatisch aus.
Garzeit-Ende: Ermöglicht die Garung bis zu einer
vorgewählten Zeit; danach schaltet sich der
Backofen automatisch ab.
Garzeit-Dauer und Garzeit-Ende: Ermöglicht die
Einstellung der Dauer und der Endzeit der
Garung. Mit dieser Funktion schaltet sich der
Backofen automatisch zu der passenden Uhrzeit
für die vorgewählte Garzeit (Dauer) ein und schal-
tet sich automatisch beim Erreichen der einges-
tellten Zeit (Garzeit-Ende) ab.
Küchenwecker: Erzeugt ein Signal bei Ablauf der
eingestellten Zeit, unabhängig davon, ob der
Backofen heizt oder nicht.
Kindersicherung: Blockiert den Backofen und
verhindert eine Manipulation durch Kleinkinder.
Programmierung des Weckers
1 Berühren Sie mehrmals den Uhrsensor ,
bis das Symbol aufleuchtet.
2 Wählen Sie die Zeitdauer, nach deren Ablauf
der Timer ertönen soll, indem Sie die
Symbole oder drücken.
3 Danach hören Sie 2 aufeinander folgende
Pieptöne; die Restzeit bis zum Ertönen des
Timers erscheint, und das Symbol (A) blinkt
langsam, um anzuzeigen, dass der Timer
programmiert ist.
4 Nach Ablauf der eingestellten Zeit ertönt ein
Signal und das Symbol (A) blinkt schneller.
5 Berühren Sie irgendeinen Sensor der
Bedienblende, um das Signal abzustellen.
Sie können jederzeit die eingestellte Zeit
ändern, indem Sie mehrmals den Uhrsensor
berühren, bis das Symbol blinkt, und
dann die Sensoren oder berühren.
Danach hören Sie zwei aufeinander folgende
Pieptöne zur Änderungsbestätigung.
Programmierung der Gar-Dauer
1 Berühren Sie den Uhrsensor ; das Symbol
leuchtet auf.
2 Wählen Sie die Gardauer, indem Sie die
Sensoren oder berühren.
3 Danach hören Sie 2 aufeinander folgende
Pieptöne; die Restgarzeit erscheint, und das
Symbol blinkt langsam, um anzuzeigen,
dass sich der Backofen automatisch abs-
chalten wird.
4 Wählen Sie eine Funktion und eine
Gartemperatur.
5 Nach Ablauf der eingestellten Garzeit
schaltet sich der Backofen ab, es ertönt ein
Signal und das Symbol blinkt schneller.
6 Berühren Sie irgendeinen Sensor der
Bedienblende, um das Signal abzustellen.
Sie können jederzeit die eingestellte Zeit
ändern, indem Sie erst den Uhrsensor und
dann die Sensoren oder berühren.
Danach hören Sie zwei aufeinander folgende
Pieptöne zur Änderungsbestätigung.
3172891-000 22/04/15 11:54 Página 52

53
DEUTSCH
Programmierung des Garzeit-Endes
1 Berühren Sie mehrmals den Uhrsensor ,
bis das Symbol aufleuchtet.
2 Wählen Sie das Garzeit-Ende, indem Sie die
Sensoren oder berühren.
3 Danach hören Sie 2 aufeinander folgende
Pieptöne; die Restgarzeit erscheint, und das
Symbol
(15)blinkt langsam, um
anzuzeigen, dass sich der Backofen
automatisch abschalten wird.
4 Wählen Sie eine Funktion und eine
Gartemperatur.
5 Wenn die eingestellte Uhrzeit erreicht ist,
schaltet sich der Backofen ab, es ertönt ein
Signal und das Symbol blinkt schneller.
6 Berühren Sie irgendeinen Sensor der
Bedienblende, um das Signal abzustellen.
Sie können jederzeit die Gar-Endzeit ändern,
indem Sie mehrmals den Uhrsensor berüh-
ren, bis das Symbol blinkt, und dann die
Sensoren oder berühren. Danach
hören Sie zwei aufeinander folgende Pieptöne
zur Änderungsbestätigung.
Sie können diese Funktion einstellen, auch
wenn der Backofen schon in Betrieb ist. Dazu
folgen Sie den Anleitungen unter Punkt 4.
Programmierung der Gar-Dauer und des
Gar-Zeitendes
11 Berühren Sie den Uhrsensor ; das
Symbol leuchtet auf.
12 Wählen Sie die Gardauer, indem Sie die
Sensoren oder berühren.
13 Danach hören Sie 2 aufeinander folgende
Pieptöne; die Restgarzeit erscheint, und
das Symbol blinkt langsam.
14 Berühren Sie mehrmals den Uhrsensor
bis das Symbol aufleuchtet.
15 Wählen Sie das Garzeit-Ende, indem Sie
die Sensoren oder berühren.
16 Danach hören Sie 2 aufeinander folgende
Pieptöne; die aktuelle Uhrzeit wird
angezeigt und das Symbol leuchtet.
17 Wählen Sie eine Funktion und eine
Gartemperatur.
18 Der Backofen bleibt ausgeschaltet, das
Symbol bleibt erleuchtet und das
Symbol blinkt langsam. Auf der
Uhranzeige sehen Sie die aktuelle Uhrzeit,
und das Innenlicht bleibt aus. Der
Backofen ist nun programmiert.
19 Wenn die eingestellte Uhrzeit des
Gar-Beginns erreicht ist, schaltet sich der
Backofen ein und führt die Garung
während der vorgewählten Zeit durch. Auf
der Uhranzeige sehen Sie die Restgarzeit.
10 Wird das eingestellte Garzeit-Ende
erreicht, schaltet sich der Backofen ab; es
ertönt ein Signal und die Symbole und
blinken.
11 Berühren Sie irgendeinen Sensor der
Bedienblende, um das Signal abzustellen.
Wenn Sie während des Garvorgangs die
Garendzeit ändern möchten, berühren Sie
mehrmals den Uhrsensor bis das Symbol
blinkt. Jetzt können Sie die Garendzeit
ändern, indem Sie die Sensoren oder
berühren. Danach ertönen 2 aufeinander fol-
gende Pieptöne zur Bestätigung der
Änderung.
Kindersicherung
Blockiert den Backofen und verhindert eine
Manipulation durch Kleinkinder. Um diese
Funktion zu aktivieren, berühren Sie länger
das Symbol
(16); Sie hören dann einen langen
Piepton und zwischen den Ziffern der
Temperaturanzeige erscheinen blinkende
Punkte. Der Backofen ist blockiert.
3172891-000 22/04/15 11:54 Página 53

54
Zur Deaktivierung der Kindersicherung
berühren Sie länger das Symbol
(16); Sie
hören einen langen Piepton.
Achtung
Im Fall eines Stromausfalls wird die gesamte
Programmierung der Elektronikuhr gelöscht,
und es erscheint die blinkende Anzeige
12:00:00 auf der Uhr. Sie müssen die Uhr wie-
der einstellen und erneut programmieren.
Bedienung der Bratensonde
Die Bratensonde misst die Temperatur im
Innern des Garguts. Wenn diese Temperatur
den voreingestellten Wert erreicht, schaltet
sich der Backofen automatisch ab. Beim
Garen mit der Bratensonde erzielen Sie
optimale Ergebnisse, unabhängig von der Art
oder dem Gewicht des Fleisches.
Die Platzierung der Bratensonde
• Benutzen Sie nur die Original-Bratensonde.
• Platzieren Sie die Sonde vor Beginn des
Garvorgangs.
• Stecken Sie die Sonde seitlich in das
Gargut, so dass die Spitze bis in die Mitte
reicht.
• Stecken Sie die Sonde vollständig und bis
zum Griff hinein.
• Es wird empfohlen, das Gargut nach der
Hälfte der Garzeit umzudrehen; dies sollte
man bei der Platzierung der Sonde
bedenken, um Schwierigkeiten zu vermeiden.
• Die Spitze der Sonde sollte weder am
Knochen noch in Fett stecken; auch nicht in
einem Hohlraum, wie es z. B. bei Geflügel
der Fall sein kann.
Anwendung der Bratensonde
• Legen Sie das mit der Bratensonde
versehene Gargut in den Backofen.
• Stecken Sie den Stecker der Bratensonde in
die Buchse, die sich auf der oberen linken
Seite des Backofens befindet.
• Beim Anschließen sehen Sie auf der
Temperaturanzeige der Sonde (3), die
sich auf der Bedienblende befindet, die
empfohlene Temperatur (65 °C).
• Wenn Sie die empfohlene Temperatur
ändern möchten, berühren Sie den Sensor
und danach die Sensoren oder .
• Danach hören Sie zwei aufeinander
folgende Pieptöne zur Bestätigung der
gewählten Temperatur.
3172891-000 22/04/15 11:54 Página 54

55
DEUTSCH
Tabelle mit Richtwerten zum Garen mit der Bratensonde
Roast-Beef 35 - 40
o
C ENGLISCH
Roast-Beef 45 - 50
o
C MEDIUM
Roast-Beef 55 - 60
o
C DURCHGEBRATEN
Lammkeule 65 - 70
o
C
Haxe 80 - 85
o
C
Lendenstück 65 - 70
o
C
Schinken 80 - 85
o
C
Hähnchen 75 - 80
o
C
Putenbraten 80 - 85
o
C
GARGUT Sondentemperatur Anmerkungen
• Wählen Sie eine Funktion und eine
Temperatur für Ihren Braten; die entspre-
chenden Werte können Sie der Gartabelle
entnehmen.
• Wird im Innern des Bratens die von Ihnen
gewählte Temperatur erreicht, schaltet sich
der Backofen ab und ein Signal ertönt für
einige Sekunden.
• Berühren Sie irgendeinen Sensor der
Bedienblende, um das Signal abzustellen.
• Der Braten ist jetzt nach Ihrem Geschmack
gegart und fertig zum Servieren.
Sie können jederzeit die gewählte Temperatur
für Ihren Braten ändern, indem Sie erst den
Sensor und danach die Sensoren und
berühren.
Position für flaches Backblech. Kurzer Haken
von oben auf das Blech.tray.
Griff für den Backblechauszug
Diesen Griff benutzt man, wenn man das Backblech vorziehen muss, um z. B. den Zustand des
Garguts zu überprüfen. Siehe Abbildungen. Zum Hantieren mit dem Backblech außerhalb des
Backofens müssen Schutzhandschuhe getragen werden.
Kurzer haken
Langer haken
Position für tiefes Bratblech. Langer Haken
von oben auf das Blech.
3172891-000 22/04/15 11:54 Página 55

56
• Entfernen Sie die Chromlaufschienen, indem
Sie die Muttern lösen (E).
• Nehmen Sie das Vorsatzglas der
Lampenfassung mithilfe eines Werkzeugs
heraus.
Austausch der Backofenlampe
E
• Ersetzen Sie die Lampe.
• Montieren Sie das Vorsatzglas erneut und
achten Sie darauf, dass es in der richtigen
Position sitzt.
Die Ersatzlampe muss eine
Temperaturresistenz bis 300 °C aufweisen.
Sie kann beim technischen Kundendienst
bestellt werden.
Achtung
Bevor Sie die Lampe auswechseln, stellen Sie
sicher, dass der Backofen vom Stromnetz
getrennt ist.
3172891-000 22/04/15 11:54 Página 56

57
NEDERLANDS
1FFYPI
1 Bedieningspaneel
2 Ovenpakking
3 Grillweerstand
4 Vleessonde
5 Handvat voor uitname
van bakplaten
6 Rooster
7 Uitschuifbare rails
8 Bakplaat
9 Diepe bakplaat
10 Deurschakelaar
11 Scharnier
12 Deur met 3 glazen
13 Koelluchtuitlaat
14 Bevestiging aan meubel
15 Grillscherm
16 Rookuitlaat
17 Achterpaneel
18 Zijlampen
19 Turbine
20 Binnenglas van groot
formaat
11 Bakfuncties
12 Temperatuurindicator
13 Temperatuurindicator van de vleessonde
14 Elektronische klok
15 Temperatuursensor
16 Sensor van de elektronische klok
17 Sensor
18 Sensor / Kinderbeveiliging
19 In-/uitschakelen
10 Binnenlicht
11 Sensor vleessonde
Bedieningspaneel
1 2 3 4 5 6
7
8
11 10 9
3172891-000 22/04/15 11:54 Página 57

Conventioneel met turbine
Geschikt voor braadgerechten en gebak. De
ventilator verdeelt de warmte gelijkmatig in de
oven waardoor de baktijd en –temperatuur
worden verlaagd.
Turbo
De turbine verdeelt de warmte die afkomstig is
van een weerstand aan de achterkant van de
oven. Door de gelijkmatige verdeling van de
temperatuur kan tegelijkertijd op twee
verschillende niveaus worden gebakken/
gebraden.
Pizza
Speciaal voor pizza's, pasteitjes, taarten en
cakes gevuld met fruit.
Op een zacht vuurtje
Speciaal om op traditionele wijze vlees met
saus, stoofgerechten en dergelijke te bereiden
en in het algemeen voor recepten met een
lange bereidingstijd op een lage temperatuur.
Voor een optimaal resultaat raden we aan om
ovenschotels met een deksel te gebruiken.
Kijk dan wel eerst of ze geschikt zijn voor de
oven.
Ontdooien
Conventioneel
Wordt gebruikt voor cakes en taarten waarbij
de warmte gelijkmatig verdeeld moet worden
om een luchtige textuur te verkrijgen.
Ovenvloer
Verwarmt alleen aan de onderkant. Geschikt
om gerechten op te warmen of gebak en
dergelijke te laten rijzen.
Grill en ovenvloer
Speciaal voor stoof- en braadgerechten. Kan
gebruikt worden voor elk stuk vlees of vis,
ongeacht de grootte.
Grill
Gratineren en oppervlakkig braden. Hiermee
kan de buitenlaag goudbruin worden gebakken
zonder de binnenkant van het voedsel mee te
bakken. Geschikt voor platte gerechten zoals
biefstuk, koteletten, vis en toast.
Maxigrill
Hiermee kunnen grotere oppervlakken worden
gegratineerd dan met de grillfunctie. Er kan
ook een hoger gratineervermogen worden
bereikt, zodat de etenswaren sneller worden
aangebraden.
MaxiGrill met turbine
Om gelijkmatig te braden en tegelijkertijd de
buitenkant lichtbruin te bakken. Ideaal voor
geroosterde gerechten. Speciaal voor grote
stukken gevogelte, wild, etc. Aanbevolen wordt
om het stuk vlees op de rooster van de oven
te leggen en de bakplaat eronder te plaatsen,
zodat het vleessap hierop kan uitdruipen.
Attentie
Bij gebruik van de functies Grill, Maxigrill of
MaxiGrill met turbine moet de deur gesloten
blijven.
Functies van de oven
58
3172891-000 22/04/15 11:54 Página 58

59
NEDERLANDS
Aanbevelingen voor het ontdooien van etenswaren
Ontdooien gebeurt door middel van een war-
meluchtsysteem op 2 niveaus: niveau HI voor
vlees en niveau LO voor vis, gebak en brood.
Wanneer u de ontdooifunctie selecteert, kunt
u op het temperatuurscherm kiezen tussen de
niveaus HI of LO door de sensor aan te
raken en vervolgens de sensoren of .
• Leg de onverpakte etenswaren op de bak-
plaat of in een schaal.
• Om grote stukken vlees of vis te ontdooien,
legt u deze op de rooster met daaronder een
bakplaat om vloeistoffen op te vangen.
• Vlees en vis hoeven niet helemaal te worden
ontdooid om ze te bereiden. Het is voldoende
als de buitenlaag zacht is zodat het vlees of
de vis kan worden gekruid.
• Na het ontdooien moeten de etenswaren
altijd bereid worden.
• Vries een eerder ontdooid product nooit
opnieuw in.
Zie onderstaande tabel voor de ontdooitijden en het te selecteren niveau:
De in de tabel getoonde tijden dienen ter oriëntatie. De ontdooitijd is afhankelijk van de omgeving-
stemperatuur, het gewicht en het diepvriesniveau van de etenswaren.
ETENSWAAR
NIVEAU LO
Gewicht Tijd Gewicht Tijd
NIVEAU HI
Brood
1
/
2
Kg
1
/
2
Kg
1
/
2
Kg
1 Kg
35 min
25 min
30 min
40 min
1 Kg
1,5 Kg
1
/
2
Kg
1
/
2
Kg
1 Kg
75 min
90 min
40 min
60 min
120 min
Taart
Vis
Vis
Kip
Kip
Entrecote
Gehakt
Gehakt
3172891-000 22/04/15 11:54 Página 59

60
Bediening van de oven
Bediening van de elektronische klok
Attentie
Uw elektronische klok is uitgerust met
TouchControl-technologie. Voor de bediening
hoeft u de symbolen op het glas enkel met uw
vinger aan te raken.
De gevoeligheid van de TouchControl past zich
continu aan de omgevingsomstandigheden
aan. Wanneer u de oven op het elektriciteits-
net aansluit, dient u erop te letten dat het
glasoppervlak van het bedieningspaneel
schoon en obstakelvrij is.
Als u het glas met uw vinger aanraakt maar de
oven niet op juiste wijze reageert, koppel dan
de oven van het elektriciteitsnet los en sluit
hem na een tijdje opnieuw aan. Op deze
manier worden de sensoren automatisch inge-
steld en reageren zij opnieuw nadat ze met de
vinger worden aangeraakt.
De elektronische klok gelijkzetten
Wanneer u de oven inschakelt, ziet u dat op de
klok de cijfers 12:00 en beginnen te knip-
peren. Stel de klok gelijk door de sensoren
of aan te raken. Vervolgens hoort u twee
pieptonen ter bevestiging van het ingestelde
tijdstip.
Om de tijd te wijzigen, raakt u verschillende
keren de kloksensor aan tot de aanduiding
knippert. Met de sensoren en kunt
u de tijd wijzigen. U hoort tenslotte twee piep-
tonen ter bevestiging van de wijziging.
Handmatige werking
Wanneer de klok is gelijkgezet, is uw oven
klaar voor gebruik:
1 Druk op de inschakelsensor .
2 Raak het symbool van de gewenste bakfunc-
tie aan.
3 De temperatuurindicator toont een stan-
daardtemperatuur voor die functie. Als u die
temperatuur wilt wijzigen, moet u de tempe-
ratuursensor aanraken en vervolgens de
sensoren of om de gewenste tempe-
ratuur in te stellen.
4 De bovenste ruimte van de oven begint te
verwarmen. In de functies
wordt de snelle voorverwarmingsfunctie
gedurende enkele minuten geactiveerd. De
oven zendt een pieptoon uit wanneer de
ingestelde temperatuur is bereikt.
Opgelet: Deze voorverwarmingsfunctie acti-
veert de turbomotor achteraan in de bovenste
ovenruimte.
5 Tijdens het opwarmen knippert het sym-
bool º om aan te geven dat het voedsel
wordt verwarmd.
6 Om de bereiding te onderbreken, moet u de
uitschakelsensor aanraken.
Attentie
Wanneer het bakproces is beëindigd, blijft de
koelfunctie van de oven werken totdat de tempe-
ratuur in de oven voldoende gedaald is.
1 2 3 4 5 6
7
8
11 10 9
3172891-000 22/04/15 11:54 Página 60

61
NEDERLANDS
Verlichting van de oven
Het binnenlicht van de oven gaat branden:
–Bij het openen van de ovendeur. Als de
ovendeur na een poosje niet wordt geslo-
ten, gaat het licht uit om het stroomverbruik
te verminderen.
–Als er een bakfunctie wordt gekozen. Na
een tijdje gaat het licht uit.
Als u het licht tijdens het bakproces wilt aan-
doen, raakt u gewoon de ovenlichtsensor aan
. Als u deze sensor langdurig aanraakt,
blijft het licht gedurende het gehele bakpro-
ces branden.
Functies van de elektronische klok
Baktijd: om gedurende de ingestelde tijd te
bakken. Daarna gaat de oven automatisch uit.
Eindtijd van het bakproces: om tot het inge-
stelde tijdstip te bakken. Daarna gaat de
oven automatisch uit.
Baktijd en eindtijd van het bakproces: om de
baktijd en de eindtijd van het bakproces te pro-
grammeren. Met deze functie gaat de oven
automatisch aan op het gewenste tijdstip, om
te bakken gedurende de ingestelde tijd (bak-
tijd). Vervolgens gaat hij automatisch uit op het
geprogrammeerde tijdstip (eindtijd).
Kookwekker: Geeft een geluidssignaal wan-
neer de geprogrammeerde tijd verstreken is.
Het maakt hier niet uit of de oven al dan niet
aan staat.
Kinderbeveiliging: Vergrendelt de oven zodat
kleine kinderen er niet mee kunnen spelen.
De kookwekker programmeren
1 Raak enkele keren de kloksensor aan
tot het symbool gaat branden.
2 Selecteer met de sensoren of de
tijd waarna de wekker moet afgaan.
3 U hoort vervolgens twee pieptonen. De
resterende tijd voordat de wekker afgaat
wordt weergegeven en het symbool
knippert traag, om aan te geven dat de
kookwekker geprogrammeerd is.
4 Na de ingestelde tijd klinkt er een geluids-
signaal en gaat het symbool sneller
knipperen.
5 Raak een willekeurige sensor van het
bedieningspaneel aan om het geluidssig-
naal te stoppen.
U kunt de ingestelde tijd steeds wijzigen door
verschillende keren op de kloksensor te
drukken, tot het symbool knippert en ver-
volgens de sensoren of aan te raken.
U hoort dan twee pieptonen ter bevestiging
van de wijziging.
De baktijd programmeren
1 Raak de kloksensor aan. Het symbool
gaat branden.
2 Selecteer de baktijd met de sensoren
of .
3 Vervolgens hoort u twee pieptonen. De
resterende baktijd wordt weergegeven en
het symbool knippert traag om aan te
geven dat de oven automatisch zal uit-
gaan.
4 Selecteer een functie en een braadtempe-
ratuur.
5 Wanneer de baktijd verstreken is, gaat de
oven uit. Er klinkt een geluidssignaal en
het symbool knippert sneller.
6 Raak een willekeurige sensor van het
bedieningspaneel aan om het geluidssig-
naal te stoppen.
U kunt de ingestelde tijd steeds wijzigen door
de kloksensor en vervolgens de sensoren
of aan te raken. U hoort dan twee piep-
tonen ter bevestiging van de wijziging.
3172891-000 22/04/15 11:54 Página 61

62
De eindtijd van het bakproces programmeren
1 Raak enkele keren de kloksensor aan
tot het symbool gaat branden.
2 Stel de eindtijd van het bakproces in met
de sensoren of .
3 Vervolgens hoort u twee pieptonen. De
resterende baktijd wordt weergegeven en
het symbool knippert traag om aan te
geven dat de oven automatisch zal uitgaan.
4 Selecteer een functie en een braadtempe-
ratuur.
5 Op het ingestelde tijdstip zal de oven uit-
gaan. Er gaat een geluidssignaal af en het
symbool knippert sneller.
6 Raak een willekeurige sensor van het
bedieningspaneel aan om het geluidssig-
naal te stoppen.
U kunt de ingestelde eindtijd steeds wijzigen
door verschillende keren op de kloksensor
te drukken tot het symbool knippert
en vervolgens de sensoren of aan te
raken. U hoort dan twee pieptonen ter
bevestiging van de wijziging.
U kunt deze functie ook gebruiken als u al
aan het bakken bent met de oven. Volg daar-
voor de voorgaande instructies op, behalve
nummer 4.
De baktijd en eindtijd programmeren
11 Raak de kloksensor aan. Het sym-
bool gaat branden.
12 Selecteer de baktijd met de sensoren
of .
13 Vervolgens hoort u twee pieptonen. De
resterende baktijd wordt weergegeven en
het symbool knippert traag.
14 Raak enkele keren de kloksensor aan
tot het symbool gaat branden.
15 Stel de eindtijd van het bakproces in met
de sensoren of .
16 U hoort twee pieptonen, de huidige tijd
wordt weergegeven en het symbool
blijft branden.
17 Selecteer een functie en een braadtem-
peratuur.
18 De oven blijft uit terwijl het symbool
blijft branden en het symbool langzaam
knippert. Op het scherm van de klok ziet u
het huidige tijdstip en het ovenlicht blijft
uit. Uw oven is geprogrammeerd.
19 Wanneer het bakproces moet beginnen,
gaat de oven aan en wordt er gebakken tij-
dens de ingestelde tijd. Op het scherm van
de klok verschijnt de resterende baktijd.
10 Op het ingestelde tijdstip zal de oven uit-
gaan. Het geluidssignaal gaat af en de
symbolen en knipperen.
11 Raak een willekeurige sensor van het
bedieningspaneel aan om het geluidssig-
naal te stoppen.
Als u tijdens het bakproces de eindtijd wilt
wijzigen, raakt u enkele keren de kloksensor
aan tot het symbool knippert. U kunt
dan de eindtijd wijzigen met de sensoren
of . U hoort twee pieptonen ter bevesti-
ging van de wijziging.
Kinderbeveiligingsfunctie
Vergrendelt de oven, zodat kleine kinderen
er niet mee kunnen spelen. Raak het sym-
bool langdurig aan. Er klinkt vervolgens
een lange pieptoon en er knipperen puntjes
tussen de cijfers van de temperatuurindica-
tor . Uw oven is nu vergrendeld.
3172891-000 22/04/15 11:54 Página 62

63
NEDERLANDS
Om de kinderbeveiliging uit te schakelen
moet u langdurig op het symbool druk-
ken totdat er een lange pieptoon klinkt.
Attentie
Bij een stroomonderbreking wordt de hele
programmering van de elektronische klok
gewist en verschijnen de cijfers 12:00 knip-
perend op de klok. U moet de klok dan
opnieuw gelijkzetten en programmeren.
Gebruik van de vleessonde
De vleessonde meet de temperatuur in het
braadgerecht. Wanneer deze temperatuur een
van tevoren geselecteerde waarde bereikt,
wordt de oven automatisch uitgeschakeld. Als
we met de vleessonde braden, weten we zeker
dat het braadresultaat optimaal is, ongeacht
het soort vlees of vis dat wordt gebraden.
Hoe moet de vleessonde worden gebruikt?
• Gebruik alleen de originele vleessonde.
• Breng de sonde aan voordat u begint met
braden.
• Steek de sonde in één zijde van het braadge-
recht, zodat de punt in het midden van dat
gerecht komt te zitten.
• Steek de sonde helemaal tot aan het hand-
vat in het braadgerecht.
• Aanbevolen wordt om het braadgerecht hal-
verwege het braden om te draaien. Houd
hiermee rekening zodat u later geen proble-
men heeft met de sonde.
• De punt van de sonde mag geen botten of
vetzones raken. Evenmin mag hij in een
holle zone terechtkomen, zoals het geval
kan zijn bij gevogelte.
Gebruik van de vleessonde
• Zet het braadgerecht met daarin de vlees-
sonde in de oven.
• Steek de stekker van de sonde in het aan-
sluitpunt dat zich aan de linkerbovenzijde
van de oven bevindt.
• Wanneer de sonde wordt aangesloten zult u
op de temperatuurindicator van de sonde (3),
die zich op het bedieningspaneel bevindt, een
aanbevolen temperatuurwaarde (65
o
C) zien.
• Wilt u de aanbevolen temperatuur wijzigen,
raak dan de sensor aan en vervolgens
de sensoren of .
• Daarna hoort u twee opeenvolgende piepto-
nen als bevestiging van de gekozen tempe-
ratuur.
3172891-000 22/04/15 11:54 Página 63

64
Oriëntatieve braadwaardentabel met de vleessonde.
Rosbief 35 - 40
o
C BIJNA RAUW
Rosbief 45 - 50
o
C MEDIUM
Rosbief 55 - 60
o
C DOORBAKKEN
Zuiglambout 65 - 70
o
C
Schenkel 80 - 85
o
C
Lende (stuk) 65 - 70
o
C
Ham 80 - 85
o
C
Kip 75 - 80
o
C
Gebraden kalkoen 80 - 85
o
C
BRAADGERECHT Temperatuur Sonde Opmerkingen
• Kies een functie en een temperatuur voor
het braadproces van uw gerecht. Kijk hier-
voor in de Baktabel.
• Wanneer de binnenkant van het braadpro-
duct de door u geselecteerde temperatuur
heeft bereikt, gaat de oven uit en klinkt er
enkele ogenblikken een geluidssignaal.
• Raak een wille keurige sensor van het
bedieningspaneel aan om het geluidssig-
naal te stoppen.
• Het braadproduct is naar uw smaak bereid
en klaar om geserveerd te worden.
U kunt op elk moment de geselecteerde tempe-
ratuur voor uw braadproduct veranderen. Druk
hiervoor op de sensor en vervolgens op de
sensoren en .
Positie voor de bakplaat. De korte haak boven
de bakplaat.
Handvat voor uitname van bakplaten
Het handvat voor de uitname van bakplaten wordt gebruikt als u de bakplaat moet verplaatsen
om te kijken hoe het bakproces verloopt. Zie tekeningen. Om de bakplaat buiten de oven te han-
teren is het gebruik van ovenwanten noodzakelijk.
Positie voor de diepe bakplaat. De lange haak
boven de bakplaat.
Korte haak
Lange haak
3172891-000 22/04/15 11:54 Página 64

65
NEDERLANDS
De ovenlamp verwisselen
• Demonteer de verchroomde steunen door ze
los te maken van de moer (E).
• Maak het glas van de lamp los met behulp
van een gereedschap.
E
• Vervang de lamp.
• Monteer het glas weer in de juiste positie.
De te verwisselen lamp moet bestand zijn
tegen temperaturen tot 300 °C. Bestel ze bij de
Technische dienst.
Attentie
Om de ovenlamp te vervangen dient de oven
van het lichtnet te worden afgesloten.
3172891-000 22/04/15 11:54 Página 65

3172891-000 22/04/15 11:54 Página 66

3172891-000 22/04/15 11:54 Página 67

kWh/cycle*
kWh/cycle*
L
*
*
0.81
0.84
57
102,5
1
36,5 kg
1FFYPI
Desideriamo anche noi dare il nostro contributo all'ambiente; per questo la carta che utilizziamo è riciclata.
Our contribution to protecting the environment - we use recycled paper.
Nuestra aportación a la protección del medio-ambiente: utilizamos papel reciclado.
O nosso contributo para a protecção do meio ambiente: utilizamos papel reciclado.
Notre contribution à la protection de l’environnement : nous utilisons du papier recyclé.
Unser Beitrag zum Umweltschutz: Wir benutzen Recyclingpapier.
Onze bijdrage aan de bescherming van het milieu: wij gebruiken kringlooppapier.
Cod.: 83172891/3172891-000
3172891-000 22/04/15 11:54 Página 68

Manual Genérico de Mantenimiento e Instalación
HORNO
Manual Genérico de Manutenção e Instalação
FORNO
Maintenance and Installation Generic Manual
OVEN
Manuel générique d’entretien et d’installation
FOUR
Allgemeine Wartungs- und Installationsanleitung
BACKOFEN
3172539-004 EPIFA 25/06/14 12:30 Página 1

3172539-004 EPIFA 25/06/14 12:30 Página 2

3
ESPAÑOL
INSTRUCCIONES DE SEGURIDAD
Lea atentamente estas instrucciones para obtener el
máximo rendimiento de su horno. Guarde este manual
de cara a que pueda leerlo un nuevo propietario.
Seguridad eléctrica
• Para la conexión del horno a la red eléctrica, el
instalador debe utilizar un cable de alimentación tipo
H05RR-F, H05SS-F o H07RN-F. El esquema de
conexión se muestra en la figura 23.
• El horno debe conectarse siempre a una buena toma
de tierra de acuerdo a la normativa vigente.
• La conexión debe realizarse a través de un interruptor
omnipolar, adecuado a la intensidad a soportar y con
una apertura mínima entre contactos de 3 mm para
la desconexión en casos de emergencia, limpieza o
cambio de la lámpara. En ningún caso el cable de
toma de tierra podrá pasar por este interruptor.
• Este interruptor se puede sustituir por una clavija de
enchufe, siempre que pueda estar accesible en un
uso normal.
• Cualquier manipulación o reparación del aparato,
incluida la sustitución del cable de alimentación,
debe realizarse por personas del Servicio de
Asistencia Técnica autorizado usando repuestos
originales. Las reparaciones o manejo realizado por
otras personas pueden ocasionar daños al aparato o
un mal funcionamiento, poniendo en peligro su
seguridad.
3172539-004 EPIFA 25/06/14 12:30 Página 3

4
• Desconecte su horno cuando esté averiado.
• En hornos combinados con encimera, sólo se podrán
montar las recomendadas por el fabricante.
Seguridad para los niños
• Impida que los niños se acerquen al horno durante el
cocinado, ya que se alcanzan temperaturas elevadas.
• Los niños menores de 8 años deben permanecer
alejados a menos que estén bajo supervisión
permanente. Los niños no deben jugar con el aparato.
• Este aparato pueden utilizarlo niños con edad de 8
años y superior y personas con capacidades físicas,
sensoriales o mentales estén reducidas, o falta de
experiencia o conocimiento, si se les ha dado la
supervisión o instrucción apropiadas respecto al uso
del aparato de una manera segura y comprenden los
peligros que implica.
Seguridad en el uso del horno
• El horno siempre tiene que funcionar con la puerta
cerrada.
• Sólo utilice el horno cuando esté instalado en el
interior del mueble (Ver Instalación del horno).
• La bandeja y la parrilla poseen un sistema para
facilitar su extracción parcial y manipular los
alimentos.
3172539-004 EPIFA 25/06/14 12:30 Página 4

5
ESPAÑOL
• Durante el uso el aparato se calienta, emplee
guantes de protección cuando quiera maniobrar
dentro de él y evite tocar los elementos de
calentamiento.
• Use sólo la sonda de medida de temperatura
suministrada dentro del horno (modelos con esta
prestación).
Limpieza y mantenimiento
• Debe desconectar el aparato de la red eléctrica para
realizar cualquier intervención.
• No utilizar limpiadores abrasivos ni aparatos
limpiadores a vapor o agua a presión.
• La limpieza y el mantenimiento a realizar por el
usuario no deben realizarlo los niños sin supervisión.
• Antes de sustituir la lámpara, asegúrese primero que
el horno está desconectado de la red eléctrica para
evitar la posibilidad de choques eléctricos.
ATENCIÓN
Para conocer las prestaciones y equipamiento
específico de su horno, debe consultar la Guía Rápida
de Uso que acompaña a este manual.
3172539-004 EPIFA 25/06/14 12:30 Página 5

6
Antes del Primer Uso
Por el proceso de fabricación, puede haber en
el horno restos de grasas y otras impurezas,
para eliminarlos proceda como sigue:
• Retire todos los elementos del embalaje,
incluído el plástico protector si lo lleva.
• Conecte su horno en función o en su
defecto , a 200
o
C y durante 1 hora. Para
ello consulte la Guía Rápida de Uso que
acompaña a este manual.
• Enfríelo abriendo la puerta, de esta forma
se ventila no quedando olores en su inte-
rior.
• Tras el enfriamiento, limpie el horno y los
accesorios.
Durante este primer funcionamiento, se pro-
ducen humos y olores por lo que se debe ase-
gurar una buena ventilación de la cocina.
Embalaje Ecológico
El embalaje está realizado con materiales
totalmente reciclables y pueden ser aprove-
chados nuevamente. Consulte con su admi-
nistración municipal sobre las normas locales
para retirar estos materiales.
ATENCIÓN
El símbolo en el producto o en el embala-
je, indica que este aparato no se puede tratar
como un desperdicio normal del hogar. Usted
debe entregarlo al punto de recolección de equi-
pos eléctricos y electrónicos para su reciclaje.
De esta forma usted ayudará a evitar posibles
consecuencias negativas para el ambiente y la
salud pública por una incorrecta manipulación.
Para obtener información más detallada sobre
el reciclado del aparato, póngase en contacto
con la administración de su ciudad, con el ser-
vicio de desechos del hogar o con el estableci-
miento donde compró el producto.
• El horno siempre tiene que funcionar con la
puerta cerrada.
• El fabricante no se responsabiliza de un uso
que no sea para la preparación de alimen-
tos de forma doméstica.
• No guarde aceites, grasas ni materiales infla-
mables en el interior, ya que puede ser peli-
groso si pone el horno en funcionamiento.
• No se apoye ni se siente en la puerta abier-
ta, podría dañarla además de poner en peli-
gro su seguridad.
• No recubra el fondo del horno con hojas de
papel de aluminio ya que puede afectar al
cocinado y dañar el esmalte de la cavidad y
el interior del mueble de su cocina.
• Para cocinar cualquier alimento, introduzca
la bandeja o parrilla en las guías laterales
de la cavidad interior.
• No deposite recipientes ni alimentos en el
fondo del horno, emplee siempre las ban-
dejas y parrilla.
• No vierta agua en el fondo durante el funcio-
namiento, ya que puede dañar el esmalte.
• Durante el cocinado abra la puerta lo
menos posible, así reducirá el consumo de
energía.
• En cocinados con un alto contenido de líqui-
dos es normal que se produzcan algunas
condensaciones en la puerta.
• Limpie el interior del horno para eliminar
restos de grasa o alimentos, los cuales en
posteriores cocinados desprenderán humos
y olores o provocarán la aparición de man-
chas.
Otras Instrucciones
Importantes
3172539-004 EPIFA 25/06/14 12:30 Página 6

7
ESPAÑOL
Si los restos de alimentos en el esmalte se
resisten a la limpieza normal (autolimpieza),
entonces:
1 Desmonte los paneles y déjelos en remojo
el tiempo necesario para que se ablanden
los restos de comida.
2 Limpie los paneles con una esponja y con
agua limpia.
3 Seque los paneles y móntelos de nuevo en
el horno.
4 Conecte el horno durante una hora y a 200
o
C.
Atención
No utilice productos limpiadores comerciales
ni polvos abrasivos sobre la superficie de los
paneles catalíticos.
Instrucciones para Desmontar los Soportes y
los Paneles Catalíticos Planos.
1 Quite los accesorios del interior del horno.
2 Tire de los soportes (C), soltándolos de la
tuerca (D). Figura 3
3 Desenrosque la tuerca (D) quedando libre
los paneles catalíticos planos. Figura 4
4 Para desmontar el panel del fondo, quite el
tornillo (E). Figura 5
5 Para el montaje proceda en sentido inverso.
Atención
Por su seguridad, nunca ponga en funciona-
miento el horno sin el panel de fondo que pro-
tege el ventilador.
Limpie el exterior del horno y los accesorios
con agua jabonosa y templada o con algún
detergente suave.
Para superficies inoxidables actúe con pre-
caución y emplee sólo esponjas o paños que
no puedan rayarlos.
Limpieza del Exterior y los
Accesorios de Horno
Limpieza de los Paneles Catalíticos
Limpieza y Mantenimiento
Atención:
Debe desconectar el aparato de la red eléctrica
para realizar cualquier intervención.
1 Hornos con esmalte de fácil limpieza
Con el horno frío y para superficies esmal-
tadas (ejemplo, suelo del horno) use cepi-
llos de nylon o esponjas con agua jabonosa
y templada. Si usa productos de limpieza
de hornos, aplíquelos sólo en las superfi-
cies esmaltadas y siguiendo las instruccio-
nes del fabricante.
2 Hornos con esmalte especial adaptado a
otros sistemas de limpieza
Por favor consulte la Hoja de
Características de su horno.
Atención
No limpie el interior de su horno con aparatos
limpiadores a vapor o agua a presión. Tampoco
utilice estropajos metálicos, cepillos de alambre
o cualquier utensilio que pueda rayar el esmalte.
• Otros modelos de horno disponen de un
sistema de limpieza por catálisis (autolim-
pieza). Este sistema elimina pequeños res-
tos de grasa durante el cocinado a tempe-
raturas elevadas.
Uso del Grill Abatible (Según Modelos)
Para limpiar la parte superior del horno,
• Espere a que su horno esté frío.
• Gire el tornillo (A) y baje la resistencia de
Grill lo más posible. Figura 1
• En otros modelos de horno debe empujar
con ambas manos la varilla de la resisten-
cia de Grill (B), hasta soltarla de la sujeción
superior. Figura 2
• Gire la resistencia y limpie la parte superior
del horno.
• Finalmente vuelva a colocar la resistencia
de Grill en su posición inicial.
Limpieza del Interior de Horno
3172539-004 EPIFA 25/06/14 12:30 Página 7

8
No use estropajos metálicos, cepillos de alam-
bre ni polvos comerciales o abrasivos para lim-
piar la puerta del horno, ya que podría arañar
la superficie y provocar la rotura del cristal.
Según el modelo de horno, usted puede des-
montar la puerta para facilitar su limpieza,
para ello:
1 Abra la puerta.
2 Gire totalmente los dos gatillos (F). Figura 6
3 Cierre la puerta hasta encajar en los dos
gatillos. Figura 7
4 Asiendo la puerta con ambas manos y por
los costados, levante y separe la puerta del
horno hasta sacar totalmente las bisagras
(G). Figura 8
Para el montaje de la puerta, proceda de
forma inversa.
Para otros modelos de horno siga estas ins-
trucciones:
1 Abra totalmente la puerta del horno.
2 Introduzca unos pasadores de seguridad en
los agujeros visibles en las bisagras de la
puerta. Figura 9
3 Agarre lateralmente la puerta con ambas
manos y ciérrela casi totalmente.
4 Levante ahora la puerta y saque las bisa-
gras de las ranuras frontales del horno
tirando de ellas hacia fuera. Figura 8
Atención
No retire los pasadores de seguridad en nin-
gún momento ya que la bisagra está tensada
y puede provocarle alguna lesión. Además
sería imposible montar la puerta si los pasa-
dores no están colocados.
Para colocar la puerta, agarre la puerta con
ambas manos e introduzca las bisagras en
las aberturas correspondientes en la parte
frontal del horno. Abra lenta y completamente
la puerta del horno.
Limpieza de la Puerta del Horno
Instrucciones Desmontaje / Montaje del
cristal interior
1 Abra la puerta del horno.
2 Tire del cristal hacia afuera por la parte
inferior (H). Figura 10
3 El cristal interior está ya suelto. Sáquelo.
Atención
Por favor preste atención porque cuando retire
el cristal interior, la puerta del horno se cerrará.
4 Limpie el cristal interior y el interior de la
puerta del horno.
5 A continuación, introduzca los soportes del
cristal interior en las ranuras superiores de
la puerta (I). Figura 11
6 Gire el cristal hacia la puerta (K).
7 Presionando con ambas manos los dos
soportes inferiores (L) y a la vez empujando
el cristal hacia la puerta (M), de nuevo el
cristal quedará fijado a la puerta. Figura 12
Instrucciones Desmontaje / Montaje
de los cristales interiores. Horno 90 cm
1 Abra la puerta del horno.
2 Gire totalmente los dos gatillos (N), para blo-
quear el giro de la puerta. Fig. 13.
3 Presione con los dedos sobre el punto 1
situado en la parte superior de ambos
lados de la puerta del horno. Fig. 14
4 Sin dejar de presionar el punto 1, tire del
cierre superior de la puerta. Fig. 15.
5 Los cristales interiores de la puerta quedan
sueltos, por lo que puede limpiarlos fácil-
mente con limpiacristales y un paño suave.
Atención
Si no ha bloqueado el giro de la puerta con el
gatillo (N), por favor preste atención porque
cuando retire los cristales interiores, la puerta
del horno se cerrará.
Limpieza de la Puerta con Cristal
Interior de gran Tamaño
3172539-004 EPIFA 25/06/14 12:30 Página 8

Atención
Si a pesar de estos consejos persiste el pro-
blema, póngase en contacto con su Servicio
de Asistencia Técnica.
Si Algo no Funciona
El Horno no funciona
Compruebe la conexión a la red.
Verifique los fusibles y el limitador
de su instalación.
Asegúrese que el reloj está en posición
manual o programado.
Verifique la posición del selector de funciones
y de temperaturas
La luz interior del horno no se enciende
Sustituya la lámpara.
Verifique el correcto montaje según
el Manual de Instrucciones.
El piloto de calentamiento no se ilumina
Seleccione una temperatura.
Seleccione una función.
Sólo se debe iluminar mientras el horno
está calentando para alcanzar
la temperatura seleccionada.
Generación de humos durante
el funcionamiento del horno
Proceso normal en el primer funcionamiento.
Limpie periódicamente el horno.
Reduzca la cantidad de grasa o aceite
añadido a la bandeja.
No utilice temperaturas más altas
de las indicadas en las tablas de cocinado.
No se obtienen los resultados
esperados en el cocinado
Revise las tablas de cocinado,
para obtener una orientación sobre
el funcionamiento de su horno.
9
ESPAÑOL
6 Una vez limpios, introduzca los cristales en
el mismo orden de forma que se pueda leer
la indicación TERMOGLASS que llevan
impresa.
7 Coloque de nuevo el cierre superior de la
puerta, asegurando que las pestañas latera-
les encajan en el punto 1.
Atención
Para cambiar la lámpara, asegure primero que
el horno está desconectado de la red eléctrica.
• Desenrosque la lente del portalámparas.
• Sustituya la lámpara y monte de nuevo la lente.
La lámpara a sustituir debe tener una resisten-
cia a la temperatura de hasta 300
o
C, solicítela
en el servicio de asistencia técnica. Figura 16
Para otros modelos de horno siga estas ins-
trucciones:
• Suelte la lente del portalámparas con la
ayuda de una herramienta. Fig. 17
• Sustituya la lámpara.
• Monte de nuevo la lente, asegurando que
encaja en posición correcta. Fig. 18
Cambio de la Lámpara del Horno
3172539-004 EPIFA 25/06/14 12:30 Página 9

10
El instalador debe verificar que:
• La tensión y la frecuencia de la red se
corresponde con lo indicado en la Placa de
Características.
• La instalación eléctrica puede soportar la
potencia máxima indicada en la Placa de
Características.
• Después de la conexión eléctrica, verifique
el correcto funcionamiento de todos los ele-
mentos eléctricos del horno.
Para todos los hornos y tras realizar la cone-
xión eléctrica,
1 Introduzca el horno en el mueble asegurán-
dose que el cable de alimentación no
queda atrapado, ni en contacto con partes
calientes del horno.
2 Sujete el horno al mueble mediante los tor-
nillos suministrados, roscándolos al mue-
ble a través de los agujeros que pueden
observarse una vez abierta la puerta.
3 Observe que la carcasa del horno no esté
en contacto con las paredes del mueble y
que hay al menos una separación de 2 mm
con los muebles contiguos.
Instalación de Horno
Conexión Eléctrica
Información Técnica
Si el aparato no funciona comunique al
Servicio de Asistencia Técnica el tipo de ano-
malía que usted observa indicando:
1 Número de Serie (S-No)
2 Modelo de Aparato (Mod.)
que usted podrá encontrar grabados en la
placa de características. Ésta se encuentra en
la parte inferior del horno, que podrá ver
abriendo la puerta.
Instalación
Esta información va dirigida exclusivamente al
instalador, ya que es el responsable del mon-
taje y conexión eléctrica. Si usted mismo ins-
tala el horno, el fabricante no se hará respon-
sable de los posibles daños.
• Para desembalar el horno tire de la lengüeta
situada en la parte inferior de la caja y para
manipularlo sujételo por las asas laterales y
nunca por el tirador de la puerta del horno.
• En el mueble se realizará una abertura con
las dimensiones indicadas en la figura,
siendo la dimensión mínima del fondo del
mueble de 550 mm. (Ver figuras 19, 20 y
21).
• Para el encastre de los hornos multifunción la
parte posterior del mueble, correspondiente a
la zona sombreada (A) en la figura 22, no
debe presentar ningún saliente (refuerzos de
mueble, tuberías, bases de enchufe, etc...).
• El adhesivo empleado en el recubrimiento
plástico de los muebles debe soportar tem-
peraturas superiores a 85ºC.
Previo a la Instalación
3172539-004 EPIFA 25/06/14 12:30 Página 10

11
PORTUGUÊS
INSTRUÇÕES DE SEGURANÇA
Leia atentamente estas instruções para obter o máximo
rendimento do seu forno. Guarde este manual de forma a
que possa ser lido por um novo proprietário.
Segurança eléctrica
• Para a ligação do forno à rede eléctrica, o instalador
deve utilizar um cabo de alimentação tipo H05RR-F,
H05SS-F ou H07RN-F. O esquema de ligação é mostrado
na figura 23.
• O forno deve ser sempre ligado a uma tomada de
terra em bom estado de acordo com a norma
vigente.
• A ligação deve realizar-se através de um interruptor
omnipolar, adequado à intensidade a suportar e com
uma abertura mínima entre contactos de 3 mm para
desligar em casos de emergência, limpeza ou troca
da lâmpada. Em caso algum o cabo da tomada de
terra poderá passar por este interruptor.
• Este interruptor pode ser substituído por uma ficha
eléctrica, sempre que possa estar acessível numa
utilização normal.
• Qualquer manipulação ou reparação do aparelho,
inclusive a substituição do cabo de alimentação, deve
realizar-se por pessoas do Serviço de Assistência
Técnica autorizado usando peças de substituição
originais. As reparações ou o manuseamento realizado
por outras pessoas podem provocar danos no aparelho
ou um mau funcionamento, colocando em perigo a sua
segurança.
3172539-004 EPIFA 25/06/14 12:30 Página 11

12
• Desligue o forno quando este estiver avariado.
• Em fornos combinados com bancada, apenas se
poderão montar as recomendadas pelo fabricante.
Segurança para as crianças
• Impeça que as crianças se aproximem do forno
durante o cozinhado, visto que são atingidas
temperaturas elevadas.
• As crianças menores de 8 anos devem permanecer
afastadas a menos que se encontrem sob supervisão
permanente. As crianças não devem brincar com o
aparelho.
• Este aparelho pode ser utilizado por crianças com
idade igual ou superior a 8 anos e por pessoas com
capacidades físicas, sensoriais ou mentais reduzidas,
ou com falta de experiência ou conhecimento, caso
lhes sejam disponibilizadas a supervisão ou as
instruções apropriadas em relação à utilização do
aparelho de uma forma segura e caso compreendam
os perigos que implica.
Segurança na utilização do forno
• O forno tem que funcionar sempre com a porta fechada.
• Utilize o forno só quando este estiver instalado no
interior do móvel (Ver Instalação do forno).
• O tabuleiro e a grelha possuem um sistema para
facilitar a sua extracção parcial e manipular os
alimentos.
3172539-004 EPIFA 25/06/14 12:30 Página 12

13
PORTUGUÊS
• Durante a sua utilização o aparelho aquece. Utilize
luvas de protecção quando pretender actuar no interior
do mesmo e evite tocar nos elementos de aquecimento.
• Dentro do forno, use apenas a sonda de medição de
temperatura fornecida (modelos com este acessório).
Limpeza e manutenção
• Deve desligar o aparelho da rede eléctrica para realizar
qualquer intervenção.
• Não utilizar produtos de limpeza abrasivos nem
aparelhos de limpeza a vapor ou com água à pressão.
• A limpeza e a manutenção a realizar pelo utilizador não
deve ser realizada por crianças sem a devida supervisão.
• Antes de substituir a lâmpada, assegure-se primeiro que
o forno está desligado da rede eléctrica para evitar a
possibilidade de choques eléctricos.
ATENÇÃO
Para conhecer as prestações e o equipamento
específico do forno, deve consultar o Guia Rápido de
Utilização que acompanha este manual.
3172539-004 EPIFA 25/06/14 12:30 Página 13

14
Antes da Primeira
Utilização
Devido ao processo de fabrico, podem existir
no forno restos de gorduras e outras impure-
zas. Para a sua eliminação proceda da seguin-
te forma:
• Retire todos os elementos da embalagem,
incluído o plástico protector se o tiver.
• Ligue o seu forno na função ou na falta
desta , a 200 ºC e durante 1 hora. Para
isso, consulte o Guia Rápido de Utilização
que acompanha este manual.
• Arrefeça o forno, abrindo a porta. Desta
forma ventila-se não ficando odores no seu
interior.
• Após o arrefecimento, limpe o forno e os
acessórios.
Durante este primeiro funcionamento, produ-
zem-se fumos e odores pelo que se deve
assegurar uma boa ventilação da cozinha.
Embalagem Ecológica
A embalagem é concebida com materiais
totalmente recicláveis e podem ser aproveita-
dos novamente. Consulte a sua administra-
ção municipal sobre as normas locais para
reciclar estes materiais.
ATENÇÃO
O símbolo no produto ou na embalagem
indica que este aparelho não pode ser tratado
como um desperdício doméstico normal. Deve
entregá-lo no ponto de recolha de equipamen-
tos eléctricos e electrónicos para a sua reci-
clagem. Desta forma ajudará a evitar possí-
veis consequências negativas para o ambien-
te e para a saúde pública devido a uma incor-
recta utilização. Para obter informação mais
detalhada sobre a reciclagem do aparelho,
contacte a administração da sua cidade, o
serviço de resíduos domésticos ou o estabe-
lecimento onde comprou o produto.
• O forno tem que funcionar sempre com a
porta fechada.
• O fabricante não se responsabiliza por uma
utilização que não seja para a preparação
de alimentos de forma doméstica.
• Não guarde óleos, gorduras nem materiais
inflamáveis no interior, visto que pode ser
perigoso se puser o forno em funcionamento.
• Não se apoie nem se sente na porta aber-
ta. Poderia danificá-la, para além de colocar
em perigo a sua segurança.
• Não cubra o fundo do forno com folhas de
papel de alumínio, visto que pode afectar o
cozinhado e danificar o esmalte da cavidade
e o interior do móvel da cozinha.
• Para cozinhar qualquer alimento, introduza o
tabuleiro ou a grelha nas guias laterais da
cavidade interior.
• Não deposite recipientes nem alimentos no
fundo do forno. Utilize sempre os tabuleiros
e a grelha.
• Não verta água no fundo do forno durante o
funcionamento, visto que pode danificar o
esmalte.
• Durante o cozinhado abra a porta o menos
possível, assim reduzirá o consumo de ener-
gia.
• Em cozinhados com um alto conteúdo de
líquidos é normal que ocorra alguma con-
densação na porta.
• Limpe o interior do forno para eliminar resí-
duos de gordura ou alimentos, os quais, em
posteriores cozinhados emitirão fumos e
cheiros ou provocarão a aparição de man-
chas.
Outras Instruções
Importantes
3172539-004 EPIFA 25/06/14 12:30 Página 14

15
PORTUGUÊS
Se os restos de alimentos no esmalte resis-
tem à limpeza normal (autolimpeza), então:
1 Desmonte os painéis e deixe-os de molho o
tempo necessário para que os restos de
comida amoleçam.
2 Limpe os painéis com uma esponja e com
água limpa.
3 Seque os painéis e monte-os de novo no
forno.
4 Ligue o forno durante uma hora e a 200 ºC.
Atenção
Não utilize produtos de limpeza comuns nem
pós abrasivos sobre a superfície dos painéis
catalíticos.
Instruções para Desmontar os Suportes e os
Painéis Catalíticos Planos.
1 Retire os acessórios do interior do forno.
2 Puxe os suportes (C), soltando-os da porca
(D). Figura 3
3 Desenrosque a porca (D), ficando soltos os
painéis catalíticos planos. Figura 4
4 Para desmontar o painel do fundo, retire o
parafuso (E). Figura 5
5 Para a montagem proceda no sentido inverso.
Atenção
Para sua segurança, nunca ponha o forno em
funcionamento sem o painel de fundo que
protege o ventilador.
Limpe o exterior do forno e os acessórios com
água com sabão morna ou com algum deter-
gente suave.
Em superfícies inoxidáveis actue com precau-
ção e utilize apenas esponjas ou panos que
não as possam riscar.
Limpeza do Exterior e dos
Acessórios do Forno
Limpeza dos Painéis Catalíticos
Limpeza e Manutenção
Atenção:
Deve desligar o aparelho da rede eléctrica
para realizar qualquer intervenção.
1 Fornos com esmalte de fácil limpeza
Com o forno frio e para superfícies esmal-
tadas (exemplo, base do forno) use esco-
vas de nylon ou esponjas com água com
sabão morna. Se usa produtos de limpeza
de fornos, aplique-os apenas nas superfí-
cies esmaltadas e siga as instruções do
fabricante.
2 Fornos com esmalte especial adaptado a
outros sistemas de limpeza
Consulte a Folha de Características do forno.
Atenção
Não limpe o interior do forno com aparelhos
de limpeza a vapor ou com água à pressão.
Também não utilize esfregões metálicos,
escovas de arame ou qualquer utensílio que
possa riscar o esmalte.
• Outros modelos de forno dispõem de um
sistema de limpeza por catálise (autolim-
peza). Este sistema elimina pequenos resí-
duos de gordura durante o cozinhado a
temperaturas elevadas.
Utilização do Grill Rebatível
(Segundo Modelos)
Para limpar a parte superior do forno:
• Espere que o forno esteja frio.
• Rode o parafuso (A) e baixe a resistência
de Grill o mais possível. Figura 1
• Em outros modelos de forno deve empurrar
com ambas as mãos a vareta da resistên-
cia de Grill (B), até a soltar da fixação supe-
rior. Figura 2
• Rode a resistência e limpe a parte superior
do forno.
• Por fim, volte a colocar a resistência de Grill
na sua posição inicial.
Limpeza do Interior do Forno
3172539-004 EPIFA 25/06/14 12:30 Página 15

16
Não use esfregões metálicos, escovas de
arame nem pós comuns ou abrasivos para
limpar a porta do forno, dado que poderia
arranhar a superfície e provocar a ruptura do
vidro.
Segundo o modelo do forno, pode desmontar
a porta para facilitar a sua limpeza. Para isso:
1 Abra a porta.
2 Rode totalmente os dois engates (F). Figura 6
3 Feche a porta até encaixar nos dois enga-
tes. Figura 7
4 Segurando a porta com ambas as mãos e
pelas laterais, levante e separe a porta do
forno até extrair totalmente as dobradiças
(G). Figura 8
Para a montagem da porta, proceda de forma
inversa.
Para outros modelos de forno siga estas ins-
truções:
1 Abra totalmente a porta do forno.
2 Introduza uns pernos de segurança nos ori-
fícios visíveis nas dobradiças da porta.
Figura 9
3 Agarre lateralmente a porta com ambas as
mãos e feche-a quase totalmente.
4 Agora, levante a porta e extraia as dobradi-
ças das ranhuras frontais do forno, puxan-
do-as para fora. Figura 8
Atenção
Não retire os pernos de segurança em
momento algum, visto que a dobradiça está
em tensão e pode provocar-lhe alguma lesão.
Além disso, é impossível montar a porta se os
pernos não estiverem colocados.
Para colocar a porta, agarre a porta com
ambas as mãos e introduza as dobradiças
nas aberturas correspondentes na parte fron-
tal do forno. Abra lenta e completamente a
porta do forno.
Limpeza da Porta do Forno
Instruções de Desmontagem / Montagem do
vidro interior
1 Abra a porta do forno.
2 Puxe o vidro para fora pela parte inferior
(H). Figura 10
3 O vidro interior já está solto. Retire-o.
Atenção
Preste muita atenção porque quando retirar o
vidro interior, a porta do forno irá fechar-se.
4 Limpe o vidro interior e o interior da porta
do forno.
5 Em seguida, introduza os suportes do vidro
interior nas ranhuras superiores da porta
(I). Figura 11
6 Rode o vidro na direcção da porta (K).
7 Pressionando com ambas as mãos os dois
suportes inferiores (L) e ao mesmo tempo
empurrando o vidro contra a porta (M), o
vidro fixar-se-á novamente à porta. Figura 12
Instruções Desmontagem/Montagem dos
vidros interiores. Forno 90 cm
1 Abra a porta do forno.
2 Gire totalmente os dois linguetes (N), para
travar a rotação da porta. Fig 13
3 Pressione com os dedos no ponto 1 locali-
zado na parte superior de ambos os lados
da porta do forno. Fig 14
4 Sem deixar de pressionar o ponto 1, puxe o
fecho superior da porta. Fig 15
5 Os vidros interiores da porta ficam soltos,
pelo que é possível limpá-los facilmente
com limpa-vidros e um pano suave.
Atenção
Caso não tenha bloqueado a rotação da porta
com o linguete (N), tenha atenção porque ao
retirar os vidros interiores a porta do forno irá
fechar-se.
Limpeza da Porta com Vidro
Interior de grande Dimensão
3172539-004 EPIFA 25/06/14 12:30 Página 16

17
Atenção
Se apesar destes conselhos o problema per-
siste, entre em contacto com o Serviço de
Assistência Técnica.
6 Uma vez limpos, introduza os vidros pela
mesma ordem, de forma que seja possível
ler a indicação TERMOGLASS impressa nos
mesmos.
7 Coloque novamente o fecho superior da
porta, assegurando que as pestanas late-
rais encaixam no ponto 1.
Atenção
Para trocar a lâmpada, certifique-se primeiro
que o forno está desligado da rede eléctrica.
• Desenrosque a lente do porta-lâmpadas.
• Substitua a lâmpada e monte de novo a
lente.
A lâmpada a substituir deve ter uma resistên-
cia à temperatura até 300 °C. Solicite-a no
serviço de assistência técnica. Figura 16
Para outros modelos de forno siga estas
instruções:
• Solte a lente do porta-lâmpadas com a ajuda
de uma ferramenta. Fig 17
• Substitua a lâmpada.
• Volte a montar a lente, assegurando-se que
a encaixa na posição correcta sem forçar.
Fig 18
Troca da Lâmpada do Forno
Se Algo Não Funciona
O Forno não funciona
Verifique a ligação à rede.
Verifique os fusíveis e o limitador
da sua instalação.
Certifique-se que o relógio está na posição
manual ou programado.
Verifique a posição do selector de funções
e de temperaturas.
A luz interior do forno não acende
Substitua a lâmpada.
Verifique a correcta montagem segundo
o Manual de Instruções.
A luz piloto de aquecimento não acende
Seleccione uma temperatura.
Seleccione uma função.
Apenas se deve manter acesa enquanto
o forno está a aquecer para alcançar
a temperatura seleccionada.
Formação de fumos durante
o funcionamento do forno
Processo normal no primeiro funcionamento.
Limpe periodicamente o forno.
Reduza a quantidade de gordura ou óleo
colocado no tabuleiro.
Não utilize temperaturas mais altas
do que as indicadas nas tabelas de cozinhado.
Não se obtêm os resultados
esperados no cozinhado
Reveja as tabelas de cozinhado
para obter uma orientação sobre
o funcionamento do forno.
PORTUGUÊS
3172539-004 EPIFA 25/06/14 12:30 Página 17

18
Informação Técnica
Se o aparelho não funciona comunique ao
Serviço de Assistência Técnica o tipo de ano-
malia detectada, indicando:
1 Número de Série (S-No)
2 Modelo do Aparelho (Mod.)
que poderá encontrar gravados na placa de
características. Esta encontra-se na parte
inferior do forno, que poderá ver abrindo a
porta.
Instalação
Esta informação é dirigida exclusivamente ao
instalador, visto que este é o responsável pela
montagem e ligação eléctrica. Se o forno for
instalado por si próprio, o fabricante não será
responsável pelos possíveis danos.
• Para desembalar o forno puxe a banda
situada na parte inferior da caixa e para o
manipular, segure-o pelas asas laterais e
nunca pelo puxador da porta do forno.
• No móvel realizar-se-á uma abertura com
as dimensões indicadas na figura, sendo a
dimensão mínima do fundo do móvel de
550 mm. (Ver figuras 19, 20 e 21).
• Para o encastramento dos fornos multifun-
ção a parte posterior do móvel, correspon-
dente à zona sombreada (A) na figura 22,
não deve apresentar qualquer saliência
(reforços do móvel, tubagens, tomadas,
etc...).
• A cola utilizada no revestimento plástico
dos móveis deve suportar temperaturas
superiores a 85 ºC.
Antes da Instalação
O instalador deve verificar se:
• A tensão e a frequência da rede correspon-
dem ao indicado na Placa de Características.
• A instalação eléctrica pode suportar a
potência máxima indicada na Placa de
Características.
• Depois da ligação eléctrica, verifique o cor-
recto funcionamento de todos os elemen-
tos eléctricos do forno.
Para todos os fornos e após realizar a ligação
eléctrica:
1 Introduza o forno no móvel assegurando
que o cabo de alimentação não fica preso,
nem em contacto com partes quentes do
forno.
2 Fixe o forno ao móvel por meio dos parafu-
sos fornecidos, aparafusando-os ao móvel
através dos orifícios que se podem obser-
var uma vez aberta a porta.
3 Verifique se o corpo do forno não fica em
contacto com as paredes do móvel e que
existe pelo menos uma distância de 2 mm
aos móveis contíguos.
Instalação do Forno
Ligação Eléctrica
3172539-004 EPIFA 25/06/14 12:30 Página 18

19
ENGLISH
SAFETY INSTRUCTIONS
Read this Instruction Manual carefully to obtain the
best performance from your oven. Keep this manual
so that it can be read by a new owner.
Electrical Safety
• To connect the oven to the power supply, the technician
should use an H05RR-F, H05SS-F or H07RN-F power
cable. The connection diagram is shown in Figure 23.
• The oven should always have a good earth connection in
line with current regulations.
• Connection must be made by means of an omnipolar
switch that is suitable for the current drawn and with a
minimum aperture between contacts of 3 mm for
disconnection in case of emergency, cleaning or bulb
changing. Under no circumstances must the earth wire
pass through this switch.
• This switch may be replaced by a plug, provided it is
accessible for normal use.
• Any handling or repair to the appliance, including
replacement of the power cable, should be carried out by
authorised Technical Service Personnel using original
spare parts. Repairs or handling by others may damage
the appliance or cause malfunctioning that could be
hazardous to your safety.
• Unplug your oven if it malfunctions.
• In ovens combined with hobs, only those recommended
by the manufacturer may be fitted.
3172539-004 EPIFA 25/06/14 12:30 Página 19

20
Child Safety
• Do not allow children to come near the oven while in use
as it can reach very high temperatures.
• Children under 8 years of age should be kept away from
the appliance unless they are under permanent
supervision. Children should not be allowed to play with
the appliance.
• The appliance may be used by children over the age of 8
and people with reduced physical, sensory or mental
capacities or a lack of experience or know-how, provided
they have been given appropriate instructions or
supervision on how to use the appliance safely and
understand the dangers involved.
Safety in the use of the oven
• The oven must always be operated with the door closed.
• Only use the oven after it has been installed inside the
kitchen unit (See Installing the Oven).
• The tray and grill have a system for easy part removal
and handling of food.
• The oven heats up when in use, so please use oven
gloves when performing operations inside the oven and
avoid touching the heating elements.
• Only use the temperature probe supplied to measure the
temperature inside the oven (in models that come with
this feature).
3172539-004 EPIFA 25/06/14 12:30 Página 20

21
Cleaning and Maintenance
• Disconnect the appliance from the mains power supply
before any operation.
• Do not use abrasive cleaning products, or steam or
pressurised water cleaning equipment.
• Cleaning and maintenance tasks to be carried out by the
user should not be done by children without supervision.
• Before replacing a bulb, first make sure that the oven
has been disconnected from the mains to avoid the
possibility of receiving an electric shock.
CAUTION
For the specific features and performance of your oven,
please consult the Quick Start Guide that comes with this
Manual.
ENGLISH
3172539-004 EPIFA 25/06/14 12:30 Página 21

22 22
Before First Use
There may be traces of grease and other sub-
stances in the oven as a result of its manu-
facturing process. These should be removed
by means of the following procedure:
• Remove all of the packaging from your
oven, including the protective plastic, if any.
• Turn the oven to setting , or else place
it on the defect settingt , at 200ºC, for
1 hour. Consult the Quick Start Guide
accompanying this manual on how to do
this.
• Cool the oven with the door open so that it
ventilates and no odours remain inside it.
• Once cold, clean the oven and accessories.
During this first operation, smoke and smells
will be produced. The kitchen should therefore
be well ventilated.
Environmentally Friendly
Packaging
The packaging is made from totally recyclable
materials which can be put to other uses.
Consult your local council regarding the neces-
sary procedures for disposing of these mate-
rials.
CAUTION
The symbol on the product or packaging
indicates that this appliance cannot be dis-
posed of as normal household waste. It
should be taken to an electrical and electron-
ic equipment collection point for recycling. In
this way, any negative consequences for the
environment and public health from incorrect
handling can be avoided. Contact your local
council, household waste disposal service or
the establishment you bought the product
from for more information on recycling the
appliance.
• The oven must always be operated with the
door closed.
• The manufacturer takes no responsibility for
any use of the oven other than for the home
preparation of food.
• Do not store oil, fats or inflammable materi-
als inside the oven. This may be dangerous
if the oven is turned on.
• Do not lean or sit on the open oven door.
You could damage it, as well as endanger
your own safety.
• Do not cover the bottom of the oven with
aluminium foil as this may affect cooking
performance and damage the enamel inside
the oven and the interior of your kitchen
unit.
• To cook any food, insert the tray or grill in
the side rails in the oven.
• Do not place containers or food on the bot-
tom surface of the oven. Always use the
trays and grill.
• Do not pour water on the bottom surface of
the oven when in use; this may damage the
enamel.
• Open the oven door as little as possible dur-
ing cooking. This will reduce power con-
sumption.
• It is normal for condensation to occur on the
oven door when cooking dishes with a high
liquid content.
• Clean the oven interior to remove traces of
grease or food, which could later give off
smoke and odours and cause stains to
appear.
Other important
instructions
3172539-004 EPIFA 25/06/14 12:30 Página 22

23
ENGLISH
If the remains of food on the enamel cannot
be cleaned off using normal (self-cleaning)
methods, then:
1 Dismantle the panels and leave them to
soak long enough to soften the remains.
2 Clean the panels with a sponge and clean
water.
3 Dry the panels and mount them in the oven
again.
4 Connect the oven for an hour at 200 ºC.
Caution
Do not use commercial cleaning products or
abrasive powder cleansers on the surface of
the catalytic panels.
Instructions for Dismantling the Flat
Catalytic Panels and their Supports.
1 Remove all accessories from inside the
oven.
2 Pull on the supports (C), releasing them
from the nut (D). Figure 3
3 Unscrew the nut (D) to release the flat cata-
lytic panels. Figure 4
4 To dismantle the panel at the back, remove
the screw (E). Figure 5
5 To assemble, proceed in reverse order.
Caution
For your own safety, never turn the oven on with-
out the rear panel in position since this pro-
tects the fan.
Clean the outside of the oven and accessories
with warm soapy water or with a mild detergent.
Take great care when cleaning stainless steel
surfaces. Use only sponges or cloths that do
not scratch.
Cleaning the Oven Exterior and
Accessories
Cleaning the Catalytic Panels
Cleaning and Maintenance
Caution:
Disconnect the appliance from mains power
supply before any operation.
1 Easy-to-clean enamel ovens
Use nylon brushes or sponges with warm
soapy water to clean enamelled surfaces
such as the bottom of the oven. Clean when
the oven is cold. Use oven-cleaning products
only on enamelled surfaces and always fol-
low the manufacturer’s instructions.
2 Ovens coated in special enamel adapted
to other cleaning systems
Please consult the Specifications Sheet for
your oven.
Caution
Do not clean the oven interior with steam or
pressurised water cleaning equipment. Do not
use metal scouring pads, wire brushes or any
utensil that can scratch the enamel.
• Other oven models have a catalytic (self-
cleaning) cleaning system. This system
removes small traces of grease while cook-
ing at high temperatures.
Use of Fold-down Grill (depending on Model)
To clean the top part of the oven:
• Wait until the oven is cold.
• Turn the screw (A) and lower the grill ele-
ment as far as possible. Figure 1
• In other oven models, push the rod of the
grill element (B) with both hands until it is
released from the upper fastening point.
Figure 2
• Turn the element round and clean the upper
part of the oven.
• Finally, return the grill element to its original
position.
Cleaning the Oven Interior
3172539-004 EPIFA 25/06/14 12:30 Página 23

24
Do not use metal scouring pads, wire brushes
or commercially available abrasive powder
cleansers to clean the oven door as they could
scratch the surface and cause the glass to
break.
In some oven models the door may be removed
to make them easier to clean, by proceeding as
follows:
1 Open the door.
2 Turn the two clamps (F) right round. Figure 6
3 Close the door until it fits in the two
clamps. Figure 7
4 Holding the door at the sides with both
hands, raise and remove the door from the
oven until the hinges (G) have been com-
pletely removed. Figure 8
To mount the door, proceed in reverse order.
For other oven models, follow these instruc-
tions:
1 Open the oven door completely.
2 Insert the safety pins in the visible slots in
the door hinges. Figure 9
3 Hold the door at the sides with both hands
and close it almost completely.
4 Now lift the door and remove the hinges
from the slots in the front of the oven by
pulling them out. Figure 8
Caution
Do not remove the safety pins at any time
since the hinge is taut and may cause injury.
It would also be impossible to mount the door
without the pins being in place.
To mount the door, hold it with both hands and
insert the hinges in the appropriate openings
in the front of the oven. Slowly open the door
until it is fully open.
Cleaning the Oven Door
Instructions for Removing / Replacing Inner
Glass
1 Open the oven door.
2 Pull the glass outwards by the bottom (H).
Figure 10
3 The inside glass will become loose.
Remove it.
Caution
Be very careful when removing the inner glass,
as the oven door will close.
4 Clean the inner glass and the inner surface
of the oven door.
5 Return the glass supports to the upper door
slots (I). Figure 11
6 Turn the glass towards the door (K).
7 Attach the glass to the door again by push-
ing the two lower supports (L) with both
hands while pushing the glass towards the
door (M). Figure 12
Instructions to remove / replace inside glass
panels. 90 cm oven
1 Open the oven door.
2 Fully rotate the two clamps (N) to stop the
door from closing. Fig 13
3 Squeeze point 1 located on the upper part
of both sides of the oven door. Fig 14
4 Continue squeezing point 1 and pull out the
upper clasp of the door. Fig 15
5 The inside glass panels will now be loose
and can be easily cleaned with window
cleaning liquid and a soft cloth.
Warning
If the door has not been blocked with the clamp
(N), please take care when removing the inside
glass panels as the oven door will close.
Cleaning the Large Inner
Glass Door
3172539-004 EPIFA 25/06/14 12:30 Página 24

Caution
If these problems persist despite these tips,
contact Technical Service.
25
6 Once clean, return the glass panels in the
same order so that the word TERMOGLASS
can be read.
7 Replace the upper clasp of the door, making
sure that the side tabs fit in point 1.
Caution
First make sure the oven is unplugged before
proceeding to change the bulb.
• Unscrew the bulb-holder glass cover.
• Replace the bulb and reassemble the glass
cover.
The replacement bulb must be resistant to tem-
peratures up to 300ºC. You can order one from
the Technical Assistance Service. Figure 16
For other oven models, follow these
instructions:
• Loosen the lens from the lampholder with
the help of the appropriate tool. Fig 17
• Exchange the bulb.
• Replace the lens, making sure it fits in the
correct position without forcing it. Fig 18
Changing the Oven Light bulb
ENGLISH
If Something Goes Wrong
The oven stops working
Check the power connection.
Check the fuses and the circuit breaker
for your installation.
Make sure the timer is either in the manual
or programmed setting.
Check the position of the function
and temperature setting.
The light inside the oven does not go on
Change the bulb.
Check that it has been properly inserted
according to the Instruction Manual.
The heating pilot light does not turn on
Select a temperature.
Select a function.
It should only come on while the oven
is heating up to the temperature selected.
Oven smoking during use
Normal during first use.
Clean the oven regularly.
Reduce the amount of grease or oil in the tray.
Do not use temperatures higher than
those indicated in the cooking chart.
The expected cooking results
are not achieved
Check the cooking chart for guidance
on how your oven operates.
3172539-004 EPIFA 25/06/14 12:30 Página 25

26
The installer must ensure that:
• The mains power voltage and frequency cor-
respond to what is marked on the identifi-
cation plate.
• The wiring system can withstand the maxi-
mum power marked on the identification
plate.
• After connecting the power, check that all
electrical parts of the oven are working cor-
rectly.
For all ovens. after the power has been con-
nected:
1 Position the oven inside the unit and en-
sure that the power cable is not trapped or in
contact with parts of the oven that heat up.
2 Anchor the oven to the unit with the screws
supplied, screwing them into the unit
through the holes that can be seen when
the door is open.
3 Make sure that the body of the oven is not
in contact with the walls of the unit and that
there is a separation of at least 2 mm with
the adjacent units.
Oven Installation
Electrical Connection
Technical Specifications
If the appliance does not work, inform
Technical Service of the kind of problem you
are experiencing and give the:
1 Serial Number (S-No)
2 Model of Appliance (Mod.)
You will find this information engraved on the
identification plate. This plate is on the bot-
tom of the oven and can be seen when open-
ing the door.
Installation
This information is exclusively for the installer,
who is responsible for the oven’s assembly
and electrical connection. If you install the
oven yourself, the manufacturer will not
accept liability for possible damage.
• To unpack the oven, pull on the tab located
at the bottom of the box and hold it by the
side handles, never by the oven door han-
dle.
• The opening in the kitchen unit must be
that indicated on the diagram. The mini-
mum size of the unit base must be 550
mm. (See Figures 19, 20 and 21).
• With built-in multifunction ovens, the rear of
the unit, corresponding to the shaded area
(A) in Figure 22, must have nothing projecting
out (unit reinforcement, pipes, sockets, etc.).
• The adhesive used in the plastic lining the
kitchen units must be able to withstand
temperatures over 85ºC.
Prior to Installation
3172539-004 EPIFA 25/06/14 12:30 Página 26

27
FRANÇAIS
CONSIGNES DE SÉCURITÉ
Lisez attentivement ces consignes pour obtenir un
rendement optimal de votre four. Conservez ce manuel
de façon à ce qu’il puisse être consulté par tout
nouveau propriétaire.
Sécurité électrique
• Pour le branchement du four au réseau électrique,
l’installateur doit utiliser un câble d’alimentation de
type H05RR-F, H05SS-F ou H07RN-F. Le schéma de
branchement est indiqué figure 23.
• Le four doit toujours être branché à une prise de terre
en bon état, conformément à la règlementation en
vigueur.
• Le branchement doit se faire avec un interrupteur
unipolaire, adapté à l’intensité à supporter et ayant
une ouverture entre contacts d’au moins 3 mm pour
le débranchement en cas d’urgence, de nettoyage ou
de changement d’ampoule. Le câble de prise de terre
ne devra en aucun cas passer par cet interrupteur.
• Cet interrupteur peut être remplacé par une fiche
tant que celle-ci reste accessible en usage normal.
• Toute manipulation ou réparation de l’appareil, y
compris le remplacement du câble, doit être réalisée
par des personnes autorisées du Service d’assistance
technique utilisant des pièces de rechange originales.
Les réparations ou manipulations réalisées par d’autres
personnes peuvent occasionner des dommages ou un
dysfonctionnement de l’appareil, mettant en danger
votre sécurité.
3172539-004 EPIFA 25/06/14 12:30 Página 27

28
• Débranchez votre four lorsqu’il est en panne.
• Pour les fours munis de plaques de cuisson, seules
celles recommandées par le fabricant pourront être
installées.
Sécurité des enfants
• Veillez à ce que les enfants ne s'approchent pas du
four lorsque celui-ci est en marche car il atteint des
températures très élevées.
• Les enfants de moins de 8 ans doivent être tenus à
l’écart à moins d’être sous surveillance permanente.
Les enfants ne doivent pas jouer avec l’appareil.
• Cet appareil peut être utilisé par des enfants de 8 ans
et plus, ainsi que par des personnes aux capacités
physiques, sensorielles ou mentales réduites, si ceux-
ci ont reçu les instructions nécessaires à un usage
sans danger de l’appareil et qu’ils comprennent les
risques encourus.
Sécurité pendant l’utilisation du four
• Le four doit toujours être fermé lorsqu’il est en
marche.
• Le four ne doit être utilisé que lorsqu’il est installé à
l’intérieur du meuble (voir Installation du four).
• La plaque et la grille sont équipées d’un système
permettant de faciliter leur extraction partielle et de
manipuler des aliments.
3172539-004 EPIFA 25/06/14 12:30 Página 28

29
FRANÇAIS
• Lorsqu’il est en marche, le four chauffe : utilisez des
gants de protection lorsque vous souhaitez effectuer
des manipulations à l’intérieur et évitez de toucher
les éléments de chauffage.
• Utilisez uniquement la sonde de température fournie
à l’intérieur du four (pour les modèles dotés de cette
fonctionnalité).
Nettoyage et entretien
• Pour toute intervention de ce type, vous devez
débrancher l’appareil du réseau électrique.
• N’utilisez pas de nettoyants abrasifs ni d’appareils à
vapeur ou de l'eau à pression.
• Le nettoyage et l’entretien à réaliser par l’utilisateur
ne doivent pas être effectués par des enfants sans
surveillance.
• Avant de remplacer l’ampoule, assurez-vous que le
four est bien débranché du réseau électrique afin
d’éviter tout risque de choc électrique.
ATTENTION
Afin de connaître les fonctionnalités et équipements
spécifiques de votre four, consultez le Guide rapide
d’utilisation qui accompagne ce manuel.
3172539-004 EPIFA 25/06/14 12:30 Página 29

30
Avant la première
utilisation
Suite au processus de fabrication, le four peut
contenir des restes de graisses ou autres
impuretés. Afin de les éliminer, procédez
comme suit :
• Retirez tous les éléments de l’emballage, y
compris le plastique protecteur s’il y en a un.
• Branchez votre four sur la fonction ou,
à défaut, , à 200 °C pendant 1 heure.
Pour cela, consultez le Guide rapide d’utili-
sation qui accompagne ce manuel.
• Laissez-le refroidir en ouvrant la porte, de
façon à ce qu’il soit ventilé et ne conserve
pas d’odeurs à l’intérieur.
• Une fois le four refroidi, nettoyez-le ainsi
que ses accessoires.
Lors de cette première mise en marche, le
four dégage des fumées et odeurs ; assurez-
vous que la cuisine est bien ventilée.
Emballage écologique
L’emballage se compose de matériaux entiè-
rement recyclables et pouvant être réutilisés.
Consultez votre administration municipale afin
de connaître les normes locales de tri de ces
matériaux.
ATTENTION
Le symbole présent sur le produit ou sur
l’emballage indique que cet appareil ne peut
être traité comme un déchet ménager normal.
Vous devez le déposer à un point de collecte
des déchets électriques ou électroniques afin
qu’il puisse être recyclé. De cette façon, vous
contribuerez à éviter de possibles conséquen-
ces négatives pour l’environnement et la
santé publique occasionnées par une mauvai-
se manipulation. Pour plus d’informations sur
le recyclage de l’appareil, veuillez prendre con-
tact avec l’administration de votre ville, service
de gestion des ordures ménagères, ou avec
l’établissement qui vous a vendu le produit.
• Le four doit toujours fonctionner porte fermée.
• Le fabricant décline toute responsabilité en
cas d'utilisation autre que la préparation
d'aliments à usages domestiques.
• Ne conservez pas d’huile, de graisse ou de
substances inflammables à l’intérieur du
four, car elles peuvent représenter un dan-
ger si vous mettez le four en marche.
• Ne vous appuyez pas ou ne vous asseyez
pas sur la porte du four lorqu'elle est ouver-
te, cela pourrait l'endommager ou mettre en
danger votre sécurité.
• Ne recouvrez pas le fond du four de papier
aluminium car cela pourrait nuire à la cuis-
son et endommager l’émail de la cavité
ainsi que l’intérieur du meuble de votre cui-
sine.
• Pour faire cuire un aliment, placez la plaque
ou la grille sur les rails latéraux à l'intérieur
du four.
• Ne déposez aucun plat ou aliment sur le
fond du four ; utilisez toujours les plaques
et la grille.
• Ne versez pas d’eau sur le fond du four pen-
dant son fonctionnement, cela pourrait
endommager l’émail.
• Lors de la cuisson, ouvrez la porte le moins
possible afin de réduire la consommation
d’énergie.
• Pour les plats à forte teneur en liquide, il est
normal que de la condensation se forme sur
la porte du four.
• Nettoyez l’intérieur du four afin d’éliminer
les restes de graisses ou d’aliments qui,
lors de cuissons ultérieures, produiront des
fumées et odeurs ou provoqueront l’appari-
tion de tâches.
Autres consignes
importantes
3172539-004 EPIFA 25/06/14 12:30 Página 30

3131
FRANÇAIS
Nettoyage et entretien
Attention :
Vous devez débrancher l’appareil du réseau
électrique avant de réaliser toute intervention.
1 Fours émaillé à nettoyage facile
Lorsque le four est froid et pour les sur-
faces émaillées (par exemple, le fond du
four), utilisez une brosse nylon ou une
éponge avec de l’eau tiède savonneuse. Si
vous utilisez des produits de nettoyage
pour four, appliquez-les uniquement sur les
surfaces émaillées et en suivant les
consignes du fabricant.
2 Fours émaillés spécialement adaptés à
d’autres systèmes de nettoyage
Veuillez consulter la Fiche technique de
votre four.
Attention
Ne nettoyez pas l’intérieur de votre four avec
des appareils de nettoyage à vapeur ou de l'eau
à pression. N’utilisez pas non plus de tampons
à récurer en métal, de brosses en fil de fer ou
tout autre ustensile susceptible de rayer l’émail.
• D’autres modèles de four disposent d’un
système de nettoyage par catalyse (auto-
nettoyage). Ce système élimine les petits
restes de graisse durant la cuisson à tem-
pératures élevées.
Utilisation du grill abattant (selon les modèles)
Pour nettoyer la partie supérieure du four :
• Attendez que le four soit froid.
• Tournez la vis (A) et baissez la résistance
de grill au maximum. Figure 1.
• Sur d’autres modèles de four, il faut pres-
sioner avec les deux mains la baguette de la
résistance de grill (B), jusqu’à ce qu'elle se
détache de la fixation supérieure. Figure 2.
• Otez la résistance et nettoyez la partie
supérieur du four.
• Enfin, replacer la résistance de grill en posi-
tion initiale.
Nettoyage de l’intérieur du four
Si les restes d’aliments sur l’émail résistent
au nettoyage normal (auto-nettoyage), alors :
1 Démontez les panneaux et laisser les trem-
per le temps nécessaire pour ramollir les
restes de nourriture.
2 Nettoyez les panneaux à l’aide d’une éponge
et d’eau claire.
3 Séchez les panneaux et remontez-les dans
le four.
4 Mettez le four en marche pendant une
heure à 200 °C.
Attention
N’utilisez pas de produits nettoyants achetés
dans le commerce ni de poudres abrasives
sur la surface des panneaux catalytiques.
Consignes pour démonter les supports et les
panneaux catalytiques plats.
1 Enlevez les accessoires de l’intérieur du
four.
2 Enlevez les supports (C) en les faisant sortir
de l’écrou (D). Figure 3.
3 Dévissez l’écrou (D) pour libérer les pan-
neaux catalytiques plats. Figure 4.
4 Pour démonter le panneau du fond, enlevez
la vis (E). Figure 5.
5 Pour le montage, suivez le processus inverse.
Attention
Pour votre sécurité, ne mettez jamais le four
en marche sans le panneau de fond, qui pro-
tège le ventilateur.
Nettoyez l’extérieur et les accessoires du four
avec de l’eau tiède savonneuse ou un autre
détergent doux.
Pour les surfaces inoxydables, agissez avec
précaution et utilisez une éponge ou un tor-
chon qui ne soit pas susceptible de les rayer.
Nettoyage de l’extérieur
et des accessoires du four
Nettoyage des panneaux catalytiques
3172539-004 EPIFA 25/06/14 12:30 Página 31

32
N’utilisez pas de tampons à récurer en métal,
de brosses en fil de fer, ni de poudres com-
merciales ou abrasives pour nettoyer la porte
du four, car ceux-ci pourraient rayer la surface
et provoquer des bris du verre.
Selon le modèle du four, vous pouvez démon-
ter la porte pour faciliter son nettoyage. Pour
cela :
1 Ouvrez la porte.
2 Relevez complètement les leviers (F).
Figure 6.
3 Fermez la porte jusqu’à ce qu’elle s’emboî-
te dans les deux leviers. Figure 7.
4 En saisissant la porte par les côtés avec
les deux mains, soulevez et tirez la porte du
four jusqu’à faire complètement sortir les
charnières (G). Figura 8.
Pour remonter la porte, suivez la procédure
inverse.
Pur d’autres modèles de four, respectez les
consignes suivantes :
1 Ouvrez complètement la porte.
2 Introduisez des vis de sécurité dans les
trous visibles des charnières de la porte.
Figure 9.
3 Saisissez la porte latéralement avec les deux
mains et fermez-la presque entièrement.
4 Soulevez maintenant la porte et sortez les
charnières des fentes avant du four en
tirant vers l’extérieur. Figure 8.
Attention
Ne retirez les verrous de sécurité à aucun
moment car la charnière est tendue et cela
pourrait engendrer des dommages. De plus, il
serait impossible de remonter la porte sans
les verrous.
Pour remonter la porte, saisissez la porte à
deux mains et insérez les charnières dans les
ouvertures correspondantes, dans la partie
avant du four. Ouvrez lentement et complète-
ment la porte du four.
Nettoyage de la porte du four
Consignes de démontage / montage de la
vitre intérieure
1 Ouvrez la porte du four.
2 Saisissez la vitre par la partie inférieure (H)
et tirez-la vers l’extérieur. Figure 10.
3 La vitre intérieure est alors débloquée.
Retirez-la.
Attention
Lorsque vous retirerez la vitre intérieure, la
porte se refermera.
4 Nettoyez la vitre intérieure et l’intérieur de
la porte du four.
5 Insérez ensuite les supports de la vitre inté-
rieure dans les fentes supérieures de la
porte (I). Figure 11.
6 Poussez la vitre vers la porte (K).
7 Appuyez avec les deux mains sur les deux
supports inférieurs (L) tout en poussant la
vitre vers la porte (M) et celle-ci se fixera à
la porte. Figure 12.
Instructions de démontage/montage des
vitres intérieures. Four 90 cm
1 Ouvrez la porte du four.
2 Tournez complètement les deux cliquets (N)
pour verrouiller la rotation de la porte. Fig 13
3 Appuyez avec les doigts sur le point 1 situé
sur la partie supérieure des deux côtés de
la porte du four. Fig 14
4 En maintenant le doigt enfoncé sur le point
1, tirez sur la fermeture supérieure de la
porte. FIg 15
5 Les vitres intérieures de la porte se
détachent, ce qui permet de les nettoyer
facilement avec du produit à vitres et un
chiffon doux.
Mise en garde
Si la rotation de la porte n’a pas été verrouillée
avec le cliquet (N), prêtez une attention
particulière lors du retrait des vitres intérieures
car la porte du four se refermera.
Nettoyage de la porte avec vitre
intérieure de grande taille
3172539-004 EPIFA 25/06/14 12:30 Página 32

Attention
Si, malgré ces conseil, le problème persiste,
contactez votre Service d’assistance technique.
33
6 Après avoir nettoyé les vitres, remettez-les
en place en suivant le même ordre de façon
à ce que l’inscription TERMOGLASS inscrite
sur le verre soit lisible.
7 Placez de nouveau la fermeture en haut de
la porte en vous assurant que les étiquettes
latérales encadrent le point 1.
Attention
Pour changer l’ampoule, assurez-vous d’abord
que le four est débranché du réseau électrique.
• Dévissez la lentille de la douille.
• Changez l’ampoule et revissez la lentille.
L’ampoule de rechange doit présenter une
résistance à la chaleur allant jusqu’à 300 °C ;
commandez-la auprès du service d’assistance
technique. Figure 16.
Pur d’autres modèles de four, respectez les
consignes suivantes:
• Dévissez le verre du soport de l ampoule
avec l’aide d’un outil. Fig 17
• Changez l’ampoule.
• Mettez de nouveau le verre en place, en s’s-
surant qu’il emboîte sans le forcer dans la
position correcte. Fig 18
Changement de l’ampoule du four
Si quelque chose
ne fonctionne pas
Le four ne fonctionne pas
Vérifiez le branchement au réseau.
Vérifiez les fusibles et le limiteur
de votre installation.
Assurez-vous que l’horloge est
en position manuelle ou programmée.
Vérifiez la position du sélecteur
de fonctions et de températures.
La lumière intérieure du four ne s’allume pas
Changez l’ampoule.
Vérifiez qu’elle soit correctement montée
selon le Manuel d’instructions.
Le voyant de chauffe ne s’allume pas
Sélectionnez une température.
Sélectionnez une fonction.
Le voyant ne s’allume que lorsque
le four préchauffe pour atteindre
la température sélectionnée.
Il y a de la fumée lorsque le four
est en marche
Processus normal lors de la première
mise en marche.
Nettoyez régulièrement le four.
Réduisez la quantité de graisse ou
d’huile ajoutée à la plaque.
N’utilisez pas de températures plus élevées
que celles indiquées dans le tableau de cuisson.
La cuisson ne donne pas les
résultats escomptés
Revoyez les tableaux de cuisson
pour obtenir des indications
sur le fonctionnement de votre four.
FRANÇAIS
3172539-004 EPIFA 25/06/14 12:30 Página 33

34
Informations techniques
Si l’appareil ne fonctionne pas, communiquez
au Service d’assistance technique le type
d’anomalie observé en indiquant :
1 Le numéro de série (S-No)
2 Le modèle de l’appareil (Mod.)
que vous pourrez trouver gravés sur la plaque
de caractéristiques. Celle-ci se trouve dans la
partie inférieure du four, que vous pourrez voir
en ouvrant la porte.
Installation
Ces informations sont exclusivement dirigées
à l’attention de l’installateur, qui est respon-
sable du montage et du branchement élec-
trique. Si vous installez vous-même le four, le
fabricant décline toute responsabilité relative
aux possibles dommages.
• Pour déballer le four, tirez sur la languette
située sur la partie inférieure de la boîte et
pour le déplacer, prenez-le par les poignées
latérales, jamais par celle de la porte.
• Des ouvertures sont réalisées dans le
meuble suivant les dimensions indiquées
sur la figure, la dimension minimale du fond
du meuble étant de 550 mm (voir
figures 19, 20 et 21).
• Pour l’encastrement des fours multifon-
ctions, la partie arrière du meuble, qui cor-
respond à la zone foncée (A) de la figure 22,
ne doit présenter aucune saillie (renforts de
meubles, tuyauteries, bases de prises, etc.).
• L’adhésif utilisé pour le recouvrement plas-
tique des meubles doit supporter des tem-
pératures supérieures à 85 °C.
Avant l’installation
L’installateur doit vérifier que :
• La tension et la fréquence du réseau cor-
respondent à celles indiquées sur la plaque
de caractéristiques.
• L’installation électrique peut supporter la
puissance maximum indiquée sur la plaque
de caractéristiques.
• Après le branchement électrique, vérifiez
que tous les éléments électriques du four
fonctionnent correctement.
Pour tous les fours et après avoir effectué le
branchement électrique,
1 Introduisez le four dans le meuble en vous
assurant que le câble d’alimentation n’est
pas coincé ni en contact avec les parties
chaudes du four.
2 Fixez le four au meuble avec les vis four-
nies, en les vissant au meuble à travers les
trous visibles une fois la porte ouverte.
3 Faites attention à ce que la carcasse du
four ne soit pas en contact avec les parois
du meuble et qu’il y ait au moins 2 mm la
séparant des meubles voisins.
Branchement électrique
Installation du four
3172539-004 EPIFA 25/06/14 12:30 Página 34

35
DEUTSCH
SICHERHEITSANWEISUNGEN
Lesen Sie diese Anweisungen aufmerksam durch, um eine
optimale Leistung Ihres Backofens zu gewährleisten.
Bewahren Sie das Handbuch so auf, dass auch ein neuer
Besitzer es lesen kann.
Elektrische Sicherheit
• Für den Anschluss des Backofens an die
Stromversorgung muss der Installateur ein
Stromversorgungskabel vom Typ H05RR-F, H05SS-F
oder H07RN-F verwenden. Der Schaltplan ist auf
Abbildung 23 dargestellt.
• Der Backofen muss entsprechend der gültigen
Vorschriften immer ordnungsgemäß geerdet werden.
• Der Anschluss muss durch einen der Stromstärke
entsprechenden allpoligen Schalter mit einer minimalen
Öffnung von 3 mm zwischen den Kontakten zur
Abschaltung im Notfall, bei Reinigung oder
Lampenwechsel erfolgen. Das Erdungskabel darf auf
keinen Fall über diesen Schalter laufen.
• Dieser Schalter kann durch eine Steckdose ersetzt
werden, vorausgesetzt, dass sie bei normalem Gebrauch
zugänglich ist.
• Jegliche Handhabung oder Reparatur des Gerätes,
einschließlich des Austauschs des Stromkabels, sollte
von Mitarbeitern des zugelassenen Kundendienstes unter
Verwendung von Originalersatzteilen durchgeführt
werden. Die Reparatur oder der Eingriff durch andere
Personen kann Schäden oder Fehlfunktionen des Gerätes
verursachen und somit Ihre Sicherheit gefährden.
3172539-004 EPIFA 25/06/14 12:30 Página 35

36
• Trennen Sie den Backofen vom Stromnetz, wenn er
defekt ist.
• Bei mit Kochfeldern kombinierten Backöfen dürfen nur
die vom Hersteller empfohlenen Kochfelder eingebaut
werden.
Kindersicherheit
• Halten Sie Kinder während des Backofenbetriebs von
diesem fern, da er sehr hohe Temperaturen erreicht.
• Kinder unter 8 Jahren sollten von ihm ferngehalten
werden, es sei denn, sie stünden unter ständiger Aufsicht.
Ferner dürfen Kinder nicht mit dem Gerät spielen.
• Das Gerät kann von Kindern ab 8 Jahren und Personen,
deren körperliche, sensorische und geistige Fähigkeiten
eingeschränkt sind bzw. denen es an Erfahrung oder
Kenntnissen mangelt, nur dann verwendet werden, wenn
sie angemessene Anweisungen über den sicheren
Gebrauch des Geräts erhalten haben und die damit
verbundenen Gefahren nachvollziehen können.
Betriebssicherheit des Backofens
• Der Backofen darf nur bei geschlossener Backofentür
betrieben werden.
• Benutzen Sie den Backofen nur, wenn er im Schrank
eingebaut ist (siehe Backofeninstallation).
• Backblech und Rost verfügen über ein System, welches
das teilweise Ausziehen und die Handhabung des
Garguts erleichtert.
3172539-004 EPIFA 25/06/14 12:30 Página 36

37
DEUTSCH
• Während des Gebrauchs wird das Gerät heiß. Wenn Sie
darin handhaben, ziehen Sie bitte Schutzhandschuhe an
und vermeiden Sie die Berührung der Heizelemente.
• Verwenden Sie nur die innerhalb des Backofens
gelieferte Temperaturmesssonde (bei Modellen mit
dieser Leistung).
Reinigung und Wartung
• Das Gerät muss vom Stromnetz getrennt werden, bevor
evtl. Tätigkeiten daran ausgeführt werden.
• Verwenden Sie keinen scheuernden Reiniger, wie auch
keine Dampf- oder Druckwasserreinigungsgeräte.
• Die vom Anwender auszuführende Reinigung und
Wartung darf nicht von Kindern ohne Aufsicht
durchgeführt werden.
• Bevor die Lampe ausgewechselt wird, muss zuerst
sichergestellt werden, dass der Backofen vom Stromnetz
getrennt ist, um evtl. Stromschläge zu vermeiden.
ACHTUNG
Um die Leistungen und spezifische Ausstattung Ihres
Backofens zu kennen, müssen Sie die diesem Handbuch
beiliegende Kurzgebrauchsanweisung lesen.
3172539-004 EPIFA 25/06/14 12:30 Página 37

38
Vor dem ersten Gebrauch
Bedingt durch den Herstellungsprozess kön-
nen im Backofen noch Fettreste und andere
Verunreinigungen vorhanden sein. Um diese
zu entfernen, verfahren Sie bitte wie folgt:
• Entfernen Sie die gesamte Verpackung
einschließlich des eventuell vorhandenen
Plastikschutzes.
• Schließen Sie den Backofen an und lassen
Sie ihn eine Stunde lang bei 200 °C in
Betrieb. Lesen Sie zu diesem Zweck die
diesem Handbuch beiliegende
Kurzgebrauchsanweisung.
• Lassen Sie den Backofen abkühlen, indem
Sie die Tür öffnen. Durch dieses Lüften wer-
den alle Gerüche aus dem Inneren entfernt.
• Reinigen Sie Backofen und Zubehörteile
nach dem Abkühlen.
Während dieser ersten Inbetriebnahme ents-
tehen Rauch und Gerüche; sorgen Sie deshalb
für eine gute Belüftung der Küche.
Ökologische Verpackung
Die Verpackung besteht aus komplett wieder-
verwertbarem Material, das wieder benutzt wer-
den kann. Kontaktieren Sie Ihre zuständige
Gemeindeverwaltung bezüglich der örtlichen
Entsorgungsvorschriften für dieses Material.
ACHTUNG
Das Symbol auf dem Produkt oder der
Verpackung zeigt an, dass dieses Gerät nicht
wie normaler Hausmüll entsorgt werden kann.
Sie müssen es an der Sammelstelle für Elektro-
und elektronische Geräte zur Wiederverwendung
abgeben. Auf diese Art tragen Sie dazu bei,
eventuelle negative Folgen für Umwelt und öffen-
tliche Gesundheit aufgrund einer fehlerhaften
Handhabung zu vermeiden. Weitere
Informationen zur Entsorgung des Geräts erhal-
ten Sie bei Ihrer zuständigen
Gemeindeverwaltung, dem zuständigen
Abfallentsorgungsbetrieb oder im Geschäft, wo
Sie das Produkt erworben haben.
• Der Backofen darf nur bei geschlossener
Backofentür betrieben werden.
• Der Hersteller übernimmt keinerlei Haftung
für eine Benutzung des Backofens, die nicht
der Zubereitung haushaltsüblicher Speisen
dient.
• Bewahren Sie kein Öl, Fett oder andere ent-
zündliche Materialien im Inneren auf, da
dies gefährlich sein könnte, wenn der
Backofen eingeschaltet wird.
• Stützen Sie sich nicht ab oder setzen Sie
sich nicht auf die geöffnete Backofentür. Sie
könnten sie dadurch beschädigen und
außerdem Ihre eigene Sicherheit in Gefahr
bringen.
• Decken Sie den Boden des Backofens nicht
mit Alufolie ab, da das Garen beeinträchtigt
und die Innenemaillierung sowie die
Innenseite des Einbauschranks beschädigt
werden könnten.
• Schieben Sie das mitgelieferte Backblech
oder den Rost zum Garen in die seitlichen
Führungsschienen des Backofeninnenraums.
• Stellen Sie weder Gefäße noch Lebensmittel
auf den Backofenboden. Benutzen Sie
immer die Backbleche oder den Rost.
• Gießen Sie während des Betriebs kein
Wasser auf den Backofenboden. Dadurch
könnte die Emaillierung beschädigt werden.
• Öffnen Sie die Backofentür während des
Garvorgangs so selten wie möglich. Damit
sparen Sie Strom.
• Bei Gargut mit hohem Feuchtigkeitsgehalt
ist es normal, dass sich Kondensat an der
Backofentür bildet.
• Reinigen Sie den Backofeninnenraum, um
Fett- oder Lebensmittelreste zu entfernen,
da diese beim nächsten Gebrauch Rauch
und Gerüche oder das Entstehen von
Flecken verursachen können.
Weitere wichtige
Anweisungen
3172539-004 EPIFA 25/06/14 12:30 Página 38

die Backofenoberseite.
• Bringen Sie die Heizspirale abschließend
wieder auf ihrer Ausgangsstellung an.
Sollten nach der normalen (Selbst-) Reinigung
hartnäckige Essensreste auf der Emaillierung
verbleiben:
1 Demontieren Sie die Platten und weichen
Sie sie so lange ein, bis die Essensreste
aufgeweicht sind.
2 Reinigen Sie die Platten mit einem
Schwamm und klarem Wasser.
3 Trocknen Sie die Platten ab und setzen Sie
sie wieder in den Backofen ein.
4 Schalten Sie den Backofen eine Stunde
lang bei 200 ºC ein.
Achtung
Verwenden Sie keine handelsüblichen
Reinigungsmittel oder Scheuerpulver auf den
katalytischen Platten.
Anweisungen zum Ausbauen der Halterungen
und flachen katalytischen Platten
1 Entfernen Sie die Zubehörteile aus dem
Backofeninnenraum.
2 Ziehen Sie an den Halterungen (C), indem Sie
sie an der Mutter lösen (D). Abbildung 3
3 Lösen Sie die Mutter (D), sodass die flachen
katalytischen Platten frei werden. Abbildung 4
4 Um die Platte der Rückwand zu lösen, müs-
sen Sie die Schraube entfernen (E).
Abbildung 5
5 Gehen Sie beim Einbau in umgekehrter
Reihenfolge vor.
Achtung
Aus Sicherheitsgründen dürfen Sie den
Backofen nie in Betrieb setzen, wenn die
Platte der Rückwand, welche das Gebläse
schützt, nicht eingebaut ist.
Reinigung der katalytischen Platten
39
DEUTSCH
Reinigung und Wartung
Achtung:
Das Gerät muss vom Stromnetz getrennt
werden, bevor Wartungstätigkeiten daran
ausgeführt werden.
1 Backöfen mit pflegeleichter Emaille
Bei kaltem Backofen benutzen Sie bitte eine
Nylonbürste oder einen Schwamm mit lau-
warmem Seifenwasser für die Reinigung der
emaillierten Flächen (z. B. Backofenboden).
Wenn Sie Backofenreiniger benutzen, dürfen
Sie ihn nur nach Herstelleranweisungen auf
die emaillierten Flächen auftragen.
2 Backöfen mit Sonderemaillierung, die an
andere Reinigungssysteme angepasst ist
Lesen Sie bitte das Datenblatt Ihres
Backofens.
Achtung
Benutzen Sie keine Dampf- oder
Hochdruckreiniger zum Reinigen des
Backofeninnenraums. Es dürfen auch keine
metallischen Topfkratzer, Drahtbürsten oder
andere Utensilien, die die Emaillebeschichtung
beschädigen könnten, verwendet werden.
• Andere Backofenmodelle verfügen über eine
Katalysereinigung (Selbstreinigung). Bei die-
sem System werden kleine Fettreste während
des Garens bei hohen Temperaturen entfernt.
Benutzung des absenkbaren Grills (je nach
Modell)
Zur Reinigung des oberen Backofenteils:
• Warten Sie, bis der Backofen abgekühlt ist.
• Drehen Sie die Schraube (A) und senken
Sie die Heizspirale so weit wie möglich ab.
Abbildung 1
• Bei anderen Backofenmodellen müssen Sie
mit beiden Händen den Stift der Heizspirale
(B) drücken, bis er sich aus der oberen
Befestigung löst. Abbildung 2
• Drehen Sie die Heizspirale und reinigen Sie
Reinigung des Backofeninnenraums
3172539-004 EPIFA 25/06/14 12:30 Página 39

40
Reinigen Sie die Backofenaußenfläche und
das -zubehör mit lauwarmem Seifenwasser
oder einem milden Reinigungsmittel.
Gehen Sie bei Edelstahlflächen vorsichtig vor.
Benutzen Sie nur Schwämme oder Tücher, die
keine Kratzer verursachen.
Benutzen Sie keine metallischen Topfkratzer,
Drahtbürsten, handelsübliche Scheuerpulver
oder Scheuermittel zur Reinigung der
Backofentür, da sie die Oberfläche zerkratzen
und das Glas zerbrechen können.
Je nach Backofenmodell können Sie die Tür
für eine einfachere Reinigung ausbauen.
Gehen Sie dabei wie folgt vor:
1 Öffnen Sie die Tür.
2 Drehen Sie die beiden Hebel komplett (F).
Abbildung 6
3 Schließen Sie die Tür, bis an den beiden
Hebeln einrastet. Abbildung 7
4 Halten Sie die Tür mit beiden Händen an
den Seiten, heben Sie sie an und ziehen
Sie sie vollständig aus den Scharnieren (G).
Abbildung 8
Gehen Sie in umgekehrter Reihenfolge für den
Einbau der Tür vor.
Für andere Ofenmodelle folgen Sie bitte die-
sen Bedienungshinweisen:
1 Öffnen Sie die Tür des Ofens vollständig.
2 Führen Sie Sicherheitsstifte in die sichtbaren
Öffnungen der Türscharniere ein. Abbildung 9
3 Fassen Sie die Tür seitlich mit beiden Händen
an und schließen Sie sie fast vollständig.
4 Heben Sie die Tür jetzt an und ziehen Sie
die Scharniere aus den vorderen Schlitzen
des Ofens, indem Sie sie nach außen zie-
hen. Abbildung 8
Reinigung der Backofentür
Reinigung der Backofenaußenfläche
und des -zubehörs
Achtung
Entfernen Sie die Sicherheitsstifte niemals,
da das Scharnier gespannt ist und Sie ver-
letzten könnte. Außerdem ist es nicht möglich,
die Tür einzubauen, ohne dass die Stifte ange-
bracht sind.
Um die Tür anzubringen, halten Sie sie mit bei-
den Händen und führen Sie die Scharniere in
die entsprechenden Öffnungen an der
Vorderseite des Ofens ein. Öffnen Sie die
Ofentür langsam und vollständig.
Anleitung zum Aus- / Einbau der
Innenscheibe
1 Öffnen Sie die Backofentür.
2 Ziehen Sie die Scheibe an der Unterseite
(H) nach außen. Abbildung 10
3 Die Innenscheibe ist schon lose. Entnehmen
Sie sie.
Achtung
Gehen Sie bei der Entnahme der Innenscheibe
bitte vorsichtig vor, da sich die Backofentür
schließt.
4 Reinigen Sie das Innenglas und die
Innenseite der Backofentür.
5 Schieben Sie anschließend die Halterungen
der Innenscheibe in die oberen Türschlitze
(I). Abbildung 11
6 Drehen Sie die Scheibe zur Tür (K).
7 Drücken Sie mit beiden Händen die zwei
unteren Halterungen (L) und schieben Sie
gleichzeitig die Scheibe zur Tür (M). Nun ist
die Scheibe wieder in der Tür fixiert.
Abbildung 12
Anleitungen zum Ausbau / Einbau der
inneren Glasteile. Backofen 90 cm
1 Öffnen Sie die Backofentür.
2 Drehen Sie die beiden Sperrhaken (N)
vollständig, um die Tür zu blockieren. Fig 13
3 Drücken Sie auf beiden Seiten mit den
Fingern auf Punkt 1 im oberen Teil der
Backofentür. Fig 14
4 Halten Sie Punkt 1 an beiden Seiten
eingedrückt, und ziehen Sie am oberen
Abschluss der Tür. Fig 15
Reinigung der Tür mit großer
Innenscheibe
3172539-004 EPIFA 25/06/14 12:30 Página 40

Achtung
Sollte das Problem trotz dieser Ratschläge
weiterhin bestehen, setzen Sie sich bitte mit
unserem Kundendienst in Verbindung.
Vorgehen bei
Funktionsstörungen
Der Backofen funktioniert nicht.
Überprüfen Sie den Stromanschluss.
Überprüfen Sie die Sicherungen und den
Begrenzer Ihrer Installation.
Stellen Sie sicher, dass die Uhr auf Manuell-
oder Programmierstellung steht.
Prüfen Sie die Stellung des Programm-
und Temperaturwahlschalters.
Das Innenlicht des Backofens leuchtet nicht.
Wechseln Sie die Lampe aus.
Überprüfen Sie den ordnungsgemäßen
Einbau gemäß der Betriebsanleitung.
Die Leuchtanzeige der Heizung leuchtet nicht.
Wählen Sie eine Temperatur.
Wählen Sie eine Funktion.
Die Leuchtanzeige soll nur leuchten,
während sich der Backofen bis zur gewählten
Temperatur aufheizt.
Während des Backofenbetriebs
entsteht Rauchbildung
Normaler Vorgang bei der ersten Inbetriebnahme.
Reinigen Sie den Backofen
in regelmäßigen Abständen.
Verringern Sie die auf das Backblech
hinzugegebene Fett- oder Ölmenge.
Verwenden Sie keine höheren Temperaturen
als die auf der Gartabelle Angegebenen.
Die erwarteten Garresultate
werden nicht erreicht.
Lesen Sie die Gartabellen, um über
den Betrieb Ihres Backofens sachgerecht
informiert zu sein.
41
DEUTSCH
5 Die inneren Glasteile der Tür sind lose, so
dass Sie sie leicht mit einem
Fensterputzmittel und einem weichen Tuch
reinigen können.
Achtung:
Wenn Sie den Drehmechanismus der Tür nicht
mit den Sperrhaken (N) blockiert haben,
müssen Sie aufpassen, denn wenn Sie die
inneren Glasscheiben herausnehmen, schließt
sich die Tür.
6 Wenn die Glasteile sauber sind, bauen Sie
sie in der Reihenfolge wieder ein, die in der
aufgedruckten TERMOGLASS Anzeige
beschrieben ist.
7 Bringen Sie den oberen Abschluss der Tür
wieder an, und stellen Sie dabei sicher, dass
die seitlichen Scharniere wieder im Punkt 1
einrasten.
Achtung
Bevor Sie die Lampe auswechseln, müssen
Sie sicherstellen, dass der Backofen vom
Stromnetz getrennt ist.
• Schrauben Sie die Linse von der
Lampenfassung ab.
• Wechseln Sie die Lampe aus und setzen
Sie die Linse wieder auf.
Die Ersatzlampe muss eine Temperaturfestigkeit
bis 300 °C haben. Sie kann beim Kundendienst
bestellt werden. Abbildung 16
Für andere Ofenmodelle folgen Sie bitte diesen
Bedienungshinweissen:
• Lösen Sie mit Hilfe des geeigneten
Werkzeugs die Linse von der
Lampenfassung ab. Fig 17
• Tauschen Sie die Lampe aus.
• Statten Sie die Linse wieder zu der korrekten
Position zurück, ohne sie zu erzwingen. Fig
18
Auswechseln der Backofenlampe
3172539-004 EPIFA 25/06/14 12:30 Página 41

Technische Information
Wenn das Gerät nicht funktioniert, müssen
Sie dem Kundendienst die Art der Störung mit
folgenden Angaben mitteilen:
1 Seriennummer (S-No)
2 Gerätemodell (Mod.)
Diese Angaben sind auf dem Typenschild ein-
graviert. Das Typenschild befindet sich auf der
Backofenunterseite, die Sie beim Öffnen der
Tür sehen können.
Installation
Diese Informationen sind ausschließlich für
den Monteur bestimmt, da er für den Einbau
und den Stromanschluss verantwortlich ist.
Wenn Sie den Backofen selbst anschließen,
übernimmt der Hersteller keinerlei Gewähr für
eventuelle Schäden.
• Zum Auspacken des Backofens ziehen Sie
an der Lasche am unteren Teil des Kartons.
Zur Handhabung benutzen Sie bitte die
Seitengriffe und niemals den Griff an der
Backofentür.
• Der Einbauschrank ist mit einer Öffnung mit
den auf der Abbildung angegebenen
Abmessungen zu versehen, wobei die
Mindesttiefe des Schranks 550 mm betra-
gen muss. (Siehe Abbildungen 19, 20 und
21).
• Die Rückwand des Schranks, dargestellt
durch die schattierte Fläche (A) auf Abb. 22,
darf keine herausragenden Teile
(Schrankverstärkungen, Rohre, Steckdosen
usw.) aufweisen.
• Der Klebstoff, der für die
Kunststoffbeschichtung der Schränke ver-
wendet wird, muss Temperaturen über
85 °C standhalten.
Vor der Installation
Der Monteur muss überprüfen, ob:
• Netzspannung und -frequenz den Angaben
auf dem Typenschild entsprechen.
• Die Elektroinstallation die auf dem
Typenschild genannte Höchstleistung verk-
raftet.
• Nach dem Anschluss an das Stromnetz
muss überprüft werden, ob alle elektrischen
Bauteile des Backofens ordnungsgemäß
funktionieren.
Für alle Backöfen nach dem Anschluss an das
Stromnetz:
1 Schieben Sie den Herd in den
Einbauschrank und stellen Sie sicher, dass
das Stromkabel dabei weder eingeklemmt
wird noch in Berührung mit heißen
Backofenteilen kommen kann.
2 Befestigen Sie den Backofen am
Einbauschrank mittels der zum
Lieferumfang gehörenden Schrauben,
indem Sie sie durch die Öffnungen, die Sie
beim Öffnen der Tür sehen, einschrauben.
3 Achten Sie darauf, dass das
Backofengehäuse nicht mit den
Schrankwänden in Kontakt kommt und zu
den angrenzenden Schränken 2 mm
Mindestabstand besteht.
Backofeninstallation
Stromanschluss
42
3172539-004 EPIFA 25/06/14 12:30 Página 42

43
DEUTSCH
Fig 1 Fig 2
Fig 3
Fig 5 Fig 6
Fig 7 Fig 8
A
B
C
D
Fig 4
D
E
F
G
G
Figuras / Figuras / Figures / Figures / Abbildungen
3172539-004 EPIFA 25/06/14 12:30 Página 43

44
Fig 11 Fig 12
I
K
M
L
Fig 9 Fig 10
H
Fig 15
Fig 13 Fig 14
Fig 16
N
3172539-004 EPIFA 25/06/14 12:30 Página 44

45
Fig 19
60-100
min 550
510-540
490
22
558-568
A
min. B
595
Fig 17 Fig 18
A: 595-455 / B: 590-450 / C: 600-460
490
558-568
min. 550
22
595
A
min. C
min. 40
Fig 20
510-540
3172539-004 EPIFA 25/06/14 12:30 Página 45

46
Fig 21
490
320
160
Fig 22
A
3172539-004 EPIFA 25/06/14 12:30 Página 46

47
Fig 23
3172539-004 EPIFA 25/06/14 12:30 Página 47

Cod.: 83172539/3172539-004
3172539-004 EPIFA 25/06/14 12:30 Página 48

Manuale generale di installazione e manutenzione
FORNO
Algemene onderhouds- en installatiehandleiding
OVEN
Γενικό Εγχειρίδιο Συντήρησης και Εγκατάστασης
ΦΟΥΡΝΟΣ
Общее руководство по установке и уходу
ДУХОВОЙ ШКАФ
3172562-002_- 25/06/14 12:40 Página 1

3172562-002_- 25/06/14 12:40 Página 2

3
ITALIANO
ISTRUZIONI SULLA SICUREZZA
Leggere attentamente queste istruzioni per ottenere un
funzionamento ottimale del forno. Conservare questo
manuale in modo da poterlo rendere consultabile da parte
di un eventuale nuovo proprietario.
Sicurezza elettrica
• Per collegare il forno alla rete elettrica l'installatore deve
usare un cavo di alimentazione tipo H05RR-F, H05SS-F
o H07RN-F. Lo schema di collegamento è riportato nella
figura 23.
• Il forno deve disporre sempre di una buona messa a
terra nel rispetto della normativa vigente.
• Il collegamento dovrà essere effettuato tramite un
interruttore onnipolare, adeguato all’intensità cui è
sottoposto l’apparecchio e con un’apertura minima tra
contatti di 3 mm per lo scollegamento in caso di
emergenza, per le operazioni di pulizia o sostituzione
della lampadina. In nessun caso il cavo di terra potrà
passare da questo interruttore.
• L’interruttore può essere sostituito da una spina di
innesto a condizione che sia accessibile in condizioni di
normale utilizzo.
• Qualsiasi manipolazione o riparazione dell’apparecchio,
compresa la sostituzione del cavo di alimentazione,
dovrà essere effettuata dal personale del Servizio di
assistenza tecnica autorizzato con l’impiego di ricambi
originali. Le riparazioni o gli interventi realizzati da terzi
3172562-002_- 25/06/14 12:40 Página 3

4
potrebbero danneggiare l’apparecchio o causarne un
funzionamento scorretto con conseguenti pericoli per la
sicurezza degli utenti.
• Scollegare il forno in caso di guasto.
• Nei forni combinati dotati di ripiano sarà possibile
montare esclusivamente quelli raccomandati dal
produttore.
Sicurezza per i bambini
• Impedire ai bambini di avvicinarsi al forno durante le
operazioni di cottura poiché vengono raggiunte
temperature elevate.
• I minori di 8 anni devono restare lontano
dall'apparecchio, a meno che non siano sottoposti a
costante supervisione. I bambini non devono giocare
con l'apparecchio.
• L'uso del forno è riservato ai bambini di età pari o
superiore agli 8 anni e alle persone con capacità fisiche,
sensoriali o mentali ridotte o con mancanza di
esperienza o conoscenza, a condizione che siano state
loro garantite supervisione o istruzioni adeguate sull'uso
dell'apparecchio in condizioni di sucurezza e
comprendendo i pericoli che tale uso implica.
Sicurezza nell’uso del forno
• Il forno deve funzionare sempre con lo sportello chiuso.
• Utilizzare il forno solo quando è installato all’interno del
mobile (cfr. la sezione dedicata all'installazione del
forno).
3172562-002_- 25/06/14 12:40 Página 4

5
ITALIANO
• Il vassoio e la griglia dispongono di un sistema per
facilitarne l’estrazione parziale e consentire la
manipolazione degli alimenti.
• Durante l'uso l'apparecchio si riscalda; usare guanti di
protezione per effettuare le manovre all'interno del
forno ed evitare di toccare gli elementi riscaldanti.
• All'interno del forno usare esclusivamente l'apposita
sonda fornita per la misurazione della temperatura
(modelli applicabili).
Pulizia e manutenzione
• Scollegare l’apparecchio dall’alimentazione elettrica
per effettuare qualsiasi intervento.
• Non usare detergenti abrasivi né apparecchi per la
pulizia a vapore o con acqua a pressione.
• Non affidare ai bambini le operazioni di pulizia e
manutenzione senza un'attenta supervisione.
• Prima di sostituire la lampadina, accertarsi che il forno
sia scollegato dall'alimentazione per evitare il rischio di
choc elettrici.
ATTENZIONE
Per conoscere le prestazioni e le dotazioni specifiche del
proprio forno, consultare la Guida Rapida in dotazione con
il presente manuale.
3172562-002_- 25/06/14 12:40 Página 5

6
Prima del Primo Utilizzo
Durante il processo di produzione all’interno del
forno potrebbero essersi accumulati grassi e
altre impurità. Per eliminarli procedere nel
modo seguente:
• Eliminare tutti gli imballaggi, compresa la plas-
tica di protezione se presente.
• Accendere il forno sulla funzione o, in
mancanza di questa, sulla funzione , a
200 ºC per un'ora. A tal fine consultare la
Guida rapida allegata al presente manuale.
• Far raffreddare il forno aprendo lo sportello e
consentendo quindi la ventilazione e l’elimi-
nazione di odori all’interno dell’apparecchio.
• Una volta raffreddato, pulire il forno e gli
accessori.
Durante la prima messa in funzione, vengono
prodotti fumi e odori; quindi fare in modo che ci
sia una buona ventilazione della cucina.
Imballaggio Ecologico
L’imballaggio è realizzato con materiali totalmen-
te riciclabili che possono essere riutilizzati.
Contattare le autorità locali per informarsi sulle
procedure previste per il ritiro di questi materiali.
ATTENZIONE
Il simbolo presente sul prodotto o sull’im-
ballaggio indica che questo apparecchio non
può essere smaltito come un normale rifiuto
domestico. Dovrà essere consegnato al punto di
raccolta di apparecchiature elettriche ed elet-
troniche per essere riciclato. In tal modo si potrà
contribuire alla salvaguardia dell’ambiente e
della salute pubblica evitando una manipolazio-
ne incorretta dell’apparecchio. Per informazioni
più dettagliate su come riciclare l’apparecchio,
contattare le autorità preposte nella propria
città di residenza, il servizio di raccolta rifiuti o
l’azienda presso cui è stato acquistato il prodotto.
• Il forno deve funzionare sempre con lo spor-
tello chiuso.
• Il produttore non si assume alcuna responsa-
bilità nel caso si utilizzi il forno per fini diversi
dalla preparazione di alimenti per uso
domestico.
• Non conservare oli, grassi né materiali infiam-
mabili all’interno del forno poiché potrebbe
essere pericoloso qualora questo venga
messo in funzione.
• Non appoggiarsi né sedersi sullo sportello
aperto del forno poiché questo potrebbe dan-
neggiarsi oltre che rappresentare un pericolo
per la sicurezza.
• Non ricoprire la base del forno con fogli di
alluminio poiché potrebbe avere conseguenze
sulla cottura degli alimenti, oltre a danneggia-
re lo smalto del forno e l’interno del mobile
della cucina.
• Per cucinare qualsiasi alimento, inserire il
vassoio o la griglia sulle guide laterali del vano
interno.
• Non depositare recipienti né alimenti sulla
base del forno, utilizzare sempre i vassoi o la
griglia forniti.
• Non versare acqua sulla base del forno duran-
te il funzionamento poiché potrebbe danneg-
giarsi lo smalto.
• Durante la cottura aprire lo sportello del forno
il meno possibile; in tal modo si ridurrà il con-
sumo di energia.
• Nelle cotture con un alto contenuto di liquidi è
normale che si produca della condensa sullo
sportello.
• Pulire l’interno del forno per eliminare i resi-
dui di grasso o di alimenti che altrimenti nelle
cotture successive emanerebbero fumo e
odori oppure provocherebbero la comparsa di
macchie.
Altre Istruzioni Importanti
3172562-002_- 25/06/14 12:40 Página 6

7
ITALIANO
Se i residui di alimenti presenti sullo smalto non
vengono eliminati con la normale pulizia (fun-
zione autopulente), procedere nel modo
seguente:
1 Smontare i pannelli e lasciarli in ammollo per
il tempo necessario ad ammorbidire i residui
di cibo.
2 Pulire i pannelli con una spugna e acqua pulita.
3 Asciugare i pannelli e rimontarli nel forno.
4 Lasciare il forno acceso per un'ora a 200 ºC.
Attenzione
Non applicare detergenti commerciali né polve-
ri abrasive sulla superficie dei pannelli catalitici.
Istruzioni per lo smontaggio dei supporti e dei
pannelli catalitici piatti
1 Estrarre gli accessori dall’interno del forno.
2 Estrarre i sopporti (C) allentandone il dado
(D). Figura 3
3 Svitare il dado (D) lasciando liberi i pannelli
catalitici piatti. Figura 4
4 Per smontare il pannello alla base, estrarre la
vite (E). Figura 5
5 Per il montaggio, procedere in senso inverso.
Attenzione
Per la sicurezza degli utenti, si raccomanda di
non mettere mai in funzione il forno senza il
pannello della base, che protegge la ventola.
Pulire la parte esterna del forno e gli accessori
con acqua saponata tiepida o con un detergen-
te neutro.
Per le superfici inossidabili, operare con atten-
zione e utilizzare solo spugne o panni che non
graffino.
Pulizia dei Pannelli Catalitici
Pulizia della Parte Esterna e degli
Accessori del Forno
Pulizia e Manutenzione
Attenzione:
Scollegare l’apparecchio dall’alimentazione
elettrica per effettuare qualsiasi intervento.
1 Forni con smalto di facile pulizia
Con il forno freddo e per pulire le superfici
smaltate (ad esempio la base del forno), uti-
lizzare spazzole di nylon o spugne con acqua
tiepida saponata. Se si utilizzano prodotti per
la pulizia del forno, applicarli solo sulle super-
fici smaltate attenendosi alle istruzioni del
produttore.
2 Forni con smalto speciale adatto ad altri
sistemi di pulizia
Consultare la scheda delle caratteristiche del
proprio forno.
Attenzione
Non pulire l’interno del forno con apparecchi di
pulizia a vapore o con acqua a pressione. Non
utilizzare neanche spugne o spazzole metalli-
che, né utensili che possano danneggiare lo
smalto.
• Altri modelli di forno dispongono di un siste-
ma di pulizia tramite catalisi (funzione auto-
pulente). Tale sistema elimina i piccoli residui
di grasso che si producono durante la cottura
utilizzando temperature elevate.
Uso del grill apribile (in base ai modelli)
Per pulire la parte superiore del forno,
• Attendere che il forno sia freddo.
• Ruotare la vite (A) e abbassare al massimo la
resistenza del grill. Figura 1
• In altri modelli di forno è necessario spingere
con entrambe le mani la serpentina della
resistenza del grill (B) fino a sganciarla dal
supporto superiore. Figura 2
• Ruotare la resistenza e pulire la parte supe-
riore del forno.
• Infine risistemare la resistenza del Grill nella
posizione iniziale.
Pulizia dell’Interno del Forno
3172562-002_- 25/06/14 12:40 Página 7

8
Non utilizzare spugne o spazzole metalliche, né
polveri pulenti o prodotti abrasivi per pulire lo
sportello del forno poiché la superficie potrebbe
rigarsi e il vetro potrebbe rompersi.
In base al modello di forno, è possibile smonta-
re lo sportello per facilitarne la pulizia.
Procedere nel modo seguente:
1 Aprire lo sportello.
2 Ruotare completamente le due levette (F).
Figura 6
3 Chiudere lo sportello fino al punto di innesto
con due levette. Figura 7
4 Afferrando lo sportello sui lati con entrambe
le mani, sollevarlo e staccarlo fino a estrarre
completamente le cerniere (G). Figura 8
Per il montaggio dello sportello, procedere nel
modo inverso.
Per gli altri modelli di forno, seguire le seguenti
istruzioni:
1 Aprire completamente lo sportello del forno.
2 Inserire dei passanti di sicurezza nei fori visi-
bili nelle cerniere dello sportello. Figura 9
3 Afferrare lateralmente lo sportello con
entrambe le mani e chiuderlo quasi total-
mente.
4 Sollevare lo sportello ed estrarre le cerniere
dalle scanalature frontali del forno tirando
verso l’esterno. Figura 8
Attenzione
Non estrarre mai i passanti di sicurezza poiché
la cerniera è sotto tensione e potrebbe causare
lesioni. Inoltre, se i passanti non sono inseriti
non è possibile montare lo sportello.
Per sistemare nuovamente lo sportello, afferrar-
lo con entrambe le mani e inserire le cerniere
nelle apposite aperture della parte frontale del
forno. Aprire lentamente e completamente lo
sportello del forno.
Pulizia dello Sportello del Forno
Istruzioni di smontaggio / montaggio del vetro
interno
1 Aprire lo sportello del forno.
2 Tirare il vetro verso l’esterno dalla parte infe-
riore (H). Figura 10
3 Il vetro interno a questo punto è libero.
Estrarlo.
Attenzione
Fare attenzione poiché, una volta estratto il
vetro interno, lo sportello del forno si chiuderà.
4 Pulire il vetro interno e l’interno dello sportel-
lo del forno.
5 Quindi inserire i supporti del vetro interno
nelle scanalature superiori dello sportello (I).
Figura 11
6 Rivolgere il vetro verso lo sportello (K).
7 Facendo pressione con entrambe le mani sui
due supporti inferiori (L) e spingendo con-
temporaneamente il vetro verso lo sportello
(M), il vetro sarà nuovamente fissato a que-
sto. Figura 12
Istruzioni di smontaggio / montaggio dei vetri
interni. Forno 90 cm
1 Aprire lo sportello del forno.
2 Ruotare totalmente le due levette (N) per
bloccare il movimento dello sportello. Fig. 13
3 Esercitare pressione con le dita sul punto 1
posto nella parte superiore di entrambi i lati
dello sportello del forno. Fig. 14
4 Continuando a mantenere la pressione sul
punto 1, tirare la chiusura superiore dello
sportello. Fig. 15
5 I vetri interni dello sportello potranno così
essere estratti e facilmente puliti con un
apposito prodotto e un panno morbido.
Attenzione
Se non è stato bloccato il movimento dello spor-
tello con l’apposita levetta (N), fare attenzione
perché quando si estraggono i vetri interni lo
sportello del forno si chiuderà.
Pulizia dello Sportello con Vetro
Interno di Grandi Dimensioni
3172562-002_- 25/06/14 12:40 Página 8

ITALIANO
Attenzione
Qualora, dopo aver consultato le tabelle, il pro-
blema persista, contattare il Servizio di
Assistenza Tecnica.
Risoluzione dei Problemi
Il forno non funziona
Verificare la connessione alla rete.
Controllare i fusibili e il limitatore dell’impianto.
Verificare che l’orologio si trovi in modalità
manuale o programmata.
Verificare la posizione del selettore delle
funzioni e delle temperature.
La lampadina interna del forno non si accende
Sostituire la lampadina.
Verificare il corretto montaggio in base
al manuale di istruzioni.
La spia pilota di riscaldamento non si accende
Selezionare una temperatura.
Selezionare una funzione.
Questa dovrà illuminarsi solo mentre
il forno si sta scaldando per raggiungere
la temperatura impostata.
Produzione di fumi durante il funzionamento
del forno
Si tratta di un processo normale durante la prima
messa in funzione.
Pulire periodicamente il forno.
Ridurre la quantità di grasso od olio presenti
nel vassoio.
Non usare temperature superiori a quelle
indicate nelle tabelle di cottura.
Non si ottengono i risultati di cottura desiderati
Rivedere le tabelle di cottura per indicazioni
sul funzionamento del forno.
6 Una volta puliti, inserire i vetri seguendo lo
stesso ordine in modo tale che la dicitura
TERMOGLASS stampigliata sulla superficie
risulti leggibile.
7 Sistemare nuovamente la chiusura superiore
dello sportello verificando che le linguette
laterali si inseriscano nel punto 1.
Attenzione
Per sostituire la lampadina, verificare innanzi-
tutto che il forno sia scollegato dall’alimentazio-
ne elettrica.
• Svitare la lente del portalampadina.
• Sostituire la lampadina e montare nuova-
mente la lente.
La lampadina da sostituire deve resistere alle
alte temperature (fino a 300 ºC); richiedere il
pezzo al servizio di assistenza tecnica. Figura 16
Per gli altri modelli di forno, seguire le seguenti
istruzioni:
•Allentare la lente del portalampadina con
l’aiuto di un utensile. Fig. 17
•Sostituire la lampadina.
•Rimontare la lente, verificando che si inseri-
sca nella posizione corretta. Fig. 18
Sostituzione della Lampadina
del Forno
9
3172562-002_- 25/06/14 12:40 Página 9

10
L’installatore dovrà verificare quanto segue:
• La tensione e la frequenza di rete devono cor-
rispondere a quanto indicato nella targa delle
caratteristiche.
• L’installazione elettrica deve essere in grado
di sopportare la potenza massima indicata
nella targa delle caratteristiche.
• Una volta effettuato il collegamento elettrico,
verificare il corretto funzionamento di tutti
i componenti elettrici del forno.
In tutti i forni, dopo aver effettuato i collega-
menti elettrici:
1 Inserire il forno nel mobile verificando che il
cavo di alimentazione non resti schiacciato
né a contatto con parti calde del forno.
2 Fissare il forno al mobile tramite le due viti
comprese nella fornitura, avvitandole al
mobile tramite i fori visibili quando si apre lo
sportello.
3 Verificare che il telaio del forno non sia in
contatto diretto con i pannelli laterali del
mobile e che vi siano almeno 2 mm di distan-
za dai mobili contigui.
Installazione del Forno
Collegamento Elettrico
Scheda Tecnica
Se l’apparecchio non funziona, comunicare al
Servizio di Assistenza Tecnica il tipo di anomalia
riscontrata indicando:
1 Numero di Serie (S-No)
2 Modello (Mod.)
incisi sulla targa delle specifiche tecniche.
Questa si trova nella parte inferiore del forno,
visibile aprendo lo sportello.
Installazione
Queste informazioni sono riservate esclusiva-
mente all’installatore poiché questi è responsa-
bile del montaggio e del collegamento alla rete
elettrica. Qualora il cliente installi il forno da
solo, il produttore non sarà responsabile per
eventuali danni.
• Per disimballare il forno, tirare la linguetta
che si trova nella parte inferiore della scatola;
per spostarlo, sostenerlo dalle maniglie late-
rali e mai dalla maniglia dello sportello del
forno.
• Predisporre un’apertura nel mobile delle
dimensioni indicate nella figura consideran-
do che le dimensioni minime della base del
mobile sono 550 mm (cfr. figura 19, 20 e 21).
• Per l’incasso dei forni multifunzione, la parte
posteriore del mobile, corrispondente alla
zona ombreggiata (A) nella figura 22, non
deve presentare sporgenze (ribattiture del
mobile, tubature, basi di innesto, ecc...).
• La pellicola adesiva utilizzata per il rivesti-
mento dei mobili deve essere in grado di sop-
portare temperature superiori a 85 ºC.
Prima dell’Installazione
3172562-002_- 25/06/14 12:40 Página 10

11
NEDERLANDS
VEILIGHEIDSINSTRUCTIES
Lees deze aanwijzingen aandachtig door om het
maximale rendement uit uw oven te halen. Bewaar deze
handleiding zodat een nieuwe eigenaar hem ook kan
lezen.
Elektrische veiligheid
• Voor de aansluiting van de oven op het lichtnet dient de
installateur een voedingskabel van het type H05RR-F,
H05SS-F of H07RN-F te gebruiken. Het aansluitschema
wordt in afbeelding 23 weergegeven.
• De oven moet altijd conform de geldige wetgeving op
een goede aarding worden aangesloten.
• De aansluiting dient te worden verricht door middel van
een omnipolaire schakelaar die geschikt is voor de te
verdragen intensiteit en uitgerust is met een minimale
ruimte tussen de contacten van 3 mm voor de
uitschakeling in noodgevallen, voor het reinigen of het
vervangen van de lamp. In geen geval mag de
aardingskabel door deze schakelaar worden geleid.
• Deze schakelaar kan worden vervangen door een
stekker, mits deze bij normaal gebruik toegankelijk is.
• Elke manipulatie of reparatie aan het apparaat, met
inbegrip van de vervanging van de voedingskabel, dient
te worden uitgevoerd door de bevoegde Technische
Dienst, die daarbij originele reserveonderdelen dient te
gebruiken. Reparaties of hantering door andere
personen kunnen schade aan het apparaat of een
verkeerde werking veroorzaken en uw veiligheid in
gevaar brengen.
3172562-002_- 25/06/14 12:40 Página 11

12
• Zet de oven uit wanneer hij kapot is.
• Bij gecombineerde ovens met werkblad worden alleen
de door de fabrikant aanbevolen werkbladen
gemonteerd.
Veiligheid voor kinderen
• Laat kinderen tijdens het bakken of braden niet in de
buurt van de oven komen. Het apparaat kan namelijk
zeer hoge temperaturen bereiken.
• Kinderen onder de 8 jaar moeten uit de buurt worden
gehouden, tenzij er voortdurend op hen gelet wordt.
Kinderen mogen niet met het apparaat spelen.
• Dit apparaat kan gebruikt worden door kinderen ouder
dan 8 jaar en personen met beperkte lichamelijke,
zintuiglijke of geestelijke vermogens of zonder ervaring
of kennis, onder toezicht en na de juiste aanwijzingen te
hebben ontvangen om het apparaat op veilige wijze te
gebruiken en mits zij zich bewust zijn van de gevaren die
het met zich mee brengt.
Gebruiksveiligheid van de oven
• De oven mag alleen met gesloten ovendeur in werking
zijn.
• Gebruik de oven alleen wanneer deze aan de
binnenkant van het meubel is geïnstalleerd (Zie
installatie van de oven).
• De bakplaat en het rooster hebben een systeem
waardoor zij gedeeltelijk uit de oven getrokken en de
etenswaren bewerkt kunnen worden.
3172562-002_- 25/06/14 12:40 Página 12

13
• Tijdens het gebruik wordt het apparaat heet. Gebruik
handschoenen wanneer u iets in de oven wilt bewerken
en raak de verwarmingselementen niet aan.
• Gebruik alleen de meegeleverde temperatuursonde in
de oven (modellen met deze uitrusting).
Reiniging en onderhoud
• Haal de stekker van het apparaat uit het stopcontact
alvorens er een willekeurige handeling aan uit te
voeren.
• Gebruik geen schuurmiddelen noch stoomreinigers of
water onder druk.
• De reinigings- en het onderhoudswerkzaamheden die
de gebruiker moet verrichten mogen niet zonder
toezicht door kinderen worden uitgevoerd.
• Controleer, voordat u het lampje gaat vervangen, eerst
of de stekker van de oven uit het stopcontact is gehaald,
om mogelijke elektrische schokken te voorkomen.
ATTENTIE
Kijk voor de mogelijkheden en specifieke toebehoren van
uw oven in de Snelle Gebruikersgids die bij deze
handleiding is gevoegd.
NEDERLANDS
3172562-002_- 25/06/14 12:40 Página 13

14
Voor Het Eerste Gebruik
Door het productieproces kunnen er zich in de
oven vetresten of andere onzuiverheden bevin-
den. Ga om deze te verwijderen als volgt te
werk:
• Verwijder alle verpakkingsonderdelen, met
inbegrip van het beschermplastic als dat er is.
• Zet uw oven een uur lang op 200 ºC aan op
functie of, in voorkomend geval, op .
Kijk hiervoor in de bij deze handleiding
gevoegde Snelle Gebruikersgids.
• Laat de oven afkoelen door de deur te
openen. Op deze manier wordt de oven
geventileerd en verdwijnen geuren uit de
binnenkant.
• Maak de oven en accessoires na het
afkoelen schoon.
Tijdens deze eerste werking ontstaan er rook en
geuren. Vandaar dat u voor een goede ventilatie
van de keuken moet zorgen.
Milieuvriendelijke
Verpakking
De verpakking is gemaakt van volledig recycleba-
re materialen en kan opnieuw gebruikt worden.
Raadpleeg de gemeente over plaatselijke nor-
men voor het verwijderen van deze materialen.
ATTENTIE
Het symbool op het product of op de ver-
pakking geeft aan dat dit apparaat niet kan wor-
den gebruikt als normaal huisafval. U dient het
voor het recyclen ervan bij een afvalpunt voor
elektrische en elektronische apparaten af te
geven. Op deze manier helpt u mogelijke nega-
tieve gevolgen voor het milieu en de volksge-
zondheid door een onjuiste verwerking te voor-
komen. Voor meer gedetailleerde informatie
over het hergebruik van het apparaat kunt u
contact opnemen met de gemeente, de huisaf-
valdienst of de winkel waar u het product heeft
gekocht.
• De oven mag alleen met gesloten ovendeur in
werking zijn.
• De fabrikant is niet aansprakelijk voor ander
gebruik dan de huishoudelijke bereiding van
levensmiddelen.
• Bewaar geen oliën, vetten of brandbare mate-
rialen in de oven. Dit kan gevaarlijk zijn als u
de oven aanzet.
• Leun niet op de geopende deur en ga er even-
min op zitten. Dit kan de ovendeur beschadi-
gen en uw veiligheid in gevaar brengen.
• Bedek de bodem van de oven niet met alumi-
niumpapier, aangezien dit de bereiding kan
beïnvloeden en het email van de ovenruimte
en de binnenkant van het keukenmeubel kan
beschadigen.
• Voor het bereiden van ongeacht welk etens-
waar dient de bakplaat of het rooster in de zij-
geleiders van de binnenkant te worden inge-
voerd.
• Zet geen schalen of etenswaren op de bodem
van de oven. Gebruik altijd de bakplaten en
het rooster.
• Giet geen water op de bodem terwijl de oven
in werking is, aangezien het email daardoor
kan beschadigen.
• Open de ovendeur tijdens het bakken zo min
mogelijk. Hiermee reduceert u het energiever-
bruik.
• Bij gerechten met een hoog vloeistofgehalte is
het normaal dat er condens op de ovendeur
ontstaat.
• Maak de binnenkant van de oven schoon om
vetresten of etenswaren te verwijderen. Deze
geven bij een volgend gebruik rook en geuren
af of kunnen vlekken doen ontstaan.
Overige Belangrijke
Aanwijzingen
3172562-002_- 25/06/14 12:40 Página 14

15
Als de voedingsresten op het email bij de nor-
male reiniging (zelfreiniging) niet loslaten:
1 Demonteer de panelen en laat ze net zolang
in water ondergedompeld liggen totdat de
voedingsresten week worden.
2 Maak de panelen met een spons en schoon
water schoon.
3 Droog de panelen af en monteer ze weer in
de oven.
4 Zet de oven een uur lang op 200 ºC aan.
Attentie
Gebruik geen commerciële reinigingsmiddelen
of schuurpoeders op het oppervlak van de kata-
lytische panelen.
Aanwijzingen voor het Demonteren van de
Houders en Platte Katalytische Panelen.
1 Verwijder de accessoires uit de oven.
2 Trek aan de houders (C) en maak ze los van
de moer (D). Afbeelding 3
3 Schroef de moer (D) los zodat de platte kata-
lytische panelen vrij komen te zitten.
Afbeelding 4
4 Om het achterpaneel te demonteren dient de
schroef (E) te worden verwijderd. Afbeelding 5
5 Ga voor de montage in omgekeerde volgorde
te werk.
Attentie
Zet de oven, voor uw veiligheid, nooit aan zon-
der het achterpaneel dat de ventilator
beschermt.
Maak de buitenkant van de oven en de acces-
soires met lauwwarm zeepwater of met een
mild afwasmiddel schoon.
Wees voorzichtig met roestvrije oppervlakken
en gebruik alleen sponzen of doeken die geen
krassen kunnen veroorzaken.
Reiniging van de Katalytische Panelen
Reiniging van de Buitenkant
en de Ovenaccessoires
Reiniging en Onderhoud
Opgelet :
Haal de stekker van het apparaat uit het stop-
contact alvorens er een willekeurige handeling
aan uit te voeren.
1 Oven met gemakkelijk te reinigen email
Gebruik nylon borstels of sponzen met lauw-
warm zeepwater voor geëmailleerde opper-
vlakken (bijvoorbeeld de ovenbodem) en
maak alleen met afgekoelde oven schoon. Als
u ovenreinigers gebruikt, breng deze dan
alleen aan op de geëmailleerde oppervlakken
en volg de aanwijzingen van de fabrikant op.
2 Ovens met speciaal email aangepast aan
andere reinigingssystemen
Raadpleeg het gegevensblad van uw oven.
Attentie
Maak de binnenkant van uw oven niet schoon
met stoomreinigers of water onder druk.
Gebruik evenmin metalen schuursponsjes,
staalborstels of andere middelen die het email
kunnen beschadigen.
• Andere ovenmodellen beschikken over een
katalytisch reinigingssysteem (zelfreinigend).
Dit systeem verwijdert kleine vetresten tij-
dens het bakken op hoge temperaturen.
Gebruik van Inklapbare Grill (Naargelang het
Model)
Voor het schoonmaken van de bovenkant van
de oven
• Wacht totdat de oven is afgekoeld.
• Draai aan de schroef (A) en haal de grillweer-
stand zoveel mogelijk omlaag. Afbeelding 1
• Bij andere ovenmodellen dient met beide
handen tegen de staaf van de grillweerstand
(A) te worden gedrukt totdat hij losraakt van
de bovenste bevestiging. Afbeelding 2
• Draai de weerstand en maak de bovenkant
van de oven schoon.
• Breng tenslotte de grillweerstand weer in zijn
aanvankelijke positie aan.
Reiniging van de Oven
NEDERLANDS
3172562-002_- 25/06/14 12:40 Página 15

16
Gebruik geen metalen schuursponzen, staalbor-
stels of commerciële schuurpoeders om de
ovendeur schoon te maken, aangezien het
oppervlak hiermee kan worden beschadigd of
het glas kapot kan gaan.
Naargelang het ovenmodel kunt u de deur
demonteren zodat hij gemakkelijk schoon te
maken is. Ga hiervoor als volgt te werk:
1 Open de ovendeur.
2 Draai de twee blokkeerpallen (F) volledig om.
Afbeelding 6
3 Sluit de deur totdat hij in de twee blokkeer-
pallen valt. Afbeelding 7
4 Pak de deur met beide handen aan weerszij-
den vast, til hem op en haal hem volledig uit
de scharnieren (G). Afbeelding 8
Ga in omgekeerde volgorde te werk om de deur
weer te monteren.
Volg voor andere ovenmodellen de volgende
aanwijzingen op:
1 Open de ovendeur volledig.
2 Breng veiligheidspennen in de in de deur-
scharnieren zichtbare gaten aan. Afbeelding 9
3 Pak de ovendeur met beide handen zijdelings
vast en sluit hem bijna geheel.
4 Til de ovendeur nu op en verwijder de schar-
nieren uit de voorste groeven van de oven door
deze naar buiten te trekken. Afbeelding 8
Attentie
Verwijder de veiligheidspennen op geen enkel
moment, aangezien de scharnier gespannen is
en letsels zou kunnen veroorzaken. Daarnaast
is het onmogelijk om de ovendeur zonder de
pennen te monteren.
Om de ovendeur aan te brengen dient hij met
beide handen te worden vastgepakt en moeten
de scharnieren in de overeenkomstige openin-
gen van de voorkant van de oven worden aange-
bracht. Open de ovendeur langzaam en volledig.
Reiniging van de Ovendeur
Aanwijzingen voor het Demonteren / Monte-
ren van het Binnenglas
1 Open de ovendeur.
2 Trek het glas aan de onderkant (H) naar bui-
ten toe. Afbeelding 10
3 Het binnenglas zit al los. Haal het eruit.
Attentie
Let goed op, want bij het verwijderen van het
binnenglas gaat de ovendeur dicht.
4 Maak het binnenglas en de binnenkant van
de ovendeur schoon.
5 Breng vervolgens de houders van het binnen-
glas aan in de bovenste gleuven van de oven-
deur (I). Afbeelding 11
6 Draai het glas naar de ovendeur (K) toe.
7 Druk met beide handen op de onderste hou-
ders (L) en druk tegelijkertijd het glas tegen
de ovendeur (M), zodat het glas weer in de
deur wordt bevestigd. Afbeelding 12
Aanwijzingen voor het Demonteren / Monte-
ren van de Binnenglazen. Oven 90 cm
1 Open de ovendeur.
2 Draai de twee blokkeerpallen (N) volledig om
zodat het draaien van de ovendeur wordt
tegengegaan. Afb. 13.
3 Druk met de vingers op punt 1 aan de boven-
kant aan weerszijden van de ovendeur. Afb. 14
4 Trek, terwijl u punt 1 blijft indrukken, aan de
bovenste vergrendeling van de ovendeur.
Afb. 15
5 De binnenglazen van de deur komen los te zit-
ten, zodat u ze gemakkelijk met een glasreini-
ger en een zachte doek kunt schoonmaken.
Attentie
Als u het draaien van de deur niet met de beu-
gel (N) heeft geblokkeerd, let dan goed op
omdat bij het verwijderen van de binnenglazen
de ovendeur dichtklapt.
Reiniging van de Ovendeur met
Groot Binnenglas
3172562-002_- 25/06/14 12:40 Página 16

Attentie
Als het probleem ondanks deze adviezen aan-
houdt, neem dan contact op met de Technische
Dienst.
Als Iets niet Werkt
De oven werkt niet
Controleer de aansluiting op het lichtnet.
Controleer de zekeringen en de begrenzer
van uw installatie.
Zorg ervoor dat de klok in de handbedieningsstand
staat of geprogrammeerd is.
Controleer de positie van de functie- en
temperatuurschakelaar.
Het licht in de oven gaat niet aan
Vervang de lamp.
Controleer de juiste montage aan de hand
van de gebruiksaanwijzing.
Het opwarmcontrolelampje gaat niet aan
Selecteer een temperatuur.
Selecteer een functie.
Het lampje hoort alleen te branden als de oven
aan het opwarmen is om de geselecteerde
temperatuur te bereiken.
Rookvorming tijdens de werking van de oven
Normaal proces bij het eerste gebruik van de oven.
Maak de oven regelmatig schoon.
Verminder de hoeveelheid aan de bakplaat
toegevoegd vet of olie.
Gebruik geen hogere temperaturen dan die
in de baktabellen aangegeven zijn.
Bij het bakken en braden worden niet de gewenste
resultaten bereikt
Kijk de baktabellen na voor informatie over
de werking van uw oven.
6 Breng de glazen, nadat ze zijn schoonge-
maakt, weer in dezelfde volgorde aan zodat
de aanduiding TERMOGLASS die erop is
gedrukt te lezen is.
7 Breng de bovenste deurvergrendeling
opnieuw aan en zorg ervoor dat de zijranden
in punt 1 passen.
Attentie
Om de ovenlamp te vervangen dient de oven
van het lichtnet te worden afgesloten.
• Schroef het glas van de fitting los.
• Vervang de lamp en bevestig het glas weer.
De te vervangen lamp moet bestand zijn tegen
een temperatuur van 300 ºC. Bestel hem bij de
technische dienst. Afbeelding 16
Volg voor andere ovenmodellen de volgende
aanwijzingen op:
•Maak het glas van de fitting los met behulp
van een gereedschap. Afb. 17
•Vervang de lamp.
•Monteer het glas weer en zorg ervoor dat hij
in de goede stand inpast. Afb. 18
Vervanging van de Ovenlamp
17
NEDERLANDS
3172562-002_- 25/06/14 12:40 Página 17

18
De installateur dient te controleren of:
• De netspanning en frequentie overeenstem-
men met de op het gegevensplaatje aange-
duide gegevens.
• De elektrische aansluiting het op het gege-
vensplaatje aangeduide maximale vermogen
kan verdragen.
• Controleer na de elektrische aansluiting de
juiste werking van alle elektrische onderde-
len van de oven.
Voor alle ovens en na de elektrische aansluiting:
1 Breng de oven in het keukenmeubel aan en
zorg ervoor dat de voedingskabel niet vastge-
klemd raakt of in aanraking komt met de
warme delen van de oven.
2 Bevestig de oven aan het meubel d.m.v. de
meegeleverde bouten, schroef ze vast aan
het meubel via de gaten die te zien zijn als u
de ovendeur opent.
3 Kijk of de kast van de oven niet in aanraking
is met de wanden van het keukenmeubel en
of er minstens een afstand van 2 mm met de
aangrenzende meubels bestaat.
Oveninstallatie
Elektrische Aansluiting
Technische Gegevens
Als het apparaat niet werkt, geef dan het soort
storing dat u heeft waargenomen aan de
Technische Dienst door met vermelding van:
1 Serienummer (S-No)
2 Toestelmodel (Mod.)
dat u op het gegevensplaatje vindt. Dit bevindt
zich aan de onderkant van de oven en is zicht-
baar wanneer u de ovendeur opent.
Installatie
Deze informatie is uitsluitend bestemd voor de
installateur, aangezien hij verantwoordelijk is
voor de montage en elektrische aansluiting. Als
u zelf de oven installeert, dan is de fabrikant
niet aansprakelijk voor mogelijke schade.
• Trek aan het lipje aan de onderkant van de
doos om de oven uit te pakken en houd de
oven bij de zijhengsels vast en nooit aan de
hendel van de ovendeur.
• Maak in het meubel een opening met de in
de afbeelding aangegeven afmetingen.
Daarbij dient de minimumdiepte van het
meubel 550 mm te bedragen. (Zie afbeeldin-
gen 19, 20 en 21).
• Voor het inbouwen van multifunctionele
ovens mag de achterkant van het meubel, de
gearceerde zone (A) in afbeelding 22, geen
uitsteeksels bevatten (meubelversterkingen,
leidingen, stopcontacten, enz.).
• Het op de plastic deklaag aangebrachte
hechtmiddel van de meubels moet tempera-
turen van meer dan 85 ºC verdragen.
Voorafgaand aan de Installatie
3172562-002_- 25/06/14 12:40 Página 18

19
ΕΛΛΗΝΙΚΑ
Διαβάστε προσεκτικά αυτές τις οδηγίες ώστε να
εκμεταλλευτείτε στο μέγιστο την απόδοση του φούρνου
σας. Φυλάξτε αυτό το εγχειρίδιο ώστε να μπορεί να το
διαβάσει στο μέλλον και κάποιος καινούριος ιδιοκτήτης.
Ηλεκτρική ασφάλεια
• Για τη σύνδεση του φούρνου στο ηλεκτρικό ρεύμα, το
εξειδικευμένο άτομο που εγκαθιστά τη συσκευή πρέπει
να χρησιμοποιήσει καλώδιο τροφοδοσίας τύπου H05RR-F,
H05SS-F ή H07RN-F. Δείτε το σχεδιάγραμμα της
σύνδεσης στην εικόνα 23.
• Ο φούρνος πρέπει να συνδέεται πάντα σε κατάλληλη
γείωση, σύμφωνα με τους ισχύοντες κανονισμούς.
• Η σύνδεση πρέπει να γίνει μέσω πολυπολικού διακόπτη,
κατάλληλου για την ένταση που πρόκειται να δεχθεί και
με ελάχιστο άνοιγμα 3 mm ανάμεσα στις επαφές, ώστε
να μπορεί να αποσυνδεθεί σε περίπτωση ανάγκης, ή
κατά τη διάρκεια καθαρισμού ή αλλαγής του λαμπτήρα.
Το καλώδιο της γείωσης δεν πρέπει σε καμία περίπτωση
να περνάει από αυτό το διακόπτη.
• Ο διακόπτης αυτός μπορεί να αντικατασταθεί από ένα
βύσμα πρίζας, εφόσον υπάρχει πρόσβαση σε αυτό σε
φυσιολογική χρήση.
• Οποιοσδήποτε χειρισμός ή επισκευή της συσκευής,
συμπεριλαμβανομένης της αποκατάστασης του
καλωδίου τροφοδοσίας, πρέπει να πραγματοποιείται
από τεχνικό της εξουσιοδοτημένης Υπηρεσίας Τεχνικής
Εξυπηρέτησης και πρέπει να χρησιμοποιούνται
αυθεντικά ανταλλακτικά. Οι επισκευές ή χειρισμοί που
3172562-002_- 25/06/14 12:40 Página 19

20
πραγματοποιούνται από άλλα άτομα μπορεί να
προκαλέσουν βλάβες στη συσκευή ή δυσλειτουργία και
να θέσουν σε κίνδυνο την ασφάλειά σας.
• Σε περίπτωση βλάβης, αποσυνδέστε το φούρνο σας.
• Σε φούρνους που εγκαθίστανται σε συνδυασμό με
πλατώ εστιών, μπορούν μόνο να χρησιμοποιηθούν τα
πλατώ εστιών που συνιστά ο κατασκευαστής.
Κλείδωμα ασφαλείας για παιδιά
• Μην αφήνετε τα παιδιά να πλησιάζουν στον αναμμένο
φούρνο, καθώς μπορεί να αναπτυχθούν υψηλές
θερμοκρασίες.
• Τα παιδιά κάτω των 8 χρόνων δεν πρέπει να πλησιάζουν
το φούρνο εκτός κι αν είναι κάτω από συνεχή επίβλεψη.
Τα παιδιά δεν πρέπει να παίζουν με τη συσκευή.
• Η συσκευή αυτή μπορεί να χρησιμοποιηθεί από παιδιά
άνω των 8 χρόνων και από άτομα με μειωμένες φυσικές,
αισθητήριες ή διανοητικές ικανότητες ή από άτομα
χωρίς εμπειρία ή γνώση, μόνο κάτω από κατάλληλη
επίβλεψη ή εάν έχουν λάβει σχετικές οδηγίες όσον
αφορά τη ασφαλή χρήση της συσκευής και έχουν
κατανοήσει τους κινδύνους που εγκυμονεί.
Ασφάλεια κατά τη Χρήση του Φούρνου
• Κατά τη λειτουργία του φούρνου, η πόρτα πρέπει να
παραμένει πάντα κλειστή.
• Χρησιμοποιείτε το φούρνο μόνο όταν βρίσκεται
εντοιχισμένος στο εσωτερικό του επίπλου (Δείτε την
ενότητα Εγκατάσταση του φούρνου).
3172562-002_- 25/06/14 12:40 Página 20

21
ΕΛΛΗΝΙΚΑ
• Το ταψί και η σχάρα διαθέτουν ειδικό σύστημα που
επιτρέπει τη μερική τους εξαγωγή ώστε να μπορείτε να
επεξεργάζεστε τα τρόφιμα.
• Κατά τη χρήση, η συσκευή θερμαίνεται. Χρησιμοποιείτε
προστατευτικά γάντια όταν θέλετε να εισάγετε τα χέρια
σας μέσα στο φούρνο και φροντίζετε ώστε να μην
αγγίζετε τα θερμαινόμενα σημεία.
• Χρησιμοποιείτε μόνο το θερμόμετρο που
περιλαμβάνεται μέσα στο φούρνο (Διαθέσιμο σε
συγκεκριμένα μόνο μοντέλα).
Καθαρισμός και συντήρηση
• Πρέπει να αποσυνδέσετε τη συσκευή από την παροχή
ηλεκτρικού ρεύματος, προτού πραγματοποιήσετε
οποιαδήποτε εργασία.
• Μην χρησιμοποιείτε διαβρωτικά καθαριστικά,
ατμοκαθαριστές ή νερό υπό πίεση.
• Ο καθαρισμός και η συντήρηση που προβλέπεται να
πραγματοποιούνται από τον χρήστη, δεν πρέπει να
πραγματοποιούνται από παιδιά χωρίς επιτήρηση.
• Προτού αλλάξετε το λαμπτήρα, βεβαιωθείτε ότι ο
φούρνος είναι αποσυνδεμένος από το ηλεκτρικό δίκτυο
για να αποφύγετε την πιθανότητα ηλεκτροπληξίας.
ΠΡΟΣΟΧΗ
Για να γνωρίσετε τις παροχές και τον ειδικό εξοπλισμό του
φούρνου σας, πρέπει να συμβουλευτείτε τον Γρήγορο
Οδηγό Χρήσης που συνοδεύει αυτό το εγχειρίδιο.
3172562-002_- 25/06/14 12:40 Página 21

22
Πριν από την Πρώτη Χρήση
Κατά τη διαδικασία κατασκευής, μπορεί να απέ-
μειναν στο φούρνο υπολείμματα από λιπαρές
ουσίες και άλλες ακαθαρσίες. Για να τις αφαιρέ-
σετε, ακολουθήστε την παρακάτω διαδικασία:
• Αφαιρέστε όλα τα υλικά συσκευασίας,
συμπεριλαμβανομένου του πλαστικού
προστατευτικού, εφόσον περιλαμβάνεται στο
φούρνο σας.
• Ανάψτε το φούρνο σας στη λειτουργία ή,
αν δεν διατίθεται, στη στους 200 ºC για 1
ώρα. Συμβουλευτείτε γι' αυτό τον Γρήγορο
Οδηγό Χρήσης που συνοδεύει αυτό το
εγχειρίδιο.
• Αφήστε το φούρνο να κρυώσει ανοίγοντας την
πόρτα. Με τον τρόπο αυτόν, αερίζεται και δεν
παραμένουν οσμές στο εσωτερικό του.
• Όταν κρυώσει εντελώς, καθαρίστε το φούρνο
και τα εξαρτήματά του.
Κατά την πρώτη λειτουργία του φούρνου, παρά-
γονται οσμές και καπνός, γι' αυτό πρέπει να
βεβαιωθείτε ότι η κουζίνα αερίζεται καλά.
Οικολογική Συσκευασία
Η συσκευασία αποτελείται από υλικά πλήρως
ανακυκλώσιμα που μπορούν να επαναχρησιμο-
ποιηθούν. Συμβουλευτείτε τις δημοτικές αρχές
διοίκησης της περιοχής σας για τους ισχύοντες
τοπικούς κανονισμούς σχετικά με την απόρριψη
των υλικών αυτών.
ΠΡΟΣΟΧΗ
Το σύμβολο πάνω στο προϊόν ή τη συσκευασία,
δηλώνει ότι αυτή η συσκευή δεν πρέπει να απορρί-
πτεται μαζί με τα οικιακά απορρίμματα. Πρέπει να
παραδίδεται σε καθορισμένο σημείο συλλογής για
την ανακύκλωση αποβλήτων ηλεκτρικού και ηλε-
κτρονικού εξοπλισμού. Με τον τρόπο αυτό, θα βοη-
θήσετε να αποφευχθούν τυχόν αρνητικές συνέπειες
για το περιβάλλον και τη δημόσια υγεία λόγω ακα-
τάλληλου χειρισμού. Για περισσότερες πληροφορίες
σχετικά με την ανακύκλωση της συσκευής, επικοι-
νωνήστε με τις τοπικές αρχές διοίκησης, με την υπη-
ρεσία οικιακών απορριμμάτων ή με το κατάστημα
από το οποίο αγοράσατε το προϊόν.
• Ο φούρνος πρέπει να λειτουργεί πάντα με την
πόρτα κλειστή.
• Ο κατασκευαστής δεν ευθύνεται για οποιαδή-
ποτε χρήση του φούρνου πέρα από την οικια-
κή χρήση για την προετοιμασία τροφίμων, για
την οποία προορίζεται.
• Μη φυλάσσετε λάδια, λίπη ή εύφλεκτα υλικά
στο εσωτερικό. Μπορεί να αποβεί επικίνδυνο
αν ο φούρνος τεθεί σε λειτουργία.
• Μη στηρίζεστε, ούτε να κάθεστε στην ανοιχτή
πόρτα του φούρνου, καθώς υπάρχει κίνδυνος
να προκαλέσετε ζημιά στην πόρτα ή ακόμα και
να τραυματιστείτε.
• Μην καλύπτετε τον πυθμένα του φούρνου με
αλουμινόχαρτο, καθώς μπορεί να επηρεάσει
το ψήσιμο και να καταστρέψει το εμαγιέ στο
εσωτερικό του φούρνου και το εσωτερικό του
επίπλου της κουζίνας σας.
• Για να μαγειρέψετε οποιοδήποτε φαγητό, εισά-
γετε το ταψί ή τη σχάρα στους πλευρικούς οδη-
γούς που διαθέτει ο φούρνος στην εσωτερική
του κοιλότητα.
• Μην τοποθετείτε σκεύη ή τρόφιμα στον πυθμέ-
να του φούρνου. Χρησιμοποιείτε πάντα τα
ταψιά και τη σχάρα.
• Μην ρίχνετε νερό στον πυθμένα του φούρνου
όταν βρίσκεται σε λειτουργία, καθώς μπορεί να
προκληθεί ζημιά στο εμαγιέ.
• Κατά τη διάρκεια του μαγειρέματος ανοίγετε
την πόρτα του φούρνου το λιγότερο δυνατό,
ώστε να μειώνεται η κατανάλωση ενέργειας.
• Όταν ψήνετε φαγητά με μεγάλη περιεκτικότη-
τα σε υγρά, είναι φυσικό να δημιουργούνται
υδρατμοί στην πόρτα του φούρνου.
• Καθαρίστε το εσωτερικό του φούρνου για να
αφαιρέσετε υπολείμματα από λίπη ή τρόφιμα
που σε μελλοντικά μαγειρέματα μπορεί να
προκαλέσουν καπνούς, οσμές και την εμφάνι-
ση κηλίδων.
Άλλες Σημαντικές Οδηγίες
3172562-002_- 25/06/14 12:40 Página 22

23
ΕΛΛΗΝΙΚΑ
• Τέλος, τοποθετήστε ξανά την αντίσταση του
γκριλ στην αρχική της θέση.
Σε περίπτωση που τα υπολείμματα τροφίμων
παραμένουν στην εμαγιέ επιφάνεια έπειτα από ένα
συνηθισμένο καθαρισμό (αυτοκαθαρισμό), τότε:
1 Αποσπάστε τα πάνελ και αφήστε τα να μουλιά-
σουν όσο χρόνο χρειάζεται ώσπου να μαλακώ-
σουν τα υπολείμματα τροφίμων.
2 Καθαρίστε τα πάνελ με ένα σφουγγάρι και με
καθαρό νερό.
3 Στεγνώστε τα πάνελ και τοποθετήστε τα και πάλι
στο φούρνο.
4 Ανάψτε το φούρνο για μία ώρα στους 200 ºC.
Προσοχή
Μη χρησιμοποιείτε καθαριστικά εμπορίου ή δια-
βρωτικά καθαριστικά σε μορφή σκόνης στην επι-
φάνεια των καταλυτικών πάνελ.
Οδηγίες για να αφαιρέσετε τα Στηρίγματα και
τα Επίπεδα Καταλυτικά Πάνελ.
1 Αφαιρέστε τα εξαρτήματα από το εσωτερικό
του φούρνου.
2 Απελευθερώστε τα στηρίγματα (C), από το παξι-
μάδι (D). Εικόνα 3
3 Ξεβιδώστε το παξιμάδι (D) ώστε να απελευθε-
ρωθούν τα επίπεδα καταλυτικά πάνελ. Εικόνα 4
4 Για να αφαιρέσετε το πάνελ που βρίσκεται στο
πίσω μέρος, βγάλτε τη βίδα (E). Εικόνα 5
5 Για να τα τοποθετήσετε πάλι στη θέση τους ακο-
λουθήστε αντίστροφα την παραπάνω διαδικασία.
Προσοχή
Για την ασφάλειά σας, μην ανάβετε ποτέ το
φούρνο χωρίς να είναι τοποθετημένο στη θέση
του το πάνελ που βρίσκεται στο πίσω μέρος του
φούρνου και προστατεύει τον ανεμιστήρα.
Καθαρίστε το εξωτερικό μέρος του φούρνου και
τον εξοπλισμό του με διάλυμα από χλιαρό νερό και
σαπούνι ή με ήπιο απορρυπαντικό.
Προσέχετε ιδιαίτερα τις ανοξείδωτες επιφάνειες
και χρησιμοποιείτε μόνο σφουγγάρια ή πανιά που
δεν χαράζουν.
Καθαρισμός των Καταλυτικών Πάνελ
Καθαρισμός των Εξωτερικών Επιφανει-
ών και των Εξαρτημάτων του Φούρνου
Καθαρισμός και Συντήρηση
Προσοχή:
Πρέπει να αποσυνδέσετε τη συσκευή από την
παροχή ηλεκτρικού ρεύματος, προτού πραγμα-
τοποιήσετε οποιαδήποτε εργασία.
1 Φούρνοι με εμαγιέ Easy-to-clean
Καθαρίστε το φούρνο όταν είναι κρύος. Για τις
εμαγιέ επιφάνειες (όπως, για παράδειγμα, το
τον πυθμένα του φούρνου) χρησιμοποιήστε νάι-
λον βούρτσες ή σφουγγάρια και διάλυμα χλια-
ρού νερού με σαπούνι. Εάν χρησιμοποιείτε προϊ-
όντα καθαρισμού για φούρνους, εφαρμόστε τα
μόνο στις εμαγιέ επιφάνειες ακολουθώντας τις
οδηγίες του κατασκευαστή.
2 Φούρνοι με εμαγιέ επιφάνειες ειδικά δια-
μορφωμένες για άλλα συστήματα καθαρι-
σμού
Συμβουλευτείτε το Φύλλο Προδιαγραφών του
φούρνου σας.
Προσοχή
Μην καθαρίζετε το εσωτερικό του φούρνου σας με
ατμοκαθαριστές ή με νερό υπό πίεση. Μη χρησιμο-
ποιείτε επίσης μεταλλικά σφουγγάρια, συρμάτινες
βούρτσες ή οποιοδήποτε εργαλείο που θα μπορού-
σε να χαράξει το εμαγιέ.
• ‘Άλλα μοντέλα φούρνου διαθέτουν σύστημα
καθαρισμού με καταλυτικά πάνελς (αυτοκαθα-
ρισμός). Αυτό το σύστημα αφαιρεί τα μικρά υπο-
λείμματα λίπους κατά τη διάρκεια του μαγειρέ-
ματος σε υψηλές θερμοκρασίες.
Χρήση Πτυσσόμενου Γκριλ (Διαθέσιμο σε συγκε-
κριμένα μόνο μοντέλα)
Για να καθαρίσετε την οροφή του φούρνου,
• Περιμένετε μέχρι να κρυώσει ο φούρνος σας.
• Γυρίστε τη βίδα (A) και κατεβάστε την αντίσταση
του γκριλ όσο πιο χαμηλά γίνεται. Εικόνα 1
• Σε άλλα μοντέλα πρέπει να σπρώξετε με τα δυο
χέρια τη ράβδο της αντίστασης του γκριλ (Β),
έως ότου την απελευθερώσετε από το πάνω
στήριγμα. Εικόνα 2
• Περιστρέψτε την αντίσταση και καθαρίστε την
οροφή του φούρνου.
Καθαρισμός του Εσωτερικού
του Φούρνου
3172562-002_- 25/06/14 12:40 Página 23

24
Μη χρησιμοποιείτε μεταλλικά σφουγγάρια, συρ-
μάτινες βούρτσες, καθαριστικά εμπορίου σε
σκόνη ή διαβρωτικά για τον καθαρισμό της πόρ-
τας του φούρνου, καθώς μπορεί να χαράξουν
την επιφάνεια και να προκαλέσουν ρωγμές στο
κρύσταλλο.
Σε ορισμένα μοντέλα φούρνου, μπορείτε να απο-
συναρμολογήσετε την πόρτα ώστε να διευκολυν-
θείτε στον καθαρισμό της. Για να αποσυναρμο-
λογήσετε την πόρτα ακολουθήστε τα παρακάτω
βήματα:
1 Ανοίξτε την πόρτα του φούρνου.
2 Περιστρέψτε πλήρως τα δύο άγκιστρα ασφα-
λείας (F). Εικόνα 6
3 Κλείστε την πόρτα έως ότου εφαρμόσει στα
δύο άγκιστρα. Εικόνα 7
4 Ενώ κρατάτε την πόρτα από τα πλαϊνά και με
τα δύο χέρια, ανασηκώστε την και αποσπάστε
την από το φούρνο έως ότου οι μεντεσέδες
βγουν εντελώς (G). Εικόνα 8
Για να την τοποθετήσετε στη θέση της, ακολου-
θήστε αντίστροφα την παραπάνω διαδικασία.
Για άλλα μοντέλα φούρνου ακολουθήστε τις
παρακάτω οδηγίες:
1 Ανοίξτε εντελώς την πόρτα του φούρνου.
2 Εισάγετε πείρους ασφαλείας στις ορατές τρύ-
πες των μεντεσέδων της πόρτας. Εικόνα 9
3 Πιάστε την πόρτα από τα πλαϊνά και με τα δύο
χέρια και κλείστε την σχεδόν εντελώς.
4 Σηκώστε τώρα την πόρτα και βγάλτε τους μεντε-
σέδες από τις μπροστινές υποδοχές του φούρ-
νου τραβώντας τους προς τα έξω. Εικόνα 8
Προσοχή
Μην αφαιρείτε σε καμία περίπτωση τους πείρους
ασφαλείας καθώς οι μεντεσέδες είναι σφιγμένοι
και μπορεί να σας τραυματίσουν. Επιπλέον, είναι
αδύνατο να τοποθετήσετε ξανά την πόρτα αν οι
πείροι δεν βρίσκονται στη θέση τους.
Για να τοποθετήσετε την πόρτα στη θέση της,
πιάστε την με τα δυο σας χέρια και εισάγετε τους
μεντεσέδες στις αντίστοιχες υποδοχές που βρί-
σκονται στο μπροστινό μέρος του φούρνου.
Ανοίξτε αργά την πόρτα του φούρνου έως ότου
ανοίξει εντελώς.
Καθαρισμός της Πόρτας
του Φούρνου
Οδηγίες Αποσυναρμολόγησης και Συναρμολό-
γησης του Εσωτερικού Κρύσταλλου
1 Ανοίξτε την πόρτα του φούρνου.
2 Τραβήξτε το κρύσταλλο από το κάτω μέρος
(Η) προς τα έξω. Εικόνα 10
3 Το εσωτερικό κρύσταλλο τώρα απελευθερώ-
θηκε. Αφαιρέστε το.
Προσοχή
Προσέξτε ιδιαίτερα γιατί όταν αφαιρέσετε το
εσωτερικό κρύσταλλο, η πόρτα του φούρνου θα
κλείσει.
4 Καθαρίστε το εσωτερικό κρύσταλλο και το
εσωτερικό της πόρτας του φούρνου.
5 Εισάγετε στη συνέχεια τα στηρίγματα του εσω-
τερικού κρύσταλλου στις οπές που βρίσκονται
στο πάνω μέρος της πόρτας (Ι). Εικόνα 11
6 Κατεβάστε το κρύσταλλο προς την πόρτα (K).
7 Για να στερεώσετε το κρύσταλλο ξανά στην
πόρτα, πιέστε με τα δυο χέρια τα δύο στηρίγ-
ματα που βρίσκονται στο κάτω μέρος (L) ενώ
ταυτόχρονα σπρώχνετε το κρύσταλλο προς
την πόρτα (M). Εικόνα 12
Οδηγίες Αποσυναρμολόγησης και Συναρμολό-
γησης των εσωτερικών κρυστάλλων. Φούρνος
90 εκ.
1 Ανοίξτε την πόρτα του φούρνου.
2 Γυρίστε εντελώς τα δύο άγκιστρα ασφαλείας
(N), για να μπλοκάρετε την πόρτα και να μην
μπορεί να κλείσει. Εικ. 13.
3 Πιέστε με τα δάχτυλα στο σημείο 1 που βρί-
σκεται στο επάνω μέρος και των δύο πλευρών
της πόρτας του φούρνου. Εικ. 14
4 Ενώ συνεχίζετε να πιέζετε στο σημείο 1, τρα-
βήξτε προς τα έξω το άνω κούμπωμα της πόρ-
τας. Εικ. 15
5 Τα εσωτερικά κρύσταλλα της πόρτας τώρα
απελευθερώθηκαν. Μπορείτε να τα καθαρίσε-
τε εύκολα με ένα μαλακό πανί και καθαριστι-
κό για τα τζάμια.
Προσοχή
Εάν δεν έχετε μπλοκάρει την πόρτα με το άγκι-
στρο ασφαλείας (N), προσέξτε ιδιαίτερα, γιατί
όταν αφαιρέσετε τα εσωτερικά κρύσταλλα, η
πόρτα του φούρνου θα κλείσει.
Καθαρισμός της Πόρτας με Εσωτε-
ρικό Κρύσταλλο Πλήρους Κάλυψης
3172562-002_- 25/06/14 12:40 Página 24

ΕΛΛΗΝΙΚΑ
Προσοχή
Αν το πρόβλημα επιμένει, παρά τις προαναφερό-
μενες πιθανές λύσεις, επικοινωνήστε με την Υπη-
ρεσία Τεχνικής Εξυπηρέτησης.
Αν Κάτι Δεν Λειτουργεί
Ο φούρνος δεν λειτουργεί
Ελέγξτε τη σύνδεση στο ηλεκτρικό δίκτυο.
Ελέγξτε τις επιμέρους ασφάλειες και τη γενική
ασφάλεια της εγκατάστασής σας.
Βεβαιωθείτε ότι το ρολόι βρίσκεται στη χειροκίνητη
λειτουργία ή είναι προγραμματισμένο.
Ελέγξτε τη θέση των διακοπτών επιλογής
λειτουργιών και θερμοκρασίας.
Ο εσωτερικός φωτισμός του φούρνου δεν λειτουργεί
Αντικαταστήστε το λαμπτήρα.
Βεβαιωθείτε ότι έχει τοποθετηθεί σωστά σύμφωνα
με το Εγχειρίδιο Οδηγιών.
Η ενδεικτική λυχνία θέρμανσης δεν ανάβει
Επιλέξτε μία θερμοκρασία.
Επιλέξτε μία λειτουργία.
Η ένδειξη θέρμανσης ανάβει μόνο κατά τη διάρκεια
προθέρμανσης του φούρνου και μέχρις ότου φθάσει
στην επιλεγμένη θερμοκρασία.
Παράγεται καπνός όταν ο φούρνος βρίσκεται
σε λειτουργία
Είναι φυσιολογικό την πρώτη φορά που ο φούρνος
τίθεται σε λειτουργία.
Καθαρίζετε τακτικά το φούρνο.
Προσθέτετε μικρότερες ποσότητες λίπους
ή λαδιού στο ταψί.
Μη χρησιμοποιείτε θερμοκρασίες υψηλότερες από
τις συνιστώμενες στους πίνακες μαγειρέματος.
Το αποτέλεσμα ψησίματος δεν είναι το αναμενόμενο
Μελετήστε τους πίνακες μαγειρέματος ώστε να προ-
σανατολιστείτε σχετικά με τον τρόπο λειτουργίας του
φούρνου σας.
6 Αφού καθαρίσετε τα κρύσταλλα, τοποθετήστε
τα με την ίδια σειρά, έτσι ώστε να μπορείτε να
διαβάζετε τη λέξη TERMOGLASS που είναι
τυπωμένη πάνω τους.
7 Τοποθετήστε και πάλι στη θέση του το άνω
κούμπωμα της πόρτας και βεβαιωθείτε ότι οι
πλευρικές προεξοχές εφαρμόζουν στο σημείο 1.
Προσοχή
Προτού αλλάξετε το λαμπτήρα, βεβαιωθείτε ότι ο
φούρνος είναι αποσυνδεμένος από το ηλεκτρικό
δίκτυο.
• Ξεβιδώστε το κάλυμμα του λαμπτήρα.
• Αντικαταστήστε το λαμπτήρα και τοποθετήστε
πάλι το κάλυμμα στη θέση του.
Ο καινούριος λαμπτήρας πρέπει να είναι ανθε-
κτικός σε θερμοκρασίες έως 300 ºC. Μπορείτε
να τον παραγγείλετε από την υπηρεσία τεχνικής
υποστήριξης. Εικόνα 16
Για άλλα μοντέλα φούρνου ακολουθήστε τις
παρακάτω οδηγίες:
•Αφαιρέστε με ένα εργαλείο το κάλυμμα του
λαμπτήρα. Εικόνα 17
•Αντικαταστήστε το λαμπτήρα.
•Τοποθετήστε πάλι το κάλυμμα στη θέση του με
προσοχή ώστε να εφαρμόσει σωστά. Εικόνα 18
Αντικατάσταση του Λαμπτήρα
Φούρνου
25
3172562-002_- 25/06/14 12:40 Página 25

26
Το εξειδικευμένο άτομο που εγκαθιστά τη
συσκευή πρέπει να βεβαιωθεί ότι:
• Η τάση και η συχνότητα του δικτύου αντιστοι-
χούν σε αυτές που αναφέρονται στην Πινακί-
δα Τεχνικών Χαρακτηριστικών.
• Η ηλεκτρική εγκατάσταση μπορεί να αντέξει
τη μέγιστη ισχύ που αναφέρεται στην Πινακί-
δα Τεχνικών Χαρακτηριστικών.
• Αφού ολοκληρωθεί η ηλεκτρική εγκατάσταση,
ελέγξτε ότι λειτουργούν σωστά όλες οι ηλε-
κτρικές λειτουργίες του φούρνου.
Οδηγίες εγκατάστασης για όλους τους φούρνους
αφού περατωθεί η ηλεκτρική σύνδεση:
1 Εισάγετε το φούρνο στο έπιπλο προσέχοντας
ώστε το καλώδιο τροφοδοσίας να μην εγκλω-
βιστεί και να μη βρίσκεται σε επαφή με σημεία
του φούρνου που ζεσταίνονται.
2 Στηρίξτε το φούρνο στο έπιπλο με τις βίδες
που περιλαμβάνονται στη συσκευασία. Βιδώ-
στε τις στο έπιπλο από τις τρύπες που φαίνο-
νται όταν ανοίξετε την πόρτα του φούρνου.
3 Βεβαιωθείτε ότι το περίβλημα του φούρνου
δεν βρίσκεται σε επαφή με τα τοιχώματα του
επίπλου και ότι υπάρχει απόσταση τουλάχι-
στον 2 mm από τα παρακείμενα έπιπλα.
Εγκατάσταση του Φούρνου
Ηλεκτρική Σύνδεση
Τεχνικές Πληροφορίες
Αν η συσκευή δεν λειτουργεί, επικοινωνήστε με
την Υπηρεσία Τεχνικής Εξυπηρέτησης και ενημε-
ρώστε για το είδος του προβλήματος που διαπι-
στώσατε, αναφέροντας τα παρακάτω στοιχεία:
1 Το Serial Number (S-No)
2 Το Μοντέλο της Συσκευής (Mod.)
που βρίσκονται χαραγμένα στην πινακίδα τεχνι-
κών χαρακτηριστικών. Η πινακίδα αυτή βρίσκε-
ται στο κάτω μέρος του φούρνου και για να μπο-
ρέσετε να τη δείτε θα πρέπει να ανοίξετε την
πόρτα.
Εγκατάσταση
Οι πληροφορίες αυτές απευθύνονται αποκλειστι-
κά στο εξειδικευμένο άτομο που θα εγκαταστή-
σει τη συσκευή, καθώς είναι υπεύθυνο για τη
συναρμολόγηση της και την ηλεκτρική σύνδεση.
Εάν εγκαταστήσετε ο ίδιος το φούρνο, ο κατα-
σκευαστής δεν ευθύνεται για τις ενδεχόμενες
ζημιές που μπορεί να προκύψουν.
• Για να αποσυσκευάσετε το φούρνο, τραβήξτε
την προεξοχή που βρίσκεται στο κάτω μέρος
του κουτιού και για να τον μετακινήσετε κρα-
τήστε τον από τις πλευρικές χειρολαβές, ποτέ
από το χερούλι της πόρτας του φούρνου.
• Το έπιπλο πρέπει να διαθέτει άνοιγμα με τις
διαστάσεις που αναφέρονται στην εικόνα και
το ελάχιστο βάθος του πρέπει να είναι
550 mm. (βλ. εικόνες 19, 20 και 21).
• Για τον εντοιχισμό των πολυλειτουργικών
φούρνων, το πίσω μέρος του επίπλου που αντι-
στοιχεί στη σκιασμένη περιοχή (A) της εικόνας
22, δεν πρέπει να παρουσιάζει καμία προεξο-
χή (όπως ενισχυτικά στηρίγματα του επίπλου,
σωλήνες, πρίζες, κλπ.).
• Το υλικό συγκόλλησης που χρησιμοποιήθηκε
στην πλαστική επικάλυψη των επίπλων πρέπει
να αντέχει θερμοκρασίες υψηλότερες από
85 ºC.
Πριν την Εγκατάσταση
3172562-002_- 25/06/14 12:40 Página 26

27
РУССКИЙ
Внимательно ознакомьтесь с инструкциями для того
чтобы получить максимальную отдачу от Вашей
духовки. Сохраните это руководство, таким образом
новый владелец, также сможет ознакомиться с его
содержанием.
Электро безопасность
• При установке духовки следует использовать провода
типа H05RR-F, H05SS-F или H07RN-F. Схема
соединения приведена на стр. 23.
• В соответсвии с действующими нормами, духовка
всегда должна иметь качественное заземление.
• Подключение должно производиться через
омниполярный выключатель предназначенный для
данной частоты и с минимальным зазором между
контактами в 3 мм для отключения в экстренном
случае, а также для чистки или замены лампочки. Ни
в коем случае провод заземления не должен
проходить через этот выключатель.
• Данный выключатель может быть заменен на
обычный выключатель в случае, если обеспечена его
доступность при нормальном использовании.
• Любые манипуляции или ремонтные работы,
включая замену провода питания, должны
производиться уполномоченными специалистами
Службы Технического Обслуживания, заменяемые
элементы должны быть оригинальными. Ремонт и
подобные действия выполненные другими лицами
могут привести к поломке аппарата или его неверной
работе, угрожая, таким образом, Вашей
безопасности.
3172562-002_- 25/06/14 12:40 Página 27

28
• В случае неисправности отключите Вашу духовку.
• В духовках, комбинированных с варочными
панелями, эти последние должны быть
рекомендованы производителем духовки.
Безопасность детей
• Не позволяйте детям приближаться к духовке во
время ее работы из-за опасности ожoгов.
• Дети младше 8 лет не должны приближаться к духовке
без постоянного надзора взрослых. Не позволяйте
детям играть с духовкой.
• Данный аппарат может использоваться детьми
старше 8 лет и лицами с ограниченными
физическими, сенсорными или умственными
способностями, либо лицами без предварительного
опыта или знаний всегда, когда это происходит под
необходимым наблюдением или с
соответствующими инструкциями относительно
безопасного использования аппарата и осознанием
опасностей связанных с ним.
Безопасность при использовании духовки
• При работе духового шкафа его дверца всегда должна
быть закрыта.
• Следует использовать духовку только после ее
установаления в мебель (см. схему установки
духового шкафа).
• Противень и решетка оснащены системой
облегчающей их частичную выемку и манипуляцию
продуктами.
3172562-002_- 25/06/14 12:40 Página 28

29
РУССКИЙ
• Во время работы аппарат нагревается,
пользуйтесь защитными варежками для
проведения манипуляций внутри духовки и
избегайте дотрагиваться до нагревающих
элементов.
• Изпользуйте только прилагаемый к Вашему
духовому шкафу зонд для измерения температуры
(для моделей имеющих такие возможности).
Чистка и уход
• Для любых подобных действий духовку следует
отключить от электрической сети.
• Не следует использовать абразивные чистящие
средства ни аппараты чистящие при помощи
водяного пара или воды под давлением.
• Не следует доверять детям чистку и уход за
духовкой без надлежащего присмотра.
• Прежде чем заменить лампочку убедитесь что
духовка оключена от электрической сети во
избежание возможных ударов током.
ВНИМАНИЕ
Для ознакомления с возможностями и оснащением
Вашего духового шкафа проконсультируйтесь с
Кратким руководством по эксплуатации
прилагаемым к данным инструкциям.
3172562-002_- 25/06/14 12:40 Página 29

30
Перед Первым
Использованием
В процессе производства в Вашем духовом
шкафу могли остаться масла и другие
загрязняющие вещества. Для их удаления
следуйте в указанном порядке:
• Удалите все элементы упаковки, включая
защитную пленку если она имеется.
• Установите на Вашем духовом шкафу
функцию или при отсутствии таковой -
, на 200 ºC и на один (1) час.
Проконсультируйтесь с Кратким
руководством по эксплуатации прилагаемым
к данной инструкции.
• Откройте дверцу и остудите духовку, таким
образом она проветрится и внутри духового
шкафа не останется неприятных запахов.
• После остывания почистите духовку и
аксессуары.
Во время первого включения образуется дым
и неприятные запахи, убедитесь в
достаточной вентиляции кухни.
Экологическая Упаковка
Упаковка произведена при помощи
полностью перерабатываемых материалов.
Проконсультируйтесь в местных органах
управления о требованиях к удалению этих
материалов.
ВНИМАНИЕ
Знак на продукции или упаковке
указывает на то что аппарат не относится к
категории обычных бытовых отходов. Следует
сдать аппарат на пункт сбора электрических и
электронных аппаратов для их последующей
переработки. Таким образом Вы поможете
избежать возможных негативных последствий
для окружающей среды и общественного
здоровья. Для получения более подробной
информации, обратитесь в органы местной
администрации, службу сбора бытовых
отходов или на предприятие, где Вы
приобрели данный аппарат.
• Духовой шкаф всегда должен работать при
закрытой дверце.
• Производитель не несет ответственности за
использование аппарата не по назначению,
т.е. для действий не являющихся
приготовлением продуктов питания в
домашних условиях.
• Не следует хранить внутри духового шкафа
масла, жиры и воспламеняющиеся
вещества, т.к. это может быть опасно при
включении духового шкафа.
• Не следует опираться или садиться на
открытую дверцу, ее можно повредить, а
также Вы можете подвергнуть себя
опасности.
• Не следует покрывать дно духового шкафа
аллюминиевой фольгой, это моежт
негативно повлиять на приготовление и
повредить эмаль и внутреннюю
поверхность мебельного шкафа вашей
кухни.
• Для приготовления любого блюда следует
установить противень или решетку в
боковые направляющие на внутренней
поверхности духового шкафа.
• Не следует оставлять утварь или продукты
питания на дне духовки; всегда используйте
противень или решетку.
• Не следует выливать воду на дно духовки во
время ее работы, это может повредить
эмаль.
• Во время приготовления следует как можно
реже открывать дверцу духового шкафа,
таким образом Вы сэкономите
электроэнергию.
• При приготовлении блюд с высоким
содержанием жидкостей на дверце духового
шкафа может образовываться конденсат.
• После готовки следует удалить остатки жира
и пищи внутри духового шкафа, таким
образом при последующем приготовлении
не будет образовываться неприятных
запахов и дыма, а также это поможет
избежать образование пятен.
Другие Важные Указания
3172562-002_- 25/06/14 12:40 Página 30

31
РУССКИЙ
• Затем следует вновь установить решетку
гриля в изначальное положение.
Если остатки пищи на эмали не удаляются при
обычной чистке (самоочистке), следует:
1 Снять панели и замачивать их до тех пор
пока остатки пищи не размягчатся.
2 Вымыть панели при помощи губки и чистой
воды.
3 Просушить панели и установить их в
духовом шкафу.
4 Включить духовку на один час при
температуре 200 ºC.
Внимание
Не использовать промышленные очистители и
абразивные порошки для чистки
поверхностей каталитических панелей.
Инструкции по Разборке Подвесок и
Плоских Каталитических Панелей.
1 Удалите из духовки все внутренние
аксессуары.
2 Потяните за подвески (C), ослабив болт (D).
Рисунок 3
3 Отвинтите болт (D) и освободить плоские
каталитические панели. Рисунок 4
4 Для разборки панели на задней части,
духовки снимите болт (E). Рисунок 5
5 Для сборки следует произвести эти
операции в обратной последовательности.
Внимание
В целях безопасности запрещается включать
духовку без защитной панели вентилятора.
Внешнюю поверхность и аксессуары духовки
следует чистить теплой водой с мылом или
любым мякгим моющим средством.
Для чистки нержавеющих поверхностей
следует действовать осторожно и применять
только мягкие губки и полотенца не
царапающие поверхность.
Чистка Каталитических Панелей
Чистка Внешней Поверхности
и Аксессуаров Духовки
Чистка и Уход
Внимание:
Для проведения любых манипуляций следует
отключить духовой шкаф от электросети.
1 Духовой шкаф с эмалью облегчающей
чистку
При холодной духовке и для эмалированных
поверхностей (например, дно духового
шкафа) используйте нейлоновые щетки или
губки и теплую мыльную воду. Если Вы
пользуетесь специальными продуктами для
чистки духовок, следует применять их только
на эмалированых поверхностях и строго
соблюдая инструкции производителя.
2 Духовые шкафы со специальной эмалью
или другими системами чистки
Пожалуйста, проконсультируйтесь с Таблицей
Характеристик Вашего духового шкафа.
Внимание
Не следует чистить внутреннюю поверхность
Вашего духового шкафа при помощи аппаратов
паровой или водяной чистки. Не следует
использовать металлические мочалки,
проволочные щетки и любые другие
инструменты способные поцарапать эмаль.
• Другие модели духовых шкафов оснащены
специальной системой каталитической
чистки (самоочистка). Эта система чистки
удаляет небольшие остатки жира при готовке
при высоких температурах.
Использование Откидного Гриля (в
зависимости от моделей)
Для чистки верхней поверхности духового
шкафа,
• Подождите до полного остывания духовки.
• Поверните болт (A) и опустите решетку гриля
как можно ниже. Рисунок 1
• В других моделях следует нажимать двумя
руками на решетку гриля (B), то тех пор, пока
она не освободиться от верхнего крепления.
Рисунок 2
• Поверните решетку и почистите верхнюю
поверхность духового шкафа.
Чистка Внутренней Поверхности
Духового шкафа
3172562-002_- 25/06/14 12:40 Página 31

32
Не следует использовать металлические
мочалки, проволочные щетки,
промышленные или абразивные порошки
которые могут поцарапать поверхность и
разбить стекло дверцы духовки.
В зависимости от модели духового шкафа
можно снять дверцу для облегчения чистки.
Для этого следует:
1 Открыть дверцу.
2 Повернуть крючки (F) до упора. Рисунок 6
3 Закрыть дверцу и вставить оба крючка.
Рисунок 7
4 Обеими руками открыть дверцу
придерживая за боковые стороны,
приподнять дверцу духовки полностью сняв
ее с петель (G). Рисунок 8
Для установки дверцы следует выполнить те
же операции в обратной последовательности.
Для других моделей духового шкафа следует:
1 Полностью открыть дверцу духовки.
2 Установить сквозные болты безопасности в
видимые отверстия петель дверцы. Рисунок 9
3 Придерживая дверцу с боков обеими
руками закройте ее почти полностью.
4 Поднять дверцу и вынуть петли из передних
пазов потянув их вперед. Рисунок 8
Внимание
Не следует вынимать сквозные болты
безопасности, поскольку петли натянуты и их
легко повредить. Кроме того будет
невозможно установить дверцу если сквозные
боты не установлены.
Для установки дверцы следует придерживать
ее обеими руками и установить петли в
соответствующие отверстия на передней
части духового шкафа. Медленно открыть
дверцу полностью.
Чистка Дверцы Духовки
Инструкции по Разборке/Сборке
Внутреннего Стекла
1 Открыть дверцу духового шкафа.
2 Потянуть за стекло взявшись за нижнюю
часть (H). Рисунок 10
3 Внутреннее стекло свободно. Вынуть его.
Внимание
Пожалуйста, будьте внимательны, т.к. вынув
стекло дверца духового шкафа закроется.
4 Почистите внутреннее стекло дверцы
духовки.
5 Затем установите держатели внутреннего
стекла в верхние пазы дверцы (I). Рисунок 11
6 Поворачивайте стекло в сторону дверцы
(K).
7 Нажмите обеими руками на оба внутренних
держателя (L) и одновременно надавливая
на стекло в направлении дверцы (M). Таким
образом стекло вновь окажется
закрепленным в дверце. Рисунок 12
Инструкции по Разборке/Сборке
Внутреннего Стекла. Духовка 90 см
1 Открыть дверцу духового шкафа.
2 Полностью повернуть держатели (N), для
блокирования поворота двери. Рис. 13.
3 Нажать пальцами на точку 1
расположенную в верхней части по обе
стороны дверцы духового шкафа. Рис. 14
4 Нажимая на точку 1, потяните за верхний
кант дверцы. Рис. 15.
5 Внутренние стекла двери будут свободны,
Вы можете помыть их при помощи
специального моющего средства для стекол
и мягкой тряпочки.
Внимание
Если поворот дверцы не заблокирован при
помощи держателя (N), пожалуйста, будьте
внимательны, т.к. при выемке стекла дверца
духового шкафа закроется.
Чистка Дверцы с Внутренним
Стеклом Большого Размера
3172562-002_- 25/06/14 12:40 Página 32

РУССКИЙ
Внимание
Если несмотря на данные советы, проблема
остается не решенной, следует обратиться в
Службу Технической Поддержки.
Причины
Неисправностей
Духовой шкаф не работает
Убедитесь, что он включен в сеть.
Проверьте пробки и ограничитель Вашей
электропроводки.
Убедитесь, что часы находятся в положении
"ручное" или "программированное".
Проверьте положение ручки выбора функций
и температур.
Не включается свет внутри духового шкафа
Замените лампочку.
Убедитесь в правильности сборки соответственно
Инструкции.
Не светится индикатор нагрева
Выберите температуру.
Выберите функцию.
Индикатор должен светиться только во время
нагревания духового шкафа до достижения
выбранной температуры.
Задымление во время работы духового шкафа
Это нормально при первом включении.
Следует периодически чистить духовой шкаф.
Следует уменьшить количество жира или масла
добавляемого на противень.
Не следует использовать температуры
превышающие указанные в кулинарных таблицах.
Неудовлетворительные результаты готовки
Проконсультируйтесь в кулинарных таблицах
для лучшей ориентации в функциях Вашего
духового шкафа.
6 После чистки вновь установите стекла
следуя вышеприведенной схеме в
обратном порядке. На установленном
стекле должно читаться отпечатанное слово
TERMOGLASS.
7 Вновь установить верхний кант дверцы
убедившись в том, что боковые язычки
попадают в точку 1.
Внимание
Для замены лампочки прежде всего следует
убедиться, что духовой шкаф отключен от
электросети.
• Отвинтить линзу прикрывающую лампочку.
• Заменить лампочку и вновь установить
линзу.
Заменяемая лампочка должна выдерживать
нагрев до температуры до 300 ºC, закажите
ее в службе технической поддержки. Рисунок
16
Для других моделей духового шкафа следуйте
нижеприведенным инструкциям:
• Снять линзу прикрывающую лампочку при
помощи инструмента. Рис. 17
• Заменить лампочку.
• Вновь установить линзу и убедиться в
правильности ее положения. Рис. 18
Замена Лампочки в Духовом
Шкафу
33
3172562-002_- 25/06/14 12:40 Página 33

34
Монтажник должен убедиться в том что:
• Напряжение и частота сети соответствует
указанным в Таблице Характеристик.
• Электросеть может выдерживать
максимальную мощность указанную в
Таблице Характеристик.
• После подключения убедитесь в
правильном функционировании всех
электроэлементов духового шкафа.
Для всех духовых шкафов и после
подключения к электросети:
1 Вставить духовку в мебельный шкаф,
убедившись что шнур питания свободен и
не соприкасается с горячими частями
духовки.
2 Закрепить духовку в мебельном шкафу при
помощи прилагаемых болтов. Болты
следует завинтить используя отверстия,
которые видны при открытой дверце
духового шкафа.
3 Убедиться что внешняя поверхность
духовки не соприкасается со стенками
мебели и остается как минимум 2 мм от
соседних предметов мебели.
Установка Духового Шкафа
Электрическое Подключение
Техническая Информация
Если Ваш аппарат не работает сообщите в
Службу Технической Поддержки о
наблюдаемых неполадках и укажите:
1 Номер серии (S-No)
2 Модель аппарата (Mod.)
Эти данные выгравированы на пластине с
характеристиками. Она находится внутри
духовки и видна при открытии дверцы.
Установка
Данная информация предназначена
исключитеьно для технического специалиста
ответственного за установку и подсоединение
в электросеть. Если Вы лично устанавливаете
духовой шкаф, изготовитель не несет
ответственности за возможные повреждения.
• Для освобождения духового шкафа от
упаковки следует потянуть за язычок,
расположенный на нижней части коробки.
Для перемещения духового шкафа следует
использовать только боковые ручки и ни в
коем случае - ручку дверцы самого духового
шкафа.
• Следует сделать отверстие в мебельном
шкафу в соответствии с размерами
указанными на схеме. Минимальная
глубина мебельного шкафа - 550 mm. (см.
рис. 19, 20 и 21).
• Для установки многофункциональных
духовых шкафов задняя поверхность
мебельного шкафа, изображенная как
темная зона (А) на рис. 22, не должна иметь
выступающих частей (поддерживающих
элементов, труб, выключателей и пр.).
• Пластиковое покрытие мебели должно
выдерживать температуры превышающие
85 ºC.
Перед Установкой
3172562-002_- 25/06/14 12:40 Página 34

35
Fig 1 Fig 2
Fig 3
Fig 5 Fig 6
Fig 7 Fig 8
A
B
C
D
Fig 4
D
E
F
G
G
Figure / Afbeeldingen / Εικόνες / Схемы
3172562-002_- 25/06/14 12:40 Página 35

36
Fig 11 Fig 12
I
K
M
L
Fig 9 Fig 10
H
Fig 15
Fig 13 Fig 14
Fig 16
N
3172562-002_- 25/06/14 12:40 Página 36

37
Fig 19
60-100
min 550
510-540
490
22
558-568
A
min. B
595
Fig 17 Fig 18
A: 595-455 / B: 590-450 / C: 600-460
490
558-568
min. 550
22
595
A
min. C
min. 40
Fig 20
510-540
3172562-002_- 25/06/14 12:40 Página 37

38
Fig 21
490
320
160
Fig 22
A
3172562-002_- 25/06/14 12:40 Página 38

39
Fig 23
3172562-002_- 25/06/14 12:40 Página 39

40
Cod.: 83172539/3172562-002
3172562-002_- 25/06/14 12:40 Página 40

Tablas de Cocinado
HORNO
Tabelas de Cozinhado
FORNO
Cooking Tables
OVEN
Tableaux de Cuissons
FOUR
Kochtabellen
BACKOFEN
3172002-009_- 27/06/14 12:43 Página 1

Español
Los tiempos y las temperaturas indicados en las Tablas son orientativos. Las
funciones de cocinado dependen de cada modelo. En general es recomen-
dable que realice un precalentamiento del horno en vacío y en función
o . El tiempo de precalentamiento finaliza cuando se apaga el piloto
de calentamiento
.
Portugues
Os tempos e as temperaturas indicados nas tabelas são para orientação. As
funções de cozinhado dependem de cada modelo. Geralmente é recomendá-
vel realizar um pré-aquecimento do forno em vazio, na função ou . O
tempo pré-aquecimento finaliza quando apaga-se ao piloto de aquecimento.
English
The Cooking Tables show examples of temperature ranges and approximate
cooking times. The cooking mode depends on the model. For the best results
we recommend the oven to be preheated with the function or . The
preheating time finish when the heating pilot light switches off.
Français
Vous trouverez dans les tableaux des indications de température et des
temps de cuisson, selon les quantités et les moules à utiliser, mais dans tous
les cas votre expérience sera finalement votre meilleure conseillère. Les
fonctions du four sont différentes selon le modèle. Pour de meilleurs
résultats, il est conseillé de préchauffer le four, en fonction ou . Le
temp de préchauffage du four est terminée lorsque le voyant lumineux
d’échauffement s’éteint.
Deutsch
Die angegebenen Zeiten und Temperaturen sind Richtwerte. Die
Kochfunktionen hängen von dem jeweiligen Modell ab. Im allgemeinen wird
ein Vorheizen des leeren Herds empfohlen. Die angegebene Zeit gilt ab
Beendigung des Vorheizens (Funktionen oder ). Die Heizleuchte
erlischt, sobald die eingestellte temperatur erreicht ist.
3172002-009_- 27/06/14 12:43 Página 2

3
Español
Portugues
EnglishFrançaisDeutsch
Arroz al horno
Arroz ao forno
Baked rice
Riz au four
Gebackener Reis
Paellera
Tacho para arroz
Shallow oven dish
Plat à paella
Reispfanne
Empanada
Empada
Pasty
Pâté en croûte
Pasteten
Pastel de verduras
Pudim de verduras
Vegetable Pie
Gâteau de légumes
Gemüsepastete
Bandeja
Bandeja
Tray
Plateau
Schale
Molde
Forma
Shallow dish
Moule
Form
Patatas asadas
Batatas assadas
Baked potatoes
Pommes de terre au grill
Bratkartoffeln
Bandeja
Bandeja
Tray
Plateau
Schale
Pizza
Pizza
Pizza
Pizza
Pizza
Parrilla
Grelha
Grid
Grille
Rost
Quiche
Quiche
Quiche
Quiche
Quiche
Molde
Forma
Quiche Mould
Moule
Form
Hojaldre de verduras
Folhado de verduras
Vegetable Pastry
Feuilleté de légumes
Blätterteig mit
Gemüsefüllung
Molde
Forma
Shallow dish
Moule
Form
1,5
1
1,5
1
1,5
0,35
180-200
170-190
190-210
190-210
180-200
190-210
180-200
45-50
170-190 35-40
45-50
160-180 30-35
160-180 30-35
35-40
170-190 30-35
170-190 35-40
55-60
170-190 45-50
170-190 50-55
60-65
180-200 50-55
180-200 50-55
20-25
0,65
170-190 10-15
170-190 15-20
45-50
160-180 45-50
160-180 45-50
ENTRANTES
ENTRADAS
STARTERS
ENTRÉES
VORSPEISEN
Peso
Peso
Weight
Poids
Gewicht
(Kg)
Altura
Posição
Tray Position
Position
Stellung
Función
Função
Cooking
Mode
Fonction
Funktion
Temperat.
Temperat.
Temperat.
Températ.
Temperat.
(
0
C)
Tiempo
Tempo
Time
Temps
Zeit
(min)
Recipiente
Recipiente
Receptacle
Récipient
Gefäß
170-190 35-40
170-190 25-30
180-200 12-20
Inferior
Inferior
Lower
Inférieure
Untere
Media
Media
Intermediate
Moyenne
Mitte
Media
Media
Intermediate
Moyenne
Mitte
Media
Media
Intermediate
Moyenne
Mitte
Media
Media
Intermediate
Moyenne
Mitte
Media
Media
Intermediate
Moyenne
Mitte
Media
Media
Intermediate
Moyenne
Mitte
3172002-009_- 27/06/14 12:43 Página 3

4
Tomates rellenos
Tomates recheados
Stuffed tomatoes
Tomates farcies
Gefüllte Tomaten
Bandeja
Bandeja
Tray
Plateau
Schale
Berenjenas gratinadas
Beringelas gratinadas
Aubergines au gratin
Aubergines gratinées
Überbackenes Gemüse
Lasaña
Lasanha
Lasagne
Lasagne
Lasagne
Bandeja
Bandeja
Tray
Plateau
Schale
Molde
Forma
Shallow dish
Moule
Form
1
1
170-190
200-220
10-15
0,75 160-180 10-15
160-180 10-15
15-20
180-200 25-30
ENTRANTES
ENTRADAS
STARTERS
ENTRÉES
VORSPEISEN
Peso
Peso
Weight
Poids
Gewicht
(Kg)
Altura
Posição
Tray Position
Position
Stellung
Función
Função
Cooking
Mode
Fonction
Funktion
Temperat.
Temperat.
Temperat.
Températ.
Temperat.
(
0
C)
Tiempo
Tempo
Time
Temps
Zeit
(min)
Recipiente
Recipiente
Receptacle
Récipient
Gefäß
Media
Media
Intermediate
Moyenne
Mitte
Media
Media
Intermediate
Moyenne
Mitte
Superior
Superior
Higher
Supérieure
Obere
3172002-009_- 27/06/14 12:43 Página 4

5
Español
Portugues
EnglishFrançaisDeutsch
Besugo
Besugo
Red Bream
Daurade
Graubarsch
Bandeja
Bandeja
Tray
Plateau
Schale
Dorada a la Sal
Dourada no sal
Salted Dorado
Dorade au sel
Goldbrassen mit Salz
Lenguado
Linguado
Sole
Sole
Seezunge
Bandeja
Bandeja
Tray
Plateau
Schale
Bandeja
Bandeja
Tray
Plateau
Schale
Lubina
Robalo
Sea-bass
Bar
Seebarsch
Bandeja
Bandeja
Tray
Plateau
Schale
Merluza
Pescada
Hake
Colin
Seehecht
Bandeja
Bandeja
Tray
Plateau
Schale
Pastel de Pescado
Pudim de Peixe
Fish Pie
Gâteau de poisson
Fischpastete
Molde
Forma
Casserole dish
Moule
Form
Hojaldre de Pescado
Folhado de Peixe
Fish Pastry
Feuilleté de poisson
Blätterteig mit
Fischfüllung
Molde
Forma
Casserole dish
Moule
Form
180-200
190-210
190-210
170-190
190-210
190-210
190-210
30-35
1,5 170-190 25-30
170-190 25-30
25-30
1 180-200 25-30
180-200 25-30
30-35
1 180-200 30-35
180-200 30-35
15-20
1 160-180 10-15
160-180 10-15
20-25
1 180-200 15-20
180-200 15-20
25-30
1,5 180-200 20-25
180-200 20-25
40-45
1,5 170-190 40-45
180-200 50-55
PESCADOS
PEIXES
FISH
POISSONS
FISCH
Peso
Peso
Weight
Poids
Gewicht
(Kg)
Altura
Posição
Tray Position
Position
Stellung
Función
Função
Cooking
Mode
Fonction
Funktion
Temperat.
Temperat.
Temperat.
Températ.
Temperat.
(
0
C)
Tiempo
Tempo
Time
Temps
Zeit
(min)
Recipiente
Recipiente
Receptacle
Récipient
Gefäß
Media
Media
Intermediate
Moyenne
Mitte
Media
Media
Intermediate
Moyenne
Mitte
Media
Media
Intermediate
Moyenne
Mitte
Media
Media
Intermediate
Moyenne
Mitte
Media
Media
Intermediate
Moyenne
Mitte
Media
Media
Intermediate
Moyenne
Mitte
Media
Media
Intermediate
Moyenne
Mitte
3172002-009_- 27/06/14 12:43 Página 5

6
Salmón en Papillote
Salmão em papel
de aluminio
Salmon in greased
paper
Saumon en papillote
Lachs im Schlafrock
Bandeja
Bandeja
Tray
Plateau
Schale
Truchas
Trutas
Trout
Truites
Forellen
Sardinas
Sardinhas
Sardines
Sardines
Sardinen
Bandeja
Bandeja
Tray
Plateau
Schale
Parrilla
Grelha
Grid
Grille
Rost
Filete de pescado
Filete de Peixe
Fillet of Fish
Filet de poisson
Fischfilet
Parrilla
Grelha
Grid
Grille
Rost
0,5
0,5
180-200 20-25
1 170-190 15-20
170-190 15-20
190-210 20-25
1 180-200 15-20
180-200 15-20
170-190 15-20
180-200 15-20
PESCADOS
PEIXES
FISH
POISSONS
FISCH
Peso
Peso
Weight
Poids
Gewicht
(Kg)
Altura
Posição
Tray Position
Position
Stellung
Función
Função
Cooking
Mode
Fonction
Funktion
Temperat.
Temperat.
Temperat.
Températ.
Temperat.
(
0
C)
Tiempo
Tempo
Time
Temps
Zeit
(min)
Recipiente
Recipiente
Receptacle
Récipient
Gefäß
Media
Media
Intermediate
Moyenne
Mitte
Media
Media
Intermediate
Moyenne
Mitte
Superior
Superior
Higher
Supérieure
Obere
Superior
Superior
Higher
Supérieure
Obere
3172002-009_- 27/06/14 12:43 Página 6

7
Español
Portugues
EnglishFrançaisDeutsch
Cochinillo
Leitão
Suckling Pig
Cochon de lait
Spanferkel
Bandeja
Bandeja
Tray
Plateau
Schale
Conejo
Coelho
Rabbit
Lapin
Kaninchen
Fiambre de carne
Fiambre de carne
Joint of Meat
Viande hachée
Fleischpastete
Bandeja
Bandeja
Tray
Plateau
Schale
Molde
Forma
Casserole dish
Moule
Form
Lomo a la Sal
Lombo no sal
Salted Pork Loin
Echine au sel
Lendenstück mit Salz
Bandeja
Bandeja
Tray
Plateau
Schale
Pollo
Frango
Chicken
Poulet
Hähnchen
Bandeja
Bandeja
Tray
Plateau
Schale
Roast-Beef
Rost-Beef
Roast-beef
Rosbif
Roastbeef
Bandeja
Bandeja
Tray
Plateau
Schale
Cordero
Borrego
Lamb
Mouton
Lamm
Bandeja
Bandeja
Tray
Plateau
Schale
1,5
180-200
190-210
170-190
170-190
190-210
190-210
60-65
190-210 75-85
2 170-190 65-75
180-200 80-85
1,5
160-180 45-50
170-190 45-50
170-190 35-40
50-55
1,5 170-190 45-50
180-200 50-55
35-40
160-180 30-35
170-190 30-35
40-45
1 160-180 30-35
170-190 30-35
50-55
1,5
170-190 45-50
170-190 45-50
170-190 40-45
35-40
1 170-190 30-35
180-200 35-40
CARNES
CARNES
MEAT
VIANDES
FLEISCHGERICHTE
Peso
Peso
Weight
Poids
Gewicht
(Kg)
Altura
Posição
Tray Position
Position
Stellung
Función
Função
Cooking
Mode
Fonction
Funktion
Temperat.
Temperat.
Temperat.
Températ.
Temperat.
(
0
C)
Tiempo
Tempo
Time
Temps
Zeit
(min)
Recipiente
Recipiente
Receptacle
Récipient
Gefäß
*
*
Media
Media
Intermediate
Moyenne
Mitte
Media
Media
Intermediate
Moyenne
Mitte
Media
Media
Intermediate
Moyenne
Mitte
Media
Media
Intermediate
Moyenne
Mitte
Media
Media
Intermediate
Moyenne
Mitte
Media
Media
Intermediate
Moyenne
Mitte
Media
Media
Intermediate
Moyenne
Mitte
3172002-009_- 27/06/14 12:43 Página 7

8
Solomillo en Hojaldre
Lombo em Folhado
Fillet Steak Pastry
Feuilleté d’Aloyau
Lendenstück im
Blätterteig
Bandeja
Bandeja
Tray
Plateau
Schale
Brochetas
Espetadas
Brochettes
Brochettes
Medaillons
Salchichas
Salsichas
Sausages
Saucisse
Würstchen
Parrilla
Grelha
Grid
Grille
Rost
Parrilla
Grelha
Grid
Grille
Rost
Hamburguesas
Hamburguers
Hamburguers
Hamburger
Hamburger
Parrilla
Grelha
Grid
Grille
Rost
180-200 35-40
1 160-180 30-35
160-180 30-35
0,5 190-210 5-10
0,5 180-200
5-10
CARNES
CARNES
MEAT
VIANDES
FLEISCHGERICHTE
Peso
Peso
Weight
Poids
Gewicht
(Kg)
Altura
Posição
Tray Position
Position
Stellung
Función
Função
Cooking
Mode
Fonction
Funktion
Temperat.
Temperat.
Temperat.
Températ.
Temperat.
(
0
C)
Tiempo
Tempo
Time
Temps
Zeit
(min)
Recipiente
Recipiente
Receptacle
Récipient
Gefäß
0,5 180-200 15-20
*
*
*
* Se recomienda colocar la pieza de carne sobre la parrilla y la bandeja por debajo, para el escurrido
de jugos o grasa.
* Recomenda-se colocar a porção de carne sobre a grelha com a bandeja por baixo, para recolher
os molhos ou gorduras.
* It is recommended to put the piece of meat on a grid with a tray beneath to collect the stock and
juices.
* Il est recommandé de placer la pièce de viande sur la grille et la lèchefrite en-dessous pour
recueillir les jus de cuisson ou la graisse.
* Es wird empfohlen, das Stück auf den Rost zu legen und die Auffangschale darunter einzusetzen,
um Bratensaft und Fett aufzufangen.
Media
Media
Intermediate
Moyenne
Mitte
Superior
Superior
Higher
Supérieure
Obere
Superior
Superior
Higher
Supérieure
Obere
Superior
Superior
Higher
Supérieure
Obere
3172002-009_- 27/06/14 12:43 Página 8

9
Español
Portugues
EnglishFrançaisDeutsch
Bizcocho Esponjoso
Bolo esponjoso
Sponge Cake
Biscuit moelleux
Rührkuchen
Molde
Forma
Cake Mould
Moule
Form
Brazo de Gitano
Bolo com creme
Swiss Roll
Biscuit Roulé
Gefüllte Blätterteigrolle
Galletas
Bolachas
Biscuits
Petits gâteaux
Plätzchen
Bandeja
Bandeja
Tray
Plateau
Schale
Bandeja
Bandeja
Tray
Plateau
Schale
Hojaldre
Folhado
Vol-au-vents
Feuilleté
Blätterteig
Bandeja
Bandeja
Tray
Plateau
Schale
Magdalenas
Bolinhos de farinha,
leite e ovos
Cup Cakes
Madeleines
Bärentatzen
Bandeja
Bandeja
Tray
Plateau
Schale
Flan
Pudim
Flan
Flan
Karamelpudding
Molde
Forma
Bread Mould
Moule
Form
170-190
170-190
160-170
160-180
170-190
160-180
35-40
0,5 160-180 30-35
160-180 30-35
10-15
0,3 160-180 10-15
160-180 10-15
60-65
0,5 150-160 55-60
160-170 55-60
20-25
0,5 150-160 20-25
150-170 15-20
15-20
0,25 150-170 15-20
170-180 15-20
25-30
0,5
150-170 20-25
150-170 25-30
REPOSTERÌA
CONFEITARIA
CAKES AND DESSERTS
PÂTISSERIE
NACHTISCH
Peso
Peso
Weight
Poids
Gewicht
(Kg)
Altura
Posição
Tray Position
Position
Stellung
Función
Função
Cooking
Mode
Fonction
Funktion
Temperat.
Temperat.
Temperat.
Températ.
Temperat.
(
0
C)
Tiempo
Tempo
Time
Temps
Zeit
(min)
Recipiente
Recipiente
Receptacle
Récipient
Gefäß
160-180 20-25
Inferior
Inferior
Lower
Inférieure
Untere
Media
Media
Intermediate
Moyenne
Mitte
Media
Media
Intermediate
Moyenne
Mitte
Media
Media
Intermediate
Moyenne
Mitte
Media
Media
Intermediate
Moyenne
Mitte
Media
Media
Intermediate
Moyenne
Mitte
3172002-009_- 27/06/14 12:43 Página 9

10
Merengue
Merengue
Meringue
Meringue
Baiser
Bandeja
Bandeja
Tray
Plateau
Schale
Plátanos al horno
Bananas ao forno
Baked bananas
Bananes au four
Gebackene Bananen
Plum-Cake
Plum-Cake
Plum-Cake
Plum-Cake
Plumcake
Molde
Forma
Casserole dish
Moule
Form
Molde
Forma
Cake Mould
Moule
Form
Tarta de Manzana
Tarte de Maçã
Apple Pie
Tarte aux pommes
Apfelkuchen
Bandeja
Bandeja
Tray
Plateau
Schale
Palmeras de hojaldre
Palmieas
Puff-pastry biscuits
Palmiers
Schweinsohren
Bandeja
Bandeja
Tray
Plateau
Schale
100-120
170-190
180-200
170-190
170-190
70-75
0,2 100-120 65-70
100-120 60-65
20-25
160-180 15-20
0,5
160-180 15-20
170-190 10-15
20-25
0,25 170-190 15-20
170-190 20-25
60-65
0,5 160-180 55-60
160-180 50-55
50-55
1 160-180 45-50
160-180 45-50
REPOSTERÌA
CONFEITARIA
CAKES AND DESSERTS
PÂTISSERIE
NACHTISCH
Peso
Peso
Weight
Poids
Gewicht
(Kg)
Altura
Posição
Tray Position
Position
Stellung
Función
Função
Cooking
Mode
Fonction
Funktion
Temperat.
Temperat.
Temperat.
Températ.
Temperat.
(
0
C)
Tiempo
Tempo
Time
Temps
Zeit
(min)
Recipiente
Recipiente
Receptacle
Récipient
Gefäß
Media
Media
Intermediate
Moyenne
Mitte
Media
Media
Intermediate
Moyenne
Mitte
Media
Media
Intermediate
Moyenne
Mitte
Media
Media
Intermediate
Moyenne
Mitte
Media
Media
Intermediate
Moyenne
Mitte
Manzanas Asadas
Maçãs assadas
Baked Apples
Pommes au four
Backäpfel
Bandeja
Bandeja
Tray
Plateau
Schale
170-190
35-40
1 25-30
170-190 30-35
180-200
Media
Media
Intermediate
Moyenne
Mitte
3172002-009_- 27/06/14 12:43 Página 10

11
Español
Portugues
EnglishFrançaisDeutsch
Tarta de Queso
Tarte de Queijo
Cheesecake
Tarte au fromage
Quarktorte
Molde
Forma
Cheescake Mould
Moule
Form
Tarta de manzana al Hojaldre
Tarte de Maçã com Massa Folhada
Apple Pastry
Tarte feuilletée aux pommes
Apfelkuchen mit Blätterteig
Molde
Forma
Cake Mould
Moule
Form
Yogur
Iogurte
Yoghurt
Yaourt
Joghurt
1 litro
1 litro
1 litre
1 litre
1 Liter
8 horas
8 horas
8 hours
8 heures
8 Stunden
Vasos de yogur
Copos de iogurte
Yoghurt pots
Pots de yaourt
Joghurtbecher
180-200 45-50
1 170-190 40-45
170-190 35-40
(1)
50
1,5 170-190 55-60
REPOSTERÌA
CONFEITARIA
CAKES AND DESSERTS
PÂTISSERIE
NACHTISCH
Peso
Peso
Weight
Poids
Gewicht
(Kg)
Altura
Posição
Tray Position
Position
Stellung
Función
Função
Cooking
Mode
Fonction
Funktion
Temperat.
Temperat.
Temperat.
Températ.
Temperat.
(
0
C)
Tiempo
Tempo
Time
Temps
Zeit
(min)
Recipiente
Recipiente
Receptacle
Récipient
Gefäß
Media
Media
Intermediate
Moyenne
Mitte
Media
Media
Intermediate
Moyenne
Mitte
(1) Colocar los vasos de yogur directamente en el suelo del horno.
(1) Colocar os copos de iogurte directamente na base do forno.
(1) Place the yoghurt pots directly on the bottom of the oven.
(1) Placer directement les pots de yaourt sur la sole du four.
(1) Die Joghurtbecher direkt auf den Boden des Ofens stellen.
3172002-009_- 27/06/14 12:43 Página 11

Nuestra aportación a la protección del medio-ambiente: utilizamos papel reciclado.
A nossa contribução para a protecção do ambiente: utilizamos papel reciclado.
Our contribution to enviromental protection: we use recycled paper.
Notre contribution à la protection de l’environnement : nous utilisons du papier recyclé.
Unser Beitrag zum Umweltschutz: wir verwenden umweltfreundliches Papier.
Cod.: 83172002/3172002-009
3172002-009_- 27/06/14 12:43 Página 12

Tabelle di cottura
FORNO
Kooktabellen
OVEN
Πίνακες Μαγειρέματος
ΦΟΥΡΝΟΣ
Кулинарные таблицы
ДУХОВОЙ ШКАФ
3172423-002_teka013_- 25/06/14 14:15 Página 1

Italiano
I tempi e le temperature riportati nelle tabelle sono indicativi. Le funzioni di
cottura variano da modello a modello. In generale è raccomandabile preris-
caldare il forno vuoto utilizzando la funzione o . Il tempo di preris-
caldamento termina quando si spegne la spia pilota di riscaldamento.
Nederlands
De in de tabellen aangegeven tijden en temperaturen zijn slechts richtlijnen.
De kookfuncties zijn afhankelijk van ieder model. In het algemeen is het raad-
zaam om de oven leeg voor te verwarmen op de functie of . De voor-
verwarmtijd eindigt als het lampje uit gaat.
Στους Πίνακες Μαγειρέματος θα βρείτε παραδείγματα για την θερμοκρασία και
την, κατά προσέγγιση, διάρκεια μαγειρέματος. Οι λειτουργίες μαγειρέματος
διαφέρουν από μοντέλο σε μοντέλο. Συνιστάται πριν το μαγείρεμα να
προθερμαίνετε τον άδειο φούρνο με τη λειτουργία ή . Ο φούρνος σας
έχει προθερμανθεί όταν σβήσει η φωτεινή ένδειξη θέρμανσης.
Время и температура указанные в кулинарных таблицах являются
ориентировочными. Функции готовки зависят от конкретной модели. В
общем, рекомендуется предварительно нагреть пустую духовку при
функции или . Отключение индикатора нагрева указывает на
окончание времени предварительного нагрева духовки.
3172423-002_teka013_- 25/06/14 14:15 Página 2

3
Italiano
Nederlands
Ελληνικά Русский
Riso al forno
Gebakken rijst
Ρύζι στο φούρνο
Рис в духовке
Stampo/recipiente
per la cottura
del riso
Paellera
Ρηχό σκεύος
Специальная
сковорода
(паэльера)
Torta salata
Pasteitje
Πίτα
Пирог
Tortino di verdure
Groentetaart
Πίτα με λαχανικά
Овощной пирог
Vassoio
Plaat
Ταψί
Противень
Stampo
Vorm
Φόρμα
Форма
Patate arrosto
Gepofte aardappelen
Πατάτες ψητές
Запеченый картофель
Vassoio
Plaat
Ταψί
Противень
Pizza
Pizza
Πίτσα
Пицца
Griglia
Grill
Σχάρα
Решетка
Quiche
Quiche
Κις
Киш
Stampo
Vorm
Φόρμα
Форма
Sfoglia di verdure
Bladerdeeg met
groentevulling
Σφολιάτα με λαχανικά
Слойка с овощами
Stampo
Vorm
Φόρμα
Форма
1,5
1
1,5
1
1,5
0,35
180-200
170-190
190-210
190-210
180-200
190-210
180-200
45-50
170-190 35-40
45-50
160-180 30-35
160-180 30-35
35-40
170-190 30-35
170-190 35-40
55-60
170-190 45-50
170-190 50-55
60-65
180-200 50-55
180-200 50-55
20-25
0,65
170-190 10-15
170-190 15-20
45-50
160-180 45-50
160-180 45-50
ANTIPASTI
VOORGERECHTEN
Peso
Gewicht
(Kg)
Altezza
Hoogte
ππ
Funzione
Functie
Temp.
Temperat.
(
0
C)
Tempo
Tijdsduur
(min)
Recipiente
Schaal
170-190 35-40
170-190 25-30
180-200 12-20
Inferiore
Laag
Χαμηλότερο
Нижний
Media
Midden
Μεσαίο
Средний
Media
Midden
Μεσαίο
Средний
Media
Midden
Μεσαίο
Средний
Media
Midden
Μεσαίο
Средний
Media
Midden
Μεσαίο
Средний
Media
Midden
Μεσαίο
Средний
3172423-002_teka013_- 25/06/14 14:15 Página 3

4
Pomodori ripieni
Gevulde tomaten
Τομάτες γεμιστές
Фаршированые
помидоры
Vassoio
Plaat
Ταψί
Противень
Melanzane gratinate
Gegratineerde
aubergines
Μελιτζάνες ογκρατέν
Запеченые
баклажаны
Lasagne
Lasagne
Λαζάνια
Лазанья
Vassoio
Plaat
Ταψί
Противень
Stampo
Vorm
Φόρμα
Форма
1
1
170-190
200-220
10-15
0,75 160-180 10-15
160-180 10-15
15-20
180-200 25-30
ANTIPASTI
VOORGERECHTEN
Peso
Gewicht
(Kg)
Altezza
Hoogte
ππ
Funzione
Functie
Temp.
Temperat.
(
0
C)
Tempo
Tijd
(min)
Recipiente
Schaal
Media
Midden
Μεσαίο
Средний
Media
Midden
Μεσαίο
Средний
Superiore
Hoog
Υψηλότερο
Верхний
3172423-002_teka013_- 25/06/14 14:15 Página 4

5
Pagello
Zeebrasem
Φαγκρί
Красноперый спар
Vassoio
Plaat
Ταψί
Противень
Orata al sale
Goudbrasem in zout
Τσιπούρα σε
κρούστα αλατιού
Дорада в соли
Sogliola
Zeetong
Γλώσσα
Камбала
Vassoio
Plaat
Ταψί
Противень
Vassoio
Plaat
Ταψί
Противень
Spigola
Zeebaars
Λαυράκι
Лаврак
Vassoio
Plaat
Ταψί
Противень
Merluzzo
Heek
Μπακαλιάρος
Мерлан
Vassoio
Plaat
Ταψί
Противень
Tortino di pesce
Vispastei
Πίτα ψαριού
Рыбный пирог
Stampo
Vorm
Φόρμα
Форма
Sfoglia di pesce
Bladerdeeg
met visvulling
Σφολιάτα με ψάρι
Слойка с рыбой
Stampo
Vorm
Φόρμα
Форма
180-200
190-210
190-210
170-190
190-210
190-210
190-210
30-35
1,5 170-190 25-30
170-190 25-30
25-30
1 180-200 25-30
180-200 25-30
30-35
1 180-200 30-35
180-200 30-35
15-20
1 160-180 10-15
160-180 10-15
20-25
1 180-200 15-20
180-200 15-20
25-30
1,5 180-200 20-25
180-200 20-25
40-45
1,5 170-190 40-45
180-200 50-55
PESCE
VISGERECHTEN
Peso
Gewicht
(Kg)
Altezza
Hoogte
ππ
Funzione
Functie
Temp.
Temperat.
(
0
C)
Tempo
Tijd
(min)
Recipiente
Schaal
Media
Midden
Μεσαίο
Средний
Media
Midden
Μεσαίο
Средний
Media
Midden
Μεσαίο
Средний
Media
Midden
Μεσαίο
Средний
Media
Midden
Μεσαίο
Средний
Media
Midden
Μεσαίο
Средний
Media
Midden
Μεσαίο
Средний
Italiano
Nederlands
Ελληνικά Русский
3172423-002_teka013_- 25/06/14 14:15 Página 5

6
Salmone al cartoccio
Zalm in Papillot
Σολομός σε λαδόχαρτο
Лосось папильот
Vassoio
Plaat
Ταψί
Противень
Trota
Forellen
Πέστροφες
Форель
Sardine
Sardines
Σαρδέλες
Сардины
Vassoio
Plaat
Ταψί
Противень
Griglia
Grill
Σχάρα
Решетка
Filetto di pesce
Visfilet
Φιλέτο ψαριού
Филе рыбы
Griglia
Grill
Σχάρα
Решетка
0,5
0,5
180-200 20-25
1 170-190 15-20
170-190 15-20
190-210 20-25
1 180-200 15-20
180-200 15-20
170-190 15-20
180-200 15-20
PESCE
VISGERECHTEN
Peso
Gewicht
(Kg)
Altezza
Hoogte
ππ
Funzione
Functie
Temp.
Temperat.
(
0
C)
Tempo
Tijd
(min)
Recipiente
Schaal
Media
Midden
Μεσαίο
Средний
Media
Midden
Μεσαίο
Средний
Superiore
Hoog
Υψηλότερο
Верхний
Superiore
Hoog
Υψηλότερο
Верхний
3172423-002_teka013_- 25/06/14 14:15 Página 6

7
Lattonzolo
Speenvarken
Γουρουνόπουλο
Поросенок
Vassoio
Plaat
Ταψί
Противень
Coniglio
Konijn
Κουνέλι
Кролик
Polpettone
Vleesschotel
Ρολό κιμά
Мясной пирог
Vassoio
Plaat
Ταψί
Противень
Stampo
Vorm
Φόρμα
Форма
Lombata al sale
Lendenstuk in zout
Χοιρινό φιλέτο
σε κρούστα αλατιού
Вырезка в соли
Vassoio
Plaat
Ταψί
Противень
Pollo
Kip
Κοτόπουλο
Курица
Vassoio
Plaat
Ταψί
Противень
Roast-beef
Rosbief
Ροστ μπιφ
Ростбиф
Vassoio
Plaat
Ταψί
Противень
Agnello
Lam
Αρνί
Ягненок
Vassoio
Plaat
Ταψί
Противень
1,5
180-200
190-210
170-190
170-190
190-210
190-210
60-65
190-210 75-85
2 170-190 65-75
180-200 80-85
1,5
160-180 45-50
170-190 45-50
170-190 35-40
50-55
1,5 170-190 45-50
180-200 50-55
35-40
160-180 30-35
170-190 30-35
40-45
1 160-180 30-35
170-190 30-35
50-55
1,5
170-190 45-50
170-190 45-50
170-190 40-45
35-40
1 170-190 30-35
180-200 35-40
CARNE
VLEESGERECHTEN
Peso
Gewicht
(Kg)
Altezza
Hoogte
ππ
Funzione
Functie
Temp.
Temperat.
(
0
C)
Tempo
Tijd
(min)
Recipiente
Schaal
*
*
Media
Midden
Μεσαίο
Средний
Media
Midden
Μεσαίο
Средний
Media
Midden
Μεσαίο
Средний
Media
Midden
Μεσαίο
Средний
Media
Midden
Μεσαίο
Средний
Media
Midden
Μεσαίο
Средний
Media
Midden
Μεσαίο
Средний
Italiano
Nederlands
Ελληνικά Русский
3172423-002_teka013_- 25/06/14 14:15 Página 7

8
Filetto in pasta sfoglia
Lendenstuk
in bladerdeeg
Φιλέτο σε σφολιάτα
Филе в слоеном тесте
Vassoio
Plaat
Ταψί
Противень
Spiedini
Grillspiesen
Σουβλάκια
Шашлыки
Salsicce
Worstjes
Λουκάνικα
Сосиски
Griglia
Grill
Σχάρα
Решетка
Griglia
Grill
Σχάρα
Решетка
Hamburger
Hamburgers
Μπιφτέκια
Гамбургер
Griglia
Grill
Σχάρα
Решетка
180-200 35-40
1 160-180 30-35
160-180 30-35
0,5 190-210 5-10
0,5 180-200
5-10
CARNE
VLEESGERECHTEN
0,5 180-200 15-20
*
*
*
* Si consiglia di collocare il pezzo di carne sulla griglia e il vassoio al di sotto, per raccogliere il liquido
o i grassi di cottura.
* Wij raden aan om het vlees op de grill te leggen met de ovenplaat eronder om het sap of vet in op
te vangen.
* Συνιστάται να τοποθετείτε το κρέας πάνω στη σχάρα με το ταψί από κάτω για να στραγγίζουν τα
υγρά ή το λίπος.
* Рекомендуется уложить кусок мяса на решетку и поставить под нее специальный поднос для
сбора стекающего жира и сока.
Media
Midden
Μεσαίο
Средний
Superiore
Hoog
Υψηλότερο
Верхний
Superiore
Hoog
Υψηλότερο
Верхний
Superiore
Hoog
Υψηλότερο
Верхний
Peso
Gewicht
(Kg)
Altezza
Hoogte
ππ
Funzione
Functie
Temp.
Temperat.
(
0
C)
Tempo
Tijd
(min)
Recipiente
Schaal
3172423-002_teka013_- 25/06/14 14:15 Página 8

9
Pandispagna
Luchtige cake
Κέικ αφράτο
Воздушный бисквит
Stampo
Vorm
Φόρμα
Форма
Tronchetto del gitano
Opgerolde cake
met vulling
Ρολό πουτίγκα
"Полено"
Biscotti
Koekjes
Μπισκότα
Печенье
Vassoio
Plaat
Ταψί
Противень
Vassoio
Plaat
Ταψί
Противень
Pasta sfoglia
Bladerdeeg
Σφολιάτα
Слойка
Vassoio
Plaat
Ταψί
Противень
Madeleine
Muffins
Ατομικά κέικ
Булочки
Vassoio
Plaat
Ταψί
Противень
Latte alla portoghese
Karamelpudding
Τάρτα
Флен
Stampo
Vorm
Φόρμα
Форма
170-190
170-190
160-170
160-180
170-190
160-180
35-40
0,5 160-180 30-35
160-180 30-35
10-15
0,3 160-180 10-15
160-180 10-15
60-65
0,5 150-160 55-60
160-170 55-60
20-25
0,5 150-160 20-25
150-170 15-20
15-20
0,25 150-170 15-20
170-180 15-20
25-30
0,5
150-170 20-25
150-170 25-30
DOLCI
NAGERECHTEN
160-180 20-25
Inferiore
Onder
Χαμηλότερο
Нижний
Media
Midden
Μεσαίο
Средний
Media
Midden
Μεσαίο
Средний
Media
Midden
Μεσαίο
Средний
Media
Midden
Μεσαίο
Средний
Media
Midden
Μεσαίο
Средний
Italiano
Nederlands
Ελληνικά Русский
Peso
Gewicht
(Kg)
Altezza
Hoogte
ππ
Funzione
Functie
Temp.
Temperat.
(
0
C)
Tempo
Tijd
(min)
Recipiente
Schaal
3172423-002_teka013_- 25/06/14 14:15 Página 9

10
Meringa
Schuimtaart
Μαρέγκα
Безе
Vassoio
Plaat
Ταψί
Противень
Banane al forno
Gebakken bananen
Μπανάνες ψητές
Запеченый банан
Plum-cake
Plumcake
Plum-Cake
(κέικ με φρούτα)
Плюм-кейк
Stampo
Vorm
Φόρμα
Форма
Stampo
Vorm
Φόρμα
Форма
Torta di mele
Appeltaart
Μηλόπιτα
Яблочный пирог
Vassoio
Plaat
Ταψί
Противень
Ventagli di sfoglia
Vlindergebak
Μικρά γλυκά σφολιάτας
Слойки
Vassoio
Plaat
Ταψί
Противень
100-120
170-190
180-200
170-190
170-190
70-75
0,2 100-120 65-70
100-120 60-65
20-25
160-180 15-20
0,5
160-180 15-20
170-190 10-15
20-25
0,25 170-190 15-20
170-190 20-25
60-65
0,5 160-180 55-60
160-180 50-55
50-55
1 160-180 45-50
160-180 45-50
DOLCI
NAGERECHTEN
Media
Midden
Μεσαίο
Средний
Media
Midden
Μεσαίο
Средний
Media
Midden
Μεσαίο
Средний
Media
Midden
Μεσαίο
Средний
Media
Midden
Μεσαίο
Средний
Mele al forno
Gepofte appel
Μήλα ψητά
Запеченые яблоки
Vassoio
Plaat
Ταψί
Противень
170-190
35-40
1 25-30
170-190 30-35
180-200
Media
Midden
Μεσαίο
Средний
Peso
Gewicht
(Kg)
Altezza
Hoogte
ππ
Funzione
Functie
Temp.
Temperat.
(
0
C)
Tempo
Tijd
(min)
Recipiente
Schaal
3172423-002_teka013_- 25/06/14 14:15 Página 10

11
Cheese cake
Kwarktaart
Τσιζκέικ
Сырный торт
Stampo
Vorm
Φόρμα
Форма
Torta di mele in sfoglia
Appeltaart
van bladerdeeg
Μηλόπιτα με
βάση σφολιάτας
Шарлотка
Stampo
Vorm
Φόρμα
Форма
Yogurt
Yoghurt
Γιαούρτι
Йогурт
1 litro
1 liter
1 λίτρο
1 литр
8 ore
8 uur
8 ώρες
8 часов
Stampo Copos
de iogurte
Yoghurtpotten
Βαζάκια
γιαουρτιού
Стаканчики
для йогурта
180-200 45-50
1 170-190 40-45
170-190 35-40
(1)
50
1,5 170-190 55-60
DOLCI
NAGERECHTEN
Media
Midden
Μεσαίο
Средний
Media
Midden
Μεσαίο
Средний
(1) Sistemare i bicchierini di yogurt direttamente sulla base del forno.
(1) Plaats de yoghurtpotten rechtstreeks op de bodem van de oven.
(1) Τοποθετείτε τα βαζάκια γιαουρτιού απευθείας στον πυθμένα του φούρνου.
(1) Установить стаканчики для йогурта непосредственно на дно духовки.
Italiano
Nederlands
Ελληνικά Русский
Peso
Gewicht
(Kg)
Altezza
Hoogte
ππ
Funzione
Functie
Temp.
Temperat.
(
0
C)
Tempo
Tijd
(min)
Recipiente
Schaal
3172423-002_teka013_- 25/06/14 14:15 Página 11

Desideriamo anche noi dare il nostro contributo all'ambiente; per questo la carta che utilizziamo è riciclata.
Onze bijdrage aan de bescherming van het milieu: wij gebruiken kringlooppapier.
Η συμβολή μας στην προστασία του περιβάλλοντος: χρησιμοποιούμε ανακυκλωμένο χαρτί.
Наш вклад в защиту окружающей среды: используем переработанную бумагу.
Cod.: 83172423/3172423-002
3172423-002_teka013_- 25/06/14 14:15 Página 12
-
 1
1
-
 2
2
-
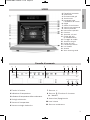 3
3
-
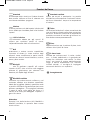 4
4
-
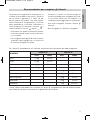 5
5
-
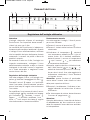 6
6
-
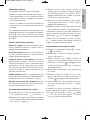 7
7
-
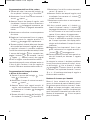 8
8
-
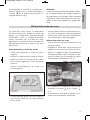 9
9
-
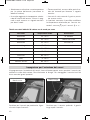 10
10
-
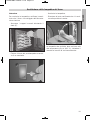 11
11
-
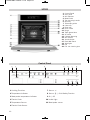 12
12
-
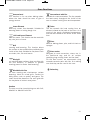 13
13
-
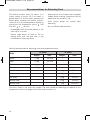 14
14
-
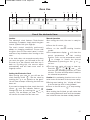 15
15
-
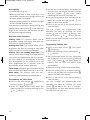 16
16
-
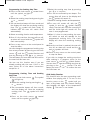 17
17
-
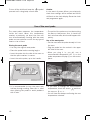 18
18
-
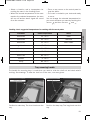 19
19
-
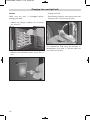 20
20
-
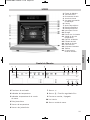 21
21
-
 22
22
-
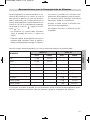 23
23
-
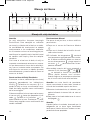 24
24
-
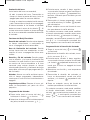 25
25
-
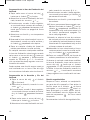 26
26
-
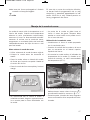 27
27
-
 28
28
-
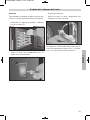 29
29
-
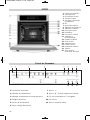 30
30
-
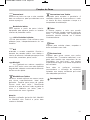 31
31
-
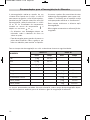 32
32
-
 33
33
-
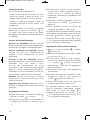 34
34
-
 35
35
-
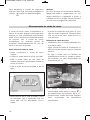 36
36
-
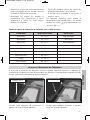 37
37
-
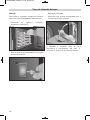 38
38
-
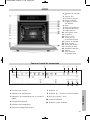 39
39
-
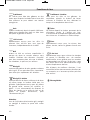 40
40
-
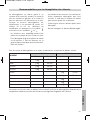 41
41
-
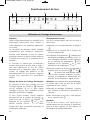 42
42
-
 43
43
-
 44
44
-
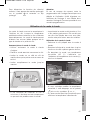 45
45
-
 46
46
-
 47
47
-
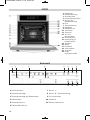 48
48
-
 49
49
-
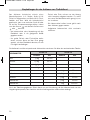 50
50
-
 51
51
-
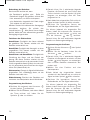 52
52
-
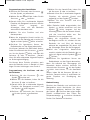 53
53
-
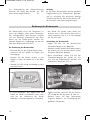 54
54
-
 55
55
-
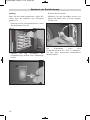 56
56
-
 57
57
-
 58
58
-
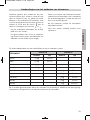 59
59
-
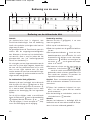 60
60
-
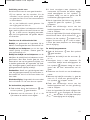 61
61
-
 62
62
-
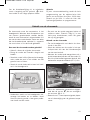 63
63
-
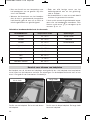 64
64
-
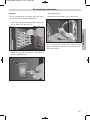 65
65
-
 66
66
-
 67
67
-
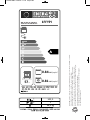 68
68
-
 69
69
-
 70
70
-
 71
71
-
 72
72
-
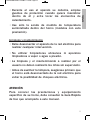 73
73
-
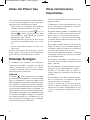 74
74
-
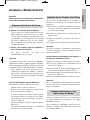 75
75
-
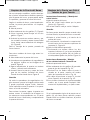 76
76
-
 77
77
-
 78
78
-
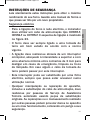 79
79
-
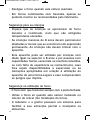 80
80
-
 81
81
-
 82
82
-
 83
83
-
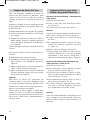 84
84
-
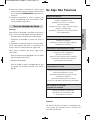 85
85
-
 86
86
-
 87
87
-
 88
88
-
 89
89
-
 90
90
-
 91
91
-
 92
92
-
 93
93
-
 94
94
-
 95
95
-
 96
96
-
 97
97
-
 98
98
-
 99
99
-
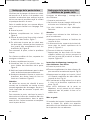 100
100
-
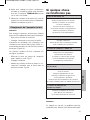 101
101
-
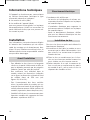 102
102
-
 103
103
-
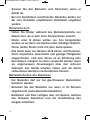 104
104
-
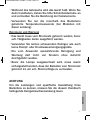 105
105
-
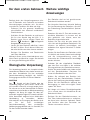 106
106
-
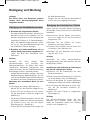 107
107
-
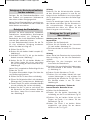 108
108
-
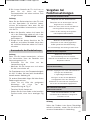 109
109
-
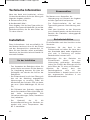 110
110
-
 111
111
-
 112
112
-
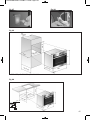 113
113
-
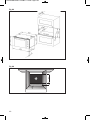 114
114
-
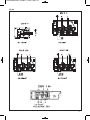 115
115
-
 116
116
-
 117
117
-
 118
118
-
 119
119
-
 120
120
-
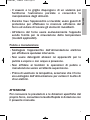 121
121
-
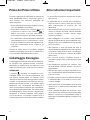 122
122
-
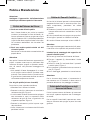 123
123
-
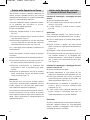 124
124
-
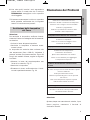 125
125
-
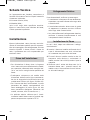 126
126
-
 127
127
-
 128
128
-
 129
129
-
 130
130
-
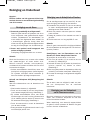 131
131
-
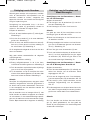 132
132
-
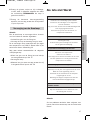 133
133
-
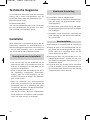 134
134
-
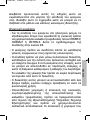 135
135
-
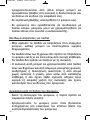 136
136
-
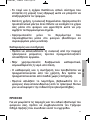 137
137
-
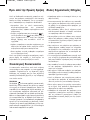 138
138
-
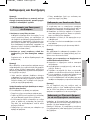 139
139
-
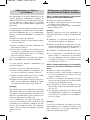 140
140
-
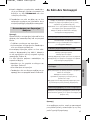 141
141
-
 142
142
-
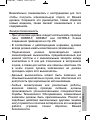 143
143
-
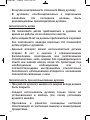 144
144
-
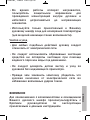 145
145
-
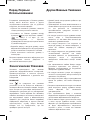 146
146
-
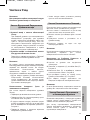 147
147
-
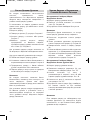 148
148
-
 149
149
-
 150
150
-
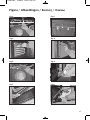 151
151
-
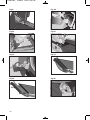 152
152
-
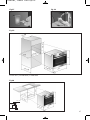 153
153
-
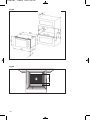 154
154
-
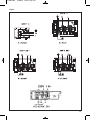 155
155
-
 156
156
-
 157
157
-
 158
158
-
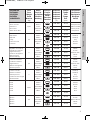 159
159
-
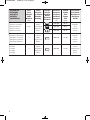 160
160
-
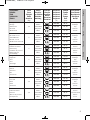 161
161
-
 162
162
-
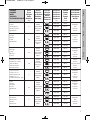 163
163
-
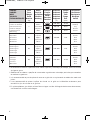 164
164
-
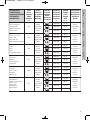 165
165
-
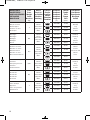 166
166
-
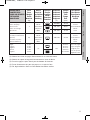 167
167
-
 168
168
-
 169
169
-
 170
170
-
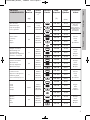 171
171
-
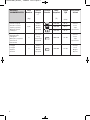 172
172
-
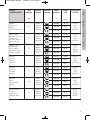 173
173
-
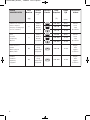 174
174
-
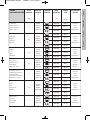 175
175
-
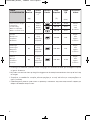 176
176
-
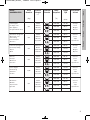 177
177
-
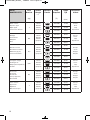 178
178
-
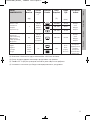 179
179
-
 180
180


Barazza 1FFYPI Instrucciones de operación
- Categoría
- Microondas
- Tipo
- Instrucciones de operación
en otros idiomas
- français: Barazza 1FFYPI Mode d'emploi
- italiano: Barazza 1FFYPI Istruzioni per l'uso
- Deutsch: Barazza 1FFYPI Bedienungsanleitung
- Nederlands: Barazza 1FFYPI Handleiding
- português: Barazza 1FFYPI Instruções de operação
Otros documentos
-
Teka HX-740 El manual del propietario
-
-
Foster KE multifunzione 9F Especificación
-
Whirlpool AKP 805/IX Guía del usuario
-
-
Foster KE 9F 6O MTL INOX Features List
-
Bertazzoni F60CONXA El manual del propietario
-
Foster KE multifunzione 5F Manual de usuario
-
Foster FL-F90 MTL Guía de inicio rápido
-