Foster FL-F90 MTL Guía de inicio rápido
- Categoría
- Barbacoas
- Tipo
- Guía de inicio rápido

Guida rapida di utilizzo
Hoja de Características
Guia Ràpido de Utilização
Quick Start Guide
Mode d’emploi rapide
Gebrauchsanleitung
Gebruiksaanwijzing
Краткое руководство по эксплуатации
FL-F90 MTL


3
FL-F90 MTL
1 Fissaggio al mobile
2 Uscita aria
3 Resistenza doppio
grill apribile
4 Supporti teglie/
guide telescopiche
5 Griglia traforata
6 Ventola
7 Vassoio per arrosto
8 Cerniera
9 Sportello
10 Pannello frontale comandi
11 Luci
Nei Paesi diversi dalla Spagna, gli accessori potrebbero non corrispondere a quelli descritti nel
presente manuale.
Pannello di controllo
1 Orologio elettronico
2 Selettore funzioni
3 Selettore temperature
2
1
3
ITALIANO

4
Spegnimento
Cottura statica
Utilizzata per torte e pan di spagna che richiedo-
no un calore uniforme per ottenere la consisten-
za spugnosa.
Cottura ventilata
Adatta per torte e arrosti. La ventola diffonde il
calore all'interno del forno in modo uniforme.
Grill
Per preparare cibi con doratura superficiale.
Consente di gratinare lo strato esterno senza modi-
ficare la parte interna. Ideali per cibi sottili, come
bistecche, costolette, pesce e pane tostato.
MaxiGrill
Consente di preparare quantità maggiori, rispet-
to al grill, e con maggiore potenza, riducendo, in
tal modo, il tempo di doratura.
MaxiGrill ventilato
Permette di arrostire in maniera uniforme e gra-
tinare le superfici contemporaneamente. Ideale
per grigliati. Specifico per pezzi di grandi dimen-
sioni, come pollame, selvaggina, ecc. Si consi-
glia di sistemare la carne su una griglia con un
vassoio sotto per raccogliere i liquidi e i grassi di
cottura.
Attenzione
Durante l'uso del Grill, MaxiGrill o del MaxiGrill
ventilato, la porta deve rimanere chiusa.
Turbo
La ventola distribuisce il calore proveniente dalla
resistenza nella parte posteriore del forno. La
temperatura uniforme consente di cucinare gli
alimenti su due altezze contemporaneamente.
Elemento inferiore
Il calore proviene soltanto dalla parte inferiore.
Indicato per riscaldare i piatti e far lievitare
impasti.
Inferiore ventilato
Distribuisce il calore che proviene dalla parte
inferiore del forno. Ideale per dolci con ripieno di
marmellata o frutta, che richiedono un apporto
di calore inferiore. È sempre necessario un pre-
riscaldamento.
Grill e Inferiore
Particolarmente adatta per agli arrosti. Si utilizza
per qualsiasi pezzo di carne, indipendentemente
dalle sue dimensioni.
Nota
La lampadina resta accesa con qualsiasi funzio-
ne di cottura.
Funzioni del forno

5
Attenzione
L'orologio è dotato di tecnologia Touch-
Control. Per attivarlo basta toccare i simboli
sul vetro con un dito.
La sensibilita del touch control si adatta
costantemente alle condizioni ambientali.
Prima di collegare il forno, verificare che la
superficie in vetro del pannello di controllo sia
pulita e libera da qualsiasi ostacolo.
Nel caso in cui l'orologio non rispondesse toccando
il vetro con il dito, scollegare il forno e attendere
qualche secondo prima di ricollegarlo. In tal modo,
i sensori si regoleranno automaticamente e torne-
ranno a rispondere al tocco del dito.
Impostazione dell'ora
Quando si collega il forno all'alimentazione elet-
trica, l'indicazione 00:00 comincerà a lampeggia-
re sul display. Premere – o + per impostare l'ora.
L'orologio emette due bip per confermare l'ora
selezionata.
Per modificare l'ora, premere – o + fino a
quando l'ora corrente lampeggia sul display.
Premere OK. In seguito, premere – o + per
modificare l'ora. L'orologio emette due bip per
confermare l'avvenuta modifica.
Funzionamento Manuale
Una volta impostato l'orologio, il forno è pron-
to all'uso. Selezionare una funzione di cottu-
ra e una temperatura.
Quando si avvia la cottura, il simbolo si
illumina per indicare che il forno si sta riscal-
dando; raggiunta la temperatura selezionata,
il simbolo si spegne.
Portare i comandi su per spegnere il
forno.
Funzioni del'orologio elettronico
Allarme: Emette una segnalazione acustica
allo scadere del tempo impostato; il forno non
deve necessariamente essere in uso per uti-
lizzare questa funzione.
Tempo di cottura: consente di impostare il
tempo di cottura, trascorso il quale, il forno si
spegne automaticamente.
Fine Tempo Cottura: Consente di cuocere fino
a un orario definito, trasarso il quale, il forno
si spegne automaticamente.
Tempo di cottura e Fine Tempo Cottura: Per
definire il tempo e l'ora di fine cottura.
Impostando questa funzione, il forno si accen-
derà automaticamente all'ora desiderata per
cuocere per il tempo impostato (Tempo di cot-
tura) e terminare automaticamente la cottura
all'ora stabilita (Fine cottura).
Programmazione dell'allarme
1 Premere + fino a quando il simbolo si
illumina. Premere OK.
2 Premere – o + per impostare il tempo dopo il
quale si desidera emettere la segnalazione
acustica.
3 L'orologio emetterà due bip, si visualizzerà
l'ora corrente e il simbolo s'illuminerà in
maniera fissa per indicare che l'allarme è
stato impostato.
4 Trascorso il tempo impostato, verrà emessa
la segnalazione acustica e il simbolo
comincerà a lampeggiare.
5 L'allarme si disattiva premendo qualsiasi
tasto. Il simbolo si spegne.
Si può visualizzare il tempo rimanente in qual-
siasi momento, premendo – o + fino a quando
il simbolo lampeggia e poi premendo OK. A
questo punto, premere – o + per modificare il
tempo impostato. L'orologio emette due bip
per confermare l'avvenuta modifica.
Se si desidera visualizzare il tempo residuo
per tutto il tempo impostato, premere – o +
fino a quando il simbolo comincia a lam-
peggiare e poi tenere premuto il tasto OK. Il
simbolo lampeggerà. Tenere premuto il
tasto OK per tornare all'ora reale.
Uso del forno
ITALIANO

6
Impostazione del tempo di cottura
1 Premere – o + fino a quando il simbolo
si illumina. Premere OK.
2 Selezionare il tempo di cottura desiderato,
premendo – o +.
3 L'orologio emetterà due bip, si visualizzerà
l'ora corrente e il simbolo s'illuminerà in
maniera fissa per indicare che il forno si
spegnerà automaticamente.
4 Selezionare una funzione di cottura e una
temperatura.
5 Trascorso il tempo di cottura, il forno si spe-
gnerà, verrà emessa una segnalazione acusti-
ca e il simbolo comincerà a lampeggiare.
6 Premere qualsiasi tasto per disattivare l'al-
larme e riaccendere il forno.
7 Posizionare il comando su per spegnere
il forno.
Si può visualizzare il tempo di cottura residuo
in qualsiasi momento, premendo – o + fino a
quando il simbolo lampeggia e poi pre-
mendo OK. A questo punto, premere – o + per
modificare il tempo impostato. L'orologio
emette due bip per confermare l'avvenuta
modifica.
Se si desidera visualizzare il tempo residuo
per tutto il tempo impostato, premere – or +
fino a quando il simbolo comincia a lam-
peggiare e poi tenere premuto il tasto OK. Il
simbolo lampeggerà. Tenere premuto il
tasto OK per tornare all'ora reale.
Impostazione Tempo Fine Cottura
1 Premere – o + fino a quando il simbolo
si illumina. Premere OK.
2 Selezionare l'ora in cui si desidera termina-
re la cottura, premendo – o +.
3 L'orologio emetterà due bip, si visualizzerà
l'ora corrente e il simbolo s'illuminerà in
maniera fissa per indicare che il forno si
spegnerà automaticamente.
4 Selezionare una funzione di cottura e una
temperatura.
5 Il forno si spegnerà all'ora impostata, verrà
emessa una segnalazione acustica e il sim-
bolo comincerà a lampeggiare.
6 Premere qualsiasi tasto per disattivare l'al-
larme e riaccendere il forno.
7 Portare i comandi su per spegnere il
forno.
Si può visualizzare il tempo di cottura residuo
in qualsiasi momento, premendo – o + fino a
quando il simbolo lampeggia e poi pre-
mendo OK. A questo punto, premere – o + per
modificare il tempo di fine cottura impostato.
L'orologio emette due bip per confermare l'av-
venuta modifica.
Tale funzione può essere utilizzata anche
quando il forno è in uso. A tal fine, seguire le
istruzioni indicate sopra a eccezione del punto
4.
Impostazione Tempo di Cottura e Fine
Tempo Cottura
1 Premere – o + fino a quando il simbolo
si illumina. Premere OK.
2 Selezionare il tempo di cottura desiderato,
premendo – o +.
3 L'orologio emetterà due bip, si visualizzerà
l'ora corrente e il simbolo s'illuminerà
in maniera fissa.
4 Premere – o + fino a quando il simbolo
si illumina. Premere OK.
5 Selezionare l'ora in cui si desidera termi-
nare la cottura, premendo – o +.
6 L'orologio emetterà due bip, si visualizzerà
l'ora corrente e il simbolo s'illuminerà
in maniera fissa.
7 Selezionare una funzione di cottura e una
temperatura.
8 Il forno rimarrà spento con i simboli e
accesi. Il forno adesso è program-
mato.
9 Raggiunta l'ora di inizio cottura, il forno si
accenderà e resterà in funzione per il
tempo impostato.

7
10
Il forno si spegnerà all'ora impostata, verrà
emessa una segnalazione acustica e i sim-
boli e cominceranno a lampeggia-
re.
11 Premere qualsiasi tasto per disattivare l'al-
larme e riaccendere il forno.
12 Portare i comandi su per spegnere il
forno.
Si può modificare il tempo fine cottura, pre-
mendo – o + fino a quando il simbolo lam-
peggia e poi premendo OK. A questo punto,
premere – o + per modificare il tempo di fine
cottura. L'orologio emette due bip per confer-
mare l'avvenuta modifica.
Importante
In caso di interruzione dell'alimentazione elet-
trica, le impostazioni dell'orologio elettronico
saranno cancellate e l'indicazione 00:00 lam-
peggerà sul display. Sarà, pertanto, necessa-
rio riprogrammare l'orologio.
ITALIANO

8
FL-F90 MTL
1 Fijación al mueble
2 Salida de aire
3 Resistencia de Grill
Doble Abatible
4 Soportes Bandejas/
Guías Telescópicas
5 Parrilla reforzada
6 Turbina
7 Bandeja de Asados
8 Bisagra
9 Puerta
10 Frontal de mandos
11 Lámparas
Para otros mercados, los accesorios pueden no corresponder con los descritos en este manual.
Frontal de Mandos
11 Reloj electrónico
12 Selector de funciones
13 Selector de temperaturas
2
1
3

9
ESPAÑOL
Desconexión del horno
Convencional
Se usa en bizcochos y tartas en los que el
calor recibido debe ser uniforme y para que
consigan una textura esponjosa.
Convencional con Turbina
Adecuado para asados y pastelería. El ventila-
dor reparte de forma uniforme el calor en el
interior del horno, reduciendo el tiempo y la
temperatura de cocinado.
Grill
Gratinado y asado superficial. Permite el dora-
do de la capa exterior sin afectar al interior del
alimento. Indicado para piezas planas como
bistec, costillas, pescado, tostadas.
MaxiGrill
Permite el gratinado en mayores superficies
que en Grill, así como una mayor potencia de
gratinado, obteniendo un dorado del alimento
de forma más rápida.
MaxiGrill con Turbina
Permite el asado uniforme al mismo tiempo
que dora superficialmente. Ideal para parrilla-
das. Especial para piezas con gran volumen
como aves, caza,... Se recomienda colocar la
pieza de carne sobre la parrilla del horno y la
bandeja por debajo, para el escurrido de jugos
o grasa.
Atención
Durante el uso de la función Grill, MaxiGrill o
MaxiGrill con Turbina la puerta debe mante-
nerse cerrada.
Turbo
La turbina reparte el calor que proviene de
una resistencia situada en la parte trasera del
horno. Por la uniformidad de la temperatura
que se produce, permite cocinar en 2 alturas
al mismo tiempo.
Solera
Calor sólo desde la parte inferior. Apropiado
para calentar platos o levantar masas de
repostería y afines.
Solera con Turbina
Distribuye el calor que proviene de la parte
inferior del horno. Ideal para pasteles con
relleno de mermelada o fruta, los cuales sólo
requieren un aporte de calor inferior. Siempre
es necesario un precalentamiento anterior
Grill y Solera
Especial para asados. Puede usarse para
cualquier pieza, independiente de su tamaño.
Nota
La lámpara permanece encendida en cual-
quier función de cocinado.
Funciones del Horno

Atención
Su reloj electrónico incorpora tecnología Touch-
Control. Para manejarlo es suficiente con tocar
los símbolos del cristal con su dedo.
La sensibilidad del Touch-Control se adapta
continuamente a las condiciones ambienta-
les. Al conectar el horno a la red tenga la pre-
caución que la superficie del cristal del frontal
de mandos esté limpia y libre de cualquier
obstáculo.
Si al tocar el cristal, el reloj no responde
correctamente entonces es necesario que
desconecte el horno de la red eléctrica y tras
un instante vuelva a conectarlo. De esta
forma los sensores se habrán ajustado auto-
máticamente y reaccionarán de nuevo al tocar
con el dedo.
Puesta en Hora del Reloj Electrónico
Al conectar su horno, observará que en el reloj
aparece parpadeando la indicación 00:00.
Pulsando las teclas – ó + pondrá el reloj en
hora; a continuación escuchará 2 beep segui-
dos como confirmación de la hora elegida.
Si desea modificar la hora, pulse las teclas – ó
+ hasta que parpadee la hora actual. A conti-
nuación pulse la tecla OK. Pulsando las teclas –
ó + podrá modificar la hora. Finalmente escu-
chará 2 beep seguidos como confirmación del
cambio realizado.
Funcionamiento Manual
Tras poner el reloj en hora, su horno está listo
para cocinar. Seleccione una función de coci-
nado y una temperatura.
Durante el cocinado observará que el símbolo
se ilumina para indicar la transmisión de
calor al alimento. Este símbolo se apaga cuan-
do se alcanza la temperatura seleccionada.
Para apagar el horno, ponga los mandos en
posición .
Funciones del Reloj Electrónico
Avisador: Genera una señal acústica al cabo
del tiempo, para ello no es necesario que el
horno esté cocinando.
Duración del Cocinado: Permite cocinar duran-
te un tiempo seleccionado, a continuación el
horno se apagará de forma automática.
Hora de Finalización del Cocinado: Permite
cocinar hasta una hora establecida, a conti-
nuación el horno se apagará de forma auto-
mática.
Duración y Fin del Cocinado: Permite progra-
mar la duración y la hora de finalización del
cocinado. Con esta función el horno se pon-
drá en marcha de forma automática a la hora
necesaria para cocinar durante el tiempo
seleccionado (Duración) y finalizando de
forma automática a la hora que le hayamos
indicado
(Fin del Cocinado).
Programación del Avisador
1 Pulse la tecla + hasta que el símbolo se
ilumine. A continuación pulse la tecla OK.
2 Seleccione el tiempo tras el cual desea que
el reloj avise, pulsando las teclas – ó +.
3 Posteriormente sonarán 2 beep seguidos,
se mostrará la hora actual y el símbolo
permanecerá iluminado, indicando que el
avisador ya está programado.
4 Transcurrido el tiempo programado, sonará
una señal acústica y el símbolo empe-
zará a parpadear.
5 Pulse cualquier tecla para detener la señal
acústica, en ese momento el símbolo se
apagará.
En cualquier momento usted puede visualizar
el tiempo restante, pulsando las teclas – ó +
hasta que el símbolo parpadee y pulsando
luego la tecla OK. En ese momento usted
puede modificar el tiempo seleccionado pul-
sando las teclas – ó +. A continuación escu-
chará 2 beep seguidos como confirmación del
cambio.
Manejo del Horno
10

Si desea ver de forma permanente el tiempo
restante hasta la finalización, pulse las
teclas – ó + hasta que el símbolo parpa-
dee y luego pulse la tecla OK de forma pro-
longada. El símbolo estará parpadeando.
Para volver a la hora actual basta con pulsar
de nuevo la tecla OK de forma prolongada.
Programación de la Duración del Cocinado
1 Pulse las teclas – ó + hasta que el símbolo
se ilumine. A continuación pulse la tecla
OK.
2 Seleccione la duración, pulsando las
teclas – ó +.
3 Posteriormente sonarán 2 beep seguidos,
se mostrará la hora actual y el símbolo
permanecerá iluminado, indicando que su
horno se apagará de forma automática.
4 Seleccione una función y una temperatura
de cocinado.
5 Transcurrida la duración del cocinado, el
horno se desconectará, sonará una señal
acústica y el símbolo parpadeará.
6 Pulse cualquier tecla para detener la señal
acústica, encendiéndose el horno de nuevo.
7 Ponga los mandos en posición para
apagar el horno.
En cualquier momento usted puede visualizar
el tiempo restante de cocinado, pulsando las
teclas – ó + hasta que el símbolo parpa-
dee y pulsando luego la tecla OK. En ese
momento usted puede modificar el tiempo
seleccionado pulsando las teclas – ó +. A con-
tinuación escuchará 2 beep seguidos como
confirmación del cambio.
Si desea ver de forma permanente el tiempo
restante hasta la finalización, pulse las
teclas – ó + hasta que el símbolo parpa-
dee y luego pulse la tecla OK de forma prolon-
gada. El símbolo estará parpadeando.
Para volver a la hora actual basta con pulsar
de nuevo la tecla OK de forma prolongada.
Programación de la Hora de Finalización del
Cocinado
1 Pulse las teclas – ó + hasta que el símbolo
se ilumine. A continuación pulse la tecla
OK.
2 Seleccione la hora de finalización del coci-
nado, pulsando las teclas – ó +.
3 Posteriormente sonarán 2 beep seguidos,
se mostrará la hora actual y el símbolo
permanecerá iluminado, indicando que su
horno se apagará de forma automática.
4 Seleccione una función y una temperatura
de cocinado.
5 Alcanzada la hora seleccionada el horno se
desconectará, sonará una señal acústica y
el símbolo parpadeará.
6 Pulse cualquier tecla para detener la señal
acústica, encendiéndose el horno de nuevo.
7 Ponga los mandos en posición para
apagar el horno.
En cualquier momento usted puede visualizar
la hora de finalización del cocinado, pulsando
las teclas – ó + hasta que el símbolo par-
padee y pulsando luego la tecla OK. En ese
momento usted puede modificar la hora de
finalización seleccionada pulsando las
teclas – ó +. A continuación escuchará 2 beep
seguidos como confirmación del cambio.
Puede emplear esta función aunque usted ya
esté cocinando con su horno. Para ello siga
las instrucciones indicadas salvo la número 4.
Programación de la Duración y Fin del
Cocinado
1 Pulse las teclas – ó + hasta que el símbolo
se ilumine. A continuación pulse la
tecla OK.
2 Seleccione la duración, pulsando las
teclas – ó +.
3 Posteriormente sonarán 2 beep seguidos,
se mostrará la hora actual y el símbolo
permanecerá iluminado.
4 Pulse las teclas – ó + hasta que el símbo-
lo se ilumine. A continuación pulse la
tecla OK.
5 Seleccione la hora de finalización del coci-
nado, pulsando las teclas – ó +.
6 Posteriormente sonarán 2 beep seguidos,
se mostrará la hora actual y el símbolo
permanecerá iluminado.
7 Seleccione una función y una temperatura
de cocinado.
11
ESPAÑOL

8 El horno permanecerá desconectado, que-
dándose iluminados los símbolos y .
Su horno está programado.
9 Cuando se alcance la hora de comienzo
del cocinado, el horno se pondrá en mar-
cha y se realizará el cocinado durante el
tiempo seleccionado.
10 Alcanzada la hora de finalización que se
había programado, el horno se desconec-
tará, sonará una señal acústica y los sím-
bolos y parpadearán.
11 Pulse cualquier tecla para detener la señal
acústica, encendiéndose su horno de
nuevo.
12 Ponga los mandos en posición para
apagar el horno.
Si usted desea modificar la hora de finaliza-
ción, pulse las teclas – ó + hasta que se ilu-
mine el símbolo y pulse la tecla OK. En
ese momento usted puede modificar la hora
seleccionada pulsando las teclas – ó +. A con-
tinuación escuchará 2 beep seguidos como
confirmación del cambio.
Atención
En caso de un corte de suministro eléctrico,
se borrará toda la programación de su reloj
electrónico y aparecerá parpadeando la indi-
cación 00:00 en el reloj. Deberá ponerlo en
hora y programarlo de nuevo.
12

13
FL-F90 MTL
1 Fixação ao Móvel
2 Saída de ar
da Refrigeração
3 Resistência do Grill
4 Suporte Cromado/
Guía Telescópica
5 Grelha reforçada
6 Turbina
7 Bandeja para Assados
8 Dobradiça
9 Porta
10 Painel de Comandos
11 Lâmpadas
Para outros mercados, os acessórios podem não corresponder aos descritos neste manual.
Painel de Comandos
1 Relógio electrónico.
2 Selector de funções.
3 Selector de temperatura.
2
1
3
PORTUGUÉS

14
Desconexão do forno
Convencional
Usado em bolos e tartes nos quais o calor rece-
bido deve ser uniforme para que adquiram uma
textura esponjosa.
Convencional com Turbina
Adequado para assados e pastelaria. O ventila-
dor reparte de forma uniforme o calor no interior
do forno.
Grill
Gratina e assa superficialmente. Permite alourar
a camada exterior sem afectar o interior do ali-
mento. Indicado para pedaços planos como file-
tes, costelas, peixe, tostas.
MaxiGrill
Permite gratinar superfícies maiores que com o
Grill, bem como gratinar com maior potência,
alourando assim o alimento de forma mais rápi-
da.
MaxiGrill com Turbina
Permite assar de modo uniforme ao mesmo
tempo que aloura superficialmente. Ideal para
churrascos. Especial para pedaços com grande
volume como aves, caça,... Recomenda-se colo-
car a porção de carne sobre a grelha do forno
com a bandeja por baixo, para recolher os
molhos ou gorduras.
Atenção
Durante o uso da função Grill, MaxiGrill ou
MaxiGrill com Turbina deve-se manter a porta
fechada.
Turbo
A turbina distribui o calor que provém de uma
resistência situada na parte traseira do forno.
Pela uniformidade da temperatura que se pro-
duz, permite cozinhar em 2 alturas ao mesmo
tempo.
Resistência Inferior
Calor somente na parte inferior. Apropriado para
aquecer pratos ou levantar massas de confeita-
ria e semelhantes.
Resistência Inferior com Turbina
Distribui o calor que provém da parte inferior do
forno. Ideal para pastéis com recheio de geleia
ou fruta, os quais só necessitam de calor na
parte inferior. É sempre necessario realizar um
pré-aquecimento.
Grill e Resistência Inferior
Especial para assados. Pode ser usado para qual-
quer porção, independente do seu tamanho.
Nota
A lâmpada permanece acesa em qualquer fun-
ção de cozinhado.
Funzioni del forno

15
Atenção
O seu relógio electrónico incorpora tecnologia
Touch-Control. Para o controlar basta tocar
nos símbolos do vidro com o dedo.
A sensibilidade do Touch-Control adapta-se
continuamente às condições ambientais. Ao
ligar o forno à corrente, deve-se ter o cuidado
de garantir que a superfície do vidro da parte
da frente dos comandos está limpa e livre de
qualquer obstáculo.
Se ao tocar no vidro, o relógio não responder
correctamente, então é necessário desligar o
forno da rede eléctrica e após um instante vol-
tar a ligá-lo. Desta forma os sensores ajustar-
se-ão automaticamente e reagirão novamente
ao toque.
Acerto do Relógio Electrónico
Ao ligar o forno, observará que, no relógio,
aparece a piscar a indicação 00:00. Premindo
as teclas – ou + acertará o relógio; a seguir
ouvirá 2 beeps seguidos como confirmação
da hora seleccionada.
Se desejar alterar a hora, prima as teclas – ou
+ até a hora actual começar a piscar. A seguir
prima a tecla OK. Premindo as teclas – ou +
poderá modificar a hora. Finalmente, ouvirá 2
beeps seguidos como confirmação da altera-
ção realizada.
Funcionamento Manual
Depois de acertar o relógio, o forno está pron-
to para cozinhar. Seleccione uma função de
cozinhado e uma temperatura.
Durante o cozinhado, o símbolo ilumina-
se indicando que o forno está a transmitir
calor ao alimento, e desliga-se quando é atin-
gida a temperatura seleccionada.
Para desligar o forno, coloque os comandos
na posição .
Funções do Relógio Electrónico
Avisador: Gera um sinal acústico ao fim de
algum tempo, para tal, não é necessário que
o forno esteja a cozinhar.
Duração do Cozinhado: Permite cozinhar
durante um tempo seleccionado; de seguida,
o forno desligar-se-á de forma automática.
Hora de Finalização do Cozinhado: Permite
cozinhar até a uma hora estabelecida, de
seguida, o forno desligar-se-á de forma auto-
mática.
Duração e Fim do Cozinhado: Permite progra-
mar a duração e a hora de finalização do cozi-
nhado. Com esta função, o forno colocar-se-á
em funcionamento de forma automática à
hora necessária para cozinhar durante o
tempo seleccionado (Duração), finalizando de
forma automática à hora anteriormente indi-
cada. (Fim do Cozinhado).
Programação do Avisador
1 Prima a tecla + até o símbolo iluminar-se.
A seguir prima a tecla OK.
2 Seleccione o tempo após o qual deseja que
o relógio avise, premindo as teclas – ou +.
3 Posteriormente, soarão 2 beeps seguidos,
será mostrada a hora actual e o símbolo
permanecerá iluminado, indicando que o
avisador já está programado.
4 Decorrido o tempo programado, soará um
sinal acústico e o símbolo começará a
piscar.
5 Prima qualquer tecla para parar o sinal
acústico, o símbolo desligar-se-á.
Em qualquer momento, pode visualizar o
tempo restante, premindo as teclas – ou + até
o símbolo piscar, e premindo de seguida a
tecla OK. Neste momento, pode alterar o
tempo seleccionado premindo as teclas – ou
+. A seguir ouvirá 2 beeps seguidos como con-
firmação da alteração.
Se desejar ver de forma permanente o tempo
restante até à finalização prima as teclas – ou
+ até o simbolo piscar e prima a tecla OK
de forma prolongada. O símbolo piscará.
Para voltar à hora actual, basta premir de
novo a tecla OK de forma prolongada.
Manejo del Horno
PORTUGUÉS

16
Programação da Duração do Cozinhado
1 Prima as teclas – ou + até o símbolo ilu-
minar-se. De seguida prima a tecla OK.
2 Seleccione a duração, premindo as teclas –
ou +.
3 Posteriormente soarão 2 beeps seguidos,
será mostrada a hora actual e o símbolo
permanecerá iluminado, indicando que o
forno desligar-se-à de forma automática.
4 Seleccione uma função e uma temperatura
de cozinhado.
5 Decorrida a duração do cozinhado, o forno
desligar-se-á, soará um sinal acústico e o
símbolo piscará.
6 Prima qualquer tecla para parar o sinal
acústico, ligando-se o forno de novo.
7 Coloque os comandos na posição para
desligar o forno.
A qualquer momento, pode visualizar o tempo
restante de cozinhado, premindo as teclas –
ou + até o símbolo piscar, e premindo de
seguida a tecla OK. Neste momento, pode
modificar o tempo seleccionado premindo as
teclas – ou +. A seguir ouvirá 2 beeps segui-
dos, como confirmação da alteração.
Se desejar ver de forma permanente o tempo
restante até à finalização prima as teclas – ou
+ até o simbolo piscar e prima a tecla OK
de forma prolongada. O símbolo piscará.
Para voltar à hora actual, basta premir de
novo a tecla OK de forma prolongada.
Programação da Hora de Finalização do
Cozinhado
1 Prima as teclas – ou + até o símbolo ilu-
minar-se. De seguida prima a tecla OK.
2 Seleccione a hora de finalização do cozi-
nhado, premindo as teclas – ou +.
3 Posteriormente soarão 2 beeps seguidos,
será mostrada a hora actual e o símbolo
permanecerá iluminado, indicando que o
forno desligar-se-à de forma automática.
4 Seleccione uma função e uma temperatura
de cozinhado.
5 Alcançada a hora seleccionada, o forno des-
ligar-se-á, soará um sinal acústico e o sím-
bolo piscará.
6 Prima qualquer tecla para parar o sinal
acústico, ligando-se o forno de novo.
7 Coloque os comandos na posição para
desligar o forno.
A qualquer momento pode visualizar a hora
de finalização do cozinhado, premindo as
teclas – ou + até o símbolo piscar, e pre-
mindo de seguida a tecla OK. Neste momento,
pode modificar a hora de finalização seleccio-
nada premindo as teclas – ou +. A seguir ouvi-
rá 2 beeps seguidos, como confirmação da
alteração.
Pode usar esta função mesmo que já esteja a
utilizar o forno. Para tal, siga as instruções
indicadas, excepto a número 4.
Programação da Duração e Fim do
Cozinhado
1 Prima as teclas – ou + até o símbolo
iluminar-se. De seguida prima a tecla OK.
2 Seleccione a duração, premindo as
teclas – ou +.
3 Posteriormente soarão 2 beeps seguidos,
será mostrada a hora actual e o símbolo
permanecerá iluminado.
4 Prima as teclas – ou + até o símbolo
se iluminar. A seguir prima a tecla OK.
5 Seleccione a hora de finalização do cozi-
nhado, premindo as teclas – ou +.
6 Posteriormente soarão 2 beeps seguidos,
será mostrada a hora actual e o símbolo
permanecerá iluminado.
7 Seleccione uma função e uma temperatu-
ra de cozinhado.
8 O forno permanecerá desligado, ficando
iluminados os símbolos e . O seu
forno está programado.
9 Quando alcançar a hora de início do cozi-
nhado, o forno entrará em funcionamento
e realizar-se-á o cozinhado durante o
tempo seleccionado.

17
10 Alcançada a hora final que tinha sido pro-
gramada, o forno desligar-se-á, soará um
sinal acústico e os símbolos
e
pis-
carão.
11 Prima qualquer tecla para parar o sinal
acústico, ligando-se o seu forno de novo.
12 Coloque os comandos na posição para
desligar o forno.
Se desejar modificar a hora de finalização,
prima as teclas – ou + até se iluminar o sím-
bolo , e prima a tecla OK. A partir deste
momento, pode modificar a hora selecciona-
da premindo as teclas – ou +. A seguir ouvirá
2 beeps seguidos, como confirmação da
modificação.
Atenção
No caso de um corte de fornecimento eléctri-
co, será eliminada toda a programação do
relógio electrónico e aparecerá a indicação
00:00 a piscar no relógio. Deverá acertá-lo e
programá-lo de novo.
PORTUGUÉS

18
FL-F90 MTL
1 Fixing to Unit
2 Air Outlet
3 Fold-down Grill element
4 Chromed Support/
Telescopic Guide
5 Grid
6 Fan
7 Roasting Tray
8 Hinge
9
Door
10 Control Panel
11 Light
For other markets, accessories may not correspond to those described in this manual.
Control Panel
1 Electronic clock.
2 Function selector.
3 Temperature selector.
2
1
3

19
ENGLISH
Switch off oven
Conventional
It is used for sponges and cakes where the
heat received must be uniform to achieve a
spongy texture.
Conventional with fan
Appropriate for roasts and cakes. The fan
spreads the heat uniformly inside the oven.
Grill
For preparing dishes with superficial roasting.
It allows the outer layer to be browned without
affecting the inside of the food. Ideal for flat
food, such as steaks, ribs, fish, toast.
MaxiGrill
Allows greater surfaces to be prepared, than
with the grill, together with higher power reduc-
ing the time required for browning of the food.
MaxiGrill with fan
Allows uniform roasting at the same time as
surface browning. Ideal for grills. Special for
large volume pieces, such as poultry, game,
etc. It is recommended to put the item on a
rack with a tray beneath to collect the stock
and juices.
Caution
While using the Grill, MaxiGrill or MaxiGrill with
fan, the door must be kept closed.
Turbo
The fan distributes the heat coming from an
element located at the back of the oven. As a
result of the evenly distributed temperature,
food can be cooked on two levels at the same
time.
Lower element
Heats only from beneath. Suitable for heating
dishes and raising pastry and similar.
Lower element with fan
It distributes the heat from the lower part of
the oven and is ideal for cakes with jam or fruit
filling, which only require heating from
beneath. Pre-heating is always necessary.
Grill and Lower element
Special for roasts. It can be used for any piece,
whatever its size.
Note
The pilot light remains on in any cooking
function.
Oven Functions

20
Caution
The electronic clock features Touch-Control
technology. To operate, simply touch the glass
control symbols with your fingertip.
The touch control sensitivity continuously
adapts to ambient conditions. Make sure the
glass surface of the control panel is clean and
free of obstacles when plugging in the oven.
If the clock does not respond correctly when
you touch the glass, unplug the oven for a few
seconds and then plug it in again. Doing this
causes the sensors to adjust automatically so
that they will react once more to fingertip con-
trol.
Setting the time on the Electronic Clock
When the oven is connected to the power sup-
ply, the indication 00:00 flash on the display.
Press – or + to set the time on the clock. The
clock beeps twice to confirm the selected
time.
If you wish to modify the time, press – or +
until the current time flash on the screen.
Press OK. Then press – or + to modify the
time. The clock beeps twice to confirm the
modification.
Manual Operation
The oven is ready to be used when the clock
has been set. Select a cooking function and a
temperature.
When you begin cooking, symbol lights up
to indicate that the oven is heating the con-
tents; the symbol goes out when the
selected temperature is reached.
Set the controls to to turn the oven off.
Functions of the Electronic Clock
Alarm: Creates an alarm signal when the peri-
od of time finishes; the oven does not need to
be in use in order to use this function.
Cooking Time: To cook for a selected length of
time; the oven turns itself off automatically
when the time finishes.
End Cooking Time: To cook until a set time;
the oven turns itself off automatically when
the time finishes.
Cooking time and End Cooking Time: To cook
for a selected length of time and end at a set
time. When this function is set, the oven
comes on automatically at the time required
in order to cook for the set length of time
(Cooking time) and end automatically at the
indicated time (End Cooking Time)
Programming the Alarm
1 Press + until symbol lights up. Press OK.
2 Set the period of time after which you wish
the alarm to sound by pressing – or +.
3 The clock beeps twice, the current time is
displayed and symbol lights up perma-
nently to indicate that the alarm has been
set.
4 When the set period of time comes to an
end, the alarm sounds and symbol starts
to flash.
5 Press any button to stop the alarm; symbol
goes out.
You can consult the remaining time at any
moment by pressing – or + until symbol
flashes and then pressing OK. You can also
modify the set time at this point by pressing –
or +. The clock beeps twice to confirm the
change.
If you wish the remaining time to be displayed
until the end of the set period of time, press –
or + until symbol flashes and then press OK
and keep it pressed in. Symbol flashes.
Keep OK pressed in again to return to the real
time.
Using the Oven

21
ENGLISH
Setting the Cooking Time
1 Press – or + until symbol lights up.
Press OK.
2 Select the period of time you wish to cook
for by pressing – or +.
3 The clock beeps twice, the current time is
displayed and symbol lights up perma-
nently to indicate that the oven will turn
itself off automatically.
4 Select a cooking function and temperature.
5 When the cooking time comes to an end,
the oven turns itself off, the alarm sounds
and symbol flashes.
6 Press any button to stop the alarm and turn
the oven back on again.
7 Set the controls to to turn the oven off.
You can consult the remaining cooking time at
any moment by pressing – or + until symbol
flashes and then pressing OK. You can
also modify the set time at this point by press-
ing – or +. The clock beeps twice to confirm
the change.
If you wish the remaining time to be displayed
until the end of the set period of time, press
– or + until symbol flashes and then press
OK and keep it pressed in. Symbol flashes.
Keep OK pressed in again to return to the real
time.
Setting the End Cooking Time
1 Press – or + until symbol lights up.
Press OK.
2 Select the time you wish the cooking
process to finish at by pressing – or +.
3 The clock beeps twice, the current time is
displayed and symbol lights up perma-
nently to indicate that the oven will turn
itself off automatically.
4 Select a cooking function and temperature.
5 When the set time is reached, the oven
turns itself off, the alarm sounds and sym-
bol flashes.
6 Press any button to stop the alarm and turn
the oven back on again.
7 Set the controls to to turn the oven off.
You can consult the end cooking time at any
moment by pressing – or + until symbol
flashes and then pressing OK. You can also
modify the end cooking time at this point by
pressing – or +. The clock beeps twice to con-
firm the change.
This function can be used even when you are
already using the oven. To do this, follow the
instructions indicated above except point
number 4.
Setting the Cooking Time and the End
Cooking Time
1 Press – or + until symbol lights up.
Press OK.
2 Select the period of time you wish to cook
for by pressing – or +.
3 The clock beeps twice, the current time is
displayed and symbol lights up perma-
nently.
4 Press – or + until symbol lights up.
Press OK.
5 Select the time you wish the cooking
process to finish at by pressing – or +.
6 The clock beeps twice, the current time is
displayed and symbol lights up perma-
nently.
7 Select a cooking function and tempera-
ture.
8 The oven remains off with symbols and
lit up. Your oven is set.
9 When the time to start cooking is reached,
the oven starts up and cooks for the set
period of time.

22
10 When the set end cooking time is reached,
the oven turns itself off, the alarm sounds
and symbols and flash.
11 Press any button to stop the alarm and
turn the oven back on again.
12 Set the controls to to turn the oven off.
You can modify the end cooking time by press-
ing – or + until symbol lights up and then
pressing OK. You can now modify the end
cooking time by pressing – or +. The clock
beeps twice to confirm the change.
Important
In the event of a power cut, all the electronic
clock settings are deleted and the indication
00:00 flashes on the display. It is necessary to
set the time and programme the clock again.

23
FL-F90 MTL
1 Fixation au Meuble
2 Sortie de l’air
de Réfrigération
3 Résistance du Grill
Abattable
4 Support Chromé/
Guide Télescopique
5 Grille renforcée
6 Turbine
7 Plateau pour Rôtis
8 Charnière
9 Porte
10 Panneau Frontal
de Commande
11 Lampe
Pour certains marchés, il est possible que les accessoires ne correspondent pas à ceux décrits
dans ce manuel.
Panneau Frontal de Commande
1 Horloge électronique.
2 Sélecteur de fonctions.
3 Sélecteur de températures.
2
1
3
FRANÇAIS

24
Arrêt du four
Conventionnel
Utiliser pour les gâteaux et les tartes qui doivent
recevoir une chaleur uniforme et pour obtenir
une texture moelleuse.
Conventionnel avec turbine
Recommandé pour les rôtis et la pâtisserie. Le
ventilateur répartit la chaleur de façon uni-forme
à l'intérieur du four.
Grill
Pour gratiner et rôtir superficiellement. Permet
de dorer la couche extérieure sans affecter l'in-
térieur de l'aliment. Indiqué pour les pièces
plates telles que les beefsteaks, les côtelettes,
les poissons, les toasts.
MaxiGrill
Permet de gratiner des surfaces plus grandes
qu'avec le Grill avec une puissance pour gratiner
supérieure, qui permet ainsi de dorer l'aliment
de façon plus rapide.
MaxiGrill avec turbine
Permet en même temps de rôtir de façon unifor-
me et de dorer superficiellement. Idéal pour les
grillades. Spécial pour les pièces volumineuses
telles que les volailles, le gibier... Il est recom-
mandé de placer la pièce de viande sur la grille
du four et la lèchefrite en dessous pour recueillir
les jus de cuisson ou la graisse.
Attention
Quand on utilise la fonction Grill, MaxiGrill ou
MaxiGrill avec Turbine, la porte doit rester fer-
mée.
Turbo
La turbine répartit la chaleur provenant de la
résistance située à l'arrière du four. L’uniformité
de la température générée permet de cuisiner
sur 2 niveaux en même temps.
Résistance inférieure
La chaleur provient seulement de la partie infé-
rieure. Approprié pour réchauffer des plats ou
faire lever des pâtes pour pâtisseries et ana-
logues.
Résistance inférieure avec Turbine
Elle distribue la chaleur qui provient de la partie
inférieure du four. Idéal pour les gâteaux fourrés
avec de la confiture ou des fruits, qui requièrent
seulement un apport de chaleur inférieur. Il est
toujours nécessaire de préchauffer.
Grill et résistance inférieure
Spécial pour les rôtis. Peut être utilisé pour
toutes sortes de pièces, indépendamment de
leur volume.
Attention
La lampe reste allumée pendant toutes les
fonctions de cuisson.
Fonctions du Four

25
Mise en garde
L’horloge électronique est équipée de la tech-
nologie Touch-Control. Pour la manipuler, il
suffit d’appuyer sur les symboles représentés
sur la vitre.
La sensibilité du Touch-Control s’adapte
constamment aux conditions ambiantes.
Lorsque vous branchez le four sur le secteur
électrique, veillez à ce que la surface vitrée du
tableau de commande soit propre et sans
aucun obstacle.
Si l’horloge ne répond pas correctement
lorsque vous touchez la vitre avec le doigt, il
faut débrancher le four du secteur et de le
rebrancher après un court instant. Ceci per-
met de régler automatiquement les capteurs
qui réagiront de nouveau lorsque vous tou-
cherez les commandes tactiles.
Mise à l’heure de l’horloge électronique
Lorsque vous branchez votre four, vous obser-
vez que l’indication 00:00 clignotent dans
l’horloge. Mettez l’horloge à l’heure à l’aide
des touches – ou +. Vous entendrez 2 bips
consécutifs comme confirmation de la mise à
l’heure.
Si vous souhaitez modifier l’heure, appuyez
sur les touches – ou + jusqu’à ce que l’heure
actuelle se mettent à clignoter. Appuyez ensui-
te sur la touche OK. À l’aide des touches – ou
+, vous pouvez alors modifier l’heure. Vous
entendrez 2 bips consécutifs comme confir-
mation de la modification réalisée.
Fonctionnement manuel
Une fois l’horloge mise à l’heure, votre four
est prêt à fonctionner. Sélectionnez une fonc-
tion de cuisson et une température.
Lors de la cuisson, le symbole s´allume
indiquant que le four est en train de trans-
mettre de la chaleur à l’aliment et s´éteint
lorsque la température sélectionnée est
atteinte.
Pour éteindre le four, mettez les commandes
sur la position .
Fonctions de l’horloge électronique
Avertisseur: génère un signal acoustique à un
moment donné; pour ce faire, il n’est pas
nécessaire que le four soit allumé.
Durée de cuisson: permet de cuire pendant
une durée sélectionnée, le four s’éteignant de
façon automatique.
Heure de fin de cuisson: permet de cuire jus-
qu’à une heure définie, le four s’éteignant de
façon automatique.
Durée et fin de cuisson: permet de program-
mer la durée et l’heure de fin de cuisson. Avec
cette fonction, le four se mettra en marche de
façon automatique à l’heure indiquée pour
cuire pendant la durée sélectionnée (Durée)
et s’éteindre de façon automatique à l’heure
indiquée (Fin de cuisson).
Programmation de l’avertisseur
1 Appuyez sur la touche +. jusqu’à ce que le
symbole s’allume. Appuyez ensuite sur la
touche OK.
2 Sélectionnez le temps au bout duquel vous
souhaitez que l’horloge vous avertisse en
appuyant sur les touches – ou +.
3 Vous entendrez alors 2 bips consécutifs,
l’heure actuelle sera affichée et le symbole
s’allumera, indiquant que l’avertisseur
est programmé.
4 Une fois le temps programmé écoulé, un
signal acoustique sonnera et le symbole
commencera à clignoter.
5 Appuyez sur n’importe quelle touche pour
arrêter le signal acoustique, à ce moment le
symbole s’éteindra.
Vous pouvez afficher le temps restant à tout
moment en appuyant sur les touches – ou +
jusqu’à ce que le symbole clignote, puis en
appuyant sur la touche OK. Vous pouvez alors
modifier le temps sélectionné en appuyant sur
les touches – ou +. Vous entendrez 2 bips
consécutifs comme confirmation de la modifi-
cation.
Maniement du Four
FRANÇAIS

26
Si vous souhaitez afficher de façon perma-
nente le temps restant jusqu’à la fin, appuyez
sur les touches – ou + jusqu’à ce que le sym-
bole clignote and appuyez sur la touche OK
de façon prolongée. Le symbole clignotera.
Pour revenir à l’heure actuelle, il suffit d’ap-
puyer à nouveau sur la touche OK de façon
prolongée.
Programmation de la durée de cuisson
1 Appuyez sur la touche – ou + jusqu’à ce que
le symbole s’allume. Appuyez ensuite
sur la touche OK.
2 Sélectionnez la durée en appuyant sur les
touches – ou +.
3 Vous entendrez alors 2 bips consécutifs,
l’heure actuelle sera affichée et le symbole
s’allumera, indiquant que votre four
s’éteindra de façon automatique.
4 Sélectionnez une fonction et une tempéra-
ture de cuisson.
5 Une fois la durée de cuisson écoulée, le four
se déconnectera, un signal acoustique son-
nera et le symbole clignotera.
6 Appuyez sur n’importe quelle touche pour
arrêter le signal acoustique; le four s’allu-
mera de nouveau.
7 Mettez les commandes sur la position
pour éteindre le four.
Vous pouvez afficher le temps de cuisson res-
tant à tout moment en appuyant sur les
touches – ou + jusqu’à ce que le symbole
clignote, puis en appuyant sur la touche OK.
Vous pouvez alors modifier le temps sélec-
tionné en appuyant sur les touches – ou +.
Vous entendrez 2 bips consécutifs comme
confirmation de la modification.
Si vous souhaitez afficher de façon perma-
nente le temps restant jusqu’à la fin, appuyez
sur les touches – ou + jusqu’à ce que le sym-
bole clignote and appuyez sur la touche OK
de façon prolongée. Le symbole clignotera.
Pour revenir à l’heure actuelle, il suffit d’ap-
puyer à nouveau sur la touche OK de façon
prolongée.
Programmation de l’heure de fin de cuisson
1 Appuyez sur la touche – ou + jusqu’à ce que
le symbole s’allume. Appuyez ensuite
sur la touche OK.
2 Sélectionnez l’heure de fin de cuisson en
appuyant sur les touches – ou +.
3 Vous entendrez alors 2 bips consécutifs,
l’heure actuelle sera affichée et le symbole
s’allumera, indiquant que votre four
s’éteindra de façon automatique.
4 Sélectionnez une fonction et une tempéra-
ture de cuisson.
5 Une fois l’heure sélectionnée atteinte, le
four se déconnectera, un signal acoustique
sonnera et le symbole clignotera.
6 Appuyez sur n’importe quelle touche pour
arrêter le signal acoustique; le four s’allu-
mera de nouveau.
7 Mettez les commandes sur la position
pour éteindre le four.
Vous pouvez afficher l’heure de fin de cuisson
à tout moment en appuyant sur les touches –
or + jusqu’à ce que le symbole clignote,
puis en appuyant sur la touche OK. Vous pou-
vez alors modifier l’heure de fin sélectionnée
en appuyant sur les touches – ou +. Vous
entendrez 2 bips consécutifs comme confir-
mation de la modification.
Vous pouvez utiliser cette fonction même si
vous êtes déjà en train d’utiliser votre four.
Pour ce faire, suivez les instructions indiquées
sauf la numéro 4.
Programmation de la durée et de la fin de
cuisson
1 Appuyez sur la touche – ou + jusqu’à ce
que le symbole s’allume. Appuyez
ensuite sur la touche OK.
2 Sélectionnez la durée en appuyant sur les
touches – ou +.
3 Vous entendrez alors 2 bips consécutifs,
l'heure actuelle sera affichée et le symbo-
le s’allumera.
4 Appuyez sur la touche – ou + jusqu’à ce
que le symbole s’allume. Appuyez
ensuite sur la touche OK.

27
5 Sélectionnez l’heure de fin de cuisson en
appuyant sur les touches – ou +.
6 Vous entendrez alors 2 bips consécutifs,
l'heure actuelle sera affichée et le symbo-
le s’allumera.
7 Sélectionnez une fonction et une tempéra-
ture de cuisson.
8 Le four restera déconnecté, et les sym-
boles et seront allumés. Votre four
est alors programmé.
9 Lorsque l’heure de début de cuisson est
atteinte, le four se mettra en marche et la
cuisson se fera pendant le temps sélec-
tionné.
10 Une fois l’heure de fin programmée attein-
te, le four se déconnectera, un signal
acoustique sonnera et les symboles et
se mettront à clignoter.
11 Appuyez sur n’importe quelle touche pour
arrêter le signal acoustique; le four s’allu-
mera de nouveau.
12 Mettez les commandes sur la position
pour éteindre le four.
Si vous souhaitez modifier l’heure de fin,
appuyez sur les touches – ou + jusqu’à ce que
le symbole s’allume, puis appuyez sur la
touche OK. Vous pouvez alors modifier l’heure
sélectionnée en appuyant sur les touches –
ou +. Vous entendrez 2 bips consécutifs
comme confirmation de la modification.
Attention
En cas de coupure de l’alimentation élec-
trique, toute la programmation de votre horlo-
ge électronique sera effacée et l’indication
00:00 clignotera dans l’horloge. Vous devrez
la mettre à l’heure et la programmer à nou-
veau.
FRANÇAIS

28
FL-F90 MTL
1 Befestigung am
Einbauschrank
2 Kühlluftaustritt
3 Doppelter klappbarer
Grillwiderstand
4 Blechhalterungen /
Ausziehschienen
5 Rost
6 Umluft
7 Bratenpfanne
8 Scharnier
9 Tür
10 Bedienfeld
11 Lampen
Für andere Märkte entspricht das Zubehör möglicherweise nicht dem, welches in dieser Anleitung
beschrieben ist.
Bedienfeld
1 Elektronikuhr
2 Funktionswahlschalter
3 Temperaturwahlschalter
2
1
3

29
Abschalten des Backofens
Normal
Wird für Kuchen und Torten, die gleichmäßige
Hitze brauchen, empfohlen, um eine luftige
Konsistenz zu erhalten.
Normal mit Umluft
Für Braten und Gebäck geeignet. Der Ventilator
verteilt die Hitze gleichmäßig im Inneren des
Backofens, wodurch Garzeit und -temperatur
gesenkt werden.
Grill
Gratinieren und überbacken. Ermöglicht das
Bräunen der äußeren Schicht, ohne das Innere des
Garguts zu beeinflussen. Geeignet für flache Stücke
wie Steaks, Rippchen, Fisch, Toasts.
MaxiGrill
Ermöglicht das Gratinieren von größeren
Oberflächen und mit höherer Leistung als mit
dem Grill, wodurch eine schnellere Bräunung
des Garguts erreicht wird.
MaxiGrill mit Umluft
Ermöglicht gleichzeitig ein gleichmäßiges Garen
und Bräunen der Oberfläche. Ideal zum Grillen.
Besonders für große Stücke wie Geflügel, Wild
usw. Es wird empfohlen, das Grillgut auf den
Rost zu legen und die Fettpfanne darunter zu
stellen, um Bratensaft und Fett aufzufangen.
Achtung
Bei Benutzung der Funktionen Grill, MaxiGrill
oder MaxiGrill mit Umluft muss die Backofentür
geschlossen gehalten werden.
Turbo
Der Ventilator verteilt die Hitze, die von einem
Heizwiderstand an der Rückseite des Backofens
erzeugt wird. Durch die so erzeugte gleich-
mäßige Temperatur ist ein gleichzeitiges Garen
auf zwei Ebenen möglich.
Unterhitze
Nur Hitze von unten. Geeignet für das Erwärmen
von Tellern oder das Aufgehenlassen von
Kuchenteig und Ähnlichem.
Unterhitze mit Umluft
Verteilt die im unteren Teil des Backofens
erzeugte Hitze. Ideal für Gebäck mit
Marmeladen- oder Obstfüllung, bei dem ein
Erhitzen von unten erforderlich ist. Der Backofen
muss immer vorgeheizt werden.
Grill und Unterhitze
Besonders für Braten. Für jedes Stück, unab-
hängig von seiner Größe, geeignet.
Anmerkung
Die Lampe bleibt bei jeder Garfunktion ein-
geschaltet.
Backofenfunktionen
DEUTSCH

30
Achtung
Ihre Elektronikuhr ist mit Touch-Control-
Technologie ausgestattet. Um sie zu bedienen,
genügt es, die Symbole auf dem Glas mit dem
Finger zu berühren.
Die Empfindlichkeit der Touch-Control passt
sich stets den Umgebungsbedingungen an.
Wenn Sie den Ofen an das Stromnetz anschlie-
ßen, müssen Sie darauf achten, dass das Glas
des Bedienfeldes sauber und frei von
Hindernissen ist.
Sollte die Uhr nicht richtig reagieren, wenn das
Glas mit dem Finger berührt wird, muss man
den Ofen vom Stromnetz trennen und nach
einem Augenblick wieder anschließen. Auf
diese Weise stellen sich die Sensoren automa-
tisch richtig ein und reagieren wieder auf
Berührung mit dem Finger.
Einstellen der Uhrzeit der Elektronikuhr
Wenn Sie den Backofen an das Netz anschlie-
ßen, blinkt auf der Uhr die Anzeige 00:00. Durch
Berühren der Taste – bzw. + wird die Uhrzeit ein-
gestellt. Danach hören Sie zwei aufeinander fol-
gende Pieptöne zur Bestätigung der gewählten
Uhrzeit.
Wenn Sie die Uhrzeit ändern möchten, müssen
Sie die Taste – bzw. + drücken, bis die aktuelle
Uhrzeit blinkt. Drücken Sie im Anschluss die OK-
Taste. Durch Betätigung der Taste – bzw. + kön-
nen Sie die Uhrzeit ändern. Abschließend ertö-
nen 2 aufeinander folgende Pieptöne zur
Bestätigung der Änderung.
Manueller Betrieb
Nach Einstellung der Uhrzeit ist der Backofen
betriebsbereit. Wählen Sie eine Garfunktion
und eine Temperatur.
Während des Garens leuchtet das Symbol ,
um anzuzeigen, dass das Gargut erhitzt wird.
Dieses Symbol erlischt, wenn die gewählte
Temperatur erreicht ist.
Zum Ausschalten des Backofens bringen Sie die
Schalter in die Position .
Funktionen der Elektronikuhr
Timer: Erzeugt ein Signal am Ende der einge-
stellten Zeit, unabhängig davon, ob der
Backofen heizt oder nicht.
Garzeit-Dauer: Ermöglicht das Garen während
der gewählten Zeit, danach schaltet sich der
Backofen automatisch aus.
Garzeit-Ende: Ermöglicht das Garen bis zu einer
vorgewählten Uhrzeit, danach schaltet sich der
Backofen automatisch aus.
Garzeit-Dauer und Garzeit-Ende: Ermöglicht die
Einstellung der Dauer und Endzeit des
Garvorgangs. Mit dieser Funktion schaltet sich
der Backofen automatisch zu der passenden
Uhrzeit für die vorgewählte Garzeit (Dauer) ein
und schaltet sich automatisch beim Erreichen
der eingestellten Zeit (Garzeit-Ende) ab.
Programmierung des Timers
1 Taste + drücken, bis das Symbol aufleuch-
tet. Drücken Sie im Anschluss die OK-Taste.
2 Wählen Sie die Zeitdauer, nach deren Ablauf
der Timer ertönen soll, indem Sie die Taste –
bzw. + drücken.
3 Danach ertönen 2 aufeinander folgende
Pieptöne; die aktuelle Zeit wird angezeigt und
das Symbol leuchtet weiter, um anzuzei-
gen, dass der Timer eingestellt ist.
4 Wenn die eingestellte Zeit abgelaufen ist,
ertönt ein Signal und das Symbol beginnt
zu blinken.
5 Drücken Sie eine beliebige Taste, um das aku-
stische Signal zu stoppen. Damit wird das
Symbol ausgeschaltet.
Sie können jederzeit die verbleibende Zeit anzei-
gen, indem Sie die Taste – bzw. + drücken, bis
das Symbol blinkt, und anschließend die OK-
Taste drücken. Dann können Sie auch die
gewählte Zeit ändern, indem Sie die Taste – bzw.
+ drücken. Danach ertönen 2 aufeinander fol-
gende Pieptöne zur Bestätigung der Änderung.
Bedienung des Backofens

31
Wenn Sie die verbleibende Zeit ständig ange-
zeigt sehen möchten, müssen Sie die Taste –
bzw. + drücken, bis das Symbol blinkt, und
anschließend die OK-Taste anhaltend drücken.
Das Symbol blinkt weiter. Um die Anzeige der
aktuellen Uhrzeit wieder zu erhalten, genügt es,
die OK-Taste länger gedrückt zu halten.
Programmierung der Gardauer
1 Drücken Sie die Taste – bzw. +, bis das
Symbol @ aufleuchtet. Drücken Sie im
Anschluss die OK-Taste.
2 Wählen Sie die Gardauer, indem Sie die Taste
– bzw. + drücken.
3 Danach ertönen 2 aufeinander folgende
Pieptöne, die aktuelle Uhrzeit wird angezeigt
und das Symbol leuchtet permanent und
zeigt damit an, dass Ihr Backofen sich auto-
matisch abschalten wird.
4 Wählen Sie eine Funktion und eine
Gartemperatur.
5 Wenn die Garzeit abgelaufen ist, schaltet sich
der Backofen ab; es ertönt ein Signal und das
Symbol blinkt.
6 Drücken Sie eine beliebige Taste, um das
Signal abzustellen, und der Backofen schaltet
sich wieder ein.
7 Stellen Sie die Schalter auf die Stellung ,
um den Backofen auszuschalten.
Sie können jederzeit die verbleibende Garzeit
anzeigen, indem Sie die Taste – bzw. + drücken,
bis das Symbol blinkt , und anschließend die
OK-Taste drücken. Dann können Sie auch die
gewählte Zeit ändern, indem Sie die Taste – bzw.
+ drücken. Danach ertönen 2 aufeinander fol-
gende Pieptöne zur Bestätigung der Änderung.
Wenn Sie die verbleibende Zeit permanent
anzeigen möchten, müssen Sie die Taste – bzw.
+ drücken, bis das Symbol blinkt, und
anschließend die OK-Taste anhaltend drücken.
Das Symbol blinkt weiter. Um die Anzeige
der aktuellen Uhrzeit wieder zu erhalten, genügt
es, die OK-Taste länger gedrückt zu halten.
Programmierung des Garzeit-Endes
1 Drücken Sie die Taste - bzw. +, bis das Symbol
aufleuchtet. Drücken Sie im Anschluss die
OK-Taste.
2 Wählen Sie das Garzeit-Ende, indem Sie die
Taste – bzw. + drücken.
3 Danach ertönen 2 aufeinander folgende
Pieptöne, die aktuelle Uhrzeit wird angezeigt
und das Symbol leuchtet permanent und
zeigt damit an, dass Ihr Backofen sich auto-
matisch abschalten wird.
4 Wählen Sie eine Funktion und eine
Gartemperatur.
5 Sobald die eingestellte Uhrzeit erreicht ist,
schaltet sich der Backofen ab; es ertönt ein
Signal und das Symbol blinkt.
6 Berühren Sie eine beliebige Taste, um das
Signal abzustellen. Der Backofen schaltet
sich wieder ein.
7 Stellen Sie die Schalter auf die Stellung ,
um den Backofen auszuschalten.
Sie können die Uhrzeit des Garzeit-Endes jeder-
zeit anzeigen, indem Sie die Taste – bzw. + drük-
ken, bis das Symbol blinkt, und anschlie-
ßend die OK-Taste drücken. Jetzt können Sie die
Abschlussuhrzeit der Garzeit ändern, indem Sie
die Taste – bzw. + drücken. Danach ertönen 2
aufeinander folgende Pieptöne zur Bestätigung
der Änderung.
Sie können diese Funktion auch benutzen,
wenn der Backofen schon am Garen ist. Dazu
befolgen Sie einfach diese Anleitung, außer
Punkt 4.
Programmierung der Gardauer und des
Garzeit-Endes
1 Drücken Sie die Taste – bzw. +, bis das
Symbol aufleuchtet. Drücken Sie im
Anschluss die OK-Taste.
2 Wählen Sie die Gardauer, indem Sie die
Taste – bzw. + drücken.
3 Danach ertönen 2 aufeinander folgende
Pieptöne, die aktuelle Uhrzeit wird angezeigt
und das Symbol leuchtet permanent.
DEUTSCH

32
4 Drücken Sie die Taste – bzw. +, bis das
Symbol @ aufleuchtet. Drücken Sie im
Anschluss die OK-Taste.
5 Wählen Sie die Uhrzeit für das Ende der
Garzeit, indem Sie die Taste – bzw. + drük-
ken.
6 Danach hören Sie 2 aufeinander folgende
Pieptöne; die aktuelle Uhrzeit wird angezeigt
und das Symbol leuchtet weiter.
7 Wählen Sie eine Funktion und eine
Gartemperatur.
8 Der Backofen bleibt ausgeschaltet, während
die Symbole und weiterleuchten. Der
Backofen ist nun programmiert.
9 Wenn die eingestellte Uhrzeit für den
Garbeginn erreicht ist, schaltet sich der
Backofen ein und führt die Garung während
der vorgewählten Zeit durch.
10 Wird die für das Ende der Garzeit eingestell-
te Uhrzeit erreicht, schaltet sich der
Backofen ab; es ertönt ein Signal und die
Symbole und blinken.
11 Berühren Sie eine beliebige Taste, um das
Signal abzustellen, und der Backofen schal-
tet sich wieder ein.
12 Stellen Sie die Schalter auf , um den
Backofen auszuschalten.
Wenn Sie das Ende der Garzeit ändern möch-
ten, müssen Sie die Taste – bzw. + drücken, bis
das Symbol aufleuchtet , und die OK-Taste
drücken. Jetzt können Sie die gewählte Zeit
ändern, indem Sie die Taste – bzw. + drücken.
Danach ertönen 2 aufeinander folgende
Pieptöne zur Bestätigung der Änderung.
Achtung
Im Falle eines Stromausfalls wird die gesamte
Programmierung der Elektronikuhr gelöscht und
auf der Uhr blinkt die Anzeige 00:00. Sie müs-
sen die Uhr wieder einstellen und erneut pro-
grammieren.

33
FL-F90 MTL
1 Bevestiging aan meubel
2 Koelluchtuitlaat
3 Dubbele uitklapbare grill-
weerstand
4 Verchroomde houders/uits-
chuifbare rails
5 Rooster
6 Turbine
7 Braadplaat
8 Scharnier
9 Deur
10 Bedieningspaneel
11 Lampen
Voor andere markten kan het zijn dat de accessoires niet overeenkomen met de in deze handleiding
omschreven accessoires.
Bedieningspaneel
1 Elektronische klok
2 Functieschakelaar
3 Temperatuurschakelaar
2
1
3
N
E
D
ERLAN
D
S

34
Uitschakeling van de oven
Conventioneel
Wordt gebruikt voor cakes en taarten waarbij de
warmte gelijkmatig verdeeld moet worden om
een luchtige textuur te verkrijgen.
Conventioneel met turbine
Geschikt voor braadgerechten en gebak. De ven-
tilator verdeelt de warmte gelijkmatig in de oven
waardoor de baktijd en –temperatuur worden
verlaagd.
Grill
Gratineren en oppervlakkig braden. Hiermee kan de
buitenlaag goudbruin worden gebakken zonder de
binnenkant van het voedsel mee te bakken.
Geschikt voor platte gerechten zoals biefstuk, kotel-
leten, vis en toast.
MaxiGrill
Hiermee kunnen grotere oppervlakken worden
gegratineerd dan met de grillfunctie. Er kan
ook een hoger gratineervermogen worden
bereikt zodat de etenswaren sneller worden
aangebraden.
MaxiGrill met turbine
Om gelijkmatig te braden en tegelijkertijd de bui-
tenkant lichtbruin te bakken. Ideaal voor
geroosterde gerechten. Geschikt voor grote stuk-
ken vlees zoals gevogelte, wild, enz. Aanbevolen
wordt om het stuk vlees op het rooster van de
oven te leggen en de bakplaat eronder te plaat-
sen voor het druppelen van vleessap of vet.
Attentie
Tijdens het gebruik van de functies Grill,
MaxiGrill of MaxiGrill met turbine dient de oven-
deur gesloten te blijven.
Turbo
De turbine verdeelt de warmte die afkomstig is
van een weerstand aan de achterkant van de
oven. Door de gelijkmatige verdeling van de tem-
peratuur kan tegelijkertijd op twee verschillende
niveaus worden gebakken/gebraden.
Ovenvloer
Verwarmt alleen aan de onderkant. Geschikt om
gerechten op te warmen of gebak en dergelijke
te laten rijzen.
Ovenvloer met turbine
Verdeelt de warmte die afkomstig is van de
onderkant van de oven. Ideaal voor gebak met
jam- of fruitvulling, dat alleen aan de onderkant
moet worden verwarmd. Er moet altijd eerst wor-
den voorverwarmd.
Grill en ovenvloer
Speciaal voor stoof- en braadgerechten. Kan
gebruikt worden voor elk stuk vlees of vis, onge-
acht de grootte.
Opmerking
De lamp blijft in elke bakfunctie branden.
Functies van de oven

35
Attentie
Uw elektronische klok is uitgerust met
TouchControl-technologie. Voor de bediening
hoeft u de symbolen op het glas enkel met uw
vinger aan te raken.
De gevoeligheid van de TouchControl past zich
continu aan de omgevingsomstandigheden
aan. Wanneer u de oven op het elektriciteitsnet
aansluit, dient u erop te letten dat het glasop-
pervlak van het bedieningspaneel schoon en
obstakelvrij is.
Als u het glas met uw vinger aanraakt maar de
klok niet op juiste wijze reageert, koppel dan de
oven af van het elektriciteitsnet en sluit hem na
een tijdje opnieuw aan. Op deze manier worden
de sensoren automatisch ingesteld en reageren
zij opnieuw nadat ze met de vinger worden aan-
geraakt.
De elektronische klok gelijkzetten
Wanneer u de oven inschakelt, ziet u dat op de
klok de cijfers 00:00 beginnen te knipperen.
Met de toetsen
–
of
+
kunt u de klok gelijkzet-
ten. Vervolgens hoort u 2 pieptonen ter bevesti-
ging van de ingestelde tijd.
Wilt u de tijd wijzigen, druk dan de toetsen
–
of
+
in totdat de huidige tijd gaat knipperen. Druk
vervolgens op de toets OK. Door de toetsen
–
of
+
in te drukken kan de tijd worden gewijzigd. U
hoort tenslotte 2 pieptonen ter bevestiging van
de wijziging.
Handmatige werking
Nadat de klok is gelijkgezet, is uw oven klaar
voor gebruik. Selecteer een temperatuur en
bakfunctie.
Tijdens het bakken gaat het symbool bran-
den om aan te duiden dat de warmte wordt
overgebracht naar het voedsel. Dit symbool
gaat uit wanneer de geselecteerde temperatuur
is bereikt.
Om de oven uit te zetten, de knoppen op stand
zetten.
Functies van de elektronische klok
Kookwekker: De kookwekker zendt na een
bepaalde tijd een geluidssignaal uit. De oven
hoeft hiervoor niet aan het bakken te zijn.
Baktijd: Om gedurende de ingestelde tijd te
bakken. Daarna gaat de oven automatisch uit.
Eindtijd van het bakproces: Om tot het inge-
stelde tijdstip te bakken. Daarna gaat de oven
automatisch uit.
Baktijd en eindtijd van het bakproces: Om de
baktijd en de eindtijd van het bakproces te pro-
grammeren. Met deze functie gaat de oven
automatisch aan op het gewenste tijdstip, om te
bakken gedurende de ingestelde tijd (baktijd).
Vervolgens gaat hij automatisch uit op het tijd-
stip dat we hebben aangegeven. (Einde van het
bakproces)
De kookwekker programmeren
1 Druk op toets + totdat het symbool gaat
branden. Druk vervolgens op de toets OK.
2 Druk de toetsen
–
of
+
in om de tijd te selec-
teren waarna de wekker moet afgaan.
3 U hoort hierna twee pieptonen. De huidige tijd
wordt weergegeven en het symbool blijft
branden om aan te geven dat de kookwekker
geprogrammeerd is.
4 Na de ingestelde tijd klinkt er een geluidssig-
naal en gaat het symbool knipperen.
5 Druk een willekeurige toets in om het geluids-
signaal uit te schakelen. Op dat moment gaat
het symbool uit.
U kunt op elk moment de resterende tijd laten
weergeven door de toetsen
–
of
+
in te drukken
totdat het symbool gaat knipperen. Druk ver-
volgens op de toets OK. Op dit moment kunt u de
geselecteerde tijd aan de hand van de toetsen -
of + wijzigen. U hoort vervolgens 2 opeenvolgen-
de pieptonen ter bevestiging van de wijziging.
U kunt desgewenst de resterende tijd permanent
laten weergeven door de toetsen
–
of
+
in te druk-
ken totdat het symbool gaat knipperen. Druk ver-
volgens op de toets OK. Het symbool @ knippert.
Bediening van de oven
N
E
D
ERLAN
D
S

36
Om terug te gaan naar de huidige tijd, hoeft
slechts de toets OK weer een poosje ingedrukt
te worden gehouden.
De baktijd programmeren
1 Druk op de toetsen
–
of
+
totdat het symbool
gaat branden. Druk vervolgens op de
toets OK.
2 Selecteer de duur door op de toetsen
–
of
+
te
drukken.
3 U hoort hierna 2 pieptonen. De huidige tijd
wordt weergegeven en het symbool blijft
branden om aan te geven dat uw oven auto-
matisch uitgaat.
4 Selecteer een functie en een baktemperatuur.
5 Wanneer de baktijd verstreken is, gaat de
oven uit. Er weerklinkt een geluidssignaal en
het symbool gaat knipperen.
6 Druk een willekeurige toets in om het alarm uit
te zetten, waarna de oven opnieuw aangaat.
7 Zet de knoppen in de stand om de oven
uit te zetten.
U kunt op elk moment de resterende tijd laten
weergeven door de toetsen
–
of
+
in te drukken
totdat het symbool gaat knipperen. Druk ver-
volgens op de toets OK. Op dit moment kunt u de
geselecteerde tijd aan de hand van de toetsen
–
of
+
wijzigen. U hoort vervolgens 2 opeenvolgende
pieptonen ter bevestiging van de wijziging.
U kunt desgewenst de resterende tijd perma-
nent laten weergeven door de toetsen
–
of
+
in
te drukken totdat het symbool gaat knippe-
ren. Druk vervolgens op de toets OK. Het sym-
bool knippert. Om terug te gaan naar de hui-
dige tijd, hoeft slechts de toets OK weer een
poosje ingedrukt te worden gehouden.
De eindtijd van het bakproces programmeren
1 Druk op de toetsen
–
of
+
totdat het symbool
gaat branden. Druk vervolgens op de
toets OK.
2 Selecteer de eindtijd door op de toetsen
–
of
+
te drukken.
3 U hoort hierna 2 pieptonen. De huidige tijd
wordt weergegeven en het symbool blijft
branden om aan te geven dat uw oven auto-
matisch uitgaat.
4 Selecteer een functie en een baktempera-
tuur.
5 Op het ingestelde tijdstip zal de oven uitgaan.
Er weerklinkt een geluidssignaal en het sym-
bool gaat knipperen.
6 Druk een willekeurige toets in om het geluids-
signaal uit te zetten, waarna de oven opnieuw
aangaat.
7 Zet de knoppen in de stand om de oven
uit te zetten.
U kunt op elk moment de eindtijd van het bak-
proces laten weergeven door de toetsen
–
of
+
in te drukken totdat het symbool gaat knip-
peren. Druk vervolgens op de toets OK. Op dit
moment kunt u de geselecteerde eindtijd aan
de hand van de toetsen
–
of
+
wijzigen. U hoort
vervolgens 2 opeenvolgende pieptonen ter
bevestiging van de wijziging.
U kunt deze functie ook gebruiken als u al aan
het bakken bent met de oven. Volg daarvoor de
voorgaande instructies op, behalve nummer 4.
De baktijd en eindtijd programmeren
1 Druk op de toetsen
–
of
+
totdat het symbool
gaat branden. Druk vervolgens op de
toets OK.
2 Selecteer de duur door op de toetsen
–
of
+
te drukken.
3 U hoort vervolgens twee pieptonen, de hui-
dige tijd wordt weergegeven en het symbool
blijft branden.
4 Druk op de toetsen
–
of
+
totdat het symbool
gaat branden. Druk vervolgens op de
toets OK.
5 Selecteer de eindtijd van het bakproces
door op de toetsen
–
of
+
te drukken.
6 U hoort vervolgens 2 pieptonen, de huidige
tijd wordt weergegeven en het symbool
blijft branden.
7 Selecteer een functie en een baktemperatuur.
8 De oven blijft uitgeschakeld en de symbolen
en blijven branden. Uw oven is gepro-
grammeerd.
9 Wanneer het bakproces moet beginnen,
gaat de oven aan en wordt er gebakken tij-
dens de ingestelde tijd.

37
10 Op de ingestelde eindtijd zal de oven uit-
gaan. Er weerklinkt een geluidssignaal en
de symbolen en knipperen.
11 Druk een willekeurige toets in om het
geluidssignaal uit te zetten, waarna de oven
opnieuw aangaat.
12 Zet de knoppen in de stand om de oven
uit te zetten.
Wilt u de eindtijd wijzigen, druk dan de toetsen
–
of
+
in totdat het symbool gaat branden.
Druk vervolgens op de toets OK. Op dit moment
kunt u de geselecteerde tijd aan de hand van de
toetsen
–
of
+
wijzigen. U hoort vervolgens 2
opeenvolgende pieptonen ter bevestiging van
de wijziging.
Attentie
Bij een stroomonderbreking wordt de hele pro-
grammering van de elektronische klok gewist
en verschijnen de cijfers 00:00 op de klok. U
moet de klok dan opnieuw gelijkzetten en pro-
grammeren.
N
E
D
ERLAN
D
S

38
FL-F90 MTL
1 Крепление в мебель
2 Выход охлаждающего
воздуха
3 Сопротивление двойного
откидного гриля
4 Поддержка для противней
/ Телескопические
направляющие
5 Прочная решетка
6 Турбина
7 Противни для запекания
8 Петли
9 Дверца
10 Передняя панель
управления
11 Лампы
Для прочих стран, аксессуары могут не соответствовать описанным в этой инструкции
Панель управления
1 Электронные часы.
2 Выбор функций.
3 Выбор температуры.
2
1
3

39
Отключение духового шкафа
Обычный нагрев
Используется для приготовления бисквитов и
тортов для которых жар должен быть однород-
ным для получения мягкой и воздушной текс-
туры.
Обычный с турбо
Подходит для жаркого и кондитерской выпеч-
ки. Вентилятор равномерно распространяет
тепло в духовке, сокращая, таким образом,
время и температуру готовки.
Гриль
Гратен и поверхностное запекание. Поджаривает
до золотистой корочки поверхность продукта.
Применяется для бифштексов, ребрышек, рыбы,
тостов.
Макси Гриль
Позволяет запекание бóльших поверхностей
чем обыкновенный Гриль, а также обладает
бóльшей мощностью для запекания и, таким
образом, золотистая корочка образуется
быстрее.
Макси Гриль с турбиной
Позволяет однородное запекание и одновре-
менно образование золотистой корочки на
поверхности. Идеально подходит для запека-
ния на решетке. Для продуктов большого объе-
ма, таких как птица, дичь и т.п. Рекомендуется
помещать мясо на решетку духового шкафа и
устанавливать противень под решетку для
сбора стекающего сока и жира.
Внимание!
Во время использования в режимах Гриль,
МаксиГриль или МаксиГриль с Турбиной двер-
ца духового шкафа должна быть закрыта.
Турбо
Турбина распространяет тепло, исходящее от
сопротивления расположенного на задней
поверхности духовки. Благодаря равномерно-
сти температуры позволяет готовить одновре-
менно на двух уровнях.
Под
Нагрев происходит только снизу. Рекомендуется
для подогрева блюд и подъема теста.
Под с турбиной
Распространяет тепло исходящее из нижней
части духового шкафа. Идеально подойдет для
приготовления пирогов с начинкой из марме-
лада или фруктов. Такие блюда требуют поступ-
ления тепла только снизу. Необходим предва-
рительный нагрев
Гриль и Под
Рекомендуется для запекания. Может исполь-
зоваться для любой порции вне зависимости
от ее размера.
Примечание
При любой функции приготовления подсветка
будет включена.
Функции духового шкафа
РУССКИЙ

40
Внимание!
Электронные часы Вашего духового шкафа
снабжены технологией Touch-Control. Для
управления достаточно дотронуться пальцем
до символов на стекле.
Чувствительность системы Touch-Control
постоянно адаптируется к условиям окружаю-
щей среды. При подключении духовки к элек-
тросети убедитесь в том, что стеклянная
поверхность панели управления чистая и сво-
бодна от каких-либо препятствий.
Если дотронувшись до стекла, часы не реаги-
руют, следует отключить духовой шкаф от элек-
тросети и вновь подключить его через некото-
рое время. Таким образом, сенсоры настро-
ятся автоматически и будут верно реагиро-
вать на нажатия.
Установка текущего времени на электрон-
ных часах
При подключении духового шкафа Вы увидите
что на часах появятся мигающие цифры
00:00. При помощи кнопок – или + установи-
те текущее время. Затем Вы услышите один за
другим 2 коротких сигнала подтверждающих
выбор времени.
Если Вы желаете изменить текущее время,
нажимайте на кнопки – или + до тех пор пока
цифры часов не начнут мигать. Затем нажми-
те на кнопку OK. При помощи кнопок – или +
можно изменить время. Затем Вы услышите
один за другим 2 коротких сигнала подтвер-
ждающих внесенные изменения.
Ручное управление
После установки текущего времени Ваш духо-
вой шкаф готов к началу работы. Выберите
функцию приготовления и температуру.
Во время приготовления Вы увидите светя-
щийся символ указывающий на передачу
тепла приготовляемому продукту. Когда быдет
достигнута выбранная температура этот сим-
вол отключится.
Для выключения духового шкафа установите
ручки в положение .
Функции электронных часов
Таймер: По истечение заданного времени,
таймер издает звуковой сигнал. Для работы
таймера необходимо, чтобы духовой шкаф
находился в процессе работы.
Длительность приготовления: Позволяет гото-
вить в течение заданного времени, по истече-
ние которого духовой шкаф отключится авто-
матически.
Время окончания приготовления: Позволяет
готовить до определенного часа, затем духо-
вой шкаф отключится автоматически.
Длительность и окончание приготовления:
Позволяет программировать длительность и
время окончания готовки. Эта функция духо-
вого шкафа придет в действие в заданный час
и духовой шкаф будет готовить в течение
заданного времени (длительность) и завершит
работу автоматически в заданный час (окон-
чание приготовления).
Программирование таймера
1 Нажмите на кнопку + до тех пор пока не
засветится символ . Затем нажмите на
кнопку OK.
2 При помощи кнопок – или + выберите
время в которое таймер должен сработать.
3 Затем Вы услышите один за другим 2 звуко-
вых сигнала и будет показано текущее
время и светящийся символ . Это озна-
чает что духовой шкаф запрограммирован.
4 По прошествии заданного времени раздаст-
ся звуковой сигнал и начнет мигать символ
.
5 Для отключения звукового сигнала, нажми-
те на любую кнопку. В этот момент символ
отключится.
В любой момент Вы можете увидеть оставшее-
ся время, нажимая на кнопки – или + до тех пор
пока символ не начнет мигать, затем нажми-
те на кнопку OK. В этот момент Вы можете изме-
нить время при помощи кнопок – или +. Затем,
Вы услышите один за другим два звуковых сиг-
нала в подтверждение изменений.
Управление духовым шкафом

41
Если Вы желаете постоянно видеть оставшее-
ся до окончания приготовления время, нажи-
майте на кнопки – или + до тех пор пока не
начнет мигать, затем длительно нажмите на
кнопку OK. Символ будет мигать. Для того
чтобы вернуться к указанию текущего време-
ни достаточно длительно нажать на кнопку OK.
Программирование времени
приготовления
1 Нажимайте на кнопки – или + до тех пор
пока не засветится символ . Затем
нажмите на кнопку OK.
2 Выберите длительность, при помощи кнопок
– или +.
3 Вы услышите один за другим 2 коротких сиг-
нала и будет светиться символ . Это озна-
чает, что духовой шкаф отключится автома-
тически.
4 Выберите функцию и температуру приготов-
ления.
5 По окончание заданного времени приготов-
ления духовой шкаф отключится, раздастся
звуковой сигнал и будет мигать символ .
6 Нажмите на любую кнопку для остановки
звукового сигнала, духовой шкаф вновь
включится.
7 Для отключения духового шкафа установите
ручки в положение .
В любой момент Вы можете увидеть время
оставшееся до окончания приготовления, при
помощи кнопок – или + до тех пор пока не ста-
нет мигать символ и затем нажав на кноп-
ку OK. В этот момент при помощи кнопок –
или + можно изменить выбранное время.
Затем, Вы услышите один за другим два сиг-
нала подтверждающие внесенные измене-
ния.
Если Вы желаете постояннов видеть остав-
шееся до окончания приготовления время,
нажмите на кнопки – или + до тех пор пока не
станет мигать символ затем длительно
нажмите на кнопку OK. Символ будет
мигать. Для возврата к указанию текущего
времени достаточно длительно нажать на
кнопку OK.
Программирование времени окончания
приготовления
1 Нажимайте на кнопки – или + до тех пор
пока не засветятся символы . Затем
нажмите на кнопку OK.
2 Выберите время окончания приготовления
при помощи кнопок – или +.
3 Затем Вы услышите один за другим 2 корот-
ких сигнала, будет указано текущее время и
символ будет светится, указывая на то,
что духовой шкаф отключится автоматически.
4 Выберите функцию и температуру приготов-
ления.
5 Когда наступит выбранный час, духовой
шкаф отключится автоматически, раздастся
звуковой сигнал и будет мигать символ .
6 Для отключения звукового сигнала достаточ-
но нажать на любую кнопку, духовой шкаф
включится автоматически.
7 Для отключения духового шкафа установите
ручки в положение .
В любой момент можно увидеть время окон-
чания приготовления, при помощи кнопок –
или + до тех пор пока не замигает символ
и затем нажав на кнопку OK. В этот момент Вы
можете изменить выбранное время оконча-
ния при помощи кнопок – или +. Затем, Вы
услышите один за другим два звуковых сигна-
ла подтверждающие внесенные изменения.
Можно использовать эту функцию когда духо-
вой шкаф уже находится в процессе приготов-
ления. Для этого следуйте указаным инструк-
циям, пропустив пункт 4.
Программирование длительности и оконча-
ния приготовления
1 Нажмите на кнопки– или + до тех пор пока
не засветится символ . Затем нажмите
на кнопку OK.
2 Выберите длительность при помощи кно-
пок – или +.
3 Затем Вы услышите один за другим 2 два
коротких сигнала, будет показано текущее
время и символ будет светится.
РУССКИЙ

42
4 Нажмите на кнопки – или + до тех пор пока
не засветится символ . Затем нажмите
на кнопку OK.
5 При помощи кнопок – или + выберите
время окончания приготовления.
6 Затем Вы услышите один за другим 2 два
коротких сигнала, будет показано текущее
время и символ будет светится.
7 Выберите функцию и температуру приго-
товления.
8 Духвой шкаф будет отключен и символы
и будут светится. Ваш духовой шкаф
запрограммирован.
9 Когда будет достигнуто время начала при-
готовления, духовой шкаф начнет работу и
будет функционировть до окончания
заданного времени.
10 Когда будет достигнуто запрограммиро-
ванное время окончания, духовой шкаф
отключится, прозвучит сигнал и символы
и будут мигать.
11 Для остановки звукового сигнала нажмите
на любую кнопку, духовой шкаф вновь
включится.
12 Для отключения духового шкафа установи-
те все ручки в положение .
Если Вы желаете изменить время окончания,
нажимайте на кнопки – или + до тех пор пока
не засветится символ затем нажмите на
кнопку OK. В этот момент Вы можете изменить
выбранное время при помощи кнопок – или
+. Затем, Вы услышите один за другим два зву-
ковых сигнала подтверждающие внесенные
изменения.
Внимание!
В случае отключения электричества, все запро-
граммированные в электронных часах данные
будут потеряны, на часах появятся мигающие
цифры 00:00. Следует вновь установить теку-
щее время и запрограммировать часы.

43

44


46

47
FL-F90 MTL
2
1
3


Classe di effi-
cienza energe-
tica (dove A è
la classe di
maggiore effi-
cienza e G di
minore effi-
cienza).
Funzione di
riscaldamento.
Riscaldamento
standard.
Convezione
forzata.
Consumo
di energia.
Riscaldamento
standard.
Convezione
forzata.
Volume netto
(litri).
Tipo:
Piccolo
Medio
Grande
Tempo di cottu-
ra a carico nor-
male.
Riscaldamento
standard.
Convezione
forzata.
Superficie di
cottura.
Rumore (dB (A)
re 1 pW).
Clase de
eficiencia
energética,
en una escala
que abarca
de A (más
eficiente)
a G (menos
eficiente).
Función de
calentamiento.
Calentamiento
convencional.
Convección
forzada.
Consumo
de energía.
Calentamiento
convencional.
Convección
forzada.
Volumen neto
(litros).
Tipo:
Pequeño
Medio
Grande
Tiempo de
cocción con
carga normal.
Calentamiento
convencional.
Convección
forzada.
Superficie de
cocción.
Ruido (dB (A)
re 1 pW).
Classe de
eficiência ener-
gética, numa
escala de A
(eficiente) a
G (ineficiente).
Função de
aquecimento.
Aquecimento
convencional.
Convecção
forçada.
Consumo
de energia.
Aquecimento
convencional.
Convecção
forçada.
Volume útil
(litros).
Tipo:
Pequeno
Médio
Grande
Tempo de
confecção com
carga normal.
Aquecimento
convencional.
Convecção
forçada.
Superfície de
confecção.
Ruído (dB (A)
re 1 pW).
Energy
efficiency
class on a
scale from A
(most efficient)
to G (least
efficient).
Heating setting
Conventional
heating.
Forced
convection.
Energy
consumption.
Conventional
heating.
Forced
convection.
Net volume
(litres).
Type:
Small
Medium
Large
Cooking time
with normal
load.
Conventional
heating.
Forced
convection.
Cooking
surface
Noise (dB (A)
re 1 pW).
Classe
d’efficience
énergétique,
sur une éche-
lle de A (plus
efficient)
à G (le moins
efficient).
Fonction de
chauffage.
Chauffage
traditionnel.
Convection
forcée.
Consommation
d´énergie.
Chauffage
traditionnel.
Convection
forcée.
Volume net
(litres).
Type:
Petit
Moyen
Grand
Temps de cuis-
son à charge
normale.
Chauffage
traditionnel.
Convection
forcée.
Surface de
cuisson.
Niveau sonore
(dB (A) re1 pW).
SCHEDA / FICHA / FICHA / FILE / FICHE
Produttore Fabricante Fabricante Manufacturer Fabricant FOSTER
Modello Modelo Modelo Model Modèle
FL-F90 MTL
Desideriamo anche noi dare il nostro contributo all'ambiente; per questo la carta che utilizziamo è riciclata.
Nuestra aportación a la protección del medio-ambiente: utilizamos papel reciclado.
O nosso contributo para a protecção do meio ambiente: utilizamos papel reciclado.
Our contribution to protecting the environment - we use recycled paper.
Notre contribution à la protection de l’environnement : nous utilisons du papier recyclé.
.
Cod.: 83172783/3172783-000
A
1,12
kWh
0,99
kWh
78
44 min.
45 min.
1300 cm
2

Energie-
effizienzklasse
auf einer
Skala von
A (geringer
Verbrauch) bis
G (hoher
Verbrauch).
Beheizung.
Konventionelle
Beheizung.
Heißluft
Energie-
verbrauch.
Konventionelle
Beheizung.
Heißluft.
Nettovolumen
(Liter).
Typ:
Klein
Mittel
Groß
Garzeit bei
Standard-
beladung.
Konventionelle
Beheizung.
Heißluft.
Backfläche.
Geräusch (dB(A)
re1 pW).
Klasse van
energie-efficiën-
tie, op een
schaal van A
(meest effi-
ciënt) tot G
(minst efficiënt).
Verwarmings-
functie.
Conventionele
verwarming.
Geforceerde
convectie.
Energie-
verbruik.
Conventionele
verwarming.
Geforceerde
convectie.
Nettovolume
(liter).
Type:
Klein
Middelgroot
Groot
Baktijd bij
normale
belasting.
Conventionele
verwarming.
Geforceerde
convectie.
Bakoppervlak.
Geluid (db (A)
re 1 pW).
Категория
энергетической
эффективности,
по шкале от A
(наиболее
эффективный)
до G
(наименее
эффективный).
Функция
нагрева.
Обычный
нагрев.
Форсированная
конвекция.
Расход
электроэнергии.
Обычный
нагрев.
Форсированная
конвекция.
Объем нетто
(литры).
Тип:
Маленький
Средний
Большой
Время
приготовления
при нормальной
загрузке.
Обычный
нагрев.
Форсированная
конвекция.
Поверхность
готовки.
Шум (dB (A)
re 1 pW).
A
1,12
kWh
0,99
kWh
78
44 min.
45 min.
1300 cm
2
DATENBLATT / GEGEVENS / ТЕХНИЧЕСКИЕ ДАННЫЕ /
Hersteller Fabrikant
Производитель
FOSTER
Modell Model Модель
FL-F90 MTL
Unser Beitrag zum Umweltschutz: Wir verwenden wiederverwertetes Papier.
Onze bijdrage aan de bescherming van het milieu: wij gebruiken kringlooppapier.
Наш вклад в защиту окружающей среды: используем только переработанную бумагу.
Cod.: 83172783/3172783-000
Transcripción de documentos
Guida rapida di utilizzo Hoja de Características Guia Ràpido de Utilização Quick Start Guide Mode d’emploi rapide Gebrauchsanleitung Gebruiksaanwijzing Краткое руководство по эксплуатации FL-F90 MTL ITALIANO FL-F90 MTL 1 Fissaggio al mobile 2 Uscita aria 3 Resistenza doppio grill apribile 4 Supporti teglie/ guide telescopiche 5 Griglia traforata 6 Ventola 7 Vassoio per arrosto 8 9 10 11 Cerniera Sportello Pannello frontale comandi Luci Nei Paesi diversi dalla Spagna, gli accessori potrebbero non corrispondere a quelli descritti nel presente manuale. Pannello di controllo 1 2 1 Orologio elettronico 2 Selettore funzioni 3 Selettore temperature 3 3 Funzioni del forno Spegnimento Cottura statica Utilizzata per torte e pan di spagna che richiedono un calore uniforme per ottenere la consistenza spugnosa. Cottura ventilata Adatta per torte e arrosti. La ventola diffonde il calore all'interno del forno in modo uniforme. Turbo La ventola distribuisce il calore proveniente dalla resistenza nella parte posteriore del forno. La temperatura uniforme consente di cucinare gli alimenti su due altezze contemporaneamente. Elemento inferiore Il calore proviene soltanto dalla parte inferiore. Indicato per riscaldare i piatti e far lievitare impasti. Grill Per preparare cibi con doratura superficiale. Consente di gratinare lo strato esterno senza modificare la parte interna. Ideali per cibi sottili, come bistecche, costolette, pesce e pane tostato. Inferiore ventilato Distribuisce il calore che proviene dalla parte inferiore del forno. Ideale per dolci con ripieno di marmellata o frutta, che richiedono un apporto di calore inferiore. È sempre necessario un preriscaldamento. MaxiGrill Consente di preparare quantità maggiori, rispetto al grill, e con maggiore potenza, riducendo, in tal modo, il tempo di doratura. Grill e Inferiore Particolarmente adatta per agli arrosti. Si utilizza per qualsiasi pezzo di carne, indipendentemente dalle sue dimensioni. MaxiGrill ventilato Permette di arrostire in maniera uniforme e gratinare le superfici contemporaneamente. Ideale per grigliati. Specifico per pezzi di grandi dimensioni, come pollame, selvaggina, ecc. Si consiglia di sistemare la carne su una griglia con un vassoio sotto per raccogliere i liquidi e i grassi di cottura. Nota Attenzione Durante l'uso del Grill, MaxiGrill o del MaxiGrill ventilato, la porta deve rimanere chiusa. 4 La lampadina resta accesa con qualsiasi funzione di cottura. Attenzione L'orologio è dotato di tecnologia TouchControl. Per attivarlo basta toccare i simboli sul vetro con un dito. La sensibilita del touch control si adatta costantemente alle condizioni ambientali. Prima di collegare il forno, verificare che la superficie in vetro del pannello di controllo sia pulita e libera da qualsiasi ostacolo. Nel caso in cui l'orologio non rispondesse toccando il vetro con il dito, scollegare il forno e attendere qualche secondo prima di ricollegarlo. In tal modo, i sensori si regoleranno automaticamente e torneranno a rispondere al tocco del dito. Tempo di cottura: consente di impostare il tempo di cottura, trascorso il quale, il forno si spegne automaticamente. Fine Tempo Cottura: Consente di cuocere fino a un orario definito, trasarso il quale, il forno si spegne automaticamente. Tempo di cottura e Fine Tempo Cottura: Per definire il tempo e l'ora di fine cottura. Impostando questa funzione, il forno si accenderà automaticamente all'ora desiderata per cuocere per il tempo impostato (Tempo di cottura) e terminare automaticamente la cottura all'ora stabilita (Fine cottura). Programmazione dell'allarme Impostazione dell'ora Quando si collega il forno all'alimentazione elettrica, l'indicazione 00:00 comincerà a lampeggiare sul display. Premere – o + per impostare l'ora. L'orologio emette due bip per confermare l'ora selezionata. Per modificare l'ora, premere – o + fino a quando l'ora corrente lampeggia sul display. Premere OK. In seguito, premere – o + per modificare l'ora. L'orologio emette due bip per confermare l'avvenuta modifica. Funzionamento Manuale Una volta impostato l'orologio, il forno è pronto all'uso. Selezionare una funzione di cottura e una temperatura. Quando si avvia la cottura, il simbolo si illumina per indicare che il forno si sta riscaldando; raggiunta la temperatura selezionata, il simbolo si spegne. Portare i comandi su forno. per spegnere il Funzioni del'orologio elettronico Allarme: Emette una segnalazione acustica allo scadere del tempo impostato; il forno non deve necessariamente essere in uso per utilizzare questa funzione. 1 Premere + fino a quando il simbolo illumina. Premere OK. si 2 Premere – o + per impostare il tempo dopo il quale si desidera emettere la segnalazione acustica. 3 L'orologio emetterà due bip, si visualizzerà l'ora corrente e il simbolo s'illuminerà in maniera fissa per indicare che l'allarme è stato impostato. 4 Trascorso il tempo impostato, verrà emessa la segnalazione acustica e il simbolo comincerà a lampeggiare. 5 L'allarme si disattiva premendo qualsiasi tasto. Il simbolo si spegne. Si può visualizzare il tempo rimanente in qualsiasi momento, premendo – o + fino a quando il simbolo lampeggia e poi premendo OK. A questo punto, premere – o + per modificare il tempo impostato. L'orologio emette due bip per confermare l'avvenuta modifica. Se si desidera visualizzare il tempo residuo per tutto il tempo impostato, premere – o + fino a quando il simbolo comincia a lampeggiare e poi tenere premuto il tasto OK. Il simbolo lampeggerà. Tenere premuto il tasto OK per tornare all'ora reale. 5 ITALIANO Uso del forno Impostazione del tempo di cottura 1 Premere – o + fino a quando il simbolo si illumina. Premere OK. 5 Il forno si spegnerà all'ora impostata, verrà emessa una segnalazione acustica e il simbolo comincerà a lampeggiare. 2 Selezionare il tempo di cottura desiderato, premendo – o +. 6 Premere qualsiasi tasto per disattivare l'allarme e riaccendere il forno. 3 L'orologio emetterà due bip, si visualizzerà l'ora corrente e il simbolo s'illuminerà in maniera fissa per indicare che il forno si spegnerà automaticamente. 7 Portare i comandi su forno. 4 Selezionare una funzione di cottura e una temperatura. 5 Trascorso il tempo di cottura, il forno si spegnerà, verrà emessa una segnalazione acustica e il simbolo comincerà a lampeggiare. 6 Premere qualsiasi tasto per disattivare l'allarme e riaccendere il forno. 7 Posizionare il comando su il forno. per spegnere Si può visualizzare il tempo di cottura residuo in qualsiasi momento, premendo – o + fino a quando il simbolo lampeggia e poi premendo OK. A questo punto, premere – o + per modificare il tempo impostato. L'orologio emette due bip per confermare l'avvenuta modifica. Se si desidera visualizzare il tempo residuo per tutto il tempo impostato, premere – or + fino a quando il simbolo comincia a lampeggiare e poi tenere premuto il tasto OK. Il simbolo lampeggerà. Tenere premuto il tasto OK per tornare all'ora reale. Impostazione Tempo Fine Cottura 1 Premere – o + fino a quando il simbolo si illumina. Premere OK. 2 Selezionare l'ora in cui si desidera terminare la cottura, premendo – o +. 3 L'orologio emetterà due bip, si visualizzerà l'ora corrente e il simbolo s'illuminerà in maniera fissa per indicare che il forno si spegnerà automaticamente. 4 Selezionare una funzione di cottura e una temperatura. 6 per spegnere il Si può visualizzare il tempo di cottura residuo in qualsiasi momento, premendo – o + fino a quando il simbolo lampeggia e poi premendo OK. A questo punto, premere – o + per modificare il tempo di fine cottura impostato. L'orologio emette due bip per confermare l'avvenuta modifica. Tale funzione può essere utilizzata anche quando il forno è in uso. A tal fine, seguire le istruzioni indicate sopra a eccezione del punto 4. Impostazione Tempo di Cottura e Fine Tempo Cottura 1 Premere – o + fino a quando il simbolo si illumina. Premere OK. 2 Selezionare il tempo di cottura desiderato, premendo – o +. 3 L'orologio emetterà due bip, si visualizzerà l'ora corrente e il simbolo s'illuminerà in maniera fissa. 4 Premere – o + fino a quando il simbolo si illumina. Premere OK. 5 Selezionare l'ora in cui si desidera terminare la cottura, premendo – o +. 6 L'orologio emetterà due bip, si visualizzerà l'ora corrente e il simbolo s'illuminerà in maniera fissa. 7 Selezionare una funzione di cottura e una temperatura. 8 Il forno rimarrà spento con i simboli accesi. Il forno adesso è programmato. e 9 Raggiunta l'ora di inizio cottura, il forno si accenderà e resterà in funzione per il tempo impostato. 11 Premere qualsiasi tasto per disattivare l'allarme e riaccendere il forno. 12 Portare i comandi su forno. Importante In caso di interruzione dell'alimentazione elettrica, le impostazioni dell'orologio elettronico saranno cancellate e l'indicazione 00:00 lampeggerà sul display. Sarà, pertanto, necessario riprogrammare l'orologio. per spegnere il Si può modificare il tempo fine cottura, premendo – o + fino a quando il simbolo lampeggia e poi premendo OK. A questo punto, premere – o + per modificare il tempo di fine cottura. L'orologio emette due bip per confermare l'avvenuta modifica. 7 ITALIANO 10 Il forno si spegnerà all'ora impostata, verrà emessa una segnalazione acustica e i simboli e cominceranno a lampeggiare. FL-F90 MTL 1 Fijación al mueble 2 Salida de aire 3 Resistencia de Grill Doble Abatible 4 Soportes Bandejas/ Guías Telescópicas 5 Parrilla reforzada 6 Turbina 7 Bandeja de Asados 8 9 10 11 Bisagra Puerta Frontal de mandos Lámparas Para otros mercados, los accesorios pueden no corresponder con los descritos en este manual. Frontal de Mandos 1 2 11 Reloj electrónico 12 Selector de funciones 13 Selector de temperaturas 3 8 Funciones del Horno Convencional Se usa en bizcochos y tartas en los que el calor recibido debe ser uniforme y para que consigan una textura esponjosa. Convencional con Turbina Adecuado para asados y pastelería. El ventilador reparte de forma uniforme el calor en el interior del horno, reduciendo el tiempo y la temperatura de cocinado. Grill Gratinado y asado superficial. Permite el dorado de la capa exterior sin afectar al interior del alimento. Indicado para piezas planas como bistec, costillas, pescado, tostadas. MaxiGrill Permite el gratinado en mayores superficies que en Grill, así como una mayor potencia de gratinado, obteniendo un dorado del alimento de forma más rápida. MaxiGrill con Turbina Permite el asado uniforme al mismo tiempo que dora superficialmente. Ideal para parrilladas. Especial para piezas con gran volumen como aves, caza,... Se recomienda colocar la pieza de carne sobre la parrilla del horno y la bandeja por debajo, para el escurrido de jugos o grasa. Turbo La turbina reparte el calor que proviene de una resistencia situada en la parte trasera del horno. Por la uniformidad de la temperatura que se produce, permite cocinar en 2 alturas al mismo tiempo. Solera Calor sólo desde la parte inferior. Apropiado para calentar platos o levantar masas de repostería y afines. Solera con Turbina Distribuye el calor que proviene de la parte inferior del horno. Ideal para pasteles con relleno de mermelada o fruta, los cuales sólo requieren un aporte de calor inferior. Siempre es necesario un precalentamiento anterior Grill y Solera Especial para asados. Puede usarse para cualquier pieza, independiente de su tamaño. Nota La lámpara permanece encendida en cualquier función de cocinado. Atención Durante el uso de la función Grill, MaxiGrill o MaxiGrill con Turbina la puerta debe mantenerse cerrada. 9 ESPAÑOL Desconexión del horno Manejo del Horno Atención Su reloj electrónico incorpora tecnología TouchControl. Para manejarlo es suficiente con tocar los símbolos del cristal con su dedo. La sensibilidad del Touch-Control se adapta continuamente a las condiciones ambientales. Al conectar el horno a la red tenga la precaución que la superficie del cristal del frontal de mandos esté limpia y libre de cualquier obstáculo. Si al tocar el cristal, el reloj no responde correctamente entonces es necesario que desconecte el horno de la red eléctrica y tras un instante vuelva a conectarlo. De esta forma los sensores se habrán ajustado automáticamente y reaccionarán de nuevo al tocar con el dedo. Puesta en Hora del Reloj Electrónico Al conectar su horno, observará que en el reloj aparece parpadeando la indicación 00:00. Pulsando las teclas – ó + pondrá el reloj en hora; a continuación escuchará 2 beep seguidos como confirmación de la hora elegida. Si desea modificar la hora, pulse las teclas – ó + hasta que parpadee la hora actual. A continuación pulse la tecla OK. Pulsando las teclas – ó + podrá modificar la hora. Finalmente escuchará 2 beep seguidos como confirmación del cambio realizado. Funcionamiento Manual Tras poner el reloj en hora, su horno está listo para cocinar. Seleccione una función de cocinado y una temperatura. Durante el cocinado observará que el símbolo se ilumina para indicar la transmisión de calor al alimento. Este símbolo se apaga cuando se alcanza la temperatura seleccionada. Para apagar el horno, ponga los mandos en posición . Funciones del Reloj Electrónico Avisador: Genera una señal acústica al cabo del tiempo, para ello no es necesario que el horno esté cocinando. 10 Duración del Cocinado: Permite cocinar durante un tiempo seleccionado, a continuación el horno se apagará de forma automática. Hora de Finalización del Cocinado: Permite cocinar hasta una hora establecida, a continuación el horno se apagará de forma automática. Duración y Fin del Cocinado: Permite programar la duración y la hora de finalización del cocinado. Con esta función el horno se pondrá en marcha de forma automática a la hora necesaria para cocinar durante el tiempo seleccionado (Duración) y finalizando de forma automática a la hora que le hayamos indicado (Fin del Cocinado). Programación del Avisador 1 Pulse la tecla + hasta que el símbolo se ilumine. A continuación pulse la tecla OK. 2 Seleccione el tiempo tras el cual desea que el reloj avise, pulsando las teclas – ó +. 3 Posteriormente sonarán 2 beep seguidos, se mostrará la hora actual y el símbolo permanecerá iluminado, indicando que el avisador ya está programado. 4 Transcurrido el tiempo programado, sonará una señal acústica y el símbolo empezará a parpadear. 5 Pulse cualquier tecla para detener la señal acústica, en ese momento el símbolo se apagará. En cualquier momento usted puede visualizar el tiempo restante, pulsando las teclas – ó + hasta que el símbolo parpadee y pulsando luego la tecla OK. En ese momento usted puede modificar el tiempo seleccionado pulsando las teclas – ó +. A continuación escuchará 2 beep seguidos como confirmación del cambio. Programación de la Duración del Cocinado 1 Pulse las teclas – ó + hasta que el símbolo se ilumine. A continuación pulse la tecla OK. 2 Seleccione la duración, pulsando las teclas – ó +. 3 Posteriormente sonarán 2 beep seguidos, se mostrará la hora actual y el símbolo permanecerá iluminado, indicando que su horno se apagará de forma automática. 4 Seleccione una función y una temperatura de cocinado. 5 Transcurrida la duración del cocinado, el horno se desconectará, sonará una señal acústica y el símbolo parpadeará. 6 Pulse cualquier tecla para detener la señal acústica, encendiéndose el horno de nuevo. 7 Ponga los mandos en posición para apagar el horno. En cualquier momento usted puede visualizar el tiempo restante de cocinado, pulsando las teclas – ó + hasta que el símbolo parpadee y pulsando luego la tecla OK. En ese momento usted puede modificar el tiempo seleccionado pulsando las teclas – ó +. A continuación escuchará 2 beep seguidos como confirmación del cambio. Si desea ver de forma permanente el tiempo restante hasta la finalización, pulse las teclas – ó + hasta que el símbolo parpadee y luego pulse la tecla OK de forma prolongada. El símbolo estará parpadeando. Para volver a la hora actual basta con pulsar de nuevo la tecla OK de forma prolongada. Programación de la Hora de Finalización del Cocinado 1 Pulse las teclas – ó + hasta que el símbolo se ilumine. A continuación pulse la tecla OK. 2 Seleccione la hora de finalización del cocinado, pulsando las teclas – ó +. 3 Posteriormente sonarán 2 beep seguidos, se mostrará la hora actual y el símbolo permanecerá iluminado, indicando que su horno se apagará de forma automática. 4 Seleccione una función y una temperatura de cocinado. 5 Alcanzada la hora seleccionada el horno se desconectará, sonará una señal acústica y el símbolo parpadeará. 6 Pulse cualquier tecla para detener la señal acústica, encendiéndose el horno de nuevo. 7 Ponga los mandos en posición para apagar el horno. En cualquier momento usted puede visualizar la hora de finalización del cocinado, pulsando las teclas – ó + hasta que el símbolo parpadee y pulsando luego la tecla OK. En ese momento usted puede modificar la hora de finalización seleccionada pulsando las teclas – ó +. A continuación escuchará 2 beep seguidos como confirmación del cambio. Puede emplear esta función aunque usted ya esté cocinando con su horno. Para ello siga las instrucciones indicadas salvo la número 4. Programación de la Duración y Fin del Cocinado 1 Pulse las teclas – ó + hasta que el símbolo se ilumine. A continuación pulse la tecla OK. 2 Seleccione la duración, pulsando las teclas – ó +. 3 Posteriormente sonarán 2 beep seguidos, se mostrará la hora actual y el símbolo permanecerá iluminado. 4 Pulse las teclas – ó + hasta que el símbolo se ilumine. A continuación pulse la tecla OK. 5 Seleccione la hora de finalización del cocinado, pulsando las teclas – ó +. 6 Posteriormente sonarán 2 beep seguidos, se mostrará la hora actual y el símbolo permanecerá iluminado. 7 Seleccione una función y una temperatura de cocinado. 11 ESPAÑOL Si desea ver de forma permanente el tiempo restante hasta la finalización, pulse las teclas – ó + hasta que el símbolo parpadee y luego pulse la tecla OK de forma prolongada. El símbolo estará parpadeando. Para volver a la hora actual basta con pulsar de nuevo la tecla OK de forma prolongada. 8 El horno permanecerá desconectado, quedándose iluminados los símbolos y . Su horno está programado. 9 Cuando se alcance la hora de comienzo del cocinado, el horno se pondrá en marcha y se realizará el cocinado durante el tiempo seleccionado. 10 Alcanzada la hora de finalización que se había programado, el horno se desconectará, sonará una señal acústica y los símbolos y parpadearán. 11 Pulse cualquier tecla para detener la señal acústica, encendiéndose su horno de nuevo. 12 Ponga los mandos en posición apagar el horno. para Si usted desea modificar la hora de finalización, pulse las teclas – ó + hasta que se ilumine el símbolo y pulse la tecla OK. En ese momento usted puede modificar la hora seleccionada pulsando las teclas – ó +. A continuación escuchará 2 beep seguidos como confirmación del cambio. 12 Atención En caso de un corte de suministro eléctrico, se borrará toda la programación de su reloj electrónico y aparecerá parpadeando la indicación 00:00 en el reloj. Deberá ponerlo en hora y programarlo de nuevo. FL-F90 MTL 4 Suporte Cromado/ Guía Telescópica 5 Grelha reforçada 6 Turbina 7 Bandeja para Assados 8 9 10 11 Dobradiça Porta Painel de Comandos Lâmpadas PORTUGUÉS 1 Fixação ao Móvel 2 Saída de ar da Refrigeração 3 Resistência do Grill Para outros mercados, os acessórios podem não corresponder aos descritos neste manual. Painel de Comandos 1 2 1 Relógio electrónico. 2 Selector de funções. 3 Selector de temperatura. 3 13 Funzioni del forno Desconexão do forno Convencional Usado em bolos e tartes nos quais o calor recebido deve ser uniforme para que adquiram uma textura esponjosa. Convencional com Turbina Adequado para assados e pastelaria. O ventilador reparte de forma uniforme o calor no interior do forno. Turbo A turbina distribui o calor que provém de uma resistência situada na parte traseira do forno. Pela uniformidade da temperatura que se produz, permite cozinhar em 2 alturas ao mesmo tempo. Resistência Inferior Calor somente na parte inferior. Apropriado para aquecer pratos ou levantar massas de confeitaria e semelhantes. Grill Gratina e assa superficialmente. Permite alourar a camada exterior sem afectar o interior do alimento. Indicado para pedaços planos como filetes, costelas, peixe, tostas. Resistência Inferior com Turbina Distribui o calor que provém da parte inferior do forno. Ideal para pastéis com recheio de geleia ou fruta, os quais só necessitam de calor na parte inferior. É sempre necessario realizar um pré-aquecimento. MaxiGrill Permite gratinar superfícies maiores que com o Grill, bem como gratinar com maior potência, alourando assim o alimento de forma mais rápida. Grill e Resistência Inferior Especial para assados. Pode ser usado para qualquer porção, independente do seu tamanho. MaxiGrill com Turbina Permite assar de modo uniforme ao mesmo tempo que aloura superficialmente. Ideal para churrascos. Especial para pedaços com grande volume como aves, caça,... Recomenda-se colocar a porção de carne sobre a grelha do forno com a bandeja por baixo, para recolher os molhos ou gorduras. Atenção Durante o uso da função Grill, MaxiGrill ou MaxiGrill com Turbina deve-se manter a porta fechada. 14 Nota A lâmpada permanece acesa em qualquer função de cozinhado. Manejo del Horno O seu relógio electrónico incorpora tecnologia Touch-Control. Para o controlar basta tocar nos símbolos do vidro com o dedo. A sensibilidade do Touch-Control adapta-se continuamente às condições ambientais. Ao ligar o forno à corrente, deve-se ter o cuidado de garantir que a superfície do vidro da parte da frente dos comandos está limpa e livre de qualquer obstáculo. Se ao tocar no vidro, o relógio não responder correctamente, então é necessário desligar o forno da rede eléctrica e após um instante voltar a ligá-lo. Desta forma os sensores ajustarse-ão automaticamente e reagirão novamente ao toque. Acerto do Relógio Electrónico Ao ligar o forno, observará que, no relógio, aparece a piscar a indicação 00:00. Premindo as teclas – ou + acertará o relógio; a seguir ouvirá 2 beeps seguidos como confirmação da hora seleccionada. Se desejar alterar a hora, prima as teclas – ou + até a hora actual começar a piscar. A seguir prima a tecla OK. Premindo as teclas – ou + poderá modificar a hora. Finalmente, ouvirá 2 beeps seguidos como confirmação da alteração realizada. Funcionamento Manual Depois de acertar o relógio, o forno está pronto para cozinhar. Seleccione uma função de cozinhado e uma temperatura. Durante o cozinhado, o símbolo iluminase indicando que o forno está a transmitir calor ao alimento, e desliga-se quando é atingida a temperatura seleccionada. Para desligar o forno, coloque os comandos na posição . Funções do Relógio Electrónico Avisador: Gera um sinal acústico ao fim de algum tempo, para tal, não é necessário que o forno esteja a cozinhar. Duração do Cozinhado: Permite cozinhar durante um tempo seleccionado; de seguida, o forno desligar-se-á de forma automática. Hora de Finalização do Cozinhado: Permite cozinhar até a uma hora estabelecida, de seguida, o forno desligar-se-á de forma automática. Duração e Fim do Cozinhado: Permite programar a duração e a hora de finalização do cozinhado. Com esta função, o forno colocar-se-á em funcionamento de forma automática à hora necessária para cozinhar durante o tempo seleccionado (Duração), finalizando de forma automática à hora anteriormente indicada. (Fim do Cozinhado). Programação do Avisador 1 Prima a tecla + até o símbolo A seguir prima a tecla OK. iluminar-se. 2 Seleccione o tempo após o qual deseja que o relógio avise, premindo as teclas – ou +. 3 Posteriormente, soarão 2 beeps seguidos, será mostrada a hora actual e o símbolo permanecerá iluminado, indicando que o avisador já está programado. 4 Decorrido o tempo programado, soará um sinal acústico e o símbolo começará a piscar. 5 Prima qualquer tecla para parar o sinal acústico, o símbolo desligar-se-á. Em qualquer momento, pode visualizar o tempo restante, premindo as teclas – ou + até o símbolo piscar, e premindo de seguida a tecla OK. Neste momento, pode alterar o tempo seleccionado premindo as teclas – ou +. A seguir ouvirá 2 beeps seguidos como confirmação da alteração. Se desejar ver de forma permanente o tempo restante até à finalização prima as teclas – ou + até o simbolo piscar e prima a tecla OK de forma prolongada. O símbolo piscará. Para voltar à hora actual, basta premir de novo a tecla OK de forma prolongada. 15 PORTUGUÉS Atenção Programação da Duração do Cozinhado 1 Prima as teclas – ou + até o símbolo iluminar-se. De seguida prima a tecla OK. 2 Seleccione a duração, premindo as teclas – ou +. 3 Posteriormente soarão 2 beeps seguidos, será mostrada a hora actual e o símbolo permanecerá iluminado, indicando que o forno desligar-se-à de forma automática. 4 Seleccione uma função e uma temperatura de cozinhado. 5 Decorrida a duração do cozinhado, o forno desligar-se-á, soará um sinal acústico e o símbolo piscará. 6 Prima qualquer tecla para parar o sinal acústico, ligando-se o forno de novo. 7 Coloque os comandos na posição para desligar o forno. A qualquer momento, pode visualizar o tempo restante de cozinhado, premindo as teclas – ou + até o símbolo piscar, e premindo de seguida a tecla OK. Neste momento, pode modificar o tempo seleccionado premindo as teclas – ou +. A seguir ouvirá 2 beeps seguidos, como confirmação da alteração. Se desejar ver de forma permanente o tempo restante até à finalização prima as teclas – ou + até o simbolo piscar e prima a tecla OK de forma prolongada. O símbolo piscará. Para voltar à hora actual, basta premir de novo a tecla OK de forma prolongada. Programação da Hora de Finalização do Cozinhado 1 Prima as teclas – ou + até o símbolo iluminar-se. De seguida prima a tecla OK. 2 Seleccione a hora de finalização do cozinhado, premindo as teclas – ou +. 3 Posteriormente soarão 2 beeps seguidos, será mostrada a hora actual e o símbolo permanecerá iluminado, indicando que o forno desligar-se-à de forma automática. 4 Seleccione uma função e uma temperatura de cozinhado. 16 5 Alcançada a hora seleccionada, o forno desligar-se-á, soará um sinal acústico e o símbolo piscará. 6 Prima qualquer tecla para parar o sinal acústico, ligando-se o forno de novo. 7 Coloque os comandos na posição para desligar o forno. A qualquer momento pode visualizar a hora de finalização do cozinhado, premindo as teclas – ou + até o símbolo piscar, e premindo de seguida a tecla OK. Neste momento, pode modificar a hora de finalização seleccionada premindo as teclas – ou +. A seguir ouvirá 2 beeps seguidos, como confirmação da alteração. Pode usar esta função mesmo que já esteja a utilizar o forno. Para tal, siga as instruções indicadas, excepto a número 4. Programação Cozinhado da Duração e Fim do 1 Prima as teclas – ou + até o símbolo iluminar-se. De seguida prima a tecla OK. 2 Seleccione a duração, premindo as teclas – ou +. 3 Posteriormente soarão 2 beeps seguidos, será mostrada a hora actual e o símbolo permanecerá iluminado. 4 Prima as teclas – ou + até o símbolo se iluminar. A seguir prima a tecla OK. 5 Seleccione a hora de finalização do cozinhado, premindo as teclas – ou +. 6 Posteriormente soarão 2 beeps seguidos, será mostrada a hora actual e o símbolo permanecerá iluminado. 7 Seleccione uma função e uma temperatura de cozinhado. 8 O forno permanecerá desligado, ficando iluminados os símbolos e . O seu forno está programado. 9 Quando alcançar a hora de início do cozinhado, o forno entrará em funcionamento e realizar-se-á o cozinhado durante o tempo seleccionado. 10 Alcançada a hora final que tinha sido programada, o forno desligar-se-á, soará um sinal acústico e os símbolos pise carão. 11 Prima qualquer tecla para parar o sinal acústico, ligando-se o seu forno de novo. 12 Coloque os comandos na posição desligar o forno. Atenção No caso de um corte de fornecimento eléctrico, será eliminada toda a programação do relógio electrónico e aparecerá a indicação 00:00 a piscar no relógio. Deverá acertá-lo e programá-lo de novo. para PORTUGUÉS Se desejar modificar a hora de finalização, prima as teclas – ou + até se iluminar o símbolo , e prima a tecla OK. A partir deste momento, pode modificar a hora seleccionada premindo as teclas – ou +. A seguir ouvirá 2 beeps seguidos, como confirmação da modificação. 17 FL-F90 MTL 1 Fixing to Unit 2 Air Outlet 3 Fold-down Grill element 4 Chromed Support/ Telescopic Guide 5 Grid 6 Fan 7 Roasting Tray 8 9 10 11 Hinge Door Control Panel Light For other markets, accessories may not correspond to those described in this manual. Control Panel 1 2 1 Electronic clock. 2 Function selector. 3 Temperature selector. 3 18 Oven Functions Conventional It is used for sponges and cakes where the heat received must be uniform to achieve a spongy texture. Conventional with fan Appropriate for roasts and cakes. The fan spreads the heat uniformly inside the oven. Grill For preparing dishes with superficial roasting. It allows the outer layer to be browned without affecting the inside of the food. Ideal for flat food, such as steaks, ribs, fish, toast. MaxiGrill Allows greater surfaces to be prepared, than with the grill, together with higher power reducing the time required for browning of the food. MaxiGrill with fan Allows uniform roasting at the same time as surface browning. Ideal for grills. Special for large volume pieces, such as poultry, game, etc. It is recommended to put the item on a rack with a tray beneath to collect the stock and juices. Turbo The fan distributes the heat coming from an element located at the back of the oven. As a result of the evenly distributed temperature, food can be cooked on two levels at the same time. Lower element Heats only from beneath. Suitable for heating dishes and raising pastry and similar. Lower element with fan It distributes the heat from the lower part of the oven and is ideal for cakes with jam or fruit filling, which only require heating from beneath. Pre-heating is always necessary. Grill and Lower element Special for roasts. It can be used for any piece, whatever its size. Note The pilot light remains on in any cooking function. ENGLISH Switch off oven Caution While using the Grill, MaxiGrill or MaxiGrill with fan, the door must be kept closed. 19 Using the Oven Caution The electronic clock features Touch-Control technology. To operate, simply touch the glass control symbols with your fingertip. The touch control sensitivity continuously adapts to ambient conditions. Make sure the glass surface of the control panel is clean and free of obstacles when plugging in the oven. If the clock does not respond correctly when you touch the glass, unplug the oven for a few seconds and then plug it in again. Doing this causes the sensors to adjust automatically so that they will react once more to fingertip control. Cooking Time: To cook for a selected length of time; the oven turns itself off automatically when the time finishes. End Cooking Time: To cook until a set time; the oven turns itself off automatically when the time finishes. Cooking time and End Cooking Time: To cook for a selected length of time and end at a set time. When this function is set, the oven comes on automatically at the time required in order to cook for the set length of time (Cooking time) and end automatically at the indicated time (End Cooking Time) Programming the Alarm Setting the time on the Electronic Clock When the oven is connected to the power supply, the indication 00:00 flash on the display. Press – or + to set the time on the clock. The clock beeps twice to confirm the selected time. If you wish to modify the time, press – or + until the current time flash on the screen. Press OK. Then press – or + to modify the time. The clock beeps twice to confirm the modification. Manual Operation The oven is ready to be used when the clock has been set. Select a cooking function and a temperature. When you begin cooking, symbol lights up to indicate that the oven is heating the contents; the symbol goes out when the selected temperature is reached. Set the controls to to turn the oven off. Functions of the Electronic Clock Alarm: Creates an alarm signal when the period of time finishes; the oven does not need to be in use in order to use this function. 20 1 Press + until symbol lights up. Press OK. 2 Set the period of time after which you wish the alarm to sound by pressing – or +. 3 The clock beeps twice, the current time is displayed and symbol lights up permanently to indicate that the alarm has been set. 4 When the set period of time comes to an end, the alarm sounds and symbol starts to flash. 5 Press any button to stop the alarm; symbol goes out. You can consult the remaining time at any moment by pressing – or + until symbol flashes and then pressing OK. You can also modify the set time at this point by pressing – or +. The clock beeps twice to confirm the change. If you wish the remaining time to be displayed until the end of the set period of time, press – or + until symbol flashes and then press OK and keep it pressed in. Symbol flashes. Keep OK pressed in again to return to the real time. lights up. 5 When the set time is reached, the oven turns itself off, the alarm sounds and symbol flashes. 2 Select the period of time you wish to cook for by pressing – or +. 6 Press any button to stop the alarm and turn the oven back on again. 3 The clock beeps twice, the current time is displayed and symbol lights up permanently to indicate that the oven will turn itself off automatically. 7 Set the controls to 1 Press – or + until symbol Press OK. 4 Select a cooking function and temperature. 5 When the cooking time comes to an end, the oven turns itself off, the alarm sounds and symbol flashes. 6 Press any button to stop the alarm and turn the oven back on again. 7 Set the controls to to turn the oven off. You can consult the remaining cooking time at any moment by pressing – or + until symbol flashes and then pressing OK. You can also modify the set time at this point by pressing – or +. The clock beeps twice to confirm the change. If you wish the remaining time to be displayed until the end of the set period of time, press – or + until symbol flashes and then press OK and keep it pressed in. Symbol flashes. Keep OK pressed in again to return to the real time. Setting the End Cooking Time 1 Press – or + until symbol Press OK. lights up. 2 Select the time you wish the cooking process to finish at by pressing – or +. 3 The clock beeps twice, the current time is displayed and symbol lights up permanently to indicate that the oven will turn itself off automatically. 4 Select a cooking function and temperature. to turn the oven off. You can consult the end cooking time at any moment by pressing – or + until symbol flashes and then pressing OK. You can also modify the end cooking time at this point by pressing – or +. The clock beeps twice to confirm the change. This function can be used even when you are already using the oven. To do this, follow the instructions indicated above except point number 4. Setting the Cooking Time and the End Cooking Time 1 Press – or + until symbol Press OK. lights up. 2 Select the period of time you wish to cook for by pressing – or +. 3 The clock beeps twice, the current time is displayed and symbol lights up permanently. 4 Press – or + until symbol Press OK. lights up. 5 Select the time you wish the cooking process to finish at by pressing – or +. 6 The clock beeps twice, the current time is displayed and symbol lights up permanently. 7 Select a cooking function and temperature. 8 The oven remains off with symbols lit up. Your oven is set. and 9 When the time to start cooking is reached, the oven starts up and cooks for the set period of time. 21 ENGLISH Setting the Cooking Time 10 When the set end cooking time is reached, the oven turns itself off, the alarm sounds and symbols and flash. 11 Press any button to stop the alarm and turn the oven back on again. 12 Set the controls to to turn the oven off. You can modify the end cooking time by pressing – or + until symbol lights up and then pressing OK. You can now modify the end cooking time by pressing – or +. The clock beeps twice to confirm the change. 22 Important In the event of a power cut, all the electronic clock settings are deleted and the indication 00:00 flashes on the display. It is necessary to set the time and programme the clock again. FL-F90 MTL 1 Fixation au Meuble 2 Sortie de l’air de Réfrigération 3 Résistance du Grill Abattable 4 Support Chromé/ Guide Télescopique 5 Grille renforcée 6 Turbine 7 Plateau pour Rôtis 8 Charnière 9 Porte 10 Panneau Frontal de Commande 11 Lampe Pour certains marchés, il est possible que les accessoires ne correspondent pas à ceux décrits dans ce manuel. Panneau Frontal de Commande 1 2 1 Horloge électronique. 2 Sélecteur de fonctions. FRANÇAIS 3 Sélecteur de températures. 3 23 Fonctions du Four Arrêt du four Conventionnel Utiliser pour les gâteaux et les tartes qui doivent recevoir une chaleur uniforme et pour obtenir une texture moelleuse. Conventionnel avec turbine Recommandé pour les rôtis et la pâtisserie. Le ventilateur répartit la chaleur de façon uni-forme à l'intérieur du four. Grill Pour gratiner et rôtir superficiellement. Permet de dorer la couche extérieure sans affecter l'intérieur de l'aliment. Indiqué pour les pièces plates telles que les beefsteaks, les côtelettes, les poissons, les toasts. MaxiGrill Permet de gratiner des surfaces plus grandes qu'avec le Grill avec une puissance pour gratiner supérieure, qui permet ainsi de dorer l'aliment de façon plus rapide. MaxiGrill avec turbine Permet en même temps de rôtir de façon uniforme et de dorer superficiellement. Idéal pour les grillades. Spécial pour les pièces volumineuses telles que les volailles, le gibier... Il est recommandé de placer la pièce de viande sur la grille du four et la lèchefrite en dessous pour recueillir les jus de cuisson ou la graisse. Attention Quand on utilise la fonction Grill, MaxiGrill ou MaxiGrill avec Turbine, la porte doit rester fermée. 24 Turbo La turbine répartit la chaleur provenant de la résistance située à l'arrière du four. L’uniformité de la température générée permet de cuisiner sur 2 niveaux en même temps. Résistance inférieure La chaleur provient seulement de la partie inférieure. Approprié pour réchauffer des plats ou faire lever des pâtes pour pâtisseries et analogues. Résistance inférieure avec Turbine Elle distribue la chaleur qui provient de la partie inférieure du four. Idéal pour les gâteaux fourrés avec de la confiture ou des fruits, qui requièrent seulement un apport de chaleur inférieur. Il est toujours nécessaire de préchauffer. Grill et résistance inférieure Spécial pour les rôtis. Peut être utilisé pour toutes sortes de pièces, indépendamment de leur volume. Attention La lampe reste allumée pendant toutes les fonctions de cuisson. Maniement du Four L’horloge électronique est équipée de la technologie Touch-Control. Pour la manipuler, il suffit d’appuyer sur les symboles représentés sur la vitre. La sensibilité du Touch-Control s’adapte constamment aux conditions ambiantes. Lorsque vous branchez le four sur le secteur électrique, veillez à ce que la surface vitrée du tableau de commande soit propre et sans aucun obstacle. Si l’horloge ne répond pas correctement lorsque vous touchez la vitre avec le doigt, il faut débrancher le four du secteur et de le rebrancher après un court instant. Ceci permet de régler automatiquement les capteurs qui réagiront de nouveau lorsque vous toucherez les commandes tactiles. Mise à l’heure de l’horloge électronique Lorsque vous branchez votre four, vous observez que l’indication 00:00 clignotent dans l’horloge. Mettez l’horloge à l’heure à l’aide des touches – ou +. Vous entendrez 2 bips consécutifs comme confirmation de la mise à l’heure. Si vous souhaitez modifier l’heure, appuyez sur les touches – ou + jusqu’à ce que l’heure actuelle se mettent à clignoter. Appuyez ensuite sur la touche OK. À l’aide des touches – ou +, vous pouvez alors modifier l’heure. Vous entendrez 2 bips consécutifs comme confirmation de la modification réalisée. Fonctionnement manuel Une fois l’horloge mise à l’heure, votre four est prêt à fonctionner. Sélectionnez une fonction de cuisson et une température. Lors de la cuisson, le symbole s´allume indiquant que le four est en train de transmettre de la chaleur à l’aliment et s´éteint lorsque la température sélectionnée est atteinte. Pour éteindre le four, mettez les commandes sur la position . Fonctions de l’horloge électronique Avertisseur: génère un signal acoustique à un moment donné; pour ce faire, il n’est pas nécessaire que le four soit allumé. Durée de cuisson: permet de cuire pendant une durée sélectionnée, le four s’éteignant de façon automatique. Heure de fin de cuisson: permet de cuire jusqu’à une heure définie, le four s’éteignant de façon automatique. Durée et fin de cuisson: permet de programmer la durée et l’heure de fin de cuisson. Avec cette fonction, le four se mettra en marche de façon automatique à l’heure indiquée pour cuire pendant la durée sélectionnée (Durée) et s’éteindre de façon automatique à l’heure indiquée (Fin de cuisson). Programmation de l’avertisseur 1 Appuyez sur la touche +. jusqu’à ce que le symbole s’allume. Appuyez ensuite sur la touche OK. 2 Sélectionnez le temps au bout duquel vous souhaitez que l’horloge vous avertisse en appuyant sur les touches – ou +. 3 Vous entendrez alors 2 bips consécutifs, l’heure actuelle sera affichée et le symbole s’allumera, indiquant que l’avertisseur est programmé. 4 Une fois le temps programmé écoulé, un signal acoustique sonnera et le symbole commencera à clignoter. 5 Appuyez sur n’importe quelle touche pour arrêter le signal acoustique, à ce moment le symbole s’éteindra. Vous pouvez afficher le temps restant à tout moment en appuyant sur les touches – ou + jusqu’à ce que le symbole clignote, puis en appuyant sur la touche OK. Vous pouvez alors modifier le temps sélectionné en appuyant sur les touches – ou +. Vous entendrez 2 bips consécutifs comme confirmation de la modification. 25 FRANÇAIS Mise en garde Si vous souhaitez afficher de façon permanente le temps restant jusqu’à la fin, appuyez sur les touches – ou + jusqu’à ce que le symbole clignote and appuyez sur la touche OK de façon prolongée. Le symbole clignotera. Pour revenir à l’heure actuelle, il suffit d’appuyer à nouveau sur la touche OK de façon prolongée. Programmation de la durée de cuisson 1 Appuyez sur la touche – ou + jusqu’à ce que le symbole s’allume. Appuyez ensuite sur la touche OK. 2 Sélectionnez la durée en appuyant sur les touches – ou +. 3 Vous entendrez alors 2 bips consécutifs, l’heure actuelle sera affichée et le symbole s’allumera, indiquant que votre four s’éteindra de façon automatique. 4 Sélectionnez une fonction et une température de cuisson. 5 Une fois la durée de cuisson écoulée, le four se déconnectera, un signal acoustique sonnera et le symbole clignotera. 6 Appuyez sur n’importe quelle touche pour arrêter le signal acoustique; le four s’allumera de nouveau. 7 Mettez les commandes sur la position pour éteindre le four. Vous pouvez afficher le temps de cuisson restant à tout moment en appuyant sur les touches – ou + jusqu’à ce que le symbole clignote, puis en appuyant sur la touche OK. Vous pouvez alors modifier le temps sélectionné en appuyant sur les touches – ou +. Vous entendrez 2 bips consécutifs comme confirmation de la modification. Si vous souhaitez afficher de façon permanente le temps restant jusqu’à la fin, appuyez sur les touches – ou + jusqu’à ce que le symbole clignote and appuyez sur la touche OK de façon prolongée. Le symbole clignotera. Pour revenir à l’heure actuelle, il suffit d’appuyer à nouveau sur la touche OK de façon prolongée. 26 Programmation de l’heure de fin de cuisson 1 Appuyez sur la touche – ou + jusqu’à ce que le symbole s’allume. Appuyez ensuite sur la touche OK. 2 Sélectionnez l’heure de fin de cuisson en appuyant sur les touches – ou +. 3 Vous entendrez alors 2 bips consécutifs, l’heure actuelle sera affichée et le symbole s’allumera, indiquant que votre four s’éteindra de façon automatique. 4 Sélectionnez une fonction et une température de cuisson. 5 Une fois l’heure sélectionnée atteinte, le four se déconnectera, un signal acoustique sonnera et le symbole clignotera. 6 Appuyez sur n’importe quelle touche pour arrêter le signal acoustique; le four s’allumera de nouveau. 7 Mettez les commandes sur la position pour éteindre le four. Vous pouvez afficher l’heure de fin de cuisson à tout moment en appuyant sur les touches – or + jusqu’à ce que le symbole clignote, puis en appuyant sur la touche OK. Vous pouvez alors modifier l’heure de fin sélectionnée en appuyant sur les touches – ou +. Vous entendrez 2 bips consécutifs comme confirmation de la modification. Vous pouvez utiliser cette fonction même si vous êtes déjà en train d’utiliser votre four. Pour ce faire, suivez les instructions indiquées sauf la numéro 4. Programmation de la durée et de la fin de cuisson 1 Appuyez sur la touche – ou + jusqu’à ce que le symbole s’allume. Appuyez ensuite sur la touche OK. 2 Sélectionnez la durée en appuyant sur les touches – ou +. 3 Vous entendrez alors 2 bips consécutifs, l'heure actuelle sera affichée et le symbole s’allumera. 4 Appuyez sur la touche – ou + jusqu’à ce que le symbole s’allume. Appuyez ensuite sur la touche OK. Si vous souhaitez modifier l’heure de fin, appuyez sur les touches – ou + jusqu’à ce que le symbole s’allume, puis appuyez sur la touche OK. Vous pouvez alors modifier l’heure sélectionnée en appuyant sur les touches – ou +. Vous entendrez 2 bips consécutifs comme confirmation de la modification. Attention En cas de coupure de l’alimentation électrique, toute la programmation de votre horloge électronique sera effacée et l’indication 00:00 clignotera dans l’horloge. Vous devrez la mettre à l’heure et la programmer à nouveau. FRANÇAIS 5 Sélectionnez l’heure de fin de cuisson en appuyant sur les touches – ou +. 6 Vous entendrez alors 2 bips consécutifs, l'heure actuelle sera affichée et le symbole s’allumera. 7 Sélectionnez une fonction et une température de cuisson. 8 Le four restera déconnecté, et les symboles et seront allumés. Votre four est alors programmé. 9 Lorsque l’heure de début de cuisson est atteinte, le four se mettra en marche et la cuisson se fera pendant le temps sélectionné. 10 Une fois l’heure de fin programmée atteinte, le four se déconnectera, un signal acoustique sonnera et les symboles et se mettront à clignoter. 11 Appuyez sur n’importe quelle touche pour arrêter le signal acoustique; le four s’allumera de nouveau. 12 Mettez les commandes sur la position pour éteindre le four. 27 FL-F90 MTL 1 Befestigung am Einbauschrank 2 Kühlluftaustritt 3 Doppelter klappbarer Grillwiderstand 4 Blechhalterungen / Ausziehschienen 5 Rost 6 Umluft 7 Bratenpfanne 8 9 10 11 Scharnier Tür Bedienfeld Lampen Für andere Märkte entspricht das Zubehör möglicherweise nicht dem, welches in dieser Anleitung beschrieben ist. Bedienfeld 1 2 1 Elektronikuhr 2 Funktionswahlschalter 3 Temperaturwahlschalter 3 28 Abschalten des Backofens Normal Wird für Kuchen und Torten, die gleichmäßige Hitze brauchen, empfohlen, um eine luftige Konsistenz zu erhalten. Normal mit Umluft Für Braten und Gebäck geeignet. Der Ventilator verteilt die Hitze gleichmäßig im Inneren des Backofens, wodurch Garzeit und -temperatur gesenkt werden. Grill Gratinieren und überbacken. Ermöglicht das Bräunen der äußeren Schicht, ohne das Innere des Garguts zu beeinflussen. Geeignet für flache Stücke wie Steaks, Rippchen, Fisch, Toasts. MaxiGrill Ermöglicht das Gratinieren von größeren Oberflächen und mit höherer Leistung als mit dem Grill, wodurch eine schnellere Bräunung des Garguts erreicht wird. MaxiGrill mit Umluft Ermöglicht gleichzeitig ein gleichmäßiges Garen und Bräunen der Oberfläche. Ideal zum Grillen. Besonders für große Stücke wie Geflügel, Wild usw. Es wird empfohlen, das Grillgut auf den Rost zu legen und die Fettpfanne darunter zu stellen, um Bratensaft und Fett aufzufangen. Turbo Der Ventilator verteilt die Hitze, die von einem Heizwiderstand an der Rückseite des Backofens erzeugt wird. Durch die so erzeugte gleichmäßige Temperatur ist ein gleichzeitiges Garen auf zwei Ebenen möglich. Unterhitze Nur Hitze von unten. Geeignet für das Erwärmen von Tellern oder das Aufgehenlassen von Kuchenteig und Ähnlichem. Unterhitze mit Umluft Verteilt die im unteren Teil des Backofens erzeugte Hitze. Ideal für Gebäck mit Marmeladen- oder Obstfüllung, bei dem ein Erhitzen von unten erforderlich ist. Der Backofen muss immer vorgeheizt werden. Grill und Unterhitze Besonders für Braten. Für jedes Stück, unabhängig von seiner Größe, geeignet. Anmerkung Die Lampe bleibt bei jeder Garfunktion eingeschaltet. Achtung Bei Benutzung der Funktionen Grill, MaxiGrill oder MaxiGrill mit Umluft muss die Backofentür geschlossen gehalten werden. 29 DEUTSCH Backofenfunktionen Bedienung des Backofens Achtung Funktionen der Elektronikuhr Ihre Elektronikuhr ist mit Touch-ControlTechnologie ausgestattet. Um sie zu bedienen, genügt es, die Symbole auf dem Glas mit dem Finger zu berühren. Timer: Erzeugt ein Signal am Ende der eingestellten Zeit, unabhängig davon, ob der Backofen heizt oder nicht. Garzeit-Dauer: Ermöglicht das Garen während der gewählten Zeit, danach schaltet sich der Backofen automatisch aus. Die Empfindlichkeit der Touch-Control passt sich stets den Umgebungsbedingungen an. Wenn Sie den Ofen an das Stromnetz anschließen, müssen Sie darauf achten, dass das Glas des Bedienfeldes sauber und frei von Hindernissen ist. Garzeit-Ende: Ermöglicht das Garen bis zu einer vorgewählten Uhrzeit, danach schaltet sich der Backofen automatisch aus. Sollte die Uhr nicht richtig reagieren, wenn das Glas mit dem Finger berührt wird, muss man den Ofen vom Stromnetz trennen und nach einem Augenblick wieder anschließen. Auf diese Weise stellen sich die Sensoren automatisch richtig ein und reagieren wieder auf Berührung mit dem Finger. Garzeit-Dauer und Garzeit-Ende: Ermöglicht die Einstellung der Dauer und Endzeit des Garvorgangs. Mit dieser Funktion schaltet sich der Backofen automatisch zu der passenden Uhrzeit für die vorgewählte Garzeit (Dauer) ein und schaltet sich automatisch beim Erreichen der eingestellten Zeit (Garzeit-Ende) ab. Einstellen der Uhrzeit der Elektronikuhr Programmierung des Timers Wenn Sie den Backofen an das Netz anschließen, blinkt auf der Uhr die Anzeige 00:00. Durch Berühren der Taste – bzw. + wird die Uhrzeit eingestellt. Danach hören Sie zwei aufeinander folgende Pieptöne zur Bestätigung der gewählten Uhrzeit. 1 Taste + drücken, bis das Symbol aufleuchtet. Drücken Sie im Anschluss die OK-Taste. Wenn Sie die Uhrzeit ändern möchten, müssen Sie die Taste – bzw. + drücken, bis die aktuelle Uhrzeit blinkt. Drücken Sie im Anschluss die OKTaste. Durch Betätigung der Taste – bzw. + können Sie die Uhrzeit ändern. Abschließend ertönen 2 aufeinander folgende Pieptöne zur Bestätigung der Änderung. Manueller Betrieb Nach Einstellung der Uhrzeit ist der Backofen betriebsbereit. Wählen Sie eine Garfunktion und eine Temperatur. Während des Garens leuchtet das Symbol , um anzuzeigen, dass das Gargut erhitzt wird. Dieses Symbol erlischt, wenn die gewählte Temperatur erreicht ist. Zum Ausschalten des Backofens bringen Sie die Schalter in die Position . 30 2 Wählen Sie die Zeitdauer, nach deren Ablauf der Timer ertönen soll, indem Sie die Taste – bzw. + drücken. 3 Danach ertönen 2 aufeinander folgende Pieptöne; die aktuelle Zeit wird angezeigt und das Symbol leuchtet weiter, um anzuzeigen, dass der Timer eingestellt ist. 4 Wenn die eingestellte Zeit abgelaufen ist, ertönt ein Signal und das Symbol beginnt zu blinken. 5 Drücken Sie eine beliebige Taste, um das akustische Signal zu stoppen. Damit wird das Symbol ausgeschaltet. Sie können jederzeit die verbleibende Zeit anzeigen, indem Sie die Taste – bzw. + drücken, bis das Symbol blinkt, und anschließend die OKTaste drücken. Dann können Sie auch die gewählte Zeit ändern, indem Sie die Taste – bzw. + drücken. Danach ertönen 2 aufeinander folgende Pieptöne zur Bestätigung der Änderung. Programmierung der Gardauer 1 Drücken Sie die Taste – bzw. +, bis das Symbol @ aufleuchtet. Drücken Sie im Anschluss die OK-Taste. 2 Wählen Sie die Gardauer, indem Sie die Taste – bzw. + drücken. 3 Danach ertönen 2 aufeinander folgende Pieptöne, die aktuelle Uhrzeit wird angezeigt und das Symbol leuchtet permanent und zeigt damit an, dass Ihr Backofen sich automatisch abschalten wird. 4 Wählen Sie eine Gartemperatur. Funktion und eine 5 Wenn die Garzeit abgelaufen ist, schaltet sich der Backofen ab; es ertönt ein Signal und das Symbol blinkt. 6 Drücken Sie eine beliebige Taste, um das Signal abzustellen, und der Backofen schaltet sich wieder ein. 7 Stellen Sie die Schalter auf die Stellung um den Backofen auszuschalten. , Sie können jederzeit die verbleibende Garzeit anzeigen, indem Sie die Taste – bzw. + drücken, bis das Symbol blinkt , und anschließend die OK-Taste drücken. Dann können Sie auch die gewählte Zeit ändern, indem Sie die Taste – bzw. + drücken. Danach ertönen 2 aufeinander folgende Pieptöne zur Bestätigung der Änderung. Wenn Sie die verbleibende Zeit permanent anzeigen möchten, müssen Sie die Taste – bzw. + drücken, bis das Symbol blinkt, und anschließend die OK-Taste anhaltend drücken. Das Symbol blinkt weiter. Um die Anzeige der aktuellen Uhrzeit wieder zu erhalten, genügt es, die OK-Taste länger gedrückt zu halten. Programmierung des Garzeit-Endes 1 Drücken Sie die Taste - bzw. +, bis das Symbol aufleuchtet. Drücken Sie im Anschluss die OK-Taste. 2 Wählen Sie das Garzeit-Ende, indem Sie die Taste – bzw. + drücken. 3 Danach ertönen 2 aufeinander folgende Pieptöne, die aktuelle Uhrzeit wird angezeigt und das Symbol leuchtet permanent und zeigt damit an, dass Ihr Backofen sich automatisch abschalten wird. 4 Wählen Sie eine Gartemperatur. Funktion und eine 5 Sobald die eingestellte Uhrzeit erreicht ist, schaltet sich der Backofen ab; es ertönt ein Signal und das Symbol blinkt. 6 Berühren Sie eine beliebige Taste, um das Signal abzustellen. Der Backofen schaltet sich wieder ein. 7 Stellen Sie die Schalter auf die Stellung um den Backofen auszuschalten. , Sie können die Uhrzeit des Garzeit-Endes jederzeit anzeigen, indem Sie die Taste – bzw. + drükken, bis das Symbol blinkt, und anschließend die OK-Taste drücken. Jetzt können Sie die Abschlussuhrzeit der Garzeit ändern, indem Sie die Taste – bzw. + drücken. Danach ertönen 2 aufeinander folgende Pieptöne zur Bestätigung der Änderung. Sie können diese Funktion auch benutzen, wenn der Backofen schon am Garen ist. Dazu befolgen Sie einfach diese Anleitung, außer Punkt 4. Programmierung der Gardauer und des Garzeit-Endes 1 Drücken Sie die Taste – bzw. +, bis das Symbol aufleuchtet. Drücken Sie im Anschluss die OK-Taste. 2 Wählen Sie die Gardauer, indem Sie die Taste – bzw. + drücken. 3 Danach ertönen 2 aufeinander folgende Pieptöne, die aktuelle Uhrzeit wird angezeigt und das Symbol leuchtet permanent. 31 DEUTSCH Wenn Sie die verbleibende Zeit ständig angezeigt sehen möchten, müssen Sie die Taste – bzw. + drücken, bis das Symbol blinkt, und anschließend die OK-Taste anhaltend drücken. Das Symbol blinkt weiter. Um die Anzeige der aktuellen Uhrzeit wieder zu erhalten, genügt es, die OK-Taste länger gedrückt zu halten. 4 Drücken Sie die Taste – bzw. +, bis das Symbol @ aufleuchtet. Drücken Sie im Anschluss die OK-Taste. 5 Wählen Sie die Uhrzeit für das Ende der Garzeit, indem Sie die Taste – bzw. + drükken. 6 Danach hören Sie 2 aufeinander folgende Pieptöne; die aktuelle Uhrzeit wird angezeigt und das Symbol leuchtet weiter. 7 Wählen Sie eine Funktion und eine Gartemperatur. 8 Der Backofen bleibt ausgeschaltet, während die Symbole und weiterleuchten. Der Backofen ist nun programmiert. 9 Wenn die eingestellte Uhrzeit für den Garbeginn erreicht ist, schaltet sich der Backofen ein und führt die Garung während der vorgewählten Zeit durch. 10 Wird die für das Ende der Garzeit eingestellte Uhrzeit erreicht, schaltet sich der Backofen ab; es ertönt ein Signal und die Symbole und blinken. 11 Berühren Sie eine beliebige Taste, um das Signal abzustellen, und der Backofen schaltet sich wieder ein. 12 Stellen Sie die Schalter auf Backofen auszuschalten. , um den Wenn Sie das Ende der Garzeit ändern möchten, müssen Sie die Taste – bzw. + drücken, bis das Symbol aufleuchtet , und die OK-Taste drücken. Jetzt können Sie die gewählte Zeit ändern, indem Sie die Taste – bzw. + drücken. Danach ertönen 2 aufeinander folgende Pieptöne zur Bestätigung der Änderung. 32 Achtung Im Falle eines Stromausfalls wird die gesamte Programmierung der Elektronikuhr gelöscht und auf der Uhr blinkt die Anzeige 00:00. Sie müssen die Uhr wieder einstellen und erneut programmieren. NEDERLANDS FL-F90 MTL 1 Bevestiging aan meubel 2 Koelluchtuitlaat 3 Dubbele uitklapbare grillweerstand 4 Verchroomde houders/uitschuifbare rails 5 Rooster 6 Turbine 7 Braadplaat 8 9 10 11 Scharnier Deur Bedieningspaneel Lampen Voor andere markten kan het zijn dat de accessoires niet overeenkomen met de in deze handleiding omschreven accessoires. Bedieningspaneel 1 2 1 Elektronische klok 2 Functieschakelaar 3 Temperatuurschakelaar 3 33 Functies van de oven Uitschakeling van de oven Conventioneel Wordt gebruikt voor cakes en taarten waarbij de warmte gelijkmatig verdeeld moet worden om een luchtige textuur te verkrijgen. Conventioneel met turbine Geschikt voor braadgerechten en gebak. De ventilator verdeelt de warmte gelijkmatig in de oven waardoor de baktijd en –temperatuur worden verlaagd. Grill Gratineren en oppervlakkig braden. Hiermee kan de buitenlaag goudbruin worden gebakken zonder de binnenkant van het voedsel mee te bakken. Geschikt voor platte gerechten zoals biefstuk, kotelleten, vis en toast. MaxiGrill Hiermee kunnen grotere oppervlakken worden gegratineerd dan met de grillfunctie. Er kan ook een hoger gratineervermogen worden bereikt zodat de etenswaren sneller worden aangebraden. MaxiGrill met turbine Om gelijkmatig te braden en tegelijkertijd de buitenkant lichtbruin te bakken. Ideaal voor geroosterde gerechten. Geschikt voor grote stukken vlees zoals gevogelte, wild, enz. Aanbevolen wordt om het stuk vlees op het rooster van de oven te leggen en de bakplaat eronder te plaatsen voor het druppelen van vleessap of vet. Attentie Tijdens het gebruik van de functies Grill, MaxiGrill of MaxiGrill met turbine dient de ovendeur gesloten te blijven. 34 Turbo De turbine verdeelt de warmte die afkomstig is van een weerstand aan de achterkant van de oven. Door de gelijkmatige verdeling van de temperatuur kan tegelijkertijd op twee verschillende niveaus worden gebakken/gebraden. Ovenvloer Verwarmt alleen aan de onderkant. Geschikt om gerechten op te warmen of gebak en dergelijke te laten rijzen. Ovenvloer met turbine Verdeelt de warmte die afkomstig is van de onderkant van de oven. Ideaal voor gebak met jam- of fruitvulling, dat alleen aan de onderkant moet worden verwarmd. Er moet altijd eerst worden voorverwarmd. Grill en ovenvloer Speciaal voor stoof- en braadgerechten. Kan gebruikt worden voor elk stuk vlees of vis, ongeacht de grootte. Opmerking De lamp blijft in elke bakfunctie branden. Bediening van de oven Attentie Functies van de elektronische klok Uw elektronische klok is uitgerust met TouchControl-technologie. Voor de bediening hoeft u de symbolen op het glas enkel met uw vinger aan te raken. Kookwekker: De kookwekker zendt na een bepaalde tijd een geluidssignaal uit. De oven hoeft hiervoor niet aan het bakken te zijn. Baktijd: Om gedurende de ingestelde tijd te bakken. Daarna gaat de oven automatisch uit. Eindtijd van het bakproces: Om tot het ingestelde tijdstip te bakken. Daarna gaat de oven automatisch uit. Als u het glas met uw vinger aanraakt maar de klok niet op juiste wijze reageert, koppel dan de oven af van het elektriciteitsnet en sluit hem na een tijdje opnieuw aan. Op deze manier worden de sensoren automatisch ingesteld en reageren zij opnieuw nadat ze met de vinger worden aangeraakt. Baktijd en eindtijd van het bakproces: Om de baktijd en de eindtijd van het bakproces te programmeren. Met deze functie gaat de oven automatisch aan op het gewenste tijdstip, om te bakken gedurende de ingestelde tijd (baktijd). Vervolgens gaat hij automatisch uit op het tijdstip dat we hebben aangegeven. (Einde van het bakproces) De elektronische klok gelijkzetten De kookwekker programmeren Wanneer u de oven inschakelt, ziet u dat op de klok de cijfers 00:00 beginnen te knipperen. Met de toetsen – of + kunt u de klok gelijkzetten. Vervolgens hoort u 2 pieptonen ter bevestiging van de ingestelde tijd. 1 Druk op toets + totdat het symbool gaat branden. Druk vervolgens op de toets OK. Wilt u de tijd wijzigen, druk dan de toetsen – of + in totdat de huidige tijd gaat knipperen. Druk vervolgens op de toets OK. Door de toetsen – of + in te drukken kan de tijd worden gewijzigd. U hoort tenslotte 2 pieptonen ter bevestiging van de wijziging. Handmatige werking Nadat de klok is gelijkgezet, is uw oven klaar voor gebruik. Selecteer een temperatuur en bakfunctie. Tijdens het bakken gaat het symbool branden om aan te duiden dat de warmte wordt overgebracht naar het voedsel. Dit symbool gaat uit wanneer de geselecteerde temperatuur is bereikt. Om de oven uit te zetten, de knoppen op stand zetten. 2 Druk de toetsen – of + in om de tijd te selecteren waarna de wekker moet afgaan. 3 U hoort hierna twee pieptonen. De huidige tijd wordt weergegeven en het symbool blijft branden om aan te geven dat de kookwekker geprogrammeerd is. 4 Na de ingestelde tijd klinkt er een geluidssignaal en gaat het symbool knipperen. 5 Druk een willekeurige toets in om het geluidssignaal uit te schakelen. Op dat moment gaat het symbool uit. U kunt op elk moment de resterende tijd laten weergeven door de toetsen – of + in te drukken totdat het symbool gaat knipperen. Druk vervolgens op de toets OK. Op dit moment kunt u de geselecteerde tijd aan de hand van de toetsen of + wijzigen. U hoort vervolgens 2 opeenvolgende pieptonen ter bevestiging van de wijziging. U kunt desgewenst de resterende tijd permanent laten weergeven door de toetsen – of + in te drukken totdat het symbool gaat knipperen. Druk vervolgens op de toets OK. Het symbool @ knippert. 35 NEDERLANDS De gevoeligheid van de TouchControl past zich continu aan de omgevingsomstandigheden aan. Wanneer u de oven op het elektriciteitsnet aansluit, dient u erop te letten dat het glasoppervlak van het bedieningspaneel schoon en obstakelvrij is. Om terug te gaan naar de huidige tijd, hoeft slechts de toets OK weer een poosje ingedrukt te worden gehouden. De baktijd programmeren 1 Druk op de toetsen – of + totdat het symbool gaat branden. Druk vervolgens op de toets OK. 2 Selecteer de duur door op de toetsen – of + te drukken. 3 U hoort hierna 2 pieptonen. De huidige tijd wordt weergegeven en het symbool blijft branden om aan te geven dat uw oven automatisch uitgaat. 4 Selecteer een functie en een baktemperatuur. 5 Wanneer de baktijd verstreken is, gaat de oven uit. Er weerklinkt een geluidssignaal en het symbool gaat knipperen. 6 Druk een willekeurige toets in om het alarm uit te zetten, waarna de oven opnieuw aangaat. 7 Zet de knoppen in de stand uit te zetten. om de oven U kunt op elk moment de resterende tijd laten weergeven door de toetsen – of + in te drukken totdat het symbool gaat knipperen. Druk vervolgens op de toets OK. Op dit moment kunt u de geselecteerde tijd aan de hand van de toetsen – of + wijzigen. U hoort vervolgens 2 opeenvolgende pieptonen ter bevestiging van de wijziging. U kunt desgewenst de resterende tijd permanent laten weergeven door de toetsen – of + in te drukken totdat het symbool gaat knipperen. Druk vervolgens op de toets OK. Het symbool knippert. Om terug te gaan naar de huidige tijd, hoeft slechts de toets OK weer een poosje ingedrukt te worden gehouden. De eindtijd van het bakproces programmeren 1 Druk op de toetsen – of + totdat het symbool gaat branden. Druk vervolgens op de toets OK. 2 Selecteer de eindtijd door op de toetsen – of +te drukken. 3 U hoort hierna 2 pieptonen. De huidige tijd wordt weergegeven en het symbool blijft branden om aan te geven dat uw oven automatisch uitgaat. 36 4 Selecteer een functie en een baktemperatuur. 5 Op het ingestelde tijdstip zal de oven uitgaan. Er weerklinkt een geluidssignaal en het symbool gaat knipperen. 6 Druk een willekeurige toets in om het geluidssignaal uit te zetten, waarna de oven opnieuw aangaat. 7 Zet de knoppen in de stand uit te zetten. om de oven U kunt op elk moment de eindtijd van het bakproces laten weergeven door de toetsen – of + in te drukken totdat het symbool gaat knipperen. Druk vervolgens op de toets OK. Op dit moment kunt u de geselecteerde eindtijd aan de hand van de toetsen – of + wijzigen. U hoort vervolgens 2 opeenvolgende pieptonen ter bevestiging van de wijziging. U kunt deze functie ook gebruiken als u al aan het bakken bent met de oven. Volg daarvoor de voorgaande instructies op, behalve nummer 4. De baktijd en eindtijd programmeren 1 Druk op de toetsen – of + totdat het symbool gaat branden. Druk vervolgens op de toets OK. 2 Selecteer de duur door op de toetsen – of + te drukken. 3 U hoort vervolgens twee pieptonen, de huidige tijd wordt weergegeven en het symbool blijft branden. 4 Druk op de toetsen – of + totdat het symbool gaat branden. Druk vervolgens op de toets OK. 5 Selecteer de eindtijd van het bakproces door op de toetsen – of + te drukken. 6 U hoort vervolgens 2 pieptonen, de huidige tijd wordt weergegeven en het symbool blijft branden. 7 Selecteer een functie en een baktemperatuur. 8 De oven blijft uitgeschakeld en de symbolen en blijven branden. Uw oven is geprogrammeerd. 9 Wanneer het bakproces moet beginnen, gaat de oven aan en wordt er gebakken tijdens de ingestelde tijd. 10 Op de ingestelde eindtijd zal de oven uitgaan. Er weerklinkt een geluidssignaal en de symbolen en knipperen. 11 Druk een willekeurige toets in om het geluidssignaal uit te zetten, waarna de oven opnieuw aangaat. 12 Zet de knoppen in de stand uit te zetten. Attentie Bij een stroomonderbreking wordt de hele programmering van de elektronische klok gewist en verschijnen de cijfers 00:00 op de klok. U moet de klok dan opnieuw gelijkzetten en programmeren. om de oven NEDERLANDS Wilt u de eindtijd wijzigen, druk dan de toetsen – of + in totdat het symbool gaat branden. Druk vervolgens op de toets OK. Op dit moment kunt u de geselecteerde tijd aan de hand van de toetsen – of + wijzigen. U hoort vervolgens 2 opeenvolgende pieptonen ter bevestiging van de wijziging. 37 FL-F90 MTL 1 Крепление в мебель 2 Выход охлаждающего воздуха 3 Сопротивление двойного откидного гриля 4 Поддержка для противней / Телескопические направляющие 5 Прочная решетка 6 Турбина 7 Противни для запекания 8 Петли 9 Дверца 10 Передняя панель управления 11 Лампы Для прочих стран, аксессуары могут не соответствовать описанным в этой инструкции Панель управления 1 2 1 Электронные часы. 2 Выбор функций. 3 Выбор температуры. 3 38 Функции духового шкафа Обычный нагрев Используется для приготовления бисквитов и тортов для которых жар должен быть однородным для получения мягкой и воздушной текстуры. Обычный с турбо Подходит для жаркого и кондитерской выпечки. Вентилятор равномерно распространяет тепло в духовке, сокращая, таким образом, время и температуру готовки. Гриль Гратен и поверхностное запекание. Поджаривает до золотистой корочки поверхность продукта. Применяется для бифштексов, ребрышек, рыбы, тостов. Макси Гриль Позволяет запекание бóльших поверхностей чем обыкновенный Гриль, а также обладает бóльшей мощностью для запекания и, таким образом, золотистая корочка образуется быстрее. Турбо Турбина распространяет тепло, исходящее от сопротивления расположенного на задней поверхности духовки. Благодаря равномерности температуры позволяет готовить одновременно на двух уровнях. Под Нагрев происходит только снизу. Рекомендуется для подогрева блюд и подъема теста. Под с турбиной Распространяет тепло исходящее из нижней части духового шкафа. Идеально подойдет для приготовления пирогов с начинкой из мармелада или фруктов. Такие блюда требуют поступления тепла только снизу. Необходим предварительный нагрев Гриль и Под Рекомендуется для запекания. Может использоваться для любой порции вне зависимости от ее размера. Примечание При любой функции приготовления подсветка будет включена. Макси Гриль с турбиной Позволяет однородное запекание и одновременно образование золотистой корочки на поверхности. Идеально подходит для запекания на решетке. Для продуктов большого объема, таких как птица, дичь и т.п. Рекомендуется помещать мясо на решетку духового шкафа и устанавливать противень под решетку для сбора стекающего сока и жира. Внимание! Во время использования в режимах Гриль, МаксиГриль или МаксиГриль с Турбиной дверца духового шкафа должна быть закрыта. 39 РУССКИЙ Отключение духового шкафа Управление духовым шкафом Внимание! Функции электронных часов Электронные часы Вашего духового шкафа снабжены технологией Touch-Control. Для управления достаточно дотронуться пальцем до символов на стекле. Таймер: По истечение заданного времени, таймер издает звуковой сигнал. Для работы таймера необходимо, чтобы духовой шкаф находился в процессе работы. Чувствительность системы Touch-Control постоянно адаптируется к условиям окружающей среды. При подключении духовки к электросети убедитесь в том, что стеклянная поверхность панели управления чистая и свободна от каких-либо препятствий. Если дотронувшись до стекла, часы не реагируют, следует отключить духовой шкаф от электросети и вновь подключить его через некоторое время. Таким образом, сенсоры настроятся автоматически и будут верно реагировать на нажатия. Установка текущего времени на электронных часах При подключении духового шкафа Вы увидите что на часах появятся мигающие цифры 00:00. При помощи кнопок – или + установите текущее время. Затем Вы услышите один за другим 2 коротких сигнала подтверждающих выбор времени. Если Вы желаете изменить текущее время, нажимайте на кнопки – или + до тех пор пока цифры часов не начнут мигать. Затем нажмите на кнопку OK. При помощи кнопок – или + можно изменить время. Затем Вы услышите один за другим 2 коротких сигнала подтверждающих внесенные изменения. Ручное управление После установки текущего времени Ваш духовой шкаф готов к началу работы. Выберите функцию приготовления и температуру. Во время приготовления Вы увидите светящийся символ указывающий на передачу тепла приготовляемому продукту. Когда быдет достигнута выбранная температура этот символ отключится. Для выключения духового шкафа установите ручки в положение . 40 Длительность приготовления: Позволяет готовить в течение заданного времени, по истечение которого духовой шкаф отключится автоматически. Время окончания приготовления: Позволяет готовить до определенного часа, затем духовой шкаф отключится автоматически. Длительность и окончание приготовления: Позволяет программировать длительность и время окончания готовки. Эта функция духового шкафа придет в действие в заданный час и духовой шкаф будет готовить в течение заданного времени (длительность) и завершит работу автоматически в заданный час (окончание приготовления). Программирование таймера 1 Нажмите на кнопку + до тех пор пока не засветится символ . Затем нажмите на кнопку OK. 2 При помощи кнопок – или + выберите время в которое таймер должен сработать. 3 Затем Вы услышите один за другим 2 звуковых сигнала и будет показано текущее время и светящийся символ . Это означает что духовой шкаф запрограммирован. 4 По прошествии заданного времени раздастся звуковой сигнал и начнет мигать символ . 5 Для отключения звукового сигнала, нажмите на любую кнопку. В этот момент символ отключится. В любой момент Вы можете увидеть оставшееся время, нажимая на кнопки – или + до тех пор пока символ не начнет мигать, затем нажмите на кнопку OK. В этот момент Вы можете изменить время при помощи кнопок – или +. Затем, Вы услышите один за другим два звуковых сигнала в подтверждение изменений. Программирование времени приготовления 1 Нажимайте на кнопки – или + до тех пор пока не засветится символ . Затем нажмите на кнопку OK. 2 Выберите длительность, при помощи кнопок – или +. 3 Вы услышите один за другим 2 коротких сигнала и будет светиться символ . Это означает, что духовой шкаф отключится автоматически. 4 Выберите функцию и температуру приготовления. 5 По окончание заданного времени приготовления духовой шкаф отключится, раздастся звуковой сигнал и будет мигать символ . 6 Нажмите на любую кнопку для остановки звукового сигнала, духовой шкаф вновь включится. 7 Для отключения духового шкафа установите ручки в положение . В любой момент Вы можете увидеть время оставшееся до окончания приготовления, при помощи кнопок – или + до тех пор пока не станет мигать символ и затем нажав на кнопку OK. В этот момент при помощи кнопок – или + можно изменить выбранное время. Затем, Вы услышите один за другим два сигнала подтверждающие внесенные изменения. Если Вы желаете постояннов видеть оставшееся до окончания приготовления время, нажмите на кнопки – или + до тех пор пока не станет мигать символ затем длительно нажмите на кнопку OK. Символ будет мигать. Для возврата к указанию текущего времени достаточно длительно нажать на кнопку OK. Программирование времени окончания приготовления 1 Нажимайте на кнопки – или + до тех пор пока не засветятся символы . Затем нажмите на кнопку OK. 2 Выберите время окончания приготовления при помощи кнопок – или +. 3 Затем Вы услышите один за другим 2 коротких сигнала, будет указано текущее время и символ будет светится, указывая на то, что духовой шкаф отключится автоматически. 4 Выберите функцию и температуру приготовления. 5 Когда наступит выбранный час, духовой шкаф отключится автоматически, раздастся звуковой сигнал и будет мигать символ . 6 Для отключения звукового сигнала достаточно нажать на любую кнопку, духовой шкаф включится автоматически. 7 Для отключения духового шкафа установите ручки в положение . В любой момент можно увидеть время окончания приготовления, при помощи кнопок – или + до тех пор пока не замигает символ и затем нажав на кнопку OK. В этот момент Вы можете изменить выбранное время окончания при помощи кнопок – или +. Затем, Вы услышите один за другим два звуковых сигнала подтверждающие внесенные изменения. Можно использовать эту функцию когда духовой шкаф уже находится в процессе приготовления. Для этого следуйте указаным инструкциям, пропустив пункт 4. Программирование длительности и окончания приготовления 1 Нажмите на кнопки– или + до тех пор пока не засветится символ . Затем нажмите на кнопку OK. 2 Выберите длительность при помощи кнопок – или +. 3 Затем Вы услышите один за другим 2 два коротких сигнала, будет показано текущее время и символ будет светится. 41 РУССКИЙ Если Вы желаете постоянно видеть оставшееся до окончания приготовления время, нажимайте на кнопки – или + до тех пор пока не начнет мигать, затем длительно нажмите на кнопку OK. Символ будет мигать. Для того чтобы вернуться к указанию текущего времени достаточно длительно нажать на кнопку OK. 4 Нажмите на кнопки – или + до тех пор пока не засветится символ . Затем нажмите на кнопку OK. 5 При помощи кнопок – или + выберите время окончания приготовления. 6 Затем Вы услышите один за другим 2 два коротких сигнала, будет показано текущее время и символ будет светится. 7 Выберите функцию и температуру приготовления. 8 Духвой шкаф будет отключен и символы и будут светится. Ваш духовой шкаф запрограммирован. 9 Когда будет достигнуто время начала приготовления, духовой шкаф начнет работу и будет функционировть до окончания заданного времени. 10 Когда будет достигнуто запрограммированное время окончания, духовой шкаф отключится, прозвучит сигнал и символы и будут мигать. 11 Для остановки звукового сигнала нажмите на любую кнопку, духовой шкаф вновь включится. 12 Для отключения духового шкафа установите все ручки в положение . Если Вы желаете изменить время окончания, нажимайте на кнопки – или + до тех пор пока не засветится символ затем нажмите на кнопку OK. В этот момент Вы можете изменить выбранное время при помощи кнопок – или +. Затем, Вы услышите один за другим два звуковых сигнала подтверждающие внесенные изменения. 42 Внимание! В случае отключения электричества, все запрограммированные в электронных часах данные будут потеряны, на часах появятся мигающие цифры 00:00. Следует вновь установить текущее время и запрограммировать часы. 43 44 46 FL-F90 MTL 1 2 3 47 SCHEDA / FICHA / FICHA / FILE / FICHE Produttore Fabricante Fabricante Manufacturer Fabricant Modello Modelo Modelo Model Modèle Classe di efficienza energetica (dove A è la classe di maggiore efficienza e G di minore efficienza). Clase de eficiencia energética, en una escala que abarca de A (más eficiente) a G (menos eficiente). Classe de eficiência energética, numa escala de A (eficiente) a G (ineficiente). Energy efficiency class on a scale from A (most efficient) to G (least efficient). Classe d’efficience énergétique, sur une échelle de A (plus efficient) à G (le moins efficient). FL-F90 MTL A Heating setting Fonction de chauffage. Riscaldamento Calentamiento Aquecimento Conventional convencional. convencional. heating. standard. Chauffage traditionnel. Convezione forzata. Convección forzada. Convecção forçada. Forced convection. Convection forcée. Consumo di energia. Consumo de energía. Consumo de energia. Energy consumption. Consommation d´énergie. Riscaldamento Calentamiento Aquecimento Conventional convencional. convencional. heating. standard. Chauffage traditionnel. 1,12 kWh Convezione forzata. Convección forzada. Convecção forçada. Forced convection. Convection forcée. 0,99 kWh Volume netto (litri). Volumen neto (litros). Volume útil (litros). Net volume (litres). Volume net (litres). 78 Tipo: Piccolo Medio Grande Tipo: Tipo: Type: Type: Pequeño Medio Grande Tempo di cottu- Tiempo de ra a carico nor- cocción con carga normal. male. Pequeno Médio Grande Small Medium Large Cooking time Tempo de confecção com with normal carga normal. load. Riscaldamento Calentamiento Aquecimento convencional. convencional. standard. Petit Moyen Grand Temps de cuisson à charge normale. Conventional heating. Chauffage traditionnel. 44 min. Convezione forzata. Convección forzada. Convecção forçada. Forced convection. Convection forcée. 45 min. Superficie di cottura. Superficie de cocción. Superfície de confecção. Cooking surface Surface de cuisson. 1300 cm2 Rumore (dB (A) Ruido (dB (A) re 1 pW). re 1 pW). Ruído (dB (A) re 1 pW). Noise (dB (A) re 1 pW). Niveau sonore (dB (A) re1 pW). Desideriamo anche noi dare il nostro contributo all'ambiente; per questo la carta che utilizziamo è riciclata. Nuestra aportación a la protección del medio-ambiente: utilizamos papel reciclado. O nosso contributo para a protecção do meio ambiente: utilizamos papel reciclado. Our contribution to protecting the environment - we use recycled paper. Notre contribution à la protection de l’environnement : nous utilisons du papier recyclé.. Cod.: 83172783/3172783-000 Função de Función de Funzione di riscaldamento. calentamiento. aquecimento. FOSTER DATENBLATT / GEGEVENS / ТЕХНИЧЕСКИЕ ДАННЫЕ / Hersteller Fabrikant Производитель FOSTER Modell Model Модель FL-F90 MTL Energieeffizienzklasse auf einer Skala von A (geringer Verbrauch) bis G (hoher Verbrauch). Klasse van energie-efficiëntie, op een schaal van A (meest efficiënt) tot G (minst efficiënt). Категория энергетической эффективности, по шкале от A (наиболее эффективный) до G (наименее эффективный). Beheizung. Verwarmingsfunctie. Функция нагрева. Heißluft Geforceerde convectie. Форсированная конвекция. Energieverbrauch. Energieverbruik. Расход электроэнергии. Konventionelle Conventionele Beheizung. verwarming. Обычный нагрев. 1,12 kWh Heißluft. Форсированная конвекция. 0,99 kWh Geforceerde convectie. Nettovolumen Nettovolume (Liter). (liter). Typ: Klein Mittel Groß Garzeit bei Standardbeladung. Объем нетто (литры). 78 Тип: Type: Маленький Klein Средний Middelgroot Большой Groot Baktijd bij normale belasting. Konventionelle Conventionele Beheizung. verwarming. Время приготовления при нормальной загрузке. Обычный нагрев. 44 min. Heißluft. Geforceerde convectie. Форсированная конвекция. 45 min. Backfläche. Bakoppervlak. Поверхность готовки. 1300 cm2 Geräusch (dB(A) Geluid (db (A) re1 pW). re 1 pW). Шум (dB (A) re 1 pW). Cod.: 83172783/3172783-000 Обычный нагрев. Unser Beitrag zum Umweltschutz: Wir verwenden wiederverwertetes Papier. Onze bijdrage aan de bescherming van het milieu: wij gebruiken kringlooppapier. Наш вклад в защиту окружающей среды: используем только переработанную бумагу. Konventionelle Conventionele Beheizung. verwarming. A-
 1
1
-
 2
2
-
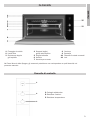 3
3
-
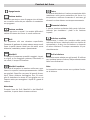 4
4
-
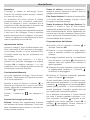 5
5
-
 6
6
-
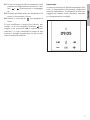 7
7
-
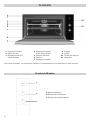 8
8
-
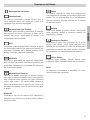 9
9
-
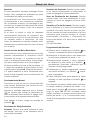 10
10
-
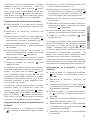 11
11
-
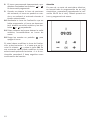 12
12
-
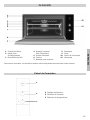 13
13
-
 14
14
-
 15
15
-
 16
16
-
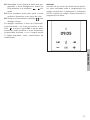 17
17
-
 18
18
-
 19
19
-
 20
20
-
 21
21
-
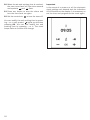 22
22
-
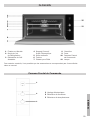 23
23
-
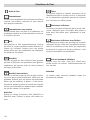 24
24
-
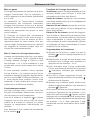 25
25
-
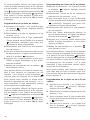 26
26
-
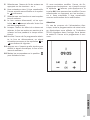 27
27
-
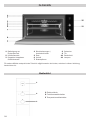 28
28
-
 29
29
-
 30
30
-
 31
31
-
 32
32
-
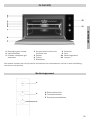 33
33
-
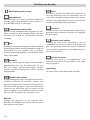 34
34
-
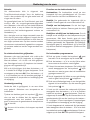 35
35
-
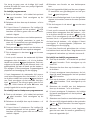 36
36
-
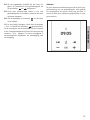 37
37
-
 38
38
-
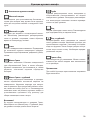 39
39
-
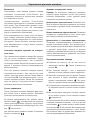 40
40
-
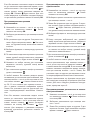 41
41
-
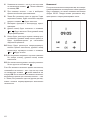 42
42
-
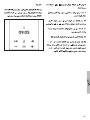 43
43
-
 44
44
-
 45
45
-
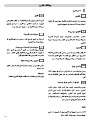 46
46
-
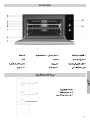 47
47
-
 48
48
-
 49
49
-
 50
50
-
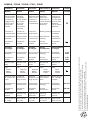 51
51
-
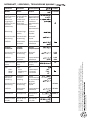 52
52


Foster FL-F90 MTL Guía de inicio rápido
- Categoría
- Barbacoas
- Tipo
- Guía de inicio rápido
en otros idiomas
- français: Foster FL-F90 MTL Guide de démarrage rapide
- italiano: Foster FL-F90 MTL Guida Rapida
- English: Foster FL-F90 MTL Quick start guide
- Deutsch: Foster FL-F90 MTL Schnellstartanleitung
- русский: Foster FL-F90 MTL Инструкция по началу работы
- Nederlands: Foster FL-F90 MTL Snelstartgids
- português: Foster FL-F90 MTL Guia rápido
Artículos relacionados
Otros documentos
-
Teka HM-815 El manual del propietario
-
-
-
-
-
Barazza 1FFYPI Instrucciones de operación
-
-
-
-
Teka HPE-735 El manual del propietario