Canon PIXMA G4200 El manual del propietario
- Tipo
- El manual del propietario
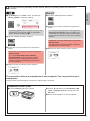
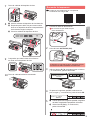
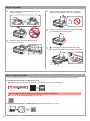
Canon PIXMA G4200 es una impresora multifunción inalámbrica, diseñada para imprimir, escanear, copiar y enviar faxes con facilidad. Cuenta con un sistema de tanques de tinta rellenables, lo que la hace ideal para usuarios con alto volumen de impresión. Su resolución máxima es de 4800 x 1200 ppp, ofreciendo impresiones y copias de alta calidad. Además, tiene una velocidad de impresión de hasta 10 ipm en blanco y negro, y 6 ipm en color. También posee una pantalla LCD de 2 líneas para facilitar su uso.
Canon PIXMA G4200 es una impresora multifunción inalámbrica, diseñada para imprimir, escanear, copiar y enviar faxes con facilidad. Cuenta con un sistema de tanques de tinta rellenables, lo que la hace ideal para usuarios con alto volumen de impresión. Su resolución máxima es de 4800 x 1200 ppp, ofreciendo impresiones y copias de alta calidad. Además, tiene una velocidad de impresión de hasta 10 ipm en blanco y negro, y 6 ipm en color. También posee una pantalla LCD de 2 líneas para facilitar su uso.


-
 1
1
-
 2
2
-
 3
3
-
 4
4
-
 5
5
-
 6
6
-
 7
7
-
 8
8
-
 9
9
-
 10
10
-
 11
11
-
 12
12
-
 13
13
-
 14
14
-
 15
15
-
 16
16
-
 17
17
-
 18
18
-
 19
19
-
 20
20


Canon PIXMA G4200 El manual del propietario
- Tipo
- El manual del propietario
Canon PIXMA G4200 es una impresora multifunción inalámbrica, diseñada para imprimir, escanear, copiar y enviar faxes con facilidad. Cuenta con un sistema de tanques de tinta rellenables, lo que la hace ideal para usuarios con alto volumen de impresión. Su resolución máxima es de 4800 x 1200 ppp, ofreciendo impresiones y copias de alta calidad. Además, tiene una velocidad de impresión de hasta 10 ipm en blanco y negro, y 6 ipm en color. También posee una pantalla LCD de 2 líneas para facilitar su uso.
en otros idiomas
- English: Canon PIXMA G4200 Owner's manual
Artículos relacionados
-
Canon PIXMA G4400 - Windows El manual del propietario
-
Canon PIXMA TS9020 Manual de usuario
-
Canon PIXMA TS8020 El manual del propietario
-
Canon PIXMA TS6020 El manual del propietario
-
Canon PIXMA TS5020 El manual del propietario
-
Canon PIXMA G3200 El manual del propietario
-
Canon PIXMA G4210 El manual del propietario
-
Canon PIXMA TS6052 Manual de usuario
-
Canon PIXMA G1200 El manual del propietario
-
Canon PIXMA TS5053 Manual de usuario