Canon PIXMA G4210 El manual del propietario
- Tipo
- El manual del propietario
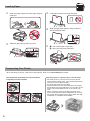
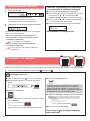
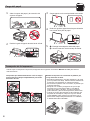
La Canon PIXMA G4210 es una impresora multifunción que te permite imprimir, escanear y copiar documentos y fotos. Con su sistema de tanques de tinta rellenables, puedes ahorrar dinero en tinta y seguir imprimiendo grandes volúmenes de documentos. También cuenta con una pantalla LCD de 2 líneas para facilitar su uso y conectividad inalámbrica para imprimir desde dispositivos móviles.
La Canon PIXMA G4210 es una impresora multifunción que te permite imprimir, escanear y copiar documentos y fotos. Con su sistema de tanques de tinta rellenables, puedes ahorrar dinero en tinta y seguir imprimiendo grandes volúmenes de documentos. También cuenta con una pantalla LCD de 2 líneas para facilitar su uso y conectividad inalámbrica para imprimir desde dispositivos móviles.


-
 1
1
-
 2
2
-
 3
3
-
 4
4
-
 5
5
-
 6
6
-
 7
7
-
 8
8
-
 9
9
-
 10
10
-
 11
11
-
 12
12
-
 13
13
-
 14
14
-
 15
15
-
 16
16
-
 17
17
-
 18
18
-
 19
19
-
 20
20


Canon PIXMA G4210 El manual del propietario
- Tipo
- El manual del propietario
La Canon PIXMA G4210 es una impresora multifunción que te permite imprimir, escanear y copiar documentos y fotos. Con su sistema de tanques de tinta rellenables, puedes ahorrar dinero en tinta y seguir imprimiendo grandes volúmenes de documentos. También cuenta con una pantalla LCD de 2 líneas para facilitar su uso y conectividad inalámbrica para imprimir desde dispositivos móviles.
En otros idiomas
- English: Canon PIXMA G4210 Owner's manual
Documentos relacionados
-
Canon PIXMA G4411 Manual de usuario
-
Canon PIXMA G4410 Manual de usuario
-
Canon PIXMA G6020 Guía de inicio rápido
-
Canon PIXMA G5020 Guía de inicio rápido
-
Canon PIXMA TS3100/TS3120 El manual del propietario
-
Canon PIXMA TS702 El manual del propietario
-
Canon PIXMA G4200 El manual del propietario
-
Canon PIXMA TS302 El manual del propietario
-
Canon PIXMA TS5120 El manual del propietario
-
Canon Pixma TS8240 - Mac El manual del propietario