Canon PIXMA TS302 El manual del propietario
- Categoría
- Enrutadores
- Tipo
- El manual del propietario

Guía de inicio
Lea primero Información de seguridad
e información importante (apéndice).
Getting Started
Read Safety and Important Information
(addendum) rst.

1
2
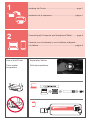
Instalación de la impresora.............................................página 1
Conexión con el ordenador y con el teléfono inteligente
o la tableta ......................................................................página 4
Cómo sujetar
la impresora
Películas explicativas
Installing the Printer ...........................................................page 1
Connecting with Computer and Smartphone/Tablet ..........page 4
How to Hold Printer Explanatory Movies

1
ENGLISH
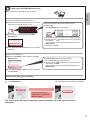
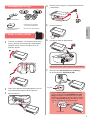
1. Unpack Box
□ Power cord □ FINE cartridge
□ Safety and Important Information
□ Getting Started (this manual)□ Setup CD-ROM for
Windows PC
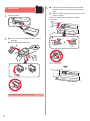
2. Remove Tape and Turn on
1
Stand the printer on its back and remove the
orange tape stuck to the bottom of it. Return the
printer to its original position.
a
b
c
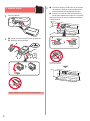
2
Remove the packing materials (such as orange
tape) from outside the printer.
3
Open the cover.
4
Remove the orange tape and the protective
material and discard them both.
5
Close the cover.
6
Connect the power cord.
Do not connect any cables except the power cord yet.
7
Press the ON/Stop button.
The ON lamp lights.
Lit
• If the Alarm lamp (A) ashes 9 times at a time,
press the ON/Stop button to turn off the power,
and then try again from step 3 of chapter 2
"Remove Tape and Turn on".
• If the Alarm lamp (A) ashes 4 times at a time,
proceed to the next step as it is.
(A)
Flashing

2
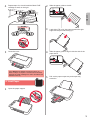
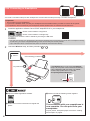
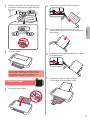
3. Install Inks
1
Open the cover.
2
aTake out the Color FINE cartridge from the
package.
bRemove the protective tape.
a
Do not touch.
b
Be careful of ink on the protective tape.
3
aInsert the Color FINE cartridge into the FINE
cartridge holder on the left at a slight upward
angle.
bPush the FINE cartridge in and up rmly until it
snaps into place.
Make sure that the FINE cartridge is installed
horizontally.
Do not bump it against
the surrounding parts.
Click!
a
b

3
ENGLISH
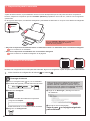
4
Repeat steps 2 to 4 and install the Black FINE
cartridge as well, on the right.
5
Close the cover.
If the Alarm lamp ashes 4 times at a time, go
back to step 3 of chapter 3 "Install Inks" and check
whether the FINE cartridges for Color and Black are
installed correctly.
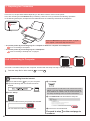
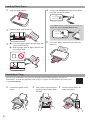
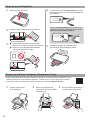
4. Load Paper
1
Open the paper support.
2
Slide the paper guide to the left.
3
Load plain LTR or A4 size paper against the right
edge with the print side facing up.
4
Slide the paper guide to align it with the side of the
paper stack.
5
Pull out the paper output tray and output tray
extension.

4
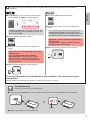
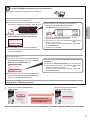
5. Preparing for Connection
From here on, the procedure differs depending on the device used to connect to the printer.
First, after checking that the Wireless lamp is ashing 2 times at a time, proceed to the following operations.
In the following description, smartphones and tablet devices are collectively described as smartphone.
When the Wireless lamp does not ash, try again
from chapter 2 "Remove Tape and Turn on".
Wireless
Flashing
• To use the printer by connecting only to a computer or both to a computer and smartphone
"6-A. Connecting to Computer"
• To use the printer by connecting only to a smartphone
"6-B. Connecting to Smartphone" on page 6
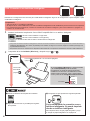
6-A. Connecting to Computer
macOS
Windows
You need a connection setup for each computer. Proceed with the setup from step 1 for each computer.
1
Start the setup le for either method or method .
aOpen a web browser ( etc.) on your computer.
bInput the following URL and access the Canon
website.
cSelect Set Up.
dInput the model name of your printer and click OK.
You can select a model name from the list.
eClick Setup.
The procedures for Windows and macOS are shown
below. If you are using a computer with an OS other
than Windows or macOS, such as a Chrome OS, do
the setup according to the on-screen instructions.
fClick Download and download the setup le.
gExecute the downloaded le.
Proceed to step on the next page to
continue.
Downloading from the Internet

5
ENGLISH
The connection with your computer is now complete. You can print from your
computer.
If the following screen appears, click Exit.
Follow the on-screen
instructions to proceed
with the setup.
Using Setup CD-ROM (Windows Only)
aLoad the Setup CD-ROM in your computer.
■ When using Windows 10 or Windows 8.1:
bWhen the following message appears on the right
side of your computer screen, click it.
cIf the following screen appears, click Run
Msetup4.exe.
dIf the User Account Control dialog box appears,
click Yes.
When This Message Does Not Appear (or Has
Disappeared)
1. Click File Explorer on the taskbar.
or
2. Click This PC on the left side of the opened window.
3. Double-click the
CD-ROM icon on the right side of
the window.
If the contents of the CD-ROM appear, double-click
Msetup4.exe.
4. Proceed to step d.
■ When using Windows 7:
b When the AutoPlay screen appears, click Run
Msetup4.exe.
c If the User Account Control dialog box appears,
click Continue.
When AutoPlay Screen Does Not Appear
1. Click Computer from the start menu.
2. Double-click the
CD-ROM icon on the right side of
the opened window.
If the contents of the CD-ROM appear, double-click
Msetup4.exe.
Proceed to step to continue.
2
Click Start Setup.

6
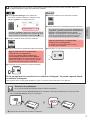
6-B. Connecting to Smartphone
Android
iOS
You need a connection setup for each smartphone. Proceed with the setup from step 1 for each smartphone.
Preparation
• Turn on Wi-Fi on your smartphone.
• If you have a wireless router, connect your smartphone to the wireless router you want to connect to the printer.
* For operations, refer to manuals of your smartphone and the wireless router or contact those manufacturers.
1
Install the application software Canon PRINT Inkjet/SELPHY in your smartphone.
: Search "Canon PRINT" in App Store.
: Search "Canon PRINT" in Google Play.
Or access the Canon website by scanning the QR code.
* You may not connect your smartphone to the Internet wirelessly during connecting the printer to the smartphone directly.
In that case, you may be charged depending on the contract with your service provider.
* Up to 5 devices can be connected to the printer via wireless LAN connection directly.
2
Check the Wireless lamp, and then proceed to or .
aTap the installed application software.
bFollow the on-screen instructions to register the
printer.
cMake sure that the following screen appears.
The connection with your smartphone is
now complete. You can print from your
smartphone.
To print photos, load photo paper. Proceed to "Loading
Photo Paper" on page 8.
If the Wireless lamp is not lit and the Network
lamp is lit, the printer cannot send transmissions
using a Wireless LAN connection. For details,
access "http://ij.start.canon" to see the
"Frequently Asked Questions".
Wireless
Network
Lit
Off or ashing (continue to )
Lit (continue to
)
Wireless

7
ENGLISH
Procedures below vary depending on iOS or Android. Select your operating system and proceed to its
procedure.
aTap Settings on your smartphone's home screen,
and tap Canon_ij_XXXX in the Wi-Fi settings.
If Canon_ij_XXXX does not appear on the list, see
"Troubleshooting" below to operate the printer, and
then repeat step a.
bTap the installed application software.
cFollow the on-screen instructions to register the
printer.
Follow the on-screen instructions to proceed
with the setup.
If you select Auto Select Conn. Method
(recommended) on the connection method
selecting screen, the appropriate connection
method is selected automatically depending on
your environment.
dMake sure that the following screen appears.
aTap the installed application software.
bFollow the on-screen instructions to register the
printer.
If a message saying "Printer is not registered.
Perform printer setup?" does not appear, see
"Troubleshooting" below to operate the printer, and
then wait for a while until the message appears.
Follow the on-screen instructions to proceed
with the setup.
The appropriate connection method is selected
depending on your environment.
cMake sure that the following screen appears.
The connection with your smartphone is now complete. You can print from your
smartphone.
To print photos, load photo paper. Proceed to "Loading Photo Paper" on page 8.
aPress and hold the Direct button on the printer for about 2 seconds until the Direct lamp starts to ash.
Flashing
bReturn to the operation of your smartphone.
Troubleshooting
Printer is not found from your smartphone.

8
1
Open the paper support.
2
Slide the paper guide to the left.
3
aLoad photo paper against the right edge with
the print side facing up.
bSlide the paper guide to align it with the side
of the paper stack.
a
b
4
Conrm that the Paper lamp that is lit matches
the paper size that is loaded.
LTR/
4"
×
6"/10
×
15cm
A4/Hagaki/L
If the Paper lamp that lights does not match the
paper size, press the Paper Select button.
LTR/
4"
×
6"/10
×
15cm
A4/Hagaki/L
5
Pull out the paper output tray and output tray
extension.
Loading Photo Paper
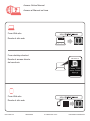
Smartphone Copy
You can copy documents by using the Canon PRINT Inkjet/SELPHY application software for
smartphones. To install the application, refer to step 1 on page 6. For the operation procedure, refer
to the Online Manual.
1
Load the document on the
printer.
2
Take a photo of the document
by using Canon PRINT Inkjet/
SELPHY.
3
Send the image data to the
printer and print it.

1
ESPAÑOL
1. Desempaquetar la caja
□ Cable de alimentación □ Cartucho FINE
□ Información de seguridad
e información importante
□ Guía de inicio (este manual)□ CD-ROM de instalación
para Windows PC
2. Quitar la cinta y activar
1
Coloque la impresora con la parte inferior hacia
arriba y quite la cinta naranja que está pegada.
Después vuelva a poner la impresora en su
posición original.
a
b
c
2
Retire los materiales de empaquetado (como la
cinta naranja) del exterior de la impresora.
3
Abra la cubierta.
4
Retire la cinta naranja y el material de protección
y deséchelos.
5
Cierre la cubierta.
6
Conecte el cable de alimentación.
No conecte ningún cable excepto el de alimentación.
7
Pulse el botón ACTIVADO/Parar (ON/Stop).
Se enciende la luz ACTIVADO (ON).
• Si la luz Alarma (Alarm) (A) parpadea 9 veces
a la vez, pulse el botón ACTIVADO/Parar (ON/
Stop) para apagar e inténtelo de nuevo a partir
del paso 3 del capítulo 2 "Quitar la cinta y activar".
• Si la luz Alarma (Alarm) (A) parpadea 4 veces
a la vez, continúe con el siguiente paso.
(A)
Parpadeando
Encendida

2
3. Instalar tintas
1
Abra la cubierta.
2
aSaque el cartucho FINE Color del paquete.
bRetire la cinta protectora.
a
No tocar.
b
Tenga cuidado con la tinta de la cinta protectora.
3
aInserte el cartucho FINE Color en el soporte
del cartucho FINE en la parte izquierda de
forma ligeramente inclinada hacia arriba.
bPresione el cartucho FINE hacia adentro y
hacia arriba hasta que encaje en su posición.
Asegúrese de que el cartucho FINE está instalado
horizontalmente.
No golpear contra los
objetos de alrededor.
Clic
a
b

3
ESPAÑOL
4
Repita los pasos del 2 al 4 e instale también
el cartucho FINE Negro en la parte derecha.
5
Cierre la cubierta.
Si la luz Alarma (Alarm) parpadea 4 a la vez,
vuelva al paso 3 del capítulo 3 "Instalar tintas"
y compruebe si los cartuchos FINE de Color
y Negro están instalados correctamente.
4. Cargar el papel
1
Abra el soporte del papel.
2
Deslice la guía del papel hacia la izquierda.
3
Cargue papel normal de tamaño LTR o A4
contra el borde derecho con el lado de impresión
hacia arriba.
4
Deslice la guía del papel para alinearla con el lado
de la pila de papel.
5
Extraiga la bandeja de salida del papel
y la extensión de la bandeja de salida.

4
5. Preparación para la conexión
A partir de este momento, el procedimiento varía en función del dispositivo que se use para conectar a la impresora.
Primero, después de comprobar que la luz Inalámbr. (Wireless) parpadea 2 veces a la vez, continúe con las siguientes
operaciones.
En la siguiente descripción, los teléfonos inteligentes y las tabletas se describen en conjunto como teléfonos inteligentes.
Si la luz Inalámbr. (Wireless) no parpadea,
inténtelo de nuevo desde el capítulo 2
"Quitar la cinta y activar".
Wireless
Parpadeando
• Para usar la impresora conectándola solo a un ordenador o tanto a un ordenador como a un teléfono inteligente
"6-A. Conexión a un ordenador"
• Para usar la impresora conectándola solo a un teléfono inteligente
"6-B. Conexión a un teléfono inteligente" en la página 6
6-A. Conexión a un ordenador
macOS
Windows
Necesita una conguración de conexión para cada ordenador. Siga con la conguración a partir del paso 1 para cada ordenador.
1
Inicie el archivo de conguración del método o el método .
aAbra un navegador web ( , etc.) en su ordenador.
bEscriba la URL siguiente y acceda al sitio web de Canon.
cSeleccione Congurar.
dEscriba el nombre del modelo de su impresora
y haga clic en Aceptar.
Puede seleccionar un nombre de modelo de la lista.
eHaga clic en Conguración.
Abajo se indican los procedimientos para Windows
y macOS. Si utiliza un ordenador con un sistema
operativo diferente a Windows o macOS, como por
ejemplo Chrome OS, realice la conguración siguiendo
las instrucciones que parecen en la pantalla.
fHaga clic en Descargar y descargue el archivo
de instalación.
gEjecute el archivo descargado.
Vaya al paso en la página siguiente
para continuar.
Descarga de Internet

5
ESPAÑOL
Uso del CD-ROM de instalación (solo para Windows)
aCargue el CD-ROM de instalación en su ordenador.
■ Si utiliza Windows 10 o Windows 8.1:
bCuando se muestre el mensaje siguiente en el lado
derecho de la pantalla del ordenador, haga clic en él.
cSi aparece la siguiente pantalla, haga clic en
Ejecutar Msetup4.exe (Run Msetup4.exe).
dSi se muestra el cuadro de diálogo Control
de cuentas de usuario (User Account Control),
haga clic en Sí (Yes).
Si este mensaje no se muestra (o ya no aparece)
1. Haga clic en el Explorador de archivos
(File Explorer) de la barra de tareas.
o
2. Haga clic en Este equipo (This PC) en la parte
izquierda de la ventana que se abra.
3. Haga doble clic en el icono de CD-ROM
en el lado
derecho de la ventana.
Si se muestra el contenido del CD-ROM, haga doble
clic en Msetup4.exe.
4. Continúe en el paso d.
■ Si utiliza Windows 7:
b Cuando se muestre la pantalla Reproducción
automática (AutoPlay), haga clic en Ejecutar
Msetup4.exe (Run Msetup4.exe).
c Si se muestra el cuadro de diálogo Control de
cuentas de usuario (User Account Control),
haga clic en Continuar (Continue).
Si no se muestra la pantalla Reproducción automática
(AutoPlay)
1. Haga clic en Equipo (Computer) en el menú de inicio.
2. Haga doble clic en el icono de CD-ROM
en el lado
derecho de la ventana abierta.
Si se muestra el contenido del CD-ROM, haga doble
clic en Msetup4.exe.
Vaya al paso para continuar.
2
Haga clic en Iniciar conguración
(Start Setup).
Se ha completado la conexión con su ordenador. Ya puede imprimir desde su ordenador.
Si aparece la siguiente pantalla,
haga clic en Salir (Exit).
Siga las instrucciones
en pantalla para continuar
con la conguración.

6
6-B. Conexión a un teléfono inteligente
Android
iOS
Necesita una conguración de conexión para cada teléfono inteligente. Siga con la conguración a partir del paso 1 para
cada teléfono inteligente.
Preparativos
• Active la Wi-Fi en su teléfono inteligente.
• Si dispone de un router inalámbrico, conecte su teléfono inteligente al router inalámbrico para conectar con la impresora.
* Por cuestiones del funcionamiento, consulte los manuales de su teléfono inteligente y del router inalámbrico o póngase en
contacto con los fabricantes.
1
Instale el software de la aplicación Canon PRINT Inkjet/SELPHY en su teléfono inteligente.
: Buscar "Canon PRINT" en App Store.
: Buscar "Canon PRINT" en Google Play.
O acceda al sitio web de Canon escaneando el código QR.
* No puede conectar su teléfono inteligente a Internet de forma inalámbrica mientras la impresora se conecta al teléfono
inteligente directamente. Si lo hace, es posible que se realice un cargo en su cuenta, según el contrato que tenga con
el proveedor del servicio.
* Se pueden conectar un máximo de 5 dispositivos directamente a la impresora mediante la conexión LAN inalámbrica.
2
Compruebe la luz de Inalámbr. (Wireless) y después vaya a o a .
aPuntee el software de la aplicación instalado.
bSiga las instrucciones en pantalla para registrar
la impresora.
cAsegúrese de que aparezca la siguiente pantalla.
Se ha completado la conexión con su
teléfono inteligente. Ya puede imprimir
desde su teléfono inteligente.
Para imprimir fotos, cargue papel fotográco y vaya
a "Carga de papel fotográco" en la página 8.
Si la luz Inalámbr. (Wireless) no está encendida
y la luz Red (Network) está encendida,
la impresora no puede enviar transmisiones
mediante una conexión LAN inalámbrica. Para
obtener más información, vaya a "http://ij.start.
canon" para ver las "Preguntas más frecuentes".
Wireless
Network
Encendida
La luz está parpadeando o se encuentra apagada
(vaya a
)
La luz está
encendida
(vaya a
)
Wireless

7
ESPAÑOL
Los procedimientos que se indican a continuación pueden variar en función del iOS o Android. Seleccione
su sistema operativo y sigua el procedimiento indicado.
aToque Ajustes (Settings) en la pantalla de
inicio de su teléfono inteligente y después toque
Canon_ij_XXXX en los ajustes de Wi-Fi.
Si Canon_ij_XXXX no aparece en la lista, consulte la
sección "Solución de problemas" a continuación para
hacer funcionar la impresora y repita el paso a.
bPuntee el software de la aplicación instalado.
cSiga las instrucciones en pantalla para registrar la impresora.
Siga las instrucciones en pantalla para
continuar con la conguración.
Si seleccionó Selec. autom. método con.
(recomendado) (Auto Select Conn. Method
(recommended)) en la pantalla de selección del
método de conexión, se seleccionará el método
de conexión adecuado según su ambiente.
dAsegúrese de que aparezca la siguiente pantalla.
aPuntee el software de la aplicación instalado.
bSiga las instrucciones en pantalla para registrar la impresora.
Si no aparece el siguiente mensaje: "Impresora no
registrada. ¿Realizar preparación de impresora?
(Printer is not registered. Perform printer
setup?)", consulte "Solución de problemas" para
poner en funcionamiento la impresora y espere
unos minutos hasta que aparezca el mensaje.
Siga las instrucciones en pantalla para
continuar con la conguración.
El método de conexión adecuado se elige
en función de su ambiente.
cAsegúrese de que aparezca la siguiente pantalla.
Se ha completado la conexión con su teléfono inteligente. Ya puede imprimir desde
su teléfono inteligente.
Para imprimir fotos, cargue papel fotográco y vaya a "Carga de papel fotográco" en la página 8.
aMantenga pulsado el botón Directa (Direct) de la impresora durante aproximadamente 2 segundos hasta
que la luz Directa (Direct) empiece a parpadear.
bRegrese a la operación de su teléfono inteligente.
Parpadeando
Solución de problemas
No se ha encontrado la impresora desde su teléfono inteligente.

8
1
Abra el soporte del papel.
2
Deslice la guía del papel hacia la izquierda.
3
a
Cargue papel fotográco contra el borde
derecho con el lado de impresión hacia arriba.
bDeslice la guía del papel para alinearla
con el lado de la pila de papel.
a
b
4
Conrme que la luz del Papel (Paper) que está
encendida coincide con el tamaño del papel que
está cargado.
LTR/
4"
×
6"/10
×
15cm
A4/Hagaki/L
Si la luz del Papel (Paper) que se enciende no
coincide con el tamaño del papel, pulse el botón
Selección de papel (Paper Select).
LTR/
4"
×
6"/10
×
15cm
A4/Hagaki/L
5
Extraiga la bandeja de salida del papel
y la extensión de la bandeja de salida.
Carga de papel fotográco
Copiar con teléfono inteligente (Smartphone Copy)
Puede copiar documentos usando el software de aplicación de Canon PRINT Inkjet/SELPHY para
teléfonos inteligentes. Para instalar la aplicación, consulte el paso 1 de la página 6. Para obtener
información sobre el procedimiento para las operaciones, consulte el Manual en línea.
1
Cargue el documento
en la impresora.
2
Saque una fotografía del
documento con Canon PRINT
Inkjet/SELPHY.
3
Envía los datos de la imagen
a la impresora e imprímala.

Videoteca sobre procedimientos
How-To Video Library
RMC (Regulatory Model Code): K10464

© CANON INC. 2017XXXXXXXX
Windows 10
Acceso al Manual en línea
Desde el sitio web
Desde el acceso directo
del escritorio
Desde el sitio web
Access Online Manual
From Web site
From desktop shortcut
From Web site
PRINTED IN XXXXXXXXQT6-1829-V01
-
 1
1
-
 2
2
-
 3
3
-
 4
4
-
 5
5
-
 6
6
-
 7
7
-
 8
8
-
 9
9
-
 10
10
-
 11
11
-
 12
12
-
 13
13
-
 14
14
-
 15
15
-
 16
16
-
 17
17
-
 18
18
-
 19
19
-
 20
20


Canon PIXMA TS302 El manual del propietario
- Categoría
- Enrutadores
- Tipo
- El manual del propietario
En otros idiomas
- English: Canon PIXMA TS302 Owner's manual
Documentos relacionados
-
Canon PIXMA TS3100/TS3120 El manual del propietario
-
Canon PIXMA TS5120 El manual del propietario
-
-
Canon PIXMA MG2420 El manual del propietario
-
-
Canon PIXMA MG3000/MG3022 El manual del propietario
-
Canon PIXMA G4210 El manual del propietario
-
Canon PIXMA iP2820 El manual del propietario
-
Canon PIXMA TR7020 Guía de inicio rápido
-
Canon Pixma TR-4551 Manual de usuario