ProfiCare PC-AKS 3102 Instrucciones de operación
- Tipo
- Instrucciones de operación

PC-AKS3102_IM 29.12.21
Bedienungsanleitung
Instruction Manual • Gebruiksaanwijzing • Mode d’emploi • Manual de instrucciones
Istruzioni per l’uso • Instrukcja obsługi / Gwarancja • Használati utasítás
Руководство по эксплуатации •
Akku-Sauger PC-AKS 3102
Battery vacuum cleaner • Accugevoede kruimelzuiger • Aspirateur à batterie
Aspiradora con batería • Aspirapolvere a batterie • Odkurzacz akumulatorowy
Akkumulátoros porszívó • Беспроводный пылесос •

PC-AKS3102_IM 29.12.21
Bedienungsanleitung ....................................................................................Seite 4
Instruction Manual ........................................................................................ Page 9
Gebruiksaanwijzing ................................................................................... Pagina 14
Mode d’emploi............................................................................................... Page 19
Manual de instrucciones .......................................................................... Página 24
Istruzioni per l’uso .....................................................................................Pagina 29
Instrukcja obsługi .......................................................................................Strona 34
Használati utasítás .......................................................................................Oldal 40
Руководство по эксплуатации .................................................................. стр. 45
53 ....................................................................................................................
2

PC-AKS3102_IM 29.12.21
3
Übersicht der Bedienelemente
Overview of the Components • Overzicht van de bedieningselementen
Liste des différents éléments de commande • Indicación de los elementos de manejo
Elementi di comando • Przegląd elementów obsługi • A kezelőelemek áttekintése
Обзор деталей прибора •

4
PC-AKS3102_IM 29.12.21
WICHTIG:
Lesen Sie unbedingt zuerst die separat beiliegenden Sicherheits-
hinweise.
Bedienungsanleitung
Vielen Dank, dass Sie sich für unser Produkt entschieden
haben. Wir wünschen Ihnen viel Freude mit dem Gerät.
Lesen Sie vor Inbetriebnahme dieses Gerätes die Be-
dienungsanleitung und die separat beiliegenden Sicher-
heitshinweise sehr sorgfältig durch. Bewahren Sie diese
Unterlagen inkl. Garantieschein, Kassenbon und nach
Möglichkeit den Karton mit Innenverpackung gut auf. Falls
Sie das Gerät an Dritte weitergeben, geben Sie auch immer
alle dazugehörigen Unterlagen mit.
Symbole in dieser Bedienungsanleitung
Wichtige Hinweise für Ihre Sicherheit sind besonders ge-
kennzeichnet. Beachten Sie diese Hinweise unbedingt, um
Unfälle und Schäden am Gerät zu vermeiden:
WARNUNG:
Warnt vor Gefahren für Ihre Gesundheit und zeigt mög-
liche Verletzungsrisiken auf.
ACHTUNG:
Weist auf mögliche Gefährdungen für das Gerät oder
andere Gegenstände hin.
Inhalt
Übersicht der Bedienelemente .............................................3
Auspacken des Gerätes .......................................................4
Übersicht der Bedienelemente / Lieferumfang ......................4
Wichtige Hinweise für die Benutzung des Gerätes
und für die Montage der Wandhalterung .............................. 4
Anwendungshinweise ........................................................... 5
Ladestation an der Wand befestigen .................................... 5
Auaden des Akkus ..............................................................5
Benutzung des Gerätes ........................................................ 5
Wartung ................................................................................. 6
Reinigung .............................................................................. 6
Aufbewahrung ....................................................................... 7
Störungsbehebung................................................................7
Technische Daten .................................................................7
Produktdaten gemäß Verordnung
(EU) 2019 / 1782 Netzteile ....................................................7
Entsorgung ............................................................................8
Auspacken des Gerätes
1. Nehmen Sie das Gerät aus seiner Verpackung.
2. Entfernen Sie sämtliches Verpackungsmaterial, wie Fo-
lien, Füllmaterial, Kabelbinder und Kartonverpackung.
3. Prüfen Sie den Lieferumfang auf Vollständigkeit.
4. Sollte der Verpackungsinhalt unvollständig oder Beschä-
digungen feststellbar sein, nehmen Sie das Gerät nicht in
Betrieb. Bringen Sie es umgehend zum Händler zurück.
5. Entfernen Sie die Transportsicherung am Ein- / Aus-
schalter.
Übersicht der Bedienelemente /
Lieferumfang
1 Ein- / Ausschalter mit Multifunktions-LED
2 Handgriff
3 PUSH Taste für die Entriegelung des Staubbehälters
4 Staubbehälter
5 Öffner / Verriegelung der Klappe
6 Öffnungsklappe
7 Anschluss für das Zubehör
8 Anschlussbuchse für das Netzteil
9 2-teiliges Multifunktionsstativ (Wandhalterung / Lade-
station und Zubehörhalterung)
10 HEPA-Filter mit Dichtungsring
11 Groblter
12 Fugendüse, lang
13 Fugendüse, mittlerer Länge
14 Fugendüse, kurz
15 Bürstenaufsatz
Ohne Abbildung
1 × Netzteil
2 × Dübel
2 × Schraube
Wichtige Hinweise
für die Benutzung des Gerätes und
für die Montage der Wandhalterung
Anweisungen lesen!
Nur mit „SEU007A-140050“ Versorgungseinheit
(Netzteil) verwenden! Zum Laden der Akkus nur
das im Lieferumfang enthaltene Netzteil ver-
wenden.

5
PC-AKS3102_IM 29.12.21
ACHTUNG:
• Platzieren Sie das Multifunktionsstativ so, dass das
Gerät keiner direkten Sonneneinstrahlung oder ande-
ren Wärmequellen ausgesetzt ist.
• Laden Sie den Akku nicht unbeaufsichtigt.
• Ziehen Sie nach dem Ladevorgang immer den Netz-
stecker aus der Steckdose.
• Saugen Sie nichts Brennbares oder Flüssigkeiten auf!
• Saugen Sie niemals ohne Filtereinheit.
WARNUNG: Bei Montage der Wandhalterung
Vergewissern Sie sich vorher, ob sich Leitungen in der
Wand verbergen, die Sie beschädigen könnten!
Anwendungshinweise
• Das Gerät ist sehr gut geeignet, um schnell kleine Men-
gen trockenen Schmutz oder Staub aufzusaugen.
• Verschmutzte Filter verringern die Saugleistung des
Staubsaugers, daher empfehlen wir eine regelmäßige
Reinigung der vorhandenen Schmutzlter.
• Der Betrieb des Gerätes erfolgt über den aufgeladenen
Akku. Die Auadung erfolgt über das mitgelieferte Netz-
teil, welches mit der Ladestation verbunden wird. Ein
direkter Netzbetrieb mit dem Netzteil ist nicht möglich.
Düsenaufsätze
• Die verschiedenen Düsenaufsätze lassen sich einfach
aufstecken und wieder abziehen.
• Den Bürstenaufsatz stecken Sie auf eine Fügendüse.
2-teiliges Multifunktionsstativ
• Möchten Sie das Multifunktionsstativ aufstellen, ver-
binden Sie die Ladestation und die Zubehörhalterung an
der Steckverbindung miteinander.
• Sie können das Gerät und das Zubehör darin abstellen.
• Wenn Sie das Netzteil an die Anschlussbuchse an-
schließen, dient das Multifunktionsstativ gleichzeitig als
Ladestation.
• Möchten Sie die Ladestation lieber als Wandhalterung
nutzen, trennen Sie diese wieder von der Zubehör-
halterung.
Ladestation an der Wand befestigen
Befestigen Sie die Ladestation in der Nähe einer Steck-
dose.
1. Messen Sie die Distanz zwischen den beiden Lang-
löchern der Halterung aus und bohren Sie in diesem
Abstand zwei Löcher in die Wand.
2. Setzen Sie die Dübel in die Wand.
3. Drehen Sie die Schrauben mit einem Schraubenzieher in
die Dübel, so dass sie ca. 3 – 4 mm überstehen.
4. Hängen Sie die Wandhalterung auf die Schrauben.
Aufladen des Akkus
1. Schalten Sie das Gerät aus.
2. Stellen Sie das Gerät in die Ladestation.
3. Verbinden Sie das Netzteil mit der Anschlussbuchse (8).
4. Schließen Sie das Netzteil an einer geprüften Steckdose
an. Laden Sie das Gerät vor der ersten Benutzung
4,5 Stunden auf.
- Während des Ladevorgangs blinkt die LED am
Schalter rot.
- Ist der Akku vollständig geladen, leuchtet die LED am
Schalter kontinuierlich blau.
- Die LED erlischt, wenn Sie den Netzstecker aus der
Steckdose ziehen oder wenn Sie das Gerät aus der
Ladestation nehmen.
- Es ist normal, dass sich das Gerät während des Auf-
ladens erwärmt.
5. Beenden Sie alle weiteren Ladungen nach spätestens
4,5 Stunden oder wenn die LED dauerhaft blau leuchtet.
ACHTUNG:
Ziehen Sie nach dem Ladevorgang immer den Netzste-
cker aus der Steckdose.
Benutzung des Gerätes
Ein- / Ausschalter mit Multifunktions-LED
Schalter Funktion LED Bedeutung
1 × kurz
drücken
Gerät
einschalten
leuchtet
grün Leistungsstufe 1
länger
gedrückt
halten
leuchtet
blau Leistungsstufe 2
1 × kurz
drücken
Gerät
ausschalten ist aus
Die LED am Schalter blinkt während des Betriebes für ca.
30 Sekunden, wenn das Ende der Akkukapazität erreicht
ist. Danach schaltet sich das Gerät aus. Laden Sie den
Akku wieder auf.
Bedienung
1. Nehmen Sie das Gerät aus der Ladestation.
2. Stecken Sie eine Düse auf. Zusätzlich können Sie den
Bürstenaufsatz auf eine der beiden Fugendüsen (12 / 13)
aufsetzen.
3. Schalten Sie das Gerät mit dem Schalter ein.
4. Möchten Sie mit der höheren Leistungsstufe saugen,
halten Sie den Schalter während des Betriebs für ca.
3 Sekunden gedrückt.
5. Beachten Sie die Markierung MAX am Staubbehälter.
Die maximale Aufnahmemenge beträgt 100 ml.

6
PC-AKS3102_IM 29.12.21
Betrieb beenden
1. Schalten Sie das Gerät aus.
2. Entleeren Sie den Staubbehälter. Reinigen Sie die
Filtereinheit nach jedem Gebrauch, um bei der nächsten
Benutzung wieder die volle Leistung des Gerätes zu
erhalten.
3. Anschließend stellen Sie das Gerät in die Ladestation.
Wartung
Entleeren des Staubbehälters
1. Lösen Sie gegebenenfalls die Fugendüse vom Gerät.
2. Halten Sie das Gerät mit der Öffnungsklappe über einen
Mülleimer.
3. Entleeren Sie den Inhalt des Staubbehälters. Drücken
Sie dafür die Verriegelung (5) am Staubbehälter, um die
Klappe zu öffnen.
4. Schließen Sie die Klappe wieder. Die Verriegelung am
Staubbehälter muss einrasten.
Die Filtereinheit
Die Filtereinheit bendet sich im Staubbehälter und besteht
aus:
• HEPA-Filter mit Dichtungsring
• Groblter
Um die Filtereinheit zu reinigen gehen Sie wie folgt vor:
1. Entleeren Sie den Staubbehälter wie zuvor beschrieben.
2. Demontage der Filtereinheit
2.1 Umfassen Sie das Gerät mit einer Hand, so dass
Sie mit dem Daumen auf die Taste PUSH drücken
können. Mit der anderen Hand ziehen Sie gleich-
zeitig den Staubbehälter nach oben ab. Sie können
das Gerät dabei auch auf eine stabile Fläche legen.
2.2 Entnehmen Sie die Filtereinheit. Ziehen Sie den
HEPA-Filter aus dem Groblter.
3. Reinigung der Filter
3.1 Klopfen Sie beide Filter über einen Mülleimer aus.
Den HEPA-Filter können Sie auch ausbürsten. Bei
stärkeren Verschmutzungen reinigen Sie die Filter
unter ießendem Wasser.
3.2 Lassen Sie die Filter an der Luft vollständig trock-
nen, bevor Sie sie wieder einsetzen!
3.3 Den Staubbehälter können Sie mit einem feuchten
Tuch auswischen. Trocknen Sie ihn danach ab.
4. Montage der Filtereinheit
4.1 Setzen Sie den HEPA-Filter zurück in den Groblter.
Drücken Sie den HEPA-Filter mit dem Dichtungsring
bis zum Anschlag fest in den Groblter.
4.2 Setzen Sie die Filtereinheit komplett zusammen-
montiert in den Staubbehälter.
4.3 Befestigen Sie den Staubbehälter wieder am Hand-
gerät. Setzen Sie den Staubbehälter zuerst mit den
Rastnasen in die Aussparungen unten am Gehäuse
an. Drücken Sie den Staubbehälter an das Ge-
häuse. Er muss hörbar einrasten.
Reinigung
WARNUNG:
Das Motorgehäuse auf keinen Fall zum Reinigen in Wasser tau-
chen. Es könnte zu einem elektrischen Schlag oder Brand führen.
ACHTUNG:
• Benutzen Sie keine Drahtbürste oder andere scheu-
ernde Gegenstände.
• Benutzen Sie keine scharfen oder scheuernden
Reinigungsmittel.
• Die einzelnen Bauteile sind nicht für die Reinigung in
der Spülmaschine geeignet.
• Das Gehäuse des Gerätes und das Zubehör kann mit
einem leicht feuchten Tuch abgewischt werden.
• Das Netzteil können Sie mit einem trockenen Tuch
abwischen.
Staubbehälter mit Filtereinheit
Für die Reinigung dieser Bauteile lesen Sie bitte im Kapitel
„Wartung“.

7
PC-AKS3102_IM 29.12.21
Aufbewahrung
• Reinigen Sie das Gerät wie beschrieben und lassen Sie
es vollständig trocknen.
• Lagern Sie das Gerät immer außerhalb der Reichweite
von Kindern an einem gut belüfteten und trockenen Ort.
• Die Lagertemperatur sollte zwischen 10 °C und 20 °C
liegen.
• Wir empfehlen, das Gerät in der Original-Verpackung
aufzubewahren, wenn Sie es über einen längeren Zeit-
raum nicht benutzen möchten.
• Akku-Lebensdauer: Auch im ausgeschalteten Zustand
entlädt sich der Akku stetig. Falls Sie das Gerät längere
Zeit nicht verwenden, laden Sie den Akku mindestens
alle 4 bis 6 Wochen auf.
Störungsbehebung
Problem Mögliche Ursache Abhilfe
Das Gerät ist ohne Funktion. Der Akku ist leer. Laden Sie den Akku auf.
Der Akku ist defekt. Wenden Sie sich an unseren Service oder an Ihren Händler.
Während des Betriebs blinkt
die LED am Schalter für
ca. 30 Sekunden. Danach
schaltet sich das Gerät aus.
Der Akku ist leer. Laden Sie den Akku auf.
Schwache Saugleistung. Der Akku ist fast leer. Laden Sie den Akku auf.
Der Staubbehälter ist voll. Entleeren Sie den Staubbehälter.
Die Filter sind ver-
schmutzt.
Reinigen Sie die Filter wie unter „Wartung“ beschrieben.
ACHTUNG:
Nehmen Sie den Betrieb nur mit trockenen Filtern wieder auf!
Der Akku hält die Auadung
nicht.
Der Akku hat das Ende
seiner Lebensdauer
erreicht.
Wenden Sie sich an unseren Service oder an Ihren Händler.
Technische Daten
Modell: ..............................................................PC-AKS 3102
Nettogewicht
(Handgerät, Ladestation, Netzteil): ........................ca. 0,83 kg
Schutzklasse (Gerät): .........................................................
Schutzklasse (Netzteil): .......................................................
Akku: ..............................................3 × 3,7 V, 2000 mAh Li-Ion
Laufzeit: .................................................. 30 Minuten maximal
Ladezeit: ........................................................ ca. 4,5 Stunden
Technische und gestalterische Änderungen im Zuge stetiger
Produktentwicklungen vorbehalten.
Dieses Gerät wurde nach allen zutreffenden, aktuellen
CE-Richtlinien geprüft und nach den neuesten sicherheits-
technischen Vorschriften gebaut.
Produktdaten gemäß Verordnung
(EU) 2019 / 1782 Netzteile
Angaben zum
verwendeten Netzteil Wert Einheit
Clatronic International GmbH
Handelsregisternummer HRB 9158
Industriering Ost 40,
47906 Kempen
Deutschland
Modellkennung SEU007A-140050
Eingangsspannung 100 – 240 V~
Eingangswechselstromfrequenz 5 0 – 6 0 Hz
Ausgangsspannung AC / DC 14,0 V DC
Ausgangsstrom 0,5 A
Ausgangsleistung 7,0 W
Durchschnittliche Efzienz im
Betrieb 79,9 %
Efzienz bei geringer Last (10 %)
* %
Leistungsaufnahme bei Nulllast 0,06 W
* entfällt, da die Ausgangsleistung unter 10 W liegt.

8
PC-AKS3102_IM 29.12.21
Relevanten Lastbedingungen:
Prozentsatz des Ausgangsstroms Typenschild
Belastungszustand 1 100 % ± 2 %
Belastungszustand 2 75 % ± 2 %
Belastungszustand 3 50 % ± 2 %
Belastungszustand 4 25 % ± 2 %
Belastungszustand 5 10 % ± 1 %
Belastungszustand 6
0 % (Leerlaufzustand)
Entsorgung
Akku- / Batterieentsorgung
Das Gerät enthält einen wiederauadbaren
Akku. Verbrauchte Batterien / Akkumulatoren
(Akkus) gehören nicht in den Hausmüll.
Der Akku muss entnommen werden, bevor das
Produkt entsorgt wird. Wenden Sie sich hierfür
an qualiziertes Fachpersonal.
Informationen, wo Batterien / Akkus zu entsorgen sind,
erhalten Sie über Ihre Kommunen oder die Gemeindever-
waltungen. Ihr Händler und Vertragspartner ist ebenfalls zur
kosten freien Rücknahme der Batterien / Akkus verpichtet.
Bedeutung des Symbols „Mülltonne“
Schonen Sie unsere Umwelt, Elektrogeräte ge-
hören nicht in den Hausmüll.
Nutzen Sie die für die Entsorgung von Elektro-
geräten vorgesehenen Sammelstellen und
geben dort Ihre Elektrogeräte ab, die Sie nicht
mehr benutzen werden.
Sie helfen damit die potenziellen Auswirkungen, durch
falsche Entsorgung, auf die Umwelt und die menschliche
Gesundheit zu vermeiden.
Sie leisten damit Ihren Beitrag zur Wiederverwertung, zum
Recycling und zu anderen Formen der Verwertung von
Elektro- und Elektronik-Altgeräten.
Informationen, wo die Geräte zu entsorgen sind, erhalten
Sie über Ihre Kommunen oder die Gemeindeverwaltungen.
Ihr Händler und Vertragspartner ist ebenfalls zur kosten-
freien Rücknahme des Altgerätes verpichtet.

PC-AKS3102_IM 29.12.21
9
IMPORTANT:
Be sure to read the separately enclosed safety instructions rst.
Instruction Manual
Thank you for choosing our product. We hope you will enjoy
using the appliance.
Read the instruction manual and the separately enclosed
safety instructions very carefully before using this appliance.
Keep these documents, including the warranty certicate,
receipt and, if possible, the box with the inner packaging in
a safe place. If you pass the appliance on to a third party,
always include all the relevant documents.
Symbols in this Instruction Manual
Important information for your safety is specially marked.
It is essential to comply with these instructions in order to
avoid accidents and prevent damage to the appliance:
WARNING:
This warns you of dangers to your health and indicates
possible injury risks.
CAUTION:
This refers to possible hazards to the appliance or other
objects.
Content
Overview of the Components ...............................................3
Unpacking the Appliance ...................................................... 9
Overview of the Components / Scope of Delivery ................9
Important Instructions for Using the Appliance
and for Mounting the Wall Mount ..........................................9
Notes for Use ......................................................................10
Attach the Charging Station to the Wall ..............................10
Charging the Rechargeable Battery ...................................10
Using the Appliance ............................................................10
Maintenance........................................................................10
Cleaning .............................................................................. 11
Storage ................................................................................ 11
Troubleshooting ..................................................................12
Technical Data.....................................................................12
Product Specications in Accordance
with Regulation (EU) 2019 / 1782 Power Supplies ............. 12
Disposal...............................................................................13
Unpacking the Appliance
1. Remove the appliance from the package.
2. Remove all packaging material such as lms, ller, cable
ties and cardboard.
3. Check the delivery contents for completeness.
4. Should the package contents be incomplete or damages
be found, do not take the appliance into operation. Take
it immediately back to the dealer.
5. Remove the transport lock from the on / off switch.
Overview of the Components /
Scope of Delivery
1 on / off switch with multifunction LED
2 Handle
3 PUSH button for unlocking the dust container
4 Dust container
5 Opener / locking of the ap
6 Opening ap
7 Connector for the accessories
8 Connection socket for the power supply unit
9 2-piece multifunction stand (wall mount / charging sta-
tion and accessory holder)
10 HEPA lter with sealing ring
11 Coarse lter
12 Crevice nozzle, long
13 Crevice nozzle, medium length
14 Crevice nozzle, short
15 Brush attachment
Without Illustration
1 × Power supply unit
2 × Plug
2 × Screw
Important Instructions for
Using the Appliance and for
Mounting the Wall Mount
Read the instructions!
Only use with “SEU007A-140050” power supply
unit! To charge the rechargeable batteries, use only
the removable power supply that comes with this
appliance.
CAUTION:
• Place the multifunction stand so that the appliance is
not exposed to direct sunlight or other sources of heat.
• Do not charge the battery unattended.
• Always disconnect the mains plug from the socket
after charging.
• Do not vacuum anything ammable or liquid!
• Never vacuum without a lter unit.

PC-AKS3102_IM 29.12.21
10
WARNING: When Mounting the Wall Mount
Make sure beforehand that there are no hidden cables in
the wall that could damage you!
Notes for Use
• The appliance is very suitable for quickly vacuuming
small amounts of dry dirt or dust.
• Dirty lters reduce the suction power of the hoover, so
we recommend regular cleaning of the existing dirt lters.
• The appliance is operated via the charged battery.
Charging is carried out via the power supply unit
supplied, which is connected to the charging station.
Direct mains operation with the power supply unit is not
possible.
Nozzle Attachments
• The various nozzle attachments are easy to attach and
detach.
• Attach the brush attachment to a crevice nozzle.
2-Piece Multifunction Stand
• If you want to set up the multifunction stand, connect the
charging station and the accessory holder to each other
at the plug connection.
• You can place the appliance and the accessories in it.
• If you connect the power supply unit to the connection
socket, the multifunction stand also serves as a charging
station.
• If you prefer to use the charging station as a wall mount,
disconnect it from the accessory mount again.
Attach the Charging Station to the Wall
Mount the charging station near a power socket.
1. Measure the distance between the two slotted holes of
the mount and drill two holes in the wall at this distance.
2. Insert the plugs into the wall.
3. Turn the screws into the plugs with a screwdriver so that
they protrude approx. 3 – 4 mm.
4. Hang the wall mount on the screws.
Charging the Rechargeable Battery
1. Switch off the appliance.
2. Place the appliance in the charging station.
3. Connect the power supply unit to the connection
socket (8).
4. Connect the power supply unit to an approved power
outlet. Charge the appliance for 4.5 hours before using it
for the rst time.
- During the charging process, the LED on the switch
ashes red.
- When the battery is fully charged, the LED on the
switch lights up blue continuously.
- The LED goes out when you disconnect the mains
plug from the socket or when you remove the appli-
ance from the charging station.
- It is normal for the appliance to heat up during
charging.
5. Stop all further charging after 4.5 hours at the latest or
when the LED lights up solid blue.
CAUTION:
Always disconnect the mains plug from the socket after
charging.
Using the Appliance
On / off Switch with Multifunction LED
Switch Function LED Meaning
Press 1 ×
briey
Switch on
appliance
Lights
green Power level 1
Press
and hold
longer
Lights
blue Power level 2
Press 1 ×
briey
Switch off
appliance Is off
The LED on the switch ashes for approx. 30 seconds
during operation when the end of the rechargeable battery
capacity is reached. The appliance then switches off. Re-
charge the rechargeable battery.
Operating
1. Remove the appliance from the charging station.
2. Attach a nozzle. You can also attach the brush attach-
ment to one of the two crevice nozzles (12 / 13).
3. Switch on the appliance with the switch.
4. If you want to vacuum at the higher power level, keep the
switch pressed for approx. 3 seconds during operation.
5. Observe the MAX marking on the dust container. The
maximum capacity is 100 ml.
End of Operation
1. Switch off the appliance.
2. Empty the dust container. Clean the lter unit after each
use to restore the appliance to full performance the next
time you use it.
3. Then place the appliance in the charging station.
Maintenance
Emptying the Dust Container
1. If necessary, detach the crevice nozzle from the appli-
ance.
2. Hold the appliance with the opening ap over a dustbin.

PC-AKS3102_IM 29.12.21
11
3. Empty the contents of the dust container. To do this,
press the locking (5) on the dust container to open the
ap.
4. Close the ap again. The locking mechanism on the dust
container must engage.
The Filter System
The lter system is located in the dust container and
consists of:
• HEPA lter with sealing ring
• Coarse lter
To clean the lter system, proceed as follows:
1. Empty the dust container as described before.
2. Dismantling the lter system
2.1 Grasp the appliance with one hand so that you can
press the PUSH button with your thumb. With the
other hand, pull the dust container upwards at the
same time. You can also place the appliance on a
stable surface.
2.2 Remove the lter system. Pull the HEPA lter out of
the coarse lter.
3. Cleaning the Filters
3.1 Hold both lters over a dustbin can and tap out
the dust. You may also brush out the HEPA lter.
In case of heavy staining, clean the lters under
running water.
3.2 Let the lters air-dry completely before retting
them!
3.3 Wipe the dust container with a damp cloth and then
wipe it dry.
4. Mounting the lter system
4.1 Put the HEPA lter back into the coarse lter. Press
the HEPA lter with the sealing ring rmly into the
coarse lter as far as it will go.
4.2 Place the lter system completely assembled into
the dust container.
4.3 Reattach the dust container to the hand-held unit.
First place the dust container with the catches in the
recesses at the bottom of the housing. Press the
dust container against the housing. It must audibly
click into place.
Cleaning
WARNING:
Never immerse the motor housing in water for cleaning. It could
cause an electric shock or re.
CAUTION:
• Do not use a wire brush or other abrasive objects.
• Do not use sharp or abrasive cleaning agents.
• The individual components are not suitable for clean-
ing in the dishwasher.
• The housing of the appliance and the accessories can
be wiped with a slightly damp cloth.
• You can wipe the power supply unit with a dry cloth.
Dust Container with Filter System
For cleaning these components, please refer to the chapter
“Maintenance”.
Storage
• Clean the appliance as described and allow it to dry
completely.
• Always store the appliance out of the reach of children in
a well-ventilated and dry place.
• The storage temperature should be between 10 °C and
20 °C.
• We recommend storing the appliance in its original
packaging if you do not intend to use it for a long period
of time.

PC-AKS3102_IM 29.12.21
12
• Life of the rechargeable battery: Even when switched
off, the rechargeable battery discharges continuously.
If the appliance is out of use for a longer period of time,
charge the rechargeable battery at least once every
4 to 6 weeks.
Troubleshooting
Problem Possible Cause Remedy
The appliance is without function. The rechargeable battery is
empty.
Charge the rechargeable battery.
The rechargeable battery is
defect.
Contact our service or your dealer.
During operation, the LED on
the switch ashes for approx.
30 seconds. The appliance then
switches off.
The rechargeable battery is
empty.
Charge the rechargeable battery.
Weak suction power. The battery is almost empty. Charge the rechargeable battery.
The dust container is full. Empty the dust container.
The lters are dirty. Clean the lters as described under “Maintenance”.
CAUTION:
Only resume operation with dry lters!
The battery rechargeable does
not hold a charge.
The rechargeable battery has
reached the end of its life.
Contact our service or your dealer.
Technical Data
Model:...............................................................PC-AKS 3102
Net weight (Handheld unit,
charging station, power supply unit): ............. approx. 0.83 kg
Protection class (appliance): ...............................................
Protection class (power supply unit): ...................................
Rechargeable Battery: .................3 × 3.7 V, 2000 mAh Li-Ion
Operating time:.....................................30 minutes maximum
Charging time: .............................................approx. 4.5 hours
The right to make technical and design modications in
the course of continuous product development remains
reserved.
This appliance has been tested according to all applicable,
current CE directives and built according to the latest safety
regulations.
Product Specications in Accordance with
Regulation (EU) 2019 / 1782 Power Supplies
Information about
the power supply used Value Unit
Clatronic International GmbH
Commercial register number
HRB 9158
Industriering Ost 40,
47906 Kempen
Germany
Information about
the power supply used Value Unit
Model identier SEU007A-140050
Input voltage 100 – 240 V~
Input alternating current frequency 5 0 – 6 0 Hz
Output voltage AC / DC 14.0 V DC
Output current 0.5 A
Output power 7.0 W
Average efciency in operation 79.9 %
Low load efciency (10 %)
* %
No-load power consumption 0.06 W
* not applicable due to an output power of less than 10 W.
The relevant load conditions are as follows:
Percentage of nameplate output current
Load condition 1 100 % ± 2 %
Load condition 2 75 % ± 2 %
Load condition 3 50 % ± 2 %
Load condition 4 25 % ± 2 %
Load condition 5 10 % ± 1 %
Load condition 6
0 %
(no-load condition)

PC-AKS3102_IM 29.12.21
13
Disposal
Accumulator / Battery Disposal
The appliance contains a rechargeable battery.
Used batteries / accumulators (rechargeable
batteries) do not belong in household waste.
The rechargeable battery must be removed
before the product is disposed of. Contact
qualied personnel for this.
Information on where to dispose of batteries / accumulators
can be obtained from your local authorities or the municipal
administrations. Your dealer and contractual partner is also
obliged to take back the batteries / accumulators free of
charge.
Meaning of the “Dustbin” Symbol
Protect our environment: do not dispose of elec-
trical equipment in the domestic waste.
Please return any electrical equipment that
you will no longer use to the collection points
provided for their disposal.
This helps avoid the potential effects of incorrect disposal
on the environment and human health.
This will contribute to the recycling and other forms of
re-utilisation of electrical and electronic equipment.
Information concerning where the equipment can be
disposed of can be obtained from your local authority. Your
dealer and contractual partner is also obliged to take back
the old appliance free of charge.

PC-AKS3102_IM 29.12.21
14
BELANGRIJK:
Lees eerst de apart bijgevoegde veiligheidsinstructies.
Gebruiksaanwijzing
Dank u voor het kiezen van ons product. Wij hopen dat u
het gebruik van het apparaat zult genieten.
Lees de gebruiksaanwijzing en de apart bijgevoegde
veiligheidsinstructies zorgvuldig door voordat u dit apparaat
in gebruik neemt. Bewaar deze documenten, inclusief het
garantiebewijs, de kassabon en, indien mogelijk, de doos
met de binnenverpakking op een veilige plaats. Als u het
apparaat aan een derde doorgeeft, voeg dan altijd alle
relevante documenten bij.
Symbolen in deze gebruiksaanwijzing
Belangrijke aanwijzingen voor uw veiligheid zijn speciaal
gekenmerkt. Neem deze aanwijzingen strikt in acht om
ongevallen en schade aan het apparaat te vermijden:
WAARSCHUWING:
Waarschuwt voor gevaren voor uw gezondheid en toont
mogelijk letsel risico’s.
LET OP:
Wijst op mogelijke gevaren voor het apparaat of andere
voorwerpen.
Inhoud
Overzicht van de bedieningselementen ...............................3
Het apparaat uitpakken .......................................................14
Overzicht van de bedieningselementen /
Omvang van de levering ..................................................... 14
Belangrijke instructies voor het gebruik van
het apparaat en voor de montage van de wandhouder ..... 14
Opmerkingen voor het gebruik ...........................................15
Bevestig het laadstation aan de muur ................................15
De accu opladen ................................................................. 15
Gebruik van het apparaat ...................................................15
Onderhoud ..........................................................................16
Reiniging .............................................................................16
Opslag ................................................................................. 17
Oplossen van storingen ......................................................17
Technische gegevens .........................................................17
Productspecicaties in overeenstemming
met de verordening (EU) 2019 / 1782 voedingen ............... 17
Verwijdering .........................................................................18
Het apparaat uitpakken
1. Verwijder het apparaat uit de verpakking.
2. Verwijder alle verpakkingsmaterialen zoals folies, vulma-
terialen, kabelbinders en karton.
3. Controleer of de inhoud van de levering compleet is.
4. Indien de inhoud van het pakket onvolledig is of er
beschadigingen worden gevonden, neem het apparaat
dan niet in gebruik. Breng het onmiddellijk terug naar de
leverancier.
5. Verwijder de transportvergrendeling van de aan / uit
schakelaar.
Overzicht van de bedieningselementen /
Omvang van de levering
1 aan / uit schakelaar met multifunctionele LED
2 Handgreep
3 PUSH toets voor het ontgrendelen van het stofreservoir
4 Stofreservoir
5 Openen / vergrendelen van de klep
6 Openingsklep
7 Aansluiting voor de accessoires
8 Aansluitbus voor de voedingseenheid
9 2-delig multifunctioneel onderstel (wandhouder / oplaad-
station en accessoirehouder)
10 HEPA-lter met afdichtring
11 Grove lter
12 Spleetmondstuk, lang
13 Spleetmondstuk, middellang
14 Spleetmondstuk, kort
15 Borstelhulpstuk
Zonder afbeelding
1 × Voedingseenheid
2 × Deuvel
2 × Schroef
Belangrijke instructies voor
het gebruik van het apparaat en voor
de montage van de wandhouder
Aanwijzingen doorlezen!
Gebruik alleen de voedingsadapter
“ SEU007A-140050”! Om de accu op te laden,
gebruik alleen de afneembare voedingsadapter die
met dit apparaat is meegeleverd.

PC-AKS3102_IM 29.12.21
15
LET OP:
• Plaats de multifunctionele standaard zo dat het
apparaat niet wordt blootgesteld aan direct zonlicht of
andere warmtebronnen.
• Laad de accu niet zonder toezicht op.
• Trek altijd de stekker uit het stopcontact na het
opladen.
• Zuig geen ontvlambare of vloeibare stoffen op!
• Zuig nooit zonder lterunit.
WAARSCHUWING:
Bij montage van de wandhouder
Controleer van tevoren of er geen verborgen kabels in de
muur zitten die u zouden kunnen beschadigen!
Opmerkingen voor het gebruik
• Het apparaat is zeer geschikt voor het snel opzuigen van
kleine hoeveelheden droog vuil of stof.
• Vuile lters verminderen de zuigkracht van de stofzuiger,
daarom raden wij aan de aanwezige vuillters regelmatig
te reinigen.
• Het apparaat werkt via de opgeladen accu. Het opladen
gebeurt via de meegeleverde voedingseenheid, die
wordt aangesloten op het oplaadstation. Directe netwer-
king met de netvoeding is niet mogelijk.
Mondstuk hulpstukken
• De verschillende mondstukopzetstukken zijn eenvoudig
te bevestigen en los te koppelen.
• Bevestig het borstelhulpstuk aan een spleetmondstuk.
2-delige multifunctionele standaard
• Als u de multifunctionele standaard wilt opstellen, sluit u
het laadstation en de accessoirehouder op de stekker-
verbinding op elkaar aan.
• U kunt het apparaat en de accessoires erin plaatsen.
• Als u de voedingseenheid op de aansluitbus aansluit,
dient de multifunctionele stand tevens als oplaadstation.
• Als u het laadstation als wandhouder wilt gebruiken,
koppelt u het weer los van de accessoirehouder.
Bevestig het laadstation aan de muur
Bevestig het laadstation in de buurt van een stopcontact.
1. Meet de afstand tussen de twee sleufgaten van de hou-
der en boor op deze afstand twee gaten in de muur.
2. Steek de pluggen in de muur.
3. Draai de schroeven met een schroevendraaier in de
pluggen, zodat ze ong. 3 – 4 mm uitsteken.
4. Hang de muurbeugel aan de schroeven.
De accu opladen
1. Schakel het apparaat uit.
2. Plaats het apparaat in het laadstation.
3. Sluit de voedingseenheid aan op de aansluitbus (8).
4. Sluit de voedingseenheid aan op een goedgekeurd
stopcontact. Laad het apparaat gedurende 4,5 uur op,
voordat u het voor de eerste keer gebruikt.
- Tijdens het opladen knippert de LED op de schakelaar
rood.
- Als de accu volledig is opgeladen, brandt de LED op
de schakelaar continu blauw.
- De LED dooft wanneer u de netstekker uit het
stopcontact haalt of wanneer u het apparaat uit het
oplaadstation haalt.
- Het is normaal dat het apparaat tijdens het opladen
warm wordt.
5. Stop met verder opladen na uiterlijk 4,5 uur of wanneer
de LED continu blauw brandt.
LET OP:
Trek altijd de stekker uit het stopcontact na het opladen.
Gebruik van het apparaat
Aan / uit schakelaar met multifunctionele LED
Schakelaar Functie LED Betekenis
1 × kort
drukken
Apparaat
inschakelen
Lichten
groen
Vermogen
niveau 1
Langer inge-
drukt houden
Brandt
blauw
Vermogen
niveau 2
1 × kort
drukken
Apparaat
uitschakelen Is uit
De LED op de schakelaar knippert tijdens het gebruik
gedurende ca. 30 seconden wanneer het einde van de
accucapaciteit is bereikt. Daarna schakelt het apparaat uit.
Laad de accu weer op.
Bediening
1. Haal het apparaat uit het laadstation.
2. Bevestig een mondstuk. U kunt het borstelhulpstuk
ook op een van de twee kierenzuigmonden (12 / 13)
bevestigen.
3. Schakel het apparaat in met de schakelaar.
4. Als u met een hoger vermogen wilt stofzuigen, houdt
u tijdens het gebruik de schakelaar ca. 3 seconden
ingedrukt.
5. Let op de MAX-markering op het stofreservoir. De maxi-
male inhoud bedraagt 100 ml.

PC-AKS3102_IM 29.12.21
16
Einde van de werking
1. Schakel het apparaat uit.
2. Leeg het stofreservoir. Reinig de ltereenheid na elk ge-
bruik, zodat het apparaat bij het volgende gebruik weer
optimaal functioneert.
3. Plaats het apparaat vervolgens in het laadstation.
Onderhoud
Legen van het stofreservoir
1. Maak, indien nodig, het spleetmondstuk los van het
apparaat.
2. Houd het apparaat met de openingsklep boven een
vuilnisbak.
3. Leeg de inhoud van het stofreservoir. Druk hiervoor op
de vergrendeling (5) op het stofreservoir om de klep te
openen.
4. Sluit de klep weer. Het vergrendelingsmechanisme op
het stofreservoir moet vastklikken.
Het ltersysteem
Het ltersysteem bevindt zich in het stofreservoir en bestaat
uit:
• HEPA lter met afdichtring
• Grove lter
Ga als volgt te werk om het ltersysteem te reinigen:
1. Leeg het stofreservoir zoals eerder beschreven.
2. Demontage van het ltersysteem
2.1 Pak het apparaat met één hand vast, zodat u met
uw duim op de PUSH toets kunt drukken. Trek met
de andere hand tegelijkertijd het stofreservoir naar
boven. U kunt het apparaat ook op een stabiele
ondergrond plaatsen.
2.2 Verwijder het ltersysteem. Trek het HEPA lter uit
het groflter.
3. De lters reinigen
3.1 Houd beide lters boven een vuilnisbak en tik het
stof eruit. U kunt ook het HEPA lter uitborstelen.
Bij sterke vervuiling kunt u de lters onder stromend
water reinigen.
3.2 Laat de lters volledig aan de lucht drogen alvorens
ze terug te plaatsen!
3.3 Veeg het stofreservoir af met een vochtige doek en
veeg het daarna droog.
4. Montage van het ltersysteem
4.1 Plaats het HEPA lter terug in het groflter. Druk
het HEPA lter met de afdichtring stevig tot aan de
aanslag in het groflter.
4.2 Plaats het ltersysteem volledig gemonteerd in het
stofreservoir.
4.3 Bevestig het stofreservoir weer aan het handappa-
raat. Plaats eerst het stofreservoir met de sluitingen
in de uitsparingen aan de onderzijde van de behui-
zing. Druk het stofreservoir tegen de behuizing. Het
moet hoorbaar op zijn plaats klikken.
Reiniging
WAARSCHUWING:
Dompel het motorhuis nooit onder in water om het te reinigen. Dit
kan een elektrische schok of brand veroorzaken.
LET OP:
• Gebruik geen staalborstel of andere schurende
voorwerpen.
• Gebruik geen scherpe of schurende reinigingsmid-
delen.
• De afzonderlijke onderdelen zijn niet geschikt voor
reiniging in de vaatwasmachine.
• De behuizing van het apparaat en de accessoires kun-
nen met een licht vochtige doek worden afgeveegd.
• De voedingseenheid kunt u met een droge doek afnemen.
Stofreservoir met ltersysteem
Voor het reinigen van deze onderdelen, zie het hoofdstuk
“Onderhoud”.

PC-AKS3102_IM 29.12.21
17
Opslag
• Reinig het apparaat zoals beschreven en laat het volle-
dig drogen.
• Bewaar het apparaat altijd buiten het bereik van kinderen
op een goed geventileerde en droge plaats.
• De opslagtemperatuur moet tussen 10 °C en 20 °C
liggen.
• Wij raden u aan het apparaat in de originele verpakking
te bewaren als u het langere tijd niet zult gebruiken.
• Levensduur van de accu: Zelfs wanneer het apparaat
is uitgeschakeld, zal de accu voortdurend ontladen. Als
het apparaat niet in gebruik is gedurende een langere
periode, laad de accu dan minstens één keer elke 4 tot
6 weken op.
Oplossen van storingen
Probleem Mogelijke oorzaak Oplossing
Het apparaat is zonder functie. De accu is leeg. Laad de accu op.
De accu is defect. Neem contact op met onze service of uw dealer.
Tijdens de werking knippert de LED op de
schakelaar gedurende ca. 30 seconden.
Daarna schakelt het apparaat uit.
De accu is leeg. Laad de accu op.
Zwakke zuigkracht. De accu is bijna leeg. Laad de accu op.
Het stofreservoir is vol. Leeg het stofreservoir.
De lters zijn vuil. Reinig de lters zoals beschreven onder
“ Onderhoud”.
LET OP:
Alleen met droge lters het gebruik hervatten!
De accu houdt de lading niet vast. De accu heeft het einde
van zijn levensduur bereikt.
Neem contact op met onze service of uw dealer.
Technische gegevens
Model:...............................................................PC-AKS 3102
Nettogewicht (draagbaar apparaat,
laadstation, voedingseenheid): ........................... ong. 0,83 kg
Beschermingsklasse (apparaat): ........................................
Beschermingsklasse (voedingseenheid): ............................
Accu: .............................................3 × 3,7 V, 2000 mAh Li-Ion
Bedrijfstijd: ............................................maximaal 30 minuten
Oplaadtijd: ........................................................... ong. 4,5 uur
Het recht om technische en ontwerpaanpassingen te ma-
ken in de loop van voortdurende productontwikkeling blijft
voorbehouden.
Dit apparaat is getest volgens alle van toepassing zijnde,
huidige CE-richtlijnen en gebouwd volgens de meest
recente veiligheidsvoorschriften.
Productspecicaties in
overeenstemming met de verordening
(EU) 2019 / 1782 voedingen
Informatie over
de gebruikte voeding Waarde
Eenheid
Clatronic International GmbH
Commercieel registernummer
HRB 9158
Industriering Ost 40,
47906 Kempen
Duitsland
Model identicatie SEU007A-140050
Ingangsspanning 100 – 240 V~
Ingang wisselstroomfrequentie 5 0 – 6 0 Hz
Uitgangsspanning AC / DC 14,0 V DC
Uitgangsstroom 0,5 A
Uitgangsvermogen 7,0 W
Gemiddelde efciëntie bij gebruik 79,9 %
Efciëntie bij lage belasting (10 %)
* %
Verbruik zonder belasting 0,06 W
* niet van toepassing door een uitgangsvermogen van
minder dan 10 W.

PC-AKS3102_IM 29.12.21
18
De relevante belastingsomstandigheden zijn als volgt:
Percentage van naamplaatje uitgangsstroom
Situatie met belasting 1 100 % ± 2 %
Situatie met belasting 2 75 % ± 2 %
Situatie met belasting 3 50 % ± 2 %
Situatie met belasting 4 25 % ± 2 %
Situatie met belasting 5 10 % ± 1 %
Situatie met belasting 6
0 %
(situatie zonder
belasting)
Verwijdering
Verwijdering van batterijen / accu’s
Het apparaat bevat een oplaadbare batterij. Ge-
bruikte batterijen / accu’s (oplaadbare batterijen)
horen niet bij het huisvuil.
De oplaadbare batterij moet worden verwijderd
voordat het product wordt weggegooid. Neem
hiervoor contact op met gekwaliceerd perso-
neel.
Informatie over waar u batterijen / accu’s kunt weggooien,
kunt u krijgen bij uw gemeente of de gemeentelijke
diensten. Uw dealer en contractpartner is ook verplicht de
batterijen / accu’s gratis terug te nemen.
Betekenis van het symbool “vuilnisemmer”
Bescherm ons milieu, elektrische apparaten ho-
ren niet in het huisafval.
Maak voor het afvoeren van elektrische appara-
ten gebruik van de voorgeschreven verzamel-
punten en geef daar de elektrische apparaten af
die u niet meer gebruikt.
Daardoor helpt u de potentiële effecten te voorkomen
die een verkeerde afvoer op het milieu en de menselijke
gezondheid kunnen hebben.
Op deze wijze levert u uw bijdrage aan het hergebruik, de
recycling en andere verwerkingsvormen voor oude elektro-
nische en elektrische apparaten.
Voor informatie over verzamelpunten voor uw apparaten
kunt u contact opnemen met uw gemeente of gemeen-
teadministratie. Uw dealer en contractpartner is bovendien
verplicht het oude apparaat gratis terug te nemen.

PC-AKS3102_IM 29.12.21
19
IMPORTANT :
Veillez à lire d’abord les instructions de sécurité jointes séparé-
ment.
Mode d’emploi
Merci d’avoir choisi notre produit. Nous espérons que vous
saurez proter votre appareil.
Lisez très attentivement le mode d’emploi et les consignes
de sécurité jointes séparément avant d’utiliser cet appareil.
Conservez ces documents, y compris le certicat de garan-
tie, le reçu et, si possible, la boîte avec l’emballage intérieur
dans un endroit sûr. Si vous transmettez l’appareil à un
tiers, joignez toujours tous les documents pertinents.
Symboles de ce mode d’emploi
Les informations importantes pour votre sécurité sont
particulièrement indiquées. Veillez à bien respecter ces
indications an d’éviter tout risque d’accident ou d’endom-
magement de l’appareil :
AVERTISSEMENT :
Prévient des risques pour votre santé et des risques
éventuels de blessure.
ATTENTION :
Indique les risques pour l’appareil ou tout autre appareil.
Sommaire
Liste des différents éléments de commande ........................3
Déballage de l’appareil .......................................................19
Liste des différents éléments de commande /
Contenu de la livraison .......................................................19
Instructions importantes pour l’utilisation
de l’appareil et pour le montage du support mural ............. 19
Notes d’utilisation ................................................................ 20
Fixer la station de charge au mur .......................................20
Chargement de l’accu ......................................................... 20
Utilisation de l’appareil ........................................................ 20
Entretien .............................................................................. 21
Nettoyage ............................................................................ 21
Rangement..........................................................................22
Dépannage..........................................................................22
Données techniques ...........................................................22
Caractéristiques techniques du produit dans
le respect de la réglementation (EU) 2019 / 1782
sur les alimentations électriques.........................................22
Élimination ...........................................................................23
Déballage de l’appareil
1. Retirez l’appareil de son emballage.
2. Retirez la totalité du matériau d’emballage, tel que les
lms, le rembourrage, les supports de câble et le carton.
3. Vériez l’intégralité du contenu de livraison.
4. Si des éléments sont manquants ou endommagés,
n’utilisez pas l’appareil. Renvoyez-le immédiatement au
vendeur.
5. Retirez le verrou de transport de l’interrupteur marche /
arrêt.
Liste des différents éléments de
commande / Contenu de la livraison
1 interrupteur marche/arrêt avec DEL multifonction
2 Poignée
3 Bouton PUSH pour déverrouiller le récipient à poussière
4 Récipient à poussière
5 Ouverture / verrouillage du rabat
6 Volet d’ouverture
7 Connecteur pour les accessoires
8 Prise de raccordement pour le bloc d’alimentation
9 Support multifonctionnel en 2 parties (support mural /
station de charge et porte-accessoires)
10 Filtre HEPA avec joint d’étanchéité
11 Filtre grossier
12 Suceur plat, long
13 Suceur plat, longueur moyenne
14 Suceur plat, court
15 Brosse
Sans illustration
1 × Bloc alimentation électrique
2 × Cheville
2 × Vis
Instructions importantes pour
l’utilisation de l’appareil et pour
le montage du support mural
Lisez les instructions !
Utilisez uniquement le bloc d’alimentation
« SEU007A-140050 » ! Pour charger les batteries
rechargeables, utilisez uniquement l’alimentation
amovible livrée avec cet appareil.

PC-AKS3102_IM 29.12.21
20
ATTENTION :
• Placez le support multifonction de manière à ce que
l’appareil ne soit pas exposé à la lumière directe du
soleil ou à d’autres sources de chaleur.
• Ne chargez pas la batterie sans surveillance.
• Débranchez toujours la che secteur de la prise après
la charge.
• N’aspirez pas de matières inammables ou liquides !
• Ne jamais aspirer sans unité de ltration.
AVERTISSEMENT :
Lors du montage du support mural
Assurez-vous au préalable qu’il n’y a pas de câbles
cachés dans le mur qui pourraient vous blesser !
Notes d’utilisation
• L’appareil convient parfaitement pour aspirer rapidement
de petites quantités de saleté sèche ou de poussière.
• Les ltres sales réduisent la puissance d’aspiration
de l’aspirateur, nous recommandons donc de nettoyer
régulièrement les ltres à poussière existants.
• L’appareil fonctionne avec une batterie chargée. La
charge s’effectue par le biais du bloc d’alimentation
fourni, qui est raccordé à la station de charge. Il n’est pas
possible d’utiliser l’appareil directement sur le secteur
avec le bloc d’alimentation électrique.
Accessoires de buse
• Les différents embouts de buse sont faciles à xer et à
détacher.
• Fixez l’accessoire brosse à un suceur plat.
Support multifonctionnel en 2 parties
• Si vous souhaitez installer le support multifonction,
connectez la station de charge et le porte-accessoires
l’un à l’autre au niveau de la prise.
• Vous pouvez y placer l’appareil et les accessoires.
• Si vous raccordez le bloc d’alimentation électrique à
la prise de raccordement, le support multifonction sert
également de station de charge.
• Si vous préférez utiliser la station de charge comme
support mural, déconnectez-la à nouveau du support
d’accessoires.
Fixer la station de charge au mur
Installez la station de charge à proximité d’une prise de
courant.
1. Mesurez la distance entre les deux trous oblongs
du support et percez deux trous dans le mur à cette
distance.
2. Insérez les chevilles dans le mur.
3. Tournez les vis dans les chevilles avec un tournevis de
manière à ce qu’elles dépassent d’environ 3 à 4 mm.
4. Accrochez le support mural aux vis.
Chargement de l’accu
1. Éteignez l’appareil.
2. Placez l’appareil dans la station de charge.
3. Branchez le bloc d’alimentation électrique sur la prise de
raccordement (8).
4. Branchez l’alimentation électrique sur une prise de cou-
rant homologuée. Chargez l’appareil pendant 4,5 heures
avant de l’utiliser pour la première fois.
- Pendant le processus de charge, la DEL de l’interrup-
teur clignote en rouge.
- Lorsque l’accu est entièrement chargée, la DEL de
l’interrupteur s’allume en bleu en continu.
- Le voyant s’éteint lorsque vous débranchez la che
secteur de la prise ou lorsque vous retirez l’appareil
de la station de charge.
- Il est normal que l’appareil chauffe pendant la charge.
5. Arrêtez toute nouvelle charge après 4,5 heures au plus
tard ou lorsque la DEL s’allume en bleu xe.
ATTENTION :
Débranchez toujours la che secteur de la prise après
la charge.
Utilisation de l’appareil
Interrupteur marche / arrêt avec DEL multifonctions
Interrupteur Fonction DEL Signication
Appuyer 1 ×
brièvement
Allumer
l’appareil
S’allume
en vert
Niveau de
puissance 1
Appuyer et
maintenir plus
longtemps
S’allume
en bleu
Niveau de
puissance 2
Appuyer 1 ×
brièvement
Éteindre
l’appareil
Est
éteint
Pendant le fonctionnement, la LED de l‘interrupteur clignote
pendant environ 30 secondes lorsque la capacité de l‘accu
est épuisée. L‘appareil s‘éteint alors. Rechargez l‘accu.
Fonctionnement
1. Retirez l’appareil de la station de charge.
2. Fixez un suceur. Vous pouvez également xer la brosse
à l’un des deux suceurs (12 / 13).
3. Mettez l’appareil en marche à l’aide de l’interrupteur.
4. Si vous souhaitez aspirer à la puissance supérieure,
maintenez l’interrupteur enfoncé pendant environ 3 se-
condes pendant le fonctionnement.
5. Respectez le marquage MAX sur le réservoir à pous-
sière. La capacité maximale est de 100 ml.

PC-AKS3102_IM 29.12.21
21
Fin de l’opération
1. Éteignez l’appareil.
2. Videz le réservoir à poussière. Nettoyez le ltre après
chaque utilisation pour que l’appareil retrouve toutes ses
performances lors de la prochaine utilisation.
3. Placez ensuite l’appareil dans la station de charge.
Entretien
Vidage du réservoir à poussière
1. Si nécessaire, détachez le suceur plat de l’appareil.
2. Tenez l’appareil avec le volet d’ouverture au-dessus
d’une poubelle.
3. Videz le contenu du bac à poussière. Pour ce faire,
appuyez sur le verrou (5) du bac à poussière pour ouvrir
le volet.
4. Refermez le clapet. Le mécanisme de verrouillage du
bac à poussière doit s’enclencher.
Le système de ltration
Le système de ltrage est situé dans le conteneur à pous-
sière et se compose de :
• Un ltre HEPA avec bague d’étanchéité
• Un ltre grossier
Pour nettoyer le système de ltration, procédez comme
suit :
1. Videz le récipient à poussière comme décrit précédem-
ment.
2. Démontage du système de ltration
2.1 Saisissez l’appareil d’une main de manière à pou-
voir appuyer sur le bouton PUSH avec votre pouce.
De l’autre main, tirez en même temps le récipient
à poussière vers le haut. Vous pouvez également
poser l’appareil sur une surface stable.
2.2 Retirez le système de ltration. Retirez le ltre
HEPA du ltre grossier.
3. Nettoyage des ltres
3.1 Tenez les deux ltres au-dessus d’une poubelle
et retirez la poussière en tapotant. Vous pouvez
également brosser le ltre HEPA. En cas de taches
importantes, nettoyez les ltres sous l’eau courante.
3.2 Laissez les ltres sécher complètement à l’air libre
avant de les remettre en place !
3.3 Essuyez le récipient à poussière avec un chiffon
humide, puis essuyez-le à sec.
4. Montage du système de ltration
4.1 Remettez le ltre HEPA dans le ltre grossier.
Enfoncez fermement le ltre HEPA avec la bague
d’étanchéité dans le ltre grossier jusqu’à la butée.
4.2 Placez le système de ltration complètement as-
semblé dans le conteneur à poussière.
4.3 Fixez à nouveau le conteneur à poussière sur l’unité
portative. Placez d’abord le conteneur à poussière
avec les loquets dans les évidements situés au fond
du boîtier. Appuyez le conteneur à poussière contre
le boîtier. Il doit s’enclencher de manière audible.
Nettoyage
AVERTISSEMENT :
Ne plongez jamais le boîtier du moteur dans l’eau pour le net-
toyer. Cela pourrait provoquer un choc électrique ou un incendie.
ATTENTION :
• N’utilisez pas de brosse métallique ou d’autres objets
abrasifs.
• N’utilisez pas de produits de nettoyage tranchants ou
abrasifs.
• Les différents composants ne sont pas adaptés au
nettoyage dans le lave-vaisselle.
• Le boîtier de l’appareil et les accessoires peuvent être
essuyés avec un chiffon légèrement humide.
• Vous pouvez essuyer le bloc d’alimentation électrique
avec un chiffon sec.

PC-AKS3102_IM 29.12.21
22
Récipient à poussière avec système de ltration
Pour le nettoyage de ces composants, veuillez vous repor-
ter au chapitre « Entretien ».
Rangement
• Nettoyez l’appareil comme indiqué et laissez-le sécher
complètement.
• Conservez toujours l’appareil hors de portée des en-
fants, dans un endroit sec et bien ventilé.
• La température de stockage doit être comprise entre
10 °C et 20 °C.
• Nous vous recommandons de conserver l’appareil dans
son emballage d’origine si vous n’avez pas l’intention de
l’utiliser pendant une longue période.
• Durée de vie de l’accu : Même lorsqu’elle est éteinte,
l’accu se décharge continuellement. Si l’appareil n’est
pas utilisé pendant une longue période, rechargez l’accu
au moins une fois toutes les 4 à 6 semaines.
Dépannage
Problème Cause possible Remède
L’appareil est sans fonction. L’accu est vide. Chargez l’accu.
L’accu est défectueuse. Contactez notre service ou votre revendeur.
Pendant le fonctionnement, la LED de
l’interrupteur clignote pendant environ
30 secondes. Ensuite, l’appareil s’éteint.
L’accu est vide. Chargez l’accu.
Faible puissance d’aspiration. L’accu est presque vide. Chargez l’accu.
Le bac à poussière est plein. Videz le bac à poussière.
Les ltres sont sales. Nettoyez les ltres comme indiqué dans la
rubrique « Entretien ».
ATTENTION :
Ne reprenez le fonctionnement qu’avec des
ltres secs !
L’accu ne tient pas la charge. L’accu a atteint la n de sa
durée de vie.
Contactez notre service ou votre revendeur.
Données techniques
Modèle : ...........................................................PC-AKS 3102
Poids net (unité portative,
station de charge, alimentation électrique) : ........ env. 0,83 kg
Classe de protection (appareil) : .........................................
Classe de protection (alimentation électrique) : ..................
Accumulateur : .............................3 × 3,7 V, 2000 mAh Li-Ion
Durée de fonctionnement : ..................30 minutes maximum
Temps de charge : .........................................env. 4,5 heures
Nous nous réservons le droit d’apporter des modications
techniques ainsi que des modications de conception dans
le cadre du développement continu de nos produits.
Cet appareil a été testé conformément à toutes les direc-
tives CE applicables et actuelles et a été construit selon les
dernières réglementations en matière de sécurité.
Caractéristiques techniques du produit
dans le respect de la réglementation (EU)
2019 / 1782 sur les alimentations électriques
Informations concernant
l’alimentation électrique utilisée Valeur Unité
Clatronic International GmbH
Numéro de registre commercial
HRB 9158
Industriering Ost 40,
47906 Kempen
Allemagne
Identiant de modèle SEU007A-140050
Tension en entrée 100 – 240 V~
Fréquence du courant alternatif en
entrée 5 0 – 6 0 Hz
Tension en sortie CA / CC 14,0 V CC
Courant en sortie 0,5 A
Puissance en sortie 7,0 W

PC-AKS3102_IM 29.12.21
23
Informations concernant
l’alimentation électrique utilisée Valeur Unité
Efcacité moyenne en opération 79,9 %
Efcacité en basse charge (10 %)
* %
Consommation électrique sans
charge 0,06 W
* non applicable à une puissance en sortie inférieure à
10 W.
Les conditions de charge associées sont les suivantes :
Pourcentage du courant en sortie indiqué sur la plaque
signalétique
Condition de charge 1 100 % ± 2 %
Condition de charge 2 75 % ± 2 %
Condition de charge 3 50 % ± 2 %
Condition de charge 4 25 % ± 2 %
Condition de charge 5 10 % ± 1 %
Condition de charge 6
0 %
(condition sans
charge)
Élimination
Mise au rebut de l’accumulateur / de la batterie
L’appareil contient une batterie rechargeable.
Les piles / accumulateurs usagés (batteries
rechargeables) ne doivent pas être jetés dans
les ordures ménagères.
L’accu doit être retirée avant de mettre le produit au rebut.
Contactez un personnel qualié pour cela.
Vous pouvez obtenir des informations sur les lieux d’élimi-
nation des piles / accumulateurs auprès de vos autorités
locales ou des administrations municipales. Votre revendeur
et partenaire contractuel est également tenu de reprendre
gratuitement les piles / accumulateurs.
Signication du symbole « Poubelle »
Protégez votre environnement, ne jetez pas vos
appareils électriques avec les ordures ména-
gères.
Utilisez, pour l’élimination de vos appareils
électriques, les bornes de collecte prévues à
cet effet où vous pouvez vous débarrasser des
appareils que vous n’utilisez plus.
Vous contribuez ainsi à éviter les impacts potentiels dans
l’environnement et sur la santé de chacun, causés par une
mauvaise élimination de ces déchets.
Vous contribuez aussi au recyclage sous toutes ses formes
des appareils électriques et électroniques usagés.
Vous trouverez toutes les informations sur les bornes
d’élimination des appareils auprès de votre commune ou
de l’administration de votre communauté. Votre revendeur
et partenaire contractuel est également tenu de reprendre
gratuitement l’ancien appareil.

PC-AKS3102_IM 29.12.21
24
IMPORTANTE:
Asegúrese de leer primero las instrucciones de seguridad adjun-
tas por separado.
Manual de instrucciones
Le agradecemos la conanza depositada en este producto
y esperamos que disfrute de su uso.
Lea atentamente el manual de instrucciones y las instruc-
ciones de seguridad adjuntas por separado antes de utilizar
este aparato. Guarde estos documentos, incluyendo el
certicado de garantía, el recibo y, si es posible, la caja
con el embalaje interior en un lugar seguro. Si entrega el
aparato a un tercero, incluya siempre todos los documentos
pertinentes.
Símbolos en este manual de instrucciones
Advertencias importantes para su seguridad están seña-
ladas en especial. Siga estas advertencias incondicional-
mente, para evitar accidentes y daños en el aparato:
AVISO:
Advierte ante los peligros para su salud y demuestra
posibles riesgos de herida.
ATENCIÓN:
Indica los posibles riesgos para el aparato u otros
objetos.
Índice
Indicación de los elementos de manejo ...............................3
Desembalado del aparato...................................................24
Indicación de los elementos de manejo /
Contenido en la entrega .....................................................24
Instrucciones importantes para el uso
del aparato y para el montaje del soporte de pared ...........24
Notas de uso ....................................................................... 25
Fijar la estación de carga a la pared ..................................25
Carga de la batería recargable ........................................... 25
Uso del aparato ...................................................................25
Mantenimiento ....................................................................26
Limpieza .............................................................................. 26
Almacenamiento .................................................................27
Solución de problemas .......................................................27
Datos técnicos.....................................................................27
Especicaciones del producto de acuerdo
con la normativa (UE) 2019 / 1782 fuentes
de alimentación ................................................................... 27
Eliminación .......................................................................... 28
Desembalado del aparato
1. Saque el aparato del embalaje.
2. Quite todos los materiales de embalaje como películas de
plástico, protecciones, sujeciones de cables, y cartones.
3. Compruebe que están todas las piezas.
4. Si el contenido del embalaje está incompleto u observa
daños, no use el aparato. Devuélvalo de inmediato al
vendedor.
5. Retire el bloqueo de transporte del interruptor de encen-
dido / apagado.
Indicación de los elementos de manejo /
Contenido en la entrega
1 interruptor de encendido / apagado con LED multi-
función
2 Mango
3 Botón PUSH para desbloquear el contenedor de polvo
4 Contenedor de polvo
5 Apertura / bloqueo de la tapa
6 Apertura de la tapa
7 Conector para los accesorios
8 Toma de conexión para la fuente de alimentación
9 Soporte multifunción de 2 piezas (soporte de pared /
estación de carga y soporte de accesorios)
10 Filtro HEPA con anillo de sellado
11 Filtro grueso
12 Boquilla para hendiduras, larga
13 Boquilla para hendiduras, longitud media
14 Boquilla para hendiduras, corta
15 Accesorio de cepillo
Sin ilustración
1 × Fuente de alimentación
2 × Taco
2 × Tornillo
Instrucciones importantes para
el uso del aparato y para
el montaje del soporte de pared
¡Lea estas instrucciones!
¡Usar exclusivamente con la unidad de alimenta-
ción “SEU007A-140050”! Para cargar las baterías
recargables, use exclusivamente la alimentación
extraíble que acompaña a este aparato.

PC-AKS3102_IM 29.12.21
25
ATENCIÓN:
• Coloque el soporte multifunción de forma que el apa-
rato no esté expuesto a la luz solar directa ni a otras
fuentes de calor.
• No cargue la batería sin vigilancia.
• Desconecte siempre el enchufe de la toma de co-
rriente después de la carga.
• No aspire nada inamable o líquido.
• No aspire nunca sin una unidad de ltro.
AVISO: Al montar el soporte de pared
¡Asegúrese de antemano de que no hay cables ocultos
en la pared que puedan dañarle!
Notas de uso
• El aparato es muy adecuado para aspirar rápidamente
pequeñas cantidades de suciedad seca o polvo.
• Los ltros sucios reducen la potencia de succión de la
aspiradora, por lo que se recomienda la limpieza perió-
dica de los ltros de suciedad existentes.
• El aparato funciona con la batería cargada. La carga
se realiza a través de la fuente de alimentación sumi-
nistrada, que se conecta a la estación de carga. No es
posible el funcionamiento directo en la red con la unidad
de alimentación.
Accesorios de boquilla
• Los distintos accesorios de boquilla son fáciles de
colocar y quitar.
• Coloque el accesorio de cepillo en una boquilla para
hendiduras.
Soporte multifunción de 2 piezas
• Si quiere montar el soporte multifunción, conecte la
estación de carga y el soporte de accesorios entre sí en
la conexión de enchufe.
• Puede colocar el aparato y los accesorios en él.
• Si conecta la fuente de alimentación a la toma de
conexión, el soporte multifunción también sirve como
estación de carga.
• Si preere utilizar la estación de carga como soporte
de pared, desconéctela de nuevo del soporte de acce-
sorios.
Fijar la estación de carga a la pared
Monte la estación de carga cerca de una toma de corriente.
1. Mida la distancia entre los dos oricios ranurados del so-
porte y perfore dos oricios en la pared a esta distancia.
2. Inserte los tacos en la pared.
3. Gire los tornillos en los tacos con un destornillador para
que sobresalgan unos 3 – 4 mm.
4. Cuelgue el soporte de pared en los tornillos.
Carga de la batería recargable
1. Apague el aparato.
2. Coloque el aparato en la estación de carga.
3. Conecte la fuente de alimentación a la toma de co-
rriente (8).
4. Conecte la fuente de alimentación a una toma de co-
rriente homologada. Cargue el aparato durante 4,5 horas
antes de utilizarlo por primera vez.
- Durante el proceso de carga, el LED del interruptor
parpadea en rojo.
- Cuando la batería está completamente cargada,
el LED del interruptor se ilumina en azul de forma
continua.
- El LED se apaga cuando se desconecta el enchufe de
la toma de corriente o cuando se retira el aparato de
la estación de carga.
- Es normal que el aparato se caliente durante la carga.
5. Detenga toda carga adicional después de 4,5 horas
como máximo o cuando el LED se ilumine en azul jo.
ATENCIÓN:
Desconecte siempre el enchufe de la toma de corriente
después de la carga.
Uso del aparato
Interruptor de encendido / apagado con LED multifunción
Interruptor Función LED Signicado
Pulse 1 ×
brevemente
Encender
el aparato
Luces
verdes
Nivel de
potencia 1
Mantenga
pulsado durante
más tiempo
Se ilumina
en azul
Nivel de
potencia 2
Pulse 1 ×
brevemente
Apagar el
aparato
Está
apagado
El LED del interruptor parpadea durante unos 30 segundos
durante el funcionamiento cuando se alcanza el nal de
la capacidad de la batería recargable. A continuación, el
aparato se apaga. Recargue la batería recargable.
Funcionamiento
1. Retire el aparato de la estación de carga.
2. Coloque una boquilla. También puede acoplar el acceso-
rio de cepillo a una de las dos boquillas para hendiduras
(12 / 13).
3. Encienda el aparato con el interruptor.
4. Si desea aspirar con el nivel de potencia más alto, man-
tenga el interruptor pulsado durante unos 3 segundos
durante el funcionamiento.
5. Observe la marca MAX en el depósito de polvo. La
capacidad máxima es de 100 ml.

PC-AKS3102_IM 29.12.21
26
Fin de la operación
1. Apague el aparato.
2. Vacíe el contenedor de polvo. Limpie la unidad de
ltrado después de cada uso para que el aparato vuelva
a funcionar a pleno rendimiento la próxima vez que lo
utilice.
3. A continuación, coloque el aparato en la estación de
carga.
Mantenimiento
Vaciado del depósito de polvo
1. Si es necesario, desmonte la boquilla para hendiduras
del aparato.
2. Sostenga el aparato con la tapa de apertura sobre un
contenedor de polvo.
3. Vacíe el contenido del contenedor de polvo. Para ello,
presione el cierre (5) del contenedor de polvo para abrir
la tapa.
4. Vuelva a cerrar la tapa. El mecanismo de bloqueo del
contenedor de polvo debe encajar.
El sistema de ltrado
El sistema de ltrado se encuentra en el contenedor de
polvo y consta de:
• Filtro HEPA con anillo de sellado
• Filtro grueso
Para limpiar el sistema de ltrado, proceda como sigue:
1. Vacíe el contenedor de polvo como se ha descrito
anteriormente.
2. Desmontaje del sistema de ltrado
2.1 Agarre el aparato con una mano para poder pulsar
el botón PUSH con el pulgar. Con la otra mano,
tire del contenedor de polvo hacia arriba al mismo
tiempo. También puede colocar el aparato sobre
una supercie estable.
2.2 Retire el sistema de ltrado. Saque el ltro HEPA
del ltro grueso.
3. Limpieza de los ltros
3.1 Sostenga ambos ltros sobre un cubo de basura
y extraiga el polvo a golpecitos. También puede
cepillar el ltro HEPA. En caso de que se manche
mucho, limpie los ltros bajo el grifo.
3.2 Deje que los ltros se sequen completamente al
aire antes de volver a colocarlos.
3.3 Limpie el contenedor de polvo con un paño húmedo
y luego séquelo.
4. Montaje del sistema de ltrado
4.1 Vuelva a colocar el ltro HEPA en el ltro grueso.
Presione el ltro HEPA con el anillo de sellado
rmemente en el ltro grueso hasta el tope.
4.2 Coloque el sistema de ltrado completamente
montado en el contenedor de polvo.
4.3 Vuelva a colocar el contenedor de polvo en el
aparato manual. Coloque primero el contenedor
de polvo con los cierres en los huecos de la parte
inferior de la carcasa. Presione el depósito de polvo
contra la carcasa. Debe encajar de forma audible.
Limpieza
AVISO:
Nunca sumerja la carcasa del motor en agua para su limpieza.
Podría provocar una descarga eléctrica o un incendio.
ATENCIÓN:
• No utilice un cepillo de alambre u otros objetos
abrasivos.
• No utilice productos de limpieza alados o abrasivos.
• Los componentes individuales no son adecuados para
su limpieza en el lavavajillas.
• La carcasa del aparato y los accesorios pueden lim-
piarse con un paño ligeramente húmedo.
• La fuente de alimentación puede limpiarse con un paño
seco.

PC-AKS3102_IM 29.12.21
27
Contenedor de polvo con sistema de ltro
Para la limpieza de estos componentes, consulte el capítulo
“Mantenimiento”.
Almacenamiento
• Limpie el aparato como se describe y déjelo secar
completamente.
• Guarde siempre el aparato fuera del alcance de los
niños en un lugar bien ventilado y seco.
• La temperatura de almacenamiento debe estar entre
10 °C y 20 °C.
• Le recomendamos que guarde el aparato en su emba-
laje original si no tiene intención de utilizarlo durante un
largo periodo de tiempo.
• Duración de la batería recargable: La batería recar-
gable se descarga continuamente, incluso cuando está
apagada. Si el aparato no se utiliza durante un período
prolongado, cargue la batería recargable al menos una
vez cada 4 ó 6 semanas.
Solución de problemas
Problema Posible causa Remedio
El aparato no funciona. La batería recargable está vacía. Cargue la batería recargable.
La batería recargable está defectuosa. Póngase en contacto con nuestro servicio
técnico o con su distribuidor.
Durante el funcionamiento, el LED
del interruptor parpadea durante
unos 30 segundos. A continuación,
el aparato se apaga.
La batería recargable está vacía. Cargue la batería recargable.
La potencia de succión es débil. La batería recargable está casi vacía. Cargue la batería recargable.
El contenedor de polvo está lleno. Vacíe el contenedor de polvo.
Los ltros están sucios. Limpie los ltros como se describe en el
apartado “Mantenimiento”.
ATENCIÓN:
Reanude el funcionamiento sólo con los
ltros secos.
La batería recargable no mantiene
la carga.
La batería recargable ha llegado al
nal de su vida útil.
Póngase en contacto con nuestro servicio
técnico o con su distribuidor.
Datos técnicos
Modelo .............................................................PC-AKS 3102
Peso neto (unidad de mano,
estación de carga, fuente de alimentación): .... aprox. 0,83 kg
Clase de protección (aparato): ...........................................
Clase de protección (fuente de alimentación): ....................
Batería recargable: ......................3 × 3,7 V, 2000 mAh Li-Ion
Tiempo de funcionamiento: .......... 30 minutos como máximo
Tiempo de carga: ..........................................aprox. 4,5 horas
El derecho de realizar modicaciones técnicas y de diseño
en el curso del desarrollo continuo del producto esta
reservado.
Este aparato ha sido probado de acuerdo con todas las
directivas CE vigentes y construido de acuerdo con las
últimas normas de seguridad.
Especicaciones del producto
de acuerdo con la normativa
(UE) 2019 / 1782 fuentes de alimentación
Información sobre la fuente de
alimentación usada Valor Unidad
Clatronic International GmbH
Número de registro comercial
HRB 9158
Industriering Ost 40,
47906 Kempen
Alemania
Identicador del modelo SEU007A-140050
Tensión de entrada 100 – 240 V~
Frecuencia de corriente alterna de
entrada 5 0 – 6 0 Hz
Tensión de salida CA / CC 14,0 V CC
Corriente de salida 0,5 A

PC-AKS3102_IM 29.12.21
28
Información sobre la fuente de
alimentación usada Valor Unidad
Potencia de salida 7,0 W
Eciencia media en funciona-
miento 79,9 %
Eciencia con carga baja (10 %)
* %
Consumo de energía sin carga 0,06 W
* no aplicable debido a una potencia de salida inferior a
10 W.
Las condiciones de carga aplicables son las siguientes:
Porcentaje de corriente de salida de la placa identicadora
Condición de carga 1 100 % ± 2 %
Condición de carga 2 75 % ± 2 %
Condición de carga 3 50 % ± 2 %
Condición de carga 4 25 % ± 2 %
Condición de carga 5 10 % ± 1 %
Condición de carga 6
0 %
(condición sin
carga)
Eliminación
Acumulador / Eliminación de la batería
El aparato contiene una batería recargable. Las
pilas / acumuladores usados (baterías recarga-
bles) no pertenecen a la basura doméstica.
La batería recargable debe retirarse antes de
desechar el producto. Póngase en contacto con
personal cualicado para ello.
Puede obtener información sobre dónde eliminar las pilas /
acumuladores en las autoridades locales o en las adminis-
traciones municipales. Su distribuidor y socio contractual
también está obligado a recuperar las pilas / acumuladores
sin coste alguno.
Signicado del símbolo “Cubo de basura”
Proteja nuestro medio ambiente, aparatos eléc-
tricos no forman parte de la basura doméstica.
Haga uso de los centros de recogida previstos
para la eliminación de aparatos eléctricos y
entregue allí sus aparatos eléctricos que no
vaya a utilizar más.
Ayudará en evitar las potenciales consecuencias, a causa
de una errónea eliminación de desechos, para el medio
ambiente y la salud humana.
Con ello, contribuirá a la recuperación, al reciclado y a otras
formas de reutilización de los aparatos viejos eléctricos y
electrónicos.
La información cómo se debe eliminar los aparatos, se
obtiene en su ayuntamiento o su administración municipal.
Su distribuidor y socio contractual también está obligado a
recuperar el aparato antiguo sin coste alguno.

PC-AKS3102_IM 29.12.21
29
IMPORTANTE:
Assicuratevi di leggere prima le istruzioni di sicurezza allegate
separatamente.
Istruzioni per l’uso
Grazie per aver scelto il nostro prodotto. Vi auguriamo un
buon utilizzo del dispositivo.
Prima di utilizzare l’apparecchio, leggere attentamente
le istruzioni per l’uso e le istruzioni di sicurezza allegate
separatamente. Conservare questi documenti, compreso il
certificato di garanzia, la ricevuta e, se possibile, la scatola
con l’imballaggio interno in un luogo sicuro. Se si cede
l’apparecchio a terzi, includere sempre tutti i documenti
pertinenti.
Simboli per questo manuale di istruzioni per l’uso
Le indicazioni importanti per la propria sicurezza sono
indicati appropriatamente. Osservare assolutamente queste
indicazioni, per evitare incidenti e danni all’apparecchio:
AVVISO:
Previene i rischi della propria salute ed indica possibili
rischi di ferite.
ATTENZIONE:
Indica possibili pericoli per l’apparecchio o altri oggetti.
Indice
Elementi di comando ............................................................3
Disimballaggio dell’apparecchio .........................................29
Elementi di comando / Nella fornitura..................................29
Istruzioni importanti per l’uso
dell’apparecchio e per il montaggio a parete ......................29
Note per l’uso ...................................................................... 30
Fissare la stazione di ricarica alla parete ...........................30
Caricare la batteria ricaricabile ...........................................30
Utilizzo dell’apparecchio .....................................................30
Manutenzione .....................................................................31
Pulizia .................................................................................. 31
Stoccaggio ..........................................................................32
Risoluzione dei problemi .....................................................32
Dati tecnici ...........................................................................32
Specifiche del prodotto in conformità con la
normativa adattatori di alimentazione (EU) 2019 / 1782 .....32
Smaltimento ........................................................................33
Disimballaggio dell’apparecchio
1. Rimuovere la macchina dalla confezione.
2. Rimuovere tutti i materiali di imballaggio come pellicole
di plastica, materiali di riempimento, fascetta serracavi
e cartone.
3. Controllare che il contenuto della confezione sia completo.
4. In caso di contenuti mancanti o danneggiati, non mettere
in funzione l’apparecchio. Riportarlo immediatamente al
rivenditore.
5. Rimuovere il blocco del trasporto dall’interruttore acceso /
spento.
Elementi di comando / Nella fornitura
1 interruttore acceso / spento con LED multifunzione
2 Maniglia
3 Tasto PUSH per sbloccare il contenitore della polvere
4 Contenitore della polvere
5 Apertura / bloccaggio dello sportello
6 Lembo di apertura
7 Connettore per gli accessori
8 Presa di collegamento per l’alimentatore
9 Supporto multifunzione in 2 pezzi (supporto a parete /
stazione di ricarica e supporto per accessori)
10 Filtro HEPA con anello di tenuta
11 Filtro grossolano
12 Bocchetta per fessure, lunga
13 Bocchetta per fessure, lunghezza media
14 Bocchetta per crepe, corta
15 Attacco a spazzola
Senza illustrazione
1 × Unità di alimentazione
2 × Tassello
2 × Vite
Istruzioni importanti per
l’uso dell’apparecchio e per
il montaggio a parete
Leggere le istruzioni!
Utilizzare solo con l’alimentatore
“SEU007A-140050”! Per ricaricare le batterie ricari-
cabili, utilizzare solo l’alimentatore rimovibile fornito
con questo apparecchio.

PC-AKS3102_IM 29.12.21
30
ATTENZIONE:
• Posizionare il supporto multifunzione in modo che
l’apparecchio non sia esposto alla luce diretta del sole
o ad altre fonti di calore.
• Non caricare la batteria incustodita.
• Staccare sempre la spina dalla presa di corrente dopo
la carica.
• Non aspirare nulla di infiammabile o liquido!
• Non aspirare mai senza unità filtro.
AVVISO: Quando si monta il supporto a muro
Assicurati prima che non ci siano cavi nascosti nel muro
che potrebbero danneggiarti!
Note per l’uso
• L’apparecchio è molto adatto per aspirare rapidamente
piccole quantità di sporco secco o polvere.
• I filtri sporchi riducono la potenza di aspirazione dell’aspi-
rapolvere, perciò si consiglia di pulire regolarmente i filtri
antisporco esistenti.
• L’apparecchio funziona tramite la batteria carica. La
ricarica avviene tramite l’alimentatore in dotazione, che
viene collegato alla stazione di ricarica. Non è possibile il
funzionamento diretto con l’alimentatore.
Attacchi dell’ugello
• Le varie bocchette sono facili da attaccare e staccare.
• Attacca l’attacco della spazzola a una bocchetta per
fessure.
Supporto multifunzione in 2 pezzi
• Se volete allestire il supporto multifunzione, collegate la
stazione di ricarica e il supporto per gli accessori l’uno
all’altro al collegamento della spina.
• Potete collocarvi l’apparecchio e gli accessori.
• Se si collega l’alimentatore alla presa di collegamento,
il supporto multifunzione serve anche come stazione di
ricarica.
• Se preferite usare la stazione di ricarica come supporto
a muro, scollegatela nuovamente dal supporto per
accessori.
Fissare la stazione di ricarica alla parete
Montare la stazione di ricarica vicino a una presa di
corrente.
1. Misurare la distanza tra i due fori asolati del supporto e
praticare due fori nel muro a questa distanza.
2. Inserire le tasselli nel muro.
3. Girare le viti nei tasselli con un cacciavite in modo che
sporgano di circa 3 – 4 mm.
4. Appendere il supporto da parete alle viti.
Caricare la batteria ricaricabile
1. Spegnere l’apparecchio.
2. Posizionare l’apparecchio nella stazione di ricarica.
3. Collegare l’alimentatore alla presa di collegamento (8).
4. Collegare l’alimentatore ad una presa di corrente
approvata. Caricare l’apparecchio per 4,5 ore prima di
utilizzarlo per la prima volta.
- Durante il processo di carica, il LED sull’interruttore
lampeggia in rosso.
- Quando la batteria è completamente carica, il LED
sull’interruttore si illumina continuamente di blu.
- Il LED si spegne quando si stacca la spina dalla
presa o quando si toglie l’apparecchio dalla stazione
di ricarica.
- È normale che l’apparecchio si riscaldi durante la
carica.
5. Interrompere ogni ulteriore ricarica al più tardi dopo
4,5 ore o quando il LED si illumina di blu fisso.
ATTENZIONE:
Staccare sempre la spina dalla presa di corrente dopo
la carica.
Utilizzo dell’apparecchio
Interruttore acceso / spento con LED multifunzione
Interruttore Funzione LED Significato
Premere 1 ×
brevemente
Accendere
l’apparecchio Luci verdi Livello di
potenza 1
Premere e
tenere premuto
più a lungo
Si illumina
di blu
Livello di
potenza 2
Premere 1 ×
brevemente
Spegnere
l’apparecchio È spento
Il LED sull’interruttore lampeggia per circa 30 secondi
durante il funzionamento quando viene raggiunta la fine
della capacità della batteria ricaricabile. Poi l’apparecchio si
spegne. Ricaricare la batteria ricaricabile.
Funzionamento
1. Rimuovere l’apparecchio dalla stazione di ricarica.
2. Attaccare un ugello. L’attacco per la spazzola può essere
collegato anche a uno dei due ugelli per fessure (12 / 13).
3. Accendere l’apparecchio con l’interruttore.
4. Se si desidera aspirare al livello di potenza superiore,
tenere premuto l’interruttore per circa 3 secondi durante
il funzionamento.
5. Osservare la scritta MAX sul contenitore della polvere.
La capacità massima è di 100 ml.

PC-AKS3102_IM 29.12.21
31
Fine del funzionamento
1. Spegnere l’apparecchio.
2. Svuotare il contenitore della polvere. Pulire l’unità filtro
dopo ogni utilizzo per ripristinare le prestazioni dell’appa-
recchio al successivo utilizzo.
3. Poi mettere l’apparecchio nella stazione di ricarica.
Manutenzione
Svuotare il contenitore della polvere
1. Se necessario, staccare l’ugello interstiziale dall’appa-
recchio.
2. Tenere l’apparecchio con lo sportello di apertura sopra
una pattumiera.
3. Svuotare il contenuto del contenitore della polvere. Per
fare questo, premere il blocco (5) sul contenitore della
polvere per aprire lo sportello.
4. Chiudere di nuovo lo sportello. Il meccanismo di bloccag-
gio del contenitore della polvere deve innestarsi.
Il sistema di filtraggio
Il sistema di filtraggio si trova nel contenitore della polvere
e consiste in:
• Filtro HEPA con anello di tenuta
• Filtro grossolano
Per pulire il sistema di filtraggio, procedere come segue:
1. Svuotare il contenitore della polvere come descritto in
precedenza.
2. Smontaggio del sistema di filtraggio
2.1 Afferrare l’apparecchio con una mano in modo da
poter premere il tasto PUSH con il pollice. Con l’al-
tra mano, tirare contemporaneamente il contenitore
della polvere verso l’alto. Si può anche appoggiare
l’apparecchio su una superficie stabile.
2.2 Rimuovere il sistema di filtraggio. Estrarre il filtro
HEPA dal filtro grosso.
3. Pulizia dei filtri
3.1 Tenere entrambi i filtri sopra una pattumiera e
battere la polvere. Potete anche spazzolare il filtro
HEPA. In caso di macchie pesanti, pulire i filtri sotto
l’acqua corrente.
3.2 Lasciare asciugare completamente i filtri all’aria
prima di rimontarli!
3.3 Pulire il contenitore della polvere con un panno
umido e poi asciugarlo.
4. Montaggio del sistema di filtraggio
4.1 Montaggio del sistema di filtraggio
4.1 Rimettere il filtro HEPA nel filtro grosso. Premere
il filtro HEPA con l’anello di tenuta saldamente nel
filtro a maglia grossa fino all’arresto.
4.2 Mettere il sistema di filtraggio completamente mon-
tato nel contenitore della polvere.
4.3 Riattaccare il contenitore della polvere all’unità por-
tatile. Posizionare prima il contenitore della polvere
con i fermi nelle rientranze sul fondo dell’alloggia-
mento. Premere il contenitore della polvere contro
l’alloggiamento. Deve scattare in posizione in modo
udibile.
Pulizia
AVVISO:
Non immergere mai l’alloggiamento del motore in acqua per la
pulizia. Potrebbe causare una scossa elettrica o un incendio.
ATTENZIONE:
• Non usare una spazzola metallica o altri oggetti
abrasivi.
• Non usare detergenti taglienti o abrasivi.
• I singoli componenti non sono adatti alla pulizia in
lavastoviglie.
• L’alloggiamento dell’apparecchio e gli accessori possono
essere puliti con un panno leggermente umido.
• L’alimentatore può essere pulito con un panno asciutto.

PC-AKS3102_IM 29.12.21
32
Contenitore della polvere con sistema di filtraggio
Per la pulizia di questi componenti, consultare il capitolo
“Manutenzione”.
Stoccaggio
• Pulire l’apparecchio come descritto e lasciarlo asciugare
completamente.
• Conservare sempre l’apparecchio fuori dalla portata dei
bambini in un luogo ben ventilato e asciutto.
• La temperatura di conservazione deve essere compresa
tra 10 °C e 20 °C.
• Si consiglia di conservare l’apparecchio nel suo imbal-
laggio originale se non si intende utilizzarlo per un lungo
periodo di tempo.
• Durata della batteria ricaricabile: Anche se spenta,
la batteria ricaricabile si scarica continuamente. Se
l’apparecchio non viene utilizzato per un lungo periodo di
tempo, caricare la batteria ricaricabile almeno una volta
ogni 4 – 6 settimane.
Risoluzione dei problemi
Problema Possibile causa Rimedio
L’apparecchio è senza funzione. La batteria ricaricabile è scarica. Caricare la batteria ricaricabile.
La batteria ricaricabile è difettosa. Contattate il nostro servizio o il vostro rivenditore.
Durante il funzionamento, il LED
sull’interruttore lampeggia per
circa 30 secondi. Dopo di che,
l’unità si spegne.
La batteria ricaricabile è scarica. Caricare la batteria ricaricabile.
Potenza di aspirazione debole. La batteria ricaricabile è quasi
scarica.
Caricare la batteria ricaricabile.
Il contenitore della polvere è
pieno.
Svuotare il contenitore della polvere.
I filtri sono sporchi. Pulire i filtri come descritto in “Manutenzione”.
ATTENZIONE:
Riprendere il funzionamento solo con i filtri asciutti!
La batteria ricaricabile non man-
tiene la carica.
La batteria ricaricabile ha rag-
giunto la fine della sua vita.
Contattate il nostro servizio o il vostro rivenditore.
Dati tecnici
Modello: ............................................................PC-AKS 3102
Peso netto (unità portatile,
stazione di ricarica, unità di alimentazione): ..........ca. 0,83 kg
Classe di protezione (apparecchio): ...................................
Classe di protezione (unità di alimentazione): .....................
Batteria ricaricabile: ....................3 × 3,7 V, 2000 mAh Li-Ion
Tempo di funzionamento: ......................30 minuti al massimo
Tempo di ricarica: ................................................... ca. 4,5 ore
Si riserva il diritto di apportare modiche tecniche e di
design nel corso dello sviluppo del prodotto.
Questo apparecchio è stato testato secondo tutte le
direttive CE in vigore e costruito secondo le ultime norme
di sicurezza.
Specifiche del prodotto in conformità con la
normativa adattatori di alimentazione
(EU) 2019 / 1782
Informazioni sulla fonte
di alimentazione utilizzata Valore Unità
Clatronic International GmbH
Numero di registro commerciale
HRB 9158
Industriering Ost 40,
47906 Kempen
Germania
Numero identicativo del modello SEU007A-140050
Tensione di ingresso 100 – 240 V~
Frequenza di corrente
alternata in ingresso 5 0 – 6 0 Hz
Tensione di uscita CA / CC 14,0 V CC
Corrente di uscita 0,5 A
Potenza di uscita 7,0 W

PC-AKS3102_IM 29.12.21
33
Informazioni sulla fonte
di alimentazione utilizzata Valore Unità
Efcienza operativa media 79,9 %
Efcienza a carico basso (10 %)
* %
Consumo energetico in
assenza di carico 0,06 W
* non applicabile a causa della potenza di uscita inferiore a
10 W.
Le condizioni di carico rilevanti sono le seguenti:
Percentuale della corrente nominale di uscita
Condizione con carico 1 100 % ± 2 %
Condizione con carico 2 75 % ± 2 %
Condizione con carico 3 50 % ± 2 %
Condizione con carico 4 25 % ± 2 %
Condizione con carico 5 10 % ± 1 %
Condizione con carico 6
0 %
(condizione in
assenza carico)
Smaltimento
Accumulatore / Smaltimento della batteria
L’apparecchio contiene una batteria ricaricabile.
Le batterie / accumulatori usati (batterie ricarica-
bili) non appartengono ai rifiuti domestici.
L’accumulatore deve essere rimosso prima
di smaltire il prodotto. Rivolgersi a personale
qualificato per questo.
Le informazioni su dove smaltire le batterie / accumulatori
possono essere richieste alle autorità locali o alle ammini-
strazioni comunali. Il vostro rivenditore e partner contrat-
tuale è inoltre obbligato a ritirare gratuitamente le batterie /
accumulatori.
Significato del simbolo “Eliminazione”
Salvaguardare l’ambiente, gli elettrodomestici
non vanno eliminati come rifiuti domestici.
Per l’eliminazione degli elettrodomestici, fare
uso dei posti di raccolta previsti per questo tipo
e porre quegli elettrodomestici che non sono
più in uso.
Si contribuisce così ad evitare un effetto potenziale sull’am-
biente e sulla salute, dovuto magari ad una eliminazione
sbagliata.
Questo signica un contributo personale alla riutilizzazione,
al riciclaggio e altre forme di utilizzazione di elettrodomestici
ed apparecchi elettronici usati.
Si possono trovare le corrispondenti informazioni sugli
appositi luoghi di raccolta, nelle amministrazioni dei comuni.
Il vostro rivenditore e partner contrattuale è anche obbligato
a riprendere gratuitamente il vecchio apparecchio.

PC-AKS3102_IM 29.12.21
34
WAŻNE:
Najpierw należy zapoznać się z oddzielnie załączoną instrukcją
bezpieczeństwa.
Instrukcja obsługi
Dziękujemy za wybór naszego produktu. Mamy nadzieję, że
korzystanie z urządzenia sprawi państwu radość.
Przed rozpoczęciem użytkowania urządzenia przeczytaj
uważnie instrukcję obsługi oraz oddzielnie załączone
wskazówki bezpieczeństwa. Przechowuj te dokumenty
wraz z kartą gwarancyjną, paragonem i, jeśli to możliwe,
pudełkiem z opakowaniem wewnętrznym w bezpiecznym
miejscu. Jeżeli przekazujesz urządzenie osobom trzecim,
dołącz zawsze wszystkie istotne dokumenty.
Symbole użyte w tej instrukcji obsługi
Ważne informacje dotyczące bezpieczeństwa użytkownika
są specjalnie wyróżnione. Koniecznie stosuj się do tych
wskazówek, aby uniknąć wypadków i uszkodzenia urzą-
dzenia:
OSTRZEŻENIE:
Ostrzega przed zagrożeniami dla zdrowia i wskazuje na
potencjalne ryzyka obrażeń.
UWAGA:
Wskazuje na potencjalne zagrożenia dla urządzenia lub
innych przedmiotów.
Spis treści
Przegląd elementów obsługi .................................................3
Rozpakowanie urządzenia .................................................34
Przegląd elementów obsługi / Zakres dostawy ................... 34
Ważne wskazówki dotyczące użytkowania
urządzenia i montażu uchwytu ściennego..........................34
Wskazówki dotyczące użytkowania ...................................35
Przymocuj stację ładującą do ściany ..................................35
Ładowanie akumulatora ......................................................35
Korzystanie z urządzenia ....................................................35
Konserwacja........................................................................36
Czyszczenie ........................................................................ 36
Przechowywanie ................................................................. 37
Rozwiązywanie problemów ................................................37
Dane techniczne .................................................................37
Specykacje produktu zgodnie
z rozporządzeniem (UE) 2019 / 1782 zasilacze..................37
Warunki gwarancji ...............................................................38
Usuwanie ............................................................................38
Rozpakowanie urządzenia
1. Urządzenie wyjąć z jego opakowania.
2. Wyjąć wszystkie elementy opakowania, takie jak folia,
wypełniacz, uchwyty kabli i tektura.
3. Sprawdzić, czy w opakowaniu znajdują się wszystkie
części składowe.
4. Jeśli zawartość opakowań nie jest kompletna lub są
uszkodzenia, takiego urządzenia nie należy użytkować.
Należy je niezwłocznie zwrócić sprzedawcy.
5. Zdjąć blokadę transportową z włącznika / wyłącznika.
Przegląd elementów obsługi /
Zakres dostawy
1 włącznik / wyłącznik z wielofunkcyjną diodą LED
2 Uchwyt
3 Przycisk PUSH do odblokowania pojemnika na kurz
4 Pojemnik na kurz
5 Otwieranie / blokowanie klapy
6 Klapa otwierająca
7 Złącze dla akcesoriów
8 Gniazdo przyłączeniowe zasilacza sieciowego
9 2-częściowy stojak wielofunkcyjny (uchwyt ścienny /
stacja ładująca i uchwyt na akcesoria)
10 Filtr HEPA z pierścieniem uszczelniającym
11 Filtr zgrubny
12 Ssawka szczelinowa, długa
13 Ssawka szczelinowa, średniej długości
14 Ssawka szczelinowa, krótka
15 Nasadka szczotkowa
Bez ilustracji
1 × zasilacz
2 × kołek
2 × śruba
Ważne wskazówki dotyczące
użytkowania urządzenia
i montażu uchwytu ściennego
Przeczytaj instrukcje!
Można używać wyłącznie zasilacza
„ SEU007A-140050”! Do ładowania akumulatorów
używaj wyłącznie wymiennego zasilacza dostar-
czonego z tym urządzeniem.

PC-AKS3102_IM 29.12.21
35
UWAGA:
• Umieść podstawkę wielofunkcyjną tak, aby urządzenie
nie było narażone na bezpośrednie działanie promieni
słonecznych lub innych źródeł ciepła.
• Nie należy ładować akumulatora bez nadzoru.
• Po zakończeniu ładowania należy zawsze odłączyć
wtyczkę sieciową od gniazdka.
• Nie odkurzać niczego, co jest łatwopalne lub płynne!
• Nigdy nie odkurzać bez jednostki ltrującej.
OSTRZEŻENIE:
Przy montażu uchwytu ściennego
Upewnij się wcześniej, że w ścianie nie ma żadnych
ukrytych kabli, które mogłyby Cię uszkodzić!
Wskazówki dotyczące użytkowania
• Urządzenie nadaje się bardzo dobrze do szybkiego
odkurzania niewielkich ilości suchego brudu lub kurzu.
• Zanieczyszczone ltry zmniejszają siłę ssania odkurza-
cza, dlatego zalecamy regularne czyszczenie istnieją-
cych ltrów zanieczyszczeń.
• Urządzenie jest zasilane przez naładowany akumulator.
Ładowanie odbywa się za pomocą dostarczonego
zasilacza, który jest podłączony do stacji ładującej. Bez-
pośrednia praca sieciowa z zasilaczem nie jest możliwa.
Przystawki dysz
• Różne nasadki do dysz można łatwo montować i de-
montować.
• Podłącz szczotkę do ssawki szczelinowej.
2-częściowy stojak wielofunkcyjny
• Jeśli chcesz ustawić wielofunkcyjny stojak, podłącz sta-
cję ładującą i uchwyt na akcesoria do siebie za pomocą
złącza wtykowego.
• Można na nim umieścić urządzenie i akcesoria.
• Po podłączeniu zasilacza do gniazda przyłączeniowego
wielofunkcyjny stojak służy również jako stacja ładująca.
• Jeśli chcesz używać stacji ładującej jako uchwytu ścien-
nego, odłącz ją ponownie od uchwytu na akcesoria.
Przymocuj stację ładującą do ściany
Zamontuj stację ładującą w pobliżu gniazdka elektrycznego.
1. Zmierz odległość między dwoma szczelinowymi
otworami uchwytu i wywierć dwa otwory w ścianie w tej
odległości.
2. Włożyć kołki do ściany.
3. Wkręcić wkręty w kołki za pomocą śrubokręta tak, aby
wystawały na ok. 3 – 4 mm.
4. Zawieś uchwyt ścienny na śrubach.
Ładowanie akumulatora
1. Wyłączyć urządzenie.
2. Umieścić urządzenie w stacji ładującej.
3. Podłączyć zasilacz do gniazda przyłączeniowego (8).
4. Podłącz zasilacz do dopuszczonego gniazda sie-
ciowego. Ładuj urządzenie przez 4,5 godziny przed
pierwszym użyciem.
- Podczas procesu ładowania dioda LED na przełącz-
niku miga na czerwono.
- Gdy akumulator jest w pełni naładowana, dioda LED
na przełączniku świeci się na niebiesko w sposób
ciągły.
- Dioda LED gaśnie po wyjęciu wtyczki sieciowej
z gniazdka lub po wyjęciu urządzenia z ładowarki.
- Jest rzeczą normalną, że urządzenie nagrzewa się
podczas ładowania.
5. Zatrzymaj dalsze ładowanie najpóźniej po 4,5 godzinach
lub gdy dioda LED zaświeci się na niebiesko.
UWAGA:
Po zakończeniu ładowania należy zawsze odłączyć
wtyczkę sieciową od gniazdka.
Korzystanie z urządzenia
Włącznik / wyłącznik z wielofunkcyjną diodą LED
Przełącznik Funkcja LED Znaczenie
Naciśnij
krótko 1 ×
Włączanie
urządzenia
Świeci się
na zielono Poziom mocy 1
Naciśnij
i przytrzymaj
dłużej
Świeci na
niebiesko Poziom mocy 2
Naciśnij
krótko 1 ×
Wyłączyć
urządzenie
Jest wyłą-
czony
Dioda LED na włączniku miga podczas pracy przez ok.
30 sekund, gdy pojemność akumulatora jest wyczerpana.
Następnie urządzenie wyłącza się. Ponownie naładować
akumulator.
Obsługa
1. Wyjąć urządzenie z ładowarki.
2. Zamontować dyszę. Do jednej z dwóch dysz szczeli-
nowych (12 / 13) można podłączyć również nasadkę
szczotkową.
3. Włączyć urządzenie za pomocą włącznika.
4. Jeśli chcesz odkurzać z większą mocą, podczas pracy
trzymaj włącznik wciśnięty przez ok. 3 sekundy.
5. Zwrócić uwagę na oznaczenie MAX na pojemniku na
kurz. Maksymalna pojemność wynosi 100 ml.

PC-AKS3102_IM 29.12.21
36
Koniec pracy
1. Wyłączyć urządzenie.
2. Opróżnić pojemnik na kurz. Po każdym użyciu wyczyść
jednostkę ltrującą, aby przywrócić urządzeniu pełną
sprawność przy następnym użyciu.
3. Następnie umieść urządzenie w stacji ładującej.
Konserwacja
Opróżnianie pojemnika na kurz
1. W razie potrzeby odłącz dyszę szczelinową od urzą-
dzenia.
2. Przytrzymaj urządzenie z klapką otwierającą nad pojem-
nikiem na kurz.
3. Opróżnij zawartość pojemnika na kurz. W tym celu naci-
śnij blokadę (5) pojemnika na kurz, aby otworzyć klapkę.
4. Ponownie zamknąć klapę. Mechanizm blokujący pojem-
nika na kurz musi się zatrzasnąć.
System ltrujący
System ltrujący znajduje się w pojemniku na kurz i składa
się z:
• Filtr HEPA z pierścieniem uszczelniającym
• Filtr zgrubny
Aby wyczyścić system ltrów, należy wykonać następujące
czynności:
1. Opróżnić pojemnik na kurz w sposób opisany wcześniej.
2. Demontaż systemu ltrów
2.1 Chwyć urządzenie jedną ręką tak, aby można było
nacisnąć przycisk PUSH kciukiem. Drugą ręką
pociągnij jednocześnie pojemnik na kurz do góry.
Możesz również postawić urządzenie na stabilnej
powierzchni.
2.2 Zdemontować system ltrów. Wyciągnij ltr HEPA
z ltra zgrubnego.
3. Czyszczenie ltrów
3.1 Trzymaj oba ltry nad pojemnikiem na śmieci
i strzepnij z nich kurz. Filtr HEPA można również
wyczyścić szczotką. W przypadku silnych zabru-
dzeń należy wyczyścić ltry pod bieżącą wodą.
3.2 Przed ponownym zamontowaniem ltrów należy
pozostawić je do całkowitego wyschnięcia!
3.3 Przetrzeć pojemnik na kurz wilgotną szmatką,
a następnie wytrzeć go do sucha.
4. Montaż systemu ltrującego
4.1 Włożyć ltr HEPA z powrotem do ltra zgrubnego.
Mocno wcisnąć ltr HEPA z pierścieniem uszczel-
niającym w ltr zgrubny do oporu.
4.2 Włożyć zmontowany system ltrów do pojemnika na
kurz.
4.3 Ponownie zamocować pojemnik na kurz na urzą-
dzeniu ręcznym. Najpierw umieścić pojemnik na
kurz z zaczepami we wgłębieniach w dolnej części
obudowy. Docisnąć pojemnik na kurz do obudowy.
Musi być słyszalne zatrzaśnięcie.
Czyszczenie
OSTRZEŻENIE:
Nigdy nie zanurzać obudowy silnika w wodzie w celu jej oczysz-
czenia. Może to spowodować porażenie prądem lub pożar.
UWAGA:
• Nie używać szczotki drucianej ani innych przedmiotów
ściernych.
• Nie używać ostrych lub ściernych środków czyszczą-
cych.
• Poszczególne elementy nie nadają się do mycia
w zmywarce.
• Obudowę urządzenia i akcesoria można przecierać
lekko wilgotną szmatką.
• Zasilacz sieciowy można przetrzeć suchą ściereczką.
Pojemnik na kurz z systemem ltrów
Informacje na temat czyszczenia tych elementów znajdują
się w rozdziale „Konserwacja”.

PC-AKS3102_IM 29.12.21
37
Przechowywanie
• Wyczyść urządzenie zgodnie z opisem i pozostaw do
całkowitego wyschnięcia.
• Zawsze przechowuj urządzenie poza zasięgiem dzieci
w dobrze wentylowanym i suchym miejscu.
• Temperatura przechowywania powinna wynosić od
10 °C do 20 °C.
• Zalecamy przechowywanie urządzenia w oryginalnym
opakowaniu, jeśli nie zamierzasz używać go przez
dłuższy okres czasu.
• Żywotność akumulatora: Nawet przy wyłączonym
urządzeniu akumulator rozładowuje się w sposób ciągły.
Jeżeli urządzenie nie jest używane przez dłuższy czas,
ładuj akumulator co najmniej raz na 4 do 6 tygodni.
Rozwiązywanie problemów
Problem Możliwa przyczyna Środek zaradczy
Urządzenie jest bez funkcji. Akumulator jest rozładowany. Naładuj akumulator.
Akumulator jest uszkodzony. Skontaktuj się z naszym serwisem lub sprzedawcą.
Podczas pracy dioda LED na wy-
łączniku miga przez ok. 30 sekund.
Następnie urządzenie wyłącza się.
Akumulator jest rozładowany. Naładuj akumulator.
Słaba siła ssania. Akumulator jest prawie pusty. Naładuj akumulator.
Pojemnik na kurz jest pełny. Opróżnić pojemnik na kurz.
Filtry są zabrudzone. Wyczyścić ltry zgodnie z opisem w rozdziale
„ Konserwacja”.
UWAGA:
Wznawiać pracę tylko z suchymi ltrami!
Akumulator nie trzyma ładunku. Akumulator osiągnął kres
swojej żywotności.
Skontaktować się z naszym serwisem lub sprze-
dawcą.
Dane techniczne
Model:...............................................................PC-AKS 3102
Waga netto (urządzenie ręczne,
stacja ładująca, zasilacz): ......................................ok. 0,83 kg
Klasa ochrony (urządzenie): ...............................................
Klasa ochrony (zasilacz): .....................................................
Akumulator: .................................. 3 × 3,7 V, 2000 mAh Li-Ion
Czas pracy: .........................................maksymalnie 30 minut
Czas ładowania: ............................................. ok. 4,5 godziny
Zastrzegamy sobie prawo wprowadzania zmian technicz-
nych i projektowych w trakcie ciągłego rozwoju produktu.
To urządzenie zostało przetestowane zgodnie z wszystkimi
obowiązującymi, aktualnymi dyrektywami CE i zbudowane
zgodnie z najnowszymi przepisami bezpieczeństwa.
Specykacje produktu zgodnie
z rozporządzeniem (UE) 2019 / 1782 zasilacze
Informacje na temat
zastosowanego zasilacza Wartość Jednostka
Clatronic International GmbH
Numer rejestru handlowego
HRB 9158
Industriering Ost 40,
47906 Kempen
Niemcy
Identykator modelu
SEU007A-140050
Napięcie wejściowe 100 – 240 V~
Wejściowa częstotliwość prądu
przemiennego 5 0 – 6 0 Hz
Napięcie wyjściowe AC / DC 14,0 V DC
Prąd wyjściowy 0,5 A
Moc wyjściowa 7,0 W
Średnia wydajność działania 79,9 %
Wydajność przy niskim ładowa-
niu (10 %)
* %

PC-AKS3102_IM 29.12.21
38
Informacje na temat
zastosowanego zasilacza Wartość Jednostka
Pobór mocy bez ładowania 0,06 W
* nie dotyczy ze względu na moc wyjściową mniejszą niż
10 W.
Odpowiednie warunki ładowania są następujące:
Procent prądu wyjściowego z tabliczki znamionowej
Stan ładowania 1 100 % ± 2 %
Stan ładowania 2 75 % ± 2 %
Stan ładowania 3 50 % ± 2 %
Stan ładowania 4 25 % ± 2 %
Stan ładowania 5 10 % ± 1 %
Stan ładowania 6
0 %
(stan bez ładowania)
Warunki gwarancji
Przyznajemy 24 miesiące gwarancji na produkt licząc od
daty zakupu.
W tym okresie będziemy bezpłatnie usuwać w terminie
14 dni od daty dostarczenia wadliwego sprzętu z kartą
gwarancyjną do miejsca zakupu wszystkie uszkodzenia
powstałe w tym urządzeniu na skutek wady materiałów
lub wadliwego wykonania, naprawiając oraz wymieniając
wadliwe części lub (jeśli uznamy za stosowne) wymieniając
całe urządzenie na nowe.
Sprzęt do naprawy powinien być dostarczony w komplecie
wraz z dowodem zakupu oraz z ważną kartą gwarancyjną
do sprzedawcy w miarę możliwości w oryginalnym opako-
waniu lub innym odpowiednim dla zabezpieczenia przed
uszkodzeniem. W razie braku kompletnego opakowania fa-
brycznego, ryzyko uszkodzenia sprzętu podczas transportu
do i z miejsca zakupu ponosi reklamujący.
Naprawa gwarancyjna nie dotyczy czynności przewidzianych
w instrukcji obsługi, do wykonania których zobowiązany jest
użytkownik we własnym zakresie i na własny koszt.
Gwarancja nie obejmuje:
• mechanicznych, termicznych, chemicznych uszkodzeń
sprzętu i wywołanych nimi wad,
• uszkodzeń powstałych w wyniku działania sił zewnętrz-
nych takich jak wyładowania atmosferyczne, zmiana
napięcia zasilania i innych zdarzeń losowych,
• nieprawidłowego ustawienia wartości napięcia elektrycz-
nego, zasilanie z nieodpowiedniego gniazda zasilania,
• sznurów połączeniowych, sieciowych, żarówek, baterii,
akumulatorów,
• uszkodzeń wyrobu powstałych w wyniku niewłaściwego
lub niezgodnego z instrukcją jego użytkowania, przecho-
wywania, konserwacji, samowolnego zrywania plomb
oraz wszelkich przeróbek i zmian konstrukcyjnych doko-
nanych przez użytkownika lub osoby niepowołane,
• roszczeń z tytułu parametrów technicznych wyrobu, o ile
są one zgodne z podanymi przez producenta,
• prawidłowego zużycia i uszkodzeń, które mają nieistotny
wpływ na wartość lub działanie tego urządzenia.
Karta gwarancyjna bez pieczątki sklepu, daty sprzedaży, nie
wypełniona, źle wypełniona, ze śladami poprawek, nieczy-
telna wskutek zniszczenia, bez możliwości ustalenia miejsca
sprzedaży oraz dołączonego dowodu zakupu jest nieważna.
Korzystanie z usług gwarancyjnych nie jest możliwe po
upływie daty ważności gwarancji. Gwarancja na części lub
całe urządzenie, które są wymieniane kończy się, wraz
z końcem gwarancji na to urządzenie.
Wszystkie inne roszczenia, wliczając w to odszkodowania
są wykluczone chyba, że prawo przewiduje inaczej. Rosz-
czenia wykraczające poza tą umowę nie są uwzględniane
przez tą gwarancję.
Gwarancja na sprzedany towar konsumpcyjny nie wyłącza,
nie ogranicza ani nie zawiesza uprawnień kupującego
wynikających z niezgodności towaru z umową.
Gwarancja oraz zawarte w niej warunki obowiązują na
terenie Rzeczpospolitej Polskiej.
Dystrybutor:
CTC Clatronic Sp. z o.o
Ul. Brzeska 1
45-960 Opole
Usuwanie
Akumulator / Utylizacja baterii
Urządzenie zawiera baterię wielokrotnego łado-
wania. Zużytych baterii / akumulatorów (baterii
wielokrotnego ładowania) nie należy wyrzucać
do odpadów domowych.
Przed utylizacją produktu należy usunąć akumulator.
W tym celu należy skontaktować się z wykwalikowanym
personelem.
Informacje na temat miejsca utylizacji baterii / akumulatorów
można uzyskać u władz lokalnych lub w urzędzie gminy.
Również Państwa sprzedawca i partner handlowy jest zo-
bowiązany do bezpłatnego odbioru baterii / akumulatorów.
Znaczenie symbolu „Pojemnik na śmieci”
Proszę oszczędzać nasze środowisko, sprzęt
elektryczny nie należy do śmieci domowych.
Proszę korzystać z punktów zbiorczych, prze-
widzianych do zdawania sprzętu elektrycznego,
i tam proszę oddawać sprzęt elektryczny,
którego już nie będą Państwo używać.
Tym sposobem pomagają Państwo unikać potencjalnych
następstw niewłaściwego usuwania odpadów, mających
wpływ na środowisko i zdrowie ludzi.

PC-AKS3102_IM 29.12.21
39
Tą drogą przyczyniają się Państwo do ponownego użycia,
do recyklingu i do innych form wykorzystania starego
sprzętu elektrycznego i elektronicznego.
Informacje, gdzie można zdać sprzęt, otrzymają Państwo
w swoich urzędach komunalnych lub w administracji gminy.
Twój sprzedawca i partner umowny jest również zobowią-
zany do bezpłatnego odbioru starego urządzenia.

PC-AKS3102_IM 29.12.21
40
FONTOS:
Először feltétlenül olvassa el a külön mellékelt biztonsági utasítá-
sokat.
Használati utasítás
Köszönjük, hogy a termékünket választotta. Reméljük,
elégedetten használja majd a készüléket.
A készülék használata előtt nagyon gyelmesen olvassa
el a használati útmutatót és a külön mellékelt biztonsági
utasításokat. Tartsa ezeket a dokumentumokat, beleértve
a jótállási jegyet, a blokkot és lehetőség szerint a belső
csomagolással ellátott dobozt is, biztonságos helyen. Ha a
készüléket harmadik félnek adja tovább, mindig mellékelje
az összes vonatkozó dokumentumot.
A használati útmutatóban található szimbólumok
Az ön biztonságára vonatkozó utasítások kifejezetten meg
vannak különböztetve. Kérjük, mindenképpen ügyeljen
ezekre annak érdekében, hogy elkerülje a baleseteket és a
készülék károsodását:
FIGYELMEZTETÉS:
Egészségét károsító veszélyforrásokra gyelmeztet és
rámutat a lehetséges sérülési lehetőségekre.
VIGYÁZAT:
Lehetséges veszélyre utal, mely a készülékben vagy más
tárgyakban kárt tehet.
Tartalom
A kezelőelemek áttekintése ..................................................3
A készülék kicsomagolása .................................................. 40
A kezelőelemek áttekintése /A csomag tartalma ................40
Fontos utasítások a készülék használatához
és a fali tartó felszereléséhez .............................................40
Megjegyzések használatra .................................................41
A töltőállomás csatlakoztatása a falhoz ..............................41
Az újratölthető akkumulátor töltése ....................................41
A készülék használata ........................................................41
Karbantartás ........................................................................42
Tisztítás ...............................................................................42
Tárolás ................................................................................43
Hibaelhárítás ....................................................................... 43
Műszaki adatok ...................................................................43
Terméktulajdonságok az (EU) 2019 / 1782
áramellátásról szóló szabályozás szerint ...........................43
Hulladékkezelés .................................................................. 44
A készülék kicsomagolása
1. Vegye ki a készüléket a csomagból.
2. Távolítsa el az összes csomagolóanyagot, úgymint a
fóliákat, töltőanyagot, kábelrögzítőket és a kartondoboz
csomagolást.
3. Ellenőrizze a csomagot, hogy minden megvan-e.
4. Ha a csomag tartalma nem teljes vagy sérülések találha-
tók, ne vegye használatba a készüléket. Azonnal vigye
vissza az értékesítőhöz.
5. Távolítsa el a szállítózárat a be- / kikapcsolóról.
A kezelőelemek áttekintése /
A csomag tartalma
1 be / kikapcsoló kapcsoló multifunkciós LED-del
2 Fogantyú
3 PUSH gomb a portartály feloldásához
4 Porgyűjtő tartály
5 A csappantyú nyitása / zárása
6 Nyitószárny
7 Csatlakozó a tartozékokhoz
8 Csatlakozóaljzat a tápegységhez
9 2 darab többfunkciós állvány (fali tartó / töltőállomás és
tartozéktartó)
10 HEPA-szűrő tömítőgyűrűvel
11 Durva szűrő
12 Fugafúvóka, hosszú
13 Fésülködő fúvóka, közepes hosszúságú
14 Résfúvóka, rövid
15 Kefés tartozék
Illusztráció nélkül
1 × Tápegység
2 × Tipli
2 × Csavar
Fontos utasítások
a készülék használatához és
a fali tartó felszereléséhez
Olvassa el az utasításokat!
Kizárólag „SEU007A-140050” tápegységgel
használja! Az újratölthető akkumulátorok töltéséhez
kizárólag a készülékhez kapott cserélhető tápegy-
séget használja.

PC-AKS3102_IM 29.12.21
41
VIGYÁZAT:
• A multifunkciós állványt úgy helyezze el, hogy a ké-
szüléket ne érje közvetlen napfény vagy más hőforrás.
• Ne töltse az akkumulátort felügyelet nélkül.
• A töltés után mindig húzza ki a hálózati csatlakozót a
konnektorból.
• Ne vákuumozzon semmi gyúlékony vagy folyékony
anyagot!
• Soha ne porszívózzon szűrőegység nélkül.
FIGYELMEZTETÉS: A fali tartó felszerelésekor
Előzetesen győződjön meg arról, hogy nincsenek-e a
falban rejtett kábelek, amelyek kárt tehetnének Önben!
Megjegyzések használatra
• A készülék nagyon alkalmas kis mennyiségű száraz
szennyeződés vagy por gyors felszívására.
• A piszkos szűrők csökkentik a porszívó szívóerejét, ezért
javasoljuk a meglévő szennyeződésszűrők rendszeres
tisztítását.
• A készülék a feltöltött akkumulátorral működik. A töltés
a mellékelt tápegységen keresztül történik, amely a
töltőállomáshoz csatlakozik. Közvetlen hálózati üzem a
tápegységgel nem lehetséges.
Fúvóka tartozékok
• A különböző fúvókafelszerelések könnyen fel- és
levehetők.
• Csatlakoztassa a kefés tartozékot egy résfúvókához.
2-részes multifunkciós állvány
• Ha a multifunkciós állványt szeretné felállítani, csatla-
koztassa a töltőállomást és a tartozéktartót egymáshoz a
dugaszcsatlakozásnál.
• A készüléket és a tartozékokat elhelyezheti benne.
• Ha a tápegységet a csatlakozóaljzathoz csatlakoztatja, a
multifunkciós állvány töltőállomásként is szolgál.
• Ha a töltőállomást inkább fali tartóként szeretné hasz-
nálni, akkor ismét válassza le a tartozéktartóról.
A töltőállomás csatlakoztatása a falhoz
Szerelje fel a töltőállomást egy konnektor közelébe.
1. Mérje meg a tartó két hornyolt lyuka közötti távolságot,
és fúrjon két lyukat a falba ebben a távolságban.
2. Helyezze a dübeleket a falba.
3. Egy csavarhúzóval forgassa be a csavarokat a tiplikbe
úgy, hogy azok kb. 3 – 4 mm-rel kiálljanak.
4. Akassza fel a fali tartó csavarokra.
Az újratölthető akkumulátor töltése
1. Kapcsolja ki a készüléket.
2. Helyezze a készüléket a töltőállomásra.
3. Csatlakoztassa a tápegységet a csatlakozóaljzathoz (8).
4. Csatlakoztassa a tápegységet egy engedélyezett há-
lózati csatlakozóhoz. Az első használat előtt töltse fel a
készüléket 4,5 órán keresztül.
- A töltési folyamat során a kapcsolón lévő LED pirosan
villog.
- Amikor az akkumulátor teljesen feltöltődött, a kapcso-
lón lévő LED folyamatosan kék színnel világít.
- A LED kialszik, amikor kihúzza a hálózati csatlakozót
a konnektorból, vagy amikor kiveszi a készüléket a
töltőállomásból.
- Normális, hogy a készülék a töltés során felmelegszik.
5. Legkésőbb 4,5 óra elteltével, vagy amikor a LED kijelző
kék színnel világít, állítsa le a további töltést.
VIGYÁZAT:
A töltés után mindig húzza ki a hálózati csatlakozót a
konnektorból.
A készülék használata
Be / kikapcsoló kapcsoló multifunkciós LED-del
Kapcsoló Funkció LED Jelentése
Nyomja meg
röviden az 1 x-et
A készülék
bekapcso-
lása
Világít
zöldet
1. teljesít-
ményszint
Nyomja meg és
tartsa lenyomva
hosszabb ideig
Világít
kék
2. teljesít-
ményszint
Nyomja meg
röviden az 1 x-et
Készülék
kikapcsolása
Ki van
kapcsolva
A kapcsolón lévő LED kb. 30 másodpercig villog működés
közben, amikor az újratölthető akkumulátor kapacitásának
végét elérte. A készülék ezután kikapcsol. Töltse újra az
újratölthető akkumulátort.
Működés
1. Vegye ki a készüléket a töltőállomásból.
2. Csatlakoztasson egy fúvókát. A kefés tartozékot a két
résfúvóka (12 / 13) egyikéhez is csatlakoztathatja.
3. Kapcsolja be a készüléket a kapcsolóval.
4. Ha magasabb teljesítményszinten szeretne porszívózni,
tartsa a kapcsolót működés közben kb. 3 másodpercig
lenyomva.
5. Figyelje a portartályon lévő MAX jelölést. A maximális
kapacitás 100 ml.

PC-AKS3102_IM 29.12.21
42
Működés vége
1. Kapcsolja ki a készüléket.
2. Ürítse ki a portartályt. Minden használat után tisztítsa
meg a szűrőegységet, hogy a készülék a következő
használat során ismét teljes teljesítményt nyújtson.
3. Ezután helyezze a készüléket a töltőállomásra.
Karbantartás
A portartály kiürítése
1. Szükség esetén vegye le a résfúvókát a készülékről.
2. Tartsa a készüléket a nyitószárnnyal egy portartály fölé.
3. Ürítse ki a portartály tartalmát. Ehhez nyomja meg a
portartályon lévő reteszelőt (5), hogy kinyissa a fedelet.
4. Csukja be újra a fedelet. A portartályon lévő reteszelő
mechanizmusnak be kell kapcsolódnia.
A szűrőrendszer
A szűrőrendszer a portartályban található, és a követke-
zőkből áll:
• HEPA-szűrő tömítőgyűrűvel
• Durva szűrő
A szűrőrendszer tisztításához a következőképpen járjon el:
1. Ürítse ki a portartályt a korábban leírtak szerint.
2. A szűrőrendszer szétszerelése
2.1 Fogja meg a készüléket az egyik kezével úgy, hogy
a hüvelykujjával meg tudja nyomni a PUSH gombot.
A másik kezével egyidejűleg húzza felfelé a portar-
tályt. A készüléket stabil felületre is helyezheti.
2.2 Távolítsa el a szűrőrendszert. Húzza ki a HEPA-
szűrőt a durva szűrőből.
3. A szűrők tisztítása
3.1 Tartsa mindkét szűrőt egy szemetes edény fölé, és
csapolja ki a port. A HEPA-szűrőt ecsettel is ki lehet
kefélni. Erős szennyeződés esetén folyó víz alatt
tisztítsa meg a szűrőket.
3.2 Hagyja a szűrőket teljesen megszáradni a levegőn,
mielőtt visszahelyezi őket!
3.3 Törölje át a portartályt nedves ruhával, majd törölje
szárazra.
4. A szűrőrendszer felszerelése
4.1 Helyezze vissza a HEPA-szűrőt a durva szűrőbe.
Nyomja a HEPA-szűrőt a tömítőgyűrűvel együtt
erősen a durva szűrőbe, amennyire csak lehet.
4.2 Helyezze a szűrőrendszert teljesen összeszerelve a
portartályba.
4.3 Csatlakoztassa vissza a portartályt a kézi készü-
lékhez. Először helyezze a portartályt a reteszekkel
együtt a ház alján lévő mélyedésekbe. Nyomja a
portartályt a házhoz. Hallhatóan be kell kattanni a
helyére.
Tisztítás
FIGYELMEZTETÉS:
Tisztításkor soha ne merítse a motorházát vízbe. Ez áramütést
vagy tüzet okozhat.
VIGYÁZAT:
• Ne használjon drótkefét vagy más koptató tárgyakat.
• Ne használjon éles vagy koptató hatású tisztítósze-
reket.
• Az egyes alkatrészek nem alkalmasak mosogatógép-
ben történő tisztításra.
• A készülék háza és a tartozékok enyhén nedves ruhával
áttörölhetők.
• A tápegységet száraz ruhával törölheti át.
Porgyűjtő tartály szűrőrendszerrel
Ezen alkatrészek tisztításához olvassa el a „Karbantartás”
című fejezetet.

PC-AKS3102_IM 29.12.21
43
Tárolás
• Tisztítsa meg a készüléket a leírtak szerint, és hagyja
teljesen megszáradni.
• A készüléket mindig gyermekek elől elzárva, jól szellőző
és száraz helyen tárolja.
• A tárolási hőmérsékletnek 10 °C és 20 °C között kell
lennie.
• Javasoljuk, hogy a készüléket az eredeti csomagolásban
tárolja, ha hosszabb ideig nem kívánja használni.
• Az újratölthető akkumulátor élettartama: Az újratölt-
hető akkumulátor kikapcsolt állapotban is folyamatosan
lemerül. Ha a készüléket hosszabb ideig nem használja,
legalább 4 – 6 hetente egyszer töltse fel az akkumulátort.
Hibaelhárítás
Probléma Lehetséges ok Megoldás
A készülék nem működik. Az akkumulátor üres. Töltse fel az akkumulátort.
Az akkumulátor meghibásodott. Vegye fel a kapcsolatot szervizünkkel vagy
kereskedőjével.
Működés közben a kapcsolón lévő
LED kb. 30 másodpercig villog.
Ezután a készülék kikapcsol.
Az akkumulátor üres. Töltse fel az akkumulátort.
Gyenge szívóteljesítmény. Az akkumulátor majdnem üres. Töltse fel az akkumulátort.
A portartály megtelt. Ürítse ki a portartályt.
A szűrők szennyezettek. Tisztítsa meg a szűrőket a „Karbantartás”
pontban leírtak szerint.
VIGYÁZAT:
Csak száraz szűrőkkel folytassa a működést!
Az újratölthető akkumulátor nem tartja
a töltést.
Az akkumulátor elérte élettar-
tama végét.
Vegye fel a kapcsolatot szervizünkkel vagy
kereskedőjével.
Műszaki adatok
Modell: ..............................................................PC-AKS 3102
Nettó súly (kézi egység,
töltőállomás, tápegység): .......................................kb. 0,83 kg
Védelmi osztály (készülék): ................................................
Védelmi osztály (tápegység):...............................................
Újratölthető akkumulátor: ........... 3 × 3,7 V, 2000 mAh Li-Ion
Működési idő: .............................................legfeljebb 30 perc
Töltési idő: .......................................................... kb. 4,5 hours
A műszaki és kivitelezési módosítások jogát a folyamatos
termékfejlesztés miatt fenntartjuk.
Ezt a készüléket az összes vonatkozó, hatályos CE-irány-
elvnek megfelelően tesztelték, és a legújabb biztonsági
előírásoknak megfelelően gyártották.
Terméktulajdonságok az (EU) 2019 / 1782
áramellátásról szóló szabályozás szerint
Tájékoztatás az alkalmazott
áramellátásról Érték Egység
Clatronic International GmbH
Kereskedelmi jegyzékszám
HRB 9158
Industriering Ost 40,
47906 Kempen
Németország
Típusazonosító SEU007A-140050
Bemeneti feszültség 100 – 240 V~
Bemeneti váltóáramú frekvencia
5 0 – 6 0 Hz
Kimeneti feszültség AC / DC 14,0 V DC
Kimeneti áram 0,5 A
Kimeneti teljesítmény 7,0 W
Átlagos hatékonyság működés
közben 79,9 %
Alacsony töltésű hatékonyság
(10 %)
* %

PC-AKS3102_IM 29.12.21
44
Tájékoztatás az alkalmazott
áramellátásról Érték Egység
Terhelés nélküli áramfogyasztás 0,06 W
* nem alkalmazható a 10 W-nál kisebb kimeneti teljesít-
mény miatt.
Az érvényes terhelési feltételek az alábbiak:
A típustábla kimeneti áramának százaléka
1. terhelési feltétel 100 % ± 2 %
2. terhelési feltétel 75 % ± 2 %
3. terhelési feltétel 50 % ± 2 %
4. terhelési feltétel 25 % ± 2 %
5. terhelési feltétel 10 % ± 1 %
6. terhelési feltétel
0 %
(terhelésmentes
állapot)
Hulladékkezelés
Az akkumulátorok / elemek ártalmatlanítása
A készülék újratölthető akkumulátort tartalmaz.
A használt elemek / akkumulátorok (újratölthető
elemek) nem tartoznak a háztartási hulladékba.
Az akkumulátort a termék ártalmatlanítása
előtt ki kell venni. Ezzel kapcsolatban forduljon
szakképzett szakemberhez.
Az elemek / akkumulátorok ártalmatlanításának helyéről
a helyi hatóságoknál vagy az önkormányzati hivataloknál
kaphat tájékoztatást. Az Ön kereskedője és szerződéses
partnere is köteles az elemeket / akkumulátorokat ingyene-
sen visszavenni.
A „kuka” piktogram jelentése
Kímélje környezetünket, az elektromos készülé-
kek nem a háztartási szemétbe valók!
Használja az elektromos készülékek ártalmat-
lanítására kijelölt gyűjtőhelyeket, ott adja le
azokat az elektromos készülékeit, amelyeket
többé már nem kíván használni!
Ezzel segítséget nyújt ahhoz, hogy elkerülhetők legyenek
azok a hatások, amelyeket a helytelen „szemétre dobás”
gyakorolhat a környezetre és az emberi egészségre.
Ezzel hozzájárul az újrahasznosításhoz, a recyclinghoz és a
kiöregedett elektromos és elektronikus készülékek értékesí-
tésének egyéb formáihoz.
Az önkormányzatoknál vagy a polgármesteri hivatalokban
tájékoztatást kaphat arról, hogy hova viheti a kiselejtezett
készülékeket. Az Ön kereskedője és szerződéses partnere
köteles a régi készüléket is ingyenesen visszavenni.

PC-AKS3102_IM 29.12.21
45
ВАЖНО:
Обязательно сначала прочитайте отдельно прилагаемые
инструкции по технике безопасности.
Руководство по эксплуатации
Спасибо за выбор нашего продукта. Надеемся, он вам
понравится.
Перед использованием данного прибора внимательно
прочитайте инструкцию по эксплуатации и отдельно
прилагаемые инструкции по технике безопасности.
Храните эти документы, включая гарантийный талон,
чек и, по возможности, коробку с внутренней упаковкой
в надежном месте. Если вы передаете прибор третьему
лицу, всегда прикладывайте к нему все соответствую-
щие документы.
Символы применяемые в
данном руководстве пользователя
Важные рекомендации для обеспечения вашей без-
опасности обозначены по особенному. Обязательно
следуйте этим рекомендациям, чтобы предотвратить
несчастный случай или поломку изделия:
ПРЕДУПРЕЖДЕНИЕ:
Предупреждает об опасности для здоровья и возмож-
ном риске получения травмы.
ВНИМАНИЕ:
Указывает на возможную опасность для изделия и
других окружающих предметов.
Содержание
Обзор деталей прибора .....................................................3
Распаковка устройства ..................................................... 45
Обзор деталей прибора / Комплект поставки ................. 45
Важные инструкции по использования прибора
и для монтаж настенного крепления ..............................46
Примечания по использования .......................................46
Прикрепите зарядную станцию к стене .......................... 46
Зарядка аккумулятора ......................................................46
Использование прибора ................................................... 46
Техническое обслуживание .............................................47
Чистка ................................................................................. 48
Хранение ............................................................................ 48
Устранение неполадок .....................................................48
Технические данные ......................................................... 49
Утилизация ........................................................................49
Распаковка устройства
1. Достаньте устройство из упаковки.
2. Удалите все упаковочные материалы, такие как
пленки, наполнительный материал, фиксаторы
кабеля и картон.
3. Проверьте комплектность поставки.
4. Не эксплуатируйте устройство при наличии повреж-
дений, либо если устройство некомплектно. Неза-
медлительно верните покупку в магазин.
5. Снимите транспортный фиксатор с выключателя
включения / выключения.
Обзор деталей прибора /
Комплект поставки
1 переключатель включения/выключения с много-
функциональным светодиодом
2 Ручка
3 Кнопка PUSH для разблокировки контейнера для
пыли
4 Контейнер для пыли
5 Открывание / блокировка заслонки
6 Открывающаяся заслонка
7 Разъем для подключения принадлежностей
8 Гнездо для подключения блока питания
9 Многофункциональная подставка из 2 частей (на-
стенное крепление / зарядная станция и держатель
для принадлежностей)
10 Фильтр HEPA с уплотнительным кольцом
11 Фильтр грубой очистки
12 Насадка для щелей, длинная
13 Щелевая насадка, средняя длина
14 Насадка для щелей, короткая
15 Насадка-щетка
Без иллюстрации
1 × Блок питания
2 × дюбель
2 × винт

PC-AKS3102_IM 29.12.21
46
Важные инструкции по
использования прибора и для
монтаж настенного крепления
Прочтите инструкцию по эксплуатации!
Используйте только источник электропитания
«SEU007A-140050»! Для зарядки аккумуляторов
применяйте только съемный источник питания,
полученный вместе с прибором.
ВНИМАНИЕ:
• Разместите многофункциональную подставку так,
чтобы прибор не подвергался воздействию прямых
солнечных лучей или других источников тепла.
• Не заряжайте аккумулятор без присмотра.
• После зарядки всегда вынимайте сетевую вилку
из розетки.
• Не пылесосьте ничего легковоспламеняющегося
или жидкого!
• Никогда не пылесосьте без фильтрующего эле-
мента.
ПРЕДУПРЕЖДЕНИЕ:
При установке настенного крепления
Заранее убедитесь, что в стене нет скрытых кабелей,
которые могут причинить вам вред!
Примечания по использования
• Прибор очень хорошо подходит для быстрой уборки
пылесосом небольшого количества сухой грязи или
пыли.
• Загрязненные фильтры снижают мощность всасыва-
ния пылесоса, поэтому мы рекомендуем регулярно
очищать имеющиеся грязевые фильтры.
• Прибор работает от заряженного аккумулятора.
Зарядка осуществляется с помощью входящего в
комплект блока питания, который подключается к
зарядной станции. Прямая работа от сети с блоком
питания невозможна.
Насадки для форсунок
• Различные насадки легко крепятся и снимаются.
• Присоедините щетку к насадке для щелей.
Многофункциональная подставка из 2 частей
• Если вы хотите установить многофункциональную
подставку, подключите зарядную станцию и дер-
жатель аксессуаров друг к другу через штекерное
соединение.
• В ней можно разместить прибор и аксессуары.
• Если подключить блок питания к разъему, много-
функциональная подставка также будет служить
зарядной станцией.
• Если вы предпочитаете использовать зарядную
станцию в качестве настенного крепления, снова
отсоедините ее от крепления для аксессуаров.
Прикрепите зарядную станцию к стене
Установите зарядную станцию рядом с розеткой.
1. Измерьте расстояние между двумя щелевыми
отверстиями крепления и просверлите два отверстия
в стене на этом расстоянии.
2. Установите дюбели в стену.
3. Вверните шурупы в дюбели отверткой так, чтобы они
выступали примерно на 3 – 4 мм.
4. Подвесьте настенное крепление на шурупы.
Зарядка аккумулятора
1. Выключите прибор.
2. Поместите прибор в зарядную станцию.
3. Подключите блок питания к соединительной ро-
зетке (8).
4. Подключите блок питания к разрешенной розетке.
Перед первым использованием зарядите прибор в
течение 4,5 часов.
- В процессе зарядки светодиод на переключателе
мигает красным цветом.
- Когда аккумулятор полностью заряжен, светодиод
на переключателе непрерывно горит синим
цветом.
- Светодиод гаснет, когда вы отсоединяете сетевую
вилку от розетки или снимаете прибор с зарядной
станции.
- Нагрев прибора во время зарядки является нор-
мальным явлением.
5. Прекратите дальнейшую зарядку не позднее чем че-
рез 4,5 часа или когда индикатор загорится ровным
синим цветом.
ВНИМАНИЕ:
После зарядки всегда вынимайте сетевую вилку из
розетки.
Использование прибора
Переключатель включения / выключения
с многофункциональным светодиодом
Переклю-
чатель Функция СИД Значение
Кратковре-
менно
нажмите 1 ×
Включение
прибора
Горит
зеленым
Уровень
мощности 1
Нажмите и
удерживайте
дольше
Горит
синим
Уровень
мощности 2

PC-AKS3102_IM 29.12.21
47
Переклю-
чатель Функция СИД Значение
Кратковре-
менно
нажмите 1 ×
Выключить
прибор Выключен
Светодиод на выключателе мигает в течение примерно
30 секунд во время работы, когда достигается конец ем-
кости аккумулятора. После этого прибор выключается.
Перезарядите аккумуляторную батарею.
Эксплуатация прибора
1. Снимите прибор с зарядной станции.
2. Присоедините насадку. Насадку-щетку можно также
прикрепить к одной из двух щелевых насадок (12 / 13).
3. Включите прибор с помощью выключателя.
4. Если вы хотите пылесосить на более высоком
уровне мощности, удерживайте переключатель
нажатым в течение примерно 3 секунд во время
работы.
5. Обратите внимание на маркировку MAX на контейнере
для пыли. Максимальная емкость составляет 100 мл.
Окончание работы
1. Выключите прибор.
2. Опорожните контейнер для пыли. Очищайте блок
фильтра после каждого использования, чтобы вос-
становить полную работоспособность прибора при
следующем использовании.
3. Затем поместите прибор в зарядную станцию.
Техническое обслуживание
Опорожнение контейнера для пыли
1. При необходимости отсоедините щелевую насадку
от прибора.
2. Держите прибор с открывающейся крышкой над
контейнером для пыли.
3. Опорожните содержимое контейнера для пыли. Для
этого нажмите на фиксатор (5) на контейнере для
пыли, чтобы открыть заслонку.
4. Снова закройте заслонку. Запорный механизм на
контейнере для пыли должен сработать.
Система фильтров
Система фильтрации находится в контейнере для пыли
и состоит из:
• HEPA-фильтр с уплотнительным кольцом
• Фильтр грубой очистки
Чтобы очистить систему фильтров, выполните следую-
щие действия:
1. Опорожните контейнер для пыли, как описано ранее.
2. Демонтаж системы фильтрации
2.1 Возьмите прибор одной рукой так, чтобы боль-
шим пальцем можно было нажать на кнопку
PUSH. Одновременно другой рукой потяните
контейнер для пыли вверх. Вы также можете
поставить прибор на устойчивую поверхность.
2.2 Снимите систему фильтров. Извлеките фильтр
HEPA из фильтра грубой очистки.
3. Очистка фильтров
3.1 Держите оба фильтра над мусорным ведром и
вытряхните пыль. Фильтр HEPA можно также
вычистить щеткой. В случае сильного загрязне-
ния очистите фильтры под проточной водой.
3.2 Дайте фильтрам полностью высохнуть на воз-
духе, прежде чем устанавливать их на место!
3.3 Протрите контейнер для пыли влажной тканью,
а затем вытрите его насухо.
4. Монтаж системы фильтрации
4.1 Установите HEPA-фильтр обратно в фильтр
грубой очистки. Плотно вдавите HEPA-фильтр
с уплотнительным кольцом в фильтр грубой
очистки до упора.
4.2 Поместите полностью собранную систему филь-
тров в контейнер для пыли.
4.3 Установите контейнер для пыли на ручное
устройство. Сначала поместите контейнер для
пыли с фиксаторами в углубления в нижней
части корпуса. Прижмите контейнер для пыли к
корпусу. Он должен со звуком защелкнуться на
месте.

PC-AKS3102_IM 29.12.21
48
Чистка
ПРЕДУПРЕЖДЕНИЕ:
Никогда не погружайте корпус двигателя в воду для очистки.
Это может привести к поражению электрическим током или
возгоранию.
ВНИМАНИЕ:
• Не используйте проволочную щетку или другие
абразивные предметы.
• Не используйте острые или абразивные чистящие
средства.
• Отдельные компоненты не подходят для чистки в
посудомоечной машине.
• Корпус прибора и принадлежности можно протирать
слегка влажной тканью.
• Блок питания можно протирать сухой тканью.
Пылесборник с системой фильтров
Для очистки этих компонентов см. главу «Техническое
обслуживание».
Хранение
• Очистите прибор в соответствии с описанием и
дайте ему полностью высохнуть.
• Всегда храните прибор в недоступном для детей,
хорошо проветриваемом и сухом месте.
• Температура хранения должна составлять от 10 °C
до 20 °C.
• Мы рекомендуем хранить прибор в оригинальной
упаковке, если вы не собираетесь использовать его в
течение длительного периода времени.
• Срок службы аккумулятора: Даже в выключенном
состоянии аккумулятор постоянно разряжается. Если
вы не используете устройство в течение длительного
периода времени, заряжайте аккумулятор не реже
одного раза в 4 – 6 недель.
Устранение неполадок
Проблема Возможная причина Устранение
Прибор не работает. Аккумулятор разряжен. Зарядите аккумулятор.
Аккумулятор неисправен. Обратитесь в нашу сервисную службу или
к дилеру.
Во время работы светодиод на
выключателе мигает в течение
примерно 30 секунд. Затем
прибор выключается.
Аккумулятор разряжен. Зарядите аккумулятор.
Слабая сила всасывания. Аккумулятор почти разряжен. Зарядите аккумулятор.
Контейнер для пыли переполнен. Опорожните контейнер для пыли.
Фильтры загрязнены. Очистите фильтры, как описано в разделе
« Техническое обслуживание».
ВНИМАНИЕ:
Возобновляйте работу только с сухими
фильтрами!
Аккумулятор не держит заряд. Срок службы аккумулятора истек. Обратитесь в нашу сервисную службу или
к дилеру.

PC-AKS3102_IM 29.12.21
49
Технические данные
Модель: ........................................................... PC-AKS 3102
Вес нетто (портативное устройство,
зарядная станция, блок питания): ................ прибл. 0,83 кг
Класс защиты (прибор): ....................................................
Класс защиты (блок питания): ..........................................
Аккумуляторная батарея: ........ 3 × 3,7 В, 2000 мАч Li-Ion
Время работы: ...................................... максимум 30 минут
Время зарядки: ............................................прибл. 4,5 часа
Сохранено право на технические и конструкционные
изменения в рамках продолжающейся разработки
продукта.
Данный прибор был протестирован в соответствии со
всеми применимыми действующими директивами CE
и изготовлен в соответствии с последними правилами
безопасности.
Утилизация
Утилизация аккумулятора / батареи
Прибор содержит перезаряжаемую батарею.
Использованные батареи / аккумуляторы
(перезаряжаемые батареи) не должны попа-
дать в бытовые отходы.
Перед утилизацией прибора необходимо извлечь
аккумуляторную батарею. Для этого обратитесь к квали-
фицированному персоналу.
Информацию о том, где можно утилизировать батареи /
аккумуляторы, можно получить у местных властей или в
муниципальных администрациях. Ваш дилер и партнер
по договору также обязан бесплатно принять обратно
батареи / аккумуляторы.
Значение символа «корзина»
Защита окружающей среды: не допускается
утилизация электроприборов вместе с быто-
выми отходами.
Утилизация устаревшей техники и неис-
правных электроприборов производится в
городских приёмных пунктах.
Не допускайте неправильной утилизации отходов. Это
наносит вред окружающей среде и оказывает негатив-
ное воздействие на здоровье людей.
Оказывайте содействие программе утилизации и дру-
гим формам переработки электронной и электрической
техники.
Информацию о пунктах утилизации бытовой техники
можно получить в местных органах власти. Ваш дилер
и партнер по договору также обязан бесплатно принять
старый прибор.

PC-AKS3102_IM 29.12.21
50
PC-AKS 3102 ................................................................................... :
, )
0,83 ..................................:(
III ..................................................................................:()
II ...........................................................:( )
3,7×3 .................................................:
2000
30 ................................................................. :
4,5 ......................................................................:
.
.
/
.
) /
. (
. .
/
.
. /
" "
:
.
.
.
.
.
.

PC-AKS3102_IM 29.12.21
51
:
•
•
:
1 . .
2 .
PUSH 2.1
.
. .
. 2.2
.
3 .
. 3.1
.
! 3.2
. 3.3
4 .
. 4.1
.
. 4.2
.
4.3
.
. .
:
.
.
:
•.
•.
•.
•.
•.
.""
•.
• .
•. 20 10
•
.
• :
.
. 6 4
. . .
. .
. . ,
. . 30
. . .
. .
."" .
:
!
. . .

PC-AKS3102_IM 29.12.21
52
/
30 . LED
.
. .
1 ..
2 . .
.(13/12)
3 . .
4 . ,
.
5 .. 100 .
1 ..
2 . .
.
3 ..
1 ..
2 ..
3 . (5) .
.
4 . .
.
•
.
•
.
• .
.
.
•.
•.
•
.
•.
•
.
•
.
.
1 .
.
2 ..
3 .
. 4–3
4 ..
1 ..
2 . .
3 ..(8)
4 . .
. 4,5
-. -
. -
. -.
5 . 4,5
.
:
..

PC-AKS3102_IM 29.12.21
53
:
.
. .
. .
.
.
.
:
:
.
:
.
3 ..............................................................................
53 ..............................................................................
53 .................................................... /
53 .............................
52............................................................................
52........................................................................
52...........................................................
52..........................................................................................
52.......................................................................................................
51 .....................................................................................................
51 ......................................................................................................
51 ......................................................................
50 ...........................................................................................
50 ....................................................................................
1 ..
2 .
.
3 ..
4 .
. .
5 ../
/
/ 1
2
PUSH 3
4
/ 5
6
7
8
/ ) 9
(
10
11
, 12
, 13
, 14
15
×1
×2
×2
!
!"SEU007A-140050"
.
:
•
.
•.
•.
•!
•.
:
!

Internet: www.procare-germany.de
Made in P.R.C.
PC-AKS 3102
PC-AKS3102_IM 29.12.21
Stand 12 / 2021
-
 1
1
-
 2
2
-
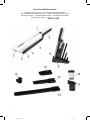 3
3
-
 4
4
-
 5
5
-
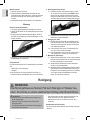 6
6
-
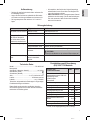 7
7
-
 8
8
-
 9
9
-
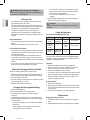 10
10
-
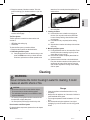 11
11
-
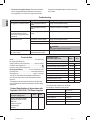 12
12
-
 13
13
-
 14
14
-
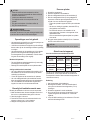 15
15
-
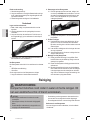 16
16
-
 17
17
-
 18
18
-
 19
19
-
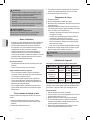 20
20
-
 21
21
-
 22
22
-
 23
23
-
 24
24
-
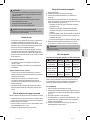 25
25
-
 26
26
-
 27
27
-
 28
28
-
 29
29
-
 30
30
-
 31
31
-
 32
32
-
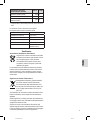 33
33
-
 34
34
-
 35
35
-
 36
36
-
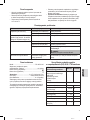 37
37
-
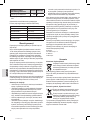 38
38
-
 39
39
-
 40
40
-
 41
41
-
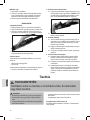 42
42
-
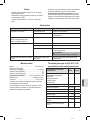 43
43
-
 44
44
-
 45
45
-
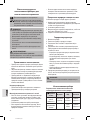 46
46
-
 47
47
-
 48
48
-
 49
49
-
 50
50
-
 51
51
-
 52
52
-
 53
53
-
 54
54


ProfiCare PC-AKS 3102 Instrucciones de operación
- Tipo
- Instrucciones de operación
en otros idiomas
- français: ProfiCare PC-AKS 3102 Mode d'emploi
- italiano: ProfiCare PC-AKS 3102 Istruzioni per l'uso
- Deutsch: ProfiCare PC-AKS 3102 Bedienungsanleitung
- polski: ProfiCare PC-AKS 3102 Instrukcja obsługi
