Kenmore 146.23676310 El manual del propietario
- Categoría
- Barbacoas
- Tipo
- El manual del propietario

OWNER'S MANUAL
BBQ PRO 4 BURNER GAS GRILL
WITH SIDE BURNER
Product code: 23676 / 0-05032629-7
Item: 146.2367631 0
UPC code: 182995000910
Date of purchase: / /

If you smell gas:
1. Shut off gas to the appliance.
2. Extinguish any open flame.
3. Open lid.
4. If odor continues, keep away from the
appliance and immediately call your gas
supplier or your fire department.
1. Do not store or use gasoline or other
flammable liquids or vapors in the vicinity of
this or any other appliance.
2. An LP cylinder not connected for use shall not
be stored in the vicinity of this or any other
appliance.
Call Grill Service Center For Help And Parts
If you have questions or need assistance during assembly,
please call 1-888-287-0735. You will be speaking to a
representative ofthe grill manufacturer. To order new parts call
at 1-800-4-MY-HOME®.
Product Record
IMPORTANT:Fill out the product record informationbelow.
Model Number
Serial Number
Seeratinglabelongrillforserialnumber.
Date Purchased
Installation Safety Precautions
• Pleaseread this User's Manual in its entirety before using the
grill.
• Failureto follow the provided instruction can result in seriously
bodily injuryand/or property damage.
• Some parts of this grill may have sharp edges. Pleasewear
suitable protective gloves.
• Use grill, as purchased, only with LP (propane) gas and the
regulator/valve assembly supplied.
• Grill installation must conform with local codes,or in their
absence of local codes, with either the National Fuel Gas
Code, ANSI Z223.1/NFPA 54, Natural Gasand Propane
Installation Code, CSABH9. L or Propane Storage and
Handling Code, BH9.2, or the Standard for Recreationa
Vehicles,ANSI A 119.2/NFPA 1192,and CSAZ240 RV Series,
Recreational Vehicle Code, as applicable.
• All electrical accessories (such as rotisserie) must be
electrically grounded in accordance with local codes, or
National Electrical Code, ANSI / NFPA 70 or Canadian
Electrical Code, CSA C22.L Keep any electrical cords and/or
fuel supply hoses away from any hot surfaces.
• This grill is safety certifiedfor use in the United States and/or
Canadaonly. Do not modify for use in any other location.
Modification will result in a safety hazard.
IMPORTANT: This grill is intended for outdoor use only and is not
intended to be installed in or on recreational vehicles or boats.
NOTE TO INSTALLER: Leave this User's Manualwith the
customer after delivery and/or installation.
NOTE TO CONSUMER: Leave this User's Manualin a convenient
place for future reference.
Safety Symbols
The symbols and boxes shown below explain what each heading
means. Read and follow all of the messages found throughout
the manual.
DANGER: Indicatesan imminently hazardoussituation
which, if not avoided,will result indeath or serious injury.
CAUTION ......
For residential use only. Do not use for commercial
cooking.
2.146.23676310
CAUTION
CAUTION: Indicates a potentially hazardous situation or
unsafe practice which, if not avoided, may result in minor
or moderate injury.

ForYourSafety...
GrillServiceCenter...
ProductRecordInformation...
installationSafety Precautions ...
Safety Symbols...
BBQ PRO Grill Warranty...
Use and Care...
2
2
2
2
2
3
.4-10
Parts List ...... 11
Parts Diagram ...
Before Assembly...
Assembly...
..12
.. 13-15
16-25
.26-28
Troubleshooting...
Repair Protection Agreements
Congratulations on making a smartpurchase. Your new BBQ PRO
product isdesigned and manufactured for years of
dependable operation. But likealI products, it may require repair
from time to time. That's when having a Repair Protection
Agreement can save you money and aggravation.
Purchase a Repair ProtectionAgreement now and protect
yourself from unexpected hassle and expense.
Here'swhat the Repair ProtectionAgreement* includes:
Expert service by our 10,000 professional repairspecialists
Unlimited service and no charge for parts and labor on atI
covered repairs
Product replacement up to $1500 ifyour covered product
can't be fixed
_. Discount of 25% from regular price of service and related
installed parts not covered by the agreement; also, 25% off
regular priceof preventive maintenance check
Fast help by phone- we call it Rapid Resolution
phone support from a Sears representative. Think of
us as a "talking owner's manual."
Once you purchase the Repair Protection Agreement, a simple
phone call is all that it takesfor you to schedule service. You
can call anytime day or night, or schedule a service appointment
online.
The Repair Protection Agreement is a risk-free purchase. If you
cancel for any reason during the productwarranty period, we
will provide a full refund. Or, a prorated refund anytime after the
product warranty period expires. Purchase your Repair
Protection Agreement today!
Some limitations and exclusions apply.
For prices and additional information call 1-800-827-6655.
* Coverage in Canada varies on some items. For full details call
Sears Canada at 1-800-361-6665.
BBQ PRO GRILL WARRANTY
One Year Full Warranty on BBQ PRO Grill
Ifthis grill fails due to a defect in materialor workmanship
within one year from the date of purchase, call 1-800-4-MY
HOME®to arrange for free repair (orreplacement if repair
proves impossible).
COOKINGGRIDSand HEATDIFFUSERS:1yearLIMITED
warranty;doesnotcoverdropping,chipping,scratching,or
surfacedamage.
STAINLESSSTEEL PARTS:1year LIMITEDwarrantyagainst
perforation;doesnotcover cosmeticissueslikesurfacecorrosion,
scratchesand rust.
ALL OTHERPARTS:1 yearLIMITEDwarranty(Includes,butnot
limitedto, valves,frame,housing,cart,controlpanel,igniter,
regulator,hoses).Doesnotcover chipping,scratching,cracking
surfacecorrosion,scratchesor rust.
Limited Warranty on Burners
For three years from the date of purchase, any burner that
rusts through will be replacedfree of charge. After the first
year from the date of purchase, you pay for labor ifyou wish
to have it installed.
All warranty coverage is void if this grill is ever usedfor
commercial or rental purposes. All warranty coverage applies
only if this grill is used in the United States.
This warranty gives you specific legal rights, and you may
also have other rights which vary from state to state.
Sears Roebuck and Co.
Hoffman Estates, IL 60179
Sears Installation Service
For Searsprofessional installationof homeappliances, garage
door openers, water heaters, and other major home items, in the
U.S.A. call 1-800-4-MY-HOME®
CALIFORNIA PROPOSITION65
1.Combustion by-productsproducedwhen using
this product containchemicals knownto theState of
Californiato cause cancer, birthdefects, andother
reproductiveharm.
2. This productcontainschemicals, including lead
and lead compounds,known to the Stateof Californiato
cause cancer,birth defectsor other reproductiveharm.
Wash your hands after handline this nroduct.
146.23676310,3

• NEVER store a spare LP cylinder under or near the
al )liance or in an enclosed area.
• Never fill a cylinder beyond 80%full.
• If the information in the two points above is not
followed exactly, afire causing death or serious
injury may occur.
• An overfilled or improperly stored cylinder is a
hazard due to possible gas release from the safety
relief valve. This could cause an intense fire with
risk of property damage, serious injury or death.
• If you see, smell or hear gas escaping, immediately
get away from the LP cylinder and appliance and
call your fire department.
LP Tank Removal, Transport And Storage
• Turn OFF all control knobs and LP tankvalve. Turn coupling
nut counterclockwise by hand only - do not use tools to
disconnect. Lift LP tank wire upward off of LP tank collar, then
lift LP tank up and off of support bracket. Installsafety cap onto
LP tank valve. Always use cap and strap supplied with valve.
Failure to use safety cap as directed may result in serious
personal injury and/or property damage.
LP TankValve
_Safety Cap
"_-_% RetainerStrap
• A disconnected LP tank in storage or being transported must
have a safety cap installed (as shown). Do not store an LP
tank in enclosed spaces such as a carport, garage, porch,
covered patio or other building. Never leave an LP tank inside
a vehicle which may become overheated by the sun.
• Do not store an LPtank in an areawhere children play.
LP Cylinder
•The LP cylinder used with your grill must meet the
following requirements:
• Use LP cylinders only withthese required measurements: 12"
(30.5cm) (diameter) x 18"(45.7 cm) (tall)with 20 lb. (9 kg.)
Capacity maximum.
• LP cylinders must be constructed and marked in accordance
with specifications for LP cylinders of the U.S. Department of
Transportation (DOT) or for Canada, CAN/CSA-B339,
cylinders, spheres and tubes for transportation of dangerous
goods. Transport Canada (TC). See LP cylinder collar for
marking.
• LP cylinder valvemust have:
• Type 1outlet compatible with
regulator or grill.
•Safety relief valve.
•UL listed Overfill Protection
OPDHandWheel
Device (OPD). This OPD safety
feature is identified by a unique triangular hand wheel. Use
only LP cylinders equipped with this type of valve.
• LP cylinder must bearrangedfor vapor withdrawal and
includecollar to protect LP cylinder valve.Always keep LP
cylinders in upright position during use, transit or storage.
i
LP cylinder in upright position for vapor withdrawal
LP (Liquefied Petroleum Gas)
• LP gas is nontoxic, odorless and colorless when produced. For
Your Safety, LP gas has been given an odor (similar to rotten
cabbage)so that it can be smelled.
• LP gas is highly flammable and may ignite unexpectedly when
mixed with air.
LP Cylinder Filling
• Use only licensed andexperienced dealers.
• LP dealer must purge new cylinder beforefilling.
• Dealershould NEVER fill LP cylinder morethan 80% of LP
cylinder volume. Volume of propane in cylinder will vary by
temperature.
•A frosty regulator indicates gas overfill. Immediately close LP
cylinder valve and call local LP gas dealer for assistance.
• Do not release liquid propane (LP) gas intothe atmosphere.
This is a hazardous practice.
•To remove gas from LP cylinder, contact an LP dealer or call a
localfire department for assistance. Check the telephone
directory under "Gas Companies" for nearest certified LP
dealers.
4,146.23676310

LP Tank Exchange Connecting Regulator To The LP Tank
• Many retailers thatsell grills offer you the option of replacing
your empty LP tank through an exchange service. Use only
those reputable exchange companies that inspect, precision fill,
test and certify their cylinders. Exchange your tank only for
an OPD safety feature-equipped tank as described in the
"LP Tank" section of this manual.
•Always keep new and exchanged LP tanks in upright position
during use, transitor storage.
• Leak test new and exchanged LP tanks BEFORE
connecting to grill.
1. LP tank must be properly secured onto grill. (Refer to
assembly section.)
2. Turn all control knobs to the OFF position.
3. Turn LP tank OFF byturning OPD hand wheel clockwise to a
full stop.
4. Remove the protective capfrom LP tank valve. Always use
cap and strap supplied with valve.
LP Tank Leak Test
For your safety
• Leak test must be repeated each time LP tank is exchanged
or refilled.
• Do not smoke during leak test.
• Do not use an open flame to checkfor gas leaks.
• Grill must be leak tested outdoors in a well-ventilated area,
away from ignition sources such as gas fired or electrical
appliances. During leaktest, keep grill awayfrom open
flames or sparks.
• Use a clean paintbrushand a 50150mildsoap and water
solution. Brush soapy solution onto areas indicated byarrows
in figure below. Leaks are indicated by growing bubbles.
SafetyRelief
/
Strapand Cap
OPDHandWheel
1 outlet with
threadon outside
If "growing" bubbles appear do not use or move the LP tank
Contact an LP gas supplier or your fire department!
ADo not use household cleaning agents. Damage to the gas
train components tvatve/hose/re¢lutator)can result.
Do not insert a POL transport plug
(plastic part with external threads)
into the type 1 valve outlet. It will
defeat the Safety Relief Valve
feature.
5. Hold regulator and insert nipple into LP
tank valve. Hand-tighten the coupling
nut, holding regulator in a straight line
with LP tank valve so as not to crossth-
thread the connection.
Nipplehas to becentered
into the LP tankvalve.
146.23676310,5

Holdcoupling nut and regulator
asshown for proper connection
to LP tank valve.
Leak Testing Valves, Hose and Regulator
1.Turn all grill control knobs to OFF.
2.Be sure regulator is tightly connected to LP tank.
&Completely open LP tank valve byturning OPD hand wheel
counterclockwise. If you hear a rushing sound, turn gas off
immediately. There isa major leak at the connection. Correct
before proceeding by callingfor replacement parts at
1-800-4-MY-HOME®.
4.Brush soapy solution onto areas where bubbles are shown in
picture below:
6. Turn the coupling nut clockwise and tighten to a full stop. The
regulatorwill seat on the back-checkfeature in the LPtank
valve, resulting in some resistance. An additional one-half
to three-quarters turn is required to complete the
connection. Tighten by hand only- do not use tools.
NOTE:
Ifyou cannot complete the connection, disconnect regulator
and repeat steps 5 and 6. If you are still unable to complete the
connection, do not use this regulator!
Call 1-800-4-MY-HOME®for an identicalreplacement part.
• Do not insert anytool orforeign object intothe valve
outlet orsafety reliefvalve. You maydamage the valve
and cause a leak. Leakingpropane may resultin
explosion,fire, severe personalinjury, ordeath.
• Outdoorgas appliance is notintendedto be installed
in or on a boat.
• Outdoorgas appliance is notintendedto be installed
in or on an RV.
• Never attemptto attachthis grill to the self-contained
LPgas system of a camper traileror motor home.
• Do not usegrill until leak-tested.
• If a leak is detectedat any time, STOPand callthe fire
department.
• If youcannot stop a gas leak, immediate/yclose
LPcylinder valve and call LP gassupplier oryour fire
department!
6,146.23676310
5. If "growing" bubbles appear, there is a leak. Close LP tank
valve immediately and retighten connections. If leaks cannot
be stopped do not try to repair. Callfor replacement
parts at 1-800-4-MY-HOME®.
6. Always close LP tank valve after performing leak test
by turning hand wheel clockwise.

For Safe Use of Your Grill and to Avoid Serious
InJury:
• Do not let childrenoperateor play neargrill
• Keep grill areaclear and free from materialsthat burn.
• Do not block holes in sides or backof grill.
• Use grill only inwell-ventilated space. NEVERuse in
enclosedspace such as carport,garage, porch,
covered patio, or underan overheadstructureof any
kind.
• Do not use charcoalor ceramicbriquets ina gas grill.
(Unlessbriquets are supplied withyour grill.)
• Use grill at least 3 ft. from any wall or surface.
Maintain 10 ft. clearance to objects that can catch fire
or sources of ignition such as pilot lights on water
heaters, live electrical appliances, etc.
• Apartment Dwellers:
Checkwith managementto learnthe requirementsan(
fire codesfor using an LPgas grill in your apartment
complex. Ifallowed, useoutside on thegroundfloor
with a three (3)foot clearancefrom walls or rails.Do
not useon orunder balconies.
• NEVER attempt to light burner with lid closed. A
buildup of non-ignited gas inside a closed grill i_
hazardous.
• Never operate grill with LP cylinder out of correct
position specified in assembly instructions.
• Always close LP cylinder valve and remove
coupling nut before moving LP cylinder from
specified operation position.
Safety Tips
• Before opening LP cylinder valve, check the coupling nut for
tightness.
• When grill is not in use, turn off all control knobs and LPcylinder
valve.
• Never move grill while in operation or still hot.
• Use long-handled barbecue utensils and oven mitts to avoid burns
and splatters.
• Maximum load for sideburner and side shelf is 10 Ibs.
• The grease tray must be inserted into grill and emptied after each
use. Do not remove grease tray until grill has completely cooled.
• Clean grill often, preferably after each cookout. If a bristle brush is
used to clean any of the grill cooking surfaces, ensure no loose
bristles remain on cooking surfaces prior to grilling. It is not
recommended to clean cooking surfaces while grill is hot.
• Ifyou notice grease or other hot material dripping from grill
Determine the cause, correct it, then clean and inspect valve,
Keep ventilation openings in cylinder enclosure (grill cart) free and
clear of debris.
• Do not store objects or materials inside the grill cart enclosure that
would block the flow of combustion air to the underside of either
the control panel or the firebox bowl.
• The regulator may make a humming or whistling noise during
operation. This will not affect safety or use of grill.
• Ifyou have a grill problem see the "TroubleshootingSection't
• Ifthe regulatorfrosts, turn off grill and LP cylinder valve
immediately. This indicates a problem with the cylinder and it
should not be usedon any product.
• Putting out grease fires by closing the lid is not possible
Grills are well ventilated for safety reasons.
• Do not use water on a grease fire. Personal injury may
result. If a grease fire develops, turn knobs and LP
cylinder off.
• Do not leave grill unattended while preheating or burninc
off food residue on HI. If grill has not been regularly
cleaned, a grease fire can occur that may damage the
product.
Main Burner Ignitor Lighting
• Do not lean over grill while lighting.
1. Open lid during lighting.
2. Turn ON valve from source or tank.
3. Push and turn Ignition Burner control knobto _ HI and
immediately press and hold Electronic Ignition button.
4. If ignitiondoes NOT occur in 5 seconds, turn Ignition Burner
control knob OFF,wait 5 minutes, and repeat the lighting
instructions.
5. To Light Other Burnersturn control knob to HI.
If ignitordoes notwork, follow Match Lighting instructions.
After Lighting: Turn knobs to HI position for 5 minutesto
pre-heat grill. Then turn knob to desired setting for cooking.
146.23676310,7

Turn controls and gas source or tank OFF when not
in use.
CAUTION
If ignitiondoes NOT occur in 5 seconds,turn the burner
controls OFF, wait 5 minutes and repeat the lighting procedure.
Ifthe burner does not ignite with
The valve open, gas will contiune to flow out of the burner and
could accidently ignitewith risk of injury
Match-Liahtina
ADo not lean over grill while lighting.
1. Open lid during lighting.
2. Place match into match holder (hanging from side of cart).
Light match, place into lighting hole on left side offirebox.
3. Push in and turn right knob to Hi position. Be sure burner lights
and stay lit.
4. Light other burners follow with steps 3.
Sideburner Ignitor Lighting
ADo not lean over grill while lighting.
1.Open lid for side burner during lighting.
2.Turn on valve from source or tank.
3.Push and turn Side Burner control knob to _ HI and
immediately press and hold Electronic Ignition button.
4. If ignitiondoes NOT occur in 5 seconds, turn Side Burner
control knob OFF,wait 5 minutes, and repeat the lighting
instructions.
Sideburner Match Lighting
1.Open sideburner lid. Turn on gas at LP cylinder.
2.Place lit match near burner.
3.Turn sideburner knobto HI. Be sure burner lights and stays lit.
8°14623676310
Burner Flame Check
• Remove cooking grates and flame tamers. Light burners,rotate
knobs from HIGHto LOW. You should see a smatler flame in
LOWposition than seen on HIGH. Perform burner flame check
on sideburner, also. Always check flame prior to each use. If
only lowflame is seen refer to "Sudden drop or low flame" in
the TroubleshootingSection.
HI
LO
Turning Grill Off
•Turn all knobs to OFF position. Turn LP cylinder off by turning
Ignitor Check
•Turn gas off at LP cylinder. Press and hold electronic ignitor
button."Click" should be heard and spark seen each time
between collector box or burner and electrode. See
"Troubleshooting"if no click or spark.
Valve Check
• Important: Make sure gas is off at LP cylinder before
checking valves. Knobs lockin OFF position. To check
valves, first push in knobs and release, knobs should spring
back. If knobs do not spring back, replacevalve assembly
before using grill. Turn knobs to LOW position then turn back to
OFF position. Valves should turn smoothly.
Hose Check
• Before each use, checkto see if hoses are cut or worn.
Replace damaged hoses before using grill. Use only
valve/hose/regulator as specified in the parts list of this Use & Care
Guide.
General Grill Cleaning
• Do not mistake brown or blackaccumulation of grease and
smoke for paint. Interiors of gas grills are not painted at the
factory (and should never be painted). Apply a strong solution
of detergent and water or use a grill cleaner with scrub brush
on insides of grill lid and bottom. Rinse and allow to completely
air dry. Do not apply acaustic grill/oven cleaner to painted
surfaces.
• Porcelain surfaces: Because of glass-like composition, most
residue can be wiped away with bakingsoda/water solution or
specially formulated cleaner. Use nonabrasive scouring powder
for stubborn stains.
• Painted surfaces: Wash with milddetergent or nonabrasive
cleanerand warm soapy water. Wipe dry with a soft
nonabrasive cloth.
• Stainless steel surfaces: To maintain your grill's high quality
appearance, wash with mild detergent and warm soapy water
and wipe dry with a soft cloth after each use. Baked-on grease
deposits may require the use of an abrasive plastic cleaning
pad. Use only in direction of brushed finish to avoid damage.
Do not use abrasive pad on areas with graphics.
• Cooking surfaces: If a bristle brush isused to clean any of
the grill cooking surfaces, ensure no loose bristles remainon
cooking surfaces prior to grilling. It is not recommended to
clean cooking surfaces while grill is hot.

.
SPIDER ALERI'!
IMPORTANT: Always ensure that the venturi burner tubes
are clean. A venturi burner tube has a narrow area in
which spiders tend to build nests.
If you notice that your grill is getting hard to light or that
the flame isn't as strong as it should be, take the time to
check and clean the venturi's.
Spidersor smallinsectshavebeenknowntocreate"flashback"
problems.Thespidersspinwebs,buildnestsandlayeggsinthe
grill'sventuritube(s)obstructingtheflow ofgastotheburner.The
backed-upgascanigniteintheventuribehindthecontrolpanel.
Thisisknownasaflashbackanditcandamageyourgrillandeven
causeinjury.
Topreventflashbacksandensuregoodperformancetheburneranc
venturiassemblyshouldbe removedfromthegrillandcleaned
Storing Your Grill
•Clean cooking grates.
•Store in dry location.
•When LP cylinder is connected to grill, store outdoors in a
well-ventilated space and out of reach of children.
•Covergrill if stored outdoors. Choosefrom a variety ofgrill
covers offered by manufacturer once available.
•Store grill indoors ONLY if LP cylinder is turned off and
Disconnected, remove from grill and stored outdoors.
•When removing grill from storage, follow "Cleaning the Burner
Assemblj/instructions before starting grill.
Cleaning the Burner Assembly
Follow these instructions to clean and/or replace parts of burner
assembly or if you have trouble igniting grill.
1. Turn gas off at control knobs and LP cylinder
2. Remove cooking grates and heat diffusers.
3. Remove carryover tubes from rear of burners.
4. Remove cotter pin from rear of burners.
5. Carefully lift each burner up and away from valve openings.
We suggest three ways to clean the burner tubes. Use theone
easiest for you.
(A) (Bend a stiff wire (a light weight coat hanger works well)
intoa small hook. Run the hook through each burner
tube several times.
(B) Use a narrow bottle brushwith a flexible handle (do not
usea brass wire brush), run the brush through each
burner tube several times.
(C)Wear eye protection: Use an air hose to force air into
the burner tube and out the burner ports. Check each
portto make sure air comes out each hole
6. Wire brush entireouter surface of burner to remove
food residue and dirt.
7. Cleanany blocked ports with a stiffwire such as an
open paper clip.
8. Check burner for damage, due to normal wear and
corrosion some holes may become enlarged. If any
large cracks or holes are found replace burner.
VERY IMPORTANT: Burner tubes must reengage
valve openings. See illustrations below.
9. CarefutIyreptace burners.
10. Attach burnersto brackets with cotter pins.
11. Reposition carryover tubes and attach
to burners. Replace heat diffusers and
cooking grates.
146.23676310,9

Indirect Cooking
Poultry and large cutsof meat cook slowly to perfection on the grill
by indirect heat. Place food over unlit burner(s); the heat from lit
burners circulates gently throughout the grill, cooking meat or
poultry without the touch of a direct flame. This method greatly
reduces flare-ups when cooking extra fatty cuts because there is no
direct flame to ignite the fats and juices that drip during cooking.
1Burner Cooking
Cook with direct or indirect heat.
Best for smaller meals or foods
Consumes less fuel.
Indirect Cooking Instructions
• Always cook with the lid closed.
• Due to weather conditions, cooking times may vary. During
cold and windy conditions the temperaturesetting may
need to be increased to insure sufficient cooking
temperature.
• Place food over over unlit burner(s).
2 Burner Cooking
Great indirect cooking on low.
Produces slow, even heating.
Ideal for slow roasting and baking.
Food Safety
Food safety isa very important part ofenjoying the outdoor
cooking experience. To keepfood safe from harmful bacteria,
follow these four basic steps:
Clean: Wash hands, utensils, and surfaces with hotsoapy water
before and after handling raw meat and poultry.
Separate: Separate raw meats and poultry from ready-to-eat
foods to avoid cross contamination. Use a clean platter and
utensils when removing cooked foods.
Cook: Cook meat and poultry thoroughly to kill bacteria. Use a
thermometer to ensure proper internal food temperatures.
Chill: Refrigerate prepared foods and leftovers promptly. For
more information call: USDA Meat and Poultry Hotline at
1-800-535-4555 (In Washington, DC (202) 720-3333, 10:00 am
4:00 pm EST).
How To Tell If Meat Is Grilled Thoroughly
• Meat and poultry cooked on a grill often browns very fast
on the outside. Use a meat thermometer to be sure food
has reached a safe internal temperature, and cut into food
to check for visual signs of aloneness.
•Whole poultry should reach 180° F; breasts, 170° F. Juices
should run clear and flesh should not be pink.
• Hamburgers made of any ground meat or poultry should
reach 160° F, and be brown in the middle with no pink
juices. Beef, veal and lamb steaks, roasts and chops can
be cooked to 145° F. All cutsof porkshould reach 160° F.
• NEVER partially grillmeat or poultry and finish cooking
later. Cook food completely to destroy harmful bacteria.
•When reheating takeout foods or fully cooked meats like
hot dogs, grill to 165° F, or until steaming hot.
WARNING: To ensure that it is safe to eat, food must be cooked
to the minimum internal temperatures listed in the table below.
USDA_Recommended Safe Minimum Internal
Temperatures
Beef,Veal, Lamband Pork - Whole Cuts** 145° F
Fish 145° F
Beef,Veal, Lamband Pork - Ground 160° F
Egg Dishes 160° F
Turkey, Chicken & Duck- Whole, Pieces & 165°F
Ground
* United States Department of Agriculture
**Allow meat to rest three minutes before carving or consuming.
10,146.23676310

Key
A01
A02
A03
A04
A05
A06
A07
A08
A09
A10
All
A12
A13
A14
A15
A16
A17
A18
A19
A20
A21
B01
B02
B03
B04
B05
B06
Description Qty Part Number Key Description Qty Part Number
Side Burner Lid
Rotate Rod, Side Burner Lid
Side Burner Grid
Side Burner
Ignitor Wire, Sideburner
Side Burner Base
Right Side Shelf
Fascia, Right Side Shelf
Electronic Ignition Module
Control Panel
GasValve, Main Burner
Side Burner Hose
GasValve, Side Burner
Regulator
Manifold, Main Burner
Control Knob
Control Knob Bezel
Cotter Pin
Gas Tank Holder
Wheel
Hex Nut
FtatWasher
Hose Fixed Pin
Right LegAssembly
Axle Rod
Bottom Shelf
Back RaiI
1 40800065
2 40800118
1 40800119
1 40300121
1 40800120
1 40800063
1 40300054
1 40300047
1 40800122
1 40300033
4 40300210
1 40900210
1 40800116
1 408D00115
1 40300037
5 408D00112
5 40800034
10 110050
1 40800130
B07 Front Panel 2 40300057
B08 Leg Extender 2 40800127
B09 Tank Baffle 1 40800090
C01 Mater Holder 1 40800128
C02 Hose Retaining Pin 1 40800129
C03 Left LegAssembty 1 40300051
C04 Grease Cup 1 40800026
C05 Grease Cup Clip 1 40800131
C06 Grease Accumulate Panel 1 50500015
C07 Fascia, LeftSide Shelf 1 40300041
D01 LeftSide Shelf 1 40800040
D02 Lid Handle 1 40900012
D03 Bezel, Lid Handle 2 40900013
D04 Silicone Rubber Bumper 2 50300205
D05 Logo 1 40300106
D06 Temperature Gauge 1 40800104
D07 Bezel, Temperature Gauge 1 40800105
D08 Silicone Rubber Bumper 2 40700103
D09 Rotate Rod, Lid 2 50300207
E01 Lid 1 40300004
E02 Warming Rack 1 40300104
E03 Cooking Grate 2 40300101
E04 Hear Diffuser 4 40800023
E05 Flame Carry OverTube 3 40300019
E06 Main Burner 4 40700125
E07 Firebox 1 40300021
E08 IgnitorWire, Main Burner 1 40900207
2
3
3
1
1
1
1
1
40800124
110011
110018
40800134
40300064
408D00125
50500039
50500040
Not Pictured
Hardware Pack
Manual
40300218
40300219
If you are missing hardware or have
damaged parts after unpacking grill,
call 1-888-287-0735for replacement.
To order replacement parts after using grill,
call 1-800-4-MY-HOME®
146.23676310,11

{_-_
'7
jf '_ ---.
_o71 -o
_s- I"
÷÷.o÷_-oo
]2"146,23676310

READ AND FOLLOW THE INSTRUCTIONSBELOW TO CORRECTLY UNPACK GRILLPARTS FROM
SHIPPING BOX.
Step 1: Open shipping box by slicing down its edges with a box cutter, take out hardware pack and
manual from top(A and B). Remove all packing materials, take out one left leg assembly (C), take out
another right leg assembly(D), axle rod (E),warmingrack (F), back rail (G)and bottom shelf (H).
C
v A
B
D •
E
F
G
H
146.23676310,13

Step 2: Open grill lid and take out there boxes and take all parts out of boxes.
14,146.23676310

Step 3: Take out the cooking grates, Grease Accumulate Panel and Front Panels from the firebox.
146.23676310,15

PLEASE READAND FOLLOW THE INSTRUCTIONSCAREFULLYSTEP BY STEP
Tools Required:
• Adjustablewrench (notprovided)
• Screwdriver(not provided)
• 7/16"Combinationwrench (not provided)
• The followinghardware is providedin blister pack:
M4X10screw
Qty:24 pcs
M5X10screw
Qty:4pcs
M6X13screw
Qty: 16pcs
AAABattery
Qty:l pc
M5flat washer
Qty: 4 pcs
M6compressionwasher
Qty: 8 pcs
16 " 146.23676310

Bottom Shelf to Legs
[] Place bottom shelf end with cut out hole for LP cylinder between legs with axle holes. Attach to right and
left leg assemblies with (6) M4xlO screws. Do not fully tighten at this time. Cart will not be level. This will
be correctedwhen thefeet and wheels are installed.
Thescrewsusedinthisstep:
6pcsof M4xl0 screws
LeftLegAssembly
RightLegAssembly
Rear
Bottom Shelf
Front
Axle hole
146.23676310,17

Wheels and Leg Extenders to Cart
[] Turn assembly upside down.
[] Attach bottom shelf to four legswith (4) M6x13 screws.
[] Insertaxle rod through wheel and otherwheel. Attach with (1)Axle washer, nut and hitch pin.
[] Hammerleg extenders into left legs.
Thescrewsusedinthisstep:
1. 4pcsofM6x13screws:
Leg Extender Front
Leg Extender Rear
Washer
Axle Rod
/
/
/
Hitch Pin
18,146.23676310

Front Panel
Standcart upright.
Attach front panel to line up with top for cart with (8) M4xl0 screws.
Attach tank baffle to front left ieg and bottom shelf with (4) M4xl0 screws.
Frontof cart
Front of cart
/
!
146.23676310,19

Grill Head to Cart
[] This step requires two people to lift and position grill head onto cart.
[] Removethe tie wraps securing regulator hose to underside of grill head. Pull
hose and igniter wires out to side of grill head.
[] Carefullylower the grill head onto the cart. Make sure the regulator hoseand
igniter wires are hanging outside the cart. Open lid and attach head to cart with
(4) M6x13 screws and M6 compression washers.
Thescrewsusedinthisstep:
1. 4pcsofM6x13screws
2. 4pcsofM6compression
washers:
20,146.23676310

Left Side Shelf
[] Attach fascia to left side shelf with (2) M5xl0 screws, and M5flat washers. (A)
[] Hangshelf onto brackets on left side offirebox.
[] Attach shelf to firebox as follows:
- From inside to outside of firebox with (2) M6x13 screws and M6 compression washers. (B)
- From outside to insideof firebox with (2) M6x13 screws. (C)
[] Attach fascia to control panel with (1) M4xl0 screw.
Thescrewsusedinthisstep:
1. 2pcs of M5xlOscrews:
3. 4pcs ofM6x13screws:
4. 1pcofM4xl0 screw:
2. 2pcsofM5flat washers:
4. 2pcsofM6compressionwashers:
A
B C
146.23676310,21

Right Side Shelf
[] Removesideburner grate from sideburner before assembling and attaching the right side shelf.
[] Attach fascia to right side shelf with (2) MSxl0 screws, and M5 flat washers.(A)
[] Hang rightside shelf onto the brackets on right side of firebox.
[] Attach shelf to firebox as follows:
- From inside to outside of firebox with (2) M6x13 screws and M6 compression washers.. (B)
- From outside to inside of firebox with (2) M6x13 screws. (C)
[] Attach fascia to control panel with (1) M4xl0 screw. (C)
Thescrewsusedinthisstep:
1. 2pcs of M5xlOscrews:
3. 4pcs ofM6x13screws:
4. 1pcofM4xl0 screw:
2. 2pcsofM5flat washers:
4. 2pcsofM6compressionwashers:
A
®
B
C
22.146.23676310

Sideburner
[] Loosenside burner in side shelf. (B). To loosen, unscrew and remove two front screws
holding sideburner in place. (A). Note: Donot loosen electrode screw.
[] Removethe 2 pre-instatIed screws from the valve stem and set them aside. (C)
[] Insertvalve stem through hole in fascia. (D)Attach bezel to fascia and valve face with
previously removed 2 screws. Attach bezelwith black mark facing up (E).
[] Placesideburner tube overthe valve, making sure that valve is inside sideburner tube.(F)
[] Pushcontrol knob onto sideburner valve stem. (G)
[] Reattach sideburner to sideburner shelfwith the 2 previously removed screws. Replace
sideburner grate. (H)
[] Connect both igniterwires to the ignitermodule on the inside of the right fascia. To
connect, push igniter wire tips onto pins in igniter modute.(I)
[] Unscrew igniter cap from control panel. Insert(1) AAA battery (provided in blister pack)
into battery slot with positiveend (+)facing outward. Screw igniter cap back onto panel. (J)
146.23676310,23

HeatDiffusers,Cooking GrateandWarming Rack
[] Place heat diffusersover burners. Diffuserswill fit in firebox in either direction. Fit tabs in firebox front
throughslotsin diffusertips. Fitdiffusertips besidetabs in firebox rear.
[] Placecookinggratesontograte rests.
[] Insertwarmingrack intobracketsattop offireboxas shown.
._ Warming Racks
"I Cooking Grates
"I Heat Diffusers
24,146.23676310

Grease Cup Clip, Grease Cup and LP tank
[] Hanggrease cup clip from bottom of grease tray. Slide grease tray into bottom offirebox from back.
Make sure the grease drainage hole is on the right side, as seen from the back of the grill. Place
grease cup into grease cup clip.
[] Align back rail holeswith holes on back legsand firebox. Attach back rail with (4) M4xlO screws.
[] Feedthe regulator hose through the hose bracket on Right Front Leg and fix with cotter pin.
[] LPtank is sold separately. Use only with an OPD (Overfill Protection Device) equipped LP tank. Fill
and leak check before attaching to grill and regulator.
[] Place LP tank into hole in bottom shelf with tank collar opening facing to side as shown. Raise tank
holder to hold LPtank securely in place.
/
Thescrewsusedinthisstep:
4pcs of M4xlOscrews
I
Failureto install grease cup clip and cup will
cause hot greaseto drip from bottom of grillwith
risk offire or propertydamage.
Failure to install tank correctly
hoseto be damaged in operation.
may allow gas
146.23676310,25

EMERGENCIES: If a gas leak cannot be stopped, or afire occurs due to gas leakage,call the fire department.
Sasleakingfrom
._racked/cut/burnedhose.
SasleakingfromLP
._ylinder.
SasleakingfromLP
._ylindervalve.
SasleakingbetweenLP
._ylinderand regulator
._onnection.
Firecomingthrough
._ontrolpanel.
Sreasefireorcontinuous
_xcessiveflamesabove
._ookingsurface.
Troubleshooting
•Damagedhose.
•Mechanicalfailuredueto rustingor
mishandling.
•Failureofcylindervalvefrommishandling
or mechanicalfailure.
•Improperinstallation,connectionnot
tight,failureof rubberseal.
•Fireinburnertubesectionof burnerdue
toblockage.
•Toomuchgreasebuildupin burnerarea.
GASISSUES:
•TurnoffgasatLPcylinderoratsourceon naturalgassystems.Ifthe
hoseiscrackedor cutbutnotburned,simplyreplacevalve/ hose/
regulator.Ifthehoseisburned,thecausecouldbe otherthana
faultyvalve/hose/regulator.Discontinueuseofgrilluntila plumberor
gastechnicianhasinvestigatedandcorrectedtheproblem.
•ReplaceLPcylinder.
•Turnoff LPcylindervalve.ReturnLPcylindertogassupplier.
•Turnoff LPcylindervalve.Removeregulatorfromcylinderand
visuallyinspectrubbersealfordamage.SeeLPCylinderLeakTest
andConnectingRegulatorto theLP Cylinder.
•Turnoffcontrolknobsand LPcylindervalve.Leavelidopento allow
flamestodiedown.Afterfireisoutandgrilliscold,removeburner
andinspectforspidernestsor rust.SeeSpiderAlertandCleaning
theBurnerAssemblysectionsofthisUse& CareGuide.
•Turnoffcontrolknobsand LPcylindervalve.Leavelidopentoallow
flamestodiedown.Aftercooling,cleanfoodparticlesandexcess
greasefrominsidefireboxarea,greasetray,andothersurfaces.
Burner(s)willnotlight
usingignitor.
(SeeElectronicIgnition
Troubleshootingalso)
Continuedonnext
page.
•Tryingtolightwrongburner.
•Burnernotengagedwith controlvalve.
•Obstructioninburner.
•Nogasflow.
•VaporlockatcouplingnuttoLPcylinder.
•Couplingnutand LPcylindervalvenot
fullyconnected.
ELECTRICALISSUES:
•Electrodecrackedor broken;"sparksat
crack.
•Electrodetipnotinproperposition.
•Wireand/orelectrodecoveredwith
cookingresidue.
•Wiresarelooseor disconnected.
•Wiresareshorting(sparking)between
ignitorandelectrode.
•Deadbattery.
•Seeinstructionsoncontrolpanelandin UseandCaresection.
•Makesurevalvesarepositionedinsideofburnertubes.
•Ensureburnertubesarenotobstructedwithspiderwebsorother
matter.SeecleaningsectionofUseandCare.
•MakesureLPcylinderisnotempty.IfLPcylinderisnotempty,
referto"Suddendropin gasflow."
•Turnoff knobsand disconnectcouplingnutfromLP cylinder.
Reconnectand retry.
•Turnthecouplingnutapproximatelyone-halftothree-quarters
additionalturnuntilsolidstop.Tightenbyhandonly- do notuse
tools.
•Replaceelectrode(s).
MainBurners:
•Tipofelectrodeshouldbe pointingtowardgasportopeningon
burner.Thedistanceshouldbe 1/8"to1/4".Adjustifnecessary.
Sideburner
•Tipofelectrodeshouldbe pointingtowardgasportopeningon
burner,thedistanceshouldbe 1/8"to3/16".Adjustif necessary.
•Cleanwireand/orelectrodewith rubbingalcoholandcleanswab.
•Reconnectwiresor replaceelectrode/wireassembly.
•Replaceignitorwire/electrodeassembly.
•Replacewitha newAAA-sizealkalinebattery.
26,146.23676310

Troubleshooting (continueo)
Burner(s)willnotlight
usingignitor.
(SeeElectronicIgnition
Troubleshootingalso)
Burner(s)willnotmatch
light.
ELECTRONICIGNITION:
•Nospark,noignitionnoise.
•Nospark,someignitionnoise.
•Sparks,butnotatelectrodeoratfull
strength.
•SeeSectionIof ElectronicIgnitionSystem.
•SeeSectionIIof ElectronicIgnitionSystem.
•SeeSectionIll ofElectronicIgnitionSystem.
•Uselong-stemmatch(fireplacematch).
•See"GAS ISSUES:"on previouspage. •See"Match-Lighting"sectionofUseandCare.
•Matchwillnotreach.
•Impropermethodofmatch-lighting.
•Checkforgasin LPcylinder.
Suddendropin gas •Outofgas.
flowor lowflame.
•Turnoff knobs,wait 30secondsandlightgrill.Ifflamesare stilllow,
•Excessflow valvetripped, turnoff knobsandLPcylindervalve.Disconnectregulator.
Reconnectregulatorandleak-test.TurnonLPcylindervalve,wait
30secondsandthenlightgrill.
•Vaporlockatcouplingnut/LPcylinder •Turnoff knobsand LPcylindervalve.Disconnectcouplingnutfrom
connection, cylinder.Reconnectandretry.
Flamesblowout.
Flare-up.
Persistentgreasefire.
•Highor gustingwinds.
•Lowon LPgas.
•Excessflowvalvetripped.
•Greasebuildup.
•Excessivefatinmeat.
•Excessivecookingtemperature.
• Greasetrappedby food builduparound
burnersystem,
Flashback... •Burnerand/orburnertubesareblocked.
(fireinburnertube(s)).
Unabletofill LP
cylinder.
Oneburnerdoes
notlightfromother
burner(s).
•Turnfrontofgrilltofacewindor increaseflameheight.
•RefillLPcylinder.
•Referto"Suddendropingasflow"above.
•Cleanburnersandinsideofgrill/firebox.
•Trimfatfrommeatbeforegrilling.
•Adjust(lower)temperatureaccordingly.
•TurnknobstoOFF.TurngasoffatLPcylinder.Leavelid inposition
andletfire burnout.Aftergrillcools,removeandcleanallparts.
•Turnknobsto OFF.Cleanburnerand/orburnertubes.Seeburner
cleaningsectionof UseandCare.
•Somedealershaveolderfill nozzles
withwornthreads.
•Greasebuilduporfoodparticlesinend(s)
ofcarryovertube(s).
•Thewornnozzlesdon'thaveenough"bite"toengagethevalve.Try
a secondLPdealer.
•Cleancarry-overtube(s)withwirebrush.
146.23676310,27

Troubleshooting- ElectronicIgnition
SECTIONI
Nosparksappearat
anyelectrodeswhen
controlknobturnedto
; nonoisecanbe
heardfromspark
module.
Batterynotinstalled
properly.
Deadbattery.
Buttonassemblynot
installedproperly.
Faultysparkmodule.
•Checkbatteryorientation.
Hasbatterybeenused
previously?
Checkto insurethreadsare
properlyengaged.Button
shouldtravelupanddown
withoutbinding.
If nosparksaregenerated
withnewbatteryandgoodwir_
connections,moduleisfaulty.
•Installbattery(makesurethat"+"and"-"
connectorsareorientedcorrectly,with"+"endup
and"-"enddown.)
•ReplacebatterywithnewAAA-sizealkalinebattery.
•Unscrewbuttoncapassemblyandreinstall,making
surethreadsarealignedandengagedfully.
•Replacesparkmoduleassembly.
SECTIONII • Outputleadconnections • Are output connections • Removeandreconnectall outputconnectionsat
Nosparksappearat notconnected, onandtight? moduleandelectrodes.
anyelectrodeswhen
controlknobturnedto
' noisecanbe
heardfromspark
module.
•Outputleadconnections
notconnected.
•Electricalarcbetween
outputwiresandgrill
frame.
•Weakbattery.
•Electrodesarewet.
•Electrodescrackedor
Broken;"sparksatcrack"
SECTIONIII
Sparksarepresent
butnotatall
electrodesand/ornot
atfullstrength
•Areoutputconnectionson
andtight?
•Ifpossible,observegrillin
Darklocation.Operateignition
systemandlookforarcing
betweenoutputwiresandgrill
frame.
•Allsparkspresentbutweak
oratslowrate.
•Hasmoistureaccumulated
onelectrodeand/orin burner
ports?
•Inspectelectrodesforcracks.
•Removeandreconnectalloutputconnectionsat
moduleandelectrodes.
•Ifsparksareobservedotherthanfromburner(s),
wireinsulationmaybedamaged.Replacewires.
•Replacebatterywitha newAAA-sizealkaline
battery.
•Usepapertoweltoremovemoisture.
•Replacecrackedor brokenelectrodes.
28,146.23676310

MANUAL DE PROPIETARIO
BBQ PRO PARILLA DE GAS CON 4 HORNILLAS
Y HORNILLA LATERAL
Codigo de producto: 23676 / 0-05032629-7
Item: 146.23676310
Codigo de UPC: 182995000910
Fecha de compra: / /

Si sienteolora gas:
1. ¢ierre el pasode gas alaparato.
2.Apague toda llama al descubierto.
3.Abra latapa.
4. Si persisteel olor, alejese del aparatoy Ilame
inmediatamenteal proveedor local de gas o a los
bomberos.
1. Noguarde ni usegasolina ni otros liquidoso
gases inflamablescercade este ni de cualquier
otro aparato.
2. Noguarde untanque de gas propano,que no
este conectado, cercade este ni de cualquier
otro aparato.
Medidas de seguridad para la instalacion
• Porfavor,leaestemanualdelusuarioen sutotalidadantesde usarla
parrilla.
• Elincumplimientodelasense_anzasimpartidasen seriopuederesultar
en lesionescorporalesy/ o da_osmateriales.
• Algunaspartesdeestaparrillapuedentenerbordesfilosos.Porfavor,
useguantesprotectoresadecuados.
• Usela parrillaOnicamentecongaspropanoyconlaunidadreguladora/
dev_lvulasuministrada.
• Lainstalaci6nde la parrilladebecumplirconlasdisposicionesde los
c6digoslocales,o,ensudefecto,conel NationalFuel GasCode(o
Codigonacionalsobregasescombustibles),y lasnormasNFPA54
/ANSIZ223.1y NaturalGasandPropaneInstallationCode(C6digo
delainstalaciondelgasnaturaly delpropano),CSAB149.1.El
manejoyel almacenamientode loscilindrosdegaspropanosedebe
realizarde conformidadconel c6digosobregaspropanoNFPA/ANSI58
Nosedebeusarlaparrillaen vehiculosde recreoni enembarcaciones.
• Todoslosaccesoriosel_ctricos(talcomoel asador)debenestar
conectadosa tierradeconformidadconlosc6digoslocales,o conel
NationalElectricalCode(C6digonacionalsobreelectricidad),ANSI
/ NFPA70.Mantengatodocableel_ctricoo tuberiadesuministrode
combustiblealejadosdelassuperficiescalientes.
• EstaparrillaQnicamentecuentaconlacertificaci6ndeseguridadpara
serusadaen losEstadosUnidos.Nola modifiqueparausarlaen ningOn
otto lugar.Cualquiermodificaci6npuedeponerenpeligrosuseguridad.
IMPORTANTE:Esta parrillaespara usoexclusivoal aire librey no
esta destinadaa serinstaladaen o sobrevehiculosde recreoo
embarcaciones.
Comuniquese con el centro de servicio para parrillas para
solicitar ayuda o repuestos
Si tiene alguna pregunta o necesitaayuda durante el armado,
IDmenos at 1-888-287-0735. Habtar_ con un representante del
fabricante de Ia parrilIa. Para pedir piezas nuevas, Ilamea at
1-800-4-MY-HOME®.
Inscripciondel producto
NOTAPARAEL INSTALADOR:Dejaeste manualdel usuariocon el
cliente despu6sde la entregay / o instalaci6n.
NOTAA LOSCONSUMIDORES:Dejaeste manualdel usuarioen
un lugarconvenienteparafutura referencia.
Simbolos de seguridad
Lossimbolosy lascasillasilustradasm&sadelanteexplicanIo
que significacadaencabezado.Lea ycumpla Ioindicadoen los
mensajesque seencuentranen todoel manual.
IMPORTANTE: Llene lasiguiente informacion de inscripcion.
Numero de modelo
Numero deserie
Fecha de compra
Elnt_merode serieseencuentraenlaetiqueta
de especificacionesdela parrilla.
29,146.23676310
PELIGRO: Indica una situaci6n peligrosa inminente que,
de no evitarse, ocasionar_ la muerte o tesionesgraves.
ADVERTENCIA:Indicaunasituaci6npotencialmentepeligrosa
que,de no evitarse,podria causarla muerteo lesionesgraves.
CAUTION: Indica una situaci6n potenciatmentepeligrosa o
pr_ctica peligrosa que, de no evitarse, puede resuttaren
Iesiones menores o moderadas.

Por su propia seguridad...
Centro de servicio para parriiias...
Informaci6n de inscripci6n de ia garantia ...
Simbotos de seguridad...
Medidas de seguridad para la instataci6n...
Garantia Limitada BBQ PRO...
Uso y mantenimiento...
Lista de piezas ...
Vista esquematica de ias piezas...
Antes De La Asambtea...
Asambtea...
.29
.29
.29
.29
..29
.30
31-37
... 38
.. 39
40-42
43-52
Res'otuci6nde probtemas ...
.53-55
Contratos de protecci6n contra los gastos de reparaciones
Felicitacionesporunasabiaadquisici6n.SunuevoproductoBBQPROha
sidodisefiadoyfabricadoparaofrecerlemuchosafiosdefuncionamiento
fiable.Pero,comoocurrecontodoproducto,esposiblequeseanecesario
repararlodevezen cuando.Esaeslaraz6nporlaqueel contarconun
contratodeprotecci6ncontralosgastosdereparacionespuedeahorrarle
dineroymolestias.Adquieraahorauncontratode protecci6ncontralos
gastosdereparacionesy prot6jasecontralosinconvenientesy los
gastosinesperados.
Sucontratode protecci6ncontralosgastosdereparacionesincluye:
[] Servicioexpertoqueofrecennuestros10,000especialistasen
reparaciones.
[] Servicioilimitadosincargoporpiezasnipormanodeobraparatodas
lasreparacionesamparadasporelcontrato
[] Cambiodel producto,porunvalordehasta$1500,sinosepuede
repararsu productoamparadoporel contrato
[] Descuentode un25%delprecioregulardel serviciodemantenimiento
yde laspiezasutilizadasenel serviciodemantenimientoquenoest_n
amparadasporel contrato;adem_s,undescuentode un25%del
precioregularde loscontrolesdemantenimientopreventivo
[] Asistenciainmediataportelefono:Lo IlamamosSoluci6ninstantanea,
eslaasistenciatelef6nicaporpartedeunt6cnicodeSears.Imaginese
quesomosun "manualdepropietarioparlante."
Garantia completa de un aSo para la parrilla BBQ PRO
Siestaparrillafalladebidoa defectosde materialo demano
de obradentrodel plazode unafiodesdelafechade
compra,Ilameal 1-800-4-MY-HOME®?6ngratuita(o elcambiosi la
reparaci6nresultaimposiblede realizar).
LAS PARRILLASDECOCClONY DIFUSORESDECALOR: 1
afiodegarantia;nocubrecaidas,cincelado,rayaro dafiarla
superficie.
PIEZASDEACEROINOXlDABLE:1afiodegarantiacontrala
perforaci6n;nocubreproblemascosm_ticoscomo,arafiazoso
corrosi6nsuperficial.
TODASLAS OTRASPARTES:1afio degarantialimitada(incluye
peronolimitadoa, lasv_lvulas,marco,vivienda,carro,panelde
control,encendedor,regulador,mangueras).Nocubrecincelado,
arafiazos,corrosi6ngrietassuperficial,raspaduraso herrumbre.
Garantialimitada los quemadores
Garantiadecincoafios,desdelafechade compra,parael
cambio,sincargo,de todoquemadorqueseperforedebido
al 6xido.Luegodelprimerafiode lafechade compra,usted
debepagarel costodela manodeobraporla instalaci6n.
Elamparode todaslasgarantiasquedar_nuloysinvalorsi
laparrillaseusaalgunavez parafinescomercialeso de
alquiler.Estagarantiaesv_lida_nicamentesila parrillaseusaen
losEstadosUnidos.
Estagarantialeotorgaderechosespecificos,yes posible
que tengaotrosderechosquepuedenvariarde unestadoa
otro.
Sears Roebuck and Co.
Hoffman Estates, IL 60179
Servicio de instalacion
Para ta instalaci6n profesionatde electrodomesticos,
dispositivos para abrir puertas de cocheras, catentadoresde
agua, y otros artefactos para el hogar,en EE. UU., iiame at
1-600-4-MY-HOME®
Unavezquehayaadquiridolosserviciosquele ofreceelcontrato,le
bastar_ unaIlamadatelef6icaparaconcertarunacitaparalas
reparaciones.PuedeIlamara cualquierhoradel diao de lanoche,o
puedeconcertarunacitaen linea.
Elcontratode protecci6ncontralosgastosde reparacionesesuna
adquisici6nsinriesgos.Si,poralgunaraz6n,Iocanceladuranteel
peridode garantia,lereembolsaremostodosudinero.O,despuesque
venzala garantia,le reembolsaremosunacantidadcalculadaa prorrata.
Compresucontratode protecci6ncontralosgastosde reparaciones
hoymismo!
Seaplicanalgunaslimitacionesyexclusiones.
Pidamayorinformaci6ny preciosIlamandoal 1-800-827-6655.
* LacoberturaenCanadavariaenalgunosarticulos.Paramas
informacion,IlameaSearsCanadaal 1-800-361-6665.
PROPOSIClON 65 DEL ESTADO DE CALIFORNIA
1.Subproductos de ia combusti6n generados al usar este
producto contienen sustancias quimicas conocidas en el
estado de California como causantes de cancer, defectos
de nacimiento y otros problemas reproductivos.
2. Este producto contiene quimicos, incluyendo ptomo y
sus compuestos, conocidos en el estado de California
como causantes de cancer, defectos de nacimiento u
otros dafios reproductivos.
Lavese las manos despues de manipular este.
146.23676310,30

• NUNCA guarde los cilindros de gas de repuesto debajo
del aparato, cerca del mismo, ni en _ireascerradas.
• Nunca cargue el tanque con m_isdel 80% de su
capacidad.
• Los tanques de gas propano de repuesto
sobrecargados o mal Ilenados son peligrosos, ya
que la v_ilvula de seguridad puede dejar salir gas.
Esto puede provocar incendios intensos que
pueden causar danos materiales, lesiones graves
o la muerte.
• Si observa, huele o escucha una fuga de gas,
alejese de inmediato del cilindro y del aparato, y
Ilame a los bomberos.
Remocion, transporte y almacenamiento del tanque de
gas propano
•CIERRE todas IasperilIas de control y Iav_lvuta del tanque.
Gire Iatuerca de uni6n en sentido contrario a tas agujas del
reloj, a mano sotamente; no use herramientas para
desconectarla. Afloje el tornilIo del tanque que se encuentra
por debajo de el estante inferior, y luego Ievante el tanque y
saquelo del carro. InstateIa tapa de seguridad en tav_lvula
del tanque de gas.
V_ilvula del tan(
de gas
Tapa de
seguridad
Use siempre Ia tapa y Iatira que vienen Tira de sujecion
con la v_lvuta. Los otros tipos de coflas o tapones pueden
dejar escapar el gas propano. Si la tapa de seguridad no se
usa tal como se indica, esto puede ocasionar lesiones o
danos materiales graves.
• Noguarde el tanque de gas en tugares donde jueguen los
niSos.
31,146.23676310
Tanque de gas propano
• El tanque de gas que use con su parrilla debe cumplir los
siguientes requisitos:
• Use _nicamentetanques degas que tengan tas siguientes
medidas obtigatorias: 12" (30.5 cm) (di_metro) x 18"(45.7
cm)(altura), con una capacidad maximade 20 lb. (9 kg).
• Debeestar fabricados y codificados seg_n las especiflcaciones
del Departamento de Transporte de los Estados Unidos (DOT),
para tanques de gas propano. El c6digo se encuentra en el
cotlarin del tanque de gas.
• La v_lvuta del tanque de gas debe tener:
• Unasatida de tipo 1,compatible con el
regutadoro Ia parrilIa.
• Una v_lvuta de paso de seguridad.
• Un dispositivo deseguridad
votumetrica (OPD por sus siglas
en ingles) certificado por UL. Esta
Manilladel dispositivo
caracteristica de seguridad OPD , de seguridadvolumetrica
se identifica mediante una manilIa ae Torma[rtangutar.use
unicamente tanques equipados con v_ilvulas de este tipo.
• El tanque de gas debe tener un dispositivo de extracci6n del
vapor y venir con un cotlarin para proteger su v_lvuta. Siempre
mantenga los tanques de gas en posici6n vertical durante su
uso, su transporte o su atmacenamiento.
Tanquede gasen posicion
vertical paraextraer el vapor
El gas propano (GLP)
• Esat6xico, inodoro e incotoro en et momentoen que se
produce. Por su propia seguridad, al gas propano se le ha
incorporado un otor (parecido al de Iacot podrida), de modo
que se pueda oter.
• El gas propano es sumamente inflamabtey se puede encender
en forma inesperadaat mezclarse conel aire.
Carga de los tanques de gas propano
• Recurra sotamente a vendedoresautorizados y con
experiencia.
• El vendedor de gas debe purgar el tanque nuevo antes de
cargarlo.
• El vendedor no debe cargar NUNCA et tanque de gas con m_s
del 80% de su votumen. Elvotumen de gas propano en el tanque
puede variar con la temperatura.
• Si el regutadorest_ empaSado,eso indica que et tanque est_
sobrecargado. Cierre de inmediato Iav_lvuta del tanque y
soticite ayuda del vendedor de gas propano.
• No deje escapar gas propanoa taatm6sfera. Cstaes una
pr_ctica peligrosa.
• Soticiteayuda del vendedor de propano o de los bomberos,
para vaciar el gas de su tanque. Identifique a los vendedores
autorizados de propano de su regi6n en ta secci6n de
"compaSiasde gas" de Iaguia telef6nica.

Cambiodeltanquedegas
•MuchoscomerciantesminoristasquevendenparriIIas,Ie
ofrecentaopci6ndecambiarsutanquedegasvaciomediante
unservicioderecambio.EmpleeOnicamenteempresasde
recambiodebuenareputaci6n,queinspeccionen,carguencon
precisi6n,verifiquenycertifiquensuscilindros.Cambiesu
tanques61oporotrostanquesequipadosconel
dispositivodeseguridadvolumetricaquesedescribeenla
secci6ndeTanques de gas de este manual.
• Siempre mantenga los tanques de gas, nuevos y de repuesto,
en posici6n vertical durante su uso, su transporte o su
atmacenamiento.
•Verifique que los tanques de gas, nuevos o de recambio,
no tengan fugas ANTES de conectarlos a la parrilla.
Prueba para detectar fugas del tanque degas propano
Por su propiasu sequridad
•Se debe efectuar Iaprueba para detectar fugas cada vez que
se cambie o se recargue el tanque.
• Nofume durante Ia prueba para detectarfugas.
• No use una llama atdescubierto para comprobar si el tanque
tiene fugas.
• La prueba paradetectar fugasde Ia parriIIase debe efectuar al
aire Iibre,en un area bien ventiIada, atejadade toda fuente de
ignici6n tat como los artefactos a gas o electricos. Durante la
prueba para detectar fugas, mantenga la parriIIa alejada de Ias
llamas at descubierto o de Ias chispas.
• Use una brocha de pintura Iimpia y una soluci6n de 50/50 de
agua y jab6n suave. Pintecon ta sotuci6njabonosa tas areas
indicadas por Ias flechas en taiIustraci6n que sigue.
burbujas que aumentan de tamaSo, no use ni mueva el tanque
Je gas. iComuniquese con el proveedor de gas propano o con Iosbomberos!
,&.No useproductos de limpieza del hogar. Esto puede daSar
los componentes del circuito de gas.
Como conectar el regulador al tanque degas propano
1. El tanque de gas debe quedar bien fijado a la parriIIa.(Lea ta
secci6n de ensambtado.)
2. Gire todas Ias periIIasde control a ta posici6n APAGADO
(OFF).
3. ClERRE el tanque de gas, girando IamaniIIade Iav_lvuta en
el sentido de Ias agujas del reloj, hasta que se detenga por
completo.
4. Retire Iatapa protectora de Iav_lvuta del tanque de gas. Use
siempre Iatapa y Ia tira que vienen con tav_lvuta.
Manilla del dispositivo
de seguridad volumetrica
tipo 1, con
rosca exterior
Valvula de seguridad
/
Tira y tapa
No use un tapon POL para
transporte (la pieza de plastico
con roscas en el exterior). Anulara
la caracteristica deseguridad de
la valvula.
5. Sostenga et regutadore inserte el
manguito de uni6n en ta v_lvutadel
tanque de gas. Apriete a mano Ia
tuerca de uni6n, mientras sostiene el
regutadoren linea recta con la v_lvuta
del tanque, para no sattar ninguna
rosca de Ia conexi6n.
El manguito de union debe
quedar centrado en la valvula
del tanque de gas.
146.23676310,32

Sostenga la tuerca de uniony el
regulador, como se ilustra, para
conectarlos bien a lavalvula del
tanque.
6. Gire Iatuerca de uni6n en el sentido de Ias agujas del reloj,
apretandota hasta que no se mueva mas. El regutador formar_
un sello en el dispositivo de seguridad de Ia v_lvuta del tanque
Io que crear_ cierta resistencia. Se debera hacer girar la
tuerca entre un cuarto y tres cuartos de vuelta adicionales
para completar la conexi6n. Aprietela a mano unicamente
-- no use herramientas.
NOTA:
Si no puede completar Ia conexi6n, desconecte el regutador y
repita los pasos 5 y 6. Si a pesar de haberlo hecho, todavia no
puede completar Ia conexi6n, ino use este reguladort
Prueba para detectar fugas de las valvulas, las mangueras y
el regulador
1. Gire todas las perillas de control de la parrilla a la
posicion deAPAGADO.
2. Cerci6rese de que el regulador este bienconectado al tanque
de gas.
3.Abra por completo Iav_lvuta del tanque, girando IamanilIa en
sentido contrario a tas agujas del reloj. Si escucha un sonido
de rafaga, cierre de inmediato el paso de gas. La conexi6n
tiene una fuga considerable. Corrija esta situaci6n antes de
continuar.
4. Aptique sotuci6njabonosa con ta brocha, en lasareas
marcadas con un circuto en ta ilustraci6nque sigue.
• No introduzca ninguna herramienta ni ningOnobjeto extrafio
en la satida de Iav_lvuta ni en tavalvuta de seguridad. Puede
dafiarta y causar una fuga. Lasfugas de gas propano pueden
causar explosiones,incendios, Iesionesgraves o Iamuerte.
• El aparato a gas para uso al aireIibre noha sido
disefiado para ser instatadoen embarcaciones.
• El aparato a gas para uso al aireIibre noha sido
disefiado para ser instatadoen vehicutos de recreo.
• Nunca trate de conectar esta parriIIaat sistema de gas
propano independiente de un remotque de recreoo de
una casa rodante.
• Nouse Ia parriIIasin antes haber verificado que no
tenga fugas.
• En caso de detectar unafuga en cuatquier momento,
DETCNGASE y IIamea los bomberos.
•Si no puede detener unafuga de gas, icierre de
inmediato la v_lvuta del tanque de gas y IIameal
distribuidor o a los bomberos!
33,146.23676310
5. Si aparecen burbujas que aumentan de tamafio, existe
una fuga. Cierre de inmediato Ia v_lvutadel tanque de gas
y vuelva a apretar Ias conexiones. Si no puede eliminar
las fugas, no intente repararlas. Soticite una pieza de repuesto.
Encargue Ias piezas nuevas indicando el nOmerode serie, de
modelo y el nombre de Ias piezas que requiera (vea ta tistade
piezas), llamando at centro de servicio para parrilIas at
1-800-4-MY-HOME®.
6. Despues de hacer una prueba para detectar fugas, cierre
siempre Iav_lvutadel tanque de gas, girando IamanilIa en el
sentido de Ias agujas del reloj.

Para usar su parrilla en forma segura y para evitar
lesiones graves:
• No deje quelos nifios usen taparriIIa ni que jueguen cerca
de la misma.
• Mantenga el area de IaparrilIa limpiay sin materiates
combustibles.
• Noobstruya losagujeros Iateratesni losde Ia parte
posterior de Ia parrilIa.
• Reviseperi6dicamente Ias llamas del quemador.
• Use Ia parriIIas6to en tugares bien ventiIados. NUNCA Ia
use en tugares cerrados tales como cocheras, garajes,
porches, patios techadoso debajo de superficies de ningt_n
tipo.
• No use carb6n ni briquetas de cer_mica en una parriIIaa gas
(Salvo que /as briquetas vengancon suparrilla,)
• Use la parrilla al menos a 3 pies de distancia de
cualquier pared o superficie. Deje unespaciode 10 pies
entre Ia parriIIay los objetos que puedan incendiarse o que
sean fuentes de ignici6n, tat como las llamas de encendido
de calentadores de agua, etectrodomesticos conectados, etc.
• Para personas que viven en apartamentos:
Pidate atadministrador que Ie indique los requisitosy los
c6digos contra incendios que corresponden atuso de
parriIIasde gas propano en un edificio de apartamentos. Si
se Ie permite usarla, hagalo at aire Iibre, en ta ptanta baja,
dejando un espacio Iibrede tres (3) pies entre Ia parriIIay Ias
paredes o Ias barandiIIas.NoIause en balconeso debajo de
los mismos.
• NUNCAtrate de encender el quernador con la tapa
cerrada. Las acurnulaciones de gas no encendido en las
parrillas tapadas son peligrosas.
• Nunca use la parrilla si el tanque de gas no esta en la
posicion correcta que se especifica en las instrucciones
de ensamblado.
• Siernpre cierre la valvula del tanque de gas y retire la
tuerca de union antes de mover el tanque del sitio
especifico de uso.
Consejos de seguridad
• Verifique que la tuerca de uni6n este bien apretada antes de
abrir la valvula del tanque de gas.
• Cuando no use la parrilla, derre todas las perillas de control
y la valvula del tanque de gas.
• Si la aplicad6n al aire libre del gas que cocina no es adentro uso, el gas se debe
dar vuelta apagado en el cilindro de la fuente. El almacenaje de una aplicad6n
al aire libre del gas que cocina dentro es permitido solamente si el cilindro se
desconecta y se quita de la aplicad6n.
• Nunca mueva la parrilla cuando la este usando o mientras este caliente.
• Use utensilios para parrilla de mango largo y guantes para hornear, para evitar
quemaduras y salpicaduras.
• El peso maximo que soportan los estantes laterales es 10 lb.
• La lata para la grasa debe estar colocada en su presilla, y se debe vaciar cada
vez, despues de usarla. No retire la lata para la grasa hasta que la parrilla se
haya enfriado por completo.
• Limpie la parrilla con frecuenda; de preferenda cada vez despues de usarla. Si
utiliza un cepillo de cerdas para limpiar las superficies para codnar, antes de
usar la parrilla verifique que no queden cerdas sueltas sobre estas. Se
recomienda no limpiar las superficies para cocinar cuando la parrilla este a_n
caliente.
• Si observa que de la parrilla caen gotas de grasa u otras sustandas calientes a
la valvula, la manguera o el regulador, cierre inmediatamente el paso de gas.
Establezca la causa, corrija el problema, limpie e inspecdone la valvula, la
manguera y el regulador, antes de proseguir. Haga una prueba para detectar
fugas.
• El regulador puede emitir un sonido zumbante o sibilante durante su uso. Esto
noafectara la seguridad niel uso de la parrilla.
• Utilice solamente el regulador de presi6n y el montaje de manguera provistos de
esta parrilla. El regulador de presi6n del reemplazo y los montajes de manguera
deben ser espedficados o provisto cerca.
• Si tiene un problema con la parrifla, lea lasecci6n de Reso/ucidn deprob/emas.
• Si el regulador se congela, apague inmediatamente la parfilla y cierre la valvula
del tanque de gas. Esto indica que existe un problema con el tanque y no debe
ser usado en otro producto, iDevuelvalo al proveedor!
CAUTION
• Noesposibleapagarlosfuegosprovocadosporlagrasacerrando
la tapa.Porrazonesdeseguridad,lasparrillastienenaberturasde
ventilaci6n.
•Nouseaguaparaapagarlosfuegosprovocadosporlagrasa.Esto
puedeocasionarlesiones.Sisurgeunfuegoprovocadoporlagrasa,
cierrelasperillasyel tanquede gas.
•Nodejedesatendidalaparrillacuandola est_precalentandoo
usandola altatemperaturaparaquemarlosresiduosde comida.Si
noseha limpiado,peri6dicamentela parrilla,sepuedepresentarun
fuegoprovocadoporlagrasa,quepuededafiaral producto.
Comousarel encendedor
ANo seincline sobrela parrilla cuando laeste encendiendo.
1.Abralatapaduranteelencendido.
2.Abraelgasenel tanqueo en lafuentedesuministro.
3.Optimay girelaperillade encendidodelquemador
lateralala graduaci6ndellamaALTA,e inmediatamoptimay
mantengaoprimidoel bot6nde Encendidoelectr6nico.
4.Si NOseenciendeen5 segundos,girela perilladecontroldel
quemadordel ladoizquierdoa laposici6ndeAPAGADO,espere5
minutosyrepitael procesode encendido.
5.Paraencenderlosotrosquemadores,girela perilladecontrolhasta
lagraduaci6nde llamaALTA.
Si elencendedornofunciona,sigalasinstruccionesdelencendido
conf6sforos.Despu_sdelencendido:Perillasdevueltaa HIposici6n
durante15minutosparaprecalentarparrilla.
146.23676310,34

Gire los controlesy lafuente de gas o OFF tanque cuando
no este en uso.
SiNOse enciendeen5segundos,gireloscontrolesdel
quemadora laposiciondeAPAGADO(OFF),espere5
minutosy repitael procesodeencendido.Siel quemador
noseenciendeconlavalvulaabierta,elgascontinuara
saliendoporelmismoy puedeencenderseaccidentalmente,
conel riesgodeocasionarlesiones.
Encendido con fosforos
ANo se incline sobre la parrilla cuando la este encendiendo.
1. Gire todas las perillas de control de las valvulas del quemador a la posici6n
de apagado OFF.
2. Abra la tapa durante el encendido. Abra el paso de gas desde el tanque.
3. Coloque un f6sforo encendido en el portaf6sforos, y luego en el orificio de
encendido con f6sforos ubicado en la parte inferior del lado de la parrilla,
(como se ilustra mas abajo).
4. Oprima y gire la perilla del QUEMADOR DE ENCENDIDO a la posici6n de.
Verifique que el quemadorse encienda y que permanezca encendido.
Encendido con fosforos
ANo se incline sobre la parrilla cuando laeste Encendiendo.
1.Abra latapao la cubiertadelquemadorlateralduranteel encendido.
2.Abrael gasenel tanqueo enla fuentedesuministro.
3.Optimaygire laperilladecontroldel quemadorlaterala la graduaci6n
dellamaALTA,e inmediatamenteoptimaymantengaoprimidoel
bot6nde Encendidoelectr6nico.
4.Si NOseenciendeen 5 segundos,gireel/loscontrol(es)delquemador
a laposici6nde APAGADO,espere5 minutosy repitael procesode
encendido.Sielencendedornofunciona,sigalasinstruccionesdel
encendidoconf6sforos.Despu_sdelencendido:Girelasperillashasta
laaraduaci6nde llamaALTA.Daracalentarla parrilla.
Encendido con fosforos
1.Sideburnertapaabierta.Enciendaelgasenel cilindroLP.
2.Lugarcerillacercadel quemador.
3. MandosideburnerGirea HI.AsegQresedequelaslucesdel
quemador,/se mantienenA
Control de la llama del quemador
• Retirelasparrillasdecocci6ny losreguladoresdellama.Encienda
losquemadoresy girelasperillas,dela graduaci6nALTA(HI)a la
graduaci6nBAJA(LO).Deber_verunallamam_sreducidaen la
graduaci6nbajaqueen lagraduaci6nalta.Controlesiemprelasllamas
antesdecadauso.Si s61oseobservanllamasbajas,leaIoreferentea
la Cafdarepentinade/as//areaso//areasbajasenla secci6nde
Resoluciondeproblemas. HI
LO
Como apagar la parrilla
• Giretodaslasperillasdecontrola la posici6ndeAPAGADO(OFF).
Control del encendedor
• Cierreel pasodegasdesdeel tanque. Presioneel bot6ndel
encendedorr&pidamente.Deber_oir unchasquidoyvet chispascada
vez,entrelacajade recolecci6noel quemadory elelectrodo.Encaso
de nooir chasquidosnivet chispas,leala seccionde Reso/udonde
problemas
Control de la valvula
• Importante:Cercioresedehabercerradoelpasodegasdesdeel
tanqueantesderevisarlasvalvulas.Lasperillassetrabanal Ilegara
laposici6nde APAGADO(OFF).Pararevisarlasv_lvulas,primero
presionelasperillasy luegosu_ltelas;lasperillasdebenregresarasu
posici6noriginal.DeIocontrario,cambiela unidadde lav_lvulaantes
de usarla parrilla.Girelasperillasa lagraduaci6nBAJA yluego
regr_selasa la posici6ndeAPAGADO.Lasv_lvulasdebengirar
suavemente.
Control de la manguera
•Antesdecadauso,verifiquequelasmanguerasnotengancortesni
est_ndesgastadas.Cambielasmanguerasdafiadasantesde usarla
parrilla.Uses61olav_lvula/ la manguera/ elreguladorespecificadopor
el fabricante.
Limpieza general de la parrilla
• Noconfundalaacumulaci6ndegrasayde humo,decolormarr6no
negro,conla pintura.Laparteinternadelasparrillasa gasno viene
pintadadef_brica(y nose debepintarnunca).Apliqueunasoluci6n
concentradadedetergentey deagua,o useun limpiadorparaparrillas
conuncepillode cerdasresistentes,cepillandola parteinternadela
tapade laparrillayel fondodela misma.Enju_guelosydejequese
sequencompletamenteal aire.Noaplique limpiadores causticos
paraparrillas / limpiadores de hornosa lassuperficiespintadas.
•Piezasplasticas:L_velasconaguajabonosatibiay s_quelas
.conunpatio.
•Superficies deporcelana:Debidoasucomposici6nvitrea,la mayoria
de losresiduossepuedeeliminarconunpatioempapadoenuna
soluci6nde bicarbonatodesodayagua,o conunlimpiador
especialmenteformulado.Useun polvolimpiadornoabrasivoparalas
manchasdificilesdeeliminar.
•Superficiespintadas:L&velasconundetergentesuaveo unlimpiador
noabrasivoy aguatibiajabonosa.S_quelasconun patiosuave,no
abrasivo.
•Superficiesparacocinar:Si utilizauncepillodecerdasparalimpiar
lassuperficiesparacocinar,antesdeusarlaparrillaverifiquequeno
quedencerdassueltassobre_stas.Se recomiendanolimpiarlas
superficiesparacocinarcuandolaparrillaest_aQncaliente.
35,146.23676310

CAUTION
iALERTA CONTRA LAS
Si usted nota que lees rods dificil encender la parrilla o que la
llama es rods ddbil de lo normal, examine y limpie los tubos Venturi.
_::_, :::::::::::::::::::::::::
.........................
Lasarafiasy losinsectospequefioshanproducido"fogonazos".
Lasarafiastejensustelas,hacensus nidosy ponensushuevos
en lostubosVenturidelasparrillas,queobstruyenel pasodel
gasalquemador.Elgasqueseacumuladentrode lostubos
Venturi,ubicadosenla parteposteriordeltablerodecontrol,se
puedeencender.A estose lellama"fogonazo",y puededafiarsu
parrillae,incluso,puedeproducirlesiones.
Paraevitarlosfogonazosygarantizarel buenfuncionamiento,
retirela unidaddelquemadorydeltuboVenturiy limpielosantes
de usarla parrilla,sinola hausadoduranteuntiempo
prolongado.
C6mo guardar su parrilla
• Limpie las parrilIas de cocci6n.
• Gu_rdela en un tugarseco.
• Cuando el tanque de gas este conectado a ta parrilIa, gu_rdeta
at aire Iibre,en un tugarbien ventilado y fuera del atcance de los
nifios.
• Cubra taparrilIa si Iaguarda at aire Iibre. Elfabricante tiene a su
disposici6n una variedad de cubiertas para parrilIas.
• SOLO guarde IaparrilIa bajo techo si se ha cerrado el paso y
desconectado el tanque de gas, retir_ndoto de IaparrilIa y
guardandoto at aire Iibre.
• Siga tas instrucciones sobre Como limpiar la unidad de/
'quemadorantes de encender Ia parrilIa,cuando Iamisma haya
estado guardada.
Como limpiar la unidad del quemador
Sigaestasinstruccionesparalimpiaro cambiarpiezasdela unidaddel
quemador,o sitieneproblemasparaencenderla parrilla.
1.Cierreelpasodegasenlasperillasdecontroly desdeel
tanquedegas.
2.Retirelasparrillasdecocci6ny Termodisipador.
3.Retirelostornillosy lostubosdearrastredela parteposteriorde
losquemadores.
4.Retirelostornillosy lasarandelasparadesconectarel quemadordel
soportedelac_marade combusti6n.
5.Retirelostornillosparadesmontarel electrododelquemador.El
electrododebepermaneceren lac_maradecombusti6n.
6.Levanteyretirecuidadosamentecadaquemadordelasaberturasdela
v_lvula.
Sugerimostres manerasde limpiarlostubosdel quemador.Sigalaque le
seam_sf_cil.
(A) Dobleunalambrerigido(unganchodealambrepararopasirvebien)
paraformarunganchopequefio.Pasevariasvecesel ganchoa trav_s
deltubode cadaquemador.
............. h
(B) Useuncepillodelgadode botella,de mangoflexible(nouseuncepillo
dealambrede lat6n),p_selovariasvecesa trav_sdel tubodecada
quemador.
(C)Useprotectores para la vista: Conunamangueraneum_tica,fuerce
el pasodelairea trav_sdeltuboyde lospuertosdelquemador.
Examinecadapuertoparaverificarqueel airesalgaa trav_sde cada
7.Cepilleconuncepillodealambretodala superficieexteriordel
quemadorparaeliminarlosresiduosdecomidayla suciedad.
8.Limpietodopuertoqueest_atascadoconunalambrerigido,talcomo
unsujetapapeles.
9.Examineel quemadorparadetectardafios;algunosorificiospueden
alargarsedebidoal desgastenormalya la corrosi6n.Si observa
grietasu orificiosgrandes,cambieelquemador.
MUYIMPORTANTE:Lostubosdelquemadorse debenvolvera
conectaren lasaberturasde lav_ilvula.Vealasilustracionesa la
derecha.
10.Vuelvaa colocarcuidadosamentelos ' ....
quemadores,
11.Fijelosquemadoresa lossoportesde la
c_marade combusti6n.
12.Vuelvaa colocarlostubosde arrastrey fije....
losquemadores,Cambielosreguladoresdellamay lasparrillasde
cocci6n,
146.23676310,36

Coccion indirecta
Las aves y los cortes grandes de came se cocinan tentamente a ta
perfecci6n en taparriIIa por cator indirecto. El cator de los
quemadores elegidos circula suavemente por IaparriIIa,cociendo
Iacame y Iasaves sin contacto directo con la llama. Este metodo
disminuye considerabtemente los fogonazos al cocer cortes de
came con mucha grasa, debido a que no hay llamadirecta que
incendie Ia grasa y losjugos durante Iacocci6n, during cooking.
Coccioncon 1 quemador
Cocine con calor directo o indirecto.
Es lo meior para porciones pequefias de comida o alimento.
Consume menos combustible.
Instrucciones para la coccion indirecta
•Siempre cocine con tatapa cerrada.
• Debidoalas condiciones del clima,el tiempo de cocci6n puede
variar. En tiempo frio y ventoso, es posibte que sea necesario
elevar Iagraduaci6n de Ia temperatura para garantizar una
suflciente temperatura de cocci6n.
Coccion con 2 quemadores
Excelente cocci6n con cator indirecto en graduaci6n baja.
Produce catentamiento lentoy uniforme.
Idealpara asar y hornear Ientamente.
Seguridad con los alimentos
Laseguridadconlosalimentosesunapartemuyimportantedel
disfrutedesu parrilladaal airelibre.Sigaestoscuatropasosb&sicos
paraprotegera losalimentoscontralasbacteriasnocivas:
Limpieza: L_veselasmanos,lavelosutensiliosy lassuperficiesconagua
jabonosacaliente,antesydespu_sde manipularcamesyavescrudas.
Separaci6n: Mantengalascamesy laspiezasdeavescrudasseparadas
delosalimentoslistosparacomer,paraevitarlacontaminaci6ncruzada.
Usebandejasy utensilioslimpiosparaservirlosalimentospreparados.
Cocci6n: Cocinebienlascamesy laspiezasde ave,paramatarlas
bacterias.Useunterm6metroparaverificarquelosalimentosalcancenla
temperaturaintemaadecuada.
Refrigeraci6n: Refrigereconprontitudlosalimentospreparadosy las
sobras.
ParamayorinformacionIlamea: la linea deinformacionsobre
carnesy avesdelMinisteriodeAgriculturadeEEUU,1-800-535-
4555.EnWashington,D.C.porel(202)720-3333,entrelas10.00y
las16.00horas,horanormaldelEste.EST.
Como saber cuando las carnes estan bien cocidas
•Elexteriorde lascarnesy laspiezasde avepreparadasa la parrillaa
menudosedorar&pidamente.Useunterm6metroparacarnes,para
verificarquelosalimentosalcancenunatemperaturainternasegura,y
cortelacameparaverificarvisualmentesi yaest&lista.
•Latemperaturadelasavesenterasdebealcanzar180° F;las
pechugas,170° F. Eljugode lasmismasdebesettransparenteyla
cameno debetenercolorrosado.
•Latemperaturadelashamburguesashechasconcamemolidade reso
deave,debealcanzar160° F,y elcolorde sucentrodebesermarr6n,
sinjugosde colorrosado.Losfiletes,asadosychuletasderes,de
terneray decorderosepuedenasara 145° F. Latemperaturadetodos
loscortesdecerdodebealcanzar160° F.
•NUNCAcocineparcialmentelaspiezasde cameode aves,para
terminardecocinarlasdespu_s.Cocinelosalimentos
completamente,paradestruirlasbacteriasnocivas.
•Cuandorecalientelosalimentosdecomidar_pidao lascamesya
cocidasporcompleto,_selosa 165° F,o hastaquehumeen.
ADVERTENCIA: Para asegurarse que Ia comida se pueda comer
sin peligro, debe cocinarse a tas temperaturas internas minimas
sefiatadas en tatabta siguiente:
USDA*Temperaturasinternas minimasde cocci6n
Came de vacuno,Ternera, Corderoy cerdo- 145° F
todocortes
Peces 145° F
Came de vacuno, Ternera, Cordero y cerdo 160°F
-Tierra
Platosde huevo 160° F
Turquia,Polio&Pato-Todo,Piezas&Tierra 165° F
* Departamentodeagriculturade EstadosUnidos
** Dejereposartresminutosantesde tallaroconsumirlascarnes.
37.146.23676310

CAN NUMERO
CLAVE DESCRIPCION TIDA
DE PIEZA
D
A01 Tapa Del Quemador Lateral 1 40800065
A02 De Tapa Superior Quemador Lateral 2 40800118
A03 Rejilla Del Quemador Lateral 1 40800119
A04 Quemador Lateral 1 40300121
A05 Cable Del Electrodo, Quemador Lateral 1 40800120
A06 Recipiente Para Jugos, Quemador Lateral 1 40800063
A07 Repisa Lateral Derecha 1 40300054
A08 Mascara, Repisa Del Lado Derecho 1 40300047
A09 Bot6n Del M6dulo De 1 40800122
A10 Tablero De Control Principal 1 40300033
All Valvula, Principal Sin Electrodo 4 40300210
A12 Manguera, Quemador Lateral 1 40900210
A13 Valvula, Quemador Lateral 1 40800116
A14 Regulador 1 408D00115
A15 Colector 1 40300037
A16 Perilla De Control 5 408D00112
A17 Marco, Perilla De Control 5 40800034
A18 Hitch Pin 10 110050
A19 Titular De La Cisterna 1 40800130
A20 Rueda 2 40800124
A21 Tuerca hexagonal 3 110011
B01 Arandela plana 3 110018
B02 Manguera Pin fijo 1 40800134
B03 Marco, Perilla De Control 1 40300064
B04 Varilla De Eje 1 408D00125
B05 Repisa Inferior 1 50500039
B06 Barra Posterior 1 50500040
CLAVE
B07
B08
B09
C01
C02
C03
C04
C05
C06
C07
D01
D02
D03
D04
D05
D06
D07
D08
D09
E01
E02
E03
E04
E05
E06
E07
E08
DESCRIPCION
CAN
TIDA
D
Protector Contra El Calor, De Combusti6n 2
Extensor de la pierna 2
Tanque De Confusi6n 1
Portaf6sforos 1
Soporte de la puerta 1
Unidad De La Pata Izquierda 1
Recipiente Para La Grasa 1
Presilla Para El Recipiente Para Lagrasa 1
Panel De Grasa De Drenaje 1
Mascara, Repisa Del Lado 1
Repisa Del Quemador Lateral 1
Asa De Tapa Superior 1
Bisel, mango de la tapa 2
Tope Posterior De Caucho Y Silicona 2
Placa Del Logotipo 1
Medidor De Temperatura 1
Marco Para El De Temperatura 1
Tope Posterior De Caucho Y Silicona 2
Rotar Bolt Bisagra DeTapa Superior 2
Tapa Superior 1
Rejilla Basculante 1
Parrilla de cocci6n 2
Termodisipador 4
Tubo De Arrastre Del 3
Quemador principal 4
Camara de combusti6n 1
Cable del encendedor, Quemador
1
principal
NUMERO
DE PIEZA
40300057
40800127
40800090
40800128
40800129
40300051
40800026
40800131
50500015
40300041
40800040
40900012
40900013
50300205
40300106
40800104
40800105
40700103
50300207
40300004
40300104
40300101
40800023
40300019
40700125
40300021
40900207
No se ilustra
Paquete De Herrajes 1 40300218
Manual Del Producto 1 40300219
Si le falta el hardwareoque han deterioradolas
partesdespuesdedesempaquetarparrilla,Ilameal
1-888-287-0735parasu sustitucion.
Sifalta oestada5adaalgunapieza,Ilameal
1-800-4-MY-HOME®,para su reposicion.
146.23676310,38

'\. •.J' -- ._ _ ..
'_ ;;7........
_- J
I-
/
39,146.23676310

POR FAVOR LEA Y SIGA LAS INSTRUCCIONES PARA EXTRAER LOS ACCESORIOS PEQUENOS DE UN
PAQUETE.
Paso 1: Caja de transporte abierta por cortado por los bordes con un cortador de cajas, sacar dos
pequenas cajas (A y B) de arriba. Quite todos los materiales de embalaje, Saque una Asamblea de la
pierna izquierda (C), sacar otra pierna derecha Asamblea (D), barra del eje (E), (F) de rejilla para calentar,
riel (G)y estante inferior (H).
C
v A
B
g •
E
F
G
H
146.23676310,40

Paso 2: Tapa de la parrilla abierta y tomar alli cajas y sacar todas las piezas de cuadros.
41.14623676310

Paso 3: Quite las rejillas para cocinar, Panel de acumular grasa y paneles frontales de la camara de
combustion.
146.23676310,42

POR FAVOR LEAY SIGA LAS INSTRUCCIONES CUIDADOSAMENTE PASO A PASO
Herramientasnecesarias para el armado:
• LIave inglesa (que no viene incluida)
• DestomilIador(que no viene incluida)
• LIave mixta de 7/16" (queno viene incluida) Maze de goma
• El hardwaresiguiente se presenta en blister:
Tornillos de M4X10
Cant.: 24 us
Tornillos de M5X10
Cant.: 4us
Tornillos de M6X13
Cant.: 16 us
Pilo AAA
Cant.: 1 us
Arandelas de fibra de M5
Cant.: 4 us
Arandelas
M6
Cant.: 8 us
de compresi6n de
43 _ 146.23676310

D Larepisa inferior a las patas
[] Coloque el extremo de la repisa inferior que tiene la abertura para el tanque entre las patas con los
orificios para el eje. Fijela alas unidadesde patas de lado derecho e izquierdocon (6) tornillos de
M4xl0. Noaprietetotalmenteen este momento.
t,,,,,,
Lostornillosutilizadosen este paso:
6 piezas de tornillos de M4xlO
Unidad de la pata izquierda
Unidad de la pata derecha
PartePosteriro
i__Pa_e delantera
Repisa inferior
Orificio para el eje
146.23676310• 44

Extensoresde pierna alcarroy ruedas
[] VolteeAsamblea.
[] Fije larepisainferiora cuatropatas contornillos deM6x13(4).
[] Insertarbarradel eje a trav6sde la rueday la otrarueda. Fijecon pasadorde enganche,la tuercay la
arandelade eje (1).
[] Martilloextensoresde piernaen piernasizquierdas.
Lostornillosutilizadosen este paso:
4 piezasdetornillosde M6x13
Extensorde patadelantero
Extensorde patatrasero
Extensorde patadelantero
/
/
Pasador de
acoplamiento
Separador
de rueda
Arandela
paraeleje
45,146.23676310

Panelesdelanteros
_ Pongael carfitoen posici6nvertical.
Instaleel estribotraseroen la partesuperiordel carrito con(8) tornillos de M4xlO.Noapriete
DeflectortanqueAdjuntara los panelesfrontaly la plataformainferiorcon(4) tornillo deM4xlO.
Lostornillosutilizadosen este paso:
12piezasde tornitios deM4xlO
Parte delanteradel carro
Parte delanteradel carro
.-,4w
// x
\
/
146.23676310'46

H Cabeza alcarro de la parrilla
[] Estepasorequierede dospersonasparalevantar lacabezay la posici6nde la parrillaen la cesta.
[] Retirelas atadurassujetan la mangueradel reguladoren la parte inferiorde la cabezade la
parrilla.Tire de la manguera y encendedor alambresafueraal lado de la cabezade la parrilla.
[] Bajecuidadosamentelapartesuperiorde la parrillasobreel carrito.Compruebeque la mangueradel
reguladorquedecolgandofueradel carrito. Fijelacon (4) tornillosde M6x13y (4)Arandelasde compresion
Lostornillosutilizadosen este paso:
1. 4 piezasde tornillosde M6x13
2. 4 piezasdearandelasde
compresiondeM6
47°14623676310

Repisalateral Izquierdo
[] LafasciaAdjuntara la izquierdadel ladode la plataforma(2) tornillos de M5xl0, Arandelas de seguridadde M5. (A)
[] Alaizquierdaplataformalado a los soportesen el lado izquierdode la cajade fuego.
[] Adjuntarlafasciay de la plataformaizquierdaparacamarade combusti6nde la siguientemanera:
- Deafuerahaciaadentrocon (2) tomillos de M6x13,Arandelasde seguridadde M6yArandelas de fibra de M6.(B)
- Desdedentro haciafueracon (2)tornillos de M6x13yArandelas de compresion de M6..(C)
[] Parael panelde controlbaio el lado estantecon (1)tornillos de M4xl0.
Lostornillosutilizadosen este paso:
1. 2 piezas de tornillos de M5xlO
2. 2 piezasdeArandelasdefibra deM5
3. 4 piezasde tornillos de M6x13
4. 2 piezasde arandelasde compresiondeM6
5. 1 piezadetornillos de M4xl0
A
B C
146.23676310,48

Repisalateral derecha
[] Retirela rejillasideburnerde sideburnerantesde montaryla asignaci6nde la plataformalado derecho.
[] Adjuntara lafasciade la plataformalado derechocon(2) tornillos deM5xl0, Arandelasdefibra deM5.
[] Hangplataformalado derechoa lossoportesen el ladoderechode lacaja defuego.
[] Adjuntarlafascia yde laplataformaladoderechoal fog6n de lasiguiente manera:
- Deafuerahaciaadentrocon (2) tornillos de M6x13,Arandelasdefibrade M6. (B)
- Desdedentrohaciafueracon (2) tornillos de M6x13. (C)
[] Parael panelde control bajoel lado estantecon (1) tornillos de M4xl0. (C)
(A)
Lostornillosutilizadosen este paso:
6. 2 piezasde tornillosde MSxl0
7. 2 piezasdeArandelasdefibra deM5
8. 4 piezasde tornillosde M6x13
9. 2 piezasde arandelasde compresiondeM6
10. 1 piezadetornillosde M4xl0
A
B C
49,146.23676310

Quemador lateral
[] Aflojequemadorlateralen la plataformalateral. (B).Destornillary quitardostornillosy arandelasfrente
sideburnermantengaen su lugar.(A).Nota:Noaflojeel tornillodel electrodo.
[] Remuevala perillade la valvulay el biselde sideburnerde control.Pararetirarlo,tirede mandoen linea recta desde
la valvulade vapor. Desenrosquebiselde la carade la valvulay establecerlos dostornillosde lado. (C)
[] Insertela valvulaa trav6sdel agujeroen la fascia. (D)
[] Adjuntarbisela la fasciay la carade la valvulaconel previamenteeliminado2 tornillos.(E)
[] Sideburnertubolugarsobrela valvula,asegurandosede que lavalvula seencuentradentrodel tubosideburner
comose muestra.(F)
[] Perilladecontroldeempujeen la valvula devastagosideburner.(G)
[] SideburnerVuelvaa colocara la plataformasideburnerconlos2 tornillosquequit6anteriormentey arandelas.
Reemplacerejilla sideburner.(H)
[] Insertela puntapequefiade loscuatrocables principalesdel panelde control en cuatrode loscinco z6calosde
m6dulo. Insertela puntadel alambrepequefioquemadorlateralen la toma desesiones. Porel otrocablecon
grandespuntas,coloquela puntade doscablesa laterminaldedesnudosm6dulo.Conectela otrapuntade la
terminalen la partesuperiorde la valvulade controlde quemadorlateral. (I)
[] Tapade encendidoDesenrosquede panelde control,lnsertar (1)pilaAAA (presentaen blister)en la ranurade la
bateriacon el extremopositivo(+) haciaafuera.Tomillotapaencendidode nuevoen el panel.(J)
146.23676310,50

Difusoresde calor,Cooking Gratesy Parrilla de calentamiento
[] Coloquedifusoresde calorsobrelosquemadoresinsertandolas leng(Jetasenlas ranurasen la partedelantera
y la parteposteriorde la camarade combusti6n.
[] Coloquerejillaspara cocinarsobrela parrilladescansa.
[] Insertarrejillapara calentaren lossoportesen la partesuperiorde la camarade combusti6ntal comose
muestra.
Parrilladecalentamiento
Lasparrillasde coccion
Difusores de calor
51o146.23676310

[]
Presilla,recipientepara lagrasay Tanquede gas
Cuelguela presillaparael recipientepara lagrasadel fondode la camarade combusti6n,y coloqueel
recipienteen la presilla.
Alinearriel traseroagujeroscon agujerosen las patastraserasy la camarade combusti6n.Fijeel riel
traserocon losdostornillos M4xl0 (4).
[] Desenrosque el gancho de la manguera, coloque el tubo de reguladoren el interior del gancho, a
continuaci6n,aprietelostornillosen su lugar.
[] El tanquede gas propanose vendepor separado.Use Onicamenteun tanquede gas propanoequipado
con un dispositivo de seguridadvolum6trica(u OPDpor sus siglas en ingl6s). Lleneel tanquey reviselo
para detectarfugas, antesde instalarloen la parrillay de instalarleel regulador.Coloqueel tanquede gas
en la repisa inferior, con la aberturadel protectordel mecanismode conexi6norientada hacia un lado,
comose ilustra.Aumentartitulartanquepara sostenerel tanqueLP en sulugar.
t,,,1
Lostornillosutilizadosen este paso:
4 piezasdetornillosde M4xl0
Si noinstala el recipientepara la grasay su
presilla,gotearagrasa calientedesde el fondo de la
parrilla,Ioquepuedeocasionarel riesgo de
incendioo de dahosa la propiedad.
Si no se instalacorrectamente el tanquese puede
dahar la manguerade gas durante el suministro,Io
que puede ocasionarel riesgo de incendio.
146.23676310,52

EMERGENCIAS: Si nose puededetenerunafuga degas, osi ocurre unincendiodebidoa unafuga de gas,Ilamea los bomberos.
Fuga de gas de
mangueras quebradas,
cortadas o quemadas.
Fuga de gas del
cilindro.
Fuga de gas de la
valvula del cilindro de gas.
Fuga de gas entre
cilindro de gas y la
conexi6n del regulador.
Sale fuego a traves del
panel de control.
Hay continuamente
fuego de la grasa o
demasiadas llamas
sobre la superficie de
cocinar.
• Mangueradafiada.
• Fallamecanicadebido a la oxidaci6no
al maluso.
• Fallade lavalvula delcilindrodebidaa
realusoo a falla mecanica.
• Instalaci6ninadecuada,la conexi6nno
esta bien apre_da, falla delajunta de
caucho.
• Fuegoen la secci6ndel tubodel
quemadordebidoa un bloqueo.
• Demasiadagrasaacumuladaen la zona
del quemador.
• Cierre elgas en el cilindro o en la fuente de los sistemas de gas natural.
Si tiene todo tipo de desperfectos, pero no esta quemada, cambie la valvula/la
manguera/el regulador. Siesta quemada, deje de usar el producto hasta que
un plomero haya investigado la causa y haya hecho las correcciones.
• Cambie el cilindro de gas.
•Cierre lavalvula del cilindro de gas. Devuelva el cilindro al proveedor de gas.
•Cierre lavalvula del cilindro de gas. Retire el regulador del cilindro y examine
visualmente la junta de caucho para detectar cualquier dafio. Lea las seccione
tituladas Prueba #ara detectar fugas en un dlindro de[7as y Como conectar el
regulador al dlindro de gas.
• Cierre las perillas de control y la valvula del cilindro de gas. Deje abierta la
tapa para permitir que las llamas se extingan. Una vez que se haya extinguido
el fuego y la parrilla este fria, retire el quemador y examinelo para ver si tiene
nidos de arafias o herrumbre. Lea las paginas relativas a Lospeligros
naturales y la limpieza de la unidad de/quemador.
• Cierre las perillas de control y la valvula del cilindro de gas. Deje abierta la tap_
para permitir que las llamas se extingan. Una vez que se haya enfriado, limpie
las particulas de comida y laacumulaci6n de grasa en la parte interior de la
zona de la camara de combusti6n, de la lata para la grasa y de toda otra
superficie.
Resolucion de problemas
Elquemadoro los
quemadoresno se
enciende(n)al usarel
encendedor.
Continuaenla pagina
siguiente,
PROBLEMASDEGAS:
• Estatratandode encenderel quemador
equivocado.
• Elquemadornoesta conectadoa la
valvula de control.
•Obstrucci6nenel quemador.
• Nohayflujode gas.
• Hayvaporatrapadoen la tuerca de
uni6nal tanquede gas.
• Latuerca deuni6nyla v&lvuladel
tanquede gas noestan bien
conectadas.
PROBLEMAS DE ELECTRIClDAD:
• Electrodoquebradoo roto; salen
"chispasde la quebradura".
• Lapuntadel electrodono esta en
posici6ncorrecta.
• Lealas instruccionesen el panelde control yen la secci6n
titulada Usoy cuidado..
•Verifiqueque lasvalvulasest6n ubicadasdentrode lostubosde
losquemadores.
•Verifiqueque el tubode losquemadoresno est6 obstruidocon
telarafiasu otras materias.Leala secci6nde limpiezade Usoy
cuidado.
•Verifiquequeel tanqueno est6 vacio.Si el tanquede gasno esta
vacio,lea la secci6nreferentea la Cafdarepentinadelfldo de
gas.
•Cierrelas perillasy desconectela tuerca de uni6ndel tanque.
Vuelvaa conectarlay tratede nuevo.
•Girelatuercade uni6n entremediavueltay trescuartosde vuelta
adicionales,hastaque no la puedagirar mas.Apri_telaa mano
Onicamente,no use herramientas.
•Cambieel (los)electrodo(s).
Quemadoresprincipales:
• Lapuntadel electrododebeestar orientadahaciael agujerode
combusti6ndel quemador.La distanciadebeser de 1/8"a 1/4".
AjQstelasies necesario.
Quemadorlateral(si Iotiene)
• Lapuntadel electrododebeestar orientadahaciael agujerode
combusti6ndel quemador.La distanciadebeser de 1/8"a 3/169.
AjQstelasies necesario.
53,146.23676310

Resolucionde problemas(continuacion)
Elquemadoro los
quemadoresnose
enciende(n)al usarel
encendedor.
• Elcableo elelectrodoesta cubiertocon
restosde comida.
• Loscablesestanflojos o desconectados.
• Loscablesproducencortocircuitos
(chispas)entreel encendedory el
electrodo.
BOTONPULSADORPIEZOELI_CTRICO
Y GIRATORIO:
• El bot6npulsadorsepega en el fondo.
• Laperilla giratoriagira sin hacerclic.
• Haychispasentre el encendedory el
electrodo.
• Limpieel cabley el electrodoconalcoholdefrotar y un hisopo
limpio.
•Vuelvaa conectarloscableso cambiela unidadde
electrodo/cable.
•Cambielaunidaddel cabledelencendedor/ el electrodo.
•Cambieel encendedor.
•Cambielaperilla.
• Examineel aislamientode loscables yverifiqueque las
conexionesest6n bienhechas.Cambieloscablessi tienenrotoel
aislamiento.
• Lea"PROBLEMASDEGAS:"en la
• Useun f6sforode palitolargo(f6sforoparaencender
El quemadoro los p&ginaanterior, chimeneas).
quemadoresno se • Elf6sforono Ilegaal puntodeencendido. .Lealasecci6ndelimpiezadeUsoycuidado.
enciendenal usar • M6todoinadecuadode encendercon
f6sforos.
f6sforos.
Llamabaja,gotaen • Verifique que el tanque de gas este cargado.
• De vuelta apagado al control y las perillas del tanque, esperan 30
flujodel gas. segundos, perilla del tanque de la vuelta encendido lentamente, parrilla
ligera. Si las llamas siguen siendo bajas, de vuelta apagado alas perillas
del control y del tanque y desconecte el regulador. Vuelva a conectar el
regulador, perilla del tanque de la vuelta encendido lentamente, parrilla
ligera.
• De vuelta apagado al control y alas perillas del tanque y
desconecte el regulador. Vuelva a conectar el regulador, gire la
perilladeltanquelentamente,parrillaligera.
•Vientosfuertes. • Gireel frente de laparrillade modoque quedede caraal viento
•Seacab6el gas.
•Seactiv6la valvula porsobrecargade
gas.
• Hayvaporatrapadoen la conexi6nde
la tuerca de uni6ny el tanquede gas.
Llamasque se
apagan.
Fogonazos.
3roducidosporla
grasa.
Retornode lasllamas
• Bajoflujode gaspropano.
•Seactiv6la valvula porsobrecargade
gas.
•Acumulaci6nde grasa.
•Carne sumamentegrasosa.
•Temperaturade cocci6nmuyelevada.
•Grasaatrapadapor acumulaci6nde
restosde comidaalrededordel
sistema del quemador.
• Elquemadoro lostubos delquemador
(fuegoen el (los)tubo(s) estan obstruidos.
del quemador).
o aumentela graduaci6nde las llamas.
• Recargueel tanquede gas.
• LeaIoreferentea la Cafdarepentinadelfldo degasen la
secci6nanterior.
• Limpielos quemadoresyel interiorde la parrilla/ camarade
combusti6n.
• Desgraselacame antes de cocinarlaa la parrilla.
•Ajuste(baje)la temperaturasegOncorresponda.
•Cierrelas perillas.Cierreel pasode gas desdeel tanque.Dejela
tapaen susitio y deje quese apagueel fuego. Despu6sdeque
seenfrie la parrilla,retirey limpietodas laspiezas.
•Cierrelas perillas.Limpieel quemadoro lostubos delquemador.
Lea la secci6nde limpiezadel quemadorde U5oy cuidado.
\ •Aigunosvenaedoiesaegastienen ' i i,,.... i ] i ]i ]ii ] ii ii
i'!,ose pueu,e recargar _._, ;._ ,4_._._.4_ ,;_;..... _........ • LasDOqUlIlaSaesgas[aaasno [lenenSUflclen[eagarre para
el [anqueae gas _u4u,,,oo,_ ,,_.o,_uv,_]oo,,_u. ,oo,uo,_oo conectarsea lavalvula.Comuniquesecon otrovendedorde gas.
propano, gastadas.
Unquemadornose • Laacumulaci6nde grasao particulas • Girelas perillasen OFF.Apagueel gasen el cilindroLP.Dejala
enciendedesdeel de alimentosen el extremo(s)de tubo tapaen su posici6ny dejar queel fuegose queme. Despu6sde
quemadorotra (s). de pr6rroga(s).Fuegospersistentes, la parrillase enfrie,quitey limpietodas laspartes.
146.23676310.54

secr:s
Made in/Hecho en CHINA
Distributed by Sears, Roebuck and Co., Hoffman Estates, IL 60179
See our extensive assortment of outdoor living products
On-line at www.sears.com and www.kmart.com
-
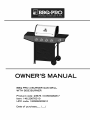 1
1
-
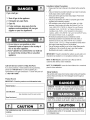 2
2
-
 3
3
-
 4
4
-
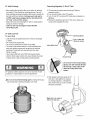 5
5
-
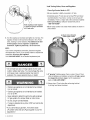 6
6
-
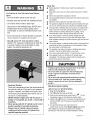 7
7
-
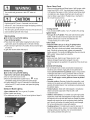 8
8
-
 9
9
-
 10
10
-
 11
11
-
 12
12
-
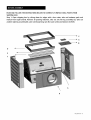 13
13
-
 14
14
-
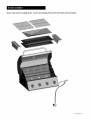 15
15
-
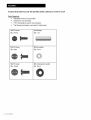 16
16
-
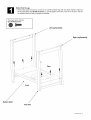 17
17
-
 18
18
-
 19
19
-
 20
20
-
 21
21
-
 22
22
-
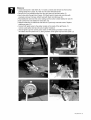 23
23
-
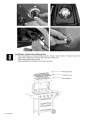 24
24
-
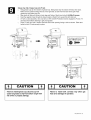 25
25
-
 26
26
-
 27
27
-
 28
28
-
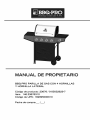 29
29
-
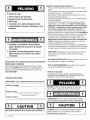 30
30
-
 31
31
-
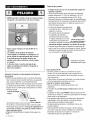 32
32
-
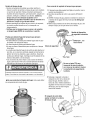 33
33
-
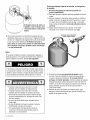 34
34
-
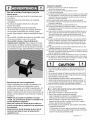 35
35
-
 36
36
-
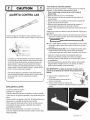 37
37
-
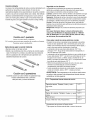 38
38
-
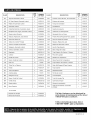 39
39
-
 40
40
-
 41
41
-
 42
42
-
 43
43
-
 44
44
-
 45
45
-
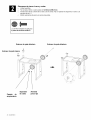 46
46
-
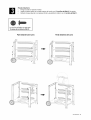 47
47
-
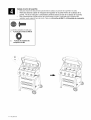 48
48
-
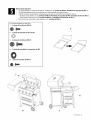 49
49
-
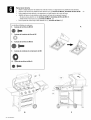 50
50
-
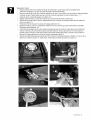 51
51
-
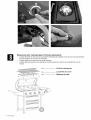 52
52
-
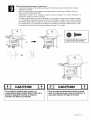 53
53
-
 54
54
-
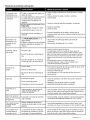 55
55
-
 56
56


Kenmore 146.23676310 El manual del propietario
- Categoría
- Barbacoas
- Tipo
- El manual del propietario
en otros idiomas
- English: Kenmore 146.23676310 Owner's manual
Artículos relacionados
-
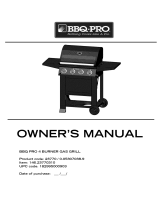 BBQ-Pro PG-40408OOLD El manual del propietario
-
Kenmore 146.23770310 El manual del propietario
-
-
-
Centro 640-05057299-9 Guía del usuario
-
-
-
-
-

Otros documentos
-
Charbroil 463277918 El manual del propietario
-
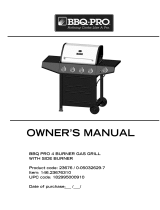 BBQ-Pro PG-40403SOL El manual del propietario
-
Char-Broil 463274016 El manual del propietario
-
-
Blackstone 1575 El manual del propietario
-
BBQ PG-CG004 El manual del propietario
-
 BBQ-Pro 720-0894 El manual del propietario

