Haier HC32TW10SB Manual de usuario
- Categoría
- Enfriadores de bebidas
- Tipo
- Manual de usuario
Este manual también es adecuado para

User Manual
Manual del usuario
HC32TW10SB
HC32TW10SV
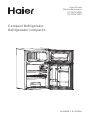
Compact Refrigerator
Refrigerador compacto
49-60808-1 03-18 GEA

49-60808-1
2

3
49-60808-1
TABLE OF CONTENTS
ENGLISH
REFRIGERATOR SAFETY ....................................................4
Proper Disposal of Your Old Refrigerated Appliance ..........................5
PARTS AND FEATURES ......................................................6
INSTALLATION REQUIREMENTS .............................................7
Location Requirements .....................................................7
Connecting Electricity ...................................................... 8
INSTALLATION INSTRUCTIONS .............................................9
Step 1 - Unpack Refrigerator. . . . . . . . . . . . . . . . . . . . . . . . . . . . . . . . . . . . . . . . . . . . . . . . . 9
Step 2 - Door Reversing ....................................................10
Step 3 - Align Door ........................................................ 12
Step 4 - Level Refrigerator ..................................................13
Step 5 - Complete Installation ..............................................13
REFRIGERATOR USE .......................................................14
Control ....................................................................14
Shelves ....................................................................14
Dispense-a-can ...........................................................15
Crisper ....................................................................15
Ice Trays ...................................................................15
REFRIGERATOR CARE .....................................................16
Cleaning ...................................................................16
Light Bulb Replacement ....................................................17
Defrosting and Draining ................................................... 17
Vacation and Moving .......................................................18
Reinstalling/Using Refrigerator Again .......................................20
TROUBLESHOOTING ...................................................... 21
LIMITED WARRANTY ......................................................22
RECORD KEEPING ........................................................24

49-60808-1
4
ENGLISH
Ŷ Use this appliance only for its intended purpose as described in this
user manual.
Ŷ This appliance must be properly installed in accordance with the
installation instructions before it is used. See grounding instructions in
the installation section.
Ŷ Plug into a grounded 3 prong outlet.
Ŷ Do not remove ground prong.
Ŷ Do not use an adapter or extension cord.
Ŷ Do not repair or replace any part of the appliance unless specifically
recommended in the manual. All other servicing should be referred to a
qualified technician.
Ŷ Disconnect power before servicing.
Ŷ Replace all parts and panels before operating.
Ŷ Use nonflammable cleaner.
Ŷ Do not store or use gasoline or other flammable vapors and liquids in
the vicinity of this or any other appliance.
Ŷ Do not store explosive substances such as aerosol cans with a
flammable propellant in this appliance.
Ŷ Before discarding or removing from service, remove the door. This will
reduce the possibility of danger to children.
Ŷ To avoid serious injury or death, children should not stand on, or play in
or with the appliance.
Ŷ Children and persons with reduced physical, sensory or mental
capabilities or lack of experience and knowledge can use this appliance
only if they are supervised or have been given instructions on safe use
and understand the hazards involved.
Ŷ This appliance is intended to be used in household and similar
applications such as: staff kitchen areas in shops, offices and other
working environments; farm houses; by clients in hotels, motels, bed
& breakfast and other residential environments; catering and similar
non-retail applications.
REFRIGERATOR SAFETY
CAUTION
To reduce the risk of injury when using your refrigerator,
follow these basic safety precautions.
Ŷ Keep fingers out of the “pinch point” areas; clearances between the
door and cabinet are necessarily small. Be careful closing door when
children are in the area.
Ŷ Do not refreeze frozen foods which have thawed completely.
Ŷ Do not touch the cold surfaces in the freezer compartment when hands
are damp or wet, skin may stick to these extremely cold surfaces.
IMPORTANT SAFETY INSTRUCTIONS
WARNING
To reduce the risk of fire, electrical shock, injury to
persons, or damage when using the refrigerator, follow
basic precautions, including the following:

5
49-60808-1
ENGLISH
STATE OF CALIFORNIA PROPOSITION 65 WARNINGS:
WARNING
This product contains one or more chemicals known to
the State of California to cause cancer and birth defects or other
reproductive harm.
REFRIGERATOR SAFETY
WARNING
EXPLOSION HAZARD Flammable Refrigerant
This appliance contains isobutane refrigerant, R600a, a natural
gas with high environmental compatibility. However, it is also
combustible. Adhere to the warnings below to reduce the risk of
injury or property damage.
1) When handling, installing and operating the appliance, care should be
taken to avoid damage to the refrigerant tubing.
2) Service shall only be performed by authorized service personnel. Use
only manufacturer-authorized service parts.
3) Dispose of refrigerator in accordance with Federal and Local
Regulations. Flammable refrigerant and insulation material used
require special disposal procedures. Contact your local authorities for
the environmentally safe disposal of your refrigerator.
4) Keep ventilation openings in the appliance enclosures or in the built-in
structure clear of obstruction.
5) Do not use mechanical devices or other means to accelerate the
defrosting process.
6) Do not damage refrigerant circuit.
7) Do not use electrical appliances inside the food storage compartment
of the appliance.
PROPER DISPOSAL OF YOUR OLD APPLIANCE
WARNING
SUFFOCATION AND ENTRAPMENT HAZARD
Failure to follow these disposal instructions can result in death or
serious injury.
IMPORTANT: Child entrapment and suffocation are not problems of the
past. Junked or abandoned appliances are still dangerous even if they
will sit for “just a few days.” If you are getting rid of your old appliance,
please follow the instructions below to help prevent accidents.
Before You Throw Away Your Old Appliance:
Ŷ Take off the door.
Ŷ Leave the shelves in place so that children may not easily climb inside.

49-60808-1
6
ENGLISH
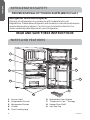
PARTS AND FEATURES
1. Interior Light
2. Temperature Control
3. Refrigerator Shelves
4. Crisper
5. Front Leveling Legs
6. Refrigerator Door Shelves
7. “Dispense-A-Can™” Storage
8. Freezer Door Shelf
9. Ice Cube Tray
Refrigerant and Foam Disposal:
Dispose of refrigerator in accordance with Federal and Local
Regulations. Flammable refrigerant and insulation material used require
special disposal procedures. Contact your local authorities for the
environmentally safe disposal of your refrigerator.
READ AND SAVE THESE INSTRUCTIONS
REFRIGERATOR SAFETY
PROPER DISPOSAL OF YOUR OLD APPLIANCE (Cont.)
൰
൬
൳
൭
൴
൮
൲
൯
൱

7
49-60808-1
ENGLISH
INSTALLATION REQUIREMENTS
WARNING
LOCATION REQUIREMENTS
IMPORTANT: This refrigerator is designed for freestanding installation
only. It should not be recessed or built-in an enclosed cabinet. To ensure
your refrigerator works at optimum efficiency, you should install it in a
location where there is proper air circulation, and electrical connections.
Explosion and Fire Hazard
Keep flammable materials and vapors, such as gasoline, away from
appliance.
Failure to do so can result in death, explosion or fire.
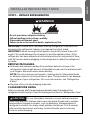
Recommended Clearances:
Ŷ Your refrigerator is designed for use in a location where the temperature
ranges from a minimum of 55°F (13°C) to a maximum of 110°F (43°C).
Ŷ It is recommended that you do
not install the refrigerator in
direct sunlight or near a heat
source e.g. radiators, baseboard
heaters, cooking appliances etc.
Ŷ Place the refrigerator on a floor
strong enough to support it fully
loaded. If the floor is uneven,
adjust the leveling legs so that
the refrigerator is level. See
“Level Refrigerator.”
4”
(10.2 cm)
4”
(10.2 cm)
4”
(10.2 cm)
LOCATION REQUIREMENTS
• Do not install the refrigerator where the temperature will go below
55°F (13°C) because it will not run often enough to maintain proper
temperatures.
• Do not install the refrigerator where the temperature will go above
110°F (43°C) because it will not perform properly.
• Install it on a floor strong enough to support it fully loaded.
• Do not install the refrigerator in a location exposed to water (rain,
etc.) or direct sunlight.

49-60808-1
8
INSTALLATION REQUIREMENTS
ENGLISH
Do not, under any circumstances, cut or remove the third (ground)
prong from the power cord. For personal safety, this appliance must
be properly grounded.
The power cord of this appliance is equipped with a 3-prong (grounding)
plug which mates with a standard 3-prong (grounding) wall outlet to
minimize the possibility of electric shock hazard from this appliance.
Have the wall outlet and circuit checked by a qualified electrician to make
sure the outlet is properly grounded.
Where a standard 2-prong wall outlet is encountered, it is your personal
responsibility and obligation to have it replaced with a properly grounded
3-prong wall outlet.
The refrigerator should always be plugged into its own individual
electrical outlet which has a voltage rating that matches the rating plate.
A 115 Volt AC, 60 Hz, 15- or 20-amp fused, grounded electrical supply
is required. This provides the best performance and also prevents
overloading house wiring circuits which could cause a fire hazard from
overheated wires.
Never unplug your refrigerator by pulling on the power cord. Always grip
plug firmly and pull straight out from the outlet.
Immediately discontinue use of a damaged supply cord. If the supply
cord is damaged, it must be replaced by a qualified service professional
with an authorized service part from the manufacturer.
When moving the refrigerator away from the wall, be careful not to roll
over or damage the power cord.
CONNECTING ELECTRICITY
WARNING
ELECTRICAL SHOCK HAZARD
Plug into a grounded 3-prong outlet.
Do not remove the ground prong.
Do not use an adapter.
Do not use an extension cord.
Failure to follow these instructions can result in death, fire, or
electrical shock.

9
49-60808-1
IMPORTANT: Handle with care when moving refrigerator to avoid either
damaging the refrigerant tubing or increasing the risk of a leak.
IMPORTANT: When moving the refrigerator, never tilt it more than a 45°
angle. This could damage the compressor and the sealed system. If the
refrigerator has been placed in a horizontal position for any period of time,
wait 30 minutes before plugging in the refrigerator to allow the refrigerant
to settle.
REMOVE PACKAGING
Ŷ Remove tape and glue residue from surfaces before turning on the
refrigerator. Rub a small amount of liquid dish soap over the adhesive with
your fingers. Wipe with warm water and dry.
NOTE: Do not use sharp instruments, rubbing alcohol, flammable fluids,
or abrasive cleaners to remove tape or glue. These products can damage
the surface of your refrigerator. For more information, see “Refrigerator
Safety.”
Ŷ Dispose of/recycle all packaging materials.
CLEAN BEFORE USING
After you remove all of the packaging materials, clean the inside of the
refrigerator before using it. See the cleaning instructions in “Refrigerator Care.”
ENGLISH
INSTALLATION INSTRUCTIONS
WARNING
STEP 1 - UNPACK REFRIGERATOR
Explosion and Fire Hazard
Do not puncture refrigerant tubing.
Follow handling instructions carefully.
Flammable refrigerant used.
Failure to do so can result in death, explosion or fire.
CAUTION
Do not clean glass shelves or covers with warm water
when they are cold. Shelves and covers may break if exposed to sudden
temperature changes or impact, such as bumping. Tempered glass is
designed to shatter into many small, pebble-size pieces. This is normal.
Glass shelves and covers are heavy. Use both hands when removing
them to avoid dropping.

49-60808-1
10
INSTALLATION REQUIREMENTS
ENGLISH
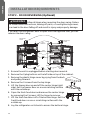
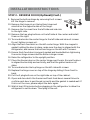
STEP 2 - DOOR REVERSING (Optional)
If you want the refrigerator door to open from the opposite side, you can
reverse the door swing.
1. Ensure the unit is unplugged before starting door reversal.
2. Remove the 2 plug buttons on the left side on top of the cabinet.
3. Remove the plastic hinge cover by prying from the back
and pulling forward.
4. Remove the 2 screws from the top hinge.
5. Lift the freezer door up and off the center hinge (right
side). Set the freezer door on a nonscratching surface
with the outside up.
6. Open the fresh food door and remove the center hinge
by removing the 2 screws. Lift the hinge to remove.
7. Lift the fresh food door off of the bottom hinge. Set the
fresh food door on a non-scratching surface with the
outside up.
8. Lay the refrigerator on its back to access the bottom hinge.
WARNING
Follow all steps when reversing the door swing. Failure
to follow these instructions, leaving off parts, or overtightening screws,
can lead to the door falling off and result in injury and property damage.
Turn
Turn
Plug
Buttons
Plug
Buttons
Center
Hinge
Center
Hinge
Bottom
Hinge
Hinge
Pin
Hinge
Pin
Bottom
Hinge
Hinge and
Cover
Hinge and
Cover

11
49-60808-1
ENGLISH
INSTALLATION INSTRUCTIONS
STEP 2 - REVERSE DOOR (Optional) (Cont.)
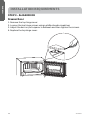
9. Remove the bottom hinge by removing the 3 screws.
Lift the hinge to remove.
10. Remove the hinge pin on the bottom hinge and
reinstall on the opposite side of the hinge.
11. Remove the 2 screws from the left side and relocate
to the right side.
12. Remove the two plug buttons on the left side at the center and install
them on the right.
13. Turn and relocate the center hinge to the left side and reinsert screws.
Do not tighten screws yet.
14. Align the fresh food door on the left center hinge. With the magnetic
gasket holding the door in place, make sure the door is aligned with the
refrigerator, and secure the bottom hinge on the left with 3 screws.
15. Ensure fresh food door is properly sealed and leveled before tightening
the center hinge screws and the bottom hinge screws.
16. Raise the refrigerator to the upright position.
17. Place the freezer door on the center hinge over the pin. Ensure the door
is aligned horizontally and vertically, and that the gasket seals on all
sides.
18. Turn and relocate the top hinge on the left side with screws.
19. Replace the hinge cover on top of the hinge by sliding it from front to
back.
20. Put the 2 plug buttons on the right side on top of the cabinet.
21. Open and close both the freezer and fresh food doors several times to
confirm each door is positioned correctly and the gasket is sealed well. If
this is not the case, please adjust the door again.
22. Wait at least 30 minutes before plugging in the refrigerator to allow the
refrigerant to settle down. Then plug in the unit.

49-60808-1
12
INSTALLATION REQUIREMENTS
ENGLISH
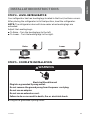
STEP 3 - ALIGN DOOR
Freezer Door
1. Remove the top hinge cover.
2. Loosen the top hinge screws using a phillips head screwdriver.
3. Adjust the door or put a spacer in between and then tighten the screws.
4. Replace the top hinge cover.

13
49-60808-1
ENGLISH
INSTALLATION INSTRUCTIONS
STEP 4 - LEVEL REFRIGERATOR
Your refrigerator has two leveling legs located in the front, bottom corners.
After placing the refrigerator in its final position, level the refrigerator.
NOTE: The refrigerator door will close easier when leveling legs are
extended.
Adjust the Leveling Legs:
Ŷ To Raise – Turn the leveling legs to the left.
Ŷ To Lower – Turn the leveling legs to the right.
Raise Lower
Ŷ Plug into a grounded 3 prong outlet.
STEP 5 - COMPLETE INSTALLATION
WARNING
Electrical Shock Hazard
Plug into a grounded 3 prong outlet.
Do not remove the ground prong from the power cord plug.
Do not use an adapter.
Do not use an extension cord.
Failure to do so can result in death, fire or electrical shock.

49-60808-1
14
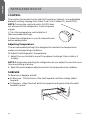
CONTROL
The control, located at the top right of the interior cabinet, is an adjustable
dial with settings ranging from Least Cold (1) to Coldest (7), and 0 (OFF).
NOTE: Turning the control knob to 0 (OFF) does
not disconnect the refrigerator from the power
supply.
1. Turn the temperature control dial to 4
(Recommended Setting).
2. Allow the refrigerator to cool for several hours
before adding food.
Adjusting Temperature
The recommended setting (4) is designed to maintain the temperature
under normal operating conditions.
To Adjust the Refrigerator Temperature:
1. Adjust the control dial to one of the adjacent settings 2 (less cold) or 5
(colder).
NOTE: Except when starting the refrigerator, do not adjust the control more
than one setting at a time.
2. Wait 24 hours between adjustments for the temperature to stabilize.
SHELVES
To Remove or Replace a Shelf:
Ŷ To Remove - Tilt the front of the shelf upward, and then slowly slide it
forward.
Ŷ To Replace - Align the shelf with the supports and gently slide the shelf
toward the rear.
REFRIGERATOR USE
ENGLISH

15
49-60808-1
ENGLISH
REFRIGERATOR USE
DISPENSE-A-CAN ™
Your refrigerator is equipped with the convenient
“Dispense-A-Can™” compartment. Each compartment
will hold up to six cans. Simply load the cans from the top.
To dispense a can, simply draw one out from the bottom.
It is that easy.
CRISPER
Your refrigerator has a clear crisper. Grasp the top of the crisper and gently
slide our. Push back to replace.
ICE CUBE TRAY
Ŷ If ice cube tray freezes to the bottom of the compartment, pour a little
warm water around it to loosen it.
NOTE: Do not use boiling water, which can damage plastic parts, or
sharp metal objects such as a knife or screwdriver, which can damage the
cooling system tubing.
Ŷ Wash the ice cube tray in lukewarm water only. Do not wash in the
dishwasher.

49-60808-1
16
REFRIGERATOR CARE
ENGLISH
CLEANING
WARNING
Electrical Shock Hazard
Unplug your appliance or disconnect power before cleaning.
Failure to do so can result in death, electric shock or personal injury.
WARNING
Explosion Hazard
Use nonflammable cleaner.
Failure to do so can result in death, explosion or fire.
IMPORTANT: Do not use harsh chemicals, ammonia, chlorine bleach,
concentrated detergent, solvents, abrasives or metal scouring pads to clean
your product inside or out. They can damage and/or discolor the finish.
General
1. Unplug or disconnect power.
2. Wash interior surfaces, accessories, and outer frame with a solution of
warm water mixed with 3 - 4 tablespoons of baking soda.
NOTE: Before using cleaning products, always read and follow
manufacturer’s instructions and warnings to avoid personal injury or
product damage.
3. Rinse with clean, warm water.
4. Dry thoroughly with a soft cloth.
5. Plug in or reconnect power.

17
49-60808-1
ENGLISH
REFRIGERATOR CARE
Door Gaskets
Gaskets must be kept clean and pliable to ensure a proper seal.
Ŷ Clean door gaskets every 3 months with solution of baking soda and
warm water.
Ŷ Petroleum jelly applied lightly to the hinge-side gasket will keep the
gasket pliable and ensure a good seal.
Light Bulb Replacement
1. Switch off power to refrigerator.
2. Gently pull out the clear cover
3. Replace with same type light bulb rated at 15 watts.
4 . Push the clear cover back into place.
DANGER
DEFROSTING AND DRAINING
Explosion and Fire Hazard
Flammable refrigerant used.
Do not use mechanical devices to defrost freezer.
Do not puncture refrigerant tubing.
Failure to do so can result in death, explosion or fire.
For maximum energy efficiency, defrost freezer section whenever frost
accumulates to a thickness of 1/4" or more on freezer walls. Note that frost
tends to accumulate more during the summer months.
• To defrost freezer, remove food and ice cube tray from the freezer section.
Turn temperature control dial to "0" position. Defrosting may take a few
hours. To speed up defrost time, keep the door open and place a bowl of
warm water in the freezer.
¬Íøõìñê÷ëèçèéõòö÷úä÷èõúìïïäææøðøïä÷èÞöèä÷òúèï÷òúìóèòģèûæèöö
dripping water. Do not leave unattended.
• After defrosting, empty and wipe down the interior of the freezer. You may
now reset your refrigerator to the desired temperature and return food.

49-60808-1
18
VACATION AND MOVING
Vacation
If you will be away for an extended period of time and do not want to leave
the appliance on while you are gone, prepare it for your absence.
1. Remove all items.
2. Turn the temperature control to the 0 (OFF) position.
3. Unplug or disconnect power.
4. Clean the interior. See “Cleaning.”
5. Clean lid/door gaskets. See “Cleaning.”
6. Prop doors open, so air can circulate inside.
REFRIGERATOR CARE
ENGLISH

19
49-60808-1
Moving
If you are moving your refrigerator to a new home, prepare the appliance for
the move.
IMPORTANT:
Ŷ Handle with care when moving to avoid either damaging the refrigerant
tubing or increasing the risk of a leak.
Ŷ When moving the refrigerator, never tilt it more than a 45° angle. This
could damage the compressor and the sealed system.
1. Complete vacation preparation steps 1 through 5. See “Vacation.”
2. Take out all removable parts, wrap them well, and tape them together so
they don’t shift and rattle during the move.
3. Tape the lid/door closed and tape the power cord to the back of the
refrigerator.
ENGLISH
REFRIGERATOR CARE
WARNING
Explosion and Fire Hazard
Do not puncture refrigerant tubing.
Follow handling instructions carefully.
Flammable refrigerant used.
Failure to do so can result in death, explosion or fire.

49-60808-1
20
REFRIGERATOR CARE
ENGLISH
REINSTALLING/USING REFRIGERATOR AGAIN
IMPORTANT: If the refrigerator has been placed in a horizontal or tilted
position for any period of time, wait 30 minutes before plugging in the
refrigerator to allow the refrigerant to settle.
1. Clean refrigerator. See Cleaning.
2. Place refrigerator in desired location and level. See Installation
Instructions.
3. Plug into a grounded 3 prong outlet.
WARNING
Electrical Shock Hazard
Plug into a grounded 3 prong outlet.
Do not remove the ground prong from the power cord plug.
Do not use an adapter.
Do not use an extension cord.
Failure to do so can result in death, fire or electrical shock.

21
49-60808-1
ENGLISH
TROUBLESHOOTING
First try the solutions suggested here to possibly avoid the cost of a
service call.
PROBLEM POSSIBLE CAUSE(S) SOLUTION
Refrigerator
does not run.
Refrigerator is unplugged.
Plug refrigerator into a
grounded 3 prong outlet.
The circuit breaker is
÷õìóóèç¦÷øõñèçòģòõ÷ëè
fuse is blown.
Reset/Turn on circuit breaker
or replace fuse.
The temperature control
is in the 0 (OFF) position.
Turn the temperature control
to a setting between 1 and 7.
The compressor has
æüæïèçòģ
Wait 30 to 40 minutes to see
whether the compressor will
start.
Compressor
runs too
frequently
The room temperature is
hot and/or humid.
This is normal to maintain
constant temperature during
high temperature, humid days.
Refrigerator door is ajar. Close the door completely
The door gasket is not
sealing properly.
Clean the door gasket. See
Cleaning.
Frequent or prolonged
door openings.
Limit door openings to
maintain the internal
temperature.
Door is blocked open.
Rearrange or remove items
that are keeping the door from
closing completely.
Refrigerator light
does not work
Ùòúèõìöòģ Check power supply.
Bulb is not inserted
correctly
Tighten bulb in socket.
Bulb needs to be replaced Replace burned out bulb.
Door does not
close properly
Refrigerator is not level or
door is not aligned.
Level refrigerator or align the
door.
Door is blocked open.
Rearrange or remove items
that are keeping the door from
closing completely.
Food
temperature is
too warm
The door is opened
frequently.
Limit door openings.
A large amount of food was
recently added.
Allow time for recently added
warm food to cool.
The door is not sealing
properly.
Clean the door gasket. See
Cleaning.
The control is not set to a
cold enough temperature.
Adjust the temperature control
to a colder setting.

49-60808-1
22
TROUBLESHOOTING
First try the solutions suggested here to possibly avoid the cost of a
service call.
PROBLEM POSSIBLE CAUSE(S) SOLUTION
Food temperature
is too cold
The control is set to a too
cold setting.
Adjust the temperature to a
less cold setting.
Refrigerator has
an odor.
The refrigerator needs
cleaning.
Clean refrigerator. See
Cleaning.
Improperly wrapped food is
êìùìñêòģäñòçòõ
Wrap and seal food tightly
before storing in the
refrigerator.
Gurgling sound Refrigerant circulating
through the cooling coils.
This sound is normal.
Clicking The temperature control
æüæïìñêòñäñçòģ
This sound is normal.
Popping or
cracking sound
when compressor
comes on
Refrigerator is not level. Level the refrigerator. See
ÕèùèïìñêÒé÷ëèĥòòõìöøñèùèñ
you may need to place metal or
wood shims underpart of the
refrigerator.
The refrigerator is touching
a wall.
Move the refrigerator away
from the wall and re-level, if
necessary.
ENGLISH

23
49-60808-1
ENGLISH ENGLISH
LIMITED WARRANTY
12 Months on Parts and Labor
For 12 months from the date of original retail
purchase, GE Appliances will replace any part
of the refrigerator that fails due to a defect in
materials or workmanship. GE Appliances will
choose, at its discretion, to replace or service
the defective unit. Should GE Appliances
decide to service the unit, GE Appliances will
provide any part which fails due to a defect
in materials or workmanship free of charge,
along with any labor and related service
costs to replace the defective part. During
this period, should GE Appliances choose to
replace the unit, it may do so by providing you
with a certificate redeemable at a retailer for a
replacement product.
Product must be accessible, without
encumbrance and installed properly to receive
warranty repair service.
NOTE: This warranty commences on the
date the item was purchased, and the original
purchase receipt must be presented to the
authorized service representative before
warranty repairs are rendered.
FOR WARRANTY SERVICE
For US Customers, all warranty service must
be performed by our Factory Service centers
or an authorized Customer Care Technician.
To schedule service, call 1-877-337-3639.
Please have serial number and model number
available when calling for service.
In Canada, call 1.877.470.9174.
EXCLUSION OF IMPLIED WARRANTIES - Your sole and exclusive remedy is product
repair as provided in this Limited Warranty. Any implied warranties, including the implied
warranties of merchantability or fitness for a particular purpose, are limited to one year or
the shortest period allowed by law.
What is not covered by this warranty:
Service trips to your home to teach you how
to use the product.
Improper installation, delivery, or
maintenance.
Failure of the product if it is abused, misused,
or used for other that the intended purpose or
used commercially.
Loss of food due to spoilage.
Damage caused after delivery.
Replacement of house fuses or resetting of
circuit breakers.
Replacement of the light bulbs.
Damage to the product caused by accident,
fire, floods or acts of God.
Incidental or consequential damage caused by
possible defects in this appliance.
Product not accessible to provide required
service.
Associated costs when GE Appliances
chooses to issue the consumer a certificate
as a form of product replacement.

49-60808-1
24
LIMITED WARRANTY
RECORD KEEPING
For US Customers: This warranty is extended
to the original purchaser and any succeeding
owner for products purchased for home use
within the USA. If the product is located in
an area where service by a GE Appliances
Authorized Servicer is not available, you may
be responsible for a trip charge or you may be
required to bring the product to an Authorized
GE Appliances Service location for service.
In Alaska, the warranty excludes the cost of
shipping or service calls to your home.
Some states do not allow the exclusion or
limitation of incidental or consequential
çäðäêèöÝëìöúäõõäñ÷üêìùèöüòøöóèæìĤæ
legal rights, and you may also have other
rights which vary from state to state. To know
what your legal rights are, consult your local
òõö÷ä÷èæòñöøðèõäģäìõöòĦæèòõüòøõö÷ä÷èđö
Attorney General.
Warrantor US:
GE Appliances, a Haier company
For Customers in Canada: This warranty is
extended to the original purchaser and any
succeeding owner for products purchased in
Canada for home use within Canada. In-home
warranty service will be provided in areas
where it is available and deemed reasonable
by Mabe to provide.
Warrantor Canada:
MC Commercial, Burllington, Ontario,
L7R 5B6
Thank you for purchasing this Haier product.
This user manual will help you get the best
performance from your new refrigerator.
For future reference, record the model
number, serial number, and the date of
purchase. The model/serial number plate is
located on the inside wall of the refrigerator.
Staple your proof of purchase to this manual
to aid in obtaining warranty service if needed.
_______________________________________
Model number
_______________________________________
Serial number
_______________________________________
Date of purchase
ENGLISH

25
49-60808-1
ÍNDICE
ESPAÑOL
SEGURIDAD DEL REFRIGERADOR ..........................................26
Cómo deshacerse adecuadamente de su aparato refrigerador viejo ..............27
PIEZAS Y CARACTERÍSTICAS ..............................................28
REQUISITOS DE INSTALACIÓN .............................................29
Requisitos de ubicación . ...................................................29
Conexión de la electricidad ................................................ 30
INSTRUCCIONES DE INSTALACIÓN ........................................31
Paso 1 -Desempaque el refrigerador ........................................31
Paso 2 - Cambio del sentido de abertura de la puerta ........................32
Paso 3 - Cómo alinear la puerta ............................................ 34
Paso 4 - Cómo nivelar el refrigerador ........................................34
Paso 5 - Complete la instalación ............................................35
USO DEL REFRIGERADOR ..................................................36
Control ....................................................................36
Estantes ...................................................................36
“Dispense-A-Can™” Almacen ..............................................37
Cajón de Verduras ..........................................................37
Bandeja del cubo de hielo ...................................................37
CUIDADO DEL REFRIGERADOR ............................................38
Limpieza ...................................................................38
Reemplazo de la Lámpara de Luz ............................................39
Descongelamiento y desagüe ............................................. 39
Vacaciones y mudanzas ....................................................40
Cómo volver a instalar o usar el refrigerador nuevamente ....................42
SOLUCIÓN DE PROBLEMAS ................................................ 43
GARANTÍA LIMITADA .....................................................45
INFORMACIÓN A TENER EN CUENTA .......................................47

49-60808-1
26
ESPAÑOL
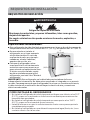
INSTRUCCIONES IMPORTANTES DE SEGURIDAD
ADVERTENCIA
Para reducir el riesgo de incendio, choque eléctrico,
lesiones a personas o daños al utilizar el refrigerador, siga precauciones básicas,
incluyendo las siguientes:
Ŷ Use este aparato solamente para el propósito que fue diseñado, como se
describe en este manual para el usuario.
Ŷ Esta centro de la bebida debe instalarse correctamente de acuerdo con las
instrucciones de instalación antes de que se use. Vea las instrucciones de
conexión a tierra en la sección de instalación.
Ŷ Conecte a un contacto de pared de conexión a tierra de 3 terminales.
Ŷ No quite el terminal de conexión a tierra.
Ŷ No use un adaptador o un cable eléctrico de extensión.
Ŷ No repare ni reemplace ningún componente del aparato a menos que se
recomiende específicamente en el manual. Todas las demás tareas de
mantenimiento deben ser realizadas por un técnico calificado.
Ŷ Desconecte el suministro de energía antes de darle servicio técnico.
Ŷ Vuelva a colocar todas las piezas y paneles antes de ponerlo en funcionamiento.
Ŷ Use un limpiador no inflamable.
Ŷ No guarde ni use gasolina u otros vapores inflamables y líquidos cerca de este
ni de otro electrodoméstico.
Ŷ No guarde sustancias explosivas tales como latas de aerosoles con
propelentes inflamables en este electrodoméstico.
Ŷ Antes de desechar o dejar de utilizar el aparato, quítele la puerta. Esto evitará
que los niños se lastimen.
Ŷ Para evitar lesiones graves o la muerte, los niños no se deberán parar sobre ni
jugar en o con el electrodoméstico.
Ŷ Los niños y las personas con capacidad física, sensorial o mental reducida o con
falta de experiencia y conocimiento podrán usar este electrodoméstico sólo
si son supervisados o les fueron dadas instrucciones sobre un uso seguro y
entienden los riesgos involucrados.
Ŷ Este electrodoméstico fue diseñado para uso hogareño y para aplicaciones
similares tales como: áreas de personal de cocina en tiendas, oficinas y otros
espacios laborales; casas de campo; por clientes en hoteles, moteles, hostales
y otros espacios residenciales, catering y aplicaciones no minoristas similares.
SEGURIDAD DEL REFRIGERADOR
PRECAUCIÓN
Para reducir el riesgo de lesiones al usar el refrigerador,
siga estas precauciones básicas.
Ŷ Mantenga los dedos fuera de las áreas de “pellizco”; Los espacios libres entre
la puerta y el gabinete son necesariamente pequeños. Tenga cuidado al cerrar
la puerta cuando los niños están en el área.
Ŷ No vuelva a congelar comidas que hayan estado totalmente congeladas en
forma previa.
Ŷ No toque las superficies frías del compartimiento del freezer cuando las
manos estén húmedas o mojadas, ya que la piel se podrá adherir a estas
superficies extremadamente frías.

27
49-60808-1
SEGURIDAD DEL REFRIGERADOR
ADVERTENCIAS DE LA PROPOSICIÓN 65 DEL ESTADO
DE CALIFORNIA
ADVERTENCIA
Este producto contiene uno o más químicos que el
Estado de California entiende que producen cáncer y defectos en el
nacimiento u otros daños reproductivos.
ADVERTENCIA
PELIGRO DE EXPLOSIÓN
Refrigerantes Inflamables
Este electrodoméstico cuenta con refrigerante isobutano, R600a, un gas
natural con alto nivel de compatibilidad medioambiental. Sin embargo,
también es combustible. Siga las advertencias que figuran a continuación, a
fin de reducir el riesgo de lesiones o daños sobre la propiedad.
1) Al mover, instalar y operar el electrodoméstico, se deberá tener cuidado de
no dañar la tubería del refrigerante.
2) El servicio técnico sólo debe ser realizado por personal autorizado del servicio.
Use sólo piezas del servicio autorizadas por el fabricante
3) Descarte el electrodoméstico de acuerdo con las Regulaciones Federales y
Locales. El refrigerante inflamable y el material aislante inflamable usados
requieren procedimientos de descarte especiales. Comuníquese con las
autoridades locales para descartar su refrigerador de forma ambientalmente
segura.
4) Mantenga las aberturas de ventilación en el espacio de protección del
electrodoméstico o en la estructura incorporada libres de obstrucción.
5) No use dispositivos mecánicos u otros medios para acelerar el proceso de
descongela miento.
6) No dañe el circuito del refrigerante.
7) No use dispositivos eléctricos dentro del compartimiento de almacenamiento
de comida del electrodoméstico.
DISPOSICIÓN APROPIADA DE SU ANTIGUO APARATO
ADVERTENCIA
PELIGRO DE ATRAPAMIENTO Y ASFIXIA
El incumplimiento de estas instrucciones de eliminación puede causar la muerte
o lesiones graves.
IMPORTANTE: El atrapamiento y
asfixia de niños no es un problema
del pasado. Un aparato refrigerador
desechado y abandonado es un
peligro, aún si va a quedar ahí “por
unos pocos días”. Si usted está por
deshacerse de su aparato refrigerador
viejo, siga las instrucciones a
continuación para evitar accidentes.
Antes de descartar su aparato
refrigerador viejo:
Ŷ Quite la puerta.
Ŷ Deje los estantes en su lugar así los
niños no pueden meterse adentro
con facilidad.
ESPAÑOL

49-60808-1
28
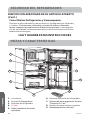
PIEZAS Y CARACTERÍSTICAS
LEA Y GUARDE ESTAS INSTRUCCIONES
SEGURIDAD DEL REFRIGERADOR
DISPOSICIÓN APROPIADA DE SU ANTIGUO APARATO
(Cont.)
ESPAÑOL
Cómo Eliminar Refrigerantes y Gomaespumas:
Descarte el electrodoméstico de acuerdo con las Regulaciones Federales
y Locales.
El refrigerante inflamable y el material aislante inflamable
usados requieren procedimientos de descarte especiales.
Comuníquese
con las autoridades locales para descartar su electrodoméstico de forma
ambientalmente segura
1. Luz interior
2. Control de Temperatura
3.
Estantes del refrigerador
4. Crisper
5. Patas niveladoras frontales
ajustables
6.
Estantes de puerta del refrigerador
7. Sistema de almacenamiento de latas
“Dispense-A-Can™”
8.
Estante de la puerta del congelador
9. Bandeja para cubos de hielo
൰
൬
൳
൭
൴
൮
൲
൯
൱

29
49-60808-1
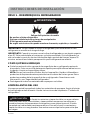
REQUISITOS DE INSTALACIÓN
ADVERTENCIA
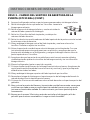
REQUISITOS DE UBICACIÓN
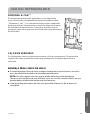
IMPORTANTE: Este refrigerador se ha diseñado para instalarse de forma
independiente únicamente. No debe estar empotrado ni integrado en un armario
cerrado. Para asegurarse de que el refrigerador funciona con la máxima eficiencia,
lo debe instalar en una ubicación donde haya circulación de aire y conexiones
eléctricas adecuadas.
Peligro de Explosión o Incendio
Mantenga los materiales y vapores inflamables, tales como gasolina,
alejados del aparato.
No seguir esta instrucción puede ocasionar la muerte, explosión, o
incendio.
Espacios libres recomendados:
Ŷ Este refrigerador ha sido diseñado para usarse en un lugar en donde los rangos de
temperatura varíen entre un mínimo de 55 °F (13 °C) y un máximo de 110 °F (43 °C).
Ŷ Se recomienda no instalar el
refrigerador en un lugar expuesto
a la luz directa del sol o cerca de
una fuente de calor, por ejemplo:
radiadores, zócalos radiantes,
aparatos de cocción, etc.
Ŷ Coloque el refrigerador sobre
una superficie lo suficientemente
resistente como para soportar su
peso estando completamente lleno.
Si el piso no está nivelado, regule
las patas niveladoras para que el
refrigerador se nivele. Vea “Nivele el
refrigerador”.
4”
(10,2 cm)
4”
(10,2 cm)
4”
(10,2 cm)
ESPAÑOL
CÓMO INSTALAR EL REFRIGERADOR
• No instale el refrigerador donde la temperatura llegue a ser inferior a los 55 °F
(13 °C), ya que no se activará con la frecuencia necesaria para mantener las
temperaturas apropiadas.
• No instale el refrigerador donde la temperatura sea superior a los 110 °F
(43 °C), ya que no funcionará de forma correcta.
• Instale el mismo en un piso lo suficientemente fuerte como para soportarlo
completamente cargado.
• No instale el refrigerador en una ubicación expuesta al agua (lluvia, etc.) o en
contacto directo con la luz solar.

49-60808-1
30
REQUISITOS DE INSTALACIÓN
ESPAÑOL
Nunca, bajo ninguna circunstancia, corte o elimine el tercer cable (tierra) del
cable de corriente. Para su seguridad personal, este electrodoméstico debe
estar adecuadamente conectado a tierra.
El cable de corriente de este electrodoméstico cuenta con un enchufe de 3
cables (conexión a tierra) que se conecta a un tomacorriente de pared estándar
de 3 cables (conexión a tierra) para minimizar la posibilidad de riesgos de
descargas eléctricas por parte del mismo.
Contrate a un electricista calificado para que controle el tomacorriente y el
circuito eléctrico, a fin de asegurar que el enchufe esté correctamente conectado
a tierra.
En caso de contar con un tomacorriente de pared de 2 cables, es su
responsabilidad y obligación reemplazarlo por un tomacorriente de pared de 3
cables correctamente conectado a tierra. No use un adaptador.
El freezer deberá estar siempre conectado a un enchufe específico con un índice
de voltaje equivalente al que figura en la placa de calificación.
Se requiere un suministro eléctrico con fusible y conexión a tierra de 115 voltios
de CA, 60 Hz, 15 o 20 amperes. Esto garantiza el mejor funcionamiento y además
previene la sobrecarga de los circuitos del hogar, lo cual podría ocasionar riesgos
de incendio debido al recalentamiento de cables.
Nunca desenchufe el refrigerador tirando del cable de corriente. Siempre tome
su enchufe firmemente y empuje el mismo hacia fuera para retirarlo.
Inmediatamente interrumpa el uso de un cable de suministro de corriente
dañado. Si el cable de corriente se encuentra dañado, su reemplazo deberá ser
realizado por un profesional calificado del servicio técnico, utilizando una pieza
del servicio técnico autorizada por el fabricante.
Al alejar el freezer de la pared, se deberá tener cuidado de que no ruede sobre ni
dañe el cable de corriente.
CONEXIÓN DE LA ELECTRICIDAD
ADVERTENCIA
RIESGO DE DESCARGA ELÉCTRICA
Enchufe en un tomacorriente con conexión a tierra de 3 cables.
No elimine el cable de conexión a tierra.
No use un adaptador.
No use un prolongador.
Si no se siguen estas instrucciones se podrá producir la muerte, incendios o
descargas eléctricas.

31
49-60808-1
IMPORTANTE: Tenga cuidado al mover el refrigerador para evitar dañar el tubo
refrigerante o aumentar el riesgo de fuga.
IMPORTANTE: Cuando lo mueva, nunca incline el refrigerador en un ángulo superior
a los 45°. Esto podría dañar el compresor y el sistema sellado. Si el refrigerador ha
sido colocado en posición horizontal durante algún período de tiempo, espere 30
minutos antes de enchufarlo para permitir que el refrigerante se asiente.
CÓMO QUITAR EL EMPAQUE
Ŷ Quite los restos de cinta y goma de las superficies de su refrigerador antes de
encenderlo. Frote un poco de detergente líquido para vajilla sobre el adhesivo con
los dedos. Limpie con agua tibia y seque.
NOTA: No use instrumentos filosos, alcohol isopropílico, líquidos inflamables o
productos de limpieza abrasivos para eliminar los restos de cinta o goma. Estos
productos pueden dañar la superficie de su refrigerador. Para obtener más
información, vea “Seguridad del refrigerador”.
Ŷ Deshágase de todos los materiales de empaque o recíclelos.
LIMPIEZA ANTES DEL USO
Una vez que usted haya quitado todos los materiales de empaque, limpie el interior
del refrigerador antes de usarlo. Vea las instrucciones de limpieza en “Cuidado del
refrigerador”.
INSTRUCCIONES DE INSTALACIÓN
ADVERTENCIA
PASO 1 - DESEMPAQUE EL REFRIGERADOR
Peligro de Explosión o Incendio
No perfore el tubo refrigerante.
Siga con cuidado las instrucciones de manipulación.
El refrigerante usado es inflamable.
No seguir esta instrucción puede ocasionar la muerte, explosión, o incendio.
ESPAÑOL
PRECAUCIÓN
No limpie los estantes y tapas de vidrio con agua caliente
mientras estén fríos. Los estantes y tapas pueden romperse si se exponen a
cambios bruscos de temperatura o a impactos como golpes bruscos. El vidrio
templado se ha diseñado para hacerse añicos. Esto es normal. Los estantes y
tapas de vidrio son muy pesados. Use ambas manos al quitarlos para evitar que
se caigan.

49-60808-1
32
REQUISITOS DE INSTALACIÓN
ESPAÑOL
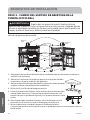
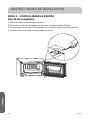
PASO 2 - CAMBIO DEL SENTIDO DE ABERTURA DE LA
PUERTA (OPCIONAL)
ADVERTENCIA
Siga todos los pasos al invertir la dirección de
apertura de la puerta. Si no se siguen estas instrucciones, dejando piezas
sin uso o ajustando tornillos en exceso, esto podrá hacer que la puerta se
caiga y producir lesiones y daños sobre la propiedad.
Si desea que la puerta del refrigerador se abra del lado opuesto, puede cambiar el
sentido de abertura de la puerta.
1. Asegúrese de que la unidad esté desenchufada antes de comenzar a realizar la
inversión de la puerta.
2. Retire los 2 botones obturadores que se encuentran del lado
izquierdo en la parte superior del gabinete.
3. Retire la tapa de la bisagra de plástico haciendo palanca desde
la parte trasera y empujando hacia adelante.
4. Retire los 2 tornillos de la bisagra superior.
5. Levante la puerta del freezer hacia arriba y afuera de la bisagra
central (lado derecho). Coloque la puerta del freezer en una
superficie que no produzca rayones, con la parte exterior hacia
arriba.
6. Abra la puerta de comidas frescas y retire la bisagra central
retirando los 2 tornillos. Levante la bisagra para retirarla.
7. Retire la puerta de comidas frescas de la bisagra inferior.
Coloque la puerta en una superficie que no produzca rayones con la parte exterior
hacia arriba.
Turn
Turn
Botones
Obturadores
Botones
Obturadores
Bisagra
Central
Bisagra
Central
Bisagra
Inferior
Perno de
la Bisagra
Perno de
la Bisagra
Bisagra
Inferior
Bisagra y
Tapa
Bisagra y
Tapa
Giro
Giro

33
49-60808-1
INSTRUCCIONES DE INSTALACIÓN
ESPAÑOL
PASO 2 - CAMBIO DEL SENTIDO DE ABERTURA DE LA
PUERTA (OPCIONAL) (CONT.)
8. Apoye el refrigerador sobre su parte trasera para acceder a la bisagra inferior.
9. Retire la bisagra inferior quitando los 3 tornillos. Levante la
bisagra para retirarla.
10. Retire el perno de la bisagra inferior y vuelva a instalar la
misma del lado opuesto de la bisagra.
11. Retire los 2 tornillos del lado izquierdo y reubique los
mismos del lado derecho.
12. Retire los dos botones obturadores del lado izquierdo de la parte central e instale
los mismos sobre la derecha.
13. Gire y reubique la bisagra central del lado izquierdo y vuelva a colocar los
tornillos. Todavía no ajuste los tornillos.
14. Alinee la puerta de comida fresca sobre la bisagra central izquierda. Con una
junta imantada que sostenga la puerta en su posición, asegúrese de que la
puerta esté alineada con el refrigerador, y asegure la bisagra inferior sobre la
parte izquierda con 3 tornillos.
15. Asegúrese de que la puerta de comida fresca esté correctamente sellada y
nivelada antes de ajustar los tornillos de la bisagra central y los tornillos de la
bisagra inferior.
16. Eleve el refrigerador hasta su posición erguida.
17. Coloque la puerta del freezer en la bisagra central sobre el perno. Asegúrese de
que la puerta esté alineada de forma horizontal y vertical, y que la junta quede
sellada sobre todos los lados.
18. Gire y reubique la bisagra superior del lado izquierdo por tornillos.
19. Reemplace la tapa de la bisagra en la parte superior de la bisagra deslizando la
misma desde el frente hasta la parte trasera.
20. Coloque los 2 botones obturadores sobre el lado derecho en la parte superior del
gabinete.
21. Abra y cierre la puerta del freezer y la puerta de comida fresca varias veces para
confirmar que cada una se encuentra posicionada de forma correcta y que la
junta se encuentra bien sellada. En caso contrario, por favor ajuste la puerta
nuevamente.
22. Espere por lo menos 30 minutos antes de enchufar el refrigerador, a fin de
permitir que el mismo se estabilice. Luego enchufe la unidad”.

49-60808-1
34
INSTRUCCIONES DE INSTALACIÓN
ESPAÑOL
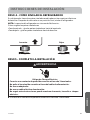
PASO 3 - CÓMO ALINEAR LA PUERTA
Puerta del congelador
1. Retire la cubierta de la bisagra superior.
2. Afloje los tornillos de la bisagra superior con un destornillador Phillips.
3. Ajuste la puerta o coloque un separador en el medio y luego ajuste los tornillos.
4. Vuelva a colocar la cubierta de la bisagra superior.

35
49-60808-1
INSTRUCCIONES DE INSTALACIÓN
PASO 4 - CÓMO NIVELAR EL REFRIGERADOR
Su refrigerador tiene dos patas niveladoras ubicadas en las esquinas inferiores
delanteras. Después de colocarlo en su posición final, nivele el refrigerador.
NOTA: La puerta del refrigerador se cierra más fácilmente .
Cómo regular las patas niveladoras:
•Para levantarlo - gire las patas niveladoras hacia la izquierda.
•Para bajarlo - gire las patas niveladoras hacia la derecha.
Levantar Bajar
Ŷ Conecte a un contacto de pared de conexión a tierra de 3 terminales.
PASO5 - COMPLETE LA INSTALACIÓN
ADVERTENCIA
Peligro de Choque Eléctrico
Conecte a un contacto de pared de conexión a tierra de 3 terminales.
No quite el terminal de conexión a tierra del cable de alimentación.
No use un adaptador.
No use un cable eléctrico de extensión.
No seguir estas instrucciones puede ocasionar la muerte, incendio o choque
eléctrico.
ESPAÑOL

49-60808-1
36
CONTROL
El control ubicado en la parte superior derecha del armario interior, es un cuadrante
regulable con ajustes que van desde el menos frío (1) al más frío (7) y 0 (OFF)
(Apagado).
NOTA: Al girar el cuadrante de control hacia 0 (OFF)
(Apagado), el refrigerador no se desconecta del
suministro de energía.
1. Gire el cuadrante de control de temperatura a 4 (ajuste
recomendado).
2. Deje que el refrigerador se enfríe durante algunas
horas antes de agregar alimentos.
Cómo regular la temperatura
El ajuste recomendado se diseñó para mantener la temperatura bajo condiciones
normales de funcionamiento.
Para regular la temperatura del refrigerador:
1. Ajuste el cuadrante de control a uno de los ajustes adyacentes, 2 (menos frío) o 5
(más frío).
NOTA: No ajuste el control de temperatura en más de un ajuste por vez, excepto
cuando encienda el refrigerador.
2. Espere 24 horas entre los ajustes para que se estabilice la temperatura.
ESTANTES
Para quitar o volver a colocar un estante:
Ŷ Para quitar un estante - incline el frente del estante hacia arriba y, luego deslícelo
hacia adelante.
Ŷ Para volverlo a colocar - alinee el estante con los soportes y deslícelo ligeramente
hacia la parte posterior.
USO DEL REFRIGERADOR
ESPAÑOL

37
49-60808-1
USO DEL REFRIGERADOR
ESPAÑOL
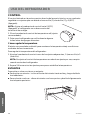
DISPENSE-A-CAN ™
El refrigerador puede venir equipado con un dispositivo
muy conveniente para guardar envases de hojalata o latas,
“Dispense A-Can™ Los compartimientos tienen capacidad
para unas 4 latas. Simplemente coloque las latas por la parte
de arriba del compartimiento. Para sacar una lata, sólo es
necesario remover la que está en el fondo del compartimiento.
Es así de fácil.
CAJÓN DE VERDURAS
Su refrigerador tiene un cajón para verduras y frutas transparente. Tome la parte
superior del cajón y deslícelo hacia fuera suavemente. Empújelo para volver a
colocarlo.
BANDEJA PARA CUBOS DE HIELO
Ŷ Si la bandeja para cubos de hielo se pega a la base del compartimiento, vierta un
poco de agua tibia alrededor de la bandeja para liberarla.
NOTA: No utilice agua hirviendo, ya que puede dañar las piezas de plástico.
Tampoco utilice objetos de metal filosos como un cuchillo o destornillador, ya que
pueden dañar la tubería del sistema de enfriamiento.
Ŷ Lave la bandeja para cubos de hielo con agua tibia solamente. No la lave en la
lavavajillas.

49-60808-1
38
CUIDADO DEL REFRIGERADOR
LIMPIEZA
ADVERTENCIA
Peligro de choque eléctrico
Desenchufe el aparato o desconecte el suministro de energía antes de
limpiarlo.
No seguir esta instrucción puede ocasionar la muerte, choque eléctrico o
daños personales.
ADVERTENCIA
Peligro de Explosión
Use un limpiador no inflamable.
No seguir esta instrucción puede ocasionar la muerte, explosión o incendio.
IMPORTANTE: No use productos químicos fuertes, amoníaco, blanqueador con
cloro, detergente concentrado, solventes o estropajos de metal o abrasivos para
limpiar su producto por dentro o por fuera. Estos pueden dañar o decolorar el
acabado.
General
1. Desenchufe o desconecte el suministro de energía.
2. Lave las superficies interiores, los accesorios y el marco exterior con una solución
de agua tibia mezclada con 3 a 4 cucharadas de bicarbonato de sodio.
NOTA: Antes de usar productos de limpieza, siempre lea y siga las instrucciones
del fabricante y las advertencias para evitar lesiones físicas o daños al producto.
3. Enjuague con agua tibia limpia.
4. Seque bien con un paño suave.
5. Enchufe o vuelva a conectar el suministro de energía.
ESPAÑOL

39
49-60808-1
CUIDADO DEL REFRIGERADOR
Juntas de la puerta
Las juntas deben mantenerse limpias y flexibles para asegurar un sellado adecuado.
Ŷ Limpie las juntas de la puerta cada 3 meses con una solución de bicarbonato de
sodio y agua tibia.
Ŷ El petrolato ligeramente aplicado en el lado de las bisagras de las juntas
mantendrá la junta flexible y asegurará un buen sellado.
Reemplazo de la Lámpara de Luz
1. Apague la corriente al refrigerador.
2. De forma suave, retire la tapa transparente.
3. Reemplace por el mismo tipo de lámpara con calificación de 15 watts.
4. Vuelva a colocar la tapa transparente calzando la misma en su posición.
PELIGRO
DESCONGELAMIENTO Y DESAGÜE
Peligro de Explosión o Incendio
El refrigerante usado es inflamable.
No utilice dispositivos mecánicos para descongelar el congelador.
No perfore el tubo refrigerante.
No seguir esta instrucción puede ocasionar la muerte, explosión, o incendio.
ESPAÑOL
Para una máxima eficiencia de la energía, descongele la sección del congelador
cuando la escarcha que se acumule en las paredes del congelador tenga un grosor
de 1/4” o más. Advierta que la escarcha se tiende a acumular en los meses de
verano.
• Para descongelar el congelador, quite los alimentos y la bandeja de los cubos de
hielo de la sección del congelador. Gire la perilla de control de la temperatura a la
posición “0”. La descongelación por lo general lleva unas horas. Para acelerar el
tiempo de descongelación, mantenga la puerta abierta y coloque un recipiente de
agua tibia en el congelador.
• Se acumulará agua durante el descongelamiento. Utilice una toalla para quitar el
exceso del agua que gotea. No desatienda el refrigerador.
• Luego de descongelar, vacíe y pase un trapo al interior del descongelador. Ahora
óøèçèùòïùèõäæòñĤêøõäõèïæòñêèïäçòõäïä÷èðóèõä÷øõäôøèçèöèèüùòïùèõä
colocar los alimentos.

49-60808-1
40
VACACIONES Y MUDANZAS
Vacaciones
Si se ausentará durante un periodo largo de tiempo y no desea dejar el aparato
encendido mientras no está, prepárelo para el lapso de su ausencia.
1. Retire los alimentos del congelador.
2. Gire el control de temperatura hacia 0 (OFF [Apagado]).
3. Desenchufe o desconecte el suministro de energía.
4. Limpie el interior. Vea “Limpieza”.
5. Limpie las juntas de la tapa/la puerta. Vea la sección “Limpieza”.
6. Mantenga las puertas abiertas para que pueda circular aire adentro.
CUIDADO DEL REFRIGERADOR
ESPAÑOL

41
49-60808-1
VACACIONES Y MUDANZAS (Cont.)
Mudanza
Si Ud. muda su refrigerador a una casa nueva, siga estos pasos para prepararse para
la mudanza.
IMPORTANTE:
Ŷ Tenga cuidado al moverlo para evitar dañar el tubo refrigerante o aumentar el
riesgo de fuga.
Ŷ Cuando lo mueva, nunca incline el refrigerador en un ángulo superior a los 45°.
Esto podría dañar el compresor y el sistema sellado.
1. Complete los pasos del 1 al 5 para prepararlo para las vacaciones. Vea
“Vacaciones”.
2. Saque todas las piezas removibles, envuélvalas bien y asegúrelas con cinta
adhesiva para que no se muevan ni se sacudan durante la mudanza.
3. Para que las puertas queden cerradas y el cable pegado a la parte posterior del
refrigerador, use cinta adhesiva.
CUIDADO DEL REFRIGERADOR
ADVERTENCIA
Peligro de Explosión o Incendio
No perfore el tubo refrigerante.
Siga con cuidado las instrucciones de manipulación.
El refrigerante usado es inflamable.
No seguir esta instrucción puede ocasionar la muerte, explosión, o incendio.
ESPAÑOL

49-60808-1
42
CUIDADO DEL REFRIGERADOR
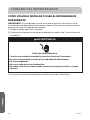
CÓMO VOLVER A INSTALAR O USAR EL REFRIGERADOR
NUEVAMENTE
IMPORTANTE: Si el refrigerador ha sido colocado en posición horizontal o se ha
inclinado durante algún período de tiempo, espere 30 minutos antes de enchufarlo
para permitir que el refrigerante se asiente.
1. Limpie el refrigerador. Vea “Limpieza”.
2. Coloque el refrigerador en la ubicación deseada y nivélelo. Vea “Instrucciones de
instalación”.
3. Conecte a un contacto de pared de conexión a tierra de 3 terminales.
ADVERTENCIA
Peligro de Choque Eléctrico
Conecte a un contacto de pared de conexión a tierra de 3 terminales.
No quite el terminal de conexión a tierra del cable de alimentación.
No use un adaptador.
No use un cable eléctrico de extensión.
No seguir estas instrucciones puede ocasionar la muerte, incendio o choque
eléctrico
ESPAÑOL

43
49-60808-1
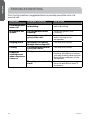
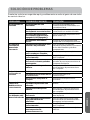
SOLUCIÓN DE PROBLEMAS
Pruebe las soluciones sugeridas aquí y posiblemente se evite el gasto de una visita
de servicio técnico.
PROBLEMA POSIBLE(S) CAUSA(S) SOLUCIÓN
El refrigerador no
funciona
El refrigerador no está
enchufado.
Enchufe el refrigerador a un
tomacorriente de 3 terminales con
conexión a tierra.
Se ha quemado un fusible ose
ha disparado un cortacircuitos.
Reemplace/encienda el
cortacircuitos o cambie el fusible.
El control de temperatura
se encuentra en posición de
apagado 0 (OFF[apagado]).
Gire el control de temperatura a un
ajuste entre 1 y 7.
El compresor funciona en
ciclos.
Espere de 30 a 40 minutos para
comprobar si el compresor se inicia.
El compresor
funciona con
demasiada
frecuencia
La temperatura ambiente está
elevada o hay humedad.
Esto puede ser normal para
mantener la temperatura constante
en los días húmedos y de altas
temperaturas.
La puerta del refrigerador no
está cerrada por completo.
Cierre la puerta por completo.
La junta de la puerta no sella
correctamente.
Limpie la junta de la puerta.
Vea “Limpieza”.
La puerta se abre con
frecuencia o durante períodos
prolongados.
Disminuya la cantidad de veces
que abre la puerta para mantener la
temperatura interna.
La puerta está bloqueada
abierta.
Reorganizar o eliminar elementos
que mantienen la puerta se cierre
por completo.
La luz del
refrigerador no
funciona
No hay corriente Controle el suministro de corriente.
La lámpara no fue insertada de
forma correcta
Ajuste la lámpara en el
tomacorriente.
Es necesario reemplazar la
lámpara
Reemplace la lámpara si está
quemada.
La puerta del
centro de la
bebida no cierra
correctamente
El refrigerador no está
nivelado o la puerta no está
alineada.
Nivele el refrigerador o alinee la
puerta.
La puerta está bloqueada
abierta.
Reorganizar o eliminar elementos
que mantienen la puerta se cierre
por completo.
La temperatura de
los alimentos está
demasiado elevada
La puerta se abre con
frecuencia.
Disminuya la cantidad de veces que
abre la puerta.
Se ha agregado recientemente
una gran cantidad de
alimentos.
Deje que pase algún tiempo para
que se enfríen los alimentos tibios
que agregó recientemente.
La puerta no sella
correctamente.
Limpie la junta de la puerta.
Vea “Limpieza”.
Îïæòñ÷õòïñòöèĤíſèñ
una temperatura lo
öøĤæìèñ÷èðèñ÷èéõżä
Regule el temperatura a un ajuste
más frío.
ESPAÑOL

49-60808-1
44
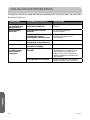
SOLUCIÓN DE PROBLEMAS
Pruebe las soluciones sugeridas aquí y posiblemente se evite el gasto de una visita
de servicio técnico.
PROBLEMA POSIBLE(S) CAUSA(S) SOLUCIÓN
La temperatura de
los alimentos está
demasiado fría
El control se ha fijado en un
ajuste demasiado frío.
Ajuste la temperatura a un ajuste
menos .
El refrigerador
huele mal
El refrigerador necesita
limpieza.
Limpie el refrigerador.
Vea“Limpieza”.
Los alimentos están envueltos
o sellados de manera
inadecuada y emanan olores.
Envuelva y selle bien los alimentos
antes de guardarlos en el
refrigerador.
Sonido de gorgoteo Hay refrigerante circulando en
el serpentín de enfriamiento.
Este sonido es normal.
Chasquidos El control de temperatura se
enciende y se apaga.
Este sonido es normal.
Sonido de estallido
o crujido cuando
se enciende el
compresor
El refrigerador no está
nivelado.
Nivele el refrigerador.
Vea“Nivelación”. Si el piso está
desnivelado, es posible que
deba colocar cuñas de metal o
madera debajo de una parte del
refrigerador.
El refrigerador toca la pared. Aleje el refrigerador de la pared y
vuelva a nivelar, si es necesario.
ESPAÑOL

45
49-60808-1
GARANTÍA LIMITADA
12 meses por piezas y mano de obra
Durante 12 meses desde la fecha de compra
minorista original, GE Appliances reemplazará
cualquier pieza del refrigerador que falle
debido a un defecto en los materiales o
la fabricación. GE Appliances podrá, a su
criterio, reemplazar o realizar la reparación
de la unidad defectuosa. En caso de que
GE Appliances decida realizar el servicoi
técnico sobre la unidad, GE Appliances
brindará sin costo cualquier pieza que falle
debido a un defecto en los materiales o la
fabricación, junto con cualquier trabajo o
costos relacionados con el servicio para
reemplazar la pieza defectuosa. Durante este
período, si GE Appliances decide reemplazar
la unidad, podrá hacerlo brindándole a usted
øñæèõ÷ìĤæäçòæäñíèäåïèèñøñðìñòõìö÷äèï
cual podrá ser usado para un producto de
reemplazo.
NOTA: Esta garantía comienza en la fecha
de compra de este producto, y el recibo
original deberá presentarse al representante
autorizado de servicio antes de hacerse las
reparaciones bajo la garantía.
PARA OBTENER SERVICIO BAJO LA
GARANTÍA
Para los clientes de EE.UU., todo el servicio
de garantía deberá ser provisto por nuestros
Centros de Servicio de Fabricación, o por un
técnico autorizado del Servicio al Cliente.
Para programar una visita del servicio técnico,
llame al 1.877.337.3639.
Cuando llame para solicitar el servicio, tenga
los números de serie y modelo disponibles.
En Canadá, llame al 1.877.470.9174.
EXCLUSIÓN DE GARANTÍAS IMPLÍCITAS - Su única y exclusiva alternativa es la reparación
del producto, como se indica en la Garantía Limitada. Las garantías implícitas, incluyendo
garantías implícitas de comerciabilidad o conveniencia sobre un propósito particular, se
limitan a un año o al período más corto permitido por la ley.
Lo que no está cubierto bajo esta garantía:
Viajes del técnico del servicio a su hogar para
enseñarle sobre cómo usar el producto.
Instalación inadecuada, entrega o
mantenimiento.
Fallas del producto en caso de abuso, mal uso,
o uso para propósitos diferentes al original o
uso comercial.
Pérdida de alimentos por mal estado.
Daño causado después de la entrega.
Reemplazo de fusibles de la casa o reinicio de
disyuntores.
Reemplazo de las bombillas de luz.
Daños ocasionados sobre el producto
por accidente, incendio, inundaciones o
catástrofes naturales.
Daños consecuentes o incidentales causados
por posibles defectos de este producto.
Producto no accesible para brindar el servicio
requerido.
Costos asociados cuando GE Appliances
decide entregar al consumidor un certificado
como forma de reemplazo del producto.
ESPAÑOL

49-60808-1
46
GARANTÍA LIMITADA
ESPAÑOL
Para los clientes de los EEUU: Esta garantía
se extiende al comprador original y a
cualquier dueño subsiguiente de productos
comprados para uso hogareño dentro de
EE.UU. Si el producto está en un área donde
no se encuentra disponible un Proveedor
Autorizado del Servicio Técnico de GE
Appliances, usted será responsable por el
costo de un viaje o se podrá requerir que
traiga el producto a una ubicación del Servicio
Técnico de GE Appliances Autorizado para
recibir el servicio. En Alaska, la garantía
excluye el costo de envío o llamadas del
servicio a su hogar.
Algunos estados no permiten la exclusión o
limitación de daños fortuitos o consecuentes.
Esta garantía le da derechos legales
èöóèæżĤæòöüèöóòöìåïèôøè÷èñêäò÷õòö
derechos legales que varían entre un estado
y otro. Para conocer cuáles son sus derechos
ïèêäïèöæòñöøï÷èäïäòĤæìñäçèäöøñ÷òöçèï
consumidor local o estatal o al Fiscal de su
estado.
Garante US:
GE Appliances, a Haier company
Para Clientes en Canadá: Esta garantía se
extiende al comprador original y a cualquier
dueño subsiguiente de productos comprados
para uso hogareño dentro de Canadá. El
servicio técnico hogareño de la garantía será
brindado en áreas donde Mabe se encuentre
disponible y lo considere apropiado.
Garante Canada:
MC Commercial, Burllington, Ontario, L7R
5B6

47
49-60808-1
INFORMACIÓN A TENER EN CUENTA
Le agradecemos la compra de este producto
de marca Haier. Este manual para el usuario lo
ayudará a obtener el mejor funcionamiento de
su nuevo refrigerador.
Para referencia futura, anote el número de
modelo y de serie y la fecha de compra. La
placa con el número de modelo o de serie
está ubicada en una etiqueta dentro del
refrigerador.
Engrape la prueba de compra a este manual
para asistirle cuando necesite obtener
servicio bajo la garantía.
_______________________________________
Número de modelo
_______________________________________
Número de serie
_______________________________________
Fecha de compra
ESPAÑOL

IMPORTANTE
No regrese este producto a la tienda
Si tiene un problema con este producto, por favor comuníquese al 1-877-337-3639 p
ara solicitar el nombre y número telefónico del centro de servicio al cliente autorizado
más cercano.
NECESITA UNA PRUEBA DE COMPRA FECHADA, NÚMERO DE MODELO
Y DE SERIE PARA EL SERVICIO DE LA GARANTÍA
IMPORTANT
Do Not Return This Product To The Store
If you have a problem with this product, please call 1-877-337-3639 for the name and
telephone number of the nearest authorized service center.
DATED PROOF OF PURCHASE REQUIRED FOR WARRANTY SERVICE
-
 1
1
-
 2
2
-
 3
3
-
 4
4
-
 5
5
-
 6
6
-
 7
7
-
 8
8
-
 9
9
-
 10
10
-
 11
11
-
 12
12
-
 13
13
-
 14
14
-
 15
15
-
 16
16
-
 17
17
-
 18
18
-
 19
19
-
 20
20
-
 21
21
-
 22
22
-
 23
23
-
 24
24
-
 25
25
-
 26
26
-
 27
27
-
 28
28
-
 29
29
-
 30
30
-
 31
31
-
 32
32
-
 33
33
-
 34
34
-
 35
35
-
 36
36
-
 37
37
-
 38
38
-
 39
39
-
 40
40
-
 41
41
-
 42
42
-
 43
43
-
 44
44
-
 45
45
-
 46
46
-
 47
47
-
 48
48


Haier HC32TW10SB Manual de usuario
- Categoría
- Enfriadores de bebidas
- Tipo
- Manual de usuario
- Este manual también es adecuado para
en otros idiomas
- italiano: Haier HC32TW10SB Manuale utente
- English: Haier HC32TW10SB User manual