Motorola IMPRES Smart Energy System Manual de usuario
- Categoría
- Baterías recargables
- Tipo
- Manual de usuario

Accessories
EN
DE
FR
PR
IT
NL
RU
CZ
Adaptive Multi-Unit Charger
Mehrfach-Rekonditionierungsladegerät
Chargeur Conditionneur Multiple
Cargador adaptable múltiple
Carregador auto adaptável múltiplo
Caricatore adattivo a più unità
Adaptieve meervoudige lader
Àäàïòèâíîå ìíîãîìåñòíîå çàðÿäíîå óñòðîéñòâî
Adaptivní víceèlánkovou nabíjeèku
ES
IMPRES™
Adaptive Mult-unit Charger
37D22-B_Cover_new.fm Page 1 Tuesday, July 11, 2006 3:17 PM

37D22-B_Cover_new.fm Page 2 Tuesday, July 11, 2006 3:17 PM

1
English
TABLE OF CONTENTS
Important Safety Instructions . . . . . . . . . . . . . . . . . . . . . . . . . . . . . . . . 2
Operational Safety Guidelines . . . . . . . . . . . . . . . . . . . . . . . . . . . . . . . 3
IMPRES Feature/Benefit Description . . . . . . . . . . . . . . . . . . . . . . . . . 4
Operational Characteristics/Differences . . . . . . . . . . . . . . . . . . . . . . . 5
Battery Lists . . . . . . . . . . . . . . . . . . . . . . . . . . . . . . . . . . . . . . . . . . . . . 7
Power Sources and Motorola Authorized Power Adapters . . . . . . . . 10
Operating Instructions . . . . . . . . . . . . . . . . . . . . . . . . . . . . . . . . . . . . 11
Charging the Batteries. . . . . . . . . . . . . . . . . . . . . . . . . . . . . . . . . . 13
Manually Reconditioning the Batteries . . . . . . . . . . . . . . . . . . . . . 14
Automatically Reconditioning the Batteries . . . . . . . . . . . . . . . . . . 14
Manually Terminating the Reconditioning Process . . . . . . . . . . . . 15
Troubleshooting . . . . . . . . . . . . . . . . . . . . . . . . . . . . . . . . . . . . . . . . . 16
Service. . . . . . . . . . . . . . . . . . . . . . . . . . . . . . . . . . . . . . . . . . . . . . . . 17
Chargers with Display Module (CDM) . . . . . . . . . . . . . . . . . . . . . . . . 18
This accessory manual is applicable to the following IMPRES Universal Multi-Unit
chargers:
WPLN4108, WPLN4109, WPLN4110, WPLN4118, WPLN4119, WPLN4120, WPLN4121,
WPLN4123, WPLN4130, WPLN4131, WPLN4132, WPLN4133, WPLN4134,
WPLN4135, WPLN4136
Additionally, this manual includes the following IMPRES Universal Multi-Unit chargers
that are available for the GP Professional Series radios:
WPLN4144, WPLN4145, WPLN4146, WPLN4187, WPLN4188, WPLN4189,
WPLN4190, WPLN4191, WPLN4192, WPLN4193, WPLN4194, WPLN4195,
WPLN4196, WPLN4204, WPLN4205
‘Universal’ denotes that the charger supports multiple radio models and, through the use
of battery adapters, all batteries listed in tables 1 - 6 inclusive.
37D22-B_Impres_MUC_EN.fm Page 1 Wednesday, July 12, 2006 2:02 PM

2
English
IMPORTANT SAFETY INSTRUCTIONS
SAVE THESE INSTRUCTIONS
This document contains important safety and operating instructions.
Please read these instructions carefully and save them for future
reference.
Before using the battery charger, read all the instructions and
cautionary markings on (1) the charger and (2) the battery (3) and on
the radio using the battery.
1. To reduce risk of injury, charge only the
rechargeable Motorola authorized batteries listed in
Tables 1 through 5. Other batteries may explode,
causing personal injury and damage.
2. Use of accessories not recommended by Motorola may result in
risk of fire, electric shock, or injury.
3. To reduce risk of damage to the electric plug and cord, pull by
the plug rather than the cord when disconnecting the charger.
4. An extension cord should not be used unless absolutely
necessary. Use of an improper extension cord could result in
risk of fire and electric shock. If an extension cord must be used,
make sure that the cord size is 18AWG for lengths of up to 100
feet (30.48m), and 16AWG for lengths up to 150 feet (45.72m).
5. To reduce risk of fire, electric shock, or injury, do not operate the
charger if it has been broken or damaged in any way. Take it to a
qualified Motorola service representative.
6. This unit is repairable.
Each pocket is powered by a unique
printed circuit board & power supply. The PCB / power supply
can be purchased from the Aftermarket / Parts organization.
The PCB replacement part number is RLN5325. No other
component level replacement parts are available. A service
manual describing the replacement process can also be
ordered from the Aftermarket / Parts organization. The Service
Manual Number is 6880309L66.
7. To reduce risk of electric shock, unplug the charger from the ac
outlet before attempting any maintenance or cleaning.
!
WARNING
37D22-B_Impres_MUC_EN.fm Page 2 Wednesday, July 12, 2006 2:02 PM

3
English
OPERATIONAL SAFETY GUIDELINES
• Turn the radio off when charging the battery.
• This equipment is not suitable for outdoor use. Use only in dry
locations/conditions.
• Connect equipment only to an appropriately fused and wired supply
of the correct voltage (as specified on the product).
• Disconnect from line voltage by removing the mains plug from the outlet.
• The socket outlet to which this equipment is connected should be
close and easily accessible.
• For equipment using fuses, replacements must comply with the type
and rating specified in the equipment instructions.
• Maximum ambient temperature around the charger must not exceed
40°C (104°F).
• Make sure the cord is located where it will not be stepped on, tripped
over, or subjected to water, damage, or stress.
• This unit utilizes the same wall mount unit as the NTN4796 Multi Unit
Charger. The wall mount part number is NLN7967.
• For fuse replacement, use only fuses of the same type and rating
listed on the charger label. The following parts can be ordered from
your local Parts / Aftermarket facility:
Fuse 6571489S01
Holder 0987626G01
Cover 0987739G01
37D22-B_Impres_MUC_EN.fm Page 3 Wednesday, July 12, 2006 2:02 PM

4
English
IMPRES FEATURE / BENEFIT DESCRIPTION
The IMPRES energy solution is an advanced Tri-Chemistry energy
system developed by Motorola which encompasses (a) IMPRES
batteries, (b) the IMPRES Adaptive Multi-Unit Charger, and (c) radio
hardware / software which provides the capability for IMPRES
compatible radios to communicate with IMPRES batteries (not
applicable for GP Professional Series radios).
The IMPRES Adaptive Multi-Unit Charger, when used in conjunction
with Motorola IMPRES batteries will:
• maximize operation time between charge cycles by automatically
eliminating memory effect
• maximize battery life by significantly reducing heat during the trickle
and post charge cycles
• eliminate the need to purchase reconditioning equipment and train
personnel to “manage battery maintenance tasks.”
With this unique patented system approach, there is no need to track
and record battery use, conduct manual reconditioning cycles or
remove batteries from chargers following charging.
The IMPRES Adaptive Multi-Unit Charger monitors the usage pattern
of the IMPRES batteries, stores that information in the IMPRES
batteries, and performs a recondition cycle only when needed.
The IMPRES Adaptive Multi-Unit Charger will not overheat the
batteries regardless of how long the batteries are left in the charger
pockets. The charger monitors the batteries and automatically “tops
off” the batteries, as required.
The IMPRES Adaptive Multi-Unit Charger simplifies the charging and
battery care process: Just follow these simple steps:
1. Place the radios / batteries into the charger pockets.
2. Remove the radios / batteries when fully charged!
Motorola is the only manufacturer that offers a conditioning or
reconditioning charger that provides users with the choice of charging
the radios with the batteries attached or the batteries separately.
37D22-B_Impres_MUC_EN.fm Page 4 Wednesday, July 12, 2006 2:02 PM

5
English
OPERATIONAL CHARACTERISTICS / DIFFERENCES:
1. IMPRES batteries may be charged in conventional chargers.
However, in order for the Smart Energy features to be enabled,
IMPRES batteries must be charged in the IMPRES Adaptive Multi-
Unit Charger. The first time an IMPRES battery is charged in an
IMPRES Adaptive Multi-Unit Charger, the charger initially indicates
a
STEADY YELLOW
on the charger indicator. This first charge
must be allowed to complete to a
STEADY GREEN
indication on
the charger indicator. This properly calibrates the IMPRES battery
and enables the Smart Energy features. If this process is
interrupted, the charger will calibrate the battery upon the next
insertion.
2. Since the IMPRES Adaptive Multi-Unit Charger automatically
determines the conditions necessary to recondition an IMPRES
battery, the charger may go into recondition mode when a radio or
battery is inserted. This is indicated by a
STEADY YELLOW
on the
charger indicator. The recondition mode can be over ridden, if
required, by removing and reinserting the radio or battery. (Please
see instructions later in this guide.)
3. The IMPRES Adaptive Multi-Unit Charger is designed to charge
any battery listed in Tables 1 through 6. However, only genuine
IMPRES batteries will provide Smart Energy features.
4. The IMPRES Adaptive Multi-Unit Charger must be used to calibrate
IMPRES Smart batteries to ensure they accurately record, store
and display IMPRES battery usage data.
37D22-B_Impres_MUC_EN.fm Page 5 Wednesday, July 12, 2006 2:02 PM

6
English
5. If an IMPRES battery is used with a display radio (e.g. XTS5000),
the radio may display an icon indicating the charge status of the
battery. This icon is enabled after an IMPRES battery has been
calibrated in an IMPRES charger. The charger status icon will
remain displayed as long as the user continues to use IMPRES
chargers to charge the batteries. However, if an IMPRES battery is
charged in a non-IMPRES charger for a period of 7 days (or more),
the icon will disappear. To re-enable the icon, insert an IMPRES
battery into an IMPRES charger and allow it to complete the
charging process (resulting in a
STEADY GREEN
indication). The
charge status icon will then be displayed on the radio. If the icon
does not appear after a full charge, place a partially discharged
battery (at least 70% discharged) into the charger, initiate a
reconditioning, and allow it to complete the charging process.
The icon will then appear on the radio display (not applicable to GP
Professional Series radios).
6. The IMPRES Adaptive Multi-Unit Charger can only be repaired by a
qualified service technician authorised by Motorola CGISS. Any
violation of this policy can void unit warranty.
37D22-B_Impres_MUC_EN.fm Page 6 Wednesday, July 12, 2006 2:02 PM

7
English
BATTERY LISTS
The following tables list the batteries that can be used with the specific
subscriber radios identified in the table headings.
*
Universal Charger requires battery adapter part number RLN5212 to charge MTP700
batteries
.
Table 1. ASTRO XTS3000 / XTS3500 / DiMetra Series Radios
& ASTRO XTS5000 Digital Radio
Kit (PN) Chemistry FM Smart Capacity New Model
HNN9031 NiCD No Yes Ultra High No
HNN9032 NiCD Yes Yes Ultra High No
NTN8294 NiCD No No Ultra High No
NTN8295 NiCD Yes No Ultra High No
NTN8297 NiCD Yes No Ultra High No
NTN8299 NiCD Yes No Ultra High No
NTN8610 LiIon No No High No
NTN8293 NiMH No No Ultra High No
NNTN4435 NiMH No Yes Ultra High No
NNTN4436 NiMH Yes Yes Ultra High No
NNTN4437 NiMH Yes Yes Ultra High No
RNN4006 NiMH No No Very High New
RNN4007 NIMH Yes No Very High New
NTN9862 LiIon No Yes Ultra High New
Table 2. ASTRO XTS2500 Digital Radios
Kit (PN) Chemistry FM Smart Capacity New Model
NTN9859 NiMH No No Ultra High New
NTN9857 NiMH Yes No Ultra High New
NTN9815 NiCD No No High New
NTN9816 NiCD Yes No High New
Table 3. MTP700 Digital Radios
Kit (PN) Chemistry FM Smart Capacity New Model
PMNN4048* NiMH No Yes High New
PMNN4049* NiMH Yes Yes High New
PMNN4050* Lilon No Yes High New
PMNN4047* LiIon No Yes High New
37D22-B_Impres_MUC_EN.fm Page 7 Wednesday, July 12, 2006 2:02 PM

8
English
**Universal Charger requires battery adapter part number 4385922B01 to charge Astro
Saber batteries
.
Table 4. HT1000 / MT2000 / MTS2000 / MTX8000
& MTX9000 Jedi Series Radios
Kit (PN) Chemistry FM Smart Capacity New Model
HNN9028 NiCD No Yes Ultra High No
HNN9029 NiCD Yes Yes Ultra High No
NTN7143 NiCD No No High No
NTN7144 NiCD No No Ultra High No
NTN7146 NiCD Yes No High No
NTN7147 NiCD Yes No Ultra High No
NTN7148 NiCD CENELEC No High No
NTN7149 NiCD CSA No High No
NTN7150 NiCD MSHA No High No
NTN7341 NiCD Yes No Ultra High No
NTN7372 NiCD Yes No High No
WPPN4013 NiMH No No Ultra High No
WPPN4037 NiMH Yes No Ultra high No
RNN4008 NiCD ATEX No High No
Table 5. Saber / Astro Saber/ SSE5000 / MX1000 Radios
Kit (PN) Chemistry FM Smart Capacity New Model
HNN9033 NiCD No Yes Ultra High No
HNN9031 NiCD Yes Yes Ultra High No
NTN4537** NiCD Yes No Low No
NTN4538 NiCD Yes No High No
NTN4592** NiCD No No Low No
NTN4593 NiCD No No High No
NTN4595 NiCD No No Ultra High No
NTN4596 NiCD Yes No Ultra High No
NTN4657 NiCD No No High No
NTN4671 NiCD CENELEC No High No
NTN4992 NiCD Yes No Ultra High No
NTN7014** NiMH No No High No
NTN7058 NiCD Yes No Ultra High No
NTN7426 NiCD Yes No Low No
NTN8251 NiMH Yes No Ultra High No
NTN8818** LiIon No No High No
37D22-B_Impres_MUC_EN.fm Page 8 Wednesday, July 12, 2006 2:02 PM

9
English
Universal Charger requires battery adapter part number RLN5648.
Table 6. GP Professional Series Radios
Kit (PN) Chemistry FM Smart Capacity New Model
HNN9003 NiMH
AA Bluetooth
No No High No
HNN9008 NiMH No No High No
HNN9009 NiMH No No Ultra High No
HNN9010 NiMH Yes No Ultra High No
HNN9011 NiCD Yes No High No
HNN9012 NiCD No No High No
HNN9013 LiIon No No High No
WPNN4045 NiMH No No High No
PMNN4045 NiMH No No High No
HNN4001 Impres NiMH No Yes Ultra High Yes
HNN4002 Impres NiMH Yes Yes Ultra High Yes
HNN4003 Impres LiIon No Yes Ultra High Yes
NOTE:
Adapters can be purchased from a radio sales or Aftermarket
sales team representative.
37D22-B_Impres_MUC_EN.fm Page 9 Wednesday, July 12, 2006 2:02 PM

10
English
POWER SOURCES AND MOTOROLA AUTHORIZED POWER ADAPTERS
This charger is designed for use in 100 V ac to 240 V ac, 50/60 Hz
applications and uses the following Motorola power cords shown in
Table 7. Power cords used with the charger for GP Professional Series
radios are listed in Table 8:
Table 7. Motorola Universal Model Power Cords
Plug Type Charger Kit Charger Kit
(Display Model)
Power Cord
No Power cord / plug WPLN4121 WPLN4127 None
U.S./NA WPLN4108 WPLN4130 3087791G01
Euro WPLN4109 WPLN4131 3087791G04
U.K. WPLN4110 WPLN4132 3087791G07
Australia/New Zealand WPLN4118 WPLN4133 3087791G10
Argentina WPLN4119 WPLN4134 3087791G13
U.S./NA WPLN4120 WPLN4135 3087791G01
Korea WPLN4123 WPLN4136 3087791G16
Table 8. Motorola GP Professional Series Model Power Cords
Plug Type Charger Kit Charger Kit
(Display Model)
Power Cord
No Power cord / plug WPLN4197 WPLN4198 None
U.S./NA WPLN4187 WPLN4192 3087791G01
Euro WPLN4189 WPLN4194 3087791G04
U.K. WPLN4188 WPLN4193 3087791G07
Australia/New Zealand WPLN4190 WPLN4195 3087791G10
Argentina WPLN4191 WPLN4196 3087791G13
U.S./NA WPLN4205 WPLN4204 3087791G01
Korea WPLN4146 WPLN4145 3087791G16
37D22-B_Impres_MUC_EN.fm Page 10 Wednesday, July 12, 2006 2:02 PM

11
English
OPERATING INSTRUCTIONS
The charger pockets accommodate either a radio with a battery
attached or a battery alone. Prior to charging a radio with a battery,
turn the radio off. Batteries charge best if they are at room
temperature when charged.
1. Plug the charger end of the power cord into the ac receptacle
located at the back of the charger.
2. Plug the wall receptacle end of the power cord into the appropriate
ac outlet. A successful power-up sequence is indicated by a
SINGLE FLASH GREEN
on the charger indicator.
3. Insert a battery, or radio with a battery (radio turned off), into a
charger pocket by:
a. aligning the groove on each side of the battery with the
corresponding raised rail on each side of the charger pocket
b. pressing the battery toward the rear of the pocket
c. sliding the battery into the charger pocket, ensuring complete
contact between the charger and battery contacts.
Once a battery is properly seated into a charger pocket, the charger
indicator illuminates, indicating the charger has recognized the
presence of a battery. Refer to the charging indicators in Table 9
.
NOTES
The IMPRES Multi-Unit Adaptive Charger charges only the
Motorola authorized batteries listed in Tables 1 through 6. Other
batteries may not charge.
The IMPRES Multi-Unit Adaptive Charger has automatic features
and capabilities that are different from other battery chargers.
Pay close attention to the charge indicator to ensure that the
charger is in the desired/expected mode of operation.
37D22-B_Impres_MUC_EN.fm Page 11 Wednesday, July 12, 2006 2:02 PM

12
English
In order for the features of Motorola Smart batteries and the Adaptive
Charging System to be fully available, the data contained in Motorola
Smart batteries must be initialized by the charger the first time it is
charged. This process is indicated by a
STEADY YELLOW
on the
charger indicator (the same as though the battery were reconditioning).
The process is automatic, includes an initial reconditioning of the
battery, and begins charging upon completion of this process. This
process requires time to initialize the battery, so the battery should be
left in the charger overnight on the initial insertion.
Table 9. Charging Indicators
Charge Indicator Description
Single Flash Green
Charger has successfully powered up.
Steady Red
Battery is in rapid charge mode.
Flashing Green
Battery has completed rapid charge (>90% available
capacity). Battery is in Top-Off charge (Trickle charge).
Steady Green
Battery has completed charging and is fully charged.
Flashing Yellow
Battery is recognized by charger but is waiting to charge.
(Either the battery voltage is too low or the battery
temperature is too low or to high to allow charging. When
this condition is corrected, the battery will begin charging.)
Flashing Red
Battery is unchargeable or not making proper contact.
Steady Yellow
(This feature is for Smart batteries only)
Battery is in recondition mode. The length of time the
charger remains in this mode is dependent upon the state
of charge remaining in the battery when inserted. (Fully
charged batteries require more time to recondition – 8
hours or more - than fully discharged batteries.)
Flashing Red/Green
(This feature is for Smart batteries only)
Battery has completed charging and is fully charged.
Battery continues to be usable, but may be nearing the end
of its rated service life.
NOTE
The IMPRES Adaptive Multi-Unit Charger is unique in that it
has the ability, when used with Motorola IMPRES batteries, to
automatically determine the need of the batteries to be
reconditioned.
37D22-B_Impres_MUC_EN.fm Page 12 Wednesday, July 12, 2006 2:02 PM

13
English
The IMPRES Adaptive Multi-Unit Charger operates both as:
•a Charger with all Motorola authorized batteries, and
•a Reconditioner with Motorola authorized IMPRES batteries.
Charging the Batteries
To ensure optimum performance, Motorola recommends all new
batteries be left in the charger 14 to 16 hours prior to initial use.
1. Once a battery or radio with a battery is properly inserted into a
charger pocket, the charger begins to rapid charge the battery and is
indicated by a
STEADY RED
on the charger indicator. The length of
time the charger indicates a
STEADY RED
is dependent upon the
charge remaining in the battery.
2. Completion of rapid charge (>90% available capacity) is indicated by
a
FLASHING GREEN
on the charger indicator. This indicates the
“top-off” charge (trickle charge) and requires approximately 1 hour.
3. Completion of “top-off” charge is indicated by a
STEADY GREEN
on the charger indicators. This indicates a battery is fully charged.
4. Other indications that
may
appear on the charger indicator while
charging are:
•
FLASHING YELLOW
– indicates that either the battery
temperature or the battery voltage is out of range for charging.
Charging resumes when theses conditions have been
corrected.
•
FLASHING RED AND GREEN
– indicates that the battery may
be approaching the end of its rated service life. While this battery
IMPORTANT:
The charger pockets are designed to accept several different
battery shapes and sizes, so it is important to make certain
that a radio with a battery attached or a battery alone is
inserted correctly. If a radio with a battery attached or battery
alone is inserted incorrectly, the indicator will not illuminate,
indicating that the battery is not being charged.
NOTE:
New batteries (never used before) prematurely indicate a full
charge in some cases (
STEADY GREEN
indication)
37D22-B_Impres_MUC_EN.fm Page 13 Wednesday, July 12, 2006 2:02 PM

14
English
is
fully charged, its charging capacity has been reduced by usage
and may not adequately support heavier applications. This
feature is available only when used with Motorola IMPRES
batteries. This is not a fault indication, merely a notification to the
user that a battery may soon no longer be able to yield expected
service and may need to be replaced.
•
FLASHING RED
– indicates that the battery is unchargeable.
This could be the result of a loss of contact between the battery
and the charger’s contacts. Charging resumes when the
condition causing this indication is corrected.
Motorola Smart batteries have an internal memory device that is read
by the Motorola IMPRES Adaptive Multi-Unit Charger. If an IMPRES
battery is charged for more than 2-1/2 minutes, the IMPRES Adaptive
Multi-Unit Charger retains the serial number of the IMPRES battery.
The IMPRES battery may be removed from the charger for up to 30
minutes. Once the battery is reinserted back into the charger, it will
resume the charging process from that point from when the battery
was first removed.
Manually Reconditioning the Batteries
Within 2-1/2 minutes of the initial insertion of an IMPRES battery
(
STEADY RED
indication), remove and reinsert the battery within 5
seconds to manually force reconditioning to occur. The charger
indicator changes from a
STEADY RED
to a
STEADY YELLOW
. This
forces the charger to recondition and automatically recharge the
battery.
Automatically Reconditioning the Batteries
The Motorola IMPRES Adaptive Multi-Unit Charger, when used in
conjunction with a Motorola IMPRES battery, has the ability to
determine when it is appropriate to recondition the battery.
NOTE:
Excessive use of this feature may reduce the overall life of the battery.
37D22-B_Impres_MUC_EN.fm Page 14 Wednesday, July 12, 2006 2:02 PM

15
English
When an IMPRES battery is properly inserted into the charger, the
charger determines if it is appropriate to recondition the battery. If the
battery needs reconditioning, the charger automatically indicates a
STEADY YELLOW
. This process may take up to 8 hours or more to
complete, depending upon the state of charge and capacity rating of
the battery when it is inserted.
It is important to note, for this process to be effective, the battery
must be allowed to complete the recondition/recharge process.
Leave the battery in the charger until the charger indicates a
STEADY GREEN
.
At the completion of the recondition cycle, the charger automatically
recharges the battery.
Manually Terminating the Reconditioning Process
At any time during the reconditioning process of a Motorola IMPRES
battery (
STEADY YELLOW
indication), reconditioning may be
terminated by removing and reinserting the battery within 5 seconds.
This causes the charger to terminate the reconditioning process and
begin the charging process. The charger indicator changes to a
STEADY RED
.
37D22-B_Impres_MUC_EN.fm Page 15 Wednesday, July 12, 2006 2:02 PM

16
English
TROUBLESHOOTING
The IMPRES Adaptive Multi-Unit Charger incorporates the features of:
• a universal input (100 V ac-240 V ac, 50/60 Hz) power supply
• a constant current rapid charger
• an interrupted current (negative pulse) conditioning charger
• a reconditioning unit.
The combination of the features listed above are unique in a desktop
charger. Therefore, operation of a radio with a battery attached while in
the charger is not recommended.
While in the charger, radio operation can result in minimally reduced
radio performance and extended battery charge time.
Towards the end of the rapid charge cycle (
STEADY RED
indication),
the battery voltage exceeds the normal operating voltage of the radio.
The voltage returns to a normal level following the rapid charge mode
or when the battery is removed from the charger.
If a radio is turned on while the charger is in rapid charge mode, the
radio becomes temporarily inoperable. This condition can be cleared
by removing the radio from the charger and turning the radio off and on
again.
During the reconditioning process, the battery becomes fully
discharged. As a result, the radio may not function during
reconditioning mode.
When troubleshooting, always observe the charge indicator – Refer to
Table 9.
37D22-B_Impres_MUC_EN.fm Page 16 Wednesday, July 12, 2006 2:02 PM

17
English
SERVICE
The IMPRES Adaptive Multi-Unit Charger can only be repaired by a
qualified service technician authorised by Motorola. Any violation of
this policy can void unit warranty.
Table 10. Troubleshooting
Problem What it means... What to do...
No charger
indication
• Charger contact is not
being made.
• No power to the charger.
• Check that the radio with battery,
or the battery alone, is inserted cor-
rectly.
• Make sure that the power cord is
securely plugged into the charger
and an appropriate ac outlet, and
that there is power to the outlet.
• Replace fuse(s).
Flashing Red
Indication
• Charger contact is not
being made.
• Battery is unchargeable.
• Remove the battery from the
charger and replace it back into the
charger.
• Verify that the battery is a Motorola
authorized battery listed in Tables 1
through 6. Other batteries may not
charge.
• Remove power from the battery
charger and, using a clean dry cloth,
clean the gold metal charging con-
tacts of both the battery and the
charger.
• Replace battery.
Flashing Yellow
Indication
• Battery it waiting to charge.
The battery temperature may
be below 5°C (41°F) or above
40°C (104°F) or the battery
voltage may be lower than the
predetermined threshold level
for rapid charging.
• When this condition is corrected,
the battery will begin charging.
37D22-B_Impres_MUC_EN.fm Page 17 Wednesday, July 12, 2006 2:02 PM

18
English
CHARGERS WITH DISPLAY MODULE (CDM)
The IMPRES Adaptive Multi-Unit Charger can be enhanced with the
addition of a charger display module (CDM), Motorola part no.
RLN5382.
General Display Information
The IMPRES
Adaptive Multi-Unit Charger with CDM provides the user
with valuable information while performing battery maintenance and
care. The information that the charger displays and the corresponding
LED indicators are detailed in the following tables.
Start Up
Non-IMPRES
Battery in the Pocket
IMPRES
Battery in the Pocket
Upon Charger Power-up
LED SINGLE FLASH GREEN
Line 1 IMPRES
Line 2
If There is No Battery in the Pocket
LED OFF
Line 1 NO BATTERY
Line 2
Reading Battery Data
LED Any Defined Indication
Line 1 READING
Line 2 BATTERY DATA
LED Defined by Charge State
Line 1 NON-IMPRES
Line 2 BATTERY
I
MPRES
and Software Versions are Displayed
LED Defined by Charge State
Line 1 IMPRES
Line 2 SW xx.yy; aa.bb
NOTE:
xx.yy denotes charger SW version, and aa.bb denotes CDM
SW version.
37D22-B_Impres_MUC_EN.fm Page 18 Wednesday, July 12, 2006 2:02 PM

19
English
IMPRES
Battery Kit # and Chemistry are Displayed
LED Defined by Charge State
Line 1 KIT# --------
Line 2 -----CHEMISTRY
Forecasted # of Cycles Prior to Automatic Recondition
LED Defined by Charge State
Line 1 ----CYCLES
Line 2 TO RECONDITION
* Displayed only when the number of cycles to recondition is less than 6.
Charger Waiting to Charge, Battery is Hot
LED Flashing ORANGE
Line 1 WAITING TO CHG
Line 2 HOT BATTERY
Charger Waiting to Charge, Battery is Cold
LED Flashing ORANGE
Line 1 WAITING TO CHG
Line 2 COLD BATTERY
Charger Waiting to Charge, Low Voltage
LED Flashing ORANGE
Line 1 WAITING TO CHG
Line 2 LOW VOLTAGE
NOTE:
Not all screens shown above will be displayed. For example,
Waiting to Charge displays (battery hot, cold, low voltage) will
only be shown if the situation warrants.
37D22-B_Impres_MUC_EN.fm Page 19 Wednesday, July 12, 2006 2:02 PM

20
English
Charger is in Trickle Charge Mode
LED Flashing GREEN
Line 1 TRICKLE CHARGE
Line 2
Charge is Complete
LED Steady GREEN or Flashing RED / GREEN
Line 1 CHARGE COMPLETE
Line 2
Charger is in Discharge/Reconditioning Mode
LED Steady ORANGE
Line 1 DISCHARGE
Line 2
Charger is Calibrating an IMPRES Battery
LED Steady ORANGE, Steady RED, & Flashing ORANGE or
GREEN
Line 1 Calibrating
Line 2 Battery
LED Steady GREEN
Line 1 Battery
Line 2 Calibrated
* All IMPRES batteries should be calibrated before initial use. An IMPRES
charger will automatically initiate calibration for all new batteries
Battery Capacity Data is Displayed as “%” in mAH, and Voltage
LED Defined by Charge State
Line 1 ----% RATED CAP.
Line 2 ----mAH --.-V
37D22-B_Impres_MUC_EN.fm Page 20 Wednesday, July 12, 2006 2:02 PM

21
English
NOTE:
(1) Estimated time to complete charging includes rapid charge
and discharge cycles (if applicable).
(2) Battery capacity information may not be displayed for
uncalibrated batteries.
(3) Use of IMPRES batteries with non-IMPRES chargers can
affect capacity and charging time accuracy.
Estimated Time to Rapid Charge
Complete Displayed in Hours, Minutes for NiCd & NiMH IMPRES
Batteries Only
LED Defined by Charge State
Line 1 RAPID CHG ENDS
Line 2 IN xx HRS, yy MIN
37D22-B_Impres_MUC_EN.fm Page 21 Wednesday, July 12, 2006 2:02 PM

22
English
Sequencing Diagrams for IMPRES Batteries
Note: These diagrams are the sequences shown in the previous ‘General Display
Information’ and are in English only.
IMPRES NiCd & NiMH Battery Display Sequence
LED Defined by Charge State
Line 1 KIT# xxxxxxxx
Line 2 SN: yyyyyyyyyyyy
LED Defined by Charge State
Line 1 KIT# xxxxxxxx
Line 2 yyyyy CHEMISTRY
LED Defined by Charge State
Line 1 xxxx CYCLES
Line 2 TO RECONDITION
LED Steady RED
Line 1 RAPID CHARGE
Line 2
LED Defined by Charge State
Line 1 xx% RATED CAP.
Line 2 yyyyy mAH zz.z V
LED Defined by Charge State
Line 1 RAPID CHG ENDS
Line 2 IN xx HRS, yy MIN
Start
(4.0 sec)
(2.0 sec)
(2.0 sec)
(2.0 sec)
(7.0 sec)
(4.0 sec)
Every
73.0 sec
Every
13.0 sec
5X
65.0
sec
37D22-B_Impres_MUC_EN.fm Page 22 Wednesday, July 12, 2006 2:02 PM

23
English
Before Calibration:
LED Defined by Charge State
Line 1 KIT# xxxxxxxx
Line 2 SN: yyyyyyyyyyyy
LED Defined by Charge State
Line 1 KIT# xxxxxxxx
Line 2 yyyyy CHEMISTRY
LED Steady ORANGE
Line 1 DISCHARGE
Line 2
LED Defined by Charge State
Line 1 CALIBRATING
Line 2 BATTERY
LED Defined by Charge State
Line 1 RAPID CHG ENDS
Line 2 IN xx HRS, yy MIN
Every
71.0 sec
Start
(4.0 sec)
(2.0 sec)
(2.0 sec)
(7.0 sec)
(4.0 sec)
Every
13.0 sec
5X
65.0
sec
37D22-B_Impres_MUC_EN.fm Page 23 Wednesday, July 12, 2006 2:02 PM

24
English
After Calibration:
LED Defined by Charge State
Line 1 KIT# xxxxxxxx
Line 2 SN: yyyyyyyyyyyy
LED Defined by Charge State
Line 1 KIT# xxxxxxxx
Line 2 yyyyy CHEMISTRY
LED Steady GREEN
Line 1 CHARGE COMPLETE
Line 2
LED Defined by Charge State
Line 1 BATTERY
Line 2 CALIBRATED
LED Defined by Charge State
Line 1 xx% RATED CAP.
Line 2 yyyy mAH zz.z V
Start
(4.0 sec)
(2.0 sec)
(2.0 sec)
(2.0 sec)
(7.0 sec)
Every
61.0sec
Every
11 sec
5X
55.0
sec
37D22-B_Impres_MUC_EN.fm Page 24 Wednesday, July 12, 2006 2:02 PM

25
English
IMPRES Li-Ion Battery Display Sequence
LED Defined by Charge State
Line 1 KIT# xxxxxxxx
Line 2 SN: yyyyyyyyyyyy
LED Defined by Charge State
Line 1 KIT# xxxxxxxx
Line 2 yyyyy CHEMISTRY
LED Defined by Charge State
Line 1 xxxx CYCLES
Line 2 TO RECONDITION
LED Steady RED
Line 1 RAPID CHARGE
Line 2
LED Defined by Charge State
Line 1 xx% RATED CAP.
Line 2 yyyyy mAH zz.z V
Start
(4.0 sec)
(2.0 sec)
(2.0 sec)
(2.0 sec)
(7.0 sec)
Every
53.0 sec
Every
9.0 sec
5X
45.0
sec
37D22-B_Impres_MUC_EN.fm Page 25 Wednesday, July 12, 2006 2:02 PM

26
English
Before Calibration:
LED Defined by Charge State
Line 1 KIT# xxxxxxxx
Line 2 SN: yyyyyyyyyyyy
LED Defined by Charge State
Line 1 KIT# xxxxxxxx
Line 2 yyyyy CHEMISTRY
LED Steady ORANGE
Line 1 DISCHARGE
Line 2
LED Defined by Charge State
Line 1 CALIBRATING
Line 2 BATTERY
Start
(4.0 sec)
(2.0 sec)
(2.0 sec)
(7.0 sec)
Every
51.0 sec
Every
9.0 sec
5X
45.0
sec
37D22-B_Impres_MUC_EN.fm Page 26 Wednesday, July 12, 2006 2:02 PM

27
English
After Calibration:
LED Defined by Charge State
Line 1 KIT# xxxxxxxx
Line 2 SN: yyyyyyyyyyyy
LED Defined by Charge State
Line 1 KIT# xxxxxxxx
Line 2 yyyyy CHEMISTRY
LED Steady GREEN
Line 1 CHARGE COMPLETE
Line 2
LED Defined by Charge State
Line 1 BATTERY
Line 2 CALIBRATED
LED Defined by Charge State
Line 1 xx% RATED CAP.
Line 2 yyyy mAH zz.z V
Start
(4.0 sec)
(2.0 sec)
(2.0 sec)
(2.0 sec)
(7.0 sec)
Every
61.0sec
Every
11 sec
5X
55.0
sec
37D22-B_Impres_MUC_EN.fm Page 27 Wednesday, July 12, 2006 2:02 PM

28
English
Display Text Orientation
In order to allow for desk or wall mounting of the IMPRES
Adaptive
Multi-Unit Charger, the CDM is equipped with the ability to “flip” the
display text 180 degrees.
To do this, insert a large paper clip into the pinhole below the display
perpendicular to the desktop. A “click” indicates the toggle button has
been actuated, flipping the text 180 degrees.
IMPRES Adaptive Multi-Unit Charger Operation
For more information on serviceability of the MUC and CDM, refer to
the Charger Service Guide, 6880309L66.
Service
For service, contact the following depot. Please call and confirm your
return before sending the unit to the depot for service.
Motorola Service Centre
Motorola GmbH
Customer Care
Am Borsigturm 130
13507 Berlin
Germany.
Tel: +49 30 6686 1555
37D22-B_Impres_MUC_EN.fm Page 28 Wednesday, July 12, 2006 2:02 PM

Deutsch
1
INHALTSVERZEICHNIS
Wichtige Sicherheitshinweise . . . . . . . . . . . . . . . . . . . . . . . . . . . . . . . 2
Sicherheitsrichtlinien für den Betrieb . . . . . . . . . . . . . . . . . . . . . . . . . . 3
Leistungsmerkmale des IMPRES-Mehrfachladegeräts . . . . . . . . . . . . 4
Betriebscharakteristik und funktionelle Unterschiede . . . . . . . . . . . . . 5
Akkutabellen . . . . . . . . . . . . . . . . . . . . . . . . . . . . . . . . . . . . . . . . . . . . 7
Netzteile und von Motorola zugelassene Netzadapter . . . . . . . . . . . 10
Bedienungsanleitung . . . . . . . . . . . . . . . . . . . . . . . . . . . . . . . . . . . . . 11
Laden von Akkus . . . . . . . . . . . . . . . . . . . . . . . . . . . . . . . . . . . . . 13
Manuelle Rekonditionierung von Akkus . . . . . . . . . . . . . . . . . . . . 14
Automatische Rekonditionierung von Akkus . . . . . . . . . . . . . . . . 14
Manuelles Beenden des Rekonditionierungsprozesses . . . . . . . . 15
Fehlersuche . . . . . . . . . . . . . . . . . . . . . . . . . . . . . . . . . . . . . . . . . . . . 16
Wartung . . . . . . . . . . . . . . . . . . . . . . . . . . . . . . . . . . . . . . . . . . . . . . . 17
Ladegeräte mit Displaymodul (CDM). . . . . . . . . . . . . . . . . . . . . . . . . 18
Dieses Zubehörbeilage gilt für die folgenden IMPRES Universal-Mehrfachladegeräte:
WPLN4108, WPLN4109, WPLN4110, WPLN4118, WPLN4119, WPLN4120, WPLN4121,
WPLN4123, WPLN4130, WPLN4131, WPLN4132, WPLN4133, WPLN4134,
WPLN4135, WPLN4136
Weiterhin gilt diese Anleitung auch für die folgenden IMPRES Universal-
Mehrfachladegeräte, die für die Serie der GP Professionellen Funkgeräte erhältlich sind:
WPLN4144, WPLN4145, WPLN4146, WPLN4187, WPLN4188, WPLN4189,
WPLN4190, WPLN4191, WPLN4192, WPLN4193, WPLN4194, WPLN4195,
WPLN4196, WPLN4204, WPLN4205
‘Universal’ bedeutet, dass das Ladegerät mit unterschiedlichen Funkgerätemodellen
eingesetzt werden kann und dass mit Hilfe von Akkuadaptern alle in den Tabellen 1 bis
einschließlich 6 aufgeführten Akkus verwendet werden können.
37D22-B_Impres_MUC_DE.fm Page 1 Wednesday, July 12, 2006 2:05 PM

Deutsch
2
WICHTIGE SICHERHEITSHINWEISE
BEWAHREN SIE DIESE HINWEISE AUF
Dieses Dokument enthält wichtige Sicherheits- und Bedienungshinweise. Bitte
lesen Sie diese Hinweise sorgfältig durch und heben Sie das Handbuch auf, damit
Sie sie später jederzeit nachschlagen können.
Lesen Sie alle Hinweise und Warnungen (1) am Ladegerät und (2) am Akku sowie
(3) an dem Handsprechfunkgerät, in das der Akku eingesetzt wird.
1.Um die Verletzungsgefahr zu verringern, dürfen nur die in den
Tabellen 1 bis 5 aufgeführten, von der Firma Motorola
zugelassenen Akkus aufgeladen werden. Andere Akkus können
beim Aufladen explodieren und Verletzungen bzw.
Sachschäden verursachen.
2. Bei Verwendung von Zubehörteilen, die nicht von der Firma Motorola
freigegeben sind, besteht Feuer-, Stromschlag- und Verletzungsgefahr.
3. Ziehen Sie den Stecker niemals am Kabel aus der Steckdose, wenn Sie die
Stromversorgung des Ladegeräts unterbrechen möchten, um
Beschädigungen des Netzkabels und des Steckers zu vermeiden.
4. Verwenden Sie nach Möglichkeit kein Verlängerungskabel. Bei Verwendung
eines ungeeigneten Verlängerungskabels besteht Brand- und Strom-
schlaggefahr. Wenn der Einsatz eines Verlängerungskabels unbedingt
erforderlich ist, sollten Sie auf die richtigen Kabeldimensionen achten.
5. Bei Verwendung schadhafter Ladegeräte besteht Feuer-, Stromschlag- und
Verletzungsgefahr. Lassen Sie daher bitte beschädigte Ladegeräte vom
Motorola-Kundendienst reparieren.
6. Dieses Gerät ist reparierbar.
Jede seiner Ladeschalen wird von einer spez-
iellen Leiterplatte mit Strom versorgt. Die Leiterplatte/Stromversorgung ist bei
Ihrem Motorola Vertriebspartner/Kundendienst vor Ort erhältlich. Die Ersatz-
teilnummer für die Leiterplatte ist RLN5325. Für andere Bauteile des Geräts
gibt es keine Ersatzteile.
Bei Ihrem Motorola Vertriebspartner/Kundendienst kann auch ein Wartungs-
handbuch – Teilnummer 6880309L66 – bestellt werden, das den Austausch-
vorgang beschreibt.
7. Bevor Sie das Ladegerät warten oder reinigen, sollten Sie den Netzstecker
abziehen, um einem Stromschlag vorzubeugen.
!
ACHTUNG
37D22-B_Impres_MUC_DE.fm Page 2 Wednesday, July 12, 2006 2:05 PM

Deutsch
3
SICHERHEITSRICHTLINIEN FÜR DEN BETRIEB
• Schalten Sie das Handsprechfunkgerät zum Laden eines Akkus ab.
• Das Ladegerät ist nicht für den Einsatz im Freien ausgelegt und darf nur in
trockenen Räumen betrieben werden.
• Schließen Sie das Ladegerät nur an eine ordnungsgemäß gesicherte und
verkabelte Steckdose an, die die richtige Spannung aufweist (siehe Etikett am
Ladegerät).
• Ziehen Sie den Netzstecker ab, wenn das Ladegerät von der Netzspannung
isoliert werden soll.
• Die Steckdose für das Ladegerät muss in der Nähe befindlich und leicht
erreichbar sein.
• In Geräten mit Überspannungsschutz dürfen nur solche Sicherungen verwendet
werden, die dem in der Bedienungsanleitung angegebenen Typ entsprechen.
• Das Ladegerät darf bei Umgebungstemperaturen über 40°C nicht eingesetzt
werden.
• Achten Sie darauf, dass Sie das Kabel so verlegen, dass niemand darauf treten
oder darüber stolpern kann. Außerdem darf es nicht mit Wasser in Berührung
kommen, Zugkräften ausgesetzt werden oder beschädigt werden.
• Die Wandhalterung für dieses Gerät ist die gleiche wie die des
Mehrfachladegeräts NTN4796 (Teilnummer NLN7967).
• Defekte Sicherungen dürfen nur durch Sicherungen ersetzt werden, die den
Angaben auf dem Etikett am Ladegerät entsprechen. Die folgenden Teile können
bei Ihrem Motorola Vertriebspartner/Kundendienst vor Ort bestellt werden:
Sicherung 6571489S01
Halter 0987626G01
Abdeckung 0987739G01
37D22-B_Impres_MUC_DE.fm Page 3 Wednesday, July 12, 2006 2:05 PM

Deutsch
4
LEISTUNGSMERKMALE DES IMPRES-MEHRFACHLADEGERÄTS
Das IMPRES-Akkuladesystem von Motorola ist ein modernes Energiesystem für
drei verschiedene Akkutypen. Zum System gehören: (a) IMPRES-Akkus, (b) das
IMPRES-Mehrfachladegerät und (c) Funkgerät-Hardware/Software, über die der
Datenaustausch zwischen IMPRES-kompatiblen Sprechfunkgeräten und IMPRES-
Akkus möglich ist (gilt nicht für die Serie der GP Professionellen Funkgeräte).
Die Verwendung des IMPRES-Mehrfachladegeräts zusammen mit IMPRES-Akkus
bietet die folgenden Vorzüge:
• Die Betriebszeit zwischen Ladezyklen wird maximiert, da der Memory-Effekt
automatisch eliminiert wird.
• Die Akku-Lebensdauer wird maximiert, da wesentlich weniger Wärme während
der Erhaltungsladezyklen und der an das Laden anschließenden Zyklen entsteht.
• Der Kauf von zusätzlichen Rekonditionierungsgeräten wird überflüssig, ebenso
die Schulung von Personal in „Akkuwartungsaufgaben“.
Mit diesem einzigartigen, patentierten Akkuladesystem gehören das Kontrollieren
und Protokollieren der Akkunutzung, die Durchführung manueller
Rekonditionierungszyklen und die Notwendigkeit, Akkus nach dem Aufladen aus
dem Ladegerät nehmen zu müssen, der Vergangenheit an.
Das IMPRES-Mehrfachladegerät überwacht die Nutzungsmuster der IMPRES-
Akkus, speichert diese Informationen im IMPRES-Akku und führt nur dann einen
Rekonditionierungszyklus durch, wenn es erforderlich ist.
Im IMPRES-Mehrfachladegerät wird der Akku nie zu heiß, ganz gleich, wie lange er
in der Ladeschale verbleibt. Das Ladegerät überwacht den Akku und lädt ihn bei
Bedarf automatisch nach.
Mit dem IMPRES-Mehrfachladegerät wird der Lade- und Akkuwartungsprozess
vereinfacht. Gehen Sie einfach wie folgt vor:
1. Setzen Sie das Handsprechfunkgerät/den Akku in das Ladegerät ein.
2. Nehmen Sie das Handsprechfunkgerät/den Akku aus dem Ladegerät,
wenn es/er vollständig geladen ist!
Motorola ist der einzige Hersteller, der ein Konditionierungs- oder
Rekonditionierungsladegerät anbietet, bei dem Benutzer die Wahl haben, das
Funkgerät mit eingesetztem Akku oder den Akku separat aufzuladen.
37D22-B_Impres_MUC_DE.fm Page 4 Wednesday, July 12, 2006 2:05 PM

Deutsch
5
BETRIEBSCHARAKTERISTIK UND FUNKTIONELLE
UNTERSCHIEDE:
1. IMPRES-Akkus können in herkömmlichen Ladegeräten geladen werden. Die
Chip-Funktion dieser Akkus wird aber nur dann aktiviert, wenn der IMPRES-
Akku in einem IMPRES-Ladegerät geladen wird. Wenn ein IMPRES-Akku das
erste Mal in einem IMPRES-Mehrfachladegerät geladen wird, leuchtet die
Ladeanzeige des Ladegeräts zunächst
GELB
. Die Erstladung darf nicht
unterbrochen werden, d.h. der Akku darf erst dann aus dem Ladegerät
genommen werden, wenn die Ladeanzeige
GRÜN
leuchtet. Der IMPRES-Akku
wird dadurch ordnungsgemäß kalibriert und die Chip-Funktion aktiviert. Wird
der Erstladungsprozess unterbrochen, kalibriert das Ladegerät den Akku, wenn
er das nächste Mal in die Ladeschale gesteckt wird.
2. Das IMPRES-Mehrfachladegerät bestimmt die zum Rekonditionieren des
IMPRES-Akkus erforderlichen Bedingungen jeweils automatisch und schaltet
daher eventuell auf Rekonditionierungsbetrieb, wenn ein Handsprechfunkgerät
oder ein Akku in die Ladeschale gesteckt wird. Die Ladeanzeige leuchtet in
diesem Fall
GELB
. Der Rekonditionierungsbetrieb kann erforderlichenfalls
durch Herausnehmen und erneutes Einsetzen des Handsprechfunkgeräts bzw.
Akkus umgangen werden (siehe Gebrauchsanleitung in diesem Handbuch).
3. Das IMPRES-Mehrfachladegerät eignet sich zum Laden aller in den Tabellen 1
bis 6 aufgelisteten Akkus. Die Chip-Funktion steht allerdings nur bei Original-
IMPRES-Akkus zur Verfügung. (Bei der Einführung neuer
Handsprechfunkgeräte- bzw. Akkumodelle wird diese Liste entsprechend
aktualisiert und über die diversen globalen OEM- und
Kundendienstorganisationen an die Kunden verteilt.)
4. Zum Kalibrieren von IMPRES-Chip-Akkus muss das IMPRES-
Mehrfachladegerät verwendet werden. Dadurch wird sichergestellt, dass die
Nutzungsdaten der IMPRES-Akkus korrekt aufgezeichnet, gespeichert und
angezeigt werden.
37D22-B_Impres_MUC_DE.fm Page 5 Wednesday, July 12, 2006 2:05 PM

Deutsch
6
5. Wird ein IMPRES Akku mit einem Funkgerät mit Display (z.B. dem XTS5000)
verwendet, kann das Funkgerät den Ladezustand des Akkus durch ein Symbol
anzeigen. Diese Symbol wird aktiviert, nachdem der IMPRES Akku in einem
IMPRES Ladegerät kalibriert wurde. Das Ladestatussymbol wird dann
weiterhin angezeigt, solange der Benutzer IMPRES Ladegeräte zum Aufladen
der Akkus verwendet. Wird ein IMPRES Akku jedoch 7 Tage (oder länger) in
einem anderen als einem IMPRES Ladegerät aufgeladen, erlischt das Symbol.
Zur erneuten Aktivierung des Symbols legen Sie den IMPRES Akku in ein
IMPRES Ladegerät und führen eine vollständige Ladung durch (bis die Anzeige
UNUNTERBROCHEN GRÜN
leuchtet). Danach wird das Ladestatussymbol
auf dem Display des Funkgeräts angezeigt. Wird das Symbol nach
vollständiger Ladung nicht angezeigt, legen Sie einen teilweise entladenen
Akku (mindestens 70 % entladen) in das Ladegerät, leiten eine
Rekonditionierung ein und lassen das Ladegerät den Ladevorgang vollständig
durchführen. Danach wird das Symbol auf dem Display des Funkgeräts
angezeigt (gilt nicht für die Serie der GP Professionellen Funkgeräte).
6. Das IMPRES Mehrfachladegerät darf ausschließlich von einem von Motorola
CGISS zugelassenen Servicetechniker repariert werden. Bei Nichtbeachten
dieser Vorschriften kann die Garantie ungültig werden.
37D22-B_Impres_MUC_DE.fm Page 6 Wednesday, July 12, 2006 2:05 PM

Deutsch
7
AKKUTABELLEN
In den folgenden Tabellen werden die Akkus aufgeführt, die mit den in
den Tabellenüberschriften angegebenen Funkgerätemodellen
eingesetzt werden können.
*
Zum Laden von MTP700-Akkus im IMPRES-Mehrfachladegerät wird der Akku-Adapter mit der
Teilnummer RLN5212 benötigt.
Tabelle 1. XTS3000/XTS3500/Dimetra-Handsprechfunkgeräte & XTS5000
Digital-Handsprechfunkgeräte
Kit
(Teilenummer)
Akkutyp FM Chip-
Akku
Kapazität Neues
Modell
HNN9031 NiCD Nein Ja Ultrahochleistung Nein
HNN9032 NiCD Ja Ja Ultrahochleistung Nein
NTN8294 NiCD Nein Nein Ultrahochleistung Nein
NTN8295 NiCD Ja Nein Ultrahochleistung Nein
NTN8297 NiCD Ja Nein Ultrahochleistung Nein
NTN8299 NiCD Ja Nein Ultrahochleistung Nein
NTN8610 LiIon Nein Nein Hochleistung Nein
NTN8293 NiMH Nein Nein Ultrahochleistung Nein
NNTN4435 NiMH Nein Ja Ultrahochleistung Nein
NNTN4436 NiMH Ja Ja Ultrahochleistung Nein
NNTN4437 NiMH Ja Ja Ultrahochleistung Nein
RNN4006 NiMH Nein Nein Ultrahochleistung Neu
RNN4007 NIMH Ja Nein Ultrahochleistung Neu
NTN9862 LiIon Nein Ja Ultrahochleistung Neu
Tabelle 2. XTS2500 Digital-Handsprechfunkgeräte
Kit
(Teilenummer)
Akkutyp FM Chip-
Akku
Kapazität Neues
Modell
NTN9859 NiMH Nein Nein Ultrahochleistung Neu
NTN9857 NiMH Ja Nein Ultrahochleistung Neu
NTN9815 NiCD Nein Nein Hochleistung Neu
NTN9816 NiCD Ja Nein Hochleistung Neu
Tabelle 3. MTP700 Digital-Handsprechfunkgeräte
Kit
(Teilenummer)
Akkutyp FM Chip-
Akku
Kapazität Neues
Modell
PMNN4048* NiMH Nein Ja Hochleistung Neu
PMNN4049* NiMH Ja Ja Hochleistung Neu
PMNN4050* Li-Ionen Nein Ja Hochleistung Neu
PMNN4047* LiIon Nein Ja Hochleistung Neu
37D22-B_Impres_MUC_DE.fm Page 7 Wednesday, July 12, 2006 2:05 PM

Deutsch
8
** Zum Laden von Astro Saber-Akkus im IMPRES-Mehrfachladegerät wird der Akku-Adapter mit
der Teilnummer 4385922B01 benötigt.
Tabelle 4. Handsprechfunkgeräte der Modellreihen Jedi HT1000/MT2000/
MTS2000/MTX8000 & MTX9000
Kit
(Teilenummer)
Akkutyp FM Chip-
Akku
Kapazität Neues
Modell
HNN9028 NiCD Nein Ja Ultrahochleistung Nein
HNN9029 NiCD Ja Ja Ultrahochleistung Nein
NTN7143 NiCD Nein Nein Hochleistung Nein
NTN7144 NiCD Nein Nein Ultrahochleistung Nein
NTN7146 NiCD Ja Nein Hochleistung Nein
NTN7147 NiCD Ja Nein Ultrahochleistung Nein
NTN7148 NiCD CENELEC Nein Hochleistung Nein
NTN7149 NiCD CSA Nein Hochleistung Nein
NTN7150 NiCD MSHA Nein Hochleistung Nein
NTN7341 NiCD Ja Nein Ultrahochleistung Nein
NTN7372 NiCD Ja Nein Hochleistung Nein
WPPN4013 NiMH Nein Nein Ultrahochleistung Nein
WPPN4037 NiMH Ja Nein Ultrahochleistung Nein
RNN4008 NiCD ATEX Nein Hochleistung Nein
Tabelle 5. Saber/Astro Saber/SSE5000/MX1000-Handsprechfunkgeräte
Kit
(Teilenummer)
Akkutyp FM Chip-
Akku
Kapazität Neues
Modell
HNN9033 NiCD Nein Ja Ultrahochleistung Nein
HNN9031 NiCD Ja Ja Ultrahochleistung Nein
NTN4537** NiCD Ja Nein Niedrigleistung Nein
NTN4538 NiCD Ja Nein Hochleistung Nein
NTN4592** NiCD Nein Nein Niedrigleistung Nein
NTN4593 NiCD Nein Nein Hochleistung Nein
NTN4595 NiCD Nein Nein Ultrahochleistung Nein
NTN4596 NiCD Ja Nein Ultrahochleistung Nein
NTN4657 NiCD Nein Nein Hochleistung Nein
NTN4671 NiCD CENELEC Nein Hochleistung Nein
NTN4992 NiCD Ja Nein Ultrahochleistung Nein
NTN7014** NiMH Nein Nein Hochleistung Nein
NTN7058 NiCD Ja Nein Ultrahochleistung Nein
NTN7426 NiCD Ja Nein Niedrigleistung Nein
NTN8251 NiMH Ja Nein Ultrahochleistung Nein
NTN8818** LiIon Nein Nein Hochleistung Nein
37D22-B_Impres_MUC_DE.fm Page 8 Wednesday, July 12, 2006 2:05 PM

Deutsch
9
Für das Universal-Ladegerät ist ein Akkuadapter (Teilenr. RLN5648) erforderlich.
Tabelle 6. Serie GP Professionelle Funkgeräte
Kit
(Teilenummer)
Akkutyp FM Chip-
Akku
Kapazität Neues
Modell
HNN9003 NiMH
AA Bluetooth
Nein Nein Hochleistung Nein
HNN9008 NiMH Nein Nein Hochleistung Nein
HNN9009 NiMH Nein Nein Ultrahochleistung Nein
HNN9010 NiMH Ja Nein Ultrahochleistung Nein
HNN9011 NiCD Ja Nein Hochleistung Nein
HNN9012 NiCD Nein Nein Hochleistung Nein
HNN9013 LiIon Nein Nein Hochleistung Nein
WPNN4045 NiMH Nein Nein Hochleistung Nein
PMNN4045 NiMH Nein Nein Hochleistung Nein
HNN4001 Impres NiMH Nein Ja Ultrahochleistung Ja
HNN4002 Impres NiMH Ja Ja Ultrahochleistung Ja
HNN4003 Impres LiIon Nein Ja Ultrahochleistung Ja
HINWEIS:
Adapter sind bei Ihrem Motorola Vertriebspartner/Kundendienst
vor Ort erhältlich.
37D22-B_Impres_MUC_DE.fm Page 9 Wednesday, July 12, 2006 2:05 PM

Deutsch
10
NETZTEILE UND VON MOTOROLA ZUGELASSENE
NETZADAPTER
Dieses Ladegerät ist zur Verwendung in Anwendungen mit 100 V ~ bis 240 V ~, 50/
60 Hz bestimmt und ist mit den in Tabelle 7 aufgeführten Motorola Kabeln zu
verwenden. Die Kabel, die mit dem Ladegerät für die GP Professionellen
Funkgeräte zu verwendende sind, sind in Tabelle 8 aufgeführt:
Tabelle 7. Motorola Kabel für Universal-Ladegeräte
Steckertyp Ladegerät-Kit Ladegerät-Kit
(Modell mit
Display)
Netzkabel
Kein Kabel/Stecker WPLN4121 WPLN4127 Kein Netzkabel
US/Nordamerika WPLN4108 WPLN4130 3087791G01
Europa WPLN4109 WPLN4131 3087791G04
GB WPLN4110 WPLN4132 3087791G07
Australien/Neuseeland WPLN4118 WPLN4133 3087791G10
Argentinien WPLN4119 WPLN4134 3087791G13
US/Nordamerika WPLN4120 WPLN4135 3087791G01
Korea WPLN4123 WPLN4136 3087791G16
Tabelle 8. Motorola Kabel für die Serie der GP Professionellen
Funkgeräte
Steckertyp Ladegerät-Kit Ladegerät-Kit
(Modell mit
Display)
Netzkabel
Kein Kabel/Stecker WPLN4197 WPLN4198 Kein Netzkabel
US/Nordamerika WPLN4187 WPLN4192 3087791G01
Europa WPLN4189 WPLN4194 3087791G04
GB WPLN4188 WPLN4193 3087791G07
Australien/Neuseeland WPLN4190 WPLN4195 3087791G10
Argentinien WPLN4191 WPLN4196 3087791G13
US/Nordamerika WPLN4205 WPLN4204 3087791G01
Korea WPLN4146 WPLN4145 3087791G16
37D22-B_Impres_MUC_DE.fm Page 10 Wednesday, July 12, 2006 2:05 PM

Deutsch
11
BEDIENUNGSANLEITUNG
Die Ladeschale des Ladegeräts nimmt entweder ein Handsprechfunkgerät samt
eingesetztem Akku oder einen separaten Akku auf. Schalten Sie das
Handsprechfunkgerät aus, bevor Sie ein Handsprechfunkgerät zusammen
mit Akku laden. Akkus werden am besten bei Raumtemperatur geladen.
1. Stecken Sie den Ladegerätestecker des Netzkabels in die
Stromversorgungsbuchse an der Rückseite des Ladegeräts.
2. Stecken Sie den Netzstecker des Netzkabels in die Netzsteckdose. Ein
erfolgreicher Einschaltvorgang wird durch
EINMALIGES GRÜNES
AUFBLINKEN
der Ladeanzeige angezeigt.
3. Setzen Sie den Akku bzw. das Handsprechfunkgerät samt Akku
(Handsprechfunkgerät ist ausgeschaltet) wie folgt in die Ladeschale ein:
a. Richten Sie die Aussparung an jeder Seite des Akkus auf die
entsprechende Führung an jeder Seite der Ladeschale aus.
b. Drücken Sie den Akku zur Rückseite der Ladeschale.
c. Schieben Sie den Akku in die Ladeschale. Achten Sie dabei darauf, dass
die Ladekontakte die Kontakte des Akkus berühren.
Wenn der Akku richtig in der Ladeschale sitzt, leuchtet die Ladeanzeige auf.
Dadurch wird angezeigt, dass der Akku registriert wird; siehe Ladeanzeige in
Tabelle 9.
HINWEISE
Das IMPRES-Mehrfachladegerät lädt nur die von Motorola
freigegebenen Akkus in den Tabellen 1 bis 6 auf. Andere Akkus
werden eventuell nicht geladen.
Das IMPRES-Mehrfachladegerät unterscheidet sich durch
bestimmte Leistungsmerkmale und automatische Funktionen von
anderen Akkuladegeräten. Beobachten Sie die Ladeanzeige
genau, um sicherzustellen, dass sich das Ladegerät in der
gewünschten/erwarteten Betriebsart befindet.
37D22-B_Impres_MUC_DE.fm Page 11 Wednesday, July 12, 2006 2:05 PM

Deutsch
12
Damit die Leistungsmerkmale der Motorola Chip-Akkus und des IMPRES-
Akkuladesystems uneingeschränkt zur Verfügung stehen, müssen die in Motorola
Chip-Akkus enthaltenen Daten bei der Erstladung des Akkus vom Ladegerät
initialisiert werden. Dieser Initialisierungsprozess wird durch
GELBES
Leuchten
der Ladeanzeige angezeigt (wie beim Rekonditionieren des Akkus).
Dabei wird zuerst eine Rekonditionierung des Akkus durchgeführt, an die sich das
Laden des Akkus anschließt. Dieser Prozess benötigt eine gewisse Zeit zum
Initialisieren des Akkus. Deshalb sollte der Akku beim ersten Laden über Nacht im
Ladegerät bleiben.
Tabelle 9. Ladestatusanzeigen
Ladeanzeige Beschreibung
Einmaliges grünes
Aufblinken
Ladegerät wurde erfolgreich eingeschaltet.
Rot
Schnellladung des Akkus.
Grün blinkend
Schnellladung des Akkus beendet (>90 % verfügbare
Kapazität). Akku wird durch Erhaltungsladung auf volle
Kapazität aufgeladen.
Grün
Ladevorgang des Akkus ist abgeschlossen. Der Akku ist
vollständig geladen.
Gelb blinkend
Akku wird vom Ladegerät registriert (Chip-Akku), wird aber
noch nicht geladen (entweder ist die Akkuspannung zu niedrig
oder der Akku ist zu kalt oder zu heiß zum Laden. Der
Ladezyklus beginnt, wenn dieser Zustand korrigiert worden
ist).
Rot blinkend
Akku kann nicht geladen werden oder Kontakt zwischen Akku
und Ladekontakten ist nicht einwandfrei.
Gelb
(Nur für Chip-Akkus)
Akku ist im Rekonditionierungsmodus. Wie lange das
Ladegerät in dieser Betriebsart bleibt, hängt vom Ladezustand
des Akkus beim Einsetzen in das Ladegerät ab (bei
vollständig geladenen Akkus dauert die Rekonditionierung
länger – 8 Stunden oder mehr – als bei vollständig entladenen
Akkus).
Rot/Grün blinkend
(Nur für Chip-Akkus)
Ladevorgang des Akkus ist abgeschlossen. Der Akku ist
vollständig aufgeladen. Akku ist noch verwendbar, nähert sich
aber eventuell dem Ende seiner nutzbaren Lebensdauer.
HINWEIS
Das IMPRES-Mehrfachladegerät ist einzigartig. Es kann bei
Motorola IMPRES-Akkus automatisch den Rekonditionierungs-
bedarf des Akkus bestimmen.
37D22-B_Impres_MUC_DE.fm Page 12 Wednesday, July 12, 2006 2:05 PM

Deutsch
13
Das IMPRES-Mehrfachladegerät hat zwei Aufgaben, d.h. es arbeitet:
•als ein Ladegerät für alle von Motorola freigegebenen Akkus und
•als ein Rekonditionierungsgerät für von Motorola freigegebenen IMPRES-
Akkus.
Laden von Akkus
Um die optimale Leistungsfähigkeit Ihrer Akkus zu gewährleisten, empfiehlt
Motorola, dass alle neuen Akkus vor dem ersten Einsatz 14 bis 16 Stunden lang im
Ladegerät bleiben, bevor sie das erste Mal benutzt werden.
1. Wenn ein Handsprechfunkgerät samt Akku bzw. ein Akku richtig in das
Ladegerät gesteckt worden ist, beginnt das Ladegerät den Akku
schnellzuladen. Das wird durch das
ROTE
Leuchten
der Ladeanzeige
angezeigt. Wie lange die Ladeanzeige
ROT
leuchtet
, hängt von der im Akku
noch vorhandenen Rest-Ladung ab.
2. Das Ende der Schnellladung (>90 % verfügbare Kapazität) wird durch ein
GRÜNES BLINKEN
der Ladeanzeige angezeigt. Dieses Blinken zeigt das
Schlussladen (mit Erhaltungsstromstärke) an und dauert ungefähr eine Stunde.
3. Nach dem Schlussladen (mit Erhaltungsstromstärke) leuchtet die Ladeanzeige
GRÜN
und zeigt dadurch an, dass der Akku vollständig geladen ist.
4.
Eventuell
gibt die Ladeanzeige während des Ladens auch folgende Anzeigen
aus:
•
GELBES BLINKEN
– zeigt an, dass sich entweder die Akkutemperatur
oder die Akkuspannung außerhalb des zum Laden erforderlichen Bereichs
befindet. Der Akku wird wieder geladen, wenn diese Bedingungen korrigiert
wurden.
•
ROTES UND GRÜNES BLINKEN
– zeigt an, dass sich der Akku dem Ende
seiner nutzbaren Lebensdauer nähert. Dieser Akku
ist
zwar vollständig
geladen, aber seine Ladekapazität hat einsatzbedingt abgenommen;
Funktionen, die einen hohen Energiebedarf haben können u.U. nicht mehr
ausgeführt werden. Dieses Leistungsmerkmal steht nur bei Motorola
WICHTIG:
Die Ladeschale ist so ausgeführt, dass sie verschiedene
Akkuformen und -größen aufnehmen kann. Aus diesem Grund
müssen Sie darauf achten, dass Akkus bzw. Sprechfunkgeräte
mit eingesetztem Akku richtig in die Ladeschale gesteckt werden.
Wird ein Akku bzw. ein Sprechfunkgerät mit eingesetztem Akku
falsch eingesteckt, leuchtet die Ladeanzeige nicht. Das bedeutet,
dass der Akku nicht geladen wird.
HINWEIS:
Neue (noch nie benutzte) Akkus zeigen in einigen Fällen zu früh
eine Vollladung an (Ladeanzeige leuchtet
GRÜN
).
37D22-B_Impres_MUC_DE.fm Page 13 Wednesday, July 12, 2006 2:05 PM

Deutsch
14
IMPRES-Akkus zur Verfügung. Diese Anzeige ist keine Fehleranzeige,
sondern ein Hinweis für den Benutzer, dass der Akku die erwartete
Leistung bald nicht mehr erbringen wird und dass er eventuell ersetzt
werden muss.
•
ROTES BLINKEN
– zeigt an, dass der Akku nicht ladbar ist. Grund dafür
könnte sein, dass der Kontakt zwischen Akku- und Ladegerätkontakten
unterbrochen ist. Der Akku wird weiter geladen, wenn die Ursache für diese
Anzeige beseitigt wurde.
Motorola Chip-Akkus haben einen internen Speicherbaustein, der von Motorolas
IMPRES-Mehrfachladegerät gelesen wird. Wenn ein IMPRES-Akku mehr als 2 ½
Minuten lang geladen wird, speichert das Mehrfachladegerät die Seriennummer
des IMPRES-Akkus. Der IMPRES-Akku kann bis zu 30 Minuten lang aus dem
Ladegerät genommen werden. Wenn er dann wieder in das Ladegerät gesteckt
wird, beginnt der Ladevorgang an dem Punkt, an dem er sich befand, als der Akku
das erste Mal aus dem Ladegerät genommen wurde.
Manuelle Rekonditionierung von Akkus
Um die Rekonditionierung eines IMPRES-Akkus manuell herbei zu führen, nehmen
Sie den Akku innerhalb von 2 ½ Minuten nach seinem ersten Einsetzen in das
Ladegerät (Ladeanzeige leuchtet
ROT
) aus dem Ladegerät heraus und setzen Sie
ihn dann innerhalb von 5 Sekunden wieder ein. Dadurch schaltet das Ladegerät in
den Rekonditionierungsmodus, der Akku wird rekonditioniert und automatisch
nachgeladen. Die Ladeanzeige leuchtet dabei anhaltend
GELB
(anstatt
ROT
).
Automatische Rekonditionierung von Akkus
Beim Einsatz zusammen mit einem Motorola IMPRES-Akku kann das IMPRES-
Mehrfachladegerät bestimmen, wann eine Rekonditionierung des Akkus
angebracht ist.
Wenn ein IMPRES-Akku ordnungsgemäß in das Ladegerät gesteckt wird, bestimmt
das Ladegerät, ob der Akku rekonditioniert werden muss. Ist eine
Rekonditionierung erforderlich, leuchtet die Ladeanzeige
GELB
. Dieser
Rekonditionierungsprozess kann 8 Stunden und länger dauern, je nach
Ladezustand und Nennkapazität des Akkus beim Einsetzen in das Ladegerät.
Wichtig: Um eine effektive Rekonditionierung zu erzielen, muss der
Rekonditionierungs-/Nachladevorgang des Akkus vollständig durchgeführt
werden. Lassen Sie den Akku deshalb im Ladegerät, bis die Ladeanzeige
GRÜN
leuchtet.
HINWEIS:
Wird diese Funktion übermäßig oft eingesetzt, kann dies die
Lebensdauer des Akkus verkürzen.
37D22-B_Impres_MUC_DE.fm Page 14 Wednesday, July 12, 2006 2:05 PM

Deutsch
15
Nach Beendigung des Rekonditionierungszyklus lädt das Ladegerät den Akku
automatisch nach.
Manuelles Beenden des Rekonditionierungsprozesses
Während des Rekonditionierungsprozesses eines Motorola IMPRES-Akkus
(
GELBE
Anzeige) kann die Rekonditionierung jederzeit unterbrochen werden,
indem der Akku aus dem Ladegerät genommen und innerhalb von 5 Sekunden
wieder in das Ladegerät eingesetzt wird. Das bewirkt, dass das Ladegerät den
Rekonditionierungsprozess beendet und den Ladeprozess beginnt. Die
Ladeanzeige zeigt dann
ROT
an.
37D22-B_Impres_MUC_DE.fm Page 15 Wednesday, July 12, 2006 2:05 PM

Deutsch
16
FEHLERSUCHE
Das IMPRES-Mehrfachladegerät umfasst die folgenden Leistungsmerkmale:
• ein Universal-Netzteil (100 V AC - 240 V AC, 50/60 Hz)
• ein Konstantstrom-Schnellladegerät,
• ein Konditionierungsladegerät mit IU-Kennlinie
• eine Rekonditionierungseinheit.
Die Kombination der oben genannten Leistungsmerkmale ist für ein Tischladegerät
einmalig. Aus diesem Grund sollte ein samt Akku in das Ladegerät eingesetztes
Handsprechfunkgerät im Ladegerät nicht in Betrieb sein.
Wenn ein Handsprechfunkgerät betrieben wird, während es sich in einem
Ladegerät befindet, ist es möglich, dass die Funkgeräteleistung geringfügig
reduziert ist und die Akkuladezeit länger dauert.
Gegen Ende des Schnellladungszyklus (Ladeanzeige
ROT
) überschreitet die
Akkuspannung die normale Betriebsspannung des Handsprechfunkgeräts. Nach
Beenden des Schnellladebetriebs, oder wenn der Akku aus dem Ladegerät
genommen wird, kehrt die Spannung auf einen normalen Spannungspegel zurück.
Befindet sich das Ladegerät im Schnellladebetrieb, und wird das Handsprech-
funkgerät dabei eingeschaltet, wird es vorübergehend funktionsunfähig. Sie können
diesen Zustand beheben, indem Sie das Handsprechfunkgerät aus dem Ladegerät
nehmen und es aus- und wieder einschalten.
Im Lauf des Rekonditionierungsprozesses wird der Akku vollständig entladen. Als
Folge dessen kann es sein, dass das Handsprechfunkgerät während der
Rekonditionierung nicht funktioniert.
Beobachten Sie bei der Fehlersuche stets die Ladeanzeige – siehe Tabelle 9.
37D22-B_Impres_MUC_DE.fm Page 16 Wednesday, July 12, 2006 2:05 PM

Deutsch
17
WARTUNG
Das IMPRES Mehrfachladegerät darf ausschließlich von einem von Motorola
zugelassenen Servicetechniker repariert werden. Bei Nichtbeachten dieser
Vorschriften kann die Garantie ungültig werden.
Tabelle 10. Fehlerbehebung
Problem Fehlfunktion Abhilfemaßnahme
Keine
Ladeanzeige
• Kontakt mit dem Ladegerät
nicht hergestellt.
• Stromversorgung zum
Ladegerät besteht nicht.
• Prüfen Sie, ob der Akku bzw. das
Handsprechfunkgerät samt Akku
richtig in die Ladeschale gesteckt
wurde.
• Achten Sie darauf, dass das
Netzkabel richtig an das Ladegerät
und eine geeignete Netzsteckdose
angeschlossen ist und dass die
Netzsteckdose Strom führt.
• Sicherung(en) austauschen.
Anzeige blinkt
rot
• Kontakt mit dem Ladegerät
nicht hergestellt.
• Akku ist nicht aufladbar.
• Nehmen Sie den Akku aus dem
Ladegerät und setzen Sie ihn
wieder ein.
• Prüfen Sie nach, ob der Akku ein in
den Tabellen 1 bis 6 genannter,
von Motorola zugelassener Akku
ist. Andere Akkus werden evtl.
nicht geladen.
• Trennen Sie das Ladegerät von
der Stromversorgung und reinigen
Sie die goldfarbenen Ladekontakte
am Akku und am Ladegerät mit
einem sauberen trockenen Tuch.
• Ersetzen Sie den Akku.
Anzeige blinkt
gelb
• Akku wartet auf Ladung. Es
kann sein, dass die
Akkutemperatur unter 5°C
oder über 40°C liegt oder
die Akkuspannung
niedriger ist als der
vorbestimmte
Schwellenwert für die
Schnellladung.
• Wenn dieser Zustand korrigiert
worden ist, wird der Akku geladen.
37D22-B_Impres_MUC_DE.fm Page 17 Wednesday, July 12, 2006 2:05 PM

Deutsch
18
LADEGERÄTE MIT DISPLAYMODUL (CDM)
Die Funktionalität des IMPRES Mehrfachladegeräts kann durch
Hinzufügen eines Ladegerät-Displaymoduls (CDM), Motorola Teilenr.
RLN5382, noch weiter verbessert werden.
Allgemeine Informationen zum Display
Das IMPRES Mehrfachladegerät mit CDM bietet dem Benutzer
während der Wartung und Pflege des Akkus nützliche Informationen.
Die vom Ladegerät angegebenen Informationen und die zugehörigen
LED-Anzeigen werden in den folgenden Tabellen detailliert angeführt.
Inbetriebnahme
Non-IMPRES
Battery in the Pocket (Kein IMPRES Akku in der Ladeschale)
IMPRES
Battery in the Pocket (IMPRES Akku in der Ladeschale)
Upon Charger Power-up
(Bei Inbetriebnahme des Ladegeräts)
LED SINGLE FLASH GREEN (LEUCHTET EINMAL GRÜN AUF)
Zeile 1 IMPRES
Zeile 2
If There is No Battery in the Pocket
(Wenn kein Akku in der Schale steckt)
LED OFF (AUS)
Zeile 1 NO BATTERY (KEIN AKKU)
Zeile 2
Reading Battery Data
(Akkudaten werden gelesen)
LED Any Defined Indication (Beliebige vordefinierte Anzeige)
Zeile 1 READING (AKKUDATEN)
Zeile 2 BATTERY DATA (WERDEN GELESEN)
LED Defined by Charge State (Je nach Ladezustand)
Zeile 1 NON-IMPRES (KEIN IMPRES)
Zeile 2 BATTERY (AKKU)
I
MPRES
and Software Versions are Displayed
(IMPRES und
Softwareversionen werden angezeigt)
LED Defined by Charge State (Je nach Ladezustand)
Zeile 1 IMPRES
Zeile 2 SW xx.yy; aa.bb
HINWEIS:
xx.yy bezeichnet Ladegerät-SW-Version, während aa.bb die
CDM-SW-Version angibt.
37D22-B_Impres_MUC_DE.fm Page 18 Wednesday, July 12, 2006 2:05 PM

Deutsch
19
IMPRES
Battery Kit # and Chemistry are Displayed
(IMPRES Akku-Kit-Nr.
und chem. Eigenschaften werden angezeigt)
LED Defined by Charge State (Je nach Ladezustand)
Zeile 1 KIT# -------- (KIT-NR)
Zeile 2 -----CHEMISTRY (CHEM. EIGENSCH.)
Forecasted # of Cycles Prior to Automatic Recondition
(Voraussichtliche
Zahl der Zyklen bis zur automatischen Rekonditionierung)
LED Defined by Charge State (Je nach Ladezustand)
Zeile 1 ----CYCLES (ZYKLEN)
Zeile 2 TO RECONDITION (BIS REKONDITIONIERUNG)
* Displayed only when the number of cycles to recondition is less than 6.
(Wird nur angezeigt, wenn die Anzahl der Zyklen bis zur Rekonditionierung
weniger als 6 beträgt.)
Charger Waiting to Charge, Battery is Hot
(Ladegerät wartet auf Ladebeginn,
Akku ist heiss)
LED Flashing ORANGE (ORANGE blinkend)
Zeile 1 WAITING TO CHG (WARTEN AUF LADEN)
Zeile 2 HOT BATTERY (AKKU HEISS)
Charger Waiting to Charge, Battery is Cold
(Ladegerät wartet auf Ladebeginn,
Akku ist kalt)
LED Flashing ORANGE (ORANGE blinkend)
Zeile 1 WAITING TO CHG (WARTEN AUF LADEN)
Zeile 2 COLD BATTERY (AKKU KALT)
Charger Waiting to Charge, Low Voltage
(Ladegerät wartet auf Ladebeginn,
Spannung niedrig)
LED Flashing ORANGE (ORANGE blinkend)
Zeile 1 WAITING TO CHG (WARTEN AUF LADEN)
Zeile 2 LOW VOLTAGE (SPANNUNG NIEDRIG)
HINWEIS:
Es werden nicht alle der oben angeführten Hinweise
angezeigt. Die Anzeigen ‘Warten auf Laden‘ (Akku heiss, kalt;
Spannung niedrig) werden nur angezeigt, wenn der
entsprechende Zustand gegeben ist.
37D22-B_Impres_MUC_DE.fm Page 19 Wednesday, July 12, 2006 2:05 PM

Deutsch
20
Charger is in Trickle Charge Mode
(Ladegerät arbeitet im
Erhaltungsladungsbetrieb)
LED Flashing GREEN (GRÜN blinkend)
Zeile 1 TRICKLE CHARGE (ERHALTUNGSLADUNG)
Zeile 2
Charge is Complete
(Laden abgeschlossen)
LED Steady GREEN or Flashing RED / GREEN (Ununterbrochen
GRÜN oder ROT/GRÜN blinkend)
Zeile 1 CHARGE COMPLETE (LADEN ABGESCHLOSSEN)
Zeile 2
Charger is in Discharge/Reconditioning Mode
(Ladegerät arbeitet im
Entlade-/Rekonditionierungsbetrieb)
LED Steady ORANGE (Ununterbrochen ORANGE)
Zeile 1 DISCHARGE (ENTLADEN)
Zeile 2
Charger is Calibrating an IMPRES Battery
(Ladegerät kalibriert einen
IMPRES Akku)
LED Steady ORANGE, Steady RED, & Flashing ORANGE or
GREEN (Ununterbrochen ORANGE, ununterbrochen ROT
und ORANGE oder GRÜN blinkend)
Zeile 1 Calibrating (wird kalibriert)
Zeile 2 Battery (Akku)
LED Steady GREEN (Ununterbrochen GRÜN)
Zeile 1 Battery (Akku)
Zeile 2 Calibrated (kalibriert)
* Alle IMPRES Akkus sind vor der Erstverwendung zu kalibrieren. Das
IMPRES Ladegerät kalibriert jeden neuen Akku automatisch.
Battery Capacity Data is Displayed as “%” in mAH, and Voltage
(Akkukapazitätsdaten werden als “%” mAH und Spannung angegeben)
LED Defined by Charge State (Je nach Ladezustand)
Zeile 1 ----% RATED CAP. (% NENNLEISTUNG)
Zeile 2 ----mAH --.-V
37D22-B_Impres_MUC_DE.fm Page 20 Wednesday, July 12, 2006 2:05 PM

Deutsch
21
HINWEIS:
(1) Die angegebene Zeit bis zur vollständigen Ladung enthält
auch Schnelllade- und Entladezyklen (sofern relevant).
(2) Bei nicht kalibrierten Akkus werden die
Akkukapazitätsdaten eventuell nicht angezeigt.
(3) Das Laden von IMPRES Akkus in anderen als IMPRES
Ladegeräten kann die Genauigkeit der Angaben bezüglich
Kapazität und Ladezeiten beeinflussen.
Estimated Time to Rapid Charge
Complete Displayed in Hours, Minutes for NiCd & NiMH IMPRES
Batteries Only
(Geschätzte Zeit bis zum Abschluss der Schnellladung in Stunden und
Minuten; Angabe nur bei NiCd & NiMH IMPRES Akkus)
LED Defined by Charge State (Je nach Ladezustand)
Zeile 1 RAPID CHG ENDS (SCHNELLLADG.ABGESCHL.)
Zeile 2 IN xx HRS, yy MIN
37D22-B_Impres_MUC_DE.fm Page 21 Wednesday, July 12, 2006 2:05 PM

Deutsch
22
Anzeigesequenz Diagramme für IMPRES Akku
Hinweis:
Die folgenden Diagramme stellen die in den vorhergehenden
‘Allgemeinen Informationen zum Display’
dargestellten Sequenzen
dar und werden nur in englischer Sprache angezeigt.
Anzeigesequenz bei IMPRES NiCd- und NiMH-Akku
LED Defined by Charge State
Zeile 1 KIT# xxxxxxxx
Zeile 2 SN: yyyyyyyyyyyy
LED Defined by Charge State
Zeile 1 KIT# xxxxxxxx
Zeile 2 yyyyy CHEMISTRY
LED Defined by Charge State
Zeile 1 xxxx CYCLES
Zeile 2 TO RECONDITION
LED Steady RED
Zeile 1 RAPID CHARGE
Zeile 2
LED Defined by Charge State
Zeile 1 xx% RATED CAP.
Zeile 2 yyyyy mAH zz.z V
LED Defined by Charge State
Zeile 1 RAPID CHG ENDS
Zeile 2 IN xx HRS, yy MIN
Start
(4.0 sek.)
(2.0 sek.)
(2.0 sek.)
(2.0 sek.)
(7.0 sek.)
(4.0 sek.)
Alle
73.0 sek.
Alle
13.0 sek.
5X
65.0
sek.
37D22-B_Impres_MUC_DE.fm Page 22 Wednesday, July 12, 2006 2:05 PM

Deutsch
23
Vor der Kalibrierung:
LED Defined by Charge State
Zeile 1 KIT# xxxxxxxx
Zeile 2 SN: yyyyyyyyyyyy
LED Defined by Charge State
Zeile 1 KIT# xxxxxxxx
Zeile 2 yyyyy CHEMISTRY
LED Steady ORANGE
Zeile 1 DISCHARGE
Zeile 2
LED Defined by Charge State
Zeile 1 CALIBRATING
Zeile 2 BATTERY
LED Defined by Charge State
Zeile 1 RAPID CHG ENDS
Zeile 2 IN xx HRS, yy MIN
Alle
71.0 sek.
Start
(4.0 sek.)
(2.0 sek.)
(2.0 sek.)
(7.0 sek.)
(4.0 sek.)
Alle
13.0 sek.
5X
65.0
sek.
37D22-B_Impres_MUC_DE.fm Page 23 Wednesday, July 12, 2006 2:05 PM

Deutsch
24
Nach der Kalibrierung:
LED Defined by Charge State
Zeile 1 KIT# xxxxxxxx
Zeile 2 SN: yyyyyyyyyyyy
LED Defined by Charge State
Zeile 1 KIT# xxxxxxxx
Zeile 2 yyyyy CHEMISTRY
LED Steady GREEN
Zeile 1 CHARGE COMPLETE
Zeile 2
LED Defined by Charge State
Zeile 1 BATTERY
Zeile 2 CALIBRATED
LED Defined by Charge State
Zeile 1 xx% RATED CAP.
Zeile 2 yyyy mAH zz.z V
Start
(4.0 sek.)
(2.0 sek.)
(2.0 sek.)
(2.0 sek.)
(7.0 sek.)
Alle
61.0sek.
Alle
11 sek.
5X
55.0
sek.
37D22-B_Impres_MUC_DE.fm Page 24 Wednesday, July 12, 2006 2:05 PM

Deutsch
25
Anzeigesequenz bei IMPRES LiIon-Akku
LED Defined by Charge State
Zeile 1 KIT# xxxxxxxx
Zeile 2 SN: yyyyyyyyyyyy
LED Defined by Charge State
Zeile 1 KIT# xxxxxxxx
Zeile 2 yyyyy CHEMISTRY
LED Defined by Charge State
Zeile 1 xxxx CYCLES
Zeile 2 TO RECONDITION
LED Steady RED
Zeile 1 RAPID CHARGE
Zeile 2
LED Defined by Charge State
Zeile 1 xx% RATED CAP.
Zeile 2 yyyyy mAH zz.z V
Start
(4.0 sek.)
(2.0 sek.)
(2.0 sek.)
(2.0 sek.)
(7.0 sek.)
Alle
53.0 sek.
Alle
9.0 sek.
5X
45.0
sek.
37D22-B_Impres_MUC_DE.fm Page 25 Wednesday, July 12, 2006 2:05 PM

Deutsch
26
Vor der Kalibrierung:
LED Defined by Charge State
Zeile 1 KIT# xxxxxxxx
Zeile 2 SN: yyyyyyyyyyyy
LED Defined by Charge State
Zeile 1 KIT# xxxxxxxx
Zeile 2 yyyyy CHEMISTRY
LED Steady ORANGE
Zeile 1 DISCHARGE
Zeile 2
LED Defined by Charge State
Zeile 1 CALIBRATING
Zeile 2 BATTERY
Start
(4.0 sek.)
(2.0 sek.)
(2.0 sek.)
(7.0 sek.)
Alle
51.0 sek.
Alle
9.0 sek.
5X
45.0
sek.
37D22-B_Impres_MUC_DE.fm Page 26 Wednesday, July 12, 2006 2:05 PM

Deutsch
27
Nach der Kalibrierung:
LED Defined by Charge State
Zeile 1 KIT# xxxxxxxx
Zeile 2 SN: yyyyyyyyyyyy
LED Defined by Charge State
Zeile 1 KIT# xxxxxxxx
Zeile 2 yyyyy CHEMISTRY
LED Steady GREEN
Zeile 1 CHARGE COMPLETE
Zeile 2
LED Defined by Charge State
Zeile 1 BATTERY
Zeile 2 CALIBRATED
LED Defined by Charge State
Zeile 1 xx% RATED CAP.
Zeile 2 yyyy mAH zz.z V
Start
(4.0 sek.)
(2.0 sek.)
(2.0 sek.)
(2.0 sek.)
(7.0 sek.)
Alle
61.0sek.
Alle
11 sek.
5X
55.0
sek.
37D22-B_Impres_MUC_DE.fm Page 27 Wednesday, July 12, 2006 2:05 PM

Deutsch
28
Ausrichtung des Anzeigetextes
Der Text auf dem CDM kann um 180 Grad gedreht werden, sodass
das IMPRES Mehrfachladegerät nach Wunsch auf einem Tisch oder
an einer Wand montiert werden kann.
Zum Drehen der Anzeige eine große Büroklammer in das Loch
unterhalb des Displays senkrecht zum Tisch stecken. Ein
Klickgeräusch zeigt an, dass die Umschaltung aktiviert und der
Anzeigetext um 180 Grad gedreht wurde.
Betrieb des IMPRES Mehrfachladegeräts
Weitere Informationen zur Wartung des Mehrfachladegeräts und des
Display-Moduls sind in der Wartungsanleitung des Ladegeräts, Teilenr.
6880309L66, enthalten.
Service/Kundendienst
Für sämtliche Serviceleistungen wenden Sie sich bitte an die unten
angegebene Adresse. Bitte rufen Sie vor Absenden eines Geräts an
das Kundendienstcenter an und teilen Sie mit, dass Sie es zur
Wartung zurücksenden.
Motorola Kundendienstcenter
Motorola GmbH
Customer Care
Am Borsigturm 130
13507 Berlin
Germany.
Tel: +49 30 6686 1555
37D22-B_Impres_MUC_DE.fm Page 28 Wednesday, July 12, 2006 2:05 PM

Français
1
TABLE DES MATIERES
Instructions de sécurité importantes . . . . . . . . . . . . . . . . . . . . . . . . . . 2
Instructions de sécurité pour l’utilisation . . . . . . . . . . . . . . . . . . . . . . . 3
Description des caractéristiques et des avantages d’IMPRES . . . . . . 4
Caractéristiques/différences opérationnelles. . . . . . . . . . . . . . . . . . . . 5
Listes des batteries . . . . . . . . . . . . . . . . . . . . . . . . . . . . . . . . . . . . . . . 7
Sources d’alimentation électriques et chargeurs électriques
agréés Motorola. . . . . . . . . . . . . . . . . . . . . . . . . . . . . . . . . . . . . . . . . . 9
Mode d’emploi . . . . . . . . . . . . . . . . . . . . . . . . . . . . . . . . . . . . . . . . . . 10
Chargement de la batterie . . . . . . . . . . . . . . . . . . . . . . . . . . . . . . 12
Reconditionnement manuel de la batterie . . . . . . . . . . . . . . . . . . 13
Reconditionnement automatique de la batterie . . . . . . . . . . . . . . 13
Interruption manuelle du reconditionnement . . . . . . . . . . . . . . . . 14
Recherche de dysfonctionnement . . . . . . . . . . . . . . . . . . . . . . . . . . 15
Réparation . . . . . . . . . . . . . . . . . . . . . . . . . . . . . . . . . . . . . . . . . . . . . 16
Chargeurs avec afficheur (CDM, chargers with Display Module . . . . 17
Ce manuel d’accessoire concerne les chargeurs multiples universels IMPRES suivants :
WPLN4108, WPLN4109, WPLN4110, WPLN4118, WPLN4119, WPLN4120, WPLN4121,
WPLN4123, WPLN4130, WPLN4131, WPLN4132, WPLN4133, WPLN4134,
WPLN4135, WPLN4136
En outre, ce manuel inclut les chargeurs multiples universels IMPRES disponibles pour
les postes de la gamme GP Professionnel :
WPLN4144, WPLN4145, WPLN4146, WPLN4187, WPLN4188, WPLN4189,
WPLN4190, WPLN4191, WPLN4192, WPLN4193, WPLN4194, WPLN4195,
WPLN4196, WPLN4204, WPLN4205
“Universel” signifie que le chargeur est compatible avec plusieurs types de postes et
convient aux batteries indiquées dans les tableaux 1 à 6 (inclus), avec l’adaptateur
correspondant à chaque type de batterie.
37D22-B_Impres_MUC_FR.fm Page 1 Wednesday, July 12, 2006 2:10 PM

Français
2
INSTRUCTIONS DE SECURITE IMPORTANTES
CONSERVEZ CES INSTRUCTIONS
Ce document contient d'importantes instructions de sécurité et d'utilisation. Veuillez
lire attentivement ces instructions et conservez-les pour pouvoir les consulter à
nouveau à titre de référence.
Avant d’utiliser le chargeur, lisez toutes les instructions, les avertissements et les
informations sur (1) le chargeur, (2) la batterie et (3) le poste.
1. Pour réduire les risques de blessure, ne rechargez que des
batteries rechargeables agréées Motorola indiquées dans les
Tableaux 1 à 5. Les autres types de batteries peuvent éclater ou
provoquer des blessures ou des dégâts.
2. L’utilisation d’accessoires non agréés par Motorola peut présenter un
risque d’incendie, d’électrocution ou de blessure.
3. Pour ne jamais risquer d’endommager la prise et le câble électriques, tirez
toujours sur la prise et jamais sur le câble pour débrancher le chargeur.
4. Sauf dans les cas où cela est absolument indispensable, il est préférable
de ne jamais utiliser de rallonge électrique pour brancher le chargeur. Un
câble d’extension électrique défectueux peut introduire un risque
d’incendie ou d’électrocution. Si une rallonge est indispensable, vous
devez utiliser un câble 18AWG pour toutes les longueurs inférieures à 30
m et un câble 16AWG toutes les longueurs inférieures à 45 m.
5. Pour réduire le risque d’incendie, d’électrocution ou de blessure, n’utilisez
jamais un chargeur endommagé ou présentant un quelconque défaut. Con-
fiez-le à un agent de maintenance Motorola agréé.
6. Cette unité peut être réparée.
Chaque compartiment est équipé d’une
alimentation unique avec un circuit imprimé spécifique. Ils peuvent être
achetés auprès des services après-vente et de pièces détachées Motorola.
Le numéro de référence du circuit imprimé/ alimentation est RLN5325.
Aucune autre pièce de remplacement n’est disponible. Vous pouvez
également commander aux services après-vente et de pièces détachées
un manuel de maintenance décrivant la procédure de remplacement. Le
numéro de référence de ce manuel est 6880309L66.
7. Pour réduire le risque d’électrocution, débranchez l’alimentation électrique c.a.
du chargeur avant d’effectuer toute opération d’entretien ou de nettoyage.
!
AVERTISSEMENT
37D22-B_Impres_MUC_FR.fm Page 2 Wednesday, July 12, 2006 2:10 PM

Français
3
INSTRUCTIONS DE SECURITE POUR L’UTILISATION
• Eteignez le poste lorsque vous voulez charger sa batterie.
• Cet équipement n’est pas conçu pour être utilisé à l’extérieur. Utilisez-le
uniquement dans des endroits secs et des conditions sans humidité.
• Connectez uniquement l’équipement avec un câble d’alimentation protégé par un
fusible à une source dont la tension a été vérifiée et égale à celle indiquée sur le
produit.
• Pour débrancher l’appareil de la source d'alimentation, retirez la prise secteur.
• La prise d’alimentation à laquelle l’équipement est connecté doit être proche et
facilement accessible.
• Si l’appareil est doté d’un fusible, le fusible de remplacement doit être identique
en type et en valeur nominale aux spécifications indiquées dans les instructions
fournies avec cet appareil.
• La température ambiante maximale autour de l’équipement ne doit pas dépasser
40°C (104°F).
• Vérifiez que le câble est placé de façon à ce que personne ne puisse marcher
dessus ou s’y prendre les pieds, pour qu’il ne reçoive aucune projection d’eau, ni
risque d’être endommagé ou étiré.
• Cette unité utilise le même système de fixation murale que le chargeur multiple
NTN4796. Le numéro de référence de ce système est NLN7967.
• Remplacez uniquement le fusible avec un modèle du type et de la valeur
nominale indiqués sur l’étiquette du chargeur. Les pièces suivantes peuvent être
commandées aux services après-vente et de pièces détachées :
Fusible 6571489S01
Etui 0987626G01
Couvercle 0987739G01
37D22-B_Impres_MUC_FR.fm Page 3 Wednesday, July 12, 2006 2:10 PM

Français
4
DESCRIPTION DES CARACTERISTIQUES ET DES AVANTAGES
IMPRES
La solution d’énergie IMPRES fait appel au système tri-chimique développé par
Motorola incluant (a) les batteries IMPRES, (b) le Chargeur Conditionneur Multiple
IMPRES, et (c) les matériels/ logiciels radio qui permettent aux postes compatibles
IMPRES d’utiliser des batteries IMPRES (à l’exclusion des postes de la gamme GP
Professionnel).
Utilisé avec des batteries Motorola IMPRES, le Chargeur Conditionneur Multiple
IMPRES :
• Maximise la durée de fonctionnement entre les chargements en éliminant
automatiquement tout effet mémoire.
• Maximise la durée de vie de la batterie en réduisant considérablement la chaleur
pendant les cycles de charge d’entretien et d’appoint.
• Elimine toute nécessité d’acheter un appareil de reconditionnement des batteries
et élimine le besoin de former les personnels aux tâches de maintenance des
batteries.
Grâce à cette conception brevetée unique, il n’est plus nécessaire de suivre
l’utilisation et le chargement des batteries, d’exécuter des cycles de
reconditionnement manuels ou de retirer les batteries des chargeurs après
chargement.
Le Chargeur Conditionneur Multiple IMPRES établit le profil de l’utilisation de la
batterie IMPRES, mémorise ces informations dans la batterie IMPRES, et exécute
un cycle de reconditionnement lorsque cela est nécessaire.
Le Chargeur Conditionneur Multiple IMPRES ne peut pas surchauffer la batterie,
quelle que soit la durée pendant laquelle elle reste dans le chargeur. Le chargeur
contrôle la batterie et lui donne automatiquement une recharge complémentaire, si
nécessaire.
Le Chargeur Conditionneur Multiple IMPRES simplifie les procédures de
chargement et d’entretien des batteries. Pour l’utilisateur, il suffit de faire deux
choses :
1. Placer le poste / la batterie dans le chargeur
2. Retirer le poste / la batterie lorsque la charge est terminée !
Motorola est le seul fabricant capable de proposer un chargeur-conditionneur (ou
reconditionneur) qui donne aux utilisateurs le choix de charger leur batterie en la
laissant sur le poste ou de la placer sans le poste dans le chargeur.
37D22-B_Impres_MUC_FR.fm Page 4 Wednesday, July 12, 2006 2:10 PM

Français
5
CARACTERISTIQUES / DIFFERENCES OPERATIONNELLES:
1. Les batteries IMPRES peuvent être rechargées dans des chargeurs
conventionnels. Cependant, pour que les fonctions Smart Energy soient
activées, chaque batterie IMPRES doit être chargée par un Chargeur
Conditionneur Multiple IMPRES. La première fois qu’une batterie IMPRES est
chargée dans un Chargeur Conditionneur Multiple IMPRES, son voyant
JAUNE
FIXE
est allumé. Cette première charge doit se poursuivre jusqu’à ce
que ce témoin lumineux soit
VERT FIXE
. De cette façon, la batterie IMPRES
sera correctement calibrée et les fonctions Smart Energy seront activées. Si
cette procédure est interrompue, le chargeur effectuera le calibrage de la
batterie à la prochaine insertion.
2. Comme le Chargeur Conditionneur Multiple IMPRES détermine
automatiquement les conditions nécessaires au reconditionnement de la
batterie IMPRES, le chargeur peut passer en mode de reconditionnement
lorsque vous insérez un poste ou une batterie.
Ceci est alors signalé par le
voyant
JAUNE FIXE
. Le mode de conditionnement peut être annulé si
nécessaire en retirant et en réinsérant le poste ou la batterie (voir les
instructions plus loin dans ce guide).
3. Le Chargeur Conditionneur Multiple IMPRES est conçu pour charger toutes les
batteries listées dans les Tableaux 1 à 6. Cependant, seules les batteries
IMPRES d’origine déclencheront les fonctions Smart Energy. (Au fur et à
mesure que de nouveaux postes/batteries seront introduits sur le marché, cette
liste sera mise à jour et distribuée aux clients par l’intermédiaire du Réseau de
Distribution et du Service client Motorola).
4. Le Chargeur Conditionneur Multiple IMPRES doit être utilisé pour calibrer les
batteries Smart IMPRES et garantir que leurs données d’utilisation sont
analysées, mémorisées et affichées avec précision.
5. Si une batterie IMPRES est utilisée avec un poste à afficheur (par ex. ASTRO
XTS5000), une icône indiquant l’état de charge de la batterie peut être affichée.
Cette icône est activée après calibration de la batterie IMPRES dans un
chargeur IMPRES. L’icône d’état du chargeur reste affichée tant que l’utilisateur
se sert d’un chargeur IMPRES pour charger la batterie. Si une batterie IMPRES
est chargée dans un chargeur non-IMPRES pendant 7 jours (ou plus), cette
icône ne sera plus affichée. Pour réactiver l’affichage de l’icône, insérez une
batterie IMPRES dans un chargeur IMPRES et laissez le chargement se
terminer complètement (signalé par le témoin lumineux
VERT FIXE
). On verra
alors s’afficher de nouveau l’icône d’état de charge. Si elle n’apparaît pas après
une charge complète, insérez une batterie partiellement vide (au moins
déchargée à 70%) dans le chargeur, et lancez le reconditionnement. Laissez se
terminer le chargement complet. Le poste affiche l’icône (à l’exception des
postes de la gamme GP Professionnel).
6. Le chargeur multiple adaptatif IMPRES peut uniquement être réparé par un
technicien de maintenance agréé par Motorola CGISS. Le non-respect de cette
clause peut annuler la garantie.
37D22-B_Impres_MUC_FR.fm Page 5 Wednesday, July 12, 2006 2:10 PM

Français
6
LISTES DES BATTERIES
Les tableaux suivants répertorient les batteries qui peuvent être utilisées avec les
postes indiqués dans le titre de chaque tableau.
* Le chargeur nécessite l’adaptateur de batterie RLN5212 pour charger les batteries
MTP700.
Tableau 1. Gamme des postes XTS3000/ XTS3500/ Dimetra & Poste
numérique XTS5000
Kit (PN) Chimie FM Smart Capacité Nouveau
modèle
HNN9031 NiCD Non Oui Ultra-haute Non
HNN9032 NiCD Oui Oui Ultra-haute Non
NTN8294 NiCD Non Non Ultra-haute Non
NTN8295 NiCD Oui Non Ultra-haute Non
NTN8297 NiCD Oui Non Ultra-haute Non
NTN8299 NiCD Oui Non Ultra-haute Non
NTN8610 LiIon Non Non Haute Non
NTN8293 NiMH Non Non Ultra-haute Non
NNTN4435 NiMH Non Oui Ultra-haute Non
NNTN4436 NiMH Oui Oui Ultra-haute Non
NNTN4437 NiMH Oui v Ultra-haute Non
RNN4006 NiMH Non Non Ultra-haute Nouveau
RNN4007 NIMH Oui Non Ultra-haute Nouveau
NTN9862 LiIon No Oui Ultra-haute Nouveau
Tableau 2. Postes numériques XTS2500
Kit (PN) Chimie FM Smart Capacité Nouveau
modèle
NTN9859 NiMH Non Non Ultra-haute Nouveau
NTN9857 NiMH Oui Non Ultra-haute Nouveau
NTN9815 NiCD Non Non Haute Nouveau
NTN9816 NiCD Oui Non Haute Nouveau
Tableau 3. Postes numériques MTP700
Kit (PN) Chimie FM Smart Capacité Nouveau
modèle
PMNN4048* NiMH Non Oui Haute Nouveau
PMNN4049* NiMH Oui Oui Haute Nouveau
PMNN4050* Lilon Non Oui Haute Nouveau
PMNN4047* LiIon Non Oui Haute Nouveau
37D22-B_Impres_MUC_FR.fm Page 6 Wednesday, July 12, 2006 2:10 PM

Français
7
** Le chargeur nécessite l’adaptateur de batterie 4385922B01 pour charger les
batteries Astro Saber.
Tableau 4. Gammes des postes HT1000/ MT2000/ MTS2000/ MTX8000 &
MTX9000
Kit (PN) Chimie FM Smart Capacité Nouv.
modèle
HNN9028 NiCD Non Oui Ultra-haute Non
HNN9029 NiCD Oui Oui Ultra-haute Non
NTN7143 NiCD Non Non Haute Non
NTN7144 NiCD Non Non Ultra-haute Non
NTN7146 NiCD Oui Non Haute Non
NTN7147 NiCD Oui Non Ultra-haute Non
NTN7148 NiCD CENELEC Non Haute Non
NTN7149 NiCD CSA Non Haute Non
NTN7150 NiCD MSHA Non Haute Non
NTN7341 NiCD Oui Non Ultra-haute Non
NTN7372 NiCD Oui Non Haute Non
WPPN4013 NiMH Non Non Ultra-haute Non
WPPN4037 NiMH Oui Non Ultra-haute Non
RNN4008 NiCD ATEX Non Haute Non
Tableau 5. Postes Saber/Astro Saber/SSE5000/MX1000
Kit (PN) Chimie FM Smart Capacité Nouv.
modèle
HNN9033 NiCD Non Oui Ultra-haute Non
HNN9031 NiCD Oui Oui Ultra-haute Non
NTN4537** NiCD Oui Non Faible Non
NTN4538 NiCD Oui Non Haute Non
NTN4592** NiCD Non Non Faible Non
NTN4593 NiCD Non Non Haute Non
NTN4595 NiCD Non Non Ultra-haute Non
NTN4596 NiCD Oui Non Ultra-haute Non
NTN4657 NiCD Non Non Haute Non
NTN4671 NiCD CENELEC Non Haute Non
NTN4992 NiCD Oui Non Ultra-haute Non
NTN7014** NiMH Non Non Haute Non
NTN7058 NiCD Oui Non Ultra-haute Non
NTN7426 NiCD Oui Non Faible Non
NTN8251 NiMH Oui Non Ultra-haute Non
NTN8818** LiIon Non Non Haute Non
37D22-B_Impres_MUC_FR.fm Page 7 Wednesday, July 12, 2006 2:10 PM

Français
8
Le chargeur universel doit être utilisé avec l’adaptateur de batterie RLN5648.
Tableau 6. Postes de la gamme GP Professionnel
Kit (PN) Chimie FM Smart Capacité Nouv.
modèle
HNN9003 NiMH
AA Bluetooth
Non Non Haute Non
HNN9008 NiMH Non Non Haute Non
HNN9009 NiMH Non Non Ultra-haute Non
HNN9010 NiMH Oui Non Ultra-haute Non
HNN9011 NiCD Oui Non Haute Non
HNN9012 NiCD Non Non Haute Non
HNN9013 LiIon Non Non Haute Non
WPNN4045 NiMH Non Non Haute Non
PMNN4045 NiMH Non Non Haute Non
HNN4001 Impres NiMH Non Oui Ultra-haute Oui
HNN4002 Impres NiMH Oui Oui Ultra-haute Oui
HNN4003 Impres LiIon Non Oui Ultra-haute Oui
REMARQUE :
Vous pouvez acheter un adaptateur auprès d’un représentant des
services commerciaux ou après-vente.
37D22-B_Impres_MUC_FR.fm Page 8 Wednesday, July 12, 2006 2:10 PM

Français
9
SOURCES D’ALIMENTATION ELECTRIQUE ET CHARGEURS
AGREES MOTOROLA
Ce chargeur est conçu pour les alimentations 100 V CA à 240 V CA, 50 / 60 Hz et
les cordons Motorola indiqués dans le Tableau 7. Les cordons d’alimentation
utilisables avec les chargeurs pour postes GP Professionnel figurent dans le
Tableau 8 :
Tableau 7. Cordons d’alimentation pour chargeurs universels Motorola
Type de prise Kit de chargeur Kit de chargeur
(modèle avec
afficheur)
Câble
d’alimentation
Aucun câble ou prise WPLN4121 WPLN4127 Aucun
U.S./ NA WPLN4108 WPLN4130 3087791G01
Euro WPLN4109 WPLN4131 3087791G04
R.U. WPLN4110 WPLN4132 3087791G07
Australie/ NZ WPLN4118 WPLN4133 3087791G10
Argentine WPLN4119 WPLN4134 3087791G13
U.S./ NA WPLN4120 WPLN4135 3087791G01
Corée WPLN4123 WPLN4136 3087791G16
Tableau 8. Cordons d’alimentation pour modèles GP Professionnel
Motorola
Type de prise Kit de chargeur Kit de chargeur
(modèle avec
afficheur)
Câble
d’alimentation
Aucun câble ou prise WPLN4197 WPLN4198 Aucun
U.S./NA WPLN4187 WPLN4192 3087791G01
Euro WPLN4189 WPLN4194 3087791G04
R.U. WPLN4188 WPLN4193 3087791G07
Australie/ NZ WPLN4190 WPLN4195 3087791G10
Argentine WPLN4191 WPLN4196 3087791G13
U.S./NA WPLN4205 WPLN4204 3087791G01
Corée WPLN4146 WPLN4145 3087791G16
37D22-B_Impres_MUC_FR.fm Page 9 Wednesday, July 12, 2006 2:10 PM

Français
10
MODE D’EMPLOI
Le compartiment du chargeur peut recevoir un poste équipé d’une batterie ou une
batterie seule. Avant de charger une batterie avec le poste, éteignez le poste.
Les batteries se chargent mieux lorsqu’elles se trouvent à température ambiante.
1. Branchez le câble d’alimentation du chargeur dans le connecteur c.a. situé à
l’arrière du chargeur.
2. Branchez le cordon d’alimention sur une prise secteur. La mise sous tension
correcte est signalée par un
ECLAT VERT UNIQUE
du témoin de charge.
3. Insérez une batterie, ou un poste (éteint) contenant une batterie, dans le
compartiment du chargeur de la façon suivante :
a. Alignez la rainure de chaque côté de la batterie sur le rail correspondant de
chaque côté du compartiment du chargeur.
b. Appuyez sur la batterie pour la pousser vers l’arrière du compartiment.
c. Poussez la batterie dans le compartiment du chargeur pour garantir un bon
contact des bornes du chargeur et de la batterie.
Lorsque la batterie est correctement placée dans le compartiment, le témoin de
charge s’allume, indiquant que le chargeur a reconnu la présence de la batterie.
Consultez les indicateurs de charge dans le Tableau 9.
REMARQUES
Le Chargeur Conditionneur Multiple IMPRES charge uniquement
les batteries agréées Motorola listées dans les Tableau 1 à 6. Il
est possible que d’autres types de batteries ne puissent pas être
chargées.
Le Chargeur Conditionneur Multiple IMPRES est doté de
fonctions automatiques et de caractéristiques différentes de tous
les autres chargeurs de batteries. Veuillez vérifier l’indicateur de
charge confirmant que le chargeur se trouve effectivement dans
le mode de fonctionnement voulu/escompté.
37D22-B_Impres_MUC_FR.fm Page 10 Wednesday, July 12, 2006 2:10 PM

Français
11
Pour que les fonctions des batteries Smart Motorola et du système de chargement
(ou de conditionnement) soient totalement opérationnelles, les données contenues
dans les batteries Smart Motorola doivent être initialisées par le chargeur lors de
leur première recharge. Cette procédure est signalée par le témoin
JAUNE FIXE
du
chargeur (ce témoin indique également le conditionnement d’une batterie).
La procédure est automatique. Elle inclut un conditionnement initial suivi du
chargement. La procédure d’initialisation peut être longue et la batterie doit rester
dans le chargeur pendant une nuit.
Tableau 9. Indicateurs de charge
Indicateur de charge Description
Eclat vert unique
Mise sous tension réussie
Rouge fixe
Batterie en charge rapide.
Vert clignotant
Charge rapide terminée (capacité disponible >90%).
Batterie en charge d’appoint/ charge d’entretien.
Vert fixe
Chargement terminé. Batterie totalement chargée.
Jaune clignotant
Le chargeur a reconnu la batterie et attend avant de
charger (soit la tension de la batterie est trop faible ou la
température de la batterie est trop basse ou trop haute
pour permettre un chargement correct). Lorsque ce
paramètre est revenu dans les normes, le chargement
débutera.
Rouge clignotant
La batterie ne peut pas être chargée ou il y a un
mauvais contact.
Jaune fixe
(Cette fonction concerne uniquement les batteries
Smart)
La batterie est en mode de reconditionnement. La
durée de ce mode dépend de la charge restante dans la
batterie au moment de son insertion (les batteries
totalement chargées nécessitent un reconditionnement
plus long – 8 heures ou plus – que les batteries
totalement vides).
Rouge/vert clignotant
(Cette fonction concerne uniquement les batteries
Smart)
Le chargement de la batterie est terminé. Elle est
totalement chargée. Elle peut être utilisée mais elle
approche de la fin de son cycle de vie.
REMARQUE
Le Chargeur Conditionneur Multiple IMPRES est unique en son
genre, car il est capable de déterminer automatiquement si la
batterie doit être reconditionnée ou non. Cette fonction ne
fonctionne qu’avec les batteries IMPRES Motorola.
37D22-B_Impres_MUC_FR.fm Page 11 Wednesday, July 12, 2006 2:10 PM

Français
12
Le Chargeur Conditionneur Multiple IMPRES fonctionne à la fois comme :
• Chargeur pour toutes les batteries agréées Motorola, et
• Reconditionneur pour les batteries agréées IMPRES de Motorola.
Chargement des batteries
Pour obtenir des performances optimales, Motorola conseille de laisser les
batteries neuves dans le chargeur pendant 14 à 16 heures avant de les utiliser.
1. Lorsque l’insertion du poste ou de la batterie dans le chargeur est correcte, le
chargement débute et le voyant
ROUGE FIXE
du chargeur est allumé. La
durée pendant laquelle ce voyant
ROUGE FIXE
reste allumé va dépendre de la
charge restante dans la batterie.
2. La fin d’une charge rapide (capacité disponible >90%) est signalée par le
voyant
VERT CLIGNOTANT
. Il signifie que le chargeur est passé en charge
d’entretien, qui nécessite environ une heure.
3. La fin de la charge d’entretien est signalée par le voyant
VERT FIXE
. Il signifie
que la batterie est totalement chargée.
4. Autres indications
pouvant
être signalées par le témoin du chargeur pendant le
chargement :
•
JAUNE CLIGNOTANT
– la tension de la batterie est trop faible ou la
température de la batterie est trop basse ou trop élevée pour permettre un
chargement correct. Le chargement débutera lorsque ce paramètre sera
revenu dans les normes.
•
CLIGNOTANT ROUGE ET VERT
– la batterie approche de la fin de son
cycle de vie. Bien qu’elle soit totalement chargée, sa capacité a été réduite
par les utilisations successives et elle est susceptible de ne pas suffire à
une application à service intensif. Cette fonction est uniquement disponible
avec les batteries IMPRES Motorola. Ce voyant ne signale pas un défaut.
Elle informe l’utilisateur que la batterie ne pourra bientôt plus fonctionner
normalement et qu’elle devra être remplacée.
IMPORTANT :
Le compartiment du chargeur est conçu pour recevoir des
batteries de taille et de forme différentes. Il est donc très
important de vérifier que le poste contenant la batterie, ou que la
batterie seule, a été correctement inséré dans le compartiment du
chargeur. Si l’insertion n’est pas correcte, le témoin lumineux
reste éteint et le chargement ne peut pas commencer.
REMARQUE :
Les batteries neuves (qui n’ont jamais été utilisées) peuvent,
dans certains cas, donner une indication de charge totale
prématurée (voyant
VERT FIXE
).
37D22-B_Impres_MUC_FR.fm Page 12 Wednesday, July 12, 2006 2:10 PM

Français
13
•
ROUGE CLIGNOTANT
– la batterie ne peut pas être chargée. Ceci peut
être provoqué par un mauvais contact entre les bornes de la batterie et du
chargeur. La charge débutera lorsque la cause de cette indication aura été
rectifiée.
Les batteries Smart Motorola ont une mémoire interne qui peut être lue par un
Chargeur Conditionneur Multiple IMPRES Motorola. Lorsqu’une batterie IMPRES
est chargée pendant plus de 2,5 minutes, le Chargeur Conditionneur Multiple
IMPRES mémorise le numéro de série de la batterie IMPRES. Cette batterie peut
alors être retirée du chargeur pendant 30 minutes maximum. Ainsi, lorsqu’elle sera
replacée dans le chargeur, le chargement pourra reprendre au point où il a été
interrompu.
Reconditionnement manuel des batteries
Pendant l’intervalle de 2,5 minutes qui suit l’insertion initiale d’une batterie IMPRES
(voyant
ROUGE FIXE
), retirez la batterie du compartiment et réinsérez-la dans les
5 secondes qui suivent pour forcer manuellement le reconditionnement. Le témoin
du chargeur passe du
ROUGE FIXE
au
JAUNE FIXE
. Cette méthode permet de
forcer le cycle de reconditionnement avant recharge de la batterie.
Reconditionnement automatique des batteries
Utilisé avec des batteries Motorola IMPRES, le Chargeur Conditionneur Multiple
IMPRES Motorola peut déterminer si une batterie a besoin d’un reconditionnement.
Lorsqu’une batterie IMPRES est correctement insérée dans le chargeur, il
détermine si le reconditionnement est nécessaire. Si la batterie a besoin d’un
reconditionnement, le voyant du chargeur passe automatiquement au
JAUNE
FIXE
. Cette procédure peut nécessiter jusqu’à 8 heures ou plus, selon l’état de
charge et la capacité de la batterie insérée.
Remarque importante : pour que cette procédure soit efficace, la batterie doit
rester dans le chargeur de façon ininterrompue jusqu’à la fin du
reconditionnement/ chargement, signalé par le voyant
VERT FIXE
.
A la fin du cycle de reconditionnement, le chargeur passe automatiquement en
cycle de recharge.
REMARQUE :
Une utilisation excessive de cette fonction peut réduire la
durée de vie globale de la batterie.
37D22-B_Impres_MUC_FR.fm Page 13 Wednesday, July 12, 2006 2:10 PM

Français
14
Interruption manuelle du reconditionnement
A n’importe quel moment du cycle de reconditionnement d’une batterie IMPRES
Motorola (voyant
JAUNE FIXE
), il est possible d’interrompre ce cycle en sortant la
batterie du chargeur et en la réinsérant dans un délai de cinq secondes. Cette
manipulation simple met fin au cycle de reconditionnement et lance le cycle de
recharge. Le témoin du chargeur devient alors
ROUGE FIXE
.
37D22-B_Impres_MUC_FR.fm Page 14 Wednesday, July 12, 2006 2:10 PM

Français
15
RECHERCHE DE DYSFONCTIONNEMENT
Caractéristiques du Chargeur Conditionneur Multiple IMPRES :
• Alimentation universelle (100 V c.a. – 240 V c.a., 50/60 Hz)
• Chargeur rapide, courant continu
• Chargeur conditionneur à courant intermittent inverse (impulsion négative)
• Unité de reconditionnement
La combinaison de ces fonctions est inédite pour un chargeur de bureau. Par
conséquent, nous déconseillons de laisser dans le chargeur un poste contenant
une batterie alors que le poste est allumé ou en cours d’utilisation.
L’utilisation d’un poste laissé dans le chargeur peut provoquer une réduction des
performances radio et un allongement du cycle de charge.
Lorsque le cycle de charge rapide est presque terminé, (voyant
ROUGE FIXE
), la
tension de la batterie dépasse la tension de fonctionnement normale du poste. Ce
niveau de tension revient à la normale après la fin du cycle de charge rapide, ou
lorsque la batterie est retirée du chargeur.
Si le poste est mis sous tension pendant que le chargeur est en mode de charge
rapide, le poste sera temporairement hors service. Pour remettre le poste en
service, il suffit de le retirer du chargeur, de l’éteindre et de le rallumer.
Le cycle de reconditionnement inclut une décharge totale de la batterie. Par
conséquent, le poste risque de ne pas être opérationnel pendant ce cycle (attendre
la fin du reconditionnement.)
Pendant toute recherche de dysfonctionnement, vérifiez constamment le voyant
lumineux du chargeur. Voir le Tableau 9.
37D22-B_Impres_MUC_FR.fm Page 15 Wednesday, July 12, 2006 2:10 PM

Français
16
REPARATATION
Le chargeur multiple reconditionneur IMPRES peut uniquement être réparé par un
technicien de maintenance agréé par Motorola. Le non-respect de cette clause
peut annuler la garantie.
Tableau 10. Recherche de dysfonctionnement
Problème Signification Action
Le témoin
lumineux est
éteint.
• Absence de contact.
• Aucune alimentation
électrique.
• Vérifiez que le poste contenant la
batterie, ou la batterie seule, est
correctement inséré dans le
chargeur.
• Vérifiez que le câble d’alimentation
est correctement branché au
chargeur et au secteur, et qu’il n’y a
pas de coupure de courant.
• Remplacez le(s) fusible(s).
Rouge
clignotant
• Absence de contact.
• La batterie ne peut pas être
chargée.
• Retirez la batterie et réinsérez-la
dans le chargeur.
• Vérifiez que la batterie est une
batterie agréée Motorola listée
dans les Tableaux 1 à 6. Le
système risque de ne pas charger
les autres types de batteries.
• Débranchez le chargeur de son
alimentation électrique. A l’aide
d’un chiffon sec et propre, nettoyez
les broches de contact de la
batterie et du chargeur.
• Réinsérez la batterie dans le
chargeur.
Jaune
clignotant
• En attente du début du
cycle de charge. La
température de la batterie
peut être inférieure à 5°C
(41°F) ou supérieure à
40°C (104°F) ou la tension
de la batterie peut être
inférieure à celle du seuil
minimal nécessaire à la
charge rapide.
• Dès que cette condition est
rectifiée, la charge de la batterie
débutera.
37D22-B_Impres_MUC_FR.fm Page 16 Wednesday, July 12, 2006 2:10 PM

Français
17
CHARGEURS AVEC MODULE D’AFFICHAGE (CDM)
Le chargeur multiple adaptif IMPRES peut être amélioré par
l’adjonction d’un module d’affichage (CDM – Charger Display Module,
référence Motorola RLN5382).
Informations générales affichées
Le chargeur multiple reconditionneur IMPRES avec l’afficheur CDM
donne à l’utilisateur des informations importantes pendant les
opérations de maintenance de ses batteries. Ces informations et les
indications du témoin lumineux sont décrites dans les tableaux
suivants.
Démarrage
Non-IMPRES
Battery in the Pocket (La batterie dans la case du chargeur n’est pas du
type IMPRES
)
IMPRES
Battery in the Pocket (La batterie dans la case du chargeur est du type IMPRES)
Upon Charger Power-up
(À la mise sous tension du chargeur)
TÉMOIN SINGLE FLASH GREEN (UN ÉCLAT VERT)
Ligne 1 IMPRES
Ligne 2
If There is No Battery in the Pocket
(S’il n’y a pas de batterie dans la case)
TÉMOIN OFF (DÉSACTIVÉ)
Ligne 1 NO BATTERY (
SANS BATTERIE)
Ligne 2
Reading Battery Data
(Lecture des données de la batterie)
TÉMOIN Any Defined Indication (
toute indication)
Ligne 1 READING (
LECTURE EN COURS)
Ligne 2 BATTERY DATA (
DONNÉES DE LA BATTERIE)
TÉMOIN Defined by Charge State (
Défini par l’état de charge)
Ligne 1 NON-IMPRES (
NON-IMPRES)
Ligne 2 BATTERY (
BATTERIE)
I
MPRES
and Software Versions are Displayed
TÉMOIN Defined by Charge State (Défini par l’état de charge)
Ligne 1 IMPRES
Ligne 2 SW xx.yy; aa.bb
37D22-B_Impres_MUC_FR.fm Page 17 Wednesday, July 12, 2006 2:10 PM

Français
18
REMARQUE :
xx.yy indique la version du logiciel et aa.bb indique la version de
l’afficheur CDM.
IMPRES
Battery Kit # and Chemistry are Displayed
(Le numéro de
référence du kit batterie IMPRES et sa catégorie chimique sont affichés)
TÉMOIN Defined by Charge State (Défini par l’état de charge)
Ligne 1 KIT# -------- (
KIT No. --------)
Ligne 2 -----CHEMISTRY (
-----CHIMIE)
Forecasted # of Cycles Prior to Automatic Recondition
(Nombre de cycles
prévus avant le reconditionnement automatique)
TÉMOIN Defined by Charge State (Défini par l’état de charge)
Ligne 1 ----CYCLES (
----CYCLES)
Ligne 2 TO RECONDITION (
RECONDITIONNER)
*
Uniquement affiché lorsque le nombre de cycles avant le recondi-
tionnement est inférieur à 6.
Charger Waiting to Charge, Battery is Hot
(Le chargeur est en attente. La
batterie est chaude)
TÉMOIN Flashing ORANGE (ORANGE clignotant)
Ligne 1 WAITING TO CHG (
ATTENTE CHARGE)
Ligne 2 HOT BATTERY (
BATTERIE CHAUDE)
Charger Waiting to Charge, Battery is Cold
(Le chargeur est en attente. La
batterie est froide)
TÉMOIN Flashing ORANGE (ORANGE clignotant)
Ligne 1 WAITING TO CHG (
ATTENTE CHARGE)
Ligne 2 COLD BATTERY
(BATTERIE FROIDE)
Charger Waiting to Charge, Low Voltage
(Le chargeur est en attente. Tension
faible)
TÉMOIN Flashing ORANGE (ORANGE clignotant)
Ligne 1 WAITING TO CHG (
ATTENTE CHARGE)
Ligne 2 LOW VOLTAGE (
TENSION FAIBLE)
REMARQUE :
Tous les écrans indiqués ci-dessus ne sont pas affichés. Par exemple,
Attente de charge (batterie chaude, froide, tension faible) n’apparaît
que lorsque la situation l’exige.
37D22-B_Impres_MUC_FR.fm Page 18 Wednesday, July 12, 2006 2:10 PM

Français
19
Charger is in Trickle Charge Mode
(Le chargeur est en mode Charge d’appoint)
TÉMOIN Flashing GREEN (VERT clignotant)
Ligne 1 TRICKLE CHARGE (
CHARGE D’APPOINT)
Ligne 2
Charge is Complete
(Charge terminée)
TÉMOIN Steady GREEN or Flashing RED / GREEN (VERT fixe ou
ROUGE / VERT clignotant
)
Ligne 1 CHARGE COMPLETE (
CHARGE TERMINÉE)
Ligne 2
Charger is in Discharge/Reconditioning Mode
(Le chargeur est en mode
Décharge / reconditionnement)
TÉMOIN Steady ORANGE (ORANGE fixe)
Ligne 1 DISCHARGE (
DÉCHARGE)
Ligne 2
Charger is Calibrating an IMPRES Battery
(Le chargeur calibre une batterie
IMPRES)
TÉMOIN Steady ORANGE, Steady RED, & Flashing ORANGE or
GREEN (
ORANGE fixe, ROUGE fixe, & ORANGE ou
VERT clignotant)
Ligne 1 Calibrating (
Calibrage)
Ligne 2 Battery (
Batterie)
TÉMOIN Steady GREEN (
VERT fixe)
Ligne 1 Battery (
Batterie)
Ligne 2 Calibrated (
Calibrée)
*Toutes les batteries IMPRES doivent être calibrées avant d’être utilisées. Un
chargeur IMPRES lance automatiquement la calibration chaque fois qu’une
batterie neuve est insérée.
Battery Capacity Data is Displayed as “%” in mAH, and Voltage
(Les
données de capacité sont affichées : “%” en mAH, et voltage
)
TÉMOIN Defined by Charge State (Défini par l’état de charge)
Ligne 1 ----% RATED CAP. (
----% CAPAC. NOM.)
Ligne 2 ----mAH --.-V
37D22-B_Impres_MUC_FR.fm Page 19 Wednesday, July 12, 2006 2:10 PM

Français
20
REMARQUE :
(1) La durée estimée du chargement complet inclut les cycles
de charge rapide et de décharge (le cas échéant).
(2) Les informations relatives à la capacité de la batterie
peuvent ne pas être affichées lorsque la batterie n’a pas
été calibrée.
(3) L’utilisation de batteries IMPRES avec des chargeurs non-
IMPRES peut affecter la capacité et la précision de la
durée de chargement.
Estimated Time to Rapid Charge
Complete Displayed in Hours, Minutes for NiCd & NiMH IMPRES
Batteries Only
(Durée estimée du chargement rapide en heures & minutes
uniquement pour les batteries NiCd & NiMH IMPRES
)
TÉMOIN Defined by Charge State (Défini par l’état de charge)
Ligne 1 RAPID CHG ENDS (
FIN CHG RAPIDE)
Ligne 2 IN xx HRS, yy MIN (
EN xx H, yy MN)
37D22-B_Impres_MUC_FR.fm Page 20 Wednesday, July 12, 2006 2:10 PM

Français
21
Diagrams de Séquences pour les Batteries IMPRES
Remarque : Ces diagrammes correspondent aux séquences affichées dans la
précédente section “Informations générales affichées” et sont uniquement en
anglais.
Séquence d’affichage pour les batteries IMPRES NiCd & NiMH
TÉMOIN Defined by Charge State
Ligne 1 KIT# xxxxxxxx
Ligne 2 SN: yyyyyyyyyyyy
TÉMOIN Defined by Charge State
Ligne 1 KIT# xxxxxxxx
Ligne 2 yyyyy CHEMISTRY
TÉMOIN Defined by Charge State
Ligne 1 xxxx CYCLES
Ligne 2 TO RECONDITION
TÉMOIN Steady RED
Ligne 1 RAPID CHARGE
Ligne 2
TÉMOIN Defined by Charge State
Ligne 1 xx% RATED CAP.
Ligne 2 yyyyy mAH zz.z V
TÉMOIN Defined by Charge State
Ligne 1 RAPID CHG ENDS
Ligne 2 IN xx HRS, yy MIN
Démarrage
(2,0 sec)
(2,0 sec)
(2,0 sec)
(7,0 sec)
(4,0 sec)
Toutes les
73,0 sec
Toutes les
13,0 sec
5X
65,0
sec
(4,0 sec)
37D22-B_Impres_MUC_FR.fm Page 21 Wednesday, July 12, 2006 2:10 PM

Français
22
Avant calibration :
TÉMOIN Defined by Charge State
Ligne 1 KIT# xxxxxxxx
Ligne 2 SN: yyyyyyyyyyyy
TÉMOIN Defined by Charge State
Ligne 1 KIT# xxxxxxxx
Ligne 2 yyyyy CHEMISTRY
TÉMOIN Steady ORANGE
Ligne 1 DISCHARGE
Ligne 2
TÉMOIN Defined by Charge State
Ligne 1 CALIBRATING
Ligne 2 BATTERY
TÉMOIN Defined by Charge State
Ligne 1 RAPID CHG ENDS
Ligne 2 IN xx HRS, yy MIN
Toutes les
71,0 sec
Démarrage
(4,0 sec)
(2,0 sec)
(2,0 sec)
(7,0 sec)
(4,0 sec)
Toutes les
13,0 sec
5X
65,0
sec
37D22-B_Impres_MUC_FR.fm Page 22 Wednesday, July 12, 2006 2:10 PM

Français
23
Après calibration :
TÉMOIN Defined by Charge State
Ligne 1 KIT# xxxxxxxx
Ligne 2 SN: yyyyyyyyyyyy
TÉMOIN Defined by Charge State
Ligne 1 KIT# xxxxxxxx
Ligne 2 yyyyy CHEMISTRY
TÉMOIN Steady GREEN
Ligne 1 CHARGE COMPLETE
Ligne 2
TÉMOIN Defined by Charge State
Ligne 1 BATTERY
Ligne 2 CALIBRATED
TÉMOIN Defined by Charge State
Ligne 1 xx% RATED CAP.
Ligne 2 yyyy mAH zz.z V
Démarrage
(4,0 sec)
(2,0 sec)
(2,0 sec)
(2,0 sec)
(7,0 sec)
Toutes les
61,0sec
Toutes les
11 sec
5X
55,0
sec
37D22-B_Impres_MUC_FR.fm Page 23 Wednesday, July 12, 2006 2:10 PM

Français
24
Séquence d’affichage pour les batteries IMPRES Li-Ion
TÉMOIN Defined by Charge State
Ligne 1 KIT# xxxxxxxx
Ligne 2 SN: yyyyyyyyyyyy
TÉMOIN Defined by Charge State
Ligne 1 KIT# xxxxxxxx
Ligne 2 yyyyy CHEMISTRY
TÉMOIN Defined by Charge State
Ligne 1 xxxx CYCLES
Ligne 2 TO RECONDITION
TÉMOIN Steady RED
Ligne 1 RAPID CHARGE
Ligne 2
TÉMOIN Defined by Charge State
Ligne 1 xx% RATED CAP.
Ligne 2 yyyyy mAH zz.z V
Démarrage
(4,0 sec)
(2,0 sec)
(2,0 sec)
(2,0 sec)
(7,0 sec)
Toutes les
53,0 sec
Toutes les
9,0 sec
5X
45,0
sec
37D22-B_Impres_MUC_FR.fm Page 24 Wednesday, July 12, 2006 2:10 PM

Français
25
Avant calibration :
TÉMOIN Defined by Charge State
Ligne 1 KIT# xxxxxxxx
Ligne 2 SN: yyyyyyyyyyyy
TÉMOIN Defined by Charge State
Ligne 1 KIT# xxxxxxxx
Ligne 2 yyyyy CHEMISTRY
TÉMOIN Steady ORANGE
Ligne 1 DISCHARGE
Ligne 2
TÉMOIN Defined by Charge State
Ligne 1 CALIBRATING
Ligne 2 BATTERY
Démarrage
(4,0 sec)
(2,0 sec)
(2,0 sec)
(7,0 sec)
Toutes les
51,0 sec
Toutes les
9,0 sec
5X
45,0
sec
37D22-B_Impres_MUC_FR.fm Page 25 Wednesday, July 12, 2006 2:10 PM

Français
26
Après calibration :
TÉMOIN Defined by Charge State
Ligne 1 KIT# xxxxxxxx
Ligne 2 SN: yyyyyyyyyyyy
TÉMOIN Defined by Charge State
Ligne 1 KIT# xxxxxxxx
Ligne 2 yyyyy CHEMISTRY
TÉMOIN Steady GREEN
Ligne 1 CHARGE COMPLETE
Ligne 2
TÉMOIN Defined by Charge State
Ligne 1 BATTERY
Ligne 2 CALIBRATED
TÉMOIN Defined by Charge State
Ligne 1 xx% RATED CAP.
Ligne 2 yyyy mAH zz.z V
Démarrage
(4,0 sec)
(2,0 sec)
(2,0 sec)
(2,0 sec)
(7,0 sec)
Toutes les
61,0sec
Toutes les
11 sec
5X
55,0
sec
37D22-B_Impres_MUC_FR.fm Page 26 Wednesday, July 12, 2006 2:10 PM

Français
27
Orientation du texte affiché
Pour une installation de bureau ou murale du chargeur multiple
adaptatif IMPRES, l’afficheur CDM est équipé d’une fonction
d’inversion du texte à 180 degrés.
Pour l’activer, insérez l’extrémité d’un trombone à papier dans le petit
orifice sous l’affichage et perpendiculairement à la surface du bureau.
Un son “clic ” confirme le changement (activé / désactivé) et que
l’affichage a été inversé à 180 degrés.
Fonctionnement du chargeur multiple adaptatif IMPRES
Pour tout complément d’informations sur l’aptitude au service du
chargeur MUC et de l’afficheur CDM, consultez le Guide de
maintenance du chargeur (référence : 6880309L66).
Maintenance
Pour toute opération de maintenance, contactez le centre indiqué ci-
dessous. Veuillez téléphoner et confirmer les informations de
référence avant d’envoyer un équipement au service de maintenance.
Centre de maintenance Motorola
Motorola GmbH
Customer Care
Am Borsigturm 130
13507 Berlin
Germany.
Tel: +49 30 6686 1555
37D22-B_Impres_MUC_FR.fm Page 27 Wednesday, July 12, 2006 2:10 PM

Français
28
Notes
37D22-B_Impres_MUC_FR.fm Page 28 Wednesday, July 12, 2006 2:10 PM

Español
1
ÍNDICE GENERAL
Instrucciones de seguridad importantes . . . . . . . . . . . . . . . . . . . . . . . 2
Directrices de seguridad . . . . . . . . . . . . . . . . . . . . . . . . . . . . . . . . . . . 3
Descripción de funciones/ventajas de IMPRES. . . . . . . . . . . . . . . . . . 4
Características/Diferencias de funcionamiento . . . . . . . . . . . . . . . . . . 5
Lista de baterías . . . . . . . . . . . . . . . . . . . . . . . . . . . . . . . . . . . . . . . . . 7
Voltajes y adaptadores de alimentación autorizados por Motorola . . 10
Instrucciones de funcionamiento . . . . . . . . . . . . . . . . . . . . . . . . . . . . 11
Carga de las baterías . . . . . . . . . . . . . . . . . . . . . . . . . . . . . . . . . . 13
Reacondicionamiento manual de las baterías . . . . . . . . . . . . . . . 14
Reacondicionamiento automático de las baterías . . . . . . . . . . . . 14
Finalización manual del proceso de reacondicionamiento . . . . . . 15
Solución de problemas . . . . . . . . . . . . . . . . . . . . . . . . . . . . . . . . . . . 16
Servicio Técnico . . . . . . . . . . . . . . . . . . . . . . . . . . . . . . . . . . . . . . . . 17
Cargadores con módulo de pantalla (CDM) . . . . . . . . . . . . . . . . . . . 18
Este manual de accesorios puede aplicarse a estos cargadores múltiples universales
IMPRES:
WPLN4108, WPLN4109, WPLN4110, WPLN4118, WPLN4119, WPLN4120, WPLN4121,
WPLN4123, WPLN4130, WPLN4131, WPLN4132, WPLN4133, WPLN4134, WPLN4135,
WPLN4136
Asimismo, el manual incluye los siguientes cargadores múltiples universales IMPRES
disponibles para los radioteléfonos de la serie GP Professional:
WPLN4144, WPLN4145, WPLN4146, WPLN4187, WPLN4188, WPLN4189, WPLN4190,
WPLN4191, WPLN4192, WPLN4193, WPLN4194, WPLN4195, WPLN4196, WPLN4204,
WPLN4205
‘Universal’ indica que el cargador admite una gran variedad de modelos de radioteléfonos,
además de todas las baterías que figuran en las tablas 1–6, mediante adaptadores de
baterías.
37D22-B_Impres_MUC_ES.fm Page 1 Wednesday, July 12, 2006 2:06 PM

Español
2
INSTRUCCIONES DE SEGURIDAD IMPORTANTES
GUARDE ESTAS INSTRUCCIONES
Este documento contiene instrucciones de seguridad y funcionamiento
importantes. Lea estas instrucciones detenidamente y guárdelas para futura
referencia.
Antes de utilizar el cargador de baterías, lea la totalidad de las instrucciones y las
señales de precaución que aparecen en (1) el cargador, (2) la batería y (3) la radio
que utiliza la batería.
1. TPara reducir el riesgo de lesiones, cargue únicamente las
baterías recargables autorizadas por Motorola que se enumeran
en las tablas 1 a 5. Otras baterías distintas a las especificadas
podrían explotar, causando lesiones y daños materiales.
2. El uso de accesorios no recomendados por Motorola puede provocar
riesgo de incendio, descarga eléctrica o lesiones.
3. Al desconectar el cargador, tire del enchufe y nunca del cable a fin de
reducir el riesgo de daños en el enchufe y el cable de alimentación.
4. No utilice un cable alargador a menos que sea absolutamente necesario.
El uso de un cable alargador inadecuado podría ocasionar un incendio o
descargas eléctricas. En caso de utilizar un cable alargador, asegúrese de
que el grosor del cable es de 18AWG para longitudes superiores a 30,49 m
(100 pies), y de 16AWG para longitudes superiores a 45,72 m (150 pies).
5. Para reducir el riesgo de incendio, descarga eléctrica o lesiones, no manipule
el cargador si está roto o dañado. Llévelo a un representante cualificado del
servicio técnico de Motorola.
6. Esta unidad puede repararse.
Cada receptáculo está equipado con una
exclusiva placa de circuito impreso y una fuente de alimentación. Ambas
pueden adquirirse en la organización de repuestos y piezas. El número de
referencia de la pieza de repuesto de la placa de circuito impreso es
RLN5325. No hay disponibles otras piezas de repuesto con carácter de
componentes. Puede solicitarse un manual de servicio con la descripción
del proceso de sustitución de piezas a la organización de repuestos y
piezas. El número del Manual de servicio es 6880309L66.
7. Para reducir el riesgo de descarga eléctrica, desenchufe el cargador de la
toma de alimentación de CA antes de proceder a su mantenimiento o
limpieza.
!
ADVERTENCIA
37D22-B_Impres_MUC_ES.fm Page 2 Wednesday, July 12, 2006 2:06 PM

Español
3
DIRECTRICES DE SEGURIDAD
• Cuando cargue la batería, apague la radio.
• Este equipo no está diseñado para su uso al aire libre. Utilícelo sólo en lugares
secos.
• Conecte el equipo sólo a una fuente de alimentación del voltaje adecuado
protegida por fusible y cableada correctamente (como se especifica en el
producto).
• Desconecte el cargador de la red desenchufándolo de la toma de alimentación.
• La toma de alimentación a la que se conecte este equipo debe estar cerca y ser
fácilmente accesible.
• En el caso de equipos que utilicen fusibles, los repuestos deben ser del tipo y
régimen nominal especificados en las instrucciones del equipo.
• La temperatura ambiente a la que se encuentre el cargador no debe ser superior
a 40°C (104°F).
• Asegúrese de que el cable no se encuentre en un lugar en el que se pueda pisar,
ni esté sometido a humedad, daños o tensión.
• Esta unidad utiliza la misma unidad de montaje mural que el cargador múltiple
NTN4796. El número de referencia de dicha unidad de montaje mural es
NLN7967.
• En caso de sustitución del fusible, utilice únicamente fusibles del mismo tipo y
régimen nominal enumerados en la etiqueta del cargador. Pueden encargarse
las siguientes piezas a la organización de repuestos y piezas:
Fusible 6571489S01
Soporte 0987626G01
Cubierta 0987739G01
37D22-B_Impres_MUC_ES.fm Page 3 Wednesday, July 12, 2006 2:06 PM

Español
4
DESCRIPCIÓN DE FUNCIONES/VENTAJAS DE IMPRES
La solución de energía IMPRES es un sistema de energía avanzado Tri Chemistry
desarrollado por Motorola que incluye (a) baterías IMPRES, (b) el cargador
adaptable múltiple IMPRES y (c) el hardware/software de radio que permite que las
radios compatibles con IMPRES establezcan comunicación con las baterías
IMPRES (esto no se aplicará a los radioteléfonos de la serie GP Professional).
Al utilizar el cargador adaptable múltiple IMPRES junto con las baterías IMPRES
de Motorola:
• Aumentará el tiempo de funcionamiento entre ciclos de carga al eliminar
automáticamente el efecto memoria.
• Aumentará la vida de la batería al reducir de forma significativa el calor durante
los ciclos de carga lenta y posterior a la carga.
• Eliminará la necesidad de adquirir equipos de reacondicionamiento y de formar
al personal para “llevar a cabo las tareas de mantenimiento de las baterías.”
Gracias a este exclusivo sistema patentado, no hay necesidad de controlar y
registrar el uso de la batería, realizar ciclos de reacondicionamiento manual ni
retirar las baterías de los cargadores después de la carga.
El cargador adaptable múltiple IMPRES controla el patrón de uso de la batería
IMPRES, almacena esa información en la batería IMPRES y lleva a cabo un ciclo
de reacondicionamiento sólo cuando resulta necesario.
El cargador adaptable múltiple IMPRES no producirá un calentamiento excesivo de
la batería independientemente del tiempo que permanezca en el receptáculo. El
cargador realiza un control de la batería y cambia automáticamente a la función de
carga lenta de la batería, según sea necesario.
El cargador adaptable múltiple IMPRES simplifica el proceso de carga y
mantenimiento de la batería: Todo lo que el usuario necesita es llevar a cabo lo
siguiente:
1. Colocar la radio/batería en el cargador.
2. Retirar la radio/batería cuando se haya cargado por completo.
Motorola es el único fabricante que ofrece un cargador de acondicionamiento o
reacondicionamiento que permite a los usuarios la posibilidad de cargar la radio
con la batería conectada, o bien cargar la batería de forma independiente.
37D22-B_Impres_MUC_ES.fm Page 4 Wednesday, July 12, 2006 2:06 PM

Español
5
CARACTERÍSTICAS/DIFERENCIAS DE FUNCIONAMIENTO:
1. Las baterías IMPRES se pueden cargar en cargadores convencionales. Sin
embargo, para activar las funciones Smart Energy, es necesario cargar cada
batería IMPRES en un cargador adaptable múltiple IMPRES. La primera vez
que se carga una batería IMPRES en un cargador adaptable múltiple IMPRES,
el indicador del cargador aparece inicialmente en color
AMARILLO FIJO
. Es
preciso permitir una primera carga completa para que aparezca el indicador del
cargador en
VERDE FIJO
. Esta operación calibra de forma adecuada la
batería IMPRES y activa las funciones Smart Energy. Si se interrumpe este
proceso, el cargador calibrará la batería hasta la siguiente inserción.
2. Puesto que el cargador adaptable múltiple IMPRES determina de forma
automática las condiciones necesarias para reacondicionar la batería IMPRES,
el cargador puede pasar a modo de reacondicionamiento cuando se inserta
una radio o una batería. Ello se indica mediante el indicador del cargador en
AMARILLO
FIJO
. El modo de reacondicionamiento puede anularse, si es
necesario, mediante la extracción y reinserción de la radio o la batería.
(Consulte las instrucciones que aparecen más adelante en esta guía).
3. El cargador adaptable múltiple IMPRES está diseñado para cargar cualquier
batería enumerada en las tablas 1 a 6. Sin embargo, sólo las auténticas
baterías IMPRES proporcionarán funciones Smart Energy. (A medida que
aparezcan nuevos modelos de radios o baterías, se actualizará y distribuirá
esta lista a los clientes a través de las diferentes organizaciones de OEM
globales y de repuestos)
4. El cargador adaptable múltiple IMPRES debe utilizarse para calibrar las
baterías IMPRES Smart a fin de garantizar que el registro, almacenamiento y
visualización de los datos de uso de las baterías IMPRES es preciso.
37D22-B_Impres_MUC_ES.fm Page 5 Wednesday, July 12, 2006 2:06 PM

Español
6
5. Si utiliza una batería IMPRES con un radioteléfono con pantalla (como
XTS5000), éste mostrará un icono que indica el estado de carga de la batería.
Este icono se activará después de que el cargador IMPRES haya calibrado la
batería IMPRES. El icono del estado de carga permanecerá en la pantalla
mientras el usuario continúe utilizando cargadores IMPRES para cargar las
baterías. No obstante, si se carga una batería IMPRES en un cargador distinto
de IMPRES durante un periodo de siete días o más, el icono desaparecerá.
Para volver a activar el icono, deberá introducir una batería IMPRES en un
cargador IMPRES y dejar que se complete el proceso de carga (hasta que
aparezca una luz
VERDE FIJA
en el indicador). Así, el icono del estado de
carga aparecerá de nuevo en el radioteléfono. En caso de que el icono no
aparezca tras haber completado la carga, coloque una batería parcialmente
descargada (70 % de descarga) en el cargador, inicie el reacondicionamiento y
deje que se complete el proceso de carga. A continuación, el icono aparecerá
en la pantalla del radioteléfono (esto no se aplica a los radioteléfonos de la
serie GP Professional).
6. Sólo un técnico de servicio autorizado por Motorota CGISS podrá reparar el
cargador múltiple adaptable IMPRES. Cualquier violación de estas
instrucciones anulará la garantía.
37D22-B_Impres_MUC_ES.fm Page 6 Wednesday, July 12, 2006 2:06 PM

Español
7
LISTA DE BATERÍAS
Las tablas siguientes incluyen una lista de las baterías que pueden utilizarse con
los terminales radiotelefónicos específicos que figuran en los encabezados de las
tablas.
* El cargador requiere el adaptador de batería con el nº de referencia RLN5212 para
cargar baterías MTP700.
Tabla 1. XTS3000 / XTS3500 / Radios serie Dimetra y radios digitales
XTS5000
Kit (Nº de
referencia)
Composición
química
FM Smart Capacidad Modelo nuevo
HNN9031 NiCD No Sí Ultra-alta No
HNN9032 NiCD Sí Sí Ultra-alta No
NTN8294 NiCD No No Ultra-alta No
NTN8295 NiCD Sí No Ultra-alta No
NTN8297 NiCD Sí No Ultra-alta No
NTN8299 NiCD Sí No Ultra-alta No
NTN8610 LiIon No No Alta No
NTN8293 NiMH No No Ultra-alta No
NNTN4435 NiMH No Sí Ultra-alta No
NNTN4436 NiMH Sí Sí Ultra-alta No
NNTN4437 NiMH Sí Sí Ultra-alta No
RNN4006 NiMH No No Muy alta Nuevo
RNN4007 NIMH Sí No Muy alta Nuevo
NTN9862 LiIon No Sí Ultra-alta Nuevo
Tabla 2. Radios digitales TS2500
Kit (Nº de
referencia)
Composición
química
FM Smart Capacidad Modelo nuevo
NTN9859 NiMH No No Ultra-alta Nuevo
NTN9857 NiMH Sí No Ultra-alta Nuevo
NTN9815 NiCD No No Alta Nuevo
NTN9816 NiCD Sí No Alta Nuevo
Tabla 3. Radios digitales MTP700
Kit (Nº de
referencia)
Composición
química
FM Smart Capacidad Modelo nuevo
PMNN4048* NiMH No Sí Alta Nuevo
PMNN4049* NiMH Sí Sí Alta Nuevo
PMNN4050* Lilon No Sí Alta Nuevo
PMNN4047* LiIon No Sí Alta Nuevo
37D22-B_Impres_MUC_ES.fm Page 7 Wednesday, July 12, 2006 2:06 PM

Español
8
** El cargador requiere el adaptador de batería con el nº de referencia 4385922B01
para cargar baterías Astro Saber.
Tabla 4. Radios serie HT1000 / MT2000 / MTS2000 / MTX8000 y MTX9000
Kit (Nº de
referencia)
Composición
química
FM Smart Capacidad Modelo
nuevo
HNN9028 NiCD No Sí Ultra-alta No
HNN9029 NiCD Sí Sí Ultra-alta No
NTN7143 NiCD No No Alta No
NTN7144 NiCD No No Ultra-alta No
NTN7146 NiCD Sí No Alta No
NTN7147 NiCD Sí No Ultra-alta No
NTN7148 NiCD CENELEC No Alta No
NTN7149 NiCD CSA No Alta No
NTN7150 NiCD MSHA No Alta No
NTN7341 NiCD Sí No Ultra-alta No
NTN7372 NiCD Sí No Alta No
WPPN4013 NiMH No No Ultra-alta No
WPPN4037 NiMH Sí No Ultra-alta No
RNN4008 NiCD ATEX No Alta No
Tabla 5. Radios Saber / Astro Saber / SSE5000 / MX1000
Kit (Nº de
referencia)
Composición
química
FM Smart Capacidad Modelo
nuevo
HNN9033 NiCD No Sí Ultra-alta No
HNN9031 NiCD Sí Sí Ultra-alta No
NTN4537** NiCD Sí No Baja No
NTN4538 NiCD Sí No Alta No
NTN4592** NiCD No No Baja No
NTN4593 NiCD No No Alta No
NTN4595 NiCD No No Ultra-alta No
NTN4596 NiCD Sí No Ultra-alta No
NTN4657 NiCD No No Alta No
NTN4671 NiCD CENELEC No Alta No
NTN4992 NiCD Sí No Ultra-alta No
NTN7014** NiMH No No Alta No
NTN7058 NiCD Sí No Ultra-alta No
NTN7426 NiCD Sí No Baja No
NTN8251 NiMH Sí No Ultra-alta No
NTN8818** LiIon No No Alta No
37D22-B_Impres_MUC_ES.fm Page 8 Wednesday, July 12, 2006 2:06 PM

Español
9
Los cargadores universales necesitan adaptadores para baterías con el número de ref-
erencia RLN5648.
Tabla 6. Radioteléfonos de la serie GP Professional
Kit (Nº de
referencia)
Composición
química
FM Smart Capacidad
Modelo
nuevo
HNN9003 NiMH
AA Bluetooth
No No Alta No
HNN9008 NiMH No No Alta No
HNN9009 NiMH No No Ultra-alta No
HNN9010 NiMH Sí No Ultra-alta No
HNN9011 NiCD Sí No Alta No
HNN9012 NiCD No No Alta No
HNN9013 LiIon No No Alta No
WPNN4045 NiMH No No Alta No
PMNN4045 NiMH No No Alta No
HNN4001 Impres NiMH No Sí Ultra-alta Sí
HNN4002 Impres NiMH Sí Sí Ultra-alta Sí
HNN4003 Impres LiIon No Sí Ultra-alta Sí
NOTA:
El adaptador puede adquirirse a través del representante de
ventas de radio o de repuestos.
37D22-B_Impres_MUC_ES.fm Page 9 Wednesday, July 12, 2006 2:06 PM

Español
10
VOLTAJES Y ADAPTADORES DE ALIMENTACIÓN AUTORIZADOS
POR MOTOROLA
Este cargador está diseñado para su utilización en instalaciones de entre 100 y 240 V
de corriente alterna y 50 / 60 Hz; además, utiliza los cables de alimentación Motorola
que figuran en la tabla 7. Los cables de alimentación que se utilizan con el cargador
para radioteléfonos de la serie GP Professional están incluidos en la tabla 8:
Tabla 7. Cables de alimentación para modelos universales de Motorola
Tipo de enchufe Kit cargador Kit cargador
(Modelo con
pantalla)
Cable de
alimentación
Nº del cable/enchufe de
alimentación
WPLN4121 WPLN4127 Ninguno
EE.UU/América del Norte WPLN4108 WPLN4130 3087791G01
Europa WPLN4109 WPLN4131 3087791G04
Reino Unido WPLN4110 WPLN4132 3087791G07
Australia/Nueva Zelanda WPLN4118 WPLN4133 3087791G10
Argentina WPLN4119 WPLN4134 3087791G13
EE.UU/América del Norte WPLN4120 WPLN4135 3087791G01
Corea WPLN4123 WPLN4136 3087791G16
Tabla 8. Cables de alimentación para modelos de la serie GP
Professional de Motorola
Tipo de enchufe Kit cargador Kit cargador
(Modelo con
pantalla)
Cable de
alimentación
Nº del cable/enchufe de
alimentación
WPLN4197 WPLN4198 Ninguno
EE.UU/América del Norte WPLN4187 WPLN4192 3087791G01
Europa WPLN4189 WPLN4194 3087791G04
Reino Unido WPLN4188 WPLN4193 3087791G07
Australia/Nueva Zelanda WPLN4190 WPLN4195 3087791G10
Argentina WPLN4191 WPLN4196 3087791G13
EE.UU/América del Norte WPLN4205 WPLN4204 3087791G01
Corea WPLN4146 WPLN4145 3087791G16
37D22-B_Impres_MUC_ES.fm Page 10 Wednesday, July 12, 2006 2:06 PM

Español
11
INSTRUCCIONES DE FUNCIONAMIENTO
El receptáculo del cargador permite colocar una radio con una batería conectada, o
bien una batería de forma independiente. Antes de cargar una radio con una
batería, apague la radio. La carga de las baterías se realiza de forma óptima si
éstas se encuentran a temperatura ambiente.
1. Conecte el extremo del cable de alimentación del cargador en el receptáculo
de CA situado en la parte posterior del cargador.
2. Enchufe el otro extremo del cable de alimentación en la toma de CA adecuada.
Si el indicador del cargador está en
VERDE INTERMITENTE
, indicará una
secuencia de encendido satisfactoria.
3. Inserte una batería o una radio con batería (radio apagada) en el receptáculo
del cargador:
a. Alineando la ranura de cada lateral de la batería con el raíl correspondiente
situado a cada lado del receptáculo del cargador.
b. Presionando la batería hacia la parte trasera del receptáculo.
c. Deslizando la batería en el receptáculo, asegurándose de que haya un
contacto total entre el cargador y los contactos de la batería.
Una vez que la batería se encuentra bien encajada en el receptáculo, el indicador
del cargador se ilumina indicando que el cargador ha detectado la presencia de la
batería. Consulte los indicadores de carga en la tabla 9.
NOTAS
El cargador adaptable múltiple IMPRES carga únicamente las
baterías autorizadas por Motorola enumeradas en las tablas 1 a
6. Es posible que otras baterías distintas a las especificadas no
se carguen.
El cargador adaptable múltiple IMPRES cuenta con funciones y
capacidades automáticas que difieren de las de otros cargadores
de baterías. Observe detenidamente el indicador de carga para
asegurarse de que el cargador se encuentra en el modo de
funcionamiento deseado/previsto.
37D22-B_Impres_MUC_ES.fm Page 11 Wednesday, July 12, 2006 2:06 PM

Español
12
A fin de que todas las funciones de las baterías Smart y del sistema de carga
adaptable de Motorola estén disponibles, el cargador debe inicializar los datos de
las baterías Smart de Motorola la primera vez que se cargue. Este proceso se
indica mediante el indicador
AMARILLO FIJO
del cargador (al igual que ocurre
cuando se reacondiciona la batería).
El proceso es automático, incluye un reacondicionamiento inicial de la batería y
comienza la carga una vez finalizado este proceso. La inicialización de la batería
es un proceso que requiere tiempo, de modo que se debe dejar en el cargador toda
la noche la primera vez.
Tabla 9. Indicadores de carga
Indicador de carga Descripción
Un destello verde
El cargador se ha encendido correctamente.
Rojo fijo
La batería está en modo de carga rápida.
Verde intermitente
La batería ha terminado el ciclo de carga rápida (>90% de
capacidad disponible). La batería está en modo de carga
lenta.
Verde fijo
La batería ha terminado el proceso de carga y está
completamente cargada.
Amarillo intermitente
El cargador ha detectado la batería pero está esperando
la carga. (El voltaje de la batería es demasiado bajo, o
bien la temperatura es excesivamente alta o baja como
para permitir la carga. Una vez solucionada esta
situación, la batería comenzará la carga.)
Rojo intermitente
La batería no se puede cargar o bien no hace contacto.
Amarillo fijo
(Función sólo para baterías Smart)
La batería está en modo de reacondicionamiento. El
tiempo que el cargador permanezca en este modo
dependerá del estado de la carga restante en la batería
en el momento de insertarla en el cargador. (Las baterías
totalmente cargadas precisan más tiempo para su
reacondicionamiento (8 horas o más) que las baterías
descargadas por completo.)
Rojo/verde intermitente
(Función sólo para baterías Smart)
La batería ha completado su carga y está completamente
cargada. Se puede continuar utilizando la batería pero es
posible que esté llegando al fin de su vida útil.
NOTA
El cargador adaptable múltiple IMPRES es único por el hecho de
que, cuando se usa con baterías IMPRES de Motorola, indica
automáticamente la necesidad de reacondicionamiento de la
batería.
37D22-B_Impres_MUC_ES.fm Page 12 Wednesday, July 12, 2006 2:06 PM

Español
13
El cargador adaptable múltiple IMPRES funciona como:
• un cargador válido para todas las baterías autorizadas por Motorola, y
• un reacondicionador válido para todas las baterías IMPRES autorizadas por
Motorola.
Carga de las baterías
Para garantizar el máximo rendimiento, Motorola recomienda dejar todas las
baterías nuevas en el cargador durante un período de 14 a 16 horas antes de su
primer uso.
1. Una vez que se ha insertado una batería o una radio con batería en el
cargador, éste comienza la carga rápida de la batería y ello se indica mediante
el indicador en color
ROJO FIJO
del cargador. El tiempo que el cargador
permanece con el indicador en
ROJO FIJO
depende de la carga que quede en
la batería.
2. La finalización de la carga rápida (>90% de capacidad disponible) se indica
mediante una luz
VERDE INTERMITENTE
en el indicador del cargador. Esto
significa una carga lenta y tiene una duración de 1 hora aproximadamente.
3. La finalización de la carga lenta se indica mediante una luz
VERDE FIJA
en el
indicador del cargador. Esto significa que la batería se encuentra
completamente cargada.
4. Otras indicaciones que
pueden
aparecer en el indicador del cargador durante
la carga son:
•
AMARILLO INTERMITENTE
: indica que tanto la temperatura como el
voltaje de la batería están fuera de las especificaciones de carga. La carga
se reanuda cuando se han solucionado estas condiciones.
•
ROJO Y VERDE INTERMITENTE
: indica que la batería puede estar
próxima al fin de su vida útil. Aunque la batería
esté
totalmente cargada, su
capacidad de carga se ha reducido por el uso y es posible que no admita
aplicaciones que precisen de gran potencia. Esta función sólo se encuentra
disponible cuando se utiliza con baterías IMPRES de Motorola. Ésta no es
IMPORTANTE:
El receptáculo del cargador está diseñado para aceptar baterías
de distintas formas y tamaños, por lo que resulta importante
asegurarse de que se insertan correctamente una radio con una
batería o bien una batería sola. Si se insertan de modo
incorrecto, el indicador no se iluminará, lo que indicará que la
batería no se está cargando.
NOTA:
Las baterías nuevas (que nunca se han utilizado con
anterioridad) pueden indicar, en algunos casos, una carga
completa antes de tiempo (indicador
VERDE FIJO
).
37D22-B_Impres_MUC_ES.fm Page 13 Wednesday, July 12, 2006 2:06 PM

Español
14
una indicación de avería, simplemente una notificación al usuario de que la
batería puede dejar de prestar el servicio esperado en un período breve de
tiempo y es posible que sea necesaria su sustitución.
•
ROJO INTERMITENTE
: indica que la batería no se puede volver a cargar.
Ello puede ser el producto de una pérdida de contacto entre la batería y los
contactos del cargador. La carga se reanuda cuando se soluciona la
condición que provoca esta situación.
El cargador adaptable múltiple IMPRES de Motorola lee el dispositivo de memoria
interna que tienen las baterías Smart de Motorola. Si se carga una batería IMPRES
durante más de 2 y 1/2 minutos, el cargador adaptable múltiple IMPRES conserva
el número de serie de la batería IMPRES. La batería IMPRES puede extraerse del
cargador durante un período máximo de 30 minutos. Una vez que se vuelve a
insertar la batería en el cargador, éste reanudará el proceso de carga desde el
punto en que se retiró la batería por primera vez.
Reacondicionamiento manual de las baterías
Durante los 2 y 1/2 minutos de la inserción inicial de una batería IMPRES (la luz
ROJA FIJA
), retire y vuelva a insertar la batería en los 5 segundos siguientes para
provocar el reacondicionamiento de la batería. El indicador del cargador pasa de
ROJO FIJO
a
AMARILLO FIJO
. Esta operación provoca que el cargador inicie el
reacondicionamiento y a continuación la recarga automática de la batería.
Reacondicionamiento automático de las baterías
El cargador adaptable múltiple IMPRES de Motorola, cuando se utiliza junto con
una batería IMPRES de Motorola, permite determinar el momento adecuado para
el reacondicionamiento de la batería.
NOTA:
Cualquier exceso en el uso de esta función puede reducir la vida
global de la batería.
37D22-B_Impres_MUC_ES.fm Page 14 Wednesday, July 12, 2006 2:06 PM

Español
15
Cuando se ha insertado correctamente una batería IMPRES en el cargador, éste
determina si es necesario realizar el reacondicionamiento de la batería. Si la
batería necesita ser reacondicionada, el indicador del cargador automáticamente
se ilumina en
AMARILLO FIJO
. Este proceso puede tener una duración de 8 horas
o superior dependiendo del estado de la carga y la capacidad de la batería en el
momento de su inserción.
Para que este proceso resulte efectivo, es importante tener en cuenta que se
debe permitir que la batería termine el proceso de reacondicionamiento/
recarga. Deje la batería en el cargador hasta que el indicador se ilumine en
VERDE FIJO
.
Al terminar el ciclo de reacondicionamiento, el cargador recarga automáticamente
la batería.
Finalización manual del proceso de reacondicionamiento
El reacondicionamiento de una batería IMPRES de Motorola (indicador en
AMARILLO FIJO
) puede detenerse en cualquier momento extrayendo y
reinsertando la batería en un intervalo de 5 segundos. Esto hace que el cargador
termine el proceso de reacondicionamiento y comience el proceso de carga. El
indicador del cargador pasará a
ROJO FIJO
.
37D22-B_Impres_MUC_ES.fm Page 15 Wednesday, July 12, 2006 2:06 PM

Español
16
RESOLUCIÓN DE PROBLEMAS
El cargador adaptable IMPRES incluye las funciones de:
• una fuente de alimentación con entrada universal
(100 V CA - 240 V CA, 50/60 Hz)
• un cargador rápido de CC,
• un cargador de acondicionamiento de corriente alterna (impulso negativo)
• una unidad de reacondicionamiento.
La combinación de las características enumeradas es única en un cargador de
sobremesa. Por lo tanto, se desaconseja el funcionamiento de la radio con una
batería conectada mientras se encuentre en el cargador.
Si es así, el rendimiento de la radio puede verse reducido a la vez que aumenta el
tiempo de carga de la batería.
Al aproximarse al final del ciclo de carga rápida (indicador en
ROJO FIJO
), el
voltaje de la batería supera el voltaje de funcionamiento normal de la radio. El
voltaje vuelve a un nivel normal siguiendo el modo de carga rápida o cuando se
extrae la batería del cargador.
Si se enciende la radio mientras el cargador está en modo de carga rápida, la radio
no estará operativa de forma temporal. Esta situación puede desaparecer retirando
la radio del cargador y apagándola y encendiéndola de nuevo.
Durante el proceso de reacondicionamiento, la batería se descargará por
completo. Como resultado, es posible que la radio no funcione durante el modo de
reacondicionamiento.
Durante la resolución de problemas, observe siempre el indicador del cargador.
Consulte la tabla 9.
37D22-B_Impres_MUC_ES.fm Page 16 Wednesday, July 12, 2006 2:06 PM

Español
17
SERVICIO TÉCNICO
Sólo un técnico de servicio cualificado autorizado por Motorola, podrá reparar el
cargador múltiple adaptable IMPRES. Cualquier violación de estas instrucciones
anulará la garantía.
Tabla 10. Resolución de problemas
Problema Significado... Acción...
Sin indicación
en el cargador
• No hay contacto en el
cargador.
• Cargador sin alimentación.
• Compruebe que la radio con la
batería, o la propia batería, están
insertadas correctamente.
• Asegúrese de que el cable de
alimentación está bien conectado
al cargador y a la toma de CA
adecuada, así como de que la
toma tenga energía.
• Cambie el fusible.
Indicador en
Rojo
intermitente
• No hay contacto en el
cargador.
• La batería no es recargable.
• Retire la batería del cargador y
vuélvala a insertar en el cargador.
• Compruebe que la batería es una
batería autorizada de Motorola
enumerada en las tablas 1 a 6. Es
posible que otras baterías distintas
a las especificadas no se carguen.
• Desconecte la alimentación del
cargador de baterías y, con ayuda
de un paño limpio y seco, limpie los
contactos dorados metálicos de
carga de la batería y el cargador.
• Sustituya la batería.
Indicador en
Amarillo
intermitente
• La batería está esperando
para cargar. La temperatura
de la batería puede estar
por debajo de 5°C (41°F) o
por encima de 40°C
(104°F), o bien el voltaje de
la batería puede ser inferior
al nivel de umbral
especificado para la carga
rápida.
• Una vez solucionada esta
situación, la batería comenzará la
carga.
37D22-B_Impres_MUC_ES.fm Page 17 Wednesday, July 12, 2006 2:06 PM

Español
18
CARGADORES CON MÓDULO DE PANTALLA (CDM)
El cargador múltiple adaptable IMPRES puede reforzarse añadiendo un módulo de
pantalla para cargadores (CDM) de Motorola con el número de referencia
RLN5382.
Información general de la pantalla
El cargador múltiple adaptable IMPRES con CDM ofrece valiosa
información al tiempo que facilita el cuidado y mantenimiento de las
baterías. La información que muestra el cargador y los indicadores
correspondientes (LED) se detallan en las tablas siguientes.
Inicio
Non-IMPRES
Battery in the Pocket (Sin baterías IMPRES en el receptáculo)
IMPRES
Battery in the Pocket (Baterías IMPRES en los receptáculos)
Upon Charger Power-up
(Encendido del cargador)
LED SINGLE FLASH GREEN (VERDE INTERMITENTE
SENCILLO)
Línea 1 IMPRES
Línea 2
If There is No Battery in the Pocket
(Sin baterías en los receptáculos)
LED OFF (APAGADO)
Línea 1 NO BATTERY (SIN BATERÍA)
Línea 2
Reading Battery Data
(Lectura de datos de las baterías)
LED Any Defined Indication (Cualquier luz definida)
Línea 1 READING (LEYENDO)
Línea 2 BATTERY DATA (DATOS DE LAS BATERÍAS)
LED Defined by Charge State (Definido por el estado de carga)
Línea 1 NON-IMPRES (DISTINTA DE IMPRES)
Línea 2 BATTERY (BATERÍA)
I
MPRES
and Software Versions are Displayed (
IMPRES y versiones de
software son mostradas)
LED Defined by Charge State (Definido por el estado de carga)
Línea 1 IMPRES
Línea 2 SW xx.yy; aa.bb
NOTA:
xx.yy hace referencia a la version del software y aa.bb, a la
version del software del CDM.
37D22-B_Impres_MUC_ES.fm Page 18 Wednesday, July 12, 2006 2:06 PM

Español
19
IMPRES
Battery Kit # and Chemistry are Displayed
(N.º de kit de baterías
IMPRES y composición química)
LED Defined by Charge State (Definido por el estado de carga)
Línea 1 KIT# -------- (KIT N.º -------)
Línea 2 -----CHEMISTRY (COMPOSICIÓN QUÍMICA)
Forecasted # of Cycles Prior to Automatic Recondition
(Número de ciclos
previsto antes del reacondicionamiento automático)
LED Defined by Charge State (Definido por el estado de carga)
Línea 1 ----CYCLES (CICLOS)
Línea 2 TO RECONDITION (PARA REACONDICIONAR)
* Displayed only when the number of cycles to recondition is less than 6.
(Aparece sólo cuando el número de ciclos que quedan para proceder al rea-
condicionamiento es menor de seis.)
Charger Waiting to Charge, Battery is Hot
(Cargador en espera para comenzar
la carga, la batería está caliente)
LED Flashing ORANGE (NARANJA intermitente)
Línea 1 WAITING TO CHG (EN ESPERA PARA COMENZAR LA
CARGA)
Línea 2 HOT BATTERY (BATERÍA CALIENTE)
Charger Waiting to Charge, Battery is Cold
(Cargador en espera para
comenzar la carga, la batería está fría)
LED Flashing ORANGE (NARANJA intermitente)
Línea 1 WAITING TO CHG (EN ESPERA PARA COMENZAR LA
CARGA)
Línea 2 COLD BATTERY(BATERÍA FRÍA)
Charger Waiting to Charge, Low Voltage
(Cargador en espera para comenzar la
carga, voltaje bajo)
LED Flashing ORANGE (NARANJA intermitente)
Línea 1 WAITING TO CHG (EN ESPERA PARA COMENZAR LA
CARGA)
Línea 2 LOW VOLTAGE (VOLTAJE BAJO)
NOTA
No se mostrarán todas las pantallas mencionadas
anteriormente. Por ejemplo, las pantallas de En espera para
comenzar la carga (batería caliente, fría, voltaje bajo)
aparecerán exclusivamente si la situación lo merece.
37D22-B_Impres_MUC_ES.fm Page 19 Wednesday, July 12, 2006 2:06 PM

Español
20
Charger is in Trickle Charge Mode
(Cargador en el modo de carga lenta)
LED Flashing GREEN (VERDE intermitente)
Línea 1 TRICKLE CHARGE (CARGA LENTA)
Línea 2
Charge is Complete
(Se ha completado la carga)
LED Steady GREEN or Flashing RED / GREEN (VERDE fija o
ROJA / VERDE intermitente)
Línea 1 CHARGE COMPLETE (CARGA COMPLETADA)
Línea 2
Charger is in Discharge/Reconditioning Mode
(El cargador está en el modo de
descarga / reacondicionamiento)
LED Steady ORANGE (NARANJA fija)
Línea 1 DISCHARGE (DESCARGA)
Línea 2
Charger is Calibrating an IMPRES Battery
(Calibración de baterías IMPRES)
LED Steady ORANGE, Steady RED, & Flashing ORANGE or
GREEN (NARANJA fija, ROJA fija y NARANJA o VERDE
intermitentes)
Línea 1 Calibrating (Calibrando)
Línea 2 Battery (Batería)
LED Steady GREEN (VERDE fija)
Línea 1 Battery (Batería)
Línea 2 Calibrated (Calibrada)
* Todas las baterías IMPRES deben calibrarse antes de utilizarlas por prim-
era vez. Los cargadores IMPRES comenzarán la calibración automática-
mente con todas las baterías nuevas.
Battery Capacity Data is Displayed as “%” in mAH, and Voltage
(Datos de
la capacidad de la batería en “%” en mAH y voltaje)
LED Defined by Charge State (Definido por el estado de carga)
Línea 1 ----% RATED CAP. (% de capacidad nominal)
Línea 2 ----mAH --.-V
37D22-B_Impres_MUC_ES.fm Page 20 Wednesday, July 12, 2006 2:06 PM

Español
21
NOTA:
(1) El tiempo estimado para completer la carga incluye la
carga rápida así como los ciclos de carga (si es aplicable).
(2) La información sobre la capacidad de la batería no
aparecerá en aquellas baterías que no se hayan calibrado.
(3) El uso de baterías IMPRES con cargadores distintos de
IMPRES pueden afectar a la capacidad y la precisión del
tiempo de carga.
Estimated Time to Rapid Charge
Complete Displayed in Hours, Minutes for NiCd & NiMH IMPRES
Batteries Only
(Tiempo de carga rápida estimado Aparecerán las horas
y minutos totales para NiCd y NiMH IMPRES Sólo baterías)
LED Defined by Charge State (Definido por el estado de carga)
Línea 1 RAPID CHG ENDS (FIN DE CARGA RÁPIDA)
Línea 2 IN xx HRS, yy MIN (EN xx h, yy min)
37D22-B_Impres_MUC_ES.fm Page 21 Wednesday, July 12, 2006 2:06 PM

Español
22
Esquemas de secuencia para las baterías IMPRESS
Nota: Estas esquemas son las secuencias mostradas anteriormente en “InformaciÓn
general de pantalla” y solo están dispenibles en inglés
Secuencia de las baterías NiCd y NiMH IMPRES
LED Defined by Charge State
Línea 1 KIT# xxxxxxxx
Línea 2 SN: yyyyyyyyyyyy
LED Defined by Charge State
Línea 1 KIT# xxxxxxxx
Línea 2 yyyyy CHEMISTRY
LED Defined by Charge State
Línea 1 xxxx CYCLES
Línea 2 TO RECONDITION
LED Steady RED
Línea 1 RAPID CHARGE
Línea 2
LED Defined by Charge State
Línea 1 xx% RATED CAP.
Línea 2 yyyyy mAH zz.z V
LED Defined by Charge State
Línea 1 RAPID CHG ENDS
Línea 2 IN xx HRS, yy MIN
Inicio
(4,0 seg)
(2.0 seg)
(2.0 seg)
(2.0 seg)
(7.0 seg)
(4.0 seg)
Cada
73,0 seg
Cada
13,0 seg
5X
65,0
seg
37D22-B_Impres_MUC_ES.fm Page 22 Wednesday, July 12, 2006 2:06 PM

Español
23
Antes de la calibración:
LED Defined by Charge State
Línea 1 KIT# xxxxxxxx
Línea 2 SN: yyyyyyyyyyyy
LED Defined by Charge State
Línea 1 KIT# xxxxxxxx
Línea 2 yyyyy CHEMISTRY
LED Steady ORANGE
Línea 1 DISCHARGE
Línea 2
LED Defined by Charge State
Línea 1 CALIBRATING
Línea 2 BATTERY
LED Defined by Charge State
Línea 1 RAPID CHG ENDS
Línea 2 IN xx HRS, yy MIN
Cada
71,0 seg
Inicio
(4,0 s)
(2,0 s)
(2,0 s)
(7,0 s)
(4,0 s)
Cada
13,0 s
5X
65,0
s
37D22-B_Impres_MUC_ES.fm Page 23 Wednesday, July 12, 2006 2:06 PM

Español
24
Después de la calibración:
LED Defined by Charge State
Línea 1 KIT# xxxxxxxx
Línea 2 SN: yyyyyyyyyyyy
LED Defined by Charge State
Línea 1 KIT# xxxxxxxx
Línea 2 yyyyy CHEMISTRY
LED Steady GREEN
Línea 1 CHARGE COMPLETE
Línea 2
LED Defined by Charge State
Línea 1 BATTERY
Línea 2 CALIBRATED
LED Defined by Charge State
Línea 1 xx% RATED CAP.
Línea 2 yyyy mAH zz.z V
Start
(4,0 s)
(2,0 s)
(2,0 s)
(2,0 s)
(7,0 s)
Cada
61,0s
Cada
11 s
5X
55,0
s
37D22-B_Impres_MUC_ES.fm Page 24 Wednesday, July 12, 2006 2:06 PM

Español
25
Secuencia de la pantalla con baterías Li-Ion IMPRES
LED Defined by Charge State
Línea 1 KIT# xxxxxxxx
Línea 2 SN: yyyyyyyyyyyy
LED Defined by Charge State
Línea 1 KIT# xxxxxxxx
Línea 2 yyyyy CHEMISTRY
LED Defined by Charge State
Línea 1 xxxx CYCLES
Línea 2 TO RECONDITION
LED Steady RED
Línea 1 RAPID CHARGE
Línea 2
LED Defined by Charge State
Línea 1 xx% RATED CAP.
Línea 2 yyyyy mAH zz.z V
Inicio
(4,0 s)
(2,0 s)
(2,0 s)
(2,0 s)
(7,0 s)
Cada
53,0 s
Cada
9,0 s
5X
45,0
s
37D22-B_Impres_MUC_ES.fm Page 25 Wednesday, July 12, 2006 2:06 PM

Español
26
Antes de la calibración:
LED Defined by Charge State
Línea 1 KIT# xxxxxxxx
Línea 2 SN: yyyyyyyyyyyy
LED Defined by Charge State
Línea 1 KIT# xxxxxxxx
Línea 2 yyyyy CHEMISTRY
LED Steady ORANGE
Línea 1 DISCHARGE
Línea 2
LED Defined by Charge State
Línea 1 CALIBRATING
Línea 2 BATTERY
Inicio
(4,0 s)
(2,0 s)
(2,0 s)
(7,0 s)
Cada
51,0 s
Cada
9,0 s
5X
45,0
s
37D22-B_Impres_MUC_ES.fm Page 26 Wednesday, July 12, 2006 2:06 PM

Español
27
Después de la calibración:
LED Defined by Charge State
Línea 1 KIT# xxxxxxxx
Línea 2 SN: yyyyyyyyyyyy
LED Defined by Charge State
Línea 1 KIT# xxxxxxxx
Línea 2 yyyyy CHEMISTRY
LED Steady GREEN
Línea 1 CHARGE COMPLETE
Línea 2
LED Defined by Charge State
Línea 1 BATTERY
Línea 2 CALIBRATED
LED Defined by Charge State
Línea 1 xx% RATED CAP.
Línea 2 yyyy mAH zz.z V
Inicio
(4,0 s)
(2,0 s)
(2,0 s)
(2,0 s)
(7,0 s)
Cada
61,0s
Cada
11 s
5X
55,0
s
37D22-B_Impres_MUC_ES.fm Page 27 Wednesday, July 12, 2006 2:06 PM

Español
28
Orientación del texto en la pantalla
Para permitir el montaje mural o de sobremesa del cargador múltiple
adaptable IMPRES, el CDM está equipado para «girar» 180 grados el
texto de la pantalla.
Si desea hacerlo, introduzca un clip grande en el agujero que se
encuentra en la parte inferior de la pantalla, perpendicular a la
sobremesa. El sonido de un «clic» indicará que se ha accionado el
botón alterno y, por tanto, el texto se ha girado 180 grados.
Funcionamiento del cargador múltiple adaptable IMPRES
Si desea obtener más información sobre la utilización de MUC y CDM,
consulte la Guía de mantenimiento del cargador 6880309L66.
Mantenimiento
Si desea información sobre el mantenimiento, póngase en contacto
con el departamento siguiente. Póngase en contacto y confirme su
regreso antes de enviar la unidad al departamento de mantenimiento.
Centro de mantenimiento de Motorola
Motorola GmbH
Customer Care
Am Borsigturm 130
13507 Berlin
Germany.
Tel: +49 30 6686 1555
37D22-B_Impres_MUC_ES.fm Page 28 Wednesday, July 12, 2006 2:06 PM

Português
1
ÍNDICE
Instruções importantes de segurança . . . . . . . . . . . . . . . . . . . . . . . . . 2
Directrizes para uma utilização segura . . . . . . . . . . . . . . . . . . . . . . . . 3
Descrição dos recursos e vantagens do IMPRES . . . . . . . . . . . . . . . . 4
Características/diferenças do funcionamento . . . . . . . . . . . . . . . . . . . 5
Listas de Baterias . . . . . . . . . . . . . . . . . . . . . . . . . . . . . . . . . . . . . . . . 6
Fontes de energia e adaptadores de corrente autorizados da
Motorola. . . . . . . . . . . . . . . . . . . . . . . . . . . . . . . . . . . . . . . . . . . . . . . . 9
Instruções de utilização . . . . . . . . . . . . . . . . . . . . . . . . . . . . . . . . . . . 10
Carregamento da bateria. . . . . . . . . . . . . . . . . . . . . . . . . . . . . . . . 12
Reparação manual da bateria . . . . . . . . . . . . . . . . . . . . . . . . . . . . 13
Reparação automática da bateria . . . . . . . . . . . . . . . . . . . . . . . . . 13
Interrupção manual do processo de reparação. . . . . . . . . . . . . . . 14
Detecção e resolução de problemas . . . . . . . . . . . . . . . . . . . . . . . . . 15
Manutenção . . . . . . . . . . . . . . . . . . . . . . . . . . . . . . . . . . . . . . . . . . . . 16
Carregadores com Módulo de Visor (CDM). . . . . . . . . . . . . . . . . . . . 17
Este manual é aplicável aos carregadores Multi-Unidades Universais IMPRES:
WPLN4108, WPLN4109, WPLN4110, WPLN4118, WPLN4119, WPLN4120, WPLN4121,
WPLN4123, WPLN4130, WPLN4131, WPLN4132, WPLN4133, WPLN4134,
WPLN4135, WPLN4136
Adicionalmente, este manual inclui os seguintes carregadores Multi-Unidades
Universais IMPRES, disponíveis para rádios GP Série Profissional:
WPLN4144, WPLN4145, WPLN4146, WPLN4187, WPLN4188, WPLN4189,
WPLN4190, WPLN4191, WPLN4192, WPLN4193, WPLN4194, WPLN4195,
WPLN4196, WPLN4204, WPLN4205
“Universal” indica que o carregador suporta vários modelos de rádio e, através da
utilização de adaptadores de bateria, todas as baterias listadas nasTabelas de 1 a 6
inclusive.
37D22-B_Impres_MUC_PR.fm Page 1 Wednesday, July 12, 2006 2:45 PM

Português
2
INSTRUÇÕES IMPORTANTES DE SEGURANÇA
GUARDE ESTAS INSTRUÇÕES
Este documento contém instruções importantes de segurança e de utilização. Leia
atentamente estas instruções e guarde-as para futura referência.
Antes de utilizar o carregador de baterias, leia todas as instruções e indicações de
aviso existentes (1) no carregador, (2) na bateria (3) e no rádio no qual a bateria é
utilizada.
.
1. Para reduzir o risco de ferimentos, carregue apenas as
baterias recarregáveis autorizadas pela Motorola indicadas nas
Tabelas 1 a 5. Outras baterias poderão explodir e causar
ferimentos pessoais ou danos.
2. O uso de acessórios não recomendados pela Motorola poderá resultar em
risco de incêndio, choque eléctrico ou ferimentos.
3. Para reduzir o risco de danos na ficha e cabos eléctricos, puxe pela ficha e
não pelo cabo para desligar o carregador.
4. Não deve utilizar uma extensão, a menos que seja absolutamente
necessária. O uso de uma extensão inadequada poderá resultar em risco
de incêndio e choque eléctrico. Se tiver que utilizar uma extensão,
certifique-se de que se trata de um cabo 18AWG para comprimentos até
30,48 m e 16AWG para comprimentos até 45,72 m.
5. Para reduzir o risco de incêndio, choque eléctrico ou ferimentos, não utilize o
carregador se estiver partido ou de alguma forma danificado. Leve-o a um
agente técnico qualificado Motorola.
6. Este carregador pode ser reparado.
Cada cavidade é alimentada por uma
única placa de circuito impresso e fonte de alimentação. A PCB/fonte de
alimentação pode ser adquirida no estabelecimento de venda de peças e
acessórios. A referência para a PCB é RLN5325. Não existem quaisquer
outras peças componentes sobressalentes. É também possível
encomendar um manual de assistência, no qual se descreve o processo de
substituição, no estabelecimento de venda de peças de acessórios. A
referência do Manual de Assistência é 6880309L66.
7. Para reduzir o risco de choque eléctrico, retire a ficha do carregador da
tomada CA antes de encetar qualquer procedimento de manutenção ou
limpeza.
!
AVISO
37D22-B_Impres_MUC_PR.fm Page 2 Wednesday, July 12, 2006 2:45 PM

Português
3
DIRECTRIZES PARA UMA UTILIZAÇÃO SEGURA
• Desligue o rádio para carregar a bateria.
• Este equipamento não é adequado para a utilização no exterior. Utilize-o apenas
em locais/condições isentas de humidade.
• Ligue o equipamento apenas a uma tomada devidamente ligada e equipada com
fusível e de tensão correcta (tal como especificado no produto).
• Desligue da tensão de linha, removendo a ficha principal da tomada.
• A tomada, à qual é ligado este equipamento, deve situar-se próxima do mesmo e
ser facilmente acessível.
• Para equipamentos que utilizem fusíveis, as substituições devem ser
compatíveis com o tipo e valor nominal especificados nas instruções do
equipamento.
• A temperatura ambiente máxima à volta do carregador não deve exceder os
40°C.
• Certifique-se de que o cabo se encontra posicionado de forma a que não seja
pisado, trilhado ou fique sujeito a água, danos ou esforço.
• Esta unidade utiliza a mesma unidade de montagem na parede que o carregador
múltiplo NTN4796. A referência da unidade de montagem de parede é NLN7967.
• Para a substituição do fusível, utilize somente fusíveis do mesmo tipo e valor
nominal que os indicados na etiqueta do carregador. As peças a seguir indicadas
podem ser encomendadas no estabelecimento de venda de peças e acessórios
da sua área:
Fusível 6571489S01
Porta-fusível 0987626G01
Tampa 0987739G01
37D22-B_Impres_MUC_PR.fm Page 3 Wednesday, July 12, 2006 2:45 PM

Português
4
DESCRIÇÃO DOS RECURSOS E VANTAGENS DO IMPRES
A solução de energia IMPRES é um sistema de energia avançado, desenvolvido
pela Motorola, que comporta baterias com três tipos de composições químicas.
Este é composto por: (a) baterias IMPRES, (b) o carregador auto adaptável
múltiplo IMPRES e (c) hardware/software de rádio que permite a comunicação de
outros rádios compatíveis com as baterias IMPRES
(não aplicável a rádios GP
Série Profissional).
Quando o carregador auto adaptável múltiplo IMPRES é usado com as baterias
Motorola IMPRES:
• Maximiza o tempo de utilização entre ciclos de carga, eliminando
automaticamente o efeito de memória.
• Maximiza a vida útil da bateria, reduzindo significativamente o calor durante os
ciclos de carga lenta e pós carga.
• Elimina a necessidade de adquirir equipamento de reparação e de formar
pessoal para "gerir tarefas de manutenção da bateria".
Com esta abordagem exclusiva do sistema patenteado, não é necessário controlar
e registar a utilização da bateria, efectuar ciclos de reparação manuais ou remover
as baterias dos carregadores após o carregamento.
O carregador auto adaptável múltiplo IMPRES controla o padrão de utilização da
bateria IMPRES, guarda as informações na bateria IMPRES e efectua um ciclo de
reparação apenas quando necessário.
O carregador auto adaptável múltiplo IMPRES não sobreaquecerá a bateria,
independentemente do tempo que a mesma permanecer colocada no mesmo.
Este controla e carrega a bateria, conforme necessário.
O carregador auto adaptável múltiplo IMPRES simplifica o processo de
carregamento e os cuidados a ter com a bateria -
basta que o utilizador siga
estes simples passos:
1. Coloque o rádio/bateria no carregador
2. Retire o rádio/bateria assim que estiver totalmente carregada!
A Motorola é o único fabricante que oferece um carregador de reparação que
permite aos utilizadores escolher entre carregar o rádio juntamente com a bateria
ou apenas a bateria.
37D22-B_Impres_MUC_PR.fm Page 4 Wednesday, July 12, 2006 2:45 PM

Português
5
CARACTERÍSTICAS/DIFERENÇAS DO FUNCIONAMENTO:
1. As baterias IMPRES podem ser carregadas em carregadores convencionais.
No entanto, para activar os recursos Smart Energy, todas as baterias IMPRES
devem ser carregadas num carregador auto adaptável múltiplo IMPRES. Ao
carregar pela primeira vez uma bateria IMPRES num carregador auto
adaptável múltiplo IMPRES, o indicador de carga apresenta a cor
AMARELA
CONSTANTE
. Deve permitir-se que este primeiro carregamento seja
concluído, passando a
VERDE CONSTANTE
no indicador de carga. Este
procedimento calibra devidamente a bateria IMPRES e activa os recursos
Smart Energy. Se este processo for interrompido, o carregador calibrará a
bateria no carregamento seguinte.
2. Uma vez que o carregador auto adaptável múltiplo IMPRES determina
automaticamente as condições necessárias para reparar as baterias IMPRES,
poderá entrar em modo de reparação assim que for colocado um rádio ou uma
bateria. Este modo é indicado pela cor
AMARELA CONSTANTE
no indicador
de carga. O modo de reparação pode ser anulado, se necessário, removendo
e voltando a inserir o rádio ou a bateria. (Consulte as instruções mais adiante
neste manual.)
3. O carregador auto adaptável múltiplo IMPRES é concebido para carregar
qualquer bateria indicada nas Tabelas 1 a 6. No entanto, apenas as baterias
IMPRES genuínas incorporam os recursos Smart Energy. (À medida que forem
sendo lançados novos modelos de rádios ou baterias, esta lista será
actualizada e distribuída aos clientes através das várias organizações
mundiais de fabricantes de equipamento original e de pós-venda).
4. O carregador auto adaptável múltiplo IMPRES deve ser utilizado para calibrar
as baterias IMPRES Smart para que registem, guardem e apresentem os
dados de utilização da bateria IMPRES correctos.
5. Se uma bateria IMPRES for utilizada com um rádio com visor (por exemplo, o
XTS5000), o rádio pode exibir um símbolo de indicação do estado de carga da
bateria. Este símbolo é accionado após uma bateria IMPRES ter sido calibrada
num carregador IMPRES. O símbolo do estado do carregador continuará no
visor enquanto o utilizador continuar a utilizar carregadores IMPRES para
carregar as baterias. No entanto, se uma bateria IMPRES for carregada num
carregador de terceiros por um período de 7 dias (ou mais), o símbolo
desaparecerá. Para voltar a accionar o símbolo, insira uma bateria IMPRES
num carregador IMPRES e deixe que termine o processo de carregamento
(que resultará numa indicação
VERDE CONSTANTE
). O símbolo do estado de
carga será então exibido no rádio. Se o símbolo não aparecer após uma carga
completa, coloque uma bateria parcialmente descarregada (pelo menos 70%
descarregada) no carregador, inicie um recondicionamento e permita que
complete o processo de carregamento. O símbolo aparecerá então no visor do
rádio (não aplicável a rádios GP Série Profissional).
6. O Carregador Multi-Unidades Adaptável IMPRES só pode ser reparado por um
técnico de assistência qualificado, autorizado pela Motorola CGISS. Qualquer
violação destas directrizes pode anular a garantia da unidade.
37D22-B_Impres_MUC_PR.fm Page 5 Wednesday, July 12, 2006 2:45 PM

Português
6
LISTAS DE BATERIAS
As tabelas seguintes possuem uma lista das baterias que podem ser utilizadas
com os rádios específicos, identificados nos cabeçalhos das tabelas.
* O carregador requer o adaptador de bateria Ref. RLN5212 para carregar baterias
MTP700.
Tabela 1. XTS3000 / XTS3500 / Rádios da Série Dimetra e Rádio Digital
XTS5000
Kit (Ref.) Composição
química
FM Smart Capacidade Novo Modelo
HNN9031 NiCD Não Sim Ultra-Alta Não
HNN9032 NiCD Sim Sim Ultra-Alta Não
NTN8294 NiCD Não Não Ultra-Alta Não
NTN8295 NiCD Sim Não Ultra-Alta Não
NTN8297 NiCD Sim Não Ultra-Alta Não
NTN8299 NiCD Sim Não Ultra-Alta Não
NTN8610 Ião de lítio Não Não Alta Não
NTN8293 NiMH Não Não Ultra-Alta Não
NNTN4435 NiMH Não Sim Ultra-Alta Não
NNTN4436 NiMH Sim Sim Ultra-Alta Não
NNTN4437 NiMH Sim Sim Ultra-Alta Não
RNN4006 NiMH Não Não Muito Alta Novo
RNN4007 NIMH Sim Não Muito Alta Novo
NTN9862 Ião de lítio Não Sim Ultra-Alta Novo
Tabela 2. Rádios Digitais XTS2500
Kit (Ref.) Composição
química
FM Smart Capacidade Novo Modelo
NTN9859 NiMH Não Não Ultra-Alta Novo
NTN9857 NiMH Sim Não Ultra-Alta Novo
NTN9815 NiCD Não Não Alta Novo
NTN9816 NiCD Sim Não Alta Novo
Tabela 3. Rádios Digitais MTP700
Kit (Ref.) Composição
química
FM Smart Capacidade Novo Modelo
PMNN4048* NiMH Não Sim Alta Novo
PMNN4049* NiMH Sim Sim Alta Novo
PMNN4050* Lilon Não Sim Alta Novo
PMNN4047* Ião de lítio Não Sim Alta Novo
37D22-B_Impres_MUC_PR.fm Page 6 Wednesday, July 12, 2006 2:45 PM

Português
7
** O carregador requer o adaptador de bateria Ref. 4385922B01 para carregar
baterias Astro Saber.
Tabela 4. Rádios das Séries HT1000 / MT2000 / MTS2000 / MTX8000 e
MTX9000
Kit (Ref.) Composição
química
FM Smart Capacidade Novo
Modelo
HNN9028 NiCD Não Sim Ultra-Alta Não
HNN9029 NiCD Sim Sim Ultra-Alta Não
NTN7143 NiCD Não Não Alta Não
NTN7144 NiCD Não Não Ultra-Alta Não
NTN7146 NiCD Sim Não Alta Não
NTN7147 NiCD Sim Não Ultra-Alta Não
NTN7148 NiCD CENELEC Não Alta Não
NTN7149 NiCD CSA Não Alta Não
NTN7150 NiCD MSHA Não Alta Não
NTN7341 NiCD Sim Não Ultra-Alta Não
NTN7372 NiCD Sim Não Alta Não
WPPN4013 NiMH Não Não Ultra-Alta Não
WPPN4037 NiMH Sim Não Ultra-Alta Não
RNN4008 NiCD ATEX Não Alta Não
Tabela 5. Rádios Saber / Astro Saber/SSE5000/MX1000
Kit (Ref.) Composição
química
FM Smart Capacidade Novo Modelo
HNN9033 NiCD Não Sim Ultra-Alta Não
HNN9031 NiCD Sim Sim Ultra-Alta Não
NTN4537** NiCD Sim Não Baixa Não
NTN4538 NiCD Sim Não Alta Não
NTN4592** NiCD Não Não Baixa Não
NTN4593 NiCD Não Não Alta Não
NTN4595 NiCD Não Não Ultra-Alta Não
NTN4596 NiCD Sim Não Ultra-Alta Não
NTN4657 NiCD Não Não Alta Não
NTN4671 NiCD CENELEC Não Alta Não
NTN4992 NiCD Sim Não Ultra-Alta Não
NTN7014** NiMH Não Não Alta Não
NTN7058 NiCD Sim Não Ultra-Alta Não
NTN7426 NiCD Sim Não Baixa Não
NTN8251 NiMH Sim Não Ultra-Alta Não
NTN8818** Ião de lítio Não Não Alta Não
37D22-B_Impres_MUC_PR.fm Page 7 Wednesday, July 12, 2006 2:45 PM

Português
8
O Carregador Universal precisa do adaptador de bateria com a referência RLN5648.
Tabela 6. Rádios GP Série Profissional
Kit (Ref.) Composição
química
FM Smart Capacidade Novo
Modelo
HNN9003 NiMH
AA Bluetooth
Não Não Alta Não
HNN9008 NiMH Não Não Alta Não
HNN9009 NiMH Não Não Ultra-Alta Não
HNN9010 NiMH Sim Não Ultra-Alta Não
HNN9011 NiCD Sim Não Alta Não
HNN9012 NiCD Não Não Alta Não
HNN9013 Ião de lítio Não Não Alta Não
WPNN4045 NiMH Não Não Alta Não
PMNN4045 NiMH Não Não Alta Não
HNN4001 Impres NiMH Não Sim Ultra-Alta Sim
HNN4002 Impres NiMH Sim Sim Ultra-Alta Sim
HNN4003 Impres Ião de lítio Não Sim Ultra-Alta Sim
NOTA:
Os adaptadores podem ser adquiridos num representante do
grupo de vendas de rádios ou de peças e acessórios.
37D22-B_Impres_MUC_PR.fm Page 8 Wednesday, July 12, 2006 2:45 PM

Português
9
FONTES DE ENERGIA E ADAPTADORES DE CORRENTE
AUTORIZADOS DA MOTOROLA
Este carregador foi concebido para ser utilizado em aplicações de 100 V ca a 240
V ca, 50/60 Hz, e utiliza os seguintes cabos de alimentação Motorola da Tabela 7.
Os cabos de alimentação utilizados com o carregador para rádios GP Série
Profissional estão listados na Tabela 8:
Tabela 7. Cabos de Alimentação Motorola, Modelo Universal
Tipo de ficha Kit de carregador Kit de carregador
(Modelo de Visor)
Cabo de
alimentação
Cabo de alimentação/
ficha inexistentes
WPLN4121 WPLN4127 n/d
EUA/América do Norte WPLN4108 WPLN4130 3087791G01
Europa WPLN4109 WPLN4131 3087791G04
Reino Unido WPLN4110 WPLN4132 3087791G07
Austrália/Nova Zelândia WPLN4118 WPLN4133 3087791G10
Argentina WPLN4119 WPLN4134 3087791G13
EUA/América do Norte WPLN4120 WPLN4135 3087791G01
Coreia WPLN4123 WPLN4136 3087791G16
Tabela 8. Cabos de Alimentação Motorola, GP Série Profissional
Tipo de ficha Kit de carregador Kit de carregador
(Modelo de Visor)
Cabo de
alimentação
Cabo de alimentação/
ficha inexistentes
WPLN4197 WPLN4198 n/d
EUA/América do Norte WPLN4187 WPLN4192 3087791G01
Europa WPLN4189 WPLN4194 3087791G04
Reino Unido WPLN4188 WPLN4193 3087791G07
Austrália/Nova Zelândia WPLN4190 WPLN4195 3087791G10
Argentina WPLN4191 WPLN4196 3087791G13
EUA/América do Norte WPLN4205 WPLN4204 3087791G01
Coreia WPLN4146 WPLN4145 3087791G16
37D22-B_Impres_MUC_PR.fm Page 9 Wednesday, July 12, 2006 2:45 PM

Português
10
INSTRUÇÕES DE UTILIZAÇÃO
A cavidade do carregador acondiciona um rádio com a bateria ou unicamente a
bateria. Desligue o rádio, antes de o pôr a carregar com a bateria. As baterias
carregam melhor à temperatura ambiente.
1. Ligue a parte do cabo de alimentação que liga ao carregador à tomada CA
localizada na parte de trás do carregador.
2. Ligue a parte do cabo de alimentação que liga à tomada de parede à devida
tomada CA. Uma sequência de activação bem sucedida é indicada pela cor
VERDE INTERMITENTE
no indicador de carga.
3. Insira uma bateria ou um rádio com uma bateria (rádio desligado) na
cavidade do carregador:
a. alinhando as ranhuras dos lados da bateria com as respectivas guias, em
cada um dos lados da cavidade do carregador;
b. empurrando a bateria para a parte posterior da cavidade;
c. fazendo deslizar a bateria para a cavidade do carregador, assegurando um
contacto total entre o carregador e os contactos da bateria.
Assim que a bateria estiver devidamente encaixada na cavidade, o indicador de
carga acende-se, indicando que o carregador detectou a presença da bateria.
Consulte os indicadores de carga na Tabela 9.
NOTAS
O carregador auto adaptável múltiplo IMPRES carrega
unicamente as baterias autorizadas Motorola, indicadas nas
Tabelas 1 a 6. Outras baterias poderão não carregar.
O carregador auto adaptável múltiplo IMPRES possui recursos e
capacidades automáticas que os tornam distintos de outros
carregadores de bateria. Tenha em atenção o indicador de carga
para se certificar de que o carregador se encontra no modo
pretendido.
37D22-B_Impres_MUC_PR.fm Page 10 Wednesday, July 12, 2006 2:45 PM

Português
11
Para poder usufruir de todos os recursos das baterias Motorola Smart e do sistema
de carregamento auto adaptável, o carregador deve iniciar os dados contidos nas
baterias Motorola Smart quando estas forem carregadas pela primeira vez. Este
processo é indicado pela cor
AMARELA CONSTANTE
no indicador de carga
(idêntica à que indica que a bateria está a ser reparada).
O processo é automático, inclui uma reparação inicial da bateria, sendo iniciado o
carregamento após a conclusão do processo que, todavia, requer tempo para
iniciar a bateria, pelo que esta deve permanecer no carregador de um dia para o
outro a primeira vez que for colocada.
Tabela 9. Indicadores de Carregamento
Indicador de carga Descrição
Verde Intermitente
A activação do carregador foi bem sucedida.
Vermelho Constante
A bateria encontra-se no modo de carregamento rápido.
Verde Intermitente
A bateria concluiu o carregamento rápido (>90% de
capacidade disponível). A bateria encontra-se em modo de
carregamento lento.
Verde Constante
A bateria completou o carregamento e está totalmente
carregada.
Amarelo Intermitente
A bateria é detectada pelo carregador e aguarda
carregamento. (A voltagem da bateria é demasiado baixa ou
a temperatura da bateria é demasiado baixa ou alta para
permitir o carregamento. Assim que esta condição for
corrigida, a bateria começará a ser carregada.)
Vermelho Intermitente
A bateria não carrega ou existe mau contacto.
Amarelo Constante
(Este recurso destina-se unicamente a baterias Smart)
A bateria está em modo de reparação. O período de tempo
que o carregador permanece neste modo depende do estado
de carga remanescente na bateria quando colocada no
mesmo. (As baterias totalmente carregadas requerem mais
tempo de reparação – 8 horas ou mais – do que baterias
totalmente descarregadas.)
Vermelho/Verde
Intermitente
(Este recurso destina-se unicamente a baterias Smart)
A bateria completou o carregamento e está totalmente
carregada. A bateria pode ainda ser usada, mas está a atingir
o fim da respectiva vida útil.
NOTA
O carregador auto adaptável múltiplo IMPRES é impar pela sua
capacidade de, quando utilizado com baterias Motorola IMPRES,
determinar automaticamente a necessidade de reparação da bateria.
37D22-B_Impres_MUC_PR.fm Page 11 Wednesday, July 12, 2006 2:45 PM

Português
12
O carregador auto adaptável múltiplo IMPRES funciona como:
• um Carregador com todas as baterias autorizadas da Motorola, e
• um Reparador com baterias IMPRES autorizadas da Motorola.
Carregamento das baterias
Para assegurar um óptimo desempenho, a Motorola recomenda que todas as
novas baterias permaneçam no carregador 14 a 16 horas antes da utilização
inicial.
1. Depois de uma bateria ou um rádio com bateria terem sido correctamente
colocados no carregador, este inicia o carregamento rápido da bateria,
condição que é indicada pela cor
VERMELHA CONSTANTE
no indicador de
carga. O período de tempo que o carregador permanecer neste estado
depende da carga remanescente na bateria.
2. A conclusão do carregamento rápido (>90% de capacidade disponível) é
indicada pela cor
VERDE INTERMITENTE
no indicador de carga, o que
significa que se encontra no modo de carregamento lento e que requer cerca
de 1 hora.
3. A conclusão do carregamento lento é indicada pela cor
VERDE CONSTANTE
no indicador de carga. Isto indica que a bateria se encontra totalmente
carregada.
4. Outras indicações que podem aparecer no indicador de carga durante o
carregamento são:
•
AMARELO INTERMITENTE
– indica que a temperatura ou a voltagem da
bateria se encontram fora do limite para o carregamento. O carregamento
é retomado assim que estas condições forem corrigidas.
•
VERMELHO E VERDE INTERMITENTE
– indicam que a bateria poderá
estar a atingir o fim da respectiva vida útil. Embora a bateria esteja
totalmente carregada, a respectiva capacidade foi reduzida pela utilização
e poderá não comportar convenientemente as aplicações mais intensas.
Este recurso só se encontra disponível quando utilizado com as baterias
Motorola IMPRES.
Esta não constitui uma indicação de falha, meramente uma notificação
IMPORTANTE:
A cavidade do carregador comporta vários formatos e tamanhos de
bateria, por isso, é importante assegurar a correcta colocação de um
rádio com uma bateria ou apenas da bateria. Caso contrário, o indicador
não acenderá, indicando que a bateria não está a ser carregada.
NOTA:
As novas baterias (nunca antes utilizadas) indicam prematuramente uma
carga completa em alguns casos (indicação
VERDE CONSTANTE
).
37D22-B_Impres_MUC_PR.fm Page 12 Wednesday, July 12, 2006 2:45 PM

Português
13
para o utilizador de que, em breve, a bateria poderá não ser capaz de
apresentar um desempenho conforme esperado e precisar de ser
substituída.
•
VERMELHO INTERMITENTE
– indica que não é possível carregar a
bateria. Este poderá ser o resultado de uma falta de contacto entre a
bateria e os contactos do carregador. O carregamento é retomado assim
que for corrigida a condição que originou esta indicação.
As baterias Motorola Smart possuem um dispositivo de memória interna que é lido
pelo carregador auto adaptável múltiplo IMPRES. Se uma bateria IMPRES for
carregada durante mais de 2 minutos e meio, o carregador auto adaptável múltiplo
IMPRES retém o número de série da bateria IMPRES. A bateria IMPRES pode ser
removida do carregador durante até 30 minutos. Ao ser novamente inserida no
carregador, retomará o processo de carregamento, a partir do ponto em que se
encontrava quando foi retirada.
Reparação manual das baterias
Passados 2 minutos e meio da colocação inicial de uma bateria IMPRES
(indicação
VERMELHO CONSTANTE
) no carregador, retire e volte a inserir a
bateria num intervalo de tempo de 5 segundos para forçar manualmente a
reparação. O indicador de carga passa de
VERMELHO CONSTANTE
a
AMARELO CONSTANTE.
Isto força a reparação pelo carregador e carrega
automaticamente a bateria.
Reparação automática das baterias
O carregador auto adaptável múltiplo IMPRES da Motorola, quando utilizado em
conjunto com a bateria Motorola IMPRES, possui a capacidade de determinar o
momento adequado para reparar a bateria.
Ao colocar devidamente uma bateria IMPRES no carregador, este determina se é
apropriado reparar a bateria. Se for necessário proceder à reparação, o carregador
apresenta automaticamente a cor
AMARELA CONSTANTE
. Este processo poderá
demorar até 8 horas ou mais a completar, dependendo do estado de carga e da
capacidade da bateria quando esta é colocada no carregador.
É importante salientar que, para este processo ser eficaz, deve permitir-se que a
bateria complete o processo de reparação/carregamento. Deixe a bateria no
carregador até o indicador passar a
VERDE CONSTANTE
.
Ao completar o ciclo de reparação, o carregador carrega automaticamente a bateria.
NOTA:
a utilização excessiva desta função pode reduzir a vida útil da bateria.
37D22-B_Impres_MUC_PR.fm Page 13 Wednesday, July 12, 2006 2:45 PM

Português
14
Interrupção manual do processo de reparação
A qualquer momento, durante o processo de reparação de uma bateria Motorola
IMPRES (indicação
AMARELO CONSTANTE
), poderá interromper-se a
reparação, removendo e voltando a colocar a bateria num intervalo de tempo de 5
segundos. Esta acção leva a que o carregador interrompa o processo de reparação
e inicie o processo de carregamento. O indicador de carga passa a
VERMELHO
CONSTANTE
.
37D22-B_Impres_MUC_PR.fm Page 14 Wednesday, July 12, 2006 2:45 PM

Português
15
DETECÇÃO E RESOLUÇÃO DE PROBLEMAS
O carregador auto adaptável múltiplo IMPRES incorpora os seguintes recursos:
• fonte de alimentação de entrada universal (100 V CA-240 V CA, 50/60 Hz);
• um carregador rápido de corrente contínua;
• carregador de reparação de corrente interrompida (pulso negativo);
• uma unidade de reparação.
A combinação dos recursos acima indicados é exclusiva de um carregador de
mesa. Portanto, não se recomenda a utilização de um rádio com uma bateria
enquanto estiver colocado no carregador.
A utilização do rádio, enquanto no carregador, poderá resultar num desempenho
de rádio minimamente reduzido e num tempo de carregamento de bateria
prolongado.
Para o fim do ciclo de carregamento rápido (indicação
VERMELHO CONSTANTE
),
a voltagem da bateria excede a voltagem de funcionamento normal do rádio. A
voltagem é restaurada para o nível normal, uma vez concluído o processo de
carregamento rápido ou assim que a bateria for removida do carregador.
Se o rádio for ligado estando o carregador no modo de carregamento rápido, o
rádio ficará temporariamente inoperacional. Esta condição pode ser corrigida,
removendo o rádio do carregador, desligando-o e voltando a ligá-lo.
Durante o processo de reparação, a bateria fica totalmente descarregada. O rádio
poderá, por consequência, não funcionar durante o modo de reparação.
Para detectar e resolver problemas, observe sempre o indicador de carga –
Consulte a Tabela 9.
37D22-B_Impres_MUC_PR.fm Page 15 Wednesday, July 12, 2006 2:45 PM

Português
16
MANUTENÇÃO
O Carregador Multi-Unidades Adaptável IMPRES só pode ser
reparado por um técnico de assistência qualificado, autorizado pela
Motorola. Qualquer violação destas directrizes pode anular a garantia
da unidade.
Tabela 10. Detecção e resolução de problemas
Problema O que significa... O que fazer...
O carregador
não fornece
qualquer
indicação
• Não existe contacto com o
carregador.
• Alimentação para o
carregador inexistente.
• Verifique se o rádio com bateria ou
apenas a bateria se encontram
devidamente colocados.
• Certifique-se de que o cabo de
alimentação está correctamente
ligado ao carregador e a uma
tomada CA e de que existe
corrente para a tomada.
• Substituir fusível(eis).
Indicação
Vermelho
Intermitente
• Não existe contacto com o
carregador.
• A bateria não carrega.
• Retire a bateria do carregador e
volte a colocá-la.
• Verifique se se trata de uma
bateria autorizada da Motorola
indicada nas Tabelas 1 a 6. Outras
baterias poderão não carregar.
• Desligue o carregador da bateria
e, utilizando um pano limpo e
seg.o, limpe os contactos
metálicos dourados da bateria e do
carregador.
• Substitua a bateria.
Indicação
Amarelo
Intermitente
• A bateria aguarda
carregamento. A
temperatura da bateria
poderá ser inferior a 5°C ou
superior a 40°C ou a
voltagem da mesma
poderá ser inferior ao limite
pré-definido para um
carregamento rápido.
• Uma vez corrigida esta condição, a
bateria iniciará o carregamento.
37D22-B_Impres_MUC_PR.fm Page 16 Wednesday, July 12, 2006 2:45 PM

Português
17
CARREGADORES COM MÓDULO DE VISOR (CDM)
O Carregador Multi-Unidades Adaptável IMPRES pode ser melhorado
com o acréscimo de um módulo de visor para carregadores (CDM),
referência RLN5382 da Motorola.
Informações Gerais do Visor
O Carregador Multi-Unidades Adaptável IMPRES com CDM
proporciona informações valiosas ao utilizador enquanto executa a
manutenção e cuidados da bateria. As informações que o carregador
exibe e os indicadores LED correspondentes estão descritos nas
tabelas que se seguem.
Activação
Non-IMPRES
Battery in the Pocket (Bateria de Terceiros na Cavidade)
IMPRES
Battery in the Pocket (Bateria IMPRES na Cavidade)
Upon Charger Power-up
(Após Ligação do Carregador)
LED SINGLE FLASH GREEN (INTERMITÊNCIA SIMPLES
VERDE)
Linha 1 IMPRES
Linha 2
If There is No Battery in the Pocket
(Caso Não Haja Bateria na Cavidade)
LED OFF (DESLIGADO)
Linha 1 NO BATTERY (SEM BATERIA)
Linha 2
Reading Battery Data
(A Ler Dados da Bateria)
LED Any Defined Indication (Qualquer Indicação Definida)
Linha 1 READING (A LER)
Linha 2 BATTERY DATA (DADOS DA BATERIA)
LED Defined by Charge State (Definido por Estado de Carga)
Linha 1 NON-IMPRES (DE TERCEIROS)
Linha 2 BATTERY (BATERIA)
I
MPRES
and Software Versions are Displayed
Visualização das Versões
IMPRES e de Software
LED Defined by Charge State (Definido por Estado de Carga)
Linha 1 IMPRES
Linha 2 SW xx.yy; aa.bb
37D22-B_Impres_MUC_PR.fm Page 17 Wednesday, July 12, 2006 2:45 PM

Português
18
NOTA:
xx.yy indica a versão do software do carregador, aa.bb indica
a versão do software do CDM.
IMPRES
Battery Kit # and Chemistry are Displayed
(Visualização do # do Kit
e Química da Bateria IMPRES)
LED Defined by Charge State (Definido por Estado de Carga)
Linha 1 KIT# -------- (# do KIT)
Linha 2 -----CHEMISTRY (QUÍMICA)
Forecasted # of Cycles Prior to Automatic Recondition
(Previsão do # de
Ciclos Anteriores ao Recondicionamento Automático)
LED Defined by Charge State (Definido por Estado de Carga)
Linha 1 ----CYCLES (CICLOS)
Linha 2 TO RECONDITION (PARA RECONDICIONAMENTO)
* Exibido apenas quando o número de ciclos para o recondicionamento é
inferior a 6.
Charger Waiting to Charge, Battery is Hot
(Carregador à Espera de Carregar, a
Bateria está Quente)
LED Flashing ORANGE (COR-DE-LARANJA Intermitente)
Linha 1 WAITING TO CHG (À ESPERA DE CARREGAR)
Linha 2 HOT BATTERY (BATERIA QUENTE)
Charger Waiting to Charge, Battery is Cold
(Carregador à Espera de Carregar,
a Bateria está Fria)
LED Flashing ORANGE (COR-DE-LARANJA Intermitente)
Linha 1 WAITING TO CHG (À ESPERA DE CARREGAR)
Linha 2 COLD BATTERY (BATERIA FRIA)
Charger Waiting to Charge, Low Voltage
(Carregador à Espera de Carregar,
Baixa Tensão)
LED Flashing ORANGE (COR-DE-LARANJA Intermitente)
Linha 1 WAITING TO CHG (À ESPERA DE CARREGAR)
Linha 2 LOW VOLTAGE (BAIXA TENSÃO)
NOTA:
Nem todos os ecrãs mostrados acima serão exibidos. Por
exemplo, os ecrãs À Espera de Carregar (bateria quente, fria,
baixa tensão) apenas serão exibidos se a situação se
justificar.
37D22-B_Impres_MUC_PR.fm Page 18 Wednesday, July 12, 2006 2:45 PM

Português
19
Charger is in Trickle Charge Mode
(Carregador em Modo de Carga Lenta)
LED Flashing GREEN (VERDE Intermitente)
Linha 1 TRICKLE CHARGE (CARGA LENTA)
Linha 2
Charge is Complete
(A Carga está Completa)
LED Steady GREEN or Flashing RED / GREEN (VERDE Con-
stante ou VERMELHO/VERDE Intermitente)
Linha 1 CHARGE COMPLETE (CARGA COMPLETA)
Linha 2
Charger is in Discharge/Reconditioning Mode
(Carregador em Modo de
Descarga/Recondicionamento)
LED Steady ORANGE (COR-DE-LARANJA Constante)
Linha 1 DISCHARGE (DESCARGA)
Linha 2
Charger is Calibrating an IMPRES Battery
(Carregador a Calibrar uma Bateria
IMPRES)
LED Steady ORANGE, Steady RED, & Flashing ORANGE or
GREEN (COR-DE-LARANJA Constante, VERMELHO Con-
stante e COR-DE-LARANJA ou VERDE Intermitente)
Linha 1 Calibrating (A calibrar)
Linha 2 Battery (Bateria)
LED Steady GREEN (VERDE Constante)
Linha 1 Battery (Bateria)
Linha 2 Calibrated (Calibrada)
* Todas as baterias IMPRES devem ser calibradas antes da utilização inicial.
Um carregador IMPRES iniciará automaticamente a calibragem de todas as
baterias novas.
Battery Capacity Data is Displayed as “%” in mAH, and Voltage
(Os
Dados da Capacidade da Bateria são Exibidos como "%" em mAH e em Voltagem)
LED Defined by Charge State (Definido por Estado de Carga)
Linha 1 ----% RATED CAP. (----% de POTÊNCIA NOMINAL)
Linha 2 ----mAH --.-V
37D22-B_Impres_MUC_PR.fm Page 19 Wednesday, July 12, 2006 2:45 PM

Português
20
NOTA:
(1) O tempo previsto para carga completa inclui a carga
rápida e os ciclos de descarga (se aplicável).
(2) As informações de capacidade da bateria podem não ser
exibidas em baterias descalibradas.
(3) A utilização de baterias IMPRES com carregadores de
terceiros pode afectar a capacidade e a precisão do tempo
de carregamento.
Estimated Time to Rapid Charge
Complete Displayed in Hours, Minutes for NiCd & NiMH IMPRES
Batteries Only
(Completa, Visualizada em Horas e Minutos, Apenas para Baterias NiCd
e NiMH IMPRES)
LED Defined by Charge State (Definido por Estado de Carga)
Linha 1 RAPID CHG ENDS (FIM DE CARGA RÁPIDA)
Linha 2 IN xx HRS, yy MIN (EM xx HORAS, yy MINUTOS)
37D22-B_Impres_MUC_PR.fm Page 20 Wednesday, July 12, 2006 2:45 PM

Português
21
Sequências diagramas para Baterias
IMPRES
Nota:
estes diagramas são as sequências mostradas anteriormente
em "Informações Gerais do Visor" e encontram-se apenas em
inglês.
Sequência do Visor da Bateria NiMH e NiCd IMPRES
LED Defined by Charge State
Linha 1 KIT# xxxxxxxx
Linha 2 SN: yyyyyyyyyyyy
LED Defined by Charge State
Linha 1 KIT# xxxxxxxx
Linha 2 yyyyy CHEMISTRY
LED Defined by Charge State
Linha 1 xxxx CYCLES
Linha 2 TO RECONDITION
LED Steady RED
Linha 1 RAPID CHARGE
Linha 2
LED Defined by Charge State
Linha 1 xx% RATED CAP.
Linha 2 yyyyy mAH zz.z V
LED Defined by Charge State
Linha 1 RAPID CHG ENDS
Linha 2 IN xx HRS, yy MIN
Iniciar
(4.0 seg.)
(2.0 seg.)
(2.0 seg.)
(2.0 seg.)
(7.0 seg.)
(4.0 seg.)
A cada
73.0 seg.
A cada
13.0 seg.
5X
65.0
seg.
37D22-B_Impres_MUC_PR.fm Page 21 Wednesday, July 12, 2006 2:45 PM

Português
22
Antes da Calibragem:
LED Defined by Charge State
Linha 1 KIT# xxxxxxxx
Linha 2 SN: yyyyyyyyyyyy
LED Defined by Charge State
Linha 1 KIT# xxxxxxxx
Linha 2 yyyyy CHEMISTRY
LED Steady ORANGE
Linha 1 DISCHARGE
Linha 2
LED Defined by Charge State
Linha 1 CALIBRATING
Linha 2 BATTERY
LED Defined by Charge State
Linha 1 RAPID CHG ENDS
Linha 2 IN xx HRS, yy MIN
A cada
71.0 seg.
Iniciar
(4.0 seg.)
(2.0 seg.)
(2.0 seg.)
(7.0 seg.)
(4.0 seg.)
A cada
13.0 seg.
5X
65.0
seg.
37D22-B_Impres_MUC_PR.fm Page 22 Wednesday, July 12, 2006 2:45 PM

Português
23
Após a Calibragem:
LED Defined by Charge State
Linha 1 KIT# xxxxxxxx
Linha 2 SN: yyyyyyyyyyyy
LED Defined by Charge State
Linha 1 KIT# xxxxxxxx
Linha 2 yyyyy CHEMISTRY
LED Steady GREEN
Linha 1 CHARGE COMPLETE
Linha 2
LED Defined by Charge State
Linha 1 BATTERY
Linha 2 CALIBRATED
LED Defined by Charge State
Linha 1 xx% RATED CAP.
Linha 2 yyyy mAH zz.z V
Iniciar
(4.0 seg.)
(2.0 seg.)
(2.0 seg.)
(2.0 seg.)
(7.0 seg.)
A cada
61.0 seg.
A cada
11 seg.
5X
55.0
seg.
37D22-B_Impres_MUC_PR.fm Page 23 Wednesday, July 12, 2006 2:45 PM

Português
24
Sequência do Visor da Bateria de Lões de Lítio IMPRES
LED Defined by Charge State
Linha 1 KIT# xxxxxxxx
Linha 2 SN: yyyyyyyyyyyy
LED Defined by Charge State
Linha 1 KIT# xxxxxxxx
Linha 2 yyyyy CHEMISTRY
LED Defined by Charge State
Linha 1 xxxx CYCLES
Linha 2 TO RECONDITION
LED Steady RED
Linha 1 RAPID CHARGE
Linha 2
LED Defined by Charge State
Linha 1 xx% RATED CAP.
Linha 2 yyyyy mAH zz.z V
Iniciar
(4.0 seg.)
(2.0 seg.)
(2.0 seg.)
(2.0 seg.)
(7.0 seg.)
A cada
53.0 seg.
A cada
9.0 seg.
5X
45.0
seg.
37D22-B_Impres_MUC_PR.fm Page 24 Wednesday, July 12, 2006 2:45 PM

Português
25
Antes da Calibragem:
LED Defined by Charge State
Linha 1 KIT# xxxxxxxx
Linha 2 SN: yyyyyyyyyyyy
LED Defined by Charge State
Linha 1 KIT# xxxxxxxx
Linha 2 yyyyy CHEMISTRY
LED Steady ORANGE
Linha 1 DISCHARGE
Linha 2
LED Defined by Charge State
Linha 1 CALIBRATING
Linha 2 BATTERY
Iniciar
(4.0 seg.)
(2.0 seg.)
(2.0 seg.)
(7.0 seg.)
A cada
51.0 seg.
A cada
9.0 seg.
5X
45.0
seg.
37D22-B_Impres_MUC_PR.fm Page 25 Wednesday, July 12, 2006 2:45 PM

Português
26
Após a Calibragem:
LED Defined by Charge State
Linha 1 KIT# xxxxxxxx
Linha 2 SN: yyyyyyyyyyyy
LED Defined by Charge State
Linha 1 KIT# xxxxxxxx
Linha 2 yyyyy CHEMISTRY
LED Steady GREEN
Linha 1 CHARGE COMPLETE
Linha 2
LED Defined by Charge State
Linha 1 BATTERY
Linha 2 CALIBRATED
LED Defined by Charge State
Linha 1 xx% RATED CAP.
Linha 2 yyyy mAH zz.z V
Iniciar
(4.0 seg.)
(2.0 seg.)
(2.0 seg.)
(2.0 seg.)
(7.0 seg.)
A cada
61.0 seg.
A cada
11 seg.
5X
55.0
seg.
37D22-B_Impres_MUC_PR.fm Page 26 Wednesday, July 12, 2006 2:45 PM

Português
27
Orientação do Texto do Visor
De forma a permitir a utilização do Carregador Multi-Unidades
Adaptável IMPRES na secretária ou na parede, o CDM possui a
capacidade de "rodar" o texto do visor em 180 graus.
Para o fazer, insira um clipe grande no furo por baixo do visor
perpendicular ao tampo da secretária. Um "estalido" indica que o
botão de alternar foi accionado, rodando o texto em 180 graus.
Funcionamento do Carregador Multi-Unidades Adaptável IMPRES
Para mais informações sobre a manutenção do Carregador Multi-
Unidades e do CDM, consulte o Guia de Assistência do Carregador,
6880309L66.
Assistência
Para serviços de assistência, contacte o entreposto que se segue.
Ligue e confirme a devolução antes de enviar a unidade para
manutenção no entreposto.
Centro de Assistência Motorola
Motorola GmbH
Customer Care
Am Borsigturm 130
13507 Berlin
Germany.
Tel: +49 30 6686 1555
37D22-B_Impres_MUC_PR.fm Page 27 Wednesday, July 12, 2006 2:45 PM

Português
28
Nota
37D22-B_Impres_MUC_PR.fm Page 28 Wednesday, July 12, 2006 2:45 PM

Italiano
1
INDICE
Informazioni importanti sulla sicurezza . . . . . . . . . . . . . . . . . . . . . . . . 2
Precauzioni per il funzionamento sicuro . . . . . . . . . . . . . . . . . . . . . . . 3
Descrizione delle caratteristiche e dei benefici di IMPRES . . . . . . . . . 4
Funzioni e differenze operative . . . . . . . . . . . . . . . . . . . . . . . . . . . . . . 5
Elenco delle batterie . . . . . . . . . . . . . . . . . . . . . . . . . . . . . . . . . . . . . . 6
Alimentazione e adattatori approvati da Motorola . . . . . . . . . . . . . . . . 9
Istruzioni per l’uso . . . . . . . . . . . . . . . . . . . . . . . . . . . . . . . . . . . . . . . 10
Carica della batteria. . . . . . . . . . . . . . . . . . . . . . . . . . . . . . . . . . . . 12
Ricondizionamento manuale della batteria . . . . . . . . . . . . . . . . . . 13
Ricondizionamento automatico della batteria . . . . . . . . . . . . . . . . 13
Interruzione manuale del processo di ricondizionamento . . . . . . . 14
Diagnostica . . . . . . . . . . . . . . . . . . . . . . . . . . . . . . . . . . . . . . . . . . . . 15
Manutenzione . . . . . . . . . . . . . . . . . . . . . . . . . . . . . . . . . . . . . . . . . . 16
Caricatori dotati di modulo display (CDM) . . . . . . . . . . . . . . . . . . . . . 17
Le informazioni riportate nel presente manuale accessori si riferiscono ai seguenti
caricatori universali a più unità IMPRES:
WPLN4108, WPLN4109, WPLN4110, WPLN4118, WPLN4119, WPLN4120, WPLN4121,
WPLN4123, WPLN4130, WPLN4131, WPLN4132, WPLN4133, WPLN4134,
WPLN4135, WPLN4136
Il manuale comprende inoltre i seguenti caricatori universali a più unità IMPRES,
disponibili per le radio della serie GP Professional:
WPLN4144, WPLN4145, WPLN4146, WPLN4187, WPLN4188, WPLN4189,
WPLN4190, WPLN4191, WPLN4192, WPLN4193, WPLN4194, WPLN4195,
WPLN4196, WPLN4204, WPLN4205
Con il termine “universale” si definisce la caratteristica del caricatore di supportare
diversi modelli di radio e, utilizzando gli adattatori di batteria, qualsiasi batteria elencata
nelle Tabelle 1-6.
37D22-B_Impres_MUC_IT.fm Page 1 Wednesday, July 12, 2006 2:12 PM

Italiano
2
INFORMAZIONI IMPORTANTI SULLA SICUREZZA
CONSERVARE QUESTE ISTRUZIONI
Nel presente documento sono riportate informazioni importanti sulla sicurezza e
l'utilizzo. Leggere con attenzione queste istruzioni e conservarle per riferimento
futuro.
Prima di utilizzare il caricatore, leggere con attenzione tutte le istruzioni e le
avvertenze relative (1) al caricatore, (2) alla batteria e (3) alla radio in cui è inserita
la batteria.
1. Per ridurre il rischio di lesioni, caricare solo le batterie
ricaricabili, approvate da Motorola, elencate nelle Tabelle
1-5. L’uso di altre batterie può comportare pericolo di esplosioni,
che potrebbero causare lesioni personali o danni.
2. L’uso di accessori non consigliati da Motorola può comportare rischio
d’incendio, scosse elettriche o lesioni.
3. Per ridurre il rischio di danni alla spina elettrica o al cavo, scollegare il
caricatore staccando la spina e non tirando il cavo.
4. Non utilizzare prolunghe salvo che non sia assolutamente necessario.
L’uso di una prolunga non idonea può comportare rischio di incendio e
scosse elettriche. Se è necessario utilizzare una prolunga, accertarsi che il
cavo sia del diametro di 18AWG per le prolunghe fino a 30,48 m e di
16AWG per quelle fino a 45,72 m.
5. Per ridurre il rischio d’incendio, scosse elettriche o lesioni, non utilizzare il car-
icatore se è rotto o danneggiato. Portarlo a un centro assistenza Motorola
qualificato e autorizzato.
6. Questa unità può essere riparata.
Una scheda del circuito stampato con
alimentatore, unica nel suo genere, alimenta ciascun vano. La PCB con
alimentatore è disponibile presso l’ufficio Accessori post-vendita, P/N
RLN5325. Non sono disponibili parti di ricambio per gli altri componenti. Un
manuale di manutenzione, in cui è descritto il processo di sostituzione, è
anche disponibile presso l’ufficio Accessori post-vendita, con il P/N
6880309L66.
7. Per ridurre il rischio di scosse elettriche, scollegare il caricatore dalla presa di
rete prima di eseguire la manutenzione o di pulirlo.
!
AVVERTENZA
37D22-B_Impres_MUC_IT.fm Page 2 Wednesday, July 12, 2006 2:12 PM

Italiano
3
PRECAUZIONI PER IL FUNZIONAMENTO SICURO
• Spegnere la radio quando si carica la batteria.
• L’apparecchio non è adatto per essere utilizzato all’aperto. Utilizzare solo in
ambienti asciutti.
• Collegare l’apparecchio a una presa dotata di salvavita e con la tensione
corretta, come specificato sul prodotto.
• Scollegare dalla tensione di rete staccando la spina dalla presa.
• La presa di rete cui l’apparecchio è collegato deve essere vicina e di facile
accesso.
• Negli apparecchi dotati di fusibili, quelli di ricambio devono essere di tipo e
taratura uguali alle specifiche riportate nelle istruzioni che accompagnano
l’apparecchio.
• La temperatura ambiente massima nell’area circostante l’alimentatore non deve
superare i 40°C.
• Verificare che il cavo sia posizionato in modo che non venga calpestato, che non
intralci il passaggio o che non venga bagnato, danneggiato o sia soggetto a
sollecitazioni.
• Questo caricatore utilizza la stessa unità di montaggio a muro del caricatore a più
unità NTN4796; il codice parte dell’unità di montaggio a muro è NLN7967.
• Sostituire i fusibili solo con quelli dello stesso tipo e taratura, specificati
sull’etichetta del caricatore. Le seguenti parti di ricambio possono essere
ordinate presso l’ufficio Accessori post-vendita locale:
Fusibile 6571489S01
Portafusibili 0987626G01
Coperchio 0987739G01
37D22-B_Impres_MUC_IT.fm Page 3 Wednesday, July 12, 2006 2:12 PM

Italiano
4
DESCRIZIONE DELLE CARATTERISTICHE E DEI BENEFICI DI
IMPRES
La soluzione IMPRES è un sistema avanzato compatibile con tre chimiche
differenti, concepito da Motorola, che consiste di (a) batterie IMPRES, (b)
caricatore adattivo a più unità IMPRES e (c) hardware e software della radio che
permette alle radio compatibili con IMPRES di comunicare con le batterie IMPRES
(non disponibile per le radio della serie GP Professional).
Se utilizzato con le batterie IMPRES, il caricatore adattivo a più unità IMPRES
consente di:
• massimizzare il tempo operativo tra i cicli di carica, eliminando automaticamente
l’effetto memoria;
• massimizzare la durata della batteria, riducendone notevolmente il riscaldamento
durante i cicli di carica di mantenimento e di post-carica;
• eliminare la necessità di acquistare apparecchi di ricondizionamento e di formare
il personale nella “gestione dei compiti di manutenzione delle batterie.”
Grazie a questo esclusivo sistema brevettato, non è più necessario tenere le
registrazioni dell’uso della batteria, eseguire manualmente i cicli di
ricondizionamento né rimuovere le batterie dal caricatore dopo averle caricate.
Il caricatore adattivo a più unità IMPRES controlla le modalità di utilizzo della
batteria IMPRES, memorizza in esse i dati ed esegue il ciclo di ricondizionamento
solo quando è necessario.
Il caricatore adattivo a più unità IMPRES non surriscalda la batteria,
indipendentemente dal tempo in cui rimane nel vano del caricatore. Il caricatore
controlla il livello di carica della batteria e, all’occorrenza, passa automaticamente
alla carica di mantenimento.
Il caricatore adattivo a più unità IMPRES semplifica le operazioni di carica e di
manutenzione della batteria. L’utente deve solo eseguire queste semplici
operazioni:
1. Inserire la radio / la batteria nel caricatore
2. Rimuovere la radio / la batteria a carica ultimata
Motorola è il solo produttore in grado di offrire un caricatore di condizionamento o
ricondizionamento che consente agli utenti la scelta di caricare la batteria inserita
nella radio o solamente la batteria.
37D22-B_Impres_MUC_IT.fm Page 4 Wednesday, July 12, 2006 2:12 PM

Italiano
5
FUNZIONI E DIFFERENZE OPERATIVE:
1. Le batterie IMPRES possono anche essere caricate con caricatori tradizionali.
Tuttavia, per abilitare le funzioni Smart Energy, ciascuna batteria IMPRES deve
essere caricata con un caricatore adattivo a più unità IMPRES. Quando la
batteria viene caricata per la prima volta con un caricatore adattivo a più unità
IMPRES, l’indicatore di carica
GIALLO
resta acceso; il primo ciclo di carica
deve essere completato, fino all’accensione dell’indicatore
VERDE
. Questo
processo calibra correttamente la batteria IMPRES ed abilita le funzioni Smart
Energy. Se il processo viene interrotto, il caricatore calibrerà la batteria alla
carica successiva.
2. Dal momento che il caricatore adattivo a più unità IMPRES determina
automaticamente le condizioni necessarie a ricondizionare la batteria, è
possibile che entri nella modalità di ricondizionamento quando si inserisce la
radio o la batteria. Il processo di ricondizionamento viene segnalato
dall’accensione dell’indicatore
GIALLO
. All’occorrenza, è possibile
soprassedere la modalità di ricondizionamento rimuovendo e reinserendo la
radio o la batteria. (Vedere le istruzioni riportate in seguito nel manuale).
3. Il caricatore adattivo a più unità IMPRES è studiato per caricare qualsiasi
batteria elencata nelle Tabelle 1-6. Tuttavia, solo le autentiche batterie IMPRES
dispongono delle funzioni Smart Energy. (All’introduzione nel mercato di nuovi
modelli di radio o batterie, l’elenco verrà aggiornato e distribuito ai clienti).
4. Utilizzare il caricatore adattivo a più unità IMPRES per calibrare le batterie
IMPRES Smart, al fine di assicurare la registrazione, memorizzazione e
visualizzazione dei dati sul loro utilizzo.
5. Se una batteria IMPRES viene utilizzata con una radio dotata di display (ad es.
XTS5000), è possibile che la radio visualizzi un’icona per segnalare lo stato di
carica della batteria. L’attivazione di questa icona avviene dopo aver calibrato
una batteria IMPRES con un caricatore IMPRES. L’icona di stato del caricatore
verrà sempre visualizzata se l’utente continua a utilizzare i caricatori IMPRES
per caricare le batterie. Tuttavia, se una batteria IMPRES viene caricata con un
caricatore non del tipo IMPRES per un periodo pari o superiore a 7 giorni,
l’icona scomparirà. Per riattivarla, inserire una batteria IMPRES in un caricatore
IMPRES e lasciarla nel vano fino a carica ultimata, segnalata dall’accensione
dell’indicatore
VERDE
. L’icona dello stato di carica verrà quindi visualizzata sul
display della radio. Qualora non venga visualizzata dopo un ciclo di carica
completo, inserire una batteria parzialmente scarica (perlomeno al 70%) nel
caricatore, avviare il processo di ricondizionamento, quindi lasciarla nel vano
finché il processo di carica non sia ultimato. L’icona verrà visualizzata sul
display della radio (non disponibile nelle radio della serie GP Professional).
6. Il caricatore adattivo a più unità IMPRES può essere riparato solo da tecnici
specializzati, autorizzati da Motorola CGISS. La mancata osservanza di questo
requisito renderà nulla la garanzia dell’unità.
37D22-B_Impres_MUC_IT.fm Page 5 Wednesday, July 12, 2006 2:12 PM

Italiano
6
ELENCO DELLE BATTERIE
Nelle tabelle che seguono è riportato l’elenco delle batterie che possono essere
utilizzate con specifiche radio abbonate, come indicato nell’intestazione delle
tabelle.
* Per il caricatore è richiesto l’adattatore di batteria P/N RLN5212 per caricare le
batterie MTP700.
Tabella 1. Radio della serie DiMetra XTS3000 / XTS3500 e radio digitali
XTS5000
Kit (PN) Tipo FM Smart Capacità Nuovo
modello
HNN9031 NiCD No Sì Altissima No
HNN9032 NiCD Sì Sì Altissima No
NTN8294 NiCD No No Altissima No
NTN8295 NiCD Sì No Altissima No
NTN8297 NiCD Sì No Altissima No
NTN8299 NiCD Sì No Altissima No
NTN8610 Ioni di litio No No Alta No
NTN8293 NiMH No No Altissima No
NNTN4435 NiMH No Sì Altissima No
NNTN4436 NiMH Sì Sì Altissima No
NNTN4437 NiMH Sì Sì Altissima No
RNN4006 NiMH No No Altissima Nuovo
RNN4007 NIMH Sì No Altissima Nuovo
NTN9862 Ioni di litio No Sì Altissima Nuovo
Tabella 2. Radio digitali XTS2500
Kit (PN) Tipo FM Smart Capacità Nuovo
modello
NTN9859 NiMH No No Altissima Nuovo
NTN9857 NiMH Sì No Altissima Nuovo
NTN9815 NiCD No No Alta Nuovo
NTN9816 NiCD Sì No Alta Nuovo
Tabella 3. Radio digitali MTP700
Kit (PN) Tipo FM Smart Capacità Nuovo
modello
PMNN4048* NiMH No Sì Alta Nuovo
PMNN4049* NiMH Sì Sì Alta Nuovo
PMNN4050* Ioni di litio No Sì Alta Nuovo
PMNN4047* Ioni di litio No Sì Alta Nuovo
37D22-B_Impres_MUC_IT.fm Page 6 Wednesday, July 12, 2006 2:12 PM

Italiano
7
** Per il caricatore è richiesto l’adattatore di batteria P/N 4385922B01 per caricare le
batterie Astro Saber.
Tabella 4. Radio della serie HT1000 / MT2000 / MTS2000 / MTX8000 e
MTX9000
Kit (PN) Tipo FM Smart Capacità Nuovo
modello
HNN9028 NiCD No Sì Altissima No
HNN9029 NiCD Sì Sì Altissima No
NTN7143 NiCD No No Alta No
NTN7144 NiCD No No Altissima No
NTN7146 NiCD Sì No Alta No
NTN7147 NiCD Sì No Altissima No
NTN7148 NiCD CENELEC No Alta No
NTN7149 NiCD CSA No Alta No
NTN7150 NiCD MSHA No Alta No
NTN7341 NiCD Sì No Altissima No
NTN7372 NiCD Sì No Alta No
WPPN4013 NiMH No No Altissima No
WPPN4037 NiMH Sì No Altissima No
RNN4008 NiCD ATEX No Alta No
Tabella 5. Radio Saber / Astro Saber / SSE5000 / MX1000
Kit (PN) Tipo FM Smart Capacità Nuovo
modello
HNN9033 NiCD No Sì Altissima No
HNN9031 NiCD Sì Sì Altissima No
NTN4537** NiCD Sì No Bassa No
NTN4538 NiCD Sì No Alta No
NTN4592** NiCD No No Bassa No
NTN4593 NiCD No No Alta No
NTN4595 NiCD No No Altissima No
NTN4596 NiCD Sì No Altissima No
NTN4657 NiCD No No Alta No
NTN4671 NiCD CENELEC No Alta No
NTN4992 NiCD Sì No Altissima No
NTN7014** NiMH No No Alta No
NTN7058 NiCD Sì No Altissima No
NTN7426 NiCD Sì No Bassa No
NTN8251 NiMH Sì No Altissima No
NTN8818** Ioni di litio No No Alta No
37D22-B_Impres_MUC_IT.fm Page 7 Wednesday, July 12, 2006 2:12 PM

Italiano
8
Il caricatore universale richiede l’uso dell’adattatore di batteria RLN5648.
Tabella 6. Radio della serie GP Professional
Kit (PN) Tipo FM Smart Capacità Nuovo
modello
HNN9003 NiMH
AA Bluetooth
No No Alta No
HNN9008 NiMH No No Alta No
HNN9009 NiMH No No Altissima No
HNN9010 NiMH Sì No Altissima No
HNN9011 NiCD Sì No Alta No
HNN9012 NiCD No No Alta No
HNN9013 Ioni di litio No No Alta No
WPNN4045 NiMH No No Alta No
PMNN4045 NiMH No No Alta No
HNN4001 Impres NiMH No Sì Altissima Sì
HNN4002 Impres NiMH Sì Sì Altissima Sì
HNN4003 Impres Ioni di litio No Sì Altissima Sì
NOTA:
Gli adattatori sono disponibili presso l’ufficio vendite Radio o
Accessori post-vendita.
37D22-B_Impres_MUC_IT.fm Page 8 Wednesday, July 12, 2006 2:12 PM

Italiano
9
ALIMENTAZIONE E ADATTATORI APPROVATI DA MOTOROLA
Questo caricatore è progettato per l’uso con tensioni di rete comprese tra 100
V c.a. e 240 V c.a., 50/60Hz e con i cavi di alimentazione riportati nella Tabella
7. I cavi di alimentazione da utilizzare con il caricatore per le radio della serie
GP Professional sono elencati nella Tabella 8
.
Tabella 7. Cavi di alimentazione per caricatori di modello universale
Motorola
Tipo di spina Kit del caricatore Kit del caricatore
(Modello con
display)
Cavo di
alimentazione
Nessun cavo / spina WPLN4121 WPLN4127 Nessuno
U.S./Nordamerica WPLN4108 WPLN4130 3087791G01
Europa WPLN4109 WPLN4131 3087791G04
U.K. WPLN4110 WPLN4132 3087791G07
Australia/Neozelanda WPLN4118 WPLN4133 3087791G10
Argentina WPLN4119 WPLN4134 3087791G13
U.S./Nordamerica WPLN4120 WPLN4135 3087791G01
Corea WPLN4123 WPLN4136 3087791G16
Tabella 8. Cavi di alimentazione per caricatori per radio della serie GP
Professional Motorola
Tipo di spina Kit del caricatore Kit del caricatore
(Modello con
display)
Cavo di
alimentazione
Nessun cavo / spina WPLN4197 WPLN4198 Nessuno
U.S./Nordamerica WPLN4187 WPLN4192 3087791G01
Europa WPLN4189 WPLN4194 3087791G04
U.K. WPLN4188 WPLN4193 3087791G07
Australia/Neozelanda WPLN4190 WPLN4195 3087791G10
Argentina WPLN4191 WPLN4196 3087791G13
U.S./Nordamerica WPLN4205 WPLN4204 3087791G01
Corea WPLN4146 WPLN4145 3087791G16
37D22-B_Impres_MUC_IT.fm Page 9 Wednesday, July 12, 2006 2:12 PM

Italiano
10
ISTRUZIONI PER L'USO
Il vano del caricatore può alloggiare la radio con la batteria inserita oppure la sola
batteria. Prima di caricare la batteria inserita nella radio, spegnere la radio. Per
una carica ottimale, caricare la batteria a temperatura ambiente.
1. Inserire lo spinotto del cavo di alimentazione nella presa sulla parte posteriore
del caricatore.
2. Inserire la spina del cavo di alimentazione nella presa di rete appropriata. Se
l’accensione avviene correttamente, l’indicatore
VERDE
del caricatore
lampeggia una sola volta.
3. Inserire la batteria, o la radio con la batteria (radio spenta) nel vano del
caricatore:
a. allineando la scanalatura su ciascun lato della batteria alla rispettiva rotaia
in rilievo su ciascun lato del vano del caricatore
b. spingendo la batteria verso la parte posteriore del vano
c. facendo scivolare la batteria nel vano del caricatore, verificando che i
contatti del caricatore e della batteria vengano a contatto.
Quando la batteria è alloggiata correttamente nel vano, l’indicatore del caricatore si
illumina, per segnalare che ne ha rilevato la presenza. Per gli indicatori di carica,
vedere Tabella 9.
NOTA
Il caricatore adattivo a più unità IMPRES carica solo le batterie
approvate da Motorola, elencate nelle Tabelle 1-6. È possibile che
altri tipi di batterie non vengano caricati.
Il caricatore adattivo a più unità IMPRES dispone di funzioni e
funzionalità automatiche che differiscono da altri caricatori.
Osservare con attenzione l’indicatore di carica, per verificare che
il caricatore sia nella modalità operativa voluta o attesa.
37D22-B_Impres_MUC_IT.fm Page 10 Wednesday, July 12, 2006 2:12 PM

Italiano
11
Affinché le funzioni della batteria Smart e del sistema di carica adattivo di Motorola
siano completamente disponibili, il caricatore deve inizializzare i dati contenuti nelle
batterie Smart quando vengono caricate per la prima volta. Questo processo viene
segnalato dall’accensione dell’indicatore
GIALLO
(come avviene per il processo di
ricondizionamento).
Il processo è automatico e comprende un primo ricondizionamento della batteria, al
termine del quale ha inizio la carica. Poiché l’inizializzazione della batteria richiede
del tempo, essa va lasciata nel caricatore per tutta la notte quando la si carica per
la prima volta.
Tabella 9. Indicatori di carica
Indicatore di carica Descrizione
Verde lampeggiante
una sola volta
Accensione corretta del caricatore.
Rosso
La batteria è nella modalità di caricamento rapido.
Verde lampeggiante
Il ciclo di carica rapida è stato completato (>90% della capacità
disponibile). La batteria passa alla carica di mantenimento.
Verde
Il ciclo di carica è completato e la batteria è completamente
carica.
Giallo lampeggiante
La batteria è stata rilevata dal caricatore, ma è in attesa di
essere caricata. (La tensione della batteria è troppo bassa
oppure la sua temperatura è troppo bassa o troppo alta per
consentire il processo di carica. Questo avrà inizio non appena
le condizioni si sono normalizzate.)
Rosso lampeggiante
La batteria non può essere caricata o non fa buon contatto con il
caricatore.
Giallo
(Questa funzione è disponibile solo con le batterie Smart)
La batteria è in modalità di ricondizionamento. Il periodo per il
quale il caricatore resta in questa modalità dipende dallo stato di
carica rimanente nella batteria al momento del suo inserimento
nel vano. (Il tempo di ricondizionamento di batterie
completamente cariche – 8 o più ore – è maggiore del tempo
richiesto per batterie completamente scariche.)
Rosso e verde
lampeggiante
(Questa funzione è disponibile solo con le batterie Smart)
Il ciclo di carica è stato completato e la batteria è
completamente carica. La batteria continua ad essere
utilizzabile, ma è vicina al termine del suo normale ciclo di vita.
NOTA
L’esclusività del caricatore adattivo a più unità IMPRES risiede
nella capacità, se utilizzato con le batterie IMPRES Motorola, di
determinare automaticamente quando la batteria deve essere
ricondizionata.
37D22-B_Impres_MUC_IT.fm Page 11 Wednesday, July 12, 2006 2:12 PM

Italiano
12
Il caricatore adattivo a più unità IMPRES funziona come:
• caricatore con tutte le batterie approvate da Motorola, e
• ricondizionatore con tutte le batterie IMPRES approvate da Motorola.
Carica della batteria
Per ottenere prestazioni ottimali, Motorola consiglia di lasciare le nuove batterie nel
caricatore per 14-16 ore prima di utilizzarle per la prima volta.
1. Quando la batteria o la radio con batteria è alloggiata correttamente nel
caricatore, ha inizio il ciclo di carica rapida, segnalato dall’accensione
dell’indicatore
ROSSO
del caricatore. Il tempo per il quale l’indicatore resta
acceso dipende dal livello di carica restante nella batteria.
2. Una volta ultimato il ciclo di carica rapida (>90% della capacità disponibile),
l’indicatore
VERDE LAMPEGGIA
, per segnalare il passaggio alla carica di
mantenimento; questo processo richiede circa 1 ora.
3. Una volta ultimata la carica di mantenimento l’indicatore
VERDE RESTA
ACCESO
, per segnalare che la batteria è completamente carica.
4.
È possibile
che, durante la carica, l’indicatore del caricatore segnali altri stati di
carica:
•
GIALLO LAMPEGGIANTE
: indica che la temperatura o la tensione della
batteria sono fuori limite per il processo di carica. Questo riprende alla
normalizzazione delle condizioni.
•
ROSSO E VERDE LAMPEGGIANTE
: indica che la batteria sta per
raggiungere il termine della normale durata di vita. Anche se
completamente carica, la sua capacità è stata ridotta dall’uso ed è possibile
che non possa supportare adeguatamente le applicazioni più impegnative.
Questa funzione è disponibile solo se il caricatore è utilizzato con le batterie
IMPRES Motorola. Questa segnalazione non indica un guasto, bensì
semplicemente notifica all’utente che, a breve, la batteria potrebbe non
essere più in grado di offrire la funzionalità voluta e pertanto può essere
necessario sostituirla.
IMPORTANTE:
Considerato che il vano del caricatore è studiato per alloggiare batterie di
forma e dimensioni diverse, è essenziale accertarsi che la radio con la
batteria o la sola batteria sia inserita correttamente. In caso contrario,
l’indicatore non si illumina, segnalando che la batteria non è sotto carica.
NOTA:
È possibile che, in alcuni casi, l’indicatore segnali prematuramente che
le nuove batterie (mai utilizzate) sono completamente cariche (indicatore
VERDE
).
37D22-B_Impres_MUC_IT.fm Page 12 Wednesday, July 12, 2006 2:12 PM

Italiano
13
•
ROSSO LAMPEGGIANTE
: indica che la batteria non può essere caricata.
È possibile che si sia interrotto il contatto tra la batteria e il caricatore.
La
carica riprende alla correzione delle condizioni che causano questa
segnalazione.
Le batterie Smart Motorola dispongono di un dispositivo di memoria interno, che
viene letto dal caricatore adattivo a più unità IMPRES Motorola. Se una batteria
IMPRES viene caricata per oltre 2 ½ minuti, il caricatore ne memorizza il numero di
serie. Può essere quindi rimossa dal caricatore per un massimo di 30 minuti e,
quando viene reinserita, il processo di carica riprenderà dal punto in cui era stato
interrotto al momento della sua rimozione.
Ricondizionamento manuale della batteria
Per ricondizionare manualmente la batteria IMPRES, entro 2 ½ dall’inserimento
iniziale nel caricatore (indicatore
ROSSO
), rimuoverla e quindi reinserirla entro 5
secondi. L’indicatore del caricatore passa dal
ROSSO
al
GIALLO
. Questa
operazione forza il ricondizionamento, al termine del quale la batteria verrà caricata
automaticamente.
Ricondizionamento automatico della batteria
Il caricatore adattivo a più unità IMPRES, utilizzato insieme alla batteria IMPRES
Motorola, è in grado di determinare quando la batteria deve essere ricondizionata.
Se la batteria IMPRES è alloggiata correttamente, il caricatore determina se il
ricondizionamento è necessario, nel qual caso, il caricatore inizia automaticamente
il processo di ricondizionamento, segnalato dall’accensione dell’indicatore
GIALLO
. Il processo può impiegare fino ad 8 o più ore, a seconda dello stato di
carica e della capacità della batteria al momento dell’inserimento nel caricatore.
È importante ricordare che, affinché questo processo sia efficace, la batteria
deve poter completare il ciclo di ricondizionamento e di carica. Lasciare
pertanto la batteria nel caricatore finché l’indicatore
VERDE
si illumina.
Al termine del ciclo di ricondizionamento, il caricatore inizia automaticamente quello
di carica.
NOTA:
L’uso eccessivo di questa funzione riduce la durata di vita della
batteria.
37D22-B_Impres_MUC_IT.fm Page 13 Wednesday, July 12, 2006 2:12 PM

Italiano
14
Interruzione manuale del processo di ricondizionamento
In qualsiasi momento durante il ciclo di ricondizionamento di una batteria IMPRES
Motorola (indicatore
GIALLO
), è possibile interrompere il ricondizionamento
rimuovendo la batteria e reinserendola entro 5 secondi. Questa operazione fa sì
che il caricatore termini il processo di ricondizionamento ed inizi quello di carica.
L’indicatore passa dal giallo al
ROSSO
.
37D22-B_Impres_MUC_IT.fm Page 14 Wednesday, July 12, 2006 2:12 PM

Italiano
15
DIAGNOSTICA
Il caricatore adattivo a più unità IMPRES dispone delle seguenti funzioni:
• alimentatore universale (100 V c.a.-240 V c.a., 50/60 Hz)
• caricatore rapido a corrente costante
• caricatore di condizionamento a corrente interrotta (impulso negativo)
• unità di ricondizionamento.
La combinazione di queste funzioni in un caricatore da tavolo è una caratteristica
esclusiva. Non si consiglia perciò di usare la radio munita di batteria mentre è
alloggiata nel caricatore.
L’uso della radio nel caricatore può ridurne leggermente le prestazioni e prolungare
il tempo di carica della batteria.
Verso la fine del ciclo di carica rapida (indicatore
ROSSO
), la tensione della batteria
supera quella normale di esercizio della radio e torna ad un livello normale dopo il
ciclo di carica rapida o quando la batteria viene rimossa dal caricatore.
La radio diventa temporaneamente inutilizzabile se viene accesa mentre il
caricatore è nella modalità di carica rapida. Per ripristinarne la funzionalità, è
sufficiente rimuovere la radio dal caricatore, quindi spegnerla e riaccenderla.
Durante il processo di ricondizionamento, la batteria viene scaricata
completamente, per il qual motivo in questa fase la radio potrebbe non funzionare.
Quando si esegue il processo di diagnostica, osservare l’indicatore del caricatore;
vedere la Tabella 9.
37D22-B_Impres_MUC_IT.fm Page 15 Wednesday, July 12, 2006 2:12 PM

Italiano
16
MANUTENZIONE
Il caricatore adattivo a più unità IMPRES può essere riparato solo da
tecnici specializzati, autorizzati da Motorola. La mancata osservanza di
questo requisito renderà nulla la garanzia dell’unità.
Tabella 10. Diagnostica
Problema Causa Azione correttiva
Indicatore
spento
• Il caricatore e la batteria
non sono in contatto.
• Non arriva alimentazione al
caricatore.
• Controllare che la radio con la
batteria o la sola batteria sia
alloggiata correttamente.
• Verificare che il cavo di
alimentazione sia inserito
correttamente nel caricatore e
nella presa di rete appropriata e
che la corrente venga erogata dalla
presa di rete.
• Sostituire il fusibile (o i fusibili).
Indicatore rosso
lampeggiante
• Il caricatore e la batteria
non sono in contatto.
• La batteria non può essere
caricata.
• Rimuovere e reinserire la batteria
nel caricatore.
• Verificare che la batteria sia una
batteria approvata da Motorola,
come elencato nelle Tabelle 1-6. È
possibile che altri tipi di batterie
non vengano caricati
• Staccare il caricatore dalla presa di
rete, quindi pulire i contatti di
carica, di metallo dorato, della
batteria e del caricatore con un
panno pulito ed asciutto.
• Sostituire la batteria.
Indicatore giallo
lampeggiante
• La batteria è in attesa di
essere caricata. È possibile
che la temperatura della
batteria sia inferiore a 5°C o
superiore a 40°C, oppure
che la tensione della
batteria sia inferiore al
livello di soglia predefinito
per la carica rapida.
• La carica della batteria avrà inizio
non appena le condizioni si sono
normalizzate.
37D22-B_Impres_MUC_IT.fm Page 16 Wednesday, July 12, 2006 2:12 PM

Italiano
17
CARICATORI DOTATI DI MODULO DISPLAY (CDM)
Il caricatore adattivo a più unità IMPRES può essere potenziato
installando un modulo display per caricatori (CDM), codice parte
Motorola RLN5382.
Informazioni generali sul display
Il caricatore adattivo a più unità IMPRES con CDM consente all’utente
di visualizzare dati importanti durante l’esecuzione delle operazioni di
manutenzione e ricondizionamento della batteria. I dati visualizzati dal
caricatore e i relativi indicatori LED sono riportati nelle tabelle che
seguono.
Avvio
Non-IMPRES
Battery in the Pocket (Batteria non IMPRES nel vano)
IMPRES
Battery in the Pocket (Batteria IMPRES nel vano )
Upon Charger Power-up
(All’accensione del caricatore)
LED SINGLE FLASH GREEN (VERDE, LAMPEGGIA UNA
VOLTA)
Riga 1 IMPRES
Riga 2
If There is No Battery in the Pocket
(Nessuna batteria nel vano)
LED OFF (SPENTO)
Riga 1 NO BATTERY (NESSUNA BATTERIA)
Riga 2
Reading Battery Data
(Lettura dei dati della batteria)
LED Any Defined Indication (Qualsiasi indicazione definita)
Riga 1 READING (LETTURA)
Riga 2 BATTERY DATA (DATI BATTERIA)
LED Defined by Charge State (Definito dallo stato di carica)
Riga 1 NON-IMPRES (NON IMPRES)
Riga 2 BATTERY (BATTERIA)
I
MPRES
and Software Versions are Displayed
(Vengono visualizzati IMPRES
e la versione del software)
LED Defined by Charge State (Definito dallo stato di carica)
Riga 1 IMPRES
Riga 2 SW xx.yy; aa.bb
37D22-B_Impres_MUC_IT.fm Page 17 Wednesday, July 12, 2006 2:12 PM

Italiano
18
NOTA:
xx.yy indica la versione software del caricatore, mentre aa.bb
la versione software del CDM.
IMPRES
Battery Kit # and Chemistry are Displayed
(Vengono visualizzati il
numero del kit e il tipo di batteria IMPRES)
LED Defined by Charge State (Definito dallo stato di carica)
Riga 1 KIT# -------- (KIT n.--------)
Riga 2 -----CHEMISTRY (TIPO--------)
Forecasted # of Cycles Prior to Automatic Recondition
(Numero di cicli
previsti prima del ricondizionamento automatico)
LED Defined by Charge State (Definito dallo stato di carica)
Riga 1 ----CYCLES (----CICLI)
Riga 2 TO RECONDITION (AL RICONDIZIONAMENTO)
*Visualizzato solo se il numero di cicli prima del ricondizionamento è inferiore a 6.
Charger Waiting to Charge, Battery is Hot
(Il caricatore è in attesa di iniziare la
carica: la batteria è calda)
LED Flashing ORANGE (ARANCIONE lampeggiante)
Riga 1 WAITING TO CHG (IN ATTESA DI CAR)
Riga 2 HOT BATTERY (BATTERIA CALDA)
Charger Waiting to Charge, Battery is Cold
(Il caricatore è in attesa di iniziare la
carica: la batteria è fredda)
LED Flashing ORANGE (ARANCIONE lampeggiante)
Riga 1 WAITING TO CHG (IN ATTESA DI CAR)
Riga 2 COLD BATTERY (BATTERIA FREDDA)
Charger Waiting to Charge, Low Voltage
(Il caricatore è in attesa di iniziare la
carica: tensione bassa)
LED Flashing ORANGE (ARANCIONE lampeggiante)
Riga 1 WAITING TO CHG (IN ATTESA DI CAR)
Riga 2 LOW VOLTAGE (BASSA TENSIONE)
NOTA:
Non tutte le informazioni summenzionate verranno
visualizzate sul display. Ad esempio, quelle relative all’attesa
di inizio della carica (batteria calda o fredda, bassa tensione)
verranno visualizzate solo quando richiesto dal caso.
37D22-B_Impres_MUC_IT.fm Page 18 Wednesday, July 12, 2006 2:12 PM

Italiano
19
Charger is in Trickle Charge Mode
(Il caricatore è nella modalità di carica di
mantenimento)
LED Flashing GREEN (VERDE lampeggiante)
Riga 1 TRICKLE CHARGE (CARICA DI MANTENIMENTO)
Riga 2
Charge is Complete
(Carica ultimata)
LED Steady GREEN or Flashing RED / GREEN (VERDE; oppure
ROSSO/VERDE lampeggiante)
Riga 1 CHARGE COMPLETE (CARICA ULTIMATA)
Riga 2
Charger is in Discharge/Reconditioning Mode
(Il caricatore è nella modalità di
scarica/ricondizionamento)
LED Steady ORANGE (ARANCIONE)
Riga 1 DISCHARGE (SCARICA)
Riga 2
Charger is Calibrating an IMPRES Battery
(Il caricatore sta calibrando una
batteria IMPRES)
LED Steady ORANGE, Steady RED, & Flashing ORANGE or
GREEN (ARANCIONE, ROSSO, e ARANCIONE o VERDE
lampeggiante )
Riga 1 Calibrating (Calibrazione)
Riga 2 Battery (Batteria)
LED Steady GREEN (VERDE)
Riga 1 Battery (Batteria)
Riga 2 Calibrated (Calibrata)
*Calibrare tutte le batterie IMPRES prima di utilizzarle per la prima volta. Il
caricatore IMPRES avvierà automaticamente il processo di calibrazione in
tutte le batterie nuove.
Battery Capacity Data is Displayed as “%” in mAH, and Voltage
(I dati di
capacità della batteria sono visualizzati come “%”, mAH e tensione)
LED Defined by Charge State (Definito dallo stato di carica)
Riga 1 ----% RATED CAP. (----%CAP NOMINALE)
Riga 2 ----mAH --.-V
37D22-B_Impres_MUC_IT.fm Page 19 Wednesday, July 12, 2006 2:12 PM

Italiano
20
NOTA:
(1) Il tempo stimato fino al completamento della carica
comprende i cicli di carica rapida e di scarica, se
applicabile.
(2) È possibile che i dati di capacità della batteria non vengano
visualizzati in caso di batterie non calibrate.
(3) Se le batterie IMPRES vengono caricate con caricatori non
IMPRES, è possibile alterare la precisione della capacità e
del tempo di carica.
Estimated Time to Rapid Charge
Complete Displayed in Hours, Minutes for NiCd & NiMH IMPRES
Batteries Only
(Il tempo stimato fino al completamento della carica rapida è visualizzato
in ore e minuti solo per le batterie IMPRES al NiCd e NiMH)
LED Defined by Charge State (Definito dallo stato di carica)
Riga 1 RAPID CHG ENDS (FINE CAR RAPIDA)
Riga 2 IN xx HRS, yy MIN (IN xx ORE,yy MIN)
37D22-B_Impres_MUC_IT.fm Page 20 Wednesday, July 12, 2006 2:12 PM

Italiano
21
Diagrammi di Sequenze delle Batterie IMPRESS
Nota: Questi diagrammi si riferiscono alle sequenze illustrate nella sezione “Infor-
mazioni generali sul display” e sono riportati solo in lingua inglese.
Sequenza di visualizzazione delle batterie IMPRES al NiCd e NiMH
LED Defined by Charge State
Riga 1 KIT# xxxxxxxx
Riga 2 SN: yyyyyyyyyyyy
LED Defined by Charge State
Riga 1 KIT# xxxxxxxx
Riga 2 yyyyy CHEMISTRY
LED Defined by Charge State
Riga 1 xxxx CYCLES
Riga 2 TO RECONDITION
LED Steady RED
Riga 1 RAPID CHARGE
Riga 2
LED Defined by Charge State
Riga 1 xx% RATED CAP.
Riga 2 yyyyy mAH zz.z V
LED Defined by Charge State
Riga 1 RAPID CHG ENDS
Riga 2 IN xx HRS, yy MIN
Avvio
(4.0 sec)
(2.0 sec)
(2.0 sec)
(2.0 sec)
(7.0 sec)
(4.0 sec)
Ogni
73.0 sec
Ogni
13.0 sec
5X
65.0
sec
37D22-B_Impres_MUC_IT.fm Page 21 Wednesday, July 12, 2006 2:12 PM

Italiano
22
Prima della calibrazione:
LED Defined by Charge State
Riga 1 KIT# xxxxxxxx
Riga 2 SN: yyyyyyyyyyyy
LED Defined by Charge State
Riga 1 KIT# xxxxxxxx
Riga 2 yyyyy CHEMISTRY
LED Steady ORANGE
Riga 1 DISCHARGE
Riga 2
LED Defined by Charge State
Riga 1 CALIBRATING
Riga 2 BATTERY
LED Defined by Charge State
Riga 1 RAPID CHG ENDS
Riga 2 IN xx HRS, yy MIN
Ogni
71.0 sec
Avvio
(4.0 sec)
(2.0 sec)
(2.0 sec)
(7.0 sec)
(4.0 sec)
Ogni
13.0 sec
5X
65.0
sec
37D22-B_Impres_MUC_IT.fm Page 22 Wednesday, July 12, 2006 2:12 PM

Italiano
23
Dopo la calibrazione:
LED Defined by Charge State
Riga 1 KIT# xxxxxxxx
Riga 2 SN: yyyyyyyyyyyy
LED Defined by Charge State
Riga 1 KIT# xxxxxxxx
Riga 2 yyyyy CHEMISTRY
LED Steady GREEN
Riga 1 CHARGE COMPLETE
Riga 2
LED Defined by Charge State
Riga 1 BATTERY
Riga 2 CALIBRATED
LED Defined by Charge State
Riga 1 xx% RATED CAP.
Riga 2 yyyy mAH zz.z V
Avvio
(4.0 sec)
(2.0 sec)
(2.0 sec)
(2.0 sec)
(7.0 sec)
Ogni
61.0sec
Ogni
11 sec
5X
55.0
sec
37D22-B_Impres_MUC_IT.fm Page 23 Wednesday, July 12, 2006 2:12 PM

Italiano
24
Sequenza di visualizzazione delle batterie IMPRES agli ioni di litio
LED Defined by Charge State
Riga 1 KIT# xxxxxxxx
Riga 2 SN: yyyyyyyyyyyy
LED Defined by Charge State
Riga 1 KIT# xxxxxxxx
Riga 2 yyyyy CHEMISTRY
LED Defined by Charge State
Riga 1 xxxx CYCLES
Riga 2 TO RECONDITION
LED Steady RED
Riga 1 RAPID CHARGE
Riga 2
LED Defined by Charge State
Riga 1 xx% RATED CAP.
Riga 2 yyyyy mAH zz.z V
Avvio
(4.0 sec)
(2.0 sec)
(2.0 sec)
(2.0 sec)
(7.0 sec)
Ogni
53.0 sec
Ogni
9.0 sec
5X
45.0
sec
37D22-B_Impres_MUC_IT.fm Page 24 Wednesday, July 12, 2006 2:12 PM

Italiano
25
Prima della calibrazione:
LED Defined by Charge State
Riga 1 KIT# xxxxxxxx
Riga 2 SN: yyyyyyyyyyyy
LED Defined by Charge State
Riga 1 KIT# xxxxxxxx
Riga 2 yyyyy CHEMISTRY
LED Steady ORANGE
Riga 1 DISCHARGE
Riga 2
LED Defined by Charge State
Riga 1 CALIBRATING
Riga 2 BATTERY
Avvio
(4.0 sec)
(2.0 sec)
(2.0 sec)
(7.0 sec)
Ogni
51.0 sec
Ogni
9.0 sec
5X
45.0
sec
37D22-B_Impres_MUC_IT.fm Page 25 Wednesday, July 12, 2006 2:12 PM

Italiano
26
Dopo la calibrazione:
LED Defined by Charge State
Riga 1 KIT# xxxxxxxx
Riga 2 SN: yyyyyyyyyyyy
LED Defined by Charge State
Riga 1 KIT# xxxxxxxx
Riga 2 yyyyy CHEMISTRY
LED Steady GREEN
Riga 1 CHARGE COMPLETE
Riga 2
LED Defined by Charge State
Riga 1 BATTERY
Riga 2 CALIBRATED
LED Defined by Charge State
Riga 1 xx% RATED CAP.
Riga 2 yyyy mAH zz.z V
Avvio
(4.0 sec)
(2.0 sec)
(2.0 sec)
(2.0 sec)
(7.0 sec)
Ogni
61.0sec
Ogni
11 sec
5X
55.0
sec
37D22-B_Impres_MUC_IT.fm Page 26 Wednesday, July 12, 2006 2:12 PM

Italiano
27
Orientazione del testo sul display
Per consentire il montaggio del caricatore adattivo a più unità IMPRES
su tavolo o su parete, il CDM è dotato della funzione di “rotazione” del
testo visualizzato a 180 gradi.
Per ruotare il testo, inserire una grossa graffa nel piccolo foro
sottostante il display, in direzione perpendicolare alla superficie del
tavolo. Uno scatto segnala l’attivazione del pulsante di selezione della
rotazione e il testo viene ruotato di 180 gradi.
Funzionamento del caricatore adattivo a più unità IMPRES
Per ulteriori informazioni sulla manutenzione e riparazione del
caricatore a più unità e del CDM, consultare il Manuale di
manutenzione del caricatore, 6880309L66.
Manutenzione
Per la riparazione dell’unità, rivolgersi al Centro riparazioni riportato di
seguito. Prima di restituirla, chiamare il Centro per segnalare la
spedizione.
Centro riparazioni Motorola
Motorola GmbH
Customer Care
Am Borsigturm 130
13507 Berlin
Germany.
Tel: +49 30 6686 1555
37D22-B_Impres_MUC_IT.fm Page 27 Wednesday, July 12, 2006 2:12 PM

Italiano
28
Appunti
37D22-B_Impres_MUC_IT.fm Page 28 Wednesday, July 12, 2006 2:12 PM

Nederlands
1
INHOUDSOPGAVE
Belangrijke veiligheidsvoorschriften. . . . . . . . . . . . . . . . . . . . . . . . . . . 2
Richtlijnen voor veilig gebruik . . . . . . . . . . . . . . . . . . . . . . . . . . . . . . . 3
Beschrijving van functies en voorzieningen van IMPRES . . . . . . . . . . 4
Kenmerken en verschillen in gebruik. . . . . . . . . . . . . . . . . . . . . . . . . . 5
Lijst van batterijen . . . . . . . . . . . . . . . . . . . . . . . . . . . . . . . . . . . . . . . . 7
Voedingsbronnen en door Motorola goedgekeurde
voedingsadapters . . . . . . . . . . . . . . . . . . . . . . . . . . . . . . . . . . . . . . . 10
Gebruiksaanwijzing . . . . . . . . . . . . . . . . . . . . . . . . . . . . . . . . . . . . . . 11
Opladen van de batterijen . . . . . . . . . . . . . . . . . . . . . . . . . . . . . . . 13
Handmatig reconditioneren van de batterijen . . . . . . . . . . . . . . . . 14
Automatisch reconditioneren van de batterijen . . . . . . . . . . . . . . . 14
Handmatig beëindigen van de reconditioneringsprocedure . . . . . 15
Problemen en oplossingen . . . . . . . . . . . . . . . . . . . . . . . . . . . . . . . . 16
Service. . . . . . . . . . . . . . . . . . . . . . . . . . . . . . . . . . . . . . . . . . . . . . . . 17
Laders met displaymodule (CDM) . . . . . . . . . . . . . . . . . . . . . . . . . . . 18
Deze accessoirehandleiding is van toepassing op de volgende universele meervoudige
IMPRES-laders:
WPLN4108, WPLN4109, WPLN4110, WPLN4118, WPLN4119, WPLN4120, WPLN4121,
WPLN4123, WPLN4130, WPLN4131, WPLN4132, WPLN4133, WPLN4134,
WPLN4135, WPLN4136
Deze handleiding is tevens van toepassing op de volgende universele meervoudige
IMPRES-laders, die verkrijgbaar zijn voor de portofoons uit de GP Professional Serie:
WPLN4144, WPLN4145, WPLN4146, WPLN4187, WPLN4188, WPLN4189,
WPLN4190, WPLN4191, WPLN4192, WPLN4193, WPLN4194, WPLN4195,
WPLN4196, WPLN4204, WPLN4205
‘Universeel’ betekent dat de lader meerdere radiomodellen ondersteunt en, met
gebruikmaking van batterijadapters, alle batterijen zoals vermeld in tabel 1 tot en met 6.
37D22-B_Impres_MUC_NL.fm Page 1 Wednesday, July 12, 2006 2:47 PM

Nederlands
2
BELANGRIJKE VEILIGHEIDSVOORSCHRIFTEN
BEWAAR DEZE INSTRUCTIES
Dit document bevat belangrijke veiligheidsvoorschriften en instructies voor gebruik.
Lees deze instructies aandachtig door en bewaar het document voor toekomstig
gebruik.
Lees alle instructies en waarschuwingen op (1) de lader zelf, (2) de batterij en (3)
de radio waarin de batterij gebruikt wordt aandachtig door alvorens de lader in
gebruik te nemen.
.
1. Beperk het risico van persoonlijk letsel tot het minimum door
uitsluitend de door Motorola goedgekeurde oplaadbare
batterijen te laden, zoals vermeld in tabel 1 t/m 5. Andere
batterijen kunnen exploderen en persoonlijk letsel en schade
veroorzaken.
2. Gebruik van accessoires die niet zijn aanbevolen door Motorola kan risico
van brand, elektrische schokken of persoonlijk letsel veroorzaken.
3. Beperk het risico van beschadiging van de stekker en het stroomsnoer door
bij het uitschakelen van de lader en verwijderen van het stroomsnoer aan
de stekker te trekken en nooit aan het stroomsnoer zelf.
4. Gebruik geen verlengsnoer tenzij absoluut noodzakelijk. Gebruik van een
ongeschikt verlengsnoer veroorzaakt risico van brand en elektrische
schokken.
5. Beperk het risico van brand, elektrische schokken, of persoonlijk letsel door de
lader niet te gebruiken indien deze op enigerlei wijze is gebroken of beschad-
igd. Breng de lader in dit geval naar een erkend Motorola onderhoudsbedrijf.
6. Dit apparaat kan worden gerepareerd
. Elk laadvak wordt gevoed door een
unieke printkaart met voedingseenheid. De printkaart met voedingseenheid
is verkrijgbaar bij de aftermarket-/onderdelenorganisatie. Het
onderdeelnummer van de reserveprintkaart is RLN5325. Er zijn geen
andere reserveonderdelen verkrijgbaar. Bij de aftermarket-/
onderdelenorganisatie kan een onderhoudshandleiding worden besteld
waarin de procedure voor het vervangen van deze onderdelen wordt
beschreven. Het nummer van de onderhoudshandleiding is 6880309L66.
7. Verwijder de lader altijd eerst uit het stopcontact alvorens onderhoud aan de
lader uit te voeren of de lader te reinigen, om het risico van elektrische
schokken te beperken.
!
WAARSCHUWING
37D22-B_Impres_MUC_NL.fm Page 2 Wednesday, July 12, 2006 2:47 PM

Nederlands
3
RICHTLIJNEN VOOR VEILIG GEBRUIK
• Zet de radio uit wanneer de batterij wordt opgeladen.
• Deze apparatuur is niet geschikt voor gebruik buitenshuis en mag uitsluitend op
droge plaatsen/onder droge omstandigheden worden gebruikt.
• Sluit het apparaat uitsluitend aan op een stopcontact met een geschikte zekering
en met het juiste voltage (zoals vermeld op het product).
• Ontkoppel het apparaat van lijnspanning door de stekker uit het stopcontact te
trekken.
• Het stopcontact waarop het apparaat is aangesloten, dient dichtbij en makkelijk
bereikbaar te zijn.
• Voor apparatuur met zekeringen dienen nieuwe zekeringen overeen te komen
met het type en toelaatbare vermogen zoals vermeld in de instructies van de
apparatuur.
• Maximale omgevingstemperatuur om de lader mag niet hoger zijn dan 40°C.
• Zorg dat het snoer zodanig is gelegd dat niemand erop kan trappen of erover kan
struikelen, en dat het niet kan worden blootgesteld aan water, beschadiging of te
strak gespannen wordt.
• Dit apparaat gebruikt dezelfde muursteun als de meervoudige lader NTN4796.
Het onderdeelnummer van de muursteun is NLN7967.
• Gebruik bij het vervangen van zekeringen alleen zekeringen van het type en
toelaatbare vermogen zoals genoemd op het etiket van de lader. De volgende
onderdelen kunnen bij uw plaatselijke aftermarket-/onderdelencentrum worden
besteld:
Zekering 6571489S01
Houder 0987626G01
Deksel 0987739G01
37D22-B_Impres_MUC_NL.fm Page 3 Wednesday, July 12, 2006 2:47 PM

Nederlands
4
BESCHRIJVING VAN FUNCTIES EN VOORZIENINGEN VAN
IMPRES
De IMPRES-lader is een geavanceerd energiesysteem op basis van drie
chemicaliën dat is ontwikkeld door Motorola, en bevat het volgende: (a) IMPRES-
batterijen, (b) IMPRES Adaptieve meervoudige lader, en (c) radiohardware/-
software voor communicatie tussen de IMPRES-compatibele radio’s en IMPRES-
batterijen (niet van toepassing op portofoons uit de GP Professional Serie).
Indien gebruikt met IMPRES-batterijen van Motorola, biedt de Adaptieve
meervoudige lader van IMPRES het volgende:
• Optimale werkingsduur tussen ladingscycli door automatisch het geheugeneffect
te elimineren.
• Optimale levensduur van de batterij door de warmte tijdens de druppel- en
naladingscycli aanzienlijk te verminderen.
• De noodzaak tot het kopen van reconditioneringsapparatuur en het opleiden van
personeel voor beheer van de onderhoudstaken voor batterijen komt hierbij
geheel te vervallen.
Met dit unieke gepatenteerde systeem hoeft batterijgebruik niet meer te worden
bijgehouden en geregistreerd, zijn handmatige reconditioneringscycli overbodig en
hoeven batterijen niet meer uit de laders te worden verwijderd als ze zijn
opgeladen.
De IMPRES Adaptieve meervoudige lader houdt zelf het gebruikspatroon van de
IMPRES-batterij bij, slaat deze informatie op in de IMPRES-batterij en voert alleen
wanneer nodig een reconditioneringscyclus uit.
De batterij raakt nooit oververhit in de IMPRES Adaptieve meervoudige lader,
ongeacht hoe lang de batterij in het laadvak staat. De lader controleert de batterij
en laadt de batterij automatisch bij wanneer noodzakelijk.
De IMPRES Adaptieve meervoudige lader vereenvoudigt het laden en onderhoud
van de batterij: De gebruiker hoeft slechts de volgende eenvoudige stappen te
volgen:
1. Plaats de radio/batterij in de lader
2. Verwijder de radio/batterij wanneer deze volledig is geladen!
Motorola is de enige fabrikant die een conditionerings- of reconditioneringslader
biedt waarmee gebruikers ofwel de radio met de batterij of alleen de batterij kunnen
laden.
37D22-B_Impres_MUC_NL.fm Page 4 Wednesday, July 12, 2006 2:47 PM

Nederlands
5
KENMERKEN EN VERSCHILLEN IN GEBRUIK:
1. IMPRES-batterijen kunnen in conventionele laders worden geladen. De functie
Smart Energy wordt echter alleen ingeschakeld als elke IMPRES-batterij in een
IMPRES Adaptieve meervoudige lader wordt geladen. De eerste keer dat een
IMPRES-batterij in een IMPRES Adaptieve meervoudige lader wordt geladen,
geeft de laadindicator van de lader een
CONSTANT BRANDEND GEEL
lampje weer. Laat de batterij in de lader staan totdat de laadindicator een
CONSTANT BRANDEND GROEN
lampje weergeeft. De IMPRES-batterij is
dan geijkt en de functie Smart Energy ingeschakeld. Als deze procedure wordt
onderbroken, wordt de batterij de volgende keer wanneer deze in de lader
wordt geplaatst geijkt.
2. De IMPRES Adaptieve meervoudige lader stelt automatisch de
omstandigheden vast waaronder de IMPRES-batterij gereconditioneerd moet
worden. Hierdoor kan het gebeuren dat de lader overschakelt in de
reconditioneringsmodus wanneer er een radio of batterij in de lader wordt
geplaatst. Dit wordt aangegeven met een
CONSTANT BRANDEND GEEL
lampje op de laadindicator. De reconditioneringsmodus kan indien gewenst
worden uitgeschakeld door de radio of batterij uit de lader te verwijderen en
weer in de lader te plaatsen. (Zie de instructies verderop in deze
gebruiksaanwijzing.)
3. De IMPRES Adaptieve meervoudige lader is ontworpen voor het laden van de
batterijen die vermeld worden in tabel 1 t/m 6. De functies van Smart Energy
werken echter alleen met originele IMPRES-batterijen. (Deze lijst zal worden
bijgewerkt wanneer nieuwe modellen radio’s en/of batterijen op de markt
worden gebracht, en zal via de verschillende OEM- en aftermarket-organisaties
over de hele wereld onder de klanten worden verspreid.)
4. Voor het ijken van de IMPRES Smart-batterijen moet gebruik worden gemaakt
van de IMPRES Adaptieve meervoudige lader, om te zorgen dat de gegevens
van het gebruik van de IMPRES-batterij nauwkeurig worden geregistreerd,
opgeslagen en weergegeven.
37D22-B_Impres_MUC_NL.fm Page 5 Wednesday, July 12, 2006 2:47 PM

Nederlands
6
5. Als een IMPRES-batterij wordt gebruikt met een portofoon met display
(bijvoorbeeld de XTS5000), dan kan de portofoon een symbool weergeven dat
de laadstatus van de batterij aangeeft. Dit symbool wordt geactiveerd nadat
een IMPRES-batterij in een IMPRES-lader gekalibreerd is. Het
laderstatussymbool blijft geactiveerd zo lang de batterijen met IMPRES-laders
worden opgeladen. Als een IMPRES-batterij over een periode van 7 dagen (of
langer) echter wordt geladen in een lader anders dan IMPRES, zal het symbool
verdwijnen. U activeert het symbool weer door een IMPRES-batterij in een
IMPRES-lader te plaatsen en deze de volledige laadcyclus te laten doorlopen
(aangeduid met een
CONSTANT BRANDEND GROEN
lampje). Het
laadstatussymbool wordt dan weer op het display van de portofoon
weergegeven. Als het symbool na een volledige laadcyclus niet opnieuw wordt
weergegeven, plaatst u een gedeeltelijk ontladen batterij (ten minste 70%
ontladen) in de lader, start u een reconditioneringscyclus en laat u de batterij de
volledige laadcyclus doorlopen. Het symbool wordt dan op het display van de
portofoon weergegeven (niet van toepassing op portofoons uit de GP
Professional Serie).
6. De IMPRES Adaptieve meervoudige lader mag alleen gerepareerd worden
door een bevoegd servicemonteur, die door Motorola goedgekeurd is. Bij
overtreding van dit voorschrift kan de garantie op het apparaat vervallen.
37D22-B_Impres_MUC_NL.fm Page 6 Wednesday, July 12, 2006 2:47 PM

Nederlands
7
LIJST VAN BATTERIJEN
De onderstaande tabel vermeldt alle batterijen die kunnen worden gebruikt met de
specifieke portofoons zoals vermeld boven aan de tabel.
* Voor de lader is batterij-adapter nummer RLN5212 vereist als MTP700-batterijen
worden opgeladen.
Tabel 1. Radio’s in de serie XTS3000 / XTS3500 / Dimetra & de XTS5000
digitale radio
Kit (PN) Chemicaliën FM Smart Capaciteit Nieuw model
HNN9031 NiCD Nee Ja Ultra-hoog Nee
HNN9032 NiCD Ja Ja Ultra-hoog Nee
NTN8294 NiCD Nee Nee Ultra-hoog Nee
NTN8295 NiCD Ja Nee Ultra-hoog Nee
NTN8297 NiCD Ja Nee Ultra-hoog Nee
NTN8299 NiCD Ja Nee Ultra-hoog Nee
NTN8610 LiIon Nee Nee Hoog Nee
NTN8293 NiMH Nee Nee Ultra-hoog Nee
NNTN4435 NiMH Nee Ja Ultra-hoog Nee
NNTN4436 NiMH Ja Ja Ultra-hoog Nee
NNTN4437 NiMH Ja Ja Ultra-hoog Nee
RNN4006 NiMH Nee Nee Ultra-hoog Nieuw
RNN4007 NIMH Ja Nee Ultra-hoog Nieuw
NTN9862 LiIon Nee Ja Ultra-hoog Nieuw
Tabel 2. De XTS2500 digitale radio’s
Kit (PN) Chemicaliën FM Smart Capaciteit Nieuw model
NTN9859 NiMH Nee Nee Ultra-hoog Nieuw
NTN9857 NiMH Ja Nee Ultra-hoog Nieuw
NTN9815 NiCD Nee Nee Hoog Nieuw
NTN9816 NiCD Ja Nee Hoog Nieuw
Tabel 3. De MTP700 digitale radio’s
Kit (PN) Chemicaliën FM Smart Capaciteit Nieuw model
PMNN4048* NiMH Nee Ja Hoog Nieuw
PMNN4049* NiMH Ja Ja Hoog Nieuw
PMNN4050* Lilon Nee Ja Hoog Nieuw
PMNN4047* LiIon Nee Ja Hoog Nieuw
37D22-B_Impres_MUC_NL.fm Page 7 Wednesday, July 12, 2006 2:47 PM

Nederlands
8
** Voor de lader is batterij-adapter nummer 4385922B01 vereist als Astro Saber-
batterijen worden opgeladen
.
Tabel 4. De radio’s in de serie HT1000 / MT2000 / MTS2000 / MTX8000 &
MTX9000
Kit (PN) Chemicaliën FM Smart Capaciteit Nieuw model
HNN9028 NiCD Nee Ja Ultra-hoog Nee
HNN9029 NiCD Ja Ja Ultra-hoog Nee
NTN7143 NiCD Nee Nee Hoog Nee
NTN7144 NiCD Nee Nee Ultra-hoog Nee
NTN7146 NiCD Ja Nee Hoog Nee
NTN7147 NiCD Ja Nee Ultra-hoog Nee
NTN7148 NiCD CENELEC Nee Hoog No
NTN7149 NiCD CSA Nee Hoog Nee
NTN7150 NiCD MSHA Nee Hoog Nee
NTN7341 NiCD Ja Nee Ultra-hoog Nee
NTN7372 NiCD Ja Nee Hoog Nee
WPPN4013 NiMH Nee Nee Ultra-hoog Nee
WPPN4037 NiMH Ja Nee Ultra-hoog Nee
RNN4008 NiCD ATEX Nee Hoog No
Tabel 5. De Saber / Astro Saber / SSE5000 / MX1000-radio’s
Kit (PN) Chemicaliën FM Smart Capaciteit Nieuw model
HNN9033 NiCD Nee Ja Ultra-hoog Nee
HNN9031 NiCD Ja Ja Ultra-hoog Nee
NTN4537** NiCD Ja Nee Lag Nee
NTN4538 NiCD Ja Nee Hoog Nee
NTN4592** NiCD Nee Nee Lag Nee
NTN4593 NiCD Nee Nee Hoog Nee
NTN4595 NiCD Nee Nee Ultra-hoog Nee
NTN4596 NiCD Ja Nee Ultra-hoog Nee
NTN4657 NiCD Nee Nee Hoog Nee
NTN4671 NiCD CENELEC Nee Hoog No
NTN4992 NiCD Ja Nee Ultra-hoog Nee
NTN7014** NiMH Nee Nee Hoog Nee
NTN7058 NiCD Ja Nee Ultra-hoog Nee
NTN7426 NiCD Ja Nee Lag Nee
NTN8251 NiMH Ja Nee Ultra-hoog Nee
NTN8818** LiIon Nee Nee Hoog Nee
37D22-B_Impres_MUC_NL.fm Page 8 Wednesday, July 12, 2006 2:47 PM

Nederlands
9
De universele lader vereist een batterijadapter, onderdeelnummer RLN5648.
Tabel 6. Portofoons uit de GP Professional Serie
Kit (PN) Chemicaliën FM Smart Capaciteit
Nieuw
model
HNN9003 NiMH
AA Bluetooth
Nee Nee Hoog Nee
HNN9008 NiMH Nee Nee Hoog Nee
HNN9009 NiMH Nee Nee Ultra-hoog Nee
HNN9010 NiMH Ja Nee Ultra-hoog Nee
HNN9011 NiCD Ja Nee Hoog Nee
HNN9012 NiCD Nee Nee Hoog Nee
HNN9013 LiIon Nee Nee Hoog Nee
WPNN4045 NiMH Nee Nee Hoog Nee
PMNN4045 NiMH Nee Nee Hoog Nee
HNN4001 Impres NiMH Nee Ja Ultra-hoog Ja
HNN4002 Impres NiMH Ja Ja Ultra-hoog Ja
HNN4003 Impres LiIon Nee Ja Ultra-hoog Ja
OPMERKING:
Adapters zijn verkrijgbaar bij de verkoper van de radio of bij een
vertegenwoordiger van het aftermarket-verkoopteam.
37D22-B_Impres_MUC_NL.fm Page 9 Wednesday, July 12, 2006 2:47 PM

Nederlands
10
VOEDINGSBRONNEN EN DOOR MOTOROLA GOEDGEKEURDE
VOEDINGSADAPTERS
Deze lader is bedoeld voor gebruik in toepassingen van 100 V - 240 V
wisselstroom, 50/60 Hz. De lader gebruikt de volgende stroomkabels van Motorola,
zoals vermeld in tabel 7. Stroomkabels voor gebruik met de lader voor portofoons
uit de GP Professional Serie worden vermeld in tabel 8.
Tabel 7. Stroomkabels van Motorola voor de universele modellen
Stekkertype Lader-kit Lader-kit
(Model met display)
Stroomkabel
Geen stroomkabel/
stekker
WPLN4121 WPLN4127 Geen
VS/n.v.t WPLN4108 WPLN4130 3087791G01
Euro WPLN4109 WPLN4131 3087791G04
U.K. WPLN4110 WPLN4132 3087791G07
Australië/Nieuw Zeeland WPLN4118 WPLN4133 3087791G10
Argentinië WPLN4119 WPLN4134 3087791G13
VS/n.v.t WPLN4120 WPLN4135 3087791G01
Korea WPLN4123 WPLN4136 3087791G16
Tabel 8. Stroomkabels van Motorola voor modellen uit de GP
Professional Serie
Stekkertype Lader-kit Lader-kit
(Model met display)
Stroomkabel
Geen stroomkabel/
stekker
WPLN4197 WPLN4198 Geen
VS/n.v.t WPLN4187 WPLN4192 3087791G01
Euro WPLN4189 WPLN4194 3087791G04
U.K. WPLN4188 WPLN4193 3087791G07
Australië/Nieuw Zeeland WPLN4190 WPLN4195 3087791G10
Argentinië WPLN4191 WPLN4196 3087791G13
VS/n.v.t WPLN4205 WPLN4204 3087791G01
Korea WPLN4146 WPLN4145 3087791G16
37D22-B_Impres_MUC_NL.fm Page 10 Wednesday, July 12, 2006 2:47 PM

Nederlands
11
GEBRUIKSAANWIJZING
In het laadvak van de lader kan een radio met batterij of alleen de batterij worden
geplaatst. Alvorens een radio met batterij te laden, de radio altijd eerst
uitschakelen. Batterijen worden het beste geladen wanneer ze tijdens het laden op
kamertemperatuur zijn.
1. Steek het uiteinde van de stroomkabel voor de lader in de
wisselstroomaansluiting op de achterkant van de lader.
2. Steek de stekker aan het andere uiteinde van de stroomkabel in een geschikt
stopcontact. Als de opstartprocedure goed verloopt, ziet u een
ENKEL
KNIPPEREND GROEN
lampje op de laadindicator.
3. Plaats een batterij, of een radio met batterij (radio uitgeschakeld), als volgt in
het laadvak van de lader:
a. Richt de groef aan elke kant van de batterij uit op de opstaande rand aan
beide zijden van het laadvak.
b. Duw de batterij tegen de achterkant van het laadvak.
c. Schuif de batterij in het laadvak, waarbij u erop moet letten dat de lader en
de batterijcontacten goed contact maken.
Als de batterij goed in het laadvak is geplaatst, gaat de laadindicator branden om
aan te geven dat de lader een batterij in het laadvak heeft geregistreerd. Raadpleeg
tabel 9 voor informatie over de betekenis van de laadlampjes.
OPMERKINGEN
Met de IMPRES adaptieve meervoudige lader worden alleen de
batterijen geladen die zijn goedgekeurd door Motorola, zoals
vermeld in tabel 1 t/m 6. Andere batterijen kunnen veelal niet
worden geladen met de lader.
De IMPRES adaptieve meervoudige lader heeft automatische
functies en voorzieningen die verschillen van andere
batterijladers.
Let goed op de laadindicator om te controleren dat
de lader in de gewenste/verwachte gebruiksmodus werkt.
37D22-B_Impres_MUC_NL.fm Page 11 Wednesday, July 12, 2006 2:47 PM

Nederlands
12
De functies van de Motorola Smart-batterijen en het adaptieve laadsysteem kunnen
alleen volledig werken als de gegevens in de Motorola Smart-batterijen bij de
eerste lading in de lader worden geïnitialiseerd. Deze procedure wordt aangegeven
met een
CONSTANT BRANDEND GEEL
lampje op de laadindicator (dezelfde
indicatie als wanneer de batterij wordt gereconditioneerd). Deze procedure, die
geheel automatisch is, omvat tevens een eerste reconditionering van de batterij.
Na voltooiing hiervan wordt de batterij geladen. De initialisering neemt enige tijd in
beslag, en de batterij dient daarom bij de eerste lading een hele nacht in de lader te
blijven staan.
Tabel 9. Laadlampjes
Laadindicator Betekenis
Enkel knipperend groen
Opstartprocedure van lader is met succes voltooid.
Constant brandend rood
Batterij werkt in snellaadmodus.
Groen knipperend
Snellaadprocedure is voltooid (>90% beschikbare
capaciteit). Batterij is nu in afrondingsmodus
(druppellading).
Constant brandend
groen
Opladen is voltooid en de batterij is geheel geladen.
Geel knipperend
Lader heeft batterij geregistreerd maar wacht op opladen.
(De spanning van de batterij is te laag of de temperatuur
van de batterij is te laag of te hoog om geladen te kunnen
worden. De batterij wordt opgeladen zodra deze toestand is
gecorrigeerd.)
Rood knipperend
Batterij kan niet worden geladen of maakt geen contact met
de lader.
Constant brandend geel
(Deze functie is uitsluitend voor Smart-batterijen)
Batterij is in reconditioneringsmodus. De tijdsduur dat de
batterij in deze modus blijft, is afhankelijk van de lading van
de batterij op het moment dat deze in de lader wordt
geplaatst. (Geheel geladen batterijen nemen meer tijd in
beslag voor reconditioneren – 8 uur of langer – dan
batterijen die helemaal leeg zijn.)
Rood/groen knipperend
(Deze functie is uitsluitend voor Smart-batterijen)
Opladen is voltooid en batterij is geheel geladen. Hoewel
de batterij nog kan worden gebruikt, moet deze
waarschijnlijk binnenkort worden vervangen.
OPMERKING
Indien gebruikt met Motorola IMPRES-batterijen beschikt de IMPRES Adaptieve
meervoudige lader over het unieke vermogen automatisch te kunnen registreren
of de in de lader geplaatste batterij gereconditioneerd moet worden.
37D22-B_Impres_MUC_NL.fm Page 12 Wednesday, July 12, 2006 2:47 PM

Nederlands
13
De IMPRES Adaptieve meervoudige lader functioneert als:
• een lader met alle door Motorola goedgekeurde batterijen, en
• een reconditioneringsapparaat met door Motorola goedgekeurde IMPRES-
batterijen.
Opladen van de batterijen
Voor optimale prestaties wordt u aanbevolen nieuwe batterijen 14 tot 16 uur in de
lader te laten staan alvorens deze in gebruik te nemen.
1. Als de radio met batterij of de losse batterij goed in de lader is geplaatst, begint
de lader met de snellaadprocedure, hetgeen wordt aangegeven met een
CONSTANT BRANDEND ROOD
lampje op de laadindicator. De duur dat het
CONSTANT BRANDENDE RODE
lampje blijft branden, is afhankelijk van de
lading die de batterij heeft op het moment dat deze in de lader wordt geplaatst.
2. Als de snellaadprocedure is voltooid (>90% beschikbare capaciteit), verschijnt
er een
KNIPPEREND GROEN
lampje op de laadindicator. Hiermee wordt de
afrondingslading (druppellading) aangegeven, hetgeen ongeveer 1 uur duurt.
3. Als de afrondingslading is voltooid, verschijnt er een
CONSTANT BRANDEND
GROEN
lampje op de laadindicator. Hiermee wordt aangegeven dat de batterij
geheel geladen is.
4. Andere lampjes die tijdens het laden op de laadindicator kunnen verschijnen,
zijn:
•
KNIPPEREND GEEL
– geeft aan dat ofwel de temperatuur van de batterij
of de spanning van de batterij buiten bereik is voor opladen. Het laden
wordt weer hervat zodra deze toestand is gecorrigeerd.
•
KNIPPEREND ROOD EN GROEN
– geeft aan dat de batterij tegen het
einde van zijn levensduur loopt. Zelf als de batterij volledig is geladen zal
de capaciteit toch zijn verminderd, waardoor de batterij bepaalde
intensievere toepassingen wellicht niet meer goed kan verwerken. Deze
functie is uitsluitend beschikbaar bij gebruik van Motorola IMPRES-
batterijen. Dit is geen aanduiding van een defect, maar meer een melding
om de gebruiker op de hoogte te stellen dat de batterij binnenkort niet meer
BELANGRIJK:
Het laadvak is geschikt voor batterijen van verschillende vormen en grootten,
en het is daarom uiterst belangrijk dat een radio met batterij of een losse
batterij correct in het laadvak wordt geplaatst. Als een radio met batterij of
een losse batterij niet goed in het laadvak is geplaatst, gaat de indicator niet
branden, hetgeen betekent dat de batterij niet wordt geladen.
OPMERKING:
Bij het laden van nieuwe (nog niet eerder gebruikte) batterijen wordt in
sommige gevallen vroegtijdig aangegeven dat de batterij is geladen
(
CONSTANT BRANDEND GROEN
lampje).
37D22-B_Impres_MUC_NL.fm Page 13 Wednesday, July 12, 2006 2:47 PM

Nederlands
14
goed zal functioneren en aan vervanging toe is.
•
KNIPPEREND ROOD
– geeft aan dat de batterij niet kan worden geladen.
Dit kan veroorzaakt worden doordat er geen contact is tussen de contacten
van de batterij en de lader. Het opladen wordt hervat zodra deze toestand
is verholpen.
Motorola Smart-batterijen hebben een intern geheugenapparaat, dat wordt gelezen
door de Motorola IMPRES Adaptieve meervoudige lader. Als een IMPRES-batterij
meer dan 2 ½ minuut wordt geladen, behoudt de IMPRES Adaptieve lader het
serienummer van de IMPRES-batterij.
De IMPRES-batterij kan dan gedurende
maximaal 30 minuten uit de lader worden verwijderd. Wanneer de batterij weer in
de lader wordt geplaatst, hervat de lader de laadprocedure weer vanaf het punt
waarop de batterij uit de lader werd verwijderd.
Handmatig reconditioneren van de batterijen
Binnen 2 ½ minuut nadat een IMPRES-batterij voor het eerst in de lader is
geplaatst (
CONSTANT BRANDEND ROOD
lampje), verwijdert u de batterij en
plaatst u deze binnen 5 seconden weer in de lader om handmatige reconditionering
te starten. De laadindicator verandert van een
CONSTANT BRANDEND ROOD
lampje in een
CONSTANT BRANDEND GEEL
lampje. De lader zal de batterij eerst
reconditioneren en vervolgens opladen.
Automatisch reconditioneren van de batterijen
Indien gebruikt met een Motorola IMPRES-batterij heeft de Motorola IMPRES
Adaptieve meervoudige lader het vermogen te bepalen wanneer de batterij moet
worden gereconditioneerd.
Als een IMPRES-batterij goed in de lader is geplaatst, kan de lader bepalen of de
batterij gereconditioneerd moet worden. Als de batterij moet worden
gereconditioneerd, verschijnt er automatisch een
CONSTANT BRANDEND GEEL
lampje op de laadindicator. Deze procedure kan maximaal 8 uur duren, afhankelijk
van de lading en het vermogen van de batterij wanneer deze in de lader wordt
geplaatst.
OPMERKING:
Overmatig gebruik van deze functie heeft een negatieve invloed op
de levensduur van de batterij.
37D22-B_Impres_MUC_NL.fm Page 14 Wednesday, July 12, 2006 2:47 PM

Nederlands
15
Voor effectieve werking van deze functie is het belangrijk dat de procedure
voor reconditioneren en opladen van de batterij geheel wordt afgerond. Laat
de batterij in de lader staan totdat er een
CONSTANT BRANDEND GROEN
lampje op de laadindicator verschijnt.
Als de reconditionering is voltooid, wordt de batterij automatisch opgeladen.
Handmatig beëindigen van de reconditioneringsprocedure
Op elk gewenst moment tijdens de reconditionering van een Motorola IMPRES-
batterij (
CONSTANT BRANDEND GEEL
lampje), kan de reconditionering worden
afgebroken door de batterij uit de lader te verwijderen en binnen 5 seconden weer
in de lader te plaatsen. Hierdoor zal de lader de reconditionering beëindigen en
beginnen met het opladen van de batterij. De laadindicator verandert in een
CONSTANT BRANDEND ROOD
lampje.
37D22-B_Impres_MUC_NL.fm Page 15 Wednesday, July 12, 2006 2:47 PM

Nederlands
16
PROBLEMEN EN OPLOSSINGEN
De IMPRES Adaptieve meervoudige lader beschikt over het volgende:
• een universele voedingsingang (100 V - 240 V wisselstroom, 50/60 Hz)
• een snellader met constante stroomsterkte,
• een conditioneringslader met onderbroken stroom (negatieve puls)
• een reconditioneringseenheid.
De hierboven vermelde functies zijn uniek voor een desktop-lader. Wanneer u een
radio met batterij in de lader plaatst, wordt gebruik van de radio afgeraden.
Wanneer een radio in de lader is geplaatst, kan dit een minimale storing in de
werking van de radio veroorzaken en kan het opladen van de batterij langer duren.
Tegen het einde van de snellaadcyclus (
CONSTANT BRANDEND ROOD
lampje),
overschrijdt de spanning van de batterij de normale gebruiksspanning van de radio.
De spanning bereikt het normale niveau na de snellaadmodus of wanneer de
batterij uit de lader wordt verwijderd.
Als de radio wordt ingeschakeld wanneer de lader in snellaadmodus werkt, wordt
de radio tijdelijk onbruikbaar. Dit wordt verholpen door de radio uit de lader te
verwijderen en de radio uit en weer in te schakelen.
Tijdens de reconditioneringsprocedure wordt alle spanning uit de batterij verwijderd.
Hierdoor is het mogelijk dat de radio niet werkt tijdens reconditionering.
Let bij het oplossen van problemen altijd op de laadindicator – raadpleeg tabel 9.
37D22-B_Impres_MUC_NL.fm Page 16 Wednesday, July 12, 2006 2:47 PM

Nederlands
17
SERVICE
De IMPRES Adaptieve meervoudige lader mag alleen gerepareerd worden door
een bevoegd servicemonteur, die door Motorola goedgekeurd is. Bij overtreding
van dit voorschrift kan de garantie op het apparaat vervallen.
Tabel 10. Problemen en oplossingen
Probleem Verklaring Oplossing
Geen
laadindicator
• Geen contact met de lader.
• Geen stroom naar de lader.
• Controleer of de radio met batterij
of de losse batterij goed in de lader
is geplaatst.
• Controleer of de stroomkabel goed
is aangesloten op de lader en dat
een geschikt stopcontact wordt
gebruikt, en dat er stroom staat op
het stopcontact.
• Vervang de zekering(en).
Knipperend
rood lampje
• Geen contact met de lader.
• Batterij kan niet worden
geladen.
• Verwijder de batterij uit de lader en
plaats deze dan weer in de lader.
• Controleer of de batterij tot de door
Motorola goedgekeurde batterijen
behoort, zoals vermeld in tabel 1 t/
m 6. Andere batterijen kunnen
veelal niet worden geladen.
• Verwijder de stroomaansluiting van
de lader en reinig de goudmetalen
laadcontacten op de batterij en de
lader met een schone droge doek.
• Vervang de batterij.
Knipperend
geel lampje
• Batterij wacht om te worden
geladen. De temperatuur
van de batterij is misschien
lager dan 5°C of hoger dan
40°C, of de spanning van
de batterij is lager dan de
vooringestelde
drempelwaarde voor
snelladen.
• Zodra deze toestand is
gecorrigeerd, begint de lader met
het opladen van de batterij.
37D22-B_Impres_MUC_NL.fm Page 17 Wednesday, July 12, 2006 2:47 PM

Nederlands
18
LADERS MET DISPLAYMODULE (CDM)
De IMPRES Adaptieve meervoudige lader kan worden uitgebreid met
een laderdisplaymodule (CDM), Motorola-onderdeelnr. RLN5382.
Algemene informatie op display
De IMPRES Adaptieve meervoudige lader met CDM geeft de
gebruiker waardevolle informatie tijdens het onderhouden en
verzorgen van de batterij. De onderstaande tabellen geven een
overzicht van de informatie op het laderdisplay en de betekenis van de
lampjes.
Opstarten
Non-IMPRES
Battery in the Pocket (Niet-IMPRES batterij in laadvak)
IMPRES
Battery in the Pocket (IMPRES-batterij in laadvak)
Upon Charger Power-up (Wanneer de lader wordt ingeschakeld)
Lampje SINGLE FLASH GREEN (ENKEL KNIPPEREND GROEN)
Regel 1 IMPRES (IMPRES)
Regel 2
If There is No Battery in the Pocket (Geen batterij in laadvak)
Lampje OFF (UIT)
Regel 1 NO BATTERY (GEEN BATTERIJ)
Regel 2
Reading Battery Data
(
Batterijgegevens worden gelezen
)
Lampje Any Defined Indication (Een van de specifieke aanduidin-
gen)
Regel 1 READING (BEZIG MET LEZEN VAN)
Regel 2 BATTERY DATA (BATTERIJGEGEVENS)
Lampje Defined by Charge State (Afhankelijk van laadstatus)
Regel 1 NON-IMPRES (NIET-IMPRES)
Regel 2 BATTERY (BATTERIJ)
IMPRES en softwareversies worden weergegeven
Lampje Defined by Charge State (Afhankelijk van laadstatus)
Regel 1 IMPRES (IMPRES)
Regel 2 SW xx.yy; aa.bb (SW xx.yy;aa.bb)
37D22-B_Impres_MUC_NL.fm Page 18 Wednesday, July 12, 2006 2:47 PM

Nederlands
19
OPMERKING:
xx.yy geeft de softwareversie van de lader aan, en aa.bb de
softwareversie van de CDM.
IMPRES
Battery Kit # and Chemistry are Displayed (IMPRES-batterijkit
# en Chemistry worden weergegeven)
Lampje Defined by Charge State (Afhankelijk van laadstatus)
Regel 1 KIT# -------- (KIT#--------)
Regel 2 -----CHEMISTRY (-----CHEMISTRY)
Forecasted # of Cycles Prior to Automatic Recondition (Verwacht
aantal cycli voor automatische reconditionering)
Lampje Defined by Charge State (Afhankelijk van laadstatus)
Regel 1 ----CYCLES (----CYCLI)
Regel 2 TO RECONDITION (TOT RECONDITIONEREN)
* Wordt alleen weergegeven wanneer reconditionering in minder dan 6 cycli
verwacht wordt.
Charger Waiting to Charge, Battery is Hot (Lader wacht met laden,
batterij is heet )
Lampje Flashing ORANGE (Knipperend ORANJE)
Regel 1 WAITING TO CHG (WACHT MET LADEN)
Regel 2 HOT BATTERY (HETE BATTERIJ)
Charger Waiting to Charge, Battery is Cold (Lader wacht met laden,
batterij is koud)
Lampje Flashing ORANGE (Knipperend ORANJE)
Regel 1 WAITING TO CHG (WACHT MET LADEN)
Regel 2 COLD BATTERY (KOUDE BATTERIJ)
Charger Waiting to Charge, Low Voltage (Lader wacht met laden, lage
spanning)
Lampje Flashing ORANGE (Knipperend ORANJE)
Regel 1 WAITING TO CHG (WACHT MET LADEN)
Regel 2 LOW VOLTAGE (LAGE SPANNING)
OPMERKING:
Niet alle hierboven genoemde schermen zullen worden
weergegeven. Lader wacht met laden (hete batterij, koude
batterij, lage spanning) wordt bijvoorbeeld alleen weergegeven
wanneer dit nodig is.
37D22-B_Impres_MUC_NL.fm Page 19 Wednesday, July 12, 2006 2:47 PM

Nederlands
20
Charger is in Trickle Charge Mode (Lader in druppellaadmodus)
Lampje Flashing GREEN (Knipperend GROEN)
Regel 1 TRICKLE CHARGE (DRUPPELLADING)
Regel 2
Charge is Complete (Laden voltooid)
Lampje Steady GREEN or Flashing RED / GREEN (Constant
brandend GROEN of knipperend ROOD /GROEN )
Regel 1 CHARGE COMPLETE (LADEN VOLTOOID)
Regel 2
Charger is in Discharge/Reconditioning Mode (Lader in ontlaad-/
reconditioneringsmodus)
Lampje Steady ORANGE (Constant brandend ORANJE)
Regel 1 DISCHARGE (ONTLADEN)
Regel 2
Charger is Calibrating an IMPRES Battery (Lader kalibreert een
IMPRES-batterij)
Lampje Steady ORANGE, Steady RED, & Flashing ORANGE or
GREEN (Constant brandend ORANJE, constant brandend
ROOD en knipperend ORANJE of GROEN)
Regel 1 Calibrating (Bezig met kalibreren)
Regel 2 Battery (van batterij)
Lampje Steady GREEN (Constant brandend GROEN)
Regel 1 Battery (Batterij)
Regel 2 Calibrated (gekalibreerd)
*Alle IMPRES-batterijen moeten worden gekalibreerd alvorens u ze voor het
eerst in gebruik neemt. Een IMPRES-lader zal voor alle nieuwe batterijen
automatisch een kalibratie starten.
Battery Capacity Data is Displayed as “%” in mAH, and Voltage
(Gegevens over de batterijcapaciteit worden weergegeven als “%” in
mAH, en Voltage)
Lampje Defined by Charge State (Afhankelijk van laadstatus)
Regel 1 ----% RATED CAP. (----% NOM. CAP.)
Regel 2 ----mAH --.-V (----mAH --.-V)
37D22-B_Impres_MUC_NL.fm Page 20 Wednesday, July 12, 2006 2:47 PM

Nederlands
21
OPMERKING:
(1) Geschatte tijd tot voltooiing van de lading is met inbegrip
van snellaad- en ontlaadcycli (indien van toepassing).
(2) Voor niet-gekalibreerde batterijen wordt mogelijk geen
informatie over batterijcapaciteit weergegeven.
(3) Het gebruik van IMPRES-batterijen in combinatie met
laders anders dan IMPRES-laders kan een negatieve
invloed hebben op de capaciteit en nauwkeurigheid van de
laadduur.
Estimated Time to Rapid Charge
Complete Displayed in Hours, Minutes for NiCd & NiMH IMPRES
Batteries Only
Geschatte tijd tot snellading Voor NiCd & NiMH IMPRES wordt tijd tot
voltooiing weergegeven in uren en minuten Alleen batterijen
Lampje Defined by Charge State (Afhankelijk van laadstatus)
Regel 1 RAPID CHG ENDS (EINDE SNELLADEN)
Regel 2 IN xx HRS, yy MIN (OVER xx UUR,jj MIN)
37D22-B_Impres_MUC_NL.fm Page 21 Wednesday, July 12, 2006 2:47 PM

Nederlands
22
Procedureschema's voor IMPRES-batterijen
Opmerking:
deze schema’s geven een overzicht van de procedures
vermeld in
‘Algemene informatie op display’
en zijn alleen in het
Engels beschikbaar.
Volgorde van weergave bij IMPRES NiCd- en NiMH-batterij
Lampje Defined by Charge State
Regel 1 KIT# xxxxxxxx
Regel 2 SN: yyyyyyyyyyyy
Lampje Defined by Charge State
Regel 1 KIT# xxxxxxxx
Regel 2 yyyyy CHEMISTRY
Lampje Defined by Charge State
Regel 1 xxxx CYCLES
Regel 2 TO RECONDITION
Lampje Steady RED
Regel 1 RAPID CHARGE
Regel 2
Lampje Defined by Charge State
Regel 1 xx% RATED CAP.
Regel 2 yyyyy mAH zz.z V
Lampje Defined by Charge State
Regel 1 RAPID CHG ENDS
Regel 2 IN xx HRS, yy MIN
Start
(4,0 sec)
(2,0 sec)
(2,0 sec)
(2,0 sec)
(7,0 sec)
(4,0 sec)
Elke
73,0 sec
Elke
13,0 sec
5 x 65,0
sec
37D22-B_Impres_MUC_NL.fm Page 22 Wednesday, July 12, 2006 2:47 PM

Nederlands
23
Voor kalibratie:
Lampje Defined by Charge State
Regel 1 KIT# xxxxxxxx
Regel 2 SN: yyyyyyyyyyyy
Lampje Defined by Charge State
Regel 1 KIT# xxxxxxxx
Regel 2 yyyyy CHEMISTRY
Lampje Steady ORANGE
Regel 1 DISCHARGE
Regel 2
Lampje Defined by Charge State
Regel 1 CALIBRATING
Regel 2 BATTERY
Lampje Defined by Charge State
Regel 1 RAPID CHG ENDS
Regel 2 IN xx HRS, yy MIN
Every
71.0 sec
Start
(4,0 sec)
(2,0 sec)
(2,0 sec)
(7,0 sec)
(4,0 sec)
Every
13,0 sec
5X
65.0
sec
37D22-B_Impres_MUC_NL.fm Page 23 Wednesday, July 12, 2006 2:47 PM

Nederlands
24
Na kalibratie:
Lampje Defined by Charge State
Regel 1 KIT# xxxxxxxx
Regel 2 SN: yyyyyyyyyyyy
Lampje Defined by Charge State
Regel 1 KIT# xxxxxxxx
Regel 2 yyyyy CHEMISTRY
Lampje Steady GREEN
Regel 1 CHARGE COMPLETE
Regel 2
Lampje Defined by Charge State
Regel 1 BATTERY
Regel 2 CALIBRATED
Lampje Defined by Charge State
Regel 1 xx% RATED CAP.
Regel 2 yyyy mAH zz.z V
Start
(4,0 sec)
(2,0 sec)
(2,0 sec)
(2,0 sec)
(7,0 sec)
Every
61,0sec
Every
11 sec
5X
55,0
sec
37D22-B_Impres_MUC_NL.fm Page 24 Wednesday, July 12, 2006 2:47 PM

Nederlands
25
Volgorde van weergave bij IMPRES Li-Ionbatterij
Lampje Defined by Charge State
Regel 1 KIT# xxxxxxxx
Regel 2 SN: yyyyyyyyyyyy
Lampje Defined by Charge State
Regel 1 KIT# xxxxxxxx
Regel 2 yyyyy CHEMISTRY
Lampje Defined by Charge State
Regel 1 xxxx CYCLES
Regel 2 TO RECONDITION
Lampje Steady RED
Regel 1 RAPID CHARGE
Regel 2
Lampje Defined by Charge State
Regel 1 xx% RATED CAP.
Regel 2 yyyyy mAH zz.z V
Start
(4,0 sec)
(2,0 sec)
(2,0 sec)
(2,0 sec)
(7,0 sec)
Every
53,0 sec
Every
9,0 sec
5X
45,0
sec
37D22-B_Impres_MUC_NL.fm Page 25 Wednesday, July 12, 2006 2:47 PM

Nederlands
26
Voor kalibratie:
Lampje Defined by Charge State
Regel 1 KIT# xxxxxxxx
Regel 2 SN: yyyyyyyyyyyy
Lampje Defined by Charge State
Regel 1 KIT# xxxxxxxx
Regel 2 yyyyy CHEMISTRY
Lampje Steady ORANGE
Regel 1 DISCHARGE
Regel 2
Lampje Defined by Charge State
Regel 1 CALIBRATING
Regel 2 BATTERY
Start
(4,0 sec)
(2,0 sec)
(2,0 sec)
(7,0 sec)
Every
51,0 sec
Every
9,0 sec
5X
45,0
sec
37D22-B_Impres_MUC_NL.fm Page 26 Wednesday, July 12, 2006 2:47 PM

Nederlands
27
Na kalibratie:
Lampje Defined by Charge State
Regel 1 KIT# xxxxxxxx
Regel 2 SN: yyyyyyyyyyyy
Lampje Defined by Charge State
Regel 1 KIT# xxxxxxxx
Regel 2 yyyyy CHEMISTRY
Lampje Steady GREEN
Regel 1 CHARGE COMPLETE
Regel 2
Lampje Defined by Charge State
Regel 1 BATTERY
Regel 2 CALIBRATED
Lampje Defined by Charge State
Regel 1 xx% RATED CAP.
Regel 2 yyyy mAH zz.z V
Start
(4,0 sec)
(2,0 sec)
(2,0 sec)
(2,0 sec)
(7,0 sec)
Every
61,0sec
Every
11 sec
5X
55,0
sec
37D22-B_Impres_MUC_NL.fm Page 27 Wednesday, July 12, 2006 2:47 PM

Nederlands
28
Stand van tekst op display
Omdat de IMPRES Adaptieve meervoudige lader soms op een bureau
of aan de muur bevestigd moet worden, kan de tekst op het display
ondersteboven worden weergegeven.
Om dit te doen steekt u een grote paperclip in het gaatje onder het
display, loodrecht naar het bureaublad gericht. Een klik geeft aan dat
de schakelaar geactiveerd is en de tekst 180 graden gedraaid wordt.
Werking van de IMPRES Adaptieve meervoudige lader
Raadpleeg de onderhoudshandleiding, 6880309L66, voor meer
informatie over het onderhoud van de MUC en CDM.
Onderhoud
Voor onderhoud kunt u contact opnemen met het volgende depot. Bel
het depot en spreek een retourdatum met hen af alvorens de eenheid
op te sturen. Motorola Onderhoudsbedrijf
Motorola GmbH
Customer Care
Am Borsigturm 130
13507 Berlin
Germany.
Tel: +49 30 6686 1555
37D22-B_Impres_MUC_NL.fm Page 28 Wednesday, July 12, 2006 2:47 PM

Ðóññêèé
1
ÑÎÄÅÐÆÀÍÈÅ
âàæíûå èíñòðóêöèè ïî òåõíèêå áåçîïàñíîñòè. . . . . . . . . . . . . . . . 2
Òåõíèêà áåçîïàñíîñòè ïðè ýêñïëóàòàöèè. . . . . . . . . . . . . . . . . . . . 3
Îïèñàíèå îñîáåííîñòåé, ôóíêöèé è ïðåèìóùåñòâ çàðÿäíîãî
óñòðîéñòâà IMPRES. . . . . . . . . . . . . . . . . . . . . . . . . . . . . . . . . . . . . 4
Ðàáî÷èå õàðàêòåðèñòèêè/îñîáåííîñòè . . . . . . . . . . . . . . . . . . . . . . 5
Ñïèñîê àêêóìóëÿòîðîâ. . . . . . . . . . . . . . . . . . . . . . . . . . . . . . . . . . . . 7
Èñòî÷íèêè ïèòàíèÿ è îäîáðåííûå êîìïàíèåé Motorola
àäàïòåðû . . . . . . . . . . . . . . . . . . . . . . . . . . . . . . . . . . . . . . . . . . . . 10
Èíñòðóêöèè ïî ýêñïëóàòàöèè . . . . . . . . . . . . . . . . . . . . . . . . . . . . 11
Çàðÿäêà àêêóìóëÿòîðà . . . . . . . . . . . . . . . . . . . . . . . . . . . . . . . 13
Ðó÷íîå âîññòàíîâëåíèå àêêóìóëÿòîðîâ . . . . . . . . . . . . . . . . . 14
Àâòîìàòè÷åñêîå âîññòàíîâëåíèå àêêóìóëÿòîðîâ . . . . . . . . . . 15
Ïðåêðàùåíèå ïðîöåññà âîññòàíîâëåíèÿ âðó÷íóþ . . . . . . . . 15
Óñòðàíåíèå íåèñïðàâíîñòåé. . . . . . . . . . . . . . . . . . . . . . . . . . . . . 16
Îáñëóæèâàíèå. . . . . . . . . . . . . . . . . . . . . . . . . . . . . . . . . . . . . . . . 17
Çàðÿäíûå óñòðîéñòâà ñ ìîäóëåì äèñïëåÿ (CDM) . . . . . . . . . . . . 18
Äàííîå äîïîëíèòåëüíîå ðóêîâîäñòâî ïðèìåíèìî ê ñëåäóþùèì óíèâåðñàëüíûì
ìíîãîìåñòíûì çàðÿäíûì óñòðîéñòâàì IMPRES:
WPLN4108, WPLN4109, WPLN4110, WPLN4118, WPLN4119, WPLN4120, WPLN4121,
WPLN4123, WPLN4130, WPLN4131, WPLN4132, WPLN4133, WPLN4134,
WPLN4135, WPLN4136
Êðîìå òîãî, äàííîå ðóêîâîäñòâî ñîäåðæèò ñâåäåíèÿ ïî óíèâåðñàëüíûì
ìíîãîìåñòíûì çàðÿäíûì óñòðîéñòâàì IMPRES, äîñòóïíûì äëÿ ðàäèîñòàíöèé
ïðîôåññèîíàëüíîé ñåðèè GP:
WPLN4144, WPLN4145, WPLN4146, WPLN4187, WPLN4188, WPLN4189,
WPLN4190, WPLN4191, WPLN4192, WPLN4193, WPLN4194, WPLN4195,
WPLN4196, WPLN4204, WPLN4205
Ñëîâî «óíèâåðñàëüíûé» îçíà÷àåò, ÷òî çàðÿäíîå óñòðîéñòâî ïîääåðæèâàåò
ðàçëè÷íûå ìîäåëè ðàäèîñòàíöèé è, ïðè èñïîëüçîâàíèè àêêóìóëÿòîðíûõ
àäàïòåðîâ, âñå àêêóìóëÿòîðû, ïåðå÷èñëåííûå â Òàáë. 1 - 6 âêëþ÷èòåëüíî.
37D22-B_Impres_MUC_RU.fm Page 1 Wednesday, July 12, 2006 2:18 PM

Ðóññêèé
2
ÂÀÆÍÛÅ ÈÍÑÒÐÓÊÖÈÈ ÏÎ ÒÅÕÍÈÊÅ ÁÅÇÎÏÀÑÍÎÑÒÈ
ÑÎÕÐÀÍÈÒÅ ÝÒÈ ÈÍÑÒÐÓÊÖÈÈ Â ÍÀÄÅÆÍÎÌ ÌÅÑÒÅ
 äàííîì äîêóìåíòå ñîäåðæàòñÿ âàæíûå èíñòðóêöèè ïî òåõíèêå áåçîïàñíîñòè è
ýêñïëóàòàöèè. Âíèìàòåëüíî ïðî÷òèòå ýòè èíñòðóêöèè è ñîõðàíèòå èõ äëÿ
äàëüíåéøåãî èñïîëüçîâàíèÿ.
Ïåðåä òåì êàê ïðèñòóïèòü ê èñïîëüçîâàíèþ çàðÿäíîãî óñòðîéñòâà ïðî÷òèòå âñå
èíñòðóêöèè è èíñòðóêöèè ïî òåõíèêå áåçîïàñíîñòè, ïðî÷òèòå âñþ èíôîðìàöèþ íà
(1) ñàìîì óñòðîéñòâå; (2) àêêóìóëÿòîðå; (3) ðàäèîñòàíöèè, â êîòîðîé èñïîëüçóåòñÿ
àêêóìóëÿòîð..
1.Âî èçáåæàíèå òðàâì çàðÿæàéòå â ýòîì óñòðîéñòâå
òîëüêî àêêóìóëÿòîðû, îäîáðåííûå êîìïàíèåé Motorola -
îíè ïåðå÷èñëåíû â òàáë. 1-5. Äðóãèå àêêóìóëÿòîðû ìîãóò
âçîðâàòüñÿ, ÷òî ìîæåò ïðèâåñòè ê òðàâìàì è
ïîâðåæäåíèþ èìóùåñòâà.
2. Èñïîëüçîâàíèå àêñåññóàðîâ, íå ðåêîìåíäîâàííûõ êîìïàíèåé Motorola,
ìîæåò ïðèâåñòè ê ïîæàðó, ïîðàæåíèþ ýëåêòðîòîêîì èëè òðàâìàì.
3. Äëÿ óìåíüøåíèÿ îïàñíîñòè ïîâðåæäåíèé øòåêåðà è øíóðà ïðè
îòñîåäèíåíèè çàðÿäíîãî óñòðîéñòâà áåðèòåñü çà øòåêåð, à íå çà øíóð.
4. Óäëèíèòåëüíûé øíóð ìîæíî èñïîëüçîâàòü òîëüêî â ñëó÷àå êðàéíåé
íåîáõîäèìîñòè. Èñïîëüçîâàíèå íåïîäõîäÿùåãî óäëèíèòåëüíîãî øíóðà
ìîæåò ïðèâåñòè ê âîçíèêíîâåíèþ îïàñíîñòè ïîæàðà è ïîðàæåíèÿ
ýëåêòðîòîêîì. Åñëè íåîáõîäèìî èñïîëüçîâàòü óäëèíèòåëüíûé øíóð,
îáåñïå÷üòå èñïîëüçîâàíèå øíóðà 18AWG, åñëè äëèíà øíóðà íå ïðåâûøàåò
30,48 ìåòðà è 16AWG, åñëè äëèíà øíóðà íå ïðåâûøàåò 45,72 ìåòðà.
5. Äëÿ óìåíüøåíèÿ îïàñíîñòè ïîæàðà, ïîðàæåíèÿ ýëåêòðîòîêîì è
ïîëó÷åíèÿ òðàâì íå èñïîëüçóéòå ñëîìàííîå èëè äàæå ñëåãêà
ïîâðåæäåííîå çàðÿäíîå óñòðîéñòâî. Îáðàòèòåñü â ïðåäñòàâèòåëþ
êîìïàíèè Motorola äëÿ ðåìîíòà çàðÿäíîãî óñòðîéñòâà
6. Ýòî óñòðîéñòâî ìîæíî ðåìîíòèðîâàòü.
Êàæäîå ãíåçäî ïèòàåòñÿ îò
ñïåöèàëüíîé ïå÷àòíîé ïëàòû è èñòî÷íèêà ïèòàíèÿ. Ïå÷àòíûå ïëàòû è
èñòî÷íèêè ïèòàíèÿ ìîæíî ïðèîáðåòàòü ó îðãàíèçàöèè, çàíèìàþùåéñÿ
ïîñëåïðîäàæíûì îáñëóæèâàíèåì èëè òîðãîâëåé çàï÷àñòÿìè. Ïå÷àòíàÿ
ïëàòà èìååò íîìåð ïî êàòàëîãó RLN5325. Äðóãèõ çàìåíÿåìûõ êîìïîíåíòîâ
óñòðîéñòâî íå èìååò. Ó îðãàíèçàöèè, çàíèìàþùåéñÿ ïîñëåïðîäàæíûì
îáñëóæèâàíèåì èëè òîðãîâëåé çàï÷àñòÿìè, ìîæíî òàêæå ïðèîáðåñòè
ðóêîâîäñòâî ïî îáñëóæèâàíèþ, â êîòîðîì îïèñàí ïîðÿäîê çàìåíû. Ýòî
ðóêîâîäñòâî ïî îáñëóæèâàíèþ èìååò íîìåð ïî êàòàëîãó 6880309L66.
7. Äëÿ ñíèæåíèÿ îïàñíîñòè ïîðàæåíèÿ ýëåêòðîòîêîì âûíüòå âèëêó øíóðà
ïèòàíèÿ çàðÿäíîãî óñòðîéñòâà èç ñåòåâîé ðîçåòêè ïåðåä âûïîëíåíèåì
êàêîãî-ëèáî îáñëóæèâàíèÿ èëè ÷èñòêè.
!
Ïðåäóïðåæäåíèå
37D22-B_Impres_MUC_RU.fm Page 2 Wednesday, July 12, 2006 2:18 PM

Ðóññêèé
3
ÒÅÕÍÈÊÀ ÁÅÇÎÏÀÑÍÎÑÒÈ ÏÐÈ ÝÊÑÏËÓÀÒÀÖÈÈ
• Ïðè çàðÿäêå àêêóìóëÿòîðîâ âûêëþ÷èòå ðàäèîñòàíöèþ.
• Äàííîå îáîðóäîâàíèå íåïðèãîäíî äëÿ ýêñïëóàòàöèè âíå ïîìåùåíèé.
Èñïîëüçîâàòü òîëüêî â óñëîâèÿõ íèçêîé âëàæíîñòè.
• Ïîäñîåäèíÿéòå îáîðóäîâàíèå òîëüêî ê èñòî÷íèêó ïèòàíèÿ ñ ñîîòâåòñòâóþùèì
íàïðÿæåíèåì (óêàçàííûì íà èçäåëèè) è îñíàùåííûì âñåìè íåîáõîäèìûìè
ïðåäîõðàíèòåëÿìè è ïðàâèëüíî âûïîëíåííîé ïðîâîäêîé/ýëåêòðîìîíòàæîì.
• Îòñîåäèíèòå îò èñòî÷íèêà ïèòàíèÿ – âûíüòå âèëêó øíóðà ïèòàíèÿ èç ñåòåâîé
ðîçåòêè.
• Ñåòåâàÿ ðîçåòêà, â êîòîðîé ïîäêëþ÷àåòñÿ äàííîå îáîðóäîâàíèå, äîëæíà
íàõîäèòüñÿ ïîáëèçîñòè è áûòü ëåãêî äîñòóïíîé.
• Åñëè â îáîðóäîâàíèè èìåþòñÿ ïðåäîõðàíèòåëè, ñìåííûå ïðåäîõðàíèòåëè
äîëæíû îòíîñèòüñÿ ê òèïó è èìåòü íîìèíàëû, óêàçàííûå â èíñòðóêöèÿõ ê ýòîìó
îáîðóäîâàíèþ.
• Îêðóæàþùàÿ òåìïåðàòóðà â ìåñòå óñòàíîâêè çàðÿäíîãî óñòðîéñòâà íå äîëæíà
ïðåâûøàòü 40°C.
• Ðàñïîëîæèòå øíóð òàê, ÷òîáû íà íåãî íåëüçÿ áûëî íàñòóïèòü/ñïîòêíóòüñÿ,
÷òîáû íà íåãî íå ïîïàäàëà âîäà è ÷òîáû îí íå ïîäâåðãàëñÿ ïîâðåæäàþùåìó
âîçäåéñòâèþ èëè ñèëàì.
• Ñ ýòèì çàðÿäíûì óñòðîéñòâîì èñïîëüçóåòñÿ òî æå íàñòåííîå êðåïëåíèå, ÷òî è ñ
ìíîãîìåñòíûì çàðÿäíûì óñòðîéñòâîì NTN4796. Íàñòåííîå êðåïëåíèå èìååò
íîìåð ïî êàòàëîãó NLN7967.
• Ïðè çàìåíå ïðåäîõðàíèòåëåé èñïîëüçóéòå òîëüêî ïðåäîõðàíèòåëè, òèï è
íîìèíàë êîòîðûõ óêàçàí â òàáëè÷êå íà çàðÿäíîì óñòðîéñòâå. Ó ìåñòíîé
îðãàíèçàöèè, çàíèìàþùåéñÿ ïîñëåïðîäàæíûì îáñëóæèâàíèåì èëè òîðãîâëåé
çàï÷àñòÿìè, ìîæíî çàêàçàòü ñëåäóþùèå ÷àñòè:
Ïðåäîõðàíèòåëü 6571489S01
Êîðïóñ 0987626G01
Êðûøêà 0987739G01
37D22-B_Impres_MUC_RU.fm Page 3 Wednesday, July 12, 2006 2:18 PM

Ðóññêèé
4
ÎÏÈÑÀÍÈÅ ÎÑÎÁÅÍÍÎÑÒÅÉ, ÔÓÍÊÖÈÉ È ÏÐÅÈÌÓÙÅÑÒÂ
ÇÀÐßÄÍÎÃÎ ÓÑÒÐÎÉÑÒÂÀ IMPRES
Ýíåðãîðåøåíèå IMPRES ÿâëÿåòñÿ âîïëîùåíèåì ïåðåäîâîé ýíåðãîñèñòåìû Tri
Chemistry êîìïàíèè Motorola, â ñîñòàâ êîòîðîé âõîäÿò: (a) àêêóìóëÿòîðû IMPRES,
(á) àäàïòèâíîå ìíîãîìåñòíîå çàðÿäíîå óñòðîéñòâî IMPRES è (â) àïïàðàòíîå/
ïðîãðàììíîå îáåñïå÷åíèå ðàäèîñòàíöèè, êîòîðîå îáåñïå÷èâàåò âîçìîæíîñòü
âçàèìîäåéñòâèÿ/îáìåíà äàííûìè ìåæäó IMPRES-ñîâìåñòèìûìè
ðàäèîñòàíöèÿìè è àêêóìóëÿòîðàìè IMPRES (íå ïðèìåíèìî ê ðàäèîñòàíöèÿì
ïðîôåññèîíàëüíîé ñåðèè GP).
Ìíîãîìåñòíîå çàðÿäíîå óñòðîéñòâî IMPRES, èñïîëüçóåìîå ñ àêêóìóëÿòîðàìè
Motorola IMPRES, îáåñïå÷èò ñëåäóþùåå:
• Ìàêñèìàëüíîå âðåìÿ ìåæäó ïîñëåäîâàòåëüíûìè çàðÿäêàìè çà ñ÷åò
àâòîìàòè÷åñêîãî óñòðàíåíèÿ ýôôåêòà ïàìÿòè.
• Óâåëè÷èâàåò ñðîê ñëóæáû àêêóìóëÿòîðîâ ïóòåì çíà÷èòåëüíîãî óìåíüøåíèÿ
íàãðåâà âî âðåìÿ ìåäëåííîé çàðÿäêè è ïîñëå ïîëíîé çàðÿäêè.
• Óñòðàíÿåò íåîáõîäèìîñòü ïîêóïêè îáîðóäîâàíèÿ è îáó÷åíèÿ ïåðñîíàëà äëÿ
"âûïîëíåíèÿ çàäà÷ ïî îáñëóæèâàíèþ àêêóìóëÿòîðîâ".
Áëàãîäàðÿ èñïîëüçîâàíèþ óíèêàëüíîé çàïàòåíòîâàííîé ñèñòåìû íåò
íåîáõîäèìîñòè â âåäåíèè ó÷åòà è êîíòðîëÿ èñïîëüçóåìûõ àêêóìóëÿòîðîâ,
âîññòàíîâëåíèè êîíäèöèé àêêóìóëÿòîðîâ âðó÷íóþ è èçâëå÷åíèÿ àêêóìóëÿòîðîâ èç
çàðÿäíîãî óñòðîéñòâà ïî çàâåðøåíèè çàðÿäêè.
Àäàïòèâíîå ìíîãîìåñòíîå çàðÿäíîå óñòðîéñòâî IMPRES ñëåäèò çà ãðàôèêîì
èñïîëüçîâàíèÿ àêêóìóëÿòîðà IMPRES, ñîõðàíÿåò ýòó èíôîðìàöèþ â ñàìîì
àêêóìóëÿòîðå è âêëþ÷àåò öèêë âîññòàíîâëåíèÿ òîëüêî êîãäà ýòî íåîáõîäèìî.
Àäàïòèâíîå ìíîãîìåñòíîå çàðÿäíîå óñòðîéñòâî IMPRES íå ïåðåãðåâàåò
àêêóìóëÿòîð, äàæå åñëè àêêóìóëÿòîð îñòàâëåí â çàðÿäíîì óñòðîéñòâå íà
äëèòåëüíîå âðåìÿ. Çàðÿäíîå óñòðîéñòâî ñëåäèò çà ñîñòîÿíèåì àêêóìóëÿòîðà è
äîçàðÿæàåò åãî ïî ìåðå íåîáõîäèìîñòè.
Àäàïòèâíîå ìíîãîìåñòíîå çàðÿäíîå IMPRES óñòðîéñòâî óïðîùàåò ïðîöåññ
çàðÿäêè àêêóìóëÿòîðîâ è óõîä çà íèìè.
Ïîëüçîâàòåëþ íåîáõîäèìî âûïîëíèòü
ëèøü ñëåäóþùèå ïðîñòûå äåéñòâèÿ:
1. Âñòàâèòü ðàäèîñòàíöèþ/àêêóìóëÿòîð â ãíåçäî çàðÿäíîãî óñòðîéñòâà.
2. Âûíóòü ðàäèîñòàíöèþ/àêêóìóëÿòîð ïîñëå ïîëíîé çàðÿäêè!
Motorola ÿâëÿåòñÿ åäèíñòâåííîé ôèðìîé-èçãîòîâèòåëåì êîíäèöèîíèðóþùåãî èëè
âîññòàíàâëèâàþùåãî çàðÿäíîãî óñòðîéñòâà, êîòîðîå äàåò âîçìîæíîñòü çàðÿäêè
íå òîëüêî îòäåëüíûõ àêêóìóëÿòîðîâ, íî è àêêóìóëÿòîðîâ, íàõîäÿùèõñÿ â
ðàäèîñòàíöèè.
37D22-B_Impres_MUC_RU.fm Page 4 Wednesday, July 12, 2006 2:18 PM

Ðóññêèé
5
ÐÀÁÎ×ÈÅ ÕÀÐÀÊÒÅÐÈÑÒÈÊÈ/ÎÑÎÁÅÍÍÎÑÒÈ:
1. Àêêóìóëÿòîðû IMPRES ìîæíî çàðÿæàòü â îáû÷íûõ çàðÿäíûõ óñòðîéñòâàõ.
Îäíàêî äëÿ èñïîëüçîâàíèÿ ñèñòåìû Smart Energy êàæäûé àêêóìóëÿòîð
IMPRES íåîáõîäèìî çàðÿæàòü â àäàïòèâíîì ìíîãîìåñòíîì çàðÿäíîì
óñòðîéñòâå IMPRES. Ïðè ïåðâîé çàðÿäêå àêêóìóëÿòîðà IMPRES â àäàïòèâíîì
ìíîãîìåñòíîì çàðÿäíîì óñòðîéñòâå IMPRES èíäèêàòîð çàðÿäíîãî óñòðîéñòâà
áóäåò ñâåòèòüñÿ ÍÅÏÐÅÐÛÂÍÛÌ ÆÅËÒÛÌ.
Ïåðâóþ çàðÿäêó íåîáõîäèìî
âûïîëíèòü äî ïîÿâëåíèÿ ÍÅÏÐÅÐÛÂÍÎÃÎ ÇÅËÅÍÎÃÎ ñâå÷åíèÿ èíäèêàòîðà
çàðÿäíîãî óñòðîéñòâà. Ýòî îáåñïå÷èò íàäëåæàùóþ êàëèáðîâêó àêêóìóëÿòîðà
IMPRES è èñïîëüçîâàíèå âñåõ ïðåèìóùåñòâ ñèñòåìû Smart Energy. Åñëè
ïðîöåññ çàðÿäêè ïðåðâàòü, çàðÿäíîå óñòðîéñòâî îòêàëèáðóåò àêêóìóëÿòîð,
êîãäà îí áóäåò â ñëåäóþùèé ðàç âñòàâëåí â ãíåçäî çàðÿäíîãî óñòðîéñòâà.
2. Ïîñêîëüêó àäàïòèâíîå ìíîãîìåñòíîå çàðÿäíîå óñòðîéñòâî IMPRES
àâòîìàòè÷åñêè îïðåäåëÿåò, êîãäà àêêóìóëÿòîðó IMPRES òðåáóåòñÿ
âîññòàíîâëåíèå, çàðÿäíîå óñòðîéñòâî ìîæåò ïåðåêëþ÷àòüñÿ íà ðåæèì
âîññòàíîâëåíèÿ ïðè âñòàâëåíèè â íåãî ðàäèîñòàíöèè èëè àêêóìóëÿòîðà.
Î
ïåðåêëþ÷åíèè íà ýòîò ðåæèì ñâèäåòåëüñòâóåò èíäèêàòîð çàðÿäíîãî
óñòðîéñòâà, ñâåòÿùèéñÿ ÍÅÏÐÅÐÛÂÍÛÌ ÆÅËÒÛÌ. Ïðè íåîáõîäèìîñòè
ðåæèì âîññòàíîâëåíèÿ ìîæåò áûòü îòìåíåí, äëÿ ýòîãî äîñòàòî÷íî âûíóòü è
ñíîâà âñòàâèòü ðàäèîñòàíöèþ èëè àêêóìóëÿòîð â çàðÿäíîå óñòðîéñòâî. (Ñì.
èíñòðóêöèè íèæå).
3. Àäàïòèâíîå çàðÿäíîå óñòðîéñòâî IMPRES ïðåäíàçíà÷åíî äëÿ çàðÿäêè ëþáûõ
àêêóìóëÿòîðîâ, ïåðå÷èñëåííûõ â
òàáë. 1-5. Îäíàêî òîëüêî ïðè çàðÿäêå
àêêóìóëÿòîðîâ IMPRES áóäåò ðàáîòàòü ñèñòåìà Smart Energy. (Ïî ìåðå
ïîÿâëåíèÿ íîâûõ ðàäèîñòàíöèé è àêêóìóëÿòîðîâ ýòîò ñïèñîê áóäåò
èçìåíÿòüñÿ è ðàñïðîñòðàíÿòüñÿ ñðåäè çàêàç÷èêîâ/ïîêóïàòåëåé ÷åðåç ñèñòåìû
ãëîáàëüíûõ ôèðìåííûõ ïðåäñòàâèòåëüñòâ è îðãàíèçàöèè ïîñëåïðîäàæíîãî
îáñëóæèâàíèÿ).
4. Äëÿ êàëèáðîâêè àêêóìóëÿòîðîâ IMPRES Smart íåîáõîäèìî èñïîëüçîâàòü
àäàïòèâíîå ìíîãîìåñòíîå çàðÿäíîå óñòðîéñòâî IMPRES - ýòî îáåñïå÷èò
òî÷íóþ ðåãèñòðàöèþ, ñîõðàíåíèå â ïàìÿòè è îòîáðàæåíèå äàííûõ îá
ýêñïëóàòàöèè àêêóìóëÿòîðà IMPRES.
37D22-B_Impres_MUC_RU.fm Page 5 Wednesday, July 12, 2006 2:18 PM

Ðóññêèé
6
5. Ïðè èñïîëüçîâàíèè àêêóìóëÿòîðîâ IMPRES â ðàäèîñòàíöèÿõ ñ äèñïëååì
(íàïðèìåð, XTS5000) ðàäèîñòàíöèÿ ìîæåò îòîáðàæàòü ïèêòîãðàììó,
ïîêàçûâàþùóþ çàðÿäêó àêêóìóëÿòîðà. Ýòà ïèêòîãðàììà ïîÿâëÿåòñÿ, åñëè
àêêóìóëÿòîð IMPRES ïðåäâàðèòåëüíî áûë îòêàëèáðîâàí â çàðÿäíîì
óñòðîéñòâå IMPRES. Ïèêòîãðàììà çàðÿäêè îòîáðàæàåòñÿ, âî âðåìÿ
èñïîëüçîâàíèÿ çàðÿäíîãî óñòðîéñòâà IMPRES äëÿ çàðÿäà àêêóìóëÿòîðîâ.
Îäíàêî ïðè èñïîëüçîâàíèè çàðÿäíîãî óñòðîéñòâà íå-IMPRES äëÿ çàðÿäêè
àêêóìóëÿòîðîâ IMPRES â òå÷åíèå 7 äíåé (èëè áîëåå) ïèêòîãðàììà ïðîïàäàåò.
×òîáû âîññòàíîâèòü ïèêòîãðàììó, âñòàâüòå àêêóìóëÿòîð IMPRES â çàðÿäíîå
óñòðîéñòâî IMPRES è äîæäèòåñü îêîí÷àíèÿ çàðÿäêè (èíäèêàòîð áóäåò ãîðåòü
ÐÎÂÍÛÌ ÇÅËÅÍÛÌ ñâåòîì). Ïîñëå ýòîãî ïèêòîãðàììà çàðÿäà ñíîâà áóäåò
îòîáðàæàòüñÿ ðàäèîñòàíöèåé. Åñëè ïèêòîãðàììà íå ïîÿâèëàñü ïîñëå ïîëíîãî
çàðÿäà, óñòàíîâèòå ÷àñòè÷íî ðàçðÿæåííûé àêêóìóëÿòîð (ðàçðÿæåííûé, ïî
ìåíüøåé ìåðå, íà 70%) â çàðÿäíîå óñòðîéñòâî, íà÷íèòå ïðîöåññ
âîññòàíîâëåíèÿ è äàéòå çàâåðøèòüñÿ çàðÿäêå. Ïîñëå ýòîãî ïèêòîãðàììà
ïîÿâèòñÿ íà äèñïëåå ðàäèîñòàíöèè (íå ïðèìåíèìî ê ðàäèîñòàíöèÿì
ïðîôåññèîíàëüíîé ñåðèè GP).
6. Ðåìîíò àäàïòèâíîãî ìíîãîìåñòíîãî çàðÿäíîãî óñòðîéñòâà IMPRES ìîæåò
âûïîëíÿòüñÿ òîëüêî êâàëèôèöèðîâàííûì ñïåöèàëèñòîì ïî îáñëóæèâàíèþ,
àâòîðèçîâàííûì Motorola CGISS. Ëþáîå íàðóøåíèå äàííîãî óñëîâèÿ âåäåò ê
ïðåêðàùåíèþ ãàðàíòèè íà óñòðîéñòâî.
37D22-B_Impres_MUC_RU.fm Page 6 Wednesday, July 12, 2006 2:18 PM

Ðóññêèé
7
ÑÏÈÑÎÊ ÀÊÊÓÌÓËßÒÎÐÎÂ
 òàáëèöàõ íèæå ïðèâåäåí ñïèñîê àêêóìóëÿòîðîâ, êîòîðûå ìîãóò èñïîëüçîâàòüñÿ
ñ óêàçàííûìè â çàãîëîâêå òàáëèöû ðàäèîñòàíöèÿìè.
* Äëÿ çàðÿäêè àêêóìóëÿòîðîâ MTP700 ñ çàðÿäíûì óñòðîéñòâîì íåîáõîäèìî èñïîëüçîâàòü
àäàïòåð (íîìåð ïî êàòàëîãó RLN5212).
Òàáë. 1. Ðàäèîñòàíöèè XTS3000 / XTS3500 / Dimetra è öèôðîâàÿ
ðàäèîñòàíöèÿ XTS5000
Êîìïë. (¹) Òèï Ñåðò.
FM
Smart Åìêîñòü Íîâàÿ
ìîäåëü
HNN9031 NiCD Íåò Åñòü Ñâåðõâûñîêàÿ Íåò
HNN9032 NiCD Åñòü Åñòü Ñâåðõâûñîêàÿ Íåò
NTN8294 NiCD Íåò Íåò Ñâåðõâûñîêàÿ Íåò
NTN8295 NiCD Åñòü Íåò Ñâåðõâûñîêàÿ Íåò
NTN8297 NiCD Åñòü Íåò Ñâåðõâûñîêàÿ Íåò
NTN8299 NiCD Åñòü Íåò Ñâåðõâûñîêàÿ Íåò
NTN8610 LiIon Íåò Íåò Âûñîêàÿ Íåò
NTN8293 NiMH Íåò Íåò Ñâåðõâûñîêàÿ Íåò
NNTN4435 NiMH Íåò Åñòü Ñâåðõâûñîêàÿ Íåò
NNTN4436 NiMH Åñòü Åñòü Ñâåðõâûñîêàÿ Íåò
NNTN4437 NiMH Åñòü Åñòü Ñâåðõâûñîêàÿ Íåò
RNN4006 NiMH Íåò Íåò Ñâåðõâûñîêàÿ Íîâàÿ
RNN4007 NIMH Åñòü Íåò Ñâåðõâûñîêàÿ Íîâàÿ
NTN9862 LiIon Íåò Åñòü Ñâåðõâûñîêàÿ Íîâàÿ
Òàáë. 2. Öèôðîâûå ðàäèîñòàíöèè XTS2500
Êîìïë. (¹) Òèï Ñåðò.
FM
Smart Åìêîñòü Íîâàÿ
ìîäåëü
NTN9859 NiMH Íåò Íåò Ñâåðõâûñîêàÿ Íîâàÿ
NTN9857 NiMH Åñòü Íåò Ñâåðõâûñîêàÿ Íîâàÿ
NTN9815 NiCD Íåò Íåò Âûñîêàÿ Íîâàÿ
NTN9816 NiCD Åñòü Íåò Âûñîêàÿ Íîâàÿ
Òàáë. 3. Öèôðîâûå ðàäèîñòàíöèè MTP700
Êîìïë. (¹) Òèï Ñåðò.
FM
Smart Åìêîñòü Íîâàÿ
ìîäåëü
PMNN4048* NiMH Íåò Åñòü Âûñîêàÿ Íîâàÿ
PMNN4049* NiMH Åñòü Åñòü Âûñîêàÿ Íîâàÿ
PMNN4050* Lilon Íåò Åñòü Âûñîêàÿ Íîâàÿ
PMNN4047* LiIon Íåò Åñòü Âûñîêàÿ Íîâàÿ
37D22-B_Impres_MUC_RU.fm Page 7 Wednesday, July 12, 2006 2:18 PM

Ðóññêèé
8
** Äëÿ çàðÿäêè àêêóìóëÿòîðîâ Astro Saber ñ çàðÿäíûì óñòðîéñòâîì íåîáõîäèìî
èñïîëüçîâàòü àäàïòåð (íîìåð ïî êàòàëîãó 4385922B01).
Òàáë. 4. Ðàäèîñòàíöèè ñåðèé HT1000 / MT2000 / MTS2000 / MTX8000 è
MTX9000
Êîìïë. (¹) Òèï Ñåðò. FM Smart Åìêîñòü Íîâàÿ
ìîäåëü
HNN9028 NiCD Íåò Åñòü Ñâåðõâûñîêàÿ Íåò
HNN9029 NiCD Åñòü Åñòü Ñâåðõâûñîêàÿ Íåò
NTN7143 NiCD Íåò Íåò Âûñîêàÿ Íåò
NTN7144 NiCD Íåò Íåò Ñâåðõâûñîêàÿ Íåò
NTN7146 NiCD Åñòü Íåò Âûñîêàÿ Íåò
NTN7147 NiCD Åñòü Íåò Ñâåðõâûñîêàÿ Íåò
NTN7148 NiCD CENELEC Íåò Âûñîêàÿ Íåò
NTN7149 NiCD CSA Íåò Âûñîêàÿ Íåò
NTN7150 NiCD MSHA Íåò Âûñîêàÿ Íåò
NTN7341 NiCD Åñòü Íåò Ñâåðõâûñîêàÿ Íåò
NTN7372 NiCD Åñòü Íåò Âûñîêàÿ Íåò
WPPN4013 NiMH Íåò Íåò Ñâåðõâûñîêàÿ Íåò
WPPN4037 NiMH Åñòü Íåò Ñâåðõâûñîêàÿ Íåò
RNN4008 NiCD ATEX Íåò Âûñîêàÿ Íåò
Òàáë. 5. Ðàäèîñòàíöèè Saber / Astro Saber
Êîìïë. (¹) Òèï Ñåðò. FM Smart Åìêîñòü Íîâàÿ
ìîäåëü
HNN9033 NiCD Íåò Åñòü Ñâåðõâûñîêàÿ Íåò
HNN9031 NiCD Åñòü Åñòü Ñâåðõâûñîêàÿ Íåò
NTN4537** NiCD Åñòü Íåò Íèçêàÿ Íåò
NTN4538 NiCD Åñòü Íåò Âûñîêàÿ Íåò
NTN4592** NiCD Íåò Íåò Íèçêàÿ Íåò
NTN4593 NiCD Íåò Íåò Âûñîêàÿ Íåò
NTN4595 NiCD Íåò Íåò Ñâåðõâûñîêàÿ Íåò
NTN4596 NiCD Åñòü Íåò Ñâåðõâûñîêàÿ Íåò
NTN4657 NiCD Íåò Íåò Âûñîêàÿ Íåò
NTN4671 NiCD CENELEC Íåò Âûñîêàÿ Íåò
NTN4992 NiCD Åñòü Íåò Ñâåðõâûñîêàÿ Íåò
NTN7014** NiMH Íåò Íåò Âûñîêàÿ Íåò
NTN7058 NiCD Åñòü Íåò Ñâåðõâûñîêàÿ Íåò
NTN7426 NiCD Åñòü Íåò Íèçêàÿ Íåò
NTN8251 NiMH Åñòü Íåò Ñâåðõâûñîêàÿ Íåò
NTN8818** LiIon Íåò Íåò Âûñîêàÿ Íåò
37D22-B_Impres_MUC_RU.fm Page 8 Wednesday, July 12, 2006 2:18 PM

Ðóññêèé
9
Äëÿ óíèâåðñàëüíîãî çàðÿäíîãî óñòðîéñòâà òðåáóåòñÿ àêêóìóëÿòîðíûé àäàïòåð,
íîìåð èçäåëèÿ — RLN5648.
Òàáë. 6. Ðàäèîñòàíöèè ïðîôåññèîíàëüíîé ñåðèè GP
Êîìïë. (¹)
Òèï
Ñåðò. FM Smart Åìêîñòü
Íîâàÿ
ìîäåëü
HNN9003 NiMH
AA Bluetooth
Íåò Íåò Âûñîêàÿ Íåò
HNN9008 NiMH Íåò Íåò Âûñîêàÿ Íåò
HNN9009 NiMH Íåò Íåò Ñâåðõâûñîêàÿ Íåò
HNN9010 NiMH Åñòü Íåò Ñâåðõâûñîêàÿ Íåò
HNN9011 NiCD Åñòü Íåò Âûñîêàÿ Íåò
HNN9012 NiCD Íåò Íåò Âûñîêàÿ Íåò
HNN9013 LiIon Íåò Íåò Âûñîêàÿ Íåò
WPNN4045 NiMH Íåò Íåò Âûñîêàÿ Íåò
PMNN4045 NiMH Íåò Íåò Âûñîêàÿ Íåò
HNN4001 Impres NiMH Íåò Åñòü Ñâåðõâûñîêàÿ Åñòü
HNN4002 Impres NiMH Åñòü Åñòü Ñâåðõâûñîêàÿ Åñòü
HNN4003 Impres LiIon Íåò Åñòü Ñâåðõâûñîêàÿ Åñòü
ÏÐÈÌÅ×ÀÍÈÅ
Àäàïòåðû ìîæíî ïðèîáðåñòè ó ïðåäñòàâèòåëåé ïî ïðîäàæå ðàäèîñòàíöèé
èëè ïðåäñòàâèòåëåé ïî ïîñëåïðîäàæíîìó îáñëóæèâàíèþ.
37D22-B_Impres_MUC_RU.fm Page 9 Wednesday, July 12, 2006 2:18 PM

Ðóññêèé
10
ÈÑÒÎ×ÍÈÊÈ ÏÈÒÀÍÈß È ÎÄÎÁÐÅÍÍÛÅ ÊÎÌÏÀÍÈÅÉ MOTOROLA
ÀÄÀÏÒÅÐÛ
Äàííîå çàðÿäíîå óñòðîéñòâî ðàññ÷èòàíî íà ïèòàíèå îò èñòî÷íèêà ïåðåìåííîãî
òîêà 100 - 240 Â, 50/60 Ãö ïðè èñïîëüçîâàíèè ñëåäóþùèõ øíóðîâ ïèòàíèÿ
Motorola, óêàçàííûõ â Òàáë. 7. Øíóðû ïèòàíèÿ, èñïîëüçóåìûå ñ çàðÿäíûìè
óñòðîéñòâàìè äëÿ ðàäèîñòàíöèé ïðîôåññèîíàëüíîé ñåðèè GP ïåðå÷èñëåíû â
Òàáë. 8.
Òàáë. 7. Øíóðû ïèòàíèÿ Motorola äëÿ óíèâåðñàëüíîé ìîäåëè
Òèï âèëêè Êîìïëåêò
çàðÿäíîãî
óñòðîéñòâà
Êîìïëåêò
çàðÿäíîãî
óñòðîéñòâà
(Ìîäåëü ñ
äèñïëååì)
Øíóð ïèòàíèÿ
Áåç øíóðà ïèòàíèÿ/âèëêè WPLN4121 WPLN4127 Íåò
ÑØÀ/Ñåâåðíàÿ Àìåðèêà WPLN4108 WPLN4130 3087791G01
Åâðîïà WPLN4109 WPLN4131 3087791G04
Âåëèêîáðèòàíèÿ. WPLN4110 WPLN4132 3087791G07
Àâñòðàëèÿ/Íîâàÿ Çåëàíäèÿ WPLN4118 WPLN4133 3087791G10
Àðãåíòèíà WPLN4119 WPLN4134 3087791G13
ÑØÀ/Ñåâåðíàÿ Àìåðèêà WPLN4120 WPLN4135 3087791G01
Êîðåÿ WPLN4123 WPLN4136 3087791G16
Òàáë. 8. Øíóðû ïèòàíèÿ Motorola äëÿ ìîäåëåé ïðîôåññèîíàëüíîé
ñåðèè GP
Òèï âèëêè Êîìïëåêò
çàðÿäíîãî
óñòðîéñòâà
Êîìïëåêò
çàðÿäíîãî
óñòðîéñòâà
(Ìîäåëü ñ
äèñïëååì)
Øíóð ïèòàíèÿ
Áåç øíóðà ïèòàíèÿ/âèëêè WPLN4197 WPLN4198 Íåò
ÑØÀ/Ñåâåðíàÿ Àìåðèêà WPLN4187 WPLN4192 3087791G01
Åâðîïà WPLN4189 WPLN4194 3087791G04
Âåëèêîáðèòàíèÿ. WPLN4188 WPLN4193 3087791G07
Àâñòðàëèÿ/Íîâàÿ Çåëàíäèÿ WPLN4190 WPLN4195 3087791G10
Àðãåíòèíà WPLN4191 WPLN4196 3087791G13
ÑØÀ/Ñåâåðíàÿ Àìåðèêà WPLN4205 WPLN4204 3087791G01
Êîðåÿ WPLN4146 WPLN4145 3087791G16
37D22-B_Impres_MUC_RU.fm Page 10 Wednesday, July 12, 2006 2:18 PM

Ðóññêèé
11
ÈÍÑÒÐÓÊÖÈÈ ÏÎ ÝÊÑÏËÓÀÒÀÖÈÈ
 ãíåçäî çàðÿäíîãî óñòðîéñòâà ìîæíî âñòàâëÿòü ëèáî ðàäèîñòàíöèþ, ëèáî òîëüêî
àêêóìóëÿòîð. Ïåðåä çàðÿäêîé àêêóìóëÿòîðà â ðàäèîñòàíöèè âûêëþ÷èòå
ðàäèîñòàíöèþ. Çàðÿäêó àêêóìóëÿòîðîâ ðåêîìåíäóåòñÿ âûïîëíÿòü ïðè êîìíàòíîé
òåìïåðàòóðå.
1. Âñòàâüòå øòåêåð øíóðà ïèòàíèÿ â ãíåçäî íà çàäíåé ñòîðîíå çàðÿäíîãî
óñòðîéñòâà.
2. Âñòàâüòå âèëêó øíóðà ïèòàíèÿ â ñåòåâóþ ðîçåòêó. Îá óñïåøíîé ïîäà÷å
ïèòàíèÿ ñâèäåòåëüñòâóåò èíäèêàòîð çàðÿäíîãî óñòðîéñòâà, äàþùèé ÎÄÍÓ
ÇÅËÅÍÓÞ ÂÑÏÛØÊÓ.
3. Âñòàâüòå â ãíåçäî çàðÿäíîãî óñòðîéñòâà àêêóìóëÿòîð èëè ðàäèîñòàíöèþ
(âûêëþ÷åííóþ) ñ àêêóìóëÿòîðîì ñëåäóþùèì îáðàçîì:
à. Ñîâìåñòèòå êàíàâêè íà êàæäîé áîêîâîé ñòîðîíå àêêóìóëÿòîðà ñ
ñîîòâåòñòâóþùèìè âûñòóïàþùèìè ðåáðàìè íà áîêîâûõ ñòåíêàõ ãíåçäà.
á. Âäâèíüòå àêêóìóëÿòîð âíóòðü ãíåçäà.
â. Âäâèãàÿ àêêóìóëÿòîð, îáåñïå÷üòå ïîëíûé êîíòàêò ìåæäó êîíòàêòàìè
çàðÿäíîãî óñòðîéñòâà è àêêóìóëÿòîðà.
Êàê òîëüêî àêêóìóëÿòîð ñÿäåò ïîëíîñòüþ â ãíåçäî, çàãîðèòñÿ èíäèêàòîð çàðÿäíîãî
óñòðîéñòâà, ÷òî ïîäòâåðäèò ðàñïîçíàâàíèå àêêóìóëÿòîðà çàðÿäíûì óñòðîéñòâîì.
Ñèãíàëû èíäèêàòîðà ñâåäåíû â òàáë. 9.
.
ÏÐÈÌÅ×ÀÍÈß
Ìíîãîìåñòíîå àäàïòèâíîå çàðÿäíîå óñòðîéñòâî IMPRES
çàðÿæàåò òîëüêî àêêóìóëÿòîðíûå áàòàðåè, îäîáðåííûå
êîìïàíèåé Motorola è ïåðå÷èñëåííûå â
òàáë. 1-6. Äëÿ äðóãèõ
áàòàðåé ýòî çàðÿäíîå óñòðîéñòâî ìîæåò îêàçàòüñÿ íåïðèãîäíûì.
Ìíîãîìåñòíîå àäàïòèâíîå çàðÿäíîå óñòðîéñòâî IMPRES èìååò
àâòîìàòè÷åñêèå ôóíêöèè è âîçìîæíîñòè, êîòîðûõ íå èìåþò
äðóãèå çàðÿäíûå óñòðîéñòâà. Âíèìàòåëüíî ñëåäèòå çà
èíäèêàòîðîì çàðÿäíîãî óñòðîéñòâà, ÷òîáû îáåñïå÷èòü ðàáîòó
çàðÿäíîãî óñòðîéñòâà â íóæíîì/îæèäàåìîì ðåæèìå.
37D22-B_Impres_MUC_RU.fm Page 11 Wednesday, July 12, 2006 2:18 PM

Ðóññêèé
12
×òîáû ïîëíîñòüþ èñïîëüçîâàòü âîçìîæíîñòè è ôóíêöèè àêêóìóëÿòîðîâ Motorola
Smart è àäàïòèâíîé çàðÿäíîé ñèñòåìû, çàðÿäíîå óñòðîéñòâî äîëæíî
èíèöèàëèçèðîâàòü äàííûå, õðàíÿùèåñÿ â êàæäîì àêêóìóëÿòîðå Motorola Smart,
ïðè åãî ïåðâîé çàðÿäêå. Îá ýòîì ïðîöåññå ãîâîðèò ÍÅÏÐÅÐÛÂÍÎ ÃÎÐßÙÈÉ
Òàáë. 9. Èíäèêàöèÿ çàðÿäêè
Èíäèêàòîð çàðÿäíîãî
óñòðîéñòâà
×òî ýòî îçíà÷àåò
Îäíà âñïûøêà çåëåíûì
Óñïåøíîå çàïèòûâàíèå çàðÿäíîãî óñòðîéñòâà.
Íåïðåðûâíî ãîðÿùèé
êðàñíûé
Àêêóìóëÿòîð íàõîäèòñÿ â ðåæèìå áûñòðîé çàðÿäêè.
Ìèãàþùèé çåëåíûé
Áûñòðàÿ çàðÿäêà àêêóìóëÿòîðà çàâåðøåíà (>90%
åìêîñòè àêêóìóëÿòîðà çàðÿæåíî). Èäåò ìåäëåííàÿ
çàðÿäêà àêêóìóëÿòîðà.
Íåïðåðûâíî ãîðÿùèé
çåëåíûé
Çàðÿäêà àêêóìóëÿòîðà çàêîí÷åíà ïîëíîñòüþ.
Ìèãàþùèé æåëòûé
Àêêóìóëÿòîð ðàñïîçíàí çàðÿäíûì óñòðîéñòâîì è
îæèäàåò íà÷àëà çàðÿäêè. (Ëèáî íàïðÿæåíèå
àêêóìóëÿòîðà, ëèáî åãî òåìïåðàòóðà ñëèøêîì íèçêà
èëè âûñîêà, ïîýòîìó çàðÿäêà çàäåðæèâàåòñÿ. Çàðÿäêà
àêêóìóëÿòîðà íà÷íåòñÿ, êîãäà íàïðÿæåíèå èëè
òåìïåðàòóðà âîçðàñòåò.)
Ìèãàþùèé êðàñíûé
Àêêóìóëÿòîð çàðÿäèòü íåëüçÿ èëè îòñóòñòâóåò êîíòàêò
ìåæäó àêêóìóëÿòîðîì è çàðÿäíûì óñòðîéñòâîì.
Íåïðåðûâíî ãîðÿùèé
æåëòûé
(Ýòî îòíîñèòñÿ òîëüêî ê àêêóìóëÿòîðàì òèïà Smart)
Àêêóìóëÿòîð íàõîäèòñÿ â ðåæèìå âîññòàíîâëåíèÿ. Âðåìÿ,
â òå÷åíèå êîòîðîãî àêêóìóëÿòîð áóäåò îñòàâàòüñÿ â ýòîì
ðåæèìå, çàâèñèò îò íà÷àëüíîé ñòåïåíè çàðÿæåííîñòè
âñòàâëåííîãî àêêóìóëÿòîðà. (Âîññòàíîâëåíèå ïîëíîñòüþ
çàðÿæåííûõ àêêóìóëÿòîðîâ çàíèìàåò áîëüøå âðåìåíè – 8
÷àñîâ è áîëåå – ÷åì âîññòàíîâëåíèå ïîëíîñòüþ
ðàçðÿæåííûõ àêêóìóëÿòîðîâ.)
Ìèãàþùèé êðàñíûé/
çåëåíûé
(Ýòî îòíîñèòñÿ òîëüêî ê àêêóìóëÿòîðàì òèïà Smart)
Çàðÿäêà àêêóìóëÿòîðà çàêîí÷åíà ïîëíîñòüþ.
Àêêóìóëÿòîð âñå åùå ïðèãîäåí ê èñïîëüçîâàíèþ, íî
ñðîê åãî ñëóæáû ïîäõîäèò ê êîíöó.
ÏÐÈÌÅ×ÀÍÈÅ
Àäàïòèâíîå ìíîãîìåñòíîå çàðÿäíîå óñòðîéñòâî IMPRES
óíèêàëüíî òåì, ÷òî ïðè çàðÿäêå â íåì àêêóìóëÿòîðîâ Motorola
IMPRES îíî àâòîìàòè÷åñêè îïðåäåëÿåò, íóæäàåòñÿ ëè
àêêóìóëÿòîð â âîññòàíîâëåíèè.
37D22-B_Impres_MUC_RU.fm Page 12 Wednesday, July 12, 2006 2:18 PM

Ðóññêèé
13
ÆÅËÒÛÉ èíäèêàòîð çàðÿäíîãî óñòðîéñòâà (ýòîò ñèãíàë èíäèêàòîðà èìååòñÿ è ïðè
âîññòàíîâëåíèè).
Ýòîò ïðîöåññ ïðîèñõîäèò àâòîìàòè÷åñêè, îí âêëþ÷àåò íà÷àëüíîå âîññòàíîâëåíèå,
ïî çàâåðøåíèè ïðîöåññà íà÷èíàåòñÿ çàðÿäêà àêêóìóëÿòîðà. Íà èíèöèàëèçàöèþ
àêêóìóëÿòîðà ïðè ýòîì ïðîöåññå òðåáóåòñÿ íåêîòîðîå âðåìÿ, ïîýòîìó ïðè ïåðâîì
âñòàâëåíèè àêêóìóëÿòîðà â ãíåçäî çàðÿäíîãî óñòðîéñòâà åãî ñëåäóåò îñòàâèòü òàì
íà íî÷ü.
Àäàïòèâíîå ìíîãîìåñòíîå çàðÿäíîå óñòðîéñòâî IMPRES ðàáîòàåò êàê:
• Çàðÿäíîå óñòðîéñòâî äëÿ âñåõ àêêóìóëÿòîðîâ, îäîáðåííûõ ôèðìîé Motorola,
• Âîññòàíàâëèâàþùåå óñòðîéñòâî äëÿ àêêóìóëÿòîðîâ IMPRES, îäîáðåííûõ
ôèðìîé Motorola.
Çàðÿäêà àêêóìóëÿòîðîâ
Äëÿ îáåñïå÷åíèÿ îïòèìàëüíîé ðàáîòû Motorola ðåêîìåíäóåò îñòàâëÿòü âñå íîâûå
àêêóìóëÿòîðû â çàðÿäíîì óñòðîéñòâå íà 14-16 ÷àñîâ ïåðåä ïåðâûì
èñïîëüçîâàíèåì.
1. Ïîñëå íàäëåæàùåé óñòàíîâêè ðàäèîñòàíöèè ñ àêêóìóëÿòîðîì èëè îòäåëüíîãî
àêêóìóëÿòîðà â çàðÿäíîì óñòðîéñòâå íà÷èíàåòñÿ áûñòðàÿ çàðÿäêà
àêêóìóëÿòîðà, î ÷åì ãîâîðèò ÍÅÏÐÅÐÛÂÍÎ ÃÎÐßÙÈÉ ÊÐÀÑÍÛÉ èíäèêàòîð
çàðÿäíîãî óñòðîéñòâà. Âðåìÿ, â òå÷åíèå êîòîðîãî èíäèêàòîð çàðÿäíîãî
óñòðîéñòâà ãîðèò ÍÅÏÐÅÐÛÂÍÛÌ ÊÐÀÑÍÛÌ, çàâèñèò îò îñòàòî÷íîãî çàðÿäà
àêêóìóëÿòîðà.
2. Ïî îêîí÷àíèè áûñòðîé çàðÿäêè (>90% åìêîñòè) çàãîðàåòñÿ ÌÈÃÀÞÙÈÉ
ÇÅËÅÍÛÉ èíäèêàòîð çàðÿäíîãî óñòðîéñòâà. Ýòî ãîâîðèò î íà÷àëå ìåäëåííîé
çàðÿäêè, íà êîòîðóþ óõîäèò îêîëî 1 ÷àñà.
3. Ïî îêîí÷àíèè ìåäëåííîé çàðÿäêè çàãîðàåòñÿ ÍÅÏÐÅÐÛÂÍÛÉ ÇÅËÅÍÛÉ
èíäèêàòîð çàðÿäíîãî óñòðîéñòâà. Ýòî ãîâîðèò î òîì, ÷òî àêêóìóëÿòîð
ïîëíîñòüþ çàðÿäèëñÿ.
ÂÍÈÌÀÍÈÅ!
Ãíåçäî çàðÿäíîãî óñòðîéñòâà ðàññ÷èòàíî íà ïðèåì
àêêóìóëÿòîðîâ ðàçíûõ ðàçìåðîâ è ôîðì, ïîýòîìó íåîáõîäèìî
îáåñïå÷èòü ïðàâèëüíóþ óñòàíîâêó ðàäèîñòàíöèè èëè
àêêóìóëÿòîðà â ãíåçäî. Ïðè íåïðàâèëüíî âñòàâëåííîé
ðàäèîñòàíöèè èëè îòäåëüíîì àêêóìóëÿòîðå èíäèêàòîð íå
çàãîðèòñÿ, óêàçûâàÿ íà òî, ÷òî àêêóìóëÿòîð íå çàðÿæàåòñÿ.
ÏÐÈÌÅ×ÀÍÈÅ
Èíîãäà â ñëó÷àå íîâûõ (ðàíåå íå èñïîëüçîâàâøèõñÿ)
àêêóìóëÿòîðîâ èíäèêàöèÿ ïîëíîñòüþ çàðÿæåííîãî
àêêóìóëÿòîðà (ÏÎÑÒÎßÍÍÎ ÃÎÐßÙÈÉ ÇÅËÅÍÛÉ ) âîçíèêàåò
ïðåæäåâðåìåííî.
37D22-B_Impres_MUC_RU.fm Page 13 Wednesday, July 12, 2006 2:18 PM

Ðóññêèé
14
4. Âî âðåìÿ çàðÿäêè ìîãóò âîçíèêíóòü è äðóãèå, ïåðå÷èñëåííûå íèæå
èíäèêàöèè:
• ÌÈÃÀÞÙÈÉ ÆÅËÒÛÉ – òåìïåðàòóðà èëè íàïðÿæåíèå àêêóìóëÿòîðà çà
ïðåäåëàìè äèàïàçîíà çàðÿäêè. Çàðÿäêà âîçîáíîâèòñÿ ïîñëå
íîðìàëèçàöèè òåìïåðàòóðû èëè íàïðÿæåíèÿ.
• ÌÈÃÀÞÙÈÉ ÊÐÀÑÍÛÉ È ÇÅËÅÍÛÉ – àêêóìóëÿòîð ïðèáëèæàåòñÿ ê
êîíöó ñðîêà ñëóæáû. Íåñìîòðÿ íà ïîëíûé çàðÿä ýòîãî àêêóìóëÿòîðà, åãî
åìêîñòè, óìåíüøèâøåéñÿ â ðåçóëüòàòå ýêñïëóàòàöèè, ìîæåò îêàçàòüñÿ
íåäîñòàòî÷íî äëÿ ïèòàíèÿ ìîùíûõ ïîòðåáèòåëåé. Ýòà ôóíêöèÿ èìååòñÿ
òîëüêî ïðè â ñëó÷àå àêêóìóëÿòîðîâ Motorola IMPRES. Ýòà èíäèêàöèÿ íå
ÿâëÿåòñÿ óêàçàíèåì íà íåèñïðàâíîñòü, îíà ëèøü ãîâîðèò î òîì, ÷òî
àêêóìóëÿòîð ìîæåò â ñêîðîì âðåìåíè ïåðåñòàòü îáåñïå÷èâàòü
íîðìàëüíîå ïèòàíèå è ïîòðåáóåò çàìåíû.
• ÌÈÃÀÞÙÈÉ ÊÐÀÑÍÛÉ – óêàçûâàåò íà òî, ÷òî àêêóìóëÿòîð íåëüçÿ
çàðÿäèòü. Ýòî ìîæåò ïðîèçîéòè â ðåçóëüòàòå íàðóøåíèÿ êîíòàêòà ìåæäó
àêêóìóëÿòîðîì è çàðÿäíûì óñòðîéñòâîì. Çàðÿäêà âîçîáíîâèòñÿ, êîãäà
áóäåò óñòðàíåíà ïðè÷èíà òàêîé èíäèêàöèè.
 àêêóìóëÿòîðàõ Motorola Smart èìååòñÿ âíóòðåííåå çàïîìèíàþùåå óñòðîéñòâî
(ÇÓ), êîòîðîå ñ÷èòûâàåòñÿ àäàïòèâíûì ìíîãîìåñòíûì çàðÿäíûì óñòðîéñòâîì
IMPRES. Åñëè àêêóìóëÿòîð IMPRES çàðÿæàåòñÿ â òå÷åíèå áîëåå 2,5 ìèíóò,
àäàïòèâíîå ìíîãîìåñòíîå çàðÿäíîå óñòðîéñòâî çàïîìèíàåò ñåðèéíûé íîìåð
àêêóìóëÿòîðà IMPRES. Àêêóìóëÿòîð IMPRES ìîæíî óäàëèòü èç çàðÿäíîãî
óñòðîéñòâà íà âðåìÿ äî 30 ìèíóò. Åñëè ïîñëå ýòîãî ñíîâà âñòàâèòü àêêóìóëÿòîð â
çàðÿäíîå óñòðîéñòâî, åãî çàðÿäêà âîçîáíîâèòñÿ ñ òîé òî÷êè, â êîòîðîé îíà áûëà
ïðåðâàíà.
Ðó÷íîå âîññòàíîâëåíèå àêêóìóëÿòîðîâ
Äî èñòå÷åíèÿ ïåðâûõ 2,5 ìèíóò ïîñëå ïåðâîé óñòàíîâêè àêêóìóëÿòîðà
(ÍÅÏÐÅÐÛÂÍÛÉ ÊÐÀÑÍÛÉ ) èçâëåêèòå è ñíîâà, íå ïîçäíåå ÷åì ÷åðåç 5 ñåêóíä,
âñòàâüòå àêêóìóëÿòîð â çàðÿäíîå óñòðîéñòâî äëÿ ïðèíóäèòåëüíîãî
èíèöèèðîâàíèÿ ïðîöåññà âîññòàíîâëåíèÿ. Èíäèêàòîð çàðÿäíîãî óñòðîéñòâà
èçìåíèò èíäèêàöèþ ñ ÍÅÏÐÅÐÛÂÍÎÉ ÊÐÀÑÍÎÉ íà ÍÅÏÐÅÐÛÂÍÓÞ ÆÅËÒÓÞ.
 ðåçóëüòàòå ïðèíóäèòåëüíî âêëþ÷èòñÿ ðåæèì âîññòàíîâëåíèÿ è àâòîìàòè÷åñêîé
çàðÿäêè àêêóìóëÿòîðà.
ÏÐÈÌÅ×ÀÍÈÅ
×ðåçìåðíîå èñïîëüçîâàíèå ýòîé ôóíêöèè ìîæåò ñíèçèòü
ñðîê ñëóæáû, ò.å. ÷èñëî öèêëîâ çàðÿä/ðàçðÿä,
àêêóìóëÿòîðà.
37D22-B_Impres_MUC_RU.fm Page 14 Wednesday, July 12, 2006 2:18 PM

Ðóññêèé
15
Àâòîìàòè÷åñêîå âîññòàíîâëåíèå àêêóìóëÿòîðîâ
Ïðè çàðÿäêå â àäàïòèâíîì ìíîãîìåñòíîì çàðÿäíîì óñòðîéñòâå Motorola IMPRES
àêêóìóëÿòîðîâ Motorola IMPRES óñòðîéñòâî îïðåäåëÿåò, êîãäà íåîáõîäèìî
âîññòàíîâèòü àêêóìóëÿòîð.
Ïðè íàäëåæàùåé óñòàíîâêå àêêóìóëÿòîðà IMPRES â çàðÿäíîå óñòðîéñòâî
ïîñëåäíåå îïðåäåëÿåò, òðåáóåòñÿ ëè âîññòàíîâëåíèå àêêóìóëÿòîðà. Åñëè
àêêóìóëÿòîð íóæäàåòñÿ â âîññòàíîâëåíèè, àâòîìàòè÷åñêè âêëþ÷àåòñÿ
ÍÅÏÐÅÐÛÂÍÛÉ ÆÅËÒÛÉ èíäèêàòîð çàðÿäíîãî óñòðîéñòâà. Ýòîò ïðîöåññ ìîæåò
çàíÿòü äî 8 ñ ëèøíèì ÷àñîâ – â çàâèñèìîñòè îò ñòåïåíè çàðÿæåííîñòè è åìêîñòè
àêêóìóëÿòîðà.
Âàæíî îòìåòèòü, ÷òî äëÿ îáåñïå÷åíèÿ ýôôåêòèâíîñòè ýòîãî ïðîöåññà
íåîáõîäèìî äàòü çàðÿäíîìó óñòðîéñòâó âîçìîæíîñòü ïîëíîñòüþ çàâåðøèòü
âîññòàíîâëåíèå/çàðÿäêó àêêóìóëÿòîðà. Îñòàâüòå àêêóìóëÿòîð â çàðÿäíîì
óñòðîéñòâå äî òåõ ïîð, ïîêà èíäèêàòîð çàðÿäíîãî óñòðîéñòâà íå ñòàíåò ãîðåòü
ÍÅÏÐÅÐÛÂÍÛÌ ÇÅËÅÍÛÌ.
Ïî çàâåðøåíèè öèêëà âîññòàíîâëåíèÿ çàðÿäíîå óñòðîéñòâî àâòîìàòè÷åñêè
çàðÿäèò àêêóìóëÿòîð.
Ïðåêðàùåíèå ïðîöåññà âîññòàíîâëåíèÿ âðó÷íóþ
Äëÿ ïðåêðàùåíèÿ âîññòàíîâëåíèÿ àêêóìóëÿòîðà Motorola IMPRES (â ýòîì ðåæèìå
ãîðèò ÍÅÏÐÅÐÛÂÍÛÉ ÆÅËÒÛÉ èíäèêàòîð) äîñòàòî÷íî â ëþáîé ìîìåíò âûíóòü
è íå ïîçäíåå ÷åì ÷åðåç 5 ñåêóíä ñíîâà âñòàâèòü àêêóìóëÿòîð.  ðåçóëüòàòå
çàðÿäíîå óñòðîéñòâî ïðåðâåò ïðîöåññ âîññòàíîâëåíèÿ è íà÷íåò ïðîöåññ çàðÿäêè.
Èíäèêàòîð çàðÿäíîãî óñòðîéñòâà íà÷íåò ãîðåòü ÍÅÏÐÅÐÛÂÍÛÌ ÊÐÀÑÍÛÌ.
37D22-B_Impres_MUC_RU.fm Page 15 Wednesday, July 12, 2006 2:18 PM

Ðóññêèé
16
ÓÑÒÐÀÍÅÍÈÅ ÍÅÈÑÏÐÀÂÍÎÑÒÅÉ
Àäàïòèâíîå ìíîãîìåñòíîå çàðÿäíîå óñòðîéñòâî IMPRES èìååò:
• óíèâåðñàëüíûé áëîê äëÿ ïîäêëþ÷åíèþ ïèòàíèÿ (100-240  ïåð. òîêà, 50/60 Ãö);
• áëîê äëÿ áûñòðîé çàðÿäêè íåïðåðûâíûì òîêîì;
• áëîê äëÿ êîíäèöèîíèðîâàíèÿ àêêóìóëÿòîðîâ èìïóëüñíûì òîêîì
(îòðèöàòåëüíûìè èìïóëüñàìè);
• áëîê äëÿ âîññòàíîâëåíèÿ.
Òàêîå ñî÷åòàíèå áëîêîâ â îäíîì óñòðîéñòâå íå èìååò àíàëîãîâ ñðåäè íàñòîëüíûõ
çàðÿäíûõ óñòðîéñòâ.  ñâÿçè ñ íàëè÷èåì ýòèõ ôóíêöèé âêëþ÷åíèå ðàäèîñòàíöèè
âî âðåìÿ çàðÿäêè íàõîäÿùåãîñÿ â íåì àêêóìóëÿòîðà íå ðåêîìåíäóåòñÿ.
Âêëþ÷åíèå ðàäèîñòàíöèè ñ çàðÿæàåìûì àêêóìóëÿòîðîì ìîæåò ïðèâåñòè ê
óõóäøåíèþ ðàáîòû ðàäèîñòàíöèè è óâåëè÷åíèþ âðåìåíè çàðÿäêè.
Ê êîíöó öèêëà áûñòðîé çàðÿäêè (èíäèêàòîð ÍÅÏÐÅÐÛÂÍÛÉ ÊÐÀÑÍÛÉ )
íàïðÿæåíèå àêêóìóëÿòîðà ñòàíîâèòñÿ âûøå íîðìàëüíîãî ðàáî÷åãî íàïðÿæåíèÿ
ðàäèîñòàíöèè. Íàïðÿæåíèå âîçâðàùàåòñÿ ê íîðìàëüíîìó óðîâíþ ïîñëå
ìåäëåííîé çàðÿäêè èëè â ðåçóëüòàòå èçâëå÷åíèÿ àêêóìóëÿòîðà èç çàðÿäíîãî
óñòðîéñòâà.
Åñëè âêëþ÷èòü ðàäèîñòàíöèþ âî âðåìÿ ìåäëåííîé çàðÿäêè, ðàäèîñòàíöèÿ
ðàáîòàòü íå áóäåò. Ýòî âðåìåííîå ÿâëåíèå, äëÿ óñòðàíåíèÿ êîòîðîãî äîñòàòî÷íî
âûíóòü ðàäèîñòàíöèþ èç çàðÿäíîãî óñòðîéñòâà, âûêëþ÷èòü, à çàòåì âêëþ÷èòü åå.
 ïðîöåññå âîññòàíîâëåíèÿ àêêóìóëÿòîð ïîëíîñòüþ ðàçðÿæàåòñÿ, ïîýòîìó âî
âðåìÿ âîññòàíîâëåíèÿ ðàäèîñòàíöèÿ ìîæåò íå ðàáîòàòü.
Âî âðåìÿ óñòðàíåíèÿ íåèñïðàâíîñòåé ïîñòîÿííî ñëåäèòå çà èíäèêàòîðîì
çàðÿäíîãî óñòðîéñòâà – ñì. òàáë. 9.
37D22-B_Impres_MUC_RU.fm Page 16 Wednesday, July 12, 2006 2:18 PM

Ðóññêèé
17
ÎÁÑËÓÆÈÂÀÍÈÅ
Ðåìîíò àäàïòèâíîãî ìíîãîìåñòíîãî çàðÿäíîãî óñòðîéñòâà IMPRES ìîæåò
âûïîëíÿòüñÿ òîëüêî êâàëèôèöèðîâàííûì ñïåöèàëèñòîì ïî îáñëóæèâàíèþ,
àâòîðèçîâàííûì Motorola. Ëþáîå íàðóøåíèå äàííîãî óñëîâèÿ âåäåò ê
ïðåêðàùåíèþ ãàðàíòèè íà óñòðîéñòâî.
Òàáë. 10. Óñòðàíåíèå íåèñïðàâíîñòåé
Ïðîáëåìà ×òî ýòî îçíà÷àåò… Äåéñòâèÿ ïî óñòðàíåíèþ
Èíäèêàòîð
çàðÿäíîãî
óñòðîéñòâà íå
ãîðèò
•Íåò êîíòàêòà ìåæäó
àêêóìóëÿòîðîì è
êîíòàêòàìè çàðÿäíîãî
óñòðîéñòâà.
• Çàðÿäíîå óñòðîéñòâî íå
çàïèòûâàåòñÿ.
• Óáåäèòåñü, ÷òî ðàäèîñòàíöèÿ èëè
àêêóìóëÿòîð ïðàâèëüíî âñòàâëåí â
ãíåçäî çàðÿäíîãî óñòðîéñòâà.
• Íàäåæíî âñòàâüòå øòåêåð øíóðà
ïèòàíèÿ â ãíåçäî çàðÿäíîãî
óñòðîéñòâà, à âèëêó – â ñåòåâóþ
ðîçåòêó, óáåäèòåñü â íàëè÷èè
íàïðÿæåíèÿ â ðîçåòêå.
• Çàìåíèòå ïðåäîõðàíèòåëü(è).
Ìèãàþùèé
êðàñíûé
èíäèêàòîð
• Ðàäèîñòàíöèÿ/àêêóìóëÿòîð
íå êîíòàêòèðóåò ñ çàðÿäíûì
óñòðîéñòâîì.
• Àêêóìóëÿòîð çàðÿäèòü
íåëüçÿ.
• Âûíüòå è ñíîâà âñòàâüòå
àêêóìóëÿòîð â çàðÿäíîå óñòðîéñòâî.
• Óáåäèòåñü, ÷òî àêêóìóëÿòîð ÿâëÿåòñÿ
îäîáðåííûì êîìïàíèåé Motorola
àêêóìóëÿòîðîì, óêàçàííûì â òàáë. 1-
6. Äëÿ äðóãèõ áàòàðåé ýòî çàðÿäíîå
óñòðîéñòâî ìîæåò îêàçàòüñÿ
íåïðèãîäíûì.
• Îòêëþ÷èòå ïèòàíèå îò çàðÿäíîãî
óñòðîéñòâà è ïðè ïîìîùè ñóõîé
÷èñòîé òêàíè ïðîòðèòå
ìåòàëëè÷åñêèå "çîëîòûå" êîíòàêòû
àêêóìóëÿòîðà è çàðÿäíîãî
óñòðîéñòâà.
• Çàìåíèòå àêêóìóëÿòîð.
Ìèãàþùèé
æåëòûé
èíäèêàòîð
• Àêêóìóëÿòîð îæèäàåò
íà÷àëà çàðÿäêè. Âîçìîæíî,
òåìïåðàòóðà àêêóìóëÿòîðà
íèæå 5°C èëè âûøå 40°C èëè
æå åãî íàïðÿæåíèå íèæå
ïîðîãîâîãî çíà÷åíèÿ,
êîòîðîãî îíî äîëæíî
äîñòèãíóòü ïðåæäå ÷åì
íà÷íåòñÿ áûñòðàÿ çàðÿäêà.
• Çàðÿäêà àêêóìóëÿòîðà íà÷íåòñÿ,
êîãäà íàïðÿæåíèå èëè òåìïåðàòóðà
ïðèäåò â íîðìó.
37D22-B_Impres_MUC_RU.fm Page 17 Wednesday, July 12, 2006 2:18 PM

Ðóññêèé
18
ÇÀÐßÄÍÛÅ ÓÑÒÐÎÉÑÒÂÀ Ñ ÌÎÄÓËÅÌ ÄÈÑÏËÅß (CDM)
Àäàïòèâíûå ìíîãîìåñòíûå çàðÿäíûå óñòðîéñòâà IMPRES ìîãóò áûòü
äîïîëíèòåëüíî îáîðóäîâàíû ìîäóëåì äèñïëåÿ (charger display module
— CDM), íîìåð èçäåëèÿ Motorola RLN5382.
Îáùèå ñâåäåíèÿ î äèñïëåå
Àäàïòèâíîå ìíîãîìåñòíîå çàðÿäíîå óñòðîéñòâî IMPRES ñ CDM
ïðåäîñòàâëÿåò ïîëüçîâàòåëþ âàæíóþ èíôîðìàöèþ ïðè îáñëóæèâàíèè
àêêóìóëÿòîðà. Ñâåäåíèÿ, îòîáðàæàåìûå çàðÿäíûì óñòðîéñòâîì è
ñîîòâåòñòâóþùèìè ñâåòîäèîäíûìè èíäèêàòîðàìè îïèñàíû â
ïðèâåäåííûõ íèæå òàáëèöàõ.
Âêëþ÷åíèå
Upon Charger Power-up
(Ïðè âêëþ÷åíèè çàðÿäíîãî óñòðîéñòâà)
LED SINGLE FLASH GREEN (ОДИНОЧНАЯ ВСПЫШКА
ЗЕЛЕНЫМ СВЕТОМ)
Line 1 IMPRES
Line 2
If There is No Battery in the Pocket
(Ïðè îòñóòñòâèè óñòàíîâëåííîãî
àêêóìóëÿòîðà)
LED OFF (ВЫКЛ.)
Line 1 NO BATTERY (НЕТ АККУМУЛЯТОРА)
Line 2
Reading Battery Data
(Ñ÷èòûâàíèå äàííûõ àêêóìóëÿòîðà)
LED Any Defined Indication (Любая описанная индикация)
Line 1 READING (ЧТЕНИЕ)
Line 2 BATTERY DATA (ДАННЫХ АККУМУЛЯТОРА)
37D22-B_Impres_MUC_RU.fm Page 18 Wednesday, July 12, 2006 2:18 PM

Ðóññêèé
19
Non-IMPRES
Battery in the Pocket (Óñòàíîâëåí àêêóìóëÿòîð íå-IMPRES)
IMPRES
Battery in the Pocket (Óñòàíîâëåí àêêóìóëÿòîð IMPRES)
LED Defined by Charge State (Определяется состоянием
зарядки)
Line 1 NON-IMPRES (НЕ-IMPRES)
Line 2 BATTERY (АККУМУЛЯТОР)
I
MPRES
and Software Versions are Displayed (
Îòîáðàæàåòñÿ ñëîâî
IMPRESS è âåðñèÿ ïðîãðàììíîãî îáåñïå÷åíèÿ)
LED Defined by Charge State (Определяется состоянием
зарядки)
Line 1 IMPRES
Line 2 SW xx.yy; aa.bb (ПО xx.yy; aa.bb)
ÏÐÈÌÅ×ÀÍÈÅ
xx.yy îáîçíà÷àåò âåðñèþ ÏÎ, à aa.bb — âåðñèþ ÏÎ CDM.
IMPRES
Battery Kit # and Chemistry are Displayed
(Îòîáðàæàþòñÿ íîìåð
êîìïëåêòà àêêóìóëÿòîðîâ è õèìè÷åñêèé ïðîöåññ)
LED Defined by Charge State (Определяется состоянием
зарядки)
Line 1 KIT# -------- (КОМПЛЕКТ №--------)
Line 2 -----CHEMISTRY (-----ХИМИЧЕСКИЙ ПРОЦЕСС)
Forecasted # of Cycles Prior to Automatic Recondition
(Ïðîãíîçèðóåìîå
÷èñëî öèêëîâ äî àâòîìàòè÷åñêîãî âîññòàíîâëåíèÿ)
LED Defined by Charge State (Определяется состоянием
зарядки)
Line 1 ----CYCLES (----ЦИКЛОВ)
Line 2 TO RECONDITION (ДО ВОССТАНОВЛЕНИЯ)
*Îòîáðàæàåòñÿ òîëüêî, åñëè ÷èñëî öèêëîâ ìåíüøå 6.
Charger Waiting to Charge, Battery is Hot
(Çàðÿäíîå óñòðîéñòâî îæèäàåò
çàðÿäêè, àêêóìóëÿòîð íàãðåëñÿ)
LED Flashing ORANGE (Мигающий ОРАНЖЕВЫЙ)
Line 1 WAITING TO CHG (ОЖИДАНИЕ ЗАРЯДКИ)
Line 2 HOT BATTERY (АККУМУЛЯТОР НАГРЕЛСЯ)
37D22-B_Impres_MUC_RU.fm Page 19 Wednesday, July 12, 2006 2:18 PM

Ðóññêèé
20
Charger Waiting to Charge, Battery is Cold
(Çàðÿäíîå óñòðîéñòâî îæèäàåò
çàðÿäêè, àêêóìóëÿòîð õîëîäíûé)
LED Flashing ORANGE (Мигающий ОРАНЖЕВЫЙ)
Line 1 WAITING TO CHG (ОЖИДАНИЕ ЗАРЯДКИ)
Line 2 COLD BATTERY (АККУМУЛЯТОР ХОЛОДНЫЙ)
Charger Waiting to Charge, Low Voltage
(Çàðÿäíîå óñòðîéñòâî îæèäàåò
çàðÿäêè, íèçêîå íàïðÿæåíèå)
LED Flashing ORANGE (Мигающий ОРАНЖЕВЫЙ)
Line 1 WAITING TO CHG (ОЖИДАНИЕ ЗАРЯДКИ)
Line 2 LOW VOLTAGE (НИЗКОЕ НАПРЯЖЕНИЕ)
ÏÐÈÌÅ×ÀÍÈÅ:
Íå âñå ïîêàçàííûå âûøå ýêðàíû áóäóò îòîáðàæåíû.
Íàïðèìåð, ýêðàí Îæèäàíèå çàðÿäêè (àêêóìóëÿòîð
íàãðåëñÿ, àêêóìóëÿòîð õîëîäíûé, íèçêîå íàïðÿæåíèå)
îòîáðàçÿòñÿ òîëüêî ïðè âîçíèêíîâåíèè ñîîòâåòñòâóþùåé
ñèòóàöèè.
Charger is in Trickle Charge Mode
(Çàðÿäíîå óñòðîéñòâî â ðåæèìå çàðÿäêè
ìàëûì òîêîì)
LED Flashing GREEN (Мигающий ЗЕЛЕНЫЙ)
Line 1 TRICKLE CHARGE (ЗАРЯДКА МАЛЫМ ТОКОМ)
Line 2
Charge is Complete
(Çàðÿäêà çàâåðøåíà)
LED Steady GREEN or Flashing RED / GREEN (Ровный
ЗЕЛЕНЫЙ или мигающий КРАСНЫЙ / ЗЕЛЕНЫЙ)
Line 1 CHARGE COMPLETE (ЗАРЯДКА ЗАВЕРШЕНА)
Line 2
Charger is in Discharge/Reconditioning Mode
(Çàðÿäíîå óñòðîéñòâî â
ðåæèìå ðàçðÿäà/âîññòàíîâëåíèÿ)
LED Steady ORANGE (Ровный ОРАНЖЕВЫЙ)
Line 1 DISCHARGE (РАЗРЯД)
Line 2
37D22-B_Impres_MUC_RU.fm Page 20 Wednesday, July 12, 2006 2:18 PM

Ðóññêèé
21
Charger is Calibrating an IMPRES Battery
(Çàðÿäíîå óñòðîéñòâî âûïîëíÿåò
êàëèáðîâêó àêêóìóëÿòîðà IMPRES)
LED Steady ORANGE, Steady RED, & Flashing ORANGE or
GREEN (Ровный ОРАНЖЕВЫЙ, ровный КРАСНЫЙ и
мигающий ОРАНЖЕВЫЙ или ЗЕЛЕНЫЙ)
Line 1 Calibrating (Калибровка)
Line 2 Battery (аккумулятора)
LED Steady GREEN (Ровный ЗЕЛЕНЫЙ)
Line 1 Battery (аккумулятор)
Line 2 Calibrated (откалиброван)
*Âñå àêêóìóëÿòîðû IMPRES äîëæíû áûòü îòêàëèáðîâàíû ïåðåä
èñïîëüçîâàíèåì. Çàðÿäíîå óñòðîéñòâî IMPRES àâòîìàòè÷åñêè
çàïóñêàåò êàëèáðîâêó äëÿ âñåõ íîâûõ àêêóìóëÿòîðîâ
Battery Capacity Data is Displayed as “%” in mAH, and Voltage
(Îòîáðàæàåòñÿ åìêîñòü àêêóìóëÿòîðà â % è ìÀ÷)
LED Defined by Charge State (Определяется состоянием
зарядки)
Line 1 ----% RATED CAP. (----%НОМИНАЛЬНОЙ ЕМКОСТИ)
Line 2 ----mAH --.-V (----мАч --.-В)
ÏÐÈÌÅ×ÀÍÈÅ:
(1) Ïðåäïîëîæèòåëüíîå âðåìÿ îêîí÷àíèÿ çàðÿäêè
âêëþ÷àåò â ñåáÿ äëèòåëüíîñòü öèêëîâ áûñòðîé
çàðÿäêè è ðàçðÿäà (ïðè íåîáõîäèìîñòè).
(2) Äëÿ íåêàëèáðîâàííûõ àêêóìóëÿòîðîâ ñâåäåíèÿ î
åìêîñòè ìîãóò íå îòîáðàæàòüñÿ.
(3) Ïðèìåíåíèå çàðÿäíûõ óñòðîéñòâ íå-IMPRES äëÿ
çàðÿäêè àêêóìóëÿòîðîâ IMPRES ìîæåò ïîâëèÿòü íà
åìêîñòü è òî÷íîñòü îöåíêè âðåìåíè çàðÿäêè.
Estimated Time to Rapid Charge
Complete Displayed in Hours, Minutes for NiCd & NiMH IMPRES
Batteries Only
(Ïðåäïîëîæèòåëüíîå âðåìÿ îêîí÷àíèÿ áûñòðîé çàðÿäêè â ÷àñàõ è
ìèíóòàõ òîëüêî äëÿ NiCd è NiMH àêêóìóëÿòîðîâ IMPRES)
LED Defined by Charge State (Определяется состоянием
зарядки)
Line 1 RAPID CHG ENDS (БЫСТРАЯ ЗАРЯДКА ЗАКОНЧИТСЯ)
Line 2 IN xx HRS, yy MIN (ЧЕРЕЗ xx Ч, yy МИН)
37D22-B_Impres_MUC_RU.fm Page 21 Wednesday, July 12, 2006 2:18 PM

Ðóññêèé
22
Äèàãðàììû ïîñëåäîâàòåëüíîñòè äëÿ àêêóìóëÿòîðîâ IMPRES
Ïðèìå÷àíèå: äàííûå äèàãðàììû äåìîíñòðèðóþò ïîñëåäîâàòåëüíîñòè,
ïîêàçàííûå â ïðåäûäóùåì ðàçäåëå “Îáùèå ñâåäåíèÿ î äèñïëåå”, è
äîñòóïíû òîëüêî íà àíãëèéñêîì ÿçûêå.
Ïîñëåäîâàòåëüíîñòü ýêðàíîâ äëÿ NiCd è NiMH àêêóìóëÿòîðîâ IMPRES
LED Defined by Charge State
Line 1 KIT# xxxxxxxx
Line 2 SN: yyyyyyyyyyyy
LED Defined by Charge State
Line 1 KIT# xxxxxxxx
Line 2 yyyyy CHEMISTRY
LED Defined by Charge State
Line 1 xxxx CYCLES
Line 2 TO RECONDITION
LED Steady RED
Line 1 RAPID CHARGE
Line 2
LED Defined by Charge State
Line 1 xx% RATED CAP.
Line 2 yyyyy mAH zz.z V
LED Defined by Charge State
Line 1 RAPID CHG ENDS
Line 2 IN xx HRS, yy MIN
Çàïóñê
(4,0 c)
(2,0 c)
(2,0 c)
(2,0 c)
(7,0 c)
(4,0 c)
Êàæäûå
73,0 c
Êàæäûå
13,0 c
5X
65,0
c
37D22-B_Impres_MUC_RU.fm Page 22 Wednesday, July 12, 2006 2:18 PM

Ðóññêèé
23
Ïåðåä êàëèáðîâêîé:
LED Defined by Charge State
Line 1 KIT# xxxxxxxx
Line 2 SN: yyyyyyyyyyyy
LED Defined by Charge State
Line 1 KIT# xxxxxxxx
Line 2 yyyyy CHEMISTRY
LED Steady ORANGE
Line 1 DISCHARGE
Line 2
LED Defined by Charge State
Line 1 CALIBRATING
Line 2 BATTERY
LED Defined by Charge State
Line 1 RAPID CHG ENDS
Line 2 IN xx HRS, yy MIN
Êàæäûå
71,0 c
Çàïóñê
(4,0 c)
(2,0 c)
(2,0 c)
(7,0 c)
(4,0 c)
Êàæäûå
13,0 c
5X
65,0
c
37D22-B_Impres_MUC_RU.fm Page 23 Wednesday, July 12, 2006 2:18 PM

Ðóññêèé
24
Ïîñëå êàëèáðîâêè:
LED Defined by Charge State
Line 1 KIT# xxxxxxxx
Line 2 SN: yyyyyyyyyyyy
LED Defined by Charge State
Line 1 KIT# xxxxxxxx
Line 2 yyyyy CHEMISTRY
LED Steady GREEN
Line 1 CHARGE COMPLETE
Line 2
LED Defined by Charge State
Line 1 BATTERY
Line 2 CALIBRATED
LED Defined by Charge State
Line 1 xx% RATED CAP.
Line 2 yyyy mAH zz.z V
Çàïóñê
(4,0 c)
(2,0 c)
(2,0 c)
(2,0 c)
(7,0 c)
Êàæäûå
61,0c
Êàæäûå
11 c
5X
55,0
c
37D22-B_Impres_MUC_RU.fm Page 24 Wednesday, July 12, 2006 2:18 PM

Ðóññêèé
25
Ïîñëåäîâàòåëüíîñòü ýêðàíîâ äëÿ Li-Ion àêêóìóëÿòîðîâ IMPRES
LED Defined by Charge State
Line 1 KIT# xxxxxxxx
Line 2 SN: yyyyyyyyyyyy
LED Defined by Charge State
Line 1 KIT# xxxxxxxx
Line 2 yyyyy CHEMISTRY
LED Defined by Charge State
Line 1 xxxx CYCLES
Line 2 TO RECONDITION
LED Steady RED
Line 1 RAPID CHARGE
Line 2
LED Defined by Charge State
Line 1 xx% RATED CAP.
Line 2 yyyyy mAH zz.z V
Çàïóñê
(4,0 c)
(2,0 c)
(2,0 c)
(2,0 c)
(7,0 c)
Êàæäûå
53,0 c
Êàæäûå
9,0 c
5X
45,0
c
37D22-B_Impres_MUC_RU.fm Page 25 Wednesday, July 12, 2006 2:18 PM

Ðóññêèé
26
Ïåðåä êàëèáðîâêîé:
LED Defined by Charge State
Line 1 KIT# xxxxxxxx
Line 2 SN: yyyyyyyyyyyy
LED Defined by Charge State
Line 1 KIT# xxxxxxxx
Line 2 yyyyy CHEMISTRY
LED Steady ORANGE
Line 1 DISCHARGE
Line 2
LED Defined by Charge State
Line 1 CALIBRATING
Line 2 BATTERY
Çàïóñê
(4,0 c)
(2,0 c)
(2,0 c)
(7,0 c)
Êàæäûå
51,0 c
Êàæäûå
9,0 c
5X
45,0
c
37D22-B_Impres_MUC_RU.fm Page 26 Wednesday, July 12, 2006 2:18 PM

Ðóññêèé
27
Ïîñëå êàëèáðîâêè:
LED Defined by Charge State
Line 1 KIT# xxxxxxxx
Line 2 SN: yyyyyyyyyyyy
LED Defined by Charge State
Line 1 KIT# xxxxxxxx
Line 2 yyyyy CHEMISTRY
LED Steady GREEN
Line 1 CHARGE COMPLETE
Line 2
LED Defined by Charge State
Line 1 BATTERY
Line 2 CALIBRATED
LED Defined by Charge State
Line 1 xx% RATED CAP.
Line 2 yyyy mAH zz.z V
Çàïóñê
(4,0 c)
(2,0 c)
(2,0 c)
(2,0 c)
(7,0 c)
Êàæäûå
61,0c
Êàæäûå
11 c
5X
55,0
c
37D22-B_Impres_MUC_RU.fm Page 27 Wednesday, July 12, 2006 2:18 PM

Ðóññêèé
28
Îðèåíòàöèÿ òåêñòà íà äèñïëåå
Äèñïëåé CDM ìîæåò ïîâîðà÷èâàòüñÿ íà 180 ãðàäóñîâ, ïîçâîëÿÿ
ðàçìåùàòü àäàïòèâíîå ìíîãîìåñòíîå çàðÿäíîå óñòðîéñòâî
IMPRES íà ñòîëå èëè ñòåíå.
×òîáû ïîâåðíóòü äèñïëåé, âñòàâüòå áîëüøóþ êàíöåëÿðñêóþ
ñêðåïêó â îòâåðñòèå ïîä äèñïëååì ïåðïåíäèêóëÿðíî
ïîâåðõíîñòè. Ùåë÷îê áóäåò îçíà÷àòü ñðàáàòûâàíèå
ïåðåêëþ÷àòåëÿ, ïîñëå ÷åãî òåêñò áóäåò ïîâåðíóò íà 180 ãðàäóñîâ.
Îáñëóæèâàíèå àäàïòèâíîãî ìíîãîìåñòíîãî çàðÿäíîãî
óñòðîéñòâà IMPRES
Ïîäðîáíåå î âîçìîæíîñòÿõ îáñëóæèâàíèÿ MUC è CDM ñì.
Ðóêîâîäñòâî ïî îáñëóæèâàíèþ çàðÿäíîãî óñòðîéñòâà,
6880309L66.
Îáñëóæèâàíèå
Äëÿ îáñëóæèâàíèÿ îáðàùàéòåñü â ñëåäóþùåå
ïðåäñòàâèòåëüñòâî. Ïîæàëóéñòà, ïåðåä îòïðàâêîé óñòðîéñòâà íà
îáñëóæèâàíèå ïîçâîíèòå â ïðåäñòàâèòåëüñòâî è ïîäòâåðäèòå
âîçâðàò.
Öåíòð îáñëóæèâàíèÿ Motorola
Motorola GmbH
Customer Care
Am Borsigturm 130
13507 Berlin
Germany.
Tel: +49 30 6686 1555
37D22-B_Impres_MUC_RU.fm Page 28 Wednesday, July 12, 2006 2:18 PM

Èeština
1
OBSAH
Dùležité bezpeènostní pokyny . . . . . . . . . . . . . . . . . . . . . . . . . . . . . 2
Pravidla provozní bezpeènosti . . . . . . . . . . . . . . . . . . . . . . . . . . . . . 3
IMPRES - vlastnosti a výhody. . . . . . . . . . . . . . . . . . . . . . . . . . . . . . 4
Provozní charakteristiky a odlišnosti . . . . . . . . . . . . . . . . . . . . . . . . 5
Seznam baterií . . . . . . . . . . . . . . . . . . . . . . . . . . . . . . . . . . . . . . . . . 7
Napájecí sít’ a schválené napájecí adaptéry Motorola. . . . . . . . . . 10
Provozní pokyny . . . . . . . . . . . . . . . . . . . . . . . . . . . . . . . . . . . . . . . 11
Nabíjení baterií . . . . . . . . . . . . . . . . . . . . . . . . . . . . . . . . . . . . . 13
Manuální regenerace baterií . . . . . . . . . . . . . . . . . . . . . . . . . . . 14
Automatická regenerace baterií . . . . . . . . . . . . . . . . . . . . . . . . . 14
Manuální ukonèení regenerace . . . . . . . . . . . . . . . . . . . . . . . . . 15
Odstraòování závad . . . . . . . . . . . . . . . . . . . . . . . . . . . . . . . . . . . . 16
Servis . . . . . . . . . . . . . . . . . . . . . . . . . . . . . . . . . . . . . . . . . . . . . . . 17
Nabíjeèky s modulem displeje (CDM) . . . . . . . . . . . . . . . . . . . . . . 18
Tento doplòující manuál platí pro dále uvedené univerzální víceèlánkové nabíjeèky
IMPRES:
WPLN4108, WPLN4109, WPLN4110, WPLN4118, WPLN4119, WPLN4120, WPLN4121,
WPLN4123, WPLN4130, WPLN4131, WPLN4132, WPLN4133, WPLN4134, WPLN4135,
WPLN4136
Kromì toho jsou v tomto manuálu popsány dále uvedené univerzální víceèlánkové
nabíjeèky IMPRES, dodávané k profesionálním radiostanicím øady GP Professional:
WPLN4144, WPLN4145, WPLN4146, WPLN4187, WPLN4188, WPLN4189, WPLN4190,
WPLN4191, WPLN4192, WPLN4193, WPLN4194, WPLN4195, WPLN4196, WPLN4204,
WPLN4205
Výraz 'univerzální' znamená, že nabíjeèku lze použít pro více typù radiostanic, a s
použitím bateriových adaptérù pro všechny baterie uvedené v tabulkách 1 - 6.
37D22-B_Impres_MUC_CZ.fm Page 1 Wednesday, July 12, 2006 2:00 PM

2
Èeština
DÙLEžITÉ BEZPEÈNOSTNÍ POKYNY
TYTO POKYNY SI USCHOVEJTE
Následující dokument obsahuje dùležité pokyny o bezpeènosti a
obsluze. Peèlivì si je pøeètìte a uschovejte si je pro pozdìjší použití.
Døíve, než zaènete nabíjeèku baterií používat, pøeètìte si všechny
pokyny a výstražná oznaèení na nabíjeèce (1), baterii (2) a na
radiostanici (3), v níž se baterie používá.
1. Nabíjejte pouze schválené nabíjecí baterie Motorola
uvedené v tabulce 1 až 5, abyste pøedešli možnému
poranìní. Jiné baterie mohou vybuchnout a zpùsobit
zranìní osob a vìcné škody.
2.Použití pøíslušenství, které není doporuèeno firmou
Motorola mùže zpùsobit požár, úraz elektrickým proudem nebo
zranìní.
3. Nabíjeèku odpojujte ze zásuvky tahem za zástrèku, nikoli tahem
za kabel; pøedejdete tak možnému poškození zástrèky nebo
kabelu.
4. Pokud to není nezbytnì nutné, nepoužívejte prodlužovací kabel.
Použití nesprávného prodlužovacího kabelu mùže zpùsobit požár
nebo úraz elektrickým proudem. Pokud je nutné použít
prodlužovací kabel, dbejte na to, aby byl do délky 100 stop (30,48
m) použit kabel velikosti 18AWG a do délky 150 stop (45,72 m)
kabel velikosti 16AWG.
5. Pro zamezení vzniku požáru, úrazu elektrickým proudem nebo
zranìní nepoužívejte nabíjeèku, která je jakkoli poškozená. Pøedejte
ji servisnímu pracovníkovi firmy Motorola.
6. Toto zaøízení je opravitelné
. Každá nabíjecí pozice je napájená
vlastním obvodem na desce plošných spojù a napájecím zdrojem.
Desku plošných spojù resp. zdroj lze zakoupit v prodejnách s
pøíslušenstvím a náhradními díly. Deska plošných spojù má
objednací èíslo RLN5325. Jiné náhradní díly se nedodávají. V
prodejnách s pøíslušenstvím a náhradními díly lze rovnìž
objednat pøíruèku popisující výmìnu souèásti. Tato servisní
pøíruèka má objednací èíslo 6880309L66.
7. Pøed zapoèetím jakékoli údržby nebo èistìní nabíjeèku nejdøíve
odpojte od elektrického rozvodu, abyste zamezili možnému úrazu
elektrickým proudem.
!
VÝSTRAHA
37D22-B_Impres_MUC_CZ.fm Page 2 Wednesday, July 12, 2006 2:00 PM

Èeština
3
PRAVIDLA PROVOZNÍ BEZPEÈNOSTI
• Pøed nabíjením baterie vypnìte radiostanici.
• Toto zaøízení není vhodné pro vekovní použití. Používejte je pouze
v suchém prostøedí.
• Pøipojujte zaøízení pouze ke správnì jištìnému a zapojenému
napájecímu okruhu s odpovídajícím napìtím (viz specifikace
výrobku).
• Odpojujte zaøízení od napájení vytažením zástrèky ze zásuvky.
• Zásuvka, k nìmuž zaøízení pøipojujete, musí být dobøe pøístupná.
• U zaøízení vybaveného pojistkou musí náhradní pojistka souhlasit
s typem a hodnotou uvedenou ve specifikacích zaøízení.
• Maximální teplota okolí nabíjeèky nesmí pøekroèit 40 °C (104 °F).
• Dbejte na to, aby na napájecí kabel nikdo nešlapal, nezakopl o nìj,
aby nebyl pod vodou a nebyl napnutý.
• Pro toto zaøízení lze použít stejnou konzolu pro instalaci na stìnu,
jako pro univerzální nabíjeèku NTN4796. Objednací èíslo montážní
konzoly na stìnu je NLN7967.
• Pøi výmìnì pojistky používejte výhradnì typ, který je uveden na
výrobním štítku nabíjeèky. Následující souèásti lze objednat u
místního prodejce pøíslušenství a náhradních dílù:
Pojistka 6571489S01
Držák 0987626G01
Kryt 0987739G01
37D22-B_Impres_MUC_CZ.fm Page 3 Wednesday, July 12, 2006 2:00 PM

4
Èeština
IMPRES - VLASTNOSTI A VÝHODY
Øešení IMPRES je vyspìlý napájecí systém Tri-Chemistry vyvinutý
firmou Motorola, který obsahuje baterie IMPRES (a), adaptivní
víceèlánkovou nabíjeèku IMPRES (b) a systém hardwaru a softwaru
v radiostanici (c), zajišt’ující interní komunikaci radiostanic IMPRES
kompatibilních s bateriemi IMPRES (neplatí pro radiostanice øady
GP Professional).
Když je adaptivní víceèlánková nabíjeèka IMPRES použita ve spojení
s bateriemi Motorola IMPRES, pak:
• zabezpeèuje maximální provozní èas mezi nabíjecími cykly
potlaèením pamìt’ového efektu.
• maximalizuje životnost baterií výrazným snížením zahøívání
bìhem udržovacího nabíjení a cyklù po nabití.
• vyluèuje nutnost poøízení regeneraèního zaøízení a zácviku
obsluhy pro “údržbu baterií”.
Díky tomuto jedineènému patentovanému systému není nutno vést
záznamy o použití baterií, provádìt manuální regeneraèní cyklování
nebo po nabití vyjímat baterie z nabíjeèky.
Adaptivní víceèlánková nabíjeèka IMPRES monitoruje charakter
použití baterií IMPRES, ukládá tyto informace pøímo do nich a
provádí regeneraèní cykly, pouze když je to nutné.
Pøi použití adaptivní víceèlánkové nabíjeèky IMPRES se baterie
nepøehøívají, bez ohledu na to jak dlouho zùstanou v nabíjecích
pozicích nabíjeèky. Nabíjeèka monitoruje baterie a po nabití je
automaticky odpojí.
Adaptivní víceèlánková nabíjeèka IMPRES zjednodušuje nabíjení
baterií a jejich údržbu: Staèí dodržovat následující postup:
1. Vložit radiostanici resp. baterii do nabíjecí pozice nabíjeèky.
2. Vyjmout radiostanici resp. baterii z nabíjeèky, když je plnì
nabitá!
Motorola je jediný výrobce, který nabízí formovací nebo regeneraèní
nabíjeèku poskytující uživatelùm možnost nabíjení jak samostatných
baterií, tak i baterií pøipojených k radiostanici.
37D22-B_Impres_MUC_CZ.fm Page 4 Wednesday, July 12, 2006 2:00 PM

Èeština
5
PROVOZNÍ CHARAKTERISTIKY A ODLIŠNOSTI:
1. Baterie IMPRES lze nabíjet v konvenèních nabíjeèkách. Pokud
však má být použita funkce Smart Energy, je nutno nabíjet baterie
IMPRES v adaptivní víceèlánkové nabíjeèce IMPRES. Pøi prvním
nabíjení baterie IMPRES v adaptivní víceèlánkové nabíjeèce
IMPRES bude kontrolka nabíjeèky zpoèátku svítit TRVALE
Ž
LUTÌ. První nabíjení musí být zcela dokonèeno, dokud
kontrolka nabíjeèky nezaène svítit TRVALE ZELENÌ. Tím je
baterie IMPRES správnì zkalibrována, což umožòuje funkci
Smart Energy. Pokud je uvedený proces pøerušen, nabíjeèka
baterii zkalibruje bìhem pøíštího nabíjení.
2. Vzhledem k tomu, že adaptivní víceèlánková nabíjeèka IMPRES
automaticky stanovuje podmínky nutné pro regeneraci baterie
IMPRES, mùže po vložení radiostanice nebo baterie pøejít do
regeneraèního režimu. Ten je indikován TRVALÝM
Ž
LUTÝM
svitem kontrolky nabíjeèky. Regeneraèní režim lze v pøípadì
potøeby potlaèit vyjmutím a opìtovným vložením radiostanice
nebo baterie. (Pøeètìte si pokyny uvedené dále v této pøíruèce.)
3. Adaptivní víceèlánková nabíjeèka IMPRES je urèena k nabíjení
baterií uvedených v tabulkách 1 až 6. Funkci Smart Energy však
umožòují pouze originální baterie IMPRES.
4. Pro zabezpeèení pøesného záznamu o stavu baterie IMPRES,
uložení a zobrazení tìchto dat, musí být baterie IMPRES Smart
zkalibrována adaptivní víceèlánkovou nabíjeèkou IMPRES.
37D22-B_Impres_MUC_CZ.fm Page 5 Wednesday, July 12, 2006 2:00 PM

6
Èeština
5. Pokud je baterie IMPRES použita v radiostanici s displejem
(napø. XTS5000), mùže být na displeji radiostanice zobrazena
ikona indikující stav baterie. Tato ikona je aktivována po
zkalibrování baterie IMPRES nabíjeèkou IMPRES. Ikona stavu
nabití zùstane zobrazena tak dlouho, dokud bude uživatel pro
nabíjení baterie používat nabíjeèku IMPRES. Pokud však bude
baterie IMPRES po období 7 dnù (nebo déle) nabíjena v jiné
nabíjeèce než IMPRES, ikona zmizí. Pro opìtovné zobrazení
ikony je tøeba vložit baterii IMPRES do nabíjeèky IMPRES a
nechat probìhnout celý proces nabíjení (s výsledným TRVALÝM
ZELENÝM svitem kontrolky). Ikona stavu nabití se potom opìt
zobrazí na displeji radiostanice. Jestliže se ikona ani po plném
nabití baterie nezobrazí, vložte èásteènì vybitou baterii (nejménì
na 70%) do nabíjeèky, aktivujte regeneraèní režim a nechejte
probìhnout celý nabíjecí cyklus. Ikona se potom zobrazí na
displeji radiostanice (neplatí pro radiostanice GP Professional).
6. Adaptivní víceèlánkovou nabíjeèku IMPRES smí opravovat pouze
servisní pracovník, autorizovaný firmou Motorola CGISS.
Porušením této zásady mùže zaniknout záruka pøístroje.
37D22-B_Impres_MUC_CZ.fm Page 6 Wednesday, July 12, 2006 2:00 PM

Èeština
7
SEZNAM BATERIÍ
V následujících tabulkách je pøehled baterií, které lze používat v
radiostanicích uvedených v záhlaví tabulek.
*
Nabíjení baterií MTP700 v univerzální nabíjeèce vyžaduje použití bateriového
adaptéru obj.è. RLN5212
.
Tabulka 1. Radiostanice øady ASTRO XTS3000 / XTS3500 / DiMetra a
digitální radiostanice ASTRO XTS5000
Sada (PN) Typ baterie FM Smart Kapacita Nový model
HNN9031 NiCD ne ano Ultra vysoká ne
HNN9032 NiCD ano ano Ultra vysoká ne
NTN8294 NiCD ne ne Ultra vysoká ne
NTN8295 NiCD ano ne Ultra vysoká ne
NTN8297 NiCD ano ne Ultra vysoká ne
NTN8299 NiCD ano ne Ultra vysoká ne
NTN8610 LiIon ne ne Vysoká ne
NTN8293 NiMH ne ne Ultra vysoká ne
NNTN4435 NiMH ne ano Ultra vysoká ne
NNTN4436 NiMH ano ano Ultra vysoká ne
NNTN4437 NiMH ano ano Ultra vysoká ne
RNN4006 NiMH ne ne Velmi vysoká nový
RNN4007 NIMH ano ne Velmi vysoká nový
NTN9862 LiIon ne ano Ultra vysoká nový
Tabulka 2. Digitální radiostanice ASTRO XTS2500
Sada (PN) Typ baterie FM Smart Kapacita Nový model
NTN9859 NiMH ne ne Ultra vysoká nový
NTN9857 NiMH ano ne Ultra vysoká nový
NTN9815 NiCD ne ne Vysoká nový
NTN9816 NiCD ano ne Vysoká nový
Tabulka 3. Digitální radiostanice MTP700
Sada (PN) Typ baterie FM Smart Kapacita Nový model
PMNN4048* NiMH ne ano Vysoká nový
PMNN4049* NiMH ano ano Vysoká nový
PMNN4050* Lilon ne ano Vysoká nový
PMNN4047* LiIon ne ano Vysoká nový
37D22-B_Impres_MUC_CZ.fm Page 7 Wednesday, July 12, 2006 2:00 PM

8
Èeština
**Nabíjení baterií Astro Saber v univerzální nabíjeèce vyžaduje použití bateriového
adaptéru obj.è. 4385922B01.
Tabulka 4. Radiostanice HT1000 / MT2000 / MTS2000 / MTX8000 &
MTX9000 øady Jedi
Sada (PN) Typ baterie FM Smart Kapacita Nový model
HNN9028 NiCD ne ano Ultra vysoká ne
HNN9029 NiCD ano ano Ultra vysoká ne
NTN7143 NiCD ne ne Vysoká ne
NTN7144 NiCD ne ne Ultra vysoká ne
NTN7146 NiCD ano ne Vysoká ne
NTN7147 NiCD ano ne Ultra vysoká ne
NTN7148 NiCD CENELEC ne Vysoká ne
NTN7149 NiCD CSA ne Vysoká ne
NTN7150 NiCD MSHA ne Vysoká ne
NTN7341 NiCD ano ne Ultra vysoká ne
NTN7372 NiCD ano ne Vysoká ne
WPPN4013 NiMH ne ne Ultra vysoká ne
WPPN4037 NiMH ano ne Ultra vysoká ne
RNN4008 NiCD ATEX ne Vysoká ne
Tabulka 5. Radiostanice Saber / Astro Saber/ SSE5000 / MX1000
Sada (PN) Typ baterie FM Smart Kapacita Nový model
HNN9033 NiCD ne ano Ultra vysoká ne
HNN9031 NiCD ano ano Ultra vysoká ne
NTN4537** NiCD ano ne Nízká ne
NTN4538 NiCD ano ne Vysoká ne
NTN4592** NiCD ne ne Nízká ne
NTN4593 NiCD ne ne Vysoká ne
NTN4595 NiCD ne ne Ultra vysoká ne
NTN4596 NiCD ano ne Ultra vysoká ne
NTN4657 NiCD ne ne Vysoká ne
NTN4671 NiCD CENELEC ne Vysoká ne
NTN4992 NiCD ano ne Ultra vysoká ne
NTN7014** NiMH ne ne Vysoká ne
NTN7058 NiCD ano ne Ultra vysoká ne
NTN7426 NiCD ano ne Nízká ne
NTN8251 NiMH ano ne Ultra vysoká ne
NTN8818** LiIon ne ne Vysoká ne
37D22-B_Impres_MUC_CZ.fm Page 8 Wednesday, July 12, 2006 2:00 PM

Èeština
9
Univerzální nabíjeèka vyžaduje bateriový adaptér obj.è. RLN5648.
Tabulka 6. Radiostanice øady GP Professional
Sada (PN) Typ baterie FM Smart Kapacita Nový model
HNN9003 NiMH
AA Bluetooth
ne ne Vysoká ne
HNN9008 NiMH ne ne Vysoká ne
HNN9009 NiMH ne ne Ultra vysoká ne
HNN9010 NiMH ano ne Ultra vysoká ne
HNN9011 NiCD ano ne Vysoká ne
HNN9012 NiCD ne ne Vysoká ne
HNN9013 LiIon ne ne Vysoká ne
WPNN4045 NiMH ne ne Vysoká ne
PMNN4045 NiMH ne ne Vysoká ne
HNN4001 Impres NiMH ne ano Ultra vysoká ano
HNN4002 Impres NiMH ano ano Ultra vysoká ano
HNN4003 Impres LiIon ne ano Ultra vysoká ano
POZNÁMKA:
Adaptéry lze zakoupit od zástupcù prodejce radiostanice
nebo prodejce náhradních dílù.
37D22-B_Impres_MUC_CZ.fm Page 9 Wednesday, July 12, 2006 2:00 PM

10
Èeština
Napájecí sít’ a Schválené Napájecí Adaptéry Motorola
Tato nabíjeèka je urèena pro použití ve støídavých rozvodných sítích
o napìtí 100 V až 240 V, 50/60 Hz s použitím sít’ových kabelù
Motorola uvedených v Tabulce 7. Sít’ové kabely používané k
nabíjeèce pro radiostanice øady GP Professional jsou uvedeny v
Tabulce 8:
Tabulka 7. Sít’ové kabely Motorola Universal
Typ zástrèky Nabíjeèka Nabíjeèka
(model s
displejem)
Napájecí kabel
Bez sít’. kabelu /
zástrèky
WPLN4121 WPLN4127 žádný
U.S.A/NA WPLN4108 WPLN4130 3087791G01
Euro WPLN4109 WPLN4131 3087791G04
V. Británie WPLN4110 WPLN4132 3087791G07
Austrálie/Nový Zéland WPLN4118 WPLN4133 3087791G10
Argentina WPLN4119 WPLN4134 3087791G13
U.S.A./NA WPLN4120 WPLN4135 3087791G01
Korea WPLN4123 WPLN4136 3087791G16
Tabulka 8. Sít’ové kabely Motorola pro øadu GP Professional
Typ zástrèky Nabíjeèka Nabíjeèka
(model s
displejem)
Napájecí kabel
Bez sít’. kabelu /
zástrèky
WPLN4197 WPLN4198
žádný
U.S.A/NA WPLN4187 WPLN4192 3087791G01
Euro WPLN4189 WPLN4194 3087791G04
V. Británie WPLN4188 WPLN4193 3087791G07
Austrálie/Nový Zéland WPLN4190 WPLN4195 3087791G10
Argentina WPLN4191 WPLN4196 3087791G13
U.S.A./NA WPLN4205 WPLN4204 3087791G01
Korea WPLN4146 WPLN4145 3087791G16
37D22-B_Impres_MUC_CZ.fm Page 10 Wednesday, July 12, 2006 2:00 PM

Èeština
11
PROVOZNÍ POKYNY
Do nabíjecích pozic nabíjeèky lze vložit buï radiostanici s
pøipojenou baterií nebo pouze samotnou baterii. Pøed nabíjením
radiostanice s baterií radiostanici nejdøíve vypnìte. Nabíjení
baterie probíhá nejlépe pøi pokojové teplotì.
1. Zapojte odpovídající konec sít’ového kabelu do napájecího
konektoru na zadní èásti nabíjeèky.
2. Zapojte zástrèku sít’ového kabelu do odpovídající zásuvky
elektrického rozvodu. Úspìšné zapnutí je indikováno JEDNÍM
ZELENÝM BLIKNUTÍM kontrolky nabíjeèky.
3. Vložte baterii nebo radiostanici s baterií (vypnutá radiostanice)
do nabíjecí pozice:
a. Dbejte na to, aby drážky na obou stranách baterie souhlasily s
odpovídajícími vodítky na bocích nabíjecí pozice.
b. Zatlaète baterii smìrem k zadní stìnì nabíjecí pozice.
c. Zasuòte baterii do nabíjecí pozice tak, aby byl zaruèen
dokonalý dotyk kontaktù baterie a nabíjeèky.
Jakmile je baterie správnì zasunuta do nabíjeèky rozsvítí se
kontrolka nabíjeèky, která tím indikuje, že nabíjeèka rozpoznala
pøítomnost baterie. Viz popis indikací nabíjeèky v Tabulce 9.
.
POZNÁMKY
V adaptivní víceèlánkové nabíjeèce IMPRES lze nabíjet pouze
baterie schválené firmou Motorola, uvedené v tabulkách 1 až 6.
Ostatní baterie nelze nabíjet.
Adaptivní víceèlánkové nabíjeèky IMPRES jsou vybaveny
automatickými funkcemi a možnostmi, které jsou odlišné od
jiných nabíjeèek. Vìnujte zvláštní pozornost kontrolce
nabíjeèky abyste se ujistili, že pracuje v požadovaném resp.
oèekávaném režimu.
37D22-B_Impres_MUC_CZ.fm Page 11 Wednesday, July 12, 2006 2:00 PM

12
Èeština
Plné využití všech možností baterií Motorola Smart i adaptivního
systému nabíjení vyžaduje, aby byla pøi prvním nabíjení
inicializována data uložená v bateriích Motorola Smart. Tento proces
je indikován TRVALÝM
Ž
LUTÝM svitem kontrolky nabíjeèky (stejnì
jako pøi regeneraci baterie). Uvedený proces probíhá automaticky a
zahrnuje prvotní regeneraci baterie s následným nabíjením po
skonèení tohoto procesu. Celý proces vyžaduje urèitý èas pro
inicializaci baterie, takže ji lze pøi prvním nabíjení ponechat v
nabíjeèce pøes noc.
Tabulka 9. Indikace nabíjeèky
Kontrolka nabíjeèky Popis
Jedno zelené bliknutí Nabíjeèka je správnì zapnutá.
Trvale èervenì svítí Baterie je v režimu rychlonabíjení.
Zelenì bliká Dokonèené rychlonabíjení baterie (>90% dosažitelné
kapacity). Baterie v režimu dobíjení (udržovací nabíjení).
Trvale zelenì svítí Nabíjení skonèilo a baterie je plnì nabitá.
Ž
lutì bliká Nabíjeèka rozpoznala baterii, ale nabíjení ještì nezaèalo.
(Buï je napìtí baterie pøíliš nízké, nebo je baterie pøíliš
studená nebo horká. Jakmile uvedené podmínky pominou,
bude zahájeno nabíjení.)
Èervenì bliká Baterii nelze nabít nebo má špatný kontakt.
Trvale
ž
lutì svítí (Platí pouze pro baterie Smart.)
Baterie je v regeneraèním režimu. Doba, po kterou
nabíjeèka zùstane v tomto režimu závisí na zbytkovém
náboji baterie v okamžiku vložení do nabíjeèky. (Plnì
nabitá baterie vyžaduje delší dobu regenerace - 8 hodin
nebo více - než se zcela vybije.)
Bliká èervenì a zelenì (Platí pouze pro baterie Smart.)
Nabíjení skonèilo a baterie je plnì nabitá. Baterie je
dosud použitelná, její životnost však brzy skonèí.
POZNÁMKA
Adaptivní víceèlánková nabíjeèka IMPRES má tu jedineènou
schopnost, že pøi použití s bateriemi Motorola IMPRES
dokáže automaticky urèit, kdy je potøeba baterii regenerovat.
37D22-B_Impres_MUC_CZ.fm Page 12 Wednesday, July 12, 2006 2:00 PM

Èeština
13
Adaptivní víceèlánková nabíjeèka IMPRES pracuje jako:
• Nabíjeèka všech baterií schválených firmou Motorola a
• Regeneraèní zaøízení baterií Motorola IMPRES.
Nabíjení baterií
Pro zajištìní optimálního výkonu firma Motorola doporuèuje,
ponechat pøed prvním použitím nové baterie v nabíjeèce 14 až 16
hodin.
1. Jakmile je baterie nebo radiostanice s pøipojenou baterií správnì
vložena do nabíjecí pozice, nabíjeèka zahájí rychlonabíjení
indikované TRVALÝM ÈERVENÝM svitem kontrolky nabíjeèky.
Doba TRVALÉHO ÈERVENÉHO svitu kontrolky závisí na
zbytkovém náboji baterie.
2. Dokonèené rychlonabíjení (>90% dosažitelné kapacity) je
indikováno ZELENÝM BLIKÁNÍM kontrolky nabíjeèky. To
oznaèuje dobíjení (udržovací nabíjení), které trvá asi 1 hodinu.
3. Dokonèení udržovacího nabíjení je indikováno TRVALÝM
ZELENÝM svitem kontrolky nabíjeèky. Tím je ohlášeno plné
nabití baterie.
4. Jiné indikace, které se mohou bìhem nabíjení objevit:
•
Ž
LUTÉ BLIKÁNÍ – indikuje, že teplota nebo napìtí baterie je
mimo rozsah pøípustný pro nabíjení. Nabíjení bude
pokraèovat, jakmile tyto podmínky pominou.
• ÈERVENÉ A ZELENÉ BLIKÁNÍ – indikuje, že se baterie blíží
DÙLEŽITÉ:
Do nabíjecích pozic nabíjeèky lze vložit baterie nìkolika
rùzných tvarù a velikostí, a proto je dùležité se pøesvìdèit,
zda je baterie nebo radiostanice s pøipojenou baterií vložena
do nabíjeèky správnì. Pokud je samotná baterie nebo
radiostanice s pøipojenou baterií vložena nesprávnì,
kontrolka nabíjeèky se nerozsvítí a tím indikuje, že se baterie
nenabíjí.
POZNÁMKA:
Nové baterie (dosud nepoužité) v nìkterých pøípadech
pøedèasnì indikují plné nabití (TRVALÝ ZELENÝ svit
kontrolky).
37D22-B_Impres_MUC_CZ.fm Page 13 Wednesday, July 12, 2006 2:00 PM

14
Èeština
konci své životnosti. Aèkoli tato baterie je plnì nabitá, její
kapacita se užíváním snížila, takže nemusí být dostaèující pro
vìtší zatížení. Tato funkce je k dispozici pouze s bateriemi
Motorola IMPRES. Nejedná se o indikaci závady, ale více
ménì o upozornìní uživateli, že baterie již brzy nebude
splòovat oèekávané pøedpoklady a je tøeba ji vymìnit.
• ÈERVENÉ BLIKÁNÍ – indikuje, že baterii nelze nabít. To
mùže být zpùsobeno ztrátou kontaktu mezi baterií a
nabíjeèkou. Po odstranìní pøíèiny indikované kontrolkou bude
nabíjení pokraèovat.
Baterie Motorola Smart mají vnitøní pamìt’, kterou ète adaptivní
víceèlánková nabíjeèka Motorola IMPRES. Když je baterie IMPRES
nabíjena v adaptivní víceèlánkové nabíjeèce IMPRES déle než 2,5
minuty, nabíjeèka si uchová sériové èíslo baterie IMPRES. Baterii
IMPRES lze vyjmout z nabíjeèky na dobu až 30 minut. Po vložení
baterie zpìt do nabíjeèky bude proces nabíjení pokraèovat od bodu,
kdy byla baterie z nabíjeèky vyjmuta.
Manuální regenerace baterií
Bìhem 2,5 minuty po prvním vložení baterie IMPRES do nabíjeèky
(TRVALÁ ÈERVENÁ indikace) baterii vyjmìte a bìhem 5 sekund ji
vložte zpìt - tím bude manuálnì vynucen režim regenerace. Indikace
kontrolky nabíjeèky se zmìní z TRVALÉ ÈERVENÉ na TRVALOU
Ž
LUTOU. Nabíjeèka je ve stavu nucené regenerace a potom
automaticky zahájí nabíjení baterie.
Automatická regenerace baterií
Adaptivní víceèlánková nabíjeèka IMPRES firmy Motorola je schopná
ve spojitosti s bateriemi Motorola IMPRES urèit, kdy je vhodné
baterii regenerovat.
POZNÁMKA:
Nadmìrné používání této funkce mùže snížit celkovou životnost
baterie.
37D22-B_Impres_MUC_CZ.fm Page 14 Wednesday, July 12, 2006 2:00 PM

Èeština
15
Po øádném vložení baterie IMPRES do nabíjecí pozice nabíjeèka
urèí, zda je vhodné baterii regenerovat. Jestliže baterie vyžaduje
regeneraci, nabíjeèka to automaticky indikuje TRVALÝM
Ž
LUTÝM
svitem kontrolky. Tento proces mùže trvat až 8 hodin nebo více, v
závislosti na kapacitì baterie a na stavu jejího nabití pøi vložení do
nabíjeèky.
Na tomto místì je nutno upozornit, ž e proces regenerace je
úèinný pouze tehdy, když se baterie postupnì zcela vybije a
potom znovu plnì nabije. Ponechejte proto baterii v nabíjeèce
tak dlouho, dokud se kontrolka nabíjeèky TRVALE ZELENÌ
nerozsvítí.
Na konci regeneraèního cyklu nabíjeèka automaticky baterii znovu
nabije.
Manuální ukonèení regenerace
Proces regenerace baterie Motorola IMPRES (TRVALÝ
Ž
LUTÝ svit
kontrolky) lze kdykoli pøerušit tím, že baterii vyjmete z nabíjeèky a
bìhem 5 sekund ji znovu vložíte zpìt. Tím se proces regenerace
pøeruší a nabíjeèka bude pokraèovat nabíjením baterie. Kontrolka
nabíjeèky zaène svítit TRVALE ÈERVENÌ.
37D22-B_Impres_MUC_CZ.fm Page 15 Wednesday, July 12, 2006 2:00 PM

16
Èeština
ODSTRAÒOVÁNÍ ZÁVAD
Adaptivní víceèlánková nabíjeèka IMPRES má následující vlastnosti:
• univerzální napájení ze støídavé elektrické sítì (100 V -240 V, 50/60
Hz).
• rychlonabíjení konstantním proudem.
•udržovací nabíjení pøerušovaným proudem (záporné impulzy).
• regenerace baterií.
Kombinace výše uvedených vlastností je pro stolní nabíjeèku
ojedinìlá. Nedoporuèuje se však provozovat radiostanici s
pøipojenou baterií, když je vložená do nabíjeèky.
Pøi použití radiostanice vložené do nabíjeèky mùže dojít k
výraznému snížení výkonu radiostanice a k prodloužení doby
nabíjení.
S blížícím se koncem cyklu rychlonabíjení (TRVALÝ ÈERVENÝ svit
kontrolky) napìtí baterie pøekroèí normální provozní napìtí
radiostanice. Napìtí baterie se vrátí zpìt na normální úroveò po
ukonèení cyklu rychlonabíjení nebo po vyjmutí baterie z nabíjeèky.
Pokud radiostanici zapnete v dobì, kdy je nabíjeèka v režimu
rychlonabíjení, radiostanice nebude doèasnì provozuschopná. Tento
stav lze zrušit vyjmutím radiostanice z nabíjeèky, vypnutím a
opìtovným zapnutím.
Bìhem procesu regenerace se baterie zcela vybije. Proto se bìhem
procesu regenerace mùže stát, že radiostanice nebude fungovat.
Pøi odstraòování závad vždy sledujte stav kontrolky nabíjeèky - viz
Tabulka 9.
37D22-B_Impres_MUC_CZ.fm Page 16 Wednesday, July 12, 2006 2:00 PM

Èeština
17
SERVIS
Adaptivní víceèlánkovou nabíjeèku IMPRES smí opravovat pouze
kvalifikovaný servisní pracovník, autorizovaný firmou Motorola.
Nedodržením této zásady mùže zaniknou záruka pøístroje.
Tabulka 10. Odstraòování závad
Problém Co to znamená... Co je tøeba udìlat...
Žádná indikace
kontrolky.
• Nabíjeèka nemá kontakt s
baterií.
• Nabíjeèka není pøipojená k
síti.
• Zkontrolujte, zda je radiostanice s
baterií nebo samotná baterie øádnì
vložená do nabíjeèky.
• Zkontrolujte, zda je sít’ový kabel
øádnì pøipojen k nabíjeèce a do
zásuvky elektrické sítì, a zda je
zásuvka pod napìtím.
• Vymìòte pojistku.
Kontrolka
èervenì bliká
• Nabíjeèka nemá kontakt s
baterií.
• Baterii nelze nabít.
• Vyjmìte baterii z nabíjeèky a
znovu ji vložte zpìt.
• Zkontrolujte, zda se jedná o
baterii schválenou firmou Motorola
uvedenou v tabulkách 1 až 6.
Ostatní baterie nelze nabíjet.
• Odpojte nabíjeèku od elektrické
rozvodné sítì a èistým suchým
hadøíkem vyèistìte pozlacené
kontakty nabíjeèky i baterie.
• Vymìòte baterii.
Kontrolka žlutì
bliká
• Baterie èeká na
nabíjení.Teplota baterie je
nižší než 5 °C (41°F) nebo
vyšší než 40 °C (104°F),
nebo je napìtí baterie nižší
než pøeddefinovaná prahová
hodnota pro rychlonabíjení.
• Jakmile uvedené podmínky
pominou, bude zahájeno nabíjení.
37D22-B_Impres_MUC_CZ.fm Page 17 Wednesday, July 12, 2006 2:00 PM

18
Èeština
NABÍJEÈKY S MODULEM DISPLEJE (CDM)
Adaptivní víceèlánkovou nabíjeèku IMPRES lze zdokonalit
doplnìním modulu displeje nabíjeèky (CDM), obj. è. Motorola
RLN5382.
Obecné informace displeje
Adaptivní víceèlánková nabíjeèka IMPRES vybavená CDM poskytuje
uživateli cenné informace pro ošetøování a údržbu baterie. Informace
zobrazované nabíjeèkou a odpovídající indikace kontrolky jsou
uvedeny v následujících tabulkách.
Zapnutí
V nabíjecí pozici není baterie IMPRES
V nabíjecí pozici je baterie IMPRES
Po zapnutí nabíjeèky
Kontrolka JEDNO ZELENÉ BLIKNUTÍ
Øádek 1 IMPRES
Øádek 2
Kdy
ž
není v nabíjecí pozici baterie
Kontrolka NESVÍTÍ
Øádek 1 NO BATTERY
Øádek 2
Ètení dat baterie
Kontrolka Libovolná definovaná indikace
Øádek 1 READING
Øádek 2 BATTERY DATA
Kontrolka Podle stavu nabíjení
Øádek 1 NON-IMPRES
Øádek 2 BATTERY
Zobrazí se IMPRES a verze softwaru
Kontrolka Podle stavu nabíjení
Øádek 1 IMPRES
Øádek 2 SW xx.yy; aa.bb
POZNÁMKA:
xx.yy oznaèuje verzi softwaru nabíjeèky, aa.bb oznaèuje
verzi softwaru CDM.
37D22-B_Impres_MUC_CZ.fm Page 18 Wednesday, July 12, 2006 2:00 PM

Èeština
19
Zobrazí se sada baterie IMPRES a její typ
Kontrolka Podle stavu nabíjení
Øádek 1 KIT# --------
Øádek 2 -----CHEMISTRY
Pøedpokládaný poèet cyklù pøed regenerací
Kontrolka Podle stavu nabíjení
Øádek 1 ----CYCLES
Øádek 2 TO RECONDITION
* Zobrazí se pouze tehdy, když je poèet cyklù do regenerace nižší než 6.
Nabíjeèka èeká na nabíjení, baterie je pøíliš horká
Kontrolka Bliká ORANŽOVÌ
Øádek 1 WAITING TO CHG
Øádek 2 HOT BATTERY
Nabíjeèka èeká na nabíjení, baterie je studená
Kontrolka Bliká ORANŽOVÌ
Øádek 1 WAITING TO CHG
Øádek 2 COLD BATTERY
Nabíjeèka èeká na nabíjení, napìtí je nízké
Kontrolka Bliká ORANŽOVÌ
Øádek 1 WAITING TO CHG
Øádek 2 LOW VOLTAGE
POZNÁMKA:
Výše uvedené displeje se nezobrazují všechny. Napøíklad
hlášení, že nabíjeèka èeká na nabíjení (horká baterie,
studená baterie, nízké napìtí) se zobrazí, pouze když
nastane daná situace.
37D22-B_Impres_MUC_CZ.fm Page 19 Wednesday, July 12, 2006 2:00 PM

20
Èeština
Nabíjeèka je v re
ž
imu udr
ž
ovacího nabíjení
Kontrolka Bliká ZELENÌ
Øádek 1 TRICKLE CHARGE
Øádek 2
Nabíjení skonèilo
Kontrolka ZELENÌ svítí nebo ÈERVENÌ / ZELENÌ bliká
Øádek 1 CHARGE COMPLETE
Øádek 2
Nabíjeèka je v re
ž
imu vybíjení/regenerace
Kontrolka Trvale ORANŽOVÌ svítí
Øádek 1 DISCHARGE
Øádek 2
Nabíjeèka kalibruje baterii IMPRES
Kontrolka Svítí trvale ORANŽOVÌ, ÈERVENÌ a bliká ORANŽOVÌ
nebo ZELENÌ
Øádek 1 Calibrating
Øádek 2 Battery
Kontrolka Trvale ZELENÌ svítí
Øádek 1 Battery
Øádek 2 Calibrated
* Všechny baterie IMPRES musí být pøed prvním použitím kalibrovány.
Nabíjeèka IMPRES automaticky provede kalibraci pro všechny nové
baterie.
Údaje o kapacitì baterie jsou zobrazeny jako “%” v mAh a Voltech
Kontrolka Podle stavu nabíjení
Øádek 1 ----% RATED CAP.
Øádek 2 ----mAH --.-V
37D22-B_Impres_MUC_CZ.fm Page 20 Wednesday, July 12, 2006 2:00 PM

Èeština
21
POZNÁMKA:
(1) Odhadovaný èas dokonèeného nabíjení zahrnuje cykly
rychlonabíjení a vybíjení (pokud je tøeba).
(2) Pro nekalibrované baterie se nezobrazí informace o
kapacitì baterie.
(3) Nabíjení baterií IMPRES jinými nabíjeèkami než IMPRES
mùže ovlivnit kapacitu a pøesnost èasu nabíjení.
Odhadovaná doba rychlonabíjení
Úplné zobrazení v hodinách a minutách pouze pro NiCd a NiMH
baterie IMPRES.
Kontrolka Podle stavu nabíjení
Øádek 1 RAPID CHG ENDS
Øádek 2 IN xx HRS, yy MIN
37D22-B_Impres_MUC_CZ.fm Page 21 Wednesday, July 12, 2006 2:00 PM

22
Èeština
Èasové diagramy pro baterie IMPRES
Poznámka: Tyto diagramy jsou sekvence uvedené v pøedchozích
‘Obecných informacích displeje a jsou pouze v angliètinì.
Èasové diagramy NiCd a NiMH baterií IMPRES
Kontrolka Podle stavu nabíjení
Øádek 1 KIT# xxxxxxxx
Øádek 2 SN: yyyyyyyyyyyy
Kontrolka Podle stavu nabíjení
Øádek 1 KIT# xxxxxxxx
Øádek 2 yyyyy CHEMISTRY
Kontrolka Podle stavu nabíjení
Øádek 1 xxxx CYCLES
Øádek 2 TO RECONDITION
Kontrolka Trvale ÈERVENÌ svítí
Øádek 1 RAPID CHARGE
Øádek 2
Kontrolka Podle stavu nabíjení
Øádek 1 xx% RATED CAP.
Øádek 2 yyyyy mAH zz.z V
Kontrolka Podle stavu nabíjení
Øádek 1 RAPID CHG ENDS
Øádek 2 IN xx HRS, yy MIN
Start
(4,0 sec)
(2,0 sec)
(2,0 sec)
(2,0 sec)
(7,0 sec)
(4,0 sec)
Každých
73,0 sec
Každých
13,0 sec
5X
65,0
sec
37D22-B_Impres_MUC_CZ.fm Page 22 Wednesday, July 12, 2006 2:00 PM

Èeština
23
Pøed kalibrací:
Kontrolka Podle stavu nabíjení
Øádek 1 KIT# xxxxxxxx
Øádek 2 SN: yyyyyyyyyyyy
Kontrolka Podle stavu nabíjení
Øádek 1 KIT# xxxxxxxx
Øádek 2 yyyyy CHEMISTRY
Kontrolka Trvale ORANŽOVÌ
svítí
Øádek 1 DISCHARGE
Øádek 2
Kontrolka Podle stavu nabíjení
Øádek 1 CALIBRATING
Øádek 2 BATTERY
Kontrolka Podle stavu nabíjení
Øádek 1 RAPID CHG ENDS
Øádek 2 IN xx HRS, yy MIN
Každých
71,0 sec
Start
(4,0 sec)
(2,0 sec)
(2,0 sec)
(7,0 sec)
(4,0 sec)
Každých
13,0 sec
5X
65,0
sec
37D22-B_Impres_MUC_CZ.fm Page 23 Wednesday, July 12, 2006 2:00 PM

24
Èeština
Po kalibraci:
Kontrolka Podle stavu nabíjení
Øádek 1 KIT# xxxxxxxx
Øádek 2 SN: yyyyyyyyyyyy
Kontrolka Podle stavu nabíjení
Øádek 1 KIT# xxxxxxxx
Øádek 2 yyyyy CHEMISTRY
Kontrolka Trvale ZELENÌ svítí
Øádek 1 CHARGE COMPLETE
Øádek 2
Kontrolka Podle stavu nabíjení
Øádek 1 BATTERY
Øádek 2 CALIBRATED
Kontrolka Podle stavu nabíjení
Øádek 1 xx% RATED CAP.
Øádek 2 yyyy mAH zz.z V
Start
(4,0 sec)
(2,0 sec)
(2,0 sec)
(2,0 sec)
(7,0 sec)
Každých
61,0sec
Každých
11 s e c
5X
55,0
sec
37D22-B_Impres_MUC_CZ.fm Page 24 Wednesday, July 12, 2006 2:00 PM

Èeština
25
Èasový diagram Li-Ion baterií IMPRES
Kontrolka Podle stavu nabíjení
Øádek 1 KIT# xxxxxxxx
Øádek 2 SN: yyyyyyyyyyyy
Kontrolka Podle stavu nabíjení
Øádek 1 KIT# xxxxxxxx
Øádek 2 yyyyy CHEMISTRY
Kontrolka Podle stavu nabíjení
Øádek 1 xxxx CYCLES
Øádek 2 TO RECONDITION
Kontrolka Trvale ÈERVENÌ svítí
Øádek 1 RAPID CHARGE
Øádek 2
Kontrolka Podle stavu nabíjení
Øádek 1 xx% RATED CAP.
Øádek 2 yyyyy mAH zz.z V
Start
(4,0 sec)
(2,0 sec)
(2,0 sec)
(2,0 sec)
(7,0 sec)
Každých
53,0 sec
Každých
9,0 sec
5X
45,0
sec
37D22-B_Impres_MUC_CZ.fm Page 25 Wednesday, July 12, 2006 2:00 PM

26
Èeština
Pøed kalibrací:
Kontrolka Podle stavu nabíjení
Øádek 1 KIT# xxxxxxxx
Øádek 2 SN: yyyyyyyyyyyy
Kontrolka Podle stavu nabíjení
Øádek 1 KIT# xxxxxxxx
Øádek 2 yyyyy CHEMISTRY
Kontrolka Trvale ORANŽOVÌ
svítí
Øádek 1 DISCHARGE
Øádek 2
Kontrolka Podle stavu nabíjení
Øádek 1 CALIBRATING
Øádek 2 BATTERY
Start
(4,0 sec)
(2,0 sec)
(2,0 sec)
(7,0 sec)
Každých
51,0 sec
Každých
9.0 sec
5X
45,0
sec
37D22-B_Impres_MUC_CZ.fm Page 26 Wednesday, July 12, 2006 2:00 PM

Èeština
27
Po kalibraci:
Kontrolka Podle stavu nabíjení
Øádek 1 KIT# xxxxxxxx
Øádek 2 SN: yyyyyyyyyyyy
Kontrolka Podle stavu nabíjení
Øádek 1 KIT# xxxxxxxx
Øádek 2 yyyyy CHEMISTRY
Kontrolka Trvale ZELENÌ svítí
Øádek 1 CHARGE COMPLETE
Øádek 2
Kontrolka Podle stavu nabíjení
Øádek 1 BATTERY
Øádek 2 CALIBRATED
Kontrolka Podle stavu nabíjení
Øádek 1 xx% RATED CAP.
Øádek 2 yyyy mAH zz.z V
Start
(4,0 sec)
(2,0 sec)
(2,0 sec)
(2,0 sec)
(7,0 sec)
Každých
61,0sec
Každých
11 s e c
5X
55,0
sec
37D22-B_Impres_MUC_CZ.fm Page 27 Wednesday, July 12, 2006 2:00 PM

28
Èeština
Orientace zobrazeného textu
Vzhledem k možnosti instalace adaptivní víceèlánkové nabíjeèky
IMPRES na stùl nebo na zeï umožòuje modul CDM "pøevrácení"
zobrazeného textu o 180 stupòù.
Pokud chcete tuto možnost použít, zasuòte kolmo do dírky pod
displejem velkou sponu na papír. Stisknutí pøepínacího tlaèítka je
indikováno "kliknutím" a text se pøevrátí o 180 stupòù.
Provoz adaptivní víceèlánkové nabíjeèky IMPRES
Podrobnìjší informace o obsluze MUC a CDM jsou uvedeny v
pøíruèce Charger Service Guide, 6880309L66.
Servis
Pokud budete potøebovat servis, kontaktujte následující adresu. Pøed
odesláním nabíjeèky do servisu laskavì zavolejte a ovìøte si svùj
požadavek.
Motorola Service Centre
Motorola GmbH
Péèe o zákazníky
Am Borsigturm 130
13507 Berlin
Nìmecko.
Tel: +49 30 6686 1555
37D22-B_Impres_MUC_CZ.fm Page 28 Wednesday, July 12, 2006 2:00 PM

37D22-B_Cover_new.fm Page 3 Tuesday, July 11, 2006 3:17 PM

© 2006 Motorola, Inc.
and MOTOROLA are registered trademarks of Motorola, Inc. IMPRES is a
trademark of Motorola, Inc.
07/06. All Rights Reserved
und MOTOROLA sind eingetragene Warenzeichen von Motorola Inc.
IMPRES ist ein Warenzeichen der Motorola, Inc.
07/06. Alle Rechte vorbehalten.
et MOTOROLA sont des marques déposées de Motorola, Inc. IMPRES est
une marque de fabrique de Motorola, Inc.
07/06. Tous droits réservés.
y MOTOROLA son marcas registradas de Motorola, Inc. IMPRES es una
marca comercial de Motorola, Inc
07/06. Todos los derechos reservados.
e MOTOROLA são marcas registadas da Motorola, Inc. IMPRES é uma
marca comercial da Motorola, Inc.
07/06. Todos os direitos reservados.
e MOTOROLA sono marchi registrati di Motorola Inc. IMPRES è un marchio
registrato di Motorola, Inc.
07/06. Tutti i diritti riservati
en MOTOROLA zijn wettig gedeponeerde handelsmerken van Motorola, Inc.
IMPRES is een handelsmerk van Motorola, Inc.
07/06. Alle rechten voorbehouden
a MOTOROLA jsou zapsané ochranné známky spoleènosti Motorola, Inc.
IMPRES je ochranná známka spoleènosti Motorola, Inc.
07/06. Všechna práva vyhrazena
è MOTOROLA ÿâëÿþòñÿ òîâàðíûìè çíàêàìè êîìïàíèè Motorola Inc.
IMPRES ÿâëÿåòñÿ òîâàðíûì çíàêîì êîìïàíèè Motorola, Inc.
07/06. Âñå ïðàâà ñîõðàíÿþòñÿ.
6866537D22-B
@6866537D22@
37D22-B_Cover_new.fm Page 4 Tuesday, July 11, 2006 3:17 PM
Transcripción de documentos
IMPRES™ Adaptive Mult-unit Charger Accessories RU Adaptive Multi-Unit Charger Mehrfach-Rekonditionierungsladegerät Chargeur Conditionneur Multiple Cargador adaptable múltiple Carregador auto adaptável múltiplo Caricatore adattivo a più unità Adaptieve meervoudige lader Àäàïòèâíîå ìíîãîìåñòíîå çàðÿäíîå óñòðîéñòâî CZ Adaptivní víceèlánkovou nabíjeèku EN DE FR ES PR IT NL TABLE OF CONTENTS Operational Safety Guidelines . . . . . . . . . . . . . . . . . . . . . . . . . . . . . . . 3 IMPRES Feature/Benefit Description . . . . . . . . . . . . . . . . . . . . . . . . . 4 Operational Characteristics/Differences . . . . . . . . . . . . . . . . . . . . . . . 5 Battery Lists . . . . . . . . . . . . . . . . . . . . . . . . . . . . . . . . . . . . . . . . . . . . . 7 Power Sources and Motorola Authorized Power Adapters . . . . . . . . 10 Operating Instructions . . . . . . . . . . . . . . . . . . . . . . . . . . . . . . . . . . . . 11 Charging the Batteries. . . . . . . . . . . . . . . . . . . . . . . . . . . . . . . . . . 13 Manually Reconditioning the Batteries . . . . . . . . . . . . . . . . . . . . . 14 Automatically Reconditioning the Batteries . . . . . . . . . . . . . . . . . . 14 Manually Terminating the Reconditioning Process . . . . . . . . . . . . 15 Troubleshooting . . . . . . . . . . . . . . . . . . . . . . . . . . . . . . . . . . . . . . . . . 16 Service . . . . . . . . . . . . . . . . . . . . . . . . . . . . . . . . . . . . . . . . . . . . . . . . 17 Chargers with Display Module (CDM) . . . . . . . . . . . . . . . . . . . . . . . . 18 This accessory manual is applicable to the following IMPRES Universal Multi-Unit chargers: WPLN4108, WPLN4109, WPLN4110, WPLN4118, WPLN4119, WPLN4120, WPLN4121, WPLN4123, WPLN4130, WPLN4131, WPLN4132, WPLN4133, WPLN4134, WPLN4135, WPLN4136 Additionally, this manual includes the following IMPRES Universal Multi-Unit chargers that are available for the GP Professional Series radios: WPLN4144, WPLN4145, WPLN4146, WPLN4187, WPLN4188, WPLN4189, WPLN4190, WPLN4191, WPLN4192, WPLN4193, WPLN4194, WPLN4195, WPLN4196, WPLN4204, WPLN4205 ‘Universal’ denotes that the charger supports multiple radio models and, through the use of battery adapters, all batteries listed in tables 1 - 6 inclusive. 1 English Important Safety Instructions . . . . . . . . . . . . . . . . . . . . . . . . . . . . . . . . 2 English IMPORTANT SAFETY INSTRUCTIONS SAVE THESE INSTRUCTIONS This document contains important safety and operating instructions. Please read these instructions carefully and save them for future reference. Before using the battery charger, read all the instructions and cautionary markings on (1) the charger and (2) the battery (3) and on the radio using the battery. 1. To reduce risk of injury, charge only the rechargeable Motorola authorized batteries listed in Tables 1 through 5. Other batteries may explode, WARNING causing personal injury and damage. ! 2. Use of accessories not recommended by Motorola may result in risk of fire, electric shock, or injury. 3. To reduce risk of damage to the electric plug and cord, pull by the plug rather than the cord when disconnecting the charger. 4. An extension cord should not be used unless absolutely necessary. Use of an improper extension cord could result in risk of fire and electric shock. If an extension cord must be used, make sure that the cord size is 18AWG for lengths of up to 100 feet (30.48m), and 16AWG for lengths up to 150 feet (45.72m). 5. To reduce risk of fire, electric shock, or injury, do not operate the charger if it has been broken or damaged in any way. Take it to a qualified Motorola service representative. 6. This unit is repairable. Each pocket is powered by a unique printed circuit board & power supply. The PCB / power supply can be purchased from the Aftermarket / Parts organization. The PCB replacement part number is RLN5325. No other component level replacement parts are available. A service manual describing the replacement process can also be ordered from the Aftermarket / Parts organization. The Service Manual Number is 6880309L66. 7. To reduce risk of electric shock, unplug the charger from the ac outlet before attempting any maintenance or cleaning. 2 OPERATIONAL SAFETY GUIDELINES • This equipment is not suitable for outdoor use. Use only in dry locations/conditions. • Connect equipment only to an appropriately fused and wired supply of the correct voltage (as specified on the product). • Disconnect from line voltage by removing the mains plug from the outlet. • The socket outlet to which this equipment is connected should be close and easily accessible. • For equipment using fuses, replacements must comply with the type and rating specified in the equipment instructions. • Maximum ambient temperature around the charger must not exceed 40°C (104°F). • Make sure the cord is located where it will not be stepped on, tripped over, or subjected to water, damage, or stress. • This unit utilizes the same wall mount unit as the NTN4796 Multi Unit Charger. The wall mount part number is NLN7967. • For fuse replacement, use only fuses of the same type and rating listed on the charger label. The following parts can be ordered from your local Parts / Aftermarket facility: Fuse 6571489S01 Holder 0987626G01 Cover 0987739G01 3 English • Turn the radio off when charging the battery. English IMPRES FEATURE / BENEFIT DESCRIPTION The IMPRES energy solution is an advanced Tri-Chemistry energy system developed by Motorola which encompasses (a) IMPRES batteries, (b) the IMPRES Adaptive Multi-Unit Charger, and (c) radio hardware / software which provides the capability for IMPRES compatible radios to communicate with IMPRES batteries (not applicable for GP Professional Series radios). The IMPRES Adaptive Multi-Unit Charger, when used in conjunction with Motorola IMPRES batteries will: • maximize operation time between charge cycles by automatically eliminating memory effect • maximize battery life by significantly reducing heat during the trickle and post charge cycles • eliminate the need to purchase reconditioning equipment and train personnel to “manage battery maintenance tasks.” With this unique patented system approach, there is no need to track and record battery use, conduct manual reconditioning cycles or remove batteries from chargers following charging. The IMPRES Adaptive Multi-Unit Charger monitors the usage pattern of the IMPRES batteries, stores that information in the IMPRES batteries, and performs a recondition cycle only when needed. The IMPRES Adaptive Multi-Unit Charger will not overheat the batteries regardless of how long the batteries are left in the charger pockets. The charger monitors the batteries and automatically “tops off” the batteries, as required. The IMPRES Adaptive Multi-Unit Charger simplifies the charging and battery care process: Just follow these simple steps: 1. Place the radios / batteries into the charger pockets. 2. Remove the radios / batteries when fully charged! Motorola is the only manufacturer that offers a conditioning or reconditioning charger that provides users with the choice of charging the radios with the batteries attached or the batteries separately. 4 OPERATIONAL CHARACTERISTICS / DIFFERENCES: 2. Since the IMPRES Adaptive Multi-Unit Charger automatically determines the conditions necessary to recondition an IMPRES battery, the charger may go into recondition mode when a radio or battery is inserted. This is indicated by a STEADY YELLOW on the charger indicator. The recondition mode can be over ridden, if required, by removing and reinserting the radio or battery. (Please see instructions later in this guide.) 3. The IMPRES Adaptive Multi-Unit Charger is designed to charge any battery listed in Tables 1 through 6. However, only genuine IMPRES batteries will provide Smart Energy features. 4. The IMPRES Adaptive Multi-Unit Charger must be used to calibrate IMPRES Smart batteries to ensure they accurately record, store and display IMPRES battery usage data. 5 English 1. IMPRES batteries may be charged in conventional chargers. However, in order for the Smart Energy features to be enabled, IMPRES batteries must be charged in the IMPRES Adaptive MultiUnit Charger. The first time an IMPRES battery is charged in an IMPRES Adaptive Multi-Unit Charger, the charger initially indicates a STEADY YELLOW on the charger indicator. This first charge must be allowed to complete to a STEADY GREEN indication on the charger indicator. This properly calibrates the IMPRES battery and enables the Smart Energy features. If this process is interrupted, the charger will calibrate the battery upon the next insertion. English 5. If an IMPRES battery is used with a display radio (e.g. XTS5000), the radio may display an icon indicating the charge status of the battery. This icon is enabled after an IMPRES battery has been calibrated in an IMPRES charger. The charger status icon will remain displayed as long as the user continues to use IMPRES chargers to charge the batteries. However, if an IMPRES battery is charged in a non-IMPRES charger for a period of 7 days (or more), the icon will disappear. To re-enable the icon, insert an IMPRES battery into an IMPRES charger and allow it to complete the charging process (resulting in a STEADY GREEN indication). The charge status icon will then be displayed on the radio. If the icon does not appear after a full charge, place a partially discharged battery (at least 70% discharged) into the charger, initiate a reconditioning, and allow it to complete the charging process. The icon will then appear on the radio display (not applicable to GP Professional Series radios). 6. The IMPRES Adaptive Multi-Unit Charger can only be repaired by a qualified service technician authorised by Motorola CGISS. Any violation of this policy can void unit warranty. 6 BATTERY LISTS Table 1. ASTRO XTS3000 / XTS3500 / DiMetra Series Radios & ASTRO XTS5000 Digital Radio Kit (PN) HNN9031 HNN9032 NTN8294 NTN8295 NTN8297 NTN8299 NTN8610 NTN8293 NNTN4435 NNTN4436 NNTN4437 RNN4006 RNN4007 NTN9862 Chemistry NiCD NiCD NiCD NiCD NiCD NiCD LiIon NiMH NiMH NiMH NiMH NiMH NIMH LiIon FM No Yes No Yes Yes Yes No No No Yes Yes No Yes No Smart Yes Yes No No No No No No Yes Yes Yes No No Yes Capacity Ultra High Ultra High Ultra High Ultra High Ultra High Ultra High High Ultra High Ultra High Ultra High Ultra High Very High Very High Ultra High New Model No No No No No No No No No No No New New New Table 2. ASTRO XTS2500 Digital Radios Kit (PN) NTN9859 NTN9857 NTN9815 NTN9816 Chemistry NiMH NiMH NiCD NiCD FM No Yes No Yes Smart No No No No Capacity Ultra High Ultra High High High New Model New New New New Table 3. MTP700 Digital Radios Kit (PN) PMNN4048* PMNN4049* PMNN4050* PMNN4047* Chemistry NiMH NiMH Lilon LiIon FM No Yes No No Smart Yes Yes Yes Yes Capacity High High High High New Model New New New New * Universal Charger requires battery adapter part number RLN5212 to charge MTP700 batteries. 7 English The following tables list the batteries that can be used with the specific subscriber radios identified in the table headings. English Table 4. HT1000 / MT2000 / MTS2000 / MTX8000 & MTX9000 Jedi Series Radios Kit (PN) HNN9028 HNN9029 NTN7143 NTN7144 NTN7146 NTN7147 NTN7148 NTN7149 NTN7150 NTN7341 NTN7372 WPPN4013 WPPN4037 RNN4008 Chemistry NiCD NiCD NiCD NiCD NiCD NiCD NiCD NiCD NiCD NiCD NiCD NiMH NiMH NiCD FM No Yes No No Yes Yes CENELEC CSA MSHA Yes Yes No Yes ATEX Smart Yes Yes No No No No No No No No No No No No Capacity Ultra High Ultra High High Ultra High High Ultra High High High High Ultra High High Ultra High Ultra high High New Model No No No No No No No No No No No No No No Table 5. Saber / Astro Saber/ SSE5000 / MX1000 Radios Kit (PN) HNN9033 HNN9031 NTN4537** NTN4538 NTN4592** NTN4593 NTN4595 NTN4596 NTN4657 NTN4671 NTN4992 NTN7014** NTN7058 NTN7426 NTN8251 NTN8818** Chemistry NiCD NiCD NiCD NiCD NiCD NiCD NiCD NiCD NiCD NiCD NiCD NiMH NiCD NiCD NiMH LiIon FM No Yes Yes Yes No No No Yes No CENELEC Yes No Yes Yes Yes No Smart Yes Yes No No No No No No No No No No No No No No Capacity Ultra High Ultra High Low High Low High Ultra High Ultra High High High Ultra High High Ultra High Low Ultra High High New Model No No No No No No No No No No No No No No No No **Universal Charger requires battery adapter part number 4385922B01 to charge Astro Saber batteries. 8 Table 6. GP Professional Series Radios HNN9008 HNN9009 HNN9010 HNN9011 HNN9012 HNN9013 WPNN4045 PMNN4045 HNN4001 HNN4002 HNN4003 Chemistry NiMH AA Bluetooth NiMH NiMH NiMH NiCD NiCD LiIon NiMH NiMH Impres NiMH Impres NiMH Impres LiIon FM No Smart No No No Yes Yes No No No No No Yes No No No No No No No No No Yes Yes Yes Capacity High New Model No High Ultra High Ultra High High High High High High Ultra High Ultra High Ultra High No No No No No No No No Yes Yes Yes Universal Charger requires battery adapter part number RLN5648. NOTE: Adapters can be purchased from a radio sales or Aftermarket sales team representative. 9 English Kit (PN) HNN9003 English POWER SOURCES AND MOTOROLA AUTHORIZED POWER ADAPTERS This charger is designed for use in 100 V ac to 240 V ac, 50/60 Hz applications and uses the following Motorola power cords shown in Table 7. Power cords used with the charger for GP Professional Series radios are listed in Table 8: Table 7. Motorola Universal Model Power Cords Plug Type No Power cord / plug U.S./NA Euro U.K. Australia/New Zealand Argentina U.S./NA Korea Charger Kit WPLN4121 WPLN4108 WPLN4109 WPLN4110 WPLN4118 WPLN4119 WPLN4120 WPLN4123 Charger Kit (Display Model) WPLN4127 WPLN4130 WPLN4131 WPLN4132 WPLN4133 WPLN4134 WPLN4135 WPLN4136 Power Cord None 3087791G01 3087791G04 3087791G07 3087791G10 3087791G13 3087791G01 3087791G16 Table 8. Motorola GP Professional Series Model Power Cords Plug Type No Power cord / plug U.S./NA Euro U.K. Australia/New Zealand Argentina U.S./NA Korea Charger Kit WPLN4197 WPLN4187 WPLN4189 WPLN4188 WPLN4190 WPLN4191 WPLN4205 WPLN4146 10 Charger Kit (Display Model) WPLN4198 WPLN4192 WPLN4194 WPLN4193 WPLN4195 WPLN4196 WPLN4204 WPLN4145 Power Cord None 3087791G01 3087791G04 3087791G07 3087791G10 3087791G13 3087791G01 3087791G16 OPERATING INSTRUCTIONS The charger pockets accommodate either a radio with a battery attached or a battery alone. Prior to charging a radio with a battery, turn the radio off. Batteries charge best if they are at room temperature when charged. 1. Plug the charger end of the power cord into the ac receptacle located at the back of the charger. 2. Plug the wall receptacle end of the power cord into the appropriate ac outlet. A successful power-up sequence is indicated by a SINGLE FLASH GREEN on the charger indicator. 3. Insert a battery, or radio with a battery (radio turned off), into a charger pocket by: a. aligning the groove on each side of the battery with the corresponding raised rail on each side of the charger pocket b. pressing the battery toward the rear of the pocket c. sliding the battery into the charger pocket, ensuring complete contact between the charger and battery contacts. Once a battery is properly seated into a charger pocket, the charger indicator illuminates, indicating the charger has recognized the presence of a battery. Refer to the charging indicators in Table 9 . 11 English NOTES The IMPRES Multi-Unit Adaptive Charger charges only the Motorola authorized batteries listed in Tables 1 through 6. Other batteries may not charge. The IMPRES Multi-Unit Adaptive Charger has automatic features and capabilities that are different from other battery chargers. Pay close attention to the charge indicator to ensure that the charger is in the desired/expected mode of operation. English Table 9. Charging Indicators Charge Indicator Single Flash Green Steady Red Flashing Green Flashing Red Steady Yellow Description Charger has successfully powered up. Battery is in rapid charge mode. Battery has completed rapid charge (>90% available capacity). Battery is in Top-Off charge (Trickle charge). Battery has completed charging and is fully charged. Battery is recognized by charger but is waiting to charge. (Either the battery voltage is too low or the battery temperature is too low or to high to allow charging. When this condition is corrected, the battery will begin charging.) Battery is unchargeable or not making proper contact. (This feature is for Smart batteries only) Flashing Red/Green Battery is in recondition mode. The length of time the charger remains in this mode is dependent upon the state of charge remaining in the battery when inserted. (Fully charged batteries require more time to recondition – 8 hours or more - than fully discharged batteries.) (This feature is for Smart batteries only) Steady Green Flashing Yellow Battery has completed charging and is fully charged. Battery continues to be usable, but may be nearing the end of its rated service life. NOTE The IMPRES Adaptive Multi-Unit Charger is unique in that it has the ability, when used with Motorola IMPRES batteries, to automatically determine the need of the batteries to be reconditioned. In order for the features of Motorola Smart batteries and the Adaptive Charging System to be fully available, the data contained in Motorola Smart batteries must be initialized by the charger the first time it is charged. This process is indicated by a STEADY YELLOW on the charger indicator (the same as though the battery were reconditioning). The process is automatic, includes an initial reconditioning of the battery, and begins charging upon completion of this process. This process requires time to initialize the battery, so the battery should be left in the charger overnight on the initial insertion. 12 The IMPRES Adaptive Multi-Unit Charger operates both as: • a Reconditioner with Motorola authorized IMPRES batteries. Charging the Batteries IMPORTANT: The charger pockets are designed to accept several different battery shapes and sizes, so it is important to make certain that a radio with a battery attached or a battery alone is inserted correctly. If a radio with a battery attached or battery alone is inserted incorrectly, the indicator will not illuminate, indicating that the battery is not being charged. NOTE: New batteries (never used before) prematurely indicate a full charge in some cases (STEADY GREEN indication) To ensure optimum performance, Motorola recommends all new batteries be left in the charger 14 to 16 hours prior to initial use. 1. Once a battery or radio with a battery is properly inserted into a charger pocket, the charger begins to rapid charge the battery and is indicated by a STEADY RED on the charger indicator. The length of time the charger indicates a STEADY RED is dependent upon the charge remaining in the battery. 2. Completion of rapid charge (>90% available capacity) is indicated by a FLASHING GREEN on the charger indicator. This indicates the “top-off” charge (trickle charge) and requires approximately 1 hour. 3. Completion of “top-off” charge is indicated by a STEADY GREEN on the charger indicators. This indicates a battery is fully charged. 4. Other indications that may appear on the charger indicator while charging are: • FLASHING YELLOW – indicates that either the battery temperature or the battery voltage is out of range for charging. Charging resumes when theses conditions have been corrected. • FLASHING RED AND GREEN – indicates that the battery may be approaching the end of its rated service life. While this battery 13 English • a Charger with all Motorola authorized batteries, and English • is fully charged, its charging capacity has been reduced by usage and may not adequately support heavier applications. This feature is available only when used with Motorola IMPRES batteries. This is not a fault indication, merely a notification to the user that a battery may soon no longer be able to yield expected service and may need to be replaced. FLASHING RED – indicates that the battery is unchargeable. This could be the result of a loss of contact between the battery and the charger’s contacts. Charging resumes when the condition causing this indication is corrected. Motorola Smart batteries have an internal memory device that is read by the Motorola IMPRES Adaptive Multi-Unit Charger. If an IMPRES battery is charged for more than 2-1/2 minutes, the IMPRES Adaptive Multi-Unit Charger retains the serial number of the IMPRES battery. The IMPRES battery may be removed from the charger for up to 30 minutes. Once the battery is reinserted back into the charger, it will resume the charging process from that point from when the battery was first removed. Manually Reconditioning the Batteries Within 2-1/2 minutes of the initial insertion of an IMPRES battery (STEADY RED indication), remove and reinsert the battery within 5 seconds to manually force reconditioning to occur. The charger indicator changes from a STEADY RED to a STEADY YELLOW. This forces the charger to recondition and automatically recharge the battery. NOTE: Excessive use of this feature may reduce the overall life of the battery. Automatically Reconditioning the Batteries The Motorola IMPRES Adaptive Multi-Unit Charger, when used in conjunction with a Motorola IMPRES battery, has the ability to determine when it is appropriate to recondition the battery. 14 It is important to note, for this process to be effective, the battery must be allowed to complete the recondition/recharge process. Leave the battery in the charger until the charger indicates a STEADY GREEN. At the completion of the recondition cycle, the charger automatically recharges the battery. Manually Terminating the Reconditioning Process At any time during the reconditioning process of a Motorola IMPRES battery (STEADY YELLOW indication), reconditioning may be terminated by removing and reinserting the battery within 5 seconds. This causes the charger to terminate the reconditioning process and begin the charging process. The charger indicator changes to a STEADY RED. 15 English When an IMPRES battery is properly inserted into the charger, the charger determines if it is appropriate to recondition the battery. If the battery needs reconditioning, the charger automatically indicates a STEADY YELLOW. This process may take up to 8 hours or more to complete, depending upon the state of charge and capacity rating of the battery when it is inserted. English TROUBLESHOOTING The IMPRES Adaptive Multi-Unit Charger incorporates the features of: • a universal input (100 V ac-240 V ac, 50/60 Hz) power supply • a constant current rapid charger • an interrupted current (negative pulse) conditioning charger • a reconditioning unit. The combination of the features listed above are unique in a desktop charger. Therefore, operation of a radio with a battery attached while in the charger is not recommended. While in the charger, radio operation can result in minimally reduced radio performance and extended battery charge time. Towards the end of the rapid charge cycle (STEADY RED indication), the battery voltage exceeds the normal operating voltage of the radio. The voltage returns to a normal level following the rapid charge mode or when the battery is removed from the charger. If a radio is turned on while the charger is in rapid charge mode, the radio becomes temporarily inoperable. This condition can be cleared by removing the radio from the charger and turning the radio off and on again. During the reconditioning process, the battery becomes fully discharged. As a result, the radio may not function during reconditioning mode. When troubleshooting, always observe the charge indicator – Refer to Table 9. 16 Table 10. Troubleshooting What it means... What to do... No charger indication • Charger contact is not being made. • Check that the radio with battery, or the battery alone, is inserted correctly. • Make sure that the power cord is securely plugged into the charger and an appropriate ac outlet, and that there is power to the outlet. • Replace fuse(s). • No power to the charger. Flashing Red Indication • Charger contact is not being made. • Battery is unchargeable. Flashing Yellow Indication • Remove the battery from the charger and replace it back into the charger. • Verify that the battery is a Motorola authorized battery listed in Tables 1 through 6. Other batteries may not charge. • Remove power from the battery charger and, using a clean dry cloth, clean the gold metal charging contacts of both the battery and the charger. • Replace battery. • Battery it waiting to charge. • When this condition is corrected, The battery temperature may the battery will begin charging. be below 5°C (41°F) or above 40°C (104°F) or the battery voltage may be lower than the predetermined threshold level for rapid charging. SERVICE The IMPRES Adaptive Multi-Unit Charger can only be repaired by a qualified service technician authorised by Motorola. Any violation of this policy can void unit warranty. 17 English Problem English CHARGERS WITH DISPLAY MODULE (CDM) The IMPRES Adaptive Multi-Unit Charger can be enhanced with the addition of a charger display module (CDM), Motorola part no. RLN5382. General Display Information The IMPRES Adaptive Multi-Unit Charger with CDM provides the user with valuable information while performing battery maintenance and care. The information that the charger displays and the corresponding LED indicators are detailed in the following tables. Start Up Upon Charger Power-up LED SINGLE FLASH GREEN Line 1 IMPRES Line 2 If There is No Battery in the Pocket LED OFF Line 1 NO BATTERY Line 2 Reading Battery Data LED Any Defined Indication Line 1 READING Line 2 BATTERY DATA Non-IMPRES Battery in the Pocket LED Defined by Charge State Line 1 NON-IMPRES Line 2 BATTERY IMPRES Battery in the Pocket IMPRES and Software Versions are Displayed LED Defined by Charge State Line 1 IMPRES Line 2 SW xx.yy; aa.bb NOTE: xx.yy denotes charger SW version, and aa.bb denotes CDM SW version. 18 IMPRES Battery Kit # and Chemistry are Displayed Defined by Charge State Line 1 KIT# -------- Line 2 -----CHEMISTRY Forecasted # of Cycles Prior to Automatic Recondition LED Defined by Charge State Line 1 ----CYCLES Line 2 TO RECONDITION * Displayed only when the number of cycles to recondition is less than 6. Charger Waiting to Charge, Battery is Hot LED Flashing ORANGE Line 1 WAITING TO CHG Line 2 HOT BATTERY Charger Waiting to Charge, Battery is Cold LED Flashing ORANGE Line 1 WAITING TO CHG Line 2 COLD BATTERY Charger Waiting to Charge, Low Voltage LED Flashing ORANGE Line 1 WAITING TO CHG Line 2 LOW VOLTAGE NOTE: Not all screens shown above will be displayed. For example, Waiting to Charge displays (battery hot, cold, low voltage) will only be shown if the situation warrants. 19 English LED English Charger is in Trickle Charge Mode LED Flashing GREEN Line 1 TRICKLE CHARGE Line 2 Charge is Complete LED Steady GREEN or Flashing RED / GREEN Line 1 CHARGE COMPLETE Line 2 Charger is in Discharge/Reconditioning Mode LED Steady ORANGE Line 1 DISCHARGE Line 2 Charger is Calibrating an IMPRES Battery LED Steady ORANGE, Steady RED, & Flashing ORANGE or GREEN Line 1 Calibrating Line 2 Battery LED Steady GREEN Line 1 Battery Line 2 Calibrated * All IMPRES batteries should be calibrated before initial use. An IMPRES charger will automatically initiate calibration for all new batteries Battery Capacity Data is Displayed as “%” in mAH, and Voltage LED Defined by Charge State Line 1 ----% RATED CAP. Line 2 ----mAH --.-V 20 LED Defined by Charge State Line 1 RAPID CHG ENDS Line 2 IN xx HRS, yy MIN NOTE: (1) Estimated time to complete charging includes rapid charge and discharge cycles (if applicable). (2) Battery capacity information may not be displayed for uncalibrated batteries. (3) Use of IMPRES batteries with non-IMPRES chargers can affect capacity and charging time accuracy. 21 English Estimated Time to Rapid Charge Complete Displayed in Hours, Minutes for NiCd & NiMH IMPRES Batteries Only English Sequencing Diagrams for IMPRES Batteries Note: These diagrams are the sequences shown in the previous ‘General Display Information’ and are in English only. IMPRES NiCd & NiMH Battery Display Sequence Start LED Defined by Charge State Line 1 KIT# xxxxxxxx (4.0 sec) Line 2 SN: yyyyyyyyyyyy LED Defined by Charge State Line 1 KIT# xxxxxxxx (2.0 sec) Line 2 yyyyy CHEMISTRY LED Defined by Charge State Line 1 xxxx CYCLES (2.0 sec) Line 2 Every 73.0 sec TO RECONDITION LED Steady RED Line 1 RAPID CHARGE Every 13.0 sec (2.0 sec) Line 2 LED Defined by Charge State Line 1 xx% RATED CAP. (7.0 sec) Line 2 yyyyy mAH zz.z V LED Defined by Charge State Line 1 RAPID CHG ENDS (4.0 sec) Line 2 IN xx HRS, yy MIN 22 5X 65.0 sec Before Calibration: (4.0 sec) (2.0 sec) (2.0 sec) LED Defined by Charge State Line 1 KIT# xxxxxxxx Line 2 SN: yyyyyyyyyyyy LED Defined by Charge State Line 1 KIT# xxxxxxxx Line 2 yyyyy CHEMISTRY LED Steady ORANGE Line 1 DISCHARGE Every 71.0 sec Every 13.0 sec Line 2 5X (7.0 sec) (4.0 sec) LED Defined by Charge State Line 1 CALIBRATING Line 2 BATTERY LED Defined by Charge State Line 1 RAPID CHG ENDS Line 2 IN xx HRS, yy MIN 23 65.0 sec English Start English After Calibration: Start (4.0 sec) (2.0 sec) (2.0 sec) LED Defined by Charge State Line 1 KIT# xxxxxxxx Line 2 SN: yyyyyyyyyyyy LED Defined by Charge State Line 1 KIT# xxxxxxxx Line 2 yyyyy CHEMISTRY LED Steady GREEN Line 1 CHARGE COMPLETE Every 61.0sec Every 11 sec Line 2 5X (2.0 sec) (7.0 sec) LED Defined by Charge State Line 1 BATTERY Line 2 CALIBRATED LED Defined by Charge State Line 1 xx% RATED CAP. Line 2 yyyy mAH zz.z V 24 55.0 sec IMPRES Li-Ion Battery Display Sequence (4.0 sec) (2.0 sec) (2.0 sec) (2.0 sec) LED Defined by Charge State Line 1 KIT# xxxxxxxx Line 2 SN: yyyyyyyyyyyy LED Defined by Charge State Line 1 KIT# xxxxxxxx Line 2 yyyyy CHEMISTRY LED Defined by Charge State Line 1 xxxx CYCLES Line 2 TO RECONDITION LED Steady RED Line 1 RAPID CHARGE Every 53.0 sec Every 9.0 sec Line 2 5X (7.0 sec) LED Defined by Charge State Line 1 xx% RATED CAP. Line 2 yyyyy mAH zz.z V 25 45.0 sec English Start English Before Calibration: Start (4.0 sec) (2.0 sec) (2.0 sec) LED Defined by Charge State Line 1 KIT# xxxxxxxx Line 2 SN: yyyyyyyyyyyy LED Defined by Charge State Line 1 KIT# xxxxxxxx Line 2 yyyyy CHEMISTRY LED Steady ORANGE Line 1 DISCHARGE Every 51.0 sec Every 9.0 sec Line 2 5X (7.0 sec) LED Defined by Charge State Line 1 CALIBRATING Line 2 BATTERY 26 45.0 sec After Calibration: (4.0 sec) (2.0 sec) (2.0 sec) LED Defined by Charge State Line 1 KIT# xxxxxxxx Line 2 SN: yyyyyyyyyyyy LED Defined by Charge State Line 1 KIT# xxxxxxxx Line 2 yyyyy CHEMISTRY LED Steady GREEN Line 1 CHARGE COMPLETE Every 61.0sec Every 11 sec Line 2 5X (2.0 sec) (7.0 sec) LED Defined by Charge State Line 1 BATTERY Line 2 CALIBRATED LED Defined by Charge State Line 1 xx% RATED CAP. Line 2 yyyy mAH zz.z V 27 55.0 sec English Start English Display Text Orientation In order to allow for desk or wall mounting of the IMPRES Adaptive Multi-Unit Charger, the CDM is equipped with the ability to “flip” the display text 180 degrees. To do this, insert a large paper clip into the pinhole below the display perpendicular to the desktop. A “click” indicates the toggle button has been actuated, flipping the text 180 degrees. IMPRES Adaptive Multi-Unit Charger Operation For more information on serviceability of the MUC and CDM, refer to the Charger Service Guide, 6880309L66. Service For service, contact the following depot. Please call and confirm your return before sending the unit to the depot for service. Motorola Service Centre Motorola GmbH Customer Care Am Borsigturm 130 13507 Berlin Germany. Tel: +49 30 6686 1555 28 INHALTSVERZEICHNIS Wichtige Sicherheitshinweise . . . . . . . . . . . . . . . . . . . . . . . . . . . . . . . 2 Sicherheitsrichtlinien für den Betrieb . . . . . . . . . . . . . . . . . . . . . . . . . . 3 Leistungsmerkmale des IMPRES-Mehrfachladegeräts . . . . . . . . . . . . 4 Betriebscharakteristik und funktionelle Unterschiede . . . . . . . . . . . . . 5 Netzteile und von Motorola zugelassene Netzadapter . . . . . . . . . . . 10 Bedienungsanleitung . . . . . . . . . . . . . . . . . . . . . . . . . . . . . . . . . . . . . 11 Laden von Akkus . . . . . . . . . . . . . . . . . . . . . . . . . . . . . . . . . . . . . 13 Manuelle Rekonditionierung von Akkus . . . . . . . . . . . . . . . . . . . . 14 Automatische Rekonditionierung von Akkus . . . . . . . . . . . . . . . . 14 Manuelles Beenden des Rekonditionierungsprozesses . . . . . . . . 15 Fehlersuche . . . . . . . . . . . . . . . . . . . . . . . . . . . . . . . . . . . . . . . . . . . . 16 Wartung . . . . . . . . . . . . . . . . . . . . . . . . . . . . . . . . . . . . . . . . . . . . . . . 17 Ladegeräte mit Displaymodul (CDM). . . . . . . . . . . . . . . . . . . . . . . . . 18 Dieses Zubehörbeilage gilt für die folgenden IMPRES Universal-Mehrfachladegeräte: WPLN4108, WPLN4109, WPLN4110, WPLN4118, WPLN4119, WPLN4120, WPLN4121, WPLN4123, WPLN4130, WPLN4131, WPLN4132, WPLN4133, WPLN4134, WPLN4135, WPLN4136 Weiterhin gilt diese Anleitung auch für die folgenden IMPRES UniversalMehrfachladegeräte, die für die Serie der GP Professionellen Funkgeräte erhältlich sind: WPLN4144, WPLN4145, WPLN4146, WPLN4187, WPLN4188, WPLN4189, WPLN4190, WPLN4191, WPLN4192, WPLN4193, WPLN4194, WPLN4195, WPLN4196, WPLN4204, WPLN4205 ‘Universal’ bedeutet, dass das Ladegerät mit unterschiedlichen Funkgerätemodellen eingesetzt werden kann und dass mit Hilfe von Akkuadaptern alle in den Tabellen 1 bis einschließlich 6 aufgeführten Akkus verwendet werden können. 1 Deutsch Akkutabellen . . . . . . . . . . . . . . . . . . . . . . . . . . . . . . . . . . . . . . . . . . . . 7 WICHTIGE SICHERHEITSHINWEISE BEWAHREN SIE DIESE HINWEISE AUF Deutsch Dieses Dokument enthält wichtige Sicherheits- und Bedienungshinweise. Bitte lesen Sie diese Hinweise sorgfältig durch und heben Sie das Handbuch auf, damit Sie sie später jederzeit nachschlagen können. Lesen Sie alle Hinweise und Warnungen (1) am Ladegerät und (2) am Akku sowie (3) an dem Handsprechfunkgerät, in das der Akku eingesetzt wird. ! ACHTUNG 1.Um die Verletzungsgefahr zu verringern, dürfen nur die in den Tabellen 1 bis 5 aufgeführten, von der Firma Motorola zugelassenen Akkus aufgeladen werden. Andere Akkus können beim Aufladen explodieren und Verletzungen bzw. Sachschäden verursachen. 2. Bei Verwendung von Zubehörteilen, die nicht von der Firma Motorola freigegeben sind, besteht Feuer-, Stromschlag- und Verletzungsgefahr. 3. Ziehen Sie den Stecker niemals am Kabel aus der Steckdose, wenn Sie die Stromversorgung des Ladegeräts unterbrechen möchten, um Beschädigungen des Netzkabels und des Steckers zu vermeiden. 4. Verwenden Sie nach Möglichkeit kein Verlängerungskabel. Bei Verwendung eines ungeeigneten Verlängerungskabels besteht Brand- und Stromschlaggefahr. Wenn der Einsatz eines Verlängerungskabels unbedingt erforderlich ist, sollten Sie auf die richtigen Kabeldimensionen achten. 5. Bei Verwendung schadhafter Ladegeräte besteht Feuer-, Stromschlag- und Verletzungsgefahr. Lassen Sie daher bitte beschädigte Ladegeräte vom Motorola-Kundendienst reparieren. 6. Dieses Gerät ist reparierbar. Jede seiner Ladeschalen wird von einer speziellen Leiterplatte mit Strom versorgt. Die Leiterplatte/Stromversorgung ist bei Ihrem Motorola Vertriebspartner/Kundendienst vor Ort erhältlich. Die Ersatzteilnummer für die Leiterplatte ist RLN5325. Für andere Bauteile des Geräts gibt es keine Ersatzteile. Bei Ihrem Motorola Vertriebspartner/Kundendienst kann auch ein Wartungshandbuch – Teilnummer 6880309L66 – bestellt werden, das den Austauschvorgang beschreibt. 7. Bevor Sie das Ladegerät warten oder reinigen, sollten Sie den Netzstecker abziehen, um einem Stromschlag vorzubeugen. 2 SICHERHEITSRICHTLINIEN FÜR DEN BETRIEB • Defekte Sicherungen dürfen nur durch Sicherungen ersetzt werden, die den Angaben auf dem Etikett am Ladegerät entsprechen. Die folgenden Teile können bei Ihrem Motorola Vertriebspartner/Kundendienst vor Ort bestellt werden: Sicherung 6571489S01 Halter 0987626G01 Abdeckung 0987739G01 3 Deutsch • Schalten Sie das Handsprechfunkgerät zum Laden eines Akkus ab. • Das Ladegerät ist nicht für den Einsatz im Freien ausgelegt und darf nur in trockenen Räumen betrieben werden. • Schließen Sie das Ladegerät nur an eine ordnungsgemäß gesicherte und verkabelte Steckdose an, die die richtige Spannung aufweist (siehe Etikett am Ladegerät). • Ziehen Sie den Netzstecker ab, wenn das Ladegerät von der Netzspannung isoliert werden soll. • Die Steckdose für das Ladegerät muss in der Nähe befindlich und leicht erreichbar sein. • In Geräten mit Überspannungsschutz dürfen nur solche Sicherungen verwendet werden, die dem in der Bedienungsanleitung angegebenen Typ entsprechen. • Das Ladegerät darf bei Umgebungstemperaturen über 40°C nicht eingesetzt werden. • Achten Sie darauf, dass Sie das Kabel so verlegen, dass niemand darauf treten oder darüber stolpern kann. Außerdem darf es nicht mit Wasser in Berührung kommen, Zugkräften ausgesetzt werden oder beschädigt werden. • Die Wandhalterung für dieses Gerät ist die gleiche wie die des Mehrfachladegeräts NTN4796 (Teilnummer NLN7967). LEISTUNGSMERKMALE DES IMPRES-MEHRFACHLADEGERÄTS Deutsch Das IMPRES-Akkuladesystem von Motorola ist ein modernes Energiesystem für drei verschiedene Akkutypen. Zum System gehören: (a) IMPRES-Akkus, (b) das IMPRES-Mehrfachladegerät und (c) Funkgerät-Hardware/Software, über die der Datenaustausch zwischen IMPRES-kompatiblen Sprechfunkgeräten und IMPRESAkkus möglich ist (gilt nicht für die Serie der GP Professionellen Funkgeräte). Die Verwendung des IMPRES-Mehrfachladegeräts zusammen mit IMPRES-Akkus bietet die folgenden Vorzüge: • Die Betriebszeit zwischen Ladezyklen wird maximiert, da der Memory-Effekt automatisch eliminiert wird. • Die Akku-Lebensdauer wird maximiert, da wesentlich weniger Wärme während der Erhaltungsladezyklen und der an das Laden anschließenden Zyklen entsteht. • Der Kauf von zusätzlichen Rekonditionierungsgeräten wird überflüssig, ebenso die Schulung von Personal in „Akkuwartungsaufgaben“. Mit diesem einzigartigen, patentierten Akkuladesystem gehören das Kontrollieren und Protokollieren der Akkunutzung, die Durchführung manueller Rekonditionierungszyklen und die Notwendigkeit, Akkus nach dem Aufladen aus dem Ladegerät nehmen zu müssen, der Vergangenheit an. Das IMPRES-Mehrfachladegerät überwacht die Nutzungsmuster der IMPRESAkkus, speichert diese Informationen im IMPRES-Akku und führt nur dann einen Rekonditionierungszyklus durch, wenn es erforderlich ist. Im IMPRES-Mehrfachladegerät wird der Akku nie zu heiß, ganz gleich, wie lange er in der Ladeschale verbleibt. Das Ladegerät überwacht den Akku und lädt ihn bei Bedarf automatisch nach. Mit dem IMPRES-Mehrfachladegerät wird der Lade- und Akkuwartungsprozess vereinfacht. Gehen Sie einfach wie folgt vor: 1. Setzen Sie das Handsprechfunkgerät/den Akku in das Ladegerät ein. 2. Nehmen Sie das Handsprechfunkgerät/den Akku aus dem Ladegerät, wenn es/er vollständig geladen ist! Motorola ist der einzige Hersteller, der ein Konditionierungs- oder Rekonditionierungsladegerät anbietet, bei dem Benutzer die Wahl haben, das Funkgerät mit eingesetztem Akku oder den Akku separat aufzuladen. 4 BETRIEBSCHARAKTERISTIK UND FUNKTIONELLE UNTERSCHIEDE: 5 Deutsch 1. IMPRES-Akkus können in herkömmlichen Ladegeräten geladen werden. Die Chip-Funktion dieser Akkus wird aber nur dann aktiviert, wenn der IMPRESAkku in einem IMPRES-Ladegerät geladen wird. Wenn ein IMPRES-Akku das erste Mal in einem IMPRES-Mehrfachladegerät geladen wird, leuchtet die Ladeanzeige des Ladegeräts zunächst GELB. Die Erstladung darf nicht unterbrochen werden, d.h. der Akku darf erst dann aus dem Ladegerät genommen werden, wenn die Ladeanzeige GRÜN leuchtet. Der IMPRES-Akku wird dadurch ordnungsgemäß kalibriert und die Chip-Funktion aktiviert. Wird der Erstladungsprozess unterbrochen, kalibriert das Ladegerät den Akku, wenn er das nächste Mal in die Ladeschale gesteckt wird. 2. Das IMPRES-Mehrfachladegerät bestimmt die zum Rekonditionieren des IMPRES-Akkus erforderlichen Bedingungen jeweils automatisch und schaltet daher eventuell auf Rekonditionierungsbetrieb, wenn ein Handsprechfunkgerät oder ein Akku in die Ladeschale gesteckt wird. Die Ladeanzeige leuchtet in diesem Fall GELB. Der Rekonditionierungsbetrieb kann erforderlichenfalls durch Herausnehmen und erneutes Einsetzen des Handsprechfunkgeräts bzw. Akkus umgangen werden (siehe Gebrauchsanleitung in diesem Handbuch). 3. Das IMPRES-Mehrfachladegerät eignet sich zum Laden aller in den Tabellen 1 bis 6 aufgelisteten Akkus. Die Chip-Funktion steht allerdings nur bei OriginalIMPRES-Akkus zur Verfügung. (Bei der Einführung neuer Handsprechfunkgeräte- bzw. Akkumodelle wird diese Liste entsprechend aktualisiert und über die diversen globalen OEM- und Kundendienstorganisationen an die Kunden verteilt.) 4. Zum Kalibrieren von IMPRES-Chip-Akkus muss das IMPRESMehrfachladegerät verwendet werden. Dadurch wird sichergestellt, dass die Nutzungsdaten der IMPRES-Akkus korrekt aufgezeichnet, gespeichert und angezeigt werden. Deutsch 5. Wird ein IMPRES Akku mit einem Funkgerät mit Display (z.B. dem XTS5000) verwendet, kann das Funkgerät den Ladezustand des Akkus durch ein Symbol anzeigen. Diese Symbol wird aktiviert, nachdem der IMPRES Akku in einem IMPRES Ladegerät kalibriert wurde. Das Ladestatussymbol wird dann weiterhin angezeigt, solange der Benutzer IMPRES Ladegeräte zum Aufladen der Akkus verwendet. Wird ein IMPRES Akku jedoch 7 Tage (oder länger) in einem anderen als einem IMPRES Ladegerät aufgeladen, erlischt das Symbol. Zur erneuten Aktivierung des Symbols legen Sie den IMPRES Akku in ein IMPRES Ladegerät und führen eine vollständige Ladung durch (bis die Anzeige UNUNTERBROCHEN GRÜN leuchtet). Danach wird das Ladestatussymbol auf dem Display des Funkgeräts angezeigt. Wird das Symbol nach vollständiger Ladung nicht angezeigt, legen Sie einen teilweise entladenen Akku (mindestens 70 % entladen) in das Ladegerät, leiten eine Rekonditionierung ein und lassen das Ladegerät den Ladevorgang vollständig durchführen. Danach wird das Symbol auf dem Display des Funkgeräts angezeigt (gilt nicht für die Serie der GP Professionellen Funkgeräte). 6. Das IMPRES Mehrfachladegerät darf ausschließlich von einem von Motorola CGISS zugelassenen Servicetechniker repariert werden. Bei Nichtbeachten dieser Vorschriften kann die Garantie ungültig werden. 6 AKKUTABELLEN In den folgenden Tabellen werden die Akkus aufgeführt, die mit den in den Tabellenüberschriften angegebenen Funkgerätemodellen eingesetzt werden können. Tabelle 1. XTS3000/XTS3500/Dimetra-Handsprechfunkgeräte & XTS5000 Digital-Handsprechfunkgeräte Akkutyp FM NiCD NiCD NiCD NiCD NiCD NiCD LiIon NiMH NiMH NiMH NiMH NiMH NIMH LiIon Nein Ja Nein Ja Ja Ja Nein Nein Nein Ja Ja Nein Ja Nein ChipAkku Ja Ja Nein Nein Nein Nein Nein Nein Ja Ja Ja Nein Nein Ja Kapazität Ultrahochleistung Ultrahochleistung Ultrahochleistung Ultrahochleistung Ultrahochleistung Ultrahochleistung Hochleistung Ultrahochleistung Ultrahochleistung Ultrahochleistung Ultrahochleistung Ultrahochleistung Ultrahochleistung Ultrahochleistung Neues Modell Nein Nein Nein Nein Nein Nein Nein Nein Nein Nein Nein Neu Neu Neu Tabelle 2. XTS2500 Digital-Handsprechfunkgeräte Kit (Teilenummer) NTN9859 NTN9857 NTN9815 NTN9816 Akkutyp FM NiMH NiMH NiCD NiCD Nein Ja Nein Ja ChipAkku Nein Nein Nein Nein Kapazität Neues Modell Ultrahochleistung Neu Ultrahochleistung Neu Hochleistung Neu Hochleistung Neu Tabelle 3. MTP700 Digital-Handsprechfunkgeräte Kit (Teilenummer) PMNN4048* PMNN4049* PMNN4050* PMNN4047* * Akkutyp FM NiMH NiMH Li-Ionen LiIon Nein Ja Nein Nein ChipAkku Ja Ja Ja Ja Kapazität Hochleistung Hochleistung Hochleistung Hochleistung Neues Modell Neu Neu Neu Neu Zum Laden von MTP700-Akkus im IMPRES-Mehrfachladegerät wird der Akku-Adapter mit der Teilnummer RLN5212 benötigt. 7 Deutsch Kit (Teilenummer) HNN9031 HNN9032 NTN8294 NTN8295 NTN8297 NTN8299 NTN8610 NTN8293 NNTN4435 NNTN4436 NNTN4437 RNN4006 RNN4007 NTN9862 Deutsch Tabelle 4. Handsprechfunkgeräte der Modellreihen Jedi HT1000/MT2000/ MTS2000/MTX8000 & MTX9000 Kit (Teilenummer) HNN9028 HNN9029 NTN7143 NTN7144 NTN7146 NTN7147 NTN7148 NTN7149 NTN7150 NTN7341 NTN7372 WPPN4013 WPPN4037 RNN4008 Akkutyp FM NiCD NiCD NiCD NiCD NiCD NiCD NiCD NiCD NiCD NiCD NiCD NiMH NiMH NiCD Nein Ja Nein Nein Ja Ja CENELEC CSA MSHA Ja Ja Nein Ja ATEX ChipAkku Ja Ja Nein Nein Nein Nein Nein Nein Nein Nein Nein Nein Nein Nein Kapazität Ultrahochleistung Ultrahochleistung Hochleistung Ultrahochleistung Hochleistung Ultrahochleistung Hochleistung Hochleistung Hochleistung Ultrahochleistung Hochleistung Ultrahochleistung Ultrahochleistung Hochleistung Neues Modell Nein Nein Nein Nein Nein Nein Nein Nein Nein Nein Nein Nein Nein Nein Tabelle 5. Saber/Astro Saber/SSE5000/MX1000-Handsprechfunkgeräte Kit (Teilenummer) HNN9033 HNN9031 NTN4537** NTN4538 NTN4592** NTN4593 NTN4595 NTN4596 NTN4657 NTN4671 NTN4992 NTN7014** NTN7058 NTN7426 NTN8251 NTN8818** ** Akkutyp FM NiCD NiCD NiCD NiCD NiCD NiCD NiCD NiCD NiCD NiCD NiCD NiMH NiCD NiCD NiMH LiIon Nein Ja Ja Ja Nein Nein Nein Ja Nein CENELEC Ja Nein Ja Ja Ja Nein ChipAkku Ja Ja Nein Nein Nein Nein Nein Nein Nein Nein Nein Nein Nein Nein Nein Nein Kapazität Ultrahochleistung Ultrahochleistung Niedrigleistung Hochleistung Niedrigleistung Hochleistung Ultrahochleistung Ultrahochleistung Hochleistung Hochleistung Ultrahochleistung Hochleistung Ultrahochleistung Niedrigleistung Ultrahochleistung Hochleistung Neues Modell Nein Nein Nein Nein Nein Nein Nein Nein Nein Nein Nein Nein Nein Nein Nein Nein Zum Laden von Astro Saber-Akkus im IMPRES-Mehrfachladegerät wird der Akku-Adapter mit der Teilnummer 4385922B01 benötigt. 8 Tabelle 6. Serie GP Professionelle Funkgeräte Kit (Teilenummer) HNN9003 FM Nein ChipAkku Nein NiMH AA Bluetooth NiMH NiMH NiMH NiCD NiCD LiIon NiMH NiMH Impres NiMH Impres NiMH Impres LiIon Kapazität Hochleistung Neues Modell Nein Nein Nein Ja Ja Nein Nein Nein Nein Nein Ja Nein Nein Nein Nein Nein Nein Nein Nein Nein Ja Ja Ja Hochleistung Ultrahochleistung Ultrahochleistung Hochleistung Hochleistung Hochleistung Hochleistung Hochleistung Ultrahochleistung Ultrahochleistung Ultrahochleistung Nein Nein Nein Nein Nein Nein Nein Nein Ja Ja Ja Für das Universal-Ladegerät ist ein Akkuadapter (Teilenr. RLN5648) erforderlich. HINWEIS: Adapter sind bei Ihrem Motorola Vertriebspartner/Kundendienst vor Ort erhältlich. 9 Deutsch HNN9008 HNN9009 HNN9010 HNN9011 HNN9012 HNN9013 WPNN4045 PMNN4045 HNN4001 HNN4002 HNN4003 Akkutyp NETZTEILE UND VON MOTOROLA ZUGELASSENE NETZADAPTER Deutsch Dieses Ladegerät ist zur Verwendung in Anwendungen mit 100 V ~ bis 240 V ~, 50/ 60 Hz bestimmt und ist mit den in Tabelle 7 aufgeführten Motorola Kabeln zu verwenden. Die Kabel, die mit dem Ladegerät für die GP Professionellen Funkgeräte zu verwendende sind, sind in Tabelle 8 aufgeführt: Tabelle 7. Motorola Kabel für Universal-Ladegeräte Steckertyp Kein Kabel/Stecker US/Nordamerika Europa GB Australien/Neuseeland Argentinien US/Nordamerika Korea Ladegerät-Kit WPLN4121 WPLN4108 WPLN4109 WPLN4110 WPLN4118 WPLN4119 WPLN4120 WPLN4123 Ladegerät-Kit (Modell mit Display) WPLN4127 WPLN4130 WPLN4131 WPLN4132 WPLN4133 WPLN4134 WPLN4135 WPLN4136 Netzkabel Kein Netzkabel 3087791G01 3087791G04 3087791G07 3087791G10 3087791G13 3087791G01 3087791G16 Tabelle 8. Motorola Kabel für die Serie der GP Professionellen Funkgeräte Steckertyp Kein Kabel/Stecker US/Nordamerika Europa GB Australien/Neuseeland Argentinien US/Nordamerika Korea Ladegerät-Kit WPLN4197 WPLN4187 WPLN4189 WPLN4188 WPLN4190 WPLN4191 WPLN4205 WPLN4146 10 Ladegerät-Kit (Modell mit Display) WPLN4198 WPLN4192 WPLN4194 WPLN4193 WPLN4195 WPLN4196 WPLN4204 WPLN4145 Netzkabel Kein Netzkabel 3087791G01 3087791G04 3087791G07 3087791G10 3087791G13 3087791G01 3087791G16 BEDIENUNGSANLEITUNG HINWEISE Das IMPRES-Mehrfachladegerät lädt nur die von Motorola freigegebenen Akkus in den Tabellen 1 bis 6 auf. Andere Akkus werden eventuell nicht geladen. Die Ladeschale des Ladegeräts nimmt entweder ein Handsprechfunkgerät samt eingesetztem Akku oder einen separaten Akku auf. Schalten Sie das Handsprechfunkgerät aus, bevor Sie ein Handsprechfunkgerät zusammen mit Akku laden. Akkus werden am besten bei Raumtemperatur geladen. 1. Stecken Sie den Ladegerätestecker des Netzkabels in die Stromversorgungsbuchse an der Rückseite des Ladegeräts. 2. Stecken Sie den Netzstecker des Netzkabels in die Netzsteckdose. Ein erfolgreicher Einschaltvorgang wird durch EINMALIGES GRÜNES AUFBLINKEN der Ladeanzeige angezeigt. 3. Setzen Sie den Akku bzw. das Handsprechfunkgerät samt Akku (Handsprechfunkgerät ist ausgeschaltet) wie folgt in die Ladeschale ein: a. Richten Sie die Aussparung an jeder Seite des Akkus auf die entsprechende Führung an jeder Seite der Ladeschale aus. b. Drücken Sie den Akku zur Rückseite der Ladeschale. c. Schieben Sie den Akku in die Ladeschale. Achten Sie dabei darauf, dass die Ladekontakte die Kontakte des Akkus berühren. Wenn der Akku richtig in der Ladeschale sitzt, leuchtet die Ladeanzeige auf. Dadurch wird angezeigt, dass der Akku registriert wird; siehe Ladeanzeige in Tabelle 9. 11 Deutsch Das IMPRES-Mehrfachladegerät unterscheidet sich durch bestimmte Leistungsmerkmale und automatische Funktionen von anderen Akkuladegeräten. Beobachten Sie die Ladeanzeige genau, um sicherzustellen, dass sich das Ladegerät in der gewünschten/erwarteten Betriebsart befindet. Tabelle 9. Ladestatusanzeigen Deutsch Ladeanzeige Beschreibung Einmaliges grünes Aufblinken Ladegerät wurde erfolgreich eingeschaltet. Rot Schnellladung des Akkus. Grün blinkend Schnellladung des Akkus beendet (>90 % verfügbare Kapazität). Akku wird durch Erhaltungsladung auf volle Kapazität aufgeladen. Grün Ladevorgang des Akkus ist abgeschlossen. Der Akku ist vollständig geladen. Gelb blinkend Akku wird vom Ladegerät registriert (Chip-Akku), wird aber noch nicht geladen (entweder ist die Akkuspannung zu niedrig oder der Akku ist zu kalt oder zu heiß zum Laden. Der Ladezyklus beginnt, wenn dieser Zustand korrigiert worden ist). Rot blinkend Akku kann nicht geladen werden oder Kontakt zwischen Akku und Ladekontakten ist nicht einwandfrei. Gelb (Nur für Chip-Akkus) Akku ist im Rekonditionierungsmodus. Wie lange das Ladegerät in dieser Betriebsart bleibt, hängt vom Ladezustand des Akkus beim Einsetzen in das Ladegerät ab (bei vollständig geladenen Akkus dauert die Rekonditionierung länger – 8 Stunden oder mehr – als bei vollständig entladenen Akkus). Rot/Grün blinkend (Nur für Chip-Akkus) Ladevorgang des Akkus ist abgeschlossen. Der Akku ist vollständig aufgeladen. Akku ist noch verwendbar, nähert sich aber eventuell dem Ende seiner nutzbaren Lebensdauer. HINWEIS Das IMPRES-Mehrfachladegerät ist einzigartig. Es kann bei Motorola IMPRES-Akkus automatisch den Rekonditionierungsbedarf des Akkus bestimmen. Damit die Leistungsmerkmale der Motorola Chip-Akkus und des IMPRESAkkuladesystems uneingeschränkt zur Verfügung stehen, müssen die in Motorola Chip-Akkus enthaltenen Daten bei der Erstladung des Akkus vom Ladegerät initialisiert werden. Dieser Initialisierungsprozess wird durch GELBES Leuchten der Ladeanzeige angezeigt (wie beim Rekonditionieren des Akkus). Dabei wird zuerst eine Rekonditionierung des Akkus durchgeführt, an die sich das Laden des Akkus anschließt. Dieser Prozess benötigt eine gewisse Zeit zum Initialisieren des Akkus. Deshalb sollte der Akku beim ersten Laden über Nacht im Ladegerät bleiben. 12 Das IMPRES-Mehrfachladegerät hat zwei Aufgaben, d.h. es arbeitet: • als ein Ladegerät für alle von Motorola freigegebenen Akkus und • als ein Rekonditionierungsgerät für von Motorola freigegebenen IMPRESAkkus. Laden von Akkus HINWEIS: Neue (noch nie benutzte) Akkus zeigen in einigen Fällen zu früh eine Vollladung an (Ladeanzeige leuchtet GRÜN ). Um die optimale Leistungsfähigkeit Ihrer Akkus zu gewährleisten, empfiehlt Motorola, dass alle neuen Akkus vor dem ersten Einsatz 14 bis 16 Stunden lang im Ladegerät bleiben, bevor sie das erste Mal benutzt werden. 1. Wenn ein Handsprechfunkgerät samt Akku bzw. ein Akku richtig in das Ladegerät gesteckt worden ist, beginnt das Ladegerät den Akku schnellzuladen. Das wird durch das ROTE Leuchten der Ladeanzeige angezeigt. Wie lange die Ladeanzeige ROT leuchtet, hängt von der im Akku noch vorhandenen Rest-Ladung ab. 2. Das Ende der Schnellladung (>90 % verfügbare Kapazität) wird durch ein GRÜNES BLINKEN der Ladeanzeige angezeigt. Dieses Blinken zeigt das Schlussladen (mit Erhaltungsstromstärke) an und dauert ungefähr eine Stunde. 3. Nach dem Schlussladen (mit Erhaltungsstromstärke) leuchtet die Ladeanzeige GRÜN und zeigt dadurch an, dass der Akku vollständig geladen ist. 4. Eventuell gibt die Ladeanzeige während des Ladens auch folgende Anzeigen aus: • GELBES BLINKEN – zeigt an, dass sich entweder die Akkutemperatur oder die Akkuspannung außerhalb des zum Laden erforderlichen Bereichs befindet. Der Akku wird wieder geladen, wenn diese Bedingungen korrigiert wurden. • ROTES UND GRÜNES BLINKEN – zeigt an, dass sich der Akku dem Ende seiner nutzbaren Lebensdauer nähert. Dieser Akku ist zwar vollständig geladen, aber seine Ladekapazität hat einsatzbedingt abgenommen; Funktionen, die einen hohen Energiebedarf haben können u.U. nicht mehr ausgeführt werden. Dieses Leistungsmerkmal steht nur bei Motorola 13 Deutsch WICHTIG: Die Ladeschale ist so ausgeführt, dass sie verschiedene Akkuformen und -größen aufnehmen kann. Aus diesem Grund müssen Sie darauf achten, dass Akkus bzw. Sprechfunkgeräte mit eingesetztem Akku richtig in die Ladeschale gesteckt werden. Wird ein Akku bzw. ein Sprechfunkgerät mit eingesetztem Akku falsch eingesteckt, leuchtet die Ladeanzeige nicht. Das bedeutet, dass der Akku nicht geladen wird. Deutsch • IMPRES-Akkus zur Verfügung. Diese Anzeige ist keine Fehleranzeige, sondern ein Hinweis für den Benutzer, dass der Akku die erwartete Leistung bald nicht mehr erbringen wird und dass er eventuell ersetzt werden muss. ROTES BLINKEN – zeigt an, dass der Akku nicht ladbar ist. Grund dafür könnte sein, dass der Kontakt zwischen Akku- und Ladegerätkontakten unterbrochen ist. Der Akku wird weiter geladen, wenn die Ursache für diese Anzeige beseitigt wurde. Motorola Chip-Akkus haben einen internen Speicherbaustein, der von Motorolas IMPRES-Mehrfachladegerät gelesen wird. Wenn ein IMPRES-Akku mehr als 2 ½ Minuten lang geladen wird, speichert das Mehrfachladegerät die Seriennummer des IMPRES-Akkus. Der IMPRES-Akku kann bis zu 30 Minuten lang aus dem Ladegerät genommen werden. Wenn er dann wieder in das Ladegerät gesteckt wird, beginnt der Ladevorgang an dem Punkt, an dem er sich befand, als der Akku das erste Mal aus dem Ladegerät genommen wurde. Manuelle Rekonditionierung von Akkus Um die Rekonditionierung eines IMPRES-Akkus manuell herbei zu führen, nehmen Sie den Akku innerhalb von 2 ½ Minuten nach seinem ersten Einsetzen in das Ladegerät (Ladeanzeige leuchtet ROT ) aus dem Ladegerät heraus und setzen Sie ihn dann innerhalb von 5 Sekunden wieder ein. Dadurch schaltet das Ladegerät in den Rekonditionierungsmodus, der Akku wird rekonditioniert und automatisch nachgeladen. Die Ladeanzeige leuchtet dabei anhaltend GELB (anstatt ROT ). HINWEIS: Wird diese Funktion übermäßig oft eingesetzt, kann dies die Lebensdauer des Akkus verkürzen. Automatische Rekonditionierung von Akkus Beim Einsatz zusammen mit einem Motorola IMPRES-Akku kann das IMPRESMehrfachladegerät bestimmen, wann eine Rekonditionierung des Akkus angebracht ist. Wenn ein IMPRES-Akku ordnungsgemäß in das Ladegerät gesteckt wird, bestimmt das Ladegerät, ob der Akku rekonditioniert werden muss. Ist eine Rekonditionierung erforderlich, leuchtet die Ladeanzeige GELB. Dieser Rekonditionierungsprozess kann 8 Stunden und länger dauern, je nach Ladezustand und Nennkapazität des Akkus beim Einsetzen in das Ladegerät. Wichtig: Um eine effektive Rekonditionierung zu erzielen, muss der Rekonditionierungs-/Nachladevorgang des Akkus vollständig durchgeführt werden. Lassen Sie den Akku deshalb im Ladegerät, bis die Ladeanzeige GRÜN leuchtet. 14 Nach Beendigung des Rekonditionierungszyklus lädt das Ladegerät den Akku automatisch nach. Manuelles Beenden des Rekonditionierungsprozesses 15 Deutsch Während des Rekonditionierungsprozesses eines Motorola IMPRES-Akkus (GELBE Anzeige) kann die Rekonditionierung jederzeit unterbrochen werden, indem der Akku aus dem Ladegerät genommen und innerhalb von 5 Sekunden wieder in das Ladegerät eingesetzt wird. Das bewirkt, dass das Ladegerät den Rekonditionierungsprozess beendet und den Ladeprozess beginnt. Die Ladeanzeige zeigt dann ROT an. Deutsch FEHLERSUCHE Das IMPRES-Mehrfachladegerät umfasst die folgenden Leistungsmerkmale: • ein Universal-Netzteil (100 V AC - 240 V AC, 50/60 Hz) • ein Konstantstrom-Schnellladegerät, • ein Konditionierungsladegerät mit IU-Kennlinie • eine Rekonditionierungseinheit. Die Kombination der oben genannten Leistungsmerkmale ist für ein Tischladegerät einmalig. Aus diesem Grund sollte ein samt Akku in das Ladegerät eingesetztes Handsprechfunkgerät im Ladegerät nicht in Betrieb sein. Wenn ein Handsprechfunkgerät betrieben wird, während es sich in einem Ladegerät befindet, ist es möglich, dass die Funkgeräteleistung geringfügig reduziert ist und die Akkuladezeit länger dauert. Gegen Ende des Schnellladungszyklus (Ladeanzeige ROT ) überschreitet die Akkuspannung die normale Betriebsspannung des Handsprechfunkgeräts. Nach Beenden des Schnellladebetriebs, oder wenn der Akku aus dem Ladegerät genommen wird, kehrt die Spannung auf einen normalen Spannungspegel zurück. Befindet sich das Ladegerät im Schnellladebetrieb, und wird das Handsprechfunkgerät dabei eingeschaltet, wird es vorübergehend funktionsunfähig. Sie können diesen Zustand beheben, indem Sie das Handsprechfunkgerät aus dem Ladegerät nehmen und es aus- und wieder einschalten. Im Lauf des Rekonditionierungsprozesses wird der Akku vollständig entladen. Als Folge dessen kann es sein, dass das Handsprechfunkgerät während der Rekonditionierung nicht funktioniert. Beobachten Sie bei der Fehlersuche stets die Ladeanzeige – siehe Tabelle 9. 16 Tabelle 10. Fehlerbehebung Fehlfunktion Abhilfemaßnahme Keine Ladeanzeige • Kontakt mit dem Ladegerät • Prüfen Sie, ob der Akku bzw. das nicht hergestellt. Handsprechfunkgerät samt Akku richtig in die Ladeschale gesteckt • Stromversorgung zum wurde. Ladegerät besteht nicht. • Achten Sie darauf, dass das Netzkabel richtig an das Ladegerät und eine geeignete Netzsteckdose angeschlossen ist und dass die Netzsteckdose Strom führt. • Sicherung(en) austauschen. Anzeige blinkt rot • Kontakt mit dem Ladegerät • Nehmen Sie den Akku aus dem nicht hergestellt. Ladegerät und setzen Sie ihn wieder ein. • Prüfen Sie nach, ob der Akku ein in den Tabellen 1 bis 6 genannter, von Motorola zugelassener Akku ist. Andere Akkus werden evtl. nicht geladen. • Trennen Sie das Ladegerät von der Stromversorgung und reinigen Sie die goldfarbenen Ladekontakte am Akku und am Ladegerät mit einem sauberen trockenen Tuch. • Ersetzen Sie den Akku. • Akku ist nicht aufladbar. Anzeige blinkt gelb • Akku wartet auf Ladung. Es • Wenn dieser Zustand korrigiert kann sein, dass die worden ist, wird der Akku geladen. Akkutemperatur unter 5°C oder über 40°C liegt oder die Akkuspannung niedriger ist als der vorbestimmte Schwellenwert für die Schnellladung. WARTUNG Das IMPRES Mehrfachladegerät darf ausschließlich von einem von Motorola zugelassenen Servicetechniker repariert werden. Bei Nichtbeachten dieser Vorschriften kann die Garantie ungültig werden. 17 Deutsch Problem Deutsch LADEGERÄTE MIT DISPLAYMODUL (CDM) Die Funktionalität des IMPRES Mehrfachladegeräts kann durch Hinzufügen eines Ladegerät-Displaymoduls (CDM), Motorola Teilenr. RLN5382, noch weiter verbessert werden. Allgemeine Informationen zum Display Das IMPRES Mehrfachladegerät mit CDM bietet dem Benutzer während der Wartung und Pflege des Akkus nützliche Informationen. Die vom Ladegerät angegebenen Informationen und die zugehörigen LED-Anzeigen werden in den folgenden Tabellen detailliert angeführt. Inbetriebnahme Upon Charger Power-up (Bei Inbetriebnahme des Ladegeräts) LED SINGLE FLASH GREEN (LEUCHTET EINMAL GRÜN AUF) Zeile 1 IMPRES Zeile 2 If There is No Battery in the Pocket (Wenn kein Akku in der Schale steckt) LED OFF (AUS) Zeile 1 NO BATTERY (KEIN AKKU) Zeile 2 Reading Battery Data (Akkudaten werden gelesen) LED Any Defined Indication (Beliebige vordefinierte Anzeige) Zeile 1 READING (AKKUDATEN) Zeile 2 BATTERY DATA (WERDEN GELESEN) Non-IMPRES Battery in the Pocket (Kein IMPRES Akku in der Ladeschale) LED Defined by Charge State (Je nach Ladezustand) Zeile 1 NON-IMPRES (KEIN IMPRES) Zeile 2 BATTERY (AKKU) IMPRES Battery in the Pocket (IMPRES Akku in der Ladeschale) IMPRES and Software Versions are Displayed (IMPRES und Softwareversionen werden angezeigt) LED Defined by Charge State (Je nach Ladezustand) Zeile 1 IMPRES Zeile 2 SW xx.yy; aa.bb HINWEIS: xx.yy bezeichnet Ladegerät-SW-Version, während aa.bb die CDM-SW-Version angibt. 18 IMPRES Battery Kit # and Chemistry are Displayed (IMPRES Akku-Kit-Nr. und chem. Eigenschaften werden angezeigt) LED Defined by Charge State (Je nach Ladezustand) Zeile 1 KIT# -------- (KIT-NR) Zeile 2 -----CHEMISTRY (CHEM. EIGENSCH.) Zahl der Zyklen bis zur automatischen Rekonditionierung) LED Defined by Charge State (Je nach Ladezustand) Zeile 1 ----CYCLES (ZYKLEN) Zeile 2 TO RECONDITION (BIS REKONDITIONIERUNG) * Displayed only when the number of cycles to recondition is less than 6. (Wird nur angezeigt, wenn die Anzahl der Zyklen bis zur Rekonditionierung weniger als 6 beträgt.) Charger Waiting to Charge, Battery is Hot (Ladegerät wartet auf Ladebeginn, Akku ist heiss) LED Flashing ORANGE (ORANGE blinkend) Zeile 1 WAITING TO CHG (WARTEN AUF LADEN) Zeile 2 HOT BATTERY (AKKU HEISS) Charger Waiting to Charge, Battery is Cold (Ladegerät wartet auf Ladebeginn, Akku ist kalt) LED Flashing ORANGE (ORANGE blinkend) Zeile 1 WAITING TO CHG (WARTEN AUF LADEN) Zeile 2 COLD BATTERY (AKKU KALT) Charger Waiting to Charge, Low Voltage (Ladegerät wartet auf Ladebeginn, Spannung niedrig) LED Flashing ORANGE (ORANGE blinkend) Zeile 1 WAITING TO CHG (WARTEN AUF LADEN) Zeile 2 LOW VOLTAGE (SPANNUNG NIEDRIG) HINWEIS: Es werden nicht alle der oben angeführten Hinweise angezeigt. Die Anzeigen ‘Warten auf Laden‘ (Akku heiss, kalt; Spannung niedrig) werden nur angezeigt, wenn der entsprechende Zustand gegeben ist. 19 Deutsch Forecasted # of Cycles Prior to Automatic Recondition (Voraussichtliche Charger is in Trickle Charge Mode (Ladegerät arbeitet im Erhaltungsladungsbetrieb) LED Flashing GREEN (GRÜN blinkend) Zeile 1 TRICKLE CHARGE (ERHALTUNGSLADUNG) Deutsch Zeile 2 Charge is Complete (Laden abgeschlossen) LED Steady GREEN or Flashing RED / GREEN (Ununterbrochen GRÜN oder ROT/GRÜN blinkend) Zeile 1 CHARGE COMPLETE (LADEN ABGESCHLOSSEN) Zeile 2 Charger is in Discharge/Reconditioning Mode (Ladegerät arbeitet im Entlade-/Rekonditionierungsbetrieb) LED Steady ORANGE (Ununterbrochen ORANGE) Zeile 1 DISCHARGE (ENTLADEN) Zeile 2 Charger is Calibrating an IMPRES Battery (Ladegerät kalibriert einen IMPRES Akku) LED Steady ORANGE, Steady RED, & Flashing ORANGE or GREEN (Ununterbrochen ORANGE, ununterbrochen ROT und ORANGE oder GRÜN blinkend) Zeile 1 Calibrating (wird kalibriert) Zeile 2 Battery (Akku) LED Steady GREEN (Ununterbrochen GRÜN) Zeile 1 Battery (Akku) Zeile 2 Calibrated (kalibriert) * Alle IMPRES Akkus sind vor der Erstverwendung zu kalibrieren. Das IMPRES Ladegerät kalibriert jeden neuen Akku automatisch. Battery Capacity Data is Displayed as “%” in mAH, and Voltage (Akkukapazitätsdaten werden als “%” mAH und Spannung angegeben) LED Defined by Charge State (Je nach Ladezustand) Zeile 1 ----% RATED CAP. (% NENNLEISTUNG) Zeile 2 ----mAH --.-V 20 Estimated Time to Rapid Charge Complete Displayed in Hours, Minutes for NiCd & NiMH IMPRES Batteries Only (Geschätzte Zeit bis zum Abschluss der Schnellladung in Stunden und Minuten; Angabe nur bei NiCd & NiMH IMPRES Akkus) Defined by Charge State (Je nach Ladezustand) Zeile 1 RAPID CHG ENDS (SCHNELLLADG.ABGESCHL.) Zeile 2 IN xx HRS, yy MIN HINWEIS: (1) Die angegebene Zeit bis zur vollständigen Ladung enthält auch Schnelllade- und Entladezyklen (sofern relevant). (2) Bei nicht kalibrierten Akkus werden die Akkukapazitätsdaten eventuell nicht angezeigt. (3) Das Laden von IMPRES Akkus in anderen als IMPRES Ladegeräten kann die Genauigkeit der Angaben bezüglich Kapazität und Ladezeiten beeinflussen. 21 Deutsch LED Anzeigesequenz Diagramme für IMPRES Akku Hinweis: Die folgenden Diagramme stellen die in den vorhergehenden ‘Allgemeinen Informationen zum Display’ dargestellten Sequenzen dar und werden nur in englischer Sprache angezeigt. Deutsch Anzeigesequenz bei IMPRES NiCd- und NiMH-Akku Start LED Defined by Charge State Zeile 1 KIT# xxxxxxxx (4.0 sek.) Zeile 2 SN: yyyyyyyyyyyy LED Defined by Charge State Zeile 1 KIT# xxxxxxxx (2.0 sek.) Zeile 2 yyyyy CHEMISTRY LED Defined by Charge State Zeile 1 xxxx CYCLES (2.0 sek.) Zeile 2 Alle 73.0 sek. TO RECONDITION LED Steady RED Zeile 1 RAPID CHARGE Alle 13.0 sek. (2.0 sek.) Zeile 2 LED Defined by Charge State Zeile 1 xx% RATED CAP. (7.0 sek.) Zeile 2 yyyyy mAH zz.z V LED Defined by Charge State Zeile 1 RAPID CHG ENDS (4.0 sek.) Zeile 2 IN xx HRS, yy MIN 22 5X 65.0 sek. Vor der Kalibrierung: Start (4.0 sek.) Defined by Charge State Zeile 1 KIT# xxxxxxxx Zeile 2 SN: yyyyyyyyyyyy LED Defined by Charge State Zeile 1 KIT# xxxxxxxx Zeile 2 yyyyy CHEMISTRY LED Steady ORANGE Zeile 1 DISCHARGE Alle 71.0 sek. Deutsch (2.0 sek.) LED Alle 13.0 sek. (2.0 sek.) Zeile 2 5X LED Defined by Charge State Zeile 1 CALIBRATING Zeile 2 BATTERY LED Defined by Charge State Zeile 1 RAPID CHG ENDS (4.0 sek.) Zeile 2 IN xx HRS, yy MIN (7.0 sek.) 23 65.0 sek. Nach der Kalibrierung: Start LED Defined by Charge State Zeile 1 KIT# xxxxxxxx Deutsch (4.0 sek.) Zeile 2 (2.0 sek.) (2.0 sek.) Alle 61.0sek. SN: yyyyyyyyyyyy LED Defined by Charge State Zeile 1 KIT# xxxxxxxx Zeile 2 yyyyy CHEMISTRY LED Steady GREEN Zeile 1 CHARGE COMPLETE Alle 11 sek. Zeile 2 5X (2.0 sek.) (7.0 sek.) LED Defined by Charge State Zeile 1 BATTERY Zeile 2 CALIBRATED LED Defined by Charge State Zeile 1 xx% RATED CAP. Zeile 2 yyyy mAH zz.z V 24 55.0 sek. Anzeigesequenz bei IMPRES LiIon-Akku Start (4.0 sek.) Defined by Charge State Zeile 1 KIT# xxxxxxxx Zeile 2 SN: yyyyyyyyyyyy LED Defined by Charge State Zeile 1 KIT# xxxxxxxx Zeile 2 yyyyy CHEMISTRY LED Defined by Charge State Zeile 1 xxxx CYCLES (2.0 sek.) Zeile 2 (2.0 sek.) Alle 53.0 sek. Deutsch (2.0 sek.) LED TO RECONDITION LED Steady RED Zeile 1 RAPID CHARGE Alle 9.0 sek. Zeile 2 5X (7.0 sek.) LED Defined by Charge State Zeile 1 xx% RATED CAP. Zeile 2 yyyyy mAH zz.z V 25 45.0 sek. Vor der Kalibrierung: Start LED Defined by Charge State Zeile 1 KIT# xxxxxxxx Deutsch (4.0 sek.) Zeile 2 SN: yyyyyyyyyyyy LED Defined by Charge State Zeile 1 KIT# xxxxxxxx (2.0 sek.) Zeile 2 Alle 51.0 sek. yyyyy CHEMISTRY LED Steady ORANGE Zeile 1 DISCHARGE Alle 9.0 sek. (2.0 sek.) Zeile 2 5X LED Defined by Charge State Zeile 1 CALIBRATING (7.0 sek.) Zeile 2 BATTERY 26 45.0 sek. Nach der Kalibrierung: Start LED Defined by Charge State Zeile 1 KIT# xxxxxxxx (4.0 sek.) Zeile 2 SN: yyyyyyyyyyyy Defined by Charge State Zeile 1 KIT# xxxxxxxx Deutsch LED (2.0 sek.) Zeile 2 Alle 61.0sek. yyyyy CHEMISTRY LED Steady GREEN Zeile 1 CHARGE COMPLETE Alle 11 sek. (2.0 sek.) Zeile 2 5X LED Defined by Charge State Zeile 1 BATTERY (2.0 sek.) Zeile 2 CALIBRATED LED Defined by Charge State Zeile 1 xx% RATED CAP. (7.0 sek.) Zeile 2 yyyy mAH zz.z V 27 55.0 sek. Deutsch Ausrichtung des Anzeigetextes Der Text auf dem CDM kann um 180 Grad gedreht werden, sodass das IMPRES Mehrfachladegerät nach Wunsch auf einem Tisch oder an einer Wand montiert werden kann. Zum Drehen der Anzeige eine große Büroklammer in das Loch unterhalb des Displays senkrecht zum Tisch stecken. Ein Klickgeräusch zeigt an, dass die Umschaltung aktiviert und der Anzeigetext um 180 Grad gedreht wurde. Betrieb des IMPRES Mehrfachladegeräts Weitere Informationen zur Wartung des Mehrfachladegeräts und des Display-Moduls sind in der Wartungsanleitung des Ladegeräts, Teilenr. 6880309L66, enthalten. Service/Kundendienst Für sämtliche Serviceleistungen wenden Sie sich bitte an die unten angegebene Adresse. Bitte rufen Sie vor Absenden eines Geräts an das Kundendienstcenter an und teilen Sie mit, dass Sie es zur Wartung zurücksenden. Motorola Kundendienstcenter Motorola GmbH Customer Care Am Borsigturm 130 13507 Berlin Germany. Tel: +49 30 6686 1555 28 TABLE DES MATIERES Instructions de sécurité importantes . . . . . . . . . . . . . . . . . . . . . . . . . . 2 Instructions de sécurité pour l’utilisation . . . . . . . . . . . . . . . . . . . . . . . 3 Description des caractéristiques et des avantages d’IMPRES . . . . . . 4 Caractéristiques/différences opérationnelles . . . . . . . . . . . . . . . . . . . . 5 Listes des batteries . . . . . . . . . . . . . . . . . . . . . . . . . . . . . . . . . . . . . . . 7 Sources d’alimentation électriques et chargeurs électriques agréés Motorola . . . . . . . . . . . . . . . . . . . . . . . . . . . . . . . . . . . . . . . . . . 9 Recherche de dysfonctionnement . . . . . . . . . . . . . . . . . . . . . . . . . . 15 Réparation . . . . . . . . . . . . . . . . . . . . . . . . . . . . . . . . . . . . . . . . . . . . . 16 Chargeurs avec afficheur (CDM, chargers with Display Module . . . . 17 Ce manuel d’accessoire concerne les chargeurs multiples universels IMPRES suivants : WPLN4108, WPLN4109, WPLN4110, WPLN4118, WPLN4119, WPLN4120, WPLN4121, WPLN4123, WPLN4130, WPLN4131, WPLN4132, WPLN4133, WPLN4134, WPLN4135, WPLN4136 En outre, ce manuel inclut les chargeurs multiples universels IMPRES disponibles pour les postes de la gamme GP Professionnel : WPLN4144, WPLN4145, WPLN4146, WPLN4187, WPLN4188, WPLN4189, WPLN4190, WPLN4191, WPLN4192, WPLN4193, WPLN4194, WPLN4195, WPLN4196, WPLN4204, WPLN4205 “Universel” signifie que le chargeur est compatible avec plusieurs types de postes et convient aux batteries indiquées dans les tableaux 1 à 6 (inclus), avec l’adaptateur correspondant à chaque type de batterie. 1 Français Mode d’emploi . . . . . . . . . . . . . . . . . . . . . . . . . . . . . . . . . . . . . . . . . . 10 Chargement de la batterie . . . . . . . . . . . . . . . . . . . . . . . . . . . . . . 12 Reconditionnement manuel de la batterie . . . . . . . . . . . . . . . . . . 13 Reconditionnement automatique de la batterie . . . . . . . . . . . . . . 13 Interruption manuelle du reconditionnement . . . . . . . . . . . . . . . . 14 INSTRUCTIONS DE SECURITE IMPORTANTES CONSERVEZ CES INSTRUCTIONS Ce document contient d'importantes instructions de sécurité et d'utilisation. Veuillez lire attentivement ces instructions et conservez-les pour pouvoir les consulter à nouveau à titre de référence. Français Avant d’utiliser le chargeur, lisez toutes les instructions, les avertissements et les informations sur (1) le chargeur, (2) la batterie et (3) le poste. 1. Pour réduire les risques de blessure, ne rechargez que des batteries rechargeables agréées Motorola indiquées dans les Tableaux 1 à 5. Les autres types de batteries peuvent éclater ou AVERTISSEMENT provoquer des blessures ou des dégâts. ! 2. L’utilisation d’accessoires non agréés par Motorola peut présenter un risque d’incendie, d’électrocution ou de blessure. 3. Pour ne jamais risquer d’endommager la prise et le câble électriques, tirez toujours sur la prise et jamais sur le câble pour débrancher le chargeur. 4. Sauf dans les cas où cela est absolument indispensable, il est préférable de ne jamais utiliser de rallonge électrique pour brancher le chargeur. Un câble d’extension électrique défectueux peut introduire un risque d’incendie ou d’électrocution. Si une rallonge est indispensable, vous devez utiliser un câble 18AWG pour toutes les longueurs inférieures à 30 m et un câble 16AWG toutes les longueurs inférieures à 45 m. 5. Pour réduire le risque d’incendie, d’électrocution ou de blessure, n’utilisez jamais un chargeur endommagé ou présentant un quelconque défaut. Confiez-le à un agent de maintenance Motorola agréé. 6. Cette unité peut être réparée. Chaque compartiment est équipé d’une alimentation unique avec un circuit imprimé spécifique. Ils peuvent être achetés auprès des services après-vente et de pièces détachées Motorola. Le numéro de référence du circuit imprimé/ alimentation est RLN5325. Aucune autre pièce de remplacement n’est disponible. Vous pouvez également commander aux services après-vente et de pièces détachées un manuel de maintenance décrivant la procédure de remplacement. Le numéro de référence de ce manuel est 6880309L66. 7. Pour réduire le risque d’électrocution, débranchez l’alimentation électrique c.a. du chargeur avant d’effectuer toute opération d’entretien ou de nettoyage. 2 INSTRUCTIONS DE SECURITE POUR L’UTILISATION • Remplacez uniquement le fusible avec un modèle du type et de la valeur nominale indiqués sur l’étiquette du chargeur. Les pièces suivantes peuvent être commandées aux services après-vente et de pièces détachées : Fusible 6571489S01 Etui 0987626G01 Couvercle 0987739G01 3 Français • Eteignez le poste lorsque vous voulez charger sa batterie. • Cet équipement n’est pas conçu pour être utilisé à l’extérieur. Utilisez-le uniquement dans des endroits secs et des conditions sans humidité. • Connectez uniquement l’équipement avec un câble d’alimentation protégé par un fusible à une source dont la tension a été vérifiée et égale à celle indiquée sur le produit. • Pour débrancher l’appareil de la source d'alimentation, retirez la prise secteur. • La prise d’alimentation à laquelle l’équipement est connecté doit être proche et facilement accessible. • Si l’appareil est doté d’un fusible, le fusible de remplacement doit être identique en type et en valeur nominale aux spécifications indiquées dans les instructions fournies avec cet appareil. • La température ambiante maximale autour de l’équipement ne doit pas dépasser 40°C (104°F). • Vérifiez que le câble est placé de façon à ce que personne ne puisse marcher dessus ou s’y prendre les pieds, pour qu’il ne reçoive aucune projection d’eau, ni risque d’être endommagé ou étiré. • Cette unité utilise le même système de fixation murale que le chargeur multiple NTN4796. Le numéro de référence de ce système est NLN7967. DESCRIPTION DES CARACTERISTIQUES ET DES AVANTAGES IMPRES Français La solution d’énergie IMPRES fait appel au système tri-chimique développé par Motorola incluant (a) les batteries IMPRES, (b) le Chargeur Conditionneur Multiple IMPRES, et (c) les matériels/ logiciels radio qui permettent aux postes compatibles IMPRES d’utiliser des batteries IMPRES (à l’exclusion des postes de la gamme GP Professionnel). Utilisé avec des batteries Motorola IMPRES, le Chargeur Conditionneur Multiple IMPRES : • Maximise la durée de fonctionnement entre les chargements en éliminant automatiquement tout effet mémoire. • Maximise la durée de vie de la batterie en réduisant considérablement la chaleur pendant les cycles de charge d’entretien et d’appoint. • Elimine toute nécessité d’acheter un appareil de reconditionnement des batteries et élimine le besoin de former les personnels aux tâches de maintenance des batteries. Grâce à cette conception brevetée unique, il n’est plus nécessaire de suivre l’utilisation et le chargement des batteries, d’exécuter des cycles de reconditionnement manuels ou de retirer les batteries des chargeurs après chargement. Le Chargeur Conditionneur Multiple IMPRES établit le profil de l’utilisation de la batterie IMPRES, mémorise ces informations dans la batterie IMPRES, et exécute un cycle de reconditionnement lorsque cela est nécessaire. Le Chargeur Conditionneur Multiple IMPRES ne peut pas surchauffer la batterie, quelle que soit la durée pendant laquelle elle reste dans le chargeur. Le chargeur contrôle la batterie et lui donne automatiquement une recharge complémentaire, si nécessaire. Le Chargeur Conditionneur Multiple IMPRES simplifie les procédures de chargement et d’entretien des batteries. Pour l’utilisateur, il suffit de faire deux choses : 1. Placer le poste / la batterie dans le chargeur 2. Retirer le poste / la batterie lorsque la charge est terminée ! Motorola est le seul fabricant capable de proposer un chargeur-conditionneur (ou reconditionneur) qui donne aux utilisateurs le choix de charger leur batterie en la laissant sur le poste ou de la placer sans le poste dans le chargeur. 4 CARACTERISTIQUES / DIFFERENCES OPERATIONNELLES: 5 Français 1. Les batteries IMPRES peuvent être rechargées dans des chargeurs conventionnels. Cependant, pour que les fonctions Smart Energy soient activées, chaque batterie IMPRES doit être chargée par un Chargeur Conditionneur Multiple IMPRES. La première fois qu’une batterie IMPRES est chargée dans un Chargeur Conditionneur Multiple IMPRES, son voyant JAUNE FIXE est allumé. Cette première charge doit se poursuivre jusqu’à ce que ce témoin lumineux soit VERT FIXE. De cette façon, la batterie IMPRES sera correctement calibrée et les fonctions Smart Energy seront activées. Si cette procédure est interrompue, le chargeur effectuera le calibrage de la batterie à la prochaine insertion. 2. Comme le Chargeur Conditionneur Multiple IMPRES détermine automatiquement les conditions nécessaires au reconditionnement de la batterie IMPRES, le chargeur peut passer en mode de reconditionnement lorsque vous insérez un poste ou une batterie. Ceci est alors signalé par le voyant JAUNE FIXE. Le mode de conditionnement peut être annulé si nécessaire en retirant et en réinsérant le poste ou la batterie (voir les instructions plus loin dans ce guide). 3. Le Chargeur Conditionneur Multiple IMPRES est conçu pour charger toutes les batteries listées dans les Tableaux 1 à 6. Cependant, seules les batteries IMPRES d’origine déclencheront les fonctions Smart Energy. (Au fur et à mesure que de nouveaux postes/batteries seront introduits sur le marché, cette liste sera mise à jour et distribuée aux clients par l’intermédiaire du Réseau de Distribution et du Service client Motorola). 4. Le Chargeur Conditionneur Multiple IMPRES doit être utilisé pour calibrer les batteries Smart IMPRES et garantir que leurs données d’utilisation sont analysées, mémorisées et affichées avec précision. 5. Si une batterie IMPRES est utilisée avec un poste à afficheur (par ex. ASTRO XTS5000), une icône indiquant l’état de charge de la batterie peut être affichée. Cette icône est activée après calibration de la batterie IMPRES dans un chargeur IMPRES. L’icône d’état du chargeur reste affichée tant que l’utilisateur se sert d’un chargeur IMPRES pour charger la batterie. Si une batterie IMPRES est chargée dans un chargeur non-IMPRES pendant 7 jours (ou plus), cette icône ne sera plus affichée. Pour réactiver l’affichage de l’icône, insérez une batterie IMPRES dans un chargeur IMPRES et laissez le chargement se terminer complètement (signalé par le témoin lumineux VERT FIXE). On verra alors s’afficher de nouveau l’icône d’état de charge. Si elle n’apparaît pas après une charge complète, insérez une batterie partiellement vide (au moins déchargée à 70%) dans le chargeur, et lancez le reconditionnement. Laissez se terminer le chargement complet. Le poste affiche l’icône (à l’exception des postes de la gamme GP Professionnel). 6. Le chargeur multiple adaptatif IMPRES peut uniquement être réparé par un technicien de maintenance agréé par Motorola CGISS. Le non-respect de cette clause peut annuler la garantie. LISTES DES BATTERIES Les tableaux suivants répertorient les batteries qui peuvent être utilisées avec les postes indiqués dans le titre de chaque tableau. Tableau 1. Gamme des postes XTS3000/ XTS3500/ Dimetra & Poste numérique XTS5000 Français Kit (PN) HNN9031 HNN9032 NTN8294 NTN8295 NTN8297 NTN8299 NTN8610 NTN8293 NNTN4435 NNTN4436 NNTN4437 RNN4006 RNN4007 NTN9862 Chimie FM Smart NiCD NiCD NiCD NiCD NiCD NiCD LiIon NiMH NiMH NiMH NiMH NiMH NIMH LiIon Non Oui Non Oui Oui Oui Non Non Non Oui Oui Non Oui No Oui Oui Non Non Non Non Non Non Oui Oui v Non Non Oui Capacité Ultra-haute Ultra-haute Ultra-haute Ultra-haute Ultra-haute Ultra-haute Haute Ultra-haute Ultra-haute Ultra-haute Ultra-haute Ultra-haute Ultra-haute Ultra-haute Nouveau modèle Non Non Non Non Non Non Non Non Non Non Non Nouveau Nouveau Nouveau Tableau 2. Postes numériques XTS2500 Kit (PN) NTN9859 NTN9857 NTN9815 NTN9816 Chimie FM Smart NiMH NiMH NiCD NiCD Non Oui Non Oui Non Non Non Non Capacité Ultra-haute Ultra-haute Haute Haute Nouveau modèle Nouveau Nouveau Nouveau Nouveau Tableau 3. Postes numériques MTP700 Kit (PN) PMNN4048* PMNN4049* PMNN4050* PMNN4047* * Chimie FM Smart NiMH NiMH Lilon LiIon Non Oui Non Non Oui Oui Oui Oui Capacité Haute Haute Haute Haute Nouveau modèle Nouveau Nouveau Nouveau Nouveau Le chargeur nécessite l’adaptateur de batterie RLN5212 pour charger les batteries MTP700. 6 Tableau 4. Gammes des postes HT1000/ MT2000/ MTS2000/ MTX8000 & MTX9000 Kit (PN) FM Smart NiCD NiCD NiCD NiCD NiCD NiCD NiCD NiCD NiCD NiCD NiCD NiMH NiMH NiCD Non Oui Non Non Oui Oui CENELEC CSA MSHA Oui Oui Non Oui ATEX Oui Oui Non Non Non Non Non Non Non Non Non Non Non Non Capacité Ultra-haute Ultra-haute Haute Ultra-haute Haute Ultra-haute Haute Haute Haute Ultra-haute Haute Ultra-haute Ultra-haute Haute Nouv. modèle Non Non Non Non Non Non Non Non Non Non Non Non Non Non Tableau 5. Postes Saber/Astro Saber/SSE5000/MX1000 Kit (PN) HNN9033 HNN9031 NTN4537** NTN4538 NTN4592** NTN4593 NTN4595 NTN4596 NTN4657 NTN4671 NTN4992 NTN7014** NTN7058 NTN7426 NTN8251 NTN8818** ** Chimie FM Smart NiCD NiCD NiCD NiCD NiCD NiCD NiCD NiCD NiCD NiCD NiCD NiMH NiCD NiCD NiMH LiIon Non Oui Oui Oui Non Non Non Oui Non CENELEC Oui Non Oui Oui Oui Non Oui Oui Non Non Non Non Non Non Non Non Non Non Non Non Non Non Capacité Ultra-haute Ultra-haute Faible Haute Faible Haute Ultra-haute Ultra-haute Haute Haute Ultra-haute Haute Ultra-haute Faible Ultra-haute Haute Nouv. modèle Non Non Non Non Non Non Non Non Non Non Non Non Non Non Non Non Le chargeur nécessite l’adaptateur de batterie 4385922B01 pour charger les batteries Astro Saber. 7 Français HNN9028 HNN9029 NTN7143 NTN7144 NTN7146 NTN7147 NTN7148 NTN7149 NTN7150 NTN7341 NTN7372 WPPN4013 WPPN4037 RNN4008 Chimie Tableau 6. Postes de la gamme GP Professionnel Kit (PN) Français HNN9003 HNN9008 HNN9009 HNN9010 HNN9011 HNN9012 HNN9013 WPNN4045 PMNN4045 HNN4001 HNN4002 HNN4003 Chimie FM Smart Capacité NiMH AA Bluetooth NiMH NiMH NiMH NiCD NiCD LiIon NiMH NiMH Impres NiMH Impres NiMH Impres LiIon Non Non Haute Nouv. modèle Non Non Non Oui Oui Non Non Non Non Non Oui Non Non Non Non Non Non Non Non Non Oui Oui Oui Haute Ultra-haute Ultra-haute Haute Haute Haute Haute Haute Ultra-haute Ultra-haute Ultra-haute Non Non Non Non Non Non Non Non Oui Oui Oui Le chargeur universel doit être utilisé avec l’adaptateur de batterie RLN5648. REMARQUE : Vous pouvez acheter un adaptateur auprès d’un représentant des services commerciaux ou après-vente. 8 SOURCES D’ALIMENTATION ELECTRIQUE ET CHARGEURS AGREES MOTOROLA Ce chargeur est conçu pour les alimentations 100 V CA à 240 V CA, 50 / 60 Hz et les cordons Motorola indiqués dans le Tableau 7. Les cordons d’alimentation utilisables avec les chargeurs pour postes GP Professionnel figurent dans le Tableau 8 : Tableau 7. Cordons d’alimentation pour chargeurs universels Motorola Type de prise WPLN4121 WPLN4108 WPLN4109 WPLN4110 WPLN4118 WPLN4119 WPLN4120 WPLN4123 Kit de chargeur (modèle avec afficheur) WPLN4127 WPLN4130 WPLN4131 WPLN4132 WPLN4133 WPLN4134 WPLN4135 WPLN4136 Câble d’alimentation Aucun 3087791G01 3087791G04 3087791G07 3087791G10 3087791G13 3087791G01 3087791G16 Tableau 8. Cordons d’alimentation pour modèles GP Professionnel Motorola Type de prise Aucun câble ou prise U.S./NA Euro R.U. Australie/ NZ Argentine U.S./NA Corée Kit de chargeur WPLN4197 WPLN4187 WPLN4189 WPLN4188 WPLN4190 WPLN4191 WPLN4205 WPLN4146 9 Kit de chargeur (modèle avec afficheur) WPLN4198 WPLN4192 WPLN4194 WPLN4193 WPLN4195 WPLN4196 WPLN4204 WPLN4145 Câble d’alimentation Aucun 3087791G01 3087791G04 3087791G07 3087791G10 3087791G13 3087791G01 3087791G16 Français Aucun câble ou prise U.S./ NA Euro R.U. Australie/ NZ Argentine U.S./ NA Corée Kit de chargeur MODE D’EMPLOI Français REMARQUES Le Chargeur Conditionneur Multiple IMPRES charge uniquement les batteries agréées Motorola listées dans les Tableau 1 à 6. Il est possible que d’autres types de batteries ne puissent pas être chargées. Le Chargeur Conditionneur Multiple IMPRES est doté de fonctions automatiques et de caractéristiques différentes de tous les autres chargeurs de batteries. Veuillez vérifier l’indicateur de charge confirmant que le chargeur se trouve effectivement dans le mode de fonctionnement voulu/escompté. Le compartiment du chargeur peut recevoir un poste équipé d’une batterie ou une batterie seule. Avant de charger une batterie avec le poste, éteignez le poste. Les batteries se chargent mieux lorsqu’elles se trouvent à température ambiante. 1. Branchez le câble d’alimentation du chargeur dans le connecteur c.a. situé à l’arrière du chargeur. 2. Branchez le cordon d’alimention sur une prise secteur. La mise sous tension correcte est signalée par un ECLAT VERT UNIQUE du témoin de charge. 3. Insérez une batterie, ou un poste (éteint) contenant une batterie, dans le compartiment du chargeur de la façon suivante : a. Alignez la rainure de chaque côté de la batterie sur le rail correspondant de chaque côté du compartiment du chargeur. b. Appuyez sur la batterie pour la pousser vers l’arrière du compartiment. c. Poussez la batterie dans le compartiment du chargeur pour garantir un bon contact des bornes du chargeur et de la batterie. Lorsque la batterie est correctement placée dans le compartiment, le témoin de charge s’allume, indiquant que le chargeur a reconnu la présence de la batterie. Consultez les indicateurs de charge dans le Tableau 9. 10 Tableau 9. Indicateurs de charge Indicateur de charge Description Mise sous tension réussie Rouge fixe Batterie en charge rapide. Vert clignotant Charge rapide terminée (capacité disponible >90%). Batterie en charge d’appoint/ charge d’entretien. Vert fixe Chargement terminé. Batterie totalement chargée. Jaune clignotant Le chargeur a reconnu la batterie et attend avant de charger (soit la tension de la batterie est trop faible ou la température de la batterie est trop basse ou trop haute pour permettre un chargement correct). Lorsque ce paramètre est revenu dans les normes, le chargement débutera. Rouge clignotant La batterie ne peut pas être chargée ou il y a un mauvais contact. Jaune fixe (Cette fonction concerne uniquement les batteries Smart) La batterie est en mode de reconditionnement. La durée de ce mode dépend de la charge restante dans la batterie au moment de son insertion (les batteries totalement chargées nécessitent un reconditionnement plus long – 8 heures ou plus – que les batteries totalement vides). Rouge/vert clignotant (Cette fonction concerne uniquement les batteries Smart) Le chargement de la batterie est terminé. Elle est totalement chargée. Elle peut être utilisée mais elle approche de la fin de son cycle de vie. REMARQUE Le Chargeur Conditionneur Multiple IMPRES est unique en son genre, car il est capable de déterminer automatiquement si la batterie doit être reconditionnée ou non. Cette fonction ne fonctionne qu’avec les batteries IMPRES Motorola. Pour que les fonctions des batteries Smart Motorola et du système de chargement (ou de conditionnement) soient totalement opérationnelles, les données contenues dans les batteries Smart Motorola doivent être initialisées par le chargeur lors de leur première recharge. Cette procédure est signalée par le témoin JAUNE FIXE du chargeur (ce témoin indique également le conditionnement d’une batterie). La procédure est automatique. Elle inclut un conditionnement initial suivi du chargement. La procédure d’initialisation peut être longue et la batterie doit rester dans le chargeur pendant une nuit. 11 Français Eclat vert unique Le Chargeur Conditionneur Multiple IMPRES fonctionne à la fois comme : • Chargeur pour toutes les batteries agréées Motorola, et • Reconditionneur pour les batteries agréées IMPRES de Motorola. Français Chargement des batteries IMPORTANT : Le compartiment du chargeur est conçu pour recevoir des batteries de taille et de forme différentes. Il est donc très important de vérifier que le poste contenant la batterie, ou que la batterie seule, a été correctement inséré dans le compartiment du chargeur. Si l’insertion n’est pas correcte, le témoin lumineux reste éteint et le chargement ne peut pas commencer. REMARQUE : Les batteries neuves (qui n’ont jamais été utilisées) peuvent, dans certains cas, donner une indication de charge totale prématurée (voyant VERT FIXE ). Pour obtenir des performances optimales, Motorola conseille de laisser les batteries neuves dans le chargeur pendant 14 à 16 heures avant de les utiliser. 1. Lorsque l’insertion du poste ou de la batterie dans le chargeur est correcte, le chargement débute et le voyant ROUGE FIXE du chargeur est allumé. La durée pendant laquelle ce voyant ROUGE FIXE reste allumé va dépendre de la charge restante dans la batterie. 2. La fin d’une charge rapide (capacité disponible >90%) est signalée par le voyant VERT CLIGNOTANT. Il signifie que le chargeur est passé en charge d’entretien, qui nécessite environ une heure. 3. La fin de la charge d’entretien est signalée par le voyant VERT FIXE. Il signifie que la batterie est totalement chargée. 4. Autres indications pouvant être signalées par le témoin du chargeur pendant le chargement : • JAUNE CLIGNOTANT – la tension de la batterie est trop faible ou la température de la batterie est trop basse ou trop élevée pour permettre un chargement correct. Le chargement débutera lorsque ce paramètre sera revenu dans les normes. • CLIGNOTANT ROUGE ET VERT – la batterie approche de la fin de son cycle de vie. Bien qu’elle soit totalement chargée, sa capacité a été réduite par les utilisations successives et elle est susceptible de ne pas suffire à une application à service intensif. Cette fonction est uniquement disponible avec les batteries IMPRES Motorola. Ce voyant ne signale pas un défaut. Elle informe l’utilisateur que la batterie ne pourra bientôt plus fonctionner normalement et qu’elle devra être remplacée. 12 • ROUGE CLIGNOTANT– la batterie ne peut pas être chargée. Ceci peut être provoqué par un mauvais contact entre les bornes de la batterie et du chargeur. La charge débutera lorsque la cause de cette indication aura été rectifiée. Les batteries Smart Motorola ont une mémoire interne qui peut être lue par un Chargeur Conditionneur Multiple IMPRES Motorola. Lorsqu’une batterie IMPRES est chargée pendant plus de 2,5 minutes, le Chargeur Conditionneur Multiple IMPRES mémorise le numéro de série de la batterie IMPRES. Cette batterie peut alors être retirée du chargeur pendant 30 minutes maximum. Ainsi, lorsqu’elle sera replacée dans le chargeur, le chargement pourra reprendre au point où il a été interrompu. Pendant l’intervalle de 2,5 minutes qui suit l’insertion initiale d’une batterie IMPRES (voyant ROUGE FIXE ), retirez la batterie du compartiment et réinsérez-la dans les 5 secondes qui suivent pour forcer manuellement le reconditionnement. Le témoin du chargeur passe du ROUGE FIXE au JAUNE FIXE. Cette méthode permet de forcer le cycle de reconditionnement avant recharge de la batterie. REMARQUE : Une utilisation excessive de cette fonction peut réduire la durée de vie globale de la batterie. Reconditionnement automatique des batteries Utilisé avec des batteries Motorola IMPRES, le Chargeur Conditionneur Multiple IMPRES Motorola peut déterminer si une batterie a besoin d’un reconditionnement. Lorsqu’une batterie IMPRES est correctement insérée dans le chargeur, il détermine si le reconditionnement est nécessaire. Si la batterie a besoin d’un reconditionnement, le voyant du chargeur passe automatiquement au JAUNE FIXE. Cette procédure peut nécessiter jusqu’à 8 heures ou plus, selon l’état de charge et la capacité de la batterie insérée. Remarque importante : pour que cette procédure soit efficace, la batterie doit rester dans le chargeur de façon ininterrompue jusqu’à la fin du reconditionnement/ chargement, signalé par le voyant VERT FIXE. A la fin du cycle de reconditionnement, le chargeur passe automatiquement en cycle de recharge. 13 Français Reconditionnement manuel des batteries Interruption manuelle du reconditionnement Français A n’importe quel moment du cycle de reconditionnement d’une batterie IMPRES Motorola (voyant JAUNE FIXE ), il est possible d’interrompre ce cycle en sortant la batterie du chargeur et en la réinsérant dans un délai de cinq secondes. Cette manipulation simple met fin au cycle de reconditionnement et lance le cycle de recharge. Le témoin du chargeur devient alors ROUGE FIXE. 14 RECHERCHE DE DYSFONCTIONNEMENT Caractéristiques du Chargeur Conditionneur Multiple IMPRES : • Alimentation universelle (100 V c.a. – 240 V c.a., 50/60 Hz) • Chargeur rapide, courant continu • Chargeur conditionneur à courant intermittent inverse (impulsion négative) • Unité de reconditionnement La combinaison de ces fonctions est inédite pour un chargeur de bureau. Par conséquent, nous déconseillons de laisser dans le chargeur un poste contenant une batterie alors que le poste est allumé ou en cours d’utilisation. Lorsque le cycle de charge rapide est presque terminé, (voyant ROUGE FIXE ), la tension de la batterie dépasse la tension de fonctionnement normale du poste. Ce niveau de tension revient à la normale après la fin du cycle de charge rapide, ou lorsque la batterie est retirée du chargeur. Si le poste est mis sous tension pendant que le chargeur est en mode de charge rapide, le poste sera temporairement hors service. Pour remettre le poste en service, il suffit de le retirer du chargeur, de l’éteindre et de le rallumer. Le cycle de reconditionnement inclut une décharge totale de la batterie. Par conséquent, le poste risque de ne pas être opérationnel pendant ce cycle (attendre la fin du reconditionnement.) Pendant toute recherche de dysfonctionnement, vérifiez constamment le voyant lumineux du chargeur. Voir le Tableau 9. 15 Français L’utilisation d’un poste laissé dans le chargeur peut provoquer une réduction des performances radio et un allongement du cycle de charge. Tableau 10. Recherche de dysfonctionnement Problème Signification Action Le témoin lumineux est éteint. • Absence de contact. • Vérifiez que le poste contenant la batterie, ou la batterie seule, est correctement inséré dans le chargeur. • Vérifiez que le câble d’alimentation est correctement branché au chargeur et au secteur, et qu’il n’y a pas de coupure de courant. • Remplacez le(s) fusible(s). Français • Aucune alimentation électrique. Rouge clignotant • Absence de contact. Jaune clignotant • En attente du début du cycle de charge. La température de la batterie peut être inférieure à 5°C (41°F) ou supérieure à 40°C (104°F) ou la tension de la batterie peut être inférieure à celle du seuil minimal nécessaire à la charge rapide. • Retirez la batterie et réinsérez-la dans le chargeur. • Vérifiez que la batterie est une batterie agréée Motorola listée dans les Tableaux 1 à 6. Le système risque de ne pas charger les autres types de batteries. • Débranchez le chargeur de son alimentation électrique. A l’aide d’un chiffon sec et propre, nettoyez les broches de contact de la batterie et du chargeur. • La batterie ne peut pas être • Réinsérez la batterie dans le chargée. chargeur. • Dès que cette condition est rectifiée, la charge de la batterie débutera. REPARATATION Le chargeur multiple reconditionneur IMPRES peut uniquement être réparé par un technicien de maintenance agréé par Motorola. Le non-respect de cette clause peut annuler la garantie. 16 CHARGEURS AVEC MODULE D’AFFICHAGE (CDM) Le chargeur multiple adaptif IMPRES peut être amélioré par l’adjonction d’un module d’affichage (CDM – Charger Display Module, référence Motorola RLN5382). Informations générales affichées Le chargeur multiple reconditionneur IMPRES avec l’afficheur CDM donne à l’utilisateur des informations importantes pendant les opérations de maintenance de ses batteries. Ces informations et les indications du témoin lumineux sont décrites dans les tableaux suivants. Upon Charger Power-up (À la mise sous tension du chargeur) TÉMOIN SINGLE FLASH GREEN (UN ÉCLAT VERT) Ligne 1 IMPRES Ligne 2 If There is No Battery in the Pocket (S’il n’y a pas de batterie dans la case) TÉMOIN OFF (DÉSACTIVÉ) Ligne 1 NO BATTERY (SANS BATTERIE) Ligne 2 Reading Battery Data (Lecture des données de la batterie) TÉMOIN Any Defined Indication (toute indication) Ligne 1 READING (LECTURE EN COURS) Ligne 2 BATTERY DATA (DONNÉES DE LA BATTERIE) Non-IMPRES Battery in the Pocket (La batterie dans la case du chargeur n’est pas du type IMPRES) TÉMOIN Defined by Charge State (Défini par l’état de charge) Ligne 1 NON-IMPRES (NON-IMPRES) Ligne 2 BATTERY (BATTERIE) IMPRES Battery in the Pocket (La batterie dans la case du chargeur est du type IMPRES) IMPRES and Software Versions are Displayed TÉMOIN Defined by Charge State (Défini par l’état de charge) Ligne 1 IMPRES Ligne 2 SW xx.yy; aa.bb 17 Français Démarrage REMARQUE : xx.yy indique la version du logiciel et aa.bb indique la version de l’afficheur CDM. IMPRES Battery Kit # and Chemistry are Displayed (Le numéro de référence du kit batterie IMPRES et sa catégorie chimique sont affichés) TÉMOIN Defined by Charge State (Défini par l’état de charge) Ligne 1 KIT# -------- (KIT No. --------) Ligne 2 -----CHEMISTRY (-----CHIMIE) Forecasted # of Cycles Prior to Automatic Recondition (Nombre de cycles Français prévus avant le reconditionnement automatique) TÉMOIN Defined by Charge State (Défini par l’état de charge) Ligne 1 ----CYCLES (----CYCLES) Ligne 2 TO RECONDITION (RECONDITIONNER) * Uniquement affiché lorsque le nombre de cycles avant le recondi- tionnement est inférieur à 6. Charger Waiting to Charge, Battery is Hot (Le chargeur est en attente. La batterie est chaude) TÉMOIN Flashing ORANGE (ORANGE clignotant) Ligne 1 WAITING TO CHG (ATTENTE CHARGE) Ligne 2 HOT BATTERY (BATTERIE CHAUDE) Charger Waiting to Charge, Battery is Cold (Le chargeur est en attente. La batterie est froide) TÉMOIN Flashing ORANGE (ORANGE clignotant) Ligne 1 WAITING TO CHG (ATTENTE CHARGE) Ligne 2 COLD BATTERY (BATTERIE FROIDE) Charger Waiting to Charge, Low Voltage (Le chargeur est en attente. Tension faible) TÉMOIN Flashing ORANGE (ORANGE clignotant) Ligne 1 WAITING TO CHG (ATTENTE CHARGE) Ligne 2 LOW VOLTAGE (TENSION FAIBLE) REMARQUE : Tous les écrans indiqués ci-dessus ne sont pas affichés. Par exemple, Attente de charge (batterie chaude, froide, tension faible) n’apparaît que lorsque la situation l’exige. 18 Charger is in Trickle Charge Mode (Le chargeur est en mode Charge d’appoint) TÉMOIN Flashing GREEN (VERT clignotant) Ligne 1 TRICKLE CHARGE (CHARGE D’APPOINT) Ligne 2 Charge is Complete (Charge terminée) TÉMOIN Steady GREEN or Flashing RED / GREEN (VERT fixe ou ROUGE / VERT clignotant) Ligne 1 CHARGE COMPLETE (CHARGE TERMINÉE) Ligne 2 Décharge / reconditionnement) TÉMOIN Steady ORANGE (ORANGE fixe) Ligne 1 DISCHARGE (DÉCHARGE) Ligne 2 Charger is Calibrating an IMPRES Battery (Le chargeur calibre une batterie IMPRES) TÉMOIN Steady ORANGE, Steady RED, & Flashing ORANGE or GREEN (ORANGE fixe, ROUGE fixe, & ORANGE ou VERT clignotant) Ligne 1 Calibrating (Calibrage) Ligne 2 Battery (Batterie) TÉMOIN Steady GREEN (VERT fixe) Ligne 1 Battery (Batterie) Ligne 2 Calibrated (Calibrée) *Toutes les batteries IMPRES doivent être calibrées avant d’être utilisées. Un chargeur IMPRES lance automatiquement la calibration chaque fois qu’une batterie neuve est insérée. Battery Capacity Data is Displayed as “%” in mAH, and Voltage (Les données de capacité sont affichées : “%” en mAH, et voltage) TÉMOIN Defined by Charge State (Défini par l’état de charge) Ligne 1 ----% RATED CAP. (----% CAPAC. NOM.) Ligne 2 ----mAH --.-V 19 Français Charger is in Discharge/Reconditioning Mode (Le chargeur est en mode Estimated Time to Rapid Charge Complete Displayed in Hours, Minutes for NiCd & NiMH IMPRES Batteries Only (Durée estimée du chargement rapide en heures & minutes Français uniquement pour les batteries NiCd & NiMH IMPRES) TÉMOIN Defined by Charge State (Défini par l’état de charge) Ligne 1 RAPID CHG ENDS (FIN CHG RAPIDE) Ligne 2 IN xx HRS, yy MIN (EN xx H, yy MN) REMARQUE : (1) La durée estimée du chargement complet inclut les cycles de charge rapide et de décharge (le cas échéant). (2) Les informations relatives à la capacité de la batterie peuvent ne pas être affichées lorsque la batterie n’a pas été calibrée. (3) L’utilisation de batteries IMPRES avec des chargeurs nonIMPRES peut affecter la capacité et la précision de la durée de chargement. 20 Diagrams de Séquences pour les Batteries IMPRES Remarque : Ces diagrammes correspondent aux séquences affichées dans la précédente section “Informations générales affichées” et sont uniquement en anglais. Séquence d’affichage pour les batteries IMPRES NiCd & NiMH Démarrage (4,0 sec) TÉMOIN Defined by Charge State Ligne 1 KIT# xxxxxxxx Ligne 2 SN: yyyyyyyyyyyy Toutes les 73,0 sec Français TÉMOIN Defined by Charge State Ligne 1 (2,0 sec) Ligne 2 KIT# xxxxxxxx yyyyy CHEMISTRY TÉMOIN Defined by Charge State Ligne 1 (2,0 sec) Ligne 2 xxxx CYCLES TO RECONDITION TÉMOIN Steady RED Ligne 1 Toutes les 13,0 sec RAPID CHARGE (2,0 sec) Ligne 2 TÉMOIN Defined by Charge State Ligne 1 xx% RATED CAP. (7,0 sec) Ligne 2 yyyyy mAH zz.z V TÉMOIN Defined by Charge State Ligne 1 RAPID CHG ENDS (4,0 sec) Ligne 2 IN xx HRS, yy MIN 21 5X 65,0 sec Avant calibration : Démarrage (4,0 sec) TÉMOIN Defined by Charge State Ligne 1 KIT# xxxxxxxx Ligne 2 SN: yyyyyyyyyyyy Toutes les 71,0 sec TÉMOIN Defined by Charge State KIT# xxxxxxxx Ligne 2 yyyyy CHEMISTRY Français (2,0 sec) Ligne 1 TÉMOIN Steady ORANGE Ligne 1 (2,0 sec) Toutes les 13,0 sec DISCHARGE Ligne 2 5X TÉMOIN Defined by Charge State (7,0 sec) Ligne 1 CALIBRATING Ligne 2 BATTERY TÉMOIN Defined by Charge State (4,0 sec) Ligne 1 RAPID CHG ENDS Ligne 2 IN xx HRS, yy MIN 22 65,0 sec Après calibration : Démarrage (4,0 sec) TÉMOIN Defined by Charge State Ligne 1 KIT# xxxxxxxx Ligne 2 SN: yyyyyyyyyyyy Toutes les 61,0sec TÉMOIN Defined by Charge State (2,0 sec) Ligne 1 KIT# xxxxxxxx Ligne 2 yyyyy CHEMISTRY Français TÉMOIN Steady GREEN Ligne 1 (2,0 sec) CHARGE COMPLETE Toutes les 11 sec Ligne 2 5X TÉMOIN Defined by Charge State (2,0 sec) Ligne 1 BATTERY Ligne 2 CALIBRATED TÉMOIN Defined by Charge State (7,0 sec) Ligne 1 xx% RATED CAP. Ligne 2 yyyy mAH zz.z V 23 55,0 sec Séquence d’affichage pour les batteries IMPRES Li-Ion Démarrage (4,0 sec) TÉMOIN Defined by Charge State Ligne 1 KIT# xxxxxxxx Ligne 2 SN: yyyyyyyyyyyy Toutes les 53,0 sec TÉMOIN Defined by Charge State Français (2,0 sec) Ligne 1 KIT# xxxxxxxx Ligne 2 yyyyy CHEMISTRY TÉMOIN Defined by Charge State (2,0 sec) Ligne 1 xxxx CYCLES Ligne 2 TO RECONDITION TÉMOIN Steady RED Ligne 1 (2,0 sec) Toutes les 9,0 sec RAPID CHARGE Ligne 2 5X TÉMOIN Defined by Charge State (7,0 sec) Ligne 1 xx% RATED CAP. Ligne 2 yyyyy mAH zz.z V 24 45,0 sec Avant calibration : Démarrage (4,0 sec) TÉMOIN Defined by Charge State Ligne 1 KIT# xxxxxxxx Ligne 2 SN: yyyyyyyyyyyy Toutes les 51,0 sec TÉMOIN Defined by Charge State (2,0 sec) Ligne 1 KIT# xxxxxxxx Ligne 2 yyyyy CHEMISTRY Français TÉMOIN Steady ORANGE Ligne 1 (2,0 sec) Toutes les 9,0 sec DISCHARGE Ligne 2 5X TÉMOIN Defined by Charge State (7,0 sec) Ligne 1 CALIBRATING Ligne 2 BATTERY 25 45,0 sec Après calibration : Démarrage (4,0 sec) TÉMOIN Defined by Charge State Ligne 1 KIT# xxxxxxxx Ligne 2 SN: yyyyyyyyyyyy Toutes les 61,0sec TÉMOIN Defined by Charge State KIT# xxxxxxxx Ligne 2 yyyyy CHEMISTRY Français (2,0 sec) Ligne 1 TÉMOIN Steady GREEN Ligne 1 (2,0 sec) CHARGE COMPLETE Toutes les 11 sec Ligne 2 TÉMOIN Defined by Charge State (2,0 sec) Ligne 1 BATTERY Ligne 2 CALIBRATED 5X TÉMOIN Defined by Charge State (7,0 sec) Ligne 1 xx% RATED CAP. Ligne 2 yyyy mAH zz.z V 26 55,0 sec Orientation du texte affiché Pour une installation de bureau ou murale du chargeur multiple adaptatif IMPRES, l’afficheur CDM est équipé d’une fonction d’inversion du texte à 180 degrés. Pour l’activer, insérez l’extrémité d’un trombone à papier dans le petit orifice sous l’affichage et perpendiculairement à la surface du bureau. Un son “clic ” confirme le changement (activé / désactivé) et que l’affichage a été inversé à 180 degrés. Maintenance Pour toute opération de maintenance, contactez le centre indiqué cidessous. Veuillez téléphoner et confirmer les informations de référence avant d’envoyer un équipement au service de maintenance. Centre de maintenance Motorola Motorola GmbH Customer Care Am Borsigturm 130 13507 Berlin Germany. Tel: +49 30 6686 1555 27 Français Fonctionnement du chargeur multiple adaptatif IMPRES Pour tout complément d’informations sur l’aptitude au service du chargeur MUC et de l’afficheur CDM, consultez le Guide de maintenance du chargeur (référence : 6880309L66). Français Notes 28 ÍNDICE GENERAL Instrucciones de seguridad importantes . . . . . . . . . . . . . . . . . . . . . . . 2 Directrices de seguridad . . . . . . . . . . . . . . . . . . . . . . . . . . . . . . . . . . . 3 Descripción de funciones/ventajas de IMPRES. . . . . . . . . . . . . . . . . . 4 Características/Diferencias de funcionamiento . . . . . . . . . . . . . . . . . . 5 Lista de baterías . . . . . . . . . . . . . . . . . . . . . . . . . . . . . . . . . . . . . . . . . 7 Voltajes y adaptadores de alimentación autorizados por Motorola . . 10 Solución de problemas . . . . . . . . . . . . . . . . . . . . . . . . . . . . . . . . . . . 16 Servicio Técnico . . . . . . . . . . . . . . . . . . . . . . . . . . . . . . . . . . . . . . . . 17 Cargadores con módulo de pantalla (CDM) . . . . . . . . . . . . . . . . . . . 18 Este manual de accesorios puede aplicarse a estos cargadores múltiples universales IMPRES: WPLN4108, WPLN4109, WPLN4110, WPLN4118, WPLN4119, WPLN4120, WPLN4121, WPLN4123, WPLN4130, WPLN4131, WPLN4132, WPLN4133, WPLN4134, WPLN4135, WPLN4136 Asimismo, el manual incluye los siguientes cargadores múltiples universales IMPRES disponibles para los radioteléfonos de la serie GP Professional: WPLN4144, WPLN4145, WPLN4146, WPLN4187, WPLN4188, WPLN4189, WPLN4190, WPLN4191, WPLN4192, WPLN4193, WPLN4194, WPLN4195, WPLN4196, WPLN4204, WPLN4205 ‘Universal’ indica que el cargador admite una gran variedad de modelos de radioteléfonos, además de todas las baterías que figuran en las tablas 1–6, mediante adaptadores de baterías. 1 Español Instrucciones de funcionamiento . . . . . . . . . . . . . . . . . . . . . . . . . . . . 11 Carga de las baterías . . . . . . . . . . . . . . . . . . . . . . . . . . . . . . . . . . 13 Reacondicionamiento manual de las baterías . . . . . . . . . . . . . . . 14 Reacondicionamiento automático de las baterías . . . . . . . . . . . . 14 Finalización manual del proceso de reacondicionamiento . . . . . . 15 INSTRUCCIONES DE SEGURIDAD IMPORTANTES GUARDE ESTAS INSTRUCCIONES Este documento contiene instrucciones de seguridad y funcionamiento importantes. Lea estas instrucciones detenidamente y guárdelas para futura referencia. Antes de utilizar el cargador de baterías, lea la totalidad de las instrucciones y las señales de precaución que aparecen en (1) el cargador, (2) la batería y (3) la radio que utiliza la batería. ! Español ADVERTENCIA 1. TPara reducir el riesgo de lesiones, cargue únicamente las baterías recargables autorizadas por Motorola que se enumeran en las tablas 1 a 5. Otras baterías distintas a las especificadas podrían explotar, causando lesiones y daños materiales. 2. El uso de accesorios no recomendados por Motorola puede provocar riesgo de incendio, descarga eléctrica o lesiones. 3. Al desconectar el cargador, tire del enchufe y nunca del cable a fin de reducir el riesgo de daños en el enchufe y el cable de alimentación. 4. No utilice un cable alargador a menos que sea absolutamente necesario. El uso de un cable alargador inadecuado podría ocasionar un incendio o descargas eléctricas. En caso de utilizar un cable alargador, asegúrese de que el grosor del cable es de 18AWG para longitudes superiores a 30,49 m (100 pies), y de 16AWG para longitudes superiores a 45,72 m (150 pies). 5. Para reducir el riesgo de incendio, descarga eléctrica o lesiones, no manipule el cargador si está roto o dañado. Llévelo a un representante cualificado del servicio técnico de Motorola. 6. Esta unidad puede repararse. Cada receptáculo está equipado con una exclusiva placa de circuito impreso y una fuente de alimentación. Ambas pueden adquirirse en la organización de repuestos y piezas. El número de referencia de la pieza de repuesto de la placa de circuito impreso es RLN5325. No hay disponibles otras piezas de repuesto con carácter de componentes. Puede solicitarse un manual de servicio con la descripción del proceso de sustitución de piezas a la organización de repuestos y piezas. El número del Manual de servicio es 6880309L66. 7. Para reducir el riesgo de descarga eléctrica, desenchufe el cargador de la toma de alimentación de CA antes de proceder a su mantenimiento o limpieza. 2 DIRECTRICES DE SEGURIDAD • Cuando cargue la batería, apague la radio. • Este equipo no está diseñado para su uso al aire libre. Utilícelo sólo en lugares secos. • Conecte el equipo sólo a una fuente de alimentación del voltaje adecuado protegida por fusible y cableada correctamente (como se especifica en el producto). • Desconecte el cargador de la red desenchufándolo de la toma de alimentación. • La toma de alimentación a la que se conecte este equipo debe estar cerca y ser fácilmente accesible. • En el caso de equipos que utilicen fusibles, los repuestos deben ser del tipo y régimen nominal especificados en las instrucciones del equipo. • La temperatura ambiente a la que se encuentre el cargador no debe ser superior a 40°C (104°F). 3 Español • Asegúrese de que el cable no se encuentre en un lugar en el que se pueda pisar, ni esté sometido a humedad, daños o tensión. • Esta unidad utiliza la misma unidad de montaje mural que el cargador múltiple NTN4796. El número de referencia de dicha unidad de montaje mural es NLN7967. • En caso de sustitución del fusible, utilice únicamente fusibles del mismo tipo y régimen nominal enumerados en la etiqueta del cargador. Pueden encargarse las siguientes piezas a la organización de repuestos y piezas: Fusible 6571489S01 Soporte 0987626G01 Cubierta 0987739G01 DESCRIPCIÓN DE FUNCIONES/VENTAJAS DE IMPRES La solución de energía IMPRES es un sistema de energía avanzado Tri Chemistry desarrollado por Motorola que incluye (a) baterías IMPRES, (b) el cargador adaptable múltiple IMPRES y (c) el hardware/software de radio que permite que las radios compatibles con IMPRES establezcan comunicación con las baterías IMPRES (esto no se aplicará a los radioteléfonos de la serie GP Professional). Al utilizar el cargador adaptable múltiple IMPRES junto con las baterías IMPRES de Motorola: • Aumentará el tiempo de funcionamiento entre ciclos de carga al eliminar automáticamente el efecto memoria. Español • Aumentará la vida de la batería al reducir de forma significativa el calor durante los ciclos de carga lenta y posterior a la carga. • Eliminará la necesidad de adquirir equipos de reacondicionamiento y de formar al personal para “llevar a cabo las tareas de mantenimiento de las baterías.” Gracias a este exclusivo sistema patentado, no hay necesidad de controlar y registrar el uso de la batería, realizar ciclos de reacondicionamiento manual ni retirar las baterías de los cargadores después de la carga. El cargador adaptable múltiple IMPRES controla el patrón de uso de la batería IMPRES, almacena esa información en la batería IMPRES y lleva a cabo un ciclo de reacondicionamiento sólo cuando resulta necesario. El cargador adaptable múltiple IMPRES no producirá un calentamiento excesivo de la batería independientemente del tiempo que permanezca en el receptáculo. El cargador realiza un control de la batería y cambia automáticamente a la función de carga lenta de la batería, según sea necesario. El cargador adaptable múltiple IMPRES simplifica el proceso de carga y mantenimiento de la batería: Todo lo que el usuario necesita es llevar a cabo lo siguiente: 1. Colocar la radio/batería en el cargador. 2. Retirar la radio/batería cuando se haya cargado por completo. Motorola es el único fabricante que ofrece un cargador de acondicionamiento o reacondicionamiento que permite a los usuarios la posibilidad de cargar la radio con la batería conectada, o bien cargar la batería de forma independiente. 4 CARACTERÍSTICAS/DIFERENCIAS DE FUNCIONAMIENTO: 5 Español 1. Las baterías IMPRES se pueden cargar en cargadores convencionales. Sin embargo, para activar las funciones Smart Energy, es necesario cargar cada batería IMPRES en un cargador adaptable múltiple IMPRES. La primera vez que se carga una batería IMPRES en un cargador adaptable múltiple IMPRES, el indicador del cargador aparece inicialmente en color AMARILLO FIJO. Es preciso permitir una primera carga completa para que aparezca el indicador del cargador en VERDE FIJO. Esta operación calibra de forma adecuada la batería IMPRES y activa las funciones Smart Energy. Si se interrumpe este proceso, el cargador calibrará la batería hasta la siguiente inserción. 2. Puesto que el cargador adaptable múltiple IMPRES determina de forma automática las condiciones necesarias para reacondicionar la batería IMPRES, el cargador puede pasar a modo de reacondicionamiento cuando se inserta una radio o una batería. Ello se indica mediante el indicador del cargador en AMARILLO FIJO. El modo de reacondicionamiento puede anularse, si es necesario, mediante la extracción y reinserción de la radio o la batería. (Consulte las instrucciones que aparecen más adelante en esta guía). 3. El cargador adaptable múltiple IMPRES está diseñado para cargar cualquier batería enumerada en las tablas 1 a 6. Sin embargo, sólo las auténticas baterías IMPRES proporcionarán funciones Smart Energy. (A medida que aparezcan nuevos modelos de radios o baterías, se actualizará y distribuirá esta lista a los clientes a través de las diferentes organizaciones de OEM globales y de repuestos) 4. El cargador adaptable múltiple IMPRES debe utilizarse para calibrar las baterías IMPRES Smart a fin de garantizar que el registro, almacenamiento y visualización de los datos de uso de las baterías IMPRES es preciso. Español 5. Si utiliza una batería IMPRES con un radioteléfono con pantalla (como XTS5000), éste mostrará un icono que indica el estado de carga de la batería. Este icono se activará después de que el cargador IMPRES haya calibrado la batería IMPRES. El icono del estado de carga permanecerá en la pantalla mientras el usuario continúe utilizando cargadores IMPRES para cargar las baterías. No obstante, si se carga una batería IMPRES en un cargador distinto de IMPRES durante un periodo de siete días o más, el icono desaparecerá. Para volver a activar el icono, deberá introducir una batería IMPRES en un cargador IMPRES y dejar que se complete el proceso de carga (hasta que aparezca una luz VERDE FIJA en el indicador). Así, el icono del estado de carga aparecerá de nuevo en el radioteléfono. En caso de que el icono no aparezca tras haber completado la carga, coloque una batería parcialmente descargada (70 % de descarga) en el cargador, inicie el reacondicionamiento y deje que se complete el proceso de carga. A continuación, el icono aparecerá en la pantalla del radioteléfono (esto no se aplica a los radioteléfonos de la serie GP Professional). 6. Sólo un técnico de servicio autorizado por Motorota CGISS podrá reparar el cargador múltiple adaptable IMPRES. Cualquier violación de estas instrucciones anulará la garantía. 6 LISTA DE BATERÍAS Las tablas siguientes incluyen una lista de las baterías que pueden utilizarse con los terminales radiotelefónicos específicos que figuran en los encabezados de las tablas. Tabla 1. XTS3000 / XTS3500 / Radios serie Dimetra y radios digitales XTS5000 Composición química NiCD NiCD NiCD NiCD NiCD NiCD LiIon NiMH NiMH NiMH NiMH NiMH NIMH LiIon FM Smart No Sí No Sí Sí Sí No No No Sí Sí No Sí No Sí Sí No No No No No No Sí Sí Sí No No Sí Capacidad Ultra-alta Ultra-alta Ultra-alta Ultra-alta Ultra-alta Ultra-alta Alta Ultra-alta Ultra-alta Ultra-alta Ultra-alta Muy alta Muy alta Ultra-alta Modelo nuevo No No No No No No No No No No No Nuevo Nuevo Nuevo Tabla 2. Radios digitales TS2500 Kit (Nº de referencia) NTN9859 NTN9857 NTN9815 NTN9816 Composición química NiMH NiMH NiCD NiCD FM Smart No Sí No Sí No No No No Capacidad Ultra-alta Ultra-alta Alta Alta Modelo nuevo Nuevo Nuevo Nuevo Nuevo Tabla 3. Radios digitales MTP700 Kit (Nº de referencia) PMNN4048* PMNN4049* PMNN4050* PMNN4047* * Composición química NiMH NiMH Lilon LiIon FM Smart No Sí No No Sí Sí Sí Sí Capacidad Alta Alta Alta Alta Modelo nuevo Nuevo Nuevo Nuevo Nuevo El cargador requiere el adaptador de batería con el nº de referencia RLN5212 para cargar baterías MTP700. 7 Español Kit (Nº de referencia) HNN9031 HNN9032 NTN8294 NTN8295 NTN8297 NTN8299 NTN8610 NTN8293 NNTN4435 NNTN4436 NNTN4437 RNN4006 RNN4007 NTN9862 Español Tabla 4. Radios serie HT1000 / MT2000 / MTS2000 / MTX8000 y MTX9000 Kit (Nº de referencia) HNN9028 HNN9029 NTN7143 NTN7144 NTN7146 NTN7147 NTN7148 NTN7149 NTN7150 NTN7341 NTN7372 WPPN4013 WPPN4037 RNN4008 Composición FM química NiCD No NiCD Sí NiCD No NiCD No NiCD Sí NiCD Sí NiCD CENELEC NiCD CSA NiCD MSHA NiCD Sí NiCD Sí NiMH No NiMH Sí NiCD ATEX Smart Sí Sí No No No No No No No No No No No No Capacidad Ultra-alta Ultra-alta Alta Ultra-alta Alta Ultra-alta Alta Alta Alta Ultra-alta Alta Ultra-alta Ultra-alta Alta Modelo nuevo No No No No No No No No No No No No No No Tabla 5. Radios Saber / Astro Saber / SSE5000 / MX1000 Kit (Nº de referencia) HNN9033 HNN9031 NTN4537** NTN4538 NTN4592** NTN4593 NTN4595 NTN4596 NTN4657 NTN4671 NTN4992 NTN7014** NTN7058 NTN7426 NTN8251 NTN8818** ** Composición FM química NiCD No NiCD Sí NiCD Sí NiCD Sí NiCD No NiCD No NiCD No NiCD Sí NiCD No NiCD CENELEC NiCD Sí NiMH No NiCD Sí NiCD Sí NiMH Sí LiIon No Smart Sí Sí No No No No No No No No No No No No No No Capacidad Ultra-alta Ultra-alta Baja Alta Baja Alta Ultra-alta Ultra-alta Alta Alta Ultra-alta Alta Ultra-alta Baja Ultra-alta Alta Modelo nuevo No No No No No No No No No No No No No No No No El cargador requiere el adaptador de batería con el nº de referencia 4385922B01 para cargar baterías Astro Saber. 8 Tabla 6. Radioteléfonos de la serie GP Professional Kit (Nº de referencia) HNN9003 FM No Smart No No No Sí Sí No No No No No Sí No No No No No No No No No Sí Sí Sí Capacidad Alta Modelo nuevo No Alta Ultra-alta Ultra-alta Alta Alta Alta Alta Alta Ultra-alta Ultra-alta Ultra-alta No No No No No No No No Sí Sí Sí Los cargadores universales necesitan adaptadores para baterías con el número de referencia RLN5648. NOTA: El adaptador puede adquirirse a través del representante de ventas de radio o de repuestos. 9 Español HNN9008 HNN9009 HNN9010 HNN9011 HNN9012 HNN9013 WPNN4045 PMNN4045 HNN4001 HNN4002 HNN4003 Composición química NiMH AA Bluetooth NiMH NiMH NiMH NiCD NiCD LiIon NiMH NiMH Impres NiMH Impres NiMH Impres LiIon VOLTAJES Y ADAPTADORES DE ALIMENTACIÓN AUTORIZADOS POR MOTOROLA Este cargador está diseñado para su utilización en instalaciones de entre 100 y 240 V de corriente alterna y 50 / 60 Hz; además, utiliza los cables de alimentación Motorola que figuran en la tabla 7. Los cables de alimentación que se utilizan con el cargador para radioteléfonos de la serie GP Professional están incluidos en la tabla 8: Tabla 7. Cables de alimentación para modelos universales de Motorola Español Tipo de enchufe Nº del cable/enchufe de alimentación EE.UU/América del Norte Europa Reino Unido Australia/Nueva Zelanda Argentina EE.UU/América del Norte Corea Kit cargador WPLN4121 Kit cargador (Modelo con pantalla) WPLN4127 Cable de alimentación Ninguno WPLN4108 WPLN4109 WPLN4110 WPLN4118 WPLN4119 WPLN4120 WPLN4123 WPLN4130 WPLN4131 WPLN4132 WPLN4133 WPLN4134 WPLN4135 WPLN4136 3087791G01 3087791G04 3087791G07 3087791G10 3087791G13 3087791G01 3087791G16 Tabla 8. Cables de alimentación para modelos de la serie GP Professional de Motorola Tipo de enchufe Nº del cable/enchufe de alimentación EE.UU/América del Norte Europa Reino Unido Australia/Nueva Zelanda Argentina EE.UU/América del Norte Corea Kit cargador WPLN4197 Kit cargador (Modelo con pantalla) WPLN4198 Ninguno WPLN4187 WPLN4189 WPLN4188 WPLN4190 WPLN4191 WPLN4205 WPLN4146 WPLN4192 WPLN4194 WPLN4193 WPLN4195 WPLN4196 WPLN4204 WPLN4145 3087791G01 3087791G04 3087791G07 3087791G10 3087791G13 3087791G01 3087791G16 10 Cable de alimentación INSTRUCCIONES DE FUNCIONAMIENTO NOTAS El cargador adaptable múltiple IMPRES carga únicamente las baterías autorizadas por Motorola enumeradas en las tablas 1 a 6. Es posible que otras baterías distintas a las especificadas no se carguen. El cargador adaptable múltiple IMPRES cuenta con funciones y capacidades automáticas que difieren de las de otros cargadores de baterías. Observe detenidamente el indicador de carga para asegurarse de que el cargador se encuentra en el modo de funcionamiento deseado/previsto. b. Presionando la batería hacia la parte trasera del receptáculo. c. Deslizando la batería en el receptáculo, asegurándose de que haya un contacto total entre el cargador y los contactos de la batería. Una vez que la batería se encuentra bien encajada en el receptáculo, el indicador del cargador se ilumina indicando que el cargador ha detectado la presencia de la batería. Consulte los indicadores de carga en la tabla 9. 11 Español El receptáculo del cargador permite colocar una radio con una batería conectada, o bien una batería de forma independiente. Antes de cargar una radio con una batería, apague la radio. La carga de las baterías se realiza de forma óptima si éstas se encuentran a temperatura ambiente. 1. Conecte el extremo del cable de alimentación del cargador en el receptáculo de CA situado en la parte posterior del cargador. 2. Enchufe el otro extremo del cable de alimentación en la toma de CA adecuada. Si el indicador del cargador está en VERDE INTERMITENTE, indicará una secuencia de encendido satisfactoria. 3. Inserte una batería o una radio con batería (radio apagada) en el receptáculo del cargador: a. Alineando la ranura de cada lateral de la batería con el raíl correspondiente situado a cada lado del receptáculo del cargador. Tabla 9. Indicadores de carga Español Indicador de carga Descripción Un destello verde El cargador se ha encendido correctamente. Rojo fijo La batería está en modo de carga rápida. Verde intermitente La batería ha terminado el ciclo de carga rápida (>90% de capacidad disponible). La batería está en modo de carga lenta. Verde fijo La batería ha terminado el proceso de carga y está completamente cargada. Amarillo intermitente El cargador ha detectado la batería pero está esperando la carga. (El voltaje de la batería es demasiado bajo, o bien la temperatura es excesivamente alta o baja como para permitir la carga. Una vez solucionada esta situación, la batería comenzará la carga.) Rojo intermitente La batería no se puede cargar o bien no hace contacto. Amarillo fijo (Función sólo para baterías Smart) La batería está en modo de reacondicionamiento. El tiempo que el cargador permanezca en este modo dependerá del estado de la carga restante en la batería en el momento de insertarla en el cargador. (Las baterías totalmente cargadas precisan más tiempo para su reacondicionamiento (8 horas o más) que las baterías descargadas por completo.) Rojo/verde intermitente (Función sólo para baterías Smart) La batería ha completado su carga y está completamente cargada. Se puede continuar utilizando la batería pero es posible que esté llegando al fin de su vida útil. NOTA El cargador adaptable múltiple IMPRES es único por el hecho de que, cuando se usa con baterías IMPRES de Motorola, indica automáticamente la necesidad de reacondicionamiento de la batería. A fin de que todas las funciones de las baterías Smart y del sistema de carga adaptable de Motorola estén disponibles, el cargador debe inicializar los datos de las baterías Smart de Motorola la primera vez que se cargue. Este proceso se indica mediante el indicador AMARILLO FIJO del cargador (al igual que ocurre cuando se reacondiciona la batería). El proceso es automático, incluye un reacondicionamiento inicial de la batería y comienza la carga una vez finalizado este proceso. La inicialización de la batería es un proceso que requiere tiempo, de modo que se debe dejar en el cargador toda la noche la primera vez. 12 El cargador adaptable múltiple IMPRES funciona como: • un cargador válido para todas las baterías autorizadas por Motorola, y • un reacondicionador válido para todas las baterías IMPRES autorizadas por Motorola. Carga de las baterías IMPORTANTE: El receptáculo del cargador está diseñado para aceptar baterías de distintas formas y tamaños, por lo que resulta importante asegurarse de que se insertan correctamente una radio con una batería o bien una batería sola. Si se insertan de modo incorrecto, el indicador no se iluminará, lo que indicará que la batería no se está cargando. Para garantizar el máximo rendimiento, Motorola recomienda dejar todas las baterías nuevas en el cargador durante un período de 14 a 16 horas antes de su primer uso. 1. Una vez que se ha insertado una batería o una radio con batería en el cargador, éste comienza la carga rápida de la batería y ello se indica mediante el indicador en color ROJO FIJO del cargador. El tiempo que el cargador permanece con el indicador en ROJO FIJO depende de la carga que quede en la batería. 2. La finalización de la carga rápida (>90% de capacidad disponible) se indica mediante una luz VERDE INTERMITENTE en el indicador del cargador. Esto significa una carga lenta y tiene una duración de 1 hora aproximadamente. 3. La finalización de la carga lenta se indica mediante una luz VERDE FIJA en el indicador del cargador. Esto significa que la batería se encuentra completamente cargada. 4. Otras indicaciones que pueden aparecer en el indicador del cargador durante la carga son: • AMARILLO INTERMITENTE: indica que tanto la temperatura como el voltaje de la batería están fuera de las especificaciones de carga. La carga se reanuda cuando se han solucionado estas condiciones. • ROJO Y VERDE INTERMITENTE: indica que la batería puede estar próxima al fin de su vida útil. Aunque la batería esté totalmente cargada, su capacidad de carga se ha reducido por el uso y es posible que no admita aplicaciones que precisen de gran potencia. Esta función sólo se encuentra disponible cuando se utiliza con baterías IMPRES de Motorola. Ésta no es 13 Español NOTA: Las baterías nuevas (que nunca se han utilizado con anterioridad) pueden indicar, en algunos casos, una carga completa antes de tiempo (indicador VERDE FIJO ). • una indicación de avería, simplemente una notificación al usuario de que la batería puede dejar de prestar el servicio esperado en un período breve de tiempo y es posible que sea necesaria su sustitución. ROJO INTERMITENTE: indica que la batería no se puede volver a cargar. Ello puede ser el producto de una pérdida de contacto entre la batería y los contactos del cargador. La carga se reanuda cuando se soluciona la condición que provoca esta situación. El cargador adaptable múltiple IMPRES de Motorola lee el dispositivo de memoria interna que tienen las baterías Smart de Motorola. Si se carga una batería IMPRES durante más de 2 y 1/2 minutos, el cargador adaptable múltiple IMPRES conserva el número de serie de la batería IMPRES. La batería IMPRES puede extraerse del cargador durante un período máximo de 30 minutos. Una vez que se vuelve a insertar la batería en el cargador, éste reanudará el proceso de carga desde el punto en que se retiró la batería por primera vez. Español Reacondicionamiento manual de las baterías Durante los 2 y 1/2 minutos de la inserción inicial de una batería IMPRES (la luz ROJA FIJA), retire y vuelva a insertar la batería en los 5 segundos siguientes para provocar el reacondicionamiento de la batería. El indicador del cargador pasa de ROJO FIJO a AMARILLO FIJO. Esta operación provoca que el cargador inicie el reacondicionamiento y a continuación la recarga automática de la batería. NOTA: Cualquier exceso en el uso de esta función puede reducir la vida global de la batería. Reacondicionamiento automático de las baterías El cargador adaptable múltiple IMPRES de Motorola, cuando se utiliza junto con una batería IMPRES de Motorola, permite determinar el momento adecuado para el reacondicionamiento de la batería. 14 Cuando se ha insertado correctamente una batería IMPRES en el cargador, éste determina si es necesario realizar el reacondicionamiento de la batería. Si la batería necesita ser reacondicionada, el indicador del cargador automáticamente se ilumina en AMARILLO FIJO. Este proceso puede tener una duración de 8 horas o superior dependiendo del estado de la carga y la capacidad de la batería en el momento de su inserción. Para que este proceso resulte efectivo, es importante tener en cuenta que se debe permitir que la batería termine el proceso de reacondicionamiento/ recarga. Deje la batería en el cargador hasta que el indicador se ilumine en VERDE FIJO. Al terminar el ciclo de reacondicionamiento, el cargador recarga automáticamente la batería. Finalización manual del proceso de reacondicionamiento 15 Español El reacondicionamiento de una batería IMPRES de Motorola (indicador en AMARILLO FIJO) puede detenerse en cualquier momento extrayendo y reinsertando la batería en un intervalo de 5 segundos. Esto hace que el cargador termine el proceso de reacondicionamiento y comience el proceso de carga. El indicador del cargador pasará a ROJO FIJO. RESOLUCIÓN DE PROBLEMAS El cargador adaptable IMPRES incluye las funciones de: • una fuente de alimentación con entrada universal (100 V CA - 240 V CA, 50/60 Hz) • un cargador rápido de CC, • un cargador de acondicionamiento de corriente alterna (impulso negativo) • una unidad de reacondicionamiento. La combinación de las características enumeradas es única en un cargador de sobremesa. Por lo tanto, se desaconseja el funcionamiento de la radio con una batería conectada mientras se encuentre en el cargador. Español Si es así, el rendimiento de la radio puede verse reducido a la vez que aumenta el tiempo de carga de la batería. Al aproximarse al final del ciclo de carga rápida (indicador en ROJO FIJO), el voltaje de la batería supera el voltaje de funcionamiento normal de la radio. El voltaje vuelve a un nivel normal siguiendo el modo de carga rápida o cuando se extrae la batería del cargador. Si se enciende la radio mientras el cargador está en modo de carga rápida, la radio no estará operativa de forma temporal. Esta situación puede desaparecer retirando la radio del cargador y apagándola y encendiéndola de nuevo. Durante el proceso de reacondicionamiento, la batería se descargará por completo. Como resultado, es posible que la radio no funcione durante el modo de reacondicionamiento. Durante la resolución de problemas, observe siempre el indicador del cargador. Consulte la tabla 9. 16 Tabla 10. Resolución de problemas Problema Sin indicación en el cargador Significado... Acción... • No hay contacto en el cargador. • Cargador sin alimentación. • Compruebe que la radio con la batería, o la propia batería, están insertadas correctamente. • Asegúrese de que el cable de alimentación está bien conectado al cargador y a la toma de CA adecuada, así como de que la toma tenga energía. • Cambie el fusible. • No hay contacto en el cargador. Indicador en Amarillo intermitente • La batería está esperando • Una vez solucionada esta para cargar. La temperatura situación, la batería comenzará la de la batería puede estar carga. por debajo de 5°C (41°F) o por encima de 40°C (104°F), o bien el voltaje de la batería puede ser inferior al nivel de umbral especificado para la carga rápida. • Retire la batería del cargador y vuélvala a insertar en el cargador. • Compruebe que la batería es una batería autorizada de Motorola enumerada en las tablas 1 a 6. Es posible que otras baterías distintas a las especificadas no se carguen. • Desconecte la alimentación del cargador de baterías y, con ayuda de un paño limpio y seco, limpie los contactos dorados metálicos de carga de la batería y el cargador. • La batería no es recargable. • Sustituya la batería. SERVICIO TÉCNICO Sólo un técnico de servicio cualificado autorizado por Motorola, podrá reparar el cargador múltiple adaptable IMPRES. Cualquier violación de estas instrucciones anulará la garantía. 17 Español Indicador en Rojo intermitente CARGADORES CON MÓDULO DE PANTALLA (CDM) El cargador múltiple adaptable IMPRES puede reforzarse añadiendo un módulo de pantalla para cargadores (CDM) de Motorola con el número de referencia RLN5382. Información general de la pantalla El cargador múltiple adaptable IMPRES con CDM ofrece valiosa información al tiempo que facilita el cuidado y mantenimiento de las baterías. La información que muestra el cargador y los indicadores correspondientes (LED) se detallan en las tablas siguientes. Inicio Upon Charger Power-up (Encendido del cargador) LED SINGLE FLASH GREEN (VERDE INTERMITENTE SENCILLO) Línea 1 IMPRES Español Línea 2 If There is No Battery in the Pocket (Sin baterías en los receptáculos) LED OFF (APAGADO) Línea 1 NO BATTERY (SIN BATERÍA) Línea 2 Reading Battery Data (Lectura de datos de las baterías) LED Any Defined Indication (Cualquier luz definida) Línea 1 READING (LEYENDO) Línea 2 BATTERY DATA (DATOS DE LAS BATERÍAS) Non-IMPRES Battery in the Pocket (Sin baterías IMPRES en el receptáculo) LED Defined by Charge State (Definido por el estado de carga) Línea 1 NON-IMPRES (DISTINTA DE IMPRES) Línea 2 BATTERY (BATERÍA) IMPRES Battery in the Pocket (Baterías IMPRES en los receptáculos) IMPRES and Software Versions are Displayed (IMPRES y versiones de software son mostradas) LED Defined by Charge State (Definido por el estado de carga) Línea 1 IMPRES Línea 2 SW xx.yy; aa.bb NOTA: xx.yy hace referencia a la version del software y aa.bb, a la version del software del CDM. 18 IMPRES Battery Kit # and Chemistry are Displayed (N.º de kit de baterías IMPRES y composición química) LED Defined by Charge State (Definido por el estado de carga) Línea 1 KIT# -------- (KIT N.º -------) Línea 2 -----CHEMISTRY (COMPOSICIÓN QUÍMICA) Forecasted # of Cycles Prior to Automatic Recondition (Número de ciclos previsto antes del reacondicionamiento automático) LED Defined by Charge State (Definido por el estado de carga) Línea 1 ----CYCLES (CICLOS) Línea 2 TO RECONDITION (PARA REACONDICIONAR) * Displayed only when the number of cycles to recondition is less than 6. (Aparece sólo cuando el número de ciclos que quedan para proceder al reacondicionamiento es menor de seis.) Charger Waiting to Charge, Battery is Hot (Cargador en espera para comenzar la carga, la batería está caliente) Flashing ORANGE (NARANJA intermitente) Línea 1 WAITING TO CHG (EN ESPERA PARA COMENZAR LA CARGA) Línea 2 HOT BATTERY (BATERÍA CALIENTE) Charger Waiting to Charge, Battery is Cold (Cargador en espera para comenzar la carga, la batería está fría) LED Flashing ORANGE (NARANJA intermitente) Línea 1 WAITING TO CHG (EN ESPERA PARA COMENZAR LA CARGA) Línea 2 COLD BATTERY(BATERÍA FRÍA) Charger Waiting to Charge, Low Voltage (Cargador en espera para comenzar la carga, voltaje bajo) LED Flashing ORANGE (NARANJA intermitente) Línea 1 WAITING TO CHG (EN ESPERA PARA COMENZAR LA CARGA) Línea 2 LOW VOLTAGE (VOLTAJE BAJO) NOTA No se mostrarán todas las pantallas mencionadas anteriormente. Por ejemplo, las pantallas de En espera para comenzar la carga (batería caliente, fría, voltaje bajo) aparecerán exclusivamente si la situación lo merece. 19 Español LED Charger is in Trickle Charge Mode (Cargador en el modo de carga lenta) LED Flashing GREEN (VERDE intermitente) Línea 1 TRICKLE CHARGE (CARGA LENTA) Línea 2 Charge is Complete (Se ha completado la carga) LED Steady GREEN or Flashing RED / GREEN (VERDE fija o ROJA / VERDE intermitente) Línea 1 CHARGE COMPLETE (CARGA COMPLETADA) Línea 2 Charger is in Discharge/Reconditioning Mode (El cargador está en el modo de descarga / reacondicionamiento) LED Steady ORANGE (NARANJA fija) Línea 1 DISCHARGE (DESCARGA) Español Línea 2 Charger is Calibrating an IMPRES Battery (Calibración de baterías IMPRES) LED Steady ORANGE, Steady RED, & Flashing ORANGE or GREEN (NARANJA fija, ROJA fija y NARANJA o VERDE intermitentes) Línea 1 Calibrating (Calibrando) Línea 2 Battery (Batería) LED Steady GREEN (VERDE fija) Línea 1 Battery (Batería) Línea 2 Calibrated (Calibrada) * Todas las baterías IMPRES deben calibrarse antes de utilizarlas por primera vez. Los cargadores IMPRES comenzarán la calibración automáticamente con todas las baterías nuevas. Battery Capacity Data is Displayed as “%” in mAH, and Voltage (Datos de la capacidad de la batería en “%” en mAH y voltaje) LED Defined by Charge State (Definido por el estado de carga) Línea 1 ----% RATED CAP. (% de capacidad nominal) Línea 2 ----mAH --.-V 20 Estimated Time to Rapid Charge Complete Displayed in Hours, Minutes for NiCd & NiMH IMPRES Batteries Only (Tiempo de carga rápida estimado Aparecerán las horas y minutos totales para NiCd y NiMH IMPRES Sólo baterías) LED Defined by Charge State (Definido por el estado de carga) Línea 1 RAPID CHG ENDS (FIN DE CARGA RÁPIDA) Línea 2 IN xx HRS, yy MIN (EN xx h, yy min) NOTA: (1) El tiempo estimado para completer la carga incluye la carga rápida así como los ciclos de carga (si es aplicable). (2) La información sobre la capacidad de la batería no aparecerá en aquellas baterías que no se hayan calibrado. (3) El uso de baterías IMPRES con cargadores distintos de IMPRES pueden afectar a la capacidad y la precisión del tiempo de carga. Español 21 Esquemas de secuencia para las baterías IMPRESS Nota: Estas esquemas son las secuencias mostradas anteriormente en “InformaciÓn general de pantalla” y solo están dispenibles en inglés Secuencia de las baterías NiCd y NiMH IMPRES Inicio (4,0 seg) LED Defined by Charge State Cada 73,0 seg Línea 1 KIT# xxxxxxxx Línea 2 SN: yyyyyyyyyyyy LED Defined by Charge State Línea 1 KIT# xxxxxxxx Español (2.0 seg) Línea 2 yyyyy CHEMISTRY LED Defined by Charge State Línea 1 xxxx CYCLES (2.0 seg) Línea 2 TO RECONDITION LED Steady RED Cada 13,0 seg Línea 1 RAPID CHARGE (2.0 seg) Línea 2 LED Defined by Charge State Línea 1 xx% RATED CAP. (7.0 seg) Línea 2 yyyyy mAH zz.z V LED Defined by Charge State Línea 1 RAPID CHG ENDS (4.0 seg) Línea 2 IN xx HRS, yy MIN 22 5X 65,0 seg Antes de la calibración: Inicio LED Defined by Charge State Cada 71,0 seg Línea 1 KIT# xxxxxxxx (4,0 s) Línea 2 SN: yyyyyyyyyyyy LED Defined by Charge State Línea 1 KIT# xxxxxxxx (2,0 s) Línea 2 yyyyy CHEMISTRY Steady ORANGE Cada 13,0 s Línea 1 DISCHARGE (2,0 s) Línea 2 5X LED Defined by Charge State Línea 1 CALIBRATING (7,0 s) Línea 2 BATTERY LED Defined by Charge State Línea 1 RAPID CHG ENDS (4,0 s) Línea 2 IN xx HRS, yy MIN 23 65,0 s Español LED Después de la calibración: Start LED Defined by Charge State Cada 61,0s Línea 1 KIT# xxxxxxxx (4,0 s) Línea 2 SN: yyyyyyyyyyyy LED Defined by Charge State Línea 1 KIT# xxxxxxxx Español (2,0 s) Línea 2 yyyyy CHEMISTRY LED Steady GREEN Línea 1 CHARGE COMPLETE (2,0 s) Cada 11 s Línea 2 5X LED Defined by Charge State Línea 1 BATTERY (2,0 s) Línea 2 CALIBRATED LED Defined by Charge State Línea 1 xx% RATED CAP. (7,0 s) Línea 2 yyyy mAH zz.z V 24 55,0 s Secuencia de la pantalla con baterías Li-Ion IMPRES Inicio LED Defined by Charge State Cada 53,0 s Línea 1 KIT# xxxxxxxx (4,0 s) Línea 2 SN: yyyyyyyyyyyy LED Defined by Charge State Línea 1 KIT# xxxxxxxx (2,0 s) Línea 2 yyyyy CHEMISTRY LED Defined by Charge State Línea 1 xxxx CYCLES (2,0 s) Línea 2 TO RECONDITION Español LED Steady RED Cada 9,0 s Línea 1 RAPID CHARGE (2,0 s) Línea 2 5X LED Defined by Charge State Línea 1 xx% RATED CAP. (7,0 s) Línea 2 yyyyy mAH zz.z V 25 45,0 s Antes de la calibración: Inicio LED Defined by Charge State Cada 51,0 s Línea 1 KIT# xxxxxxxx (4,0 s) Línea 2 SN: yyyyyyyyyyyy LED Defined by Charge State Línea 1 KIT# xxxxxxxx Español (2,0 s) Línea 2 yyyyy CHEMISTRY LED Steady ORANGE Cada 9,0 s Línea 1 DISCHARGE (2,0 s) Línea 2 5X LED Defined by Charge State Línea 1 CALIBRATING (7,0 s) Línea 2 BATTERY 26 45,0 s Después de la calibración: Inicio LED Defined by Charge State Cada 61,0s Línea 1 KIT# xxxxxxxx (4,0 s) Línea 2 SN: yyyyyyyyyyyy LED Defined by Charge State Línea 1 KIT# xxxxxxxx (2,0 s) Línea 2 yyyyy CHEMISTRY Steady GREEN Cada 11 s Línea 1 CHARGE COMPLETE (2,0 s) Línea 2 5X LED Defined by Charge State Línea 1 BATTERY (2,0 s) Línea 2 CALIBRATED LED Defined by Charge State Línea 1 xx% RATED CAP. (7,0 s) Línea 2 yyyy mAH zz.z V 27 55,0 s Español LED Orientación del texto en la pantalla Para permitir el montaje mural o de sobremesa del cargador múltiple adaptable IMPRES, el CDM está equipado para «girar» 180 grados el texto de la pantalla. Si desea hacerlo, introduzca un clip grande en el agujero que se encuentra en la parte inferior de la pantalla, perpendicular a la sobremesa. El sonido de un «clic» indicará que se ha accionado el botón alterno y, por tanto, el texto se ha girado 180 grados. Funcionamiento del cargador múltiple adaptable IMPRES Si desea obtener más información sobre la utilización de MUC y CDM, consulte la Guía de mantenimiento del cargador 6880309L66. Español Mantenimiento Si desea información sobre el mantenimiento, póngase en contacto con el departamento siguiente. Póngase en contacto y confirme su regreso antes de enviar la unidad al departamento de mantenimiento. Centro de mantenimiento de Motorola Motorola GmbH Customer Care Am Borsigturm 130 13507 Berlin Germany. Tel: +49 30 6686 1555 28 ÍNDICE Instruções importantes de segurança . . . . . . . . . . . . . . . . . . . . . . . . . 2 Directrizes para uma utilização segura . . . . . . . . . . . . . . . . . . . . . . . . 3 Descrição dos recursos e vantagens do IMPRES . . . . . . . . . . . . . . . . 4 Características/diferenças do funcionamento . . . . . . . . . . . . . . . . . . . 5 Listas de Baterias . . . . . . . . . . . . . . . . . . . . . . . . . . . . . . . . . . . . . . . . 6 Fontes de energia e adaptadores de corrente autorizados da Motorola . . . . . . . . . . . . . . . . . . . . . . . . . . . . . . . . . . . . . . . . . . . . . . . . 9 Instruções de utilização . . . . . . . . . . . . . . . . . . . . . . . . . . . . . . . . . . . 10 Carregamento da bateria. . . . . . . . . . . . . . . . . . . . . . . . . . . . . . . . 12 Reparação manual da bateria . . . . . . . . . . . . . . . . . . . . . . . . . . . . 13 Reparação automática da bateria . . . . . . . . . . . . . . . . . . . . . . . . . 13 Interrupção manual do processo de reparação. . . . . . . . . . . . . . . 14 Detecção e resolução de problemas . . . . . . . . . . . . . . . . . . . . . . . . . 15 Carregadores com Módulo de Visor (CDM). . . . . . . . . . . . . . . . . . . . 17 Este manual é aplicável aos carregadores Multi-Unidades Universais IMPRES: WPLN4108, WPLN4109, WPLN4110, WPLN4118, WPLN4119, WPLN4120, WPLN4121, WPLN4123, WPLN4130, WPLN4131, WPLN4132, WPLN4133, WPLN4134, WPLN4135, WPLN4136 Adicionalmente, este manual inclui os seguintes carregadores Multi-Unidades Universais IMPRES, disponíveis para rádios GP Série Profissional: WPLN4144, WPLN4145, WPLN4146, WPLN4187, WPLN4188, WPLN4189, WPLN4190, WPLN4191, WPLN4192, WPLN4193, WPLN4194, WPLN4195, WPLN4196, WPLN4204, WPLN4205 “Universal” indica que o carregador suporta vários modelos de rádio e, através da utilização de adaptadores de bateria, todas as baterias listadas nasTabelas de 1 a 6 inclusive. 1 Português Manutenção . . . . . . . . . . . . . . . . . . . . . . . . . . . . . . . . . . . . . . . . . . . . 16 INSTRUÇÕES IMPORTANTES DE SEGURANÇA GUARDE ESTAS INSTRUÇÕES Este documento contém instruções importantes de segurança e de utilização. Leia atentamente estas instruções e guarde-as para futura referência. Antes de utilizar o carregador de baterias, leia todas as instruções e indicações de aviso existentes (1) no carregador, (2) na bateria (3) e no rádio no qual a bateria é utilizada. . ! AVISO 1. Para reduzir o risco de ferimentos, carregue apenas as baterias recarregáveis autorizadas pela Motorola indicadas nas Tabelas 1 a 5. Outras baterias poderão explodir e causar ferimentos pessoais ou danos. 2. O uso de acessórios não recomendados pela Motorola poderá resultar em risco de incêndio, choque eléctrico ou ferimentos. Português 3. Para reduzir o risco de danos na ficha e cabos eléctricos, puxe pela ficha e não pelo cabo para desligar o carregador. 4. Não deve utilizar uma extensão, a menos que seja absolutamente necessária. O uso de uma extensão inadequada poderá resultar em risco de incêndio e choque eléctrico. Se tiver que utilizar uma extensão, certifique-se de que se trata de um cabo 18AWG para comprimentos até 30,48 m e 16AWG para comprimentos até 45,72 m. 5. Para reduzir o risco de incêndio, choque eléctrico ou ferimentos, não utilize o carregador se estiver partido ou de alguma forma danificado. Leve-o a um agente técnico qualificado Motorola. 6. Este carregador pode ser reparado. Cada cavidade é alimentada por uma única placa de circuito impresso e fonte de alimentação. A PCB/fonte de alimentação pode ser adquirida no estabelecimento de venda de peças e acessórios. A referência para a PCB é RLN5325. Não existem quaisquer outras peças componentes sobressalentes. É também possível encomendar um manual de assistência, no qual se descreve o processo de substituição, no estabelecimento de venda de peças de acessórios. A referência do Manual de Assistência é 6880309L66. 7. Para reduzir o risco de choque eléctrico, retire a ficha do carregador da tomada CA antes de encetar qualquer procedimento de manutenção ou limpeza. 2 DIRECTRIZES PARA UMA UTILIZAÇÃO SEGURA • Desligue o rádio para carregar a bateria. • Este equipamento não é adequado para a utilização no exterior. Utilize-o apenas em locais/condições isentas de humidade. • Ligue o equipamento apenas a uma tomada devidamente ligada e equipada com fusível e de tensão correcta (tal como especificado no produto). • Desligue da tensão de linha, removendo a ficha principal da tomada. • A tomada, à qual é ligado este equipamento, deve situar-se próxima do mesmo e ser facilmente acessível. • Para equipamentos que utilizem fusíveis, as substituições devem ser compatíveis com o tipo e valor nominal especificados nas instruções do equipamento. • A temperatura ambiente máxima à volta do carregador não deve exceder os 40°C. 3 Português • Certifique-se de que o cabo se encontra posicionado de forma a que não seja pisado, trilhado ou fique sujeito a água, danos ou esforço. • Esta unidade utiliza a mesma unidade de montagem na parede que o carregador múltiplo NTN4796. A referência da unidade de montagem de parede é NLN7967. • Para a substituição do fusível, utilize somente fusíveis do mesmo tipo e valor nominal que os indicados na etiqueta do carregador. As peças a seguir indicadas podem ser encomendadas no estabelecimento de venda de peças e acessórios da sua área: Fusível 6571489S01 Porta-fusível 0987626G01 Tampa 0987739G01 DESCRIÇÃO DOS RECURSOS E VANTAGENS DO IMPRES A solução de energia IMPRES é um sistema de energia avançado, desenvolvido pela Motorola, que comporta baterias com três tipos de composições químicas. Este é composto por: (a) baterias IMPRES, (b) o carregador auto adaptável múltiplo IMPRES e (c) hardware/software de rádio que permite a comunicação de outros rádios compatíveis com as baterias IMPRES (não aplicável a rádios GP Série Profissional). Quando o carregador auto adaptável múltiplo IMPRES é usado com as baterias Motorola IMPRES: • Maximiza o tempo de utilização entre ciclos de carga, eliminando automaticamente o efeito de memória. • Maximiza a vida útil da bateria, reduzindo significativamente o calor durante os ciclos de carga lenta e pós carga. • Elimina a necessidade de adquirir equipamento de reparação e de formar pessoal para "gerir tarefas de manutenção da bateria". Português Com esta abordagem exclusiva do sistema patenteado, não é necessário controlar e registar a utilização da bateria, efectuar ciclos de reparação manuais ou remover as baterias dos carregadores após o carregamento. O carregador auto adaptável múltiplo IMPRES controla o padrão de utilização da bateria IMPRES, guarda as informações na bateria IMPRES e efectua um ciclo de reparação apenas quando necessário. O carregador auto adaptável múltiplo IMPRES não sobreaquecerá a bateria, independentemente do tempo que a mesma permanecer colocada no mesmo. Este controla e carrega a bateria, conforme necessário. O carregador auto adaptável múltiplo IMPRES simplifica o processo de carregamento e os cuidados a ter com a bateria - basta que o utilizador siga estes simples passos: 1. Coloque o rádio/bateria no carregador 2. Retire o rádio/bateria assim que estiver totalmente carregada! A Motorola é o único fabricante que oferece um carregador de reparação que permite aos utilizadores escolher entre carregar o rádio juntamente com a bateria ou apenas a bateria. 4 CARACTERÍSTICAS/DIFERENÇAS DO FUNCIONAMENTO: 5 Português 1. As baterias IMPRES podem ser carregadas em carregadores convencionais. No entanto, para activar os recursos Smart Energy, todas as baterias IMPRES devem ser carregadas num carregador auto adaptável múltiplo IMPRES. Ao carregar pela primeira vez uma bateria IMPRES num carregador auto adaptável múltiplo IMPRES, o indicador de carga apresenta a cor AMARELA CONSTANTE. Deve permitir-se que este primeiro carregamento seja concluído, passando a VERDE CONSTANTE no indicador de carga. Este procedimento calibra devidamente a bateria IMPRES e activa os recursos Smart Energy. Se este processo for interrompido, o carregador calibrará a bateria no carregamento seguinte. 2. Uma vez que o carregador auto adaptável múltiplo IMPRES determina automaticamente as condições necessárias para reparar as baterias IMPRES, poderá entrar em modo de reparação assim que for colocado um rádio ou uma bateria. Este modo é indicado pela cor AMARELA CONSTANTE no indicador de carga. O modo de reparação pode ser anulado, se necessário, removendo e voltando a inserir o rádio ou a bateria. (Consulte as instruções mais adiante neste manual.) 3. O carregador auto adaptável múltiplo IMPRES é concebido para carregar qualquer bateria indicada nas Tabelas 1 a 6. No entanto, apenas as baterias IMPRES genuínas incorporam os recursos Smart Energy. (À medida que forem sendo lançados novos modelos de rádios ou baterias, esta lista será actualizada e distribuída aos clientes através das várias organizações mundiais de fabricantes de equipamento original e de pós-venda). 4. O carregador auto adaptável múltiplo IMPRES deve ser utilizado para calibrar as baterias IMPRES Smart para que registem, guardem e apresentem os dados de utilização da bateria IMPRES correctos. 5. Se uma bateria IMPRES for utilizada com um rádio com visor (por exemplo, o XTS5000), o rádio pode exibir um símbolo de indicação do estado de carga da bateria. Este símbolo é accionado após uma bateria IMPRES ter sido calibrada num carregador IMPRES. O símbolo do estado do carregador continuará no visor enquanto o utilizador continuar a utilizar carregadores IMPRES para carregar as baterias. No entanto, se uma bateria IMPRES for carregada num carregador de terceiros por um período de 7 dias (ou mais), o símbolo desaparecerá. Para voltar a accionar o símbolo, insira uma bateria IMPRES num carregador IMPRES e deixe que termine o processo de carregamento (que resultará numa indicação VERDE CONSTANTE). O símbolo do estado de carga será então exibido no rádio. Se o símbolo não aparecer após uma carga completa, coloque uma bateria parcialmente descarregada (pelo menos 70% descarregada) no carregador, inicie um recondicionamento e permita que complete o processo de carregamento. O símbolo aparecerá então no visor do rádio (não aplicável a rádios GP Série Profissional). 6. O Carregador Multi-Unidades Adaptável IMPRES só pode ser reparado por um técnico de assistência qualificado, autorizado pela Motorola CGISS. Qualquer violação destas directrizes pode anular a garantia da unidade. LISTAS DE BATERIAS As tabelas seguintes possuem uma lista das baterias que podem ser utilizadas com os rádios específicos, identificados nos cabeçalhos das tabelas. Tabela 1. XTS3000 / XTS3500 / Rádios da Série Dimetra e Rádio Digital XTS5000 Português Kit (Ref.) HNN9031 HNN9032 NTN8294 NTN8295 NTN8297 NTN8299 NTN8610 NTN8293 NNTN4435 NNTN4436 NNTN4437 RNN4006 RNN4007 NTN9862 Composição química NiCD NiCD NiCD NiCD NiCD NiCD Ião de lítio NiMH NiMH NiMH NiMH NiMH NIMH Ião de lítio FM Smart Não Sim Não Sim Sim Sim Não Não Não Sim Sim Não Sim Não Sim Sim Não Não Não Não Não Não Sim Sim Sim Não Não Sim Capacidade Ultra-Alta Ultra-Alta Ultra-Alta Ultra-Alta Ultra-Alta Ultra-Alta Alta Ultra-Alta Ultra-Alta Ultra-Alta Ultra-Alta Muito Alta Muito Alta Ultra-Alta Novo Modelo Não Não Não Não Não Não Não Não Não Não Não Novo Novo Novo Tabela 2. Rádios Digitais XTS2500 Kit (Ref.) NTN9859 NTN9857 NTN9815 NTN9816 Composição química NiMH NiMH NiCD NiCD FM Smart Não Sim Não Sim Não Não Não Não Capacidade Ultra-Alta Ultra-Alta Alta Alta Novo Modelo Novo Novo Novo Novo Tabela 3. Rádios Digitais MTP700 Kit (Ref.) Composição FM Smart Capacidade Novo Modelo química PMNN4048* NiMH Não Sim Alta Novo PMNN4049* NiMH Sim Sim Alta Novo PMNN4050* Lilon Não Sim Alta Novo PMNN4047* Ião de lítio Não Sim Alta Novo * O carregador requer o adaptador de bateria Ref. RLN5212 para carregar baterias MTP700. 6 Tabela 4. Kit (Ref.) HNN9028 HNN9029 NTN7143 NTN7144 NTN7146 NTN7147 NTN7148 NTN7149 NTN7150 NTN7341 NTN7372 WPPN4013 WPPN4037 RNN4008 Rádios das Séries HT1000 / MT2000 / MTS2000 / MTX8000 e MTX9000 Composição química NiCD NiCD NiCD NiCD NiCD NiCD NiCD NiCD NiCD NiCD NiCD NiMH NiMH NiCD FM Smart Não Sim Não Não Sim Sim CENELEC CSA MSHA Sim Sim Não Sim ATEX Sim Sim Não Não Não Não Não Não Não Não Não Não Não Não Capacidade Ultra-Alta Ultra-Alta Alta Ultra-Alta Alta Ultra-Alta Alta Alta Alta Ultra-Alta Alta Ultra-Alta Ultra-Alta Alta Novo Modelo Não Não Não Não Não Não Não Não Não Não Não Não Não Não Tabela 5. Rádios Saber / Astro Saber/SSE5000/MX1000 Composição FM Smart Capacidade Novo Modelo química HNN9033 NiCD Não Sim Ultra-Alta Não HNN9031 NiCD Sim Sim Ultra-Alta Não NTN4537** NiCD Sim Não Baixa Não NTN4538 NiCD Sim Não Alta Não NTN4592** NiCD Não Não Baixa Não NTN4593 NiCD Não Não Alta Não NTN4595 NiCD Não Não Ultra-Alta Não NTN4596 NiCD Sim Não Ultra-Alta Não NTN4657 NiCD Não Não Alta Não NTN4671 NiCD CENELEC Não Alta Não NTN4992 NiCD Sim Não Ultra-Alta Não NTN7014** NiMH Não Não Alta Não NTN7058 NiCD Sim Não Ultra-Alta Não NTN7426 NiCD Sim Não Baixa Não NTN8251 NiMH Sim Não Ultra-Alta Não NTN8818** Ião de lítio Não Não Alta Não ** O carregador requer o adaptador de bateria Ref. 4385922B01 para carregar baterias Astro Saber. 7 Português Kit (Ref.) Tabela 6. Rádios GP Série Profissional Kit (Ref.) HNN9003 HNN9008 HNN9009 HNN9010 HNN9011 HNN9012 HNN9013 WPNN4045 PMNN4045 HNN4001 HNN4002 HNN4003 Composição química NiMH AA Bluetooth NiMH NiMH NiMH NiCD NiCD Ião de lítio NiMH NiMH Impres NiMH Impres NiMH Impres Ião de lítio FM Smart Capacidade Não Não Alta Novo Modelo Não Não Não Sim Sim Não Não Não Não Não Sim Não Não Não Não Não Não Não Não Não Sim Sim Sim Alta Ultra-Alta Ultra-Alta Alta Alta Alta Alta Alta Ultra-Alta Ultra-Alta Ultra-Alta Não Não Não Não Não Não Não Não Sim Sim Sim Português O Carregador Universal precisa do adaptador de bateria com a referência RLN5648. NOTA: Os adaptadores podem ser adquiridos num representante do grupo de vendas de rádios ou de peças e acessórios. 8 FONTES DE ENERGIA E ADAPTADORES DE CORRENTE AUTORIZADOS DA MOTOROLA Este carregador foi concebido para ser utilizado em aplicações de 100 V ca a 240 V ca, 50/60 Hz, e utiliza os seguintes cabos de alimentação Motorola da Tabela 7. Os cabos de alimentação utilizados com o carregador para rádios GP Série Profissional estão listados na Tabela 8: Tabela 7. Cabos de Alimentação Motorola, Modelo Universal Tipo de ficha WPLN4108 WPLN4109 WPLN4110 WPLN4118 WPLN4119 WPLN4120 WPLN4123 WPLN4130 WPLN4131 WPLN4132 WPLN4133 WPLN4134 WPLN4135 WPLN4136 3087791G01 3087791G04 3087791G07 3087791G10 3087791G13 3087791G01 3087791G16 Tabela 8. Cabos de Alimentação Motorola, GP Série Profissional Tipo de ficha Cabo de alimentação/ ficha inexistentes EUA/América do Norte Europa Reino Unido Austrália/Nova Zelândia Argentina EUA/América do Norte Coreia Kit de carregador Kit de carregador Cabo de (Modelo de Visor) alimentação WPLN4197 WPLN4198 n/d WPLN4187 WPLN4189 WPLN4188 WPLN4190 WPLN4191 WPLN4205 WPLN4146 WPLN4192 WPLN4194 WPLN4193 WPLN4195 WPLN4196 WPLN4204 WPLN4145 9 3087791G01 3087791G04 3087791G07 3087791G10 3087791G13 3087791G01 3087791G16 Português Cabo de alimentação/ ficha inexistentes EUA/América do Norte Europa Reino Unido Austrália/Nova Zelândia Argentina EUA/América do Norte Coreia Kit de carregador Kit de carregador Cabo de (Modelo de Visor) alimentação WPLN4121 WPLN4127 n/d INSTRUÇÕES DE UTILIZAÇÃO NOTAS O carregador auto adaptável múltiplo IMPRES carrega unicamente as baterias autorizadas Motorola, indicadas nas Tabelas 1 a 6. Outras baterias poderão não carregar. O carregador auto adaptável múltiplo IMPRES possui recursos e capacidades automáticas que os tornam distintos de outros carregadores de bateria. Tenha em atenção o indicador de carga para se certificar de que o carregador se encontra no modo pretendido. Português A cavidade do carregador acondiciona um rádio com a bateria ou unicamente a bateria. Desligue o rádio, antes de o pôr a carregar com a bateria. As baterias carregam melhor à temperatura ambiente. 1. Ligue a parte do cabo de alimentação que liga ao carregador à tomada CA localizada na parte de trás do carregador. 2. Ligue a parte do cabo de alimentação que liga à tomada de parede à devida tomada CA. Uma sequência de activação bem sucedida é indicada pela cor VERDE INTERMITENTE no indicador de carga. 3. Insira uma bateria ou um rádio com uma bateria (rádio desligado) na cavidade do carregador: a. alinhando as ranhuras dos lados da bateria com as respectivas guias, em cada um dos lados da cavidade do carregador; b. empurrando a bateria para a parte posterior da cavidade; c. fazendo deslizar a bateria para a cavidade do carregador, assegurando um contacto total entre o carregador e os contactos da bateria. Assim que a bateria estiver devidamente encaixada na cavidade, o indicador de carga acende-se, indicando que o carregador detectou a presença da bateria. Consulte os indicadores de carga na Tabela 9. 10 Tabela 9. Indicadores de Carregamento Indicador de carga Descrição A activação do carregador foi bem sucedida. Vermelho Constante A bateria encontra-se no modo de carregamento rápido. Verde Intermitente A bateria concluiu o carregamento rápido (>90% de capacidade disponível). A bateria encontra-se em modo de carregamento lento. Verde Constante A bateria completou o carregamento e está totalmente carregada. Amarelo Intermitente A bateria é detectada pelo carregador e aguarda carregamento. (A voltagem da bateria é demasiado baixa ou a temperatura da bateria é demasiado baixa ou alta para permitir o carregamento. Assim que esta condição for corrigida, a bateria começará a ser carregada.) Vermelho Intermitente A bateria não carrega ou existe mau contacto. Amarelo Constante (Este recurso destina-se unicamente a baterias Smart) A bateria está em modo de reparação. O período de tempo que o carregador permanece neste modo depende do estado de carga remanescente na bateria quando colocada no mesmo. (As baterias totalmente carregadas requerem mais tempo de reparação – 8 horas ou mais – do que baterias totalmente descarregadas.) Vermelho/Verde Intermitente (Este recurso destina-se unicamente a baterias Smart) A bateria completou o carregamento e está totalmente carregada. A bateria pode ainda ser usada, mas está a atingir o fim da respectiva vida útil. NOTA O carregador auto adaptável múltiplo IMPRES é impar pela sua capacidade de, quando utilizado com baterias Motorola IMPRES, determinar automaticamente a necessidade de reparação da bateria. Para poder usufruir de todos os recursos das baterias Motorola Smart e do sistema de carregamento auto adaptável, o carregador deve iniciar os dados contidos nas baterias Motorola Smart quando estas forem carregadas pela primeira vez. Este processo é indicado pela cor AMARELA CONSTANTE no indicador de carga (idêntica à que indica que a bateria está a ser reparada). O processo é automático, inclui uma reparação inicial da bateria, sendo iniciado o carregamento após a conclusão do processo que, todavia, requer tempo para iniciar a bateria, pelo que esta deve permanecer no carregador de um dia para o outro a primeira vez que for colocada. 11 Português Verde Intermitente O carregador auto adaptável múltiplo IMPRES funciona como: • um Carregador com todas as baterias autorizadas da Motorola, e • um Reparador com baterias IMPRES autorizadas da Motorola. Carregamento das baterias IMPORTANTE: A cavidade do carregador comporta vários formatos e tamanhos de bateria, por isso, é importante assegurar a correcta colocação de um rádio com uma bateria ou apenas da bateria. Caso contrário, o indicador não acenderá, indicando que a bateria não está a ser carregada. Português NOTA: As novas baterias (nunca antes utilizadas) indicam prematuramente uma carga completa em alguns casos (indicação VERDE CONSTANTE). Para assegurar um óptimo desempenho, a Motorola recomenda que todas as novas baterias permaneçam no carregador 14 a 16 horas antes da utilização inicial. 1. Depois de uma bateria ou um rádio com bateria terem sido correctamente colocados no carregador, este inicia o carregamento rápido da bateria, condição que é indicada pela cor VERMELHA CONSTANTE no indicador de carga. O período de tempo que o carregador permanecer neste estado depende da carga remanescente na bateria. 2. A conclusão do carregamento rápido (>90% de capacidade disponível) é indicada pela cor VERDE INTERMITENTE no indicador de carga, o que significa que se encontra no modo de carregamento lento e que requer cerca de 1 hora. 3. A conclusão do carregamento lento é indicada pela cor VERDE CONSTANTE no indicador de carga. Isto indica que a bateria se encontra totalmente carregada. 4. Outras indicações que podem aparecer no indicador de carga durante o carregamento são: • AMARELO INTERMITENTE – indica que a temperatura ou a voltagem da bateria se encontram fora do limite para o carregamento. O carregamento é retomado assim que estas condições forem corrigidas. • VERMELHO E VERDE INTERMITENTE – indicam que a bateria poderá estar a atingir o fim da respectiva vida útil. Embora a bateria esteja totalmente carregada, a respectiva capacidade foi reduzida pela utilização e poderá não comportar convenientemente as aplicações mais intensas. Este recurso só se encontra disponível quando utilizado com as baterias Motorola IMPRES. Esta não constitui uma indicação de falha, meramente uma notificação 12 • para o utilizador de que, em breve, a bateria poderá não ser capaz de apresentar um desempenho conforme esperado e precisar de ser substituída. VERMELHO INTERMITENTE – indica que não é possível carregar a bateria. Este poderá ser o resultado de uma falta de contacto entre a bateria e os contactos do carregador. O carregamento é retomado assim que for corrigida a condição que originou esta indicação. As baterias Motorola Smart possuem um dispositivo de memória interna que é lido pelo carregador auto adaptável múltiplo IMPRES. Se uma bateria IMPRES for carregada durante mais de 2 minutos e meio, o carregador auto adaptável múltiplo IMPRES retém o número de série da bateria IMPRES. A bateria IMPRES pode ser removida do carregador durante até 30 minutos. Ao ser novamente inserida no carregador, retomará o processo de carregamento, a partir do ponto em que se encontrava quando foi retirada. Reparação manual das baterias NOTA: a utilização excessiva desta função pode reduzir a vida útil da bateria. Reparação automática das baterias O carregador auto adaptável múltiplo IMPRES da Motorola, quando utilizado em conjunto com a bateria Motorola IMPRES, possui a capacidade de determinar o momento adequado para reparar a bateria. Ao colocar devidamente uma bateria IMPRES no carregador, este determina se é apropriado reparar a bateria. Se for necessário proceder à reparação, o carregador apresenta automaticamente a cor AMARELA CONSTANTE. Este processo poderá demorar até 8 horas ou mais a completar, dependendo do estado de carga e da capacidade da bateria quando esta é colocada no carregador. É importante salientar que, para este processo ser eficaz, deve permitir-se que a bateria complete o processo de reparação/carregamento. Deixe a bateria no carregador até o indicador passar a VERDE CONSTANTE. Ao completar o ciclo de reparação, o carregador carrega automaticamente a bateria. 13 Português Passados 2 minutos e meio da colocação inicial de uma bateria IMPRES (indicação VERMELHO CONSTANTE) no carregador, retire e volte a inserir a bateria num intervalo de tempo de 5 segundos para forçar manualmente a reparação. O indicador de carga passa de VERMELHO CONSTANTE a AMARELO CONSTANTE. Isto força a reparação pelo carregador e carrega automaticamente a bateria. Interrupção manual do processo de reparação Português A qualquer momento, durante o processo de reparação de uma bateria Motorola IMPRES (indicação AMARELO CONSTANTE), poderá interromper-se a reparação, removendo e voltando a colocar a bateria num intervalo de tempo de 5 segundos. Esta acção leva a que o carregador interrompa o processo de reparação e inicie o processo de carregamento. O indicador de carga passa a VERMELHO CONSTANTE. 14 DETECÇÃO E RESOLUÇÃO DE PROBLEMAS O carregador auto adaptável múltiplo IMPRES incorpora os seguintes recursos: • fonte de alimentação de entrada universal (100 V CA-240 V CA, 50/60 Hz); • um carregador rápido de corrente contínua; • carregador de reparação de corrente interrompida (pulso negativo); • uma unidade de reparação. A combinação dos recursos acima indicados é exclusiva de um carregador de mesa. Portanto, não se recomenda a utilização de um rádio com uma bateria enquanto estiver colocado no carregador. A utilização do rádio, enquanto no carregador, poderá resultar num desempenho de rádio minimamente reduzido e num tempo de carregamento de bateria prolongado. Para o fim do ciclo de carregamento rápido (indicação VERMELHO CONSTANTE), a voltagem da bateria excede a voltagem de funcionamento normal do rádio. A voltagem é restaurada para o nível normal, uma vez concluído o processo de carregamento rápido ou assim que a bateria for removida do carregador. Durante o processo de reparação, a bateria fica totalmente descarregada. O rádio poderá, por consequência, não funcionar durante o modo de reparação. Para detectar e resolver problemas, observe sempre o indicador de carga – Consulte a Tabela 9. 15 Português Se o rádio for ligado estando o carregador no modo de carregamento rápido, o rádio ficará temporariamente inoperacional. Esta condição pode ser corrigida, removendo o rádio do carregador, desligando-o e voltando a ligá-lo. Tabela 10. Detecção e resolução de problemas Problema O que significa... O que fazer... O carregador não fornece qualquer indicação • Não existe contacto com o carregador. • Verifique se o rádio com bateria ou apenas a bateria se encontram devidamente colocados. • Certifique-se de que o cabo de alimentação está correctamente ligado ao carregador e a uma tomada CA e de que existe corrente para a tomada. • Substituir fusível(eis). Indicação Vermelho Intermitente • Não existe contacto com o carregador. • Alimentação para o carregador inexistente. Português • A bateria não carrega. Indicação Amarelo Intermitente • • Retire a bateria do carregador e volte a colocá-la. • Verifique se se trata de uma bateria autorizada da Motorola indicada nas Tabelas 1 a 6. Outras baterias poderão não carregar. • Desligue o carregador da bateria e, utilizando um pano limpo e seg.o, limpe os contactos metálicos dourados da bateria e do carregador. • Substitua a bateria. A bateria aguarda • Uma vez corrigida esta condição, a carregamento. A bateria iniciará o carregamento. temperatura da bateria poderá ser inferior a 5°C ou superior a 40°C ou a voltagem da mesma poderá ser inferior ao limite pré-definido para um carregamento rápido. MANUTENÇÃO O Carregador Multi-Unidades Adaptável IMPRES só pode ser reparado por um técnico de assistência qualificado, autorizado pela Motorola. Qualquer violação destas directrizes pode anular a garantia da unidade. 16 CARREGADORES COM MÓDULO DE VISOR (CDM) O Carregador Multi-Unidades Adaptável IMPRES pode ser melhorado com o acréscimo de um módulo de visor para carregadores (CDM), referência RLN5382 da Motorola. Informações Gerais do Visor O Carregador Multi-Unidades Adaptável IMPRES com CDM proporciona informações valiosas ao utilizador enquanto executa a manutenção e cuidados da bateria. As informações que o carregador exibe e os indicadores LED correspondentes estão descritos nas tabelas que se seguem. Activação Upon Charger Power-up (Após Ligação do Carregador) LED SINGLE FLASH GREEN (INTERMITÊNCIA SIMPLES VERDE) Linha 1 IMPRES Linha 2 If There is No Battery in the Pocket (Caso Não Haja Bateria na Cavidade) LED OFF (DESLIGADO) Linha 1 NO BATTERY (SEM BATERIA) Reading Battery Data (A Ler Dados da Bateria) LED Any Defined Indication (Qualquer Indicação Definida) Linha 1 READING (A LER) Linha 2 BATTERY DATA (DADOS DA BATERIA) Non-IMPRES Battery in the Pocket (Bateria de Terceiros na Cavidade) LED Defined by Charge State (Definido por Estado de Carga) Linha 1 NON-IMPRES (DE TERCEIROS) Linha 2 BATTERY (BATERIA) IMPRES Battery in the Pocket (Bateria IMPRES na Cavidade) IMPRES and Software Versions are Displayed Visualização das Versões IMPRES e de Software LED Defined by Charge State (Definido por Estado de Carga) Linha 1 IMPRES Linha 2 SW xx.yy; aa.bb 17 Português Linha 2 NOTA: xx.yy indica a versão do software do carregador, aa.bb indica a versão do software do CDM. IMPRES Battery Kit # and Chemistry are Displayed (Visualização do # do Kit e Química da Bateria IMPRES) LED Defined by Charge State (Definido por Estado de Carga) Linha 1 KIT# -------- (# do KIT) Linha 2 -----CHEMISTRY (QUÍMICA) Forecasted # of Cycles Prior to Automatic Recondition (Previsão do # de Ciclos Anteriores ao Recondicionamento Automático) LED Defined by Charge State (Definido por Estado de Carga) Linha 1 ----CYCLES (CICLOS) Linha 2 TO RECONDITION (PARA RECONDICIONAMENTO) * Exibido apenas quando o número de ciclos para o recondicionamento é inferior a 6. Charger Waiting to Charge, Battery is Hot (Carregador à Espera de Carregar, a Português Bateria está Quente) LED Flashing ORANGE (COR-DE-LARANJA Intermitente) Linha 1 WAITING TO CHG (À ESPERA DE CARREGAR) Linha 2 HOT BATTERY (BATERIA QUENTE) Charger Waiting to Charge, Battery is Cold (Carregador à Espera de Carregar, a Bateria está Fria) LED Flashing ORANGE (COR-DE-LARANJA Intermitente) Linha 1 WAITING TO CHG (À ESPERA DE CARREGAR) Linha 2 COLD BATTERY (BATERIA FRIA) Charger Waiting to Charge, Low Voltage (Carregador à Espera de Carregar, Baixa Tensão) LED Flashing ORANGE (COR-DE-LARANJA Intermitente) Linha 1 WAITING TO CHG (À ESPERA DE CARREGAR) Linha 2 LOW VOLTAGE (BAIXA TENSÃO) NOTA: Nem todos os ecrãs mostrados acima serão exibidos. Por exemplo, os ecrãs À Espera de Carregar (bateria quente, fria, baixa tensão) apenas serão exibidos se a situação se justificar. 18 Charger is in Trickle Charge Mode (Carregador em Modo de Carga Lenta) LED Flashing GREEN (VERDE Intermitente) Linha 1 TRICKLE CHARGE (CARGA LENTA) Linha 2 Charge is Complete (A Carga está Completa) LED Steady GREEN or Flashing RED / GREEN (VERDE Constante ou VERMELHO/VERDE Intermitente) Linha 1 CHARGE COMPLETE (CARGA COMPLETA) Linha 2 Charger is in Discharge/Reconditioning Mode (Carregador em Modo de Descarga/Recondicionamento) LED Steady ORANGE (COR-DE-LARANJA Constante) Linha 1 DISCHARGE (DESCARGA) Linha 2 Charger is Calibrating an IMPRES Battery (Carregador a Calibrar uma Bateria IMPRES) Steady ORANGE, Steady RED, & Flashing ORANGE or GREEN (COR-DE-LARANJA Constante, VERMELHO Constante e COR-DE-LARANJA ou VERDE Intermitente) Linha 1 Calibrating (A calibrar) Linha 2 Battery (Bateria) LED Steady GREEN (VERDE Constante) Linha 1 Battery (Bateria) Linha 2 Calibrated (Calibrada) * Todas as baterias IMPRES devem ser calibradas antes da utilização inicial. Um carregador IMPRES iniciará automaticamente a calibragem de todas as baterias novas. Battery Capacity Data is Displayed as “%” in mAH, and Voltage (Os Dados da Capacidade da Bateria são Exibidos como "%" em mAH e em Voltagem) LED Defined by Charge State (Definido por Estado de Carga) Linha 1 ----% RATED CAP. (----% de POTÊNCIA NOMINAL) Linha 2 ----mAH --.-V 19 Português LED Estimated Time to Rapid Charge Complete Displayed in Hours, Minutes for NiCd & NiMH IMPRES Batteries Only (Completa, Visualizada em Horas e Minutos, Apenas para Baterias NiCd e NiMH IMPRES) LED Defined by Charge State (Definido por Estado de Carga) Linha 1 RAPID CHG ENDS (FIM DE CARGA RÁPIDA) Linha 2 IN xx HRS, yy MIN (EM xx HORAS, yy MINUTOS) Português NOTA: (1) O tempo previsto para carga completa inclui a carga rápida e os ciclos de descarga (se aplicável). (2) As informações de capacidade da bateria podem não ser exibidas em baterias descalibradas. (3) A utilização de baterias IMPRES com carregadores de terceiros pode afectar a capacidade e a precisão do tempo de carregamento. 20 Sequências diagramas para Baterias IMPRES Nota: estes diagramas são as sequências mostradas anteriormente em "Informações Gerais do Visor" e encontram-se apenas em inglês. Sequência do Visor da Bateria NiMH e NiCd IMPRES Iniciar LED Defined by Charge State Linha 1 KIT# xxxxxxxx (4.0 seg.) Linha 2 SN: yyyyyyyyyyyy LED Defined by Charge State Linha 1 KIT# xxxxxxxx (2.0 seg.) Linha 2 yyyyy CHEMISTRY LED Defined by Charge State Linha 1 xxxx CYCLES TO RECONDITION LED Steady RED Linha 1 RAPID CHARGE Português (2.0 seg.) Linha 2 A cada 73.0 seg. A cada 13.0 seg. (2.0 seg.) Linha 2 LED Defined by Charge State Linha 1 xx% RATED CAP. (7.0 seg.) Linha 2 yyyyy mAH zz.z V LED Defined by Charge State Linha 1 RAPID CHG ENDS (4.0 seg.) Linha 2 IN xx HRS, yy MIN 21 5X 65.0 seg. Antes da Calibragem: Iniciar LED Defined by Charge State Linha 1 KIT# xxxxxxxx (4.0 seg.) Linha 2 SN: yyyyyyyyyyyy LED Defined by Charge State Linha 1 KIT# xxxxxxxx (2.0 seg.) Linha 2 A cada 71.0 seg. yyyyy CHEMISTRY LED Steady ORANGE Linha 1 DISCHARGE A cada 13.0 seg. Português (2.0 seg.) Linha 2 5X LED Defined by Charge State Linha 1 CALIBRATING (7.0 seg.) Linha 2 BATTERY LED Defined by Charge State Linha 1 RAPID CHG ENDS (4.0 seg.) Linha 2 IN xx HRS, yy MIN 22 65.0 seg. Após a Calibragem: Iniciar LED Defined by Charge State Linha 1 KIT# xxxxxxxx (4.0 seg.) Linha 2 SN: yyyyyyyyyyyy LED Defined by Charge State Linha 1 KIT# xxxxxxxx (2.0 seg.) Linha 2 A cada 61.0 seg. yyyyy CHEMISTRY LED Steady GREEN Linha 1 CHARGE COMPLETE A cada 11 seg. (2.0 seg.) Linha 2 5X Defined by Charge State Linha 1 BATTERY (2.0 seg.) Linha 2 CALIBRATED LED Defined by Charge State Linha 1 xx% RATED CAP. (7.0 seg.) Linha 2 yyyy mAH zz.z V 23 55.0 seg. Português LED Sequência do Visor da Bateria de Lões de Lítio IMPRES Iniciar LED Defined by Charge State Linha 1 KIT# xxxxxxxx (4.0 seg.) Linha 2 Defined by Charge State Linha 1 KIT# xxxxxxxx yyyyy CHEMISTRY LED Defined by Charge State Linha 1 xxxx CYCLES (2.0 seg.) Linha 2 Português SN: yyyyyyyyyyyy LED (2.0 seg.) Linha 2 A cada 53.0 seg. TO RECONDITION LED Steady RED Linha 1 RAPID CHARGE A cada 9.0 seg. (2.0 seg.) Linha 2 5X LED Defined by Charge State Linha 1 xx% RATED CAP. (7.0 seg.) Linha 2 yyyyy mAH zz.z V 24 45.0 seg. Antes da Calibragem: Iniciar LED Defined by Charge State Linha 1 KIT# xxxxxxxx (4.0 seg.) Linha 2 SN: yyyyyyyyyyyy LED Defined by Charge State Linha 1 KIT# xxxxxxxx (2.0 seg.) Linha 2 A cada 51.0 seg. yyyyy CHEMISTRY LED Steady ORANGE Linha 1 DISCHARGE A cada 9.0 seg. (2.0 seg.) Linha 2 5X Defined by Charge State Linha 1 CALIBRATING (7.0 seg.) Linha 2 BATTERY 25 45.0 seg. Português LED Após a Calibragem: Iniciar LED Defined by Charge State Linha 1 KIT# xxxxxxxx (4.0 seg.) Linha 2 SN: yyyyyyyyyyyy LED Defined by Charge State Linha 1 KIT# xxxxxxxx (2.0 seg.) Linha 2 A cada 61.0 seg. yyyyy CHEMISTRY LED Steady GREEN Linha 1 CHARGE COMPLETE A cada 11 seg. Português (2.0 seg.) Linha 2 5X LED Defined by Charge State Linha 1 BATTERY (2.0 seg.) Linha 2 CALIBRATED LED Defined by Charge State Linha 1 xx% RATED CAP. (7.0 seg.) Linha 2 yyyy mAH zz.z V 26 55.0 seg. Orientação do Texto do Visor De forma a permitir a utilização do Carregador Multi-Unidades Adaptável IMPRES na secretária ou na parede, o CDM possui a capacidade de "rodar" o texto do visor em 180 graus. Para o fazer, insira um clipe grande no furo por baixo do visor perpendicular ao tampo da secretária. Um "estalido" indica que o botão de alternar foi accionado, rodando o texto em 180 graus. Funcionamento do Carregador Multi-Unidades Adaptável IMPRES Para mais informações sobre a manutenção do Carregador MultiUnidades e do CDM, consulte o Guia de Assistência do Carregador, 6880309L66. Assistência Para serviços de assistência, contacte o entreposto que se segue. Ligue e confirme a devolução antes de enviar a unidade para manutenção no entreposto. Centro de Assistência Motorola Português Motorola GmbH Customer Care Am Borsigturm 130 13507 Berlin Germany. Tel: +49 30 6686 1555 27 Português Nota 28 INDICE Informazioni importanti sulla sicurezza . . . . . . . . . . . . . . . . . . . . . . . . 2 Precauzioni per il funzionamento sicuro . . . . . . . . . . . . . . . . . . . . . . . 3 Descrizione delle caratteristiche e dei benefici di IMPRES . . . . . . . . . 4 Funzioni e differenze operative . . . . . . . . . . . . . . . . . . . . . . . . . . . . . . 5 Elenco delle batterie . . . . . . . . . . . . . . . . . . . . . . . . . . . . . . . . . . . . . . 6 Alimentazione e adattatori approvati da Motorola . . . . . . . . . . . . . . . . 9 Istruzioni per l’uso . . . . . . . . . . . . . . . . . . . . . . . . . . . . . . . . . . . . . . . 10 Carica della batteria. . . . . . . . . . . . . . . . . . . . . . . . . . . . . . . . . . . . 12 Ricondizionamento manuale della batteria . . . . . . . . . . . . . . . . . . 13 Ricondizionamento automatico della batteria . . . . . . . . . . . . . . . . 13 Interruzione manuale del processo di ricondizionamento . . . . . . . 14 Diagnostica . . . . . . . . . . . . . . . . . . . . . . . . . . . . . . . . . . . . . . . . . . . . 15 Manutenzione . . . . . . . . . . . . . . . . . . . . . . . . . . . . . . . . . . . . . . . . . . 16 Caricatori dotati di modulo display (CDM) . . . . . . . . . . . . . . . . . . . . . 17 Il manuale comprende inoltre i seguenti caricatori universali a più unità IMPRES, disponibili per le radio della serie GP Professional: WPLN4144, WPLN4145, WPLN4146, WPLN4187, WPLN4188, WPLN4189, WPLN4190, WPLN4191, WPLN4192, WPLN4193, WPLN4194, WPLN4195, WPLN4196, WPLN4204, WPLN4205 Con il termine “universale” si definisce la caratteristica del caricatore di supportare diversi modelli di radio e, utilizzando gli adattatori di batteria, qualsiasi batteria elencata nelle Tabelle 1-6. 1 Italiano Le informazioni riportate nel presente manuale accessori si riferiscono ai seguenti caricatori universali a più unità IMPRES: WPLN4108, WPLN4109, WPLN4110, WPLN4118, WPLN4119, WPLN4120, WPLN4121, WPLN4123, WPLN4130, WPLN4131, WPLN4132, WPLN4133, WPLN4134, WPLN4135, WPLN4136 INFORMAZIONI IMPORTANTI SULLA SICUREZZA CONSERVARE QUESTE ISTRUZIONI Nel presente documento sono riportate informazioni importanti sulla sicurezza e l'utilizzo. Leggere con attenzione queste istruzioni e conservarle per riferimento futuro. Prima di utilizzare il caricatore, leggere con attenzione tutte le istruzioni e le avvertenze relative (1) al caricatore, (2) alla batteria e (3) alla radio in cui è inserita la batteria. 1. Per ridurre il rischio di lesioni, caricare solo le batterie ricaricabili, approvate da Motorola, elencate nelle Tabelle 1-5. L’uso di altre batterie può comportare pericolo di esplosioni, AVVERTENZA che potrebbero causare lesioni personali o danni. ! 2. L’uso di accessori non consigliati da Motorola può comportare rischio d’incendio, scosse elettriche o lesioni. 3. Per ridurre il rischio di danni alla spina elettrica o al cavo, scollegare il caricatore staccando la spina e non tirando il cavo. Italiano 4. Non utilizzare prolunghe salvo che non sia assolutamente necessario. L’uso di una prolunga non idonea può comportare rischio di incendio e scosse elettriche. Se è necessario utilizzare una prolunga, accertarsi che il cavo sia del diametro di 18AWG per le prolunghe fino a 30,48 m e di 16AWG per quelle fino a 45,72 m. 5. Per ridurre il rischio d’incendio, scosse elettriche o lesioni, non utilizzare il caricatore se è rotto o danneggiato. Portarlo a un centro assistenza Motorola qualificato e autorizzato. 6. Questa unità può essere riparata. Una scheda del circuito stampato con alimentatore, unica nel suo genere, alimenta ciascun vano. La PCB con alimentatore è disponibile presso l’ufficio Accessori post-vendita, P/N RLN5325. Non sono disponibili parti di ricambio per gli altri componenti. Un manuale di manutenzione, in cui è descritto il processo di sostituzione, è anche disponibile presso l’ufficio Accessori post-vendita, con il P/N 6880309L66. 7. Per ridurre il rischio di scosse elettriche, scollegare il caricatore dalla presa di rete prima di eseguire la manutenzione o di pulirlo. 2 PRECAUZIONI PER IL FUNZIONAMENTO SICURO • Spegnere la radio quando si carica la batteria. • L’apparecchio non è adatto per essere utilizzato all’aperto. Utilizzare solo in ambienti asciutti. • Collegare l’apparecchio a una presa dotata di salvavita e con la tensione corretta, come specificato sul prodotto. • Scollegare dalla tensione di rete staccando la spina dalla presa. • La presa di rete cui l’apparecchio è collegato deve essere vicina e di facile accesso. • Negli apparecchi dotati di fusibili, quelli di ricambio devono essere di tipo e taratura uguali alle specifiche riportate nelle istruzioni che accompagnano l’apparecchio. • La temperatura ambiente massima nell’area circostante l’alimentatore non deve superare i 40°C. • Verificare che il cavo sia posizionato in modo che non venga calpestato, che non intralci il passaggio o che non venga bagnato, danneggiato o sia soggetto a sollecitazioni. • Questo caricatore utilizza la stessa unità di montaggio a muro del caricatore a più unità NTN4796; il codice parte dell’unità di montaggio a muro è NLN7967. • Sostituire i fusibili solo con quelli dello stesso tipo e taratura, specificati sull’etichetta del caricatore. Le seguenti parti di ricambio possono essere ordinate presso l’ufficio Accessori post-vendita locale: Fusibile 6571489S01 Portafusibili 0987626G01 Coperchio 0987739G01 Italiano 3 DESCRIZIONE DELLE CARATTERISTICHE E DEI BENEFICI DI IMPRES La soluzione IMPRES è un sistema avanzato compatibile con tre chimiche differenti, concepito da Motorola, che consiste di (a) batterie IMPRES, (b) caricatore adattivo a più unità IMPRES e (c) hardware e software della radio che permette alle radio compatibili con IMPRES di comunicare con le batterie IMPRES (non disponibile per le radio della serie GP Professional). Se utilizzato con le batterie IMPRES, il caricatore adattivo a più unità IMPRES consente di: • massimizzare il tempo operativo tra i cicli di carica, eliminando automaticamente l’effetto memoria; • massimizzare la durata della batteria, riducendone notevolmente il riscaldamento durante i cicli di carica di mantenimento e di post-carica; • eliminare la necessità di acquistare apparecchi di ricondizionamento e di formare il personale nella “gestione dei compiti di manutenzione delle batterie.” Grazie a questo esclusivo sistema brevettato, non è più necessario tenere le registrazioni dell’uso della batteria, eseguire manualmente i cicli di ricondizionamento né rimuovere le batterie dal caricatore dopo averle caricate. Italiano Il caricatore adattivo a più unità IMPRES controlla le modalità di utilizzo della batteria IMPRES, memorizza in esse i dati ed esegue il ciclo di ricondizionamento solo quando è necessario. Il caricatore adattivo a più unità IMPRES non surriscalda la batteria, indipendentemente dal tempo in cui rimane nel vano del caricatore. Il caricatore controlla il livello di carica della batteria e, all’occorrenza, passa automaticamente alla carica di mantenimento. Il caricatore adattivo a più unità IMPRES semplifica le operazioni di carica e di manutenzione della batteria. L’utente deve solo eseguire queste semplici operazioni: 1. Inserire la radio / la batteria nel caricatore 2. Rimuovere la radio / la batteria a carica ultimata Motorola è il solo produttore in grado di offrire un caricatore di condizionamento o ricondizionamento che consente agli utenti la scelta di caricare la batteria inserita nella radio o solamente la batteria. 4 FUNZIONI E DIFFERENZE OPERATIVE: 5 Italiano 1. Le batterie IMPRES possono anche essere caricate con caricatori tradizionali. Tuttavia, per abilitare le funzioni Smart Energy, ciascuna batteria IMPRES deve essere caricata con un caricatore adattivo a più unità IMPRES. Quando la batteria viene caricata per la prima volta con un caricatore adattivo a più unità IMPRES, l’indicatore di carica GIALLO resta acceso; il primo ciclo di carica deve essere completato, fino all’accensione dell’indicatore VERDE. Questo processo calibra correttamente la batteria IMPRES ed abilita le funzioni Smart Energy. Se il processo viene interrotto, il caricatore calibrerà la batteria alla carica successiva. 2. Dal momento che il caricatore adattivo a più unità IMPRES determina automaticamente le condizioni necessarie a ricondizionare la batteria, è possibile che entri nella modalità di ricondizionamento quando si inserisce la radio o la batteria. Il processo di ricondizionamento viene segnalato dall’accensione dell’indicatore GIALLO. All’occorrenza, è possibile soprassedere la modalità di ricondizionamento rimuovendo e reinserendo la radio o la batteria. (Vedere le istruzioni riportate in seguito nel manuale). 3. Il caricatore adattivo a più unità IMPRES è studiato per caricare qualsiasi batteria elencata nelle Tabelle 1-6. Tuttavia, solo le autentiche batterie IMPRES dispongono delle funzioni Smart Energy. (All’introduzione nel mercato di nuovi modelli di radio o batterie, l’elenco verrà aggiornato e distribuito ai clienti). 4. Utilizzare il caricatore adattivo a più unità IMPRES per calibrare le batterie IMPRES Smart, al fine di assicurare la registrazione, memorizzazione e visualizzazione dei dati sul loro utilizzo. 5. Se una batteria IMPRES viene utilizzata con una radio dotata di display (ad es. XTS5000), è possibile che la radio visualizzi un’icona per segnalare lo stato di carica della batteria. L’attivazione di questa icona avviene dopo aver calibrato una batteria IMPRES con un caricatore IMPRES. L’icona di stato del caricatore verrà sempre visualizzata se l’utente continua a utilizzare i caricatori IMPRES per caricare le batterie. Tuttavia, se una batteria IMPRES viene caricata con un caricatore non del tipo IMPRES per un periodo pari o superiore a 7 giorni, l’icona scomparirà. Per riattivarla, inserire una batteria IMPRES in un caricatore IMPRES e lasciarla nel vano fino a carica ultimata, segnalata dall’accensione dell’indicatore VERDE. L’icona dello stato di carica verrà quindi visualizzata sul display della radio. Qualora non venga visualizzata dopo un ciclo di carica completo, inserire una batteria parzialmente scarica (perlomeno al 70%) nel caricatore, avviare il processo di ricondizionamento, quindi lasciarla nel vano finché il processo di carica non sia ultimato. L’icona verrà visualizzata sul display della radio (non disponibile nelle radio della serie GP Professional). 6. Il caricatore adattivo a più unità IMPRES può essere riparato solo da tecnici specializzati, autorizzati da Motorola CGISS. La mancata osservanza di questo requisito renderà nulla la garanzia dell’unità. ELENCO DELLE BATTERIE Nelle tabelle che seguono è riportato l’elenco delle batterie che possono essere utilizzate con specifiche radio abbonate, come indicato nell’intestazione delle tabelle. Tabella 1. Radio della serie DiMetra XTS3000 / XTS3500 e radio digitali XTS5000 Kit (PN) HNN9031 HNN9032 NTN8294 NTN8295 NTN8297 NTN8299 NTN8610 NTN8293 NNTN4435 NNTN4436 NNTN4437 RNN4006 RNN4007 NTN9862 Tipo FM Smart NiCD NiCD NiCD NiCD NiCD NiCD Ioni di litio NiMH NiMH NiMH NiMH NiMH NIMH Ioni di litio No Sì No Sì Sì Sì No No No Sì Sì No Sì No Sì Sì No No No No No No Sì Sì Sì No No Sì Capacità Altissima Altissima Altissima Altissima Altissima Altissima Alta Altissima Altissima Altissima Altissima Altissima Altissima Altissima Nuovo modello No No No No No No No No No No No Nuovo Nuovo Nuovo Italiano Tabella 2. Radio digitali XTS2500 Kit (PN) NTN9859 NTN9857 NTN9815 NTN9816 Tipo FM Smart NiMH NiMH NiCD NiCD No Sì No Sì No No No No Capacità Altissima Altissima Alta Alta Nuovo modello Nuovo Nuovo Nuovo Nuovo Tabella 3. Radio digitali MTP700 Kit (PN) PMNN4048* PMNN4049* PMNN4050* PMNN4047* * Tipo FM Smart NiMH NiMH Ioni di litio Ioni di litio No Sì No No Sì Sì Sì Sì Capacità Alta Alta Alta Alta Nuovo modello Nuovo Nuovo Nuovo Nuovo Per il caricatore è richiesto l’adattatore di batteria P/N RLN5212 per caricare le batterie MTP700. 6 Tabella 4. Radio della serie HT1000 / MT2000 / MTS2000 / MTX8000 e MTX9000 Kit (PN) Tipo FM Smart HNN9028 HNN9029 NTN7143 NTN7144 NTN7146 NTN7147 NTN7148 NTN7149 NTN7150 NTN7341 NTN7372 WPPN4013 WPPN4037 RNN4008 NiCD NiCD NiCD NiCD NiCD NiCD NiCD NiCD NiCD NiCD NiCD NiMH NiMH NiCD No Sì No No Sì Sì CENELEC CSA MSHA Sì Sì No Sì ATEX Sì Sì No No No No No No No No No No No No Capacità Altissima Altissima Alta Altissima Alta Altissima Alta Alta Alta Altissima Alta Altissima Altissima Alta Nuovo modello No No No No No No No No No No No No No No Tabella 5. Radio Saber / Astro Saber / SSE5000 / MX1000 Kit (PN) ** FM Smart NiCD NiCD NiCD NiCD NiCD NiCD NiCD NiCD NiCD NiCD NiCD NiMH NiCD NiCD NiMH Ioni di litio No Sì Sì Sì No No No Sì No CENELEC Sì No Sì Sì Sì No Sì Sì No No No No No No No No No No No No No No Capacità Altissima Altissima Bassa Alta Bassa Alta Altissima Altissima Alta Alta Altissima Alta Altissima Bassa Altissima Alta Nuovo modello No No No No No No No No No No No No No No No No Per il caricatore è richiesto l’adattatore di batteria P/N 4385922B01 per caricare le batterie Astro Saber. 7 Italiano HNN9033 HNN9031 NTN4537** NTN4538 NTN4592** NTN4593 NTN4595 NTN4596 NTN4657 NTN4671 NTN4992 NTN7014** NTN7058 NTN7426 NTN8251 NTN8818** Tipo Tabella 6. Radio della serie GP Professional Kit (PN) HNN9003 HNN9008 HNN9009 HNN9010 HNN9011 HNN9012 HNN9013 WPNN4045 PMNN4045 HNN4001 HNN4002 HNN4003 Tipo FM Smart Capacità NiMH AA Bluetooth NiMH NiMH NiMH NiCD NiCD Ioni di litio NiMH NiMH Impres NiMH Impres NiMH Impres Ioni di litio No No Alta Nuovo modello No No No Sì Sì No No No No No Sì No No No No No No No No No Sì Sì Sì Alta Altissima Altissima Alta Alta Alta Alta Alta Altissima Altissima Altissima No No No No No No No No Sì Sì Sì Il caricatore universale richiede l’uso dell’adattatore di batteria RLN5648. NOTA: Italiano Gli adattatori sono disponibili presso l’ufficio vendite Radio o Accessori post-vendita. 8 ALIMENTAZIONE E ADATTATORI APPROVATI DA MOTOROLA Questo caricatore è progettato per l’uso con tensioni di rete comprese tra 100 V c.a. e 240 V c.a., 50/60Hz e con i cavi di alimentazione riportati nella Tabella 7. I cavi di alimentazione da utilizzare con il caricatore per le radio della serie GP Professional sono elencati nella Tabella 8. Tabella 7. Cavi di alimentazione per caricatori di modello universale Motorola Tipo di spina Nessun cavo / spina U.S./Nordamerica Europa U.K. Australia/Neozelanda Argentina U.S./Nordamerica Corea Kit del caricatore Kit del caricatore (Modello con display) WPLN4121 WPLN4127 WPLN4108 WPLN4130 WPLN4109 WPLN4131 WPLN4110 WPLN4132 WPLN4118 WPLN4133 WPLN4119 WPLN4134 WPLN4120 WPLN4135 WPLN4123 WPLN4136 Cavo di alimentazione Nessuno 3087791G01 3087791G04 3087791G07 3087791G10 3087791G13 3087791G01 3087791G16 Tabella 8. Cavi di alimentazione per caricatori per radio della serie GP Professional Motorola Tipo di spina 9 Cavo di alimentazione Nessuno 3087791G01 3087791G04 3087791G07 3087791G10 3087791G13 3087791G01 3087791G16 Italiano Nessun cavo / spina U.S./Nordamerica Europa U.K. Australia/Neozelanda Argentina U.S./Nordamerica Corea Kit del caricatore Kit del caricatore (Modello con display) WPLN4197 WPLN4198 WPLN4187 WPLN4192 WPLN4189 WPLN4194 WPLN4188 WPLN4193 WPLN4190 WPLN4195 WPLN4191 WPLN4196 WPLN4205 WPLN4204 WPLN4146 WPLN4145 ISTRUZIONI PER L'USO NOTA Il caricatore adattivo a più unità IMPRES carica solo le batterie approvate da Motorola, elencate nelle Tabelle 1-6. È possibile che altri tipi di batterie non vengano caricati. Il caricatore adattivo a più unità IMPRES dispone di funzioni e funzionalità automatiche che differiscono da altri caricatori. Osservare con attenzione l’indicatore di carica, per verificare che il caricatore sia nella modalità operativa voluta o attesa. Il vano del caricatore può alloggiare la radio con la batteria inserita oppure la sola batteria. Prima di caricare la batteria inserita nella radio, spegnere la radio. Per una carica ottimale, caricare la batteria a temperatura ambiente. 1. Inserire lo spinotto del cavo di alimentazione nella presa sulla parte posteriore del caricatore. 2. Inserire la spina del cavo di alimentazione nella presa di rete appropriata. Se l’accensione avviene correttamente, l’indicatore VERDE del caricatore lampeggia una sola volta. 3. Inserire la batteria, o la radio con la batteria (radio spenta) nel vano del caricatore: a. allineando la scanalatura su ciascun lato della batteria alla rispettiva rotaia in rilievo su ciascun lato del vano del caricatore b. spingendo la batteria verso la parte posteriore del vano Italiano c. facendo scivolare la batteria nel vano del caricatore, verificando che i contatti del caricatore e della batteria vengano a contatto. Quando la batteria è alloggiata correttamente nel vano, l’indicatore del caricatore si illumina, per segnalare che ne ha rilevato la presenza. Per gli indicatori di carica, vedere Tabella 9. 10 Tabella 9. Indicatori di carica Indicatore di carica Descrizione Accensione corretta del caricatore. Rosso La batteria è nella modalità di caricamento rapido. Verde lampeggiante Il ciclo di carica rapida è stato completato (>90% della capacità disponibile). La batteria passa alla carica di mantenimento. Verde Il ciclo di carica è completato e la batteria è completamente carica. Giallo lampeggiante La batteria è stata rilevata dal caricatore, ma è in attesa di essere caricata. (La tensione della batteria è troppo bassa oppure la sua temperatura è troppo bassa o troppo alta per consentire il processo di carica. Questo avrà inizio non appena le condizioni si sono normalizzate.) Rosso lampeggiante La batteria non può essere caricata o non fa buon contatto con il caricatore. Giallo (Questa funzione è disponibile solo con le batterie Smart) La batteria è in modalità di ricondizionamento. Il periodo per il quale il caricatore resta in questa modalità dipende dallo stato di carica rimanente nella batteria al momento del suo inserimento nel vano. (Il tempo di ricondizionamento di batterie completamente cariche – 8 o più ore – è maggiore del tempo richiesto per batterie completamente scariche.) Rosso e verde lampeggiante (Questa funzione è disponibile solo con le batterie Smart) Il ciclo di carica è stato completato e la batteria è completamente carica. La batteria continua ad essere utilizzabile, ma è vicina al termine del suo normale ciclo di vita. NOTA L’esclusività del caricatore adattivo a più unità IMPRES risiede nella capacità, se utilizzato con le batterie IMPRES Motorola, di determinare automaticamente quando la batteria deve essere ricondizionata. Affinché le funzioni della batteria Smart e del sistema di carica adattivo di Motorola siano completamente disponibili, il caricatore deve inizializzare i dati contenuti nelle batterie Smart quando vengono caricate per la prima volta. Questo processo viene segnalato dall’accensione dell’indicatore GIALLO (come avviene per il processo di ricondizionamento). Il processo è automatico e comprende un primo ricondizionamento della batteria, al termine del quale ha inizio la carica. Poiché l’inizializzazione della batteria richiede del tempo, essa va lasciata nel caricatore per tutta la notte quando la si carica per la prima volta. 11 Italiano Verde lampeggiante una sola volta Il caricatore adattivo a più unità IMPRES funziona come: • caricatore con tutte le batterie approvate da Motorola, e • ricondizionatore con tutte le batterie IMPRES approvate da Motorola. Carica della batteria IMPORTANTE: Considerato che il vano del caricatore è studiato per alloggiare batterie di forma e dimensioni diverse, è essenziale accertarsi che la radio con la batteria o la sola batteria sia inserita correttamente. In caso contrario, l’indicatore non si illumina, segnalando che la batteria non è sotto carica. Italiano NOTA: È possibile che, in alcuni casi, l’indicatore segnali prematuramente che le nuove batterie (mai utilizzate) sono completamente cariche (indicatore VERDE). Per ottenere prestazioni ottimali, Motorola consiglia di lasciare le nuove batterie nel caricatore per 14-16 ore prima di utilizzarle per la prima volta. 1. Quando la batteria o la radio con batteria è alloggiata correttamente nel caricatore, ha inizio il ciclo di carica rapida, segnalato dall’accensione dell’indicatore ROSSO del caricatore. Il tempo per il quale l’indicatore resta acceso dipende dal livello di carica restante nella batteria. 2. Una volta ultimato il ciclo di carica rapida (>90% della capacità disponibile), l’indicatore VERDE LAMPEGGIA, per segnalare il passaggio alla carica di mantenimento; questo processo richiede circa 1 ora. 3. Una volta ultimata la carica di mantenimento l’indicatore VERDE RESTA ACCESO, per segnalare che la batteria è completamente carica. 4. È possibile che, durante la carica, l’indicatore del caricatore segnali altri stati di carica: • GIALLO LAMPEGGIANTE: indica che la temperatura o la tensione della batteria sono fuori limite per il processo di carica. Questo riprende alla normalizzazione delle condizioni. • ROSSO E VERDE LAMPEGGIANTE: indica che la batteria sta per raggiungere il termine della normale durata di vita. Anche se completamente carica, la sua capacità è stata ridotta dall’uso ed è possibile che non possa supportare adeguatamente le applicazioni più impegnative. Questa funzione è disponibile solo se il caricatore è utilizzato con le batterie IMPRES Motorola. Questa segnalazione non indica un guasto, bensì semplicemente notifica all’utente che, a breve, la batteria potrebbe non essere più in grado di offrire la funzionalità voluta e pertanto può essere necessario sostituirla. 12 • ROSSO LAMPEGGIANTE: indica che la batteria non può essere caricata. È possibile che si sia interrotto il contatto tra la batteria e il caricatore. La carica riprende alla correzione delle condizioni che causano questa segnalazione. Le batterie Smart Motorola dispongono di un dispositivo di memoria interno, che viene letto dal caricatore adattivo a più unità IMPRES Motorola. Se una batteria IMPRES viene caricata per oltre 2 ½ minuti, il caricatore ne memorizza il numero di serie. Può essere quindi rimossa dal caricatore per un massimo di 30 minuti e, quando viene reinserita, il processo di carica riprenderà dal punto in cui era stato interrotto al momento della sua rimozione. Ricondizionamento manuale della batteria Per ricondizionare manualmente la batteria IMPRES, entro 2 ½ dall’inserimento iniziale nel caricatore (indicatore ROSSO), rimuoverla e quindi reinserirla entro 5 secondi. L’indicatore del caricatore passa dal ROSSO al GIALLO. Questa operazione forza il ricondizionamento, al termine del quale la batteria verrà caricata automaticamente. NOTA: L’uso eccessivo di questa funzione riduce la durata di vita della batteria. Ricondizionamento automatico della batteria Il caricatore adattivo a più unità IMPRES, utilizzato insieme alla batteria IMPRES Motorola, è in grado di determinare quando la batteria deve essere ricondizionata. È importante ricordare che, affinché questo processo sia efficace, la batteria deve poter completare il ciclo di ricondizionamento e di carica. Lasciare pertanto la batteria nel caricatore finché l’indicatore VERDE si illumina. Al termine del ciclo di ricondizionamento, il caricatore inizia automaticamente quello di carica. 13 Italiano Se la batteria IMPRES è alloggiata correttamente, il caricatore determina se il ricondizionamento è necessario, nel qual caso, il caricatore inizia automaticamente il processo di ricondizionamento, segnalato dall’accensione dell’indicatore GIALLO. Il processo può impiegare fino ad 8 o più ore, a seconda dello stato di carica e della capacità della batteria al momento dell’inserimento nel caricatore. Interruzione manuale del processo di ricondizionamento Italiano In qualsiasi momento durante il ciclo di ricondizionamento di una batteria IMPRES Motorola (indicatore GIALLO), è possibile interrompere il ricondizionamento rimuovendo la batteria e reinserendola entro 5 secondi. Questa operazione fa sì che il caricatore termini il processo di ricondizionamento ed inizi quello di carica. L’indicatore passa dal giallo al ROSSO. 14 DIAGNOSTICA Il caricatore adattivo a più unità IMPRES dispone delle seguenti funzioni: • alimentatore universale (100 V c.a.-240 V c.a., 50/60 Hz) • caricatore rapido a corrente costante • caricatore di condizionamento a corrente interrotta (impulso negativo) • unità di ricondizionamento. La combinazione di queste funzioni in un caricatore da tavolo è una caratteristica esclusiva. Non si consiglia perciò di usare la radio munita di batteria mentre è alloggiata nel caricatore. L’uso della radio nel caricatore può ridurne leggermente le prestazioni e prolungare il tempo di carica della batteria. Verso la fine del ciclo di carica rapida (indicatore ROSSO), la tensione della batteria supera quella normale di esercizio della radio e torna ad un livello normale dopo il ciclo di carica rapida o quando la batteria viene rimossa dal caricatore. La radio diventa temporaneamente inutilizzabile se viene accesa mentre il caricatore è nella modalità di carica rapida. Per ripristinarne la funzionalità, è sufficiente rimuovere la radio dal caricatore, quindi spegnerla e riaccenderla. Durante il processo di ricondizionamento, la batteria viene scaricata completamente, per il qual motivo in questa fase la radio potrebbe non funzionare. 15 Italiano Quando si esegue il processo di diagnostica, osservare l’indicatore del caricatore; vedere la Tabella 9. Tabella 10. Diagnostica Problema Indicatore spento Causa Azione correttiva • Il caricatore e la batteria non sono in contatto. • Controllare che la radio con la batteria o la sola batteria sia alloggiata correttamente. • Non arriva alimentazione al • Verificare che il cavo di caricatore. alimentazione sia inserito correttamente nel caricatore e nella presa di rete appropriata e che la corrente venga erogata dalla presa di rete. • Sostituire il fusibile (o i fusibili). Indicatore rosso • Il caricatore e la batteria lampeggiante non sono in contatto. Italiano • La batteria non può essere caricata. • Rimuovere e reinserire la batteria nel caricatore. • Verificare che la batteria sia una batteria approvata da Motorola, come elencato nelle Tabelle 1-6. È possibile che altri tipi di batterie non vengano caricati • Staccare il caricatore dalla presa di rete, quindi pulire i contatti di carica, di metallo dorato, della batteria e del caricatore con un panno pulito ed asciutto. • Sostituire la batteria. Indicatore giallo • La batteria è in attesa di • La carica della batteria avrà inizio lampeggiante essere caricata. È possibile non appena le condizioni si sono che la temperatura della normalizzate. batteria sia inferiore a 5°C o superiore a 40°C, oppure che la tensione della batteria sia inferiore al livello di soglia predefinito per la carica rapida. MANUTENZIONE Il caricatore adattivo a più unità IMPRES può essere riparato solo da tecnici specializzati, autorizzati da Motorola. La mancata osservanza di questo requisito renderà nulla la garanzia dell’unità. 16 CARICATORI DOTATI DI MODULO DISPLAY (CDM) Il caricatore adattivo a più unità IMPRES può essere potenziato installando un modulo display per caricatori (CDM), codice parte Motorola RLN5382. Informazioni generali sul display Il caricatore adattivo a più unità IMPRES con CDM consente all’utente di visualizzare dati importanti durante l’esecuzione delle operazioni di manutenzione e ricondizionamento della batteria. I dati visualizzati dal caricatore e i relativi indicatori LED sono riportati nelle tabelle che seguono. Avvio Upon Charger Power-up (All’accensione del caricatore) LED SINGLE FLASH GREEN (VERDE, LAMPEGGIA UNA VOLTA) Riga 1 IMPRES Riga 2 If There is No Battery in the Pocket (Nessuna batteria nel vano) LED OFF (SPENTO) Riga 1 NO BATTERY (NESSUNA BATTERIA) Riga 2 Reading Battery Data (Lettura dei dati della batteria) Any Defined Indication (Qualsiasi indicazione definita) Riga 1 READING (LETTURA) Riga 2 BATTERY DATA (DATI BATTERIA) Non-IMPRES Battery in the Pocket (Batteria non IMPRES nel vano) LED Defined by Charge State (Definito dallo stato di carica) Riga 1 NON-IMPRES (NON IMPRES) Riga 2 BATTERY (BATTERIA) IMPRES Battery in the Pocket (Batteria IMPRES nel vano ) IMPRES and Software Versions are Displayed (Vengono visualizzati IMPRES e la versione del software) LED Defined by Charge State (Definito dallo stato di carica) Riga 1 IMPRES Riga 2 SW xx.yy; aa.bb 17 Italiano LED NOTA: xx.yy indica la versione software del caricatore, mentre aa.bb la versione software del CDM. IMPRES Battery Kit # and Chemistry are Displayed (Vengono visualizzati il numero del kit e il tipo di batteria IMPRES) LED Defined by Charge State (Definito dallo stato di carica) Riga 1 KIT# -------- (KIT n.--------) Riga 2 -----CHEMISTRY (TIPO--------) Forecasted # of Cycles Prior to Automatic Recondition (Numero di cicli previsti prima del ricondizionamento automatico) LED Defined by Charge State (Definito dallo stato di carica) Riga 1 ----CYCLES (----CICLI) Riga 2 TO RECONDITION (AL RICONDIZIONAMENTO) *Visualizzato solo se il numero di cicli prima del ricondizionamento è inferiore a 6. Charger Waiting to Charge, Battery is Hot (Il caricatore è in attesa di iniziare la carica: la batteria è calda) LED Flashing ORANGE (ARANCIONE lampeggiante) Riga 1 WAITING TO CHG (IN ATTESA DI CAR) Riga 2 HOT BATTERY (BATTERIA CALDA) Charger Waiting to Charge, Battery is Cold (Il caricatore è in attesa di iniziare la Italiano carica: la batteria è fredda) LED Flashing ORANGE (ARANCIONE lampeggiante) Riga 1 WAITING TO CHG (IN ATTESA DI CAR) Riga 2 COLD BATTERY (BATTERIA FREDDA) Charger Waiting to Charge, Low Voltage (Il caricatore è in attesa di iniziare la carica: tensione bassa) LED Flashing ORANGE (ARANCIONE lampeggiante) Riga 1 WAITING TO CHG (IN ATTESA DI CAR) Riga 2 LOW VOLTAGE (BASSA TENSIONE) NOTA: Non tutte le informazioni summenzionate verranno visualizzate sul display. Ad esempio, quelle relative all’attesa di inizio della carica (batteria calda o fredda, bassa tensione) verranno visualizzate solo quando richiesto dal caso. 18 Charger is in Trickle Charge Mode (Il caricatore è nella modalità di carica di mantenimento) LED Riga 1 Flashing GREEN (VERDE lampeggiante) TRICKLE CHARGE (CARICA DI MANTENIMENTO) Riga 2 Charge is Complete (Carica ultimata) LED Steady GREEN or Flashing RED / GREEN (VERDE; oppure ROSSO/VERDE lampeggiante) Riga 1 CHARGE COMPLETE (CARICA ULTIMATA) Riga 2 Charger is in Discharge/Reconditioning Mode (Il caricatore è nella modalità di scarica/ricondizionamento) LED Steady ORANGE (ARANCIONE) Riga 1 DISCHARGE (SCARICA) Riga 2 Charger is Calibrating an IMPRES Battery (Il caricatore sta calibrando una batteria IMPRES) Steady ORANGE, Steady RED, & Flashing ORANGE or GREEN (ARANCIONE, ROSSO, e ARANCIONE o VERDE lampeggiante ) Riga 1 Calibrating (Calibrazione) Riga 2 Battery (Batteria) LED Steady GREEN (VERDE) Riga 1 Battery (Batteria) Riga 2 Calibrated (Calibrata) *Calibrare tutte le batterie IMPRES prima di utilizzarle per la prima volta. Il caricatore IMPRES avvierà automaticamente il processo di calibrazione in tutte le batterie nuove. Battery Capacity Data is Displayed as “%” in mAH, and Voltage (I dati di capacità della batteria sono visualizzati come “%”, mAH e tensione) LED Defined by Charge State (Definito dallo stato di carica) Riga 1 ----% RATED CAP. (----%CAP NOMINALE) Riga 2 ----mAH --.-V 19 Italiano LED Estimated Time to Rapid Charge Complete Displayed in Hours, Minutes for NiCd & NiMH IMPRES Batteries Only (Il tempo stimato fino al completamento della carica rapida è visualizzato in ore e minuti solo per le batterie IMPRES al NiCd e NiMH) LED Defined by Charge State (Definito dallo stato di carica) Riga 1 RAPID CHG ENDS (FINE CAR RAPIDA) Riga 2 IN xx HRS, yy MIN (IN xx ORE,yy MIN) Italiano NOTA: (1) Il tempo stimato fino al completamento della carica comprende i cicli di carica rapida e di scarica, se applicabile. (2) È possibile che i dati di capacità della batteria non vengano visualizzati in caso di batterie non calibrate. (3) Se le batterie IMPRES vengono caricate con caricatori non IMPRES, è possibile alterare la precisione della capacità e del tempo di carica. 20 Diagrammi di Sequenze delle Batterie IMPRESS Nota: Questi diagrammi si riferiscono alle sequenze illustrate nella sezione “Informazioni generali sul display” e sono riportati solo in lingua inglese. Sequenza di visualizzazione delle batterie IMPRES al NiCd e NiMH Avvio LED Defined by Charge State Riga 1 KIT# xxxxxxxx (4.0 sec) Riga 2 SN: yyyyyyyyyyyy LED Defined by Charge State Riga 1 KIT# xxxxxxxx (2.0 sec) Riga 2 yyyyy CHEMISTRY LED Defined by Charge State Riga 1 xxxx CYCLES (2.0 sec) Riga 2 Ogni 73.0 sec TO RECONDITION Steady RED Riga 1 RAPID CHARGE Ogni 13.0 sec (2.0 sec) Riga 2 LED Defined by Charge State Riga 1 xx% RATED CAP. (7.0 sec) Riga 2 yyyyy mAH zz.z V LED Defined by Charge State Riga 1 RAPID CHG ENDS (4.0 sec) Riga 2 IN xx HRS, yy MIN 21 5X 65.0 sec Italiano LED Prima della calibrazione: Avvio (4.0 sec) (2.0 sec) (2.0 sec) LED Defined by Charge State Riga 1 KIT# xxxxxxxx Riga 2 SN: yyyyyyyyyyyy LED Defined by Charge State Riga 1 KIT# xxxxxxxx Riga 2 yyyyy CHEMISTRY LED Steady ORANGE Riga 1 DISCHARGE Ogni 71.0 sec Ogni 13.0 sec Riga 2 5X Italiano (7.0 sec) (4.0 sec) LED Defined by Charge State Riga 1 CALIBRATING Riga 2 BATTERY LED Defined by Charge State Riga 1 RAPID CHG ENDS Riga 2 IN xx HRS, yy MIN 22 65.0 sec Dopo la calibrazione: Avvio (4.0 sec) (2.0 sec) (2.0 sec) LED Defined by Charge State Riga 1 KIT# xxxxxxxx Riga 2 SN: yyyyyyyyyyyy LED Defined by Charge State Riga 1 KIT# xxxxxxxx Riga 2 yyyyy CHEMISTRY LED Steady GREEN Riga 1 CHARGE COMPLETE Ogni 61.0sec Ogni 11 sec Riga 2 5X (2.0 sec) Defined by Charge State Riga 1 BATTERY Riga 2 CALIBRATED LED Defined by Charge State Riga 1 xx% RATED CAP. Riga 2 yyyy mAH zz.z V 23 55.0 sec Italiano (7.0 sec) LED Sequenza di visualizzazione delle batterie IMPRES agli ioni di litio Avvio (4.0 sec) (2.0 sec) (2.0 sec) (2.0 sec) LED Defined by Charge State Riga 1 KIT# xxxxxxxx Riga 2 SN: yyyyyyyyyyyy LED Defined by Charge State Riga 1 KIT# xxxxxxxx Riga 2 yyyyy CHEMISTRY LED Defined by Charge State Riga 1 xxxx CYCLES Riga 2 TO RECONDITION LED Steady RED Riga 1 RAPID CHARGE Ogni 53.0 sec Ogni 9.0 sec Riga 2 Italiano 5X (7.0 sec) LED Defined by Charge State Riga 1 xx% RATED CAP. Riga 2 yyyyy mAH zz.z V 24 45.0 sec Prima della calibrazione: Avvio (4.0 sec) (2.0 sec) (2.0 sec) LED Defined by Charge State Riga 1 KIT# xxxxxxxx Riga 2 SN: yyyyyyyyyyyy LED Defined by Charge State Riga 1 KIT# xxxxxxxx Riga 2 yyyyy CHEMISTRY LED Steady ORANGE Riga 1 DISCHARGE Ogni 51.0 sec Ogni 9.0 sec Riga 2 5X (7.0 sec) LED Defined by Charge State Riga 1 CALIBRATING Riga 2 BATTERY 45.0 sec Italiano 25 Dopo la calibrazione: Avvio (4.0 sec) (2.0 sec) (2.0 sec) LED Defined by Charge State Riga 1 KIT# xxxxxxxx Riga 2 SN: yyyyyyyyyyyy LED Defined by Charge State Riga 1 KIT# xxxxxxxx Riga 2 yyyyy CHEMISTRY LED Steady GREEN Riga 1 CHARGE COMPLETE Ogni 61.0sec Ogni 11 sec Riga 2 5X Italiano (2.0 sec) (7.0 sec) LED Defined by Charge State Riga 1 BATTERY Riga 2 CALIBRATED LED Defined by Charge State Riga 1 xx% RATED CAP. Riga 2 yyyy mAH zz.z V 26 55.0 sec Orientazione del testo sul display Per consentire il montaggio del caricatore adattivo a più unità IMPRES su tavolo o su parete, il CDM è dotato della funzione di “rotazione” del testo visualizzato a 180 gradi. Per ruotare il testo, inserire una grossa graffa nel piccolo foro sottostante il display, in direzione perpendicolare alla superficie del tavolo. Uno scatto segnala l’attivazione del pulsante di selezione della rotazione e il testo viene ruotato di 180 gradi. Funzionamento del caricatore adattivo a più unità IMPRES Per ulteriori informazioni sulla manutenzione e riparazione del caricatore a più unità e del CDM, consultare il Manuale di manutenzione del caricatore, 6880309L66. Manutenzione Per la riparazione dell’unità, rivolgersi al Centro riparazioni riportato di seguito. Prima di restituirla, chiamare il Centro per segnalare la spedizione. Centro riparazioni Motorola Motorola GmbH Customer Care Am Borsigturm 130 13507 Berlin Germany. Italiano Tel: +49 30 6686 1555 27 Italiano Appunti 28 INHOUDSOPGAVE Belangrijke veiligheidsvoorschriften. . . . . . . . . . . . . . . . . . . . . . . . . . . 2 Richtlijnen voor veilig gebruik . . . . . . . . . . . . . . . . . . . . . . . . . . . . . . . 3 Beschrijving van functies en voorzieningen van IMPRES . . . . . . . . . . 4 Kenmerken en verschillen in gebruik . . . . . . . . . . . . . . . . . . . . . . . . . . 5 Lijst van batterijen . . . . . . . . . . . . . . . . . . . . . . . . . . . . . . . . . . . . . . . . 7 Voedingsbronnen en door Motorola goedgekeurde voedingsadapters . . . . . . . . . . . . . . . . . . . . . . . . . . . . . . . . . . . . . . . 10 Gebruiksaanwijzing . . . . . . . . . . . . . . . . . . . . . . . . . . . . . . . . . . . . . . 11 Opladen van de batterijen . . . . . . . . . . . . . . . . . . . . . . . . . . . . . . . 13 Handmatig reconditioneren van de batterijen . . . . . . . . . . . . . . . . 14 Automatisch reconditioneren van de batterijen . . . . . . . . . . . . . . . 14 Handmatig beëindigen van de reconditioneringsprocedure . . . . . 15 Problemen en oplossingen . . . . . . . . . . . . . . . . . . . . . . . . . . . . . . . . 16 Service . . . . . . . . . . . . . . . . . . . . . . . . . . . . . . . . . . . . . . . . . . . . . . . . 17 Laders met displaymodule (CDM) . . . . . . . . . . . . . . . . . . . . . . . . . . . 18 Deze accessoirehandleiding is van toepassing op de volgende universele meervoudige IMPRES-laders: WPLN4108, WPLN4109, WPLN4110, WPLN4118, WPLN4119, WPLN4120, WPLN4121, WPLN4123, WPLN4130, WPLN4131, WPLN4132, WPLN4133, WPLN4134, WPLN4135, WPLN4136 ‘Universeel’ betekent dat de lader meerdere radiomodellen ondersteunt en, met gebruikmaking van batterijadapters, alle batterijen zoals vermeld in tabel 1 tot en met 6. 1 Nederlands Deze handleiding is tevens van toepassing op de volgende universele meervoudige IMPRES-laders, die verkrijgbaar zijn voor de portofoons uit de GP Professional Serie: WPLN4144, WPLN4145, WPLN4146, WPLN4187, WPLN4188, WPLN4189, WPLN4190, WPLN4191, WPLN4192, WPLN4193, WPLN4194, WPLN4195, WPLN4196, WPLN4204, WPLN4205 BELANGRIJKE VEILIGHEIDSVOORSCHRIFTEN BEWAAR DEZE INSTRUCTIES Dit document bevat belangrijke veiligheidsvoorschriften en instructies voor gebruik. Lees deze instructies aandachtig door en bewaar het document voor toekomstig gebruik. Lees alle instructies en waarschuwingen op (1) de lader zelf, (2) de batterij en (3) de radio waarin de batterij gebruikt wordt aandachtig door alvorens de lader in gebruik te nemen. . 1. Beperk het risico van persoonlijk letsel tot het minimum door uitsluitend de door Motorola goedgekeurde oplaadbare batterijen te laden, zoals vermeld in tabel 1 t/m 5. Andere batterijen kunnen exploderen en persoonlijk letsel en schade WAARSCHUWING veroorzaken. ! 2. Gebruik van accessoires die niet zijn aanbevolen door Motorola kan risico van brand, elektrische schokken of persoonlijk letsel veroorzaken. 3. Beperk het risico van beschadiging van de stekker en het stroomsnoer door bij het uitschakelen van de lader en verwijderen van het stroomsnoer aan de stekker te trekken en nooit aan het stroomsnoer zelf. 4. Gebruik geen verlengsnoer tenzij absoluut noodzakelijk. Gebruik van een ongeschikt verlengsnoer veroorzaakt risico van brand en elektrische schokken. Nederlands 5. Beperk het risico van brand, elektrische schokken, of persoonlijk letsel door de lader niet te gebruiken indien deze op enigerlei wijze is gebroken of beschadigd. Breng de lader in dit geval naar een erkend Motorola onderhoudsbedrijf. 6. Dit apparaat kan worden gerepareerd. Elk laadvak wordt gevoed door een unieke printkaart met voedingseenheid. De printkaart met voedingseenheid is verkrijgbaar bij de aftermarket-/onderdelenorganisatie. Het onderdeelnummer van de reserveprintkaart is RLN5325. Er zijn geen andere reserveonderdelen verkrijgbaar. Bij de aftermarket-/ onderdelenorganisatie kan een onderhoudshandleiding worden besteld waarin de procedure voor het vervangen van deze onderdelen wordt beschreven. Het nummer van de onderhoudshandleiding is 6880309L66. 7. Verwijder de lader altijd eerst uit het stopcontact alvorens onderhoud aan de lader uit te voeren of de lader te reinigen, om het risico van elektrische schokken te beperken. 2 RICHTLIJNEN VOOR VEILIG GEBRUIK • Zet de radio uit wanneer de batterij wordt opgeladen. • Deze apparatuur is niet geschikt voor gebruik buitenshuis en mag uitsluitend op droge plaatsen/onder droge omstandigheden worden gebruikt. • Sluit het apparaat uitsluitend aan op een stopcontact met een geschikte zekering en met het juiste voltage (zoals vermeld op het product). • Ontkoppel het apparaat van lijnspanning door de stekker uit het stopcontact te trekken. • Het stopcontact waarop het apparaat is aangesloten, dient dichtbij en makkelijk bereikbaar te zijn. • Voor apparatuur met zekeringen dienen nieuwe zekeringen overeen te komen met het type en toelaatbare vermogen zoals vermeld in de instructies van de apparatuur. • Maximale omgevingstemperatuur om de lader mag niet hoger zijn dan 40°C. • Zorg dat het snoer zodanig is gelegd dat niemand erop kan trappen of erover kan struikelen, en dat het niet kan worden blootgesteld aan water, beschadiging of te strak gespannen wordt. • Dit apparaat gebruikt dezelfde muursteun als de meervoudige lader NTN4796. Het onderdeelnummer van de muursteun is NLN7967. • Gebruik bij het vervangen van zekeringen alleen zekeringen van het type en toelaatbare vermogen zoals genoemd op het etiket van de lader. De volgende onderdelen kunnen bij uw plaatselijke aftermarket-/onderdelencentrum worden besteld: Zekering 6571489S01 Houder 0987626G01 Deksel 0987739G01 Nederlands 3 BESCHRIJVING VAN FUNCTIES EN VOORZIENINGEN VAN IMPRES De IMPRES-lader is een geavanceerd energiesysteem op basis van drie chemicaliën dat is ontwikkeld door Motorola, en bevat het volgende: (a) IMPRESbatterijen, (b) IMPRES Adaptieve meervoudige lader, en (c) radiohardware/software voor communicatie tussen de IMPRES-compatibele radio’s en IMPRESbatterijen (niet van toepassing op portofoons uit de GP Professional Serie). Indien gebruikt met IMPRES-batterijen van Motorola, biedt de Adaptieve meervoudige lader van IMPRES het volgende: • Optimale werkingsduur tussen ladingscycli door automatisch het geheugeneffect te elimineren. • Optimale levensduur van de batterij door de warmte tijdens de druppel- en naladingscycli aanzienlijk te verminderen. • De noodzaak tot het kopen van reconditioneringsapparatuur en het opleiden van personeel voor beheer van de onderhoudstaken voor batterijen komt hierbij geheel te vervallen. Met dit unieke gepatenteerde systeem hoeft batterijgebruik niet meer te worden bijgehouden en geregistreerd, zijn handmatige reconditioneringscycli overbodig en hoeven batterijen niet meer uit de laders te worden verwijderd als ze zijn opgeladen. De IMPRES Adaptieve meervoudige lader houdt zelf het gebruikspatroon van de IMPRES-batterij bij, slaat deze informatie op in de IMPRES-batterij en voert alleen wanneer nodig een reconditioneringscyclus uit. Nederlands De batterij raakt nooit oververhit in de IMPRES Adaptieve meervoudige lader, ongeacht hoe lang de batterij in het laadvak staat. De lader controleert de batterij en laadt de batterij automatisch bij wanneer noodzakelijk. De IMPRES Adaptieve meervoudige lader vereenvoudigt het laden en onderhoud van de batterij: De gebruiker hoeft slechts de volgende eenvoudige stappen te volgen: 1. Plaats de radio/batterij in de lader 2. Verwijder de radio/batterij wanneer deze volledig is geladen! Motorola is de enige fabrikant die een conditionerings- of reconditioneringslader biedt waarmee gebruikers ofwel de radio met de batterij of alleen de batterij kunnen laden. 4 KENMERKEN EN VERSCHILLEN IN GEBRUIK: 1. IMPRES-batterijen kunnen in conventionele laders worden geladen. De functie Smart Energy wordt echter alleen ingeschakeld als elke IMPRES-batterij in een IMPRES Adaptieve meervoudige lader wordt geladen. De eerste keer dat een IMPRES-batterij in een IMPRES Adaptieve meervoudige lader wordt geladen, geeft de laadindicator van de lader een CONSTANT BRANDEND GEEL lampje weer. Laat de batterij in de lader staan totdat de laadindicator een CONSTANT BRANDEND GROEN lampje weergeeft. De IMPRES-batterij is dan geijkt en de functie Smart Energy ingeschakeld. Als deze procedure wordt onderbroken, wordt de batterij de volgende keer wanneer deze in de lader wordt geplaatst geijkt. 2. De IMPRES Adaptieve meervoudige lader stelt automatisch de omstandigheden vast waaronder de IMPRES-batterij gereconditioneerd moet worden. Hierdoor kan het gebeuren dat de lader overschakelt in de reconditioneringsmodus wanneer er een radio of batterij in de lader wordt geplaatst. Dit wordt aangegeven met een CONSTANT BRANDEND GEEL lampje op de laadindicator. De reconditioneringsmodus kan indien gewenst worden uitgeschakeld door de radio of batterij uit de lader te verwijderen en weer in de lader te plaatsen. (Zie de instructies verderop in deze gebruiksaanwijzing.) 3. De IMPRES Adaptieve meervoudige lader is ontworpen voor het laden van de batterijen die vermeld worden in tabel 1 t/m 6. De functies van Smart Energy werken echter alleen met originele IMPRES-batterijen. (Deze lijst zal worden bijgewerkt wanneer nieuwe modellen radio’s en/of batterijen op de markt worden gebracht, en zal via de verschillende OEM- en aftermarket-organisaties over de hele wereld onder de klanten worden verspreid.) 4. Voor het ijken van de IMPRES Smart-batterijen moet gebruik worden gemaakt van de IMPRES Adaptieve meervoudige lader, om te zorgen dat de gegevens van het gebruik van de IMPRES-batterij nauwkeurig worden geregistreerd, opgeslagen en weergegeven. Nederlands 5 5. Als een IMPRES-batterij wordt gebruikt met een portofoon met display (bijvoorbeeld de XTS5000), dan kan de portofoon een symbool weergeven dat de laadstatus van de batterij aangeeft. Dit symbool wordt geactiveerd nadat een IMPRES-batterij in een IMPRES-lader gekalibreerd is. Het laderstatussymbool blijft geactiveerd zo lang de batterijen met IMPRES-laders worden opgeladen. Als een IMPRES-batterij over een periode van 7 dagen (of langer) echter wordt geladen in een lader anders dan IMPRES, zal het symbool verdwijnen. U activeert het symbool weer door een IMPRES-batterij in een IMPRES-lader te plaatsen en deze de volledige laadcyclus te laten doorlopen (aangeduid met een CONSTANT BRANDEND GROEN lampje). Het laadstatussymbool wordt dan weer op het display van de portofoon weergegeven. Als het symbool na een volledige laadcyclus niet opnieuw wordt weergegeven, plaatst u een gedeeltelijk ontladen batterij (ten minste 70% ontladen) in de lader, start u een reconditioneringscyclus en laat u de batterij de volledige laadcyclus doorlopen. Het symbool wordt dan op het display van de portofoon weergegeven (niet van toepassing op portofoons uit de GP Professional Serie). Nederlands 6. De IMPRES Adaptieve meervoudige lader mag alleen gerepareerd worden door een bevoegd servicemonteur, die door Motorola goedgekeurd is. Bij overtreding van dit voorschrift kan de garantie op het apparaat vervallen. 6 LIJST VAN BATTERIJEN De onderstaande tabel vermeldt alle batterijen die kunnen worden gebruikt met de specifieke portofoons zoals vermeld boven aan de tabel. Tabel 1. Radio’s in de serie XTS3000 / XTS3500 / Dimetra & de XTS5000 digitale radio Kit (PN) HNN9031 HNN9032 NTN8294 NTN8295 NTN8297 NTN8299 NTN8610 NTN8293 NNTN4435 NNTN4436 NNTN4437 RNN4006 RNN4007 NTN9862 Chemicaliën NiCD NiCD NiCD NiCD NiCD NiCD LiIon NiMH NiMH NiMH NiMH NiMH NIMH LiIon FM Nee Ja Nee Ja Ja Ja Nee Nee Nee Ja Ja Nee Ja Nee Smart Ja Ja Nee Nee Nee Nee Nee Nee Ja Ja Ja Nee Nee Ja Capaciteit Ultra-hoog Ultra-hoog Ultra-hoog Ultra-hoog Ultra-hoog Ultra-hoog Hoog Ultra-hoog Ultra-hoog Ultra-hoog Ultra-hoog Ultra-hoog Ultra-hoog Ultra-hoog Nieuw model Nee Nee Nee Nee Nee Nee Nee Nee Nee Nee Nee Nieuw Nieuw Nieuw Tabel 2. De XTS2500 digitale radio’s Chemicaliën NiMH NiMH NiCD NiCD FM Nee Ja Nee Ja Smart Nee Nee Nee Nee Capaciteit Ultra-hoog Ultra-hoog Hoog Hoog Nieuw model Nieuw Nieuw Nieuw Nieuw Tabel 3. De MTP700 digitale radio’s Kit (PN) PMNN4048* PMNN4049* PMNN4050* PMNN4047* * Chemicaliën NiMH NiMH Lilon LiIon FM Nee Ja Nee Nee Smart Ja Ja Ja Ja Capaciteit Hoog Hoog Hoog Hoog Nieuw model Nieuw Nieuw Nieuw Nieuw Voor de lader is batterij-adapter nummer RLN5212 vereist als MTP700-batterijen worden opgeladen. 7 Nederlands Kit (PN) NTN9859 NTN9857 NTN9815 NTN9816 Tabel 4. De radio’s in de serie HT1000 / MT2000 / MTS2000 / MTX8000 & MTX9000 Kit (PN) HNN9028 HNN9029 NTN7143 NTN7144 NTN7146 NTN7147 NTN7148 NTN7149 NTN7150 NTN7341 NTN7372 WPPN4013 WPPN4037 RNN4008 Chemicaliën FM NiCD Nee NiCD Ja NiCD Nee NiCD Nee NiCD Ja NiCD Ja NiCD CENELEC NiCD CSA NiCD MSHA NiCD Ja NiCD Ja NiMH Nee NiMH Ja NiCD ATEX Smart Ja Ja Nee Nee Nee Nee Nee Nee Nee Nee Nee Nee Nee Nee Capaciteit Ultra-hoog Ultra-hoog Hoog Ultra-hoog Hoog Ultra-hoog Hoog Hoog Hoog Ultra-hoog Hoog Ultra-hoog Ultra-hoog Hoog Nieuw model Nee Nee Nee Nee Nee Nee No Nee Nee Nee Nee Nee Nee No Nederlands Tabel 5. De Saber / Astro Saber / SSE5000 / MX1000-radio’s Kit (PN) HNN9033 HNN9031 NTN4537** NTN4538 NTN4592** NTN4593 NTN4595 NTN4596 NTN4657 NTN4671 NTN4992 NTN7014** NTN7058 NTN7426 NTN8251 NTN8818** ** Chemicaliën FM NiCD Nee NiCD Ja NiCD Ja NiCD Ja NiCD Nee NiCD Nee NiCD Nee NiCD Ja NiCD Nee NiCD CENELEC NiCD Ja NiMH Nee NiCD Ja NiCD Ja NiMH Ja LiIon Nee Smart Ja Ja Nee Nee Nee Nee Nee Nee Nee Nee Nee Nee Nee Nee Nee Nee Capaciteit Ultra-hoog Ultra-hoog Lag Hoog Lag Hoog Ultra-hoog Ultra-hoog Hoog Hoog Ultra-hoog Hoog Ultra-hoog Lag Ultra-hoog Hoog Nieuw model Nee Nee Nee Nee Nee Nee Nee Nee Nee No Nee Nee Nee Nee Nee Nee Voor de lader is batterij-adapter nummer 4385922B01 vereist als Astro Saberbatterijen worden opgeladen. 8 Tabel 6. Portofoons uit de GP Professional Serie Kit (PN) HNN9003 HNN9008 HNN9009 HNN9010 HNN9011 HNN9012 HNN9013 WPNN4045 PMNN4045 HNN4001 HNN4002 HNN4003 Chemicaliën NiMH AA Bluetooth NiMH NiMH NiMH NiCD NiCD LiIon NiMH NiMH Impres NiMH Impres NiMH Impres LiIon FM Nee Smart Nee Nee Nee Ja Ja Nee Nee Nee Nee Nee Ja Nee Nee Nee Nee Nee Nee Nee Nee Nee Ja Ja Ja Capaciteit Hoog Nieuw model Nee Hoog Ultra-hoog Ultra-hoog Hoog Hoog Hoog Hoog Hoog Ultra-hoog Ultra-hoog Ultra-hoog Nee Nee Nee Nee Nee Nee Nee Nee Ja Ja Ja De universele lader vereist een batterijadapter, onderdeelnummer RLN5648. OPMERKING: Adapters zijn verkrijgbaar bij de verkoper van de radio of bij een vertegenwoordiger van het aftermarket-verkoopteam. Nederlands 9 VOEDINGSBRONNEN EN DOOR MOTOROLA GOEDGEKEURDE VOEDINGSADAPTERS Deze lader is bedoeld voor gebruik in toepassingen van 100 V - 240 V wisselstroom, 50/60 Hz. De lader gebruikt de volgende stroomkabels van Motorola, zoals vermeld in tabel 7. Stroomkabels voor gebruik met de lader voor portofoons uit de GP Professional Serie worden vermeld in tabel 8. Tabel 7. Stroomkabels van Motorola voor de universele modellen Stekkertype Geen stroomkabel/ stekker VS/n.v.t Euro U.K. Australië/Nieuw Zeeland Argentinië VS/n.v.t Korea Lader-kit WPLN4121 Lader-kit Stroomkabel (Model met display) WPLN4127 Geen WPLN4108 WPLN4109 WPLN4110 WPLN4118 WPLN4119 WPLN4120 WPLN4123 WPLN4130 WPLN4131 WPLN4132 WPLN4133 WPLN4134 WPLN4135 WPLN4136 3087791G01 3087791G04 3087791G07 3087791G10 3087791G13 3087791G01 3087791G16 Tabel 8. Stroomkabels van Motorola voor modellen uit de GP Professional Serie Nederlands Stekkertype Geen stroomkabel/ stekker VS/n.v.t Euro U.K. Australië/Nieuw Zeeland Argentinië VS/n.v.t Korea Lader-kit WPLN4197 Lader-kit Stroomkabel (Model met display) WPLN4198 Geen WPLN4187 WPLN4189 WPLN4188 WPLN4190 WPLN4191 WPLN4205 WPLN4146 WPLN4192 WPLN4194 WPLN4193 WPLN4195 WPLN4196 WPLN4204 WPLN4145 10 3087791G01 3087791G04 3087791G07 3087791G10 3087791G13 3087791G01 3087791G16 GEBRUIKSAANWIJZING OPMERKINGEN Met de IMPRES adaptieve meervoudige lader worden alleen de batterijen geladen die zijn goedgekeurd door Motorola, zoals vermeld in tabel 1 t/m 6. Andere batterijen kunnen veelal niet worden geladen met de lader. De IMPRES adaptieve meervoudige lader heeft automatische functies en voorzieningen die verschillen van andere batterijladers. Let goed op de laadindicator om te controleren dat de lader in de gewenste/verwachte gebruiksmodus werkt. 11 Nederlands In het laadvak van de lader kan een radio met batterij of alleen de batterij worden geplaatst. Alvorens een radio met batterij te laden, de radio altijd eerst uitschakelen. Batterijen worden het beste geladen wanneer ze tijdens het laden op kamertemperatuur zijn. 1. Steek het uiteinde van de stroomkabel voor de lader in de wisselstroomaansluiting op de achterkant van de lader. 2. Steek de stekker aan het andere uiteinde van de stroomkabel in een geschikt stopcontact. Als de opstartprocedure goed verloopt, ziet u een ENKEL KNIPPEREND GROEN lampje op de laadindicator. 3. Plaats een batterij, of een radio met batterij (radio uitgeschakeld), als volgt in het laadvak van de lader: a. Richt de groef aan elke kant van de batterij uit op de opstaande rand aan beide zijden van het laadvak. b. Duw de batterij tegen de achterkant van het laadvak. c. Schuif de batterij in het laadvak, waarbij u erop moet letten dat de lader en de batterijcontacten goed contact maken. Als de batterij goed in het laadvak is geplaatst, gaat de laadindicator branden om aan te geven dat de lader een batterij in het laadvak heeft geregistreerd. Raadpleeg tabel 9 voor informatie over de betekenis van de laadlampjes. Tabel 9. Laadlampjes Nederlands Laadindicator Betekenis Enkel knipperend groen Opstartprocedure van lader is met succes voltooid. Constant brandend rood Batterij werkt in snellaadmodus. Groen knipperend Snellaadprocedure is voltooid (>90% beschikbare capaciteit). Batterij is nu in afrondingsmodus (druppellading). Constant brandend groen Opladen is voltooid en de batterij is geheel geladen. Geel knipperend Lader heeft batterij geregistreerd maar wacht op opladen. (De spanning van de batterij is te laag of de temperatuur van de batterij is te laag of te hoog om geladen te kunnen worden. De batterij wordt opgeladen zodra deze toestand is gecorrigeerd.) Rood knipperend Batterij kan niet worden geladen of maakt geen contact met de lader. Constant brandend geel (Deze functie is uitsluitend voor Smart-batterijen) Batterij is in reconditioneringsmodus. De tijdsduur dat de batterij in deze modus blijft, is afhankelijk van de lading van de batterij op het moment dat deze in de lader wordt geplaatst. (Geheel geladen batterijen nemen meer tijd in beslag voor reconditioneren – 8 uur of langer – dan batterijen die helemaal leeg zijn.) Rood/groen knipperend (Deze functie is uitsluitend voor Smart-batterijen) Opladen is voltooid en batterij is geheel geladen. Hoewel de batterij nog kan worden gebruikt, moet deze waarschijnlijk binnenkort worden vervangen. OPMERKING Indien gebruikt met Motorola IMPRES-batterijen beschikt de IMPRES Adaptieve meervoudige lader over het unieke vermogen automatisch te kunnen registreren of de in de lader geplaatste batterij gereconditioneerd moet worden. De functies van de Motorola Smart-batterijen en het adaptieve laadsysteem kunnen alleen volledig werken als de gegevens in de Motorola Smart-batterijen bij de eerste lading in de lader worden geïnitialiseerd. Deze procedure wordt aangegeven met een CONSTANT BRANDEND GEEL lampje op de laadindicator (dezelfde indicatie als wanneer de batterij wordt gereconditioneerd). Deze procedure, die geheel automatisch is, omvat tevens een eerste reconditionering van de batterij. Na voltooiing hiervan wordt de batterij geladen. De initialisering neemt enige tijd in beslag, en de batterij dient daarom bij de eerste lading een hele nacht in de lader te blijven staan. 12 De IMPRES Adaptieve meervoudige lader functioneert als: • een lader met alle door Motorola goedgekeurde batterijen, en • een reconditioneringsapparaat met door Motorola goedgekeurde IMPRESbatterijen. Opladen van de batterijen BELANGRIJK: Het laadvak is geschikt voor batterijen van verschillende vormen en grootten, en het is daarom uiterst belangrijk dat een radio met batterij of een losse batterij correct in het laadvak wordt geplaatst. Als een radio met batterij of een losse batterij niet goed in het laadvak is geplaatst, gaat de indicator niet branden, hetgeen betekent dat de batterij niet wordt geladen. OPMERKING: Bij het laden van nieuwe (nog niet eerder gebruikte) batterijen wordt in sommige gevallen vroegtijdig aangegeven dat de batterij is geladen (CONSTANT BRANDEND GROEN lampje). 13 Nederlands Voor optimale prestaties wordt u aanbevolen nieuwe batterijen 14 tot 16 uur in de lader te laten staan alvorens deze in gebruik te nemen. 1. Als de radio met batterij of de losse batterij goed in de lader is geplaatst, begint de lader met de snellaadprocedure, hetgeen wordt aangegeven met een CONSTANT BRANDEND ROOD lampje op de laadindicator. De duur dat het CONSTANT BRANDENDE RODE lampje blijft branden, is afhankelijk van de lading die de batterij heeft op het moment dat deze in de lader wordt geplaatst. 2. Als de snellaadprocedure is voltooid (>90% beschikbare capaciteit), verschijnt er een KNIPPEREND GROEN lampje op de laadindicator. Hiermee wordt de afrondingslading (druppellading) aangegeven, hetgeen ongeveer 1 uur duurt. 3. Als de afrondingslading is voltooid, verschijnt er een CONSTANT BRANDEND GROEN lampje op de laadindicator. Hiermee wordt aangegeven dat de batterij geheel geladen is. 4. Andere lampjes die tijdens het laden op de laadindicator kunnen verschijnen, zijn: • KNIPPEREND GEEL – geeft aan dat ofwel de temperatuur van de batterij of de spanning van de batterij buiten bereik is voor opladen. Het laden wordt weer hervat zodra deze toestand is gecorrigeerd. • KNIPPEREND ROOD EN GROEN – geeft aan dat de batterij tegen het einde van zijn levensduur loopt. Zelf als de batterij volledig is geladen zal de capaciteit toch zijn verminderd, waardoor de batterij bepaalde intensievere toepassingen wellicht niet meer goed kan verwerken. Deze functie is uitsluitend beschikbaar bij gebruik van Motorola IMPRESbatterijen. Dit is geen aanduiding van een defect, maar meer een melding om de gebruiker op de hoogte te stellen dat de batterij binnenkort niet meer • goed zal functioneren en aan vervanging toe is. KNIPPEREND ROOD – geeft aan dat de batterij niet kan worden geladen. Dit kan veroorzaakt worden doordat er geen contact is tussen de contacten van de batterij en de lader. Het opladen wordt hervat zodra deze toestand is verholpen. Motorola Smart-batterijen hebben een intern geheugenapparaat, dat wordt gelezen door de Motorola IMPRES Adaptieve meervoudige lader. Als een IMPRES-batterij meer dan 2 ½ minuut wordt geladen, behoudt de IMPRES Adaptieve lader het serienummer van de IMPRES-batterij. De IMPRES-batterij kan dan gedurende maximaal 30 minuten uit de lader worden verwijderd. Wanneer de batterij weer in de lader wordt geplaatst, hervat de lader de laadprocedure weer vanaf het punt waarop de batterij uit de lader werd verwijderd. Handmatig reconditioneren van de batterijen Binnen 2 ½ minuut nadat een IMPRES-batterij voor het eerst in de lader is geplaatst (CONSTANT BRANDEND ROOD lampje), verwijdert u de batterij en plaatst u deze binnen 5 seconden weer in de lader om handmatige reconditionering te starten. De laadindicator verandert van een CONSTANT BRANDEND ROOD lampje in een CONSTANT BRANDEND GEEL lampje. De lader zal de batterij eerst reconditioneren en vervolgens opladen. OPMERKING: Overmatig gebruik van deze functie heeft een negatieve invloed op de levensduur van de batterij. Automatisch reconditioneren van de batterijen Nederlands Indien gebruikt met een Motorola IMPRES-batterij heeft de Motorola IMPRES Adaptieve meervoudige lader het vermogen te bepalen wanneer de batterij moet worden gereconditioneerd. Als een IMPRES-batterij goed in de lader is geplaatst, kan de lader bepalen of de batterij gereconditioneerd moet worden. Als de batterij moet worden gereconditioneerd, verschijnt er automatisch een CONSTANT BRANDEND GEEL lampje op de laadindicator. Deze procedure kan maximaal 8 uur duren, afhankelijk van de lading en het vermogen van de batterij wanneer deze in de lader wordt geplaatst. 14 Voor effectieve werking van deze functie is het belangrijk dat de procedure voor reconditioneren en opladen van de batterij geheel wordt afgerond. Laat de batterij in de lader staan totdat er een CONSTANT BRANDEND GROEN lampje op de laadindicator verschijnt. Als de reconditionering is voltooid, wordt de batterij automatisch opgeladen. Handmatig beëindigen van de reconditioneringsprocedure Op elk gewenst moment tijdens de reconditionering van een Motorola IMPRESbatterij (CONSTANT BRANDEND GEEL lampje), kan de reconditionering worden afgebroken door de batterij uit de lader te verwijderen en binnen 5 seconden weer in de lader te plaatsen. Hierdoor zal de lader de reconditionering beëindigen en beginnen met het opladen van de batterij. De laadindicator verandert in een CONSTANT BRANDEND ROOD lampje. Nederlands 15 PROBLEMEN EN OPLOSSINGEN De IMPRES Adaptieve meervoudige lader beschikt over het volgende: • een universele voedingsingang (100 V - 240 V wisselstroom, 50/60 Hz) • een snellader met constante stroomsterkte, • een conditioneringslader met onderbroken stroom (negatieve puls) • een reconditioneringseenheid. De hierboven vermelde functies zijn uniek voor een desktop-lader. Wanneer u een radio met batterij in de lader plaatst, wordt gebruik van de radio afgeraden. Wanneer een radio in de lader is geplaatst, kan dit een minimale storing in de werking van de radio veroorzaken en kan het opladen van de batterij langer duren. Tegen het einde van de snellaadcyclus (CONSTANT BRANDEND ROOD lampje), overschrijdt de spanning van de batterij de normale gebruiksspanning van de radio. De spanning bereikt het normale niveau na de snellaadmodus of wanneer de batterij uit de lader wordt verwijderd. Als de radio wordt ingeschakeld wanneer de lader in snellaadmodus werkt, wordt de radio tijdelijk onbruikbaar. Dit wordt verholpen door de radio uit de lader te verwijderen en de radio uit en weer in te schakelen. Tijdens de reconditioneringsprocedure wordt alle spanning uit de batterij verwijderd. Hierdoor is het mogelijk dat de radio niet werkt tijdens reconditionering. Nederlands Let bij het oplossen van problemen altijd op de laadindicator – raadpleeg tabel 9. 16 Tabel 10. Problemen en oplossingen Probleem Verklaring Oplossing Geen laadindicator • Geen contact met de lader. • Controleer of de radio met batterij of de losse batterij goed in de lader is geplaatst. • Geen stroom naar de lader. • Controleer of de stroomkabel goed is aangesloten op de lader en dat een geschikt stopcontact wordt gebruikt, en dat er stroom staat op het stopcontact. • Vervang de zekering(en). Knipperend rood lampje • Geen contact met de lader. • Verwijder de batterij uit de lader en plaats deze dan weer in de lader. • Controleer of de batterij tot de door Motorola goedgekeurde batterijen behoort, zoals vermeld in tabel 1 t/ m 6. Andere batterijen kunnen veelal niet worden geladen. • Verwijder de stroomaansluiting van de lader en reinig de goudmetalen laadcontacten op de batterij en de lader met een schone droge doek. • Batterij kan niet worden • Vervang de batterij. geladen. Knipperend geel lampje • Batterij wacht om te worden • Zodra deze toestand is geladen. De temperatuur gecorrigeerd, begint de lader met van de batterij is misschien het opladen van de batterij. lager dan 5°C of hoger dan 40°C, of de spanning van de batterij is lager dan de vooringestelde drempelwaarde voor snelladen. De IMPRES Adaptieve meervoudige lader mag alleen gerepareerd worden door een bevoegd servicemonteur, die door Motorola goedgekeurd is. Bij overtreding van dit voorschrift kan de garantie op het apparaat vervallen. 17 Nederlands SERVICE LADERS MET DISPLAYMODULE (CDM) De IMPRES Adaptieve meervoudige lader kan worden uitgebreid met een laderdisplaymodule (CDM), Motorola-onderdeelnr. RLN5382. Algemene informatie op display De IMPRES Adaptieve meervoudige lader met CDM geeft de gebruiker waardevolle informatie tijdens het onderhouden en verzorgen van de batterij. De onderstaande tabellen geven een overzicht van de informatie op het laderdisplay en de betekenis van de lampjes. Opstarten Upon Charger Power-up (Wanneer de lader wordt ingeschakeld) Lampje SINGLE FLASH GREEN (ENKEL KNIPPEREND GROEN) Regel 1 IMPRES (IMPRES) Regel 2 If There is No Battery in the Pocket (Geen batterij in laadvak) Lampje OFF (UIT) Regel 1 NO BATTERY (GEEN BATTERIJ) Regel 2 Reading Battery Data (Batterijgegevens worden gelezen) Lampje Any Defined Indication (Een van de specifieke aanduidingen) Regel 1 READING (BEZIG MET LEZEN VAN) Regel 2 BATTERY DATA (BATTERIJGEGEVENS) Nederlands Non-IMPRES Battery in the Pocket (Niet-IMPRES batterij in laadvak) Lampje Defined by Charge State (Afhankelijk van laadstatus) Regel 1 NON-IMPRES (NIET-IMPRES) Regel 2 BATTERY (BATTERIJ) IMPRES Battery in the Pocket (IMPRES-batterij in laadvak) IMPRES en softwareversies worden weergegeven Lampje Defined by Charge State (Afhankelijk van laadstatus) Regel 1 IMPRES (IMPRES) Regel 2 SW xx.yy; aa.bb (SW xx.yy;aa.bb) 18 OPMERKING: xx.yy geeft de softwareversie van de lader aan, en aa.bb de softwareversie van de CDM. IMPRES Battery Kit # and Chemistry are Displayed (IMPRES-batterijkit # en Chemistry worden weergegeven) Lampje Defined by Charge State (Afhankelijk van laadstatus) Regel 1 KIT# -------- (KIT#--------) Regel 2 -----CHEMISTRY (-----CHEMISTRY) Forecasted # of Cycles Prior to Automatic Recondition (Verwacht aantal cycli voor automatische reconditionering) Lampje Defined by Charge State (Afhankelijk van laadstatus) Regel 1 ----CYCLES (----CYCLI) Regel 2 TO RECONDITION (TOT RECONDITIONEREN) * Wordt alleen weergegeven wanneer reconditionering in minder dan 6 cycli verwacht wordt. Charger Waiting to Charge, Battery is Hot (Lader wacht met laden, batterij is heet ) Lampje Flashing ORANGE (Knipperend ORANJE) Regel 1 WAITING TO CHG (WACHT MET LADEN) Regel 2 HOT BATTERY (HETE BATTERIJ) Charger Waiting to Charge, Battery is Cold (Lader wacht met laden, batterij is koud) Lampje Flashing ORANGE (Knipperend ORANJE) Regel 1 WAITING TO CHG (WACHT MET LADEN) Regel 2 COLD BATTERY (KOUDE BATTERIJ) Lampje Flashing ORANGE (Knipperend ORANJE) Regel 1 WAITING TO CHG (WACHT MET LADEN) Regel 2 LOW VOLTAGE (LAGE SPANNING) OPMERKING: Niet alle hierboven genoemde schermen zullen worden weergegeven. Lader wacht met laden (hete batterij, koude batterij, lage spanning) wordt bijvoorbeeld alleen weergegeven wanneer dit nodig is. 19 Nederlands Charger Waiting to Charge, Low Voltage (Lader wacht met laden, lage spanning) Charger is in Trickle Charge Mode (Lader in druppellaadmodus) Lampje Flashing GREEN (Knipperend GROEN) Regel 1 TRICKLE CHARGE (DRUPPELLADING) Regel 2 Charge is Complete (Laden voltooid) Lampje Steady GREEN or Flashing RED / GREEN (Constant brandend GROEN of knipperend ROOD /GROEN ) Regel 1 CHARGE COMPLETE (LADEN VOLTOOID) Regel 2 Charger is in Discharge/Reconditioning Mode (Lader in ontlaad-/ reconditioneringsmodus) Lampje Steady ORANGE (Constant brandend ORANJE) Regel 1 DISCHARGE (ONTLADEN) Regel 2 Nederlands Charger is Calibrating an IMPRES Battery (Lader kalibreert een IMPRES-batterij) Lampje Steady ORANGE, Steady RED, & Flashing ORANGE or GREEN (Constant brandend ORANJE, constant brandend ROOD en knipperend ORANJE of GROEN) Regel 1 Calibrating (Bezig met kalibreren) Regel 2 Battery (van batterij) Lampje Steady GREEN (Constant brandend GROEN) Regel 1 Battery (Batterij) Regel 2 Calibrated (gekalibreerd) *Alle IMPRES-batterijen moeten worden gekalibreerd alvorens u ze voor het eerst in gebruik neemt. Een IMPRES-lader zal voor alle nieuwe batterijen automatisch een kalibratie starten. Battery Capacity Data is Displayed as “%” in mAH, and Voltage (Gegevens over de batterijcapaciteit worden weergegeven als “%” in mAH, en Voltage) Lampje Defined by Charge State (Afhankelijk van laadstatus) Regel 1 ----% RATED CAP. (----% NOM. CAP.) Regel 2 ----mAH --.-V (----mAH --.-V) 20 Estimated Time to Rapid Charge Complete Displayed in Hours, Minutes for NiCd & NiMH IMPRES Batteries Only Geschatte tijd tot snellading Voor NiCd & NiMH IMPRES wordt tijd tot voltooiing weergegeven in uren en minuten Alleen batterijen Lampje Defined by Charge State (Afhankelijk van laadstatus) Regel 1 RAPID CHG ENDS (EINDE SNELLADEN) Regel 2 IN xx HRS, yy MIN (OVER xx UUR,jj MIN) OPMERKING: (1) Geschatte tijd tot voltooiing van de lading is met inbegrip van snellaad- en ontlaadcycli (indien van toepassing). (2) Voor niet-gekalibreerde batterijen wordt mogelijk geen informatie over batterijcapaciteit weergegeven. (3) Het gebruik van IMPRES-batterijen in combinatie met laders anders dan IMPRES-laders kan een negatieve invloed hebben op de capaciteit en nauwkeurigheid van de laadduur. Nederlands 21 Procedureschema's voor IMPRES-batterijen Opmerking: deze schema’s geven een overzicht van de procedures vermeld in ‘Algemene informatie op display’ en zijn alleen in het Engels beschikbaar. Volgorde van weergave bij IMPRES NiCd- en NiMH-batterij Start Lampje Defined by Charge State Elke 73,0 sec Regel 1 KIT# xxxxxxxx (4,0 sec) Regel 2 SN: yyyyyyyyyyyy Lampje Defined by Charge State Regel 1 KIT# xxxxxxxx (2,0 sec) Regel 2 yyyyy CHEMISTRY Lampje Defined by Charge State Regel 1 xxxx CYCLES (2,0 sec) Regel 2 TO RECONDITION Lampje Steady RED Elke 13,0 sec Regel 1 RAPID CHARGE Nederlands (2,0 sec) Regel 2 Lampje Defined by Charge State Regel 1 xx% RATED CAP. (7,0 sec) Regel 2 yyyyy mAH zz.z V Lampje Defined by Charge State Regel 1 RAPID CHG ENDS (4,0 sec) Regel 2 IN xx HRS, yy MIN 22 5 x 65,0 sec Voor kalibratie: Start Lampje Defined by Charge State Every 71.0 sec Regel 1 KIT# xxxxxxxx (4,0 sec) Regel 2 SN: yyyyyyyyyyyy Lampje Defined by Charge State Regel 1 KIT# xxxxxxxx (2,0 sec) Regel 2 yyyyy CHEMISTRY Lampje Steady ORANGE Every 13,0 sec Regel 1 DISCHARGE (2,0 sec) Regel 2 5X Lampje Defined by Charge State Regel 1 CALIBRATING (7,0 sec) 65.0 sec Regel 2 BATTERY Lampje Defined by Charge State Regel 1 RAPID CHG ENDS (4,0 sec) Regel 2 IN xx HRS, yy MIN Nederlands 23 Na kalibratie: Start Lampje Defined by Charge State Regel 1 KIT# xxxxxxxx (4,0 sec) Every 61,0sec Regel 2 SN: yyyyyyyyyyyy Lampje Defined by Charge State Regel 1 KIT# xxxxxxxx (2,0 sec) Regel 2 yyyyy CHEMISTRY Lampje Steady GREEN Regel 1 CHARGE COMPLETE (2,0 sec) Every 11 sec Regel 2 5X Lampje Defined by Charge State Regel 1 BATTERY (2,0 sec) Regel 2 CALIBRATED Lampje Defined by Charge State Regel 1 xx% RATED CAP. Regel 2 yyyy mAH zz.z V Nederlands (7,0 sec) 24 55,0 sec Volgorde van weergave bij IMPRES Li-Ionbatterij Start Lampje Defined by Charge State Every 53,0 sec Regel 1 KIT# xxxxxxxx (4,0 sec) Regel 2 SN: yyyyyyyyyyyy Lampje Defined by Charge State Regel 1 KIT# xxxxxxxx (2,0 sec) Regel 2 yyyyy CHEMISTRY Lampje Defined by Charge State Regel 1 xxxx CYCLES (2,0 sec) Regel 2 TO RECONDITION Lampje Steady RED Every 9,0 sec Regel 1 RAPID CHARGE (2,0 sec) Regel 2 5X Lampje Defined by Charge State Regel 1 xx% RATED CAP. (7,0 sec) 45,0 sec Regel 2 yyyyy mAH zz.z V Nederlands 25 Voor kalibratie: Start Lampje Defined by Charge State Every 51,0 sec Regel 1 KIT# xxxxxxxx (4,0 sec) Regel 2 SN: yyyyyyyyyyyy Lampje Defined by Charge State Regel 1 KIT# xxxxxxxx (2,0 sec) Regel 2 yyyyy CHEMISTRY Lampje Steady ORANGE Every 9,0 sec Regel 1 DISCHARGE (2,0 sec) Regel 2 5X Lampje Defined by Charge State Regel 1 CALIBRATING Regel 2 BATTERY Nederlands (7,0 sec) 26 45,0 sec Na kalibratie: Start Lampje Defined by Charge State Every 61,0sec Regel 1 KIT# xxxxxxxx (4,0 sec) Regel 2 SN: yyyyyyyyyyyy Lampje Defined by Charge State Regel 1 KIT# xxxxxxxx (2,0 sec) Regel 2 yyyyy CHEMISTRY Lampje Steady GREEN Regel 1 CHARGE COMPLETE (2,0 sec) Every 11 sec Regel 2 5X Lampje Defined by Charge State Regel 1 BATTERY (2,0 sec) 55,0 sec Regel 2 CALIBRATED Lampje Defined by Charge State Regel 1 xx% RATED CAP. (7,0 sec) Regel 2 yyyy mAH zz.z V Nederlands 27 Stand van tekst op display Omdat de IMPRES Adaptieve meervoudige lader soms op een bureau of aan de muur bevestigd moet worden, kan de tekst op het display ondersteboven worden weergegeven. Om dit te doen steekt u een grote paperclip in het gaatje onder het display, loodrecht naar het bureaublad gericht. Een klik geeft aan dat de schakelaar geactiveerd is en de tekst 180 graden gedraaid wordt. Werking van de IMPRES Adaptieve meervoudige lader Raadpleeg de onderhoudshandleiding, 6880309L66, voor meer informatie over het onderhoud van de MUC en CDM. Onderhoud Voor onderhoud kunt u contact opnemen met het volgende depot. Bel het depot en spreek een retourdatum met hen af alvorens de eenheid op te sturen. Motorola Onderhoudsbedrijf Motorola GmbH Customer Care Am Borsigturm 130 13507 Berlin Germany. Nederlands Tel: +49 30 6686 1555 28 ÑÎÄÅÐÆÀÍÈÅ âàæíûå èíñòðóêöèè ïî òåõíèêå áåçîïàñíîñòè. . . . . . . . . . . . . . . . 2 Òåõíèêà áåçîïàñíîñòè ïðè ýêñïëóàòàöèè. . . . . . . . . . . . . . . . . . . . 3 Îïèñàíèå îñîáåííîñòåé, ôóíêöèé è ïðåèìóùåñòâ çàðÿäíîãî óñòðîéñòâà IMPRES. . . . . . . . . . . . . . . . . . . . . . . . . . . . . . . . . . . . . 4 Ðàáî÷èå õàðàêòåðèñòèêè/îñîáåííîñòè . . . . . . . . . . . . . . . . . . . . . . 5 Ñïèñîê àêêóìóëÿòîðîâ. . . . . . . . . . . . . . . . . . . . . . . . . . . . . . . . . . . . 7 Èñòî÷íèêè ïèòàíèÿ è îäîáðåííûå êîìïàíèåé Motorola àäàïòåðû . . . . . . . . . . . . . . . . . . . . . . . . . . . . . . . . . . . . . . . . . . . . 10 Èíñòðóêöèè ïî ýêñïëóàòàöèè . . . . . . . . . . . . . . . . . . . . . . . . . . . . Çàðÿäêà àêêóìóëÿòîðà . . . . . . . . . . . . . . . . . . . . . . . . . . . . . . . Ðó÷íîå âîññòàíîâëåíèå àêêóìóëÿòîðîâ . . . . . . . . . . . . . . . . . Àâòîìàòè÷åñêîå âîññòàíîâëåíèå àêêóìóëÿòîðîâ . . . . . . . . . . Ïðåêðàùåíèå ïðîöåññà âîññòàíîâëåíèÿ âðó÷íóþ . . . . . . . . 11 13 14 15 15 Óñòðàíåíèå íåèñïðàâíîñòåé. . . . . . . . . . . . . . . . . . . . . . . . . . . . . 16 Îáñëóæèâàíèå. . . . . . . . . . . . . . . . . . . . . . . . . . . . . . . . . . . . . . . . 17 Çàðÿäíûå óñòðîéñòâà ñ ìîäóëåì äèñïëåÿ (CDM) . . . . . . . . . . . . 18 Äàííîå äîïîëíèòåëüíîå ðóêîâîäñòâî ïðèìåíèìî ê ñëåäóþùèì óíèâåðñàëüíûì ìíîãîìåñòíûì çàðÿäíûì óñòðîéñòâàì IMPRES: WPLN4108, WPLN4109, WPLN4110, WPLN4118, WPLN4119, WPLN4120, WPLN4121, WPLN4123, WPLN4130, WPLN4131, WPLN4132, WPLN4133, WPLN4134, WPLN4135, WPLN4136 Êðîìå òîãî, äàííîå ðóêîâîäñòâî ñîäåðæèò ñâåäåíèÿ ïî óíèâåðñàëüíûì ìíîãîìåñòíûì çàðÿäíûì óñòðîéñòâàì IMPRES, äîñòóïíûì äëÿ ðàäèîñòàíöèé ïðîôåññèîíàëüíîé ñåðèè GP: WPLN4144, WPLN4145, WPLN4146, WPLN4187, WPLN4188, WPLN4189, WPLN4190, WPLN4191, WPLN4192, WPLN4193, WPLN4194, WPLN4195, WPLN4196, WPLN4204, WPLN4205 1 Ðóññêèé Ñëîâî «óíèâåðñàëüíûé» îçíà÷àåò, ÷òî çàðÿäíîå óñòðîéñòâî ïîääåðæèâàåò ðàçëè÷íûå ìîäåëè ðàäèîñòàíöèé è, ïðè èñïîëüçîâàíèè àêêóìóëÿòîðíûõ àäàïòåðîâ, âñå àêêóìóëÿòîðû, ïåðå÷èñëåííûå â Òàáë. 1 - 6 âêëþ÷èòåëüíî. ÂÀÆÍÛÅ ÈÍÑÒÐÓÊÖÈÈ ÏÎ ÒÅÕÍÈÊÅ ÁÅÇÎÏÀÑÍÎÑÒÈ ÑÎÕÐÀÍÈÒÅ ÝÒÈ ÈÍÑÒÐÓÊÖÈÈ Â ÍÀÄÅÆÍÎÌ ÌÅÑÒÅ Â äàííîì äîêóìåíòå ñîäåðæàòñÿ âàæíûå èíñòðóêöèè ïî òåõíèêå áåçîïàñíîñòè è ýêñïëóàòàöèè. Âíèìàòåëüíî ïðî÷òèòå ýòè èíñòðóêöèè è ñîõðàíèòå èõ äëÿ äàëüíåéøåãî èñïîëüçîâàíèÿ. Ïåðåä òåì êàê ïðèñòóïèòü ê èñïîëüçîâàíèþ çàðÿäíîãî óñòðîéñòâà ïðî÷òèòå âñå èíñòðóêöèè è èíñòðóêöèè ïî òåõíèêå áåçîïàñíîñòè, ïðî÷òèòå âñþ èíôîðìàöèþ íà (1) ñàìîì óñòðîéñòâå; (2) àêêóìóëÿòîðå; (3) ðàäèîñòàíöèè, â êîòîðîé èñïîëüçóåòñÿ àêêóìóëÿòîð.. 1.Âî èçáåæàíèå òðàâì çàðÿæàéòå â ýòîì óñòðîéñòâå òîëüêî àêêóìóëÿòîðû, îäîáðåííûå êîìïàíèåé Motorola îíè ïåðå÷èñëåíû â òàáë. 1-5. Äðóãèå àêêóìóëÿòîðû ìîãóò âçîðâàòüñÿ, ÷òî ìîæåò ïðèâåñòè ê òðàâìàì è Ïðåäóïðåæäåíèå ïîâðåæäåíèþ èìóùåñòâà. 2. Èñïîëüçîâàíèå àêñåññóàðîâ, íå ðåêîìåíäîâàííûõ êîìïàíèåé Motorola, ìîæåò ïðèâåñòè ê ïîæàðó, ïîðàæåíèþ ýëåêòðîòîêîì èëè òðàâìàì. 3. Äëÿ óìåíüøåíèÿ îïàñíîñòè ïîâðåæäåíèé øòåêåðà è øíóðà ïðè îòñîåäèíåíèè çàðÿäíîãî óñòðîéñòâà áåðèòåñü çà øòåêåð, à íå çà øíóð. 4. Óäëèíèòåëüíûé øíóð ìîæíî èñïîëüçîâàòü òîëüêî â ñëó÷àå êðàéíåé íåîáõîäèìîñòè. Èñïîëüçîâàíèå íåïîäõîäÿùåãî óäëèíèòåëüíîãî øíóðà ìîæåò ïðèâåñòè ê âîçíèêíîâåíèþ îïàñíîñòè ïîæàðà è ïîðàæåíèÿ ýëåêòðîòîêîì. Åñëè íåîáõîäèìî èñïîëüçîâàòü óäëèíèòåëüíûé øíóð, îáåñïå÷üòå èñïîëüçîâàíèå øíóðà 18AWG, åñëè äëèíà øíóðà íå ïðåâûøàåò 30,48 ìåòðà è 16AWG, åñëè äëèíà øíóðà íå ïðåâûøàåò 45,72 ìåòðà. 5. Äëÿ óìåíüøåíèÿ îïàñíîñòè ïîæàðà, ïîðàæåíèÿ ýëåêòðîòîêîì è ïîëó÷åíèÿ òðàâì íå èñïîëüçóéòå ñëîìàííîå èëè äàæå ñëåãêà ïîâðåæäåííîå çàðÿäíîå óñòðîéñòâî. Îáðàòèòåñü â ïðåäñòàâèòåëþ êîìïàíèè Motorola äëÿ ðåìîíòà çàðÿäíîãî óñòðîéñòâà Ðóññêèé ! 6. Ýòî óñòðîéñòâî ìîæíî ðåìîíòèðîâàòü. Êàæäîå ãíåçäî ïèòàåòñÿ îò ñïåöèàëüíîé ïå÷àòíîé ïëàòû è èñòî÷íèêà ïèòàíèÿ. Ïå÷àòíûå ïëàòû è èñòî÷íèêè ïèòàíèÿ ìîæíî ïðèîáðåòàòü ó îðãàíèçàöèè, çàíèìàþùåéñÿ ïîñëåïðîäàæíûì îáñëóæèâàíèåì èëè òîðãîâëåé çàï÷àñòÿìè. Ïå÷àòíàÿ ïëàòà èìååò íîìåð ïî êàòàëîãó RLN5325. Äðóãèõ çàìåíÿåìûõ êîìïîíåíòîâ óñòðîéñòâî íå èìååò. Ó îðãàíèçàöèè, çàíèìàþùåéñÿ ïîñëåïðîäàæíûì îáñëóæèâàíèåì èëè òîðãîâëåé çàï÷àñòÿìè, ìîæíî òàêæå ïðèîáðåñòè ðóêîâîäñòâî ïî îáñëóæèâàíèþ, â êîòîðîì îïèñàí ïîðÿäîê çàìåíû. Ýòî ðóêîâîäñòâî ïî îáñëóæèâàíèþ èìååò íîìåð ïî êàòàëîãó 6880309L66. 7. Äëÿ ñíèæåíèÿ îïàñíîñòè ïîðàæåíèÿ ýëåêòðîòîêîì âûíüòå âèëêó øíóðà ïèòàíèÿ çàðÿäíîãî óñòðîéñòâà èç ñåòåâîé ðîçåòêè ïåðåä âûïîëíåíèåì êàêîãî-ëèáî îáñëóæèâàíèÿ èëè ÷èñòêè. 2 ÒÅÕÍÈÊÀ ÁÅÇÎÏÀÑÍÎÑÒÈ ÏÐÈ ÝÊÑÏËÓÀÒÀÖÈÈ • Ïðè çàðÿäêå àêêóìóëÿòîðîâ âûêëþ÷èòå ðàäèîñòàíöèþ. • Äàííîå îáîðóäîâàíèå íåïðèãîäíî äëÿ ýêñïëóàòàöèè âíå ïîìåùåíèé. Èñïîëüçîâàòü òîëüêî â óñëîâèÿõ íèçêîé âëàæíîñòè. • Ïîäñîåäèíÿéòå îáîðóäîâàíèå òîëüêî ê èñòî÷íèêó ïèòàíèÿ ñ ñîîòâåòñòâóþùèì íàïðÿæåíèåì (óêàçàííûì íà èçäåëèè) è îñíàùåííûì âñåìè íåîáõîäèìûìè ïðåäîõðàíèòåëÿìè è ïðàâèëüíî âûïîëíåííîé ïðîâîäêîé/ýëåêòðîìîíòàæîì. • Îòñîåäèíèòå îò èñòî÷íèêà ïèòàíèÿ – âûíüòå âèëêó øíóðà ïèòàíèÿ èç ñåòåâîé ðîçåòêè. • Ñåòåâàÿ ðîçåòêà, â êîòîðîé ïîäêëþ÷àåòñÿ äàííîå îáîðóäîâàíèå, äîëæíà íàõîäèòüñÿ ïîáëèçîñòè è áûòü ëåãêî äîñòóïíîé. • Åñëè â îáîðóäîâàíèè èìåþòñÿ ïðåäîõðàíèòåëè, ñìåííûå ïðåäîõðàíèòåëè äîëæíû îòíîñèòüñÿ ê òèïó è èìåòü íîìèíàëû, óêàçàííûå â èíñòðóêöèÿõ ê ýòîìó îáîðóäîâàíèþ. • Îêðóæàþùàÿ òåìïåðàòóðà â ìåñòå óñòàíîâêè çàðÿäíîãî óñòðîéñòâà íå äîëæíà ïðåâûøàòü 40°C. • Ðàñïîëîæèòå øíóð òàê, ÷òîáû íà íåãî íåëüçÿ áûëî íàñòóïèòü/ñïîòêíóòüñÿ, ÷òîáû íà íåãî íå ïîïàäàëà âîäà è ÷òîáû îí íå ïîäâåðãàëñÿ ïîâðåæäàþùåìó âîçäåéñòâèþ èëè ñèëàì. • Ñ ýòèì çàðÿäíûì óñòðîéñòâîì èñïîëüçóåòñÿ òî æå íàñòåííîå êðåïëåíèå, ÷òî è ñ ìíîãîìåñòíûì çàðÿäíûì óñòðîéñòâîì NTN4796. Íàñòåííîå êðåïëåíèå èìååò íîìåð ïî êàòàëîãó NLN7967. • Ïðè çàìåíå ïðåäîõðàíèòåëåé èñïîëüçóéòå òîëüêî ïðåäîõðàíèòåëè, òèï è íîìèíàë êîòîðûõ óêàçàí â òàáëè÷êå íà çàðÿäíîì óñòðîéñòâå. Ó ìåñòíîé îðãàíèçàöèè, çàíèìàþùåéñÿ ïîñëåïðîäàæíûì îáñëóæèâàíèåì èëè òîðãîâëåé çàï÷àñòÿìè, ìîæíî çàêàçàòü ñëåäóþùèå ÷àñòè: Ïðåäîõðàíèòåëü 6571489S01 Êîðïóñ 0987626G01 Êðûøêà 0987739G01 Ðóññêèé 3 ÎÏÈÑÀÍÈÅ ÎÑÎÁÅÍÍÎÑÒÅÉ, ÔÓÍÊÖÈÉ È ÏÐÅÈÌÓÙÅÑÒ ÇÀÐßÄÍÎÃÎ ÓÑÒÐÎÉÑÒÂÀ IMPRES Ýíåðãîðåøåíèå IMPRES ÿâëÿåòñÿ âîïëîùåíèåì ïåðåäîâîé ýíåðãîñèñòåìû Tri Chemistry êîìïàíèè Motorola, â ñîñòàâ êîòîðîé âõîäÿò: (a) àêêóìóëÿòîðû IMPRES, (á) àäàïòèâíîå ìíîãîìåñòíîå çàðÿäíîå óñòðîéñòâî IMPRES è (â) àïïàðàòíîå/ ïðîãðàììíîå îáåñïå÷åíèå ðàäèîñòàíöèè, êîòîðîå îáåñïå÷èâàåò âîçìîæíîñòü âçàèìîäåéñòâèÿ/îáìåíà äàííûìè ìåæäó IMPRES-ñîâìåñòèìûìè ðàäèîñòàíöèÿìè è àêêóìóëÿòîðàìè IMPRES (íå ïðèìåíèìî ê ðàäèîñòàíöèÿì ïðîôåññèîíàëüíîé ñåðèè GP). Ìíîãîìåñòíîå çàðÿäíîå óñòðîéñòâî IMPRES, èñïîëüçóåìîå ñ àêêóìóëÿòîðàìè Motorola IMPRES, îáåñïå÷èò ñëåäóþùåå: • Ìàêñèìàëüíîå âðåìÿ ìåæäó ïîñëåäîâàòåëüíûìè çàðÿäêàìè çà ñ÷åò àâòîìàòè÷åñêîãî óñòðàíåíèÿ ýôôåêòà ïàìÿòè. • Óâåëè÷èâàåò ñðîê ñëóæáû àêêóìóëÿòîðîâ ïóòåì çíà÷èòåëüíîãî óìåíüøåíèÿ íàãðåâà âî âðåìÿ ìåäëåííîé çàðÿäêè è ïîñëå ïîëíîé çàðÿäêè. • Óñòðàíÿåò íåîáõîäèìîñòü ïîêóïêè îáîðóäîâàíèÿ è îáó÷åíèÿ ïåðñîíàëà äëÿ "âûïîëíåíèÿ çàäà÷ ïî îáñëóæèâàíèþ àêêóìóëÿòîðîâ". Áëàãîäàðÿ èñïîëüçîâàíèþ óíèêàëüíîé çàïàòåíòîâàííîé ñèñòåìû íåò íåîáõîäèìîñòè â âåäåíèè ó÷åòà è êîíòðîëÿ èñïîëüçóåìûõ àêêóìóëÿòîðîâ, âîññòàíîâëåíèè êîíäèöèé àêêóìóëÿòîðîâ âðó÷íóþ è èçâëå÷åíèÿ àêêóìóëÿòîðîâ èç çàðÿäíîãî óñòðîéñòâà ïî çàâåðøåíèè çàðÿäêè. Àäàïòèâíîå ìíîãîìåñòíîå çàðÿäíîå óñòðîéñòâî IMPRES ñëåäèò çà ãðàôèêîì èñïîëüçîâàíèÿ àêêóìóëÿòîðà IMPRES, ñîõðàíÿåò ýòó èíôîðìàöèþ â ñàìîì àêêóìóëÿòîðå è âêëþ÷àåò öèêë âîññòàíîâëåíèÿ òîëüêî êîãäà ýòî íåîáõîäèìî. Àäàïòèâíîå ìíîãîìåñòíîå çàðÿäíîå óñòðîéñòâî IMPRES íå ïåðåãðåâàåò àêêóìóëÿòîð, äàæå åñëè àêêóìóëÿòîð îñòàâëåí â çàðÿäíîì óñòðîéñòâå íà äëèòåëüíîå âðåìÿ. Çàðÿäíîå óñòðîéñòâî ñëåäèò çà ñîñòîÿíèåì àêêóìóëÿòîðà è äîçàðÿæàåò åãî ïî ìåðå íåîáõîäèìîñòè. Ðóññêèé Àäàïòèâíîå ìíîãîìåñòíîå çàðÿäíîå IMPRES óñòðîéñòâî óïðîùàåò ïðîöåññ çàðÿäêè àêêóìóëÿòîðîâ è óõîä çà íèìè. Ïîëüçîâàòåëþ íåîáõîäèìî âûïîëíèòü ëèøü ñëåäóþùèå ïðîñòûå äåéñòâèÿ: 1. Âñòàâèòü ðàäèîñòàíöèþ/àêêóìóëÿòîð â ãíåçäî çàðÿäíîãî óñòðîéñòâà. 2. Âûíóòü ðàäèîñòàíöèþ/àêêóìóëÿòîð ïîñëå ïîëíîé çàðÿäêè! Motorola ÿâëÿåòñÿ åäèíñòâåííîé ôèðìîé-èçãîòîâèòåëåì êîíäèöèîíèðóþùåãî èëè âîññòàíàâëèâàþùåãî çàðÿäíîãî óñòðîéñòâà, êîòîðîå äàåò âîçìîæíîñòü çàðÿäêè íå òîëüêî îòäåëüíûõ àêêóìóëÿòîðîâ, íî è àêêóìóëÿòîðîâ, íàõîäÿùèõñÿ â ðàäèîñòàíöèè. 4 ÐÀÁÎ×ÈÅ ÕÀÐÀÊÒÅÐÈÑÒÈÊÈ/ÎÑÎÁÅÍÍÎÑÒÈ: 1. 2. 3. 4. Àêêóìóëÿòîðû IMPRES ìîæíî çàðÿæàòü â îáû÷íûõ çàðÿäíûõ óñòðîéñòâàõ. Îäíàêî äëÿ èñïîëüçîâàíèÿ ñèñòåìû Smart Energy êàæäûé àêêóìóëÿòîð IMPRES íåîáõîäèìî çàðÿæàòü â àäàïòèâíîì ìíîãîìåñòíîì çàðÿäíîì óñòðîéñòâå IMPRES. Ïðè ïåðâîé çàðÿäêå àêêóìóëÿòîðà IMPRES â àäàïòèâíîì ìíîãîìåñòíîì çàðÿäíîì óñòðîéñòâå IMPRES èíäèêàòîð çàðÿäíîãî óñòðîéñòâà áóäåò ñâåòèòüñÿ ÍÅÏÐÅÐÛÂÍÛÌ ÆÅËÒÛÌ. Ïåðâóþ çàðÿäêó íåîáõîäèìî âûïîëíèòü äî ïîÿâëåíèÿ ÍÅÏÐÅÐÛÂÍÎÃÎ ÇÅËÅÍÎÃÎ ñâå÷åíèÿ èíäèêàòîðà çàðÿäíîãî óñòðîéñòâà. Ýòî îáåñïå÷èò íàäëåæàùóþ êàëèáðîâêó àêêóìóëÿòîðà IMPRES è èñïîëüçîâàíèå âñåõ ïðåèìóùåñòâ ñèñòåìû Smart Energy. Åñëè ïðîöåññ çàðÿäêè ïðåðâàòü, çàðÿäíîå óñòðîéñòâî îòêàëèáðóåò àêêóìóëÿòîð, êîãäà îí áóäåò â ñëåäóþùèé ðàç âñòàâëåí â ãíåçäî çàðÿäíîãî óñòðîéñòâà. Ïîñêîëüêó àäàïòèâíîå ìíîãîìåñòíîå çàðÿäíîå óñòðîéñòâî IMPRES àâòîìàòè÷åñêè îïðåäåëÿåò, êîãäà àêêóìóëÿòîðó IMPRES òðåáóåòñÿ âîññòàíîâëåíèå, çàðÿäíîå óñòðîéñòâî ìîæåò ïåðåêëþ÷àòüñÿ íà ðåæèì âîññòàíîâëåíèÿ ïðè âñòàâëåíèè â íåãî ðàäèîñòàíöèè èëè àêêóìóëÿòîðà. Î ïåðåêëþ÷åíèè íà ýòîò ðåæèì ñâèäåòåëüñòâóåò èíäèêàòîð çàðÿäíîãî óñòðîéñòâà, ñâåòÿùèéñÿ ÍÅÏÐÅÐÛÂÍÛÌ ÆÅËÒÛÌ. Ïðè íåîáõîäèìîñòè ðåæèì âîññòàíîâëåíèÿ ìîæåò áûòü îòìåíåí, äëÿ ýòîãî äîñòàòî÷íî âûíóòü è ñíîâà âñòàâèòü ðàäèîñòàíöèþ èëè àêêóìóëÿòîð â çàðÿäíîå óñòðîéñòâî. (Ñì. èíñòðóêöèè íèæå). Àäàïòèâíîå çàðÿäíîå óñòðîéñòâî IMPRES ïðåäíàçíà÷åíî äëÿ çàðÿäêè ëþáûõ àêêóìóëÿòîðîâ, ïåðå÷èñëåííûõ â òàáë. 1-5. Îäíàêî òîëüêî ïðè çàðÿäêå àêêóìóëÿòîðîâ IMPRES áóäåò ðàáîòàòü ñèñòåìà Smart Energy. (Ïî ìåðå ïîÿâëåíèÿ íîâûõ ðàäèîñòàíöèé è àêêóìóëÿòîðîâ ýòîò ñïèñîê áóäåò èçìåíÿòüñÿ è ðàñïðîñòðàíÿòüñÿ ñðåäè çàêàç÷èêîâ/ïîêóïàòåëåé ÷åðåç ñèñòåìû ãëîáàëüíûõ ôèðìåííûõ ïðåäñòàâèòåëüñòâ è îðãàíèçàöèè ïîñëåïðîäàæíîãî îáñëóæèâàíèÿ). Äëÿ êàëèáðîâêè àêêóìóëÿòîðîâ IMPRES Smart íåîáõîäèìî èñïîëüçîâàòü àäàïòèâíîå ìíîãîìåñòíîå çàðÿäíîå óñòðîéñòâî IMPRES - ýòî îáåñïå÷èò òî÷íóþ ðåãèñòðàöèþ, ñîõðàíåíèå â ïàìÿòè è îòîáðàæåíèå äàííûõ îá ýêñïëóàòàöèè àêêóìóëÿòîðà IMPRES. Ðóññêèé 5 5. Ðóññêèé 6. Ïðè èñïîëüçîâàíèè àêêóìóëÿòîðîâ IMPRES â ðàäèîñòàíöèÿõ ñ äèñïëååì (íàïðèìåð, XTS5000) ðàäèîñòàíöèÿ ìîæåò îòîáðàæàòü ïèêòîãðàììó, ïîêàçûâàþùóþ çàðÿäêó àêêóìóëÿòîðà. Ýòà ïèêòîãðàììà ïîÿâëÿåòñÿ, åñëè àêêóìóëÿòîð IMPRES ïðåäâàðèòåëüíî áûë îòêàëèáðîâàí â çàðÿäíîì óñòðîéñòâå IMPRES. Ïèêòîãðàììà çàðÿäêè îòîáðàæàåòñÿ, âî âðåìÿ èñïîëüçîâàíèÿ çàðÿäíîãî óñòðîéñòâà IMPRES äëÿ çàðÿäà àêêóìóëÿòîðîâ. Îäíàêî ïðè èñïîëüçîâàíèè çàðÿäíîãî óñòðîéñòâà íå-IMPRES äëÿ çàðÿäêè àêêóìóëÿòîðîâ IMPRES â òå÷åíèå 7 äíåé (èëè áîëåå) ïèêòîãðàììà ïðîïàäàåò. ×òîáû âîññòàíîâèòü ïèêòîãðàììó, âñòàâüòå àêêóìóëÿòîð IMPRES â çàðÿäíîå óñòðîéñòâî IMPRES è äîæäèòåñü îêîí÷àíèÿ çàðÿäêè (èíäèêàòîð áóäåò ãîðåòü ÐÎÂÍÛÌ ÇÅËÅÍÛÌ ñâåòîì). Ïîñëå ýòîãî ïèêòîãðàììà çàðÿäà ñíîâà áóäåò îòîáðàæàòüñÿ ðàäèîñòàíöèåé. Åñëè ïèêòîãðàììà íå ïîÿâèëàñü ïîñëå ïîëíîãî çàðÿäà, óñòàíîâèòå ÷àñòè÷íî ðàçðÿæåííûé àêêóìóëÿòîð (ðàçðÿæåííûé, ïî ìåíüøåé ìåðå, íà 70%) â çàðÿäíîå óñòðîéñòâî, íà÷íèòå ïðîöåññ âîññòàíîâëåíèÿ è äàéòå çàâåðøèòüñÿ çàðÿäêå. Ïîñëå ýòîãî ïèêòîãðàììà ïîÿâèòñÿ íà äèñïëåå ðàäèîñòàíöèè (íå ïðèìåíèìî ê ðàäèîñòàíöèÿì ïðîôåññèîíàëüíîé ñåðèè GP). Ðåìîíò àäàïòèâíîãî ìíîãîìåñòíîãî çàðÿäíîãî óñòðîéñòâà IMPRES ìîæåò âûïîëíÿòüñÿ òîëüêî êâàëèôèöèðîâàííûì ñïåöèàëèñòîì ïî îáñëóæèâàíèþ, àâòîðèçîâàííûì Motorola CGISS. Ëþáîå íàðóøåíèå äàííîãî óñëîâèÿ âåäåò ê ïðåêðàùåíèþ ãàðàíòèè íà óñòðîéñòâî. 6 ÑÏÈÑÎÊ ÀÊÊÓÌÓËßÒÎÐΠ òàáëèöàõ íèæå ïðèâåäåí ñïèñîê àêêóìóëÿòîðîâ, êîòîðûå ìîãóò èñïîëüçîâàòüñÿ ñ óêàçàííûìè â çàãîëîâêå òàáëèöû ðàäèîñòàíöèÿìè. Òàáë. 1. Ðàäèîñòàíöèè XTS3000 / XTS3500 / Dimetra è öèôðîâàÿ ðàäèîñòàíöèÿ XTS5000 Êîìïë. (¹) HNN9031 HNN9032 NTN8294 NTN8295 NTN8297 NTN8299 NTN8610 NTN8293 NNTN4435 NNTN4436 NNTN4437 RNN4006 RNN4007 NTN9862 Òèï NiCD NiCD NiCD NiCD NiCD NiCD LiIon NiMH NiMH NiMH NiMH NiMH NIMH LiIon Ñåðò. FM Íåò Åñòü Íåò Åñòü Åñòü Åñòü Íåò Íåò Íåò Åñòü Åñòü Íåò Åñòü Íåò Smart Åñòü Åñòü Íåò Íåò Íåò Íåò Íåò Íåò Åñòü Åñòü Åñòü Íåò Íåò Åñòü Åìêîñòü Ñâåðõâûñîêàÿ Ñâåðõâûñîêàÿ Ñâåðõâûñîêàÿ Ñâåðõâûñîêàÿ Ñâåðõâûñîêàÿ Ñâåðõâûñîêàÿ Âûñîêàÿ Ñâåðõâûñîêàÿ Ñâåðõâûñîêàÿ Ñâåðõâûñîêàÿ Ñâåðõâûñîêàÿ Ñâåðõâûñîêàÿ Ñâåðõâûñîêàÿ Ñâåðõâûñîêàÿ Íîâàÿ ìîäåëü Íåò Íåò Íåò Íåò Íåò Íåò Íåò Íåò Íåò Íåò Íåò Íîâàÿ Íîâàÿ Íîâàÿ Òàáë. 2. Öèôðîâûå ðàäèîñòàíöèè XTS2500 Êîìïë. (¹) NTN9859 NTN9857 NTN9815 NTN9816 Òèï NiMH NiMH NiCD NiCD Ñåðò. FM Íåò Åñòü Íåò Åñòü Smart Íåò Íåò Íåò Íåò Åìêîñòü Ñâåðõâûñîêàÿ Ñâåðõâûñîêàÿ Âûñîêàÿ Âûñîêàÿ Íîâàÿ ìîäåëü Íîâàÿ Íîâàÿ Íîâàÿ Íîâàÿ Òàáë. 3. Öèôðîâûå ðàäèîñòàíöèè MTP700 Êîìïë. (¹) * NiMH NiMH Lilon LiIon Ñåðò. FM Íåò Åñòü Íåò Íåò Smart Åñòü Åñòü Åñòü Åñòü Åìêîñòü Âûñîêàÿ Âûñîêàÿ Âûñîêàÿ Âûñîêàÿ Íîâàÿ ìîäåëü Íîâàÿ Íîâàÿ Íîâàÿ Íîâàÿ Äëÿ çàðÿäêè àêêóìóëÿòîðîâ MTP700 ñ çàðÿäíûì óñòðîéñòâîì íåîáõîäèìî èñïîëüçîâàòü àäàïòåð (íîìåð ïî êàòàëîãó RLN5212). 7 Ðóññêèé PMNN4048* PMNN4049* PMNN4050* PMNN4047* Òèï Òàáë. 4. Ðàäèîñòàíöèè ñåðèé HT1000 / MT2000 / MTS2000 / MTX8000 è MTX9000 Êîìïë. (¹) HNN9028 HNN9029 NTN7143 NTN7144 NTN7146 NTN7147 NTN7148 NTN7149 NTN7150 NTN7341 NTN7372 WPPN4013 WPPN4037 RNN4008 Òèï NiCD NiCD NiCD NiCD NiCD NiCD NiCD NiCD NiCD NiCD NiCD NiMH NiMH NiCD Ñåðò. FM Íåò Åñòü Íåò Íåò Åñòü Åñòü CENELEC CSA MSHA Åñòü Åñòü Íåò Åñòü ATEX Smart Åñòü Åñòü Íåò Íåò Íåò Íåò Íåò Íåò Íåò Íåò Íåò Íåò Íåò Íåò Åìêîñòü Ñâåðõâûñîêàÿ Ñâåðõâûñîêàÿ Âûñîêàÿ Ñâåðõâûñîêàÿ Âûñîêàÿ Ñâåðõâûñîêàÿ Âûñîêàÿ Âûñîêàÿ Âûñîêàÿ Ñâåðõâûñîêàÿ Âûñîêàÿ Ñâåðõâûñîêàÿ Ñâåðõâûñîêàÿ Âûñîêàÿ Íîâàÿ ìîäåëü Íåò Íåò Íåò Íåò Íåò Íåò Íåò Íåò Íåò Íåò Íåò Íåò Íåò Íåò Òàáë. 5. Ðàäèîñòàíöèè Saber / Astro Saber Ðóññêèé Êîìïë. (¹) HNN9033 HNN9031 NTN4537** NTN4538 NTN4592** NTN4593 NTN4595 NTN4596 NTN4657 NTN4671 NTN4992 NTN7014** NTN7058 NTN7426 NTN8251 NTN8818** ** Òèï NiCD NiCD NiCD NiCD NiCD NiCD NiCD NiCD NiCD NiCD NiCD NiMH NiCD NiCD NiMH LiIon Ñåðò. FM Íåò Åñòü Åñòü Åñòü Íåò Íåò Íåò Åñòü Íåò CENELEC Åñòü Íåò Åñòü Åñòü Åñòü Íåò Smart Åñòü Åñòü Íåò Íåò Íåò Íåò Íåò Íåò Íåò Íåò Íåò Íåò Íåò Íåò Íåò Íåò Åìêîñòü Ñâåðõâûñîêàÿ Ñâåðõâûñîêàÿ Íèçêàÿ Âûñîêàÿ Íèçêàÿ Âûñîêàÿ Ñâåðõâûñîêàÿ Ñâåðõâûñîêàÿ Âûñîêàÿ Âûñîêàÿ Ñâåðõâûñîêàÿ Âûñîêàÿ Ñâåðõâûñîêàÿ Íèçêàÿ Ñâåðõâûñîêàÿ Âûñîêàÿ Íîâàÿ ìîäåëü Íåò Íåò Íåò Íåò Íåò Íåò Íåò Íåò Íåò Íåò Íåò Íåò Íåò Íåò Íåò Íåò Äëÿ çàðÿäêè àêêóìóëÿòîðîâ Astro Saber ñ çàðÿäíûì óñòðîéñòâîì íåîáõîäèìî èñïîëüçîâàòü àäàïòåð (íîìåð ïî êàòàëîãó 4385922B01). 8 Òàáë. 6. Ðàäèîñòàíöèè ïðîôåññèîíàëüíîé ñåðèè GP Êîìïë. (¹) HNN9003 HNN9008 HNN9009 HNN9010 HNN9011 HNN9012 HNN9013 WPNN4045 PMNN4045 HNN4001 HNN4002 HNN4003 Òèï NiMH AA Bluetooth NiMH NiMH NiMH NiCD NiCD LiIon NiMH NiMH Impres NiMH Impres NiMH Impres LiIon Ñåðò. FM Íåò Smart Íåò Íåò Íåò Åñòü Åñòü Íåò Íåò Íåò Íåò Íåò Åñòü Íåò Íåò Íåò Íåò Íåò Íåò Íåò Íåò Íåò Åñòü Åñòü Åñòü Åìêîñòü Âûñîêàÿ Íîâàÿ ìîäåëü Íåò Âûñîêàÿ Ñâåðõâûñîêàÿ Ñâåðõâûñîêàÿ Âûñîêàÿ Âûñîêàÿ Âûñîêàÿ Âûñîêàÿ Âûñîêàÿ Ñâåðõâûñîêàÿ Ñâåðõâûñîêàÿ Ñâåðõâûñîêàÿ Íåò Íåò Íåò Íåò Íåò Íåò Íåò Íåò Åñòü Åñòü Åñòü Äëÿ óíèâåðñàëüíîãî çàðÿäíîãî óñòðîéñòâà òðåáóåòñÿ àêêóìóëÿòîðíûé àäàïòåð, íîìåð èçäåëèÿ — RLN5648. ÏÐÈÌÅ×ÀÍÈÅ Àäàïòåðû ìîæíî ïðèîáðåñòè ó ïðåäñòàâèòåëåé ïî ïðîäàæå ðàäèîñòàíöèé èëè ïðåäñòàâèòåëåé ïî ïîñëåïðîäàæíîìó îáñëóæèâàíèþ. Ðóññêèé 9 ÈÑÒÎ×ÍÈÊÈ ÏÈÒÀÍÈß È ÎÄÎÁÐÅÍÍÛÅ ÊÎÌÏÀÍÈÅÉ MOTOROLA ÀÄÀÏÒÅÐÛ Äàííîå çàðÿäíîå óñòðîéñòâî ðàññ÷èòàíî íà ïèòàíèå îò èñòî÷íèêà ïåðåìåííîãî òîêà 100 - 240 Â, 50/60 Ãö ïðè èñïîëüçîâàíèè ñëåäóþùèõ øíóðîâ ïèòàíèÿ Motorola, óêàçàííûõ â Òàáë. 7. Øíóðû ïèòàíèÿ, èñïîëüçóåìûå ñ çàðÿäíûìè óñòðîéñòâàìè äëÿ ðàäèîñòàíöèé ïðîôåññèîíàëüíîé ñåðèè GP ïåðå÷èñëåíû â Òàáë. 8. Òàáë. 7. Øíóðû ïèòàíèÿ Motorola äëÿ óíèâåðñàëüíîé ìîäåëè Òèï âèëêè Áåç øíóðà ïèòàíèÿ/âèëêè ÑØÀ/Ñåâåðíàÿ Àìåðèêà Åâðîïà Âåëèêîáðèòàíèÿ. Àâñòðàëèÿ/Íîâàÿ Çåëàíäèÿ Àðãåíòèíà ÑØÀ/Ñåâåðíàÿ Àìåðèêà Êîðåÿ Êîìïëåêò çàðÿäíîãî óñòðîéñòâà WPLN4121 WPLN4108 WPLN4109 WPLN4110 WPLN4118 WPLN4119 WPLN4120 WPLN4123 Êîìïëåêò çàðÿäíîãî óñòðîéñòâà (Ìîäåëü ñ äèñïëååì) WPLN4127 WPLN4130 WPLN4131 WPLN4132 WPLN4133 WPLN4134 WPLN4135 WPLN4136 Øíóð ïèòàíèÿ Íåò 3087791G01 3087791G04 3087791G07 3087791G10 3087791G13 3087791G01 3087791G16 Òàáë. 8. Øíóðû ïèòàíèÿ Motorola äëÿ ìîäåëåé ïðîôåññèîíàëüíîé ñåðèè GP Ðóññêèé Òèï âèëêè Áåç øíóðà ïèòàíèÿ/âèëêè ÑØÀ/Ñåâåðíàÿ Àìåðèêà Åâðîïà Âåëèêîáðèòàíèÿ. Àâñòðàëèÿ/Íîâàÿ Çåëàíäèÿ Àðãåíòèíà ÑØÀ/Ñåâåðíàÿ Àìåðèêà Êîðåÿ Êîìïëåêò çàðÿäíîãî óñòðîéñòâà WPLN4197 WPLN4187 WPLN4189 WPLN4188 WPLN4190 WPLN4191 WPLN4205 WPLN4146 10 Êîìïëåêò çàðÿäíîãî óñòðîéñòâà (Ìîäåëü ñ äèñïëååì) WPLN4198 WPLN4192 WPLN4194 WPLN4193 WPLN4195 WPLN4196 WPLN4204 WPLN4145 Øíóð ïèòàíèÿ Íåò 3087791G01 3087791G04 3087791G07 3087791G10 3087791G13 3087791G01 3087791G16 ÈÍÑÒÐÓÊÖÈÈ ÏÎ ÝÊÑÏËÓÀÒÀÖÈÈ ÏÐÈÌÅ×ÀÍÈß Ìíîãîìåñòíîå àäàïòèâíîå çàðÿäíîå óñòðîéñòâî IMPRES çàðÿæàåò òîëüêî àêêóìóëÿòîðíûå áàòàðåè, îäîáðåííûå êîìïàíèåé Motorola è ïåðå÷èñëåííûå â òàáë. 1-6. Äëÿ äðóãèõ áàòàðåé ýòî çàðÿäíîå óñòðîéñòâî ìîæåò îêàçàòüñÿ íåïðèãîäíûì. Ìíîãîìåñòíîå àäàïòèâíîå çàðÿäíîå óñòðîéñòâî IMPRES èìååò àâòîìàòè÷åñêèå ôóíêöèè è âîçìîæíîñòè, êîòîðûõ íå èìåþò äðóãèå çàðÿäíûå óñòðîéñòâà. Âíèìàòåëüíî ñëåäèòå çà èíäèêàòîðîì çàðÿäíîãî óñòðîéñòâà, ÷òîáû îáåñïå÷èòü ðàáîòó çàðÿäíîãî óñòðîéñòâà â íóæíîì/îæèäàåìîì ðåæèìå.  ãíåçäî çàðÿäíîãî óñòðîéñòâà ìîæíî âñòàâëÿòü ëèáî ðàäèîñòàíöèþ, ëèáî òîëüêî àêêóìóëÿòîð. Ïåðåä çàðÿäêîé àêêóìóëÿòîðà â ðàäèîñòàíöèè âûêëþ÷èòå ðàäèîñòàíöèþ. Çàðÿäêó àêêóìóëÿòîðîâ ðåêîìåíäóåòñÿ âûïîëíÿòü ïðè êîìíàòíîé òåìïåðàòóðå. 1. Âñòàâüòå øòåêåð øíóðà ïèòàíèÿ â ãíåçäî íà çàäíåé ñòîðîíå çàðÿäíîãî óñòðîéñòâà. 2. Âñòàâüòå âèëêó øíóðà ïèòàíèÿ â ñåòåâóþ ðîçåòêó. Îá óñïåøíîé ïîäà÷å ïèòàíèÿ ñâèäåòåëüñòâóåò èíäèêàòîð çàðÿäíîãî óñòðîéñòâà, äàþùèé ÎÄÍÓ ÇÅËÅÍÓÞ ÂÑÏÛØÊÓ. 3. Âñòàâüòå â ãíåçäî çàðÿäíîãî óñòðîéñòâà àêêóìóëÿòîð èëè ðàäèîñòàíöèþ (âûêëþ÷åííóþ) ñ àêêóìóëÿòîðîì ñëåäóþùèì îáðàçîì: à. Ñîâìåñòèòå êàíàâêè íà êàæäîé áîêîâîé ñòîðîíå àêêóìóëÿòîðà ñ ñîîòâåòñòâóþùèìè âûñòóïàþùèìè ðåáðàìè íà áîêîâûõ ñòåíêàõ ãíåçäà. á. Âäâèíüòå àêêóìóëÿòîð âíóòðü ãíåçäà. â. Âäâèãàÿ àêêóìóëÿòîð, îáåñïå÷üòå ïîëíûé êîíòàêò ìåæäó êîíòàêòàìè çàðÿäíîãî óñòðîéñòâà è àêêóìóëÿòîðà. Êàê òîëüêî àêêóìóëÿòîð ñÿäåò ïîëíîñòüþ â ãíåçäî, çàãîðèòñÿ èíäèêàòîð çàðÿäíîãî óñòðîéñòâà, ÷òî ïîäòâåðäèò ðàñïîçíàâàíèå àêêóìóëÿòîðà çàðÿäíûì óñòðîéñòâîì. Ñèãíàëû èíäèêàòîðà ñâåäåíû â òàáë. 9. . Ðóññêèé 11 Òàáë. 9. Èíäèêàöèÿ çàðÿäêè Ðóññêèé Èíäèêàòîð çàðÿäíîãî óñòðîéñòâà ×òî ýòî îçíà÷àåò Îäíà âñïûøêà çåëåíûì Óñïåøíîå çàïèòûâàíèå çàðÿäíîãî óñòðîéñòâà. Íåïðåðûâíî ãîðÿùèé êðàñíûé Àêêóìóëÿòîð íàõîäèòñÿ â ðåæèìå áûñòðîé çàðÿäêè. Ìèãàþùèé çåëåíûé Áûñòðàÿ çàðÿäêà àêêóìóëÿòîðà çàâåðøåíà (>90% åìêîñòè àêêóìóëÿòîðà çàðÿæåíî). Èäåò ìåäëåííàÿ çàðÿäêà àêêóìóëÿòîðà. Íåïðåðûâíî ãîðÿùèé çåëåíûé Çàðÿäêà àêêóìóëÿòîðà çàêîí÷åíà ïîëíîñòüþ. Ìèãàþùèé æåëòûé Àêêóìóëÿòîð ðàñïîçíàí çàðÿäíûì óñòðîéñòâîì è îæèäàåò íà÷àëà çàðÿäêè. (Ëèáî íàïðÿæåíèå àêêóìóëÿòîðà, ëèáî åãî òåìïåðàòóðà ñëèøêîì íèçêà èëè âûñîêà, ïîýòîìó çàðÿäêà çàäåðæèâàåòñÿ. Çàðÿäêà àêêóìóëÿòîðà íà÷íåòñÿ, êîãäà íàïðÿæåíèå èëè òåìïåðàòóðà âîçðàñòåò.) Ìèãàþùèé êðàñíûé Àêêóìóëÿòîð çàðÿäèòü íåëüçÿ èëè îòñóòñòâóåò êîíòàêò ìåæäó àêêóìóëÿòîðîì è çàðÿäíûì óñòðîéñòâîì. Íåïðåðûâíî ãîðÿùèé æåëòûé (Ýòî îòíîñèòñÿ òîëüêî ê àêêóìóëÿòîðàì òèïà Smart) Ìèãàþùèé êðàñíûé/ çåëåíûé (Ýòî îòíîñèòñÿ òîëüêî ê àêêóìóëÿòîðàì òèïà Smart) Çàðÿäêà àêêóìóëÿòîðà çàêîí÷åíà ïîëíîñòüþ. Àêêóìóëÿòîð âñå åùå ïðèãîäåí ê èñïîëüçîâàíèþ, íî ñðîê åãî ñëóæáû ïîäõîäèò ê êîíöó. Àêêóìóëÿòîð íàõîäèòñÿ â ðåæèìå âîññòàíîâëåíèÿ. Âðåìÿ, â òå÷åíèå êîòîðîãî àêêóìóëÿòîð áóäåò îñòàâàòüñÿ â ýòîì ðåæèìå, çàâèñèò îò íà÷àëüíîé ñòåïåíè çàðÿæåííîñòè âñòàâëåííîãî àêêóìóëÿòîðà. (Âîññòàíîâëåíèå ïîëíîñòüþ çàðÿæåííûõ àêêóìóëÿòîðîâ çàíèìàåò áîëüøå âðåìåíè – 8 ÷àñîâ è áîëåå – ÷åì âîññòàíîâëåíèå ïîëíîñòüþ ðàçðÿæåííûõ àêêóìóëÿòîðîâ.) ÏÐÈÌÅ×ÀÍÈÅ Àäàïòèâíîå ìíîãîìåñòíîå çàðÿäíîå óñòðîéñòâî IMPRES óíèêàëüíî òåì, ÷òî ïðè çàðÿäêå â íåì àêêóìóëÿòîðîâ Motorola IMPRES îíî àâòîìàòè÷åñêè îïðåäåëÿåò, íóæäàåòñÿ ëè àêêóìóëÿòîð â âîññòàíîâëåíèè. ×òîáû ïîëíîñòüþ èñïîëüçîâàòü âîçìîæíîñòè è ôóíêöèè àêêóìóëÿòîðîâ Motorola Smart è àäàïòèâíîé çàðÿäíîé ñèñòåìû, çàðÿäíîå óñòðîéñòâî äîëæíî èíèöèàëèçèðîâàòü äàííûå, õðàíÿùèåñÿ â êàæäîì àêêóìóëÿòîðå Motorola Smart, ïðè åãî ïåðâîé çàðÿäêå. Îá ýòîì ïðîöåññå ãîâîðèò ÍÅÏÐÅÐÛÂÍÎ ÃÎÐßÙÈÉ 12 ÆÅËÒÛÉ èíäèêàòîð çàðÿäíîãî óñòðîéñòâà (ýòîò ñèãíàë èíäèêàòîðà èìååòñÿ è ïðè âîññòàíîâëåíèè). Ýòîò ïðîöåññ ïðîèñõîäèò àâòîìàòè÷åñêè, îí âêëþ÷àåò íà÷àëüíîå âîññòàíîâëåíèå, ïî çàâåðøåíèè ïðîöåññà íà÷èíàåòñÿ çàðÿäêà àêêóìóëÿòîðà. Íà èíèöèàëèçàöèþ àêêóìóëÿòîðà ïðè ýòîì ïðîöåññå òðåáóåòñÿ íåêîòîðîå âðåìÿ, ïîýòîìó ïðè ïåðâîì âñòàâëåíèè àêêóìóëÿòîðà â ãíåçäî çàðÿäíîãî óñòðîéñòâà åãî ñëåäóåò îñòàâèòü òàì íà íî÷ü. Àäàïòèâíîå ìíîãîìåñòíîå çàðÿäíîå óñòðîéñòâî IMPRES ðàáîòàåò êàê: • Çàðÿäíîå óñòðîéñòâî äëÿ âñåõ àêêóìóëÿòîðîâ, îäîáðåííûõ ôèðìîé Motorola, • Âîññòàíàâëèâàþùåå óñòðîéñòâî äëÿ àêêóìóëÿòîðîâ IMPRES, îäîáðåííûõ ôèðìîé Motorola. Çàðÿäêà àêêóìóëÿòîðîâ ÂÍÈÌÀÍÈÅ! Ãíåçäî çàðÿäíîãî óñòðîéñòâà ðàññ÷èòàíî íà ïðèåì àêêóìóëÿòîðîâ ðàçíûõ ðàçìåðîâ è ôîðì, ïîýòîìó íåîáõîäèìî îáåñïå÷èòü ïðàâèëüíóþ óñòàíîâêó ðàäèîñòàíöèè èëè àêêóìóëÿòîðà â ãíåçäî. Ïðè íåïðàâèëüíî âñòàâëåííîé ðàäèîñòàíöèè èëè îòäåëüíîì àêêóìóëÿòîðå èíäèêàòîð íå çàãîðèòñÿ, óêàçûâàÿ íà òî, ÷òî àêêóìóëÿòîð íå çàðÿæàåòñÿ. ÏÐÈÌÅ×ÀÍÈÅ Èíîãäà â ñëó÷àå íîâûõ (ðàíåå íå èñïîëüçîâàâøèõñÿ) àêêóìóëÿòîðîâ èíäèêàöèÿ ïîëíîñòüþ çàðÿæåííîãî àêêóìóëÿòîðà (ÏÎÑÒÎßÍÍÎ ÃÎÐßÙÈÉ ÇÅËÅÍÛÉ ) âîçíèêàåò ïðåæäåâðåìåííî. 13 Ðóññêèé Äëÿ îáåñïå÷åíèÿ îïòèìàëüíîé ðàáîòû Motorola ðåêîìåíäóåò îñòàâëÿòü âñå íîâûå àêêóìóëÿòîðû â çàðÿäíîì óñòðîéñòâå íà 14-16 ÷àñîâ ïåðåä ïåðâûì èñïîëüçîâàíèåì. 1. Ïîñëå íàäëåæàùåé óñòàíîâêè ðàäèîñòàíöèè ñ àêêóìóëÿòîðîì èëè îòäåëüíîãî àêêóìóëÿòîðà â çàðÿäíîì óñòðîéñòâå íà÷èíàåòñÿ áûñòðàÿ çàðÿäêà àêêóìóëÿòîðà, î ÷åì ãîâîðèò ÍÅÏÐÅÐÛÂÍÎ ÃÎÐßÙÈÉ ÊÐÀÑÍÛÉ èíäèêàòîð çàðÿäíîãî óñòðîéñòâà. Âðåìÿ, â òå÷åíèå êîòîðîãî èíäèêàòîð çàðÿäíîãî óñòðîéñòâà ãîðèò ÍÅÏÐÅÐÛÂÍÛÌ ÊÐÀÑÍÛÌ, çàâèñèò îò îñòàòî÷íîãî çàðÿäà àêêóìóëÿòîðà. 2. Ïî îêîí÷àíèè áûñòðîé çàðÿäêè (>90% åìêîñòè) çàãîðàåòñÿ ÌÈÃÀÞÙÈÉ ÇÅËÅÍÛÉ èíäèêàòîð çàðÿäíîãî óñòðîéñòâà. Ýòî ãîâîðèò î íà÷àëå ìåäëåííîé çàðÿäêè, íà êîòîðóþ óõîäèò îêîëî 1 ÷àñà. 3. Ïî îêîí÷àíèè ìåäëåííîé çàðÿäêè çàãîðàåòñÿ ÍÅÏÐÅÐÛÂÍÛÉ ÇÅËÅÍÛÉ èíäèêàòîð çàðÿäíîãî óñòðîéñòâà. Ýòî ãîâîðèò î òîì, ÷òî àêêóìóëÿòîð ïîëíîñòüþ çàðÿäèëñÿ. 4. Âî âðåìÿ çàðÿäêè ìîãóò âîçíèêíóòü è äðóãèå, ïåðå÷èñëåííûå íèæå èíäèêàöèè: • ÌÈÃÀÞÙÈÉ ÆÅËÒÛÉ – òåìïåðàòóðà èëè íàïðÿæåíèå àêêóìóëÿòîðà çà ïðåäåëàìè äèàïàçîíà çàðÿäêè. Çàðÿäêà âîçîáíîâèòñÿ ïîñëå íîðìàëèçàöèè òåìïåðàòóðû èëè íàïðÿæåíèÿ. • ÌÈÃÀÞÙÈÉ ÊÐÀÑÍÛÉ È ÇÅËÅÍÛÉ – àêêóìóëÿòîð ïðèáëèæàåòñÿ ê êîíöó ñðîêà ñëóæáû. Íåñìîòðÿ íà ïîëíûé çàðÿä ýòîãî àêêóìóëÿòîðà, åãî åìêîñòè, óìåíüøèâøåéñÿ â ðåçóëüòàòå ýêñïëóàòàöèè, ìîæåò îêàçàòüñÿ íåäîñòàòî÷íî äëÿ ïèòàíèÿ ìîùíûõ ïîòðåáèòåëåé. Ýòà ôóíêöèÿ èìååòñÿ òîëüêî ïðè â ñëó÷àå àêêóìóëÿòîðîâ Motorola IMPRES. Ýòà èíäèêàöèÿ íå ÿâëÿåòñÿ óêàçàíèåì íà íåèñïðàâíîñòü, îíà ëèøü ãîâîðèò î òîì, ÷òî àêêóìóëÿòîð ìîæåò â ñêîðîì âðåìåíè ïåðåñòàòü îáåñïå÷èâàòü íîðìàëüíîå ïèòàíèå è ïîòðåáóåò çàìåíû. • ÌÈÃÀÞÙÈÉ ÊÐÀÑÍÛÉ – óêàçûâàåò íà òî, ÷òî àêêóìóëÿòîð íåëüçÿ çàðÿäèòü. Ýòî ìîæåò ïðîèçîéòè â ðåçóëüòàòå íàðóøåíèÿ êîíòàêòà ìåæäó àêêóìóëÿòîðîì è çàðÿäíûì óñòðîéñòâîì. Çàðÿäêà âîçîáíîâèòñÿ, êîãäà áóäåò óñòðàíåíà ïðè÷èíà òàêîé èíäèêàöèè.  àêêóìóëÿòîðàõ Motorola Smart èìååòñÿ âíóòðåííåå çàïîìèíàþùåå óñòðîéñòâî (ÇÓ), êîòîðîå ñ÷èòûâàåòñÿ àäàïòèâíûì ìíîãîìåñòíûì çàðÿäíûì óñòðîéñòâîì IMPRES. Åñëè àêêóìóëÿòîð IMPRES çàðÿæàåòñÿ â òå÷åíèå áîëåå 2,5 ìèíóò, àäàïòèâíîå ìíîãîìåñòíîå çàðÿäíîå óñòðîéñòâî çàïîìèíàåò ñåðèéíûé íîìåð àêêóìóëÿòîðà IMPRES. Àêêóìóëÿòîð IMPRES ìîæíî óäàëèòü èç çàðÿäíîãî óñòðîéñòâà íà âðåìÿ äî 30 ìèíóò. Åñëè ïîñëå ýòîãî ñíîâà âñòàâèòü àêêóìóëÿòîð â çàðÿäíîå óñòðîéñòâî, åãî çàðÿäêà âîçîáíîâèòñÿ ñ òîé òî÷êè, â êîòîðîé îíà áûëà ïðåðâàíà. Ðó÷íîå âîññòàíîâëåíèå àêêóìóëÿòîðîâ Äî èñòå÷åíèÿ ïåðâûõ 2,5 ìèíóò ïîñëå ïåðâîé óñòàíîâêè àêêóìóëÿòîðà (ÍÅÏÐÅÐÛÂÍÛÉ ÊÐÀÑÍÛÉ ) èçâëåêèòå è ñíîâà, íå ïîçäíåå ÷åì ÷åðåç 5 ñåêóíä, âñòàâüòå àêêóìóëÿòîð â çàðÿäíîå óñòðîéñòâî äëÿ ïðèíóäèòåëüíîãî èíèöèèðîâàíèÿ ïðîöåññà âîññòàíîâëåíèÿ. Èíäèêàòîð çàðÿäíîãî óñòðîéñòâà èçìåíèò èíäèêàöèþ ñ ÍÅÏÐÅÐÛÂÍÎÉ ÊÐÀÑÍÎÉ íà ÍÅÏÐÅÐÛÂÍÓÞ ÆÅËÒÓÞ.  ðåçóëüòàòå ïðèíóäèòåëüíî âêëþ÷èòñÿ ðåæèì âîññòàíîâëåíèÿ è àâòîìàòè÷åñêîé çàðÿäêè àêêóìóëÿòîðà. Ðóññêèé ÏÐÈÌÅ×ÀÍÈÅ ×ðåçìåðíîå èñïîëüçîâàíèå ýòîé ôóíêöèè ìîæåò ñíèçèòü ñðîê ñëóæáû, ò.å. ÷èñëî öèêëîâ çàðÿä/ðàçðÿä, àêêóìóëÿòîðà. 14 Àâòîìàòè÷åñêîå âîññòàíîâëåíèå àêêóìóëÿòîðîâ Ïðè çàðÿäêå â àäàïòèâíîì ìíîãîìåñòíîì çàðÿäíîì óñòðîéñòâå Motorola IMPRES àêêóìóëÿòîðîâ Motorola IMPRES óñòðîéñòâî îïðåäåëÿåò, êîãäà íåîáõîäèìî âîññòàíîâèòü àêêóìóëÿòîð. Ïðè íàäëåæàùåé óñòàíîâêå àêêóìóëÿòîðà IMPRES â çàðÿäíîå óñòðîéñòâî ïîñëåäíåå îïðåäåëÿåò, òðåáóåòñÿ ëè âîññòàíîâëåíèå àêêóìóëÿòîðà. Åñëè àêêóìóëÿòîð íóæäàåòñÿ â âîññòàíîâëåíèè, àâòîìàòè÷åñêè âêëþ÷àåòñÿ ÍÅÏÐÅÐÛÂÍÛÉ ÆÅËÒÛÉ èíäèêàòîð çàðÿäíîãî óñòðîéñòâà. Ýòîò ïðîöåññ ìîæåò çàíÿòü äî 8 ñ ëèøíèì ÷àñîâ – â çàâèñèìîñòè îò ñòåïåíè çàðÿæåííîñòè è åìêîñòè àêêóìóëÿòîðà. Âàæíî îòìåòèòü, ÷òî äëÿ îáåñïå÷åíèÿ ýôôåêòèâíîñòè ýòîãî ïðîöåññà íåîáõîäèìî äàòü çàðÿäíîìó óñòðîéñòâó âîçìîæíîñòü ïîëíîñòüþ çàâåðøèòü âîññòàíîâëåíèå/çàðÿäêó àêêóìóëÿòîðà. Îñòàâüòå àêêóìóëÿòîð â çàðÿäíîì óñòðîéñòâå äî òåõ ïîð, ïîêà èíäèêàòîð çàðÿäíîãî óñòðîéñòâà íå ñòàíåò ãîðåòü ÍÅÏÐÅÐÛÂÍÛÌ ÇÅËÅÍÛÌ. Ïî çàâåðøåíèè öèêëà âîññòàíîâëåíèÿ çàðÿäíîå óñòðîéñòâî àâòîìàòè÷åñêè çàðÿäèò àêêóìóëÿòîð. Ïðåêðàùåíèå ïðîöåññà âîññòàíîâëåíèÿ âðó÷íóþ Äëÿ ïðåêðàùåíèÿ âîññòàíîâëåíèÿ àêêóìóëÿòîðà Motorola IMPRES (â ýòîì ðåæèìå ãîðèò ÍÅÏÐÅÐÛÂÍÛÉ ÆÅËÒÛÉ èíäèêàòîð) äîñòàòî÷íî â ëþáîé ìîìåíò âûíóòü è íå ïîçäíåå ÷åì ÷åðåç 5 ñåêóíä ñíîâà âñòàâèòü àêêóìóëÿòîð.  ðåçóëüòàòå çàðÿäíîå óñòðîéñòâî ïðåðâåò ïðîöåññ âîññòàíîâëåíèÿ è íà÷íåò ïðîöåññ çàðÿäêè. Èíäèêàòîð çàðÿäíîãî óñòðîéñòâà íà÷íåò ãîðåòü ÍÅÏÐÅÐÛÂÍÛÌ ÊÐÀÑÍÛÌ. Ðóññêèé 15 ÓÑÒÐÀÍÅÍÈÅ ÍÅÈÑÏÐÀÂÍÎÑÒÅÉ Àäàïòèâíîå ìíîãîìåñòíîå çàðÿäíîå óñòðîéñòâî IMPRES èìååò: • óíèâåðñàëüíûé áëîê äëÿ ïîäêëþ÷åíèþ ïèòàíèÿ (100-240  ïåð. òîêà, 50/60 Ãö); • áëîê äëÿ áûñòðîé çàðÿäêè íåïðåðûâíûì òîêîì; • áëîê äëÿ êîíäèöèîíèðîâàíèÿ àêêóìóëÿòîðîâ èìïóëüñíûì òîêîì (îòðèöàòåëüíûìè èìïóëüñàìè); • áëîê äëÿ âîññòàíîâëåíèÿ. Òàêîå ñî÷åòàíèå áëîêîâ â îäíîì óñòðîéñòâå íå èìååò àíàëîãîâ ñðåäè íàñòîëüíûõ çàðÿäíûõ óñòðîéñòâ.  ñâÿçè ñ íàëè÷èåì ýòèõ ôóíêöèé âêëþ÷åíèå ðàäèîñòàíöèè âî âðåìÿ çàðÿäêè íàõîäÿùåãîñÿ â íåì àêêóìóëÿòîðà íå ðåêîìåíäóåòñÿ. Âêëþ÷åíèå ðàäèîñòàíöèè ñ çàðÿæàåìûì àêêóìóëÿòîðîì ìîæåò ïðèâåñòè ê óõóäøåíèþ ðàáîòû ðàäèîñòàíöèè è óâåëè÷åíèþ âðåìåíè çàðÿäêè. Ê êîíöó öèêëà áûñòðîé çàðÿäêè (èíäèêàòîð ÍÅÏÐÅÐÛÂÍÛÉ ÊÐÀÑÍÛÉ ) íàïðÿæåíèå àêêóìóëÿòîðà ñòàíîâèòñÿ âûøå íîðìàëüíîãî ðàáî÷åãî íàïðÿæåíèÿ ðàäèîñòàíöèè. Íàïðÿæåíèå âîçâðàùàåòñÿ ê íîðìàëüíîìó óðîâíþ ïîñëå ìåäëåííîé çàðÿäêè èëè â ðåçóëüòàòå èçâëå÷åíèÿ àêêóìóëÿòîðà èç çàðÿäíîãî óñòðîéñòâà. Åñëè âêëþ÷èòü ðàäèîñòàíöèþ âî âðåìÿ ìåäëåííîé çàðÿäêè, ðàäèîñòàíöèÿ ðàáîòàòü íå áóäåò. Ýòî âðåìåííîå ÿâëåíèå, äëÿ óñòðàíåíèÿ êîòîðîãî äîñòàòî÷íî âûíóòü ðàäèîñòàíöèþ èç çàðÿäíîãî óñòðîéñòâà, âûêëþ÷èòü, à çàòåì âêëþ÷èòü åå.  ïðîöåññå âîññòàíîâëåíèÿ àêêóìóëÿòîð ïîëíîñòüþ ðàçðÿæàåòñÿ, ïîýòîìó âî âðåìÿ âîññòàíîâëåíèÿ ðàäèîñòàíöèÿ ìîæåò íå ðàáîòàòü. Ðóññêèé Âî âðåìÿ óñòðàíåíèÿ íåèñïðàâíîñòåé ïîñòîÿííî ñëåäèòå çà èíäèêàòîðîì çàðÿäíîãî óñòðîéñòâà – ñì. òàáë. 9. 16 Òàáë. 10. Óñòðàíåíèå íåèñïðàâíîñòåé Ïðîáëåìà ×òî ýòî îçíà÷àåò… Äåéñòâèÿ ïî óñòðàíåíèþ Èíäèêàòîð çàðÿäíîãî óñòðîéñòâà íå ãîðèò • Íåò êîíòàêòà ìåæäó àêêóìóëÿòîðîì è êîíòàêòàìè çàðÿäíîãî óñòðîéñòâà. • Çàðÿäíîå óñòðîéñòâî íå çàïèòûâàåòñÿ. • Óáåäèòåñü, ÷òî ðàäèîñòàíöèÿ èëè àêêóìóëÿòîð ïðàâèëüíî âñòàâëåí â ãíåçäî çàðÿäíîãî óñòðîéñòâà. • Ðàäèîñòàíöèÿ/àêêóìóëÿòîð íå êîíòàêòèðóåò ñ çàðÿäíûì óñòðîéñòâîì. • Âûíüòå è ñíîâà âñòàâüòå àêêóìóëÿòîð â çàðÿäíîå óñòðîéñòâî. • Óáåäèòåñü, ÷òî àêêóìóëÿòîð ÿâëÿåòñÿ îäîáðåííûì êîìïàíèåé Motorola àêêóìóëÿòîðîì, óêàçàííûì â òàáë. 16. Äëÿ äðóãèõ áàòàðåé ýòî çàðÿäíîå óñòðîéñòâî ìîæåò îêàçàòüñÿ íåïðèãîäíûì. • Îòêëþ÷èòå ïèòàíèå îò çàðÿäíîãî óñòðîéñòâà è ïðè ïîìîùè ñóõîé ÷èñòîé òêàíè ïðîòðèòå ìåòàëëè÷åñêèå "çîëîòûå" êîíòàêòû àêêóìóëÿòîðà è çàðÿäíîãî óñòðîéñòâà. • Çàìåíèòå àêêóìóëÿòîð. Ìèãàþùèé êðàñíûé èíäèêàòîð • Àêêóìóëÿòîð çàðÿäèòü íåëüçÿ. Ìèãàþùèé æåëòûé èíäèêàòîð • Àêêóìóëÿòîð îæèäàåò íà÷àëà çàðÿäêè. Âîçìîæíî, òåìïåðàòóðà àêêóìóëÿòîðà íèæå 5°C èëè âûøå 40°C èëè æå åãî íàïðÿæåíèå íèæå ïîðîãîâîãî çíà÷åíèÿ, êîòîðîãî îíî äîëæíî äîñòèãíóòü ïðåæäå ÷åì íà÷íåòñÿ áûñòðàÿ çàðÿäêà. • Íàäåæíî âñòàâüòå øòåêåð øíóðà ïèòàíèÿ â ãíåçäî çàðÿäíîãî óñòðîéñòâà, à âèëêó – â ñåòåâóþ ðîçåòêó, óáåäèòåñü â íàëè÷èè íàïðÿæåíèÿ â ðîçåòêå. • Çàìåíèòå ïðåäîõðàíèòåëü(è). • Çàðÿäêà àêêóìóëÿòîðà íà÷íåòñÿ, êîãäà íàïðÿæåíèå èëè òåìïåðàòóðà ïðèäåò â íîðìó. ÎÁÑËÓÆÈÂÀÍÈÅ 17 Ðóññêèé Ðåìîíò àäàïòèâíîãî ìíîãîìåñòíîãî çàðÿäíîãî óñòðîéñòâà IMPRES ìîæåò âûïîëíÿòüñÿ òîëüêî êâàëèôèöèðîâàííûì ñïåöèàëèñòîì ïî îáñëóæèâàíèþ, àâòîðèçîâàííûì Motorola. Ëþáîå íàðóøåíèå äàííîãî óñëîâèÿ âåäåò ê ïðåêðàùåíèþ ãàðàíòèè íà óñòðîéñòâî. ÇÀÐßÄÍÛÅ ÓÑÒÐÎÉÑÒÂÀ Ñ ÌÎÄÓËÅÌ ÄÈÑÏËÅß (CDM) Àäàïòèâíûå ìíîãîìåñòíûå çàðÿäíûå óñòðîéñòâà IMPRES ìîãóò áûòü äîïîëíèòåëüíî îáîðóäîâàíû ìîäóëåì äèñïëåÿ (charger display module — CDM), íîìåð èçäåëèÿ Motorola RLN5382. Îáùèå ñâåäåíèÿ î äèñïëåå Àäàïòèâíîå ìíîãîìåñòíîå çàðÿäíîå óñòðîéñòâî IMPRES ñ CDM ïðåäîñòàâëÿåò ïîëüçîâàòåëþ âàæíóþ èíôîðìàöèþ ïðè îáñëóæèâàíèè àêêóìóëÿòîðà. Ñâåäåíèÿ, îòîáðàæàåìûå çàðÿäíûì óñòðîéñòâîì è ñîîòâåòñòâóþùèìè ñâåòîäèîäíûìè èíäèêàòîðàìè îïèñàíû â ïðèâåäåííûõ íèæå òàáëèöàõ. Âêëþ÷åíèå Upon Charger Power-up (Ïðè âêëþ÷åíèè çàðÿäíîãî óñòðîéñòâà) LED SINGLE FLASH GREEN (ОДИНОЧНАЯ ВСПЫШКА ЗЕЛЕНЫМ СВЕТОМ) Line 1 IMPRES Line 2 If There is No Battery in the Pocket (Ïðè îòñóòñòâèè óñòàíîâëåííîãî àêêóìóëÿòîðà) LED OFF (ВЫКЛ.) Line 1 NO BATTERY (НЕТ АККУМУЛЯТОРА) Line 2 Reading Battery Data (Ñ÷èòûâàíèå äàííûõ àêêóìóëÿòîðà) Any Defined Indication (Любая описанная индикация) Line 1 READING (ЧТЕНИЕ) Line 2 BATTERY DATA (ДАННЫХ АККУМУЛЯТОРА) Ðóññêèé LED 18 Non-IMPRES Battery in the Pocket (Óñòàíîâëåí àêêóìóëÿòîð íå-IMPRES) LED Defined by Charge State (Определяется состоянием зарядки) Line 1 NON-IMPRES (НЕ-IMPRES) Line 2 BATTERY (АККУМУЛЯТОР) IMPRES Battery in the Pocket (Óñòàíîâëåí àêêóìóëÿòîð IMPRES) IMPRES and Software Versions are Displayed (Îòîáðàæàåòñÿ ñëîâî IMPRESS è âåðñèÿ ïðîãðàììíîãî îáåñïå÷åíèÿ) LED Defined by Charge State (Определяется состоянием зарядки) Line 1 IMPRES Line 2 SW xx.yy; aa.bb (ПО xx.yy; aa.bb) ÏÐÈÌÅ×ÀÍÈÅ xx.yy îáîçíà÷àåò âåðñèþ ÏÎ, à aa.bb — âåðñèþ ÏÎ CDM. IMPRES Battery Kit # and Chemistry are Displayed (Îòîáðàæàþòñÿ íîìåð êîìïëåêòà àêêóìóëÿòîðîâ è õèìè÷åñêèé ïðîöåññ) LED Defined by Charge State (Определяется состоянием зарядки) Line 1 KIT# -------- (КОМПЛЕКТ №--------) Line 2 -----CHEMISTRY (-----ХИМИЧЕСКИЙ ПРОЦЕСС) Forecasted # of Cycles Prior to Automatic Recondition (Ïðîãíîçèðóåìîå ÷èñëî öèêëîâ äî àâòîìàòè÷åñêîãî âîññòàíîâëåíèÿ) LED Defined by Charge State (Определяется состоянием зарядки) Line 1 ----CYCLES (----ЦИКЛОВ) Line 2 TO RECONDITION (ДО ВОССТАНОВЛЕНИЯ) *Îòîáðàæàåòñÿ òîëüêî, åñëè ÷èñëî öèêëîâ ìåíüøå 6. Charger Waiting to Charge, Battery is Hot (Çàðÿäíîå óñòðîéñòâî îæèäàåò çàðÿäêè, àêêóìóëÿòîð íàãðåëñÿ) Flashing ORANGE (Мигающий ОРАНЖЕВЫЙ) Line 1 WAITING TO CHG (ОЖИДАНИЕ ЗАРЯДКИ) Line 2 HOT BATTERY (АККУМУЛЯТОР НАГРЕЛСЯ) 19 Ðóññêèé LED Charger Waiting to Charge, Battery is Cold (Çàðÿäíîå óñòðîéñòâî îæèäàåò çàðÿäêè, àêêóìóëÿòîð õîëîäíûé) LED Flashing ORANGE (Мигающий ОРАНЖЕВЫЙ) Line 1 WAITING TO CHG (ОЖИДАНИЕ ЗАРЯДКИ) Line 2 COLD BATTERY (АККУМУЛЯТОР ХОЛОДНЫЙ) Charger Waiting to Charge, Low Voltage (Çàðÿäíîå óñòðîéñòâî îæèäàåò çàðÿäêè, íèçêîå íàïðÿæåíèå) LED Flashing ORANGE (Мигающий ОРАНЖЕВЫЙ) Line 1 WAITING TO CHG (ОЖИДАНИЕ ЗАРЯДКИ) Line 2 LOW VOLTAGE (НИЗКОЕ НАПРЯЖЕНИЕ) ÏÐÈÌÅ×ÀÍÈÅ: Íå âñå ïîêàçàííûå âûøå ýêðàíû áóäóò îòîáðàæåíû. Íàïðèìåð, ýêðàí Îæèäàíèå çàðÿäêè (àêêóìóëÿòîð íàãðåëñÿ, àêêóìóëÿòîð õîëîäíûé, íèçêîå íàïðÿæåíèå) îòîáðàçÿòñÿ òîëüêî ïðè âîçíèêíîâåíèè ñîîòâåòñòâóþùåé ñèòóàöèè. Charger is in Trickle Charge Mode (Çàðÿäíîå óñòðîéñòâî â ðåæèìå çàðÿäêè ìàëûì òîêîì) LED Line 1 Flashing GREEN (Мигающий ЗЕЛЕНЫЙ) TRICKLE CHARGE (ЗАРЯДКА МАЛЫМ ТОКОМ) Line 2 Charge is Complete (Çàðÿäêà çàâåðøåíà) LED Steady GREEN or Flashing RED / GREEN (Ровный ЗЕЛЕНЫЙ или мигающий КРАСНЫЙ / ЗЕЛЕНЫЙ) Line 1 CHARGE COMPLETE (ЗАРЯДКА ЗАВЕРШЕНА) Line 2 Charger is in Discharge/Reconditioning Mode (Çàðÿäíîå óñòðîéñòâî â Ðóññêèé ðåæèìå ðàçðÿäà/âîññòàíîâëåíèÿ) LED Steady ORANGE (Ровный ОРАНЖЕВЫЙ) Line 1 DISCHARGE (РАЗРЯД) Line 2 20 Charger is Calibrating an IMPRES Battery (Çàðÿäíîå óñòðîéñòâî âûïîëíÿåò êàëèáðîâêó àêêóìóëÿòîðà IMPRES) LED Steady ORANGE, Steady RED, & Flashing ORANGE or GREEN (Ровный ОРАНЖЕВЫЙ, ровный КРАСНЫЙ и мигающий ОРАНЖЕВЫЙ или ЗЕЛЕНЫЙ) Line 1 Calibrating (Калибровка) Line 2 Battery (аккумулятора) LED Steady GREEN (Ровный ЗЕЛЕНЫЙ) Line 1 Battery (аккумулятор) Line 2 Calibrated (откалиброван) *Âñå àêêóìóëÿòîðû IMPRES äîëæíû áûòü îòêàëèáðîâàíû ïåðåä èñïîëüçîâàíèåì. Çàðÿäíîå óñòðîéñòâî IMPRES àâòîìàòè÷åñêè çàïóñêàåò êàëèáðîâêó äëÿ âñåõ íîâûõ àêêóìóëÿòîðîâ Battery Capacity Data is Displayed as “%” in mAH, and Voltage (Îòîáðàæàåòñÿ åìêîñòü àêêóìóëÿòîðà â % è ìÀ÷) LED Defined by Charge State (Определяется состоянием зарядки) Line 1 ----% RATED CAP. (----%НОМИНАЛЬНОЙ ЕМКОСТИ) Line 2 ----mAH --.-V (----мАч --.-В) Estimated Time to Rapid Charge Complete Displayed in Hours, Minutes for NiCd & NiMH IMPRES Batteries Only (Ïðåäïîëîæèòåëüíîå âðåìÿ îêîí÷àíèÿ áûñòðîé çàðÿäêè â ÷àñàõ è ìèíóòàõ òîëüêî äëÿ NiCd è NiMH àêêóìóëÿòîðîâ IMPRES) LED Defined by Charge State (Определяется состоянием зарядки) Line 1 RAPID CHG ENDS (БЫСТРАЯ ЗАРЯДКА ЗАКОНЧИТСЯ) Line 2 IN xx HRS, yy MIN (ЧЕРЕЗ xx Ч, yy МИН) 21 Ðóññêèé ÏÐÈÌÅ×ÀÍÈÅ: (1) Ïðåäïîëîæèòåëüíîå âðåìÿ îêîí÷àíèÿ çàðÿäêè âêëþ÷àåò â ñåáÿ äëèòåëüíîñòü öèêëîâ áûñòðîé çàðÿäêè è ðàçðÿäà (ïðè íåîáõîäèìîñòè). (2) Äëÿ íåêàëèáðîâàííûõ àêêóìóëÿòîðîâ ñâåäåíèÿ î åìêîñòè ìîãóò íå îòîáðàæàòüñÿ. (3) Ïðèìåíåíèå çàðÿäíûõ óñòðîéñòâ íå-IMPRES äëÿ çàðÿäêè àêêóìóëÿòîðîâ IMPRES ìîæåò ïîâëèÿòü íà åìêîñòü è òî÷íîñòü îöåíêè âðåìåíè çàðÿäêè. Äèàãðàììû ïîñëåäîâàòåëüíîñòè äëÿ àêêóìóëÿòîðîâ IMPRES Ïðèìå÷àíèå: äàííûå äèàãðàììû äåìîíñòðèðóþò ïîñëåäîâàòåëüíîñòè, ïîêàçàííûå â ïðåäûäóùåì ðàçäåëå “Îáùèå ñâåäåíèÿ î äèñïëåå”, è äîñòóïíû òîëüêî íà àíãëèéñêîì ÿçûêå. Ïîñëåäîâàòåëüíîñòü ýêðàíîâ äëÿ NiCd è NiMH àêêóìóëÿòîðîâ IMPRES Çàïóñê LED (4,0 c) (2,0 c) (2,0 c) (2,0 c) Ðóññêèé (7,0 c) (4,0 c) Defined by Charge State Line 1 KIT# xxxxxxxx Line 2 SN: yyyyyyyyyyyy LED Defined by Charge State Line 1 KIT# xxxxxxxx Line 2 yyyyy CHEMISTRY LED Defined by Charge State Line 1 xxxx CYCLES Line 2 TO RECONDITION LED Steady RED Line 1 RAPID CHARGE Êàæäûå 73,0 c Êàæäûå 13,0 c Line 2 LED Defined by Charge State Line 1 xx% RATED CAP. Line 2 yyyyy mAH zz.z V LED Defined by Charge State Line 1 RAPID CHG ENDS Line 2 IN xx HRS, yy MIN 22 5X 65,0 c Ïåðåä êàëèáðîâêîé: Çàïóñê LED (4,0 c) (2,0 c) (2,0 c) Defined by Charge State Line 1 KIT# xxxxxxxx Line 2 SN: yyyyyyyyyyyy LED Defined by Charge State Line 1 KIT# xxxxxxxx Line 2 yyyyy CHEMISTRY LED Steady ORANGE Line 1 DISCHARGE Êàæäûå 71,0 c Êàæäûå 13,0 c Line 2 5X (7,0 c) (4,0 c) LED Defined by Charge State Line 1 CALIBRATING Line 2 BATTERY LED Defined by Charge State Line 1 RAPID CHG ENDS Line 2 IN xx HRS, yy MIN 65,0 c Ðóññêèé 23 Ïîñëå êàëèáðîâêè: Çàïóñê LED (4,0 c) (2,0 c) (2,0 c) Defined by Charge State Line 1 KIT# xxxxxxxx Line 2 SN: yyyyyyyyyyyy LED Defined by Charge State Line 1 KIT# xxxxxxxx Line 2 yyyyy CHEMISTRY LED Steady GREEN Line 1 CHARGE COMPLETE Êàæäûå 61,0c Êàæäûå 11 c Line 2 5X (2,0 c) Defined by Charge State Line 1 BATTERY Line 2 CALIBRATED LED Defined by Charge State Line 1 xx% RATED CAP. Line 2 yyyy mAH zz.z V Ðóññêèé (7,0 c) LED 24 55,0 c Ïîñëåäîâàòåëüíîñòü ýêðàíîâ äëÿ Li-Ion àêêóìóëÿòîðîâ IMPRES Çàïóñê (4,0 c) (2,0 c) (2,0 c) (2,0 c) LED Defined by Charge State Line 1 KIT# xxxxxxxx Line 2 SN: yyyyyyyyyyyy LED Defined by Charge State Line 1 KIT# xxxxxxxx Line 2 yyyyy CHEMISTRY LED Defined by Charge State Line 1 xxxx CYCLES Line 2 TO RECONDITION LED Steady RED Line 1 RAPID CHARGE Êàæäûå 53,0 c Êàæäûå 9,0 c Line 2 5X (7,0 c) LED Defined by Charge State Line 1 xx% RATED CAP. Line 2 yyyyy mAH zz.z V 45,0 c Ðóññêèé 25 Ïåðåä êàëèáðîâêîé: Çàïóñê (4,0 c) (2,0 c) (2,0 c) LED Defined by Charge State Line 1 KIT# xxxxxxxx Line 2 SN: yyyyyyyyyyyy LED Defined by Charge State Line 1 KIT# xxxxxxxx Line 2 yyyyy CHEMISTRY LED Steady ORANGE Line 1 DISCHARGE Êàæäûå 51,0 c Êàæäûå 9,0 c Line 2 5X Defined by Charge State Line 1 CALIBRATING Line 2 BATTERY Ðóññêèé (7,0 c) LED 26 45,0 c Ïîñëå êàëèáðîâêè: Çàïóñê (4,0 c) (2,0 c) (2,0 c) LED Defined by Charge State Line 1 KIT# xxxxxxxx Line 2 SN: yyyyyyyyyyyy LED Defined by Charge State Line 1 KIT# xxxxxxxx Line 2 yyyyy CHEMISTRY LED Steady GREEN Line 1 CHARGE COMPLETE Êàæäûå 61,0c Êàæäûå 11 c Line 2 5X (2,0 c) (7,0 c) LED Defined by Charge State Line 1 BATTERY Line 2 CALIBRATED LED Defined by Charge State Line 1 xx% RATED CAP. Line 2 yyyy mAH zz.z V 55,0 c Ðóññêèé 27 Îðèåíòàöèÿ òåêñòà íà äèñïëåå Äèñïëåé CDM ìîæåò ïîâîðà÷èâàòüñÿ íà 180 ãðàäóñîâ, ïîçâîëÿÿ ðàçìåùàòü àäàïòèâíîå ìíîãîìåñòíîå çàðÿäíîå óñòðîéñòâî IMPRES íà ñòîëå èëè ñòåíå. ×òîáû ïîâåðíóòü äèñïëåé, âñòàâüòå áîëüøóþ êàíöåëÿðñêóþ ñêðåïêó â îòâåðñòèå ïîä äèñïëååì ïåðïåíäèêóëÿðíî ïîâåðõíîñòè. Ùåë÷îê áóäåò îçíà÷àòü ñðàáàòûâàíèå ïåðåêëþ÷àòåëÿ, ïîñëå ÷åãî òåêñò áóäåò ïîâåðíóò íà 180 ãðàäóñîâ. Îáñëóæèâàíèå àäàïòèâíîãî ìíîãîìåñòíîãî çàðÿäíîãî óñòðîéñòâà IMPRES Ïîäðîáíåå î âîçìîæíîñòÿõ îáñëóæèâàíèÿ MUC è CDM ñì. Ðóêîâîäñòâî ïî îáñëóæèâàíèþ çàðÿäíîãî óñòðîéñòâà, 6880309L66. Îáñëóæèâàíèå Äëÿ îáñëóæèâàíèÿ îáðàùàéòåñü â ñëåäóþùåå ïðåäñòàâèòåëüñòâî. Ïîæàëóéñòà, ïåðåä îòïðàâêîé óñòðîéñòâà íà îáñëóæèâàíèå ïîçâîíèòå â ïðåäñòàâèòåëüñòâî è ïîäòâåðäèòå âîçâðàò. Öåíòð îáñëóæèâàíèÿ Motorola Motorola GmbH Customer Care Am Borsigturm 130 13507 Berlin Germany. Ðóññêèé Tel: +49 30 6686 1555 28 OBSAH Pravidla provozní bezpeènosti . . . . . . . . . . . . . . . . . . . . . . . . . . . . . 3 IMPRES - vlastnosti a výhody. . . . . . . . . . . . . . . . . . . . . . . . . . . . . . 4 Provozní charakteristiky a odlišnosti . . . . . . . . . . . . . . . . . . . . . . . . 5 Seznam baterií . . . . . . . . . . . . . . . . . . . . . . . . . . . . . . . . . . . . . . . . . 7 Napájecí sít’ a schválené napájecí adaptéry Motorola. . . . . . . . . . 10 Provozní pokyny . . . . . . . . . . . . . . . . . . . . . . . . . . . . . . . . . . . . . . . Nabíjení baterií . . . . . . . . . . . . . . . . . . . . . . . . . . . . . . . . . . . . . Manuální regenerace baterií . . . . . . . . . . . . . . . . . . . . . . . . . . . Automatická regenerace baterií . . . . . . . . . . . . . . . . . . . . . . . . . Manuální ukonèení regenerace . . . . . . . . . . . . . . . . . . . . . . . . . 11 13 14 14 15 Odstraòování závad . . . . . . . . . . . . . . . . . . . . . . . . . . . . . . . . . . . . 16 Servis . . . . . . . . . . . . . . . . . . . . . . . . . . . . . . . . . . . . . . . . . . . . . . . 17 Nabíjeèky s modulem displeje (CDM) . . . . . . . . . . . . . . . . . . . . . . 18 Tento doplòující manuál platí pro dále uvedené univerzální víceèlánkové nabíjeèky IMPRES: WPLN4108, WPLN4109, WPLN4110, WPLN4118, WPLN4119, WPLN4120, WPLN4121, WPLN4123, WPLN4130, WPLN4131, WPLN4132, WPLN4133, WPLN4134, WPLN4135, WPLN4136 Kromì toho jsou v tomto manuálu popsány dále uvedené univerzální víceèlánkové nabíjeèky IMPRES, dodávané k profesionálním radiostanicím øady GP Professional: WPLN4144, WPLN4145, WPLN4146, WPLN4187, WPLN4188, WPLN4189, WPLN4190, WPLN4191, WPLN4192, WPLN4193, WPLN4194, WPLN4195, WPLN4196, WPLN4204, WPLN4205 Výraz 'univerzální' znamená, že nabíjeèku lze použít pro více typù radiostanic, a s použitím bateriových adaptérù pro všechny baterie uvedené v tabulkách 1 - 6. 1 Èeština Dùležité bezpeènostní pokyny . . . . . . . . . . . . . . . . . . . . . . . . . . . . . 2 Èeština DÙLEžITÉ BEZPEÈNOSTNÍ POKYNY TYTO POKYNY SI USCHOVEJTE Následující dokument obsahuje dùležité pokyny o bezpeènosti a obsluze. Peèlivì si je pøeètìte a uschovejte si je pro pozdìjší použití. Døíve, než zaènete nabíjeèku baterií používat, pøeètìte si všechny pokyny a výstražná oznaèení na nabíjeèce (1), baterii (2) a na radiostanici (3), v níž se baterie používá. 1. Nabíjejte pouze schválené nabíjecí baterie Motorola uvedené v tabulce 1 až 5, abyste pøedešli možnému poranìní. Jiné baterie mohou vybuchnout a zpùsobit zranìní osob a vìcné škody. ! VÝSTRAHA 3. 4. 5. 6. 7. 2.Použití pøíslušenství, které není doporuèeno firmou Motorola mùže zpùsobit požár, úraz elektrickým proudem nebo zranìní. Nabíjeèku odpojujte ze zásuvky tahem za zástrèku, nikoli tahem za kabel; pøedejdete tak možnému poškození zástrèky nebo kabelu. Pokud to není nezbytnì nutné, nepoužívejte prodlužovací kabel. Použití nesprávného prodlužovacího kabelu mùže zpùsobit požár nebo úraz elektrickým proudem. Pokud je nutné použít prodlužovací kabel, dbejte na to, aby byl do délky 100 stop (30,48 m) použit kabel velikosti 18AWG a do délky 150 stop (45,72 m) kabel velikosti 16AWG. Pro zamezení vzniku požáru, úrazu elektrickým proudem nebo zranìní nepoužívejte nabíjeèku, která je jakkoli poškozená. Pøedejte ji servisnímu pracovníkovi firmy Motorola. Toto zaøízení je opravitelné. Každá nabíjecí pozice je napájená vlastním obvodem na desce plošných spojù a napájecím zdrojem. Desku plošných spojù resp. zdroj lze zakoupit v prodejnách s pøíslušenstvím a náhradními díly. Deska plošných spojù má objednací èíslo RLN5325. Jiné náhradní díly se nedodávají. V prodejnách s pøíslušenstvím a náhradními díly lze rovnìž objednat pøíruèku popisující výmìnu souèásti. Tato servisní pøíruèka má objednací èíslo 6880309L66. Pøed zapoèetím jakékoli údržby nebo èistìní nabíjeèku nejdøíve odpojte od elektrického rozvodu, abyste zamezili možnému úrazu elektrickým proudem. 2 PRAVIDLA PROVOZNÍ BEZPEÈNOSTI • Toto zaøízení není vhodné pro vekovní použití. Používejte je pouze v suchém prostøedí. • Pøipojujte zaøízení pouze ke správnì jištìnému a zapojenému napájecímu okruhu s odpovídajícím napìtím (viz specifikace výrobku). • Odpojujte zaøízení od napájení vytažením zástrèky ze zásuvky. • Zásuvka, k nìmuž zaøízení pøipojujete, musí být dobøe pøístupná. • U zaøízení vybaveného pojistkou musí náhradní pojistka souhlasit s typem a hodnotou uvedenou ve specifikacích zaøízení. • Maximální teplota okolí nabíjeèky nesmí pøekroèit 40 °C (104 °F). • Dbejte na to, aby na napájecí kabel nikdo nešlapal, nezakopl o nìj, aby nebyl pod vodou a nebyl napnutý. • Pro toto zaøízení lze použít stejnou konzolu pro instalaci na stìnu, jako pro univerzální nabíjeèku NTN4796. Objednací èíslo montážní konzoly na stìnu je NLN7967. • Pøi výmìnì pojistky používejte výhradnì typ, který je uveden na výrobním štítku nabíjeèky. Následující souèásti lze objednat u místního prodejce pøíslušenství a náhradních dílù: Pojistka 6571489S01 Držák 0987626G01 Kryt 0987739G01 3 Èeština • Pøed nabíjením baterie vypnìte radiostanici. Èeština IMPRES - VLASTNOSTI A VÝHODY Øešení IMPRES je vyspìlý napájecí systém Tri-Chemistry vyvinutý firmou Motorola, který obsahuje baterie IMPRES (a), adaptivní víceèlánkovou nabíjeèku IMPRES (b) a systém hardwaru a softwaru v radiostanici (c), zajišt’ující interní komunikaci radiostanic IMPRES kompatibilních s bateriemi IMPRES (neplatí pro radiostanice øady GP Professional). Když je adaptivní víceèlánková nabíjeèka IMPRES použita ve spojení s bateriemi Motorola IMPRES, pak: • zabezpeèuje maximální provozní èas mezi nabíjecími cykly potlaèením pamìt’ového efektu. • maximalizuje životnost baterií výrazným snížením zahøívání bìhem udržovacího nabíjení a cyklù po nabití. • vyluèuje nutnost poøízení regeneraèního zaøízení a zácviku obsluhy pro “údržbu baterií”. Díky tomuto jedineènému patentovanému systému není nutno vést záznamy o použití baterií, provádìt manuální regeneraèní cyklování nebo po nabití vyjímat baterie z nabíjeèky. Adaptivní víceèlánková nabíjeèka IMPRES monitoruje charakter použití baterií IMPRES, ukládá tyto informace pøímo do nich a provádí regeneraèní cykly, pouze když je to nutné. Pøi použití adaptivní víceèlánkové nabíjeèky IMPRES se baterie nepøehøívají, bez ohledu na to jak dlouho zùstanou v nabíjecích pozicích nabíjeèky. Nabíjeèka monitoruje baterie a po nabití je automaticky odpojí. Adaptivní víceèlánková nabíjeèka IMPRES zjednodušuje nabíjení baterií a jejich údržbu: Staèí dodržovat následující postup: 1. Vložit radiostanici resp. baterii do nabíjecí pozice nabíjeèky. 2. Vyjmout radiostanici resp. baterii z nabíjeèky, když je plnì nabitá! Motorola je jediný výrobce, který nabízí formovací nebo regeneraèní nabíjeèku poskytující uživatelùm možnost nabíjení jak samostatných baterií, tak i baterií pøipojených k radiostanici. 4 PROVOZNÍ CHARAKTERISTIKY A ODLIŠNOSTI: 2. Vzhledem k tomu, že adaptivní víceèlánková nabíjeèka IMPRES automaticky stanovuje podmínky nutné pro regeneraci baterie IMPRES, mùže po vložení radiostanice nebo baterie pøejít do regeneraèního režimu. Ten je indikován TRVALÝM ŽLUTÝM svitem kontrolky nabíjeèky. Regeneraèní režim lze v pøípadì potøeby potlaèit vyjmutím a opìtovným vložením radiostanice nebo baterie. (Pøeètìte si pokyny uvedené dále v této pøíruèce.) 3. Adaptivní víceèlánková nabíjeèka IMPRES je urèena k nabíjení baterií uvedených v tabulkách 1 až 6. Funkci Smart Energy však umožòují pouze originální baterie IMPRES. 4. Pro zabezpeèení pøesného záznamu o stavu baterie IMPRES, uložení a zobrazení tìchto dat, musí být baterie IMPRES Smart zkalibrována adaptivní víceèlánkovou nabíjeèkou IMPRES. 5 Èeština 1. Baterie IMPRES lze nabíjet v konvenèních nabíjeèkách. Pokud však má být použita funkce Smart Energy, je nutno nabíjet baterie IMPRES v adaptivní víceèlánkové nabíjeèce IMPRES. Pøi prvním nabíjení baterie IMPRES v adaptivní víceèlánkové nabíjeèce IMPRES bude kontrolka nabíjeèky zpoèátku svítit TRVALE ŽLUTÌ. První nabíjení musí být zcela dokonèeno, dokud kontrolka nabíjeèky nezaène svítit TRVALE ZELENÌ. Tím je baterie IMPRES správnì zkalibrována, což umožòuje funkci Smart Energy. Pokud je uvedený proces pøerušen, nabíjeèka baterii zkalibruje bìhem pøíštího nabíjení. Èeština 5. Pokud je baterie IMPRES použita v radiostanici s displejem (napø. XTS5000), mùže být na displeji radiostanice zobrazena ikona indikující stav baterie. Tato ikona je aktivována po zkalibrování baterie IMPRES nabíjeèkou IMPRES. Ikona stavu nabití zùstane zobrazena tak dlouho, dokud bude uživatel pro nabíjení baterie používat nabíjeèku IMPRES. Pokud však bude baterie IMPRES po období 7 dnù (nebo déle) nabíjena v jiné nabíjeèce než IMPRES, ikona zmizí. Pro opìtovné zobrazení ikony je tøeba vložit baterii IMPRES do nabíjeèky IMPRES a nechat probìhnout celý proces nabíjení (s výsledným TRVALÝM ZELENÝM svitem kontrolky). Ikona stavu nabití se potom opìt zobrazí na displeji radiostanice. Jestliže se ikona ani po plném nabití baterie nezobrazí, vložte èásteènì vybitou baterii (nejménì na 70%) do nabíjeèky, aktivujte regeneraèní režim a nechejte probìhnout celý nabíjecí cyklus. Ikona se potom zobrazí na displeji radiostanice (neplatí pro radiostanice GP Professional). 6. Adaptivní víceèlánkovou nabíjeèku IMPRES smí opravovat pouze servisní pracovník, autorizovaný firmou Motorola CGISS. Porušením této zásady mùže zaniknout záruka pøístroje. 6 SEZNAM BATERIÍ Tabulka 1. Radiostanice øady ASTRO XTS3000 / XTS3500 / DiMetra a digitální radiostanice ASTRO XTS5000 Sada (PN) HNN9031 HNN9032 NTN8294 NTN8295 NTN8297 NTN8299 NTN8610 NTN8293 NNTN4435 NNTN4436 NNTN4437 RNN4006 RNN4007 NTN9862 Typ baterie NiCD NiCD NiCD NiCD NiCD NiCD LiIon NiMH NiMH NiMH NiMH NiMH NIMH LiIon FM ne ano ne ano ano ano ne ne ne ano ano ne ano ne Smart ano ano ne ne ne ne ne ne ano ano ano ne ne ano Kapacita Ultra vysoká Ultra vysoká Ultra vysoká Ultra vysoká Ultra vysoká Ultra vysoká Vysoká Ultra vysoká Ultra vysoká Ultra vysoká Ultra vysoká Velmi vysoká Velmi vysoká Ultra vysoká Nový model ne ne ne ne ne ne ne ne ne ne ne nový nový nový Tabulka 2. Digitální radiostanice ASTRO XTS2500 Sada (PN) NTN9859 NTN9857 NTN9815 NTN9816 Typ baterie NiMH NiMH NiCD NiCD FM ne ano ne ano Smart ne ne ne ne Kapacita Ultra vysoká Ultra vysoká Vysoká Vysoká Nový model nový nový nový nový Tabulka 3. Digitální radiostanice MTP700 Sada (PN) PMNN4048* PMNN4049* PMNN4050* PMNN4047* Typ baterie NiMH NiMH Lilon LiIon FM ne ano ne ne Smart ano ano ano ano Kapacita Vysoká Vysoká Vysoká Vysoká Nový model nový nový nový nový * Nabíjení baterií MTP700 v univerzální nabíjeèce vyžaduje použití bateriového adaptéru obj.è. RLN5212. 7 Èeština V následujících tabulkách je pøehled baterií, které lze používat v radiostanicích uvedených v záhlaví tabulek. Èeština Tabulka 4. Radiostanice HT1000 / MT2000 / MTS2000 / MTX8000 & MTX9000 øady Jedi Sada (PN) HNN9028 HNN9029 NTN7143 NTN7144 NTN7146 NTN7147 NTN7148 NTN7149 NTN7150 NTN7341 NTN7372 WPPN4013 WPPN4037 RNN4008 Typ baterie NiCD NiCD NiCD NiCD NiCD NiCD NiCD NiCD NiCD NiCD NiCD NiMH NiMH NiCD FM ne ano ne ne ano ano CENELEC CSA MSHA ano ano ne ano ATEX Smart ano ano ne ne ne ne ne ne ne ne ne ne ne ne Kapacita Ultra vysoká Ultra vysoká Vysoká Ultra vysoká Vysoká Ultra vysoká Vysoká Vysoká Vysoká Ultra vysoká Vysoká Ultra vysoká Ultra vysoká Vysoká Nový model ne ne ne ne ne ne ne ne ne ne ne ne ne ne Tabulka 5. Radiostanice Saber / Astro Saber/ SSE5000 / MX1000 Sada (PN) HNN9033 HNN9031 NTN4537** NTN4538 NTN4592** NTN4593 NTN4595 NTN4596 NTN4657 NTN4671 NTN4992 NTN7014** NTN7058 NTN7426 NTN8251 NTN8818** Typ baterie NiCD NiCD NiCD NiCD NiCD NiCD NiCD NiCD NiCD NiCD NiCD NiMH NiCD NiCD NiMH LiIon FM ne ano ano ano ne ne ne ano ne CENELEC ano ne ano ano ano ne Smart ano ano ne ne ne ne ne ne ne ne ne ne ne ne ne ne Kapacita Ultra vysoká Ultra vysoká Nízká Vysoká Nízká Vysoká Ultra vysoká Ultra vysoká Vysoká Vysoká Ultra vysoká Vysoká Ultra vysoká Nízká Ultra vysoká Vysoká Nový model ne ne ne ne ne ne ne ne ne ne ne ne ne ne ne ne **Nabíjení baterií Astro Saber v univerzální nabíjeèce vyžaduje použití bateriového adaptéru obj.è. 4385922B01. 8 Tabulka 6. Radiostanice øady GP Professional HNN9008 HNN9009 HNN9010 HNN9011 HNN9012 HNN9013 WPNN4045 PMNN4045 HNN4001 HNN4002 HNN4003 Typ baterie NiMH AA Bluetooth NiMH NiMH NiMH NiCD NiCD LiIon NiMH NiMH Impres NiMH Impres NiMH Impres LiIon FM ne Smart ne Kapacita Vysoká Nový model ne ne ne ano ano ne ne ne ne ne ano ne ne ne ne ne ne ne ne ne ano ano ano Vysoká Ultra vysoká Ultra vysoká Vysoká Vysoká Vysoká Vysoká Vysoká Ultra vysoká Ultra vysoká Ultra vysoká ne ne ne ne ne ne ne ne ano ano ano Univerzální nabíjeèka vyžaduje bateriový adaptér obj.è. RLN5648. POZNÁMKA: Adaptéry lze zakoupit od zástupcù prodejce radiostanice nebo prodejce náhradních dílù. 9 Èeština Sada (PN) HNN9003 Èeština Napájecí sít’ a Schválené Napájecí Adaptéry Motorola Tato nabíjeèka je urèena pro použití ve støídavých rozvodných sítích o napìtí 100 V až 240 V, 50/60 Hz s použitím sít’ových kabelù Motorola uvedených v Tabulce 7. Sít’ové kabely používané k nabíjeèce pro radiostanice øady GP Professional jsou uvedeny v Tabulce 8: Tabulka 7. Sít’ové kabely Motorola Universal Typ zástrèky Bez sít’. kabelu / zástrèky U.S.A/NA Euro V. Británie Austrálie/Nový Zéland Argentina U.S.A./NA Korea Nabíjeèka WPLN4121 Nabíjeèka (model s displejem) WPLN4127 Napájecí kabel žádný WPLN4108 WPLN4109 WPLN4110 WPLN4118 WPLN4119 WPLN4120 WPLN4123 WPLN4130 WPLN4131 WPLN4132 WPLN4133 WPLN4134 WPLN4135 WPLN4136 3087791G01 3087791G04 3087791G07 3087791G10 3087791G13 3087791G01 3087791G16 Tabulka 8. Sít’ové kabely Motorola pro øadu GP Professional Typ zástrèky Bez sít’. kabelu / zástrèky U.S.A/NA Euro V. Británie Austrálie/Nový Zéland Argentina U.S.A./NA Korea Nabíjeèka WPLN4197 Nabíjeèka (model s displejem) WPLN4198 žádný WPLN4187 WPLN4189 WPLN4188 WPLN4190 WPLN4191 WPLN4205 WPLN4146 WPLN4192 WPLN4194 WPLN4193 WPLN4195 WPLN4196 WPLN4204 WPLN4145 3087791G01 3087791G04 3087791G07 3087791G10 3087791G13 3087791G01 3087791G16 10 Napájecí kabel PROVOZNÍ POKYNY Do nabíjecích pozic nabíjeèky lze vložit buï radiostanici s pøipojenou baterií nebo pouze samotnou baterii. Pøed nabíjením radiostanice s baterií radiostanici nejdøíve vypnìte. Nabíjení baterie probíhá nejlépe pøi pokojové teplotì. 1. Zapojte odpovídající konec sít’ového kabelu do napájecího konektoru na zadní èásti nabíjeèky. 2. Zapojte zástrèku sít’ového kabelu do odpovídající zásuvky elektrického rozvodu. Úspìšné zapnutí je indikováno JEDNÍM ZELENÝM BLIKNUTÍM kontrolky nabíjeèky. 3. Vložte baterii nebo radiostanici s baterií (vypnutá radiostanice) do nabíjecí pozice: a. Dbejte na to, aby drážky na obou stranách baterie souhlasily s odpovídajícími vodítky na bocích nabíjecí pozice. b. Zatlaète baterii smìrem k zadní stìnì nabíjecí pozice. c. Zasuòte baterii do nabíjecí pozice tak, aby byl zaruèen dokonalý dotyk kontaktù baterie a nabíjeèky. Jakmile je baterie správnì zasunuta do nabíjeèky rozsvítí se kontrolka nabíjeèky, která tím indikuje, že nabíjeèka rozpoznala pøítomnost baterie. Viz popis indikací nabíjeèky v Tabulce 9. . 11 Èeština POZNÁMKY V adaptivní víceèlánkové nabíjeèce IMPRES lze nabíjet pouze baterie schválené firmou Motorola, uvedené v tabulkách 1 až 6. Ostatní baterie nelze nabíjet. Adaptivní víceèlánkové nabíjeèky IMPRES jsou vybaveny automatickými funkcemi a možnostmi, které jsou odlišné od jiných nabíjeèek. Vìnujte zvláštní pozornost kontrolce nabíjeèky abyste se ujistili, že pracuje v požadovaném resp. oèekávaném režimu. Èeština Tabulka 9. Indikace nabíjeèky Kontrolka nabíjeèky Jedno zelené bliknutí Trvale èervenì svítí Zelenì bliká Èervenì bliká Trvale žlutì svítí Popis Nabíjeèka je správnì zapnutá. Baterie je v režimu rychlonabíjení. Dokonèené rychlonabíjení baterie (>90% dosažitelné kapacity). Baterie v režimu dobíjení (udržovací nabíjení). Nabíjení skonèilo a baterie je plnì nabitá. Nabíjeèka rozpoznala baterii, ale nabíjení ještì nezaèalo. (Buï je napìtí baterie pøíliš nízké, nebo je baterie pøíliš studená nebo horká. Jakmile uvedené podmínky pominou, bude zahájeno nabíjení.) Baterii nelze nabít nebo má špatný kontakt. (Platí pouze pro baterie Smart.) Bliká èervenì a zelenì Baterie je v regeneraèním režimu. Doba, po kterou nabíjeèka zùstane v tomto režimu závisí na zbytkovém náboji baterie v okamžiku vložení do nabíjeèky. (Plnì nabitá baterie vyžaduje delší dobu regenerace - 8 hodin nebo více - než se zcela vybije.) (Platí pouze pro baterie Smart.) Trvale zelenì svítí Žlutì bliká Nabíjení skonèilo a baterie je plnì nabitá. Baterie je dosud použitelná, její životnost však brzy skonèí. POZNÁMKA Adaptivní víceèlánková nabíjeèka IMPRES má tu jedineènou schopnost, že pøi použití s bateriemi Motorola IMPRES dokáže automaticky urèit, kdy je potøeba baterii regenerovat. Plné využití všech možností baterií Motorola Smart i adaptivního systému nabíjení vyžaduje, aby byla pøi prvním nabíjení inicializována data uložená v bateriích Motorola Smart. Tento proces je indikován TRVALÝM ŽLUTÝM svitem kontrolky nabíjeèky (stejnì jako pøi regeneraci baterie). Uvedený proces probíhá automaticky a zahrnuje prvotní regeneraci baterie s následným nabíjením po skonèení tohoto procesu. Celý proces vyžaduje urèitý èas pro inicializaci baterie, takže ji lze pøi prvním nabíjení ponechat v nabíjeèce pøes noc. 12 Adaptivní víceèlánková nabíjeèka IMPRES pracuje jako: • Regeneraèní zaøízení baterií Motorola IMPRES. Nabíjení baterií DÙLEŽITÉ: Do nabíjecích pozic nabíjeèky lze vložit baterie nìkolika rùzných tvarù a velikostí, a proto je dùležité se pøesvìdèit, zda je baterie nebo radiostanice s pøipojenou baterií vložena do nabíjeèky správnì. Pokud je samotná baterie nebo radiostanice s pøipojenou baterií vložena nesprávnì, kontrolka nabíjeèky se nerozsvítí a tím indikuje, že se baterie nenabíjí. POZNÁMKA: Nové baterie (dosud nepoužité) v nìkterých pøípadech pøedèasnì indikují plné nabití (TRVALÝ ZELENÝ svit kontrolky). Pro zajištìní optimálního výkonu firma Motorola doporuèuje, ponechat pøed prvním použitím nové baterie v nabíjeèce 14 až 16 hodin. 1. Jakmile je baterie nebo radiostanice s pøipojenou baterií správnì vložena do nabíjecí pozice, nabíjeèka zahájí rychlonabíjení indikované TRVALÝM ÈERVENÝM svitem kontrolky nabíjeèky. Doba TRVALÉHO ÈERVENÉHO svitu kontrolky závisí na zbytkovém náboji baterie. 2. Dokonèené rychlonabíjení (>90% dosažitelné kapacity) je indikováno ZELENÝM BLIKÁNÍM kontrolky nabíjeèky. To oznaèuje dobíjení (udržovací nabíjení), které trvá asi 1 hodinu. 3. Dokonèení udržovacího nabíjení je indikováno TRVALÝM ZELENÝM svitem kontrolky nabíjeèky. Tím je ohlášeno plné nabití baterie. 4. Jiné indikace, které se mohou bìhem nabíjení objevit: • ŽLUTÉ BLIKÁNÍ – indikuje, že teplota nebo napìtí baterie je mimo rozsah pøípustný pro nabíjení. Nabíjení bude pokraèovat, jakmile tyto podmínky pominou. • ÈERVENÉ A ZELENÉ BLIKÁNÍ – indikuje, že se baterie blíží 13 Èeština • Nabíjeèka všech baterií schválených firmou Motorola a Èeština konci své životnosti. Aèkoli tato baterie je plnì nabitá, její kapacita se užíváním snížila, takže nemusí být dostaèující pro vìtší zatížení. Tato funkce je k dispozici pouze s bateriemi Motorola IMPRES. Nejedná se o indikaci závady, ale více ménì o upozornìní uživateli, že baterie již brzy nebude splòovat oèekávané pøedpoklady a je tøeba ji vymìnit. • ÈERVENÉ BLIKÁNÍ – indikuje, že baterii nelze nabít. To mùže být zpùsobeno ztrátou kontaktu mezi baterií a nabíjeèkou. Po odstranìní pøíèiny indikované kontrolkou bude nabíjení pokraèovat. Baterie Motorola Smart mají vnitøní pamìt’, kterou ète adaptivní víceèlánková nabíjeèka Motorola IMPRES. Když je baterie IMPRES nabíjena v adaptivní víceèlánkové nabíjeèce IMPRES déle než 2,5 minuty, nabíjeèka si uchová sériové èíslo baterie IMPRES. Baterii IMPRES lze vyjmout z nabíjeèky na dobu až 30 minut. Po vložení baterie zpìt do nabíjeèky bude proces nabíjení pokraèovat od bodu, kdy byla baterie z nabíjeèky vyjmuta. Manuální regenerace baterií Bìhem 2,5 minuty po prvním vložení baterie IMPRES do nabíjeèky (TRVALÁ ÈERVENÁ indikace) baterii vyjmìte a bìhem 5 sekund ji vložte zpìt - tím bude manuálnì vynucen režim regenerace. Indikace kontrolky nabíjeèky se zmìní z TRVALÉ ÈERVENÉ na TRVALOU ŽLUTOU. Nabíjeèka je ve stavu nucené regenerace a potom automaticky zahájí nabíjení baterie. POZNÁMKA: Nadmìrné používání této funkce mùže snížit celkovou životnost baterie. Automatická regenerace baterií Adaptivní víceèlánková nabíjeèka IMPRES firmy Motorola je schopná ve spojitosti s bateriemi Motorola IMPRES urèit, kdy je vhodné baterii regenerovat. 14 Na tomto místì je nutno upozornit, že proces regenerace je úèinný pouze tehdy, když se baterie postupnì zcela vybije a potom znovu plnì nabije. Ponechejte proto baterii v nabíjeèce tak dlouho, dokud se kontrolka nabíjeèky TRVALE ZELENÌ nerozsvítí. Na konci regeneraèního cyklu nabíjeèka automaticky baterii znovu nabije. Manuální ukonèení regenerace Proces regenerace baterie Motorola IMPRES (TRVALÝ ŽLUTÝ svit kontrolky) lze kdykoli pøerušit tím, že baterii vyjmete z nabíjeèky a bìhem 5 sekund ji znovu vložíte zpìt. Tím se proces regenerace pøeruší a nabíjeèka bude pokraèovat nabíjením baterie. Kontrolka nabíjeèky zaène svítit TRVALE ÈERVENÌ. 15 Èeština Po øádném vložení baterie IMPRES do nabíjecí pozice nabíjeèka urèí, zda je vhodné baterii regenerovat. Jestliže baterie vyžaduje regeneraci, nabíjeèka to automaticky indikuje TRVALÝM ŽLUTÝM svitem kontrolky. Tento proces mùže trvat až 8 hodin nebo více, v závislosti na kapacitì baterie a na stavu jejího nabití pøi vložení do nabíjeèky. Èeština ODSTRAÒOVÁNÍ ZÁVAD Adaptivní víceèlánková nabíjeèka IMPRES má následující vlastnosti: • univerzální napájení ze støídavé elektrické sítì (100 V -240 V, 50/60 Hz). • rychlonabíjení konstantním proudem. • udržovací nabíjení pøerušovaným proudem (záporné impulzy). • regenerace baterií. Kombinace výše uvedených vlastností je pro stolní nabíjeèku ojedinìlá. Nedoporuèuje se však provozovat radiostanici s pøipojenou baterií, když je vložená do nabíjeèky. Pøi použití radiostanice vložené do nabíjeèky mùže dojít k výraznému snížení výkonu radiostanice a k prodloužení doby nabíjení. S blížícím se koncem cyklu rychlonabíjení (TRVALÝ ÈERVENÝ svit kontrolky) napìtí baterie pøekroèí normální provozní napìtí radiostanice. Napìtí baterie se vrátí zpìt na normální úroveò po ukonèení cyklu rychlonabíjení nebo po vyjmutí baterie z nabíjeèky. Pokud radiostanici zapnete v dobì, kdy je nabíjeèka v režimu rychlonabíjení, radiostanice nebude doèasnì provozuschopná. Tento stav lze zrušit vyjmutím radiostanice z nabíjeèky, vypnutím a opìtovným zapnutím. Bìhem procesu regenerace se baterie zcela vybije. Proto se bìhem procesu regenerace mùže stát, že radiostanice nebude fungovat. Pøi odstraòování závad vždy sledujte stav kontrolky nabíjeèky - viz Tabulka 9. 16 Tabulka 10. Odstraòování závad Problém Co to znamená... Co je tøeba udìlat... • Nabíjeèka není pøipojená k síti. Kontrolka èervenì bliká • Nabíjeèka nemá kontakt s baterií. • Zkontrolujte, zda je radiostanice s baterií nebo samotná baterie øádnì vložená do nabíjeèky. • Zkontrolujte, zda je sít’ový kabel øádnì pøipojen k nabíjeèce a do zásuvky elektrické sítì, a zda je zásuvka pod napìtím. • Vymìòte pojistku. • Vyjmìte baterii z nabíjeèky a znovu ji vložte zpìt. • Zkontrolujte, zda se jedná o baterii schválenou firmou Motorola uvedenou v tabulkách 1 až 6. Ostatní baterie nelze nabíjet. • Odpojte nabíjeèku od elektrické rozvodné sítì a èistým suchým hadøíkem vyèistìte pozlacené kontakty nabíjeèky i baterie. • Vymìòte baterii. • Baterii nelze nabít. Kontrolka žlutì bliká • Baterie èeká na nabíjení.Teplota baterie je nižší než 5 °C (41°F) nebo vyšší než 40 °C (104°F), nebo je napìtí baterie nižší než pøeddefinovaná prahová hodnota pro rychlonabíjení. • Jakmile uvedené podmínky pominou, bude zahájeno nabíjení. SERVIS Adaptivní víceèlánkovou nabíjeèku IMPRES smí opravovat pouze kvalifikovaný servisní pracovník, autorizovaný firmou Motorola. Nedodržením této zásady mùže zaniknou záruka pøístroje. 17 Èeština Žádná indikace • Nabíjeèka nemá kontakt s kontrolky. baterií. Èeština NABÍJEÈKY S MODULEM DISPLEJE (CDM) Adaptivní víceèlánkovou nabíjeèku IMPRES lze zdokonalit doplnìním modulu displeje nabíjeèky (CDM), obj. è. Motorola RLN5382. Obecné informace displeje Adaptivní víceèlánková nabíjeèka IMPRES vybavená CDM poskytuje uživateli cenné informace pro ošetøování a údržbu baterie. Informace zobrazované nabíjeèkou a odpovídající indikace kontrolky jsou uvedeny v následujících tabulkách. Zapnutí Po zapnutí nabíjeèky Kontrolka JEDNO ZELENÉ BLIKNUTÍ Øádek 1 IMPRES Øádek 2 Když není v nabíjecí pozici baterie Kontrolka NESVÍTÍ Øádek 1 NO BATTERY Øádek 2 Ètení dat baterie Kontrolka Libovolná definovaná indikace Øádek 1 READING Øádek 2 BATTERY DATA V nabíjecí pozici není baterie IMPRES Kontrolka Podle stavu nabíjení Øádek 1 NON-IMPRES Øádek 2 BATTERY V nabíjecí pozici je baterie IMPRES Zobrazí se IMPRES a verze softwaru Kontrolka Podle stavu nabíjení Øádek 1 IMPRES Øádek 2 SW xx.yy; aa.bb POZNÁMKA: xx.yy oznaèuje verzi softwaru nabíjeèky, aa.bb oznaèuje verzi softwaru CDM. 18 Zobrazí se sada baterie IMPRES a její typ Podle stavu nabíjení Øádek 1 KIT# -------- Øádek 2 -----CHEMISTRY Pøedpokládaný poèet cyklù pøed regenerací Kontrolka Podle stavu nabíjení Øádek 1 ----CYCLES Øádek 2 TO RECONDITION * Zobrazí se pouze tehdy, když je poèet cyklù do regenerace nižší než 6. Nabíjeèka èeká na nabíjení, baterie je pøíliš horká Kontrolka Bliká ORANŽOVÌ Øádek 1 WAITING TO CHG Øádek 2 HOT BATTERY Nabíjeèka èeká na nabíjení, baterie je studená Kontrolka Bliká ORANŽOVÌ Øádek 1 WAITING TO CHG Øádek 2 COLD BATTERY Nabíjeèka èeká na nabíjení, napìtí je nízké Kontrolka Bliká ORANŽOVÌ Øádek 1 WAITING TO CHG Øádek 2 LOW VOLTAGE POZNÁMKA: Výše uvedené displeje se nezobrazují všechny. Napøíklad hlášení, že nabíjeèka èeká na nabíjení (horká baterie, studená baterie, nízké napìtí) se zobrazí, pouze když nastane daná situace. 19 Èeština Kontrolka Èeština Nabíjeèka je v režimu udržovacího nabíjení Kontrolka Bliká ZELENÌ Øádek 1 TRICKLE CHARGE Øádek 2 Nabíjení skonèilo Kontrolka ZELENÌ svítí nebo ÈERVENÌ / ZELENÌ bliká Øádek 1 CHARGE COMPLETE Øádek 2 Nabíjeèka je v režimu vybíjení/regenerace Kontrolka Trvale ORANŽOVÌ svítí Øádek 1 DISCHARGE Øádek 2 Nabíjeèka kalibruje baterii IMPRES Kontrolka Svítí trvale ORANŽOVÌ, ÈERVENÌ a bliká ORANŽOVÌ nebo ZELENÌ Øádek 1 Calibrating Øádek 2 Battery Kontrolka Trvale ZELENÌ svítí Øádek 1 Battery Øádek 2 Calibrated * Všechny baterie IMPRES musí být pøed prvním použitím kalibrovány. Nabíjeèka IMPRES automaticky provede kalibraci pro všechny nové baterie. Údaje o kapacitì baterie jsou zobrazeny jako “%” v mAh a Voltech Kontrolka Podle stavu nabíjení Øádek 1 ----% RATED CAP. Øádek 2 ----mAH --.-V 20 Kontrolka Podle stavu nabíjení Øádek 1 RAPID CHG ENDS Øádek 2 IN xx HRS, yy MIN POZNÁMKA: (1) Odhadovaný èas dokonèeného nabíjení zahrnuje cykly rychlonabíjení a vybíjení (pokud je tøeba). (2) Pro nekalibrované baterie se nezobrazí informace o kapacitì baterie. (3) Nabíjení baterií IMPRES jinými nabíjeèkami než IMPRES mùže ovlivnit kapacitu a pøesnost èasu nabíjení. 21 Èeština Odhadovaná doba rychlonabíjení Úplné zobrazení v hodinách a minutách pouze pro NiCd a NiMH baterie IMPRES. Èeština Èasové diagramy pro baterie IMPRES Poznámka: Tyto diagramy jsou sekvence uvedené v pøedchozích ‘Obecných informacích displeje a jsou pouze v angliètinì. Èasové diagramy NiCd a NiMH baterií IMPRES Start Kontrolka Podle stavu nabíjení Øádek 1 KIT# xxxxxxxx (4,0 sec) Øádek 2 (2,0 sec) SN: yyyyyyyyyyyy Kontrolka Podle stavu nabíjení Øádek 1 KIT# xxxxxxxx (2,0 sec) Øádek 2 Každých 73,0 sec yyyyy CHEMISTRY Kontrolka Podle stavu nabíjení Øádek 1 xxxx CYCLES Øádek 2 TO RECONDITION Kontrolka Trvale ÈERVENÌ svítí Øádek 1 RAPID CHARGE Každých 13,0 sec (2,0 sec) Øádek 2 Kontrolka Podle stavu nabíjení Øádek 1 xx% RATED CAP. (7,0 sec) Øádek 2 yyyyy mAH zz.z V Kontrolka Podle stavu nabíjení Øádek 1 RAPID CHG ENDS (4,0 sec) Øádek 2 IN xx HRS, yy MIN 22 5X 65,0 sec Pøed kalibrací: (4,0 sec) (2,0 sec) (2,0 sec) Kontrolka Podle stavu nabíjení Øádek 1 KIT# xxxxxxxx Øádek 2 SN: yyyyyyyyyyyy Kontrolka Podle stavu nabíjení Øádek 1 KIT# xxxxxxxx Øádek 2 yyyyy CHEMISTRY Kontrolka Trvale ORANŽOVÌ svítí Øádek 1 DISCHARGE Každých 71,0 sec Každých 13,0 sec Øádek 2 5X (7,0 sec) (4,0 sec) Kontrolka Podle stavu nabíjení Øádek 1 CALIBRATING Øádek 2 BATTERY Kontrolka Podle stavu nabíjení Øádek 1 RAPID CHG ENDS Øádek 2 IN xx HRS, yy MIN 23 65,0 sec Èeština Start Èeština Po kalibraci: Start (4,0 sec) (2,0 sec) (2,0 sec) Kontrolka Podle stavu nabíjení Øádek 1 KIT# xxxxxxxx Øádek 2 SN: yyyyyyyyyyyy Kontrolka Podle stavu nabíjení Øádek 1 KIT# xxxxxxxx Øádek 2 yyyyy CHEMISTRY Kontrolka Trvale ZELENÌ svítí Øádek 1 CHARGE COMPLETE Každých 61,0sec Každých 11 sec Øádek 2 5X (2,0 sec) (7,0 sec) Kontrolka Podle stavu nabíjení Øádek 1 BATTERY Øádek 2 CALIBRATED Kontrolka Podle stavu nabíjení Øádek 1 xx% RATED CAP. Øádek 2 yyyy mAH zz.z V 24 55,0 sec Èasový diagram Li-Ion baterií IMPRES (4,0 sec) (2,0 sec) (2,0 sec) (2,0 sec) Kontrolka Podle stavu nabíjení Øádek 1 KIT# xxxxxxxx Øádek 2 SN: yyyyyyyyyyyy Kontrolka Podle stavu nabíjení Øádek 1 KIT# xxxxxxxx Øádek 2 yyyyy CHEMISTRY Kontrolka Podle stavu nabíjení Øádek 1 xxxx CYCLES Øádek 2 TO RECONDITION Kontrolka Trvale ÈERVENÌ svítí Øádek 1 RAPID CHARGE Každých 53,0 sec Každých 9,0 sec Øádek 2 5X (7,0 sec) Kontrolka Podle stavu nabíjení Øádek 1 xx% RATED CAP. Øádek 2 yyyyy mAH zz.z V 25 45,0 sec Èeština Start Èeština Pøed kalibrací: Start (4,0 sec) (2,0 sec) (2,0 sec) Kontrolka Podle stavu nabíjení Øádek 1 KIT# xxxxxxxx Øádek 2 SN: yyyyyyyyyyyy Kontrolka Podle stavu nabíjení Øádek 1 KIT# xxxxxxxx Øádek 2 yyyyy CHEMISTRY Kontrolka Trvale ORANŽOVÌ svítí Øádek 1 DISCHARGE Každých 51,0 sec Každých 9.0 sec Øádek 2 5X (7,0 sec) Kontrolka Podle stavu nabíjení Øádek 1 CALIBRATING Øádek 2 BATTERY 26 45,0 sec Po kalibraci: (4,0 sec) (2,0 sec) (2,0 sec) Kontrolka Podle stavu nabíjení Øádek 1 KIT# xxxxxxxx Øádek 2 SN: yyyyyyyyyyyy Kontrolka Podle stavu nabíjení Øádek 1 KIT# xxxxxxxx Øádek 2 yyyyy CHEMISTRY Kontrolka Trvale ZELENÌ svítí Øádek 1 CHARGE COMPLETE Každých 61,0sec Každých 11 sec Øádek 2 5X (2,0 sec) (7,0 sec) Kontrolka Podle stavu nabíjení Øádek 1 BATTERY Øádek 2 CALIBRATED Kontrolka Podle stavu nabíjení Øádek 1 xx% RATED CAP. Øádek 2 yyyy mAH zz.z V 27 55,0 sec Èeština Start Èeština Orientace zobrazeného textu Vzhledem k možnosti instalace adaptivní víceèlánkové nabíjeèky IMPRES na stùl nebo na zeï umožòuje modul CDM "pøevrácení" zobrazeného textu o 180 stupòù. Pokud chcete tuto možnost použít, zasuòte kolmo do dírky pod displejem velkou sponu na papír. Stisknutí pøepínacího tlaèítka je indikováno "kliknutím" a text se pøevrátí o 180 stupòù. Provoz adaptivní víceèlánkové nabíjeèky IMPRES Podrobnìjší informace o obsluze MUC a CDM jsou uvedeny v pøíruèce Charger Service Guide, 6880309L66. Servis Pokud budete potøebovat servis, kontaktujte následující adresu. Pøed odesláním nabíjeèky do servisu laskavì zavolejte a ovìøte si svùj požadavek. Motorola Service Centre Motorola GmbH Péèe o zákazníky Am Borsigturm 130 13507 Berlin Nìmecko. Tel: +49 30 6686 1555 28 © 2006 Motorola, Inc. and MOTOROLA are registered trademarks of Motorola, Inc. IMPRES is a trademark of Motorola, Inc. 07/06. All Rights Reserved und MOTOROLA sind eingetragene Warenzeichen von Motorola Inc. IMPRES ist ein Warenzeichen der Motorola, Inc. 07/06. Alle Rechte vorbehalten. et MOTOROLA sont des marques déposées de Motorola, Inc. IMPRES est une marque de fabrique de Motorola, Inc. 07/06. Tous droits réservés. y MOTOROLA son marcas registradas de Motorola, Inc. IMPRES es una marca comercial de Motorola, Inc 07/06. Todos los derechos reservados. e MOTOROLA são marcas registadas da Motorola, Inc. IMPRES é uma marca comercial da Motorola, Inc. 07/06. Todos os direitos reservados. e MOTOROLA sono marchi registrati di Motorola Inc. IMPRES è un marchio registrato di Motorola, Inc. 07/06. Tutti i diritti riservati en MOTOROLA zijn wettig gedeponeerde handelsmerken van Motorola, Inc. IMPRES is een handelsmerk van Motorola, Inc. 07/06. Alle rechten voorbehouden a MOTOROLA jsou zapsané ochranné známky spoleènosti Motorola, Inc. IMPRES je ochranná známka spoleènosti Motorola, Inc. 07/06. Všechna práva vyhrazena è MOTOROLA ÿâëÿþòñÿ òîâàðíûìè çíàêàìè êîìïàíèè Motorola Inc. IMPRES ÿâëÿåòñÿ òîâàðíûì çíàêîì êîìïàíèè Motorola, Inc. 07/06. Âñå ïðàâà ñîõðàíÿþòñÿ. 6866537D22-B @6866537D22@-
 1
1
-
 2
2
-
 3
3
-
 4
4
-
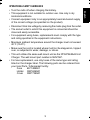 5
5
-
 6
6
-
 7
7
-
 8
8
-
 9
9
-
 10
10
-
 11
11
-
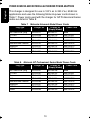 12
12
-
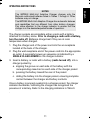 13
13
-
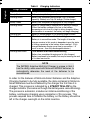 14
14
-
 15
15
-
 16
16
-
 17
17
-
 18
18
-
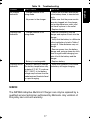 19
19
-
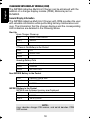 20
20
-
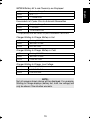 21
21
-
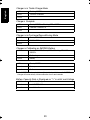 22
22
-
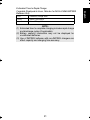 23
23
-
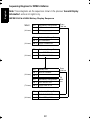 24
24
-
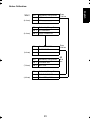 25
25
-
 26
26
-
 27
27
-
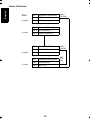 28
28
-
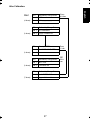 29
29
-
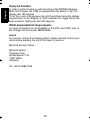 30
30
-
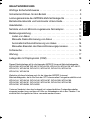 31
31
-
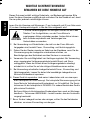 32
32
-
 33
33
-
 34
34
-
 35
35
-
 36
36
-
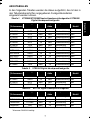 37
37
-
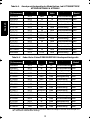 38
38
-
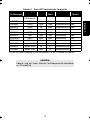 39
39
-
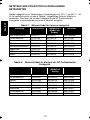 40
40
-
 41
41
-
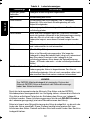 42
42
-
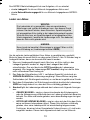 43
43
-
 44
44
-
 45
45
-
 46
46
-
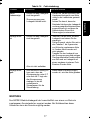 47
47
-
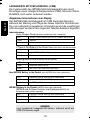 48
48
-
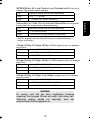 49
49
-
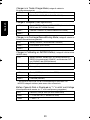 50
50
-
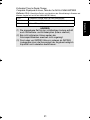 51
51
-
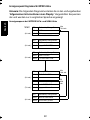 52
52
-
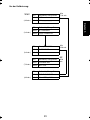 53
53
-
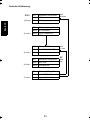 54
54
-
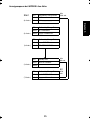 55
55
-
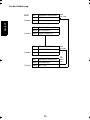 56
56
-
 57
57
-
 58
58
-
 59
59
-
 60
60
-
 61
61
-
 62
62
-
 63
63
-
 64
64
-
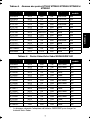 65
65
-
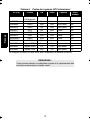 66
66
-
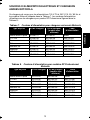 67
67
-
 68
68
-
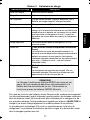 69
69
-
 70
70
-
 71
71
-
 72
72
-
 73
73
-
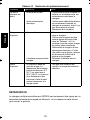 74
74
-
 75
75
-
 76
76
-
 77
77
-
 78
78
-
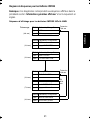 79
79
-
 80
80
-
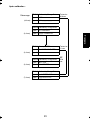 81
81
-
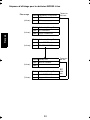 82
82
-
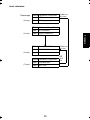 83
83
-
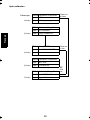 84
84
-
 85
85
-
 86
86
-
 87
87
-
 88
88
-
 89
89
-
 90
90
-
 91
91
-
 92
92
-
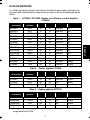 93
93
-
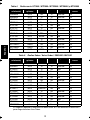 94
94
-
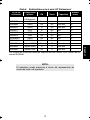 95
95
-
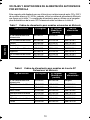 96
96
-
 97
97
-
 98
98
-
 99
99
-
 100
100
-
 101
101
-
 102
102
-
 103
103
-
 104
104
-
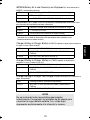 105
105
-
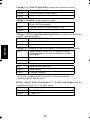 106
106
-
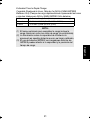 107
107
-
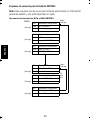 108
108
-
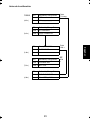 109
109
-
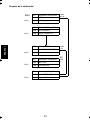 110
110
-
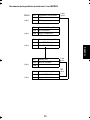 111
111
-
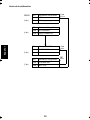 112
112
-
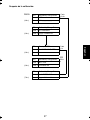 113
113
-
 114
114
-
 115
115
-
 116
116
-
 117
117
-
 118
118
-
 119
119
-
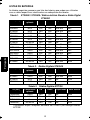 120
120
-
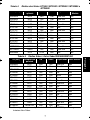 121
121
-
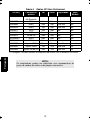 122
122
-
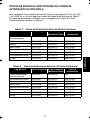 123
123
-
 124
124
-
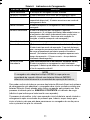 125
125
-
 126
126
-
 127
127
-
 128
128
-
 129
129
-
 130
130
-
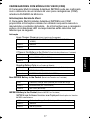 131
131
-
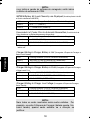 132
132
-
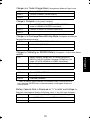 133
133
-
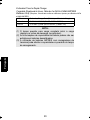 134
134
-
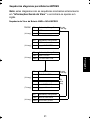 135
135
-
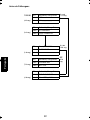 136
136
-
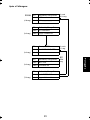 137
137
-
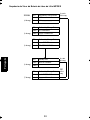 138
138
-
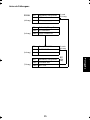 139
139
-
 140
140
-
 141
141
-
 142
142
-
 143
143
-
 144
144
-
 145
145
-
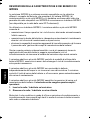 146
146
-
 147
147
-
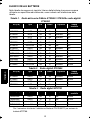 148
148
-
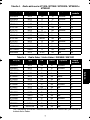 149
149
-
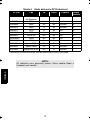 150
150
-
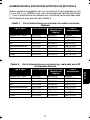 151
151
-
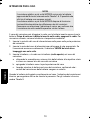 152
152
-
 153
153
-
 154
154
-
 155
155
-
 156
156
-
 157
157
-
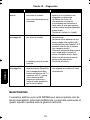 158
158
-
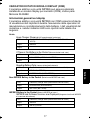 159
159
-
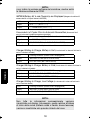 160
160
-
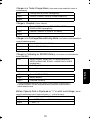 161
161
-
 162
162
-
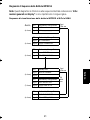 163
163
-
 164
164
-
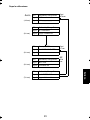 165
165
-
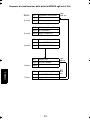 166
166
-
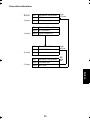 167
167
-
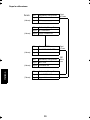 168
168
-
 169
169
-
 170
170
-
 171
171
-
 172
172
-
 173
173
-
 174
174
-
 175
175
-
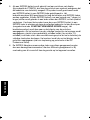 176
176
-
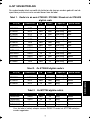 177
177
-
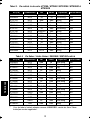 178
178
-
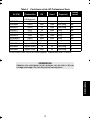 179
179
-
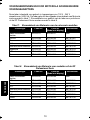 180
180
-
 181
181
-
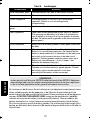 182
182
-
 183
183
-
 184
184
-
 185
185
-
 186
186
-
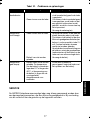 187
187
-
 188
188
-
 189
189
-
 190
190
-
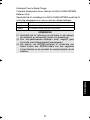 191
191
-
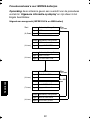 192
192
-
 193
193
-
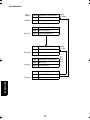 194
194
-
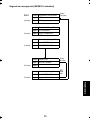 195
195
-
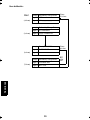 196
196
-
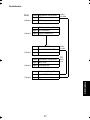 197
197
-
 198
198
-
 199
199
-
 200
200
-
 201
201
-
 202
202
-
 203
203
-
 204
204
-
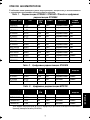 205
205
-
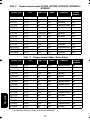 206
206
-
 207
207
-
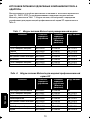 208
208
-
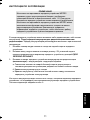 209
209
-
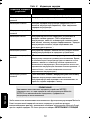 210
210
-
 211
211
-
 212
212
-
 213
213
-
 214
214
-
 215
215
-
 216
216
-
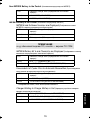 217
217
-
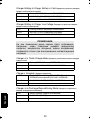 218
218
-
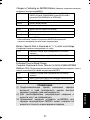 219
219
-
 220
220
-
 221
221
-
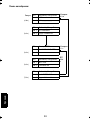 222
222
-
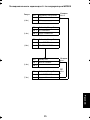 223
223
-
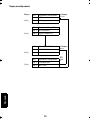 224
224
-
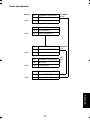 225
225
-
 226
226
-
 227
227
-
 228
228
-
 229
229
-
 230
230
-
 231
231
-
 232
232
-
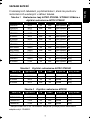 233
233
-
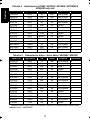 234
234
-
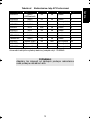 235
235
-
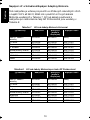 236
236
-
 237
237
-
 238
238
-
 239
239
-
 240
240
-
 241
241
-
 242
242
-
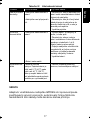 243
243
-
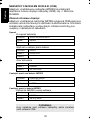 244
244
-
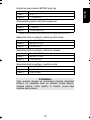 245
245
-
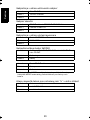 246
246
-
 247
247
-
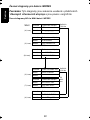 248
248
-
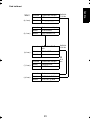 249
249
-
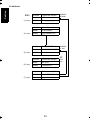 250
250
-
 251
251
-
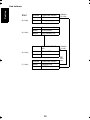 252
252
-
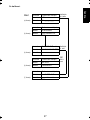 253
253
-
 254
254
-
 255
255
-
 256
256


Motorola IMPRES Smart Energy System Manual de usuario
- Categoría
- Baterías recargables
- Tipo
- Manual de usuario
En otros idiomas
- français: Motorola IMPRES Smart Energy System Manuel utilisateur
- italiano: Motorola IMPRES Smart Energy System Manuale utente
- English: Motorola IMPRES Smart Energy System User manual
- Deutsch: Motorola IMPRES Smart Energy System Benutzerhandbuch
- Nederlands: Motorola IMPRES Smart Energy System Handleiding
- português: Motorola IMPRES Smart Energy System Manual do usuário
- čeština: Motorola IMPRES Smart Energy System Uživatelský manuál
Documentos relacionados
-
Motorola IMPRES WPLN4191 Manual de usuario
-
-
-
-
-
-
Motorola IMPRES NNTN7587 Manual de usuario
-
Motorola NNTN8845 Guía del usuario
-
Motorola PS000029A02 Manual de usuario
-
