
ATENCIÓN: Lea, entienda y siga las instrucciones de seguridad contenidas en este
manual antes de operar esta herramienta.
WARNING: Read, understand and follow the safety rules in this manual, before operating this tool.
BC615 • BC620
Bomba Centrífuga
Centrifugal Water Pump
Manual de Usuario y Garantía.
User’s Manual and Warranty.

2
ENGLISH ESPAÑOL
General safety rules
Electric safety
Personal safety
Tool use and care
Specific safety rules for
centrifugal water pumps
Features
· Technical data
· Electrical connection
Operation instructions
Maintenance
Troubleshooting
Warranty policy
10
10
10
11
11
11
12
12
12
14
14
16
Normas generales de seguridad
Seguridad eléctrica
Seguridad personal
Utilización y cuidados de las
herramientas eléctricas
Advertencias de seguridad para
bombas centrífugas
Características
· Especificaciones técnicas
· Conexión eléctrica
Instrucciones de operación
Mantenimiento
Solucionador de problemas
Garantía
3
3
3
4
4
5
5
5
6
7
8
16
CONTENIDO CONTENT
PELIGRO, ADVERTENCIA, PRECAUCIÓN: Indi-
ca un riesgo personal o la posibilidad de un
daño.
Profundidad máxima de funcionamiento.
Lea el manual de usuario: Lea las instruccio-
nes contenidas en este manual.
Máxima altura manométrica total.
DANGER, CAUTION, WARNING: Indicates risk of
personal injury and/or the possibility of damage.
Maximum operating depth.
Read the user manual: Read all the instructions in
this manual.
Maximum manometric height.
SÍMBOLOS SYMBOLS

3
ESPAÑOL•Manual de usuario
NORMAS GENERALES DE SEGURIDAD
Esta BOMBA SUMERGIBLE tiene características
que harán su trabajo más rápido y fácil. Segu-
ridad, comodidad y confiabilidad fueron previs-
tos como prioridad para el diseño del mismo,
haciendo más fácil su operación.
ADVERTENCIA: Lea todas las advertencias
de seguridad y todas las instrucciones. La omi-
sión de alguna de las advertencias e instruccio-
nes que se enlistan a continuación puede dar
como resultado un choque eléctrico, fuego y/o
un daños serios. CONSERVE TODAS LAS ADVER-
TENCIAS Y TODAS LAS INSTRUCCIONES.
NOTA: La expresión "herramienta" en las adver-
tencias se refiere a la herramienta eléctrica que
se conecta a la fuente de alimentación (con ca-
ble) o a la herramienta que se acciona a batería
(sin cable).
SEGURIDAD EN EL ÁREA DE TRABAJO
Mantenga el área de trabajo limpia y bien ilu-
minada. Las áreas desordenadas y oscuras pro-
vocan accidentes.
No maneje herramientas eléctricas en atmós-
feras explosivas, tales como en presencia de
líquidos inflamables, gases o polvo. Las herra-
mientas eléctricas crean chispas que pueden en-
cender el polvo o los humos.
Mantenga alejados a los niños y curiosos mien-
tras maneja una herramienta eléctrica. Las dis-
tracciones pueden causarle la pérdida del con-
trol.
SEGURIDAD ELÉCTRICA
La clavija de la herramienta eléctrica debe
coincidir con receptáculo. No modificar nunca
la clavija de ninguna manera. No usar ningún
adaptador de clavijas con herramientas eléctri-
cas puestas a tierra. Clavijas no modificadas y
bases coincidentes reducirán el riesgo de cho-
que eléctrico.
Evite el contacto del cuerpo con superficies
puestas a tierra como tuberías, radiadores, co-
cinas eléctricas y refrigeradores. Hay un riesgo
aumentado de choque eléctrico si su cuerpo está
puesto a tierra.
No exponga las herramientas eléctricas a la llu-
via o a condiciones de humedad. El agua que
entre en la herramienta aumentará el riesgo de
choque eléctrico.
No abuse del cable. No usar nunca el cable para
llevar, levantar o desenchufar la herramienta
eléctrica. Mantenga el cable lejos del calor, acei-
te, cantos vivos o piezas en movimiento. Los
cables dañados o enredados aumentan el riesgo
de choque eléctrico.
Cuando maneje una herramienta eléctrica en el
exterior, use una prolongación de cable adecua-
da para uso en el exterior. El uso de una prolon-
gación de cable adecuada para uso en el exte-
rior reduce el riesgo de choque eléctrico.
Si el uso de una herramienta en un lugar hú-
medo es inevitable, use una alimentación pro-
tegida por un dispositivo de corriente residual
(RCD). El uso de un RCD reduce el riesgo de cho-
que eléctrico.
EXTENSIONES DE CABLE
NOTA: El uso de cables dañados incrementa el
riesgo de descargas eléctricas o quemaduras.
Si es necesario un cable de extensión, debe ser
usado un cable con el tamaño adecuado de los
conductores. La tabla de la siguiente página,
muestra el tamaño correcto para usar depen-
diendo en la longitud del cable y el rango de
amperaje especificado en la etiqueta de valores
nominales del producto. Si está en duda, use el
rango próximo más grande.
Siempre use cables de extensión listados en UL,
CSA ó NOM. TAMAÑOS RECOMENDADOS DE
EXTENSIONES DE CABLE:
Cuando esté usando el producto en el exterior,
use una extensión para exteriores marcadas con
lo siguiente: “WA” o “W”. Estas extensiones es-
tán pensadas para trabajar en exteriores y redu-
cen el riesgo de descarga eléctrica.
“ESTA HERRAMIENTA CUENTA CON UN
SUJETACABLE TIPO “Y“, EN CASO DE DAÑARSE
EL CORDÓN DE ALIMENTACIÓN, ÉSTE DEBERÁ
SER REEMPLAZADO POR EL FABRICANTE, SUS
CENTROS DE SERVICIO AUTORIZADOS, O PER-
SONAL CALIFICADO A FIN DE EVITAR RIESGOS.”
NOTA: La instalación eléctrica de la bomba debe
hacerse conforme a lo señalado en la NOM-001_
SEDE-2012 en sus partes aplicables.
SEGURIDAD PERSONAL
Esté alerta, vigile lo que está haciendo y use el
sentido común cuando maneje una herramien-
ta eléctrica. No use una herramienta eléctrica
cuando esté cansado o bajo la influencia de

4
drogas, alcohol o medicamentos. Un momento
de distracción mientras maneja herramientas
eléctricas puede causar un daño personal serio.
Use equipo de seguridad. Lleve siempre protec-
ción para los ojos. La utilización para las con-
diciones apropiadas de un equipo de seguridad
tal como mascarilla antipolvo, zapatos no resba-
ladizos, gorro duro, o protección para los oídos
reducirá los daños personales.
Evite un arranque accidental. Asegúrese de que
el interruptor está en posición apagado antes
de conectar a la red y/o a la batería, coger o
transportar la herramienta. Transportar herra-
mientas eléctricas con el dedo sobre el interrup-
tor o enchufar herramientas eléctricas que tie-
nen en interruptor en posición encendido invita
a accidentes.
Retire llaves o herramienta antes de arrancar la
herramienta eléctrica. Una llave o herramienta
dejada unida a una pieza rotativa de una herra-
mienta eléctrica puede causar un daño personal.
No se sobrepase. Mantenga los pies bien asen-
tados sobre el suelo y conserve el equilibrio en
todo momento. Esto permite un mejor control
de la herramienta eléctrica en situaciones ines-
peradas.
Vista adecuadamente. No vista ropa suelta o jo-
yas. Mantenga su pelo, su ropa y guantes aleja-
dos de las piezas en movimiento. La ropa suelta,
las joyas o el pelo largo pueden ser cogidos en
las piezas en movimiento.
Si hay dispositivos para la conexión de medios
de extracción y recolección de polvo, asegúrese
de que éstos estén conectados y se usen correc-
tamente. El uso de estos dispositivos puede re-
ducir los peligros relacionados con el polvo.
IMPORTANTE: Este aparato no se destina
para utilizarse por personas (incluyendo niños)
cuyas capacidades físicas, sensoriales o mentales
sean diferentes o estén reducidas, o carezcan de
experiencia o conocimiento, a menos que dichas
personas reciban una supervisión o capacitación
para el funcionamiento del aparato por una
persona responsable de su seguridad. Los niños
deben supervisarse para asegurar que ellos no
empleen los aparatos como juguete.
UTILIZACIÓN Y CUIDADOS DE LAS
HERRAMIENTAS ELÉCTRICAS
No fuerce la herramienta eléctrica. Use la he-
rramienta eléctrica correcta para su aplicación.
La herramienta eléctrica correcta hará el traba-
jo mejor y más seguro al ritmo para la que fue
concebida.
No use la herramienta eléctrica si el interruptor
no acciona “encendido” y “apagado”. Cualquier
herramienta eléctrica que no pueda controlarse
con el interruptor es peligrosa y debe repararse.
Desconecte la clavija de la fuente de alimenta-
ción y/o de la batería antes de efectuar cual-
quier ajuste, cambio de accesorios, o de alma-
cenar las herramientas eléctricas. Tales medidas
preventivas de seguridad reducen el riesgo de
arrancar la herramienta accidentalmente.
Almacene las herramientas eléctricas inactivas
fuera del alcance de los niños y no permita el
manejo de la herramienta eléctrica a personas
no familiarizadas con las herramientas o con
estas instrucciones. Las herramientas eléctricas
son peligrosas en manos de usuarios no entre-
nados.
SERVICIO: Haga revisar su herramienta eléctrica
por un servicio de reparación calificado usando
solamente piezas de reemplazo idénticas. Esto
garantizará que la seguridad de la herramienta
eléctrica se mantiene.
ADVERTENCIA: Si el cordón de alimentación
a sido dañado debe ser reemplazado únicamen-
te por personal capacitado en los centros de ser-
vicio autorizados por Urrea Herramientas Profe-
sionales S.A. de C.V.
IMPORTANTE: El tipo de sujeta-cables em-
pleado para este producto es tipo “Y”. La cons-
trucción de este producto esta diseñada de ma-
nera que su aislamiento eléctrico es alterado
por salpicaduras o derramamiento de líquidos
durante su operación.
ADVERTENCIAS DE SEGURIDAD
PARA BOMBAS CENTRÍFUGAS
· Esta bomba ha sido diseñada para bombear lí-
quidos limpios neutrales, a temperaturas no su-
periores a 35°C. Útil para subir agua a tinacos.
ADVERTENCIA: Esta bomba no debe ser uti-
lizada cuando haya personas o animales dentro
del agua.
· Este producto no debe quedar expuesto a go-
teo o salpicaduras de líquidos.
· No debe utilizarse para suministrar agua pota-
ble ni para la entrega de productos alimenticios.
· No se deberán bombear sustancias explosivas,
inflamables, agresivas o peligrosas para la salud
ni materia fecal.
· El aparato no es apropiado para operar de ma-
nera continua (por ejemplo, circulación perma-
nente en sistemas de filtro). Tampoco es apro-

5
ESPAÑOL•Manual de usuario
piado para su uso con líquidos que contengan
materiales abrasivos (por ejemplo, arena) o que
contengan mezclas de tierra, arena, lodo o ba-
rro.
· Cualquier otro tipo de uso es inapropiado. El
uso inapropiado o el que se le hagan modifica-
ciones a este dispositivo o el uso de sus compo-
nentes que no sea sometido a prueba y apro-
bado por el fabricante puede resultar en daño
impredecible.
· Se debe hacer conexión con una toma de co-
rriente a tierra que sea instalada, conectada a
tierra y probada adecuadamente. El voltaje del
suministro eléctrico y del fusible debe cumplir
con los datos técnicos.
· El aparato debe estar conectado por medio de
un interruptor de corriente residual (RCCB) con
diseño de corriente de corto circuito no mayor
a 30 mA. Antes de conectarlo se debe asegurar
que el suministro eléctrico corresponda a los re-
querimientos del aparato.
· Fije la herramienta. Con ayuda de taquetes y
tornillos fije la herramienta al suelo.
· No retuerza, aplaste, arrastre no pase por enci-
ma del cable de alimentación, protéjalo contra
bordes filosos, aceite y calor.
· Desconecte el cable alimentador de electrici-
dad antes de realizar cualquier trabajo de man-
tenimiento.
· No instale y encienda el aparato si hay perso-
nas o animales en el medio en que se bombeará
ni deberán estar en contacto con dicho medio.
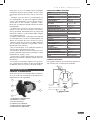
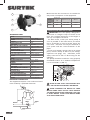
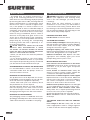
CARACTERÍSTICAS
CONOZCA SU HERRAMIENTA
Antes de intentar usar este producto, familiarí-
cese con todas sus características de operación y
requerimientos de seguridad.
1. CUBIERTA DE TERMINALES.
2. ENTRADA DE AGUA.
3. SALIDA DE AGUA.
4. TORNILLO DE CEBADO.
5. CARCASA DEL VENTILADOR.
6. CARCASA DEL IMPULSOR.
ESPECIFICACIONES TÉCNICAS
BC615
VOLTAJE-FRECUENCIA 127 V ~ 60 Hz
POTENCIA 1-1/2 HP (1 100 W)
CORRIENTE 12,2 A
TIPO DE PROTECCIÓN IPX4
FLUJO MÁXIMO 146 L/min
DIÁMETRO DE ENTRADA Y
DESCARGA 1-1/4" y 1" NPT
ALTURA MÁXIMA 37 m
VELOCIDAD EN VACÍO 3 450 r/min
CONSUMO ENERGÉTICO 1,7 kWh
TEMPERATURA MÁX. DE AGUA 35°C
CICLO DE TRABAJO (máx. 6 hr) 50 min x 20 min
PESO 16,6 kg (36,6 lb)
BC620
VOLTAJE-FRECUENCIA 127 V ~ 60 Hz
POTENCIA 2 HP (1500 W)
CORRIENTE 16,4 A
TIPO DE PROTECCIÓN IPX4
FLUJO MÁXIMO 152 L/min
DIÁMETRO DE ENTRADA Y
DESCARGA 1-1/4" y 1" NPT
ALTURA MÁXIMA 42 m
VELOCIDAD EN VACÍO 3 450 r/min
CONSUMO ENERGÉTICO 2,3 kWh
TEMPERATURA MÁX. DE AGUA 35°C
CICLO DE TRABAJO (máx. 6 hr) 50 min x 20 min
PESO 22,5 kg (49,6 lb)
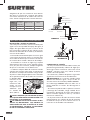
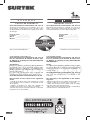
CONEXIÓN ELÉCTRICA
Este equipo requiere una instalación eléctrica a
127 V hecha por un electricista calificado.
1
2
3
4
5
6
127 V
~
Blanco
Negro Amarillo
Amarillo y verde

6
Asegúrese de que las conexiones sean adecua-
das para el consumo de corriente del equipo.
Solo utilice extensiones de calibre 10 como mí-
nimo. Véase el diagrama de conexión eléctrico.
Código
Protector
de sobre
carga (3)
Capacitor (1) Motor
BC615 17Am165 ºC 250V 70uF 1-1/2 HP
BC620 N/A 250V 100uF 2 HP
INSTRUCCIONES DE OPERACIÓN
INSTALACIÓN Y PUESTA EN SERVICIO
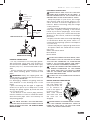
· Para mejores resultados, instale su bomba para
agua lo mas cerca posible del espejo del agua, el
espejo del agua debe esta por lo menos 50 cm
por encima de la válvula de pie. Calcule correc-
tamente la demanda de su sistema y el diámetro
correcto de la tubería.
· Esta bomba esta diseñada para succionar agua
a una altura de hasta 6 metros a nivel del mar,
esta condición disminuye conforme se incremen-
ta la altura de la ciudad o ubicación de trabajo.
· Si su bomba va a tener un lugar fijo, sujétela
firmemente al piso (use anclas, taquetes expan-
sivos, etc.) En caso contrario, siempre asegúrese
de que no se moverá con las vibraciones.
· La tubería siempre debe de instalarse usando
soportes de sujeción para evitar la transmisión
de tensión al cuerpo de la bomba. tenga cuida-
do para no dañar ninguna parte como resultado
de un apriete excesivo de los tubos al colocarlos.
La bomba debe
instalarse en un
lugar seco, con
ventilacion ade-
cuada, con una
temperatura
ambiente que
no exceda de
40° C (104° F).
NUNCA PERMITA QUE SU MOTOR SE MOJE,
COLOQUE ALGÚN MEDIO DE PROTECCIÓN SI SE
ENCUENTRA A LA INTEMPERIE.
NO AGREGUE PLÁSTICOS O FORROS AL MO-
TOR DE SU MOTOBOMBA QUE IMPIDAN LA
CIRCULACIÓN DEL AIRE A TRAVÉS DE EL PARA
SU ENFRIAMIENTO. COLOQUE SU MOTOBOM-
BA EN UN LUGAR BIEN VENTILADO.
CONEXIONES DE TUBERÍA
· Es muy conveniente utilizar tubería nueva, de
preferencia galvanizada, además de algún pro-
ducto para sellar conexiones (cinta sella roscas
SURTEK®, cemento, pola, etc.). Utilice el menor
número de codos posible.
· En conexiones y tuberías de plástico siga cuida-
dosamente las instrucciones del fabricante.
IMPORTANTE: En la succión siempre utilice
un tubo de diámetro igual o mayor al del ori-
ficio de succión de la bomba, NUNCA MENOR.
En la descarga SIEMPRE utilice un tubo con el
mismo diámetro al orificio de descarga de la
bomba.
· Al conectar el primer tubo o niple en la succión
y descarga de la bomba, tenga cuidado de no
introducirlo demasiado de forma que llegue a
dañar la bomba (apretar a mano y con herra-
mienta 1½ vuelta más).
· En la parte inferior del tubo de succión instale
perfectamente una válvula de pie de metal de
un diámetro mayor al de la succión. Esto no es
necesario en las bombas autocebantes.
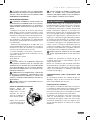
INCORRECTA
Nivel mínimo
de Agua:
50 cm
Válvula de pié
(Pichancha)
Depósito de
Agua
Arenero
Tuerca de unión
Válvula
Check de línea
(válvula anti-retorno)
Soporte de tubería
de succión
Base de
concret
o
INSTALACIÓN
CORRECTA

7
ESPAÑOL•Manual de usuario
LA GRAN MAYORÍA DE LOS PROBLEMAS
POSTERIORES SE DEBEN A CONEXIONES DEFEC-
TUOSAS Y MAL SELLADO EN LAS TUBERÍAS. SEA
CUIDADOSO AL HACERLAS.
INSTALACIÓN ELÉCTRICA
ASEGÚRESE SIEMPRE DE HACER TODAS LAS
CONEXIONES SIN CORRIENTE EN LA(S) LINEA(S).
UNA CONEXIÓN INADECUADA AL SISTEMA O
TIERRA PUEDE PROVOCAR UN CHOQUE ELÉC-
TRICO.
· Verifique en la placa de su motor, que voltaje
debe utilizar, cuanta corriente consume y como
hacer las debidas conexiones. Antes de conectar
verifique el voltaje de la línea de alimentación.
· Instale un interruptor (de preferencia ter-
mo magnético o de fusibles) con capacidad de
acuerdo a las necesidades de corriente de su mo-
tor (amperaje).
· Seleccione apropiadamente el cable que va a
utilizar, dependiendo de la distancia a la que se
encuentra la toma de corriente y el amperaje
(consumo de corriente de su motor).
· Conecte la bomba a un circuito a tierra física.
· Los cables de energía están codificados con los
siguientes colores:
Verde y amarillo: Tierra
Azul: Neutral
Café: Fase
UN VEZ HECHA LA CONEXIÓN, VERIFIQUE
CON MUCHO CUIDADO QUE EL VOLTAJE QUE
APARECE EN LAS PUNTAS QUE SE CONECTARAN
A SU MOTOBOMBA, SEA EL VOLTAJE NECESA-
RIO PARA SU OPERACIÓN. SI EL VOLTAJE ES DI-
FERENTE, CORRÍJALO
TERMINADAS LAS CONEXIONES Y ANTES DE
CONECTAR LA CORRIENTE, ASEGÚRESE DE QUE
EL INTERRUPTOR ESTE ABIERTO Y TODOS LOS
CABLES Y UNIONES DEBIDAMENTE AISLADOS Y
PROTEGIDOS.
SIEMPRE HAGA LAS CONEXIONES SIN CO-
RRIENTE EN LA LINEA.
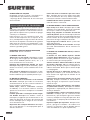
ANTES DE ENCENDER SU MOTOR
Purgue (llene de
agua) su bomba y ve-
rifique que no haya
entradas de aire ni
fugas en la tubería, ni
en la válvula de pie.
Espere unos minutos
y cerciórese de que el
nivel no haya bajado.
NUNCA OPERE LA BOMBA CUANDO ESTÉ
VACÍA. SI OCURRE ESTO ACCIDENTALMENTE
APAGUE LA BOMBA, ESPERE A QUE SE ENFRÍE Y
LUEGO CÉBELA USANDO AGUA LIMPIA.
MANTENIMIENTO
Cuando exista riesgo de congelación, vacié la
bomba quitando el tubo de succión aseguran-
do que se cebe la bomba cuando se arranque
nuevamente, revise que la válvula de pie esté
limpia a intervalos regulares, si la bomba va a
permanecer inactiva por un periodo prolonga-
do es aconsejable vaciarla completamente , en-
juagarla con agua limpia y almacenarla en un
lugar seco. si la flecha no gira libremente, libére-
la usando un destornillador, en la parte trasera
de la bomba existe un orificio que le da acceso
a la flecha, haga girarlo con ayuda del destorni-
llador, si esto no resuelve el problema retire el
cuerpo de la bomba, aflojando los tornillos de
montaje correspondientes y limpiela perfecta-
mente para retirar cualquier incrustación.
NUNCA REALICE TRABAJOS EN LA BOMBA
SIN ANTES DESCONECTARLA DE LA RED ELÉC-
TRICA.
• Limpie con frecuencia la válvula de pie (pi-
chancha) revise que no esta dañada o que no
tenga obstrucciones.
Revise con frecuencia que la bomba esté ceba-
da, puede dañar la bomba si se trabaja sin agua.
• Para identificar el lugar de las fugas de agua,
seque la motobomba y la tubería y llene este
nuevamente de agua.
CONSIDERACIONES PARA INSTALACIÓN CON
TINACO
Se recomienda instalar una válvula de pie con
diámetro mayor al de la succión de la bomba
para evitar pérdidas por fricción.
ELIMINACIÓN DEL APARATO
Este aparato no debe ser eliminado como basu-
ra doméstica. Debe eliminar los equipos eléctri-
cos y electrónicos viejos de forma separada.
Favor de consultar con su autoridad local sobre
las alternativas de eliminación adecuadas.
Al eliminar sus aparatos viejos de forma sepa-
rada, los está enviando a reciclar o para que
se reutilicen de alguna forma. De esta forma,
usted está ayudando a evitar en algunos casos
que materiales dañinos se viertan en el medio
ambiente.

8
ELIMINACIÓN DEL PAQUETE
El paquete consiste en cartón y sus plásticos co-
rrespondientes que pueden ser reciclados.
- Disponga dichos materiales de tal forma que
sean reciclados.
SOLUCIONADOR DE PROBLEMAS
PELIGRO: Peligro de lesión. Realizar repara-
ciones de forma inadecuada puede dar como re-
sultado que el aparato no funcione de forma se-
gura. Dichas reparaciones lo pondrán en peligro
a usted y a su alrededor.
Fallas menores son con frecuencia causa sufi-
ciente de descompostura. En la mayoría de los
casos, usted puede corregir las fallas de manera
fácil. Favor de empezar consultando la siguiente
tabla antes de contactar a su distribuidor o cen-
tro de servicio. Esto le ayudará a ahorrar mucho
esfuerzo y posibles gastos.
PROBLEMAS QUE SE PUDIERAN PRESENTAR
Posible falla. Acción correctiva
LA BOMBA TIRA AGUA
Tubería floja o mal sellada. Identifique el lugar
de la fuga y utilice algún tipo de sellador (cinta
sella roscas SURTEK®,cemento Pola, etc .) al
hacer nuevamente las conexiones.
Empaque de acoplamiento dañado y/o torni-
llos flojos. Reponga las partes dañadas y aprie-
te bien los tornillos, siendo cuidadoso de no ba-
rrerlos.
Sello mecánico defectuoso. Reemplace las par-
tes dañadas y ensamble nuevamente su moto-
bomba cuidando que no queden piezas flojas .
EL MOTOR NO ARRANCA
Falso contacto en la instalación o en la conexión
del motor. Verifique que todas las conexiones
estén bien hechas. En caso contrarío vuélvalas a
hacer y aíslelas correctamente.
Cables flojos, rotos o incorrectos. Verifique
el cableado, si es incorrecto vuelva a conectar,
apriete las conexiones Y reemplace los alambres
defectuosos.
Fusibles quemados o interruptor termo magné-
tico botado. Reemplace los fusibles o cierre el
interruptor, asegúrese que el tamaño de los fu-
sibles sea adecuado al consumo de corriente del
motor. Verifique que no tenga un corto circuito
en la linea del motor.
Dispositivo de arranque defectuoso. Reemplá-
celo si está dañado o si es inapropiado para el
tamaño del motor.
Flecha del motor o elementos que rotan atora-
dos. Verifique que no haya objetos que impi-
dan el movimiento del rotor, flecha e impulsor,
revise que los baleros estén en buen estado.
Embobinado del motor quemado. Acuda a un
taller de servicio autorizado.
EL MOTOR PRENDE Y APAGA CONTINUAMENTE
Bajo voltaje en la linea. Verifique que el cable
utilizado sea el apropiado, instale un regulador
de voltaje o acuda a la compañía de Luz.
Rango muy pequeño en flotador de nivel de
switch de presión. Ajuste su interruptor (de nivel
o de presión) para que su motobomba prenda el
menor número de veces posible aunque sea por
períodos más largos. Cheque su flotador.
Fuga de agua en la tubería. Revise y selle cual-
quier tipo de fuga.
Válvula de pie o check en mal estado. Verifique
que selle adecuadamente. De ser necesario re-
emplácela.
LA BOMBA NO SUMINISTRA AGUA (o suminis-
tra muy poca)
La bomba no está cebada impulsor dañado
o válvula de pie defectuosa. Llene de agua su
bomba y tubería de succión de agua, utilizando
el orificio hecho para este propósito.
Válvula cerrada o tubería obstruida en la linea
de succión o descarga. Abra las válvulas que im-
pidan el flujo del agua y limpie o reemplace las
tuberías obstruidas. Revise que la válvula de pie
no esté pegada.
Entrada de aire en la tubería de succión. Veri-
fique que la tubería y las conexiones estén en
buen estado. Use algún tipo de sellador en las
conexiones.
Excesiva altura de succión (máximo 8 m al nivel
del mar). Acerque su bomba lo más posible al
espejo de agua, sin exponerla a que eventual-
mente se moje.
Tubería muy usada o de diámetro, muy peque-
ño (demasiada fricción). Reemplace la tubería
desgastada o inapropiada por tubería nueva o
de mayor diámetro.
La bomba trabaja a menos revoluciones que las
indicadas. Verifique que las conexiones estén
bien hechas y que el impulsor gire en el sentido
correcto; verifique el voltaje de operación de la
bomba o bien, el amperaje de la bomba en fun-
cionamiento.
Impulsor tapado por impurezas. Destape el im-
pulsor y ponga una coladera o un cedazo en la
succión si es necesario. (En las bombas que no
sean autocebantes no quite la pichancha).

9
ESPAÑOL•Manual de usuario
Bomba descargada. Una pichancha de mala ca-
lidad causa fugas de agua y hace que se pierda
la carga.
Coladera sucia. Destape el receptáculo de la co-
ladera, limpiela y vuélvala a colocar.
MOTOBOMBA RUIDOSA
Válvula de succión cerrada, válvula de pie atas-
cada o bomba inadecuada. Abra la válvula o
quite cualquier cosa que impida que el agua
fluya fácilmente, por la succión, verifique el diá-
metro de la tubería de succión sea correcto.
Baleros dañados. Reemplace los baleros daña-
dos y asegúrese que, estén bien ajustados.
IMPORTANTE: Si no puede corregir la falla
por usted mismo, favor de ponerse en contac-
to con soporte técnico directamente. Favor de
tener en cuenta que las reparaciones que se rea-
licen de manera inapropiada anulan sus dere-
chos de la garantía y pueden causar gastos adi-
cionales.

10
GENERAL SAFETY RULES
Your CENTRIFUGAL WATER PUMP has many fea-
tures that will make your job faster and easier.
Safety, performance and reliability have been
given top priority in the design of this tool,
qualities to make easy to maintain and to oper-
ate.
WARNING: Read and understand all instruc-
tions. Failure to follow all indications listed be-
low, may result in electric shock, fire and/or seri-
ous personal injury. SAVE THESE INSTRUCTIONS.
SAFETY IN WORKING AREA
Keep your work area clean and well lit. Clut-
tered benches and dark areas may cause acci-
dents.
Do not operate power tools in explosive atmo-
spheres, such as in the presence of flammable
liquids, gases or dust. Some power tools create
sparks which may provoke fire.
Keep away observers, children and visitors
while operating a power tool. Distractions can
cause you to lose control.
ELECTRIC SAFETY
Double insulation eliminates the need for the
three wire grounded power cord and grounded
power supply system.
Avoid the body contact with grounded surfaces
such as pipes, radiators and refrigerators. There
is an increased risk of electric shock if your body
is grounded.
Don’t expose power tools to rain or wet condi-
tions. The presence of water into power tools
will increase the risk of electric shock.
Do not abuse of the power cord. Never use the
power cord to carry the tool and do not pull
the plug off the outlet. Keep the cable away of
heat, oil, sharp edges or moving parts. Replace
damaged cords immediately. Damaged cords in-
crease the risk of electric shock.
When operating a power tool outside, use an
outdoor extension cord marked “W-A” or “W”.
These cords are rated for outdoor use and re-
duce the risk of electric shock.
EXTENSION CORDS
Replace damaged cords immediately. The use
of damaged cords can shock, burn or electric
shock. If an extension cord is necessary, a cord
with adequate size conductors should be used
to prevent excessive voltage drop, loss of power
or overheating. The table below shows the cor-
rect size to use, depending on cord length and
nameplate amperage rating of tools. In case of
doubt use the next heavier gauge. Always use
UL listed extension cords.
SIZE RECOMMEND EXTENSION CABLES
PERSONAL SAFETY
Stay alert, watch what you are doing and use
common sense when operating a power tool.
Don't use the tool if you are tired or under the
influence of drugs, alcohol or medication. A
moment of inattention while operating power
tools may cause a serious personal injury.
Dress properly. Do not wear loose clothing or
jewelry. Contain long hair. Keep your hair, cloth-
ing and gloves away of moving parts. Loose
clothes, jewelry or long hair can be caught in
moving parts.
Avoid an accidental starting. Be sure that the
switch is OFF before plugging in. Carrying tools
with the finger on the switch or plug in the tool
switch in ON may cause accidents.
Remove the adjusting keys or wrenches before
turning the tool on. A wrench or a key that is
left close to a rotating part of the tool may pro-
voke a personal injury.
Do not overreach. Keep proper footing and bal-
ance at all times. Proper footing and balance
enables better control of the tools on unexpect-
ed situations.
Use safety equipment. Always wear eye protec-
tion. Dust mask, nonskid safety shoes, hard hat,
or hearing protection must be used for appro-
priate conditions.
Before connecting the tool to a power source
(receptacle, outlet, etc.) be sure that the voltage
supplied is the same as that one specified on
the nameplate of the tool. To use a not specified
voltage may cause a serious injury to the user as
well as damage the tool.
IMPORTANT: This appliance is not intended
for use by persons (including children) with re-
duced physical, sensory or mental capabilities
may be different or reduced, or lack of experi-
ence or knowledge, unless such persons are su-

11
ENGLISH•User's Manual
pervised or trained to operate the product by
a person responsible for their safety. Children
should be supervised to ensure they do not use
the devices as toys.
TOOL USE AND CARE
Do not force the power tool. Use the correct
tool for the application. The correct tool will do
the job better and more safely at the rate that it
was designed to work at.
Do not use tools if switch does not turn it on or
off. Any tool that cannot be controlled with the
switch is dangerous and must be repaired.
Disconnect the plug from the power source be-
fore making any adjustments, changing acces-
sories or storing the tool. This preventive safety
measures reduce the risk of accidental starting
of the tool.
When the power tool is not in use, store it out
of the reach of children, and do not allow in-
dividuals who are not familiar with the power
tool or these instructions to operate it. Power
tools are dangerous in the hands on untrained
users.
Maintain the power tool. Check for misalign-
ment or binding of moving parts, broken parts,
and any other condition that may affect the
operation of the power tool. If it is damaged,
have it repaired before using. Many accidents
are caused by poorly maintained power tools.
Check for misalignment or bonding of moving
parts, breakage parts, and any other condition
that may affect the tools operation. If you find
a damaged tool, take it to service before use it.
Is recommendable to use a safety device suit-
able, such a thermal and differential switch
when you are using an electric equipment.
SERVICE: Tool service must be performed only
by qualified repair personnel. Service or main-
tenance performed by unqualified personnel
could result in a risk of injury.
WARNING: If the power cord has been dam-
aged, it must only be replaced by trained per-
sonnel in the service centers authorized by Ur-
rea Herramientas Profesionales S.A. de C.V.
IMPORTANT: Any use that deviated from the
instructions indicated in this manual is considered
unauthorized use which invalidates the warranty
and releases Urrea Herramientas Profesionales
S.A. de C.V. from legal responsibilities.
SPECIFIC SAFETY RULES FOR
SUBMERSIBLE PUMP
· This pump is designed for pumping clean neu-
tral liquids, at temperatures not exceeding 35°C.
WARNING: The water pump must not be
used when people or animals are in the water
· It must not be used for the drinking water sup-
ply or for the delivery of foodstuffs.
· Explosive, flammable, aggressive or health-
hazardous substances and faecal matter must
not be pumped.
· This product must not be exposed to dripping
or splashing liquids.
· The appliance is not suitable for continuous
running (e.g. permanent circulation in filter
systems).
· It is also not suitable for use with liquids con-
taining abrasive materials (e.g. sand) or contain-
ing mixtures of dirt, sand, mud or clay.
· Any other use is considered improper. Unpre-
dictable damage can occur as a result of improp-
er use, modifications to the appliance or due to
the use of parts which have not been tested and
approved by the manufacturer.
· The connection must be made to earthed sock-
ets which have been properly installed, earthed
and tested. Mains voltage and fuse must comply
with the technical data.
· Do not kink, crush, drag or drive over the mains
cable; protect against sharp edges, oil and heat.
· During operation for swimming pools, garden
ponds and similar places, the appliance must be
equipped with a residual current circuit breaker
(RCCB) with a design fault current of not more
than 30 mA.
· Disconnect the mains plug before all work on
the appliance .
· Do not install and switch on the appliance if
there are people or animals in the medium be-
ing pumped, or they are in contact with it.
· If repairs are carried out incorrectly, there is a
danger of liquid penetrating into the electrical
components of the appliance.
FEATURES
KNOW YOUR TOOL
Before attempting to use this product, become
familiar with all of its operating features and
safety requirements.
1. TERMINAL COVER.
2. INLET.
3. OUTLET.
4. PRIME SCREW.
5. FAN COVER.
6. IMPELLER CASING.

12
TECHNICAL DATA
BC615
VOLTAGE-FREQUENCY 127 V ~ 60 Hz
POWER 1-1/2 HP (1 100 W)
CURRENT 12,2 A
WATER PROTECTION IPX4
MAX FLOW 146 L/min
INLET AND OUTLET DIAMETER 1-1/4" y 1" NPT
MAX HEIGHT 37 m
NO LOAD SPEED 3 450 r/min
POWER CONSUMPTION 1,7 kWh
MAX WATER TEMPERATURE 35°C
DUTY CYCLE (max. 6 hours) 50 min x 20 min
WEIGHT 16,6 kg (36,6 lb)
BC620
VOLTAGE-FREQUENCY 127 V ~ 60 Hz
POWER 2 HP (1500 W)
CURRENT 16,4 A
WATER PROTECTION IPX4
MAX FLOW 152 L/min
INLET AND OUTLET DIAMETER 1-1/4" y 1" NPT
MAX HEIGHT 42 m
NO LOAD SPEED 3 450 r/min
POWER CONSUMPTION 2,3 kWh
MAX WATER TEMPERATURE 35°C
DUTY CYCLE (max. 6 hours) 50 min x 20 min
WEIGHT 22,5 kg (49,6 lb)
ELECTRICAL CONNECTION
This equipment requires a 127 V electrical instal-
lation made by a qualified electrician.
Make sure that the connections are suitable for
the power consumption of the equipment.
Code
Overload
protector
(3)
Capacitor (1) Motor
BC615 17Am165 ºC 250V 70uF 1-1/2 HP
BC620 N/A 250V 100uF 2 HP
OPERATION INSTRUCTIONS
IMPORTANT: These This pump is designed to
suck water at a height of up to 6 meters at sea
level, this condition decreases as the height of
the city or workplace increases.
- For best results, install your water pump as
close as possible to the water mirror, the water
mirror should be at least 20 inches above the
foot valve. Calculate correctly the demand of
your system and the correct diameter of the
pipes.
- If your motor pump is going to be set at a fixed
place, attach it firmly to the floor (use clamps,
expansive raw plugs, etc.) Otherwise, make
always sure that it will not be moving for the
vibration.
The pump should be installed in a dry, properly
ventilated location at an ambient temperature
not to exceed 40 ° C (104 ° F)
NEVER ALLOW THAT YOUR MOTOR GETS
WET, USE PROTECTION COVER IF OUTDOORS.
AVOID COVERING THE MOTOR OF YOUR
MOTOR PUMP WITH PLASTIC THAT PREVENT
THE CIRCULATION OF AIR THROUGH IT SO THAT
IT COOLS DOWN. PLACE YOUR MOTOR PUMP
AT A VENTILATED PLACE.
127 V
~
White
Black Yellow
Yellow & Green
1
2
3
4
5
6

13
ENGLISH•User's Manual
PUMPING CONNECTIONS
- It is very convenient to use new pipes, prefer-
ably galvanized, along with some product to
seal connections (SURTEK® threads sealer tape,
Cement, Pola, etc.). Use the fewer bends as pos-
sible.
- Follow carefully the manufacturer’s instruc-
tions when installing plastic connections and
pipes.
IMPORTANT: Always use a piping with a di-
ameter equal to or greater than the suction hole
of the pump, NEVER LESS.
For discharging, ALWAYS use piping with the
same diameter to the discharge hole of the
pump.
· Upon connecting the first pipe or nipple be
careful not to put it in too deep since it could
damage the pump (tighten by hand and with
tool 1 ½ more turns.
· At the bottom of the suction pipe, perfectly
install a metallic foot valve of a diameter wider
than the suction pipe. This is not necessary for
self-priming pumps.
THE GREAT MAJORITY OF FURTHER PROB-
LEMS ARE DUE TO DEFECTIVE CONNECTIONS OR
BADLY SEALING THE PIPES. BE CAREFUL WHEN
MAKING THEM.
ELECTRICAL CONNECTIONS
MAKE ALWAYS SURE TO DO ALL THE CON-
NECTIONS WITH POWER OFF IN THE LINE(S). A
WRONG CONNECTION TO THE SYSTEM OR TO
GROUND MAY CAUSE AN ELECTRICAL SHOCK.
- Verify the plaque of your motor, the voltage
that must be used, how much current it con-
sumes and how to make the appropriate con-
nections. Before connecting, verify the voltage
of the power line.
- Install a switch (preferably thermomagnetic or
fuse) with a capacity according to the current
needs of your motor (amperage). As for three-
phase motors, always use a starter and verify the
direction of the rotation, and have overcharge
protection.
- Properly select the cable to be used, depending
on the distance where the power outlet is lo-
cated and the amperage (current consumption
of your motor).
- Connect the pump to a physical ground circuit.
- The power cables are coded with the follow-
ing colors:
Green and Yellow: Earth
Blue: Neutral
Brown: Phase
AFTER THE CONNECTION WAS MADE, CARE-
FULLY VERIFY THAT THE VOLTAGE AT THE WIRES
THAT WILL BE CONNECTED TO YOUR MOTOR
PUMP IS THE VOLTAGE NEEDED FOR OPERA-
TION. IF VOLTAGE IS DIFFERENT, CORRECT IT.
AFTER THE CONNECTIONS ARE COMPLETED
AND BEFORE CONNECTING TO THE POWER
LINE, MAKE SURE THAT THIS SWITCH IS OPEN
AND ALL THE CABLES AND UNIONS ARE DULY
ISOLATED AND PROTECTED.
ALWAYS DO THE CONNECTIONS WITHOUT
POWER IN THE LINE.
BEFORE STARTING YOUR MOTOR
Drain (fill up with wa-
ter) your pump and
verify that there are
no air entrance or
leaks in the pipes or
in the foot valve.
Wait some minutes
and make sure that
the level has not
dropped.
NEVER OPERATE THE PUMP WHEN IT IS EMP-
TY. IF THIS HAPPENS ACCIDENTALLY TURN THE
PUMP OFF, WAIT FOR IT TO COOL AND THEN
TURN IT ON USING CLEAN WATER.
WRONG INSTALLATION
Minimum
water level:
20”
Foot valve Water deposit
Sand
screen
Union nut
Valve
Swing ap check
(non-return)
Suction pipe
holder
C
oncrete
base
RIGHT INSTALLATION

14
MAINTENANCE
- The pump does not require maintenance as
long as the following precautions are taken:
when there is a risk of freezing, empty the pump
by removing the suction tube, ensuring that the
pump is primed when it is started again, check
that the foot valve is cleaned at regular inter-
vals, if the pump is to remain inactive for an
extended period of time it is advisable empty it
completely, rinse it with clean water and store it
in a dry place. if the arrow does not turn freely,
release it using a screwdriver, there is a hole in
the back of the pump that gives access to the
arrow, turn it with the help of the screwdriver,
if this does not solve the problem remove the
pump body, by loosening the corresponding
mounting screws and clean it perfectly to re-
move any incrustation.
NEVER CARRY OUT WORK ON THE PUMP
WITHOUT FIRST DISCONNECTING IT FROM
THE MAINS.- TO IDENTIFY WHERE THE WATER
LEAKS ARE, DRY THE MOTOR PUMP AND PIPING
AND FILL IT UP AGAIN WITH WATER.
- Below you will find a box with the problems
that may arise.
- If you find any failure in your motor pump,
even out of the Guarantee term or if you need-
ed to repair the product by yourself, we remind
you that we have authorized service shops.
CONSIDERATIONS TO INSTALL THE WATER TANK
It is recommended to install a foot valve with
a diameter wider than the pump´s suction to
avoid losses due to friction.
DISPOSING OF THE APPLIANCE
This product must not be disposed of in house-
hold rubbish. You must dispose of such old elec-
trical and electronic equipment separately.
- Please check with your local authority about
the possibilities for correct disposal.
Through separate disposal you send old equip-
ment for recycling or for other forms of re-use.
You will thus help to avoid in some cases that
damaging material gets into the environment.
DISPOSING OF THE PACKAGING
The packaging consists of cardboard and corre-
spondingly marked plastics that can be recycled.
- Make these materials available for recycling.
TROUBLESHOOTING
DANGER: Improperly conducted repairs may
prevent your appliance from working safely.
Such re airs will endanger you and your sur-
roundings.
Minor faults are often sufficient to cause a
malfunction. In most cases, you will be able to
correct these faults easily yourself. Please start
by referring to the following list before contact-
ing our technical support. This will help you save
much effort and possibly expense.
PROBLEMS THAT MAY ARISE
Possible failure. Corrective action
THE PUPM SPILLS WATER
Loose or badly sealed pipes. Identify the place of
the leak and use some type of sealant (SURTEK®
threads sealer tape, Cement, Pola, etc.) When
doing the connections again.
Damaged coupling seal and/or loose screws.
Replace the damaged parts and securely tighten
the screws, being careful not to strip them.
Defective mechanical seal. Replace the dam-
aged parts and assembly again your motor
pump making sure no part is loose.
MOTOR WOULD NOT START
False contact in the installation or in the motor
connection. Verify that all the connections are
well done. If not, do them again and protect
them correctly.
Loose, broken or incorrect wires. Verify the
wiring, if correct, connect it again, tighten the
connections and replace defective wires.
Burnt fuses or thermomagnetic switch tripped.
Replace the fuses or close the switch. Make sure
that the size of the fuses is correct according to
the current consumption of the motor. Verify
there is no short circuit in the motor line.
Defective start-up device. Replace it if damaged
or if not appropriate for the size of the motor.
Motor shaft or other elements rotate stuck.
Verify there are no objects preventing the free
motion of the rotor, shaft or impeller.
Check that the bearings are in good condition.
Motor coil burnt. Visit an authorized service
workshop.
THE MOTOR TURNS ON AND OFF CONTINU-
OUSLY
Low voltage in the line. Verify that the wire
used is appropriate. Install a voltage regulator
or check it with the electrical supply company.

15
Manual de usuario • User’s manual
Very small range in pressure switch level floata-
tion tank. Adjust your (level or pressure) switch
so that your motor pump starts on the few-
est times possible even if it is for long periods.
Check your floating tank.
Water leak in piping. Check and seal any type of
leak.
Foot or check valve in bad condition. Verify it
seals properly. Replace it if necessary.
THE PUMP DOES NOT SUPPLY WATER (or sup-
plies very little water)
The pump is not primed, the impeller is dam-
aged or the foot valve is defective. Fill up your
pump and suction piping with water, using the
hole made for this purpose through the dis-
charge tee.
Closed valve or blocked piping in the suction or
discharge line. Open the valves that prevent the
flowing of water and clean or replace blocked
piping. Check that the foot valve is not stuck.
Air enters the suction piping. Verify that the
piping and connections are in good condition.
Use some type of sealant in connections.
Excessive height of the suction (maximum 5 m).
Get your pump the closest possible to the water
mirror, without exposing it to possibly get wet.
The piping is worn or its diameter is very little
(too much friction). Replace worn or inappropri-
ate piping and install new pipes or with wider
diameter.
The pump works at fewer revolutions that indi-
cated. Verify that the connections are well done
and that the impeller turns in the correct direc-
tion; verify the operating voltage of the pump,
or the amperage of the pump while function-
ing.
The impeller is blocked by impurities. Open the
impeller and install a strainer or screen in suc-
tion if necessary. (In non-self-priming pumps do
not remove the strainer check valve).
Discharged pump. A bad quality strainer check
valve causes water leaks and causes the load is
lost.
Dirty strainer. Open the strainer container, clean
it and put it back in place.
NOISY MOTOR PUMP
The suction valve is closed, the foot valve is
stuck or the pump is inappropriate. Open the
valve or remove anything that is preventing the
water from easily flowing by suction, verify that
the diameter of the piping for suction is correct.
Very low discharge pressure. If you wish to re-
duce the noise, close the discharge valve a little.
The impeller is brushing in the pipes or in the
body of the pump. If the suction piping screws
more than what is appropriate, it may brush
against the impeller. Loosen it and then apply
connection sealant and screw it again up to it
can be done.
Damaged bearings. Replace the damaged bear-
ings and make sure they are well adjusted.
IMPORTANT: If you are unable to correct a
fault yourself, please contact our technical sup-
port directly. Please note that improperly con-
ducted repairs will void your warranty and may
cause you additional expenses.

16
BC615 · BC620
ESPAÑOL
PÓLIZA DE GARANTÍA
ENGLISH
WARRANT POLICY
Urrea Herramientas Profesionales S.A. de C.V.
Warranties this product for a period of 1 year in its
parts, components and manual labour against any
manufacture defect from the purchasing date.
Purchase date: ____/____/____
Product:____________________
Brand:______________________
Model:______________________
______________________________
Distributor seal and signature
Sold and Imported by:
Urrea Herramientas Profesionales S.A. de C.V.
km 11,5 Carretera A El Castillo, El Salto, Jalis-
co, México. C. P. 45680, Tel. (33) 3208 7900, RFC
UHP900402Q29
Terms:
In order to make warranty effective you must pres-
ent the product along with the warranty properly
fillled and signed to an authorized distributor or
service center.
Urrea Herramientas Profesionales S.A. de C.V.
will cover the transportation cost related to the
warranty.
This warranty is not applicable in the follow-
ing cases:
· When the product has not been used according to
normal conditions or natural wear of its parts.
· When the product has not been used according
with this user’s manual instructions.
· When the product has been fixed or modified by
unauthorized or unqualified person.
Urrea Herramientas Profesionales S.A. de C.V.
garantiza este producto por el termino de 1 año
en sus piezas, componentes y mano de obra contra
cualquier defecto de fabricación a partir de la fecha
de entrega.
Fecha de venta: ____/____/____
Producto: ___________________
Marca: ______________________
Modelo: ____________________
______________________________
Sello y firma de distribuidor
Comercializado e Importado por:
Urrea Herramientas Profesionales S.A. de C.V.
km 11,5 Carretera A El Castillo, El Salto, Jalis-
co, México. C. P. 45680, Tel. (33) 3208 7900, RFC
UHP900402Q29
Condiciones:
Para hacer efectiva la garantía deberá presentar
el producto junto con la póliza de garantía debi-
damente firmada y sellada por el establecimiento
donde la adquirió, en cualquiera de los centros de
servicio autorizados.
Los gastos de transportación que se deriven del
cumplimiento de la garantía serán cubiertos por:
Urrea Herramientas Profesionales S.A. de C.V.
Esta garantía no será valida en los siguientes
casos:
· Cuando el producto haya sido utilizado en condi-
ciones distintas a las normales o al desgaste natural
de sus partes.
· Cuando el producto no haya sido operado de
acuerdo al instructivo de uso que lo acompaña.
· Cuando el producto haya sido alterado o reparado
por personas no autorizadas.
-
 1
1
-
 2
2
-
 3
3
-
 4
4
-
 5
5
-
 6
6
-
 7
7
-
 8
8
-
 9
9
-
 10
10
-
 11
11
-
 12
12
-
 13
13
-
 14
14
-
 15
15
-
 16
16


Surtek BC615 El manual del propietario
- Tipo
- El manual del propietario
- Este manual también es adecuado para
en otros idiomas
- English: Surtek BC615 Owner's manual
Artículos relacionados
Otros documentos
-
URREA 768 El manual del propietario
-
Truper BOAP-1A El manual del propietario
-
PRETUL BOAP-1/2P-250 El manual del propietario
-
TOYAMA TWP40SH El manual del propietario
-
-
 Pentair Flotec N4151060 El manual del propietario
-
-
 Ultracraft BOAP-1/2U El manual del propietario
-
Champion Power Equipment Model #66520 Manual de usuario
-

