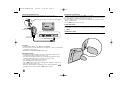
LG PF391P El manual del propietario
- Categoría
- Equipo de música suplementario
- Tipo
- El manual del propietario

ENGLISH
PF391P
P/NO : MFL42173825(R1)
PF391-N_APANLLK_ENG 3/10/08 12:25 PM Page 1

2
CAUTION: TO REDUCE THE RISK OF ELECTRIC SHOCK. DO NOT REMOVE
COVER (OR BACK). NO USER-SERVICEABLE PARTS INSIDE. REFER SERVIC-
ING TO QUALIFIED SERVICE PERSONNEL.
This lightning flash with arrowhead symbol within an equilateral triangle is
intended to alert the user to the presence of uninsulated dangerous voltage
within the product’s enclosure that may be of sufficient magnitude to consti-
tute a risk of electric shock to persons.
The exclamation point within an equilateral triangle is intended to alert the
user to the presence of important operating and maintenance (servicing)
instructions in the literature accompanying the product.
WARNING: TO PREVENT FIRE OR ELECTRIC SHOCK HAZARD, DO NOT
EXPOSE THIS PRODUCT TO RAIN OR MOISTURE.
WARNING: Do not install this equipment in a confined space such as a book case or
similar unit.
CAUTION: Do not block any ventilation openings. Install in accordance with the man-
ufacturer's instructions. Slots and openings in the cabinet are provided for ventilation
and to ensure reliable operation of the product and to protect it from over heating.
The openings should be never be blocked by placing the product on a bed, sofa, rug
or other similar surface. This product should not be placed in a built-in installation
such as a bookcase or rack unless proper ventilation is provided or the manufactur-
er's instruction has been adhered to.
CAUTION: The apparatus should not be exposed to water (dripping or splashing) and
no objects filled with liquids, such as vases, should be placed on the apparatus.
CAUTION concerning the Power Cord
Most appliances recommend they be placed upon a dedicated circuit;
That is, a single outlet circuit which powers only that appliance and has no additional
outlets or branch circuits. Check the specification page of this owner's manual to be
certain.Do not overload wall outlets. Overloaded wall outlets, loose or damaged wall
outlets, extension cords, frayed power cords, or damaged or cracked wire insulation
are dangerous. Any of these conditions could result in electric shock or fire.
Periodically examine the cord of your appliance, and if its appearance indicates dam-
age or deterioration, unplug it, discontinue use of the appliance, and have the cord
replaced with an exact replacement part by an authorized service center.
Protect the power cord from physical or mechanical abuse, such as being twisted,
kinked, pinched, closed in a door, or walked upon. Pay particular attention to plugs,
wall outlets, and the point where the cord exits the appliance.
To disconnect power from the mains, pull out the mains cord plug. When installing the
product, ensure that the plug is easily accessible.
Important Safety Instructions
1. Read these instructions.
2. Keep these instructions.
3. Heed all warnings.
4. Follow all instructions.
5. Do not use this apparatus near water.
6. Clean only with dry cloth.
7. Do not block any ventilation openings. Install in accordance with the manu-
facturer’s instructions.
8. Do not install near any heat sources such as radiators, heat registers,
stoves, or other apparatus (including amplifiers) that produce heat.
9. Do not defeat the safety purpose of the polarized or grounding-type plug. A
polarized plug has two blades with one wider than the other. A grounding
type plug has two blades and a third grounding prong. The wide blade or the
third prong are provided for your safety. If the provided plug does not fit into
your outlet, consult an electrician for replacement of the obsolete outlet.
10. Protect the power cord from being walked on or pinched particularly at
plugs, convenience receptacles, and the point where they exit from the
apparatus.
11. Only use attachments/accessories specified by the manufacturer.
12. Use only with the cart, stand, tripod, bracket, or table specified by the
manufacturer, or sold with the apparatus. When a cart is used, use caution
when moving the cart/apparatus combination to avoid injury from tip-over.
13. Unplug this apparatus during lightning storms or when unused for long
periods of time.
14.
Refer all servicing to qualified service personnel. Servicing is required when
the apparatus has been damaged in any way, such as power-supply cord or
plug is damaged, liquid has been spilled or objects have fallen into the
apparatus, the apparatus has been exposed to rain or moisture, does not
operate normally, or has been dropped.
Safety Precaution
CAUTION
RISK OF ELECTRIC SHOCK
DO NOT OPEN
PF391-N_APANLLK_ENG 3/10/08 12:25 PM Page 2

3
Contents
Safety Precaution . . . . . . . . . . . . . . . . . . . . . . . . . . . . . . . . . . . . . . . . . . . . .2
Contents . . . . . . . . . . . . . . . . . . . . . . . . . . . . . . . . . . . . . . . . . . . . . . . . . . . .3
Features . . . . . . . . . . . . . . . . . . . . . . . . . . . . . . . . . . . . . . . . . . . . . . . . . . . .3
Main Unit . . . . . . . . . . . . . . . . . . . . . . . . . . . . . . . . . . . . . . . . . . . . . . . . . . . .4
Getting Started . . . . . . . . . . . . . . . . . . . . . . . . . . . . . . . . . . . . . . . . . . . . . . .5
• Inserting or removing a memory card . . . . . . . . . . . . . . . . . . . . . . . . . . .5
• Connecting an USB Device . . . . . . . . . . . . . . . . . . . . . . . . . . . . . . . . . . .5
• Connecting the Power Cable . . . . . . . . . . . . . . . . . . . . . . . . . . . . . . . . . .6
• Turning On or Off the Unit . . . . . . . . . . . . . . . . . . . . . . . . . . . . . . . . . . . .6
• Power Save mode . . . . . . . . . . . . . . . . . . . . . . . . . . . . . . . . . . . . . . . . . .6
• Installing the Stand . . . . . . . . . . . . . . . . . . . . . . . . . . . . . . . . . . . . . . . . .6
• Using the Device Menu . . . . . . . . . . . . . . . . . . . . . . . . . . . . . . . . . . . . . .7
Adjust the settings . . . . . . . . . . . . . . . . . . . . . . . . . . . . . . . . . . . . . . . . . . .7-8
Viewing a Photo file . . . . . . . . . . . . . . . . . . . . . . . . . . . . . . . . . . . . . . . . . . . .9
Playing a Movie file . . . . . . . . . . . . . . . . . . . . . . . . . . . . . . . . . . . . . . . . . . .10
Playing a Music file . . . . . . . . . . . . . . . . . . . . . . . . . . . . . . . . . . . . . . . . . . .11
Using a File menu . . . . . . . . . . . . . . . . . . . . . . . . . . . . . . . . . . . . . . . . . . . .12
Viewing the Calendar . . . . . . . . . . . . . . . . . . . . . . . . . . . . . . . . . . . . . . . . . .13
PC Connection (USB) . . . . . . . . . . . . . . . . . . . . . . . . . . . . . . . . . . . . . . . . .14
Troubleshooting . . . . . . . . . . . . . . . . . . . . . . . . . . . . . . . . . . . . . . . . . . . . . .15
Specifications . . . . . . . . . . . . . . . . . . . . . . . . . . . . . . . . . . . . . . . . . . . . . . .15
Features
• Live picture gallery:
High resolution and deep digital color from LCD wide screen.
• Easy power save mode:
Better 1 second power save mode than 15 seconds power off and on.
• Portable digital album:
Share your memories with built-in battery for easy mobility
• Plug-in viewer:
Easy viewing photos via memory card slot and USB port
• 2,000 photo storage:
2,000 precious memories with 256MB built-in flash memory
• Digital calendar & alarm clock:
For your efficient date and time scheduling
• Convenient photo explorer:
Coolest interface navigation for easiest access to your memory
• Premium interior decorator
3 different changeable faceplate to suit various interior
PF391-N_APANLLK_ENG 3/10/08 12:25 PM Page 3

4
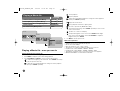
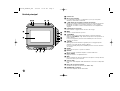
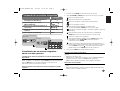
Main Unit
a LCD screen
b Faceplate (interchangeable)
Four edges of the faceplate are magnetic, so that the faceplate can easily
be attached or detached.
c 1 BAT. (Power button and Battery indicator)
Turns the unit ON or OFF and indicates the battery status.
The indicator lights in red during charging the battery.
The indicator lights in green when battery is full.
d P-SAVE (Power Save)
Accesses or exits the power save mode.
e MENU
Accesses or exits the option menu.
f b VOLUME B
Adjusts the volume of the unit. To adjust the volume, press and hold
VOLUME (b or B) during playback of the movie or music file.
Left and Right buttons for selecting an item on the menu.
g b PAGE B
Press and hold for 2 seconds to move to the previous or next page on the
[Photo], [Movie] or [Music] menu.
Up and Down buttons for selecting an item on the menu.
h ENTER
Selects an option or executes a command.
i ROTATE
Rotates the photo in full screen counterclockwise.
j BACK
Returns to a previous menu or screen.
k NX
Starts playback. Press to pause playback; press again to restart.
l USB connector
Connect the supplied USB adapter cable then connect an USB device.
m Memory card slot
Insert a memory card (SD, MMC or MS).
n DC 12V IN
Connect the supplied AC adapter.
cd e f
nml
b
a
g
h
i
j
k
PF391-N_APANLLK_ENG 3/10/08 12:25 PM Page 4

5
Getting Started
Inserting or removing a memory card
Insert a memory card to the memory card slot on the unit.
To withdraw the memory card from the slot, press on the center of the memory
card then withdraw it carefully.
Card useable on this unit
• Secure Digital Card (SD)
• Multi Media Card (MMC)
• Memory Stick (MS)
• Compatible with: FAT 12, FAT 16, or FAT 32
• Only use the memory cards recommended above.
• The card will only fit in one direction; do not force it.
The card should fit snugly when properly inserted.
• Any memory card may not be available on the unit.
• Do not extract the memory card in operating (play, copy, etc.).
Regarding Write Protect
For cards that have a write protect switch, it will not be possible to write, erase
or format the card if the switch is on.
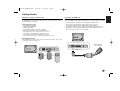
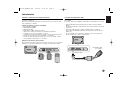
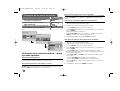
Connecting an USB Device
Connect the small end of the USB adapter cable to the USB port on the unit.
Connect an USB Device and the USB adapter. Use an USB cable, if you need.
• This unit supports only USB Device with FAT16 or FAT32 format.
• Do not extract the USB Device during operation (play, copy, etc.).
• USB Device: USB Device that support USB 1.1 and USB 2.0.
(For example: USB Flash Drive, Memory Card Reader, Digital Camera, etc.)
• An USB Device which requires additional program installation when you
have connected it to a PC, is not supported.
USB Flash Drive
(For example)
USB Adapter Cable
To USB port
SD
or or
MMC
MS
PF391-N_APANLLK_ENG 3/10/08 12:25 PM Page 5

6
Connecting the Power Cable
Connect the supplied power cable from the unit to a power outlet.
AC adapter
• This AC adapter operates on 100-240V~ 1A 50/60Hz.
• Contact an electrical parts distributor for assistance in selecting a suitable AC
plug adapter or AC cord set.
• Manufactured by WANLIDA GROUP CO., LTD
Rechargeable battery
• Its internal rechargeable battery provides you with the freedom to pass it
around and play the files without the power cord.
• The internal rechargeable battery will start charging only when the unit is
turned off and the AC adapter is connected to a power outlet.
• The charging is stopped if you turn on the unit.
• The charging will take approximately 2 hour.
• The 1 BAT. indicator turns red in charging. If the charging is complete, the
indicator changes to green color.
• When the remaining time of the battery power is under 10 minutes, “ ”
will appear on the screen and the 1 BAT. indicator flashes.
Turning On or Off the Unit
To turn on the unit, press and hold 1 BAT. for 2 seconds.
The demonstration slideshow will start and then the [Device Menu] will appear.
Press any button to skip the demonstration slideshow.
The demonstration photos are located in the internal memory, and you cannot
change or delete them.
Press 1 BAT. again to turn off the unit.
Power Save mode
You can set up the unit into an economic power save mode. Press P-SAVE
and the LCD screen is turned off. To exit the power save mode, press P-SAVE
or 1 BAT.
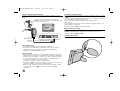
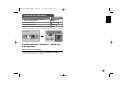
Installing the Stand
Attach the detachable stand on the back of the unit as below.
To “DC 12V IN” jack
Attach the power plug to the body of the AC adapter.
Power cord
release knob
To AC outlet
PF391-N_APANLLK_ENG 3/10/08 12:25 PM Page 6

7
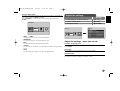
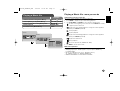
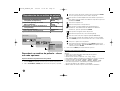
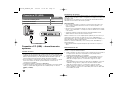
Using the Device Menu
The Device Menu will appear when the unit is turned on and you can display the
Device Menu by pressing BACK repeatedly.
Use b VOLUME B to select an option on the [Device Menu] then press
ENTER.
• USB-C ..... USB-Z
You can play a file(s) in the connected USB device.
• SD/MMC/MS
You can play a file(s) in the external memory card.
• Flash
You can play a file(s) in the internal memory card.
• Calendar
You can view the current date, clock and alarm information through calendar
screen.
• Setup
You can change the settings of the unit on the [Setup] menu.
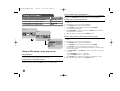
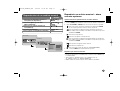
Adjust the settings - more you can do
To display the [Setup] menu
Use b VOLUME B to select the [Setup] option on the [Device Menu] then
press ENTER.
[Language]
Select a language for the Setup menu and on-screen display.
[Slideshow time]
Specify how long each picture is displayed in a slideshow; 3 seconds,
5 seconds, 15 seconds, 1 minutes, 15 minutes, 1 hour.
Device Menu
USB-C Flash SetupCalendar
Device Menu
USB-C Flash SetupCalendar
Setup
Language
Slideshow time 5s:
Slideshow mode Random:
Display mode Normal:
Time format 24h:
Time 2007 / 11 / 22 21 : 17:
Auto On 2007 / 11 / 22 00 : 00 Off:
Auto Off 2007 / 11 / 22 00 : 00 Off:
Alarm 00 : 00 Ring1 Off:
Default Reset:
English
Adjust the settings
1 Select [Setup] on the [Device Menu]:
bb
VOLUME
BB
, ENTER
2 Select a desired option:
bb
PAGE
BB
3 Change the setting:
bb
VOLUME
BB
BUTTON
PF391-N_APANLLK_ENG 3/10/08 12:25 PM Page 7

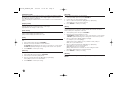
[Slideshow mode]
Specify the transition style between pictures in a slideshow; Random, Fading,
Off, Bottom-To-Top, Top-To-Bottom, Left-To-Right, Right-To-Left, Door-Close,
Door-Open, Hori-Cross, Verti-Cross.
If you select [Off], the slideshow does not work and the screen is fixed with one
picture.
[Display mode]
Specify the display mode for viewing photo file; Normal, Fit.
[Normal]: Retains the original aspect ratio of the image.
[Fit]: Optimizes the image to fit the screen
[Time format]
Specify the time format for displaying the clock ; 12h, 24h
[12h]: 12-hour display type with am or pm
[24h]: 24-hour display type without am or pm
[Time]
Specify the time and date of the unit to use the various timer features of the
unit.
1. Select [Time] option then press VOLUME B.
2. Enter the necessary information for date and time.
b VOLUME B (left/right): Moves the cursor to the previous or next column.
b PAGE B (up/down): Changes the setting at the current cursor position.
3. Press ENTER to confirm your setting.
[Auto On]
Specify when the unit turns on automatically.
1. Select [Auto On] option then press VOLUME B.
2. Follow step 2 as shown in [Time] above.
3. Choose a desired repeat mode; [Off], [Once] or [Everyday].
Select [Off] if you do not use this function.
4. Press ENTER to confirm your setting.
[Auto Off]
Specify when the unit turns off automatically.
1. Select [Auto Off] option then press VOLUME B.
2. Follow step 2 as shown in [Time] above.
3. Choose a desired repeat mode; [Off], [Once] or [Everyday].
Select [Off] if you do not use this function.
4. Press ENTER to confirm your setting.
[Alarm]
Specify the clock for alarm function. If you set the alarm, the unit will be turned
on automatically at the alarm time and the alarm will sound. To turn off the
alarm sound, press any button on the unit.
1. Select [Alarm] option then press VOLUME B.
2. Enter the necessary information for clock.
b VOLUME B (left/right): Moves the cursor to the previous or next column.
b PAGE B (up/down): Changes the setting at the current cursor position.
3. Choose a ring option; [Ring1], [Ring2] or [Ring3].
For example, if you select [Ring2];
Alarm sound (1 min.) c Mute (15 sec.) c Alarm sound (1 min.) c
Mute (15 sec.) c Normal mode
4. Choose a desired repeat mode; [Off], [Once] or [Everyday].
Select [Off] if you do not use this function.
[Off]: Alarm function is not activated.
[Once]: Alarm function is activated once after setting the alarm.
[Everyday]: Alarm function is activated everyday.
5. Press ENTER to confirm your setting.
[Default]
Reset the unit to its original factory settings. Select [Default] option then press
ENTER.
8
PF391-N_APANLLK_ENG 3/10/08 12:25 PM Page 8

9
Viewing a Photo file - more you can do
Viewing photo files as a slideshow
On the [Photo] menu, use b VOLUME B and b PAGE B to select a photo file
then press NX to start the slideshow. Press NX to pause the slideshow tem-
porarily, press again to exit pause mode.
Options during viewing a photo file in full screen
You can use various features during viewing a picture in full screen.
1. Press MENU to display the option menu.
2. Use b VOLUME B and ENTER to select an option and execute it.
To view the previous photo file.
To start the slideshow.
To pause the slideshow.
To view the next photo file.
To rotate the photo in 90 degrees clockwise. Press ENTER repeatedly
to select a degrees.
To stop viewing the photo in full screen and returns to [Photo] menu.
To enlarge the photo image. Press ENTER repeatedly to select a zoom
mode or normal mode.
To switch on or off the clock display.
To adjust the brightness of the screen. Press ENTER and the bright-
ness menu will appear, and use b VOLUME B to adjust the brightness
then press ENTER.
You can listen to music during slideshow, if the current media contain
music and photo files together. Press ENTER and will appear lower-
right side of the screen. To exit this function, press ENTER again.
3. Use MENU to exit the option menu.
Photo file requirement
JPEG file compatibility with this unit is limited as follows:
• File extensions: “.jpg”
• Photo size: Less than 8,000 x 8,000 (W x H) pixel (baseline)
Less than 100,000 pixel (progressive)
• Maximum Files/Media: Less than 650 recommended
Notes on JPEG file
• Lossless compression JPEG image files are not supported.
• Depending on the size and number of the JPEG files, it may take several
minutes to read the contents of the media.
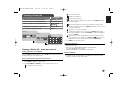
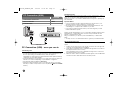
Viewing a Photo file
1 Select a device on the [Device Menu]:
bb
VOLUME
BB
, ENTER
2 Select [Photo] on the [Media Menu]:
bb
VOLUME
BB
, ENTER
3 Select a photo file on the [Photo] menu:
bb
VOLUME
BB
,
bb
PAGE
BB
4 Display the selected file in full screen: ENTER, NX
5 To return to the [Photo] menu: BACK
BUTTON
Device Menu
USB-C Flash SetupCalendar
Media Menu
Movie
Music
Photo
File
Photo
1/2
DSC_0029.jpg 2007/11/22 12:00:00
PF391-N_APANLLK_ENG 3/10/08 12:25 PM Page 9

Playing a Movie file - more you can do
Options during playing a movie file
You can use various features during playing a movie file.
1. Press MENU to display the option menu during playback.
2. Use b VOLUME B and ENTER to select an option and execute it.
To return to the beginning of the current file. Press ENTER twice briefly
to play the previous movie file.
To play fast reverse during playback. To change the various playback
speed, press ENTER repeatedly.
To start playback.
To pause playback.
To play fast forward during playback. To change the various playback
speed, press ENTER repeatedly.
To play the next movie file.
To stop playback and returns to [Movie] menu.
To select a repeat mode (TRACK, ALL, OFF).
To enlarge the video image. Press ENTER repeatedly to select a zoom
mode or normal mode.
To switch on or off the clock display.
To adjust the brightness of the screen. Press ENTER and the bright-
ness control menu will appear, and use b VOLUME B to adjust the
brightness then press ENTER.
3. Use MENU to exit the option menu.
Movie file requirement
Movie file compatibility with this unit is limited as follows:
• Available resolution size: 720x576 (W x H) pixel.
• Bit rate: Less than 15 Mbps
• Movie file extensions: “.avi”, “.mpg”, “.mpeg”
• This unit does not support to display the subtitle of the movie file.
• Playable Codec format: “MPEG1”, “MPEG2”, “MJPEG”
• Playable Audio format: “MPEG1”, “MPEG2”, “MPEG3”, “PCM”
• “Not Support” will appear on the screen if the movie file is not playable.
• Maximum Files/Media: Less than 650 recommended
10
Playing a Movie file
1 Select a device on the [Device Menu]:
bb
VOLUME
BB
, ENTER
2 Select [Movie] on the [Media Menu]:
bb
VOLUME
BB
, ENTER
3 Select a movie file on the [Movie] menu:
bb
PAGE
BB
4 Start playback: ENTER, NX
5 To return to the [Movie] menu: BACK
BUTTON
Device Menu
USB-C Flash SetupCalendar
Media Menu
Movie
Music
Photo
File
Movie
Movie 1.avi
Movie 2.avi
Movie 3.avi
Movie 4.avi
Movie 5.avi
Movie 6.avi
Movie 7.avi
File Name Movie 1.avi
File Size 14MB
File Type AVI
PF391-N_APANLLK_ENG 3/10/08 12:25 PM Page 10

11
Playing a Music file - more you can do
Options during playing a music file
You can use various features during playing a music file.
1. Press MENU to display the option menu during playback.
2. Use b VOLUME B and ENTER to select an option and execute it.
To return to the beginning of the current file. Press ENTER twice briefly
to play the previous movie file.
To play fast reverse during playback. To change the various playback
speed, press ENTER repeatedly.
To start playback.
To pause playback.
To play fast forward during playback. To change the various playback
speed, press ENTER repeatedly.
To play the next music file.
To stop playback.
To select a repeat mode. (TRACK, ALL, OFF)
3. Use MENU to exit the option menu.
Music file requirement
• File extensions: “.mp3”
• Sampling frequency: 8 - 48 kHz (Layer 1, Layer 2, Layer 3, MPEG 2.5),
8 - 96 kHz (PCM)
• Bit rate: 32 - 448 kbps (Layer 1), 32 - 384 kbps (Layer 2),
32 - 320 kbps (Layer 3), 8 - 160 kbps (MPEG 2.5)
• Maximum Files/Media: Less than 650 recommended
Playing a Music file
1 Select a device on the [Device Menu]:
bb
VOLUME
BB
, ENTER
2 Select [Music] on the [Media Menu]:
bb
VOLUME
BB
, ENTER
3 Select a music file on the [Music] menu:
bb
PAGE
BB
4 Start playback: ENTER, NX
5 To return to the [Media Menu]: BACK
BUTTON
Device Menu
USB-C Flash SetupCalendar
Media Menu
Movie
Music
Photo
File
Music
Music 01.mp3
Music 02.mp3
Music 03.mp3
Music 04.mp3
Music 05.mp3
Music 06.mp3
Music 07.mp3
File Name Music 01.mp3
File Size 3MB
File Type MP3
PF391-N_APANLLK_ENG 3/10/08 12:25 PM Page 11

12
Using a File menu - more you can do
Using [File] menu
• You can view a list of folders and files in the current media.
• You can delete or copy a file(s) in the current media.
To display a list of subfolders and files
Use b PAGE B to select a folder then press ENTER. The list of the files and
subfolders within the folder. Press BACK to move to the upper folder.
To select multiple files on the [File] menu
You can select not only single file but also multiple files using
VOLUME B
button. Press VOLUME B at the desired files to select multiple files.
To delete a file(s) using the [File] menu
1. Select a file then press VOLUME B and “B” appear on the right of the file
name.
2. Repeat step 1 if you need to select multiple files.
3. Press ENTER and the option menu will appear.
4. Use b PAGE B to select [Delete>] option then press ENTER.
The confirm menu will appear.
5. Use b VOLUME B to select [Yes] then press ENTER and the file will be
deleted from the current media.
6.
When the deleting is completed,
press ENTER to finish.
To copy a file(s) from the current media to another media
1. Select a file then press VOLUME B and “B” appear on the right of the file
name.
2. Repeat step 1 if you need to select multiple files.
3. Press ENTER and the option menu will appear.
4. Use b PAGE B to select [Copy >] option then press ENTER.
5. Use b PAGE B to select a media that you would like to copy to.
The free space of the selected media will be displayed on the upper-right
side of the [File] menu.
6. Use b VOLUME B and b PAGE B to select a folder that you would like
to copy to.
- Press VOLUME B to move to a subfolder.
- Press b VOLUME to move to a upper folder.
7. Press ENTER. The files will be copied to the selected media or folder.
8.
When the copying is completed,
press ENTER to finish.
Using a File menu
1 Select a device on the [Device Menu]:
bb
VOLUME
BB
, ENTER
2 Select [File] on the [Media Menu]:
bb
VOLUME
BB
, ENTER
3 Select a file on the [File] menu:
bb
PAGE
BB
4 To return to the previous screen: BACK
BUTTON
Device Menu
USB-C Flash SetupCalendar
Media Menu
Movie
Music
Photo
File
File
D:/
Folder 1
Folder 2
Movie 02.mov
Music 04.mp3
Photo 07.jpg
Photo 09.jpg
Modify Date 22 / 11 / 2007
File type Folder
PF391-N_APANLLK_ENG 3/10/08 12:25 PM Page 12

13
Viewing the Calendar - more you can do
Using [Calendar] menu
• You can view the current time and date with slideshow.
• You can change the month and year using b VOLUME B and b PAGE B.
• You can view the alarm information.
Viewing the Calendar
1 Select [Calendar] on the [Device Menu]:
bb
VOLUME
BB
, ENTER
2 Select a month:
bb
VOLUME
BB
3 Select a year:
bb
PAGE
BB
4 To return to the [Device Menu] menu: BACK
BUTTON
Device Menu
USB-C Flash SetupCalendar
SUN MON TUE WED THU FRI SAT
PF391-N_APANLLK_ENG 3/10/08 12:25 PM Page 13

14
PC Connection (USB) - more you can do
Connecting a PC
Connect the unit to your PC using an optional USB cable. Upon connection:
• Your PC will automatically recognize any memory cards installed in the unit.
An icon representing your installed memory cards will appear as
“PF39 Memory” (Internal memory) and “Removable Disks” (External memory
card) when you open “My Computer”.
• It may take Windows several minutes to recognize and set up the device the
first time it is connected depending on your hardware configuration.
• Plug and Play Support: Windows 2000/ME/XP
• PC monitor image will appear on the screen when the unit is connected to
PC and you cannot use any buttons on the unit (Except
11
BAT. and P-SAVE
buttons).
Transferring Files
The USB 2.0 High-Speed connection makes it easy to transfer music, video, or
photo files (or any other data) quickly between the unit and PC.
Simply use the unit as you would a USB Flash Drive using basic operating sys-
tem commands.
Important Notice:
• If you need further assistance with transferring files, please refer to your
operating system’s instruction manual or on-screen help.
• Do not disconnect or otherwise interrupt the unit during transmission - this
could damage or corrupt the unit’s firmware or your files.
• If you want to format the internal memory of the unit using PC, you must
format it with FAT file system.
Double-click the “My Computer” icon on your desktop and then double-click the
“PF39 Memory” or “Removable Disks” icon that corresponds with the unit’s
internal or external memory card.
Drag your media files (or other files) to the “PF39 Memory” or “Removable
Disks”.
• You may choose to use folders/subfolders to organize your media and data.
Disconnecting from a PC
Disconnect the unit as instructed below to prevent data loss or file/firmware cor-
ruption.
1. Double-click the green arrow in the task bar located on the lower-right side
of the PC screen (Safely Remove Hardware).
2. Safely Remove Hardware: Select “USB Mass Storage Device” from the list
that appears and then click on “Stop”.
Stop a Hardware Device: Select “USB Mass Storage Device” from the list
that appears and then click on “OK”.
3. When the “Safe to Remove Hardware” window appears, click the OK button
and disconnect the USB cable from the unit and your PC.
PC Connection (USB)
1 Connect the unit and PC: –
2 Turn on the unit: 1 BAT.
3 Transfer Files: –
BUTTON
USB Cable
PF391-N_APANLLK_ENG 3/10/08 12:25 PM Page 14

15
Power Supply DC 12 V, 2 A
Power consumption 10 W
Operating time on battery: Approx. 1 hour
Set dimensions (W x H x D) 213 x 147 x 103.5 mm with stand
Net Weight 630g
Operating temperature 5˚C to 45˚C
Operating humidity 5 % to 90 %
Display Type 8” Wide (Full-Color TFT LCD)
Viewing area: 7.18”
Display Resolution 800 x 480 (WVGA)
Internal Memory Flash Memory (256MB*)
Memory Card Slot 1 slot for SD/MMC/MS Card
Interface USB 2.0 High-Speed (device)
Plug and Play Support Windows 2000/ME/XP
* The 21MB is assigned for the unit’s software.
Accessory
• AC Adapter (MPA-630)
• USB Adapter Cable
• USB Cable
• Detachable Stand
• 3 different changeable faceplate
Specifications
Troubleshooting
The power does not turned on.
b Ensure that the power cord has been properly connected to the power outlet.
The sound quality of the music is poor.
b Try playing the file on your PC. If the sound quality is still poor, try downloading the file
again or re-encoding the file yourself.
b Ensure that the bit rate of the file is not too low. The higher the bit rate of the file, the
better it will sound. Refer to “
Music file requirement”
on page 11.
Cannot transfer files to the unit from your PC.
b Ensure that your PC is running a supported operating system.
b Ensure that the USB cable is securely attached to the unit and the PC.
b If you have connected the unit through a USB hub, try connecting the unit directly to
your PC.
b Ensure that the capacity of the memory cards installed in the unit.
Cannot select a memory card.
b Ensure that a memory card has been installed.
b Ensure that the memory card is properly installed.
b Ensure that the memory card is not defective.
Cannot copy files to a target location.
b Ensure that the target media has enough memory to contain the file.
The unit will not play a music file.
b Ensure that the file is in a compatible format (MP3). Refer to “
Music file requirement”
on page 11.
The unit will not play a video file.
b Ensure that the video file is available on the unit. Refer to “
Movie file requirement”
on
page 10.
There is no sound.
b Ensure that the volume has been set to a reasonable level.
The unit has malfunctioned.
b Press 1 BAT. button to turn off the unit then turn the unit back on.
• Designs and specifications are subject to change without prior
notice.
PF391-N_APANLLK_ENG 3/10/08 12:25 PM Page 15

PF391-N_APANLLK_ENG 3/10/08 12:25 PM Page 16

PF391P
P/NO : MFL42173825(R1)
ESPAÑOL
PF391-N_APANLLK_SPA 3/10/08 12:25 PM Page 1

2
PRECAUCIÓN: NO RETIRE LA CARCASA (O CUBIERTA POSTERIOR) A FIN DE
REDUCIR EL RIESGO DE DESCARGA ELÉCTRICA. NO INTENTE REPARAR LAS
PIEZAS INTERNAS. DELEGUE TODAS LAS LABORES DE REPARACIÓN AL PER-
SONAL DE MANTENIMIENTO CUALIFICADO.
Este símbolo de relámpago con punta de flecha dentro de un triángulo equi-
látero está diseñado para alertar al usuario de la presencia de voltajes peli-
grosos no aislados en el interior del producto, que podrían tener la suficiente
magnitud como para constituir un riesgo de descarga eléctrica.
El signo de exclamación dentro de un triángulo equilátero está diseñado para
alertar al usuario de la presencia de instrucciones importantes de operación y
mantenimiento (reparación) en la documentación incluida con el producto.
ADVERTENCIA: NO EXPONGA ESTE PRODUCTO A LA LLUVIA O HUMEDAD, A
FIN DE EVITAR EL RIESGO DE INCENDIO O DESCARGA ELÉCTRICA.
ADVERTENCIA: no instale este equipo en un espacio cerrado, como en una
estantería o mueble similar.
PRECAUCIÓN: no bloquee ninguno de los orificios de ventilación. Instalar conforme
a las instrucciones del fabricante. Las ranuras y orificios de la carcasa cumplen un
propósito de ventilación y aseguran el correcto funcionamiento del producto, y a fin
de protegerlo de un posible sobrecalentamiento. Los orificios no deben bloquearse
en ningún caso, colocando el producto sobre una cama, sofá, alfombra o superficie
similar. Este producto no debe colocarse en una instalación empotrada, como una
librería o estante, a menos que se proporcione una correcta ventilación del mismo y
se respeten todas las instrucciones del fabricante.
PRECAUCIÓN: el equipo no debe ser expuesto al agua (goteo o salpicadura), y no
deben colocarse sobre él objetos que contengan líquidos, por ejemplo floreros.
PRECAUCIONES relativas al cable de alimentación
Se recomienda que la mayoría de los equipos sean ubicados en un circuito
dedicado;
Es decir, en un circuito de toma única que sólo alimentará ese equipo y que no tiene
enchufes adicionales ni circuitos derivados. Compruebe la página de especificaciones
de este manual de usuario para estar seguro. No sobrecargue los enchufes de pared.
Los enchufes de pared sobrecargados, sueltos o dañados, los cables de alimentación
desgastados o cables con aislamientos dañados o rotos presentan situaciones de
riesgo. Cualquiera de estas condiciones podría causar una descarga eléctrica o fuego.
Examine periódicamente el cable de su electrodoméstico, y si su aspecto indica
daños o deterioro, desenchúfelo, cese el uso del electrodoméstico y haga que un
profesional del servicio cualificado lo sustituya por un recambio exacto y homologado
de un servicio técnico autorizado.
Proteja el cable de alimentación de abusos físicos o mecánicos: torcerlo, doblarlo, pun-
zarlo, cerrar una puerta sobre el cable o caminar sobre él. Preste particular atención a
los enchufes, tomas de pared, y el punto de unión entre el cable y el electrodoméstico.
Para desconectar la alimentación principal, retire el cable principal de alimentación.
Durante la instalación del producto, asegúrese de que el enchufe sea fácilmente accesible.
Instrucciones importantes
de seguridad
1. Lea estas instrucciones.
2. Guarde estas instrucciones.
3. Siga todas las advertencias.
4. Siga todas las instrucciones.
5. No utilice este aparato cerca del agua.
6. Limpie únicamente con un paño seco.
7. No obstruya ninguna salida de ventilación. Instale de acuerdo con las
instrucciones del fabricante.
8. No instale cerca de fuentes de calor como radiadores, registros de calefacción,
estufas u otros aparatos (incluyendo amplificadores) que produzcan calor.
9. Respete el uso de la conexión del enchufe polarizado o con conexión a tierra.
Un enchufe polarizado tiene una cuchilla más ancha que la otra. Un enchufe
con tierra tiene dos cuchillas y una pata para tierra. La cuchilla más ancha o la
pata para tierra sirven como protección. Si el enchufe proporcionado no se ajus-
ta a su tomacorriente, consulte a un electricista para que lo reemplace.
10. Proteja el cable de alimentación para que no caminen sobre él o quede
atorado, particularmente en contactos, en receptáculos y en el punto por
donde sale del aparato.
11. Utilice únicamente los aditamentos / accesorios especificados por el fabricante.
12. Utilice únicamente con el carro, estante, trípode, soporte o mesa
especificados por el fabricante o que haya sido vendido junto con el
aparato. Cuando utilice un carro, tenga cuidado cuando mueva la unidad /
carro para evitar accidentes por vuelcos.
13. Desenchufe este aparato durante tormentas eléctricas o cuando no vaya a
utilizarlo por períodos prolongados.
14. Haga que todo el mantenimiento sea realizado solamente por personal técnico
calificado. Solicite mantenimiento cuando el aparato haya sufrido cualquier tipo
de daño, por ejemplo, si el cable de alimentación o el enchufe están dañados,
cuando se haya derramado líquido sobre el aparato o hayan caído objetos
sobre él, cuando haya sido expuesto a lluvia o humedad, cuando no funcione
con normalidad o cuando haya sufrido una caída.
Precauciones de seguridad
PRECAUCIÓN
RIESGO DE DESCARGA ELÉCTRICA
NO ABRIR
PF391-N_APANLLK_SPA 3/10/08 12:25 PM Page 2

3
Contenido
Precauciones de seguridad . . . . . . . . . . . . . . . . . . . . . . . . . . . . . . . . . . . . . .2
Contenido . . . . . . . . . . . . . . . . . . . . . . . . . . . . . . . . . . . . . . . . . . . . . . . . . . .3
Características . . . . . . . . . . . . . . . . . . . . . . . . . . . . . . . . . . . . . . . . . . . . . . . .3
Unidad principal . . . . . . . . . . . . . . . . . . . . . . . . . . . . . . . . . . . . . . . . . . . . . . .4
Introducción . . . . . . . . . . . . . . . . . . . . . . . . . . . . . . . . . . . . . . . . . . . . . . . . . .5
• Inserción o extracción de la tarjeta de memoria . . . . . . . . . . . . . . . . . . . .5
• Conexión de un dispositivo USB . . . . . . . . . . . . . . . . . . . . . . . . . . . . . . .5
• Conexión del cable de alimentación . . . . . . . . . . . . . . . . . . . . . . . . . . . .6
• Encendido o apagado de la unidad . . . . . . . . . . . . . . . . . . . . . . . . . . . . .6
• Modo de ahorro de energía . . . . . . . . . . . . . . . . . . . . . . . . . . . . . . . . . . .6
• Instalación del soporte . . . . . . . . . . . . . . . . . . . . . . . . . . . . . . . . . . . . . .6
• Utilización del menú del dispositivo . . . . . . . . . . . . . . . . . . . . . . . . . . . . .7
Ajuste de configuración . . . . . . . . . . . . . . . . . . . . . . . . . . . . . . . . . . . . . . . .7-8
Visionado de un archivo fotográfico . . . . . . . . . . . . . . . . . . . . . . . . . . . . . . . .9
Reproducción de un archivo de película . . . . . . . . . . . . . . . . . . . . . . . . . . . .10
Reproducción de un archivo musical . . . . . . . . . . . . . . . . . . . . . . . . . . . . . .11
Utilización de un menú de archivo . . . . . . . . . . . . . . . . . . . . . . . . . . . . . . . .12
Visionado del calendario . . . . . . . . . . . . . . . . . . . . . . . . . . . . . . . . . . . . . . .13
Conexión a PC (USB) . . . . . . . . . . . . . . . . . . . . . . . . . . . . . . . . . . . . . . . . .14
Solución de problemas . . . . . . . . . . . . . . . . . . . . . . . . . . . . . . . . . . . . . . . .15
Especificaciones . . . . . . . . . . . . . . . . . . . . . . . . . . . . . . . . . . . . . . . . . . . . .15
Características
• Galería de imágenes en vivo:
alta resolución y colores profundos desde una pantalla LCD panorámica.
• Modo de ahorro de energía sencillo:
mejor 1 segundo para ahorro de energía que 15 segundos para encender y
apagar.
• Álbum digital portátil:
comparte tus fotografías gracias a la movilidad que ofrece su batería interna.
• Visor Plug-in:
visionado sencillo de fotografías mediante ranura para tarjeta de memoria y
puerto USB.
• Almacene 2.000 fotografías:
almacene hasta 2.000 fotografías gracias a la memoria flash interna de
256MB de capacidad
• Calendario digital y reloj con alarma:
para planificación de fecha y hora
• Explorador fotográfico de utilización sencilla:
fácil navegación a través de menús parar conseguir acceso rápido a sus
imágenes.
• Decoración de interior insuperable:
3 marcos intercambiables diferentes para adecuarse a cualquier interior.
PF391-N_APANLLK_SPA 3/10/08 12:25 PM Page 3

4
Unidad principal
a Pantalla LCD
b Marco (intercambiable)
Los cuatro lados del marco son magnéticos, por lo que éste puede
instalarse y desinstalarse fácilmente.
c 1 BAT. (Botón de encendido e indicador de baterías)
Apague y encienda la unidad para que muestre el estado de las baterías.
El indicador se ilumina en rojo mientras la batería se está cargando.
El indicador se ilumina en verde cuando la batería está completamente
cargada.
d P-SAVE (ahorro de energía)
Para encender o apagar el modo de ahorro de energía.
e MENU
Accede o sale del menú de opciones.
f b VOLUME B
Ajusta el volumen de la unidad. Para ajustar el volumen, mantenga
presionado VOLUME (b o B) durante la reproducción de la película o el
archivo musical.
Los botones Izquierda y Derecha sirven también para seleccionar un
elemento en el menú.
g b PAGE B
Mantenga presionado durante 2 segundos para ir a la página previa o
siguiente en el menú [Photo], [Movie] o [Music].
Los botones Arriba y Abajo sirven también para seleccionar un elemento
en el menú.
h ENTER
Selecciona una opción o ejecuta un comando.
i ROTATE
Gira la fotografía, a pantalla completa, en sentido antihorario.
j BACK (ATRÁS)
Regresa al menú o a la pantalla anterior.
k NX
Inicia la reproducción. Presione para hacer una pausa en la reproducción;
presione de nuevo para continuar.
l Conector USB
Conecte el cable adaptador USB suministrado al conectar a un dispositivo
USB.
m Ranura de la tarjeta de memoria
Introduzca una tarjeta de memoria (SD, MMC o MS).
n ENTRADA DE 12 V DE CC
Conecte el adaptador de CA suministrado.
cd e f
nml
b
a
g
h
i
j
k
PF391-N_APANLLK_SPA 3/10/08 12:25 PM Page 4

5
Introducción
Inserción o extracción de la tarjeta de memoria
Introduzca una tarjeta de memoria en su ranura correspondiente como se
muestra a continuación.
Para retirar la tarjeta de memoria de su ranura, presione en el centro de la tar-
jeta y extráigala con cuidado.
Tarjetas de memoria y formatos compatibles
• Secure Digital Card (SD)
• Multi Media Card (MMC)
• Memory Stick (MS)
• Compatible con: FAT 12, FAT 16 ó FAT 32
• Utilice sólo las tarjetas de memoria recomendadas previamente.
• La tarjeta sólo encaja en un sentido; no la fuerce.
La tarjeta debe encajar cómodamente cuando se inserta de forma adecuada.
• No todos los tipos de tarjeta son compatibles con la unidad.
• No retire la tarjeta de memoria mientras está en uso, por ejemplo, cuando
está accediendo a una imagen o a otros datos.
Relativo a la protección contra escritura
En las tarjetas con interruptor de protección contra escritura, si éste se encuentra
activado no será posible escribir, borrar o formatear el contenido de la tarjeta.
Conexión de un dispositivo USB
Conecte el extremo pequeño del cable adaptador USB al puerto al puerto USB
de la unidad.
Conecte un dispositivo al adaptador USB. Utilice un cable USB, si lo necesita.
• Esta unidad admite únicamente dispositivos USB con formato FAT16 ó
FAT32.
• No extraiga el dispositivo USB mientras está en funcionamiento (reproducir,
copiar, etc.).
• Dispositivo USB: dispositivos USB que admitan USB 1.1 y USB 2.0.
(Por ejemplo: Unidad Flash USB, lector de tarjetas de memoria, cámara
digital, etc.)
• No es compatible con un dispositivo USB que necesite un programa de
instalación adicional al estar conectado al PC.
Unidad Flash USB
(por ejemplo)
Cable adaptador USB
Al puerto USB
SD
or or
MMC
MS
o
o
PF391-N_APANLLK_SPA 3/10/08 12:25 PM Page 5

6
Conexión del cable de alimentación
Conecte el cable de alimentación suministrado desde la unidad a un enchufe
de pared.
Transformador de CA
• Este adaptador de CA funciona a 100-240V~ 1A 50/60Hz.
• Contactar con un distribuidor de componentes eléctricos para elegir un
adaptador de corriente o un cable de conexión de CA adecuados.
• Fabricado por WANLIDA GROUP CO., LTD
Batería recargable
• Su batería interna recargable le ofrece libertad de movimiento y la posibili-
dad de reproducir archivos sin necesidad de utilizar el cable de alimentación.
• La batería interna recargable se cargará sólo cuando la unidad esté apaga-
da y conectada a una toma de corriente mediante el adaptador de CA.
• La recarga se detendrá si enciende la unidad.
• La recarga se realizará en 2 horas aproximadamente.
• El indicador 1 BAT. se volverá rojo durante la carga. Una vez la carga esté
completa, la iluminación del indicador cambiará a verde.
• Cuado el tiempo restante de batería esté por debajo de 10 minutos, apare-
cerá en pantalla el icono “ ” y el indicador de batería 1 BAT.
parpadeará.
Encender o apagar la unidad
Para encender la unidad, mantenga presionado durante dos segundos el botón
1 BAT..
Se iniciará el pase de diapositivas de presentación y, a continuación, aparecerá
el menú del dispositivo [Menú del dispositivo].
Presione cualquier botón para saltarse el pase de diapositivas de
demostración.
Las fotografías de demostración están localizadas en la memoria interna, y no
podrá cambiarlas o eliminarlas.
Presione de nuevo 1 BAT. para apagar la unidad.
Modo de ahorro de energía
La unidad dispone de un modo de ahorro de energía. Para activarlo, presione
P-SAVE y la pantalla LCD se apagará. Para salir del modo de ahorro de
energía, presione P-SAVE o 1 BAT.
Instalación del soporte
Fije el soporte a la parte trasera de la unidad como se muestra a continuación.
A la toma “ENTRADA DE CC, 12V”
Conecte el cable de alimentación al cuerpo del
adaptador de CA. (El conjunto actual podría diferir del
mostrado en la ilustración.)
Botón de
liberación de las
clavijas del
enchufe.
A la toma de
CA
PF391-N_APANLLK_SPA 3/10/08 12:25 PM Page 6

7
Utilización del menú del dispositivo (Menú del dispositivo)
El menú del dispositivo aparecerá al encender la unidad, y podrá acceder a este
presionando repetidamente el botón BACK.
Utilice b VOLUME B para seleccionar una opción del menú [Menú del
dispositivo] y, a continuación, presione ENTER.
• USB-C ..... USB-Z
Podrá reproducir un archivo(s) del dispositivo USB conectado.
• SD/MMC/MS
Podrá reproducir un archivo(s) de la tarjeta de memoria externa.
• Flash
Podrá reproducir un archivo(s) de la memoria flash interna.
• Calendario
Podrá ver la fecha y hora actuales, y la información sobre alarmas a través
de la pantalla del calendario.
• Configur.
Podrá cambiar los ajustes de la unidad en el menú de configuración
[Configur.].
Ajustar la configuración - ahora con más
opciones
Para visualizar el menú de configuración [Configur.]
Utilice los botones b VOLUME B para seleccionar la opción [Configur.] en el
menú de dispositivo [Menú del dispositivo] y, a continuación, presione ENTER.
[Idioma]
Seleccione un idioma para el menú Configuración y las visualizaciones en
pantalla.
[Tiempo pase de diapos.]
Especifique el tiempo que permanecerá cada imagen en pantalla durante una
presentación de diapositivas: 3 segundos, 5 segundos, 15 segundos, 1 minuto,
15 minutos ó 1 hora.
Menú del dispositivo
USB-C Flash Configur.Calendario
Menú del dispositivo
USB-C Flash Configur.Calendario
Ajustar la configuración
1 Seleccione [Configur.] en el menú
bb
VOLUME
BB
, ENTER
[Menú del dispositivo]:
2 Seleccione la opción que desee:
bb
PAGE
BB
3 Cambie la configuración:
bb
VOLUME
BB
BOTÓN
PF391-N_APANLLK_SPA 3/10/08 12:25 PM Page 7

[Modo pase de diapos.]
Especifique el estilo de transición entre imágenes durante una presentación de
diapositivas: Aleatorio, Atenuación, Apag., De-abajo-a-arriba, De-arriba-a-abajo,
De-izquierda-a-derecha, De-derecha-a-izquierda, Puerta-cerrada,
Puerta-abierta, Cruce-horiz (Cruce-horizontal), Cruce-vertic (Cruce-vertical)
Si selecciona la opción [Apag.], se desactivará la presentación de diapositivas
y permanecerá fija en pantalla una imagen.
[Modo visualización]
Especifique el modo de visualización para archivos fotográficos: Normal, Ajustar.
[Normal]: conserva la proporción original de la imagen.
[Ajustar]: optimiza la imagen ajustándola a la pantalla.
[Formato de hora]
Especifique el formato horario para visualizar el reloj: 12h, 24h
[12h]: se muestra el formato de 12 horas con “a.m.” o “p.m.”
[24h]: se muestra el formato de 24 horas sin “a.m.” o “p.m."
[Tiempo]
Especifique la hora y la fecha de la unidad para utilizar sus diferentes
funciones temporizadas.
1. Seleccione la opción [Tiempo] y, después, presione VOLUME B.
2. Introduzca la información necesaria de fecha y hora.
b VOLUME B (izquierda/derecha): desplaza el cursor a la columna
anterior o siguiente.
b PAGE B (arriba/abajo): cambia el ajuste en la posición actual del cursor.
3. Presione ENTER para confirmar su selección.
[Encendido]
Seleccione para que la unidad se encienda automáticamente.
1. Seleccione la opción [Encendido] y, después, presione VOLUME B.
2. Siga el paso 2 como se indicó anteriormente en [Tiempo].
3. Elija el modo de repetición deseado; [Apagado], [Una vez] o [A diario].
Seleccione la opción [Apagado] si no desea utilizar esta función.
4. Presione ENTER para confirmar su selección.
[Desactivación automát.]
Seleccione para que la unidad se apague automáticamente.
1. Seleccione la opción [Desactivación automát.] y, después, presione
VOLUME B.
2. Siga el paso 2 como se indicó anteriormente en [Tiempo].
3. Elija el modo de repetición deseado; [Apagado], [Una vez] o [A diario].
Seleccione la opción [Apagado] si no desea utilizar esta función.
4. Presione ENTER para confirmar su selección.
[Alarma]
Seleccione la hora para establecer la función de alarma. Si ajusta la alarma, la
unidad se encenderá automáticamente a la hora programada y la alarma
sonará. Para apagar el sonido de la alarma, presione cualquier botón en la
unidad.
1. Seleccione la opción [Alarma] y, después, presione VOLUME B.
2. Introduzca la información horaria necesaria.
b VOLUME B (izquierda/derecha): desplaza el cursor a la columna
anterior o siguiente.
b PAGE B (arriba/abajo): cambia el ajuste en la posición actual del cursor.
3. Seleccione una opción para el sonido de aviso: [Ring1], [Ring2] ó [Ring3].
Por ejemplo, si selecciona [Ring2]:
Sonido de aviso (1 min.) c Silencio (15 seg.) c Sonido de aviso (1 min.) c
Silencio (15 seg.) c Modo normal
4. Elija el modo de repetición deseado; [Apagado], [Una vez] o [A diario].
Seleccione la opción [Apagado] si no desea utilizar esta función.
[Apagado]: alarma no activada.
[Una vez]: alarma activada una vez tras su ajuste.
[A diario]: alarma activada todos los días.
5. Presione ENTER para confirmar su selección.
[Predeterminado]
Puede restablecer la unidad a los valores de fábrica. Seleccione la opción
[Predeterminado] y, a continuación, presione ENTER.
8
PF391-N_APANLLK_SPA 3/10/08 12:25 PM Page 8

9
Visualización de un archivo fotográfico –
ahora con más opciones
Visualización de archivos fotográficos en forma de presentación de
diapositivas
En el menú [Foto], utilice b VOLUME B y b PAGE B para seleccionar un
archivo fotográfico y, a continuación, presione NX para iniciar la presentación.
Presione NX para hacer una pausa temporal en la presentación de
diapositivas; presione de nuevo para continuar.
Opciones durante el visionado de un archivo fotográfico a pantalla
completa
Puede utilizar varias funciones mientras disfruta de una fotografía a pantalla completa.
1. Presione el botón MENU para mostrar el menú de opciones.
2. Utilice b VOLUME B y ENTER para seleccionar una opción y ejecutarla.
Para ver la fotografía anterior.
Para iniciar la presentación de diapositivas.
Para hacer una pausa en la presentación de diapositivas.
Para ver la siguiente fotografía.
Para girar la fotografía 90 grados en sentido horario.
Presione repetidamente ENTER para seleccionar un grado.
Para detener el visionado fotográfico en pantalla completa y regresar al
menú [Foto].
Para aumentar el tamaño de la imagen. Presione repetidamente
ENTER para seleccionar un modo de zoom o el modo normal.
Para poner o quitar la hora en pantalla.
Para ajustar el brillo de la pantalla. Presione ENTER y aparecerá el
menú de brillo. Utilice b VOLUME B para ajustar el brillo, a
continuación presione ENTER.
Podrá escuchar música durante la presentación de diapositivas si el
soporte actual contiene conjuntamente archivos de música y fotografía.
Presione ENTER y aparecerá en la parte inferior derecha de la
pantalla. Pulse de nuevo ENTER para salir de esta función.
3. Utilice el botón MENU para salir del menú de opciones.
Requisitos para archivos fotográficos
La compatibilidad de las imágenes JPEG con esta unidad está limitada a lo
siguiente:
• Extensiones de archivo: “.jpg”
• Tamaño de foto: el tamaño recomendado es inferior a 8.000 x 8.000 (An x
Al) píxeles (referencia) e inferior a 100.000 píxeles (progresivo)
• Máximo número de archivos/soportes: inferior a 650 recomendados
Notas sobre archivos JPEG
• No se admiten archivos de imágenes JPEG comprimidos sin pérdida de
datos.
• Dependiendo del tamaño y número de archivos JPEG, puede tardar varios
minutos en leer el contenido del soporte.
Visionado de un archivo fotográfico
1 Seleccione un dispositivo mediante el
bb
VOLUME
BB
, ENTER
menú [Menú del dispositivo]:
2 Seleccione [Foto] en el menú
bb
VOLUME
BB
,
[Menú multimedia]: ENTER
3 Seleccione un archivo fotográfico en el
bb
VOLUME
BB
,
menú [Foto]:
bb
PAGE
BB
4 Mostrar el archivo seleccionado a pantalla ENTER, NX
completa:
5 Para regresar al menú [Foto]: BACK
BOTÓN
Menú del dispositivo
USB-C Flash Configur.Calendario
Menú multimedia
Película
Música
Foto
Archivo
Foto
1/2
DSC_0029.jpg 2007/11/22 12:00:00
PF391-N_APANLLK_SPA 3/10/08 12:25 PM Page 9

Reproducir un archivo de película – ahora
con más opciones
Opciones durante la reproducción de una película
Existen varias opciones posibles durante la reproducción de una película.
1. Presione MENU para visualizar el menú de opciones durante la reproducción.
2. Utilice b VOLUME B y ENTER tpara seleccionar una opción y ejecutarla.
Para volver al inicio del archivo actual. Presione brevemente ENTER
dos veces para reproducir el anterior archivo de película.
Para reproducir a cámara rápida hacia atrás durante la reproducción.
Para cambiar entre las distintas velocidades de reproducción, presione
repetidamente ENTER.
Para iniciar la reproducción.
Para hacer una pausa en la reproducción.
Para reproducir a cámara rápida hacia adelante durante la
reproducción. Para cambiar entre las distintas velocidades de
reproducción, presione repetidamente ENTER.
Para reproducir el siguiente archivo de película.
Para detener la reproducción y volver al menú [Movie].
Para seleccionar un modo de repetición (PISTA, TODO, OFF).
Para aumentar el tamaño de la imagen de vídeo. Presione repetida-
mente ENTER para seleccionar un modo de zoom o el modo normal.
Para poner o quitar la hora en pantalla.
Para ajustar el brillo de la pantalla. Presione ENTER y aparecerá el
menú de control de brillo. Utilice b VOLUME B para ajustar el brillo, a
continuación presione ENTER.
3. Utilice el botón MENU para salir del menú de opciones.
Requisitos para archivos de película
La compatibilidad de los archivos de película con ésta unidad está limitada a lo
siguiente:
• Tamaño de resolución disponible: 720 x 576 (An x Al) píxeles
• Tasa de bits: inferior a 15 Mbps
• Extensiones de archivos de película: “.avi”, “.mpg”, “.mpeg”
• Esta unidad no admite la visualización de subtítulos de archivos de película.
• Formato de Códec reproducible: “MPEG1”, “MPEG2”, “MJPEG”
• Formato de audio reproducible: “MPEG1”, “MPEG2”, “MPEG3”, “PCM”
• Si el archivo de película no está admitido por la unidad, aparecerá el
mensaje “Not Support” (“No admitido”) en la pantalla.
• Máximo número de archivos/soporte: inferior a 650 recomendados
10
Reproducción de un archivo de película
1 Seleccione un dispositivo mediante el
bb
VOLUME
BB
,
menú [Menú del dispositivo]: ENTER
2 Seleccione [Película] en el menú
bb
VOLUME
BB
,
[Menú multimedia]: ENTER
3 Seleccione un archivo de película en el
bb
PAGE
BB
menú [Película]:
4 Iniciar la reproducción: ENTER, NX
5 Para regresar al menú [Película]: BACK
BOTÓN
Menú del dispositivo
USB-C Flash Configur.Calendario
Menú multimedia
Película
Música
Foto
Archivo
Película
Película 1.avi
Película 2.avi
Película 3.avi
Película 4.avi
Película 5.avi
Película 6.avi
Película 7.avi
Nombre archivo Película 1.avi
Tamaño arch. 14MB
Tipo archivo AVI
PF391-N_APANLLK_SPA 3/10/08 12:25 PM Page 10

11
Reproducir un archivo musical – ahora
con más opciones
Opciones durante la reproducción de un archivo musical
Existen varias opciones posibles durante la reproducción de un archivo musical.
1. Presione MENU para visualizar el menú de opciones durante la reproducción.
2. Utilice b VOLUME B y ENTER para seleccionar una opción y ejecutarla.
Para volver al inicio del archivo actual presione brevemente ENTER
dos veces para reproducir el anterior archivo de película.
Para una reproducción rápida hacia atrás durante la reproducción.
Para cambiar entre las distintas velocidades de reproducción, presione
repetidamente ENTER.
Para iniciar la reproducción.
Para hacer una pausa en la reproducción.
Para una reproducción rápida hacia adelante durante la reproducción.
Para cambiar entre las distintas velocidades de reproducción, presione
repetidamente ENTER.
Para reproducir el siguiente archivo musical.
Para detener la reproducción.
Para seleccionar el modo de repetición. (PISTA/TODAS/OFF)
3. Utilice el botón MENU para salir del menú de opciones.
Requisitos para archivos musicales
• Extensiones de archivo: “.mp3”
• Frecuencia de muestreo: 8 - 48 kHz (Layer 1, Layer 2, Layer 3, MPEG 2.5),
8 - 96 kHz (PCM)
• Tasa de bits: 32 - 448 kbps (Layer 1), 32 - 384 kbps (Layer 2),
32 - 320 kbps (Layer 3), 8 - 160 kbps (MPEG 2.5)
• Máximo número de archivos/soporte: inferior a 650 recomendados
Reproducción de un archivo musical
1 Seleccione un dispositivo mediante el
bb
VOLUME
BB
,
menú [Menú del dispositivo]: ENTER
2 Seleccione [Música] en el menú
bb
VOLUME
BB
,
[Menú multimedia]: ENTER
3 Seleccione un archivo musical en el
bb
PAGE
BB
menú [Música]:
4 Iniciar la reproducción: ENTER, NX
5 Para regresar al menú [Menú multimedia]: BACK
BOTÓN
Menú del dispositivo
USB-C Flash Configur.Calendario
Menú multimedia
Película
Música
Foto
Archivo
Música
Música 01.mp3
Música 02.mp3
Música 03.mp3
Música 04.mp3
Música 05.mp3
Música 06.mp3
Música 07.mp3
Nombre archivo Música 01.mp3
Tamaño arch. 3MB
Tipo archivo MP3
PF391-N_APANLLK_SPA 3/10/08 12:25 PM Page 11

12
Utilización de un menú de archivo – ahora
con más opciones
Utilización del menú [Archivo]
• Podrá ver una lista de carpetas y de archivos del soporte actual.
• Podrá eliminar o copiar un archivo(s) del soporte actual.
Para visualizar una lista de subcarpetas y archivos
Utilice b PAGE B para seleccionar una carpeta y, a continuación, presione
ENTER. Aparecerá la lista de archivos y subcarpetas del interior de la carpeta.
Presione BACK para desplazarse a la carpeta superior.
Para seleccionar varios archivos en el menú [File]:
Puede seleccionar también varios archivos utilizando el botón
VOLUME B.
Presione
VOLUME B en los archivos escogidos para seleccionar varios
archivos.
Para eliminar un archivo(s) utilizando el menú [Archivo]
1. Seleccione un archivo y, a continuación, presione VOLUME B y aparecerá
“B” sobre la derecha del nombre del archivo.
2. Repita el paso 1 si quiere seleccionar varios archivos.
3. Presione ENTER y aparecerá el menú de opciones.
4. Utilice b PAGE B para seleccionar la opción [Eliminar >] y, a continuación,
presione ENTER.
Aparecerá el menú de confirmación.
5. Utilice b VOLUME B para seleccionar [Sí] y, a continuación, presione
ENTER y el archivo será eliminado del soporte actual.
6.
Al completar la eliminación, presione ENTER para finalizar.
Para copiar un archivo(s) del soporte actual a otro distinto
1. Seleccione un archivo y, a continuación, presione VOLUME B y aparecerá
“B” sobre la derecha del nombre del archivo.
2. Repita el paso 1 si quiere seleccionar varios archivos.
3. Presione ENTER y aparecerá el menú de opciones.
4. Utilice b PAGE B para seleccionar la opción [Copiar >] y, a continuación,
presione ENTER.
5. Utilice b PAGE B para seleccionar el soporte al que desea copiar.
El espacio libre del soporte seleccionado se visualizará en el lado superior
derecho del menú [Archivo].
6. Utilice b VOLUME B y b PAGE B para seleccionar la carpeta a la que
desea copiar.
- Presione VOLUME B para desplazarse a una subcarpeta.
- Presione b VOLUME para desplazarse a una carpeta superior.
7. Presione ENTER. Los archivos serán copiados al soporte o a la carpeta
seleccionada.
8.
Al completar la copia, presione ENTER para finalizar.
Utilización de un menú de archivo
1 Seleccione un dispositivo mediante el
bb
VOLUME
BB
,
menú [Menú del dispositivo]: ENTER
2 Seleccione [Archivo] en el menú
bb
VOLUME
BB
,
[Menú multimedia]: ENTER
3
Seleccione un archivo en el menú [Archivo]:
bb
PAGE
BB
4 Para regresar a la pantalla anterior: BACK
BOTÓN
Menú del dispositivo
USB-C Flash Configur.Calendario
Menú multimedia
Película
Música
Foto
Archivo
Archivo
D:/
Folder 1
Folder 2
Película 02.mov
Música 04.mp3
Foto 07.jpg
Foto 09.jpg
Modificar fecha 22 / 11 / 2007
PF391-N_APANLLK_SPA 3/10/08 12:25 PM Page 12

13
Visualización del calendario – ahora con
más opciones
Utilización del menú [Calendario]
• Puede ver la hora y la fecha actuales como una presentación de diapositivas.
• Puede cambiar el mes y el año utilizando b VOLUME B y b PAGE B.
• Puede ver la información sobre alarmas.
Visionado del calendario
1 Seleccione [Calendario] en el menú
bb
VOLUME
BB
,
[Menú del dispositivo]: ENTER
2 Seleccione un mes:
bb
VOLUME
BB
3 Seleccione un año:
bb
PAGE
BB
4
Para regresar al menú [Menú del dispositivo]:
BACK
BOTÓN
Menú del dispositivo
USB-C Flash Configur.Calendario
SOL LUN MAR MIÉR JUE VIE SÁB
PF391-N_APANLLK_SPA 3/10/08 12:25 PM Page 13

14
Conexión a PC (USB) – ahora tiene más
opciones
Conexión de un PC
Conecte la unidad a su PC utilizando un cable USB opcional. Una vez conectado:
• Su PC reconocerá automáticamente cualquier tarjeta de memoria instalada en la
unidad. Al abrir “My Computer” (“Mi PC”), aparecerá un icono denominado “PF39
Memory” (memoria interna) y otro denominado “Removable Disks” (tarjeta de
memoria externa) que representan las tarjetas de memoria instaladas.
• El reconocimiento y configuración de los dispositivos por primera vez, puede
llevar varios minutos al sistema operativo Windows en función de su
configuración de hardware.
• Plug-and-Play admitido en: Windows 2000/ME/XP
• La imagen del monitor del PC aparecerá en la pantalla al conectar la unidad
al PC y no podrá utilizar ningún botón de la unidad (excepto los botones
11
BAT. y P-SAVE).
Transferencia de archivos
La conexión de alta velocidad USB 2.0 permite una transferencia sencilla y
rápida de archivos de música, vídeo o fotografía (o de cualquier otro dato) entre
la unidad y el PC.
Sencillamente use la unidad como si de un dispositivo Flash USB se tratase,
utilizando funciones básicas del sistema operativo.
Aviso importante:
• Si necesitase más ayuda con respecto a la transferencia de archivos, por
favor, consulte el manual de instrucciones de su sistema operativo o la
ayuda en pantalla.
• No desconecte o interrumpa de ningún otro modo la unidad durante la trans-
misión – esto podría dañar o corromper el archivo de firmware de su unidad
o sus archivos.
• Si quisiera formatear la memoria interna de la unidad utilizando el PC,
deberá utilizar el sistema de archivos FAT al hacerlo.
Realice un doble clic en el icono “My Computer” (“Mi PC”) de su escritorio y, a
continuación, realice de nuevo un doble clic en el icono “PF39 Memory” o
“Removable Disks”, que corresponden a la memoria interna de la unidad y a la
tarjeta de memoria externa respectivamente.
Arrastre sus archivos multimedia (u otros archivos) hasta “PF39 Memory” o
“Removable Disks”.
• Quizá prefiera utilizar carpetas/subcarpetas para ordenar sus soportes y
datos.
Desconexión de un PC
Desconecte la unidad según las siguientes instrucciones para prevenir pérdidas
de datos o corrupción de datos/firmware.
1. Realice un doble clic sobre la flecha verde en la barra de tareas situada en
la esquina inferior derecha de la pantalla de su PC (Safely Remove
Hardware) (Quitar hardware con seguridad).
2. Safely Remove Hardware (Quitar hardware con seguridad): seleccione
“USB Mass Storage Device” (“Dispositivo de almacenamiento masivo
USB”) de la lista que aparece y, a continuación, haga clic en “Stop”
(“Detener”).
Stop a Hardware Device (Detener un dispositivo de Hardware): seleccione
“USB Mass Storage Device” (“Dispositivo de almacenamiento masivo
USB”) de la lista que aparece y, a continuación, haga clic en “OK”.
3. Cuando aparezca la ventana “Safe to Remove Hardware” (“Es seguro
retirar el hardware”), haga clic en el botón OK y desconecte el cable USB
de la unidad y de su PC.
Conexión a PC (USB)
1 Conecte la unidad y el PC: –
2 Encienda la unidad: 1 BAT.
3 Transfiera archivos: –
BOTÓN
Cable USB
PF391-N_APANLLK_SPA 3/10/08 12:25 PM Page 14

15
Suministro eléctrico CC 12 V, 2 A
Consumo de energía 10 W
Tiempo de funcionamiento
de la batería 1 hora aproximadamente.
Dimensiones del conjunto
(An x Al x Pr) 213 x 147 x 103,5 mm con soporte
Peso neto 630g
Temperatura operativa entre 5°C y 45°C
Humedad operativa entre 5% y 90%
Tipo de pantalla 8” panorámica (TFT LCD a todo color)
Área de visión: 7,18”
Resolución de pantalla 800 x 480 (WVGA)
Memoria interna Memoria Flash (256MB*)
Ranura de la tarjeta de
memoria 1 ranura para tarjetas SD/MMC/MS
Interfaz USB 2.0 de alta velocidad (dispositivo)
Plug-and-Play admitido en Windows 2000/ME/XP
* 21MB de capacidad están asignados al software de la unidad.
Accesorios
• Adaptador de CA (MPA-630)
• Cable adaptador USB
• Cable USB
• Soporte desmontable
• 3 marcos intercambiables diferentes
Especificaciones
Solución de problemas
El sistema no se enciende.
b Asegúrese de que el cable de alimentación esté conectado correctamente a la toma de pared.
La calidad del sonido de la música es mala.
b Pruebe reproduciendo el archivo en su PC. Si la calidad del sonido continuase siendo
mala, trate de descargar el archivo de nuevo o de volver a codificarlo usted mismo.
b Asegúrese de que la tasa de bits del archivo no es demasiado baja. Mientras más alta
sea la tasa de bits del archivo, mejor sonará. Consulte los “Requisitos para archivos
musicales” en la página 11.
No puede transferir archivos desde su PC a la unidad.
b Asegúrese de que su PC tenga instalado un sistema operativo admitido.
b Asegúrese de que el cable USB esté conectado firmemente a la unidad y al PC.
b Si ha conectado la unidad a través de un hub USB, pruebe conectando la unidad
directamente a su PC.
b Compruebe la capacidad de la tarjeta de memoria instalada en la unidad.
No puede seleccionar una tarjeta de memoria.
b Asegúrese de que se ha instalada una tarjeta de memoria.
b Asegúrese de que la tarjeta de memoria se ha instalado correctamente.
b Asegúrese de que la tarjeta de memoria no está defectuosa.
No puede copiar archivos a un destino concreto.
b Asegúrese de que el soporte en el que desea copiar tiene suficiente memoria para
contener el archivo.
La unidad no reproduce un archivo de música.
b Asegúrese de que el archivo tiene un formato compatible (MP3). Consulte los
“Requisitos para archivos musicales” en la página 11.
La unidad no reproduce un archivo de vídeo.
b Asegúrese de que el archivo de vídeo está disponible en la unidad. Consulte los
“Requisitos para archivos de película” en la página 10.
No suena nada.
b Asegúrese de que el volumen esté ajustado a un nivel razonable.
La unidad no funciona correctamente.
b Presione el botón 1 BAT. para apagar la unidad y, a continuación, vuelva a encenderla.
• El diseño y las especificaciones están sujetos a cambios sin
previo aviso.
PF391-N_APANLLK_SPA 3/10/08 12:25 PM Page 15

PF391-N_APANLLK_ENG 3/10/08 12:25 PM Page 16
-
 1
1
-
 2
2
-
 3
3
-
 4
4
-
 5
5
-
 6
6
-
 7
7
-
 8
8
-
 9
9
-
 10
10
-
 11
11
-
 12
12
-
 13
13
-
 14
14
-
 15
15
-
 16
16
-
 17
17
-
 18
18
-
 19
19
-
 20
20
-
 21
21
-
 22
22
-
 23
23
-
 24
24
-
 25
25
-
 26
26
-
 27
27
-
 28
28
-
 29
29
-
 30
30
-
 31
31
-
 32
32


LG PF391P El manual del propietario
- Categoría
- Equipo de música suplementario
- Tipo
- El manual del propietario
en otros idiomas
- English: LG PF391P Owner's manual
Artículos relacionados
Otros documentos
-
Memorex MDF8402-DWD Manual de usuario
-
Pandigital PAN7001W01-ESP Manual de usuario
-
Insignia Digital Photo Frame NS-DPF10A Manual de usuario
-
Lenco DF-1520 El manual del propietario
-
-
ViewSonic DF88W Manual de usuario
-
Samsung 8500 Manual de usuario
-
-
Premier PF-4334LL Manual de usuario
-