Brita WFSHS102 Manual de usuario
- Categoría
- Artículos sanitarios
- Tipo
- Manual de usuario
Este manual también es adecuado para

Version 1.0BSHS-102 Installation Instructions
Version 1.0BSHS-102 Installation InstructionsVersion 1.0BSHS-102 Installation Instructions
SHS-102
Installation
Instructions
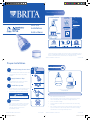
Tools & Materials Required
main components secondary
components
package contents
tools needed for
installation
adjustable
wrench
plumber’s tape
secondary:
filter system
filter cartridge
main:
filter system
filter cartridge
Internet & Mobile866.709.2086 Free Installation Video
Manufactured for: Protect Plus, LLC 420 3rd Avenue NW, Hickory, NC 28601 USA
plumber’s tape
Step 1
Remove Existing Shower Head
materials and tools needed
CAUTION
Proper Installation
• Remove existing shower head from shower arm.
• Clean shower arm to remove any residue
or debris.
Step 2
Apply Plumber’s Tape
• Wrap plumber’s tape clockwise around the
threads on the end of shower arm.
Step 3
Install Filter System
• Screw Filter System onto the threads of shower
arm in a clockwise position until hand-tight.
• Using wrench, tighten an additional 1/4 turn.
Step 4
Flush System
• Turn on water to shower head. In order for the
Filter System to flush out any air and carbon
fines (fine black powder) from the Filter
Cartridge, allow the water to run for
approximately 1 minute.
Do not over tighten, as this may result in damage to the Filter System.
CAUTION
!
adjustable
wrench
1
2
3
4
Filter Replacement
(every 6 months)
R
E
P
L
A
C
E
E
V
E
R
Y
S
I
X
M
O
N
T
H
S
Note: Water may drip from the Filter System during cartridge removal.
• Turn o water to the Filter System.
• Turn head of Filter System counter-clockwise until it releases. Gently
remove housing and pull out used Filter Cartridge and discard.
• Insert a new Filter Cartridge.
• Screw the head of the Filter System clockwise back onto the housing
until tight.
• Turn on water to shower head. In order for the Filter System to flush out
any air and carbon fines (fine black powder) from the Filter Cartridge,
allow the water to run for approximately 1 minute.
For FREE Filter Replacement Reminder, go to
www.protectplus.com
© 2014 Protect Plus. All rights reserved. Protect Plus is a trademark of Protect
Plus, LLC. The BRITA trademark and logo are registered trademarks of Brita LP
and are used under license by Protect Plus, LLC. All rights reserved.
SHS-102_IM_V1-0B.indd 1 6/6/2014 10:33:18 AM

Version 1.0BSHS-102 Installation Instructions
Version 1.0BSHS-102 Installation InstructionsVersion 1.0BSHS-102 Installation Instructions
SHS-102
Instrucciones
de instalación
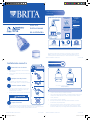
Implementos y materiales
necesarios
Componentes principales
Componentes
secundarios
Contenido del
paquete
Implementos
necesarios para la
instalación
Llave ajustable
Cinta de plomería
Secundarios:
sistema de filtrado
cartucho del filtro
Principal:
sistema de filtrado
cartucho
del filtro
Cinta de plomería
Paso 1
Retire del brazo de ducha
Instalación correcta
• Retire del brazo de ducha el cabezal de ducha
(flor) existente.
• Limpie el brazo de ducha para eliminar desechos
o residuos.
Paso 2
Aplique cinta de plomero
• Envuelva la rosca del extremo del brazo de
ducha en sentido horario con cinta para cañerías.
Paso 3
Instalar sistema de filtro
• Enrosque el sistema de filtrado en la rosca del
brazo de ducha en sentido horario hasta que
quede apretado con la mano.
• Usando una llave, apriételo 1/4 de vuelta adicional.
Paso 4
Limpie el sistema
• Abra el suministro de agua el cabezal de ducha. A fin de que el sistema de
filtrado lave todo el aire y los residuos de carbón (polvo fino negro) del cartucho
del filtro, deje correr el agua durante aproximadamente 1 minuto.
No apriete en exceso, puesto que puede dañarse el sistema de filtrado.
PRECAUCIÓN
!
PRECAUCIÓN
llave
ajustable
1
2
3
4
Reemplazo del filtro
(cada 6 meses)
Nota: Puede gotear agua del sistema de filtrado durante la remoción del cartucho.
• Cierre el suministro de agua al sistema de filtrado.
• Gire el cabezal del sistema de filtrado en sentido antihorario hasta que se
suelte. Retire cuidadosamente la carcasa, extraiga el cartucho de filtro
usado y deséchelo.
• Inserte un nuevo cartucho del filtro.
• Enrosque nuevamente el cabezal del sistema de filtrado en sentido
horario hasta que quede apretado.
• Abra el suministro de agua al cabezal de ducha. A fin de que el sistema
de filtrado lave todo el aire y los residuos de carbón (polvo fino negro)
del cartucho del filtro, deje correr el agua durante aproximadamente 1 minuto.
Para recordatorios GRATIS de cambio del filtro, ingrese a
www.protectplus.com
© 2014 Protect Plus. Todos los derechos reservados. La marca comercial
BRITA y el logotipo son marcas comerciales registradas de Brita LP y se
utilizan bajo licencia de Protect Plus, LLC. Todos los derechos reservados.
866.709.2086
Información del producto y servicio www.protectplus.com
www.protectplus.com
Video de instalación gratuito
Internet y móvil
Fabricado por: Protect Plus, LLC 420 3rd Avenue NW, Hickory, NC 28601 USA
Materiales e implementos necesarios
R
E
E
M
P
L
A
Z
O
C
A
D
A
S
E
I
S
M
E
S
E
S
SHS-102_IM_V1-0B.indd 2 6/6/2014 10:33:18 AM
-
 1
1
-
 2
2


Brita WFSHS102 Manual de usuario
- Categoría
- Artículos sanitarios
- Tipo
- Manual de usuario
- Este manual también es adecuado para