Silvercrest 378331 El manual del propietario
- Categoría
- Calentadores espaciales
- Tipo
- El manual del propietario

US-ESUS-EN
FREESTANDING ELECTRIC FIREPLACE SEK 1500 A1
CHIMENEA ELÉCTRICA INDEPENDIENTE SEK 1500 A1
US
FREESTANDING ELECTRIC
FIREPLACE
Operation and Safety Instructions
CHIMENEA ELÉCTRICA
INDEPENDIENTE
Instrucciones de utilización y de seguridad
IAN 378331_2101

Open the page with the illustrations before reading these instructions and familiarize yourself with all of
the functions of this appliance.
CHIMENEA ELÉCTRICA
INDEPENDIENTE
Instrucciones de utilización y de seguridad
US-EN Operation and Safety Instructions Page 5
US-ES Instrucciones de utilización y de seguridad Página 13
Antes de comenzar la lectura, despliegue la página con las ilustraciones y familiarícese con todas las
funciones de su aparato.
US-ES
US-EN

2
1
3
5 4
6

US-EN 5
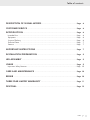
Table of contents
DESCRIPTION OF SIGNAL WORDS .............................................................................. Page 6
CUSTOMER SERVICE ............................................................................................................... Page 6
INTRODUCTION ........................................................................................................................ Page 6
Intended Use .................................................................................................................................... Page 6
Equipment ........................................................................................................................................ Page 6
Scope of Delivery ............................................................................................................................ Page 6
Technical Data ................................................................................................................................. Page 7
Features ........................................................................................................................................... Page 7
IMPORTANT INSTRUCTIONS ............................................................................................ Page 7
INSTALLATION PREPARATION ........................................................................................ Page 9
LEG ASSEMBLY ........................................................................................................................... Page 9
USAGE ............................................................................................................................................. Page 9
Important Safety Features ................................................................................................................ Page 10
CARE AND MAINTENANCE .............................................................................................. Page 10
REPAIR ............................................................................................................................................. Page 10
THREE YEAR LIMITED WARRANTY ................................................................................ Page 11
DISPOSAL ...................................................................................................................................... Page 12

US-EN6
FREESTANDING ELECTRIC FIREPLACE
SEK 1500 A1
INTRODUCTION
Congratulations on your purchase. You have selected a
quality product. The instructions for use are a part of the
product. They contain important information about the
safety, use and disposal of the product. Before using the
product, please learn about all the safety information and
usage instructions. Only use the product as described and
for the specified applications. If you lend the product to
someone else, please also give all the instructions.
INTENDED USE
This product is intended for indoor residential and
office use only, not for industrial or other commercial
application. Use only with electrical wiring that is in
good working order and that meets applicable codes
and ordinances. This heater must be plugged into a
120V AC, 15Amp circuit. Do not plug anything addi-
tional into the same circuit. lf you have any questions
whether your wiring is adequate, consult a qualified
electrician. Risk of fire, overheating, malfunction,
property damage, injury or even death result if not
adhered to use your heater-fan only with a working
smoke detector located in the vicinity of your heater/
fan. While using your heater/fan, you should follow
the IMPORTANT INSTRUCTIONS listed below.
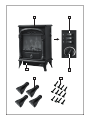
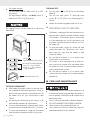
EQUIPMENT
1 Fireplace
2 Operating panel
3 Thermostat
4 Screws M4 x 15 mm (0,6 in)
5 Legs
6 Ventilation exhaust
SCOPE OF DELIVERY
1 Freestanding electric fireplace
1 Instructions manual
4 Legs
14 Screws
DESCRIPTION OF SIGNAL WORDS
CUSTOMER SERVICE
Please have your
IAN number ready.
WARNING indicates a hazardous situation that, if not avoided, could
result in death or serious injury.
CAUTION indicates a hazardous situation that, if not avoided, could
result in minor or moderate injury.
NOTICE indicates information considered important, but not hazard
related (e.g. messages related to property damage).
Call customer service at
1 (844) 543-5872
Visit the Website Customer Service
Platform at www.lidl.com/contact-us
Visit a LIDL store for further assistance.
IAN 378331_2101

US-EN 7
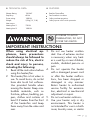
IMPORTANT INSTRUCTIONS
When using electrical ap-
pliances, basic precautions
should always be followed to
reduce the risk of fire, electric
shock and injury to persons,
including the following:
1. Read all the instructions before
using this heater/fan.
2. This heater/fan is hot when in
use. To avoid burns, do not let
bare skin touch hot surfaces.
Use provided handle when
moving this heater. Keep com-
bustible materials, such as
furniture, pillows, bedding, pa-
pers, clothes and curtains at
least 0.9 meters from the front
of the heater-fan and keep
them away from the sides and
rear.
3. Do not use heater unatten-
ded. Use of extreme caution
is necessary when any heat-
er is used by or near children,
invalids, disabled persons or
pets.
4. Do not operate the heater
with a damaged power cord
or after the heater malfunc-
tions, has been dropped or
damaged in any manner.
Return heater to authorized
service facility for examina-
tion, electrical or mechanical
adjustment or repair.
5. Do not use heater outdoors.
6. Use your heater only in dry
environments. This heater is
not intended for use in a bath-
room, laundry area, or similar
IN ORDER TO AVOID
OVERHEATING, DO NOT
COVER THIS DEVICE.
TECHNICAL DATA
Voltage Rating: 120 VAC
Frequency: 60 Hz
Power rating: 1500 W
Weight: 5,5 kg (12,13 lb)
Heat output:
Heating level 1: 750 W
Heating level 2: 1500 W
FEATURES
Realistic Flame effect
Fan forced air circulation
Safety overheat protection
Safety tip-over cutoff switch protection

US-EN8
locations, or near sinks, wash-
ing machines, swimming pools
or other sources of water.
Never locate heater where it
may fall into a bathtub or oth-
er water container. Do not use
in damp environments such as
flooded basements.
7. Do not place the heater on a
small, unlevel, uneven or any
surface which might allow
heater to tip or fall.
8. For proper operation, heat-
er should be placed on a
smooth, non-combustible sur-
face. Do not place on rugs,
carpet, vinyl flooring or other
plastic surfaces. Not for use
outdoors or in wet areas.
9. This heater is not designed as
a primary heat source.
10. Always plug heaters directly
into a wall outlet/receptacle.
Never use with an extension
cord or relocatable power
tap (outlet/power strip).
11. Always unplug heater when
not in use.
12. Do not run power cord un-
der carpeting. Do not cover
cord with throw rugs, runners
or similar coverings. Arrange
cord away from traffic area
where it will not be tripped
over.
13. To disconnect heater, turn
controls off then remove plug
from outlet.
14. Do not insert or allow foreign
objects to enter any ventila-
tion or exhaust opening as
this may cause an electric
shock or fire or damage the
heater.
15. To prevent a possible fire,
do not block air intakes or
exhaust in any manner. Do
not use on soft surfaces like
a bed, where openings may
become blocked.
16. A heater has hot and arcing
or sparking parts inside. Do
not use it in areas where gaso-
line, paint or flammable li-
quids are used or stored.
17. Use this heater only as de-
scribed in this manual. Any
other use not recommend-
ed by the manufacturer may
cause fire, electric shock or
injury to persons or property.
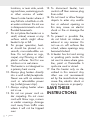
SAVE THESE
INSTRUCTIONS

US-EN 9
INSTALLATION PREPARATION
Remove all packaging materials and all trans-
port bracing from the device.
Check the delivery contents for completeness
and any signs of damage.
LEG ASSEMBLY
12
34
After you have completely unpacked the de-
vice, place it upside down on a clean surface
so that you can fully see the underside (Fig. 1).
Take a leg 5 and insert 3 screws 4 through
the holes (Fig. 2).
There are 5 holes in each corner of the device.
Now take the leg 5 with the screws 4 and
place it exactly over the matching holes.
When the screws 4 are inserted in the correct
holes, tighten them with a screwdriver (Fig. 3).
Proceed in the same way with all four legs 5
until they have all been assembled.
The device can now be placed on its legs 5 .
The device is ready for usage (Fig. 4).
Always operate the heater in upright position.
USAGE
HEATER OPERATION: Always operate the
heater in the upright position following all in-
structions and recommendations listed in this
manual.
HEATER LOCATION: Place the heater in the
area of the room that is coldest.
HEATER CONNECTION: Plug heater directly
lnto 120 V AC, 60 Hz wall outlet. Be sure plug
fits tightly in outlet. A loose connection may
cause overheating and damage to the plug or
heater.
Match the wide blade of the plug to the wide
slot of the outlet. Insert the plug fully.
The cable must remain on the rear-side of the device
and must not come into contact with any hot elements.
To prevent overloading a circuit, do not plug the heater
into a circuit that is servicing other electrical needs.
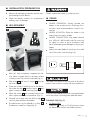
TURNING ON (Fig. 5):
For flame effect:
Slide the “ ” switch to ON [I] position to have
the flame effect without any heater functions.

US-EN10
For heater function:
For Low Heat (750 W), slide switch “I” to ON
[I] position.
For High Heat (1500 W), slide both switch “I”
and switch “II” to ON [I] position.
The heating function can be used with or without the
flame effect.
SETTING THERMOSTAT:
After heater has been turned on and the room
has reached the desired temperature, slowly ro-
tate the thermostat knob counter-clockwise until
the heater shuts off (you should hear a faint
“click”).
By leaving the thermostat at the setting, it will
automatically maintain this temperature.
To lower the temperature, rotate the knob further
counter-clockwise towards the LOW (‒) position.
To raise the temperature, rotate the thermostat
knob clockwise towards the HIGH (+) position.
TURNING OFF:
Turn the switch “ ” to OFF [O] to turn the flame
effect off.
Turn the low heat switch “I” and high heat
switch “II” to OFF [O] to turn the heating func-
tion off.
Heater should be unplugged when not in use.
IMPORTANT SAFETY FEATURES
The heater is equipped with an automatic over-
heat protection device located inside the body
of the heater. lf the heater grille is obstructed,
or if the heater gets too hot for any reason, the
automatic overheat protection device will turn
the heater off.
To reset the heater, simply turn power off and
unplug the heater for 10 minutes until it cools
down and you may plug the heater in and
restart the heater.
Be sure that the heater is on a smooth level
surface with no obstructions.
This heater is also equipped with a safety tip-
over switch to turn power off to the heater when
the heater tips over. To resume heater functions,
simply stand heater upright.
Be sure that the heater is on a smooth level
surface where the heater will not be accidently
tipped over.
CARE AND MAINTENANCE
CLEANING: Before cleaning the heater be sure
to disconnect power cord and allow the heater to
cool completely. Clean the outside surface with a
clean damp cloth.
Do not use harsh chemical or abrasive cleaners.
DO NOT IMMERSE THE HEATER IN WATER.
Allow heater to dry completely before use.
Use a vacuum or duster to keep heat and vent
area clean and free of dust and dirt.
5
+
Adjustable Thermostat
- Switch “ “
Simulated flame (without heat)
Two switches for HEAT SETTINGS:
- Switch “I” = low (750 W)
- Switch “I” + “II” combined
= high (1500 W)

US-EN 11
REPAIR
DO NOT OPERATE THE HEATER WITHOUT THE
GRILLE IN PLACE. DO NOT USE THE HEATER IF IT
HAS MALFUNCTIONED OR BECOME DAMAGED
IN ANY WAY. DO NOT REMOVE BACK COVER OF
HEATER; NO SERVICEABLE PARTS.
Three year limited warranty
What does this warranty cover?
The warranty covers:
· Damage, breakage or inoperability due to defect.
· Damage not caused by normal wear and tear or
failure to follow the safety and maintenance in-
structions provided in the user manual.
What is not covered by the warranty?
The warranty does not cover damage caused by:
· Normal wear and tear of the product, including
fragile parts (such as switches, glass, etc.);
· Improper use or transport;
· Disregarding safety and maintenance instructions;
· Accidents or acts of nature (e.g. lightning, fire, wa-
ter, etc.);
· Tampering with the product (such as removing
cover, unscrewing screws etc.).
Consequential and incidental damages are also not
covered under this warranty. However, some states
do not allow the exclusion or limitation of incidental
or consequential damages, so this limitation or ex-
clusion may not apply to you.
What is the period of coverage and warranty
resolution?
The warranty is for 3 years from the date of purchase.
At our discretion, product will either be refunded or
replaced.
What will we not do?
We will not:
·
Start a new warranty period upon product exchange;
· Repair product.
How to process the warranty?
To initiate, please:
· Call customer service at 1 (844) 543-5872
· Visit the Website Customer Service Platform at
www.lidl.com/contact-us
or
· Visit a LIDL store for further assistance
To ensure the quickest warranty return process,
please have the following available:
· The original sales receipt that includes the date pur-
chased;
· The product and manual in the original package;
· A statement of the problem.
What must you do to keep the warranty in effect?
· Retain the original receipt;
· Follow all product instructions;
· Do not repair or modify the product.
How does state law relate to this warranty?
This warranty gives you specific legal rights, and you
may also have other rights which vary from state to
state. All implied warranties are limited by the dura-
tion and terms of this warranty. Some states do not
allow limitations on how long an implied warranty
lasts, so the above limitation may not apply to you.
NOTICE: At
www.lidl-service.com
you can download this
manual as well as many
other manuals, product
videos and software. This
QR code will take you
directly to the Lidl service
page (www.lidl-service.
com) and allow you to
open your operating
instructions simply by en-
tering the article number
(IAN 378331_2101).

US-EN12
DISPOSAL
Dispose of the packaging through your
local recycling facilities and in compli-
ance with all federal, state and local reg-
ulations.
04
PE-LD
Please note the package markings re-
garding waste separation, indicated by
abbreviations and numbers, meaning:
1–7: plastics / 20–22: paper and card-
board / 80–98: composite materials.
Contact your local waste management
authority for additional information on
how to dispose of the used product.
To help protect the environment, please dispose of
the product properly when it has reached the end of
its useful life, do not throw in the garbage. Informa-
tion on collection sites and their opening hours is
available from your local authority.

US-ES 13
Índice
DESCRIPCIÓN DE LAS PALABRAS DE ADVERTENCIA .................................. Página 14
SERVICIO AL CLIENTE ........................................................................................................ Página 14
INTRODUCCIÓN ................................................................................................................... Página 14
Uso correcto ................................................................................................................................ Página 14
Equipamiento ............................................................................................................................... Página 14
Volumen de suministro ................................................................................................................. Página 14
Datos téchnicos ........................................................................................................................... Página 15
Características ............................................................................................................................. Página 15
INSTRUCCIONES IMPORTANTES .............................................................................. Página 15
PREPARACIÓN PARA EL MONTAJE ......................................................................... Página 17
MONTAJE DE LAS PATAS ................................................................................................ Página 17
USO ............................................................................................................................................... Página 18
Características de seguridad importantes ................................................................................. Página 19
CUIDADO Y MANTENIMIENTO ................................................................................. Página 19
REPARAR .................................................................................................................................... Página 19
GARANTÍA LIMITADA DE 3 AÑOS ........................................................................... Página 19
ELIMINACIÓN ........................................................................................................................ Página 20

US-ES14
CHIMENEA ELÉCTRICA
INDEPENDIENTE SEK 1500 A1
INTRODUCCIÓN
Felicidades por la compra de su nuevo producto.
Usted ha seleccionado un producto de calidad. Las
instrucciones de uso son parte del producto. Contienen
información importante respecto a la seguridad,
el uso y la eliminación. Antes de usar el producto,
familiarícese con toda la información de seguridad y
las instrucciones de uso. Utilice la unidad únicamente
como se describe y para las aplicaciones indicadas.
Si traspasa el producto a alquien más, por favor
asegúrese de incluir toda la documentación con él.
USO CORRECTO
Este producto está diseñado para uso en interiores
de viviendas y oficinas solamente, no para uso in-
dustrial u otras aplicaciones comerciales. Use sólo
con cable eléctrico que se encuentre en buen estado
de funcionamiento y que cumpla con los códigos y
ordenanzas. Conecte el calentador a una toma de
corriente de 120 V AC con 15 Amp. No enchufe el
calentador en un circuito que está dando servicio a
otras eléctricas. Si usted tiene alguna pregunta sobre
si el cableado es el adecuado, consulte a un electri-
cista cualificado. Utilice el calentador con ventilador
sólo cuando haya un detector de humo ubicado en
las inmediaciones de su calentador/ventilador. Mient-
ras utilice su calentador/ventilador, usted debe seguir
LAS INSTRUCCIONES IMPORTANTES que se en-
umeran a continuación.
EQUIPAMIENTO
1 Chimenea
2 Panel de servicio
3 Termostato
4 Tornillos M4 x 15 mm
5 Patas
6 Rejilla de ventilación
VOLUMEN DE SUMINISTRO
1 chimenea eléctrica
1 manual de instrucciones
4 patas
14 tornillos
ADVERTENCIA indica una situación peligrosa, que puede provocar la
muerte o lesiones graves si no se evita.
PRECAUCIÓN indica una situación peligrosa, que puede provocar lesio-
nes leves o moderadas si no se evita.
AVISO indica información que se considera importante, pero que no im-
plica un
peligro (p. ej. mensajes relacionados co
n daños materiales).
DESCRIPCIÓN DE LAS PALABRAS DE ADVERTENCIA
SERVICIO AL CLIENTE
Llame al Servicio de atención al cliente al
1 (844) 543-5872
Visite el Portal de atención al cliente en
www.lidl.com/contact-us
Visite una de nuestras tiendas LIDL en caso de cual-
quier inquietud.
IAN 378331_2101
Por favor tenga su
número IAN a la mano.

US-ES 15
DATOS TÉCNICOS
Voltaje: 120 VAC
Frecuencia: 60 Hz
Potencia: 1500 W
Peso: 5,5 kg (12,13 lb)
Potencia de calor:
Nivel de calor 1: 750 W
Nivel de calor 2: 1500 W
CARACTERÍSTICAS
Efecto de llama realista
Ventilador de circulación de aire forzado
Protección contra sobrecalentamiento
Sistema de seguridad antivuelco
INSTRUCCIONES IMPORTANTES
Al utilizar aparatos eléctricos,
siempre deberán tomarse pre-
cauciones básicas para reducir
el riesgo de incendio, descarga
eléctrica y lesiones a personas.
Éstas incluyen:
1. Leer todas las instrucciones
antes de usar el calentador/
ventilador.
2. No toque las superficies cali-
entes, ya que el calentador se
calienta mucho cuando está
en uso. Para evitar quemadu-
ras, use el asa para trasladar
el calentador. Mantenga los
materiales inflamables, como
muebles, almohadas, ropa de
cama, papeles, prendas de
vestir y cortinas a un mínimo
de tres pies (0,9 m) de dis-
tancia de todos los lados del
calentador.
3. No use deje el calentador/
venti lador funcionando sin
vigilancia. Debe tener mucho
cuidado cuando el calefac-
tor/ventilador se está usando
cerca de niños, inválidos o
mascotas.
4. No haga funcionar el calenta-
dor/ventilador con un cable
de alimentación dañado o
después de un mal funcion-
amiento de la calefacción/
ventilador, cuando se haya
caído o dañado de cualquier
manera. Devuelva el calenta-
dor/ventilador al centro de
servicio autorizado para su
revisión, ajuste eléctrico o
mecánico o para reparar.
5. No utilice el aparato en exte-
riores.
PARA EVITAR SOBRECALEN-
TAMIENTO, NO CUBRA ESTE
DIPOSITIVO.

US-ES16
6. Usar solamente en ambientes
secos. No utilice este producto
en baños, áreas de lavado
o lugares interiores húme-
dos similares. No coloque
este producto donde podría
caerse en una bañera o en
otro recipiente con agua. No
usar en ambientes húmedos
como sótanos inundados.
7. No coloque el calentador/
ventilador sobre una superficie
pequeña, desigual o con irreg-
ulares que pudiera hacer caer
el calentador/ventilador.
8. Para un correcto funcionami-
ento, el calentador/ventilador
debe ser colocado sobre una
superficie lisa y no combus-
tible. No lo coloque en al-
fombras. No diseñado para
el uso al aire libre o en zonas
húmedas.
9. Éste aparato no es apto como
principal fuente de calor.
10. Siempre enchufe los calenta-
dores directamente en un re-
ceptáculo o tomacorriente de
pared. Nunca los utilice con
un cable prolongador o un
contacto múltiple con tomas
reubicables (tomacorriente/
enchufe múltiple).
11. Siempre desenchufe el calenta-
dor cuando no esté en uso.
12. No coloque el cable de elec-
tricidad debajo de alfombras
ni lo cubra con tapetes, al-
fombras pequeñas o reves-
timientos similares. Coloque
el cable lejos de las áreas de
paso y donde no ocasione
tropezones.
13. Para desconectar el calenta-
dor, primero apague el pro-
ducto, luego apriete el cuerpo
del enchufe y tire de la toma
de corriente.
14. No introduzca ni permita que
objetos extraños ingresen a
ninguna abertura de venti-
lación o escape del producto,
ya que esto podría causar una
descarga eléctrica o incendio
o bien dañar el calentador.
15. No bloquee las entradas ni
las salidas de aire, ya que esto
podría provocar un riesgo de
incendio. No utilice el produc-
to sobre superficies blandas,
como una cama, donde las
aberturas podrían bloquearse.
16. Un calefactor tiene partes cal-
ientes y que pueden producir
chispas en su interior. No lo uti-
lice en áreas donde se utiliza o
se guarda gasolina, pintura o
líquidos inflamables.
17. Use este calentador/ventilador
solamente como se describe

US-ES 17
en este manual. Cualquier otro
uso no recomendado por el
fabricante puede causar in-
cendio, choque eléctrico o
lesiones a las personas o la
vivienda.
GUARDE ESTAS
INSTRUCCIONES
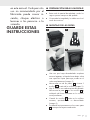
PREPARACIÓN PARA EL MONTAJE
Retire todo el material de embalaje y todos los
seguros para el transporte del aparato.
Compruebe la integridad y los daños en el vol-
umen de suministro.
MONTAJE DE LAS PATAS
1 2
34
Una vez que haya desembalado completa-
mente el aparato, colóquelo boca abajo sobre
una superficie limpia para que pueda ver el
suelo completamente (imagen 1).
Ahora tome uno de las patas 5 e inserte 3
tornillos 4 a través de los orificios (imagen 2).
Hay 5 orificios en cada esquina del aparato.
Ahora tome la pata 5 con los tornillos 4 y
colóquelo de forma coherente en los orificios
correspondientes.
Cuando los tornillos 4 estén en los orificios
correctos, apriételos con un destornillador
(imagen 3).
Proceda de la misma manera con las cuatro patas
5
hasta que las haya montada todas.

US-ES18
Ahora puede colocar el aparato sobre sus pies
5 . El aparato está listo para la puesta en mar-
cha (imagen 4).
Siempre coloque el calefactor en una posición vertical.
USO
OPERACIÓN DEL CALENTADOR: Siempre
opere el calentador en posición vertical siguiendo
todas las instrucciones y recomendaciones en
este manual.
UBICACIÓN DEL CALENTADOR: Coloque el
calentador en el área más fría de la habitación.
CONEXION DEL CALENTADOR: Conecte el
calentador directamente a una toma de corri-
ente de 120 V AC, 60Hz. Una conexión floja
puede causar sobrecalentamiento y dañar el
enchufe o el calentador.
Haga coincidir la hoja ancha del enchufe con
la ranura ancha del tomacorriente. Inserte el
enchufe completamente.
¡IMPORTANTE! El cable debe permanecer en la
parte posterior del aparato y no debe tocar ningún
elemento caliente.
No enchufe el calefactor en un circuito que está dan-
do servicio a otras eléctricas para evitar sobrecargas.
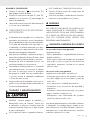
ENCENDER EL CALENTADOR (imagen 5):
Para efecto de llama:
Coloque el interruptor “ ” en la posición [I]
para tener el efecto de llama sin ninguna otra
función del calentador.
Para función de calefacción:
Para una calefacción baja (750 W), coloque el
interruptor “I” en la posición [I].
Para una calefacción alta (1500 W), coloque
ambos interruptores “I” y “II” en la posición [I].
La función de calefacción se puede usar con y sin el
efecto de llama simulada.
CONFIGURACIÓN DEL TERMOSTATO:
Una vez que se haya encendido el calentador y
la habitación haya alcanzado la temperatura de-
seada, gire lentamente el termostato en sentido con-
trario a las agujas del reloj hasta que el calentador
se apague (debería escuchar un leve “clic”).
Al dejar el termostato en esa configuración, se
mantendrá automáticamente la temperatura.
Para bajar la temperatura, gire el termostato
más en sentido contrario a las agujas del reloj
hacia la posición BAJA (‒).
Para aumentar la temperatura, gire el termosta-
to en sentido de las agujas del reloj hacia la
posición ALTA (‒).
5
+
Termostato regulable
- Interruptor ” ”
Llama simulada
(sin calor)
Dos interruptores para la
configuración de calefacción:
- Interruptor “I” = baja (750 W)
- Interruptor “I” + “II” combinados
= alta (1500 W)

US-ES 19
APAGAR EL CALENTADOR:
Coloque el interruptor “ ” en la posición [O]
para apagar el efecto de llama.
Coloque los interruptores de baja “I”y alta “II”-
calefacción en la posición [O] para apagar la
función de calefacción.
Siempre desconecte el enchufe de alimentación
si no va a usar el calentador.
CARACTERÍSTICAS DE SEGURIDAD
IMPORTANTES
El calentador está equipado con un dispositivo
automático de protección contra sobrecalenta-
miento ubicado dentro del cuerpo del calentador.
Si la rejilla del calentador está obstruida, o si
el calentador se calienta demasiado por algún
motivo, el dispositivo de protección contra sobre-
calentamiento apagará el calentador.
Para reiniciar el calentador, simplemente apague y
desenchufe el calentador durante 10 minutos hasta
que éste se enfríe y puede enchufarlo y reiniciarlo.
Asegúrese de que el calentador esté en una
superficie nivelada y sin obstrucciones.
Este calefactor esta equipado con un sistema de
seguridad antivuelco, una vez que el calenta-
dor volcó un interruptor interno se encargará
de apagar la unidad. Una vez restablecido a
su posición normal el calentador restablecerá
su funcionamiento normal.
Asegúrese de que el calentador esté en una su-
perficie lisa y nivelada donde el calentador no
se incline accidentalmente.
CUIDADO Y MANTENIMIENTO
LIMPIEZA: Siempre apague el calefactor y
desenchufelo antes de limpiarlo. Espere que
el calentador se enfríe por completo antes de
comenzar a limpiarlo. Limpie con un paño humedo
el cuerpo del aparato.
NO use químicos fuertes o limpiadores abrasivos.
NO SUMERJA EL CALENTADOR EN AGUA.
Permita suficiente tiempo de secado antes de
operar nuevamente.
Limpie las entradas y salidas de aire frecuente-
mente con una aspiradora o un plumero.
REPARAR
NO OPERE EL CALENTADOR SIN LA REJILLA. NO
HAGA FUNCIONAR EL CALENTADOR / VENTI-
LADOR DESPUÉS DE UN MAL FUNCIONAMIEN-
TO O DAÑO. NO RETIRE LA TAPA DEL CALENTA-
DOR; NO CONTIENE PIEZAS DENTRO QUE
REQUIERAN MANTENIMIENTO.
GARANTÍA LIMITADA DE 3 AÑOS
Lo que cubre la presente garantía
La garantía incluye:
· Daños, quebraduras o incapacidad para funcionar
debido a defectos.
· Daños que no hayan sido causados por el desgaste
propio del uso o por no seguir las instrucciones de
seguridad y mantención incluidas en el manual
para el usuario.
Lo que no cubre esta garantía
La garantía no cubre daños causados por:
· El desgaste propio del uso del producto, incluidas
las partes frágiles (como interruptores, piezas de
vidrio, etc.).
· Uso o transporte no indicado del producto.
· Desatención a las instrucciones de seguridad y
mantención.
· Accidentes o causas de fuerza mayor (e.g. relám-
pagos, incendio, inundación, etc.).
· Manipulación mal intencionada del producto
(retirar la cubierta, tornillos, etc.).
La presente garantía tampoco cubre daños indirectos
o emergentes. Sin embargo algunos estados no per-
miten la exclusión o limitación de daños indirectos o
emergentes, por lo que dicha exclusión o limitación
pudiera no aplicarse en su caso.

US-ES20
Período de cobertura y resolución de la
garantía
La garantía es válida por 3 años a partir de la fecha
de compra. La empresa, según lo estime conveni
ente,
devolverá el dinero o repondrá el producto.
La empresa no:
· Dará inicio a un nuevo período de garantía al
hacerse el cambio del producto.
· Reparará el producto.
¿Cómo se tramita la garantía?
Recomendamos que primero usted:
· Llame al Servicio de atención al cliente al
1 (844) 543-5872.
· Visite el Portal de atención al cliente en
www.lidl.com/contact-us
· Visite una de nuestras tiendas LIDL en caso de
cualquier inquietud.
A fin de acelerar el trámite de la garantía, tenga a
bien contar con lo siguiente:
· Recibo de venta original que incluya la fecha de
compra.
· Producto y manual en su empaque original.
· Descripción del problema.
¿Qué debe hacer usted para mantener la
garantía vigente?
· Guardar el recibo original.
· Seguir todas las instrucciones para el uso del
producto.
· No realizar ninguna reparación ni alteración al
producto.
¿De qué manera influyen las leyes estatales
con esta garantía?
La presente garantía le otorga derechos legales es-
pecíficos, y pudiera usted contar con otros derechos
los cuales varían de un estado a otro. Todas las ga-
rantías implícitas se encuentran limitadas a la dura-
ción y términos de la presente garantía. Algunos
estados no permiten limitaciones al período de ti
empo
y términos de la garantía implícita, por lo que dichas
limitaciones pudieran no aplicarse en su caso.
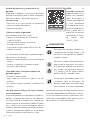
NOTA: En
www.lidl-service.com
puede descargar estos y
muchos otros manuales,
vídeos de productos y
software. Este código QR
le lleva directamente
a la página de servicio
de Lidl (www.lidl-service.
com) y puede abrir el
manual de instrucciones
introduciendo el número
de artículo (IAN
378331_2101).
ELIMINACIÓN
Deshágase del empaque mediante sus
instalaciones de reciclaje locales y de
acuerdo con las regulaciones federales,
estatales y locales.
04
PE-LD
Observe las señales del material de em-
paque para la separación de residuos,
los cuales están señalados con abreviatu-
ras y números que significan lo siguiente:
1–7: plásticos / 20–22: papel y tablero
de fibra / 80–98: materiales mixtos.
Contacte a las autoridades locales corre-
spondientes para la eliminación de
desechos para mayor información sobre
cómo desechar su producto desgastado.
Para ayudar a proteger el medio ambiente, elimine
el producto adecuadamente al final de su vida útil,
no lo tire en la basura normal. Puede obtener infor-
mación de sus autoridades locales sobre los puntos
de recolección y horarios de atención.

Distributed by / Distribuido por:
Lidl US LLC., Arlington, VA 22202
Made in / Hecho en: China
Last Information Update ·
Estado de las informaciones: 06/2021
ID No.: SEK1500A1-062021-US-1
IAN 378331_2101 9
-
 1
1
-
 2
2
-
 3
3
-
 4
4
-
 5
5
-
 6
6
-
 7
7
-
 8
8
-
 9
9
-
 10
10
-
 11
11
-
 12
12
-
 13
13
-
 14
14
-
 15
15
-
 16
16
-
 17
17
-
 18
18
-
 19
19
-
 20
20


Silvercrest 378331 El manual del propietario
- Categoría
- Calentadores espaciales
- Tipo
- El manual del propietario
en otros idiomas
- English: Silvercrest 378331 Owner's manual


