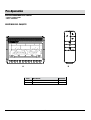
Whalen WSLWFP48-5/1031289 Manual de usuario
- Tipo
- Manual de usuario

THANK YOU
We appreciate the trust and confidence you have placed in Whalen Furniture through the purchase of this electric fireplace/heater. We
strive to continually create quality products designed to enhance your home. Visit us online to see our full line of products available for
your home improvement needs. Thank you for choosing Whalen Furniture Manufacturing!
Date: 2018-05-08 Rev 0001-A Factory: ZHOSUM
LOT NUMBER:
DATE PURCHASED: / /
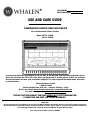
USE AND CARE GUIDE
COMBINATION ELECTRIC FIREPLACE/HEATER
US and International Patents Pending
Model #SF127-23AI2D
#SF127-26AI2D
If you have any questions regarding the use of this unit, or find that your fireplace/heater unit needs service,
please do not return the unit to the store where you purchased it. Instead, please contact our Customer
Service Department and have your instructions and parts list ready to provide the model name, part name,
or factory number.
Whalen Customer Service
1-866-942-5362
Pacific Standard Time: 8:30 a.m. - 4:30 p.m., Monday - Friday
Or visit our website www.whalenfurniture.com / www.whalenstyle.com
Or e-mail your request to: [email protected]
THIS INSTRUCTION BOOKLET CONTAINS IMPORTANT SAFETY INFORMATION.
PLEASE READ AND KEEP FOR FUTURE REFERENCE.

2
Table of Contents
Table of Contents .................................................................. 2
Safety Information ................................................................ 2
Important Safety Information .......................................... 2
Save These Instructions .................................................. 2
Safety Information (continued) ............................................. 3
Grounding Instructions .................................................... 3
Warranty ............................................................................. 3
Pre-Operation ....................................................................... 4
Electrical Specifications .................................................. 4
Package Contents ........................................................... 4
Operation ............................................................................. 5
Using the Remote Control ..................................................... 7
Care and Maintenance .......................................................... 9
Troubleshooting ................................................................... 9
Safety Information
IMPORTANT SAFETY INFORMATION
PLEASE READ ALL OF THE INFORMATION IN THIS OPERATING
MANUAL, INCLUDING ALL SAFETY, OPERATING, AND
MAINTENANCE INFORMATION. TO AVOID THE POTENTIAL RISK
OF FIRE, ELECTRIC SHOCK, OR INJURY TO PERSONS, USERS
SHOULD FOLLOW THE DIRECTIONS AND WARNINGS IN THIS
MANUAL.
1. Read all instructions before using this heater.
2. Do not use this heater outdoors.
3. This heater is not intended for use in bathrooms,
laundry areas and similar indoor locations. Never
locate the heater where it may fall into a bathtub or
other water container.
4. Do not run the power cord under carpeting. Do not
cover the power cord with throw rugs, runners, or the
like. Arrange the power cord away from traffic areas
and where it will not be tripped over.
5. To disconnect the heater, turn controls to off, then
remove the plug from the outlet.
6. Connect to properly grounded outlets only. Always plug
heaters directly into a wall outlet/receptacle. Never use
with an extension cord or reloadable power tap
(outlet/power strip).
7. To prevent a possible fire, do not block firebox air
intakes or the exhaust in any manner. Do not operate
the firebox on soft surfaces, like a bed, where openings
may become blocked.
8. There is a thermostat limiter inside the heater. When
the inner temperature over heats or abnormal heating
occurs, the thermostat protective device cuts off the
power supply to avoid fireplace damaged or risk of fire.
9. Use this heater only as described in this manual. Any
other use not recommended by the manufacturer may
cause fire, electrical shock, or injury to persons.
SAVE THESE INSTRUCTIONS
WARNING: There are no user serviceable parts inside the
fireplace/heater. If the unit appears to malfunction, turn the
unit off and unplug the unit from the wall immediately, and
contact Customer Service at 1-866-942-5362.
WARNING: This heater is hot when in use. To avoid burns, do
not let bare skin touch hot surfaces. If provided, use handles
when moving this heater. Keep combustible material, such as
furniture, pillows, bedding, papers, clothes and curtains at
least 3 ft. (0.9 meters) from the front of the heater and keep
them away from the sides and rear.
WARNING: Extreme caution is necessary when any heater is
used by or near children or invalids and whenever the heater
is left operating and unattended.
WARNING: Always unplug the heater when not in use.
WARNING: Do not operate any heater with a damaged cord or
plug or after the heater malfunctions, has been dropped or
damaged in any manner. Return the heater to an authorized
service facility for examination, electrical or mechanical
adjustment, or repair.
WARNING: Do not insert or allow foreign objects to enter any
ventilation or exhaust openings as this may cause an electric
shock or fire, or damage the heater.
WARNING: A heater has hot and arching or sparking parts
inside. Do not use in areas where gasoline, paint, or
flammable liquids are used or stored.
CAUTION: While the heater is in use, the top center of the
fireplace can get hot to the touch, and may cause serious
injury or burns. Always supervise small children around the
fireplace/heater. Do not place any cloth or decorations over
the heater outlet of the fireplace, or otherwise obstruct the
heater outlet of the fireplace, as this may cause a fire and
serious injury may result.

3
Safety Information (continued)
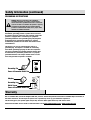
GROUNDING INSTRUCTIONS
DANGER: Improper connection of the equipment-
grounding conductor can result in a risk of electric
shock. Check with a qualified electrician or serviceman
if you are in doubt as to whether the product is properly
grounded. Do not modify the plug provided with the
product. If it will not fit the outlet, have a proper outlet
installed by qualified electrician.
This product must be grounded. If it should malfunction or
breakdown, grounding provides a path of least resistance
for electric current to reduce the risk of electric shock. This
product is equipped with a cord having an equipment-
grounding conductor and a grounding plug. The plug must
be plugged into an appropriate outlet that is properly
installed and grounded in accordance with all local codes
and ordinances.
This heater is for use on 120 volt circuits and has a
grounded plug. An adapter is available for connecting
three-blade grounding type plugs to two-slot receptacles.
The green grounding lug extending from the adapter must
be connected to a permanent ground such as a properly
grounded outlet box. The adapter should not be used if a
three-slot grounded receptacle is available.
Warranty
We are confident that you will be delighted with this purchase. Should this product be defective in workmanship or materials, or
fail under normal use, we will repair or replace it for a period of up to one (1) year from date of purchase.
This warranty gives you specific rights and you may also have other rights which vary from state to state.
Contact the Customer Service Team at 1-866-942-5362 or visit www.whalenfurniture.com / www.whalenstyle.com
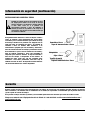
A
Grounding Pin
Adapter
Metal Screw
Cover of Grounded Outlet Box
Grounding Lug
Cover of Grounded Outlet Box
B

4
Pre-Operation
ELECTRICAL SPECIFICATIONS
□ Voltage: 120 V AC, 60 Hz
□ Watts: 1500 Watts
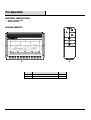
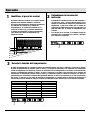
PACKAGE CONTENTS
Part
Description
Quantity
A Fireplace 1
B
Remote control
1
B
A

5
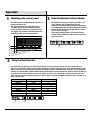
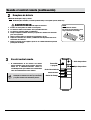
Operation
1
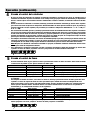
Identifying the control panel
2
Understanding the function indicator
□ The control panel is located on the top left corner of
the fireplace/heater unit.
□ The control panel contains the display unit (1),
function indicator (2), timer function (3), heater
control (4), flames control (5), and main power (6).
□ The display unit (1) displays information about the
flame level, timer, and current temperature.
□ The function indicator (2) has three square LEDs – red,
green, and blue. The red LED indicates that the
Fahrenheit temperature heating function is running, the
green LED indicates that the Celsius temperature heating
function is running, and the blue LED indicates that the
timer function is engaged.
□ To the right of the three LEDs, is the infrared receiver
module which communicates with the remote control to
control the heater.
3
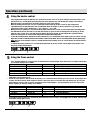
Using the timer function
□ The timer button (3) allows you to set the amount of time you want the fireplace/heater to run. The timer button (3)
operates both the flames and the heater function. If the heater is operating when the timer is set, then the heater is on the
timer. If the flames are operating, then the timer will control the flames. If both the heater and flames are operating with
the timer set, then the timer controls both the flames and the heater. Pressing the button in sequence will set the timer for
a set interval. This interval period is shown in the display (1), in blue. The set intervals are displayed in this table. The
timer interval is set from the time the interval is selected. There is no clock function for turning the heater or flames on or
off at a specific time.
Button Press Timer Interval Display
1st press
30 Minutes
30
2nd press 1 Hour 1h
3rd press
2 Hours
2h
4th press 3 Hours 3h
5th press 4 Hours 4h
6th press
5 Hours
5h
7th press 6 Hours 6h
8th press
OFF
None
1
2
3
4
5
6
2
1
3

6
Operation (continued)
4
Using the heater control
□
Pressing the heater button (4) will turn on or off the heat function. There is no speed setting for the heater blower. If you
put the heater in a standby mode (turn off by the main power button 6), the unit will hold the settings in the memory.
When the power is turned back on, the heater will turn on at the same settings.
□
When the heating function turns on, press and hold the heater button (4) for five seconds to enter temperature
adjustment mode. The LED indicator is red. In adjustment mode, the display (1) flashes (interval is 0.5 second). The
temperature setting range is between 62°F - 82°F - ON (17°C - 27°C - ON).
□
With the heater on, gently press and hold the main power button for five seconds to enter temperature converting mode.
The LED indicator flashes five times in red color then changes to green. In this converting mode, the display (1) flashes
(interval is 0.5 second). Press and hold the heater button (4) for five seconds to enter temperature adjustment mode.
Repeat the same process to convert Celsius temperature into Fahrenheit temperature.
□
To lock the heating function, with the main power button on, press and hold the heater button (4) for ten seconds. The log
lights flash six times to indicate that the heater function is locked. In this mode, there is no heating function but only glowing logs.
NOTE: After the heater function or power is shutoff the blower will continue to run for several minutes to cool the internal
components.
□
To unlock the heating function, press and hold the heater button (4) for ten seconds. The log lights flash six times and
then enter heating function mode.
5
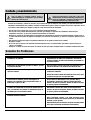
Using the flame control
□
Press the flame button (5) to set the flames for different levels of flame height. These flame levels are shown in the display
(1). The flame settings are as follows:
Button Press Flame Level Display Value Fireplace Appearance
1st press
High
L4
Flames Highest, Logs Glow Highest
2nd press Medium L3 Flames Medium, Logs Glow Medium
3rd press Low L2 Flames Low, Logs Glow Low
4th press
Flames Off
L1
Flames Off, Logs Glow Highest
5th press All Off None Flames Off, Logs Off
□
Regardless of the previous flame setting, when powered off by the main power button, the flames will come on in L4 mode
(High) when you turn the heater on.
□
To lock the flame function, with the flame in L4 mode, press and hold the flame button (5) for five seconds. The log lights flash
six times to indicate that the flame function is locked. In this mode, there are no flames but only glowing logs. Pressing the
flame button in sequence will set the logs for different levels of log brightness. The logs brightness levels are shown in the
display segment (1). The logs settings are as follows:
Button Press
Flame Level
Display Value
Fireplace Appearance
1st press
Flames Off
L4
Logs Glow Brightest
2nd press Flames Off L3 Logs Glow Medium
3rd press
Flames Off
L2
Logs Glow Low
4th press Flames Off L1 Logs Glow Brightest
5th press
All Off
None
Logs Off
□
To unlock the flame function, press and hold the flame button (5) for five seconds. The log lights flash six times and then both
flame lights and log lights turn on.
1
5
1
4

7
Operation (continued)
6
Using the main power button
□
Press the power button (6) to turn the fireplace/heater unit on and off. Press the power button (6) once to turn the
unit on. Press again to turn the unit off.
7
Using the Demo Mode
□
For Use in Retail Store
□
To turn Demo Mode on, press and hold the timer button (3) for 10 seconds until the front LED lights show "00". Demo
Mode deactivates the heater and all front control panel buttons except the flame control button. To turn Demo Mode
off, press and hold the timer button (3) for 10 seconds until the front LED lights show "L4". This fireplace is shipped
with Demo Mode turned off for normal customer usage.
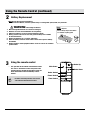
Using the Remote Control
1
Installing the battery
For replacement batteries, use AAA batteries.
□
Press down and slide back cover off the battery compartment.
□
Insert two provided AAA batteries into the battery
compartment making sure that the ends of the
batteries with the negative (-) symbols are against
the springs in the battery compartment.
□
Replace the battery compartment cover, making
sure it snaps into position.
□
Turn the remote over and aim it towards the fireplace/heater unit.
□
Press the power button on the upper left, and see if the flames on the fireplace/heater turn on or off.
□
If nothing appears to happen, check to make sure the battery is installed correctly, and try again.
OPEN
CLOSE
6

8
Using the Remote Control (continued)
NOTE:
Do not mix old and new batteries.
Do not mix alkaline, standard (carbon zinc), or rechargeable (nicad, nimh, etc.) batteries.
2
Battery Replacement
3
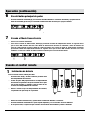
Using the remote control
□
The operation of the
remote control buttons work
s
the same as the buttons on the front panel of the
fireplace/heater. Review the Operation section for
more information on the functionality of these
buttons.
NOTE: The remote control cannot lock/unlock
the flame and heating function, and it cannot
switch between Fahrenheit and Celsius
.
Heater Up
Main Power
Heater Control
Flames Control
Timer Control
Heater Down
WARNING:
Do not ingest batteries.
1.
Non-rechargeable batteries are not to be recharged.
2.
Batteries are to be inserted with the correct polarity.
3.
Exhausted batteries are to be removed from the product.
4.
Always purchase the correct size and grade of battery most suitable
for the intended use.
5.
Replace all batteries of a set at the same time.
6.
Clean the battery contacts and also those of the device prior to battery
installation.
7.
Remove batteries from equipment with is not to be used for an extended
period of time.
NOTE:
Battery disposal
Please always dispose of batteries
at a suitable recycling point.

9
Care and Maintenance
WARNING: Always disconnect from the power supply
before cleaning the heater. First turn off the main
power. Then remove the electrical plug from the wall
outlet.
The blower motor and flame motor are pre-lubricated for a durable using time and need no further lubrication or maintenance.
To remove any accumulation of dust or fluff the soft brush attachment of a vacuum cleaner should occasionally be used to
clean the outlet grille of the fan heater.
□
Use a soft, clean cloth that will not scratch the surface when dusting.
□
Use a clean soft cloth dampened with warm water to clean the fireplace surface. DO NOT use household or abrasive
cleaners, as these products may damage the surface.
□
When cleaning the glass viewing screen use a non-abrasive damp cloth with liquid cleaner or soft soap if necessary; DO
NOT use cleaning powders or any other substance with abrasives since these substances will scratch glass.
□
Under no circumstances should this product be operated with a broken or chipped glass panel.
□
Do not strike or slam the glass.
□
In the event that your appliance is stained or otherwise damaged during use, we recommend that you call a professional
to repair your furniture.
□
When not in use please unplug the cord from the outlet to prevent any damage or accidental plug of the cord.
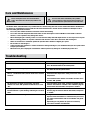
Troubleshooting
Problem
Solution
The unit does not turn on. Check that the unit is plugged into a standard 120V outlet.
Press the Power button on the control panel.
The Main power switch lights up, but there is no flame
effect.
Open the top and back panels to check if the flame spindle
has fallen off from the spindle motor.
There is a visible flame effect, but the heater does not blow
warm air.
Confirm that the temperature setting exceeds the room
temperature.
Turn on/off the Heater button several times to make sure it
is in the “ON” position.
The heater does not work, but the Power and Heater
switches are in the “ON” position and thermostat is set to
“HI”.
Turn all switches to the “OFF” position and unplug the unit
from the wall outlet for 5 minutes. After 5 minutes plug the
unit back into the wall outlet, and operate as normal.
The display unit on the control panel shows “88” and the
function indicator is quick flashing, indicating it is in alarm
mode.
Unplug the unit from the wall outlet for 5 minutes. After 5
minutes plug the unit back into the wall outlet, and operate
as normal.
Remote control is not working. Change the remote batteries.
Operate remote transmitter at a slow measured pace. Press
the remote control buttons with an even motion and gentle
pressure.
Repeatedly pressing buttons in rapid succession may
cause the transmitter to malfunction.
WARNING: Do not use this fireplace insert if any part of it
has been under water. Immediately call a qualified
service technician to inspect the firebox and replace any
part of the electrical system which has been under water.


GRACIAS
Agradecemos la confianza que ha depositado en Whalen Furniture a través de la compra de esta chimenea. Nos esforzamos por
crear continuamente productos de calidad diseñados para mejorar su hogar. Visítenos en línea para ver nuestro grupo completo
de productos disponibles para sus necesidades para el hogar. ¡Gracias por escoger Whalen Furniture!
Fecha 2018-05-08 Rev. 0001-A Fábrica: ZHOSUM
LOTE NÚMERO:
FECHA DE COMPRA: / /
GUÍA DE USO Y CUIDADO
COMBINACIÓN CHIMENEA/CALENTÓN ELÉCTRICO
Patentes de e.u.a. e internacionales pendientes
MODELO #SF127-23AI2D
#SF127-26AI2D
Si usted tiene alguna pregunta relacionada con el uso de esta unidad, o encuentra que la unidad de su
chimenea / calentador necesita servicio, por favor, no devuelva la unidad a la tienda donde lo compró. En
su lugar, póngase en contacto con nuestro Departamento de Servicio al Cliente y teniendo sus
instrucciones y lista de piezas listas para proporcionar el nombre del modelo, nombre de la pieza, o el
número de fábrica.
Whalen Servico al Cliente
1-866-942-5362
Hora del Pacífico: 8:30 a.m. - 4:30 p.m., Lunes a Viernes
O visite nuestra página de Internet para ayuda en su producto en:
www.whalenfurniture.com / www.whalenstyle.com
O mande un correo eléctronico a [email protected]
ESTE INSTRUCTIVO CONTIENE INFORMACIÓN IMPORTANTE DE SEGURIDAD.
POR FAVOR LEA Y MANTENGA EL INSTRUCTIVO PARA USO FUTURO.

2
Índice de contenido
Índice de contenido .............................................................. 2
Información de seguridad ..................................................... 2
Información de seguridad importante ............................. 2
Guarde estas instrucciones ............................................. 2
Información de seguridad (continuación) ............................. 3
Instrucciones para conectar a tierra ............................... 3
Garantia .......................................................................... 3
Pre-Operación ...................................................................... 4
Especificaciones electricas ............................................. 4
Contenido del empaque ................................................... 4
Operación ............................................................................. 5
Uso del control remoto ......................................................... 7
Mantenimiento y cuidados ................................................... 9
Solución de problemas ........................................................ 9
Información de seguridad
INFORMACIÓN IMPORTANTE DE SEGURIDAD
POR FAVOR LEER TODA LA INFORMACIÓN EN ESTE
MANUAL DE INSTRUCCIONES, INCLUYENDO TODO LO
REFERENTE A SEGURIDAD, OPERACIÓN Y
MANTENIMIENTO. PARA EVITAR EL RIESGO
POTENCIAL DE INCENDIOS, DESCARGAS
ELÉCTRICAS O LESIONES PERSONALES, LOS
USUARIOS DEBEN SEGUIR LAS INSTRUCCIONES Y
ADVERTENCIAS DE ESTE MANUAL.
1. Lea todas las instrucciones antes de usar el calentador.
2. No utilice este calentador al aire libre.
3. Este calentador no se debe de usar en baños, áreas de lavado
y recintos similares. Nunca coloque el calentador en donde se
pueda caer en una bañera u otro recipiente con agua.
4. No coloque el cable por debajo de la alfombra. No cubra el
cable con tapetes, alfombras o similares. Disponga el cable
de alimentación alejado de las áreas de tráfico y donde no
pueda provocar tropezones.
5. Para desconectar el calentador, apague los controles, luego
retire el enchufe de la toma.
6. Conectar a tierra correctamente sólo puntos de venta.
Siempre conecte los calentadores directamente en una toma
de corriente / receptáculo. Nunca utilice un cable de extensión
o pulse poder recargable (tira/potencia de salida).
7. Para evitar un posible incendio, no bloquee las entradas de
aire del fogón o el escape de cualquier manera. No utilice la
cámara de combustión sobre superficies blandas, como una
cama, donde las aberturas se pueden bloquear.
8. Hay un limitador de termostato en el interior del calentador.
Cuando se produce la temperatura interior se sobrecalienta o
hay calentamiento anormal, el termostato recorta dispositivo
de protección frente a la fuente de alimentación para evitar
que la chimenea se dañe o riesgo de incendio.
9. Utilice este calentador sólo como se describe en este manual.
Cualquier otro uso no recomendado por el fabricante puede
causar incendios, descargas eléctricas o lesiones a las
personas.
GUARDE ESTAS INSTRUCCIONES
ADVERTENCIA: No hay piezas en el interior de la
chimenea/calefactor. Si la unidad parece no funcionar
correctamente, apague la unidad y desconecte la unidad
de la pared de inmediato y comuníquese con el Servicio
al Cliente al 1-866-942-5362.
ADVERTENCIA: El aparato se calienta cuando está en uso.
Para evitar quemaduras, no deje que la piel toque
superficies calientes. Si tiene mangos, utilice para
desplazar este calentador. Mantenga materiales
combustibles, tales como muebles, almohadas, ropa de
cama, papeles, ropa y cortinas por lo menos 3 pies. (0.9
metros) desde el frente del calentador y manténgalos
alejados de los costados y parte trasera.
ADVERTENCIA: Extreme la precaución cuando el
calentador es usado por o cerca de niños o inválidos y
cuando el calentador se deje en funcionamiento sin
supervision.
ADVERTENCIA: Desconecte siempre el calentador
cuando no esté en uso.
ADVERTENCIA: No utilice ningún calentador con un cable o
enchufe dañado o después de que haya funcionado mal, se
haya caído o dañado de alguna manera. Devuelva el calentador
a un centro de servicio autorizado para su revisión, ajuste
eléctrico o mecánico, o reparación
.
ADVERTENCIA: No inserte o permita que objetos extraños en
ninguna abertura de ventilación o escape ya que esto puede
causar una descarga eléctrica o un incendio o dañar el
calentador
.
ADVERTENCIA: Un calentador tiene partes calientes y arqueadas
y chispas. No lo use en áreas donde la gasolina, pintura o líquidos
inflamables se use o almacene.
PRECAUCIÓN: Mientras el calentador está en uso, el centro
superior de la chimenea puede calentarse al tacto, y puede
causar lesiones graves o quemaduras. Siempre supervise a
los niños pequeños alrededor de la chimenea/calefactor. No coloque
ningún paño o decoraciones sobre la salida del calentador
de la chimenea, o cualquier otra forma obstaculiza la salida
del calentador de la chimenea, ya que esto puede causar
puede producirse un incendio y lesiones graves.

3
Información de seguridad (continuación)
INSTRUCCIONES DE CONEXIÓN A TIERRA
PELIGRO: La conexión incorrecta del conductor de tierra
del equipo puede resultar en un riesgo de descarga
eléctrica. Consulte a un electricista o técnico calificado
si tiene dudas acerca de si el producto está
correctamente conectado a tierra. No modifique el
enchufe que viene con el producto. Si no encaja en el
tomacorriente, haga instalar un nuevo tomacorriente por
un electricista calificado.
Este producto debe conectarse a tierra. Si llegara a fallar o
avería, la conexión a tierra proporciona una vía de menor
resistencia para la corriente eléctrica para reducir el riesgo
de descarga eléctrica. Este producto está equipado con un
cable que tiene un conductor de tierra y un enchufe de
conexión a tierra. El enchufe debe conectarse a un
tomacorriente apropiado que esté instalado y conectado a
tierra de acuerdo con todos los códigos y ordenanzas locales.
Este calentador es para el uso en circuitos de 120 voltios y
tiene un enchufe conectado a tierra. Hay disponible un
adaptador para conectar enchufes de tipo de conexión a
tierra de tres clavijas a receptáculos de dos ranuras. La
terminal de tierra verde que sale del adaptador debe
conectarse a una tierra permanente, como una caja de
enchufe con toma de tierra. El adaptador no debe utilizarse
sin un tomacorriente de tres ranuras disponible.
Garantia
Estamos seguros de que usted estará encantado con esta compra. En caso de que este producto presente defectos en mano de
obra o materiales, o no funcione bien en condiciones de uso normal, lo repararemos o sustituiremos por un período de hasta un
(1) año a partir de la fecha de compra.
Esta garantía le otorga derechos específicos y usted también puede tener otros derechos que varían de estado a estado.
Póngase en contacto con el Equipo de Servicio al Cliente al 1-866-942-5362 o visita www.whalenfurniture.com /
www.whalenstyle.com
Conexión a tierra
Tapa de tomacorriente a tierra
Adapatador
Ceja a tierra
Tornillo de metal
Tapa de tomacorriente a tierra

4
Pre-Operación
ESPECIFICACIONES ELÉCTRICAS
□ Voltaje: 120 VAC, 60 Hz
□ Watts: 1500 Watts
CONTENIDO DEL PAQUETE
Part
e
Descripción
Cantidad
A Chimenea 1
B
Control remoto
1
B
A

5
Operación
1
Identificar el panel de control
2
Entendiendo la función del
indicador
□ El panel de control está situado en la esquina superior
izquierda de la unidad de chimenea / calefactor.
□ El panel de control contiene la unidad de visualización
(1), indicador de la función (2), la función de
temporizador (3), de control del calentador (4), el
control de las llamas (5), y la potencia principal (6).
□ La unidad de visualización (1) muestra información
sobre el nivel de la llama, el temporizador y la
temperatura actual.
□ El indicador de función (2) tiene tres LEDs cuadrados -
de color rojo, verde y azul. El LED rojo indica que la
función de calefacción de temperatura Fahrenheit está
funcionando, el LED verde indica que la función de
calefacción de temperatura Celsius está en marcha, y el
LED azul indica que la función de temporizador está
activado.
□ A la derecha de los tres LED, es el módulo receptor de
infrarrojos que se comunica con el mando a distancia
para controlar el calentador.
3
Usando la función del temporizador
□ El botón del temporizador (3) le permite establecer la cantidad de tiempo que desea la chimenea / calefactor se ejecute.
El botón del temporizador (3) funciona tanto las llamas y la función de calefacción. Si el calentador está funcionando
cuando el temporizador está preparado, entonces el calentador está en el temporizador. Si las llamas están funcionando,
entonces el temporizador controlar las llamas. Si tanto el calentador y las llamas están operando con el conjunto del
temporizador, el temporizador controla tanto las llamas y el calentador. Al pulsar el botón en secuencia será ajustar el
temporizador para un intervalo establecido. Este período de intervalo se muestra en la pantalla (1), en azul. Los intervalos
del sistema se muestran en esta tabla. El intervalo del temporizador se establece desde el momento de seleccionar el
intervalo. No existe una función de reloj para encender el calentador o llamas dentro o fuera en un momento específico.
Presionar el botón Tiempo de intervalo Visualización
1 una vez 30 Minutos 30
2
da vez
1 Hora
1h
3ra vez
2 Horas
2h
4ta vez 3 Horas 3h
5ta vez 4 Horas 4h
6t
a
vez
5
Horas
5h
7
ma vez
6
Horas
6h
8va vez
APAGADO
Noda
1
2
3
4
5
6
2
1
3

6
Operación (continuación)
4
Usando el control del calentador
□
Al pulsar el botón del calentador (4)
convierte el calentador encendido o apagado. No hay ajuste de velocidad para el
ventilador del calentador. Si pones el calentador en un standby mode (apagar por el boton de encendido 6), la Dependencia
llevará a cabo los ajustes en la memoria. Cuando la alimentación se vuelve a encender, el calentador activará los mismos
ajustes.
□ Cuando la función de calefacción se enciende, mantenga presionado el botón del calentador (4) durante cinco segundos
para entrar en el modo de ajuste de la temperatura. El indicador LED es de color rojo. En el modo de ajuste, la pantalla (1)
parpadea (intervalo es de 0,5 segundos). Hay 22 niveles para cambiar la temperatura Fahrenheit 62 ° F - 82 ° F -ON (17 °
C -27 ° C .-.ON).
□ Con el calentador encendido, presione y mantenga presionado el botón de encendido durante cinco segundos suavemente
para entrar en el modo de conversión de temperatura. El indicador LED parpadea cinco veces en color rojo y luego cambia
al color verde. En este modo de conversión, la pantalla (1) parpadea (intervalo es de 0,5 segundos). mantenga presionado
el botón del calentador (4) durante cinco segundos para entrar en el modo de ajuste de la temperature. Repita el mismo
proceso para convertir la temperatura Celsius en la temperatura Fahrenheit.
□ Para bloquear la función de calefacción, con el botón de encendido principal, presione y mantenga presionado el botón del
calentador (4) durante diez segundos. Las luces de registro de Flash seis veces para indicar que la función de calentador
está bloqueado. En este modo, no hay ninguna función de calentamiento, pero los troncos sólo brillan intensamente.
NOTA: Después de la función de calefacción o encendido es apagado, el ventilador continuará funcionando durante varios
minutos para enfriar los componentes internos.
□ Para desbloquear la función de calefacción, presione y mantenga presionado el botón del calentador (4) durante diez
segundos. Las luces de troncos parpadean seis veces y luego entrar en el modo función de calefacción.
5
Usando el control de llama
□ Presione el botón de llama (5) para ajustar las llamas para diferentes niveles de altura de la llama. Estos niveles de llama
se muestran en la pantalla (1). Los ajustes de llama son como sigue:
Presionar el botón
Nivel de llama
Valor
Apariencia de chimenea
1 una vez
Alta
L4
Llamas altas, Troncos brillo máximo
2da vez
Mediana
L3
Llamas medio, Troncos brillo medio
3ra vez Baja L2 Flamas bajas, Troncos brillo bajo
4ta vez Llamas apagadas L1 Flamas apagadas, Troncos brillo máximo
5ta vez
Todo apagado
Ninguno
Flamas apagadas, troncos apagados
□ Independientemente de la configuración anterior de la llama, la llama se encenderá en el modo de L4 (Alto) al encender
el calentador.
□ Para bloquear la función de la llama, con la llama en modo L4, mantenga presionado el botón de llama (5) durante cinco
segundos. Las luces de registro de Flash seis veces para indicar que la función de la llama está bloqueado. En este
modo, no hay llamas, pero los troncos sólo brillan intensamente. Al pulsar el botón de la llama en la secuencia fijará los
troncos para los diferentes niveles de brillo de troncos. Los niveles de brillo troncos se muestran en el segmento de
visualización (1). La configuración de troncos son los siguientes:
Presionar el botón Nivel de llama Valor Apariencia de chimenea
1 una vez Llamas apagadas L4 Troncos brillo máximo
2da vez Llamas apagadas L3 Troncos brillo medio
3ra vez
Llamas apagadas
L2
Troncos brillo bajo
4ta vez
Llamas apagadas
L1
Troncos brillo máximo
5ta vez Todo apagado Nada Troncos apagados
□ Para desbloquear la llama función, pulse y mantenga pulsado el botón de llama (5) para dar segundos. Las luces de
troncos parpadean seis veces y luego las dos luces de llama y log luces se encienden.
1
4
1
5

7
Operación (continuación)
6
Uso del botón principal de poder
□ Presione el botón de encendido (6) para encender la unidad chimenea / calefactor encendido y apagado. Pulse el
botón de encendido (6) una vez para encender la unidad. Presione de nuevo para apagar la unidad.
7
Usando el Modo Demostración
□
Para uso en la tienda unicamente
□
Para activar el modo de demostración, mantenga presionado el botón del temporizador durante 10 segundos hasta
que las luces LED frontales muestren "00". Modo de demostración desactiva el calentador y todos los botones del
panel de control frontal excepto el botón de control de llama. Para apagar el modo de demostración, mantenga
presionado el botón del temporizador durante 10 segundos hasta que las luces LED frontales muestren "L4". Esta
chimenea se envía con el modo de demostración desactivado para el uso normal del cliente.
Usando el control remoto
1
Instalación de bateria
Para las baterias nuevas, utilice pilas AAA.
□
Presione hacia abajo y deslice la cubierta posterior fuera
del compartimento de la batería
.
□ Inserte dos pilas AAA proporcionado en el compartimiento
de la batería asegurándose de que los extremos de las pilas
con el polo negativo (-) símbolos están en contra de los
resortes en el compartimiento de la batería.
□ Vuelva a colocar la tapa del compartimento de la batería,
asegurándose de que encaje en su posición.
□ Colocar el mando a distancia una y apuntar hacia la unidad de chimenea / calefactor.
□ Presione el botón de encendido en la parte superior izquierda, y ver si las llamas estan en chimenea.
□ Si no aparece nada, asegúrese de que la batería esté instalada correctamente y vuelve a intentarlo.
6
CERRADO
ABRA

8
Usando el control remote (continuación)
2
Remplazo de bateria
NOTA: No mezcle pilas viejas y nuevas.
No mezcle pilas alcalinas, estándar (carbono-zinc) o recargables (nicad, nimh, etc.).
3
Uso del control remoto
□ El funcionamiento de los botones del control
remoto funciona igual que los botones del panel
frontal de la chimenea/calefactor. Revise la
sección Operación para obtener más información
sobre la funcionalidad de estos botones.
NOTA: El control remoto no puede bloquear/
desbloquear la función de la llama y la calefacción,
y no puede cambiar entre Fahrenheit y Celsius.
ADVERTENCIA:
No ingiera las baterias.
1. Baterías no recargables no deben ser recargadas.
2. Las baterías deben ser insertadas con la polaridad correcta.
3. Las baterías agotadas deben ser eliminadas.
4. Siempre adquirir el tamaño correcto y el grado de la batería más adecuada
para el uso previsto.
5. Vuelva a colocar todas las baterías de un conjunto a la vez.
6. Limpie los contactos de la batería y también los del dispositivo antes de la
instalación de la batería.
7. Retire las baterías de los equipos que no se va a utilizar durante un período
prolongado de tiempo.
Subir temperatura
Encendido
/ apagado
Control de calefactor
Control de llama
Control de tiempo
Bajar temperatura
NOTA:
Eliminación de bateria
Por favor deseche baterias en un
lugar adecuado de reciclaje.

9
Cuidado y mantenimiento
ADVERTENCIA: Siempre desconecte de la red eléctrica
antes de limpiar el calentador. Primero apague la
alimentación principal. A continuación, retire el enchufe
eléctrico de la toma de pared.
El motor del ventilador y el motor de la llama son pre-lubricados por un tiempo de uso durable y no necesitan lubricación
adicional o mantenimiento. Para eliminar cualquier acumulación de polvo o pelusa el cepillo suave de una aspiradora de vez
en cuando se debe utilizar para limpiar la rejilla de salida del calentador de ventilador.
□ Use un paño suave y limpio que no se raye la superficie cuando desempolvar.
□ Use un paño suave y limpio humedecido con agua tibia para limpiar la superficie de la chimenea. NO use hogar o
limpiadores abrasivos, ya que estos productos pueden dañar la superficie.
□ Al limpiar la pantalla de visualización de cristal utilice un paño húmedo no abrasivo con líquido limpiador o jabón suave si
es necesario; NO use polvos de limpieza o cualquier otra sustancia con abrasivos, ya que estas sustancias pueden rayar el
vidrio.
□ Bajo ninguna circunstancia debe este producto funcionar con un panel de vidrio roto o astillado.
□ No golpee el vidrio.
□ En caso de que su aparato está manchado o dañado durante el uso, le recomendamos que llame a un profesional para
reparar sus muebles.
□ Cuando no se utilice por favor desconecte el cable de la toma para evitar cualquier daño o el enchufe accidental del cable.
Solución De Problemas
Problem
a
Solución
La unidad no se enciende. Compruebe que la unidad esté enchufada a una toma de
corriente estándar de 120V. Pulse el botón de encendido en
el panel de control.
El interruptor de alimentación principal se ilumina, pero no
hay efecto de la llama.
Abra los paneles superior y posterior para comprobar si el
cabezal de la llama se ha caído desde el motor de giro.
Hay un efecto de la llama visible, pero la calefacción no
sopla aire caliente.
Compruebe que el ajuste de temperatura excede la
temperatura ambiente.
Activar/desactivar el botón del calentador varias veces para
asegurarse de que está en la posición "ON".
El calentador no funciona, pero los interruptores de
potencia y el calentador están en la posición "ON" y el
termostato se ajusta en "HI".
Apague todos los interruptores en la posición "OFF" y
desenchufe la unidad de la toma de corriente durante 5
minutos. Después de 5 minutos enchufe la unidad a la toma
de pared, y operar con normalidad.
La unidad de visualización en el panel de control muestra
"88" y el indicador de la función es intermitente rápido, lo
que indica que está en modo de alarma.
Desenchufe la unidad de la toma de corriente durante 5
minutos. Después de 5 minutos enchufe la unidad a la toma
de pared, y operar con normalidad.
El control remoto no funciona.
Cambie las pilas del control remoto.
Opere transmisor remoto a un ritmo mesurado lento.
Presione los botones del control remoto con un movimiento
uniforme y suave presión.
Repetidamente pulse los botones en rápida sucesión pueden
hacer que el transmisor no funcione correctamente.
ADVERTENCIA: No utilice este relleno de la chimenea si
alguna parte del mismo ha estado bajo el agua. Llame
inmediatamente a un técnico calificado para inspeccionar la
cámara de combustión y reemplazar cualquier parte del
sistema eléctrico que haya estado bajo el agua
.

-
 1
1
-
 2
2
-
 3
3
-
 4
4
-
 5
5
-
 6
6
-
 7
7
-
 8
8
-
 9
9
-
 10
10
-
 11
11
-
 12
12
-
 13
13
-
 14
14
-
 15
15
-
 16
16
-
 17
17
-
 18
18
-
 19
19
-
 20
20


Whalen WSLWFP48-5/1031289 Manual de usuario
- Tipo
- Manual de usuario
en otros idiomas
Artículos relacionados

Otros documentos
-
Twin-Star International 23WM9083-PM92 Manual de usuario
-
Muskoka MFBC42WS Guía del usuario
-
-
Allen + Roth 2317FM-33-202 Guía de instalación
-
Remington Hearth Vent-Free Gas Log Heater Manual de usuario
-
-
Silvercrest 378331 El manual del propietario
-
 ProCom Heating CRHED24RT Manual de usuario
-
 ProCom Heating CRHED24RT Manual de usuario
-
Pleasant Hearth VFF-PH26D Manual de usuario

