Bresser 90-62000 Manual de usuario
- Categoría
- Telescopios
- Tipo
- Manual de usuario

AUTOMATIK
TELESKOP
AUTOMATIC
TELESCOPE
Bedienungsanleitung
Operating instructions
Mode d’emploi
Istruzioni per l’uso
Instrucciones de uso
Руководство по
эксплуатации
EN
FR
IT
ES
RU
DE
Art.No. 90-62000 / 90-62100
https://tm.by
Интернет-магазин TM.by

2
(EN) CAUTION:
Never attempt to observe the sun with this telescope.
Make sure children do not attempt to observe the sun with the telescope.
Observing the sun directly, even for a short time, may cause blindness.
Packing materials, like plastic bags and rubber bands, should be kept out of the reach of children.
(ES) ADVERTENCIA!
No utilice nunca este aparato óptico para mirar directamente al sol a las inmediaciones de éste. Tome asimismo pre-
cauciones especiales si va a ser utilizado por niños, pues existe el PELIGRO DE QUE SE QUEDEN CIEGOS. Mantenga
el material de embalaje (bolsas de plástico, bandas de goma, etc.) lejos del alcance de los niños.
(IT) ATTENZIONE!
Non guardare mai direttamente il sole o vicino al sole con questo apparecchio ottico! Prestare particolare
attenzione quando l’apparecchio viene usato da bambini! Pericolo di ACCECAMENTO!
Tenere il materiale di imballaggio (sacchetti di plastica, elastici, etc.) lontano dalla portata dei bambini!
(FR) AVERTISSEMENT!
Ne regardez jamais avec cet apparareil directement ou à proximité du soleil ! Veillez y particulièrement,
lorsque l‘appareil est utilisé par des enfants ! Il existe un DANGER DE PERTE DE LA VUE !
Tenez le matériel d‘emballage (sacs en plastique, élastiques, etc.) éloigné des enfants!
(DE) WARNUNG!
Schauen Sie mit diesem optischen Gerät niemals direkt oder in die Nähe der Sonne! Achten Sie
besonders darauf, wenn es von Kindern benutzt wird! Es besteht ERBLINDUNGSGEFAHR!
Verpackungsmaterial (Plastiktüten, Gummibänder, etc.) von Kindern fernhalten!
(RU) Внимание!
Никогда не смотрите через телескоп на Солнце! Можно необратимо повредить зрение, вплоть до полной
слепоты. Дети должны проводить наблюдения под надзором взрослых. Упаковочные материалы следует
держать в недоступном для детей месте из-за опасности удушения.
https://tm.by
Интернет-магазин TM.by

(DE) Bedienungsanleitung ..................................................................................... 6
(EN) Operating instructions ................................................................................. 10
(FR) Mode d’emploi .............................................................................................. 14
(IT) Istruzioni per l’uso .......................................................................................... 18
(ES) Instrucciones de uso .................................................................................... 22
(RU) Руководство по эксплуатации ................................................................. 26
3
https://tm.by
Интернет-магазин TM.by

4
Art.No. 90-62000 Art.No. 90-62100 No. 3
Fig. 3No. 6
No. 2
Art.No. 90-62100
1)
No. 5No. 4
F
G
G
I
1!
I
BC
D
1@
D
1$
1#
J
G
H
No. 1
E
H
https://tm.by
Интернет-магазин TM.by

Zubehör kann je nach Modell variieren.
Accessories may vary depending on the model.
Les accessoires peuvent varier en fonction du modèle.
Gli accessori possono variare a seconda del modello.
Los accesorios pueden variar según el modelo.
Оснастка может изменяться в зависимости от модели.
5
1(
2)
1&
1^
gF
d
E
h
c
B
D
1*
1% C
No. 8
1$
Fig. 9
i
J 1)
No. 9
No. 7
J
https://tm.by
Интернет-магазин TM.by

6
Allgemeine Informationen
Zu dieser Anleitung
Lesen Sie bitte aufmerksam die Sicherheitshinweise in dieser Anleitung.
Verwenden Sie dieses Produkt nur wie in der Anleitung beschrieben,
um Schäden am Gerät oder Verletzungen zu vermeiden. Bewahren
Sie die Bedienungsanleitung auf, damit Sie sich jederzeit über alle
Bedienungsfunktionen neu informieren können.
GEFAHR!
Dieses Zeichen steht vor jedem Textabschnitt, der auf
Gefahren hinweist, die bei unsachgemäßer Anwendung zu
schweren Verletzungen oder sogar zum Tode führen.
ACHTUNG!
Dieses Zeichen steht vor jedem Textabschnitt, der auf
Sach- oder Umweltschädigungen bei unsachgemäßer
Anwendung hinweist.
Verwendungszweck
Dieses Produkt dient ausschließlich der privaten Nutzung.
Es wurde entwickelt zur vergrößerten Darstellung von Naturbeobachtungen.
Allgemeine Warnhinweise
ERBLINDUNGSGEFAHR!
Schauen Sie mit diesem Gerät niemals direkt in die Sonne oder in
die Nähe der Sonne. Es besteht ERBLINDUNGSGEFAHR!
ERSTICKUNGSGEFAHR!
Kinder dürfen das Gerät nur unter Aufsicht benutzen.
Verpackungsmaterialien (Plastiktüten, Gummibänder, etc.) von
Kindern fernhalten! Es besteht ERSTICKUNGSGEFAHR!
BRANDGEFAHR!
Setzen Sie das Gerät – speziell die Linsen – keiner direkten
Sonneneinstrahlung aus! Durch die Lichtbündelung könnten Brände
verursacht werden.
GEFAHR EINES STROMSCHLAGS!
Dieses Gerät beinhaltet Elektronikteile, die über eine Stromquelle
(Netzteil und/oder Batterien) betrieben werden. Lassen Sie Kinder
beim Umgang mit dem Gerät nie unbeaufsichtigt! Die Nutzung darf
nur, wie in der Anleitung beschrieben, erfolgen, andernfalls besteht
GEFAHR eines STROMSCHLAGS!
VERÄTZUNGSGEFAHR!
Batterien gehören nicht in Kinderhände! Achten Sie beim Einlegen
der Batterie auf die richtige Polung. Ausgelaufene oder beschä-
digte Batterien verursachen Verätzungen, wenn Sie mit der Haut
in Berührung kommen. Benutzen Sie gegebenenfalls geeignete
Schutzhandschuhe.
BRAND-/EXPLOSIONSGEFAHR!
Setzen Sie das Gerät keinen hohen Temperaturen aus. Benutzen
Sie nur die empfohlenen Batterien. Gerät und Batterien nicht
kurzschließen oder ins Feuer werfen! Durch übermäßige Hitze und
unsachgemäße Handhabung können Kurzschlüsse, Brände und
sogar Explosionen ausgelöst werden!
ACHTUNG!
Bauen Sie das Gerät nicht auseinander! Wenden Sie sich im Falle
eines Defekts an Ihren Fachhändler. Er nimmt mit dem Service-
Center Kontakt auf und kann das Gerät ggf. zwecks Reparatur
einschicken.
SCHUTZ der Privatsphäre!
Das Gerät ist für den Privatgebrauch gedacht. Achten Sie
die Privatsphäre Ihrer Mitmenschen – schauen Sie mit die-
sem Gerät zum Beispiel nicht in Wohnungen!
Zubehör kann je nach Modell variieren.
Teileübersicht (No. 1-8)
B Teleskop-Tubus
C Tubusöffnung
D Okularstutzen
E Scharfeinstellungsknopf
F Handbox
G Okularhalter
H Handbox-Ablage
I Azimuthal Sperre
J Stativ
1) LED Sucher (Nur bei Art. Nr. 90-62100)
1! Batteriefach
1@ Feststellschraube
1# Zubehör-Ablage
1$ Höhenverstellung Feststellgriff
1% Staubschutzkappe
1^ Okulare
1& Mondfilter
1* Kompass
1( Sternkarte
2) Software CD
Handbox (No. 9)
B Rotlicht Quelle
C Handbox-Bildschirm
D Plus-/Minus-Taste
E Beleuchtung
F Pfeiltasten
G Zentral-Taste
H Nummernblock
I Mini-USB Port
J RJ-45 Port
1) RJ-22 Port
Teil I – Der Aufbau
1. Allgemeines/Standort
Bevor Sie mit dem Aufbau beginnen, wählen Sie einen geeigneten Standort
für Ihr Teleskop aus. Es wird Ihnen helfen, wenn Sie das Teleskop an
einem Ort aufbauen, an dem Sie gute Sicht auf den Himmel, einen festen
Untergrund und genügend Platz haben.
Nehmen Sie zuerst alle Teile aus der Verpackung. Überprüfen Sie anhand
des Schaubildes, ob alle Teile vorhanden sind.
2. Stativ
Nehmen Sie das Stativ (9) aus der Verpackung. Spreizen Sie die Stativbeine
vollständig und platzieren Sie das Stativ auf einem festen, ebenen Untergrund.
Setzen Sie die Zubehör-Ablage (13) auf den Halteknauf der Stativspinne und
drehen Sie die Ablageplatte bis sie einrastet (No. 3).
Hinweis: Vergessen Sie bitte nicht die Zubehör-Ablage (13) zu entfernen,
bevor Sie das Stativ zusammenklappen.
3. Teleskop
Lösen Sie die Feststellschraube an der Prismenklemme bis die Schraube
nicht mehr in die Halterung ragt (No. 4). Setzen Sie die Prismenschiene
am Teleskop in die Halterung ein und ziehen Sie die Klemmschraube an.
Vergewissern Sie sich, dass das National Geographic Logo aufrecht ist.
4. Höhenverstellung
Lösen Sie den Feststellgriff der Höhenverstellung, indem Sie ihn gegen
den Uhrzeigersinn drehen und richten Sie den optischen Teleskop-Tubus
(1) waagerecht aus. Anschließend stellen Sie die Höhenverstellung wieder
fest (No. 5).
5. Montierung
Platzieren Sie die Bohrungen an der Unterseite der Montierung auf die
Schrauben die aus dem Stativ herausragen. (No. 6). Die Schrauben sind
gefedert und rasten mit einem deutlichen “Klick” in den Bohrungen ein.
Ziehen Sie anschließend die Schrauben an.
https://tm.by
Интернет-магазин TM.by

7
DE
6. Okular
Entnehmen Sie ein Okular aus der Halterung (6) und setzen Sie es in den
Okularstutzen ein (3). Die Klemmschraube am Okularstutzen vorsichtig
anziehen (No. 5). Beginnen Sie mit dem Okular das die niedrigste
Vergrößerung bietet, also das Okular mit der höchsten Brennweite (z. B.
20 mm oder 25 mm, je nach Modell). Sobald Sie das Objekt mittig im
Sichtfeld haben, können Sie auf ein Okular wechseln das eine höhere
Vergrößerung bietet, also das Okular mit der niedrigeren Brennweite. Nach
dem Okularwechsel müssen Sie möglicherweise die Scharfeinstellung
erneut vornehmen (siehe Punkt 8).
7. Staubschutzkappe
Die Staubschutzkappe (15) schützt die Optik vor Verschmutzung. Vor
Gebrauch von der Tubusöffnung (2) entfernen.
8. Scharfeinstellungsknopf
Um Objekte scharf einzustellen, ist das Teleskop mit einer feinfühlig verstell-
baren Fokussiermechanik ausgestattet. Wenn Sie das Teleskop zum ersten
Mal verwenden oder von nahen Objekten zu weit entfernten Objekten wech-
seln, müssen Sie den Scharfeinstellungsknopf (4) gegebenenfalls einige
Male drehen, bis Sie ein scharfes Bild erhalten.
Wenn Sie nahe gelegene Objekte beobachten möchten (Naturbeobachtung),
beachten Sie bitte die minimal mögliche Entfernung von ca. 20 Metern.
9. LED Sucher (Nur bei Art. Nr. 90-62100)
Das Teleskop mit der Art. Nr. 90-62100 ist mit einem LED Sucher (10)
ausgestattet. Der LED Sucher projiziert einen roten Punkt am Visier um
Ihnen beim anvisieren der Objekte behilflich zu sein. Zur ersten Verwendung
müssen Sie die Schutzfolie der Batterie entfernen damit der LED Sucher
eingeschaltet werden kann. Sie müssen jetzt den LED Sucher mit dem
Teleskop zusammen ausrichten. Richten Sie dafür das Teleskop auf einen
Orientierungspunkt oder Gebäude aus, das ein paar hundert Meter ent-
fernt liegt und zentrieren Sie dieses Objekt im Sichtfeld. Benutzen Sie
dafür ein Objektiv mit einer niedrigen Vergrößerung (z. B. 20 mm oder
25 mm). Schalten Sie den LED Sucher an und stellen Sie mit Hilfe der
Justierschrauben den Sucher genau auf das Objekt ein.
Abschnitt II – Handbox
1. Batterien
Nehmen Sie die Abdeckung des Batteriefachs (11) auf der Oberseite der
Montierungsbasis ab, und legen Sie die Batterien in den Halter ein (No.
2). Verwenden Sie 6 Batterien vom Typ AA und achten Sie auf die korrekte
Polarität. Platzieren Sie den Batteriehalter im Batteriefach und schließen
Sie anschließend den Deckel. Verwenden Sie keine wiederaufladbaren
Batterien!
2. Handbox
Stellen Sie sicher, dass der EIN/AUS Schalter auf der Position AUS steht
(No. 8). Entnehmen Sie die Handbox aus der Halterung (7) und stecken
Sie ein Ende des Spiralkabels in die Buchse "HBX" und das andere
Ende in die RJ-45 Buchse der Handbox. Schalten Sie das Gerät ein. Die
Displaybeleuchtung wird eingeschaltet und es ertönt ein Signal.
3. Setup
Uhrzeit und Datum
Nach dem Einschalten werden Sie aufgefordert, Uhrzeit und Datum ein-
zugeben. Navigieren Sie durch die Anzeige mit den Pfeiltasten, und nutzen
Sie den Nummernblock (7) um Zahlen einzugeben. Abschließend drücken
Sie die Zentral-Taste (5) zwischen den Pfeiltasten um die Eingaben zu
bestätigen.
Sommerzeit
Wählen Sie, ob die Sommerzeit aktiv ist, indem Sie Status: ein bzw. Status:
aus im Menü einstellen.
Standort
Werden Sie nach dem Standort gefragt, können Sie diesen aus einer
Länder- bzw. Ortsliste auswählen, oder alternativ ihre GPS Koordinaten
unter “Benutzerdefinierter Ort” eingeben.
a) Land & Stadt
Wählen Sie Ihr Land aus der Liste mit Hilfe der Pfeiltasten “oben” und “unten”
aus. Blättern Sie durch die Ortsliste mit den Pfeiltasten “links” und “rechts”.
Drücken Sie anschließend die Zentral-Taste (5) zur Bestätigung.
b) Benutzerdefinierter Ort (Custom Site)
Geben Sie die Daten nach folgendem Schema ein:
Name: Wählen Sie eine Bezeichnung (z. B. Ortsname).
Lon: Geben Sie den Längengrad ein.
Lat: Geben Sie den Breitengrad ein.
Zone: Wählen Sie die Zeitzone für Ihren Standort
Ausgangsposition / OTA (Optical Tube Assembly) Zero
Als Startpunkt für die Ausrichtung muss die Teleskopsteuerung die Richtung
kennen, in die der Tubus (OTA) zeigt.
Im Feld „Azi:“ geben Sie den Wert „000“ für den Azimut ein.
Im Feld „Alt:“ geben Sie den Wert „00“ für die Höhenachse ein.
Lösen Sie beide Achsklemmungen und richten Sie nun die Teleskopöffnung
(2) waagerecht und in Richtung Norden aus. Nehmen Sie den im Lieferumfang
enthaltenen Kompass (18) mit integrierter Wasserwaage zur Hilfe und setzten
diesen in den Okularstutzen (3) ein, um die exakte Startposition zu bestim-
men. In dieser Position werden die Achsklemmungen wieder angezogen.
4. Ausrichtung
Um die GoTo Funktion zu nutzen, muss eine Ausrichtung durchgeführt
werden, bei der das Teleskop die Ausrichtung des Tubus ermittelt. Hierzu
werden je nach gewünschter Genauigkeit ein bis drei Sterne angefahren, die
Sie mit den Pfeiltasten zentrieren müssen.
Schritt 1: Drücken Sie die Zentral-Taste (5) und wählen Sie den ersten
Menüpunkt “Ausrichtung”. Wählen Sie die Ein-Stern, Zwei-Stern oder Drei-
Stern Ausrichtung aus.
Je mehr Sterne gewählt werden, desto genauer ist die Positionierung im
GoTo Betrieb.
Ein-Stern Ausrichtung (One-Star Alignment):
Schritt 2: Nachdem Sie diese Option gewählt haben, werden Sie nach
einem Ausrichtstern gefragt. Die Software wählt in der Regel einen hellen,
gut sichtbaren Stern aus, der deutlich heller als die umgebenden Sterne ist.
In den meisten Fällen sollten Sie den zuerst ausgewählten Stern benutzen.
Bestätigen Sie diesen mit der Zentral-Taste (5). Kennen Sie einen anderen,
hellen Stern, den Sie leicht finden, so wählen Sie diesen mittels Pfeiltasten
aus und bestätigen Sie mit der Zentral-Taste (5).
Schritt 3: Das Teleskop schwenkt zu der angenommenen Sternposition
und bittet Sie, diesen Stern mit den Pfeiltasten genau im Okulargesichtsfeld
zu zentrieren. Der Stern den Sie fokussieren wollen, ist deutlich heller als
die umgebenden Sterne. Haben Sie den Stern in die Mitte des Okulars
gebracht, bestätigen Sie mit der Zentral-Taste (5).
Zwei- und Drei-Stern Ausrichtung:
Die Durchführung ist identisch, allerdings wiederholen Sie Schritt 2 und 3
zweimal bzw. dreimal für weitere Ausrichtsterne.
Hinweis: Schwenken Sie das Teleskop nach der Ausrichtung nicht manuell,
benutzen Sie dafür nur die Pfeiltasten der Handbox. Versetzen Sie das Stativ
nicht, da sonst die Orientierung verloren geht und Sie das Teleskop erneut
ausrichten müssen.
5. Erhöhen der Genauigkeit:
Synchronisieren (Target Sync):
Hiermit kann die Genauigkeit erhöht werden:
Schwenken Sie mittels GoTo zu einem Ziel das Sie gut erkennen, und brin-
gen Sie dieses in die Mitte des Okulargesichtsfelds. Drücken Sie die Zentral-
Taste (5) und wählen Sie “Ausrichtung” und anschließend “Synchronisation”.
Das Teleskop gleicht nun die Position dieses Objekts mit der Datenbank
ab. Himmelsobjekte in der näheren Umgebung werden dann genauer
angefahren.
Getriebespiel-Ausgleich (Backlash Correction):
Sie können für verbesserte Genauigkeit das Getriebespiel bzw. “backlash
correction of the axis” trainieren. Dieses muss für beide Achsen separat
durchgeführt werden und ist in der Regel nicht notwendig.
Drücken Sie die Zentral-Taste (5) um ins Menü zu kommen und wählen Sie
“Ausrichten”. Anschließend wählen Sie dementsprechend “RA Spielausgl.”
bzw. “DEC Spielausgl.”. Folgen Sie der Menüführung um diese Korrektur
durchzuführen.
Abschnitt III – Menüs
Erste Inbetriebnahme:
Welcome screen Willkommen Bildschirm
Date and Time Datum und Uhrzeit
Daylight saving Sommerzeit
Status: off Status: Ein
Status: on Status: Aus
Custom Site Benutzerdefinierter Ort
Name: Name
Lon: Längengrad
Lat: Breitengrad
Zone: Zeitzone
https://tm.by
Интернет-магазин TM.by

8
Country & City Land & Stadt
Country: up and down Land: Pfeiltasten oben und unten
City: left and right Stadt: Pfeiltasten links und rechts
OTA Zero Ausgangsposition
Hauptmenü Übersicht:
• Ausrichtung
• Ein-Stern Teleskop auf einen Stern ausrichten
• Zwei-Stern Teleskop auf zwei Sterne ausrichten
• Drei-Stern Teleskop auf drei Sterne ausrichten
• Synchronisation Erhöht die Genauigkeit der Ausrichtung
• RA Spielausgl. RA Spielausgleich-Kalibrierung
• DEC Spielausgl. DEC Spielausgleich-Kalibrierung
• Navigation
• Sonnensystem Objekt Katalog des Sonnensystems
• Sternbilder Sternbilder Katalog
• Helle Sterne Katalog mit bekannten Sternen
• Messier Objekte Katalog mit hellen Deep-Sky-Objekten
• NGC Objekte Umfangreicher Katalog mit breiter Vielfalt
• IC Objekte Katalog mit schwachen Objekten
• Sh2 Objekte Katalog mit schwachen Objekten
• Bright Star Objekte Katalog mit hellen Sternen
• SAO Objekte Umfangreicher Sternen Katalog
• Benutzer Objekte Ermöglicht das speichern eigener Objekte
• Eingabe Koordin. Eigenen Punkt am Himmel festlegen
• Landobjekte Eigenen Punkt auf dem Land festlegen
• Zubehör
• Aktuelle Ereign. Derzeit sichtbare Objekte
• Auf- u. Untergang Anstiegs- und Abstiegszeit eines Objektes
• Mondphase Die aktuelle Mondphase
• Zeit Timer Funktionalität
• Alarm Alarm Einstellen
• Okular FOV Sichtfeld des Okulars
• Okular Vergr. Vergrößerung des Okulars
• Beleuchtung Bildschirm Helligkeit
• Teleskop parken In die Parkposition schwenken
• Einstellungen
• Datum/Zeit Datum und Uhrzeit einstellen
• Sommer/Winter Sommerzeit ein- oder ausstellen
• Standort Den aktuellen Ort einstellen
• Country & City Den Standort aus der Datenbank auswählen
• Custom Site Den Standort per GPS Daten eingeben
• Astron./Terrest. Zwischen Himmel- und Landzeile wechseln
• Sky Target Einstellung für Himmelsbeobachtung
• Land Target Einstellung für Landbeobachtung
• Nachführmodus Zwischen Azimuthal und
Equatorial Montierung wechseln
• Alt Telescope Alt./AZ-Montierung
• Eq Telescope EQ-Montierung
• Montierung Einstellungen für Teleskop Montierung
• Nachführgeschw. Die Nachführgeschwindigkeit einstellen
• Star Speed
• Solar Speed
• Moon Speed
• Customize Speed
• Sprache Sprache auswählen
• Teleskop Modell
• Reset Auf Werkseinstellung zurücksetzen
Abschnitt IV – Beobachtung
Nach abgeschlossener Ausrichtung führt das Teleskop automatisch mit
der richtigen Geschwindigkeit nach um die Erddrehung zu kompensieren.
Himmelsobjekte bleiben längere Zeit im Okulargesichtsfeld.
Hinweis: Schwenken Sie das Teleskop nach der Ausrichtung nicht manuell,
benutzen Sie dafür nur die Pfeiltasten der Handbox. Versetzen Sie das Stativ
nicht, da sonst die Orientierung verloren geht und Sie das Teleskop erneut
ausrichten müssen.
Nach der Ausrichtung schwenken Sie das Teleskop mittels GoTo Funktion
zu jedem Himmelsobjekt. Drücken Sie hierzu die Zentral-Taste (5) und
wählen “Navigation” aus dem Menü aus. Anschließend wählen Sie den
gewünschten Objektkatalog aus.
Blättern Sie mit den Pfeiltasten durch die Liste und bestätigen Sie das Objekt
mit der Zentral-Taste (5). Das Teleskop schwenkt jetzt automatisch zum
gewünschten Objekt.
Beispiel: Beobachten Sie den Jupiter
Je nach Standort und Datum kann Jupiter nicht zu jeder Zeit beobachtet
werden.
Ist er aktuell sichtbar, so gehen Sie ins Menü und wählen “Navigation” mit
den Pfeiltasten und bestätigen Ihre Auswahl mit der Zentral-Taste (5).
Dort wählen Sie Sonnensystem “Solar System” und blättern mit den
Pfeiltasten solange bis “Jupiter” ausgewählt ist. Bestätigen Sie Ihre Auswahl
mit der Zentral-Taste (5).
Das Teleskop schwenkt automatisch in Richtung Jupiter und es ertönt ein
lautes Signal, sobald der Planet positioniert wurde. Sie können nun mit der
Beobachtung beginnen.
350 mm ÷ 20 mm = 17,5X
350 mm ÷ 10 mm = 35X
1250 mm ÷ 25 mm = 50X
1250 mm ÷ 12,5 mm = 100X
Formel zur Berechnung der Vergrößerung:
Brennweite (Teleskop) ÷ Brennweite (Okular) = Vergrößerung
Beispiele:
Mögliche Beobachtungsobjekte
Nachfolgend haben wir für Sie einige sehr interessante Himmelsobjekte
ausgesucht und erklärt.
Mond
Der Mond ist der einzige natürliche Satellit der Erde
Durchmesser: 3.476 km
Entfernung: 384.400 km von der Erde entfernt
Der Mond ist nach der Sonne das zweithellste Objekt am Himmel.
Da der Mond einmal im Monat um die Erde kreist, verändert sich ständig
der Winkel zwischen der Erde, dem Mond und der Sonne; man sieht das an
den Zyklen der Mondphasen. Die Zeit zwischen zwei aufeinander folgenden
Neumondphasen beträgt etwa 29,5 Tage (709 Stunden).
Sternbild ORION / M42
Rektaszension: 05h 35m (Stunden : Minuten)
Deklination: -05° 25' (Grad : Minuten)
Entfernung: 1.344 Lichtjahre von der Erde entfernt
Mit einer Entfernung von etwa 1.344 Lichtjahren ist der Orion-Nebel (M42)
der hellste diffuse Nebel am Himmel - mit dem bloßen Auge sichtbar, und ein
lohnendes Objekt für Teleskope in allen Größen, vom kleinsten Feldstecher
bis zu den größten erdgebundenen Observatorien und dem Hubble Space
Telescope.
https://tm.by
Интернет-магазин TM.by

9
DE
Es handelt sich um den Hauptteil einer weit größeren Wolke aus
Wasserstoffgas und Staub, die sich mit über 10 Grad gut über die Hälfte
des Sternbildes des Orions erstreckt. Die Ausdehnung dieser gewaltigen
Wolke beträgt mehrere hundert Lichtjahre.
Sternbild LEIER / M57
Rektaszension: 18h 53m (Stunden : Minuten)
Deklination: +33° 02' (Grad : Minuten)
Entfernung: 2.412 Lichtjahre von der Erde entfernt
Der berühmte Ringnebel M57 im Sternbild Leier wird oft als der Prototyp
eines planetarischen Nebels angesehen; er gehört zu den Prachtstücken
des Sommerhimmels der Nordhalbkugel. Neuere Untersuchungen haben
gezeigt, dass es sich aller Wahrscheinlichkeit nach um einen Ring (Torus)
aus hell leuchtender Materie handelt, die den Zentralstern umgibt (nur
mit größeren Teleskopen sichtbar), und nicht um eine kugel- oder ellips-
oid förmige Gasstruktur. Würde man den Ringnebel von der Seitenebene
betrachten, würde er dem Dumbbell Nebel M27 ähneln. Wir blicken bei
diesem Objekt genau auf den Pol des Nebels.
Sternbild Füchslein / M27
Rektaszension: 19h 59m (Stunden : Minuten)
Deklination: +22° 43' (Grad : Minuten)
Entfernung: 1.360 Lichtjahre von der Erde entfernt
Der Dumbbellnebel M27 oder Hantel-Nebel im Füchslein war der erste
planetarische Nebel, der überhaupt entdeckt wurde. Am 12. Juli 1764 ent-
deckte Charles Messier diese neue und faszinierende Klasse von Objekten.
Wir sehen dieses Objekt fast genau von seiner Äquatorialebene. Würde man
den Dumbbellnebel von einem der Pole sehen, würde er wahrscheinlich die
Form eines Ringes aufweisen und dem Anblick ähneln, den wir von dem
Ringnebel M57 kennen.
Dieses Objekt kann man bereits bei halbwegs guten Wetter be dingungen bei
kleinen Vergrößerungen gut sehen.
HINWEISE zur Reinigung
Trennen Sie das Gerät vor der Reinigung von der Stromquelle (Netzstecker
ziehen oder Batterien entfernen)!
Reinigen Sie die Linsen (Okulare und/oder Objektive) nur mit einem wei-
chen und fusselfreien Tuch (z. B. Microfaser). Das Tuch nicht zu stark auf-
drücken, um ein Verkratzen der Linsen zu vermeiden.
Schützen Sie das Gerät vor Staub und Feuchtigkeit! Bewahren Sie es in
der mitgelieferten Tasche oder Transportverpackung auf. Entfernen Sie
Batterien aus dem Gerät, wenn es längere Zeit nicht benutzt wird!
EG-Konformitätserklärung
Eine „Konformitätserklärung“ in Übereinstimmung mit den anwendbaren
Richtlinien und entsprechenden Normen ist von der Meade Instruments
Europe GmbH & Co. KG erstellt worden. Diese kann auf Anfrage jederzeit
eingesehen werden.
ENTSORGUNG
Entsorgen Sie die Verpackungsmaterialien sortenrein. Beachten Sie bitte
bei der Entsorgung des Geräts die aktuellen gesetzlichen Bestimmungen.
Informationen zur fachgerechten Entsorgung erhalten Sie bei den kommu-
nalen Entsorgungsdienstleistern oder dem Umweltamt.
Werfen Sie Elektrogeräte nicht in den Hausmüll!
Gemäß der Europäischen Richtlinie 2002/96/EG über Elektro-
und Elektronik-Altgeräte und deren Umsetzung in nationales Recht
müssen verbrauchte Elektrogeräte getrennt gesammelt und einer umwelt-
gerechten Wiederverwertung zugeführt werden. Entladene Altbatterien
und Akkus müssen vom Verbraucher in Batteriesammelgefäßen entsorgt
werden. Informationen zur Entsorgung alter Geräte oder Batterien, die nach
dem 01.06.2006 produziert wurden, erfahren Sie beim kommunalen Ent-
sorgungsdienstleister oder Umweltamt.
Batterien und Akkus dürfen nicht im Hausmüll entsorgt werden, son-
dern Sie sind zur Rückgabe gebrauchter Batterien und Akkus gesetz-
lich verpflichtet. Sie können die Batterien nach Gebrauch entweder in unse-
rer Verkaufsstelle oder in unmittelbarer Nähe (z.B. im Handel oder in
kommunalen Sammelstellen) unentgeltlich zurückgeben.
Batterien und Akkus sind mit einer durchgekreuzten Mülltonne sowie dem
chemischen Symbol des Schadstoffes bezeichnet.
A D ?
1 Batterie enthält Cadmium
2 Batterie enthält Quecksilber
3 Batterie enthält Blei
Garantie und Garantiezeitverlängerung
Die Garantiezeit beträgt 2 Jahre und beginnt am Tag des Kaufs. Bitte be-
wahren Sie die Rechnung auf. Sie können die Garantiezeit auf 5 Jahre ver-
längern, wenn Sie sich auf www.bresser.de/garantie registrieren und den
kurzen Fragebogen ausfüllen. Zur Inanspruchnahme der 5-Jahre-Garantie
müssen Sie die Registrierung innerhalb von 3 Monaten nach dem Kauf (es
gilt das Datum des Kaufbelegs) durchführen. Danach erlischt der Anspruch
auf die verlängerte Garantie. Sollten Sie Probleme mit Ihrem Gerät haben,
wenden Sie sich bitte an unseren Service. Bitte senden Sie uns keine Artikel
ohne vorherige telefonische Rücksprache. Viele Probleme lassen sich be-
reits am Telefon erledigen; falls nicht, kümmern wir uns um den Transport.
Sollte das Problem nach Ablauf der Garantie auftreten, oder nicht von der
Garantie gedeckt sein, so erhalten Sie von uns kostenfrei einen Kostenvor-
anschlag über die Reparaturkosten.
Service Hotline: +49 (0) 2872 - 80 74-210
Wichtig bei Rücksendungen:
Um Transportschäden zu vermeiden achten Sie bitte darauf, dass das Gerät
sorgfältig verpackt in der Original-Verpackung zurückgegeben wird. Bitte den
Kassenbon (oder eine Kopie) sowie die Fehlerbeschreibung beifügen. Ihre
gesetzlichen Rechte werden durch diese Garantie nicht eingeschränkt.
Ihr Fachhändler: ................................................................................
Art. Nr.: ............................................................................................
Fehlerbeschreibung: ..........................................................................
.......................................................................................................
.......................................................................................................
.......................................................................................................
Name: .............................................................................................
Straße: .............................................................................................
PLZ/Ort: ..........................................................................................
Telefon: ............................................................................................
Kaufdatum: .......................................................................................
Unterschrift: .....................................................................................
https://tm.by
Интернет-магазин TM.by

10
General Information
About this Instruction Manual
Please read the safety instructions in this manual carefully. To avoid damage
to the unit and the risk of injury, only use this product as described in the
manual.
Keep the instruction manual handy so that you can easily look up information
on all the functions.
CAREFUL
You will find this symbol before every section of text that
deals with the risk of minor to severe injuries resulting from
improper use.
ATTENTION
You will find this symbol in front of every section of text
which deals with the risk of damage to property or the
environment.
Intended Use
This product is intended only for private use.
It was developed for the magnified display of things in nature.
General Warning
RISK OF BLINDNESS
Never use this device to look directly at the sun or in the direct prox-
imity of the sun. Doing so may result in a risk of blindness.
CHOKING HAZARD
Children should only use the device under adult supervision. Keep
packaging material, like plastic bags and rubber bands, out of the
reach of children, as they pose a choking hazard.
FIRE RISK
Do not place the device, particularly the lenses, in direct sunlight.
The concentration of light could cause a fire.
RISK OF ELECTRIC SHOCK
This device contains electronic components which operate via a
power source (power supply and/or batteries). Children should
only use the device under adult supervision. Only use the device as
described in the manual; otherwise, you run the risk of an electric
shock.
RISK OF CHEMICAL BURN
Keep batteries out of the reach of children! Make sure you insert the
batteries correctly. Empty or damaged batteries could cause burns
if they come into contact with the skin. If necessary, wear adequate
gloves for protection.
RISK OF FIRE/EXPLOSION
Do not expose the device to high temperatures. Use only the rec-
ommended batteries. Do not short-circuit the device or batteries, or
throw them into a fire. Excessive heat or improper handling could
trigger a short-circuit, a fire or an explosion.
ATTENTION
Do not disassemble the device. In the event of a defect, please
contact your dealer. The dealer will contact the Service Centre and
can send the device in to be repaired, if necessary.
Privacy Protection
This device is intended only for private use. Please heed
the privacy of other people. Do not use the device to look
into apartments, for example.
Accessories may vary depending on the model.
Parts overview (No. 1-8)
B Telescope tube
C Tube opening
D Eyepiece connection
E Focus wheel
F Handbox
G Eyepiece holder
H Handbox tray
I Azimuthal lock
J Tripod
1) LED viewfinder (only with Art.No. 90-62100)
1! Battery compartment
1@ Locking screw
1# Accessory tray
1$ Altitude locking knob
1% Dust cover
1^ Eyepieces
1& Moon filter
1* Compass
1( Star map
2) Software CD
Handbox (No. 9)
B Red light source
C Handbox display
D Plus/minus key
E Illumination
F Arrow keys
G Centre key
H Number pad
I Mini-USB port
J RJ-45 port
1) RJ-22 port
Part I – Construction
1. General/Location
Before you begin assembly, choose a suitable location for your telescope. It
is best to build the telescope in a place where you have a clear view of the
skies, a stable footing and sufficient space around you.
Before beginning assembly, remove all the parts from the packaging, and,
using the diagram, check to make sure no parts are missing.
2. Tripod
Take the tripod (9) out of the box. Carefully open the legs and place the
tripod on a level surface place and lock the accessory tray (13) on the centre
knob and rotate until it snaps in place (No. 3).
Note: Please do not forget to remove the accessory tray before collapsing
the tripod.
3. Telescope
Loosen the screw in the dovetail mount so that it is completely retracted
(No. 4). Place the telescope with the dovetail in the mount and tighten the
screw. Make sure that the National Geographic logo is upright.
4. Altitude knob
Loosen the vertical knob by rotating it anticlockwise, align the optical tel-
escope tube (1) horizontally and retighten the knob (No. 5).
5. Mount
Place the mount base's mounting holes on the tripod's mounting screws and
tighten them (No. 6).
6. Eyepiece
Remove one eyepiece from its eyepiece holder (6) and slide it into the
eyepiece connection (3). Tighten the holding screws (No. 5). Start with the
lowest magnification eyepiece, which has the highest focal length printed on
it (e.g. 20 mm or 25 mm, depending on your model) to locate objects and
find the correct focus. If you have the object you want to view centred in
the field of view, switch to a higher magnification by using an eyepiece with
https://tm.by
Интернет-магазин TM.by

EN
11
shorter focal length. After changing the eyepiece, it might be necessary to
adjust the focus again (see section 8).
7. Dust cover
Remove the dust cover (15) that protects the objective lens of the optical
tube opening (2).
8. Focus wheel
To get objects into focus, your telescope is equipped with a precise focus
control. When you use the telescope for the first time, you might need to turn
the focus wheel (4) multiple times to achieve a focused image. To try it out,
pick a landmark or a building far away in daylight or bright twilight, and turn
the focus wheel until the object comes into focus. Remember, objects to be
observed cannot be closer than 20 metres away.
9. LED viewfinder (only included with 90-62100)
The telescope with Art. No. 90-62100 is equipped with a LED viewfinder
(10). The LED viewfinder projects a red dot on the visor to help you point
at objects. For the first use, remove the plastic cover on the battery so the
LED can be switched on. To use the viewfinder, you need to align the finder
to the telescope optic. To achieve this, point the telescope at a landmark or
building that is a few hundred metres away and centre this object in the field
of view while using an eyepiece with a low magnification (e.g. 20 mm or 25
mm). Switch on the LED viewfinder and adjust it using the alignment screws
of the viewfinder.
Part II – Handbox
1. Batteries
Remove the cover of the battery compartment (11), located on the top side
of the mount's base, and insert the batteries in the battery holder (No. 2).
Use 6 AA batteries and make sure the polarities are aligned correctly. Place
the holder into the compartment and cover it. Do not use rechargeable bat-
teries.
2. Handbox
Ensure that the on/off switch is in the off position (No. 8). Remove the
handbox from the handbox tray (7), and plug one end of the cable into the
port labelled with "HBX" and the other one into the RJ-45 port of the hand-
box. Flip the switch to the on position. The handbox display should light up,
accompanied by a sound.
3. Setup
Time and Date
After turning on the handbox, you will be prompted to enter the date and
time. Do so by navigating with the arrow keys and entering the numbers with
the number pad (7) on the handbox. When done, press the centre key (5),
located between the arrow keys.
Daylight saving time
If the daylight saving time is in effect, select status:on. If daylight saving time
is not in effect, select status:off.
Location
When asked for your location, you can either choose a city near you by
selecting the 'Country & City' option or enter your GPS coordinates by select-
ing 'Custom Site'.
a) Country & City
Select the country where you are by using the up and down arrow keys. Then
select the city by using the left and right arrow keys. When done, use the
centre key (5) to select the location.
b) Custom Site
Enter the details of your location as follows:
Name: Enter a custom name for your location.
Lon: Enter the longitudinal coordinate of your location.
Lat: Enter the latitudinal coordinate of your location.
Zone: Enter the time zone of your location.
OTA (Optical Tube Assembly) Zero
Here you will be asked to provide the orientation of the telescope.
In the 'Azi:' field, enter '000'.
In the 'Alt:' field, enter '00'.
Open the Altitude and Azimuthal locking knobs. Adjust the telescope so that
the tube opening (2) is pointing directly north and is level. It is recommended
that you use the included compass (18) and bubble level to make sure the
device is positioned accurately. You can put the compass into the eyepiece
connection (3). Then retighten the locking knobs.
4. Alignment
In order to use your telescope's Go To mode, you must align the telescope
properly so it knows where it is pointing when it is turned on. There are three
ways to align your telescope: one-, two- and three-star alignment.
Step 1: To start the alignment, press the centre key (5) on the handbox
and select the first menu option, 'Telescope Align'. There you will be able to
choose between one-, two- and three-star alignment.
The more stars you use for the alignment the higher the slewing precision of
your telescope will be.
One-Star Alignment:
Step 2: After you select this option, you will be prompted to select a target
star. The software will select a star that is very visible in the night sky. If you
happen to know of a star you can see with the naked eye, you can choose it
by pressing the up and down arrow keys and then selecting it with the centre
key (5). In most cases, you will want to select the first option presented to
you. Do so by pressing the centre key (5).
Step 3: The telescope will now slew to that star and will prompt you to centre
it in the field of view, which you can do by using the arrow keys. The star
you're focusing on is the brightest star in the region your telescope is point-
ing at. When the star is centred, confirm the position with the centre key (5).
The telescope is now aligned.
Two- and Three-Star Alignment:
The procedure is similar to one-star alignment. The only difference is that
you'll have to repeat steps 2 and 3 twice or thrice depending on the type of
alignment you've chosen.
Note: If you have aligned the telescope, don’t move it manually. Use the
arrow keys on the handbox to make adjustments. If you do move it manually
or change the tripod orientation, the telescope has to be realigned.
5. Further Adjustment:
Target Sync:
With this method, you can further improve the alignment of the telescope.
After slewing to a star target you know, you can centre the object precisely in
the field of view. Press the centre key (5) and select 'Telescope Align', then
'Target Sync'. The telescope will align to that target and have more precise
positioning for further targets you want to observe.
Backlash Correction:
You can improve the precision of the telescope by training the backlash
correction of the axis. This must be done separately for each axis and is not
necessary for most cases.
Simply go to the main menu by pressing the centre key (5) and select
'Telescope Align' and then 'RA BKlash Corr.' to adjust the right ascension
axis (horizontal axis) or 'DEC BKlash Corr.' to adjust the declination axis
(vertical axis). Then follow the on-screen instructions.
Part III – Menus
Initial Start:
Welcome screen
Date and Time
Daylight saving
Status: off
Status: on
Custom Site
Name:
Lon:
Lat:
Zone:
Country & City
Country: up and down
City: left and right
OTA Zero
Main Menu Overview:
• Telescope Align
• One Star Align Aligns the telescope with a single star
• Two Star Align Aligns the telescope with two stars
• Three Star Align Aligns the telescope with three stars
• Target Sync Further improves the alignment
of the telescope
• RA BKlash Corr. Calibrate RA axis backlash
• DEC Bklash Corr. Calibrate DEC axis backlash
https://tm.by
Интернет-магазин TM.by

12
• Navigation
• Solar System Object catalogue of the solar system
• Constellation Catalogue with the stellar constellations
• Famous Star Famous star catalogue
• Messier Catal. Catalogue with bright deep-sky objects
• NGC Catalog. Extensive catalogue with broad variety
• IC Catalogue Catalogue with faint objects
• Sh2 Catalog. Catalogue with faint objects
• Bright Star Cat Catalogue with bright stars
• SAO Star Catal. Extensive star catalogue
• Customer Objects Allows you to store your own objects
• Input RA and DEC Insert a custom point in the sky
• Custom Land Goal Insert a custom land target
• Utilities
• Current Objects Currently visible objects
• Object Rise/Set Rising and setting time of an object
• Curr. Lunar Phase The current lunar phase
• Timer Timer function
• Alarm Set up an alarm
• Eyepiece FOV Field of view of the eyepiece
• Eyepiece Magn. Magnification of the eyepiece
• Display Illumin. Display brightness
• Parkposition Slew to park position
• Setup
• Time and Date Enter time and date
• Daylight Saving Enable/disable daylight saving
• Site Setting Set the current location
• Country & City Set the current location according to a city
• Custom Site Set the current location by using
GPS coordinates
• Sky/Land Switch between sky and land targets
• Sky Target Setting for sky observation
• Land Target Setting for land target observation
• AZ / EQ Switch between Azimuthal
and equatorial mounting
• Alt Telescope Alt./AZ mount type
• Equ Telescope EQ mount type
• Telescope Mount Configure telescope mount settings
• Tracking Rate Set the tracking rate
• Star Speed
• Solar Speed
• Moon Speed
• Customize Speed
• Language Change the language
• Telescope Model
• Reset Reset to factory settings
Part IV – Observation
After aligning the telescope, the motors in the mount will begin to move the
telescope so that the Earth’s rotation is compensated for and the objects
stay in the field of view of the telescope.
Note: If you have aligned the telescope, don’t move it manually. Use the
arrow keys on the handbox to make adjustments. If you do move it manually
or change the tripod position, the telescope has to be realigned.
Once you have aligned the telescope, you can slew to every object in the
night sky. This is done by pressing the centre key (5) on the handbox and
selecting the 'Navigation' option from the menu.
Select the object catalogue you prefer from the menu by using the arrow
keys. Press the centre key (5) to confirm your selection.
When you select an object catalogue, the first object of the catalogue will be
displayed. You can change the currently displayed object by pressing the up
and down arrow keys.
Select the object you want to view with the telescope by pressing the centre
key (5). The telescope will then slew to that position.
Example: Let’s observe Jupiter.
Jupiter is visible in different parts of the world at different times depending on
location, time of year and local conditions.
If it is visible from your location and the telescope is aligned, you can navi-
gate to Jupiter by following these steps. Press the centre key (5) on your
handbox and select the 'Navigation' option. Move the selection bar with the
arrow keys, then press the centre key (5) for confirmation.
Next, select the 'Solar System' menu option and scroll with the arrow keys
to find Jupiter. Select Jupiter by pressing the centre key (5).
Once you select Jupiter, your telescope will automatically slew towards
Jupiter. When the telescope reaches Jupiter's position, a loud beeping noise
will let you know that the telescope is done moving. You may then begin your
observation.
350 mm ÷ 20 mm = 17.5X
350 mm ÷ 10 mm = 35X
1250 mm ÷ 25 mm = 50X
1250 mm ÷ 12.5 mm = 100X
Formula for calculating magnification:
Focal length (Telescope) ÷ Focal length (Eyepiece) = Magnification
Examples:
Possible observation targets
The following section details several interesting and easy-to-find celestial
objects you may want to observe through your telescope.
The moon
The moon is Earth's only natural satellite.
Diameter: 3,476 km
Distance: 384,400 km from Earth (average)
The moon has been known to humans since prehistoric times. It is the sec-
ond brightest object in the sky, after the sun. Because the moon circles the
Earth once per month, the angle between the Earth, the moon and the sun
is constantly changing; one sees this change in the phases of the moon.
The time between two consecutive new moon phases is about 29.5 days
(709 hours).
Constellation Orion: The Orion Nebula (M 42)
Right Ascension: 05h 35m (hours : minutes)
Declination: -05° 22' (Degrees : minutes)
Distance: 1,344 light years from Earth
Though it is more than 1,344 light years from Earth, the Orion Nebula
(M 42) is the brightest diffuse nebula in the sky. It is visible even with the
https://tm.by
Интернет-магазин TM.by

EN
13
naked eye and a worthwhile object for telescopes of all types and sizes.
The nebula consists of a gigantic cloud of hydrogen gas with a diameter of
hundreds of light years.
Constellation Lyra: The Ring Nebula (M 57)
Right Ascension: 18h 53m (hours : minutes)
Declination: +33° 02' (Degrees : minutes)
Distance: 2,412 light years from Earth
The famous Ring Nebula (M57) in the Lyra constellation is often viewed as
the prototype of a planetary nebula. It is one of the magnificent features of
the Northern Hemisphere's summer sky. Recent studies have shown that it
is probably comprised of a ring (torus) of brightly shining material that sur-
rounds the central star (only visible with larger telescopes), and not a gas
structure in the form of a sphere or an ellipse. If you were to look at the
Ring Nebula from the side, it would look like the Dumbbell Nebula (M 27).
When viewed from Earth, we are looking directly at the pole of the nebula.
Constellation Vulpecula (Little Fox):
The Dumbbell Nebula (M 27)
Right Ascension: 19h 59m (hours : minutes)
Declination: +22° 43' (Degrees : minutes)
Distance: 1,360 light years from Earth
The Dumbbell Nebula (M 27) was the first planetary nebula ever discov-
ered. On 12 July 1764, Charles Messier discovered this new and fascinat-
ing class of objects. We see this object almost directly from its equatorial
plane. If we could see the Dumbbell Nebula from one of its poles, we
would probably see the shape of a ring, something very similar to what we
know as the Ring Nebula (M 57). In reasonably good weather, we can see
this object well, even with low magnification.
Notes on cleaning
Before cleaning the device, disconnect it from the power supply by removing
the plug or batteries.
Clean the eyepieces and lenses only with a soft, lint-free cloth, like a micro-
fibre cloth. Do not apply excess pressure to the cloth to avoid scratching
the lenses.
Protect the device from dust and moisture. Store it in the supplied bag or
transportation packaging. The batteries should be removed from the unit if it
has not been used for a long time.
EC Declaration of Conformity
Meade Instruments Europe GmbH & Co. KG has issued a 'Declaration of
Conformity' in accordance with applicable guidelines and corresponding
standards. This can be viewed any time upon request.
DISPOSAL
Dispose of the packaging materials properly, according to their type, such
as paper or cardboard. Contact your local waste-disposal service or envi-
ronmental authority for information on the proper disposal.
Do not dispose of electronic devices in the household garbage!
As per Directive 2002/96/EC of the European Parliament on waste
electrical and electronic equipment and its adaptation into German law,
used electronic devices must be collected separately and recycled in an
environmentally friendly manner.
Empty, old batteries must be disposed of at battery collection points by the
consumer. You can find out more information about the disposal of devices
or batteries produced after 6 January 2006 from your local waste-disposal
service or environmental authority.
In accordance with the regulations concerning batteries and re-
chargeable batteries, disposing of them in the normal household
waste is explicitly forbidden. Please make sure to dispose of your
used batteries as required by law — at a local collection point or in the retail
market. Disposal in domestic waste violates the Battery Directive.
Batteries that contain toxins are marked with a sign and a chemical symbol.
A D ?
1 battery contains cadmium
2 battery contains mercury
3 battery contains lead
Warranty and warranty term extension
The warranty term is two years from the date of purchase. Please keep your
proof of purchase. Register at www.bresser.de/warranty and fi ll out a brief
questionnaire to get your warranty term extended to fi ve years. Registra-
tion must be completed within three months of purchase (date of receipt) to
validate the warranty. If you register thereafter, the warranty term will not be
extended. If you have problems with your device, please contact our cus-
tomer service fi rst. Do not send any products without consulting us fi rst by
telephone. Many problems with your device can be solved over the phone. If
the problem cannot be resolved by phone, we will take care of transporting
your device to be repaired. If the problem occurred after the warranty ended
or it is not covered by our warranty terms, you will receive an estimate of
repair costs, free of charge.
Service Hotline: +49 (0) 2872 - 80 74-210
Important for any returns:
Please make sure to return the device carefully packed in the original pack-
aging in order to prevent damage during transport. Also, please enclose your
receipt for the device (or a copy) and a description of the defect. This war-
ranty does not imply any restriction of your statutory rights.
Your dealer: ......................................................................................
Art. No.: ...........................................................................................
Description of problem: ......................................................................
.......................................................................................................
.......................................................................................................
.......................................................................................................
Name: .............................................................................................
Street: .............................................................................................
City/Postcode: ..................................................................................
Telephone: .......................................................................................
Date of purchase: ..............................................................................
Signature: ........................................................................................
https://tm.by
Интернет-магазин TM.by

14
Informations générales
A propos de ce manuel
Veuillez lire attentivement les consignes de sécurité présentées dans ce
manuel. N’utilisez ce produit comme décrit dans ce manuel, afin d’éviter tout
risque de blessure ou de dommage sur l’appareil.
Conservez le manuel d’utilisation afin de pouvoir revoir à tout moment les
informations concernant certaines fonctionnalités.
DANGER !
Ce symbole précède un passage destiné à mettre
l’utilisateur en garde face à un danger susceptible de
résulter d’un usage inapproprié et pouvant entraîner des
blessures graves voire mortelles.
ATTENTION !
Ce symbole précède un passage destiné à mettre
l’utilisateur en garde face à un danger susceptible de
résulter d’un usage inapproprié et pouvant entraîner des
dommages matériels ou de l‘environnement.
Utilisation conforme / destination du produit
Ce produit est exclusivement destiné pour un usage privé.
Il a été conçu pour l’agrandissement d’images dans le cadre d’expériences
d’observation de la nature.
Consignes générales de sécurité
RISQUE DE CECITE !
Ne jamais regarder directement le soleil à travers cet appareil en
le pointant directement en sa direction. L’observateur court un
RISQUE DE CECITE !
RISQUE D’ETOUFFEMENT !
Les enfants ne doivent utiliser cet appareil que sous surveillan-
ce. Maintenez les enfants éloignés des matériaux d’emballa-
ge (sacs plastiques, bandes en caoutchouc, etc.) ! RISQUE
D’ETOUFFEMENT !
RISQUE D’INCENDIE !
Ne jamais orienter l’appareil – en particuliers les lentilles – de
manière à capter directement les rayons du soleil ! La focalisation
de la lumière peut déclencher des incendies.
RISQUE D’ELECTROCUTION !
Cet appareil contient des pièces électroniques raccordées à une
source d’alimentation électrique (par bloc d’alimentation et/ou
batteries). Ne jamais laisser les enfants manipuler l’appareil sans
surveillance ! L’utilisation de l’appareil doit se faire exclusivement
comme décrit dans ce manuel, faute de quoi un RISQUE d’ELEC-
TROCUTION peut exister !
RISQUE DE BLESSURE !
Les batteries ne sont pas destinées à être manipulées par des
enfants ! En équipant l’appareil des batteries, il convient de veiller à
ce que la polarité des batteries soit correcte. Les batteries endom-
magées ou ayant coulées causent des brûlures par acide, lorsque
les acides qu’elles contiennent entrent en contact direct avec la
peau. Le cas échéant, il convient d’utiliser des gants de protection
adaptés.
RISQUE DE BLESSURE !
Ne pas exposer l’appareil à des températures trop élevées. N’utilisez
que les batteries conseillées. L’appareil et les batteries ne doivent
pas être court-circuitées ou jeter dans le feu ! Toute surchauffe ou
manipulation inappropriée peut déclencher courts-circuits, incen-
dies voire conduire à des explosions !
ATTENTION !
Ne pas démonter l’appareil ! En cas de défaut, veuillez vous
adresser à votre revendeur spécialisé. Celui-ci prendra contact
avec le service client pour, éventuellement, envoyer l’appareil en
réparation.
PROTECTION de la sphère privée !
Cet appareil est conçu uniquement pour un usage privé.
Respectez la sphère privée de vos concitoyens et n’utilisez
pas cet appareil pour, par exemple, observer ce qui se
passe dans un appartement !
Les accessoires peuvent varier en fonction du modèle.
Vue d’ensemble des pièces (No. 1-8)
B Tube du télescope
C Ouverture du tube
D Porte oculaire
E Molette de mise au point
F Raquette de commande
G Emplacement de réserve pour oculaire
H Porte raquette
I Frein en Azimuth
J Trépied
1) Viseur LED (seulement inclus avec 90-62100)
1! Compartiment des piles
1@ Vis de blocage
1# Plateau accessoires
1$ Molette de blocage en Altitude
1% Cache objectif
1^ Oculaires
1& Filtre lunaire
1* Boussole
1( Carte céleste
2) Logiciel sur CD
Raquette de commande (No. 9)
B Source lumineuse rouge
C Ecran d’affichage
D Touche Plus/Moins
E Eclairage
F Touches de déplacement
G Touche centrale
H Clavier numérique
I Port mini-USB
J Port RJ-45
1) Port RJ-22
Chapitre I – Assemblage :
1. General/Lieux
Avant de commencer l’assemblage, choisissez un endroit approprié pour
votre télescope. Il est préférable de monter votre instrument dans un endroit
où vous pouvez disposer d’une vue dégagée sur le ciel, un sol stable et
suffisamment d’espace autour de vous.
Avant de commencer l’assemblage, enlever toutes les pièces de l’emballage
et en utilisant le diagramme, assurez-vous qu’aucune pièce ne manque.
2. Trépied
Sortez le trépied (9) de la boite. Ouvrez soigneusement les jambes du
trépied, placez celui-ci sur une surface plane. Placez ensuite la tablette porte
accessoire (13) sur l’axe de centrage, puis la faire tourner jusqu’à ce que
celle-ci vienne en butée pour prendre sa place (No. 3).
Note: Ne pas oublier d’enlever la tablette porte accessoires avant de
démonter le trépied.
3. Tube optique
Desserrez la vis sur la queue d’aronde de telle façon, qu’elle soit totalement
libre (No. 4). Placez le tube optique sur la queue d’aronde sur la monture et
serrez fermement la vis. Assurez-vous que le logo "National Geographic" soit
bien orienté vers le haut.
4. Molette d’Altitude
Desserrez la mollette du mouvement vertical en la tournant dans le sens
contraire des aiguilles d’une montre, alignez le tube du télescope optique
(1) à l’horizontal puis resserrez la molette (No. 5).
5. Monture
Placez les perçages de montage à la base de la monture sur les vis de mon-
tage du trépied, puis serrez-les fermement (No. 6).
6. Oculaire
Retirez un oculaire de son emplacement (6) puis glissez le dans le porte
oculaire (3). Serrez la vis de blocage fermement mais sans excès (No. 5).
https://tm.by
Интернет-магазин TM.by

FR
15
Toujours commencer avec le grossissement le plus faible, qui possède
la focale la plus longue inscrite sur l’oculaire (ex. 20 mm ou 25 mm, en
fonction de votre modèle) pour localiser les objets et trouver la mise au
point correcte. Si vous avez l’objet centré dans votre champ de vision,
vous pouvez alors choisir un grossissement plus important en utilisant un
oculaire d’une longueur focale plus courte. Après avoir change d’oculaire, il
peut s’avérer nécessaire de refaire la mise au point pour obtenir une image
parfaitement nette (voir point 8 ci-dessous).
7. Cache de protection
Enlever le cache de protection (15) qui protège la lentille de l’objectif de
l’ouverture du tube optique (2).
8. Molette de mise au point
Pour effectuer la mise au point sur les objets, votre télescope est équipé
avec d’une commande de contrôle précise. Si vous utiliser votre télescope
pour la première fois, vous aurez sans doute besoin de tourner la molette
de mise au point (4) de multiples fois pour obtenir une image parfaitement
nette. Pour vous entrainer, utilisez en journée, un point de repère terrestre
ou un bâtiment éloigné. Si vous désirez observer des objets proches, tenez
compte du fait qu’ils doivent se situer à plus de 20 mètres.
9. Viseur LED (seulement inclus avec 90-62100)
Le télescope Art. No. 90-62100 est équipé d’un viseur LED (10). Le viseur
LED projette un point rouge dans le viseur pour vous aider à pointer les objets.
Pour la première utilisation, enlevez le film plastique sur la pile, de façon à ce
que la LED puisse s’allumer. Pour l’utiliser, vous devez préalablement aligner
le viseur sur le tube optique. Pour effectuer cette opération, pointez le téles-
cope vers un repère terrestre ou un bâtiment distant de quelques centaines
de mètres et centrez l’objet dans le champ de vision en utilisant un oculaire
de faible grossissement (ex. 20 mm ou 25 mm). Mettez le viseur LED sous
tension et ajuster-le à l’aide des vis situées au dessus de celui-ci.
Chapitre II – Raquette de commande
1. Piles
Enlevez le couvercle du compartiment des piles (11), sur le dessus de
la base de la monture et insérez les piles dans le compartiment (No. 2).
Assurez-vous de bien utiliser des piles du type AA (x6) en respectant le sens
de polarité. Placez le support dans le compartiment et le recouvrir. Ne pas
utiliser de piles rechargeables.
2. Raquette de commande
Assurez-vous que l’interrupteur ON/OFF soit bien sur la position OFF (No.
8). Enlevez la raquette de commande de son support (7) et branchez une
des extrémités du câble dans le port marqué "HBX" et l’autre dans le port
RJ-45 de la raquette de commande. Mettre l’interrupteur sur la position ON.
L’affichage de la raquette de commande s’allume accompagné d’un son.
3. Réglages
Heure et date
Après avoir allumé la raquette de commande, il vous sera demandé d’entrer la
date et l’heure de votre montre en utilisant les touches de déplacement et le
clavier (7) sur la raquette de commande. Une fois ces opérations effectuées,
appuyez sur la touche centrale (5), située entre les touches de déplacement.
Heure d’été
Sélectionnez si l’heure d’été doit être active ou non en sélectionnant respec-
tivement le statut:on ou statut:off
Réglage Site (Lieu d’observation)
Lorsque le système vous demande d’entrer votre lieu d’observation, vous
pouvez aussi bien sélectionner une ville proche en sélectionnant l’option «
pays & ville » ("Country & City") ou entrer vos coordonnées GPS en sélec-
tionnant "Custom Site".
a) Country & City (Pays & ville)
Vous pouvez sélectionner le pays à partir duquel vous observez en utilisant
les touches flèches vers le haut ou vers le bas. Sélectionnez ensuite la ville
en utilisant de la même façon les touches de déplacements. Une fois cette
opération effectuée, utilisez la touche centrale (5) pour sélection le lieu.
b) Custom Site (Site utilisateur)
Entrez les détails de votre lieu comme suit :
Nom: entrez un nom de votre choix pour ce lieu.
Lon: entrez les coordonnées en longitude de votre lieu.
Lat: entrez les coordonnées en latitude de votre lieu.
Zone: entez le fuseau horaire de votre lieu (+ 1 heure pour la France).
Position de départ du tube optique (OTA)
Vous serez invité à effectuer l’orientation du télescope.
Dans le champ „Azi:“ vous devrez entrer „000“.
Dans le champ „Alt:“ vous devrez entrer „00“.
Desserrez les molettes de blocage en altitude et en azimut. Placez le téles-
cope avec le coté objectif (2) dirigé vers le Nord et placez le tube de niveau
à l’horizontale. Il est recommandé d’utiliser la boussole (18) et le niveau à
bulle fourni pour trouver la position de départ correcte. Vous pouvez ensuite
resserrer les molettes de blocage en Altitude et en Azimut.
4. Alignement
Pour pouvoir utiliser correctement votre télescope en mode GoTo, un
alignement préalable est essential pour que votre instrument sache dans
quelle direction pointer lorsque vous le mettez sous tension. Il y a 3 façons
de d’effectuer l’alignement: Sur une, deux ou trois étoiles.
Etape 1: Pour commencer l’alignement, appuyez sur la touche centrale
(5) de la raquette de commande et sélectionnez la première option dans le
menu “Alignement”. Vous aurez alors la possibilité de choisir entre l’aligne-
ment sur une, deux ou trois étoiles.
Plus vous utilisez d’étoiles pour l’alignement, plus la précision de suivi du
télescope sera grande.
Alignement sur une étoile:
Etape 2: Une fois sélectionné cette option, il vous sera demandé de sélec-
tionner une étoile cible. Le logiciel sélectionne une étoile particulièrement
visible dans le ciel nocturne. Si vous connaissez une étoile que vous pouvez
repérer à l’œil nu, vous pouvez également la choisir en appuyant sur les
touches de déplacement vers le haut ou vers le bas pour la sélectionner,
puis appuyer sur la touche centrale (5). Dans la plupart des cas, vous pou-
vez simplement sélectionner la première option qui se présente à vous en
appuyant sur la touche centrale (5).
Etape 3: Le télescope va maintenant pointer vers cette étoile et vous
demandera de la centrer dans le champ de vision. Vous pouvez effectuer
cette opération en utilisant les touches de déplacement. Cette étoile est la
plus lumineuse dans la zone du ciel vers laquelle votre télescope va pointer.
Une fois l’étoile centrée, vous pouvez confirmer la position avec la touche
centrale (5). Le télescope est maintenant aligné.
Alignement sur deux- et trois étoiles:
La procédure est similaire à l’alignement sur une étoile avec la différence, qu’il
vous faudra répéter ici les étapes 2 et 3, respectivement deux et trois fois.
Note: Lorsque vous avez aligné le télescope, ne le déplacer pas manuelle-
ment, mais utilisez les touches de déplacement de la raquette de comman-
de. Si vous le déplacez manuellement ou changez l’orientation du trépied,
vous devrez réaligner votre instrument.
5. Améliorations complémentaires:
Sync cible:
Par cette méthode, vous pouvez améliorer significativement l’alignement du
télescope.
Après avoir pointé une cible que vous connaissez, vous pouvez la centrer
avec précision. En appuyant sur la touche centrale (5) et en sélectionnant
“Alignement” puis “Synchr. Cible” le télescope s’alignera sur cette cible
et aura une précision encore supérieure pour les autres cibles que vous
désirez observer.
Correction Backlash/calibrage:
Vous pouvez améliorer la précision de votre télescope en calibrant ce que
l’on appelle la “correction backlash” des axes. Cela doit être effectué sépa-
rément pour chaque axe mais n’est pas nécessaire dans la plupart des cas.
Allez simplement au menu principal en appuyant sur la touche centrale (5) et
sélectionner “Alignement” puis respectivement “Corr. Backl. RA” puis “Corr.
Backl. DEC”. Puis suivez simplement les instructions affichées sur l’écran.
Chapitre III – Menus
Démarrage initial:
Welcome Screen Ecran de bienvenue
Date and Time Date et heure
Daylight Saving Heure d’été
Status: off Statut: off/désactivé
Status: on Statut: on/activé
Custom Site Site utilisateur
Name: Nom:
Lon: Lon:
Lat: Lat:
Zone: Zone:
Country & City Pays & Ville
Country: up and down Pays: haut et bas
City: left and right City: gauche et droite
OTA Zero OTA Zéro
https://tm.by
Интернет-магазин TM.by

16
Vue d’ensembe du menu principal:
• Alignement
• Align. 1 étoile Alignement du télescope sur une étoile
• Align. 2 étoiles Alignement du télescope sur deux étoiles
• Align. 3 étoiles Alignement du télescope sur trois étoiles
• Synchr. Cible Amélioration de l’alignement
• Corr. Backl. RA Calibration de l’axe AD
• Corr. Backl. DEC Calibration de l’axe DEC
• Objets
• Sytème Solaire Calalogue d’objets su système solaire
• Constellations Catalogue des constellations
• Meilleurs Objets Catalogues des étoiles fameuses
• Messier Catal. Catalogue des objets lumineux
du ciel profond
• NGC Catalog. Catalogue étendu avec une large variété
• IC Catalogue Catalogue avec des objets ténus
• Sh2 Catalog. Catalogue avec des objets ténus
• Bright Star Cat. Catalogue avec les étoiles lumineuses
• SAO Star Catal. Catalogue avec des étoiles étendues
• Objets Utilisat. Possibilité de stocker vos propres objets
• Cordonné. RA/DEC Insérer un point utilisateur dans le ciel
• Repères Terrest. Insérer une cible utilisateur terrestre
• Utilités
• Objets Courants Objets actuellement visibles
• Lever et Coucher Heures de lever et coucher d’un objet
• Phases de LUNE Phase de la Lune actuelle
• Horloge Fonctionnalité temporisateur Timer
• Alarme Réglage de l’alarme
• Oculaire FOV Champ de vision de l’oculaire
• Calc. Oculaire Grossissement de l’oculaire
• Rétroéclairage Luminosité de l’écran
• Fonction Parking Déplacement vers la position parking
• Setup
• Date et Heure Entrée heure et date
• Décal. Horaire Activation/Désactivation de l’heure d’été
• Réglage Site Réglage de la position actuelle
• Country & City Réglage de la position actuelle par ville
• Custom Site Réglage de la position actuelle en
utilisant les coordonnées GPS
• Ciel / Terre Sélection entre cibles terrestres et célestes
• Sky Target Observation d’une cible céleste
• Land Target Observation d’une cible terrestre
• AZ / EQ Sélection entre mode Azimutal
ou équatorial
• Alt Telescope Type monture Alt./AZ
• Equ Telescope Type monture EQ
• Monture Configure les réglages monture
du télescope
• Taux de Suivi Réglage du taux de suivi
• Star Speed Vitesse sidérale
• Solar Speed Vitesse planétaire
• Moon Speed Vitesse Lunaire
• Customize Speed Vitesse utilisateur
• Language Change la langue
• Modèle Télescope
• Reset Retour aux réglages usines
Chapitre IV – Observation
Une fois l’alignement effectué, les moteurs de la monture commenceront à
déplacer le télescope de façon à compenser le mouvement de rotation de
la Terre et ainsi, à conserver en permanence l’objet observé au centre du
champ de vision de l’oculaire.
Note: Lorsque vous avez aligné le télescope, ne le déplacer pas manuelle-
ment, mais utilisez les touches de déplacement de la raquette de comman-
de. Si vous le déplacez manuellement ou changez l’orientation du trépied,
vous devrez réaligner votre instrument.
Une fois que vous avez aligné le télescope, vous pouvez pointer votre instru-
ment vers n’importe quel objet du ciel nocturne. Cela s’effectue en appuyant
sur la touche centrale (5) de la raquette de commande et en sélectionnant
dans la menu l’option Navigation.
Dans le menu, vous pouvez sélectionner les objets du catalogue, que vous
préférez en appuyant sur la touche centrale (5) pour le sélectionner.
Le premier objet du catalogue sera affiché et vous pourrez passer au(x)
suivant(s) en appuyant sur les touches de déplacement vers le haut ou vers
le bas.
Pour finir, en appuyant sur la touché de centrage (5) vous pouvez sélection-
ner l’objet et le télescope pointe alors cette direction.
Exemple: Observons Jupiter
Jupiter est visible dans différentes régions du monde à des moments, des
heures et des endroits différents en fonction de l’endroit à partir duquel vous
observez, ainsi que des conditions locales.
Si celle-ci est visible à partir de votre lieu d’observation et que votre télescope
est aligné, vous pouvez naviguer vers Jupiter en appuyant sur la touche cen-
trale (5) de votre raquette de commande, en sélectionnant l’option “Objets
(Navigation)”, et en déplaçant la barre de sélection à l’aide des touches de
déplacement. Puis appuyez sur la touche centrale (5) pour confirmer.
Vous pouvez alors sélectionner l’option menu “Système Solaire” et en
appuyant sur les touches de déplacement vers le haut ou vers le bas, sélec-
tionner Jupiter en appuyant sur la touche centrale (5).
Votre télescope va se déplacer de manière autonome et pointer vers Jupiter.
Lorsque le pointage de Jupiter est effectué, le télescope le confirmera en
émettant un bip sonore venant de la raquette de commande.
350 mm ÷ 20 mm = 17,5X
350 mm ÷ 10 mm = 35X
1250 mm ÷ 25 mm = 50X
1250 mm ÷ 12,5 mm = 100X
Formule pour calculer l‘agrandissement :
Distance focale (Télescope) ÷ Distance focale (Oculaire) = Grossissement
Exemples:
Objets à observer possibles
Ci-après nous avons sélectionné et expliqué pour vous quelques corps
célestes et amas stellaire très intéressants.
Lune
La lune est le seul satellite naturel de la terre.
Diamètre: 3476 Km
Distance: 384 400 Km de la terre.
La lune est connue depuis des temps préhistoriques. Elle est, après le soleil,
le deuxième objet le plus brillant dans le ciel. Comme la lune fait le tour de
la terre une fois par mois l‘angle entre la terre, la lune et le soleil se modifie
en permanence; on s‘en aperçoit dans les cycles des quartiers de lune. La
période entre deux phases lunaires successives de la Nouvelle Lune est de
29,5 jours env. (709 heures).
Constellation ORION / M42
L’ascension droite: 05h 35m (heures : minutes)
Déclinaison: -05° 22' (degré : minutes)
Distance : 1344 années lumière de la terre.
https://tm.by
Интернет-магазин TM.by

FR
17
Avec une distance de 1344 années lumière env.la nébuleuse Orion (M42)
est la nébuleuse diffuse la plus brillante dans le ciel - visible à l‘oeil nu, et
un objet valable pour des télescopes de toutes les tailles, des jumelles les
plus petites jusqu’aux observatoires terrestres les plus grands et le Hubble
Space Telescope.
Il s’agit de la partie principale d‘un nuage nettement plus grand composé
d‘hydrogène et de poussière qui s‘étend de 10 degrés au-delà de la moitié
de la constellation de l‘Orion. L‘étendu de ce nuage immense est de plu-
sieurs centaines d‘années lumière.
Constellation LEIER / M57
L’ascension droite: 18h 53m (heures : minutes)
Déclinaison: +33° 02' (degré : minutes)
Distance : 2412 années lumière de la terre.
La nébuleuse annulaire très connue M57 dans la constellation Leier est
considérée souvent comme le prototype d‘une nébuleuse planétaire. Elle
fait partie des plus beaux objets du ciel d‘été de l‘hémisphère nord. Des
examens plus récents ont montré qu‘il s‘agit, de toute vraisemblance, d‘un
anneau (Torus) de matière très rayonnante qui entoure l‘étoile centrale (visi-
ble uniquement avec des télescopes plus grands), et non d‘une structure
gazeuse sphérique ou ellipsoïdale. Si l‘on regardait la nébuleuse annulaire
de profil elle ressemblerait à la nébuleuse M27 Dumbell. Avec cet objet nous
voyons précisément le pôle de la nébuleuse.
Constellation Füchslein / M27
L’ascension droite: 19h 59m (heures : minutes)
Déclinaison: +22° 43' (degré : minutes)
Distance : 1360 années lumière de la terre.
La nébuleuse M27 Dumbbell ou Hantelbebel dans le Füchslein était la premiè-
re nébuleuse planétaire jamais découverte. Le 12. juillet 1764 Charles Messier
a découvert cette nouvelle et fascinante classe d‘objets. Nous voyons cet
objet presque entièrement au niveau son équateur. Si l‘on voyait la nébuleuse
Dumbell de l‘un des pôles il présenterait probablement la forme d‘un anneau et
ressemblerait à ce que nous connaissons de la nébuleuse annulaire M57.
On peut déjà bien apercevoir cet objet avec des grossissements peu élevés
lors de conditions météorologiques à peu près bonnes.
REMARQUE concernant le nettoyage
Avant de nettoyer l’appareil, veuillez le couper de son alimentation électri-
que (tirez le câble d’alimentation ou enlevez les batteries) !
Les lentilles (oculaires et/ou objectifs) ne doivent être nettoyé qu’avec un
chiffon doux et ne peluchant pas (p. ex. microfibres). Le chiffon doit être
passé sans trop le presser sur la surface, afin d’éviter de rayer les lentilles.
Protégez l’appareil de la poussière et de l’humidité ! Conservez l’appareil
dans sa sacoche (de transport) fournie. Les batteries doivent être retirées
de l’appareil lorsque celui-ci est destiné à ne pas être utilisé un certain
temps.
Déclaration de conformité CE
Meade Instruments Europe GmbH & Co. KG a émis une « déclaration
de conformité » conformément aux lignes directrices applicables et aux
normes correspondantes. Celle-ci peut être consultée à tout moment sur
demande.
ELIMINATION
Eliminez l’emballage en triant les matériaux. Pour plus d’informations
concernant les règles applicables en matière d’élimination de ce type des
produits, veuillez vous adresser aux services communaux en charge de la
gestion des déchets ou de l’environnement.
Ne jamais éliminer les appareils électriques avec les ordures ménagè-
res ! Conformément à la directive européenne 2002/96/CE sur les
appareils électriques et électroniques et ses transpositions aux plans
nationaux, les appareils électriques usés doivent être collectés séparément
et être recyclés dans le respect des réglementations en vigueur en matière
de protection de l’environnement. Les batteries déchargées et les accumu-
lateurs usés doivent être apportés par leurs utilisateurs dans les points de
collecte prévus à cet effet. Pour plus d’informations concernant les règles
applicables en matière d’élimination des batteries produites après la date du
01.06.2006, veuillez vous adresser aux services communaux en charge de
la gestion des déchets ou de l’environnement.
En conformité avec les règlements concernant les piles et les piles
rechargeables, jeter ces produits avec les déchets ménagers nor-
maux est strictement interdit. Veuillez à bien déposer vos piles usagées
dans des lieux prévus à cet effet par la Loi, comme un point de collecte
locale ou dans un magasin de détail (une élimination de ces produits avec
les déchets domestiques constituerait une violation des directives sur les
piles et batteries).
Les piles qui contiennent des toxines sont marquées avec un signe et un
symbole chimique.
A D ?
1 pile contenant du cadmium
2 pile contenant du mercure
3 pile contenant du plomb
Garantie et extension de la durée de la garantie
La durée de la garantie est de 2 ans et elle commence au jour de l’achat. Le tic-
ket de caisse doit être conservé comme preuve d’achat. Afi n de pouvoir profi ter
d’une extension à 5 ans facultative de la garantie, il vous suffi t de vous enregis-
trer sur notre site Internet sous le lien suivant www.bresser.de/warranty et de
répondre à quelques questions. Pour pouvoir profi ter de cette garantie, vous
devez vous enregistrer dans les 3 mois qui suivent l’achat (date mentionnée sur
votre ticket de caisse). Après ce délai, vous perdez votre droit à une extension
de la garantie. Si vous avez des problèmes avec votre appareil, veuillez contac-
ter d'abord notre service client - S'il vous plaît, NE JAMAIS ENVOYER les pro-
duits sans nous consulter au préalable par téléphone. En général, de nombreux
problèmes peuvent être résolus par téléphone sinon nous nous occupons du
transport aller/retour. Si le problème survient après la période de garantie ou
que le problème ne soit pas couvert par nos conditions de garantie, vous rece-
vrez un devis gratuit de notre part sur les coûts de réparation.
Service Hotline: +49 (0) 2872 - 80 74-210
Important pour les retours :
Assurez-vous de retourner l'appareil soigneusement emballé dans l'embal-
lage d'origine pour éviter tout dommage de transport. S'il vous plaît, veuillez
également joindre le reçu de caisse (ou une copie) et une description de
la panne constatée. Cette garantie ne comporte aucune restriction de vos
droits légaux.
Votre revendeur spécialisé : ................................................................
Art. No. : ..........................................................................................
Description du problème : ...................................................................
.......................................................................................................
Nom : ..............................................................................................
Rue : ...............................................................................................
Code postale / lieu : ..........................................................................
Téléphone : ......................................................................................
Date d’achat : ...................................................................................
Signature : ........................................................................................
https://tm.by
Интернет-магазин TM.by

18
Informazioni generali
Informazioni sul presente manuale
Leggere con attenzione le avvertenze di sicurezza riportate nel manuale. Per
evitare danni all‘apparecchio o possibili lesioni, utilizzare questo prodotto
soltanto come descritto manuale.
Conservare il manuale di istruzioni per poter attingere alle informazioni
riguardanti tutte le funzioni di comando dell’apparecchio anche in un secon-
do momento.
PERICOLO!
Questo simbolo precede sempre le porzioni di testo
che avvisano di eventuali pericoli legati a un utilizzo
non conforme che può comportare lesioni gravi o
avere persino conseguenze letali.
ATTENZIONE!
Questo simbolo precede sempre le porzioni di testo
che avvisano di eventuali pericoli legati a un utilizzo
non conforme che può comportare danni materiali o
ambientali.
Scopo di utilizzo
Questo prodotto è destinato esclusivamente all’utilizzo privato.
È stato progettato per ingrandire le immagini legate alle osservazioni in
natura.
Avvertenze di sicurezza generali
PERICOLO PER LA VISTA!
Mai utilizzare questo apparecchio per fissare direttamente il sole o
altri oggetti nelle sue vicinanze. PERICOLO PER LA VISTA!
PERICOLO DI SOFFOCAMENTO!
I bambini possono utilizzare l’apparecchio soltanto sotto la vigilanza
di un adulto. Tenere i materiali di imballaggio (sacchetti di plasti-
ca, elastici, ecc.) fuori dalla portata dei bambini! PERICOLO DI
SOFFOCAMENTO!
PERICOLO DI INCENDIO!
Non esporre l’apparecchio, in particolare le lenti, ai raggi solari
diretti. La compressione della luce può provocare un incendio.
RISCHIO DI FOLGORAZIONE!
Questo apparecchio contiene componenti elettronici azionati da una
sorgente di corrente (alimentatore e/o batterie). Non consentire ai
bambini di utilizzare l‘apparecchio senza supervisione! L’utilizzo deve
avvenire soltanto conformemente a quanto descritto nella guida, in
caso contrario esiste il PERICOLO di SCOSSA ELETTRICA!
RISCHIO DI CORROSIONE!
Le batterie non devono essere manipolate dai bambini! Per inserire
le batterie rispettare la polarità indicata. Le batterie scariche o
danneggiate possono causare irritazioni se vengono a contatto con
la pelle. Se necessario indossare un paio di guanti di protezione
adatto.
PERICOLO DI INCENDIO/ESPLOSIONE!
Non esporre l’apparecchio a temperature elevate. Utilizzare esclu-
sivamente le batterie consigliate. Non cortocircuitare o buttare nel
fuoco l‘apparecchio e le batterie! Un surriscaldamento oppure un
utilizzo non conforme può provocare cortocircuiti, incendi e persino
esplosioni!
ATTENZIONE!
Non smontare l’apparecchio! In caso di guasto, rivolgersi al proprio
rivenditore specializzato. Egli provvederà a contattare il centro di
assistenza e se necessario a spedire l’apparecchio in riparazione.
PROTEZIONE della privacy!
Il binocolo è stata realizzato solo per l’uso privato.
Rispettare la privacy delle altre persone: ad esempio
non utilizzare l’apparecchio per guardare negli appar-
tamenti altrui.
Gli accessori possono variare a seconda del modello.
Panoramica dei pezzi (n. 1-8)
B Tubo del telescopio
C Apertura del tubo
D Tronco oculare
E Manopola di regolazione della messa a fuoco
F Handbox
G Supporto oculare
H Superficie di appoggio per handbox
I Blocco azimutale
J Treppiede
1) Cercatore LED (solo nel codice art. 90-62100)
1! Scomparto batterie
1@ Vite di arresto
1# Supporto accessori
1$ Manopola di arresto per la regolazione dell'altezza
1% Tappo antipolvere
1^ Oculari
1& Filtro lunare
1* Bussola
1( Carta del cielo
2) CD del software
Handbox (n. 9)
B Sorgente luce a infrarossi
C Schermo handbox
D Tasto più/meno
E Illuminazione
F Tasti freccia
G Tasto centrale
H Tastierino numerico
I Porta mini-USB
J Porta RJ-45
1) Porta RJ-22
Parte I – Montaggio
1. Indicazioni generali/ubicazione
Prima di iniziare il montaggio, scegliere un'ubicazione idonea per il telesco-
pio. Conviene montare questo apparecchio in un punto in cui si disponga di
una buona vista del cielo, di una superficie solida e di spazio sufficiente.
Per prima cosa estrarre tutti i pezzi dalla confezione. Controllare in base al
diagramma se sono presenti tutti i pezzi.
2. Treppiede
Estrarre il treppiede (9) dalla confezione. Allargare le gambe del treppiede e
collocare il treppiede su una superficie solida e piana. Collocare il supporto
per gli accessori (13) sul pomello di arresto del perno del treppiede e girare
il supporto fino a innestarlo (n. 3).
Nota: prima di chiudere il treppiede non dimenticarsi di togliere il supporto
per gli accessori.
3. Telescopio
Allentare la vite di arresto del morsetto del prisma fino a quando la vita
non sporge più nell'attacco (n. 4). Inserire la guida prisma del telescopio
nell'attacco e stringere la vite a mano. Assicurarsi che il logo "National
Geographic" sia dritto.
4. Regolazione dell'altezza
Allentare la manopola di arresto per la regolazione dell'altezza girandola in
senso antiorario e allineare il tubo del telescopio ottico (1) orizzontalmente.
Quindi bloccare di nuovo il dispositivo di regolazione dell'altezza (n. 5).
5. Sostegno
Collocare i fori del lato inferiore del sostegno sulle viti che sporgono dal
treppiede (n. 6). Le viti sono molleggiate e si innestano nei fori con un "clic"
udibile. Quindi stringere a mano le viti.
6. Oculare
Togliere un oculare dal supporto (6) e collocarlo nell'apposito tronco (3).
Stringere con precauzione la vite di bloccaggio del tronco dell'oculare (n. 5).
https://tm.by
Интернет-магазин TM.by

IT
19
Iniziare con l'oculare che offre l'ingrandimento minore, ossia l'oculare con la
maggiore distanza focale (ad es. 20 mm o 25 mm, a seconda del modello).
Non appena l'oggetto si trova al centro del campo visivo, si può passare
ad un oculare che offra un maggiore ingrandimento, ossia quello con la
minore distanza focale. Dopo aver sostituito l'oculare, sarà eventualmente
necessario regolare di nuovo la messa a fuoco (vedere punto 8).
7. Tappo antipolvere
Il tappo antipolvere (15) protegge l'ottica dalla sporcizia. Toglierlo dall'aper-
tura del tubo (2) prima dell'uso.
8. Manopola di regolazione della messa a fuoco
Per mettere a fuoco gli oggetti, il telescopio è dotato di un meccanismo di
messa a fuoco con regolazione di precisione. Quando si utilizza il telescopio
per la prima volta o si passa da oggetti vicini (osservazione della natura)
a oggetti molto lontani, è eventualmente necessario girare alcune volte la
manopola di regolazione della messa a fuoco (4) prima di ottenere un'im-
magine nitida.
Se si desidera osservare oggetti vicini, mantenere la distanza minima possi-
bile di circa 20 m.
9. Cercatore LED (solo nel codice art. 90-62100)
Il telescopio con il codice art. 90-62100 è dotato di un cercatore LED (10).
Il cercatore LED proietta un punto rosso nel mirino per agevolare il punta-
mento degli oggetti. Per utilizzarlo per la prima volta è necessario rimuovere
il film protettivo della batteria in modo da poter accendere il cercatore LED.
A questo punto bisogna allineare il cercatore LED con il telescopio. Per
farlo, dirigere il telescopio su un punto di orientamento o un edificio distante
un paio di centinaia di metri e centrare questo oggetto nel campo visivo.
Utilizzare a tale scopo un obiettivo dall'ingrandimento ridotto (ad es. 20 mm
o 25 mm). Accendere il cercatore LED e regolarlo esattamente sull'oggetto
con l'ausilio delle viti di regolazione.
Sezione II – Handbox
1. Batterie
Togliere il coperchio dello scomparto batterie (11) situato nel lato superiore
della base del sostegno e inserire le batterie nel supporto (n. 2). Utilizzare 6
batterie (tipo AA, Mignon) rispettando la polarità. Collocare le batterie nello
scomparto batterie e chiudere il coperchio. Non usare batterie ricaricabili!
2. Handbox
Assicurarsi che l'interruttore ON/OFF si trovi in posizione OFF (n. 8).
Togliere l'handbox dal supporto (7) e inserire un'estremità del cavo a spi-
rale nella presa "HBX" e l'altra estremità nella presa RJ-45 dell'handbox.
Accendere l'apparecchio. Si accende l'illuminazione del display e suona un
segnale.
3. Configurazione
Ora e data
Dopo l'accensione viene richiesto di inserire l'ora a e la data. Spostarsi all'in-
terno dello schermo con i tasti freccia e utilizzare il tastierino numerico (7)
per immettere i numeri. Quindi premere il tasto centrale (5) situato tra i tasti
freccia per confermare i dati immessi.
Ora legale
Selezionare se è attiva l'ora legale impostando Status: On o Status: Off nel
menu.
Paese/Stato (Ubicazione)
Se viene richiesta l'ubicazione, è possibile selezionarla da un elenco di
"Country & City" oppure scegliere le proprie coordinate GPS alla voce
"Custom Site".
a) Country & City (Paese e città)
Selezionare il proprio Paese dall'elenco per mezzo dei tasti freccia "In alto"
e "In basso". Sfogliare l'elenco delle località con i tasti freccia "Sinistra" o
"Destra". Poi premere il tasto centrale (5) per confermare.
b) Custom Site (Località definita dall'utente)
Immettere i dati secondo lo schema seguente:
Nome: scegliere una denominazione (ad es. il nome della località).
Lon: immettere il grado di longitudine.
Lat: immettere il grado di latitudine.
Zona: scegliere il fuso orario per la propria ubicazione.
Posizione iniziale / OTA (Optical Tube Assembly) Zero
Come punto di inizio per l'allineamento, è necessario che il dispositivo di
controllo del telescopio conosca la direzione verso cui punta il tubo (OTA).
Nel campo "Azi:" inserire il valore "000" per l'azimut.
Nel campo "Alt:" inserire il valore "00" per la quota.
Allentare i due bloccaggi degli assi e orientare ora l'apertura del telescopio
(2) orizzontalmente e in direzione nord. Aiutarsi con la bussola (18) con livella
ad acqua integrata compresa nella fornitura e inserirla nel tronco dell'ocu-
lare (3) per determinare la posizione di partenza esatta. In questa posizione
vanno serrati di nuovo i bloccaggi degli assi.
4. Allineamento
Per utilizzare la funzione GoTo è necessario eseguire un allineamento nel
quale il telescopio rileva l'allineamento del tubo. A tale scopo bisogna punta-
re il telescopio su due-tre stelle, a seconda della precisione desiderata, che
bisogna centrare con i tasti freccia.
Passo 1: premere il tasto centrale (5) e selezionare la prima voce di menu,
"Allineamento". Selezionare l'allineamento con una stella, due stelle o tre
stelle.
Quanto maggiore è il numero di stelle selezionato, tanto più preciso è il
posizionamento nella modalità GoTo.
Allineamento con una stella (One-Star Alignment):
Passo 2: dopo aver selezionato questa opzione, viene richiesta una stella di
allineamento. Di solito il software sceglie una stella luminosa e ben visibile
che sia sensibilmente più luminosa delle stelle circostanti. Se si conosce
un'altra stella luminosa che si è in grado di trovare facilmente, selezionarla
con i tasti freccia e confermare con il tasto centrale (5).
Passo 3: il telescopio ruota sulla posizione acquisita per la stella e invita a
centrare esattamente questa stella nel campo visivo dell'oculare con i tasti
freccia. La stella è sensibilmente più luminosa delle stelle circostanti. Una
volta portata la stella al centro dell'oculare, confermare con il tasto centrale (5).
Allineamento con due e tre stelle:
Il procedimento è identico, con la differenza che bisogna ripetere due o tre
volte i passi 2 e 3 per le ulteriori stelle di allineamento.
Nota: dopo l'allineamento ruotare il telescopio solo per mezzo del comando
manuale e non spostare il treppiede. In caso contrario si perde l'allinea-
mento.
5. Aumento della precisione:
Sincronizzazione / Target Sync:
In questo modo è possibile aumentare la precisione:
Per mezzo di GoTo, spostarsi su un obiettivo che si riconosce bene e
portarlo al centro del campo visivo dell'oculare. Premere il tasto centrale
(5), selezionare "Allineamiento" e poi "Sincronizzazione". Ora il telescopio
sincronizza la posizione di questo oggetto con la banca dati. In seguito sarà
possibile puntare con maggiore precisione sugli oggetti più vicini.
Compensazione del gioco degli ingranaggi / Backlash correction:
Per migliorare la precisione è possibile regolare il gioco degli ingranaggi o
"backlash correction of the axis". Va fatto separatamente per i due assi e di
regola non è necessario.
Premere il tasto centrale (5) per passare al menu e selezionare "Allineamento".
Selezionare poi "Calibrate RA" o "Calibrate DEC". Seguire le istruzioni del
menu per procedere a questa correzione.
Sezione III – Menu
Prima messa in funzione:
Welcome Screen
Date and Time
Daylight Saving
Status: off
Status: on
Custom Site
Name:
Lon:
Lat:
Zone:
Country & City
Country: up and down
City: left and right
OTA Zero
Panoramica del menu principale:
• Allineamento
• A. to una Stella Allineamento del telescopio su una stella
• A. due Stella Allineamento del telescopio su due stelle
• A. tre Stella Allineamento del telescopio su tre stelle
• Sincronizzazione Aumenta la precisione dell'allineamento
https://tm.by
Интернет-магазин TM.by

20
• Calibrate RA Calibrazione della compensazione
del gioco RA
• Calibrate DEC Calibrazione della compensazione
del gioco DEC
• Navigazione
• Sistema Solare Catalogo degli oggetti del sistema solare
• Costellazione Catalogo delle costellazioni
• Miglione oggetti Catalogo con stelle note
• Messier Catal. Catalogo con oggetti del profondo cielo
• NGC Catalog. Esauriente catalogo con una gran varietà
• IC Catalogue Catalogo con oggetti deboli
• Sh2 Catalog. Catalogo con oggetti deboli
• Bright Star Cat. Catalogo con stelle luminose
• SAO Star Catal. Esauriente catalogo di stelle
• Utilizzat. Ogg. Possibilità di salvare oggetti propri
• Coord. RA/DEC Stabilire un punto nel cielo
• Rifer. Terrestri Stabilire un punto proprio a terra
• Inst.d´accessori
• Att. Avvenimento Oggetti attualmente visibili
• Sorgere/Tramonto Ora di ascesa e discesa di un oggetto
• Fasi Lunari Fase lunare attuale
• Temporizzatore Funzionalità di timer
• Allarme Impostazione dell'allarme
• Oculare FOV Campo visivo dell'oculare
• Calcolo Oculare Ingrandimento dell'oculare
• Rego. Luminositá Luminosità dello schermo
• Parcheggio Rotazione in posizione di riposo
• Installazione
• Data/Ora Impostazione di data e ora
• Inverno/Estate Impostazione o annullamento
dell'ora legale
• Paese/Stato Impostazione dell'ubicazione attuale
• Country & City Selezione dell'ubicazione dalla banca dati
• Custom Site Immissione dell'ubicazione
mediante dati GPS
• Astron. / Terr. Alternanza tra modalità cielo e modalità terra
• Sky Target Osservazione del cielo
• Land Target Osservazione del terreno
• Inseguimento Alternanza tra sostegno azimutale
ed equatoriale
• Alt Telescope Sostegno Alt/AZ
• Equ Telescope Sostegno EQ
• Montatura Impostazioni per il sostegno del telescopio
• Velocitá Impostazione della velocità di inseguimento
• Star Speed
• Solar Speed
• Moon Speed
• Customize Speed
• Idioma Selezione della lingua
• Mod. di Telescop
• Azzerare Ripristino delle impostazioni di fabbrica
Sezione IV – Osservazione
Una volta concluso l'allineamento, il telescopio esegue il puntamento auto-
matico alla velocità corretta per compensare la rotazione terrestre. Gli ogget-
ti celesti permangono a lungo nel campo visivo dell'oculare.
Nota: dopo l'allineamento ruotare il telescopio solo per mezzo del comando
manuale e non spostare il treppiede. In caso contrario si perde l'allinea-
mento.
Dopo l'allineamento servirsi della funzione GoTo per ruotare il telescopio su
ogni oggetto celeste. Premere a tale scopo il tasto centrale (5) e selezio-
nare "Navigazione" nel menu.
Poi selezionare il catalogo di oggetti desiderato.
Sfogliare l'elenco con i tasti freccia e confermare l'oggetto con il tasto cen-
trale (5). Il telescopio ruota sull'oggetto desiderato.
Esempio: osservazione di Giove
Giove non può essere osservato in ogni momento, dipende dall'ubicazione
e dalla data.
Se attualmente è visibile, passare al menu, selezionare "Navigazione" con i
tasti freccia e confermare la selezione con il tasto centrale (5).
Scegliere il sistema solare "Sistema Solare" e sfogliare con i tasti freccia fino
a selezionare "Jupiter". Confermare la selezione con il tasto centrale (5).
Il telescopio ruota su Giove e, non appena il pianeta viene posizionato,
suona un segnale.
350 mm ÷ 20 mm = 17,5X
350 mm ÷ 10 mm = 35X
1250 mm ÷ 25 mm = 50X
1250 mm ÷ 12,5 mm = 100X
Formula per il calcolo dell’ingrandimento:
Distanza focale telescopio ÷ Distanza focale oculare = Ingrandimento
Esempi:
Possibili oggetti di osservazione
Qui di seguito abbiamo indicato alcuni corpi celesti e ammassi stellari molto
interessanti che abbiamo selezionato e spiegato apposta per Lei.
Luna
La Luna è l’unico satellite naturale della Terra.
Diametro: 3.476 km
Distanza: 384.400 km dalla terra
La Luna era conosciuta già dalla preistoria. È il secondo oggetto più lumi-
noso nel cielo dopo il Sole. Siccome la Luna compie un giro completo
intorno alla Terra in un mese, l’angolo tra la Terra, la Luna e il Sole cambia
continuamente; ciò si vede anche dai cicli delle fasi lunari. Il periodo di
tempo che intercorre tra due fasi successive di luna nuova è di circa 29,5
giorni (709 ore).
Costellazione ORIONE / M42
Ascensione retta: 05h 35m (ore: minuti)
Declinazione: -05° 22‘ (gradii : minuti)
Distanza: 1.344 anni luce dalla terra
Con una distanza di circa 1.344 anni luce la nebulosa di Orione è la nebulo-
sa diffusa più luminosa nel cielo. Visibile anche ad occhio nudo, costituisce
comunque un degno oggetto di osservazione ai telescopi di ogni dimen-
sione, dal più piccolo cannocchiale ai più grandi osservatori terrestri, fino
all’Hubble Space Telescope.
https://tm.by
Интернет-магазин TM.by

IT
21
Si tratta della parte principale di una nuvola in realtà ben più grossa di idro-
geno e polvere che si estende per più di 10 gradi su più della metà della
costellazione di Orione. L’estensione di questa nuvola gigantesca è di diver-
se centinaia di anni luce.
Costellazione LIRA / M57
Ascensione retta: 18h 53m (ore : minuti)
Declinazione: +33° 02‘ (gradi : minuti)
Distanza: 2.412 anni luce dalla terra
La famosa nebulosa anulare M57 viene spesso citata come esempio di
nebulosa planetaria e di oggetto estivo da osservare nell‘emisfero boreale.
Recenti scoperte invece hanno confermato che si tratta, con tutta probabi-
lità, di un anello (toro) di materia luminosa che circonda la stella centrale,
e non un inviluppo sferoidale o ellissoidale. Osservandola dal piano su cui
poggia l‘anello, dovrebbe quindi assomigliare molto alla Nebulosa Manubrio
M27 invece noi la vediamo in prossimità di uno degli assi polari
Costellazione Vulpecula / M27
Ascensione retta: 19h 59m (ore : minuti)
Declinazione: +22° 43‘ (gradi : minuti)
Distanza: 1.360 anni luce dalla terra
La Nebulosa Manubrio M27 o il Manubrio nella Vulpecula è stata la prima
nebulosa planetaria ad essere scoperta. Il 12 luglio 1764 Charles Messier
scoprì questa nuova classe affascinante di oggetti. Noi vediamo questo
oggetto quasi esattamente dal suo piano equatoriale. Osservando la
Nebulosa Manubrio da uno dei poli, la sua forma dovrebbe ricordare pro-
babilmente la forma di un anello e quindi assomigliare alla nebulosa anulare
M57 che già conosciamo.
Questo oggetto è ben visibile anche in presenza di condizioni metereologiche
quasi buone con ingrandimenti modesti.
NOTE per la pulizia
Prima di procedere con la pulizia, staccare l’apparecchio dalla sorgente di
corrente (staccare il connettore oppure rimuovere le batterie)!
Pulire le lenti (gli oculari e/o gli obiettivi) soltanto con un panno morbido e
privo di pelucchi (es. in microfibra). Non premere troppo forte il panno per
evitare di graffiare le lenti.
Proteggere l’apparecchio dalla polvere e dall’umidità! Conservarlo nella
borsa fornitura o nella confezione per il trasporto. Togliere le batterie
dall’apparecchio nel caso non venga utilizzato per un periodo prolungato!
Dichiarazione di conformità CE
Meade Instruments Europe GmbH & Co. KG ha redatto una "dichiarazione
di conformità" in linea con le disposizioni applicabili e le rispettive norme.
Su richiesta, è visionabile in qualsiasi momento.
SMALTIMENTO
Smaltire i materiali di imballaggio in maniera differenziata. Le informazioni su
uno smaltimento conforme sono disponibili presso il servizio di smaltimento
comunale o l’Agenzia per l’ambiente locale.
Non smaltire gli apparecchi elettronici con i rifiuti domestici!
Secondo la Direttiva Europea 2002/96/CE riguardante gli appa-
recchi elettrici ed elettronici usati e la sua applicazione nel diritto
nazionale, gli apparecchi elettronici usati devono essere raccolti in maniera
differenziata e destinati al riciclaggio ecologico.
Le batterie e gli accumulatori scarichi devono essere smaltiti dall’utilizzatore
negli appositi contenitori di raccolta. Le informazioni degli apparecchi o
delle batterie usate prodotte dopo il 01.06.2006 sono disponibili presso il
servizio di smaltimento o l’Agenzia per l’ambiente locale.
Le batterie normali e ricaricabili devono essere correttamente smaltiti
come sta previsto dalla legge. È possibile tornare batterie inutilizzati
presso il punto di vendita o cedere in centri di raccolta organizzati dai comu-
ni per la raccolta gratuitamente.
Le batterie normali e ricaricabili sono contrassegnati con il simbolo corri-
spondente disposte per lo smaltimento e il simbolo chimico della sostanza
inquinante.
A D ?
1 Batteria contiene cadmio
2 Batteria contiene mercurio
3 Batteria contiene piombo
Garanzia ed estensione della garanzia
La durata della garanzia si estende per 2 anni a partire dalla data di acquisto.
Si raccomanda di conservare lo scontrino fi scale come prova d’acquisto.
Per poter estendere il periodo di garanzia a 5 anni, è suffi ciente effettuare
la registrazione in Internet e compilare un breve modulo. La registrazione
va effettuata all'indirizzo www.bresser.de/warranty. Per potersi avvalere
dell’estensione facoltativa della garanzia, la registrazione va effettuata entro e
non oltre 3 mesi dalla data di acquisto del prodotto (fa fede la data riportata
sullo scontrino fi scale). Al termine della suddetta scadenza non sarà più pos-
sibile avvalersi dell’estensione del periodo di garanzia. In caso di problemi
con il prodotto, contattare il nostro servizio clienti. Non inviare il prodotto
senza previa consultazione telefonica. Diversi problemi possono essere ri-
solti attraverso una consulenza telefonica. Per la spedizione e la riparazione,
ci occupiamo del trasporto da e verso casa. Se il difetto si verifi ca dopo la
scadenza della garanzia, o non rientra nella garanzia, riceverete una nostra
offerta gratuita per il costo della riparazione.
Servizio clienti: +49 (0) 2872 - 80 74-210
Importante per il ritorno del prodotto:
Assicurarsi di inviare il prodotto accuratamente imballato nella confezione ori-
ginale per evitare danni durante la spedizione! Si prega di allegare la prova
d'acquisto (copia) e una descrizione del difetto. I vostri diritti legali non saran-
no danneggiati da questa garanzia.
Il vostro rivenditore specializzato: .........................................................
Art. No.: ...........................................................................................
Descrizione di errore: .........................................................................
.......................................................................................................
.......................................................................................................
.......................................................................................................
Nome: .............................................................................................
Via: .................................................................................................
CAP/Località: ...................................................................................
Telefono: ..........................................................................................
Data di acquisto: ...............................................................................
Firma: ..............................................................................................
https://tm.by
Интернет-магазин TM.by

22
Informaciones de carácter general
Sobre este manual
Lea atentamente las indicaciones de seguridad recogidas en este manual.
Emplee este producto exclusivamente de la forma descrita en el manual,
con el fin de evitar daños en el aparato o lesiones.
Conserve el manual de instrucciones para poder volver a informarse en todo
momento sobre las funciones de manejo.
¡PELIGRO!
Este signo se encuentra delante de cualquier sección de
texto que indica peligros provocados por el uso indebido
que tienen como consecuencia lesiones graves o incluso
la muerte.
¡PRECAUCIÓN!
Este signo se encuentra delante de cualquier sección de
texto que indica daños materiales o medioambientales
provocados por el uso indebido.
Uso previsto
Este producto sirve exclusivamente para el uso privado.
Se ha desarrollado para ampliar la representación de observaciones natu-
rales.
Advertencias de carácter general
¡Existe PELIGRO DE CEGUERA!
No mire nunca directamente al sol o cerca de él con este aparato.
¡Existe PELIGRO DE CEGUERA!
¡Existe PELIGRO DE ASFIXIA!
Los niños solo deberían utilizar el aparato bajo supervisión.
Mantener los materiales de embalaje (bolsas de plástico, bandas
de goma) alejadas del alcance de los niños. ¡Existe PELIGRO DE
ASFIXIA!
¡PELIGRO DE INCENDIO!
No exponer el aparato – especialmente las lentes – a la radiación
directa del sol. La concentración de la luz puede provocar incen-
dios.
¡PELIGRO DE DESCARGA ELÉCTRICA!
Este aparato contiene componentes electrónicos que funcionan
mediante una fuente de electricidad (equipo de alimentación y/o
pilas). No deje nunca que los niños utilicen el aparato sin supervi-
sión. El uso se deberá realizar de la forma descrita en el manual; de
lo contrario, existe PELIGRO de DESCARGA ELÉCTRICA.
¡PELIGRO DE ABRASIÓN!
No dejar las pilas al alcance de los niños. Al colocar las pilas, preste
atención a la polaridad. Las pilas descargadas o dañadas producen
causticaciones al entrar en contacto con la piel. Dado el caso, utili-
ce guantes protectores adecuados.
¡PELIGRO DE INCENDIO/EXPLOSIÓN!
No exponga el aparato a altas temperaturas. Utilice exclusivamente
las pilas recomendadas. ¡No cortocircuitar ni arrojar al fuego el apa-
rato o las pilas! El calor excesivo y el manejo inadecuado pueden
provocar cortocircuitos, incendios e incluso explosiones.
¡PRECAUCIÓN!
No desmonte el aparato. En caso de que exista algún defecto, le
rogamos que se ponga en contacto con su distribuidor autorizado.
Este se pondrá en contacto con el centro de servicio técnico y,
dado el caso, podrá enviarle el aparato para su reparación.
¡PROTECCIÓN de la privacidad!
Este aparato están concebidos para el uso privado.
Respete la privacidad de las personas de su entorno – por
ejemplo, no utilice este aparato para mirar en el interior
de viviendas.
Los accesorios pueden variar según el modelo.
Piezas (No. 1-8)
B Tubo del telescopio
C Parte abierta del abierto
D Ubicación del ocular
E Rueda de enfoque
F Mando control
G Portaocular
H Bandeja para el mando de control
I Bloqueo azimutal
J Trípode
1) Buscador de LED (sólo se incluye con 90-62100)
1! Compartimiento para las pilas
1@ Tornillo de bloqueo
1# Bandeja para accesorios
1$ Tornillo de bloqueo de la altura
1% Tapa
1^ Oculares
1& Filtro lunar
1* Brújula
1( Mapa de estrella
2) Software CD
Mando de control (No. 9)
B Fuente de luz roja
C Pantalla del mando
D Tecla Más / Menos
E Iluminación
F Teclas de flechas de dirección
G Tecla central
H Teclado numérico
I Puerto Mini-USB
J Puerto RJ-45
1) Puerto RJ-22
Parte I – Montaje:
1. General / Ubicación
Antes de comenzar el montaje, elija una ubicación adecuada para su tele-
scopio. Lo mejor para montar el telescopio, es elegir un lugar donde se
tenga una vista clara del cielo, una base estable y suficiente espacio a su
alrededor.
Antes de comenzar el montaje, retire todas las piezas del embalaje, y, usan-
do el esquema, asegúrese de no falta ninguna pieza.
2. Trípode
Saque el trípode (9) de la caja. Abra con cuidado las patas y coloque el
trípode en un lugar nivelado, colocar la bandeja de accesorios (13) en el
centro y girar hasta que encaje en su lugar (No. 3).
Nota: Por favor no se olvide de quitar la bandeja de accesorios antes de
cerrar el trípode.
3. Telescopio
Afloje el tornillo del soporte de la cola de milano para que quede comple-
tamente retraído (No. 4). Coloque el telescopio con la cola de milano en el
soporte y apriete el tornillo hasta que de una sensación estable. Asegúrese
de que el logotipo de "National Geographic" está en posición vertical.
4. Mando de altitud
Afloje el mando vertical, girando hacia la izquierda, alinee el tubo del telesco-
pio óptico (1) horizontal y vuelva a apretarlo (No. 5).
5. Montura
Coloque los agujeros de la montura en la base de la montura sobre los tor-
nillos de montaje del trípode y aprietelos hasta que tenga una sensación de
que están bien ajustados (No. 6).
6. Ocular
Coja uno de los oculares de su porta ocular (6) y coloquelo en el portaocular
(3). Apriete los tornillos que sujetan hasta que tenga una sensación firme
(No. 5). Comience con el ocular de aumento más bajo, que tiene la longitud
https://tm.by
Интернет-магазин TM.by

ES
23
focal máxima impreso en ella (por ejemplo, 20 mm o 25 mm, dependiendo
del modelo) para localizar objetos y encontrar el enfoque correcto. Si
usted tiene el objeto centrado en el campo de visión, puede cambiar a un
mayor aumento con un ocular de una longitud focal más corta. Después
de cambiar el ocular, puede ser necesario ajustar el foco otra vez (véase
la sección 8).
7. Tapa
Retire la tapa contra el polvo (15) que protege la lente del objetivo del tubo
óptico (2).
8. Rueda de enfoque
Para conseguir los objetos en el foco del telescopio, viene equipado con un
control de enfoque preciso. Si utiliza el telescopio por primera vez puede
que tenga que girar la rueda de enfoque (4) varias veces para lograr una
imagen nítida. Para probarlo, utilice una marca o un edificio lejos a la luz
del día o al brillo del atardecer. Si desea observar objetos que están cerca,
por favor considere el hecho de que los objetos no puede estar más cerca
de 20 metros.
9. Buscador LED (sólo se incluye con 90-62100)
El telescopio, Art. No. 90-62100, está equipado con un buscador de LED
(10). El buscador LED proyecta un punto rojo en el buscador para ayudarle
a señalar objetos. Para la primera vez, quitar la cubierta de plástico de la pila
para que el punto de LED puede ser encendido. Para utilizarlo, es necesario
alinear el buscador al telescopio óptico. Para ello, apunte el telescopio a
un punto de referencia o un edificio que se encuentra a pocos metros de
distancia, y el centro de este objeto en el campo de visión durante el uso de
un ocular con un aumento bajo (por ejemplo, 20 mm o 25 mm). Encienda el
buscador LED y ajuste con los tornillos de alineación del buscador.
Parte II – Mando de control
1. Pilas
Retire la tapa del compartimento de la batería (11), en la parte superior
de la base del soporte e inserte las pilas en el compartimiento (No. 2).
Por favor, asegúrese de insertar pilas tipo AA (6 piezas) con la polaridad
correcta. Coloque el soporte en el compartimiento y cerrar. No utilice pilas
recargables.
2. Mando de control
Asegúrese de que el interruptor ON / OFF está en la posición OFF (No.
8). Retire el mando de la bandeja (7) y conecte un extremo del cable en
el puerto marcado con "HBX" y el otro en el puerto RJ-45 del mando de
control. Poner el interruptor en la posición ON. La pantalla del mando debe
encenderse acompañada de un sonido.
3. Configuración
Hora y Fecha
Después de encender el mando se le pedirá que introduzca la fecha y la
hora, puede hacerlo navegando con las teclas de flechas y escribir los
números con el teclado numérico (7) en el mismo mando. Cuando haya
terminado, pulse la tecla central (5), que se encuentra entre las teclas de
flecha.
El horario de verano
Por favor, seleccione si el horario de verano está activo o no según la situa-
ción siguiente: en on o bien en off, respectivamente.
País / Ciudad (Ubicación)
Cuando se le pregunta por la ubicación,puede seleccionar una ciudad cerca
de su lugar de observación mediante la selección en la opción "Country &
City" o introducir las coordenadas GPS seleccionando la opción "Custom
Site".
a) Country & City
You may select the country of your observing site by using the up and down
arrow keys. Then select the city by using the left and right arrow keys. When
done use the center key (6) to select the location.
b) Custom Site
Introduzca los detalles de su ubicación de la siguiente manera:
Nombre: introduzca un nombre personalizado para su ubicación.
Lon: introducir la coordenada longitudinal de su ubicación.
Latitud: introducir la coordenada de latitud de su ubicación.
Zona: entrar en la zona horaria de su ubicación.
OTA (tubo óptico) Zero
A continuación se le pedirá que proporcione la orientación del telescopio.
En el campo "Azi:" tendrá que introducir "000".
En el campo "Alt:" tendrá que introducir "00".
Para liberar la altitud y azimut, use el botón de bloqueo de Azimut. Oriente
la óptica del telescopio (2) en dirección norte y nivelelo. Se recomienda el
uso de la brújula (18) incluida y el nivel de burbuja con el fin de encontrar la
posición inicial correcta. A continuación, la altitud y el botón de bloqueo de
Azimut se pueden volver a apretar.
4. Alineación
Para poder utilizar los telescopios GoTo, es esencial alinear el telescopio,para
que sepa en qué dirección está apuntando cuando lo enciende. Hay tres
maneras de alinear: la alineación a una, dos y tres estrellas.
Paso 1: Para iniciar la alineación oprima la tecla central (5) en el control
de mando y seleccione la primera opción del menú "Telescopio Align". Allí
usted podrá elegir entre alineación a una , a dos o a tres estrellas.
Cuantas más estrellas utlice para la alineación, mayor será la precisión de
giro de su telescopio.
Alineación a Una Estrella:
Paso 2: Después de seleccionar esta opción, se le pedirá que seleccione
una estrella. El software selecciona una estrella que esté bien visible en
el cielo nocturno. Si por casualidad usted conoce una estrella se puede
ver a simple vista se puede elegir ésta presionando las teclas de flecha
de dirección y seleccionando con la tecla central (5). En la mayoría de los
casos basta con seleccionar la primera opción que se presenta, pulsando
la tecla central (5).
Paso 3: El telescopio ahora localizo a la estrella y se le pedirá que la centre
en el campo de visión, puede hacerlo utilizando las teclas de flecha de
dirección. Cuando la estrella esté centrada puede confirmar la posición con
la tecla central (5). El telescopio está alineado.
Alineación a dos y a tres estrellas:
El procedimiento es similar a la alineación con una estrella, con la única
diferencia es que usted tendrá que repetir los pasos 2 y 3, dos o tres veces,
respectivamente.
Nota: Si ha alineado el telescopio no lo utilice de forma manual pero puede
usar las teclas de dirección del mando. Si mueve manualmente o cambiar la
orientación del trípode tiene que ser reajustado.
5. Otras mejoras:
Sync Target:
Con este método se puede mejorar aún más la alineación del telescopio.
Después de localizar un objeto que conocemos, lo puede centrar con pre-
cisión. Pulsando la tecla central (5) y seleccionando "Alineamiento" y luego
"Sincronización" el telescopio se alineará al objeto elegido y tener un posi-
cionamiento más preciso de nuevos objetos que desea observar.
Corrección Backlash:
Usted puede mejorar la precisión del telescopio mediante lo que se llama
"corrección del huelgo del eje". Esto debe hacerse por separado para cada
eje y no es necesario para la mayoría de los casos.
Sólo tienes que ir al menú principal pulsando la tecla central (5) y selec-
cione "Alineamiento" y luego "Calibración AR" O "Calibración DEC".
Respectivamente. Entonces sólo tiene que seguir las instrucciones que
aparecen en pantalla.
Parte III – Menús
Inicio:
Welcome Screen Pantalla de bienvenida
Date and Time Fecha y hora
Daylight Saving Ahora de energía
Status: off Estado: off
Status: on Estado: on
Custom Site Lugar
Name: Nombre:
Lon: Lon:
Lat: Lat:
Zone: Zona:
Country & City País y ciudad
Country: up and down País: arriba y abajo
City: left and right Ciudad:derecha e izquierda
OTA Zero Tubo óptico Zero
Vista del menú:
• Alineamiento
• A. una estrella Alienando el telescopio a una estrella
• A. dos estrellas Alienando el telescopio a dos estrellas
• A. tres estrell. Alienando el telescopio a tres estrellas
https://tm.by
Интернет-магазин TM.by

24
• Sincronización Mas mejoras en el alienamiento
• Calibración AR Calibrando el eje RA Backlash
• Calibración DEC Calibrando el eje DEC Backlash
• Navegación
• Sistema solar Catálogo de objetos del sistema solar
• Constelaciones Catálogo de constelaciones
• Mejores objetos Catálogo famoso de estrellas
• Messier Catal. Catálogo con objetos de cielo profundo
• NGC Catalog. Amplio catálogo con recorridos variados
• IC Catalogue Catálogo con objetos
• Sh2 Catalog. Catálogo con objetos
• Bright Star Cat. Catálogo con estrellas brillantes
• SAO Star Catal. Amplio catálogo de estrellas
• Obj. del usuario Opción de almacenar tus propios objetos
• Coorden. RA/DEC Añadir un lugar señalado del cielo
• Refer.Terrestre Añadir un lugar señalado de la tierra
• Accesorios
• Eventos actuales Objetos visibles actualmente
• Salida y puesta Eligiendo y configurando hora de un objeto
• Fases Lunares Actual fase lunar
• Temporizador Funciones horarias
• Alarma Configurando una alarma
• Ocular FOV Campo de visión del ocular
• Calc. del ocular Aumento del ocular
• Iluminación Pantalla del brillo
• Pos. de estacio. Mover para posición de reposo
• Instalaciòn
• Fecha / Hora Poner hora y fecha
• Invierno / Verano Disponible/no disponible ahorro de energía
• País / Ciudad Configurar actual localización
• Country & City Configurar actual localización de
acuerdo a la ciudad
• Custom Site Configurar localización actual
usando coordenadas del GPS
• Astron. / Terr. Cambiar entre cielo y objetos terrestres
• Sky Target Observando el cielo
• Land Target Observando un objeto terrestre
• Seg. Astronómico Cambiar entre montura azimuthal
y ecuatorial
• Alt Telescope Montura tipo Alt/Az
• Equ Telescope Montura del tipo ecuatorial
• Montura Configurar tipo de montura del telescopio
• Velo.de seguim. Configurar velocidad de track
• Star Speed
• Solar Speed
• Moon Speed
• Customize Speed
• Idioma Cambiar el lenguaje
• Mod. d. telescop
• Reiniciar Volver a configuración de fábrica
Parte IV – Observación
Después de alinear el telescopio, los motores en el campo empezarán a
mover el telescopio de manera que compense el movimiento de rotación de
la Tierra y los objetos se mantengan en el campo de visión del telescopio.
Nota: Si ha alineado el telescopio, no se debe mover de forma manual pero
puede usar las teclas de dirección del mando de control. Si mueve manual-
mente o cambia la posición del trípode, tiene que ser reajustado.
Una vez alineado el telescopio es posible que localize todos los objetos en
el cielo nocturno. Esto se hace pulsando la tecla central (5) en el mando
de control y seleccionando la opción de navegación en el menú.
En el menú se puede seleccionar el catálogo de objetos que prefiere y
pulsando la tecla central (5) seleccionarla.
Se mostrará el primer objeto del catálogo y se puede cambiar el objeto
mostrado presionando las teclas de flecha de dirección.
Finalmente, al presionar la tecla central (5), puede seleccionar el objeto y el
telescopio irá a esa posición.
Ejemplo: Vamos a observar Júpiter
Júpiter es visible en diferentes partes del mundo en diferentes momentos
dependiendo de la ubicación, época del año y de las condiciones locales.
Si es visible desde la ubicación y el telescopio está alineado, usted puede
navegar a Júpiter pulsando la tecla central (5) en su mando de control y
seleccionando la opción "Navegación", al mover la barra de selección con
las teclas de flecha y pulsando la tecka del centro (5) para la confirmación.
Así, usted puede seleccionar en la opción de menú "Sistema solar" y des-
plazándose con la tecla de flecha arriba y abajo seleccione Jupiter pulsando
la tecla central para confirmar (5).
Su telescopio se moverá autómaticamente y le mostrará a Júpiter, cuando
se alcanza la posición de Júpiter, el telescopio confirma con un pitido estri-
dente procedente del mando de control.
350 mm ÷ 20 mm = 17,5X
350 mm ÷ 10 mm = 35X
1250 mm ÷ 25 mm = 50X
1250 mm ÷ 12,5 mm = 100X
Fórmula para calcular el aumento:
Distancia focal (Telescopio) ÷ Distancia focal (Ocular) = Aumento
Ejemplos:
Posibles objetos de observación
A continuación, le incluimos una recopilación de algunos cuerpos celestes
y constelaciones que puede observar con el telescopio.
La luna
La luna es el único satélite natural de la tierra
Diámetro: 3.476 km
Distancia: 384.400 km de la tierra
La luna se conoce desde tiempos prehistóricos. Después del sol, es el
segundo objeto celeste más claro. Como la luna da una vuelta alrededor de
la tierra cada mes, el ángulo entre la tierra, la luna y el se modifica continua-
mente; esto se ve en los ciclos de las fases lunares. El tiempo transcurrido
entre dos fases de luna nueva consecutivos es de aproximadamente 29,5
días (709 horas).
Constelación ORION / M42
Ascensión recta: 05h 35m (Horas : Minutos)
Declinación: -05° 25' (Grados : Minutos)
Distancia: 1.344 años luz de la tierra
Con una distancia de aproximadamente 1.344 años luz la nebulosa Orión
(M42) es la nebulosa difusa más clara del cielo, visible a simple vista, así
como un objeto que puede alcanzarse con telescopios de todos los tama-
https://tm.by
Интернет-магазин TM.by

ES
25
ños, desde los binoculares más sencillos hasta los observatorios terrestres
más grandes y el telescopio Hubble Space.
Se trata en su mayor parte de una gran nube de gas de hidrógeno y polvo
que se extiende a 10 grados a través de la constelación de Orión. La exten-
sión de esta potente nebulosa es de varios cientos de años luz.
Constelación LEIER / M42
Ascensión recta: 18h 53m (Horas : Minutos)
Declinación: +33° 02' (Grados : Minutos)
Distancia: 2.412 años luz de la tierra
La famosa nebulosa del anillo M57 de la constelación de Lyra se considera
con frecuencia el prototipo de una nebulosa planetaria; pertenece a las
grandes bellezas del cielo de verano del hemisferio norte. Algunas inves-
tigaciones recientes han demostrado que, con toda probabilidad, se trata
de un anillo de materia clara y brillante que rodea a la estrella central (sólo
visible con telescopios de gran tamaño), y no de una estructura gaseosa en
forma esférica o elíptica. Si la nebulosa del anillo se contemplara desde el
lateral, se asemejaría a la nebulosa Dumbbell M27. En este objetos miramos
exactamente al polo de la nebulosa.
Constelación de Vulpécula / M27
Ascensión recta: 19h 59m (Horas : Minutos)
Declinación: +22° 43' (Grados : Minutos)
Distancia: 1.360 años luz de la tierra
La nebulosa Dumbbell M27 fue la primera nebulosa planetaria que se
descubrió en el cielo. El 12 de julio de 1764 Charles Messier descubrió
esta nueva y fascinante clase de objetos. En este caso vemos este objeto
prácticamente desde su plano ecuatorial. Si la nebulosa se contemplara
desde uno de los polos, probablemente presentaría la forma de un anillo y
se asemejaría en su aspecto a lo que conocemos de la nebulosa del anillo
M57. Este objeto puede verse bien incluso con oculares de poco aumento,
siempre y cuando las condiciones atmosféricas sean adecuadas.
INSTRUCCIONES de limpieza
Antes de limpiar el aparato, desconéctelo de la fuente de electricidad (des-
enchúfelo o quite las pilas).
Limpie las lentes (oculares y/o objetivos) exclusivamente con un paño
suave y sin hilachas (p. ej. de microfibras). No presione el paño con dema-
siada fuerza para evitar arañazos en las lentes.
¡Proteja el aparato del polvo y la humedad! Consérvelo en la bolsa suminis-
trada o en el embalaje de transporte. Se deben retirar las pilas del aparato
si no se va a usar durante un periodo prolongado.
Declaración de conformidad de la
Unión Europea (CE)
Meade Instruments Europe GmbH & Co. KG ha emitido una "Declaración
de conformidad" de acuerdo con las directrices y normas correspondien-
tes. Dicha declaración se puede consultar en cualquier momento, previa
petición.
ELIMINACIÓN
Elimine los materiales de embalaje separados por tipos. Obtendrá informa-
ción sobre la eliminación reglamentaria en los proveedores de servicios de
eliminación municipales o en la agencia de protección medioambiental.
¡No elimine los electrodomésticos junto con la basura doméstica!
Conforme a la directiva europea 2002/96/UE sobre aparatos eléctri-
cos y electrónicos usados y a su aplicación en la legislación nacional,
los aparatos eléctricos usados se deben recoger por separado y conducir a
un reciclaje que no perjudique al medio ambiente.
Las pilas y baterías descargadas deben ser llevadas por los consumidores
a recipientes de recogida para su eliminación. En los proveedores de ser-
vicios de eliminación municipales o en la agencia de protección medioam-
biental podrá obtener información sobre la eliminación de aparatos o pilas
usados fabricados después del 01-06-2006.
De acuerdo con la normativa en materia de pilas y baterías recarga-
bles, está explicitamente prohibido depositarlas en la basura normal.
Por favor, preste atención a lo que la normativa obliga cuando usted quiera
deshacerse de estos productos - sobre puntos de recogida municipal o en
el mercado minorista (disposición sobre violación de la Directiva en materia
de los residuos domésticos- pilas y baterías-).
Las pilas y baterías que contienen productos tóxicos están marcados con
un signo y un símbolo químico.
A D ?
1 pila que contiene cadmio
2 pila que contiene mercurio
3 pila que contiene plomo
Garantía y prolongación del período de garantía
El período de garantía asciende a 2 años a partir del día de la com-
pra. Por favor, conserve el ticket de compra como justifi cante. Para po-
der disfrutar de un período de garantía prolongado voluntariamente a
5 años, sólo tiene que registrarse en Internet y rellenar un breve cuestiona-
rio. Puede realizar el registro en www.bresser.de/warranty. Para hacer uso
de la garantía es necesario realizar este registro dentro del plazo de 3 meses
después de la compra (para ello se utiliza como referencia el justifi cante de
compra). Si la inscripción se realiza con posterioridad a dicha fecha, esto
supone la pérdida de su derecho a la prolongación de la garantía. Si tiene
problemas con el producto, póngase en contacto con nuestro servicio al
cliente primero - por favor no envíe ningún producto sin consulta previa por
teléfono. En general, nosotros nos encargamos del transporte desde y hacia
usted, y muchos problemas se pueden resolver por teléfono. Si el problema
se produjo después de que el periodo de garantía ha terminado, o no está
cubierto por los términos de nuestra garantía, recibirá una presupuesto por
nuestra parte de forma gratuita del coste de reparación.
Servicio al cliente: +49 (0) 2872 - 80 74-210
Importante para cualquier devolución:
Asegúrese de devolver el producto cuidadosamente empaquetado en el em-
balaje original para evitar daños durante el transporte. Por favor adjuntar el
recibo de caja (o una copia) y una descripción del defecto. Esta garantía no
implica ninguna restricción de sus derechos legales.
Su tienda especializada: .....................................................................
Art. No.: ...........................................................................................
Descripción del error: ........................................................................
.......................................................................................................
.......................................................................................................
.......................................................................................................
Nombre: ..........................................................................................
Calle: ...............................................................................................
Código postal/Ciudad: .......................................................................
Teléfono: ..........................................................................................
Fecha de compra: .............................................................................
Firma: ..............................................................................................
https://tm.by
Интернет-магазин TM.by

26
Общая информация
О руководстве пользователя
Внимательно прочтите данное руководство пользователя. Неправильное
использование или обслуживание прибора может привести к травмам
или повреждению самого прибора.
Держите данное руководство под рукой в качестве справочника по пра-
вилам эксплуатации и мерам предосторожности.
ОПАСНО!
Этот символ используется в данном руководстве для
привлечения внимания к действиям, которые могут
повлечь за собой серьезные травмы с необратимыми
последствиями или летальный исход.
ОСТОРОЖНО!
Этот символ используется в данном руководстве для
привлечения внимания к действиям, которые могут
привести к повреждениям прибора или окружающей
среды.
Предназначение
Этот прибор предназначен для частного использования.
Этот прибор способен увеличивать изображение природных объектов.
Общее предупреждение
Опасность ПОТЕРИ ЗРЕНИЯ!
Ни в коем случае не смотрите через этот прибор прямо на солн-
це или в направлении солнца. Опасность ПОТЕРИ ЗРЕНИЯ!
РИСК УДУШЬЯ!
Разрешайте детям пользоваться этим прибором только под при-
смотром взрослых. Упаковочные материалы следует держать в
местах, недоступных для детей.
ВОЗМОЖЕН пожар!
Не оставляйте прибор или линзы под прямым солнечным све-
том. Сфокусированные лучи могут привести к пожару.
ОПАСНОСТЬ ПОРАЖЕНИЯ ЭЛЕКТРОТОКОМ!
Данное устройство содержит электронные компоненты, при-
водимые в действие от источника тока (сетевой адаптер и/или
батарейки). Не оставляйте ребенка без присмотра. Устройство
следует использовать только так, как указано в инструкции,
иначе есть серьезный риск получить УДАР ТОКОМ.
ОПАСНОСТЬ ПОЛУЧЕНИЯ ОЖОГА!
Исключите доступ детей к батарейкам! При установке/замене
батареек соблюдайте полярность. Вытекшие или поврежденные
батарейки вызывают раздражения при контакте с кожей. В слу-
чае необходимости надевайте подходящие защитные перчатки.
ОПАСНОСТЬ ПОЖАРА / ВЗРЫВА!
Не допускайте нагревания устройства до высокой температуры.
Используйте только рекомендованные батарейки. Не закорачи-
вайте устройство и батарейки, не бросайте их в огонь! Перегрев
и неправильное обращение могут стать причиной короткого
замыкания, пожара и даже взрыва!
ОСТОРОЖНО!
Не разбирайте прибор самостоятельно. В случае обнаружения
дефектов обратитесь к вашему поставщику. Связавшись с сер-
висным центром производителя, поставщик может по необходи-
мости направить ваш прибор на ремонт.
ЗАЩИТА частной жизни!
Оптические приборы предназначены для частного
использования. Не используйте ваш телескоп для
наблюдений за другими людьми.
Комплектация может изменяться в зависимости от модели.
Устройство телескопа (No. 1-8)
B Оптическая труба
C Объектив
D Фокусер
E Колесо фокусировки
F Пульт управления
G Держатель окуляра
H Держатель пульта управления
I Фиксатор регулировки по азимуту
J Тренога
1) Искатель с красной точкой (входит в комплект телескопа 90-62100)
1! Батарейный отсек
1@ Фиксатор ножки треноги
1# Лоток для аксессуаров
1$ Фиксатор регулировки по высоте
1% Пылезащитная крышка
1^ Окуляры
1& Лунный фильтр
1* Компас
1( Планисфера
2) Компакт-диск с программным обеспечением
Пульт управления (No. 9)
B ИК-порт
C Дисплей пульта управления
D Клавиши «Плюс» и «Минус»
E Клавиша подсветки
F Клавиши направления
G Клавиша ввода
H Цифровая клавиатура
I Разъем mini-USB
J Разъем RJ-45
1) Разъем RJ-22
Часть I – Сборка телескопа
1. Общая информация и размещение телескопа
Перед началом сборки выберите удобное место для наблюдений. Лучше
всего подойдет местность с открытым горизонтом, ровной землей и
достаточным количеством места вокруг.
Достаньте все детали из упаковки и убедитесь в наличии всех необхо-
димых деталей.
2. Тренога
Возьмите треногу (9), раздвиньте ножки и поставьте ее на ровную
поверхность. Разместите лоток для аксессуаров (13) на распорке
треноги и поверните его, чтобы закрепить на месте (рис. 3).
Примечание: Не забудьте снять лоток для аксессуаров во время
разборки треноги.
3. Телескоп
Ослабьте барашковый винт в креплении типа «ласточкино гнездо» (рис.
4). Вставьте трубу телескопа в крепление и затяните барашковый винт
(старайтесь не перетянуть винт и не сорвать резьбу). Убедитесь, что
логотип National Geographic расположен так же, как указано на иллю-
страциях.
4. Фиксатор регулировки по высоте
Ослабьте фиксатор, повернув его против часовой стрелки, измените
положение трубы телескопа (1) и затяните фиксатор (рис. 5).
5. Монтировка
Разместите монтировку на верхней части треноги так, чтобы отверстия
в основании монтировки совпали с винтами на треноге. Затяните фикси-
рующие винты (рис. 6).
6. Окуляр
Выньте один из окуляров из держателя (6) и вставьте его в фокусер
(3). Затяните винты фокусера (рис. 5). Начинать наблюдения лучше с
https://tm.by
Интернет-магазин TM.by

RU
27
окуляра с наименьшим увеличением и наибольшим фокусным расстоя-
нием (например, 20 или 25 мм – в зависимости от модели телескопа).
Вам будет проще находить и центрировать объекты с таким окуляром.
После того как вы нашли интересный небесный объект, вы можете вос-
пользоваться окуляром с большим увеличением и меньшим фокусным
расстоянием. После замены окуляра может потребоваться повторная
фокусировка (см. Раздел 8).
7. Пылезащитная крышка
Пылезащитная крышка (15) на передней части телескопа защищает объ-
ектив (2). Не забудьте снять крышку перед наблюдением.
8. Колесо фокусировки
Ваш новый телескоп обладает очень точной системой фокусировки,
позволяющей вам с легкостью регулировать резкость изображения в
окуляре. Если вы впервые пользуетесь телескопом, вам может потре-
боваться некоторое время, чтобы привыкнуть к управлению. Попробуйте
потренироваться в течение дня, наводя телескоп на различные объекты
и поворачивая колесо фокусировки (4), чтобы отрегулировать резкость.
Обратите внимание, что телескоп в состоянии сфокусироваться на объ-
ектах на расстоянии не ближе двадцати метров.
9. Искатель с красной точкой (входит в комплект телескопа 90-62100)
Модель телескопа № 90-62100 оснащена искателем с красной точкой
(10). Подобные искатели проецируют небольшую красную точку на
визирную сетку, чтобы помочь вам быстрее находить интересующие
вас объекты. Перед первым использованием потребуется выровнять
искатель и оптическую трубу – это необходимо сделать в течение дня.
Снимите пластик с батарейки в батарейном отсеке, затем наведите
телескоп на крупный объект и убедитесь, что он находится в центре поля
зрения окуляра (для выравнивания лучше подойдет окуляр меньшего
увеличения). Включите искатель и отрегулируйте его положение юстиро-
вочными винтами так, чтобы наблюдаемый объект находился в центре
поля зрения искателя.
Часть II – Пульт управления
1. Батарейки
Снимите крышку батарейного отсека (11) в верхней части основания
монтировки и вставьте батарейки (рис. 2). Вам потребуется шесть
батареек класса АА. Закройте крышку батарейного отсека. Обязательно
соблюдайте полярность при замене батареек и не используйте аккуму-
ляторы.
2. Пульт управления
Убедитесь, что выключатель находится в положении OFF («ВЫКЛ») (рис.
8). Возьмите пульт управления в руки и вставьте один конец кабеля в
разъем НВХ на монтировке, а другой конец в разъем RJ-45 на пульте
управления. Включите пульт управления – должен загореться дисплей и
прозвучать сигнал включения.
3. Установки
Время и дата
При первом включении пульта управления необходимо указать время и
дату. Воспользуйтесь клавишами направления (5) и цифровой клавиату-
рой (7), чтобы ввести необходимую информацию. После настройки даты
и времени нажмите клавишу ввода (6).
Переход на летнее время
Укажите, будет ли производиться переход на летнее время, выбрав
необходимое значение: ON («ВКЛ») или OFF («ВЫКЛ»).
Местоположение
После запроса программой вашего местоположения вы можете указать
ближайший к вам город, воспользовавшись опцией «Страна и город»
(Country&City), или ввести точные координаты, воспользовавшись опци-
ей «Уникальное местоположение» (Custom Site).
a) Страна и город
Воспользуйтесь клавишами направления, чтобы выбрать из списка
страну, в которой вы проводите наблюдения, и ближайший к вам город.
Подтвердите выбор, нажав клавишу ввода (6).
b) Уникальное местоположение
Введите необходимую информацию при помощи цифровой клавиатуры:
Имя: уникальное название для вашего местоположения;
Дол: долгота вашего местоположения;
Шир: широта вашего местоположения;
Пояс: часовой пояс вашего местоположения.
Исходное положение оптической трубы
После настройки вашего местоположения программа попросит вас
задать исходное положение для трубы телескопа.
В поле Azi: (азимут) введите «000».
В поле Alt: (высота) введите «00».
Ослабьте фиксаторы регулировки по высоте и азимуту. Направьте теле-
скоп прямо на север и выровняйте его по горизонту (с помощью компа-
са (18) и пузырькового уровня, входящими в комплект поставки). После
этого затяните фиксаторы регулировки.
4. Выравнивание
Для того чтобы вы могли пользоваться функцией автоматического наве-
дения, ваш телескоп должен быть выровнен. Существует три способа
выравнивания. Мы рассмотрим каждый из них по порядку.
Шаг 1: Прежде чем приступить к выравниванию, нажмите клави-
шу ввода (6) на пульте управления и выберите первый пункт меню
(«Выравнивание телескопа»). Затем выберите способ выравнивания (по
одной, двум или трем звездам).
Чем большее количество звезд вы задаете при выравнивании, тем выше
точность наведения телескопа при автоматическом наведении.
Выравнивание по одной звезде:
Шаг 2: После выбора способа выравнивания программа предложит вам
выбрать звезду. Программа автоматически создает список из наиболее
ярких звезд ночного неба. С помощью клавиш направления выберите
звезду, которую сможете легко найти, и подтвердите выбор, нажав
клавишу ввода (6).
Шаг 3: Телескоп автоматически наведется на выбранную звезду, и вы
сможете отцентрировать ее в поле зрению с помощью клавиш направ-
ления. После этого нажмите клавишу ввода (6), чтобы подтвердить
наведение телескопа. Теперь ваш телескоп выровнен по звезде, и вы
можете приступать к наблюдениям.
Выравнивание по двум или трем звездам:
Процедура выравнивания по двум или трем звездам схожа с выравни-
ванием по одной звезде – с той лишь разницей, что шаги 2 и 3 должны
быть повторены дважды или трижды, в зависимости от выбранного
способа.
Примечание: После проведения выравнивания не пытайтесь изменять
положение телескопа вручную – пользуйтесь клавишами направления
на пульте управления. Если вы измените положение телескопа вручную,
процедуру выравнивания придется повторить.
5. Дальнейшее повышение точности:
Синхронизация:
Воспользовавшись функцией синхронизации, вы можете повысить
точность наведения телескопа. После наведения на знакомую вам
звезду наведите телескоп так, чтобы звезда находилась точно в центре
поля зрения. Затем нажмите клавишу ввода (6), выберите пункт меню
«Выравнивание телескопа» и «Синхронизация» в следующем меню.
Программа запомнит точность наведения на конкретную звезду, что
повысит общую точность наведения еще больше.
Мертвый ход:
Еще больше повысить точность наведения вам позволит функция ком-
пенсации мертвого хода. Значение компенсации может быть выставле-
но отдельно для каждой оси.
Откройте главное меню нажатием клавиши ввода (6), выберите пункт
«Выравнивание телескопа», а затем пункт «Комп. м. хода оси ПВ» или
«Комп. м. хода оси скл.». Следуйте инструкциям на дисплее, чтобы
настроить значения.
Часть III – Меню
Первое включение:
Welcome Screen Приветственное сообщение
Date and Time Дата и время
Daylight Saving Переход на летнее время
Status: off Значение: выкл
Status: on Значение: вкл
Custom Site Уникальное местоположение
Name: Имя:
Lon: Дол:
Lat: Шир:
Zone: Пояс:
https://tm.by
Интернет-магазин TM.by

28
Страна и город
Страна: вверх и вниз
Город: влево и вправо
Исходное положение
Главное меню:
• Telescope Align
• One Star Align Выравнивание телескопа по одной звезде
• Two Star Align Выравнивание телескопа по двум звездам
• Three Star Align Выравнивание телескопа по трем звездам
• Target Sync Дальнейшее увеличение точности
наведения
• RA BKlash Corr. Калибровка мертвого хода оси
прямого восхождения
• DEC Bklash Corr. Калибровка мертвого хода оси склонения
• Navigation
• Solar System Каталог объектов Солнечной системы
• Constellation Каталог созвездий
• Famous Star Каталог известных звезд
• Messier Catal. Каталог Messier (Каталог ярких
объектов дальнего космоса)
• NGC Catalog. Каталог NGC (Обширный каталог
без яркой классификации)
• IC Catalogue Каталог IC (Каталог тусклых объектов)
• Sh2 Catalog. Каталог Sh2 (Каталог тусклых объектов)
• Bright Star Cat Каталог ярких звезд
• SAO Star Catal. Каталог SAO (Обширный звездный каталог)
• Customer Objects Персональный каталог звезд
• Input RA and DEC Ввод уникальной точки на звездном небе
• Custom Land Goal Ввод уникальной точки на земле
• Utilities
• Current Objects Видимые в данный момент объекты
• Object Rise/Set Время восхода и захода объекта
• Curr. Lunar Phase Нынешняя фаза Луны
• Timer Таймер
• Alarm Настройка будильника
• Eyepiece FOV Поле зрения окуляра
• Eyepiece Magn. Увеличение окуляра
• Display Illumin. Яркость дисплея
• Parkposition Перевести телескоп в исходное положение
• Setup
• Time and Date Настройка времени и даты
• Daylight Saving Включение и выключение перехода
на летнее время
• Site Setting Настройка нынешнего местоположения
• Country & City Настройка местоположения по
ближайшему городу
• Custom Site Настройка местоположения по
координатам
• Sky/Land Переключение между небесными
и наземными объектами
• Sky Target Наблюдение за небесными объектами
• Land Target Наблюдение за наземными объектами
• AZ / EQ Переключение между типами монтировок
• Alt Telescope Альт-азимутальная монтировка
• Equ Telescope Экваториальная монтировка
• Telescope Mount Настройки монтировки телескопа
• Tracking Rate Настройка скорости слежения
• Star Speed
• Solar Speed
• Moon Speed
• Customize Speed
• Language Изменить язык
• Reset Вернуться к заводским установкам
Часть IV – Наблюдения
После выравнивания телескопа сервоприводы будут автоматически
поворачивать трубу телескопа, чтобы компенсировать вращение Земли
во время наблюдения. Таким образом наблюдаемые объекты всегда
будут находиться в центре поля зрения.
Примечание: После проведения выравнивания не пытайтесь изменять
положение телескопа вручную – пользуйтесь клавишами направления
на пульте управления. Если вы измените положение телескопа вручную,
процедуру выравнивания придется повторить.
После выравнивания телескопа вы можете воспользоваться функ-
цией автоматического наведения во время проведения наблюдений.
Нажмите клавишу ввода (6) на пульте управления и выберите пункт
меню «Навигация».
Выберите любой каталог в появившемся списке и подтвердите выбор
нажатием клавиши ввода (6).
В открывшемся каталоге вы можете воспользоваться клавишами
направления для прокрутки списка объектов.
Выбрав интересующий вас объект, нажмите клавишу ввода (6), чтобы
подтвердить выбор.
Пример: Наблюдение Юпитера
Юпитер можно наблюдать из многих точек земного шара, однако время
наблюдения будет зависеть от вашего местоположения.
После выравнивания телескопа откройте главное меню нажатием кла-
виши ввода (6) на пульте управления и выберите пункт «Навигация».
Откройте подменю нажатием клавиши ввода (6).
В появившемся меню выберите пункт «Солнечная система» и выбе-
рите «Юпитер» в открывшемся списке. Подтвердите выбор нажатием
клавиши ввода (6).
Телескоп начнет автоматически наводиться на Юпитер. После того как
планета окажется в центре поля зрения окуляра, пульт управления сиг-
нализирует об этом звуковым сигналом.
350 mm ÷ 20 mm = 17,5X
350 mm ÷ 10 mm = 35X
1250 mm ÷ 25 mm = 50X
1250 mm ÷ 12,5 mm = 100X
Формула вычисления увеличения:
Фокусное расстояние (Телескоп) ÷ Фокусное расстояние (окуляра) = Увеличение
например:
Возможные объекты наблюдения
Мы хотим предложить вам ряд очень интересных небесных объектов,
которые легко наблюдать.
Луна
Луна - единственный естественный спутник
Земли. Диаметр: 3 476 км.
Расстояние: 384 400 км (в среднем).
Луна хорошо известна вот уже тысячи лет. Она второй по яркости небес-
ный объект после Солнца. Так как Луна вращается вокруг Земли,
она периодически меняет свой наклон по отношению к Солнцу, поэтому
мы видим сменяющиеся фазы Луны. Время одного оборот Луны состав-
ляет 29,5 дней (709 часов).
https://tm.by
Интернет-магазин TM.by

RU
29
Созвездие Орион
Большая туманность Ориона (объект М42).
Прямое восхождение: 05ч 35’
Склонение: -05° 22’
Расстояние: 1 344 световых лет
Хотя туманность Ориона (М42) находится на расстоянии 1 344 световых
лет от Земли, это ярчайшая туманность, которую можно видеть в небе,
- она видна даже невооруженным глазом и является достойным объ-
ектом наблюдения в телескоп любого вида и размера.
Оно состоит из гигантского облака водорода диаметром в сотни свето-
вых лет и занимает 10° поля обзора в небе.
Созвездие Лира
Кольцевая туманность / Объект М57.
Прямое восхождение: 18ч 53'
Склонение: +33° 02’
Расстояние: 2 412 световых лет
Известную Кольцевая туманность часто называют прототипом плане-
тарных туманностей, она принадлежит к самым прекрасным объектам
летнего неба в Северном полушарии. Недавние исследования показали,
что она представляет собой кольцо светоиспускающего вещества, кото-
рое окружает центральную звезду (ее можно увидеть только в большие
телескопы). Если бы можно было взглянуть на нее сверху, можно было
бы разглядеть структуру, подобную туманности Гантель (М27).
Созвездие Лисичка
Туманность Гантель / Объект М27.
Прямое восхождение: 19ч 59’
Склонение: +22° 43’
Расстояние: 1 360 световых лет
Туманность Гантель / Объект M27 - первая открытая планетарная туман-
ность. Шарль Мессье обнаружил этот новый вид небесных объектов 12
июля 1764 года. Мы можем наблюдать эту туманность прямо в ее
экваториальной части. Если бы можно было видеть ее сверху, она бы
предстала в виде Кольцевой туманности (объект M57). Этот объект можно
видеть даже при низком увеличении в обычных погодных условиях.
СОВЕТЫ по уходу
Перед чисткой отключите устройство от источника питания (выдерните
штепсельную вилку из розетки или выньте батарейки)!
Линзы (окуляры и объектив) следует очищать только мягкой нетканой
салфеткой (например, микрофиброй). Не давите слишком сильно –
можно поцарапать линзу.
Берегите устройство от пыли и влаги. Храните устройство в кейсе или
в оригинальной упаковке. Если устройство не будет использоваться в
течение длительного времени, выньте из него батарейки!
Сертификат соответствия ЕС
Сертификат соответствия был составлен с учетом действующих правил
и соответствующих норм компанией Meade Instruments Europe GmbH &
Co. KG. Его можно просмотреть по запросу в любое время.
УТИЛИЗАЦИЯ
Утилизируйте упаковку как предписано законом. При необходимости
проконсультируйтесь с местными властями.
Не выбрасывайте электронные детали в обычный мусорный кон-
тейнер. Европейская директива по утилизации электронного и
электрического оборудования 2002/96/EU и соответствующие ей
законы требуют отдельного сбора и переработки подобных устройств.
Использованные элементы питания следует утилизировать отдельно.
Подробную информацию об утилизации электроники можно получить у
местных властей.
Элементы питания не являются бытовыми отходами, поэтому в
соответствии с законодательными требованиями их необходимо
сдавать в пункты приема использованных элементов питания. Вы може-
те бесплатно сдать использованные элементы питания в нашем магази-
не или рядом с вами (например, в торговых точках или в пунктах прие-
ма).
На элементах питания изображен перечеркнутый контейнер, а также
указано содержащееся ядовитое веществ.
A D ?
1 Элемент питания содержит кадмий
2 Элемент питания содержит ртуть
3 Элемент питания содержит свинец
Гарантия и продление гарантийного срока
Гарантийный срок составляет два года со дня покупки. Сохраняйте кас-
совый чек как подтверждение покупки. Для продления гарантии еще на
3 года зарегистрируйтесь на веб-сайте и заполните анкету: www.bresser.
de/warranty. Регистрацию необходимо пройти в течение трех месяцев со
дня покупки (дня, указанного на чеке). Если вы зарегистрируетесь позже,
гарантийный срок не будет продлен.
При обнаружении неисправности изделия обратитесь сначала в нашу
сервисную службу; не следует отправлять нам изделие без предвари-
тельной консультации по телефону. Обычно мы можем организовать до-
ставку изделия от вас и обратно, а многие проблемы можно решить по
телефону. Если неисправность возникла после окончания гарантийного
срока или не покрывается условиями гарантии, мы бесплатно оценим
стоимость ремонта.
Сервисная служба онлайн: +49 (0) 2872 - 80 74-210
При возврате изделия:
убедитесь, что изделие правильно и тщательно упаковано в оригиналь-
ную упаковку — это предотвратит повреждения изделия во время транс-
портировки. Приложите чек (или его копию) и краткое описание неис-
правности. Данная гарантия не ограничивает ваши законные права.
Ваш дилер: ......................................................................................................
Артикул №: ......................................................................................................
Описание неисправности: ..............................................................................
..........................................................................................................................
Имя: .................................................................................................................
Улица: ...............................................................................................................
Индекс / Город: ...............................................................................................
Телефон: ..........................................................................................................
Дата покупки: ..................................................................................................
Подпись: ..........................................................................................................
https://tm.by
Интернет-магазин TM.by

30
https://tm.by
Интернет-магазин TM.by

31
https://tm.by
Интернет-магазин TM.by

Meade Instruments Europe
GmbH & Co. KG
Gutenbergstr. 2 · DE-46414 Rhede
www.bresser.de · info@bresser.de
© 2013 National Geographic Society
NATIONAL GEOGRAPHIC and Yellow Border Design
are trademarks of the National Geographic Society.
All rights reserved.
Experience the National Geographic Channel.
Visit our website: www.nationalgeographic.com
ANL9062X00MSP0413NG
AUTOMATIK
TELESKOP
AUTOMATIC
TELESCOPE
Irrtümer und technische Änderungen vorbehalten.
Errors and technical changes reserved.
https://tm.by
Интернет-магазин TM.by
-
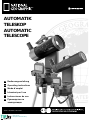 1
1
-
 2
2
-
 3
3
-
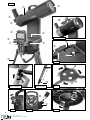 4
4
-
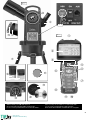 5
5
-
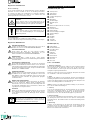 6
6
-
 7
7
-
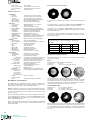 8
8
-
 9
9
-
 10
10
-
 11
11
-
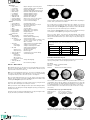 12
12
-
 13
13
-
 14
14
-
 15
15
-
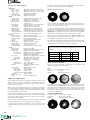 16
16
-
 17
17
-
 18
18
-
 19
19
-
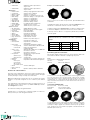 20
20
-
 21
21
-
 22
22
-
 23
23
-
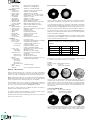 24
24
-
 25
25
-
 26
26
-
 27
27
-
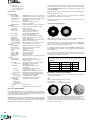 28
28
-
 29
29
-
 30
30
-
 31
31
-
 32
32


Bresser 90-62000 Manual de usuario
- Categoría
- Telescopios
- Tipo
- Manual de usuario
En otros idiomas
- français: Bresser 90-62000 Manuel utilisateur
- italiano: Bresser 90-62000 Manuale utente
- Deutsch: Bresser 90-62000 Benutzerhandbuch
