
WI-FI SMART DOORBELL
QUICK START GUIDE
ENGLISH / ESPAÑOL
TIMBRE INTELIGENTE WI-FI
GUÍA DE INICIO RÁPIDO

2
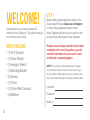
WELCOME!
Congratulations on your latest purchase and
welcome to the Q-See family. This guide will help get
your doorbell up and running.
WHAT’S INCLUDED
• (1) Wi-Fi Doorbell
• (1) Power Dongle
• (1) Hexagon Wrench
• (1) Mounting Bracket
• (3) Screws
• (1) Chime
• (1) Chime Wire Connector
• (4) Batteries
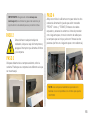
STEP 1
Before installing, please register your device on the
Q-See Support Portal at www.q-see.com/register
to receive critical updates and support for your
device. Registering will also help us to assist you with
any technical or warranty issues if ever necessary.
Please be sure to keep a record of your model
number(s) and to save this guide, as you will
need this information if you are ever in need
of technical or warranty support.
NOTE: Your username and password used to register
your device are not the same as those you use to log in
to your doorbell. Please write down your username, pass-
word, and model number(s) in the spaces provided below:
Username:
Password:
Model #:

3
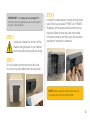
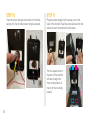
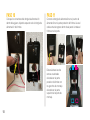
STEP 2
Locate your breaker box and turn o the
breakers that give power to your doorbell
and chime before working with any wiring.
STEP 3
Go to your existing chime and remove the cover.
Your chime may look dierent than the one shown.
IMPORTANT: Visit www.q-see.com/support to
nd the most recent guides and up-to-date support
for your Q-See products.
NOTE: Battery-operated wireless chimes are not
compatible with the QCW1000 doorbell.
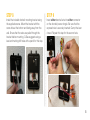
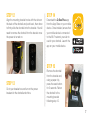
STEP 4
Loosen the screws enough to remove the two power
wires (They may be labeled “FRONT” and “TRANS”).
Straighten out the exposed wires and twist them at
the ends. Before the next step, take the included
chime wire connector and rmly open the two levers
(see photo in next step for reference).

4
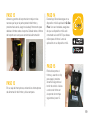
STEP 5
Insert either chime wire into either opening on the
chime wire connector. Be sure that the exposed
wire is securely inserted. Clamp the lever closed.
Repeat this step for the second wire.
The nished chime
wiring should look like
this. Replace the cover
on your chime and go
to your existing doorbell.
STEP 6
Unscrew or unmount your existing doorbell.
STEP 7
Disconnect the wiring that connects to the doorbell.

5
STEP 8
Install the included doorbell mounting bracket using
the supplied screws. Mount the bracket with the
screw hole at the bottom and facing away from the
wall. Ensure that the wires are pulled through the
bracket before mounting. Q-See suggests using a
level and marking drill holes with a pencil for this step.
STEP 9
Insert either doorbell wire into either connector
on the doorbell power dongle. Be sure that the
exposed wire is securely inserted. Clamp the lever
closed. Repeat this step for the second wire.

6
STEP 10
Push the power dongle connectors into the hole,
leaving only the doorbell power dongle exposed.
STEP 11
Plug the power dongle into the power port on the
back of the doorbell. Feed the extra wire back into the
wall and mount the doorbell to the bracket.
The two square slots on
the back of the doorbell
will need to align with
the mounting hooks at
the top of the mounting
bracket.

7
STEP 12
Align the mounting bracket hooks with the slots on
the back of the doorbell and push back, then down
to rmly slide the doorbell onto the bracket. You will
need to remove the doorbell from the bracket once
the power is turned on.
STEP 13
Go to your breaker box and turn on the power
breakers for the doorbell and chime.
STEP 15
Remove the doorbell
from the bracket and,
using a paper clip,
press the reset button
for 3 seconds. Return
the doorbell to the
mounting bracket
following step 12.
STEP 14
Download the Q-See Plus app
from the App Store on your mobile
device. Once installed, ensure that
your mobile device is connected
to the Wi-Fi network you wish to
use for your doorbell. Launch the
app on your mobile device.

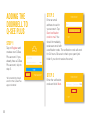
ADDING THE
DOORBELL TO
Q-SEE PLUS
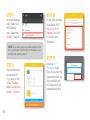
STEP 1
Tap on Register and
create a new Q-See
Plus account. If you
already have a Q-See
Plus account, skip to
step 5.
*All screenshots shown
are from the Q-See Plus
app on Android.
STEP 2
Enter an email
address to use for
your account. Tap
Send verication
code to mail. You
should immediately
receive an email with
a verication code. The verication code will work
for 24 hours. Be sure to check your spam/junk
folder if you do not receive the email.
STEP 3
Enter the verication
code and click Next.
8

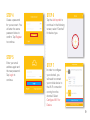
STEP 4
Create a password
for your account. You
will enter the same
password twice to
conrm. Tap Register
to continue.
STEP 5
Enter your email
address again and
the new password.
Tap Login to
continue.
STEP 6
Tap the Add symbol to
continue. In the following
screen, select “Doorbell”
for device type.
STEP 7
In order to congure
your doorbell, you
will need to connect
your mobile device to
the Wi-Fi connection
coming from the
doorbell. Select
Congure Wi-Fi for
Device.
9

STEP 8
Go to your Settings
menu. Select your
Wi-Fi Settings
menu. Select the
DoorBell_ network.
STEP 10
Q-See Plus will Scan
for available Wi-Fi.
Select the Wi-Fi
Network you wish
to connect your
doorbell to.
STEP 11
Input the W-Fi
Password. Select
Save. If you enter the
password incorrectly,
the connection will
fail. Please verify the
password and retry.
NOTE: If you don’t see your doorbell network in this
list, try pressing the reset button on the back of your
doorbell and repeating step 6.
STEP 9
Once connected to
the doorbell Wi-
Fi, go back to the
Q-See Plus App.
Select Connected to
Hotspot, Continue.
10

11
STEP 12
Once the doorbell
is connected to the
Wi-Fi network, the
Indicator Light on the
front will be Blue, and
not blinking.
When the Blue
Indicator is steady,
select OK.
STEP 13
Q-See Plus will begin
to show the live feed
from your doorbell.
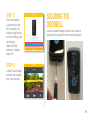
Use the included hexagon wrench and screw to
securely x the doorbell to the mounting bracket.
SECURING THE
DOORBELL

12
STEP 1
Remove the battery cover with a small, at
screwdriver (not included). Insert the screwdriver
in the hole on the bottom of the chime, then gently
push in towards the doorbell and pry up to release
the front cover.
INSTALLING
THE CHIME
STEP 2
Install the four included
batteries into the chime.
STEP 4
Press the Register
button to pair the chime
to the doorbell. You may
hear a beeping sound
from the doorbell again.
STEP 3
Hold the doorbell button
for ~10 seconds until you
hear a beeping sound.
STEP 5
Replace the front cover
of the chime. To hang the
chime, use a nail or small
screw that ts the top
hole on the back of the
chime.

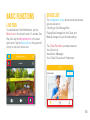
BASIC FUNCTIONS
LIVE FEED
To enable Motion Push Notications, tap the
Motion Icon in the top left corner. To activate Two-
Way Talk, tap the Microphone Icon in the lower
right corner. Tap the Back button in the upper left
corner to view your Device List.
DEVICE LIST
The Conguration Icons, above the device preview,
give you access to:
Choosing a Cloud Storage Plan,
Playing Back footage from the Cloud, and
Making changes to your Doorbell settings
The Q-See Plus Menu provides access to:
Your Device List
Alerts/Alarm Messages
Your Q-See Plus Account Preferences
13

14
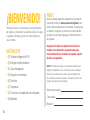
¡BIENVENIDO!
Felicitaciones por la compra de su nuevo dispositivo
de vigilancia y bienvenido a la familia Q-See. Esta guía
le ayudará a instalar y poner en funcionamiento su
nuevo timbre.
QUÉ INCLUYE
• (1) Timbre inteligente Wi-Fi
• (1) Dongle de alimentación
• (1) Llave hexagonal
• (1) Soporte de montaje
• (3) Tornillos
• (1) Campana
• (1) Conector de cable para la campana
• (4) Baterías
PASO 1
Antes de instalar, registre su dispositivo en el portal de
soporte de Q-See en www.q-see.com/register para
poder recibir actualizaciones importantes y soporte para
su sistema. Al registrar su producto nos será más fácil
ayudarlo en caso este tenga algún problema técnico o
de garantía.
Asegúrese de llevar un registro del número de
modelo de su dispositivo y guardar esta guía;
esta información la necesitará si requiere soporte
técnico o de garantía.
NOTA: El nombre de usuario y la contraseña utilizados para
registrar su dispositivo no son los mismos que los utilizados
para iniciar una sesión para el timbre que ha adquirido. Por
favor escriba su nombre de usuario, contraseña y número de
modelo en el espacio provisto abajo:
Nombre de usuario:
Contraseña:
Modelo #:

15
PASO 2
Antes de hacer cualquier trabajo de
cableado, ubique su caja de interruptores y
apague el interruptor que alimenta el timbre
y la campana.
PASO 3
Ubíquese delante de su campana existente, retire la
cubierta. Puede que su campana luzca diferente a la que
se muestra aquí.
IMPORTANTE: Asegúrese de visitar www.q-see.
com/support para obtener las guías más recientes y el
soporte técnico actualizado para sus productos Q-See.
NOTA: Las campanas inalámbricas operadas con
baterías no son compatibles con el timbre para puerta
QCW1000.
PASO 4
Aoje los tornillos lo suciente como para retirar los dos
cables de alimentación (puede que estén marcados
“FRONT” -frente- y “TRANS”). Enderece los cables
expuestos y retuerza los extremos. Antes de proceder
con el siguiente paso, tome el conector de cable para
la campana que se incluye y abra con rmeza las dos
palancas (ver foto en el siguiente paso como referencia).

16
PASO 5
Inserte cada cable de campana dentro de cada oricio
en el conector del cable de campana. Asegúrese de que
el cable expuesto esté adentro. Cierre la palanca. Repita
este paso con el segundo cable.
Al terminar el cableado
de la campana debe lucir
así. Vuelva a colocar la
cubierta de su campana
y ahora diríjase al timbre
existente.
PASO 6
Desentornille o desinstale su timbre existente.
PASO 7
Desconecte el cableado que se conecta con el timbre
de la puerta.

17
PASO 8
Usando los tornillos incluidos, instale el soporte de
montaje del timbre que se incluye. Instale el soporte
con los agujeros para tornillo en la parte inferior y en
dirección opuesta a la pared. Asegúrese de pasar los
cables a través del soporte antes de instalarlo. En este
paso Q-See sugiere usar un nivel y marcar los agujeros
con un lápiz.
PASO 9
Inserte cada cable de campana en cada conector en el
dongle de alimentación del timbre. Asegúrese de que el
alambre expuesto esté adentro. Cierre la palanca. Repita
este paso con el segundo cable.

18
PASO 10
Coloque los conectores del dongle de alimentación
dentro del agujero, dejando expuesto solo el dongle de
alimentación del timbre.
PASO 11
Conecte el dongle de alimentación en el puerto de
alimentación en la parte posterior del timbre. Lleve el
cable extra de regreso dentro de la pared e instale el
timbre en el soporte.
Deberá alinear las dos
ranuras cuadradas
ubicadas en la parte
posterior del timbre con
los ganchos de montaje
ubicados en la parte
superior del soporte de
montaje.

19
PASO 12
Alinee los ganchos del soporte de montaje con las
ranuras que hay en la parte posterior del timbre y
presione hacia atrás, luego hacia abajo rmemente para
deslizar el timbre sobre el soporte. Deberá retirar el timbre
del soporte una vez que se encienda la alimentación.
PASO 13
En su caja de interruptores, encienda los interruptores
de alimentación del timbre y de la campana.
PASO 15
Retire del soporte el
timbre y, usando un clip
para papel, presione
durante 3 segundos el
botón de reinicio. Vuelva
a colocar el timbre en
el soporte de montaje
siguiendo el paso 12.
PASO 14
Desde App Store descargue en su
dispositivo móvil la aplicación Q-See
Plus. Una vez instalada, asegúrese
de que su dispositivo móvil esté
conectado a la red Wi-Fi que desea
utilizar para el timbre. Lance la
aplicación en su dispositivo móvil.

20
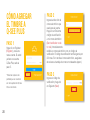
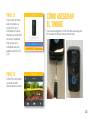
CÓMO AGREGAR
EL TIMBRE A
Q-SEE PLUS
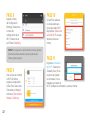
PASO 1
Haga clic en Registrar
(Register) y cree una
nueva cuenta. Si usted
ya tiene una cuenta
Q-See Plus, salte al
paso 5.
*Todas las capturas de
pantalla que se muestran
son de la aplicación Q-See
Plus en Androide.
PASO 2
Ingrese la dirección de
correo electrónico que
usará para la cuenta.
Haga clic en Enviarme
código de vericación
a mi correo electrónico
(Send verication code
to mail). Inmediatamente
recibirá un correo electrónico con un código de
vericación. El código de vericación tendrá vigencia por
24 horas. Si no recibe el correo electrónico, asegúrese
de revisar su bandeja de correos no deseados (spam).
PASO 3
Ingrese el código de
vericación y haga clic
en Siguiente (Next).

21
PASO 4
Cree una contraseña
para su cuenta. Deberá
ingresar la misma
contraseña dos veces
para conrmarla.
Haga clic en Registrar
(Register) para
continuar.
PASO 5
Ingrese su dirección
de correo electrónico
nuevamente y la nueva
contraseña. Haga clic
en Iniciar sesión (Login)
para continuar.
PASO 6
Haga clic en el Símbolo para
agregar (Add symbol) para
continuar. En la siguiente
pantalla, seleccione Timbre
de puerta “Doorbell” para el
tipo de dispositivo.
PASO 7
Para congurar su timbre
necesitará conectar su
dispositivo móvil a la
conexión Wi-Fi que sale
del timbre. Seleccione
Congurar Wi-Fi para
dispositivo (Congure
Wi-Fi for Device).

22
PASO 8
Ingrese al menú
de Conguración
(Settings). Seleccione
el menú de
conguración de su
Wi-Fi. Seleccione la
red Timbre (DoorBell_).
PASO 10
Q-See Plus realizará
un escaneado para
ubicar las redes Wi-Fi
disponibles. Seleccione
la red de Wi-Fi a la que
desee conectar su
timbre.
PASO 11
Ingrese la contraseña
del Wi-Fi. Seleccione
Guardar (Save). Si se
equivoca al ingresar
la contraseña, no se
realizará la conexión al
Wi-Fi. Verique la contraseña y vuelva a intentar.
NOTA: Si no aparece su red de timbre en la lista, presione
el botón de reinicio ubicado en la parte posterior del
timbre y repite el paso 6.
PASO 9
Una vez que se conecte
al Wi-Fi del timbre,
regrese a la aplicación
Q-See Plus. Seleccione
Conectado a Hotspot,
continuar (Connected to
Hotspot, Continue).

23
PASO 12
Una vez que el timbre
esté conectado a la
red de Wi-Fi, la luz
indicadora en la parte
delantera se encenderá
en azul sin pestañear.
Una vez que la luz
indicadora azul esté
estable, seleccione OK
(OK).
PASO 13
Q-See Plus comenzará
a mostrar la señal
directa desde su timbre.
Use la llave hexagonal y tornillo incluidos para asegurar
rmemente el timbre al soporte de montaje.
CÓMO ASEGURAR
EL TIMBRE

24
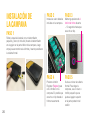
PASO 1
Retire la tapa de la batería con un destornillador
pequeño y plano (no incluido). Inserte el destornillador
en el agujero en la parte inferior de la campana, luego
empuje suavemente hacia el timbre y levante para liberar
la cubierta frontal.
INSTALACIÓN DE
LA CAMPANA
PASO 2
Instale las cuatro baterías
incluidas en la campana.
PASO 4
Presione el botón
Registrar (Register) para
unir el timbre con la
campana. Es posible que
escuche un bip desde el
timbre nuevamente.
PASO 3
Mantenga presionado el
botón del timbre durante
~ 10 segundos hasta que
escuche un bip.
PASO 5
Vuelva a colocar la cubierta
frontal. Para colgar la
campana, use un clavo o
tornillo pequeño que se
ajuste al agujero superior
en la parte posterior del
carillón.

25
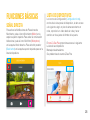
FUNCIONES BÁSICAS
SEÑAL DIRECTA
Para activar las Noticaciones de Pulsaciones de
Movimiento, pulse el ícono Movimiento (Motion) en la
esquina superior izquierda. Para activar la conversación
bidireccional, pulse el ícono Micrófono (Microphone)
en la esquina inferior derecha. Pulse el botón posterior
(Back button) en la esquina superior izquierda para ver la
lista de dispositivos.
LISTA DE DISPOSITIVOS
Los Iconos de Conguración (Conguration Icons),
encima de la vista previa del dispositivo, le dan acceso
a lo siguiente: elegir un plan de almacenamiento en
nube, reproducir un video desde la nube y hacer
cambios en los ajustes del timbre de la puerta.
El menú Q-See Plus proporciona acceso a lo siguiente:
La lista de sus dispositivos
Mensajes de alerta/alarma
Sus preferencias de cuenta Q-See Plus

26
Regulatory Information
FCC Information
This device complies with Part 15 of the FCC Rules. Operation is subject to the following two conditions:
(1) This device may not cause harmful interference, and
(2) This device must accept any interference received, including interference that may cause undesired operation.
Attention that changes or modification not expressly approved by the party responsible for compliance could void the user’s authority to operate
the equipment.
Note: This product has been tested and found to comply with the limits for a Class B digital device, pursuant to Part 15 of the FCC Rules. These
limits are designed to provide reasonable protection against harmful interference in a residential installation. This product generates, uses, and
can radiate radio frequency energy and, if not installed and used in accordance with the instructions, may cause harmful interference to radio
communications. However, there is no guarantee that interference will not occur in a particular installation. If this product does cause harmful in-
terference to radio or television reception, which can be determined by turning the equipment off and on, the user is encouraged to try to correct
the interference by one or more of the following measures:
• Reorient or relocate the receiving antenna.
• Increase the separation between the equipment and receiver.
• Connect the equipment into an outlet on a circuit different from that to which the receiver is connected.
• Consult the dealer or an experienced radio/TV technician for help.
This equipment should be installed and operated with a minimum distance 20cm between the radiator and your body.
1.2.51.32.Tgz001-000
DISCLAIMER: Although Q-See has made every eort to ensure that the information in this guide was correct at the time
of printing, Q-See does not assume any liability to any party for any loss, damage, or disruption caused by any errors,
omissions, or typos that may occur.
Q-See is always here to answer your questions and take your valued suggestions. Visit us
at www.q-see.com/support for 24/7 support and access to our Support Portal.

27
Información reguladora
Información FCC
Este dispositivo cumple con la Sección 15 de las Reglas FCC. El funcionamiento está sujeto a las siguientes dos condiciones:
(1) Este dispositivo puede que no provoque interferencia negativa, y
(2) Este dispositivo debe aceptar toda interferencia recibida, incluyendo la interferencia que puede provocar un funcionamiento indeseado.
Toda atención que cambie o modificación que no haya sido expresamente aprobada por la parte responsable del cumplimiento podría anular la
autoridad del usuario para operar el equipo.
Nota: este producto ha pasado las pruebas y se ha confirmado su cumplimiento con los límites de un dispositivo digital Clase B, de conformidad
con la Sección 15 de las Reglas FCC. Estos límites están diseñados para proporcionar protección razonable contra toda interferencia negativa
en una instalación residencial. Este producto genera, usa y puede irradiar energía de radiofrecuencia y si no se instala y usa de acuerdo con lo
indicado en las instrucciones, puede provocar interferencia negativa a radiocomunicaciones. No obstante, no hay garantía alguna de que no se
producirán interferencias en una instalación en particular. Si este producto provoca interferencia negativa en la recepción de radio o televisión,
lo cual se puede determinar prendiendo y apagando el equipo, se sugiere al usuario tratar de corregir la interferencia mediante una de las
siguientes acciones:
• Reorientar o reubicar la antena receptora.
• Aumentar la separación entre el equipo y el receptor.
• Conectar el equipo a un enchufe en un circuito diferente al circuito donde está conectado el receptor.
• Consultar con el distribuidor o pedir ayuda a un experimentado técnico de radio/TV.
Este equipo debe instalarse y operarse con una distancia mínima de 20cm entre el radiador y su cuerpo.
1.2.51.32.Tgz001-000
EXENCIÓN DE RESPONSABILIDAD: EXENCIÓN DE RESPONSABILIDAD: A pesar de que Q-See ha hecho todo lo posible para
garantizar que la información contenida en esta guía sea la correcta al momento de la impresión, Q-See no asume responsabilidad
alguna y declina expresamente toda responsabilidad para con cualquier parte debido a pérdida, daño o interrupción provocada por
errores, omisiones o errores tipográcos que puedan producirse.
Q-See está siempre presente para responder a sus preguntas y para acoger sus sugerencias.
Visítenos en www.q-see.com/support para acceder a nuestro Portal de soporte técnico.

Rev. 11/28/17, QCW1000 GQCW1000-ES-V2
-
 1
1
-
 2
2
-
 3
3
-
 4
4
-
 5
5
-
 6
6
-
 7
7
-
 8
8
-
 9
9
-
 10
10
-
 11
11
-
 12
12
-
 13
13
-
 14
14
-
 15
15
-
 16
16
-
 17
17
-
 18
18
-
 19
19
-
 20
20
-
 21
21
-
 22
22
-
 23
23
-
 24
24
-
 25
25
-
 26
26
-
 27
27
-
 28
28


Q-See 66300 Guía de inicio rápido
- Tipo
- Guía de inicio rápido
- Este manual también es adecuado para
en otros idiomas
- English: Q-See 66300 Quick start guide
Artículos relacionados
Otros documentos
-
Lorex 2K QHD Video Doorbell Manual de usuario
-
EZVIZ CS-CV246 Manual de usuario
-
NuTone KNOCK DCAM100FM Guía de instalación
-
Netatmo Netatmo Smart Video Doorbell Guía de instalación
-
Heath Zenith SL-6157 Manual de usuario
-
Sonic Alert HomeAware HA360MKSB Manual de usuario
-
-
ACE AC-6507 Manual de usuario
-
-
Nexxt Solutions NHC-D100 Guía del usuario