
Owner’s Manual
Manual del usuario
Notice d’utilisation
Nursery Essentials Organizer
™
Organizador de artículos esenciales para el cuarto del bebé
™
Organiseur de nécessaire à langer
™
KEEP FOR FUTURE REFERENCE
Please read the instructions carefully before using this product. Adult assembly required.
GUARDE PARA FUTURA REFERENCIA
Lea las instrucciones detenidamente antes de usar este producto. Requiere ser ensamblado por un adulto.
À CONSERVER POUR CONSULTATION FUTURE
Veuillez lire attentivement ces instructions avant en utilisant ce produit. Montage devant
être coné à un adulte.
CCD-0106-000 Rev 2
MKCA0301 REV 2

Contents | Contenido | Contenu
3
Contents | Contenido | Contenu
2
IMPORTANT INFORMATION
Warnings ................................................................................................................................................ 4
GETTING STARTED
Included Parts .......................................................................................................................................4
HOW TO INSTALL
Step 1: Assemble Metal Tubes (4) .................................................................................................... 5
Step 2: Insert Metal Tubes And Wooden Dowels Into Sleeves ................................................. 5
Step 3: Attach Top Legs To Corners ................................................................................................. 6
Step 4: Attach Bottom Legs To Corners ..........................................................................................8
Step 5: Lay Shelf Support Panels ..................................................................................................... 8
CUSTOMER SERVICE
Contact Us .............................................................................................................................................9
INFORMACIÓN IMPORTANTE
Advertencia .......................................................................................................................................... 11
INICIO
Piezas incluidas ................................................................................................................................... 11
INSTALACIÓN
Paso 1: Ensamble los tubos metálicos (4) .....................................................................................12
Paso 2: Inserte los tubos metálicos y las clavijas de madera en las mangas .....................12
Paso 3: Sujete las patas superiores a las esquinas ....................................................................13
Paso 4: Sujete las patas inferiores a las esquinas ......................................................................15
Paso 5: Coloque los paneles de soporte de estantes ................................................................15
SERVICIO AL CLIENTE
Contáctenos ........................................................................................................................................ 16
RENSEIGNEMENTS IMPORTANTS
Mise en garde ..................................................................................................................................... 18
DÉMARRAGE
Pièces comprises ............................................................................................................................... 18
INSTALLATION
Étape 1: Montage des 4 tubes en métal ...................................................................................... 19
Étape 2: Insertion des tubes en métal et des goujons en bois dans les gaines ............... 19
Étape 3: Fixation des pattes supérieures aux coins .................................................................20
Étape 4: Fixation des pattes inférieures aux coins ................................................................... 22
Étape 5: Pose des supports d’étagères .......................................................................................22
SERVICE À LA CLIENTÈLE
Nous contacter ...................................................................................................................................23

Getting Started |
Getting Started
5
Important Information |
4
WARNING:
• For safety, total contents placed in organizer should
not exceed 25 lbs (11.3 kg).
• This product is not a toy.
• The Nursery Essentials Organizer is intended for storage only.
• Do not place child on top of this product. It is not designed
to support the weight of a child.
• It is not intended to be used as a child carrier or changing table.
• Never leave child unattended.
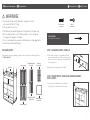
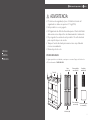
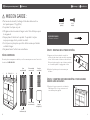
INCLUDED PARTS
If any parts are missing or damaged, please contact our Customer Satisfaction Team
at 1-800-344-2229.
A
A
B
B
C
C
ABC D
D
D
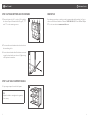
STEP 1: ASSEMBLE METAL TUBES 4
1. Press down on button on metal tube and slide
into metal tube with hole. Make sure to align the
button to the hole. Slide until you hear the button
click into the hole.
2. Repeat for the 3 remaining sets of tubes.
STEP 2: INSERT METAL TUBES AND WOODEN DOWELS
INTO SLEEVES
1. Locate logo to identify the top of the fabric
body. Logo is located front top left corner.
1
1
TOOLS NEEDED:
• Phillips-head screwdriver
A
A
B
B
C
C
D
D
ABC D
Self-Tapping
Screw (X4)
Flat-Bottom
Screw (X8)
Wood
Screw (X8)
Fabric (x1)
Top Leg (x4)
Metal Tube With
Hole (X4)
Wooden
Dowel (x4)
Bottom Leg (x4)
Shelf Support
Panel (x6)
Metal Tube With
Button (X4)
How To Install
Flat-Bottom
Screw (x8)
Wood
Screw (x8)
A
A
B
B
C
C
D
D
ABC D
Self-Tapping
Screw (X4)
Flat-Bottom
Screw (X8)
Wood
Screw (X8)
A
A
B
B
C
C
D
D
ABC D
Self-Tapping
Screw (X4)
Flat-Bottom
Screw (X8)
Wood
Screw (X8)

How To Install How To Install
6 7
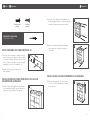
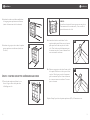
2. Insert assembled metal tubes into the top
and bottom long sleeves (located on the front
and back of the unit).
3. Insert wooden dowels into the top and bottom
short sleeves (located on the sides).
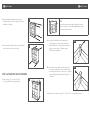
STEP 3: ATTACH TOP LEGS TO CORNERS
1. Place top leg "A" in corner "A" with
the leg's wider holes facing the fabric.
2
3
ABC D
1
2a. Insert the metal tube into the upper hole
of the leg, then secure from the other side
with a flat-bottom screw. Hold the metal tube
firmly to secure in place. Tighten using a
Phillips-head screwdriver.
2b. Insert the wooden dowel into the leg's other
hole, then secure with a wood screw. Hold the
wooden dowel firmly to secure in place. Tighten
using a Phillips-head screwdriver. Apply force
if needed.
Repeat Step 3 to attach top legs "B", "C" and "D” to the remaining corners.
2a
2b
TIP:
Some force may be necessary to tighten the screws.
Turn the unit onto its side while tightening the screws
for greater rotational force.

Customer Service
Customer Service
9
How To Install
8
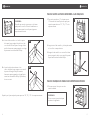
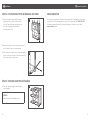
STEP 4: ATTACH BOTTOM LEGS TO CORNERS
1. Connect bottom leg "A" to top leg "A” and align
the letters. Repeat to attach bottom legs "B", "C"
and "D” to the remaining corners.
2. Then insert the metal tube and wooden dowel into
their matching holes.
3. Secure the metal tube with a flat-bottom screw and
secure the dowel with a wood screw. Tighten using
a Phillips-head screwdriver.
STEP 5: LAY SHELF SUPPORT PANELS
1. Lay a support panel in each shelf square.
A
ABC D
ABC D
1
3
1
TIP:
Adjust the fabric to straighten the organizer,
if necessary.
CONTACT US
If you have any questions or wish to provide comments about this product, feel free to
contact our Customer Satisfaction Team at 1-800-344-2229 (M-F from 8:00am-5:00pm
PST) or visit our website at www.munchkin.com.

Información Importante
Información importante |
Inicio
11
ADVERTENCIA:
• Por razones de seguridad, el peso total del contenido del
organizador no debe ser superior a 11 kg (25 lb).
• Este producto no es un juguete.
• El Organizador de Artículos Esenciales para el Cuarto del Bebé
debe usarse como dispositivo de almacenamiento únicamente.
• No ponga al niño encima de este producto. No está diseñado
para soportar el peso de un niño.
• Tampoco ha sido diseñado para usarse como un portabebés
ni como un cambiador.
• Nunca deje al niño solo.
PIEZAS INCLUIDAS
Si alguna pieza falta o está dañada, comuníquese con nuestro Equipo de Satisfacción
al Cliente llamando al 1-800-344-2229.
A
A
B
B
C
C
ABC D
D
D
Tela (x1)
Pata
superior (x4)
Tubos metálicos
con oricio (4)
Clavijas de
madera (x4)
Patas
inferiores (x4)
Paneles de soporte
de estantes (6)
Tubos metálicos
con botón (4)
SPANISH
ESPAÑOL
ESPAGNOL

Instalación
13
Instalación
12
Inicio |
PASO 1: ENSAMBLE LOS TUBOS METÁLICOS 4
1. Presione el botón ubicado en el tubo metálico y
deslice el tubo hacia el interior del tubo metálico
con orificio. Asegúrese de alinear el botón con el
orificio. Deslice el tubo hasta que el botón quede
asegurado en el orificio. Escuchará un clic.
2. Repita estos pasos para los 3 juegos de
tubos restantes.
PASO 2: INSERTE LOS TUBOS METÁLICOS Y LAS CLAVIJAS
DE MADERA EN LAS MANGAS
1. Ubique el logo para identificar la parte superior
de la estructura de tela. El logo está ubicado en
el frente, en la esquina superior izquierda.
Tornillos de base
plana (8)
Tornillos de
punta (8)
A
A
B
B
C
C
D
D
ABC D
Self-Tapping
Screw (X4)
Flat-Bottom
Screw (X8)
Wood
Screw (X8)
A
A
B
B
C
C
D
D
ABC D
Self-Tapping
Screw (X4)
Flat-Bottom
Screw (X8)
Wood
Screw (X8)
1
1
HERRAMIENTAS REQUERIDAS:
• Destornillador Phillips
A
A
B
B
C
C
D
D
ABC D
Self-Tapping
Screw (X4)
Flat-Bottom
Screw (X8)
Wood
Screw (X8)
2. Inserte los tubos metálicos ya ensamblados en
las mangas largas superiores e inferiores (ubicadas
en la parte delantera y trasera de la unidad).
3. Inserte las clavijas de madera en las mangas
cortas superiores e inferiores (ubicadas en
los laterales).
PASO 3: SUJETE LAS PATAS SUPERIORES A LAS ESQUINAS
1. Coloque la pata superior "A" en la esquina
"A" con los orificios más amplios de la pata
de cara a la tela.
2
3
ABC D
1

Instalación Instalación
14 15
PASO 4: SUJETE LAS PATAS INFERIORES A LAS ESQUINAS
1. Conecte la pata inferior "A" a la pata superior
"A” alineando las letras. Repita este paso para
sujetar las patas inferiores "B", "C" y "D” a las
esquinas restante.
2. Luego inserte el tubo metálico y la clavija de madera
en los orificios correspondientes.
3. Asegure el tubo metálico con un
tornillo de base
plana
y asegure la clavija con un tornillo de punta.
Ajuste usando un destornillador Phillips.
PASO 5: COLOQUE LOS PANELES DE SOPORTE DE ESTANTES
1. Coloque un panel de soporte en cada
estante cuadrado.
A
ABC D
ABC D
1
3
1
SUGERENCIA:
De ser necesario, ajuste la tela para
enderezar el organizador.
2a. Inserte el tubo metálico en el orificio superior
de la pata, luego asegúrelo desde el otro lado
con un tornillo de base plana. Sostenga el tubo
metálico firmemente para asegurarlo en su lugar.
Ajuste usando un destornillador Phillips.
2b. Inserte la clavija de madera en el otro
orificio de la pata, luego asegure con un tornillo
de punta. Sostenga la clavija de madera
firmemente para asegurarla en su lugar. Ajuste
usando un destornillador Phillips. Ejerza fuerza,
de ser necesario.
Repita el paso 3 para sujetar las patas superiores "B", "C" y "D” a las esquinas restantes.
2a
2b
SUGERENCIA:
Es posible que necesite ejercer un poco de fuerza
para ajustar los tornillos. Voltee la unidad hacia un
lado mientras ajusta los tornillos para lograr una
mayor fuerza de rotación.

Servicio al cliente
16
CONTÁCTENOS
Si tiene preguntas o desea enviar comentarios sobre este producto, comuniquese con
nuestro Equipo de Satisfaccion del Cliente llamando al 1-800-344-2229 (Lu a Vi 8:00am-
5:00pm PST) o visite nuestro sitio web en www.munchkin.com.
FRENCH
FRANCÉS
FRANÇAIS

Démarrage
18
Renseignements importants |
18
Démarrage |
19
Installation
MISE EN GARDE :
• Par mesure de sécurité, la charge totale dans la desserte ne
doit pas dépasser 11 kg (25 lb).
• Ce produit n’est pas un jouet.
• L’Organiseur de nécessaire à langer ne doit être utilisé que pour
le rangement.
• Ne pas placer l’enfant sur le produit. Ce produit n’est pas
conçu pour supporter le poids d’un enfant.
• Il n’est pas non plus prévu pour être utilisé comme porte-bébé
ou table à langer.
• Ne jamais laisser l’enfant sans surveillance.
PIÈCES COMPRISES
En cas de pièces manquantes ou abîmées, veuillez communiquer avec notre Service à la
clientèle au 1-800-344-2229.
A
A
B
B
C
C
ABC D
D
D
ÉTAPE 1: MONTAGE DES 4 TUBES EN MÉTAL
1. Appuyez sur le bouton du tube en métal et
enfoncez le tube dans le tube en métal comportant
le trou. Veillez à mettre le bouton en face du trou.
Enfoncez le tube jusqu’à ce que le bouton produise
un clic audible quand il s'engage dans le trou.
2. Répéter l’opération pour les trois autres jeux
de tubes.
ÉTAPE 2: INSERTION DES TUBES EN MÉTAL ET DES GOUJONS
EN BOIS DANS LES GAINES
1. Repérer le logo pour savoir où est le haut de
l’habillage en toile. Le logo se trouve sur le
coin avant supérieur gauche.
Vis à pointe
plate (8)
Vis à
bois (8)
A
A
B
B
C
C
D
D
ABC D
Self-Tapping
Screw (X4)
Flat-Bottom
Screw (X8)
Wood
Screw (X8)
A
A
B
B
C
C
D
D
ABC D
Self-Tapping
Screw (X4)
Flat-Bottom
Screw (X8)
Wood
Screw (X8)
1
1
OUTILS NÉCESSAIRES :
• Tournevis cruciforme
A
A
B
B
C
C
D
D
ABC D
Self-Tapping
Screw (X4)
Flat-Bottom
Screw (X8)
Wood
Screw (X8)
Toile (x1)
Pate
supérieure(x4)
Tube en métal
avec trou (4)
Goujons
en bois (x4)
Pattes
inférieures (x4)
Tube en métal
avec bouton (4)
Support
d’étagère (6)

Installation Installation
20 21
2a. Introduire le tube en métal dans l'orifice
supérieur de la patte. Utiliser une vis à pointe
plate pour fixer le tube en place de l'autre
côté. Tenir le tube en métal fermement pour
le maintenir en place. Serrer solidement la vis
avec un tournevis cruciforme.
2b. Enfoncer un goujon en bois dans l’autre orifice
de la patte. Utiliser une vis à bois pour le fixer
en place. Tenir le goujon en bois fermement
pour le maintenir en place. Serrer solidement
la vis avec un tournevis cruciforme. Forcer un
peu si nécessaire.
Répéter l’étape 3 pour fixer les pattes supérieures B, C, et D aux autres coins.
2a
2b
CONSEIL :
Il peut être nécessaire de forcer un peu pour serrer les vis.
Pour maximiser la force rotationnelle, il est conseillé de
placer la desserte sur le côté.
2. Introduire les tubes en métal assemblés dans
les longues gaines supérieures et inférieures
(situées à l'avant et au dos de la desserte).
3. Introduire les goujons en bois dans les petites
gaines supérieures et inférieures (situées sur
les côtés).
ÉTAPE 3: FIXATION DES PATTES SUPÉRIEURES AUX COINS
1. Placer la patte supérieure A dans le coin
A avec les gros orifices de la patte face
à l'habillage en toile.
2
3
ABC D
1

Service à la clientèle
Service à la clientèle
23
Installation
22
NOUS CONTACTER
Si vous avez des questions ou desirez nous faire part de vos suggestions concernant
ce produit, veuillez communiquer avec notre Service apr.s-vente au 1-800-344-2229
(du lundi au vendredi de 8h a 5h, heure du Pacifique) ou visitez note site Web :
www.munchkin.com.
22
ÉTAPE 4: FIXATION DES PATTES INFÉRIEURES AUX COINS
1. Accrocher la patte inférieure A à la patte
supérieure A et mettre les lettres en face
l’une de l’autre. Répéter l’opération pour
accrocher les pattes inférieures B, C
et D aux autres coins.
2. Introduire ensuite le tube en métal et le goujon
en bois dans les orifices correspondants.
3. Fixer le tube en métal avec une vis à pointe plate et
le goujon avec une vis à bois. Serrer solidement les
vis avec un tournevis cruciforme.
ÉTAPE 5: POSE DES SUPPORTS D’ÉTAGÈRES
1. Poser un support d’étagère dans chaque
case d’étagère.
A
ABC D
ABC D
1
3
1
CONSEIL :
Au besoin, ajuster l’habillage en toile.

PRODUCT AND DESIGN ARE TM & ©2017 MUNCHKIN, INC. MUNCHKIN, THE HEART LOGO AND IT'S THE LITTLE
THINGS ARE TRADEMARKS OR REGISTERED TRADEMARKS OF MUNCHKIN, INC. 7835 GLORIA AVE., VAN NUYS,
CA 91406. MUNCHKIN BABY CANADA LTD., 50 PRECIDIO CT., UNIT A, BRAMPTON, ON L6S 6E3. MADE IN CHINA/
HECHO EN CHINA/FABRIQUÉ EN CHINE. 43449-IS-2
Transcripción de documentos
Owner’s Manual Manual del usuario Notice d’utilisation Nursery Essentials Organizer™ Organizador de artículos esenciales para el cuarto del bebé™ Organiseur de nécessaire à langer™ MKCA0301 REV 2 KEEP FOR FUTURE REFERENCE Please read the instructions carefully before using this product. Adult assembly required. GUARDE PARA FUTURA REFERENCIA Lea las instrucciones detenidamente antes de usar este producto. Requiere ser ensamblado por un adulto. À CONSERVER POUR CONSULTATION FUTURE Veuillez lire attentivement ces instructions avant en utilisant ce produit. Montage devant être confié à un adulte. CCD-0106-000 Rev 2 Contents | Contenido | Contenu Contents | Contenido | Contenu IMPORTANT INFORMATION Warnings................................................................................................................................................. 4 RENSEIGNEMENTS IMPORTANTS Mise en garde...................................................................................................................................... 18 GETTING STARTED Included Parts........................................................................................................................................ 4 DÉMARRAGE Pièces comprises................................................................................................................................ 18 HOW TO INSTALL Step 1: Assemble Metal Tubes (4)..................................................................................................... 5 Step 2: Insert Metal Tubes And Wooden Dowels Into Sleeves.................................................. 5 Step 3: Attach Top Legs To Corners.................................................................................................. 6 Step 4: Attach Bottom Legs To Corners...........................................................................................8 Step 5: Lay Shelf Support Panels......................................................................................................8 INSTALLATION Étape 1 : Montage des 4 tubes en métal....................................................................................... 19 Étape 2 : Insertion des tubes en métal et des goujons en bois dans les gaines................ 19 Étape 3 : Fixation des pattes supérieures aux coins..................................................................20 Étape 4 : Fixation des pattes inférieures aux coins....................................................................22 Étape 5 : Pose des supports d’étagères........................................................................................22 CUSTOMER SERVICE Contact Us.............................................................................................................................................. 9 SERVICE À LA CLIENTÈLE Nous contacter....................................................................................................................................23 INFORMACIÓN IMPORTANTE Advertencia........................................................................................................................................... 11 INICIO Piezas incluidas.................................................................................................................................... 11 INSTALACIÓN Paso 1: Ensamble los tubos metálicos (4)......................................................................................12 Paso 2: Inserte los tubos metálicos y las clavijas de madera en las mangas......................12 Paso 3: Sujete las patas superiores a las esquinas.....................................................................13 Paso 4: Sujete las patas inferiores a las esquinas.......................................................................15 Paso 5: Coloque los paneles de soporte de estantes.................................................................15 SERVICIO AL CLIENTE Contáctenos......................................................................................................................................... 16 2 3 Important Information | Getting Started Getting Started | How To Install WARNING: • For safety, total contents placed in organizer should not exceed 25 lbs (11.3 kg). • This product is not a toy. • The Nursery Essentials Organizer is intended for storage only. • Do not place child on top of this product. It is not designed to support the weight of a child. • It is not intended to be used as a child carrier or changing table. • Never leave child unattended. Self-Tapping Flat-Bottom Wood Wood Flat-Bottom Screw (x8) Screw (x8) Screw (X4) Screw (X8) Screw (X8)Wood Self-Tapping Self-Tapping Flat-Bottom Flat-Bottom Wood Screw Screw (X4) (X4) Screw Screw (X8) (X8) Screw Screw (X8) (X8) TOOLS NEEDED: • Phillips-head screwdriver INCLUDED PARTS STEP 1: ASSEMBLE METAL TUBES (4) If any parts are missing or damaged, please contact our Customer Satisfaction Team at 1-800-344-2229. 1. Press down on button on metal tube and slide into metal tube with hole. Make sure to align the button to the hole. Slide until you hear the button click into the hole. Top Leg (x4) C D Fabric (x1) B Metal Tube With Hole (X4) Wooden Dowel (x4) A 1 2. Repeat for the 3 remaining sets of tubes. STEP 2: INSERT METAL TUBES AND WOODEN DOWELS INTO SLEEVES A B C D A B C D 1. Locate logo to identify the top of the fabric body. Logo is located front top left corner. Metal Tube With Button (X4) 1 Shelf Support Panel (x6) Bottom Leg (x4) 4 5 How To Install 2. Insert assembled metal tubes into the top and bottom long sleeves (located on the front and back of the unit). 3. Insert wooden dowels into the top and bottom short sleeves (located on the sides). How To Install 2 TIP: Some force may be necessary to tighten the screws. Turn the unit onto its side while tightening the screws for greater rotational force. 3 STEP 3: ATTACH TOP LEGS TO CORNERS 1. Place top leg "A" in corner "A" with the leg's wider holes facing the fabric. 1 C D B 2a. Insert the metal tube into the upper hole of the leg, then secure from the other side with a flat-bottom screw. Hold the metal tube firmly to secure in place. Tighten using a Phillips-head screwdriver. 2a 2b. Insert the wooden dowel into the leg's other hole, then secure with a wood screw. Hold the wooden dowel firmly to secure in place. Tighten using a Phillips-head screwdriver. Apply force if needed. 2b A Repeat Step 3 to attach top legs "B", "C" and "D” to the remaining corners. 6 7 Customer Service How To Install Customer Service STEP 4: ATTACH BOTTOM LEGS TO CORNERS 1. Connect bottom leg "A" to top leg "A” and align the letters. Repeat to attach bottom legs "B", "C" and "D” to the remaining corners. 1 CONTACT US CC DD BB If you have any questions or wish to provide comments about this product, feel free to contact our Customer Satisfaction Team at 1-800-344-2229 (M-F from 8:00am-5:00pm PST) or visit our website at www.munchkin.com. AA A 2. Then insert the metal tube and wooden dowel into their matching holes. 3. Secure the metal tube with a flat-bottom screw and secure the dowel with a wood screw. Tighten using a Phillips-head screwdriver. 3 STEP 5: LAY SHELF SUPPORT PANELS 1. Lay a support panel in each shelf square. 1 TIP: Adjust the fabric to straighten the organizer, if necessary. 8 9 Información Importante Información importante | Inicio ADVERTENCIA: SPANISH • Por razones de seguridad, el peso total del contenido del organizador no debe ser superior a 11 kg (25 lb). • Este producto no es un juguete. • El Organizador de Artículos Esenciales para el Cuarto del Bebé debe usarse como dispositivo de almacenamiento únicamente. • No ponga al niño encima de este producto. No está diseñado para soportar el peso de un niño. • Tampoco ha sido diseñado para usarse como un portabebés ni como un cambiador. • Nunca deje al niño solo. ESPAÑOL PIEZAS INCLUIDAS ESPAGNOL Si alguna pieza falta o está dañada, comuníquese con nuestro Equipo de Satisfacción al Cliente llamando al 1-800-344-2229. Pata superior (x4) C D Tela (x1) B Tubos metálicos con orificio (4) Clavijas de madera (x4) A A B C D A B C D Tubos metálicos con botón (4) Paneles de soporte de estantes (6) Patas inferiores (x4) 11 Inicio | Instalación Instalación Self-Tapping Flat-Bottom Wood Tornillos de Tornillos de base plana (8) punta (8) Screw (X4) Screw (X8) Screw Self-Tapping Self-Tapping Flat-Bottom Flat-Bottom (X8)Wood Wood Screw Screw (X4) (X4) Screw Screw (X8) (X8) 2. Inserte los tubos metálicos ya ensamblados en las mangas largas superiores e inferiores (ubicadas en la parte delantera y trasera de la unidad). 2 3. Inserte las clavijas de madera en las mangas cortas superiores e inferiores (ubicadas en los laterales). 3 Screw Screw (X8) (X8) HERRAMIENTAS REQUERIDAS: • Destornillador Phillips PASO 1: ENSAMBLE LOS TUBOS METÁLICOS (4) 1. Presione el botón ubicado en el tubo metálico y deslice el tubo hacia el interior del tubo metálico con orificio. Asegúrese de alinear el botón con el orificio. Deslice el tubo hasta que el botón quede asegurado en el orificio. Escuchará un clic. 1 2. Repita estos pasos para los 3 juegos de tubos restantes. PASO 2: INSERTE LOS TUBOS METÁLICOS Y LAS CLAVIJAS DE MADERA EN LAS MANGAS 1. Ubique el logo para identificar la parte superior de la estructura de tela. El logo está ubicado en el frente, en la esquina superior izquierda. 12 1 PASO 3: SUJETE LAS PATAS SUPERIORES A LAS ESQUINAS 1. Coloque la pata superior "A" en la esquina "A" con los orificios más amplios de la pata de cara a la tela. 1 C D B A 13 Instalación Instalación PASO 4: SUJETE LAS PATAS INFERIORES A LAS ESQUINAS SUGERENCIA: Es posible que necesite ejercer un poco de fuerza para ajustar los tornillos. Voltee la unidad hacia un lado mientras ajusta los tornillos para lograr una mayor fuerza de rotación. 1. Conecte la pata inferior "A" a la pata superior "A” alineando las letras. Repita este paso para sujetar las patas inferiores "B", "C" y "D” a las esquinas restante. 1 CC DD BB AA A 2a. Inserte el tubo metálico en el orificio superior de la pata, luego asegúrelo desde el otro lado con un tornillo de base plana. Sostenga el tubo metálico firmemente para asegurarlo en su lugar. Ajuste usando un destornillador Phillips. 2a 2b. Inserte la clavija de madera en el otro orificio de la pata, luego asegure con un tornillo de punta. Sostenga la clavija de madera firmemente para asegurarla en su lugar. Ajuste usando un destornillador Phillips. Ejerza fuerza, de ser necesario. 2b 2. Luego inserte el tubo metálico y la clavija de madera en los orificios correspondientes. 3. Asegure el tubo metálico con un tornillo de base plana y asegure la clavija con un tornillo de punta. Ajuste usando un destornillador Phillips. PASO 5: COLOQUE LOS PANELES DE SOPORTE DE ESTANTES 1. Coloque un panel de soporte en cada estante cuadrado. Repita el paso 3 para sujetar las patas superiores "B", "C" y "D” a las esquinas restantes. 14 3 1 SUGERENCIA: De ser necesario, ajuste la tela para enderezar el organizador. 15 Servicio al cliente CONTÁCTENOS Si tiene preguntas o desea enviar comentarios sobre este producto, comuniquese con nuestro Equipo de Satisfaccion del Cliente llamando al 1-800-344-2229 (Lu a Vi 8:00am5:00pm PST) o visite nuestro sitio web en www.munchkin.com. FRENCH FRANCÉS FRANÇAIS 16 Renseignements importants | Démarrage Démarrage | Installation MISE EN GARDE : • Par mesure de sécurité, la charge totale dans la desserte ne doit pas dépasser 11 kg (25 lb). • Ce produit n’est pas un jouet. • L’Organiseur de nécessaire à langer ne doit être utilisé que pour le rangement. • Ne pas placer l’enfant sur le produit. Ce produit n’est pas conçu pour supporter le poids d’un enfant. • Il n’est pas non plus prévu pour être utilisé comme porte-bébé ou table à langer. • Ne jamais laisser l’enfant sans surveillance. PIÈCES COMPRISES En cas de pièces manquantes ou abîmées, veuillez communiquer avec notre Service à la clientèle au 1-800-344-2229. Pate supérieure(x4) C D Toile (x1) B Tube en métal avec trou (4) Goujons en bois (x4) A Self-Tapping Flat-Bottom Wood Vis à pointe Vis à plate (8) Screw (X8) bois (8) Screw (X4) Screw (X8) Self-Tapping Self-Tapping Flat-Bottom Flat-Bottom Wood Wood Screw Screw (X4) (X4) Screw Screw (X8) (X8) Screw Screw (X8) (X8) OUTILS NÉCESSAIRES : • Tournevis cruciforme ÉTAPE 1 : MONTAGE DES 4 TUBES EN MÉTAL 1. Appuyez sur le bouton du tube en métal et enfoncez le tube dans le tube en métal comportant le trou. Veillez à mettre le bouton en face du trou. Enfoncez le tube jusqu’à ce que le bouton produise un clic audible quand il s'engage dans le trou. 1 2. Répéter l’opération pour les trois autres jeux de tubes. ÉTAPE 2 : INSERTION DES TUBES EN MÉTAL ET DES GOUJONS EN BOIS DANS LES GAINES A B C D A B C D 1. Repérer le logo pour savoir où est le haut de l’habillage en toile. Le logo se trouve sur le coin avant supérieur gauche. Tube en métal avec bouton (4) 1 Support d’étagère (6) Pattes inférieures (x4) 18 19 Installation 2. Introduire les tubes en métal assemblés dans les longues gaines supérieures et inférieures (situées à l'avant et au dos de la desserte). 3. Introduire les goujons en bois dans les petites gaines supérieures et inférieures (situées sur les côtés). Installation 2 CONSEIL : Il peut être nécessaire de forcer un peu pour serrer les vis. Pour maximiser la force rotationnelle, il est conseillé de placer la desserte sur le côté. 3 ÉTAPE 3 : FIXATION DES PATTES SUPÉRIEURES AUX COINS 1. Placer la patte supérieure A dans le coin A avec les gros orifices de la patte face à l'habillage en toile. 1 C D B A 2a. Introduire le tube en métal dans l'orifice supérieur de la patte. Utiliser une vis à pointe plate pour fixer le tube en place de l'autre côté. Tenir le tube en métal fermement pour le maintenir en place. Serrer solidement la vis avec un tournevis cruciforme. 2a 2b. Enfoncer un goujon en bois dans l’autre orifice de la patte. Utiliser une vis à bois pour le fixer en place. Tenir le goujon en bois fermement pour le maintenir en place. Serrer solidement la vis avec un tournevis cruciforme. Forcer un peu si nécessaire. 2b Répéter l’étape 3 pour fixer les pattes supérieures B, C, et D aux autres coins. 20 21 Service à la clientèle Installation Service à la clientèle ÉTAPE 4 : FIXATION DES PATTES INFÉRIEURES AUX COINS 1. Accrocher la patte inférieure A à la patte supérieure A et mettre les lettres en face l’une de l’autre. Répéter l’opération pour accrocher les pattes inférieures B, C et D aux autres coins. 1 CC DD BB NOUS CONTACTER Si vous avez des questions ou desirez nous faire part de vos suggestions concernant ce produit, veuillez communiquer avec notre Service apr.s-vente au 1-800-344-2229 (du lundi au vendredi de 8h a 5h, heure du Pacifique) ou visitez note site Web : www.munchkin.com. AA A 2. Introduire ensuite le tube en métal et le goujon en bois dans les orifices correspondants. 3. Fixer le tube en métal avec une vis à pointe plate et le goujon avec une vis à bois. Serrer solidement les vis avec un tournevis cruciforme. 3 ÉTAPE 5 : POSE DES SUPPORTS D’ÉTAGÈRES 1. Poser un support d’étagère dans chaque case d’étagère. 1 CONSEIL : Au besoin, ajuster l’habillage en toile. 22 23 PRODUCT AND DESIGN ARE TM & ©2017 MUNCHKIN, INC. MUNCHKIN, THE HEART LOGO AND IT'S THE LITTLE THINGS ARE TRADEMARKS OR REGISTERED TRADEMARKS OF MUNCHKIN, INC. 7835 GLORIA AVE., VAN NUYS, CA 91406. MUNCHKIN BABY CANADA LTD., 50 PRECIDIO CT., UNIT A, BRAMPTON, ON L6S 6E3. MADE IN CHINA/ HECHO EN CHINA/FABRIQUÉ EN CHINE. 43449-IS-2-
 1
1
-
 2
2
-
 3
3
-
 4
4
-
 5
5
-
 6
6
-
 7
7
-
 8
8
-
 9
9
-
 10
10
-
 11
11
-
 12
12
-
 13
13


Munchkin MKCA0301 Manual de usuario
- Tipo
- Manual de usuario
- Este manual también es adecuado para
en otros idiomas
- français: Munchkin MKCA0301 Manuel utilisateur
- English: Munchkin MKCA0301 User manual
Artículos relacionados
-
Munchkin Home Care Product Manual de usuario
-
Munchkin vibe Berry Baby Gate Manual de usuario
-
-
-
-
-
-
-
-