Yamaha DVD-S795 El manual del propietario
- Categoría
- Reproductores de DVD
- Tipo
- El manual del propietario

DVD/Video CD/CD Player
DVD-S795
Operating Instructions
Before attempting to connect, operate or adjust this product,
please read this Operating Instructions manual completely
and save this manual for future reference.
UC
VQT8007-1

2
Safety information
Note:
This player can be used only where the power supply
is AC 120 V, 60 Hz. It cannot be used elsewhere.
CAUTION:
DVD/VIDEO CD/CD PLAYER IS A CLASS I LASER
PRODUCT. HOWEVER THIS DVD/VIDEO CD/CD
PLAYER USES A VISIBLE LASER BEAM WHICH
COULD CAUSE HAZARDOUS RADIATION EXPO-
SURE IF DIRECTED. BE SURE TO OPERATE THE
DVD/VIDEO CD/CD PLAYER CORRECTLY AS IN-
STRUCTED.
WHEN THIS DVD/VIDEO CD/CD PLAYER IS
PLUGGED TO THE WALL OUTLET, DO NOT
PLACE YOUR EYES CLOSE TO THE OPENING
OF THE DISC TRAY AND OTHER OPENINGS TO
LOOK INTO THE INSIDE OF THIS PLAYER.
USE OF CONTROLS OR ADJUSTMENTS OR PER-
FORMANCE OF PROCEDURES OTHER THAN
THOSE SPECIFIED HEREIN MAY RESULT IN
HAZARDOUS RADIATION EXPOSURE.
DO NOT OPEN COVERS AND DO NOT REPAIR
YOURSELF. REFER SERVICING TO QUALIFIED
PERSONNEL.
WARNING:
TO REDUCE THE RISK OF FIRE OR ELECTRIC
SHOCK, DO NOT EXPOSE THIS PLAYER TO
RAIN OR MOISTURE.
TO REDUCE THE RISK OF FIRE OR ELECTRIC
SHOCK, AND ANNOYING INTERFERENCE, USE
THE SUPPLIED ACCESSORIES ONLY.
The lightning flash with arrowhead symbol, within
an equilateral triangle, is intended to alert the user
to the presence of uninsulated “dangerous volt-
age” within the product’s enclosure that may be of
sufficient magnitude to constitute a risk of electric
shock to persons.
The exclamation point within an equilateral trian-
gle is intended to alert the user to the presence of
important operating and maintenance (servicing)
instructions in the literature accompanying the ap-
pliance.
CAUTION: TO REDUCE THE RISK OF ELECTRIC
SHOCK, DO NOT REMOVE COVER
(OR BACK). NO USER-SERVICEABLE
PARTS INSIDE. REFER SERVICING
TO QUALIFIED SERVICE PER-
SONNEL.
RISK OF ELECTRIC SHOCK
DO NOT OPEN
CAUTION
CAUTION -LASER RADIATION WHEN OPEN.
DO NOT STARE INTO BEAM.
ATTENTION-RAYONNEMENT LASER EN CAS D'OUVERTURE.
NE PAS REGARDER DANS LE FAISCEAU.
VORSICHT -LASERSTRAHLUNG, WENN ABDECKUNG GEÖFFNET.
NICHT IN DEN STRAHL BLICKEN.
ADVARSEL -LASERSTRÅLING VED ÅBNING.
SE IKKE IND I STRÅLEN.
ADVARSEL -LASERSTRÅLING NÅR DEKSEL ÅPNES.
STIRR IKKE INN I STRÅLEN.
VARNING -LASERSTRÅLNING NÄR DENNA DEL ÄR ÖPPNAD.
STIRRA EJ IN I STRÅLEN.
VARO! -AVATTAESSA OLET ALTTIINA LASERSÄTEILYLLE.
ÄLÄ TUIJOTA SÄTEESEEN.
(Inside of player)
This player is not disconnected from the AC power
source as long as it is connected to the wall outlet,
even if this player itself is turned off. This state is
called the standby mode.
In this state, this player is designed to consume a
very small quantity of power.
FOR CANADIAN CUSTOMERS
TO PREVENT ELECTRIC SHOCK, MATCH WIDE
BLADE OF PLUG TO WIDE SLOT AND FULLY
INSERT.
THIS CLASS B DIGITAL APPARATUS COMPLIES
WITH CANADIAN ICES-003.

3
Getting Started
FCC INFORMATION (for U.S.A)
1. IMPORTANT NOTICE: DO NOT MODIFY THIS
UNIT!
This product, when installed as indicated in the in-
structions contained in this manual, meets FCC require-
ments. Modifications not expressly approved by Yamaha
may void your authority, granted by the FCC, to use the
product.
2.
IMPORTANT: When connecting this product to accesso-
ries and/or another product use only high quality shielded ca-
bles. Cable/s supplied with this product MUST be used. Fol-
low all installation instructions. Failure to follow instructions
could void your FCC authorization to use this product in the
USA.
3.
NOTE: This product has been tested and found to comply
with the requirements listed in FCC Regulations, Part 15 for
Class “B” digital devices. Compliance with these require-
ments provides a reasonable level of assurance that your
use of this product in a residential enviroment will not result
in harmful interference with other electronic devices.
This equipment generates/uses radio frequencies and, if not
installed and used according to the instructions found in the
users manual, may cause interference harmful to the opera-
tion of other electronic devices.
Compliance with FCC regulations does not guarantee that in-
terference will not occur in all installations. If this product is
found to be the source of interference, which can be deter-
mined by turning the unit “OFF” and “ON”, please try to elimi-
nate the problem by using one of the following measures:
Relocate either this product or the device that is being affect-
ed by the interference.
Utilize power outlets that are on different branch (circuit
breaker of fuse) circuits or install AC line filter/s.
In the case of radio or TV interference, relocate/reorient the
antenna. If the antenna lead-in is 300 ohm ribbon lead,
change the lead-in to coaxial type cable.
If these corrective measures do not produce satisfactory re-
sults, please contact the local retailer authorized to distribute
this type of product. If you can not locate the appropriate re-
tailer, please contact Yamaha Electronics Corp., U.S.A. 6600
Orangethorpe Ave, Buena Park, CA 90620
The above statement apply ONLY to those products distribut-
ed by Yamaha Corporation of America or its subsidiaries.
We Want You Listening For A Lifetime
YAMAHA and the Electronic Industries Association’s
Consumer Electronics Group want you to get the
most out of your equipment by playing it at a safe lev-
el. One that lets the sound come through loud and
clear without annoying blaring or distortion—and,
most importantly, without affecting your sensitive
hearing. Since hearing damage from loud sounds is
often undetectable until it is too late,
YAMAHA and the Electronic Industries
Association’s Consumer Electronics
Group recommend you to avoid
prolonged exposure from excessive
volume levels.
Precautions
Please read these precautions before operating this player.
È AC cord
To avoid any malfunctions of the player, and to protect against
electric shock, fire or personal injury, please observe the fol-
lowing:
ÁHold the plug firmly when connecting or disconnecting
the AC cord to this player.
ÁDo not connect or disconnect the AC cord when your
hands are wet.
ÁKeep the AC cord away from heating appliances.
ÁNever put any heavy object on the AC cord.
ÁDo not attempt to repair or reconstruct the AC cord in
any way.
ÁRemove dust, dirt, etc. on the plug at regular intervals.
ÁIf the player has been dropped or otherwise damaged,
set the player to the standby mode and disconnect the
AC cord.
ÁIf smoke, malodors or noises are emitted from the play-
er, set the player to the standby mode and disconnect
the AC cord.
È Placement
Avoid placing the player in areas of:
Ádirect sunlight or heating radiators, or closed automobiles
Áhigh temperature [over 95uF (35uC)] or high humidity (over
90%)
Áexcessive dust
Ávibration, impact or where the surface is tilted as the internal
parts may be seriously damaged.
ÁPlace the player in a horizontal position, and do not place
anything heavy on it.
ÁDo not place the player on amplifiers or other equipment
which may become hot.
È Non-use periods
When the player is not being used, set the player to the stand-
by mode.
When left unused for a long period of time, the player should
be unplugged from the household AC outlet.
È Do not place objects inside the player
ÁTouching internal parts of this player is dangerous, and may
cause serious damage to the player. Do not attempt to disas-
semble the player.
ÁDo not put any foreign object on the disc tray.
È Keep away from water and magnets.
ÁKeep the player away from flower vases, tubs, sinks, etc. If
liquids are spilled into the player, serious damage could
occur.
ÁKeep magnetic objects such as speakers, at a distance from
the player.
È Condensation
Moisture may form on the lens in the following conditions:
Áimmediately after a heater has been turned on.
Áin a steamy or very humid room.
Áwhen the player is moved from a cold environment to a warm
one.
If moisture forms inside this player, it may not operate proper-
ly. In this case, turn on the power and wait about one hour for
the moisture to evaporate.
È When watching a TV broadcast
Depending on the reception condition of the TV, interference
may appear on the TV screen while you are watching a TV
broadcast and the player is left on. This is not a malfunction of
the player or the TV. To watch a TV broadcast, set the player
to the standby mode.

4
Dear Customers
May we take this opportunity to thank you for purchasing this
YAMAHA DVD/Video CD/CD player.
We strongly recommend that you carefully study the Operating
Instructions before attempting to operate the player and that
you note the listed precautions.
Accessories
Please check and identify the
supplied accessories.
Remote control
unit . . . . . . . . . . . . . . 1
Batteries . . . . . . . . . 2
for remote control unit
[size “AA”]
AC cord . . . . . . . . . . 1
Video/audio
cable . . . . . . . . . . . . 1
The model number and serial number of this player can
be found on either the back or the bottom of the player.
Please note them in the space provided below and re-
tain this booklet as a permanent record of your purchase
to aid identification in the event of theft.
MODEL NUMBER__________________________
SERIAL NUMBER__________________________
This product incorporates copyright protection technolo-
gy that is protected by method claims of certain U.S. pat-
ents and other intellectual property rights owned by
Macrovision Corporation and other rights owners. Use of
this copyright protection technology must be authorized
by Macrovision Corporation, and is intended for home
and other limited viewing uses only unless otherwise au-
thorized by Macrovision Corporation. Reverse engineer-
ing or disassembly is prohibited.

5
Getting StartedBasic OperationOperation Using
On-Screen Menu Icons
Advanced OperationInitial SettingsFor Your Reference
Table of contents
Getting Started:
Safety information . . . . . . . . . . . . . . . . . . . . . 02
Precautions . . . . . . . . . . . . . . . . . . . . . . . . . . . 03
Accessories . . . . . . . . . . . . . . . . . . . . . . . . . . . 04
Features . . . . . . . . . . . . . . . . . . . . . . . . . . . . . . 06
Definition of terms . . . . . . . . . . . . . . . . . . . . . 7
Control reference guide . . . . . . . . . . . . . . . . . 08
ÁMain unit . . . . . . . . . . . . . . . . . . . . . . . . . . . . . . . . . . . . . 008
ÁRemote control unit . . . . . . . . . . . . . . . . . . . . . . . . . . . . 008
Front panel FL display . . . . . . . . . . . . . . . . . . 09
Connection . . . . . . . . . . . . . . . . . . . . . . . . . . . 10
ÁConnecting to an AV amplifier containing Dolby Digital
or dts (digital theater systems) decoder . . . . . . . . . . . . . 010
ÁConnecting to an AV amplifier which does not contain
Dolby Digital or dts (digital theater systems)
decoder. . . . . . . . . . . . . . . . . . . . . . . . . . . . . . . . . . . . . . 012
Remote control unit preparation . . . . . . . . . . 13
ÁBattery installation . . . . . . . . . . . . . . . . . . . . . . . . . . . . . 013
ÁRemote control operation range . . . . . . . . . . . . . . . . . . . 013
Connecting headphones . . . . . . . . . . . . . . . . 13
Basic Operation:
Basic play . . . . . . . . . . . . . . . . . . . . . . . . . . . . 14
ÁBefore enjoying DVD/Video CD/CD . . . . . . . . . . . . . . . . 014
ÁBasic play . . . . . . . . . . . . . . . . . . . . . . . . . . . . . . . . . . . . 014
ÁStopping play . . . . . . . . . . . . . . . . . . . . . . . . . . . . . . . . . 015
Skipping ahead or back . . . . . . . . . . . . . . . . . 16
Still picture (Pause) . . . . . . . . . . . . . . . . . . . . 16
Rapid advance (Rapid reverse) . . . . . . . . . . . 17
Frame advance (Frame reverse)
[DVD/Video CD] . . . . . . . . . . . . . . . . . . . . . . . . 17
Slow-motion play
[DVD/Video CD] . . . . . . . . . . . 17
Enjoying Video CDs with playback control
without using menus
[Video CD] . . . . . . . . . 17
Operation Using On-Screen Menu Icons:
General information about On-Screen Menu
Icons . . . . . . . . . . . . . . . . . . . . . . . . . . . . . . . 18
ÁCommon procedures . . . . . . . . . . . . . . . . . . . . . . . . . . . 018
Detailed descriptions of each On-Screen
Menu Icon. . . . . . . . . . . . . . . . . . . . . . . . . . . 19
ÁScreen for disc information (For DVD) . . . . . . . . . . . . . . 019
ÁScreen for disc information (For Video CD/CD) . . . . . . . 020
ÁScreen for player information . . . . . . . . . . . . . . . . . . . . . 021
ÁShuttle screen. . . . . . . . . . . . . . . . . . . . . . . . . . . . . . . . . 022
Advanced Operation:
Repeat play . . . . . . . . . . . . . . . . . . . . . . . . . . . 23
ÁRepeat viewing (listening) . . . . . . . . . . . . . . . . . . . . . . . 023
ÁRepeating sections between two specific points
(A-B repeat) . . . . . . . . . . . . . . . . . . . . . . . . . . . . . . . . . . 024
Program play [Video CD/CD] . . . . . . . . . . . . . . . . . . 25
Random play
[Video CD/CD] . . . . . . . . . . . . . . . 26
Storing markers in memory to be viewed
(listened to) again . . . . . . . . . . . . . . . . . . . . 26
ÁStoring a marker in the memory . . . . . . . . . . . . . . . . . . . 026
ÁRecalling/clearing a marker . . . . . . . . . . . . . . . . . . . . . . 027
Changing audio soundtrack language
[DVD] . . . . . . . . . . . . . . . . . . . . . . . . . . . . . . . 27
Switching vocals ON or OFF for Karaoke
discs
[DVD/Video CD] . . . . . . . . . . . . . . . . . . . 27
Changing subtitle language
[DVD] . . . . . . . . . 28
Viewing from another angle
[DVD] . . . . . . . . . 29
Using a title menu
[DVD] . . . . . . . . . . . . . . . . . 29
Using a DVD menu
[DVD]. . . . . . . . . . . . . . . . . 29
Initial Settings:
Initial settings . . . . . . . . . . . . . . . . . . . . . . . . . 30
ÁCommon procedures of initial settings . . . . . . . . . . . . . . 030
ÁSelecting disc languages [DVD] . . . . . . . . . . . . . . . . . . . 031
ÁSelecting rating level [DVD] . . . . . . . . . . . . . . . . . . . . . . 032
ÁSelecting language of On-Screen Display menu . . . . . . 033
ÁSelecting the display format of the On-Screen
Display . . . . . . . . . . . . . . . . . . . . . . . . . . . . . . . . . . . . . . 034
ÁSelecting the FL display brightness . . . . . . . . . . . . . . . . 035
ÁSelecting TV screen type . . . . . . . . . . . . . . . . . . . . . . . . 036
ÁConcerning images which appear on the TV screen
(aspect ratios of the screen) . . . . . . . . . . . . . . . . . . . . . . 037
ÁSelecting digital output . . . . . . . . . . . . . . . . . . . . . . . . . . 038
ÁSpeaker settings . . . . . . . . . . . . . . . . . . . . . . . . . . . . . . . . 40
ÁOther settings . . . . . . . . . . . . . . . . . . . . . . . . . . . . . . . . . 042
Language code list . . . . . . . . . . . . . . . . . . . . . 44
For Your Reference:
Disc handling and maintenance . . . . . . . . . . 45
ÁMaintenance . . . . . . . . . . . . . . . . . . . . . . . . . . . . . . . . . . 045
Troubleshooting . . . . . . . . . . . . . . . . . . . . . . . 46
ÁSelf-diagnosis display function . . . . . . . . . . . . . . . . . . . . 047
Specifications . . . . . . . . . . . . . . . . . . . . . . . . . 48

6
Features
È High picture quality
Á10 bit video D/A converter
With its 10 bit capability, this D/A converter reproduces fine
images faithfully.
ÁComponent video output
When used with a compatible monitor, a video connection via
the component video output jacks of your new DVD/Video CD/
CD player is capable of the most precise color reproduction in
a video signal.
ÁAn array of picture quality modes yielded by digital
processing
Signal deterioration is kept to the minimum by processing the
data as digital data.
This feature can be used as the picture quality setting individ-
ually tailored for DVD playback.
–Cinema Image (See page 21.)
Using the On-Screen Menu Icon enables the cinema mode,
which is best for the playback of movie programs, to be se-
lected.
In addition, the picture quality best suited to the type of soft-
ware programs concerned can be selected. In all, four pic-
ture quality modes are provided: normal, soft, fine and
cinema.
–User selection (See page 21.)
Using the On-Screen Menu Icon, the contrast, color hue,
equalizer and brightness can be adjusted to suit your own
preference.
–Monitor selector (See page 36.)
Once the type of TV used [Standard (Direct View TV), CRT
Projector, LCD Projector, Projection TV] has been selected
when the initial setting operations are performed, the opti-
mum picture quality for the type of TV concerned will be
automatically selected.
È High sound quality
Á96 kHz/24 bit audio D/A converter
This player enables 96 kHz/24 bit linear PCM signals, which
constitute the highest specifications in the DVD standards, to
be reproduced faithfully. To support 96 kHz sampling/24 bit
sound, the shaping noise of this multi-level digital sigma type
of D/A converter is kept flat up to 44 kHz, thus preventing the
important audio signals from being affected in any way. In
terms of the bottom line, the sound in all of its various modes
is reproduced faithfully.
ÁDolby Digital 5.1ch surround decoder
(See pages 21 and 40.)
The Dolby Digital 5.1ch surround decoder incorporated in
this player comes with speaker mode settings which support
the low-range reproduction capability of the speakers, speak-
er level settings, delay time settings, audio dynamic range
suppression, Cinema Dialogue function to make it easier to
hear movie dialogues, and other features.
Ádts (digital theater systems) digital output (See page 10.)
By connecting an amplifier incorporating a dts decoder, you
can enjoy high quality digital surround from dts discs.
È On-Screen Menu Icons (See page 18.)
By simply pressing the ON SCREEN button on the remote
control, information on the DVD/Video CD/CD player and disc
can be displayed on the TV screen for easy identification. The
player’s operations and settings can be easily accessed by
operating the cursor buttons on the remote control while moni-
toring the TV screen. The color and position of the On-Screen
Menu Icons can be changed.
È Versatile DVD features
ÁMulti-audio function (See page 27.)
The audio soundtrack can be heard in up to 8 languages.
(The number of audio sound languages depends on the soft-
ware.)
ÁMulti-subtitle function (See page 28.)
Subtitles may be displayed in one of a maximum of 32 lan-
guages. (The number of the subtitle languages depends on
the software.)
ÁMulti-angle function (See page 29.)
This function allows you to choose the viewing angle of
scenes which were shot from a number of different angles.
(Limited to DVD recorded with multiple camera angles.)
ÁParental lock function (See page 32.)
This function can prevent playback of DVD software unsuita-
ble for some audiences (especially for children).
È Marker function (See page 26.)
This player can store a maximum of 5 positions in memory, for
convenient access, as desired.
È Disc formats supported by this player
The player can play back discs bearing any of the following
marks:
È Discs which cannot be played with this
player
ÁDVD with Region No. other than “1” or “ALL”
ÁDisc of PAL system ÁCD-G
ÁDVD-ROM ÁCD-RW
ÁDVD-R/DVD-RAM ÁDVDoRW
ÁCD-ROM ÁCVD
ÁVSD ÁSVCD
ÁCDV ÁDivx Video Disc
etc.
ÁDo not try to play Photo CD or CD-R.
(Otherwise, data on the disc may be damaged.)
È Region Management Information
This player is designed and manufactured to respond to the
Region Management Information that is recorded on a DVD
disc. The Region number of this player is “1”. If the Region
number described on the DVD disc does not correspond to the
Region number of this player, this player cannot play this disc.
This player will play DVD discs made for “ALL” Regions. This
player will play DVD discs marked with the following symbols:
DVD
[3w (8 cm) disc/
5w (12 cm) disc]
Video CD
[3w (8 cm) disc/
5w (12 cm) disc]
CD
[3w (8 cm) disc/
5w (12 cm) disc]
1
ALL
or

7
Getting Started
Angle
Recorded onto some DVD discs are scenes which have been
simultaneously shot from a number of different angles (the
same scene is shot from the front, from the left side, from the
right side, etc.). With such discs, the ANGLE button can be
used to view the scene from different angles.
Chapter number
These numbers are recorded on DVD discs. A title is subdivid-
ed into many sections, each of which is numbered, and specif-
ic parts of video presentations can be searched quickly using
these numbers.
Digital audio output connector (Optical)
The digital audio output connector (optical) converts electrical
signals into optical signals and transfers them to the amplifier.
Consequently, it has a number of features including its immu-
nity from electrical interference from external sources and its
ability to prevent the generation of noise and its minimal effect
on the external environment.
DVD
This refers to a high-density optical disc on which high-quality
pictures and sound have been recorded by means of digital
signals. Incorporating a new video compression technology
(MPEG 2) and high-density recording technology, DVD en-
ables esthetically pleasing full-motion video to be recorded
over long periods of time (for instance, a whole movie can be
recorded).
DVD has a structure consisting of two 0.6 mm thin discs which
are adhered to each other. Since the thinner the disc, the high-
er the density at which the information can be recorded, a DVD
disc has a greater capacity than a single 1.2 mm thick disc.
Since the two thin discs are adhered to each other, there is the
potential to achieve double-sided play sometime in the future
for even longer duration of play.
Field
Half of the video information (video signal) in a frame is called
a field. With conventional TV systems, a signal frame (a single
screen) consists of two fields.
Field still
Only one field (half of the video information) is displayed on the
TV screen, so the apparent resolution is low. However, there is
no blurring on the screen.
Frame
Individual images in a video or on the TV are called frames.
Frame still
The two fields are displayed, alternately, on the TV screen, so
the image is blurry. However, the image quality is better than
field images.
Playback control
This is recorded on a Video CD (version 2.0). The scenes or
information to be viewed (or listened to) can be selected inter-
actively with the TV monitor by looking at the menu shown on
the TV monitor.
Subtitles
This is the appearance of the dialogue at the bottom of the
screen which are prerecorded on some DVD discs.
Title number
These numbers are recorded on DVD discs. When a disc con-
tains two or more movies, these movies are numbered as title
1, title 2, etc.
Track number
These numbers are assigned to the tracks which are recorded
on Video CDs and CDs. They enable specific tracks to be lo-
cated quickly.
Video CD
This contains recordings of pictures and sound whose quality
is on a par with that of videotape. This player also supports
Video CDs with playback control (version 2.0).
Definition of terms

8
Remote control unit
Page
e POWER button (*/I) . . . . . . . . . . . . . . . . . . . . . . . . . . 14
f STOP button (@) . . . . . . . . . . . . . . . . . . . . . . . . . . . . . . 15
g SKIP buttons (H, I). . . . . . . . . . . . . . . . . . . . 15, 16
h TITLE button . . . . . . . . . . . . . . . . . . . . . . . . . . . . . . 15, 29
i Cursor buttons (A, B, C, D)/SELECT button . . . . . 15
j ON SCREEN button . . . . . . . . . . . . . . . . . . . . . . . . . . . 18
k AUDIO button . . . . . . . . . . . . . . . . . . . . . . . . . . . . . . . . 27
l SUBTITLE button . . . . . . . . . . . . . . . . . . . . . . . . . . . . . 28
m MARKER button . . . . . . . . . . . . . . . . . . . . . . . . . . . . . . 26
n PLAY MODE button . . . . . . . . . . . . . . . . . . . . . . . . 25, 26
o REPEAT button . . . . . . . . . . . . . . . . . . . . . . . . . . . . . . 23
p CLEAR button. . . . . . . . . . . . . . . . . . . . . . . 18, 21, 25, 27
q A-B button. . . . . . . . . . . . . . . . . . . . . . . . . . . . . . . . . . . 24
r SET UP button . . . . . . . . . . . . . . . . . . . . . . . . . . . . . . . 30
s OPEN/CLOSE button . . . . . . . . . . . . . . . . . . . . . . . . . . 14
t STILL/PAUSE button (g). . . . . . . . . . . . . . . . . . . . . . . 16
u PLAY button (D) . . . . . . . . . . . . . . . . . . . . . . . . . . . . . 14
v SLOW/SEARCH buttons (F, G) . . . . . . . . . . . . . . 17
w MENU button . . . . . . . . . . . . . . . . . . . . . . . . . . 15, 17, 29
x RETURN button . . . . . . . . . . . . . . . . . . . . . . . . 15, 18, 30
y ANGLE button . . . . . . . . . . . . . . . . . . . . . . . . . . . . . . . 29
z Numeric buttons. . . . . . . . . . . . . . . . . . . . . . . . . . . . . . 15
ÁTo select a 2-digit number
Example: To select track 23
Press “X10”, “2” and then “3”.
Control reference guide
Main unit
Page
e STANDBY/ON button . . . . . . . . . . . . . . . . . . . . . . . . . . 14
Press to switch the player from standby mode to ON or vice
versa. In standby mode, the player is still consuming a
small amount of power.
f Disc tray . . . . . . . . . . . . . . . . . . . . . . . . . . . . . . . . . . . . 14
g OPEN/CLOSE button (E) . . . . . . . . . . . . . . . . . . . . . . . 14
h PLAY button (D) . . . . . . . . . . . . . . . . . . . . . . . . . . . . . 14
i PAUSE button (g) . . . . . . . . . . . . . . . . . . . . . . . . . . . . 16
Page
j STOP button (@) . . . . . . . . . . . . . . . . . . . . . . . . . . . . . . 15
k Headphones jack (PHONES) . . . . . . . . . . . . . . . . . . . . 13
l Phones level control (LEVEL) . . . . . . . . . . . . . . . . . . . 13
m Remote control signal sensor. . . . . . . . . . . . . . . . . . . 13
n FL Display . . . . . . . . . . . . . . . . . . . . . . . . . . . . . . . . . . . 9
o SKIP buttons (H, I). . . . . . . . . . . . . . . . . . . . 15, 16
p SEARCH buttons (F, G) . . . . . . . . . . . . . . . . . . . . 17
NATURAL SOUND DVD PLAYER
STANDBY/ON
PHONES LEVEL
010
f OPEN/CLOSE
DVD / VIDEO CD / CD
C
SEARCH
D:
SKIP
;
D I G I T A L
1fghij
ponmlk
POWER
@
STOP
TITLE
SUBTITLE
MARKER
ANGLEAUDIO
ON SCREEN RETURN
MENU
SELECT
H
SKIP IF
G
D
PLAY
g
STILL/PAUSE
OPEN/CLOSE
*/ I
PLAY MODE
REPEAT
A-B CLEAR
DVD
SET UP
SLOW/
SEARCH
1
2
3
4
9
0
o
q
p
r
8
6
7
5
t
v
w
x
y
z
u
s

9
Getting Started
Front panel FL display
e Rotates during play.
Rotates fast clockwise or counterclockwise
during rapid advance (reverse). (See page 17.)
Rotates slowly clockwise or counterclockwise
during slow-motion play.
[DVD/Video CD] (See page 17.)
Illuminates in the stop mode.
f Illuminates during playback.
Flashes when the RESUME function is ON.
(See page 15.)
g Illuminates during repeat play. (See pages 23 and 24.)
h Illuminates in the still picture (pause) mode.
(See page 16.)
i Indicates the title/chapter number. [DVD]
Indicates the track number. [Video CD/CD]
j Indicates the elapsed playing time from the start of the
title/track during play.
k Indicates the audio channel information recorded in the
disc being played back (e.g. 2ch or 5.1ch).
l Illuminates when a DVD is loaded.
m Illuminates when it is possible to switch the angle.
[DVD] (See page 29.)
n Illuminates during program play. [Video CD/CD]
(See page 25.)
o Illuminates when Linear PCM of 96 kHz sampling is be-
ing played.
p Illuminates when Linear PCM of 24 bit is being played.
q Illuminates when the disc tray is open.
r Illuminates when the disc tray is being closed (re-
tracted).
s Illuminates during play of a DVD.
t Illuminates during play of an interactive DVD.
\
u Illuminates during play of a Karaoke DVD.
v Illuminates during play of an interactive Karaoke DVD.
\
w Illuminates during play of a Video CD.
x Illuminates during play of a Video CD with playback
control.
y Illuminates during play of a CD.
z Illuminates when the track number is selected to be
stored in the memory (program play). [Video CD/CD]
(See page 25.)
{ Illuminates when playback is impossible.
ÁDVD for which playback is prohibited by the initial settings
“2 Ratings”. (See page 32.)
ÁDVD with Region No. other than “1” or “ALL”
Á(See page 6.)
ÁDisc of PAL system
| Illuminates when no disc is loaded.
\
An interactive DVD is DVD software which includes multi-
\
ple angles, multiple plot endings, etc.
Surround (L)
Front (L)
Center
Surround (R)
Subwoofer
Front (R)
DVD
PROG.
ANGLE
96kHz 24bit
1 3 5 642
89 o0 p
q
r
s
t
u
v
w
x
y
{
DVD
DVD
DVD
DVD
|
7
z
PROG.

10
Connection
ÁEnsure that this player and other equipment to be connected are set to the standby mode or off, and disconnect the AC cord, before commencing
connection.
ÁDo not block ventilation holes of any of the equipment and arrange them so that air can circulate freely.
ÁRead through the instructions before connecting other equipment.
ÁEnsure that you observe the color coding when connecting audio and video cables.
ÁSelect the appropriate screen type at the initial setting “6 TV Aspect” according to your TV set [4:3/16:9 and Standard (Direct View TV)/CRT Projector/
LCD Projector/Projection TV]. (See page 36.)
Notes:
ÁIf the DVD/Video CD/CD player is connected to the TV through a video cassette recorder, the picture may not be played back normally with some
DVDs.
ÁWhen playing some DVD discs, TV volume level may be lower than from some other sources, adjust the TV volume to your desired level.
ÁWhen the DVD/Video CD/CD player is connected to the TV set through the component video output connectors, the ON SCREEN informations from
the amplifier will not show on the TV screen. To show them, select the input position which is connected to the amplifier on the TV set.
Do not place the player on amplifiers or other equipment which may become hot.
Connecting to an AV amplifier containing Dolby Digital or dts (digital theater systems)
decoder
When DVDs recorded in Dolby Digital or dts are played, Dolby Digital bitstream or dts bitstream is output from the player’s OPTICAL
digital audio output connector or COAXIAL digital audio output connector. When the player is connected to a Dolby Digital decoder or
dts decoder, you can enjoy theater-quality audio in your home. [An optical digital audio cable or coaxial digital audio cable (both
optional) is required when an optional Dolby Digital decoder or dts decoder is used.]
Note:
ÁWhen connecting an AV amplifier which contains dts decoder, be sure to select “Bitstream” at “3 dts” of the initial setting “7 Digital
Audio Output”. (“Off” is selected at the factory preset.) If “Off” is selected, dts bitstream is not output from the digital audio output
connector.
Video cable (optional)
Direction of
signal flow
TV set (optional)
Coaxial digital
audio cable
(optional)
Optical
digital
audio cable
(optional)
Video/audio
cable
(supplied)
S video
cable
(optional)
DVD/Video CD/CD player
AC cord (supplied)
To AC outlet
or
To component video input
connectors (Y, C
B, CR)
COAXIAL
DVD/LD
OPTICAL
DVD/
LD
DVD/
LD
AUDIO SIGNAL
R L VIDEO S-VIDEO
VIDEO SIGNAL
PCM/U DIGITAL
DTS
COAXIAL
AUDIO OUT
OPTICAL
L
SUBWOOFER
CENTER SURROUND
6CH DISCRETE
MIXED 2CH
VIDEO
MAIN
S VIDEO
YCB CR
R
L
R
L
R
2
1
VIDEO OUT
COMPONENT VIDEO
AC IN
AV amplifier with
Dolby Digital/dts
decoder (optional)
or

11
Getting Started
Dust protection cap
Component video output connectors (Y, C
B, CR)
The component video output connector outputs the color dif-
ference signals (C
B, CR) and luminance signal (Y) separately in
order to achieve high fidelity in reproducing colors.
ÁThe description of the component video input connectors
may differ depending on the TV set or monitor (e.g. Y, P
B, PR/
Y, B-Y, R-Y/Y, C
B, CR and so on). Refer to the instruction
manual of your TV set for details.
S video output connector
The S video output connector separates the color (C) and lu-
minance (Y) signals before transmitting them to the TV set in
order to achieve a sharper picture.
Use the S video cable (optional) when connecting the player to
a TV set equipped with an S video input connector for the best
picture clarity possible.
Notes when connecting the optical digital audio cable
(optional)
ÁRemove the dust protection cap from the optical digital audio
output connector and connect the cable firmly so that the
configurations of both the cable and the connector match.
ÁKeep the dust protection cap and, to protect against dust, al-
ways reattach the cap when not using the connector.
Concerning the audio output from the player’s optical/
coaxial digital audio output connector
\1
The type of audio output from the connector can be selected
by “7 Digital Audio Output” of the initial settings.
(See page 38.)
\2
Compressed sound converted to PCM will be output.
Disc
DVD
Video
CD
CD
Sound
recording
format
Dolby Digital
Linear PCM
(48/96 kHz
16/20/24 bit)
dts
MPEG 1
Linear PCM
Optical/coaxial digital
audio output from
connector
Dolby Digital bitstream
(1–5.1ch) or PCM (2ch)
(48 kHz/16 bit)
\1 \2
Linear PCM (2ch)
(48 kHz sampling/16 bit
only) or no output
\1
dts bitstream (1–5.1ch) or
no output
\1
PCM
(44.1 kHz sampling)
\2
Linear PCM
(44.1 kHz sampling)
Caution for the optical/coaxial digital audio output
connector:
È When connecting an amplifier (with an optical/
coaxial digital input connector) which contains
the Dolby Digital decoder or dts decorder
ÁBe sure to select “Bitstream” both at “2 Dolby Digi-
tal” and “3 dts” of the initial setting “7 Digital Audio
Output”. (See page 38.)
È When connecting an amplifier (with an optical/
coaxial digital input connector) which does not
contain the Dolby Digital decoder or dts de-
coder
ÁBe sure to select “PCM” at “2 Dolby Digital” and
“Off” at “3 dts” of the initial setting “7 Digital Audio
Output”. (See page 38.)
ÁOtherwise any attempt to play DVDs may cause
such a high level of noise that it may be harmful to
your ears and damage your speakers.
ÁVideo CDs and CDs can be played as they would
normally be played.
C
Note:
ÁSome dts decoders which do not support DVD-dts interface
may not work properly with the DVD/Video CD/CD player.
For your reference:
ÁDolby Digital is a digital sound compression technique devel-
oped by the Dolby Laboratories, Inc.
Supporting 5.1-channel surround sound, as well as stereo
(2-channel) sound, this technique enables a large quantity
of sound data to be efficiently recorded on a disc.
ÁLinear PCM is a signal recording format used in a CD. While
a CD is recorded in 44.1 kHz/16 bit, a DVD is recorded in
48 kHz/16 bit up to 96 kHz/24 bit.
ÁIf you have a Dolby Pro Logic Surround decoder, you will
obtain the full benefit of Pro Logic from the same DVD mov-
ies that provide full 5.1-channel Dolby Digital soundtracks, as
well as from titles with the Dolby Surround mark.
Manufactured under license from Dolby Laboratories.
“Dolby” and the double-D symbol are trademarks of
Dolby Laboratories. Confidential Unpublished Works.
j 1992–1997 Dolby Laboratories, Inc. All rights re-
served.

12
Connection
Connecting to an AV amplifier which does not contain Dolby Digital or dts (digital theater
systems) decoder
This DVD/Video CD/CD player contains a Dolby Digital decoder. This enables the playback of DVDs recorded in Dolby Digital Sur-
round or Linear PCM without the need for an optional decoder with Dolby Digital or Linear PCM processing. When the DVD/Video CD/
CD player is connected to an AV amplifier with 5.1ch input connectors, you can enjoy theater-quality audio in your home when playing
discs recorded in Dolby Digital Surround or Linear PCM.
TV set (optional)
Video/audio
cord
(supplied)
DVD/Video CD/CD player
Audio cord
(optional)
Notes:
ÁAfter connection is made, set the “8 Speaker Setting” (such
as Yes/No and Large/Small) according to your speaker sys-
tem. (See page 40.)
ÁIf the surround speakers are set to “No” at the “8 Speaker
Setting” (see page 40), the discs recorded in Linear PCM will
be played back only in 2 channels even when the center
speaker is connected as well as the front speakers.
ÁDVDs recorded in Linear PCM/96 kHz sampling in which
“Center Speaker” is contained will also be played back only
in 2 channels.
ÁIf the player is connected to the AV amplifier as shown
above, audio recorded in dts will not be output. To enjoy dts
sound, it is necessary to connect the player as shown on
page 10.
Direction of
signal flow
Video cable
(optional)
To component video input
connectors (Y, C
B, CR)
PCM/U DIGITAL
DTS
COAXIAL
AUDIO OUT
OPTICAL
L
SUBWOOFER
CENTER SURROUND
6CH DISCRETE
MIXED 2CH
VIDEO
MAIN
S VIDEO
YC
B
C
R
R
L
R
L
R
2
1
VIDEO OUT
COMPONENT VIDEO
AC IN
CENTER
SUB
WOOFER
MAIN
SURROUND
AUDIO SIGNAL
DVD/LD
L
R
L
R
VIDEO SIGNAL
S-VIDEO
6CH DISCRETE INPUT DVD/LD
AV amplifier without
Dolby Digital/dts
decoder (optional)
S video cord
(optional)
In the case of the AV amplifier without
5.1ch input connectors
In the case of the AV amplifier
with 5.1ch input connectors
or

13
Getting Started
Remote control unit preparation
Battery installation A
Insert the batteries while observing the correct (o) and (p) po-
larities as illustrated at left.
Service life of batteries
ÁThe batteries normally last for about one year although this
depends on how often, and for what operations, the remote
control unit is used.
ÁIf the remote control unit fails to work, even when it is operat-
ed near the player, replace the batteries.
ÁUse size “AA” batteries.
Remote control operation range B
Point the remote control unit from no more than about 23 feet
(7 m) from the remote control sensor and within about 60u of
the front of the player.
ÁThe operating distance may vary according to the brightness
of the room.
Notes:
ÁDo not point bright lights at the remote control sensor.
ÁDo not place objects between the remote control unit and the
remote control sensor.
ÁDo not use this remote control unit while simultaneously op-
erating the remote control unit of any other equipment.
Connecting headphones C
1
Connect the headphones (optional).
ÁHeadphones with a
1
/4w (6.3 mm) stereo plug can be con-
nected.
2
Adjust the volume.
Caution:
Avoid listening to sound at levels which may be harmful to your
ears.
Notes:
ÁDo not use rechargeable (Ni-Cd) batteries.
ÁDo not attempt to recharge, short-circuit, disassemble,
heat or throw the batteries into a fire.
ÁDo not drop, step on or otherwise impact the remote
control unit. This may damage the parts or lead to mal-
function.
ÁDo not mix old and new batteries.
ÁIf the remote control unit is not going to be used for a
long time, remove the batteries. Otherwise, electrolyte
may leak which may lead, not only to malfunctioning
but also, to burns if contact is made with the electro-
lyte.
ÁWipe away any electrolyte leaking inside the remote
control unit, and install new batteries.
ÁIf any electrolyte should come into contact with parts of
your body, wash it off thoroughly with water.
Remote control signal sensor
23 feet (7 m)
A
B
C
STANDBY/ON
PHONES LEVEL
010
f OPEN/CLOSE
DVD / VIDEO CD / CD
NATURAL SOUND DVD PLAYER
C
SEARCH
D:
SKIP
;
D I G I T A L
30˚ 30˚
7
8
7
8
STANDBY/ON
PHONES LEVEL
010
DVD / VIDEO CD /
NATURAL SOUND DVD PLAYER
LEVEL
010

14
POWER
@
STOP
TITLE
SUBTITLE
MARKER
ANGLEAUDIO
ON SCREEN RETURN
MENU
SELECT
H
SKIP IF
G
D
PLAY
g
STILL/PAUSE
OPEN/CLOSE
*/ I
POWER
*/ I
@
STOP
TITLE
RETURN
D
PLAY
OPEN/CLOSE
H
SKIP I
PLAY MODE
REPEAT
A-B CLEAR
DVD
SET UP
SLOW/
SEARCH
SELECT
NATURAL SOUND DVD PLAYER
STANDBY/ON
STANDBY/ON
PHONES LEVEL
010
f OPEN/CLOSE
f OPEN/CLOSE
DVD / VIDEO CD / CD
C
SEARCH
D:
SKIP
;
:
SKIP
;
D I G I T A L
1
2
MENU
Before enjoying DVD/Video CD/CD
The On-Screen menu language of your player has been
factory preset to English.
If you would like to change the menu language to
French or Spanish, please refer to “Selecting language
of On-Screen Display menu” on page 33.
In the explanations given below it is assumed that Eng-
lish has been selected as the menu language.
Basic play
Open
CloseReading
Preparations
ÁConfirm that the TV set or the audio equipment (if connected)
is properly connected to the player.
ÁConfirm that the power for the TV set or the audio equipment
(if connected) is turned on.
ÁConfirm that the input setting for the TV set or the audio
equipment (if connected) is properly selected.
(Example: Select “VCR 2” on the TV set if this player has
been connected to TV input connector [2].)
Basic play
1
Press POWER to switch on the power.
2
Press OPEN/CLOSE to
open the disc tray.
3
Place the disc on the disc tray with the label
side to be played facing upwards.
Hold the disc without touching either of its surfaces, posi-
tion it with the label side to be played facing upwards,
align it with the guides, and place it in its proper position.
e 3w (8 cm) disc
f 5w (12 cm) disc
4
Press PLAY.
The disc tray is automatically closed and play begins.

15
Basic Operation
ÁWhen the disc tray is closed by pressing OPEN/CLOSE,
press PLAY to start play.
ÁWhen a menu screen appears on the TV monitor
In case of an interactive DVD or
a Video CD with playback con-
trol, a menu screen appears on
the TV monitor. Perform step
5 to start play.
5
Press the cursor buttons (A, B, C, D) and
press SELECT, or press the numeric but-
tons, to select the preferred item.
ÁThe cursor buttons (A, B, C, D) are not effective for
selecting items for Video CDs.
Play of the selected item now begins.
While watching the movie program
ÁSetting to the picture quality best suited to movies
Using the On-Screen Menu Icon will select the optimum pic-
ture quality for movie programs (this setting gives a gentler
feel to videos, producing more detail in darker scenes and
helping to reduce noise).
The picture quality of your choice can be set using the On-
Screen Menu Icons. (See “Cinema Image” on page 21.)
ÁRaising the volume but only for the dialogue
The volume for the dialogue only can be raised by displaying
the On-Screen Menu Icons (for player information) and set-
ting “Cinema Dialogue” to “ON”. (See page 21.)
[This setting takes effect only for discs which are recorded
with Dolby Digital 5.1ch and with the sound contained in the
center channel.]
When the menu continues onto another screen
After step 4 on page 14, press SKIP (I).
ÁTo return to the previous menu screen
Press SKIP (H).
ÁDue to the design of some software titles, SKIP (H, I)
may not always work. For operation, refer also to the jacket
of the disc concerned.
Stopping play and returning to the menu
screen
Press TITLE, MENU or RETURN (for DVD), or RETURN (for
Video CD).
Play is suspended, and the menu screen is displayed.
ÁThe buttons may not work depending on the disc used.
What is playback control?
If a Video CD has “playback control” written on its disc or
jacket, it means that particular scenes or information can
be selected for viewing interactively with the TV monitor
using the menu screen.
(Example)
(Example of DVD)
B
Notes:
ÁThe disc continues to rotate while the menu is displayed
even after the player has finished playing a particular item.
When no further selections are to be played, be sure to press
STOP to clear the menu display.
ÁIf the disc is placed in upside down (and it is a single sided
disc), the FL display will indicate “NO PLAY”.
For your reference:
ÁWhen —— appears on the TV monitor while a button is be-
ing operated, it means that the corresponding operation is
prohibited by the player or the disc.
Stopping play
Press STOP during play.
RESUME function
The player records the point where STOP was pressed during
play (RESUME function). (“D” flashes on the player’s FL dis-
play when this function is activated.)
ÁPress PLAY again while “D” flashes, and play will resume
from this point.
ÁWhen the tray is opened or STOP is pressed again while “D”
flashes, the RESUME function will be cleared.
The RESUME function works only with titles for which the
elapsed playing time appears on the player’s FL display during
playback.
This feature will not be cleared when the player is set to the
standby mode and then turned back ON.
Chapter preview function (DVD only)
When PLAY is pressed while
“D” flashes, the message
shown at right is displayed.
When PLAY is pressed again while the above message is dis-
played, the first few seconds of each chapter from the begin-
ning of the title up to the point where operation was stopped
will be played. This makes it possible to review previously
viewed chapters. Normal playback will commence from the
point where operation was stopped.
Notes:
ÁCancelling the RESUME function will also clear the chapter
preview function.
ÁThe chapter preview function may not work with some DVDs.
After operation
When the player is not in use, remove the disc and press
POWER to set the player to the standby mode.
The player is automatically set to the standby mode after
30 minutes or so have elapsed in the stop mode.
(Auto power-off function)
TITLE MENU
Dogs
BirdsLovers
Castles
of the world
TITLE MENU
Birds
Birds
Dogs
Lovers
Castles
Press PLAY to Chapter Preview

16
Skipping ahead or back
Press SKIP (H, I) during play.
H: Reverse direction
I: Forward direction
For your reference:
ÁA chapter (DVD) or a track (Video CD/CD) is skipped each
time the button is pressed.
ÁWhen SKIP (H) is pressed once midway through a chap-
ter/track, play returns to the start of that chapter/track. When
it is pressed again, a chapter/track is skipped each time the
button is pressed.
ÁWhen SKIP (H, I) is pressed during menu play of Vid-
eo CDs with playback control, a menu screen may some-
times be recalled.
Still picture (Pause)
By the remote control unit
Press STILL/PAUSE during play.
By the main unit
Press PAUSE during play.
ÁDVD/Video CD: The player will be placed in the still picture
mode.
ÁCD: The player will be placed in the pause
mode.
ÁNormal play is resumed when PLAY is pressed.
POWER
@
STOP
TITLE
SUBTITLE
MARKER
ANGLEAUDIO
ON SCREEN RETURN
MENU
H
SKIP IF
G
D
PLAY
g
STILL/PAUSE
OPEN/CLOSE
*/ I
SELECT
g
STILL/PAUSE
D
PLAY
H
SKIP I
PLAY MODE
REPEAT
A-B CLEAR
DVD
SET UP
SLOW/
SEARCH
F
G
SLOW/
SEARCH
POWER
NATURAL SOUND DVD PLAYER
STANDBY/ON
PHONES LEVEL
010
f OPEN/CLOSE
DVD / VIDEO CD / CD
C
SEARCH
D
C
SEARCH
D
:
SKIP
;
:
SKIP
;
D I G I T A L
@
STOP
MENU

Basic Operation
17
Rapid advance (Rapid reverse)
By the remote control unit
Press SLOW/SEARCH (F, G) during play.
On the main unit
Press SEARCH (F, G) during play.
ÁThe speed of advance (reverse) is relatively slow at first.
When the button is pressed again, the speed becomes fast-
er. (Each time the button is pressed, the speed increases up
to 5 steps.)
ÁThe speed will be retained even after the button is released.
ÁNormal play is resumed when PLAY is pressed.
For your reference:
ÁWhen SLOW/SEARCH (F, G) or SEARCH (F, G)
is used during menu play of Video CDs with playback control,
a menu screen may sometimes be recalled.
ÁFor DVD and Video CDs, audio from 6CH DISCRETE or
MIXED 2CH output connectors will be heard during rapid
advance scanning at the initial scan speed. (See page 42.)
Frame advance (Frame reverse)
[DVD/Video CD]
Press the cursor buttons (C, D) in the still pic-
ture mode.
(See page 16.)
C: Reverse direction
D: Forward direction
ÁThe disc is advanced (reversed) by one frame each time the
cursor button (C, D) is pressed.
ÁWhen the cursor button (C, D) is kept pressed, consecutive
frame advance (reverse) works.
ÁNormal play is resumed when PLAY is pressed.
Note:
ÁFor Video CDs, frame reverse is not possible.
For your reference:
ÁPressing STILL/PAUSE or PAUSE also activates frame ad-
vance.
ÁWhether the pictures are advanced by a “Frame” or “Field” is
automatic. (See page 42.)
Reverse
direction
Forward
direction
(Example)
Forward
direction
Reverse
direction
Slow-motion play [DVD/Video CD]
By the remote control unit
Press SLOW/SEARCH (F, G) in the still pic-
ture mode.
(See page 16.)
On the main unit
Press SEARCH (F, G) in the still picture
mode.
(See page 16.)
ÁThe speed of slow-motion is slow at first. When the button is
pressed again, the speed becomes faster. (Each time the
button is pressed, the speed increases up to 5 steps.)
ÁThe speed will be retained even after the button is released.
ÁNormal play is resumed when PLAY is pressed.
Note:
ÁFor Video CDs, slow-motion playback in reverse direction is
not possible.
Enjoying Video CDs with
playback control without using
menus [Video CD]
1. Press STOP after the menu screen appears (after step 4 on
page 14).
(“PBC” will be cleared from the player’s FL display.)
2. Press the numeric buttons to select the preferred track.
(Play begins.)
ÁRefer to the jacket etc. of the disc concerned for the track
numbers.
ÁPress “1” to start play from the beginning of the disc.
To return to menu play
Press STOP to stop playback and press MENU.
(“PBC” will light up on the player’s FL display and the menu
screen is resumed.)
Perform step 5 on page 15.
(Example)
Forward
direction
Reverse
direction
Forward
direction
Reverse
direction
F
G
SLOW/
SEARCH
C
SEARCH
D
F
G
SLOW/
SEARCH
C
SEARCH
D

1818
General information about On-
Screen Menu Icons
This player features On-Screen Menu Icons providing various
functions. A “banner” will be displayed on the TV monitor by
pressing the ON SCREEN button on the remote control.
Operating the cursor buttons/SELECT button on the remote
control will show disc information (title/chapter/track number,
elapsed playing time, audio/subtitle language, and angle) and
player information (repeat play, play mode, marker, etc.).
Some icons allow the settings to be changed.
Common procedures
1
Press ON SCREEN during play or in the
stop mode.
Each time this button is pressed, the TV monitor changes
as shown below.
[>On-Screen Menu Icons are not displayed
l
v
l>On-Screen Menu Icons for selecting disc information
l
v
l On-Screen Menu Icons for selecting player information
l
v
{=Shuttle screen
ÁSome functions cannot be accessed from the stop
mode.
2
Press the cursor buttons (C, D) to select
the preferred item.
ÁThe currently selected item is indicated by the yellow
frame on the On-Screen Menu Icons.
3
Press the cursor buttons (A, B) to select
the preferred setting.
ÁFor some functions, the setting will be registered imme-
diately; for others, SELECT or PLAY must be pressed.
ÁWhen numbers are displayed (e.g. title No.), the numeric
buttons are also effective for setting instead of the cursor
buttons (A, B). When numbers are entered by the nu-
meric buttons, press SELECT to register the setting.
Press RETURN or CLEAR to clear the On-Screen Menu
Icons.
Examples of On-Screen Menu Icons
(See A, B and C for detailed illustration.)
(The screens may differ depending on the disc contents.)
ÁDVD (A) ÁVideo CD (B) ÁCD (C)
For your reference:
ÁDepending on the type of DVD software and a TV with auto-
matic picture zoom function enabled, the On-Screen Menu
Icons may not be displayed or only partially displayed on the
TV screen.
In this case, change the position of the On-Screen Menu
Icons in “4 On-Screen Messages” of the initial settings.
(See page 34.)
ÁThe color (blue, violet or green) of the On-Screen Menu
Icons can be changed. (See page 34.)
A
B
C
1 1:56:37 1
LPCM
ENG
148k 16
b
OFF
ENG
ON
1
1
3:37
L R
OFF
PBC
PRG
1
3:37
0N
dB
F
dB
PRG
0
dB
µ
p
µ
p
µ
p
N0
OFF
OFF
POWER
@
STOP
TITLE
SUBTITLE
MARKER
ANGLEAUDIO
ON SCREEN RETURN
MENU
SELECT
H
SKIP IF
G
D
PLAY
g
STILL/PAUSE
OPEN/CLOSE
*/ I
PLAY MODE
REPEAT
A-B CLEAR
DVD
SET UP
SLOW/
SEARCH
D
PLAY
CLEAR
SELECT
RETURN
ON SCREEN
OFF

Operation Using
On-Screen Menu Icons
19
Detailed descriptions of each On-Screen Menu Icon
Screen for disc information (For DVD)
Chapter No.
Change the chapter No. by using the cursor buttons (A, B) or the numeric buttons and
press SELECT.
Audio soundtrack
language No.
(See page 27.)
Audio soundtrack
language
LPCM
$
dts
Vocal
Vocal
Change the No. by using the
cursor buttons (A, B) or the
numeric buttons.
ENG: English POR: Portuguese
FRA: French RUS Russian
DEU: German JPN: Japanese
ITA: Italian CHI: Chinese
ESP: Spanish KOR: Korean
NLD: Dutch MAL: Malay
SVE: Swedish VIE: Vietnamese
NOR: Norwegian THA: Thai
DAN: Danish U: Others
Linear PCM
(“k” stands for kHz
and “b” stands for bit.)
Dolby Digital
dts
DVD Karaoke (Solo)
DVD Karaoke (Duet)
16b
20b
24b
Audio
attribute
96k
or
48k
1–5.1ch
1–5.1ch
--- (OFF)
ON
--- (OFF)
V1oV2
V1
V2
Change the No. by using the
cursor buttons (A, B) or the
numeric buttons.
ENG: English POR: Portuguese
FRA: French RUS Russian
DEU: German JPN: Japanese
ITA: Italian CHI: Chinese
ESP: Spanish KOR: Korean
NLD: Dutch MAL: Malay
SVE: Swedish VIE: Vietnamese
NOR: Norwegian THA: Thai
DAN: Danish U: Others
Select “ON” or “OFF” by using
the cursor buttons (A, B).
OFF Subtitle is cleared.
ON Subtitle is displayed.
Subtitle language No.
(See page 28.)
Subtitle language
Subtitle on/off
For your reference:
Á“Ô Õ” around the icon means that the item can be changed using the cursor buttons (A, B).
Title No. Change the title No. by using the cursor buttons (A, B) or the numeric buttons and press SELECT.
Angle No.
(See page 29.)
Change the No. by using the cursor buttons (A, B) or the
numeric buttons.
Elapsed playing time
(hour: minute: second)
Change the time by using the numeric buttons and press SELECT.
It can be used to find a specific scene quickly.
Example: To specify “1 hour 56 min. 37 sec.”, enter “15637”.
(This function does not work with some discs.)

2020
Playback control
(Video CD only)
(See page 15.)
OFF Menu play is not ON.
ON Menu play is ON.
Detailed descriptions of each On-Screen Menu Icon
Screen for disc information (For Video CD/CD)
Track No.
Change the track No. by using the cursor buttons
(A, B) or the numeric buttons and press SELECT.
Elapsed playing time
(minute: second)
During CD play, display is changed by using the cursor
buttons (A, B).
Elapsed playing time>
Remaining time of the track
^-----Remaining time of the disc(--}
Audio mode
(Video CD only)
(See page 27.)
Change the mode by using the cursor buttons (A, B).
LR
L
R
Left channel sound is output from the speaker (L),
and right channel sound from the speaker (R).
Left channel sound only is output.
Right channel sound only is output.
Note:
ÁTrack No. and the elapsed playing time are not displayed during menu play of Video CDs with playback control.
ÁIt is not possible to turn playback control ON or OFF using the On-Screen Menu Icons.
For your reference:
Á“Ô Õ” around the icon means that the item can be changed using the cursor buttons (A, B).

Operation Using
On-Screen Menu Icons
21
Screen for player information
Notes:
ÁRepeat play and marker functions do not work with an interactive DVD or during menu play of a Video CD with playback control.
ÁA-B repeat play does not work with an interactive DVD.
ÁIt is not possible to change the play mode using the On-Screen Menu Icons.
For your reference:
ÁThe master volume can be set and stored separately for DVD, Video CD and CD.
A-B repeat play
(See page 24.)
Press SELECT during play to store location A and press SELECT again to store location B and to start
repeat play between the specified two locations. Press SELECT again to return to normal play.
Marker
(See page 26.)
Press SELECT during play
and press SELECT again
at the preferred point to
store a marker. (Marker
no. is displayed instead of
“U”.)
ÁTo recall a marker, select
the preferred marker no.
by using the cursor
buttons (C, D) and enter
the selection using the
cursor button (A).
ÁTo clear a marker, select
the preferred marker no.
using the cursor buttons
(C, D) and press
CLEAR.
Adjust the master volume by
using the cursor buttons
(A, B).
0 to p127 dB or p¨
Master
volume
Contrast (o7 to p7) Equalizer (o1/0/p1) Brightness (0 to 15)
Repeat play
(See page 23.)
Select the preferred mode during play by
using the cursor buttons (A, B).
OFF
C
T
OFF
T
A
Normal play
Chapter repeat play
Title repeat play
Normal play
Track repeat play
Disc repeat play
DVD
Video CD/
CD
ÁDVD
Cinema Dialogue
(See page 15.)
ÁVideo CD/CD
Play mode
(See pages 25 and 26.)
OFF
ON
PRG
RND
---
Normal
volume
Louder
volume
Program
play
Random
play
Normal
play
Select the
preferred mode
during play by
using the cursor
buttons (A, B).
Cinema
Image
(DVD/Video
CD only)
Select the preferred mode by using the cursor buttons (A, B).
N Normal mode F Fine mode
S Soft mode C Cinema mode
User selection mode (Adjust the picture quality as you like.)
When “U” is selected and SELECT is pressed, the On-Screen Menu Icon as shown below appears.
Select the preferred item by using the cursor buttons (C, D) and select the preferred value by using the
cursor buttons (A, B).
U
Color hue (o7 to p7)

2222
µ
p
For your reference:
ÁEach time the cursor button (C, D) is pressed, the speed of rapid reverse/advance and slow-motion play increases up to 5 steps.
ÁThe figures appearing at both ends of the shuttle screen stand for the maximum speeds of rapid reverse and rapid advance.
(DVD: o100/p100, Video CD: o40/p40, CD: o50/p50)
Detailed descriptions of each On-Screen Menu Icon
Shuttle screen
Still/Pause Press the cursor button (A).
Slow-motion play
(Backward)
Press the cursor button (C).
(DVD only)
Slow-motion play
(Forward)
Press the cursor button (D).
(DVD/Video CD only)
Rapid advance Press the cursor button (D).Rapid reverse Press the cursor button (C).
Play Press the cursor button (B).

Operation Using
On-Screen Menu Icons
Advanced Operation
23
Repeat play
Repeat viewing (listening)
Press REPEAT during play.
Each time this button is pressed, the TV monitor changes as
shown below and the disc will repeat a chapter or title (DVD) or
a track (Video CD/CD).
ÁDVD
Normal play
Repeat of chapter being played
Repeat of title being played
Cancel repeat mode
(Normal play)
ÁVideo CD/CD
Normal play
Repeat of track being played
Repeat of entire disc contents
Cancel repeat mode
(Normal play)
To return to normal play
Press REPEAT several times until “' OFF” is displayed.
Notes:
ÁRepeat play may not work correctly with some DVDs.
ÁRepeat play does not work with an interactive DVD or during
menu play of a Video CD with playback control.
POWER
@
STOP
TITLE
SUBTITLE
MARKER
ANGLEAUDIO
ON SCREEN RETURN
MENU
SELECT
H
SKIP IF
G
D
PLAY
g
STILL/PAUSE
OPEN/CLOSE
*/ I
PLAY MODE
REPEAT
REPEAT
A-B CLEAR
DVD
SET UP
SLOW/
SEARCH
C
T
OFF
T
A
OFF

2424
Repeat play
To enjoy program repeat play
If REPEAT is pressed during program play (see page 25), the
display changes as follows:
Program play
Repeat of programmed track
being played
Repeat of all programs
Cancel repeat mode
(Program play)
To return to program play
Press REPEAT several times until “' OFF” is displayed.
Repeating sections between two
specific points (A-B repeat)
1
Press A-B during play at the point where re-
peat play is to start (A).
2
Press A-B at the point where repeat play is
to be concluded (B).
Repeat play of the selection between points A and B starts.
To return to normal play
Press A-B several times until “' Á Á” is displayed.
Notes:
ÁA-B repeat play does not work with an interactive DVD.
ÁSome subtitles recorded around point A or B may fail to ap-
pear. [DVD]
ÁA-B repeat play works only within a title [DVD] or a track
[Video CD/CD].
For your reference:
ÁIf the title/track is completed before end location B is speci-
fied, the end point of the title/track serves as end location B.
POWER
@
STOP
TITLE
SUBTITLE
MARKER
ANGLEAUDIO
ON SCREEN RETURN
MENU
SELECT
H
SKIP IF
G
D
PLAY
g
STILL/PAUSE
OPEN/CLOSE
*/ I
@
STOP
D
PLAY
PLAY MODE
REPEAT
A-B CLEAR
DVD
SET UP
PLAY MODE
REPEAT
A-B
CLEAR
SLOW/
SEARCH
SELECT
T PRG
A
OFF
PRG
PRG
A •
A B

Advanced Operation
25
The player plays the tracks on the disc in an order you specify.
1
Press PLAY MODE in the stop mode.
The program playback screen appears on the TV monitor.
ÁTo exit the screen
Press PLAY MODE twice.
2
Press the cursor buttons (A, B, C, D) to
select the preferred track number.
3
Press SELECT.
The selected track is stored in the memory.
ÁRepeat steps 2 and 3 to select another track.
ÁUp to 18 tracks can be programmed.
4
Press PLAY.
Play now begins in the programmed sequence.
After playback
Play is stopped and the program playback screen is displayed.
Example: a disc
including 17 tracks
To return to normal play
1. Press STOP. (Program play is suspended.)
2. Press PLAY MODE twice.
3. Press PLAY.
Normal play begins from the beginning of the disc.
(The content of the program is still retained in the memory.)
Clearing the program
When the program playback screen is displayed
ÁTo clear the last program one by one
Move to “Clear last” and press SELECT.
(Pressing CLEAR of the remote control unit also clears the
last program.)
ÁTo clear all the programs
Move to “Clear all” and press SELECT.
(The programs are also cleared when the player is set to the
standby mode or turned off, or OPEN/CLOSE is pressed.)
Programming track numbers while monitoring
the player’s FL display
This function works with the following discs.
ÁCDs
ÁVideo CDs with playback control when menu play is can-
celled
(Press STOP while the menu screen is displayed.)
ÁVideo CDs which do not support playback control (Ver 1.1)
1. Press PLAY MODE once in the stop mode.
2. Press the numeric buttons to select the track.
The selected track is stored in the memory.
ÁRepeat step 2 to select another track.
3. Press PLAY.
Program play starts.
Program play [Video CD/CD]
In the case of a CD
Choose a track, then press SELECT.
Clear last
Clear all
Press PLAY to start
113
214
315
7
8
9
41610
51711
612
Clear last
Clear all
Press PLAY to start
113
214
315
7
8
9
41610
51711
612
Choose a track, then press SELECT.
Clear last
Clear all
Press PLAY to start
113 2
214
315
7
8
9
41610
51711
612
Choose a track, then press SELECT.
Flashes
Track No.
Program No.

2626
Random play [Video CD/CD]
The player plays the tracks on the disc in random order.
1
Press PLAY MODE twice in the stop mode.
The random playback screen appears on the TV monitor.
ÁTo exit the screen
Press PLAY MODE once.
2
Press PLAY.
Play now begins in random order.
After playback
Play is stopped and the random playback screen is displayed.
To return to normal play
1. Press STOP. (Random play is suspended.)
2. Press PLAY MODE once.
3. Press PLAY.
Normal play begins from the beginning of the disc.
Storing markers in memory to be
viewed (listened to) again
Storing a marker in the memory
1
Press MARKER during play.
The marker screen appears on the TV monitor.
2
Press SELECT during play at the starting
point to be viewed (listened to) again.
Indicates “MARKER 1” is stored
in the memory.
(If SELECT is pressed where any
number is already displayed, the
previous starting point will be
replaced by the new one.)
ÁUp to 5 markers can be stored in the memory.
ÁPress MARKER to clear the display.
“U” indicates no
marker has
been stored yet.
POWER
@
STOP
TITLE
SUBTITLE
MARKER
ANGLEAUDIO
ON SCREEN RETURN
MENU
SELECT
H
SKIP IF
G
D
PLAY
g
STILL/PAUSE
OPEN/CLOSE
*/ I
PLAY MODE
REPEAT
A-B CLEAR
DVD
SET UP
SLOW/
SEARCH
@
STOP
D
PLAY
AUDIO
MARKER
PLAY MODE
CLEAR
SELECT
Random Playback
Press PLAY to start
UUUUU
1
UUUU

Advanced Operation
27
Storing markers in memory to be viewed
(listened to) again
Recalling/clearing a marker
1
Press MARKER during play.
2
Press the cursor buttons (C, D) to select
the marker to be recalled/cleared.
3
Press the cursor button (A) to recall a mark-
er.
or
Press CLEAR to clear a marker.
Play resumes from the point corresponding to the selected
marker.
or
The selected marker is cleared. (Press MARKER to clear the
display.)
Notes:
ÁSome subtitles recorded around the marker may fail to ap-
pear. [DVD]
ÁThese operations do not work with an interactive DVD or dur-
ing menu play of a Video CD with playback control.
For your reference:
ÁAll the markers are cleared when the player is set to the
standby mode or turned off, or OPEN/CLOSE is pressed.
Changing audio soundtrack
language [DVD]
It is possible to change the audio soundtrack language to a
different language from the one selected at the initial settings.
(If available. See page 31.)
(This operation works only with discs on which multiple audio
soundtrack languages are recorded.)
1
Press AUDIO during play.
ÁWhen no audio soundtrack is recorded, “–” will be dis-
played instead of the language number.
2
Press the cursor buttons (A, B) until the
preferred language is selected.
Pressing the numeric
buttons also changes the
audio soundtrack
language.
ÁPress AUDIO or SELECT to
clear the display.
For your reference:
ÁWhen the preferred language is not selected, even after
pressing the cursor buttons (A, B) several times, it means
that language is not available on the disc.
ÁWhen the power is turned on, or the disc tray is opened, the
language heard is the one selected at the initial settings. If
this language is not recorded on the disc, only the available
language on the disc will be heard.
Switching vocals ON or OFF for
Karaoke discs [DVD/Video CD]
1
Press AUDIO during play.
2
Press the cursor buttons (A, B, C, D) until
the preferred setting is selected.
ÁDVD Karaoke (Solo) (C, D)
–––(OFF)()ON
ÁDVD Karaoke (Duet) (C, D)
–––(OFF)>1o2 (ON)>V1 (ON)>V2 (ON)
^-----------------------------------------------------------------}
ÁVideo CD (A, B)
LR>L>R
^--------------}
ÁPress AUDIO or SELECT to clear the display.
Note:
ÁThis operation does not work with CDs.
Number of the audio
soundtrack language
being played back
1 2 3 4
U
1 2 3 4
U
Hello
1
LPCM
ENG
96k 24
b
2
LPCM
FRA
96k 24
b
Bonjour
1
U
Vocal
ON
---
1
U
Vocal
L R

2828
Changing subtitle language [DVD]
It is possible to change the subtitle language to a different
language from the one selected at the initial settings.
(If available. See page 31.)
(This operation works only with discs on which multiple subtitle
languages are recorded.)
1
Press SUBTITLE during play.
ÁWhen no subtitles are recorded, “––” will be displayed
instead of the language number.
2
Press the cursor buttons (A, B) until the
preferred language is selected.
Pressing the numeric
buttons also changes the
subtitle language.
ÁPress SUBTITLE or SELECT to clear the display.
To clear/display the subtitles
Press the cursor buttons (C, D) to select ON or OFF at step 2.
Notes:
ÁIn some cases, the subtitle language is not changed to the
selected one immediately.
ÁWhen a disc supported the closed caption is played, the sub-
title and the closed caption may overlap each other on the TV
monitor. In this case, turn the subtitle off.
For your reference:
ÁWhen the preferred language is not selected even after
pressing the cursor buttons (A, B) several times, it means
that the language is not available on the disc.
ÁWhen the power is turned on or the disc tray is opened, sub-
titles appear in the language selected at the initial settings. If
this language is not recorded on the disc, they appear in the
disc’s priority language.
Number of the subtitle
language being played
back
POWER
@
STOP
TITLE
SUBTITLE
MARKER
ANGLEAUDIO
ON SCREEN RETURN
MENU
SELECT
H
SKIP IF
G
D
PLAY
g
STILL/PAUSE
OPEN/CLOSE
*/ I
TITLE
MENU
D
PLAY
SUBTITLE
ANGLE
PLAY MODE
REPEAT
A-B CLEAR
DVD
SET UP
SLOW/
SEARCH
SELECT
I love you
1
ENG
ON
Je t’aime
2
FRA
ON

Advanced Operation
29
Viewing from another angle [DVD]
Some DVDs may contain scenes which have been shot simul-
taneously from a number of different angles. For these discs,
the same scene can be viewed from each of these different
angles using the ANGLE button. (The recorded angles differ
depending on the disc used.)
1
Press ANGLE during play.
2
Press the cursor buttons (A, B) until the
preferred angle is selected.
Pressing the numeric buttons
also changes the angle.
ÁPress ANGLE or SELECT to clear the display.
Note:
ÁThis function only works for titles having scenes recorded at
different angles.
For your reference:
Á“ANGLE” lights up on the player’s FL display at scenes re-
corded at different angles to indicate that angle switching is
possible.
ÁThe angle number can be programmed beforehand with
some DVDs; the angle will be switched to the selected
number when “ANGLE” lights up.
Number of angle being
played back
Using a title menu [DVD]
Some discs with movies, for example, may be available with
two or more titles. If the disc has a title menu recorded on it,
the TITLE button can be used to select the movie title.
(The details of operation differ depending on the disc used.)
1
Press TITLE during play.
A list of the titles on the
disc is now displayed.
ÁPressing TITLE again resumes play from the scene
when TITLE was first pressed.
2
Press the cursor buttons (A, B, C, D) and
press SELECT or PLAY, or press the numer-
ic buttons, to select the preferred title.
The selected title now starts playing.
Using a DVD menu [DVD]
Some DVDs have unique menu structures called DVD menus.
For example, DVDs programmed with complex contents pro-
vide guide menus, and those recorded with various languages
provide menus for audio and subtitle language. Although the
DVD menu’s contents and operation differ from disc to disc,
the following explains basic operation when this feature is
used.
1
Press MENU during play.
The DVD menu available on the
disc is now displayed.
ÁPressing MENU again resumes play from the scene
when MENU was first pressed.
2
Press the cursor buttons (A, B, C, D) and
press SELECT, or press the numeric but-
tons, to select the preferred item.
The selected item is now executed.
When the menu continues onto another screen
Repeat step 2.
(Example)
(Example)
(Example)
(Example)
1
3
TITLE MENU
Dogs
Lovers
Castles
Birds
TITLE MENU
Dogs
Lovers
Castles
Birds
Birds
of the world
DVD MENU
1.SUBTITLE
2.AUDIO
3.ANGLE
DVD MENU
1.SUBTITLE
2.AUDIO
3.ANGLE

3030
Initial settings
Once the intial settings have been completed, the player can
always be operated under the same conditions (especially with
DVD discs).
The settings will be retained in the memory, until the settings
are changed, even after switching to standby mode.
Common procedures of initial settings
1
Press SET UP in the stop mode.
2
Press the cursor buttons (A, B) to select
the preferred item and press SELECT.
Each screen for setting the value is displayed.
1 Disc Languages (see page 31)
2 Ratings (see page 32)
3 Menu Language (see page 33)
4 On-Screen Messages (see page 34)
5 FL Display (see page 35)
6 TV Aspect (see page 36)
7 Digital Audio Output (see page 38)
8 Speaker Setting (see page 40)
9 Other Settings (see page 42)
3
Press the cursor buttons (A, B) to select
the preferred value and press SELECT.
ÁSome items require additional steps. (See the respec-
tive page.)
To cancel during setup operation
Press RETURN or select “0”. (The previous screen is dis-
played.)
To clear the initial settings screen
Press the cursor buttons (A, B) to select “0” and press
SELECT. (Pressing SET UP or RETURN also clears the initial
settings screen.)
Note:
ÁAfter the player is set to the “Lock All” setting in “2 Ratings”,
none of the initial settings, including “2 Ratings”, can be
changed if the DVD disc is left inside the player. In this case,
remove the disc, and unlock the player.
For your reference:
ÁThe numeric buttons can also be used for selecting items or
values instead of the cursor buttons (A, B); in this case,
pressing SELECT is not necessary.
POWER
@
STOP
TITLE
SUBTITLE
MARKER
ANGLEAUDIO
ON SCREEN RETURN
MENU
SELECT
H
SKIP IF
G
D
PLAY
g
STILL/PAUSE
OPEN/CLOSE
*/ I
RETURN
PLAY MODE
REPEAT
A-B CLEAR
DVD
SET UP
SET UP
CLEAR
SLOW/
SEARCH
SELECT
1 Disc Languages
Level 8
2 Ratings
3 Menu Language
4 On-Screen Messages
5 FL Display
6 TV Aspect
7 Digital Audio Output
8 Speaker Setting
9 Other Settings
0 Exit
English
Bright
4:3

Initial Settings
31
Selecting disc languages [DVD]
This is to select the audio soundtrack language, subtitle lan-
guage and the language used in title menus or DVD menus
which will always be used for every disc to be played back.
1
At the initial settings screen (on page 30)
Press the cursor buttons (A, B) to select
“1 Disc Languages” and press SELECT.
2
Press the cursor buttons (A, B) to select
the preferred item and press SELECT.
1 Audio:
To select the audio soundtrack language.
2 Subtitle:
To select the subtitle language.
3 Menus:
To select the language used in title menus or DVD
menus.
3
Press the cursor buttons (A, B) to select
the preferred language and press SELECT.
When “1 Audio” is selected
1 English: English is selected. (Factory preset)
2 French/3 Spanish:
Each language is selected.
4 Original: The original language of each disc will
be selected.
5 Other UUUU: Another language can be selected.
(Refer to the language codes on
page 44. Press CLEAR if an incorrect
language code is entered.)
When “2 Subtitle” is selected
1 Automatic: The same language selected for the
“1 Audio” will be selected.
(Factory preset)
ÁIf the language selected for the “1
Audio” is actually used during play-
back, the subtitles will not appear.
ÁIf another language is used during
playback, the subtitles will appear in
the language selected at the setup
“1 Audio”.
2 English/3 French/4 Spanish:
Each language is selected.
5 Other UUUU: Another language can be selected.
(Refer to the language codes on
page 44. Press CLEAR if an incorrect
language code is entered.)
When “3 Menus” is selected
1 English: English is selected. (Factory preset)
2 French/3 Spanish:
Each language is selected.
4 Other UUUU: Another language can be selected.
(Refer to the language codes on
page 44. Press CLEAR if an incorrect
language code is entered.)
The screen illustrated in step 1 is displayed. Select “0” by
using the cursor buttons (A, B) and press SELECT to return
to the initial settings screen.
Also refer to “Common procedures of initial settings” on
page 30.
Note:
ÁIf the language selected is not available on the disc, the lan-
guage designated by each disc will be selected.
Disc Languages
1 Audio
2 Subtitle
3 Menus
Automatic
English
0 Exit
English

3232
Initial settings
Selecting rating level [DVD]
This is to disable the playing of specified DVDs which are un-
suitable for children.
ÁSome DVDs are encoded with a specific rating level. If the
rating level of the disc is higher than that preset in the initial
settings operation, playback of the disc will be prohibited.
1
At the initial settings screen (on page 30)
Press the cursor buttons (A, B) to select
“2 Ratings” and press SELECT.
2
Press the cursor buttons (A, B) to select
the preferred level and press SELECT.
Level 8: All DVDs can be played back.
(Factory preset)
Level 7 to 2: DVDs for general audiences/children can
be played back.
(DVDs for adults are prohibited.)
Level 1: DVDs for children can be played back.
(DVDs for adults/general audiences are
prohibited.)
Level 0: Playback of all DVDs is prohibited (e.g. to
prohibit playback of DVDs for adults which
are not encoded with rating level
information).
3
When level 7 or lower is selected
Input a 4-digit password by pressing the
numeric buttons and press SELECT.
The lock symbol
appears closed to
show the rating is
locked.
Example: “4343”
Do not forget your
password.
POWER
@
STOP
TITLE
SUBTITLE
MARKER
ANGLEAUDIO
ON SCREEN RETURN
MENU
SELECT
H
SKIP IF
G
D
PLAY
g
STILL/PAUSE
OPEN/CLOSE
*/ I
PLAY MODE
REPEAT
A-B CLEAR
DVD
SET UP
SLOW/
SEARCH
SELECT
Please set a rating limit
8 No Limit
7
6
5
4
3
2
1
0 Lock All
Press RETURN to cancel
Ratings
Enter a 4-digit password,
then press SELECT.
Press RETURN to cancel
The player is locked.
Remember the password.
Ratings
Press SELECT to continue

Initial Settings
33
4
Press SELECT.
Setting is finished and the initial settings screen is displayed.
ÁThe rating is locked. Any discs whose rating is higher than
the setting cannot be played back unless the correct pass-
word is entered.
When the player is locked
The following screen appears when “2 Ratings” is selected at
the initial settings screen.
1. Input a 4-digit password and press SELECT.
2. To unlock the player
Press “1” and then press SELECT.
To change the password
Press “2”, enter a new 4-digit password and press
SELECT, then press SELECT again.
To change the rating level
Press “3”, select a new level by pressing the cursor buttons
(A, B), then press SELECT.
To unlock the player temporarily
Press “4” and then press SELECT.
ÁThe rating is unlocked temporarily only for the current disc
or only until the player is set to the standby mode.
To finish setting without changing the rating level
Press “0”.
Setting is finished and the initial settings screen is displayed.
Also refer to “Common procedures of initial settings” on
page 30.
Note:
ÁSome discs may not be encoded with specific rating level
information though its disc jacket says that it is for “adults”.
For those discs, the age restriction will not work.
Selecting language of On-Screen
Display menu
This is to select the language to be used in the On-Screen Dis-
play menus which the player will show on the TV monitor.
1
At the initial settings screen (on page 30)
Press the cursor buttons (A, B) to select
“3 Menu Language” and press SELECT.
2
Press the cursor buttons (A, B) to select
the preferred language and press SELECT.
1 English:
English is selected. (Factory preset)
2 Français/3 Español:
Each language is selected.
Setting is finished and the initial settings screen is displayed.
Also refer to “Common procedures of initial settings” on
page 30.
Press RETURN to cancel
Ratings
Enter your 4-digit password,
then press SELECT.
0 Exit
Ratings
1 Unlock Player
2 Change Password
3 Change Level
4 Temporary Unlock
Press RETURN to cancel
Select the language
for these Menus.
1 English
2 Français
3 Español

3434
Initial settings
Selecting the display format of the
On-Screen Display
You can select whether “Play”, “Still” and other displays will be
displayed or not, and the color and position of “Play”, “Still” and
other displays as well as On-Screen Menu Icons.
1
At the initial settings screen (on page 30)
Press the cursor buttons (A, B) to select
“4 On-Screen Messages” and press
SELECT.
2
Press the cursor buttons (A, B) to select
the preferred item and press SELECT.
1 On-Screen Messages:
To select whether “Play”, “Still” and other displays are
displayed or not.
2 Color and Position:
To select the color (Blue/Violet/Green) and position
(above/slightly below) of “Play”, “Still” and other dis-
plays as well as On-Screen Menu Icons.
3
Press the cursor buttons (A, B) to select
the preferred setting and press SELECT.
When “1 On-Screen Messages” is selected
1 On: “Play”, “Still” and other displays will always ap-
pear on the TV screen. (Factory preset)
2 Off: “Play”, “Still” and other displays will not appear
on the TV screen.
When “2 Color and Position” is selected
The colors and positions are set as follows:
1 Blue (Factory preset)
2 Violet
3 Green
4 Blue
5 Violet
6 Green
POWER
@
STOP
TITLE
SUBTITLE
MARKER
ANGLEAUDIO
ON SCREEN RETURN
MENU
SELECT
H
SKIP IF
G
D
PLAY
g
STILL/PAUSE
OPEN/CLOSE
*/ I
PLAY MODE
REPEAT
A-B CLEAR
DVD
SET UP
SLOW/
SEARCH
SELECT
g
STILL/PAUSE
F
G
SLOW/
SEARCH
On-Screen Messages
1
On-Screen Messages
2
Color and Position Blue
On
0 Exit

35
Initial Settings
The screen illustrated in step 1 is displayed. Select “0” by
using the cursor buttons (A, B) and press SELECT to return
to the initial settings screen.
Also refer to “Common procedures of initial settings” on
page 30.
For your reference:
ÁWhen is selected, “Play”, “Still” and other displays
as well as On-Screen Menu Icons will be displayed at a little
lower position than the factory setting. It is recommended to
choose this setting in such a case that the screen is only par-
tially displayed.
Selecting the FL display brightness
This is to select the brightness of the player’s FL display.
1
At the initial settings screen (on page 30)
Press the cursor buttons (A, B) to select
“5 FL Display” and press SELECT.
2
Press the cursor buttons (A, B) to select
the preferred item and press SELECT.
1 Bright:
The FL display will always be bright. (Factory preset)
2 Dim:
The FL display will always be dimmed.
3 Dim During DVD/VCD Play (Auto):
The FL display will be dimmed during playback of
DVDs and Video CDs.
Setting is finished and the initial settings screen is displayed.
For your reference:
ÁEven if “3 Dim During DVD/VCD Play (Auto)” is selected, the
display resumes brightness when a button for special play
such as SLOW/SEARCH and STILL/PAUSE is pressed.
Also refer to “Common procedures of initial settings” on
page 30.
FL Display
Press RETURN to cancel
1 Bright
2 Dim
3
Dim During DVD/VCD Play (Auto)

36
Initial settings
Selecting TV screen type
Select the TV aspect, conventional size screen (4:3) or wide-
screen (16:9), and the TV type according to your TV set.
1
At the initial settings screen (on page 30)
Press the cursor buttons (A, B) to select
“6 TV Aspect” and press SELECT.
2
Press the cursor buttons (A, B) to select
the TV aspect and press SELECT.
1 4:3:
Select when a conventional TV set is connected.
(Factory preset)
2 16:9:
Select when a wide-screen TV set is connected.
3
Press the cursor buttons (A, B) to select
the TV type and press SELECT.
When “4:3” is selected
When “16:9” is selected
Following TV types can be selected in both cases.
1 Standard (Direct View TV):
Select when a standard TV (Direct view) is connected.
(Factory preset)
2 CRT Projector:
Select when a CRT projector is connected.
3 LCD Projector:
Select when a LCD projector is connected.
4 Projection TV:
Select when a projection TV is connected.
Setting is finished and the initial settings screen is displayed.
Also refer to “Common procedures of initial settings” on
page 30.
For your reference:
ÁFor further details on the images which appear on the TV
screen (aspect ratios of the screen), see page 37.
POWER
@
STOP
TITLE
SUBTITLE
MARKER
ANGLEAUDIO
ON SCREEN RETURN
MENU
SELECT
H
SKIP IF
G
D
PLAY
g
STILL/PAUSE
OPEN/CLOSE
*/ I
PLAY MODE
REPEAT
A-B CLEAR
DVD
SET UP
SLOW/
SEARCH
SELECT
Select your TV aspect
1 4 : 3
2 16 : 9
Press RETURN to cancel

37
Initial Settings
ÁThe images which appear on the TV screen, and what each screen mode is called, may differ depending on the manufacturer of the
TV set or on the type of the TV set. Consult the instruction manual provided with your TV set.
For your reference:
ÁLetterbox
Black bands are inserted at the top and bottom of the screen to fill in the gaps at the top and bottom where the size of the picture is
smaller than the screen.
ÁPan & Scan
Part of the wide-screen picture (either at both sides or one side of the screen) is automatically eliminated so that the picture fills the
whole screen.
Concerning images which appear on the TV screen (aspect ratios of the screen)
Images which appear on the TV screen differ depending on the type of software and the TV set connected.
4:3
Screen whose right and
left edges are cut off
Letterbox (with black
bands at top and
bottom)
Full screen
Letterbox (with black
bands at top and
bottom
TV set connected (Screen mode)
Type of software
Software for wide-
screen (formatted
in the Pan & Scan
style)
Software for wide-
screen (not
formatted in the
Pan & Scan style)
Software (4:3)
Software
(4:3, Letterbox)
16:9 (“FULL” mode)
Full screen
Screen horizontally
enlarged
Screen horizontally
enlarged (with black
bands at top and
bottom)
16:9 (“ZOOM” mode)
Screen whose top and
bottom edges are cut
off
Screen whose top and
bottom edges are cut
off
Full screen
16:9 (“AUTO” mode)
Full screen
Full screen
(with black bands at
right and left)
Screen in which the
picture at the far left
and far right ends only
is extended horizontally
(with black bands at top
and bottom)

38
Initial settings
Selecting digital output
Select the digital output to be output from the optical/coaxial
digital audio output connector of the player.
1
At the initial settings screen (on page 30)
Press the cursor buttons (A, B) to select
“7 Digital Audio Output” and press
SELECT.
2
Press the cursor buttons (A, B) to select
the preferred item and press SELECT.
1 LPCM 96k>48k:
To select whether digital audio converted to 48 kHz/
16 bit is output from the optical/coaxial digital audio
output connector or no digital audio is output during
playback of the DVD recorded in Linear PCM of
96 kHz.
(In case of the DVD recorded in Linear PCM of 48 kHz,
digital audio converted to 48 kHz/16 bit is output irre-
spective of the setting.)
2 Dolby Digital:
To select the signal format (Bitstream or PCM) to be
output from the optical/coaxial digital audio output con-
nector during playback of the DVD recorded in Dolby
Digital.
3 dts:
To select whether dts bitstream is output from the opti-
cal/coaxial digital audio output connector or no digital
audio is output during playback of the DVD recorded in
dts.
POWER
@
STOP
TITLE
SUBTITLE
MARKER
ANGLEAUDIO
ON SCREEN RETURN
MENU
SELECT
H
SKIP IF
G
D
PLAY
g
STILL/PAUSE
OPEN/CLOSE
*/ I
PLAY MODE
REPEAT
A-B CLEAR
DVD
SET UP
SLOW/
SEARCH
SELECT
Digital Audio Output
1
LPCM 96k 48k
0 Exit
No
2
Dolby Digital
3 dts
Bitstream
Off

39
Initial Settings
3
Press the cursor buttons (A, B) to select
the preferred value and press SELECT.
When “1 LPCM 96k>48k” is selected
1 No: Digital audio of 48 kHz/16 bit is output during
playback of the DVD recorded in Linear PCM of
48 kHz. No digital audio is output during play-
back of the DVD recorded in Linear PCM of
96 kHz. However, audio will be output using the
original audio recording system in case of the
DVD which has not been copyright-protected.
(Factory preset)
2 Yes: During playback of the DVD recorded in Lin-
ear PCM of 48 kHz or 96 kHz, digital audio con-
verted to 48 kHz/16 bit is output.
(Digital output of PCM audio is restricted to
48 kHz/16 bit or below for copyright protection.)
When “2 Dolby Digital” is selected
1 Bitstream: Dolby Digital bitstream (1ch–5.1ch) is
output during playback of the DVD
recorded in the Dolby Digital. (Factory
preset)
Select this setting when the player is
connected to the Dolby Digital decoder.
2 PCM
\1
: Digital audio converted to PCM (2ch) of
48 kHz/16 bit is output during playback of
the DVD recorded in the Dolby Digital.
When “3 dts” is selected
1 Off
\1
: No digital audio is output during playback
of the DVD recorded in dts.
(Factory preset)
2 Bitstream: dts bitstream is output during playback of
the DVD recorded in dts.
Select this setting when the player is
connected to the dts decoder.
The screen illustrated in step 1 is displayed. Select “0” by us-
ing the cursor buttons (A, B) and press SELECT to return to
the initial settings screen.
Also refer to “Common procedures of initial settings” on
page 30.
Recommended setting of “Digital Audio Out-
put”
Make settings as shown in table below depending on the kind
of equipment that is connected to the optical/coaxial digital au-
dio output connector.
ÁUnderlined item is a factory preset.
\1
When connecting an AV amplifier (with an optical/coaxial
digital audio input connector) without Dolby Digital or dts
decoder, be sure to select “PCM” of “2 Dolby Digital” and
“Off” of “3 dts”. If “Bitstream” is selected, any attempt to play
DVD may cause such a high level of noise that it may be
harmful to your ears and damage your speakers.
\2
When “PCM” is selected and “Yes” is selected for the speak-
ers other than the front speakers at “8 Speaker Setting” (see
page 40), only audio corresponding to the front speakers will
be output from the player’s digital audio output connector
during playback of the DVD recorded in Dolby Digital 5.1 ch
surround. In this case, select “No” for the speakers other
than the front speakers at “8 Speaker Setting”.
\3
The audio which is output from the player’s audio output
connectors (6CH DISCRETE and MIXED 2CH) is also set to
the Linear PCM 48 kHz sound quality level.
To enjoy high quality sound at 96 kHz, connect the amplifier
or decoder directly to the audio output connectors, not to the
digital audio output connector. (Select “No” at the “1 LPCM
96k>48k”.)
\2
Type of equipment
to be connected
No equipment is
connected
AV amplifier (with
digital audio input
connector) without
Dolby Digital/dts
decoder
AV amplifier with
Dolby Digital decoder
(See page 10.)
AV amplifier with
Dolby Digital/dts
decoder
(See page 10.)
Recommended setting
1 LPCM
96k>48k
No
Yes
\3
Yes
\3
Yes
\3
3 dts
Off
Off
\1
Off
Bitstream
2 Dolby
Digital
Bitstream
PCM
\1
Bitstream
Bitstream
\2

40
Initial settings
Speaker settings
1
At the initial settings screen (on page 30)
Press the cursor buttons (A, B) to select
“8 Speaker Setting” and press SELECT.
ÁUnderlined item is a factory preset.
2
Press the cursor buttons (A, B, C, D) to
select the preferred item and press
SELECT.
3
Press the cursor buttons (A, B) to select
the preferred value and press SELECT.
Speaker icons:
ÁIf the speaker is connected, display the icon by using the
cursor buttons (A, B) and pressing SELECT.
ÁIf the speaker supports low-frequency (under 100 Hz)
reproduction, select the larger icon. If the speaker does
not support low-frequency (under 100 Hz) reproduction,
select the smaller icon. [When the subwoofer is not con-
nected, be sure to select “Large” for the front speakers
(L/R).]
Center
Large/Small/
No
Center
Delay time (
0 ms)
Front (L)
Large/Small
Test
signal
Surround (L)
Large/Small/No
Surround (L)
Channel balance (
0 dB)
Surround (R)
Large/Small/
No
Surround (L/R)
Delay time (
0 ms)
Subwoofer
Channel balance
(
0 dB)
Subwoofer
Yes/
No
Front (R)
Large/Small
Center
Channel balance (
0 dB)
In the case of surround speaker (L)
ÁLarge/Yes
POWER
@
STOP
TITLE
SUBTITLE
MARKER
ANGLEAUDIO
ON SCREEN RETURN
MENU
SELECT
H
SKIP IF
G
D
PLAY
g
STILL/PAUSE
OPEN/CLOSE
*/ I
PLAY MODE
REPEAT
A-B CLEAR
DVD
SET UP
SLOW/
SEARCH
SELECT
L R
Press RETURN to cancel
Speaker Setting
Exit
Test
0
dB
0
dB
0
dB
0
dB
0
ms
0
ms
Exit
ÁSmall/Yes ÁNo
Surround (R)
Channel balance (
0 dB)

41
Initial Settings
Delay time:
If the surround speakers or the center speaker can not be
installed at an equal distance to the front speakers from
the listening position, change the delay time to get better
surround effect.
ÁWhen D2 or D3 is equal to or larger than D1, no setting is
necessary. Otherwise, change the setting according to
the table below.
Ideal position of the
center speaker
It is recommended to locate all the
speakers inside of this circle.
Ideal position
of the
surround
speakers
To adjust the channel balance using the test signal:
1. Select “Test” by using the cursor buttons (A, B, C,
D), and then press SELECT.
(Test signals will be output clockwise from each speak-
er except the subwoofer consecutively.)
2. While listening to the test signal, adjust the volume of
each speaker so that all the test signals are heard at
the equal level.
3. Press SELECT. (The test signals are stopped.)
Note:
ÁTest signal is not output from the subwoofer. Adjust the
channel balance for each disc to be played back.
4
Press the cursor buttons (A, B, C, D) to
select “Exit” and press SELECT.
Setting is finished and the initial settings screen is displayed.
Also refer to “Common procedures of initial settings” on
page 30.
FRONT (L)
SURROUND (L) SURROUND (R)
FRONT (R)CENTER
SL
SR
L
R
C
D2
D1
D3
SW
Speaker
Center
speaker
(D2)
Surround
speakers
(D3)
Delay time
01.3 ms
02.6 ms
03.9 ms
05.3 ms
05.3 ms
10.6 ms
15.9 ms
Difference between D1
and D2/D3
approx. 1
1
/2 feet (50 cm)
approx. 03 feet (100 cm)
approx. 05 feet (150 cm)
approx. 06 feet (200 cm)
approx. 06 feet (200 cm)
approx. 12 feet (400 cm)
approx. 18 feet (600 cm)

42
Initial settings
Other settings
Compression of the sound’s dynamic range and other special
settings can be performed.
1
At the initial settings screen (on page 30)
Press the cursor buttons (A, B) to select
“9 Other Settings” and press SELECT.
2
Press the cursor buttons (A, B) to select
the preferred item and press SELECT.
1 Still Mode:
To select “Field still” or “Frame still” to prevent jittering
from occurring or to let small text or fine patterns seen
clearly in the still picture mode.
2 Audio during Search:
To select whether audio is heard during search at the
initial scan speed or not.
3 TV Mode (4:3):
To select whether the video material for a wide-screen
will be played back in the Pan & Scan style or in the
Letterbox style on a conventional size TV.
4 D. (Dynamic) Range Compression:
To select the dynamic range during playback.
5 Still Picture Display:
To select whether the picture type (I/P/B) is displayed
on the TV screen in the still picture mode or not.
6 Black Level Control:
To select the black level of the picture, “Lighter” or
“Darker”.
3
Press the cursor buttons (A, B) to select
the preferred value and press SELECT.
When “1 Still Mode” is selected
1 Automatic: “Field still” and “Frame still” are automati-
cally selected in the still picture mode.
(Factory preset)
2 Field: “Field still” is always selected.
Select this setting when jittering occurs in
the pictures even when “1 Automatic” is
selected.
3 Frame: “Frame still” is always selected.
Select this setting when small text or fine
patterns cannot be seen clearly even
when “1 Automatic” is selected.
POWER
@
STOP
TITLE
SUBTITLE
MARKER
ANGLEAUDIO
ON SCREEN RETURN
MENU
SELECT
H
SKIP IF
G
D
PLAY
g
STILL/PAUSE
OPEN/CLOSE
*/ I
PLAY MODE
REPEAT
A-B CLEAR
DVD
SET UP
SLOW/
SEARCH
SELECT
Other Settings
1 Still Mode
2 Audio during Search
3 TV Mode (4:3)
4 D. Range Compression
0 Exit
Automatic
5 Still Picture Display
On
Pan&Scan
Off
Off
6 Black Level Control
Lighter

43
Initial Settings
When “2 Audio during Search” is selected
1 On: Audio from 6CH DISCRETE or MIXED 2CH out-
put connectors will be heard during search at the
initial scan speed. (Factory preset)
2 Off: Select this setting when audio during search at
the initial scan speed is not desired.
When “3 TV Mode (4:3)” is selected
1 Pan & Scan: The video material for a wide-screen
will be played back in the Pan & Scan
style on a conventional size TV.
(Factory preset)
ÁVideo material not formatted in the
Pan & Scan style will be played back
in the letterbox style. (See page 37.)
2 Letterbox: The video material for a wide-screen
will be played back in the letterbox style
on a conventional size TV.
When “4 D. (Dynamic) Range Compression” is selected
1 Off: Normal audio range is selected. (Factory preset)
2 On: Select this setting to enjoy listening to dynamic
sound even on a low volume.
Dynamic range is the difference in volume
between the quietest and loudest sounds heard.
Dynamic Compression limits level for listening at
low volume. This is useful late at night, for
example.
[This function only works with Dolby Digital
DVD.]
When “5 Still Picture Display” is selected
1 Off: The picture type (I/P/B) will not be displayed on
the TV screen in the still picture mode.
(Factory preset)
2 On: The picture type (I/P/B) will be displayed on the
TV screen in the still picture mode.
When “6 Black Level Control” is selected
1 Lighter: The black level of the picture is selected to
the lighter one.
Select this setting normally when the player
is connected to a TV set through the VIDEO
OUT connector or S VIDEO OUT connector.
(Factory preset)
2 Darker: The black level of the picture is selected to
the darker one.
Select this setting normally when the player
is connected to a TV set through the COM-
PONENT VIDEO OUT (Y, C
B, CR) con-
nector.
The screen illustrated in step 1 is displayed. Select “0” by us-
ing the cursor buttons (A, B) and press SELECT to return to
the initial settings screen.
Also refer to “Common procedures of initial settings” on
page 30.
Predict
Predict
General Picture type
For your reference:
ÁWhen the “2 On” is selected at the “5 Still Picture Display”,
the following screen is displayed in the still picture mode;
ÁI/P/B:
The MPEG 2 standard adopted for DVD uses the following
3 picture types for the coding of each picture (frame) on the
TV screen.
I: I-Picture (Intra coded picture)
This is the standard picture type, and each picture is coded
separately. Since it features the best picture quality, it is rec-
ommended that the screen be frozen with I-Picture when the
picture quality is to be adjusted.
P: P-Picture (Predictive coded picture)
This picture type is computed on the basis of a past I-Picture
or P-Picture.
B: B-Picture (Bidirectionally-predictive coded picture)
This picture type is computed by comparing the previous and
subsequent I-Picture or P-Picture. It has the lowest volume of
information.
Example: in the case of the P-Picture
Still (P)

44
Language code list
Enter the appropriate code number for the initial settings “Audio”, “Subtitle” and/or “Menus” (see page 31).
Code
6565
6566
6570
6577
6582
6583
6588
6590
6665
6669
6671
6672
6678
6679
6682
6765
6779
6783
6789
6865
6869
6890
6976
6978
6979
6983
6984
6985
7065
7073
7074
Language
Afar
Abkhazian
Afrikaans
Ameharic
Arabic
Assamese
Aymara
Azerbaijani
Bashkir
Byelorussian
Bulgarian
Bihari
Bengali; Bangla
Tibetan
Breton
Catalan
Corsican
Czech
Welsh
Danish
German
Bhutani
Greek
English
Esperanto
Spanish
Estonian
Basque
Persian
Finnish
Fiji
Code
7079
7082
7089
7165
7168
7176
7178
7185
7265
7273
7282
7285
7289
7365
7378
7383
7384
7387
7465
7473
7487
7565
7575
7576
7577
7578
7579
7583
7585
7589
7665
Language
Faroese
French
Frisian
Irish
Scots Gaelic
Galician
Guarani
Gujarati
Hausa
Hindi
Croatian
Hungarian
Armenian
Interlingua
Indonesian
Icelandic
Italian
Hebrew
Japanese
Yiddish
Javanese
Georgian
Kazakh
Greenlandic
Cambodian
Kannada
Korean
Kashmiri
Kurdish
Kirghiz
Latin
Code
7678
7679
7684
7686
7771
7773
7775
7776
7778
7779
7782
7783
7784
7789
7865
7869
7876
7879
7982
8065
8076
8083
8084
8185
8277
8279
8285
8365
8368
8372
8373
Language
Lingala
Laothian
Lithuanian
Latvian, Lettish
Malagasy
Maori
Macedonian
Malayalam
Mongolian
Moldavian
Marathi
Malay
Maltese
Burmese
Nauru
Nepali
Dutch
Norwegian
Oriya
Panjabi
Polish
Pashto, Pushto
Portuguese
Quechua
Rhaeto-Romance
Romanian
Russian
Sanskrit
Sindhi
Serbo-Croatian
Singhalese
Code
8375
8376
8377
8378
8379
8381
8382
8385
8386
8387
8465
8469
8471
8472
8473
8475
8476
8479
8482
8484
8487
8575
8582
8590
8673
8679
8779
8872
8979
9072
9085
Language
Slovak
Slovenian
Samoan
Shona
Somali
Albanian
Serbian
Sundanese
Swedish
Swahili
Tamil
Telugu
Tajik
Thai
Tigrinya
Turkmen
Tagalog
Tonga
Turkish
Tatar
Twi
Ukrainian
Urdu
Uzbek
Vietnamese
Volapük
Wolof
Xhosa
Yoruba
Chinese
Zulu

45
Initial SettingsFor Your Reference
Disc handling and maintenance
Handling precautions
ÁHold the disc by the edges so the surface will not be soiled
with fingerprints. (A)
Fingerprints, dirt and scratches can cause skipping and dis-
tortion.
ÁDo not write on the label side with a ball-point pen or other
writing utensils.
ÁDo not use record cleaning sprays, benzine, thinner, static
electricity prevention liquids or any other solvent.
ÁBe careful not to drop or bend the disc.
ÁDo not install more than 1 disc on the disc tray.
ÁDo not try to close the disc tray when the disc is not installed
properly. (B)
ÁBe sure to store the disc in its exclusive case when not in
use.
If the surface is soiled C
Wipe gently with a soft, damp (water only) cloth.
When wiping discs, always move the cloth from the center hole
toward the outer edge.
(If you wipe the discs using a circular motion, circular scratch-
es are likely to occur, which will cause noise.)
If the disc is brought from a cold to a warm en-
vironment, moisture may form on the disc
Wipe this moisture off with a soft, dry, lint-free cloth before us-
ing the disc.
Improper disc storage
You can damage discs if you store them in the following
places:
ÁAreas exposed to direct sunlight
ÁHumid or dusty areas
ÁAreas directly exposed to a heat outlet or heating appliance
Discs which cannot be played with this player
ÁDVD with Region No. other than “1” or “ALL”
ÁDisc of PAL system ÁCD-G
ÁDVD-ROM ÁCD-RW
ÁDVD-R/DVD-RAM ÁDVDGRW
ÁCD-ROM ÁCVD
ÁVSD ÁSVCD
ÁCDV ÁDivx Video Disc
etc.
ÁDo not try to play Photo CD or CD-R.
(Otherwise, data on the disc may be damaged.)
To prevent a malfunction of this player
ÁDo not use any non standard shaped CD (heart etc.) avail-
able on the market, because it may damage the player.
ÁDo not use a CD with tape, seals, or paste on it, because
damage to the player may result.
Maintenance
ÁBe sure to press POWER to set the player to the standby
mode and disconnect the AC cord before maintaining the
player.
ÁWipe this player with a dry, soft cloth.
If the surfaces are extremely dirty, wipe clean with a cloth
which has been dipped in a weak soap-and-water solution
and wrung out thoroughly, and then wipe again with a dry
cloth.
ÁNever use alcohol, benzine, thinner, cleaning fluid or other
chemicals. And do not use compressed air to remove dust.
Disc tray
Disc
A
B
C

46
If the player fails to operate normally, check the following points to determine whether the fault can be corrected by the simple mea-
sures suggested. If it cannot be corrected, or if the fault is not listed in the SYMPTOM column, disconnect the AC cord and contact your
authorized YAMAHA dealer or service center for help.
Symptom (Common) Remedy
Troubleshooting
No power.
The player is automatically set to the
standby mode.
ÁPlay fails to start even when PLAY is
pressed.
ÁPlay starts but then stops immediately.
No picture.
ÁNo sound.
ÁDistorted sound.
Picture is distorted during rapid advance
or rapid reverse.
No key operation (by the main unit and/or
the remote control unit) is effective.
No 4:3 (16:9) picture.
No on-screen display.
No operations can be performed with the
remote control unit.
On-Screen Menu Icons not displayed or
only partially displayed on the TV screen.
Insert the AC plug securely into the AC cord.
To conserve power, the player is automatically set to the standby mode after
approx. 30 minutes have elapsed in the stop mode (Auto power-off function). Turn
the power back to ON.
ÁCondensation has formed: wait about 1 to 2 hours to allow the player to dry out.
ÁThis player cannot play a disc other than DVD, Video CD and CD.
ÁThe disc may be dirty and may require cleaning.
ÁEnsure that the disc is installed with the label side up to be played facing upwards.
ÁEnsure that the equipment is connected properly.
ÁEnsure that the input setting for the TV is “Video”.
ÁEnsure that the equipment is connected properly.
ÁEnsure that the input settings for the TV and stereo system are correct.
ÁAdjust the master volume using the On-Screen Menu Icon for player information.
The picture will be somewhat distorted at times: this is normal.
ÁSome operations may be prohibited by the disc.
ÁPress POWER to set the player to the standby mode and then back to ON.
Alternatively, press POWER to set the player to the standby mode, disconnect the
AC plug and then re-connect it. (The player may not be operating properly due to
lightning, static electricity or some other external factor.)
Choose the correct setup “6 TV Aspect” item which matches the TV set used.
The “Off” setting is selected for “1 On-Screen Messages” in “4 On-Screen
Messages”: select “On”.
ÁTo conserve power, the player is automatically set to the standby mode after
approx. 30 minutes have elapsed in the stop mode (Auto power-off function).
Turn the power back to ON.
ÁCheck the batteries are installed with the correct polarities (o and p).
ÁThe batteries are depleted: replace them with new ones.
ÁPoint the remote control unit at the remote control sensor and operate.
ÁOperate the remote control unit at a distance of not more than 23 feet (7 m) from
the remote control sensor.
ÁRemove the obstacles between the remote control unit and remote control sensor.
Change the position of the On-Screen Menu Icon using “2 Color and Position” in
“4 On-Screen Messages” of the initial settings.

47
For Your Reference
ÁIf the service number fails to be cleared even when the remedial action is taken, ask the service technician to repair the player.
Symptom (DVD) Remedy
Symptom (Video CD) Remedy
No menu play. This function works only for Video CDs with playback control.
Self-diagnosis display function
When an error or trouble is detected during operation, a service number appears in the FL display.
When a service number has appeared, check out the details given below.
Service number
stands
for a number.
Player status
Disc is dirty.
Trouble is likely to have occurred. The
number following “H” differs depending
on the status of the player.
Remedy
Wipe the disc clean.
Press POWER to set the player to the standby mode and then
back to ON. Alternatively, press POWER to set the player to
the standby mode, disconnect the AC cord, and then re-
connect it.
No subtitles.
Alternative audio soundtrack (or subtitle)
languages fail to be selected.
Angle cannot be changed.
Play does not start even when title is
selected.
Audio soundtrack and/or subtitle
language is not the one selected at the
initial settings.
The menu is displayed in French
(example).
No surround sound
The password for rating level has been
forgotten.
ÁSubtitles appear only with discs which contain them.
ÁSubtitles are cleared from the TV monitor. Perform the steps on page 28 to
display the subtitles.
ÁAn alternative language is not selected with discs which do not contain more than
one language.
ÁIn the case of some discs, the alternative language cannot be selected by
operating the AUDIO or SUBTITLE button. Try selecting it from the DVD menu if
one is available.
This function is dependent on software availability. Even if a disc has a number of
angles recorded, these angles may be recorded for specific scenes only (when
“ANGLE” lights up on the player’s FL display).
Confirm the “2 Ratings” setting.
If the audio soundtrack and/or subtitle language does not exist on the disc, the
language selected at the initial settings will not be seen/heard.
The setup “3 Menus” of “1 Disc Languages” is set to French: select English.
Choose the correct setup at the “8 Speaker Setting” which matches your stereo
system.
Reset all the settings to Factory Preset.
While the player is in the stop mode, hold the player’s SKIP (H) button and the
PAUSE button down simultaneously and then hold the OPEN/CLOSE button down
for longer than 3 seconds (until “Initialized” disappears from the TV monitor). The
lock will be released and all initial settings will return to the default values.

48
YAMAHA ELECTRONICS CORPORATION, USA 6660 ORANGETHORPE AVE., BUENA PARK, CALIF. 90620, U.S.A.
YAMAHA CANADA MUSIC LTD. 135 MILNER AVE., SCARBOROUGH, ONTARIO M1S 3R1, CANADA
YAMAHA ELECTRONIK EUROPA G.m.b.H. SIEMENSSTR. 22-34, 25462 RELLINGEN BEI HAMBURG, F.R. OF GERMANY
YAMAHA ELECTRONIQUE FRANCE S.A. PA PARIS-EST RUE AMBROISE CROIZAT CROISSY-BEAUBOURG BP70-77312 MARNE LAVALLEE, CEDEX 2 FRANCE
YAMAHA ELECTRONICS (UK) LTD. YAMAHA HOUSE, 200 RICKMANSWORTH ROAD WATFORD, HERTS WD1 7JS, ENGLAND
YAMAHA SCANDINAVIA A.B. J A WETTERGRENS GATA 1, BOX 30053, 400 43 VÄSTRA FRÖLUNDA, SWEDEN
YAMAHA MUSIC AUSTRALIA PTY, LTD. 17-33 MARKET ST., SOUTH MELBOURNE, 3205 VIC., AUSTRALIA
Printed in Japan
Specifications
Signal system: NTSC
Weight: 7.9 lbs. (3.6 kg)
Dimensions: 17
3
/16w (W)q10
3
/8w (D)q3
15
/16w (H)
[435 (W)q263 (D)q100 (H) mm]
(excluding protrusions)
Operating temperature range:
o41 to o95uF (o5 to o35uC)
Operating humidity range:
5 to 90% RH (no condensation)
Discs played:
(1) DVD-VIDEO disc
5w (12 cm) single-sided, single-layer
5w (12 cm) single-sided, dual-layer
5w (12 cm) double-sided, single-layer
3w (8 cm) single-sided, single-layer
3w (8 cm) single-sided, dual-layer
3w (8 cm) double-sided, single-layer
(2) Compact disc (CD-DA, VIDEO CD)
5w (12 cm) disc
3w (8 cm) disc
Component video output:
Y output level: 1 Vp-p (75°)
C
B output level: 0.7 Vp-p (75°)
C
R output level: 0.7 Vp-p (75°)
Output connector: Pin jack
(Y; green, C
B; blue, CR; red)
S video output:
Y output level: 1 Vp-p (75°)
C output level: 0.286 Vp-p (75°)
Output connector: S terminal
Number of connectors:1 system
Video output:
Output level: 1 Vp-p (75°)
Output connector: Pin jack
Number of connectors:2 systems
Audio output:
Output level: 2 Vrms (1 kHz, 0 dB)
Output connector: Pin jack
Number of connectors:
5.1ch mixed output (2ch): 1 system
5.1ch discrete output (5.1ch): 1 system
Audio signal output characteristics:
(1) Frequency response:
ÁDVD (linear audio):
2 Hz–22 kHz (48 kHz sampling)
2 Hz–44 kHz (96 kHz sampling)
ÁCD audio: 2 Hz–20 kHz (EIAJ)
(2) S/N ratio:
ÁCD audio: 115 dB (EIAJ)
(3) Dynamic range:
ÁDVD (linear audio):
103 dB
ÁCD audio: 100 dB (EIAJ)
(4) Total harmonic distortion:
ÁCD audio: 0.002% (EIAJ)
Digital audio output:
Optical digital output: Optical connector
Coaxial digital output: Pin jack
PHONES jack:
Output connector: Stereo,
1
/4w (6.3 mm) jack
Pickup: Wave length: 665 nm
Laser power: CLASS II
Specifications are subject to change without notice.
Weight and dimensions are approximate.
Power
requirements: AC 120 V, 60 Hz
Power
consumption: 19 W (approx. 1.0 W when set to
the standby mode)
-
 1
1
-
 2
2
-
 3
3
-
 4
4
-
 5
5
-
 6
6
-
 7
7
-
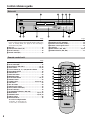 8
8
-
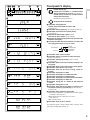 9
9
-
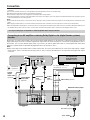 10
10
-
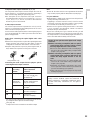 11
11
-
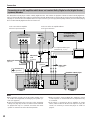 12
12
-
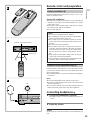 13
13
-
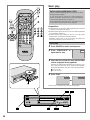 14
14
-
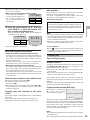 15
15
-
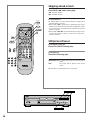 16
16
-
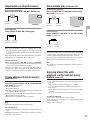 17
17
-
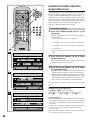 18
18
-
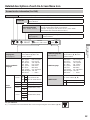 19
19
-
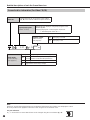 20
20
-
 21
21
-
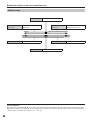 22
22
-
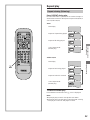 23
23
-
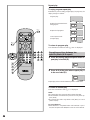 24
24
-
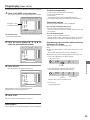 25
25
-
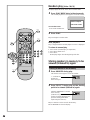 26
26
-
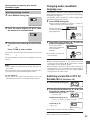 27
27
-
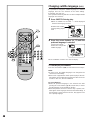 28
28
-
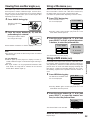 29
29
-
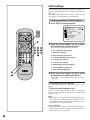 30
30
-
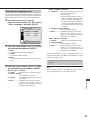 31
31
-
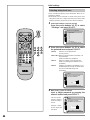 32
32
-
 33
33
-
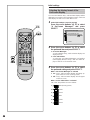 34
34
-
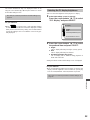 35
35
-
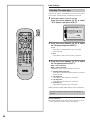 36
36
-
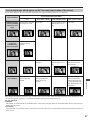 37
37
-
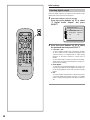 38
38
-
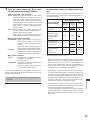 39
39
-
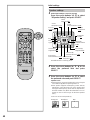 40
40
-
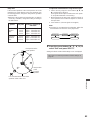 41
41
-
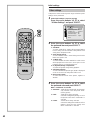 42
42
-
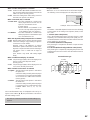 43
43
-
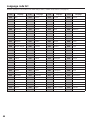 44
44
-
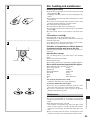 45
45
-
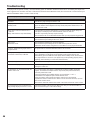 46
46
-
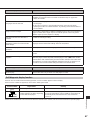 47
47
-
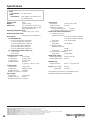 48
48


Yamaha DVD-S795 El manual del propietario
- Categoría
- Reproductores de DVD
- Tipo
- El manual del propietario
en otros idiomas
- français: Yamaha DVD-S795 Le manuel du propriétaire
- italiano: Yamaha DVD-S795 Manuale del proprietario
- English: Yamaha DVD-S795 Owner's manual
- Deutsch: Yamaha DVD-S795 Bedienungsanleitung
- русский: Yamaha DVD-S795 Инструкция по применению
- Nederlands: Yamaha DVD-S795 de handleiding
- português: Yamaha DVD-S795 Manual do proprietário
- dansk: Yamaha DVD-S795 Brugervejledning
- polski: Yamaha DVD-S795 Instrukcja obsługi
- čeština: Yamaha DVD-S795 Návod k obsluze
- svenska: Yamaha DVD-S795 Bruksanvisning
- Türkçe: Yamaha DVD-S795 El kitabı
- română: Yamaha DVD-S795 Manualul proprietarului