Yamaha CD-S2100 El manual del propietario
- Categoría
- Reproductores de CD
- Tipo
- El manual del propietario
Este manual también es adecuado para

LV
Printed in Malaysia ZK20420
© 2013 Yamaha Corporation
OWNER’S MANUAL
MANUAL DE INSTRUCCIONES
Compact Disc Player

A Living Tradition in Sound
A piano comes into this world through the perfect synergy of advanced technical
skill and artistry. Such a piano can create sound that truly reflects the player’s
feelings.
The final stage in piano production is called “voicing”. It is here that the
instrument is given its soul.
A highly skilled expert concentrates his mind and sensitivity on the sound of each
key, finely adjusting the dynamic feel of the hammers, bringing the tone and
vibrancy of all 88 keys together perfectly; a truly stunning achievement.
It is a quality of sound that can only be determined by an astute, sensitive ear. We
apply this very same concept to the manufacture of our audio products. The
technician performs exhaustive listening tests and every component is considered,
in order to finally achieve the ideal sound.
Yamaha’s tradition of audio quality stretches back over 125 years, and continues to
live on in all Yamaha products today.

Excellence in Audio Achievement
First HiFi System introduced in 1920
We introduced numerous HiFi components
(turntables, FM/AM tuners, integrated
amplifiers, preamplifiers, power amplifiers
and speakers) in 1955 - 1965.
Natural Sound Speaker Series introduced
in 1967
NS-20 Monitor Speaker
CA-1000 Integrated Amplifier
Featuring A-Class operation, the CA-1000 set
the standard for integrated amplifiers.
NS-690 Natural Sound Speaker
NS-1000M Monitor Speaker
A truly legendary speaker still revered by HiFi
enthusiasts.
B-1 Power Amplifier
An innovative power amp that used vertical FETs in all
stages.
C-2 Control Amplifier
Received top prize at the Milan International Music
and HiFi Show.
NS-10M Studio Monitor Speaker
Became of the most popular studio monitors
in the world.
A-1 Integrated Amplifier
PX-2 Turntable
Yamaha’s first straight arm turntable.
B-6 Power Amplifier
Pyramid-shaped power amplifier.
GT-2000/L Turntab le
First CD Player (CD-1) introduced in 1983
B-2x Power Amplifier
MX-10000 Power Amplifier and
CX-10000 Control Amplifier
Redefined the capabilities of separate components.
AX-1 Integrated Amplifier
GT-CD1 CD Player
MX-1 Power Amplifier and
CX-1 Preamplifier
Soavo-1 and Soavo-2 Natural Sound
Speaker Systems
A-S2000 Stereo Amplifier and
CD-S2000 Super Audio CD Player
NP-S2000 Network Player
English

4 En
◆ Full-stage balanced signal transmission beginning with the DAC
achieves the ultimate in CD reproduction
◆ Independent power supplies with digital and analog completely
separated
◆ Exclusive Yamaha loading mechanism and high precision CD drive
◆ Left-right symmetrical design with rigid, stable construction
◆ Pure Direct
◆ Super sound from Super Audio CDs
◆ Heavy feet with newly-developed antivibration spikes
◆ DSD playback via 192 kHz, 24-bit USB DAC
■ Supplied accessories
Please check that you have received all of the following parts.
• Power cable
• Remote control
• Batteries (AAA, R03, UM-4) (×2)
• Stereo pin cable
• SAFETY BROCHURE
■ About this manual
• y indicates a tip for your operation.
• The color of images in this manual may vary from the original.
• Read the “SAFETY BROCHURE” before using this unit.
Contents
Controls and functions.......................................................................................................................................... 6
Connections.......................................................................................................................................................... 18
Playback of music files stored on a PC.............................................................................................................. 22
Specifications ....................................................................................................................................................... 26
Playable disc format............................................................................................................................................ 27
Troubleshooting................................................................................................................................................... 29

CONTROLS AND FUNCTIONS
5 En
Controls and functions
In this chapter, you will learn the controls and functions of CD-S3000.

6 En
Controls and functions
■ Front panel (pages 6 to 9)
1 STANDBY/ON/OFF switch
Turns on or off this unit.
STANDBY/ON (upper position):
In this position, you can select STANDBY or ON,
using the p CD key on the remote control.
OFF (lower position):
The power of this unit is turned off.
• When you turn on this unit, it will take a few seconds
before this unit can reproduce sound.
• If this unit is not operated for 30 minutes with no audio
signal detected, it goes to STANDBY mode (page 15).
• If you disconnect the power cable from the AC outlet and
connect it again when this unit is in STANDBY mode, the
power of the unit is turned on (page 20). If the unit is not to
be operated for a long time, set the STANDBY/ON/OFF
switch to OFF.
2 STANDBY/ON indicator
Lit brightly:
Shows that the power of the unit is ON. In this
condition, you can switch the unit to STANDBY mode
using the p CD key on the remote control.
Lit dimly:
Shows that the unit is in STANDBY mode. In this
condition, press the p CD key on the remote control
to turn on the unit.
Off:
Shows that the power of the unit is OFF. In this
condition, you can turn on the unit using the
STANDBY/ON/OFF switch only.
STANDBY/ON
OFF
PURE DIRECT
SA-CD CD
SOURCE LAYER
LAYER
USB
OPTICAL COAXIAL
DISC
SA-CD HYBRID
TRACK TOTAL
REMAIN
PROG
SHUFFLE
REP OFF S ALL A-B
SOURCE
2 41 3 5 7 8 6
Notes

7 En
3 PURE DIRECT key
Turns on the PURE DIRECT mode to improve audio
quality.
When this unit is in the PURE DIRECT mode:
• No signal is output from the DIGITAL OUT
(OPTICAL and COAXIAL) jacks on the rear panel
(page 10).
• The least indicators and messages appear on the
front panel display.
y
• Press this key again to turn off the PURE DIRECT mode.
• This setting is retained even if you turn off this unit.
4 PURE DIRECT indicator
Lights when the PURE DIRECT mode is turned on.
5 SOURCE key
Selects the audio source to be played back. Each time
you press this key, the audio source is switched.
y
The audio source setting is retained even if you turn off this
unit.
6 SOURCE indicators
The indicator of the audio source selected with the
SOURCE key lights.
7 LAYER key
Switches the playback layer of a hybrid Super Audio
CD between SA-CD and CD while playback is
stopped (page 27).
y
This setting is retained even if you turn off this unit.
When SA-CD layer is selected, audio signals are output only
from the BALANCED OUT and ANALOG OUT jacks.
8 LAYER indicators
The indicator of the layer selected with the LAYER
key lights.
Note
(coaxial digital input) (optical digital input)
English

8 En
Controls and functions
■ Front panel (pages 6 to 9)
9 Disc tray
Loads a disc.
0 (Open/Close) key
Opens or closes the disc tray.
y
The disc tray also closes automatically when you press:
• the (Play) key on the front panel or on the remote
control.
• the front edge of the disc tray gently.
• a numeric button on the remote control.
A (Skip/Search backward) key
Press the key once to skip back to the beginning of the
current track.
Press it twice to skip to the beginning of the previous
track.
Press and hold it to search backward.
(Skip/Search forward) key
Press the key once to skip to the next track.
Press and hold it to search forward.
B (Play) key
Starts playback.
C (Pause) key
Pauses playback. Press the or key to resume
playback.
D (Stop) key
Stops playback.
STANDBY/ON
OFF
PURE DIRECT
SA-CD CD
SOURCE LAYER
LAYER
USB
OPTICAL COAXIAL
DISC
SA-CD HYBRID
TRACK TOTAL
REMAIN
PROG
SHUFFLE
REP OFF S ALL
SOURCE
GF
9 0
H
I JEK

9 En
E Remote control sensor
Receives signals from the remote control.
y
The remote control transmits a directional infrared beam.
Be sure to aim the remote control directly at the remote
control sensor on the front panel of this unit during operation.
F Display
The brightness can be adjusted with the DIMMER key
on the remote control (page 12).
G (playback) / (pause) indicator
Lights in the playback/pause mode.
H Disc type indicator
Indicates the type (SA-CD/CD/HYBRID) of the disc
in the disc tray.
I Time display mode indicator
Indicates the time display mode of the display. Change
the mode by pressing the DISPLAY key on the remote
control (page 13).
J Playback mode indicator
Indicates the current playback mode.
PROG: Program playback (page 14)
SHUFFLE: Shuffle playback (page 13)
REP OFF: Repeat playback off (page 12)
REP S: Single repeat playback (page 12)
REP ALL: All repeat playback (page 12)
K Information display
A
B C
D
30 30
Approximately 6 m (20 ft)
See page 28 for more information on MP3/WMA
playback.
Elapsed time of the current track
Remaining time of the
current track
Total remaining time of the
disc
English

10 En
Controls and functions
■ Rear panel
1 BALANCED OUT jacks (male)
2 ANALOG OUT jacks
3 DIGITAL IN USB jack (Type B)
4 DIGITAL IN OPTICAL jack
5 DIGITAL IN COAXIAL jack
6 DIGITAL OUT OPTICAL jack
7 DIGITAL OUT COAXIAL jack
While playing the Super Audio CD layer, the audio signals are
output only from the BALANCED OUT and ANALOG OUT
jacks.
8 SYSTEM CONNECTOR
Use this connector to connect a product testing device
for servicing.
9 REMOTE IN/OUT jacks
Use these jacks to connect an external component for
remote operation.
For details on the connection, see page 21.
0 AC IN inlet
Use this inlet to plug in the supplied power cable.
See page 20 for connection information.
SYSTEM CONNECTOR
REMOTE
IN OUT
BALANCED OUT DIGITAL IN
COAXIAL
DI
OPTICOPTICALUSB
ANALOG OUT BALANCED OUT
GND +HOT
- COLD
2
3
1
AC IN
8
0
3 4 5
9
1 2
See page 18 for connection information.
Note

11 En
A Foot
The feet of this unit include built-in spikes. Using the
spikes can reduce the effect of vibrations on the set.
When using the spikes, remove the transport tape, then
remove the magnet foot by pulling it.
When using the feet’s built-in spikes, the spikes may scratch
the shelf or floor on which this unit is installed. Use the
magnet feet or appropriate supports when placing this unit on
expensive furniture, etc.
y
If this unit is unstable, you can adjust the foot height by
rotating it.
COAXIAL
DIGITAL OUT
OPTICAL
A
6 7
Caution
Spike
Transport
tape Magnet
foot
English

12 En
Controls and functions
■ Remote control
1 Infrared signal transmitter
Sends infrared signals to this unit.
2 p CD key
Turns this unit ON or switches it to STANDBY mode.
For details on STANDBY, see “Front panel” (page 6).
3 OPEN/CLOSE key
Opens or closes the disc tray.
4 p AMP key
Turns the Yamaha amplifier ON or switches it to
STANDBY mode.
Some Yamaha amplifiers cannot be controlled with the
p AMP key of this remote control.
5 DIMMER key
Selects the brightness level for the front panel display.
Each time you press the DIMMER key, the brightness
level changes in the following order:
y
This setting is retained even if you turn off this unit.
6 Numeric buttons
Use to select a track directly.
This operation is ineffective for MP3 or WMA discs.
7 REPEAT key
Repeats playback of a single track or all tracks. Each
time you press the REPEAT key during playback, the
repeat playback mode changes as follows:
This operation is ineffective for MP3 or WMA discs.
PROGRAM key
Turns on or off the program playback mode. See
“Program playback” (page 14).
1
2
B
A
@
5
3
7
4
6
C
D
8
9
AMP CD
OPEN/CLOSE
DIMMER PURE DIRECT
2
5
8
DISPLAY
1 3
INPUT
4
6
79
ENTER0 CLEAR
PROGRAMREPEAT SHUFFLE
MUTE
SOURCE LAYER
VOLUME
Note
Note
Note
Max (brightest) Level 1 (default)
Level 2 Level 3 (darkest)
(repeat playback off): Repeat
playback is cancelled.
(single repeat playback): On reaching
the end of the current track, playback repeats
from the beginning of the current track.
(all repeat playback): On reaching
the end of the last track, playback repeats from
the beginning of the first track.

13 En
SHUFFLE key
Plays tracks on the disc in random order (shuffle
playback).
• This operation is ineffective for MP3 or WMA discs.
• The shuffle playback mode is cancelled when playback is
stopped or the disc is ejected.
8 (Search backward) key
(Search forward) key
Searches tracks backward/forward.
(Pause) key
Pauses playback. Press the or key to resume
playback.
(Play) key
Starts playback.
(Skip backward) key
Press the key once to skip back to the beginning of the
current track.
Press it twice to skip to the beginning of the previous
track.
(Skip forward) key
Press the key once to skip to the next track.
(Stop) key
Stops playback.
9 SOURCE key
Selects the audio source to be played back. Each time
you press this key, the audio source is switched.
y
The audio source setting is retained even if you turn off this
unit.
0 PURE DIRECT key
Turns on the PURE DIRECT mode to improve audio
quality.
When this unit is in the PURE DIRECT mode:
• The PURE DIRECT indicator lights.
• No signal is output from the DIGITAL OUT
(OPTICAL and COAXIAL) jacks on the rear panel
(page 10).
• The least indicators and messages appear on the
front panel display.
y
• Press this key again to turn off the PURE DIRECT mode.
• This setting is retained even if you turn off this unit.
A DISPLAY key
Switches the time display. Each time you press the
DISPLAY key during playback, the time display
changes as follows:
B ENTER key
Confirms a track number entered when you are
programming tracks.
CLEAR key
Erases the last programmed track when this unit is in
the program editing mode. See “Program playback”
(page 14).
y
To erase all programmed tracks, press the CLEAR key while
programmed playback is stopped.
C LAYER key
Switches the playback layer of a hybrid Super Audio
CD between SA-CD and CD while playback is
stopped (page 27).
y
This setting is retained even if you turn off this unit.
When SA-CD layer is selected, audio signals are output only
from the BALANCED OUT and ANALOG OUT jacks.
D Yamaha amplifier operation keys
Operates the Yamaha amplifier.
Refer to the owner’s manual of your amplifier for
details.
Some Yamaha amplifiers cannot be controlled with the keys
of this remote control.
Notes
(coaxial digital input) (optical digital input)
Note
Note
See page 28 for more information on MP3/WMA
playback.
Elapsed time of the current track
Remaining time of the
current track
Total remaining time of the
disc
English

14 En
Controls and functions
■ Program playback
In the program playback mode, you can play back tracks
in a programmed sequence.
• This operation is ineffective for MP3 or WMA discs.
• The programmed tracks are erased in the following cases:
– when the disc is ejected
– when this unit is turned off or goes to STANDBY mode
– when an audio source other than the disc is selected
– when the playback layer of a hybrid Super Audio CD is
switched between SA-CD and CD
1 Press PROGRAM while playback is stopped.
This unit is set to the program editing mode.
2 Select a track by using the numeric buttons
and press ENTER.
3 Repeat step 2 to program the next track.
You can program up to 24 tracks.
4 Press the p (Play) key.
Playback starts from the beginning of the
programmed sequence.
■ Setting the DPLL (Digital Phased Lock
Loop) bandwidth
The audio DAC (ES9018) of this unit employs DPLL to
generate accurate clock signals synchronized with the
clock of the input digital audio signal. The 7-step DPLL
bandwidth setting gives the unit tolerance for fluctuation
of the clock of the input digital signal and adjustment of
the accuracy of the operating clock in the DAC.
1 Press SOURCE to select the audio source to
be played back.
The DPLL bandwidth can be set for each audio
source, respectively.
2 Within 5 seconds after selecting the audio
source, press ENTER.
The unit enters the setting mode, and the DPLL
bandwidth currently set appears on the information
display.
3 Select the DPLL bandwidth using the
(pause) key and the (stop) key.
Each time the (pause) key is pressed, the
bandwidth changes in the following order. If you
press the (stop) key, it changes in reverse order.
Notes
(default)

15 En
4 Press ENTER.
The setting value flashes for 3 seconds, then the unit
resumes to normal mode.
To cancel the setting, press CLEAR.
• As the DPLL bandwidth setting value approaches “Lowest,” the
accuracy of the operating clock in the DAC improves, but the
unit may be susceptible to a change in the clock of the external
component. The sound from such a component may more easily
skips.
• As the DPLL bandwidth setting value approaches “Highest,”
the accuracy of the operating clock in the DAC deteriorates, but
the unit is far less susceptible to a change in the clock of the
external component, and the sound from such a component
hardly skips.
■ Setting the AUTO POWER STANDBY
function
The AUTO POWER STANDBY function can be set to
ON or OFF. When set to ON, if the unit is not operated for
30 minutes with no audio signal detected, it automatically
goes to STANDBY mode. When set to OFF, the unit does
not go to STANDBY mode automatically.
1 Open the disc tray and remove any currently-
loaded disc from the unit.
Skip step 1 to 3 if “NO DISC” appears on the
information display.
2 Close the disc tray.
3 Press SOURCE to select “DISC” as the audio
source.
“NO DISC” appears on the information display.
4 Press and hold the (Stop) key or (Play)
key on the front panel for about 2 seconds to
switch the setting.
(Stop) key: The AUTO POWER STANDBY
function switches to ON, and
“AutoSTBY ON” appears on the
information display.
(Play) key: The AUTO POWER STANDBY
function switches to OFF, and
“AutoSTBY OFF” appears on the
information display.
• The default setting for the AUTO POWER STANDBY function
is ON.
• This setting is retained even if you turn off this unit.
Notes
Notes
English

16 En
Controls and functions
■ Installing batteries in the remote control
1 Remove the battery compartment cover.
2 Insert the two batteries (AAA, R03, UM-4)
according to the polarity markings (+ and -)
on the inside of the battery compartment.
3 Reinstall the battery compartment cover.
2
1
3

Connections
In this section, you will make connections between CD-S3000 and your amplifier.

18 En
Connections
SYSTEM CONNECTOR
REMOTE
IN OUT
BALANCED OUT DIGITAL IN
COAXIALOPTICALUSB
ANALOG OUT BALANCED OUT
GND +HOT
- COLD
2
3
1
AC IN
If your amplifier is equipped with XLR
balanced input jacks,
we recommend balanced connection
for optimum audio performance.
When the SA-CD layer is played, the
audio signals are output only from the
BALANCED OUT and ANALOG OUT
jacks.
XLR balanced cable
Stereo pin cable
Amplifier

19 En
LINK CONTROL
IN
DIGITAL IN
COAXIAL COAXIAL
DIGITAL OUT
OPTICALOPTICALUSB
UT BALANCED OUT
AC IN
Coaxial digital cable
Optical digital cable
USB cable (Type B)
PC
Component equipped with a
digital output (PCM) jack
Only PCM signals can be input to the DIGITAL IN
(OPTICAL/COAXIAL) jacks of this unit. For details on
the supported PCM signals, see page 26.
Note
Coaxial digital cable
Optical digital cable
AV receiver equipped with a
digital input jack
English

20 En
Connections
■ Connecting to the BALANCED OUT
jacks
Connect your amplifier with the XLR balanced input
jacks. The pin assignments for these jacks are shown
below. Refer to the owner’s manual supplied with your
amplifier and verify that its XLR balanced input jacks are
compatible with the pin assignments.
When connecting, be sure to match the pins and insert the
connector of the “female” XLR balanced cable. When
disconnecting, pull out the “female” XLR balanced cable
while pressing down the latch lock on the plug.
■ Connecting the power cable
Plug the power cable into the AC IN inlet when all
connections are complete, and then plug in the power
cable to the AC outlet.
1: ground 2: hot
3: cold
“Female” XLR connector
“Male” XLR connector
Latch lock
T
E
OUT
DIGITAL IN
COAXIAL
DIGI
T
OPTICALOPTICALUSB
AC IN
Supplied power cable
to an AC outlet
Rear panel of CD-S3000

21 En
■ Operating this unit from another room
If you connect an infrared receiver and transmitter to the
REMOTE IN/OUT jacks of this unit, you can operate the
unit and/or external component using the supplied remote
control located in another room.
■ Remote connection between Yamaha
components
When you have another Yamaha component supporting
remote connection, as this unit does, an infrared
transmitter is not necessary. You can transmit remote
signals by connecting an infrared receiver and the
REMOTE IN jack of the other component to the
REMOTE IN/OUT jacks of this unit, using cables with
monaural miniplugs.
Up to three Yamaha components (including this unit) can
be connected.
SYSTEM CONNECTOR
REMOTE
IN OUT
AC IN
Rear panel of CD-S3000
Infrared
receiver
Remote control
Infrared
transmitter
External component
(e.g. Amplifier)
SYSTEM CONNECTOR
REMOTE
IN OUT
AC IN
REMOTE
IN OUT
Rear panel of CD-S3000
Infrared
receiver
Yamaha component
(up to three components
including this unit)
Remote control
English

22 En
Playback of music files stored on a PC
When a PC is connected to the USB jack of this unit, the
unit functions as a USB DAC, enabling music files stored
on the PC to be played via an amplifier connected to the
unit.
■ Supported operating systems
The USB connection with this unit is for PCs with the
following operating systems:
Windows: Windows Vista (SP2, 32bit/64bit)/
Windows 7 (32bit/64bit)/
Windows 8 (32bit/64bit)
Mac: OS X 10.5.8/10.6.8/10.7.x/10.8.x
• Operations with other operating systems are not guaranteed.
• Operations may be disabled even with the above-mentioned
operating systems, depending on the configuration or
environment of the PC.
• Operations may not be executed correctly if the PC is connected
to this unit before the driver is installed.
■ Installing the dedicated driver
Before connecting a PC to this unit, install the dedicated
driver on the PC.
1 Access the following URL, download the
dedicated “Yamaha Steinberg USB Driver,”
then extract and execute the file.
2 Install the downloaded “Yamaha Steinberg
USB Driver” on the PC.
For details, refer to the Installation Guide supplied
with the downloaded driver.
3 When installation is complete, quit all
running applications.
4 Set the audio output destination of the
computer to “Yamaha CD Player.”
With Windows OS:
Control Panel → Sound → [Playback] tab
With Mac OS:
System Preferences → Sound → [Output] tab
The setting may vary, depending on the operating
system. For details, consult the manufacturer of your
PC.
y
Transmittable sampling frequencies are as follows:
44.1 kHz/48 kHz/88.2 kHz/96 kHz/176.4 kHz/192 kHz
• Operations may not be executed correctly if the PC is connected
to this unit before the driver is installed.
• When the driver is installed on a Windows XP computer, the
operation speed of the computer may be reduced. In such a case,
restart the computer.
• The “Yamaha Steinberg USB Driver” is subject to change
without prior notice. For details and the latest information, refer
to the download page for the driver.
Notes
DIGITAL IN
COAXIALOPTICALUSB
BALANCED OUT
Rear panel of CD-S3000
USB cable (Type B)
PC
Website for downloading the exclusive driver
URL: http://download.yamaha.com/
Notes

23 En
■ Playing back music files stored on the
PC
1 Connect the PC to this unit, using a USB
cable.
2 Turn on the PC.
3 Turn this unit on by pressing the STANDBY/
ON/OFF switch on the front panel.
4 Select “USB,” using the SOURCE key of this
unit.
5 Set the audio output destination of the PC to
“Yamaha CD Player.”
With Windows OS:
Control Panel → Sound → [Playback] tab
With Mac OS:
System Preferences → Sound → [Output] tab
The setting may vary, depending on the operating
system. For details, consult the manufacturer of your
PC.
6 Operate the PC to start playback of music
files.
When the music signal is fed from the PC to
the unit,
the sampling frequency of the file being played is
indicated on the display of the unit.
■ Adjusting the sound volume
To obtain higher sound quality, set the sound volume at
the PC to the maximum, and gradually increase the
volume at the amplifier from the minimum to your desired
level.
• Do not disconnect the USB cable, turn off the unit, or change
the input with the SOURCE key while playback on a PC
connected via the USB cable is in progress. Doing so may cause
a malfunction.
• To mute operation sounds of the PC during music playback,
change the setting on the PC.
• If music files cannot be played correctly, restart the computer
and perform the mentioned procedure again.
• The music files stored on a PC cannot be controlled from this
unit or the remote control of this unit. Operate them on the PC.
Notes
English

24 En

Specifications
In this section, you will find technical specifications for CD-S3000.

26 En
Specifications
AUDIO SECTION
• Frequency Response (1 kHz, 0 dB)
SA-CD ..................................................... 2 Hz to 50 kHz (–3 dB)
CD ......................................................................... 2 Hz to 20 kHz
• Playback Frequency Range........................................2 Hz to 96 kHz
• Harmonic Distortion (1 kHz, 0 dB)
SA-CD .................................................................... 0.002% or less
CD .......................................................................... 0.002% or less
• Signal to Noise Ratio (IHF-A Network) (1 kHz, 0 dB)
SA-CD/CD ........................................................... 116 dB or more
• Dynamic Range (1 kHz, 0 dB)
SA-CD .................................................................. 110 dB or more
CD ........................................................................ 100 dB or more
• Output Level (1 kHz, 0 dB)
SA-CD/CD .................................................................. 2.0 ± 0.3 V
LASER DIODE PROPERTIES
• Wavelength
SA-CD ............................................................................... 655 nm
CD ..................................................................................... 790 nm
• Output Power
SA-CD .................................................................. 1.89 mW (max)
CD ........................................................................ 1.36 mW (max)
INPUT/OUTPUT SECTION
• Digital Input (DIGITAL IN)
USB (Type B) × 1 ........................................ USB 2.0 compliant
OPTICAL × 1
COAXIAL × 1
Support audio sample rate ......... 44.1/48/88.2/96/176.4/192 kHz
Word depths ............................................................. 16 bit/24 bit
• Digital Output (DIGITAL OUT)
OPTICAL × 1
COAXIAL × 1
Support audio sample rate ......... 44.1/48/88.2/96/176.4/192 kHz
Word depths ............................................................. 16 bit/24 bit
• Audio Output
ANALOG OUT ..................................... Unbalanced × 2 ch (L/R)
BALANCED OUT .................................... Balanced × 2 ch (L/R)
• Remote Input/Output
REMOTE IN
REMOTE OUT
• System Connector
SYSTEM CONNECTOR
GENERAL
• Power Supply
[China, Korea, Asia, Australia, U.K. and Europe models]
.......................................................... AC 220 – 240 V, 50/60 Hz
[U.S.A, Canada and Taiwan models]
.......................................................... AC 110 – 120 V, 50/60 Hz
• Power Consumption ................................................................ 30 W
• Standby Power Consumption (reference data) ......................... 0.3 W
• Dimensions (W × H × D) ............................... 435 × 142 × 440 mm
(17-1/8” × 5-5/8” × 17-3/8”)
• Weight .................................................................. 19.2 kg (42.3 lbs)
* Specifications are subject to change without notice.
Taking care of this unit
Polish finish on the side panels
Use of Yamaha Unicon cloth (sold separately) is
recommended. For heavy dirt, use Yamaha Piano
Unicon (sold separately). For puschasing, contact your
nearest authorized Yamaha dealer or service center.
Other finish
When you wipe this unit, do not use chemical solvents
(alcohol, thinner, etc.), which might damage the finish.
Use a clean, dry cloth. For heavy dirt, dampen a soft
cloth in detergent diluted with water, wring it out, and
clean this unit with the cloth.

27 En
Playable disc format
■ Supported disc types
This unit is designed to play back compact discs bearing
the marks shown below. Never attempt to load any other
types of discs into this unit. This unit can also play back 8-
cm (3-inch) compact discs.
Super Audio CD
Audio format based upon the current CD standards but
includes a greater amount of information that provides
higher quality sound. There are three types of discs: single
layer, dual layer and hybrid discs. The hybrid disc can be
played on existing CD players as well as Super Audio CD
players since it contains both standard audio CD and
Super Audio CD information.
This unit does not show text data on the front panel display.
Compact discs (digital audio)
The most popular discs for commercially available audio
CDs.
CD-R, CD-RW digital audio discs
Music CDs made by copying onto a CD-R or CD-RW
(including MP3 or WMA format files).
• Be sure to use a CD-R or CD-RW disc made by a reliable
manufacturer.
• Be sure to use a CD-R or CD-RW disc which has at least one of
the following phrases on the disc or disc case.
– FOR CONSUMER
– FOR CONSUMER USE
– FOR MUSIC USE ONLY
• Be sure to use a finalized CD-R or CD-RW disc.
CD-TEXT discs
The discs recorded with text data such as album titles,
track titles, and artist names. These discs can be played
back with ordinary CD players.
This unit does not show text data on the front panel display.
Note
1
2
3
Super Audio CD disc type
Single layer disc
HD layer
Dual layer disc
Hybrid layer disc
HD layer
CD layer
HD layer
Hybrid Super Audio CD disc
CD layer that plays on any
CD player
- High Quality DSD Stereo
- High Quality DSD Multi-channel
High Density layer containing:
Notes
Note
NOTE:
This unit may not be able to play back some CD-RW discs or
discs on which recording was not made correctly.
To prevent a malfunction of this unit:
• Do not use any nonstandard shaped
disc (heart, etc.) available in the
market as it might damage this unit.
• Do not use a disc with tape, seals, or
paste on it. Such a disc may get stuck
in this unit or cause damage to this
unit.
English

28 En
Playable disc format
■ About MP3 and WMA discs
You can play back MP3 and WMA files recorded on a
CD-R or CD-RW with similar uses as a music CD.
MP3
MP3 (MPEG-1 Audio Layer-3) is a standard technology
and format for compressing an audio sequence into a
small-sized file. However, the original level of sound
quality is preserved during playback.
• This unit plays back MP3 files in alphanumeric order.
• Up to 648 folders and files (combined) and up to 299 folders are
recognized; however, some folders and files may not be
recognized depending on their directory structure.
• Depending on recording conditions such as recording software
settings, this unit may not be able to play back the disc or files
in the order they were recorded.
• This unit is compatible with a sampling frequency of 44.1 kHz.
• This unit is compatible with a bitrate of 32, 40, 48, 56, 64, 80,
96, 112, 128, 160, 192, 224, 256, or 320 kbps. Variable bitrate is
not supported.
• The disc must be ISO9660 compatible.
• The text data contained in the files are not displayed on this
unit.
WMA
WMA (Windows Media Audio) is a Microsoft file format
for encoding digital audio files similar to MP3 although
WMA can compress files at a higher rate than MP3.
• This unit plays back WMA files in alphanumeric order.
• Up to 648 folders and files (combined) and up to 299 folders are
recognized; however, some folders and files may not be
recognized depending on their directory structure.
• This unit is compatible with a sampling frequency of 44.1 kHz.
• This unit is compatible with a bitrate of 48, 64, 80, 96, 128, 160,
or 192 kbps. Variable bitrate is not supported.
• The disc must be ISO9660 compatible.
• Copyright-protected WMA files cannot be played back with
this unit.
• The text data contained in the files are not displayed on this
unit.
■ Handling compact discs
• Always handle a disc with care so that its surface is not
scratched.
• Compact discs are rarely worn out during playback, but
damage to the disc surface when the disc is being
handled can adversely affect the disc playback.
• Be sure to use a felt-tip pen or similar writing tool
when writing on the label side of a disc. Do not use a
ball-point pen, pencil, or other hard-tipped writing
tools as these may damage the disc and may adversely
affect the disc playback.
• Do not warp discs.
• When a disc is not currently being used, remove it from
this unit and store it in an appropriate case.
• When removing or storing a disc, be careful not to
scratch the playing surface.
• Compact discs are not affected by small particles of
dust or fingerprints on their playing surface, but even
so they must be kept clean. Wipe the disc surface with
a clean, cry cloth. Do not wipe the disc surface with a
circular motion; wipe it straight outward from the
center.
• Do not try to clean the disc surface with any type of
disc cleaner, record spray, anti-static spray or liquid, or
any other chemical-based liquid as such substances
may irreparably damage the disc surface.
• Do not expose discs to direct sunlight, high
temperature, or high humidity for a long period of time
as these conditions may warp or otherwise damage the
disc.
• To play back an 8-cm (3-inch) compact disc, place it in
the inner recessed area of the disc tray. Do not put a
normal 12-cm CD on top of an 8-cm CD.
Notes
Notes

29 En
Troubleshooting
Refer to the chart below if this unit does not function properly. If the problem you are experiencing is not listed below or
if the instructions below do not help, turn off this unit, disconnect the power cable, and contact the nearest authorized
Yamaha dealer or service center.
Problem Cause Remedy
See
page
The unit does not
switch ON when
STANDBY/ON/OFF is
pressed upward.
The power cable is not connected nor completely
connected.
Securely connect the power cable.
20
This unit
automatically goes to
STANDBY mode.
The automatic standby function is activated. If the unit is not operated for 30 minutes with no
audio signal detected, it automatically goes to
STANDBY mode.
6
The disc tray does not
close completely.
A foreign object is obstructing the tray. Carefully check the disc tray and remove the
foreign object.
—
Playback does not
start.
The disc is damaged. Check the disc carefully; replace it if necessary.
—
There is moisture on the laser pickup. Wait 20 to 30 minutes after switching the unit
ON before trying to play back a disc.
—
The disc is loaded upside down. Reload the disc with the label side up.
—
The disc is dirty. Clean the disc.
28
The MP3 or WMA formats are not compatible
with this unit.
Replace the disc with a correctly recorded disc
playable with this unit.
28
The CD-RW (ReWritable) disc is not recorded
correctly.
Replace the disc with a correctly recorded disc
playable with this unit.
27
The disc is a non-standard disc not playable with
this unit.
Replace the disc with a correctly recorded disc
playable with this unit.
27
Playback is delayed,
or begins at the
wrong place.
The disc may be scratched or damaged. Check the disc carefully; replace it if necessary.
28
No sound. Improper output cable connections. Connect the cables properly. If the problem
persists, the cables may be defective.
18
Improper amplifier operation. Set the amplifier controls to the correct input
selection.
—
No playback sound
from the component
connected to the
digital input jacks.
The unit is in PURE DIRECT mode. Turn off PURE DIRECT mode.
7
The Super Audio CD layer is being played. Change the layer for playback.
7
Sound “skips.” This unit is being subjected to vibrations or
impacts.
Relocate this unit.
—
The disc is dirty. Clean the disc.
28
The clock of the playback audio signal is
fluctuated.
Change the DPLL bandwidth of the audio DAC
(ES9018).
14
Sound “hums.” Improper cable connections. Securely connect the audio cables. If the problem
persists, the cables may be defective.
18
English

30 En
Troubleshooting
■ On USB connection
Problem Cause Remedy
See
page
Noise from a nearby
tuner.
The tuner is too close to this unit. Move the tuner and this unit farther apart.
—
Noise from inside of
the disc tray.
The disc may be warped. Replace the disc.
28
No sound from the
component
connected to the
DIGITAL IN (OPTICAL
or COAXIAL) jack.
The output audio source setting on the connected
component is not “PCM.”
Only PCM audio sources can be played via the
DIGITAL IN (OPTICAL/COAXIAL) jacks of
this unit.
Set the output audio source of the connected
component to “PCM.”
—
The remote control
does not work.
The batteries of the remote control are too weak. Replace the batteries with new ones.
16
Remote control is too far away or tilted too
much.
Use within 6 m and 60° radius.
9
Direct sunlight or lighting (of an inverter type
fluorescent lamp etc.) is striking the remote
control sensor of this unit.
Reposition this unit.
9
Problem Cause Remedy
See
page
The connected PC
does not recognize
this unit.
The operating system of the PC is not supported. Use a PC with an operation-guaranteed operating
system.
22
Improper USB cable connection Connect the USB cable properly.
19, 22
The output of the PC or application is muted. Cancel the sound muting of the PC or
application.
—
Noisy playback. Another application is launched on the PC while
a music file is being played.
If another application is launched while a music
file is being played, sound may be momentarily
lost or noise may be generated.
Do not launch other applications during
playback.
—
Music files cannot be
played.
The music data are not properly reproduced,
because this unit is connected to the PC or the
input of this unit is switched to “USB” while the
music application is running on the PC.
Connect this unit to the PC and set the input of
the unit to “USB” in advance. Then launch the
music application and start playback.
23
The dedicated “Yamaha Steinberg USB Driver”
has not been installed correctly.
Install the “Yamaha Steinberg USB Driver”
again, following the correct procedure.
22

31 En
■ Messages on the information display
Message Status
NO DISC No disc is set on the disc tray.
Check Cable The dedicated “Yamaha Steinberg USB Driver” has not been installed correctly. Or, the audio output
of the computer has not been set to “Yamaha CD Player.”
Check PC The audio signal from the computer cannot be recognized.
Fs: ----kHz No audio signal is recognized.
English

Historia viva en el mundo del
sonido
El nacimiento de un piano es el resultado de una perfecta sinergia entre los
conocimientos técnicos más avanzados y la diestra mano del artesano. Solo un
piano creado así puede reproducir fielmente la intención de quien lo toca.
La última fase de producción de un piano recibe el nombre de “armonización”
(voicing). Y es aquí donde se le infunde el alma.
Un experto con un gran bagaje a sus espaldas pone su técnica y sensibilidad al
servicio del sonido de cada tecla, ajustando la ejecución dinámica de los macillos
y armonizando a la perfección el tono y el color de las 88 teclas, un auténtico hito.
Es una calidad de sonido solo al alcance de los especialistas con una sensibilidad y
una afinación fuera de lo común. Este mismo concepto es el que aplicamos en la
fabricación de nuestros equipos de audio. Los técnicos realizan incontables
pruebas de sonido y todos los componentes se someten a examen para conseguir el
sonido perfecto.
La calidad es la seña de identidad de Yamaha desde hace más de 125 años y sigue
siendo la piedra angular de los productos Yamaha fabricados hoy.

Excelencia en audio
Primer sistema HiFi presentamos en 1920
En 1955 – 1965 hemos presentado numerosos
componentes HiFi (tocadiscos, sintonizadores
de FM/AM, amplificadores integrados,
preamplificadores, amplificadores de
potencia, y altavoces).
Serie de Altavoces Natural Sound presentada
en 1967
Altavoz monitor NS-20
Amplificador integrado CA-1000
Con un funcionamiento clase A, el CA-1000 se convirtió
en la referencia de los amplificadores integrados.
Altavoces Natural Sound NS-690
Altavoz monitor NS-1000M
Un amplificador verdaderamente legendario aún
reverenciado por los entusiastas de HiFi.
Amplificador de potencia B-1
Un innovador amplificador de potencia que usaba FETs
verticales en todas las etapas.
Amplificador de control C-2
Primer premio en la Muestra Internacional de Música
y HiFi de Milán.
Altavoz monitor de estudio NS-10M
Se convirtió en uno de los altavoces monitores de estudio
más populares del mundo.
Amplificador integrado A-1
Giradiscos PX-2
Primer tocadiscos de brazo recto de Yamaha.
Amplificador de potencia B-6
Amplificador de potencia en forma de pirámide.
Giradiscos GT-2000/L
Primer reproductor de CD (CD-1)
presentado en 1983
Amplificador de potencia B-2x
Amplificador de potencia MX-10000 y
amplificador de control CX-10000
Redefinió la capacidad de los componentes separados.
Amplificador integrado AX-1
Reproductor de CD GT-CD1
Amplificador de potencia MX-1 y
preamplificadorCX-1
Sistemas de altavoces Natural Sound Soavo-1
y Soavo-2
Amplificador estéreo A-S2000 y
reproductor CD Super Audio CD-S2000
Reproductor de red NP-S2000
Español

4 Es
◆ Transmisión de señal equilibrada de etapa completa con el DAC que
logra lo último en reproducción de CD
◆ Suministros de alimentación independientes con señales digitales y
analógicas completamente separadas
◆ Mecanismo de carga exclusivo de Yamaha y unidad de CD de alta
precisión
◆ Diseño simétrico de izquierda-derecha con construcción fuerte y estable
◆ Pure Direct
◆ Supersonido de Super Audio CD
◆ Patas resistentes con puntas antivibración de nuevo diseño
◆ Reproducción DSD a través de un DAC USB de 192 kHz y 24 bits
■ Accesorios suministrados
Verifique que ha recibido todos los componentes siguientes.
• Cable de alimentación
• Mando a distancia
• Pilas (AAA, R03, UM-4) (×2)
• Cable con clavijas estéreo
• FOLLETO DE SEGURIDAD
■ Acerca de este manual
• y indica un consejo para su utilización.
• El color de las imágenes de este manual puede ser diferente al original.
• Lea el “FOLLETO DE SEGURIDAD” antes de utilizar esta unidad.
Índice
Controles y funciones ............................................................................................................................................ 6
Conexiones ........................................................................................................................................................... 18
Reproducción de archivos de música guardados en un PC............................................................................. 22
Especificaciones ................................................................................................................................................... 26
Formato de disco reproducible .......................................................................................................................... 27
Solución de problemas ........................................................................................................................................ 29

CONTROLES Y FUNCIONES
5 Es
Controles y funciones
En este capítulo podrá familiarizarse con los controles y funciones del CD-S3000.

6 Es
Controles y funciones
■ Panel delantero (páginas 6 a 9)
1 Interruptor STANDBY/ON/OFF
Enciende o apaga esta unidad.
STANDBY/ON (posición superior):
En esta posición, puede seleccionar STANDBY u ON
pulsando la tecla p CD en el mando a distancia.
OFF (posición inferior):
La alimentación de esta unidad está apagada.
• Cuando encienda esta unidad, tendrá que esperar unos
segundos antes de que pueda reproducir sonido.
• Si no se utiliza esta unidad durante 30 minutos y no se
detecta señal de audio, pasa al modo STANDBY
(página 15).
• Si desconecta el cable de alimentación de la toma de CA y
vuelve a conectarlo mientras la unidad está en el modo
STANDBY, se enciende la alimentación de la unidad
(página 20). Si la unidad no va a utilizarse durante un
período prolongado, sitúe el interruptor STANDBY/ON/
OFF en OFF.
2 Indicador STANDBY/ON
Iluminación intensa:
Indica que la unidad está encendida. En este estado,
puede activar el modo STANDBY pulsando la tecla p
CD en el mando a distancia.
Iluminación tenue:
Indica que la unidad se encuentra en el modo
STANDBY. En este estado, puede pulsar la tecla p
CD en el mando a distancia para encender la unidad.
Apagado:
Indica que la unidad está apagada. En este estado, solo
puede encender la unidad pulsando el interruptor
STANDBY/ON/OFF.
STANDBY/ON
OFF
PURE DIRECT
SA-CD CD
SOURCE LAYER
LAYER
USB
OPTICAL COAXIAL
DISC
SA-CD HYBRID
TRACK TOTAL
REMAIN
PROG
SHUFFLE
REP OFF S ALL A-B
SOURCE
2 41 3 5 7 8 6
Notas

7 Es
3 Tecla PURE DIRECT
Activa el modo PURE DIRECT para mejorar la
calidad de audio.
Cuando esta unidad está en el modo PURE DIRECT:
• No se emite ninguna señal por los jacks DIGITAL
OUT (OPTICAL y COAXIAL) del panel trasero
(página 10).
• Los últimos indicadores y mensajes aparecen en el
visor del panel delantero.
y
• Pulse de nuevo esta tecla para desactivar el modo PURE
DIRECT.
• Este ajuste se mantiene aunque usted apague esta unidad.
4 Indicador PURE DIRECT
Se ilumina al activar el modo PURE DIRECT.
5 Tecla SOURCE
Permite seleccionar la fuente de audio reproducida. La
fuente de audio cambia cada vez que pulsa esta tecla.
y
El ajuste de la fuente de audio se mantiene aunque apague
esta unidad.
6 Indicadores SOURCE
Se ilumina el indicador de la fuente de audio
seleccionada con la tecla SOURCE.
7 Tecla LAYER
Permite seleccionar la capa de reproducción de un
Super Audio CD híbrido entre las opciones SA-CD y
CD mientras la reproducción está detenida
(página 27).
y
Este ajuste se mantiene aunque usted apague esta unidad.
Si selecciona la capa SA-CD, las señales de audio se emiten
solo por los jacks BALANCED OUT y ANALOG OUT.
8 Indicadores LAYER
Se ilumina el indicador de la capa seleccionada con la
tecla LAYER.
Nota
(entrada digital coaxial) (entrada digital óptica)
Español

8 Es
Controles y funciones
■ Panel delantero (páginas 6 a 9)
9 Bandeja de disco
Carga un disco.
0 Tecla (Abrir/cerrar)
Abre o cierra la bandeja del disco.
y
La bandeja del disco también se cierra automáticamente al
pulsar:
• la tecla (Reproducción) en el panel delantero o el
mando a distancia.
• el borde delantero de la bandeja del disco con suavidad.
• un botón numérico del mando a distancia.
A Tecla (Salto/búsqueda hacia atrás)
Pulse la tecla una vez para saltar al principio de la
pista actual.
Pulse la tecla dos veces para saltar al principio de la
pista anterior.
Manténgala pulsada para buscar hacia atrás.
Tecla (Salto/búsqueda hacia delante)
Pulse la tecla una vez para saltar a la siguiente pista.
Manténgala pulsada para buscar hacia delante.
B Tecla (Reproducción)
Inicia la reproducción.
C Tecla (Pausa)
Hace una pausa en la reproducción. Pulse la tecla o
para reanudar la reproducción.
D Tecla (Parada)
Detiene la reproducción.
STANDBY/ON
OFF
PURE DIRECT
SA-CD CD
SOURCE LAYER
LAYER
USB
OPTICAL COAXIAL
DISC
SA-CD HYBRID
TRACK TOTAL
REMAIN
PROG
SHUFFLE
REP OFF S ALL
SOURCE
GF
9 0
H
I JEK

9 Es
E Sensor de mando a distancia
Recibe señales del mando a distancia.
y
El mando a distancia transmite un haz infrarrojo direccional.
Asegúrese de apuntar directamente el mando a distancia al
sensor de mando a distancia del panel delantero de esta
unidad durante el funcionamiento.
F Pantalla
El brillo puede ajustarse con la tecla DIMMER del
mando a distancia (página 12).
G Indicador (reproducción) / (pausa)
Se ilumina cuando el modo de reproducción/pausa
está activado.
H Indicador del tipo de disco
Indica el tipo de disco cargado en la bandeja del disco
(SA-CD/CD/HYBRID).
I Indicador del modo de visualización de
tiempo
Indica el modo de visualización del tiempo en la
pantalla. Para cambiar de modo, pulse el botón
DISPLAY en el mando a distancia (página 13).
J Indicador del modo de reproducción
Indica el modo de reproducción actual.
PROG: reproducción programada (página 14)
SHUFFLE: reproducción aleatoria (página 13)
REP OFF: repetición de la reproducción desactivada
(página 12)
REP S: repetición de la reproducción de una pista
(página 12)
REP ALL: repetición de la reproducción de todas las
pistas (página 12)
K Visor de información
A
B C
D
30 30
6 m aproximadamente
Consulte la página 28 para obtener más información
sobre la reproducción de MP3/WMA.
Tiempo transcurrido de la pista actual
Tiempo restante de la pista
actual
Tiempo total restante del
disco
Español

10 Es
Controles y funciones
■ Panel trasero
1 Jacks BALANCED OUT (macho)
2 Jacks ANALOG OUT
3 Jack DIGITAL IN USB (tipo B)
4 Jack DIGITAL IN OPTICAL
5 Jack DIGITAL IN COAXIAL
6 Jack DIGITAL OUT OPTICAL
7 Jack DIGITAL OUT COAXIAL
Cuando reproduzca la capa de un Super Audio CD, las señales de
audio solo se emiten a través de los jacks BALANCED OUT y
ANALOG OUT.
8 SYSTEM CONNECTOR
Utilice este conector para conectar un dispositivo para
probar el producto al realizar operaciones de
mantenimiento.
9 Jacks REMOTE IN/OUT
Utilice estos jacks para conectar un componente
externo utilizado como mando a distancia.
Para obtener más información sobre la conexión,
consulte la página 21.
0 Entrada AC IN
Use esta entrada para conectar el cable de
alimentación suministrado.
Consulte la página 20 para obtener información sobre
las conexiones.
SYSTEM CONNECTOR
REMOTE
IN OUT
BALANCED OUT DIGITAL IN
COAXIAL
DI
OPTICOPTICALUSB
ANALOG OUT BALANCED OUT
GND +HOT
- COLD
2
3
1
AC IN
8
0
3 4 5
9
1 2
Consulte la página 18 para obtener información sobre
las conexiones.
Nota

11 Es
A Pata
Las patas de esta unidad incluyen puntas. Usar las
puntas puede reducir el efecto de las vibraciones en el
aparato. Cuando use las puntas, quite la cinta utilizada
para el transporte y, después, retire las patas
magnéticas tirando de ellas.
Cuando use las puntas incorporadas en las patas, las puntas
podrán rayar la estantería o el suelo donde se instale esta
unidad. Use las patas magnéticas o soportes adecuados
cuando coloque esta unidad sobre un mueble caro, etc.
y
Si esta unidad no está estable podrá ajustar la altura de las
patas girándolas.
COAXIAL
DIGITAL OUT
OPTICAL
A
6 7
Precaución
Punta
Cinta para
transporte
Pata
magnética
Español

12 Es
Controles y funciones
■ Mando a distancia
1 Transmisor de señal infrarroja
Envía señales infrarrojas a esta unidad.
2 Tecla p CD
Enciende esta unidad o activa el modo STANDBY.
Para obtener más información sobre el modo
STANDBY, consulte “Panel delantero” (página 6).
3 Tecla OPEN/CLOSE
Abre o cierra la bandeja del disco.
4 Tecla p AMP
Enciende el amplificador Yamaha o activa el modo
STANDBY.
Algunos amplificadores Yamaha no pueden controlarse con
la tecla p AMP de este mando a distancia.
5 Tecla DIMMER
Selecciona el nivel de brillo del visor del panel
delantero. Cada vez que pulse la tecla DIMMER, el
nivel de brillo cambiará de la forma siguiente:
y
Este ajuste se mantiene aunque usted apague esta unidad.
6 Botones numéricos
Se usan para seleccionar directamente una pista.
Esta operación no sirve para los discos MP3 ni WMA.
7 Tecla REPEAT
Repite la reproducción de una pista o todas ellas. Cada
vez que pulsa la tecla REPEAT durante la
reproducción, el modo de repetición cambia de la
forma siguiente:
Esta operación no sirve para los discos MP3 o WMA.
Tecla PROGRAM
Activa o desactiva el modo de reproducción
programada. Consulte “Reproducción programada”
(página 14).
1
2
B
A
@
5
3
7
4
6
C
D
8
9
AMP CD
OPEN/CLOSE
DIMMER PURE DIRECT
2
5
8
DISPLAY
1 3
INPUT
4
6
79
ENTER0 CLEAR
PROGRAMREPEAT SHUFFLE
MUTE
SOURCE LAYER
VOLUME
Nota
Nota
Nota
Max
(máximo brillo)
Level 1 (brillo
predeterminado)
Level 2
Level 3
(brillo mínimo)
(repetición de la reproducción
desactivada):
cancela la repetición de la reproducción.
(repetición de la reproducción de una
pista):
al llegar al final de la pista actual, la
reproducción se repite desde el comienzo de esa pista.
(repetición de la reproducción de
todas las pistas):
al llegar al final de la última
pista, la reproducción se repite desde el comienzo de
la primera pista.

13 Es
Tecla SHUFFLE
Reproduce las pistas del disco en un orden aleatorio
(reproducción aleatoria).
• Esta operación no sirve para los discos MP3 ni WMA.
• El modo de reproducción aleatoria se cancela cuando se
detiene la reproducción o se expulsa el disco.
8 Tecla (Búsqueda hacia atrás)
Tecla (Búsqueda hacia delante)
Busca pistas hacia atrás/adelante.
Tecla (Pausa)
Hace una pausa en la reproducción. Pulse la tecla o
para reanudar la reproducción.
Tecla (Reproducción)
Inicia la reproducción.
Tecla (Salto hacia atrás)
Pulse la tecla una vez para saltar al principio de la
pista actual.
Pulse la tecla dos veces para saltar al principio de la
pista anterior.
Tecla (Salto hacia delante)
Pulse la tecla una vez para saltar a la siguiente pista.
Tecla (Parada)
Detiene la reproducción.
9 Tecla SOURCE
Permite seleccionar la fuente de audio reproducida. La
fuente de audio cambia cada vez que pulsa esta tecla.
y
El ajuste de la fuente de audio se mantiene aunque apague
esta unidad.
0 Tecla PURE DIRECT
Activa el modo PURE DIRECT para mejorar la
calidad de audio.
Cuando esta unidad está en el modo PURE DIRECT:
• Se ilumina el indicador PURE DIRECT.
• No se emite ninguna señal por los jacks DIGITAL
OUT (OPTICAL y COAXIAL) del panel trasero
(página 10).
• Los últimos indicadores y mensajes aparecen en el
visor del panel delantero.
y
• Pulse de nuevo esta tecla para desactivar el modo PURE
DIRECT.
• Este ajuste se mantiene aunque usted apague esta unidad.
A Tecla DISPLAY
Cambia a la visualización del tiempo. Cada vez que
pulsa la tecla DISPLAY durante la reproducción, la
visualización del tiempo cambia de la forma siguiente:
B Tecla ENTER
Confirma un número de pista introducido cuando
programa pistas.
Tecla CLEAR
Borra la última pista programada cuando esta unidad
está en el modo de edición de programa. Consulte
“Reproducción programada” (página 14).
y
Para borrar todas las pistas programadas, pulse la tecla
CLEAR mientras la reproducción está parada.
C Tecla LAYER
Permite seleccionar la capa de reproducción de un
Super Audio CD híbrido entre las opciones SA-CD y
CD mientras la reproducción está detenida (página 27).
y
Este ajuste se mantiene aunque usted apague esta unidad.
Si selecciona la capa SA-CD, las señales de audio se emiten
solo por los jacks BALANCED OUT y ANALOG OUT.
D Teclas de control del amplificador Yamaha
Permiten controlar el amplificador Yamaha.
Consulte el manual del usuario de su amplificador
para obtener más información.
Algunos amplificadores Yamaha no pueden controlarse con
las teclas de este mando a distancia.
Notas
(entrada digital coaxial) (entrada digital óptica)
Nota
Nota
Consulte la página 28 para obtener más información
sobre la reproducción de MP3/WMA.
Tiempo transcurrido de la pista actual
Tiempo restante de la pista
actual
Tiempo total restante del
disco
Español

14 Es
Controles y funciones
■ Reproducción programada
En el modo de reproducción programada puede reproducir
pistas en un orden programado.
• Esta operación no sirve para los discos MP3 ni WMA.
• Las pistas programadas se borran en los siguientes casos:
– al expulsar el disco
– al apagar esta unidad o situarla en el modo STANDBY
– al seleccionar una fuente de audio diferente del disco
– al cambiar la capa de reproducción de un Super Audio CD
híbrido entre SA-CD y CD
1 Pulse PROGRAM mientras la reproducción
esté parada.
Esta unidad se pone en el modo de edición
programada.
2 Seleccione una pista con los botones
numéricos y pulse ENTER.
3 Repita el paso 2 para programar la siguiente
pista.
Puede programar hasta 24 pistas.
4 Pulse la tecla p (Reproducción).
La reproducción empieza desde el comienzo del
orden programado.
■ Configuración del ancho de banda DPLL
(Digital Phased Lock Loop)
El DAC de audio (ES9018) de esta unidad utiliza DPLL
para generar señales de reloj precisas sincronizadas con el
reloj de la señal de audio digital de entrada. La
configuración de ancho de banda DPLL en 7 pasos
permite definir la tolerancia de la unidad en relación con
la fluctuación del reloj de la señal digital de entrada y el
ajuste de la precisión del reloj del sistema en el DAC.
1 Pulse SOURCE para seleccionar la fuente de
audio reproducida.
Es posible configurar el ancho de banda DPLL para
cada fuente de audio por separado.
2 Unos 5 segundos después de seleccionar la
fuente de audio, pulse ENTER.
La unidad pasa al modo de configuración y el ancho
de banda DPLL configurado actualmente aparece en
el visor de información.
3 Seleccione el ancho de banda DPLL
utilizando el botón (pausa) y el botón
(parada).
Cada vez que pulse el botón (pausa), el ancho de
banda cambiará en el orden siguiente. Si pulsa el
botón (parada), cambiará en el orden inverso.
Notas
(predeterminado)

15 Es
4 Pulse ENTER.
El valor de configuración parpadea durante 3
segundos y la unidad recupera el modo normal.
Para cancelar la configuración, pulse CLEAR.
• A medida que el valor de configuración del ancho de banda
DPLL se aproxima al nivel “Lowest”, la precisión del reloj del
sistema del DAC mejora, aunque la unidad puede verse
afectada por un cambio en el reloj del componente externo. El
sonido de un componente de estas características puede sufrir
saltos más fácilmente.
• A medida que el valor de configuración del ancho de banda
DPLL se aproxima al nivel “Highest”, la precisión del reloj del
sistema del DAC empeora, aunque la unidad se verá menos
afectada por un cambio en el reloj del componente externo y el
sonido de un componente de estas características difícilmente
experimentará saltos.
■ Configuración de la función AUTO
POWER STANDBY
La función AUTO POWER STANDBY se puede
configurar en ON u OFF. Cuando se configura en ON, si
no se utiliza esta unidad durante 30 minutos y no se
detecta señal de audio, pasa automáticamente al modo
STANDBY. Cuando se configura en OFF, la unidad no
pasa al modo STANDBY automáticamente.
1 Abra la bandeja del disco y extraiga el disco
cargado actualmente de la unidad.
Salte del paso 1 al 3 si aparece “NO DISC” en la
pantalla de información.
2 Cierre la bandeja del disco.
3 Pulse SOURCE para seleccionar “DISC”
como fuente de audio.
“NO DISC” aparece en la pantalla de información.
4 Mantenga pulsado la tecla (Parada) o
(Reproducción) del panel frontal durante
aproximadamente 2 segundos para cambiar
el ajuste.
Tecla (Parada): La función AUTO
POWER STANDBY
cambia a ON, y
“AutoSTBY ON” aparece
en la pantalla de
información.
Tecla (Reproducción):La función AUTO
POWER STANDBY
cambia a OFF, y
“AutoSTBY OFF” aparece
en la pantalla de
información.
• El ajuste predeterminado para la función AUTO POWER
STANDBY es ON.
• Este ajuste se mantiene aunque usted apague esta unidad.
Notas
Notas
Español

16 Es
Controles y funciones
■ Instalación de las pilas en el mando a
distancia
1 Retire la tapa del compartimento de las pilas.
2 Introduzca las dos pilas (AAA, R03, UM-4)
teniendo en cuenta las marcas de polaridad
(+ y -) del interior del compartimento de las
pilas.
3 Vuelva a colocar la tapa del compartimento
de las pilas.
2
1
3

CONEXIONES
17 Es
Conexiones
En esta sección hará las conexiones entre el CD-S3000 y su amplificador.

18 Es
Conexiones
SYSTEM CONNECTOR
REMOTE
IN OUT
BALANCED OUT DIGITAL IN
COAXIALOPTICALUSB
ANALOG OUT BALANCED OUT
GND +HOT
- COLD
2
3
1
AC IN
Si su amplificador cuenta con jacks de
entrada equilibrada XLR,
le recomendamos una conexión
equilibrada para disfrutar del mejor
audio.
Al reproducir la capa SA-CD, las
señales de audio se emiten solo por
los jacks BALANCED OUT y ANALOG
OUT.
Cable equilibrado XLR
Cable con clavijas
estéreo
Amplificador

19 Es
LINK CONTROL
IN
DIGITAL IN
COAXIAL COAXIAL
DIGITAL OUT
OPTICALOPTICALUSB
UT BALANCED OUT
AC IN
Cable digital coaxial
Cable digital óptico
Cable USB (tipo B)
PC Componente provisto de un
jack de salida digital (PCM)
Solo las señales PCM pueden enviarse a los jacks DIGITAL IN
(OPTICAL/COAXIAL) de esta unidad. Para obtener más información
sobre las señales PCM compatibles, consulte la página 26.
Nota
Cable digital coaxial
Cable digital óptico
Receptor AV provisto de un
jack de entrada digital
Español

20 Es
Conexiones
■ Conexión a los jacks BALANCED OUT
Conecte su amplificador con los jacks de entrada
equilibrada XLR. Las asignaciones de contactos para estos
jacks se muestran a continuación. Consulte el manual de
instrucciones suministrado con su amplificador y
verifique que sus jacks de entrada equilibrada XLR sean
compatibles con las asignaciones de las clavijas.
Cuando realice la conexión, asegúrese de casar los
contactos e inserte el conector del cable equilibrado XLR
“hembra”. Cuando lo desconecte, tire del cable
equilibrado XLR “hembra” manteniendo presionado el
seguro de bloqueo del conector.
■ Conexión del cable de alimentación
Enchufe el cable de alimentación en la toma AC IN
cuando termine todas las conexiones y, luego, enchufe el
cable de alimentación en la toma de CA.
1: tierra 2: con corriente
3: sin corriente
Conector XLR “hembra”
Conector XLR “macho”
Seguro de
bloqueo
T
E
OUT
DIGITAL IN
COAXIAL
DIGI
T
OPTICALOPTICALUSB
AC IN
Cable de alimentación
suministrado
a una toma de CA
Panel trasero del CD-S3000

21 Es
■ Control de esta unidad desde otra
habitación
Si conecta un receptor y un transmisor de señales
infrarrojas a los jacks REMOTE IN/OUT de esta unidad,
podrá controlar la unidad y/o un componente externo con
el mando a distancia suministrado desde otra habitación.
■ Conexión remota entre componentes
Yamaha
Si tiene otro componente Yamaha compatible con la
conexión remota, como esta unidad, no es necesario el
transmisor de señales infrarrojas. Las señales remotas
pueden transmitirse conectando un receptor de señales
infrarrojas y el jack REMOTE IN del otro componente a
los jacks REMOTE IN/OUT de esta unidad mediante
cables con minitomas monoaurales.
Pueden conectarse un máximo de tres componentes
Yamaha (incluida esta unidad).
SYSTEM CONNECTOR
REMOTE
IN OUT
AC IN
Panel trasero del CD-S3000
Receptor de
señales infrarrojas
Mando a distancia
Transmisor de
señales infrarrojas
Componente externo
(p. ej., amplificador)
SYSTEM CONNECTOR
REMOTE
IN OUT
AC IN
REMOTE
IN OUT
Panel trasero del CD-S3000
Receptor de
señales infrarrojas
Componente Yamaha
(hasta tres componentes,
esta unidad incluida)
Mando a distancia
Español

22 Es
Reproducción de archivos de música guardados en un PC
Al conectar un PC al jack USB de esta unidad, la unidad
funciona como un DAC USB, lo que permite reproducir
los archivos de música guardados en el PC a través de un
amplificador conectado a esta unidad.
■ Sistemas operativos compatibles
La conexión USB de esta unidad está pensada para los PC
que funcionan con los siguientes sistemas operativos:
Windows: Windows Vista (SP2, 32 bits/64 bits)/
Windows 7 (32 bits/64 bits)/
Windows 8 (32 bits/64 bits)
Mac: OS X 10.5.8/10.6.8/10.7.x/10.8.x
• No se puede garantizar su funcionamiento con otros sistemas
operativos.
• Es posible que no puedan llevarse a cabo las operaciones
deseadas aunque utilice los sistemas operativos indicados
arriba, en función de la configuración o el entorno del PC.
• Es posible que las operaciones no se ejecuten correctamente si
conecta el PC a esta unidad antes de instalar el driver.
■ Instalación del driver propio
Antes de conectar un PC a esta unidad, instale el driver
propio en el PC.
1 Visite la URL indicada a continuación,
descargue el “Yamaha Steinberg USB Driver”
y, después, extraiga y ejecute el archivo.
2 Instale el “Yamaha Steinberg USB Driver”
descargado en el PC.
Para obtener más información, consulte la Guía de
instalación suministrada con el driver descargado.
3 Cuando haya terminado la instalación, salga
de todas las aplicaciones que tenga abiertas.
4 Seleccione “Yamaha CD Player” como
destino de salida de audio del ordenador.
Con un sistema operativo Windows:
Panel de control
→
Sonido
→
Pestaña [Reproducción]
Con un sistema operativo Mac:
Preferencias del Sistema → Sonido → Pestaña [Salida]
La configuración puede variar en función del sistema
operativo. Para obtener más información al respecto,
póngase en contacto con el fabricante del PC.
y
Las frecuencias de muestreo que pueden transmitirse son:
44,1 kHz/48 kHz/88,2 kHz/96 kHz/176,4 kHz/192 kHz
• Es posible que las operaciones no se ejecuten correctamente si
conecta el PC a esta unidad antes de instalar el driver.
• Si instala el driver en un ordenador con Windows XP, es posible
que la velocidad de funcionamiento del ordenador disminuya.
Si le sucede, reinicie el ordenador.
• El “Yamaha Steinberg USB Driver” está sujeto a cambios sin
previo aviso. Para obtener más información y conocer las
últimas novedades, consulte la página de descarga del driver.
Notas
DIGITAL IN
COAXIALOPTICALUSB
BALANCED OUT
Panel trasero del CD-S3000
Cable USB (tipo B)
PC
Sitio web para descargar el driver exclusivo
URL: http://download.yamaha.com/
Notas

23 Es
■ Reproducción de archivos de música
guardados en el PC
1 Conecte el PC a esta unidad con un cable
USB.
2 Encienda el PC.
3 Encienda esta unidad pulsando el interruptor
STANDBY/ON/OFF del panel delantero.
4 Seleccione “USB” con la tecla SOURCE de
esta unidad.
5 Seleccione “Yamaha CD Player” como
destino de salida de audio del PC.
Con un sistema operativo Windows:
Panel de control
→
Sonido
→
Pestaña [Reproducción]
Con un sistema operativo Mac:
Preferencias del Sistema → Sonido → Pestaña [Salida]
La configuración puede variar en función del sistema
operativo. Para obtener más información al respecto,
póngase en contacto con el fabricante del PC.
6 Inicie la reproducción de los archivos de
música del PC.
Cuando la unidad recibe las señales de música de un
PC, la frecuencia de muestreo del archivo
reproducido se indica en el visor de la unidad.
■ Ajuste del volumen del sonido
Para disfrutar de la máxima calidad de audio, ponga el
volumen de sonido del PC al máximo y suba
gradualmente el volumen del amplificador desde el
mínimo hasta el nivel deseado.
• No desconecte el cable USB, apague la unidad ni cambie la
entrada con la tecla SOURCE mientras esté reproduciendo
contenidos desde un PC conectado a través de un cable USB.
De lo contrario, pueden producirse problemas de
funcionamiento.
• Para silenciar los sonidos generados por las operaciones
realizadas en el PC durante la reproducción de música, cambie
la configuración desde el PC.
• Si los archivos de música no se reproducen correctamente,
reinicie el ordenador y repita los pasos indicados antes.
• Los archivos de música guardados en un PC no pueden
controlarse desde esta unidad ni con el mando a distancia de
esta unidad. Debe controlarlos desde el PC.
Notas
Español

24 Es

Especificaciones
En esta sección encontrará las especificaciones técnicas del CD-S3000.

26 Es
Especificaciones
SECCIÓN DE AUDIO
• Respuesta de frecuencia (1 kHz, 0 dB)
SA-CD ....................................................... 2 Hz a 50 kHz (–3 dB)
CD ............................................................................ 2 Hz a 20 kHz
• Intervalo de frecuencias de reproducción .................. 2 Hz a 96 kHz
• Distorsión armónica (1 kHz, 0 dB)
SA-CD ................................................................ 0,002% o menos
CD ...................................................................... 0,002% o menos
• Relación señal a ruido (red IHF-A) (1 kHz, 0 dB)
SA-CD/CD .............................................................. 116 dB o más
• Gama dinámica (1 kHz, 0 dB)
SA-CD ..................................................................... 110 dB o más
CD ........................................................................... 100 dB o más
• Nivel de salida (1 kHz, 0 dB)
SA-CD/CD .................................................................. 2,0 ± 0,3 V
PROPIEDADES DE DIODO LÁSER
• Longitud de onda
SA-CD ............................................................................... 655 nm
CD ..................................................................................... 790 nm
• Potencia de salida
SA-CD ................................................................. 1,89 mW (máx.)
CD ....................................................................... 1,36 mW (máx.)
SECCIÓN DE ENTRADA/SALIDA
• Entrada digital (DITIGAL IN)
USB (tipo B) × 1 ..................................Compatible con USB 2.0
OPTICAL × 1
COAXIAL × 1
Frecuencias de muestreo de audio admitidas
.................................................... 44,1/48/88,2/96/176,4/192 kHz
Profundidad de palabras..........................................16 bits/24 bits
• Salida digital (DITIGAL OUT)
OPTICAL × 1
COAXIAL × 1
Frecuencias de muestreo de audio admitidas
.................................................... 44,1/48/88,2/96/176,4/192 kHz
Profundidad de palabras..........................................16 bits/24 bits
• Salida de audio
ANALOG OUT........................... No equilibrada × 2 canales (I/D)
BALANCED OUT........................... equilibrada × 2 canales (I/D)
• Entrada/salida remota
REMOTE IN
REMOTE OUT
• Conector del sistema
SYSTEM CONNECTOR
GENERALIDADES
• Alimentación
[Modelos de China, Corea, Asia, Australia, Reino Unido y Europa]
........................................................... CA 220 – 240 V, 50/60 Hz
[Modelos de EE.UU., Canadá y Taiwán]
........................................................... CA 110 – 120 V, 50/60 Hz
• Consumo de energía ................................................................ 30 W
• Consumo de energía en reposo (datos de referencia) ...............0,3 W
• Dimensiones (An. × Al. × Prof.) .................... 435 × 142 × 440 mm
• Peso ...................................................................................... 19,2 kg
* Las especificaciones están sujetas a cambios sin previo aviso.
Cuidados de esta unidad
Acabado pulido de los paneles laterales
Se recomienda utilizar un paño Unicon de Yamaha (de
venta por separado). En el caso de suciedad
persistente, utilice el paño Unicon para Piano de
Yamaha (de venta por separado). Para adquirir estos
productos, póngase en contacto con el centro de
servicio o distribuidor Yamaha autorizado más
cercano.
Otros acabados
Cuando limpie esta unidad no use disolventes
químicos (alcohol, diluyente de pintura, etc.), ya que
pueden dañar el acabado. Use un paño limpio y seco.
Para la suciedad difícil de limpiar, moje un paño
blando en detergente diluido en agua, escúrralo y luego
páselo por la unidad para limpiarla.

27 Es
Formato de disco reproducible
■ Tipos de discos compatibles
Esta unidad ha sido diseñada para reproducir discos
compactos que tienen las marcas mostradas abajo. No
intente nunca introducir ningún otro tipo de disco en esta
unidad. Esta unidad también puede reproducir discos
compactos de 8 cm.
Super Audio CD
Este formato de audio se basa en las normas de CD
actuales, pero incluye más información y proporciona un
sonido de calidad más alta. Hay tres tipos de discos: discos
de capa única, de capa doble e híbridos. El disco híbrido
se puede reproducir en los reproductores CD existentes,
así como también en reproductores Super Audio CD, ya
que contiene información de CD de audio estándar y
Super Audio CD.
Esta unidad no muestra datos de texto en el visor del panel
delantero.
Discos compactos (audio digital)
Los discos más populares de venta en comercios de discos
CD.
Discos de audio digital CD-R y CD-RW
CD de música creados copiando en discos CD-R o CD-
RW (con archivos en formato MP3 o WMA).
• Asegúrese de usar un disco CD-R o CD-RW de un fabricante
fiable.
• Asegúrese de usar un disco CD-R o CD-RW que tenga al menos
una de las frases siguientes en el disco o en su caja.
– FOR CONSUMER
– FOR CONSUMER USE
– FOR MUSIC USE ONLY
• Asegúrese de usar un disco CD-R o CD-RW finalizado.
Discos CD-TEXT
Los discos grabados con datos de texto tales como títulos
de álbumes, títulos de pistas y nombres de artistas. Estos
discos se pueden reproducir con reproductores de CD
convencionales.
Esta unidad no muestra datos de texto en el visor del panel
delantero.
Nota
1
2
3
Tipo de disco Super Audio CD
Disco de una capa
Capa HD
Disco de dos capas
Disco de capa híbrida
Capa HD
Capa CD
Capa HD
Disco Super Audio CD híbrido
Capa de CD que se puede
reproducir en cualquier
reproductor de CD
- DSD estéreo de alta calidad
- DSD multicanal de alta calidad
Contiene capa de alta densidad:
Notas
Nota
NOTA:
Es posible que esta unidad no pueda reproducir algunos
discos CD-RW o discos que estén grabados correctamente.
Para evitar fallos en esta unidad:
• No use discos de formas extrañas
(forma de corazón, etc.) de venta en el
mercado porque podrían dañar esta
unidad.
• No utilice un disco con cinta,
pegatinas o pegamento pegados en él.
Tal disco podrá quedar atascado en
esta unidad o podrá dañarla.
Español

28 Es
Formato de disco reproducible
■ Acerca de los discos MP3 y WMA
Puede reproducir archivos MP3 y WMA grabados en un
CD-R o CD-RW de forma similar a como reproduce un
CD de música.
MP3
MP3 (MPEG-1 Audio Layer-3) es un formato y una
tecnología estándar para comprimir secuencias de audio
en archivos de pequeño tamaño. Sin embargo, el nivel
original de calidad de sonido se mantiene durante la
reproducción.
• Esta unidad reproduce los archivos MP3 en orden alfanumérico.
• Se reconocen hasta 648 carpetas y archivos (combinados) y
hasta 299 carpetas; sin embargo, algunas carpetas y archivos
pueden no ser reconocidos según la estructura de sus
directorios.
• Dependiendo de las condiciones de grabación, tales como el
ajuste del software de grabación, esta unidad tal vez no pueda
reproducir el disco o archivos en el orden en que fueron
grabados.
• Esta unidad es compatible con una frecuencia de muestreo de
44,1 kHz.
• Esta unidad es compatible con velocidades de bits de 32, 40, 48,
56, 64, 80, 96, 112, 128, 160, 192, 224, 256, o 320 kbps. No es
compatible con velocidades de bits variables.
• El disco debe ser compatible con ISO9660.
• Los datos de texto de los archivos no se visualizan en esta
unidad.
WMA
WMA (Windows Media Audio) es un formato de archivo
de Microsoft para codificar archivos de audio digital
similar a MP3, aunque WMA puede comprimir archivos a
una velocidad superior a MP3.
• Esta unidad reproduce los archivos WMA en orden
alfanumérico.
• Se reconocen hasta 648 carpetas y archivos (combinados) y
hasta 299 carpetas; sin embargo, algunas carpetas y archivos
pueden no ser reconocidos según la estructura de sus
directorios.
• Esta unidad es compatible con una frecuencia de muestreo de
44,1 kHz.
• Esta unidad es compatible con velocidades de bits de 48, 64, 80,
96, 128, 160, o 192 kbps. No es compatible con velocidades de
bits variables.
• El disco debe ser compatible con ISO9660.
• Los archivos WMA con protección de derechos de autor no se
pueden reproducir con esta unidad.
• Los datos de texto de los archivos no se visualizan en esta
unidad.
■ Manipulación de los discos compactos
• Manipule siempre los discos con cuidado para no rayar
su superficie.
• Los discos compactos raramente se desgastan durante
la reproducción, pero los daños en las superficies
causados al manejar los discos pueden afectar a la
reproducción de los mismos.
• Asegúrese de usar un marcador de fieltro o algo similar
cuando escriba en el lado de la etiqueta de un disco. No
use bolígrafos, lapiceros u otros utensilios de escritura
duros porque podrá dañar el disco y afectar a su
reproducción.
• No deforme los discos.
• Cuando no esté usando un disco, retírelo de la unidad y
guárdelo en una caja apropiada.
• Cuando retire o guarde un disco, tenga cuidado para no
rayar la superficie de reproducción.
• A los discos compactos no les afectan las partículas
pequeñas de polvo ni las huellas dactilares en su
superficie de reproducción, pero de todos modos
deberán mantenerse limpios. Limpie la superficie del
disco con un paño limpio y seco. No limpie la
superficie del disco con un movimiento circular;
mueva el paño en línea recta del exterior hacia el
centro.
• No intente limpiar la superficie del disco con ningún
tipo de limpiador de discos, aerosoles de discos de
vinilo, aerosoles o líquidos antiestáticos o cualquier
otro líquido con base química porque la superficie del
disco podría dañarse irreparablemente.
• No exponga los discos a la luz solar directa, a altas
temperaturas ni a niveles de humedad elevados durante
mucho tiempo porque estas condiciones podrían
deformar o dañar el disco.
• Para reproducir un disco compacto de 8 cm, póngalo en
el hueco interior de la bandeja del disco. No ponga un
CD normal de 12 cm encima de un CD de 8 cm.
Notas
Notas

29 Es
Solución de problemas
Consulte la tabla de abajo si esta unidad no funciona correctamente. Si el problema que tiene no está en esta lista o las
instrucciones no sirven de ayuda, apague esta unidad, desconecte el cable de alimentación y póngase en contacto con el
centro de servicio o distribuidor Yamaha autorizado más cercano.
Problema Causa Remedio
Vea la
página
La unidad no se
enciende al pulsar
STANDBY/ON/OFF
hacia arriba.
No se ha enchufado el cable de alimentación o
está mal conectado.
Enchufe bien el cable de alimentación.
20
Esta unidad pasa
automáticamente al
modo STANDBY.
La función de espera automática se activa. Si no se utiliza esta unidad durante 30 minutos
y no se detecta señal de audio, pasa
automáticamente al modo STANDBY.
6
No se cierra
completamente la
bandeja.
Hay materias extrañas atrapadas en la bandeja. Inspeccione la bandeja del disco y limpie las
materias extrañas.
—
No comienza a
reproducir.
El disco está dañado. Inspeccione cuidadosamente el disco; coloque
otro si está dañado.
—
Hay humedad condensada en el lector de rayos
láser.
Espere 20 a 30 minutos después de conectar el
aparato antes de reproducir el disco.
—
Se ha colocado el disco al revés. Vuelva a colocar el disco con la etiqueta hacia
arriba.
—
El disco está sucio. Limpie el disco.
28
Los formatos MP3 o WMA no son compatibles
con esta unidad.
Cambie el disco por otro disco grabado
correctamente y que pueda reproducirse en este
aparato.
28
El disco CD-RW (regrabable) no está bien
grabado.
Cambie el disco por otro disco grabado
correctamente y que pueda reproducirse en este
aparato.
27
El disco es un disco no normal, que no puede
reproducirse en este aparato.
Cambie el disco por otro disco grabado
correctamente y que pueda reproducirse en este
aparato.
27
Hay un retraso en la
reproducción o
comienza en otro
lugar.
El disco puede estar rayado o dañado. Inspeccione cuidadosamente el disco; coloque
otro si está dañado.
28
No se escucha ningún
sonido.
Las conexiones de los cables de salida están mal. Conecte correctamente los cables. Si sigue
habiendo problemas, los cables están en mal
estado.
18
El amplificador funciona mal. Coloque los controles del amplificador en la
posición de entrada correcta.
—
No se reproduce el
sonido del
componente
conectado a los jacks
de entrada digital.
La unidad se encuentra en el modo PURE
DIRECT.
Apague el modo PURE DIRECT.
7
Se está reproduciendo la capa Super Audio CD. Cambie la capa reproducida.
7
El sonido salta. Esta unidad recibe vibraciones o impactos. Coloque este aparato en otro lugar.
—
El disco está sucio. Limpie el disco.
28
El reloj de la señal de audio reproducida fluctúa. Cambie el ancho de banda DPLL del DAC de
audio (ES9018).
14
Español

30 Es
Solución de problemas
■ Conexión USB
Problema Causa Remedio
Vea la
página
Se oye un zumbido. Las conexiones de los cables están mal. Conecte firmemente los cables de audio. Si
sigue habiendo problemas, los cables están en
mal estado.
18
Ruidos de un
sintonizador en las
cercanías.
El sintonizador está demasiado cerca de este
aparato.
Separe el sintonizador y este aparato.
—
Ruidos desde la
bandeja.
El disco puede estar doblado. Cambie el disco.
28
No se reproduce el
sonido del
componente
conectado al jack
DIGITAL IN (OPTICAL
o COAXIAL).
No ha seleccionado “PCM” como fuente de
audio de salida en el componente conectado.
Solo las fuentes de audio PCM pueden
reproducirse a través de los jacks DIGITAL IN
(OPTICAL/COAXIAL) de esta unidad.
Seleccione “PCM” como fuente de audio de
salida del componente conectado.
—
El mando a distancia
no transmite bien las
señales.
Las pilas del mando a distancia están con poca
carga.
Cambie las pilas por otras nuevas.
16
El mando a distancia está demasiado alejado o se
inclina demasiado.
Úselo a una distancia máxima de 6 m y dentro
de un radio de 60°.
9
El detector del mando a distancia de este aparato
recibe los rayos del sol o una luz intensa (de una
lámpara fluorescente concentrada, etc.).
Cambie la posición de esta unidad.
9
Problema Causa Remedio
Vea la
página
El PC conectado no
reconoce esta unidad.
El sistema operativo del PC no es compatible
con esta unidad.
Utilice un PC con un sistema operativo
compatible.
22
La conexión del cable USB está mal. Conecte correctamente el cable USB.
19, 22
La salida del PC o la aplicación está silenciada. Active el sonido del PC o la aplicación.
—
Se oyen sonidos
durante la
reproducción.
Ha abierto otra aplicación en el PC mientras se
está reproduciendo un archivo de música.
Si abre otra aplicación mientras se está
reproduciendo un archivo de música, es
posible que el sonido se pierda temporalmente
o que oiga un ruido.
No abra otras aplicaciones durante la
reproducción.
—
No pueden
reproducirse archivos
de música.
Los archivos de música no se reproducen
correctamente porque ha conectado esta unidad
al PC o ha seleccionado la entrada “USB” de esta
unidad con la aplicación de música abierta en el
PC.
Conecte esta unidad al PC o seleccione la
entrada “USB” de esta unidad antes de abrir la
aplicación. Después, abra la aplicación de
música e inicie la reproducción.
23
El “Yamaha Steinberg USB Driver” propio no se
ha instalado correctamente.
Vuelva a instalar el “Yamaha Steinberg USB
Driver” siguiendo el procedimiento correcto.
22

31 Es
■ Mensajes de la pantalla de información
Mensaje Estado
NO DISC No hay ningún disco insertado en la bandeja.
Check Cable El “Yamaha Steinberg USB Driver” no se ha instalado correctamente. También es posible que la salida de audio
del ordenador no esté configurada en “Yamaha CD Player”.
Check PC No se reconoce la señal de audio del ordenador.
Fs: ----kHz No se reconoce ninguna señal de audio.
Español

LV
Printed in Malaysia ZK20420
© 2013 Yamaha Corporation
OWNER’S MANUAL
MANUAL DE INSTRUCCIONES
Compact Disc Player
-
 1
1
-
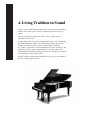 2
2
-
 3
3
-
 4
4
-
 5
5
-
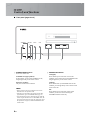 6
6
-
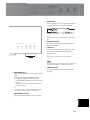 7
7
-
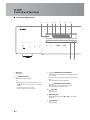 8
8
-
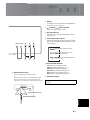 9
9
-
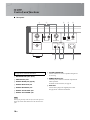 10
10
-
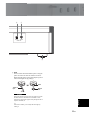 11
11
-
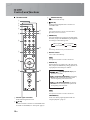 12
12
-
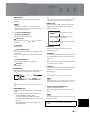 13
13
-
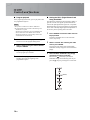 14
14
-
 15
15
-
 16
16
-
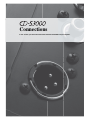 17
17
-
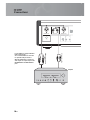 18
18
-
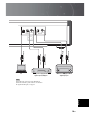 19
19
-
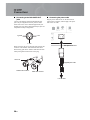 20
20
-
 21
21
-
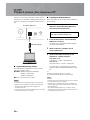 22
22
-
 23
23
-
 24
24
-
 25
25
-
 26
26
-
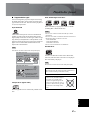 27
27
-
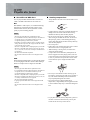 28
28
-
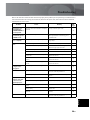 29
29
-
 30
30
-
 31
31
-
 32
32
-
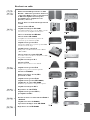 33
33
-
 34
34
-
 35
35
-
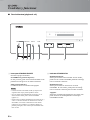 36
36
-
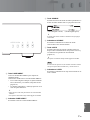 37
37
-
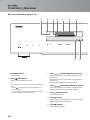 38
38
-
 39
39
-
 40
40
-
 41
41
-
 42
42
-
 43
43
-
 44
44
-
 45
45
-
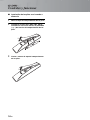 46
46
-
 47
47
-
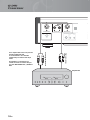 48
48
-
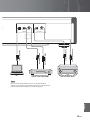 49
49
-
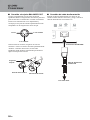 50
50
-
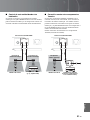 51
51
-
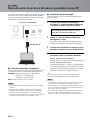 52
52
-
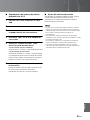 53
53
-
 54
54
-
 55
55
-
 56
56
-
 57
57
-
 58
58
-
 59
59
-
 60
60
-
 61
61
-
 62
62


Yamaha CD-S2100 El manual del propietario
- Categoría
- Reproductores de CD
- Tipo
- El manual del propietario
- Este manual también es adecuado para
en otros idiomas
- English: Yamaha CD-S2100 Owner's manual
Artículos relacionados
-
Yamaha CD-S2100 El manual del propietario
-
Yamaha CD-S3000 El manual del propietario
-
-
Yamaha CD-S1000 El manual del propietario
-
-
-
-
Yamaha RX-A3080 El manual del propietario
-
-
Yamaha CX-A5100 El manual del propietario