
English
Français
Español
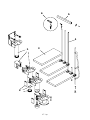
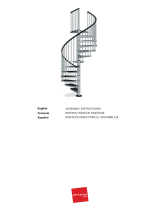
ASSEMBLY INSTRUCTIONS
INSTRUCTIONS DE MONTAGE
INSTRUCCIONES PARA EL ENSAMBLAJE

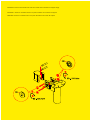
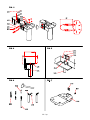
ATTENTION:inserttheflatwashersC20withtheknurledsurfacetowardsthesupportflange.
ATTENTION:insérerlesrondellesC20aveclapartiecréneléeversl'embasedusupport.
ATENCIÓN:introducirlaarandelaC20conlapartedentadahaciaelladodelsoporte.

3-kp

4
-kp
English
WARNING: Carry out the installation in a “workmanlike” manner, strictly following the installation instructions and using
suitable tools. Always consult your local building department for code requirements that must be respected depending
on its destination of use (private, secondary, public…).
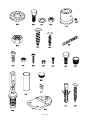
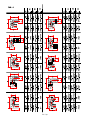
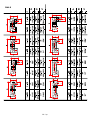
Inordertoproceedwiththeassembly,unpackallstaircomponentsandlaythemoutonasufcientlylargesurface.
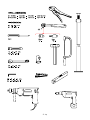
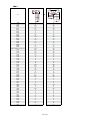
Checkallcomponentsforquantity,comparingwiththelistinTAB.1(A=Code,B=Quantity).
ForcustomersintheUSAthereisacustomerassistancenumber1-888STAIRKT,whichyoucantelephoneincase
ofproblems.
Assembly
1.
Measurecarefullytheoor-to-oorheight(H)(g.2).
2. CalculatetheheightoftheRise:
a) deduct20,5cm(8
1
/
16
”
)(heightoftherstrise)fromtheoor-to-oorheight(H);
b) dividetheresultbythenumberofrises-1(dividebythenumberoftreads,asthelastriseisgivenbythe
distancebetweenthelasttreadandthelandingoor).
Example(g.2):withaoor-to-oorheightof263cm(103
9
/
16
”
)andastaircasewith13rises(i.e.with12
treads):(263–20.5/13–1)(103
9
/
16
”
–8
1
/
16
”
/13–1)=20.21cm(7
31
/
32
”
).
3.
Measurecarefullytheceilingopening(C)(g.2).
4. CalculatethemeasureoftheGoing(P):
withtheversionofthestaircaseL=74(29
1
/
8
”
)(railingincluded)asing.2Athecalculationisthefollowing:
a) Deductfromthemeasure(C)oftheceilingopeningthefollowingsteadymeasures:
1) 29cm(11
13
/
32
”
)=depthofthelasttread;
2) 69cm(27
3
/
16
”
)=angletreads;
3) 1cm(
25
/
64
”
)=distancefromthewall.
b) Dividetheresultbythenumberoftheremainingtreads.
Example:withaceilingopeningmeasureof231cm(90
15
/
16
”
)andastaircaseasing.2A,thecalculationisthe
following:
231–29–69–1/6(90
15
/
16
”
–11
13
/
32
”
–27
3
/
16
”
–
25
/
64
”
/6)=22cm(8
21
/
32
”
)(=measureofthegoing).
WiththeversionofthestaircaseL=89(35
1
/
16
”
)(railingincluded)asing.2Bthecalculationisthefollowing:
a) Deductfromthemeasure(C)oftheceilingopeningthefollowingsteadymeasures:
1) 33cm(13
”
)=depthofthelasttread;
2) 84cm(33
1
/
16
”
)=angletreads;
3) 1cm(
25
/
64
”
)=distancefromthewall.
b) Dividetheresultbythenumberoftheremainingtreads.
Example:withaceilingopeningmeasureof262cm(103
1
/
8
”
)andastaircaseasing.2B,thecalculationisthe
following:
262–33–84–1/6(103
1
/
8
”
–13
”
–33
1
/
16
”
–
25
/
64
”
/6)=24cm(9
7
/
16
”
)(=measureofthegoing).
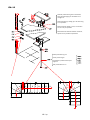
5. Todetermineeasilythedrillingpointontheceiling,youcantwiththecrewC53,thetreadL25ontothesupport
N20withouttighteningitdenitively.Inthismanneritwillbeeasytosignthedrillingpointsinlinewiththeholes
intheplateofthenalsupport.DrillwithbitØ18mm(
45
/
64
”
)(g.4)(g.5).TightenthenalsupportN20onthe
ceilingwiththearticlesC48checkingthehorizontallineofthestair.
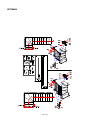
6. Preparethetie-rodsC22insertingtheatwashersC20withtheknurledsurfacetowardsthesupportangeand
thenutsB99.FittheelementsN24tothesupportsN21,N22(g.3).Insert,withouttightening,thescrews
B07,B06andB23.InsertthetubesC21intotheinternalpartoftheelementsN24;thetie-rodsC22;theat
washersC20withtheknurledsurfacetowardsthesupportangeandthenutsB99.Setthemeasureofthe
going(P):forthestraighttreadsthemeasure(P)islikecalculatedbefore(seepoint4).
Fortheangletreadsthegoinghasameasure(P)of:
20cm(7
7
/
8
”
)(g.2A)fortheversionwiththetreadwidth(railingincluded)L=74(29
1
/
8
”
).
24cm(9
7
/
16
”
)(g.2B)fortheversionwiththetreadwidth(railingincluded)L=89(35
1
/
16
”
).
FastendenitivelythecrewsB07,B06andB23.ProceedwiththeassemblyofallthesupportsN21.Screwthe
tubewiththethreadedtie-rodN25tothesupport2ndriseN22untiltheend.
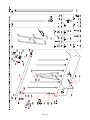
7. InsertthearticlesC13andB02intotheelementsF23.FittheelementsF23withthearticlesC57onlevelwith
theforeedgeofthetreadsL25upsidedown(onthesidewiththeholes).DrillwithbitØ4.5mm(
11
/
64
”
)toa
depthof30mm(1
3
/
16
”
)(g.1)(g.7).
8. FitthetreadL25tothesupportN20withthescrewsC53.Checkthehorizontallineofthetreadandtighten
denitivelythearticlesC48.PutonthearticleD34tocoverthebracketwiththehelpoftheelementsB12and
C62,drillingwithbitØ8mm(
5
/
16
”
)(g.4)(g.5).
9. FitanintermediatesupportN21intothenalsupportN20.Fastenitbelowbymeansofaself-blockingclamp
beforetightening.AssemblethetreadbyusingthescrewsC53.(Asyouproceedwiththeassemblyofsupports
andtreads,itisnecessarytoprop-upthesupportswithamechanicalsteelprop,sothattheceilingwillnothave
tobeartoomuchweight).Itisnecessarytoputapieceofwoodunderevery4to5supportsanditisstrictly

5
-kp
forbidden,forsafetyreasons,togetonthestairbeforehavingxedittotheoor(point13)andstrengthenit
(point14).Adjusttheheightoftherisethatyouhavecalculatedinpoint2;checkthehorizontalpositionofthe
treadandthealignmentwiththetreadprevioustread.TightennallythepiecesB99bybothsideofthesupport,
inordertoavoidthatthetreadistobemodiedinitstrim(horizontalityandverticality).Proceedinthesameway
withtheassemblyoftheremainingintermediatesupportsN21.Ontheangletreads(seeg.8)itisnecessary
tocarryoutthedrillingsforconnectionwiththesupportingelement,accordingtothechosenwindingdirection
(drillwithdrillingbitØ8,5mm(
21
/
64
”
)foradepthof30mm(1
3
/
16
”
).
10.
(seeg.9)–FittheelementsF23ontotheinternalsideoftheangletreadsL26,L27,L28byusingthe
elementsC57(drillwithdrillingbitØ4.5mm(
11
/
64
”
)foradepthof30mm(1
3
/
16
”
).Todeterminetheposition,
useabalusterC03(H1190mm-46
7
/
8
”
)asaverticalguidereference.
11.Insertthesecond-lastsupportN22(withthetwoarticlesN24whicharealreadyinsertedin)intothesupport
N21.AssemblethetreadswiththescrewsC53.Setuptherisewhichhadbeencalculatedbefore(lookatpoint2).
UnscrewthearticleN25untiltheoor.InsertthesupportN23andassembleittothearticleN24.Fixthetread.
ControlthehorizontalandverticallineofthetreadbeforeandtightendenitivelythearticlesB99.
12.Checkforverticalpositionofthewholestaircaseand,ifnecessary,adjustbyshiftingthesupportN23.
13.Disassemblethersttreadandmarktheholesontheoor.DrilltheoorwithbitØ14mm(
35
/
64
”
)inaccordance
withtheholeswhichareonthesupportN23.InserttheplugsC47andtightendenitively(g.1).
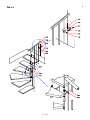
14.(seeg.15)–Reinforcethestaircaseonthefollowingplaces:
a)atanintermediatelevelofthestaircasepositionthepoleG08totheoor,byusingthearticlesD31,C35etB20.
b) connectthestaircasetothewallbyusingtheelementF12togetherwiththearticlesB13(drillwithdrillingbit
Ø 14mm(
35
/
64
”
)andthescrewsC57(drillwithdrillingbitØ4.5mm(
11
/
64
”
)strictlyintheshowenpoints.Cover
withtheelementB95.
Assembly of the railing
15.
(seeg.6)–FittheelementsB65,C59,C54intothebalustersC03(H1190mm-46
7
/
8
”
)byusingthetube
B68tohammerin.
16.AssembletheelementsF23ontothestraighttreadsusingtheuprightC03(H1190mm-46
7
/
8
”
)todetermine
theidealposition(theuseofaspirit-levelisadvised).MarktheholesinaccordanceoftheelementF23.Drill
withbitØ4.5mm(
11
/
64
”
)withadepthof30mm(1
3
/
16
”
).
17.
InserttheconnectingbalustersC03(H1190mm-46
7
/
8
”
)betweenthetreads.Positionthebalustersinaway,
thattheholesofthexingelementB65beturnedupwardsasing.6.TightentheelementsB02tothearticle
F23.
18.TakethedistancebetweenthethreeangletreadsandcutonmeasureanuprightC03(H1190mm-46
7
/
8
”
).
Connectafterwardswiththehelpofthisuprightpiecethethreeangletreads(g.9).
19.Fitontheoor,inaccordancewiththerstupright(C03,H1190mm-46
7
/
8
”
),theelementF01,drillingwithbit
Ø 8mm(
5
/
16
”
).UsetheelementsC58,B12andB02(g.1).AssemblethereinforcingelementF07attherst
upright.
Payattention:therstuprightmustbecutconsideringtheheightoftheotheruprights.
20.CustomcutthehandrailsegmentsA11(g.10);assemblythemwitharticleB51(g.11).Inordertoobtaina
perfecttting,thehandrailmustdoaboutan1/8rotationfromthecontactpoint,tothealignmentpointofthe
lowerslots(g.12);ifthatdoesnothappen,turnenoughthethreadelementofthehandrail,screwingit,with
elementsB89andB35(g.13).FixtheelementA09witharticleC43(g.1).
21.Connectthehandrailtothebalusters,bymeansofthearticleB49.Checktheverticalpositionofthebalusters.
22.PositiontheelementF23inthemiddleofthetwouprightsC03(H1190mm).Cuttheuprightsofthemiddle
C03(H1190mm-46
7
/
8
”
)intheheightconsideringtherestofthestairrailing.Cuttheintermediatebalusters
C03(H1190mm-46
7
/
8
”
)toalengththathastobemeasuredontherailing.
23.InserttheintermediatebalustersC03(H1190mm-46
7
/
8
”
).Positionthebalustersinaway,thattheholesof
thexingelementB65beturnedupwardsasinFIG.14.TightenthearticlesB02.
24.ConnectthebalusterstothehandrailbymeansofthescrewsB49.Checktheverticalpositionofthebalusters.
25.(seeg.14)–Inordertoreinforcetherailingitisnecessarytousethefollowingelements:
a) –seedrawingg.14,below–connecttogethertwobalustersbyusingtheelementsF08,C49,C50anda
pieceoftubeC03(H1190mm-46
7
/
8
”
).
b) –seedrawingg.14above–connectabalustertothewallbymeansofthearticleF09togetherwiththe
piecesF08.DrillwithdrillingbitØ8mm(
5
/
16
”
)andusethearticlesC49,C50,C58,B12.
26.(seeg.14)CompletetheassemblyoftherailingbyttingthepiecesB82tothebottomofthebalusters.
27.(seeg.1)–FitontothesupportingelementsthelowerclosinglidsD27,D28,D29.
28.(seeg.1)–FitontothesupportingelementsthelateralclosinglidsD30,proceedingasfollows:
a) –hookthebacksideofthelidontothecurvedsideofthesupport.
b) –pressthelidtothemetalsheet,untilthetwoelastichooksspringintotheholes.
www.
arkestairs.com

6-kp
Français
ATTENTION : Effectuer l’installation dans les règles de l’art en utilisant des outils appropriés ; suivre scrupuleusement les
instructions de montage. Pour réaliser un montage conforme aux normes en vigueur, il faut s’informer avant l’installation
quant aux réglementations locales et nationales à respecter, en fonction du domaine d’utilisation (résidence privée
principale, secondaire, bureaux, magasins,…).
Avantdeprocéderàl’assemblage,déballertouslesélémentsdel’escalieretlesdistribuersurunesurface
sufsammentlarge.Vérierlaquantitédeséléments(TAB.1:A=CodesArticles,B=Quantité).
Assemblage
1. Mesurersoigneusementlahauteurdesolàsolni(H)(g.2).
2. Calculerlahauteurdelamarche:
a) déduire20.5cms(hauteurdelapremièremarche)delavaleurdelahauteursol-à-sol(H);
b) diviserlerésultatparlenombredeshauteursdesmarchesmoinune(c’est-à-dire:diviserparlenombredes
marches,carladernièreHauteurdeMarcheestladistanceentreladernièremarcheetlesold’arrivée).
Exemple(g.2):pourunehauteursol-à-solàmonterde263cmsetunescalieravec13hauteursdemarches
(c’est-à-dire,avec12marches),lecalculàfaireestlesuivant:(263–20.5/13–1)=20.21cms.
3. Mesurersoigneusementlatrémie(C)(g.2).
4. Calculerlamesuredugiron(P).
PourlaversionL = 74(garde-corpscompris)(g.2A):
a) déduiredelamesuredelavaleurdelatrémie(C)lessuivantesdimensionsxes:
1) 29cms=profondeurdeladernièremarche;2)69cms=marchesd’angle;3)1cm=distancedumur.
b) diviserleresultatparlenombredesmarchesrestantes.
Exemple:pourunetrémiede231cmsetunescaliercommeindiquéeng.2A,lecalculestlesuivant:
231–29–69–1/6=22cms(=mesuregiron)
PourlaversionL = 89(garde-corpscompris)(FIG.2B):
a) déduiredelamesuredelavaleurdelatrémie(C)lessuivantesdimensionsxes:
1) 33cms=profondeurdeladernièremarche;2)84cms=marchesd’angle;3)1cm=distancedumur.
b) Diviserleresultatparlenombredesmarchesrestantes.Exemple:pourunetrémiede262cmsetun
escaliercommeindiquéenFIG.2B,lecalculestlesuivant:
262–33–84–1/6=24cms.
5. Andesimplierladéterminationdupointdeperçagesurleplancher,onpeutmonter,aveclavisC53,la
marcheL25surlesupportN20sanslexerdénitivement.Decettemanièreilserafacilemarquerlespoints
deperçageencorrespondancedestrous.PerceravecavecunforetØ18mm(g.4)(g.5).Fixerlesupport
nalN20auplancheraveclesarticlesC48envériantl’horizontalitédel’escalier.
6. PréparerlestirantsC22enyinsérantlesrondellesC20entenantlecôtéraillétournéversl’embaseetles
écrousB99.AssemblerlesélémentsN24auxsupportsN21,N22(g.3).Aboucher,sansserrer,lesvisB07,
B06etB23.InsérerlestuyauxC21danslapartieintérieuredesélémentsN24;lestirantsC22;lesrondelles
C20entenantlecôtérailléversl’embaseetlesécrousB99.Etablirlegiron(P):Pourlesmarchesdroitesla
valeur(P)s’établitselonlecalculprécédent(voirpoint4).Pourlesmarchesbalancéeslavaleur(P)est:
20cm(g.2A)pourlaversionaveclalargeurdemarche(garde-corpscompris)L=74.
24cm(g.2B)pourlaversionaveclalargeurdemarche(garde-corpscompris)L=89.
SerrerdénitivementlesvisB07,B06etB23.Continueravecl’assemblagedetouslessupportsN21.Visserle
tuyauavecletirantletéN25ausupportdela2èmehauteurN22jusqu’aufond.
7. InsérerlesarticlesC13etB02danslesélémentsF23.FixerlesélémentsF23aveclesarticlesC57auniveau
dubordantérieurdesmarchesL25renversées(ducôtépercé).PerceravecunforetØ4.5mmjusqu’à30mm
deprofondeur(g.1)(g.7).
8. AssemblerlamarcheL25ausupportN20aveclesvisC53.Contrôlerl’horizontalitédelamarcheetserrer
dénitivementlesarticlesC48.Appliquerl’articleD34,pourcouvrirlaplaque,aveclesélémentsB12etC62,en
perçantavecunforetØ8mm.(g.4)(g.5).
9. InsérerunsupportintermédiaireN21danslesupportnalN20.Lebloquerdanslapartiebasseavecuneborne
auto-bloquanteavantdeserrer.AssemblerlamarcheaveclesvisC53.(Aufuretàmesurequel’onprocèdeà
l’assemblagedelastructureetdesmarches,ilfautétayerlessupports,defaçonqueleplanchersoitsoulagé
dupoidsdel’escalier).Ilestindispensabledeplacerunsoutientousles4/5supportsetilestformellement
interdit,pourdesraisonsdesécurité,demontersurl'escalieravantdel'avoirxéausol(point13)etstabilisé
(point14).
Réglerlahauteurdemarchecalculéeaupoint2;vérierlapositionhorizontaledelamarcheainsique
l’alignementaveclamarcheprécédente.SerrerdénitivementlespiècesB99,enagissantsurlesdeuxcôtésdu
supportenmêmetemps,and’éviterdemodierl’assiette(horizontalitéetverticalité)delamarche.
Procéderdelamêmefaçonavecl’assemblagedesautressupportsintermédiaresN21.Pourlesmarches

7-kp
d’angleilfautfairelesperçagesdeliaisonentrelamarcheetlesupport,d’aprèslesensderotationchoisi
(perceravecunforetØ8,5mmjusqu’àuneprofondeurde30mm(g.8).
10.(voirg.9)-FixerlespiècesF23danslapartieintérieuredesmarchesd’anglesL26,L27,L28aveclespièces
C57(perceravecunforetØ4.5mmjusqu’àuneprofondeurde30mm),enutilisantcommeréférenceune
balustreC03dugarde-corps.
11.Insérerl’avant-derniersupportN22(aveclesdeuxarticlesN24déjàinsérés)danslesupportN21.Assembler
lesmarchesaveclesvisC53.Etablirlahauteurcalculéeprécédemment(voirpoint2).Dévisserl’articleN25
jusqu’ausol.InsérerlesupportN23etl’assembleràl’articleN24.Monterlamarche.Contrôlerl’horizontalitéet
l’alignementaveclamarcheprécédenteetserrerdénitivementlesarticlesB99.
12.Vérierlapositionverticaledetoutl’escalieret,sinécessaire,corrigerendéplaçantlesupportN23.
13.Démonterlapremièremarcheetmarquerlestrousausol.PercerladalleavecunforetØ14mm,en
correspondancedestrousquisetrouventdanslesupportN23.InsérerlesgoujonsC47etserrerdénitivement
(g.1)
14.(voirg.15)-Renforcerl’escalierdanslesendroitssuivants:a)inséreràniveauintermédiairelepylôneG08au
solaveclesartivlesD31,C35etB20.–b)xeraumurl’escalierenutilisantl’élémentF12avecl’articleB13
(perceravecunforetØ14mm)etlesvisC57(perceravecunforetØ4.5mm)exclusivementdanslespoints
indiqués.Couvriravecl’élémentB95.
Assemblage du garde-corps
15.(voirg.6)-AssemblerlesélémentsB65,C59,C54auxcolonnettesC03enutilisantlapièceB68pourles
insérer.
16.AssemblerlesélémentsF23surlesmarchesdroitesenutilisantlacolonnetteC03andedéterminerla
positionidéale(nousconseillonsl’utilisationd’unenivelle).Marquerlestrousencorrespondanceavecl’élément
F23.PerceravecunforetØ4.5mmjusqu’àuneprofondeurde30mm.
17.InsérerlescolonnettesC03deliaisonentrelesmarches.Orienterlescolonnettesaveclestrousdel’élément
B65tournésverslehaut.SerrerlesélémentsB02àl’articleF23.
18.MesurerladistanceentrelestroismarchesbalancéesetcoupersurmesureunecolonnetteC03.Relieravec
cettepiècedecolonnette,lestroismarchesbalancées(g.9).
19.Fixersurlesol,encorrespondancedelapremièrecolonnette(C03),l’élémentF01,enperçantavecun
foretØ8mm.UtiliserlesélémentsC58,B12,B02(g.1).Assemblerl’élémentderenfortF07surlapremière
colonnette.
Attention :lapremièrecolonnettedoitêtrecoupéeparrapportàlahauteurdesautrescolonnettes.
20.CoupersurmesurelesmorceauxdemaincouranteA11(g.10);lesassembleraveclapièceB51(g.11).
Pourobtenirunetrèsbonnexation,lamaincourantedoitfaireenvirons1/8detouràpartirdupointdecontact
jusqu’aupointd’alignementdesstriesinférieures(g.12);sicelanedevaitpassevérier,tournerselon
nécessitél’élémentletédelamaincouranteenvissantaveclesélémentsB89etB35(g.13).Fixerl’élément
A09aveclapièceC43(g.1).
21.Fixerlamaincouranteauxcolonnettes(C03),avecl’articleB49;vérierlapositionverticalesdescolonnettes.
22.Positionnerl’élémentF23aumilieudesdeuxcolonnettesC03.CouperlescolonnettesintermédiairesC03àla
mêmehauteurdurestedugarde-corpsforméparlesautrescolonnettes.
23.InsérerlescolonnettesintermédiaresC03.Orienterlescolonnettesaveclestrousdel’élémentB65tournés
verslehaut(g.14).SerrerlesarticlesB02.
24.Fixerlescolonnettesàlamain-couranteaveclesvisB49.Vérierlapositionverticalesdescolonnettes.
25.(voirg.14)–Pourrenforcerlegarde-corpsilfaututiliserlesélémentssuivants:
a) voircroquisg.14–RelierlescolonnettesparlespiècesF08,C49,C50etunmorceaudetubeC03.
b) voircroquisg.14-xerunecolonnetteaumuravecl’articleF09,enutilisantlesarticlesF08.Perceravec
unforetØ8mmetutiliserlesarticlesC49,C50,C58,B12.
26.(voirg.14)Compléterl’assemblagedugarde-corps,eninsérantlespiècesB82danslapartieinférieuredes
colonnettes(C03).
27.(voirg.1)AppliquerauxsupportsdesmarcheslesélémentsdecouvertureinférieureD27,D28,D29.
28.AppliquerauxsupportsdesmarcheslesélémentsdecouverturelatéraleD30enprocédantdefaçonsuivante:
a) accrocherlapartiepostérieuredel’élémentD30àlatôleprolée.
b) porterlesélémentsD30àcontactedelatôle,jusqu’àfairedéclancherlesdeuxcrochetsélastiquesdansles
trouscarrès.
www.
arkestairs.com

8-kp
Español
CUIDADO: realizar la instalación "según las reglas del arte", utilizando herramientas adecuadas; seguir estrictamente
las instrucciones de montaje. Informarse antes de la instalación sobre los reglamentos locales y nacionales a respetar,
en función del destino de uso (privado principal, secundario, ocinas, tiendas…).
Antesdeempezarelensamblaje,desembalartodosloselementosdelaescalera.Situarlossobreunasupercie
ampliaycomprobarlacantidaddeloselementos(TAB.1:A=Código,B=Cantidad.Para"B"elegirlacolumnacon
elcódigoindicadoenlacajadelembalaje).
Ensamblaje
1. Medirconatenciónlaalturadepavimentoapavimento(H)(g.2).
2. Calcularelvalordelatabica:a)restar20,5cm(alturadelaprimeratabica)alvalorhalladodelaalturade
pavimentoapavimento(H);b)dividirestevalorporelnúmerodetabicasmenosuna.
a) Ejemplo:paraunaalturadepavimentoapavimentode263cmyunaescalerade13tabicas;
b) (263-20,5/13-1)=20.21cm(g.2).
3. Medirconcuidadoelhuecodelforjado(L)(g.2).
4. Calcularelvalordelahuella(P):
Paralaversiónconanchuradepeldaño(incluidalabarandillaL= 74(g.2A):
a) restaralvalortotaldelhuecoforjado(C)lassiguientesmedidasjas:
1) 29cm=peldañonal2)69cm=peldañosdeesquina3)1cm=distanciadesdelapared
b) Dividirestevalorporelnúmerodepeldañosrestantes.
Ejemplo:paraunhuecoforjadode231cmyunaescalerasegún(g.2A);
231-29-69-1/6=22cm.
Paralaversiónconanchuradepeldaño(incluidalabarandillaL= 89(g.2B):
a) restaralvalortotaldelhuecoforjado(C)lassiguientesmedidasjas:
1) 33cm=peldañonal2)84cm=peldañosdeesquina3)1cm=distanciadesdelapared
b) Dividirestevalorporelnúmerodepeldañosrestantes.
Ejemplo:paraunhuecoforjadode262cmyunaescalerasegún(g.2B);
262-33-84-1/6=24cm.
5. Paraqueseamássencilloeldeterminardondetaladrarelforjado,esaconsejablemontarconlostornillosC53,
elpeldañoL25sobreelsoporteN20sinjarlodenitivamente.Deestamaneraserámássencilloseñalarlos
puntosdondetaladrarencorrespondenciadelosojales.
Taladrarconbrocade18mm(dibujo4y5).FijarelsoportenalN20alforjadoconlosartículosC48vericando
losnivelesdelaescalera.
6. PrepararlostensoresC22introduciendolasarandelasC20conlaparteestriadahaciaelsoporteylastuercas
B99.EnsamblarloselementosN24alossoportesN21,N22(dibujo3).Montar,sinapretar,lostornillosB07,
B06yB23.IntroducirlostubosC21enelinteriordelelementoN24;lostensoresC22;lasarandelasC20con
laparteestriadahacialaestructuraylastuercasB99.Presentarelpeldaño(P):Paralospeldañosrectosel
valor(P)eselcalculadoanteriormente(verpunto4).Paralospeldañosdeesquinaelvalor(P)es:
20cm(dibujo2A)paralaversiónconanchodepeldaño(incluidalabarandilla)L=74
24cm(dibujo2A)paralaversiónconanchodepeldaño(incluidalabarandilla)L=89
ApretardenitivamentelostornillosB07,B06yB23.SeguirconelensamblajedetodoslossoportesN21.
AtornillarlabaseconlabarraroscadaN25al2ºsoporteN22hastaelnal.
7. MontarlosartículosC13yB02enloselementosF23.FijarloselementosF23conlosartículosC57enel
bordeanteriordelospeldañosL25bocaabajo(porelladotaladrado).Taladrarconbrocade4,5mmauna
profundidadde30mm.(dibujo1)(dibujo7)
8. EnsamblarelpeldañoL25alsoporteN20conlostornillosC53.Comprobarlosnivelesdepeldañoyapretar
denitivamentelosartículosC48.ColocarelartículoD34,paracubrirlaplaca,conloselementosB12yC62,
taladrandolaparedcon8mm(Dibujo4y5).
9. IntroducirelsoporteintermedioN21enelsoportenalN20.Sujetarloinferiormentecongatoantesdejarlo
denitivamente.EnsamblarelpeldañoconlostornillosC53;apuntalarlossoportesaliravanzandoenel
ensamblajedelaestructuraydelospeldaños,paraevitarqueelpesonocargueenelforjado.Esindispensable
utilizarunpuntalcada4/5soportesyquedaterminantementeprohibido,pormotivosdeseguridad,subirse
enlaescaleraantesdejarlaalsuelo(punto13)ycolocarlosrefuerzos(punto14).Presentarlaaltura
tabicacalculadaanteriormente(verpunto2);comprobarelnivelylaalineaciónconelpeldañoanterior,yjar
denitivamenteloselementosB99interviniendoalavezenlosdosladosdelsoporte,paraevitarlaposible
variación(horizontalovertical)delpeldaño.Seguiremosdeestemodoensamblandolosdemáspeldaños
intermediosN21.Paralospeldañosdeesquinaesnecesariorealizarlosoriciosdeuniónsegúnelsentidode
rotaciónelegido.TaladrarconbrocadeØ8,5mmconunaprofundidadde30mm(g.8).
10.FijarelelementoF23enlaparteinteriordelospeldañosdeesquinaL26,L27yL28conlosartículosC57

9-kp
(taladrarconbrocadeØ4,5mmconunaprofundidadde30mm)utilizandocomoreferenciaverticalunbarrote
C03(g.9).
11.IntroducirelpenúltimosoporteN22(conlosdosartículosN24yamontaos)enelsoporteN21.Ensamblar
lospeldañosconlostornillosC53.Presentarlatabicacalculadaanteriormente(verpunto2).Desenroscar
elartículoN25hastallegaralpavimento.IntroducirelsoporteN23ensamblarloalartículoN24.Montarel
peldaño.Comprobarlosnivelesylaalineaciónconelpeldañoanterioryapretardenitivamentelosartículos
B99.
12.Comprobarlaverticalidaddetodalaescaleray,sifueranecesario,corregirladesplazandoelelementoN23.
13.Desmontarelprimerpeldañoymarcarlosagujerosenelsuelo.Taladrarelpavimentoconbrocade14mm,
IntroducirlostacosC47yapretardenitivamente.(dibujo1).
14.Darlerigidezalaescaleraenlossiguientespuntos:a)montarenunaposiciónintermediaelpaloG08a
pavimentoconlosrelativoselementosD31,C35yB20.b)jaralaparedlaescalerautilizandoelelementoF12
conelelementoB13(taladrarconunabrocadeØ14)ylostornillosC57(taladrarconunabrocadeØ4,5mm).
CubrirconelelementoB95(g.15).
Ensamblaje de la barandilla
15.EnsamblarloselementosB65,C59,C54alosbarrotesC03utilizandoelelementoB68(g.6).
16.EnsamblarloselementosF23alospeldañosrectosutilizandolosbarrotesC03paradeterminarlaposición
ideal(seaconsejaelusodelnivel).MarcarlostaladrosdelelementoF23.Taladrarconbroca4,5mmauna
profundidadde30mm.
17.IntroducirelbarroteC03deuniónentrelospeldaños.OrientarelbarroteconelelementoB65conlaparte
taladradahaciaarriba.ApretarloselementosB02yelartículoF23.
18.MedirladistanciaentrelostrespeldañoscompensadosdeesquinaycortaramedidaunbarroteC03.Unir,con
estetrozodebarrote,lostrespeldañosdeesquina(dibujo9).
19.Fijaralasolería,encorrespondenciadelprimerbarrote(C03),elelementoF01,Taladrandoconunabroca
de8mm.UtilizarloselementosC58,B12,B02(dibujo.1).EnsamblarelelementoderefuerzoF07alprimer
barrote.
Atención:elprimerbarrotedebesercortadoenlabasealaalturadelosdemásbarrotes.
20.CortaramedidalasseccionesdepasamanosA11(dibujo10);ensamblarconelartículoB51(dibujo11).Para
obtenerunajaciónoptima,elpasamanosdeberealizarporlomenos1/8degirodesdeelpuntodecontacto,
hastaelpuntodealineacióndelacanaladoinferior(dibujo12);siestonoocurriera,girarlonecesarioel
elementoroscadodelpasamanos,atornillándolo,conelelementoB89yB35(dibujo13).FijarelelementoA09
conelarticuloC43(dibujo1).
21.Fijarelpasamanosalosbarrotes(C03),conloselementosB49.Mantenerlosbarrotesverticales.
22.ColocarelelementoF03enlamitadentrelosdosbarrotesC03.CortarlosbarrotesintermediosC03alaaltura
amedirenlamismaescalera.
23.IntroducirlosbarrotesintermediosC03.OrientandolosbarrotesconelelementoB65conlapartetaladrada
haciaarriba(g.14).ApretarloselementosB02.
24.Fijarlosbarrotesalpasamanos,conlostornillosB49.Mantenerlosbarrotesverticales.
25.Paradarrigidezalabarandillautilizarloselementos:a)UnirlosbarrotesconelelementoF08,C49,C50y
unapartedelelementoC03.b)jarelbarrotealaparedconelelementoF09,utilizandoloselementosF08.
TaladrarconunabrocadeØ8mmyutilizarloselementosC49,C50,C58,B12(g.14).
26.Completarelensamblajedelabarandilla,introduciendoloselementosB82enlaparteinferiordelosbarrotes
(C03)(g.14).
27.ColocarloselementosdeterminacióninferioresD27,D28yD29(g.1).
28.ColocarloselementosdeterminaciónlateralD30delasiguienteforma:
1) engancharlaparteposterioralachapacurvada.
2) llevarlosencontactodelachapahastaquesaltenlosdosganchoselásticosenlosoportunoshuecos
cuadrados.
www.arkestairs.com

10-kp
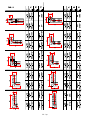
A
L
B
U
A09 6 6
A11 4 3
B02 34 30
B06 22 22
B07 22 22
B12 10 10
B13 2 2
B20 3 3
B23 22 22
B35 1 1
B49 40 30
B51 4 3
B65 20 15
B68 1 1
B82 20 15
B89 1 1
B95 4 4
B99 44 44
C03H1190mm(46⁄”)
20 15
C13 29 25
C20 44 44
C21 22 22
C22 22 22
C35 1 1
C43 6 6
C47 3 3
C48 2 2
C49 6 6
C50 6 6
C53 48 48
C54 20 15
C57 64 56
C58 8 8
C59 20 15
C62 2 2
D27 10 10
D28 11 11
D29 11 11
D30 22 22
D31 1 1
D34 1 1
F01 2 2
F07 1 1
F08 12 12
F09 2 2
F12 2 2
F23 29 25
G08 1 1
L25 9 6
L26 1 2
L27 1 2
L28
1 2
N20 1 1
N21 9 9
N22 1 1
N23 1 1
N24 11 11
X01 1 1
TAB 1
1
2
3
4
5
6
7
8
9
10
11
12
13
6
5
4
3
2
1
7
8
9
10
11
12
13

11-kp

12-kp
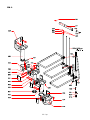
FIG. 1

13-kp
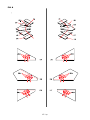
SI EHE UMFANG DER kOFI G URAT I O NE N
LO OK A T T HE CONF I GURAT I ON O VERAL L
SPACE
CO N S U LT E Z L ’E NCO M B RE M E NT DES
CO N F I G U R AT I ONS
VEDI INGOM B R O CONFIGUR AZIONI
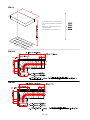
FIG. 2
FIG. 2A
FIG. 2B

14-kp
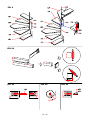
FIG. 3
FIG. 4
FIG. 5
FIG. 6
FIG. 7

15-kp
FIG. 8

16-kp
FIG. 9
FIG. 13FIG. 12
FIG. 10
FIG. 11

17-kp
FIG. 14

18-kp
FIG. 15
Seitlichepositionierungdurchmauerwerk,
wenndiebefestigungimfussbodennicht
moeglichist.
Sidepositioningbywallingupiftheoorxing
isnotpossible.
Positionnementlateralamurer,silaxation
ausoln'estpaspossible.
Posizionamentolateralemediantemuratura,
quandononèpossibileapavimento.
Siehepositionierungauf
Checkpositioningon
Considerez le positionnement par
rapport a
Vediposizionamentosu

19-kp
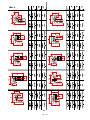
English
KITEXTERNALRAILING(composedof5balusters,handrailandfixings).Fromthefollowingdrawingitispossibletodeterminethe
necessarynumberofbalustersontheexternalsideofthestaircase,takingintoaccountthechoosenconfiguration(thebalustersare
representedbythefiguresanddotsvisibleontheexternalside)
Français
KITGARDE-CORPSEXTERIEUR(composéde5colonnettes,main-couranteetfixations).Dansleplanci-dessousilestpossibile
decompterlenombredecolonnettesnécessaires,surlecotéextérieurdel’escalier,enconsidérantlaconfigurationchoisie(les
colonnettessontreprésentésparleschiffresetparlespointssurlecotéextérieur)
Español
KITBARANDILLAEXTERIOR(compuestopor5barrotes,elpasamanosylasfijaciones).Elsiguientedibujonospermitesaberelnúmero
debarrotesnecesarios,enelladoexteriordelaescalera,segúnlaconfiguraciónelegida(losbarrotesestánrepresentadosporlos
númerosyporlospuntosenelladoexterior.

20-kp
OPTIONAL

21-kp
TAB. 2

22-kp
TAB. 3

23-kp
TAB. 4

24-kp
TAB. 5

25-kp

English
Français
Español
PRODUCT DETAILS
DONNÉESD’IDENTIFICATIONDUPRODUIT
DATOSDEIDENTIFICACIÓN

27-kp
6
5
4
3
1
2

28-kp
product details
trade name: KP
type:ightwithstraighttreads,fan-shapedramped
rotation
used materials
STRUCTURE
description
composed of metal supports (1) assembled to each
otherwithbolts
materials
metalsupports:Fe370
plastic covers (2):polypropyleneandABS
nishing
supports
:epoxypowdercoatedinfurnace
TREADS
description
straight,fan-shapedtreads(3) in solid beech assembled
tothestructurewithbolts
materials
beech
nishing
water-basecolour
water-baseundercoat
water-basenishing
RAILING
description
composedofverticalmetalbalusters(4)securedtothe
treads (3)andofawoodenhandrail(5)
materials
balusters:Fe370
handrail: solid beech
xings(6):nylon
nishing
balusters
: epoxypowdercoatedinfurnace
woodenhandrail:water-basecolour,polyurethane
undercoatandpolyurethanenishing
OBLIGATORY CLEANING AND MAINTENANCE
Clean the treads as soon as dirt spots and dust
deposits appear and at least every 6 months using
a soft cloth moistened with water and specic non-
abrasive and non-aggressive detergents. NEVER use
abrasive scourers. After cleaning, thoroughly dry the
surfaceswith amicrobre clothto removethehaloes
thatformbecauseofthelimestoneinthewater.
Approximately12monthsfromthedateofinstallation,
check tightness of the screws of the various
components. Should even the smallest malfunction
occur,itisobligatorytoimmediatelyandprofessionally
carryoutextraordinarymaintenance.
USE PRECAUTION
Avoid any improper use that is not in accordance
with the product. Possible violations or installations
whichdon’tcomplywiththeprovidersinstructionscan
invalidatetheagreedproductconformities.
EN)

29-kp
données d’identication du produit
denomination commerciale : KP
type:escalieràvoléeavecmarchesrectilignes,en
éventail et rotation des rampes
materiaux utilisés
STRUCTURE
description
comprenantdessupports(1)métalliquesassemblés
entreeuxpardesboulons
materiaux
supportsmétalliques:Fe370
cachesdefermeture(2) :polypropylèneet ABS
nition
supports:vernissageàchaudavecpoudresd'époxy
MARCHES
description
marches
(3) en hêtre massif, rectilignes, en éventail
assembléesàlastructurepardesboulons
materiaux
hêtre
nition
vernisàl’eau
mordantàl’eau
nitionàl’eau
GARDE-CORPS
description
composé de colonnettes
(4)verticalesenmétalxées
auxmarches(3)etparunemain-courante(5) en bois
materiaux
colonnettes:Fe370
main-courante:hêtre
xations(6) :nylon
nition
colonnettes:vernissageàchaudavecpoudresd'époxy
main-courante en bois : vernis à l’eau, mordant
polyuréthaniqueetnitionpolyuréthanique
NETTOYAGE ET MAINTENANCE OBLIGATOIRE
Nettoyer les marches dès que des taches de saleté
ou des dépôts de poussière apparaissent ; effectuer
égalementunnettoyagepériodique,tousles6mois,à
l’aided’unchiffondoux,humectéd’eauetdedétergents
spéciquesnonabrasifsetnon agressifs. NE JAMAIS
utiliser de la paille de fer abrasive. Après lavage,
nettoyeretessuyersoigneusementavecunchiffonen
microbre,and’éliminerlesauréolesprovoquéespar
lecalcairecontenudansl’eau.Environ12moisaprès
ladated’installation,contrôlerleserragedesvisdes
différentscomposants.Àlamoindredéfaillance,ilest
obligatoired’effectuerimmédiatementunemaintenance
corrective,danslesrèglesdel’art.
PRECAUTION D’UTILISATION
Eviter l’utilisation impropre et non conforme au
produit. D’éventuelles alterations ou installations
non correspondantes aux instructions du producteur
peuventinvaliderlesconformitéspréetabliesduproduit.
FR)

30-kp
datos de identicación del producto
denominacióncomercial:KP
tipología:escaleraabiertaconpeldañosrectilíneos,en
formadeabanicoyrotacióndelasrampas
materiales empleados
ESTRUCTURA
descripción
compuesta por soportes (1) metálicos ensamblados
entre sícon pernos
materiales
soportesmetálicos:Fe370
tapas embellecedoras (2):polipropilenoyABS
acabado
soportes
:barnizadoalhornoconpolvosepoxídicos
PELDAÑOS
descripción
peldaños(3)demaderamacizadehaya,rectilíneosy
enformadeabanico,ensambladosalaestructuracon
pernos
materiales
haya
acabado
barnizalagua
imprimaciónalagua
acabadoalagua
BARANDILLA
descripción
compuestaporbarrotes(4)verticalesdemetaljados
enlospeldaños(3)yporunpasamanos(5) de madera
materiales
barrotes:Fe370
pasamanos: haya
jaciones(6):nylon
acabado
barrotes:barnizadoalhornoconpolvosepoxídicos
pasamanos de madera: barniz al agua, imprimación
poliuretánicayacabadopoliuretánico
LIMPIEZA Y MANTENIMIENTO OBLIGATORIO
Realizar la limpieza de la escalera en cuanto aparezcan
manchas de suciedad y depósitos de polvo, y
periódicamente al menos cada 6 meses, con un paño
suavehumedecidoenaguaydetergentesespecícos no
abrasivos ni agresivos. NO utilizar nunca lanas abrasivas
o de hierro. Limpiar y secar bien después del lavado
utilizandounpañodemicrobraparaeliminarlasaureolas
decaldejadasporelagua.Transcurridosunos12meses
desdelafechadeinstalación,comprobarquelostornillos
quejanlasdistintaspartessiganbienapretados.Anteel
menordefectodefuncionamiento,esobligatoriorealizarun
mantenimientoextraordinariosegúnlasreglasdelarte.
PRECAUCIONES DE USO
Evitarusosimpropiosynoconformesconelproducto.
Eventuales manipulaciones o instalaciones que no
cumplan con las instrucciones del fabricante pueden
menoscabarlascualidadescerticadasenlaspruebas
deconformidadalasquepreviamentefuesometidoel
producto.
ES)

arkèbyFontanotS.p.A.
75 Jackson Street,
Suite 100
Newnan, GA 30263
tel.
770-683-7000
fax 770-683-7209
info@arkestairs.com
www.arkestairs.com
cod.065428000
KP
D.U.M
10/2017
www.arkestairs.com
www.arkestairs.com
-
 1
1
-
 2
2
-
 3
3
-
 4
4
-
 5
5
-
 6
6
-
 7
7
-
 8
8
-
 9
9
-
 10
10
-
 11
11
-
 12
12
-
 13
13
-
 14
14
-
 15
15
-
 16
16
-
 17
17
-
 18
18
-
 19
19
-
 20
20
-
 21
21
-
 22
22
-
 23
23
-
 24
24
-
 25
25
-
 26
26
-
 27
27
-
 28
28
-
 29
29
-
 30
30
-
 31
31


Arke K35017 Guía de instalación
- Tipo
- Guía de instalación
en otros idiomas
- français: Arke K35017 Guide d'installation
- italiano: Arke K35017 Guida d'installazione
- English: Arke K35017 Installation guide
Artículos relacionados
-
Arke K35001 Guía de instalación
-
Arke K50107 Guía de instalación
-
-
 Fontanot K03030 Guía de instalación
-
-
-
-
Arke K00035 Guía de instalación
-
-

Otros documentos
-
Everbilt 20334 Instrucciones de operación
-
-
-
Dolle 68300-2 Guía de instalación
-
-
-
Deckorators ADA-Compliant Handrail Guía de instalación
-
Paso C47/12-TW El manual del propietario
-