
Rev. B 1/12
12
7050ES
MODEL 7050
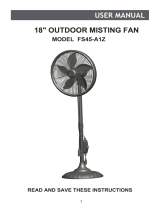
READ AND SAVE THESE INSTRUCTIONS
READ CAREFULLY BEFORE ATTEMPTING TO ASSEMBLE,
INSTALL, OPERATE OR MAINTAIN THE PRODUCT DESCRIBED.
PROTECT YOURSELF AND OTHERS BY OBSERVING ALL
SAFETY INFORMATION. FAILURE TO COMPLY WITH
INSTRUCTIONS COULD RESULT IN PERSONAL INJURY AND/OR
PROPERTY DAMAGE!
KEEP INSTRUCTIONS FOR FUTURE REFERENCE.
IMPORTANT INSTRUCTIONS -
OPERATING MANUAL
SAVE THESE INSTRUCTIONS
Rev. B 1/12
1
7050ES
This Fan is for commercial and residential use only.
It is not intended to be used in industrial or agricultural settings.
MODEL/MODELO 7050
NOTES/NOTAS
misto
™

Rev. B 1/12
2
7050ES
Rev. B 1/12
11
7050ES
GENERAL SAFETY INFORMATION
When using electrical appliances, basic precautions should always be followed to reduce the risk of
fire, electrical shock and injury to persons, including the following:
SAVE THESE INSTRUCTIONS
Read all instructions before using this Fan.
1. This fan is an outdoor product and is NOT intended for indoor use. Do not leave the misto fan unattended when it is plugged in.
2. Make certain the power source conforms to the electrical requirements of the Fan. Completely assemble the fan before connecting
to power source. Do not use the fan with any solid state speed control.
3. Use this Fan only as described in this manual. Any other use not recommended by the manufacturer may cause fire, electrical shock,
or injury to persons. Never place the fan where it may fall into a water reservoir such as a Pool or water container. Do not hang the
misto fan on a wall or ceiling or use in a window.
4. The misto fan should not be used as a toy. To reduce the risk of personal injury and electric shock, the Fan should not be played with or
placed where children can reach it.
5. Turn off the misto fan and unplug power cord before installing, servicing, or moving the Fan.
DO NOT DEPEND ON THE ON/OFF SWITCH AS THE SOLE MEANS OF DISCONNECTING POWER WHEN SERVICING OR MOVING THE FAN.
ALWAYS UNPLUG THE POWER CORD. ALWAYS TURN OFF AND UNPLUG FAN BEFORE LEAVING THE AREA. NEVER LEAVE CHILDREN
UNATTENDED WHEN THE FAN IS ON OR PLUGGED IN
.
6. This Fan must NOT be used in potentially dangerous locations such as flammable, explosive, chemical-laden or where gasoline,
paint or flammable liquids are used or stored.
7. CAUTION: Surfaces in the area of the fan may become slippery when wet.
REDUCE THE RISK OF FIRE OR ELECTRIC SHOCK - DO NOT USE THIS
FAN WITH ANY SOLID STATE SPEED CONTROL DEVICES.
8. NEVER operate any Fan with a damaged cord or plug or after the Fan malfunctions, has been dropped or damaged in any manner. This
GFCI plug does not protect against electrical shock due to contact with both circuit conductors or a fault in any wiring supplying this
device. Do not use an extension cord between the Fan GFCI cord and power outlet. Customer service is available at 800-233-0268,
Monday through Friday, 8am to 5pm to answer your questions.
9. DO NOT USE AN EXTENSION CORD WITH THIS FAN.
10. Prior to use, inspect for debris and/or insects.
11. NEVER insert or allow fingers or foreign objects to enter any ventilation or exhaust opening as it may cause an electric shock or fire,
or damage the Fan. To reduce the risk of fire, DO NOT block or tamper with the Fan in any manner while it is in operation.
12. Turn off water at the source before changing the nozzle.
13. Turn off water at the source after each use. Disconnect your garden hose from the valve adapter and drain unit to winterize.
14. Always place the Fan on a stable, flat, level surface when operating, to avoid the chance of the Fan overturning. Locate the Power
Cord so the Fan or other objects are not resting on it. Do not run cord under carpeting. Do not cover cord with throw rugs, runners,
or similar coverings. Do not route cord under furniture or appliances. Arrange cord away from traffic area and where it will not be
tripped over.
15. DO NOT use this Fan in close proximity to cooking grills, fire pits or other open flames.
16. The use of attachments not recommended or sold by the appliance manufacturer may cause hazards.
17. This Fan is not suitable for use in agricultural facilities including areas where livestock, poultry or other animals are confined. Please
refer to National Electric Code (NEC) Article 547-7 (2008), or applicable state or local codes or standards relating to electrical require-
ments for Agricultural Buildings. THIS FAN DOES NOT MEET THE REQUIREMENTS OF NEC ARTICLE 547-7 (2008).
18. This Fan is not suitable for use in hazardous locations. Please refer to National Electric Code (NEC) Article 500 or applicable state
OR LOCAL CODES OR STANDARDS RELATING TO ELECTRICAL REQUIREMENTS FOR HAZARDOUS LOCATIONS. THIS FAN DOES
NOT MEET THE REQUIREMENTS OF NEC ARTICLE 500 (2008).
The power cord is equipped with a three-prong, grounded GFCI (Ground Fault Circuit Interrupter) plug that must be inserted into a
grounded receptacle. Under no circumstances must the grounding prong be cut off the plug. WARNING: Do not use a three-prong
to two-prong adapter.Where a two-prong wall receptacle is encountered, it must be replaced with a properly grounded three-prong
receptacle installed in accordance with the National Electrical Code (NEC) and all applicable local codes and ordinances. This work
must be done only by a qualified electrician, using copper wire only. The GFCI Fan cord set can be plugged into an existing GFCI
outlet if present.
RISK OF ELECTRIC SHOCK. TEST GFCI PLUG BEFORE EACH USE.
1. PLUG GFCI INTO POWER OUTLET. INDICATOR LIGHT SHOULD TURN ON.
2. PRESS TEST BUTTON. INDICATOR LIGHT SHOULD TURN OFF.
3. PRESS AND RELEASE RESET BUTTON. INDICATOR LIGHT SHOULD TURN ON.
If above test fails, DO NOT USE THIS GFCI FAN. Call 800-233-0268, Mon - Fri, 8:00 a.m. and 5:00 p.m. Eastern
USE OF A THREE-PRONG TO TWO-PRONG ADAPTER IS NOT PERMITTED. IMPROPER CONNECTION MAY CREATE THE RISK OF
ELECTRICAL SHOCK. USE OF SUCH ADAPTERS IS NOT PERMITTED IN CANADA.
This plug is a safety feature. It contains a safety device (fuse) that should not be removed. Discard product if the attachment plug is
damaged. To reduce the risk of fire, electric shock and personal injury, DO NOT remove, replace, repair or tamper with the originally
supplied plug or GFCI. If the Fan does not function properly, it may be due to the safety device incorporated in this plug. Call
800-233-0268, Monday - Friday, between 8:00 a.m. and 5:00 p.m. Eastern. If the plug warning label is missing or damaged, call
the toll free number for a replacement label.
MODELO 7050
MANTENIMIENTO
Para reducir el riesgo de choque eléctrico e incendio, por favor obedezca las
siguientes instrucciones.
- Siempre desconecte el cable eléctrico antes de trasladar, reparar o limpiar.
- Limpie el Ventilador únicamente con una aspiradora equipada con un accesorio de cepillo; la aspiradora quitará
el polvillo y los desperdicios del interior del Ventilador.
- NUNCA intente desarma el Ventilador.
- Limpie el cuerpo del Ventilador únicamente con un trapo suave.
- NUNCA use ALCOHOL o SOLVENTES tales como gasolina, bencina, disolvente para pinturas u otros
limpiadores duros.
GARANTÍA LIMITADA DE LASKO PRODUCTS, INC.
(VÁLIDO EN EE.UU., SUS TERRITORIOS, Y CANADÁ ÚNICAMENTE)
QUÉ CUBRE ESTA GARANTÍAS: Este producto está garantizado contra defectos de mano de obra y/o materiales.
CUÁNTO DURA ESTA GARANTÍA: Esta garantía se extiende únicamente al comprador original del producto y dura un (1) año a partir de la fecha
original de compra o hasta que el comprador original del producto venda o transfiera el producto, cualesquiera de ambas que ocurriera en primer lugar.
QUÉ HARÁ LASKO: Durante el período de garantía, Lasko, a opción propia, reparará o reemplazará cualquier parte o partes que demuestren ser
defectuosas o reemplazará el producto completo por el mismo modelo u otro comparable.
QUÉ NO CUBRE ESTA GARANTÍA: Esta garantía no tiene validez si el producto fue dañado o falló debido a un accidente, manipulación u operación
inadecuadas, daño en el envío, abuso, mal uso, reparaciones no autorizadas hechas o el intento de hacerlas. Esta garantía no cubre los costos de
envío para la devolución de productos a Lasko para su reparación o reemplazo. Lasko abonará los cargos de envío de devolución a Lasko con
posterioridad a las reparaciones o el reemplazo bajo garantía.
CUALESQUIERA Y TODAS LAS GARANTÍAS, EXPLÍCITAS O IMPLÍCITAS (INCLUYENDO, SIN LIMITACIÓN, CUALESQUIERA GARANTÍA IMPLÍCITA
DE COMERCIABILIDAD), DURAN UN AÑO A PARTIR DE LA FECHA ORIGINAL DE COMPRA O HASTA QUE EL COMPRADOR ORIGINAL DEL
PRODUCTO VENDA O TRANSFIERA EL PRODUCTO, CUALESQUIERA DE AMBAS QUE OCURRIERA EN PRIMER LUGAR Y EN NINGÚN
CASO LA RESPONSABILIDAD DE LASKO BAJO CUALQUIER GARANTÍA EXPLÍCITA O IMPLÍCITA INCLUIRÁ (I) DAÑOS INCIDENTALES O POR
CONSECUENCIA POR CUALQUIER CAUSA QUE FUERE, O (II) REEMPLAZO O REPARACIÓN DE CUALESQUIERA FUSIBLES HOGAREÑOS,
CORTA-CIRCUITOS O TOMACORRIENTES. INDEPENDIENTEMENTE DE CUALQUIER DECLARACIÓN CONTRARIA, EN NINGÚN CASO
LA RESPONSABILIDAD DE LASKO BAJO CUALQUIER GARANTÍA EXPLÍCITA O IMPLÍCITA PODRÁ EXCEDER EL PRECIO DE COMPRA DEL
PRODUCTO Y DICHA RESPONSABILIDAD TERMINARÁ AL VENCIMIENTO DEL PERÍODO DE GARANTÍA.
Algunos estados y provincias no permiten limitaciones sobre la duración de una garantía implícita, o sobre la exclusión o limitación de los daños
incidentales o por consecuencia, por lo tanto dichas exclusiones o limitaciones podrían no aplicarse en su caso. Esta garantía le otorga a usted
derechos legales específicos. Usted también podría tener otros derechos que varían de estado en estado y de provincia en provincia.
Se requiere prueba de compra antes que se acepte un reclamo bajo garantía.
REPARACIONES: Para cualquier reparación, que no sea de mantenimiento general por parte del usuario, por favor contacte a nuestro
equipo de Servicio al Cliente al (800) 233-0268 de Lunes a Viernes de 8 a.m. a 5 p.m.
ALMACENAMIENTO: Almacene el Ventilador con estas instrucciones, en la caja original en un lugar fresco y seco.
SERVICIO AL CLIENTE:
Línea gratuita (800) 233-0268. Correo electrónico: pr[email protected]
Nuestro equipo de Servicio al Cliente está disponible para ayudarle con preguntas sobre productos, ubicaciones de los centros
de reparación y repuestos. Se puede comunicar con nuestro equipo de Servicio al Cliente de lunes a viernes, de 8 a.m. a 5 p.m.
hora del Este. Por favor tenga disponible el número de modelo, así como también el tipo y estilo
(ubicados en la parte inferior de su producto). Customer Service Dept., 820 Lincoln Ave., West Chester, PA 19380
(Por favor no envíe el producto a esta dirección) www.laskoproducts.com
El Manual imprimió en la China
MOLESTE PUNTAS que DISPARAN
Si su Ventilador falla de operar, ver abajo para de causa y solucione probable:
1. Esté seguro que la cuerda del poder se tapa en un trabajar salida eléctrica.
Si usted tiene un problema que no puede ser la resolución por los pasos listó arriba,el contacto Ayuda Técnica en 1-800-233-0268, el
lunes por el viernes, entre las horas de 8:00 de la mañana y 5:00 de la tarde. EST.

Rev. B 1/12
10
7050ES
Rev. B 1/12
3
7050ES
MODEL 7050
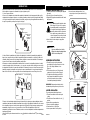
ASSEMBLY INSTRUCTIONS (Figure 1)
1. Carefully remove the Fan from the plastic bag and
the carton.
2. Place the Fan on a firm and level surface.
3. Plug the GFCI plug into a standard 120 volt AC outlet
with ground.
Be sure that the plug fits tightly into outlet.
When plugs fit loosely into receptacles,
they may slip partially or completely out of
the receptacle with only the slight move-
ment of the attached cord. Receptacles in
this condition may overheat and pose a
serious fire hazard; if covered by a curtain
or drape, the fire hazard is even greater.
4. Attach the hose valve adapter to any garden
hose or spigot.
If you use an Extension Cord, the
Extension Cord must be plugged into a
GFCI Protected Receptacle.
OPERATING INSTRUCTIONS
1. Turn the Fan on by selecting the desired
speed with the Power Knob on the side of the
Fan. 0-Off, 3-High, 2-Medium, 1-Low
(Figure 2)
2. Turn on water at the source. Turn the valve
adapter to the "Open" position. (Figure 3)
3. To adjust the vertical angle, push the Fan
body forward or backward to the desired
position. It is normal to hear a clicking
sound while performing this function.
IMPORTANT: Spray angle and droplet size is
determined by water pressure at your location.
LOUVER OSCILLATION:
To operate internal air directing Louvers:
1. Turn the Power Knob to the desired speed
setting.
2. Turn the Louver Power Switch to the On ( | )
position.
Louvers will stop operating when:
1. Power to the unit is unplugged.
2. Power knob is in 0 -Off position.
3. Louver power switch is in Off position.
Figure 1
Figure 2
Louver
Power Switch
Power Knob
To center Louvers in Air Flow:
1. Observe Louvers during operation. Once
centered, place Louver power switch in Off (0)
position.
Figure 3
Hose Valve
Adapter
Ventilador de nebulización misto
TM
para exteriores: Guía de cuidado y limpieza del colector de nebulización:
Si las boquillas se tapan por la contaminación, siga los siguientes pasos:
1. Cierre el agua en la fuente.
2. Desconecte el adaptador de la válvula del ensamblaje de nebulización, de la manguera de jardín o grifo y
el adaptador de la manguera. Haga esto con cuidado y permita que drene la presión del agua residual. Haga
el ciclo (gire la manija hacia atrás y adelante) de la válvula y asegúrese de que tenga libertad de movimiento y
de que no hay residuos que bloqueen el trayecto del agua.
3. Quite el filtro de la pantalla desde el interior del adaptador de la válvula del ensamblaje de nebulización.
Inspeccione y asegúrese de que el filtro de la pantalla está libre de acumulación o suciedad. Si el filtro está
obstruido, sumerja en una solución de vinagre blanco destilado con una acidez sin diluir del 5% durante por
lo menos 2 horas. Para una solución inmediata, cambie el filtro.
4. Remueva con cuidado cada boquilla de nebulización de la carcasa de las boquillas al girarla en el sentido
contrario a las agujas del reloj al usar su mano o, si es necesario, un par de alicates. Sumerja en una solución
de vinagre blanco destilado con una acidez sin diluir del 5% durante por lo menos 2 horas. Para una solución
inmediata, reemplace las boquillas con las piezas de repuesto suministradas. Si se requieren más boquillas,
llame al 1-800-233-0268, o realice un pedido en línea en www.laskoproducts.com en Partes y Accesorios.
5. Después de la cantidad apropiada de tiempo de inmersión de las piezas que requieran limpieza, vuelva a
ensamblar el subsistema de nebulización mediante la inserción de las boquillas de nebulización en la carcasa
de las boquillas y al girar en el sentido de las agujas del reloj. (Figura 5) Sólo gire hasta que quede apretado
manualmente; no apriete en exceso. Luego vuelva a colocar el filtro de la pantalla en el interior del
adaptador de la válvula del colector. Finalmente, vuelva a conectar el adaptador de la válvula al adaptador de
la manguera. (Figura 4)
6.Ahora está listo para continuar estando fresco con su Ventilador de nebulización misto
TM
para exteriores.
Adaptador de la
válvula del
ensamblaje de
nebulización
Adaptador de la
manguera
Junta de goma
Boquillas de nebulización Carcasa de boquillas
Figura 4
Filtro de la pantalla
Figura 5
MODELO 7050

Rev. B 1/12
4
7050ES Rev. B 1/12
9 7050ES
misto
TM
Outdoor Misting Fan: Misting Manifold Clean and Care Guide:
If the nozzles become clogged from contamination, follow the steps below:
1. Turn the water off at the source.
2. Remove the misting assembly’s valve adapter from garden hose or spigot and the hose adapter. Do this
carefully and allow residual water pressure to drain. Cycle (turn the handle back and forth) the valve and en-
sure freedom of movement and that there is no debris blocking the water’s path.
3. Remove the screen filter from inside the Misting Assembly Valve Adapter. Inspect and ensure the screen
filter is free of buildup or debris. If filter is clogged, soak in a solution of undiluted 5% acidity distilled white
vinegar for at least 2 hours. For an immediate solution, replace the filter.
4. Carefully remove each misting nozzle from the nozzle housing by turning it counter-clockwise using your
hand or, if required, a pair of pliers. Soak the nozzles in a solution of undiluted 5% acidity distilled white
vinegar for at least 2 hours. For an immediate solution, replace the nozzles with the supplied replacement
parts. If more nozzles are required, call 1-800-233-0268, or order online at www.laskoproducts.com in Parts &
Accessories.
5. After the appropriate amount of soak time for the parts requiring cleaning, reassemble the misting
subsystem by inserting the misting nozzles into the Nozzle Housing and turning clockwise until secure.
(Figure 5) Only turn until hand tight; do not over tighten. Next, return the screen filter to the inside of the
manifold’s valve adapter. Finally, reattach the valve adapter to the hose adapter. (Figure 4)
6. You are now ready to continue to stay cool with your misto
TM
Outdoor Misting Fan.
MODELO 7050
Misting
Assembly
Valve Adapter
Hose Adapter
Rubber Gasket
Misting Nozzles Nozzle Housing
Figure 4
Screen Filter
Figure 5
INSTRUCCIONES DE ENSAMBLAJE (Figura 1)
1. Cuidadosamente retire el ventilador de la bolsa plástica y de la
caja de cartón.
2. Coloque el ventilador sobre una superficie firme y nivelada.
3. Conecte el enchufe GFCI en una toma de corriente estándar
de corriente alterna de 120 voltios con conexión a tierra.
Asegúrese que el enchufe encaje firmemente en el
tomacorriente.
Cuando los enchufes quedan flojos en los
tomacorrientes, pueden deslizarse parcial o
completamente fuera del tomacorriente con un leve
movimiento del cable adosado. Los tomacorrientes
en este estado podrían sobrecalentarse y representar
un grave peligro de incendio; si está cubierto por una
cortina o tela, el riesgo de incendio es aún mayor.
4. Conecte el adaptador de la válvula de la manguera a cualquier
manguera de jardín o grifo.
Si usa un cable de extensión, se debe conectar
a un receptáculo protegido de GFCI.
INSTRUCCIONES DE OPERACION
1. Encienda el ventilador al seleccionar la velocidad deseada con
la Perilla de encendido en un lado del ventilador. 0-Apagado,
3-Alto, 2-Medio, 1-Bajo (Figura 2)
2. Abra el agua en la fuente. Gire el adaptador de la válvula a la
posición de "Abierto". (Figura 3)
3. Para ajustar el ángulo vertical, presione el cuerpo del ventilador
hacia adelante o hacia atrás a la posición deseada. Es normal
escuchar un sonido de clic mientras realiza esta función.
IMPORTANTE: El ángulo de rociado y el tamaño de la gota están
determinados por la presión del agua donde usted se encuentra.
OSCILACIÓN DE LA REJILLA:
Para operar el aire interno que dirige las rejillas:
1. Gire la Perilla de encendido hasta el ajuste de la velocidad
deseada.
2. Ponga el interruptor de la rejilla en la posición de "On"
(Encendido).
Las rejillas dejarán de operar cuando:
1. Se desconecta la corriente de la unidad.
2. La Perilla de encendido está en posición 0-Off.
3. El interruptor de la rejilla está en posición "Off" (Apagado).
Para centrar las rejillas en el flujo de aire:
1. Observe las rejillas durante la operación. Una vez centradas,
coloque el interruptor de la rejilla en la posición "Off" (Apagado).
Figura 1
Figura 2
Interruptor de
la rejilla
Perilla de
encendido
Adaptador de la
válvula de la manguera
Figura 3
MODEL 7050

Rev. B 1/12
5
7050ES
Rev. B 1/12
8
7050ES
MAINTENANCE
To reduce the risk of electrical shock and fire please observe the following instructions:
- Always turn off the fan, unplug the cord and disconnect from the water supply before moving, servicing or cleaning.
- Clean the Fan only with a vacuum equipped with a brush attachment; the vacuum will remove the lint
and dirt from inside the Fan.
- NEVER attempt to take apart the Fan.
- Clean the body of the Fan with a soft cloth only.
- NEVER use ALCOHOL or SOLVENTS such as gasoline, benzene, paint thinner, or other harsh cleaners.
LASKO PRODUCTS, INC. LIMITED WARRANTY
(VALID IN THE USA, ITS TERRITORIES, AND CANADA ONLY)
WHAT THIS WARRANTY COVERS: This product is warranted against defects in workmanship and/or materials.
HOW LONG THIS WARRANTY LASTS: This warranty extends only to the original purchaser of the product and lasts for one (1) year from the date of
original purchase or until the original purchaser of the product sells or transfers the product, whichever first occurs.
WHAT LASKO WILL DO: During the warranty period, Lasko will, at its sole option, repair or replace any part or parts that prove to be defective or
replace the whole product with the same or comparable model.
WHAT THIS WARRANTY DOES NOT COVER: This warranty does not apply if the product was damaged or failed because of accident, improper
handling or operation, shipping damage, abuse, misuse, unauthorized repairs made or attempted. This warranty does not cover shipping costs for
the return of products to Lasko for repair or replacement. Lasko will pay return shipping charges from Lasko following warranty repairs or replacement.
ANY AND ALL WARRANTIES, EXPRESSED OR IMPLIED (INCLUDING, WITHOUT LIMITATION, ANY IMPLIED WARRANTY OF MERCHANTABILITY),
LAST ONE YEAR FROM THE DATE OF ORIGINAL PURCHASE OR UNTIL THE ORIGINAL PURCHASER OF THE PRODUCT SELLS OR TRANSFERS
THE PRODUCT, WHICHEVER FIRST OCCURS AND IN NO EVENT SHALL LASKO’S LIABILITY UNDER ANY EXPRESS OR IMPLIED WARRANTY
INCLUDE (I) INCIDENTAL OR CONSEQUENTIAL DAMAGES FROM ANY CAUSE WHATSOEVER, OR (II) REPLACMENT OR REPAIR OF ANY
HOUSE FUSES, CIRCUIT BREAKERS OR RECEPTACLES. NOTWITHSTANDING ANYTHING TO THE CONTRARY, IN NO EVENT SHALL LASKO’S
LIABILITY UNDER ANY EXPRESS OR IMPLIED WARRANTY EXCEED THE PURCHASE PRICE OF THE PRODUCT AND ANY SUCH LIABILITY
SHALL TERMINATE UPON THE EXPIRATION OF THE WARRANTY PERIOD.
Some states and provinces do not allow limitations on how long an implied warranty lasts, or the exclusion or limitation of incidental or consequential
damages, so these exclusions or limitations may not apply to you. This warranty gives you specific legal rights. You may also have other rights which
vary from state to state and province to province.
Proof of purchase is required before a warranty claim will be accepted.
CUSTOMER SERVICE:
Toll-Free (800) 233-0268. Email: producthelp@laskoproducts.com
Our Customer Service team is available to assist you with product and service questions, and replacement parts.
They can be reached Monday through Friday, 8am-5pm Eastern. Please have your model number available, as well
as the type and style (located on the underside of your product).
Customer Service Dept., 820 Lincoln Ave., West Chester, PA 19380
(Please do not send product to this location) www.laskoproducts.com
Manual printed in China
SERVICING: For servicing, other than general user maintenance, please contact Customer Service at 800-233-0268, Monday through
Friday, from 8am-5pm Eastern.
STORAGE: Store the Fan with these instructions, in the original carton in a cool, dry place.
9. NO USE UN CABLE DE ALARGUE CON ESTE VENTILADOR.
10. Antes de usarlo, inspeccione para detectar sucio e insectos.
11. NUNCA inserte ni permita que los dedos u objetos extraños ingresen en alguna apertura de la ventilación o el extractor,
pues puede causar una descarga eléctrica o incendio, o dañar el ventilador. Para reducir el riesgo de incendio, NO
bloquee ni manipule el ventilador en alguna manera mientras está en funcionamiento.
12. Cierre el agua en la fuente antes de cambiar la boquilla.
13. Cierre el agua en la fuente antes de cada uso. Desconecte la manguera del jardín del adaptador de la válvula y la
unidad de drenaje para acondicionar.
14. Siempre coloque el ventilador sobre una superficie estable, plana y nivelada mientras esté en funcionamiento para
evitar la posibilidad de que el ventilador se caiga. Ubique el cable de corriente de manera que el ventilador o los
demás objetos no queden sobre éste. No coloque el cable de corriente debajo de alfombras. No cubra el cable de
corriente con tapetes, alfombras estrechas o artículos de coberturas similares. No coloque el cable de corriente debajo
de muebles o artefactos. Coloque el cable de corriente lejos del tráfico de la habitación, donde las personas no se
tropiecen con éste.
15. NO use este ventilador en las proximidades de parrillas de cocinar, fogones u otras llamas abiertas.
16. El uso de accesorios no recomendados ni vendidos por el fabricante puede causar peligros.
17. Este ventilador no es adecuado para su uso en instalaciones agrícolas, incluyendo las áreas donde el ganado, aves de
corral u otros animales están encerrados. Consulte el Artículo 547-7 (2008) del Código Eléctrico Nacional (NEC) o los
códigos o normas locales o estatales aplicables, relacionados con los requerimientos eléctricos para las instalaciones
de agricultura. ESTE VENTILADOR NO CUMPLE CON LOS REQUERIMIENTOS DEL ARTÍCULO 547-7 (2008) DEL NEC.
18. Este ventilador no es apropiado para usarlo en sitios peligrosos. Consulte el Artículo 500 del Código Eléctrico
Nacional (NEC) o LOS CÓDIGOS O NORMAS LOCALES O ESTATALES APLICABLES, RELACIONADOS CON LOS
REQUERIMIENTOS ELÉCTRICOS PARA LOS SITIOS PELIGROSOS. ESTE VENTILADOR NO CUMPLE CON LOS
REQUERIMIENTOS DEL ARTÍCULO 500 (2008) DEL NEC.
DISMINUYA EL RIESGO DE INCENDIO O GOLPES DE ELECTRICIDAD – NO USE ESTE VENTILADOR CON ARTEFACTOS
DE CONTROL DE VELOCIDAD EN ESTADO SÓLIDO.
CONSERVE ESTAS INSTRUCCIONES
MODELO 7050
MODEL 7050
TROUBLE SHOOTING TIPS
If your Fan fails to operate, see below for a probable cause and solution:
1. Be sure the power cord is plugged into a working electrical outlet.
If you have a problem that can not be resolved by the steps listed above, contact Technical Assistance at 1-800-233-0268, Monday
through Friday, between the hours of 8:00 a.m. and 5:00 p.m. Eastern.

Rev. B 1/12
6
7050ES
Rev. B 1/12
7
7050ES
MODELO 7050
INSTRUCCIONES IMPORTANTES -
MANUAL DE OPERACIÓN
LEA Y GUARDE ESTAS INSTRUCCIONES
LEA CUIDADOSAMENTE LAS INSTRUCCIONES ANTES DE
INTENTAR ARMAR, INSTALAR, USAR O DAR MANTENIMIENTO
AL PRODUCTO DESCRITO.
PROTÉJASE A SÍ MISMO Y A LOS DEMÁS CUMPLIENDO CON
TODA LA INFORMACIÓN DE SEGURIDAD. EL NO SEGUIR
LAS INSTRUCCIONES PODRÍA RESULTAR EN LESIONES
PERSONALES Y/O DAÑOS A LA PROPIEDAD.
CONSERVE LAS INSTRUCCIONES COMO FUTURA
REFERENCIA.
CONSERVE ESTAS INSTRUCCIONES
Este Ventilador es sólo para uso comerciales o residencial.
No está destinado para ser usado en instalaciones industriales o agricultura.
INFORMACIÓN GENERAL DE SEGURIDAD
Al usar artefactos eléctricos, siempre deben tomarse precauciones básicas para reducir el
riesgo de incendio, choque eléctrico y lesiones a personas, incluyendo las siguientes:
Lea todas las instrucciones antes de usar este Ventilador.
6. Este ventilador NO debe ser utilizado en lugares potencialmente peligrosos tales como sitios inflamables, explosivos,
cargados de químicos o donde se utilicen o almacenen gasolina, pintura o líquidos inflamables.
7. PRECAUCION: Las superficies en el área del ventilador pueden ser resbaladizas cuando están mojadas.
1. Este ventilador es un producto para espacios abiertos y NO está destinado para uso en interiores. No deje el ventilador
Misto desatendido cuando está enchufado.
2. Asegúrese de que la fuente de alimentación se ajuste a los requerimientos eléctricos del ventilador. Ensamble
completamente el ventilador antes de conectarlo a la fuente de energía. No utilice este ventilador con algún control de
velocidad de estado sólido.
3. Utilice este ventilador sólo según se describe en este manual. Cualquier otro uso no recomendado por el fabricante
puede causar incendios, descargas eléctricas o lesiones a las personas. Nunca coloque el ventilador donde pueda
caer en un depósito de agua, tales como una piscina o un recipiente de agua. No cuelgue el ventilador Misto en una
pared o el techo ni lo utilice en una ventana.
4. El ventilador Misto no debe utilizarse como un juguete. Para reducir el riesgo de lesiones personales y descargas
eléctricas, no se debe jugar con el ventilador ni colocarlo en lugares donde los niños puedan alcanzarlo.
5. Apague el ventilador Misto y desconecte el cable de corriente antes de instalarlo, realizarle mantenimiento, o moverlo.
NO DEPENDA DEL INTERRUPTOR DE ENCENDIDO Y APAGADO COMO EL ÚNICO MEDIO DE DESCONECTAR
LA CORRIENTE CUANDO MUEVA O REALICE MANTENIMIENTO AL VENTILADOR. SIEMPRE DESCONECTE
EL CABLE DE CORRIENTE. SIEMPRE APAGUE Y DESENCHUFE EL VENTILADOR ANTES DE SALIR DEL
ÁREA. NUNCA DEJE NIÑOS SIN SUPERVISIÓN CUANDO EL VENTILADOR ESTÁ ENCENDIDO O CONECTADO.
8. NUNCA opere el ventilador con un cable o enchufe dañado, cuando tenga una falla o cuando se haya caído o dañado
en alguna manera. Este enchufe GFCI no protege contra descargas eléctricas debido al contacto con los conductores
del circuito o una falla en cualquier cable que suministre corriente a este dispositivo. No utilice un cable de extensión
entre el cable GFCI del ventilador y la toma de corriente. El Servicio al cliente está disponible en el 800-233-0268, de
lunes a viernes, de 8am a 5pm, para responder a sus preguntas.
El cable de alimentación está equipado con un enchufe de tres clavijas con conexión a tierra GFCI (Interruptor de circuito
con conexión a tierra) que debe insertarse en un receptáculo con conexión a tierra. Bajo ninguna circunstancia se debe
cortar la clavija de conexión a tierra del enchufe. No utilice un adaptador de tres a dos clavijas. Cuando se encuentre un
tomacorriente de dos clavijas de pared, se debe reemplazar con un tomacorriente apropiado de tres clavijas con conexión
a tierra, el cual se debe instalar de acuerdo con el Código Eléctrico Nacional (National Electrical Code, NEC) y todos los
códigos y ordenanzas locales aplicables. Este trabajo sólo deberá realizarlo un electricista calificado, mediante el uso de
alambre de cobre únicamente. El conjunto de cables del Ventilador con GFCI se puede conectar a una toma de corriente
GFCI existente si está disponible.
RIESGO DE DESCARGA ELÉCTRICA. PRUEBE EL ENCHUFE GFCI ANTES DE CADA USO.
1. ENCHUFE EL GFCI A LA TOMA DE CORRIENTE. LA LUZ DEL INDICADOR DEBE ENCENDERSE.
2. PRESIONE EL BOTÓN DE PRUEBA. LA LUZ DEL INDICADOR DEBE APAGARSE.
3. PRESIONE Y SUELTE EL BOTÓN DE REINICIAR. LA LUZ DEL INDICADOR DEBE ENCENDERSE.
Si las pruebas anteriores fallan, NO UTILICE ESTE VENTILADOR CON GFCI. Llame al 800-233-0268, de lunes a viernes,
de 8:00 a.m. a 5:00 p.m. hora del Este.
NO SE RECOMIENDA EL USO DE UN ADAPTADOR DE TRES A DOS CLAVIJAS. LA CONEXIÓN INADECUADA PUEDE
CREAR EL RIESGO DE ELECTROCUCIÓN. NO SE PERMITE EL USO DE DICHOS ADAPTADORES EN CANADA.
Este enchufe es una función de seguridad. Contiene un dispositivo de seguridad (fusible) que no se debe quitar. Deseche
el producto si el enchufe está dañado. Para reducir el riesgo de incendios, descargas eléctricas y lesiones personales, no
remueva, reemplace, repare ni altere el enchufe original suministrado. Si el ventilador no funciona adecuadamente, puede
deberse al dispositivo de seguridad incorporado en este enchufe. Llame al 800-233-0268, de lunes a viernes, entre las 8:00
a.m. y 5:00 p.m. hora del Este. Si no tiene la etiqueta de advertencia del enchufe o está dañada, llame al número gratuito
para obtener una etiqueta de reemplazo.
misto
™
Continúa en la página 8
Transcripción de documentos
MODEL/MODELO 7050 IMPORTANT INSTRUCTIONS OPERATING MANUAL NOTES/NOTAS misto™ MODEL 7050 This Fan is for commercial and residential use only. It is not intended to be used in industrial or agricultural settings. READ AND SAVE THESE INSTRUCTIONS READ CAREFULLY BEFORE ATTEMPTING TO ASSEMBLE, INSTALL, OPERATE OR MAINTAIN THE PRODUCT DESCRIBED. PROTECT YOURSELF AND OTHERS BY OBSERVING ALL SAFETY INFORMATION. FAILURE TO COMPLY WITH INSTRUCTIONS COULD RESULT IN PERSONAL INJURY AND/OR PROPERTY DAMAGE! KEEP INSTRUCTIONS FOR FUTURE REFERENCE. SAVE THESE INSTRUCTIONS Rev. B 1/12 12 7050ES Rev. B 1/12 1 7050ES MODELO 7050 MOLESTE PUNTAS que DISPARAN GENERAL SAFETY INFORMATION When using electrical appliances, basic precautions should always be followed to reduce the risk of fire, electrical shock and injury to persons, including the following: Read all instructions before using this Fan. 1. This fan is an outdoor product and is NOT intended for indoor use. Do not leave the misto fan unattended when it is plugged in. 2. Make certain the power source conforms to the electrical requirements of the Fan. Completely assemble the fan before connecting to power source. Do not use the fan with any solid state speed control. 3. Use this Fan only as described in this manual. Any other use not recommended by the manufacturer may cause fire, electrical shock, or injury to persons. Never place the fan where it may fall into a water reservoir such as a Pool or water container. Do not hang the misto fan on a wall or ceiling or use in a window. 4. The misto fan should not be used as a toy. To reduce the risk of personal injury and electric shock, the Fan should not be played with or placed where children can reach it. 5. Turn off the misto fan and unplug power cord before installing, servicing, or moving the Fan. DO NOT DEPEND ON THE ON/OFF SWITCH AS THE SOLE MEANS OF DISCONNECTING POWER WHEN SERVICING OR MOVING THE FAN. ALWAYS UNPLUG THE POWER CORD. ALWAYS TURN OFF AND UNPLUG FAN BEFORE LEAVING THE AREA. NEVER LEAVE CHILDREN UNATTENDED WHEN THE FAN IS ON OR PLUGGED IN. 6. This Fan must NOT be used in potentially dangerous locations such as flammable, explosive, chemical-laden or where gasoline, paint or flammable liquids are used or stored. 7. CAUTION: Surfaces in the area of the fan may become slippery when wet. The power cord is equipped with a three-prong, grounded GFCI (Ground Fault Circuit Interrupter) plug that must be inserted into a grounded receptacle. Under no circumstances must the grounding prong be cut off the plug. WARNING: Do not use a three-prong to two-prong adapter.Where a two-prong wall receptacle is encountered, it must be replaced with a properly grounded three-prong receptacle installed in accordance with the National Electrical Code (NEC) and all applicable local codes and ordinances. This work must be done only by a qualified electrician, using copper wire only. The GFCI Fan cord set can be plugged into an existing GFCI outlet if present. RISK OF ELECTRIC SHOCK. Test GFCI plug before each use. 1. Plug GFCI into POWER outlet. Indicator LIGHT should turn on. 2. Press test button. Indicator LIGHT should turn off. 3. Press AND RELEASE reset button. INDICATOR LIGHT SHOULD TURN ON. If above test fails, DO NOT USE THIS GFCI Fan. Call 800-233-0268, Mon - Fri, 8:00 a.m. and 5:00 p.m. Eastern USE OF A THREE-PRONG TO TWO-PRONG ADAPTER IS NOT PERMITTED. IMPROPER CONNECTION MAY CREATE THE RISK OF ELECTRICAL SHOCK. USE OF SUCH ADAPTERS IS NOT PERMITTED IN CANADA. This plug is a safety feature. It contains a safety device (fuse) that should not be removed. Discard product if the attachment plug is damaged. To reduce the risk of fire, electric shock and personal injury, DO NOT remove, replace, repair or tamper with the originally supplied plug or GFCI. If the Fan does not function properly, it may be due to the safety device incorporated in this plug. Call 800-233-0268, Monday - Friday, between 8:00 a.m. and 5:00 p.m. Eastern. If the plug warning label is missing or damaged, call the toll free number for a replacement label. 8. NEVER operate any Fan with a damaged cord or plug or after the Fan malfunctions, has been dropped or damaged in any manner. This GFCI plug does not protect against electrical shock due to contact with both circuit conductors or a fault in any wiring supplying this device. Do not use an extension cord between the Fan GFCI cord and power outlet. Customer service is available at 800-233-0268, Monday through Friday, 8am to 5pm to answer your questions. 9. DO NOT USE an extension cord with this fan. 10. Prior to use, inspect for debris and/or insects. 11. NEVER insert or allow fingers or foreign objects to enter any ventilation or exhaust opening as it may cause an electric shock or fire, or damage the Fan. To reduce the risk of fire, DO NOT block or tamper with the Fan in any manner while it is in operation. 12. Turn off water at the source before changing the nozzle. 13. Turn off water at the source after each use. Disconnect your garden hose from the valve adapter and drain unit to winterize. 14. Always place the Fan on a stable, flat, level surface when operating, to avoid the chance of the Fan overturning. Locate the Power Cord so the Fan or other objects are not resting on it. Do not run cord under carpeting. Do not cover cord with throw rugs, runners, or similar coverings. Do not route cord under furniture or appliances. Arrange cord away from traffic area and where it will not be tripped over. 15. DO NOT use this Fan in close proximity to cooking grills, fire pits or other open flames. 16. The use of attachments not recommended or sold by the appliance manufacturer may cause hazards. 17. This Fan is not suitable for use in agricultural facilities including areas where livestock, poultry or other animals are confined. Please refer to National Electric Code (NEC) Article 547-7 (2008), or applicable state or local codes or standards relating to electrical requirements for Agricultural Buildings. THIS FAN DOES NOT MEET THE REQUIREMENTS OF NEC ARTICLE 547-7 (2008). 18. This Fan is not suitable for use in hazardous locations. Please refer to National Electric Code (NEC) Article 500 or applicable state or local codes or standards relating to electrical requirements for Hazardous locations. THIS FAN DOES NOT MEET THE REQUIREMENTS OF NEC ARTICLE 500 (2008). Si su Ventilador falla de operar, ver abajo para de causa y solucione probable: 1. Esté seguro que la cuerda del poder se tapa en un trabajar salida eléctrica. Si usted tiene un problema que no puede ser la resolución por los pasos listó arriba,el contacto Ayuda Técnica en 1-800-233-0268, el lunes por el viernes, entre las horas de 8:00 de la mañana y 5:00 de la tarde. EST. MANTENIMIENTO - - - - - Para reducir el riesgo de choque eléctrico e incendio, por favor obedezca las siguientes instrucciones. Siempre desconecte el cable eléctrico antes de trasladar, reparar o limpiar. Limpie el Ventilador únicamente con una aspiradora equipada con un accesorio de cepillo; la aspiradora quitará el polvillo y los desperdicios del interior del Ventilador. NUNCA intente desarma el Ventilador. Limpie el cuerpo del Ventilador únicamente con un trapo suave. NUNCA use ALCOHOL o SOLVENTES tales como gasolina, bencina, disolvente para pinturas u otros limpiadores duros. REPARACIONES: Para cualquier reparación, que no sea de mantenimiento general por parte del usuario, por favor contacte a nuestro equipo de Servicio al Cliente al (800) 233-0268 de Lunes a Viernes de 8 a.m. a 5 p.m. ALMACENAMIENTO: Almacene el Ventilador con estas instrucciones, en la caja original en un lugar fresco y seco. GARANTÍA LIMITADA DE LASKO PRODUCTS, INC. (Válido en EE.UU., sus territorios, y Canadá únicamente) QUÉ CUBRE ESTA GARANTÍAS: Este producto está garantizado contra defectos de mano de obra y/o materiales. CUÁNTO DURA ESTA GARANTÍA: Esta garantía se extiende únicamente al comprador original del producto y dura un (1) año a partir de la fecha original de compra o hasta que el comprador original del producto venda o transfiera el producto, cualesquiera de ambas que ocurriera en primer lugar. QUÉ HARÁ LASKO: Durante el período de garantía, Lasko, a opción propia, reparará o reemplazará cualquier parte o partes que demuestren ser defectuosas o reemplazará el producto completo por el mismo modelo u otro comparable. QUÉ NO CUBRE ESTA GARANTÍA: Esta garantía no tiene validez si el producto fue dañado o falló debido a un accidente, manipulación u operación inadecuadas, daño en el envío, abuso, mal uso, reparaciones no autorizadas hechas o el intento de hacerlas. Esta garantía no cubre los costos de envío para la devolución de productos a Lasko para su reparación o reemplazo. Lasko abonará los cargos de envío de devolución a Lasko con posterioridad a las reparaciones o el reemplazo bajo garantía. CUALESQUIERA Y TODAS LAS GARANTÍAS, EXPLÍCITAS O IMPLÍCITAS (INCLUYENDO, SIN LIMITACIÓN, CUALESQUIERA GARANTÍA IMPLÍCITA DE COMERCIABILIDAD), DURAN UN AÑO A PARTIR DE LA FECHA ORIGINAL DE COMPRA O HASTA QUE EL COMPRADOR ORIGINAL DEL PRODUCTO VENDA O TRANSFIERA EL PRODUCTO, CUALESQUIERA DE AMBAS QUE OCURRIERA EN PRIMER LUGAR Y EN NINGÚN CASO LA RESPONSABILIDAD DE LASKO BAJO CUALQUIER GARANTÍA EXPLÍCITA O IMPLÍCITA INCLUIRÁ (I) DAÑOS INCIDENTALES O POR CONSECUENCIA POR CUALQUIER CAUSA QUE FUERE, O (II) REEMPLAZO O REPARACIÓN DE CUALESQUIERA FUSIBLES HOGAREÑOS, CORTA-CIRCUITOS O TOMACORRIENTES. INDEPENDIENTEMENTE DE CUALQUIER DECLARACIÓN CONTRARIA, EN NINGÚN CASO LA RESPONSABILIDAD DE LASKO BAJO CUALQUIER GARANTÍA EXPLÍCITA O IMPLÍCITA PODRÁ EXCEDER EL PRECIO DE COMPRA DEL PRODUCTO Y DICHA RESPONSABILIDAD TERMINARÁ AL VENCIMIENTO DEL PERÍODO DE GARANTÍA. Algunos estados y provincias no permiten limitaciones sobre la duración de una garantía implícita, o sobre la exclusión o limitación de los daños incidentales o por consecuencia, por lo tanto dichas exclusiones o limitaciones podrían no aplicarse en su caso. Esta garantía le otorga a usted derechos legales específicos. Usted también podría tener otros derechos que varían de estado en estado y de provincia en provincia. Se requiere prueba de compra antes que se acepte un reclamo bajo garantía. SERVICIO AL CLIENTE: Línea gratuita (800) 233-0268. Correo electrónico: [email protected] Nuestro equipo de Servicio al Cliente está disponible para ayudarle con preguntas sobre productos, ubicaciones de los centros de reparación y repuestos. Se puede comunicar con nuestro equipo de Servicio al Cliente de lunes a viernes, de 8 a.m. a 5 p.m. hora del Este. Por favor tenga disponible el número de modelo, así como también el tipo y estilo (ubicados en la parte inferior de su producto). Customer Service Dept., 820 Lincoln Ave., West Chester, PA 19380 (Por favor no envíe el producto a esta dirección) www.laskoproducts.com REDUCE THE RISK OF FIRE OR ELECTRIC SHOCK - DO NOT USE THIS FAN WITH ANY SOLID STATE SPEED CONTROL DEVICES. Rev. B 1/12 SAVE THESE INSTRUCTIONS 2 El Manual imprimió en la China 7050ES Rev. B 1/12 11 7050ES MODELO 7050 MODEL 7050 mistoTM Ventilador de nebulización para exteriores: Guía de cuidado y limpieza del colector de nebulización: Si las boquillas se tapan por la contaminación, siga los siguientes pasos: 1. Cierre el agua en la fuente. 2. Desconecte el adaptador de la válvula del ensamblaje de nebulización, de la manguera de jardín o grifo y el adaptador de la manguera. Haga esto con cuidado y permita que drene la presión del agua residual. Haga el ciclo (gire la manija hacia atrás y adelante) de la válvula y asegúrese de que tenga libertad de movimiento y de que no hay residuos que bloqueen el trayecto del agua. To center Louvers in Air Flow: 1. Observe Louvers during operation. Once centered, place Louver power switch in Off (0) position. ASSEMBLY INSTRUCTIONS (Figure 1) 1. Carefully remove the Fan from the plastic bag and the carton. 2. Place the Fan on a firm and level surface. 3. Plug the GFCI plug into a standard 120 volt AC outlet with ground. Be sure that the plug fits tightly into outlet. When plugs fit loosely into receptacles, they may slip partially or completely out of the receptacle with only the slight movement of the attached cord. Receptacles in this condition may overheat and pose a serious fire hazard; if covered by a curtain or drape, the fire hazard is even greater. 4. Attach the hose valve adapter to any garden hose or spigot. Adaptador de la manguera Junta de goma Adaptador de la válvula del ensamblaje de nebulización Figure 1 Figura 4 If you use an Extension Cord, the Extension Cord must be plugged into a GFCI Protected Receptacle. Filtro de la pantalla 3. Quite el filtro de la pantalla desde el interior del adaptador de la válvula del ensamblaje de nebulización. Inspeccione y asegúrese de que el filtro de la pantalla está libre de acumulación o suciedad. Si el filtro está obstruido, sumerja en una solución de vinagre blanco destilado con una acidez sin diluir del 5% durante por lo menos 2 horas. Para una solución inmediata, cambie el filtro. 4. Remueva con cuidado cada boquilla de nebulización de la carcasa de las boquillas al girarla en el sentido contrario a las agujas del reloj al usar su mano o, si es necesario, un par de alicates. Sumerja en una solución de vinagre blanco destilado con una acidez sin diluir del 5% durante por lo menos 2 horas. Para una solución inmediata, reemplace las boquillas con las piezas de repuesto suministradas. Si se requieren más boquillas, llame al 1-800-233-0268, o realice un pedido en línea en www.laskoproducts.com en Partes y Accesorios. Boquillas de nebulización Carcasa de boquillas Power Knob Louver Power Switch OPERATING INSTRUCTIONS 1. Turn the Fan on by selecting the desired speed with the Power Knob on the side of the Fan. 0-Off, 3-High, 2-Medium, 1-Low (Figure 2) 2. Turn on water at the source. Turn the valve adapter to the "Open" position. (Figure 3) 3. To adjust the vertical angle, push the Fan body forward or backward to the desired position. It is normal to hear a clicking sound while performing this function. IMPORTANT: Spray angle and droplet size is determined by water pressure at your location. Figure 2 Hose Valve Adapter LOUVER OSCILLATION: Figura 5 5. Después de la cantidad apropiada de tiempo de inmersión de las piezas que requieran limpieza, vuelva a ensamblar el subsistema de nebulización mediante la inserción de las boquillas de nebulización en la carcasa de las boquillas y al girar en el sentido de las agujas del reloj. (Figura 5) Sólo gire hasta que quede apretado manualmente; no apriete en exceso. Luego vuelva a colocar el filtro de la pantalla en el interior del adaptador de la válvula del colector. Finalmente, vuelva a conectar el adaptador de la válvula al adaptador de la manguera. (Figura 4) 6.Ahora está listo para continuar estando fresco con su Ventilador de nebulización mistoTM para exteriores. Rev. B 1/12 10 7050ES To operate internal air directing Louvers: 1. Turn the Power Knob to the desired speed setting. 2. Turn the Louver Power Switch to the On ( | ) position. Louvers will stop operating when: 1. Power to the unit is unplugged. 2. Power knob is in 0 -Off position. 3. Louver power switch is in Off position. Figure 3 Rev. B 1/12 3 7050ES MODEL 7050 mistoTM Outdoor Misting Fan: MODELO 7050 INSTRUCCIONES DE ENSAMBLAJE Misting Manifold Clean and Care Guide: If the nozzles become clogged from contamination, follow the steps below: 1. Turn the water off at the source. 2. Remove the misting assembly’s valve adapter from garden hose or spigot and the hose adapter. Do this carefully and allow residual water pressure to drain. Cycle (turn the handle back and forth) the valve and ensure freedom of movement and that there is no debris blocking the water’s path. (Figura 1) 1. Cuidadosamente retire el ventilador de la bolsa plástica y de la caja de cartón. 2. Coloque el ventilador sobre una superficie firme y nivelada. 3. Conecte el enchufe GFCI en una toma de corriente estándar de corriente alterna de 120 voltios con conexión a tierra. Asegúrese que el enchufe encaje firmemente en el tomacorriente. Cuando los enchufes quedan flojos en los tomacorrientes, pueden deslizarse parcial o completamente fuera del tomacorriente con un leve movimiento del cable adosado. Los tomacorrientes en este estado podrían sobrecalentarse y representar un grave peligro de incendio; si está cubierto por una cortina o tela, el riesgo de incendio es aún mayor. 4. Conecte el adaptador de la válvula de la manguera a cualquier manguera de jardín o grifo. Hose Adapter Rubber Gasket Misting Assembly Valve Adapter Figura 1 Perilla de encendido Figure 4 Interruptor de la rejilla Screen Filter 3. Remove the screen filter from inside the Misting Assembly Valve Adapter. Inspect and ensure the screen filter is free of buildup or debris. If filter is clogged, soak in a solution of undiluted 5% acidity distilled white vinegar for at least 2 hours. For an immediate solution, replace the filter. 4. Carefully remove each misting nozzle from the nozzle housing by turning it counter-clockwise using your hand or, if required, a pair of pliers. Soak the nozzles in a solution of undiluted 5% acidity distilled white vinegar for at least 2 hours. For an immediate solution, replace the nozzles with the supplied replacement parts. If more nozzles are required, call 1-800-233-0268, or order online at www.laskoproducts.com in Parts & Accessories. Misting Nozzles Nozzle Housing Si usa un cable de extensión, se debe conectar a un receptáculo protegido de GFCI. INSTRUCCIONES DE OPERACION 1. Encienda el ventilador al seleccionar la velocidad deseada con la Perilla de encendido en un lado del ventilador. 0-Apagado, 3-Alto, 2-Medio, 1-Bajo (Figura 2) 2. Abra el agua en la fuente. Gire el adaptador de la válvula a la posición de "Abierto". (Figura 3) 3. Para ajustar el ángulo vertical, presione el cuerpo del ventilador hacia adelante o hacia atrás a la posición deseada. Es normal escuchar un sonido de clic mientras realiza esta función. Figura 2 Adaptador de la válvula de la manguera IMPORTANTE: El ángulo de rociado y el tamaño de la gota están determinados por la presión del agua donde usted se encuentra. OSCILACIÓN DE LA REJILLA: Para operar el aire interno que dirige las rejillas: 1. Gire la Perilla de encendido hasta el ajuste de la velocidad deseada. 2. Ponga el interruptor de la rejilla en la posición de "On" (Encendido). Las rejillas dejarán de operar cuando: 1. Se desconecta la corriente de la unidad. 2. La Perilla de encendido está en posición 0-Off. 3. El interruptor de la rejilla está en posición "Off" (Apagado). Figure 5 Para centrar las rejillas en el flujo de aire: 1. Observe las rejillas durante la operación. Una vez centradas, coloque el interruptor de la rejilla en la posición "Off" (Apagado). Figura 3 5. After the appropriate amount of soak time for the parts requiring cleaning, reassemble the misting subsystem by inserting the misting nozzles into the Nozzle Housing and turning clockwise until secure. (Figure 5) Only turn until hand tight; do not over tighten. Next, return the screen filter to the inside of the manifold’s valve adapter. Finally, reattach the valve adapter to the hose adapter. (Figure 4) 6. You are now ready to continue to stay cool with your mistoTM Outdoor Misting Fan. Rev. B 1/12 4 7050ES Rev. B 1/12 9 7050ES MODEL 7050 MODELO 7050 9. NO USE UN CABLE DE ALARGUE CON ESTE VENTILADOR. 10. Antes de usarlo, inspeccione para detectar sucio e insectos. 11. NUNCA inserte ni permita que los dedos u objetos extraños ingresen en alguna apertura de la ventilación o el extractor, pues puede causar una descarga eléctrica o incendio, o dañar el ventilador. Para reducir el riesgo de incendio, NO bloquee ni manipule el ventilador en alguna manera mientras está en funcionamiento. 12. Cierre el agua en la fuente antes de cambiar la boquilla. 13. Cierre el agua en la fuente antes de cada uso. Desconecte la manguera del jardín del adaptador de la válvula y la unidad de drenaje para acondicionar. 14. Siempre coloque el ventilador sobre una superficie estable, plana y nivelada mientras esté en funcionamiento para evitar la posibilidad de que el ventilador se caiga. Ubique el cable de corriente de manera que el ventilador o los demás objetos no queden sobre éste. No coloque el cable de corriente debajo de alfombras. No cubra el cable de corriente con tapetes, alfombras estrechas o artículos de coberturas similares. No coloque el cable de corriente debajo de muebles o artefactos. Coloque el cable de corriente lejos del tráfico de la habitación, donde las personas no se tropiecen con éste. 15. NO use este ventilador en las proximidades de parrillas de cocinar, fogones u otras llamas abiertas. 16. El uso de accesorios no recomendados ni vendidos por el fabricante puede causar peligros. 17. Este ventilador no es adecuado para su uso en instalaciones agrícolas, incluyendo las áreas donde el ganado, aves de corral u otros animales están encerrados. Consulte el Artículo 547-7 (2008) del Código Eléctrico Nacional (NEC) o los códigos o normas locales o estatales aplicables, relacionados con los requerimientos eléctricos para las instalaciones de agricultura. ESTE VENTILADOR NO CUMPLE CON LOS REQUERIMIENTOS DEL ARTÍCULO 547-7 (2008) DEL NEC. 18. Este ventilador no es apropiado para usarlo en sitios peligrosos. Consulte el Artículo 500 del Código Eléctrico Nacional (NEC) o LOS CÓDIGOS O NORMAS LOCALES O ESTATALES APLICABLES, RELACIONADOS CON LOS REQUERIMIENTOS ELÉCTRICOS PARA LOS SITIOS PELIGROSOS. ESTE VENTILADOR NO CUMPLE CON LOS REQUERIMIENTOS DEL ARTÍCULO 500 (2008) DEL NEC. TROUBLE SHOOTING TIPS If your Fan fails to operate, see below for a probable cause and solution: 1. Be sure the power cord is plugged into a working electrical outlet. If you have a problem that can not be resolved by the steps listed above, contact Technical Assistance at 1-800-233-0268, Monday through Friday, between the hours of 8:00 a.m. and 5:00 p.m. Eastern. MAINTENANCE - - - - - To reduce the risk of electrical shock and fire please observe the following instructions: Always turn off the fan, unplug the cord and disconnect from the water supply before moving, servicing or cleaning. Clean the Fan only with a vacuum equipped with a brush attachment; the vacuum will remove the lint and dirt from inside the Fan. NEVER attempt to take apart the Fan. Clean the body of the Fan with a soft cloth only. NEVER use ALCOHOL or SOLVENTS such as gasoline, benzene, paint thinner, or other harsh cleaners. SERVICING: For servicing, other than general user maintenance, please contact Customer Service at 800-233-0268, Monday through Friday, from 8am-5pm Eastern. STORAGE: Store the Fan with these instructions, in the original carton in a cool, dry place. DISMINUYA EL RIESGO DE INCENDIO O GOLPES DE ELECTRICIDAD – NO USE ESTE VENTILADOR CON ARTEFACTOS DE CONTROL DE VELOCIDAD EN ESTADO SÓLIDO. LASKO PRODUCTS, INC. LIMITED WARRANTY (Valid in the USA, its Territories, and CANADA Only) WHAT THIS WARRANTY COVERS: This product is warranted against defects in workmanship and/or materials. HOW LONG THIS WARRANTY LASTS: This warranty extends only to the original purchaser of the product and lasts for one (1) year from the date of original purchase or until the original purchaser of the product sells or transfers the product, whichever first occurs. WHAT LASKO WILL DO: During the warranty period, Lasko will, at its sole option, repair or replace any part or parts that prove to be defective or replace the whole product with the same or comparable model. WHAT THIS WARRANTY DOES NOT COVER: This warranty does not apply if the product was damaged or failed because of accident, improper handling or operation, shipping damage, abuse, misuse, unauthorized repairs made or attempted. This warranty does not cover shipping costs for the return of products to Lasko for repair or replacement. Lasko will pay return shipping charges from Lasko following warranty repairs or replacement. ANY AND ALL WARRANTIES, EXPRESSED OR IMPLIED (INCLUDING, WITHOUT LIMITATION, ANY IMPLIED WARRANTY OF MERCHANTABILITY), LAST ONE YEAR FROM THE DATE OF ORIGINAL PURCHASE OR UNTIL THE ORIGINAL PURCHASER OF THE PRODUCT SELLS OR TRANSFERS THE PRODUCT, WHICHEVER FIRST OCCURS AND IN NO EVENT SHALL LASKO’S LIABILITY UNDER ANY EXPRESS OR IMPLIED WARRANTY INCLUDE (I) INCIDENTAL OR CONSEQUENTIAL DAMAGES FROM ANY CAUSE WHATSOEVER, OR (II) REPLACMENT OR REPAIR OF ANY HOUSE FUSES, CIRCUIT BREAKERS OR RECEPTACLES. NOTWITHSTANDING ANYTHING TO THE CONTRARY, IN NO EVENT SHALL LASKO’S LIABILITY UNDER ANY EXPRESS OR IMPLIED WARRANTY EXCEED THE PURCHASE PRICE OF THE PRODUCT AND ANY SUCH LIABILITY SHALL TERMINATE UPON THE EXPIRATION OF THE WARRANTY PERIOD. Some states and provinces do not allow limitations on how long an implied warranty lasts, or the exclusion or limitation of incidental or consequential damages, so these exclusions or limitations may not apply to you. This warranty gives you specific legal rights. You may also have other rights which vary from state to state and province to province. Proof of purchase is required before a warranty claim will be accepted. CUSTOMER SERVICE: Toll-Free (800) 233-0268. Email: [email protected] Our Customer Service team is available to assist you with product and service questions, and replacement parts. They can be reached Monday through Friday, 8am-5pm Eastern. Please have your model number available, as well as the type and style (located on the underside of your product). Customer Service Dept., 820 Lincoln Ave., West Chester, PA 19380 (Please do not send product to this location) www.laskoproducts.com CONSERVE ESTAS INSTRUCCIONES Rev. B 1/12 8 Manual printed in China 7050ES Rev. B 1/12 5 7050ES INSTRUCCIONES IMPORTANTES MANUAL DE OPERACIÓN INFORMACIÓN GENERAL DE SEGURIDAD Al usar artefactos eléctricos, siempre deben tomarse precauciones básicas para reducir el riesgo de incendio, choque eléctrico y lesiones a personas, incluyendo las siguientes: Lea todas las instrucciones antes de usar este Ventilador. 1. Este ventilador es un producto para espacios abiertos y NO está destinado para uso en interiores. No deje el ventilador Misto desatendido cuando está enchufado. 2. Asegúrese de que la fuente de alimentación se ajuste a los requerimientos eléctricos del ventilador. Ensamble completamente el ventilador antes de conectarlo a la fuente de energía. No utilice este ventilador con algún control de velocidad de estado sólido. 3. Utilice este ventilador sólo según se describe en este manual. Cualquier otro uso no recomendado por el fabricante puede causar incendios, descargas eléctricas o lesiones a las personas. Nunca coloque el ventilador donde pueda caer en un depósito de agua, tales como una piscina o un recipiente de agua. No cuelgue el ventilador Misto en una pared o el techo ni lo utilice en una ventana. 4. El ventilador Misto no debe utilizarse como un juguete. Para reducir el riesgo de lesiones personales y descargas eléctricas, no se debe jugar con el ventilador ni colocarlo en lugares donde los niños puedan alcanzarlo. 5. Apague el ventilador Misto y desconecte el cable de corriente antes de instalarlo, realizarle mantenimiento, o moverlo. misto™ MODELO 7050 Este Ventilador es sólo para uso comerciales o residencial. No está destinado para ser usado en instalaciones industriales o agricultura. NO DEPENDA DEL INTERRUPTOR DE ENCENDIDO Y APAGADO COMO EL ÚNICO MEDIO DE DESCONECTAR LA CORRIENTE CUANDO MUEVA O REALICE MANTENIMIENTO AL VENTILADOR. SIEMPRE DESCONECTE EL CABLE DE CORRIENTE. SIEMPRE APAGUE Y DESENCHUFE EL VENTILADOR ANTES DE SALIR DEL ÁREA. NUNCA DEJE NIÑOS SIN SUPERVISIÓN CUANDO EL VENTILADOR ESTÁ ENCENDIDO O CONECTADO. 6. Este ventilador NO debe ser utilizado en lugares potencialmente peligrosos tales como sitios inflamables, explosivos, cargados de químicos o donde se utilicen o almacenen gasolina, pintura o líquidos inflamables. 7. PRECAUCION: Las superficies en el área del ventilador pueden ser resbaladizas cuando están mojadas. El cable de alimentación está equipado con un enchufe de tres clavijas con conexión a tierra GFCI (Interruptor de circuito con conexión a tierra) que debe insertarse en un receptáculo con conexión a tierra. Bajo ninguna circunstancia se debe cortar la clavija de conexión a tierra del enchufe. No utilice un adaptador de tres a dos clavijas. Cuando se encuentre un tomacorriente de dos clavijas de pared, se debe reemplazar con un tomacorriente apropiado de tres clavijas con conexión a tierra, el cual se debe instalar de acuerdo con el Código Eléctrico Nacional (National Electrical Code, NEC) y todos los códigos y ordenanzas locales aplicables. Este trabajo sólo deberá realizarlo un electricista calificado, mediante el uso de alambre de cobre únicamente. El conjunto de cables del Ventilador con GFCI se puede conectar a una toma de corriente GFCI existente si está disponible. LEA Y GUARDE ESTAS INSTRUCCIONES LEA CUIDADOSAMENTE LAS INSTRUCCIONES ANTES DE INTENTAR ARMAR, INSTALAR, USAR O DAR MANTENIMIENTO AL PRODUCTO DESCRITO. PROTÉJASE A SÍ MISMO Y A LOS DEMÁS CUMPLIENDO CON TODA LA INFORMACIÓN DE SEGURIDAD. EL NO SEGUIR LAS INSTRUCCIONES PODRÍA RESULTAR EN LESIONES PERSONALES Y/O DAÑOS A LA PROPIEDAD. CONSERVE LAS INSTRUCCIONES COMO FUTURA REFERENCIA. CONSERVE ESTAS INSTRUCCIONES Rev. B 1/12 6 7050ES RIESGO DE DESCARGA ELÉCTRICA. PRUEBE EL ENCHUFE GFCI ANTES DE CADA USO. 1. ENCHUFE EL GFCI A LA TOMA DE CORRIENTE. LA LUZ DEL INDICADOR DEBE ENCENDERSE. 2. PRESIONE EL BOTÓN DE PRUEBA. LA LUZ DEL INDICADOR DEBE APAGARSE. 3. PRESIONE Y SUELTE EL BOTÓN DE REINICIAR. LA LUZ DEL INDICADOR DEBE ENCENDERSE. Si las pruebas anteriores fallan, NO UTILICE ESTE VENTILADOR CON GFCI. Llame al 800-233-0268, de lunes a viernes, de 8:00 a.m. a 5:00 p.m. hora del Este. NO SE RECOMIENDA EL USO DE UN ADAPTADOR DE TRES A DOS CLAVIJAS. LA CONEXIÓN INADECUADA PUEDE CREAR EL RIESGO DE ELECTROCUCIÓN. NO SE PERMITE EL USO DE DICHOS ADAPTADORES EN CANADA. Este enchufe es una función de seguridad. Contiene un dispositivo de seguridad (fusible) que no se debe quitar. Deseche el producto si el enchufe está dañado. Para reducir el riesgo de incendios, descargas eléctricas y lesiones personales, no remueva, reemplace, repare ni altere el enchufe original suministrado. Si el ventilador no funciona adecuadamente, puede deberse al dispositivo de seguridad incorporado en este enchufe. Llame al 800-233-0268, de lunes a viernes, entre las 8:00 a.m. y 5:00 p.m. hora del Este. Si no tiene la etiqueta de advertencia del enchufe o está dañada, llame al número gratuito para obtener una etiqueta de reemplazo. 8. NUNCA opere el ventilador con un cable o enchufe dañado, cuando tenga una falla o cuando se haya caído o dañado en alguna manera. Este enchufe GFCI no protege contra descargas eléctricas debido al contacto con los conductores del circuito o una falla en cualquier cable que suministre corriente a este dispositivo. No utilice un cable de extensión entre el cable GFCI del ventilador y la toma de corriente. El Servicio al cliente está disponible en el 800-233-0268, de lunes a viernes, de 8am a 5pm, para responder a sus preguntas. Continúa en la página 8 Rev. B 1/12 7 7050ES-
 1
1
-
 2
2
-
 3
3
-
 4
4
-
 5
5
-
 6
6


Lasko Products Model 7050 Manual de usuario
- Tipo
- Manual de usuario
- Este manual también es adecuado para
En otros idiomas
Documentos relacionados
Otros documentos
-
Lasko 7050 Manual de usuario
-
-
Lasko 4305 Guía del usuario
-
NAD D 7050 El manual del propietario
-
EGO FN1800 Manual de usuario
-
 Cozy Breeze FS45-A1Z Guía de instalación
-
Lasko 2535 Guía del usuario
-
-
-
