Kenmore Elite 66561689101 El manual del propietario
- Categoría
- Microondas
- Tipo
- El manual del propietario
Este manual también es adecuado para

E L ! T
ULTRA WAVETMMicrowave Hood Combination
Combinacibn Microondas Campana
de ULTRA WAVETM
Models/Modelos 665.61682
665.61689
665.61684
665.61683
;:iiii_iiiiiiiiiiiii_¸¸
4619-652-60641/8183956 Sears, Roebuck and Co., Hoffman Estates, IL 60179 www.sears.com

Table of
Contents
Warranty .............................................................. 2
We Service What We Sell .................................. 3
Microwave Oven Safety .................................... 4
Getting to Know Your
Microwave Oven ................................................ 7
How your Kenmore ULTRA WAVE TM
microwave hood combination works .............. 7
Radio interference ........................................... 7
Testing your microwave oven .......................... 8
Testing your dinnerware or cookware ............. 8
Operating tips .................................................. 8
Electrical connection ....................................... 8
Microwave oven features ................................ 9
Control panel features ................................... 10
Using the cooking rack ................................. 13
Using the exhaust fan ................................... 13
Using the cooktop/countertop light .............. 14
Setting the clock ........................................... 14
Using the kitchen timer ................................. 15
Using ADD ONE MINUTE .............................. 16
Changing preset cooking times .................... 16
Microwave Oven Use ....................................... 17
Cooking at high cook power ......................... 17
Cooking at different cook powers ................. 18
Cooking in stages ......................................... 20
Progress Bar .................................................. 21
Using AUTO COOK ....................................... 22
Using AUTO REHEAT .................................... 23
Using ULTRA DEFROST TM ............................ 24
ULTRA DEFROST TM chart ............................. 25
Defrosting tips ............................................... 27
Using BREAD DEFROST ............................... 28
Using SOFTEN .............................................. 28
SOFTEN chart ............................................... 28
Using MELT ................................................... 29
MELT chart .................................................... 29
Using BEVERAGE ......................................... 29
Using SURE SIMMER ................................... 30
Sensor Cooking ............................................ 31
Using HOLD WARM ...................................... 32
Microwave Oven Care ..................................... 33
Installing and caring for filters ....................... 34
Replacing the cooktop and oven lights ........ 35
Cooking Guide ................................................. 36
Questions and Answers .................................. 38
Troubleshooting ............................................... 39
Service .............................................. Back Cover
Microwave
Hood
Combination
Warranty
FULL ONE-YEAR WARRANTY ON
MICROWAVE HOOD COMBINATION
For one year from the date of purchase, if this
Kenmore Microwave Hood Combination fails due to
a defect in material or workmanship, Sears will
repair it free of charge.
FULL FIVE-YEAR WARRANTY ON THE
MAGNETRON
For five years from the date of purchase, if the
magnetron in this Kenmore Microwave Hood
Combination fails due to a defect in material or
workmanship, Sears will repair it free of charge.
The above warranty coverage applies only to
Microwave Ovens which are used for private
household purposes.
WARRANTY SERVICE IS AVAILABLE BY SIMPLY
CONTACTING THE NEAREST SEARS STORE OR
SERVICE CENTER IN THE UNITED STATES.
This warranty applies only while this product is in use
in the United States.
This warranty gives you specific legal rights, and you
may also have other rights which vary from state to
state.
Sears, Roebuck and Co.,
Dept. 817WA,
Hoffman Estates, IL 60179
For service, please reference the service
numbers on the back page of this manual.
Please record your model's
information.
Whenever you call to request service for your appli-
ance, you need to know your complete model number
and serial number. You can find this information on
the model and serial number label/plate (see
"Microwave oven features" in the "Getting to Know
Your Microwave Oven" section). Also, record the other
information shown below.
Model Number
Serial Number
Purchase Date

We Service What We Sell
Your purchase has added value because you can depend on Sears HomeCentral®, for service. With over
12,000 trained repair specialists and access to over 4.2 million parts and accessories, we have the tools,
parts, knowledge and skills to ensure our pledge: We Service What We Sell.
Sears Maintenance Agreements
Your Kenmore appliance is designed, manufactured and tested to provide years of dependable operation. Yet
any major appliance may require service from time to time. The Sears Maintenance Agreement offers you an
outstanding service program, affordably priced.
The Sears Maintenance Agreement
- Is your way to buy tomorrow's service at today's price.
- Eliminates repair bills resulting from normal wear and tear.
- Provides for non-technical and instructional assistance.
- Even if you don't need repairs, provides an annual Preventive Maintenance Check, at your request, to ensure
that your appliance is in proper running condition.
Some limitations apply. For more information, call 1-800-827-6655
Here's a comparative Warranty and Maintenance Agreement chart showing you the benefits of Sears
Microwave Oven Service.
YEARS OF OWNERSHIP COVERAGE 1ST YR. 2ND YR. THRU 5TH YR.
Replacement of defective parts other than magnetron W MA
Replacement of magnetron W W
Annual preventive maintenance check at your request MA MA
W - WARRANTY
MA - MAINTENANCE AGREEMENT
Contact your Sears salesperson or local Sears Service Center today and purchase a Sears Maintenance
Agreement.
Keep this book and the sales slip together for future reference.

Microwave Oven Safety
Your safety and the safety of others are very important.
We have provided many important safety messages in this manual and on your appliance. Always read and
obey all safety messages.
This is the safety alert symbol.
This symbol alerts you to potential hazards that can kill or hurt you and others.
All safety messages will follow the safety alert symbol and either the word "DANGER" or
"WARNING." These words mean:
You can be killed or seriously injured if you don't
immediately follow instructions.
You can be killed or seriously injured if you don't
follow instructions.
All safety messages will tell you what the potential hazard is, tell you how to reduce the chance of injury,
and tell you what can happen if the instructions are not followed.
IMPORTANT SAFETY INSTRUCTIONS
When using electrical appliances basic safety precautions should be followed, including the following:
WARNING: To reduce the risk of burns, electric
shock, fire, injury to persons, or exposure to
excessive microwave energy:
• Read all instructions before using the microwave
oven.
• Read and follow the specific "PRECAUTIONS TO
AVOID POSSIBLE EXPOSURE TO EXCESSIVE
MICROWAVE ENERGY" found in this section.
• The microwave oven must be grounded. Connect
only to properly grounded outlet. See
"GROUNDING INSTRUCTIONS" found in this
section and in the provided installation instructions.
• Install or locate the microwave oven only in
accordance with the provided Installation
Instructions.
• Some products such as whole eggs in the shell
and sealed containers - for example, closed glass
jars - may explode and should not be heated in
the microwave oven.
• Use the microwave oven only for its intended use
as described in this manual. Do not use corrosive
chemicals or vapors in the microwave oven. This
type of oven is specifically designed to heat, cook,
or dry food. It is not designed for industrial or
laboratory use.
• As with any appliance, close supervision is
necessary when used by children.
• Do not operate the microwave oven if it has a
damaged cord or plug, if it is not working properly,
or if it has been damaged or dropped.
• The microwave oven should be serviced only by
qualified service personnel. Call an authorized
service company for examination, repair, or
adjustment.
• See door surface cleaning instructions in the
"Microwave Oven Care" section.
• To reduce the risk of fire in the oven cavity:
- Do not overcook food. Carefully attend the
microwave oven if paper, plastic, or other
combustible materials are placed inside the oven
to facilitate cooking.
- Remove wire twist-ties from paper or plastic bags
before placing bags in oven.
- If materials inside the oven should ignite, keep
oven door closed, turn oven off, and disconnect
the power cord, or shut off power at the fuse or
circuit breaker panel.
- Do not use the cavity for storage purposes. Do
not leave paper products, cooking utensils, or
food in the cavity when not in use.
• Suitable for use above both gas and electric
cooking equipment.
SAVE THESE INSTRUCTIONS

IMPORTANT SAFETY INSTRUCTIONS
• Intended to be used above ranges with maximum
width of 36 inches.
• Clean Ventilating Hoods Frequently - Grease
should not be allowed to accumulate on hood or
filter.
• Oversized foods or oversized metal utensils
should not be inserted in the microwave oven as
they may create a fire or risk of electric shock.
• Do not clean with metal scouring pads. Pieces can
burn off the pad and touch electrical parts involv-
ing a risk of electric shock.
• Do not use paper products when appliance is
operated in the "TOP BROWN" mode (on models
with this feature).
• Do not store any materials other than manufactur-
er's recommended accessories in this oven when
not in use.
• Do not store anything directly on top of the
microwave oven when the microwave oven is
in operation.
• When flaming foods under the hood, turn the fan on.
• Use care when cleaning the vent-hood filter.
Corrosive cleaning agents, such as lye-based oven
cleaners, may damage the filter.
• Do not cover or block any openings on the
microwave oven.
• Do not store this microwave oven outdoors.
Do not use the microwave oven near water - for
example, near a kitchen sink, in a wet basement, or
near a swimming pool, and the like.
• Do not immerse cord or plug in water.
• Keep cord away from heated surfaces.
• Do not let cord hang over edge of table or counter.
• Do not mount over a sink.
• Do not cover racks or any other part of the oven with
metal foil. This will cause overheating of the oven.
SAVE THESE INSTRUCTIONS
PRECAUTIONS TO AVOID POSSIBLE EXPOSURE TO
EXCESSIVE MICROWAVE ENERGY
(a) Do not attempt to operate this oven with the
door open since open-door operation can result
in harmful exposure to microwave energy. It is
important not to defeat or tamper with the safety
interlocks.
(b) Do not place any object between the oven front
face and the door or allow soil or cleaner residue
to accumulate on sealing surfaces.
(c) Do not operate the oven if it is damaged. It is
particularly important that the oven door close
properly and that there is no damage to the:
(1) Door (bent),
(2) Hinges and latches (broken or loosened),
(3) Door seals and sealing surfaces.
(d) The oven should not be adjusted or repaired by
anyone except properly qualified service
personnel.

ELECTRICAL REQUIREMENTS
Observe all governing codes and ordinances. A
120 Volt, 60 Hz, AC only, 15- or 20-amp fused
electrical supply is required. (A time-delay fuse or
circuit breaker is recommended.) It is recommend-
ed that a separate circuit serving only this appli-
ance be provided.
Electrical Shock Hazard
Plug into a grounded 3 prong outlet.
Do not remove ground prong.
Do not use an adapter.
Do not use an extension cord.
Failure to follow these instructions can
result in death, fire, or electrical shock.
GROUNDING INSTRUCTIONS
* For all cord connected appliances:
The microwave oven must be grounded. In the
event of an electrical short circuit, grounding
reduces the risk of electric shock by providing an
escape wire for the electric current. The microwave
oven is equipped with a cord having a grounding
wire with a grounding plug. The plug must be
plugged into an outlet that is properly installed and
grounded.
WARNING: Improper use of the grounding plug
can result in a risk of electric shock.
Consult a qualified electrician or serviceman if the
grounding instructions are not completely under-
stood, or if doubt exists as to whether the microwave
oven is properly grounded.
Do not use an extension cord. If the power supply
cord is too short, have a qualified electrician or
serviceman install an outlet near the microwave oven.
,, For a permanently connected appliance:
The microwave oven must be connected to a
grounded, metallic, permanent wiring system, or an
equipment grounding conductor should be run with
the circuit conductors and connected to the
equipment grounding terminal or lead on the
microwave oven.
SAVE THESE INSTRUCTIONS

Getti to Kn
Microwave Oven
Your
This section discusses the concepts behind microwave cooking. It also shows you the basics you need
to know to operate your microwave oven. Please read this information before you use your oven.
HOW YOUR KENMORE ULTRA WAVE TMMICROWAVE
HOOD COMBINATION WORKS
Conventional microwave ovens operate on HIGH
power only. To achieve a 50% power level in a conven-
tional microwave oven, the oven operates 50% of the
time at HIGH power and 50% of the time OFE
Microwave energy is not hot. It causes food to make
its own heat, and it's this heat that cooks the food.
Microwaves are like TV waves, radio waves, or
light waves. You cannot see them, but you can see
what they do.
A magnetron in the microwave oven produces
microwaves. The microwaves move into the oven
where they contact food as it turns on the turntable.
Magnetron
/
/
0% 0% 0%
The ULTRA WAVE Inverter Microwave System delivers
power continuously, to defrost more evenly and mini-
mize overcooking of food and messy food spatters.
'\ /
i
Oven cavity
Metal floor Glass turntable
The glass turntable of your microwave oven lets
microwaves pass through. Then they bounce off a
metal floor, back through the glass turntable, and
are absorbed by the food.
Microwaves pass through most glass, paper, and
plastics without heating them so food absorbs the
energy. Microwaves bounce off metal containers so
food does not absorb the energy.
ULTRA WAVETMInverter Microwave System gives you
better microwave cooking performance for defrosting,
cooking and reheating foods quickly and uniformly.
The ULTRA WAVE Inverter Microwave System is
proven technology that delivers a constant stream of
microwave power - true high, medium and low power.
The ULTRAWAVETMInverter Microwave System fea-
tures Sensor Cooking functions. A humidity sensor in
the oven cavity detects moisture and humidity emitted
from food as it heats. The sensor adjusts cooking times
to various types and amounts of food. Sensor cooking
takes the guesswork out of microwave cooking.
,,Always cook food for the shortest cooking time
recommended. Check to see how the food iscooking.
,,To help make sure the food is evenly cooked, stir,
turn over, or rearrange the food about halfway
through the cooking time.
,, If you do not have a cover for a dish, use wax paper,
or microwave-approved paper towels or plastic wrap.
Remember to turn back a corner of the plastic wrap
to _ in. (6.35 to 12.7 mm) to vent steam during heating
or cooking.
RADIO NTERFERENCE
Using your microwave oven may cause interfer-
ence to your radio, TV, or similar equipment. When
there is interference, you can reduce it or remove it
by:
* Cleaning the door and sealing surfaces of the
,, Adjusting the receiving antenna of the radio or
television.
Moving the receiver away from the microwave oven.,
Plugging the microwave oven into a different outlet
so that the microwave oven and receiver are on
oven. different branch circuits.
7

TESTING YOUR MICROWAVE OVEN
TESTING YOUR DINNERWARE OR COOKWARE
Test dinnerware or cookware before using.
To test a dish, put it into the oven with 1 cup
(250 mL) of water beside it. Cook at 100% cook
power for one minute. If the dish gets hot and
water stays cool, do not use it. Some dishes
(melamine, some ceramic dinnerware, etc.)
absorb microwave energy, and may become too hot
to handle or may slow cooking times. Cooking in
metal containers not designed for microwave use
could damage the oven, as could containers with
hidden metal (twist-ties, foil lining, staples, metallic
glaze or trim).
OPERATING TIPS
,, Never lean on the door or allow a child to swing ,, Never cook or reheat a whole egg inside the
on it when the door is open.
,, Use hot pads. Microwave energy does not heat
containers, but the heat from the food can make
the container hot.
,, Do not use newspaper or other printed paper in
the oven.
,, Do not dry flowers, fruit, herbs, wood, paper,
gourds, or clothes in the oven.
,, Do not start a microwave oven when it is empty.
Product life may be shortened. If you practice
programming the oven, put a container of water in
the oven. It is normal for the oven door to look
wavy after the oven has been running for a while.
,, Do not try to melt paraffin wax in the oven.
Paraffin wax will not melt in a microwave oven
because it allows microwaves to pass through it.
,, Do not operate the microwave oven unless the
glass turntable is securely in place and can rotate
freely. The turntable can rotate in either direction.
Make sure the turntable is correct-side up in the
oven. Handle your turntable with care when
removing it from the oven to avoid possibly
breaking it. If your turntable cracks or breaks,
contact your dealer for a replacement.
* When you use a browning dish, the browning
dish bottom must be at least _0 in. (5 mm) above
the turntable. Follow the directions supplied with
the browning dish.
shell. Steam buildup in whole eggs may cause
them to burst, and possibly damage the oven.
Slice hard-boiled eggs before heating. In rare
cases, poached eggs have been known to
explode. Cover poached eggs and allow a stand-
ing time of one minute before cutting into them.
* For best results, stir any liquid several times
during heating or reheating. Liquids heated in
certain containers (especially containers shaped
like cylinders) may become overheated. The liquid
may splash out with a loud noise during or after
heating or when adding ingredients (coffee
granules, tea bags, etc.). This can damage the oven.
,, Microwaves may not reach the center of a roast.
The heat spreads to the center from the outer,
cooked areas just as in regular oven cooking. This
is one of the reasons for letting some foods (for
example, roasts or baked potatoes) stand for a
while after cooking, or for stirring some foods
during the cooking time.
,, Do not deep fry in the oven. Microwavable
utensils are not suitable and it is difficult to
maintain appropriate deep-frying temperatures.
,, Do not overcook potatoes. At the end of the
recommended cooking time, potatoes should be
slightly firm because they will continue cooking
during standing time. After microwaving, let
potatoes stand for 5 minutes. They will finish
cooking while standing.
ELECTRICAL CONNECTION

MICROWAVE OVEN FEATURES
9
2 3
74 65 8 6
Your microwave oven is designed to make your
cooking experience as enjoyable and productive
as possible. To help get you up and running
quickly, the following is a list of the oven's basic
features:
1. Door Handle. Pull to open door.
2. Door Safety Lock System. The oven will not
operate unless the door is securely closed.
3. Window with Metal Shield. Shield prevents
microwaves from escaping. It is designed as a
screen to allow you to view food as it cooks.
4. Cooking Rack (PN 8184052). Use for extra
space when cooking in more than one con-
tainer at the same time.
5. Glass Turntable (PN 4393751) (not shown). In-
cluded in oven cavity - see below for installa-
tion instructions. This turntable turns food as it
cooks for more even cooking. It must be in the
oven during operation for best cooking results.
The turntable is sunken into the cavity floor to
give you more cooking space and better cook-
ing results.
• Remove tape from hub PN 4393754).
Raised,
• Place the support
(PN 4393752) on the
cavity bottom.
• Place the turntable on
the hub. Make sure the
raised, curved lines in
the center of the
turntable bottom are
between the three
"spokes" of the hub.
6. Grease Filters. Included in oven cavity.
7. Cooktop/Countertop Light. Turn on to light your
cooktop or countertop or turn on as a night light.
8. Cooking Guide Label. Use as a quick reference
for Auto Cook, Auto Reheat, ULTRA DEFROST TM,
and Sensor Cook settings.
9. Exhaust Fan and Cooktop Light Switches.
10. Control Panel. Touch the pads on this panel to
perform all functions.
11. Vent Grille.
12. Oven Cavity Light.
13. Microwave Inlet Cover.
14. Model and Serial Number Plate.
15. 3M Charcoal Filter. Located behind the grille.
• The rollers (PN 4393753) on the support should fit
inside the ridge on the bottom of the turntable.
• The turntable turns both clockwise and counter-
clockwise. This is normal.
9

CONTROL PANEL FEATURES
1. Display. This display includes a clock and
indicators to tell you the time of day, cooking
time settings, and cooking functions you chose.
2. AUTO REHEAT. Touch this pad to reheat
microwavable foods without entering times and
cook powers.
3. DINNER PLATE. Touch this pad to heat a plate of
food without entering a cook power or time.
4. AUTO COOK. Touch this pad to cook
microwavable foods without entering times and
cook powers.
5. POPCORN. Touch this pad when popping
popcorn in your microwave oven.
6. ULTRA DEFROST TM. Touch this pad to defrost
frozen foods without entering times and cook
powers.
7. BEVERAGE. Touch this pad to heat 1 or 2
8-ounce (250 mL) cups of a beverage.
8. BREAD DEFROST. Touch this pad to defrost
frozen bread without entering a cook power or
time.
9. SOUP. Touch this pad to heat 1 to 4 cups
(250 mL to 1 L) of soup without entering a cook
power or time.
10. FROZEN VEGETABLE. Touch this pad to cook 1
to 4 cups (250 mL to 1 L) of a frozen vegetable,
without entering a cook power or time.
11. FROZEN ENTREE. Touch this pad to cook a 10- to
20-ounce (284 to 567 g) frozen entree without
entering a cook power or time.
12. FRESH VEGETABLE. Touch this pad to cook
1 to 4 cups (250 mL to 1 L) of a fresh vegetable,
without entering a cook power or time.
13. BAKED POTATO. Touch this pad to bake 1 to 4
potatoes, without entering a cook power or time.
14. SOFTEN. Touch this pad to soften ice cream,
cream cheese, butter or frozen juice.
15. HOLD WARM. Touch this pad to keep hot,
cooked foods warm in your microwave oven.
HOLD WARM can be used by itself, or it can
automatically follow a cooking cycle.
MELT. Touch this pad to melt chocolate, cheese,
butter or marshmallows.
16.
17.
18.
SURE SIMMER. Touch this pad to simmer soups,
casseroles, stews and other liquid foods.
ADD ONE MINUTE. Touch this pad to cook for 1
minute, at 100% cook power, or to add extra min-
utes to your cooking cycle at the set cook power.
19. Clock. Touch this pad to enter the correct
time of day.
20. KITCHEN TIMER. Touch this pad to set or cancel
the Kitchen Timer.
21.
22.
Number pads. Touch Number pads to enter
cooking times, cook powers, quantities, weights,
or food categories.
COOK TIME. Touch this pad followed by Number
pads to set a cooking time.
®
G
®....
G
......................
@
v
ON/OFF 5SPEEDS H_ED_J_T/OFF
23. POWER. Touch this pad after the cooking time
has been set, followed by a Number pad to set
the amount of microwave energy released to
cook the food. Also touch this pad to lengthen
or shorten a preset cooking time.
24. TURNTABLE ON/OFF. Touch this pad to turn
your turntable on or off.
25. START/ENTER. Touch this pad to start a function.
26. OFF/CANCEL. Touch this pad to erase an
incorrect command, cancel a program during
cooking, or to clear the display.
(Exhaust Fan) ON/OFF. Touch this pad to turn the
fan on or off.
27.
28.
29.
(Exhaust Fan) 5 SPEEDS. Touch this pad to
choose one of 5 fan speeds.
(Light) HIGHIMEDlUMINIGHTIOFF. Touch this pad
to turn the light on high, medium, or off, or the night
light on or off.
NOTES:
• If you have entered all settings for a function but do
not touch START/ENTER in 5 seconds, the START?
indicator light will show.
• If you choose a function but do not touch another
command pad within 1 minute, the display returns to
the time of day and you have to start over.
10

CONTROL PANEL FEATURES (CONT.)
Your microwave oven comes with audible
signals that can guide you when setting and
using your oven:
,, E_ A programming tone will sound each
time you touch a pad.
,, E_ one long tone signals the end of a
Kitchen Timer countdown.
• I-_IE_E_I-_I Four tones signal the end
of a cooking cycle.
• I_lE_ Two quick, short tones sound once
every minute for the first 15 minutes after an
end-of-cooking signal as a reminder if the
food has not been removed from the oven.
,, I-;_1;_1 Two quick, short tones will sound
while entering and exiting from a hidden fea-
ture (for example, Child Lock).
• I-;_F_E_ Three tones sound if you have
made an incorrect entry.
To disable the programming tone:
TOUCH
G
and hold for 5 seconds
To turn the programming tone back on:
TOUCH
G
and hold for 5 seconds
To disable all audible signals except the
end-of-timer signal:
TOUCH
and hold for 5 seconds
To turn signals back on:
TOUCH
and hold for 5 seconds
You can stop the oven during a cycle by opening
the door. The oven stops heating and the fan stops,
but the light stays on. To restart cooking, close the
door and
TOUCH
If you do not want to continue cooking:
,, Close the door and the light goes off.
OR
TOUCH
NOTE: Before setting a function, touch
OFF/CANCEL to make sure no other function is on.
If a sensor cooking function is interrupted while
"SENSE" is displayed, the oven will return to stand-
by mode.
:. ©. O :: OO'
When heating plates of food with a cook time that
you set, you can heat two 11-in. (28 cm) plates side
by side or one dish larger than the turntable. You can
heat 2 more plates on the Cooking Rack for a possi-
ble total of 4 plates. For best results, halfway
through cooking turn the plates halfway around until
the food in the front is in the back. Do the same
when heating a larger (9- to 13-in. [23 to 33 cm])
casserole. When heating 4 dinner plates turn as de-
scribed above and switch the top plates with the
bottom plates.
To heat 2 bottom plates together or one larger
dish, the turntable should not be
turning. You can shut the turntable
off by touching TURNTABLE ON/OFF.
If you touch TURNTABLE ON/OFF
before starting to set the cooking function, your oven
will prompt you to enter a cooking time without you
needing to touch COOK TIME. Your turntable will be
turned back on when cooking is over or when you
touch OFF/CANCEL
NOTE: You cannot turn off the turntable when using
an "auto" function.
NOTE: Two tones will sound when audible signals
are turned on or off. This will work only when the
oven is not performing some other function.
11

iiii!!iii!iiiii!_iii_iiiiiii_il!!ii?::!ii!liiiiiiii;:ii!'iI!!iiill!i!iiiiiililill'_ii!!iiiii_"iiii_iiiiiiiiiiiill_liiiiii_i i!_!iiiii_iiii!liii_iiiiii_iiiiiliiiiiii"_ii!_ii_!i!ii:iiii!_ii_iiiii!iiiiiiiiiiiill
CONTR()L PANEL FEATURES (CONT.)
The Child Lock locks the control panel so
children cannot use the microwave oven when
you do not want them to. This will work only when
the oven is not performing some other function.
To lock the control panel:
TOUCH
and hold for 5 seconds
Two tones will sound and i_ will appear on
the display. When the control panel is locked,
3 tones will sound and LOCK will appear when
you touch any pad except for (Exhaust Fan)
ON/OFF, (Exhaust Fan) 5 SPEEDS and (Light)
ON/HIGH/MEDIUM/NIGHT/OFR
To unlock the control panel:
TOUCH
and hold for 5 seconds
Two tones will sound and I_ will be cleared from
the display.
You can set your microwave oven to display your com-
mands as you enter them without turning the magnetron
on. This feature helps you learn to use your oven without
actually cooking food. This will work only when the oven
is not performing some other function.
To set the demo/learning feature:
TOUCH
and hold for 5 seconds
Two tones will sound and a small "d" will appear
on the display.
To cancel the demo/learning feature:
TOUCH
and hold for 5 seconds
Two tones will sound and the small "d" will
disappear from the display.
12

TheCookingRackgivesyouextraspacewhencook-
inginmorethanonecontaineratthesametime.
Ifyouneedareplacementrack,youcanorder
onefromyourSearsServiceCenter.Please
referencetheservicenumbersonthebackpage
ofthismanual.Makesuretohaveyourmodel
numberwhenordering.
USING THE COOKING RACK
NOTES:
" Use oven mitts to remove items from microwave
oven.
,, Do not store the metal rack in the oven. Arcing
and damage to the oven could result if someone
accidentally starts the oven.
,, Do not operate the oven with the metal rack
stored on the floor of the oven. Damage to the
interior finish will result.
Insert the rack securely into the rack supports ,, Use rack only in the microwave oven.
on the side walls of ,, Do not use rack with browning dish.
the oven. ,, Do not let food container on rack touch the top
or sides of the oven.
,, Do not cook foods directly on rack. Put them in
microwave-safe containers first.
,, Do not place a metal cooking container on rack.
,, Only use the Cooking Rack when cooking at
more than one level.
,, Remove Cooking Rack before placing package
of popcorn in oven.
USING THE EXHAUST FAN
The two pads on the bottom left of the control
panel control the 5-speed exhaust fan.
1. Touch (Exhaust Fan) ON/OFR
TOUCH
O
0N/0FF
(once)
2. Choose fan speed. TOUCH
NOTE: If the temperature from the range or
cooktop below the oven gets too hot, the
exhaust fan in the vent hood will automatically
turn on at the HIGH setting to protect the oven.
It may stay on up to an hour to cool the oven.
When this occurs, the (Exhaust Fan) ON/OFF
pad will not turn the fan off.
A
V
5 SPEEDS
3. Turn off fan when desired. TOUCH
O
0N/0FF
,J
13

ii!!!i:ii_i_!i:_:_:_:_:iii!_iif!¸i_;il!iiiiiili !!!i!iiii_ _iiiiii_iiiil!iii_ii:iiiiiiii!:i'iii!iiii!!;!;ii_:iiii!i!i!i!ii!ii_i:ii'_!_ii!iJi!ii_i;i_i_!_iiiiiiii
USING THE COOKTOP/COUNTERTOP LIGHT
The pad on the bottom right of the control panel
controls the cooktop/countertop light.
1. Turn on light.
2. Turn off light when desired.
TOUCH
O
C>
(once for regular light, twice for night light)
TOUCH
C>
_G._G.T_ (1 or 2 times, depending on light setting)
SETTING THE CLOCK
When your microwave oven is first plugged in, or
after a power failure, the display will flash ":'. If a
time of day is not set, ":" will flash until you touch
any pad.
NOTES:
,, Ifyou touch in an invalidtime and touch the CLOCK
symbol, 3 tones willsound. Enterthe correct time.
,, Ifyou touch OFF/CANCEL while settingthe clock, the
display will show the last time of day set.
,, Toturn off the clock, touch the Clock symbol, Number
pad 0, and the Clock symbol again.The set time will
disappear and ":" will show on the display.
1. Touch (_). TOUCH YOU SEE
2. Enter the time of day.
Example for 12:00:
TOUCH
G
G
YOU SEE
3. Complete your entry.
TOUCH YOU SEE
G
OR
14

USING THE KITCHEN TIMER
You can use your microwave oven as a kitchen NOTE: The oven can operate while the Kitchen Timer
timer. Use the Kitchen Timer for timing up to is in use. To see the Kitchen Timer while the oven is
99 minutes, 99 seconds, cooking, touch KITCHEN TIMER.
1. Touch KITCHEN TIMER.
TOUCH YOU SEE
2. Enter the time to be counted down.
Example for 1 minute, 30 seconds:
NOTE: If you enter more than 4 digits, the first
4 digits will disappear and the following digit(s)
will appear on the right side as you enter them.
TOUCH YOU SEE
3. Start the countdown.
NOTE: If you do not do this step within 5
seconds of doing Step 2, "START?" will appear.
You then have 1 minute to touch KITCHEN
TIMER or START/ENTER before the display
returns to the time of day or the previous
cooking information displayed.
At the end of the countdown:
TOUCH
OR
YOU SEE
YOU SEE
(one long tone will sound)
While the Timer is the active display:
TOUCH YOU SEE
(time of day)
15

USING ADD ONE MINUTE
ADD ONE MINUTE lets you cook food for 1 minute
at 100% cook power or add an extra minute to your
cooking time cycle. You can also use it to extend
cooking time cycles in multiples of 1 minute, up to
99 minutes.
NOTES:
- To extend cooking time cycles in multiples of
1 minute, touch ADD ONE MINUTE repeatedly
during cooking.
- After closing the door, you can enter ADD ONE
MINUTE without having to touch START/ENTER.
- If you touch ADD ONE MINUTE during cooking,
the oven will cook at the currently selected cook
power. If you touch ADD ONE MINUTE after
cooking is over, the oven will cook at 100%
cook power. You can also change the cook power
after you touch ADD ONE MINUTE by touching
POWER, Number pads for the new cook power,
and START/ENTER.
- You can use ADD ONE MINUTE only for the cook
time function.
1. Make sure the food is in the oven.
2. Touch ADD ONE MINUTE.
Example for cooking for 1 minute:
TOUCH YOU SEE
CHANGING PRESET COOKING TIMES
If a preset cooking time is too long or too short, you
can lengthen or shorten the cooking time after
choosing AUTO COOK, AUTO REHEAT or ULTRA
DEFROST TM.
To lengthen cooking time:
TOUCH
once
YOU SEE
To shorten cooking time:
TOUCH
twice
(example for auto reheat)
YOU SEE
To reset to the original cooking time: TOUCH YOU SEE
@
three times
16

Microwave Oven Use
This section gives you instructions for operating each function. Please read these instructions carefully.
COOKING AT HIGH COOK POWER
1. Put your food in the oven and close the door.
2. Touch COOK TIME. TOUCH YOU SEE
3. Enter the cooking time.
Example for 1 minute, 30 seconds:
4. Start the oven.
At the end of the cooking time:
TOUCH
G
G
TOUCH
YOU SEE
YOU SEE
YOU SEE
You can change the cooking time any time
during cooking by repeating Steps 2, 3, and 4.
(four tones will sound)
17

COOKING AT DIFFERENT COOK POWERS
For best results, some recipes call for different cook
powers. The lower the cook power, the slower the
cooking. Each Number pad also stands for a
different percentage of cook power. Many
microwave cookbook recipes tell you by number,
percent, or name which cook power to use.
The following chart gives the percentage of cook
power each Number pad stands for, and the cook
power name usually used. It also tells you when to
use each cook power. Follow recipe or food package
instructions if available.
NOTE: Refer to a reliable cookbook for cooking times.
COOK POWER
10=100% of full power
(automatic)
9=90% of full power
8=80% of full power
NAME WHEN TO USE IT
High ,, Quick heating many convenience foods and
foods with high water content, such as soups
and beverages
,, Cooking small tender pieces of meat, ground
meat, poultry pieces, fish fillets, and most
vegetables
,, Heating cream soups
,, Heating rice, pasta, or stirrable casseroles
,, Cooking and heating foods that need a cook
power lower than high (for example, whole fish
and meat loaf)
7=70% of full power Medium-High ,, Reheating a single serving of food
6=60% of full power ,, Cooking sensitive foods, such as cheese and egg
dishes, pudding, and custards
,, Cooking nonstirrable casseroles, such as lasagna
5=50% of full power Medium ,, Cooking ham, whole poultry, and pot roasts
,, Simmering stews
4=40% of full power ,, Melting chocolate
,, Heating pastries
3=30% of full power Medium-Low, ,, Defrosting foods, such as bread, fish, meats,
Defrost poultry, and precooked foods
2=20% of full power ,, Softening butter, cheese, and ice cream
1=10% of full power Low ,, Taking chill out of fruit
NOTE: Once cook time has been entered, you can also use the POWER pad as a second Kitchen Timer
by entering "0" for the cook power. The oven will count down the cooking time you set without cooking.
18

COOKING AT DIFFERENT COOK POWERS (CONT.)
i................................................................................................................................................................................................................................................................................................................................................................................................................................................................................................................................................................................................................................................................................................................................................................................................................................................................................................................................................................................................................................................................................
1. Put your food in the oven and close the door.
2. Touch COOK TIME.
TOUCH YOU SEE
3. Enter the cooking time.
Example for 7 minutes, 30 seconds:
4. Set the cook power.
Example for 50% cook power:
5. Start the oven.
TOUCH
G
TOUCH
TOUCH
OR
{repeat until desired
cook power appears)
TOUCH
YOU SEE
YOU SEE
YOU SEE
YOU SEE
At the end of the cooking time:
You can change the cooking time or cook power
any time during cooking by repeating Steps 2, 3
and/or 4 and 5.
YOU SEE
(four tones will sound)
19

iiii!!i!iii_!i_ii:iiiiiii!i_i_iil!ili!iiiiiiiii!?Yllii!iiiii_!iiiiiii_'!iiii_'''iiiiiiii_iiilli_iiiii¸;_iiiiiiiiii!'_!iiiiiii!iiiiiiii!i!_iiiiil!_ii_iiif?:,',:i!:!iiiiii!iiiI i
COOKING IN STAGES
For best results, some recipes call for one cook
power for a certain length of time, and another
cook power for another length of time. Your oven
can be set to change from one to another
automatically, for up to 3 stages.
You can set your chosen cook functions in any
order.
NOTE: You cannot Sensor Cook, ULTRA
DEFROST TM, Auto Cook or Auto Reheat with
stages.
1. Put your food in the oven and close the door.
2. Touch COOK TIME. YOU SEETOUCH
3. Enter the cooking time for the first stage.
Example for 7 minutes, 30 seconds:
TOUCH
G
G
YOU SEE
4. Set the cook power for the first stage. TOUCH YOU SEE
Example for 50% cook power:
TOUCH
OR
{repeat until desired
cook power appears)
YOU SEE
5. Repeat Steps 2, 3, and 4 to set the cooking time
and cook power for each additional stage.
20

COOKING IN STAGES (CONT.)
6. Start the oven. TOUCH
YOU SEE
After the first stage is over, the next stage(s)
will count down.
At the end of the cooking time:
(first stage, when cooking
with 2 stages)
YOU SEE
You can change cooking times or cook powers
for a stage any time after that stage starts by
repeating Steps 2, 3 and/or 4 and 5.
(four tones will sound)
PROGRESS BAR
The display contains a Progress Bar, which indi-
cates how far the Auto Cook functions have gone
and how much more the functions have to go. The
full length of the bar represents the estimated run-
ning time of the cooking cycle. The Progress Bar
advances line by line during a cycle.
The 12 segments on the Progress Bar give an
estimate of progress during cooking and show the
ratio of the time remaining on Auto Cook functions.
At the end of the cooking cycle, all 12 segments
will be lighted.
NOTE: The Progress Bar appears with Auto Cook,
ULTRA DEFROST TM, Auto Reheat, Soften and Melt,
but not with Manual Cooking functions.
21

iii+i!!i!+++iii++!i++++i+i+ i :I!iii!iiiiii+iii!+ii?+!Yllii!iiiii !iiiiii?++!iii+i!++ii!ili+iiiii+! Iii?iii+ii; iii ii:!+++il;+iii++++iii!iiiiii++ii!i! +++iiiiil! i++ +iiii:ii+i+ i+i!!iiiI i
USING AUTO COOK
You can cook microwavable foods just by choosing
a category and quantity. AUTO COOK has preset
times and cook powers for 7 categories (see chart
below).
To use AUTO COOK, follow the steps below:
1. TOUCH @
once
YOU SEE
2. Touch AUTO COOK 1 to 7 times to choose the
type of food.
Example
for canned
vegetables
once
OR
Touch a Number pad to choose the type of food.
Example
for canned
vegetables
YOU SEE
Example
for canned
vegetables
3. Touch a Number pad to enter the quantity.
Example
for 1 cup (250 mL)
YOU SEE
Example
for 1 cup (250 mL)
4. TOUCH
YOU SEE
(countdown time
may vary)
NOTES:
" AUTO COOK will prompt you to choose a
quantity. You then have 1 minute to enter a
quantity and to touch START/ENTER. If you do
not do so, AUTO COOK will be canceled.
- If you touch AUTO COOK 8 times, the display
returns to the Canned Vegetables setting.
- If you need more or less time, do not touch
AUTO COOK again. Touch POWER before you
touch START/ENTER. (See "Changing preset
cooking times" in the "Getting to Know Your
Microwave Oven" section.)
- When cooking bacon, keep in mind that
differences in the amount of fat, meat, thickness,
and curing process will affect how bacon is
cooked. Also, regular sliced bacon averages
about 16 slices per pound (454 g).
This chart shows you how to choose a type of food and the amounts you can choose for each type.
TOUCH OR TOUCH AMOUNTS YOU
FOOD AUTO COOK* NUMBER PAD CAN CHOOSE
Canned Vegetables 1 time 1 1 to 4 cups (250 mL to 1 L)
Poached Chicken Breasts 2 times 2 to 4 pieces
Rice (sensor) 3 times 3 0.5 to 2 cups** 125 mL to 500 mL)
Cereal 4 times 4 1 to 4 servings
*You must touch AUTO COOK once before choosing the food type. **Because this food is cooked by the sensor, you don't need to enter a quantity.
The amount shown here is the amount you can cook. After you choose the food type and touch START/ENTER, "SENSE" appears on the display. Also,
the sensor needs 2 minutes, 30 seconds to warm up after the oven is connected to power or after a power failure. If you start sensor cooking during
the warm-up, "SENSE" shows on the display until the warm-up is over. Microwave energy will not be turned on until the sensor is warm.
22

USING AUTO REHEAT
You can reheat microwavable foods just by
choosing a category and quantity. AUTO REHEAT
has preset times and cook powers for 4 categories
(see chart below).
To use AUTO REHEAT, follow the steps below:
1. Touch
once
You see
2. Touch AUTO REHEAT 1 to 4 times to choose the
type of food.
Example for
casserole
twice
OR
Touch a Number pad to choose the type
of food.
Example for
casserole
YOU SEE
Example for
casserole
3. Touch a Number pad to enter the quantity.
Example for 1cup (250 mL)
You see
Example for
cup (250 mL)
4. Touch
YOU SEE
(countdown
time may
vary)
NOTES:
* AUTO REHEAT will prompt you to choose a
quantity. You then have 1 minute to enter a
quantity and to touch START/ENTER. If you do
not do so, AUTO REHEAT will be canceled.
,, If you touch AUTO REHEAT 5 times, the display
returns to the Pizza setting.
,, If you need more or less time, do not touch
AUTO REHEAT again. Touch POWER before you
touch START/ENTER. (See "Changing preset
cooking times" in the "Getting to Know your
Microwave Oven" section.)
,, When reheating a large (4 oz [113 g]) muffin or
bagel use the 2-piece setting. The 1-piece set-
ting bakes 1 regular-size muffin or bagel, or 2
small dinner rolls.
)_ iii
This chart shows you how to choose a type of food and the amounts you can choose for each type.
TOUCH TOUCH
Pizza**(sensor) 1 time 1 1 to 3 slices, 5 oz (142 g) each
Casserole 2 times 2 1 to 4 cups (250 mL to 1 L)
Sauce**(sensor) 3 times 3 1 to 4 cups (250 mL to 1 L)
Baked Goods 4 times 4 1 to 6 pieces, 2 oz (57 g) each
i
* You must touch AUTO REHEAT once before choosing the food type.
** After you choose the food type and touch START/ENTER, "SENSE" appears on the display. Also, the sensor needs 2 minutes,
30 seconds to warm up after the oven is connected to power or after a power failure. If you start sensor cooking during the warm-
up, "SENSE" shows on the display until the warm-up is over. Microwave energy will not be turned on until the sensor is warm.
23

USING ULTRA DEFROST TM
You can defrost food by choosing a category and
setting a weight. ULTRA DEFROSTTM can be used
only for defrosting of frozen foods in the categories of
Meat, Poultry or Fish. For defrosting foods or weights
not listed, manually set a defrosting time using 30%
power. ULTRA DEFROSTTM has preset times and
cook powers for 3 categories (see following chart).
To use ULTRA DEFROST TM, follow the steps below:
1. Touch the ULTRA DEFROST TM side of pad
to enter the ULTRA DEFROST TM function.
-_RA I BR_D__
DEFROST J
once
2. Continue to touch ULTRA DEFROST TM
to select food class.
3. Touch Number pad(s) to enter the
weight. Input the correct weight.
4. Touch START. The estimated defrost
time is displayed. The time display
begins counting down.
If the weight has been set too low or too
high, when you touch START or POWER,
a warning beep will sound and the dis-
play will show RETRY for 2 seconds.
Then the minimum/maximum weight
allowed will be displayed.
(See the following chart.)
This chart shows you how to choose a type of food and the weights you can set for each type.
TOUCH OR TOUCH WEIGHTS YOU CAN SET
FOOD ULTRA DEFROST TM* NUMBER PAD (tenths of a pound)
Meats once 1 .2 to 6.6 (91 g to 2994 g)
Poultry twice 2 .2 to 6.6 (91 g to 2994 g)
Fish 3 times 3 .2 to 4.4 (91 g to 1998 g)
You must touch ULTRA DEFROST TM once before choosing the food type.
NOTES:
• ULTRA DEFROST TM will prompt you to enter a weight. You then have 1 minute to enter a weight and to touch
START/ENTER. If you do not do so, ULTRA DEFROST TM will be canceled.
• If you enter a weight higher than the highest weight or lower than the lowest weight (0.2 lb.) allowed for your
food setting, 3 tones will sound and "RETRY" will appear on the display when you touch START/ENTER. Then
the maximum weight allowed will be displayed.
• If you touch ULTRA DEFROST TM 4 times, the display returns to the Meats setting.
• If you need more or less defrosting time, do not touch ULTRA DEFROST TM again. Touch POWER
before you touch START/ENTER. (See "Changing preset cooking times" in the "Getting to Know Your
Microwave Oven" section.)
• See the "ULTRA DEFROST TM chart" later in this section for defrosting directions for each food.
• To defrost items not listed in the "ULTRA DEFROST TM chart," use 30% cook power. Refer to a reliable cook-
book for defrosting information.
24

USING ULTRA DEFROST TM (cont.)
ii!_O___ ©O_t@_;:_i!!_ _:_OS_
• The shape of the package affects how quickly food will defrost. Shallow packages will defrost more quickly
than a deep block.
• As food begins to defrost, separate the pieces. Separated pieces defrost more evenly.
• Use small pieces of aluminum foil to shield parts of food such as chicken wings, leg tips, fish tails, or areas that
start to get warm. Make sure the foil does not touch the sides, top, or bottom of the oven.
ULTRA DEFROST TM CHART
FOOD SPECIAL INSTRUCTIONS
Beef Meat of irregular shape and large, fatty cuts of meat should have the
narrow or fatty areas shielded with foil at the beginning of a defrost cycle.
Do not defrost less than 1/4 Ib (113 g).
Do not defrost less than two 4 oz (113 g) patties.
Place on a microwavable roasting rack.
Ground Beef, Bulk
Ground Beef, Patties
Round Steak, Tenderloin Steak,
Pot Roast, Chuck Roast, Rib
Roast, Rolled Rump Roast
Stew Beef
Place in a microwavable baking dish.
Lamb
Cubes for Stew Place in a microwavable baking dish.
C hoPS(!! 2 thick).......................................................................P!ace on a mic!ow ava e!oasti n !ack: .................................................................................................................................................................................................................................................................................................................................................
Pork
Chops (1/2 in. [13 mm] thick), Place on a microwavable roasting rack.
Hot Dogs, Spareribs, Country-
Style Ribs, Loin Roast (Boneless),
Sausage, Links
Sausage, Bulk Place in a microwavable baking dish.
25

iiii!!_i!iT!_liliiii:iiiii!!i!jii_iiiiiiiiiliiiiiii"_ii!_ij_!i!ili_i!ii!:iiillliiiiiiili'_iiiii!!iiiii!_iiiiiii_i!iiiiiii!!!!!iiiii_iiiii_iill_l i
ULTRA DEFROST CHART TM (CONT.)
FOOD SPECIAL INSTRUCTIONS
Chicken
Whole
(up to 9-1/2 Ibs [4.3 kg])
Cut Up
Place chicken breast-side up on a microwavable roasting rack. Finish defrosting
by immersing in cold water. Remove giblets when chicken is partially defrosted.
Place on a microwavable roasting rack.
Finish defrosting by immersing in cold water.
Cornish Hens
Whole Place on a microwavable roasting rack. Finish defrosting by immersing in cold water.
Turkey
Breast Place on a microwavable roasting rack. Finish defrosting by immersing in cold water.
(under 6 Ibs [2.7 kg])
Fillets
Place in a microwavable baking dish. Carefully separate fillets under
cold water.
Steaks
Place in a microwavable baking dish. Run cold water over to finish defrosting.
Whole Place in a microwavable baking dish. Cover head and tail with foil; do
not let foil touch sides of microwave oven. Finish defrosting by
immersing in cold water.
Shell Fish
Crabmeat, Place in a microwavable baking dish.
Lobster Tails,
Shrimp, Scallops
26

DEFROSTING TIPS
• When using ULTRA DEFROST TM, you need to enter
the net weight (the weight of the food minus
the container). Enter the weight to the nearest
1/10 Ib (45 g).
• Only use ULTRA DEFROST TM for raw food.
ULTRA DEFROSTTM gives best results when the
food to be thawed is completely frozen. If the
food is partially defrosted, always set a lower
food weight (for a shorter defrosting time) to
prevent cooking the food.
You are probably used to food weights as being in
pounds and ounces that are fractions of a pound (for
example 4 ounces equals 1/4 pound). However, in
order to enter food weight in ULTRA DEFROSTTM,
you must specify pounds and tenths of a pound.
° For better results, a preset standing time is
included in the defrosting time. This may make the
defrosting time seem longer than expected. (For
more information on standing time, see the
"Microwave cooking tips" in the "Cooking Guide"
section.)
If the weight on the food package is in fractions of a
pound, you can use the following chart to convert the
weight to decimals.
DECIMAL WEIGHT
EQUIVALENT GRAM WEIGHT
.10
.20
.25
.30
.40
.50
.60
.70
.75
.80
.90
One-Quarter Pound
One-Half Pound
Three-Quarters Pound
45
91
113
136
181
227
272
318
34O
363
4O8
1.00 One Pound 454
27

USING BREAD DEFROST
You can use this feature for defrosting bread. The
feature works similarly to ULTRA DEFROST TM.
To use BREAD DEFROST, follow the steps below:
1. Touch the BREAD DEFROST side of
pad to enter the Bread Defrost function.
TRA I BR_D_
DEFROST
once
The display will ask you to enter the weight.
2. Touch number pad(s) to enter the
weight in pounds and tenths of a pound.
(See the following chart.)
BREAD
Large Muffin
1
3. Touch START. The estimated defrost
time is displayed. The time display
begins counting down.
4 Slices of Bread 0.2 lb. (91 g)
If the weight has been set too low or too high,
when you touch START or POWER, a warning
beep will sound and the display will show
RETRY for 2 seconds. Then the minimum/max-
imum weight allowed will be displayed.
USING SOFTEN
The oven uses low power to soften foods (butter, ...............................................................................................................................................................................................................................................................................................................................................................................................................................................................................................................
cream cheese, ice cream or frozen juice). See the 3, Select food to be softened.
following chart. (See the following chart.)
1. Place food in oven and close door. 4. Select amount.
SOFTEN CHART
easily mix with water.
28

USING MELT
The oven uses low power to melt foods (butter or
margarine, chocolate, marshmallows, or processed 3. Select food to be melted,
cheese food). See the following chart. (See the following chart.)
1. Place food in oven and close the door. 4. Select amount.
........................................................................................................................................................................................................................................................................................................................................................................................................................................................................................................(See the following chart.)
2. Touch the MELT side of the pad to ....................................................................................................................................................................................................................................................................................................................................................................................................................................................................................
enter the MELT function. 5. Touch START.
MELT CHART
USING BEVERAGE
iiii_:,;,;,i:'i;eii
i!i;_
29

USING SURE SIMMER
Your microwave oven lets you simmer soups,
casseroles, stews, and other liquid foods. All you
do is set a simmer time and your oven will bring your
food to a boil and then simmer it for the time you specify.
NOTES:
• You cannot change the cook power or doneness
for SURE SIMMER.
• This function uses the sensor. The sensor needs 2
minutes, 30 seconds to warm up after the oven is
connected to power or after a power failure. If you
start SURE SIMMER during the warm-up, microwave
energy will not be turned on until the sensor
is warm.
When cooking vegetables, increase amount of water
to 1/4 to 1/2 cup (60 to 125 mL).
Cover dish with a hard lid, i.e.,the lid that comes with
the dish or a dinner plate. Do not use plastic wrap.
1. Place the food in the oven and shut the door.
2. Touch SURE SIMMER. TOUCH YOU SEE
G
3. Touch Number pads to enter the simmer time. TOUCH YOU SEE
Example for 30 minutes:
3Q_j
G
G
G
4. Touch START/ENTER. TOUCH YOU SEE
The oven will bring the food to a boil.
The food will then simmer for the time you set.
When simmering foods like pasta
Use a container that can hold enough water to
cover the food completely when cooking, such as a
3-quart (12-cup [2.84 L]) casserole with a lid. When
cooking pasta or noodles, add 1 tbsp (15 mL) oil to
the water before boiling. Use the following method.
Place container with water in the oven and follow
Steps 2-4, setting the simmer time at 1 second.
At the end of the signal, place the food in the
water and stir until completely covered by water.
Cover. Repeat Steps 2-4, setting the simmer time
you want.
Changing instructions
You can change the simmering time while simmer-
ing by repeating Steps 2, 3, and 4.
30

SENSOR COOKING
Food releases humidity during cooking/heating.
How much humidity food releases is affected by
the quantity, temperature, and shape of the food.
Your microwave oven has a sensor that detects
this humidity. The amount of humidity detected
tells the oven how long to cook or heat your food.
You can sensor cook when preparing any of 7
types of food. Just touch the pad for the food you
want to cook or heat (see the chart below).
To sensor cook:
1. Touch a SENSOR COOK pad.
Example for baked
potato
You see
(until cooking
time is esti-
mated)
NOTES:
* You do not need to touch START/ENTERto
start the oven. The oven will start cooking/
heating when you touch one of the
SENSOR COOK pads.
* If you need more or less cooking time, do not touch
the selected SENSOR COOK pad again. Touch
POWER within 20 seconds after choosing the food
type. (See "Changing preset cooking times" in the
"Getting to Know Your Microwave Oven" section.) You
cannot change preset cooking times for POPCORN.
. The sensor needs 2 minutes, 30 seconds to warm up
after the oven is connected to power or after a power
failure in your home. If you start sensor cooking dur-
ing the warm-up, "SENSE" shows on the display until
the warm-up is over. Microwave energy will not be
turned on until the sensor is warm.
* When cooking foods for a long time, allow the oven to
cool down before sensor cooking again.
How well your popcorn cooks will depend on the brand of popcorn and how much fat it has in it. Try
several brands to decide which pops the best. For best results, use fresh bags of popcorn.
This chart shows you how to choose a type of food and the amount you can choose for each type.
PAD INSTRUCTIONS AMOUNT
Popcorn* Pop only 1 package at a time. If you are using a 3.5 oz (100 g), 3.0 oz (85 g),
microwave popcorn popper, follow manufacturer's 1.75 oz (50 g)
instructions.
NOTE: Remove cooking rack before placing pack-
age in oven.
Baked Before baking, remember to pierce the potato with a 1 to 4 potatoes
Potato fork several times. After cooking, let the potato (10 oz [284 g] to 13 oz [369 g]
stand 5 minutes to finish cooking, each)
Fresh Prepare as you want, wash, but do not dry 1 to 4 cups (250 mL to 1 L)
Vegetable vegetables. Place vegetables in a correct-size mi-
crowavable container. Add 2 to 4 tbsp (30 to
60 mL) water. Cover with plastic wrap and vent.
Frozen Remove from package, rinse off frost under running 1 to 4 cups (250 mL to 1 L)
Vegetable water. Place vegetables in a correct-size microwav-
able container. Add 2 to 4 tbsp (30 to 60 mL) water.
Cover with plastic wrap and vent.
Frozen Entree Loosen the covering for venting. 10- or 20-ounce (284 g or 568 g)
Dinner Plate Place food to be heated on a dinner plate or similar 1 serving (or 1 plate) (8 to 16 oz
dish. Cover with plastic wrap and vent. [227 g to 454 g])
Soup Place soup to be heated in a correct-size microwav- 1 to 4 cups (250 mL to 1 L)
able container. Cover with plastic wrap and vent.
* The display does not show cooking time for this setting. "SENSE" stays on the display until cooking is finished.
iiiiiii!iii_'_'_ii!!iiiii
31

USING HOLD WARM
Food Poisoning Hazard
Do not let food sit in oven more than one hour
before or after cooking.
Doing so can result in food poisoning or
sickness.
You can keep hot, cooked food warm in your
microwave oven. You can use HOLD WARM by
itself, or to automatically follow a cooking cycle.
NOTES:
• Opening the oven door cancels HOLD WARM.
Close the door and touch HOLD WARM, then
touch START/ENTER if additional HOLD WARM
time is desired.
• Food cooked covered should be covered during
HOLD WARM.
° Pastry items (pies, turnovers, etc.) should be
uncovered during HOLD WARM.
° Complete meals kept warm on a dinner plate
should be covered during HOLD WARM.
• Do not use more than one complete HOLD WARM
cycle. The quality of some foods will suffer with
extended time.
1. Put hot, cooked food in the oven and close
the door.
TOUCH YOU SEE
2. Touch HOLD WARM.
3. Start the oven. TOUCH YOU SEE
° While entering cooking instructions, touch
HOLD WARM before touching START/ENTER,
or during cooking.
° When the last cooking cycle is over, you will hear
two tones. "WARM" will come on while the oven
continues to run.
32

Microwave Oven Care
To make sure your microwave oven looks good and works well for a long time, you should maintain it properly.
For proper care, please follow these instructions carefully.
For interior surfaces: Wash often with warm,
sudsy water and a
sponge or soft cloth.
Use only mild, nonabra-
sive soaps or a mild
detergent. Be sure to
keep the areas clean
where the door and
oven frame touch
when closed. Wipe
well with clean water.
Over time, stains can
occur on the surfaces as the result of food particles
spattering during cooking. This is normal.
For stubborn soil, boil a cup of water in the oven
for 2 or 3 minutes.
Steam will soften the
soil. To get rid of odors
inside the oven, boil a
cup of water with some
lemon juice or vinegar
in it.
To clean turntable and turntable support, wash
in mild, sudsy water; for
Glass turntable heavily soiled areas use
a mild cleanser and
scouring sponge. The
turntable and turntable
support are dishwasher
safe.
Turntable
support
• Wash by hand with a mild detergent and a soft
sponge or nylon scrub
brush. Dry completely.
• Do not use abrasive
scrubbers or cleansers to
clean rack.
• The rack is dishwasher
safe.
For exterior surfaces and
control panel: Use a
soft cloth with spray
glass cleaner. Apply the
spray glass cleaner to
the soft cloth; do not
spray directly on the
oven.
NOTE: Abrasive
cleansers, steel-wool
pads, gritty wash
cloths, some paper
towels, etc., can dam-
age the control panel and the interior and exterior
oven surfaces.
_iii/i__i_¸
33

ii!!!illii!i!iiiiiii!sii:!iiiiiii!i!i iiiii!i! l iiiii!l!iiii!!i;iiiii;iiiiiiii !
INSTALLING AND CARING FOR FILTERS
Electrical Shock Hazard
Disconnect power before removing filters.
Replace all panels before operating,
Failure to do so can result in death or
electrical shock,
The grease (aluminum) filters should be removed
and cleaned often, at least once a month.
You can order replacements (Part No. 8184001)
from your nearest Sears Service Center.
The 3M charcoal filter cannot be cleaned and
should be replaced every 6 to 12 months.
NOTE: Your microwave hood combination comes
with the 3M charcoal filter (Part No. 8184019)
installed behind the vent grille.
1, Unplug microwave oven or disconnect power.
2, To remove the grease filters (aluminum), push
each filter up on the
side opposite the tab.
Grasp the tab and slide
the filter to the side.
Pull the filter down-
ward. It will drop out.
3, Soak grease filters in hot
•
DISHWASHEP
CLEANER _ _
water and a mild deter-
gent. Scrub and swish to
remove embedded dirt
and grease. Rinsewell and
shake to dry. Do not use
ammonia, corrosive
cleaningagents such as
lye-based oven cleaners,
or place in a dishwasher.
The filterwill turn black
or could be damaged.
4. To replace the grease filters, slide each filter
into the outer side of
the filter opening. Make
sure you are sliding in
the side of the filter that
does not have the tab.
Hold the tab with your
other hand. Push up the
tab side of the filter and
slide the filter to the
other side of the open-
ing to lock into place.
5. To remove the 3M charcoal filter, (located
behind vent grille) tilt
the grille forward, then
lift out to remove.
Grasp charcoal filter
and lift up and out of
slot.
6. To replace the 3M charcoal filter, place new fil-
ter in slot and replace
vent grille by snapping
it into place.
NOTE: See edge of
charcoal filter for cor-
rect orientation.
7. Plug in microwave oven or reconnect power.
i
NOTE: Do not operate the vent fan without the
grease filters in place.
34

REPLACING THE COOKTOP AND OVEN LIGHTS
2. Remove the bulb cover mounting screw and
carefully remove the
cover.
i
5. Replace the bulb with a candelabra-base
10-watt halogen bulb (Part No. 8169418)
available from your Sears Service Center.
3. Replace bulb(s) with candelabra-base 10-watt
halogen bulb(s) (Part No. 8169418) available
from your Sears Service Center.
4. Replace the bulb cover and mounting screw.
5. Plug in microwave oven or reconnect power.
6. Close the bulb cover.
7. Slide the 3M filter into )lace. NOTE: See edge
of charcoal filter for
correct orientation.
8. Slide the top of the vent grille into place. Push
the bottom until it snaps into place.
1. Unplug microwave oven or disconnect power.
2. Tilt the grille forward, then lift out to remove.
3. Tip the 3M filter forward.
9. Plug in microwave oven or reconnect power.
35

C G
MICROWAVE COOKING TIPS
• If you increase or decrease the amount of food
you prepare, the time it takes to cook that food
will also change. For example, if you double a
recipe, add a little more than half the original
cooking time. Check for doneness and, if
necessary, add more time in small increments.
• The lower the temperature of the food being put
into the microwave oven, the longer it takes to
cook. Food at room temperature will be reheated
more quickly than food at refrigerator tempera-
ture.
• Food with a lot of fat and sugar will be heated
faster than food containing a lot of water. Fat and
sugar will also reach a higher temperature than
water in the cooking process.
• The more dense the food, the longer it takes to
heat. "Very dense" food like meat takes longer to
reheat than lighter, more porous food like sponge
cakes.
• Smaller pieces of food will cook faster than larg-
er pieces. Also, same-shaped pieces cook more
evenly than different-shaped pieces.
• With foods that have different thicknesses, the
thinner parts will cook faster than the thicker
parts. Place the thinner parts of chicken wings
and legs in the center of the dish.
• Stirring and turning foods spreads heat quickly
to the center of the dish and avoids overcooking
at the outer edges of the food.
Cover food to:
• Reduce spattering
• Shorten cooking times
• Keep food moist
You can use any covering that lets microwaves
pass through. See "Getting to Know Your
Microwave Oven" for materials that microwaves will
pass through.
• Several foods (for example: baked potatoes,
sausages, egg yolks, and some fruits) are tightly
covered by a skin or membrane. Steam can build
up under the membrane during cooking, causing
the food to burst. To relieve the pressure and to
prevent bursting, pierce these foods before cook-
ing with a fork, cocktail pick, or toothpick.
• Always allow food to stand after cooking.
Standing time after defrosting and cooking allows
the temperature to spread evenly throughout the
food, improving the cooking results.
The length of the standing time depends on
how much food you are cooking and how dense
it is. Sometimes it can be as short as the time it
takes you to remove the food from the oven and
take it to the serving table. However, with larger,
denser food, the standing time may be as long as
10 minutes.
For best results, place food evenly on the plate. You
can do this in several ways:
• If you are cooking several items of the same
food, such as baked potatoes, place them in a
ring pattern for uniform cooking.
• When cooking foods of uneven shapes or
thickness, such as chicken breasts, place the
smaller or thinner area of the food toward the
center of the dish where it will be heated last.
• Layer thin slices of meat on top of each other.
• When you cook or reheat whole fish, score the
skin - this prevents cracking.
• Do not let food or a container touch the top or
sides of the oven. This will prevent possible arcing.
Metal containers should not be used in a micro-
wave oven. There are, however, some exceptions.
If you have purchased food which is prepackaged
in an aluminum foil container, refer to the
instructions on the package. When using aluminum
foil containers, cooking times may be longer
because microwaves will only penetrate the top of
the food. If you use aluminum containers without
package instructions, follow these guidelines:
36

MICROWAVE COOKING TIPS (CONT.)
• Place the container in a glass bowl and add
some water so that it covers the bottom of the
container, not more than ¼in. (.64 cm) high. This
ensures even heating of the container bottom.
• Always remove the lid to avoid damage to the
oven.
• Use only undamaged containers.
• Do not use containers taller than _ in. (1.9 cm).
• Container must be at least half filled.
• To avoid arcing, there must be a minimum ¼ in.
(.64 cm) between the aluminum container and the
walls of the oven and also between two aluminum
containers.
• Always place the container on the turntable.
° Reheating food in aluminum foil containers usually
takes up to double the time compared to reheating
in plastic, glass, china, or paper containers. The
time when food is ready will vary depending upon
the type of container you use.
° Let food stand for 2 to 3 minutes after heating so
that heat is spread evenly throughout container.
° Do not do canning of foods in the oven. Closed
glass jars may explode, resulting in damage to the
oven.
° Do not use the microwave oven to sterilize objects
(baby bottles, etc.). It is difficult to keep the oven at
the high temperature needed for sterilization.
37

Questions and Answers
QUESTIONS ANSWERS
Can I operate my microwave oven without the No. If you remove or turn over the turntable, you
turntable or turn the turntable over to hold a will get poor cooking results. Dishes used in
large dish? your oven must fit on the turntable.
Can I use a rack in my microwave oven so that I You can use a rack only if the rack is supplied
may reheat or cook on two levels at a time? with your microwave oven. If you use a rack not
supplied with the microwave oven, you can get
poor cooking performance and/or arcing.
Can I use either metal or aluminum pans in my You can use aluminum foil for shielding (use small,
microwave oven? flat pieces), small skewers, and shallow foil trays
(if tray is not taller than _ in. [1.9 cm] deep and half
filled with food to absorb microwave energy).
Never allow metal to touch walls or door.
...........................................................................................................................................................................................................................................................................................................................................................................................................................................................................................................................................................................................................................................................................................................................................................................................................................................................................................................................................................................................................................................................[
Is it normal for the turntable to turn in Yes. The turntable rotates clockwise or counter-
either direction? clockwise, depending on the rotation of the
motor when the cooking cyc!e begins: ................................................................................................................................
Sometimes the door of my microwave oven ap- This appearance is normal and does not affect the
pears wavy. Is this normal? operation of your oven.
What are the humming noises that I hear when my You may hear the sound of the power supply when
microwave oven is operating? the magnetron tube cycles on.
Why does the dish become hot when I microwave As the food becomes hot it will conduct the heat
food in it? Ithought that this should not happen, to the dish. Be prepared to use hot pads to
remove food after cooking.
What does "standing time" mean? "Standing time" means that food should be
removed from the oven and covered for additional
time to allow it to finish cooking. This frees the
oven for other cooking.
Why does steam come out of the air exhaust vent? Steam is normally produced during cooking. The
microwave oven has been designed to vent this
steam out the vents.
Can I pop popcorn in my microwave oven? Yes. Pop packaged microwave popcorn
How do I get the best results? following manufacturer's guidelines or use the pre-
set POPCORN pad. Do not use regular paper
bags. Use the "listening test" by stopping the oven
as soon as the popping slows to a "pop" every 1
to 2 seconds. Do not repop unpopped kernels. Do
not pop popcorn in glass cookware.
NOTE: Remove cooking rack before placing pack-
age in oven.
38

Troubleshooting
Most cooking problems often are caused by little things you can find and fix without tools of any kind. Check
the lists below and on the next page before calling for assistance or service. If you still need help, see the
Sears toll-free numbers on the back cover.
MICROWAVE OVEN DOES NOT WORK
PROBLEM CAUSE
Nothing works. • The power supply cord is not plugged into a grounded 3 prong outlet.
See the "Electrical requirements" and the "Electrical connection" sections.
• A household fuse has blown or a circuit breaker has tripped.
• The electric company has had a power failure.
The microwave oven • You are using the oven as a timer. Touch OFF/CANCEL to cancel the
will not run. Kitchen Timer.
• The door is not firmly closed and latched.
• You did not touch START/ENTER.
• You did not follow directions exactly.
• An operation that you set earlier is still running. Touch OFF/CANCEL to
cancel that operation.
COOKING TIMES
PROBLEM CAUSE
Food is not cooked • The electrical supply to your home or wall outlets is low or lower than normal.
enough. Your electric company can tell you if the line voltage is low. Your electrician
or service technician can tell you if the outlet voltage is low.
• The cook power is not at the recommended setting. See "Cook Power
Chart."
• You have not allowed enough cooking time for the amount of food being
cooked. Larger amounts of food need longer cooking times.
The display shows a time • The oven door is not closed completely.
counting down but the • You have set the controls as a kitchen timer. Touch OFF/CANCEL to cancel
oven is not cooking, the Kitchen Timer.
39

iiii!6ii7i!i!iiiiiiiiiii:iiiiiJiii311!liiii!ii!!!{{iiiiiiii:KiK_i!i!iii?ii;iiil;:i_ii_"!I!'i!il;iiiiiil¸_,! li!
TURNTABLE
PROBLEM CAUSE
The turntable will
not turn.
• The turntable is not correctly in place. It should be correct-side up and
sitting firmly on the center shaft.
• The support is not operating correctly. Remove the turntable and restart the
oven. If the support still does not move, call an authorized service technician
for repair. Cooking without the turntable can give you poor results.
TONES
PROBLEM CAUSE
You do not hear the • You have not entered the correct command.
programming or • You have turned off the tone. See the "Audible signals" section.
end-of-cycle tone.
DISPLAY MESSAGES
i...............................................................................................................................................................................................................................................................................................................................................................................................................................................................................................................................................................................................................................................................................................................................................................................................................................................................................................................................................................................................................................................................................
PROBLEM CAUSE
The display is flashing ":". • There has been a power interruption. Reset the clock. See the "Setting the
clock" section.
If none of these items are causing your problem, see the "Sears Toll-Free Numbers" section on Back Cover.
40

41

f
[]
Garantia .................................................................... 42
Reparamos Io que vendemos ................................. 43
Seguridad del horno de microondas ..................... 44
Conozca su horno de microondas ......................... 47
Como funciona su combinacion microondas
campana de Kenmore ULTRA WAVETM ................ 47
Interferencia electromagnetica ............................. 48
Como probar su homo de microondas ................ 48
Como probar su vajilla o sus utensilios de cocina_48
Consejos para la operacion .................................. 48
Conexion electrica ................................................ 49
Caractedsticas del horno de microondas ............ 50
Partes del panel de control ................................... 52
Como utilizar la parrilla de coccion ...................... 55
Como utilizar el extractor de aire ......................... 56
C6mo utilizar la luz para la superficie
de coccion/encimera ............................................ 56
Como programar el reloj ....................................... 57
Como utilizar el cronometro ................................. 58
Como utilizar ADD ONE MINUTE ......................... 59
Como cambiar los tiempos prefijados de cocci6n._59
C6mo utilizar su homo de microondas ................. 60
Como cocinar a un nivel alto de energ_a.............. 60
Cocci6n a distintas intensidades .......................... 61
Como cocinar por pasos ...................................... 63
Barra indicadora progreso .................................... 64
Como utilizar AUTO COOK
(coccion automatica) ............................................... 65
Como utilizar AUTO REHEAT
(recalentado automatico) ...................................... 67
C6mo utilizar ULTRA DEFROST TM
(descongelaci6n veloz) ......................................... 68
Cuadro para ULTRA DEFROST TM ......................... 69
Consejos de descongelado .................................. 71
C6mo utilizar BREAD DEFROST
(descongelacion de pan) ....................................... 72
Como utilizar SOFTEN .......................................... 73
Cuadro para SOFTEN ........................................... 73
Como utilizar MELT ............................................... 73
Cuadro para MELT ................................................ 73
Como utilizar BEVERAGE (Bebidas) ..................... 74
Como utilizar SURE SIMMER
(Coccion segura a fuego lento)............................. 74
Coccion por sensor ................................................. 75
Como utilizar HOLD WARM .................................... 77
C6mo cuidar su homo de microondas .................. 78
Como instalar y cuidar los filtros .......................... 79
C6mo cambiar las luces del horno y
de la superficie de coccion ................................... 80
Guia para cocinar .................................................... 82
Preguntas y respuestas .......................................... 84
Diagn6stico y soluci6n de problemas ................... 85
Servicio t_cnico .................................. Contraportada
42
Garantia de la
combinacibn
microondas
compana
GARANTiA COMPLETA DE UN ANO
PARA LA COMBINACION MICRO-
ONDAS COMPANA
Durante un a_o a partir de la fecha de compra, siesta
combinacion microondas campana Kenmore fallara
debido a defectos en el material o la mano de obra,
Sears Io reparara sin costo alguno.
GARANTiA COMPLETA DE CINCO
ANOS PARA EL MAGNETRON
Durante cinco a_os a partir de la fecha de compra, si
el magnetron de esta combinacion microondas cam-
pana Kenmore fallara debido a defectos en el material
o la mano de obra, Sears Io reparara sin costo alguno.
La cobertura de la garantia antes citada corresponde
solo a hornos de microondas cuyo uso es para fines
domesticos privados.
EL SERVICIO DE LA GARANT|A ESTA A SU
DISPOSICION CON TAN SOLO PONERSE EN
CONTACTO CON LA TIENDA O EL CENTRO DE
SERVICIO SEARS MAS CERCANO EN LOS
ESTADOS UNIDOS.
Esta garantia tiene vigor Qnicamente mientras este pro-
ducto sea utilizado en los Estados Unidos.
Esta garantia le otorga derechos legales especificos y
quizas usted tenga tambien otros derechos, los cuales
pueden variar de un estado a otro.
Sears, Roebuck and Co.,
Dept. 817WA,
Hoffman Estates, IL 60179
Para pedir servicio t_cnico, por favor tome refer-
encia de los nt_meros de servicio en la contrapor-
tada de este manual.
Por favor anote la informaci6n acerca
del modelo de su electrodomdstico.
Siempre que Ilame para solicitar servicio tecnico para
su electrodomestico, usted necesitara saber los
nQmeros completos del modelo y de la serie. Usted
podra encontrar esta informacion en la placa/etiqueta
con los nQmeros del modelo y de la serie (vea
"Caracteristicas del horno de microondas" en la sec-
cion "Conozca su horno de microondas'). Asimismo,
anote la informacion que se indica a continuacion.
Nt_mero del modelo
Nt_mero de la serie
Fecha de compra

Reparamos Io que vendemos
Su compra adquiere un nuevo valor ya que usted puede confiar en Sears HomeCentral® para obtener servicio
de reparacion. Con mas de 12,000 especialistas capacitados en reparaciones y acceso a mas de 4.2 millones
de piezas de repuesto y accesorios, contamos con las herramientas, piezas, conocimiento y la destreza para
asegurarnos de cumplir nuestra promesa de que: Reparamos Io que vendemos.
Contratos de mantenimiento Sears
Su electrodomestico Kenmore esta dise_ado, fabricado y sometido a prueba para proporcionarle a_os de fun-
cionamiento confiable. No obstante, cualquier electrodomestico moderno puede necesitar servicio tecnico de
vez en cuando. El Contrato de mantenimiento Sears le ofrece un programa de servicio excepcional, a un precio
accesible.
El contrato de mantenimiento Sears
• Es la manera de adquirir el servicio t6cnico del manana a precios de hoy.
• Elimina las facturas de reparaci6n producidas por el uso normal y el desgaste.
• Proporciona asistencia no t6cnica y educativa.
• Ann cuando no necesite reparaciones, le proporciona una Revisi6n anual de mantenimiento preventivo a
solicitud suya, para asegurarse de que su electrodomestico esta en condiciones apropiadas de
funcionamiento.
Se aplican ciertas restricciones. Para obtener mas informaci6n, Ilame al 1-888-784-6427.
He aqui un cuadro comparativo de la Garantia y el Contrato de Mantenimiento, que le muestra los beneficios de
un contrato de mantenimiento Sears para su homo de microondas.
AI_IOS DE COBERTURA PARA EL PROPIETARIO 1° AI_IO 2° AL 5° AI_IO
Reemplazo de piezas defectuosas, a excepcion del magnetron G CM
Reemplazo del magnetron G G
Revision anual de mantenimiento preventivo a solicitud suya CM CM
G - GARANTiA
CM - CONTRATO DE MANTENIMIENTO
Pongase en contacto con el representante de Sears o el Centro de Servicio Sears de su Iocalidad y adquiera
un Contrato de mantenimiento Sears.
Guarde este manual y el comprobante de ventas juntos para referencia en el futuro.
43

Se rida
microondas
I
Su seguridad y la seguridad de los demos es muy importante.
Hemos incluido muchos mensajes importantes de seguridad en este manual yen su electrodomestico.
Lea y obedezca siempre todos los mensajes de seguridad.
Este es el simbolo de advertencia de seguridad.
Este simbolo le llama la atenci6n sobre peligros potenciales que pueden ocasionar la muerte
o una lesi6n a usted y a los demas.
Todos los mensajes de seguridad iran a continuaci6n del simbolo de advertencia de
seguridad y de la palabra "PELIGRO" o "ADVERTENClA". Estas palabras significan:
Si no sigue las instrucciones de inmediato,
usted puede morir o sufrir una lesi6n grave.
Si no sigue las instrucciones, usted puede
morir o sufrir una lesi6n grave.
Todos los mensajes de seguridad le diran el peligro potencial, le diran c6mo reducir las posibilidades de
sufrir una lesi6n y Io que puede suceder si no se siguen las instrucciones.
INSTRUCCIONES IMPORTANTES DE SEGURIDAD
Cuando se usan aparatos electrodom6sticos, deben tomarse precauciones de seguridad, incluyendo las
siguientes:
ADVERTENCIA: Para reducir el riesgo de
quemaduras, choques el6ctricos, incendio, da_os
personales o exposici6n a energia excesiva de
microondas:
• Lea todas las instrucciones antes de usar el homo
de microondas.
• Lea y siga las "PRECAUCIONES PARA EVITAR
LA POSIBLE EXPOSICION A ENERGiA
EXCESIVA DE MICROONDAS" especificas que
se encuentran en esta secci6n.
• El homo de microondas debe estar conectado a
tierra. Solamente debe conectarse a un tomacorri-
ente debidamente conectado a tierra. Vea
"INSTRUCCIONES PARA CONEXION A TIERRA"
en esta seccidn yen las instrucciones de insta-
laci6n proporcionadas.
• Instale o ubique el homo de microondas s61ode
acuerdo alas instrucciones para instalacidn
proporcionadas.
• Algunos productos tales como huevos enteros con
la c_scara y recipientes herm6ticos - por ejemplo,
frascos de vidrio cerrados =pueden explotar y no
deben calentarse en el homo de microondas.
• Use el homo de microondas solamente como se
describe en este manual. No use productos
quimicos o vapores corrosivos en el homo de
microondas. Este tipo de homo est_ espedfica-
mente disedado para calentar, cocinar o
deshidratar alimentos. No est_ disedado para uso
industrial o de laboratorio.
• Lo mismo que con cualquier aparato
electrodom6stico, es necesario supervisar de
cerca si Io usan los ni_os.
• No opere el homo de microondas si el cable o el
enchufe est_n dadados, si el homo no funciona
correctamente o si se ha dadado o caido.
• El homo de microondas debe ser revisado y
reparado s61o por personal t6cnico calificado.
Llame a una compa_ia de servicio autorizada para
el examen, reparaci6n y ajuste.
• Vea las instrucciones para limpieza de la puerta en
la seccion "Cuidado de su homo de microondas".
GUARDE ESTAS INSTRUCCIONES
44

INSTRUCCIONES IMPORTANTES DE SEGURIDAD
• Para reducir el riesgo de incendio en la cavidad
del horno:
- No recocine los alimentos. Vigile cuicado sola-
mente atenci6n al homo si usa papel, plastico u
otro material combustible dentro del homo para
facilitar la cocci6n.
- Quite las ataduras de alambre de las bolsas de
papel o plastico antes de ponerlas en el horno.
- Si algQn elemento se prende fuego dentro del
homo, mantenga la puerta cerrada, apague el
homo y desenchQfelo o corte la corriente con los
fusibles o el disyuntor.
- No use la cavidad para guardar cosas. No deje
productos de papel, utensilios de cocina o
alimentos en la cavidad cuando no esta en uso.
• Se adapta para el uso tanto sobre cocinas a gas
como electricas.
• Destinado para usarse sobre cocinas de una
anchura maxima de 36 pulgadas (91 cm).
• Limpie con frecuencia las salidas de aire de la
campana extractora - no permita que se acumule
grasa en la campana o en el filtro.
• No hay que introducir alimentos o utensilios de
metal demasiado grandes en el homo de
microondas debido a que pueden ocasionar un
incendio o riesgo de choque electrico.
• No limpie con esponjas de lana de acero. Las
fibras de la esponja pueden desprenderse y tocar
las piezas electricas originando un riesgo de
choque electrico.
* No use articulos de papel mientras la operacion
del homo ester en el modo "TOP BROWN" (Dorado
en la sarten) (en modelos con esta caracteristica).
* No almacene ningQn material en el homo cuando
no este en uso, salvo los accesorios
recomendados pot el fabricante.
* No ponga nada directamente sobre el homo de
microondas cuando este ester funcionando.
* Cuando flamee alimentos debajo de la campana,
encienda el ventilador.
* Tenga cuidado al limpiar el filtro de la campana
extractora. Los agentes de limpieza corrosivos,
tales como productos para limpieza de hornos con
lejia, pueden da_ar el filtro.
* No cubra o bloquee ninguna abertura en el horno
de microondas.
* No guarde el homo de microondas a la
intemperie. No use el horno de microondas cerca
del agua - por ejemplo, cerca del fregadero en la
cocina, en un s6tano hQmedo o cerca de una
alberca o lugares similares.
* No sumerja el cable o el enchufe en agua.
* Mantenga el cable alejado de superficies calientes.
* No deje que el cable cuelgue del borde de una
mesa o mostrador.
* No instale el homo sobre un fregadero.
* Nunca cubra la parrilla o cualquier otro accesorio
con papel met_tlico. Esto puede recalentar el homo.
GUARDE ESTAS INSTRUCCIONES
PRECAUCIONES PARA EVITAR LA POSIBLE
EXPOSlClON A ENERGiA EXCESIVA DE
MICROONDAS
(a} No intente operar este homo con la puerta abier-
ta ya que esto puede resultar en exposici6n
nociva a energia de microondas. Es importante
no forzar o tocar las trabas de seguridad.
(b) No ponga ningQn objeto entre la cara frontal del
homo y la puerta y no permita que se acumule
suciedad o residuos de limpiadores en las
superficies de sellado.
(c) No opere el horno si ¢ste esta da_ado. Es par-
ticularmente importante que la puerta del homo
cierre correctamente y que no haya da_o en:
(1) La puerta (torcida),
(2) Bisagras y seguros (rotos o flojos),
(3) Sellado de la puerta y superficies de sella-
do.
(d) El horno no debe ser ajustado o reparado por
nadie, excepto personal de servicio calificado.
45

REQUERIMIENTOS EL¢:CTRICOS
Cumpla con todos los c6digos y 6rdenes vigentes.
Se requiere un suministro de electricidad de
120 voltios, 60 Hz, Qnicamente CAde 15- 6 20-
amperios a fusible. (Se recomienda un fusible de
acci6n retardada o un disyuntor.) Se recomienda
que se use un circuito dedicado exclusivamente
para este aparato electrodomestico.
Peligro de Choque Electrico
Conecte a un contacto de pared de conexi6n
a tierra de 3 terminales,
No quite el terminal de conexi6n a tierra.
No use un adaptador.
No use un cable electrico de extensi6n.
No seguir estas instrucciones puede
ocasionar la muerte, incendio o
choque electrico.
INSTRUCCIONES PARA LA CONEXION A TIERRA
• Para todos los aparatos electrodomesticos No use un cable de extensi6n. Si el cable es muy
de conexi6n con cable: corto, haga que un electricista o t6cnico calificado
El homo de microondas debe estar conectado a instale un tomacorriente cerca del homo de
tierra. En caso de que se produzca un corto microondas.
circuito, la conexi6n a tierra reduce el riesgo de • Para aparatos electrodomesticos de conexi6n
choque el6ctrico pot medio de un alambre de permanente:
escape para la corriente el6ctrica. El homo de Este aparato electrodomestico debe conectarse a
microondas esta equipado con un cable que tiene un sistema de alambrado metalico permanente
un alambre de conexi6n a tierra con un enchufe con conexi6n a tierra o un conductor de conexi6n
para conexi6n a tierra. El enchufe debe estar a tierra para equipos debe funcionar con los
conectado a un tomacorriente que esta conductores del circuito y estar conectado a la
correctamente instalado y conectado a tierra, terminal o conductor de la conexi6n a tierra para
ADVERTENCIA: El uso incorrecto de la equipos en el aparato electrodomestico.
conexi6n a tierra puede resultar en riesgo de
choque electrico.
Consulte con un electricista o t6cnico calificado si las
instrucciones para conexi6n a tierra no se entienden
bien o si hay alguna duda con respecto a la correcta
conexi6n a tierra del homo de microondas.
GUARDE ESTAS INSTRUCCIONES
46

Conozca su horno de
microondas
Esta secci6n habla de los conceptos de cocci6n a microondas. Tambien le muestra los elementos basicos que
usted debe conocer para operar el horno de microondas. Por favor lea esta informaci6n antes de usar su horno.
COMO FUNCIONA SU COMBINACION MICROONDAS
COMPANA DE KENMORE ULTRA WAVE TM
La energia de microondas no produce calor. Esta
energia hace que los alimentos generen calory este a
su vez hace que los alimentos se cocinen.
Las microondas son como las ondas de TV, radio
o luz. Usted no las puede ver, pero puede ver Io que
hacen.
Un magnetron de produce las microondas en un
horno de microondas. Las microondas se mueven
dentro del horno donde se ponen en contacto con
los alimentos cuando giran sobre la bandeja giratoria.
U
Magnetrbn
Los hornos convencionales a microondas operan
solo en energia alta (HIGH). Para Iograr un nivel de
energia de 50% en un horno convencional a
microondas, el horno opera el 50% del tiempo en
energ[a alta y el 50% del tiempo apagado (OFF).
0% 0% 0%
El sistema de inversor de microondas ULTRA WAVE
entrega energia al en forma continua, para descongelar
mas uniformemente y minimizar el exceso de coccion
de los alimentos y las sucias salpicaduras.
(_avidaddel horno
Pisode metal Bandeja giratoria de vidrio
La bandeja giratoria de vidrio de su homo de
microondas permite que las microondas pasen.
Luego, estas rebotan en el piso de metal, atraviesan
la bandeja giratoria de vidrio y son absorbidas por los
alimentos.
Las microondas pasan a traves de la mayoria de los
tipos de vidrio, papel y pl_tstico sin calentarlos, de
manera que el alimento absorbe la energia. Las
microondas rebotan en los recipientes de metal, por
Io tanto los alimentos no absorben la energia.
El sistema de inversor de microondas ULTRA
WAVETM le ofrece mejor rendimiento de coccion en
microondas para descongelar, cocinar y recalentar
alimentos rapida y uniformemente. La tecnologfa
probada del sistema de inversor de microondas
ULTRA WAVE entrega una corriente constante de
energia de microondas - verdadera energfa alta,
media y baja, a la vez que usa menos potencia y
ahorra tiempo.
El sistema de inversor de microondas ULTRA WAVE
cuenta con funciones de coccion por sensor. Un sensor
de humedad en la cavidad del homo detecta la
humedad emitida por los alimentos al calentarse. El
sensor ajusta el tiempo para diversos tipos y cantidades
de alimentos. La coccion por sensor elimina la
incertidumbre al cocinar con hornos de microondas.
• Siempre cocine los alimentos por el tiempo mas
corto recomendado. Verifique como se est_tn
cocinando los alimentos.
• Para ayudar a asegurarse de que los alimentos
estan cocinados de forma pareja, revuelva, rote o
redistribuya los alimentos que se est_tn
cocinando a la mitad del tiempo de coccion.
• Si usted no tiene una tapa para un plato, use papel
encerado o toallas de papel aprobadas para uso con
microondas o pelfcula de pl_tstico. Recuerde doblar
una esquina de la pelfcula de pl_tsticode _ a _ pulg
(6.35 a 12.7 mm) para que el vapor salga durante la
coccion.
47

ii_!_:iiiill!iiil;:iii:i¸¸¸'i!'iiiili:_iii'i,i?iiii:iiii_i_';!!_;lii,iiii_i__!'_'_iiiiii:;!:_ii_il"ii'li_iiiiiiiiii:l!'iiiii_i_"_i!_li"i_i"ii'i!iiiii_"ii:iii!i_iiii_!iii;i;i:iili'i!"_ii'ii!i:ii_!:_iiliiil i
INTERFERENCIA ELECTROMAGNI_TICA
El uso de su horno de microondas puede causar
interferencia con su radio, TV o equipos similares.
Si hay interferencia, usted puede reducirla o elimi-
narla:
• Limpiando la puerta y las superficies sellantes
del horno.
,, Ajustando la antena receptora de radio o television.
,, Moviendo la radio/television para que esten
alejadas del horno de microondas.
• Enchufando el horno de microondas en otro toma-
corriente para que el horno de microondas y la
radio/TV esten en distintos circuitos electricos.
COMO PROBAR SU HORNO DE MICROONDAS
i ...................................................................................................................................................................................................................................................................................................................................................................................................................................................................................................................................................................................................................................................................................................................................................................................................................................................................................................................................................................................................................
Para probar el horno ponga 1 taza (250 mL) que este asegurada. Cocine a 100% de intensidad
aproximadamente de agua fria en un recipiente de durante 2 minutos. Cuando el tiempo se cumple, el
vidrio dentro del horno. Cierre la puerta. Verifique agua debe estar caliente.
COMO PROBAR SU VAJILLA O SUS UTENSILIOS
DE COCINA
Pruebe la vajilla de mesa o de cocina antes de
usarla. Para saber si un plato se puede usar en
forma segura, col6quelo dentro del homo junto a 1
taza (250 mL) con agua. Cocine a 100% de intensi-
dad durante un minuto. Si el plato se calienta y el
agua esta fria, no Io use. Algunos platos (melami-
na, alguna vajilla ceramica, etc.) absorben energia
de microondas, calentandose demasiado para agarrar-
los y hace mas lentos los tiempos de cocci6n. La coc-
ci6n en recipientes de metal que no estan disefiados
para uso con microondas puede dafiar el homo, Io
mismo que recipientes con metal escondido (ataduras
de alambre revestido, revestimiento de aluminio,
broches metalicos, esmalte o adomos metalicos).
CONSEJOS PARA LA OPERACION
ni_os se columpien con ella mientras esta abierta.
,, Use guantes para homo. La energia de microondas
no calienta los recipientes, pero el calor de los alimen-
tos puede hacer que el recipiente se caliente.
,, No use peri6dicos u otros papeles impresos en el
homo.
,, No seque flores, frutas, hierbas, madera, papel, cal-
abazas o ropa en el homo.
• No encienda el horno cuando esta vacio. La duraci6n
del producto se puede acortar. Si practica con la pro-
gramaci6n del homo, coloque un recipiente con agua
en el homo. Es normal que la puerta parezca ondula-
da cuando el homo ha estado funcionando por un
tiempo.
• No trate de fundir parafina en el homo. La parafina no
se fundira en un homo de microondas porque permite
que las microondas la atraviesen.
• No opere el horno de microondas a menos que la
bandeja giratoria est6 asegurada en su lugar y pueda
rotar con libertad. La bandeja giratoria puede rotar en
ambas direcciones. Asegerese que el lado correcto
de la bandeja giratoria esta hacia arriba. IVlanejesu
bandeja giratoria con cuidado para sacarla del
homo para evitar que se rompa. Si su bandeja girato-
ria se quiebra o se astilla, Ilame a su distribuidor para
reemplazarla.
fondo del plato debe quedar a una distancia de por Io
menos Y6de pulg (5 mm) por arriba de la bandeja
giratoria. Siga las instrucciones provistas con el plato
para dorar alimentos.
Nunca cocine o caliente un huevo entero con la
cascara. La acumulaci6n de vapor en el huevo
entero puede hacer que explote y posiblemente el
homo se dafie. Corte los huevos duros antes de
calentarlos. En raras ocasiones ha ocurrido que los
huevos poche han explotado. Cubra los huevos
poche y deje reposar durante un minuto antes de
cortarlos.
Para 6ptimos resultados, revuelva los liquidos
varias veces mientras los calienta o recalienta.
Los liquidos calentados en algunos recipientes (espe-
cialmente recipientes con forma cilindrica) se pueden
calentar excesivamente. El liquido puede salpicar
haciendo un ruido fuerte durante o despues del
calentamiento o cuando se agregan ingredientes
(granulos de caf6, bolsitas de t6, etc.). Esto puede
dafiar el homo.
48

i iiiii;i!ii_i_i_'_S/iii;_l;;!!!!i!iiiiil;i::ili'i;!ii_i!_iiliiii:i!;iiiii!'i!i<_i"!i!"I!iiiiiil;_ii:i"'ii;!'_!"'i!"i_iii;!'"_i_};:i'_ii!ii!i:!iliI'_i_i_i_lil;iiiii_i_iiii'::i;iiii;ii!_i:!_ili"_'_i"'_i;_;i_ii_!i!!!ii_i_i_ii!ii!ii!
CONSEJOS PARA LA OPERACION (CONT.)
• Las microondas pueden no Ilegar al centro de un
asado. El calor se extiende al centro desde la parte
de afuera cocinada, Io mismo que cuando se coci-
na en un homo comQn. Esta es una de las razones
para dejar que algunos alimentos (por ejemplo
asado o papas horneadas) reposen por un tiempo
luego de cocinar, o para revolver algunos alimentos
mientras se estan cocinando.
• No haga frituras en el homo. La vajilla para coci-
nar a microondas no es apropiada y es dificil man-
tener las temperaturas apropiadas para freir.
CONEXION ELI_CTRICA
Los tiempos de cocci6n seran prolongados en
caso de que su suministro de energia electrica
o el voltaje de salida sea menor de 110 voltios.
• No recocine las papas. AI final del tiempo de
cocci6n recomendado, las papas deben estar ligera-
mente flrmes porque se seguiran cocinando durante
el tiempo de reposo. Luego de cocinar a microon-
alas, dejelas reposar por 5 minutos. #stas se ter-
minaran de cocinar durante el tiempo de reposo.
Haga que un electricista calificado compruebe su
sistema electrico.
49

CARACTERISTICAS DEL HORNO DE MICROONDAS
14 13 12 15 11
II
9
2 3
74 65 8 6 7
Su horno de microondas ester dise_ado para
hacer que su experiencia en la cocina sea Io mas
placentera y productiva posible. Para ayudarle a
estar preparado y listo rapidamente, la siguiente
es una lista de las funciones basicas de su horno
de microondas:
1. Asa de la puerta. Jale para abrir la puerta.
2. Sistema de seguro para la puerta. El horno
no operara a menos que la puerta este cerrada
o asegurada.
3. Ventana con protecci6n de metal. La protec-
cion de metal evita que se escapen
las microondas. Esterdise_ada en forma de
ventana para permitirle ver los alimentos mien-
tras se cocinan.
4. Parrilla de cocci6n (Numero de parte
8184052). Uso de espacio extra cuando cocina
en mas de un recipiente a la vez.
5. Bandeja giratoria de vidrio (NOmero de parte
4393751) (no se muestra). Incluida en
la cavidad del homo, vea mas adelante las
instrucciones de instalacion. Esta bandeja gira-
toria da vuelta a los alimentos mientras los
cocina para una coccion mas uniforme. Para
mejores resultados, la bandeja debera estar
dentro del horno mientras este operando. La
bandeja giratoria esta hundida en el piso de la
cavidad del horno para darle un mayor espacio
para cocinar y obtener mejores resultados.
6. Filtros de grasa. Incluido en la cavidad del homo.
7. Luz de la superficie de cocci6n/encimera.
Encienda la luz para iluminar la superficie de coc-
ci6n o encimera, o utilicela como una luz
nocturna.
8. Etiqueta de guia de cocina. Utilicela para refe-
rencias rapidas para Cocci6n automatica,
Recalentado automatico, Descongelaci6n veloz, y
programaci6n de Cocci6n por sensor.
9. Interruptores del extractor y de la luz de la
superficie de cocci6n.
10. Panel de control. Toque los botones en este
panel para realizar todas las funciones.
Rejilla de ventilaci6n.
Luz de la cavidad del horno.
11.
12.
13.
14.
15.
Cubierta interna del horno de microondas.
Placa con modelo y nemero de serie.
Filtro de carb6n de 3M. Detras de la rejilla de
ventilaci6n.
50

CARACTERiSTICAS DEL HORNO DE MICROONDAS (CONT.)
• Quite la cinta adhesiva del centro (NOmero de
Lineas curvas parte 4393754).
• Coloque el soporte
en
(NOmero de parte
4393752) en el fondo
de la cavidad.
• Coloque la bandeja
giratoria en el centro.
Cerciorese de que las
curvas en relieve del
centro de la parte
• Las rodillas (NOmero de parte 4393753) del soporte
deberan entrar en el carril de la parte inferior de la
bandeja giratoria.
• La bandeja giratoria rota Io mismo en el sentido de
las manecillas del reloj queen sentido contrario.
I_sto es normal.
inferior de la bandeja
giratoria esten entre los tres "rayos" del centro.
51

PARTES DEL PANEL DE CONTROL
1.
2.
; 3.
4.
5.
; 6.
7.
8.
9.
10,
: 11.
; 12.
; 13.
14.
15,
16.
17.
; 18.
19.
20.
21.
Pantalla. Esta pantalla induye un reloj e indicadores que le
pen-nitensaber la hora, la programad6n del tiempo de coc-
ci6ny las funciones de cocci6n que usted elige.
AUTO REHEAT (Recalentado automatico).Toque este
bot6n para recalentar alimentos especiales para microondas
sin necesidad de introducir tiempos oenergias de cocci6n.
DINNER PLATE (Plato llano). Toque este bot6n para calen-
tar un plato llano de alimentos, sin ingresar ni tiempo ni
intensidadde cocci6n.
AUTO COOK (Cocci6n automatica). Toque este bot6n
para cocinar alimentosespedales para microondas sin
necesidadde introducir tiempos o energias de cocci6n.
POPCORN (Palomitas de maiz). Toque este botSn para
preparar palomitas de maiz.
ULTRA DEFROSTTM (Descongelacion veloz).Toque este
bot6n para descongelar alimentos sin necesidad de intro-
ducir tiempos o energias de cocciSn.
BEVERAGE (Bebidas). Presioneeste bot6n para calentar 1
o 2 tazas de 8-onzas (250 mL) de bebida.
BREAD DEFROST (Descongelaci6n de pan). Toqueeste
bot6n para descongelar pansin necesidad de introducir
tiempos o energias de cocci6n.
SOUP (Sopa). Toque este bot6n para calentar de 1 a 4
tazas (250 mL a 1 L) de sopa sin ingresar ni tiempo ni inten-
sidad de cocci6n.
FROZEN VEGETABLE (Vegetales congelados). Presione
este bot6n para cocinar de 1a 4 tazas (250 mL a 1 L) de
vegetales congelados sin necesidad de introducirun poder o
tiempo de cocci6n.
FROZEN ENTREE (Comida congelada). Toqueeste para
cocinar una comida congelada de 10 a 20 onzas (284 a 567
g) sin ingresar ni tiempo ni intensidadde cocciSn.
FRESH VEGETABLE (Vegetales frescos). Presioneeste
bot6n para cocinar de 1 a 4 tazas (250 mL a 1 L) de vege-
tales frescos sin necesidad de introducir un podero tiempo
de cocciSn.
BAKED POTATO (Papas al homo). Presione este bot6n
para homear de 1a 4 papas sin necesidad de introducir un
podero tiempo de cocci6n.
SOFTEN (Ablandar). Toqueeste bot6n para ablandar
maritequilla,helado, queso crema, o jugo congelado.
HOLD WARM (Mantener caliente). Presioneeste bot6n
para mantener calientessus alimentos en su homo de
microondas. HOLD WARM puede utilizarseen forma inde-
pendiente o puede seguir a un ciclo de cocci6n.
MELT (Derritir). Toque este bot6n para derritir maritequilla,
chocolate,queso procesado o malvaviscos.
SURE SIMMER (Coccion segura a fuego lento). Toque
este bot6n para cocer afuego lento las sopas, guisados,
estofados y otros alimentos liquidos.
ADD ONE MINUTE (Un minuto mas). Presioneeste bot6n
para cocinar por un minuto al 100% de poder de cocci6n o
para agregar los minutos extra a su ciclo de cocci6n en el
poderde cocci6n que usted haya programado.
Reloj. Toque este bot6n para introducir la hora correcta.
KITCHEN TIMER (Cron6metro de ¢ocina). Toqueeste
botSn para activar o cancelar el cron6metro de cocina.
Botones numedcos. Toquelos botones numericos para
introducirtiempos de cocci6n, energias de cocci6n, canti-
dades, pesos o categodas de alimentos.
C (Z)
@
®................................ @
v
ON/OIF 5 SPEEDS XIGIPMEDINIGIT_/OFF
22. COOK TIME (Tiempo de coccion). Toque este bot6n
seguido por los botones numericos para programar un tiem-
po de cocci6n.
23. POWER (Energia). Toque este bot6n despues de que el
tiempo de cocci6n haya sido establecido,seguido de un
bot6n numerico para establecer la cantidad de energia de
microondas liberadaspara cocinar los alimentos. Tambien
presioneeste bot6n para aumentar o disminuir un tiempo
de cocci6n preestablecido.
24. TURNTABLE ON/OFF (Encendido/apagado
de la bandeja giratoria). Presione este bot6n para encen-
der o apagar la bandeja giratoria de su horno.
25. START/ENTER (Encendedintroducir). Toque este bot6n
para iniciar una funci6n.
26. OFF/CANCEL (Apagarlcancelar). Toqueeste bot6n para
borraruna instrucci6n incorrecta, cancelar un programa
durante la cocciSno para borrar la pantalla.
27. (Exhaust Fan) ON/OFF (Extractor de aire -
encendidolapagado). Toque este bot6n para encendido y
apagar el extractor.
28. (Exhaust Fan) 5SPEEDS (Extractor de aire -- 5 veloci-
dades). Toqueeste bot6n para encender el extractor a
velocidad 1- 5 velocidades.
29. (Light) HIGHIMEDIUMINIGHTIOFF (Luz--
altalmedialnochelapagado). Toque este bot6n para alta,
media, apagado la luz or apagar y encendido la luz noctuma.
52

PARTES DEL PANEL DE CONTROL (CONT.)
NOTAS:
° Si introdujo los valores para una funcion pero
no ha tocado START/ENTER en 5 segundos,
aparecera el indicador START? (INICIAR?).
° Si elige una funcion pero no toca otro boton
de comando en un minuto, la pantalla regre-
sara a la hora del dfa y tendra que empezar
de nuevo.
Para desactivar todas las sehales audibles,
excepto la de fin del cronometro:
TOQUE
y sost_ngalo durante 5 segundos
Para volver a activar las sehales:
Su horno de microondas emite sefiales audibles
que le pueden guiar al programar o utilizar su
horno:
° E_ Un tono de programacion sonara cada vez
que toque un boton.
° F;_ un tono largo indica que termino la cuenta
regresiva del cronometro de la cocina.
o _-_E_F_F_ cuatro tonos indican que
termino el ciclo de coccion.
o E_[_ Dos tonos cortos y rapidos suenan
cada minuto durante los primeros 15 minutos
despues de la serial de fin de ciclo de coccion
como recordatorio si no se han sacado los ali-
mentos del horno.
o F_F_ Dos tonos cortos y rapidos sonaran
al entrar y salir de una funcion no visible (por
ejemplo, seguro para ni_os).
o F_[_E_ sonaran tres tonos si hizo una
entrada erronea.
Para desactivar el tono de programacion:
TOQUE
G
y sost_ngalo durante 5 segundos
Para activar nuevamente el tono de programacibn:
TOQUE
TOQUE
G
y sost_ngalo durante 5 segundos
NOTA:Dos tonos se oiran cuando seenciendan o se
apaguen las se_alesaudibles. Esto funciona solamente
cuando el homo no esteractivando ninguna otra funci6n.
Puede detener el funcionamiento del horno
durante un ciclo si abre la puerta. El horno deja
de calentar y se detiene el extractor pero la luz
permanece encendida. Para reiniciar la cocci6n
cierre la puerta y
TOQUE
Si no desea continuar cocinando:
• Cierre la puerta y se apagara la luz.
O
° TOQUE
NOTA: Antes de programar una funci6n toque
OFF/CANCEL para asegurarse de que no este
activa ninguna otra funci6n. Si una funci6n de
cocci6n por sensor se interrumpe mientras
"SENSE" aparece en la pantalla, el horno volvera
al modo de reserva.
y sost_ngalo durante 5 segundos
53

iiii!!illiii;_!!!_ililii_i!''iii!i_:i_!ii_iii::iiii_!!_ill!_ili!_!ii_!:::_!ii:__i!i!iiiii!iii_:_:il¸i:_ii_Ii;iiii_i_i:_i_i:iiiiiiii_i!i!!!ii_ii!!i!ii_il!!_!_i
PARTES DEL PANEL DE CONTROL (CONT.)
CO _¸_¸__i _¸¸¸_@_©S
Cuando calienta platos con alimentos a un tiem-
po de coccion de su eleccion, usted podra
calentar dos platos de 11 pulgadas (28 cm) jun-
tos o un plato mas grande que la bandeja girato-
ria. Usted podra calentar 2 platos mas en la par-
rilla de coccion para tener un total posible de 4
platos. Para mejores resultados, a la mitad de la
coccion gire los platos de manera que los ali-
mentos de enfrente ahora se encuentren atras.
Haga Io mismo cuando caliente una cacerola
mas grande (9 a 13 pulgadas [23 a 33 cm]).
Cuando caliente 4 platos extendidos, gfrelos tal
y como se describio anteriormente y cambie los
dos platos de arriba por los dos de abajo.
Para calentar 2 platos juntos en la parte de
@ bajo o un plato mas grande, la ban-
deja giratoria no debera estar en
movimiento. Puede apagar la bande-
ja giratoria con solo tocar TURNTA-
BLE ON/OFF. Si oprime TURNTABLE ON/OFF
antes de comenzar a programar la funcion de
coccion, su homo le solicitara que introduzca un
tiempo de coccion sin necesidad de que usted
toque COOK TIME. Su bandeja giratoria regre-
sara a su posicion original cuando la coccion
haya terminado o cuando toque OFF/CANCEL.
NOTA: No puede apagar la bandeja giratoria
cuando este utilizando alguna funcion automatic&
Para desbloquear el panel de control:
TOQUE
y sost_ngalo durante 5 segundos
Se escucharan dos tonos y _1 se eliminara de
la pantalla.
Puede programar su homo de microondas para
visualizar las instrucciones conforme las vaya intro-
duciendo sin tener que encender el magnetron. Esta
funcion le ayudara a aprender como utilizar su
homo sin necesidad de cocinar alimentos
realmente. Esto funciona solamente cuando el
homo no esta activando ninguna otra funcion.
Para programar la funcion demostracion/
aprendizaje:
TOQUE
@
y sost_ngalo durante 5 segundos
Sonaran dos tonos y aparecera una "d" peque_a
en la pantalla.
Cbmo utilizar el seguro para nihos
El Seguro para ni_os bloquea el panel de control
para que los ni_os no puedan utilizar el homo de
microondas si usted no desea que Io hagan.
Esto funciona solamente cuando el homo no
esta activando ninguna otra funcion.
Para bloquear el panel de control:
TOQUE
y sost_ngalo durante 5 segundos
Se escucharan dos tonos y t_ aparecera en la
pantalla. Cuando se haya bloqueado el panel,
se escucharan 3 tonos y aparecera LOCK
(BLOQUEAR) cuando toque cualesquiera de los
botones a excepcion de (Exhaust Fan) ON/OFF,
(Exhaust Fan) 5 SPEEDS y (Light)
ON/HIGH/MEDIUM/NIGHT/OFR
Para cancelar la funcion demostracion/apren-
dizaje:
TOQUE
@
y sost_ngalo durante 5 segundos
Se escucharan dos tonos y desaparecera la "d"
de la pantalla.
54

COMO UTILIZAR LA PARRILLA DE COCCION
La parrilla de coccion le proporciona un espacio
adicional para cocinar en mas de un recipiente a
la vez.
Si necesita una parrilla de repuesto, puede
ordenar una a Centro de Servicio Sears. Pot favor
tome referencia de los nQmeros de servicio en la
contraportada de este manual. AsegQrese de
tenet a la mano el nQmero de modelo cuando
ordene.
Coloque la parrilla hasta que se encuentre bien
firme en los soportes
para la parrilla que se
encuentran en las pare-
des laterales del homo.
NOTAS:
• Use guantes para hornos para sacar elementos
del homo de microondas.
• No deje la parrilla metalica en el horno. Podria
ocasionarse una descarga electrica o da_ar
el horno si alguien enciende el homo accidental-
mente.
• No opere el homo con la parrilla metalica en el
piso del horno. Esto da_aria el acabado interior.
• Utilice la parrilla solamente en el homo de
microondas.
• No utilice la parrilla con el recipiente para dorar.
• No permita que el recipiente con alimentos que
se encuentre en la parrilla toque las partes supe-
rior y laterales del horno.
• No cocine alimentos directamente sobre la par-
rilla. Coloquelos en recipientes especiales para
hornos de microondas.
• No coloque recipientes met_tlicos para cocinar
sobre la parrilla.
• Utilice la parrilla de coccion solamente cuando
cocine a mas de un nivel.
° Quite la parrilla de coccion antes de poner un
paquete de palomitas en el horno.
55

ii!!ii!!illi;iii!!!Iiiiiii!ii_iii:i:!i_ii!i__i!i:i!iI_iiii_ii!iiliii;;i_i_iiIi!'_ii!ii_ii_iliIiJ!iJ_i_i!ii!iiiiii_iiTiiii_iiiii!il¸_i_i;!i_;iiii:!_!!i!iii_:!i!!!
COMO UTILIZAR EL EXTRACTOR DE AIRE
Los dos botones en la parte inferior izquierda del
panel de control sirve para manejar el extractor de
5 velocidades.
1. Seleccione la velocidad del extractor.
TOQUE
O
0N/OFF
2. Seleccione la velocidad del extractor.
NOTA: Si la temperatura procedente de las
hornillas o la superficie de coccion sube
demasiado debajo del homo, el extractor de
aire en el conducto de ventilacion se encendera
automaticamente en estado HIGH (Alto) para
proteger el horno. El extractor de aire puede
seguir trabajando hasta pot una hora para
enfriar el homo. Cuando _sto suceda, el
extractor no podr,_ apagarse con el boton
(Exhaust Fan) ON/OFR
TOQUE
A
V
5SPEEDS
3. Apague el extractor de aire cuando Io desee.
TOQUE
Q
ON/OFF
COMO UTILIZAR LA LUZ PARA LA SUPERFICIE DE
COCCION/ENCIMERA
El boton en la parte inferior derecha del panel
de control regula la luz para la superficie de
coccion/encimera.
1. Encienda la luz.
TOQUE
ItlGI'_ED_IIGHT/O_
(una vez para luz alta, dos veces para luz media y tres
veces para luz nocturnal)
2. Apague la luz cuando Io desee. TOQUE
C>
HIGWMED/NIGHTiOFF
(1 b 4 veces)
56

COMO PROGRAMAR EL RELOJ
Cuando conecte por primera vez su homo de
microondas o despues de una falla electrica, la
pantalla desplegara el signo ":" de manera intermi-
tente. Si no se programa una hora, el signo ":",
destellara hasta que presione alg0n boton.
NOTAS:
• Si selecciona una hora no valida y toca el sim-
bolo del reloj, se escucharan 3 tonos. Introduzca
la hora correcta.
• Si usted toca OFF/CANCEL al programar el reloj,
la pantalla desplegara la 01tima hora que se pro-
gramo del dfa.
• Para apagar el reloj, toque el simbolo del reloj, el
nQmero 0 y el simbolo del reloj nuevamente, la
hora que se habia programado desaparecera y
aparecera el signo ":" en la pantalla.
1. Toque (_. TOQUE USTED VE
2. Introduzca la hora del dfa.
Ejemplo para las 12:00:
TOQUE
G
G
G
G
USTED VE
3. Termine la programacion.
TOQUE
G
O
USTED VE
57

ii!!!ii_il;iiiii!iii!i_:i;_ii:i_ii!_ili!_!ii__!iiii!ii_i!i!i;ii!iii_:_iil¸ii_ii_li;iiii_i_i:_i_iiiiiiiiiii_iii!_iii!ii_ii!!!_iil!!_!
COMO UTILIZAR EL CRONOMETRO
Puede utilizar su horno de microondas como un NOTA: El horno puede funcionar mientras se utiliza
cronometro. Utilice el cronometro para cronometrar el cronometro. Para ver el cronometro mientras fun-
hasta 99 minutos y 99 segundos, ciona el homo, toque KITCHEN TIMER.
1. Toque KITCHEN TIMER.
TOQUE USTED VE
[]
2. Programe el tiempo a contar en forma regresiva.
Por ejemplo, para 1 minuto, 30 segundos:
NOTA: Si programa mas de 4 digitos, desapare-
ceran los primeros 4 y apareceran los siguentes
digitos a la derecha a medida que usted los va
introduciendo.
TOQUE USTED VE
G
G
CD
3. Inicie la cuenta regresiva.
NOTA: Si no realiza este paso dentro de los 5
segundos despues de realizar el paso 2, apare-
cera "START? (4,1NICIAR?)'. Despues tendra 1
minuto para tocar KITCHEN TIMER o para tocar
START/ENTER antes de que la pantalla vuelva a
la hora del dfa.
AI final de la cuenta regresiva:
TOQUE
@
O
USTED VE
USTED VE
Durante la cuenta regresiva:
TOQUE
(se escuchara un tono largo)
USTED VE
(hora del dJa)
58

! !!!ii i Y! iJiliiiiiiilii!iiiiiiii¸¸¸ii!!!!ii!ii!!i!iiiiiii!!!!!i!!!
C(SMO UTILIZAR ADD ONE MINUTE (UNMINUTOMAS)
ADD ONE MINUTE permite cocinar los alimentos
durante 1 minuto a un nivel de energfa de coccion
de 100%, o bien, agregar un minuto extra al ciclo
de coccion. Tambien Io puede utilizar para prolon-
gar los ciclos de coccion en mQltiplos de
1 minuto, hasta 99 minutos.
NOTAS:
,, Para prolongar los ciclos de coccion en m_ltiplos
de 1 minuto, toque ADD ONE MINUTE repetida-
mente durante la coccion.
,, Despues de cerrar la puerta, puede introducir
ADD ONE MINUTE sin tenet que oprimir
START/E NTER (Iniciar/I ntrod ucir).
Si oprime ADD ONE MINUTE durante la coccion,
el homo cocinara al nivel de energfa de coccion
seleccionada previamente. Si oprime ADD ONE
MINUTE despues de haber terminado la coccion,
el homo cocinara al nivel de energfa de coccion
del 100%. Puede cambiar la intensidad de coccion
si oprime POWER (Energfa), despues de haber
oprimido el boton ADD ONE MINUTE, y luego
oprimir los botones numericos para determinar la
nueva intensidad de coccion, y finalmente
START/E NTER (Iniciar/I ntrod ucir).
Puede utilizar ADD ONE MINUTE solo para la fun-
cion de ciclo de coccion.
1. Cerciorese de que la comida este dentro del homo.
2. Toque ADD ONE MINUTE.
Ejemplo, para cocinar durante 1 minuto: TOQUE USTED VE
C(SMO CAMBIAR LOS TIEMPOS PREFIJADOS
DE COCCI(DN
Si el tiempo de coccion preestablecido es
demasiado largo o corto, puede aumentarlo o
disminuirlo despues de seleccionar AUTO COOK,
AUTO REHEAT o ULTRA DEFROST TM.
Para prolongar el tiempo de coccion: TOQUE USTED VE
una vez
Para reducir el tiempo de coccion:
(ejemplo para recalentar
automaticamente)
TOQUE USTED VE
dos veces
Para restablecer el tiempo de coccion original:
TOQUE USTED VE
tres veces
59

Cbmo utilizar su horno de
microondas
Esta seccion le proporciona las instrucciones para operar cada funcion. Por favor, lea cuidadosamente estas
instrucciones.
COMO COClNAR A UN NIVEL ALTO DE ENERGiA
1. Coloque la comida dentro del homo y cierre
la puerta.
2. Toque COOK TIME.
TOQUE USTED VE
3. Introduzca el tiempo de coccion.
Ejemplo para 1 minuto, 30 segundos:
4. Encienda el horno.
TOQUE USTED VE
G
G
TOQUE USTED VE
AI terminar el tiempo de coccion:
USTED VE
i:,10
Puede cambiar el tiempo de coccion en
cualquier momento durante la coccion si
repite los pasos 2, 3 y 4.
tonos)
6O

COCClON A DISTINTAS INTENSIDADES
Para obtener optimos resultados, algunas recetas
necesitan distintas intensidades de coccion.
Cuanto mas baja es la intensidad, mas lenta es la
coccion. Cada boton numerado tambien representa
un porcentaje distinto de intensidad de coccion.
Muchas recetas de libros de cocina para micro-
ondas le indican mediante un nQmero, porcentaje o
nombre, la intensidad de coccion que debe utilizar.
El siguiente cuadro le da el porcentaje de intensi-
dad de coccion que cada boton numerado repre-
senta y el nombre de la intensidad de coccion que
pot Io general se utiliza. Tambien le indica cu_tndo
usar cada intensidad de coccion. Siga las instruc-
ciones de la receta o del paquete de alimentos si
dispone de elias.
NOTA: Consulte un libro de cocina confiable para
obtener los tiempos de coccion.
10 = 100% de intensidad Alta ° Calentar rapidamente alimentos preparados y con alto
total (automatica) contenido de agua, como sopas y bebidas
9 = 90% de intensidad ° Cocinar peque_os trozos tiernos de came, carne moli-
total da, trozos de ave, filetes de pescado y la mayoria de
las verduras
• Calentar sopas cremosas .....
8 = 80% de intensidad ° Calentar arroz, pasta o guisados
total • Cocinar y calentar alimentos que necesitan una intensi-
dad de coccion menor que la alta (por ejemplo, pesca-
do entero y rollo de carne molida)
7 = 70% de intensidad Media-Alta ° Recalentar una sola porcion de alimentos
total
6 = 60% de intensidad ° Cocinar alimentos delicados como platos con queso y
total huevo, budines y natillas
° Cocinar guisados que no pueden revolverse, como la
lasa_a
5 = 50% de intensidad Media ° Cocinar jamon, ave entera y cazuelas
total • Coccion lenta de estofados
4 = 40% de intensidad ° Derretir chocolate
total • Calentar pan y pasteles
.... 3 = 30% de Media-Baja, ° Descongelar alimentos como panes, pescado, carnes,
intensidad total
total
Descongelar
aves y alimentos precocidos
° Ablandar mantequilla, queso y helado
intensidad total
NOTA: Una vez que haya ingresado el tiempo de coccion, usted puede usar tambien el boton POWER
como un segundo temporizador de cocina ingresando "0" para la intensidad de coccion. El homo hara
la cuenta regresiva del tiempo de coccion que usted fija sin cocinar.
61

ii!liiiliiiiiiiiiii iii i_;_ii/_i_iii!_!iliii!_lil_iI:;ii_iiiiii_iiii!lii!!!!'!!!ii::__!i!i!i!i!i_iii¸ii:iiliiiiii!!il!ii!i!!ili!!I
COCClON A DISTINTAS INTENSIDADES (CONT.)
1. Coloque su comida en el horno y cierre la puerta.
2. Toque COOK TIME.
TOQUE USTED VE
3. Introduzca el tiempo de coccion.
Por ejemplo, para 7 minutos, 30 segundos:
4. Establezca el nivel de intensidad de coccion.
TOQUE
TOQUE
@
USTED VE
USTED VE
Por ejemplo, para un nivel de intensidad de
coccion del 50%:
TOQUE
0
@
(repita esta operacibn hasta
que aparezca el nivel de
energ{a de coccibn deseado)
USTED VE
5. Encienda el horno. TOQUE USTED VE
AI terminar el tiempo de coccion:
USTED VE
(se escucharan cuatro
tonos)
62

COCClON A DISTINTAS INTENSIDADES (CONT.)
l G6_O ©_b_ __S _S_%_©_O_@S
Puede cambiar el tiempo o la intensidad de coccion
en cualquier momento si repite los pasos 2, 3
y/o 4 y 5.
COMO COCINAR POR PASOS
Para mejores resultados, algunas recetas requieren
una intensidad de coccion para un determinado
lapso de tiempo y otra intensidad de coccion para
otro lapso de tiempo. Puede programar su homo
para cambiar de un nivel de intensidad a otro
automaticamente hasta tres pasos diferentes.
Puede programar sus funciones de coccion en cualquier
orden.
NOTA: Usted no puede cocinar con Sensor,
Descongelacion veloz, Coccion automatica o Recalentado
automatico cuando estercocinado por pasos.
1. Coloque la comida en el horno y cierre la puerta.
2. Toque COOK TIME.
TOQUE USTED VE
3. Introduzca el tiempo de coccion para el
primer paso.
Por ejemplo, para 7 minutos, 30 segundos:
TOQUE USTED VE
G
G
63

COMO COCINAR POR PASOS (CONT.)
4. Establezca la intensidad de coccion para el TOQUE USTED VE
primer paso.
Ejemplo, para un nivel de intensidad de coccion
del 50%:
TOQUE USTED VE
O
(repita la operacibn hasta
que aparezca la intensidad
de coccibn deseada)
5. Repita los pasos 2, 3 y 4 para programar el tiempo
y la intensidad de coccion para cada paso adicional.
6. Encienda el horno. TOQUE USTED VE
Despues de haber completado el primer paso,
el(los) siguiente(s) se contara(n) de manera
regresiva.
AI terminar el tiempo de coccion:
(el primer paso si cocina en
dos pasos)
USTED VE
(se escucharan 4 tonos)
Puede cambiar los tiempos de coccion o las intensidades de coccion de un paso en cualquier
momento despu_s de que se inicie el proceso, si repite los pasos 2, 3 y/o 4 y 5.
BARRA INDICADORA DE PROGRESO
La pantalla contiene una barra indicadora de pro-
greso, la cual indica hasta donde han avanzado las
funciones de Auto Cook y cu_tnto tiempo mas resta
a dichas funciones. La Iongitud total de la barra
representa el tiempo estimado de duracion del
ciclo de coccion. La barra indicadora avanza I[nea
por I[nea durante un ciclo.
Los 12 segmentos en la barra indicadora de pro-
greso dan un estimado del avance durante la coc-
cion y muestran la proporcion del tiempo restante
en las funciones de Auto Cook. AI final del ciclo de
coccion los 12 segmentos estaran encendidos.
NOTA: La barra indicadora de progreso aparece con
Auto Cook, ULTRA DEFROST TM y Auto Reheat,
Soften and Melt. Pero no con las funciones de coc-
cion manual.
64

COMO UTILIZAR AUTO COOK (COCCION AUTOMATICA)
Puede cocinar alimentos preparados para hornos
de microondas seleccionando simplemente una
cantidad y categoria. AUTO COOK tiene tiempos e
intensidades de coccion preestablecidos para 7
categorias (vea la tabla siguiente).
Para utilizar AUTO COOK, siga estos pasos:
1. TOQUE
3. Toque uno o mas nOmeros del panel para
introducir la cantidad.
Ejemplo para
1 taza (250 mL)
USTED
VE
Ejemplo para
1 taza (250 mL)
una vez
USTED
VE
4. TOQUE
2. Toque AUTO COOK de 1 a 7 veces para
seleccionar el tipo de alimento.
Ejemplo para verduras
enlatadas
una vez
O
Toque un n0mero del panel para seleccionar
el tipo de alimento.
Ejemplo para ver-
duras enlatadas
USTED
VE
Ejemplo para
verduras
enlatadas
USTED
VE
(la cuenta
regresiva
puede variar)
NOTAS:
• AUTO COOK le solicitara que elija una cantidad.
Tendra 1 minuto para introducir la cantidad y
para tocar START/ENTER. De no ser asf, AUTO
COOK se cancelar&
• Si toca AUTO COOK 8 veces, la pantalla volvera
al programa para verduras enlatadas.
• Si necesita mas o menos tiempo de coccion, no
toque el boton AUTO COOK nuevamente. Toque
el boton POWER antes de tocar START/ENTER.
(Yea "Como cambiar los tiempos prefijados de
coccion" en la seccion "Conozca su horno de
microondas").
• Cuando cocine tocino, tenga en cuenta que las
diferencias de grasa, came, espesor y procesos
de curado afectaran la coccion del tocino.
Generalmente los trozos regulares de tocino
promedian aproximadamente 16 rebanadas
por libra (454 g).
65

COMO UTILIZAR AUTO COOK (COCCION AUTOMATICA)(CONT.)
2 1 a 4 piezas
poch_
Arroz (sensor) 3 veces 3 0.5 a 2 tazas** (125 mL a 500 mL)
1 a 4 piezas
Huevos revueltos 6 veces 6 1 a 4 huevos
Tocino 7 veces 7 1 a 6 piezas, espesor normal
* Debe tocar AUTO COOK una vez antes de elegir el tipo de comida.
** Ya que este alimento se cocina por medio de sensor, no es necesario que introduzca la informaci6n de la cantidad. La cantidad
que se muestra aqui es la cantidad que puede cocinar. Despues de que selecciona el tipo de alimento y presiona START/ENTER,
aparace "SENSE" (SENSOR) en la pantalla. Adem_s, el sensor requiere 2 minutos y 30 segundos para prepararse despues de que
se conecta el homo o despues de una falla electrica. Si usted comienza a cocinar por sensor durante este tiempo de preparaci6n,
la palabra "SENSE" (SENSOR) aparece en la pantalla hasta que se completa dicha preparaci6n. El microondas no funcionar&
hasta que el sensor este listo.
66

COMO UTILIZAR AUTO REHEAT (RECALENTADOAUTOMATICO)
Puede volver a calentar alimentos preparados
para hornos de microondas simplemente
seleccionando una cantidad y categoria. AUTO
REHEAT tiene tiempos e intensidades de coccion
preestablecidos para 4 categorias (vea la tabla
siguiente).
Para utilizar AUTO REHEAT, siga estos pasos:
1. TOQUE @
una vez
USTED
VE
3. Toque un nQmero del panel para introducir
la cantidad.
Ejemplo para
1 taza (250 mL)
USTED
VE
Ejemplo para 1
1 taza (250 mL)
4. TOQUE
USTED
VE
(la cuenta
regresiva puede
variar)
2. Toque AUTO REHEAT de 1 a 4 veces para
elegir el tipo de comida.
Ejemplo para
guisados
dos veces
O
Toque un nQmero del panel para elegir el tipo de
comida.
[_ Ejemplo para
guisados
USTED
VE
Ejemplo para
guisados
NOTAS:
• AUTO REHEAT le solicitara que elija una
cantidad. Tendra 1 minuto para introducir una
cantidad y tocar START/ENTER. De no set as[,
AUTO REHEAT se cancelara.
• Si toca AUTO REHEAT 5 veces, la pantalla
volvera al programa para pizza.
• Si necesita mas, o menos tiempo de coccion, no
toque AUTO REHEAT nuevamente. Toque el
boton de POWER antes de tocar START/ENTER.
(Vea "Como cambiar los tiempos prefijados de
coccion" en la seccion "Conozca su homo de
microondas").
• Cuando caliente nuevamente un muffin o bagel
grande (4 onzas [113 g]), utilice el programa para
2 piezas. El programa para 1 pieza calienta
1 muffin o bagel de tama_o regular, o 2 panes
de cenar peque_os.
Esta tabla le mostrara como elegir el tipo de comida y las cantidades que puede seleccionar para cada
tipo.
1
Salsa** (sensor) 3 veces 3 1 a 4 tazas (250 mL a 1 L)
4 1 a 6 piezas, 2 onzas (57 g)
cada una
* Debe tocar AUTO REHEAT una vez antes de elegir el tipo de comida.
** Despues de que seleccione el tipo y la cantidad de alimento y presione START/ENTER (INICIAR/INTRO), aparece "SENSE" (SENSOR)
en la pantalla. Adem&s, el sensor requiere 2 minutos y 30 segundos para prepararse despues de que se conecta el homo o despues
de una falla electrica. Si usted comienza a cocinar por sensor durante este tiempo de preparacidn, aparece la palabra "SENSE"
(SENSOR) en la pantalla hasta que se completa dicha preparacidn. El microondas no funcionara hasta que el sensor este listo.
67

COMO UTILIZAR ULTRA DEFROST TM
(DESCONGELACION VELOZ)
Usted puede descongelar los alimentos eligiendo
una categofia y fijando un peso. ULTRA
DEFROST TM puede ser usando solo para una
descongelacion de alimentos congelados en las
categofias de came, aves o pescado. Para la
descongelation de alimentos o pesos no alistados,
ajuste manualmente un tiempo de descongelacion
usando una potencia del 30%. ULTRA DEFROST TM
tiene tiempos e intensidades de coccion para 3
categorias (vea el siguiente cuadro).
Para usar ULTRA DEFROST TM, siga los pasos
indicados a continuacion:
1. Toque el botbn ULTRA DEFROST TM
para ingresar la funcibn descon-
gelacibn veloz.
_-_RA I BREAD
1
DEFROST _._
una vez
2. Contint_e tocando ULTRA DEFROST TM
para seleccionar la clase de alimentos.
(Vea el cuadro siguiente.)
3. Toque el(los) botbn(es) para ingresar
el peso. Seleccione el peso correcto.
.
Toque START. El tiempo estimado de
descongelacibn aparecer& en la
pantalla. El tiempo indicado en la
pantalla comienza la cuenta regresiva.
NOTAS:
• ULTRA DEFROST TM le pedira que ingrese un peso.
De all usted tendra 1 minuto para ingresar un peso
y para tocar START/ENTER. Si usted no Io hace,
ULTRA DEFROST TM se anulara.
• Si usted ingresa un peso mas alto que el peso
maximo o mas bajo que el peso minimo (0.2
libras) que se permite para el ajuste de sus
alimentos, se escucharan 3 tonos y "RETRY"
aparecera en la pantalla cuando usted toque
START/ENTER. Luego aparecera en la pantalla el
peso maximo permitido.
• Si usted toca ULTRA DEFROST TM 4 veces, la
pantalla regresa al ajuste de Meats (carnes).
• Si usted necesita mas o menos tiempo para
descongelacion, no toque ULTRA DEFROST TM de
nuevo. Toque POWER antes de tocar
START/ENTER. (Consulte "Como cambiar los
tiempos prefijados de coccion" en la seccion
"Conozca su homo de microondas.')
• Vea el "Cuadro de ULTRA DEFROST TM"mas ade-
lante en esta seccion para obtener instrucciones
de descongelacion para cada alimento.
• Para descongelar articulos no incluidos en el
"Cuadro de ULTRA DEFROST TM (descongelacion
veloz)", use la intensidad de coccion al 30%.
Consulte un libro de cocina confiable para obten-
er informacion acerca de la descongelacion.
Si el peso ha sido fijado
demasiado bajo o demasiado alto,
cuando usted toca START o POWER,
un bip de advertencia sonar& y la
pantalla mostrar& RETRY durante 2
segundos. Luego aparecer& en pan-
talla el peso minimo/m&ximo permitido.
i
68

ii!ii!ii!!!!_i!iiii!i!i!!iifilliilli;!!!!iiiiiil!i: iiiilli/ii!!!!!i!!iiili!!!i!!i!_iliiii!!! Iiiii!ii!i!i!!iliiiiiZiii!IiiiiiLi!iilii!!iii!!!!!!iii!i!!!il!!iiiiii!!!_!ii!!!iiiiiiili¸iIii!!!!i!ii!iiiiif!!ii!iiiii!!ii!i;!!iliil!!!iiiii!!_!ii
COMO UTILIZAR ULTRA DEFROST TM (CONT.)
• La forma del paquete afecta el grado de rapidez
con que los alimentos se van a descongelar. Los
paquetes poco profundos se descongelaran con
mas rapidez que un bloque profundo.
• A medida que los alimentos comienzan a
descongelarse, separe las piezas. Las piezas
separadas se descongelan de manera mas pareja.
• Use pedazos peque_os de papel de aluminio
para proteger partes de los alimentos, tales como
alas de polio, puntas de las piernas, colas de
pescado o Areas que comienzan a calentarse.
Aseg6rese de que el papel de aluminio no toque
los lados, la parte superior o la parte inferior del
homo.
Este cuadro le muestra como elegir un tipo de alimento y los pesos que usted puede fijar para cada tipo.
TOQUE O TOQUE BOTON PESOS QUE USTED PUEDE FIJAR
ALIMENTO ULTRA DEFROST* NUMERADO (d_cimas partes de una libra)
Carnes una vez 1 .2 a 6.6 (91 g a 2994 g)
Ayes dos veces 2 .2 a 6.6 (91 g a 2994 g)
Pescado 3 veces 3 .2 a 4.4 (91 g a 1998 g)
Usted debe tocar ULTRA DEFROST una vez antes de elegir el tipo de alimento.
CUADRO ULTRA DEFROST TM (DESCONGELACION VELOZ)
ALIMENTO INSTRUCCIONES ESPECIALES
Came de res Se deben cubrir con papel aluminio las partes grasosas o angostas de
Came molida
Came molida, Tortitas
Medallones, Lomo en bisteces,
Estofado al homo, Estofado de
espaldilla, Estofado de came de
costillas, Estofado de rollos
de came
Estofado
carnes grandes de forma irregular y cortes de carne grasosa al inicio de
los ciclos de descongelado.
No descongele menos de ¼de libra (113 g).
No descongele menos de dos tortitas de 4 onzas (113 g).
Coloque en una parrilla para rostizar en microondas.
Coloque en un platon para hornear en microondas.
Cordero
Cubos para estofado Coloque en un platon para homear en microondas.
Chuletas (1 pulg [2.5 cm] Coloque en una parrilla para rostizar en microondas.
de grueso)
Cerdo
Chuletas (_ pulg [13 mm] de
grueso), Hot Dogs, Costillas de
cerdo, Costillas estilo campestre,
Estofado de Iomo (sin hueso),
Salchicha
Salchichon
Coloque en una parrilla para rostizar en microondas.
Coloque en un platon para homear en microondas.
69

CUADRO ULTRADEFROSTTM (DESCONGELACIONVELOZ) (CONT)
ALIMENTO INSTRUCCIONES ESPECIALES
Polio
Entero
(hasta 9-1/_Ibs (4.3 kg)
Coloque el polio con la pechuga hacia arriba en una parrilla especial
para rostizar para microondas. Termine de descongelarlo
sumergiendolo en agua fria. Retire las menudencias cuando el polio
este parcialmente descongelado.
En piezas Coloquelo en una parrilla para rostizar en microondas.
Termine de descongelarlo sumergiendolo en agua fria.
Codornices
Enteras Coloquelas en una parrilla para rostizar en microondas. Termine de
descongelarlas sumergiendolas en agua fria.
Pecho Coloquelo en una parrilla para rostizar en microondas. Termine de
(menos de 6 Ibs [2.7 kg]) descongelarlo sumergiendolo en agua fria.
ALIMENTO INSTRUCCIONES ESPECIALES
Pescados
Filetes Coloque en un plat6n para hornear en microondas. Separe
cuidadosamente los filetes bajo agua fria.
Bistec Coloque en un platon para hornear en microondas. Haga correr
agua fria sobre el pescado para terminar de descongelar.
Entero Coloque en un platon para hornear en microondas. Cubra la cabeza
y la cola con papel aluminio. No deje que el papel toque los lados
del horno. Para terminar de descongelar sumerja en agua fria.
Mariscos
Cangrejo, Colas Coloque en un platon para hornear en microondas.
de langosta,
Camaron, Callo .....
de hacha
70

ii ii!iiil;:il__I!i_!!!iii_i!!Wii!!!i!!_!iii_i_¸iii ii:!!li_l!ii!ii!!iiii!i_!iilii¸i!!:i__iii_!i!iZ!:_i!
CONSEJOS DE DESCONGELADO
,, Cuando utilice ULTRA DEFROST TM,
(Descongelacion veloz), necesita introducir el
peso neto (el peso del alimento menos el del
recipiente). Introduzca el peso Io mas cercano a
K0Ib (45 g).
,, Solo utilice el ULTRA DEFROST TM para alimentos
crudos. ULTRA DEFROST TM le brinda los mejores
resultados cuando el alimento a descongelar ester
completamente congelado. Si el alimento esta
parcialmente descongelado, siempre programe
un peso menor (para un periodo de desconge-
lamiento menor), para evitar que el alimento se
cueza.
,, Para obtener mejores resultados, se incluye un
tiempo de reposo preestablecido en el periodo
de descongelamiento. Esto pudiera hacer que el
tiempo de descongelamiento parezca mas largo
de Io esperado. (Para mayor informacion acerca
del periodo de reposo, consulte la seccion
"Consejos para cocinar con microondas," en la
seccion "Guia de cocina").
Probablemente este usted acostumbrado a que el
peso de los alimentos se describa en libras y onzas
que son fracciones de 1 libra (por ejemplo 4 onzas
equivalen a ¼de libra). Sin embargo, para poder
programar el peso del alimento en el ULTRA
DEFROST TM, debe especificarlo en libras y decimas
de libra.
Si el peso en el empaque del alimento se expresa
en fracciones de libra, usted puede utilizar la
siguiente tabla para convertir el peso a decimas.
PESO EN DECIMAS
0.10
0.20
0.25
0.30
0.40
0.50
0.60
0.70
0.75
0.80
0.90
1.00
Un cuarto de libra
Media libra
Tres cuartos de libra
Una libra
71

i ;;iiiiilil:iiiiYiiil_i_i!iiii_iiiii_iiiiiiilili_;iiiT!i_'iiiii:!i_liiiiii!!;li_iiii:iiiiiiiii:i;l_i_ii!_iiiiiiiiiiiii_ii!¸?!i!i_ii'_iiliiii_iii!iiiilliiiiii_iiii!!ii;!_!i;_i!!!
COMO UTILIZAR BREAD DEFROST
(DESCONGELACION DE PAN)
1. Toque el botbn BREAD DEFROST
para ingresar la funcibn de descon-
gelacibn de pan.
I_TRAi BR_
t DEFROST_..J
una vez
La pantalla le pedira que indique el peso.
2. Toque el(los) botbn(es) numerados
para indicar el peso en libras y d_ci-
mas partes de una libra.
( Vea el cuadro siguiente.)
descongelacibn aparecer& en la pan-
talla. El tiempo indicado en la pantalla
comienza la cuenta regresiva.
Si el peso ha sido fijado demasiado bajo o
demasiado alto, cuando usted toca START o
POWER, un bip de advertencia sonara y la
pantalla mostrara RETRY durante 2 segundos.
Luego aparecera en la pantalla el peso mini-
mo/maximo permitido.
PESO APROXIMADO
1 bagel peque_o 0.2 de libra (91 g)
1 bagel grande 0.3 de libra (136 g)
4 rebanadas de pan 0.2 de libra (91 g)
1 molde de pan 1.0 libra (454 g)
1 bolillo 0.2 de libra (91 g)
1 pan para 0.2 de libra (91 g)
..................hamb urguesa/hot dog.........................................................................................................................................................................................................................................................
1 panecillo (muffin) 0.2 de libra (91 g)
peque_o
1 panecillo (muffin) 0.3 de libra (136 g)
72

C(SMO UTILIZAR SOFTEN (ABLANDAR)
El homo usa una potencia baja para ablandar ali-
mentos (mantequilla, queso crema, helado o jugo
congelado). Vea la tabla siguiente.
(Toque una vez para mantequilla, dos veces para
helado, 3 veces para queso crema, o 4 veces para
jugo congelado).
1. Coloque el alimento en el horno y
cierre la puerta.
2. Toque el botbn SOFTEN para ingresar
la funcibn de ablander.
3. Seleccione el alimento que va a
I Seleccione la cantidad.
(Mantequilla - toque 1 para un barrita, 2 para dos
barritas o 3 para tres barritas, helado - toque 1
para 16 onzas, 2 para 32 onzas o 3 para 64
onzas, queso crema - toque 1 para 3 onzas o 2
para 8 onzas, jugo congelado - toque 1 para 6
onzas, 2 para 12 onzas o 3 para 16 onzas)
ablandar. 5. Toque START (puesta en marcha).
CUADRO PARA SOFTEN (ABLANDAR)
ALIMENTO SOFTEN DEL PANEL ESCOGER AL FINAL DE LA COCCI(DN
Mantequilla o 1 vez 1 1, 2 o 3 barritas La mantequilla estar_t al tiempo y
margarina lista para usarse en la receta.
Helado 2 veces 2 16, 32 o 64 onzas El helado estar_tIo suficientemente
suave para poderlo servir con facilidad
Queso crema 3 veces 3 3 o 8 onzas El queso crema estar_t al tiempo y
listo para usarse en la receta
Jugo congelado 4 veces 3 6, 12 o 16 onzas El jugo congelado estar_t Io suficien-
temente suave para mezclarlo f_tcil-
mente
con agua
COMO UTILIZAR MELT (DERRETIR)
El homo usa una potencia baja para derretir alimen-
tos (mantequilla o margarina, chocolate, malvavis-
cos o queso procesado). Vea la tabla siguiente.
1. Coloque el alimento en el horno y
cierre la puerta.
2. Toque el botbn MELT para ingresar la
funcibn de derretir.
3. Seleccione el alimento que va a derretir.
(Toque una vez para mantequilla, dos veces
para chocolate, 3 veces para queso proces
do o 4 veces para malvaviscos).
4. Seleccione la cantidad.
(Mantequilla - toque 1 para un barrita, 2 para
dos barritas o 3 para tres barritas, chocolate -
toque 1 para 4 onzas o 2 para 8 onzas, queso
procesado - toque 1 para 8 onzas o 2 para 16
onzas, malvaviscos - toque 1para 5 onzas o 2
para 10 onzas)
5. Toque START (puesta en marcha).
CUADRO PARA MELT (DERRETIR)
TOQUE OTOQUE NUMERO CANTIDADESA
ALIMENTO SOFTEN DEL PANEL ESCOGER AL FINAL DE LA COCCI(DN
Mantequilla o 1 vez 1 1, 2 o 3 barritas No hay necesidad de cubrir la mantequilla
margarina - no salpica. Remueve al final de la coc-
cion para derretir completamente.
Chocolate 2 veces 2 4 o 8 onzas Las chispas o cuadras de chocolate para
repostefia se pueden usar. Remueve al final
de la coccion para derretir completamente. _
Queso (queso 3 veces 3...........................................................i6 °rlzas .........Ose soio queso procesado: Remueve
73

iiii!i;i_iii!ii_!:?iiiiiiiiil¸_i!!!l!i_iiii_!i!!!_ii!_iil!ii!_lilI iiiil;:::i_i'_iii!':iiiii:ii!ii!_:ii!_i!_ii_!_!ii/il_i:i_ii;i_i_!l!!_ii!ii_!ii!!_
MELT CHART CONT.)
TOQUE OTOQUE NUMERO CANTIDADESA
ALIMENTO SOFTEN DEL PANEL ESCOGER AL FINAL DE LA COCClON
Marshmallows 4 veces 4 5 o 10 onzas
Se puede usar malvaviscos grandes o
miniaturas. Remueve al final de la coc-
cion para derretir completamente.
i
COMO UTILIZAR BEVERAGE
1. Coloque 1 o 2 tazas (250 o 500 mL) de
bebida en el horno y cierre la puerta.
2. Toque BEVERAGE.
O
3. Seleccione 1 o 2 tazas.
4. Toque START.
COMO UTILIZAR SURE SIMMER
(COCCION SEGURA A FUEGO LENTO
Su horno de microondas le permite cocinar a fuego
lento sopas, guisados, estofados y otros alimentos
liquidos. Todo Io que tiene que hacer es fijar un
tiempo de coccion a fuego lento y su homo Ilevara
los alimentos al punto de ebullicion y luego los man-
tendra en coccion a fuego lento durante el tiempo
que usted especifique.
NOTAS:
', AI utilizar SURE SIMMER usted no puede cambiar
la intensidad de coccion ni el grado de coccion.
,, Esta funcion utiliza el sensor. El sensor necesita 2
minutos, 30 segundos para calentar despues de
haber conectado el homo al suministro electricoo
luego de una interrupcion del suministro electrico. Si
usted pone a funcionar SURE SIMMER durante el
periodo de calentamiento, laenergfa de microondas
no se encendera hasta que el sensor este caliente.
,, Siempre que cocine verduras, aumente la cantidad de
agua de 1/4 a 1/2 taza (60 a 125 mL).
• Tape el recipiente con una tapa resistente, por ejemp-
Io, la tapa que viene con el recipiente o un plato llano.
No use peliculas de pl_tstico.
1. Coloque los alimentos en el horno y cierre la puerta.
2. Toque SURE SIMMER. TOQUE USTED VE
3. Toque los botones numerados para seleccionar TOQUE USTED VE
el tiempo de coccion a fuego lento.
Ejemplo para 30 minutos:
3LZJ
G
G
74

COMO UTILIZAR SURE SIMMER
COCClON SEGURA A FUEGO LENTO) (CONT.)
4. Toque START/ENTER. TOQUE USTED VE
El horn© Ilevara los alimentos al punt© de
ebullicion.
Luego los alimentos herviran a fuego lento
durante el tiempo que usted fije.
i,
: :,: ::: ©S :: :: S ©::::i: ::© 1: S :
Use un recipiente con capacidad sufi-
ciente para que el agua cubra los alimen-
tos por completo durante la cocci©n,
como una cacerola de 3 cuartos (12 tazas
[2.84 I]) con tapa. AI cocinar pasta o
fide©s, agregue 1 cucharada (15 ml) de
aceite al agua antes de hervir.
Emplee el siguiente met©do. Ponga el recipiente
con agua en el homo y siga los pasos 2 a 4, fijando
el tiempo de coccion a fuego lento en 1 segundo.
AI fin de la serial, coloque los alimentos en el agua
y revuelvalos hasta que esten completamente
cubiertos por el agua. Tape. Repita los pasos 2 a 4,
fijando el tiempo de coccion a fuego lento que
usted desee.
Usted puede cambiar el tiempo de coc
cion a fuego lento durante dicho perido
de coccion, repitiendo los pasos 2, 3 y 4.
COCClON POR SENSOR
Los alimentos liberan humedad durante la coc-
cion o calentamiento. La cantidad de humedad
que li-beran depende de la cantidad, temperatu-
ray forma del aliment©. Su homo de microon-
das tiene un sensor que detecta la humedad. La
cantidad de humedad que se detecta le indica
al homo por cu_tnto tiempo debe cocinar o
calentar sus alimentos. Puede cocinar por sen-
sor cuando prepara cualquiera de los 8 tipos de
alimentos. Solo presione el boton para el tip© de
aliment© que desee cocinar o calentar (vea la
tabla a continuacion).
Para cocinar por sensor:
1. Toque un boton de SENSOR COOK
(coccion por sensor).
Ejemplo para
papas al horn©
Usted ve
(hasta que se
calcula el tiempo
de coccibn)
NOTAS:
• No necesita oprimir START/ENTER (Iniciar/intro)
para encender el horn©. El horn© comenzara a
cocinar o calentar cuando presione uno de los
botones de SENSOR COOK (Coccion por sensor).
• Si requiere mas o menos tiempo de cocci©n, no
toque el boton SENSOR COOK. Toque POWER
(Poder) dentro de los 20 segundos despues de
seleccionar el tip© de aliment©. (Yea "Como cam-
biar los tiempos de coccion preestablecidos"
en la seccion "Conozca su horn© de microondas').
No puede cambiar el tiempo de coccion para POP-
CORN.
• El sensor requiere 2 minutos y 30 segundos para
preparse despues de que se conecta el horn© o
despues de una falla de electricidad. Si comienza a
cocinar por sensor durante la preparacion, aparece
"SENSE" (Sensor) en la pantalla hasta que se
complete la preparacion. El microondas no fun-
cionara hasta que el sensor este preparado.
• Cuando se cocinen los alimentos por un tiempo
prolongado, deje que se enfrie el horn© antes de
volver a cocinar por sensor.
75

COCClON POR SENSOR (CONT.)
_/ i!iii_iiii!!!!iC,i_!;!!i_i_ii_::!iiiC_iiiiiiiiii_!i!!!_i!_iii_!:!;_iiiiiiCii_ii!!!_1
El que tan bien se hagan las palomitas depende del
tipo de palomitas y de la cantidad de grasa que con-
tengan. Experimente con diferentes tipos de palomi-
tas de maiz para decidir curries se hacen mejor. Para
un mejor resultado utilice paquetes de palomitas de
maiz mas frescos.
i....................................................................................................................................................................................................................................................................................................................................................................................................................................................................................................................................................................................................................................................................................................................................................................................................................................................................................................................
Esta tabla muestra como seleccionar un tipo de alimento y la cantidad que puede elegir para cada tipo.
BOTON INSTRUCCIONES CANTIDAD
Popcorn Prepare solo un paquete a la vez. Si utiliza 3.5 oz (100 g), 3.0 oz (85 g), ....
ii
ii
ii
ii
ii
ii
ii
(Palomitas de maiz)* un paquete de palomitas de maiz con plato 1.75 oz (50 g)
integrado para microondas, siga las .....
instrucciones del fabricante. ....
NOTA: Quite la parrilla de coccion antes de .....
poner el paquete en el horno.
Baked potato Antes de hornear, recuerde que debe picar 1 a 4 papas ....
(Papas al homo) las papas varias veces con un tenedor. (10 oz [284 g] a 13 oz [369 g]
Despues de cocinar, deje reposar las cada una)
papas durante 5 minutos para que termi-
iiiii
nen de cocinarse.
(Verduras frescas) no seque las verduras. Coloque las ver-
duras en un recipiente para microondas de
tamafio adecuado. Agregue de 2 a 4
cucharadas (30 a 60 mL)de agua. Cubra
con pl_tstico y permita la ventilacion.
Frozen vegetable Saque las verduras del paquete, elimine el 1 a 4 tazas (250 mL a 1 L)
(Verduras hielo debajo de un chorro de agua.
congeladas) Coloque las verduras en un recipiente para
microondas de tamafio adecuado. Agregue ......
de 2 a 4 cucharadas (30 a 60 mL) de agua.
Cubra con pl_tstico y permita la ventilacion.
Frozen Entree Afloje la cubierta para ventilacion. 10- o 20-oz (284 g o 568 g)
(comidas _
congeladas)
Dinner Plate Coloque los alimentos para calentar en un 1 porcion (o 1 plato) (8 a 16 oz
(plato llano) plato llano o vajilla similar. CObralos con [227 a 454 g])
una pelicula de pl_tstico y deje un espacio
de ventilacion.
Soup (sopa) Coloque la sopa para calentar en un recipi- 1 a 4 tazas (237 ml a 946 ml)
ente para microondas de tamafio correcto.
Cebrala con una pelicula de pl_tstico y deje
un espacio de ventilacion.
* La pantalla no muestra el tiempo de coccion para esta programacion. "SENSE" (SENSOR) permanece
en la pantalla hasta que se complete la coccion.
76

COMO UTILIZAR HOLD WARM (Mantener Caliente)
Peligro de Intoxicacion Alimentaria
No deje sus alimentos en el horno por mas
de una hora antes o despues de su coccion,
No seguir esta instruccion puede ocasionar
intoxicacion alimentaria o enfermedad.
Usted puede conservar calientes los alimentos
cocinados en su homo de microondas. Puede uti-
lizar HOLD WARM por s[ solo, o bien seguido
automaticamente por un ciclo de coccion.
NOTAS:
" Abrir la puerta del horno cancela HOLD WARM.
Cierre la puerta y toque HOLD WARM; en segui-
da, toque START/ENTER (Iniciar/Introducir) si
requiere mas tiempo para la funcion HOLD
WARM.
- Los alimentos que se cocinen tapados deberan
mantenerse cubiertos al utilizar HOLD WARM.
- Los articulos de pasteleria (pasteles, volteados,
etc.), deben destaparse cuando se use HOLD
WARM.
- Para mantener calientes los alimentos, deben
cubrirse cuando se use HOLD WARM.
- No utilice mas de un ciclo de HOLD WARM. La
calidad de algunos alimentos se deteriora si se
excede de este tiempo.
1. Ponga el alimento caliente cocinado en el horno
y cierre la puerta.
2. Toque HOLD WARM.
TOQUE
USTED VERA
3. Encienda el horno. TOQUE USTED VERA
Oi;,O C*C:O:
- Mientras est¢ programando las instrucciones para
cocinar, toque HOLD WARM antes de oprimir
START/ENTER, o durante el ciclo.
- Cuando termine el Qltimo ciclo de coccion
escuchara dos tonos. Aparecera la palabra
"WARM" ("CALIENTE") mientras el homo
continQa trabajando.
77

Cbmo cuidar su horno de
microondas
Para asegurarse de que su homo de microondas se vea y funcione bien por mucho tiempo, debe darle el
mantenimiento apropiado. Para un cuidado adecuado, pot favor siga cuidadosamente estas instrucciones.
Para las superficies interiores: Lave frecuentemente
con agua tibia jabonosa
y una esponja o lienzo
suave. Utilice sola-
mente jabones suaves,
no abrasivos o un
detergente suave.
Asegt_rese de mante-
ner limpias las Areas
donde la puerta y el
marco del horno con-
vergen cuando esta
cerrado. Limpie bien con agua limpia. Con el tiem-
po pueden aparecer manchas en las superficies
debido a particulas de comida salpicadas al coci-
nar. Esto es normal.
Para manchas dificiles, hierva una taza de agua en
I l homo durante 2 6 3
minutos. El vapor
suavizara las manchas.
Para eliminar olores
dentro del homo, hierva
una taza de agua con
unas gotas de jugo de
limon o vinagre.
Para limpiar la bandeja
Bandeja giratoria
de la
bandeja giratoria
liratoria y el soporte de
la bandeja giratoria,
IAvese con agua suave
jabonosa; para Areas
muy manchadas, utilice
un limpiador suave y
una esponja para tallar.
La bandeja giratoria y el
soporte de la bandeja
giratoria son resistentes
a lavavajillas.
• Lavese a mano con un detergente y esponja
suaves o un cepillo
de nylon. Sequese
pot completo.
• No utilice fibras o
limpiadores abrasivos
para limpiar la parrilla.
• La parilla es resistente
a lavavajillas.
Para las superficies exteriores y el panel de
control: Utilice un lien-
zo suave con limpiador
de cristales en aerosol.
Aplique el limpiador de
cristales en aerosol en
el lienzo suave; no Io
aplique directamente en
el horno.
NOTA: Los
limpiadores abrasivos,
fibras de acero o lana,
trapos viejos, algunas toallas de papel, etc.,
pueden da_ar el panel de control y las superficies
interiores y exteriores del horno.
78

COMO INSTALAR Y CUIDAR LOS FILTROS
Peligro de Choque El_ctrico
Desconecte el suministro de energia antes
de quitar los filtros.
Vuelva a colocar todos los paneles antes
de hacer funcionar.
No seguir estas instrucciones puede
ocasionar la muerte o choque el_ctrico.
Se deben quitar con frecuencia los filtros de
grasa (aluminio) para limpiarlos, al menos una
vez al mes. Puede ordenar refacciones (N0mero
de parte 8184001) disponibles en el centro de
servicio Sears mas cercano. El filtro de carb6n
3M no puede limpiarse y debe reemplazarse
cada 6 a 12 rneses.
NOTA: Su combinacion microondas campana
viene con un filtro de carbon (N0mero de parte
8184019) instalada detras de la rejilla de venti-
lacion.
1. Desenchufe el homo de microondas o
desconecte el suministro de energfa electrica.
2. Para quitar los filtros de grasa (aluminio), empu-
je cada filtro hacia arri-
ba, en lado opuesta a
la lengQeta. Sujete la
leng(Jeta y jale el filtro
hacia el lado opuesto.
Jale el filtro hacia
abajo para quitarlo.
3. Remoje los filtros de grasa en agua caliente y un
AMMONIA DISHWASHEP
detergente suave.
Restrieguelos y agitelos
para eliminar la suciedad
y grasa incrustada.
Enju_tguelos bien y sacQ-
dalos para que se
sequen. No use
amoniaco, agentes de
limpieza corrosivos
como limpiadores de
homo con base de lejia
ni los coloque en la lavavajillas. El filtro se pondra
negro o podria daharse.
4. Para volver a colocar los filtros de grasa, deslice
cada filtro den-tro del
lado exterior del orificio
para filtros. AsegQrese de
deslizar el lado del filtro
que no tiene la lengOeta.
Sujete la lengOeta con la
otra mano. Empuje hacia
arriba el lado del filtro
con la leng(Jeta y deslice
el filtro hacia el otro lado
del orificio para que
encaje en su lugar.
5. Para quitar el filtro de carbon 3M (ubicado
detr._s de la rejilla de
ventilacion}, incline la
rejilla hacia adelante y
luego levantelo hacia
afuera para quitarlo.
Sujete el filtro de car-
bon, levantelo y quitelo
de la ranura.
6. Para reemplazar el filtro de carbon 3M,
coloque un nuevo filtro
en la ranura y vuelva a
colocar la rejilla de ven-
tilacion a su lugar.
7. Vuelva a conectar el suministro de energ[a o
enchufe el horno de microondas.
NOTA: No haga funcionar el extractor de aire sin
que los filtros de grasa esten en su lugar.
79

ii!ii!!i_!i!i: i!i!i!!__!!_l!i_i::!_iii _iiUiiiiiiii;i _ii:!!liliiil:I!;iiiiii!i!iii!iii!_!ii!iiii_ii_iiiiiii!:i_iiiil;;ii_!i:iiii__!:iii_!!iiii!!!!!ii_!
C(SMO CAMBIAR LAS LUCES DEL HORNO Y DE LA
SUPERFICIE DE COCCION
1. Desenchufe el horno de microondas o
desconecte el suministro de energfa.
2. Quite el tornillo de montaje de la cubierta del
foco y retirela con
cuidado.
3. Recorre el filtro 3M hacia adelante y levantelo
para quitarlo.
4. Levante la cubierta del foco.
,
Cambie el(los) foco(s) por uno de halogeno de
10 watts con portal_tmparas (N0mero de parte
8169418), el cual puede conseguir en su centro
de servicio Sears mas cercano.
4. Vuelva a colocar la cubierta del foco y el tomillo
de montaje.
5. Enchufe el homo de microondas o reconecte el
suministro de energfa.
1. Desenchufe el homo de microondas o
desconecte el suministro de energfa.
2. Recorra la rejilla hacia adelante y levantela
para quitarla.
5. Cambie el foco pot uno halogeno de 10 watts
con portal_tmparas (N0mero de parte 8169418),
el cual puede conseguir en su centro de servi-
cio Sears mas cercano.
6. Cierre la cubierta del foco.
80

COMO CAMBIAR LAS LUCES DEL HORNO Y DE LA
SUPERFICIE PARA PREPARACION DE ALIMENTOS
(CONT.)
7. Deslice el filtro 3M a su lugar. NOTA: Vea el
borde del filtro de
carbon para la ori-
_l_ _ entacion correcta.
8. Deslice la parte superior de la rejilla de
I entilacion a su lugar.
Toque la parte inferior
hasta que quede
perfectamente
colocada.
9. Enchufe el horno de microondas o reconecte el
suministro de energ[a.
81

G" pa coci r
CONSEJOS PARA COCINAR CON
MICROONDAS
EL HORNO DE
• Si usted aumenta o disminuye la cantidad de
alimentos que prepara, el tiempo requerido para
cocinarlos tambien cambiar& Per ejemplo, si
usted usa el doble de una receta, agregue un
poco mas de la mitad del tiempo de coccion
original. Verifique si ester cocido y, si es nece-
sario, agregue mas tiempo en incrementos
peque_os.
• Cuanto menor es la temperatura del alimento
que usted coloca en el horno de microondas,
mayor sera el tiempo requerido para su coccion.
Los alimentos a temperatura ambiente se reca-
lentaran mas rapido que los alimentos que est_m
a la temperatura del refrigerador.
• Los alimentos con mucha grasa o azucar se
calentaran mas rapido que los alimentos con alto
contenido de agua. La grasa y el azQcar alcanzan
una temperatura mas alta que el agua durante el
proceso de coccion.
• Cuanto m,_s dense es el alimento, mayor es el
tiempo requerido para calentarlo. Alimentos "muy
densos" come las carnes necesitan mas tiempo
para recalentarse que los alimentos mas livianos
o mas porosos come pasteles esponjosos.
• Las piezas m,_s pequehas de alimento se coci-
naran mas rapido que las piezas mas grandes y
piezas con la misma forma se cocinaran en forma
mas pareja que los alimentos con forma irregular.
° En los alimentos con grosores diferentes, las
partes mas delgadas se cocinaran mas rapido
que las partes mas gruesas. Ooloque las partes
mas delgadas de las alas y patas de polio en el
centre del plato.
::::::::::::::::::::::::
• Cuando usted rota o revuelve los alimentos, el
calor se distribuye rapidamente al centre del
plato y evita que los bordes del alimento se
recocinen.
i _,: : :;:i0
Tape los alimentos para:
• Reducir salpicaduras
• Acortar los tiempos de coccion
• Retener la humedad de los alimentos
Todas las tapas que permiten pasar las microondas
son adecuadas. Para mas informacion acerca de
los materiales que permiten el paso de las
microondas, ver la seccion "Conozca su horno de
microondas'.
Muches alimentes (per ejemplo: papas al horno,
salchichas, yemas de huevo y algunas frutas)
est_m cubiertos per una piel o membrana apreta-
da. Esto puede causar que los alimentos estallen
per la acumulacion de vapor bajo la membrana
mientras se cocinan. Para aliviar la presion y pre-
venir los estallidos, trinche estos alimentos con
un tenedor, palillo de coctel o un palillo de
dientes antes de cocinarlos.
• Siempre deje reposar los alimentos per un
rate despues de cocinar. El periodo de repose
despues de cocinar, descongelar o recalentar
siempre mejora el resultado ya que la temperatu-
ra se distribuye en forma pareja a traves del ali-
mento.
• El intervalo del tiempo de repose depende del
volumen y la densidad del alimento. A veces
puede ser tan corto come el tiempo que le Ileva
sacar los alimentos del hornoy servirlos en la
mesa. Sin embargo, con alimentos mas volumi-
noses y mas densos, el intervalo de tiempo de
repose puede ser tan largo come de 10 minutes.
Para resultados optimos, distribuya los alimentos
en forma pareja sobre el plato. Usted puede hacer
esto de varias maneras:
• Si usted est,_ cocinando varias piezas del
mismo tipo de alimento, come papas al homo,
coloquelas en forma de anillo para una coccion
uniforme.
82

CONSEJOS PARA COCINAR CON EL HORNO DE
MICROONDAS (CONT.)
= Cuando cocina alimentos con forma o espe-
sor irregular, tales como pechugas de polio,
coloque las partes mas pequefias y delgadas
hacia el centro del plato donde se calentaran en
L_ltimo lugar.
• Apile las rodajas delgadas de came una sobre
otra.
• Cuando usted cocina o recalienta pescados
enteros, haga un corte en la piel - esto evita que
se quiebre.
• No deje que los alimentos o los recipientes
toquen el techo o los costados del horno. Esto
evitara la posible formacion de chispas.
No deben usarse recipientes de metal en el horno
de microondas. Sin embargo, hay algunas excep-
ciones. Si usted ha comprado alimentos que est_tn
pre-empaquetados en un recipiente de papel de
aluminio, siga las instrucciones del paquete. Si usa
recipientes de papel de aluminio, los tiempos de
coccion pueden ser mas largos porque las
microondas penetraran solo la parte superior del
alimento. Si usted usa recipientes de aluminio que
no tienen instrucciones en el paquete, siga las
siguientes indicaciones:
• Coloque el recipiente en un tazon de vidrio y
agregue un poco de agua para que cubra la base
del recipiente, a no mas de ¼de pulg
(0.64 cm) de alto. Esto asegura un calentamiento
parejo en la base del recipiente.
• Siempre quite la tapa para evitar que el horno se
da_e.
• Use solo recipientes que no est_tn da_ados.
• No use recipientes mas altos de _ de pulg
(1.9 cm).
° El recipiente debe estar Ileno por Io menos hasta
la mitad.
° Para evitar que se formen chispas, debe haber
como minimo ¼de pulg (0.64 cm) entre el recipiente
de aluminio y las paredes del horno Io mismo que
entre dos recipientes de aluminio.
° Siempre coloque el recipiente sobre la bandeja
giratoria.
° El recalentamiento de alimentos en recipientes
papel de aluminio Ileva el doble de tiempo que
recalentarlos en recipientes de pl_tstico, vidrio,
porcelana o papel. El tiempo requerido para que los
alimentos esten listos depende del tipo de recipi-
ente que usted usa.
° Deje reposar los alimentos por 2 a 3 minutos
despues de calentar para que el calor se distribuya
en forma pareja a traves del recipiente.
• No envase alimentos en el horno. Los frascos de
vidrio cerrados pueden explotar, resultando en
da_os al horno.
• No use el horno de microondas para esterilizar
objetos (mamaderas, etc.). Es dificil mantener el
horno a la temperatura alta requerida para una
esterilizaci6n segura.
83

Preguntas y respuestas
PREGUNTAS RESPUESTAS
4,Puedo hacer funcionar mi horno de microondas No. Si usted saca o da vuelta a la bandeja girato-
sin la bandeja giratoria o voltear la bandeja ria, tendra resultados de coccion insatisfactorios.
giratoria para acomodar un plato mas grande? Los platos que use en su horno deben caber en la
bandeja giratoria.
4,Puedo usar una parrilla en mi horno de Usted puede usar una parrilla si esta vino con su
microondas para recalentar o cocinar en dos horno de microondas. El uso de una parrilla ajena
niveles al mismo tiempo? al horno de microondas, puede dar como resulta-
do una coccion insatisfactoria y/o la produccion de
chispas.
4,Puedo usar bandejas de metal o aluminio en mi Usted puede usar papel de aluminio para
horno de microondas? proteccion (use pedazos pequefios y pianos),
brochetas pequefias y bandejas poco profundas
de aluminio (si la bandeja tiene una profundidad de
de pulgada [1.9 cm] y esta a medio Ilenar con
alimentos para absorber la energia de microondas).
Nunca deje que el metal toque las paredes o la
puerta.
4,Es normal que la bandeja giratoria rote en ambas SL La bandeja giratoria gira a la izquierda o a la
direcciones? derecha, dependiendo de la rotacion del motor
cuando se inicia el ciclo de coccion.
A veces la puerta de mi horno de microondas Esta apariencia es normal y no afecta el fun-
parece ondulada. _,Es normal? cionamiento de su horno.
4,Que son los zumbidos que escucho cuando el Usted puede escuchar el sonido del transformador
horno de microondas ester funcionando? cuando el tubo de magnetron comienza los ciclos.
4,Por que el plato se calienta cuando cocino ali- A medida que los alimentos se calientan, estos
mentos en 61? Pense que esto no ocurrir[a, transfieren el calor al plato. Preparese para usar
guantes de hornear para sacar los alimentos
despues de la coccion.
4,Que significa "tiempo de reposo'? "Tiempo de reposo" significa que los alimentos
deben sacarse del horno y quedar tapados por un
tiempo adicional para permitir que se termine la
coccion. Esto libera el horno para cocinar otras
cosas.
4,Por que sale vapor del conducto de ventilacion? El vapor se produce normalmente durante la coc-
cion. El horno de microondas ha sido disefiado para
ventilar el vapor por los orificios de ventilacion.
[
4,Puedo hacer palomitas de maiz en mi horno de
microondas? 4,C6mo Iogro optimos resultados?
S[. Haga palomitas de maiz empaquetadas si-
guiendo las instrucciones del fabricante o use el
boton prefijado POPCORN. No use bolsas
comunes de papel. Use la "prueba de sonido"
parando el homo en cuanto los estallidos sean
mas espaciados hasta que haya uno cada uno o
dos segundos. No vuelva a usar granos de maiz
que no hayan reventado. No haga palomitas de
maiz en utensilios de vidrio.
NOTA: Quite la parrilla de coccion antes de poner
el paquete en el horno.
84

m
|
n6sti
Y
[] f
C|
pPo
La mayoriade losproblemas alcocinara menudo son causados pot peque_as cosas que ustedpuede
encontrar y arreglar sin herramientas de ningt3n tipo. Revise las siguientes listas detalladas a continuaci6n yen
la pr6xima p_gina antes de pedir ayuda o servicio. Si usted a0n necesita ayuda, vea los n0meros telef6nicos
gratuitos de Sears, que se encuentran en la contraportada.
EL HORNO DE MICROONDAS NO FUNCIONA
PROBLEMA CAUSA
Nada funciona. • El cable de alimentacion no esta enchufado en un contacto de tres terminales
con conexion a tierra. Vea la seccion "Requerimientos electricos" y la seccion
"Conexion electrica".
• Se ha quemado algt_n fusible en la casa o se ha disparado el disyuntor.
• La empresa de servicios electricos ha tenido una interrupcion en el suministro
de electricidad.
El homo de microondas • Usted esta. usando el homo como temporizador. Toque OFF/CANCEL para
no funciona, anular el temporizador de cocina.
• La puerta no esta. bien cerrada o asegurada.
• Usted no toco START/ENTER.
• Usted no siguio las instrucciones con exactitud.
• Una funcion que usted fijo anteriormente todavia esta. funcionando. Toque
OFF/CANCEL para anular dicha seleccion.
TIEMPOS DE COCClON
PROBLEMA CAUSA
Los alimentos no esta.n • El suministro electrico de su casa o los contactos de pared son bajos o ma.s
bien cocidos, bajos de Io normal. La empresa de servicios electricos puede indicarle si el
voltaje del contacto es bajo. El electricista o tecnico de servicio puede
indicarle si el voltaje del contacto es bajo.
• La intensidad de coccion no esta. en el ajuste recomendado. Revise el cuadro
de coccion a distintas intensidades.
• Usted no ha dejado suficiente tiempo de coccion para la cantidad de alimen-
tos que esta. cocinando. Las cantidades mas grandes de alimentos necesitan
tiempos de coccion mas prolongados.
La pantalla muestra un
tiempo de cuenta
regresiva pero el homo
no esta. cocinando.
• La puerta del homo no esta. completamente cerrada.
• Usted ha fijado los controles como un temporizador de cocina. Toque
OFF/CANCEL para anular el temporizador de cocina.
85

ii!!!!iiiii'iJ!ii__ii_ii_!__Iiiii_i_:i:i!!!!ili!'Jii_iiiii:iii;iiliiili;_il'_'¸ii_!!!ii_i;iiii;iiiiiiiiil!ilii_iiiii::i'lliiii_i!i'!!i'filliii_iiiiii_!iiiii_iililli!ii_iill!i_!_ii!!_i!ill_!ii::_iiii!!!_ili_i
BANDEJA GIRATORIA
PROBLEMA CAUSA
La bandeja giratoria no • La bandeja giratoria no esta en su debido lugar. Su posicion correcta debe
funciona, ser con el lado piano hacia arriba y bien asentada en el eje central.
• El soporte no esta funcionando correctamente. Saque la bandeja giratoria y
ponga el homo a funcionar de nuevo. Si el soporte todavia no se mueve,
Ilame a un tecnico autorizado para que Io repare. Los resultados de coccion
sin la bandeja giratoria pueden ser insatisfactorios.
TONOS
PROBLEMA CAUSA
Usted no escucha • Usted no ha ingresado el comando correcto.
el tono de • Usted ha apagado el tono. Vea la seccion "Se_ales audibles".
programacion o
de fin de ciclo.
MENSAJES EN LA PANTALLA
PROBLEMA CAUSA
La pantalla muestra • Ha habido una interrupcion en el suministro electrico. Vuelva a programar el
intermitentemente":", reloj. Vea la seccion "Como programar el reloj".
Si ninguna de estas es la causa del problema, vea la seccion "NOmeros telefonicos gratuitos de Sears" en la
contraportada.
86

87

For repair of major brand appliances in yourown home...
iiiiiiiiiiiiiiiiiiiiii
iiiiiiiiiiiiiiiiiiiiiiiiiiiiiiiiiiii nomatterwhomadeit, nomatterwhosoldit! iiiiiiiiiiiiiiiiiiii
iiiiiiiiiiiiiiiiiiii
i:i:i:i:i:i:i:i:i:i:i:i:i:i:i:i:i:i:1-800-4-MY-HOME ®Anytime, dayornight iiiiiiiiiiiiiiiiiiii
iiiiiiiiiiiiiiiiiiiiiiiiiiiiiiiiiiii (1-800-469-4663) (U.S.A. andCanada) iiiiiiiiiiiiiiiiiiii
i:i:i:i:i:i:i:i:i:i:i:i:i:i:i:i:i:i: www.sears.com www.sears.ca iiiiiiiiiiiiiiiiiiii
i:i:i:i:i:i:i:i:i:i:i:i:i:i:i:i:i:i:Forrepairofcarry-in productslikevacuums, lawnequipment,
i:i:i:i:i:i:i:i:i:i:i:i:i:i:i:i:i:i: andelectronics, callforthelocationofyournearest
iiiiiiiiiiiiiiiiiiiiiiiiiiiiiiiiiiii SearsPartsandRepairCenter.
iiiiiiiiiiiiiiiiii
i:i:i:i:i:i:i:i:i:i:i:i:i:i:i:i:i:i:1-800-488-1222 Anytime,dayornight(U.a.A,only)
:i:i:i:i:i:i:i:i:i:i:i:i:i:i:i:i:ii
iiiiiiiiiiiiiiiiiiiii:
iiiiiiiiiiiiiiiiiiiiii
Forthe replacementparts,accessories and owner's manuals iiiiiiiiiiiiiiiiiiiiii
that you need to do-it-yourself, call Sears PartsDirectSM! iiiiiiiiiiiiiiiiiiiiii
iiiiiiiiiiiiiiiiiiiiii
1-800-366-PART 6a.m.-11 p.m. CST,7daysaweek iiiii
iiiiiiiiiiiiiiiiiiiiiiiiiiiiiiiiiiiiiiiiii (1-800-366-7278) (U.S.A. only) iiiiiiiiiiiiiiiiiiiii
11111111111111117
iiiiiiiiiiiiiiiiiiiii www.sears.com/partsdirect
To purchase or inquireabout a Sears Service Agreement
...orSearsMaintenanceAgreement:.
1 800 827 6655 (U.S.A.) 1 800 361 6665 (Canada)
7 a.m. - 5 p.m. CST, Mon. - Sat. 9 a.m. - 8 p.m. EST, M - F, 4 p.m. Sat.
AU Canada pour service en fran?ais: iiiiiiiiiiiiiiiii
iiiiiiiiiiiiiiiiiiiiiiiiiiiiiiiiiiiiiiiiiii Parapedirserviciodereparacidna
domicilio, yparaordenarpiezas: I"800"LE'FOYERMC _7_i_717171717171!!i
_iiiilililililililililililililililililili1.888.SU.HOGARSM (1-800-533-6937)
_ii:i:i:i:i:i:i:i:i:i:i:i:i:i:i:i:i(1-888-784-6427) www.sears.ca
• • ....::i_!:i!:i!:i!:i!:i!:i!:i!:i!_!!!
HomeOentral ®
4619-652-60641/8183956
© Sears, Roebuck and Co.
TM SM
®Registered Trademark / Trademark / Service Mark of Sears, Roebuck and Co.
®Maroa Registrada / TMMaroade Fabrioa / SMMaroade Servioio de Sears, Roebuck and Co,
7/01
Printed in China
Impreso en China
-
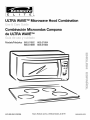 1
1
-
 2
2
-
 3
3
-
 4
4
-
 5
5
-
 6
6
-
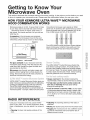 7
7
-
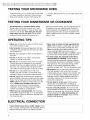 8
8
-
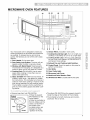 9
9
-
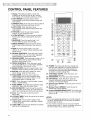 10
10
-
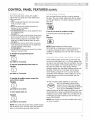 11
11
-
 12
12
-
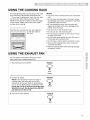 13
13
-
 14
14
-
 15
15
-
 16
16
-
 17
17
-
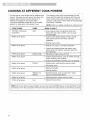 18
18
-
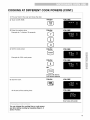 19
19
-
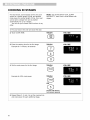 20
20
-
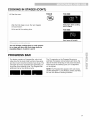 21
21
-
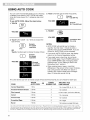 22
22
-
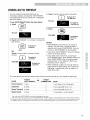 23
23
-
 24
24
-
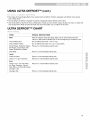 25
25
-
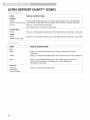 26
26
-
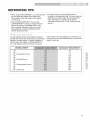 27
27
-
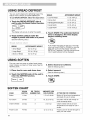 28
28
-
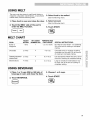 29
29
-
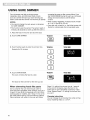 30
30
-
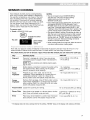 31
31
-
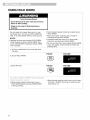 32
32
-
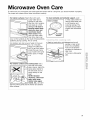 33
33
-
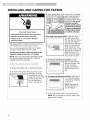 34
34
-
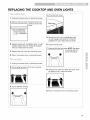 35
35
-
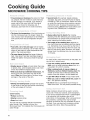 36
36
-
 37
37
-
 38
38
-
 39
39
-
 40
40
-
 41
41
-
 42
42
-
 43
43
-
 44
44
-
 45
45
-
 46
46
-
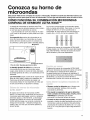 47
47
-
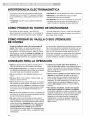 48
48
-
 49
49
-
 50
50
-
 51
51
-
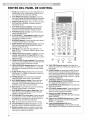 52
52
-
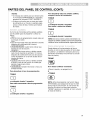 53
53
-
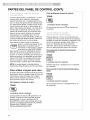 54
54
-
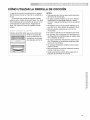 55
55
-
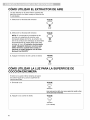 56
56
-
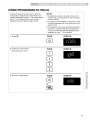 57
57
-
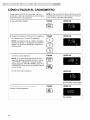 58
58
-
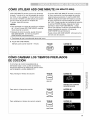 59
59
-
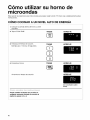 60
60
-
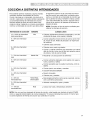 61
61
-
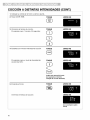 62
62
-
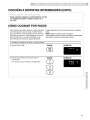 63
63
-
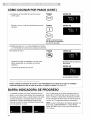 64
64
-
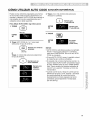 65
65
-
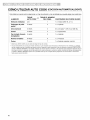 66
66
-
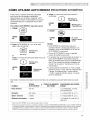 67
67
-
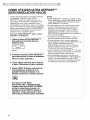 68
68
-
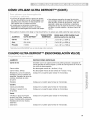 69
69
-
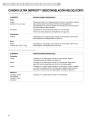 70
70
-
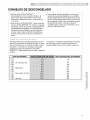 71
71
-
 72
72
-
 73
73
-
 74
74
-
 75
75
-
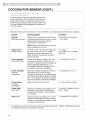 76
76
-
 77
77
-
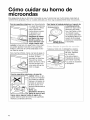 78
78
-
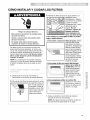 79
79
-
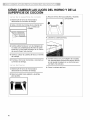 80
80
-
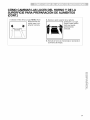 81
81
-
 82
82
-
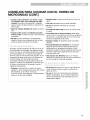 83
83
-
 84
84
-
 85
85
-
 86
86
-
 87
87
-
 88
88


Kenmore Elite 66561689101 El manual del propietario
- Categoría
- Microondas
- Tipo
- El manual del propietario
- Este manual también es adecuado para
en otros idiomas
Artículos relacionados
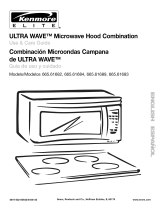
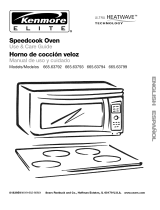
Otros documentos
-
Kenmore 66561652100 El manual del propietario
-
-
-
-
-
-
-
KitchenAid KCMC155JBT0 El manual del propietario
-
-