Craftsman 706141210 El manual del propietario
- Tipo
- El manual del propietario

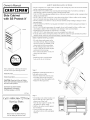
Owner's Manual
[ CRRFTSMRN°[
Side Cabinet
with SS Protect-it s
14121
Please indicate the following information
from the se_wicepart drawing provided.
Model Number
Model Description
CAUTION: Read and follow all Safety
Rules and Operating Instructions before
first use of this product,
Distributed by Sears Brands
Management Corporation,
Hoffman Estates, IL60179
F1714
Call 1-800-366-7278 for
Service Parts
Refer to Service Parts Drawing
for full listing of Service Parts
SAFETY WARNINGS AND CAUTIONS:
*DO NOT STAND in or on unit. Failure to adhere to this warning may cause unit to become unstable
and tip, resulting in personal injury.
*WEAR SAFETY GLASSES when removing and repositioning slides. Screwdriver could slip or
metal shavings could be produced, possibly causing personal injury.
*USE CAUTION when opening multiple drawers, unit may become unstable and tip, causing product
damage or personal injury.
*DO NOT MOUNT unit on truck bed or any other moving ob.iect. Failure to adhere to this warning
may void warranty and cause damage to unit or personal injury
*DO NOT STEP in or on drawers. Unit may become unstable and tip resulting in damage to unit or
personal injur3z
*USE EXTREME CAUTION if moving unit with forklift. Unit could fall causing personal injury or
product damage.
*DO NOT ALTER unit in any manner, for example, do not weld external lock bars or dollies onto
unit. Failure to adhere to this warning may cause damage to unit or personal injury.
. MAXIMUM LOAD capacity for each &awer is 75 pounds.
*A HEAVY DUTY slide cabinet must be used on an equally heavy duty cart.
*Lock the drawers before moving this product. The &awers could come open and make the product
unstable and tip, which may cause personal injury or product damage.
SIDE CABINET INSTALLATION:
*The side cabinet only mounts on the
roll cabinet left side. Make sure handle
and swivel casters are installed on roll
cabinet right side before proceeding.
*Use the locking feature of the swivel
casters to lock the roll cabinet in place
and prevent it from moving.
*Close and lock all drawers on the roll
cabinet and side cabinet.
Step !
*Install four bolts to outside handle
holes on left side of roll cabinet.
Step 2
WARNING: Check that inside bolts on
both rigid casters are tight.
• Remove outside bolts on liont caster.
• Insert plate between the front rigid
caster and bolt head, then tighten bolts.
• Repeat for other rigid caster.
\
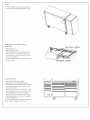
Step 3
• Lift and place side cabinet in place over
the four bolts. Be sure to place side
cabinet over all four bolts.
Note: this may require two people. The
side cabinet is 100 lbs. empty.
• Hold the side cabinet securely against
the roll cabinet.
• Fasten each hold down plate to the
side cabinet with two bolts and tighten
securely.

Step4
Securetheupperreartopofthesidecabinetto
therollcabinetwiththebracketandtwobolts.
REMOVING AND INSTALLING
DRAWERS:
*Empty the drawer.
*Fully extend the drawer.
*Lift the release lever on the right side, while
depressing the lever on the left side (this al-
lows the slides to ride over the stops). Pull the
&awer out to remove.
*To reinstall, push the drawer into the unit until
the &awer stops.
RELEASE LEVER
RELEASE LEVER
MAINTENANCE:
*Lubricate the slides (twice yearly).
*Lubricate the lock with graphite (yearly).
*Periodically the &awer fionts, drawer trim and
other surfaces should be cleaned with a mild
detergent and water.
*Auto wax will preserve the storage unit's luster
finish. Apply the wax as to a car. The wax will
also help protect the unit against scratches.
*Grease and oil can be removed with most stan-
dard cleaning fluids. For safety, use a nonflam-
mable cleaning fluid.
Note: This unit has the SS Protect-It'R coating. Do
not use stainless steel polish on this unit.
i

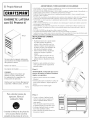
El Propio Manual
GABINETE LATERA
con SS Protect-it ®
14121
Sirvase indicar la siguiente informaci0n
que encontrara en el dibujo suministrado
de la pieza de servicio.
Ntimero de modelo:
Descripcion del modelo:
CUIDADO:
Antes de utilizar este producto por
primera vez, lea y observe todos
los reglamentos de seguridad y las
instrucciones de operacion.
Distribue par Sears Brands Management
Corporation, Hoffman Estates, IL 60179
F1714
Para sloicitar piezas de
repuesto, llame al
1-800-659-7084
Consulte el Dibujo de las piezas de
servicio para obtener una lista
completa de las piezas de servicio.
ADVERTENCIAS Y PRECAUCIONES DE SEGURIDAD:
NO SE PARE en o sobre este producto. La negligencia en observar esta advertencia puede originar que la unidad
quede inestable y se vuelque, causando lesiones personales.
USE GAFAS DE SEGURIDAD al quitar o volver a simar las correderas. Se podria resbalar el destornillador o se
podrian producir virutas metfilicas, y posiblemente causar lesiones personales.
TENGA CUIDADO al abrir varias gavetas, la unidad podria quedar inestable y volcarse, causando lesiones
personales o dafios al producto.
NO INSTALE este producto sobre la plataforma de un camidn ni sobre nin_m otro objeto mdvil. La negligencia
en observar esta advertencia podria anular la garantia y causar lesiones personales o dafios a la unidad.
NO SE PARE en o sobre las gavetas. La unidad puede quedar inestable y volcarse, causando lesiones personales
o dafios a la unidad.
TENGA SUMO CUIDADO al mover este producto con un montacargas. Se puede caer la unidad y causar lesio
nes personales o dafios al producto.
NO MODIFIQUE este producto de nin_ma forma. Por ejemplo, no suelde barras de bloqueo externas ni car
retillas a la unidad. La negligencia en observar esta advertencia podria causar lesiones personales o dafios al
producto.
• LA CARGA MAXIMA en cada gaveta no debe ser mayor de 50 libras.
• Un gabinete lateral EXTRAFUERTE se debe usar en un carro que tambidn sea extrafuerte.
• Asegure las gavetas y puertas antes de mover este producto. Estas se podrian abrir y hacer que el producto quede
inestable y _ vuek ue. lo cual odria causar lesiones personales o dafios al producto.
INSTALACION DE GABINETE
DE LATERA:
• El gabinete lateral solo se puede instalar
en el lado izquierdo de gabinetes
rodantes. Antes de proceder con la in-
stalacidn, asegtirese que la agarradera y
las llantas movibles estdn instaladas del
lado derecho del gabinete rodante.
• Trabe las llantas mdviles del gabinete
rodante para asegnrar el gabinete
rodante
y prevenir algfin movimiento de este.
• Cierre con llave todos los cajones del
gabinete lateral y del gabinete rodante.
Paso 1
• Instale los cuatro tornillos en los hoyos
de la agarradera del lado izquierdo del
gabinete rodante.
Paso 2
ADVERTENCIA: Compruebe que eso los
pernos del interior en ambos echadores
rigidos son apretados.
• Quite los pernos exteriores en el echador
delantero.
• Inserte la placa entre el echador y la cabeza de
perno rigidos delanteros, despuds apriete los
pernos.
• Repita para el otro echador rigido.
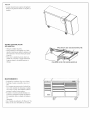
Paso 3
• Levante y coloque el gabinete lateral
sobre los cuatro pernos. Asegurese de
colocar el gabinete lateral sobre los
euatro pemos.
Nota: esto puede requerir dos personas.
E1gabinete lateral pesa 1O0 libras vacio.
• Sostenga el gabinete lateral con segnrb
dad contra el gabinete rodante.
• Sujete cada placa al gabinete lateral con
dos pernos y apriete.

Paso 4
• Asegure la parte trasera superior del gabinete
lateral con el gabinete rodante con la placa y 2
tornillos.
RETIRO E INSTALACION
DE GAVETAS:
• Abra por completo la gaveta.
• Suba la palanca de deseuganche eu el lado
derecho, mientras que oprime la palanca eu el
lado izquierdo y tire hacia afuera para quitar
la gaveta.
Para volver a instalar la gaveta, alinee con
cuidado las correderas y empuie lentamente
la gaveta deutro de la unidad hasta que se
detenga.
PALANCA DE DESENGANCHE
PALANCA DE DESENGANCHE
iVlANTENIIVIIENTO:
• Lubrique las correderas, (dos veces al afio).
• Lubrique el seguro con grafito, (una vez al
afio).
La cera para autos preservarfi el acabado lus-
troso de las unidades de almacenaje. Aplique
cera como a un auto. Esta tambidn ayudarfi a
proteger la unidad contra arafiazos.
La grasa y el aceite se pueden eliminar con
la mayoria de liquidos normales de limpieza.
Por seguridad, utilice un liquido de limpieza
no
i_fftamable.
Nota: Unidad esta cubierta de SS Protect-it _:.No
utilice cera de acero inoxidable en esta unidad.
-
 1
1
-
 2
2
-
 3
3
-
 4
4


Craftsman 706141210 El manual del propietario
- Tipo
- El manual del propietario
en otros idiomas
- English: Craftsman 706141210 Owner's manual
Artículos relacionados
-
Craftsman 6-Drawer El manual del propietario
-
-
-
-
-
-
-
-
Craftsman ProSeries 115825 El manual del propietario
-