Haier LET19T1000H Manual de usuario
- Categoría
- Televisores LCD
- Tipo
- Manual de usuario
Este manual también es adecuado para

LED LCD TV RECEIVER
USER MANUAL
Please read this manual carefully before using
your television and keep this manual in a good
place for future reference.
MODEL:
LET19T1000H
LET22T1000HF
LET24T1000HF
LET26T1000HF

02 Introduction
03 Remote Control
Main Parameter …………………………………………………………………
Control Panel ……………………………………………………………………
Rear/Side Sockets ………………………………………………………………
Connecting your TV ………………………………………………………………
Remote Control …………………………………………………………………
05 Trouble shooting
Trouble shooting ………………………………………………………………
04 Operation
Installation Guide …………………………………………………………………
01 Safety and warnings
Welcome …………………………………………………………………………
Important information ……………………………………………………………
Safety notice ……………………………………………………………………
Warnings and cautions …………………………………………………………
Specification ……………………………………………………………………
P.05
P.11
P.11
P.12
P.14
P.27
P.16
P.02
P.02
P.03
P.04
P.28
Common interface ………………………………………………………………… P.13
Base Stand Assembly Instruction …………………………………………… P.07
Wall Mounting Installation Guidelines ……………………………………… P.09

P.02
Thanks for buying this 19"/ 22"/24"/26" LED LCD TV . This guide will help you set up and
begin using your TV.
19" HD Digital LED
Remote control
AAA ba x2
Instruction Manual
Quick start guide
ttery
IMPOR
TANT INFORMATION
READ ALL INSTRU
CTIONS BEFORE USE AND KEEP FOR FUTURE REFERENCE.
CAUTION
TO REDUCE THE RISK OF ELECTRIC SHOCK, DO NOT REMOVE COVER (OR BACK).NO USER SERVICEABLE PARTS INSIDE.
FOR ANY PROBLEMS, REFER SERVICING TO THE CUSTOMER HELP LINE. THERE IS A LIGHTNING ARROW SYMBOL IN
THE TRIANGLE: THIS SYMBOL INDICATES HIGH VOLTAGE IS PRESENT INSIDE. IT IS DANGEROUS TO MAKE ANY KIND OF
CONTACT WITH ANYINSIDE PART OF THIS PRODUCT.
THERE IS A EXCLAMATION MARK IN THE TRIANGLE: THIS SYMBOL ALERTS YOU THAT IMPORTANT LITERATURE
CONCERNING OPERATION AND MAINTENANCE HAS BEEN INCLUDED WITH THIS PRODUCT.
CAUTION:TO REDUCE THE RISK OF ELECTRIC SHOCK AND FIRE, DO NOT PUT THE TV SET NEAR
SOURCES OF HUMIDITY. DO NOT USE ANY ABRASIVE CLEANERS WHICH MAY SCRATCH OR DAMAGE
THE LCD SCREEN. AVOID CONTACT WITH OBJECTS THAT MAY SCRATCH THE LCD SCREEN.
NOTE: SERVICING THE UNIT YOURSELF IS UNAUTHORISED AND COULD LEAD TO INJURY OR PRODUCT
DAMAGE. REFER ALL SERVICING TO THE CUSTOMER HELPLINE.
Now you can get star
ted!
LCD TV
Stand
22" Full HD 1080P Digital
Remote control
AAA ba x2
Instruction Manual
Quick start guide
ttery
LED LCD TV
Stand
24" Full HD 1080P Digital
Remote control
AAA ba x2
Instruction Manual
Quick start guide
ttery
LED LCD TV
Stand
26" HD Digital LED
Remote control
AAA ba x2
Instruction Manual
Quick start guide
ttery
LCD TV
Stand

P.03
the

WARNINGS AND CAUTIONS
Warning
High voltages are used in the operation
of this television receiver. Do not remove
the cabinet back from your set. Refer
servicing to qualified service personnel.
Warning
To prevent fire or electrical shock
hazard, do not expose the television
receiver to rain or moisture.
Warning
Do not drop or push objects into the
television cabinet slots or openings.
Never spill any kind of liquid on the
television receiver.
Caution
Do not block the ventilation holes in the
back cover. Adequate ventilation is
essential to prevent failure of electrical
components.
Caution
Do not trap the power supply cord under
the television receiver.
Caution
Never stand on, lean on, or suddenly push
the television or its stand. You should pay
special attention to children. Serious injury
may result if it should fall.
Caution
Do not place your television on an unstable
cart, stand, shelf or table. Serious injury to
an individual , and damage to the
television, may result if it should fall.
Caution
When the television receiver is not
used for an extended period of time, it
is advisable to disconnect the AC power
cord from the AC outlet.
Dim:5 15*32 0mm(不 包括底座 )
Caution
If the television is to be built into a
compartment or similar enclosure, the
minimum distances must be maintained.
Heat build-up can reduce the service life of
your television, and can also be dangerous.
P.04
01
Safety and warnings

Introduction
INSTALLATIONCAUTION
*Locate the TV in the room where light
does not strike the screen directly.
*Total darkness or a reflection on the
picture screen can cause eyestrain. Soft
and indirect lighting is recommended for
comfortable viewing.
*Allow enough space between the TV and
the wall to permit ventilation.
*Avoid excessively warm locations to
prevent possible damage to the cabinet or
premature component failure.
*Do not cover the ventilation openings
when using theTV.
Main parameter
Main features
02
P.05
4 NICAM;
3
HDMI interface and SCART
Interface;
5 T ;ime-shift
High luminance, wide viewing
angle;
2
Used as Television, display terminal,
PC display;
1
Panel
TV System
PAL-B/G、I、D/K
SECAM- B/G 、D/K、L、 L
Video Signal System PAL/SECAM
Input Power Voltage AC 100
-
240V 50/60Hz
Power consumption
Audio Output Power (THD 7%)
2x3W
Signal Input
Analog RGB(PC) x1; PC audio x1
High-Definition Multimedia Interface (HDMI)x2
Video Input x1
Audio Input x1
YPb Prx1
SCARTx1
30W
19
'
CI x 1
USB x 1
RF Co-Ax x 1
Standby Power consumption
<0.5W
40W
24
Horizontal definition(TV line)
Composite Video input >=350
YPbPr >=400
Signal output
Headphone x 1
S/PDIF x 1
Never tamper with any components inside
the TV, or any other adjustment controls not
described in this manual. All LED-TV's are
high voltage electrical equipment.
When you clean dust or any water drops off
the SCREEN or CABINET or around any of
the buttons or connectors, the power cabled
should be removed from the power socket.
Wipe the TV with a soft, dry, dust free cloth.
During thunderstorms, unplug the power
cable and aerial / antenna cable to prevent
damage to your TV and any other devices
connected to it.
All repairs to this TV should only be
performed by qualified TV service
personnel.
26
55W
22
38W

PRESET MODE
PC
P.06
02
Introduction
3
5
6
1024x768
1280x1024
60
60
1
640x480
60
31.47
2
800x600
60
37.88
48.36
63.98
RESOLUTION
V.Freq.(Hz) H.Freq.(KHz)
4
1360x768
60
47.7
1920x1080
(except for 19",26")
60
66.64

INSTALLATION NOTES
Locate the TV in a room where light does not strike the screen directly. Total darkness
or a reflection on the screen can cause eyestrain. Soft and indirect lighting is
recommended for comfortable viewing.
Allow enough space between the TV and the wall to permit ventilation.
Avoid excessively warm locations to prevent possible damage to the cabinet or
premature component failure.
P.07
Base Stand Assembly Instruction
1. Insert the stand support pillar into the stand as the arrow indicated
direction, and then fastened with one screw.
2. Insert the stand Ass'y into back cover as the arrow indicated direction,
and then fastened with one screw.
19"/22"/24"

INSTALLATION NOTES
Locate the TV in a room where light does not strike the screen directly. Total darkness
or a reflection on the screen can cause eyestrain. Soft and indirect lighting is
recommended for comfortable viewing.
Allow enough space between the TV and the wall to permit ventilation.
Avoid excessively warm locations to prevent possible damage to the cabinet or
premature component failure.
Base Stand Assembly Instruction
1. Insert the stand support pillar into the stand as the arrow indicated
direction, and then fastened with three screws.
2. Insert the stand Ass'y into back cover as the arrow indicated direction,
and then fastened with two screws.
26"
P.08

WALL MOUNTING INSTALLATION GUIDELINES
This television can be wall mounted as follows:
1.Place the LED LCD Television onto a solid surface. Please place some soft material
over the front of the screen to protect it from any damage.
2.Remove the screws from the lower part of the television, where the base joins to the
TV, and take away the stand (put the stand somewhere safe for future use).
3.Use the four screws provided to fix the TV onto a wall mounting bracket (not included)
via the four VESA standard holes on the back of the television.
02
Introduction
M4X5
M4X5
M4X5
M4X5
75mm
75mm
19"/22"/24"
M4X5
M4X5
M4X5
M4X5
100mm
100mm
(19")
(22",24")
P.09

WALL MOUNTING INSTALLATION GUIDELINES
This television can be wall mounted as follows:
1.Place the LED LCD Television onto a solid surface. Please place some soft material
over the front of the screen to protect it from any damage.
2.Remove the screws from the lower part of the television, where the base joins to the
TV, and take away the stand (put the stand somewhere safe for future use).
3.Use the four screws provided to fix the TV onto a wall mounting bracket (not included)
via the four VESA standard holes on the back of the television.
P.10
02
Introduction
M4X5
M4X5
M4X5
M4X5
200mm
100mm
26"

SPDIF OUTPUT
P.11
1
VIDEO
2
input
3
digital audio output
4
input
5
input
input
8
9
HDMI1 input
10
L/R AUDIO
11
12
13
input
Rear/Side Sockets
6
input
SCART
HEADPHONE
PC AUDIO
VGA
input
input
analogue audio output
4
1 2
5
COMMON INTERFACE (CI)
USB
6
7 8 9 10
11 12 13
USB
COMMON INTERFACE(CI)
3
YPbPr
S/PDIF
7
input
HDMI2
input
RF
Front control panel
ME NU
CH +
CH -
VO L+
VO L-
2
SO URC E
1
3
4
STAND BY
5
1
2
3
Remote control sensor.
Indicator LED:
BLUE: POWER ON. RED: STAND BY.
Key board.
1
SOURCE
Display the input source menu.
MENU
Display main MENU.
3
4
CH+/CH-
In TV mode,press CH+ or CH- to change
the channel up and down.
In MENU, press CH+ or CH- to select items .
In standby mode, it can Turn on the TV.
STANDBY
2
VOL+/VOL-
Adjust sound level.
In MENU,adjust the item that you Selected.
5
3
1
2
30 30

P.12
02
Introduction
HEADPHONE OUTPUT
Insert the plug of the earphone into the earphone
jack on the unit HEADPHONE. The speakers
are now muted.
S/PDIF OUTPUT
S/PDIF is a digital audio connection used to connect
audio equipment, for example home theatres and
other digital HiFi systems over short distances. The
signal is transmitted over either a coaxial cable with
RCA connectors.
Make sure that both TV and the device are
switched off before connecting.
Make sure that both TV and the device are switched
off before connecting.
Connect the AV cables (not supplied) from the
S/PDIF socket on the TV to the Home Theater sound
system or digital HiFi system etc.
CONNECTING YOUR
Haier TV

The common interface (CI) slot is designed to
accept the conditional Access (CA) Module
and Smart card in order to view the pay TV
programmes and additional services.
Contact your Common Interface service
provider to get more information about the
modules and subscription.
Please noted that CA modules and smart
cards are neither supplied nor optional
accessories from us.
COMMON INTERFACE
P.13
CHANNEL
PICTURE
SOUND
STIME
OPTION
LOCK
Auto Tuning
ATV Manual Tuning
Programme Edit
Signal Information
DTV Manual Tuning
Software Update(USB)
CI Information
OK
OK
MENU M OVE O K

Remote control
03
P.14
03
Remote Control
1.POWER:Press to turn on the TV.
2.D.MENU:No function.
3.P.Mode:To switch picture mode.
4.INFO:Press to display the current signal
status,including input source and channel audio
mode.
5.AUDIO I/II: Press to select MONO,Nicam stereo
for ATV channel. Select Audio language for DTV
channel.
6.SUBTITLE:Press to turn the subtitle On or Off.
7.Number Buttons:For direct access to channels.
8.SOURCE:To select input source.
9.MUTE:To disable or enable the sound output.
10.Volume Control:To adjust sound level.
11.MENU:To display TV menu.
12.OK:To confirm selection.
13.EXIT:To return to the previous menu or exit
menu.
14.Teletext Index/USB PLAY
15.REPEAT:No function
16.Teletext Green Button / USB Fast Forward
17.Teletext Red Button / USB Fast Rewind
18.Teletext Mix
19.Teletext Text
20.Teletext Reveal
21.Teletext Size
22.Teletext Time/ANGLE/REC.LIST(teletext time
is no function)
23.Teletext Mode:No function
24.Teletext Hold
25.Teletext Subcode:Teletext Subpage
26.Teletext Blue Button / USB Next File
27.Teletext Yellow Button / USB Previous File
28.USB STOP
29.USB PAUSE
30.START RECORD
31.UP,DOWN,LEFT,RIGHT Cursor:Press to
navigate your selection.
32.Fav:To access your favourite channels list in
TV or DTV mode.
33.Select Programme:Press / Button to select
the next or previous TV channel.
34.GUIDE:Press to display electronic programme
guide in TV mode.
35.Q.View:To access the previously viewed
channel.
36.CH.LIST: Press to display the channel list.
37.Screen:To change picture aspect ratio.
38.Sleep :Set timer to turn off the TV.
39.S.Mode:To switch sound mode.
40.OPEN/CLOSE:No Function
:No DVD function

E
T
EXT
SELECTING A PAGE
DIRECT ACCESS
TO THE ITEMS
INDEX
SUB PAGE
HOLD
REVEAL
Press:
You will obtain :
LIST
TELETEXT
Enter the number of the page required using the 0 to 9 up/down.
Example: page 120, enter 120. The number is displayed top left, the
counter turns and then the page is displayed. Repeat this operation to
view another page. If the counter continues to search, this means
that the page is not transmitted. Select another number.
Coloured are as are displayed at the bottom of the screen. The 4
coloured keys are used to access the items or corresponding pages.
The coloured areas flash when the item or the page is not yet
available.
This returns to the contents page (usually page 100).
Certain pages contain sub-pages which are automatically
displayed successively. This key is used to stop or resume sub-
page acquisition. The indication appears top left.
To freeze the page.
To display or hide the concealed information (games solutions).
The user can set four favorite pages to be directly linked to the four
color keys. While list mode is activated, it is not possibility to use TOP
or FLOF navigation with the colorkeys. The favorite page numbers
should be stored and restored to/from nonvolatile memory for each
channel by the system software.
This is used to call or exit teletext modes. The summary appears with
a list of items that can be accessed. Each item has a corresponding
3 digit page number. If the channel selected does not broadcast
teletext, theindication 100 will be displayed and the screen will
remain blank (in this case, exit teletext and select another channel).
Teletext is an information system broadcast by certain channels which can be
consulted like a newspaper. It also offers access to subtitles for viewers with hearing
problems or who are not familiar with the transmission language(cable networks,
satellite channels, etc.)
REMOTE CONTROL
P.15

WELCOME!
Thank you for choosing
Please select on OSD language
OK
Czech
English
French
Italian
Greek
Spanish
Deutsch
Magyar
Nederlands
Polski
Russian
Romanian
Password
Please enter old password
Please enter new password
Confirm new password
Home Mode
Mode Select
OK
Shop Mode
OPERATION
04
04
Operation
The installation guide only appear when the TV
first time turn on or reset to factory set.
Installation Guide
1).Press the buttons to navigate the
menu and change the settings. Press the OK
button to confirm.
Select your desired language ,Home/Shop
Mode to be displayed on the menu.
The default password is 6666.
2). Press the buttons to select DVB-T/DVB-C
and then press the OK button to confirm.
OK
French
Italy
Greece
Nederlands
Poland
Germany
Hungary
Luxembourg
Norway
a. If you select DVB-T, the next step is to select
the Tune type and country then press the OK
button to start tuning.
b. If you select DVB-C, the next step is to config
the DVB-C system like (scan type / Frequency/
Network ID/Sy mbol(KS/S) then press OK
button to into the tune type and country select
menu, this step is the same as DVB-T, select the
tune type (DTV/ATV).
Choose the right country, press OK button to
start tuning.
P.16
HOME or SHOP modes
1. Home Mode is an energy-saving Mode. Home
Mode is recommended for normal viewing setting
and is set as default during manufacturer.
2. Shop Mode is an option for retailers for
Advertising or product presentation.
Shop Mode has a brighter image than Home Mode.
3. You may switch between Home or Shop Mode
as you choose.If you choose Shop Mode ,it will
enter HDMI1 source automatically,and you wil
press Exit key to exit POP menu.

1. 1 Auto Tuning (DVB-T)
1. CHANNEL MENU
04
Operation
CHANNEL
PICTURE
SOUND
STIME
OPTION
LOCK
Auto Tuning
ATV Manual Tuning
Programme Edit
Signal Information
DTV Manual Tuning
Software Update(USB)
CI Information
OK
Programme(s)
Programme(s)
Programme(s)
Programme(s)
1
OK
MENU M OVE O K
1). Press the MENU button and then press the
buttons to select the CHANNEL menu
and then press the OK button.
2). Press the buttons to select Auto Tuning
and then press the OK button.
3). Channel tuning will commence. This operation
may take up to 6 minutes. The display will show
the progress of the tuning and the number of
channels found.
4). If you want to skip the ATV tuning, press the
MENU button to interrupt the tuning half way.
A pop-up screen will be displayed, press the
button to select YES to confirm. You will then go
straight to DTV tuning.
You may repeat the above step if you also want
to skip the DTV tuning. An installation reminder
will appear the next time you turn on the TV.
5). After tuning is complete, the channels are
arranged in a preset order. If you wish to skip
channels, modify the preset order or rename
channels, select Programme Edit under the
Channel menu.
6) Congratulations
Congratulations!!!
Completed Initial Quick Setup.
Enjoy your Haier TV
Press OK to Exit
3). Press the buttons to select DVB-T/
DVB-C Press select DVB-T and then press
the OK button to confirm.
4). In the Tune Type menu, press the buttons to
select ATV / DTV / DTV + ATV. Press the button
and then press the buttons to select the
country where you will operate the TV. Press the
OK button to confirm
P.17

5). Channel tuning will commence. This
operation may take up to 6 minutes. The display
will show the progress of the tuning and the
number of channels found.
6). If you want to skip the ATV tuning, press the
MENU button to interrupt the tuning half way. A
pop-up screen will be displayed, press the
button to select YES to confirm. You will then go
straight to DTV tuning. You may repeat the
above step if you also want to skip the DTV
tuning. An installation reminder will appear the
next time you turn on the TV.
7). After tuning is complete, the channels are
arranged in a preset order. If you wish to skip
channels, modify the preset order or rename
channels, select Programme Edit under the
channel menu.
1.2 Auto Tuning (DVB-C)
2). Press the buttons to select Auto Tuning and
then press the OK button.
3). Press the buttons to select DVB-T/DVB-C
Press select DVB-C and then press the OK button
to confirm.
4). Press buttons to select Scan type/Symbol
(Ks/S) press the OK button to confirm.
5). In the Tune Type menu, press the buttons to
select ATV / DTV / DTV + ATV. Press the button
and then press the buttons to select the
country where you will operate the TV. Press the
OK button to confirm.
Programme(s)
Programme(s)
Programme(s)
Programme(s)
1
CHANNEL
PICTURE
SOUND
STIME
OPTION
LOCK
Auto Tuning
ATV Manual Tuning
Programme Edit
Signal Information
CADTV Manual Tuning
Software Update(USB)
CI Information
OK
OK
MENU M OVE O K
OK
French
Italy
Greece
Nederlands
Poland
Germany
Hungary
Luxembourg
Norway
1). Press the MENU button and then press the
buttons to select the CHANNEL menu and then
press the OK button.
OK
French
Italy
Greece
Nederlands
Poland
Germany
Hungary
Luxembourg
Norway
P.18

6). Channel tuning will commence. This operation may
take up to 6 minutes. The display will show the
progress of the tuning and the number of channels
found.
7). If you want to skip the ATV tuning, press the MENU
button to interrupt the tuning half way. A pop-up screen
will be displayed, press the button to select YES to
confirm. You will then go straight to DTV tuning. You
may repeat the above step if you also want to skip the
DTV tuning. An installation reminder will appear the
next time you turn on the TV.
8). After tuning is complete, the channels are arranged
in a preset order. If you wish to skip channels, modify
the preset order or rename channels, select Programme
Edit under the channel menu.
2. 1 DTV Manual Tuning (DVB-T)
NOTE:
All the channels including ATV, DTV and Radio
can be tuning by one time,if the Tune Type is
DTV+ATV .
All the stored channels will be disappear after
auto tuning .
After auto tuning , the channel will skip to
the first DTV channel.
2). Press the buttons to select DTV Manual Tuning
and then press the OK button.
4). Press the MENU button to return back to the
main menu.
5). Press the EXIT button to exit the menu.
2. 2 DTV Manual Tuning (DVB-C)
1). Press the MENU button and then press the
buttons to select the CHANNEL menu and then
press the OK button.
3). The DTV Manual Tuning screen will pop up.
Press the buttons to select the desired UHF
channel and then press the OK button to
commence the search of that channel. When the
signal has been tuned, the picture and signal
strength will be displayed on the screen.
1). Press the MENU button and then press the
buttons to select the CHANNEL menu and then
press the OK button.
2). Press the buttons to select CADTV Manual
Tuning and then press the OK button.
3). The CADTV Manual Tuning screen will pop up.
Press the buttons to select(Frequency /Symbol
(ks/s/QAM Type QAM) press the OK button to
commence the search of that channel. When the
signal has been tuned, the picture and signal
strength will be displayed on the screen.
4). Press the MENU button to return back to the
main menu.
5). Press the EXIT button to exit the menu.
04
Operation
Programme(s)
Programme(s)
Programme(s)
Programme(s)
1
CHANNEL
PICTURE
SOUND
STIME
OPTION
LOCK
Auto Tuning
ATV Manual Tuning
Programme Edit
Signal Information
DTV Manual Tuning
Software Update(USB)
CI Information
OK
D
CHANNEL
PICTURE
SOUND
STIME
OPTION
LOCK
Auto Tuning
ATV Manual Tuning
Programme Edit
Signal Information
CADTV Manual Tuning
Software Update(USB)
CI Information
OK
490000
16
NO SIGNAL
OK
MENU M OVE O K
OK
MENU M OVE O K
P.19

2). CI information: (optional)
This menu can display the CI card' s information.
Rename:
Use the Arrow Buttons to select the channel you
wish to move. Then press the Yellow Button to
select Move function. Once active use the Arrow
Buttons to move and then press OK to confirm.
Only can rename ATV programs .
Move the cursor to the program, press teletext
green button to rename the program.
Press to choose the character. Press to
move the cursor .
Press MENU button to exit edit , Press EXIT to
exit the menu.
Note: ATV programs name only can be 5 character,
DTV programs name can be 25 character.
NOTE:
Press teletext red button to storage to channels
after manual tuning .
1). Program edit:
You can Delete ,Rename ,Move, Skip , FAV any
programs.
Delete
Press teletext red button , the program in cursor
will delete.
Press to choose the program , press teletext
blue button to skip this program, The will
show on the right side of the program .
Choose the skipped program, press blue button
again , you can cancel the skip ,The will
disappear .
ATV Manual Tuning
Storage To 1
System BG
Current CH 1
Search
Fine-Tune
Frequency 424.25 MHz
3.1 ATV Manual tuning :
You can change the sound system to search the
analog TV channels and fine tune the channels ,
then storage the channels you selected.
Favourite
Press to choose the program , press FAV
button , it will show on the right side of the
program.Choose the FAV program , press
FAV button again , you can cancel the FAV,
the will disappear .
Once your favorite group is created, you can
press the FAV key to quickly access your favorite
channel.
NOTE:
1).Tint is available in NTSC system only.
2).There are four colors temperature modes
can be selected medium, warm, cool,user
3).Screen is available in PC mode only which
can adjust Horizontal position, vertical
position, size and phase.
3.SOUND MENU
The third item of the MENU is the SOUND
MENU.
You can adjust the sound effect here such as
treble, bass, balance etc.
Press to move, press OK to adjust.
Note:
Auto volume: only available when the input
signal volume is too large or distortion.
Picture Mode Standard
Contrast 50
Brightness 50
Color 50
Sharpness 75
Tint 50
Color Temperature Medium
Red 50
Green 50
Blue 50
4.TIME MENU
The forth item of the menu is the TIME MENU
You can adjust the clock, power on/off time,
sleep time etc Press to move, press OK to
adjust.
The second item of the MENU is PICTURE MENU.
You can adjust picture effect here, such as
contrast, brightness, etc.
Press OK to move, press OK to adjust.
2. PICTURE MENU
Save MENU
MENU
MENU
CHANNEL
PICTURE
SOUND
STIME
OPTION
LOCK
Sound Mode
Auto Volume
Surround Sound
Balance
Stan dard
Musi c
Thea ter
Spor ts
User
S/PDIF Mode
CHANNEL
PICTURE
SOUND
STIME
OPTION
LOCK
Picture Mode
Aspect Ratio
Noise Reduction
Screen
Color Temperature
Eco
Mild
User
Stsn dard
OK
MENU M OVE O K
OK
MENU M OVE O K
P.20

5.OPTION MENU
The fifth item of the MENU is the OPTION
MENU. You can adjust the Menu language,
Audio language,Subtitle language etc.
NOTE:
Within 15 minutes there is no signal, the TV
will auto sleep , if Auto Sleep is set ON. The
clock time can get from the DTV system auto.
04
Operation
6.LOCK MENU
The sixth item of the menu is the LOCK MENU
You can lock system, set password, block program
and set parental guidance Once you set the lock
system on you can not search the channels or
change any programs.
NOTE:
The default pass word is 0000, If you forget the
password, you can use the super password:9443.
Block program: Press to choose the
program ,press teletext green button to block
the program. If you want unblock the program,
pls enter the main menu , input the password,
then press green button again.Parental
guidance: Press to choose rating.
7.EPG Menu(Electronic Program
Guide).
The EPG menu is used to look at what is being
broadcasted on DTV or Radio channel in the day.
To access the EPG menu, press the EPG
botton,the following menu will be displayed:
1.
Use to choose the programs , Press
INFO key, you can display the highlight program's
information.
INFO
2.
Press the teletext yellow key, It can list
all the reminder schedule, press to choose
the list, press red key to delete the
schedule list.
Schedule
DELETE
Schedule List 04:55 28th Apr Delete
Time Date
Programme Title
Channel Name
NOTE:
Restore factory default will clear all the programs
and password.
In PVR File system menu you can set up USB
disk for PVR.
Automatic Power-down
1.If after 4 hours from switch on and no changes
have been made to the TV, for example no channel
or volume changes,the TV will start the automatic
power down sequence.
And pop-up window will appear on screen.
After 150 seconds the TV will automatically switch
to standby. To override the automatic shutdown
press any button on the remote control.
2. To cancel the automatic power-down
On the Option Menu select Automatic power-
down(4H)
Press OK. A pop-up message will appear
“Are you sure you want to enable automatic power-
down?”
Use the right arrow key to select NO
The TV screen returns to the Option Menu and the
Automatic
power-down(4H) option will display.
Automatic power-down(4H) OFF
To return to auto shutdown after 4 hours repeat the
above except
use the left arrow key to select YES
XXX’s to automatic power-down
Please press any Key to Cancel
CHANNEL
PICTURE
SOUND
TIME
OPTION
LOCK
Clock
Off Time
Sleep Timer
Auto Sleep
Time Zone
On Time
OK
CHANNEL
PICTURE
SOUND
STIME
OPTION
LOCK
OSD Language
Subtitle Language
Country
PVR File System
Restore Factory Default
Automatic power-down(4h)
Home/Shop Mode
DCR
Audio Languages
OK
CHANNEL
PICTURE
SOUND
STIME
OPTION
LOCK
Lock System
Block Program
Parental Guidance
Set Password
OK
OK
MENU M OVE O K
OK
MENU M OVE O K
OK
MENU M OVE O K
26/Jan 11:40
1 TV3
Club/Super3-Naturalmen..
No Information
No Information
PROGRAMME GUIDE
Schedule
Record
INFO
Remind
TIME
2 3/24
3 TVC HD
OK
INDEX
USB Disk
Time Shift Size
Speed
Select Disk C:
Check PVR File System Start
Format
Free Record Limit 6 Hr.
OK
MENU
P.21

CHANNEL
PICTURE
SOUND
STIME
OPTION
LOCK
OSD Language
Subtitle Language
Country
Restore Factory Default
Automatic power-down(4h)
Home/Shop Mode
DCR
Audio Languages
OK
OK
MENU M OVE O K
3. Record
Press the red key ,It can set the program
to be recorded.
4.
Press the blue key to choose one program
and set up one reminder time, the TV screen will
skip to the choosed program in the reminder time
automatically.
Remind
Check PVR File System: check if the PVR File
System set up in the USB device or not.
Format:
Select Disk
USB 0
Disk C:
PVR File System Type Hi Speed FS
PVR File System Size All
SD 104 Mins
HD 29 Mins
File System Size
Select Disk:select which disc to save the
record file.
PVR File System Type FAT32
SD 104 Mins
HD 29 Mins
File System Size
1.Prepare to record the program
8.PVR function
PVR function only works in DTV.
From OPTION MENU enter into PVR File
System In “OPTION MENU”, please
choose “check PVR File System”. Click
“OK”, until “checking”change into
“Success”.
Note: please check the term “speed”. If it
is “HD support”, that means the speed of
USB device is available for time shift and
record. If not, please format the device, to
make sure the device available. The default
“Free Record Limit” is 6 hour, if the space
on the disk is big enough. If the space is not
big enough, the record time should be
shorter, depends on the room on the
device. During the “check PVR File
System” checking, please do not take any
other operation until it finished.
The recordings must be done with the TV PVR
system. It can only be played in the same TV,
not in any other kind of device (computer,
DVD, etc.) which is not compatible with .
TS. file format.
Please note that in order to carry out any kind of
recording, the TV will require you to format the
connected USB device to store the recording.
WARNING. WHEN YOU FORMAT, THE
EXTERNAL USB DEVICE YOU WILL LOSE ALL
THE FILES AND INFORMATION YOU HAVE
STORAGE ON THE DEVICE.
The USB file system will limit the size of the
storage size.
File system: NTFS up to 2TB
FAT32 with up to 192GB
FAT16 with up to 2GB
From OPTION MENU enter into PVR File
System as below:
1 TV3
37 Minute
11 Hour
Jan Month
26 Date
Once Mode
Reminder
BACK
OK
PVR File System
OK
OK
OK
USB Disk
Time Shift Size
Speed
Select Disk C:
Check PVR File System Start
Format
Free Record Limit 6 Hr.
OK
MENU
P.22

04
Operation
below menu appear after Format finish:
2.Record the program
3.Play the record
(Suggest to format the format the device by
“High Speed Fs...”, which can speed up
the record.)
Format disk
If you select the “Hi Speed FS ”format mode,
then you can change the time shift size:
Time Shift Size
Time Shift Disk Size 512 MB
SB 14 Mins
HD 4 Mins
Do not unplug USB device.
Formatting,please wait
Format disk
As playing the DTV source, choose the
channel and click “record”, the record
frame will pop up. Click “record” again,
the record frame will disappear and the
“REC” icon still on the left top. It will
disappear until you click “stop”.
The program recorded on the “USB”will be
saved in the folder “_MSTPVR” on the
device.
1.The USB storage size can be between
128MB and 500GB in size, but for practical
use 2GB to 500GB is recommended.
2. Video may become pixelated when Video
bit rate is too low. This can be caused by
connecting a USB extension cable instead
of plugging the USB directly into the TV
3. Not all USB devices are compatible.
Below is a list of recommended USB drives.
Models that are not listed may be
compatible, but it is not guaranteed to work.
The USB support list are the same as
Timeshift function,see the following pages
for details.
Start Exit
Format disk
Warning! All data will be lost.
OK
USB Disk
Time Shift Size
Select Disk C:
Check PVR File System SUCCESS
Format
Pass
Pass
All
Speed HD Support
2730KB/S
Free Record Limit 6 Hr.
USB Disk
Time Shift Size
Select Disk C:
Check PVR File System Checking
Format
Pass
Pass
All
Speed
Checking
Free Record Limit 6 Hr.
OK
MENU
OK
MENU
OK
P.23

1.Prepare to record the program
9.Timeshift function
This TV allows you to pause and record the
currently watched digital program to a USB
storage device, and to resume to the point
where it was paused.
NOTE:
Formatting a USB 2.0 storage device will
be needed. Save your original data
before formatting. All the data stored in
the USB device will be erased after
formatting.
USB Drive Storage Format
Select to format the USB device and
allocate the amount of space for the Time
Shift function.
The format process will take at least 2
minutes. Please do not turn off the power
or remove the USB device during
formatting.
During formatting, a speed test will be
done on the USB device. If it fails, it
means the USB device may not support
the Time Shift function.
Record a paused DTV program to
USB storage device
NOTE:
NOTE:
Please do not unplug the USB storage
device when the Time Shift function is
activated.
Approximately 4GB of memory buffers
about offer 140 minutes.
1. While in the DTV input source, insert
USB storage device to the USB port on the
side of your TV.
2. Press PAUSE to start Time Shift
function. The TV program paused. The Time
Shift OSD appears, and starts recording.
3. Press STOP to stop Time Shift
function and stop recording program.
Pause FF Prev. NextFB Stop
Repeat ALL
00:04:22
Set A
AB
play
00:04:22
P.24

04
Operation
8. This feature is not available for all digital
TV,such as scrambled or audio only
channels.
Time Shift limitations:
1. When the Time Shift feature is activated,
only the PLAY/PAUSE/STOP/FWD/REV/
VOL+/VOL-/MUTE keys and some basic
operation keys (ENTER/EXIT/navigation
keys) are available.
2. Video playback may not be smooth and
skip if USB recording speed does not meet
the minimum requirements .
3. Do Not remove USB disk or switch off the
power during Time Shift operations. It will
abort once the signal is lost.
4. Do Not remove the signal source during
Time Shift operations.
5. Do Not quickly and repeatedly change
operations between
PLAY/PAUSE/FWD/REV.
6. Video may become pixelated when Video
bit rate is too low.
7. Not all USB devices are compatible, The
USB hard disk drive electricty should be
< 500MA.
Below is a list of recommended USB drvies.
Models that are not listed may be
compatible, but it is not guaranteed to work.
P.25

Press source key, and selsct USB in soure
list, press OK button to enter the USB menu.
10.USB Player
Please make sure that the USB device have
plugged in the slot.There are four type media
item can be selected, such as photo, music,
Movie, and text. Select the type media item by
pressing , press OK button to enter
the disk selection menu.
Press the to select the right disk and press
OK to display media files and folder list or
choose Return to back to the media type
selection menu.
Select the media file by pressing or , then
the preview frame will pop up.Press the button
to play the media file in full screen.When the
media file (photo, Movie, or text type) is playing,
press the OK or Info button can display the control
bar.
Press to select the function icon, press OK
button to confirm the function.
Press or EXIT button to exit the control bar
except for music.
NOTE:
You can adjust the audio track, or program in the
Info menu while Playing the video file.Choose the
Info icon and press OK can display the Info MENU.
SUB-10.avi
Resolution: 720x400
Subtitle:
Program:
Size: 4142 KBytes
Close
AudioTrack: 1/1
USB playback is supported for the following photo
file formats:
-JPEG(JPEG format, files with the extension ".jpg" )
-BMP (files with the extension ".bmp")
-PNG (files with the extension ".png")
USB playback is supported for the following music
file formats:
-MP3 (files with the extension ".mp3")
-WAV (files with the extension ".wav")
USB playback is supported for the following text
file formats:
-TXT (files with the extension ".txt")
USB playback is supported for the following movie
file formats:
-AVI (file with the extension".avi")
-TS (MPEG2 & H.264)
Pause FF Prev. NextFB Stop
Repeat ALL
00:04:22
Set A
AB
play
00:04:22
PHOTO MUSIC TEXT MOVIE
Haier Innovation Life
Usb2.0 Back
MENU
Move Select
OK
Return C
Haier Innovation Life
Back
MENU
Move Select
OK
Picture
Back
MENU
Move Select
OK
Return 720 480 1080Up Folder 0021.JPG
0021.JPG
OFF
--/0
P.26

Trouble shooting
05
Picture Audio
Snow Noise
antenna position, direction
or connection
Inspection Check
Interference
Noise
electronic equipment,car/
motorcycle,fluorescent light
Normal Picture
Mute
Volume(check if mute is
activated or if the audio system
connections are not correct)
No picture Mute
Power cord is not inserted
Power switch is not opened
Contrast and brightness/volume
setup
Press standby key on the remote
control for inspecting
No colour Normal audio Colour control
Picture
breaking up
Normal audio
or weak
retune channel
No colour
Noise
TVsystem
Normal audio
antenna position, direction
or connection
Trouble phenomenon Symptom
Ghost
07
Trouble shooting
Normal audio
Change aspect to zoom
There is black bar
on top and bottom
P.27

Specification
Colour system
Sound system BG, DK, I, L,L'
Video input
SCART,
YP
b
Pr,
AV,
VGA, HDMI, USB.
Y/P
b/Pr
480i/p, 576i/p,
720p, 1080i,1080p
Audio output 2x3W
Environment
conditions
Working temperature:
+5 C - +35 C
Working humidity:
20% - 80%
Storage temperature:
Accessory
* The part specifications of this TV set provided here
are for reference only.
Difierences may occur as product technology is updated.
Design and specifications are subject to change without notice.
HDMI
480i/p, 576i/p, 720p, 1080i, 1080p
User manual
Remote control
Battery (x2)
Quick start guide
-15 C - +45 C
Storage humidity:
5% - 90%
Power
requirements
100-240V~ 50/60Hz
Power
consumption
30W(19")
Standby Power
<0.5W
Comsumption
Scart Output description :
1. When current source is ATV/AV/SCART, scart output signal is ATV.
2. When current source is DTV, scart output signal is DTV.
3. Other source have no scart output signal.
PAL-B/G, I, D/K
SECAM-B/G, D/K, L, L’
55W(26")
40W(24")38W(22")
P.28


1
LCD-FERNSEHER
BEDIENUNGSANLEITUNG
Bitte lesen Sie die Bedienungsanleitung aufmerksam durch, bevor Sie Ihren Fernseher
benutzen. Bewahren Sie die Anleitungen für zukünftigen Nachschlagen auf.
MODELL
LET19T1000H
LET22T1000HF
LET24T1000HF
LET26T1000HF

2
Inhaltsverzeichnis
01 Sicherheits- und Warnhinweise
Willkommen S. 03
Wichtige Informationen S. 03
Sicherheitshinweise S. 04
Warn- und Vorsichtshinweise S. 05
02 Einleitung
Parameter S. 07
Standfuß montieren S. 08
Wandmontage S. 09
Frontblende S. 11
AV-Anschlüsse S. 12
Fernseher anschließen S. 13
Common Interface S. 14
03 Fernbedienung
Fernbedienung S. 15
04 Bedienungshinweise
Installation S. 17
05 Störungserkennung
Störungserkennung S. 33
Spezifikationen S. 34

3
01 Sicherheits- und Warnhinweise
WILLKOMMEN
Vielen Dank, dass Sie sich für diesen 19"/22"/24"/26".Zoll LED LCD-Fernseher entschieden haben. Diese Anleitung hilft Ihnen bei der
Einstellung und Bedienung Ihres Fernsehers.
Vergewissern Sie sich zunächst, dass alle Zubehörteile mitgeliefert wurden:
19" HD-Ready LED LCD-Fernseher
2 x AAA-Batterien für Fernbedienung
Benutzerhandbuch
Kurzanleitung
Standfuss
22" Full HD 1080P digitaler LED LCD-Fernseher
Fernbedienung
2 x AAA-Batterien
Benutzerhandbuch
Kurzanleitung
Standfuss
24" Full HD 1080P digitaler LED LCD-Fernseher
Fernbedienung
2 x AAA-Batterien
Benutzerhandbuch
Kurzanleitung
Standfuss
26" HD-Ready LED LCD-Fernseher
2 x AAA-Batterien für Fernbedienung
Benutzerhandbuch
Kurzanleitung
Standfuss
Nun können Sie beginnen!
WICHTIGE INFORMATIONEN
LESEN SIE ALLE ANLEITUNGEN VOR GEBRAUCH UND BEWAHREN SIE SIE FÜR SPÄTERES NACHSCHLAGEN AUF.
VORSICHT
STROMSCHLAGGEFAHR
NICHT ÖFFNEN
VORSICHT
ZUR VERMEIDUNG VON STROMSCHLAG ÖFFNEN SIE DAS GERÄTEGEHÄUSE NICHT. ES BEFINDEN SICH KEINE VOM
VERBRAUCHER WARTBAREN TEILE IM INNERN DES GERÄTS. WENDEN SIE SICH MIT PROBLEMEN UND FRAGEN ZUR
WARTUNG AN DEN KUNDENDIENST.
DER BLITZ IM GLEICHSEITIGEN DREIECK BEDEUTET, DASS IM GERÄT HOCHSPANNUNGSGEFAHR BESTEHT.
DAS AUFRUFUNGSZEICHEN IM GLEICHSEITIGEN DREIECK BEDEUTET, DASS WICHTIGE WARTUNGS- UND
BEDIENUNGSHINWEISE IN DER BEDIENUNGSANLEITUNG GEFUNDEN WERDEN.
VORSICHT: ZUR VERMEIDUNG VON STROMSCHLAG UND FEUER SETZEN SIE DEN FERNSEHER NICHT
FEUCHTIGKEIT AUS. REINIGEN SIE DAS GERÄT UND DEN BILDSCHIRM NICHT MIT SCHEUERMITTELN; DAS
FÜHRT ZU KRATZERN.
BITTE BEACHTEN SIE: REPARIEREN SIE DAS GERÄT NICHT SELBST, DAS KANN ZU VERLETZUNGEN UND
SCHÄDEN AM GERÄT FÜHREN. WENDEN SIE SICH MIT WARTUNGS- UND REPARATURARBEITEN STETS AN
DEN AUTORISIERTEN KUNDENDIENST.

4
SICHERHEITSHINWEISE
• Warnung: Zur Vermeidung von Feuer und Stromschlag öffnen Sie nicht das Gerätegehäuse. Es befinden sich
keine vom Verbraucher wartbaren Teile im Innern des Gerätes. Wenden Sie sich mit Wartungs- und
Reparaturarbeiten stets an den autorisierten Kundendienst.
• Warnung: Zur Vermeidung von Feuer und Stromschlag setzen Sie das Gerät nicht Regen oder Feuchtigkeit
aus.
• Setzen Sie Netzteil und Gerät nicht Spritzwasser oder Tropfwasser aus und stellen Sie keine mit Wasser
gefüllten Gegenstände (wie Vasen) auf dem Gerät ab.
• Schützen Sie das Gerät vor direkter Sonneneinstrahlung und Hitze (Heizkörper, Herd).
• Blockieren Sie nicht die Ventilationsöffnungen, sie werden zur Belüftung benötigt. Stellen Sie das Gerät nicht
auf einem Kissen, Sofa oder ähnlichen Flächen ab.
• Stellen Sie das Gerät nicht auf einem unstabilen Wagen, Aufsteller, Stativ, Tisch oder einer Halterung auf. Es
kann herunterfallen und Verletzungen und Schäden verursachen.
• Stellen Sie keine schweren oder scharfkantigen Gegenstände auf dem Gerät ab.
• Ziehen Sie nach der Benutzung den Netzstecker.
• Entsorgen Sie Batterien umweltgerecht.
• WARNUNG: Batterien oder Akkus dürfen nicht übermäßiger Hitze ausgesetzt werden (direkte
Sonneneinstrahlung, Feuer usw.).
• WARNUNG: Übermäßiger Schalldruck von Ohrhörern oder Kopfhörern kann zu Hörschäden führen.
Dieses Symbol zeigt an, dass das Gerät nicht mit dem Hausmüll entsorgt werden darf. Zur Vermeidung von
Gesundheits- und Umweltschäden durch unkontrollierte Entsorgung muss das Gerät recycelt werden. Geben Sie das
Gerät bitte an einer Sammelstelle für Elektroaltgeräte ab oder wenden Sie sich an Ihren Fachhändler.

5
WARN- UND VORSICHTSHINWEISE
Warnung
Vorsicht
Dieser Fernseher wird mit Hochspannung betrieben. Öffnen Sie nicht das Gerätegehäuse. Wenden Sie sich mit
Wartungs- und Reparaturarbeiten stets an den autorisierten Kundendienst.
Zur Vermeidung von Feuer und Stromschlag setzen Sie das Gerät nicht Regen oder Feuchtigkeit aus.
Führen Sie keine Fremdkörper in das Gerät ein, stoßen Sie es nicht stark an. Verschütten Sie keine Flüssigkeiten auf
Ihrem Fernseher.
Blockieren Sie nicht die Ventilationsöffnungen, sie werden zur Belüftung benötigt.

6
Klemmen Sie das Netzkabel nicht unter dem Fernseher ein.
Stehen Sie nicht auf dem Fernseher, lehnen Sie sich nicht gegen den Fernseher, stoßen Sie ihn nicht an. Achten Sie
auch besonders auf Kinder. Der Fernseher kann schwere Verletzungen und Schäden verursachen, wenn er umfällt.
• Stellen Sie das Gerät nicht auf einem unstabilen Wagen, Aufsteller, Stativ, Tisch oder einer Halterung auf. Es
kann herunterfallen und Verletzungen und Schäden verursachen.
Bei längerer Nichtbenutzung des Fernsehers ziehen Sie bitte das Netzkabel ab.
Mindestabstände
Wird der Fernseher eingebaut, so achten Sie bitte auf die Mindestabstände. Hitzestau kann die Lebensdauer Ihres
Fernsehers verkürzen und ist gefährlich.

7
02 Einleitung
ACHTUNG
Machen Sie sich nicht an Bauteilen im Fernsehgerät oder an irgendwelchen anderen Einstellungssteuerungen zu
schaffen, die nicht in diesem Handbuch beschrieben sind. Alle LED Fernsehgeräte sind elektrische
Hochspannungsgeräte.
Wenn Sie Staub oder Wassertropfen von dem Bildschirm oder dem Gehäuse oder um die Knöpfe oder Anschlüsse
herum abwischen, sollte das Stromkabel aus der Steckdose aus gesteckt sein.
Wischen Sie das Fernsehgerät mit einem weichen, trockenen, staubfreien Tuch ab.
Trennen Sie während Gewittern das Stromkabel und das Antennenkabel, um Schäden an Ihrem Fernsehgerät und
anderen angeschlossenen Geräten zu vermeiden.
Alle Reparaturen sollten nur von qualifiziertem Fernsehgeräte Servicepersonal durchgeführt werden.
INSTALLATION
• Stellen Sie den Fernseher vor direkter Sonneneinstrahlung geschützt auf.
• Dunkelheit und Reflektionen auf dem Bildschirm können zu einer Überforderung der Augen führen. Weiche
und indirekte Beleuchtung wird für komfortables Fernsehen empfohlen.
• Lassen Sie auf der Rückseite des Fernsehers ausreichend Platz zur Ventilation.
• Vermeiden Sie besonders warme Standorte, um einen Hitzestau im Gerät und vorzeitige Schäden zu
vermeiden.
• Decken Sie die Lüftungsöffnungen während des Betriebs nicht ab.
Ausstattungsmerkmale
1. Nutzbar als Fernseher oder PC-Monitor
2. Hohe Leuchtkraft, breiter Betrachtungswinkel
3. HDMI- und SCART-Anschluss
4. NICAM
5. Time shift
Parameter
Bildschirm 19“ 22“ 24“ 26“
Spannungsversorgung
100-240V~50/60Hz
30W
100-240V~50/60Hz
38W
100-240V~50/60Hz
40W
100-240V~50/60Hz
55W
Audio-Ausgangsleistung
(Klirrfaktor ≤7 %)
2x3W
Anschlüsse
Analog RGB (PC) x 1
High-Definition Multimedia Interface (HDMI) x 2
Videoeingang x 1
Audioeingang x 2
USB-Port x 1
YPbPr x 1
SCART x 1
CI x 1
RF Co-Ax X 1
Headphone X 1
S/PDIF X 1
Horizontale Auflösung
(TV-Zeilen)
Composite Videoeingang ≥350
YPbPr ≥400

8
PC
MODE PRÉDÉFINI
RESOLUTION V. Fréq. (Hz) H. Fréq. (KHz)
1 800*600 60 37. 88
2 640*480 60 31. 47
3 1360*768 60 47.7
4 1024*768 60 48. 36
5 1280*1024 60 63. 98
Montageanleitung für Standfuß
HINWEISE ZUR INSTALLATION
Stellen Sie den Fernseher vor direkter Sonneneinstrahlung geschützt auf. Dunkelheit und Reflektionen auf dem
Bildschirm können zu einer Überforderung der Augen führen. Weiche und indirekte Beleuchtung wird für komfortables
Fernsehen empfohlen.
Lassen Sie auf der Rückseite des Fernsehers ausreichend Platz zur Ventilation.
Vermeiden Sie besonders warme Standorte, um einen Hitzestau im Gerät und vorzeitige Schäden zu vermeiden.
(19”,22”,24”)
1. Stecken Sie die Stütze in Richtung des
Pfeils in den Standfuß und befestigen
Sie sie anschließend mit den einzelnen
Schrauben.
2. Stecken Sie die Standfußbaugruppe in
Richtung des Pfeils in die Rückwand und
befestigen Sie sie anschließend mit der
einzelnen Schrauben.
1. Stecken Sie die Stütze in Richtung des
Pfeils in den Standfuß und befestigen
Sie sie anschließend mit den drei
Schrauben.
2. Stecken Sie die Standfußbaugruppe in
Richtung des Pfeils in die Rückwand und
befestigen Sie sie anschließend mit der
zwei Schrauben.
(19”,22”,24”)
(26”)
(26”)

9
WANDMONTAGE
Dieser Fernseher kann wie folgt an der Wand montiert werden:
1. Legen Sie den Fernseher mit dem Bildschirm auf eine flache Arbeitsfläche. Legen Sie ein Tuch unter, um den
Bildschirm zu schützen.
2. Schrauben Sie die Halterung für den Standfuß unten am Fernseher ab (bewahren Sie den Standfuß für späteren
Gebrauch auf).
3. Schrauben Sie den Fernseher mit den vier vorgesehenen Schrauben an einer VESA-Wandhalterung (nicht
mitgeliefert).
(
19”
,
22”
,
24”
)
(
26”
)
(
19”
)

10
(
22”
,
24”
)
(
26”
)

11
Frontblende
1 Sensor Fernbedienung
2 Status-LED:
BLAU: eingeschaltet
ROT: Stand-by-Modus
3 Funktionstasten
1
SOURCE
Menü der Eingangsquellen anzeigen.
2
MENU
Hauptmenü anzeigen.
3
CH+/CH-
Im TV-Modus schalten Sie mit CH+ oder CH- den Kanal aufwärts oder abwärts um.
Im MENÜ wählen Sie mit CH+ oder CH- einen Menüpunkt.
In Stand-by-Modus schalten Sie den Fernseher ein.
4
VOL+/VOL-
Lautstärke einstellen.
Im MENÜ stellen Sie den gewählten Menüpunkt ein.
5
STANDBY

12
Anschlüsse Seite/Rückseite
1
L/R AUDIO
Eingang
2
Video
Eingang
3
S/PDIF
Digital Audio Ausgang
4
YPbPr
Eingang
5
SCART
Eingang
6
USB
Eingang
7
HDMI2
Eingang
8
HDMI1
Eingang
9
HEADPHONE
Analog Audio Ausgang
10
COMMON INTERFACE (CI)
Eingang
11
PC AUDIO
Eingang
12
VGA
Eingang
13
ANTENNE
Eingang

13
FERNSEHER ANSCHLIEßEN
ANTENNE ANSCHLIEßEN
Schließen Sie die Antenne auf der Rückseite des Fernsehers am Anschluss ANT IN an.
SIGNAL VERBESSERN
Zur Verbesserung schlechter Bildqualität in bestimmten Bereichen benutzen Sie einen Antennenverstärker (nicht mitgeliefert).
PC AM FERNSEHER ANSCHLIEßEN
Sie können den Fernseher ebenfalls als Monitor für Ihren PC benutzen, der Anschluss erfolgt über ein VGA-Kabel (nicht mitgeliefert).
1 Lesen Sie in der Bedienungsanleitung Ihres Computers nach, ob dieser einen VGA-Anschluss hat.
2 Schalten Sie Fernseher und PC aus.
3 Schließen Sie ein D-Typ 15-Pin VGA-Kabel am VGA-Anschluss des PC und am Fernseher an. Ziehen Sie die Schrauben an und
schließen Sie ein Audiokabel (nicht mitgeliefert) am Audioeingang auf der Rückseite des Fernsehers an.
4 Schalten Sie erst den Fernseher und dann den PC ein.
5 Rufen Sie auf dem Fernseher oder mit der Fernbedienung den VGA-Modus auf.
6 Sie können den VGA-Modus zu einer anderen Auflösung umschalten, Helligkeit und Kontrast im Menü einstellen, bis Sie ein klares
Bild haben.
DVD-PLAYER ODER VIDEOREKORDER AM FERNSEHER ANSCHLIEßEN
Einen DVD-Player oder Videorekorder können Sie auf zweierlei Weise anschließen. Beide Geräte müssen zunächst ausgeschaltet sein.
1 Schließen Sie die AV DVD/VCR Ausgänge an AV IN des Fernsehers an.
2 Schließen Sie Audio L und R am Audioeingang (8) an. Drücken Sie SOURCE und stellen Sie den Eingangsmodus auf AV ein.
SCART-EINGANG
1
Schließen Sie das SCART-Kabel vom externen Gerät (DVD-Player, Digitalempfänger, Spielkonsole usw.) am SCART-Eingang des
Fernsehers an.
2 Drücken Sie SOURCE und stellen Sie den Eingangsmodus auf SCART ein.
3 Drücken Sie PLAY auf dem externen Gerät.
HDMI-EINGANG
1
Schließen Sie das HDMI-Kabel vom externen Gerät am HDMI-Eingang des Fernsehers an.
2 Drücken Sie SOURCE und stellen Sie den Eingangsmodus auf HDMI ein.
3 Sehen Sie die Bedienungshinweise in der Anleitung Ihres HDMI-Gerätes nach.
HEADPHONE Ausgang
Den Kopfhörerstecker in die Kopfhörerbuchse stecken. Die Lautsprecher sind nun stummgeschaltet.
S/PDIF Ausgang
S/PDIF ist ein digitaler Audio Anschluss, der verwendet wird, um Audio Geräte, wie z.B. Heimkinoanlagen oder andere digitale
HiFi-Systeme über kurze Entfernungen anzuschließen. Das Signal wird über ein Koaxial Kabel mit RCA Anschlüssen übertragen.
1.Achten Sie darauf, dass sowohl das Fernsehgerät als auch das Gerät ausgeschaltet sind, bevor Sie das Gerät an das Fernsehgerät
anschließen.
Achten Sie darauf, dass sowohl das Fernsehgerät als auch das Gerät ausgeschaltet sind, bevor Sie das Gerät an das Fernsehgerät
anschließen.
2.Schließen Sie die AV Kabel (nicht im Lieferumfang enthalten) von der S/PDIF an das Fernsehgerät, das Heimkino System oder das
digitale Hifi System, usw. an.

14
COMMON INTERFACE
Der Schacht Common Interface (CI) dient der Aufnahme des Conditional Access (CA) Moduls und der Smartcard für Bezahlsender. Bitte
wenden Sie sich an Ihren Dienstanbieter für weitere Informationen. Bitte beachten Sie, dass CA Module und Smartcards von uns nicht
geliefert werden.
Warnung
• Schalten Sie den Fernseher aus, bevor Sie das Modul in den Common Interface Schacht einschieben.
1. Setzen Sie zunächst das CI Modul und dann die Smartcard im CI Schacht an der Seite des Fernsehers ein.
CI SLOT CI-Schacht
CAM CA-Modul
Smart Card Smartcard
2. Schalten Sie den Fernseher ein, die nachstehende Meldung wird angezeigt, wenn das CA-Modul erkannt wird. Warten Sie einen
Moment ab, bis die Karte aktiviert ist.
3. Drücken Sie MENU und dann ▲▼ zur Anzeige der CI-Informationen.
4. Detaillierte Informationen zur benutzten CI-Karte werden angezeigt.
5. Drücken Sie OK, um das Kartenmenü aufzurufen. Finden Sie detaillierte Anleitungen in der Bedienungsanleitung des Moduls.
6. Nach dem Abziehen des Moduls wird die nachstehende Meldung angezeigt.

15
03 Fernbedienung
1. EINSCHALTEN: Drücken Sie die Taste zum Einschalten des
Fernsehgerätes.
2. D.MENÜ: Keine Funktion.
3. P. Modus: Umschalten zum Bildmodus.
4. INFO: Drücken Sie die Taste, um den aktuellen Signalstatus,
inklusive der Eingangsquelle und dem Kanal-Audio-Modus
anzuzeigen.
5. AUDIO l/ll: Drücken Sie die Taste, um MONO, Nicam Stereo für
den ATV Kanal auszuwählen. Stellen Sie die Audiosprache für den
DTV Kanal ein.
6. UNTERTITEL: Drücken Sie die Taste, um den Untertitel On oder
Off zu schalten.
7. Anzahl der Tasten: Für den direkten Zugriff auf die Kanäle.
8. QUELLE: Zur Auswahl der Eingangsquelle.
9. STUMM: Um die Tonausgabe zu deaktivieren bzw. zu aktivieren.
10. Lautsprechersteuerung: Zum Einstellen des Schallpegels.
11. MENÜ: Zur Anzeige des Fernsehmenüs.
12. OK: Zur Bestätigung der Auswahl.
13. SCHLIESSEN: Zum vorhergehenden Menü zurückzukehren oder
Menü Schließen,
14. Teletext Index.
15. WIEDERHOLEN: Keine Funktion
16. Teletext grüne Taste / USB Schnellvorlauf
17. Teletext rote Taste / USB Schnellrücklauf
18. Teletext Mischung
19. Teletext Text
20. Teletext Öffnen
21. Teletext Größe
22. Teletext Zeit / REC.LISTE (Teletext Zeit hat keine Funktion)
23. Teletext Modus: Keine Funktion
24. Teletext Halten
25. Teletext Untercode: Teletext Unterseite
26. Teletext blaue Taste / USB Nächste Datei
27. Teletext Gelbe Taste / USB Vorhergehende Datei
28. USB STOPP
29. USB ABSPIELEN/PAUSE
30. AUFZEICHNUNG STARTEN
31 . Mauszeiger NACH OBEN, NACH UNTEN, NACH LINKS, NACH RECHTS: Drücken Sie die Taste, um zu Ihrer Auswahl
zu navigieren.
32. Fav: Greifen Sie im TV DVD auf die Favoritenkanäle.
33. Programm auswählen: Drücken Sie die Taste, um das folgende oder vorhergehende Fernsehprogramm auszuwählen.
34. ANLEITUNG: Drücken Sie die Taste, um die Programmieranweisung für die Elektronik im TV Modus anzuzeigen.
35. Q. Ansicht: Um wieder auf den zuvor eingeschalteten Kanal zuzugreifen.
36. CH.LISTE: Drücken Sie die Taste, um die Kanalliste anzuzeigen.
37. Bildschirm: Zur Änderung des Bildseitenverhältnisses.
38. Ruhemodus: Stellen Sie die Zeitschaltuhr ein.
39. S .Modus: Zum Umschalten in den Tonmodus.
40. ÖFFNEN/SCHLIESSEN: Keine Funktion
:Keine DVD Funktion

16
Batterien in die Fernbedienung einsetzen
FERNBEDIENUNG
VIDEOTEXT
Videotext ist ein Informationssystem, das von einigen Sendern übertragen wird und wie eine Zeitung aufgebaut ist.
Hier haben Sie ebenfalls Untertitel für Hörgeschädigte (Kabelnetzwerke, Satellitenkanäle usw.).
Drücken Sie:
Sie haben folgende Funktion:
TEXT
Mit dieser Taste rufen Sie den Videotext auf oder Sie verlassen ihn. Eine Liste mit
Menüpunkten wird angezeigt. Jede Seite hat eine 3-stellige Nummer. Wird kein
Videotext übertragen, so wird die Zahl 100 angezeigt, ansonsten bleibt der
Bildschirm leer (verlassen Sie diesen Kanal).
SEITE WÄHLEN
Mit 0 bis 9 und den Navigationstasten aufwärts/abwärts rufen Sie die Seite auf.
Beispiel: Für Seite 120 geben Sie 1-2-0 ein. Die Nummer wird oben links im Bild
angezeigt. Zum Aufrufen einer neuen Seite geben Sie die entsprechende Nummer
ein. Ist die gewählte Seite nicht vorhanden, so läuft die Seitenzahl weiter.
UNTERSEITEN DIREKT AUFRUFEN
Die Farbtasten entsprechen den Farbmarkierungen unten auf der Seite und dienen
als Schnelltasten zum Aufrufen. Der farbige Bereich blinkt, wenn die Seite noch
nicht zur Verfügung steht.
INDEX Inhaltsverzeichnis aufrufen (gewöhnlich Seite 100).
SUB PAGE Einige Seiten haben Unterseiten, die nacheinander angezeigt werden. Mit dieser
Taste blättern Sie um oder halten Sie die Unterseite. Die Seitenzahl wird oben links
im Bild angezeigt.
HOLD Mit dieser Taste halten Sie eine Seite, sie wird nicht umgeblättert.
REVEAL Versteckte Informationen anzeigen oder verbergen (Spielauflösungen).
LIST Mit den vier Farbtasten können vier Favoritenseiten markiert werden. In diesem
Modus ist eine weitere Navigation mit den Farbtasten nicht möglich.
1. Öffnen Sie das Batteriefach.
2. Setzen Sie 2 AAA 1,5-V-Batterien mit korrekter Polarität ein, wie im Batteriefach aufgedruckt.
3. Schließen Sie das Batteriefach wieder. Tauschen Sie die Batterien aus, wenn die Reichweite der Fernbedienung nachlässt.
Bitte beachten Sie:
1) Benutzen Sie Alkali-Batterien.
2
)
Bei län
g
erer Nichtbenutzun
g
oder wenn die Batterien erschö
p
ft sind, entnehmen Sie sie bitte aus der Fernbedienun
g
.

17
04 BEDIENUNGSHINWEISE
Installation
Der Installationsmodus erscheint nur beim ersten Start des Fernsehers oder nach Zurücksetzen des Fernsehers auf Werkseinstellungen.
HOME oder SHOP Modus
①.Der Home-Modus ist ein Energiesparmodus. Der Home Modus wird für alle normalen Ansichtseinstellungen empfohlen und wird beim
Hersteller als Standard eingestellt.
②.Der Shop Modus ist eine Option für Wiederverkäufer, die für Werbung oder für Produktpräsentation genutzt werden kann. Der Shop
Modus hat ein helleres Bild als der Home-Modus.
③.Sie können zwischen Zuhause- und Geschäftsmodus hin- und herschalten. Wenn der Geschäftsmodus eingestellt ist, wird
automatisch die Eingangsquelle HDMI 1 ausgewählt. Sie können das Menü mit Exit verlassen.
2. Drücken Sie die Tasten, um DVB-T/DVB-C auszuwählen und drücken Sie dann die OK Taste, um zu bestätigen.
a. Wenn Sie DVB-T ausgewählt haben, wählen Sie im nächsten Schritt den Tune Typ und das Land aus und drücken Sie dann die OK
Taste, um mit dem Einregeln zu beginnen.
b. Wenn Sie DVB-C ausgewählt haben, konfigurieren Sie im nächsten Schritt das DVB-C System, wie Scan Typ, Häufigkeit, Netzwerk ID,
Symbol/KS/S und drücken Sie dann die OK Taste, im Tune Typ und Länderauswahlmenü, dieser Schritt erfolgt wie im DVB-T wählen Sie
den Tune Typ (DTV/ATV) aus.
1. Drücken Sie die Tasten, um im Menü zu navigieren und die Einstellungen zu ändern. Drücken Sie die OK Taste,
um die Auswahl zu bestätigen.Wählen Sie die gewünschte Sprache aus, in der das Menü angezeigt werden soll.
Wählen Sie die gewünschte Sprache und den
Zuhause- oder Geschäftsmodus aus, der verwendet werden soll.
Achtung: Das voreingestellte Passwort ist 6666.

18
Wählen Sie das entsprechende Land aus und drücken Sie die OK Taste, um mit dem Einregeln zu beginnen.
3. Kanal Einregeln beginnt. Dies kann bis zu 6 Minuten dauern. In der Anzeige sehen Sie den Fortschritt beim Einregeln und die Anzahl
der gefundenen Kanäle.
4. Wenn Sie das ATV Einregeln überspringen möchten und drücken Sie die MENU Menü Taste, um das Einregeln während des
Vorgangs zu unterbrechen. Ein Pop-Up Fenster wird angezeigt, drücken Sie die Taste, um YES auszuwählen. Gehen Sie dann direkt
weiter zum DTV Einregeln. Sie können den Schritt wiederholen, wenn Sie auch die DTV Einreglung überspringen möchten. Eine
Installationserinnerung wird angezeigt, wenn Sie das nächste Mal Ihr Fernsehgerät einschalten.
5. Nachdem das Einregeln fertig gestellt ist, werden die Kanäle in einer vorgegebenen Reihenfolge angeordnet. Wenn Sie Kanäle
überspringen möchten, ändern Sie die voreingestellte Reihenfolge oder nennen Sie die Kanäle um, wählen Sie Programme bearbeiten
imChannel Menü aus.
6.
1. KANAL MENÜ
1.1 Automatisches Einregeln (DVB-T)
1)Drücken Sie die MENU Taste und drücken Sie anschließend die Tasten um das Menü CHANNEL auszuwählen und drücken Sie
dann die OK Taste.
2. Drücken Sie die Tasten, um Auto Tuning auszuwählen und drücken Sie dann die OK Taste.

19
3. Drücken Sie die Tasten DVB-T/DVB-C auszuwählen. Drücken Sie DVB-T auswählen und dann die OK Taste, um zu bestätigen.
4. Im Einregel Typ Menü drücken Sie die Tasten Tasten, um ATV / DTV / DTV + ATVauszuwählen. Drücken Sie die Taste und
drücken Sie dann die Tasten , um das Land auszuwählen in welchem das Fernsehgerät betrieben wird. Drücken Sie die OK
Taste, um die Auswahl zu bestätigen.
5. Kanal Einregeln beginnt. Dies kann bis zu 6 Minuten dauern. In der Anzeige sehen Sie den Fortschritt beim Einregeln und die Anzahl
der gefundenen Kanäle.
6. Wenn Sie das ATV Einregeln überspringen möchten und drücken Sie die MENU Menü Taste, um das Einregeln während des
Vorgangs zu unterbrechen. Ein Pop-Up Fenster wird angezeigt, drücken Sie die Taste, um YES auszuwählen. Gehen Sie dann direkt
weiter zum DTV Einregeln. Sie können den Schritt wiederholen, wenn Sie auch die DTV Einreglung überspringen möchten. Eine
Installationserinnerung wird angezeigt, wenn Sie das nächste Mal Ihr Fernsehgerät einschalten.
7. Nachdem das Einregeln fertig gestellt ist, werden die Kanäle in einer vorgegebenen Reihenfolge angeordnet. Wenn Sie Kanäle
überspringen möchten, ändern Sie die voreingestellte Reihenfolge oder nennen Sie die Kanäle um, wählen Sie Programme bearbeiten
aus dem Kanal Menü aus.
1.2 Automatisches Einregeln (DVB-C)
1. Drücken Sie die MENU Taste und drücken Sie anschließend die Tasten um das Menü CHANNEL auszuwählen und drücken Sie
dann die OK Taste.
2. Drücken Sie die
Tasten, um Automatisches Einregeln auszuwählen und drücken Sie dann die OK Taste.

20
3. Drücken Sie die Tasten, um DVB-T/DVB-C auszuwählen und drücken Sie dann die OK Taste zum Bestätigen.
4. Drücken Sie die Tasten , um Scan Typ/Symbol Ks/S auszuwählen und drücken Sie die OK Taste zum Bestätigen.
5. Im Einregel Typ Menü drücken Sie die Tasten , um ATV / DTV / DTV + ATV auszuwählen. Drücken Sie die Taste und drücken
Sie dann die Tasten , um das Land auszuwählen in welchem das Fernsehgerät betrieben wird. Drücken Sie die OK Taste, um
die Auswahl zu bestätigen.
6. Kanal Einregeln beginnt. Dies kann bis zu 6 Minuten dauern. In der Anzeige sehen Sie den Fortschritt beim Einregeln und die Anzahl
der gefundenen Kanäle.
7. Wenn Sie das ATV Einregeln überspringen möchten und drücken Sie die MENU Menü Taste, um das Einregeln während des
Vorgangs zu unterbrechen. Ein Pop-Up Fenster wird angezeigt, drücken Sie die Taste, um YES auszuwählen. Gehen Sie dann direkt
weiter zum DTV Einregeln. Sie können den Schritt wiederholen, wenn Sie auch die DTV Einreglung überspringen möchten. Eine
Installationserinnerung wird angezeigt, wenn Sie das nächste Mal Ihr Fernsehgerät einschalten.
8. Nachdem das Einregeln fertig gestellt ist, werden die Kanäle in einer vorgegebenen Reihenfolge angeordnet. Wenn Sie Kanäle
überspringen möchten, ändern Sie die voreingestellte Reihenfolge oder nennen Sie die Kanäle um, wählen Sie Programme bearbeiten
aus dem Kanal Menü aus.

21
HINWEIS:
Alle Kanäle inklusive ATV, DTV und Radio können gleichzeitig eingeregelt werden, wenn der Einregeltyp DTV+ATV ist.
Alle gespeicherten Kanäle gehen nach dem automatischen Einregeln verloren.
Nach dem automatischen Einregeln, springt der Kanal zum ersten DTV Kanal.
2.1 Manuelles Einregeln (DVB-T)
1. Drücken Sie die MENU Taste und drücken Sie anschließend die Tasten um das Menü CHANNEL auszuwählen und drücken Sie
dann die OK Taste.
2. Drücken Sie die Tasten, um DTV Manual Tuning und drücken Sie dann die OK Taste.
3. Der DTV Bildschirm für manuelles Einregeln wird angezeigt. Drücken Sie die Tasten, um den gewünschten UHF Kanal
auszuwählen und drücken Sie dann die OK Taste, um mit der Suche nach diesem Kanal zu beginnen. Wenn das Signal eingeregelt
wurde, wird das Bild und die Signalstärke auf dem Bildschrim angezeigt.
4. Drücken Sie die Taste MENU, um zum Hauptmenü zurückzukehren.
5. Drücken Sie die Taste EXIT, um das Menü zu verlassen.
2.2 DTV Manuelles Einregeln (DVB-C)
1. Drücken Sie die MENU-Taste und drücken Sie dann die Tasten um, das Menü CHANNEL auszuwählen und drücken Sie dann
die OK Taste.
2. Drücken Sie die Tasten, um CADTV Manual Tuning und drücken Sie dann die OK Taste.

22
3. Der Bildschirm CADTV Manual Tuning wird angezeigt. Drücken Sie die Tasten , um folgendes auszuwählen (Frequenz, Symbol
Ks/S/QAM Typ QAM) und drücken Sie dann die OK Taste, um die Suche nach diesem Kanal zu starten. Wenn das Signal eingeregelt
wurde, wird das Bild und die Signalstärke auf dem Bildschirm angezeigt.
4. Drücken Sie die Taste MENU, um zum Hauptmenü zurückzukehren.
5. Drücken Sie die Taste EXIT, um das Menü zu verlassen.
3) ATV Manuelle Suche:
Stellen Sie das Tonsystem zur Suche nach Analogkanälen ein, dann nehmen Sie die Feinabstimmung vor und speichern Sie den
gewählten Kanal.
BITTE BEACHTEN SIE:
Drücken Sie die rote Videotexttaste zum Speichern eines manuell gesuchten Kanals.
4). Kanal bearbeiten:
Sie können Kanäle löschen, umbenennen, verschieben, überspringen und als Favoriten einstellen.
Löschen
Drücken Sie die rote Taste zum Löschen eines Kanals.
Umbenennen
Sie können nur ATV-Kanäle umbenennen.

23
Navigieren Sie zu dem gewünschten Kanal und drücken Sie die grüne Taste, um den Kanal umzubenennen.
Drücken Sie zur Auswahl der Schriftzeichen. Drücken Sie , um zu navigieren.
Drücken Sie MENU, um die Bearbeitung zu beenden und drücken Sie EXIT, um das Menü zu verlassen.
Bitte beachten Sie: ATV-Kanäle können bis zu 5 Schriftzeichen haben, DTV-Kanäle bis zu 25 Schriftzeichen.
Verschieben
Mit den Navigationstasten wählen Sie den zu verschiebenden Kanal, dann drücken Sie die gelbe Taste. Mit den Navigationstasten
verschieben Sie den Kanal, mit OK bestätigen Sie.
Überspringen
Drücken Sie zur Auswahl des Kanals und drücken Sie die blaue Taste, um diesen Kanal zu überspringen. Rechts vom Kanal wird
angezeigt. Zur Anzeige des übersprungenen Kanals drücken Sie zunächst wieder die blaue Taste, um die Funktion aufzuheben.
Das Symbol erlischt.
Favoriten
Drücken Sie zur Auswahl des Kanals und drücken Sie FAV, damit wird rechts vom Kanal das Symbol angezeigt. Zur
Auswahl eines Favoritenkanals drücken Sie FAV. Zum Löschen des Kanals in der Favoritenliste drücken Sie FAV, damit erlischt das
Symbol .
Drücken Sie FAV zum Aufrufen Ihrer Favoritenkanäle.
5) CI-Informationen (optional)
In diesem Menü zeigen Sie die Informationen auf Ihrer CI-Karte an.
2. BILDMENÜ
Das zweite Menü ist das Bildmenü (PICTURE). Hier stellen Sie Kontrast, Helligkeit usw. ein.
Mit OK bestätigen Sie Ihre Einstellung.
BITTE BEACHTEN SIE:
1). Tint (Hautfarbe) haben Sie nur für das NTSC-System.

24
2). Ihnen stehen vier Farbtemperaturen (Color Temperature) zur Verfügung: medium (mittel), warm, cool (kühl) und User
(benutzerdefiniert).
3). Screen (Bildschirm) steht Ihnen nur im PC-Modus zur Verfügung, hier stellen Sie die horizontal und vertikale Position, Größe und
Phase ein.
3. KLANGMENÜ
Das dritte Menü ist das Klangmenü (SOUND).
Hier stellen Sie die Klangeffekte wie Höhen, Bässe, Balance usw. ein.
Drücken Sie zur Navigation und OK zur Einstellung.
Bitte beachten Sie:
Auto Volume (automatische Lautstärkeregelung) steht Ihnen nur zur Verfügung, wenn die Lautstärke des Eingangssignals zu hoch oder
das Signal verzerrt ist.
4. ZEITMENÜ
Das vierte Menü ist das Zeitmenü (TIME). Hier stellen Sie Uhrzeit, Ein- und Ausschaltzeit, Sleeptimer usw. ein. Drücken Sie zur
Navigation und OK zur Einstellung.
BITTE BEACHTEN SIE:
Der Fernseher schaltet sich automatisch aus, wenn für 15 Minuten kein Signal anliegt, sofern Auto Sleep aktiviert ist. Die Uhrzeit kann
über den DTV-Kanal automatisch eingestellt werden.
5. OPTIONSMENÜ
Das fünfte Menü ist das Optionsmenü (OPTION). Hier stellen Sie die Menüsprache, Audio- und Untertitelsprache usw. ein.

25
1. Wenn nach 4 Stunden nach dem Einschalten an dem TV Gerät keine Änderungen vorgenommen wurden, d.h. es wurde kein Kanal
gewechselt oder keine Lautstärke geregelt, startet das Gerät die automatische Abschaltsequenz.
Ein Pop-Up Fenster erscheint auf dem Bildschirm.
Nach 150 Sekunden schaltet das Fernsehgerät automatisch in den Bereitschaftsmodus um. Um das automatische Abschalten zu
verhindern, drücken Sie irgendeine Taste auf der Fernbedienung.
2. Um das automatische Abschalten zu widerrufen, wählen Sie automatisches Abschalten (4h) im Optionsmenü aus und drücken Sie
Die OK Taste. Eine Pop-Up Nachricht erscheint „Are you sure you want to enable automatic powerdown?”
Drücken Sie auf die rechte Pfeiltaste und wählen Sie NO aus.
Der TV Bildschirm kehrt zum Optionsmenü zurück und die Option automatisches Abschalten (4h) wird angezeigt.
Automatic power-down(4H) OFF
Um zum automatischen Abschalten nach 4 Stunden zurück zu kehren, wiederholen Sie den oben beschriebenen Vorgang, nur dass Sie
die linke Pfeiltaste drücken, um YES auszuwählen.
Im Menü PVR File System stellen Sie das USB-Laufwerk für die PVR-Aufnahme ein.
BITTE BEACHTEN SIE:
Mit Restore Factory Default (Rückstellung zu den Werkseinstellungen) werden alle Kanäle und das Passwort gelöscht.
6. SPERRMENÜ
Das sechste Menü ist das Sperrmenü (LOCK). Hier sperren Sie das System, stellen Sie das Passwort ein, blockieren Sie Programme und
stellen Sie die Kindersicherung ein. Nach Aktivierung der Sperre können Sie den Kanal nicht mehr einstellen.
BITTE BEACHTEN SIE:
Das Standardpasswort lautet 0000. Sollten Sie Ihr Passwort einmal vergessen, so benutzen Sie das Superpasswort 9443.
Block Program (Kanal blockieren): Drücken Sie zur Auswahl des Kanal, dann drücken Sie die grüne Taste zur Blockierung. Zum
Entsperren rufen Sie das Hauptmenü auf, geben Sie das Passwort ein und dann drücken Sie die grüne Taste erneut.
Parental Guidance (Kindersicherung): Drücken Sie
zur Auswahl der Bewertungsstufe.
7. EPG-Menü (Elektronische Programmzeitschrift)
Das EPG-Menü dient der Anzeige der Programmvorschau für DTV- und Radiokanäle des Tages.

26
Zum Aufrufen des EPG-Menüs drücken Sie EPG:
1. INFO
Mit wählen Sie den Kanal, Drücken Sie INFO, um die Programminformationen zu markieren.
2 Planung
Drücken Sie die gelbe Taste, um die Planungsliste (Schedule) anzuzeigen, drücken Sie zur Auswahl der Liste und drücken Sie die
rote Taste zum Löschen der Planungsliste.
3.
Aufnahme
Drücken Sie die rote Taste, um die Aufnahme des Programms einzustellen.
4. Erinnerung
Drücken Sie die blaue Taste und stellen Sie eine Erinnerungszeit ein. Der Fernseher schaltet dann automatisch auf das gewählte
Programm um.
8. PVR-Funktion
1. Vorbereitung der Aufnahme
Die Aufnahme- und Time-Shift-Funktion funktionieren nur bei digitalem Fernsehempfang (DVB-T, -C oder S2).
Rufen Sie im Optionsmenü PVR File System auf, hier wählen Sie „Check PVR File System“. Drücken Sie OK, bis „Checking“ zu
„Success“ umschaltet.
Bitte beachten Sie: Überprüfen Sie den Punkt „Speed“ (Geschwindigkeit). Bei Einstellung auf „HD Support“ steht Ihnen das
USB-Speichermedium für Timeshift und Aufnahme zur Verfügung. Anderenfalls formatieren Sie bitte das Gerät. „Free Record Limit“ ist
standardgemäß auf 6 Stunden eingestellt, sofern die Speicherkapazität ausreichend ist. Anderenfalls ist die Aufnahmezeit kürzer.
Während der Überprüfung gemäß „Check PVR File System“ drücken Sie bitte keine weiteren Tasten.

27
Die Eingaben müssen im TV PVR System vorgenommen werden. Es kann nur auf demselben Fernsehgerät abgespielt werden und nicht
auf irgendeinem anderen Gerät (Computer, DVD, usw.) , das nicht mit dem .TS Datei Format kompatibel ist.
Bitte beachten Sie, dass Sie das Fernsehgerät zur Aufzeichnung auffordert ,das angeschlossenen USB Gerät zu formatieren, um die
Aufzeichnung abzuspeichern.
WARNUNG WENN SIE FORMATIEREN; GEHEN DIE DATEIEN UND INFORMATIONEN, DIE AUF DEM EXTERNEN USB GERÄT
GESPEICHERT SIND, VERLOREN.
AUF DEM GERÄT SPEICHERN.
Das USB Dateisystem begrenzt die Größe der Speichergröße.
Dateisystem NTFS bis zu 2TB
FAT32 mit bis zu 192GB
FAT16 mit bis zu 2GB
Rufen Sie das PVR Datei System wie unten beschrieben vom Optionsmenü aus auf.
Select Disk (Laufwerk wählen): Wählen Sie das Laufwerk zur Aufnahme.
Check PVR File System (PVR-Dateisystem überprüfen): Vergewissern Sie sich, dass das PVR-Dateisystem für das
USB-Speichermedium eingestellt ist.
Format:

28
(Wir empfehlen, das Gerät mit „High Speed FS“ zu formatieren, wodurch sich die Aufnahme beschleunigt.)
Nach Beendigung der Formatierung erhalten Sie nachstehendes Menü:
Bei Auswahl von „Hi Speed FS“ können Sie die Timeshiftgröße einstellen:

29
2. Programm aufzeichnen
Während der DTV-Wiedergabe wählen Sie den gewünschten Kanal, dann drücken Sie „Record“ zur Anzeige des Aufnahmemenüs.
drücken Sie ERNEUT „Record“, DAS Aufnahmemenü Erlischt und „REC“ wird oben links im Bild angezeigt. Das Symbol erlischt,
nachdem Sie die Stopptaste drücken.
3. Aufnahme wiedergeben
Das auf dem „USB” aufgezeichnete Programm wird im Ordner„_MSTPVR” auf dem Gerät gespeichert.
1. Die USB Speichergröße kann zwischen 128MB und 500GB liegen, aber für den praktischen Gebrauch wird eine Größe von 2GB bis
500GB empfohlen.
2. Videos erscheinen gepixelt, wenn die Video Bitrate zu gering ist. Dies kann verursacht werden, wenn ein USB Verlängerungskabel
verwendet wird, anstatt den USB Anschluss direkt am Fernsehgerät anzuschließen.
3. Nicht alle USB Geräte sind kompatibel.
Im folgenden finden Sie eine Liste der empfohlenen USB Festplatten.
Modelle die nicht unten aufgelistet sind, können kompatibel sein, aber es wird keine Garantie für deren Funktion übernommen.
Die USB Unterstützungsliste ist dieselbe wie die Zeitversatzfunktion; weitere Informationen finden Sie auf den folgenden Seiten.
9. Timeshiftfunktion
1. Vorbereitung der Aufnahme
Mit diesem Fernseher können Sie das aktuelle Programm unterbrechen und auf einen USB-Speichermedium aufzeichnen, dann ab der
Unterbrechung weiter sehen.
BITTE BEACHTEN SIE:
• Das USB 2. 0 Speichermedium muss formatiert sein. Erstellen Sie vor der Formatierung Sicherheitskopien, da alle Daten gelöscht
werden.
USB-Laufwerk formatieren
Wählen Sie die Formatierung des USB-Speichermediums und ordnen Sie den Speicherplatz für die Timeshiftfunktion zu.
BITTE BEACHTEN SIE:
• Die Formatierung dauert etwa 2 Minuten. Schalten Sie das Gerät während dieses Zeitraums nicht aus und trennen Sie das
USB-Speichermedium nicht ab.
• Während der Formatierung wird für das USB-Speichermedium ein Geschwindigkeitstest durchgeführt. Schlägt dieser fehl, so kann das
USB-Speichermedium nicht für die Timeshiftfunktion benutzt werden.
Unterbrochenes DTV-Programm auf USB-Speichermedium aufzeichnen
1. Im DTV-Modus schließen Sie das USB-Speichermedium am USB-Port auf der Seite des Fernsehers an.

30
2. Drücken Sie PAUSE (29), um die Timeshiftfunktion zu starten. Das Fernsehprogramm wird unterbrochen. Das Timeshiftmenü wird
angezeigt und die Aufnahme beginnt.
3. Drücken Sie STOPP (28), um die Timeshiftfunktion und die Aufnahme zu beenden.
BITTE BEACHTEN SIE:
• Ziehen Sie das USB-Speichermedium während der aktivierten Timeshiftfunktion nicht ab.
• 4 GB Speicher puffern ca. 140 Minuten.
Limitierungen der Timeshiftfunktion:
1. Bei aktivierter Timeshiftfunktion stehen Ihnen nur WIEDERGABE/PAUSE/STOPP/VORLAUF/RÜCKLAUF/VOL+/VOL-/MUTE sowie
einige allgemeine Funktionstasten (ENTER/EXIT/Navigation) zur Verfügung.
2. Die Videowiedergabe ist nicht gleichmäßig und kann springen, falls die USB-Aufnahmegeschwindigkeit nicht den
Mindestanforderungen entspricht.
3. Ziehen Sie das USB-Speichermedium nicht ab, schalten Sie das Gerät während der Timeshiftfunktion nicht aus. Bei Verlust des
Signals schaltet sich das Gerät aus.
4. Ändern Sie während der Timeshiftfunktion nicht die Signalquelle.
5. Schalten Sie nicht schnell zwischen WIEDERGABE/PAUSE/VORLAUF/RÜCKLAUF um.
6. Das Video kann verpixeln, falls die Bitrate zu niedrig eingestellt ist.
7. Nicht alle USB-Speichermedien sind kompatibel. Das USB-Laufwerk sollte wenigstens < 500 mA haben.
Nachstehend Liste mit empfohlenen USB-Laufwerken. Nicht aufgeführte Modelle sind möglicherweise kompatibel, das ist jedoch nicht
garantiert.
• SanDisk Extreme® Contour™ USB Flash Drive - 8GB SDCZ8-8192-E75
• SanDisk Extreme® Contour™ USB Flash Drive -16GB SDCZ8-016G-A75
• Kingston DataTraveler 410 USB 2. 0 Flash Drive - 8GB DT410/8GB
• Kingston DataTraveler 410 USB 2. 0 Flash Drive -16GB DT410/16GB
• OCZ Technology Rally2 USB 2. 0 Flash Drive - 4GB OCZUSBR2DC-4GB
• OCZ Technology ATV USB 2. 0 Flash Drive - 8GB OCZUSBATV-8GB
• OCZ Technology Rally2 USB 2. 0 Flash Drive - 8GB OCZUSBR2DC-8GB
• SAMSUNG-HM500JI-500G
8. Diese Funktion haben Sie nicht für alle digitalen Fernsehprogramme, wie verschlüsselte oder reine Audiokanäle.

31
10. USB-Player
Drücken Sie die Quellentaste und wählen Sie in der Liste der Quellengeräte USB, dann drücken Sie OK, um das USB-Menü aufzurufen.
Ein USB-Speichermedium muss angeschlossen sein. Wählen Sie zwischen Foto, Musik, Movie und Text. Drücken Sie zu Auswahl,
dann drücken Sie OK.
Drücken Sie zur Auswahl des Laufwerks, dann drücken Sie OK zur Anzeige der Mediendateien und Ordner. Mit Return kehren Sie
zur Medienauswahl zurück.
Mit oder wählen Sie die Datei, das Vorschaufenster wird angezeigt. Drücken Sie ► zur Wiedergabe als Vollbild. Während
der Wiedergabe (Foto, Movie oder Text) drücken Sie OK oder INFO zur Anzeige der Leister mit den Steuerungssymbolen.
Drücken Sie zur Auswahl der Funktion und OK zur Bestätigung.
Drücken Sie "▼" oder EXIT auf Ihrer Fernbedienung um die Steuerleiste zu verlassen. Außer bei Musik.
BITTE BEACHTEN SIE:
Sie können den Audiotrack oder das Programm während der Videowiedergabe einstellen. Mit Info und OK zeigen Sie das Infomenü an.

32
USB Wiedergabe wird unterstützt für folgende Bildformate :
-JPEG (JPEG Format, Dateien mit der Endung ".jpg")
-BMP (Dateien mit der Endung ".bmp")
-PNG (Dateien mit der Endung ".png")
USB Wiedergabe wird unterstützt für folgende Audioformate:
-MP3 (Dateien mit der Endung ".mp3")
-WAV (Dateien mit der Endung ".wav")
USB Wiedergabe wird unterstützt für folgende Textformate:
-TXT (Dateien mit der Endung ".txt")
USB Wiedergabe wird unterstützt für folgende Videoformate:
-AVI (Dateien mit der Endung ".avi")
- TS (MPEG2 & H.264)

33
05 Störungserkennung
Problem Überprüfen
Bild Ton
verschneit
gestört
Antennenposition,
Ausrichtung oder
Anschluss
Schatten normaler Ton
Antennenposition,
Ausrichtung oder
Anschluss
Störungen
gestört
elektronische Geräte,
Fahrzeug/Motorrad,
Neonlicht
normales Bild
stummgeschaltet
Lautstärke
(stummgeschaltet oder
Audioanschlüsse nicht
korrekt)
kein Bild
stummgeschaltet
Kein Netzanschluss,
Gerät ausgeschaltet,
Kontrast und
Helligkeit/Lautstärke
einstellen.
Drücken Sie STANDBY
auf der Fernbedienung.
keine Farbe normaler Ton
Farbe einstellen
Bild verschwindet normaler Ton oder
leise
Kanal neu einstellen
keine Farbe
gestört TV-System
Sie sehen einen
schwarzen Balken
oben und unten.
normaler Ton Ansicht auf Zoomen
ändern

34
Spezifikationen
Farbsystem PAL-B/G, I, D/K
SECAM- B/G, D/K L, L'
Tonsystem B/G, DK, I, L, L'
Videoeingänge
SCART, YPbPr, AV,
VGA, HDMI, USB.
Y/Pb/Pr
480i/p, 576i/p, 720p, 1080i, 1080p
HDMI
480i/p, 576i/p, 720p, 1080i, 1080p
Spannungsversorgung
100-240V~50/60Hz
30W(19“)
100-240V~50/60Hz
38W(22“)
100-240V~50/60Hz
40W(24“)
100-240V~50/60Hz
55W(26“)
Stromverbrauch im
Modus Standby
<0.5W
Audioausgang
2 x 3W
Umweltbedingungen
Betriebstemperatur: +5°C - +35°C
Betriebsluftfeuchtigkeit: 20 % - 80 %
Lagertemperatur: -15°C - +45°C
Lagerluftfeuchtigkeit: 5 % - 90 %
Zubehör Bedienungsanleitung
Fernbedienung
Batterien (x2)
Schnellanleitung
*Einige der Spezifikationen nur als Referenz.
Abweichungen vom tatsächlichen Gerät nicht ausgeschlossen.
Änderung von Design und Spezifikationen vorbehalten.
Scart-Ausgang:
1. Ist der Eingang ATV/AV/SCART, so ist das Signal am Scart-Ausgang ATV.
2. Wenn der Eingang DTV ist, so ist das Signal am Scart-Ausgang DTV.
3. Andere Quellen haben kein Scart-Ausgangssignal.

35

1
Récepteur TV LED LCD
MANUEL DE
L'UTILISATEUR
Lisez attentivement ce manuel avant d'utiliser votre téléviseur et conservez ce manuel
dans un bon endroit pour toute référence ultérieure.
Modèle :
LET19T1000H
LET22T1000HF
LET24T1000HF
LET26T1000HF

2
Table des Matières
01 Avertissment de sécurité
Bienvenue P. 03
Information Importante P. 03
Instruction de sécurité P. 04
Avertissements et mise en garde P. 05
02 Introduction
Principaux Caractéristiques P. 07
Installation du pied P. 08
Installation Murale P. 09
Panneau de commande avant et latéral P. 11
Prises arrières P. 12
Connexion du Téléviseur P. 13
Interface commune :Canal Ready P. 14
03 Télécommande
Présentation de la Télécommande P. 15
Installation des piles dans la Télécommande. P. 16
Télétexte P. 16
04 Utilisation
Guide d'installation P. 17
05 Dépannage
Dépannage P. 32
Spécification P. 33

3
01 Avertissements et mesures de sécurité
BIENVENUE
Nous vous remercions d'avoir acheté ce téléviseur LCD LED 19"/22"/24"/26" . Ce guide va vous aider à régler et utiliser votre téléviseur.
Commencez par vérifier le contenu de votre boîte avec la liste des pièces ci-dessous :
Téléviseur LCD 19" HD Ready.
Télécommande et 2 piles AAA ;
Guide d'utilisation
Guide de démarrage rapide
Pied du TV
Téléviseur numérique LCD LED 22" Full HD 1080p
Télécommande et 2 piles AAA ;
Guide d'utilisation
Guide de démarrage rapide
Pied du TV
Téléviseur numérique LCD LED 24" Full HD 1080p
Télécommande et 2 piles AAA ;
Guide d'utilisation
Guide de démarrage rapide
Pied du TV
Téléviseur LCD 26" HD Ready.
Télécommande et 2 piles AAA ;
Guide d'utilisation
Guide de démarrage rapide
Pied du TV
Maintenant vous pouvez commencer !
INFORMATION IMPORTANTE
LISEZ ENTIÈREMENT CE MANUEL AVANT L'UTILISATION ET CONSERVEZ-LE POUR TOUTE RÉFÉRENCE ULTÉRIEURE
ATTENTION
RISQUES D'ELECTROCUTION
NE PAS OUVRIR
AVERTISSEMENT : afin d'éviter tout risque d'incendie ou de décharge électrique, n'installez jamais votre téléviseur
dans un lieu humide. Redoublez d'attention lorsque vous manipulez l'écran pour ne pas le rayer par inadvertance ou
l'endommager d'une autre façon. Veillez à ne pas obstruer les orifices d'aération de votre téléviseur en tenant journaux,
nappes, rideaux, etc., à distance.
ATTENTION : s la fiche électrique sert de dispositif de sectionnement et doit rester facilement accessible.
s Consultez attentivement le présent mode d'emploi avant utilisation, puis rangez-le dans un endroit facilement
accessible pour pouvoir vous y reporter ultérieurement.
s Pour obtenir des performances optimales, consultez attentivement le présent mode d'emploi, puis rangez-le dans un
endroit facilement accessible pour pouvoir vous y reporter ultérieurement.
s Les chiffres et les données communiqués au sujet de l'écran dans le présent mode d'emploi peuvent, suite aux innovations
technologiques apportées, ne pas correspondre tout à fait aux caractéristiques de votre modèle.
s Tout démontage, sans approbation préalable, du présent produit est strictement interdit.
AVERTISSEMENT : pour éviter tout risque d'incendie, tenez bougies et autres sources de flammes ouvertes à distance du produit en
toutes circonstances.

4
INSTRUCTIONS DE SÉCURITÉ
• Attention : Pour réduire le risque d'électrocution, ne déposez aucun panneau. Aucun des éléments internes ne
peut être réparé par l'utilisateur. Confiez l'entretien à un technicien qualifié.
• Attention : POUR REDUIRE LES RISQUES D'INCENDIE OU D'ELECTROCUTION, N'EXPOSEZ PAS CET
APPAREIL A LA PLUIE OU A L'HUMIDITE.
• N'exposez pas l'appareil et l'adaptateur au ruissellement ni à la projection d'eau, et ne placez aucun objet
contenant un liquide (tel qu'un vase) au dessus de l'appareil.
• Éloignez le produit de la lumière directe du soleil et de toute source de chaleur telle que radiateurs ou poêles.
• N'obstruez jamais les fentes d'aération. Les fentes et ouvertures sur l'unité sont prévues pour la ventilation.
Ces fentes ne doivent jamais être obstruées en plaçant l'appareil sur un canapé, un tapis ou toute autre surface
similaire.
• Ne placez pas cet appareil sur un chariot, un support, un trépied ou une table instable. L'appareil pourrait
tomber, causant des dommages ou des blessures.
• Ne placez jamais d'objets lourds ou tranchants sur le panneau ou le cadre.
• Débranchez la prise de courant lorsque l'appareil n'est pas utilisé.
• Il faut tenir compte de la protection de l'environnement lors de l'élimination des piles.
• AVERTISSEMENT : Les piles (pile ou batterie ou bloc batterie) ne doivent pas être exposées à une chaleur
excessive telle que rayons du soleil, feu, etc.
• AVERTISSEMENT : L'utilisation d'un casque ou d'écouteurs avec un volume sonore trop fort peut causer une
perte auditive.
Ce symbole indique que ce produit ne doit pas être mis au rebut avec les déchets ménagers et ce dans tous les pays
de l'Union Européenne. En aidant à la récupération séparée, vous aidez à garantir que les produits seront recyclés
d’une façon appropriée et ainsi à préserver les ressources naturelles et à protéger l’environnement et la santé
humaine. Ramenez donc cet appareil aux points de collecte appropriées ou retournez-le au revendeur auprès duquel
vous l'avez acheté. Ainsi il sera recyclé et contribue à préserver l’environnement.

5
Avertissements et mise en garde
Avertissement
Attention
Des hautes tensions dangereuses existent à l'intérieur de cet appareil. Ne déposez pas le panneau de sécurité à
l'arrière du téléviseur. Pour toute réparation, veuillez faire appel à un technicien qualifié.
Pour prévenir tout risque d'incendie ou d'électrocution, n'exposez pas cet appareil à la pluie et à l'humidité.
N'introduisez pas d'objets étrangers par les fentes des panneaux du téléviseur. Ne renversez jamais de liquide sur le
récepteur du téléviseur
Ne bloquez pas les fentes d'aération du panneau arrière. L'aération est essentielle pour éviter que les composants
électriques ne tombent en panne.
Ne coincez pas le cordon d'alimentation sous le récepteur de télévision.

6
Ne montez jamais sur le téléviseur, ne vous appuyez pas dessus et ne le poussez pas brusquement sur son socle.
Prêtez une attention particulière aux enfants. Risque de blessures graves en cas de chute.
Ne placez pas le téléviseur sur un chariot, une étagère ou une table instable. Le téléviseur risque de tomber et peut
provoquer des blessures graves et des dommages matériels importants.
Débranchez le téléviseur du secteur s'il ne va pas être utilisé pour une longue période.
Distances minimales
Si le téléviseur est placé dans un compartiment fermé, il faut veiller à respecter les distances minimales.
L'accumulation de chaleur réduit la durée de vie de service de votre téléviseur et peut aussi être dangereuse.

7
02 Introduction
Données principales
Panneau 19” 22” 24” 26”
Système TV
PAL-B/G, I, D/K
SECAM-B/G, D/K, L, L'
Système du signal vidéo PAL/SECAM
Tension d'entrée 100-240V CA 50/60Hz
Consommation d'énergie 30 W 38 W 40 W 55 W
Consommation électrique en veille <0.5W
Puissance de sortie audio
(Taux de distorsion dynamique ≤7%)
2 x 3W
Signal d’entrée 1 RVB analogique (PC) ; 1 audio PC
2 Interface HDMI (High Definition Multimedia Interface)
1 Entrées Vidéo
1 Entrées audio
YPbPrx1
1 Péritel
1 CI
1 USB
1
RF Co-Ax
signal de sortie
1 Headphone
1 S/PDIF
Définition horizontale (lignes TV)
Entrée vidéo composite >= 350
YPbPr >=400
Caractéristiques principales
1. Utilisable comme écran télé, moniteur d'affichage ou
écran pour PC ;
2. Grande luminance et lar
g
e an
g
le de la visualisation
;
3. Interface HDMI et péritel ;
4. NICAM ;
5. Time-shift
INSTALLATION
* Placez le téléviseur dans une pièce où la lumière ne
frappe pas directement sur l'écran.
* L'obscurité totale ou une réflexion sur l'écran peut
provoquer une fatigue visuelle. Un éclairage doux et
indirect est recommandé pour une visualisation
confortable.
* Prévoyez suffisamment d'espace entre le téléviseur
et le mur pour permettre la ventilation.
* Évitez les endroits trop chauds pour éviter tout
dommage possible à l'enceinte ou une défaillance
prématurée des composants.
* Ce téléviseur peut être connecté à une prise secteur
de 100-240 volts. 50/60 Hz. Ne le branchez jamais sur
une prise de courant CC ou de n'importe quel autre
type.
* Ne couvrez pas les fentes de ventilation lors de
l'utilisation du téléviseur.
ATTENTION
Ne modifiez aucun composant interne et bouton de
commande du téléviseur non décrit dans ce manuel.
Toutes les téléviseurs à LED sont des équipements de
haute tension électrique.
Il faut débrancher le téléviseur avant de nettoyer de la
poussière ou des gouttes d'eau de l’écran, du boîtier
ou autour de l'un des boutons ou des connecteurs.
Utilisez un chiffon doux et sec et non pelucheux pour
essuyer le téléviseur.
Pendant les orages, débranchez le câble
d'alimentation et le câble d'antenne pour éviter
d'endommager votre téléviseur et les autres appareils
connectés.
Toutes les opération de réparation de ce téléviseur ne
doivent être effectuées que par du personnel qualifié.

8
PC
MODE PRÉDÉFINI
RESOLUTION V. Fréq. (Hz) H. Fréq. (KHz)
1 800*600 60 37. 88
2 640*480 60 31. 47
3 1360*768 60 47.7
4 1024*768 60 48. 36
5 1280*1024 60 63. 98
Instructions pour l'assemblage du support
REMARQUES SUR L'INSTALLATION
Placez le téléviseur dans une pièce où la lumière ne frappe pas directement sur l'écran. L'obscurité totale ou une
réflexion sur l'écran peut provoquer une fatigue visuelle. Un éclairage doux et indirect est recommandé pour une
visualisation confortable.
Prévoyez suffisamment d'espace entre le téléviseur et le mur pour permettre la ventilation.
Évitez les endroits trop chauds pour éviter tout dommage possible à l'enceinte ou une défaillance prématurée des
composants.
1. Insérez la tige du support dans le
support dans le sens indiqué par la
flèche, serrez ensuite celle-ci à l'aide
d'une vis.
2. Insérez le plateau du support dans le couvercle
arrière dans le sens indiqué par la flèche, serrez
ensuite celui-ci à l'aide d'une vis.
3. Insérez la tige du support dans le
support dans le sens indiqué par la
flèche, serrez ensuite celle-ci à l'aide de
trois vis.
4. Insérez le plateau du support dans le couvercle
arrière dans le sens indiqué par la flèche, serrez
ensuite celui-ci à l'aide de deux vis.
(19”,22”,24”)
(19”,22”,24”)
(26”)
(26”)

9
DIRECTIVES D'INSTALLATION DU SUPPORT MURAL
Ce téléviseur peut être accroché au mur en suivant la procédure suivante :
1. Placez le téléviseur LCD LED sur une surface solide. Mettez un matériau souple à l'avant de l'écran pour le
protéger contre tout dommage.
2. Retirez les vis de la partie inférieure du téléviseur, où le socle est fixé au téléviseur, et enlevez le socle (rangez le
socle dans un endroit sûr pour une utilisation ultérieure).
3. Utilisez les quatre vis fournies pour fixer le téléviseur sur un support mural (non inclus) par les quatre trous VESA
standard à l'arrière du téléviseur.
(
19”
,
22”
,
24”
)
(
26”
)
(
19”
)

10
(
22”
,
24”
)
(
26”
)

11
Panneau frontal
1
SOURCE
Pour afficher le Menu Source.
2
MENU
Pour ouvrir le Menu principal.
3
CH+/CH-
En mode TV, appuyez sur CH+ ou CH- pour passer au canal suivant ou précédent.
Dans MENU, appuyez sur CH+ ou CH- pour sélectionner des éléments.
En mode veille, appuyez dessus pour allumer le téléviseur
4
VOL+/VOL-
Pour régler le niveau sonore.
Dans MENU, permet de régler l'élément sélectionné.
5
VEILLE
1 Capteur de télécommande
2 Témoins
BLEU : ALLUMÉ.
ROUGE : VEILLE.
3 Touches.

12
Prises arrières/latérales
1
Audio Gauche/Droite
Entrée
2
vidéo
Entrée
3
S/PDIF sortie audio numérique
4
YPBPR
Entrée
5
PERITEL
Entrée
6
USB
Entrée
7
HDMI2
Entrée
8 HDMI1 Entrée
9 HEADPHONE Sortie Casque audio Analogique
10
INTERFACE COMMUNE (CI)
Entrée
11
Audio PC
Entrée
12
Entrée VGA
Entrée
13
ANT
Entrée

13
CONNEXION DE VOTRE TV
RACCORDEMENT DE L'ANTENNE
Connectez votre antenne à l'arrière du téléviseur dans la prise ANT IN.
AMÉLIORER VOTRE SIGNAL
Pour améliorer la qualité de l'image dans une région de mauvaise réception, utilisez un amplificateur de signal (non fourni).
CONNECTEZ VOTRE PC AU TÉLÉVISEUR
Vous pouvez utiliser votre téléviseur comme un moniteur pour votre ordinateur personnel en le connectant avec un câble VGA (non
fourni).
1 Lisez le guide utilisateur de votre ordinateur et vérifiez qu'il dispose d'un connecteur VGA.
2 Arrêtez votre téléviseur et votre PC.
3 Branchez un câble d'interface VGA de type D à 15 broches au connecteur d'interface vidéo VGA du PC. Branchez l'autre extrémité du
câble au connecteur d'interface PC du téléviseur. Serrez les vis des connecteurs VGA et connectez le câble audio (non fourni) à la prise
d'entrée audio à l'arrière du téléviseur.
4 Allumez le téléviseur d'abord puis le PC.
5 Réglez le mode d'entrée vidéo sur VGA à l'aide de la touche du téléviseur ou de la télécommande.
6 Une fois l'image apparaît, s'il y a du bruit, changez la résolution du mode VGA, changez le taux de rafraîchissement ou réglez la
luminosité et le contraste dans le menu jusqu'à ce que l'image soit claire.
CONNECTER UN LECTEUR DVD OU UN MAGNÉTOSCOPE À VOTRE TV
Il y a deux manières pour connecter un lecteur DVD ou un magnétoscope à votre téléviseur. Assurez-vous que le téléviseur, lecteur DVD
ou le magnétoscope soient éteints avant de les connecter.
1 Connectez les sorties AV du lecteur DVD/magnétoscope à la prise AV IN de votre téléviseur.
2 Connectez les sorties audio AV L & R à l'entrée audio (8), appuyez sur la touche SOURCE du téléviseur pour définir le mode d'entrée
vidéo sur AV.
ENTRÉE PÉRITEL
1 Connectez le câble péritel de l'appareil externe (lecteur DVD, boîtier décodeur ou console de jeux) à la prise péritel du téléviseur.
2 Appuyez sur la touche SOURCE pour sélectionner le mode PÉRITEL.
3 Appuyez sur la touche PLAY de l'appareil externe.
Entrée HDMI
1 Connectez le câble HDMI de l'appareil à la prise HDMI du téléviseur.
2 Appuyez sur la touche SOURCE pour sélectionner le mode HDMI.
3 Reportez-vous au guide utilisateur de l'appareil HDMI pour avoir des informations sur son fonctionnement.
SORTIE HEADPHONE
Insérer la prise casque dans le connecteur jack HEADPHONE. Les hauts parleurs sont maintenant muet
SORTIE S/PDIF
S/PDIF est une connexion audio numérique utilisée pour connecter sur de courtes distances un appareil audio tel que cinédom, chaîne
Hi-Fi etc. Le signal est transmis via un câble coaxial avec des connecteurs RCA.
1. Éteignez le téléviseur et l'appareil avant de procéder aux connexions.
2. Connectez les câbles AV (non fournis) à partir du connecteur S/PDIF du téléviseur au cinédom ou chaîne HiFi etc.

14
INTERFACE COMMUNE
Le logement de l'interface commune (CI) est destiné à un module d'accès conditionnel (CA) et une carte à puce pour pouvoir regarder
des programmes télé et des services supplémentaires payants. Contactez votre prestataire de services d'interface commune pour obtenir
plus d'informations sur les modules et l'abonnement. Notez que les modules CA et les cartes à puce ne sont ni fournis ni des accessoires
en option.
Avertissement
• Teignez votre téléviseur avant d'insérer un module dans le logement d'interface commune.
1. Eteignez correctement le CAM (module d'accès conditionnel), puis la carte à puce dans le logement CI qui se trouve sur le côté du
téléviseur.
CI SLOT LOGEMENT D'INTERFACE COMMUNE
CAM CAM (module d'accès conditionnel)
Smart Card Carte à puce
2. Allumez le téléviseur, le message ci-dessous s'affiche si un module CA est détecté. Attendez quelques instants jusqu'à ce que la carte
soit activée.
3. Appuyez sur la touche MENU puis appuyez sur la touche ▲▼ pour sélectionner l'option Informations CI.
4. Des informations détaillées sur la carte CI en cours d'utilisation seront affichées.
5. Appuyez sur OK pour accéder au menu de la carte. Reportez-vous au manuel d'utilisation du module pour régler les détails.
6. Lorsque le module est retiré, le message suivant apparaît sur l'écran.
Module CI incéré
Module CI retiré

15
03 Télécommande
1. Marche/Arrêt : Appuyez pour allumer le téléviseur.
2. D.MENU : Aucun rôle.
3. P.Mode : Pour changer le mode image.
4. INFO : Appuyez pour afficher l'état courant, dont la source d’entrée et
le mode audio de la chaîne.
5. AUDIO l/ll : Appuyez pour sélectionner MONO, Nicam stéréo pour les
chaînes TV. Sélection de la langue audio des chaînes numériques.
6. SUBTITLE (SOUS-TITRAGE) : Appuyez sur pour activer/désactiver
le sous-titrage.
7. Touches numériques : Pour accéder directement aux chaînes.
8. SOURCE : Pour sélectionner la source d'entrée
9. MUTE : Pour couper/rétablir le son.
10. Touches Volume : Pour régler le niveau sonore.
11. MENU : Pour afficher le menu TV.
12. OK : pour confirmer la sélection.
13. EXIT : pour retourner au menu précédent ou quitter le menu.
14. Index de télétexte
15. REPEAT (REPETER) : Aucun rôle
16. Touche télétexte verte / avance rapide USB
17. Touche télétexte rouge / retour rapide USB
18. Mixage télétexte
19. Texte Télétexte
20. Révéler le télétexte
21. Taille du télétexte
22. Heure télétexte / REC.LIST (Heure télétexte n’a aucun rôle)
23. Mode Télétexte : Aucun rôle
24. Figer le télétexte
25. Sous-code télétexte : Sous-page de télétexte
26. Touche télétexte bleue / fichier suivant USB
27. Touche télétexte jaune / fichier précédent USB
28. Arrêt USB
29. PLAY/PAUSE (Lecture/Pause)
30. DEMARRER L'ENREGISTREMENT
31. TOUCHES DE DEPLACEMENT (HAUT/BAS/DROITE/GAUCHE) : Appuyez pour atteindre votre sélection.
32. Fav : Pour accéder à votre liste de chaînes favorites en mode TV ou DTV.
33. Sélection de programme: Utilisez pour sélectionner la chaîne suivante ou précédente.
34. GUIDE : Appuyez pour afficher le guide électronique des programmes en mode TV.
35. Q.View : Pour retourner à la dernière chaîne regardée.
36. CH.LIST : Appuyez pour afficher la liste des chaînes.
37. Screen : Pour changer le format d'image.
38. Sleep : Pour définir l'heure d'arrêt du téléviseur.
39. S.Mode: To switch sound mode.
40. OPEN/CLOSE : Aucun rôle
:pas de function DVD

16
Insertion des piles dans la télécommande
TÉLÉCOMMANDE
TÉLÉTEXTE
Le télétexte est un système d'information diffusé par certaines chaînes, qui se consulte comme un journal. Il offre
également l'accès aux sous-titrages pour les personnes malentendantes ou qui ne sont pas familiers avec la langue
de transmission (réseaux câblés, chaînes satellites, etc.)
Appuyez sur :
Vous obtenez :
TEXTE
Il est utilisé pour appeler ou quitter le mode télétexte. Le sommaire apparaît avec
une liste d'éléments qui peuvent être accédés. Chaque élément a un numéro de
page correspondante de 3 chiffres. Si la chaîne sélectionnée ne diffuse pas de
télétexte, l'indication 100 s'affiche et l'écran reste noir (dans ce cas, quittez le
télétexte et sélectionnez un autre canal).
SÉLECTION D'UNE PAGE
Entrez le numéro de la page désirée à l'aide de touches 0 à 9 et haut/bas. Exemple:
page 120, tapez 120. Le numéro est affiché en haut à gauche, le compteur tourne,
puis la page est affichée. Répétez cette opération pour afficher une autre page. Si le
compteur continue à chercher, cela signifie que la page n'est pas transmise.
Sélectionnez un autre numéro.
ACCÈS DIRECT AUX ÉLÉMENTS
Les touches de couleur sont comme elles sont affichées en bas de l'écran. Les 4
touches colorées permettent d'accéder aux rubriques ou aux pages
correspondantes. Les zones colorées clignotent lorsque la rubrique ou la page n'est
pas encore disponible.
INDEX Cela renvoie à la page sommaire (généralement la page 100).
SUB PAGE
Certaines pages contiennent des sous-pages qui sont automatiquement affichées
successivement. Cette touche permet d'arrêter ou reprendre la sous-page.
L'indication apparaît en haut à gauche.
HOLD Pour figer la page.
REVEAL Pour afficher ou masquer les informations cachées (solutions de jeux).
LIST
L'utilisateur peut définir quatre pages préférées à être directement liées aux quatre
touches de couleur. Lorsque que le mode liste est activé, il n'est pas possible
d'utiliser la navigation Haut et Bas avec les touches de couleur. Les numéros des
pages préférées sont conservés et restaurés dans/de la mémoire non volatile pour
chaque canal par le logiciel du système.
1. Ouvrez le compartiment des piles.
2. Insérez 2 piles AAA 1,5 V en respectant les indications de polarité (+/-) des piles à l'intérieur du compartiment.
3. Remettez le couvercle du compartiment des piles en place. Remplacez par des piles neuves si le téléviseur présente les
symptômes suivants : Son fonctionnement devient instable ou capricieux. S'il arrive que le téléviseur ne réponde pas à la
télécommande.
Remarques :
1) Utilisation de piles alcalines conseillée.
2) Retirez les piles lorsqu'elles sont usées ou si la télécommande ne va pas être utilisée sur une période prolongée.

17
04. Utilisation
Guide d'installation
le guide d'installation apparait seulement quand le téléviseur est mise en marche pour la première fois ou lorsque qu'il est réstauré en
paramétrage usine.
Modes Accueil ou Boutique
1.Le mode Accueil est un mode d'économie d'énergie. Le mode Accueil est recommandé pour une utilisation normale, c’est le réglage
par défaut.
2.Le mode Boutique est utilisé par les revendeurs pour la publicité ou la présentation du produit. Le mode Boutique offre une image plus
lumineuse que le mode Accueil.
3.Vous pouvez choisir de passer en mode Domestique au mode magasin. Si vous choisissez le le mode magasin, la source sera
automatiquement sur HDMI 1 et vous pouvez retirez les affichages POP en appuyant sur la touche Exit de la télécommande.
2). Appuyez sur les touches pour sélectionner DVB-T/DVB-C puis appuyez sur OK pour confirmer.
a.Si vous sélectionnez DVB-T, l'étape suivante consiste à sélectionner le type de Recherche et le pays puis appuyez OK pour lancer la
recherche.
b.Si vous sélectionnez DVB-C, l'étape suivante consiste à configurer le système DVB-C tel que (le type de recherche/Fréquence/ID
Réseau /Symbole (KS/S), puis d’appuyer sur OK pour accéder au menu de sélection du type de recherche et du pays ; cette étape est la
même que celle pour DVB-T, sélectionnez le type de recherche (DTV/ATV).
Sélectionnez le bon pays, appuyez sur OK pour lancer la recherche.
1). Appuyez sur les touches pour naviguer dans les menus et modifier les paramètres. Appuyez sur OK pour
confirmer.Sélectionnez la langue souhaitée des menus.
Selectionner la langue désirée, Mode domestique / Mode magasin pour l'afficher sur le menu.
Nota: Le mot de passe par défaut est 6666.

18
3). La recherche des chaînes démarre. Cette opération peut prendre jusqu'à 6 minutes. L'écran affiche l'état d'avancement de la
recherche et le nombre de chaînes trouvées.
4). Si vous voulez ignorer la recherche ATV, appuyez sur la touche MENU pour l’interrompre. Un écran s'affiche, appuyez sur la touche
pour sélectionner YES (OUI) pour confirmer. Vous serez redirigez directement à la recherche DTV. Vous pouvez répéter l'étape
ci-dessus si vous voulez ignorer recherche DTV. Un rappel d'installation apparaîtra la prochaine fois vous allumez le téléviseur.
5). Une fois la recherche terminée, les chaînes seront disposées dans un ordre préétabli. Si vous souhaitez ignorer des chaînes, modifier
l’ordre des chaînes préréglées ou les renommer, sélectionnez Programme Edit (Modifier les programmes) dans le menu Channel.
6)
1. MENU CHANNEL
1.1 Recherche automatique (DVB-T)
1) Appuyez sur la touche MENU puis sur les touches pour sélectionner le menu CHANNEL puis sur la touche OK.
2) Appuyez sur les touches pour sélectionner Auto Tuning (recherche automatique) puis sur OK.
3) Appuyez sur les touches
pour sélectionner DVB-T/DVB-C, appuyez pour sélectionner DVB-T puis sur OK pour confirmer.

19
4) Dans le menu Tune Type (type de recherche), appuyez sur les touches pour sélectionner ATV/DTV/DTV + ATV. Appuyez
sur la touche puis sur les touches pour sélectionner le pays d’utilisation du téléviseur. Appuyez sur OK pour confirmer.
5) La recherche des chaînes démarre. Cette opération peut prendre jusqu'à 6 minutes. L'écran affiche l'état d'avancement de la
recherche et le nombre de chaînes trouvées.
6) Si vous voulez ignorer la recherche ATV, appuyez sur la touche MENU pour l’interrompre. Un écran s'affiche, appuyez sur la
touche pour sélectionner YES (OUI) pour confirmer. Vous serez redirigez directement à la recherche DTV. Vous pouvez répéter
l'étape ci-dessus si vous voulez ignorer recherche DTV. Un rappel d'installation apparaîtra la prochaine fois vous allumez le téléviseur.
7) Une fois la recherche terminée, les chaînes seront disposées dans un ordre préétabli. Si vous souhaitez ignorer des chaînes,
modifier l’ordre des chaînes préréglées ou les renommer, sélectionnez Programme Edit (Modifier les programmes) dans le menu
Channel.
1.2 Recherche automatique (DVB-C)
1). Appuyez sur la touche MENU puis sur les touches pour sélectionner le menu CHANNEL puis sur la touche OK.
2). Appuyez sur les touches pour sélectionner Auto Tuning (recherche automatique) puis sur OK.
3). Appuyez sur les touches pour sélectionner DVB-T/DVB-C puis appuyez sur OK pour confirmer.

20
4). Appuyez sur les touches pour sélectionner Scan Type/Symbol (Ks/S) puis sur OK pour confirmer.
5). Dans le menu Tune Type (type de recherche), appuyez sur les touches
pour sélectionner ATV/DTV/DTV + ATV. Appuyez sur la
touche puis sur les touches pour sélectionner le pays d’utilisation du téléviseur. Appuyez sur OK pour confirmer.
6). La recherche des chaînes démarre. Cette opération peut prendre jusqu'à 6 minutes. L'écran affiche l'état d'avancement de la
recherche et le nombre de chaînes trouvées.
7). Si vous voulez ignorer la recherche ATV, appuyez sur la touche MENU pour l’interrompre. Un écran s'affiche, appuyez sur la touche
pour sélectionner YES (OUI) pour confirmer. Vous serez redirigez directement à la recherche DTV. Vous pouvez répéter l'étape
ci-dessus si vous voulez ignorer recherche DTV. Un rappel d'installation apparaîtra la prochaine fois vous allumez le téléviseur.
8). Une fois la recherche terminée, les chaînes seront disposées dans un ordre préétabli. Si vous souhaitez ignorer des chaînes, modifier
l’ordre des chaînes préréglées ou les renommer, sélectionnez Programme Edit (Modifier les programmes) dans le menu Channel.
Remarque :
Toutes les chaînes, y compris ATV, DTV et radio peuvent être recherchées en une fois, si le type de recherche est DTV + ATV.
Toutes les chaînes mémorisées seront effacées après une recherche automatique.
Après la recherche automatique, le téléviseur se syntonise à la première chaîne numérique (DTV).
2.1 Recherche manuelle DTV (DVB-T)
1). Appuyez sur la touche MENU puis sur les touches
pour sélectionner le menu CHANNEL puis sur la touche OK.
2). Appuyez sur les touches
pour sélectionner DTV Manual Tuning (recherche manuelle DTV) puis sur OK.

21
3). L'écran DTV Manual Tuning (recherche manuelle DTV) s'affiche. Appuyez sur les touches pour sélectionner UN canal UHF puis
sur la touche OK pour lancer la recherche dans ce canal. Lorsque le signal est accordé, l'image et la force du signal sont affichées à
l'écran.
4). Appuyez sur la touche MENU pour retourner au menu principal.
5). Appuyez sur la touche EXIT pour quitter le menu.
2.2 Recherche manuelle DTV (DVB-C)
1). Appuyez sur la touche MENU puis sur les touches pour sélectionner le menu CHANNEL puis sur la touche OK.
2). Appuyez sur les touches pour sélectionner CADTV Manual Tuning (recherche manuelle CADTV) puis sur OK.
3). L'écran CADTV Manual Tuning (recherche manuelle CADTV) s'affiche. Appuyez sur les touches pour sélectionner
(Fréquence/Symbole (ks/s/QAM type QAM) puis sur OK pour lancer la recherche dans ce canal. Lorsque le signal est accordé, l'image et
la force du signal sont affichées à l'écran.
4). Appuyez sur la touche MENU pour retourner au menu principal.
5). Appuyez sur la touche EXIT pour quitter le menu.

22
3). ATV Manual tuning (Recherche manuelle de programmes analogiques (ATV)) :
Vous pouvez changer le système de sonorisation pour rechercher les chaînes de télévision analogiques puis affiner les canaux
sélectionnés.
Remarque :
Appuyez sur la touche télétexte rouge pour mémoriser les chaînes après la recherche manuelle.
4). Program edit (Modification des programmes) :
Vous pouvez supprimer, renommer, déplacer, ignorer et rendre favori tout programme.
Delete (Supprimer)
Appuyez sur la touche télétexte rouge, le programme pointé par le curseur sera supprimé.
Rename (Renommer) :
Vous ne pouvez renommer que les programmes ATV.
Déplacez le curseur sur le programme, appuyez sur la touche télétexte verte pour renommer le programme.
Appuyez sur pour choisir un caractère. Appuyez sur pour déplacer le curseur.
Appuyez sur la touche Menu pour quitter la modification, appuyez sur EXIT pour quitter le menu.
Remarque : Les noms des programmes ATV ne peuvent être que de 5 caractères, les noms des programmes DTV peuvent être de 25
caractères.
Move (Déplacer)
Utilisez les touches fléchées pour sélectionner la chaîne que vous souhaitez déplacer. Ensuite, appuyez sur la touche jaune pour
sélectionner la fonction Déplacer. Une fois activée, utilisez les touches fléchées pour se déplacer et appuyez sur OK pour confirmer.
Skip (Ignorer)
Appuyez sur
pour choisir le programme, appuyez sur la touche télétexte bleue pour ignorer ce programme, le symbole apparaît
sur le côté droit du programme.
Choisissez le programme ignoré, appuyez à nouveau sur la touche bleue pour annuler ignorer, le symbole va disparaître.
Favorite (Favoris)

23
Appuyez sur pour choisir le programme, appuyez sur la touche FAV, le symbole apparaît sur le côté droit du programme.
Choisissez le programme FAV, appuyez à nouveau sur la touche FAV pour annuler FAV, le symbole disparaît.
Une fois votre groupe favori créé, vous pouvez appuyer sur la touche FAV pour accéder rapidement à votre programme favori.
5). CI information (Informations sur la CI) : (en option)
Ce menu peut afficher des informations sur la carte CI.
2. PICTURE MENU (Menu Image)
Le second élément du Menu principal est le Menu Image.
Ce menu permet de régler les paramètres de l'image tels que contraste, luminosité, etc.
Appuyez sur OK pour se déplacer, appuyez sur OK pour régler.
Remarque :
1). Teinte n'est disponible qu'avec le système NTSC.
2). Il y a quatre modes de température des couleurs disponibles : moyen, chaud, froid, et personnalisé
3). L'écran est disponible en mode PC uniquement qui permet de régler la position horizontale, verticale, la taille et la phase.
3. SOUND MENU (Menu Audio)
Le troisième élément du Menu principal est le Menu audio.
Ici vous pouvez régler l'effet sonore tel que aigus, graves, balance, etc.
Appuyez sur pour se déplacer, appuyez sur OK pour régler.
Remarque :
Volume automatique : disponible uniquement lorsque le volume du signal d'entrée est trop élevé ou présente une distorsion.
4. TIME MENU (Menu Temps)
Le quatrième élément du Menu principal est le Menu Temps ; vous pouvez régler l'heure, l'heure marche/arrêt, le temps de veille
automatique, etc. Appuyez sur pour se déplacer, appuyez sur OK pour régler

24
Remarque :
Dans 15 minutes, il n'y aura pas de signal, le téléviseur passe en veille automatiquement, si Veille automatique est activée (ON). L'heure
peut être obtenue du système DTV automatiquement.
5. OPTION MENU (Menu Options)
Le cinquième élément du Menu principal est le Menu Options. Vous pouvez choisir la langue des menus, la langue audio, la langue de
sous-titres, etc.
Arrêt automatique
1. Le téléviseur lance la séquence d’arrêt automatique, si au bout de 4 heures de mise en marche aucun changement n’est apporté, par
exemple changement de chaîne ou de volume.
Une fenêtre apparaîtra à l'écran.
Au bout de 150 secondes, le téléviseur passe automatiquement en mode veille. Appuyez sur une touche quelque de la télécommande
pour éviter l'arrêt automatique.
2. Sélectionnez Automatic powerdown (4H) dans le menu Options pour annuler l’arrêt automatique.
Appuyez sur OK. Un message apparaîtra “Are you sure you want to enable automatic powerdown?” (Etes-vous sûr de vouloir activer
l’arrêt automatique ?)
Utilisez la touche vers la droite pour sélectionner NO (NON).
L'écran du téléviseur retourne au menu Options et l’option arrêt automatique (4H) s'affiche.
Automatic power-down (4H) OFF (désactiver l’arrêt automatique)
Pour retourner à l’arrêt automatique après 4 heures répéter ce qui précède, en utilisant la touche vers la gauche pour sélectionner YES
(OUI)
Dans le système de fichiers PVR, vous pouvez configurer le disque USB pour PVR.

25
Remarque :
La restauration des paramètres par défaut, efface tous les programmes et mot de passe.
6. LOCK MENU (Menu Verrouillage)
Le sixième élément du Menu principal est le Menu verrouillage. Vous pouvez verrouiller le système, définir un mot de passe, verrouiller
des programmes et définir le contrôle parental, après avoir activé le système de verrouillage, vous ne pouvez pas rechercher les chaînes
ou modifier les programmes.
Remarque :
Le mot de passe par défaut est 0000. En cas d’oubli du mot de passe, il est possible d'utiliser le super mot de passe : 9443.
Verrouillage de programmes : Appuyez sur
pour choisir le programme, appuyez sur la touche télétexte verte pour verrouiller le
programme. Si vous voulez déverrouiller le programme, accédez au menu principal, entrez le mot de passe, puis appuyez sur la touche
verte. Contrôle parental : Appuyez sur de choisir une classification.
7. Menu EPG (Guide Électronique des Programmes)
Le Menu EPG est utilisé pour avoir une idée sur les programmes télé et radio de la journée.
Pour accéder au Menu EPG, appuyez sur la touche EPG, le menu suivant s'affiche :

26
1. INFO
Utilisez pour choisir les programmes, appuyez sur la touche INFO, pour afficher les informations du programme mis en surbrillance.
2. Schedule (Programme)
Appuyez sur la touche télétexte jaune pour lister tout le Programme, appuyez sur pour choisir la liste, appuyez sur la touche rouge
pour supprimer la liste de programmes.
3. Record (Enregistrer)
Appuyez sur la touche rouge pour choisir le programme à enregistrer.
4. Reminder (Rappel)
Appuyez sur la touche bleue pour choisir un programme et mettre en place une heure de rappel, le téléviseur passe automatiquement au
programme choisi à l'heure de rappel.
8. Fonction PVR
1. Préparer l'enregistrement d'un programme
la fonction PVR fonctionne uniquement sur la TNT.
Entrez dans le système de fichiers PVR dans le menu Options, choisissez "Vérifier le système de fichiers PVR". Cliquez sur "OK", jusqu'à
ce que "Vérifier" se transforme en "Réussi".
Remarque : sélectionnez le terme "Vitesse". S'il prend en charge "HD", cela signifie que la vitesse du dispositif USB peut supporter
l'enregistrement décalé (TimeShift). Dans le cas contraire, formatez le dispositif pour s'assurer qu'il la prendra en charge. La valeur par
défaut "Limite d'enregistrement" est 6 heures, si l'espace sur le disque est suffisant. Si l'espace n'est pas suffisant, le temps
d'enregistrement devrait être réduit en fonction de l'espace disponible sur le disque. Pendant le processus "Vérifier le système de fichiers
PVR", ne faites aucune opération jusqu'à ce qu'il soit terminé.
Les enregistrements doivent être faits avec le système TV PVR. Ils ne peuvent être regardés que sur le même téléviseur et non avec
n'importe quel autre type de dispositif (ordinateur, lecteur DVD, etc.) qui n'est pas compatible avec les fichiers de format .TS.
Notez que pour réaliser des enregistrements de tout type, le téléviseur vous obligera à formater le dispositif USB connecté pour stocker
l'enregistrement.
AVERTISSEMENT VOUS PERDREZ TOUS LES FICHIERS ET INFORMATIONS SUR LE DISPOSITIF USB EXTERNE LORS DU
FORMATAGE.
CAPACITE DE STOCKAGE DU DISPOSITIF.
Le système de fichiers USB limitera la taille la capacité de stockage.
Système de fichiers : NTFS jusqu'à 2 To
FAT32 jusqu'à 192 Go

27
FAT16 jusqu'à 2 Go
Dans le menu Options entrez dans le système de fichiers PVR comme indiqué ci-dessous :
Sélection de disque : sélectionnez le disque pour enregistrer le fichier d'enregistrement.
Vérifier le système de fichiers PVR : vérifiez si le système de fichiers PVR est défini dans le dispositif USB ou pas.
Formater :

28
(Suggestions du format de formatage du dispositif en "FS grande vitesse ..." ce qui peut accélérer l'enregistrement.)
Le menu ci-dessous apparaît une fois le formatage terminé :
Si vous sélectionnez l'option mode de formatage "FS grande vitesse", vous pouvez modifier la taille de lecture décalée (TimeShift) :
2. Enregistrer le programme
En cours de lecture de source DTV, choisissez le canal et cliquez sur "Enregistrer", l'écran d'enregistrement apparaît. Cliquez à nouveau
sur "Enregistrer", l'écran d'enregistrement disparaît et le symbole "REC" reste affiché dans le coin supérieur gauche. Il disparaîtra lorsque
vous cliquez sur "stop".
3. Lire l'enregistrement

29
Le programme sera sauvegardé dans le dossier "_MSTPVR" du dispositif USB.
1. La capacité de stockage USB peut être comprise entre 128 et 500 Go, mais pour des raisons pratiques, il est recommandé d’utiliser 2
Go à 500 Go.
2. La vidéo risque de devenir pixélisée si le débit vidéo est trop faible. Cela peut être dû à la connexion d'un câble de rallonge USB au lieu
d’une connexion directe du téléviseur via un câble USB
3. Les dispositifs USB ne sont pas tous compatibles.
Voici une liste des lecteurs USB recommandés.
Les modèles qui ne sont pas listés peuvent être compatibles, mais ce n'est pas garanti.
La liste de dispositifs USB supportés est la même que celle de la fonction Timeshift (lecture décalée), reportez-vous aux pages suivantes
pour plus de détails.
9. Fonction Timeshift (lecture décalée)
1. Préparer l'enregistrement d'un programme
Ce téléviseur vous permet de faire une pause et d'enregistrer le programme numérique en cours dans un dispositif de stockage USB, et
de reprendre au point où il s'était arrêté.
REMARQUE :
• Le formatage d'un dispositif de stockage USB 2.0 serait nécessaire. Sauvegardez vos données avant de formater. Toutes les données
stockées dans le dispositif USB seront effacées après un formatage.
Format de stockage du lecteur USB
Sélectionnez cette option pour formater le dispositif USB et pour allouer l'espace pour la fonction TimeShift (lecture décalée).
REMARQUE :
• Le processus de formatage prendra au moins 2 minutes. N'éteignez pas l'appareil et ne retirez pas le dispositif USB pendant le
formatage.
• Lors du formatage, un test de vitesse sera effectué sur le dispositif USB. S'il échoue, cela signifie que le dispositif USB peut ne pas
supporter la fonction TimeShift (lecture décalée).
Enregistrer une émission DTV (télévision numérique) mise en pause sur le dispositif de
stockage USB
1. En mode source d'entrée DTV, insérez le dispositif de stockage USB dans le port USB situé sur le côté de votre téléviseur.
2. Appuyez sur PAUSE (29) pour démarrer la fonction TimeShift (lecture décalée). Le programme TV en pause. L'OSD TimeShift apparaît,
et l'enregistrement démarre.
3. Appuyez sur STOP (28) pour arrêter la fonction TimeShift et arrêter l'enregistrement du programme.

30
REMARQUE :
• Ne débranchez pas le dispositif de stockage USB lorsque la fonction TimeShift est en cours.
• Environ 4 Go de mémoire tampon offre 140 minutes d'enregistrement.
Limites du TimeShift :
1). Lorsque la fonction TimeShift est activée, seules les touches PLAY/PAUSE/STOP/FWD/REV/ VOL+/VOL-/MUTE et quelques touches
de fonctionnement de base (ENTRER / EXIT / navigation) sont disponibles.
2). La lecture vidéo peut ne pas être continue et peut présenter des sauts si la vitesse d'enregistrement USB ne répond pas aux
exigences minimales.
3). Ne retirez pas le dispositif USB et n'éteignez pas l'appareil pendant l'opération TimeShift. L'opération sera abandonnée dès que le
signal est perdu.
4). Ne retirez pas la source du signal lors de l'opération TimeShift.
5). Ne changez pas rapidement et de façon répétée les opérations entre PLAY/PAUSE/FWD/REV.
6). La vidéo risque de devenir pixélisée si le débit vidéo est trop faible.
7). Pas tous les dispositifs USB sont compatibles, le courant électrique des disques durs USB devrait être <500 mA.
Voici une liste des lecteurs USB recommandés. Les modèles qui ne sont pas listés peuvent être compatibles, mais ce n'est pas garanti.
• Clé USB Flash SanDisk Extreme® Contour™ - SDCZ8-8192-E75 8Go
• Clé USB Flash SanDisk Extreme® Contour™ - SDCZ8-016G-A75 16Go
• Clé USB 2.0 Flash Kingston DataTraveler 410 - DT410/ 8Go
• Clé USB 2.0 Flash Kingston DataTraveler 410 DT410/16Go
• Clé USB 2.0 Flash OCZ Technology Rally2 - OCZUSBR2DC-4Go
• Clé USB 2.0 Flash OCZ Technology ATV - OCZUSBATV-8Go
• Clé USB 2.0 Flash OCZ Technology Rally2 - OCZUSBR2DC-8Go
• SAMSUNG-HM500JI-500G
8). Cette fonctionnalité n'est pas disponible pour toutes les TV numériques, tels que les canaux brouillés ou audio seulement.
10. Lecteur USB
Cliquez sur l’icone de la source, et sélectionnez l’USB dans la liste, pressez le bouton OK pour entrer dans le menu USB.

31
Assurez-vous que le dispositif USB est inséré dans la fente. Il existe quatre types d'éléments multimédia qui peuvent être sélectionnés,
tels que photo, musique, film et texte. Sélectionnez l'élément multimédia en appuyant sur , appuyez sur OK pour accéder au menu
de sélection de disque.
Appuyez sur la touche pour sélectionner le bon disque et appuyez sur OK pour afficher les fichiers et dossiers multimédias ou
choisir Retour pour revenir au menu de sélection du type multimédia.
Sélectionnez le fichier multimédia en appuyant sur ou , pour afficher l'image de prévisualisation. Appuyez sur la touche ►
pour lire le fichier multimédia en plein écran. Lorsque le fichier multimédia (photo, film, ou texte) est en cours de lecture, appuyez sur la
touche OK ou sur la touche Info pour afficher la barre de contrôle.
Appuyez sur pour sélectionner l'icône de la fonction, appuyez sur la touche OK pour valider la fonction.
Appuyer sur "▼" ou sur le bouton Exit pour quitter la barre contrôle excepter pour la musique.
REMARQUE :
Vous pouvez régler la piste audio, ou programme dans le menu Info pendant la lecture du fichier vidéo. Choisissez l'icône Info et appuyez
sur OK pour afficher le Menu Info.
La lecture USB est prise en charge pour les formats de fichiers photo suivants :
- JPEG (format JPEG, les fichiers avec l'extension ".Jpg")
- BMP (fichiers avec l'extension ".Bmp")
- PNG (fichiers avec l'extension ".Png")
La lecture USB est prise en charge pour les formats de fichiers audio suivants:
- MP3 (fichiers avec l'extension ".Mp3")
- WAV (fichiers avec l'extension ".Wav")
La lecture USB est prise en charge pour les formats de fichiers texte suivants :
- TXT (fichiers avec l'extension ".Txt")
La lecture USB est prise en charge pour les formats de fichiers vidéo suivants :
- AVI (fichier avec l'extension ".Avi")
- TS (MPEG2 et H.264)

32
05 Dépannage
Symptôme du problème Vérification Inspection
Image Audio
Neige
Bruit
position de l'antenne, direction
ou connexion
fantôme Audio
normal
position de l'antenne, direction
ou connexion
Interférence
Bruit
équipements électroniques,
voiture / moto, lumière
fluorescente
Image normale
Son coupé
Volume (vérifiez si muet est
activé ou si les connexions du
système audio ne sont pas
corrects)
Pas d'image
Son coupé
Le cordon d'alimentation n'est
pas inséré. L'interrupteur
d'alimentation n'est pas ouvert.
Configuration du contraste,
luminosité/volume
Appuyez sur la touche standby
(veille) de la télécommande pour
inspection
Pas de couleur Audio
normal
Contrôle des couleurs
Rupture de l'image Audio
normal ou
faible
recherchez le canal
Pas de couleur
Bruit Système TV
Il y a une barre noire
en haut et en bas
Audio
normal
Changer le format d’image
en zoom

33
Spécifications
Système de couleurs PAL-B/G, I, D/K
SECAM- B/G, D/K, L, L'
Système audio BG, DK, I, L, L'
Entrée vidéo Péritel, YPbPr, AV,
VGA, HDMI, USB.
Y/Pb/Pr 480i/p, 576i/p,
720p, 1080i, 1080p
HDMI 480i/p, 576i/p, 720p, 1080i, 1080p
Alimentation
Conditions requises
100-240V ~ 50/60Hz
Consommation d'énergie 30W (19”) 38W (22”) 40W (24”) 55W (26”)
Consommation électrique en veille <0.5W
Sortie audio 2 x 3W
Conditions d'environnement Température de fonctionnement :
+5 C - +35 C
Humidité de fonctionnement :
20% - 80%
Température de stockage :
-15 C - +45 C
Humidité de stockage :
5% - 90%
Accessoires Guide d'utilisation
Télécommande
Piles (x 2)
Guide de démarrage rapide
* Les spécifications de ce téléviseur ne sont fournies ici qu'à titre de référence.
Des différences peuvent apparaître car la technologie du produit est en amélioration continue.
La conception et les caractéristiques sont sujettes à modification sans préavis.
Description de sortie Péritel :
1. Lorsque la source en cours est ATV/AV/SCART, le signal de sortie péritel est ATV.
2. Lorsque la source en cours est DTV, le signal de sortie péritel est DTV.
3. Une autre source n'a pas de signal de sortie péritel.

34

1
LED LCD TV-ONTVANGER
GEBRUIKERSHANDLEIDING
Lees deze handleiding aandachtig door voordat u uw televisie gaat gebruiken en houd
deze handleiding op de juiste plaats voor latere verwijzing.
Model :
LET19T1000H
LET22T1000HF
LET24T1000HF
LET26T1000HF

2
Inhoud
01 Veiligheid en waarschuwingen
Welkom P. 03
Belangrijke informatie P. 03
Mededeling over de veiligheid P. 04
Waarschuwingen en voorzichtigheid P. 05
02 Introductie
Belangrijkste kenmerken P. 07
Montagewijze van het voetstuk P. 08
Richtlijnen voor monteren aan een muur P. 09
Het voorpaneel P. 11
AV-verbindingen P. 12
Het aansluiten van uw tv P. 13
Gemeenschappelijke interface P. 14
03 Afstandsbediening
Afstandsbediening P. 15
04 Werking
Installatiehandleiding P. 17
05 Oplossen van problemen
Oplossen van problemen P. 37
Specificatie P. 38

3
01 Veiligheid en waarschuwingen
WELKOM
Hartelijk dank voor de aanschaf van deze 19”/22”/24”/26” LED/LCD-tv. Deze handleiding zal u helpen bij het opzetten en het gebruik van
uw tv.
Controleer eerst de inhoud van de doos, met de onderdelen die vermeld staan op de onderstaande lijst:
19” HD-voorbereide LED/LCD-tv
Afstandsbediening
2x AAA batterijen
Handleiding
Snelle startgids
Stand
22” volledige HD 1080P LED/LCD-tv
Afstandsbediening
2x AAA batterijen
Handleiding
Snelle startgids
Stand
24” volledige HD 1080P LED/LCD-tv
Afstandsbediening
2x AAA batterijen
Handleiding
Snelle startgids
Stand
26” HD-voorbereide LED/LCD-tv
Afstandsbediening
2x AAA batterijen
Handleiding
Snelle startgids
Stand
Nu kunt u beginnen!
BELANGRIJKE INFORMATIE
LEES EERST ALLE INSTRUCTIES DOOR EN BEWAAR DEZE HANDLEIDING VOOR LATERE VERWIJZING.
LET OP!
KANS OP EEN ELEKTRISCHE SCHOK
NIET OPENEN
LET OP!
MAAK DE AFDEKPLAAT (OF ACHTERKANT) NIET OPEN, DIT OM HET RISICO VAN EEN ELEKTRISCHE SCHOK TE
VOORKOMEN. ER BEVINDEN ZICH GEEN GEBRUIKERSONDERDELEN IN DIT APPARAAT. NEEMT U CONTACT OP MET DE
KLANTENDIENST VOOR EVENTUELE PROBLEMEN. ER BEVINDT ZICH EEN BLIKSEMSCHICHT/PIJLSYMBOOL IN DE
DRIEHOEK. DIT SYMBOOL GEEFT AAN DAT ER ZICH EEN HOOG VOLTAGE BINNENIN BEVINDT. HET KAN GEVAARLIJK ZIJN
OM ELKE VORM VAN CONTACT TE MAKEN MET DE ONDERDELEN BINNENIN DIT PRODUCT.
ER BEVINDT ZICH EEN UITROEPTEKEN IN DE DRIEHOEK: DIT SYMBOOL ATTENDEERT U EROP DAT ER BELANGRIJKE
LITERATUUR MEEGELEVERD IS BIJ DIT PRODUCT BETREFFENDE HET ONDERHOUD EN INBEDRIJFSTELLING.
LET OP: PLAATS HET TV-TOESTEL NIET IN DE BUURT VAN VOCHTIGHEID, DIT OM HET RISICO VAN
ELEKTRISCHE SCHOKKEN EN BRAND TE VERMIJDEN. GEBRUIK GEEN SCHURENDE
SCHOONMAAKMIDDELEN DIE KRASSEN OF SCHADE AAN HET LCD-SCHERM KUNNEN AANBRENGEN.
VOORKOM CONTACT MET VOORWERPEN DIE HET LCD-SCHERM KUNNEN BESCHADIGEN.
OPMERKING: HET ONDERHOUDEN VAN HET APPARAAT DOOR UZELF IS NIET TOEGESTAAN EN KAN TOT
LETSEL LEIDEN, OF TOT SCHADE AAN HET PRODUCT. NEEM CONTACT OP MET DE KLANTENDIENST VOOR
AL HET ONDERHOUD.

4
KENNISGEVING OVER DE VEILIGHEID
• Waarschuwing: Verwijder de afdekplaat of achterkant niet om het risico van een elektrische schok te
voorkomen. Er bevinden zich geen gebruikersonderdelen binnen in het apparaat. Laat onderhoud over aan
gekwalificeerd personeel.
• Waarschuwing: Het apparaat mag niet blootgesteld staan aan regen of vocht om brand of een elektrische
schok te voorkomen.
• Stel de omvormer en het product niet bloot aan water (druppels of spatten) en plaats geen objecten gevuld met
vloeistoffen zoals vazen op het apparaat.
• Houd het product uit de buurt van direct zonlicht en warmtebronnen zoals radiatoren of kachels.
• Blokkeer de ventilatie-openingen niet. Sleuven en openingen van het apparaat zijn bedoeld voor ventilatie. De
openingen mogen nooit geblokkeerd worden door uw product op een kussen, bank of soortgelijk oppervlak te
plaatsen.
• Gebruik het product niet op een onstabiel karretje, standaard, statief, beugel of tafel. Het apparaat kan vallen
wat resulteert in mogelijke schade of mogelijk letsel.
• Plaats nooit zware of scherpe voorwerpen op het paneel of frame.
• Haal de stekker uit het stopcontact wanneer het apparaat niet in gebruik is.
• Er moet speciale aandacht besteed worden aan milieu-aspecten bij inzameling van batterijen.
• WAARSCHUWING: de batterijen (of accu’s) mogen niet blootgesteld worden aan extreme hitte zoals zonlicht,
vuur en dergelijke.
• WAARSCHUWING: Overmatige geluidsdruk van oor- of hoofdtelefoon kan gehoorverlies veroorzaken.
Deze afbeelding geeft aan dat dit product niet weggegooid mag worden met ander huishoudelijk afval in de gehele
Europese Gemeenschap. Zorg voor verantwoord recyclen zodat het duurzaam hergebruik van grondstoffen
bevorderd wordt en om mogelijke schade aan het milieu of de menselijke gezondheid te voorkomen door
ongecontroleerde afvalverwijdering. Breng uw gebruikte apparaat naar het grofvuil of neem contact op met uw
winkelier waar dit product gekocht is om uw gebruikte apparaat in te leveren. Zij kunnen voor een milieuveilige
recycling van dit product zorgen.

5
WAARSCHUWINGEN EN VOORZICHTIGHEID
Waarschuwing
Voorzichtigheid
Deze televisie-ontvanger gebruikt hoge spanningen tijdens de werking. Verwijder de afdekplaat of achterkant van dit
apparaat niet. Laat onderhoud aan gekwalificeerd personeel over.
Stel de televisie-ontvanger nooit bloot aan regen of vocht om brand of een elektrische schok te vermijden.
Laat dit product niet vallen, duw geen objecten in de gleuven of openingen van de televisie. Mors nooit enige vloeistof
op de televisieontvanger.
Blokkeer de ventilatie-openingen aan de achterkant niet. Voldoende ventilatie is essentieel om te voorkomen dat
elektrische componenten falen.

6
Zorg ervoor dat het snoer zich nooit onder de televisie-ontvanger bevindt.
Leun of sta nooit op de televisie of standaard, of druk er niet plotseling tegenaan. Besteed speciale aandacht aan
kinderen. Een ernstig letsel kan veroorzaakt worden indien het toestel valt.
Plaats uw televisie niet op een onstabiel karretje, standaard, plank of tafel. Een ernstig letsel aan een individu of
schade aan de televisie kan veroorzaakt worden indien het valt.
Het is raadzaam om de stekker uit het stopcontact te halen wanneer de televisie-ontvanger langere tijd niet gebruikt
wordt.
Minimum afstanden
Indien de televisie ingebouwd wordt in een compartiment of soortgelijke behuizing, moeten de minimum afstanden
gehandhaafd worden. Warmte-ontwikkeling kan de levensduur van uw televisie verkorten en kan ook gevaarlijk zijn.

7
02 Introductie
OPGELET
Knoei nooit met onderdelen binnenin de TV of andere instelknoppen die niet in deze handleiding beschreven zijn.Alle
LED-TV's zijn hoogspanning elektrische apparatuur.
Wanneer u afstoft of er water aan het scherm, de kast, rond de knoppen of aansluitingen komt, moet het netsnoer uit
het stopcontact worden verwijderd.
Veeg de TV af met een zachte, droge, stofvrije doek.
Ontkoppel het netsnoer en de antenne/antennekabel tijdens onweer om schade aan uw TV en eventuele andere
aangesloten apparaten te voorkomen.
Alle reparaties aan deze TV mogen alleen door gekwalificeerd TV-onderhoudspersoneel worden uitgevoerd.
INSTALLATIE
* Plaats de tv in de kamer waar het licht niet rechtstreeks in aanraking komt met het scherm.
* Totale duisternis of een reflectie op het beeldscherm kan leiden tot vermoeide ogen. Zachte en indirecte verlichting
wordt aanbevolen voor meer kijkcomfort.
* Laat voldoende ruimte tussen de tv en de muur om ventilatie mogelijk te maken.
* Vermijd uitzonderlijk warme plaatsen om schade aan de kast of voortijdig falen van een component te voorkomen.
* Bedek de ventilatie-openingen niet wanneer de tv in gebruik is.
Belangrijkste kenmerken
1 Kan gebruikt worden als televisie, beeldscherm, pc-scherm;
2 Hoge helderheid, brede kijkhoek;
3 Tijdsverschuiving;
4 HDMI-interface en SCART-interface;
5 NICAM;
Belangrijkste kenmerken
Paneel 19” 22” 24” 26”
tv-systeem PAL-B/G, I, D/K
SECAM- B/G, D/K, L, L'
Signaal videosysteem PAL/SECAM
Ingang voedingsspanning AC 100-240V 50/60Hz
Energieverbruik 30W 38W 40W 55W
Energieverbruik Stand-by <0.5W
Vermogen audio-uitgang
(THD≤7%)
2x3W
Ingangs signaal
Analoge RGB(PC) x1; PC audio x1
Hoge definitie multi-media interface (HDMI) x2
Video-ingang x1
Audio-ingang x1
Y/Pb/Prx1
Scart x1
CI x 1

8
USB x 1
Tuner x 1
RF Co-Ax x 1
uitgangssignaal
Hoofdtelefoon x 1
S/PDIF x 1
Horizontale definitie (TV-lijn)
Samengestelde video-ingang >=350
YPbPr >=400
PC
VOORAF INGESTELD
RESOLUTIE V.Freq.(Hz) H.Freq.(KHz)
1 640x480 60 31.47
2 800x600 60 37.88
3 1024x768 60 48.36
4 1360x768 60 47.7
5 1280x1024 60 63.98
Montagewijze van het voetstuk
(19”,22”,24”)
1. Zet de ondersteunende pilaarvoet op
het voetstuk in de richting van de
aangegeven pijl en zet deze vervolgens
vast met drie schroeven.
2.Zet de standaard terug op de
achterkant in de richting van de
aangegeven pijl en zet deze vervolgens
met één schroef vast.
1. Zet de ondersteunende pilaarvoet op het
voetstuk in de richting van de aangegeven
pijl en zet deze vervolgens vast met drie
schroeven.
2.Zet de standaard terug op de achterkant in
de richting van de aangegeven pijl en zet
deze vervolgens met twee schroeven vast.
(19”,22”,24”)
(26”)
(26”)

9
INSTALLATIE-OPMERKINGEN
Zoek een plek voor de tv in een kamer waar er geen rechtstreeks licht op het scherm valt. Totale duisternis of een
reflectie op het scherm kan leiden tot vermoeidheid van de ogen. Zachte en indirecte verlichting wordt aanbevolen
voor meer kijkcomfort.
Laat voldoende ruimte tussen de tv en de muur om ventilatie mogelijk te maken.
Vermijd uitzonderlijk warme plaatsen om schade aan de kast of voortijdig falen van een component te voorkomen.
RICHTLIJNEN VOOR MONTEREN AAN EEN MUUR
Deze televisie kan als volgt aan de muur gemonteerd worden:
1. Plaats de LED-LCD-televisie op een stevige ondergrond. Plaats een zachte doek over de voorkant van het
scherm om het tegen eventuele schade te beschermen.
2. Verwijder de schroeven uit het onderste deel van de tv, daar waar de voet de televisie verbindt en haal de voet
weg (zet de voet op een veilige plaats voor toekomstig gebruik).
3. Gebruik de vier meegeleverde schroeven om de tv vast te zetten aan de wandbeugel (niet meegeleverd) via de
vier VESA-standaardgaten aan de achterzijde van de televisie.
(
19”
,
22”
,
24”
)
(
26”
)

10
(
22”
,
24”
)
(
26”
)
(
19”
)

11
Het voorpaneel
1 Sensor van de afstandsbediening.
2 LED-wijzer:
BLAUW: VERMOGEN AAN.
ROOD: STANDBY.
3 Toetsen.
1
BRON
Laat het broningangsmenu zien.
2
MENU
Laat het hoofdmenu zien.
3
CH+/CH-
In de TV-instelling, druk op CH+ of CH- om naar een hoger of lager kanaal te veranderen.
In MENU, druk op CH+ of CH- om uit geselecteerde onderdelen te kiezen.
In standby kan het de tv inschakelen.
4
VOL+/VOL-
Aanpassen geluidsniveau.
In MENU, past het onderdeel aan dat u geselecteerd heeft.
5
STANDBY

12
Achter/zijcontacten
1
L/R audio
Ingang
2
VIDEO
Ingang
3
S/PDIF Digitale audio-uitgang
4
YPbPr
Ingang
5
SCART
Ingang
6
USB
Ingang
7
HDMI2
Ingang
8
HDMI1
Ingang
9
Hoofdtelefoon analoge audio-uitgang
10
GEMEENSCHAPPELIJKE IN INTERFACE (CI)
Ingang
11
PC AUDIO
Ingang
12
VGA-INGANG
Ingang
13
ANT
Ingang

13
HET AANSLUITEN VAN UW TV
ANTENNE-AANSLUITING
Sluit uw antenne aan de achterkant van de tv aan in de ANT IN-aansluiting.
VERBETER UW SIGNAAL
Om de beeldkwaliteit te verbeteren in een gebied met een slecht bereik, gebruikt u een signaalversterker (niet meegeleverd).
SLUIT UW PC AAN OP DE TV
U kunt uw tv ook als monitor voor uw pc gebruiken door deze te verbinden met een VGA-kabel (niet meegeleverd).
1 Lees de gebruikershandleiding van uw computer en controleer of er een VGA-aansluiting aanwezig is.
2 Schakel de stroom van uw tv en pc uit.
3 Sluit een type D, 15-pin VGA-interface-kabel aan op de VGA-video interface-aansluiting van de pc. Sluit het andere uiteinde van de
kabel aan op de interface-aansluiting van de tv. Draai de schroeven van de VGA-aansluitingen aan en verbindt de audiokabel (niet
meegeleverd) naar de audio-ingang aan de achterkant van de tv.
4 Zet eerst de stroom van de tv aan en daarna dat van de pc.
5 Druk op de toets van de tv of van de afstandsbediening om de video-ingang in te stellen op VGA.
6 Wanneer het beeld laat zien dat er een ruis aanwezig is, wijzigt u de VGA-instelling naar een andere resolutie, verander de sterkte of
verander de helderheid en het contrast in het menu tot het beeld duidelijk is.
SLUIT EEN DVD-SPELER OF VIDEORECORDER AAN OP UW TV
Er zijn twee manieren waarop u een dvd-speler of videorecorder op uw tv kunt aansluiten. Zorg ervoor dat zowel de tv, dvd-speler of
videorecorder zijn uitgeschakeld voordat u deze aansluit.
1. Sluit de AV-uitgang van de dvd/video aan op de AV-ingang van uw tv.
2. Sluit de AV-audio L en R aan op de audio-ingang (8). Druk op de BRON-toets van de tv om de video-ingang naar AV te zetten.
SCART-INGANG
1
Sluit de SCART-kabel van het externe apparaat (dvd-speler, top-setbox of spelcomputer) aan op de SCART-aansluiting van de tv.
2 Druk op de BRON-toets om de SCART-optie te selecteren.
3 Druk op de AFSPEEL-toets van het externe apparaat.
HDMI-INGANG
1
Sluit de kabel van het HDMI-apparaat aan op de HDMI-aansluiting van de tv.
2 Druk op de BRON-toets om de HDMI-optie te selecteren.
3 Raadpleeg de gebruikershandleiding van het HDMI-apparaat voor de bediening hiervan.
HOOFDTELEFOON- UITGANG
Stop de stekker van de hoofdtelefoon in de voorzine ingang « HEADPHONE ». De luidsprekers zijn nu gedempt.
S/PDIF-UITGANG
S/PDIF is een digitale audioverbinding gebruikt voor het over korte afstanden aansluiten van audioapparatuur, bijvoorbeeld thuistheaters
en andere digitale Hi-fi-systemen.Het signaal wordt doorgegeven over een coaxiale kabel met RCA-connectors.
1. Zorg ervoor dat zowel de TV als het apparaat vóór het aansluiten zijn uitgeschakeld.
2. luit de AV-kabel (niet meegeleverd) aan vanaf de S/PDIF-aansluiting van de TV naar het geluidssysteem van het thuistheater of digitaal
hi-fi-systeem enz.

14
GEMEENSCHAPPELIJKE INTERFACE
De gemeenschappelijke interface-gleuf (common interface of CI) is ontworpen om de conditionele toegang-module (CA) en smartkaart te
aanvaarden, dit om het mogelijk te maken om naar betaal-tv en aanvullende diensten te kijken. Neemt u contact op met de installateur
van de gemeenschappelijke interface voor meer informatie betreffende modules en abonnementen. Let op, CA-modules en smartkaarten
zijn geen optionele accessoires van ons.
Waarschuwing
• Schakel uw tv uit voordat u een module in de gemeenschappelijke interface-gleuf stopt.
1. Plaats de CAM er correct in, stop daarna pas de smartkaart in het CI-sleuf dat zich aan de zijkant van de tv bevindt.
CI SLOT CI-GLEUF
CAM CAM
Smart Card Smartkaart
2. Schakel de tv in, op het scherm zal een bericht verschijnen indien de CA-module gedetecteerd wordt. Wacht enkele ogenblikken tot de
kaart geactiveerd is.
3. Druk op de MENU-toets en druk vervolgens op de ▲▼-toetsen om de CI informatie-optie te selecteren.
4. Gedetailleerde informatie over de CI-kaart die in gebruik is, wordt weergegeven.
5. Druk op de OK-toets om het kaartmenu te openen. Wij verwijzen naar de modulehandleiding voor het instellen van de details.
6. Wanneer de module verwijderd is, zal het volgende bericht op het scherm verschijnen:

15
03 Afstandsbediening
1.VOEDING: Indrukken om de TV in te schakelen
2.D.MENU: Geen functie.
3.P.Mode: Om de beeldmodus te schakelen.
4.INFO: Indrukken om de huidige signaalstatus, inclusief ingangsbron
en audiokanaalmodus weer te geven.
5.AUDIO l/ll: Indrukken om "MONO” en “Nicam stereo” voor ATV-kanaal
te selecteren. Selecteer de audiotaal voor het DTV-kanaal.
6.ONDERTITELING: Indrukken om de ondertiteling “On” of “Off" te
schakelen
7.Cijferknoppen: Voor directe toegang tot kanalen.
8.BRON: Voor het selecteren van de ingangsbron.
9.DEMPEN: Om het geluid in of uit te schakelen.
10.Volumeregeling: Om het geluidsniveau aan te passen.
11.MENU: Om het TV-menu weer te geven.
12.OK: Om een selectie te bevestigen
13.AFSLUITEN: Om naar het vorige menu terug te keren of het menu te
verlaten.
14.Teletekst Index
15. HERHALEN: Geen functie.
16.Teletekst groene knop/USB snel vooruit
17.Teletekst rode knop/USB snel achteruit
18.Teletekst mix
19.Teletekst tekst
20.Teletekst tonen
21.Teletekst grootte
22.Teletekst tijd/OPNAMELIJST (teleteksttijd is geen functie)
23.Teletekst modus: Geen functie.
24.Teletekst aanhouden
25.Teletekst subcode: Teletekst subpagina
26.Teletekst blauwe kno
p
/USB vol
g
end bestand
27.Teletekst gele knop/USB vorig bestand
28.USB STOP
29.USB AFSPELEN/PAUZEREN
30.START OPNEMEN
31.Cursor OMHOOG, OMLAAG, LINKS, RECHTS: Indrukken om uw selectie te navigeren.
32.Fav: Om uw favoriete kanalenlijst in de TV- of DTV-modus te benaderen.
33.Selecteer programma: Druk op de “ ”-knop om het volgende of vorige TV-kanaal te selecteren.
34.GIDS: Indrukken om het elektronische programmagids in de TV-modus weer te geven.
35.Q.View: Om het eerder bekeken kanaal te benaderen.
36.CH.LIST: Indrukken om de kanalenlijst weer te geven.
37.Scherm: Om de aspectratio van het beeld te wijzigen.
38.Slapen: Stel de timer in om de TV uit te schakelen.
39.S.Mode: Om de geluidsmodus te schakelen.
40. OPENEN/SLUITEN: Geen functie.
:Geen DVD – functie

16
Plaats de batterijen in de afstandsbediening
AFSTANDSBEDIENING
TELETEKST
Teletekst is een informatiesysteem dat door bepaalde zenders uitgezonden wordt en geraadpleegd kan worden zoals
een krant. Het biedt ook toegang tot ondertiteling voor kijkers met gehoorsproblemen of die niet vertrouwd zijn met de
taal van een uitzending (kabelnetwerken, satellietkanalen enz.).
Druk op:
U verkrijgt:
TEKST
Dit wordt gebruikt om de teletekst-optie op te openen of te verlaten. De inhoud wordt
weergegeven in een lijst van pagina’s die geraadpleegd kan worden. Elke pagina
heeft een overeenkomstige 3-cijferig paginanummer. Als het gekozen kanaal geen
teletekst uitzendt, zal de aanduiding 100 zijn en het scherm zal leeg blijven (in dit
geval kiest u een ander kanaal voor teletekst).
EEN PAGINA SELECTEREN
Voer het nummer van de gewenste pagina met de 0 t/m 9 toetsen in of met de pijlen
omhoog/omlaag. Bijvoorbeeld: voor pagina 120, kiest u 120. Het nummer verschijnt
in de linkerbovenhoek, de teller draait en hierna wordt de pagina weergegeven.
Herhaal deze handeling om een andere pagina te bekijken. Als de teller blijft
zoeken, betekent dit dat de pagina niet uitgezonden wordt. Selecteer dan een ander
nummer.
DIRECT TOEGANG TOT RUBRIEKEN
Gekleurde toetsen bevinden zich aan de onderkant van het scherm. De vier
gekleurde toetsen worden gebruikt om de overeenkomstige rubrieken of pagina’s te
openen. De gekleurde velden knipperen wanneer de rubriek of de pagina nog niet
beschikbaar is.
INDEX Dit laat u terugkeren naar de Inhoud (meestal pagina 100).
SUB PAGINA (sub page)
Bepaalde pagina’s bevatten sub-pagina’s die automatisch achtereenvolgens
weergegeven worden. Deze toets wordt gebruikt om te stoppen dat de sub-pagina
de overname hervat. De aanduiding verschijnt links bovenaan.
VASTHOUDEN (hold)
De pagina bevriezen.
ONTHULLEN (reveal)
Het weergeven of verbergen van informatie (oplossingen bij spelletjes).
LIJST (list)
De gebruiker kan vier favoriete pagina’s direct koppelen aan de vier gekleurde
toetsen. Terwijl de lijst geactiveerd is, is het niet mogelijk om met TOP of FLOF te
navigeren met de kleurtoetsen. De favoriete paginanummers moeten opgeslagen,
en hersteld worden van/naar een niet-vluchtig geheugen voor elk kanaal door de
systeemsoftware.
1. Verwijder het batterijklepje.
2. Plaats 2 AAA 1,5V batterijen in het compartiment en let erop dat de polariteit (+ of -) van de batterijen overeenkomt met de
polariteitsmerken op de afstandsbediening.
3. Monteer het batterijklepje. Vervang de batterijen wanneer uw tv de volgende symptomen begint te vertonen: bediening is
instabiel of onregelmatig, soms werkt de tv niet met de afstandsbediening.
Opmerking:
1) Alkaline-batterijen worden aanbevolen.
2
)
Verwi
j
der de batteri
j
en als ze lee
g
zi
j
n of als de afstandsbedienin
g
lan
g
ere ti
j
d niet
g
ebruikt wordt.

17
04 DE WERKING
Installatiegids
De installatiegids verschijnt enkel wanneer de TV voor de eerste keer gebruikt wordt of terug is ingesteld op
fabrieksinstellingen.
1) Druk op de “
”-knoppen om in het menu te navigeren en de instellingen te wijzigen. Druk op de
“OK”-knop om te bevestigen.
Selecteer de gewenste taal, thuis mode/mode winkel voor de weergave op het menu
Hetstandaard paswoord is 6666.
WONING- of WINKEL-modi
① De woningmodus is een energiebesparende modus.De woningmodus wordt aanbevolen voor normale
weergave-instelling en is door de fabrikant als standaard ingesteld.
② De winkelmodus is een optie voor detailhandelaars voor reclame- of productpresentatie.De winkelmodus heeft een
helderder beeld dan de woningmodus.
③ U kan kiezen tussen thuis mode of winkel mode.Indien u voor winkel mode kiest zal de bron automatisch HDMI 1
zijn en zal u op exit moeten drukken op de afstandsbediening om het popup menu te verlaten.
2) Druk op de “
”-knoppen om “DVB-T/DVB-C” te selecteren en druk vervolgens op de “OK”-knop om te
bevestigen.
a. Als u DVB-T selecteert, is de volgende stap het selecteren van het afstemtype en land, druk vervolgens op de
“OK”-knop om het afstemmen te starten.

18
b. Als u DVB-C selecteert, is de volgende stap het configureren van het DVB-C-systeem zoals
Scantype/Frequentie/Netwerk ID/Symbool(KS/S), druk vervolgens op de “OK”-knop om naar het selectiemenu van de
afstemtype en land te gaan, deze stap is hetzelfde als bij DVB-T, selecteer het afstemtype (DTV/ATV).
Kies het juiste land, druk op de “OK”-knop om het afstemmen te starten.
3) Het kanaalafstemmen zal beginnen. Deze bewerking kan tot 6 minuten duren. De display zal de voortgang van
het afstemmen en het aantal gevonden kanalen weergeven.
4) Als u het ATV-afstemmen wilt overslaan, druk op de “MENU”-knop om het afstemmen te onderbreken. Een
pop-up-scherm zal worden weergegeven, druk op de “
”-knop om “YES” te selecteren om te bevestigen.
Vervolgens gaat u rechtstreeks naar DTV-afstemmen. U kunt de bovenstaande stap herhalen als u ook de
DTV-afstemmen wilt overslaan. Een installatie herinnering verschijnt de volgende keer dat u de TV inschakelt.
5) Nadat het afstemmen voltooid is, zijn de kanalen gerangschikt in een vooraf ingestelde volgorde. Als u kanalen
wilt overslaan, wijzig de vooraf ingestelde volgorde of hernoem kanalen, selecteer “Programme” bewerken
onder het “Channel ”-menu.
6)
1. KANAALMENU
1.2 Automatisch afstemmen (DVB-T)

19
1) Druk op de “MENU”-knop en druk vervolgens op de " “-knoppen om het “Channel ”-menu te selecteren en
druk vervolgens op de “OK”-knop.
2) Druk op de "
“-knoppen om “Auto Tuning” te selecteren en druk vervolgens op de “OK”-knop.
3) Druk op de " “-knoppen om "DVB-T/DVB-C" te selecteren. Selecteer “DVB-T” en druk vervolgens op de
“OK”-knop om te bevestigen
4) Druk in het “Afstemtype"-menu op de " “-knoppen om ATV/DTV/DTV + ATV te selecteren. Druk op de
"
"-knop en druk vervolgens op de “ ”-knoppen om het land waar u de TV zult gebruiken. Druk op de
“OK”-knop om te bevestigen.
5) Het kanaalafstemmen zal beginnen. Deze bewerking kan tot 6 minuten duren. De display zal de voortgang van
het afstemmen en het aantal gevonden kanalen weergeven.
6) Als u het ATV-afstemmen wilt overslaan, druk op de “MENU”-knop om het afstemmen te onderbreken. Een
pop-up-scherm zal worden weergegeven, druk op de “
”-knop om “YES” te selecteren om te bevestigen.
Vervolgens gaat u rechtstreeks naar DTV-afstemmen. U kunt de bovenstaande stap herhalen als u ook de
DTV-afstemmen wilt overslaan. Een installatie herinnering verschijnt de volgende keer dat u de TV inschakelt.

20
7) Nadat het afstemmen voltooid is, zijn de kanalen gerangschikt in een vooraf ingestelde volgorde. Als u kanalen
wilt overslaan, wijzig de vooraf ingestelde volgorde of hernoem kanalen, selecteer “Programme” bewerken
onder het “Channel ”-menu.
1.2 Automatisch afstemmen (DVB-C)
1) Druk op de “MENU”-knop en druk vervolgens op de " “-knoppen om het “Channel ”-menu te selecteren en
druk vervolgens op de “OK”-knop.
2) Druk op de "
“-knoppen om “Auto Tuning” te selecteren en druk vervolgens op de “OK”-knop.
3) Druk op de “ ”-knoppen om "DVB-T/DVB-C" te selecteren en druk vervolgens op de “OK”-knop om te
bevestigen.
4)
Druk op de “ ”-knoppen om "Scantype/Symbool (KS/S)" te selecteren en druk vervolgens op de “OK”-knop
om te bevestigen
.

21
5) Druk in het “Afstemtype"-menu op de " “-knoppen om ATV/DTV/DTV + ATV te selecteren. Druk op de
"
"-knop en druk vervolgens op de “ ”-knoppen om het land waar u de TV zult gebruiken. Druk op de
“OK”-knop om te bevestigen.
6) Het kanaalafstemmen zal beginnen. Deze bewerking kan tot 6 minuten duren. De display zal de voortgang van
het afstemmen en het aantal gevonden kanalen weergeven.
7) Als u het ATV-afstemmen wilt overslaan, druk op de “MENU”-knop om het afstemmen te onderbreken. Een
pop-up-scherm zal worden weergegeven, druk op de “
”-knop om “YES” te selecteren om te bevestigen.
Vervolgens gaat u rechtstreeks naar DTV-afstemmen. U kunt de bovenstaande stap herhalen als u ook de
DTV-afstemmen wilt overslaan. Een installatie herinnering verschijnt de volgende keer dat u de TV inschakelt.
8) Nadat het afstemmen voltooid is, zijn de kanalen gerangschikt in een vooraf ingestelde volgorde. Als u kanalen
wilt overslaan, wijzig de vooraf ingestelde volgorde of hernoem kanalen, selecteer “Programme” bewerken
onder het “Channel ”-menu.
OPMERKING:

22
Alle kanalen met inbegrip van ATV, DTV en Radio kunnen in één keer worden afgestemd, als het afstemtype DTV +
ATV is.
Alle opgeslagen zenders zullen na het automatisch afstemmen verdwijnen.
Na het automatisch afstemmen, zal het kanaal naar het eerste DTV-kanaal overslaan.
2.1 DTV handmatig afstemmen (DVB-T)
1) Druk op de “MENU”-knop en druk vervolgens op de “
”-knoppen om het “Channel ”-menu te selecteren en
druk vervolgens op de “OK”-knop.
2) Druk op de “ ”-knoppen om “DTV Manual Tuning” te selecteren en druk vervolgens op de “OK”-knop.
3) Het “DTV Manual Tuning”-scherm zal verschijnen. Druk op de " “-knoppen om het gewenste UHF-kanaal te
selecteren en druk vervolgens op de “OK”-knop om het zoeken van dat kanaal te beginnen. Wanneer het
signaal is afgestemd, zal het beeld en de signaalsterkte op het scherm worden weergegeven.
4) Druk op de “MENU”-knop om naar het hoofdmenu terug te keren.
5) Druk op de “EXIT”-knop om het menu te verlaten.
2. 2 DTV handmatig afstemmen (DVB-C)
1) Druk op de “MENU”-knop en druk vervolgens op de “ ”-knoppen om het “Channel”-menu te selecteren en
druk vervolgens op de “OK”-knop.
2) Druk op de “
”-knoppen om “CADTV Manual Tuning” te selecteren en druk vervolgens op de “OK”-knop.

23
3) Het “CADTV Manual Tuning”-scherm zal verschijnen. Druk op de " “-knoppen om “Frequency/Symbol
(Ks/s/QAM Type QAM" te selecteren en druk vervolgens op de “OK”-knop om het zoeken van dat kanaal te
beginnen. Wanneer het signaal is afgestemd, zal het beeld en de signaalsterkte op het scherm worden
weergegeven.
4) Druk op de “MENU”-knop om naar het hoofdmenu terug te keren.
5) Druk op de “EXIT”-knop om het menu te verlaten.
3). ATV handmatig afstemmen:
U kunt het geluidsysteem veranderen om naar analoge tv-kanalen te zoeken en fijn af te stellen, sla hierna de kanalen
op die u geselecteerd heeft.
OPMERKING:
Druk op de rode toets van teletekst om de kanalen na handmatige afstemming op te slaan.
4). Programma wijzigen:
U kunt elk programma verwijderen, hernoemen, verplaatsen, overslaan, ook FAV (favorieten).

24
Verwijderen
Druk op de rode toets van teletekst, het programma waar de cursor zich bevindt, zal verwijderd worden.
Hernoemen:
Alleen ATV-programma’s kunnen hernoemd worden.
Verplaats de cursor naar het programma, druk op de groene toets van teletekst om het programma te hernoemen.
Druk op
om de karakters te kiezen. Druk op om de cursor te verplaatsen.
Druk op de menu knop om het bewerken af te sluiten. Druk vervolgens op UITGAAN om het menu te verlaten.
Opmerking: ATV-programma’s kunnnen alleen een naam van 5 karakters hebben, bij DTV zijn dit 25 karakters.
Verplaatsen
Gebruik de pijltoetsen om het kanaal dat u wilt verplaatsen te selecteren. Druk vervolgens op de gele toets om de
verplaatsfunctie te selecteren. Wanneer deze actief is, gebruikt u de pijltoetsen om het kanaal te verplaatsen en
daarna OK om dit te bevestigen.
Overslaan
Druk op
om het programma te kiezen, drukt u hierna op de blauwe toets van teletekst om dit programma over te
slaan. zal aan de rechterkant van het programma verschijnen.
Kies het programma dat overgeslagen moet worden, druk nogmaals op de blauwe toets. U kunt overslaan annuleren,
zal dan verdwijnen.
Favoriet
Druk op
om het programma te kiezen. Druk op de FAV-toets, zal aan de rechterkant van het programma
verschijnen. Kies het favoriete programma en druk nogmaals op de FAV-toets. U kunt FAV annuleren,
zal dan
verdwijnen.
Zodra uw favoriete groep is aangemaakt, kunt u snel toegang krijgen tot uw favoriete kanaal door op de FAV-toets te
drukken.
5). CI-informatie: (optioneel)
Dit menu kan de informatie over de gemeenschappelijke interface kaart (CI-kaart) weergeven.
2. BEELDMENU
Het tweede deel van het MENU is het BEELDMENU.
U kunt hier effect geven aan het beeld zoals contrast, helderheid enz.
Druk op OK om te bewegen, druk op OK om het aan te passen.

25
OPMERKING:
1). Tint is alleen beschikbaar voor het NTSC-systeem.
2). Er zijn vier kleurtemperatuurinstellingen die geselecteerd kunnen worden, medium, warm, koel, gebruiker.
3). Beeld (screen) is beschikbaar in de PC-optie die de horizontale positie, vertikale positie, grootte en fase kan
aanpassen.
3. GELUIDMENU
Het derde deel van het MENU is het GELUIDMENU.
U kunt hier het geluidseffect aanpassen zoals hoge en lage tonen, balans enz.
Druk op
om te bewegen, druk op OK om het aan te passen.
Opmerking:
Auto volume: dit is alleen beschikbaar als het ingangssignaal te groot is of het geluid vervalst wordt.
4. TIJDMENU
Het vierde onderdeel van het MENU is het TIJDSMENU.
U kunt hier de klok, het vermogen aan/uit tijd, de slaaptijd enz. aanpassen.
Druk op
om te bewegen, druk op OK om het aan te passen.

26
OPMERKING:
Indien er 15 minuten geen signaal aanwezig is, zal de tv naar de automatische slaapinstelling schakelen (auto sleep)
als deze op AAN (on) ingeschakeld is. De kloktijd kan verkregen worden via het DTV-systeem auto.
5. INSTELMENU
Het vijfde deel van het MENU is het INSTELMENU. Hier kunt u de menutaal, gesproken taal, ondertiteling enz.
instellen.
Automatische uitschakelen
1. Als na 4 uur vanaf het inschakelen geen wijzigingen aan de TV worden aangebracht, bijvoorbeeld geen kanaal of
volume veranderd, zal de TV het automatische uitschakelproces starten.
En pop-up-venster zal verschijnen op het scherm
.
Na 150 seconden schakelt de TV automatisch over naar stand-by.Druk op een willekeurige knop op de
afstandsbediening om het automatisch uitschakelen te annuleren.
2. Om het automatisch uitschakelen te annuleren, selecteer “Automatic power-down (4H)” in het optiemenu en druk
op "OK”.Een pop-up-bericht "Are you sure you want to enable automatic powerdown?" zal verschijnen.
Gebruik de rechter pijltoets om “NO” te selecteren.
Het TV-scherm keert naar het optiemenu terug en de “Automatic power-down (4H)”-optie zal verschijnen.
Automatic power-down(4H) OFF
Om na 4 uur naar automatisch uitschakelen terug te keren, herhaal het bovenstaande maar gebruik de linker

27
pijltoetsom “YES” te selecteren.
In het PVR-file systeemmenu kunt u de USB-schijf instellen voor PVR (persoonlijke videorecorder).
OPMERKING:
Fabrieksinstellingen (restore factory default) zal alle programma’s en wachtwoorden verwijderen.
6. KINDERSLOTMENU
Het zesde onderdeel van het MENU is het KINDERSLOTMENU. U kunt het systeem op slot zetten, een wachtwoord
aanbrengen, programma’s blokkeren en ouderlijke begeleiding instellen. Zodra u het kinderslotsysteem heeft
ingeschakeld, kunt u geen kanalen meer zoeken of programma’s wijzigen.
OPMERKING:
Het standaard wachtwoord is 0000. Indien u het wachtwoord vergeet, kunt u gebruik maken van het superwachtwoord:
9443.
Blokkeer programma (block program): druk op
om het programma te kiezen, druk op de groene toets van
teletekst om het programma te blokkeren. Indien u het programma wilt deblokkeren, gaat u dan naar het hoofdmenu,
geeft het wachtwoord in, drukt hierna nogmaals op de groene toets. Ouderlijk toezicht (parental guidance): Druk op
om de waardering te kiezen.
7. EPG-MENU (electronische programmagids)
Het EPG-menu wordt gebruikt om na te kijken wat er wordt uitgezonden op DTV of de radio op de dag zelf.
Om toegang tot het EPG-menu te krijgen, drukt u op de EPG-toets en het volgende menu zal worden weergegeven:

28
1.
INFO
Gebruik
om de programma’s te kiezen. Om de informatie van het programma te markeren, drukt u op de
INFO-toets.
2.
Schema
Druk op de gele teletekst-toets. Dit kan het hele herinneringsschema op een rij zetten, druk op de gekozen lijst en
druk op de rode toets
VERWIJDEREN om de schemalijst te verwijderen.
3.
Opnemen
Druk op de rode toets. Dit kan ingesteld worden om het programma te laten opnemen.
4.
Herinneren
Druk op de blauwe toets om één programma te kiezen en om één herinnertijd in te stellen. Het tv-scherm zal op de
gekozen tijd automatisch naar het gekozen programma verspringen.
8. PVR-FUNCTIE
1. Voorbereiding om een programma op te nemen
De PVR functie werkt enkel op TNT

29
Kies in het INSTELMENU het PVR file systeem. Kies in het “INSTELMENU” nu “controleer PVR file systeem” (check
PVR File System). Klik op “OK” totdat “controleren” (checking) veranderd is naar “succes”.
Opmerking: controleer ook de term “snelheid” (speed). Indien er “HD-ondersteuning” (HD support) is, betekent dit dat
de snelheid van het USB-apparaat beschikbaar is voor tijdverplaatsing en opnemen. Indien dit niet het geval is, dient u
het apparaat te formateren om ervoor te zorgen dat het apparaat beschikbaar is. De standaard “vrije opneemlimiet”
(free record limit) is zes uur, mits de ruimte op de schijf groot genoeg is. Indien de ruimte niet groot genoeg is, moet de
opneemtijd korter worden, afhankelijk van de ruimte op het apparaat. Voer geen andere functies uit tijdens de
“controlleer PVR File systeem”-controle totdat deze gereed is.
De opnames moeten met het PVR-systeem van de TV gebeuren.Het kan alleen op de dezelfde TV worden
afgespeeld, niet op een ander soort apparaat (computer, DVD, enz.) die niet met de TS-bestandsindeling compatibel
is.
Houd er rekening mee dat om elke vorm van opname uit te voeren, de TV het formatteren van het aangesloten
USB-apparaat, voor het opslaan van de opname, van u zal vereisen.
WAARSCHUWING. BIJ HET FORMATTEREN VAN DE EXTERNE USB-APPARAAT, ZULT U ALLE BESTANDEN EN
INFORMATIE VERLIEZEN DIE U OP HET APPARAAT HEBT OPGESLAGEN.
Het USB-bestandssysteem zal de opslaggrootte beperken.
Bestandssysteem: NTFS maximaal 2TB
FAT32 maximaal 192 GB
FAT16 maximaal 2 GB
Open vanaf het optiemenu het PVR-bestandssysteem zoals hieronder:

30
Selecteer schijf (select disk): selecteer op welke schijf er opgenomen moet worden.
Controleer PVR file systeem (check PVR File System): controleer of het PVR file systeem is ingesteld op het USB
apparaat of niet.
Formatteren:
(Suggestie voor het formatteren van het formaat van het apparaat door “High Speed Fs…”, dat versneld kan
opnemen).

31
Het onderstaande menu verschijnt nadat het formatteren beeïndigd is:
Indien u het "hoge snelheid FS" formaatinstelling kiest (Hi Speed FS), kunt u de grootte van de tijdverplaatsing
veranderen:
2. Het programma opnemen
Als de DTV-bron speelt, kies dan het kanaal en klik op “opnemen” (record), het opnamevenster zal verschijnen. Klik
nogmaals op “opnemen” (record) en het opneemvenster zal verdwijnen, het “opneem”-ikoon (REC) bevindt zich nog
steeds links bovenaan. Het zal verdwijnen wanneer u op “stop” drukt.

32
3. Een nummer afspelen
Het programma opgenomen op de "USB" zal in de map "_MSTPVR" op het apparaat worden opgeslagen.
1. De USB-opslaggrootte kan tussen 128 MB en 500 GB in grootte zijn, maar voor praktisch gebruik is 2 GB tot 500
GB aanbevolen.
2. De video kan korrelig worden wanneer de bitratio van de video te laag is.Dit kan door het aansluiten van een
USB-verlengkabel worden veroorzaakt in plaats van de USB direct op de TV aan te sluiten.
3. Niet alle USB-apparaten zijn compatibel.
Hieronder is een lijst van aanbevolen USB-stations.
Modellen die niet worden vermeld kunnen compatibel zijn, maar zijn niet gegarandeerd te werken.
De ondersteuningslijst van USB-station is dezelfde als die van de tijdverschuivingsfunctie, raadpleeg de volgende
pagina's voor details.

33
9. Functie om de tijd te verschuiven
1. Voorbereiding om een programma op te nemen
Met deze tv kunt u het programma dat u aan het kijken bent laten pauzeren en laten opnemen naar een
USB-opslagapparaat, en dit hervatten op het punt waar er gepauzeerd werd.
OPMERKING:
• Het formatteren van een USB 2.0 opslagapparaat is nodig. Sla uw originele gegevens op voordat u gaat
formatteren. Alle data die op het USB-apparaat voorheen opgeslagen waren, worden na het formatteren gewist.
USB-DRIVE OPSLAG FORMATTEREN
Selecteer formatteren van het USB-apparaat en wijs de hoeveelheid ruimte aan de TIJDVERPLAATS-functie toe.
OPMERKING:
• Het formatteerproces zal tenminste twee minuten in beslag nemen. Schakel de stroom niet uit tijdens het
formatteren, verwijder ook het USB-apparaat niet tijdens het formatteren.
• Tijdens het formatteren wordt een snelheidstest gedaan op het USB-apparaat. Indien dit mislukt, betekent dit
dat het USB-apparaat eventueel geen ondersteuning heeft voor de TIJDVERPLAATS-functie.
OPNEMEN VAN EEN GEPAUZEERD DTV-PROGRAMMA NAAR EEN USB-OPSLAGAPPARAAT
1. Terwijl u in de DTV-ingangsbron bent, steekt u het USB-opslagapparaat in de USB-poort aan de zijkant van uw
tv.
2. Druk op PAUSE (29) om de TIJDVERPLAATS-functie te starten. Het tv-programma wordt gepauzeerd. De
TIJDVERPLAATS OSD (time shift OSD) zal verschijnen en begint op te nemen.
3. Druk op STOP (28) om de TIJDVERPLAATS-functie te stoppen en het programma dat opgenomen wordt,
stopt.

34
OPMERKING:
• Verwijder het USB-opslagapparaat niet wanneer de TIJDVERPLAATS-functie geactiveerd is.
• 4GB aan geheugen biedt ongeveer 140 minuten aan opneemtijd.
TIJDVERPLAATS-beperkingen:
1. Wanneer de TIJDVERPLAATS-functie geactiveerd is, werken alleen de bassistoetsen zoals
AFSPELEN/PAUSE/STOP/FWD/REV/VOL+/ VOL-/MUTE en sommige basishandelingtoetsen
(ENTER/EXIT/pijltoetsen).
2. Het terugspelen van een video kan haperen en overslaan als de USB-opnamesnelheid niet aan de minimum
eisen voldoet.
3. Verwijder de USB-schijf niet, schakel ook de stroom niet uit tijdens een TIJDVERPLAATS-operatie. Het zal
afbreken zodra het signaal verdwenen is.
4. Verwijder de signaalbron niet tijdens de TIJDVERPLAATS-opnames.
5. Wissel AFSPELEN/PAUSE/FWD/REV niet herhaaldelijk en te snel steeds met elkaar af.
6. De video kan korrelig worden als de videobit-sterkte te laag is.
7. Niet alle USB-apparaten zijn gelijkwaardig, de electriciteit van de USB-harde schijf dient < 500MA te zijn.
Hieronder treft u een lijst aan met aanbevolen USB-drives.Modellen die niet opgenomen zijn kunnen werken, maar dit
is niet gegarandeerd.
• SanDisk Extreme® Contour™ USB Flash Drive - 8GB SDCZ8-8192-E75
• SanDisk Extreme® Contour™ USB Flash Drive 16GB SDCZ8-016G-A75
• Kingston DataTraveler410 USB 2.0 Flash Drive - 8GB DT410/8GB
• Kingston DataTraveler410 USB 2.0 Flash Drive - 16GB DT410/16GB
• OCZ Technology Rally2 USB 2.0 Flash Drive - 4GB OCZUSBR2DC-4GB
• OCZ Technology ATV USB 2.0. 0 Flash Drive - 8GB OCZUSBATV-8GB
• OCZ Technology Rally2 USB 2.0. 0 Flash Drive - 8GB OCZUSBR2DC-8GB
• SAMSUNG-HM500JI-500G
8. Deze functie is niet beschikbaar voor alle digitale televisies zoals gestoorde (scrambled) of alleen
audio-kanalen.

35
10. USB-speler
Druk op de brontoets, en selecteer USB in de bronlijst. Druk op de OK-toets om het USB-menu te openen.
Zorg ervoor dat het USB-apparaat aangesloten is in de sleuf. Er zijn vier types media-onderdelen die geselecteerd
kunnen worden, dit zijn foto, muziek, film en tekst. Selecteer het media-onderdeel door op
te drukken, daarna
drukt u op de OK-toets om naar het schijfselectiemenu (disk selection menu) te gaan.
Druk op
om de juiste schijf te selecteren en druk op OK om de mediabestanden en mappen weer te geven, of
kies TERUG (return) om terug te keren naar het media-onderdeel selectiemenu.
Selecteer het mediabestand door op ◄► of ▼▲ te drukken, hierna zal een venster met een voorvertoning in een
pop-up verschijnen. Druk op ► om het mediabestand op een volledig scherm af te spelen. Wanneer het
mediabestand (foto, muziek, film of type tekst) speelt, drukt u op OK of de INFO-toets zodat de afspeelbalk zichtbaar
wordt.
Druk op ◄► om het functie-ikoon te selecteren, druk op de OK-toets om de functie te bevestigen.
Druk op "▼ " of op de exit knop om de controlebalk te verlaten, behalve voor muziek
OPMERKING:

36
U kunt het audionummer of programma afstellen in het INFO-menu tijdens het afspelen van het videobestand. Kies
het INFO-ikoon en druk op OK om het INFO-menu weer te geven.
USB-terugspelen wordt ondersteund door de volgende fotobestandformaten:
— JPEG (JPEG-formaat, bestanden met het achtervoegsel ".jpg")
— BMP (bestanden met het achtervoegsel ".bmp")
— PNG (bestanden met het achtervoegsel ".png")
USB-terugspelen wordt ondersteund door de volgende muziekbestandformaten:
— MP3 (bestanden met het achtervoegsel ".mp3")
— WAV (bestanden met het achtervoegsel ".wav")
USB-teruspelen wordt ondersteund door de volgende tekstbestandformaten:
— TXT (bestanden met het achtervoegsel ".txt")
USB-terugspelen wordt ondersteund door de volgende filmbestandformaten:
— AVI (bestand met het achtervoegsel “avi”)
— TS (MPEG2 en H.264)

37
05 Probleemoplossing
Probleemsymtoom Inspecteer of:
Beeld Audio
Sneeuw
Ruis
Antennepositie, richting of aansluiting
Wazig Normale audio
Antennepositie, richting of aansluiting
Interferentie
Lawaai
Elektronische apparatuur/auto’s/
motorfietsen/tl-verlichting
Normaal
beeld
Dempen
(mute)
Volume (controleer of “gedempt”
(mute) geactiveerd is of dat de
aansluitingen van het audiosysteem
correct zijn)
Geen beeld
Dempen
(mute)
Netsnoer zit niet in stopcontact.
Aan/uit-schakelaar staat niet aan.
Contrast en helderheid/volume-
instellingen zijn geopend. Druk vanuit
de standby-toets op de
afstandsbediening om dit te
controleren
Geen kleur Normale audio
Kleurbeheer
Steeds
verlies van
beeld
Normale audio
of zwak
Kanaal opnieuw instellen
Geen kleur
Geluid tv-systeem
Er is een
zwarte balk
aan boven-
en onderkant
Normale audio Aspect wijzigen om te zoomen

38
Specificatie
Kleursysteem PAL-B/G, I, D/K
SECAM- B/G, D/K, L, L'
Geluidsysteem BG, DK, I, L, L'
Video-ingang
SCART, YPbPr, AV,
VGA, HDMI, USB.
Y/Pb/Pr 480i/p, 576i/p
720p, 1080i, 1080p
HDMI 480i/p, 576i/p, 720p, 1080i, 1080p
Stroomvereisten 100-240V~ 50/60Hz
Energieverbruik 30W (19”) 38W (22”) 40W (24”) 55W (26”)
Energieverbruik stand-by <0.5W
Audio-uitgang 2 x 3W
Milieuvoorwaarden Werkende temperatuur: +5 ºC - +35 ºC
Vochtigheidsgraad: 20% - 80%
Opslagtemperatuur: -15 ºC - +45 ºC
Luchtvochtigheid bij opslag: 5% - 90%
Accessoires Gebruikershandleiding
Afstandsbediening
Batterij (x2)
Snelle startgids
* Specificaties van onderdelen van deze televisie die hier gegeven zijn, zijn alleen ter referentie.
Verschillen kunnen optreden als producttechnologie wordt bijgewerkt.
Ontwerp en specificaties zijn onderhevig aan verandering zonder kennisgeving.
Beschrijving scart-uitgang:
1. Wanneer de huidige bron ATV/AV/SCART is, is het scart-uitgangssignaal ATV.
2. Wanneer de huidige bron DTV is, is het scart-uitgangssignaal DTV.
3. Andere bronnen hebben geen scart-uitgangssignaal.

39

1
RECEPTOR DE TV LED LCD
MANUAL DE USUARIO
Lea este manual con atención antes de usar su televisión y guárdelo para futura referencia.
MODELO:
LET19T1000H
LET22T1000HF
LET24T1000HF
LET26T1000HF

2
Contenido
01 Seguridad y advertencias
Bienvenidos P. 0 3
Información importante P. 03
Aviso de seguridad P. 04
Advertencias y precauciones P. 05
02
Introducción
Características principales P. 07
Instrucciones sobre el montaje del soporte base P. 09
Pautas de instalación para el montaje en pared P. 10
Panel frontal P. 12
Conexiones posteriores AV P. 13
Conexión de su TV P. 14
Interfaz común P. 15
03
Mando a distancia
Mando a distancia P. 16
04
Funcionamiento
Guía de instalación P. 18
05
Solución de problemas
Solución de problemas P. 34
Especificaciones P. 35

3
01 SEGURIDAD Y PRECAUCIONES
BIENVENIDO
Gracias por comprar este TV LED LCD de 19"/22"/24"/26". Esta guía le ayudará a instalar y a comenzar a usar su TV.
En principio, verifique los contenidos de su caja con la siguiente lista
TV LED LCD HD Ready de 19”
Mando a distancia
2 baterías AAA
Manual de instrucciones
Guía rápida de inicio
1 base
TV LED LCD Digital de 22" Full HD 1080P
Mando a distancia
2 baterías AAA
Manual de instrucciones
Guía de inicio rápido
1 base
TV LED LCD Digital de 24" Full HD 1080P
Mando a distancia
2 baterías AAA
Manual de instrucciones
Guía rápida de inicio
1 base
TV LED LCD HD Ready de 26”
Mando a distancia
2 baterías AAA
Manual de instrucciones
Guía rápida de inicio
1 base
¡Ahora puede comenzar!
INFORMACIÓN IMPORTANTE
LEA TODAS LAS INSTRUCCIONES ANTES DE USAR SU TELEVISOR Y GUÁRDELAS PARA CONSULTAS FUTURAS.
PRECAUCIÓN
RIESGO DE DESCARGA ELÉCTRICA
NO ABRIR
PRECAUCIÓN
PARA REDUCIR EL RIESGO DE DESCARGA ELÉCTRICA. NO RETIRE LA CUBIERTA (O LA PARTE POSTERIOR). NO CONTIENE
PIEZAS INTERNAS QUE EL USUARIO PUEDA REPARAR. ANTE CUALQUIER PROBLEMA, SOLICITE SERVICIO TÉCNICO A LA
LÍNEA DE ASISTENCIA AL CLIENTE. EL SÍMBOLO DEL RAYO EN EL INTERIOR DE UN TRIÁNGULO, INDICA ALTA TENSIÓN EN
SU INTERIOR. ES PELIGROSO TENER CUALQUIER TIPO DE CONTACTO CON LAS PIEZAS INTERNAS DE ESTE PRODUCTO.
UN SIMBOLO DE EXCLAMACIÓN EN EL INTERIOR DE UN TRIÁNGULO: ESTE SÍMBOLO LE AVISA QUE SE HA INCLUIDO
LITERATURA RELACIONADA CON EL FUNCIONAMIENTO Y CON EL MANTENIMIENTO CON ESTE PRODUCTO.
PRECAUCIÓN: PARA REDUCIR EL RIESGO DE DESCARGA ELÉCTRICA E INCENDIO, NO COLOQUE EL TV
CERCA DE LAS FUENTES DE HUMEDAD. NO UTILIZAR LIMPIADORES ABRASIVOS QUE PUEDAN RAYAR O
DAÑAR LA PANTALLA LCD. EVITE EL CONTACTO CON OBJETOS QUE PUEDAN RAYAR LA PANTALLA LCD.
NOTA: ESTÁ PROHIBIDO REPARAR LA UNIDAD USTED MISMO, Y HACERLO PUEDE DAR COMO RESULTADO
LESIONES O DAÑOS AL PRODUCTO. SOLICITE SERVICIO TÉCNICO A LA LÍNEA DE ASISTENCIA AL CLIENTE.

4
AVISO DE SEGURIDAD
Precaución: Para reducir el riesgo de descarga eléctrica, no retire la cubierta ni la parte trasera.
No hay partes utilizables por el usuario en el interior.
Para el servicio técnico, consulte al personal cualificado.
Precaución: Para evitar peligro de incendios o descargas eléctricas, no exponga el aparato a la lluvia o la humedad.
No exponga el Adaptador ni el producto al agua (goteo o salpicaduras), ni coloque objetos llenos de líquido, tales como jarrones, sobre el
aparato.
Mantenga el producto alejado de la luz solar directa y de fuentes de calor como radiadores o estufas.
No obstruya los orificios de ventilación.
Las ranuras y orificios del aparato sirven para su ventilación. Los orificios nunca deben estar obstruidos colocando el producto sobre un
cojín, sofá, u otra superficie similar.
No coloque el producto sobre un carrito, trípode, soporte o mesa, inestables. El aparato podría caer, produciendo posibles daños o
lesiones.
Nunca coloque objetos pesados o afilados sobre el panel o el marco.
Desenchufe la alimentación de la toma de corriente cuando no se utilice el aparato.
Se debe prestar atención a los aspectos medioambientales sobre la eliminación de la batería.
PRECAUCIÓN: La batería (batería, baterías o pack de baterías) no debe exponerse a una temperatura excesiva, como la luz solar, fuego,
o similares.
PRECAUCIÓN: Un volumen excesivo en el sonido de los auriculares puede causar pérdida de audición.
Este símbolo significa que este producto no se debe eliminar junto con el resto de desechos domésticos, según la U.E. Para evitar
perjuicios sobre el medioambiente o la salud humana, causados por la eliminación descontrolada de residuos, recíclelo con
responsabilidad, promoviendo la reutilización sostenible de los recursos materiales. Para deshacerse de su aparato usado, por favor,
utilice los sistemas de recogida o contacte con el distribuidor al cual compró el producto. Ellos pueden recoger el producto para reciclarlo
sin riesgos para el medio ambiente.

5
ADVERTENCIAS Y CUIDADOS
Advertencia
Cuidado
Advertencia
Para el funcionamiento de este televisor se utiliza alto voltaje. No retire la cubierta posterior de su aparato. Para servicio técnico, consulte
al personal cualificado.
Advertencia
Para evitar peligro de incendio o descarga eléctrica, no exponga el televisor a la lluvia ni a la humedad.
Advertencia
No deje caer ni introduzca objetos en las aberturas ni ranuras de la cubierta del televisor. Nunca derrame ningún tipo de líquido sobre el
televisor..
Cuidado
No obstruya los orificios de ventilación de la cubierta posterior. Una ventilación adecuada es esencial para evitar el fallo de los
componentes eléctricos.

6
Cuidado
Evite que el cable de alimentación quede atrapado bajo el televisor.
Cuidado
Nunca se suba, ni se apoye, ni empuje bruscamente el televisor o su soporte. Debe prestar especial atención a los niños. Si cayera,
podría causar serias lesiones.
Cuidado
No coloque su televisor sobre un carrito, soporte, estantería, o mesa, inestables. Si cayera podría causar serias lesiones personales y
daños al televisor.
Cuidado
Cuando el televisor no se vaya a usar durante un largo período de tiempo, es recomendable desconectar el cable de alimentación de la
toma de corriente.
Cuidado
Distancias mínimas
Si el televisor se va a incorporar a un compartimento o un lugar cerrado, se deben mantener unas distancias mínimas. La acumulación de
calor puede reducir la vida útil de su televisor y también puede ser peligroso.

7
02 INTRODUCCIÓN
PRECAUCIÓN
Nunca manipule ningún componente interno del TV ni cualquier otro control de ajuste que no se mencione en este manual. Todos los TV
LED son equipos eléctricos de alta tensión.
Cuando limpie el polvo o cualquier gota de agua en la PANTALLA o el Auriculares, o alrededor de los botones o conectores, debe
desconectar el cable de alimentación del conector de alimentación.
Limpie el TV con un paño suave y seco, libre de polvo.
Durante las tormentas eléctricas, desconecte el cable de alimentación y el cable de la antena para evitar daños al TV y a otros
dispositivos que estén conectados al mismo.
Todas las reparaciones al TV deben efectuarse por personal de servicio calificado en estas tareas.
INSTALACIÓN
*Coloque el TV en la estancia donde la luz no incida directamente sobre la pantalla.
*La oscuridad total o los reflejos en la imagen en pantalla pueden causar fatiga ocular. Se recomienda una iluminación tenue e indirecta
para un visionado cómodo.
*Deje suficiente espacio entre el TV y la pared para permitir la ventilación.
*Evite los lugares excesivamente calurosos para evitar posibles daños en la cubierta o fallo prematuro de los componentes.
*No obstruya los orificios de ventilación durante el uso del TV.
Características principales
1. Se puede utilizar como Televisor, dispositivo de visualización, pantalla de PC;
2. Alta luminosidad, amplio Ángulo de visión
3. Función "TIME SHIFT" de desplazamiento en la emisión;
4. Conexión HDMI y Euroconector;
5. Sonido Estéreo NICAM;
Parámetros principales
Panel 19" 22" 24" 26"
Sistemas de TV
PAL-B/G I,D/K
SECAM-B/G,D/K,L,L’
Sistema de Señal de Vídeo PAL/SECAM
Tensión de alimentación CC 100-240V 50/60Hz
Consumo de energía 30W 38W 40W 55W
Consumo de energía en modo tandby
<0.5W
Potencia de salida de Audio (THD≤ 7%)
2x3W
Señal de entrada
1 RGB(PC) analógico, 1 PC audio
2 Interfaces multimedia de alta definición (HDMI)
1 entrada de video compuesto
1 entrada de audio
1 Entrada de video por componentes
1 SCART
1 IC
1 USB
1 Entrada de Antena
señal de salida 1 Auriculares

8
1 S/PDIF
Definición horizontal (líneas de TV) Entrada de vídeo Compuesto >=350
Entrada de video por Componentes >=400
PC
MODOS PREESTABLECIDOS
RESOLUCIÓN Frecuencia V.(Hz) Frecuencia H.(KHz)
1 640*480 60 31.47
2 800*600 60 37.88
3 1024*768 60 48. 36
4 1360*768 60 47.7
5 1280*1024 60 63.98

9
Instrucción sobre el montaje del soporte base
NOTAS DE INSTALACIÓN
Ubique el TV en una habitación en donde la luz no le refleje directamente sobre la pantalla. La oscuridad total o un
reflejo en la pantalla pueden provocar cansancio en la vista. Se recomienda iluminación suave e indirecta para una
visión cómoda.
Deje espacio suficiente entre el TV y la pared a fin de permitir ventilación.
Evite ubicaciones excesivamente calurosas para prevenir un posible daño al gabinete o un fallo prematuro de los
componentes.
1. Inserte la columna de soporte dentro
del soporte en la dirección que indica la
flecha y luego asegure con los tornillos
suministrados.
2. Inserte el soporte en la cubierta posterior en la
dirección que indica la flecha y luego asegure con
un tornillo.
1. Inserte la columna de soporte dentro
del soporte en la dirección que indica la
flecha y luego asegure con los tornillos
suministrados.
2. Inserte el soporte en la cubierta posterior en la
dirección que indica la flecha y luego asegure con
los tornillos suministrados.
(19”,22”,24”) (19”,22”,24”)
(26”)
(26”)

10
INSTRUCCIONES DE INSTALACIÓN PARA EL MONTAJE EN PARED
Este televisor puede montarse en pared de la siguiente manera:
1. Coloque el Televisor LED LCD sobre una superficie sólida. Por favor, coloque algún material suave sobre el frente de la pantalla para
protegerla de cualquier daño.
2. Retire los tornillos de la parte baja del televisor, donde la base se une con el TV, y retire el soporte de la base (guárdelo en un lugar
seguro para su uso en el futuro).
3. Utilice los cuatro tornillos suministrados para fijar el TV sobre el soporte de pared del TV (no incluido), por medio de los cuatro orificios
estándar VESA de la parte posterior del televisor.
(
19”
,
22”
,
24”
)
(
26”
)
(
19”
)

11
(
22”
,
24”
)
(
26”
)

12
Panel frontal de control
1. Sensor del mando a distancia
2. Indicador LED:
AZUL: ENCENDIDO ROJO: STANDBY.
3. Teclado
1
SOURCE
Muestra el menú fuente de entrada.
2
MENU
Muestra el MENÚ principal.
3
CH+/CH-
En el modo TV, pulse CH+ o CH- para cambiar el canal de arriba abajo.
En MENU, pulse CH+ o CH- para seleccionar las opciones.
En el modo standby, puede encender el TV.
4
VOL+/VOL-
Ajusta el nivel del sonido.
En MENU, ajuste la opción que Seleccionó.
5
STANDBY

13
Conexiones posteriores/laterales
1
L/R AUDIO
entrada
2
VIDEO
entrada
3
S/PDIF
Salida de audio digital
4
YPbPr
entrada
5
SCART
entrada
6
USB
entrada
7
HDMI2
entrada
8
HDMI1
entrada
9
HEADPHONE
Salida de audio analógico
10
COMMON INTERFACE (CI)
entrada
11
PC AUDIO
entrada
12
ENTRADA VGA
entrada
13 ANT entrada

14
CONEXIÓN DE SU TV
CONEXIÓN DE LA ANTENA
Conecte su antena a la parte posterior del TV en la conexión ANT IN.
MEJORE SU SEÑAL
Para mejorar la calidad de la imagen en un área con escasa señal, utilice un amplificador de señal (no incluido).
CONECTE SU PC AL TV
Puede utilizar su TV como monitor para su ordenador personal, conectándolo con un cable VGA (no incluido).
1. Lea la guía del usuario de su ordenador y verifique que tenga un conector VGA.
2. Desconecte la alimentación en su TV y en su PC.
3. Conecte un cable de interfaz VGA tipo D de 15 pines al conector de interfaz de video VGA en el PC. Conecte el otro extremo del
cable al conector de interfaz de PC en el TV. Ajuste los tornillos en los conectores VGA y conecte el cable de audio (no incluido) a la
conexión de entrada de audio en la parte posterior del TV.
4. Conecte la alimentación del TV primero y luego el del PC.
5. Pulse el botón en el TV o en el mando a distancia del TV para configurar el modo de entrada de video a VGA.
6. Una vez que se ve la imagen, si hay ruido, cambie el modo VGA a otra resolución, cambie la frecuencia de refresco a otra frecuencia
o ajuste el brillo y el contraste en el menú hasta que la imagen sea clara.
CONECTE UN REPRODUCTOR DVD O VCR A SU TV
Hay dos maneras en las que puede conectar un reproductor DVD o VCR a su TV. Asegúrese de que tanto el TV como el reproductor
DVD o VCR estén apagados antes de conectarlos.
1.
Conecte las salidas AV DVD/VCR a la conexión AV IN en su TV.
2. Conecte el audio D/I de AV a la entrada de audio (8). Pulse el botón SOURCE en el TV para configurar el modo de entrada de video en AV.
ENTRADA SCART
1. Conecte el cable Euroconector del dispositivo externo (reproductor DVD, decodificador o consola de videojuegos) a la conexión
Scart del TV.
2. Pulse el botón SOURCE (Fuente) para seleccionar el modo SCART.
3. Pulse el botón PLAY (Reproducir) en el dispositivo externo.
Entrada HDMI
1. Conecte el cable del dispositivo HDMI a la conexión HDMI del TV.
2. Pulse el botón SOURCE para seleccionar el modo HDMI.
3. Consulte acerca del funcionamiento en la guía del usuario del dispositivo HDMI.
SALIDA AURICULARES
Inserte el conector de los auriculares a la conexión de auriculares del televisor. Los altavoces del televisor se ponen en silencio.
SALIDA S/PDIF
S/PDIF es una conexión de audio digital utilizada para conectar equipos de audio, por ejemplo, teatros domésticos y otros sistemas
digitales de Alta Fidelidad (HiFi). La señal se transmite por un cable coaxial con conectores RCA.
1. Asegúrese de que tanto el TV como el dispositivo estén apagados antes de conectarlos.
2. Conecte los cables de AV (no suministrados) desde el conector S/PDIF del TV hasta el sistema de sonido del Teatro Doméstico, el
sistema HiFi digital, etc.

15
INTERFAZ COMÚN
La ranura de la interfaz común (IC) está diseñada para admitir el módulo de acceso condicional (AC) y la tarjeta Inteligente a fin de ver los
programas de televisión de pago y los servicios adicionales. Comuníquese con su proveedor de servicio de Interfaz Común para obtener
más información acerca de los módulos y de la suscripción. Tenga en cuenta que no se proporcionan los módulos AC ni las tarjetas
inteligentes, ni los ofrecemos como accesorios opcionales.
Advertencia
• Desconecte el TV antes de insertar los módulos en la ranura de la Interfaz Común.
1. Inserte la CAM correctamente, luego la Tarjeta Inteligente a la ranura de la IC que se ubica en la parte lateral del TV.
CI SLOT RANURA DE IC
CAM CAM
Smart Card Tarjeta Inteligente
2. Encienda el TV, y éste mostrará el siguiente mensaje si se detecta el módulo AC. Aguarde unos minutos hasta que se active la tarjeta.
Módulo IC insertado
3. Pulse el botón MENU y luego, el botón ▲▼ para seleccionar la opción de Información IC.
4. Se muestra la información detallada en la tarjeta IC en uso.
5. Pulse el botón OK para acceder al menú de la tarjeta. Consulte el manual de instrucciones del módulo para configurar los detalles.
6. Cuando se retira el módulo, el siguiente mensaje aparecerá en la pantalla.
Módulo IC retirado

16
03 Mando a distancia
1.ALIMENTACIÓN: Presiónelo para encender el TV.
2. D.MENU: Sin función
3. P.Mode: Para conmutar el modo de la imagen.
4. INFO: Presiónelo para mostrar el estado actual de la señal, incluyendo la
fuente de entrada y el modo del canal de audio.
5. AUDIO l/ll: Presiónelo para seleccionar MONO, Nicam stereo para
canales Analógicos. Seleccione idioma de audio para canales TDT.
6. SUBTITLE: Presiónelo para activar o desactivar los subtítulos.
7. Botones numéricos: Para acceder directamente a los canales.
8. SOURCE: Selección de una fuente de entrada
9. MUTE: Habilita o inhabilita el sonido.
10. Control de volumen: Ajusta el nivel de sonido.
11. MENU: Para mostrar el menú del TV.
12. OK: Para confirmar una selección.
13. EXIT: Para salir del menú o para regresar al menú anterior.
14. Índice de teletexto
15.REPEAT: Sin función
16. Botón verde de teletexto / Avance rápido de USB
17. Botón rojo de teletexto / Retroceso rápido de USB
18. Mezcla de teletexto
19. Texto del teletexto
20. Ver teletexto
21. Tamaño del teletexto
22. Teletext Time / REC.LIST (teletext time no tiene función)
23. Modo de teletexto: Sin función
24. Mantener teletexto
25. Subcódigo de teletexto: Subpágina de teletexto
26. Botón azul de teletexto / Archivo siguiente USB
27. Botón Amarillo de teletexto / Archivo anterior USB
28. PARAR USB
29. REPRODUCIR / PAUSA USB
30. INICIO DE LA GRABACIÓN
31. Cursor ARRIBA, ABAJO, IZQUIERDA, DERECHA: Pulse para navegar hasta su selección.
32. Fav: Utilizado para acceder a sus canales favoritos en el modo de TV analógica o de TDT.
33. Seleccionar programa: Presione los botones para seleccionar el canal de TV siguiente o anterior.
34. GUÍA: Presiónelo para mostrar la guía electrónica de programación en el modo de TV.
35. Q.View: Para acceder al canal que se estaba viendo anteriormente.
36. CH.LIST: Presiónelo para visualizar la lista de canales.
37. Pantalla: Cambia la relación de aspecto de la imagen.
38. Sleep: Activa el temporizador para apagar el TV.
39. S.Mode: Para conmutar el modo de sonido.
40. 40. OPEN/CLOSE: Sin función.
:No DVD

17
Inserte las baterías en el mando a distancia
1. Retire la tapa de las baterías.
2. Inserte las 2 pilas AAA 1.5v asegurándose de que la
polaridad (+ o -) coincida con la polaridad marcada dentro
de la unidad.
3. Coloque de nuevo la tapa de las baterías. Sustituya las
baterías por otras nuevas, cuando el televisor comience a
mostrar los síntomas siguientes: El funcionamiento es
inestable o errático. A veces, el televisor no funciona con el
mando a distancia.
Observaciones:
1) Se recomienda el uso de pilas alcalinas.
2) Retire las baterías cuando estén gastadas o si el mando a
distancia no se va a utilizar durante un período de tiempo
prolongado.
TELETEXTO
El Teletexto es un sistema de información emitido por algunos canales que puede ser consultado como un periódico. También ofrece
acceso a los subtítulos para los telespectadores con problemas de audición o que no estén familiarizados con el idioma de transmisión
(redes por cable, canales por satélite, etc.)
Pulse: Obtendrá:
TEXTO
Se usa para entrar o salir de los modos de teletexto. Aparece el sumario con una
lista de elementos a los que puede accederse. Cada elemento tiene un número de
página correspondiente de 3 dígitos. Si el canal seleccionado no emite teletexto, se
mostrará la indicación 100 y la pantalla permanecerá en blanco (en este caso, salga
del teletexto y seleccione otro canal).
SELECCIONAR UNA
Introduzca el número de la página deseada, utilizando los botones 0 a 9 o
arriba/abajo. Ejemplo: página 120, introduzca 120. El número aparece en la parte
superior izquierda, el contador cambia y entonces aparece la página. Repita esta
operación para ver otra página. Si el contador continúa buscando, significa que esa
página no se transmite. Seleccione otro número.
TECLAS DE ACCESO DIRECTO
Están coloreados como se muestra en la parte inferior de la pantalla. Las cuatro
teclas de colores se utilizan para acceder a los elementos o páginas
correspondientes. Las áreas coloreadas parpadean cuando el elemento o la página
no están aún disponibles.
ÍNDICE Esto le devuelve a la página de contenidos (normalmente la página 100).
SUB PÁGINA
Algunas páginas contienen subpáginas que se muestran sucesivamente de forma
automática. Esta tecla se utiliza para detener o retomar la muestra de subpáginas.
La indicación aparece en la parte superior izquierda.
ESPERA Para congelar la página.
REVELAR Para mostrar u ocultar la información oculta (soluciones de juegos).
LISTA
El usuario puede establecer cuatro páginas favoritas para ser enlazadas
directamente por las cuatro teclas coloreadas. Mientras el modo de lista esté
activado, no hay posibilidad de utilizar la navegación TOP o FLOF con las teclas
coloreadas. Los números de página favoritos se almacenarán y recuperarán
en/desde la memoria no volátil de cada canal, mediante el software del sistema.

18
04 FUNCIONAMIENTO
Guía de Instalación
La guía de instalación solo aparece la primera vez que se enciende el televisor o después de resetearlo.
1). Presione los botones para navegar por el menú y cambiar los ajustes. Presione el botón OK para confirmar.Seleccione el
idioma que desee para mostrar el menú.
Selecciona el idioma que desées, Modo Casa/Tienda para mostrar en el menú.
Aviso: La contraseña por defecto es 6666
Modos CASA o TIENDA
①El modo Casa es un modo de ahorro de energía. El modo Casa se recomienda para los ajustes de visualización normal y se
predeterminan por el fabricante.
②El modo Tienda es una opción para los vendedores minoristas para la publicidad o presentación del producto. El modo Tienda brinda
una imagen más brillante que el modo Casa.
③Puedes cambiar libremente entre los modos Casa y Tienda. Si eliges modo Tienda, se seleccionará automáticamente la
2). Presione los botones para seleccionar DVB-T/DVB-C y a continuación presione el botón OK para confirmar.
a. Si seleccionó DVB-T, el paso siguiente es seleccionar el tipo de Sintonía y el país; a continuación presione el botón OK para comenzar
a sintonizar.
b. Si selecciona DVB-C, el paso siguiente es configurar el sistema DVB-C como (tipo de exploración / Frecuencia/ID de red/Símbolo
(KS/S), entonces presione el botón OK para ir al menú del tipo de sintonía y de selección de país. Este paso es el mismo que DVB-T,
seleccione el tipo de sintonía (DTV/ATV).
Seleccione el país correcto, presione el botón OK para comenzar la sintonización.

19
3) Comenzará la sintonización de canales. Esta operación puede tomar hasta 6 minutos. La pantalla mostrará el progreso de la sintonía y
la cantidad de canales encontrados.
4). Si desea saltar la sintonización ATV (analógica), presione el botón MENU para interrumpir el proceso de sintonización. Se mostrará
una pantalla emergente, presione el botón y seleccione YES para confirmar. Entonces irá directamente a la sintonía de DTV. Puede
repetir el paso anterior si también desea saltar la sintonización de TDT. La próxima vez que encienda el TV aparecerá un recordatorio de
instalación.
5). Después que esté completa la sintonización, los canales se ordenarán en un orden preestablecido. Si desea saltar canales, modifique
el orden preestablecido o cambie el nombre de los canales, seleccione Programme Edit en el menú Channel.
6)
1.MENÚ CHANNEL
1. 1 Sintonía automática (DVB-T)
1).Presione el botón MENU y a continuación presione los botones para seleccionar el menú CHANNEL y presione el botón OK.
2). Presione los botones para seleccionar Auto Tuning y a continuación presione el botón OK.
3). Presione los botones
para seleccionar DVB-T/DVB-C. Presione DVB-T y presione el botón OK para confirmar.

20
4). En el menú Tune Type presione los botones para seleccionar ATV / DTV / DTV + ATV. Presione el botón y a continuación
presione los botones para seleccionar el país donde operará el TV. Presione el botón OK para confirmar.
5) Comenzará la sintonía de canales. Esta operación puede tomar hasta 6 minutos. La pantalla mostrará el progreso de la sintonía y la
cantidad de canales encontrados.
6). Si desea saltar la sintonización ATV, presione el botón MENU para interrumpir el proceso de sintonización. Se mostrará una pantalla
emergente, presione el botón y seleccione YES para confirmar. Entonces irá directamente a la sintonía de DTV. Puede repetir el
paso anterior si también desea saltar la sintonía de DTV. La próxima vez que encienda el TV aparecerá un recordatorio de instalación.
7). Después que esté completa la sintonización, los canales se ordenarán en un orden preestablecido. Si desea saltar canales, modifique
el orden preestablecido o cambie el nombre de los canales, seleccione Editar Programa en el menú Canales.
1.2 Sintonía automática (DVB-C)
1). Presione el botón MENU y a continuación presione los botones para seleccionar el menú CHANNEL y presione el botón OK.
2). Presione los botones para seleccionar Auto Tuning y a continuación presione el botón OK.
3). Presione los botones para seleccionar DVB-T/DVB-C y a continuación presione el botón OK para confirmar.
4). Presione los botones para seleccionar el tipo de sintonización / Símbolo (Ks/S) y presione el botón OK para confirmar.

21
5). En el menú Tune Type presione los botones para seleccionar ATV / DTV / DTV + ATV. Presione el botón y a continuación
presione los botones para seleccionar el país donde operará el TV. Presione el botón OK para confirmar.
6) Comenzará la sintonización de canales. Esta operación puede tomar hasta 6 minutos. La pantalla mostrará el progreso de la sintonía y
la cantidad de canales encontrados.
7). Si desea saltar la sintonización ATV (analógica), presione el botón MENU para interrumpir el proceso de sintonización. Se mostrará
una pantalla emergente, presione el botón y seleccione YES para confirmar. Entonces irá directamente a la sintonía de DTV. Puede
repetir el paso anterior si también desea saltar la sintonización de TDT. La próxima vez que encienda el TV aparecerá un recordatorio de
instalación.
8). Después que esté completa la sintonización, los canales se ordenarán en un orden preestablecido. Si desea saltar canales, modifique
el orden preestablecido o cambie el nombre de los canales, seleccione Edit Programme en el menú Channel.
NOTA:
Todos los canales, incluyendo ATV, DTV y Radio, pueden sintonizarse a la vez, si el Tipo de Sintonización es DTV+ATV.
Todos los canales almacenados desaparecerán después de la sintonización automática.
Después de la sintonización automática, el canal saltará al primer canal DTV
2.1 sintonización manual de DTV (DVB-T)
1). Presione el botón MENU y a continuación presione los botones para seleccionar el menú CHANNEL y presione el botón OK.
2). Presione los botones para seleccionar DTV Manual Tuning y a continuación presione el botón OK.

22
3) Emergerá la pantalla de DTV Manual Tuning. Presione los botones para seleccionar el canal UHF deseado y a continuación
presione el botón OK para comenzar la búsqueda de ese canal. Cuando se haya sintonizado la señal, la imagen y la intensidad de la
señal de mostrarán en la pantalla.
4). Presione el botón MENU para regresar al menú principal.
5). Presione el botón EXIT para salir del menú.
2. 2 Sintonización manual de DTV (DVB-C)
1). Presione el botón MENU y a continuación presione los botones para seleccionar el menú CHANNEL y presione el botón OK.
2). Presione los botones para seleccionar CADTV Manual Tuning y a continuación presione el botón OK.
3) Emergerá la pantalla de CADTV Manual Tuning. Presione los botones para seleccionar (Frecuencia /Símbolo (ks/s)/Tipo QAM),
presione el botón OK para comenzar la búsqueda de ese canal. Cuando se haya sintonizado la señal, la imagen y la intensidad de la
señal de mostrarán en la pantalla.
4). Presione el botón MENU para regresar al menú principal.
5). Presione el botón EXIT para salir del menú.
3). Sintonización manual de ATV:

23
Usted puede cambiar el sistema de sonido para buscar los canales analógicos y para una sintonización fina de los canales, luego
almacenar los canales que haya seleccionado.
NOTA:
Pulse el botón rojo del teletexto para almacenar los canales tras la sintonización manual.
4). Editar programas:
Usted puede Borrar, Renombrar, Mover, Saltar, y guardar en FAVORITOS cualquier programa.
Borrar
Pulse el botón rojo del teletexto, se borrará el programa en el cursor.
Renombrar:
Sólo se pueden renombrar los programas de ATV.
Desplace el cursor hasta el programa, pulse el botón verde del teletexto para renombrar el programa.
Pulse
para escoger el carácter. Pulse para desplazar el cursor.
Pulse el botón MENÚ para salir de la edición, pulse SALIR para salir del menú.
Nota: Los nombres de programas de ATV sólo pueden tener 5 caracteres, los nombres de programas de TDT pueden tener 25
caracteres.
Mover
Utilice los Botones de Flecha para seleccionar el canal que desea mover. Luego, pulse el Botón Amarillo para seleccionar la función
Mover. Una vez activo, utilice los Botones de Flecha para mover y luego pulse OK para confirmar.
Saltar
Pulse para escoger el programa, pulse el botón azul del teletexto para saltarse ese programa. El símbolo se mostrará al lado
derecho del programa.
Escoja el programa que ha omitido, pulse el botón azul de nuevo, podrá cancelar la omisión. El símbolo
desaparecerá.
Favoritos
Pulse
para escoger el programa, pulse el botón FAVORITOS, se mostrará al lado derecho del programa. Escoja el programa
en FAVORITOS, pulse el botón FAVORITOS de nuevo, podrá cancelar la acción. El símbolo
desaparecerá.

24
Una vez creado su grupo de favoritos, puede pulsar la tecla FAVORITOS para acceder rápidamente a sus canales favoritos.
5). Información sobre IC: (opcional)
Este menú puede mostrar la información sobre la tarjeta IC.
2. MENÚ DE IMAGEN
El segundo elemento del MENÚ es MENÚ DE IMAGEN.
Aquí puede ajustar los efectos de imagen, tales como contraste, brillo, etc.
Pulse para desplazarse, pulse OK para ajustarlo.
NOTA:
1).El matiz sólo está disponible en el sistema NTSC.
2).Hay cuatro modos de temperatura del color que pueden seleccionarse, medio, cálido, fresco, usuario.
3).Pantalla, sólo está disponible en el modo PC, en el que se puede ajustar la posición horizontal, la posición vertical, tamaño y fase.
3. MENÚ DE SONIDO
El tercer elemento del MENÚ es el MENÚ DE SONIDO.
Aquí puede usted ajustar los efectos de sonido, tales como agudos, bajos, balance, etc.
Pulse para desplazarse, pulse OK para ajustarlo.
Nota:
Volumen automático: Sólo está disponible cuando el volumen de señal de entrada es demasiado alto o presenta distorsión.
4. MENÚ DE HORA
El cuarto elemento del menú es MENÚ DE HORA. Usted puede ajustar el reloj, activar/desactivar la hora, establecer el temporizador de
apagado, etc. Pulse para desplazarse, pulse OK para ajustarlo.

25
NOTA:
Si no hay señal durante 15 minutos, el TV se apagará automáticamente, siempre que esté activado el Apagado Automático. La hora del
reloj puede obtenerse automáticamente del sistema TDT.
5. MENÚ DE OPCIONES
El quinto elemento del MENÚ es el MENÚ DE OPCIONES. Puede ajustar el idioma del menú, el idioma de audio, el idioma de los
subtítulos, etc.
Apagado automático
1. Si después de 4 horas a partir del encendido no se hacen cambios en el TV, por ejemplo, no se cambia de canal ni se ajusta el
volumen, el TV iniciará la secuencia de apagado automático.
Aparecerá en la pantalla una ventana emergente.
Después de 150 segundos el TV pasará automáticamente al estado de espera. Para anular el apagado automático, presione cualquier
botón del mando a distancia.
2. Para cancelar el apagado automático, seleccione Apagado automático (4H) en el Menú de opciones
Presione OK. Aparecerá un mensaje emergente "Are you sure you want to enable automatic powerdown?" (¿Está seguro de que desea
habilitar el apagado automático?)
Use la tecla de flecha derecha para seleccionar NO.
La pantalla del TV vuelve al Menú de opciones y se mostrará la opción de Apagado automático (4H).
Automatic power-down(4H) OFF
Para volver al apagado automático después de 4 horas, repita lo anterior, excepto que utilice la tecla de flecha izquierda para seleccionar
YES.
En el menú de sistema de archivos PVR, puede configurar un disco USB para PVR.

26
NOTA:
Restaurar a los valores por defecto de fábrica, eliminará todos los programas y contraseñas.
6. MENÚ DE BLOQUEO
El sexto elemento del menú es el MENÚ DE BLOQUEO. Puede bloquear su sistema, establecer una contraseña, bloquear un programa,
y establecer control parental. Una vez que haya establecido el bloqueo del sistema, no podrá buscar canales ni cambiar de programa.
NOTA:
La contraseña por defecto es 0000. Si se la olvida, puede usar la super contraseña: 9443.
Bloquear programa: Pulse para elegir el programa, pulse el botón verde del teletexto para bloquearlo.
Si desea desbloquear el programa, por favor entre en el menú principal, introduzca la contraseña, y luego pulse el botón verde de nuevo.
Control Parental: Pulse para elegir la calificación.
7. MENÚ EPG (Guía electrónica de programación)
El menú EPG se usa para ver lo que se está transmitiendo en TDT o en el canal de Radio en el día.
Para tener acceso al menú EPG, pulse el botón EPG; se mostrará el siguiente menú:
1. INFO
Utilice para escoger los programas. Pulse la tecla INFO para mostrar información sobre el programa destacado.
2. Programación
Pulse la tecla amarilla de teletexto. enumera la lista de grabaciones programadas. Pulse para escoger la lista. Pulse la tecla roja
para borrar la lista de programación.

27
3. Grabar
Pulse la tecla roja. Establece el programa que se va a grabar.
4. Recordatorio
Pulse la tecla azul para escoger un programa y establecer una hora de recordatorio. La pantalla de TV pasará al programa escogido a la
hora del recordatorio automáticamente.
8. Función PVR
1. Preparativos para la grabación de un programa.
La función de grabación solo funciona en canales TDT.
En el MENU DE OPCIONES, seleccione PVR. En el MENU DE OPCIONES, seleccione “check PVR File System” (verificar el Sistema de
Archivos PVR). Pinche en “OK”, hasta que "checking” (verificación) cambie a “Success” (éxito).
Nota: Verifique el término “speed” (velocidad). Si es “HD support” (soporte HD), significa que la velocidad del dispositivo USB está
disponible para desplazamiento temporal y para grabación. De otro modo, formatee el dispositivo a fin de asegurar que el dispositivo esté
disponible. El “Free Record Limit” (Límite libre de grabación) por defecto es de 6 horas, si el espacio en el disco es suficientemente
grande. Si el espacio no es suficientemente grande, el tiempo de grabación será más corto; eso depende del espacio en el dispositivo.
Durante la verificación “check PVR File System” (verificar Sistema de Archivos PVR), no realice ninguna otra operación hasta que ésta
finalice.
Las grabaciones realizadas con el sistema PVR de su televisor,. Pueden reproducirse solamente en el mismo TV, no en ninguna otra
clase de dispositivo (computadora, DVD, etc.) que no sea compatible con el formato de archivos .TS.
Tenga presente que para efectuar cualquier clase de grabación, el TV requerirá que usted formatee el dispositivo USB conectado para
almacenar la grabación.
ADVERTENCIA. CUANDO FORMATEE EL DISPOSITIVO USB EXTERNO, PERDERÁ TODOS LOS ARCHIVOS Y LA INFORMACIÓN
QUE TENGA.
ALMACENAMIENTO EN EL DISPOSITIVO.
El formato del sistema de archivos del dispositivo USB limitará el tamaño del archivo.
Sistema de archivos: NTFS hasta 2TB
FAT32 con hasta 192GB
FAT16 con hasta 2GB
Desde el menú OPTION entre el Sistema de Archivos PVR como si indica a continuación:

28
Seleccione el disco: Seleccione el disco para guardar el archivo de grabación.
Verifique el Sistema de Archivos PVR: Verifique si el Sistema de Archivos PVR está instalado en el dispositivo USB o si no lo está.
Formato:
(Se sugiere formatear el dispositivo con “High Speed Fs...” Alta Velocidad SA que puede acelerar la grabación).

29
A continuación aparece el menú después de que el Formato finaliza:
Si selecciona el modo de formato “High Speed Fs”, puede cambiar el tamaño del cronodesplazamiento:
2. Grabación de un programa
Mientras se reproduce la fuente DTV, escoja el canal y pulse en “record” (grabar). El cuadro de grabación aparecerá. Pinche en “record”
otra vez. El cuadro de grabación desaparecerá, y el ícono “REC” permanecerá en la parte superior izquierda. Éste desaparecerá hasta
que pulse en “stop” (detener).
3. Reproducir la grabación
El programa grabado en el dispositivo USB se guardará en la carpeta "_MSTPVR" del dispositivo.
1. El tamaño de almacenamiento del dispositivo USB puede variar entre 128MB y 500GB, pero para el uso práctico se recomienda utilizar
de 2GB a 500GB.
2. Cuando la tasa de bits es muy baja, la imagen puede pixelarse. Esto puede estar provocado por la conexión de un cable de extensión
USB en vez de conectar directamente el USB al TV
3. No todos los dispositivos USB son compatibles.
A continuación hay una lista de unidades USB recomendadas.

30
Los modelos que no aparezcan en la lista pueden ser compatibles, pero no se garantiza que trabajen.
La lista dispositivos USB soportados es la misma que para la función Timeshift, consulte las páginas siguientes para ver detalles.
9. Función Timeshift (desplazamiento temporal)
1. Seleccione el programa que desea grabar
Este TV le permite grabar o poner en pausa el programa TDT que este visionando actualmente en un dispositivo de almacenamiento
USB, y continuar desde el punto en el que se pausó.
NOTA:
• Se necesitará formatear un dispositivo de almacenamiento USB 2.0. Guarde sus datos originales antes de formatear. Todos los datos
almacenados en el dispositivo USB se borrarán después del formato.
Formato de almacenamiento de la unidad USB
Seleccione formatear el dispositivo USB y asigne la cantidad de espacio para la función Timeshift.
NOTA:
• El proceso de formato tomará al menos 2 minutos. No desactive la alimentación ni retire el dispositivo USB durante el formato.
• Durante el formato, se realizará una prueba de velocidad al dispositivo USB. Si falla, significa que el dispositivo USB no puede soportar
la función Timeshift.
Grabación de una emisión de TDT en pausa en el dispositivo de almacenamiento USB
1. Mientras está en la fuente de entrada DTV, inserte el dispositivo de almacenamiento USB en el puerto USB en la parte lateral del TV.
2. Pulse PAUSE (Pausa) (29) para comenzar la función Timeshift. El programa de TV se pausa. Aparece el Timeshift en pantalla y
comienza a grabar.
3. Pulse STOP (28) para detener la función Timeshift y dejar de grabar el programa.
NOTA:
• No desconecte el dispositivo de almacenamiento USB cuando la función Timeshift esté activada.
• Con un dispositivo de 4 gb, se puede almacenar temporalmente hasta 140 minutos de emisión.
Limitaciones de la función Timeshift:
1. Cuando la función Timeshift está activada, sólo las teclas PLAY/PAUSE/STOP/FWD/REV/ VOL+/VOL-/MUTE y algunas teclas de
funcionamiento básico (ENTER/EXIT/teclas de navegación) están disponibles.
2. La reproducción del video puede que no sea fluida y se produzcan saltos en la imagen si la velocidad de grabación del USB no cumple
con los requisitos mínimos.
3. No retire el disco USB ni desconecte la alimentación mientras la función Timeshift está en uso.
4. mientras la función Timeshift está en uso..
5. No cambie las operaciones rápidamente ni repetidamente entre PLAY/PAUSE/FWD/REV.
6. El video puede pixelarse si la tasa de transferencia de video es demasiado baja.
7. No todos los dispositivos USB son compatibles. La tensión del dispositivo USB debe de ser menor de 500Ma.

31
A continuación hay una lista de unidades USB recomendadas. Los modelos que no estén en la lista pueden ser compatibles, pero su
funcionamiento no está garantizado.
• Unidad Flash USB SanDisk Extreme® Contour™ - 8GB SDCZ8-8192-E75
• Unidad Flash USB SanDisk Extreme® Contour™ - 16GB SDCZ8-016G-A75
• Unidad Flash USB 2.0 Kingston DataTraveler 410 - 8GB DT410/8GB
• Unidad Flash USB 2.0 Kingston DataTraveler 410 - 16GB DT410/16GB
• Unidad Flash USB 2.0 OCZ Technology Rally2 - 4GB OCZUSBR2DC-4GB
• Unidad Flash USB 2.0 OCZ Technology Rally2 - 8GB OCZUSBR2DC-8GB
• Unidad Flash USB 2.0 OCZ Technology Rally2 - 8GB OCZUSBR2DC-8GB
• SAMSUNG-HM500JI-500G
8. Esta función no está disponible para todos los TV digitales, tales como canales codificados o canales sólo de audio.

32
10. Reproductor USB
Pulse la tecla fuente y seleccione el USB en la lista fuente; pulse el botón OK para acceder al menú USB.
Asegúrese de que el dispositivo USB esté conectado en la toma USB del televisor.. Hay cuatro opciones de tipo multimedia que pueden
seleccionarse, tales como imagen, música, película y texto. Seleccione la opción de tipo multimedia estándar pulsando . Pulse el
botón OK para acceder al menú de selección de disco.
Pulse para seleccionar el disco adecuado y pulse OK para mostrar los archivos multimedia y la lista de carpetas, o escoja Return
(Volver) para volver al menú de selección de tipo multimedia.
Seleccione el archivo multimedia pulsando o , luego aparecerá el recuadro de vista previa. Pulse el botón ► para reproducir
el archivo multimedia en pantalla completa. Cuando el archivo multimedia (tipo imagen, película o texto) se esté reproduciendo, pulse el
botón OK o Info para mostrar la barra de control.
Pulse para seleccionar el ícono de función, pulse el botón OK para confirmar la función.
Pulsa o "EXIT" para salir de la barra de control, salvo para música.
NOTA:
Puede ajustar la pista de audio o el programa en el menú Info mientras se reproduce el archivo de video. Escoja el ícono Info y pulse OK
para mostrar el Menú Info.

33
La reproducción del USB está soportada para los siguientes formatos de archivo de imagen:
—JPEG ( formato JPEG, archivos con extensión "jpg")
—BMP (archivos con extensión “bmp")
—PNG (archivos con extensión "png")
La reproducción del USB está soportada para los siguientes formatos de archivo de música:
—MP3 (archivos con extensión “.mp3")
—WAV (archivos con extensión “.wav")
La reproducción del USB está soportada para los siguientes formatos de archivo de texto:
—TXT (archivos con extensión “.txt")
La reproducción del USB está soportada para los siguientes formatos de archivo de película:
—AVI (archivo con extensión ".avi")
—TS (MPEG2 & H.264)

34
05 SOLUCIÓN DE PROBLEMAS
Síntoma del problema Comprobar
Imagen Sonido
Nieve
Ruido
Posición, dirección o conexión de
la antena
Borroso Sonido normal
Posición, dirección o conexión de
la antena
Interferencias
Ruido
Equipos electrónicos, coche/moto,
luz fluorescente
Imagen normal
Silencio
Volumen(comprobar si está
activado el Silencio o si las
conexiones de audio son
incorrectas)
Sin imagen
Silencio
Cable de alimentación no
conectado. Interruptor de
alimentación apagado. Ajustes de
Contraste y brillo / Volumen.
Pulsar tecla Standby en el mando
para examinarlo.
Sin color Sonido normal Control del color
Imagen partida
Sonido normal o
débil
Resintonizar canal
Sin color
Ruido Sistema de TV
Hay barras negras en
la parte superior y en la
parte inferior
Sonido normal Cambie el formato de pantalla

35
Especificación
Sistema de color PAL-B/G, I, D/K
SECAM- B/G, D/K L, L'
Sistema de sonido BG, DK, I, L, L'
Entrada de video
SCART, YPbPr, AV,
VGA, HDMI, USB.
Entrada de video por componentes
480i/p, 576i/p, 720p, 1080i, 1080p
HDMI
480i/p, 576i/p, 720p, 1080i, 1080p
Requerimientos de alimentación
100-240V~50/60Hz
Consumo de energía 30W(19") 38W(22") 40W (24") 55W (26")
Consumo de energía en modo Standby
<0.5W
Salida de audio 2 x 3W
Condiciones de entorno
Temperatura de operación: +5°C - +35°C
Humedad de operación: 20% - 80%
Temperatura de almacenamiento: -15°C - +45°C
Humedad de almacenamiento: 5% - 90%
Accesorio
Manual de usuario
Mando a distancia
Batería (2)
Guía rápida de inicio
*Las especificaciones sobre las piezas de este TV que se proporcionan en el presente son solamente a modo de referencia.
Puede haber diferencias a medida que la tecnología del producto se actualiza.
El diseño y las especificaciones están sujetos a modificaciones sin aviso.
Descripción de salida Scart:
1. Cuando la fuente en uso sea ATV/AV/SCART, la señal de salida scart será analógica.
2. Cuando la fuente en uso sea DTV, la señal de salida scart será TDT.
3. Otras fuentes no tienen señal de salida scart.

36

TV LED
MANUALE DELL'UTENTE
Leggete attentamente questo manuale prima di utilizzare il vostro televisore e
conservatelo in un posto sicuro per future consultazioni .
MODELLO:
LET19T1000H
LET22T1000HF
LET24T1000HF
LET26T1000HF

2
Contenuti
01 Sicurezza ed avvisi
Benvenuti P. 03
Informazioni Importanti P. 03
Avvisi di sicurezza P. 05
Avvisi e cautela P. 06
02 Introduzione
Parametri principali P. 08
Istruzioni di assemblaggio della base di sostegno P. 09
Linee guida per l'installazione a muro P. 10
Pannello anteriore P. 12
Collegamenti AV supportati P. 13
Collegare il vostro televisore P. 14
Common interface P. 15
03 Telecomando
Telecomando P.16
04 Operatività
Guida all'installazione P. 18
05 Risoluzione dei problemi
Risoluzione dei problemi P. 35
Specifiche P. 36

3
01 Sicurezza ed avvisi
BENVENUTI
Grazie per aver acquistato questo televisore LED LCD 19"/22”/24"/26”. Questa guida vi aiuterà ad impostare e ad iniziare ad utilizzare il
vostro televisore.
Per prima cosa, controllate il contenuto della confezione con la lista di controllo delle parti sottostante.
TV LCD LED 19" HD Ready.
Telecomando
2 x Batterie AAA
Manuale di istruzioni
Guida rapida all'avvio
Piedistallo
TV LED LCD 22" Full HD 1080P Digital
Telecomando
2 x batterie AAA
Manuale di istruzioni
Guida rapida all'avvio
Piedistallo
TV LED LCD 24" Full HD 1080P Digital
Telecomando
2 x batterie AAA
Manuale di istruzioni
Guida rapida all'avvio
Piedistallo
TV LCD LED 26" HD Ready.
Telecomando
2 x Batterie AAA
Manuale di istruzioni
Guida rapida all'avvio
Piedistallo
Adesso potete iniziare!
INFORMAZIONI IMPORTANTI
LEGGETE TUTTE LE ISTRUZIONI PRIMA DELL'USO E CONSERVATELO PER FUTURE CONSULTAZIONI.
CAUTELA
RISCHIO DI SHOCK ELETTRICO
NON APRIRE
CAUTELA
PER RIDURRE IL RISCHIO DI SHOCK ELETTRICI, NON RIMUOVETE IL COPERCHIO (O IL RETRO). ALL'INTERNO NON VI SONO
PARTI A CUI L'UTENTE POSSA FARE MANUTENZIONE DA SOLO. PER QUALUNQUE PROBLEMA, FATE RIFERIMENTO PER LA
MANUTENZIONE CALL CENTER. E' PRESENTE IL SIMBOLO DI UNA FRECCIA A FORMA DI FULMINE IN UN TRIANGOLO.
QUESTO SIMBOLO INDICA LA PRESENZA ALL'INTERNO DI ALTO VOLTAGGIO. E' PERICOLOSO AVERE QUALUNQUE TIPO DI
CONTATTO CON QUALUNQUE PARTE INTERNA DI QUESTO PRODOTTO
E' PRESENTE UN PUNTO ESCLAMATIVO IN UN TRIANGOLO: QUESTO SIMBOLO VI AVVISA CHE NEL PRODOTTO SONO
INCLUSE ISTRUZIONI IMPORTANTI PER L'USO E LA MANUTENZIONE.

4
CAUTELA: PER RIDURRE IL RISCHIO DI INCENDI O SHOCK ELETTRICO, NON PONETE IL TELEVISORE VICINO A SORGENTI DI
UMIDITA'. NON UTILIZZATE DETERSIVI ABRASIVI CHE POSSANO GRAFFIARE O ROVINARE LO SCHERMO LCD. EVITATE IL
CONTATTO CON OGGETTI CHE POSSANO GRAFFIARE LO SCHERMO LCD.
NOTA: NON SIETE AUTORIZZATI AD EFFETTUARE DA SOLI LA MANUTENZIONE, POICHE' POTREBBE PORTARE A FERITE O A
DANNI AL PRODOTTO. FATE RIFERIMENTO PER LA MANUTENZIONE ALLA LINEA DI AIUTO DEL CLIENTE.
DICHIARAZIONE DI CONFORMITA’
Si dichiara che questo apparecchio TV mod.LET19T1000H,LET22T1000HF,LET24T1000HF,LET26T1000HF.
è stato fabbricato nell’ Unione Europea e risponde alle prescrizioni dell’ art. 1 del DM 26.03.92 ed a quelle dell’ art. 2 comma 1 del D.M.
28.08.95 n.548. Haier Europe Trading,
Via de Cristoforis, 12 - I 21100 Varese (Italy) VAT IT02607360126

5
NOTIFICHE DI SICUREZZA
• Avviso: Per ridurre il rischio di shock elettrici, non rimuovete il coperchio (o il retro). Non vi sono parti a cui
l'utente possa fare manutenzione da solo all'interno. Per tutta la manutenzione fate riferimento a personale di
servizio qualificato.
• Avviso: per ridurre il rischio di shock elettrico, non esponete quest'unità a pioggia o umidità.
• Non esponete l'alimentatore e l'apparecchio all'acqua (gocciolamenti o schizzi), e nessun oggetto riempito con
liquidi, come i vasi, dovrebbe essere posizionato sull'apparecchio.
• Tenete il prodotto lontano dalla luce diretta del sole e da fonti di calore come radiatori o fornelli.
• Non bloccate le aperture di ventilazione. Gli slot e le aperture sull'unità devono ventilare. Le aperture non
devono mai essere bloccate posizionando il prodotto su cuscini, divani o altre superfici simili.
• Non posizionate l'unità su un carrello, sostegno, scaffale, tripode, braccio o tavolo instabile. L'unità potrebbe
cadere, causando danni.
• Non posizionate oggetti pesanti o affilati sullo schermo o sulla cornice.
• Scollegate l'alimentatore dalla presa quando l'unità non è in uso.
• Si deve fare attenzione agli aspetti ambientali perlo smaltimento delle batterie.
• AVVISO: Le batterie (batteria, batterie o pacco batterie) non devono essere esposte a calore eccessivo come
luce diretta del sole, fuoco o simili.
• AVVISO: L'eccessiva pressione acustica dalle cuffie può causare danni all'udito.
Questo marchio indica che questo prodotto non dev'essere smaltito con la spazzatura casalinga in tutta Europa. Per
prevenire possibili danni all'ambiente o alla salute umana per lo smaltimento incontrollato, riciclate responsabilmente
per promuovere l'utilizzo sostenibile delle materie prime. Per gettare il vostro dispositivo usato, fate uso dei sistemi di
raccolta o contattate il rivenditore dove il prodotto è stato acquistato. Loro potranno ritirare il prodotto per riciclarlo in
modo sicuro per l'ambiente.

6
AVVISI E CAUTELA
Avviso:
Cautela:
Sono utilizzati alti voltaggi nell'operatività del televisore. Non rimuovete il retro del cabinet dal teleuisore. Per la
manutenzione fate riferimento solo a personale di servizio qualificato.
Per prevenire il rischio di shock elettrico, non esponete il televisore a pioggia o umidità.
Non lasciate cadere o spingete oggetti negli slot e aperture del televisore. Non lasciate cadere alcun tipo di liquidi su
di esso.
Non bloccate i fori di ventilazione sul retro. Un'adeguata ventilazione è essenziale per prevenire guasti ai componenti
elettrici.

7
Non bloccate il cavo di alimentazione sotto il televisore.
Non state vicino, non appoggiatevi, né spingete all'improvviso il televisore o il suo supporto. Fate particolarmente
attenzione ai bambini. Se dovesse cadere potrebbe causare serie ferite.
Non posizionate l'unità su un carrello, sostegno, scaffale o tavolo instabile. Se dovesse cadere potrebbe causare serie
ferite alle persone e danni al televisore stesso.
Quando il televisore non viene utilizzato per un lungo periodo di tempo, è consigliabile scollegare il cavo di
alimentazione dalla presa AC.
Distanze minime:
Se il televisore dev'essere integrato in un mobile o in uno spazio chiuso, devono essere mantenute le distanze minime.
Tra l’apparecchio e l’alloggiamento.Il calore nel mobile potrebbe ridurre la vita del vostro televisore e potrebbe essere
pericoloso.

8
02 Introduzione
ATTENZIONE
Non alterare mai alcun componente all'interno della TV o nessun altro controllo di regolazione non descritto in questo
manuale. Tutte le TV LED sono apparecchiature elettroniche ad alta tensione.
Quando si toglie la polvere o qualsiasi goccia d'acqua dallo SCHERMO o dalla STRUTTURA o intorno a pulsanti o
connettori, il cavo di alimentazione deve essere rimosso dalla presa di alimentazione.
Pulire la TV con un panno morbido, asciutto e senza polvere.
Durante i temporali, scollegare il cavo di alimentazione e l'antenna per prevenire il danneggiamento della TV e di
qualsiasi altro dispositivo collegato ad essa.
Tutte le riparazioni a questa TV devono essere effettuate solo da personale qualificato per l'assistenza della TV.
INSTALLAZIONE
• Posizionate il televisore in una stanza dove la luce non colpisca direttamente lo schermo.
• L'oscurità totale o i riflessi sullo schermo possono causare affaticamento oculare. Si raccomanda
un'illuminazione indiretta e soffusa per una visione confortevole.
• Lasciate abbastanza spazio tra il televisore e il muro per permettere la ventilazione.
• Evitate luoghi eccessivamente caldi per prevenire eventuali danni al cabinet o guasto prematuro dei
componenti.
• Non coprite le aperture di ventilazione quando utilizzate il televisore.
Caratteristiche principali
1. Utilizzabile come televisore, terminale video, monitor PC.
2. Alta luminosità, ampio angolo di visuale.
3. Interfaccia HDMI e SCART
4. NICAM;
5. Time shift
Parametri principali
Schermo 19” 22” 24” 26”
Alimentazione:
100-240V~50/60Hz
30W
100-240V~50/60Hz
38W
100-240V~50/60Hz
40W
100-240V~50/60Hz
55W
Potenza in uscita audio
(THD≤7%)
2x3W
Terminali
Analogico RGB(PC)x1
High-Definition Multimedia Interface (HDMI) x 2
Ingresso video x 1
Ingresso audio x 2
Ingresso USB x 1
YPbPr x1
SCART x 1
CI x 1
RF Co-Ax x 1
Headphone x 1
S/PDIF x 1
Definizione orizzontale
(Linea TV)
Ingresso video composito>=350
YPbPr >=400

9
PC
MODALITA' PRECONFIGURAZIONE
RISOLUZIONE V. Freq. (Hz) H. Freq. (KHz)
1
800*600 60 37. 88
2
640*480 60 31. 47
3
1360*768 60 47.7
4
1024*768 60 48. 36
5
1280*1024 60 63. 98
Istruzioni di assemblaggio della base di sostegno
NOTE DI INSTALLAZIONE
Posizionate il televisore in una stanza dove la luce non colpisca direttamente lo schermo. L'oscurità totale o i riflessi
sullo schermo possono causare affaticamento oculare. Si raccomanda un'illuminazione indiretta e soffusa per una
visione confortevole.
Lasciate abbastanza spazio tra il televisore e il muro per permettere la ventilazione.
Evitate luoghi eccessivamente caldi per prevenire eventuali danni al cabinet o guasto prematuro dei componenti.
(19”,22”,24”)
1. Inserire il perno nel supporto come la
direzione indicate alla freccia e poi
stringere con una viti.
2. Inserire il supporto montaggio nel
coperchio come la direzione della freccia
indicate e stringere con una vite.
1. Inserire il perno nel supporto come la
direzione indicate alla freccia e poi
stringere con tre viti.
2. Inserire il supporto montaggio nel
coperchio come la direzione della freccia
indicate e stringere con due vite.
(19”,22”,24”)
(26”)
(26”)

10
LINEE GUIDA PER L'INSTALLAZIONE A MURO
Questo televisore può essere montato a muro come segue:
1. Posizionate il televisore LED LCD su una superficie stabile. Posizionate un panno morbido sulla parte anteriore
dello schermo per proteggerlo da qualunque danno.
2. Rimuovete le viti dalla parte inferiore del televisore, dove la base si collega al televisore, e rimuovete il sostegno
(Conservatelo per un uso futuro).
3. Utilizzate le quattro viti fornite per fissare il televisore su un braccio di sostegno a muro (non incluso) attraverso i
quattro fori standard VESA sul retro del televisore.
(
19”
,
22”
,
24”
)
(
26”
)
(
19”
)

11
(
22”
,
24”
)
(
26”
)

12
Controlli del pannello anteriore
1. Sensore del telecomando.
2 Indicatori LED:
BLU: ACCESO.
ROSSO: STAND BY.
3 Tastierino
1
SORGENTE
Visualizza il menù delle sorgenti in ingresso.
2
MENU
Visualizza il Menù principale
3
CH+/CH-
In modalità TV, premete i tasti CH+ o CH- per andare al canale successivo o precedente.
In modalità MENU, premete CH+ o CH- per selezionare gli oggetti.
In modalità standby, accende il televisore.
4
VOL+/VOL-
Controllo del volume audio
In menù, regola l'oggetto selezionato.
5
STANDBY
STANDBY

13
Prese sul retro/sul lato
1
AUDIO L/R
Ingresso
2
VIDEO
Ingresso
3
S/PDIF
uscita audio digitale
4
YPbPr
Ingresso
5
SCART
Ingresso
6
USB
Ingresso
7
HDMI2
Ingresso
8
HDMI1
Ingresso
9
HEADPHONE
uscita audio analogica
10
COMMON INTERFACE(CI)
Ingresso
11
AUDIO PC
Ingresso
12
Ingresso VGA
Ingresso
13
ANT
Ingresso

14
COLLEGARE IL VOSTRO
TELEVISORE
COLLEGAMENTO DELL'ANTENNA
Collegate l'antenna al retro del televisore nella presa ANT IN
MIGLIORARE IL SEGNALE
Per migliorare la qualità delle immagini in un'area con segnale basso, utilizzate un amplificatore di segnale (non fornito).
COLLEGARE IL PC AL TELEVISORE
Potete utilizzare il televisore come monitor per il vostro computer collegandolo con un cavo VGA (non fornito).
1 Leggete il manuale d'uso del vostro computer e controllate che abbia un connettore VGA.
2 Spegnete il televisore e il PC.
3 Collegate un cavo di interfaccia VGA tipo D a 15-pin al connettore interfaccia video VGA del computer. Collegate l'altra estremità del
cavo al connettore interfaccia PC sul televisore. Stringete le viti sul connettore VGA e collegate il cavo audio (non fornito) alla presa di
ingresso audio sul retro del televisore.
4 Accendete prima il televisore e poi il PC.
5 Premete il tasto sul televisore o sul telecomando per impostare l'ingresso video su VGA.
6 Una volta che viene visualizzata l'immagine, se ci sono disturbi, cambiate la modalità VGA in un'altra risoluzione, cambiate la
frequenza di aggiornamento o regolate la luminosità e il contrasto sul menù fino a che l'immagine risulta nitida.
COLLEGARE UN LETTORE DVD O UN VIDEOREGISTRATORE AL VOSTRO
TELEVISORE
Ci sono due modi per collegare un lettore DVD o un videoregistratore al vostro televisore. Assicuratevi che sia il televisore sia il lettore
DVD o il videoregistratore siano spenti prima di collegarli.
1 Collegate le uscite AV DVD/VCR nella presa in ingresso AV IN sul vostro televisore.
2 Collegate il cavo audio AV L & R all'ingresso audio (8) Premete il tasto SOURCE sul televisore per impostare la modalità di ingresso
video su AV.
Ingresso SCART
1
Collegate il cavo SCART dal dispositivo esterno (lettore DVD, Set-top box o console di videogiochi).
2 Premete il tasto SOURCE per selezionare la modalità SCART.
3 Premete il tasto PLAY sul dispositivo esterno.
Ingresso HDMI
1
Collegate il cavo dal dispositivo HDMI alla presa HDMI del televisore .
2 Premete il tasto SOURCE per selezionare la modalità HDMI.
3. Fate riferimento al manuale d'istruzioni del dispositivo HDMI per come utilizzarlo.
USCITA HEADPHONE
Inserire le cuffie nell’apposita connessione HEADPHONE. I diffusori del TV saranno silenziati.
USCITA S/PDIF
S/PDIF è un collegamento audio digitale utilizzato per collegare dispositivi audio, ad esempio home theatre e altri sistemi HIFI digitali su
brevi distanze. Il segnale è trasmesso mediante cavo coassiale con connettori RCA.
1. Assicurarsi che la TV e il dispositivo siano spenti prima di effettuare il collegamento.
2. Collegare i cavi AV (non forniti) dalla presa S/PDIF sulla TV al sistema audio Home Theater o sistema HiFi digitale ecc.

15
COMMON INTERFACE
Lo slot Common Interface è progettato per accettare i moduli di Accesso Condizionale (CA) e le smart card per vedere i programmi della
televisione a pagamenti e servizi aggiuntivi. Contattate il fornitore del servizio di Common Interface per avere più informazioni sui moduli e
sulle sottoscrizioni. Notate che i moduli CA e le smart card non sono né forniti né accessori optional acquistabili da noi.
Avviso
• Spegnete il vostro televisore prima di inserire qualunque modulo nello slot Common Interface.
1. Inserite la CAM correttamente, quindi inserite la Smart Card nello slot CI posizionato sul lato del televisore.
Slot CI. Slot CI
CAM CAM
Smart Card Smart Card
2. Accendete il televisore ed esso visualizzerà il messaggio sottostante se il modulo CA viene identificato. Aspettate qualche momento
perché la scheda si attivi.
3. Premete il tasto MENU quindi premete il tasto ▲▼ per selezionare l'opzione di informazione CI.
4. Vengolo visualizzate le informazioni dettagliate sulla scheda CI:
5. Premete il tasto OK per accedere al menù della scheda. Fate riferimento al modulo del manuale di istruzioni per i dettagli delle
impostazioni.
6. Quando il modulo viene rimosso, il seguente messaggio apparirà sullo schermo.

16
03 Telecomando
1. POWER: Premere per accendere la TV.
2.D.MENU: Nessun funzionamento.
3. P.Mode: Passare alla modalità immagine.
4. INFO: Premere per visualizzare lo stato del segnale corrente, incluso
la sorgente di ingresso e la modalità canale audio.
5. AUDIO l/ll: Premere per selezionare MONO, Nicam stereo per il
canale ATV. Per selezionare la lingua Audio per il canale DTV.
6. SUBTITLE: Premere per attivare o disattivare i sottotitoli.
7. Pulsanti numerici: Per l'accesso diretto ai canali.
8. SOURCE: Per selezione la sorgente d'ingresso.
9. MUTE: Per disabilitare o abilitare l'uscita audio.
10. Controllo volume: Per regolare il livello audio.
11. MENU: Per visualizzare il menu della TV.
12. OK: Per confermare la selezione.
13. EXIT: Per ritornare al menu precedente o uscire dal menu.
14. Indice Teletext
15. REPEAT: Nessun funzionamento
16. Tasto verde Teletext / Avanzamento veloce USB
17. Tasto rosso Teletext / Avvolgimento veloce USB
18. Mix Teletext
19. Testo Teletext
20. Reveal Teletext
21. Dimensioni Teletext
22. Tempo Teletext / REC.LIST (Il tempo di teletext non funziona)
23. Modalità Teletext: Nessun funzionamento
24. Mantieni Teletext
25. Sottocodice Teletext: Sottopagina Teletext
26. Tasto blu Teletext / File successivo USB
27. Tasto giallo Teletext / File precedente USB
28. STOP USB
29. PLAY/PAUSA USB
30. AVVIO REGISTRAZIONE
31. Cursori SOPRA, SOTTO, SINISTRA, DESTRA: Premere per muoversi nella propria selezione.
32. Fav: Per accedere ai canali preferiti in modalità TV o DTV.
33. Seleziona programma: Premere il pulsante per selezionare il canale TV successivo o precedente.
34. GUIDE: Premere per visualizzare la guida elettronica dei programmi in modalità TV.
35. Q.View: Per accedere al canale visualizzato precedentemente.
36. CH.LIST: Premere per visualizzare l'elenco dei canali.
37. Screen: Per cambiare l'aspetto dell'immagine.
38. Sleep: Imposta il timer di spegnimento della TV.
39. S.Mode: Per modificare la modalità audio.
40. OPEN/CLOSE: Nessun funzionamento
:Nessuna funzione DVD

17
Installate le batterie nel telecomando.
TELECOMANDO
TELETEXT (televideo)
Il Televideo è un sistema di informazioni trasmesso da certi canali che può essere consultato come un quotidiano.
Offre anche l'accesso ai sottotitoli per gli spettatori con problemi di udito o che non hanno familiarità con il linguaggio
della trasmissione (reti via cavo, canali via satellite etc.)
Premendo:
Otterrete:
TEXT (televideo):
Si usa per attivare o uscire dalla modalità TELEVIDEO Il sommario appare con una
lista di oggetti accessibili. Ogni oggetto ha un numero di pagina corrispondente a tre
cifre. Se il canale selezionato non trasmette televideo, verrà visualizzata
l'indicazione 100 e lo schermo rimarrà vuoto (in questo caso, uscite dal televideo e
selezionate un altro canale).
SELEZIONARE UNA PAGINA
Inserite il numero della pagina richiesta utilizzando i tasti numerici o Su e Giù.
Esempio: pagina 120, inserite 120. Il numero è visualizzato in alto a sinistra, il
contatore gira e quindi viene visualizzata la pagina. Ripetete l'operazione per vedere
un'altra pagina. Se il contatore continua a cercare, significa che quella pagina non è
trasmessa. Selezionate un altro numero.
ACCESSO DIRETTO AGLI OGGETTI.
I colori sono quelli visualizzati in fondo allo schermo. I quattro tasti colorati sono
utilizzati per accedere agli oggetti o alle pagine corrispondenti. Le aree colorate
lampeggiano quando l'oggetto o la pagina non sono disponibili.
INDICE: Permette di tornare fa tornare alla pagina dei contenuti (di solito pagina 100)
SOTTO PAGINA
Certe pagine contengono sotto pagine che sono visualizzate automaticamente
successivamente. Questo tasto su usa per interrompere o riprendere l'acquisizione
della sotto pagina. L'indicazione appare in alto a sinistra.
HOLD Per fermare l'immagine.
REVEAL Per visualizzare o nascondere le informazioni nascoste (soluzioni dei giochi).
LIST:
L'utente può impostare quattro pagine preferite da collegare direttamente ai quattro
tasti colorati. Mentre è attivata la modalità lista, non è possibile utilizzare la
navigazione TOP o FLOF con i tasti colorati. I numeri delle pagine preferite devono
essere archiviate in e ripristinate da una memoria non volatile per ogni canale dal
software di sistema.
1. Rimuovete il coperchio delle batterie.
2. Inserite le 2 AAA da 1.5V assicurandovi che la polarità (+ o -) delle batterie corrisponda alla polarità segnata all'interno dell'unità.
3. Riposizionate il coperchio delle batterie. Sostituite le batterie quando il televisore mostra i seguenti sintomi: L'operatività è instabile
o casuale. A volte il televisore non funziona con il telecomando.
Nota:
1) Sono raccomandate le batterie alcaline. 2) Rimuovete le batterie esaurite o se il telecomando non è utilizzato per lungo tempo.

18
04 OPERATIVITÀ
Guida all'installazione
La guida installazione compare solamente alla prima accensione o dopo il reset generale.
2). Premere i pulsanti per selezionare DVB-T/DVB-C e quindi premere il pulsante OK per confermare.
a.Se si seleziona DVB-T, il passo successivo è selezionare il tipo di sintonia e il paese, quindi premere il pulsante OK per avviare la
sintonizzazione.
b. Se si seleziona DVB-C, il passo successivo è configurare il sistema DVB-C come (tipo di scansione /Frequenza/ID Rete/Simbolo
(KS/S), quindi premere il pulsante OK per accedere al menu di selezione del tipo di sintonia e del paese, questo passo è lo stesso del
DVB-T, selezionare il tipo di sintonia (DTV/ATV).
Scegliere il paese giusto, premere il pulsante OK per avviare la sintonizzazione.
1). Premere i pulsanti per navigare nel menu e modificare le impostazioni. Premere il pulsante OK per
confermare.Selezionare la lingua desiderata da visualizzare sul menu.
Selezionate la vostra lingua, modo Home/Shop mostrato a video
Nota: la password di default è 6666.
Modalità CASA o NEGOZIO
①La modalità Casa è una modalità di risparmio energetico. La modalità Casa è raccomandata per impostazioni di
visualizzazione normali ed è impostata come predefinita dal produttore.
②La modalità Negozio è un'opzione per rivenditori per pubblicità o presentazione dei prodotti. La modalità Negozio ha
un'immagine più luminosa della modalità Casa.
③Potrai scegliere tra modo Home e Shop. Il modo Shop commuterà HDMI 1 automaticamente, per uscire premere exit.

19
3). La sintonizzazione dei canali inizia. Questa operazione può richiedere fino a 6 minuti. Il display mostrerà il progresso della
sintonizzazione e il numero di canali trovati.
4). Se si vuole saltare la sintonizzazione ATV, premere il pulsante MENU per interrompere la sintonizzazione in corso. Apparirà una
finestra a comparsa, premere il pulsante per selezionare YES per confermare. Si passerà direttamente alla sintonizzazione DTV. È
possibile ripetere il passo precedente se si desidera saltare la sintonizzazione DTV. Un promemoria di installazione apparirà alla
successiva accensione della TV.
5). Dopo il completamento della sintonizzazione, i canali sono organizzati in un ordine preimpostato. Se si desidera saltare canali,
modificare l'ordine preimpostato o rinominare i canali, selezionare Programme Edit nel menu Channel.
6)
1. MENU CANALI
1. 1 Sintonizzazione automatica (DVB-T)
1)Premere il pulsante MENU e premere i pulsanti per selezionare il menu CHANNEL e quindi premere il pulsante OK.
2). Premere il pulsanti per selezionare Auto Tuning e quindi premere il pulsante OK.

20
3). Premere i pulsanti per selezionare DVB-T/DVB-C Premere DVB-T e quindi premere il pulsante OK per confermare.
4). Nel meni Tipo di sintonizzazione, premere i pulsanti per selezionare ATV / DTV / DTV + ATV. Premere il pulsante e quindi
premere i pulsanti per selezionare il paese in cui si utilizzerà la TV. Premere il pulsante OK per confermare.
5). La sintonizzazione dei canali inizia. Questa operazione può richiedere fino a 6 minuti. Il display mostrerà il progresso della
sintonizzazione e il numero di canali trovati.
6). Se si vuole saltare la sintonizzazione ATV, premere il pulsante MENU per interrompere la sintonizzazione in corso. Apparirà una
finestra a comparsa, premere il pulsante per selezionare YES per confermare. Si passerà direttamente alla sintonizzazione DTV. È
possibile ripetere il passo precedente se si desidera saltare la sintonizzazione DTV. Un promemoria di installazione apparirà alla
successiva accensione della TV.
7). Dopo il completamento della sintonizzazione, i canali sono organizzati in un ordine preimpostato. Se si desidera saltare canali,
modificare l'ordine preimpostato o rinominare i canali, selezionare Programme Edit nel menu Channel.
1.2 Sintonizzazione automatica (DVB-C)

21
1). Premere il pulsante MENU e premere i pulsanti per selezionare il menu CHANNEL e quindi premere il pulsante OK.
2). Premere il pulsanti per selezionare Auto Tuning e quindi premere il pulsante OK.
3). Premere i pulsanti per selezionare DVB-T/DVB-C e quindi premere il pulsante OK per confermare.
4). Premere i pulsanti per selezionare Tipo di scansione/Simbolo (Ks/S) e quindi premere il pulsante OK per confermare.
5). Nel menu Tipo di sintonizzazione, premere i pulsanti per selezionare ATV / DTV / DTV + ATV. Premere il pulsante e quindi
premere i pulsanti per selezionare il paese in cui si utilizzerà la TV. Premere il pulsante OK per confermare.
6). La sintonizzazione dei canali inizia. Questa operazione può richiedere fino a 6 minuti. Il display mostrerà il progresso della
sintonizzazione e il numero di canali trovati.
7). Se si vuole saltare la sintonizzazione ATV, premere il pulsante MENU per interrompere la sintonizzazione in corso. Apparirà una
finestra a comparsa, premere il pulsante per selezionare YES per confermare. Si passerà direttamente alla sintonizzazione DTV. È
possibile ripetere il passo precedente se si desidera saltare la sintonizzazione DTV. Un promemoria di installazione apparirà alla
successiva accensione della TV.
8). Dopo il completamento della sintonizzazione, i canali sono organizzati in un ordine preimpostato. Se si desidera saltare canali,

22
modificare l'ordine preimpostato o rinominare i canali, selezionare Programme Edit nel menu Channel.
NOTA:
Tutti i canali inclusi ATV, DTV e Radio possono essere sintonizzati in un’unica volta, se il tipo di sintonia è DTV+ATV.
Tutti i canali salvati verranno cancellati dopo la sintonizzazione automatica.
Dopo la sintonizzazione automatica, il canale passerà al primo canale DTV.
2.1 Sintonizzazione manuale DTV (DVB-T)
1). Premere il pulsante MENU e premere i pulsanti per selezionare il menu CHANNEL e quindi premere il pulsante OK.
2). Premere il pulsanti per selezionare DTV Manual Tuning e quindi premere il pulsante OK.
3). Apparirà la schermata di Sintonizzazione manuale DTV. Premere i pulsanti per selezionare il canale UHF desiderato e quindi
premere il pulsante OK per iniziare la ricerca di tale canale. Quando il segnale è stato sintonizzato, l'immagine e la potenza del segnale
sarà visualizzata sullo schermo.
4). Premere il pulsante MENU per ritornare al menu principale.
5). Premere il pulsante EXIT per uscire dal menu.
2. 2 Sintonizzazione manuale DTV (DVB-C)
1). Premere il pulsante MENU e premere i pulsanti per selezionare il menu CHANNEL e quindi premere il pulsante OK.
2). Premere il pulsanti per selezionare CADTV Manual Tuning e quindi premere il pulsante OK.

23
3). Apparirà la schermata CADTV Manual Tuning. Premere i pulsanti per selezionare (Frequenza/Simbolo (ks/s/QAM tipo QAM)
premere il pulsante OK per iniziare la ricerca di tale canale. Quando il segnale è stato sintonizzato, l'immagine e la potenza del segnale
sarà visualizzata sullo schermo.
4). Premere il pulsante MENU per ritornare al menu principale.
5). Premere il pulsante EXIT per uscire dal menu.
3). ATV Manual tuning (Sintonizzazione manuale ATV):
Potete cambiare il sistema sonoro per ricercare nei canali analogici e affinare la sintonizzazione dei canali, quindi archiviare i canali
selezionati.
NOTA:
Premete il tasto rosso del televideo per archiviare i canali dopo la sintonizzazione manuale.
4). Program Edit (Modifica programma)
Potete cancellare, rinominare, spostare, saltare, mettere tra i preferiti qualunque canale.

24
Delete (Cancella)
Premendo il tasto rosso, il programma evidenziato dal cursore sarà cancellato.
Rename (rinomina):
Può rinominare solo i programmi ATV.
Spostate il cursore sul programma, premete il tasto verde del televideo per rinominare il programma.
Premete per scegliere la lettera. Premete per spostare il cursore.
Premete il tasto MENU per uscire dalla finestra di modifica. Premete EXIT per uscire dal menù.
Nota: I nomi dei programmi ATV possono essere al massimo di 5 lettere. I nomi dei programmi DTV possono essere di 25 lettere.
Move (sposta)
Utilizzate i tasti freccia per selezionare il canale che volete spostare. Quindi premete il tasto Giallo per selezionare la funzione Sposta.
Una volta attivato, utilizzate i tasti freccia per spostare e quindi premete OK per confermare.
Skip (salta)
Premete per scegliere il programma, premete il tasto blu del televideo per saltare il programma. Verrà visualizzato sul lato
destro del programma. Scegliete il programma saltato, premete di nuovo il tasto blu, per annullare il salio del canale. L'immagine
sparirà.
Favourite (Preferiti)
Premete per scegliere il programma, premete il tasto FAV, visualizzerà sul lato destro del programma. Scegliete il
programma preferito, premete di nuovo il tasto FAV, potrete annullare la selezione del canale preferito, l'immagine sparirà.
Una volta che avrete creato il gruppo dei preferiti, potete premete il tasto FAV per accedere rapidamente al vostro canale preferito.
5). Informazioni CI: (opzionale):
Questo menù può visualizzare le informazioni della scheda CI.
2. PICTURE MENU (menù immagini)
Il secondo elemento del MENU è il PICTURE MENU (menù immagine). Potete regolare qui l'effetto delle immagini, come contrasto,
luminosità, etc.
Premete il tasto "OK" per spostarvi, premete il tasto "OK" per regolare.

25
NOTA:
1 ). Tint (tinta) è disponibile solo in sistema NTSC.
2). Ci sono quattro modalità di temperatura colori che possono essere selezionate: medio, caldo, freddo, utente.
3). Lo schermo è disponibile solo in modalità PC, dove si può regolare la posizione orizzontale, la posizione verticale, la dimensione e la
fase.
3. SOUND MENU (menù audio)
Il terzo oggetto del MENU è il SOUND MENU (menù audio)
Potete regolare qui l'effetto audio, come alti, bassi, bilanciamento etc.
Premete il tasto per spostarvi, premete OK per effettuare la regolazione.
Nota:
Volume automatico: disponibile solo quando il volume del segnale in ingresso è troppo alto o distorto.
4. TIME MENU (menù orario)
Il quarto oggetto del menù è il TIME MENU (menù orario). Potete regolare l'ora, gli orari di accensione e spegnimento automatico, il timer
di spegnimento automatico, etc. Premete
per spostarvi, premete OK per effettuare la regolazione.

26
NOTA:
Se entro 15 minuti il televisore non riscontra segnale, il televisore si spegnerà automaticamente, se l'Auto Sleep è attivo. L'ora può essere
presa automaticamente dal sistema DTV.
5. OPTION MENU (menù opzioni)
Il quinto oggetto del MENU è l'OPTION MENU (menù opzioni) Potete regolare il Menu language (lingua menù), Audio language (Lingua
audio) ,Subtitle language (lingua sottotitoli) etc.
Spegnimento automatico
1. Se dopo 4 ore dall'accensione e non sono state effettuate modifice alla TV, ad esempio non è stato cambiato alcun canale o modificato
il volume, la TV inizierà la sequenza di spegnimento.
E una finestra di popup apparirà sullo schermo.
Dopo 150 secondi la TV passerà automaticamente in standby. Per uscire dallo spegnimento automatico premere qualsiasi tasto sul
telecomando.
2. Per cancellare lo spegnimento automatico, nel menu Option selezionare Automatic powerdown (4H)
Premere OK. Apparirà un messaggio di popup “Sei sicuro di voler abilitare lo spegnimento automatico?”
Utilizzare il tasto freccia di destra per selezionare NO.
Lo schermo della TV ritorna nel menu Option e l'opzione Automatic power-down (4H) sarà visualizzata.
Automatic power-down (4H) OFF
Per ritornare allo spegnimento automatico dopo 4 ore, ripatere quanto riportato in precedenza usano il tasto freccia di sinistra per
selezionare YES
Nel PVR File system menu (menù file di sistema PVR) potete impostare una scheda USB come PVR.

27
NOTA:
Ripristinare le impostazioni di fabbrica cancellerà tutti i programmi e le password.
6. LOCK MENU (menù blocco)
Il sesto oggetto sul menù è il LOCK MENU (menù blocco). Potrete bloccare il sistema, impostare password, bloccare programmi ed
impostare il parental control. Una volta che avrete attivato i blocchi, non potrete ricercare i canali o modificarli.
NOTA:
La password predefinita e' 0000. Se si dimentica la password si puo' usare la super password 9443.
Block Program (Blocco programma): Premete
per scegliere il programma, premete il tasto verde del televideo per bloccare il
programma. Se volete sbloccare il programma, entrate nel menù principale, inserite la password, quindi premete di nuovo il tasto verde.
Parental guidance (Parental Control: Premete per scegliere il rating.
7. EPG (Guida Elettronica alla programmazione)
Il menù EPG è utilizzato per vedere cos'è trasmesso sul digitale terrestre (DTV) o sui canali radio durante la giornata.
Per accedere al menù EPG, premete il tasto EPG, verrà visualizzato il seguente menù.
1.
INFO
Utilizzate
per scegliere i programmi, premete il tasto INFO, potete visualizzare le informazioni del programma evidenziato.

28
2 Schedule (schema)
Premete il tasto giallo. Può visualizzare la lista dello schema di promemoria, premete per scegliere la lista, premete il tasto
rosso DELETE (cancella) per cancellare la lista di programmazione.
3. Record (Registrare)
Premete il tasto rosso. Esso configura il programma da registrare.
4. Remind (promemoria)
Premete il tasto blu per scegliere un programma ed impostare l'orario di promemoria. Lo schermo televisivo salterà automaticamente al
canale scelto all'orario del promemoria.
8. PVR function (funzione PVR)
1. Preparazione per registrare il programma
La funzione PVR è attiva solo con DTV
Dall'OPTION MENU (menù opzioni) accedete al PVR File System in "OPTION MENU", scegliete "check PVR File System" (controlla il file
di sistema PVR). Cliccate su "OK", fino a che "checking" cambia in "Success".
Nota: controllate il termine "speed" (velocità). Se riporta la scritta "HD support" (supporto HD), significa che la velocità del dispositivo USB
è disponibile per la differita e la registrazione. Se non è così, formattate il dispositivo, per assicurarvi che il dispositivo sia disponibile. Il
"Free Record Limit" (limite di registrazione libera) è 6 ore, se lo spazio sul disco è sufficiente. Se lo spazio non è sufficiente, il tempo di
registrazione dovrebbe essere più breve, a seconda dello spazio sul dispositivo. Durante il controllo "check PVR File System" (controllo
del file di sistema PVR), non effettuate altre operazioni fino a che non è finito.
Le registrazioni devono essere effettuate con il sistema TV PVR. Esse possono essere riprodotte solo sulla stessa TV, non in altro tipo di
dispositivo (computer, DVD, ecc.) che non è compatibile con il formato di file .TS.
Si noti che per effettuare un qualsiasi tipo di registrazione, la TV richiederà di formattare il dispositivo USB collegato per memorizzare la
registrazione.
ATTENZIONE. QUANDO SI FORMATTA, TUTTE LE INFORMAZIONI PRESENTI SUL DISPOSITIVO USB ESTERNO SARANNO
PERSE E TUTTI I FILE CANCELLATI.
MEMORIZZAZIONE SUL DISPOSITIVO.

29
Il file system USB limiterà le dimensioni del sistema di memorizzazione.
File system: NTFS fino a 2TB
FAT32 con fino a 192GB
FAT16 con fino a 2GB
Dal MENU OPTION, accedere al File System PVR come riportato di seguito:
Selezionate disco: selezionate su quale disco salvare i file registrati.
Controllate il PVR File system (file di sistema PVR) controllate se il PVR File System è impostato sul dispositivo USB o no.
Format (formattare):

30
(Suggerisce di formattare il dispositivo con "High Speed Fs..." che può velocizzare la registrazione. )
Il menù sottostante appare dopo la fine della Formattazione:
Se selezionate la modalità di formattazione "Hi Speed FS", allora potete cambiare la dimensione della differita.

31
2. Registrare il programma
Nel riprodurre da sorgente DTV, scegliete il canale e cliccate "record", apparirà la finestra di registrazione. Cliccate "record" (registrare) di
nuovo, la schermata di registrazione sparirà e apparirà l'icona "REC" in alto a sinistra. Sparirà quando cliccate "stop".
3. Riprodurre la registrazione
Il programma registrato sulla “USB” sarà salvato nella cartella “_MSTPVR” sul dispositivo.
1. Le dimensioni di memorizzazione su USB possono essere tra 128MB e 500GB, ma per uso pratico si raccomanda da 2GB a 500GB.
2. Il video può diventare pixellato quando la frequenza video è troppo bassa. Ciò può essere causato dal collegamento di un cavo
prolunga USB invece di collegare direttamente la USB alla TV
3. Non tutti i dispositivi USB sono compatibili.
Di seguito una lista di unità USB raccomandate.
I modelli che non sono riportati nella lista possono essere compatibili, ma non è garantito il loro funzionamento.
La lista di supporto USB è la stessa della funzione Timeshift, si vedano le pagine seguenti per i dettagli.

32
9. Timeshift function (funzione differita)
1. Preparazione per registrare il programma
Questo televisore vi permette di mettere in pausa e registrare i programmi digitali in visione in un dispositivo di archiviazione USB, e di
riprendere la visione nel punto in cui è stata interrotta.
NOTA:
• Sarà necessario formattare un dispositivo di archiviazione USB 2.0. Salvate i dati originali prima di formattare. Tutti i dati archiviati nel
dispositivo USB saranno cancellati dopo la formattazione.
Formattare il dispositivo di archiviazione USB.
Selezionate per formattare il dispositivo USB e assegnate la quantità di spazio per la funzione Differita.
NOTA:
• Il processo di formattazione impiegherà almeno 2 minuti. Non spegnete l'alimentazione o rimuovete il dispositivo USB durante la
formattazione.
• Durante la formattazione, verrà fatto un test di velocità sul dispositivo USB. Se fallisce, significa che il dispositivo USB potrebbe non
supportare la funzione differita.
Registrare un programma DTV in pausa in un dispositivo di archiviazione USB.
1. Mente siete in sorgente di ingresso DTV, inserite un dispositivo di archiviazione USB nella porta USB sul lato del televisore.
2. Premete PAUSE (29) per avviare la funzione differita.. Il programma TV è in pausa. Appare l'OSD della differita, e la registrazione inizia.
3. Premete STOP (28) per interrompere la funzione differita ed interrompere la registrazione del programma.
NOTA:
• Siete pregati di non scollegare il dispositivo di archiviazione USB quando la funzione Time Shift (differita) è attivata.
• 4GB di memoria archiviano circa 140 minuti.
Limitazioni della differita:
1. Quando la funzione Differita è attiva, sono disponibili solo i tasti PLAY/PAUSE/STOP/FWD/REV/ VOL+/VOL-/MUTE e alcuni tasti
operativi di base (ENTER/EXIT/tasti di navigazione).
2. La riproduzione video potrebbe non essere lineare e saltare se la velocità di registrazione USB non corrisponde ai requisiti minimi.
3. Non rimuovete il disco USB o spegnete l'alimentazione durante le operazioni in differita. Sarà annullata una volta che il segnale è
perso.
4. Non rimuovete la sorgente di segnale durante le operazioni in differita.
5. Non cambiate rapidamente e ripetutamente l'operatività tra PLAY/PAUSE/FWD/REV.
6. Il video potrebbe diventare pixellato quando il bit rate video è troppo basso.
7. Non tutti i dispositivi USB sono compatibili. L'alimentazione necessario per l'hard disk USB dovrebbe essere <500MA
Sotto trovate una lista dei Drive USB raccomandati. I modelli che non sono qui elencati possono essere compatibili, ma non è garantito.

33
• SanDisk Extreme® Contour™ USB Flash Drive - 8GB SDCZ8-8192-E75
• SanDisk Extreme® Contour™ USB Flash Drive -16GB SDCZ8-016G-A75
• Kingston DataTraveler 410 USB 2. 0 Flash Drive 8GB DT410/8GB
• Kingston DataTraveler 410 USB 2. 0 Flash Drive -16GB DT410/16GB
• OCZ Technology Rally2 USB 2. 0 Flash Drive - 4GB OCZUSBR2DC-4GB
• OCZ Technology ATV USB 2. 0 Flash Drive - 8GB OCZUSBATV-8GB
• OCZ Technology Rally2 USB 2. 0 Flash Drive - 8GB OCZUSBR2DC-4GB
• SAMSUNG-HM500JI-500G
8. Questa caratteristica non è disponibile per tutti i televisori digitali, come per canali criptati o di soli audio.
10. Lettore USB
Premete il tasto Sorgente, e selezionate USB nella lista sorgente, quindi premete OK per accedere al menù USB.
Assicuratevi che il dispositivo USB sia collegato allo slot. Ci sono quattro tipi di media che possono essere selezionati, come foto, musica,
film e testo. Selezionate il tipo di media premendo , premete il tasto OK per accedere al menù di selezione disco.
Premete per selezionare il disco corretto e premete OK per visualizzare i file media e la lista delle cartelle o scegliete Return per
tornare al menù di selezione del tipo di media.
Selezionate il file premendo o , quindi apparirà la cornice di anteprima. Premete il tasto ► per riprodurre il file a schermo
intero. Quando il file (foto, film o testo) è in riproduzione, premete il tasto OK o Info per visualizzare la barra di controllo.
Utilizzate il tasto
per selezionare l'icona funzione, quindi premete OK per confermare la funzione.
Premere Exit per nascondere la barra informazioni - eccetto per la musica.

34
NOTA:
Potete regolare la traccia audio, o il programma nel menù Info mentre riproducete il file video. Scegliete l'icona Info e premete OK per
visualizzare il menù Info.
La riproduzione di Foto da USB è supportata per i seguenti formati:
—JPEG (Formato JPEG, file con estensione “.jpg”)
—BMP (file con estensione ".bmp")
—PNG (file con estensione ".png")
La riproduzione di Musica da USB è supportata per i seguenti formati:
—MP3 (file con estensione ".mp3")
—WAV (file con estensione ".wav")
La riproduzione di Testo da USB è supportata per i seguenti formati:
—TXT (file con estensione ".txt")
La riproduzione di Video da USB è supportata per i seguenti formati:
—AVI (file con estensione ".avi")
—TS (MPEG2 & H.264)

35
05 Risoluzione dei problemi
Sintomo del problema Controllo di ispezione
Video Audio
Effetto neve
Rumore di
sottofondo
Posizione, direzione o
collegamento dell'antenna.
Effetto fantasma Audio normale
Posizione, direzione o
collegamento dell'antenna.
Interferenze
Rumore di
sottofondo
Attrezzatura elettronica,
auto/moto, luci fluorescenti.
Immagine normale
Muto
Volume (controllate se il muto
è attivato o se i collegamenti
audio non siano corretti).
Nessuna immagine.
Muto La spina di alimentazione
non è inserita, il tasto di
accensione non è attivo,
Impostazioni
contrasto/luminosità e
volume.
Premete il tasto standby sul
telecomando per controllare
Nessun colore Audio normale
Controllo Colore
L'immagine è
spezzata
Audio normale
o debole
Ri-sintonizzate il canale
Nessun colore
Rumore di
sottofondo
Sistema TV
C'è una striscia nera
sulla parte superiore
e inferiore
Audio normale
Cambia aspetto a zoom

36
Specifiche:
Sistema colori. PAL-B/G, I, D/K
SECAM- B/G, D/K, L, L'
Sistema audio. SECAM- B/G, D/K, L, L'
Ingresso video
SCART, YPbPr, AV,
VGA, HDMI, USB.
Y/Pb/Pr
480i/p, 576i/p, 720p, 1080i, 1080p
HDMI
480i/p, 576i/p, 720p, 1080i, 1080p
Numero di canali
memorizzabili
1000
Alimentazione:
100-240V ~ 50/60 Hz
30W(19”)
100-240V ~ 50/60 Hz
38W(22”)
100-240V ~ 50/60 Hz
40W(24”)
100-240V ~ 50/60 Hz
55W(26”)
Consumo di corrente in
modalità di attesa
<0.5W
Uscita Audio
3W+3W
Condizioni
dell'ambiente.
Temperatura di lavoro: +5°C - +35°C
Umidità di lavoro: 20% - 80%
Temperatura di immagazzinamento -15°C - +45°C
Umidità di immagazzinamento 5% - 90%
Accessori:
Manuale dell'utente
Telecomando
Batterie (x2)
Guida rapida all'avvio
*La specifica delle parti di questo televisore qui fornita è solo per riferimento.
Potrebbero verificarsi differenze via via che la tecnologia del prodotto viene aggiornata.
Il progetto e le specifiche sono soggetti a cambiamenti senza notifica.
Descrizione dell'uscita Scart:
1. Quando la sorgente attiva è ATV/AV/SCART, il segnale di uscita scart è ATV.
2. Quando la sorgente attiva è DTV, il segnale di uscita scart è DTV.
3. Le altre sorgenti non hanno un segnale di uscita scart.


L:ON
H:OFF
71mA
90mV at DDR power pin(X7R)
Temperature 50
℃
680mA
1.812V
Vpp=13mV
Vpp=21mV
Vpp=23mV
218mA
CERAMIC
down
up
V =0.6X(1+R /R )
out
down
up
V =0.6X(1+R /R )
out
1.32V DC-DC
750mA
Vp-p=94mV
R814
改善开机瞬间尖峰
Vpp=100mV
11.5mS
5V
0V
1E56 BIT3
MAX 600mA
PANEL POWER
ON
OFF
老化端口
1 CN2
用于
18.5
和
21.6 U3 U4
不贴。
D10
不插
2 CN805 CN806
用于
26",CN2
不插。
3 CN804
用于
23.6, U4
不贴。
LED
H:ON
L:OFF
使用
CN2
时,贴上
18.5
寸至
24
寸二插使用
U5
,软排线的使用
U5+U3
26
寸使用三颗驱动
R850
,使用二插时,贴上,其它状态时不需要贴
26
寸使用
0R
,其它尺寸视电流而定
18.5
寸需贴
C1030
2.15/23.6/26
不需要贴
1E56 Bit2
MST Power supply
45mA
将
LDO
改为
DC to DC,
提高轻载效率,
省电做到
0.3W
以下。
Vout =0.6X(1+(R855+R857)/R859)
增加
C1036,
改善
EMC
性能
B
版增加
B
版增加
B
版增加
C
版本增加
FB13--127MHZ ----
改善辐射
12V
稳压电路
21.5"R828
贴
15K
23.6/26"R828,R841
贴
8.2K
5V
改
5.2V
BL-ADJUST
ON/BK
LED1
BL-ADJUST
LED1
FB1
LED3
LED2
+12V
LED3
LED+
LED5
LED9
ON/BK
LED11
LED10
LED12
LED13
LED14
LED15
LED16
BL-ADJUST
+5V
LED7
+5VB
SHD
+12V
ON/BK
ON/BK
SHD
LED1
OVP
LED2
LED3
SHD
LED1
LED4
OVP
LED3
+12V
FB
LED5
FB
LED2
LED+
LED6
LED4
LED7
LED5
LED7
LED8
LED6
LED+
DRV
LED8
DRV
+5V
BL-ADJUST
LED11
LED14
LED10
LED13
LED9
LED16
LED12
LED15
LED+
LED4
LED8
LED7
LED6
LED5
LED6
LED5
LED4
LED3
LED1
LED1
LED2
LED8
LED7
LED2
LED6
LED5
LED+
LED+
LED4
LED3
LED8
LED7
CON
+5V
FB
+12VB
FB1
LED+
LED14
LED13
LED12
LED11
LED9
LED10
LED16
LED15
LED+
LED+
SDBX
FBX
FBX
SDBXSDBX
+12V
PWR-ON/OFF
+5VB
+5VB
PWR-ON/OFF
+12V
CON
12VA
5VA
2.5VA
5VA
1.8VA
3.3VA
3.3VA
3.3VA
5VA
1.8VA
1.8VA
5V_TUNER
3.3VA
5VA
1.8VA
1.8VA
12VA
DC5V
1.32V
5VA
5VA
VCC-Panel
5VSCARTAUDIO
+5V
5Vstb
+5V
3.3VU
5VA
12VA
5Vstb
+5V
12VA
12VA
5Vstb
3.3VU 3.3VU
ON_PBACK2
ADJ-PWM2
ON_PANEL
2
PWR-ON/OFF2
+
EC806
220uF/16V
+
EC806
220uF/16V
C938 10uF(X5R)C938 10uF(X5R)
R817
82K
R817
82K
R900
1K
R900
1K
C935
33P/NC
C935
33P/NC
C1006 0.1uF(X7R)C1006 0.1uF(X7R)
C1000
10uF(X5R)
C1000
10uF(X5R)
C983 0.1uF(X7R)C983 0.1uF(X7R)
C986 0.1uF(X7R)C986 0.1uF(X7R)
C1068
102/25V/0805
C1068
102/25V/0805
+
C1039
1000uF/25V
+
C1039
1000uF/25V
C14
1uF-0603
C14
1uF-0603
R884
1M/1206
R884
1M/1206
R721
10K
R721
10K
C37
100pF
C37
100pF
U808
PC817
U808
PC817
12
43
R800
150K
R800
150K
R804
0R-0402
R804
0R-0402
S2S2
C18
0.1uF(X7R)
C18
0.1uF(X7R)
C949
0.1uF(X7R)
C949
0.1uF(X7R)
Q802
3904
Q802
3904
1
2 3
C971 0.1uF(X7R)C971 0.1uF(X7R)
R68 0.68Ω-0805R68 0.68Ω-0805
R877
470k/1206
R877
470k/1206
R898
1K
R898
1K
+
C1081
1000uF/25V
+
C1081
1000uF/25V
R801
120K
R801
120K
L803
10uH_1.5A
L803
10uH_1.5A
R831
51K
R831
51K
C959 0.1uF(X7R)C959 0.1uF(X7R)
D803
2A06
D803
2A06
C980 10uF(X5R)C980 10uF(X5R)
C1061
0.1uF(X7R)
C1061
0.1uF(X7R)
C35
NC
C35
NC
D10 SS36D10 SS36
2 1
+
C1064
2200uF/25V
+
C1064
2200uF/25V
J2
FOR CPT
J2
FOR CPT
1
2
3
4
5
6
C997 0.1uF(X7R)C997 0.1uF(X7R)
R851 1kR851 1k
SY8101B
SOT23-6
U800
SY8101B
SY8101B
SOT23-6
U800
SY8101B
GND
2
LX
6
VIN
5
FB
3
EN
4
BS
1
+
C1066
220uF/16V
+
C1066
220uF/16V
C955
0.1uF
C955
0.1uF
R895
1R-1206
R895
1R-1206
R848
NC
R848
NC
R841
12K
R841
12K
C974
0.1uF(X7R)
C974
0.1uF(X7R)
CN802
FOR CPT
CN802
FOR CPT
1
2
3
4
5
6
7
8
9
10
C978 0.1uF(X7R)C978 0.1uF(X7R)
AIC2352
SOT-23
U803
AIC2352
AIC2352
SOT-23
U803
AIC2352
GND
2
LX
3
VIN
4
OUT/FB
5
EN
1
R76
100R
R76
100R
C399 0.1uF(X7R)C399 0.1uF(X7R)
+
C1053
22uF/50V
+
C1053
22uF/50V
C1034
472/1KV
C1034
472/1KV
+
C1065
470uF/16V
+
C1065
470uF/16V
Q800
QM3013K
Q800
QM3013K
1
32
C970 0.1uF(X7R)/BOTC970 0.1uF(X7R)/BOT
D807
2A06
D807
2A06
R805
100K
R805
100K
R832
100R
R832
100R
R69 0.68Ω-0805R69 0.68Ω-0805
C946
10uF(X5R)
C946
10uF(X5R)
C996 0.1uF(X7R)C996 0.1uF(X7R)
R852
4.7K
R852
4.7K
C956
10uF(X5R)
C956
10uF(X5R)
Q808
3904
Q808
3904
R700
22R-0603
R700
22R-0603
+
C1067
470uF/16V
+
C1067
470uF/16V
R828
12K
R828
12K
R921 NC/0R-0805R921 NC/0R-0805
R886
NC/24K-1206
R886
NC/24K-1206
L800 10uH_1.5AL800 10uH_1.5A
C985 0.1uF(X7R)C985 0.1uF(X7R)
HS2HS2
1
2
3
10uH/3.8A
L807
10uH/3.8A
L807
C1060
100pF
C1060
100pF
Q103
B601001
TO252-DPAK
Q103
B601001
TO252-DPAK
ADJ
OUT
IN
U802
AMS1117-3.3V
ADJ
OUT
IN
U802
AMS1117-3.3V
3
2
1
4
Q803
3904
Q803
3904
1
2 3
C969 0.1uF(X7R)C969 0.1uF(X7R)
R720
20K
R720
20K
D810
HER207
D810
HER207
R830
20K
R830
20K
C962 0.1uF(X7R)C962 0.1uF(X7R)
R854
1k
R854
1k
U809
TL431
U809
TL431
S3S3
C976
10uF(X5R)
C976
10uF(X5R)
C954
10uF(X5R)
C954
10uF(X5R)
R901
47K
R901
47K
C993 0.1uF(X7R)C993 0.1uF(X7R)
CN805
SW
CN805
SW
1
2
C750
100pF
C750
100pF
R812
100K
R812
100K
C989 10uF(X5R)C989 10uF(X5R)
+
C1035
470uF/16V
+
C1035
470uF/16V
U807U807
GND
1
RI
3
CS
4
VDD
5
GATE
6
FB
2
C939 0.1uF(X7R)/BOTC939 0.1uF(X7R)/BOT
C1010 0.1uF(X7R)C1010 0.1uF(X7R)
R849
NC
R849
NC
C1040
0.1uF-0603
C1040
0.1uF-0603
R892
22R-0805
R892
22R-0805
C979 0.1uF(X7R)/BOTC979 0.1uF(X7R)/BOT
R842
NC
R842
NC
R890
10K/0805
R890
10K/0805
L802
10uH_1.5A
L802
10uH_1.5A
AIC2354
SOT-23
U804
SY8008B SOT-23
AIC2354
SOT-23
U804
SY8008B SOT-23
GND
2
LX
3
VIN
4
OUT/FB
5
EN
1
C973 10uF(X5R)C973 10uF(X5R)
R920 0R-0805R920 0R-0805
C27
1uF-0603
C27
1uF-0603
C957 0.1uFC957 0.1uF
FB10
56-4A-1206
FB10
56-4A-1206
R829
NC
R829
NC
R825 1KR825 1K
R868
1K
R868
1K
U4
AP3608E
U4
AP3608E
CH2
2
CH1
1
CH3
3
CH5
7
CH4
4
PGND1
5
PGND2
6
CH6
8
CH7
9
CH8
10
PWM
11
NC
12
FBX
13
ISET
14
FB
15
SDB
16
SDBX
17
AGND
18
VCC
19
EN
20
C992 0.1uF(X7R)C992 0.1uF(X7R)
Q809
AO4468
Q809
AO4468
4
2
1
3
8
6
5
7
D811
SBR2060
TO-220B
D811
SBR2060
TO-220B
2
2
1
1
3
3
Q805
3904
Q805
3904
1
2 3
TP1TP1
LF801LF801
3
4
12
C975
10uF(X5R)
C975
10uF(X5R)
Q801
2N7002
Q801
2N7002
C972 0.1uF(X7R)C972 0.1uF(X7R)
C1051
1n
C1051
1n
R845
20K
R845
20K
R803
10k
R803
10k
C1014 0.1uF(X7R)C1014 0.1uF(X7R)
C963
0.1uF
C963
0.1uF
C981 10uF(X5R)C981 10uF(X5R)
D1
27V
D1
27V
2 1
R814
10K
R814
10K
R897
2R2-1206
R897
2R2-1206
C945
10uF(X5R)
C945
10uF(X5R)
C1059
0.1uF(X7R)
C1059
0.1uF(X7R)
R815
1K
R815
1K
R834 NCR834 NC
U5
AP3039A
U5
AP3039A
OV
2
UVLO
1
EN
3
PGND
7
VIN
4
VCC
5
OUT
6
RT
8
CS
9
AGND
10
SHDN
11
FB
12
COMP
13
SS
14
R888
1M/1206
R888
1M/1206
C1022
680PF
C1022
680PF
R819
4.7K
R819
4.7K
R853
100R
R853
100R
R839
3.3K
R839
3.3K
C1063
0.1uF(X7R)
C1063
0.1uF(X7R)
TP2TP2
C995 0.1uF(X7R)C995 0.1uF(X7R)
C1013 0.1uF(X7R)C1013 0.1uF(X7R)
C1030
10uF
C1030
10uF
D800
1N4001
D800
1N4001
1
2
R891
1K/0805
R891
1K/0805
FB12
56-4A-1206
FB12
56-4A-1206
C1041
223/25V/0805
C1041
223/25V/0805
C1005 0.1uF(X7R)C1005 0.1uF(X7R)
RV1
PTC
RDH5-3A-W
RV1
PTC
RDH5-3A-W
R865
68K/2W
R865
68K/2W
R887 22R/1206R887 22R/1206
C936 10uF(X5R)C936 10uF(X5R)
R894
470R/1206
R894
470R/1206
C984 0.1uF(X7R)/BOTC984 0.1uF(X7R)/BOT
C982 10uF(X5R)C982 10uF(X5R)
S4S4
C1058
680PF
C1058
680PF
C943
0.1uF(X7R)
C943
0.1uF(X7R)
C800
0.1uF
C800
0.1uF
C1002
0.1uF(X7R)
C1002
0.1uF(X7R)
C1012
100PF
C1012
100PF
R810
100R-1206
R810
100R-1206
R843
510K
R843
510K
R319
10k
R319
10k
R802
10K
R802
10K
CY801CY801
R813 1KR813 1K
C994 0.1uF(X7R)/BOTC994 0.1uF(X7R)/BOT
C991 10uF(X5R)C991 10uF(X5R)
C968 0.1uF(X7R)C968 0.1uF(X7R)
+
EC805
47uF/400V
+
EC805
47uF/400V
C951
10uF(X5R)
C951
10uF(X5R)
L808
2.2uH_1.5A
L808
2.2uH_1.5A
FB13
56-4A-1206
FB13
56-4A-1206
C1007 0.1uF(X7R)C1007 0.1uF(X7R)
+
EC800
220uF/16V
+
EC800
220uF/16V
F800F800
C944 0.1uF(X7R)C944 0.1uF(X7R)
R896
2R2-1206
R896
2R2-1206
R860
1R-1206
R860
1R-1206
R62
10K
R62
10K
C920
10uF(X5R)
C920
10uF(X5R)
R826
1.5K
R826
1.5K
D809
FR107
D809
FR107
R889
100R/0603
R889
100R/0603
L804
2.2uH_1.5A
L804
2.2uH_1.5A
FB6
10uH_1.5A
FB6
10uH_1.5A
C1069
101-0805
C1069
101-0805
HS1HS1
1
2
3
C1004 0.1uF(X7R)C1004 0.1uF(X7R)
R893
470R-0805
R893
470R-0805
10uH/3.8A
L806
10uH/3.8A
L806
C960 0.1uF(X7R)C960 0.1uF(X7R)
R856 1R-1206R856 1R-1206
R809 4.7KR809 4.7K
NP2
NP1
NB1
NB2
NP2
T102 EFD25
NP2
NP1
NB1
NB2
NP2
T102 EFD25
12V
6
GND
4
12V
7
GND
5
3
5V
10
10
NC
11
12
12
8
8
9
9
5V
2
NC
1
R858
10K
R858
10K
+
C1026
220uF/50V
+
C1026
220uF/50V
C998 0.1uF(X7R)C998 0.1uF(X7R)
CN804
HEADER 12
CN804
HEADER 12
1
2
3
4
5
6
7
8
9
10
11
12
AIC2354
SOT-23
U801
SY8008B SOT-23
AIC2354
SOT-23
U801
SY8008B SOT-23
GND
2
LX
3
VIN
4
OUT/FB
5
EN
1
C15 1uF-0603C15 1uF-0603
C952
10uF(X5R)
C952
10uF(X5R)
C988 10uF(X5R)C988 10uF(X5R)
C947
0.1uF
C947
0.1uF
C34
0.1uF-50V-K-0402(X7R)
C34
0.1uF-50V-K-0402(X7R)
C1008 0.1uF(X7R)C1008 0.1uF(X7R)
J4
FOR CPT
J4
FOR CPT
1
2
3
4
D805
2A06
D805
2A06
R837 NCR837 NC
R822
10K
R822
10K
R869 22R/1206R869 22R/1206
C16 1uF-0603C16 1uF-0603
C1 10uF(X5R)C1 10uF(X5R)
TP5TP5
R899
4.7K
R899
4.7K
Q810
10N60
Q810
10N60
2
3
1
C953
0.1uF(X7R)
C953
0.1uF(X7R)
R902
4.7K
R902
4.7K
C964
10P
C964
10P
Q806
B601001
TO252-DPAK
Q806
B601001
TO252-DPAK
D806
SBR20100
TO-220B
D806
SBR20100
TO-220B
2
2
1
1
3
3
CN800
AC IN
CN800
AC IN
1
2
C958
0.1uF
C958
0.1uF
C966
33P
C966
33P
C1009 0.1uF(X7R)C1009 0.1uF(X7R)
R836 NCR836 NC
CY802
222
CY802
222
CY800CY800
FB7
40R
FB7
40R
CN803
FOR CPT
CN803
FOR CPT
1
2
3
4
5
6
7
8
9
10
FB8
10uH_1.5A
FB8
10uH_1.5A
D804
2A06
D804
2A06
C1070
2.2u-0805
C1070
2.2u-0805
R835 NCR835 NC
+
C948
220uF/16V
+
C948
220uF/16V
C1001
10uF(X5R)
C1001
10uF(X5R)
R870
100K
R870
100K
C1056
0.1uF-50V-K-0805(X7R)
C1056
0.1uF-50V-K-0805(X7R)
D9 SS36D9 SS36
2
1
R855
120K
R855
120K
R2297
10K
R2297
10K
R811
100K
R811
100K
R816
120K
R816
120K
C967 10uF(X5R)C967 10uF(X5R)
C942 0.1uF(X7R)C942 0.1uF(X7R)
+
C6
220uF/50V
+
C6
220uF/50V
R61
10K
R61
10K
C950
33P
C950
33P
C1011 0.1uF(X7R)C1011 0.1uF(X7R)
R875
10k
R875
10k
C20
0.1uF(X7R)
C20
0.1uF(X7R)
NP2
NP1
NB1
NB2
NP2
T103 EFD25
NP2
NP1
NB1
NB2
NP2
T103 EFD25
12V
8
GND
10
12V
7
GND
9
11
5V
3
3
2
2
1
1
6
6
5
5
5V
12
4
4
L805
10uH/3.8A
L805
10uH/3.8A
R883
1M/1206
R883
1M/1206
C931
0.1uF-50V-K-0805(X7R)
C931
0.1uF-50V-K-0805(X7R)
J7
FOR CPT
J7
FOR CPT
1
2
C1036
100P/1KV
C1036
100P/1KV
R859
100K
R859
100K
R847
NC
R847
NC
C1038
0.1uF-0603
C1038
0.1uF-0603
C941 0.1uF(X7R)/BOTC941 0.1uF(X7R)/BOT
CN806
HEADER 12
CN806
HEADER 12
1
2
3
4
5
6
7
8
9
10
11
12
J3J3
1
2
CX1CX1
R818
100K
R818
100K
C38
1uF-0603
C38
1uF-0603
ZD102
13V
ZD102
13V
CN2
HEADER 2
CN2
HEADER 2
3
3
4
4
1
1
2
2
S5S5
+
C1021
220uF/16V
+
C1021
220uF/16V
C2 10uF(X5R)C2 10uF(X5R)
R18
270K
R18
270K
C1071
0.1uF(X7R)
C1071
0.1uF(X7R)
R838
100R
R838
100R
R844
200K
R844
200K
L801
2.2uH_1.5A
L801
2.2uH_1.5A
R885
1M/1206
R885
1M/1206
R823
51K
R823
51K
LF800LF800
3
4
12
R876
470K/1206
R876
470K/1206
C32
103/25V/0402
C32
103/25V/0402
R65 0.68Ω-0805R65 0.68Ω-0805
C977 0.1uF(X7R)C977 0.1uF(X7R)
R846
NC
R846
NC
C99933P/NC C99933P/NC
R867 22R/1206R867 22R/1206
R882 22R/1206R882 22R/1206
C937 10uF(X5R)C937 10uF(X5R)
S19S19
1
2
TP3TP3
S1S1
C5
0.1uF
C5
0.1uF
R874
100K
R874
100K
C940 0.1uF(X7R)/BOTC940 0.1uF(X7R)/BOT
C965
0.1uF(X7R)
C965
0.1uF(X7R)
R14
100R
R14
100R
C31
102/25V/0402
C31
102/25V/0402
Q6
3904
Q6
3904
C990 10uF(X5R)C990 10uF(X5R)
U3
AP3608E
U3
AP3608E
CH2
2
CH1
1
CH3
3
CH5
7
CH4
4
PGND1
5
PGND2
6
CH6
8
CH7
9
CH8
10
PWM
11
NC
12
FBX
13
ISET
14
FB
15
SDB
16
SDBX
17
AGND
18
VCC
19
EN
20
FB5
4.7uH_1.5A
FB5
4.7uH_1.5A
C987 10uF(X5R)C987 10uF(X5R)
C961 0.1uF(X7R)C961 0.1uF(X7R)
R850
100R-0603
R850
100R-0603
R878
470k/1206
R878
470k/1206
R806
20K
R806
20K
J8J8
1
2
R750
47R
R750
47R
Q811
3906
Q811
3906
C1037
680PF
C1037
680PF
TP4TP4
R857
330K
R857
330K
R880
10R/1206
R880
10R/1206

Close to DRAM
Close to MSD309
Close to MSD306
Close to MSD306
Close to DRAM
Close to DRAM
Close to MSD309
Close to DRAM
Close to MSD306Close to MSD306
Close to DRAM
Close to DRAM
A_MVERF
MA_DQ15
MA_DQ8
MA_DQ10
MA_DQ13
MIUA_DQ[0:15]
MIUA_DQ11
MIUA_DQ12
MIUA_DQ9
MIUA_DQ14
MA_DQ11
MA_DQ12
MA_DQ9
MA_DQ14
MA_DQ6
MA_DQ1
MA_DQ3
MA_DQ4
MIUA_DQ6
MIUA_DQ1
MIUA_DQ3
MIUA_DQ4
MIUA_DQ7
MIUA_DQ0
MIUA_DQ2
MIUA_DQ5 MA_DQ5
MA_DQ2
MA_DQ7
MA_DQ0
MIUA_DQ15
MIUA_DQ8
MIUA_DQ10
MIUA_DQ13
MA_RASZ
MA_CASZ
MA_A11
MA_A8
MIUA_A[0:13]
MA_A7
MA_A9
MA_A12
MA_A3
MA_A1
MA_A10
MA_A5
MIUA_A4
MIUA_A6
MA_A0
MA_A2
MA_BA0
MA_WEZ
MIUA_BA0
MA_MCLK
MIUA_WEZ
MIUA_ODT
MA_BA1
MA_ODT
MIUA_A8
MIUA_A11
MIUA_BA1
MA_CKE
MA_BA2
MA_A4
MA_A6
MIUA_A0
MIUA_A2
MIUA_MCKEMA_DQM1
MA_BA0
MA_BA1
MA_DQM0MIUA_DQM0
MIUA_DQM1
MA_DQ6
MA_DQ3
MA_DQ1
MA_DQ4
MA_DQ15
MA_DQ8
MA_DQ10
MA_DQ13
MA_A8
MA_A11
MA_WEZ
MA_ODT
MA_RASZ
MA_BA2
MA_DQ5
MA_DQ2
MA_DQ7
MA_DQ0
MA_CASZ
MA_A1
MA_A10
MA_A5
MA_MCLKZ
MA_MCLK
MA_CKE
MA_DQM0
MA_DQM1
MA_DQS0
MA_DQSB0
MA_DQS1
MA_DQSB1
MA_A9
MA_A12
MA_A7
MA_DQ11
MA_A3
MA_A0
MA_DQ12
MA_A2
MA_A4
MA_A6
MA_DQ9
MA_DQ14
A_MVERF
MIUA_RASZ
MIUA_CASZ
MIUA_DQS0
MIUA_DQS0B
MA_DQS0
MA_DQSB0
MIUA_DQS1
MIUA_DQS1B
MA_DQS1
MA_DQSB1
MA_MCLKZ
MIUA_A5
MIUA_BA2
MIUA_A7
MIUA_A3
MIUA_A1
MIUA_A12
MIUA_A9
MIUA_A10
MB_DQ6
MB_DQ3
MB_DQ1
MB_DQ4
MB_DQ15
MB_DQ8
MB_DQ10
MB_DQ13
MB_A8
MB_A11
MB_WEZ
MB_ODT
MB_RASZ
MB_BA2
MB_DQ5
MB_DQ2
MB_DQ7
MB_DQ0
MB_CASZ
MB_A1
MB_A10
MB_A5
MB_MCLKZ
MB_MCLK
MB_CKE
MB_DQM0
MB_DQM1
MB_DQS0
MB_DQSB0
MB_DQS1
MB_DQSB1
MB_A9
MB_A12
MB_A7
MB_DQ11
MB_A3
MB_A0
MB_DQ12
MB_A2
MB_A4
MB_A6
MB_DQ9
MB_DQ14
B_MVERF
MIUB_RASZ
MIUB_CASZ
MB_DQS1
MB_DQSB1
B_MVERF
MB_MCLKZ
MIUB_A5
MIUB_BA2
MIUB_A7
MIUB_A3
MIUB_A1
MIUB_A12
MIUB_A9
MIUB_A10
MIUB_DQS0
MIUB_DQS0B
MB_DQS0
MB_DQSB0
MIUB_DQS1
MIUB_DQS1B
MB_DQ15
MB_DQ8
MB_DQ10
MB_DQ13
MIUB_DQ[0:15]
MIUB_DQ11
MIUB_DQ12
MIUB_DQ9
MIUB_DQ14
MB_DQ11
MB_DQ12
MB_DQ9
MB_DQ14
MB_DQ6
MB_DQ1
MB_DQ3
MB_DQ4
MIUB_DQ6
MIUB_DQ1
MIUB_DQ3
MIUB_DQ4
MIUB_DQ7
MIUB_DQ0
MIUB_DQ2
MIUB_DQ5 MB_DQ5
MB_DQ2
MB_DQ7
MB_DQ0
MIUB_DQ15
MIUB_DQ8
MIUB_DQ10
MIUB_DQ13
MB_RASZ
MB_CASZ
MB_A11
MB_A8
MIUB_A[0:13]
MB_A7
MB_A9
MB_A12
MB_A3
MB_A1
MB_A10
MB_A5
MIUB_A4
MIUB_A6
MB_A0
MB_A2
MB_BA0
MB_WEZ
MIUB_BA0
MB_MCLK
MIUB_WEZ
MIUB_ODT
MB_BA1
MB_ODT
MIUB_A8
MIUB_A11
MIUB_BA1
MB_CKE
MB_BA2
MB_A4
MB_A6
MIUB_A0
MIUB_A2
MIUB_MCKEMB_DQM1
MB_BA0
MB_BA1
MB_DQM0
MIUB_DQM0
MIUB_DQM1
MA_A13MIUA_A13 MA_A13
MB_A13
MIUB_A13
MB_A13
1.8VA
1.8VA
1.8VA
1.8VA
MIUA_DQ[0:15]2
MIUA_BA22
MIUA_A[0:13]2
MIUA_MCLK2
MIUA_MCLKZ2
MIUA_BA02
MIUA_WEZ2
MIUA_ODT2
MIUA_BA12
MIUA_MCKE2
MIUA_DQM02
MIUA_DQM12
MIUA_RASZ2
MIUA_CASZ2
MIUA_DQS02
MIUA_DQS0B2
MIUA_DQS12
MIUA_DQS1B2
MIUB_RASZ2
MIUB_CASZ2
MIUB_DQS02
MIUB_DQS0B2
MIUB_DQS12
MIUB_DQS1B2
MIUB_DQ[0:15]2
MIUB_BA22
MIUB_A[0:13]2
MIUB_MCLK2
MIUB_MCLKZ2
MIUB_BA02
MIUB_WEZ2
MIUB_ODT2
MIUB_BA12
MIUB_MCKE2
MIUB_DQM02
MIUB_DQM12
R396 75RR396 75R
7531
8642
RP20 22RX4
7531
8642
RP20 22RX4
C430
1n
C430
1n
7531
8642
RP13 22RX4
7531
8642
RP13 22RX4
7531
8642
RP4 22RX4
7531
8642
RP4 22RX4
7531
8642
RP10 75RX4
7531
8642
RP10 75RX4
7531
8642
RP59 22RX4
7531
8642
RP59 22RX4
7531
8642
RP8 75RX4
7531
8642
RP8 75RX4
7531
8642
RP39
22RX4
7531
8642
RP39
22RX4
R71
100R
R71
100R
7531
8642
RP11 22RX4
7531
8642
RP11 22RX4
C433
1n
C433
1n
7531
8642
RP5 75RX4
7531
8642
RP5 75RX4
753 1
864 2
RP19 75RX4
753 1
864 2
RP19 75RX4
R107
10k
R107
10k
7531
8642
RP21 22RX4
7531
8642
RP21 22RX4
7531
8642
RP1 22RX4
7531
8642
RP1 22RX4
7 5 3 1
8 6 4 2
RP17
75RX4
7 5 3 1
8 6 4 2
RP17
75RX4
7531
8642
RP6 75RX4
7531
8642
RP6 75RX4
R378
100R
R378
100R
7 5 3 1
8 642
RP18 75RX4
7 5 3 1
8 642
RP18 75RX4
7531
8642
RP3 22RX4
7531
8642
RP3 22RX4
A
B
C
D
E
F
G
H
J
K
L
M
N
P
R
123 789
Vdd NC Vss
DQ14 VssQ UDM
VddQ DQ9 VddQ
DQ12 VssQ DQ11
Vdd NC Vss
DQ6 VssQ LDM
VddQ DQ1 VddQ
DQ4 VssQ DQ3
VddL Vref Vss
CKE WE#
RFU BA0 BA1
A10 A1
Vss A3 A5
A7 A9
Vdd A12 RFU
VssQ UDQS# VddQ
UDQS VssQ DQ15
VddQ DQ8 VddQ
DQ10 VssQ DQ13
VssQ LDQS# VddQ
LDQS VssQ DQ7
VddQ DQ0 VddQ
DQ2 VssQ DQ5
VssDL CK Vdd
RAS# CK# ODT
CAS# CS#
A2 A0 Vdd
A6 A4
A11 A8
RFU NC
Vss
U15 W9751G6IB-25
Vdd
A1
NC
A2
Vss
A3
DQ14
B1
VssQ
B2
UDM
B3
A4
N8
A6
N7
Vdd
M9
A0
M8
A2
M7
CS#
L8
CAS#
L7
ODT
K9
CLK#
K8
RAS#
K7
Vdd
J9
CLK
J8
VssDL
J7
DQ5
H9
VssQ
H8
DQ2
H7
VddQ
G9
DQ0
G8
VddQ
G7
DQ7
F9
VssQ
F8
LDQS
F7
VddQ
E9
LDQS#
E8
VssQ
E7
DQ13
D9
VssQ
D8
DQ10
D7
VddQ
C9
DQ8
C8
VddQ
C7
A7
P2
A9
P3
Vdd
R1
A12
R2
RFU
R3
VssQ
A7
UDQS#
A8
VddQ
A9
UDQS
B7
VssQ
B8
DQ15
B9
A10
M2
A1
M3
Vss
N1
A3
N2
A5
N3
VddQ
C1
DQ9
C2
VddQ
C3
DQ12
D1
VssQ
D2
DQ11
D3
Vdd
E1
NC
E2
Vss
E3
DQ6
F1
VssQ
F2
LDM
F3
VddQ
G1
DQ1
G2
VddQ
G3
DQ4
H1
VssQ
H2
DQ3
H3
VddL
J1
Vref
J2
Vss
J3
CKE
K2
WE#
K3
RFU
L1
BA0
L2
BA1
L3
RFU
R7
NC
R8
Vss
P9
A8
P8
A11
P7
C428
47n
C428
47n
7531
8642
RP7 75RX4
7531
8642
RP7 75RX4
R116
10k
R116
10k
C431
47n
C431
47n
7531
8642
RP60
22RX4
7531
8642
RP60
22RX4
7531
8642
RP12 22RX4
7531
8642
RP12 22RX4
R23
100R
R23
100R
R310
10k
R310
10k
7 5 3 1
8 6 4 2
RP15
75RX4
7 5 3 1
8 6 4 2
RP15
75RX4
7531
8642
RP50 22RX4
7531
8642
RP50 22RX4
A
B
C
D
E
F
G
H
J
K
L
M
N
P
R
123 789
Vdd NC Vss
DQ14 VssQ UDM
VddQ DQ9 VddQ
DQ12 VssQ DQ11
Vdd NC Vss
DQ6 VssQ LDM
VddQ DQ1 VddQ
DQ4 VssQ DQ3
VddL Vref Vss
CKE WE#
RFU BA0 BA1
A10 A1
Vss A3 A5
A7 A9
Vdd A12 RFU
VssQ UDQS# VddQ
UDQS VssQ DQ15
VddQ DQ8 VddQ
DQ10 VssQ DQ13
VssQ LDQS# VddQ
LDQS VssQ DQ7
VddQ DQ0 VddQ
DQ2 VssQ DQ5
VssDL CK Vdd
RAS# CK# ODT
CAS# CS#
A2 A0 Vdd
A6 A4
A11 A8
RFU NC
Vss
U9 W9751G6IB-25
Vdd
A1
NC
A2
Vss
A3
DQ14
B1
VssQ
B2
UDM
B3
A4
N8
A6
N7
Vdd
M9
A0
M8
A2
M7
CS#
L8
CAS#
L7
ODT
K9
CLK#
K8
RAS#
K7
Vdd
J9
CLK
J8
VssDL
J7
DQ5
H9
VssQ
H8
DQ2
H7
VddQ
G9
DQ0
G8
VddQ
G7
DQ7
F9
VssQ
F8
LDQS
F7
VddQ
E9
LDQS#
E8
VssQ
E7
DQ13
D9
VssQ
D8
DQ10
D7
VddQ
C9
DQ8
C8
VddQ
C7
A7
P2
A9
P3
Vdd
R1
A12
R2
RFU
R3
VssQ
A7
UDQS#
A8
VddQ
A9
UDQS
B7
VssQ
B8
DQ15
B9
A10
M2
A1
M3
Vss
N1
A3
N2
A5
N3
VddQ
C1
DQ9
C2
VddQ
C3
DQ12
D1
VssQ
D2
DQ11
D3
Vdd
E1
NC
E2
Vss
E3
DQ6
F1
VssQ
F2
LDM
F3
VddQ
G1
DQ1
G2
VddQ
G3
DQ4
H1
VssQ
H2
DQ3
H3
VddL
J1
Vref
J2
Vss
J3
CKE
K2
WE#
K3
RFU
L1
BA0
L2
BA1
L3
RFU
R7
NC
R8
Vss
P9
A8
P8
A11
P7
R13 75RR13 75R
753 1
864 2
RP14 22RX4
753 1
864 2
RP14 22RX4
R377
10k
R377
10k
7 5 3 1
8 6 4 2
RP2 22RX4
7 5 3 1
8 6 4 2
RP2 22RX4
R379
100R
R379
100R
R383 75RR383 75R
7531
8642
RP40
22RX4
7531
8642
RP40
22RX4
7531
8642
RP57
22RX4
7531
8642
RP57
22RX4
R380 75RR380 75R
7531
8642
RP9 75RX4
7531
8642
RP9 75RX4

Close to DRAM
Close to MSD309
Close to MSD306
Close to MSD306
Close to DRAM
Close to DRAM
Close to MSD309
Close to DRAM
Close to MSD306Close to MSD306
Close to DRAM
Close to DRAM
A_MVERF
MA_DQ15
MA_DQ8
MA_DQ10
MA_DQ13
MIUA_DQ[0:15]
MIUA_DQ11
MIUA_DQ12
MIUA_DQ9
MIUA_DQ14
MA_DQ11
MA_DQ12
MA_DQ9
MA_DQ14
MA_DQ6
MA_DQ1
MA_DQ3
MA_DQ4
MIUA_DQ6
MIUA_DQ1
MIUA_DQ3
MIUA_DQ4
MIUA_DQ7
MIUA_DQ0
MIUA_DQ2
MIUA_DQ5
MA_DQ5
MA_DQ2
MA_DQ7
MA_DQ0
MIUA_DQ15
MIUA_DQ8
MIUA_DQ10
MIUA_DQ13
MA_RASZ
MA_CASZ
MA_A11
MA_A8
MIUA_A[0:13]
MA_A7
MA_A9
MA_A12
MA_A3
MA_A1
MA_A10
MA_A5
MIUA_A4
MIUA_A6
MA_A0
MA_A2
MA_BA0
MA_WEZ
MIUA_BA0
MA_MCLK
MIUA_WEZ
MIUA_ODT
MA_BA1
MA_ODT
MIUA_A8
MIUA_A11
MIUA_BA1
MA_CKE
MA_BA2
MA_A4
MA_A6
MIUA_A0
MIUA_A2
MIUA_MCKE
MA_DQM1
MA_BA0
MA_BA1
MA_DQM0
MIUA_DQM0
MIUA_DQM1
MA_DQ6
MA_DQ3
MA_DQ1
MA_DQ4
MA_DQ15
MA_DQ8
MA_DQ10
MA_DQ13
MA_A8
MA_A11
MA_WEZ
MA_ODT
MA_RASZ
MA_BA2
MA_DQ5
MA_DQ2
MA_DQ7
MA_DQ0
MA_CASZ
MA_A1
MA_A10
MA_A5
MA_MCLKZ
MA_MCLK
MA_CKE
MA_DQM0
MA_DQM1
MA_DQS0
MA_DQSB0
MA_DQS1
MA_DQSB1
MA_A9
MA_A12
MA_A7
MA_DQ11
MA_A3
MA_A0
MA_DQ12
MA_A2
MA_A4
MA_A6
MA_DQ9
MA_DQ14
A_MVERF
MIUA_RASZ
MIUA_CASZ
MIUA_DQS0
MIUA_DQS0B
MA_DQS0
MA_DQSB0
MIUA_DQS1
MIUA_DQS1B
MA_DQS1
MA_DQSB1
MA_MCLKZ
MIUA_A5
MIUA_BA2
MIUA_A7
MIUA_A3
MIUA_A1
MIUA_A12
MIUA_A9
MIUA_A10
MB_DQ6
MB_DQ3
MB_DQ1
MB_DQ4
MB_DQ15
MB_DQ8
MB_DQ10
MB_DQ13
MB_A8
MB_A11
MB_WEZ
MB_ODT
MB_RASZ
MB_BA2
MB_DQ5
MB_DQ2
MB_DQ7
MB_DQ0
MB_CASZ
MB_A1
MB_A10
MB_A5
MB_MCLKZ
MB_MCLK
MB_CKE
MB_DQM0
MB_DQM1
MB_DQS0
MB_DQSB0
MB_DQS1
MB_DQSB1
MB_A9
MB_A12
MB_A7
MB_DQ11
MB_A3
MB_A0
MB_DQ12
MB_A2
MB_A4
MB_A6
MB_DQ9
MB_DQ14
B_MVERF
MIUB_RASZ
MIUB_CASZ
MB_DQS1
MB_DQSB1
B_MVERF
MB_MCLKZ
MIUB_A5
MIUB_BA2
MIUB_A7
MIUB_A3
MIUB_A1
MIUB_A12
MIUB_A9
MIUB_A10
MIUB_DQS0
MIUB_DQS0B
MB_DQS0
MB_DQSB0
MIUB_DQS1
MIUB_DQS1B
MB_DQ15
MB_DQ8
MB_DQ10
MB_DQ13
MIUB_DQ[0:15]
MIUB_DQ11
MIUB_DQ12
MIUB_DQ9
MIUB_DQ14
MB_DQ11
MB_DQ12
MB_DQ9
MB_DQ14
MB_DQ6
MB_DQ1
MB_DQ3
MB_DQ4
MIUB_DQ6
MIUB_DQ1
MIUB_DQ3
MIUB_DQ4
MIUB_DQ7
MIUB_DQ0
MIUB_DQ2
MIUB_DQ5 MB_DQ5
MB_DQ2
MB_DQ7
MB_DQ0
MIUB_DQ15
MIUB_DQ8
MIUB_DQ10
MIUB_DQ13
MB_RASZ
MB_CASZ
MB_A11
MB_A8
MIUB_A[0:13]
MB_A7
MB_A9
MB_A12
MB_A3
MB_A1
MB_A10
MB_A5
MIUB_A4
MIUB_A6
MB_A0
MB_A2
MB_BA0
MB_WEZ
MIUB_BA0
MB_MCLK
MIUB_WEZ
MIUB_ODT
MB_BA1
MB_ODT
MIUB_A8
MIUB_A11
MIUB_BA1
MB_CKE
MB_BA2
MB_A4
MB_A6
MIUB_A0
MIUB_A2
MIUB_MCKEMB_DQM1
MB_BA0
MB_BA1
MB_DQM0MIUB_DQM0
MIUB_DQM1
MA_A13MIUA_A13 MA_A13
MB_A13MIUB_A13
MB_A13
1.8VA
1.8VA
1.8VA
1.8VA
MIUA_DQ[0:15]2
MIUA_BA22
MIUA_A[0:13]2
MIUA_MCLK2
MIUA_MCLKZ2
MIUA_BA02
MIUA_WEZ2
MIUA_ODT2
MIUA_BA12
MIUA_MCKE2
MIUA_DQM02
MIUA_DQM12
MIUA_RASZ2
MIUA_CASZ2
MIUA_DQS02
MIUA_DQS0B2
MIUA_DQS12
MIUA_DQS1B2
MIUB_RASZ2
MIUB_CASZ2
MIUB_DQS02
MIUB_DQS0B2
MIUB_DQS12
MIUB_DQS1B2
MIUB_DQ[0:15]2
MIUB_BA22
MIUB_A[0:13]2
MIUB_MCLK2
MIUB_MCLKZ2
MIUB_BA02
MIUB_WEZ2
MIUB_ODT2
MIUB_BA12
MIUB_MCKE2
MIUB_DQM02
MIUB_DQM12
R396 75RR396 75R
7531
8642
RP20 22RX4
7531
8642
RP20 22RX4
C430
1n
C430
1n
7531
8642
RP13 22RX4
7531
8642
RP13 22RX4
7531
8642
RP4 22RX4
7531
8642
RP4 22RX4
7531
8642
RP10 75RX4
7531
8642
RP10 75RX4
7531
8642
RP59 22RX4
7531
8642
RP59 22RX4
7531
8642
RP8 75RX4
7531
8642
RP8 75RX4
7531
8642
RP39
22RX4
7531
8642
RP39
22RX4
R71
100R
R71
100R
7531
8642
RP11 22RX4
7531
8642
RP11 22RX4
C433
1n
C433
1n
7531
8642
RP5 75RX4
7531
8642
RP5 75RX4
753 1
864 2
RP19 75RX4
753 1
864 2
RP19 75RX4
R107
10k
R107
10k
7531
8642
RP21 22RX4
7531
8642
RP21 22RX4
7531
8642
RP1 22RX4
7531
8642
RP1 22RX4
7 5 3 1
8 6 4 2
RP17
75RX4
7 5 3 1
8 6 4 2
RP17
75RX4
7531
8642
RP6 75RX4
7531
8642
RP6 75RX4
R378
100R
R378
100R
7 5 3 1
8 642
RP18 75RX4
7 5 3 1
8 642
RP18 75RX4
7531
8642
RP3 22RX4
7531
8642
RP3 22RX4
A
B
C
D
E
F
G
H
J
K
L
M
N
P
R
123 789
Vdd NC Vss
DQ14 VssQ UDM
VddQ DQ9 VddQ
DQ12 VssQ DQ11
Vdd NC Vss
DQ6 VssQ LDM
VddQ DQ1 VddQ
DQ4 VssQ DQ3
VddL Vref Vss
CKE WE#
RFU BA0 BA1
A10 A1
Vss A3 A5
A7 A9
Vdd A12 RFU
VssQ UDQS# VddQ
UDQS VssQ DQ15
VddQ DQ8 VddQ
DQ10 VssQ DQ13
VssQ LDQS# VddQ
LDQS VssQ DQ7
VddQ DQ0 VddQ
DQ2 VssQ DQ5
VssDL CK Vdd
RAS# CK# ODT
CAS# CS#
A2 A0 Vdd
A6 A4
A11 A8
RFU NC
Vss
U15 W9751G6IB-25
A
B
C
D
E
F
G
H
J
K
L
M
N
P
R
123 789
Vdd NC Vss
DQ14 VssQ UDM
VddQ DQ9 VddQ
DQ12 VssQ DQ11
Vdd NC Vss
DQ6 VssQ LDM
VddQ DQ1 VddQ
DQ4 VssQ DQ3
VddL Vref Vss
CKE WE#
RFU BA0 BA1
A10 A1
Vss A3 A5
A7 A9
Vdd A12 RFU
VssQ UDQS# VddQ
UDQS VssQ DQ15
VddQ DQ8 VddQ
DQ10 VssQ DQ13
VssQ LDQS# VddQ
LDQS VssQ DQ7
VddQ DQ0 VddQ
DQ2 VssQ DQ5
VssDL CK Vdd
RAS# CK# ODT
CAS# CS#
A2 A0 Vdd
A6 A4
A11 A8
RFU NC
Vss
U15 W9751G6IB-25
Vdd
A1
NC
A2
Vss
A3
DQ14
B1
VssQ
B2
UDM
B3
A4
N8
A6
N7
Vdd
M9
A0
M8
A2
M7
CS#
L8
CAS#
L7
ODT
K9
CLK#
K8
RAS#
K7
Vdd
J9
CLK
J8
VssDL
J7
DQ5
H9
VssQ
H8
DQ2
H7
VddQ
G9
DQ0
G8
VddQ
G7
DQ7
F9
VssQ
F8
LDQS
F7
VddQ
E9
LDQS#
E8
VssQ
E7
DQ13
D9
VssQ
D8
DQ10
D7
VddQ
C9
DQ8
C8
VddQ
C7
A7
P2
A9
P3
Vdd
R1
A12
R2
RFU
R3
VssQ
A7
UDQS#
A8
VddQ
A9
UDQS
B7
VssQ
B8
DQ15
B9
A10
M2
A1
M3
Vss
N1
A3
N2
A5
N3
VddQ
C1
DQ9
C2
VddQ
C3
DQ12
D1
VssQ
D2
DQ11
D3
Vdd
E1
NC
E2
Vss
E3
DQ6
F1
VssQ
F2
LDM
F3
VddQ
G1
DQ1
G2
VddQ
G3
DQ4
H1
VssQ
H2
DQ3
H3
VddL
J1
Vref
J2
Vss
J3
CKE
K2
WE#
K3
RFU
L1
BA0
L2
BA1
L3
RFU
R7
NC
R8
Vss
P9
A8
P8
A11
P7
C428
47n
C428
47n
7531
8642
RP7 75RX4
7531
8642
RP7 75RX4
R116
10k
R116
10k
C431
47n
C431
47n
7531
8642
RP60
22RX4
7531
8642
RP60
22RX4
7531
8642
RP12 22RX4
7531
8642
RP12 22RX4
R23
100R
R23
100R
R310
10k
R310
10k
7 5 3 1
8 6 4 2
RP15
75RX4
7 5 3 1
8 6 4 2
RP15
75RX4
7531
8642
RP50 22RX4
7531
8642
RP50 22RX4
A
B
C
D
E
F
G
H
J
K
L
M
N
P
R
123 789
Vdd NC Vss
DQ14 VssQ UDM
VddQ DQ9 VddQ
DQ12 VssQ DQ11
Vdd NC Vss
DQ6 VssQ LDM
VddQ DQ1 VddQ
DQ4 VssQ DQ3
VddL Vref Vss
CKE WE#
RFU BA0 BA1
A10 A1
Vss A3 A5
A7 A9
Vdd A12 RFU
VssQ UDQS# VddQ
UDQS VssQ DQ15
VddQ DQ8 VddQ
DQ10 VssQ DQ13
VssQ LDQS# VddQ
LDQS VssQ DQ7
VddQ DQ0 VddQ
DQ2 VssQ DQ5
VssDL CK Vdd
RAS# CK# ODT
CAS# CS#
A2 A0 Vdd
A6 A4
A11 A8
RFU NC
Vss
U9 W9751G6IB-25
A
B
C
D
E
F
G
H
J
K
L
M
N
P
R
123 789
Vdd NC Vss
DQ14 VssQ UDM
VddQ DQ9 VddQ
DQ12 VssQ DQ11
Vdd NC Vss
DQ6 VssQ LDM
VddQ DQ1 VddQ
DQ4 VssQ DQ3
VddL Vref Vss
CKE WE#
RFU BA0 BA1
A10 A1
Vss A3 A5
A7 A9
Vdd A12 RFU
VssQ UDQS# VddQ
UDQS VssQ DQ15
VddQ DQ8 VddQ
DQ10 VssQ DQ13
VssQ LDQS# VddQ
LDQS VssQ DQ7
VddQ DQ0 VddQ
DQ2 VssQ DQ5
VssDL CK Vdd
RAS# CK# ODT
CAS# CS#
A2 A0 Vdd
A6 A4
A11 A8
RFU NC
Vss
U9 W9751G6IB-25
Vdd
A1
NC
A2
Vss
A3
DQ14
B1
VssQ
B2
UDM
B3
A4
N8
A6
N7
Vdd
M9
A0
M8
A2
M7
CS#
L8
CAS#
L7
ODT
K9
CLK#
K8
RAS#
K7
Vdd
J9
CLK
J8
VssDL
J7
DQ5
H9
VssQ
H8
DQ2
H7
VddQ
G9
DQ0
G8
VddQ
G7
DQ7
F9
VssQ
F8
LDQS
F7
VddQ
E9
LDQS#
E8
VssQ
E7
DQ13
D9
VssQ
D8
DQ10
D7
VddQ
C9
DQ8
C8
VddQ
C7
A7
P2
A9
P3
Vdd
R1
A12
R2
RFU
R3
VssQ
A7
UDQS#
A8
VddQ
A9
UDQS
B7
VssQ
B8
DQ15
B9
A10
M2
A1
M3
Vss
N1
A3
N2
A5
N3
VddQ
C1
DQ9
C2
VddQ
C3
DQ12
D1
VssQ
D2
DQ11
D3
Vdd
E1
NC
E2
Vss
E3
DQ6
F1
VssQ
F2
LDM
F3
VddQ
G1
DQ1
G2
VddQ
G3
DQ4
H1
VssQ
H2
DQ3
H3
VddL
J1
Vref
J2
Vss
J3
CKE
K2
WE#
K3
RFU
L1
BA0
L2
BA1
L3
RFU
R7
NC
R8
Vss
P9
A8
P8
A11
P7
R13 75RR13 75R
753 1
864 2
RP14 22RX4
753 1
864 2
RP14 22RX4
R377
10k
R377
10k
7 5 3 1
8 6 4 2
RP2 22RX4
7 5 3 1
8 6 4 2
RP2 22RX4
R379
100R
R379
100R
R383 75RR383 75R
7531
8642
RP40
22RX4
7531
8642
RP40
22RX4
7531
8642
RP57
22RX4
7531
8642
RP57
22RX4
R380 75RR380 75R
7531
8642
RP9 75RX4
7531
8642
RP9 75RX4

FOR EUROPE
PCM_CD2_N
PCM_CD_N
PCM_CD1_N
PCM_CE_N
PCM_A10
PCM_A11
PCM_A9
PCM_A8
PCM_IRQA_N
PCM_A13
PCM_A14
PCM_A12
PCM_A7
PCM_A6
PCM_A5
PCM_A4
PCM_A3
PCM_A2
PCM_A1
PCM_A0
PCM_D0
PCM_D1
PCM_D2
PCM_D7
PCM_D4
PCM_D5
PCM_D6
PCM_D3
PCM_CE_N
PCM_CD_N
PCM_OE_N
PCM_WE_N
PCM_IRQA_N
PCM_REG_N
PCM_WAIT_N
PCM_RESET
PCM_IORD_N
PCM_IOWR_N
PCM_CD2_N
PCM_CD1_N
TS_MDI0
TS_MDI1
TS_MDI2
TS_MDI3
TS_MDI4
TS_MDI5
TS_MDI6
TS_MDI7
PCM_A[14:0]
TS_MDO3
TS_MDO4
TS_MDO5
TS_MDO6
TS_MDO7
TS_MOCLK
TS_MDO2
TS_MOVAL
TS_MOSTART
TS_MDO0
TS_MDO1
PCM_IORD_N
PCM_IOWR_N
PCM_WAIT_N
PCM_RESET
PCM_REG_N
PCM_OE_N
PCM_WE_N
PCM_D[7:0]
TS_MDO4
TS_MDO5
TS_MDO6
TS_MDO7
TS_MDO[7:0]
TS_MDO0
TS_MDO1
TS_MDO2
TS_MDO3
5VA
VCC-PCMCIAVCC-PCMCIA
5VA
PCM_IOWR_N 2
TSSTART2,4
TSCLK 2,4
TSVALID 2,4
PCM_CE_N 2
PCM_A[14:0] 2
PCM_RESET 2
PCM_WAIT_N 2
PCM_IRQA_N 2
PCM_D[7:0] 2
PCM_REG_N 2
TS_MOCLK 2
PCM_OE_N 2
PCM_WE_N 2
TS_MDI[7:0] 2,4
TS_MOSTART 2
TS_MOVAL 2
PCM_CD_N 2
PCM_IORD_N 2
TS_MDO[7:0] 2
C456
0.1uF
C456
0.1uF
R659 270RR659 270R
DD40
BAW70
DD40
BAW70
3
1
2
C166
10uF(X5R)
C166
10uF(X5R)
R393
1K
R393
1K
R658
2.2K
R658
2.2K
R397
1K
R397
1K
CONN1
PCMCIA_CNT
CONN1
PCMCIA_CNT
GND
1
D3
2
D4
3
D5
4
D6
5
D7
6
CE1#
7
A10
8
OE#
9
A11
10
A9
11
A8
12
A13
13
A14
14
WE#
15
READY
16
VCC
17
VPP1
18
MIVAL
19
MICLK
20
A12
21
A7
22
A6
23
A5
24
A4
25
A3
26
A2
27
A1
28
A0
29
D0
30
D1
31
D2
32
WP
33
GND
34
GND
35
CD1#
36
MDO3
37
MDO4
38
MDO5
39
MDO6
40
MDO7
41
CE2#
42
VS1#
43
IORD#
44
IOWR#
45
MISTRT
46
MDI0
47
MDI1
48
MDI2
49
MDI3
50
VCC
51
VPP2
52
MDI4
53
MDI5
54
MDI6
55
MDI7
56
MOCLK
57
RESET
58
WAIT#
59
INPACK
60
REG#
61
MOVAL
62
MOSTART
63
MDO0
64
MDO1
65
MDO2
66
CD2#
67
GND
68
GND
69
GND
70
GND
71
GND
72
L43
60Ω-0603
L43
60Ω-0603

DDC2BSCL
DDC2BSDA
RX2B1N
RX2B1P
RX2B0N
RX2B0P
RX2B2N
RX2BCLKN
RX2BCLKP
RX2B2P
HDMI_CEC
DDC2BSCL
RX2B2P
HDMI_CEC
DDC2BSDA
RX2B2N
RX2B0P
RX2B1N
RX2B1P
RX2BCLKP
RX2B0N
RX2BCLKN
HOTPLUG_2
HDMI2/5V
HOTPLUG2
HOTPLUG_2
HDMI2/5V
HDMI_E_CEC
L
CSB3CDDLCSB3CDD
ADSB3CDDADSB3CDD
HOTPLUG_3
HDMI3/5V
HDMI_CEC
RX3B2P
RX3B1N
RX3B1P
RX3B2N
RX3BCLKP
RX3B0N
RX3B0P
RX3BCLKN
DDC3BSCL
DDC3BSDA
RX3B2P
RX3B2N
RX3B1P
RX3B1N
RX3B0P
RX3BCLKP
RX3B0N
RX3BCLKN
HDMI3/5V
HOTPLUG3
HOTPLUG_3
HDMI2/5V
3.3VU
5VA
5VA
HDMI3/5V
HDMI_E_CEC 2
HOTPLUG22
RX2B2P 2
RX2B2N 2
RX2B1P 2
RX2B1N 2
RX2B0P 2
RX2B0N 2
RX2BCLKN 2
RX2BCLKP 2
DDC2BSDA 2
DDC2BSCL 2
RX3B2P 2
RX3B2N 2
RX3B1P 2
RX3B1N 2
RX3B0P 2
RX3B0N 2
RX3BCLKN 2
RX3BCLKP 2
DDC3BSCL 2
DDC3BSDA 2
HOTPLUG32
R616 5.1RR616 5.1R
R?
100R
R?
100R
R? 5.1RR? 5.1R
R618 5.1RR618 5.1R
R? 5.1RR? 5.1R
R?
22K
R?
22K
R609 5.1RR609 5.1R
R? 5.1RR? 5.1R
R? 5.1RR? 5.1R
CN32
HDMI
CN32
HDMI
DATA2+
1
DATA2 SHIELD
2
DATA2-
3
DATA1+
4
DATA1 SHIELD
5
DAT1A-
6
DATA0+
7
DATA0 SHIELD
8
DATA0-
9
CLK+
10
CLK SHIELD
11
CLK-
12
CEC
13
NC
14
SCL
15
SDA
16
DDC/CEC GND
17
+5V POWER
18
HOT PLUG
19
20
20
21
21
22
22
23
23
R?
10K
R?
10K
Q15
3904
Q15
3904
R? 4.7KR? 4.7K
R204 4.7KR204 4.7K
Q?
3904
Q?
3904
R610 5.1RR610 5.1R
R201
22K
R201
22K
R?
NC/47K
R?
NC/47K
R619 5.1RR619 5.1R
D6
BAW70
D6
BAW70
1
2
3
R205
1K
R205
1K
R? 5.1RR? 5.1R
R612 5.1RR612 5.1R
D600
BAW70
D600
BAW70
1
2
3
R600 5.1RR600 5.1R
R203
10K
R203
10K
R202
22K
R202
22K
R615 5.1RR615 5.1R
CN32
HDMI
CN32
HDMI
DATA2+
1
DATA2 SHIELD
2
DATA2-
3
DATA1+
4
DATA1 SHIELD
5
DAT1A-
6
DATA0+
7
DATA0 SHIELD
8
DATA0-
9
CLK+
10
CLK SHIELD
11
CLK-
12
CEC
13
NC
14
SCL
15
SDA
16
DDC/CEC GND
17
+5V POWER
18
HOT PLUG
19
20
20
21
21
22
22
23
23
R? 5.1RR? 5.1R
V800AA
RX600
V800AA
RX600
R?
22K
R?
22K
R614 5.1RR614 5.1R
R? 5.1RR? 5.1R
R?
1K
R?
1K

VIDEO_OUT
FULL SCART
VGA INPUT
Keep AGND trace with signal
Keep spacing for L/R
SC1_FSO
0-2v: TV Mode
5-8v: 16:9 AV
9.5-12v: 4:3 AV
Keep AGND trace with signal
Keep spacing for L/R
DVD
DVD POWER
ON
OFF
2
倍放大
0x1E98 bit10
2.5V
R247
上拉改下拉
改善开机瞬间尖峰
2011-8-16
改善
AV
干扰
删除
R295
,
C225
2010-11-24
DCN
R296
由
330R
改为
120R
Vp-p=558mV
CLOSED TO MSD309
SPDIF Output
AVOUT-V
AV1-V
Pr
AV1-L
SC1_FSO
LINEOUTR
AV1-R
LINEOUTL
Pb
Y
Y
Pb
Pr
VGA-B
VGA-R
VGA-G
YIN
DVD_AR
DVD_AL
SIDE_CVBS
AUIDO_L
SIDE_AR
SIDE_AL
AUIDO_R
VGA-VS
VGA-HS
AV1-V
AV1-L
AV1-R
AVOUT-V
AVOUT-V
LINEOUTL
LINEOUTR
VGA-R
VGA-B
VGA-G
SIDE_AURIN
SIDE_AVINSIDE_AVIN
SIDE_AULIN
PBIN
PRIN
SPDIFOUT
5VA
5V_TUNER
AV1-Vin+ 2
CVBS_OUT 2
SC1_FS 2
LINEOUTL 9
LINEOUTR 9
SC1_FB 2
ISP-RXD 2
VGA_HSYNC 2
VGA_VSYNC 2
VGA-Lin 2
VGA-Rin 2
ISP-TXD 2
AV1-Lin 2
AV1-Rin 2
RGB1_SOG 2
RGB1_R+ 2
RGB1_G+ 2
RGB1_B+ 2
RGB1_R- 2
RGB1_B- 2
RGB1_G- 2
RGB0-SOG 2
RGB0_BIN+ 2
RGB0_GIN+ 2
RGB0_RIN+ 2
COMP_R- 2
COMP_Y- 2
COMP_B- 2
RGB0_RIN- 2
RGB0_BIN- 2
RGB0_GIN- 2
IR_in 2
AV2-Lin 2
AV2-Rin 2
COMP_SOG+ 2
COMP_R+ 2
COMP_B+ 2
COMP_Y+ 2
DVD_CVBS 2
DVD_ON/OFF 2
SIDE_CVBS 2
AUIDO_R 2
AUIDO_L 2
SPDIFO
2
C63 1uC63 1u
C245
10P
C245
10P
CON7 VGACON7 VGA
5
10
4
9
3
8
2
7
1
15
14
13
12
11
6
16
17
R115
12K
R115
12K
C43
1n
C43
1n
C133 47nC133 47n
C145
10p
C145
10p
V800AA
RX59
V800AA
RX59
C900
10P
C900
10P
R138
0R-0402
R138
0R-0402
R104 68RR104 68R
C270
10P
C270
10P
FB101
10Ω-0402
FB101
10Ω-0402
C132
10P
C132
10P
C59 47nC59 47n
C68
10p
C68
10p
R54
10k
R54
10k
100R
R182
100R
R182
V800AARX61 V800AARX61
R91 33RR91 33R
FB100
10Ω-0402
FB100
10Ω-0402
R79
0R-0402
R79
0R-0402
Q32
3906
Q32
3906
1
3 2
C216
10P
C216
10P
R179 47RR179 47R
C65
10p
C65
10p
绿
蓝
红
CN16 YPbPr-JACK-3
绿
蓝
红
CN16 YPbPr-JACK-3
1
GND
2
Y
3
GND
4
Pb
5
GND
6
Pr
C88 47nC88 47n
R34
12K
R34
12K
150RR184150RR184
V800AA
RX54
V800AA
RX54
C56 47nC56 47n
V800AA
RX52
V800AA
RX52
R183
75R
R183
75R
C147
10p
C147
10p
C97 1nC97 1n
C60 47nC60 47n
CN6 SPDIF/
立
CN6 SPDIF/
立
1
2
3
FB102
10Ω-0402
FB102
10Ω-0402
V800AA
RX51
V800AA
RX51
C151
NC/10p
C151
NC/10p
R106
12K
R106
12K
C904
10P
C904
10P
C62 1nC62 1n
R8675R R8675R
12K
R211
12K
R211
C41
0.1uF
C41
0.1uF
黄
白
红
CN22 AV-JACK-3
黄
白
红
CN22 AV-JACK-3
1
GND
2
CVBS
3
GND
4
L
5
GND
6
R
R56
330R
R56
330R
J5
PC Audio Input
J5
PC Audio Input
1
2
3
4
5
6
7
8
R105 100RR105 100R
R66
10K
R66
10K
R6275R R6275R
V800AARX62 V800AARX62
CN12
7pin-2.0mm
CN12
7pin-2.0mm
1
2
3
4
5
6
7
C57 47nC57 47n
NC/75R
R216
NC/75R
R216
C131
10P
C131
10P
R97
0R-0402
R97
0R-0402
C33
10P
C33
10P
R99 68RR99 68R
C51 47nC51 47n
C26
10P
C26
10P
V800AA
RX57
V800AA
RX57
R111 68RR111 68R
FB104
10Ω-0402
FB104
10Ω-0402
4.7K
R185
4.7K
R185
R130 33RR130 33R
C61 47nC61 47n
R90 33RR90 33R
R232
75R
R232
75R
C905
10P
C905
10P
C69
10p
C69
10p
V800AA
RX60
V800AA
RX60
R114 68RR114 68R
FB103
10Ω-0402
FB103
10Ω-0402
C45 47nC45 47n
10K
R193
10K
R193
R8875R R8875R
R229
10K
R229
10K
R28 33RR28 33R
C902
10P
C902
10P
C272
10P
C272
10P
C46 47nC46 47n
C58 47nC58 47n
C23 1uC23 1u
C22 1uC22 1u
R100 68RR100 68R
R24175R R24175R
C90 47nC90 47n
C9410uF C9410uF
C134 1uC134 1u
R81 33RR81 33R
R11075R R11075R
C130
10P
C130
10P
1KR186 1KR186
R231
2.2K
R231
2.2K
L14
56Ω-200mA-0402
L14
56Ω-200mA-0402
R63
75R
R63
75R
R38
12K
R38
12K
R103 100RR103 100R
C901
10P
C901
10P
R101 10KR101 10K
12K
R197
12K
R197
FB105 10Ω-0402FB105 10Ω-0402
R25475R R25475R
R102 68RR102 68R
C135 1uC135 1u
R8775R R8775R
V800AARX63V800AARX63
R83 33RR83 33R
R36 10KR36 10K
R112 10KR112 10K
CON15
SCART
CON15
SCART
2
4
6
8
10
12
14
16
18
20
1
3
5
7
9
11
13
15
17
19
21
24
25
2.2u
C149
2.2u
C149
C16 47nC16 47n
R209
120R
R209
120R
C96 47nC96 47n
C76 47nC76 47n
R24275R R24275R
C28 1uC28 1u
C49 47nC49 47n
C66 1uC66 1u
C91 47nC91 47n
C29 1uC29 1u
12K
R172
12K
R172
C48 47nC48 47n
C215
10P
C215
10P
R12875R R12875R
R131 33RR131 33R
C142
10p
C142
10p
100R
R173
100R
R173
R208
75R
R208
75R
R10822K R10822K
L85 600Ω-500mA-0603L85 600Ω-500mA-0603
4pin-2.0mm
CN11
4pin-2.0mm
CN11
1
2
3
4
Q14
3904
Q14
3904
1
2 3
R96 68RR96 68R
C932
100pF
C932
100pF
R117 68RR117 68R
10K
R198
10K
R198
C903
10P
C903
10P
C271
10P
C271
10P
R84 33RR84 33R
黄
白
红
CN24 AV-JACK-3
黄
白
红
CN24 AV-JACK-3
1
GND
2
CVBS
3
GND
4
L
5
GND
6
R
C81 47nC81 47n
FB106 10Ω-0402FB106 10Ω-0402
R32 10KR32 10K
C67
10p
C67
10p
R12975R R12975R
R10922K R10922K
R5975R R5975R
12K
R181
12K
R181
R132 33RR132 33R
C92 47nC92 47n
R30
75R
R30
75R
R98 68RR98 68R
R92 33RR92 33R
V800AARX64V800AARX64

USB Interface
FOR LED USB
1E56 bit4
ON
OFF
USB_DP0
USB_DM0
USB1_DETE
USB1_CTL
5VUSB1
5VA
5VUSB1
USB_DP0 2
USB_DM0 2
USB1_CTL2
USB1_DETE2
FB108 10Ω-0402FB108 10Ω-0402
RX53
V800AA
RX53
V800AA
C226
0.1uF(X7R)
C226
0.1uF(X7R)
RX58
V800AA
RX58
V800AA
U16
MC2110HNTR
U16
MC2110HNTR
GND
2
IN
5
FLG
3
EN
4
OUT
1
R29810K R29810K
C232
10uF(X5R)
C232
10uF(X5R)
C231
10uF(X5R)
C231
10uF(X5R)
C229
10P
C229
10P
R29910K R29910K
FB107 10Ω-0402FB107 10Ω-0402
J1
USB-101B
J1
USB-101B
1
2
3
4
5 6
C156
10P
C156
10P
C155
10P
C155
10P


Transcripción de documentos
LED LCD TV RECEIVER USER MANUAL Please read this manual carefully before using your television and keep this manual in a good place for future reference. MODEL: LET19T1000H LET22T1000HF LET24T1000HF LET26T1000HF 01 Safety and warnings Welcome ………………………………………………………………………… P.02 Important information ……………………………………………………………P.02 Safety notice …………………………………………………………………… P.03 Warnings and cautions ………………………………………………………… P.04 02 Introduction Main Parameter ………………………………………………………………… P.05 Base Stand Assembly Instruction …………………………………………… P.07 Wall Mounting Installation Guidelines ……………………………………… P.09 Control Panel …………………………………………………………………… P.11 Rear/Side Sockets ……………………………………………………………… P.11 Connecting your TV ……………………………………………………………… P.12 Common interface ………………………………………………………………… P.13 03 Remote Control 04 Operation Remote Control ………………………………………………………………… P.14 Installation Guide ………………………………………………………………… P.16 05 Trouble shooting Trouble shooting ………………………………………………………………P.27 Specification …………………………………………………………………… P.28 Thanks for buying this 19"/ 22"/24"/26" LED LCD TV . This guide will help you set up and begin using your TV. 19" HD Digital LED LCD TV Remote control AAA battery x2 Instruction Manual Quick start guide Stand 22" Full HD 1080P Digital LED LCD TV Remote control AAA battery x2 Instruction Manual Quick start guide Stand 24" Full HD 1080P Digital LED LCD TV Remote control AAA battery x2 Instruction Manual Quick start guide Stand 26" HD Digital LED LCD TV Remote control AAA battery x2 Instruction Manual Quick start guide Stand Now you can get started! IMPORTANT INFORMATION READ ALL INSTRUCTIONS BEFORE USE AND KEEP FOR FUTURE REFERENCE. CAUTION TO REDUCE THE RISK OF ELECTRIC SHOCK, DO NOT REMOVE COVER (OR BACK).NO USER SERVICEABLE PARTS INSIDE. FOR ANY PROBLEMS, REFER SERVICING TO THE CUSTOMER HELP LINE. THERE IS A LIGHTNING ARROW SYMBOL IN THE TRIANGLE: THIS SYMBOL INDICATES HIGH VOLTAGE IS PRESENT INSIDE. IT IS DANGEROUS TO MAKE ANY KIND OF CONTACT WITH ANYINSIDE PART OF THIS PRODUCT. THERE IS A EXCLAMATION MARK IN THE TRIANGLE: THIS SYMBOL ALERTS YOU THAT IMPORTANT LITERATURE CONCERNING OPERATION AND MAINTENANCE HAS BEEN INCLUDED WITH THIS PRODUCT. CAUTION:TO REDUCE THE RISK OF ELECTRIC SHOCK AND FIRE, DO NOT PUT THE TV SET NEAR SOURCES OF HUMIDITY. DO NOT USE ANY ABRASIVE CLEANERS WHICH MAY SCRATCH OR DAMAGE THE LCD SCREEN. AVOID CONTACT WITH OBJECTS THAT MAY SCRATCH THE LCD SCREEN. NOTE: SERVICING THE UNIT YOURSELF IS UNAUTHORISED AND COULD LEAD TO INJURY OR PRODUCT DAMAGE. REFER ALL SERVICING TO THE CUSTOMER HELPLINE. P.02 the P.03 WARNINGS AND CAUTIONS Caution Do not trap the power supply cord under the television receiver. Warning To prevent fire or electrical shock hazard, do not expose the television receiver to rain or moisture. Caution Never stand on, lean on, or suddenly push the television or its stand. You should pay special attention to children. Serious injury may result if it should fall. Warning Caution Do not place your television on an unstable cart, stand, shelf or table. Serious injury to an individual , and damage to the television, may result if it should fall. Do not drop or push objects into the television cabinet slots or openings. Never spill any kind of liquid on the television receiver. Caution When the television receiver is not used for an extended period of time, it is advisable to disconnect the AC power cord from the AC outlet. Caution Do not block the ventilation holes in the back cover. Adequate ventilation is essential to prevent failure of electrical components. Dim:515*320mm(不包括底座) Caution If the television is to be built into a compartment or similar enclosure, the minimum distances must be maintained. Heat build-up can reduce the service life of your television, and can also be dangerous. P.04 01Safety and warnings Warning High voltages are used in the operation of this television receiver. Do not remove the cabinet back from your set. Refer servicing to qualified service personnel. 02 Introduction CAUTION INSTALLATION Never tamper with any components inside the TV, or any other adjustment controls not described in this manual. All LED-TV's are high voltage electrical equipment. When you clean dust or any water drops off the SCREEN or CABINET or around any of the buttons or connectors, the power cabled should be removed from the power socket. Wipe the TV with a soft, dry, dust free cloth. During thunderstorms, unplug the power cable and aerial / antenna cable to prevent damage to your TV and any other devices connected to it. All repairs to this TV should only be performed by qualified TV service personnel. *Locate the TV in the room where light does not strike the screen directly. *Total darkness or a reflection on the picture screen can cause eyestrain. Soft and indirect lighting is recommended for comfortable viewing. *Allow enough space between the TV and the wall to permit ventilation. *Avoid excessively warm locations to prevent possible damage to the cabinet or premature component failure. *Do not cover the ventilation openings when using theTV. Main features 2 Used as Television, display terminal, PC display; High luminance, wide viewing angle; 3 HDMI interface and SCART Interface; 1 4 NICAM; 5 Time-shift; Main parameter Panel TV System Video Signal System Input Power Voltage Power consumption Standby Power consumption Audio Output Power (THD 7%) Signal Input Signal output Horizontal definition(TV line) P.05 19 22 24 26 PAL-B/G、I、D/K SECAM- B/G 、 D/K、L、L ' PAL/SECAM AC 100-240V 50/60Hz 30W 38W 40W 55W <0.5W 2x3W Analog RGB(PC) x1; PC audio x1 High-Definition Multimedia Interface (HDMI)x2 Video Input x1 Audio Input x1 Y Pb Prx1 SCARTx1 CI x 1 USB x 1 RF Co-Ax x 1 Headphone x 1 S/PDIF x 1 Composite Video input >=350 YPbPr >=400 PC PRESET MODE V.Freq.(Hz) H.Freq.(KHz) 1 640x480 60 31.47 2 800x600 60 37.88 3 1024x768 60 48.36 4 1360x768 60 47.7 5 1280x1024 60 63.98 6 1920x1080 (except for 19",26") 60 66.64 02 Introduction RESOLUTION P.06 Base Stand Assembly Instruction 19"/22"/24" 1. Insert the stand support pillar into the stand as the arrow indicated direction, and then fastened with one screw. 2. Insert the stand Ass'y into back cover as the arrow indicated direction, and then fastened with one screw. INSTALLATION NOTES Locate the TV in a room where light does not strike the screen directly. Total darkness or a reflection on the screen can cause eyestrain. Soft and indirect lighting is recommended for comfortable viewing. Allow enough space between the TV and the wall to permit ventilation. Avoid excessively warm locations to prevent possible damage to the cabinet or premature component failure. P.07 Base Stand Assembly Instruction 26" 1. Insert the stand support pillar into the stand as the arrow indicated direction, and then fastened with three screws. 2. Insert the stand Ass'y into back cover as the arrow indicated direction, and then fastened with two screws. INSTALLATION NOTES Locate the TV in a room where light does not strike the screen directly. Total darkness or a reflection on the screen can cause eyestrain. Soft and indirect lighting is recommended for comfortable viewing. Allow enough space between the TV and the wall to permit ventilation. Avoid excessively warm locations to prevent possible damage to the cabinet or premature component failure. P.08 19"/22"/24" WALL MOUNTING INSTALLATION GUIDELINES This television can be wall mounted as follows: 1.Place the LED LCD Television onto a solid surface. Please place some soft material over the front of the screen to protect it from any damage. 3.Use the four screws provided to fix the TV onto a wall mounting bracket (not included) via the four VESA standard holes on the back of the television. M4X5 75mm M4X5 M4X5 M4X5 75mm (19") M4X5 100mm M4X5 M4X5 100mm (22",24") P.09 M4X5 02 Introduction 2.Remove the screws from the lower part of the television, where the base joins to the TV, and take away the stand (put the stand somewhere safe for future use). 26" WALL MOUNTING INSTALLATION GUIDELINES This television can be wall mounted as follows: 1.Place the LED LCD Television onto a solid surface. Please place some soft material over the front of the screen to protect it from any damage. 3.Use the four screws provided to fix the TV onto a wall mounting bracket (not included) via the four VESA standard holes on the back of the television. M4X5 100mm M4X5 200mm M4X5 M4X5 P.10 02 Introduction 2.Remove the screws from the lower part of the television, where the base joins to the TV, and take away the stand (put the stand somewhere safe for future use). Front control panel SOURCE 1 MENU 2 3 CH+ 1 2 3 CHVOL+ 4 VOLSTANDBY 30 1 2 3 5 30 Remote control sensor. Indicator LED: BLUE: POWER ON. RED: STAND BY. Key board. 1 2 3 SOURCE MENU CH+/CH- 4 VOL+/VOL- 5 STANDBY Display the input source menu. Display main MENU. In TV mode,press CH+ or CH- to change the channel up and down. In MENU, press CH+ or CH- to select items . In standby mode, it can Turn on the TV. Adjust sound level. In MENU,adjust the item that you Selected. Rear/Side Sockets 4 SPDIF OUTPUT 1 3 2 USB 6 1 2 3 4 5 6 7 P.11 L/R AUDIO VIDEO S/PDIF YPbPr SCART USB HDMI2 5 COMMON INTERFACE (CI) 7 8 input input digital audio output input input input input 9 10 11 8 9 10 11 12 13 12 HDMI1 HEADPHONE COMMON INTERFACE(CI) PC AUDIO VGA RF 13 input analogue audio output input input input input 02 Introduction CONNECTING YOUR Haier TV HEADPHONE OUTPUT Insert the plug of the earphone into the earphone jack on the unit HEADPHONE. The speakers are now muted. S/PDIF OUTPUT S/PDIF is a digital audio connection used to connect audio equipment, for example home theatres and other digital HiFi systems over short distances. The signal is transmitted over either a coaxial cable with RCA connectors. Make sure that both TV and the device are switched off before connecting. Make sure that both TV and the device are switched off before connecting. Connect the AV cables (not supplied) from the S/PDIF socket on the TV to the Home Theater sound system or digital HiFi system etc. P.12 COMMON INTERFACE The common interface (CI) slot is designed to accept the conditional Access (CA) Module and Smart card in order to view the pay TV programmes and additional services. Contact your Common Interface service provider to get more information about the modules and subscription. Please noted that CA modules and smart cards are neither supplied nor optional accessories from us. CHANNEL PICTURE SOUND STIME Auto Tuning DTV Manual Tuning ATV Manual Tuning Programme Edit Signal Information CI Information OK OPTION Software Update(USB) LOCK MENU P.13 MOVE OK OK 1.POWER:Press to turn on the TV. 2.D.MENU:No function. 3.P.Mode:To switch picture mode. 4.INFO:Press to display the current signal status,including input source and channel audio mode. 5.AUDIO I/II: Press to select MONO,Nicam stereo for ATV channel. Select Audio language for DTV channel. 6.SUBTITLE:Press to turn the subtitle On or Off. 7.Number Buttons:For direct access to channels. 8.SOURCE:To select input source. 9.MUTE:To disable or enable the sound output. 10.Volume Control:To adjust sound level. 11.MENU:To display TV menu. 12.OK:To confirm selection. 13.EXIT:To return to the previous menu or exit menu. 14.Teletext Index/USB PLAY 15.REPEAT:No function 16.Teletext Green Button / USB Fast Forward 17.Teletext Red Button / USB Fast Rewind 18.Teletext Mix 19.Teletext Text 20.Teletext Reveal 21.Teletext Size 22.Teletext Time/ANGLE/REC.LIST(teletext time is no function) 23.Teletext Mode:No function 24.Teletext Hold 25.Teletext Subcode:Teletext Subpage 26.Teletext Blue Button / USB Next File 27.Teletext Yellow Button / USB Previous File 28.USB STOP 29.USB PAUSE 30.START RECORD 31.UP,DOWN,LEFT,RIGHT Cursor:Press to navigate your selection. 32.Fav:To access your favourite channels list in TV or DTV mode. 33.Select Programme:Press / Button to select the next or previous TV channel. 34.GUIDE:Press to display electronic programme guide in TV mode. 35.Q.View:To access the previously viewed channel. 36.CH.LIST: Press to display the channel list. 37.Screen:To change picture aspect ratio. 38.Sleep :Set timer to turn off the TV. 39.S.Mode:To switch sound mode. 40.OPEN/CLOSE:No Function :No DVD function P.14 03 Remote Control 03 Remote control REMOTE CONTROL TELETEXT Press: TEXT E Teletext is an information system broadcast by certain channels which can be consulted like a newspaper. It also offers access to subtitles for viewers with hearing problems or who are not familiar with the transmission language(cable networks, satellite channels, etc.) You will obtain: This is used to call or exit teletext modes. The summary appears with a list of items that can be accessed. Each item has a corresponding 3 digit page number. If the channel selected does not broadcast teletext, theindication 100 will be displayed and the screen will remain blank (in this case, exit teletext and select another channel). Enter the number of the page required using the 0 to 9 up/down. Example: page 120, enter 120. The number is displayed top left, the SELECTING A PAGE counter turns and then the page is displayed. Repeat this operation to view another page. If the counter continues to search, this means that the page is not transmitted. Select another number. DIRECT ACCESS TO THE ITEMS INDEX SUB PAGE HOLD REVEAL LIST P.15 Coloured are as are displayed at the bottom of the screen. The 4 coloured keys are used to access the items or corresponding pages. The coloured areas flash when the item or the page is not yet available. This returns to the contents page (usually page 100). Certain pages contain sub-pages which are automatically displayed successively. This key is used to stop or resume subpage acquisition. The indication appears top left. To freeze the page. To display or hide the concealed information (games solutions). The user can set four favorite pages to be directly linked to the four color keys. While list mode is activated, it is not possibility to use TOP or FLOF navigation with the colorkeys. The favorite page numbers should be stored and restored to/from nonvolatile memory for each channel by the system software. 04 OPERATION Installation Guide The installation guide only appear when the TV first time turn on or reset to factory set. WELCOME! Thank you for choosing HOME or SHOP modes 1. Home Mode is an energy-saving Mode. Home Mode is recommended for normal viewing setting and is set as default during manufacturer. 2. Shop Mode is an option for retailers for Advertising or product presentation. Shop Mode has a brighter image than Home Mode. 3. You may switch between Home or Shop Mode as you choose.If you choose Shop Mode ,it will enter HDMI1 source automatically,and you wil press Exit key to exit POP menu. 2). Press the buttons to select DVB-T/DVB-C and then press the OK button to confirm. Czech Spanish Italian Polski Deutsch Greek Magyar Russian English French Nederlands Romanian OK Mode Select Home Mode a. If you select DVB-T, the next step is to select the Tune type and country then press the OK button to start tuning. Shop Mode OK French Hungary Nederlands Germany Italy Norway Greece Luxembourg Poland Password Please enter old password Please enter new password OK Confirm new password 1).Press the buttons to navigate the menu and change the settings. Press the OK button to confirm. Select your desired language ,Home/Shop Mode to be displayed on the menu. The default password is 6666. b. If you select DVB-C, the next step is to config the DVB-C system like (scan type / Frequency/ Network ID/Sy mbol(KS/S) then press OK button to into the tune type and country select menu, this step is the same as DVB-T, select the tune type (DTV/ATV). Choose the right country, press OK button to start tuning. P.16 04 Operation Please select on OSD language Congratulations!!! Completed Initial Quick Setup. Enjoy your Haier TV Press OK to Exit 1. CHANNEL MENU 3). Channel tuning will commence. This operation 1. 1 Auto Tuning (DVB-T) may take up to 6 minutes. The display will show the progress of the tuning and the number of channels found. 1). Press the MENU button and then press the buttons to select the CHANNEL menu and then press the OK button. 4). If you want to skip the ATV tuning, press the MENU button to interrupt the tuning half way. A pop-up screen will be displayed, press the 2). Press the buttons to select Auto Tuning and then press the OK button. button to select YES to confirm. You will then go You may repeat the above step if you also want CHANNEL OK SOUND to skip the DTV tuning. An installation reminder will appear the next time you turn on the TV. 5). After tuning is complete, the channels are arranged in a preset order. If you wish to skip Auto Tuning PICTURE STIME OPTION DTV Manual Tuning ATV Manual Tuning Programme Edit Signal Information CI Information Software Update(USB) 04 Operation straight to DTV tuning. LOCK channels, modify the preset order or rename MENU MOVE OK OK channels, select Programme Edit under the Channel menu. 3). Press the buttons to select DVB-T/ DVB-C Press select DVB-T and then press the OK button to confirm. 1 Programme(s) Programme(s) Programme(s) Programme(s) 6) Congratulations 4). In the Tune Type menu, press the select ATV / DTV / DTV + ATV. Press the and then press the buttons to button buttons to select the country where you will operate the TV. Press the OK button to confirm P.17 2). Press the buttons to select Auto Tuning and then press the OK button. CHANNEL French Hungary Nederlands OK SOUND Germany Italy Norway STIME Greece Luxembourg Poland OK Auto Tuning PICTURE OPTION CADTV Manual Tuning ATV Manual Tuning Programme Edit Signal Information CI Information Software Update(USB) LOCK MENU 5). Channel tuning will commence. This operation may take up to 6 minutes. The display MOVE OK OK 3). Press the buttons to select DVB-T/DVB-C Press select DVB-C and then press the OK button to confirm. will show the progress of the tuning and the number of channels found. 6). If you want to skip the ATV tuning, press the MENU button to interrupt the tuning half way. A pop-up screen will be displayed, press the button to select YES to confirm. You will then go straight to DTV tuning. You may repeat the above step if you also want to skip the DTV 4). Press buttons to select Scan type/Symbol (Ks/S) press the OK button to confirm. tuning. An installation reminder will appear the next time you turn on the TV. 7). After tuning is complete, the channels are arranged in a preset order. If you wish to skip channels, modify the preset order or rename channels, select Programme Edit under the channel menu. 1 Programme(s) Programme(s) Programme(s) Programme(s) 1.2 Auto Tuning (DVB-C) 1). Press the MENU button and then press the buttons to select the CHANNEL menu and then press the OK button. 5). In the Tune Type menu, press the buttons to select ATV / DTV / DTV + ATV. Press the button and then press the buttons to select the country where you will operate the TV. Press the OK button to confirm. French Hungary Nederlands Germany Italy Norway Greece Luxembourg Poland OK P.18 6). Channel tuning will commence. This operation may take up to 6 minutes. The display will show the progress of the tuning and the number of channels found. 7). If you want to skip the ATV tuning, press the MENU button to interrupt the tuning half way. A pop-up screen will be displayed, press the button to select YES to confirm. You will then go straight to DTV tuning. You may repeat the above step if you also want to skip the DTV tuning. An installation reminder will appear the next time you turn on the TV. 3). The DTV Manual Tuning screen will pop up. Press the buttons to select the desired UHF channel and then press the OK button to commence the search of that channel. When the signal has been tuned, the picture and signal strength will be displayed on the screen. 4). Press the MENU button to return back to the main menu. 5). Press the EXIT button to exit the menu. 8). After tuning is complete, the channels are arranged in a preset order. If you wish to skip channels, modify the preset order or rename channels, select Programme Edit under the channel menu. 1 Programme(s) Programme(s) Programme(s) Programme(s) D 2. 2 DTV Manual Tuning (DVB-C) 1). Press the MENU button and then press the buttons to select the CHANNEL menu and then press the OK button. 2). Press the buttons to select CADTV Manual Tuning and then press the OK button. PICTURE NOTE: SOUND All the channels including ATV, DTV and Radio can be tuning by one time,if the Tune Type is DTV+ATV . STIME OPTION All the stored channels will be disappear after auto tuning . After auto tuning , the channel will skip to the first DTV channel. 2. 1 DTV Manual Tuning (DVB-T) 1). Press the MENU button and then press the buttons to select the CHANNEL menu and then press the OK button. 2). Press the buttons to select DTV Manual Tuning and then press the OK button. CHANNEL PICTURE SOUND STIME OPTION Auto Tuning CADTV Manual Tuning OK ATV Manual Tuning Programme Edit Signal Information CI Information Software Update(USB) LOCK MENU MOVE OK OK 3). The CADTV Manual Tuning screen will pop up. Press the buttons to select(Frequency /Symbol (ks/s/QAM Type QAM) press the OK button to commence the search of that channel. When the signal has been tuned, the picture and signal strength will be displayed on the screen. 4). Press the MENU button to return back to the main menu. 5). Press the EXIT button to exit the menu. Auto Tuning DTV Manual Tuning OK 490000 ATV Manual Tuning Programme Edit Signal Information CI Information Software Update(USB) 16 LOCK MENU MOVE OK OK NO SIGNAL P.19 04 Operation CHANNEL 3.1 ATV Manual tuning : 2). CI information: (optional) You can change the sound system to search the analog TV channels and fine tune the channels , then storage the channels you selected. This menu can display the CI card' s information. 2. PICTURE MENU The second item of the MENU is PICTURE MENU. You can adjust picture effect here, such as contrast, brightness, etc. Press OK to move, press OK to adjust. ATV Manual Tuning Storage To 1 System BG CHANNEL Picture Mode PICTURE Current CH 1 Eco SOUND Mild Stsndard User Color Temperature Aspect Ratio Noise Reduction Screen Search STIME Fine-Tune OPTION Frequency 424.25 MHz LOCK Save MENU MENU NOTE: Press teletext red button to storage to channels after manual tuning . 1). Program edit: You can Delete ,Rename ,Move, Skip , FAV any programs. Picture Mode MOVE OK OK Color Temperature Standard Contrast 50 Red 50 Brightness 50 Green 50 Color 50 Blue 50 Medium Sharpness 75 Tint 50 Delete Press teletext red button , the program in cursor will delete. Rename: Only can rename ATV programs . Move the cursor to the program, press teletext green button to rename the program. Press to choose the character. Press to move the cursor . Press MENU button to exit edit , Press EXIT to exit the menu. Note: ATV programs name only can be 5 character, DTV programs name can be 25 character. Use the Arrow Buttons to select the channel you wish to move. Then press the Yellow Button to select Move function. Once active use the Arrow Buttons to move and then press OK to confirm. MENU MENU NOTE: 1).Tint is available in NTSC system only. 2).There are four colors temperature modes can be selected medium, warm, cool,user 3).Screen is available in PC mode only which can adjust Horizontal position, vertical position, size and phase. 3.SOUND MENU The third item of the MENU is the SOUND MENU. You can adjust the sound effect here such as treble, bass, balance etc. Press to move, press OK to adjust. CHANNEL Sound Mode PICTURE Standard SOUND Press to choose the program , press teletext blue button to skip this program, The will show on the right side of the program . Choose the skipped program, press blue button again , you can cancel the skip ,The will disappear . Favourite Press to choose the program , press FAV button , it will show on the right side of the program.Choose the FAV program , press FAV button again , you can cancel the FAV, the will disappear . Once your favorite group is created, you can press the FAV key to quickly access your favorite channel. STIME Music Theater Sports User Balance Auto Volume Surround Sound S/PDIF Mode OPTION LOCK MENU MOVE OK OK Note: Auto volume: only available when the input signal volume is too large or distortion. 4.TIME MENU The forth item of the menu is the TIME MENU You can adjust the clock, power on/off time, sleep time etc Press to move, press OK to adjust. P.20 CHANNEL Clock Off Time NOTE: Restore factory default will clear all the programs and password. PICTURE OK SOUND TIME On Time Sleep Timer Auto Sleep Time Zone 6.LOCK MENU OPTION LOCK MENU MOVE OK OK NOTE: Within 15 minutes there is no signal, the TV will auto sleep , if Auto Sleep is set ON. The clock time can get from the DTV system auto. The sixth item of the menu is the LOCK MENU You can lock system, set password, block program and set parental guidance Once you set the lock system on you can not search the channels or change any programs. CHANNEL Lock System PICTURE OK SOUND 5.OPTION MENU The fifth item of the MENU is the OPTION MENU. You can adjust the Menu language, Audio language,Subtitle language etc. STIME Set Password Block Program Parental Guidance OPTION LOCK OSD Language PICTURE MENU OK SOUND STIME OPTION LOCK Audio Languages Subtitle Language Country PVR File System Restore Factory Default Automatic power-down(4h) Home/Shop Mode DCR MENU MOVE OK OK Automatic Power-down 1.If after 4 hours from switch on and no changes have been made to the TV, for example no channel or volume changes,the TV will start the automatic power down sequence. And pop-up window will appear on screen. XXX’s to automatic power-down Please press any Key to Cancel After 150 seconds the TV will automatically switch to standby. To override the automatic shutdown press any button on the remote control. 2. To cancel the automatic power-down On the Option Menu select Automatic powerdown(4H) Press OK. A pop-up message will appear “Are you sure you want to enable automatic powerdown?” Use the right arrow key to select NO The TV screen returns to the Option Menu and the Automatic power-down(4H) option will display. Automatic power-down(4H) OFF To return to auto shutdown after 4 hours repeat the above except use the left arrow key to select YES In PVR File system menu you can set up USB disk for PVR. Select Disk Check PVR File System Start USB Disk Format Time Shift Size Speed Free Record Limit OK P.21 6 Hr. MENU OK OK 7.EPG Menu(Electronic Program Guide). The EPG menu is used to look at what is being broadcasted on DTV or Radio channel in the day. To access the EPG menu, press the EPG botton,the following menu will be displayed: PROGRAMME GUIDE 26/Jan TIME 11:40 1 TV3 Club/Super3-Naturalmen.. 2 3/24 No Information 3 TVC HD No Information Record INFO Schedule Remind OK INDEX INFO 1. Use to choose the programs , Press INFO key, you can display the highlight program's information. Schedule 2. Press the teletext yellow key, It can list all the reminder schedule, press to choose the list, press red key DELETE to delete the schedule list. Schedule List C: MOVE NOTE: The default pass word is 0000, If you forget the password, you can use the super password:9443. Block program: Press to choose the program ,press teletext green button to block the program. If you want unblock the program, pls enter the main menu , input the password, then press green button again.Parental guidance: Press to choose rating. Time Date 04:55 28th Apr Programme Title Delete Channel Name 04 Operation CHANNEL 3. Record Press the red key ,It can set the program to be recorded. OSD Language Audio Languages Subtitle Language Country PVR File System CHANNEL PICTURE Remind 4. Press the blue key to choose one program and set up one reminder time, the TV screen will skip to the choosed program in the reminder time automatically. SOUND OK STIME Restore Factory Default Automatic power-down(4h) Home/Shop Mode DCR OPTION LOCK Reminder MENU MOVE OK OK 1 TV3 37 Minute Select Disk 11 Hour Jan Month Start USB Disk 26 Date Format Once Mode OK C: Check PVR File System Time Shift Size Speed BACK Free Record Limit 6 Hr. OK 8.PVR function MENU 1.Prepare to record the program PVR function only works in DTV. From OPTION MENU enter into PVR File System In “OPTION MENU”, please choose “check PVR File System”. Click “OK”, until “checking”change into “Success”. Note: please check the term “speed”. If it is “HD support”, that means the speed of USB device is available for time shift and record. If not, please format the device, to make sure the device available. The default “Free Record Limit” is 6 hour, if the space on the disk is big enough. If the space is not big enough, the record time should be shorter, depends on the room on the device. During the “check PVR File System” checking, please do not take any other operation until it finished. The recordings must be done with the TV PVR system. It can only be played in the same TV, not in any other kind of device (computer, DVD, etc.) which is not compatible with . TS. file format. Please note that in order to carry out any kind of recording, the TV will require you to format the connected USB device to store the recording. WARNING. WHEN YOU FORMAT, THE EXTERNAL USB DEVICE YOU WILL LOSE ALL THE FILES AND INFORMATION YOU HAVE STORAGE ON THE DEVICE. The USB file system will limit the size of the storage size. File system: NTFS up to 2TB FAT32 with up to 192GB FAT16 with up to 2GB From OPTION MENU enter into PVR File System as below: Select Disk:select which disc to save the record file. Select Disk USB 0 Disk C: OK Check PVR File System: check if the PVR File System set up in the USB device or not. Format: File System Size PVR File System Type Hi Speed FS PVR File System Size All SD 104 Mins HD 29 Mins OK File System Size PVR File System Type FAT32 SD 104 Mins HD 29 Mins OK P.22 (Suggest to format the format the device by “High Speed Fs...”, which can speed up the record.) Format disk Format disk 2.Record the program As playing the DTV source, choose the channel and click “record”, the record frame will pop up. Click “record” again, the record frame will disappear and the “REC” icon still on the left top. It will disappear until you click “stop”. Warning! All data will be lost. Exit OK Format disk Do not unplug USB device. Formatting,please wait below menu appear after Format finish: Select Disk C: Check PVR File System Checking USB Disk Pass Format Pass Time Shift Size Speed All Checking 6 Hr. Free Record Limit OK MENU Select Disk C: Check PVR File System SUCCESS USB Disk Pass Format Pass Time Shift Size Speed HD Support Free Record Limit All 2730KB/S 6 Hr. OK MENU If you select the “Hi Speed FS ”format mode, then you can change the time shift size: Time Shift Size Time Shift Disk Size SB 14 Mins HD 4 Mins OK P.23 512 MB 3.Play the record The program recorded on the “USB”will be saved in the folder “_MSTPVR” on the device. 1.The USB storage size can be between 128MB and 500GB in size, but for practical use 2GB to 500GB is recommended. 2. Video may become pixelated when Video bit rate is too low. This can be caused by connecting a USB extension cable instead of plugging the USB directly into the TV 3. Not all USB devices are compatible. Below is a list of recommended USB drives. Models that are not listed may be compatible, but it is not guaranteed to work. The USB support list are the same as Timeshift function,see the following pages for details. 04 Operation Start 9.Timeshift function 1.Prepare to record the program This TV allows you to pause and record the currently watched digital program to a USB storage device, and to resume to the point where it was paused. play 00:04:22 00:04:22 AB Pause FB FF Prev. Next Stop Repeat ALL Set A NOTE: Formatting a USB 2.0 storage device will be needed. Save your original data before formatting. All the data stored in the USB device will be erased after formatting. USB Drive Storage Format NOTE: Please do not unplug the USB storage device when the Time Shift function is activated. Approximately 4GB of memory buffers about offer 140 minutes. Select to format the USB device and allocate the amount of space for the Time Shift function. NOTE: The format process will take at least 2 minutes. Please do not turn off the power or remove the USB device during formatting. During formatting, a speed test will be done on the USB device. If it fails, it means the USB device may not support the Time Shift function. Record a paused DTV program to USB storage device 1. While in the DTV input source, insert USB storage device to the USB port on the side of your TV. 2. Press PAUSE to start Time Shift function. The TV program paused. The Time Shift OSD appears, and starts recording. 3. Press STOP to stop Time Shift function and stop recording program. P.24 Time Shift limitations: 1. When the Time Shift feature is activated, only the PLAY/PAUSE/STOP/FWD/REV/ VOL+/VOL-/MUTE keys and some basic operation keys (ENTER/EXIT/navigation keys) are available. 2. Video playback may not be smooth and skip if USB recording speed does not meet the minimum requirements . 3. Do Not remove USB disk or switch off the power during Time Shift operations. It will abort once the signal is lost. 4. Do Not remove the signal source during Time Shift operations. 5. Do Not quickly and repeatedly change operations between PLAY/PAUSE/FWD/REV. 7. Not all USB devices are compatible, The USB hard disk drive electricty should be < 500MA. Below is a list of recommended USB drvies. Models that are not listed may be compatible, but it is not guaranteed to work. 8. This feature is not available for all digital TV,such as scrambled or audio only channels. P.25 04 Operation 6. Video may become pixelated when Video bit rate is too low. 10.USB Player Press source key, and selsct USB in soure list, press OK button to enter the USB menu. play 00:04:22 AB Pause Haier Innovation Life PHOTO Usb2.0 MUSIC MENU TEXT Back MOVIE OK Move 00:04:22 FB FF Prev. Next Stop Repeat ALL Set A Press to select the function icon, press OK button to confirm the function. Press or EXIT button to exit the control bar except for music. NOTE: You can adjust the audio track, or program in the Info menu while Playing the video file.Choose the Info icon and press OK can display the Info MENU. Select SUB-10.avi Please make sure that the USB device have plugged in the slot.There are four type media item can be selected, such as photo, music, Movie, and text. Select the type media item by pressing , press OK button to enter the disk selection menu. Resolution: 720x400 AudioTrack: 1/1 Subtitle: OFF Program: --/0 Size: Haier Innovation Life 4142 KBytes Close Return C MENU Back OK Move Select Press the to select the right disk and press OK to display media files and folder list or choose Return to back to the media type selection menu. USB playback is supported for the following photo file formats: -JPEG(JPEG format, files with the extension ".jpg" ) -BMP (files with the extension ".bmp") -PNG (files with the extension ".png") USB playback is supported for the following music file formats: -MP3 (files with the extension ".mp3") -WAV (files with the extension ".wav") USB playback is supported for the following text file formats: -TXT (files with the extension ".txt") Picture USB playback is supported for the following movie file formats: -AVI (file with the extension".avi") -TS (MPEG2 & H.264) 0021.JPG Return Up Folder MENU 720 Back 480 1080 Move 0021.JPG OK Select Select the media file by pressing or , then the preview frame will pop up.Press the button to play the media file in full screen.When the media file (photo, Movie, or text type) is playing, press the OK or Info button can display the control bar. P.26 05 Trouble shooting Trouble phenomenon Symptom Inspection Check Audio Snow Noise antenna position, direction or connection Ghost Normal audio antenna position, direction or connection Interference Noise electronic equipment,car/ motorcycle,fluorescent light Mute Volume(check if mute is activated or if the audio system connections are not correct) Normal Picture No picture Mute No colour Normal audio Colour control Picture breaking up Normal audio or weak retune channel No colour There is black bar on top and bottom P.27 Power cord is not inserted Power switch is not opened Contrast and brightness/volume setup Press standby key on the remote control for inspecting Noise Normal audio TVsystem Change aspect to zoom 07 Trouble shooting Picture Specification Colour system PAL-B/G, I, D/K SECAM-B/G, D/K, L, L’ Sound system BG, DK, I, L,L' Video input SCART, YP b Pr, AV, VGA, HDMI, USB. Y/Pb/Pr 480i/p, 576i/p, 720p, 1080i,1080p HDMI 480i/p, 576i/p, 720p, 1080i, 1080p Power requirements 100-240V~ 50/60Hz Power consumption 30W(19") Audio output 2x3W Standby Power Comsumption <0.5W Environment conditions Working temperature: +5 C - +35 C Working humidity: 20% - 80% Storage temperature: -15 C - +45 C Storage humidity: 5% - 90% Accessory 38W(22") 40W(24") 55W(26") User manual Remote control Battery (x2) Quick start guide * The part specifications of this TV set provided here are for reference only. Difierences may occur as product technology is updated. Design and specifications are subject to change without notice. Scart Output description : 1. When current source is ATV/AV/SCART, scart output signal is ATV. 2. When current source is DTV, scart output signal is DTV. 3. Other source have no scart output signal. P.28 LCD-FERNSEHER BEDIENUNGSANLEITUNG MODELL Bitte lesen Sie die Bedienungsanleitung aufmerksam durch, bevor Sie Ihren Fernseher benutzen. Bewahren Sie die Anleitungen für zukünftigen Nachschlagen auf. LET19T1000H LET22T1000HF LET24T1000HF LET26T1000HF 1 Inhaltsverzeichnis 01 Sicherheits- und Warnhinweise Willkommen S. 03 Wichtige Informationen S. 03 Sicherheitshinweise S. 04 Warn- und Vorsichtshinweise S. 05 02 Einleitung Parameter S. 07 Standfuß montieren S. 08 Wandmontage S. 09 Frontblende S. 11 AV-Anschlüsse S. 12 Fernseher anschließen S. 13 Common Interface S. 14 03 Fernbedienung Fernbedienung S. 15 04 Bedienungshinweise Installation S. 17 05 Störungserkennung Störungserkennung S. 33 Spezifikationen S. 34 2 01 Sicherheits- und Warnhinweise WILLKOMMEN Vielen Dank, dass Sie sich für diesen 19"/22"/24"/26".Zoll LED LCD-Fernseher entschieden haben. Diese Anleitung hilft Ihnen bei der Einstellung und Bedienung Ihres Fernsehers. Vergewissern Sie sich zunächst, dass alle Zubehörteile mitgeliefert wurden: 19" HD-Ready LED LCD-Fernseher 22" Full HD 1080P digitaler LED LCD-Fernseher 2 x AAA-Batterien für Fernbedienung Fernbedienung Benutzerhandbuch 2 x AAA-Batterien Kurzanleitung Benutzerhandbuch Standfuss Kurzanleitung Standfuss 24" Full HD 1080P digitaler LED LCD-Fernseher 26" HD-Ready LED LCD-Fernseher Fernbedienung 2 x AAA-Batterien für Fernbedienung 2 x AAA-Batterien Benutzerhandbuch Benutzerhandbuch Kurzanleitung Kurzanleitung Standfuss Standfuss Nun können Sie beginnen! WICHTIGE INFORMATIONEN LESEN SIE ALLE ANLEITUNGEN VOR GEBRAUCH UND BEWAHREN SIE SIE FÜR SPÄTERES NACHSCHLAGEN AUF. VORSICHT STROMSCHLAGGEFAHR NICHT ÖFFNEN VORSICHT ZUR VERMEIDUNG VON STROMSCHLAG ÖFFNEN SIE DAS GERÄTEGEHÄUSE NICHT. ES BEFINDEN SICH KEINE VOM VERBRAUCHER WARTBAREN TEILE IM INNERN DES GERÄTS. WENDEN SIE SICH MIT PROBLEMEN UND FRAGEN ZUR WARTUNG AN DEN KUNDENDIENST. DER BLITZ IM GLEICHSEITIGEN DREIECK BEDEUTET, DASS IM GERÄT HOCHSPANNUNGSGEFAHR BESTEHT. DAS AUFRUFUNGSZEICHEN IM GLEICHSEITIGEN DREIECK BEDEUTET, DASS WICHTIGE WARTUNGS- UND BEDIENUNGSHINWEISE IN DER BEDIENUNGSANLEITUNG GEFUNDEN WERDEN. VORSICHT: ZUR VERMEIDUNG VON STROMSCHLAG UND FEUER SETZEN SIE DEN FERNSEHER NICHT FEUCHTIGKEIT AUS. REINIGEN SIE DAS GERÄT UND DEN BILDSCHIRM NICHT MIT SCHEUERMITTELN; DAS FÜHRT ZU KRATZERN. BITTE BEACHTEN SIE: REPARIEREN SIE DAS GERÄT NICHT SELBST, DAS KANN ZU VERLETZUNGEN UND SCHÄDEN AM GERÄT FÜHREN. WENDEN SIE SICH MIT WARTUNGS- UND REPARATURARBEITEN STETS AN DEN AUTORISIERTEN KUNDENDIENST. 3 SICHERHEITSHINWEISE • Warnung: Zur Vermeidung von Feuer und Stromschlag öffnen Sie nicht das Gerätegehäuse. Es befinden sich keine vom Verbraucher wartbaren Teile im Innern des Gerätes. Wenden Sie sich mit Wartungs- und Reparaturarbeiten stets an den autorisierten Kundendienst. • Warnung: Zur Vermeidung von Feuer und Stromschlag setzen Sie das Gerät nicht Regen oder Feuchtigkeit aus. • Setzen Sie Netzteil und Gerät nicht Spritzwasser oder Tropfwasser aus und stellen Sie keine mit Wasser gefüllten Gegenstände (wie Vasen) auf dem Gerät ab. • Schützen Sie das Gerät vor direkter Sonneneinstrahlung und Hitze (Heizkörper, Herd). • Blockieren Sie nicht die Ventilationsöffnungen, sie werden zur Belüftung benötigt. Stellen Sie das Gerät nicht auf einem Kissen, Sofa oder ähnlichen Flächen ab. • Stellen Sie das Gerät nicht auf einem unstabilen Wagen, Aufsteller, Stativ, Tisch oder einer Halterung auf. Es kann herunterfallen und Verletzungen und Schäden verursachen. • Stellen Sie keine schweren oder scharfkantigen Gegenstände auf dem Gerät ab. • Ziehen Sie nach der Benutzung den Netzstecker. • Entsorgen Sie Batterien umweltgerecht. • WARNUNG: Batterien oder Akkus dürfen nicht übermäßiger Hitze ausgesetzt werden (direkte Sonneneinstrahlung, Feuer usw.). • WARNUNG: Übermäßiger Schalldruck von Ohrhörern oder Kopfhörern kann zu Hörschäden führen. Dieses Symbol zeigt an, dass das Gerät nicht mit dem Hausmüll entsorgt werden darf. Zur Vermeidung von Gesundheits- und Umweltschäden durch unkontrollierte Entsorgung muss das Gerät recycelt werden. Geben Sie das Gerät bitte an einer Sammelstelle für Elektroaltgeräte ab oder wenden Sie sich an Ihren Fachhändler. 4 WARN- UND VORSICHTSHINWEISE Warnung Vorsicht Dieser Fernseher wird mit Hochspannung betrieben. Öffnen Sie nicht das Gerätegehäuse. Wenden Sie sich mit Wartungs- und Reparaturarbeiten stets an den autorisierten Kundendienst. Zur Vermeidung von Feuer und Stromschlag setzen Sie das Gerät nicht Regen oder Feuchtigkeit aus. Führen Sie keine Fremdkörper in das Gerät ein, stoßen Sie es nicht stark an. Verschütten Sie keine Flüssigkeiten auf Ihrem Fernseher. Blockieren Sie nicht die Ventilationsöffnungen, sie werden zur Belüftung benötigt. 5 Klemmen Sie das Netzkabel nicht unter dem Fernseher ein. Stehen Sie nicht auf dem Fernseher, lehnen Sie sich nicht gegen den Fernseher, stoßen Sie ihn nicht an. Achten Sie auch besonders auf Kinder. Der Fernseher kann schwere Verletzungen und Schäden verursachen, wenn er umfällt. • Stellen Sie das Gerät nicht auf einem unstabilen Wagen, Aufsteller, Stativ, Tisch oder einer Halterung auf. Es kann herunterfallen und Verletzungen und Schäden verursachen. Bei längerer Nichtbenutzung des Fernsehers ziehen Sie bitte das Netzkabel ab. Mindestabstände Wird der Fernseher eingebaut, so achten Sie bitte auf die Mindestabstände. Hitzestau kann die Lebensdauer Ihres Fernsehers verkürzen und ist gefährlich. 6 02 Einleitung ACHTUNG Machen Sie sich nicht an Bauteilen im Fernsehgerät oder an irgendwelchen anderen Einstellungssteuerungen zu schaffen, die nicht in diesem Handbuch beschrieben sind. Alle LED Fernsehgeräte sind elektrische Hochspannungsgeräte. Wenn Sie Staub oder Wassertropfen von dem Bildschirm oder dem Gehäuse oder um die Knöpfe oder Anschlüsse herum abwischen, sollte das Stromkabel aus der Steckdose aus gesteckt sein. Wischen Sie das Fernsehgerät mit einem weichen, trockenen, staubfreien Tuch ab. Trennen Sie während Gewittern das Stromkabel und das Antennenkabel, um Schäden an Ihrem Fernsehgerät und anderen angeschlossenen Geräten zu vermeiden. Alle Reparaturen sollten nur von qualifiziertem Fernsehgeräte Servicepersonal durchgeführt werden. INSTALLATION • Stellen Sie den Fernseher vor direkter Sonneneinstrahlung geschützt auf. • Dunkelheit und Reflektionen auf dem Bildschirm können zu einer Überforderung der Augen führen. Weiche und indirekte Beleuchtung wird für komfortables Fernsehen empfohlen. • Lassen Sie auf der Rückseite des Fernsehers ausreichend Platz zur Ventilation. • Vermeiden Sie besonders warme Standorte, um einen Hitzestau im Gerät und vorzeitige Schäden zu vermeiden. • Decken Sie die Lüftungsöffnungen während des Betriebs nicht ab. Ausstattungsmerkmale 1. Nutzbar als Fernseher oder PC-Monitor 2. Hohe Leuchtkraft, breiter Betrachtungswinkel 3. HDMI- und SCART-Anschluss 4. NICAM 5. Time shift Parameter Bildschirm 19“ 22“ 24“ 26“ Spannungsversorgung 100-240V~50/60Hz 100-240V~50/60Hz 100-240V~50/60Hz 100-240V~50/60Hz 30W 38W 40W 55W Audio-Ausgangsleistung 2x3W (Klirrfaktor ≤7 %) Anschlüsse Analog RGB (PC) x 1 High-Definition Multimedia Interface (HDMI) x 2 Videoeingang x 1 Audioeingang x 2 USB-Port x 1 YPbPr x 1 SCART x 1 CI x 1 RF Co-Ax X 1 Headphone X 1 S/PDIF X 1 Horizontale Auflösung (TV-Zeilen) Composite Videoeingang ≥350 YPbPr ≥400 7 PC MODE PRÉDÉFINI RESOLUTION V. Fréq. (Hz) H. Fréq. (KHz) 1 800*600 60 37. 88 2 640*480 60 31. 47 3 1360*768 60 47.7 4 1024*768 60 48. 36 5 1280*1024 60 63. 98 Montageanleitung für Standfuß 1. Stecken Sie die Stütze in Richtung des 2. Stecken Sie die Standfußbaugruppe in Pfeils in den Standfuß und befestigen Richtung des Pfeils in die Rückwand und Sie sie anschließend mit den einzelnen befestigen Sie sie anschließend mit der Schrauben. einzelnen Schrauben. (19”,22”,24”) (19”,22”,24”) 1. Stecken Sie die Stütze in Richtung des 2. Stecken Sie die Standfußbaugruppe in Pfeils in den Standfuß und befestigen Richtung des Pfeils in die Rückwand und Sie sie anschließend mit den drei befestigen Sie sie anschließend mit der Schrauben. zwei Schrauben. (26”) (26”) HINWEISE ZUR INSTALLATION Stellen Sie den Fernseher vor direkter Sonneneinstrahlung geschützt auf. Dunkelheit und Reflektionen auf dem Bildschirm können zu einer Überforderung der Augen führen. Weiche und indirekte Beleuchtung wird für komfortables Fernsehen empfohlen. Lassen Sie auf der Rückseite des Fernsehers ausreichend Platz zur Ventilation. Vermeiden Sie besonders warme Standorte, um einen Hitzestau im Gerät und vorzeitige Schäden zu vermeiden. 8 WANDMONTAGE Dieser Fernseher kann wie folgt an der Wand montiert werden: 1. Legen Sie den Fernseher mit dem Bildschirm auf eine flache Arbeitsfläche. Legen Sie ein Tuch unter, um den Bildschirm zu schützen. 2. Schrauben Sie die Halterung für den Standfuß unten am Fernseher ab (bewahren Sie den Standfuß für späteren Gebrauch auf). (19”,22”,24”) (26”) 3. Schrauben Sie den Fernseher mit den vier vorgesehenen Schrauben an einer VESA-Wandhalterung (nicht mitgeliefert). (19”) 9 (22”,24”) (26”) 10 Frontblende 1 Sensor Fernbedienung 2 Status-LED: BLAU: eingeschaltet ROT: Stand-by-Modus 3 Funktionstasten 1 SOURCE Menü der Eingangsquellen anzeigen. 2 MENU Hauptmenü anzeigen. 3 CH+/CH- Im TV-Modus schalten Sie mit CH+ oder CH- den Kanal aufwärts oder abwärts um. Im MENÜ wählen Sie mit CH+ oder CH- einen Menüpunkt. In Stand-by-Modus schalten Sie den Fernseher ein. 4 VOL+/VOL- Lautstärke einstellen. Im MENÜ stellen Sie den gewählten Menüpunkt ein. 5 STANDBY 11 Anschlüsse Seite/Rückseite 1 L/R AUDIO Eingang 2 Video Eingang 3 S/PDIF Digital Audio Ausgang 4 YPbPr Eingang 5 SCART Eingang 6 USB Eingang 7 HDMI2 Eingang 8 HDMI1 Eingang 9 HEADPHONE Analog Audio Ausgang 10 COMMON INTERFACE (CI) Eingang 11 PC AUDIO Eingang 12 VGA Eingang 13 ANTENNE Eingang 12 FERNSEHER ANSCHLIEßEN ANTENNE ANSCHLIEßEN Schließen Sie die Antenne auf der Rückseite des Fernsehers am Anschluss ANT IN an. SIGNAL VERBESSERN Zur Verbesserung schlechter Bildqualität in bestimmten Bereichen benutzen Sie einen Antennenverstärker (nicht mitgeliefert). PC AM FERNSEHER ANSCHLIEßEN Sie können den Fernseher ebenfalls als Monitor für Ihren PC benutzen, der Anschluss erfolgt über ein VGA-Kabel (nicht mitgeliefert). 1 Lesen Sie in der Bedienungsanleitung Ihres Computers nach, ob dieser einen VGA-Anschluss hat. 2 Schalten Sie Fernseher und PC aus. 3 Schließen Sie ein D-Typ 15-Pin VGA-Kabel am VGA-Anschluss des PC und am Fernseher an. Ziehen Sie die Schrauben an und schließen Sie ein Audiokabel (nicht mitgeliefert) am Audioeingang auf der Rückseite des Fernsehers an. 4 Schalten Sie erst den Fernseher und dann den PC ein. 5 Rufen Sie auf dem Fernseher oder mit der Fernbedienung den VGA-Modus auf. 6 Sie können den VGA-Modus zu einer anderen Auflösung umschalten, Helligkeit und Kontrast im Menü einstellen, bis Sie ein klares Bild haben. DVD-PLAYER ODER VIDEOREKORDER AM FERNSEHER ANSCHLIEßEN Einen DVD-Player oder Videorekorder können Sie auf zweierlei Weise anschließen. Beide Geräte müssen zunächst ausgeschaltet sein. 1 Schließen Sie die AV DVD/VCR Ausgänge an AV IN des Fernsehers an. 2 Schließen Sie Audio L und R am Audioeingang (8) an. Drücken Sie SOURCE und stellen Sie den Eingangsmodus auf AV ein. SCART-EINGANG 1 Schließen Sie das SCART-Kabel vom externen Gerät (DVD-Player, Digitalempfänger, Spielkonsole usw.) am SCART-Eingang des Fernsehers an. 2 Drücken Sie SOURCE und stellen Sie den Eingangsmodus auf SCART ein. 3 Drücken Sie PLAY auf dem externen Gerät. HDMI-EINGANG 1 Schließen Sie das HDMI-Kabel vom externen Gerät am HDMI-Eingang des Fernsehers an. 2 Drücken Sie SOURCE und stellen Sie den Eingangsmodus auf HDMI ein. 3 Sehen Sie die Bedienungshinweise in der Anleitung Ihres HDMI-Gerätes nach. HEADPHONE Ausgang Den Kopfhörerstecker in die Kopfhörerbuchse stecken. Die Lautsprecher sind nun stummgeschaltet. S/PDIF Ausgang S/PDIF ist ein digitaler Audio Anschluss, der verwendet wird, um Audio Geräte, wie z.B. Heimkinoanlagen oder andere digitale HiFi-Systeme über kurze Entfernungen anzuschließen. Das Signal wird über ein Koaxial Kabel mit RCA Anschlüssen übertragen. 1.Achten Sie darauf, dass sowohl das Fernsehgerät als auch das Gerät ausgeschaltet sind, bevor Sie das Gerät an das Fernsehgerät anschließen. Achten Sie darauf, dass sowohl das Fernsehgerät als auch das Gerät ausgeschaltet sind, bevor Sie das Gerät an das Fernsehgerät anschließen. 2.Schließen Sie die AV Kabel (nicht im Lieferumfang enthalten) von der S/PDIF an das Fernsehgerät, das Heimkino System oder das digitale Hifi System, usw. an. 13 COMMON INTERFACE Der Schacht Common Interface (CI) dient der Aufnahme des Conditional Access (CA) Moduls und der Smartcard für Bezahlsender. Bitte wenden Sie sich an Ihren Dienstanbieter für weitere Informationen. Bitte beachten Sie, dass CA Module und Smartcards von uns nicht geliefert werden. Warnung • Schalten Sie den Fernseher aus, bevor Sie das Modul in den Common Interface Schacht einschieben. 1. Setzen Sie zunächst das CI Modul und dann die Smartcard im CI Schacht an der Seite des Fernsehers ein. CI SLOT CI-Schacht CAM CA-Modul Smart Card Smartcard 2. Schalten Sie den Fernseher ein, die nachstehende Meldung wird angezeigt, wenn das CA-Modul erkannt wird. Warten Sie einen Moment ab, bis die Karte aktiviert ist. 3. Drücken Sie MENU und dann ▲▼ zur Anzeige der CI-Informationen. 4. Detaillierte Informationen zur benutzten CI-Karte werden angezeigt. 5. Drücken Sie OK, um das Kartenmenü aufzurufen. Finden Sie detaillierte Anleitungen in der Bedienungsanleitung des Moduls. 6. Nach dem Abziehen des Moduls wird die nachstehende Meldung angezeigt. 14 03 Fernbedienung 1. EINSCHALTEN: Drücken Sie die Taste zum Einschalten des Fernsehgerätes. 2. D.MENÜ: Keine Funktion. 3. P. Modus: Umschalten zum Bildmodus. 4. INFO: Drücken Sie die Taste, um den aktuellen Signalstatus, inklusive der Eingangsquelle und dem Kanal-Audio-Modus anzuzeigen. 5. AUDIO l/ll: Drücken Sie die Taste, um MONO, Nicam Stereo für den ATV Kanal auszuwählen. Stellen Sie die Audiosprache für den DTV Kanal ein. 6. UNTERTITEL: Drücken Sie die Taste, um den Untertitel On oder Off zu schalten. 7. Anzahl der Tasten: Für den direkten Zugriff auf die Kanäle. 8. QUELLE: Zur Auswahl der Eingangsquelle. 9. STUMM: Um die Tonausgabe zu deaktivieren bzw. zu aktivieren. 10. Lautsprechersteuerung: Zum Einstellen des Schallpegels. 11. MENÜ: Zur Anzeige des Fernsehmenüs. 12. OK: Zur Bestätigung der Auswahl. 13. SCHLIESSEN: Zum vorhergehenden Menü zurückzukehren oder Menü Schließen, 14. Teletext Index. 15. WIEDERHOLEN: Keine Funktion 16. Teletext grüne Taste / USB Schnellvorlauf 17. Teletext rote Taste / USB Schnellrücklauf 18. Teletext Mischung 19. Teletext Text 20. Teletext Öffnen 21. Teletext Größe 22. Teletext Zeit / REC.LISTE (Teletext Zeit hat keine Funktion) 23. Teletext Modus: Keine Funktion 24. Teletext Halten 25. Teletext Untercode: Teletext Unterseite 26. Teletext blaue Taste / USB Nächste Datei 27. Teletext Gelbe Taste / USB Vorhergehende Datei 28. USB STOPP 29. USB ABSPIELEN/PAUSE 30. AUFZEICHNUNG STARTEN 31 . Mauszeiger NACH OBEN, NACH UNTEN, NACH LINKS, NACH RECHTS: Drücken Sie die Taste, um zu Ihrer Auswahl zu navigieren. 32. Fav: Greifen Sie im TV DVD auf die Favoritenkanäle. 33. Programm auswählen: Drücken Sie die Taste, um das folgende oder vorhergehende Fernsehprogramm auszuwählen. 34. ANLEITUNG: Drücken Sie die Taste, um die Programmieranweisung für die Elektronik im TV Modus anzuzeigen. 35. Q. Ansicht: Um wieder auf den zuvor eingeschalteten Kanal zuzugreifen. 36. CH.LISTE: Drücken Sie die Taste, um die Kanalliste anzuzeigen. 37. Bildschirm: Zur Änderung des Bildseitenverhältnisses. 38. Ruhemodus: Stellen Sie die Zeitschaltuhr ein. 39. S .Modus: Zum Umschalten in den Tonmodus. 40. ÖFFNEN/SCHLIESSEN: Keine Funktion :Keine DVD Funktion 15 Batterien in die Fernbedienung einsetzen 1. Öffnen Sie das Batteriefach. 2. Setzen Sie 2 AAA 1,5-V-Batterien mit korrekter Polarität ein, wie im Batteriefach aufgedruckt. 3. Schließen Sie das Batteriefach wieder. Tauschen Sie die Batterien aus, wenn die Reichweite der Fernbedienung nachlässt. Bitte beachten Sie: 1) Benutzen Sie Alkali-Batterien. 2) Bei längerer Nichtbenutzung oder wenn die Batterien erschöpft sind, entnehmen Sie sie bitte aus der Fernbedienung. FERNBEDIENUNG VIDEOTEXT Videotext ist ein Informationssystem, das von einigen Sendern übertragen wird und wie eine Zeitung aufgebaut ist. Hier haben Sie ebenfalls Untertitel für Hörgeschädigte (Kabelnetzwerke, Satellitenkanäle usw.). Drücken Sie: TEXT Sie haben folgende Funktion: Mit dieser Taste rufen Sie den Videotext auf oder Sie verlassen ihn. Eine Liste mit Menüpunkten wird angezeigt. Jede Seite hat eine 3-stellige Nummer. Wird kein Videotext übertragen, so wird die Zahl 100 angezeigt, ansonsten bleibt der Bildschirm leer (verlassen Sie diesen Kanal). SEITE WÄHLEN Mit 0 bis 9 und den Navigationstasten aufwärts/abwärts rufen Sie die Seite auf. Beispiel: Für Seite 120 geben Sie 1-2-0 ein. Die Nummer wird oben links im Bild angezeigt. Zum Aufrufen einer neuen Seite geben Sie die entsprechende Nummer ein. Ist die gewählte Seite nicht vorhanden, so läuft die Seitenzahl weiter. UNTERSEITEN DIREKT AUFRUFEN Die Farbtasten entsprechen den Farbmarkierungen unten auf der Seite und dienen als Schnelltasten zum Aufrufen. Der farbige Bereich blinkt, wenn die Seite noch nicht zur Verfügung steht. INDEX Inhaltsverzeichnis aufrufen (gewöhnlich Seite 100). SUB PAGE Einige Seiten haben Unterseiten, die nacheinander angezeigt werden. Mit dieser Taste blättern Sie um oder halten Sie die Unterseite. Die Seitenzahl wird oben links im Bild angezeigt. HOLD Mit dieser Taste halten Sie eine Seite, sie wird nicht umgeblättert. REVEAL Versteckte Informationen anzeigen oder verbergen (Spielauflösungen). LIST Mit den vier Farbtasten können vier Favoritenseiten markiert werden. In diesem Modus ist eine weitere Navigation mit den Farbtasten nicht möglich. 16 04 BEDIENUNGSHINWEISE Installation Der Installationsmodus erscheint nur beim ersten Start des Fernsehers oder nach Zurücksetzen des Fernsehers auf Werkseinstellungen. 1. Drücken Sie die Tasten, um im Menü zu navigieren und die Einstellungen zu ändern. Drücken Sie die OK Taste, um die Auswahl zu bestätigen.Wählen Sie die gewünschte Sprache aus, in der das Menü angezeigt werden soll. Wählen Sie die gewünschte Sprache und den Zuhause- oder Geschäftsmodus aus, der verwendet werden soll. Achtung: Das voreingestellte Passwort ist 6666. HOME oder SHOP Modus ①.Der Home-Modus ist ein Energiesparmodus. Der Home Modus wird für alle normalen Ansichtseinstellungen empfohlen und wird beim Hersteller als Standard eingestellt. ②.Der Shop Modus ist eine Option für Wiederverkäufer, die für Werbung oder für Produktpräsentation genutzt werden kann. Der Shop Modus hat ein helleres Bild als der Home-Modus. ③.Sie können zwischen Zuhause- und Geschäftsmodus hin- und herschalten. Wenn der Geschäftsmodus eingestellt ist, wird automatisch die Eingangsquelle HDMI 1 ausgewählt. Sie können das Menü mit Exit verlassen. 2. Drücken Sie die Tasten, um DVB-T/DVB-C auszuwählen und drücken Sie dann die OK Taste, um zu bestätigen. a. Wenn Sie DVB-T ausgewählt haben, wählen Sie im nächsten Schritt den Tune Typ und das Land aus und drücken Sie dann die OK Taste, um mit dem Einregeln zu beginnen. b. Wenn Sie DVB-C ausgewählt haben, konfigurieren Sie im nächsten Schritt das DVB-C System, wie Scan Typ, Häufigkeit, Netzwerk ID, Symbol/KS/S und drücken Sie dann die OK Taste, im Tune Typ und Länderauswahlmenü, dieser Schritt erfolgt wie im DVB-T wählen Sie den Tune Typ (DTV/ATV) aus. 17 Wählen Sie das entsprechende Land aus und drücken Sie die OK Taste, um mit dem Einregeln zu beginnen. 3. Kanal Einregeln beginnt. Dies kann bis zu 6 Minuten dauern. In der Anzeige sehen Sie den Fortschritt beim Einregeln und die Anzahl der gefundenen Kanäle. 4. Wenn Sie das ATV Einregeln überspringen möchten und drücken Sie die MENU Menü Taste, um das Einregeln während des Vorgangs zu unterbrechen. Ein Pop-Up Fenster wird angezeigt, drücken Sie die Taste, um YES auszuwählen. Gehen Sie dann direkt weiter zum DTV Einregeln. Sie können den Schritt wiederholen, wenn Sie auch die DTV Einreglung überspringen möchten. Eine Installationserinnerung wird angezeigt, wenn Sie das nächste Mal Ihr Fernsehgerät einschalten. 5. Nachdem das Einregeln fertig gestellt ist, werden die Kanäle in einer vorgegebenen Reihenfolge angeordnet. Wenn Sie Kanäle überspringen möchten, ändern Sie die voreingestellte Reihenfolge oder nennen Sie die Kanäle um, wählen Sie Programme bearbeiten imChannel Menü aus. 6. 1. KANAL MENÜ 1.1 Automatisches Einregeln (DVB-T) 1)Drücken Sie die MENU Taste und drücken Sie anschließend die Tasten um das Menü CHANNEL auszuwählen und drücken Sie dann die OK Taste. 2. Drücken Sie die Tasten, um Auto Tuning auszuwählen und drücken Sie dann die OK Taste. 18 3. Drücken Sie die Tasten DVB-T/DVB-C auszuwählen. Drücken Sie DVB-T auswählen und dann die OK Taste, um zu bestätigen. 4. Im Einregel Typ Menü drücken Sie die Tasten drücken Sie dann die Tasten Tasten, um ATV / DTV / DTV + ATVauszuwählen. Drücken Sie die Taste und , um das Land auszuwählen in welchem das Fernsehgerät betrieben wird. Drücken Sie die OK Taste, um die Auswahl zu bestätigen. 5. Kanal Einregeln beginnt. Dies kann bis zu 6 Minuten dauern. In der Anzeige sehen Sie den Fortschritt beim Einregeln und die Anzahl der gefundenen Kanäle. 6. Wenn Sie das ATV Einregeln überspringen möchten und drücken Sie die MENU Menü Taste, um das Einregeln während des Vorgangs zu unterbrechen. Ein Pop-Up Fenster wird angezeigt, drücken Sie die Taste, um YES auszuwählen. Gehen Sie dann direkt weiter zum DTV Einregeln. Sie können den Schritt wiederholen, wenn Sie auch die DTV Einreglung überspringen möchten. Eine Installationserinnerung wird angezeigt, wenn Sie das nächste Mal Ihr Fernsehgerät einschalten. 7. Nachdem das Einregeln fertig gestellt ist, werden die Kanäle in einer vorgegebenen Reihenfolge angeordnet. Wenn Sie Kanäle überspringen möchten, ändern Sie die voreingestellte Reihenfolge oder nennen Sie die Kanäle um, wählen Sie Programme bearbeiten aus dem Kanal Menü aus. 1.2 Automatisches Einregeln (DVB-C) 1. Drücken Sie die MENU Taste und drücken Sie anschließend die Tasten um das Menü CHANNEL auszuwählen und drücken Sie dann die OK Taste. 2. Drücken Sie die Tasten, um Automatisches Einregeln auszuwählen und drücken Sie dann die OK Taste. 19 3. Drücken Sie die Tasten, um DVB-T/DVB-C auszuwählen und drücken Sie dann die OK Taste zum Bestätigen. 4. Drücken Sie die Tasten , um Scan Typ/Symbol Ks/S auszuwählen und drücken Sie die OK Taste zum Bestätigen. 5. Im Einregel Typ Menü drücken Sie die Tasten Sie dann die Tasten , um ATV / DTV / DTV + ATV auszuwählen. Drücken Sie die Taste und drücken , um das Land auszuwählen in welchem das Fernsehgerät betrieben wird. Drücken Sie die OK Taste, um die Auswahl zu bestätigen. 6. Kanal Einregeln beginnt. Dies kann bis zu 6 Minuten dauern. In der Anzeige sehen Sie den Fortschritt beim Einregeln und die Anzahl der gefundenen Kanäle. 7. Wenn Sie das ATV Einregeln überspringen möchten und drücken Sie die MENU Menü Taste, um das Einregeln während des Vorgangs zu unterbrechen. Ein Pop-Up Fenster wird angezeigt, drücken Sie die Taste, um YES auszuwählen. Gehen Sie dann direkt weiter zum DTV Einregeln. Sie können den Schritt wiederholen, wenn Sie auch die DTV Einreglung überspringen möchten. Eine Installationserinnerung wird angezeigt, wenn Sie das nächste Mal Ihr Fernsehgerät einschalten. 8. Nachdem das Einregeln fertig gestellt ist, werden die Kanäle in einer vorgegebenen Reihenfolge angeordnet. Wenn Sie Kanäle überspringen möchten, ändern Sie die voreingestellte Reihenfolge oder nennen Sie die Kanäle um, wählen Sie Programme bearbeiten aus dem Kanal Menü aus. 20 HINWEIS: Alle Kanäle inklusive ATV, DTV und Radio können gleichzeitig eingeregelt werden, wenn der Einregeltyp DTV+ATV ist. Alle gespeicherten Kanäle gehen nach dem automatischen Einregeln verloren. Nach dem automatischen Einregeln, springt der Kanal zum ersten DTV Kanal. 2.1 Manuelles Einregeln (DVB-T) 1. Drücken Sie die MENU Taste und drücken Sie anschließend die Tasten um das Menü CHANNEL auszuwählen und drücken Sie dann die OK Taste. 2. Drücken Sie die Tasten, um DTV Manual Tuning und drücken Sie dann die OK Taste. 3. Der DTV Bildschirm für manuelles Einregeln wird angezeigt. Drücken Sie die Tasten, um den gewünschten UHF Kanal auszuwählen und drücken Sie dann die OK Taste, um mit der Suche nach diesem Kanal zu beginnen. Wenn das Signal eingeregelt wurde, wird das Bild und die Signalstärke auf dem Bildschrim angezeigt. 4. Drücken Sie die Taste MENU, um zum Hauptmenü zurückzukehren. 5. Drücken Sie die Taste EXIT, um das Menü zu verlassen. 2.2 DTV Manuelles Einregeln (DVB-C) 1. Drücken Sie die MENU-Taste und drücken Sie dann die Tasten um, das Menü CHANNEL auszuwählen und drücken Sie dann die OK Taste. 2. Drücken Sie die Tasten, um CADTV Manual Tuning und drücken Sie dann die OK Taste. 21 3. Der Bildschirm CADTV Manual Tuning wird angezeigt. Drücken Sie die Tasten , um folgendes auszuwählen (Frequenz, Symbol Ks/S/QAM Typ QAM) und drücken Sie dann die OK Taste, um die Suche nach diesem Kanal zu starten. Wenn das Signal eingeregelt wurde, wird das Bild und die Signalstärke auf dem Bildschirm angezeigt. 4. Drücken Sie die Taste MENU, um zum Hauptmenü zurückzukehren. 5. Drücken Sie die Taste EXIT, um das Menü zu verlassen. 3) ATV Manuelle Suche: Stellen Sie das Tonsystem zur Suche nach Analogkanälen ein, dann nehmen Sie die Feinabstimmung vor und speichern Sie den gewählten Kanal. BITTE BEACHTEN SIE: Drücken Sie die rote Videotexttaste zum Speichern eines manuell gesuchten Kanals. 4). Kanal bearbeiten: Sie können Kanäle löschen, umbenennen, verschieben, überspringen und als Favoriten einstellen. Löschen Drücken Sie die rote Taste zum Löschen eines Kanals. Umbenennen Sie können nur ATV-Kanäle umbenennen. 22 Navigieren Sie zu dem gewünschten Kanal und drücken Sie die grüne Taste, um den Kanal umzubenennen. Drücken Sie zur Auswahl der Schriftzeichen. Drücken Sie , um zu navigieren. Drücken Sie MENU, um die Bearbeitung zu beenden und drücken Sie EXIT, um das Menü zu verlassen. Bitte beachten Sie: ATV-Kanäle können bis zu 5 Schriftzeichen haben, DTV-Kanäle bis zu 25 Schriftzeichen. Verschieben Mit den Navigationstasten wählen Sie den zu verschiebenden Kanal, dann drücken Sie die gelbe Taste. Mit den Navigationstasten verschieben Sie den Kanal, mit OK bestätigen Sie. Überspringen Drücken Sie zur Auswahl des Kanals und drücken Sie die blaue Taste, um diesen Kanal zu überspringen. Rechts vom Kanal wird angezeigt. Zur Anzeige des übersprungenen Kanals drücken Sie zunächst wieder die blaue Taste, um die Funktion aufzuheben. Das Symbol erlischt. Favoriten Drücken Sie zur Auswahl des Kanals und drücken Sie FAV, damit wird rechts vom Kanal das Symbol angezeigt. Zur Auswahl eines Favoritenkanals drücken Sie FAV. Zum Löschen des Kanals in der Favoritenliste drücken Sie FAV, damit erlischt das Symbol . Drücken Sie FAV zum Aufrufen Ihrer Favoritenkanäle. 5) CI-Informationen (optional) In diesem Menü zeigen Sie die Informationen auf Ihrer CI-Karte an. 2. BILDMENÜ Das zweite Menü ist das Bildmenü (PICTURE). Hier stellen Sie Kontrast, Helligkeit usw. ein. Mit OK bestätigen Sie Ihre Einstellung. BITTE BEACHTEN SIE: 1). Tint (Hautfarbe) haben Sie nur für das NTSC-System. 23 2). Ihnen stehen vier Farbtemperaturen (Color Temperature) zur Verfügung: medium (mittel), warm, cool (kühl) und User (benutzerdefiniert). 3). Screen (Bildschirm) steht Ihnen nur im PC-Modus zur Verfügung, hier stellen Sie die horizontal und vertikale Position, Größe und Phase ein. 3. KLANGMENÜ Das dritte Menü ist das Klangmenü (SOUND). Hier stellen Sie die Klangeffekte wie Höhen, Bässe, Balance usw. ein. Drücken Sie zur Navigation und OK zur Einstellung. Bitte beachten Sie: Auto Volume (automatische Lautstärkeregelung) steht Ihnen nur zur Verfügung, wenn die Lautstärke des Eingangssignals zu hoch oder das Signal verzerrt ist. 4. ZEITMENÜ Das vierte Menü ist das Zeitmenü (TIME). Hier stellen Sie Uhrzeit, Ein- und Ausschaltzeit, Sleeptimer usw. ein. Drücken Sie zur Navigation und OK zur Einstellung. BITTE BEACHTEN SIE: Der Fernseher schaltet sich automatisch aus, wenn für 15 Minuten kein Signal anliegt, sofern Auto Sleep aktiviert ist. Die Uhrzeit kann über den DTV-Kanal automatisch eingestellt werden. 5. OPTIONSMENÜ Das fünfte Menü ist das Optionsmenü (OPTION). Hier stellen Sie die Menüsprache, Audio- und Untertitelsprache usw. ein. 24 1. Wenn nach 4 Stunden nach dem Einschalten an dem TV Gerät keine Änderungen vorgenommen wurden, d.h. es wurde kein Kanal gewechselt oder keine Lautstärke geregelt, startet das Gerät die automatische Abschaltsequenz. Ein Pop-Up Fenster erscheint auf dem Bildschirm. Nach 150 Sekunden schaltet das Fernsehgerät automatisch in den Bereitschaftsmodus um. Um das automatische Abschalten zu verhindern, drücken Sie irgendeine Taste auf der Fernbedienung. 2. Um das automatische Abschalten zu widerrufen, wählen Sie automatisches Abschalten (4h) im Optionsmenü aus und drücken Sie Die OK Taste. Eine Pop-Up Nachricht erscheint „Are you sure you want to enable automatic powerdown?” Drücken Sie auf die rechte Pfeiltaste und wählen Sie NO aus. Der TV Bildschirm kehrt zum Optionsmenü zurück und die Option automatisches Abschalten (4h) wird angezeigt. Automatic power-down(4H) OFF Um zum automatischen Abschalten nach 4 Stunden zurück zu kehren, wiederholen Sie den oben beschriebenen Vorgang, nur dass Sie die linke Pfeiltaste drücken, um YES auszuwählen. Im Menü PVR File System stellen Sie das USB-Laufwerk für die PVR-Aufnahme ein. BITTE BEACHTEN SIE: Mit Restore Factory Default (Rückstellung zu den Werkseinstellungen) werden alle Kanäle und das Passwort gelöscht. 6. SPERRMENÜ Das sechste Menü ist das Sperrmenü (LOCK). Hier sperren Sie das System, stellen Sie das Passwort ein, blockieren Sie Programme und stellen Sie die Kindersicherung ein. Nach Aktivierung der Sperre können Sie den Kanal nicht mehr einstellen. BITTE BEACHTEN SIE: Das Standardpasswort lautet 0000. Sollten Sie Ihr Passwort einmal vergessen, so benutzen Sie das Superpasswort 9443. Block Program (Kanal blockieren): Drücken Sie zur Auswahl des Kanal, dann drücken Sie die grüne Taste zur Blockierung. Zum Entsperren rufen Sie das Hauptmenü auf, geben Sie das Passwort ein und dann drücken Sie die grüne Taste erneut. Parental Guidance (Kindersicherung): Drücken Sie zur Auswahl der Bewertungsstufe. 7. EPG-Menü (Elektronische Programmzeitschrift) Das EPG-Menü dient der Anzeige der Programmvorschau für DTV- und Radiokanäle des Tages. 25 Zum Aufrufen des EPG-Menüs drücken Sie EPG: 1. INFO Mit 2 wählen Sie den Kanal, Drücken Sie INFO, um die Programminformationen zu markieren. Planung Drücken Sie die gelbe Taste, um die Planungsliste (Schedule) anzuzeigen, drücken Sie rote Taste 3. zur Auswahl der Liste und drücken Sie die zum Löschen der Planungsliste. Aufnahme Drücken Sie die rote Taste, um die Aufnahme des Programms einzustellen. 4. Erinnerung Drücken Sie die blaue Taste und stellen Sie eine Erinnerungszeit ein. Der Fernseher schaltet dann automatisch auf das gewählte Programm um. 8. PVR-Funktion 1. Vorbereitung der Aufnahme Die Aufnahme- und Time-Shift-Funktion funktionieren nur bei digitalem Fernsehempfang (DVB-T, -C oder S2). Rufen Sie im Optionsmenü PVR File System auf, hier wählen Sie „Check PVR File System“. Drücken Sie OK, bis „Checking“ zu „Success“ umschaltet. Bitte beachten Sie: Überprüfen Sie den Punkt „Speed“ (Geschwindigkeit). Bei Einstellung auf „HD Support“ steht Ihnen das USB-Speichermedium für Timeshift und Aufnahme zur Verfügung. Anderenfalls formatieren Sie bitte das Gerät. „Free Record Limit“ ist standardgemäß auf 6 Stunden eingestellt, sofern die Speicherkapazität ausreichend ist. Anderenfalls ist die Aufnahmezeit kürzer. Während der Überprüfung gemäß „Check PVR File System“ drücken Sie bitte keine weiteren Tasten. 26 Die Eingaben müssen im TV PVR System vorgenommen werden. Es kann nur auf demselben Fernsehgerät abgespielt werden und nicht auf irgendeinem anderen Gerät (Computer, DVD, usw.) , das nicht mit dem .TS Datei Format kompatibel ist. Bitte beachten Sie, dass Sie das Fernsehgerät zur Aufzeichnung auffordert ,das angeschlossenen USB Gerät zu formatieren, um die Aufzeichnung abzuspeichern. WARNUNG WENN SIE FORMATIEREN; GEHEN DIE DATEIEN UND INFORMATIONEN, DIE AUF DEM EXTERNEN USB GERÄT GESPEICHERT SIND, VERLOREN. AUF DEM GERÄT SPEICHERN. Das USB Dateisystem begrenzt die Größe der Speichergröße. Dateisystem NTFS bis zu 2TB FAT32 mit bis zu 192GB FAT16 mit bis zu 2GB Rufen Sie das PVR Datei System wie unten beschrieben vom Optionsmenü aus auf. Select Disk (Laufwerk wählen): Wählen Sie das Laufwerk zur Aufnahme. Check PVR File System (PVR-Dateisystem überprüfen): Vergewissern Sie sich, dass das PVR-Dateisystem für das USB-Speichermedium eingestellt ist. Format: 27 (Wir empfehlen, das Gerät mit „High Speed FS“ zu formatieren, wodurch sich die Aufnahme beschleunigt.) Nach Beendigung der Formatierung erhalten Sie nachstehendes Menü: Bei Auswahl von „Hi Speed FS“ können Sie die Timeshiftgröße einstellen: 28 2. Programm aufzeichnen Während der DTV-Wiedergabe wählen Sie den gewünschten Kanal, dann drücken Sie „Record“ zur Anzeige des Aufnahmemenüs. drücken Sie ERNEUT „Record“, DAS Aufnahmemenü Erlischt und „REC“ wird oben links im Bild angezeigt. Das Symbol erlischt, nachdem Sie die Stopptaste drücken. 3. Aufnahme wiedergeben Das auf dem „USB” aufgezeichnete Programm wird im Ordner„_MSTPVR” auf dem Gerät gespeichert. 1. Die USB Speichergröße kann zwischen 128MB und 500GB liegen, aber für den praktischen Gebrauch wird eine Größe von 2GB bis 500GB empfohlen. 2. Videos erscheinen gepixelt, wenn die Video Bitrate zu gering ist. Dies kann verursacht werden, wenn ein USB Verlängerungskabel verwendet wird, anstatt den USB Anschluss direkt am Fernsehgerät anzuschließen. 3. Nicht alle USB Geräte sind kompatibel. Im folgenden finden Sie eine Liste der empfohlenen USB Festplatten. Modelle die nicht unten aufgelistet sind, können kompatibel sein, aber es wird keine Garantie für deren Funktion übernommen. Die USB Unterstützungsliste ist dieselbe wie die Zeitversatzfunktion; weitere Informationen finden Sie auf den folgenden Seiten. 9. Timeshiftfunktion 1. Vorbereitung der Aufnahme Mit diesem Fernseher können Sie das aktuelle Programm unterbrechen und auf einen USB-Speichermedium aufzeichnen, dann ab der Unterbrechung weiter sehen. BITTE BEACHTEN SIE: • Das USB 2. 0 Speichermedium muss formatiert sein. Erstellen Sie vor der Formatierung Sicherheitskopien, da alle Daten gelöscht werden. USB-Laufwerk formatieren Wählen Sie die Formatierung des USB-Speichermediums und ordnen Sie den Speicherplatz für die Timeshiftfunktion zu. BITTE BEACHTEN SIE: • Die Formatierung dauert etwa 2 Minuten. Schalten Sie das Gerät während dieses Zeitraums nicht aus und trennen Sie das USB-Speichermedium nicht ab. • Während der Formatierung wird für das USB-Speichermedium ein Geschwindigkeitstest durchgeführt. Schlägt dieser fehl, so kann das USB-Speichermedium nicht für die Timeshiftfunktion benutzt werden. Unterbrochenes DTV-Programm auf USB-Speichermedium aufzeichnen 1. Im DTV-Modus schließen Sie das USB-Speichermedium am USB-Port auf der Seite des Fernsehers an. 29 2. Drücken Sie PAUSE (29), um die Timeshiftfunktion zu starten. Das Fernsehprogramm wird unterbrochen. Das Timeshiftmenü wird angezeigt und die Aufnahme beginnt. 3. Drücken Sie STOPP (28), um die Timeshiftfunktion und die Aufnahme zu beenden. BITTE BEACHTEN SIE: • Ziehen Sie das USB-Speichermedium während der aktivierten Timeshiftfunktion nicht ab. • 4 GB Speicher puffern ca. 140 Minuten. Limitierungen der Timeshiftfunktion: 1. Bei aktivierter Timeshiftfunktion stehen Ihnen nur WIEDERGABE/PAUSE/STOPP/VORLAUF/RÜCKLAUF/VOL+/VOL-/MUTE sowie einige allgemeine Funktionstasten (ENTER/EXIT/Navigation) zur Verfügung. 2. Die Videowiedergabe ist nicht gleichmäßig und kann springen, falls die USB-Aufnahmegeschwindigkeit nicht den Mindestanforderungen entspricht. 3. Ziehen Sie das USB-Speichermedium nicht ab, schalten Sie das Gerät während der Timeshiftfunktion nicht aus. Bei Verlust des Signals schaltet sich das Gerät aus. 4. Ändern Sie während der Timeshiftfunktion nicht die Signalquelle. 5. Schalten Sie nicht schnell zwischen WIEDERGABE/PAUSE/VORLAUF/RÜCKLAUF um. 6. Das Video kann verpixeln, falls die Bitrate zu niedrig eingestellt ist. 7. Nicht alle USB-Speichermedien sind kompatibel. Das USB-Laufwerk sollte wenigstens < 500 mA haben. Nachstehend Liste mit empfohlenen USB-Laufwerken. Nicht aufgeführte Modelle sind möglicherweise kompatibel, das ist jedoch nicht garantiert. • SanDisk Extreme® Contour™ USB Flash Drive - 8GB SDCZ8-8192-E75 • SanDisk Extreme® Contour™ USB Flash Drive -16GB SDCZ8-016G-A75 • Kingston DataTraveler 410 USB 2. 0 Flash Drive - 8GB DT410/8GB • Kingston DataTraveler 410 USB 2. 0 Flash Drive -16GB DT410/16GB • OCZ Technology Rally2 USB 2. 0 Flash Drive - 4GB OCZUSBR2DC-4GB • OCZ Technology ATV USB 2. 0 Flash Drive - 8GB OCZUSBATV-8GB • OCZ Technology Rally2 USB 2. 0 Flash Drive - 8GB OCZUSBR2DC-8GB • SAMSUNG-HM500JI-500G 8. Diese Funktion haben Sie nicht für alle digitalen Fernsehprogramme, wie verschlüsselte oder reine Audiokanäle. 30 10. USB-Player Drücken Sie die Quellentaste und wählen Sie in der Liste der Quellengeräte USB, dann drücken Sie OK, um das USB-Menü aufzurufen. Ein USB-Speichermedium muss angeschlossen sein. Wählen Sie zwischen Foto, Musik, Movie und Text. Drücken Sie zu Auswahl, dann drücken Sie OK. Drücken Sie zur Auswahl des Laufwerks, dann drücken Sie OK zur Anzeige der Mediendateien und Ordner. Mit Return kehren Sie zur Medienauswahl zurück. Mit oder wählen Sie die Datei, das Vorschaufenster wird angezeigt. Drücken Sie ► zur Wiedergabe als Vollbild. Während der Wiedergabe (Foto, Movie oder Text) drücken Sie OK oder INFO zur Anzeige der Leister mit den Steuerungssymbolen. Drücken Sie zur Auswahl der Funktion und OK zur Bestätigung. Drücken Sie "▼" oder EXIT auf Ihrer Fernbedienung um die Steuerleiste zu verlassen. Außer bei Musik. BITTE BEACHTEN SIE: Sie können den Audiotrack oder das Programm während der Videowiedergabe einstellen. Mit Info und OK zeigen Sie das Infomenü an. 31 USB Wiedergabe wird unterstützt für folgende Bildformate : -JPEG (JPEG Format, Dateien mit der Endung ".jpg") -BMP (Dateien mit der Endung ".bmp") -PNG (Dateien mit der Endung ".png") USB Wiedergabe wird unterstützt für folgende Audioformate: -MP3 (Dateien mit der Endung ".mp3") -WAV (Dateien mit der Endung ".wav") USB Wiedergabe wird unterstützt für folgende Textformate: -TXT (Dateien mit der Endung ".txt") USB Wiedergabe wird unterstützt für folgende Videoformate: -AVI (Dateien mit der Endung ".avi") - TS (MPEG2 & H.264) 32 05 Störungserkennung Problem Überprüfen Bild Ton verschneit gestört Antennenposition, Ausrichtung oder Anschluss Schatten normaler Ton Antennenposition, Ausrichtung oder Anschluss Störungen gestört elektronische Geräte, Fahrzeug/Motorrad, Neonlicht normales Bild stummgeschaltet Lautstärke (stummgeschaltet oder Audioanschlüsse nicht korrekt) kein Bild stummgeschaltet Kein Netzanschluss, Gerät ausgeschaltet, Kontrast und Helligkeit/Lautstärke einstellen. Drücken Sie STANDBY auf der Fernbedienung. keine Farbe normaler Ton Farbe einstellen Bild verschwindet normaler Ton oder Kanal neu einstellen leise keine Farbe gestört TV-System Sie sehen einen normaler Ton Ansicht auf Zoomen schwarzen Balken ändern oben und unten. 33 Spezifikationen Farbsystem PAL-B/G, I, D/K SECAM- B/G, D/K L, L' Tonsystem B/G, DK, I, L, L' Videoeingänge SCART, YPbPr, AV, VGA, HDMI, USB. Y/Pb/Pr 480i/p, 576i/p, 720p, 1080i, 1080p HDMI 480i/p, 576i/p, 720p, 1080i, 1080p Spannungsversorgung Stromverbrauch im 100-240V~50/60Hz 100-240V~50/60Hz 100-240V~50/60Hz 100-240V~50/60Hz 30W(19“) 38W(22“) 40W(24“) 55W(26“) <0.5W Modus Standby Audioausgang 2 x 3W Umweltbedingungen Betriebstemperatur: +5°C - +35°C Betriebsluftfeuchtigkeit: 20 % - 80 % Lagertemperatur: -15°C - +45°C Lagerluftfeuchtigkeit: 5 % - 90 % Zubehör Bedienungsanleitung Fernbedienung Batterien (x2) Schnellanleitung *Einige der Spezifikationen nur als Referenz. Abweichungen vom tatsächlichen Gerät nicht ausgeschlossen. Änderung von Design und Spezifikationen vorbehalten. Scart-Ausgang: 1. Ist der Eingang ATV/AV/SCART, so ist das Signal am Scart-Ausgang ATV. 2. Wenn der Eingang DTV ist, so ist das Signal am Scart-Ausgang DTV. 3. Andere Quellen haben kein Scart-Ausgangssignal. 34 35 Récepteur TV LED LCD MANUEL DE L'UTILISATEUR Modèle : LET19T1000H Lisez attentivement ce manuel avant d'utiliser votre téléviseur et conservez ce manuel LET22T1000HF LET24T1000HF dans un bon endroit pour toute référence ultérieure. LET26T1000HF 1 Table des Matières 01 Avertissment de sécurité Bienvenue P. 03 Information Importante P. 03 Instruction de sécurité P. 04 Avertissements et mise en garde P. 05 02 Introduction Principaux Caractéristiques P. 07 Installation du pied P. 08 Installation Murale P. 09 Panneau de commande avant et latéral P. 11 Prises arrières P. 12 Connexion du Téléviseur P. 13 Interface commune :Canal Ready P. 14 03 Télécommande Présentation de la Télécommande P. 15 Installation des piles dans la Télécommande. P. 16 Télétexte P. 16 04 Utilisation Guide d'installation P. 17 05 Dépannage Dépannage P. 32 Spécification P. 33 2 01 Avertissements et mesures de sécurité BIENVENUE Nous vous remercions d'avoir acheté ce téléviseur LCD LED 19"/22"/24"/26" . Ce guide va vous aider à régler et utiliser votre téléviseur. Commencez par vérifier le contenu de votre boîte avec la liste des pièces ci-dessous : Téléviseur LCD 19" HD Ready. Téléviseur numérique LCD LED 22" Full HD 1080p Télécommande et 2 piles AAA ; Télécommande et 2 piles AAA ; Guide d'utilisation Guide d'utilisation Guide de démarrage rapide Guide de démarrage rapide Pied du TV Pied du TV Téléviseur numérique LCD LED 24" Full HD 1080p Téléviseur LCD 26" HD Ready. Télécommande et 2 piles AAA ; Télécommande et 2 piles AAA ; Guide d'utilisation Guide d'utilisation Guide de démarrage rapide Guide de démarrage rapide Pied du TV Pied du TV Maintenant vous pouvez commencer ! INFORMATION IMPORTANTE LISEZ ENTIÈREMENT CE MANUEL AVANT L'UTILISATION ET CONSERVEZ-LE POUR TOUTE RÉFÉRENCE ULTÉRIEURE ATTENTION RISQUES D'ELECTROCUTION NE PAS OUVRIR AVERTISSEMENT : afin d'éviter tout risque d'incendie ou de décharge électrique, n'installez jamais votre téléviseur dans un lieu humide. Redoublez d'attention lorsque vous manipulez l'écran pour ne pas le rayer par inadvertance ou l'endommager d'une autre façon. Veillez à ne pas obstruer les orifices d'aération de votre téléviseur en tenant journaux, nappes, rideaux, etc., à distance. ATTENTION : s la fiche électrique sert de dispositif de sectionnement et doit rester facilement accessible. s Consultez attentivement le présent mode d'emploi avant utilisation, puis rangez-le dans un endroit facilement accessible pour pouvoir vous y reporter ultérieurement. s Pour obtenir des performances optimales, consultez attentivement le présent mode d'emploi, puis rangez-le dans un endroit facilement accessible pour pouvoir vous y reporter ultérieurement. s Les chiffres et les données communiqués au sujet de l'écran dans le présent mode d'emploi peuvent, suite aux innovations technologiques apportées, ne pas correspondre tout à fait aux caractéristiques de votre modèle. s Tout démontage, sans approbation préalable, du présent produit est strictement interdit. AVERTISSEMENT : pour éviter tout risque d'incendie, tenez bougies et autres sources de flammes ouvertes à distance du produit en toutes circonstances. 3 INSTRUCTIONS DE SÉCURITÉ • Attention : Pour réduire le risque d'électrocution, ne déposez aucun panneau. Aucun des éléments internes ne peut être réparé par l'utilisateur. Confiez l'entretien à un technicien qualifié. • Attention : POUR REDUIRE LES RISQUES D'INCENDIE OU D'ELECTROCUTION, N'EXPOSEZ PAS CET APPAREIL A LA PLUIE OU A L'HUMIDITE. • N'exposez pas l'appareil et l'adaptateur au ruissellement ni à la projection d'eau, et ne placez aucun objet contenant un liquide (tel qu'un vase) au dessus de l'appareil. • Éloignez le produit de la lumière directe du soleil et de toute source de chaleur telle que radiateurs ou poêles. • N'obstruez jamais les fentes d'aération. Les fentes et ouvertures sur l'unité sont prévues pour la ventilation. Ces fentes ne doivent jamais être obstruées en plaçant l'appareil sur un canapé, un tapis ou toute autre surface similaire. • Ne placez pas cet appareil sur un chariot, un support, un trépied ou une table instable. L'appareil pourrait tomber, causant des dommages ou des blessures. • Ne placez jamais d'objets lourds ou tranchants sur le panneau ou le cadre. • Débranchez la prise de courant lorsque l'appareil n'est pas utilisé. • Il faut tenir compte de la protection de l'environnement lors de l'élimination des piles. • AVERTISSEMENT : Les piles (pile ou batterie ou bloc batterie) ne doivent pas être exposées à une chaleur excessive telle que rayons du soleil, feu, etc. • AVERTISSEMENT : L'utilisation d'un casque ou d'écouteurs avec un volume sonore trop fort peut causer une perte auditive. Ce symbole indique que ce produit ne doit pas être mis au rebut avec les déchets ménagers et ce dans tous les pays de l'Union Européenne. En aidant à la récupération séparée, vous aidez à garantir que les produits seront recyclés d’une façon appropriée et ainsi à préserver les ressources naturelles et à protéger l’environnement et la santé humaine. Ramenez donc cet appareil aux points de collecte appropriées ou retournez-le au revendeur auprès duquel vous l'avez acheté. Ainsi il sera recyclé et contribue à préserver l’environnement. 4 Avertissements et mise en garde Avertissement Attention Des hautes tensions dangereuses existent à l'intérieur de cet appareil. Ne déposez pas le panneau de sécurité à l'arrière du téléviseur. Pour toute réparation, veuillez faire appel à un technicien qualifié. Pour prévenir tout risque d'incendie ou d'électrocution, n'exposez pas cet appareil à la pluie et à l'humidité. N'introduisez pas d'objets étrangers par les fentes des panneaux du téléviseur. Ne renversez jamais de liquide sur le récepteur du téléviseur Ne bloquez pas les fentes d'aération du panneau arrière. L'aération est essentielle pour éviter que les composants électriques ne tombent en panne. Ne coincez pas le cordon d'alimentation sous le récepteur de télévision. 5 Ne montez jamais sur le téléviseur, ne vous appuyez pas dessus et ne le poussez pas brusquement sur son socle. Prêtez une attention particulière aux enfants. Risque de blessures graves en cas de chute. Ne placez pas le téléviseur sur un chariot, une étagère ou une table instable. Le téléviseur risque de tomber et peut provoquer des blessures graves et des dommages matériels importants. Débranchez le téléviseur du secteur s'il ne va pas être utilisé pour une longue période. Distances minimales Si le téléviseur est placé dans un compartiment fermé, il faut veiller à respecter les distances minimales. L'accumulation de chaleur réduit la durée de vie de service de votre téléviseur et peut aussi être dangereuse. 6 02 Introduction INSTALLATION ATTENTION * Placez le téléviseur dans une pièce où la lumière ne frappe pas directement sur l'écran. * L'obscurité totale ou une réflexion sur l'écran peut provoquer une fatigue visuelle. Un éclairage doux et indirect est recommandé pour une visualisation confortable. * Prévoyez suffisamment d'espace entre le téléviseur et le mur pour permettre la ventilation. * Évitez les endroits trop chauds pour éviter tout dommage possible à l'enceinte ou une défaillance prématurée des composants. * Ce téléviseur peut être connecté à une prise secteur de 100-240 volts. 50/60 Hz. Ne le branchez jamais sur une prise de courant CC ou de n'importe quel autre type. * Ne couvrez pas les fentes de ventilation lors de l'utilisation du téléviseur. Ne modifiez aucun composant interne et bouton de commande du téléviseur non décrit dans ce manuel. Toutes les téléviseurs à LED sont des équipements de haute tension électrique. Il faut débrancher le téléviseur avant de nettoyer de la poussière ou des gouttes d'eau de l’écran, du boîtier ou autour de l'un des boutons ou des connecteurs. Utilisez un chiffon doux et sec et non pelucheux pour essuyer le téléviseur. Pendant les orages, débranchez le câble d'alimentation et le câble d'antenne pour éviter d'endommager votre téléviseur et les autres appareils connectés. Toutes les opération de réparation de ce téléviseur ne doivent être effectuées que par du personnel qualifié. Caractéristiques principales 1. Utilisable comme écran télé, moniteur d'affichage ou 3. Interface HDMI et péritel ; écran pour PC ; 4. NICAM ; 2. Grande luminance et large angle de la visualisation ; 5. Time-shift Données principales Panneau Système TV 19” 22” PAL-B/G, I, D/K SECAM-B/G, D/K, L, L' Système du signal vidéo PAL/SECAM Tension d'entrée 100-240V CA Consommation d'énergie 30 W Consommation électrique en veille Puissance de sortie audio (Taux de distorsion dynamique ≤7%) Signal d’entrée <0.5W 2 x 3W 38 W 24” 26” 40 W 55 W 50/60Hz 1 RVB analogique (PC) ; 1 audio PC 2 Interface HDMI (High Definition Multimedia Interface) 1 Entrées Vidéo 1 Entrées audio YPbPrx1 1 Péritel 1 CI 1 USB 1 RF Co-Ax 1 Headphone signal de sortie 1 S/PDIF Entrée vidéo composite >= 350 Définition horizontale (lignes TV) YPbPr >=400 7 PC MODE PRÉDÉFINI RESOLUTION V. Fréq. (Hz) H. Fréq. (KHz) 1 800*600 60 37. 88 2 640*480 60 31. 47 3 1360*768 60 47.7 4 1024*768 60 48. 36 5 1280*1024 60 63. 98 Instructions pour l'assemblage du support 1. Insérez la tige du support dans le 2. Insérez le plateau du support dans le couvercle support dans le sens indiqué par la arrière dans le sens indiqué par la flèche, serrez flèche, serrez ensuite celle-ci à l'aide ensuite celui-ci à l'aide d'une vis. d'une vis. (19”,22”,24”) 3. Insérez la tige du support dans le (19”,22”,24”) 4. Insérez le plateau du support dans le couvercle support dans le sens indiqué par la arrière dans le sens indiqué par la flèche, serrez flèche, serrez ensuite celle-ci à l'aide de ensuite celui-ci à l'aide de deux vis. trois vis. (26”) (26”) REMARQUES SUR L'INSTALLATION Placez le téléviseur dans une pièce où la lumière ne frappe pas directement sur l'écran. L'obscurité totale ou une réflexion sur l'écran peut provoquer une fatigue visuelle. Un éclairage doux et indirect est recommandé pour une visualisation confortable. Prévoyez suffisamment d'espace entre le téléviseur et le mur pour permettre la ventilation. Évitez les endroits trop chauds pour éviter tout dommage possible à l'enceinte ou une défaillance prématurée des composants. 8 DIRECTIVES D'INSTALLATION DU SUPPORT MURAL Ce téléviseur peut être accroché au mur en suivant la procédure suivante : 1. Placez le téléviseur LCD LED sur une surface solide. Mettez un matériau souple à l'avant de l'écran pour le protéger contre tout dommage. 2. Retirez les vis de la partie inférieure du téléviseur, où le socle est fixé au téléviseur, et enlevez le socle (rangez le socle dans un endroit sûr pour une utilisation ultérieure). (19”,22”,24”) (26”) 3. Utilisez les quatre vis fournies pour fixer le téléviseur sur un support mural (non inclus) par les quatre trous VESA standard à l'arrière du téléviseur. (19”) 9 (22”,24”) (26”) 10 Panneau frontal 1 Capteur de télécommande 2 Témoins BLEU : ALLUMÉ. ROUGE : VEILLE. 3 Touches. 1 SOURCE Pour afficher le Menu Source. 2 MENU Pour ouvrir le Menu principal. 3 CH+/CH- En mode TV, appuyez sur CH+ ou CH- pour passer au canal suivant ou précédent. Dans MENU, appuyez sur CH+ ou CH- pour sélectionner des éléments. En mode veille, appuyez dessus pour allumer le téléviseur 4 VOL+/VOL- Pour régler le niveau sonore. Dans MENU, permet de régler l'élément sélectionné. 5 VEILLE 11 Prises arrières/latérales 1 Audio Gauche/Droite Entrée 2 vidéo Entrée 3 S/PDIF sortie audio numérique 4 YPBPR Entrée 5 PERITEL Entrée 6 USB Entrée 7 HDMI2 Entrée 8 HDMI1 Entrée 9 HEADPHONE Sortie Casque audio Analogique 10 INTERFACE COMMUNE (CI) Entrée 11 Audio PC Entrée 12 Entrée VGA Entrée 13 ANT Entrée 12 CONNEXION DE VOTRE TV RACCORDEMENT DE L'ANTENNE Connectez votre antenne à l'arrière du téléviseur dans la prise ANT IN. AMÉLIORER VOTRE SIGNAL Pour améliorer la qualité de l'image dans une région de mauvaise réception, utilisez un amplificateur de signal (non fourni). CONNECTEZ VOTRE PC AU TÉLÉVISEUR Vous pouvez utiliser votre téléviseur comme un moniteur pour votre ordinateur personnel en le connectant avec un câble VGA (non fourni). 1 Lisez le guide utilisateur de votre ordinateur et vérifiez qu'il dispose d'un connecteur VGA. 2 Arrêtez votre téléviseur et votre PC. 3 Branchez un câble d'interface VGA de type D à 15 broches au connecteur d'interface vidéo VGA du PC. Branchez l'autre extrémité du câble au connecteur d'interface PC du téléviseur. Serrez les vis des connecteurs VGA et connectez le câble audio (non fourni) à la prise d'entrée audio à l'arrière du téléviseur. 4 Allumez le téléviseur d'abord puis le PC. 5 Réglez le mode d'entrée vidéo sur VGA à l'aide de la touche du téléviseur ou de la télécommande. 6 Une fois l'image apparaît, s'il y a du bruit, changez la résolution du mode VGA, changez le taux de rafraîchissement ou réglez la luminosité et le contraste dans le menu jusqu'à ce que l'image soit claire. CONNECTER UN LECTEUR DVD OU UN MAGNÉTOSCOPE À VOTRE TV Il y a deux manières pour connecter un lecteur DVD ou un magnétoscope à votre téléviseur. Assurez-vous que le téléviseur, lecteur DVD ou le magnétoscope soient éteints avant de les connecter. 1 Connectez les sorties AV du lecteur DVD/magnétoscope à la prise AV IN de votre téléviseur. 2 Connectez les sorties audio AV L & R à l'entrée audio (8), appuyez sur la touche SOURCE du téléviseur pour définir le mode d'entrée vidéo sur AV. ENTRÉE PÉRITEL 1 Connectez le câble péritel de l'appareil externe (lecteur DVD, boîtier décodeur ou console de jeux) à la prise péritel du téléviseur. 2 Appuyez sur la touche SOURCE pour sélectionner le mode PÉRITEL. 3 Appuyez sur la touche PLAY de l'appareil externe. Entrée HDMI 1 Connectez le câble HDMI de l'appareil à la prise HDMI du téléviseur. 2 Appuyez sur la touche SOURCE pour sélectionner le mode HDMI. 3 Reportez-vous au guide utilisateur de l'appareil HDMI pour avoir des informations sur son fonctionnement. SORTIE HEADPHONE Insérer la prise casque dans le connecteur jack HEADPHONE. Les hauts parleurs sont maintenant muet SORTIE S/PDIF S/PDIF est une connexion audio numérique utilisée pour connecter sur de courtes distances un appareil audio tel que cinédom, chaîne Hi-Fi etc. Le signal est transmis via un câble coaxial avec des connecteurs RCA. 1. Éteignez le téléviseur et l'appareil avant de procéder aux connexions. 2. Connectez les câbles AV (non fournis) à partir du connecteur S/PDIF du téléviseur au cinédom ou chaîne HiFi etc. 13 INTERFACE COMMUNE Le logement de l'interface commune (CI) est destiné à un module d'accès conditionnel (CA) et une carte à puce pour pouvoir regarder des programmes télé et des services supplémentaires payants. Contactez votre prestataire de services d'interface commune pour obtenir plus d'informations sur les modules et l'abonnement. Notez que les modules CA et les cartes à puce ne sont ni fournis ni des accessoires en option. Avertissement • Teignez votre téléviseur avant d'insérer un module dans le logement d'interface commune. 1. Eteignez correctement le CAM (module d'accès conditionnel), puis la carte à puce dans le logement CI qui se trouve sur le côté du téléviseur. CI SLOT LOGEMENT D'INTERFACE COMMUNE CAM CAM (module d'accès conditionnel) Smart Card Carte à puce 2. Allumez le téléviseur, le message ci-dessous s'affiche si un module CA est détecté. Attendez quelques instants jusqu'à ce que la carte soit activée. Module CI incéré 3. Appuyez sur la touche MENU puis appuyez sur la touche ▲▼ pour sélectionner l'option Informations CI. 4. Des informations détaillées sur la carte CI en cours d'utilisation seront affichées. 5. Appuyez sur OK pour accéder au menu de la carte. Reportez-vous au manuel d'utilisation du module pour régler les détails. 6. Lorsque le module est retiré, le message suivant apparaît sur l'écran. Module CI retiré 14 03 Télécommande 1. Marche/Arrêt : Appuyez pour allumer le téléviseur. 2. D.MENU : Aucun rôle. 3. P.Mode : Pour changer le mode image. 4. INFO : Appuyez pour afficher l'état courant, dont la source d’entrée et le mode audio de la chaîne. 5. AUDIO l/ll : Appuyez pour sélectionner MONO, Nicam stéréo pour les chaînes TV. Sélection de la langue audio des chaînes numériques. 6. SUBTITLE (SOUS-TITRAGE) : Appuyez sur pour activer/désactiver le sous-titrage. 7. Touches numériques : Pour accéder directement aux chaînes. 8. SOURCE : Pour sélectionner la source d'entrée 9. MUTE : Pour couper/rétablir le son. 10. Touches Volume : Pour régler le niveau sonore. 11. MENU : Pour afficher le menu TV. 12. OK : pour confirmer la sélection. 13. EXIT : pour retourner au menu précédent ou quitter le menu. 14. Index de télétexte 15. REPEAT (REPETER) : Aucun rôle 16. Touche télétexte verte / avance rapide USB 17. Touche télétexte rouge / retour rapide USB 18. Mixage télétexte 19. Texte Télétexte 20. Révéler le télétexte 21. Taille du télétexte 22. Heure télétexte / REC.LIST (Heure télétexte n’a aucun rôle) 23. Mode Télétexte : Aucun rôle 24. Figer le télétexte 25. Sous-code télétexte : Sous-page de télétexte 26. Touche télétexte bleue / fichier suivant USB 27. Touche télétexte jaune / fichier précédent USB 28. Arrêt USB 29. PLAY/PAUSE (Lecture/Pause) 30. DEMARRER L'ENREGISTREMENT 31. TOUCHES DE DEPLACEMENT (HAUT/BAS/DROITE/GAUCHE) : Appuyez pour atteindre votre sélection. 32. Fav : Pour accéder à votre liste de chaînes favorites en mode TV ou DTV. 33. Sélection de programme: Utilisez pour sélectionner la chaîne suivante ou précédente. 34. GUIDE : Appuyez pour afficher le guide électronique des programmes en mode TV. 35. Q.View : Pour retourner à la dernière chaîne regardée. 36. CH.LIST : Appuyez pour afficher la liste des chaînes. 37. Screen : Pour changer le format d'image. 38. Sleep : Pour définir l'heure d'arrêt du téléviseur. 39. S.Mode: To switch sound mode. 40. OPEN/CLOSE : Aucun rôle :pas de function DVD 15 Insertion des piles dans la télécommande 1. Ouvrez le compartiment des piles. 2. Insérez 2 piles AAA 1,5 V en respectant les indications de polarité (+/-) des piles à l'intérieur du compartiment. 3. Remettez le couvercle du compartiment des piles en place. Remplacez par des piles neuves si le téléviseur présente les symptômes suivants : Son fonctionnement devient instable ou capricieux. S'il arrive que le téléviseur ne réponde pas à la télécommande. Remarques : 1) Utilisation de piles alcalines conseillée. 2) Retirez les piles lorsqu'elles sont usées ou si la télécommande ne va pas être utilisée sur une période prolongée. TÉLÉCOMMANDE TÉLÉTEXTE Le télétexte est un système d'information diffusé par certaines chaînes, qui se consulte comme un journal. Il offre également l'accès aux sous-titrages pour les personnes malentendantes ou qui ne sont pas familiers avec la langue de transmission (réseaux câblés, chaînes satellites, etc.) Appuyez sur : TEXTE Vous obtenez : Il est utilisé pour appeler ou quitter le mode télétexte. Le sommaire apparaît avec une liste d'éléments qui peuvent être accédés. Chaque élément a un numéro de page correspondante de 3 chiffres. Si la chaîne sélectionnée ne diffuse pas de télétexte, l'indication 100 s'affiche et l'écran reste noir (dans ce cas, quittez le télétexte et sélectionnez un autre canal). SÉLECTION D'UNE PAGE Entrez le numéro de la page désirée à l'aide de touches 0 à 9 et haut/bas. Exemple: page 120, tapez 120. Le numéro est affiché en haut à gauche, le compteur tourne, puis la page est affichée. Répétez cette opération pour afficher une autre page. Si le compteur continue à chercher, cela signifie que la page n'est pas transmise. Sélectionnez un autre numéro. ACCÈS DIRECT AUX ÉLÉMENTS Les touches de couleur sont comme elles sont affichées en bas de l'écran. Les 4 touches colorées permettent d'accéder aux rubriques ou aux pages correspondantes. Les zones colorées clignotent lorsque la rubrique ou la page n'est pas encore disponible. INDEX Cela renvoie à la page sommaire (généralement la page 100). SUB PAGE Certaines pages contiennent des sous-pages qui sont automatiquement affichées successivement. Cette touche permet d'arrêter ou reprendre la sous-page. L'indication apparaît en haut à gauche. HOLD Pour figer la page. REVEAL Pour afficher ou masquer les informations cachées (solutions de jeux). LIST L'utilisateur peut définir quatre pages préférées à être directement liées aux quatre touches de couleur. Lorsque que le mode liste est activé, il n'est pas possible d'utiliser la navigation Haut et Bas avec les touches de couleur. Les numéros des pages préférées sont conservés et restaurés dans/de la mémoire non volatile pour chaque canal par le logiciel du système. 16 04. Utilisation Guide d'installation le guide d'installation apparait seulement quand le téléviseur est mise en marche pour la première fois ou lorsque qu'il est réstauré en paramétrage usine. 1). Appuyez sur les touches pour naviguer dans les menus et modifier les paramètres. Appuyez sur OK pour confirmer.Sélectionnez la langue souhaitée des menus. Selectionner la langue désirée, Mode domestique / Mode magasin pour l'afficher sur le menu. Nota: Le mot de passe par défaut est 6666. Modes Accueil ou Boutique 1.Le mode Accueil est un mode d'économie d'énergie. Le mode Accueil est recommandé pour une utilisation normale, c’est le réglage par défaut. 2.Le mode Boutique est utilisé par les revendeurs pour la publicité ou la présentation du produit. Le mode Boutique offre une image plus lumineuse que le mode Accueil. 3.Vous pouvez choisir de passer en mode Domestique au mode magasin. Si vous choisissez le le mode magasin, la source sera automatiquement sur HDMI 1 et vous pouvez retirez les affichages POP en appuyant sur la touche Exit de la télécommande. 2). Appuyez sur les touches pour sélectionner DVB-T/DVB-C puis appuyez sur OK pour confirmer. a.Si vous sélectionnez DVB-T, l'étape suivante consiste à sélectionner le type de Recherche et le pays puis appuyez OK pour lancer la recherche. b.Si vous sélectionnez DVB-C, l'étape suivante consiste à configurer le système DVB-C tel que (le type de recherche/Fréquence/ID Réseau /Symbole (KS/S), puis d’appuyer sur OK pour accéder au menu de sélection du type de recherche et du pays ; cette étape est la même que celle pour DVB-T, sélectionnez le type de recherche (DTV/ATV). Sélectionnez le bon pays, appuyez sur OK pour lancer la recherche. 17 3). La recherche des chaînes démarre. Cette opération peut prendre jusqu'à 6 minutes. L'écran affiche l'état d'avancement de la recherche et le nombre de chaînes trouvées. 4). Si vous voulez ignorer la recherche ATV, appuyez sur la touche MENU pour l’interrompre. Un écran s'affiche, appuyez sur la touche pour sélectionner YES (OUI) pour confirmer. Vous serez redirigez directement à la recherche DTV. Vous pouvez répéter l'étape ci-dessus si vous voulez ignorer recherche DTV. Un rappel d'installation apparaîtra la prochaine fois vous allumez le téléviseur. 5). Une fois la recherche terminée, les chaînes seront disposées dans un ordre préétabli. Si vous souhaitez ignorer des chaînes, modifier l’ordre des chaînes préréglées ou les renommer, sélectionnez Programme Edit (Modifier les programmes) dans le menu Channel. 6) 1. MENU CHANNEL 1.1 Recherche automatique (DVB-T) 1) Appuyez sur la touche MENU puis sur les touches 2) Appuyez sur les touches 3) Appuyez sur les touches pour sélectionner le menu CHANNEL puis sur la touche OK. pour sélectionner Auto Tuning (recherche automatique) puis sur OK. pour sélectionner DVB-T/DVB-C, appuyez pour sélectionner DVB-T puis sur OK pour confirmer. 18 4) Dans le menu Tune Type (type de recherche), appuyez sur les touches sur la touche puis sur les touches 5) pour sélectionner ATV/DTV/DTV + ATV. Appuyez pour sélectionner le pays d’utilisation du téléviseur. Appuyez sur OK pour confirmer. La recherche des chaînes démarre. Cette opération peut prendre jusqu'à 6 minutes. L'écran affiche l'état d'avancement de la recherche et le nombre de chaînes trouvées. 6) Si vous voulez ignorer la recherche ATV, appuyez sur la touche MENU pour l’interrompre. Un écran s'affiche, appuyez sur la pour sélectionner YES (OUI) pour confirmer. Vous serez redirigez directement à la recherche DTV. Vous pouvez répéter touche l'étape ci-dessus si vous voulez ignorer recherche DTV. Un rappel d'installation apparaîtra la prochaine fois vous allumez le téléviseur. 7) Une fois la recherche terminée, les chaînes seront disposées dans un ordre préétabli. Si vous souhaitez ignorer des chaînes, modifier l’ordre des chaînes préréglées ou les renommer, sélectionnez Programme Edit (Modifier les programmes) dans le menu Channel. 1.2 Recherche automatique (DVB-C) 1). Appuyez sur la touche MENU puis sur les touches pour sélectionner le menu CHANNEL puis sur la touche OK. 2). Appuyez sur les touches pour sélectionner Auto Tuning (recherche automatique) puis sur OK. 3). Appuyez sur les touches pour sélectionner DVB-T/DVB-C puis appuyez sur OK pour confirmer. 19 4). Appuyez sur les touches pour sélectionner Scan Type/Symbol (Ks/S) puis sur OK pour confirmer. 5). Dans le menu Tune Type (type de recherche), appuyez sur les touches touche puis sur les touches pour sélectionner ATV/DTV/DTV + ATV. Appuyez sur la pour sélectionner le pays d’utilisation du téléviseur. Appuyez sur OK pour confirmer. 6). La recherche des chaînes démarre. Cette opération peut prendre jusqu'à 6 minutes. L'écran affiche l'état d'avancement de la recherche et le nombre de chaînes trouvées. 7). Si vous voulez ignorer la recherche ATV, appuyez sur la touche MENU pour l’interrompre. Un écran s'affiche, appuyez sur la touche pour sélectionner YES (OUI) pour confirmer. Vous serez redirigez directement à la recherche DTV. Vous pouvez répéter l'étape ci-dessus si vous voulez ignorer recherche DTV. Un rappel d'installation apparaîtra la prochaine fois vous allumez le téléviseur. 8). Une fois la recherche terminée, les chaînes seront disposées dans un ordre préétabli. Si vous souhaitez ignorer des chaînes, modifier l’ordre des chaînes préréglées ou les renommer, sélectionnez Programme Edit (Modifier les programmes) dans le menu Channel. Remarque : Toutes les chaînes, y compris ATV, DTV et radio peuvent être recherchées en une fois, si le type de recherche est DTV + ATV. Toutes les chaînes mémorisées seront effacées après une recherche automatique. Après la recherche automatique, le téléviseur se syntonise à la première chaîne numérique (DTV). 2.1 Recherche manuelle DTV (DVB-T) 1). Appuyez sur la touche MENU puis sur les touches 2). Appuyez sur les touches pour sélectionner le menu CHANNEL puis sur la touche OK. pour sélectionner DTV Manual Tuning (recherche manuelle DTV) puis sur OK. 20 3). L'écran DTV Manual Tuning (recherche manuelle DTV) s'affiche. Appuyez sur les touches pour sélectionner UN canal UHF puis sur la touche OK pour lancer la recherche dans ce canal. Lorsque le signal est accordé, l'image et la force du signal sont affichées à l'écran. 4). Appuyez sur la touche MENU pour retourner au menu principal. 5). Appuyez sur la touche EXIT pour quitter le menu. 2.2 Recherche manuelle DTV (DVB-C) 1). Appuyez sur la touche MENU puis sur les touches 2). Appuyez sur les touches pour sélectionner le menu CHANNEL puis sur la touche OK. pour sélectionner CADTV Manual Tuning (recherche manuelle CADTV) puis sur OK. 3). L'écran CADTV Manual Tuning (recherche manuelle CADTV) s'affiche. Appuyez sur les touches pour sélectionner (Fréquence/Symbole (ks/s/QAM type QAM) puis sur OK pour lancer la recherche dans ce canal. Lorsque le signal est accordé, l'image et la force du signal sont affichées à l'écran. 4). Appuyez sur la touche MENU pour retourner au menu principal. 5). Appuyez sur la touche EXIT pour quitter le menu. 21 3). ATV Manual tuning (Recherche manuelle de programmes analogiques (ATV)) : Vous pouvez changer le système de sonorisation pour rechercher les chaînes de télévision analogiques puis affiner les canaux sélectionnés. Remarque : Appuyez sur la touche télétexte rouge pour mémoriser les chaînes après la recherche manuelle. 4). Program edit (Modification des programmes) : Vous pouvez supprimer, renommer, déplacer, ignorer et rendre favori tout programme. Delete (Supprimer) Appuyez sur la touche télétexte rouge, le programme pointé par le curseur sera supprimé. Rename (Renommer) : Vous ne pouvez renommer que les programmes ATV. Déplacez le curseur sur le programme, appuyez sur la touche télétexte verte pour renommer le programme. Appuyez sur pour choisir un caractère. Appuyez sur pour déplacer le curseur. Appuyez sur la touche Menu pour quitter la modification, appuyez sur EXIT pour quitter le menu. Remarque : Les noms des programmes ATV ne peuvent être que de 5 caractères, les noms des programmes DTV peuvent être de 25 caractères. Move (Déplacer) Utilisez les touches fléchées pour sélectionner la chaîne que vous souhaitez déplacer. Ensuite, appuyez sur la touche jaune pour sélectionner la fonction Déplacer. Une fois activée, utilisez les touches fléchées pour se déplacer et appuyez sur OK pour confirmer. Skip (Ignorer) pour choisir le programme, appuyez sur la touche télétexte bleue pour ignorer ce programme, le symbole apparaît Appuyez sur sur le côté droit du programme. Choisissez le programme ignoré, appuyez à nouveau sur la touche bleue pour annuler ignorer, le symbole va disparaître. Favorite (Favoris) 22 Appuyez sur pour choisir le programme, appuyez sur la touche FAV, le symbole apparaît sur le côté droit du programme. Choisissez le programme FAV, appuyez à nouveau sur la touche FAV pour annuler FAV, le symbole disparaît. Une fois votre groupe favori créé, vous pouvez appuyer sur la touche FAV pour accéder rapidement à votre programme favori. 5). CI information (Informations sur la CI) : (en option) Ce menu peut afficher des informations sur la carte CI. 2. PICTURE MENU (Menu Image) Le second élément du Menu principal est le Menu Image. Ce menu permet de régler les paramètres de l'image tels que contraste, luminosité, etc. Appuyez sur OK pour se déplacer, appuyez sur OK pour régler. Remarque : 1). Teinte n'est disponible qu'avec le système NTSC. 2). Il y a quatre modes de température des couleurs disponibles : moyen, chaud, froid, et personnalisé 3). L'écran est disponible en mode PC uniquement qui permet de régler la position horizontale, verticale, la taille et la phase. 3. SOUND MENU (Menu Audio) Le troisième élément du Menu principal est le Menu audio. Ici vous pouvez régler l'effet sonore tel que aigus, graves, balance, etc. Appuyez sur pour se déplacer, appuyez sur OK pour régler. Remarque : Volume automatique : disponible uniquement lorsque le volume du signal d'entrée est trop élevé ou présente une distorsion. 4. TIME MENU (Menu Temps) Le quatrième élément du Menu principal est le Menu Temps ; vous pouvez régler l'heure, l'heure marche/arrêt, le temps de veille automatique, etc. Appuyez sur pour se déplacer, appuyez sur OK pour régler 23 Remarque : Dans 15 minutes, il n'y aura pas de signal, le téléviseur passe en veille automatiquement, si Veille automatique est activée (ON). L'heure peut être obtenue du système DTV automatiquement. 5. OPTION MENU (Menu Options) Le cinquième élément du Menu principal est le Menu Options. Vous pouvez choisir la langue des menus, la langue audio, la langue de sous-titres, etc. Arrêt automatique 1. Le téléviseur lance la séquence d’arrêt automatique, si au bout de 4 heures de mise en marche aucun changement n’est apporté, par exemple changement de chaîne ou de volume. Une fenêtre apparaîtra à l'écran. Au bout de 150 secondes, le téléviseur passe automatiquement en mode veille. Appuyez sur une touche quelque de la télécommande pour éviter l'arrêt automatique. 2. Sélectionnez Automatic powerdown (4H) dans le menu Options pour annuler l’arrêt automatique. Appuyez sur OK. Un message apparaîtra “Are you sure you want to enable automatic powerdown?” (Etes-vous sûr de vouloir activer l’arrêt automatique ?) Utilisez la touche vers la droite pour sélectionner NO (NON). L'écran du téléviseur retourne au menu Options et l’option arrêt automatique (4H) s'affiche. Automatic power-down (4H) OFF (désactiver l’arrêt automatique) Pour retourner à l’arrêt automatique après 4 heures répéter ce qui précède, en utilisant la touche vers la gauche pour sélectionner YES (OUI) Dans le système de fichiers PVR, vous pouvez configurer le disque USB pour PVR. 24 Remarque : La restauration des paramètres par défaut, efface tous les programmes et mot de passe. 6. LOCK MENU (Menu Verrouillage) Le sixième élément du Menu principal est le Menu verrouillage. Vous pouvez verrouiller le système, définir un mot de passe, verrouiller des programmes et définir le contrôle parental, après avoir activé le système de verrouillage, vous ne pouvez pas rechercher les chaînes ou modifier les programmes. Remarque : Le mot de passe par défaut est 0000. En cas d’oubli du mot de passe, il est possible d'utiliser le super mot de passe : 9443. Verrouillage de programmes : Appuyez sur pour choisir le programme, appuyez sur la touche télétexte verte pour verrouiller le programme. Si vous voulez déverrouiller le programme, accédez au menu principal, entrez le mot de passe, puis appuyez sur la touche verte. Contrôle parental : Appuyez sur de choisir une classification. 7. Menu EPG (Guide Électronique des Programmes) Le Menu EPG est utilisé pour avoir une idée sur les programmes télé et radio de la journée. Pour accéder au Menu EPG, appuyez sur la touche EPG, le menu suivant s'affiche : 25 1. INFO Utilisez pour choisir les programmes, appuyez sur la touche INFO, pour afficher les informations du programme mis en surbrillance. 2. Schedule (Programme) Appuyez sur la touche télétexte jaune pour lister tout le Programme, appuyez sur pour choisir la liste, appuyez sur la touche rouge pour supprimer la liste de programmes. 3. Record (Enregistrer) Appuyez sur la touche rouge pour choisir le programme à enregistrer. 4. Reminder (Rappel) Appuyez sur la touche bleue pour choisir un programme et mettre en place une heure de rappel, le téléviseur passe automatiquement au programme choisi à l'heure de rappel. 8. Fonction PVR 1. Préparer l'enregistrement d'un programme la fonction PVR fonctionne uniquement sur la TNT. Entrez dans le système de fichiers PVR dans le menu Options, choisissez "Vérifier le système de fichiers PVR". Cliquez sur "OK", jusqu'à ce que "Vérifier" se transforme en "Réussi". Remarque : sélectionnez le terme "Vitesse". S'il prend en charge "HD", cela signifie que la vitesse du dispositif USB peut supporter l'enregistrement décalé (TimeShift). Dans le cas contraire, formatez le dispositif pour s'assurer qu'il la prendra en charge. La valeur par défaut "Limite d'enregistrement" est 6 heures, si l'espace sur le disque est suffisant. Si l'espace n'est pas suffisant, le temps d'enregistrement devrait être réduit en fonction de l'espace disponible sur le disque. Pendant le processus "Vérifier le système de fichiers PVR", ne faites aucune opération jusqu'à ce qu'il soit terminé. Les enregistrements doivent être faits avec le système TV PVR. Ils ne peuvent être regardés que sur le même téléviseur et non avec n'importe quel autre type de dispositif (ordinateur, lecteur DVD, etc.) qui n'est pas compatible avec les fichiers de format .TS. Notez que pour réaliser des enregistrements de tout type, le téléviseur vous obligera à formater le dispositif USB connecté pour stocker l'enregistrement. AVERTISSEMENT VOUS PERDREZ TOUS LES FICHIERS ET INFORMATIONS SUR LE DISPOSITIF USB EXTERNE LORS DU FORMATAGE. CAPACITE DE STOCKAGE DU DISPOSITIF. Le système de fichiers USB limitera la taille la capacité de stockage. Système de fichiers : NTFS jusqu'à 2 To FAT32 jusqu'à 192 Go 26 FAT16 jusqu'à 2 Go Dans le menu Options entrez dans le système de fichiers PVR comme indiqué ci-dessous : Sélection de disque : sélectionnez le disque pour enregistrer le fichier d'enregistrement. Vérifier le système de fichiers PVR : vérifiez si le système de fichiers PVR est défini dans le dispositif USB ou pas. Formater : 27 (Suggestions du format de formatage du dispositif en "FS grande vitesse ..." ce qui peut accélérer l'enregistrement.) Le menu ci-dessous apparaît une fois le formatage terminé : Si vous sélectionnez l'option mode de formatage "FS grande vitesse", vous pouvez modifier la taille de lecture décalée (TimeShift) : 2. Enregistrer le programme En cours de lecture de source DTV, choisissez le canal et cliquez sur "Enregistrer", l'écran d'enregistrement apparaît. Cliquez à nouveau sur "Enregistrer", l'écran d'enregistrement disparaît et le symbole "REC" reste affiché dans le coin supérieur gauche. Il disparaîtra lorsque vous cliquez sur "stop". 3. Lire l'enregistrement 28 Le programme sera sauvegardé dans le dossier "_MSTPVR" du dispositif USB. 1. La capacité de stockage USB peut être comprise entre 128 et 500 Go, mais pour des raisons pratiques, il est recommandé d’utiliser 2 Go à 500 Go. 2. La vidéo risque de devenir pixélisée si le débit vidéo est trop faible. Cela peut être dû à la connexion d'un câble de rallonge USB au lieu d’une connexion directe du téléviseur via un câble USB 3. Les dispositifs USB ne sont pas tous compatibles. Voici une liste des lecteurs USB recommandés. Les modèles qui ne sont pas listés peuvent être compatibles, mais ce n'est pas garanti. La liste de dispositifs USB supportés est la même que celle de la fonction Timeshift (lecture décalée), reportez-vous aux pages suivantes pour plus de détails. 9. Fonction Timeshift (lecture décalée) 1. Préparer l'enregistrement d'un programme Ce téléviseur vous permet de faire une pause et d'enregistrer le programme numérique en cours dans un dispositif de stockage USB, et de reprendre au point où il s'était arrêté. REMARQUE : • Le formatage d'un dispositif de stockage USB 2.0 serait nécessaire. Sauvegardez vos données avant de formater. Toutes les données stockées dans le dispositif USB seront effacées après un formatage. Format de stockage du lecteur USB Sélectionnez cette option pour formater le dispositif USB et pour allouer l'espace pour la fonction TimeShift (lecture décalée). REMARQUE : • Le processus de formatage prendra au moins 2 minutes. N'éteignez pas l'appareil et ne retirez pas le dispositif USB pendant le formatage. • Lors du formatage, un test de vitesse sera effectué sur le dispositif USB. S'il échoue, cela signifie que le dispositif USB peut ne pas supporter la fonction TimeShift (lecture décalée). Enregistrer une émission DTV (télévision numérique) mise en pause sur le dispositif de stockage USB 1. En mode source d'entrée DTV, insérez le dispositif de stockage USB dans le port USB situé sur le côté de votre téléviseur. 2. Appuyez sur PAUSE (29) pour démarrer la fonction TimeShift (lecture décalée). Le programme TV en pause. L'OSD TimeShift apparaît, et l'enregistrement démarre. 3. Appuyez sur STOP (28) pour arrêter la fonction TimeShift et arrêter l'enregistrement du programme. 29 REMARQUE : • Ne débranchez pas le dispositif de stockage USB lorsque la fonction TimeShift est en cours. • Environ 4 Go de mémoire tampon offre 140 minutes d'enregistrement. Limites du TimeShift : 1). Lorsque la fonction TimeShift est activée, seules les touches PLAY/PAUSE/STOP/FWD/REV/ VOL+/VOL-/MUTE et quelques touches de fonctionnement de base (ENTRER / EXIT / navigation) sont disponibles. 2). La lecture vidéo peut ne pas être continue et peut présenter des sauts si la vitesse d'enregistrement USB ne répond pas aux exigences minimales. 3). Ne retirez pas le dispositif USB et n'éteignez pas l'appareil pendant l'opération TimeShift. L'opération sera abandonnée dès que le signal est perdu. 4). Ne retirez pas la source du signal lors de l'opération TimeShift. 5). Ne changez pas rapidement et de façon répétée les opérations entre PLAY/PAUSE/FWD/REV. 6). La vidéo risque de devenir pixélisée si le débit vidéo est trop faible. 7). Pas tous les dispositifs USB sont compatibles, le courant électrique des disques durs USB devrait être <500 mA. Voici une liste des lecteurs USB recommandés. Les modèles qui ne sont pas listés peuvent être compatibles, mais ce n'est pas garanti. • Clé USB Flash SanDisk Extreme® Contour™ - SDCZ8-8192-E75 8Go • Clé USB Flash SanDisk Extreme® Contour™ - SDCZ8-016G-A75 16Go • Clé USB 2.0 Flash Kingston DataTraveler 410 - DT410/ 8Go • Clé USB 2.0 Flash Kingston DataTraveler 410 DT410/16Go • Clé USB 2.0 Flash OCZ Technology Rally2 - OCZUSBR2DC-4Go • Clé USB 2.0 Flash OCZ Technology ATV - OCZUSBATV-8Go • Clé USB 2.0 Flash OCZ Technology Rally2 - OCZUSBR2DC-8Go • SAMSUNG-HM500JI-500G 8). Cette fonctionnalité n'est pas disponible pour toutes les TV numériques, tels que les canaux brouillés ou audio seulement. 10. Lecteur USB Cliquez sur l’icone de la source, et sélectionnez l’USB dans la liste, pressez le bouton OK pour entrer dans le menu USB. 30 Assurez-vous que le dispositif USB est inséré dans la fente. Il existe quatre types d'éléments multimédia qui peuvent être sélectionnés, tels que photo, musique, film et texte. Sélectionnez l'élément multimédia en appuyant sur , appuyez sur OK pour accéder au menu de sélection de disque. pour sélectionner le bon disque et appuyez sur OK pour afficher les fichiers et dossiers multimédias ou Appuyez sur la touche choisir Retour pour revenir au menu de sélection du type multimédia. Sélectionnez le fichier multimédia en appuyant sur ou , pour afficher l'image de prévisualisation. Appuyez sur la touche ► pour lire le fichier multimédia en plein écran. Lorsque le fichier multimédia (photo, film, ou texte) est en cours de lecture, appuyez sur la touche OK ou sur la touche Info pour afficher la barre de contrôle. pour sélectionner l'icône de la fonction, appuyez sur la touche OK pour valider la fonction. Appuyez sur Appuyer sur "▼" ou sur le bouton Exit pour quitter la barre contrôle excepter pour la musique. REMARQUE : Vous pouvez régler la piste audio, ou programme dans le menu Info pendant la lecture du fichier vidéo. Choisissez l'icône Info et appuyez sur OK pour afficher le Menu Info. La lecture USB est prise en charge pour les formats de fichiers photo suivants : - JPEG (format JPEG, les fichiers avec l'extension ".Jpg") - BMP (fichiers avec l'extension ".Bmp") - PNG (fichiers avec l'extension ".Png") La lecture USB est prise en charge pour les formats de fichiers audio suivants: - MP3 (fichiers avec l'extension ".Mp3") - WAV (fichiers avec l'extension ".Wav") La lecture USB est prise en charge pour les formats de fichiers texte suivants : - TXT (fichiers avec l'extension ".Txt") La lecture USB est prise en charge pour les formats de fichiers vidéo suivants : - AVI (fichier avec l'extension ".Avi") - TS (MPEG2 et H.264) 31 05 Dépannage Symptôme du problème Image Vérification Inspection Audio Neige Bruit position de l'antenne, direction ou connexion fantôme Interférence Audio position de l'antenne, direction normal ou connexion Bruit équipements électroniques, voiture / moto, lumière fluorescente Image normale Son coupé Volume (vérifiez si muet est activé ou si les connexions du système audio ne sont pas corrects) Pas d'image Son coupé Le cordon d'alimentation n'est pas inséré. L'interrupteur d'alimentation n'est pas ouvert. Configuration du contraste, luminosité/volume Appuyez sur la touche standby (veille) de la télécommande pour inspection Pas de couleur Audio Contrôle des couleurs normal Rupture de l'image Audio recherchez le canal normal ou faible Pas de couleur Bruit Système TV Il y a une barre noire Audio Changer le format d’image en haut et en bas normal en zoom 32 Spécifications Système de couleurs Système audio Entrée vidéo Y/Pb/Pr HDMI Alimentation Conditions requises Consommation d'énergie Consommation électrique en veille PAL-B/G, I, D/K SECAM- B/G, D/K, L, L' BG, DK, I, L, L' Péritel, YPbPr, AV, VGA, HDMI, USB. 480i/p, 576i/p, 720p, 1080i, 1080p 480i/p, 576i/p, 720p, 1080i, 1080p 100-240V ~ 50/60Hz 30W (19”) <0.5W 38W (22”) Sortie audio 2 x 3W Conditions d'environnement Température de fonctionnement : +5 C - +35 C Humidité de fonctionnement : 20% - 80% Température de stockage : -15 C - +45 C Humidité de stockage : 5% - 90% Guide d'utilisation Télécommande Piles (x 2) Guide de démarrage rapide Accessoires 40W (24”) * Les spécifications de ce téléviseur ne sont fournies ici qu'à titre de référence. Des différences peuvent apparaître car la technologie du produit est en amélioration continue. La conception et les caractéristiques sont sujettes à modification sans préavis. Description de sortie Péritel : 1. Lorsque la source en cours est ATV/AV/SCART, le signal de sortie péritel est ATV. 2. Lorsque la source en cours est DTV, le signal de sortie péritel est DTV. 3. Une autre source n'a pas de signal de sortie péritel. 33 55W (26”) 34 LED LCD TV-ONTVANGER GEBRUIKERSHANDLEIDING Model : LET19T1000H Lees deze handleiding aandachtig door voordat u uw televisie gaat gebruiken en houd LET22T1000HF LET24T1000HF deze handleiding op de juiste plaats voor latere verwijzing. LET26T1000HF 1 Inhoud 01 Veiligheid en waarschuwingen Welkom P. 03 Belangrijke informatie P. 03 Mededeling over de veiligheid P. 04 Waarschuwingen en voorzichtigheid P. 05 02 Introductie Belangrijkste kenmerken P. 07 Montagewijze van het voetstuk P. 08 Richtlijnen voor monteren aan een muur P. 09 Het voorpaneel P. 11 AV-verbindingen P. 12 Het aansluiten van uw tv P. 13 Gemeenschappelijke interface P. 14 03 Afstandsbediening Afstandsbediening P. 15 04 Werking Installatiehandleiding P. 17 05 Oplossen van problemen Oplossen van problemen P. 37 Specificatie P. 38 2 01 Veiligheid en waarschuwingen WELKOM Hartelijk dank voor de aanschaf van deze 19”/22”/24”/26” LED/LCD-tv. Deze handleiding zal u helpen bij het opzetten en het gebruik van uw tv. Controleer eerst de inhoud van de doos, met de onderdelen die vermeld staan op de onderstaande lijst: 19” HD-voorbereide LED/LCD-tv 22” volledige HD 1080P LED/LCD-tv Afstandsbediening Afstandsbediening 2x AAA batterijen 2x AAA batterijen Handleiding Handleiding Snelle startgids Snelle startgids Stand Stand 24” volledige HD 1080P LED/LCD-tv 26” HD-voorbereide LED/LCD-tv Afstandsbediening Afstandsbediening 2x AAA batterijen 2x AAA batterijen Handleiding Handleiding Snelle startgids Snelle startgids Stand Stand Nu kunt u beginnen! BELANGRIJKE INFORMATIE LEES EERST ALLE INSTRUCTIES DOOR EN BEWAAR DEZE HANDLEIDING VOOR LATERE VERWIJZING. LET OP! KANS OP EEN ELEKTRISCHE SCHOK NIET OPENEN LET OP! MAAK DE AFDEKPLAAT (OF ACHTERKANT) NIET OPEN, DIT OM HET RISICO VAN EEN ELEKTRISCHE SCHOK TE VOORKOMEN. ER BEVINDEN ZICH GEEN GEBRUIKERSONDERDELEN IN DIT APPARAAT. NEEMT U CONTACT OP MET DE KLANTENDIENST VOOR EVENTUELE PROBLEMEN. ER BEVINDT ZICH EEN BLIKSEMSCHICHT/PIJLSYMBOOL IN DE DRIEHOEK. DIT SYMBOOL GEEFT AAN DAT ER ZICH EEN HOOG VOLTAGE BINNENIN BEVINDT. HET KAN GEVAARLIJK ZIJN OM ELKE VORM VAN CONTACT TE MAKEN MET DE ONDERDELEN BINNENIN DIT PRODUCT. ER BEVINDT ZICH EEN UITROEPTEKEN IN DE DRIEHOEK: DIT SYMBOOL ATTENDEERT U EROP DAT ER BELANGRIJKE LITERATUUR MEEGELEVERD IS BIJ DIT PRODUCT BETREFFENDE HET ONDERHOUD EN INBEDRIJFSTELLING. LET OP: PLAATS HET TV-TOESTEL NIET IN DE BUURT VAN VOCHTIGHEID, DIT OM HET RISICO VAN ELEKTRISCHE SCHOKKEN EN BRAND TE VERMIJDEN. GEBRUIK GEEN SCHURENDE SCHOONMAAKMIDDELEN DIE KRASSEN OF SCHADE AAN HET LCD-SCHERM KUNNEN AANBRENGEN. VOORKOM CONTACT MET VOORWERPEN DIE HET LCD-SCHERM KUNNEN BESCHADIGEN. OPMERKING: HET ONDERHOUDEN VAN HET APPARAAT DOOR UZELF IS NIET TOEGESTAAN EN KAN TOT LETSEL LEIDEN, OF TOT SCHADE AAN HET PRODUCT. NEEM CONTACT OP MET DE KLANTENDIENST VOOR AL HET ONDERHOUD. 3 KENNISGEVING OVER DE VEILIGHEID • Waarschuwing: Verwijder de afdekplaat of achterkant niet om het risico van een elektrische schok te voorkomen. Er bevinden zich geen gebruikersonderdelen binnen in het apparaat. Laat onderhoud over aan gekwalificeerd personeel. • Waarschuwing: Het apparaat mag niet blootgesteld staan aan regen of vocht om brand of een elektrische schok te voorkomen. • Stel de omvormer en het product niet bloot aan water (druppels of spatten) en plaats geen objecten gevuld met vloeistoffen zoals vazen op het apparaat. • Houd het product uit de buurt van direct zonlicht en warmtebronnen zoals radiatoren of kachels. • Blokkeer de ventilatie-openingen niet. Sleuven en openingen van het apparaat zijn bedoeld voor ventilatie. De openingen mogen nooit geblokkeerd worden door uw product op een kussen, bank of soortgelijk oppervlak te plaatsen. • Gebruik het product niet op een onstabiel karretje, standaard, statief, beugel of tafel. Het apparaat kan vallen wat resulteert in mogelijke schade of mogelijk letsel. • Plaats nooit zware of scherpe voorwerpen op het paneel of frame. • Haal de stekker uit het stopcontact wanneer het apparaat niet in gebruik is. • Er moet speciale aandacht besteed worden aan milieu-aspecten bij inzameling van batterijen. • WAARSCHUWING: de batterijen (of accu’s) mogen niet blootgesteld worden aan extreme hitte zoals zonlicht, vuur en dergelijke. • WAARSCHUWING: Overmatige geluidsdruk van oor- of hoofdtelefoon kan gehoorverlies veroorzaken. Deze afbeelding geeft aan dat dit product niet weggegooid mag worden met ander huishoudelijk afval in de gehele Europese Gemeenschap. Zorg voor verantwoord recyclen zodat het duurzaam hergebruik van grondstoffen bevorderd wordt en om mogelijke schade aan het milieu of de menselijke gezondheid te voorkomen door ongecontroleerde afvalverwijdering. Breng uw gebruikte apparaat naar het grofvuil of neem contact op met uw winkelier waar dit product gekocht is om uw gebruikte apparaat in te leveren. Zij kunnen voor een milieuveilige recycling van dit product zorgen. 4 WAARSCHUWINGEN EN VOORZICHTIGHEID Waarschuwing Voorzichtigheid Deze televisie-ontvanger gebruikt hoge spanningen tijdens de werking. Verwijder de afdekplaat of achterkant van dit apparaat niet. Laat onderhoud aan gekwalificeerd personeel over. Stel de televisie-ontvanger nooit bloot aan regen of vocht om brand of een elektrische schok te vermijden. Laat dit product niet vallen, duw geen objecten in de gleuven of openingen van de televisie. Mors nooit enige vloeistof op de televisieontvanger. Blokkeer de ventilatie-openingen aan de achterkant niet. Voldoende ventilatie is essentieel om te voorkomen dat elektrische componenten falen. 5 Zorg ervoor dat het snoer zich nooit onder de televisie-ontvanger bevindt. Leun of sta nooit op de televisie of standaard, of druk er niet plotseling tegenaan. Besteed speciale aandacht aan kinderen. Een ernstig letsel kan veroorzaakt worden indien het toestel valt. Plaats uw televisie niet op een onstabiel karretje, standaard, plank of tafel. Een ernstig letsel aan een individu of schade aan de televisie kan veroorzaakt worden indien het valt. Het is raadzaam om de stekker uit het stopcontact te halen wanneer de televisie-ontvanger langere tijd niet gebruikt wordt. Minimum afstanden Indien de televisie ingebouwd wordt in een compartiment of soortgelijke behuizing, moeten de minimum afstanden gehandhaafd worden. Warmte-ontwikkeling kan de levensduur van uw televisie verkorten en kan ook gevaarlijk zijn. 6 02 Introductie OPGELET Knoei nooit met onderdelen binnenin de TV of andere instelknoppen die niet in deze handleiding beschreven zijn.Alle LED-TV's zijn hoogspanning elektrische apparatuur. Wanneer u afstoft of er water aan het scherm, de kast, rond de knoppen of aansluitingen komt, moet het netsnoer uit het stopcontact worden verwijderd. Veeg de TV af met een zachte, droge, stofvrije doek. Ontkoppel het netsnoer en de antenne/antennekabel tijdens onweer om schade aan uw TV en eventuele andere aangesloten apparaten te voorkomen. Alle reparaties aan deze TV mogen alleen door gekwalificeerd TV-onderhoudspersoneel worden uitgevoerd. INSTALLATIE * Plaats de tv in de kamer waar het licht niet rechtstreeks in aanraking komt met het scherm. * Totale duisternis of een reflectie op het beeldscherm kan leiden tot vermoeide ogen. Zachte en indirecte verlichting wordt aanbevolen voor meer kijkcomfort. * Laat voldoende ruimte tussen de tv en de muur om ventilatie mogelijk te maken. * Vermijd uitzonderlijk warme plaatsen om schade aan de kast of voortijdig falen van een component te voorkomen. * Bedek de ventilatie-openingen niet wanneer de tv in gebruik is. Belangrijkste kenmerken 1 Kan gebruikt worden als televisie, beeldscherm, pc-scherm; 2 Hoge helderheid, brede kijkhoek; 3 Tijdsverschuiving; 4 HDMI-interface en SCART-interface; 5 NICAM; Belangrijkste kenmerken Paneel 19” tv-systeem PAL-B/G, I, D/K 22” 24” 26” 40W 55W SECAM- B/G, D/K, L, L' Signaal videosysteem PAL/SECAM Ingang voedingsspanning AC 100-240V Energieverbruik 30W Energieverbruik Stand-by <0.5W Vermogen audio-uitgang 2x3W 50/60Hz 38W (THD≤7%) Ingangs signaal Analoge RGB(PC) x1; PC audio x1 Hoge definitie multi-media interface (HDMI) x2 Video-ingang x1 Audio-ingang x1 Y/Pb/Prx1 Scart x1 CI x 1 7 USB x 1 Tuner x 1 RF Co-Ax x 1 Hoofdtelefoon x 1 uitgangssignaal S/PDIF x 1 Horizontale definitie (TV-lijn) Samengestelde video-ingang >=350 YPbPr >=400 PC VOORAF INGESTELD RESOLUTIE V.Freq.(Hz) H.Freq.(KHz) 1 640x480 60 31.47 2 800x600 60 37.88 3 1024x768 60 48.36 4 1360x768 60 47.7 5 1280x1024 60 63.98 Montagewijze van het voetstuk 1. Zet de ondersteunende pilaarvoet op 2.Zet de standaard terug op de het voetstuk in de richting van de achterkant in de richting van de aangegeven pijl en zet deze vervolgens aangegeven pijl en zet deze vervolgens vast met drie schroeven. met één schroef vast. (19”,22”,24”) 1. Zet de ondersteunende pilaarvoet op het (19”,22”,24”) 2.Zet de standaard terug op de achterkant in voetstuk in de richting van de aangegeven de richting van de aangegeven pijl en zet pijl en zet deze vervolgens vast met drie deze vervolgens met twee schroeven vast. schroeven. (26”) (26”) 8 INSTALLATIE-OPMERKINGEN Zoek een plek voor de tv in een kamer waar er geen rechtstreeks licht op het scherm valt. Totale duisternis of een reflectie op het scherm kan leiden tot vermoeidheid van de ogen. Zachte en indirecte verlichting wordt aanbevolen voor meer kijkcomfort. Laat voldoende ruimte tussen de tv en de muur om ventilatie mogelijk te maken. Vermijd uitzonderlijk warme plaatsen om schade aan de kast of voortijdig falen van een component te voorkomen. RICHTLIJNEN VOOR MONTEREN AAN EEN MUUR Deze televisie kan als volgt aan de muur gemonteerd worden: 1. Plaats de LED-LCD-televisie op een stevige ondergrond. Plaats een zachte doek over de voorkant van het scherm om het tegen eventuele schade te beschermen. 2. Verwijder de schroeven uit het onderste deel van de tv, daar waar de voet de televisie verbindt en haal de voet weg (zet de voet op een veilige plaats voor toekomstig gebruik). (19”,22”,24”) (26”) 3. Gebruik de vier meegeleverde schroeven om de tv vast te zetten aan de wandbeugel (niet meegeleverd) via de vier VESA-standaardgaten aan de achterzijde van de televisie. 9 (19”) (22”,24”) (26”) 10 Het voorpaneel 1 Sensor van de afstandsbediening. 2 LED-wijzer: BLAUW: VERMOGEN AAN. ROOD: STANDBY. 3 Toetsen. 1 BRON Laat het broningangsmenu zien. 2 MENU Laat het hoofdmenu zien. 3 CH+/CH- In de TV-instelling, druk op CH+ of CH- om naar een hoger of lager kanaal te veranderen. In MENU, druk op CH+ of CH- om uit geselecteerde onderdelen te kiezen. In standby kan het de tv inschakelen. 4 VOL+/VOL- Aanpassen geluidsniveau. In MENU, past het onderdeel aan dat u geselecteerd heeft. 5 STANDBY 11 Achter/zijcontacten 1 L/R audio Ingang 2 VIDEO Ingang 3 S/PDIF Digitale audio-uitgang 4 YPbPr Ingang 5 SCART Ingang 6 USB Ingang 7 HDMI2 Ingang 8 HDMI1 Ingang 9 Hoofdtelefoon analoge audio-uitgang 10 GEMEENSCHAPPELIJKE IN INTERFACE (CI) Ingang 11 PC AUDIO Ingang 12 VGA-INGANG Ingang 13 ANT Ingang 12 HET AANSLUITEN VAN UW TV ANTENNE-AANSLUITING Sluit uw antenne aan de achterkant van de tv aan in de ANT IN-aansluiting. VERBETER UW SIGNAAL Om de beeldkwaliteit te verbeteren in een gebied met een slecht bereik, gebruikt u een signaalversterker (niet meegeleverd). SLUIT UW PC AAN OP DE TV U kunt uw tv ook als monitor voor uw pc gebruiken door deze te verbinden met een VGA-kabel (niet meegeleverd). 1 Lees de gebruikershandleiding van uw computer en controleer of er een VGA-aansluiting aanwezig is. 2 Schakel de stroom van uw tv en pc uit. 3 Sluit een type D, 15-pin VGA-interface-kabel aan op de VGA-video interface-aansluiting van de pc. Sluit het andere uiteinde van de kabel aan op de interface-aansluiting van de tv. Draai de schroeven van de VGA-aansluitingen aan en verbindt de audiokabel (niet meegeleverd) naar de audio-ingang aan de achterkant van de tv. 4 Zet eerst de stroom van de tv aan en daarna dat van de pc. 5 Druk op de toets van de tv of van de afstandsbediening om de video-ingang in te stellen op VGA. 6 Wanneer het beeld laat zien dat er een ruis aanwezig is, wijzigt u de VGA-instelling naar een andere resolutie, verander de sterkte of verander de helderheid en het contrast in het menu tot het beeld duidelijk is. SLUIT EEN DVD-SPELER OF VIDEORECORDER AAN OP UW TV Er zijn twee manieren waarop u een dvd-speler of videorecorder op uw tv kunt aansluiten. Zorg ervoor dat zowel de tv, dvd-speler of videorecorder zijn uitgeschakeld voordat u deze aansluit. 1. Sluit de AV-uitgang van de dvd/video aan op de AV-ingang van uw tv. 2. Sluit de AV-audio L en R aan op de audio-ingang (8). Druk op de BRON-toets van de tv om de video-ingang naar AV te zetten. SCART-INGANG 1 Sluit de SCART-kabel van het externe apparaat (dvd-speler, top-setbox of spelcomputer) aan op de SCART-aansluiting van de tv. 2 Druk op de BRON-toets om de SCART-optie te selecteren. 3 Druk op de AFSPEEL-toets van het externe apparaat. HDMI-INGANG 1 Sluit de kabel van het HDMI-apparaat aan op de HDMI-aansluiting van de tv. 2 Druk op de BRON-toets om de HDMI-optie te selecteren. 3 Raadpleeg de gebruikershandleiding van het HDMI-apparaat voor de bediening hiervan. HOOFDTELEFOON- UITGANG Stop de stekker van de hoofdtelefoon in de voorzine ingang « HEADPHONE ». De luidsprekers zijn nu gedempt. S/PDIF-UITGANG S/PDIF is een digitale audioverbinding gebruikt voor het over korte afstanden aansluiten van audioapparatuur, bijvoorbeeld thuistheaters en andere digitale Hi-fi-systemen.Het signaal wordt doorgegeven over een coaxiale kabel met RCA-connectors. 1. Zorg ervoor dat zowel de TV als het apparaat vóór het aansluiten zijn uitgeschakeld. 2. luit de AV-kabel (niet meegeleverd) aan vanaf de S/PDIF-aansluiting van de TV naar het geluidssysteem van het thuistheater of digitaal hi-fi-systeem enz. 13 GEMEENSCHAPPELIJKE INTERFACE De gemeenschappelijke interface-gleuf (common interface of CI) is ontworpen om de conditionele toegang-module (CA) en smartkaart te aanvaarden, dit om het mogelijk te maken om naar betaal-tv en aanvullende diensten te kijken. Neemt u contact op met de installateur van de gemeenschappelijke interface voor meer informatie betreffende modules en abonnementen. Let op, CA-modules en smartkaarten zijn geen optionele accessoires van ons. Waarschuwing • Schakel uw tv uit voordat u een module in de gemeenschappelijke interface-gleuf stopt. 1. Plaats de CAM er correct in, stop daarna pas de smartkaart in het CI-sleuf dat zich aan de zijkant van de tv bevindt. CI SLOT CI-GLEUF CAM CAM Smart Card Smartkaart 2. Schakel de tv in, op het scherm zal een bericht verschijnen indien de CA-module gedetecteerd wordt. Wacht enkele ogenblikken tot de kaart geactiveerd is. 3. Druk op de MENU-toets en druk vervolgens op de ▲▼-toetsen om de CI informatie-optie te selecteren. 4. Gedetailleerde informatie over de CI-kaart die in gebruik is, wordt weergegeven. 5. Druk op de OK-toets om het kaartmenu te openen. Wij verwijzen naar de modulehandleiding voor het instellen van de details. 6. Wanneer de module verwijderd is, zal het volgende bericht op het scherm verschijnen: 14 03 Afstandsbediening 1.VOEDING: Indrukken om de TV in te schakelen 2.D.MENU: Geen functie. 3.P.Mode: Om de beeldmodus te schakelen. 4.INFO: Indrukken om de huidige signaalstatus, inclusief ingangsbron en audiokanaalmodus weer te geven. 5.AUDIO l/ll: Indrukken om "MONO” en “Nicam stereo” voor ATV-kanaal te selecteren. Selecteer de audiotaal voor het DTV-kanaal. 6.ONDERTITELING: Indrukken om de ondertiteling “On” of “Off" te schakelen 7.Cijferknoppen: Voor directe toegang tot kanalen. 8.BRON: Voor het selecteren van de ingangsbron. 9.DEMPEN: Om het geluid in of uit te schakelen. 10.Volumeregeling: Om het geluidsniveau aan te passen. 11.MENU: Om het TV-menu weer te geven. 12.OK: Om een selectie te bevestigen 13.AFSLUITEN: Om naar het vorige menu terug te keren of het menu te verlaten. 14.Teletekst Index 15. HERHALEN: Geen functie. 16.Teletekst groene knop/USB snel vooruit 17.Teletekst rode knop/USB snel achteruit 18.Teletekst mix 19.Teletekst tekst 20.Teletekst tonen 21.Teletekst grootte 22.Teletekst tijd/OPNAMELIJST (teleteksttijd is geen functie) 23.Teletekst modus: Geen functie. 24.Teletekst aanhouden 25.Teletekst subcode: Teletekst subpagina 26.Teletekst blauwe knop/USB volgend bestand 27.Teletekst gele knop/USB vorig bestand 28.USB STOP 29.USB AFSPELEN/PAUZEREN 30.START OPNEMEN 31.Cursor OMHOOG, OMLAAG, LINKS, RECHTS: Indrukken om uw selectie te navigeren. 32.Fav: Om uw favoriete kanalenlijst in de TV- of DTV-modus te benaderen. 33.Selecteer programma: Druk op de “ ”-knop om het volgende of vorige TV-kanaal te selecteren. 34.GIDS: Indrukken om het elektronische programmagids in de TV-modus weer te geven. 35.Q.View: Om het eerder bekeken kanaal te benaderen. 36.CH.LIST: Indrukken om de kanalenlijst weer te geven. 37.Scherm: Om de aspectratio van het beeld te wijzigen. 38.Slapen: Stel de timer in om de TV uit te schakelen. 39.S.Mode: Om de geluidsmodus te schakelen. 40. OPENEN/SLUITEN: Geen functie. :Geen DVD – functie 15 Plaats de batterijen in de afstandsbediening 1. Verwijder het batterijklepje. 2. Plaats 2 AAA 1,5V batterijen in het compartiment en let erop dat de polariteit (+ of -) van de batterijen overeenkomt met de polariteitsmerken op de afstandsbediening. 3. Monteer het batterijklepje. Vervang de batterijen wanneer uw tv de volgende symptomen begint te vertonen: bediening is instabiel of onregelmatig, soms werkt de tv niet met de afstandsbediening. Opmerking: 1) Alkaline-batterijen worden aanbevolen. 2) Verwijder de batterijen als ze leeg zijn of als de afstandsbediening langere tijd niet gebruikt wordt. AFSTANDSBEDIENING TELETEKST Teletekst is een informatiesysteem dat door bepaalde zenders uitgezonden wordt en geraadpleegd kan worden zoals een krant. Het biedt ook toegang tot ondertiteling voor kijkers met gehoorsproblemen of die niet vertrouwd zijn met de taal van een uitzending (kabelnetwerken, satellietkanalen enz.). Druk op: TEKST U verkrijgt: Dit wordt gebruikt om de teletekst-optie op te openen of te verlaten. De inhoud wordt weergegeven in een lijst van pagina’s die geraadpleegd kan worden. Elke pagina heeft een overeenkomstige 3-cijferig paginanummer. Als het gekozen kanaal geen teletekst uitzendt, zal de aanduiding 100 zijn en het scherm zal leeg blijven (in dit geval kiest u een ander kanaal voor teletekst). EEN PAGINA SELECTEREN Voer het nummer van de gewenste pagina met de 0 t/m 9 toetsen in of met de pijlen omhoog/omlaag. Bijvoorbeeld: voor pagina 120, kiest u 120. Het nummer verschijnt in de linkerbovenhoek, de teller draait en hierna wordt de pagina weergegeven. Herhaal deze handeling om een andere pagina te bekijken. Als de teller blijft zoeken, betekent dit dat de pagina niet uitgezonden wordt. Selecteer dan een ander nummer. DIRECT TOEGANG TOT RUBRIEKEN Gekleurde toetsen bevinden zich aan de onderkant van het scherm. De vier gekleurde toetsen worden gebruikt om de overeenkomstige rubrieken of pagina’s te openen. De gekleurde velden knipperen wanneer de rubriek of de pagina nog niet beschikbaar is. INDEX Dit laat u terugkeren naar de Inhoud (meestal pagina 100). SUB PAGINA (sub page) Bepaalde pagina’s bevatten sub-pagina’s die automatisch achtereenvolgens weergegeven worden. Deze toets wordt gebruikt om te stoppen dat de sub-pagina de overname hervat. De aanduiding verschijnt links bovenaan. VASTHOUDEN (hold) De pagina bevriezen. ONTHULLEN (reveal) Het weergeven of verbergen van informatie (oplossingen bij spelletjes). LIJST (list) De gebruiker kan vier favoriete pagina’s direct koppelen aan de vier gekleurde toetsen. Terwijl de lijst geactiveerd is, is het niet mogelijk om met TOP of FLOF te navigeren met de kleurtoetsen. De favoriete paginanummers moeten opgeslagen, en hersteld worden van/naar een niet-vluchtig geheugen voor elk kanaal door de systeemsoftware. 16 04 DE WERKING Installatiegids De installatiegids verschijnt enkel wanneer de TV voor de eerste keer gebruikt wordt of terug is ingesteld op fabrieksinstellingen. 1) Druk op de “ ”-knoppen om in het menu te navigeren en de instellingen te wijzigen. Druk op de “OK”-knop om te bevestigen. Selecteer de gewenste taal, thuis mode/mode winkel voor de weergave op het menu Hetstandaard paswoord is 6666. WONING- of WINKEL-modi ① De woningmodus is een energiebesparende modus.De woningmodus wordt aanbevolen voor normale weergave-instelling en is door de fabrikant als standaard ingesteld. ② De winkelmodus is een optie voor detailhandelaars voor reclame- of productpresentatie.De winkelmodus heeft een helderder beeld dan de woningmodus. ③ U kan kiezen tussen thuis mode of winkel mode.Indien u voor winkel mode kiest zal de bron automatisch HDMI 1 zijn en zal u op exit moeten drukken op de afstandsbediening om het popup menu te verlaten. 2) Druk op de “ ”-knoppen om “DVB-T/DVB-C” te selecteren en druk vervolgens op de “OK”-knop om te bevestigen. a. Als u DVB-T selecteert, is de volgende stap het selecteren van het afstemtype en land, druk vervolgens op de “OK”-knop om het afstemmen te starten. 17 b. Als u DVB-C selecteert, is de volgende stap het configureren van het DVB-C-systeem zoals Scantype/Frequentie/Netwerk ID/Symbool(KS/S), druk vervolgens op de “OK”-knop om naar het selectiemenu van de afstemtype en land te gaan, deze stap is hetzelfde als bij DVB-T, selecteer het afstemtype (DTV/ATV). Kies het juiste land, druk op de “OK”-knop om het afstemmen te starten. 3) Het kanaalafstemmen zal beginnen. Deze bewerking kan tot 6 minuten duren. De display zal de voortgang van het afstemmen en het aantal gevonden kanalen weergeven. 4) Als u het ATV-afstemmen wilt overslaan, druk op de “MENU”-knop om het afstemmen te onderbreken. Een pop-up-scherm zal worden weergegeven, druk op de “ ”-knop om “YES” te selecteren om te bevestigen. Vervolgens gaat u rechtstreeks naar DTV-afstemmen. U kunt de bovenstaande stap herhalen als u ook de DTV-afstemmen wilt overslaan. Een installatie herinnering verschijnt de volgende keer dat u de TV inschakelt. 5) Nadat het afstemmen voltooid is, zijn de kanalen gerangschikt in een vooraf ingestelde volgorde. Als u kanalen wilt overslaan, wijzig de vooraf ingestelde volgorde of hernoem kanalen, selecteer “Programme” bewerken onder het “Channel ”-menu. 6) 1. KANAALMENU 1.2 Automatisch afstemmen (DVB-T) 18 1) Druk op de “MENU”-knop en druk vervolgens op de " “-knoppen om het “Channel ”-menu te selecteren en druk vervolgens op de “OK”-knop. 2) Druk op de " “-knoppen om “Auto Tuning” te selecteren en druk vervolgens op de “OK”-knop. 3) Druk op de " “-knoppen om "DVB-T/DVB-C" te selecteren. Selecteer “DVB-T” en druk vervolgens op de “OK”-knop om te bevestigen 4) Druk in het “Afstemtype"-menu op de " " "-knop en druk vervolgens op de “ “-knoppen om ATV/DTV/DTV + ATV te selecteren. Druk op de ”-knoppen om het land waar u de TV zult gebruiken. Druk op de “OK”-knop om te bevestigen. 5) Het kanaalafstemmen zal beginnen. Deze bewerking kan tot 6 minuten duren. De display zal de voortgang van het afstemmen en het aantal gevonden kanalen weergeven. 6) Als u het ATV-afstemmen wilt overslaan, druk op de “MENU”-knop om het afstemmen te onderbreken. Een pop-up-scherm zal worden weergegeven, druk op de “ ”-knop om “YES” te selecteren om te bevestigen. Vervolgens gaat u rechtstreeks naar DTV-afstemmen. U kunt de bovenstaande stap herhalen als u ook de DTV-afstemmen wilt overslaan. Een installatie herinnering verschijnt de volgende keer dat u de TV inschakelt. 19 7) Nadat het afstemmen voltooid is, zijn de kanalen gerangschikt in een vooraf ingestelde volgorde. Als u kanalen wilt overslaan, wijzig de vooraf ingestelde volgorde of hernoem kanalen, selecteer “Programme” bewerken onder het “Channel ”-menu. 1.2 Automatisch afstemmen (DVB-C) 1) Druk op de “MENU”-knop en druk vervolgens op de " “-knoppen om het “Channel ”-menu te selecteren en druk vervolgens op de “OK”-knop. 2) Druk op de " 3) Druk op de “ “-knoppen om “Auto Tuning” te selecteren en druk vervolgens op de “OK”-knop. ”-knoppen om "DVB-T/DVB-C" te selecteren en druk vervolgens op de “OK”-knop om te bevestigen. 4) Druk op de “ ”-knoppen om "Scantype/Symbool (KS/S)" te selecteren en druk vervolgens op de “OK”-knop om te bevestigen. 20 5) Druk in het “Afstemtype"-menu op de " " "-knop en druk vervolgens op de “ “-knoppen om ATV/DTV/DTV + ATV te selecteren. Druk op de ”-knoppen om het land waar u de TV zult gebruiken. Druk op de “OK”-knop om te bevestigen. 6) Het kanaalafstemmen zal beginnen. Deze bewerking kan tot 6 minuten duren. De display zal de voortgang van het afstemmen en het aantal gevonden kanalen weergeven. 7) Als u het ATV-afstemmen wilt overslaan, druk op de “MENU”-knop om het afstemmen te onderbreken. Een pop-up-scherm zal worden weergegeven, druk op de “ ”-knop om “YES” te selecteren om te bevestigen. Vervolgens gaat u rechtstreeks naar DTV-afstemmen. U kunt de bovenstaande stap herhalen als u ook de DTV-afstemmen wilt overslaan. Een installatie herinnering verschijnt de volgende keer dat u de TV inschakelt. 8) Nadat het afstemmen voltooid is, zijn de kanalen gerangschikt in een vooraf ingestelde volgorde. Als u kanalen wilt overslaan, wijzig de vooraf ingestelde volgorde of hernoem kanalen, selecteer “Programme” bewerken onder het “Channel ”-menu. OPMERKING: 21 Alle kanalen met inbegrip van ATV, DTV en Radio kunnen in één keer worden afgestemd, als het afstemtype DTV + ATV is. Alle opgeslagen zenders zullen na het automatisch afstemmen verdwijnen. Na het automatisch afstemmen, zal het kanaal naar het eerste DTV-kanaal overslaan. 2.1 DTV handmatig afstemmen (DVB-T) 1) Druk op de “MENU”-knop en druk vervolgens op de “ ”-knoppen om het “Channel ”-menu te selecteren en druk vervolgens op de “OK”-knop. 2) Druk op de “ 3) Het “DTV Manual Tuning”-scherm zal verschijnen. Druk op de " ”-knoppen om “DTV Manual Tuning” te selecteren en druk vervolgens op de “OK”-knop. “-knoppen om het gewenste UHF-kanaal te selecteren en druk vervolgens op de “OK”-knop om het zoeken van dat kanaal te beginnen. Wanneer het signaal is afgestemd, zal het beeld en de signaalsterkte op het scherm worden weergegeven. 4) Druk op de “MENU”-knop om naar het hoofdmenu terug te keren. 5) Druk op de “EXIT”-knop om het menu te verlaten. 2. 2 DTV handmatig afstemmen (DVB-C) 1) Druk op de “MENU”-knop en druk vervolgens op de “ ”-knoppen om het “Channel”-menu te selecteren en druk vervolgens op de “OK”-knop. 2) Druk op de “ ”-knoppen om “CADTV Manual Tuning” te selecteren en druk vervolgens op de “OK”-knop. 22 3) Het “CADTV Manual Tuning”-scherm zal verschijnen. Druk op de " “-knoppen om “Frequency/Symbol (Ks/s/QAM Type QAM" te selecteren en druk vervolgens op de “OK”-knop om het zoeken van dat kanaal te beginnen. Wanneer het signaal is afgestemd, zal het beeld en de signaalsterkte op het scherm worden weergegeven. 4) Druk op de “MENU”-knop om naar het hoofdmenu terug te keren. 5) Druk op de “EXIT”-knop om het menu te verlaten. 3). ATV handmatig afstemmen: U kunt het geluidsysteem veranderen om naar analoge tv-kanalen te zoeken en fijn af te stellen, sla hierna de kanalen op die u geselecteerd heeft. OPMERKING: Druk op de rode toets van teletekst om de kanalen na handmatige afstemming op te slaan. 4). Programma wijzigen: U kunt elk programma verwijderen, hernoemen, verplaatsen, overslaan, ook FAV (favorieten). 23 Verwijderen Druk op de rode toets van teletekst, het programma waar de cursor zich bevindt, zal verwijderd worden. Hernoemen: Alleen ATV-programma’s kunnen hernoemd worden. Verplaats de cursor naar het programma, druk op de groene toets van teletekst om het programma te hernoemen. Druk op om de karakters te kiezen. Druk op om de cursor te verplaatsen. Druk op de menu knop om het bewerken af te sluiten. Druk vervolgens op UITGAAN om het menu te verlaten. Opmerking: ATV-programma’s kunnnen alleen een naam van 5 karakters hebben, bij DTV zijn dit 25 karakters. Verplaatsen Gebruik de pijltoetsen om het kanaal dat u wilt verplaatsen te selecteren. Druk vervolgens op de gele toets om de verplaatsfunctie te selecteren. Wanneer deze actief is, gebruikt u de pijltoetsen om het kanaal te verplaatsen en daarna OK om dit te bevestigen. Overslaan Druk op om het programma te kiezen, drukt u hierna op de blauwe toets van teletekst om dit programma over te slaan. zal aan de rechterkant van het programma verschijnen. Kies het programma dat overgeslagen moet worden, druk nogmaals op de blauwe toets. U kunt overslaan annuleren, zal dan verdwijnen. Favoriet Druk op om het programma te kiezen. Druk op de FAV-toets, zal aan de rechterkant van het programma verschijnen. Kies het favoriete programma en druk nogmaals op de FAV-toets. U kunt FAV annuleren, zal dan verdwijnen. Zodra uw favoriete groep is aangemaakt, kunt u snel toegang krijgen tot uw favoriete kanaal door op de FAV-toets te drukken. 5). CI-informatie: (optioneel) Dit menu kan de informatie over de gemeenschappelijke interface kaart (CI-kaart) weergeven. 2. BEELDMENU Het tweede deel van het MENU is het BEELDMENU. U kunt hier effect geven aan het beeld zoals contrast, helderheid enz. Druk op OK om te bewegen, druk op OK om het aan te passen. 24 OPMERKING: 1). Tint is alleen beschikbaar voor het NTSC-systeem. 2). Er zijn vier kleurtemperatuurinstellingen die geselecteerd kunnen worden, medium, warm, koel, gebruiker. 3). Beeld (screen) is beschikbaar in de PC-optie die de horizontale positie, vertikale positie, grootte en fase kan aanpassen. 3. GELUIDMENU Het derde deel van het MENU is het GELUIDMENU. U kunt hier het geluidseffect aanpassen zoals hoge en lage tonen, balans enz. Druk op om te bewegen, druk op OK om het aan te passen. Opmerking: Auto volume: dit is alleen beschikbaar als het ingangssignaal te groot is of het geluid vervalst wordt. 4. TIJDMENU Het vierde onderdeel van het MENU is het TIJDSMENU. U kunt hier de klok, het vermogen aan/uit tijd, de slaaptijd enz. aanpassen. Druk op om te bewegen, druk op OK om het aan te passen. 25 OPMERKING: Indien er 15 minuten geen signaal aanwezig is, zal de tv naar de automatische slaapinstelling schakelen (auto sleep) als deze op AAN (on) ingeschakeld is. De kloktijd kan verkregen worden via het DTV-systeem auto. 5. INSTELMENU Het vijfde deel van het MENU is het INSTELMENU. Hier kunt u de menutaal, gesproken taal, ondertiteling enz. instellen. Automatische uitschakelen 1. Als na 4 uur vanaf het inschakelen geen wijzigingen aan de TV worden aangebracht, bijvoorbeeld geen kanaal of volume veranderd, zal de TV het automatische uitschakelproces starten. En pop-up-venster zal verschijnen op het scherm. Na 150 seconden schakelt de TV automatisch over naar stand-by.Druk op een willekeurige knop op de afstandsbediening om het automatisch uitschakelen te annuleren. 2. Om het automatisch uitschakelen te annuleren, selecteer “Automatic power-down (4H)” in het optiemenu en druk op "OK”.Een pop-up-bericht "Are you sure you want to enable automatic powerdown?" zal verschijnen. Gebruik de rechter pijltoets om “NO” te selecteren. Het TV-scherm keert naar het optiemenu terug en de “Automatic power-down (4H)”-optie zal verschijnen. Automatic power-down(4H) OFF Om na 4 uur naar automatisch uitschakelen terug te keren, herhaal het bovenstaande maar gebruik de linker 26 pijltoetsom “YES” te selecteren. In het PVR-file systeemmenu kunt u de USB-schijf instellen voor PVR (persoonlijke videorecorder). OPMERKING: Fabrieksinstellingen (restore factory default) zal alle programma’s en wachtwoorden verwijderen. 6. KINDERSLOTMENU Het zesde onderdeel van het MENU is het KINDERSLOTMENU. U kunt het systeem op slot zetten, een wachtwoord aanbrengen, programma’s blokkeren en ouderlijke begeleiding instellen. Zodra u het kinderslotsysteem heeft ingeschakeld, kunt u geen kanalen meer zoeken of programma’s wijzigen. OPMERKING: Het standaard wachtwoord is 0000. Indien u het wachtwoord vergeet, kunt u gebruik maken van het superwachtwoord: 9443. Blokkeer programma (block program): druk op om het programma te kiezen, druk op de groene toets van teletekst om het programma te blokkeren. Indien u het programma wilt deblokkeren, gaat u dan naar het hoofdmenu, geeft het wachtwoord in, drukt hierna nogmaals op de groene toets. Ouderlijk toezicht (parental guidance): Druk op om de waardering te kiezen. 7. EPG-MENU (electronische programmagids) Het EPG-menu wordt gebruikt om na te kijken wat er wordt uitgezonden op DTV of de radio op de dag zelf. Om toegang tot het EPG-menu te krijgen, drukt u op de EPG-toets en het volgende menu zal worden weergegeven: 27 1. INFO Gebruik om de programma’s te kiezen. Om de informatie van het programma te markeren, drukt u op de INFO-toets. 2. Schema Druk op de gele teletekst-toets. Dit kan het hele herinneringsschema op een rij zetten, druk op de gekozen lijst en druk op de rode toets 3. VERWIJDEREN om de schemalijst te verwijderen. Opnemen Druk op de rode toets. Dit kan ingesteld worden om het programma te laten opnemen. 4. Herinneren Druk op de blauwe toets om één programma te kiezen en om één herinnertijd in te stellen. Het tv-scherm zal op de gekozen tijd automatisch naar het gekozen programma verspringen. 8. PVR-FUNCTIE 1. Voorbereiding om een programma op te nemen De PVR functie werkt enkel op TNT 28 Kies in het INSTELMENU het PVR file systeem. Kies in het “INSTELMENU” nu “controleer PVR file systeem” (check PVR File System). Klik op “OK” totdat “controleren” (checking) veranderd is naar “succes”. Opmerking: controleer ook de term “snelheid” (speed). Indien er “HD-ondersteuning” (HD support) is, betekent dit dat de snelheid van het USB-apparaat beschikbaar is voor tijdverplaatsing en opnemen. Indien dit niet het geval is, dient u het apparaat te formateren om ervoor te zorgen dat het apparaat beschikbaar is. De standaard “vrije opneemlimiet” (free record limit) is zes uur, mits de ruimte op de schijf groot genoeg is. Indien de ruimte niet groot genoeg is, moet de opneemtijd korter worden, afhankelijk van de ruimte op het apparaat. Voer geen andere functies uit tijdens de “controlleer PVR File systeem”-controle totdat deze gereed is. De opnames moeten met het PVR-systeem van de TV gebeuren.Het kan alleen op de dezelfde TV worden afgespeeld, niet op een ander soort apparaat (computer, DVD, enz.) die niet met de TS-bestandsindeling compatibel is. Houd er rekening mee dat om elke vorm van opname uit te voeren, de TV het formatteren van het aangesloten USB-apparaat, voor het opslaan van de opname, van u zal vereisen. WAARSCHUWING. BIJ HET FORMATTEREN VAN DE EXTERNE USB-APPARAAT, ZULT U ALLE BESTANDEN EN INFORMATIE VERLIEZEN DIE U OP HET APPARAAT HEBT OPGESLAGEN. Het USB-bestandssysteem zal de opslaggrootte beperken. Bestandssysteem: NTFS maximaal 2TB FAT32 maximaal 192 GB FAT16 maximaal 2 GB Open vanaf het optiemenu het PVR-bestandssysteem zoals hieronder: 29 Selecteer schijf (select disk): selecteer op welke schijf er opgenomen moet worden. Controleer PVR file systeem (check PVR File System): controleer of het PVR file systeem is ingesteld op het USB apparaat of niet. Formatteren: (Suggestie voor het formatteren van het formaat van het apparaat door “High Speed Fs…”, dat versneld kan opnemen). 30 Het onderstaande menu verschijnt nadat het formatteren beeïndigd is: Indien u het "hoge snelheid FS" formaatinstelling kiest (Hi Speed FS), kunt u de grootte van de tijdverplaatsing veranderen: 2. Het programma opnemen Als de DTV-bron speelt, kies dan het kanaal en klik op “opnemen” (record), het opnamevenster zal verschijnen. Klik nogmaals op “opnemen” (record) en het opneemvenster zal verdwijnen, het “opneem”-ikoon (REC) bevindt zich nog steeds links bovenaan. Het zal verdwijnen wanneer u op “stop” drukt. 31 3. Een nummer afspelen Het programma opgenomen op de "USB" zal in de map "_MSTPVR" op het apparaat worden opgeslagen. 1. De USB-opslaggrootte kan tussen 128 MB en 500 GB in grootte zijn, maar voor praktisch gebruik is 2 GB tot 500 GB aanbevolen. 2. De video kan korrelig worden wanneer de bitratio van de video te laag is.Dit kan door het aansluiten van een USB-verlengkabel worden veroorzaakt in plaats van de USB direct op de TV aan te sluiten. 3. Niet alle USB-apparaten zijn compatibel. Hieronder is een lijst van aanbevolen USB-stations. Modellen die niet worden vermeld kunnen compatibel zijn, maar zijn niet gegarandeerd te werken. De ondersteuningslijst van USB-station is dezelfde als die van de tijdverschuivingsfunctie, raadpleeg de volgende pagina's voor details. 32 9. Functie om de tijd te verschuiven 1. Voorbereiding om een programma op te nemen Met deze tv kunt u het programma dat u aan het kijken bent laten pauzeren en laten opnemen naar een USB-opslagapparaat, en dit hervatten op het punt waar er gepauzeerd werd. OPMERKING: • Het formatteren van een USB 2.0 opslagapparaat is nodig. Sla uw originele gegevens op voordat u gaat formatteren. Alle data die op het USB-apparaat voorheen opgeslagen waren, worden na het formatteren gewist. USB-DRIVE OPSLAG FORMATTEREN Selecteer formatteren van het USB-apparaat en wijs de hoeveelheid ruimte aan de TIJDVERPLAATS-functie toe. OPMERKING: • Het formatteerproces zal tenminste twee minuten in beslag nemen. Schakel de stroom niet uit tijdens het formatteren, verwijder ook het USB-apparaat niet tijdens het formatteren. • Tijdens het formatteren wordt een snelheidstest gedaan op het USB-apparaat. Indien dit mislukt, betekent dit dat het USB-apparaat eventueel geen ondersteuning heeft voor de TIJDVERPLAATS-functie. OPNEMEN VAN EEN GEPAUZEERD DTV-PROGRAMMA NAAR EEN USB-OPSLAGAPPARAAT 1. Terwijl u in de DTV-ingangsbron bent, steekt u het USB-opslagapparaat in de USB-poort aan de zijkant van uw tv. 2. Druk op PAUSE (29) om de TIJDVERPLAATS-functie te starten. Het tv-programma wordt gepauzeerd. De TIJDVERPLAATS OSD (time shift OSD) zal verschijnen en begint op te nemen. 3. Druk op STOP (28) om de TIJDVERPLAATS-functie te stoppen en het programma dat opgenomen wordt, stopt. 33 OPMERKING: • Verwijder het USB-opslagapparaat niet wanneer de TIJDVERPLAATS-functie geactiveerd is. • 4GB aan geheugen biedt ongeveer 140 minuten aan opneemtijd. TIJDVERPLAATS-beperkingen: 1. Wanneer de TIJDVERPLAATS-functie geactiveerd is, werken alleen de bassistoetsen zoals AFSPELEN/PAUSE/STOP/FWD/REV/VOL+/ VOL-/MUTE en sommige basishandelingtoetsen (ENTER/EXIT/pijltoetsen). 2. Het terugspelen van een video kan haperen en overslaan als de USB-opnamesnelheid niet aan de minimum eisen voldoet. 3. Verwijder de USB-schijf niet, schakel ook de stroom niet uit tijdens een TIJDVERPLAATS-operatie. Het zal afbreken zodra het signaal verdwenen is. 4. Verwijder de signaalbron niet tijdens de TIJDVERPLAATS-opnames. 5. Wissel AFSPELEN/PAUSE/FWD/REV niet herhaaldelijk en te snel steeds met elkaar af. 6. De video kan korrelig worden als de videobit-sterkte te laag is. 7. Niet alle USB-apparaten zijn gelijkwaardig, de electriciteit van de USB-harde schijf dient < 500MA te zijn. Hieronder treft u een lijst aan met aanbevolen USB-drives.Modellen die niet opgenomen zijn kunnen werken, maar dit is niet gegarandeerd. • SanDisk Extreme® Contour™ USB Flash Drive - 8GB SDCZ8-8192-E75 • SanDisk Extreme® Contour™ USB Flash Drive 16GB SDCZ8-016G-A75 • Kingston DataTraveler410 USB 2.0 Flash Drive - 8GB DT410/8GB • Kingston DataTraveler410 USB 2.0 Flash Drive - 16GB DT410/16GB • OCZ Technology Rally2 USB 2.0 Flash Drive - 4GB OCZUSBR2DC-4GB • OCZ Technology ATV USB 2.0. 0 Flash Drive - 8GB OCZUSBATV-8GB • OCZ Technology Rally2 USB 2.0. 0 Flash Drive - 8GB OCZUSBR2DC-8GB • SAMSUNG-HM500JI-500G 8. Deze functie is niet beschikbaar voor alle digitale televisies zoals gestoorde (scrambled) of alleen audio-kanalen. 34 10. USB-speler Druk op de brontoets, en selecteer USB in de bronlijst. Druk op de OK-toets om het USB-menu te openen. Zorg ervoor dat het USB-apparaat aangesloten is in de sleuf. Er zijn vier types media-onderdelen die geselecteerd kunnen worden, dit zijn foto, muziek, film en tekst. Selecteer het media-onderdeel door op te drukken, daarna drukt u op de OK-toets om naar het schijfselectiemenu (disk selection menu) te gaan. Druk op om de juiste schijf te selecteren en druk op OK om de mediabestanden en mappen weer te geven, of kies TERUG (return) om terug te keren naar het media-onderdeel selectiemenu. Selecteer het mediabestand door op ◄► of ▼▲ te drukken, hierna zal een venster met een voorvertoning in een pop-up verschijnen. Druk op ► om het mediabestand op een volledig scherm af te spelen. Wanneer het mediabestand (foto, muziek, film of type tekst) speelt, drukt u op OK of de INFO-toets zodat de afspeelbalk zichtbaar wordt. Druk op ◄► om het functie-ikoon te selecteren, druk op de OK-toets om de functie te bevestigen. Druk op "▼ " of op de exit knop om de controlebalk te verlaten, behalve voor muziek OPMERKING: 35 U kunt het audionummer of programma afstellen in het INFO-menu tijdens het afspelen van het videobestand. Kies het INFO-ikoon en druk op OK om het INFO-menu weer te geven. USB-terugspelen wordt ondersteund door de volgende fotobestandformaten: — JPEG (JPEG-formaat, bestanden met het achtervoegsel ".jpg") — BMP (bestanden met het achtervoegsel ".bmp") — PNG (bestanden met het achtervoegsel ".png") USB-terugspelen wordt ondersteund door de volgende muziekbestandformaten: — MP3 (bestanden met het achtervoegsel ".mp3") — WAV (bestanden met het achtervoegsel ".wav") USB-teruspelen wordt ondersteund door de volgende tekstbestandformaten: — TXT (bestanden met het achtervoegsel ".txt") USB-terugspelen wordt ondersteund door de volgende filmbestandformaten: — AVI (bestand met het achtervoegsel “avi”) — TS (MPEG2 en H.264) 36 05 Probleemoplossing Probleemsymtoom Inspecteer of: Beeld Audio Sneeuw Ruis Antennepositie, richting of aansluiting Wazig Normale audio Antennepositie, richting of aansluiting Interferentie Lawaai Elektronische apparatuur/auto’s/ motorfietsen/tl-verlichting Normaal Dempen beeld (mute) Volume (controleer of “gedempt” (mute) geactiveerd is of dat de aansluitingen van het audiosysteem correct zijn) Geen beeld Dempen Netsnoer zit niet in stopcontact. Aan/uit-schakelaar staat niet aan. (mute) Contrast en helderheid/volumeinstellingen zijn geopend. Druk vanuit de standby-toets op de afstandsbediening om dit te controleren Geen kleur Normale audio Kleurbeheer Steeds Normale audio Kanaal opnieuw instellen verlies van of zwak beeld Geen kleur Geluid tv-systeem Er is een Normale audio Aspect wijzigen om te zoomen zwarte balk aan bovenen onderkant 37 Specificatie Kleursysteem PAL-B/G, I, D/K SECAM- B/G, D/K, L, L' Geluidsysteem BG, DK, I, L, L' Video-ingang SCART, YPbPr, AV, VGA, HDMI, USB. Y/Pb/Pr 480i/p, 576i/p 720p, 1080i, 1080p HDMI 480i/p, 576i/p, 720p, 1080i, 1080p Stroomvereisten 100-240V~ 50/60Hz Energieverbruik 30W (19”) Energieverbruik stand-by <0.5W Audio-uitgang 2 x 3W Milieuvoorwaarden Werkende temperatuur: +5 ºC - +35 ºC 38W (22”) 40W (24”) 55W (26”) Vochtigheidsgraad: 20% - 80% Opslagtemperatuur: -15 ºC - +45 ºC Luchtvochtigheid bij opslag: 5% - 90% Accessoires Gebruikershandleiding Afstandsbediening Batterij (x2) Snelle startgids * Specificaties van onderdelen van deze televisie die hier gegeven zijn, zijn alleen ter referentie. Verschillen kunnen optreden als producttechnologie wordt bijgewerkt. Ontwerp en specificaties zijn onderhevig aan verandering zonder kennisgeving. Beschrijving scart-uitgang: 1. Wanneer de huidige bron ATV/AV/SCART is, is het scart-uitgangssignaal ATV. 2. Wanneer de huidige bron DTV is, is het scart-uitgangssignaal DTV. 3. Andere bronnen hebben geen scart-uitgangssignaal. 38 39 RECEPTOR DE TV LED LCD MANUAL DE USUARIO MODELO: Lea este manual con atención antes de usar su televisión y guárdelo para futura referencia. LET19T1000H LET22T1000HF LET24T1000HF LET26T1000HF 1 Contenido 01 Seguridad y advertencias Bienvenidos P. 03 Información importante P. 03 Aviso de seguridad P. 04 Advertencias y precauciones P. 05 02 Introducción Características principales P. 07 Instrucciones sobre el montaje del soporte base P. 09 Pautas de instalación para el montaje en pared P. 10 Panel frontal P. 12 Conexiones posteriores AV P. 13 Conexión de su TV P. 14 Interfaz común P. 15 03 Mando a distancia Mando a distancia 04 P. 16 Funcionamiento Guía de instalación 05 P. 18 Solución de problemas Solución de problemas P. 34 Especificaciones P. 35 2 01 SEGURIDAD Y PRECAUCIONES BIENVENIDO Gracias por comprar este TV LED LCD de 19"/22"/24"/26". Esta guía le ayudará a instalar y a comenzar a usar su TV. En principio, verifique los contenidos de su caja con la siguiente lista TV LED LCD HD Ready de 19” Mando a distancia 2 baterías AAA Manual de instrucciones Guía rápida de inicio 1 base TV LED LCD Digital de 22" Full HD 1080P Mando a distancia 2 baterías AAA Manual de instrucciones Guía de inicio rápido 1 base TV LED LCD Digital de 24" Full HD 1080P Mando a distancia 2 baterías AAA Manual de instrucciones Guía rápida de inicio 1 base TV LED LCD HD Ready de 26” Mando a distancia 2 baterías AAA Manual de instrucciones Guía rápida de inicio 1 base ¡Ahora puede comenzar! INFORMACIÓN IMPORTANTE LEA TODAS LAS INSTRUCCIONES ANTES DE USAR SU TELEVISOR Y GUÁRDELAS PARA CONSULTAS FUTURAS. PRECAUCIÓN RIESGO DE DESCARGA ELÉCTRICA NO ABRIR PRECAUCIÓN PARA REDUCIR EL RIESGO DE DESCARGA ELÉCTRICA. NO RETIRE LA CUBIERTA (O LA PARTE POSTERIOR). NO CONTIENE PIEZAS INTERNAS QUE EL USUARIO PUEDA REPARAR. ANTE CUALQUIER PROBLEMA, SOLICITE SERVICIO TÉCNICO A LA LÍNEA DE ASISTENCIA AL CLIENTE. EL SÍMBOLO DEL RAYO EN EL INTERIOR DE UN TRIÁNGULO, INDICA ALTA TENSIÓN EN SU INTERIOR. ES PELIGROSO TENER CUALQUIER TIPO DE CONTACTO CON LAS PIEZAS INTERNAS DE ESTE PRODUCTO. UN SIMBOLO DE EXCLAMACIÓN EN EL INTERIOR DE UN TRIÁNGULO: ESTE SÍMBOLO LE AVISA QUE SE HA INCLUIDO LITERATURA RELACIONADA CON EL FUNCIONAMIENTO Y CON EL MANTENIMIENTO CON ESTE PRODUCTO. PRECAUCIÓN: PARA REDUCIR EL RIESGO DE DESCARGA ELÉCTRICA E INCENDIO, NO COLOQUE EL TV CERCA DE LAS FUENTES DE HUMEDAD. NO UTILIZAR LIMPIADORES ABRASIVOS QUE PUEDAN RAYAR O DAÑAR LA PANTALLA LCD. EVITE EL CONTACTO CON OBJETOS QUE PUEDAN RAYAR LA PANTALLA LCD. NOTA: ESTÁ PROHIBIDO REPARAR LA UNIDAD USTED MISMO, Y HACERLO PUEDE DAR COMO RESULTADO LESIONES O DAÑOS AL PRODUCTO. SOLICITE SERVICIO TÉCNICO A LA LÍNEA DE ASISTENCIA AL CLIENTE. 3 AVISO DE SEGURIDAD Precaución: Para reducir el riesgo de descarga eléctrica, no retire la cubierta ni la parte trasera. No hay partes utilizables por el usuario en el interior. Para el servicio técnico, consulte al personal cualificado. Precaución: Para evitar peligro de incendios o descargas eléctricas, no exponga el aparato a la lluvia o la humedad. No exponga el Adaptador ni el producto al agua (goteo o salpicaduras), ni coloque objetos llenos de líquido, tales como jarrones, sobre el aparato. Mantenga el producto alejado de la luz solar directa y de fuentes de calor como radiadores o estufas. No obstruya los orificios de ventilación. Las ranuras y orificios del aparato sirven para su ventilación. Los orificios nunca deben estar obstruidos colocando el producto sobre un cojín, sofá, u otra superficie similar. No coloque el producto sobre un carrito, trípode, soporte o mesa, inestables. El aparato podría caer, produciendo posibles daños o lesiones. Nunca coloque objetos pesados o afilados sobre el panel o el marco. Desenchufe la alimentación de la toma de corriente cuando no se utilice el aparato. Se debe prestar atención a los aspectos medioambientales sobre la eliminación de la batería. PRECAUCIÓN: La batería (batería, baterías o pack de baterías) no debe exponerse a una temperatura excesiva, como la luz solar, fuego, o similares. PRECAUCIÓN: Un volumen excesivo en el sonido de los auriculares puede causar pérdida de audición. Este símbolo significa que este producto no se debe eliminar junto con el resto de desechos domésticos, según la U.E. Para evitar perjuicios sobre el medioambiente o la salud humana, causados por la eliminación descontrolada de residuos, recíclelo con responsabilidad, promoviendo la reutilización sostenible de los recursos materiales. Para deshacerse de su aparato usado, por favor, utilice los sistemas de recogida o contacte con el distribuidor al cual compró el producto. Ellos pueden recoger el producto para reciclarlo sin riesgos para el medio ambiente. 4 ADVERTENCIAS Y CUIDADOS Advertencia Cuidado Advertencia Para el funcionamiento de este televisor se utiliza alto voltaje. No retire la cubierta posterior de su aparato. Para servicio técnico, consulte al personal cualificado. Advertencia Para evitar peligro de incendio o descarga eléctrica, no exponga el televisor a la lluvia ni a la humedad. Advertencia No deje caer ni introduzca objetos en las aberturas ni ranuras de la cubierta del televisor. Nunca derrame ningún tipo de líquido sobre el televisor.. Cuidado No obstruya los orificios de ventilación de la cubierta posterior. Una ventilación adecuada es esencial para evitar el fallo de los componentes eléctricos. 5 Cuidado Evite que el cable de alimentación quede atrapado bajo el televisor. Cuidado Nunca se suba, ni se apoye, ni empuje bruscamente el televisor o su soporte. Debe prestar especial atención a los niños. Si cayera, podría causar serias lesiones. Cuidado No coloque su televisor sobre un carrito, soporte, estantería, o mesa, inestables. Si cayera podría causar serias lesiones personales y daños al televisor. Cuidado Cuando el televisor no se vaya a usar durante un largo período de tiempo, es recomendable desconectar el cable de alimentación de la toma de corriente. Cuidado Distancias mínimas Si el televisor se va a incorporar a un compartimento o un lugar cerrado, se deben mantener unas distancias mínimas. La acumulación de calor puede reducir la vida útil de su televisor y también puede ser peligroso. 6 02 INTRODUCCIÓN PRECAUCIÓN Nunca manipule ningún componente interno del TV ni cualquier otro control de ajuste que no se mencione en este manual. Todos los TV LED son equipos eléctricos de alta tensión. Cuando limpie el polvo o cualquier gota de agua en la PANTALLA o el Auriculares, o alrededor de los botones o conectores, debe desconectar el cable de alimentación del conector de alimentación. Limpie el TV con un paño suave y seco, libre de polvo. Durante las tormentas eléctricas, desconecte el cable de alimentación y el cable de la antena para evitar daños al TV y a otros dispositivos que estén conectados al mismo. Todas las reparaciones al TV deben efectuarse por personal de servicio calificado en estas tareas. INSTALACIÓN *Coloque el TV en la estancia donde la luz no incida directamente sobre la pantalla. *La oscuridad total o los reflejos en la imagen en pantalla pueden causar fatiga ocular. Se recomienda una iluminación tenue e indirecta para un visionado cómodo. *Deje suficiente espacio entre el TV y la pared para permitir la ventilación. *Evite los lugares excesivamente calurosos para evitar posibles daños en la cubierta o fallo prematuro de los componentes. *No obstruya los orificios de ventilación durante el uso del TV. Características principales 1. Se puede utilizar como Televisor, dispositivo de visualización, pantalla de PC; 2. Alta luminosidad, amplio Ángulo de visión 3. Función "TIME SHIFT" de desplazamiento en la emisión; 4. Conexión HDMI y Euroconector; 5. Sonido Estéreo NICAM; Parámetros principales Panel 19" Sistemas de TV PAL-B/G I,D/K 22" 24" 26" SECAM-B/G,D/K,L,L’ Sistema de Señal de Vídeo PAL/SECAM Tensión de alimentación CC 100-240V 50/60Hz Consumo de energía 30W Consumo de energía en modo tandby <0.5W Potencia de salida de Audio (THD≤ 7%) 2x3W Señal de entrada 1 RGB(PC) analógico, 1 PC audio 38W 2 Interfaces multimedia de alta definición (HDMI) 1 entrada de video compuesto 1 entrada de audio 1 Entrada de video por componentes 1 SCART 1 IC 1 USB 1 Entrada de Antena señal de salida 1 Auriculares 7 40W 55W 1 S/PDIF Definición horizontal (líneas de TV) Entrada de vídeo Compuesto >=350 Entrada de video por Componentes >=400 PC MODOS PREESTABLECIDOS RESOLUCIÓN Frecuencia V.(Hz) Frecuencia H.(KHz) 1 640*480 60 31.47 2 800*600 60 37.88 3 1024*768 60 48. 36 4 1360*768 60 47.7 5 1280*1024 60 63.98 8 Instrucción sobre el montaje del soporte base 1. Inserte la columna de soporte dentro 2. Inserte el soporte en la cubierta posterior en la del soporte en la dirección que indica la dirección que indica la flecha y luego asegure con flecha y luego asegure con los tornillos un tornillo. suministrados. (19”,22”,24”) (19”,22”,24”) 1. Inserte la columna de soporte dentro 2. Inserte el soporte en la cubierta posterior en la del soporte en la dirección que indica la dirección que indica la flecha y luego asegure con flecha y luego asegure con los tornillos los tornillos suministrados. suministrados. (26”) (26”) NOTAS DE INSTALACIÓN Ubique el TV en una habitación en donde la luz no le refleje directamente sobre la pantalla. La oscuridad total o un reflejo en la pantalla pueden provocar cansancio en la vista. Se recomienda iluminación suave e indirecta para una visión cómoda. Deje espacio suficiente entre el TV y la pared a fin de permitir ventilación. Evite ubicaciones excesivamente calurosas para prevenir un posible daño al gabinete o un fallo prematuro de los componentes. 9 INSTRUCCIONES DE INSTALACIÓN PARA EL MONTAJE EN PARED Este televisor puede montarse en pared de la siguiente manera: 1. Coloque el Televisor LED LCD sobre una superficie sólida. Por favor, coloque algún material suave sobre el frente de la pantalla para protegerla de cualquier daño. 2. Retire los tornillos de la parte baja del televisor, donde la base se une con el TV, y retire el soporte de la base (guárdelo en un lugar seguro para su uso en el futuro). (19”,22”,24”) (26”) 3. Utilice los cuatro tornillos suministrados para fijar el TV sobre el soporte de pared del TV (no incluido), por medio de los cuatro orificios estándar VESA de la parte posterior del televisor. (19”) 10 (22”,24”) (26”) 11 Panel frontal de control 1. Sensor del mando a distancia 2. Indicador LED: AZUL: ENCENDIDO ROJO: STANDBY. 3. Teclado 1 SOURCE Muestra el menú fuente de entrada. 2 MENU Muestra el MENÚ principal. 3 CH+/CH- En el modo TV, pulse CH+ o CH- para cambiar el canal de arriba abajo. En MENU, pulse CH+ o CH- para seleccionar las opciones. En el modo standby, puede encender el TV. 4 VOL+/VOL- Ajusta el nivel del sonido. En MENU, ajuste la opción que Seleccionó. 5 STANDBY 12 Conexiones posteriores/laterales 1 L/R AUDIO entrada 2 VIDEO entrada 3 S/PDIF Salida de audio digital 4 YPbPr entrada 5 SCART entrada 6 USB entrada 7 HDMI2 entrada 8 HDMI1 entrada 9 HEADPHONE Salida de audio analógico 10 COMMON INTERFACE (CI) entrada 11 PC AUDIO entrada 12 ENTRADA VGA entrada 13 ANT entrada 13 CONEXIÓN DE SU TV CONEXIÓN DE LA ANTENA Conecte su antena a la parte posterior del TV en la conexión ANT IN. MEJORE SU SEÑAL Para mejorar la calidad de la imagen en un área con escasa señal, utilice un amplificador de señal (no incluido). CONECTE SU PC AL TV Puede utilizar su TV como monitor para su ordenador personal, conectándolo con un cable VGA (no incluido). 1. Lea la guía del usuario de su ordenador y verifique que tenga un conector VGA. 2. Desconecte la alimentación en su TV y en su PC. 3. Conecte un cable de interfaz VGA tipo D de 15 pines al conector de interfaz de video VGA en el PC. Conecte el otro extremo del cable al conector de interfaz de PC en el TV. Ajuste los tornillos en los conectores VGA y conecte el cable de audio (no incluido) a la conexión de entrada de audio en la parte posterior del TV. 4. Conecte la alimentación del TV primero y luego el del PC. 5. Pulse el botón en el TV o en el mando a distancia del TV para configurar el modo de entrada de video a VGA. 6. Una vez que se ve la imagen, si hay ruido, cambie el modo VGA a otra resolución, cambie la frecuencia de refresco a otra frecuencia o ajuste el brillo y el contraste en el menú hasta que la imagen sea clara. CONECTE UN REPRODUCTOR DVD O VCR A SU TV Hay dos maneras en las que puede conectar un reproductor DVD o VCR a su TV. Asegúrese de que tanto el TV como el reproductor DVD o VCR estén apagados antes de conectarlos. 1. Conecte las salidas AV DVD/VCR a la conexión AV IN en su TV. 2. Conecte el audio D/I de AV a la entrada de audio (8). Pulse el botón SOURCE en el TV para configurar el modo de entrada de video en AV. ENTRADA SCART 1. Conecte el cable Euroconector del dispositivo externo (reproductor DVD, decodificador o consola de videojuegos) a la conexión Scart del TV. 2. Pulse el botón SOURCE (Fuente) para seleccionar el modo SCART. 3. Pulse el botón PLAY (Reproducir) en el dispositivo externo. Entrada HDMI 1. Conecte el cable del dispositivo HDMI a la conexión HDMI del TV. 2. Pulse el botón SOURCE para seleccionar el modo HDMI. 3. Consulte acerca del funcionamiento en la guía del usuario del dispositivo HDMI. SALIDA AURICULARES Inserte el conector de los auriculares a la conexión de auriculares del televisor. Los altavoces del televisor se ponen en silencio. SALIDA S/PDIF S/PDIF es una conexión de audio digital utilizada para conectar equipos de audio, por ejemplo, teatros domésticos y otros sistemas digitales de Alta Fidelidad (HiFi). La señal se transmite por un cable coaxial con conectores RCA. 1. Asegúrese de que tanto el TV como el dispositivo estén apagados antes de conectarlos. 2. Conecte los cables de AV (no suministrados) desde el conector S/PDIF del TV hasta el sistema de sonido del Teatro Doméstico, el sistema HiFi digital, etc. 14 INTERFAZ COMÚN La ranura de la interfaz común (IC) está diseñada para admitir el módulo de acceso condicional (AC) y la tarjeta Inteligente a fin de ver los programas de televisión de pago y los servicios adicionales. Comuníquese con su proveedor de servicio de Interfaz Común para obtener más información acerca de los módulos y de la suscripción. Tenga en cuenta que no se proporcionan los módulos AC ni las tarjetas inteligentes, ni los ofrecemos como accesorios opcionales. Advertencia • Desconecte el TV antes de insertar los módulos en la ranura de la Interfaz Común. 1. Inserte la CAM correctamente, luego la Tarjeta Inteligente a la ranura de la IC que se ubica en la parte lateral del TV. CI SLOT RANURA DE IC CAM CAM Smart Card Tarjeta Inteligente 2. Encienda el TV, y éste mostrará el siguiente mensaje si se detecta el módulo AC. Aguarde unos minutos hasta que se active la tarjeta. Módulo IC insertado 3. Pulse el botón MENU y luego, el botón ▲▼ para seleccionar la opción de Información IC. 4. Se muestra la información detallada en la tarjeta IC en uso. 5. Pulse el botón OK para acceder al menú de la tarjeta. Consulte el manual de instrucciones del módulo para configurar los detalles. 6. Cuando se retira el módulo, el siguiente mensaje aparecerá en la pantalla. Módulo IC retirado 15 03 Mando a distancia 1.ALIMENTACIÓN: Presiónelo para encender el TV. 2. D.MENU: Sin función 3. P.Mode: Para conmutar el modo de la imagen. 4. INFO: Presiónelo para mostrar el estado actual de la señal, incluyendo la fuente de entrada y el modo del canal de audio. 5. AUDIO l/ll: Presiónelo para seleccionar MONO, Nicam stereo para canales Analógicos. Seleccione idioma de audio para canales TDT. 6. SUBTITLE: Presiónelo para activar o desactivar los subtítulos. 7. Botones numéricos: Para acceder directamente a los canales. 8. SOURCE: Selección de una fuente de entrada 9. MUTE: Habilita o inhabilita el sonido. 10. Control de volumen: Ajusta el nivel de sonido. 11. MENU: Para mostrar el menú del TV. 12. OK: Para confirmar una selección. 13. EXIT: Para salir del menú o para regresar al menú anterior. 14. Índice de teletexto 15.REPEAT: Sin función 16. Botón verde de teletexto / Avance rápido de USB 17. Botón rojo de teletexto / Retroceso rápido de USB 18. Mezcla de teletexto 19. Texto del teletexto 20. Ver teletexto 21. Tamaño del teletexto 22. Teletext Time / REC.LIST (teletext time no tiene función) 23. Modo de teletexto: Sin función 24. Mantener teletexto 25. Subcódigo de teletexto: Subpágina de teletexto 26. Botón azul de teletexto / Archivo siguiente USB 27. Botón Amarillo de teletexto / Archivo anterior USB 28. PARAR USB 29. REPRODUCIR / PAUSA USB 30. INICIO DE LA GRABACIÓN 31. Cursor ARRIBA, ABAJO, IZQUIERDA, DERECHA: Pulse para navegar hasta su selección. 32. Fav: Utilizado para acceder a sus canales favoritos en el modo de TV analógica o de TDT. 33. Seleccionar programa: Presione los botones para seleccionar el canal de TV siguiente o anterior. 34. GUÍA: Presiónelo para mostrar la guía electrónica de programación en el modo de TV. 35. Q.View: Para acceder al canal que se estaba viendo anteriormente. 36. CH.LIST: Presiónelo para visualizar la lista de canales. 37. Pantalla: Cambia la relación de aspecto de la imagen. 38. Sleep: Activa el temporizador para apagar el TV. 39. S.Mode: Para conmutar el modo de sonido. 40. 40. OPEN/CLOSE: Sin función. :No DVD 16 Inserte las baterías en el mando a distancia 1. Retire la tapa de las baterías. 2. Inserte las 2 pilas AAA 1.5v asegurándose de que la polaridad (+ o -) coincida con la polaridad marcada dentro de la unidad. 3. Coloque de nuevo la tapa de las baterías. Sustituya las baterías por otras nuevas, cuando el televisor comience a mostrar los síntomas siguientes: El funcionamiento es inestable o errático. A veces, el televisor no funciona con el mando a distancia. Observaciones: 1) Se recomienda el uso de pilas alcalinas. 2) Retire las baterías cuando estén gastadas o si el mando a distancia no se va a utilizar durante un período de tiempo prolongado. TELETEXTO El Teletexto es un sistema de información emitido por algunos canales que puede ser consultado como un periódico. También ofrece acceso a los subtítulos para los telespectadores con problemas de audición o que no estén familiarizados con el idioma de transmisión (redes por cable, canales por satélite, etc.) Pulse: Obtendrá: Se usa para entrar o salir de los modos de teletexto. Aparece el sumario con una lista de elementos a los que puede accederse. Cada elemento tiene un número de TEXTO página correspondiente de 3 dígitos. Si el canal seleccionado no emite teletexto, se mostrará la indicación 100 y la pantalla permanecerá en blanco (en este caso, salga del teletexto y seleccione otro canal). SELECCIONAR UNA Introduzca el número de la página deseada, utilizando los botones 0 a 9 o arriba/abajo. Ejemplo: página 120, introduzca 120. El número aparece en la parte superior izquierda, el contador cambia y entonces aparece la página. Repita esta operación para ver otra página. Si el contador continúa buscando, significa que esa página no se transmite. Seleccione otro número. TECLAS DE ACCESO DIRECTO Están coloreados como se muestra en la parte inferior de la pantalla. Las cuatro teclas de colores se utilizan para acceder a los elementos o páginas correspondientes. Las áreas coloreadas parpadean cuando el elemento o la página no están aún disponibles. ÍNDICE Esto le devuelve a la página de contenidos (normalmente la página 100). Algunas páginas contienen subpáginas que se muestran sucesivamente de forma SUB PÁGINA automática. Esta tecla se utiliza para detener o retomar la muestra de subpáginas. La indicación aparece en la parte superior izquierda. ESPERA REVELAR Para congelar la página. Para mostrar u ocultar la información oculta (soluciones de juegos). El usuario puede establecer cuatro páginas favoritas para ser enlazadas directamente por las cuatro teclas coloreadas. Mientras el modo de lista esté LISTA activado, no hay posibilidad de utilizar la navegación TOP o FLOF con las teclas coloreadas. Los números de página favoritos se almacenarán y recuperarán en/desde la memoria no volátil de cada canal, mediante el software del sistema. 17 04 FUNCIONAMIENTO Guía de Instalación La guía de instalación solo aparece la primera vez que se enciende el televisor o después de resetearlo. 1). Presione los botones para navegar por el menú y cambiar los ajustes. Presione el botón OK para confirmar.Seleccione el idioma que desee para mostrar el menú. Selecciona el idioma que desées, Modo Casa/Tienda para mostrar en el menú. Aviso: La contraseña por defecto es 6666 Modos CASA o TIENDA ①El modo Casa es un modo de ahorro de energía. El modo Casa se recomienda para los ajustes de visualización normal y se predeterminan por el fabricante. ②El modo Tienda es una opción para los vendedores minoristas para la publicidad o presentación del producto. El modo Tienda brinda una imagen más brillante que el modo Casa. ③Puedes cambiar libremente entre los modos Casa y Tienda. Si eliges modo Tienda, se seleccionará automáticamente la 2). Presione los botones para seleccionar DVB-T/DVB-C y a continuación presione el botón OK para confirmar. a. Si seleccionó DVB-T, el paso siguiente es seleccionar el tipo de Sintonía y el país; a continuación presione el botón OK para comenzar a sintonizar. b. Si selecciona DVB-C, el paso siguiente es configurar el sistema DVB-C como (tipo de exploración / Frecuencia/ID de red/Símbolo (KS/S), entonces presione el botón OK para ir al menú del tipo de sintonía y de selección de país. Este paso es el mismo que DVB-T, seleccione el tipo de sintonía (DTV/ATV). Seleccione el país correcto, presione el botón OK para comenzar la sintonización. 18 3) Comenzará la sintonización de canales. Esta operación puede tomar hasta 6 minutos. La pantalla mostrará el progreso de la sintonía y la cantidad de canales encontrados. 4). Si desea saltar la sintonización ATV (analógica), presione el botón MENU para interrumpir el proceso de sintonización. Se mostrará una pantalla emergente, presione el botón y seleccione YES para confirmar. Entonces irá directamente a la sintonía de DTV. Puede repetir el paso anterior si también desea saltar la sintonización de TDT. La próxima vez que encienda el TV aparecerá un recordatorio de instalación. 5). Después que esté completa la sintonización, los canales se ordenarán en un orden preestablecido. Si desea saltar canales, modifique el orden preestablecido o cambie el nombre de los canales, seleccione Programme Edit en el menú Channel. 6) 1.MENÚ CHANNEL 1. 1 Sintonía automática (DVB-T) 1).Presione el botón MENU y a continuación presione los botones para seleccionar el menú CHANNEL y presione el botón OK. 2). Presione los botones para seleccionar Auto Tuning y a continuación presione el botón OK. 3). Presione los botones para seleccionar DVB-T/DVB-C. Presione DVB-T y presione el botón OK para confirmar. 19 4). En el menú Tune Type presione los botones presione los botones para seleccionar ATV / DTV / DTV + ATV. Presione el botón y a continuación para seleccionar el país donde operará el TV. Presione el botón OK para confirmar. 5) Comenzará la sintonía de canales. Esta operación puede tomar hasta 6 minutos. La pantalla mostrará el progreso de la sintonía y la cantidad de canales encontrados. 6). Si desea saltar la sintonización ATV, presione el botón MENU para interrumpir el proceso de sintonización. Se mostrará una pantalla emergente, presione el botón y seleccione YES para confirmar. Entonces irá directamente a la sintonía de DTV. Puede repetir el paso anterior si también desea saltar la sintonía de DTV. La próxima vez que encienda el TV aparecerá un recordatorio de instalación. 7). Después que esté completa la sintonización, los canales se ordenarán en un orden preestablecido. Si desea saltar canales, modifique el orden preestablecido o cambie el nombre de los canales, seleccione Editar Programa en el menú Canales. 1.2 Sintonía automática (DVB-C) 1). Presione el botón MENU y a continuación presione los botones para seleccionar el menú CHANNEL y presione el botón OK. 2). Presione los botones para seleccionar Auto Tuning y a continuación presione el botón OK. 3). Presione los botones para seleccionar DVB-T/DVB-C y a continuación presione el botón OK para confirmar. 4). Presione los botones para seleccionar el tipo de sintonización / Símbolo (Ks/S) y presione el botón OK para confirmar. 20 5). En el menú Tune Type presione los botones presione los botones para seleccionar ATV / DTV / DTV + ATV. Presione el botón y a continuación para seleccionar el país donde operará el TV. Presione el botón OK para confirmar. 6) Comenzará la sintonización de canales. Esta operación puede tomar hasta 6 minutos. La pantalla mostrará el progreso de la sintonía y la cantidad de canales encontrados. 7). Si desea saltar la sintonización ATV (analógica), presione el botón MENU para interrumpir el proceso de sintonización. Se mostrará una pantalla emergente, presione el botón y seleccione YES para confirmar. Entonces irá directamente a la sintonía de DTV. Puede repetir el paso anterior si también desea saltar la sintonización de TDT. La próxima vez que encienda el TV aparecerá un recordatorio de instalación. 8). Después que esté completa la sintonización, los canales se ordenarán en un orden preestablecido. Si desea saltar canales, modifique el orden preestablecido o cambie el nombre de los canales, seleccione Edit Programme en el menú Channel. NOTA: Todos los canales, incluyendo ATV, DTV y Radio, pueden sintonizarse a la vez, si el Tipo de Sintonización es DTV+ATV. Todos los canales almacenados desaparecerán después de la sintonización automática. Después de la sintonización automática, el canal saltará al primer canal DTV 2.1 sintonización manual de DTV (DVB-T) 1). Presione el botón MENU y a continuación presione los botones 2). Presione los botones para seleccionar el menú CHANNEL y presione el botón OK. para seleccionar DTV Manual Tuning y a continuación presione el botón OK. 21 3) Emergerá la pantalla de DTV Manual Tuning. Presione los botones para seleccionar el canal UHF deseado y a continuación presione el botón OK para comenzar la búsqueda de ese canal. Cuando se haya sintonizado la señal, la imagen y la intensidad de la señal de mostrarán en la pantalla. 4). Presione el botón MENU para regresar al menú principal. 5). Presione el botón EXIT para salir del menú. 2. 2 Sintonización manual de DTV (DVB-C) 1). Presione el botón MENU y a continuación presione los botones 2). Presione los botones para seleccionar el menú CHANNEL y presione el botón OK. para seleccionar CADTV Manual Tuning y a continuación presione el botón OK. 3) Emergerá la pantalla de CADTV Manual Tuning. Presione los botones para seleccionar (Frecuencia /Símbolo (ks/s)/Tipo QAM), presione el botón OK para comenzar la búsqueda de ese canal. Cuando se haya sintonizado la señal, la imagen y la intensidad de la señal de mostrarán en la pantalla. 4). Presione el botón MENU para regresar al menú principal. 5). Presione el botón EXIT para salir del menú. 3). Sintonización manual de ATV: 22 Usted puede cambiar el sistema de sonido para buscar los canales analógicos y para una sintonización fina de los canales, luego almacenar los canales que haya seleccionado. NOTA: Pulse el botón rojo del teletexto para almacenar los canales tras la sintonización manual. 4). Editar programas: Usted puede Borrar, Renombrar, Mover, Saltar, y guardar en FAVORITOS cualquier programa. Borrar Pulse el botón rojo del teletexto, se borrará el programa en el cursor. Renombrar: Sólo se pueden renombrar los programas de ATV. Desplace el cursor hasta el programa, pulse el botón verde del teletexto para renombrar el programa. Pulse para escoger el carácter. Pulse para desplazar el cursor. Pulse el botón MENÚ para salir de la edición, pulse SALIR para salir del menú. Nota: Los nombres de programas de ATV sólo pueden tener 5 caracteres, los nombres de programas de TDT pueden tener 25 caracteres. Mover Utilice los Botones de Flecha para seleccionar el canal que desea mover. Luego, pulse el Botón Amarillo para seleccionar la función Mover. Una vez activo, utilice los Botones de Flecha para mover y luego pulse OK para confirmar. Saltar Pulse para escoger el programa, pulse el botón azul del teletexto para saltarse ese programa. El símbolo se mostrará al lado derecho del programa. Escoja el programa que ha omitido, pulse el botón azul de nuevo, podrá cancelar la omisión. El símbolo desaparecerá. Favoritos Pulse para escoger el programa, pulse el botón FAVORITOS, se mostrará al lado derecho del programa. Escoja el programa en FAVORITOS, pulse el botón FAVORITOS de nuevo, podrá cancelar la acción. El símbolo 23 desaparecerá. Una vez creado su grupo de favoritos, puede pulsar la tecla FAVORITOS para acceder rápidamente a sus canales favoritos. 5). Información sobre IC: (opcional) Este menú puede mostrar la información sobre la tarjeta IC. 2. MENÚ DE IMAGEN El segundo elemento del MENÚ es MENÚ DE IMAGEN. Aquí puede ajustar los efectos de imagen, tales como contraste, brillo, etc. Pulse para desplazarse, pulse OK para ajustarlo. NOTA: 1).El matiz sólo está disponible en el sistema NTSC. 2).Hay cuatro modos de temperatura del color que pueden seleccionarse, medio, cálido, fresco, usuario. 3).Pantalla, sólo está disponible en el modo PC, en el que se puede ajustar la posición horizontal, la posición vertical, tamaño y fase. 3. MENÚ DE SONIDO El tercer elemento del MENÚ es el MENÚ DE SONIDO. Aquí puede usted ajustar los efectos de sonido, tales como agudos, bajos, balance, etc. Pulse para desplazarse, pulse OK para ajustarlo. Nota: Volumen automático: Sólo está disponible cuando el volumen de señal de entrada es demasiado alto o presenta distorsión. 4. MENÚ DE HORA El cuarto elemento del menú es MENÚ DE HORA. Usted puede ajustar el reloj, activar/desactivar la hora, establecer el temporizador de apagado, etc. Pulse para desplazarse, pulse OK para ajustarlo. 24 NOTA: Si no hay señal durante 15 minutos, el TV se apagará automáticamente, siempre que esté activado el Apagado Automático. La hora del reloj puede obtenerse automáticamente del sistema TDT. 5. MENÚ DE OPCIONES El quinto elemento del MENÚ es el MENÚ DE OPCIONES. Puede ajustar el idioma del menú, el idioma de audio, el idioma de los subtítulos, etc. Apagado automático 1. Si después de 4 horas a partir del encendido no se hacen cambios en el TV, por ejemplo, no se cambia de canal ni se ajusta el volumen, el TV iniciará la secuencia de apagado automático. Aparecerá en la pantalla una ventana emergente. Después de 150 segundos el TV pasará automáticamente al estado de espera. Para anular el apagado automático, presione cualquier botón del mando a distancia. 2. Para cancelar el apagado automático, seleccione Apagado automático (4H) en el Menú de opciones Presione OK. Aparecerá un mensaje emergente "Are you sure you want to enable automatic powerdown?" (¿Está seguro de que desea habilitar el apagado automático?) Use la tecla de flecha derecha para seleccionar NO. La pantalla del TV vuelve al Menú de opciones y se mostrará la opción de Apagado automático (4H). Automatic power-down(4H) OFF Para volver al apagado automático después de 4 horas, repita lo anterior, excepto que utilice la tecla de flecha izquierda para seleccionar YES. En el menú de sistema de archivos PVR, puede configurar un disco USB para PVR. 25 NOTA: Restaurar a los valores por defecto de fábrica, eliminará todos los programas y contraseñas. 6. MENÚ DE BLOQUEO El sexto elemento del menú es el MENÚ DE BLOQUEO. Puede bloquear su sistema, establecer una contraseña, bloquear un programa, y establecer control parental. Una vez que haya establecido el bloqueo del sistema, no podrá buscar canales ni cambiar de programa. NOTA: La contraseña por defecto es 0000. Si se la olvida, puede usar la super contraseña: 9443. Bloquear programa: Pulse para elegir el programa, pulse el botón verde del teletexto para bloquearlo. Si desea desbloquear el programa, por favor entre en el menú principal, introduzca la contraseña, y luego pulse el botón verde de nuevo. Control Parental: Pulse para elegir la calificación. 7. MENÚ EPG (Guía electrónica de programación) El menú EPG se usa para ver lo que se está transmitiendo en TDT o en el canal de Radio en el día. Para tener acceso al menú EPG, pulse el botón EPG; se mostrará el siguiente menú: 1. Utilice 2. INFO para escoger los programas. Pulse la tecla INFO para mostrar información sobre el programa destacado. Programación Pulse la tecla amarilla de teletexto. enumera la lista de grabaciones programadas. Pulse para borrar la lista de programación. 26 para escoger la lista. Pulse la tecla roja 3. Grabar Pulse la tecla roja. Establece el programa que se va a grabar. 4. Recordatorio Pulse la tecla azul para escoger un programa y establecer una hora de recordatorio. La pantalla de TV pasará al programa escogido a la hora del recordatorio automáticamente. 8. Función PVR 1. Preparativos para la grabación de un programa. La función de grabación solo funciona en canales TDT. En el MENU DE OPCIONES, seleccione PVR. En el MENU DE OPCIONES, seleccione “check PVR File System” (verificar el Sistema de Archivos PVR). Pinche en “OK”, hasta que "checking” (verificación) cambie a “Success” (éxito). Nota: Verifique el término “speed” (velocidad). Si es “HD support” (soporte HD), significa que la velocidad del dispositivo USB está disponible para desplazamiento temporal y para grabación. De otro modo, formatee el dispositivo a fin de asegurar que el dispositivo esté disponible. El “Free Record Limit” (Límite libre de grabación) por defecto es de 6 horas, si el espacio en el disco es suficientemente grande. Si el espacio no es suficientemente grande, el tiempo de grabación será más corto; eso depende del espacio en el dispositivo. Durante la verificación “check PVR File System” (verificar Sistema de Archivos PVR), no realice ninguna otra operación hasta que ésta finalice. Las grabaciones realizadas con el sistema PVR de su televisor,. Pueden reproducirse solamente en el mismo TV, no en ninguna otra clase de dispositivo (computadora, DVD, etc.) que no sea compatible con el formato de archivos .TS. Tenga presente que para efectuar cualquier clase de grabación, el TV requerirá que usted formatee el dispositivo USB conectado para almacenar la grabación. ADVERTENCIA. CUANDO FORMATEE EL DISPOSITIVO USB EXTERNO, PERDERÁ TODOS LOS ARCHIVOS Y LA INFORMACIÓN QUE TENGA. ALMACENAMIENTO EN EL DISPOSITIVO. El formato del sistema de archivos del dispositivo USB limitará el tamaño del archivo. Sistema de archivos: NTFS hasta 2TB FAT32 con hasta 192GB FAT16 con hasta 2GB Desde el menú OPTION entre el Sistema de Archivos PVR como si indica a continuación: 27 Seleccione el disco: Seleccione el disco para guardar el archivo de grabación. Verifique el Sistema de Archivos PVR: Verifique si el Sistema de Archivos PVR está instalado en el dispositivo USB o si no lo está. Formato: (Se sugiere formatear el dispositivo con “High Speed Fs...” Alta Velocidad SA que puede acelerar la grabación). 28 A continuación aparece el menú después de que el Formato finaliza: Si selecciona el modo de formato “High Speed Fs”, puede cambiar el tamaño del cronodesplazamiento: 2. Grabación de un programa Mientras se reproduce la fuente DTV, escoja el canal y pulse en “record” (grabar). El cuadro de grabación aparecerá. Pinche en “record” otra vez. El cuadro de grabación desaparecerá, y el ícono “REC” permanecerá en la parte superior izquierda. Éste desaparecerá hasta que pulse en “stop” (detener). 3. Reproducir la grabación El programa grabado en el dispositivo USB se guardará en la carpeta "_MSTPVR" del dispositivo. 1. El tamaño de almacenamiento del dispositivo USB puede variar entre 128MB y 500GB, pero para el uso práctico se recomienda utilizar de 2GB a 500GB. 2. Cuando la tasa de bits es muy baja, la imagen puede pixelarse. Esto puede estar provocado por la conexión de un cable de extensión USB en vez de conectar directamente el USB al TV 3. No todos los dispositivos USB son compatibles. A continuación hay una lista de unidades USB recomendadas. 29 Los modelos que no aparezcan en la lista pueden ser compatibles, pero no se garantiza que trabajen. La lista dispositivos USB soportados es la misma que para la función Timeshift, consulte las páginas siguientes para ver detalles. 9. Función Timeshift (desplazamiento temporal) 1. Seleccione el programa que desea grabar Este TV le permite grabar o poner en pausa el programa TDT que este visionando actualmente en un dispositivo de almacenamiento USB, y continuar desde el punto en el que se pausó. NOTA: • Se necesitará formatear un dispositivo de almacenamiento USB 2.0. Guarde sus datos originales antes de formatear. Todos los datos almacenados en el dispositivo USB se borrarán después del formato. Formato de almacenamiento de la unidad USB Seleccione formatear el dispositivo USB y asigne la cantidad de espacio para la función Timeshift. NOTA: • El proceso de formato tomará al menos 2 minutos. No desactive la alimentación ni retire el dispositivo USB durante el formato. • Durante el formato, se realizará una prueba de velocidad al dispositivo USB. Si falla, significa que el dispositivo USB no puede soportar la función Timeshift. Grabación de una emisión de TDT en pausa en el dispositivo de almacenamiento USB 1. Mientras está en la fuente de entrada DTV, inserte el dispositivo de almacenamiento USB en el puerto USB en la parte lateral del TV. 2. Pulse PAUSE (Pausa) (29) para comenzar la función Timeshift. El programa de TV se pausa. Aparece el Timeshift en pantalla y comienza a grabar. 3. Pulse STOP (28) para detener la función Timeshift y dejar de grabar el programa. NOTA: • No desconecte el dispositivo de almacenamiento USB cuando la función Timeshift esté activada. • Con un dispositivo de 4 gb, se puede almacenar temporalmente hasta 140 minutos de emisión. Limitaciones de la función Timeshift: 1. Cuando la función Timeshift está activada, sólo las teclas PLAY/PAUSE/STOP/FWD/REV/ VOL+/VOL-/MUTE y algunas teclas de funcionamiento básico (ENTER/EXIT/teclas de navegación) están disponibles. 2. La reproducción del video puede que no sea fluida y se produzcan saltos en la imagen si la velocidad de grabación del USB no cumple con los requisitos mínimos. 3. No retire el disco USB ni desconecte la alimentación mientras la función Timeshift está en uso. 4. mientras la función Timeshift está en uso.. 5. No cambie las operaciones rápidamente ni repetidamente entre PLAY/PAUSE/FWD/REV. 6. El video puede pixelarse si la tasa de transferencia de video es demasiado baja. 7. No todos los dispositivos USB son compatibles. La tensión del dispositivo USB debe de ser menor de 500Ma. 30 A continuación hay una lista de unidades USB recomendadas. Los modelos que no estén en la lista pueden ser compatibles, pero su funcionamiento no está garantizado. • Unidad Flash USB SanDisk Extreme® Contour™ - 8GB SDCZ8-8192-E75 • Unidad Flash USB SanDisk Extreme® Contour™ - 16GB SDCZ8-016G-A75 • Unidad Flash USB 2.0 Kingston DataTraveler 410 - 8GB DT410/8GB • Unidad Flash USB 2.0 Kingston DataTraveler 410 - 16GB DT410/16GB • Unidad Flash USB 2.0 OCZ Technology Rally2 - 4GB OCZUSBR2DC-4GB • Unidad Flash USB 2.0 OCZ Technology Rally2 - 8GB OCZUSBR2DC-8GB • Unidad Flash USB 2.0 OCZ Technology Rally2 - 8GB OCZUSBR2DC-8GB • SAMSUNG-HM500JI-500G 8. Esta función no está disponible para todos los TV digitales, tales como canales codificados o canales sólo de audio. 31 10. Reproductor USB Pulse la tecla fuente y seleccione el USB en la lista fuente; pulse el botón OK para acceder al menú USB. Asegúrese de que el dispositivo USB esté conectado en la toma USB del televisor.. Hay cuatro opciones de tipo multimedia que pueden seleccionarse, tales como imagen, música, película y texto. Seleccione la opción de tipo multimedia estándar pulsando . Pulse el botón OK para acceder al menú de selección de disco. Pulse para seleccionar el disco adecuado y pulse OK para mostrar los archivos multimedia y la lista de carpetas, o escoja Return (Volver) para volver al menú de selección de tipo multimedia. Seleccione el archivo multimedia pulsando o , luego aparecerá el recuadro de vista previa. Pulse el botón ► para reproducir el archivo multimedia en pantalla completa. Cuando el archivo multimedia (tipo imagen, película o texto) se esté reproduciendo, pulse el botón OK o Info para mostrar la barra de control. Pulse Pulsa para seleccionar el ícono de función, pulse el botón OK para confirmar la función. o "EXIT" para salir de la barra de control, salvo para música. NOTA: Puede ajustar la pista de audio o el programa en el menú Info mientras se reproduce el archivo de video. Escoja el ícono Info y pulse OK para mostrar el Menú Info. 32 La reproducción del USB está soportada para los siguientes formatos de archivo de imagen: —JPEG ( formato JPEG, archivos con extensión "jpg") —BMP (archivos con extensión “bmp") —PNG (archivos con extensión "png") La reproducción del USB está soportada para los siguientes formatos de archivo de música: —MP3 (archivos con extensión “.mp3") —WAV (archivos con extensión “.wav") La reproducción del USB está soportada para los siguientes formatos de archivo de texto: —TXT (archivos con extensión “.txt") La reproducción del USB está soportada para los siguientes formatos de archivo de película: —AVI (archivo con extensión ".avi") —TS (MPEG2 & H.264) 33 05 SOLUCIÓN DE PROBLEMAS Síntoma del problema Comprobar Imagen Sonido Posición, dirección o conexión de Nieve Ruido la antena Posición, dirección o conexión de Borroso Sonido normal la antena Interferencias Ruido Equipos electrónicos, coche/moto, luz fluorescente Volumen(comprobar si está Imagen normal Silencio activado el Silencio o si las conexiones de audio son incorrectas) Cable de alimentación no conectado. Interruptor de Sin imagen Silencio alimentación apagado. Ajustes de Contraste y brillo / Volumen. Pulsar tecla Standby en el mando para examinarlo. Sin color Sonido normal Control del color Sonido normal o Imagen partida Resintonizar canal débil Sin color Ruido Sistema de TV Hay barras negras en Sonido normal la parte superior y en la parte inferior 34 Cambie el formato de pantalla Especificación Sistema de color PAL-B/G, I, D/K SECAM- B/G, D/K L, L' Sistema de sonido BG, DK, I, L, L' Entrada de video SCART, YPbPr, AV, VGA, HDMI, USB. Entrada de video por componentes 480i/p, 576i/p, 720p, 1080i, 1080p HDMI 480i/p, 576i/p, 720p, 1080i, 1080p Requerimientos de alimentación 100-240V~50/60Hz Consumo de energía 30W(19") Consumo de energía en modo Standby <0.5W Salida de audio 2 x 3W Condiciones de entorno Temperatura de operación: +5°C - +35°C 38W(22") 40W (24") 55W (26") Humedad de operación: 20% - 80% Temperatura de almacenamiento: -15°C - +45°C Humedad de almacenamiento: 5% - 90% Accesorio Manual de usuario Mando a distancia Batería (2) Guía rápida de inicio *Las especificaciones sobre las piezas de este TV que se proporcionan en el presente son solamente a modo de referencia. Puede haber diferencias a medida que la tecnología del producto se actualiza. El diseño y las especificaciones están sujetos a modificaciones sin aviso. Descripción de salida Scart: 1. Cuando la fuente en uso sea ATV/AV/SCART, la señal de salida scart será analógica. 2. Cuando la fuente en uso sea DTV, la señal de salida scart será TDT. 3. Otras fuentes no tienen señal de salida scart. 35 36 TV LED MANUALE DELL'UTENTE MODELLO: LET19T1000H Leggete attentamente questo manuale prima di utilizzare il vostro televisore e conservatelo in un posto sicuro per future consultazioni . LET22T1000HF LET24T1000HF LET26T1000HF Contenuti 01 Sicurezza ed avvisi Benvenuti P. 03 Informazioni Importanti P. 03 Avvisi di sicurezza P. 05 Avvisi e cautela P. 06 02 Introduzione Parametri principali P. 08 Istruzioni di assemblaggio della base di sostegno P. 09 Linee guida per l'installazione a muro P. 10 Pannello anteriore P. 12 Collegamenti AV supportati P. 13 Collegare il vostro televisore P. 14 Common interface P. 15 03 Telecomando Telecomando P.16 04 Operatività Guida all'installazione P. 18 05 Risoluzione dei problemi Risoluzione dei problemi P. 35 Specifiche P. 36 2 01 Sicurezza ed avvisi BENVENUTI Grazie per aver acquistato questo televisore LED LCD 19"/22”/24"/26”. Questa guida vi aiuterà ad impostare e ad iniziare ad utilizzare il vostro televisore. Per prima cosa, controllate il contenuto della confezione con la lista di controllo delle parti sottostante. TV LCD LED 19" HD Ready. TV LED LCD 22" Full HD 1080P Digital Telecomando Telecomando 2 x Batterie AAA 2 x batterie AAA Manuale di istruzioni Manuale di istruzioni Guida rapida all'avvio Guida rapida all'avvio Piedistallo Piedistallo TV LED LCD 24" Full HD 1080P Digital TV LCD LED 26" HD Ready. Telecomando Telecomando 2 x batterie AAA 2 x Batterie AAA Manuale di istruzioni Manuale di istruzioni Guida rapida all'avvio Guida rapida all'avvio Piedistallo Piedistallo Adesso potete iniziare! INFORMAZIONI IMPORTANTI LEGGETE TUTTE LE ISTRUZIONI PRIMA DELL'USO E CONSERVATELO PER FUTURE CONSULTAZIONI. CAUTELA RISCHIO DI SHOCK ELETTRICO NON APRIRE CAUTELA PER RIDURRE IL RISCHIO DI SHOCK ELETTRICI, NON RIMUOVETE IL COPERCHIO (O IL RETRO). ALL'INTERNO NON VI SONO PARTI A CUI L'UTENTE POSSA FARE MANUTENZIONE DA SOLO. PER QUALUNQUE PROBLEMA, FATE RIFERIMENTO PER LA MANUTENZIONE CALL CENTER. E' PRESENTE IL SIMBOLO DI UNA FRECCIA A FORMA DI FULMINE IN UN TRIANGOLO. QUESTO SIMBOLO INDICA LA PRESENZA ALL'INTERNO DI ALTO VOLTAGGIO. E' PERICOLOSO AVERE QUALUNQUE TIPO DI CONTATTO CON QUALUNQUE PARTE INTERNA DI QUESTO PRODOTTO E' PRESENTE UN PUNTO ESCLAMATIVO IN UN TRIANGOLO: QUESTO SIMBOLO VI AVVISA CHE NEL PRODOTTO SONO INCLUSE ISTRUZIONI IMPORTANTI PER L'USO E LA MANUTENZIONE. 3 CAUTELA: PER RIDURRE IL RISCHIO DI INCENDI O SHOCK ELETTRICO, NON PONETE IL TELEVISORE VICINO A SORGENTI DI UMIDITA'. NON UTILIZZATE DETERSIVI ABRASIVI CHE POSSANO GRAFFIARE O ROVINARE LO SCHERMO LCD. EVITATE IL CONTATTO CON OGGETTI CHE POSSANO GRAFFIARE LO SCHERMO LCD. NOTA: NON SIETE AUTORIZZATI AD EFFETTUARE DA SOLI LA MANUTENZIONE, POICHE' POTREBBE PORTARE A FERITE O A DANNI AL PRODOTTO. FATE RIFERIMENTO PER LA MANUTENZIONE ALLA LINEA DI AIUTO DEL CLIENTE. DICHIARAZIONE DI CONFORMITA’ Si dichiara che questo apparecchio TV mod.LET19T1000H,LET22T1000HF,LET24T1000HF,LET26T1000HF. è stato fabbricato nell’ Unione Europea e risponde alle prescrizioni dell’ art. 1 del DM 26.03.92 ed a quelle dell’ art. 2 comma 1 del D.M. 28.08.95 n.548. Haier Europe Trading, Via de Cristoforis, 12 - I 21100 Varese (Italy) VAT IT02607360126 4 NOTIFICHE DI SICUREZZA • Avviso: Per ridurre il rischio di shock elettrici, non rimuovete il coperchio (o il retro). Non vi sono parti a cui l'utente possa fare manutenzione da solo all'interno. Per tutta la manutenzione fate riferimento a personale di servizio qualificato. • Avviso: per ridurre il rischio di shock elettrico, non esponete quest'unità a pioggia o umidità. • Non esponete l'alimentatore e l'apparecchio all'acqua (gocciolamenti o schizzi), e nessun oggetto riempito con liquidi, come i vasi, dovrebbe essere posizionato sull'apparecchio. • Tenete il prodotto lontano dalla luce diretta del sole e da fonti di calore come radiatori o fornelli. • Non bloccate le aperture di ventilazione. Gli slot e le aperture sull'unità devono ventilare. Le aperture non devono mai essere bloccate posizionando il prodotto su cuscini, divani o altre superfici simili. • Non posizionate l'unità su un carrello, sostegno, scaffale, tripode, braccio o tavolo instabile. L'unità potrebbe cadere, causando danni. • Non posizionate oggetti pesanti o affilati sullo schermo o sulla cornice. • Scollegate l'alimentatore dalla presa quando l'unità non è in uso. • Si deve fare attenzione agli aspetti ambientali perlo smaltimento delle batterie. • AVVISO: Le batterie (batteria, batterie o pacco batterie) non devono essere esposte a calore eccessivo come luce diretta del sole, fuoco o simili. • AVVISO: L'eccessiva pressione acustica dalle cuffie può causare danni all'udito. Questo marchio indica che questo prodotto non dev'essere smaltito con la spazzatura casalinga in tutta Europa. Per prevenire possibili danni all'ambiente o alla salute umana per lo smaltimento incontrollato, riciclate responsabilmente per promuovere l'utilizzo sostenibile delle materie prime. Per gettare il vostro dispositivo usato, fate uso dei sistemi di raccolta o contattate il rivenditore dove il prodotto è stato acquistato. Loro potranno ritirare il prodotto per riciclarlo in modo sicuro per l'ambiente. 5 AVVISI E CAUTELA Avviso: Cautela: Sono utilizzati alti voltaggi nell'operatività del televisore. Non rimuovete il retro del cabinet dal teleuisore. Per la manutenzione fate riferimento solo a personale di servizio qualificato. Per prevenire il rischio di shock elettrico, non esponete il televisore a pioggia o umidità. Non lasciate cadere o spingete oggetti negli slot e aperture del televisore. Non lasciate cadere alcun tipo di liquidi su di esso. Non bloccate i fori di ventilazione sul retro. Un'adeguata ventilazione è essenziale per prevenire guasti ai componenti elettrici. 6 Non bloccate il cavo di alimentazione sotto il televisore. Non state vicino, non appoggiatevi, né spingete all'improvviso il televisore o il suo supporto. Fate particolarmente attenzione ai bambini. Se dovesse cadere potrebbe causare serie ferite. Non posizionate l'unità su un carrello, sostegno, scaffale o tavolo instabile. Se dovesse cadere potrebbe causare serie ferite alle persone e danni al televisore stesso. Quando il televisore non viene utilizzato per un lungo periodo di tempo, è consigliabile scollegare il cavo di alimentazione dalla presa AC. Distanze minime: Se il televisore dev'essere integrato in un mobile o in uno spazio chiuso, devono essere mantenute le distanze minime. Tra l’apparecchio e l’alloggiamento.Il calore nel mobile potrebbe ridurre la vita del vostro televisore e potrebbe essere pericoloso. 7 02 Introduzione ATTENZIONE Non alterare mai alcun componente all'interno della TV o nessun altro controllo di regolazione non descritto in questo manuale. Tutte le TV LED sono apparecchiature elettroniche ad alta tensione. Quando si toglie la polvere o qualsiasi goccia d'acqua dallo SCHERMO o dalla STRUTTURA o intorno a pulsanti o connettori, il cavo di alimentazione deve essere rimosso dalla presa di alimentazione. Pulire la TV con un panno morbido, asciutto e senza polvere. Durante i temporali, scollegare il cavo di alimentazione e l'antenna per prevenire il danneggiamento della TV e di qualsiasi altro dispositivo collegato ad essa. Tutte le riparazioni a questa TV devono essere effettuate solo da personale qualificato per l'assistenza della TV. INSTALLAZIONE • Posizionate il televisore in una stanza dove la luce non colpisca direttamente lo schermo. • L'oscurità totale o i riflessi sullo schermo possono causare affaticamento oculare. Si raccomanda un'illuminazione indiretta e soffusa per una visione confortevole. • Lasciate abbastanza spazio tra il televisore e il muro per permettere la ventilazione. • Evitate luoghi eccessivamente caldi per prevenire eventuali danni al cabinet o guasto prematuro dei componenti. • Non coprite le aperture di ventilazione quando utilizzate il televisore. Caratteristiche principali 1. Utilizzabile come televisore, terminale video, monitor PC. 2. Alta luminosità, ampio angolo di visuale. 3. Interfaccia HDMI e SCART 4. NICAM; 5. Time shift Parametri principali Schermo 19” 22” 24” 26” Alimentazione: 100-240V~50/60Hz 30W 2x3W 100-240V~50/60Hz 38W 100-240V~50/60Hz 40W 100-240V~50/60Hz 55W Potenza in uscita audio (THD≤7%) Terminali Analogico RGB(PC)x1 High-Definition Multimedia Interface (HDMI) x 2 Ingresso video x 1 Ingresso audio x 2 Ingresso USB x 1 YPbPr x1 SCART x 1 CI x 1 RF Co-Ax x 1 Headphone x 1 S/PDIF x 1 Definizione orizzontale Ingresso video composito>=350 (Linea TV) YPbPr >=400 8 PC MODALITA' PRECONFIGURAZIONE 1 2 3 4 5 RISOLUZIONE V. Freq. (Hz) H. Freq. (KHz) 800*600 60 37. 88 640*480 60 31. 47 1360*768 60 47.7 1024*768 60 48. 36 1280*1024 60 63. 98 Istruzioni di assemblaggio della base di sostegno 1. Inserire il perno nel supporto come la 2. Inserire il supporto montaggio nel direzione indicate alla freccia e poi coperchio come la direzione della freccia stringere con una viti. indicate e stringere con una vite. (19”,22”,24”) (19”,22”,24”) 1. Inserire il perno nel supporto come la 2. Inserire il supporto montaggio nel direzione indicate alla freccia e poi coperchio come la direzione della freccia stringere con tre viti. indicate e stringere con due vite. (26”) (26”) NOTE DI INSTALLAZIONE Posizionate il televisore in una stanza dove la luce non colpisca direttamente lo schermo. L'oscurità totale o i riflessi sullo schermo possono causare affaticamento oculare. Si raccomanda un'illuminazione indiretta e soffusa per una visione confortevole. Lasciate abbastanza spazio tra il televisore e il muro per permettere la ventilazione. Evitate luoghi eccessivamente caldi per prevenire eventuali danni al cabinet o guasto prematuro dei componenti. 9 LINEE GUIDA PER L'INSTALLAZIONE A MURO Questo televisore può essere montato a muro come segue: 1. Posizionate il televisore LED LCD su una superficie stabile. Posizionate un panno morbido sulla parte anteriore dello schermo per proteggerlo da qualunque danno. 2. Rimuovete le viti dalla parte inferiore del televisore, dove la base si collega al televisore, e rimuovete il sostegno (Conservatelo per un uso futuro). (19”,22”,24”) (26”) 3. Utilizzate le quattro viti fornite per fissare il televisore su un braccio di sostegno a muro (non incluso) attraverso i quattro fori standard VESA sul retro del televisore. (19”) 10 (22”,24”) (26”) 11 Controlli del pannello anteriore 1. Sensore del telecomando. 2 Indicatori LED: BLU: ACCESO. ROSSO: STAND BY. 3 Tastierino 1 SORGENTE Visualizza il menù delle sorgenti in ingresso. 2 MENU Visualizza il Menù principale 3 CH+/CH- In modalità TV, premete i tasti CH+ o CH- per andare al canale successivo o precedente. In modalità MENU, premete CH+ o CH- per selezionare gli oggetti. In modalità standby, accende il televisore. 4 VOL+/VOL- Controllo del volume audio In menù, regola l'oggetto selezionato. 5 STANDBY STANDBY 12 Prese sul retro/sul lato 1 AUDIO L/R Ingresso 2 VIDEO Ingresso 3 S/PDIF uscita audio digitale 4 YPbPr Ingresso 5 SCART Ingresso 6 USB Ingresso 7 HDMI2 Ingresso 8 HDMI1 Ingresso 9 HEADPHONE uscita audio analogica 10 COMMON INTERFACE(CI) Ingresso 11 AUDIO PC Ingresso 12 Ingresso VGA Ingresso 13 ANT Ingresso 13 COLLEGARE IL VOSTRO TELEVISORE COLLEGAMENTO DELL'ANTENNA Collegate l'antenna al retro del televisore nella presa ANT IN MIGLIORARE IL SEGNALE Per migliorare la qualità delle immagini in un'area con segnale basso, utilizzate un amplificatore di segnale (non fornito). COLLEGARE IL PC AL TELEVISORE Potete utilizzare il televisore come monitor per il vostro computer collegandolo con un cavo VGA (non fornito). 1 Leggete il manuale d'uso del vostro computer e controllate che abbia un connettore VGA. 2 Spegnete il televisore e il PC. 3 Collegate un cavo di interfaccia VGA tipo D a 15-pin al connettore interfaccia video VGA del computer. Collegate l'altra estremità del cavo al connettore interfaccia PC sul televisore. Stringete le viti sul connettore VGA e collegate il cavo audio (non fornito) alla presa di ingresso audio sul retro del televisore. 4 Accendete prima il televisore e poi il PC. 5 Premete il tasto sul televisore o sul telecomando per impostare l'ingresso video su VGA. 6 Una volta che viene visualizzata l'immagine, se ci sono disturbi, cambiate la modalità VGA in un'altra risoluzione, cambiate la frequenza di aggiornamento o regolate la luminosità e il contrasto sul menù fino a che l'immagine risulta nitida. COLLEGARE UN LETTORE DVD O UN VIDEOREGISTRATORE AL VOSTRO TELEVISORE Ci sono due modi per collegare un lettore DVD o un videoregistratore al vostro televisore. Assicuratevi che sia il televisore sia il lettore DVD o il videoregistratore siano spenti prima di collegarli. 1 Collegate le uscite AV DVD/VCR nella presa in ingresso AV IN sul vostro televisore. 2 Collegate il cavo audio AV L & R all'ingresso audio (8) Premete il tasto SOURCE sul televisore per impostare la modalità di ingresso video su AV. Ingresso SCART 1 Collegate il cavo SCART dal dispositivo esterno (lettore DVD, Set-top box o console di videogiochi). 2 Premete il tasto SOURCE per selezionare la modalità SCART. 3 Premete il tasto PLAY sul dispositivo esterno. Ingresso HDMI 1 Collegate il cavo dal dispositivo HDMI alla presa HDMI del televisore . 2 Premete il tasto SOURCE per selezionare la modalità HDMI. 3. Fate riferimento al manuale d'istruzioni del dispositivo HDMI per come utilizzarlo. USCITA HEADPHONE Inserire le cuffie nell’apposita connessione HEADPHONE. I diffusori del TV saranno silenziati. USCITA S/PDIF S/PDIF è un collegamento audio digitale utilizzato per collegare dispositivi audio, ad esempio home theatre e altri sistemi HIFI digitali su brevi distanze. Il segnale è trasmesso mediante cavo coassiale con connettori RCA. 1. Assicurarsi che la TV e il dispositivo siano spenti prima di effettuare il collegamento. 2. Collegare i cavi AV (non forniti) dalla presa S/PDIF sulla TV al sistema audio Home Theater o sistema HiFi digitale ecc. 14 COMMON INTERFACE Lo slot Common Interface è progettato per accettare i moduli di Accesso Condizionale (CA) e le smart card per vedere i programmi della televisione a pagamenti e servizi aggiuntivi. Contattate il fornitore del servizio di Common Interface per avere più informazioni sui moduli e sulle sottoscrizioni. Notate che i moduli CA e le smart card non sono né forniti né accessori optional acquistabili da noi. Avviso • Spegnete il vostro televisore prima di inserire qualunque modulo nello slot Common Interface. 1. Inserite la CAM correttamente, quindi inserite la Smart Card nello slot CI posizionato sul lato del televisore. Slot CI. Slot CI CAM CAM Smart Card Smart Card 2. Accendete il televisore ed esso visualizzerà il messaggio sottostante se il modulo CA viene identificato. Aspettate qualche momento perché la scheda si attivi. 3. Premete il tasto MENU quindi premete il tasto ▲▼ per selezionare l'opzione di informazione CI. 4. Vengolo visualizzate le informazioni dettagliate sulla scheda CI: 5. Premete il tasto OK per accedere al menù della scheda. Fate riferimento al modulo del manuale di istruzioni per i dettagli delle impostazioni. 6. Quando il modulo viene rimosso, il seguente messaggio apparirà sullo schermo. 15 03 Telecomando 1. POWER: Premere per accendere la TV. 2.D.MENU: Nessun funzionamento. 3. P.Mode: Passare alla modalità immagine. 4. INFO: Premere per visualizzare lo stato del segnale corrente, incluso la sorgente di ingresso e la modalità canale audio. 5. AUDIO l/ll: Premere per selezionare MONO, Nicam stereo per il canale ATV. Per selezionare la lingua Audio per il canale DTV. 6. SUBTITLE: Premere per attivare o disattivare i sottotitoli. 7. Pulsanti numerici: Per l'accesso diretto ai canali. 8. SOURCE: Per selezione la sorgente d'ingresso. 9. MUTE: Per disabilitare o abilitare l'uscita audio. 10. Controllo volume: Per regolare il livello audio. 11. MENU: Per visualizzare il menu della TV. 12. OK: Per confermare la selezione. 13. EXIT: Per ritornare al menu precedente o uscire dal menu. 14. Indice Teletext 15. REPEAT: Nessun funzionamento 16. Tasto verde Teletext / Avanzamento veloce USB 17. Tasto rosso Teletext / Avvolgimento veloce USB 18. Mix Teletext 19. Testo Teletext 20. Reveal Teletext 21. Dimensioni Teletext 22. Tempo Teletext / REC.LIST (Il tempo di teletext non funziona) 23. Modalità Teletext: Nessun funzionamento 24. Mantieni Teletext 25. Sottocodice Teletext: Sottopagina Teletext 26. Tasto blu Teletext / File successivo USB 27. Tasto giallo Teletext / File precedente USB 28. STOP USB 29. PLAY/PAUSA USB 30. AVVIO REGISTRAZIONE 31. Cursori SOPRA, SOTTO, SINISTRA, DESTRA: Premere per muoversi nella propria selezione. 32. Fav: Per accedere ai canali preferiti in modalità TV o DTV. 33. Seleziona programma: Premere il pulsante per selezionare il canale TV successivo o precedente. 34. GUIDE: Premere per visualizzare la guida elettronica dei programmi in modalità TV. 35. Q.View: Per accedere al canale visualizzato precedentemente. 36. CH.LIST: Premere per visualizzare l'elenco dei canali. 37. Screen: Per cambiare l'aspetto dell'immagine. 38. Sleep: Imposta il timer di spegnimento della TV. 39. S.Mode: Per modificare la modalità audio. 40. OPEN/CLOSE: Nessun funzionamento :Nessuna funzione DVD 16 Installate le batterie nel telecomando. 1. Rimuovete il coperchio delle batterie. 2. Inserite le 2 AAA da 1.5V assicurandovi che la polarità (+ o -) delle batterie corrisponda alla polarità segnata all'interno dell'unità. 3. Riposizionate il coperchio delle batterie. Sostituite le batterie quando il televisore mostra i seguenti sintomi: L'operatività è instabile o casuale. A volte il televisore non funziona con il telecomando. Nota: 1) Sono raccomandate le batterie alcaline. 2) Rimuovete le batterie esaurite o se il telecomando non è utilizzato per lungo tempo. TELECOMANDO TELETEXT (televideo) Il Televideo è un sistema di informazioni trasmesso da certi canali che può essere consultato come un quotidiano. Offre anche l'accesso ai sottotitoli per gli spettatori con problemi di udito o che non hanno familiarità con il linguaggio della trasmissione (reti via cavo, canali via satellite etc.) Premendo: TEXT (televideo): Otterrete: Si usa per attivare o uscire dalla modalità TELEVIDEO Il sommario appare con una lista di oggetti accessibili. Ogni oggetto ha un numero di pagina corrispondente a tre cifre. Se il canale selezionato non trasmette televideo, verrà visualizzata l'indicazione 100 e lo schermo rimarrà vuoto (in questo caso, uscite dal televideo e selezionate un altro canale). SELEZIONARE UNA PAGINA Inserite il numero della pagina richiesta utilizzando i tasti numerici o Su e Giù. Esempio: pagina 120, inserite 120. Il numero è visualizzato in alto a sinistra, il contatore gira e quindi viene visualizzata la pagina. Ripetete l'operazione per vedere un'altra pagina. Se il contatore continua a cercare, significa che quella pagina non è trasmessa. Selezionate un altro numero. ACCESSO DIRETTO AGLI OGGETTI. I colori sono quelli visualizzati in fondo allo schermo. I quattro tasti colorati sono utilizzati per accedere agli oggetti o alle pagine corrispondenti. Le aree colorate lampeggiano quando l'oggetto o la pagina non sono disponibili. INDICE: Permette di tornare fa tornare alla pagina dei contenuti (di solito pagina 100) SOTTO PAGINA Certe pagine contengono sotto pagine che sono visualizzate automaticamente successivamente. Questo tasto su usa per interrompere o riprendere l'acquisizione della sotto pagina. L'indicazione appare in alto a sinistra. HOLD Per fermare l'immagine. REVEAL Per visualizzare o nascondere le informazioni nascoste (soluzioni dei giochi). LIST: L'utente può impostare quattro pagine preferite da collegare direttamente ai quattro tasti colorati. Mentre è attivata la modalità lista, non è possibile utilizzare la navigazione TOP o FLOF con i tasti colorati. I numeri delle pagine preferite devono essere archiviate in e ripristinate da una memoria non volatile per ogni canale dal software di sistema. 17 04 OPERATIVITÀ Guida all'installazione La guida installazione compare solamente alla prima accensione o dopo il reset generale. 1). Premere i pulsanti per navigare nel menu e modificare le impostazioni. Premere il pulsante OK per confermare.Selezionare la lingua desiderata da visualizzare sul menu. Selezionate la vostra lingua, modo Home/Shop mostrato a video Nota: la password di default è 6666. Modalità CASA o NEGOZIO ①La modalità Casa è una modalità di risparmio energetico. La modalità Casa è raccomandata per impostazioni di visualizzazione normali ed è impostata come predefinita dal produttore. ②La modalità Negozio è un'opzione per rivenditori per pubblicità o presentazione dei prodotti. La modalità Negozio ha un'immagine più luminosa della modalità Casa. ③Potrai scegliere tra modo Home e Shop. Il modo Shop commuterà HDMI 1 automaticamente, per uscire premere exit. 2). Premere i pulsanti per selezionare DVB-T/DVB-C e quindi premere il pulsante OK per confermare. a.Se si seleziona DVB-T, il passo successivo è selezionare il tipo di sintonia e il paese, quindi premere il pulsante OK per avviare la sintonizzazione. b. Se si seleziona DVB-C, il passo successivo è configurare il sistema DVB-C come (tipo di scansione /Frequenza/ID Rete/Simbolo (KS/S), quindi premere il pulsante OK per accedere al menu di selezione del tipo di sintonia e del paese, questo passo è lo stesso del DVB-T, selezionare il tipo di sintonia (DTV/ATV). Scegliere il paese giusto, premere il pulsante OK per avviare la sintonizzazione. 18 3). La sintonizzazione dei canali inizia. Questa operazione può richiedere fino a 6 minuti. Il display mostrerà il progresso della sintonizzazione e il numero di canali trovati. 4). Se si vuole saltare la sintonizzazione ATV, premere il pulsante MENU per interrompere la sintonizzazione in corso. Apparirà una finestra a comparsa, premere il pulsante per selezionare YES per confermare. Si passerà direttamente alla sintonizzazione DTV. È possibile ripetere il passo precedente se si desidera saltare la sintonizzazione DTV. Un promemoria di installazione apparirà alla successiva accensione della TV. 5). Dopo il completamento della sintonizzazione, i canali sono organizzati in un ordine preimpostato. Se si desidera saltare canali, modificare l'ordine preimpostato o rinominare i canali, selezionare Programme Edit nel menu Channel. 6) 1. MENU CANALI 1. 1 Sintonizzazione automatica (DVB-T) 1)Premere il pulsante MENU e premere i pulsanti 2). Premere il pulsanti per selezionare il menu CHANNEL e quindi premere il pulsante OK. per selezionare Auto Tuning e quindi premere il pulsante OK. 19 3). Premere i pulsanti per selezionare DVB-T/DVB-C Premere DVB-T e quindi premere il pulsante OK per confermare. 4). Nel meni Tipo di sintonizzazione, premere i pulsanti premere i pulsanti per selezionare ATV / DTV / DTV + ATV. Premere il pulsante e quindi per selezionare il paese in cui si utilizzerà la TV. Premere il pulsante OK per confermare. 5). La sintonizzazione dei canali inizia. Questa operazione può richiedere fino a 6 minuti. Il display mostrerà il progresso della sintonizzazione e il numero di canali trovati. 6). Se si vuole saltare la sintonizzazione ATV, premere il pulsante MENU per interrompere la sintonizzazione in corso. Apparirà una finestra a comparsa, premere il pulsante per selezionare YES per confermare. Si passerà direttamente alla sintonizzazione DTV. È possibile ripetere il passo precedente se si desidera saltare la sintonizzazione DTV. Un promemoria di installazione apparirà alla successiva accensione della TV. 7). Dopo il completamento della sintonizzazione, i canali sono organizzati in un ordine preimpostato. Se si desidera saltare canali, modificare l'ordine preimpostato o rinominare i canali, selezionare Programme Edit nel menu Channel. 1.2 Sintonizzazione automatica (DVB-C) 20 1). Premere il pulsante MENU e premere i pulsanti per selezionare il menu CHANNEL e quindi premere il pulsante OK. 2). Premere il pulsanti per selezionare Auto Tuning e quindi premere il pulsante OK. 3). Premere i pulsanti per selezionare DVB-T/DVB-C e quindi premere il pulsante OK per confermare. 4). Premere i pulsanti per selezionare Tipo di scansione/Simbolo (Ks/S) e quindi premere il pulsante OK per confermare. 5). Nel menu Tipo di sintonizzazione, premere i pulsanti premere i pulsanti per selezionare ATV / DTV / DTV + ATV. Premere il pulsante e quindi per selezionare il paese in cui si utilizzerà la TV. Premere il pulsante OK per confermare. 6). La sintonizzazione dei canali inizia. Questa operazione può richiedere fino a 6 minuti. Il display mostrerà il progresso della sintonizzazione e il numero di canali trovati. 7). Se si vuole saltare la sintonizzazione ATV, premere il pulsante MENU per interrompere la sintonizzazione in corso. Apparirà una finestra a comparsa, premere il pulsante per selezionare YES per confermare. Si passerà direttamente alla sintonizzazione DTV. È possibile ripetere il passo precedente se si desidera saltare la sintonizzazione DTV. Un promemoria di installazione apparirà alla successiva accensione della TV. 8). Dopo il completamento della sintonizzazione, i canali sono organizzati in un ordine preimpostato. Se si desidera saltare canali, 21 modificare l'ordine preimpostato o rinominare i canali, selezionare Programme Edit nel menu Channel. NOTA: Tutti i canali inclusi ATV, DTV e Radio possono essere sintonizzati in un’unica volta, se il tipo di sintonia è DTV+ATV. Tutti i canali salvati verranno cancellati dopo la sintonizzazione automatica. Dopo la sintonizzazione automatica, il canale passerà al primo canale DTV. 2.1 Sintonizzazione manuale DTV (DVB-T) 1). Premere il pulsante MENU e premere i pulsanti 2). Premere il pulsanti per selezionare il menu CHANNEL e quindi premere il pulsante OK. per selezionare DTV Manual Tuning e quindi premere il pulsante OK. 3). Apparirà la schermata di Sintonizzazione manuale DTV. Premere i pulsanti per selezionare il canale UHF desiderato e quindi premere il pulsante OK per iniziare la ricerca di tale canale. Quando il segnale è stato sintonizzato, l'immagine e la potenza del segnale sarà visualizzata sullo schermo. 4). Premere il pulsante MENU per ritornare al menu principale. 5). Premere il pulsante EXIT per uscire dal menu. 2. 2 Sintonizzazione manuale DTV (DVB-C) 1). Premere il pulsante MENU e premere i pulsanti 2). Premere il pulsanti per selezionare il menu CHANNEL e quindi premere il pulsante OK. per selezionare CADTV Manual Tuning e quindi premere il pulsante OK. 22 3). Apparirà la schermata CADTV Manual Tuning. Premere i pulsanti per selezionare (Frequenza/Simbolo (ks/s/QAM tipo QAM) premere il pulsante OK per iniziare la ricerca di tale canale. Quando il segnale è stato sintonizzato, l'immagine e la potenza del segnale sarà visualizzata sullo schermo. 4). Premere il pulsante MENU per ritornare al menu principale. 5). Premere il pulsante EXIT per uscire dal menu. 3). ATV Manual tuning (Sintonizzazione manuale ATV): Potete cambiare il sistema sonoro per ricercare nei canali analogici e affinare la sintonizzazione dei canali, quindi archiviare i canali selezionati. NOTA: Premete il tasto rosso del televideo per archiviare i canali dopo la sintonizzazione manuale. 4). Program Edit (Modifica programma) Potete cancellare, rinominare, spostare, saltare, mettere tra i preferiti qualunque canale. 23 Delete (Cancella) Premendo il tasto rosso, il programma evidenziato dal cursore sarà cancellato. Rename (rinomina): Può rinominare solo i programmi ATV. Spostate il cursore sul programma, premete il tasto verde del televideo per rinominare il programma. Premete per scegliere la lettera. Premete per spostare il cursore. Premete il tasto MENU per uscire dalla finestra di modifica. Premete EXIT per uscire dal menù. Nota: I nomi dei programmi ATV possono essere al massimo di 5 lettere. I nomi dei programmi DTV possono essere di 25 lettere. Move (sposta) Utilizzate i tasti freccia per selezionare il canale che volete spostare. Quindi premete il tasto Giallo per selezionare la funzione Sposta. Una volta attivato, utilizzate i tasti freccia per spostare e quindi premete OK per confermare. Skip (salta) Premete per scegliere il programma, premete il tasto blu del televideo per saltare il programma. Verrà visualizzato sul lato destro del programma. Scegliete il programma saltato, premete di nuovo il tasto blu, per annullare il salio del canale. L'immagine sparirà. Favourite (Preferiti) Premete per scegliere il programma, premete il tasto FAV, visualizzerà sul lato destro del programma. Scegliete il programma preferito, premete di nuovo il tasto FAV, potrete annullare la selezione del canale preferito, l'immagine sparirà. Una volta che avrete creato il gruppo dei preferiti, potete premete il tasto FAV per accedere rapidamente al vostro canale preferito. 5). Informazioni CI: (opzionale): Questo menù può visualizzare le informazioni della scheda CI. 2. PICTURE MENU (menù immagini) Il secondo elemento del MENU è il PICTURE MENU (menù immagine). Potete regolare qui l'effetto delle immagini, come contrasto, luminosità, etc. Premete il tasto "OK" per spostarvi, premete il tasto "OK" per regolare. 24 NOTA: 1 ). Tint (tinta) è disponibile solo in sistema NTSC. 2). Ci sono quattro modalità di temperatura colori che possono essere selezionate: medio, caldo, freddo, utente. 3). Lo schermo è disponibile solo in modalità PC, dove si può regolare la posizione orizzontale, la posizione verticale, la dimensione e la fase. 3. SOUND MENU (menù audio) Il terzo oggetto del MENU è il SOUND MENU (menù audio) Potete regolare qui l'effetto audio, come alti, bassi, bilanciamento etc. Premete il tasto per spostarvi, premete OK per effettuare la regolazione. Nota: Volume automatico: disponibile solo quando il volume del segnale in ingresso è troppo alto o distorto. 4. TIME MENU (menù orario) Il quarto oggetto del menù è il TIME MENU (menù orario). Potete regolare l'ora, gli orari di accensione e spegnimento automatico, il timer di spegnimento automatico, etc. Premete per spostarvi, premete OK per effettuare la regolazione. 25 NOTA: Se entro 15 minuti il televisore non riscontra segnale, il televisore si spegnerà automaticamente, se l'Auto Sleep è attivo. L'ora può essere presa automaticamente dal sistema DTV. 5. OPTION MENU (menù opzioni) Il quinto oggetto del MENU è l'OPTION MENU (menù opzioni) Potete regolare il Menu language (lingua menù), Audio language (Lingua audio) ,Subtitle language (lingua sottotitoli) etc. Spegnimento automatico 1. Se dopo 4 ore dall'accensione e non sono state effettuate modifice alla TV, ad esempio non è stato cambiato alcun canale o modificato il volume, la TV inizierà la sequenza di spegnimento. E una finestra di popup apparirà sullo schermo. Dopo 150 secondi la TV passerà automaticamente in standby. Per uscire dallo spegnimento automatico premere qualsiasi tasto sul telecomando. 2. Per cancellare lo spegnimento automatico, nel menu Option selezionare Automatic powerdown (4H) Premere OK. Apparirà un messaggio di popup “Sei sicuro di voler abilitare lo spegnimento automatico?” Utilizzare il tasto freccia di destra per selezionare NO. Lo schermo della TV ritorna nel menu Option e l'opzione Automatic power-down (4H) sarà visualizzata. Automatic power-down (4H) OFF Per ritornare allo spegnimento automatico dopo 4 ore, ripatere quanto riportato in precedenza usano il tasto freccia di sinistra per selezionare YES Nel PVR File system menu (menù file di sistema PVR) potete impostare una scheda USB come PVR. 26 NOTA: Ripristinare le impostazioni di fabbrica cancellerà tutti i programmi e le password. 6. LOCK MENU (menù blocco) Il sesto oggetto sul menù è il LOCK MENU (menù blocco). Potrete bloccare il sistema, impostare password, bloccare programmi ed impostare il parental control. Una volta che avrete attivato i blocchi, non potrete ricercare i canali o modificarli. NOTA: La password predefinita e' 0000. Se si dimentica la password si puo' usare la super password 9443. Block Program (Blocco programma): Premete per scegliere il programma, premete il tasto verde del televideo per bloccare il programma. Se volete sbloccare il programma, entrate nel menù principale, inserite la password, quindi premete di nuovo il tasto verde. Parental guidance (Parental Control: Premete per scegliere il rating. 7. EPG (Guida Elettronica alla programmazione) Il menù EPG è utilizzato per vedere cos'è trasmesso sul digitale terrestre (DTV) o sui canali radio durante la giornata. Per accedere al menù EPG, premete il tasto EPG, verrà visualizzato il seguente menù. 1. INFO Utilizzate per scegliere i programmi, premete il tasto INFO, potete visualizzare le informazioni del programma evidenziato. 27 2 Schedule (schema) Premete il tasto giallo. Può visualizzare la lista dello schema di promemoria, premete rosso 3. per scegliere la lista, premete il tasto DELETE (cancella) per cancellare la lista di programmazione. Record (Registrare) Premete il tasto rosso. Esso configura il programma da registrare. 4. Remind (promemoria) Premete il tasto blu per scegliere un programma ed impostare l'orario di promemoria. Lo schermo televisivo salterà automaticamente al canale scelto all'orario del promemoria. 8. PVR function (funzione PVR) 1. Preparazione per registrare il programma La funzione PVR è attiva solo con DTV Dall'OPTION MENU (menù opzioni) accedete al PVR File System in "OPTION MENU", scegliete "check PVR File System" (controlla il file di sistema PVR). Cliccate su "OK", fino a che "checking" cambia in "Success". Nota: controllate il termine "speed" (velocità). Se riporta la scritta "HD support" (supporto HD), significa che la velocità del dispositivo USB è disponibile per la differita e la registrazione. Se non è così, formattate il dispositivo, per assicurarvi che il dispositivo sia disponibile. Il "Free Record Limit" (limite di registrazione libera) è 6 ore, se lo spazio sul disco è sufficiente. Se lo spazio non è sufficiente, il tempo di registrazione dovrebbe essere più breve, a seconda dello spazio sul dispositivo. Durante il controllo "check PVR File System" (controllo del file di sistema PVR), non effettuate altre operazioni fino a che non è finito. Le registrazioni devono essere effettuate con il sistema TV PVR. Esse possono essere riprodotte solo sulla stessa TV, non in altro tipo di dispositivo (computer, DVD, ecc.) che non è compatibile con il formato di file .TS. Si noti che per effettuare un qualsiasi tipo di registrazione, la TV richiederà di formattare il dispositivo USB collegato per memorizzare la registrazione. ATTENZIONE. QUANDO SI FORMATTA, TUTTE LE INFORMAZIONI PRESENTI SUL DISPOSITIVO USB ESTERNO SARANNO PERSE E TUTTI I FILE CANCELLATI. MEMORIZZAZIONE SUL DISPOSITIVO. 28 Il file system USB limiterà le dimensioni del sistema di memorizzazione. File system: NTFS fino a 2TB FAT32 con fino a 192GB FAT16 con fino a 2GB Dal MENU OPTION, accedere al File System PVR come riportato di seguito: Selezionate disco: selezionate su quale disco salvare i file registrati. Controllate il PVR File system (file di sistema PVR) controllate se il PVR File System è impostato sul dispositivo USB o no. Format (formattare): 29 (Suggerisce di formattare il dispositivo con "High Speed Fs..." che può velocizzare la registrazione. ) Il menù sottostante appare dopo la fine della Formattazione: Se selezionate la modalità di formattazione "Hi Speed FS", allora potete cambiare la dimensione della differita. 30 2. Registrare il programma Nel riprodurre da sorgente DTV, scegliete il canale e cliccate "record", apparirà la finestra di registrazione. Cliccate "record" (registrare) di nuovo, la schermata di registrazione sparirà e apparirà l'icona "REC" in alto a sinistra. Sparirà quando cliccate "stop". 3. Riprodurre la registrazione Il programma registrato sulla “USB” sarà salvato nella cartella “_MSTPVR” sul dispositivo. 1. Le dimensioni di memorizzazione su USB possono essere tra 128MB e 500GB, ma per uso pratico si raccomanda da 2GB a 500GB. 2. Il video può diventare pixellato quando la frequenza video è troppo bassa. Ciò può essere causato dal collegamento di un cavo prolunga USB invece di collegare direttamente la USB alla TV 3. Non tutti i dispositivi USB sono compatibili. Di seguito una lista di unità USB raccomandate. I modelli che non sono riportati nella lista possono essere compatibili, ma non è garantito il loro funzionamento. La lista di supporto USB è la stessa della funzione Timeshift, si vedano le pagine seguenti per i dettagli. 31 9. Timeshift function (funzione differita) 1. Preparazione per registrare il programma Questo televisore vi permette di mettere in pausa e registrare i programmi digitali in visione in un dispositivo di archiviazione USB, e di riprendere la visione nel punto in cui è stata interrotta. NOTA: • Sarà necessario formattare un dispositivo di archiviazione USB 2.0. Salvate i dati originali prima di formattare. Tutti i dati archiviati nel dispositivo USB saranno cancellati dopo la formattazione. Formattare il dispositivo di archiviazione USB. Selezionate per formattare il dispositivo USB e assegnate la quantità di spazio per la funzione Differita. NOTA: • Il processo di formattazione impiegherà almeno 2 minuti. Non spegnete l'alimentazione o rimuovete il dispositivo USB durante la formattazione. • Durante la formattazione, verrà fatto un test di velocità sul dispositivo USB. Se fallisce, significa che il dispositivo USB potrebbe non supportare la funzione differita. Registrare un programma DTV in pausa in un dispositivo di archiviazione USB. 1. Mente siete in sorgente di ingresso DTV, inserite un dispositivo di archiviazione USB nella porta USB sul lato del televisore. 2. Premete PAUSE (29) per avviare la funzione differita.. Il programma TV è in pausa. Appare l'OSD della differita, e la registrazione inizia. 3. Premete STOP (28) per interrompere la funzione differita ed interrompere la registrazione del programma. NOTA: • Siete pregati di non scollegare il dispositivo di archiviazione USB quando la funzione Time Shift (differita) è attivata. • 4GB di memoria archiviano circa 140 minuti. Limitazioni della differita: 1. Quando la funzione Differita è attiva, sono disponibili solo i tasti PLAY/PAUSE/STOP/FWD/REV/ VOL+/VOL-/MUTE e alcuni tasti operativi di base (ENTER/EXIT/tasti di navigazione). 2. La riproduzione video potrebbe non essere lineare e saltare se la velocità di registrazione USB non corrisponde ai requisiti minimi. 3. Non rimuovete il disco USB o spegnete l'alimentazione durante le operazioni in differita. Sarà annullata una volta che il segnale è perso. 4. Non rimuovete la sorgente di segnale durante le operazioni in differita. 5. Non cambiate rapidamente e ripetutamente l'operatività tra PLAY/PAUSE/FWD/REV. 6. Il video potrebbe diventare pixellato quando il bit rate video è troppo basso. 7. Non tutti i dispositivi USB sono compatibili. L'alimentazione necessario per l'hard disk USB dovrebbe essere <500MA Sotto trovate una lista dei Drive USB raccomandati. I modelli che non sono qui elencati possono essere compatibili, ma non è garantito. 32 • SanDisk Extreme® Contour™ USB Flash Drive - 8GB SDCZ8-8192-E75 • SanDisk Extreme® Contour™ USB Flash Drive -16GB SDCZ8-016G-A75 • Kingston DataTraveler 410 USB 2. 0 Flash Drive 8GB DT410/8GB • Kingston DataTraveler 410 USB 2. 0 Flash Drive -16GB DT410/16GB • OCZ Technology Rally2 USB 2. 0 Flash Drive - 4GB OCZUSBR2DC-4GB • OCZ Technology ATV USB 2. 0 Flash Drive - 8GB OCZUSBATV-8GB • OCZ Technology Rally2 USB 2. 0 Flash Drive - 8GB OCZUSBR2DC-4GB • SAMSUNG-HM500JI-500G 8. Questa caratteristica non è disponibile per tutti i televisori digitali, come per canali criptati o di soli audio. 10. Lettore USB Premete il tasto Sorgente, e selezionate USB nella lista sorgente, quindi premete OK per accedere al menù USB. Assicuratevi che il dispositivo USB sia collegato allo slot. Ci sono quattro tipi di media che possono essere selezionati, come foto, musica, film e testo. Selezionate il tipo di media premendo Premete , premete il tasto OK per accedere al menù di selezione disco. per selezionare il disco corretto e premete OK per visualizzare i file media e la lista delle cartelle o scegliete Return per tornare al menù di selezione del tipo di media. Selezionate il file premendo o , quindi apparirà la cornice di anteprima. Premete il tasto ► per riprodurre il file a schermo intero. Quando il file (foto, film o testo) è in riproduzione, premete il tasto OK o Info per visualizzare la barra di controllo. Utilizzate il tasto per selezionare l'icona funzione, quindi premete OK per confermare la funzione. Premere Exit per nascondere la barra informazioni - eccetto per la musica. 33 NOTA: Potete regolare la traccia audio, o il programma nel menù Info mentre riproducete il file video. Scegliete l'icona Info e premete OK per visualizzare il menù Info. La riproduzione di Foto da USB è supportata per i seguenti formati: —JPEG (Formato JPEG, file con estensione “.jpg”) —BMP (file con estensione ".bmp") —PNG (file con estensione ".png") La riproduzione di Musica da USB è supportata per i seguenti formati: —MP3 (file con estensione ".mp3") —WAV (file con estensione ".wav") La riproduzione di Testo da USB è supportata per i seguenti formati: —TXT (file con estensione ".txt") La riproduzione di Video da USB è supportata per i seguenti formati: —AVI (file con estensione ".avi") —TS (MPEG2 & H.264) 34 05 Risoluzione dei problemi Sintomo del problema Video Controllo di ispezione Audio Effetto neve Effetto fantasma Rumore di Posizione, direzione o sottofondo collegamento dell'antenna. Audio normale Posizione, direzione o collegamento dell'antenna. Interferenze Immagine normale Rumore di Attrezzatura elettronica, sottofondo auto/moto, luci fluorescenti. Muto Volume (controllate se il muto è attivato o se i collegamenti audio non siano corretti). Muto Nessuna immagine. La spina di alimentazione non è inserita, il tasto di accensione non è attivo, Impostazioni contrasto/luminosità e volume. Premete il tasto standby sul telecomando per controllare Nessun colore Audio normale Controllo Colore L'immagine è Audio normale Ri-sintonizzate il canale spezzata o debole Nessun colore Rumore di Sistema TV sottofondo C'è una striscia nera Audio normale sulla parte superiore e inferiore 35 Cambia aspetto a zoom Specifiche: Sistema colori. PAL-B/G, I, D/K SECAM- B/G, D/K, L, L' Sistema audio. SECAM- B/G, D/K, L, L' Ingresso video SCART, YPbPr, AV, VGA, HDMI, USB. Y/Pb/Pr 480i/p, 576i/p, 720p, 1080i, 1080p HDMI 480i/p, 576i/p, 720p, 1080i, 1080p Numero di canali 1000 memorizzabili Alimentazione: 100-240V ~ 50/60 Hz 30W(19”) Consumo di corrente in 100-240V ~ 50/60 Hz 38W(22”) 100-240V ~ 50/60 Hz 40W(24”) <0.5W modalità di attesa Uscita Audio 3W+3W Condizioni Temperatura di lavoro: +5°C - +35°C dell'ambiente. Umidità di lavoro: 20% - 80% Temperatura di immagazzinamento -15°C - +45°C Umidità di immagazzinamento 5% - 90% Accessori: Manuale dell'utente Telecomando Batterie (x2) Guida rapida all'avvio *La specifica delle parti di questo televisore qui fornita è solo per riferimento. Potrebbero verificarsi differenze via via che la tecnologia del prodotto viene aggiornata. Il progetto e le specifiche sono soggetti a cambiamenti senza notifica. Descrizione dell'uscita Scart: 1. Quando la sorgente attiva è ATV/AV/SCART, il segnale di uscita scart è ATV. 2. Quando la sorgente attiva è DTV, il segnale di uscita scart è DTV. 3. Le altre sorgenti non hanno un segnale di uscita scart. 36 100-240V ~ 50/60 Hz 55W(26”) D805 2A06 T102 T103 10 3 NC NP1 EC805 47uF/400V + C1034 472/1KV R865 68K/2W 11 2 12V NC 2 12V NP2 3 12 1 LF801 C1056 0.1uF-50V-K-0805(X7R) R878 470k/1206 R877 470k/1206 R876 1 R880 10R/1206 1 1M/1206 D810 HER207 VDD FB 4 1 R889 CY801 5V CON R874 100K Q808 3904 Q809 AO4468 C1059 0.1uF(X7R) C1065 470uF/16V C1058 680PF 22R/1206 22R/1206 + 5Vstb 8 7 6 5 +5V 1 3 2 4 +5V + C1063 0.1uF(X7R) C1061 0.1uF(X7R) C1064 2200uF/25V 1 2 +5V R899 4.7K +5VB PWR-ON/OFF 1 2 CON 1 2 C1071 0.1uF(X7R) J3 CN805 SW TP1 TP2 12VA TP3 5VA TP4 S19 2 1 2 3 Q6 3904 10K R62 1 5V改5.2V CY802 222 10K R61 HS2 3 FOR CPT 老化端口 1 2 +12V R902 4.7K R901 47K B版增加 12V稳压电路 13V ZD102 FOR CPT C1070 2.2u-0805 U809 TL431 2 J7 J4 1 2 3 4 HS1 +5VB PWR-ON/OFF TP5 B版增加 C版本增加FB13--127MHZ ----改善辐射 12VA 18.5寸至24寸二插使用U5,软排线的使用U5+U3 26寸使用三颗驱动 R850,使用二插时,贴上,其它状态时不需要贴 LED1 1 LED2 2 LED3 3 LED4 4 5 6 LED5 7 CH1 EN CH2 VCC CH3 AGND CH4 SDBX PGND1 SDB PGND2 FB U3 CH5 LED6 8 LED8 10 NC CH8 PWM + C1021 220uF/16V 1 SDBX SHD R830 15 R14 VIN 5 R829 NC 6 7 C14 12K C27 1uF-0603 1uF-0603 U5 AP3039A EN 4 COMP FB SHDN VCC AGND OUT CS PGND RT BL-ADJUST 1 1 LED+ 12 FB 11 SHD C35 NC R839 R2297 3.3K 10K 10 FB1 R856 R860 100pF C32 103/25V/0402 1 2 1 2 3 4 HEADER 2 R750 47R C750 C31 102/25V/0402 CN2 3 4 LED+ R65 0.68Ω-0805 R68 0.68Ω-0805 R69 0.68Ω-0805 0.1uF-50V-K-0805(X7R) C6 220uF/50V 9 8 C931 + + C1026 220uF/50V R826 1.5K 13 21.5"R828贴15K 23.6/26"R828,R841贴8.2K R76 100R SS36 2 C37 100pF R18 270K 11 SS36 D9 OVP C34 0.1uF-50V-K-0402(X7R) 14 D10 2 R823 51K Q103 B601001 TO252-DPAK R700 22R-0603 DRV SS OV 3 100R +12V DRV R828 FBX 12 C15 1uF-0603 C18 0.1uF(X7R) FB 20K 14 13 ON/BK R831 51K C5 0.1uF 470uF/16V UVLO 2 OVP 17 16 + C1067 FB13 56-4A-1206 L805 10uH/3.8A C38 1uF-0603 R721 10K +5V 18 FBX CH7 ON/BK R720 20K 19 ISET CH6 AP3608E LED7 9 R832 100R 20 FB12 56-4A-1206 +12V 1R-1206 1R-1206 CN802 R835 NC LED2 LED1 LED5 +5V LED6 SHD R836 使用CN2时,贴上 NC LED4 LED7 R837 NC LED5 LED6 LED7 LED8 LED8 LED1 LED2 LED3 1 2 3 4 5 6 7 8 9 10 11 12 LED+ LED+ 100R-0603 LED3 CN804 LED1 LED2 LED3 LED4 R850 NC 1 2 3 4 5 6 7 8 9 10 LED4 LED+ LED5 LED6 LED7 LED8 U4 2 LED11 3 4 LED12 5 6 LED13 7 LED14 8 LED15 9 LED16 10 CH1 AP3608E VCC CH3 AGND CH4 SDBX PGND1 SDB PGND2 FB CH5 ISET CH6 FBX CH7 NC CH8 R838 100R 20 EN CH2 ON/BK R843 510K BL-ADJUST +5V R845 20K FB LED9 LED10 LED11 LED12 FB1 19 LED+ LED+ R844 200K 18 LED13 LED14 LED15 LED16 17 16 SDBX 15 FBX C16 1uF-0603 C20 0.1uF(X7R) 14 PWM LED10 LED11 R846 LED13 R849 LED FOR CPT FOR CPT CN806 1 2 3 4 5 6 7 8 9 10 11 12 1 CN2 用于18.5和21.6 U3 R847 LED14 LED15 NC 3.3VA R852 4.7K R851 2 ADJ-PWM R854 1k 1 1k LED16 BL-ADJUST Q805 3904 18.5寸需贴C1030 2.15/23.6/26不需要贴 C1030 10uF NC 5VA U4不贴。D10不插 2 CN805 CN806 用于26",CN2不插。 3 CN804 用于23.6, U4不贴。 3.3VA R819 4.7K R822 10K R853 100R BL-ADJUST 1 2 3 4 5 6 LED12 NC R842 NC 11 J2 LED1 LED3 LED+ LED5 LED7 HEADER 12 NC R848 LED9 R841 12K 13 12 LED5 LED6 LED7 LED8 ON/BK 3 1 LED10 1 2 3 4 5 6 7 8 9 10 FOR CPT HEADER 12 LED9 LED1 LED2 LED3 LED4 LED+ CN803 3 R834 2 26寸使用0R,其它尺寸视电流而定 L:ON H:OFF 1K 1 R825 2 ON_PBACK Q803 3904 2 1E56 Bit2 R806 20K C951 C952 Vout=0.6X(1+R up/R down ) R857 330K C967 5 0.1uF(X7R) 0.1uF(X7R) 0.1uF(X7R)/BOT 0.1uF(X7R) 0.1uF(X7R) 10uF(X5R) 5VSCARTAUDIO C1012 100PF EN LX OUT/FB 4 C959 C960 C961 C962 71mA 3.3VA 1 3 R817 82K 5 R818 100K 10uF(X5R) 10uF(X5R) 10uF(X5R) 0.1uF(X7R)/BOT 0.1uF(X7R) 0.1uF(X7R)/BOT 0.1uF(X7R)/BOT 0.1uF(X7R) 0.1uF(X7R) 0.1uF(X7R) 0.1uF(X7R) 0.1uF(X7R) D800 1N4001 2.5VA Vpp=21mV 2 Temperature 50℃ C974 C975C976 0.1uF(X7R) 10uF(X5R) 10uF(X5R) 90mV at DDR power pin(X7R) C992 C993 C994 C995 C996 C997 C998 0.1uF(X7R) 0.1uF(X7R) 10uF(X5R) 10uF(X5R) 10uF(X5R) 10uF(X5R) 10uF(X5R) 0.1uF(X7R) 0.1uF(X7R) 0.1uF(X7R)/BOT 0.1uF(X7R) 0.1uF(X7R) 0.1uF(X7R) 0.1uF(X7R) 5VA 12VA R920 R921 0R-0805 NC/0R-0805 1E56 BIT3 ON OFF 1.8VA 33P/NC C999 C1 10uF(X5R) C2 10uF(X5R) 2 ON_PANEL MAX 600mA R813 1K C1005 C1006 C1007 C1008 C1009 C1010 C1014 C1011 0.1uF(X7R) 0.1uF(X7R) 0.1uF(X7R) 0.1uF(X7R) 0.1uF(X7R) 0.1uF(X7R) 0.1uF(X7R) 0.1uF(X7R) C958 0.1uF 2 Q800 QM3013K 3 Q802 3904 C981 10uF(X5R) C982 10uF(X5R) C983 0.1uF(X7R) C984 0.1uF(X7R)/BOT Vpp=100mV VCC-Panel R810 100R-1206 5V Q801 2N7002 R811 100K 1 R814 10K R814改善开机瞬间尖峰 1.8VA C399 0.1uF(X7R) C1013 0.1uF(X7R) C1004 0.1uF(X7R) 0.1uF(X7R) 0.1uF(X7R) 0.1uF(X7R)/BOT 10uF(X5R) 1 1.8VA C985 C986 C987 C988 C989 C990 C991 C977 C978 C979 C980 3 AIC2354 SOT-23 R816 120K C936 C937 C938 C939 C944 C940 C941 C942 R812 100K C963 0.1uF 0V C964 10P 11.5mS 2 1 VIN GND 4 2 R815 1K U804 SY8008B SOT-23 5 R805 100K 5VA FB10 56-4A-1206 10uF(X5R) 1.8VA 680mA C935 33P/NC 3 R804 0R-0402 OUT/FB R859 100K L804 1.8VA 1.812V Vpp=23mV 2.2uH_1.5A FB6 10uH_1.5A C1002 0.1uF(X7R) C1000 10uF(X5R) OUT/FB 3 C968 C969 C970 C971 C972 C973 将LDO 改为DC to DC,提高轻载效率, =0.6X(1+(R855+R857)/R859) 省电做到0.3W以下。 5VA C1001 10uF(X5R) LX 2 EN AIC2352 SOT-23 Vp-p=94mV1.32V 3.3VA 4.7K Vout C965 0.1uF(X7R) 10uF(X5R) 1 VIN U802 AMS1117-3.3V 3 4 LX R801 120K Vout=0.6X(1+Rup/R down ) 3.3VU C966 33P EN AIC2354 SOT-23 C955 2 R868 1K R855 120K VIN 0.1uF C945 10uF(X5R) 10uF(X5R) 10uF(X5R) Vpp=13mV L808 3.3VU 2.2uH_1.5A U803 AIC2352 GND C920 1 IN B版增加 C956 C954 10uF(X5R) 10uF(X5R) 4 R803 10k C947 0.1uF C946 10uF(X5R) OUT FB8 10uH_1.5A FB5 4.7uH_1.5A 750mA L801 2.2uH_1.5A U801 SY8008B SOT-23 ADJ 5Vstb 5VA GND 150K MST Power supply 45mA 1.32V DC-DC 5V_TUNER C950 33P R800 3 FB L802 10uH_1.5A 2 LX DC5V R809 EN 218mA 2 C948 220uF/16V C949 0.1uF(X7R) 4 SY8101B SOT23-6 L803 10uH_1.5A 6 1 10K 1 BS VIN R802 + C800 0.1uF EC800 220uF/16V + 5 C957 0.1uF 10uH_1.5A GND L800 C953 0.1uF(X7R) CERAMIC C943 0.1uF(X7R) U800 SY8101B 12VA PANEL POWER 5VA C1066 220uF/16V +12V 5Vstb R900 1K R895 1R-1206 R896 2R2-1206 R897 2R2-1206 S1 S2 1 2 1 CN800 AC IN R870 100K R875 10k +5VB L807 10uH/3.8A + R898 1K U808 PC817 3 F800 S5 H:ON L:OFF J8 S4 S3 C1081 1000uF/25V 2 2 + 3.3VU C1051 1n 3 11 R893 470R-0805 C1036 100P/1KV R894 470R/1206 C1069 101-0805 RV1 PTC RDH5-3A-W 2 12 R882 R887 1 C1068 1 R890 10K/0805 R892 22R-0805 R891 1K/0805 102/25V/0805 LF800 2 5V 4 12VA +12V EC806 220uF/16V 增加C1036,改善EMC性能 3 4 D811 TO-220B SBR2060 1 1 3 3 NB1 9 5 4 22R/1206 4 10 9 5 Q810 10N60 3 3906 Q811 100R/0603 CY800 NP2 9 5 22R/1206 C1041 223/25V/0805 R858 10K 2 PWR-ON/OFF 2 R888 1M/1206 CS 22uF/50V C1053 6 4 R885 1M/1206 2 GATE FB7 40R R886 NC/24K-1206 R884 RI GND 3 GND GND R867 R869 +12VB + C1035 470uF/16V C1039 1000uF/25V Q806 B601001 TO252-DPAK C1040 0.1uF-0603 C1038 0.1uF-0603 L806 10uH/3.8A + + C1037 680PF 7 NB2 8 6 C1022 680PF 2 2 3 6 8 12 1 8 6 D809 FR107 D1 27V 5 U807 CX1 R883 1M/1206 + 2 470K/1206 1 3 2 2 1 1 4 D806 TO-220B SBR20100 EFD25 EFD25 1 10 3 C1060 100pF D804 2A06 D807 2A06 10k R319 D803 2A06 D805 2A06 T102 T103 10 3 NC NP1 EC805 47uF/400V + C1034 472/1KV R865 68K/2W 11 2 12V NC 2 12V NP2 3 12 1 LF801 1 R880 10R/1206 1 2 FB D810 HER207 5 GATE CS 22uF/50V C1053 6 4 1 R889 CY801 R893 470R-0805 C1036 100P/1KV 1 3 F800 CN800 AC IN R870 100K R875 10k CON 3904 AO4468 C1059 0.1uF(X7R) C1065 470uF/16V C1058 680PF 22R/1206 22R/1206 + R874 100K Q808 Q809 +5VB L807 10uH/3.8A 5Vstb 8 7 6 5 +5V 1 3 2 4 +5V + C1063 0.1uF(X7R) C1061 0.1uF(X7R) C1064 2200uF/25V +5V R899 4.7K +5VB PWR-ON/OFF 1 2 CON 1 2 C1071 0.1uF(X7R) J3 CY802 222 12VA TP1 2 1 2 3 HS1 +5VB TP3 5VA TP2 S19 Q6 3904 10K R62 1 5V改5.2V CN805 SW 10K R61 HS2 3 FOR CPT 老化端口 1 2 +12V R902 4.7K R901 47K B版增加 12V稳压电路 13V ZD102 FOR CPT C1070 2.2u-0805 U809 TL431 2 J7 J4 1 2 3 4 1 2 PWR-ON/OFF TP4 TP5 B版增加 C版本增加FB13--127MHZ ----改善辐射 12VA 18.5寸至24寸二插使用U5,软排线的使用U5+U3 26寸使用三颗驱动 R850,使用二插时,贴上,其它状态时不需要贴 LED1 1 LED2 2 LED3 3 LED4 4 5 CH1 EN CH2 VCC CH3 AGND CH4 SDBX 6 U3 CH5 LED6 8 LED8 10 CH7 NC CH8 PWM 1 SDBX SHD R830 R14 470uF/16V 5 R829 NC 6 7 C14 12K C27 1uF-0603 1uF-0603 SS U5 AP3039A EN 4 COMP FB VIN SHDN VCC AGND OUT CS PGND RT SS36 1 2 1 LED+ 12 FB SHD C35 NC R826 1.5K R839 R2297 3.3K 10K 10 FB1 R856 R860 100pF C32 103/25V/0402 1 2 1 2 3 4 HEADER 2 R750 47R C750 C31 102/25V/0402 CN2 3 4 LED+ R65 0.68Ω-0805 R68 0.68Ω-0805 R69 0.68Ω-0805 0.1uF-50V-K-0805(X7R) C6 220uF/50V 9 8 C931 + + C1026 220uF/50V C37 100pF 13 11 21.5"R828贴15K 23.6/26"R828,R841贴8.2K R76 100R SS36 D9 OVP C34 0.1uF-50V-K-0402(X7R) 14 D10 2 R823 51K Q103 B601001 TO252-DPAK R700 22R-0603 R18 270K 11 BL-ADJUST C5 0.1uF DRV OV 3 100R +12V DRV R828 FBX 12 C15 1uF-0603 C18 0.1uF(X7R) FB 20K 14 13 ON/BK R831 51K + C1067 UVLO 2 OVP 17 16 15 FBX + C1021 220uF/16V FB13 56-4A-1206 L805 10uH/3.8A C38 1uF-0603 R721 10K +5V 18 ISET CH6 AP3608E ON/BK R720 20K 19 FB PGND2 LED5 7 LED7 9 20 SDB PGND1 R832 100R FB12 56-4A-1206 +12V 1R-1206 1R-1206 CN802 R835 NC LED2 NC LED5 +5V LED6 SHD LED+ LED+ 100R-0603 R836 LED3 使用CN2时,贴上 NC LED4 LED7 R837 NC LED5 LED6 LED7 LED8 LED8 LED1 LED2 LED3 1 2 3 4 5 6 7 8 9 10 11 12 1 2 3 4 5 6 7 8 9 10 LED4 LED+ LED5 LED6 LED7 LED8 LED10 2 LED11 3 4 LED12 5 6 LED13 7 LED14 8 LED15 9 LED16 10 CH1 AP3608E 20 EN CH3 AGND CH4 SDBX PGND1 SDB PGND2 FB CH5 ISET CH6 FBX CH7 NC CH8 PWM ON/BK BL-ADJUST +5V R845 20K FB LED9 LED10 LED11 LED12 FB1 19 VCC CH2 R843 510K LED+ LED+ R844 200K 18 LED13 LED14 LED15 LED16 17 16 SDBX 15 FBX C16 1uF-0603 C20 0.1uF(X7R) 14 LED10 LED11 R846 LED13 11 R849 1 2 3 4 5 6 7 8 9 10 11 12 1 CN2 用于18.5和21.6 U3 R847 LED14 LED15 NC 3.3VA R852 4.7K R851 2 ADJ-PWM R854 1k 1 1k LED16 NC 2 3 CN805 BL-ADJUST Q805 3904 18.5寸需贴C1030 2.15/23.6/26不需要贴 C1030 10uF CN804 5VA U4不贴。D10不插 3.3VA CN806 用于26",CN2不插。 R819 4.7K R822 10K 用于23.6, U4不贴。 R853 100R BL-ADJUST LED FOR CPT FOR CPT CN806 LED12 NC R842 NC 1 2 3 4 5 6 HEADER 12 NC R848 LED9 R841 12K 13 12 J2 LED1 LED3 LED+ LED5 LED7 ON/BK 3 1 LED9 R838 100R 1 2 3 4 5 6 7 8 9 10 LED5 LED6 LED7 LED8 FOR CPT HEADER 12 U4 LED1 LED2 LED3 LED4 LED+ CN803 3 R834 LED1 CN804 LED1 LED2 LED3 LED4 R850 2 26寸使用0R,其它尺寸视电流而定 L:ON H:OFF 1K 1 R825 2 ON_PBACK Q803 3904 2 1E56 Bit2 2 R806 20K C951 C952 Vout=0.6X(1+R up/R down ) C966 33P R857 330K C967 5 0.1uF(X7R) 0.1uF(X7R) 0.1uF(X7R)/BOT 0.1uF(X7R) 0.1uF(X7R) 10uF(X5R) 5VSCARTAUDIO C1012 100PF EN LX OUT/FB R816 120K 3 R817 82K 5 R818 100K C936 C937 C938 C939 C944 C940 C941 C942 10uF(X5R) 10uF(X5R) 10uF(X5R) 0.1uF(X7R)/BOT 0.1uF(X7R) 0.1uF(X7R)/BOT 0.1uF(X7R)/BOT 0.1uF(X7R) 3.3VA 4 C959 C960 C961 C962 71mA 3.3VA 1 0.1uF(X7R) 0.1uF(X7R) 0.1uF(X7R) 0.1uF(X7R) D800 1N4001 2.5VA Vpp=21mV 2 Temperature 50℃ C974 C975C976 0.1uF(X7R) 10uF(X5R) 10uF(X5R) 90mV at DDR power pin(X7R) C992 C993 C994 C995 C996 C997 C998 0.1uF(X7R) 0.1uF(X7R) 10uF(X5R) 10uF(X5R) 10uF(X5R) 10uF(X5R) 10uF(X5R) 0.1uF(X7R) 0.1uF(X7R) 0.1uF(X7R)/BOT 0.1uF(X7R) 0.1uF(X7R) 0.1uF(X7R) 0.1uF(X7R) 5VA 12VA R920 R921 0R-0805 NC/0R-0805 1E56 BIT3 ON OFF 1.8VA 33P/NC C999 C1 10uF(X5R) C2 10uF(X5R) 2 ON_PANEL MAX 600mA R813 1K C1005 C1006 C1007 C1008 C1009 C1010 C1014 C1011 0.1uF(X7R) 0.1uF(X7R) 0.1uF(X7R) 0.1uF(X7R) 0.1uF(X7R) 0.1uF(X7R) 0.1uF(X7R) 0.1uF(X7R) C958 0.1uF 2 Q800 QM3013K 3 Q802 3904 C981 10uF(X5R) C982 10uF(X5R) C983 0.1uF(X7R) C984 0.1uF(X7R)/BOT Vpp=100mV VCC-Panel R810 100R-1206 5V Q801 2N7002 R811 100K 1 R814 10K R814改善开机瞬间尖峰 1.8VA C399 0.1uF(X7R) C1013 0.1uF(X7R) C1004 0.1uF(X7R) 0.1uF(X7R) 0.1uF(X7R) 0.1uF(X7R)/BOT 10uF(X5R) 1 1.8VA C985 C986 C987 C988 C989 C990 C991 C977 C978 C979 C980 3 AIC2354 SOT-23 GND 1 VIN 2 R815 1K U804 SY8008B SOT-23 4 5 R805 100K 5VA FB10 56-4A-1206 10uF(X5R) 1.8VA 680mA C935 33P/NC 3 R804 0R-0402 OUT/FB R859 100K L804 1.8VA 1.812V Vpp=23mV 2.2uH_1.5A FB6 10uH_1.5A C1002 0.1uF(X7R) C1000 10uF(X5R) OUT/FB 3 U802 AMS1117-3.3V C968 C969 C970 C971 C972 C973 将LDO 改为DC to DC,提高轻载效率, =0.6X(1+(R855+R857)/R859) 省电做到0.3W以下。 5VA C1001 10uF(X5R) LX 2 EN AIC2352 SOT-23 3.3VU 4.7K Vout 1 C965 0.1uF(X7R) 10uF(X5R) VIN Vp-p=94mV1.32V R812 100K C963 0.1uF 0V C964 10P 11.5mS 2 4 R855 120K EN LX R801 120K Vout=0.6X(1+Rup/R down ) 3 R868 1K GND C920 1 AIC2354 SOT-23 C955 Vpp=13mV L808 3.3VU 2.2uH_1.5A U803 AIC2352 VIN 0.1uF C945 10uF(X5R) 10uF(X5R) 10uF(X5R) IN B版增加 C956 C954 10uF(X5R) 10uF(X5R) 4 R803 10k C947 0.1uF C946 10uF(X5R) 750mA L801 2.2uH_1.5A U801 SY8008B SOT-23 FB5 4.7uH_1.5A OUT FB8 10uH_1.5A 5VA ADJ 5Vstb 1.32V DC-DC 5V_TUNER GND 150K MST Power supply 45mA L802 10uH_1.5A C950 33P R800 3 FB DC5V 2 218mA 2 EN L803 10uH_1.5A 6 LX R809 SY8101B SOT23-6 1 4 C948 220uF/16V C949 0.1uF(X7R) BS VIN 10K + C800 0.1uF EC800 220uF/16V + 5 R802 1 C957 0.1uF 10uH_1.5A GND L800 C953 0.1uF(X7R) CERAMIC C943 0.1uF(X7R) U800 SY8101B 12VA PANEL POWER 5VA C1066 220uF/16V +12V 5Vstb R900 1K R895 1R-1206 R896 2R2-1206 R897 2R2-1206 S1 S2 1 2 1 S5 2 2 + R898 1K U808 PC817 S4 S3 H:ON L:OFF J8 R894 470R/1206 C1069 101-0805 RV1 PTC RDH5-3A-W C1081 1000uF/25V C1051 1n 3 11 R882 R887 4 C1068 1 R890 10K/0805 R892 22R-0805 R891 1K/0805 102/25V/0805 LF800 2 5V 2 12 + 增加C1036,改善EMC性能 3 4 5V 4 12VA +12V EC806 220uF/16V 3.3VU 2 PWR-ON/OFF NB1 9 5 4 22R/1206 D811 TO-220B SBR2060 1 1 3 3 Q810 10N60 3 3906 Q811 100R/0603 CY800 9 5 22R/1206 4 10 9 5 2 R888 1M/1206 RI GND GND NP2 R867 R869 C1041 223/25V/0805 R858 10K C1035 470uF/16V C1039 1000uF/25V +12VB + + + Q806 B601001 TO252-DPAK C1040 0.1uF-0603 C1038 0.1uF-0603 L806 10uH/3.8A C1037 680PF 7 NB2 8 6 C1022 680PF 2 2 3 6 8 12 1 8 6 D809 FR107 D1 27V FB7 40R 1M/1206 R885 1M/1206 VDD 3 R886 NC/24K-1206 R884 GND CX1 R883 1M/1206 + U807 2 470K/1206 1 3 2 2 C1056 0.1uF-50V-K-0805(X7R) R878 470k/1206 R877 470k/1206 R876 1 1 4 D806 TO-220B SBR20100 EFD25 EFD25 1 10 3 C1060 100pF D804 2A06 D807 2A06 10k R319 D803 2A06 MIUA_DQ[0:15] MIUB_DQ[0:15] 2 MIUB_DQM1 2 MIUB_DQM0 2 MIUB_DQS1 2 MIUB_DQS1B 2 MIUB_DQS0 2 MIUB_DQS0B 2 MIUB_DQ[0:15] 2 MIUA_DQ[0:15] 2 MIUA_DQM1 2 MIUA_DQM0 2 MIUA_DQS1 2 MIUA_DQS1B 2 MIUA_DQS0 2 MIUA_DQS0B RP50 RP57 MIUB_DQ7 MIUB_DQ0 MIUB_DQ2 MIUB_DQ5 RP12 22RX4 RP1 22RX4 Close to MSD306 RP3 RP4 22RX4 22RX4 RP2 22RX4 RP59 RP60 22RX4 22RX4 Close to DRAM RP13 22RX4 Close to DRAM RP11 22RX4 Close to MSD306 MIUB_DQ15 MIUB_DQ8 MIUB_DQ10 MIUB_DQ13 MIUB_DQ6 MIUB_DQ1 MIUB_DQ3 MIUB_DQ4 22RX4 22RX4 Close to DRAM MIUB_DQ11 MIUB_DQ12 MIUB_DQ9 MIUB_DQ14 MIUB_DQM1 MIUB_DQM0 MIUB_DQS1 MIUB_DQS1B MIUB_DQS0 MIUB_DQS0B MIUA_DQ7 MIUA_DQ0 MIUA_DQ2 MIUA_DQ5 MIUA_DQ15 MIUA_DQ8 MIUA_DQ10 MIUA_DQ13 MIUA_DQ6 MIUA_DQ1 MIUA_DQ3 MIUA_DQ4 MIUA_DQ11 MIUA_DQ12 MIUA_DQ9 MIUA_DQ14 MIUA_DQM1 MIUA_DQM0 MIUA_DQS1 MIUA_DQS1B MIUA_DQS0 MIUA_DQS0B 2 4 6 8 2 4 6 8 1 3 5 7 1 3 5 7 1 3 5 7 1 3 5 7 1 3 5 7 RP14 22RX4 RP21 22RX4 RP20 22RX4 Close to DRAM RP5 RP6 MIUB_WEZ MIUB_MCKE MIUB_BA1 MIUB_BA0 RP8 RP9 75RX4 75R 75RX4 75RX4 RP40 22RX4 R116 10k A_MVERF R107 10k 1.8VA RP10 MIUB_A2 RP19 MIUB_A0 MIUB_CASZ MIUB_RASZ MIUB_A5 MIUB_A10 MIUB_A1 MIUB_BA2 MIUB_A4 MIUB_A6 MIUB_A8 MIUB_A11 MIUB_A[0:13] 75RX4 75RX4 75R MB_MCLK MB_MCLKZ MB_A12 MB_A7 MB_A9 MB_A3 75RX4 75R 75RX4 R377 10k B_MVERF R310 10k 1.8VA C431 47n MB_A13 MB_A2 MB_A0 MB_CASZ MB_RASZ MB_A5 MB_A10 MB_A1 MB_BA2 MB_A4 MB_A6 MB_A8 MB_A11 MB_WEZ MB_CKE MB_BA1 MB_BA0 MB_ODT C428 47n 75RX4 Close to MSD309 MIUB_A13 R396 75RX4 MA_A2 MA_A0 MA_CASZ MA_RASZ MA_A12 MA_A7 MA_A9 MA_A3 MA_A5 MA_A10 MA_A1 MA_BA2 MA_A4 MA_A6 MA_A8 MA_A11 MA_WEZ MA_CKE MA_BA1 MA_BA0 MA_ODT MA_MCLK MA_MCLKZ MA_A13 Close to MSD306 MB_DQ7 MB_DQ0 MB_DQ2 MB_DQ5 2 MIUB_CASZ 2 MIUB_RASZ R380 MIUB_WEZ RP17 MIUB_MCKE MIUB_BA1 MIUB_BA0 MIUB_ODT MIUB_A12 MIUB_A7 MIUB_A9 MIUB_A3 2 MIUB_BA2 2 MIUB_A[0:13] 2 2 2 2 2 MIUB_ODT 2 MIUB_MCLK 2 MIUB_MCLKZ 75RX4 75R Close to MSD309 MIUA_A13 R383 MB_DQ15 MB_DQ8 MB_DQ10 MB_DQ13 MB_DQ6 MB_DQ1 MB_DQ3 MB_DQ4 MB_DQ11 MB_DQ12 MB_DQ9 MB_DQ14 MB_DQM1 MB_DQM0 MB_DQS1 MB_DQSB1 MB_DQS0 MB_DQSB0 RP7 MIUA_A2 RP18 MIUA_A0 MIUA_CASZ MIUA_RASZ MIUA_A5 MIUA_A10 MIUA_A1 MIUA_BA2 MIUA_A4 MIUA_A6 MIUA_A8 MIUA_A11 MIUA_A[0:13] RP39 22RX4 Close to MSD306 MA_DQ7 MA_DQ0 MA_DQ2 MA_DQ5 2 MIUA_CASZ 2 MIUA_RASZ R13 MIUA_WEZ RP15 MIUA_MCKE MIUA_BA1 MIUA_BA0 MIUA_ODT MIUA_A12 MIUA_A7 MIUA_A9 MIUA_A3 2 MIUA_BA2 2 MIUA_A[0:13] 2 MIUA_WEZ 2 MIUA_MCKE 2 MIUA_BA1 2 MIUA_BA0 2 MIUA_ODT 2 MIUA_MCLK 2 MIUA_MCLKZ MA_DQ15 MA_DQ8 MA_DQ10 MA_DQ13 MA_DQ6 MA_DQ1 MA_DQ3 MA_DQ4 MA_DQ11 MA_DQ12 MA_DQ9 MA_DQ14 MA_DQM1 MA_DQM0 MA_DQS1 MA_DQSB1 MA_DQS0 MA_DQSB0 7 5 3 1 1 3 5 7 2 4 6 8 2 4 6 8 2 4 6 8 2 4 6 8 1 3 5 7 1 3 5 7 1 3 5 7 1 3 5 7 2 4 6 8 2 4 6 8 2 4 6 8 2 4 6 8 2 4 6 8 8 6 4 2 2 4 6 8 1 3 5 7 7 5 3 1 1 3 5 7 7 5 3 1 1 3 5 7 1 3 5 7 1 3 5 7 1 3 5 7 1 3 5 7 8 6 4 2 1 3 5 7 1 3 5 7 7 5 3 1 1 3 5 7 2 4 6 8 2 4 6 8 2 4 6 8 2 4 6 8 2 4 6 8 8 6 4 2 P3 R2 P2 N2 MB_A9 MB_A12 MB_A7 MB_A3 R7 L1 R3 L3 L2 M3 M2 N3 F1 G2 H3 H1 MB_DQ6 MB_DQ1 MB_DQ3 MB_DQ4 MB_A1 MB_A10 MB_A5 D3 D1 C2 B1 MB_DQ11 MB_DQ12 MB_DQ9 MB_DQ14 MB_BA1 MB_BA0 B3 F3 F7 E8 B7 A8 MB_DQS0 MB_DQSB0 MB_DQS1 MB_DQSB1 MB_BA2 RFU RFU RFU A9 A12 A7 A3 A1 A10 A5 BA1 BA0 DQ6 DQ1 DQ3 DQ4 DQ11 DQ12 DQ9 DQ14 LDQS LDQS# UDQS UDQS# UDM LDM 1.8VA NC VssQ DQ1 Vdd DQ6 VddQ VddL Vdd Vss RFU RFU RFU RFU A9 A12 A7 A3 A1 A10 A5 BA1 BA0 DQ6 DQ1 DQ3 DQ4 DQ11 DQ12 DQ9 DQ14 LDQS LDQS# UDQS UDQS# MB_A13 3 WE# A12 A7 A3 A10 RFU A9 A5 A1 BA1 Vss BA0 CKE DQ3 VddQ LDM Vss DQ11 VddQ UDM Vss Vref VssQ VssQ DQ4 DQ9 DQ14 DQ12 VssQ Vdd VddQ 2 NC 1 1.8VA UDM LDM MA_A13 MB_DQM1 MB_DQM0 U15 W9751G6IB-25 R7 L1 R3 P3 R2 P2 N2 MA_A9 MA_A12 MA_A7 MA_A3 MA_BA2 M3 M2 N3 F1 G2 H3 H1 MA_DQ6 MA_DQ1 MA_DQ3 MA_DQ4 MA_A1 MA_A10 MA_A5 D3 D1 C2 B1 MA_DQ11 MA_DQ12 MA_DQ9 MA_DQ14 L3 L2 F7 E8 B7 A8 MA_DQS0 MA_DQSB0 MA_DQS1 MA_DQSB1 MA_BA1 MA_BA0 B3 F3 MA_DQM1 MA_DQM0 U9 W9751G6IB-25 NC NC NC R8 A2 E2 UDM Vdd Vss RFU VddL RFU A9 A7 A12 A5 A1 A10 A3 BA1 WE# BA0 Vss CKE DQ3 VddQ Vref VssQ LDM VssQ DQ1 DQ6 VddQ DQ4 Vss NC DQ11 Vdd VddQ VssQ VssQ DQ9 DQ14 3 Vss DQ12 Vdd R P N M L K J H G F E D C B A VddQ 2 NC 1 R8 A2 E2 NC NC NC 2 4 6 8 J1 Vss Vss Vss Vss Vss 2 4 6 8 8 6 4 2 2 4 6 8 A1 E1 J9 M9 R1 Vdd Vdd Vdd Vdd Vdd Vss Vss Vss Vss Vss A3 E3 J3 N1 P9 A1 E1 J9 M9 R1 Vdd Vdd Vdd Vdd Vdd J1 VddL 7 VssQ 8 DQ8 VddQ DQ13 VssQ DQ0 VssQ A4 A8 NC A6 A11 RFU A0 A2 CK# CS# Vss Vdd ODT Vdd DQ5 VddQ DQ7 LDQS# VddQ VssQ CAS# RAS# 9 DQ15 UDQS# VddQ VssQ VssDL CK DQ2 VddQ LDQS VssQ DQ10 VddQ UDQS R P N M L K J H G F E D C B A VssQ UDQS DQ7 A4 NC RFU Vss Vdd A0 A8 A2 A11 CK# CS# A6 Vdd ODT VssDL CK RAS# DQ5 VddQ CAS# VssQ VssQ DQ0 LDQS VddQ DQ2 LDQS# VddQ VssQ DQ13 DQ8 VssQ VddQ DQ10 VddQ DQ15 8 UDQS# VddQ 7 VssQ 9 A9 C1 C3 C7 C9 E9 G1 G3 G7 G9 VddQ VddQ VddQ VddQ VddQ VddQ VddQ VddQ VddQ VddQ VddL A9 C1 C3 C7 C9 E9 G1 G3 G7 G9 VddQ VddQ VddQ VddQ VddQ VddQ VddQ VddQ VddQ VddQ VssQ VssQ VssQ VssQ VssQ VssQ VssQ VssQ VssQ VssQ VssDL A7 B2 B8 D2 D8 E7 F2 F8 H2 H8 J7 A3 E3 J3 N1 P9 8 6 4 2 A8 A11 WE# A0 A2 A4 A6 ODT RAS# CS# CAS# DQ7 DQ0 DQ2 DQ5 DQ15 DQ8 DQ10 DQ13 Vref CKE CLK CLK# A8 A11 WE# A0 A2 A4 A6 ODT RAS# CS# CAS# DQ7 DQ0 DQ2 DQ5 DQ15 DQ8 DQ10 DQ13 Vref CKE CLK CLK# VssQ VssQ VssQ VssQ VssQ VssQ VssQ VssQ VssQ VssQ VssDL 8 6 4 2 7 5 3 1 A7 B2 B8 D2 D8 E7 F2 F8 H2 H8 J7 7 5 3 1 MB_A0 MB_A2 MB_A4 MB_A6 MB_A8 MB_A11 MB_WEZ P8 P7 K3 MB_CASZ MB_ODT MB_RASZ MB_DQ7 MB_DQ0 MB_DQ2 MB_DQ5 MB_DQ15 MB_DQ8 MB_DQ10 MB_DQ13 M8 M7 N8 N7 K9 K7 L8 L7 F9 G8 H7 H9 B9 C8 D7 D9 B_MVERF MB_CKE MB_MCLK MB_MCLKZ MA_A8 MA_A11 MA_WEZ P8 P7 K3 J2 K2 J8 K8 MA_A0 MA_A2 MA_A4 MA_A6 MA_CASZ MA_ODT MA_RASZ MA_DQ7 MA_DQ0 MA_DQ2 MA_DQ5 MA_DQ15 MA_DQ8 MA_DQ10 MA_DQ13 A_MVERF MA_CKE MA_MCLK MA_MCLKZ M8 M7 N8 N7 K9 K7 L8 L7 F9 G8 H7 H9 B9 C8 D7 D9 J2 K2 J8 K8 C430 1n 100R R71 C433 1n R379 100R Close to DRAM R378 100R Close to DRAM 100R R23 MIUA_DQ[0:15] MIUB_DQ[0:15] 2 MIUB_DQM1 2 MIUB_DQM0 2 MIUB_DQS1 2 MIUB_DQS1B 2 MIUB_DQS0 2 MIUB_DQS0B 2 MIUB_DQ[0:15] 2 MIUA_DQ[0:15] 2 MIUA_DQM1 2 MIUA_DQM0 2 MIUA_DQS1 2 MIUA_DQS1B RP50 RP57 MIUB_DQ7 MIUB_DQ0 MIUB_DQ2 MIUB_DQ5 RP12 22RX4 RP1 22RX4 Close to MSD306 RP3 RP4 22RX4 22RX4 RP2 22RX4 RP59 RP60 22RX4 22RX4 Close to DRAM RP13 22RX4 Close to DRAM RP11 22RX4 Close to MSD306 MIUB_DQ15 MIUB_DQ8 MIUB_DQ10 MIUB_DQ13 MIUB_DQ6 MIUB_DQ1 MIUB_DQ3 MIUB_DQ4 22RX4 22RX4 Close to DRAM MIUB_DQ11 MIUB_DQ12 MIUB_DQ9 MIUB_DQ14 MIUB_DQM1 MIUB_DQM0 MIUB_DQS1 MIUB_DQS1B MIUB_DQS0 MIUB_DQS0B MIUA_DQ7 MIUA_DQ0 MIUA_DQ2 MIUA_DQ5 MIUA_DQ15 MIUA_DQ8 MIUA_DQ10 MIUA_DQ13 MIUA_DQ6 MIUA_DQ1 MIUA_DQ3 MIUA_DQ4 MIUA_DQ11 MIUA_DQ12 MIUA_DQ9 MIUA_DQ14 MIUA_DQM1 MIUA_DQM0 MIUA_DQS1 MIUA_DQS1B MIUA_DQS0 MIUA_DQS0B 1 3 5 7 2 MIUA_DQS0 2 MIUA_DQS0B 1 3 5 7 1 3 5 7 2 4 6 8 2 4 6 8 2 4 6 8 2 4 6 8 2 4 6 8 2 4 6 8 1 3 5 7 1 3 5 7 1 3 5 7 RP14 22RX4 RP21 22RX4 RP20 22RX4 Close to DRAM RP5 RP6 RP8 RP9 75RX4 75R 75RX4 75RX4 RP40 22RX4 R116 10k A_MVERF R107 10k 1.8VA RP10 MIUB_A2 RP19 MIUB_A0 MIUB_CASZ MIUB_RASZ MIUB_A5 MIUB_A10 MIUB_A1 MIUB_BA2 MIUB_A4 MIUB_A6 MIUB_A8 MIUB_A11 MIUB_A[0:13] 75RX4 75RX4 75R MB_MCLK MB_MCLKZ MB_A12 MB_A7 MB_A9 MB_A3 75RX4 75R 75RX4 R377 10k B_MVERF R310 10k 1.8VA C431 47n MB_A13 MB_A2 MB_A0 MB_CASZ MB_RASZ MB_A5 MB_A10 MB_A1 MB_BA2 MB_A4 MB_A6 MB_A8 MB_A11 MB_WEZ MB_CKE MB_BA1 MB_BA0 MB_ODT C428 47n 75RX4 Close to MSD309 MIUB_A13 R396 75RX4 MA_A2 MA_A0 MA_CASZ MA_RASZ MA_A12 MA_A7 MA_A9 MA_A3 MA_A5 MA_A10 MA_A1 MA_BA2 MA_A4 MA_A6 MA_A8 MA_A11 MA_WEZ MA_CKE MA_BA1 MA_BA0 MA_ODT MA_MCLK MA_MCLKZ MA_A13 Close to MSD306 MB_DQ7 MB_DQ0 MB_DQ2 MB_DQ5 2 MIUB_CASZ 2 MIUB_RASZ R380 MIUB_WEZ RP17 MIUB_MCKE MIUB_BA1 MIUB_BA0 MIUB_ODT 75RX4 75R Close to MSD309 MIUA_A13 R383 MIUB_A12 MIUB_A7 MIUB_A9 MIUB_A3 2 MIUB_BA2 2 MIUB_A[0:13] 2 MIUB_WEZ 2 MIUB_MCKE 2 MIUB_BA1 2 MIUB_BA0 2 MIUB_ODT 2 MIUB_MCLK 2 MIUB_MCLKZ RP7 MB_DQ15 MB_DQ8 MB_DQ10 MB_DQ13 MB_DQ6 MB_DQ1 MB_DQ3 MB_DQ4 MB_DQ11 MB_DQ12 MB_DQ9 MB_DQ14 MB_DQM1 MB_DQM0 MB_DQS1 MB_DQSB1 MB_DQS0 MB_DQSB0 RP39 22RX4 Close to MSD306 MIUA_A2 RP18 MIUA_A0 MIUA_CASZ MIUA_RASZ MIUA_A5 MIUA_A10 MIUA_A1 MIUA_BA2 MIUA_A4 MIUA_A6 MIUA_A8 MIUA_A11 MIUA_A[0:13] MA_DQ7 MA_DQ0 MA_DQ2 MA_DQ5 2 MIUA_CASZ 2 MIUA_RASZ R13 MIUA_WEZ RP15 MIUA_MCKE MIUA_BA1 MIUA_BA0 MIUA_ODT MIUA_A12 MIUA_A7 MIUA_A9 MIUA_A3 2 MIUA_BA2 2 MIUA_A[0:13] 2 MIUA_WEZ 2 MIUA_MCKE 2 MIUA_BA1 2 MIUA_BA0 2 MIUA_ODT 2 MIUA_MCLK 2 MIUA_MCLKZ MA_DQ15 MA_DQ8 MA_DQ10 MA_DQ13 MA_DQ6 MA_DQ1 MA_DQ3 MA_DQ4 MA_DQ11 MA_DQ12 MA_DQ9 MA_DQ14 MA_DQM1 MA_DQM0 MA_DQS1 MA_DQSB1 MA_DQS0 MA_DQSB0 7 5 3 1 1 3 5 7 1 3 5 7 1 3 5 7 1 3 5 7 2 4 6 8 2 4 6 8 2 4 6 8 2 4 6 8 2 4 6 8 8 6 4 2 2 4 6 8 1 3 5 7 7 5 3 1 1 3 5 7 7 5 3 1 1 3 5 7 1 3 5 7 1 3 5 7 1 3 5 7 1 3 5 7 8 6 4 2 1 3 5 7 1 3 5 7 7 5 3 1 1 3 5 7 2 4 6 8 2 4 6 8 2 4 6 8 2 4 6 8 2 4 6 8 8 6 4 2 P3 R2 P2 N2 MB_A9 MB_A12 MB_A7 MB_A3 R7 L1 R3 M3 M2 N3 MB_A1 MB_A10 MB_A5 F1 G2 H3 H1 MB_DQ6 MB_DQ1 MB_DQ3 MB_DQ4 L3 L2 D3 D1 C2 B1 MB_DQ11 MB_DQ12 MB_DQ9 MB_DQ14 MB_BA1 MB_BA0 B3 F3 F7 E8 B7 A8 MB_DQS0 MB_DQSB0 MB_DQS1 MB_DQSB1 MB_BA2 UDM LDM RFU RFU RFU A9 A12 A7 A3 A1 A10 A5 BA1 BA0 DQ6 DQ1 DQ3 DQ4 DQ11 DQ12 DQ9 DQ14 LDQS LDQS# UDQS UDQS# DQ1 VddL Vdd Vss RFU RFU RFU RFU A9 A12 A7 A3 A1 A10 A5 BA1 BA0 DQ6 DQ1 DQ3 DQ4 DQ11 DQ12 DQ9 DQ14 LDQS LDQS# UDQS UDQS# MB_A13 3 Vss WE# A10 A12 A7 A3 RFU A9 A5 A1 BA1 Vss BA0 CKE DQ3 VddQ LDM Vss DQ11 VddQ UDM Vref VssQ VddQ DQ4 NC VssQ Vdd VssQ DQ6 DQ9 DQ12 Vdd VddQ 2 NC VssQ 1 DQ14 1.8VA UDM LDM MA_A13 MB_DQM1 MB_DQM0 U15 W9751G6IB-25 R7 L1 R3 P3 R2 P2 N2 MA_A9 MA_A12 MA_A7 MA_A3 MA_BA2 M3 M2 N3 F1 G2 H3 H1 MA_DQ6 MA_DQ1 MA_DQ3 MA_DQ4 MA_A1 MA_A10 MA_A5 D3 D1 C2 B1 MA_DQ11 MA_DQ12 MA_DQ9 MA_DQ14 L3 L2 F7 E8 B7 A8 MA_DQS0 MA_DQSB0 MA_DQS1 MA_DQSB1 MA_BA1 MA_BA0 B3 F3 MA_DQM1 MA_DQM0 U9 W9751G6IB-25 1.8VA NC NC NC R8 A2 E2 3 Vss LDM VssQ DQ1 DQ6 VddQ VddL Vdd Vss RFU VddQ RFU A9 A7 A12 A5 A3 A1 WE# A10 Vss BA1 BA0 CKE DQ3 Vref VssQ NC Vdd DQ4 Vss VssQ DQ11 DQ9 VddQ UDM DQ12 Vdd R P N M L K J H G F E D C B A VddQ 2 NC VssQ 1 DQ14 NC NC NC R8 A2 E2 2 4 6 8 J1 Vss Vss Vss Vss Vss 2 4 6 8 8 6 4 2 2 4 6 8 A1 E1 J9 M9 R1 Vdd Vdd Vdd Vdd Vdd Vss Vss Vss Vss Vss A3 E3 J3 N1 P9 A1 E1 J9 M9 R1 Vdd Vdd Vdd Vdd Vdd J1 VddL 7 VssQ 8 DQ8 VddQ DQ13 VssQ DQ0 VssQ CK# A0 A4 A8 NC A2 A6 A11 RFU CS# Vss Vdd ODT Vdd DQ5 VddQ DQ7 LDQS# VddQ VssQ CAS# RAS# 9 DQ15 UDQS# VddQ VssQ VssDL CK DQ2 VddQ LDQS VssQ DQ10 VddQ UDQS R P N M L K J H G F E D C B A DQ8 RAS# VssQ DQ0 VssQ CK# A8 NC RFU A4 A0 CS# A11 A6 A2 CAS# VddQ DQ13 Vss Vdd ODT Vdd DQ5 VddQ DQ7 LDQS# VddQ VssQ VssDL CK DQ2 VddQ LDQS VssQ DQ10 VddQ VssQ UDQS DQ15 8 UDQS# VddQ 7 VssQ 9 A9 C1 C3 C7 C9 E9 G1 G3 G7 G9 VddQ VddQ VddQ VddQ VddQ VddQ VddQ VddQ VddQ VddQ VddL A9 C1 C3 C7 C9 E9 G1 G3 G7 G9 VddQ VddQ VddQ VddQ VddQ VddQ VddQ VddQ VddQ VddQ VssQ VssQ VssQ VssQ VssQ VssQ VssQ VssQ VssQ VssQ VssDL A7 B2 B8 D2 D8 E7 F2 F8 H2 H8 J7 A3 E3 J3 N1 P9 8 6 4 2 A8 A11 WE# A0 A2 A4 A6 ODT RAS# CS# CAS# DQ7 DQ0 DQ2 DQ5 DQ15 DQ8 DQ10 DQ13 Vref CKE CLK CLK# A8 A11 WE# A0 A2 A4 A6 ODT RAS# CS# CAS# DQ7 DQ0 DQ2 DQ5 DQ15 DQ8 DQ10 DQ13 Vref CKE CLK CLK# VssQ VssQ VssQ VssQ VssQ VssQ VssQ VssQ VssQ VssQ VssDL 8 6 4 2 7 5 3 1 A7 B2 B8 D2 D8 E7 F2 F8 H2 H8 J7 7 5 3 1 MB_A0 MB_A2 MB_A4 MB_A6 MB_A8 MB_A11 MB_WEZ P8 P7 K3 MB_CASZ MB_ODT MB_RASZ MB_DQ7 MB_DQ0 MB_DQ2 MB_DQ5 MB_DQ15 MB_DQ8 MB_DQ10 MB_DQ13 M8 M7 N8 N7 K9 K7 L8 L7 F9 G8 H7 H9 B9 C8 D7 D9 B_MVERF MB_CKE MB_MCLK MB_MCLKZ MA_A8 MA_A11 MA_WEZ P8 P7 K3 J2 K2 J8 K8 MA_A0 MA_A2 MA_A4 MA_A6 MA_CASZ MA_ODT MA_RASZ MA_DQ7 MA_DQ0 MA_DQ2 MA_DQ5 MA_DQ15 MA_DQ8 MA_DQ10 MA_DQ13 A_MVERF MA_CKE MA_MCLK MA_MCLKZ M8 M7 N8 N7 K9 K7 L8 L7 F9 G8 H7 H9 B9 C8 D7 D9 J2 K2 J8 K8 C430 1n 100R R71 C433 1n R379 100R Close to DRAM R378 100R Close to DRAM 100R R23 TS_MOCLK 2 TS_MOSTART 2 TS_MOVAL 2 TS_MDO0 TS_MDO1 TS_MDO2 TS_MDO3 TS_MDO4 TS_MDO5 TS_MDO6 TS_MDO7 2,4 TSSTART 35 36 37 38 39 40 41 42 43 44 45 46 47 48 49 50 51 52 53 54 55 56 57 58 59 60 61 62 63 64 65 66 67 68 TS_MDO[7:0] TS_MDO[7:0] 2 TS_MDI[7:0] 2,4 PCM_REG_N TS_MOVAL TS_MOSTART TS_MDO0 TS_MDO1 TS_MDO2 PCM_CD2_N TS_MDI4 TS_MDI5 TS_MDI6 TS_MDI7 TS_MOCLK PCM_RESET PCM_WAIT_N TS_MDI0 TS_MDI1 TS_MDI2 TS_MDI3 PCM_IORD_N PCM_IOWR_N PCM_CD1_N TS_MDO3 TS_MDO4 TS_MDO5 TS_MDO6 TS_MDO7 GND GND CD1# D3 MDO3 D4 MDO4 D5 MDO5 D6 MDO6 D7 MDO7 CE1# CE2# A10 VS1# OE# IORD# A11 IOWR# A9 MISTRT A8 MDI0 A13 MDI1 A14 MDI2 WE# MDI3 READY VCC VCC VPP2 VPP1 MDI4 MIVAL MDI5 MICLK MDI6 A12 MDI7 A7 MOCLK A6 RESET A5 WAIT# A4 INPACK A3 REG# A2 MOVAL A1 MOSTART A0 MDO0 D0 MDO1 D1 MDO2 D2 CD2# WP GND GND CONN1 PCMCIA_CNT EUROPE VCC-PCMCIA FOR GND GND GND GND PCM_D[7:0] PCM_A[14:0] PCM_CD_N PCM_RESET PCM_WAIT_N PCM_REG_N PCM_OE_N PCM_WE_N PCM_IORD_N PCM_IOWR_N PCM_CE_N PCM_IRQA_N 72 71 70 69 1 2 3 4 5 6 7 8 9 10 11 12 13 14 15 16 17 18 19 20 21 22 23 24 25 26 27 28 29 30 31 32 33 34 PCM_D[7:0] 2 PCM_A[14:0] 2 PCM_CD_N 2 PCM_RESET 2 PCM_WAIT_N 2 PCM_REG_N 2 PCM_OE_N 2 PCM_WE_N 2 PCM_IORD_N 2 PCM_IOWR_N 2 PCM_CE_N 2 PCM_IRQA_N 2 PCM_A12 PCM_A7 PCM_A6 PCM_A5 PCM_A4 PCM_A3 PCM_A2 PCM_A1 PCM_A0 PCM_D0 PCM_D1 PCM_D2 PCM_D3 PCM_D4 PCM_D5 PCM_D6 PCM_D7 PCM_CE_N PCM_A10 PCM_OE_N PCM_A11 PCM_A9 PCM_A8 PCM_A13 PCM_A14 PCM_WE_N PCM_IRQA_N VCC-PCMCIA R397 1K 5VA 1 2 PCM_CD2_N 0.1uF C456 PCM_CD1_N R393 1K TSVALID 2,4 TSCLK 2,4 DD40 BAW70 5VA 3 R659 10uF(X5R) C166 L43 60Ω-0603 270R R658 2.2K PCM_CD_N 20 22 23 21 DATA2+ 21 DATA2 SHIELD DATA2DATA1+ DATA1 SHIELD DAT1A23 DATA0+ DATA0 SHIELD DATA0CLK+ CLK SHIELD CLK22 CEC NC SCL SDA DDC/CEC GND +5V POWER 20 HOT PLUG CN32 HDMI HDMI 20 22 23 CN32 21 DATA2+ DATA2 SHIELD DATA2DATA1+ DATA1 SHIELD DAT1ADATA0+ 23DATA0 SHIELD DATA0CLK+ CLK SHIELD CLKCEC 22 NC SCL SDA DDC/CEC GND +5V POWER 20 HOT PLUG 1 2 3 4 5 6 7 8 9 10 11 12 13 14 15 16 17 18 19 1 2 3 4 5 6 7 8 9 10 11 12 13 14 15 16 17 18 19 HDMI3/5V HOTPLUG_3 HDMI_CEC HDMI2/5V HOTPLUG_2 HDMI_CEC DDC3BSCL DDC3BSDA 5.1R 5.1R 5.1R 5.1R 5.1R R615 R616 R618 R609 R619 5.1R R? 5.1R 5.1R 5.1R 5.1R R? R? 5.1R 5.1R 5.1R R? R? R612 R614 5.1R 5.1R R? R? R610 5.1R R600 RX3B1N RX3B0P RX3B2N RX3B1P RX3B2P DDC3BSCL DDC3BSDA RX3BCLKN RX3B0N RX3BCLKP DDC2BSCL DDC2BSDA RX2BCLKN RX2B0N RX2BCLKP RX2B1N RX2B0P RX2B2N RX2B1P RX2B2P 2 HOTPLUG3 R203 10K 4.7K HOTPLUG2 HOTPLUG3R204 2 HOTPLUG2 4.7K Q15 3904 R205 1K 5VA HDMI3/5V HDMI3/5V R? R? 10K HOTPLUG_3 21 1 2 HOTPLUG_2 BAW70 D6 R201 22K Q? 3904 R? 1K 3 HDMI2/5V R202 22K 5VA BAW70 3 RX3B2P RX3B2N RX3B1P RX3B1N RX3B0P RX3B0N RX3BCLKP RX3BCLKN DDC3BSDA DDC3BSCL 1 2 D600 R? 22K HDMI2/5V RX3B2P 2 RX3B2N 2 RX3B1P 2 RX3B1N 2 RX3B0P 2 RX3B0N 2 RX3BCLKP RX3BCLKN DDC3BSDA DDC3BSCL 2 2 2 2 R? 22K 3.3VU RX2B2P 2 RX2B2N 2 RX2B1P 2 RX2B1N 2 RX2B0P 2 RX2B0N 2 RX2BCLKP RX2BCLKN DDC2BSCL DDC2BSDA HDMI_CEC RX2B2P RX2B2N RX2B1P RX2B1N RX2B0P RX2B0N RX2BCLKP RX2BCLKN DDC2BSCL DDC2BSDA 100R R? NC/47K R? 2 2 2 2 RX600 V800AA HDMI_E_CEC HDMI_E_CEC 2 FB104 10Ω-0402 FB103 10Ω-0402 11 12 13 14 Pr Pb Y CON15 C69 10p VGA-VS VGA-HS VGA 5 10 4 9 3 8 2 7 1 6 J5 6 3 2 5 4 1 VGA-B R101 C68 10p R112 C65 10p 10K 10K C900 10P SCART 21 20 19 18 17 16 15 14 13 12 11 10 9 8 7 6 5 4 3 2 1 C901 10P LINEOUTL AV1-R LINEOUTR SC1_FSO Pb AV1-L Y Pr AV1-V AVOUT-V C902 10P R231 2.2K R232 75R LINEOUTR 9 LINEOUTL 9 R229 10K RX52 V800AA 100R R105 1u 1u SC1_FSO 0-2v: TV Mode 5-8v: 16:9 AV 9.5-12v: 4:3 AV R115 12K C66 C63 RX62 V800AA RX61 V800AA 100R R103 R106 12K 68R C59 68R C60 68R C61 R99 R98 R96 33R C51 33R C96 R130 R132 33R C46 C97 R131 R138 0R-0402 47n 47n 47n 47n 47n 47n 1n SC1_FS 2 RX60 V800AA SC1_FB 2 Keep AGND trace with signal Keep spacing for L/R C67 10p VGA-R VGA-G RX63V800AA RX64V800AA ISP-RXD 2 ISP-TXD 2 红 白 黄 5 GND RGB1_R- 2 RGB1_G- 2 RGB1_B- 2 RGB1_R+ 2 RGB1_B+ 2 RGB1_G+ 2 6 4 L R 3 2 CVBS GND 1 GND AV-JACK-3 2 2 RGB1_SOG 2 CN24 VGA-Rin 2 VGA-Lin 2 VGA_VSYNC VGA_HSYNC VGA-R VGA-B VGA-G LINEOUTR LINEOUTL AVOUT-V FB100 10Ω-0402 FB101 10Ω-0402 FB102 10Ω-0402 C272 10P C271 10P RX59 V800AA AVOUT-V AV1-R AV1-L C932 100pF 75R CN6 R62 33R C57 33R C58 68R C90 68R C91 68R C92 R91 R92 R117 R114 R111 75R C33 10P C26 10P R36 R32 R63 75R R59 R209 120R 10K 10K 1 RGB0_RIN- R38 12K R34 12K R54 10k 10uF 2.5V R66 10K C28 1u 1u SPDIFO 2 AV1-Rin 2 AV1-Lin 2 CVBS_OUT 2 L85 600Ω-500mA-0603 C22 C94 0.1uF C41 2倍放大 2 RGB0_GIN- 2 VIDEO_OUT L14 56Ω-200mA-0402 2 RGB0_BIN- 2 RGB0_RIN+ RGB0_BIN+ 2 RGB0_GIN+ 2 RGB0-SOG 2 2010-11-24 DCN R296由330R改为120R Vp-p=558mV 47n 47n 47n 47n 47n 47n 1n CLOSED TO MSD309 R208 75R 5V_TUNER Q14 R56 330R C245 10P 3904 1 3SPDIFOUT 2 1 3906 Q32 33R C56 C62 R90 R97 0R-0402 SPDIF Output C270 10P SPDIF/立 R110 75R 15 CON7 FULL SCART 25 R129 75R 红 白 黄 Y 2 4 2 3 4 5 6 GND L GND R CN12 7pin-2.0mm DVD C215 10P 1 2 3 4 5 6 7 DVD POWER R30 75R 4 3 2 1 C16 SIDE_AURIN R186 1K C145 10p C147 10p C904 10P C130 10P OFF IR_in 2 C905 10P SIDE_AL R216 NC/75R SIDE_AR R179 R172 12K 1u 1u DVD_AR DVD_AL C135 C134 C29 C23 AUIDO_R AUIDO_L 1u 1u AUIDO_R AV2-Rin 2 AV2-Lin 2 2 AUIDO_L 2 SIDE_CVBS 2 COMP_R- 2 COMP_B- 2 COMP_Y- 2 COMP_R+ 2 COMP_B+ 2 COMP_Y+ 2 COMP_SOG+ 2 47R C133 R181 12K 47n DVD_CVBS 2 Keep AGND trace with signal Keep spacing for L/R R197 12K SIDE_CVBS 2011-8-16 改善AV干扰 删除R295,C225 C149 2.2u 68R C88 47n 47n 68R C81 R100 47n R102 C48 47n 47n 33R R83 C45 1n 47n 68R C76 33R R81 C43 C49 R104 33R R79 0R-0402 R84 R211 12K R182 100R R183 75R C131 10P R173 100R RX51 V800AA R193 10K RX54 V800AA R198 10K RX57 V800AA 2 ON R247上拉改下拉 改善开机瞬间尖峰 R185 4.7K DVD_ON/OFF 0x1E98 bit10 C142 10p C132 10P AV1-Vin+ 2 C216 10P C903 10P C151 NC/10p R184150R R184150R 5VA 47n PRIN PBIN YIN SIDE_AULIN SIDE_AVIN R28 33R 6 CN11 4pin-2.0mm 1 GND CVBS Pr GND 5 Pb GND 3 AV-JACK-3 AV1-V CN22 红 蓝 绿 GND 1 CN16 YPbPr-JACK-3 R241 75R FB105 10Ω-0402 FB106 10Ω-0402 8 R109 22K 16 PC Audio Input 24 R86 75R R108 22K R128 75R R254 75R VGA INPUT 7 R87 75R 2 3 17 R88 75R 3 2 R242 75R USB-101B 5VA 2 USB1_DETE 2 USB1_CTL ON 1E56 bit4 OFF FOR LED USB 1 2 3 4 6 USB1_DETE USB1_CTL 3 4 C226 0.1uF(X7R) 5 J1 10K R299 5 10K R298 5VUSB1 FLG EN IN OUT U16 MC2110HNTR RX53 1 C231C232 10uF(X5R) 10uF(X5R) C155 10P USB_DM0 USB_DP0 RX58 FB107 10Ω-0402 FB108 10Ω-0402 GND 2 V800AA USB Interface V800AA C156 10P C229 10P 5VUSB1 USB_DM0 2 USB_DP0 2-
 1
1
-
 2
2
-
 3
3
-
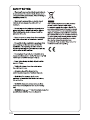 4
4
-
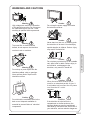 5
5
-
 6
6
-
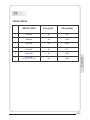 7
7
-
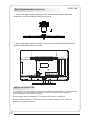 8
8
-
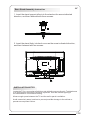 9
9
-
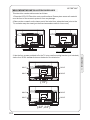 10
10
-
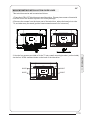 11
11
-
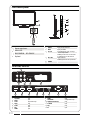 12
12
-
 13
13
-
 14
14
-
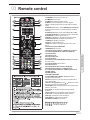 15
15
-
 16
16
-
 17
17
-
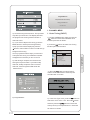 18
18
-
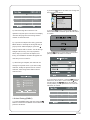 19
19
-
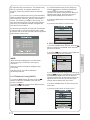 20
20
-
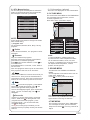 21
21
-
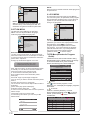 22
22
-
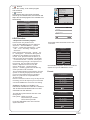 23
23
-
 24
24
-
 25
25
-
 26
26
-
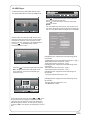 27
27
-
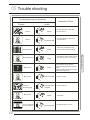 28
28
-
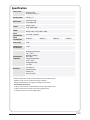 29
29
-
 30
30
-
 31
31
-
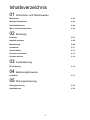 32
32
-
 33
33
-
 34
34
-
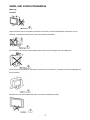 35
35
-
 36
36
-
 37
37
-
 38
38
-
 39
39
-
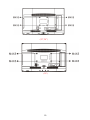 40
40
-
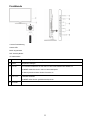 41
41
-
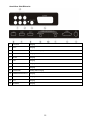 42
42
-
 43
43
-
 44
44
-
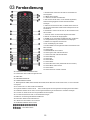 45
45
-
 46
46
-
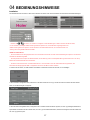 47
47
-
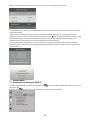 48
48
-
 49
49
-
 50
50
-
 51
51
-
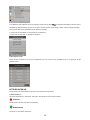 52
52
-
 53
53
-
 54
54
-
 55
55
-
 56
56
-
 57
57
-
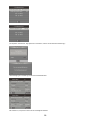 58
58
-
 59
59
-
 60
60
-
 61
61
-
 62
62
-
 63
63
-
 64
64
-
 65
65
-
 66
66
-
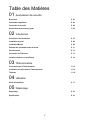 67
67
-
 68
68
-
 69
69
-
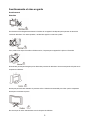 70
70
-
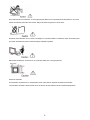 71
71
-
 72
72
-
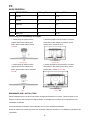 73
73
-
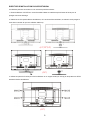 74
74
-
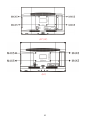 75
75
-
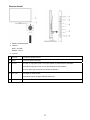 76
76
-
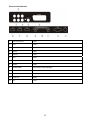 77
77
-
 78
78
-
 79
79
-
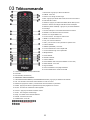 80
80
-
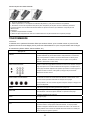 81
81
-
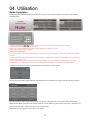 82
82
-
 83
83
-
 84
84
-
 85
85
-
 86
86
-
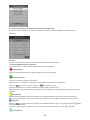 87
87
-
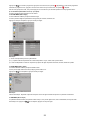 88
88
-
 89
89
-
 90
90
-
 91
91
-
 92
92
-
 93
93
-
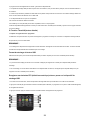 94
94
-
 95
95
-
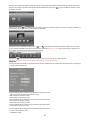 96
96
-
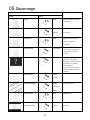 97
97
-
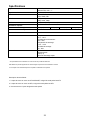 98
98
-
 99
99
-
 100
100
-
 101
101
-
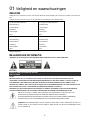 102
102
-
 103
103
-
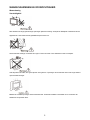 104
104
-
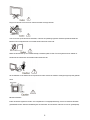 105
105
-
 106
106
-
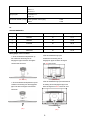 107
107
-
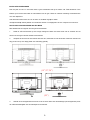 108
108
-
 109
109
-
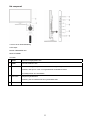 110
110
-
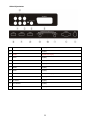 111
111
-
 112
112
-
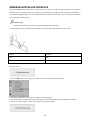 113
113
-
 114
114
-
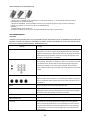 115
115
-
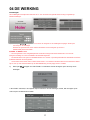 116
116
-
 117
117
-
 118
118
-
 119
119
-
 120
120
-
 121
121
-
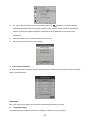 122
122
-
 123
123
-
 124
124
-
 125
125
-
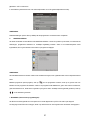 126
126
-
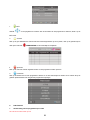 127
127
-
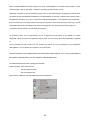 128
128
-
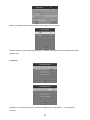 129
129
-
 130
130
-
 131
131
-
 132
132
-
 133
133
-
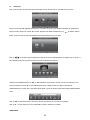 134
134
-
 135
135
-
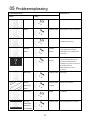 136
136
-
 137
137
-
 138
138
-
 139
139
-
 140
140
-
 141
141
-
 142
142
-
 143
143
-
 144
144
-
 145
145
-
 146
146
-
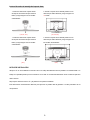 147
147
-
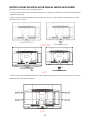 148
148
-
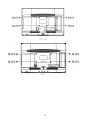 149
149
-
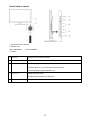 150
150
-
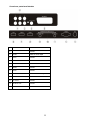 151
151
-
 152
152
-
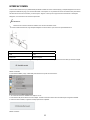 153
153
-
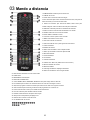 154
154
-
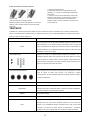 155
155
-
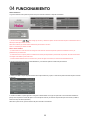 156
156
-
 157
157
-
 158
158
-
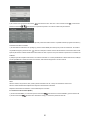 159
159
-
 160
160
-
 161
161
-
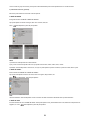 162
162
-
 163
163
-
 164
164
-
 165
165
-
 166
166
-
 167
167
-
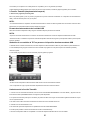 168
168
-
 169
169
-
 170
170
-
 171
171
-
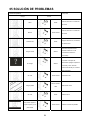 172
172
-
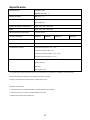 173
173
-
 174
174
-
 175
175
-
 176
176
-
 177
177
-
 178
178
-
 179
179
-
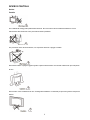 180
180
-
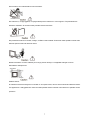 181
181
-
 182
182
-
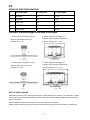 183
183
-
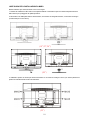 184
184
-
 185
185
-
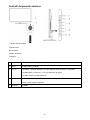 186
186
-
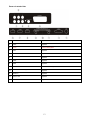 187
187
-
 188
188
-
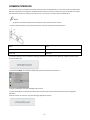 189
189
-
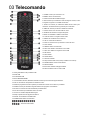 190
190
-
 191
191
-
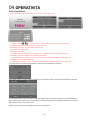 192
192
-
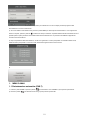 193
193
-
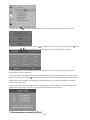 194
194
-
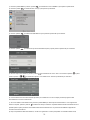 195
195
-
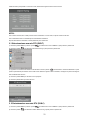 196
196
-
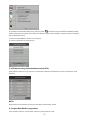 197
197
-
 198
198
-
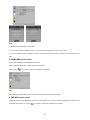 199
199
-
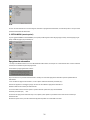 200
200
-
 201
201
-
 202
202
-
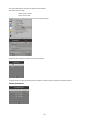 203
203
-
 204
204
-
 205
205
-
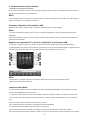 206
206
-
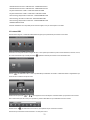 207
207
-
 208
208
-
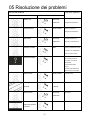 209
209
-
 210
210
-
 211
211
-
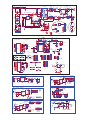 212
212
-
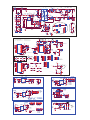 213
213
-
 214
214
-
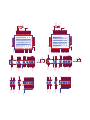 215
215
-
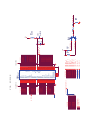 216
216
-
 217
217
-
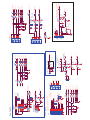 218
218
-
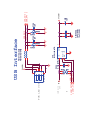 219
219
-
 220
220
-
 221
221


Haier LET19T1000H Manual de usuario
- Categoría
- Televisores LCD
- Tipo
- Manual de usuario
- Este manual también es adecuado para
en otros idiomas
- français: Haier LET19T1000H Manuel utilisateur
- italiano: Haier LET19T1000H Manuale utente
- English: Haier LET19T1000H User manual
- Deutsch: Haier LET19T1000H Benutzerhandbuch
- Nederlands: Haier LET19T1000H Handleiding
Artículos relacionados
-
Haier LE40B650CF El manual del propietario
-
Haier LEY22T1000HF Manual de usuario
-
Haier LE24G610CF Manual de usuario
-
Haier LE24M600C Manual de usuario
-
-
-
Haier LE29C810C Manual de usuario
-
-
-
Haier LET19C600F Manual de usuario
Otros documentos
-
Lenco TFT-920 El manual del propietario
-
Nevir NVR-7402-29HD-B Manual de usuario
-
SPEEDLINK DVD Remote Control Guía del usuario
-
Philips 21HT3504/01 Manual de usuario
-
-
-
OK. OLE 24450-B DVD Manual de usuario
-
dji Go Guía de inicio rápido
-
Work-pro PA 25 Manual de usuario
-
 AmazonBasics AZSW5T1A-4K2K Manual de usuario
