Dynatrap DT1210 El manual del propietario

Tipo
El manual del propietario

El Dynatrap DT1210 es una trampa para insectos para todo clima que puede usarse tanto en interiores como en exteriores, incluso bajo la lluvia. Utiliza luz ultravioleta y CO2 para atraer insectos, luego los atrapa en una base con mosquitero donde se deshidratan y mueren. La trampa es fácil de limpiar y tiene una jaula de gran capacidad para contener muchos insectos. También es resistente a la intemperie y se puede usar en cualquier época del año.

El Dynatrap DT1210 es una trampa para insectos para todo clima que puede usarse tanto en interiores como en exteriores, incluso bajo la lluvia. Utiliza luz ultravioleta y CO2 para atraer insectos, luego los atrapa en una base con mosquitero donde se deshidratan y mueren. La trampa es fácil de limpiar y tiene una jaula de gran capacidad para contener muchos insectos. También es resistente a la intemperie y se puede usar en cualquier época del año.

LIMITED WARRANTY
PARTS & ACCESSORIES AVAILABLE
PART DESCRIPTION
41050 7-Watt Replacement Fluorescent Bulb (1 piece)
41052 Fan Blade and DC Motor Ultra-Long Life Replacement
41053 Retaining Cage
41061 Large Capacity Net
(to be used instead of the Retaining Cage, suitable for extra large catch performance)
A000-335
Dynamic Solutions Worldwide, LLC
12247 W. Fairview Ave. Milwaukee, WI 53226
Phone: 414-431-2819
Toll free: 1-877-403-TRAP (8727)
Toll free fax: 877-403-3293
Visit us online at www.dynatrap.com
© Dynamic Solutions Worldwide, LLC
SAVE THESE INSTRUCTIONS
DYNAMIC warranties to the original purchaser that this product is free from defective materials and
workmanship. This warranty is limited to remedy any defective part for a period of one year from date of
original date of purchase. Retain your original receipt as proof of purchase. This warranty does not apply
to the light bulb, nor to, in our judgment, misuse or abuse. If this unit has been altered, no warranty is in
force. This warranty does not apply if this unit is purchased outside the United States, Canada and Mexico.
In no case shall DYNAMIC be liable for any accidental, punitive, consequential, or any other damages of
any kind for breach of this or any other warranty, expressed or implied, whatsoever. Some states do
not allow limitation on how long an implied warranty lasts, so the above limitation or exclusion may not
apply to you. This warranty gives you specific legal rights, and you may also have other rights that vary
from state to state.
Problem:Possible cause:Correction:
Bulbs do not illuminate
and fan does not spin.1. No electrical power 1. Check plug and receptacle and fuse or circuit breaker.
2. Check to make sure power is switched to the ON
position.
Bulb illuminates, but fan
does not spin.1. Shorted fan1. UNPLUG UNIT: Examine fan to see that it is free from
foreign material, dirt or build-up of dead insects. Clean unit as
in “CLEANING section.
Fan spins, but bulb does
not illuminate 1. Bulb not seated
properly
2. Burnt out bulb
1. Check all sockets for proper bulb seating and alignment.
2. Replace bulb if needed following instructions under
“Replacing Bulbs”.
TROUBLESHOOTING
CLEANING
Frequent cleaning will prolong the life of the unit, ensure fire prevention and provide for more efficient operation.
1. Be sure to clean the unit once per week
2. Switch the unit off and unplug before cleaning
3. For weekly cleaning, remove the screw securing the retaining cage and then twist the cage clockwise. Remove the damper
by grasping the crossbar near the edge of the damper. Pull up firmly. Remove any buildup from the inside of the
retaining cage and fan with a brush (included). Replace damper, snap firmly into place.
4. For major cleaning, remove the four screws securing the fan housing to the light housing. After removing the screws,
gently pull the fan housing away from the light housing. Using a soft brush, remove dirt and debris from the light housing.
Once the cleaning process has been completed, align the screw holes in the fan housing with the screw holes in the lighting
unit and tighten the screws to the base of the lighting unit.
5. When replacing the retaining cage – DO NOT press/push against the screen windows.
INSTALLATION & OPERATING INSTRUCTIONS
1. Unpack unit. Save carton for off-season storage (if needed).
2. Pull the cord tight through the pole stand. Turn base on its side and insert bottom threaded plastic piece
into base, connecting to the threaded plastic cap. Twist threaded plastic cap clockwise to tighten. Complete
installation by aligning upper and lower support tube and inserting the bar sections. (For more detailed
instructions, please refer to assembly guide)
3. Plug cord into an outdoor outlet or UL listed extension cord as described in “IMPORTANT SAFETY
INSTRUCTIONS”. Turn power switch to “ON” position. The switch is located under the rain cover.
4. Small holes in the lid of the unit are designed to collect rain water automatically and fill the water tray.
If more water is needed, carefully fill tray ¾ full using a small container (do not use water hose as it may
splash too much water inside the trap). Check once a week or as needed.
5. For best catch results leave unit on at all times, except when cleaning or servicing.
6. Catch rate activity will be higher at night. For best catch results it is recommended to keep the unit away
from competing light sources. Intended for household use only.
7. It is recommended to place the unit at least 10 to 20 feet away from where people will be sitting.
8. This unit is all-weather resistant - designed for outdoor use including rainy conditions.
REPLACING BULB
The light bulb life expectancy is approximately 3,000 hours (or about 4 months), and should be replaced regularly to ensure
optimal UV effectiveness. Even though the bulb’s light may be visible to you, its ability to attract insects diminishes over time.
1. Turn power switch to “off” position. UNPLUG UNIT, and allow bulb to cool before replacing.
2. Remove the screw securing the retaining cage and then remove the retaining cage by twisting the cage clockwise. Turn the
unit upside down.
3. Remove the four screws securing the fan housing to the light housing. After removing the screws, gently pull the fan housing
away from the light housing. Using a soft brush, remove dirt and debris from the light housing. Once the cleaning process
has been completed, untighten the screw securing the base of the light bulb to the light housing. Slide the metal bracket to
the side. Cover the bulb with a cloth to protect your finger and hand. Grasp the bulb (with your hand and fingers protected
by the cloth) and gently pull the bulb from the socket.
4. Remove any debris from the lamp socket with a brush before inserting the new bulb. Replace the metal plate over the base
of the bulb and tighten the retaining screw.
5. Align the screw holes in the fan housing with the screw holes in the lighting unit and tighten the screws to the base of the
lighting unit.
6. Replace the retaining cage at the bottom of the unit.
Replacement fluorescent bulbs can be found at your local retailer or
can be ordered directly from DynaTrap by visiting www.dynatrap.com
HOW THE DYNATRAP® INSECT TRAP WORKS
Flying insects are attracted to the unit by the UV light and CO2 that is
generated by the photo-catalysis between the UV lamps and the special
TiO2 coating. The fan then pulls the insects into the screened base,
trapping them until they dehydrate and die. The base can be removed,
allowing the contents to be periodically emptied into the trash. The
see-through screen shows the insects trapped in the compartment,
alerting you when the cage needs to be emptied.
IMPORTANT SAFETY INSTRUCTIONS
OWNERS MANUAL
MODEL: DT1210
Thank you for purchasing this
DYNATRAP® Insect Trap!
Please read these instructions before using the DynaTrap® Insect Trap and keep for future reference.
1. Always turn unit off and disconnect plug before servicing, cleaning, or changing bulb.
2. Do not position the unit near heat, gas, oil or other flammable materials.
3. Mount product out of reach from children.
4. Never operate this product if it has a damaged cord or plug, if it is not working properly, if it has been dropped or
damaged, or if it has been dropped into water.
5. This product is equipped with 2-conductor cord and 2-prong polarized plug as a safety feature. This plug will fit in a
polarized outlet only one way. If the plug does not fully fit in the outlet, then reverse the plug. If it still does not fit,
then contact a qualified electrician. To reduce the risk of electrical shock, only plug into a properly installed outlet.
Do not attempt to defeat this safety feature.
6. Do not insert fingers or any foreign objects into the unit while it is connected to an electrical outlet.
7. Collected insects within the unit may contribute to fire, so clean insects from the unit frequently.
8. Do not clean this product with water spray. Do not place where it can fall into water, or near flammable materials.
9. Do not touch fan while in motion.
10. Do not abuse cord—never carry or hang unit by cord or yank it to disconnect from receptacle. Keep cord away from heat,
oil, or sharp edges.
11. Use only extension cords that are clearly marked "Suitable for Use with Outdoor Appliances" and that have plug and
receptacles that match the product plug. Replace all damaged cords.
WARNING, When using electric appliances, basic precautions should always be followed, including the following:
– To disconnect, turn all controls to the off (“O”) position, then remove plug from outlet.
– Unplug from outlet when not in use and before servicing or cleaning.
– To reduce the risk of electrical shock, do not put appliance in water or other liquid.
– This appliance is provided with double insulation. Use only identical replacement parts.
– Connect only to a circuit that is protected by a ground-fault circuit-interrupter (GFCI).
See instructions for Servicing of Double-Insulated Appliances.
In a double-insulated appliance, two systems of insulation are provided instead of grounding. No grounding means is provided
on a double-insulated appliance, nor should a means for grounding be added to the appliance. Servicing of a double-insulated
appliance requires extreme care and knowledge of the system, and should be done only by qualified service personnel.
Replacement parts for a double-insulated appliance must be identical to those parts in the appliance.
INSTRUCTIONS FOR DOUBLE-INSULATED, CORD-CONNECTED APPLIANCES:
IMPORTANT SAFETY INSTRUCTIONS
This product may be covered by one or more U.S. patents
or pending patent applications. See www.dynatrap.com/patents
WATER
TRAY
TiO2 COATED
SURFACE
ON/OFF
SWITCH
UV BULB
AUTOMATIC
DAMPER
RETAINING
CAGE
FAN
ALL-WEATHER
CONSTRUCTION
INDOOR/OUTDOOR
RAIN OR SHINE
GARANTIA LIMITADA
PARTES & ACCESORIOS DISPONIBLES
PARTE DESCRIPCCION
41050 Foco Fluorescente de Repuesto de 7 watts (1 pieza)
41052 Repuesto de Aspas del Ventilador y Motor de Larga Duración
41053-DT1050 Cámara de Recolección
41061 Red de Atrapamiento de Larga Capacidad (para ser usada en lugar de la Cámara de Recolección,
especialmente cuando se necesite capturar grandes cantidades).
Dynamic Solutions Worldwide, LLC
12247 W. Fairview Ave. Milwaukee, WI 53226
Teléfono: 414-431-2819
Llamada Gratis: 1-877-403-TRAP (8727)
Fax Gratis: 877-403-3293
Visítenos en nuestra página web www.dynatrap.com
© Dynamic Solutions Worldwide, LLC
GUARDE ESTAS INSTRUCCIONES
DYNAMIC garantiza al comprador original que este producto esta libre de defectos de materiales y
mano de obra. Esta garantía esta limitada a remediar cualquier parte defectuosa durante un periodo de un
año a partir de la fecha de compra original. Retenga su recibo original como prueba de compra. Esta garantía
no es aplicable ni al foco, ni al maltrato o uso inapropiado, a nuestro juicio. Si esta unidad es alterada, se
anula la garantía. Esta no es aplicable a esta unidad si fue comprada fuera de los Estados Unidos,
excluyendo Canadá y México. DYNAMIC no será responsable en ningún caso de daños incidentales,
punitivos, derivados o daños de ningún otro tipo por incumplimiento de esta o de cualquier otra
garantía, ya sea expresa o impcita. Algunos estados no permiten limitacn con respecto a la duración
de una garantía impcita y, por lo tanto, la limitación o exclusión anterior podría no serle aplicable. Esta
garantía le otorga derechos legales específicos y usted puede tener además otros derechos que varian de
un estado a otro.
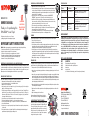
Problema: Posible Causa: Corrección:
Los focos no alumbran y
el ventilador no gira. 1. No hay corriente
eléctrica. 1. Revise la conexión, el contacto, o el breaker ectrico.
2. Asegúrese de que el switch de prendido esta en la posición
“on”.
Los focos prenden, pero el
ventilador no gira. 1. El ventilador esta en
corto. 1. DESCONECTE LA UNIDAD: Examine el ventilador para ver si
esta libre de suciedad o insectos muertos. Limpie de acuerdo
a la sección de “Limpieza”.
El ventilador gira, pero los
focos no prenden. 1. Los focos no están
firmemente colocados.
2. Los focos están
fundidos.
1. Revise que los focos estén firmemente colocados en la base
del foco.
2. Cambie los focos si es necesario, de acuerdo a las instrucciones
bajo “Reemplazo del foco”.
IDENTIFICACION Y RESOLUCION DE PROBLEMAS
LIMPIEZA
Limpieza frecuente prolongara la vida útil de la unidad, garantizara la prevención de incendios, y la unidad funcionara en
forma más eficiente.
1. Asegúrese de limpiar la unidad al menos cada semana.
2. Apague la unidad y desenchufe antes de limpiarla.
3. Para la limpieza semanal, remueva la cámara de recolección simplemente girando en la dirección y aspas del ventilador
con una brocha.
4.
Para limpieza profunda, remueva los cuatro tornillos que sujetan la sección del ventilador a la cámara de luz. Después de
remover los tornillos, remueva la sección del ventilador de la sección de la cámara de luz. Usando una brocha suave, remueva
cualquier suciedad en la sección de la cámara de luz. Una vez que el proceso de limpieza ha sido completado, aliene los
agujeros de los tornillos a la sección del ventilador y a la sección de la cámara de luz y coloque de nuevo lo tornillos.
5. Cuando abra la cámara de recolección, tenga cuidado de no presionar la malla de alambre ya que esto la dañaría
INSTALACION E INSTRUCCIONES DE OPERACION
1. Desempaque la unidad. Guarde la caja para que re-use fuera de temporada.
2. Como armar la base: jale firmemente el cable através del tubo de la base. Inserte el tubo superior e
inferior de la base y apriete el botón de resorte para asegurase que ambos tubos son conectados
seguramente. Inserte la pieza de plástico del conector debajo de la base. Alineé el tubo y conecte
usando la tuerca de plástico. Coluque el cable en la base. (Para instrucciones más detalladas,
por favor vea la guía de ensamblaje).
3. Enchufe el cable a un receptáculo a cable de aprobado por UL, tal como se describe en “INSTRUCCIONES
IMPORTANTES DE SEGURIDAD”.
4. Sujete la parte superior de la unidad y gírela en la posición “ON”. Cuando escuche un “click”,
la unidad ha sido prendida.
5. Para mejores resultados de captura, deje la unidad prendida en todo momento ,
excepto durante su limpieza o su mantenimiento.
6. La actividad de atrapamiento será mayor durante la noche. Para mejores resultados, es recomendable
que se coloque la unidad lejos de otras fuentes de luz que compitan con la trampa. Este aparato esta
diseñado únicamente para uso solo en hogares.
7. Es recomendable que se coloque la unidad de 20 a 40 pies de distancia de donde se encuentran las personas.
8. Esta unidad está diseñada para todo tipo de climas, incluyendo condiciones lluviosas.
REEMPLAZO DEL FOCO
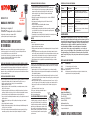
COMO FUNCIONA LA TRAMPA DE INSECTOS DYNATRAP®
La vida de uso de los focos es de aproximadamente 3,000 horas (o cerca de 4 meses), y deben de reemplazarse después de
este tiempo para mantener la eficacia óptima de la luz ultravioleta. Aun cuando usted vea la luz de los focos, su capacidad
para atraer insectos disminuye con el tiempo.
1. Apague la unida en la posición “off” y Desconecte El Cable, permita que los focos se enfríen antes de cambiarlos.
2. Remueva el tornillo que sujeta la canasta y después remueva las canasta girándola en contra de las manecillas del reloj.
Voltee la unidad de cabeza hacia abajo.
3. Remueva los cuatro tornillos que sujetan la sección del ventilador a la cámara de luz. Después de remover los tornillos,
remueva la sección del ventilador de la sección de la cámara de luz. Desatornille el pequeño soporte de metal que sujeta el
foco y con cuidado jale el foco de su base.
4. Remueva cualquier suciedad de la base del foco con una brocha suave antes de insertar el foco nuevo. Coloque el foco
nuevo en la base, y una vez que el foco ha sido cambiado y coloque el pequeño soporte de metal para sujetar el foco.
5. Aliene los agujeros de los tornillos a la sección del ventilador y a la sección de la cámara de luz y ponga de nuevo
los tornillos.
6. Coloque la cámara de recolección de nuevo en su lugar.
El foco de repuesto, lo puede adquirir en la tienda donde compró este
producto, o bien directamente en DynaTrap.
Visítenos en línea en www.dynatrap.com
Los insectos voladores son atraídos a la unidad por medio de la luz y el
CO2 (dióxido de carbono) que es generado por la foto-catálisis que sucede
entre la capa de TiO2 (dióxido de titanio) y los focos ultravioletas; luego
el ventilador los succiona hacia una cámara de recolección donde quedan
atrapados hasta que se deshidratan y mueren. La cámara de recolección
puede ser removida, de esta forma se pueden periódicamente vaciar los
contenidos en la basura. Las rejillas en la cámara de recolección permiten
ver lo que ha sido atrapado, alertando de esta manera la siguiente vez
que se necesita vaciar.
INSTRUCCIONES IMPORTANTES
DE SEGURIDAD
MANUAL DEL PROPIETARIO
MODELO: DT1210
¡Gracias por comprar el
DYNATRAP® trampa de insectos voladores!
Sírvase leer estas instrucciones antes de usar el trampa electrónico de insectos DynaTrap® y guárdelas como referencia futura.
1. Siempre desenchufe la unidad antes de darle servicio, limpiarla, cambiar el foco, cuando no este en uso, etc.
2. No coloque este producto cerca de fuentes de calor, gas, aceite u otros materiales inflamables.
3. Manténgase alejado del alcance de los niños.
4. Nunca opere este producto si su cable de corriente ha sido dañado, si no esta trabajando correctamente, si ha caído o
dañado, o si ha sido tirado en agua.
5. Esta producto esta equipado con un cable de 2 conductores y un enchufe de clavijas para calzar en el tipo de tomacor-
rientes adecuado. Para reducir el riesgo de choque eléctrico, solo enchúfelo en un receptáculo instalado correctamente.
6. No meta los dedos ni objetos extraños en la unidad mientras esta conectada a un receptáculo eléctrico.
7. Los insectos recolectados dentro de la unidad podrían contribuir a un incendio; por lo tanto, limpie los insectos muertos de
la unidad con frecuencia.
8. No limpie este producto rociándolo con agua. No lo coloque donde pueda caerse al agua, ni cerca de materiales
inflamables.
9. No toque el ventilador cuando este en movimiento.
10. No maltrate el cable-nunca transporte la unidad por el cable ni tire del mismo para desenchufarla. Mantenga el cordón
lejos del calor, el aceite, o de bordes afilados.
11. Use sólo cables de extensión que están claramente marcados "Adecuado para usarse en aparatos al aire libre" y que
tienen enchufe y receptáculos que coinciden con el enchufe del producto. Reemplace todos los cables dañados.
CUIDADO, Cuando use aparatos eléctricos, se deben de seguir precauciones básicas, incluyendo lo siguiente:
– Para desconectar, apague todos los controles en la posición (“0”), luego, remueva la clavija del enchufe eléctrico.
– Desconecte del enchufe cuando no este en uso y antes de darle servicio.
– Para reducir el riesgo de choque eléctrico, no ponga el aparato en agua o cualquier otro líquido.
– Este aparato esta proveído con aislado doble. Use solo con partes de repuesto idénticas.
Vea instrucciones para Servicio de Aparatos de Doble Aislado.
En un aparato con aislado doble, dos sistemas de aislado son proveídos en lugar de tierra. No manera de hacer tierra es
proveído en un aparato de doble aislado, ni tampoco significa que la tierra del aparato debe de ser añadida. El servicio de
mantenimiento eléctrico de un aparato con doble aislado requiere de extremo cuidado y conocimiento del sistema, y debe
únicamente de ser dado por personal calificado. Las partes de repuesto de aparatos con doble aislado deben de ser idénticas a
los de las partes originales del aparato.
INSTRUCCIONES PARA APARATOS DE DOBLE AISLADO, APARATO CONECTADO CON CABLE:
INSTRUCCIONES IMPORTANTES DE SEGURIDAD
Este producto puede estar cubierto por una o más patentes de EE.UU.
o aplicaciones pendientes de patente. Ver www.dynatrap.com/patents
SUPERFICIE
CON CAPA
DE TiO2
SWITCH PARA
PRENDER O
APAGAR
FOCO
ULTRA-
VIOLETA
COMPUERTAS
AUTOMÁTICAS
BANDEJA
PARA
AGUA
CAMARA DE
RECOLECCION
VENTILADOR
CONSTRUCCIÓN PARA
TODO TIEMPO
INTERIOR / EXTERIOR
LLUEVA O TRUENE
  • Page 1 1
  • Page 2 2

Dynatrap DT1210 El manual del propietario

Tipo
El manual del propietario

El Dynatrap DT1210 es una trampa para insectos para todo clima que puede usarse tanto en interiores como en exteriores, incluso bajo la lluvia. Utiliza luz ultravioleta y CO2 para atraer insectos, luego los atrapa en una base con mosquitero donde se deshidratan y mueren. La trampa es fácil de limpiar y tiene una jaula de gran capacidad para contener muchos insectos. También es resistente a la intemperie y se puede usar en cualquier época del año.

En otros idiomas