
5. Catch rate activity will be higher at night. For best catch results it is recommended to keep the unit away from
competing light sources.
6. It is recommended to place the unit at least 20 to 40 feet away from where people will be sitting.
7. This unit is all-weather resistant - designed for outdoor use including rainy conditions.
Intended for household and commercial, indoor and outdoor use.
8. To reduce the risk of electric shock, this appliance has a polarized plug (one blade is wider than the other).
This plug will fit in a polarized outlet only one way. If the plug does not fit fully in the outlet, reverse the plug.
If it still does not fit, contact a qualified electrician to install the proper outlet. Do not change the plug in any way.
9. SERVICING OF DOUBLE-INSULATED APPLIANCES - In a double-insulated appliance, two systems of insulation are
provided instead of grounding. No grounding means is provided on a double-insulated appliance, nor should a
means for grounding be added to the appliance. Servicing of a double-insulated appliance requires extreme care
and knowledge of the system and should be done only by qualified service personnel. Replacement parts for a
double-insulated appliance must be identical to those parts in the appliance. The symbol must be identical to those
parts in the appliance. A double-insulated appliance is marked with the words “DOUBLE INSULATION”,
“DOUBLE-INSULATED” or the symbol:
CLEANING
Frequent cleaning will prolong the life of the unit, ensure fire
prevention and provide for more efficient operation.
1. Be sure to clean the unit once per week.
2. To clean, hold the switch on the revolving rotation door and
twist housing to the “OFF” position. After hearing the “click,”
the machine is turned off. Unplug the unit.
3. For weekly cleaning, twist the cage clockwise and remove any
buildup from the inside of the retaining cage and fan with the
included cleaning brush.
4. For major cleaning, remove the screw securing the fan housing
to the light housing (A), and gently twist to separate. Do not
disconnect wires. Using the cleaning brush, remove dirt and
debris from the fan housing. Once the cleaning process has
been completed, tuck the wires into the channel of the fan
housing (D). Align the screw holes and place the light housing
on top of fan housing. Secure with a click and tighten the screw
to the base of the light housing.
IMPORTANT: When replacing the retaining cage –
DO NOT press/push against the screen windows.
5. Clean prior to off-season storage.
REPLACING BULB Replace with DynaTrap
®
bulb #41050
(or equivalent G24 Type - 56V/7W bulb)
The lightbulb life expectancy is approximately 3,000 hours (or about
4 months), and should be replaced regularly to ensure optimal UV
effectiveness. Even though the bulb’s light may be visible to you, its
ability to attract mosquitoes diminishes over time.
1. Hold the switch on the revolving rotation door and turn it to the
“POWER OFF” position. UNPLUG UNIT, and allow bulb to cool
before replacing.
2. Remove the screw securing the fan housing to the light housing
(A), and gently twist to separate carefully, do not disconnect
wires. Loosen the screw securing the metal bracket
securing the light bulb (B) and remove the metal bracket.
Cover the bulb with a cloth to protect your fingers and hand.
Grasp the bulb (with your hand and fingers protected by the
cloth) and gently pull the bulb from the socket (C).
3. Remove any debris from the lamp socket with cleaning brush.
Insert new bulb. Reposition the metal bracket over the base of
the bulb and tighten the screw. Make sure to tuck the wires into
the channel of the light housing so the wires do not get pinched
or cut by the fan (D). Align the screw holes and place the light
housing on top of fan housing. Secure with a “click” and tighten
the screw to the base of the light housing.
IMPORTANT: READ CAREFULLY
IMPORTANT SAFETY INSTRUCTIONS
SAVE THESE INSTRUCTIONS
INSTRUCTIONS PERTAINING TO A RISK OF FIRE, ELECTRIC SHOCK, OR INJURY TO PERSONS
WARNING: when using electric appliances, basic precautions should
always be followed, including the following:
1. Please read all instructions before using the DynaTrap
®
Insect Trap and keep for future reference.
2. To disconnect, twist housing to the ‘OFF’ position, then remove plug from outlet.
3. To reduce the risk of injury from moving parts or electric shock, always turn unit off and disconnect plug when
not in use and before servicing or cleaning.
4. Always unplug before replacing lamp. Replace with same type rated 7-Watt bulbs, DynaTrap
®
model 41050.
5. Do not position the unit near heat, gas, oil or other flammable materials.
6. Place out of reach from children.
7. To reduce the risk of electrical shock, do not put appliance in water or other liquid.
8. Never operate this product if it has a damaged cord or plug, if it is not working properly, if it has been
dropped or damaged, or if it has been dropped into water or other liquid.
9. Connect only to a circuit that is protected by a ground-fault circuit-interrupter (GFCI).
10. Do not insert fingers or any foreign objects into the unit while it is connected to an electrical outlet.
11. Collected insects within the unit may contribute to fire, so clean insects from the unit frequently.
12.
Do not clean this product with water spray. Do not place where it can fall into water, or near flammable materials.
13. Do not touch fan while in motion.
14. Do not abuse cord—never carry or hang unit by cord or yank it to disconnect from receptacle.
Keep cord away from sharp edges.
15. If using outdoors, use only extension cords with a tag stating, “Suitable for Use with Outdoor Appliances.”
16.
Use only extension cords that have plug and receptacles that match the product plug. Replace or repair damaged cords.
17. Only use attachments recommended or sold by the manufacturer.
18. This appliance is provided with double insulation. Use only identical replacement parts.
See instructions or Servicing of Double-Insulated Appliances.
INSTALLATION & OPERATING INSTRUCTIONS
1. Unpack unit. Save carton for off-season storage (if needed).
2. Assemble Stand: Pull the cord tight through the pole stand. Turn
base on its side and insert bottom threaded plastic piece into
base, connecting to the threaded plastic cap. Twist threaded
plastic cap clockwise to tighten. Complete installation by aligning
upper and lower support tube and inserting the bar sections.
For more detailed instructions, please refer to assembly guide.
3. Hold the power switch on the side of the revolving rotation door.
Twist the unit to the “POWER ON” position. When you hear a
“click,” the machine is turned on.
4. For best catch results leave unit on at all times, except when
cleaning or servicing.
A000-396.2019.14
DT1260-TUN
OWNER’S MANUAL
Thank you for purchasing
the DynaTrap
®
insect trap!
This product may be covered by one or more U.S. patents
or pending patent applications. See wwwDynaTrap.com/patents
TROUBLESHOOTING
Problem: Possible cause: Correction:
Bulb does not il-
luminate and fan does
not spin.
1. No electrical power. 1. Check plug, receptacle and fuse or circuit breaker.
2. Check to make sure power is switched to the “ON” position.
Bulb illuminates, but
fan does not spin.
1. Shorted fan. 1. UNPLUG UNIT: Examine fan to see that it is free from
foreign material, dirt or buildup of dead insects.
Clean unit as in “CLEANING” section.
Fan spins, but bulb
does not illuminate.
1. Bulb not seated properly.
2. Burnt out bulb.
1. Check sockets for proper bulb seating and alignment.
2. Replace bulb if needed, following instructions under
“Replacing Bulb”.
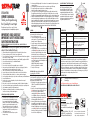
HOW THE DYNATRAP
®
INSECT TRAP WORKS
Flying insects are attracted to the unit by the UV light
and CO2 that is generated by the photo-catalysis
between the UV lamps and the special TiO2 coating.
The fan then pulls the insects into the screened base,
trapping them until they dehydrate and die. The base
can be removed, allowing the contents to be periodically
emptied into the trash. Monitor the insects trapped in
the retaining cage through the see-through screen, and
empty when compartment becomes full.
LIMITED WARRANTY
DYNAMIC guarantees to the original purchaser that this product is free from defective materials and workmanship.
This warranty is limited to remedy any defective part for a period of one year from date of original date of
purchase. Retain your original receipt as proof of purchase. This warranty does not apply to the light bulb, nor to,
in our judgment, misuse or abuse. If this unit has been altered, no warranty is in force. This warranty does not
apply if this unit is purchased outside the United States, excluding Canada and Mexico. In no case shall DYNAMIC
be liable for any accidental, punitive, consequential, or any other damages of any kind for breach of this or any
other warranty, expressed or implied, whatsoever. Some states do not allow limitation on how long an implied
warranty lasts, so the above limitation or exclusion may not apply to you. This warranty gives you specific legal
rights, and you may also have other rights that vary from state to state.
REPLACEMENT PARTS
41050 7-Watt Replacement UV Fluorescent Bulb (1 piece)
41053 Retaining Cage
To see all replacement and accessory parts visit wwwDynaTrap.com.
FOR HOUSEHOLD AND COMMERCIAL, INDOOR AND OUTDOOR USE
This device complies with Performance Standards
for Light-Emitting Products, 21 DFR, Part 1040,
Chapter 1, Subchapter J, Radiological health.
Dynamic Solutions Worldwide, LLC
U.S.A. & Canada
12247 W. Fairview Ave. Milwaukee, WI 53226
1-877-403-TRAP (8727)
[email protected] | www.DynaTrap.com
Mexico
Dynatrap Servicios de Mexico S. de R. L. de C.V.
01-800-880-8727 | [email protected]
©2019 Dynamic Solutions Worldwide, LLC
4002907

de la puerta giratoria, gire el interruptor hacia la posición “POWER ON” (prendido). Cuando escuche un “Clic”, la unidad ha prendido.
4. Para obtener mejores resultados de captura, deje la unidad perdida en todo momento, excepto cuando la limpie o le de mantenimiento.
5. La actividad en la cámara de retención será mayor por la noche. Para obtener mejores resultados de captura, se recomienda
mantener la unidad alejada de fuentes de luz con un rango de mayor eficiencia que el de la unidad.
6. Es recomendable colocar la unidad por lo menos de 6 - 12 metros de distancia de donde las personas estarán sentadas.
7. Esta unidad es resistente a todo tipo de clima – está diseñada para uso en exteriores, incluyendo en condiciones de lluvia y sol.
Para uso doméstico o comercial y en exteriores e interiores.
8. Para reducir el riesgo de descarga electrica, este aparato tiene un enchule polarizado (una de las clavijas es mas ancha
que la otra). Este enchule encaja en una tomacorriente polorizoda de una solo manera. Si el enchule no encaja comple tamente
en el tomocorriente, invierta el enchule. Si todavia no encaja,pongase en contacto con un electricista calilicado para instalar el
tomocorriente adecuado. No cambie el enchule de ninguna manera.
9. REPARACIONES PARA ELECTRODOMÉSTICOS CON DOBLE AISLAMIENTO ELÉCTRICO un aparato con doble aislamiento
eléctrico está diseñado con dos sistemas de aislamiento y no requiere una conexión a tierra. No se proporciona ningún
medio de conexión a tierra en un aparato con doble aislamiento, ni se le debe añadir un medio de conexión a tierra al aparato.
La porción de un electrodoméstico con doble aislamiento requiere un cuidado extremo y conocimiento del sistema y debe
hacerse solamente por personal de servicio calificado. Las partes de repuesto de un aparato con doble aislamiento deben
ser idénticas a las del electrodoméstico y deben estar marcadas con
las palabras “doble aislamiento” o “doble aislación”. El símbolo
INSTRUCCIONES DE LIMPIEZA Y MANTENIMIENTO
La limpieza regular prolongará la duración de la unidad, garantizará la
prevención de incendios y proporcionará un funcionamiento más eficiente.
1. Asegúrese de limpiar la unidad por lo menos una vez por semana.
2. Para limpiar, sostenga el interruptor de la puerta giratoria de rotación
y gire la carcasa a la posición “OFF”. Después de escuchar el “clic”
La máquina está apagada. Desconecte la unidad del tomacorriente.
3. Para limpieza semanal, gire la cámara de retención en sentido
contrario de las agujas del Reloj. Con el cepillo de limpieza que viene
incluido, retire la acumulación de insectos del interior de la cámara
de retención y del ventilador.
4. Para una limpieza más profunda, retire el tornillo que asegura
la carcasa del ventilador y la carcasa del foco (A) gire las carcasas
suavemente para separarlas. No desconecte los cables. Usando el
cepillo de limpieza, retire el polvo y los restos acumulados
en la carcasa del ventilador. Una vez que el proceso de limpieza
hayaterminado, coloque los cables en el canal de la carcasa del
ventilador (D). Alinee los orificios del tornillo y coloque la carcasa
del foco en la parte superior de la carcasa del ventilador. Asegúrese
de escuchar un clic y apriete el tornillo a la base de la unidad de
iluminación.
IMPORTANTE: cuando reposicione la cámara de retención – no presione
o empuje contra la malla de las ventanas para evitar dañarlas.
5. Limpie la trampa antes del almacenamiento fuera de
temporada.
CAMBIO DE FOCOS:
Adquiera focos dynatrap #41050 (o el foco equivalente G24 -56V/7 W)
La expectativa de duración del foco es de aproximadamente 3 000 horas (o
aproximadamente 4 meses) y debe cambiarse regularmente para asegurar
una óptima efectividad con la luz ultravioleta. Aunque la luz
del foco puede ser visible para usted, su capacidad de atraer mosquitos
disminuye con el tiempo.
1. Sostenga el interruptor que está al costado de la puerta giratoria,
gírelo a la posición “Power Off” (apagado). Desconecte la unidad y deje
que el foco se enfríe antes de cambiarlo.
2. Retire el tornillo que fija la carcasa del ventilador y la carcasa del foco
(A), gire las carcasas suavemente para separarlas, pero no desconecte
los cables. Afloje el tornillo que asegura el soporte de metal que
sostiene el foco (B) y retire el soporte de metal hacia un lado. Cubra el
foco con un pañuelo para proteger sus dedos y su mano. Sujete el foco
(con la mano y los dedos protegidos por el pañuelo) y retire
suavemente el foco de la toma (C).
3. Con el cepillo de limpieza, retire cualquier residuo del portalámparas.
Coloque el foco de repuesto. Vuelva a colocar el soporte de metal sobre
la base del foco y apriete el tornillo. Asegúrese de colocar los cables en
el canal de la carcasa del ventilador (D). Alinee los orificios del tornillo
y coloque la carcasa del foco en la parte superior de la carcasa del
ventilador. Asegúrese de escuchar un clic y apriete el tornillo a la base
de la unidad de iluminación.
IMPORTANTE: LEER DETENIDAMENTE
INSTRUCCIONES DE SEGURIDAD IMPORTANTES:
GUARDE ESTAS INSTRUCCIONES
INSTRUCCIONES RELATIVAS A UN RIESGO DE INCENDIO, DESCARGA ELÉCTRICA O LESIONES A PERSONAS
ADVERTENCIA: Cuando use aparatos eléctricos, siempre debe
seguir las precauciones de seguridad básicas, incluyendo las siguientes:
1. Por favor lea las instrucciones antes de usar la trampa para insectos DynaTrap
®
y guárdelas para
futuras referencias.
2. Para desconectar, gire la carcasa a la posición “OFF”, luego retire el enchufe del tomacorriente.
3. Para reducir el riesgo de lesiones por piezas móviles o descargas eléctricas, apague siempre la
unidad y desconecte el enchufe cuando no esté en uso y antes de reparar o limpiar.
4. Desenchufe siempre antes de reemplazar la lámpara. Reemplace con el mismo tipo de bombillas de
6 vatios. DynaTrap
®
modelo 32050.
5. No coloque la unidad cerca de fuentes de calor, gas, aceite u otros materiales inflamables.
6. Mantenga la unidad fuera del alcance de niños.
7. Para reducir el riesgo de una descarga eléctrica, mantenga la unidad alejada del agua o cualquier otro líquido.
8. Nunca haga funcionar la unidad si el cable de corriente eléctrica o la clavija están dañados, la
unidad no está funcionando adecuadamente, o si la unidad se ha dañado o caído al agua.
9. Conecte solo a un circuito que esté protegido por un interruptor de circuito de falla a tierra (GFCI).
10. Cuando la unidad esté conectada a un tomacorriente, NO introduzca los dedos u otros objetos extraños.
11. Los insectos acumulados dentro de la unidad pueden contribuir a un incendio, se recomienda limpiar
y vaciar los insectos muertos frecuentemente.
12. No rocié o limpié la unidad con una cantidad excesiva de agua. El agua puede dañar los componentes
eléctricos. No coloque la unidad cerca de materiales inflamables o donde le pueda caer agua directamente.
13. No toque el ventilador cuando este en movimiento.
14. No maltrate el cable – nunca desconecte la unidad jalando el cable del tomacorriente o transporte y cuelgue la
unidad por el cable. Mantenga el cable de corriente eléctrica alejado del calor, aceite o bordes afilados.
15. Si se usa en el exterior, use solo cables de extensión con una etiqueta que diga “Adecuado
para su uso con dispositivos para exteriores”.
16. Solamente utilice cables de extensión que sean compatibles con el tomacorriente y el enchufe de la
unidad. Remplace o repare los cables dañados.
17. Utilice únicamente partes de repuesto y accesorios recomendados o vendidos por el fabricante.
18. Este aparato está proporcionado con doble aislamiento, solamente utilice
partes de reemplazo que sean idénticas a las de la unidad.
INSTRUCCIONES DE INSTALACIÓN & FUNCIONAMIENTO
1. Desempaque la unidad. Conserve la caja para almacenar la unidad fuera de
temporada o cuando no esté en uso.
2. Como armar la base: jale firmemente el cable através del tubo de la base. I
nserte el tubo superior e inferior de la base y apriete el botón de resorte para
asegurase que ambos tubos son conectados seguramente. Inserte la pieza de
plástico del onector debajo de la base.
Alineé el tubo y conecte usando la tuerca de plástico. Coluque el cable en la
base. (Para instrucciones más detalladas, por favor vea la guía de ensamblaje).
3. Sujete la parte superior de la unidad, sostenga el interruptor que esta al costado
DT1260-TUN
MANUAL DEL PROPIETARIO
¡Gracias por comprar
el DYNATRAP
®
trampa de insectos!
Este producto puede estar cubierto por una o más patentes de
EE.UU. o aplicaciones pendientes de patente. Ver wwwDynaTrap.com/patents
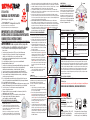
COMO FUNCIONA
LA TRAMPA DE INSECTOS DYNATRAP
®
Los insectos voladores son atraídos a la unidad por medio de
la luz y el CO2 (dióxido de carbono) que es generado por la
foto-catálisis que sucede entre la capa de TiO2 (dióxido de titanio)
y los focos ultravioletas; luego el ventilador los succiona hacia
una cámara de recolección donde quedan atrapados hasta que
se deshidratan y mueren. La cámara de recolección puede ser
removida, de esta forma se pueden periódicamente vaciar los
contenidos en la basura. Controle los insectos atrapados en la
jaula de retención, a través de la pantalla transparente, y
vacíelo cuando el compartimiento se llene.
Problema: Posible Causa: Corrección:
El foco no ilumina y
el ventilador no gira.
No hay corriente eléctrica. 1. Revise la conexión, el tomacorriente, el interruptor de circuito.
2. Asegúrese de que el botón este en la posición de “ON”
(prendido)
El foco ilumina, pero el
ventilador no gira.
El ventilador está en
cortocircuito.
1. DESCONECTE LA UNIDAD: Examine el ventilador para ver si
está libre de suciedad, acumulación de insectos muertos u otros
objetos extraños. Limpie la unidad como se indica en la sección
de “limpieza”.
El ventilador gira, pero el
foco no ilumina.
1. El foco no está puesto
adecuadamente
2. El foco esta fundido.
1. Revise que el foco estén firmemente colocados en la base
del foco.
2. Cambie el foco si es necesario, de acuerdo a las instrucciones
bajo “Reemplazo del foco”.
IDENTIFICACIÓN DE PROBLEMAS Y POSIBLES SOLUCIONES
GARANTIA LIMITADA
DYNAMIC garantiza al comprador original que este producto esta libre de defectos de materiales y mano de obra. Esta garantía
esta limitada a remediar cualquier parte defectuosa durante un periodo de un año a partir de la fecha de compra original.
Retenga su recibo original como prueba de compra. Esta garantía no es aplicable ni al foco, ni al maltrato o uso inapropiado, a
nuestro juicio. Si esta unidad es alterada, se anula la garantía. Esta no es aplicable a esta unidad si fue comprada fuera de los
Estados Unidos, excluyendo Canadá y México. DYNAMIC no será responsable en ningún caso de daños incidentales, punitivos,
derivados o daños de ningún otro tipo por incumplimiento de esta o de cualquier otra garantía, ya sea expresa o implícita.
Algunos estados no permiten limitación con respecto a la duración de una garantía implícita y, por lo tanto, la limitación o
exclusión anterior podría no serle aplicable. Esta garantía le otorga derechos legales específicos y usted puede tener además
otros derechos que variarán de un estado a otro.
PARTES & ACCESORIOS DISPONIBLES
41050 Foco fluorescente ultravioleta: 7 W (1 pieza)
41053Retaining Cage
Para ver todas las partes de repuesto y accesorios disponibles para su Dynatrap,visite wwwDynaTrap.com.
FOR HOUSEHOLD AND COMMERCIAL, INDOOR AND OUTDOOR USE
Este dispositivo cumple con las normas de funciona-
miento de los emisores de luz Productos, 21 DFR,
Parte 1040, Capítulo 1, Sección J, Salud Radiológica.
Dynamic Solutions Worldwide, LLC
U.S.A. & Canada
12247 W. Fairview Ave. Milwaukee, WI 53226
1-877-403-TRAP (8727)
[email protected] | www.DynaTrap.com
Mexico
Dynatrap Servicios de Mexico S. de R. L. de C.V.
01-800-880-8727 | [email protected]
©2019 Dynamic Solutions Worldwide, LLC

A000-427.2018.5
CÁMARA DE
RECOLECCIÓN
VENTILADOR
SUPERFICIE
CUBIERTA
CON TiO
2
FOCO UV
INTERRUPTOR
HANGER
PERCHA
CAGE DE
RÉTENTION
VENTILATEUR
INTERRUPTEUR
CROCHET
ON/OFF
SWITCH
TiO
2
COATING
FAN
UV BULB
RETAINING
CAGE
HANGER
ON/OFF
SWITCH
FAN
RETAINING
CAGE
UV BULB
AMPOULE
UV
CÁMARA DE
RECOLECCIÓN
VENTILADOR
SUPERFICIE
CUBIERTA
CON TiO
2
FOCO UV
INTERRUPTOR
HANGER
PERCHA
CAGE DE
RÉTENTION
VENTILATEUR
INTERRUPTEUR
CROCHET
ON/OFF
SWITCH
TiO
2
COATING
FAN
UV BULB
RETAINING
CAGE
HANGER
ON/OFF
SWITCH
FAN
RETAINING
CAGE
UV BULB
AMPOULE
UV
CÁMARA DE
RECOLECCIÓN
VENTILADOR
SUPERFICIE
CUBIERTA
CON TiO
2
FOCO UV
INTERRUPTOR
HANGER
PERCHA
CAGE DE
RÉTENTION
VENTILATEUR
INTERRUPTEUR
CROCHET
ON/OFF
SWITCH
TiO
2
COATING
FAN
UV BULB
RETAINING
CAGE
HANGER
ON/OFF
SWITCH
FAN
RETAINING
CAGE
UV BULB
AMPOULE
UV
CÁMARA DE
RECOLECCIÓN
VENTILADOR
SUPERFICIE
CUBIERTA
CON TiO
2
FOCO UV
INTERRUPTOR
HANGER
PERCHA
CAGE DE
RÉTENTION
VENTILATEUR
INTERRUPTEUR
CROCHET
ON/OFF
SWITCH
TiO
2
COATING
FAN
UV BULB
RETAINING
CAGE
HANGER
ON/OFF
SWITCH
FAN
RETAINING
CAGE
UV BULB
AMPOULE
UV
CÁMARA DE
RECOLECCIÓN
VENTILADOR
SUPERFICIE
CUBIERTA
CON TiO
2
FOCO UV
INTERRUPTOR
HANGER
PERCHA
CAGE DE
RÉTENTION
VENTILATEUR
INTERRUPTEUR
CROCHET
ON/OFF
SWITCH
TiO
2
COATING
FAN
UV BULB
RETAINING
CAGE
HANGER
ON/OFF
SWITCH
FAN
RETAINING
CAGE
UV BULB
AMPOULE
UV
DT1260-DEC2
OWNER’S MANUAL
FLYING INSECT TRAP
Thank you for purchasing
the DynaTrap
®
flying insect trap!
This product may be covered by one or more U.S. patents
or pending patent applications. See wwwDynaTrap.com/patent
TROUBLESHOOTING
Problem: Possible cause: Correction:
Bulb does not
illuminate and fan does
not spin.
1. No electrical power. 1. Check plug, receptacle and fuse or circuit breaker.
2. Check to make sure power is switched to the “ON” position.
Bulb illuminates, but
fan does not spin.
1. Shorted fan. 1. UNPLUG UNIT: Examine fan to see that it is free from
foreign material, dirt or build-up of dead insects.
Clean unit as in “CLEANING” section.
Fan spins, but bulb does
not illuminate.
1. Bulb not seated properly.
2. Burnt out bulb.
1. Check sockets for proper bulb seating and alignment.
2. Replace bulb if needed, following instructions under
“Replacing Bulb”.
LIMITED WARRANTY
DYNAMIC guarantees to the original purchaser that this product is free from defective materials and workmanship. This
warranty is limited to remedy any defective part for a period of one year from date of original date of purchase. Retain
your original receipt as proof of purchase. This warranty does not apply to the light bulb, nor to, in our judgment, misuse or
abuse. If this unit has been altered, no warranty is in force. This warranty does not apply if this unit is purchased outside the
United States, excluding Canada and Mexico. In no case shall DYNAMIC be liable for any accidental, punitive, consequential,
or any other damages of any kind for breach of this or any other warranty, expressed or implied, whatsoever. Some states
do not allow limitation on how long an implied warranty lasts, so the above limitation or exclusion may not apply to you.
This warranty gives you specific legal rights, and you may also have other rights that vary from state to state.
REPLACEMENT PARTS
41050 7-Watt Replacement UV Fluorescent Bulb (1 piece)
To see all replacement and accessory parts available for your DynaTrap,
including UV-bulbs, fans, retaining cages, and more, visit wwwDynaTrap.com.
SAVE THESE INSTRUCTIONS
FOR HOUSEHOLD AND COMMERCIAL, INDOOR AND OUTDOOR USE
CÁMARA DE
RECOLECCIÓN
VENTILADOR
SUPERFICIE
CUBIERTA
CON TiO
2
FOCO UV
INTERRUPTOR
HANGER
PERCHA
CAGE DE
RÉTENTION
VENTILATEUR
INTERRUPTEUR
CROCHET
ON/OFF
SWITCH
TiO
2
COATING
FAN
UV BULB
RETAINING
CAGE
HANGER
ON/OFF
SWITCH
FAN
RETAINING
CAGE
UV BULB
AMPOULE
UV
Dynamic Solutions Worldwide, LLC
12247 W. Fairview Ave. Milwaukee, WI 53226
1-877-403-TRAP (8727)
Visit us online at www.DynaTrap.com
©2018 Dynamic Solutions Worldwide, LLC
This device complies with Performance Standards
for Light-Emitting Products, 21 DFR, Part 1040,
Chapter 1, Subchapter J, Radiological health.
INSTALLATION & OPERATING INSTRUCTIONS
1. Unpack unit. Save carton for off-season storage (if needed).
2. Assemble Stand: Pull the cord tight through the pole stand. Turn base on its side
and insert bottom threaded plastic piece into base, connecting to the threaded
plastic cap. Twist threaded plastic cap clockwise to tighten. Complete installation by
aligning upper and lower support tube and inserting the bar sections. For more
detailed instructions, please refer to assembly guide.
3. Hold the Power switch on the side of the revolving rotation door.
Twist the unit to the “POWER ON” position. When you hear a “click,” the
machine is turned on.
4. For best catch results leave unit on at all times, except when cleaning or servicing.
5. Catch rate activity will be higher at night. For best catch results it is recommended
to keep the unit away from competing light sources.
6. It is recommended to place the unit at least 20 to 40 feet away from where people will be sitting.
7. This unit is all-weather resistant - designed for outdoor use including
rainy conditions. Intended for household and commercial, indoor
and outdoor use.
8. To reduce the risk of electric shock, this appliance has a polarized
plug (one blade is wider than the other). This plug will fit in a
polarized outlet only one way. If the plug does not fit fully in
the outlet, reverse the plug. If it still does not fit, contact a qualified
electrician to install the proper outlet. Do not change the plug in
any way.
CLEANING
Frequent cleaning will prolong the life of the unit, ensure fire prevention
and provide for more efficient operation.
1. Be sure to clean the unit once per week.
2. To clean, hold the switch on the revolving rotation door and
turn it to the “POWER OFF” position. After hearing the “click,”
the machine is turned off. Unplug the unit.
3. For weekly cleaning, twist the cage clockwise and remove any
buildup from the inside of the retaining cage and fan with the
included cleaning brush.
4. For major cleaning, remove the screw securing the fan housing
to the light housing (A), and gently twist to separate. Do not
disconnect wires. Using the cleaning brush, remove dirt and
debris from the fan housing. Once the cleaning process has
been completed, tuck the wires into the channel of the fan
housing (D). Align the screw holes and place the light housing
on top of fan housing. Secure with a click and tighten the screw
to the base of the light housing.
IMPORTANT: When replacing the retaining cage –
DO NOT press/push against the screen windows.
REPLACING BULB Replace with DynaTrap
®
bulb #41050
(or equivalent G24 Type - 56V/7W bulb)
The lightbulb life expectancy is approximately 3,000 hours (or about
4 months), and should be replaced regularly to ensure optimal UV
effectiveness. Even though the bulb’s light may be visible to you, its
ability to attract mosquitoes diminishes over time.
1. Hold the switch on the revolving rotation door and turn it to the
“POWER OFF” position. UNPLUG UNIT, and allow bulb to cool
before replacing.
2. Remove the screw securing the fan housing to the light housing
(A), and gently twist to separate carefully, do not disconnect
wires. Loosen the screw securing the metal bracket
securing the light bulb (B) and remove the metal bracket.
Cover the bulb with a cloth to protect your fingers and hand.
Grasp the bulb (with your hand and fingers protected by the
cloth) and gently pull the bulb from the socket (C).
3. Remove any debris from the lamp socket with cleaning brush.
Insert new bulb. Reposition the metal bracket over the base of
the bulb and tighten the screw. Make sure to tuck the wires into
the channel of the light housing so the wires do not get pinched or
IMPORTANT, RETAIN
FOR FUTURE REFERENCE:
READ CAREFULLY
WARNING: When using electric appliances, basic precautions should always be followed, including the following:
– To disconnect, turn all controls to the off (“O”) position, then remove plug from outlet.
– Unplug from outlet when not in use and before servicing or cleaning.
– To reduce the risk of electrical shock, do not put appliance in water or other liquid.
– This appliance is provided with double insulation. Use only identical replacement parts.
IMPORTANT SAFETY INSTRUCTIONS
Please read these instructions before using the DynaTrap
®
Insect trap and keep for future reference.
1. Always turn unit off and disconnect plug before servicing or cleaning.
2. Do not position the unit near heat, gas, oil or other flammable materials.
3. Mount out of reach from children.
4. Never operate this product if it has a damaged cord or plug, if it is not working properly, if it has been dropped
or damaged, or if it has been dropped into water.
5. The electrical adapter provided with this product is equipped with a 2-conductor cord and a 2-prong plug as a
safety feature. If the plug does not fully fit in the outlet, contact a qualified electrician. To reduce the risk of
electrical shock, only plug into a properly installed outlet. Do not attempt to defeat this safety feature.
6. Do not insert fingers or any foreign objects into the unit while it is connected to an electrical outlet.
7. Collected insects within the unit may contribute to fire, so clean insects from the unit frequently.
8. Do not clean this product with water spray. Do not place where it can fall into water, or near flammable materials.
9. Do not touch fan while in motion.
10. Do not abuse cord—never carry or hang unit by cord or yank it to disconnect from receptacle. Keep cord away
from sharp edges.
11. If using outdoors, use only extension cords with a tag stating “Suitable for Use with Outdoor Appliances.”
12. Use only extension cords that have plug and receptacles that match the product plug.
Replace or repair damaged cords.
13. Only use attachments recommended or sold by the manufacturer.
14. SERVICING OF DOUBLE-INSULATED APPLIANCES - In a double-insulated appliance, two systems of insulation
are provided instead of grounding. No grounding means is provided on a double insulated appliance, nor should
a means for grounding be added to the appliance. Servicing of a double-insulated appliance requires extreme
care and knowledge of the system, and should be done only by qualified service personnel. Replacement parts
for a double-insulated appliance must be identical to those parts in the appliance. A double-insulated appliance is
marked with the words “DOUBLE INSULATION”, “DOUBLE INSULATED” or the symbol .
cut by the fan (D). Align the screw holes and place the light
housing on top of fan housing. Secure with a “click” and
tighten the screw to the base of the light housing.
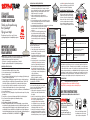
HOW THE DYNATRAP
®
INSECT TRAP WORKS
Flying insects are attracted to the unit by the UV light and
CO2 that is generated by the photo-catalysis between the
UV lamps and the special TiO2 coating. The fan then pulls
the insects into the screened base, trapping them until they
dehydrate and die. The base can be removed, allowing the
contents to be periodically emptied into the trash. Monitor
the insects trapped in the retaining cage, through the see-
through screen, and empty when compartment becomes full.

DT1260-DEC2
MANUAL
DEL PROPIETARIO
¡Gracias por comprar el DYNATRAP®
trampa de insectos voladores!
Este producto puede estar cubierto por una o más patentes de
EE.UU. o aplicaciones pendientes de patente. Ver wwwDynaTrap.com/patents
Problema: Posible Causa: Corrección:
El foco no ilumina y
el ventilador no gira.
No hay corriente eléctrica. 1. Revise la conexión, el tomacorriente, el interruptor de circuito.
2. Asegúrese que el botón esté en la posición de “ON”.
El foco ilumina, pero el
ventilador no gira.
El ventilador está en
cortocircuito.
1. DESCONECTE LA UNIDAD: Examine el ventilador para ver si
está libre de suciedad, acumulación de insectos muertos u otros
objetos extraños. Limpie la unidad como se indica en la sección
de “limpieza”.
El ventilador gira, pero el
foco no ilumina.
1. El foco no está puesto
adecuadamente
2. El foco está fundido.
1. Revise que el foco esté firmemente colocado en la base del foco
2. Cambie el foco si es necesario, de acuerdo a las instrucciones
bajo “Reemplazo del foco”.
IDENTIFICACIÓN Y RESOLUCIÓN DE PROBLEMAS:
GARANTIA LIMITADA
DYNAMIC garantiza al comprador original que este producto está libre de defectos de materiales y mano de obra. Esta garantía está
limitada a remediar cualquiera parte defectuosa durante un periodo de un ano a partir de la fecha de compra original. Retenga su
recibo original como prueba de compra. Esta garantía no es aplicable ni al foco, ni al maltrato o uso inapropiado, a nuestro juicio. Si
esta unidad es alterada, se anula la garantía. Esta no es aplicable a esta unidad si fue comprada fuera de los Estados Unidos, excluy-
endo Canadá y México. DYNAMIC no será responsable en ningún caso de daños incidentales, punitivos, derivados o daños de ningún
otro tipo por incumplimiento de esta o de cualquier otra garantía, ya sea expresa o implícita. Algunos estados no permiten limitación
con respecto a la duración de una garantía implícita y, por lo tanto, la limitación o exclusión anterior podría no serle aplicable. Esta
garantía le otorga derechos legales específicos y usted puede tener además otros derechos que variarán de un estado a otro.
PARTES & ACCESORIOS DISPONIBLES
41050 Foco fluorescente ultravioleta: 7 W (1 pieza)
Para ver todas las partes de repuesto y accesorios disponibles para su Dynatrap,
incluyendo los focos UV, los ventiladores, las cámaras de retención y más, visite wwwDynaTrap.com.
GUARDE ESTAS INSTRUCCIONES
PARA USO DOMÉSTICO O COMERCIAL Y EN EXTERIORES E INTERIORES
Dynamic Solutions Worldwide, LLC
12247 W. Fairview Ave. Milwaukee, WI 53226
1-877-403-TRAP (8727)
Visit us online at www.DynaTrap.com
©2018 Dynamic Solutions Worldwide, LLC
CÁMARA DE
RECOLECCIÓN
VENTILADOR
SUPERFICIE
CUBIERTA
CON TiO
2
FOCO UV
INTERRUPTOR
HANGER
PERCHA
CAGE DE
RÉTENTION
VENTILATEUR
INTERRUPTEUR
CROCHET
ON/OFF
SWITCH
TiO
2
COATING
FAN
UV BULB
RETAINING
CAGE
HANGER
ON/OFF
SWITCH
FAN
RETAINING
CAGE
UV BULB
AMPOULE
UV
CÁMARA DE
RECOLECCIÓN
VENTILADOR
SUPERFICIE
CUBIERTA
CON TiO
2
FOCO UV
INTERRUPTOR
HANGER
PERCHA
CAGE DE
RÉTENTION
VENTILATEUR
INTERRUPTEUR
CROCHET
ON/OFF
SWITCH
TiO
2
COATING
FAN
UV BULB
RETAINING
CAGE
HANGER
ON/OFF
SWITCH
FAN
RETAINING
CAGE
UV BULB
AMPOULE
UV
CÁMARA DE
RECOLECCIÓN
VENTILADOR
SUPERFICIE
CUBIERTA
CON TiO
2
FOCO UV
INTERRUPTOR
HANGER
PERCHA
CAGE DE
RÉTENTION
VENTILATEUR
INTERRUPTEUR
CROCHET
ON/OFF
SWITCH
TiO
2
COATING
FAN
UV BULB
RETAINING
CAGE
HANGER
ON/OFF
SWITCH
FAN
RETAINING
CAGE
UV BULB
AMPOULE
UV
CÁMARA DE
RECOLECCIÓN
VENTILADOR
SUPERFICIE
CUBIERTA
CON TiO
2
FOCO UV
INTERRUPTOR
HANGER
PERCHA
CAGE DE
RÉTENTION
VENTILATEUR
INTERRUPTEUR
CROCHET
ON/OFF
SWITCH
TiO
2
COATING
FAN
UV BULB
RETAINING
CAGE
HANGER
ON/OFF
SWITCH
FAN
RETAINING
CAGE
UV BULB
AMPOULE
UV
CÁMARA DE
RECOLECCIÓN
VENTILADOR
SUPERFICIE
CUBIERTA
CON TiO
2
FOCO UV
INTERRUPTOR
HANGER
PERCHA
CAGE DE
RÉTENTION
VENTILATEUR
INTERRUPTEUR
CROCHET
ON/OFF
SWITCH
TiO
2
COATING
FAN
UV BULB
RETAINING
CAGE
HANGER
ON/OFF
SWITCH
FAN
RETAINING
CAGE
UV BULB
AMPOULE
UV
CÁMARA DE
RECOLECCIÓN
VENTILADOR
SUPERFICIE
CUBIERTA
CON TiO
2
FOCO UV
INTERRUPTOR
HANGER
PERCHA
CAGE DE
RÉTENTION
VENTILATEUR
INTERRUPTEUR
CROCHET
ON/OFF
SWITCH
TiO
2
COATING
FAN
UV BULB
RETAINING
CAGE
HANGER
ON/OFF
SWITCH
FAN
RETAINING
CAGE
UV BULB
AMPOULE
UV
Este dispositivo cumple con las normas de funcionamiento
de los emisores de luz Productos, 21 DFR, Parte 1040,
Capítulo 1, Sección J, Salud Radiológica.
INSTRUCCIONES DE INSTALACIÓN & FUNCIONAMIENTO
1. Desempaque la unidad. Conserve la caja para almacenar la unidad fuera de
temporada o cuando no esté en uso.
2. Como armar la base: jale firmemente el cable através del tubo de la base. Inserte el tubo
superior e inferior de la base y apriete el botón de resorte para asegurase que ambos tubos
son conectados seguramente. Inserte el tubo superior e inferior de la base y apriete el
botón de resorte para asegurarse que los tubos son conectados seguramente. Inserte la
pieza de plástico del conector debajo de la base. (Para instrucciones más detalladas, por
favor vea la guía de ensamblaje).
3. Sujete la parte superior de la unidad, sostenga el interruptor que está al costado de la
puerta giratoria, gire el interruptor hacia la posición “POWER ON” (prendido). Cuando oiga
un “clic”, la unidad se enciende.
4. Para obtener mejores resultados de captura, deje la unidad encendida en todo momento,
excepto cuando la limpie o la mantenga..
5. La actividad en la cámara de retención será mayor por la noche. Para obtener mejores resultados de captura, se recomienda
mantener la unidad alejada de fuentes de luz con un rango de mayor
eficiencia que la unidad.
6. Es recomendable colocar la unidad por lo menos de 6 metros- 12 metros
de distancia de donde las personas estarán sentadas.
7. Esta unidad es resistente a todo tipo de clima-está diseñada para uso
doméstico, comercial y en exteriores, incluyendo la lluvia y el sol.
8. Para reducir el riesgo de descarga electrica, este aparato tiene una
clavija polarizada (una de las espigas es mas ancha que la otra). Esta
clavija encaja en un tomacorriente polarizado de una solo manera. Si
la clavija no encaja completamente en el tomacorriente, invierta la
clavija. Si todavía no encaja, póngase en contacto con un electricista
calificado para instalar el tomacorriente adecuado. No cambie la clavija
de ninguna manera.
INSTRUCCIONES DE USO Y MANTENIMIENTO-LIMPIEZA
Limpieza frecuentemente prolongará la vida útil de la unidad, garantizará la
prevención de incendios, y la unidad funcionará en forma más eficiente.
1. Limpie la unidad por lo menos una vez por semana
2. Para mantener, sostenga el interruptor que está al costado de la puerta
giratoria, gírelo a la posición “Power Off”.e.
3. Para limpiar semanalmente, gire la cámara de retención en sentido
contrario de las agujas del reloj. Retire la acumulación de insectos del
interior de la cámara de retención con la brocha.
4. Para limpiar profundamente, retire el tornillo que asegura la carcasa
del ventilador y la carcasa del foco (A) gire las carcasas suavemente
para separarlas. No desconecte los cables. Usando la brocha, retire el
polvo y los acumulados en la carcasa del ventilador. Coloque los cables
en el canal de la carcasa del ventilador (D). Alinee los orificios del
tornillo y coloque la carcasa del foco en la parte superior de la carcasa
del ventilador. Asegúrese de oír un “clic” y apriete el tornillo a la base de
la unidad. IMPORTANTE: Cuando reposicione la cámara de retención-no
presione ni empuje contra la malla de las ventanas para evitar dañarlas.
REEMPLAZO DEL FOCO:
Adquiera focos dynatrap #41050 (o el foco equivalente G24 -56 V/7 W)
La expectativa de duración del foco es de aproximadamente 3 000 horas (o
aproximadamente 4 meses) y debe cambiarse regularmente para asegurar
una óptima efectividad con la luz ultravioleta. Aunque la luz del foco puede
ser visible para usted, su capacidad de atraer mosquitos disminuye con el
tiempo.
1. Sostenga el interruptor que está al costado de la puerta giratoria,
gírelo a la posición “Power Off” (apagado). Desconecte la unidad y deje
que el foco se enfríe antes de cambiarlo.
2. Retire el tornillo que fija la carcasa del ventilador y la carcasa del foco
(A), gire las carcasas suavemente para separarlas, pero no desconecte
los cables. Afloje el tornillo que asegura el soporte de metal que sostiene
el foco (B) y retire el soporte de metal hacia un lado. Cubra el foco con
un pañuelo para proteger sus dedos y su mano. Sujete el foco (con la
mano y los dedos protegidos por el pañuelo) y retire suavemente el foco
de la toma (C). Continuado...
IMPORTANTE, CONSERVE
LAS INSTRUCCIONES PARA
FUTURAS REFERENCIAS:
LEER DETENIDAMENTE
ADVERTENCIA: Cuando use aparatos eléctricos, siempre debe seguir las precauciones de seguridad básicas,
incluyendo las siguientes:
-Para desconectar la unidad, gire y apague la unidad en la posición “OFF” (apagado), después retire el enchufe del tomacorriente.
-Para reducir cualquier tipo de lesiones, desconecte la unidad del tomacorriente cuando no esté en uso y antes de mantener
o limpiar.
-Para reducir el riesgo de una descarga eléctrica, mantenga la unidad alejada del agua o cualquier otro líquido.
-Este aparato está proporcionado con doble aislamiento, solamente utilice partes de reemplazo que sean idénticas
a las de la unidad.
INSTRUCCIONES DE SEGURIDAD IMPORTANTES:
Por favor lea las instrucciones antes de usar la trampa para insectos DynaTrap
®
y guárdelas para futuras referencias.
1. Siempre apague y desconecte la unidad antes de limpiarla o darle mantenimiento.
2. No coloque la unidad cerca de fuentes de calor, gas, aceite u otros materiales inflamables.
3. Mantenga la unidad fuera del alcance de los niños.
4. Nunca haga funcionar la unidad si el cable de corriente eléctrica o la clavija están dañados, la unidad no está funcionando
adecuadamente, o si la unidad se ha dañado o caído al agua.
5. Como medida de seguridad, el adaptador eléctrico de este producto está equipado con un cable de 2-conductores y un enchufe
polarizado de 2-espigas. El enchufe debe colocarse en una sola dirección y a un tomacorriente polarizado. Si el enchufe no
entra por completo en el tomacorriente, comuníquese con un electricista especializado. No intente alterar esta medida de
seguridad. Para reducir el riesgo de una descarga eléctrica, solamente conecte el enchufe a un tomacorriente que esté instalado
correctamente instalado.
6. Cuando la unidad esté conectada a un tomacorriente, no introduzca los dedos u otros objetos extraños.
7. Los insectos acumulados dentro de la unidad pueden contribuir a un incendio, se recomienda limpiar y vaciar los insectos
muertos frecuentemente.
8. No rocíe ni limpie la unidad con una cantidad excesiva de agua. El agua puede dañar los componentes eléctricos. No coloque
la unidad cerca de materiales inflamables o donde la pueda caerse en agua directamente.
9. No toque el ventilador cuando esté en movimiento.
10. No maltrate el cable – nunca desconecte la unidad jalando el cable del tomacorriente o transporte y cuelgue la unidad por el
cable. Mantenga el cable de corriente eléctrica alejado del calor, aceite o bordes afilados.
11. Si se usa en el exterior, únicamente use cables de extensión con una etiqueta que dice “Adecuado para uso en aparatos de
exterior”
12. Solamente utilice cables de extensión que sean compatibles con el tomacorriente y el enchufe de la unidad.
Remplace o repare los cables dañados.
13. Utilice únicamente partes de repuesto y accesorios recomendados o vendidos por el fabricante.
14. REPARACIONES PARA ELECTRODOMÉSTICOS CON DOBLE AISLAMIENTO ELÉCTRICO un aparato con doble
aislamiento eléctrico está diseñado con dos sistemas de aislamiento y no requiere una conexión a tierra. No se proporciona
ningún medio de conexión a tierra en un aparato con doble aislamiento, ni se le debe añadir un medio de conexión a tierra
al aparato. La porción de un electrodoméstico con doble aislamiento requiere un cuidado extremo y conocimiento del sistema
y debe hacerse solamente por personal de servicio calificado. Las partes de repuesto de un aparato con doble aislamiento
deben ser idénticas a las del electrodoméstico y deben estar marcadas con las palabras “doble aislamiento” o “doble aislación”.
El símbolo
3. Con el cepillo de limpieza, retire cualquier residuo del
portalámparas. Coloque el foco de repuesto. Vuelva a colocar
el soporte de metal sobre la base del foco y apriete el tornillo.
Asegúrese de colocar los cables en el canal de la carcasa del
ventilador (D). Alinee los orificios del tornillo y coloque la
carcasa del foco en la parte superior de la carcasa del
ventilador. Asegúrese de oír un “clic” y apriete el tornillo a la
base de la unidade iluminación.
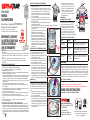
COMO FUNCIONA
LA TRAMPA DE INSECTOS DYNATRAP
®
Los insectos voladores son atraídos a la unidad por medio de la luz
y el CO2 (dióxido de carbono) que es generado por la foto-catálisis
que sucede entre la capa de TiO2 (dióxido de titanio) y los focos
ultravioletas; luego el ventilador los succiona hacia una cámara
de recolección donde quedan atrapados hasta que se deshidratan
y mueren. La cámara de recolección puede ser removida, de esta
forma se pueden periódicamente vaciar los contenidos en la basura.
Controle los insectos atrapados en la jaula de retención, a través
de la pantalla transparente, y vacíelo cuando el compartimiento se llene.
-
 1
1
-
 2
2
-
 3
3
-
 4
4


Dynamic Luxe Half-Acre Flying Insect and Mosquito Trap El manual del propietario
- Tipo
- El manual del propietario
- Este manual también es adecuado para
en otros idiomas
Otros documentos
-
Dynatrap DT1050 Series El manual del propietario
-
NOVA of California 201199DB Instrucciones de operación
-
-
Dynatrap DT1120 El manual del propietario
-
-
-
Dynatrap DT1775 El manual del propietario
-
-
-
Sharper Image Half Acre Mosquito Trap El manual del propietario