Cosori 18-IN-1 MULTIKOKER Manual de usuario
- Categoría
- Ollas arroceras
- Tipo
- Manual de usuario

EN
1
(We hope you love your new rice cooker as much as we do)
On behalf of all of us at COSORI,
Our helpful, in-house chefs are ready to assist
you with any questions you might have!
CONTACT OUR CHEFS
Email: [email protected]
Thank you for
your purchase!
Happy cking!
explore our digital recipe gallery
cosori.com
enjoy weekly, featured recipes
made exclusively by our in-house chefs
Get Creative with COSORI
Download the free VeSync app to access original
recipes and video tutorials from the COSORI chefs,
interact with our online community, and more!

EN
2
Table of Contents Package Contents
Specifications
Model CRC-R501-KEU
Power Supply AC 220–240V, 50/60Hz
Rated Power 970W
Capacity 5 L / 10 cup*
(uncooked rice)
Weight 4.45 kg / 9.81 lb
Dimensions 31.2 x 26.9 x 23.4 cm /
12.3 x 10.6 x 9.2 in
1 x 5.0-Litre Rice Cooker
1 x Inner Pot
1 x 3.0-Litre Steam Basket
1 x Standing Rice Paddle
1 x Measuring Cup
1 x Soup Ladle
1 x Recipe Book
1 x User Manual
1 x Quick Reference Guide
Package Contents
Specifications
Important Safeguards
Getting To Know Your Rice Cooker
Before First Use
Cooking with Your Rice Cooker
Care & Maintenance
Troubleshooting
Warranty Information
Customer Support
*using the included rice measuring cup, which is
approximately 180 mL / 6.1 oz.
2
2
3
6
6
7
13
14
15
15

EN
3
IMPORTANT SAFEGUARDS
Follow basic safety precautions when using your rice cooker.
Read all instructions.
Key Safety Points
General Safety
• Do not touch hot surfaces.
• Do not touch the steam vent or
the area near the steam vent while
cooking or in Keep Warm mode.
Donot cover the area with a cloth.
• Always use heat-resistant gloves,
pads, or oven mitts when moving the
rice cooker, handling hot materials,
and when placing items in or
removing items from the rice cooker,
including the inner pot, steam
basket, and accessories.
• Never use the rice cooker without
the inner pot in place.
• To protect against electric shock,
donot immerse the rice cooker,
cord, or plug in water or liquid.
• Do not use the rice cooker in water
or under running water.
• Unplug when not in use and before
cleaning. Allow to cool before putting
on or taking o parts, and before
cleaning or storage.
• Do not put food, liquid, or foreign
objects on the heating plate.
• Ensure the heating plate is clean and
the underside of the inner pot is dry
before inserting the inner pot.
• Close supervision is necessary when
the rice cooker is used by or near
children.
• Children should be supervised to
ensure that they do not play with the
rice cooker.
• Do not allow children to clean or
perform maintenance on the rice
cooker.
• Do not use your rice cooker if it
is damaged, not working, or if the
cord or plug is damaged. Contact
Customer Support (see page 15).
• Using accessories or replacement
parts not recommended by COSORI
may cause injuries.
• Do not use outdoors.
• Do not place the rice cooker or any
of its parts on or near hot gas or
electric burners, or in a heated oven.
• Do not use the included accessories
and inner pot in a microwave, on a
stove or grill, or in an oven.
• Be extremely cautious when moving
the rice cooker or inner pot if it
contains hot oil or other hot liquids.
• The rice cooker is not intended to
be operated by means of an external
timer or separate remote-control
system.
• This appliance can be used by
children aged from 8 years and
above and persons with reduced
physical, sensory or mental
capabilities or lack of experience
and knowledge if they have been
given supervision or instruction
concerning use of the appliance in a
safe way and understand the hazards
involved.
READ AND SAVE THESE
INSTRUCTIONS

EN
4
While Cooking
• CAUTION: Risk of electric shock.
Cook only in the removable inner
pot. Do not put any liquid directly on
the heating plate of the rice cooker.
• Use on a flat, stable, heat-resistant
surface away from heat sources or
liquids.
• The removable inner pot is extremely
hot during use and can be heavy
when full of ingredients.
• Be careful when handling the inner
pot or steam basket when it contains
hot food, hot oil, or other hot liquids.
• Place hot accessories on a heat-
resistant surface or potholder.
• Do not place anything on top of
your rice cooker while it is operating.
Donot store anything inside your
rice cooker other than recommended
accessories.
• Do not touch the metal portion
of the lid, hot surfaces, or any
accessories during or immediately
after cooking because they will be
hot.
• Do not place paper, cardboard, or
plastic into your rice cooker, or any
Power & Cord
• This rice cooker uses a short
power-supply cord to reduce the
risk of being pulled on by children,
entangling, or tripping.
• To turn the rice cooker o, tap
CANCEL to stop cooking, then
unplug. To unplug, grasp the plug
and pull from the outlet. Never pull
from the power cord.
• Do not spill water or liquid on the
prongs of the plug.
• Do not use with an extension cord.
This rice cooker is intended for
countertop use only.
• Do not let the power cord hang over
the edge of a table or counter or
touch hot surfaces.
• The cord should be arranged so that
it will not drape over the countertop
or tabletop where it can be pulled
on by children or tripped over
unintentionally.
• Never use an outlet below the
counter when plugging in your rice
cooker.
• Avoid spillage on the supply cord
connector.
materials which may catch fire or
melt.
• Do not use this rice cooker for deep
frying with oil.
• Do not block any ventilation
openings. Hot steam is released
through openings. Keep your hands
and face clear of openings.
• Do not leave the rice cooker
unattended while in use.
• The heating plate is subject to
residual heat after use.
• Children shall not play with the
appliance. Cleaning and user
maintenance shall not be made by
children unless they are older than 8
and supervised. Keep the appliance
and its cord out of reach of children
less than 8 years.
• Only use as directed in this manual.
Do not use for any purpose other
than its intended use.
• Not for commercial use. Household
use only.
Note: See Care & Maintenance for instructions on
how to clean accessories (page 13).

EN
5
• Keep the rice cooker and its cord out
of reach of children.
• Your rice cooker should only be used
with 220–240V, 50/60Hz electrical
systems. Do not plug into another
type of outlet.
Electromagnetic Fields (EMF)
SAVE THESE
INSTRUCTIONS
This rice cooker complies with all
standards regarding electromagnetic
fields (EMF). If handled properly and
according to the instructions in this
user manual, the appliance is safe
to use based on scientific evidence
available today.
• If the power supply cord is damaged,
it must be replaced by Arovast
Corporation or similarly qualified
persons in order to avoid an electric
or fire hazard. Please contact
Customer Support (page 15).
This symbol means the product
must not be discarded as household
waste, and should be delivered to
an appropriate collection facility for
recycling. Proper disposal and recycling
helps protect natural resources, human
health and the environment.
For more information on disposal and
recycling of this product, contact your
local municipality, disposal service,
or the shop where you bought this
product.
This product is RoHS compliant.
This product is in compliance
with Directive 2011/65/EU, and its
amendments, on the restriction of the
use of certain hazardous substances in
electrical and electronic equipment.
CAUTION: Hot surface.
220–240V, 50/60Hz 120 V, 60 Hz

EN
6
Control Panel(Figure B)
a. Progress Indicators
b. Display
c. Increase/Decrease Time
d. Delay Timer Indicator
e. Rice Type
f. White Rice Button
g. Grains Button
h. Brown Rice Button
i. Grain Type
j. Cooking Modes
GETTING TO KNOW YOUR RICE COOKER
Rice Cooker Diagram(Figure A)
a. Steam Vent
b. Open Button
c. Lid
d. Power Cord
e. Control Panel
f. Inner Lid
g. Radiator Plate
h. Inner Lid Release Button
i. Top Temperature Sensor
j. Condensation Collectors
k. Heating Plate
l. Bottom Temperature
Sensor
m. 3.0-Litre Steam Basket
n. Nonstick Inner Pot
o. Soup Ladle
p. Measuring Cup
q. Standing Rice Paddle
1. Steam Cap
2. Steam Cap Release
BEFORE FIRST USE
1. Remove all packaging around and inside
the rice cooker.
2. Place on a stable, level, heat-resistant
surface. Keep away from areas that can
be damaged by steam (such as walls or
cupboards).
3. Remove the inner lid (see page 13).
[
Figure 1.1
]
4. Wash the inner lid, steam cap, inner pot,
steam basket, rice paddle, soup ladle, and
measuring cup with hot, soapy water
and a non-abrasive sponge.
5. Dry the parts and reinstall the inner lid.
Place the inner pot in the rice cooker.
1. Make sure there is no food or packaging
in the rice cooker and plug it in.
2. Add water to the inner pot up to the
“STEAM” water level marking. Close the
lid.
3. Tap MODE to select “STEAM”.
4. Tap START to start the Steam function.
5. The rice cooker will beep several times
when finished.
6. Open the lid, carefully remove the inner
pot, and discard the remaining water.
7. Let the rice cooker cool for 15 minutes.
Wipe the inner lid and outside of the rice
cooker with a dry cloth.
Setting Up Test Run
A test run will help you become familiar
with your rice cooker, make sure it’s working
correctly, and clean it of possible residues.
k. Keep Warm Button
l. Cooking Mode Button
m. Cancel Button
n. Delay Timer Button
o. Start Button
Figure 1.1
21

EN
7
COOKING WITH YOUR RICE COOKER
Cooking Functions
Cooking Functions Quick Reference Charts
Note:
• Cook time is an estimate. Actual cook time may vary depending on factors such as amount of grain and
water, room temperature, water temperature, and voltage.
• The inner pot does not have water level markings for 1 cup. If you are cooking 1 cup, use the “Grain : Water
Ratio” column to determine the correct amount of water.
Cooking functions are programmed with an ideal time and temperature for cooking certain rice
and grains. For more information on each cooking function, see its individual section, or the
Cooking Functions Quick Reference Charts.
Grain Type Function Water Level
Marking
Grain :
Water Ratio Cups*
Estimated
Cook Time
(Minutes)
Long Grain
White Rice
WHITE RICE
LONG GRAIN
LONG GRAIN
WHITE 1 : 1¼
1 35–45
5 45–55
10 55–65
Short Grain
White Rice
WHITE RICE
SHORT GRAIN
MED/SHORT
WHITE 1 : 1¼
1 32–42
5 41–51
10 51–61
Quick White
Rice**
WHITE RICE
QUICK
SHORT GRAIN
WHITE 1 : 1¼
1 27–37
5 39–49
10 50–60
Jasmine
White Rice
WHITE RICE
LONG GRAIN
LONG GRAIN
WHITE 1 : 1¼
1 35–45
5 40–50
10 50–60
Sushi Rice WHITE RICE
SHORT GRAIN
MED/SHORT
WHITE 1 : 1¼
1 32–42
5 41–51
10 51–61
Long Grain
Brown Rice
BROWN RICE
LONG GRAIN BROWN 1 : 1¼
1 59–69
4 65–75
8 72–82
316
316
316
8
8
38

EN
8
*1 rice measuring cup is approximately 180 mL / 6.1 oz.
**The Quick Rice function cooks rice faster but may result inslightly harder rice.
Function Time Range Default Time Default
Temperature
Slow Cook 5 min–24 hr 30 min 100°C / 212°F
Steam 1 min–1 hr 10 min 100°C / 212°F
Sauté 1 min–30 min 5 min 145°–155°C /
293°–311°F
Soup 1 min–4 hr 30 min 100°C / 212°F
Jam/Sauce 5 min–2 hr 1 hr 100°C / 212°F
Cake 1 min–1 hr 30 min 50 min 110°–120°C /
230°–248°F
Keep Warm 10 min–24 hr 70°C / 158°F
Delay Timer 10 min–24 hr
Grain Type Function Water Level
Marking
Grain :
Water Ratio Cups*
Estimated
Cook Time
(Minutes)
Short Grain
Brown Rice
BROWN RICE
SHORT GRAIN BROWN 1 : 1¼
1 60–70
4 66–76
8 73–83
Quick Brown
Rice**
BROWN RICE
QUICK BROWN 1 : 1¼
1 50–60
4 55–65
8 60–70
Quinoa GRAINS
QUINOA QUINOA 1 : 1¼
1 37–47
3 42–52
6 46–56
Porridge GRAINS
PORRIDGE PORRIDGE 1 : 5
½ 35–45
1 45–55
1½ 50–60
2 55–65
2½ 60–70
Mixed Grains GRAINS
MIXED MIXGRAIN 1 : 1¼
1 59–69
3 65–75
6 72–82
38

EN
9
White Rice / Brown Rice
1. Use the measuring cup to measure
uncooked rice. Overfill the cup,
then level it o to get an accurate
measurement. [
Figure 2.1
]
a. Make sure that the inner lid and
steam cap are properly installed.
a. The Quick Rice function cooks rice
faster but the texture may be slightly
harder.
a. Keep Warm can last up to 24 hours,
but we recommend that you avoid
leaving cooked rice in the rice cooker
for more than 5 hours.
2. Place rice in a separate container or fine
mesh sieve. Wash rice until the water
appears clear.
3. Transfer washed rice to the inner pot
and add the appropriate amount of
water. You can reference the water level
markings printed on the inside of the
inner pot.
4. Place the inner pot in the rice cooker.
Close the lid.
5. Plug in the rice cooker. Tap WHITE RICE
or BROWN RICE. “LONG GRAIN” is
automatically selected. Continue tapping
to select “SHORT GRAIN” or “QUICK”.
The estimated cook time will show on
the display.
6. Optionally, tap DELAY TIMER and
use +and to delay cooking for up to
24hours. Cooking will automatically
start after counting down.
7. Tap START to start the cooking function.
Grains
1. Use the measuring cup to measure
uncooked grains, such as quinoa.
Overfill the cup, then level it o to get an
accurate measurement.
2. Places grains in the inner pot and add
the appropriate amount of water. You
can reference the water level markings
printed on the inside of the inner pot.
3. Place the inner pot in the rice cooker.
Close the lid.
a. Make sure that the inner lid and
steam cap are properly installed.
a. Keep Warm can last up to 24 hours,
but we recommend that you avoid
leaving cooked grain in the rice
cooker for more than 3 hours.
4. Plug in the rice cooker. Tap GRAINS.
“QUINOA” is automatically selected.
Continue tapping to select “PORRIDGE”
or “MIXED”. The estimated cook time
will show on the display.
5. Optionally, tap DELAY TIMER and
use +and to delay cooking for up to
24hours. Cooking will automatically
start after counting down.
6. Tap START to start the cooking function.
7. The rice cooker will beep several times
when finished and automatically switch
to the Keep Warm function. The display
will show how much time has passed
since cooking finished. Tap CANCEL
twice to stop the Keep Warm function.
8. The rice cooker will beep several times
when finished and automatically switch
to the Keep Warm function. The display
will show how much time has passed
since cooking finished. Tap CANCEL
twice to stop the Keep Warm function.
Figure 2.1

EN
10
Steam
1. Add water to the inner pot up to the
“STEAM” water level marking.
2. Place food in the steam basket, then
place the steam basket in the inner pot.
a. Do not overfill the steam basket.
a. Make sure that the inner lid and
steam cap are properly installed.
a. Keep Warm can last up to 24 hours,
but we recommend that you avoid
leaving cooked food in the rice
cooker for more than 3 hours.
3. Place the inner pot in the rice cooker.
Close the lid.
4. Plug in the rice cooker. Tap MODE to
select “STEAM”.
5. Tap + and to adjust the cook time.
6. Optionally, tap DELAY TIMER and
use +and to delay cooking for up to
24hours. Cooking will automatically
start after counting down.
7. Tap START to start the cooking function.
The“PREHEATING” progress indicator
will turn on and the rice cooker will
begin preheating. When preheating is
finished, the display will show the timer
counting down.
8. The rice cooker will beep several times
when finished and automatically switch
to the Keep Warm function. The display
will show how much time has passed
since cooking finished. Tap CANCEL
twice to stop the Keep Warm function.
Slow Cook
1. Place food in the inner pot.
a. Do not fill past the 10-cup long grain
white rice water level marking.
a. Make sure that the inner lid and
steam cap are properly installed.
a. Keep Warm can last up to 24 hours,
but we recommend that you avoid
leaving cooked food in the rice
cooker for more than 3 hours.
2. Place the inner pot in the rice cooker.
Close the lid.
3. Plug in the rice cooker. Tap MODE twice
to select “SLOW COOK”.
4. Tap + and to adjust the cook time.
5. Optionally, tap DELAY TIMER and
use +and to delay cooking for up to
24hours. Cooking will automatically
start after counting down.
6. Tap START to start the cooking function.
7. The rice cooker will beep several times
when finished and automatically switch
to the Keep Warm function. The display
will show how much time has passed
since cooking finished. Tap CANCEL
twice to stop the Keep Warm function.

EN
11
Soup
1. Place food and water in the inner pot.
a. Make sure that the inner lid and
steam cap are properly installed.
a. Keep Warm can last up to 24 hours,
but we recommend that you avoid
leaving cooked food in the rice
cooker for more than 3 hours.
a. Do not fill past the 10-cup long grain
white rice water level marking.
2. Place the inner pot in the rice cooker.
Close the lid.
3. Plug in the rice cooker. Tap MODE three
times to select “SOUP”.
4. Tap +and to adjust the cook time.
5. Optionally, tap DELAY TIMER and
use +and to delay cooking for up to
24hours. Cooking will automatically
start after counting down.
6. Tap START to start the cooking function.
7. The rice cooker will beep several times
when finished and automatically switch
to the Keep Warm function. The display
will show how much time has passed
since cooking finished. Tap CANCEL
twice to stop the Keep Warm function.
Jam/Sauce
1. Place the inner pot in the rice cooker.
You can cook with the lid open or closed.
a. Keep the lid open if you are making
jams or fruit compotes.
2. Place food in the inner pot.
3. Plug in the rice cooker. Tap MODE five
times to select “JAM/SAUCE”.
4. Tap +and to adjust the cook time.
5. Tap START to start the cooking function.
6. When finished, tap CANCEL to stop the
cooking function.
Sauté
1. Place the inner pot in the rice cooker.
You can leave the lid open or close the
lid for faster preheating.
2. Plug in the rice cooker. Tap MODE four
times to select “SAUTE”.
3. Tap +and to adjust the cook time.
4. Tap START to start the cooking function.
The”PREHEATING” progress indicator
will turn on and the rice cooker will
begin preheating. When preheating is
finished, the display will show the timer
counting down.
a. You can add oil to the inner pot
before or after preheating.
b. If food is added to the inner pot
before preheating finishes, the
countdown may not appear.
5. Place food in the inner pot to begin
cooking.
6. When finished, tap CANCEL to stop the
cooking function.

EN
12
Keep Warm
1. Place the inner pot in the rice cooker.
Close the lid.
a. Make sure that the inner lid and
steam cap are properly installed.
2. Plug in the rice cooker. Tap KEEP WARM.
3. Tap +and to adjust the time.
4. Tap START to start the cooking function.
Note: After every cooking function (except
“SAUTE” and “CAKE”), the rice cooker will
automatically switch to the Keep Warm
function. The display will show how much
time has passed since cooking finished.
Tap CANCEL twice to stop the Keep Warm
function.
Cake
1. Evenly grease the inner pot with butter
or oil.
2. Pour the cake batter into the inner pot.
Place the inner pot in the rice cooker.
Close the lid.
a. Make sure that the inner lid and
steam cap are properly installed.
3. Plug in the rice cooker. Tap MODE six
times to select “CAKE”.
4. Tap +and to adjust the baking time.
5. Tap START to start the cooking function.
6. The rice cooker will beep several times
when finished. We recommend poking
the cake with a toothpick and checking if
it comes out clean. If not, repeat steps to
bake the cake longer. Auto Off
• If no cooking function is selected, the
rice cooker will turn o after 15 minutes
of no operation. The display will turn
o and START will be illuminated.
[
Figure2.2
]
• Tap START to use the rice cooker.
Delay Timer
1. Before cooking, tap DELAY TIMER to set
a delay timer.
a. You cannot set a delay timer in
“KEEPWARM”, “SAUTE”, “JAM/
SAUCE”, or “CAKE” functions.
2. Tap +and to delay cooking for up to
24 hours.
Note: This is not a delayed start. The delay
timer takes cook time into account, so food will
finish cooking when the delay timer ends.
3. Tap START and cooking will
automatically start after counting down.
Figure 2.2

EN
13
CARE & MAINTENANCE
Note:
• Always clean the inner pot and accessories
after every use.
• The inner pot has a nonstick coating for easy
cleaning.
• Do not use abrasive cleaners, metal scouring
pads, or metal utensils on any part of the
rice cooker, including inner pot and other
accessories. These will scratch or damage their
surfaces.
• This rice cooker does not contain any user-
serviceable parts. For any repairs, contact
Customer Support (see page 15).
1. Before cleaning, turn o and unplug
the rice cooker and allow it to cool
completely.
2. Wipe the outside and inside of the rice
cooker with a moist cloth.
3. Press the Inner Lid Release Button,
then pull the inner lid to remove it.
Ifnecessary, undo the Steam Cap
Release to empty and clean the
steamcap.
4. Wash the inner lid, steam cap, inner pot,
steam basket, rice paddle, soup ladle, and
measuring cup with hot, soapy water
and a non-abrasive sponge. Soak if
necessary.
a. Accessories are also dishwasher-safe
on the top rack.
a. If necessary, you can remove the
steam cap for easy cleaning and
drying.
a. Turn the inner lid upside down to
make sure the steam cap is properly
installed.
5. Dry the parts and reinstall the inner lid.
Place the inner pot in the rice cooker.
6. Let all surfaces dry completely before
plugging in or turning on the rice
cooker.
Emptying the Steam Cap
Storage
1. Undo the Steam Cap Release located on
the inner lid. [
Figure2.3
]
2. Empty the water that is collected in the
steam cap.
3. Clean the steam cap with hot, soapy
water and a non-abrasive sponge.
1. Clean and dry the rice cooker and all
accessories.
2. Place the inner pot in the rice cooker.
Close the lid.
3. Store the rice cooker in an upright
position. Do not store anything on top.
4. To reassemble, insert the hinges into the
slot and close the Steam Cap Release.
Figure 2.3

EN
14
Problem Possible Solution
The rice cooker will not turn
on. Make sure the rice cooker is plugged into a powered outlet.
The rice cooker has a plastic
smell.
Any rice cooker may have a plastic smell from the manufacturing process.
This is normal. Follow the instructions for a Test Run (page 6) to
decrease the plastic smell. If the plastic smell does not decrease, contact
Customer Support (see page 15).
Food is undercooked, too
soft, or too hard.
Make sure the food to water ratio is correct.
Make sure you select the correct cooking function for the food you are
cooking.
Food boils over while
cooking.
Make sure the food to water ratio is correct.
Make sure the inner lid and steam cap are properly installed.
Display shows Error Code
“E1\E3”.
There is an open circuit in the temperature monitor. Contact Customer
Support (see page 15).
Display shows Error Code
“E2\E4”.
There is a short circuit in the temperature monitor. Contact Customer
Support (see page 15).
TROUBLESHOOTING
If your problem is not listed, please contact Customer Support (see page 15).

EN
15
WARRANTY INFORMATION
Product Name 5.0-Litre Rice Cooker
Model CRC-R501-KEU
For your own reference, we strongly recommend
that you record your order ID and date of purchase.
Date of Purchase
Order ID
Arovast Corporation warrants all products to be of
the highest quality in material, craftsmanship, and
service, eective from the date of purchase to the
end of the 2-year limited warranty period.
If you have any questions or concerns about your
new product, please contact our helpful Customer
Support Team.
CUSTOMER SUPPORT
If you have any questions or concerns about your new product, please contact our helpful
Customer Support Team.
*Please have your invoice and order ID ready before contacting Customer Support.
Arovast Corporation
1202 N. Miller St., Suite A
Anaheim, CA 92806
USA
Email: [email protected]

1
DE
(Wir hoen, dass Ihnen Ihr neuer Reiskocher genauso viel Freude bereitet wie uns.)
Im Namen aller Mitarbeiter von COSORI
Unsere hilfsbereiten hauseigenen Küchenchefs
sind gerne bereit, alle Ihre Fragen zu beantworten!
KONTAKTIEREN SIE UNSERE
KÜCHENCHEFS
E-Mail: [email protected]
Vielen Dank für
Ihren Kauf!
Viel Spaß beim Kochen!
Entdecken Sie unsere digitale Rezeptgalerie
cosori.com
Genießen Sie wöchentlich neue Rezepte, exklusiv
vorbereitet von unseren hauseigenen
Küchenchefs
Kreativ werden mit COSORI
Laden Sie die kostenlose VeSync-App herunter,
um auf Originalrezepte und Videoanleitungen der
COSORI-Köche zuzugreifen, mit unserer Online-
Community in Kontakt zu treten und vieles mehr!

2
DE
Inhaltsverzeichnis Verpackungsinhalt
Technische Daten
Modell CRC-R501-KEU
Stromversorgung AC 220–240V,
50/60Hz
Nennleistung 970W
Fassungsvermögen 5l / 10Tassen*
(ungekochter Reis)
Gewicht 4,45kg
Abmessungen 31,2 x 26,9 x 23,4cm
1 x 5,0-Liter-Reiskocher
1 x Innentopf
1 x 3,0-Liter-Dampfkorb
1 x Selbststehender Reislöel
1 x Messbecher
1 x Suppenkelle
1 x Rezeptbuch
1 x Bedienungsanleitung
1 x Kurzanleitung
Verpackungsinhalt
Technische Daten
Wichtige Sicherheitshinweise
Ihr Reiskocher
Vor dem ersten Gebrauch
Kochen mit dem Reiskocher
Pflege und Wartung
Problemlösung
Informationen zur Garantie
Kundendienst
*Mit dem beiliegenden Reis-Messbecher, der etwa
180ml fasst.
2
2
3
6
6
7
13
14
15
15

3
DE
WICHTIGE SICHERHEITSHINWEISE
Beachten Sie die grundlegenden Sicherheitsvorkehrungen bei der Verwendung
Ihres Reiskochers. Lesen Sie sämtliche Anweisungen.
Wesentliche Sicherheitshinweise
Allgemeine Sicherheit
• Heiße Oberflächen nicht berühren.
• Während des Kochens oder im
Warmhaltemodus nicht den Dampfauslass
oder den Bereich in der Nähe des
Dampfauslasses berühren. Diesen Bereich
nicht mit einem Tuch abdecken.
• Immer hitzebeständige Handschuhe,
Pads oder Ofenhandschuhe verwenden,
wenn Sie den Reiskocher bewegen, heiße
Materialien anfassen und Gegenstände
in den Reiskocher legen oder aus dem
Reiskocher nehmen, einschließlich des
Innentopfs, des Dampfkorbs und des
Zubehörs.
• Den Reiskocher niemals ohne den
Innentopf verwenden.
• Als Schutz vor einem elektrischen Schlag
niemals den Reiskocher, das Kabel oder
den Netzstecker in Wasser oder andere
Flüssigkeiten tauchen.
• Den Reiskocher nicht in Wasser eintauchen
oder unter fließendes Wasser halten.
• Den Stecker vor der Reinigung und wenn
das Gerät nicht benutzt wird abziehen.
Lassen Sie das Gerät abkühlen, bevor Sie
Teile anbringen oder entfernen und vor
der Reinigung sowie Lagerung.
• Keine Lebensmittel, Flüssigkeiten oder
Fremdkörper auf die Heizplatte legen.
• Sicherstellen, dass die Heizplatte sauber
und die Unterseite des Innentopfes trocken
ist, bevor der Innentopf eingesetzt wird.
• Kinder nicht unbeaufsichtigt in der Nähe
des Reiskochers lassen.
• Kinder müssen beaufsichtigt werden, um
sicherzustellen, dass sie nicht mit dem
Reiskocher spielen.
• Kindern nicht erlauben, den Reiskocher
zu reinigen oder Wartungsarbeiten daran
durchzuführen.
• Den Reiskocher nicht benutzen, wenn
er beschädigt ist oder nicht korrekt
funktioniert, oder wenn das Kabel oder
der Netzstecker beschädigt ist. Wenden
Sie sich an unseren Kundendienst (siehe
Seite 15).
• Die Verwendung von Zubehör oder
Ersatzteilen, die nicht von COSORI
empfohlen werden, kann zu Verletzungen
führen.
• Benutzen Sie das Gerät nicht im Freien.
• Stellen Sie weder den Reiskocher noch
einzelne Geräteteile auf eine Herdplatte, in
die Nähe von Gas- oder Elektrobrennern
oder in einen erhitzten Ofen.
• Das mitgelieferte Zubehör und den
Innentopf nicht in der Mikrowelle, auf
einem Herd oder Grill oder im Backofen
verwenden.
• Beim Bewegen des Reiskochers oder
des Innentopfs besonders vorsichtig
vorgehen, wenn sie heißes Öl oder andere
heiße Flüssigkeiten enthalten.
• Dieser Reiskocher ist nicht für den Betrieb
mit einer externen Zeitschaltuhr oder
einem separaten Fernbedienungssystem
vorgesehen.
• Dieses Gerät kann von Kindern ab
8Jahren und darüber sowie von Personen
mit verringerten physischen, sensorischen
oder mentalen Fähigkeiten oder Mangel
an Erfahrung und Wissen benutzt werden,
wenn sie beaufsichtigt oder bezüglich
des sicheren Gebrauchs des Geräts
unterwiesen wurden und die daraus
resultierenden Gefahren verstehen.
DIESE ANLEITUNG LESEN UND
SORGFÄLTIG AUFBEWAHREN

4
DE
Beim Kochen
• ACHTUNG: Gefahr eines Stromschlags.
Nur im herausnehmbaren Innentopf
kochen. Flüssigkeit darf nicht direkt auf
die Heizplatte des Reiskochers gelangen.
• Das Gerät auf einer flachen, stabilen,
hitzebeständigen Oberfläche verwenden,
die sich nicht in der Nähe von
Wärmequellen oder Flüssigkeiten befindet.
• Der herausnehmbare Innentopf ist
während des Gebrauchs extrem heiß und
kann schwer sein, wenn er mit Zutaten
gefüllt ist.
• Beim Umgang mit dem Innentopf oder
dem Dampfkorb vorsichtig vorgehen,
wenn dieser heiße Speisen, heißes Öl
oder andere heiße Flüssigkeiten enthält.
• Heißes Zubehör nur auf eine
hitzebeständige Unterlage oder einen
Topflappen stellen.
• Keine Gegenstände auf der Oberseite des
Reiskochers lagern, während er in Betrieb
ist. Keine Gegenstände, außer dem
empfohlenen Zubehör, im Reiskocher
aufbewahren.
• Während oder unmittelbar nach dem
Kochen nicht den Metallteil des Deckels,
Oberflächen oder Zubehörteile berühren,
da diese noch heiß sind.
• Kein/e Papier, Pappe, nicht
hitzebeständigen Kunststo oder andere
Stromversorgung und Kabel
• Dieser Reiskocher besitzt ein kurzes
Netzkabel, um die Gefahr zu verringern,
dass Kinder daran ziehen, sich darin
verheddern oder darüber stolpern.
• Zum Ausschalten des Reiskochers tippen
Sie auf CANCEL ABBRECHEN, um den
Kochvorgang zu beenden, und ziehen Sie
dann den Netzstecker. Zum Trennen des
Netzkabels den Stecker direkt anfassen
und aus der Steckdose herauszuziehen.
Niemals am Netzkabel ziehen.
• Auf die Stifte des Steckers dürfen kein/e
Wasser oder Flüssigkeiten gelangen.
• Nicht mit einem Verlängerungskabel
verwenden. Dieser Reiskocher ist nur für
die Verwendung auf einer Arbeitsplatte
vorgesehen.
• Das Kabel nicht über die Seite eines
Tischs oder einer Theke hängen lassen.
Das Kabel darf nicht mit heißen Flächen
in Berührung kommen.
• Das Kabel muss so verlegt werden, dass es
nicht über eine Arbeits- oder Tischplatte
hängt, wo Kinder daran ziehen oder
unbeabsichtigt darüber stolpern können.
• Verwenden Sie niemals eine Steckdose
unter der Arbeitsplatte für den
Stromanschluss des Reiskochers.
• Achten Sie darauf, dass keine Flüssigkeit
an den Stecker des Netzkabels gelangt.
Materialien, die sich entzünden oder
schmelzen können, in den Reiskocher
legen.
• Diesen Reiskocher nicht zum Frittieren
mit Öl verwenden.
• Keine der Lüftungsönungen blockieren.
Aus den Önungen tritt heißer Dampf
aus. Halten Sie Ihre Hände und Ihr
Gesicht von den Önungen fern.
• Den Reiskocher nicht unbeaufsichtigt
lassen, während er in Betrieb ist.
• Die Heizplatte weist nach dem Gebrauch
eine Restwärme auf.
• Kinder dürfen nicht mit dem Gerät spielen.
Die Reinigung und Wartung darf nicht
von Kindern vorgenommen werden, es
sei denn, sie sind älter als 8Jahre und
werden beaufsichtigt. Den Reiskocher und
sein Kabel außerhalb der Reichweite von
Kindern unter 8Jahren halten.
• Nur verwenden wie in diesem Handbuch
beschrieben. Den Reiskocher nur für den
vorgesehenen Zweck verwenden.
• Nicht für den kommerziellen Gebrauch.
Nur für den Hausgebrauch.
Hinweis: Siehe Pflege und Wartung für
Anweisungen zur Reinigung des Zubehörs
(Seite 13).

5
DE
• Den Reiskocher und sein Kabel außerhalb
der Reichweite von Kindern aufbewahren.
• Der Reiskocher darf nur an Stromnetzen
mit 220–240V, 50/60Hz betrieben
werden. Der Reiskocher darf nicht an
andere Steckdosentypen angeschlossen
werden.
Elektromagnetische Felder
(EMF)
DIESE
ANLEITUNG BITTE
AUFBEWAHREN
Dieser Reiskocher erfüllt alle Normen
hinsichtlich elektromagnetischer Felder
(EMF). Bei sachgemäßer Handhabung
gemäß den Anweisungen in dieser
Bedienungsanleitung ist das Gerät auf
Grundlage der derzeit verfügbaren
wissenschaftlichen Erkenntnisse
bediensicher.
• Wenn das Netzkabel beschädigt ist,
muss es von der Arovast Corporation
oder einer einem qualifizierten Fachmann
ersetzt werden, um Gefahren durch
Stromschlag oder Brand zu vermeiden.
Bitte kontaktieren Sie den Kundendienst
(Seite 15).
Dieses Symbol bedeutet, dass das Produkt
nicht als Hausmüll entsorgt werden darf
und zum Recycling an eine geeignete
Sammelstelle geliefert werden sollte.
Die ordnungsgemäße Entsorgung und
das Recycling tragen zum Schutz der
natürlichen Ressourcen, der menschlichen
Gesundheit und der Umwelt bei.
Weitere Informationen zur Entsorgung und
zum Recycling dieses Produkts erhalten
Sie von Ihrer örtlichen Gemeinde, dem
Entsorgungsdienst oder dem Geschäft, in
dem Sie dieses Produkt gekauft haben.
Dieses Produkt ist RoHS-konform.
Dieses Produkt erfüllt die Anforderungen
der Richtlinie 2011/65/EU und ihrer
Novellierungen zur Beschränkung der
Verwendung bestimmter gefährlicher Stoe
in Elektro- und Elektronikgeräten.
ACHTUNG: Heiße
Oberfläche.
220–240V, 50/60Hz 120 V, 60 Hz

6
DE
Bedienfeld (Abbildung B)
a. Fortschritts-Anzeigen
b. Display
c. Zeit erhöhen/senken
d. Zeitschaltuhr-Anzeige
e. Reissorte
f. Taste White Rice (Weißer
Reis)
g. Taste Grains (Getreide)
h. Taste Brown Rice (Naturreis)
i. Getreidesorte
j. Kochmodi
k. Taste Keep Warm
(Warmhalten)
IHR REISKOCHER
Abbildung des Reiskochers (Abbildung A)
a. Dampfauslass
b. Önen-Taste
c. Deckel
d. Stromkabel
e. Bedienfeld
f. Innendeckel
g. Heizstrahlerplatte
h. Entriegelungsknopf für
Innendeckel
i. Oberer Temperatursensor
j. Kondenswassersammler
k. Heizplatte
l. Unterer Temperatursensor
m. 3,0-Liter-Dampfkorb
n. Antihaft-Innentopf
o. Suppenkelle
p. Messbecher
q. Selbststehender Reislöel
1. Dampfhaube
2. Dampfhauben-Entriegelung
VOR DEM ERSTEN GEBRAUCH
1. Alle Verpackungen um und im Reiskocher
entfernen.
2. Auf eine stabile, ebene und hitzebeständige
Unterlage stellen. Von Bereichen fernhalten,
die durch Dampf beschädigt werden können
(wie Wände oder Schränke).
3. Den Innendeckel entfernen (siehe Seite 13).
[
Abbildung1.1
]
4. Den Innendeckel, den Dampfdeckel, den
Innentopf, den Dampfkorb, die Reislöel, den
Suppenlöel und den Messbecher mit heißem
Seifenwasser und einem nicht scheuernden
Schwamm spülen.
5. Die Teile trocknen und den Innendeckel wieder
einsetzen. Den Innentopf in den Reiskocher
einsetzen.
1. Vergewissern Sie sich, dass sich keine Lebensmittel
oder Verpackungen im Reiskocher befinden, und
schließen Sie ihn an die Stromversorgung an.
2. Wasser in den Innentopf bis zur Markierung STEAM
(DÄMPFEN) einfüllen. Schließen Sie den Deckel.
3. Zur Auswahl von STEAM (DÄMPFEN) auf MODE
MODUS tippen.
4. Auf START tippen, um die Funktion STEAM
(DÄMPFEN) zu starten.
5. Der Reiskocher gibt mehrere Signaltöne ab, wenn
er fertig ist.
6. Önen Sie den Deckel, nehmen Sie den Innentopf
vorsichtig heraus und gießen Sie das restliche
Wasser aus.
7. Den Reiskocher 15Minuten lang abkühlen
lassen. Den Innendeckel und die Außenseite des
Reiskochers mit einem trockenen Tuch abwischen.
Einrichtung Testvorgang
Bei einem Testvorgang können Sie sich mit Ihrem
Reiskocher vertraut machen sowie sicherstellen,
dass er korrekt funktioniert. Außerdem werden dabei
mögliche Rückstände im Reiskocher beseitigt.
l. Taste Cooking Mode
(Kochmodus)
m. Taste Cancel
(Abbrechen)
n. Taste Delay Timer
(Verzögerung)
o. Taste Start
21
Abbildung 1.1

7
DE
KOCHEN MIT DEM REISKOCHER
Kochfunktionen
Schnellreferenztabelle für Kochfunktionen
Hinweis:
• Die Kochzeit ist eine Schätzung. Die tatsächliche Kochzeit kann je nach Faktoren wie Getreide- und
Wassermenge, Raumtemperatur, Wassertemperatur und Spannung variieren.
• Der Innentopf hat keine Wasserstandsmarkierung für 1Tasse. Wenn Sie 1Tasse kochen, verwenden Sie die
Option „Grain (Getreide)“: Spalte „Water Ratio (Wasseranteil)“, um die richtige Wassermenge zu ermitteln.
Kochfunktionen sind mit der idealen Zeit und Temperatur zum Zubereiten unterschiedlichen Reis- und
Getreidesorten programmiert. Weitere Informationen zu den einzelnen Kochfunktionen finden Sie in
den jeweiligen Abschnitten oder in der Schnellreferenztabelle für die Kochfunktionen.
Getreidesorte Funktion Wasserstands-
markierung
Getreide:
Wasseranteil Tassen*
Geschätzte
Kochzeit
(Minuten)
Weißer
Langkornreis
WHITE RICE
LONG GRAIN
LONG GRAIN
WHITE 1: 1¼
1 35–45
5 45–55
10 55–65
Weißer
Rundkornreis
WHITE RICE
SHORT GRAIN
MED/SHORT
WHITE 1: 1¼
1 32–42
5 41–51
10 51–61
Schnell,
weißer Reis**
WHITE RICE
QUICK
SHORT GRAIN
WHITE 1: 1¼
1 27–37
5 39–49
10 50–60
Weißer
Jasmin-Reis
WHITE RICE
LONG GRAIN
LONG GRAIN
WHITE 1: 1¼
1 35–45
5 40–50
10 50–60
Sushi-Reis WHITE RICE
SHORT GRAIN
MED/SHORT
WHITE 1: 1¼
1 32–42
5 41–51
10 51–61
Langkorn
Naturreis
BROWN RICE
LONG GRAIN BROWN 1: 1¼
1 59–69
4 65–75
8 72–82
316
316
316
8
8
38

8
DE
*1 Reis-Messbecher entspricht ca. 180ml
**Mit der Schnellkochfunktion kocht der Reis schneller, kann aber etwas härter sein.
Funktion Betriebszeitbereich Standardzeit Standardtemperatur
Langsam kochen 5min–24h 30min 100°C
Dämpfen 1min–1h 10min 100°C
Anbraten 1–30min 5min 145–155°C
Suppe 1min–4h 30min 100°C
Konfitüre/Soße 5min–2h 1Stunde 100°C
Kuchen 1min–1h 30min 50min 110–120°C
Warmhalten 10min–24h 70°C
Zeitschaltuhr 10min–24h
Getreidesorte Funktion Wasserstands-
markierung
Getreide:
Wasseranteil Tassen*
Geschätzte
Kochzeit
(Minuten)
Rundkorn
Naturreis
BROWN RICE
SHORT GRAIN BROWN 1: 1¼
1 60–70
4 66–76
8 73–83
Schnell,
Naturreis**
BROWN RICE
QUICK BROWN 1: 1¼
1 50–60
4 55–65
8 60–70
Quinoa GRAINS
QUINOA QUINOA 1: 1¼
1 37–47
3 42–52
6 46–56
Porridge GRAINS
PORRIDGE PORRIDGE 1: 5
½ 35–45
1 45–55
1½ 50–60
2 55–65
2½ 60–70
Mischgetreide GRAINS
MIXED MIXGRAIN 1: 1¼
1 59–69
3 65–75
6 72–82
38

9
DE
Weißer Reis / Brauner bzw.
Naturreis
1. Verwenden Sie den Messbecher zum
Abmessen von ungekochtem Reis. Überfüllen
Sie den Becher etwas und streichen Sie die
überschüssige Menge ab, um eine genaue
Messung zu erhalten. [
Abbildung2.1
]
a. Vergewissern, dass der Innendeckel
und die Dampfhaube korrekt
angebracht sind.
a. Mit der Funktion „Quick Rice (Schnell
Reis)“ wird der Reis schneller gekocht, aber
die Konsistenz kann etwas härter sein.
a. Die Warmhaltefunktion kann bis
zu 24Stunden aktiv sein, aber wir
empfehlen, gekochten Reis nicht länger
als 5Stunden im Reiskocher zu lassen.
2. Den Reis in einen separaten Behälter
oder ein feinmaschiges Sieb geben. Reis
waschen, bis das Wasser klar ist.
3. Den gewaschenen Reis in den Innentopf
geben und die entsprechende Menge Wasser
hinzufügen. Zur Orientierung können auch
die Wasserstandsmarkierungen dienen,
die auf der Innenseite des Innentopfes
aufgedruckt sind.
4. Den Innentopf in den Reiskocher
einsetzen. Schließen Sie den Deckel.
5. Den Reiskocher an die Netzsteckdose
anschließen. Auf WHITE RICE WEISSER
REIS oder BROWN RICE NATURREIS
tippen. LONG GRAIN LANGKORN wird
automatisch ausgewählt. Tippen Sie weiter,
um SHORT GRAIN RUNDKORN oder
QUICK SCHNELL auszuwählen. Die
geschätzte Garzeit wird auf dem Display
angezeigt.
Getreide
1. Den Messbecher zum Abmessen von
ungekochtem Getreide verwenden, wie z.B.
Quinoa. Überfüllen Sie den Becher etwas
und streichen Sie die überschüssige Menge
ab, um eine genaue Messung zu erhalten.
2. Geben Sie das Getreide in den Innentopf
und fügen Sie die entsprechende Menge
Wasser hinzu. Zur Orientierung können
auch die Wasserstandsmarkierungen
dienen, die auf der Innenseite des
Innentopfes aufgedruckt sind.
3. Den Innentopf in den Reiskocher
einsetzen. Schließen Sie den Deckel.
a. Vergewissern, dass der Innendeckel
und die Dampfhaube korrekt
angebracht sind.
a. Die Warmhaltefunktion kann bis
zu 24Stunden aktiv sein, aber wir
empfehlen, gekochtes Getreide nicht
länger als 3Stunden im Reiskocher zu
lassen.
4. Den Reiskocher an die Netzsteckdose
anschließen. Auf GRAINS GETREIDE
tippen. QUINOA wird automatisch
ausgewählt. Tippen Sie weiter, um
PORRIDGE oder MIXED GEMISCHT
auszuwählen. Die geschätzte Garzeit wird
auf dem Display angezeigt.
5. Optional können Sie auf DELAY TIMER
ZEITSCHALTUHR tippen und mit
+und kann der Garvorgang um bis zu
24Stunden verzögert werden. Nach dem
Ablauf des Timers beginnt der Garvorgang
automatisch.
6. Auf START tippen, um die Kochfunktion zu
starten.
7. Der Reiskocher gibt mehrere Signaltöne
ab, wenn er fertig ist, und wechselt
automatisch zur Warmhaltefunktion. Auf
dem Display wird angezeigt, wie viel Zeit
seit dem Ende des Garvorgangs vergangen
ist. Zweimal auf CANCEL ABBRECHEN
tippen, um die Warmhaltefunktion zu
beenden.
Abbildung 2.1
6. Optional können Sie auf DELAY TIMER
ZEITSCHALTUHR tippen und mit
+und kann der Garvorgang um bis zu
24Stunden verzögert werden. Nach dem
Ablauf des Timers beginnt der Garvorgang
automatisch.
7. Auf START tippen, um die Kochfunktion zu
starten.
8. Der Reiskocher gibt mehrere Signaltöne ab,
wenn er fertig ist, und wechselt automatisch
zur Warmhaltefunktion. Auf dem Display
wird angezeigt, wie viel Zeit seit dem Ende
des Garvorgangs vergangen ist. Zweimal
auf CANCEL ABBRECHEN tippen, um die
Warmhaltefunktion zu beenden.

10
DE
Dämpfen
1. Wasser in den Innentopf bis zur Markierung
STEAM DÄMPFEN einfüllen.
2. Die Speisen in den Dampfkorb legen und
den Dampfkorb in den Innentopf setzen.
a. Den Dampfkorb nicht überfüllen.
a. Vergewissern, dass der Innendeckel
und die Dampfhaube korrekt
angebracht sind.
a. Die Warmhaltefunktion kann bis
zu 24Stunden aktiv sein, aber wir
empfehlen, gekochte Speisen nicht
länger als 3Stunden im Reiskocher zu
lassen.
3. Den Innentopf in den Reiskocher
einsetzen. Schließen Sie den Deckel.
4. Den Reiskocher an die Netzsteckdose
anschließen. Zur Auswahl von STEAM
DÄMPFEN auf MODE MODUS tippen.
5. Auf + und tippen, um die Kochzeit
einzustellen.
6. Optional können Sie auf DELAY TIMER
ZEITSCHALTUHR tippen und mit
+und kann der Garvorgang um bis zu
24Stunden verzögert werden. Nach dem
Ablauf des Timers beginnt der Garvorgang
automatisch.
7. Auf START tippen, um die Kochfunktion
zu starten. Die Fortschritts-Anzeige
PREHEATING (VORHEIZEN) leuchtet
auf und der Reiskocher beginnt mit dem
Vorheizen. Wenn das Vorheizen beendet ist,
wird auf dem Display der Timer angezeigt.
8. Der Reiskocher gibt mehrere Signaltöne
ab, wenn er fertig ist, und wechselt
automatisch zur Warmhaltefunktion. Auf
dem Display wird angezeigt, wie viel Zeit
seit dem Ende des Garvorgangs vergangen
ist. Zweimal auf CANCEL ABBRECHEN
tippen, um die Warmhaltefunktion zu
beenden.
Langsam kochen
1. Geben Sie die Lebensmittel in den
Innentopf.
a. Nicht über die 10-Tassen-Markierung
für den Wasserstand von weißem
Langkornreis hinaus auüllen.
a. Vergewissern, dass der Innendeckel
und die Dampfhaube korrekt
angebracht sind.
a. Die Warmhaltefunktion kann bis
zu 24Stunden aktiv sein, aber wir
empfehlen, gekochte Speisen nicht
länger als 3Stunden im Reiskocher zu
lassen.
2. Den Innentopf in den Reiskocher
einsetzen. Schließen Sie den Deckel.
3. Den Reiskocher an die Netzsteckdose
anschließen. Zweimal auf MODE MODUS
tippen, um die Option SLOW COOK
LANGSAMES GAREN auszuwählen.
4. Auf + und tippen, um die Kochzeit
einzustellen.
5. Optional können Sie auf DELAY TIMER
ZEITSCHALTUHR tippen und mit
+und kann der Garvorgang um bis zu
24Stunden verzögert werden. Nach dem
Ablauf des Timers beginnt der Garvorgang
automatisch.
6. Auf START tippen, um die Kochfunktion zu
starten.
7. Der Reiskocher gibt mehrere Signaltöne
ab, wenn er fertig ist, und wechselt
automatisch zur Warmhaltefunktion. Auf
dem Display wird angezeigt, wie viel Zeit
seit dem Ende des Garvorgangs vergangen
ist. Zweimal auf CANCEL ABBRECHEN
tippen, um die Warmhaltefunktion zu
beenden.

11
DE
Suppe
1. Lebensmittel und Wasser in den Innentopf
füllen.
a. Vergewissern, dass der Innendeckel
und die Dampfhaube korrekt
angebracht sind.
a. Die Warmhaltefunktion kann bis
zu 24Stunden aktiv sein, aber wir
empfehlen, gekochte Speisen nicht
länger als 3Stunden im Reiskocher zu
lassen.
a. Nicht über die 10-Tassen-Markierung
für den Wasserstand von weißem
Langkornreis hinaus auüllen.
2. Den Innentopf in den Reiskocher
einsetzen. Schließen Sie den Deckel.
3. Den Reiskocher an die Netzsteckdose
anschließen. Dreimal auf MODE MODUS
tippen, um die Option SOUP SUPPE
auszuwählen.
4. Auf +und tippen, um die Kochzeit
einzustellen.
5. Optional können Sie auf DELAY TIMER
ZEITSCHALTUHR tippen und mit
+und kann der Garvorgang um bis zu
24Stunden verzögert werden. Nach dem
Ablauf des Timers beginnt der Garvorgang
automatisch.
6. Auf START tippen, um die Kochfunktion zu
starten.
7. Der Reiskocher gibt mehrere Signaltöne
ab, wenn er fertig ist, und wechselt
automatisch zur Warmhaltefunktion. Auf
dem Display wird angezeigt, wie viel Zeit
seit dem Ende des Garvorgangs vergangen
ist. Zweimal auf CANCEL ABBRECHEN
tippen, um die Warmhaltefunktion zu
beenden.
Kontüre/Soße
1. Den Innentopf in den Reiskocher
einsetzen. Der Kochvorgang kann mit
oenem oder geschlossenem Deckel
durchgeführt werden.
a. Beim Kochen von Konfitüre oder
Obstkompott den Deckel oen halten.
2. Geben Sie die Lebensmittel in den Innentopf.
3. Den Reiskocher an die Netzsteckdose
anschließen. Fünfmal auf MODE MODUS
tippen, um die Option JAM/SAUCE
KONFITÜRE/SOSSE auszuwählen.
4. Auf +und tippen, um die Kochzeit
einzustellen.
5. Auf START tippen, um die Kochfunktion
zu starten.
6. Wenn der Vorgang abgeschlossen ist,
tippen Sie auf CANCEL ABBRECHEN,
um die Kochfunktion zu beenden.
Anbraten
1. Den Innentopf in den Reiskocher
einsetzen. Der Deckel kann oen bleiben
oder er kann zum schnelleren Vorheizen
geschlossen werden.
2. Den Reiskocher an die Netzsteckdose
anschließen. Viermal auf MODE
MODUS tippen, um die Option
SAUTE ANBRATEN auszuwählen.
3. Auf +und tippen, um die Kochzeit
einzustellen.
4. Auf START tippen, um die Kochfunktion
zu starten. DieFortschritts-Anzeige
PREHEATING (VORHEIZEN) leuchtet
auf und der Reiskocher beginnt mit dem
Vorheizen. Wenn das Vorheizen beendet ist,
wird auf dem Display der Timer angezeigt.
a. Vor oder nach dem Vorheizen kann
Öl in den Innentopf gegeben werden.
b. Wenn Lebensmittel in den Innentopf
gegeben werden, bevor das Vorheizen
beendet ist, wird der Countdown
möglicherweise nicht angezeigt.
5. Geben Sie die Lebensmittel in den
Innentopf, um das Garen zu starten.
6. Wenn der Vorgang abgeschlossen ist,
tippen Sie auf CANCEL ABBRECHEN,
um die Kochfunktion zu beenden.

12
DE
Warmhalten
1. Den Innentopf in den Reiskocher
einsetzen. Schließen Sie den Deckel.
a. Vergewissern, dass der Innendeckel
und die Dampfhaube korrekt
angebracht sind.
2. Den Reiskocher an die Netzsteckdose
anschließen. Auf KEEP WARM
WARMHALTEN tippen.
3. Auf +und tippen, um die Zeit einzustellen.
4. Auf START tippen, um die Kochfunktion zu
starten.
Hinweis: Nach jeder Kochfunktion (außer
SAUTE (ANBRATEN) und CAKE (BACKEN)),
wechselt der Reiskocher automatisch zur
Warmhaltefunktion. Auf dem Display wird
angezeigt, wie viel Zeit seit dem Ende des
Garvorgangs vergangen ist. Zweimal auf
CANCEL ABBRECHEN tippen, um die
Warmhaltefunktion zu beenden.
Kuchen
1. Den Innentopf gleichmäßig mit Butter oder
Öl einfetten.
2. Den Kuchenteig in den Innentopf
geben. Den Innentopf in den Reiskocher
einsetzen. Schließen Sie den Deckel.
a. Vergewissern, dass der Innendeckel
und die Dampfhaube korrekt
angebracht sind.
3. Den Reiskocher an die Netzsteckdose
anschließen. Sechsmal auf MODE MODUS
tippen, um die Option CAKE BACKEN
auszuwählen.
4. Auf +und tippen, um die Backzeit
einzustellen.
5. Auf START tippen, um die Kochfunktion zu
starten.
6. Der Reiskocher gibt mehrere Signaltöne
ab, wenn er fertig ist. Wir empfehlen,
den Kuchen mit einem Zahnstocher
anzustechen und zu überprüfen, ob er
sauber herauskommt oder er noch weiter
gebacken werden muss. Wenn nicht,
wiederholen Sie die Schritte, um den
Kuchen länger zu backen.
Automatische Abschaltung
• Wenn keine Kochfunktion ausgewählt
wird, schaltet sich der Reiskocher nach
15Minuten ohne Betrieb ab. Das Display
schaltet sich aus und START leuchtet.
[
Abbildung2.2
]
• Auf START tippen, um den Reiskocher zu
starten.
Zeitschaltuhr
1. Vor dem Kochen tippen Sie auf DELAY
TIMER ZEITSCHALTUHR, um die
Verzögerungszeit einzustellen.
a. Bei den Funktionen KEEP WARM
WARMHALTEN, SAUTE ANBRATEN,
JAM/SAUCE KONFITÜRE/SOSSE
oder CAKE BACKEN kann keine
Zeitschaltuhr verwendet werden.
2. Auf +und tippen, um den Garvorgang
um bis zu 24Stunden zu verzögern.
Hinweis: Es handelt sich nicht um das
verzögerte Starten. Der Zeitschaltuhr
berücksichtigt die Garzeit, so dass die Speisen
erst nach Ablauf der Zeitschaltuhr fertig gegart
sind.
3. Auf START tippen, dann beginnt der
Garvorgang nach dem Ablauf automatisch.
Abbildung 2.2

13
DE
PFLEGE UND WARTUNG
Hinweis:
• Den Innentopf und das Zubehör nach jedem
Gebrauch immer reinigen.
• Der Innentopf hat eine Antihaftbeschichtung
für eine einfachere Reinigung.
• Keine Scheuermittel, scheuernden Schwämme
aus Metall oder Metallutensilien für Teile des
Reiskochers, einschließlich dem Innentopf und
anderen Zubehörteilen verwenden. Denn diese
zerkratzen oder beschädigen die Oberflächen.
• Dieser Reiskocher enthält keine vom Benutzer
zu wartenden Teile. Für Reparaturen wenden
Sie sich bitte an den Kundendienst (siehe
Seite 15).
1. Den Reiskocher vor der Reinigung
ausschalten, den Netzstecker ziehen und
den Reiskocher vollständig abkühlen lassen.
2. Den Reiskocher außen und innen mit
einem feuchten Tuch abwischen.
3. Die Entriegelungstaste des Innendeckels
drücken und den Innendeckel herausziehen.
Bei Bedarf die Dampfhauben-Entriegelung
önen, um die Dampfhaube zu entleeren
und zu reinigen.
4. Den Innendeckel, den Dampfdeckel, den
Innentopf, den Dampfkorb, die Reislöel,
den Suppenlöel und den Messbecher mit
heißem Seifenwasser und einem nicht
scheuernden Schwamm spülen. Weichen
Sie sie bei Bedarf ein.
a. Das Zubehör ist auch spülmaschinenfest
und kann im oberen Fach der
Spülmaschine gespült werden.
a. Bei Bedarf kann die Dampfhaube zur
einfachen Reinigung und Trocknung
abgenommen werden.
a. Den Innendeckel auf den Kopf
drehen, um sicherzustellen, dass die
Dampfhaube korrekt eingesetzt ist.
5. Die Teile trocknen und den Innendeckel
wieder einsetzen. Den Innentopf in den
Reiskocher einsetzen.
6. Lassen Sie alle Oberflächen vollständig
trocknen, bevor Sie den Reiskocher an die
Stromversorgung anschließen oder ihn
einschalten.
Entleeren der Dampfhaube
Lagerung
1. Die Dampfhauben-Entriegelung am
Innendeckel drücken. [
Abbildung2.3
]
2. Das Wasser entleeren, das sich in der
Dampfhaube gesammelt hat.
3. Die Dampfhaube mit heißer Seifenlauge
und einem nicht scheuernden Schwamm
reinigen.
1. Den Reiskocher und alle Zubehörteile
reinigen und trocknen.
2. Den Innentopf in den Reiskocher
einsetzen. Schließen Sie den Deckel.
3. Den Reiskocher in aufrechter Position
lagern. Nichts auf der Oberseite lagern.
4. Zum Zusammenbau die Scharniere in den
Schlitz einsetzen und die Dampfhauben-
Entriegelung schließen.
Abbildung 2.3

14
DE
Problem Mögliche Abhilfe
Der Reiskocher lässt sich
nicht einschalten.
Sicherstellen, dass der Reiskocher an eine funktionierende Steckdose
angeschlossen ist.
Der Reiskocher riecht nach
Plastik.
Eine Reiskocher kann einen Kunststogeruch abgeben, der vom
Herstellungsprozess herrührt. Dies ist normal. Befolgen Sie die
Anweisungen zum Testlauf (Seite 6), um den Kunststogeruch
zu beseitigen. Wenn der Kunststogeruch nach einem Testlauf nicht
nachlässt, wenden Sie sich an den Kundendienst (siehe Seite 15).
Das Essen ist nicht
ausreichend gegart, zu
weich oder zu hart.
Darauf achten, dass das Verhältnis von Lebensmittel und Wasser korrekt ist.
Sicherstellen, dass die geeignete Kochfunktion für die zu kochenden
Speisen ausgewählt werden.
Lebensmittel kochen beim
Kochen über.
Darauf achten, dass das Verhältnis von Lebensmittel und Wasser korrekt ist.
Sicherstellen, dass der Innendeckel und die Dampfhaube korrekt
angebracht sind.
Auf dem Display erscheint
der Fehlercode „E1/E3“.
Die Temperaturüberwachung weist einen oenen Stromkreis auf. Wenden
Sie sich an unseren Kundendienst (siehe Seite 15).
Auf dem Display erscheint
der Fehlercode „E2/E4“.
Bei der Temperaturüberwachung ist ein Kurzschluss aufgetreten. Wenden
Sie sich an unseren Kundendienst (siehe Seite 15).
PROBLEMLÖSUNG
Sollte ein Problem auftreten, das hier nicht aufgeführt ist, wenden Sie sich an den
Kundendienst (siehe Seite 15).

15
DE
INFORMATIONEN ZUR GARANTIE
Produktname 5,0-Liter-Reiskocher
Modell CRC-R501-KEU
Zu Ihrer eigenen Information empfehlen wir Ihnen
dringend, Ihre Bestellnummer und das Kaufdatum
zu notieren.
Kaufdatum
Bestellnummer
Die Produkte der Arovast Corporation werden
fachkundig aus hochwertigen Werkstoen
gefertigt. Die Arovast Corporation übernimmt
die beschränkte Garantie für Material- und
Herstellungsfehler ab dem Kaufdatum für einen
Zeitraum von zwei Jahren.
Bei Fragen oder Problemen mit Ihrem neuen
Produkt hilft Ihnen unser Kundendienst gerne
weiter.
KUNDENDIENST
Bei Fragen oder Problemen mit Ihrem neuen Produkt hilft Ihnen unser Kundendienst gerne
weiter.
*Bitte halten Sie Ihre Rechnungs- und Bestellnummer für das Gespräch mit unserem
Kundendienst bereit.
Arovast Corporation
1202 N. Miller St., Suite A
Anaheim, CA 92806
USA
E-Mail: support.de@cosori.com

1
ES
(Esperamos que tu nueva arrocera te guste tanto como a nosotros).
En nombre de todos los que trabajamos en COSORI,
Nuestros chefs lo ayudarán con cualquier
duda que puedas tener.
PÓNGASE EN CONTACTO CON NUESTROS
CHEFS
Correo electrónico: reci[email protected]
¡Gracias por tu
compra!
¡Que disfrutes cocinando!
explora nuestra galería digital de recetas
cosori.com
disfruta de recetas destacadas cada semana
preparadas exclusivamente por nuestros chefs
Sé creativo con COSORI
Descarga la aplicación gratuita VeSync para acceder
a recetas originales y vídeos tutoriales de los chefs de
COSORI, interactuar con nuestra comunidad en línea
y mucho más.

2
ES
Índice Contenido de la caja
Especificaciones
Modelo CRC-R501-KEU
Fuente de
alimentación
CA 220–240V,
50/60Hz
Potencia
nominal 970W
Capacidad 5l/10 taza* (arroz sin
cocinar)
Peso 4,45kg (9,81lb)
Dimensiones 31,2 x 26,9 x 23,4cm /
12,3 x 10,6 x 9,2in
1 x Arrocera de 5litros
1 x Olla interior
1 x Cesta de vapor de 3litros
1 x Cuchara de arroz de pie
1 x Taza de medición
1 x Cucharón de sopa
1 x Libro de recetas
1 x Manual de usuario
1 x Guía de referencia rápida
Contenido de la caja
Especificaciones
Precauciones importantes
Conozca su arrocera
Antes del primer uso
Cocinar con su arrocera
Cuidado y mantenimiento
Solución de problemas
Información de la garantía
Servicio de Atención al Cliente
*Mediante el uso de la taza de medición de
arroz incluida, que es aproximadamente
180ml/6,1onzas.
2
2
3
6
6
7
13
14
15
15

3
ES
PRECAUCIONES IMPORTANTES
Siga las precauciones básicas de seguridad cuando utilice la arrocera. Lea todas
las instrucciones.
Aspectos clave de seguridad
Seguridad general
• No toques las superficies calientes.
• No toque la ventilación de vapor ni la
zona próxima a la ventilación de vapor
mientras esté cocinando o en modo
“Keep Warm” (Mantener templado). No
cubra la zona con un paño.
• Siempre use guantes resistentes al calor,
almohadillas o, incluso, manoplas cuando
mueva la arrocera, manipule materiales
calientes y cuando coloque elementos
o los retire de la arrocera, incluso la olla
interior, la cesta de vapor y los accesorios.
• Nunca utilice la arrocera sin la olla
interior colocada.
• Para protegerse contra descargas eléctricas,
no sumerja la arrocera, el enchufe ni el
cable en agua u otros líquidos.
• No use la arrocera en agua o bajo agua
corriente.
• Desenchúfela cuando no la utilice y antes
de limpiarla. Deje que se enfríe antes de
poner o quitar los componentes y antes
de limpiarla o guardarla.
• No coloque alimentos, líquidos ni objetos
extraños sobre la placa calentadora.
• Asegúrese de que la placa calentadora
esté limpia y la parte inferior de la olla
interior esté seca antes de introducir la
olla interior.
• Supervise atentamente a los niños que
utilicen o estén cerca de la arrocera.
• Los niños deben ser supervisados para
garantizar que no jueguen con la arrocera.
• No deje que los niños limpien o realicen
el mantenimiento de la arrocera.
• No utilice su arrocera si está dañada,
no funciona, o si el cable o el enchufe
están dañados. Póngase en contacto
con el Servicio de Atención al Cliente
(consulte la página 15).
• El uso de accesorios o repuestos no
recomendados por COSORI podría
causar lesiones.
• No la utilices en exteriores.
• No coloque la arrocera ni ninguno
de sus componentes sobre o cerca de
quemadores de gas o eléctricos ni en
un horno caliente.
• No use los accesorios incluidos ni la
olla interior en un microondas, sobre
la cocina o parrilla ni en un horno.
• Tenga mucho cuidado al retirar la
arrocera u olla interior si contiene
aceite caliente u otros líquidos calientes.
• La arrocera no está pensada para
usarse con un temporizador externo
ni un sistema de mando a distancia
independiente.
• Pueden utilizar este aparato niños
mayores de 8años y personas con
capacidades físicas, sensoriales o
mentales reducidas, o con falta de
experiencia y conocimientos si se les
supervisa o instruye sobre el uso del
aparato de manera segura y comprenden
los peligros que conlleva.
LEA Y GUARDE ESTAS
INSTRUCCIONES

4
ES
Mientras cocina
• PRECAUCIÓN: Riesgo de descargas
eléctricas. Cocine solo en la olla interior
extraíble. No coloque ningún líquido
directamente en la placa calentadora de
la arrocera.
• Use sobre una superficie lisa, estable y
resistente al calor, alejada de fuentes de
calor o líquidos calientes.
• La olla interior extraíble está
extremadamente caliente durante y
puede ser pesada cuando está llena de
ingredientes.
• Tenga cuidado al manipular la olla interior
o la cesta de vapor cuando contengan
alimentos calientes, aceite caliente u otros
líquidos calientes.
• Coloque los accesorios calientes sobre
un soporte para ollas o una superficie
resistente al calor.
• No coloque nada encima de su arrocera
mientras esté funcionando. No guarde
nada dentro de su arrocera que no sean
los accesorios recomendados.
• No toque la parte metálica de la tapa, las
superficies calientes ni ningún accesorio
durante o inmediatamente después de
cocinar porque estarán calientes.
Enchufe y cable
• Esta arrocera utiliza un cable de
alimentación corto para reducir el riesgo de
enredos, tropiezos o ser tirado por niños.
• Para apagar la arrocera, pulse CANCEL
(Cancelar) para dejar de cocinar y luego,
desenchufe. Para desenchufarla, sujete
el enchufe y tire de la toma de corriente.
Nunca tire del cable de alimentación.
• No derrame agua o líquido en los dientes
del enchufe.
• No utilice con un cable de extensión. La
arrocera está pensada para usarse solo
como encimera.
• No deje colgando el cable de
alimentación por el borde de la mesa
o la encimera, ni permita que entre en
contacto con superficies calientes.
• El cable debe colocarse de modo que
no cuelgue sobre la encimera o la
mesa, donde los niños puedan tirar
de él o se puedan tropezar con él
involuntariamente.
• Nunca utiliceun enchufe situado debajo
de la encimera cuando enchufe la
arrocera.
• Evite derramar sobre el conector del cable
de alimentación.
• No coloque papel, cartón o plástico
dentro de la arrocera, ni ningún
material que pueda prenderse fuego o
derretirse.
• No use esta arrocera para freír en
abundante aceite.
• No bloquee ninguna rejilla de ventilación.
El vapor caliente sale por las rejillas. Mantén
las manos y la cara alejadas de las rejillas.
• No deje la arrocera desatendida mientras
la utiliza.
• La placa calentadora está sujeta a calor
residual después del uso.
• Los niños no deben jugar con el aparato.
Los niños no deben realizar tareas de
limpieza ni de mantenimiento, a menos
que sean mayores de 8 años y estén
supervisados. Mantenga el aparato y
su cable fuera del alcance de los niños
menores de 8 años.
• Solo utilícela como se indica en este
manual. No la utilice para cualquier fin
distinto del previsto.
• No está diseñada para uso comercial. Uso
doméstico exclusivamente.
Nota: Consulte Cuidado y mantenimiento para
saber cómo limpiar los accesorios (página 13).

5
ES
• Mantenga la arrocera y su cable fuera del
alcance de los niños.
• La arrocera solo debe utilizarse con
sistemas eléctricos de 220–240V,
50/60Hz. No la conectes a otro tipo de
enchufe.
Campos electromagnéticos
(EMF)
GUARDE ESTAS
INSTRUCCIONES
Esta arrocera cumple con todas las normas
relativas a los campos electromagnéticos
(EMF). Si se utiliza correctamente y
conforme a las instrucciones de este manual
de usuario, el aparato se puede usar con
la máxima seguridad de acuerdo con las
pruebas científicas actualmente disponibles.
• Si el cable de alimentación está dañado,
Arovast Corporation o el personal
cualificado deben sustituirlo a fin de evitar
riesgos eléctricos o de incendio. Diríjase a
Atención al Cliente (página 15).
Este símbolo significa que el producto no
debe desecharse como residuo doméstico y
debe entregarse a un centro de recolección
adecuado para su reciclaje. La eliminación
y el reciclaje adecuados ayudan a proteger
los recursos naturales, la salud humana y el
medio ambiente.
Para obtener más información sobre la
eliminación y el reciclaje de este producto,
póngase en contacto con su municipalidad
local, servicio de eliminación de residuos o
tienda en donde compró este producto.
Este producto cumple con la normativa de
restricción de sustancias peligrosas (RoHS).
Este producto cumple con la Directiva
2011/65/UE, y sus modificaciones, sobre
la restricción del uso de determinadas
sustancias peligrosas en aparatos eléctricos y
electrónicos.
PRECAUCIÓN: Superficie
caliente.
220–240V, 50/60Hz 120 V, 60 Hz

6
ES
Panel de control(Figura B)
a. Indicadores de progreso
b. Pantalla
c. Aumento/disminución del tiempo
d. Indicador del temporizador de
retraso
e. Tipo de arroz
f. Botón “White Rice” (Arroz blanco)
g. Botón “Grains” (Granos)
h. Botón “Brown Rice” (Arroz
integral)
i. Tipo de granos
j. Modos de cocción
k. Botón “Keep Warm”
(Mantener templado)
CONOZCA SU ARROCERA
Diagrama de la arrocera(Figura A)
a. Ventilación de vapor
b. Botón “Open” (Abrir)
c. Tapa
d. Cable de alimentación
e. Panel de control
f. Tapa interior
g. Placa del radiador
h. Botón “Inner Lid Release”
(Liberación de la tapa
interior)
i. Sensor de temperatura
superior
j. Colectores de condensación
k. Placa calentadora
l. Sensor de temperatura
inferior
m. Cesta de vapor de 3litros
n. Olla interior
antiadherente
o. Cucharón de sopa
p. Taza de medición
q. Cuchara de arroz de pie
1. Tapa de vapor
2. Liberación de la tapa de vapor
ANTES DEL PRIMER USO
1. Retire todo el embalaje externo e interno de
la arrocera.
2. Coloque la arrocera en una superficie
estable, nivelada y resistente al calor.
Manténgala alejada de zonas que puedan
verse afectadas por el vapor (como paredes
o armarios).
3. Retire la tapa interna (consulte la
página 13). [
Figura 1.1
]
4. Lave la tapa interna, tapa de vapor, olla
interior, cesta de vapor, cuchara de arroz,
cucharón de sopa y taza para medir con
agua caliente con jabón y esponja no
abrasiva.
5. Seque las partes y vuelva a instalar la
tapa interna. Coloque la olla interior en la
arrocera.
1. Asegúrese de que no haya alimentos ni
envases en la arrocera y enchúfela.
2. Añada agua a la olla interior hasta la marca
de nivel de agua “STEAM” (VAPOR). Cierre
la tapa.
3. Pulse MODE (modo) para seleccionar
“STEAM” (VAPOR).
4. Pulse START (inicio) para iniciar la función
“Steam” (Vapor).
5. La arrocera emitirá varios pitidos cuando
finalice.
6. Abra la tapa, retire la olla interior
cuidadosamente y deseche el agua restante.
7. Deje que la arrocera se enfríe durante
15minutos. Limpie con un trapo seco la tapa
interior y la parte externa de la arrocera.
Preparación Prueba de funcionamiento
Una prueba de funcionamiento lo ayudará a
familiarizarse con su arrocera, asegurarse de
que funcione correctamente y limpiarla de
posibles residuos.
l. Botón “Cooking Mode”
(Modo de cocción)
m. Botón “Cancel” (Cancelar)
n. Botón “Delay Timer”
(Temporizador de retraso)
o. Botón “Start” (Encender)
21
Figura 1.1

7
ES
COCINAR CON SU ARROCERA
Funciones de cocción
Tabla de referencia rápida de las funciones de cocción
Nota:
• El tiempo de cocción es un aproximado. El tiempo de cocción real puede variar según factores como la
cantidad de granos y agua, temperatura ambiente, temperatura del agua y voltaje.
• La olla interna no tiene marcas de nivel de agua para 1taza. Si está cocinando 1taza, use la columna
“Proporción grano : agua” para determinar la cantidad correcta de agua.
Las funciones de cocción están programadas con un tiempo y una temperatura ideales para
cocinar ciertos arroces y granos. Para obtener más información sobre cada función de cocción,
consulte su sección individual o las tablas de Referencia rápida de las funciones de cocción.
Tipo de granos Función Marca del nivel
de agua
Proporción
grano: agua Tazas*
Tiempo de
cocción
estimada
(minutos)
Arroz blanco
de granos
largos
“WHITE RICE”
ARROZ BLANCO
“LONG GRAIN”
GRANO LARGO
BLANCO DE
GRANOS LARGOS 1 : 1¼
1 35–45
5 45–55
10 55–65
Arroz blanco
de granos
cortos
“WHITE RICE”
ARROZ BLANCO
“SHORT GRAIN”
GRANO CORTO
BLANCO
MEDIANO/
CORTO
1 : 1¼
1 32–42
5 41–51
10 51–61
Arroz blanco
rápido**
“WHITE RICE”
ARROZ BLANCO
“QUICK” RÁPIDO
GRANO CORTO
BLANCO 1 : 1¼
1 27–37
5 39–49
10 50–60
Arroz blanco
jazmín
“WHITE RICE”
ARROZ BLANCO
“LONG GRAIN”
GRANO LARGO
BLANCO DE
GRANOS LARGOS 1 : 1¼
1 35–45
5 40–50
10 50–60
Arroz para
sushi
“WHITE RICE”
ARROZ BLANCO
“SHORT GRAIN”
GRANO CORTO
BLANCO
MEDIANO/
CORTO
1 : 1¼
1 32–42
5 41–51
10 51–61
Arroz integral
de granos
largos
“BROWN
RICE” ARROZ
INTEGRAL
“LONG GRAIN”
GRANO LARGO
INTEGRAL 1 : 1¼
1 59–69
4 65–75
8 72–82
316
316
316
8
8
38

8
ES
*Una (1) taza de medición de arroz es aproximadamente 180ml/6,1onzas.
**La función “Quick Rice” (Arroz rápido) cocina el arroz más rápido, pero puede ser levemente
más duro.
Función Rango de tiempo Tiempo
predeterminado
Temperatura
predeterminada
Cocción lenta 5min–24h 30min 100°C/212°F
Vapor 1min – 1h 10min 100°C/212°F
Sofreír 1min – 30min 5min 145° – 155°C/293° – 311°F
Sopa 1min – 4h 30min 100°C/212°F
Dulce/salsa 5min – 2h 1h 100°C/212°F
Pastel 1min – 1h 30min 50min 110° – 120°C/230° – 248°F
Mantener templado 10min–24h 70°C/158°F
Temporizador de retraso 10min–24h
Tipo de granos Función Marca del nivel
de agua
Proporción
grano : agua Tazas*
Tiempo de
cocción
estimada
(minutos)
Arroz integral
de granos
cortos
“BROWN
RICE” ARROZ
INTEGRAL
“SHORT GRAIN”
GRANO CORTO
INTEGRAL 1 : 1¼
1 60–70
4 66–76
8 73–83
Arroz integral
rápido**
“BROWN
RICE” ARROZ
INTEGRAL
“QUICK” RÁPIDO
INTEGRAL 1 : 1¼
1 50–60
4 55–65
8 60–70
Quínoa
“GRAINS”
GRANOS
“QUINOA”
QUÍNOA
QUÍNOA 1 : 1¼
1 37–47
3 42–52
6 46–56
Avena
“GRAINS”
GRANOS
“PORRIDGE”
AVENA
AVENA 1 : 5
½ 35–45
1 45–55
1½ 50–60
2 55–65
2½ 60–70
Granos mixtos
“GRAINS”
GRANOS
“MIXED” MIXTOS
GRANOS MIXTOS 1 : 1¼
1 59–69
3 65–75
6 72–82
38

9
ES
Arroz blanco/integral
1. Utilice la taza para medir arroz para medir el
arroz sin cocinar. Llene demasiado la taza,
luego nivele para obtener una medición
precisa. [
Figura 2.1
]
2. Coloque el arroz en un recipiente separado
o tamiz de malla fina. Lave el arroz hasta
que el agua quede transparente.
3. Transfiera el arroz lavado a la olla interna y
añada la cantidad correcta de agua. Puede
tomar como referencia las marcas de nivel
de agua impresas en el interior de la olla
interior.
4. Coloque la olla interior en la arrocera. Cierre
la tapa.
a. Asegúrese de que la tapa interior
y la tapa de vapor estén instaladas
correctamente.
a. La función “Quick Rice” (Arroz rápido)
cocina el arroz más rápido, pero la
textura puede ser levemente más duro.
a. “Keep Warm” (Mantener templado)
puede durar hasta 24horas, pero le
recomendamos que evite dejar arroz
cocido en la arrocera durante más de
5horas.
5. Enchufe la arrocera. Pulse WHITE RICE
(arroz blanco) o BROWN RICE (arroz
integral). “LONG GRAIN” (GRANO LARGO)
se selecciona automáticamente. Continúe
pulsando para seleccionar “SHORT GRAIN”
(GRANO CORTO) o “QUICK” (RÁPIDO). El
tiempo de cocción estimado se mostrará en
la pantalla.
6. Opcionalmente, pulse DELAY TIMER
(temporizador de retraso) y use +y para
retrasar la cocción por hasta 24horas. La
cocción comenzará automáticamente
después de la cuenta regresiva.
7. Pulse START (inicio) para iniciar la función
“Cooking” (Cocción).
8. La arrocera emitirá varios pitidos cuando
finalice y automáticamente se cambiará a la
función “Keep Warm” (Mantener templado).
La pantalla mostrará el tiempo que ha
transcurrido desde que terminó la cocción.
Pulse CANCEL (Cancelar) dos veces para
detener la función “Keep Warm” (Mantener
templado).
Granos
1. Utilice la taza para medir los granos sin
cocinar, como la quínoa. Llene demasiado
la taza, luego nivele para obtener una
medición precisa.
2. Coloque los granos en la olla interna y
añada la cantidad correcta de agua. Puede
tomar como referencia las marcas de nivel
de agua impresas en el interior de la olla
interior.
3. Coloque la olla interior en la arrocera. Cierre
la tapa.
a. Asegúrese de que la tapa interior
y la tapa de vapor estén instaladas
correctamente.
a. “Keep Warm” (Mantener templado)
puede durar hasta 24horas, pero le
recomendamos que evite dejar granos
cocidos en la arrocera durante más de
3horas.
4. Enchufe la arrocera. Pulse GRAINS
(granos). “ QUINOA” (QUÍNOA) se
selecciona automáticamente. Continúe
pulsando para seleccionar “PORRIDGE”
(AVENA) o “MIXED” (MIXTO). El tiempo
de cocción estimado se mostrará en la
pantalla.
5. Opcionalmente, pulse DELAY TIMER
(temporizador de retraso) y use +y para
retrasar la cocción por hasta 24horas. La
cocción comenzará automáticamente
después de la cuenta regresiva.
6. Pulse START (inicio) para iniciar la función
“Cooking” (Cocción).
7. La arrocera emitirá varios pitidos cuando
finalice y automáticamente se cambiará a la
función “Keep Warm” (Mantener templado).
La pantalla mostrará el tiempo que ha
transcurrido desde que terminó la cocción.
Pulse CANCEL (Cancelar) dos veces para
detener la función “Keep Warm” (Mantener
templado).
Figura 2.1

10
ES
Vapor
1. Añada agua a la olla interior hasta
la marca de nivel de agua “STEAM”
(VAPOR).
2. Coloque el alimento en la cesta de vapor
y luego, coloque la cesta de vapor en la
olla interior.
a. No llene demasiado la cesta de vapor.
a. Asegúrese de que la tapa interior
y la tapa de vapor estén instaladas
correctamente.
a. “Keep Warm” (Mantener templado)
puede durar hasta 24horas, pero
le recomendamos que evite dejar
alimentos cocidos en la arrocera
durante más de 3horas.
3. Coloque la olla interior en la arrocera.
Cierre la tapa.
4. Enchufe la arrocera. Pulse MODE (modo)
para seleccionar “STEAM” (VAPOR).
5. Pulse + y para ajustar el tiempo de
cocción.
6. Opcionalmente, pulse DELAY TIMER
(temporizador de retraso) y use +y
para retrasar la cocción por hasta
24horas. La cocción comenzará
automáticamente después de la cuenta
regresiva.
7. Pulse START (inicio) para iniciar
la función “Cooking” (Cocción). El
indicador de progreso“PREHEATING”
(PRECALENTAMIENTO) se encenderá
y la arrocera comenzará a precalentar.
Cuando termine de precalentar, la
pantalla mostrará la cuenta atrás del
temporizador.
8. La arrocera emitirá varios pitidos cuando
finalice y automáticamente se cambiará
a la función “Keep Warm” (Mantener
templado). La pantalla mostrará el tiempo
que ha transcurrido desde que terminó
la cocción. Pulse CANCEL (Cancelar)
dos veces para detener la función “Keep
Warm” (Mantener templado).
Cocción lenta
1. Coloque los alimentos en la olla interior.
a. No llene pasando la marca del nivel
de agua de arroz blanco de granos
largos de 10tazas.
a. Asegúrese de que la tapa interior
y la tapa de vapor estén instaladas
correctamente.
a. “Keep Warm” (Mantener templado)
puede durar hasta 24horas, pero
le recomendamos que evite dejar
alimentos cocidos en la arrocera
durante más de 3horas.
2. Coloque la olla interior en la arrocera.
Cierre la tapa.
3. Enchufe la arrocera. Pulse MODE (modo)
dos veces para seleccionar “SLOW
COOK” (COCCIÓN LENTA).
4. Pulse + y para ajustar el tiempo de
cocción.
5. Opcionalmente, pulse DELAY TIMER
(temporizador de retraso) y use +y
para retrasar la cocción por hasta
24horas. La cocción comenzará
automáticamente después de la cuenta
regresiva.
6. Pulse START (inicio) para iniciar la
función “Cooking” (Cocción).
7. La arrocera emitirá varios pitidos cuando
finalice y automáticamente se cambiará
a la función “Keep Warm” (Mantener
templado). La pantalla mostrará el tiempo
que ha transcurrido desde que terminó
la cocción. Pulse CANCEL (Cancelar)
dos veces para detener la función “Keep
Warm” (Mantener templado).

11
ES
Sopa
1. Coloque los alimentos y el agua en la olla
interior.
a. Asegúrese de que la tapa interior
y la tapa de vapor estén instaladas
correctamente.
a. “Keep Warm” (Mantener templado)
puede durar hasta 24horas, pero
le recomendamos que evite dejar
alimentos cocidos en la arrocera
durante más de 3horas.
a. No llene pasando la marca del nivel
de agua de arroz blanco de granos
largos de 10tazas.
2. Coloque la olla interior en la arrocera.
Cierre la tapa.
3. Enchufe la arrocera. Pulse MODE (modo)
tres veces para seleccionar “SOUP”
(SOPA).
4. Pulse +y para ajustar el tiempo de
cocción.
5. Opcionalmente, pulse DELAY TIMER
(temporizador de retraso) y use +y
para retrasar la cocción por hasta
24horas. La cocción comenzará
automáticamente después de la cuenta
regresiva.
6. Pulse START (inicio) para iniciar la
función “Cooking” (Cocción).
7. La arrocera emitirá varios pitidos cuando
finalice y automáticamente se cambiará
a la función “Keep Warm” (Mantener
templado). La pantalla mostrará el tiempo
que ha transcurrido desde que terminó
la cocción. Pulse CANCEL (Cancelar)
dos veces para detener la función “Keep
Warm” (Mantener templado).
Dulce/salsa
1. Coloque la olla interior en la arrocera.
Puede cocinar con la tapa abierta o cerrada.
a. Mantenga la tapa abierta si está
haciendo dulces o compotas de frutas.
2. Coloque los alimentos en la olla interior.
3. Enchufe la arrocera. Pulse MODE (modo)
cinco veces para seleccionar “JAM/
SAUCE” (DULCE/SALSA).
4. Pulse +y para ajustar el tiempo de
cocción.
5. Pulse START (inicio) para iniciar la
función “Cooking” (Cocción).
6. Cuando termine, pulse CANCEL (cancelar)
para detener la funciones de cocción.
Sofreír
1. Coloque la olla interior en la arrocera.
Puede dejar la tapa abierta o cerrarla
para obtener un precalentamiento más
rápido.
2. Enchufe la arrocera. Pulse MODE (modo)
cuatro veces para seleccionar “SAUTE”
(SOFREÍR).
3. Pulse +y para ajustar el tiempo de
cocción.
4. Pulse START (inicio) para iniciar
la función “Cooking” (Cocción). El
indicador de progreso“PREHEATING”
(PRECALENTAMIENTO) se encenderá
y la arrocera comenzará a precalentar.
Cuando termine de precalentar, la pantalla
mostrará la cuenta atrás del temporizador.
a. Puede añadir el aceite a la olla interior
antes o después de precalentar.
b. Si los alimentos se añaden a la olla
interior antes de que se termine
de precalentar, es posible que no
aparezca la cuenta regresiva.
5. Coloque los alimentos en la olla interior
para comenzar a cocinar.
6. Cuando termine, pulse CANCEL (cancelar)
para detener la funciones de cocción.

12
ES
Mantener templado
1. Coloque la olla interior en la arrocera.
Cierre la tapa.
a. Asegúrese de que la tapa interior
y la tapa de vapor estén instaladas
correctamente.
2. Enchufe la arrocera. Pulse KEEP WARM
(mantener templado).
3. Pulse +y para ajustar el tiempo.
4. Pulse START (inicio) para iniciar la
función “Cooking” (Cocción).
Nota: Después de cada funciones de
cocción (excepto “SAUTE” [SOFREÍR] y
“CAKE” [PASTEL]), la arrocera se cambiará
automáticamente a la función “Keep Warm”
(Mantener templado). La pantalla mostrará el
tiempo que ha transcurrido desde que terminó
la cocción. Pulse CANCEL (Cancelar) dos veces
para detener la función “Keep Warm” (Mantener
templado).
Pastel
1. Engrase la olla interior con manteca
o aceite de manera uniforme.
2. Vierta la masa del pastel en la olla
interior. Coloque la olla interior en la
arrocera. Cierre la tapa.
a. Asegúrese de que la tapa interior
y la tapa de vapor estén instaladas
correctamente.
3. Enchufe la arrocera. Pulse MODE (modo)
seis veces para seleccionar “CAKE”
(PASTEL).
4. Pulse +y para ajustar el tiempo para
hornear.
5. Pulse START (inicio) para iniciar la
función “Cooking” (Cocción).
6. La arrocera emitirá varios pitidos cuando
finalice. Recomendamos pinchar el
pastel con un palillo y controlar si sale
limpio. De no ser así, repita los pasos para
hornear el pastel durante más tiempo.
Apagado automático
• Si no se selecciona la función de
cocción, la arrocera se apagará después
de 15minutos sin funcionamiento. La
pantalla se apagará y START (inicio) se
iluminará. [
Figura2.2
]
• Pulse START (inicio) para usar la
arrocera.
Temporizador de retraso
1. Antes de cocinar, pulse DELAY TIMER
(temporizador de retraso) para establecer
el temporizador de retraso.
a. No puede fijar un temporizador
de retraso en las funciones
“KEEPWARM” (MANTENER
TEMPLADO), “SAUTE” (SOFREÍR),
“JAM/SAUCE” (DULCE/SALSA) o
“CAKE” (PASTEL).
2. Pulse +y para retrasar la cocción por
hasta 24horas.
Nota: No es un inicio retrasado. El
temporizador de retraso tiene en cuenta
el tiempo de cocción, de manera que los
alimentos se terminarán de cocinar cuando
termine el temporizador de retraso.
3. Pulse START (inicio) y la cocción
comenzará automáticamente después
de la cuenta regresiva.
Figura 2.2

13
ES
CUIDADO Y MANTENIMIENTO
Nota:
• Siempre limpie la olla interior y los accesorios
después de cada uso.
• La olla interior tiene un revestimiento
antiadherente para una limpieza más fácil.
• No utilice limpiadores abrasivos, estropajos
metálicos ni utensilios metálicos en cualquier
parte de la arrocera, incluidas las bandejas y
otros accesorios. Estos rayarán o dañarán sus
superficies.
• Esta arrocera no contiene ninguna pieza
que el usuario pueda reparar. Para cualquier
reparación, póngase en contacto con el
Servicio de Atención al Cliente (consulte la
página 15).
1. Antes de limpiar, apague y desenchufe
la arrocera, y deje que se enfríe
completamente.
2. Limpie con un trapo húmedo la parte
externa e interior de la arrocera.
3. Pulse el botón “Inner Lid Release”
(Liberación de la tapa interior). Luego,
tire de la tapa interior para quitarla. Si
fuera necesario, deshaga la liberación de
la tapa de vapor para vaciar y limpiar la
tapa de vapor.
4. Lave la tapa interna, tapa de vapor, olla
interior, cesta de vapor, cuchara de arroz,
cucharón de sopa y taza para medir con
agua caliente con jabón y esponja no
abrasiva. Sumérjalas si fuera necesario.
a. Los accesorios también se pueden
lavar en el estante superior del
lavavajillas.
a. Si fuera necesario, puede retirar la
tapa de vapor para una limpieza y un
secado más fáciles.
a. Dé vuelta la tapa interior para
asegurarse de que la tapa de vapor
esté instalada correctamente.
5. Seque las partes y vuelva a instalar la
tapa interna. Coloque la olla interior en
la arrocera.
6. Deje que todas las superficies se sequen
por completo antes de enchufar o
encender la arrocera.
Vaciar la tapa de vapor
Almacenamiento
1. Deshaga la liberación de la tapa de vapor
ubicada en la tapa interior. [
Figura2.3
]
2. Vacíe el agua que se reúne en la tapa de
vapor.
3. Limpie la tapa de vapor con agua
caliente con jabón y una esponja no
abrasiva.
1. Limpie y seque la arrocera y todos los
accesorios.
2. Coloque la olla interior en la arrocera.
Cierre la tapa.
3. Guarde la arrocera en posición vertical.
No guarde nada encima.
4. Para volver a armar, introduzca las
bisagras en la ranura y cierre liberación
de la tapa de vapor.
Figura 2.3

14
ES
Problema Posible solución
La arrocera no se enciende. Asegúrese de que la arrocera esté enchufada en un enchufe con energía.
La arrocera desprende olor a
plástico.
Cualquier arrocera puede tener olor a plástico debido al proceso de
fabricación. Esto es normal. Sigue las instrucciones de la Prueba de
funcionamiento (página 6) para eliminar el olor a plástico. Si el olor a
plástico no disminuye, dirígete a Atención al Cliente (consulta la
página 15).
Los alimentos están poco
cocidos, demasiado blandos
o demasiado duros.
Asegúrese de que la proporción alimentos y agua sea la correcta.
Asegúrese de que seleccione la función de cocción correcta para los
alimentos que está cocinando.
Los alimentos se desbordan
mientras se cocinan.
Asegúrese de que la proporción alimentos y agua sea la correcta.
Asegúrese de que la tapa interior y la tapa de vapor estén instaladas
correctamente.
La pantalla muestra el
código de error “E1\E3”.
Hay un circuito abierto en el monitor de temperatura. Póngase en contacto
con el Servicio de Atención al Cliente (consulte la página 15).
La pantalla muestra el
código de error “E2\E4”.
Hay un cortocircuito en el monitor de temperatura. Póngase en contacto
con el Servicio de Atención al Cliente (consulte la página 15).
SOLUCIÓN DE PROBLEMAS
Si su problema no aparece aquí, diríjase al Servicio de Atención al Cliente (consulte la
página 15).

15
ES
INFORMACIÓN DE LA GARANTÍA
Nombre del producto Arrocera de 5litros
Modelo CRC-R501-KEU
Para su propia referencia, le recomendamos
encarecidamente que registre su número de pedido
y la fecha de compra.
Fecha de compra
Número de pedido
Arovast Corporation garantiza que todos los
productos son de la más alta calidad en cuanto a
materiales, mano de obra y mantenimiento, desde
la fecha de compra hasta el final del período de
garantía limitada de 2años.
Si tiene alguna pregunta o duda relacionada con su
nuevo producto, póngase en contacto con nuestro
equipo de Atención al Cliente.
SERVICIO DE ATENCIÓN AL CLIENTE
Si tiene alguna pregunta o duda relacionada con su nuevo producto, póngase en contacto con
nuestro equipo de Atención al Cliente.
*Antes de ponerte en contacto con Atención al Cliente, ten a mano tu factura y número de
pedido.
Arovast Corporation
1202 N. Miller St., Suite A
Anaheim, CA 92806
EE.UU.
Correo electrónico: [email protected]

1
FR
(nous espérons que vous aimerez autant que nous votre nouveau cuiseur à riz)
En notre nom à tous chez COSORI,
Nos dévoués cuisiniers maison sont à votre
disposition pour répondre à toutes vos questions!
CONTACTEZ NOS CHEFS
Courriel: [email protected]
Nous vous remercions
pour votre achat !
Boes préparations !
explorez notre album de recettes
cosori.com
profitez chaque semaine, d'une recette
exclusive réalisée par nos chefs cuisiniers
Soyez créatifs avec COSORI
Téléchargez l'application gratuite VeSync pour accéder aux
recettes originales et aux tutoriels vidéo des chefs COSORI,
interagir avec notre communauté en ligne, et bien plus
encore!

2
FR
Table des matières Contenu du paquet
Spécifications
Modèle CRC-R501-KEU
Alimentation
électrique
220 à 240VCA,
50/60Hz
Puissance
nominale 970W
Capacité 5L / 10tasses*
(riz non cuit)
Poids 4,45kg/9,81lb
Dimensions 31,2 x 26,9 x 23,4cm
(12,3x10,6x9,2po)
1 x Cuiseur à riz de 5litres
1 x Cuve interne
1 x Panier à vapeur de 3litres
1 x Palette à riz verticale
1 x Verre doseur
1 x Louche à potage
1 x Livre de recettes
1 x Mode d’emploi
1 x Guide de référence rapide
Contenu du paquet
Spécifications
Importantes mesures de sécurité
Apprenez à connaître votre cuiseur
à riz
Avant une première utilisation
Cuisiner avec votre cuiseur à riz
Entretien et maintenance
Dépannage
Informations sur la garantie
Support à la clientèle
*en utilisant le verre doseur de riz fourni, qui
contient environ 180ml / 6,1oz.
2
2
3
6
6
7
13
14
15
15

3
FR
IMPORTANTES MESURES DE SÉCURITÉ
Suivez les consignes élémentaires de sécurité lorsque vous utilisez votre cuiseur
à riz. Lisez toutes les instructions.
Principaux points de sécurité
Sécurité générale
• Ne touchez pas les surfaces chaudes.
• Ne touchez pasla sortie de vapeur ou la
zone proche de la sortie de vapeur lors
de la cuisson ou en mode Keep Warm
(maintenir au chaud). Ne couvrez pas la
surface avec un torchon.
• Utilisez toujours des gants, des tampons
ou des gants de cuisine résistants à
la chaleur lorsque vous déplacez le
cuiseur de riz, lorsque vous manipulez
des matériaux chauds, lorsque vous
placez des objets dans le cuiseur de riz
ou lorsque vous en retirez des objets,
y compris la cuve interne, le panier à
vapeur et les accessoires.
• N’utilisez jamais le cuiseur à riz sans que
la cuve interne ne s’y trouve.
• Pour vous protéger contre les chocs
électriques, n’immergez pas le cordon, les
prises ou le châssis du cuiseur à riz dans
l'eau ou tout autre liquide.
• N’utilisez pas le cuiseur à riz dans l'eau ou
sous l'eau courante.
• Débranchez-le lorsque vous ne l'utilisez pas
et avant tout nettoyage. Laissez-le refroidir
avant de mettre ou de retirer des pièces, et
avant de le nettoyer ou de le ranger.
• Ne placez pas d'aliments, de liquides ou
d'objets étrangers sur la plaque chauante.
• Veillez à ce que la plaque chauante soit
propre et que le dessous de la cuve interne
soit sec avant d'insérer la cuve interne.
• Une surveillance étroite est nécessaire
lorsque le cuiseur à riz est utilisé par ou à
proximité d'enfants.
• Les enfants doivent être surveillés pour
s'assurer qu'ils ne jouent pas avec le
cuiseur à riz.
• Ne laissez pas les enfants nettoyer ou
eectuer l'entretien du cuiseur à riz.
• Ne pas utiliser votre cuiseur à riz s'il
est endommagé ou ne fonctionne pas
correctement, ou si le cordon ou la fiche
sont endommagés. Contactez le Support à
la clientèle (voir page 15).
• Toute utilisation d'accessoires ou pièces de
rechange non recommandés par COSORI
peut engendrer des blessures.
• Ne pas utiliser en extérieur.
• Ne pas placer le cuiseur à riz ou l'une de
ses pièces sur ou près de brûleurs à gaz ou
électriques, ou dans un four chaué.
• Ne pas utiliser les accessoires inclus et la
cuve interne dans un four à micro-ondes,
sur une cuisinière ou un grill, ou dans un
four.
• Soyez extrêmement prudent lorsque vous
déplacez le cuiseur à riz ou la cuve interne
si il/elle contient de l'huile ou tout autre
liquide chaud.
• Ce cuiseur à riz n'est pas conçu pour être
utilisé avec une minuterie externe ou un
système de commande à distance séparé.
• Cet appareil peut être utilisé par des enfants
de 8ans et plus et des personnes dont
les capacités sensorielles, physiques ou
mentales sont réduites ou présentant un
manque d'expérience et de connaissances,
s'ils ont été supervisés ou formés à
l'utilisation de l'appareil d'une manière sûre
et s'ils comprennent les dangers encourus.
LISEZ ET CONSERVEZ CES
INSTRUCTIONS

4
FR
Pendant la cuisson
• ATTENTION: risque d'électrocution. Ne
cuisiner que dans la cuve interne amovible.
Ne pas placer un liquide directement sur la
plaque chauante du cuiseur à riz.
• Utiliser sur une surface plane, stable et
résistante à la chaleur, loin de toute source
de chaleur ou de tout liquide.
• La cuve interne amovible est extrêmement
chaude pendant l'utilisation et peut être
lourde lorsqu'elle est remplie d'ingrédients.
• Soyez prudent lorsque vous manipulez
la cuve interne ou le panier à vapeur s'ils
contiennent des aliments chauds, de l'huile
chaude ou tout autre liquide chaud.
• Placez les accessoires chauds sur un
support ou une surface résistant à la
chaleur.
• Ne pas placer quoi que ce soit sur le
dessus de votre cuiseur à riz durant son
fonctionnement. Ne pas stocker quoi que
ce soit à l'intérieur de votre cuiseur à riz, à
l'exception des accessoires recommandés.
• Ne pas toucher la partie métallique
du couvercle, les surfaces chaudes
ou tout autre accessoire pendant ou
immédiatement après la cuisson, car ils
seront chauds.
• Ne pas placer de papier, de carton ou
de plastique dans votre cuiseur à riz,
Alimentation et cordon
• Ce cuiseur à riz utilise un cordon
d'alimentation court pour réduire les
risques d'être tirés par les enfants,
de s'emmêler ou de provoquer des
trébuchements.
• Pour éteindre le cuiseur à riz, appuyez sur
CANCEL (annuler) pour arrêter la cuisson,
puis débranchez. Pour débrancher,
saisissez la fiche et retirez-la de la prise.
Ne jamais tirer sur le cordon
d'alimentation.
• Ne renversez pas d'eau ou de liquide sur
les broches de la prise.
• Ne pas utiliser avec une rallonge
électrique. Ce cuiseur à riz n’est conçu
que pour un usage sur plan de travail.
• Ne pas laisser le cordon d'alimentation
pendre sur le bord d'une table ou d'un
plan de travail ou entrer en contact avec
des surfaces chaudes.
• Le cordon doit être disposé de manière
à ne pas déborder du plan de travail ou
de la table, pour éviter que les enfants
ne le tirent ou ne trébuchent dessus par
inadvertance.
• Ne jamais utiliser une prise située sous
le plan de travail lorsque vous branchez
votre cuiseur à riz.
• Évitez de renverser de l'eau sur le
connecteur du cordon d'alimentation.
ou tout autre matériaux susceptibles de
s'enflammer ou de fondre.
• Ne pas utilisez ce cuiseur à riz pour la
friture avec de l'huile.
• Ne pas obstruer les ouvertures de
ventilation. De la vapeur chaude est libérée
par les ouvertures. Éloignez vos mains et
votre visage des ouvertures.
• Ne pas laisser votre cuiseur à riz sans
surveillance lors de son utilisation.
• La plaque chauante est sujette à une
chaleur résiduelle après utilisation.
• Les enfants ne doivent pas jouer avec
l'appareil. Le nettoyage et l'entretien par les
utilisateurs ne doivent pas être eectués par
des enfants, sauf s'ils ont plus de 8ans et
s'ils sont supervisés. Conservez l’appareil et
son cordon hors de portée des enfants de
moins de 8ans.
• N’utilisez que selon les instructions de ce
manuel. Ne pas utiliser à des fins autres
que celles pour lesquelles il a été conçu.
• Ne convient pas à un usage commercial.
Uniquement pour usage domestique.
Remarque: Consultez Entretien et Maintenance
pour obtenir des instructions sur la façon de
nettoyer les accessoires (page 13).

5
FR
• Gardez le cuiseur à riz et son cordon hors
de portée des enfants.
• Votre cuiseur à riz ne doit être utilisé
qu'avec des systèmes électriques de 220à
240V, 50/60Hz. Ne pas brancher sur un
autre type de prise.
Champs électromagnétiques
(CEM)
CONSERVEZ CES
INSTRUCTIONS
Le cuiseur à riz est conforme à toutes
les normes concernant les champs
électromagnétiques (CEM). S'il est manipulé
correctement et conformément aux
instructions du présent manuel d'utilisation,
l'utilisation de l'appareil est sûre, au regard
des preuves scientifiques disponibles à ce
jour.
• Si le cordon d'alimentation est
endommagé, il doit être remplacé par
Arovast Corporation ou toute autre
personne qualifiée afin d'éviter tout
risque électrique ou d'incendie. Veuillez
contacter le Support à la clientèle
(page 15).
Ce symbole signifie que le produit
ne doit pas être jeté avec les déchets
ménagers, mais doit être remis à un
centre de collecte approprié en vue de son
recyclage. Une élimination et un recyclage
appropriés contribuent à protéger les
ressources naturelles, la santé humaine et
l'environnement.
Pour de plus amples informations
concernant l'élimination et le recyclage de
ce produit, contactez votre municipalité,
le service d'élimination des déchets ou le
magasin où vous avez acheté ce produit.
Ce produit est conforme à la directive RoHS.
Ce produit est conforme à la directive
2011/65/UE, et ses amendements,
relative à la restriction de l'utilisation de
certaines substances dangereuses dans les
équipements électriques et électroniques.
ATTENTION: Surfaces
chaudes.
220–240V, 50/60Hz 120 V, 60 Hz

6
FR
Panneau de commande (Figure-B)
a. Indicateurs de progression
b. Achage
c. Augmentation/diminution de
la durée
d. Indicateur de minuterie
e. Type de riz
f. Bouton Riz blanc
g. Bouton Grains
h. Bouton Riz brun
i. Type de grain
j. Modes de cuisson
k. Bouton Maintenir au chaud
APPRENEZ À CONNAÎTRE VOTRE CUISEUR À RIZ
Schéma du cuiseur à riz (Figure A)
a. Évent à vapeur
b. Bouton d’ouverture
c. Couvercle
d. Cordon électrique
e. Panneau de commande
f. Cache intérieur
g. Plaque radiante
h. Bouton de libération du
cache intérieur
i. Capteur haut de température
j. Collecteurs de condensation
k. Plaque de chauage
l. Bouton du capteur de
température
m. Panier à vapeur de 3litres
n. Cuve interne anti-
adhésive
o. Louche à potage
p. Verre doseur
q. Palette à riz verticale
1. Bouchon à vapeur
2. Système de libération du bouchon à vapeur
AVANT UNE PREMIÈRE UTILISATION
1. Retirez tous les emballages autour et à
l'intérieur du cuiseur à riz.
2. Placez-le sur une surface stable, plane
et résistant à la chaleur. Tenez-la
éloignée des zones susceptibles d'être
endommagées par la vapeur (telles que
des murs ou des placards).
3. Retirez le cache intérieur (voir page
13). [
Figure 1.1
]
4. Lavez le cache intérieur, le bouchon
à vapeur, la cuve interne, le panier à
vapeur, la palette à riz, la louche à potage
et la tasse à mesurer avec de l'eau chaude
savonneuse et une éponge non abrasive.
5. Séchez les pièces et replacez le cache
intérieur. Placez la cuve interne dans le
cuiseur à riz.
1. Assurez-vous qu'il n'y a pas d'aliments ou
d'emballages dans le cuiseur à riz et branchez-le.
2. Ajoutez de l'eau dans la cuve interne jusqu'à la
marque du niveau d'eau «STEAM» (vapeur).
Fermez le couvercle.
3. Appuyez sur MODE pour sélectionner
«STEAM» (vapeur).
4. Appuyez sur START (démarrer) pour lancer la
fonction Steam (vapeur).
5. Le cuiseur à riz émet plusieurs bips lorsqu'il a
terminé.
6. Ouvrez le couvercle, retirez avec précaution la
cuve interne et jetez l'eau restante.
7. Laissez le cuiseur à riz refroidir pendant
15minutes. Essuyez le cache intérieur et
l'extérieur du cuiseur à riz à l'aide d'un chion
sec.
Conguration Lancement du test
Eectuer un test vous permet de vous familiariser
avec votre cuiseur à riz, de vous assurer qu'il
fonctionne correctement et de le nettoyer de tout
résidu éventuel.
l. Bouton Mode de cuisson
m. Bouton annulation
n. Bouton durée de
minuterie
o. Bouton de démarrage
21
Figure 1.1

7
FR
CUISINER AVEC VOTRE CUISEUR À RIZ
Fonctions de cuisson
Tableaux de référence rapide des fonctions de cuisson
Remarque:
• Le temps de cuisson n'est qu'une estimation. Le temps de cuisson réel peut varier en fonction de facteurs tels
que la quantité de céréales et d'eau, la température ambiante, la température de l'eau et la tension.
• La cuve interne n’a pas d'indication de niveau d'eau pour 1tasse. Si vous cuisez 1tasse, utilisez la colonne
«Grain: Water Ratio» pour déterminer la quantité d'eau correcte.
Les fonctions de cuisson sont programmées selon une durée et une température idéales pour
la cuisson de certains riz et graines. Pour plus d'informations sur chaque fonction de cuisson,
consultez sa section respective ou les tableaux de référence rapide des fonctions de cuisson.
Type de grain Fonction Marquage de
niveau d'eau
Grain:
rapport
d’eau
Doseurs*
Temps de
cuisson
estimé
(minutes)
Riz blanc à
long grain
WHITE RICE
LONG GRAIN
LONG GRAIN
WHITE 1: 1¼
1 35 à 45
5 45 à 55
10 55 à 65
Riz blanc à
grain court
WHITE RICE
SHORT GRAIN
MED/SHORT
WHITE 1: 1¼
1 32 à 42
5 41 à 51
10 51 à 61
Riz blanc
rapide**
WHITE RICE
QUICK
SHORT GRAIN
BLANC 1: 1¼
1 27 à 37
5 39 à 49
10 50 à 60
Riz blanc au
jasmin
WHITE RICE
LONG GRAIN
LONG GRAIN
WHITE 1: 1¼
1 35 à 45
5 40 à 50
10 50 à 60
Riz à sushi WHITE RICE
SHORT GRAIN
MED/SHORT
WHITE 1: 1¼
1 32 à 42
5 41 à 51
10 51 à 61
Riz brun à
long grain
BROWN RICE
LONG GRAIN BROWN 1: 1¼
1 59 à 69
4 65 à 75
8 72 à 82
316
316
316
8
8
38

8
FR
*1doseur à riz correspond à environ 180ml/ 6,1oz.
**La fonction Quick Rice (riz rapide) permet de cuire le riz plus rapidement, mais le riz risque
d'être légèrement plus ferme.
Fonction Minuterie Durée par défaut Température par
défaut
Slow Cook (cuisson
lente) 5min à24h 30min 100°C / 212°F
Steam (vapeur) 1min à1heure 10min 100°C / 212°F
Sauté 1min à30min 5min 145 à 155 °C /
293 à 311 °F
Soup (soupe) 1min à4h 30min 100°C / 212°F
Jam/Sauce (Confiture/
Sauce) 5min à2h 1h 100°C / 212°F
Cake 1min à1h30min 50min 110 à 120 °C /
230 à 248 °F
Maintenir au chaud 10min à24h 70°C / 158°F
Minuterie 10min à24h
Type de grain Fonction Marquage de
niveau d'eau
Grain:
rapport
d’eau
Doseurs*
Temps de
cuisson
estimé
(minutes)
Riz brun à
grain court
BROWN RICE
SHORT GRAIN BROWN 1: 1¼
1 60 à 70
4 66 à 76
8 73 à 83
Riz brun
rapide**
BROWN RICE
QUICK BROWN 1: 1¼
1 50 à 60
4 55 à 65
8 60 à 70
Quinoa GRAINS
QUINOA QUINOA 1: 1¼
1 37 à 47
3 42 à 52
6 46 à 56
Gruau GRAINS
GRUAU GRUAU 1: 5
½ 35 à 45
1 45 à 55
1½ 50 à 60
2 55 à 65
2½ 60 à 70
Grains
mélangés
GRAINS
MIXTE MIXGRAIN 1: 1¼
1 59 à 69
3 65 à 75
6 72 à 82
38

9
FR
Riz blanc / Riz brun
1. Utilisez le verre doseur pour mesurer le riz
non cuit. Remplissez le gobelet à ras bord,
puis égalisez-le pour obtenir une mesure
précise. [
Figure 2.1
]
2. Placez le riz dans un récipient séparé ou
dans un tamis à mailles fines. Lavez le riz
jusqu'à ce que l'eau soit claire.
3. Transférez le riz lavé dans la cuve interne et
ajoutez la quantité d'eau nécessaire. Vous
pouvez vous référer aux repères de niveau
d'eau figurant à l'intérieur de la cuve interne.
4. Placez la cuve interne dans le cuiseur à riz.
Fermez le couvercle.
a. Assurez-vous que le cache intérieur et
le bouchon à vapeur sont correctement
placés.
a. La fonction Quick Rice (riz rapide)
permet de cuire le riz plus rapidement,
mais la texture peut être légèrement
plus ferme.
a. Keep Warm (maintenir au chaud) peut
durer jusqu'à 24heures, mais nous vous
déconseillons de laisser du riz cuit dans
le cuiseur à riz pendant plus de 5heures.
5. Branchez le cuiseur à riz. Appuyez sur
WHITE RICE (riz blanc) ou BROWN
RICE (riz brun). «LONG GRAIN» est
automatiquement sélectionné. Continuez
à appuyer pour sélectionner «SHORT
GRAIN» (grain court) ou «QUICK»
(rapide). Le temps de cuisson estimé
s'ache à l'écran.
6. Vous pouvez également appuyer sur
DELAY TIMER (minuterie) et utiliser
+et pour programmer une cuisson
jusqu'à 24heures. La cuisson démarre
automatiquement une fois le compte à
rebours terminé.
7. Appuyez sur START (démarrer) pour lancer
la fonction de cuisson.
8. Le cuiseur à riz émet plusieurs bips lorsqu'il
a terminé et passe automatiquement à la
fonction de maintien au chaud. L'écran
ache le temps écoulé depuis la fin de la
cuisson. Appuyez deux fois sur CANCEL
(annuler) pour arrêter la fonction Keep
Warm (maintenir au chaud).
Grains
1. Utilisez le verre doseur pour mesurer
les grains non cuits, tels que le quinoa.
Remplissez le gobelet à ras bord, puis
égalisez-le pour obtenir une mesure
précise.
2. Transférez les grains lavés dans la cuve
interne et ajoutez la quantité d'eau
nécessaire. Vous pouvez vous référer aux
repères de niveau d'eau figurant à l'intérieur
de la cuve interne.
3. Placez la cuve interne dans le cuiseur à riz.
Fermez le couvercle.
a. Assurez-vous que le cache intérieur et
le bouchon à vapeur sont correctement
placés.
a. Keep Warm (maintenir au chaud) peut
durer jusqu'à 24heures, mais nous vous
déconseillons de laisser des graines
dans le cuiseur à riz pendant plus de
3heures.
4. Branchez le cuiseur à riz. Appuyez
sur GRAINS. « QUINOA» est
automatiquement sélectionné. Continuez à
appuyer pour sélectionner «PORRIDGE»
(gruau) ou «MIXED» (mélangé). Le temps
de cuisson estimé s'ache à l'écran.
5. Vous pouvez également appuyer sur
DELAY TIMER (minuterie) et utiliser
+et pour programmer une cuisson
jusqu'à 24heures. La cuisson démarre
automatiquement une fois le compte à
rebours terminé.
6. Appuyez sur START (démarrer) pour lancer
la fonction de cuisson.
7. Le cuiseur à riz émet plusieurs bips lorsqu'il
a terminé et passe automatiquement à la
fonction de maintien au chaud. L'écran
ache le temps écoulé depuis la fin de la
cuisson. Appuyez deux fois sur CANCEL
(annuler) pour arrêter la fonction Keep
Warm (maintenir au chaud).
Figure 2.1

10
FR
Steam (vapeur)
1. Ajoutez de l'eau dans la cuve interne
jusqu'à la marque du niveau d'eau
«STEAM» (vapeur).
2. Placez les aliments dans le panier à
vapeur, puis placez le panier à vapeur
dans la cuve interne.
a. Ne pas trop remplir le panier à
vapeur.
a. Assurez-vous que le cache intérieur
et le bouchon à vapeur sont
correctement placés.
a. Keep Warm (maintenir au chaud)
peut durer jusqu'à 24heures, mais
nous vous déconseillons de laisser
des aliments dans le cuiseur à riz
pendant plus de 3heures.
3. Placez la cuve interne dans le cuiseur à
riz. Fermez le couvercle.
4. Branchez le cuiseur à riz. Appuyez sur
MODE pour sélectionner «STEAM»
(vapeur).
5. Appuyez sur + et pour régler le temps
de cuisson.
6. Vous pouvez également appuyer sur
DELAY TIMER (minuterie) et utiliser
+et pour programmer une cuisson
jusqu'à 24heures. La cuisson démarre
automatiquement une fois le compte à
rebours terminé.
7. Appuyez sur START (démarrer)
pour lancer la fonction de cuisson.
L'indicateur de progression
«PREHEATING» (préchauage)
s'allume et le cuiseur à riz commence
à préchauer. Lorsque le préchauage
est terminé, l'écran ache le compte à
rebours de la minuterie.
8. Le cuiseur à riz émet plusieurs
bips lorsqu'il a terminé et passe
automatiquement à la fonction de
maintien au chaud. L'écran ache
le temps écoulé depuis la fin de la
cuisson. Appuyez deux fois sur CANCEL
(annuler) pour arrêter la fonction Keep
Warm (maintenir au chaud).
Slow Cook (cuisson lente)
1. Placez les aliments dans la cuve interne.
a. Ne pas remplir au-delà du repère du
niveau d'eau du riz blanc à long grain
de 10tasses.
a. Assurez-vous que le cache intérieur
et le bouchon à vapeur sont
correctement placés.
a. Keep Warm (maintenir au chaud)
peut durer jusqu'à 24heures, mais
nous vous déconseillons de laisser
des aliments dans le cuiseur à riz
pendant plus de 3heures.
2. Placez la cuve interne dans le cuiseur à
riz. Fermez le couvercle.
3. Branchez le cuiseur à riz. Appuyez
deux fois sur MODE pour sélectionner
«SLOW COOK» (cuisson lente).
4. Appuyez sur + et pour régler le temps
de cuisson.
5. Vous pouvez également appuyer sur
DELAY TIMER (minuterie) et utiliser
+et pour programmer une cuisson
jusqu'à 24heures. La cuisson démarre
automatiquement une fois le compte à
rebours terminé.
6. Appuyez sur START (démarrer) pour
lancer la fonction de cuisson.
7. Le cuiseur à riz émet plusieurs
bips lorsqu'il a terminé et passe
automatiquement à la fonction de
maintien au chaud. L'écran ache
le temps écoulé depuis la fin de la
cuisson. Appuyez deux fois sur CANCEL
(annuler) pour arrêter la fonction Keep
Warm (maintenir au chaud).

11
FR
Soup (soupe)
1. Placez les aliments et l’eau dans la cuve
interne.
a. Assurez-vous que le cache intérieur et
le bouchon à vapeur sont correctement
placés.
a. Keep Warm (maintenir au chaud) peut
durer jusqu'à 24heures, mais nous vous
déconseillons de laisser des aliments
dans le cuiseur à riz pendant plus de
3heures.
a. Ne pas remplir au-delà du repère du
niveau d'eau du riz blanc à long grain
de 10tasses.
2. Placez la cuve interne dans le cuiseur à riz.
Fermez le couvercle.
3. Branchez le cuiseur à riz. Appuyez trois
fois sur MODE pour sélectionner «SOUP»
(soupe).
4. Appuyez sur + et pour régler le temps de
cuisson.
5. Vous pouvez également appuyer sur
DELAY TIMER (minuterie) et utiliser
+ et pour programmer une cuisson
jusqu'à 24heures. La cuisson démarre
automatiquement une fois le compte à
rebours terminé.
6. Appuyez sur START (démarrer) pour lancer
la fonction de cuisson.
7. Le cuiseur à riz émet plusieurs bips lorsqu'il
a terminé et passe automatiquement à la
fonction de maintien au chaud. L'écran
ache le temps écoulé depuis la fin de la
cuisson. Appuyez deux fois sur CANCEL
(annuler) pour arrêter la fonction Keep
Warm (maintenir au chaud). Jam/Sauce (Conture/Sauce)
1. Placez la cuve interne dans le cuiseur à riz.
Vous pouvez cuisiner avec le couvercle
ouvert ou fermé.
a. Laissez le couvercle ouvert si vous
préparez des confitures ou des
compotes de fruits.
2. Placez les aliments dans la cuve interne.
3. Branchez le cuiseur à riz. Appuyez cinq
fois sur MODE pour sélectionner «JAM/
SAUCE» (confiture/sauce).
4. Appuyez sur + et pour régler le temps de
cuisson.
5. Appuyez sur START (démarrer) pour lancer
la fonction de cuisson.
6. Une fois terminée, appuyez sur CANCEL
(annuler) pour arrêter la fonction de
cuisson.
Sauté
1. Placez la cuve interne dans le cuiseur à riz.
Vous pouvez laisser le couvercle ouvert ou
le fermer pour un préchauage plus rapide.
2. Branchez le cuiseur à riz. Appuyez quatre
fois sur MODE pour sélectionner «SAUTE»
(sauté).
3. Appuyez sur + et pour régler le temps de
cuisson.
4. Appuyez sur START (démarrer) pour
lancer la fonction de cuisson. L'indicateur
de progression «PREHEATING»
(préchauage) s'allume et le cuiseur à
riz commence à préchauer. Lorsque le
préchauage est terminé, l'écran ache le
compte à rebours de la minuterie.
a. Vous pouvez ajouter de l'huile dans
la cuve interne avant ou après le
préchauage.
b. Si vous ajoutez des aliments dans
la cuve interne avant la fin du
préchauage, le compte à rebours peut
ne pas s'acher.
5. Placez les aliments dans la cuve interne
lpour commencer la cuisson.
6. Une fois terminée, appuyez sur CANCEL
(annuler) pour arrêter la fonction de
cuisson.

12
FR
Maintenir au chaud
1. Placez la cuve interne dans le cuiseur à
riz. Fermez le couvercle.
a. Assurez-vous que le cache intérieur
et le bouchon à vapeur sont
correctement placés.
2. Branchez le cuiseur à riz. Appuyez sur
KEEP WARM (maintenir au chaud).
3. Appuyez sur + et pour régler la durée.
4. Appuyez sur START (démarrer) pour
lancer la fonction de cuisson.
Remarque: Après chaque fonction de cuisson
(sauf «SAUTE» (sauté) et «CAKE»(gâteau)),
le cuiseur à riz passe automatiquement à la
fonction de maintien au chaud. L'écran ache
le temps écoulé depuis la fin de la cuisson.
Appuyez deux fois sur CANCEL (annuler) pour
arrêter la fonction Keep Warm (maintenir au
chaud).
Cake (gâteau)
1. Graissez uniformément l'intérieur de la
cuve interne avec du beurre ou de l'huile.
2. Versez la pâte à gâteau dans la cuve
interne. Placez la cuve interne dans le
cuiseur à riz. Fermez le couvercle.
a. Assurez-vous que le cache intérieur
et le bouchon à vapeur sont
correctement placés.
3. Branchez le cuiseur à riz. Appuyez
six fois sur MODE pour sélectionner
«CAKE» (gâteau).
4. Appuyez sur + et pour régler le temps
de cuisson du gâteau.
5. Appuyez sur START (démarrer) pour
lancer la fonction de cuisson.
6. Le cuiseur à riz émet plusieurs
bips lorsqu'il a terminé. Nous vous
recommandons de piquer le gâteau avec
un cure-dent et de vérifier si celui-ci
ressort propre. Si tel n'est pas le cas,
répétez les étapes pour faire cuire le
gâteau plus longtemps. Arrêt automatique
• Si aucune fonction de cuisson n'est
sélectionnée, le cuiseur à riz s'éteint
après 15minutes d'inactivité. L'écran
s'éteint et START (démarrer) s’allume.
[
Figure2.2
]
• Appuyez sur START (démarrer) pour
utiliser le cuiseur à riz.
Minuterie
1. Avant la cuisson, appuyez sur DELAY
TIMER (minuterie) pour définir une
temporisation.
a. Vous ne pouvez pas définir une
minuterie avec les fonctions
«KEEPWARM» (maintenir au
chaud), «SAUTE» (sauté), «JAM/
SAUCE» (confiture/sauce), ou
«CAKE» (gâteau).
2. Appuyez sur + et pour programmer
une cuisson jusqu'à 24heures.
Remarque: il ne s'agit pas d'un départ diéré.
La minuterie prend en compte le temps de
cuisson, de sorte que les aliments finissent de
cuire à la fin de la minuterie.
3. Appuyez sur START (démarrer) et la
cuisson démarre automatiquement une
fois le compte à rebours terminé.
Figure 2.2

13
FR
ENTRETIEN ET MAINTENANCE
Remarque:
• Toujours nettoyer la cuve interne et les
accessoires après chaque utilisation.
• La cuve interne est recouverte d'un revêtement
anti-adhésif pour faciliter le nettoyage.
• Ne pas utiliser de nettoyants abrasifs, de
tampons à récurer en métal ou d'ustensiles
en métal sur toute partie du cuiseur à riz,
y compris la cuve interne et les autres
accessoires. Ceux-ci risquent de rayer ou
d'endommager les surfaces.
• Ce cuiseur à riz ne contient aucune pièce
susceptible d'être réparée par l'utilisateur. Pour
toute réparation, contactez le Support à la
clientèle (voir page 15).
1. Avant tout nettoyage, éteignez et
débranchez le cuiseur à riz et laissez-le
totalement refroidir.
2. Essuyez l’intérieur et l'extérieur du
cuiseur à riz à l'aide d'un chion humide.
3. Appuyez sur le bouton de libération du
cache intérieur, puis tirez sur le cache
intérieur pour le retirer. Si nécessaire,
défaites le bouchon à vapeur pour le
vider et le nettoyer.
4. Lavez le cache intérieur, le bouchon
à vapeur, la cuve interne, le panier à
vapeur, la palette à riz, la louche à potage
et la tasse à mesurer avec de l'eau chaude
savonneuse et une éponge non abrasive.
Faites tremper si nécessaire.
a. Les accessoires peuvent également
être lavés au lave-vaisselle dans le
panier supérieur.
a. Si nécessaire, vous pouvez retirer le
bouchon à vapeur pour faciliter le
nettoyage et le séchage.
a. Retournez le cache intérieur pour
vous assurer que le bouchon à
vapeur est correctement installé.
5. Séchez les pièces et replacez le cache
intérieur. Placez la cuve interne dans le
cuiseur à riz.
6. Laissez toutes les surfaces sécher
complètement avant de brancher ou de
mettre en marche le cuiseur à riz.
Vider le bouchon à vapeur
Stockage
1. Détachez le bouchon à vapeur situé sur
le cache intérieur. [
Figure2.3
]
2. Videz l'eau qui s'est accumulée dans le
bouchon à vapeur.
3. Nettoyez le bouchon à vapeur avec de
l'eau chaude savonneuse et une éponge
non abrasive.
1. Nettoyez et séchez le cuiseur à riz et tous
les accessoires.
2. Placez la cuve interne dans le cuiseur à
riz. Fermez le couvercle.
3. Rangez le cuiseur à riz en position
verticale. Ne pas stocker quoi que ce soit
dessus.
4. Pour le remontage, insérez les charnières
dans la fente et fermez l'ouverture du
bouchon à vapeur.
Figure 2.3

14
FR
Problème Solution possible
Le cuiseur à riz ne s'allume
pas. Vérifiez que le cuiseur à riz est bien branché sur une prise de courant.
Le cuiseur à riz dégage une
odeur de plastique.
Tout cuiseur à riz peut dégager une odeur de plastique due au processus
de fabrication. Cela est normal. Respectez les instructions concernant un
Test de fonctionnement (page 6) pour diminuer l’odeur de plastique.
Si l'odeur de plastique ne diminue pas, contactez le Support à la clientèle
(voir page 15).
Les aliments ne sont pas
assez cuits, sont trop mous
ou trop durs.
Vérifiez que le rapport aliments/eau est correct.
Vérifiez que vous avez sélectionné la fonction de cuisson adaptée à
l'aliment que vous préparez.
Les aliments débordent
pendant la cuisson.
Vérifiez que le rapport aliments/eau est correct.
Vérifiez que le cache intérieur et le bouchon à vapeur sont correctement
placés.
Le code d’erreur «E1\E3»
s’ache à l’écran.
Il y a un circuit ouvert dans le contrôleur de température. Contactez le
Support à la clientèle (voir page 15).
Le code d’erreur «E2\E4»
s’ache à l’écran.
Il y a un court circuit dans le contrôleur de température. Contactez le
Support à la clientèle (voir page 15).
DÉPANNAGE
Si votre problème n’est pas répertorié ici, veuillez contacter le Support à la clientèle
(voir page 15).

15
FR
INFORMATIONS SUR LA GARANTIE
Nom du produit Cuiseur à riz de 5litres
Modèle CRC-R501-KEU
Pour votre propre référence, nous vous
recommandons vivement d'enregistrer le numéro
de votre commande et la date d'achat.
Date d'achat
Numéro de
commande
Arovast Corporation garantit que tous les
produits sont de la plus haute qualité en termes
de matériaux, de fabrication et de service, et ce, à
partir de la date d'achat jusqu'à la fin de la période
de garantie limitée de 2ans.
Pour toute question ou préoccupation concernant
votre nouveau produit, veuillez contacter notre
équipe de Support à la clientèle.
SUPPORT À LA CLIENTÈLE
Pour toute question ou préoccupation concernant votre nouveau produit, veuillez contacter
notre équipe de Support à la clientèle.
*Veuillez préparer votre facture et votre numéro de commande avant de contacter le Support à la
clientèle.
Arovast Corporation
1202 N. Miller St., Suite A
Anaheim, CA 92806
USA
Courriel: [email protected]

1
IT
(Speriamo che possiate apprezzare il vostro nuovo cuociriso tanto quanto noi)
A nome di tutti noi di COSORI,
I nostri chef interni sono pronti a fornirti
assistenza per qualsiasi domanda!
CONTATTA I NOSTRI CHEF
E-mail: [email protected]
Grazie per
l'acquisto!
Buon divertimento in cucina!
esplora la nostra galleria di ricette digitali
cosori.com
buon
divertimento
ricette settimanali, in evidenza
realizzate in esclusiva dai nostri chef interni
Lascia spazio alla tua creatività con COSORI
Scaricare l'applicazione gratuita VeSync per accedere
alle ricette originali e ai video tutorial degli chef
COSORI, per interagire con la nostra community
on-line e molto altro ancora!

2
IT
Indice dei contenuti Contenuto della confezione
Specifiche tecniche
Modello CRC-R501-KEU
Alimentazione AC 220-240V, 50/60Hz
Potenza
nominale 970W
Capacità 5 L / 10 tazze* (riso non
cotto)
Peso 4,45 kg / 9.81 lb
Dimensioni 31,2 x 26,9 x 23,4 cm /
12,3 x 10,6 x 9,2 pollici
1 x Cuociriso da 5 litri
1 x Pentola interna
1 x Cestello per la cottura a vapore da 3 litri
1 x Paletta per il riso verticale
1 x Misurino
1 x Mestolo
1 x Ricettario
1 x Manuale dell’utente
1 x Guida Rapida
Contenuto della confezione
Specifiche tecniche
Protezioni importanti
Acquisire familiarità con il cuociriso
Prima di iniziare a usare
l’apparecchio
Cucinare con il cuociriso
“Cura e manutenzione
Guida alla risoluzione dei problemi
Informazioni sulla garanzia
Assistenza Clienti
*utilizzando il misurino per il riso in dotazione, pari
a circa 180 mL / 6,1 oz.
2
2
3
6
6
7
13
14
15
15

3
IT
PROTEZIONI IMPORTANTI
Quando si utilizza il cuociriso è opportuno attenersi alle precauzioni di sicurezza
di base. Leggere tutte le istruzioni.
Punti chiave per la sicurezza
Sicurezza generale
• Non toccare le superfici calde.
• Non Non toccare lo sfiato del vapore o
l'area vicina allo sfiato del vapore durante la
cottura o in modalità “Keep Warm” (Mantieni
caldo). Non coprire l’area con un panno.
• Usare sempre guanti, protezioni o guanti
da forno resistenti al calore quando
si sposta il cuociriso, si maneggiano
materiali caldi e quando si inseriscono
o si rimuovono oggetti dal cuociriso,
compresi la pentola interna, il cestello per
la cottura a vapore e gli accessori.
• Non usare mai il cuociriso senza la
pentola interna in posizione.
• Al fine di garantire protezione dalle scosse
elettriche, non immergere il cuociriso,
il cavo la presa o la scocca in acqua o in
altri liquidi.
• Non usare il cuociriso in acqua o sotto
l'acqua corrente.
• Scollegare il dispositivo quando non
è in uso oltre che prima di eseguire le
operazioni di pulizia. Lasciare rareddare
prima di indossare o togliere le parti e
prima di pulirle o conservarle.
• Non mettere cibo, liquidi o oggetti
estranei sulla piastra riscaldante.
• Accertarsi che la piastra di riscaldamento
sia pulita e che la parte inferiore della
pentola interna sia asciutta prima di
inserire la pentola interna.
• È necessaria una stretta sorveglianza
quando il cuociriso viene utilizzato da o
in prossimità di bambini.
• I bambini devono essere sorvegliati
per assicurarsi che non giochino con il
cuociriso.
• Non permettere ai bambini di pulire o
eseguire la manutenzione del cuociriso.
• Non utilizzare il cuociriso se è
danneggiato, se non funziona o se il cavo
o la spina sono danneggiati. Contattare
l’Assistenza clienti (cfr. pagina 15).
• L'uso di accessori o parti di ricambio non
consigliati da COSORI può causare lesioni.
• Non usare all'aperto.
• Non collocare il cuociriso o le sue parti su
o vicino a bruciatori a gas o elettrici caldi
o in un forno riscaldato.
• Non utilizzare gli accessori e la pentola
interna in dotazione in un forno a
microonde, su un fornello o una griglia
o in un forno.
• Prestare la massima attenzione quando
si sposta il cuociriso o la pentola interna
se contiene olio o altri liquidi caldi.
• Il cuociriso non è destinato a essere
azionato tramite un timer esterno o un
sistema di controllo a distanza separato.
• Questa apparecchiatura può essere
utilizzata da bambini di età pari o
superiore a 8 anni oltre che da persone
con ridotte capacità fisiche, sensoriali o
mentali o con mancanza di esperienza e
conoscenza, a condizione che le stesse
abbiano ricevuto supervisione o istruzioni
sull'uso dell'umidificatore in modo sicuro
e che comprendano i rischi connessi al
suo utilizzo.
LEGGERE E CONSERVARE QUESTE
ISTRUZIONI

4
IT
Durante la cottura
• ATTENZIONE: Rischio di scosse
elettriche. Cuocere solo nella pentola
interna rimovibile. Non mettere alcun
liquido direttamente sulla piastra di
riscaldamento del cuociriso.
• Utilizzare su una superficie piana, stabile
e resistente al calore, lontano da fonti di
calore o liquidi.
• La pentola interna rimovibile è
estremamente calda durante l'uso e
può essere pesante quando è piena di
ingredienti.
• Prestare attenzione quando si maneggia
la pentola interna o il cestello per la
cottura a vapore se contiene alimenti
caldi, olio caldo o altri liquidi caldi.
• Posizionare gli accessori caldi su una
superficie resistente al calore o su una
presina.
• Non collocare nulla sopra il cuociriso
mentre è in funzione. Non riporre
all'interno del cuociriso oggetti diversi
dagli accessori consigliati.
• Non toccare la parte metallica del
coperchio, le superfici calde o gli
accessori durante o subito dopo la cottura
perché sono caldi.
Cavo di alimentazione
• Questo cuociriso si serve di un cavo di
alimentazione corto per ridurre il rischio
di essere tirato dai bambini, di impigliarsi
o di inciampare.
• Per disattivare il cuociriso, toccare
CANCEL per interrompere il processo di
cottura e poi scollegare. Per staccare la
spina, aerrarla e tirarla dalla presa. Non
tirare mai dal cavo di alimentazione.
• Non versare acqua o liquidi sui poli della
spina.
• Non utilizzare una prolunga. Questo
cuociriso è destinato esclusivamente
all'uso da banco.
• Non lasciare che il cavo di alimentazione
penda oltre il bordo del tavolo o del
bancone e non toccare superfici calde.
• Il cavo deve essere disposto in modo da
non ricadere sul piano di lavoro o sul
tavolo, dove può essere tirato dai bambini
o dove qualcuno potrebbe inciampare
involontariamente.
• Non utilizzare mai una presa di corrente
sotto il bancone quando si collega il
cuociriso.
• Evitare che il connettore del cavo di
alimentazione si rovesci.
• Non inserire carta, cartone o plastica nel
cuociriso o qualsiasi altro materiale che
possa prendere fuoco o sciogliersi.
• Non utilizzare questo cuociriso per
friggere con olio.
• Non ostruire le aperture di ventilazione.
Il vapore caldo viene rilasciato attraverso
le aperture. Tenere le mani e il viso
lontano dalle aperture.
• Non lasciare il cuociriso incustodito
durante l'uso.
• La piastra riscaldante è soggetta a calore
residuo dopo l'uso.
• I bambini non devono giocare con
l'apparecchiatura. Le operazioni di pulizia
e manutenzione da parte degli utenti non
devono essere eettuate da bambini, a
meno che non abbiano più di 8 anni e
non siano sorvegliati. Tenere la friggitrice
ad aria e il suo cavo fuori dalla portata dei
bambini di età inferiore agli 8 anni.
• Usare unicamente in linea con le
indicazioni fornite nel presente manuale.
Non utilizzare per scopi diversi da quelli
previsti.
• Non per uso commerciale. Unicamente
per uso domestico.
Nota: Cfr. Cura e Manutenzione per indicazioni
su come pulire gli accessori (pagina 13).

5
IT
• Tenere il cuociriso e il suo cavo fuori dalla
portata dei bambini.
• Il cuociriso deve essere utilizzato
solo con sistemi elettrici a 220-240V,
50/60Hz. Non inserire la spina in un altro
tipo di presa.
Campi elettromagnetici (CEM)
CONSERVARE
QUESTE
ISTRUZIONI
Questo cuociriso è conforme a tutte le
norme relative ai campi elettromagnetici
(CEM). Se utilizzata in modo corretto e
attenendosi alle istruzioni contenute in
questo manuale d'uso, l'apparecchiatura
è sicura da usare sulla base delle prove
scientifiche attualmente disponibili.
• Se il cavo di alimentazione è danneggiato,
dovrà essere sostituito da Arovast
Corporation o da persone analogamente
qualificate per evitare un rischio elettrico
o di incendio. Invitiamo a contattare
l’Assistenza clienti (pagina 15).
Questo simbolo indica che il prodotto non
deve essere smaltito come rifiuto domestico
e deve essere consegnato presso un centro
di raccolta adeguato per il riciclaggio.
Lo smaltimento e il riciclaggio corretti
contribuiscono a proteggere le risorse
naturali, la salute umana e l'ambiente.
Per ulteriori informazioni sullo smaltimento
e il riciclaggio di questo prodotto,
contattare il proprio municipio, il servizio
di smaltimento rifiuti o ancora il negozio
presso il quale è stato acquistato il prodotto.
Questo prodotto è conforme alla Direttiva
RoHS.
Questo prodotto è conforme alla Direttiva
2011/65/UE, e successive modifiche, sulla
restrizione dell'uso di determinate sostanze
pericolose nelle apparecchiature elettriche
ed elettroniche.
ATTENZIONE: Superficie
calda.
220–240V, 50/60Hz 120 V, 60 Hz

6
IT
Pannello di controllo (Figura B)
a. Spie di avanzamento
b. Display
c. Aumenta/Riduci il tempo
d. Spia Timer ritardo
e. Tipo di riso
f. Pulsante White Rice (Riso bianco)
g. Pulsante Grains (Cereali)
h. Pulsante Brown Rice (Riso
integrale)
i. Tipo di cereali
j. Modalità di cottura
k. Pulsante “Keep Warm”
(Mantieni caldo)
ACQUISIRE FAMILIARITÀ CON IL CUOCIRISO
Schema del cuociriso (Figura A)
a. Sfiato del vapore
b. Pulsante di apertura
c. Coperchio
d. Cavo di alimentazione
e. Pannello di controllo
f. Coperchio interno
g. Piastra del radiatore
h. Pulsante di rilascio del
coperchio interno
i. Sensore di temperatura
superiore
j. Collettori di condensa
k. Piastra di riscaldamento
l. Sensore di temperatura
inferiore
m. Cestello per la cottura a
vapore da 3,0 litri
n. Pentola interna
antiaderente
o. Mestolo per zuppa
p. Tazza di misurazione
q. Paletta per il riso verticale
1. Tappo per il vapore
2. Rilascio del tappo del vapore
PRIMA DI INIZIARE A USARE L’APPARECCHIO
1. Rimuovere tutti gli imballaggi intorno e
all'interno del cuociriso.
2. Posizionare su una superficie stabile, piana
e resistente al calore. Tenere lontano da
aree che possono essere danneggiate dal
vapore (come ad esempio pareti o armadi).
3. Rimuovere il coperchio interno (cfr.
pagina 13).
[Figura 1.1
]
4. Lavare il coperchio interno, il tappo per il
vapore, la pentola interna, il cestello per il
vapore, la paletta per il riso, il mestolo e il
misurino con acqua calda e sapone e una
spugna non abrasiva.
5. Asciugare le parti e reinstallare il coperchio
interno. Inserire la pentola interna nella
pentola per il riso.
1. Assicurarsi che non vi siano alimenti o
confezioni nel cuociriso e collegarlo alla
presa di corrente.
2. Aggiungere acqua alla pentola interna fino
all’indicatore di livello dell’acqua “STEAM”.
Chiudere il coperchio.
3. Toccare MODE (modalità) per selezionare
“STEAM”.
4. Toccare START (avvio) per avviare la
funzione “Steam” (Vapore).
5. Al termine dell'operazione il cuociriso
emetterà diversi segnali acustici.
6. Aprire il coperchio, rimuovere con
attenzione la pentola interna e buttare
l'acqua rimanente.
7. Lasciare rareddare il cuociriso per 15 minuti.
Pulire il coperchio interno e l'esterno del
cuociriso con un panno asciutto.
Impostazione Prova di funzionamento
Un giro di prova vi aiuterà a familiarizzare
con il cuociriso, ad assicurarvi che funzioni
correttamente e a ripulirlo da eventuali residui.
l. Pulsante modalità di
cottura
m. Pulsante Cancel
(Annulla)
n. Pulsante Delay Timer
(Timer ritardo)
o. Pulsante Start (avvio)
21
Figure 1.1

7
IT
CUCINARE CON IL CUOCIRISO
Funzioni di cottura
Tabelle di riferimento rapido delle funzioni di cottura
Nota:
• Il tempo di cottura è una stima. Il tempo di cottura eettivo può variare a seconda di fattori quali la quantità
di cereali e di acqua, la temperatura ambiente, la temperatura dell'acqua e la tensione.
• La pentola interna non ha indicatori di livello dell'acqua per 1 tazza. Se si sta cucinando 1 tazza, usare la
colonna "Rapporto cereali acqua" per determinare la quantità corretta di acqua.
Le funzioni di cottura sono programmate con tempi e temperature ideali per la cottura di
determinati tipi di riso e cereali. Per ulteriori informazioni su ogni funzione di cottura, invitiamo
a consultare la relativa sezione oppure le Tabelle di riferimento rapido delle funzioni di cottura.
Tipo di cereali Funzione
Indicatore
di livello
dell’acqua
Rapporto
cerali acqua Tazze*
Tempo di
cottura
stimato
(minuti)
Riso bianco a
chicco lungo
RISO BIANCO
CHICCO
LUNGO
BIANCO A
CHICCO
LUNGO
1 : 1¼
1 35–45
5 45–55
10 55–65
Riso bianco a
chicco corto
RISO BIANCO
CHICCO CORTO
MEDIO/CORTO
BIANCO 1 : 1¼
1 32–42
5 41–51
10 51–61
Riso bianco
rapido**
RISO BIANCO
RAPIDO
CHICCO
CORTO
BIANCO
1 : 1¼
1 27–37
5 39–49
10 50–60
Riso bianco
Jasmine
RISO BIANCO
CHICCO
LUNGO
BIANCO A
CHICCO
LUNGO
1 : 1¼
1 35–45
5 40–50
10 50–60
Riso Sushi RISO BIANCO
CHICCO CORTO
MEDIO/CORTO
BIANCO 1 : 1¼
1 32–42
5 41–51
10 51–61
Riso integrale
a chicco lungo
RISO
INTEGRALE
CHICCO
LUNGO
INTEGRALE 1 : 1¼
1 59–69
4 65–75
8 72–82
316
316
316
8
8
38

8
IT
*1 misurino da riso corrisponde a circa 180 mL / 6.1 oz.
**La funzione Quick Rice (Riso rapido) permette di cucinare il riso più velocemente, ma i chicchi
potrebbero essere leggermente più duri.
Funzione Intervallo di tempo Tempo predefinito Temperatura
predefinita
“Slow Cook”
(Cottura lenta) 5 min-24 ore 30 min 100°C / 212°F
“Steam” (Vapore) 1 min-1 ora 10 min 100°C / 212°F
Sauté 1 min-30 min 5 min 145°-155°C / 293°-311°F
“Soup” (Zuppa) 1 min-4 ore 30 min 100°C / 212°F
“Jam/Sauce”
(Marmellata/Salsa) 5 min-2 ore 1 ora 100°C / 212°F
“Cake” (Torta) 1 min–1 ora e 30 min 50 min 110°-120°C / 230°-248°F
“Keep Warm”
(Mantieni caldo) 10 min-24 ore 70°C / 158°F
Delay Timer (timer
ritardo) 10 min-24 ore
Tipo di cereali Funzione
Indicatore
di livello
dell’acqua
Rapporto
cerali acqua Tazze*
Tempo di
cottura
stimato
(minuti)
Riso integrale
a chicco corto
RISO
INTEGRALE
CHICCO CORTO
INTEGRALE 1 : 1¼
1 60–70
4 66–76
8 73–83
Riso integrale
rapido**
RISO
INTEGRALE
RAPIDO
INTEGRALE 1 : 1¼
1 50–60
4 55–65
8 60–70
Quinoa CERALI
QUINOA QUINOA 1 : 1¼
1 37–47
3 42–52
6 46–56
Porridge CERALI
PORRIDGE PORRIDGE 1 : 5
½ 35–45
1 45–55
1½ 50–60
2 55–65
2½ 60–70
Cereali misti CERALI
MISTO
MIX DI
CEREALI 1 : 1¼
1 59–69
3 65–75
6 72–82
38

9
IT
Riso bianco / Riso integrale
1. Utilizzare il misurino per misurare il riso
non cotto. Riempire la tazza e poi livellare
il livello dell’acqua per ottenere una misura
precisa.
[Figura 2.1
]
2. Mettere il riso in un contenitore separato
o in un setaccio a maglie fini. Lavare il riso
fino a che l'acqua non appare limpida.
3. Trasferire il riso lavato nella pentola
interna e aggiungere la quantità di acqua
adeguata. Sarà possibile fare riferimento alle
indicazioni di livello dell'acqua stampate
all'interno della pentola interna.
4. Inserire la pentola interna nella pentola per
il riso. Chiudere il coperchio.
a. Accertarsi che il coperchio interno e
il tappo per il vapore siano installati
correttamente.
a. La funzione “Quick Rice” (Riso rapido)
cuoce il riso più velocemente, tuttavia
la consistenza potrebbe essere
leggermente più dura.
a. La funzione “Keep Warm” (Mantieni
caldo) può durare fino a 24 ore, ma si
consiglia di non lasciare il riso cotto nel
cuociriso per più di 5 ore.
5. Collegare il cuociriso. Toccare WHITE
RICE (riso bianco) oppure BROWN
RICE (riso integrale). Viene selezionata
automaticamente l’opzione “LONG GRAIN”
(CHICCO LUNGO). Continuare a toccare
per selezionare “SHORT GRAIN” (CHICCO
CORTO) oppure “QUICK” (RAPIDO). Il
tempo di cottura previsto viene visualizzato
sul display.
6. In alternativa, toccare DELAY TIMER (timer
ritardo) e usare +e per ritardare la cottura fino
a 24 ore. La cottura si avvia automaticamente
dopo il conto alla rovescia.
7. Toccare START (avvio) per avviare la
funzione di cottura.
8. Al termine dell'operazione il cuociriso
emetterà diversi segnali acustici e passerà
automaticamente alla funzione “Keep
Warm” (Mantieni caldo). Il display visualizza
il tempo trascorso dal termine della cottura.
Toccare due volte CANCEL (annulla) per
interrompere la funzione “Keep Warm”
(Mantieni caldo).
Cerali
1. Utilizzare il misurino per misurare i cereali
non cotti, come la quinoa. Riempire la
tazza e poi livellare il livello dell’acqua per
ottenere una misura precisa.
2. Collocare i chicchi nella pentola interna e
aggiungere la quantità d'acqua appropriata.
Sarà possibile fare riferimento alle
indicazioni di livello dell'acqua stampate
all'interno della pentola interna.
3. Inserire la pentola interna nella pentola per
il riso. Chiudere il coperchio.
a. Accertarsi che il coperchio interno e
il tappo per il vapore siano installati
correttamente.
a. La funzione “Keep Warm” (Mantieni
caldo) può durare fino a 24 ore, ma si
consiglia di non lasciare i cereali cotti
nel cuociriso per più di 3 ore.
4. Collegare il cuociriso. Toccare GRAINS
(cereali). “QUINOA” viene selezionato
automaticamente. Continuare a toccare per
selezionare “PORRIDGE” oppure “MIXED”
(Misto). Il tempo di cottura previsto viene
visualizzato sul display.
5. In alternativa, toccare DELAY TIMER
(timer ritardo) e usare +e per ritardare
la cottura fino a 24 ore. La cottura si
avvia automaticamente dopo il conto alla
rovescia.
6. Toccare START (avvio) per avviare la
funzione di cottura.
7. Al termine dell'operazione il cuociriso
emetterà diversi segnali acustici e passerà
automaticamente alla funzione “Keep
Warm” (Mantieni caldo). Il display visualizza
il tempo trascorso dal termine della cottura.
Toccare due volte CANCEL (annulla) per
interrompere la funzione “Keep Warm”
(Mantieni caldo).
Figure 2.1

10
IT
“Steam” (Vapore)
1. Aggiungere acqua alla pentola interna
fino all’indicatore di livello dell’acqua
“STEAM”.
2. Collocare gli alimenti nel cestello per
la cottura a vapore, quindi inserire il
cestello per la cottura a vapore nella
pentola interna.
a. Non riempire eccessivamente il
cestello per la cottura a vapore.
a. Accertarsi che il coperchio interno e
il tappo per il vapore siano installati
correttamente.
a. La funzione “Keep Warm” (Mantieni
caldo) può durare fino a 24 ore, ma si
consiglia di non lasciare gli alimenti
cotti nel cuociriso per più di 3 ore.
3. Inserire la pentola interna nella pentola
per il riso. Chiudere il coperchio.
4. Collegare il cuociriso. Toccare MODE
(modalità) per selezionare “STEAM”.
5. Toccare + e per regolare il tempo di
cottura.
6. In alternativa, toccare DELAY TIMER
(timer ritardo) e usare +e per ritardare
la cottura fino a 24 ore. La cottura si
avvia automaticamente dopo il conto
alla rovescia.
7. Toccare START (avvio) per avviare
la funzione di cottura. La spia di
avanzamento “PREHEATING” (pre-
riscaldamento) si accende e il cuociriso
inizia a preriscaldarsi. Al termine del
pre-riscaldamento, il display visualizza
il conto alla rovescia del timer.
8. Al termine dell'operazione il cuociriso
emetterà diversi segnali acustici e
passerà automaticamente alla funzione
“Keep Warm” (Mantieni caldo). Il display
visualizza il tempo trascorso dal termine
della cottura. Toccare due volte CANCEL
(annulla) per interrompere la funzione
“Keep Warm” (Mantieni caldo).
“Slow Cook” (Cottura lenta)
1. Collocare il cibo nella pentola interna.
a. Non riempire la pentola oltre il limite
di 10 tazze di riso bianco a chicco
lungo.
a. Accertarsi che il coperchio interno e
il tappo per il vapore siano installati
correttamente.
a. La funzione “Keep Warm” (Mantieni
caldo) può durare fino a 24 ore, ma si
consiglia di non lasciare gli alimenti
cotti nel cuociriso per più di 3 ore.
2. Inserire la pentola interna nella pentola
per il riso. Chiudere il coperchio.
3. Collegare il cuociriso. Toccare MODE
(modalità) due volte per selezionare
“SLOW COOK” (Cottura lenta).
4. Toccare + e per regolare il tempo di
cottura.
5. In alternativa, toccare DELAY TIMER
(timer ritardo) e usare +e per ritardare
la cottura fino a 24 ore. La cottura si
avvia automaticamente dopo il conto
alla rovescia.
6. Toccare START (avvio) per avviare la
funzione di cottura.
7. Al termine dell'operazione il cuociriso
emetterà diversi segnali acustici e
passerà automaticamente alla funzione
“Keep Warm” (Mantieni caldo). Il display
visualizza il tempo trascorso dal termine
della cottura. Toccare due volte CANCEL
(annulla) per interrompere la funzione
“Keep Warm” (Mantieni caldo).

11
IT
“Soup” (Zuppa)
1. Collocare il cibo e l'acqua nella pentola
interna.
a. Accertarsi che il coperchio interno e
il tappo per il vapore siano installati
correttamente.
a. La funzione “Keep Warm” (Mantieni
caldo) può durare fino a 24 ore, ma si
consiglia di non lasciare gli alimenti
cotti nel cuociriso per più di 3 ore.
a. Non riempire la pentola oltre il limite
di 10 tazze di riso bianco a chicco
lungo.
2. Inserire la pentola interna nella pentola
per il riso. Chiudere il coperchio.
3. Collegare il cuociriso. Toccare MODE
(modalità) tre volte per selezionare
“SOUP” (Zuppa).
4. Toccare +e per regolare il tempo di
cottura.
5. In alternativa, toccare DELAY TIMER
(timer ritardo) e usare +e per ritardare
la cottura fino a 24 ore. La cottura si
avvia automaticamente dopo il conto alla
rovescia.
6. Toccare START (avvio) per avviare la
funzione di cottura.
7. Al termine dell'operazione il cuociriso
emetterà diversi segnali acustici e
passerà automaticamente alla funzione
“Keep Warm” (Mantieni caldo). Il display
visualizza il tempo trascorso dal termine
della cottura. Toccare due volte CANCEL
(annulla) per interrompere la funzione
“Keep Warm” (Mantieni caldo).
“Jam/Sauce” (Marmellata/Salsa)
1. Inserire la pentola interna nella pentola
per il riso. È possibile cuocere con il
coperchio aperto o chiuso.
a. Tenere il coperchio aperto se si
preparano marmellate o composte
di frutta.
2. Collocare il cibo nella pentola interna.
3. Collegare il cuociriso. Toccare MODE
(modalità) cinque volte per selezionare
“JAM/SAUCE” (Marmellata/salsa).
4. Toccare +e per regolare il tempo di
cottura.
5. Toccare START (avvio) per avviare la
funzione di cottura.
6. Al termine, toccare CANCEL (annulla)
per interrompere la funzione di cottura.
Sauté
1. Inserire la pentola interna nella pentola
per il riso. Sarà possibile lasciare il
coperchio aperto o chiuderlo per un
preriscaldamento più rapido.
2. Collegare il cuociriso. Toccare MODE
(modalità) quattro volte per selezionare
“SAUTE”.
3. Toccare +e per regolare il tempo di
cottura.
4. Toccare START (avvio) per avviare
la funzione di cottura. La spia di
avanzamento ”PREHEATING” (pre-
riscaldamento) si accende e il cuociriso
avvia il processo di preriscaldamento. Al
termine del pre-riscaldamento, il display
visualizza il conto alla rovescia del timer.
a. Sarà possibile aggiungere olio alla
pentola interna prima o dopo il
preriscaldamento.
b. Se il cibo viene aggiunto alla
pentola interna prima del termine
del preriscaldamento, il conto alla
rovescia potrebbe non apparire.
5. Inserire il cibo nella pentola interna per
iniziare la cottura.
6. Al termine, toccare CANCEL (annulla)
per interrompere la funzione di cottura.

12
IT
“Keep Warm” (Mantieni caldo)
1. Inserire la pentola interna nella pentola
per il riso. Chiudere il coperchio.
a. Accertarsi che il coperchio interno e
il tappo per il vapore siano installati
correttamente.
2. Collegare il cuociriso. Toccare “KEEP
WARM” MANTIENI CALDO.
3. Toccare +e per regolare il tempo.
4. Toccare START (avvio) per avviare la
funzione di cottura.
Nota: Dopo ogni funzione di cottura (tranne
“SAUTE” e “CAKE”), il cuociriso passa
automaticamente alla funzione “Keep Warm”
(Mantieni caldo). Il display visualizza il tempo
trascorso dal termine della cottura. Toccare due
volte CANCEL (annulla) per interrompere la
funzione “Keep Warm” (Mantieni caldo).
“Cake” (Torta)
1. Ungere in modo uniforme la pentola
interna con burro o olio.
2. Versare la pastella nella pentola interna.
Inserire la pentola interna nella pentola
per il riso. Chiudere il coperchio.
a. Accertarsi che il coperchio interno e
il tappo per il vapore siano installati
correttamente.
3. Collegare il cuociriso. Toccare MODE
(modalità) sei volte per selezionare
“CAKE” (Torta).
4. Toccare +e per regolare il tempo di
cottura.
5. Toccare START (avvio) per avviare la
funzione di cottura.
6. Al termine dell'operazione il cuociriso
emetterà diversi segnali acustici. Si
consiglia di infilzare la torta con uno
stuzzicadenti e verificare che ne esca
pulito. In caso contrario, ripetere i
passaggi per prolungare la cottura della
torta.
Spegnimento automatico
• Se non è stata selezionata alcuna
funzione di cottura, il cuociriso si spegne
dopo 15 minuti di inattività. Il display
si spegne e si accende la spia START
(avvio). [
Figura2.2
]
• Toccare START (avvio) per utilizzare il
cuociriso.
Delay Timer (Timer ritardo)
1. Prima della cottura, toccare DELAY
TIMER (Timer ritardo) per impostare un
timer di ritardo.
a. Non sarà possibile impostare un
delay timer (timer ritardo) nelle
funzioni “KEEPWARM” (Mantieni
caldo), “SAUTE”, “JAM/SAUCE”
(Marmellata/Salsa), oppure “CAKE”
(Torta).
2. Toccare +e per ritardare la cottura fino
a 24 ore.
Nota: Non si tratta di un avvio ritardato. Il delay
timer (timer ritardo) tiene conto del tempo di
cottura, pertanto gli alimenti termineranno la
cottura al termine del timer di ritardo.
3. Toccare START (avvio) e la cottura
inizierà automaticamente dopo il conto
alla rovescia.
Figure 2.2

13
IT
CURA E MANUTENZIONE
Nota:
• Pulire sempre la pentola interna e gli accessori
dopo ogni utilizzo.
• La pentola interna è dotata di un rivestimento
antiaderente che ne facilita la pulizia.
• Non utilizzare detergenti abrasivi, pagliette
metalliche o utensili metallici su nessuna parte
del cuociriso, compresi la pentola interna e
gli altri accessori. Questi elementi graano o
danneggiano le superfici.
• Questo cuociriso non contiene parti riparabili
dall'utente. Per eventuali riparazioni, contattare
l'Assistenza clienti (cfr. pagina 15).
1. Prima di procedere alla pulizia, spegnere
e scollegare il cuociriso e lasciarlo
rareddare completamente.
2. Pulire l'esterno e l'interno del cuociriso
con un panno umido.
3. Premere il pulsante di rilascio del
coperchio interno, quindi tirare il
coperchio interno per rimuoverlo. Se
necessario, allentare il pulsante di rilascio
del tappo del vapore per svuotarlo e
pulirlo.
4. Lavare il coperchio interno, il tappo per
il vapore, la pentola interna, il cestello
per il vapore, la paletta per il riso, il
mestolo e il misurino con acqua calda e
sapone e una spugna non abrasiva. Ove
necessario, mettere in ammollo.
a. Anche gli accessori possono essere
lavati in lavastoviglie sul cestello
superiore.
a. Ove necessario, sarà possibile
rimuovere il tappo del vapore per
facilitare la pulizia e l'asciugatura.
a. Capovolgere il coperchio interno
per verificare che il tappo vapore sia
installato correttamente.
5. Asciugare le parti e reinstallare il
coperchio interno. Inserire la pentola
interna nella pentola per il riso.
6. Lasciare asciugare completamente
tutte le superfici prima di collegare o
accendere il cuociriso.
Svuotamento del tappo del
vapore
Immagazzinamento
1. Allentare il rilascio del tappo del vapore
situato sul coperchio interno. [
Figura2.3
]
2. Svuotare l'acqua raccolta nel tappo del
vapore.
3. Pulire il tappo del vapore con acqua
calda e sapone e una spugna non
abrasiva.
1. Pulire e asciugare il cuociriso e tutti gli
accessori.
2. Inserire la pentola interna nella pentola
per il riso. Chiudere il coperchio.
3. Conservare il cuociriso in posizione
verticale. Non appoggiarci nulla sopra.
4. Per l’operazione di rimontaggio, inserire
le cerniere nella fessura e chiudere lo
sgancio del tappo del vapore.
Figure 2.3

14
IT
Problema Possibile soluzione
Il cuociriso non si accende. Accertarsi che il cuociriso sia collegato a una presa di corrente.
Il cuociriso emette un odore
di plastica.
Qualsiasi cuociriso può avere un odore di plastica dovuto al processo
di produzione. Questa non è un’anomalia di funzionamento. Seguire le
istruzioni per una Prova di funzionamento (pagina 6) per ridurre
l'odore di plastica. Se l'odore di plastica non diminuisce, contattare
l’Assistenza clienti (cfr. pagina 15).
Il cibo è poco cotto, troppo
morbido o troppo duro.
Accertarsi che il rapporto cibo/acqua sia corretto.
Accertarsi di aver selezionato la funzione di cottura corretta per l'alimento
in fase di cottura.
Il cibo bolle durante la
cottura.
Accertarsi che il rapporto cibo/acqua sia corretto.
Accertarsi che il coperchio interno e il tappo per il vapore siano installati
correttamente.
Sul display viene
visualizzato il codice di
errore “E1\E3”.
Il monitor della temperatura presenta un circuito aperto. Contattare
l’Assistenza clienti (cfr. pagina 15).
Sul display viene
visualizzato il codice di
errore “E2\E4”.
Si è verificato un cortocircuito nel monitor della temperatura. Contattare
l’Assistenza clienti (cfr. pagina 15).
GUIDA ALLA RISOLUZIONE DEI PROBLEMI
Se il problema non è presente nell'elenco, contattare l'Assistenza clienti (cfr. pagina 15).

15
IT
INFORMAZIONI SULLA GARANZIA
Nome del prodotto Cuociriso da 5 litri
Modello CRC-R501-KEU
A titolo di riferimento, si consiglia vivamente di
registrare il numero d’ordine e la data di acquisto.
Data di acquisto
Numero d'ordine
Arovast Corporation garantisce la massima qualità
di tutti i prodotti per quanto riguarda i materiali,
la lavorazione e l'assistenza, a partire dalla data di
acquisto fino al termine del periodo di garanzia
limitata di 2 anni.
Per eventuali domande o dubbi in merito al vostro
nuovo prodotto, vi invitiamo a contattare il nostro
team di assistenza clienti: sapranno sicuramente
fornirvi assistenza in merito.
ASSISTENZA CLIENTI
Per eventuali domande o dubbi in merito al vostro nuovo prodotto, vi invitiamo a contattare il
nostro team di assistenza clienti: sapranno sicuramente fornirvi assistenza in merito.
*Prima di contattare l'Assistenza clienti, accertarsi di avere a portata di mano la fattura e il
numero d'ordine.
Società Arovast
1202 N. Miller St., Suite A
Anaheim, CA 92806
Stati Uniti d'America
E-mail: [email protected]
-
 1
1
-
 2
2
-
 3
3
-
 4
4
-
 5
5
-
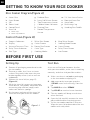 6
6
-
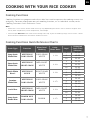 7
7
-
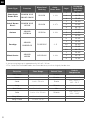 8
8
-
 9
9
-
 10
10
-
 11
11
-
 12
12
-
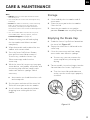 13
13
-
 14
14
-
 15
15
-
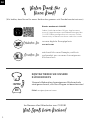 16
16
-
 17
17
-
 18
18
-
 19
19
-
 20
20
-
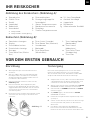 21
21
-
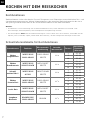 22
22
-
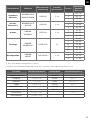 23
23
-
 24
24
-
 25
25
-
 26
26
-
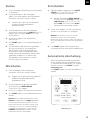 27
27
-
 28
28
-
 29
29
-
 30
30
-
 31
31
-
 32
32
-
 33
33
-
 34
34
-
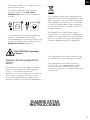 35
35
-
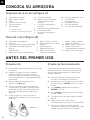 36
36
-
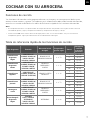 37
37
-
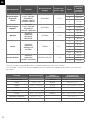 38
38
-
 39
39
-
 40
40
-
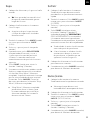 41
41
-
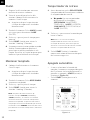 42
42
-
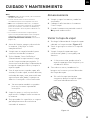 43
43
-
 44
44
-
 45
45
-
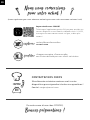 46
46
-
 47
47
-
 48
48
-
 49
49
-
 50
50
-
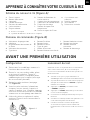 51
51
-
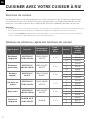 52
52
-
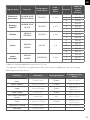 53
53
-
 54
54
-
 55
55
-
 56
56
-
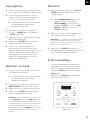 57
57
-
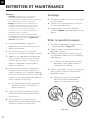 58
58
-
 59
59
-
 60
60
-
 61
61
-
 62
62
-
 63
63
-
 64
64
-
 65
65
-
 66
66
-
 67
67
-
 68
68
-
 69
69
-
 70
70
-
 71
71
-
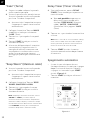 72
72
-
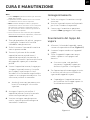 73
73
-
 74
74
-
 75
75


Cosori 18-IN-1 MULTIKOKER Manual de usuario
- Categoría
- Ollas arroceras
- Tipo
- Manual de usuario
en otros idiomas
Otros documentos
-
Aroma ARC-852 Manual de usuario
-
-
Sanyo ECJ-M100S - Micom Rice & Versatile Cooker Manual de usuario
-
Elite EPC-807 Guía del usuario
-
-
Aroma ARC-1010SB Manual de usuario
-
-
-
Fagor 670041930 Manual de usuario
-