Auna 10034802 El manual del propietario
- Categoría
- Reproductores de CD
- Tipo
- El manual del propietario

www.auna-multimedia.com
Graceland Touch
Jukebox
Gramola
10034802


3
DE
English 27
Español 49
Français 71
Italiano 93
Sehr geehrter Kunde,
wir gratulieren Ihnen zum Erwerb Ihres Gerätes.
Lesen Sie die folgenden Hinweise sorgfältig durch
und befolgen Sie diese, um möglichen Schäden
vorzubeugen. Für Schäden, die durch Missachtung der
Hinweise und unsachgemäßen Gebrauch entstehen,
übernehmen wir keine Haftung. Scannen Sie den
folgenden QR-Code, um Zugri auf die aktuellste
Bedienungsanleitung und weitere Informationen rund
um das Produkt zu erhalten:
INHALTSVERZEICHNIS
Technische Daten 4
Sicherheitshinweise 5
Geräteübersicht 7
Bedienfeld und Fernbedienung 10
Inbetriebnahme 12
FM-Radio 13
CD-Modus 14
USB/SD-Karte 15
BT-Modus 16
Aktivieren der Lichteekte 17
Verwendung des Media-Players 19
Wichtige Hinweise zur Bedienung 20
Zwischenspeicher leeren 21
Wiederherstellung der Werkseinstellungen 22
Fehlerbehebung 23
Spezielle Entsorgungshinweise für Verbraucher in Deutschland 24
Hinweise zur Entsorgung 26

4
DE
TECHNISCHE DATEN
Artikelnummer 10034802
Frequenzbereich FM 87,5 – 108 MHz
Netzadapter 100 – 240 V (AC) ~ 50 – 60 Hz
Stromverbrauch 65 W
Abmessungen (L x B x H) 30 x 57 x 105cm
Gewicht 19,5 kg
Verstärker Ausgangsleistung 2.0 Tonkanal
Bildschirmgröße 12 Zoll
USB 2.0
BT-Frequenz
BT-Sendeleistung
2402-2480 MHz
4 dBm
WLAN-Standard 802.11b/g/n
Videoauösung 1080 P (1920 x 1080)
Betriebssystem Android 6.0.1
Wiedergabemodi Loop, Zeitmessung, Einfügen etc.
Unterstütze Netzwerke Ethernet, WLAN, drahtlose
Peripherieerweiterung
Unterstützte Videoformate WMV, avi, FLV, rm, RMVB, mpeg, ts,
h.265, mp4
Unterstützte Bildformate
BMP, JPEG, PNG, GIF etc. ; RSS aktuelle
Ereignisse, Flash Animationen,
dynamische Webseiten
Unterstützt die Wiedergabe von Oice-
Dokumenten PPT, WORD, EXCEL und PDF-Dokumente
Unterstützt die Wiedergabe von
Webseiten
Webseitenwiedergabe, scrollen auf
Webseiten, Zoomen
Single Player Wiedergabe Unterstützt die Einzelwiedergabe von
importierten Programmen auf u disk
Log Management
Leistungsfähige
Protokollierungsfunktion, kann jede auf
den Zustand verweisende Anleitung
empfangen

5
DE
Geteilter Bildschirm
Programme können erweitert,
gezogen und abgelegt werden, mit
digitalem Kalender, Uhrzeitmodus,
Wettervorhersagenmodul,
Programmvorlagenbibliothek: Bietet
eine Thumbnailfunktion
SICHERHEITSHINWEISE
Allgemeine Hinweise
• Blitzschlag - Wenn Sie das Gerät länger nicht benutzen oder es
gewittert, ziehen Sie den Stecker aus der Steckdose oder trennen
Sie das Gerät vom Antennenanschluss. Dadurch werden Schäden am
Produkt durch Blitzschlag und Überspannung vermieden.
• Überlastung - Überlasten Sie keine Steckdosen, Verlängerungskabel
oder integrierten Steckdosen, da dies zu einem Brand oder Stromschlag
führen kann.
• Fremdkörper und Flüssigkeitseintritt - Schieben Sie niemals
Gegenstände jeglicher Art durch Önungen in das Gerät, da sie
gefährliche Spannungspunkte berühren oder Teile kurzschließen
können, die zu einem Brand oder einem elektrischen Schlag führen
könnten. Verschütten Sie niemals Flüssigkeiten jeglicher Art auf dem
Gerät.
• Reparatur und Wartung - Versuchen Sie nicht, dieses Produkt selbst zu
warten, da Sie sich durch das Önen oder Entfernen von Abdeckungen
gefährlichen Spannungen oder anderen Gefahren aussetzen.
Überlassen Sie alle Wartungsarbeiten qualiziertem Servicepersonal.
• Schäden, die einen Service erfordern - Ziehen Sie den Netzstecker aus
der Steckdose und wenden Sie sich an einen qualizierten Fachbetrieb,
wenn eine der folgenden Situationen eintritt:
a) Wenn das Netzkabel oder der Stecker beschädigt ist.

6
DE
b) Wenn Flüssigkeit verschüttet wurde oder Gegenstände auf das
Produkt gefallen sind.
c) Wenn das Produkt Regen oder Wasser ausgesetzt war.
d) Wenn das Produkt heruntergefallen oder beschädigt ist.
e) Wenn das Produkt eine deutlich verringerte Leistung aufweist.
• Ersatzteile - Wenn Ersatzteile benötigt werden, stellen Sie sicher, dass
der Fachbetrieb, der die Teile ersetzt, nur Ersatzteile verwendet, die
vom Hersteller zugelassen sind oder dieselben Eigenschaften wie das
Originalteil haben. Unbefugter Austausch kann zu Feuer, Stromschlag
oder anderen Gefahren führen.
• Wärme - Stellen Sie das Gerät nicht in der Nähe von Wärmequellen
wie Heizkörpern, Heizregistern, Öfen oder anderen Produkten
(einschließlich Verstärkern) auf.Besondere Hinweise
• Kinder ab 8 Jahren, psychisch, sensorisch und körperlich eingeschränkte
Menschen dürfen das Gerät nur benutzen, wenn sie vorher von einer
für sie verantwortlichen Aufsichtsperson ausführlich mit den Funktionen
und den Sicherheitsvorkehrungen vertraut gemacht wurden und die
damit verbundenen Risiken verstehen.
• Kinder sollten beaufsichtigt werden, um sicherzustellen, dass sie nicht
mit dem Gerät spielen. Achten Sie darauf, dass Kinder und Babys nicht
mit Plastiktüten oder anderen Verpackungsmaterialien spielen.
• Achten Sie darauf, dass der Netzstecker/Netzadapter immer leicht
zugänglich bleibt, damit das Gerät im Notfall schnell von Stromnetz
getrennt werden kann.
• Wenn Sie das Gerät nicht mehr benutzen, schalten Sie es aus und
ziehen Sie den Stecker aus der Steckdose.
WARNUNG
Verletzungsgefahr! Bewahren Sie Batterien außerhalb der
Reichweite von Kindern auf. Verschlucken kann in nur zwei
Stunden zu schweren Verletzungen oder zum Tod durch
innere Verbrennungen führen. Falls Batterien verschluckt
wurden, begeben Sie sich sofort in die Notaufnahme eines
Krankenhauses. Entsorgen Sie verbrauchte Batterien
umgehend.

7
DE
GERÄTEÜBERSICHT
Gerät (Vorderansicht)
A LINE OUT D Hauptbedienfeld
B Touchscreen E LED-Farbveränderung
C Mikrofon-Anschluss F Lautsprecher

8
DE
Gerät (Rückansicht)
1 Line-Out Schaltersystem 3 LINE OUT-R
2 LINE OUT-L 4 FM-Antenne
5 Netzadapter-Eingangsbuchse

9
DE
Mikrofonanschluss und Bedienung
1 Stellen Sie den Hall des Mikrofons
ein.
3 Kabelbuchse des Mikrofons.
2 Stellen Sie die Lautstärke des
Mikrofons ein.
• Es sind passende Mikrofone auf dem Markt erhältlich.
• Sie können zur Musik des Geräts mitsingen oder alleine singen.

10
DE
BEDIENFELD UND FERNBEDIENUNG
1Bildschirm 14 Fernbedienungs-Empfänger
2Lautstärke erhöhen 15 10 Titel vor
3Nächster Titel/vorspulen 16 Stereo/Mono
4Wiedergabe/Pause 17 Ordner+
5Lautstärke senken 18 10 Titel zurück
6Vorheriger Titel/
zurückspulen 19 Automatische
Radiosendersuche
7Stopp 20 Ordner-
8Klangregelung 21 Wiederholen
9Ein/Aus 22 Speichern
10 Modus 23 CD-Tür önen/schließen
11 Netzschalter 24 Licht an/aus
12 USB-Anschluss 25 SD-Karten-Anschluss
13 CD-Tür

11
DE
WARNUNG
Verletzungsgefahr!
Bewahren Sie
Batterien außerhalb
der Reichweite
von Kindern auf.
Verschlucken kann
in nur zwei Stunden
zu schweren
Verletzungen
oder zum Tod
durch innere
Verbrennungen
führen. Falls
Batterien
verschluckt wurden,
begeben Sie
sich sofort in die
Notaufnahme eines
Krankenhauses.
Entsorgen Sie
verbrauchte
Batterien
umgehend.
Hinweis: Bei der
Programmierung
zum Speichern
von Radiosendern
müssen lokale
Radioprogramme
ein starkes Signal
von 20 oder mehr
Sendern aufweisen,
damit sie auf allen
20 Senderplätzen
gespeichert werden
können, andernfalls
kann nur die Anzahl
der empfangbaren
Sender gespeichert.
1Modusauswahl 10 Auswahl Stereo/Mono
2Einschalten/Standbymodus 11 Zuvor gespeicherten Radiosender
abspielen
3Lautstärke senken 12
Einstellen des gewünschten
Senders. Es können bis zu 20
Sender gespeichert werden.
4 Stopp 13 Den nächsten gespeicherten
Radiosender abspielen
5Vorheriger Titel, zurückspulen 14 Ändern der Equalizereinstellung
6In Wiedergabeliste speichern 15 Den ersten Titel des Ordners
überspringen
7Zum ersten Titel im Ordner
springen 16 Nächster Titel, vorspulen
8Wiederholen 17 Lautstärke erhöhen
9Automatische Sendersuche 18 Wiedergabe/Pausieren

12
DE
INBETRIEBNAHME
Zeiteinstellung
Amerikanische Version:
Wenn das Gerät in den Standbymodus versetzt wird, leuchtet der LCD-
Bildschirm aus und zeigt die Uhrzeit „12:00“ an.
Europäische Version:
Wenn das Gerät in den Standbymodus versetzt wird, leuchtet der LCD-
Bildschirm aus und zeigt die Uhrzeit „00:00“ an.
Beispiel:
• Drücken Sie zum Einstellen der Uhrzeit die Taste PROG auf dem
Bedienfeld oder der Fernbedienung und halten Sie diese Taste für 3-5
Sekunden gedrückt, bis „12“ auf dem Bildschirm angezeigt wird („12“
bedeutet, dass das 12-Stundenformat eingestellt wurde).
• Durch Drücken der Taste NEXT oder PREV kann zwischen dem 12- und
dem 24-Stundenformat ausgewählt werden. Drücken Sie, sobald
„12-H“ auf dem Bildschirm angezeigt wird, erneut die Taste PROG. Auf
dem Bildschirm wird dann „00:00“ angezeigt, die „12“ blinkt jedoch.
Verwenden Sie zum Einstellen der richtigen Stunde die Tasten NEXT
und PREV auf dem Bedienfeld oder der Fernbedienung (die Uhrzeit wird
im 12-Stundenformat eingestellt werden) und drücken Sie anschließend
zum Bestätigen die Taste PROG. Verwenden Sie zum Einstellen der
richtigen Minute die Tasten NEXT und PREV auf dem Bedienfeld oder
der Fernbedienung (und drücken Sie anschließend zum Bestätigen die
Taste PROG.
Hinweis: Die Uhrzeit wird nur dann im Gerät gespeichert, wenn es sich
im Betriebs- oder im Standbymodus bendet. Wenn Sie die eingestellte
Uhrzeit speichern möchten, drücken Sie keinesfalls den Netzschalter
POWER sondern lediglich die Taste ON/OFF, um das Gerät in den
Standbymodus zu versetzen. Wenn Sie den Netzschalter drücken, wird
die von Ihnen vorgenommene Uhrzeiteinstellung gelöscht und Sie
müssen beim nächsten Einschalten es Geräts die korrekte Uhrzeit erneut
einstellen.

13
DE
FM-RADIO
Frequenzbereich: 87,5 – 108 MHz
Dieses Gerät verfügt über ein integriertes FM-Radio. Bis zu 20 Radiosender
können gespeichert werden. Drücken Sie, wenn sie das Gerät zum ersten
Mal verwenden, die Taste POWER, um das Gerät in den Standbymodus
zu versetzen. Drücken Sie zum Einschalten die Taste ON/OFF auf dem
Bedienfeld oder die Taste POWER der Fernbedienung. Das Gerät startet
den Betrieb im FM-Modus. Auf dem Bildschirm wird „FM 87,5 MHz“
angezeigt und aus den Lautsprechern ertönt ein Rauschen (es sei denn, in
Ihrer Region bendet sich auf der Frequenz 87,5 MHz ein Radiosender).
Wenn das Gerät nicht im FM-Modus gestartet werden sollte, drücken Sie
mehrfach die Taste MODE auf dem Gerät oder die Taste FUNCTION der
Fernbedienung, bis der FM-Modus auf dem Bildschirm angezeigt wird.
Automatische Sendersuche und Speichern der gefundenen Sender
Drücken Sie die Taste AUTO, um die automatische Sendersuche ab der
Frequenz 87,5 MHz aufwärts zu starten. Die ersten 20 gefundenen Sender
werden automatisch gespeichert (Bezeichnung P01 – P20). Drücken Sie
die Tasten PR- oder PR+, um alle gespeicherten Sender nacheinander
anzusehen.
Automatische Sendersuche ohne Speichern der gefundenen Sender
Halten Sie die Taste / gedrückt, um mit fallender oder steigender
Frequenz einen Sender mit gutem Signalempfang zu nden. Bei dieser
automatischen Suchfunktion werden die gefundenen Sender nicht
gespeichert. Die Suche wird, nachdem ein Sender gefunden wurde, nicht
fortgesetzt.
Hinweis: Wenn Sie die Tasten / mehrfach kurz drücken, wird der
Frequenzbereich in 0,05 MHz-Schritten angepasst.
Hinweis: Bei der Programmierung zum Speichern von Radiosendern
müssen lokale Radioprogramme ein starkes Signal von 20 oder mehr
Sendern aufweisen, damit sie auf allen 20 Senderplätzen gespeichert
werden können, andernfalls kann nur die Anzahl der empfangbaren
Sender gespeichert.

14
DE
Manuelle Senderspeicherung
Drücken Sie die Tasten / , um Ihren Lieblingssender einzustellen.
Drücken Sie die Taste MEM. Auf dem Bildschirm wird „P01“ angezeigt. Wenn
Sie innerhalb von 3 Sekunden die Taste PR- oder PR+ drücken, können Sie
den Speicherplatz auswählen. Drücken Sie innerhalb von drei Sekunden
zum Speichern die Taste MEM. Sie können bis zu 20 Radiosender speichern.
In der amerikanischen Version der FM-Frequenz, ändert sich die Frequenz
in Schritten von 0,1 MHz, in der europäischen Version in Schritten von
0,5 MHz. Fahren Sie die Antenne des Geräts vollständig aus, um den
bestmöglichen Empfang zu haben (die FM-Antenne bendet sich auf der
Rückseite des Geräts).
Hinweis: Wenn Sie Radiosender speichern möchten, muss der
jeweilige Radiosender, der gespeichert werden soll, über einen guten
Signalempfang verfügen, da dieser ansonsten, auch wenn die Frequenz
gespeichert wurde, nicht abgespielt werden kann.
CD-MODUS
1. Drücken Sie so lange die Taste MODE, bis auf dem Bildschirm „----“
angezeigt wird. Anschließend werden auf dem Bildschirm die Anzahl
der auf der CD bendlichen Titel angezeigt und die Wiedergabe wird
gestartet.
2. Drücken Sie die Taste OPEN/CLOSE auf dem Bedienfeld oder die Taste
EJECT auf der Fernbedienung, um das CD-Fach zu önen.
3. Legen Sie eine CD mit der beschrifteten Seite nach oben und der
scheinenden Seite nach unten zeigend in das CD-Fach ein.
4. Drücken Sie erneut die Taste OPEN/CLOSE auf dem Bedienfeld oder die
Taste EJECT auf der Fernbedienung, um das CD-Fach zu schließen.
5. Drücken Sie zur Auswahl des gewünschten Titels die Taste .
6. Drücken Sie zum Wiederholen eines Titels einmal die Taste REP. Die
Anzeige „REP“ blinkt dann in der oberen linken Ecke des Bildschirms
auf. Wenn Sie die Taste REP erneut drücken, werden alle Titel auf der
CD wiederholt. Die Anzeige „REP“ erscheint in der linken oberen Ecke
des Bildschirms. Wenn Sie die Taste REP erneut drücken, wird die
Wiederholungsfunktion abgebrochen.
7. Drücken Sie für die Zufallswiedergabe so lange die Taste REP, bis auf
dem Bildschirm „RAN“ angezeigt wird.

15
DE
8. Drücken Sie zum Speichern von Liedern in einer Wiedergabeliste
zunächst die Stopptaste . Drücken Sie die Taste PROG, um in den
Speichermodus zu gelangen. Der Bildschirm blinkt auf und zeigt „P01“
an. Wählen Sie das Lied, welches Sie in der Wiedergabeliste speichern
möchten aus und drücken Sie erneut die Taste PROG. Drücken Sie die
Taste , um das Speichern in der Wiedergabeliste abzubrechen oder
um die Wiedergabeliste der gespeicherten Lieder abzuspielen. Sie
können in der Wiedergabeliste bis zu 20 Lieder speichern.
9. Drehen Sie zum Erhöhen der Lautstärke den Lautstärkeregler im
Uhrzeigersinn so lange, bis die gewünschte Lautstärke erreicht wurde.
10. Drehen Sie zum Senken der Lautstärke den Lautstärkeregler so lange
gegen den Uhrzeigersinn, bis Sie die gewünschte Lautstärke erreicht
haben.
USB/SD-KARTE
1. Drücken Sie mehrfach die Taste MODE, bis auf dem Bildschirm
„USB - - - -„ angezeigt wird. Auf dem Bildschirm werden anschließend
die Anzahl der Ordner und die Anzahl der Titel angezeigt und die
Wiedergabe gestartet.
2. Drücken Sie zur Auswahl des gewünschten Titels die Taste /
oder F+10/ F-10.
3. Drücken Sie zum Wiederholen eines Titels einmal die Taste REP. Die
Anzeige „REP“ blinkt dann in der oberen linken Ecke des Bildschirms
auf. Wenn Sie die Taste REP erneut drücken, werden alle Titel des
ausgewählten Ordners. Die Anzeige „REP“ erscheint in der linken
oberen Ecke des Bildschirms. Wenn Sie die Taste REP erneut drücken,
werden alle Titel wiederholt. Drücken Sie die Taste nochmals, wird die
Wiederholungsfunktion abgebrochen.
4. Drücken Sie für die Zufallswiedergabe so lange die Taste REP, bis auf
dem Bildschirm „RAN“ angezeigt wird.
5. Drücken Sie zum Speichern von Liedern in einer Wiedergabeliste
zunächst die Stopptaste .

16
DE
BT-MODUS
1. Drücken Sie mehrfach die Taste MODE, bis auf dem Bildschirm „BT“
angezeigt wird und warten Sie 3 Sekunden, bis das Gerät von anderen
BT-Geräten in der Geräteliste gefunden werden kann.
2. Schalten Sie Ihr BT-fähiges mobiles Endgerät an und suchen Sie in der
Geräteliste nach verfügbaren BT-Geräten.
3. Wählen Sie aus der Geräteliste „JUKEBOX“ aus.
4. Sobald die Geräte erfolgreich gekoppelt wurden, wird auf dem
Bildschirm „connected“ angezeigt. Sie können nun die Lieder auf Ihrem
mobilen Endgerät abspielen. Sie können die Bedienung sowohl über Ihr
mobiles Endgerät als auch über Ihr Gerät oder über die Fernbedienung
des Geräts vornehmen.
a) Wiedergabe über das Gerät: Verwenden Sie die Tasten VOL+/VOL-,
und / , um die Lautstärke anzupassen, die Wiedergabe
zu Pausieren oder Fortzusetzen oder den vorherigen oder den
nächsten Titel auszuwählen.
b) Sie können die Wiedergabe ebenfalls über die Fernbedienung des
Geräts steuern.
c) Sobald die Geräte miteinander gekoppelt wurden, startet das
mobile BT-Gerät automatisch die Musikwiedergabe.
d) Drücken Sie zur Anpassung der Lautstärke die Tasten VOL+/VOL-.
e) Drücken Sie die Tasten /, um zum vorherigen oder nächsten
Lied zu gelangen.
f) Drücken Sie zum Fortsetzen der Wiedergabe die Taste .
g) Drücken Sie zum Beenden der Kopplung die Taste MODE und
wählen Sie einen anderen Modus aus oder deaktivieren Sie die BT-
Funktion auf Ihrem mobilen Endgerät.
Tipps für die BT-Verbindung
1. Wenn Sie Ihr Gerät mit einem mobilen BT-Gerät koppeln möchten,
platzieren Sie die Geräte zur Verbindungsherstellung so nah wie
möglich aneinander.
2. Die BT-Verbindung kann wegen unten aufgeführter Gründe nicht richtig
funktionieren:
• Es bendet sich ein Hindernis zwischen der Jukebox und dem BT-
Gerät.
• Ein anderes Gerät, wie beispielsweise medizinisches Zubehör,
Mikrowellen oder andere WLAN-Geräte, verwendet die gleiche
Frequenz wie das BT-Gerät.
• Es kann zu einem bestimmten Zeitpunkt nur ein mobiles BT-Gerät
mit der Jukebox verbunden werden. Eine Mehrfachkopplung ist
nicht möglich.

17
DE
Speichern von Liedern in einer Wiedergabeliste (im BT-Modus)
1. Drücken Sie, während der Musikwiedergabe, die Taste .
2. Drücken Sie die Taste PROG. In der oberen linken Ecke des Bildschirms
blinkt „PROG“ auf. Eine Speicherplatznummer z.B. „P01“ blinkt ebenfalls
auf.
3. Drücken Sie zur Auswahl des Lieds, welches Sie speichern möchten, die
Tasten / . Drücken Sie zum Speichern die Taste PROG.
4. Wiederholen Sie die Schritte 2-3, um weitere Lieder zu speichern.
5. Drücken Sie, wenn Sie alle gewünschten Titel gespeichert haben, die
Taste , um die Wiedergabe zu starten.
6. Sie können den Speichervorgang jederzeit durch Drücken der Taste
abbrechen.
7. Wenn Sie die maximale Anzahl an gespeicherten Liedern erreicht
haben, wird auf dem Bildschirm „FUL“ angezeigt.
AKTIVIEREN DER LICHTEFFEKTE
Das Gerät verfügt über mehrere mehrfarbige LED-Eekte, die über die LED-
Kontrolle eingestellt werden können. Das CD-Fach, der USB/SD-Anschluss
und die Unterseite der Lautsprecher können beleuchtet werden. Drücken
Sie zum Aktivieren der Lichteekte die Taste LIGHT auf dem Bedienfeld. Alle
Lichteekte leuchten auf.
• Die Lichteekte funktionieren unabhängig vom Netzschalter POWER.
Die Lichteekte können über die Rückseite des Geräts kontrolliert
werden.
• Auf der Rückseite des Geräts bendet sich ein LED-Lichtmodusschalter.
Die mehrfarbigen LEDs leuchten in verschiedenen Farben auf.
PLAY
Die Lichtfarbe wechselt
kontinuiertlich
HOLD
Eine bestimmte
Lichtfarbe (oder KEIN
Licht)

18
DE
• Wenn Sie den Modus „HOLD“ einstellen, leuchten die LEDs nur in einer
Farbe auf. Wenn Sie in den Modus „PLAY“ wechseln, werden mehrere
Farben nacheinander angezeigt.
• Wenn Sie wieder in den Modus „HOLD“ wechseln, können Sie eine
beliebige Farbe, die permanent angezeigt werden soll, auswählen
(beachten Sie, dass diese Farben eingestellt werden müssen und es
deshalb vorkommen kann, dass nicht die gleiche Farbe aueuchtet, die
angezeigt wurde, als das Gerät in den Modus „HOLD“ versetzt wurde).
• Wenn Sie die Lichteekte ausschalten möchten, drücken Sie erneut die
Taste LIGHT.
Hinweis: Im Modus „Hold“ kann es vorkommen, dass kein Licht sichtbar
ist (in diesem Fall muss der Schalter angepasst werden).

19
DE
VERWENDUNG DES MEDIA-PLAYERS
Drücken Sie so lange die Taste MODE, bis auf dem Bildschirm „MP5“
angezeigt wird. Warten Sie ca. 5 Sekunden, bis das Gerät komplett
gestartet hat.
Klicken Sie auf die angezeigte
Taste.
Klicken Sie auf „Settings“
(Einstellungen)
Klicken Sie auf das angezeigte
Symbol
Wählen Sie die gewünschte
Sprache und die Eingabe aus
Sprache
wählen

20
DE
Aktivieren Sie das WLAN
a. Stellen Sie in „Settings“ (Einstellungen) das gewünschte WLAN ein. Sie
können andere Projekte auf Ihre Bedürfnisse anpassen.
b. Wenn die Netzwerkverbindung erfolgreich hergestellt wurde, können
Sie mit dem Gerät im Internet surfen, den QQ-Chat oder WeChat nutzen
und Emails senden oder empfangen.
c. USB-Dateien können über den USB-Anschluss an der Seite des Geräts
gelesen werden.
d. Sie können Musik, Video-Dateien oder Bilder suchen.
WICHTIGE HINWEISE ZUR BEDIENUNG
• Wenn Sie das Gerät in Eile bedienen, kann es zu einer Fehlfunktion
kommen. In diesem Fall muss das Gerät neu gestartet werden.
• Wenn Sie nicht wissen, wie das Gerät zu bedienen ist, setzen Sie sich
mit der Bedienung von Tablets auseinander.
• Lassen Sie Kinder den Bildschirm des Geräts nicht mit scharfen
Objekten, da der Bildschirm dadurch zerkratzt werden könnte.

21
DE
ZWISCHENSPEICHER LEEREN
1. Klicken Sie auf das Symbol SETTINGS (Einstellungen).
2. Wählen Sie in den Einstellungen den Punkt Wählen Sie STORAGE &
USB (Speicher & USB).
3. Wählen Sie dann INTERNAL STORAGE (nterner Speicher) und dort den
Punkt APPS (Anwendungen).
4. Wählen Sie dann das Symbol für VIDEO PLAYER oder MUSIC.

22
DE
5. Wählen Sie im unter STORAGE (Speicher) die Option CLEAR DATA
(Daten löschen).
6. Wählen Sie OK, um die nach der Wiedergabe verbleibenden, relevanten
Informationen zu löschen.
WIEDERHERSTELLUNG DER
WERKSEINSTELLUNGEN
Um die restlichen Inhalte und
Spuren der Wiedergabeliste und
Informationen über alle anderen
Vorgänge zu löschen, klicken Sie
auf BACKUP AND RESET (Sichern
und Zurücksetzen).
Klicken Sie dann auf den
Unterpunkt FACTORY DATA
RESET (Werksdaten zurücksetzen).
Warten Sie dann 1-3 Minuten,
bis die Wiederherstellung der
Werkseinstellungen abgeschlossen
ist.

23
DE
FEHLERBEHEBUNG
Problem Mögliche Ursache und Lösung
Kein Radioempfang im FM-Modus. Es wurde der falsche Modus
ausgewählt. Drücken Sie die Tasten
/ um einen Radiosender
auszuwählen. Versetzen Sie den
Audio-In-Anschluss in die Position
„O“. Drücken Sie die Taste VOL+,
um die Lautstärke zu erhöhen.
Die CD wird nicht abgespielt oder
der Ton ist unterbrochen.
Legen Sie die CD mit der
beschrifteten Seite nach oben in
das CD-Fach ein.
Reinigen Sie die CD.
Der Ton wird im CD-Modus
unterbrochen wiedergegeben.
Stellen Sie das Gerät auf eine
ebene Oberäche.
Drücken Sie die Taste ON/OFF.
Im CD-Modus werden in der
Wiedergabeliste gespeicherte
Lieder nicht abgespielt.
Drücken Sie die Taste
und speichern Sie dann die
gewünschten CD-Titel in der
Wiedergabeliste.
Das Gerät funktioniert nicht. Der Netzstecker ist nicht mit der
Steckdose verbunden.
Stellen Sie sicher, dass das
Netzkabel richtig verbunden ist.
Bringen Sie den Netzschalter in die
Position „ON“.
Keine Tonausgabe. Drücken Sie die Taste ON/OFF.
Erhöhen Sie die Lautstärke durch
Drücken der Taste VOL+.
Lautes Summen oder
Störgeräusche.
Der Fernseher oder VCR steht zu
nah am Gerät.
Stellen Sie das Gerät an einen
anderen Ort.
Der Bildschirm zeigt nicht an. Schalten Sie das Gerät aus und
starten Sie es neu.

24
DE
SPEZIELLE ENTSORGUNGSHINWEISE FÜR
VERBRAUCHER IN DEUTSCHLAND
Entsorgen Sie Ihre Altgeräte fachgerecht. Dadurch wird gewährleistet,
dass die Altgeräte umweltgerecht verwertet und negative Auswirkungen
auf die Umwelt und menschliche Gesundheit vermieden werden. Bei der
Entsorgung sind folgende Regeln zu beachten:
• Jeder Verbraucher ist gesetzlich verpichtet, Elektro- und
Elektronikaltgeräte (Altgeräte) sowie Batterien und Akkus
getrennt vom Hausmüll zu entsorgen. Sie erkennen die
entsprechenden Altgeräte durch folgendes Symbol der
durchgestrichene Mülltonne (WEEE Symbol).
• Sie haben Altbatterien und Altakkumulatoren, die nicht vom Altgerät
umschlossen sind, sowie Lampen, die zerstörungsfrei aus dem
Altgerät entnommen werden können, vor der Abgabe an einer
Entsorgungsstelle vom Altgerät zerstörungsfrei zu trennen.
• Bestimmte Lampen und Leuchtmittel fallen ebenso unter das Elektro-
und Elektronikgesetz und sind dementsprechend wie Altgeräte zu
behandeln. Ausgenommen sind Glühbirnen und Halogenlampen.
Entsorgen Sie Glühbirnen und Halogenlampen bitte über den Hausmüll,
sofern Sie nicht das WEEE Symbol tragen.
• Jeder Verbraucher ist für das Löschen von personenbezogenen Daten
auf dem Elektro- bzw. Elektronikgerät selbst verantwortlich.
Rücknahmepicht der Vertreiber
Vertreiber mit einer Verkaufsäche für Elektro- und Elektronikgeräte von
mindestens 400 Quadratmetern sowie Vertreiber von Lebensmitteln
mit einer Gesamtverkauläche von mindestens 800 Quadratmetern, die
mehrmals im Kalenderjahr oder dauerhaft Elektro- und Elektronikgeräte
anbieten und auf dem Markt bereitstellen, sind verpichtet,
1 bei der Abgabe eines neuen Elektro- oder Elektronikgerätes an einen
Endnutzer ein Altgerät des Endnutzers der gleichen Geräteart, das
im Wesentlichen die gleichen Funktionen wie das neue Gerät erfüllt,
am Ort der Abgabe oder in unmittelbarer Nähe hierzu unentgeltlich
zurückzunehmen und
2 auf Verlangen des Endnutzers Altgeräte, die in keiner äußeren
Abmessung größer als 25 Zentimeter sind, im Einzelhandelsgeschäft
oder in unmittelbarer Nähe hierzu unentgeltlich zurückzunehmen; die
Rücknahme darf nicht an den Kauf eines Elektro- oder Elektronikgerätes
geknüpft werden und ist auf drei Altgeräte pro Geräteart beschränkt.

25
DE
• Bei einem Vertrieb unter Verwendung von Fernkommunikationsmitteln
ist die unentgeltliche Abholung am Ort der Abgabe auf Elektro- und
Elektronikgeräte der Kategorien 1, 2 und 4 gemäß § 2 Abs. 1 ElektroG,
nämlich „Wärmeüberträger“, „Bildschirmgeräte“ (Oberäche von mehr
als 100 cm²) oder „Großgeräte“ (letztere mit mindestens einer äußeren
Abmessung über 50Zentimeter) beschränkt. Für andere Elektro- und
Elektronikgeräte (Kategorien 3, 5, 6) ist eine Rückgabemöglichkeit in
zumutbarer Entfernung zum jeweiligen Endnutzer zu gewährleisten.
• Altgeräte dürfen kostenlos auf dem lokalen Wertstohof oder in
folgenden Sammelstellen in Ihrer Nähe abgegeben werden: www.take-
e-back.de
• Für Elektro- und Elektronikgeräte der Kategorien 1, 2 und 4 an bieten
wir auch die Möglichkeit einer unentgeltlichen Abholung am Ort der
Abgabe. Beim Kauf eines Neugeräts haben sie die Möglichkeit eine
Altgerätabholung über die Webseite auszuwählen.
• Batterien können überall dort kostenfrei zurückgegeben werden, wo sie
verkauft werden (z. B. Super-, Bau-, Drogeriemarkt). Auch Wertsto- und
Recyclinghöfe nehmen Batterien zurück. Sie können Batterien auch per
Post an uns zurücksenden. Altbatterien in haushaltsüblichen Mengen
können Sie direkt bei uns von Montag bis Freitag zwischen 07:30 und
15:30 Uhr unter der folgenden Adresse unentgeltlich zurückgeben:
Chal-Tec Fulllment GmbH
Norddeutschlandstr. 3
47475 Kamp-Lintfort
• Wichtig zu beachten ist, dass Lithiumbatterien aus Sicherheitsgründen
vor der Rückgabe gegen Kurzschluss gesichert werden müssen (z. B.
durch Abkleben der Pole).
• Finden sich unter der durchgestrichenen Mülltonne auf der Batterie
zusätzlich die Zeichen Cd, Hg oder Pb ist das ein Hinweis darauf, dass
die Batterie gefährliche Schadstoe enthält. (»Cd« steht für Cadmium,
»Pb« für Blei und »Hg« für Quecksilber).
Hinweis zur Abfallvermeidung
Indem Sie die Lebensdauer Ihrer Altgeräte verlängern, tragen Sie dazu
bei, Ressourcen eizient zu nutzen und zusätzlichen Müll zu vermeiden.
Die Lebensdauer Ihrer Altgeräte können Sie verlängern indem Sie defekte
Altgeräte reparieren lassen. Wenn sich Ihr Altgerät in gutem Zustand
bendet, könnten Sie es spenden, verschenken oder verkaufen.

26
DE
HINWEISE ZUR ENTSORGUNG
Wenn es in Ihrem Land eine gesetzliche Regelung
zur Entsorgung von elektrischen und elektronischen
Geräten gibt, weist dieses Symbol auf dem Produkt
oder auf der Verpackung darauf hin, dass dieses
Produkt nicht im Hausmüll entsorgt werden darf.
Stattdessen muss es zu einer Sammelstelle für
das Recycling von elektrischen und elektronischen
Geräten gebracht werden. Durch regelkonforme
Entsorgung schützen Sie die Umwelt und die
Gesundheit Ihrer Mitmenschen vor negativen
Konsequenzen. Informationen zum Recycling
und zur Entsorgung dieses Produkts, erhalten
Sie von Ihrer örtlichen Verwaltung oder Ihrem
Hausmüllentsorgungsdienst.
Dieses Produkt enthält Batterien. Wenn es in Ihrem
Land eine gesetzliche Regelung zur Entsorgung
von Batterien gibt, dürfen die Batterien nicht im
Hausmüll entsorgt werden. Informieren Sie sich
über die örtlichen Bestimmungen zur Entsorgung
von Batterien. Durch regelkonforme Entsorgung
schützen Sie die Umwelt und die Gesundheit Ihrer
Mitmenschen vor negativen Konsequenzen.
KONFORMITÄTSERKLÄRUNG
Hersteller:
Chal-Tec GmbH, Wallstraße 16, 10179 Berlin,
Deutschland.
Importeur für Großbritannien:
Berlin Brands Group UK Limited
PO Box 42
272 Kensington High Street
London, W8 6ND
United Kingdom
Hiermit erklärt Chal-Tec GmbH, dass der
Funkanlagentyp Graceland Touch der Richtlinie
2014/53/EU entspricht. Der vollständige Text der
EU-Konformitätserklärung ist unter der folgenden
Internetadresse verfügbar: use.berlin/10034802

27
EN
Dear Customer,
Congratulations on purchasing this device. Please read
the following instructions carefully and follow them to
prevent possible damages. We assume no liability for
damage caused by disregard of the instructions and
improper use. Scan the QR code to get access to the
latest user manual and more product information.
CONTENT
Technical Data 28
Safety Instructions 29
Product Overview 31
Control Panel and Remote Control 34
Commissioning 36
FM Radio 37
CD Mode 38
USB/SD Card 39
BT Mode 40
Using the Media Player 43
Important Notes on Operation 44
Clearing the Cache 45
Restoring the Factory Settings 46
Troubleshooting 47
Disposal Considerations 48
Declaration of Conformity 48

28
EN
TECHNICAL DATA
Item number 10034802
Frequency range FM 87,5 – 108 MHz
Power adapter 100 – 240 V (AC) ~ 50 – 60 Hz
Power consumption 65 W
Dimensions (L x W x H) 30 x 57 x 105cm
Weight 19,5 kg
Amplier Output power 2.0 sound channel
Screen size 12 inch
USB 2.0
BT frequency
Radio-frequency power
2402-2480 MHz
4 dBm
WLAN standard 802.11b/g/n
Video resolution 1080 P (1920 x 1080)
Operating system Android 6.0.1
Playback modes Loop, timing, insert etc.
Supported networks Ethernet, WLAN, wireless peripheral
expansion
Supported video formats WMV, avi, FLV, rm, RMVB, mpeg, ts,
h.265, mp4
Supported image formats
BMP, JPEG, PNG, GIF etc. ; RSS current
events, Flash animations, dynamic
websites
Supports playback of Oice documents PPT, WORD, EXCEL and PDF documents
Supports the playback of web pages Web page playback, scrolling on web
pages, zooming
Single Player playback Supports single playback of imported
programs on u disk
log management Powerful logging function, can receive
any instruction referring to the state
Split screen
Programs can be extended, dragged
and dropped, with digital calendar,
time mode, weather forecast module,
program template library: Oers a
thumbnail function

29
EN
SAFETY INSTRUCTIONS
General information
• Lightning - If you are not going to use the device for a long time or
if there is a storm, disconnect the plug from the electrical outlet and
disconnect the device from the antenna connector. This will avoid
damage to the product that may be caused by lightning or overvoltage.
• Overload - Do not overload power outlets, extension cords, or built-in
power outlets, as this may result in a re or electric shock.
• Foreign objects and liquid - Never push objects of any kind through
openings in the device as they may touch dangerous voltage points or
short out parts, which could result in a re or electric shock. Never spill
liquids of any kind on the device.
• Repairs and maintenance - Do not attempt to service this product
yourself, as opening or removing covers will expose you to dangerous
voltages or other hazards. Leave all maintenance to qualied service
personnel.
• Damage requiring service - Disconnect the power plug from the outlet
and consult a qualied specialist if any of the following conditions
occur:
a) If the power cord or plug is damaged.
b) If liquid has been spilled or objects have fallen onto the product.
c) If the product has been exposed to rain or water.
d) If the product has been dropped or damaged.
e) If the product has a markedly reduced performance.
• Replacement parts - When replacement parts are required, make
sure that the service professional who replaces the parts only uses
replacement parts that have been approved by the manufacturer or
that have the same characteristics as the original part. Unauthorized
replacement may result in re, electric shock or other hazards.
• Heat - Do not place the unit near heat sources such as radiators,
heaters, stoves or other products (including ampliers).

30
EN
Special Instructions
• This device may be only used by children 8 years old or older and
persons with limited physical, sensory and mental capabilities and /
or lack of experience and knowledge, provided that they have been
instructed in use of the device by a responsible person who understands
the associated risks.
• Children should be supervised to ensure that they do not play with the
appliance.
• Ensure children and babies do not play with plastic bags or any
packaging materials.
• Mains plug/Power adaptor is used as disconnect device and it should
remain readily operable during intended use.
• In order to disconnect the apparatus from the mains completely, the
main plug/power adaptor should be disconnected from the mains
socket outlet completely.
WARNING
Keep batteries out of reach of children. Swallowing may lead
to serious injury or death in as little as two hours due to
internal burns. If swallowed, go straight. to a hospital
emergency room. Dispose of used batteries immediately.

31
EN
PRODUCT OVERVIEW
Device (front view)
A LINE OUT D Main control panel
B Touch screen E LED color change
C Microphone socket F Speaker

32
EN
Device (rear view)
1 line-out switch system 3 LINE OUT-R
2 LINE OUT-L 4 FM antenna
5 Power adapter input socket

33
EN
Microphone connection and operation
1 Adjust the reverb of the
microphone.
3 Cable jack of the microphone.
2 Adjust the volume of the
microphone.
• There are suitable microphones available on the market.
• You can sing along to the music of the device or sing alone.

34
EN
CONTROL PANEL AND REMOTE CONTROL
1Screen 14 Remote control receiver
2Increase volume 15 10 titles forward
3Next title/forward 16 Stereo/Mono
4Play/Pause 17 Folder+
5Decrease volume 18 10 Title back
6Previous track/ rewind 19 Automatic radio station
search
7Stop 20 Folder-
8Sound control 21 Repeat
9On/O 22 Save
10 Mode 23 CD door open/close
11 Power switch 24 Light on/o
12 USB connection 25 SD card connection
13 CD door

35
EN
WARNING
Keep batteries out
of reach of children.
Swallowing may
lead to serious
injury or death in as
little as two hours
due to internal
burns. If swallowed,
go straight. to a
hospital emergency
room. Dispose
of used batteries
immediately.
Note: when
programming
to store radio
stations, local
radio programs
must have a
strong signal of 20
stations or more in
order to store to 20
stations.Otherwise,
only the number of
stations that can
be received can be
stored.
1Mode selection 10 Selection Stereo/Mono
2Switch on/standby mode 11 Playing previously saved radio
stations
3Decrease volume 12 Set the desired station. Up to 20
stations can be stored.
4 Stop 13 Play the next preset radio station
5Previous title, rewind 14 Changing the Equalizer Setting
6Save to Playlist 15 Skip the rst title of the folder
7Jump to the rst track in the
folder 16 Next title, fast forward
8Repeat 17 Increase volume
9Automatic station search 18 Play/Pause

36
EN
COMMISSIONING
Time setting
American version:
When the unit is put into standby mode, the LCD screen lights up and
displays the time „12:00“.
European version:
When the unit is put into standby mode, the LCD screen lights up and
displays the time „00:00“.
Example:
• To set the time, press and hold the PROG button on the control panel or
remote control for 3-5 seconds until „12“ is displayed on the screen („12“
means that the 12-hour format has been set).
• Press the NEXT or PREV button to select between 12-hour and 24-hour
format. When „12-H“ is displayed on the screen, press the PROG button
again. 00:00“ will be displayed on the screen, but „12“ will ash. To set
the correct hour, use the NEXT and PREV buttons on the control panel
or remote control (the time will be set in 12-hour format), then press the
PROG button to conrm. To set the correct minute, use the NEXT and
PREV buttons on the control panel or remote control (the time will be
set in 12-hour format), and then press the PROG button to conrm.
Note: The time is stored in the unit only when it is in operation or
standby mode. If you want to save the set time, do not press the POWER
switch, just press the ON/OFF button to put the unit into standby mode.
If you press the POWER switch, the time setting you have made will be
cleared and you will have to set the correct time the next time you turn
on the machine.

37
EN
FM RADIO
Frequency range: 87.5 - 108 MHz
This device has a built-in FM radio. Up to 20 radio stations can be stored.
When you use the unit for the rst time, press the POWER button to put
the unit into standby mode. Press the ON/OFF button on the control panel
or the POWER button on the remote control to turn it on. The unit starts
operating in FM mode. FM 87.5 MHz“ is displayed on the screen and a
hissing sound is heard from the speakers (unless there is a radio station on
the 87.5 MHz frequency in your area). If the unit does not start in FM mode,
press the MODE button on the unit or the FUNCTION button on the remote
control repeatedly until the FM mode is displayed on the screen.
Automatic station search and saving of found stations
Press the AUTO button to start the automatic station search from frequency
87.5 MHz upwards. The rst 20 stations found are automatically stored
(designation P01 - P20). Press the PR- or PR+ buttons to view all stored
stations in sequence.
Automatic station search without saving the found stations
Press and hold the / button to search for a station with good signal
reception with falling or rising frequency. This automatic search function
does not save the found stations. The search will not continue after a
station is found.
Note: If you press the / buttons briey several times, the frequency
range will be adjusted in 0.05 MHz steps.
Note: when programming to store radio stations, local radio programs
must have a strong signal of 20 stations or more in order to store to 20
stations.Otherwise, only the number of stations that can be received can
be stored.

38
EN
Manual station storage
Press the / buttons to tune to your favourite station. Press the MEM
button. P01“ is displayed on the screen. If you press the PR- or PR+ button
within 3 seconds, you can select the memory location. Press the MEM
button within 3 seconds to save. You can store up to 20 radio stations.
In the American version of the FM frequency, the frequency changes in steps
of 0.1 MHz, in the European version in steps of 0.5 MHz. Extend the antenna
of the device completely to get the best possible reception (the FM antenna
is located on the back of the device).
Note: If you want to save radio stations, the radio station you want to
save must have good signal reception, otherwise it will not play even if
the frequency is saved.
CD MODE
1. Press the MODE button until the screen displays „----“. Then the screen
displays the number of tracks on the CD and playback starts.
2. Press the OPEN/CLOSE button on the control panel or the EJECT button
on the remote control to open the CD tray.
3. Insert a CD into the CD tray with the label side facing up and the face
down.
4. Press the OPEN/CLOSE button on the control panel or the EJECT button
on the remote control again to close the CD tray.
5. Press the button to select the desired track.
6. Press the REP button once to repeat a track. The „REP“ indicator will
ash in the upper left corner of the screen. If you press the REP button
again, all the tracks on the CD will be repeated. The „REP“ indicator
appears in the upper left corner of the screen. Pressing the REP button
again will cancel the repeat function.
7. Press and hold the REP button until „RAN“ is displayed on the screen for
random play.

39
EN
8. To save songs in a playlist, rst press the stop button . Press the PROG
button to enter the save mode. The screen ashes and displays „P01“.
Select the song you want to save in the playlist and press the PROG
button again. Press the button to cancel saving to the playlist or to play
the playlist of saved songs. You can save up to 20 songs in the playlist.
9. To increase the volume, turn the volume control clockwise until the
desired volume is reached.
10. To decrease the volume, turn the volume control counterclockwise until
the desired volume is reached.
USB/SD CARD
1. Press the MODE button repeatedly until the screen displays „USB - - - -“
is displayed. The screen will then display the number of folders and the
number of songs and start playback.
2. Press the / or F+10/ F-10 key to select the desired title.
3. Press the REP button once to repeat a title. The REP indicator will blink
in the upper left corner of the screen. If you press the REP key again,
all titles in the selected folder will be displayed. The „REP“ indicator
appears in the upper left corner of the screen. If you press the REP
button again, all tracks will be repeated. Pressing the button again will
cancel the repeat function.
4. Press and hold the REP button until the screen displays „RAN“ for
random playback.
5. To save songs in a playlist, rst press the stop button .

40
EN
BT MODE
1. Press the MODE button repeatedly until the screen displays „BT“ and
wait 3 seconds until the device can be found by other BT devices in the
device list
2. Turn on your BT-enabled mobile device and search for available BT
devices in the device list.
3. Select „JUKEBOX“ from the device list.
4. Once the devices are successfully paired, the screen will display
„connected“. You can now play the songs on your mobile device. You
can operate them from your mobile device, from your device itself or
from the remote control of the device.
a) Playback from the device: Use the VOL+/VOL-, and /
buttons to adjust the volume, pause or resume playback, or select
the previous or next song.
b) You can also control playback from the unit‘s remote control.
c) Once the devices are paired, the mobile BT device will automatically
start playing music.
d) Press VOL+/VOL- buttons to adjust the volume.
e) Press the / buttons to move to the previous or next song.
f) Press the button to resume playback.
g) Press MODE button to end pairing and select another mode or
disable the BT function on your mobile device.
Tips for the BT connection
1. If you want to pair your device with a BT mobile device, place the
devices as close as possible to each other for connection.
2. The BT connection may not work properly for the reasons listed below:
• There is an obstacle between the jukebox and the BT device.
• Another device, such as medical equipment, microwaves or other
WLAN devices, is using the same frequency as the BT device.
• Only one mobile BT device can be connected to the jukebox at a
time. A multiple coupling is not possible.

41
EN
Storing songs in a playlist (in BT mode)
1. During music playback, press the button .
2. Press the PROG button. PROG“ ashes in the upper left corner of the
screen. A memory location number e.g. „P01“ also ashes.
3. Press the / buttons to select the song you want to store. Press
the PROG button to store.
4. Repeat steps 2-3 to save more songs.
5. When you have saved all the songs you want, press the button to
start playback.
6. You can cancel the save operation at any time by pressing the button.
7. When you have reached the maximum number of songs stored, the
screen will display „FUL“.
Activating the Light Eects
The device has several multi-coloured LED eects that can be adjusted via
the LED control. The CD compartment, the USB/SD port and the bottom
of the speakers can be illuminated. To activate the light eects, press the
LIGHT button on the control panel. All light eects will light up.
• The lighting eects work independently of the POWER switch. The light
eects can be controlled from the back of the unit.
• There is an LED light mode switch on the back of the unit. The
multicolored LEDs light up in dierent colors.
PLAY
The light colour changes
continuously
HOLD
A specic light colour (or
NO light)

42
EN
• When you set the „HOLD“ mode, the LEDs only light up in one color.
When you switch to „PLAY“ mode, several colors are displayed in
sequence.
• When you return to the HOLD mode, you can select any color to be
displayed permanently (note that these colors must be set, so it may
not be the same color that was displayed when the unit was put in the
HOLD mode).
• If you want to turn o the light eects, press the LIGHT button again.
Note: In „HOLD“ mode, it may happen that no light is visible (in this
case, the switch must be adjusted).

43
EN
USING THE MEDIA PLAYER
Press the MODE button until the screen displays „MP5“. Wait about 5
seconds until the unit has completely started.
Click on the displayed button.
Click on „Settings“.
Click on the displayed icon
Select the desired language and
input
Sprache
wählen

44
EN
Activate the WLAN
a. Set the desired WLAN in „Settings“. You can adapt other projects to
your needs.
b. When the network connection is successfully established, you can surf
the Internet, use QQ chat or WeChat and send or receive emails with
the device.
c. USB les can be read through the USB port on the side of the unit.
d. You can search for music, video les or pictures.
IMPORTANT NOTES ON OPERATION
• If you operate the unit in a hurry, a malfunction may occur. In this case,
the unit must be restarted.
• If you do not know how to operate the device, learn how to use tablets.
• Do not let children use sharp objects on the product‘s screen, as this
may scratch the screen.

45
EN
CLEARING THE CACHE
1. Click the SETTINGS icon.
2. In the settings, select the item Select STORAGE & USB.
3. Select internal storage and then select APPS.
4. Then select the icon for VIDEO PLAYER or MUSIC.

46
EN
5. Under Storage, select CLEAR DATA.
6. Select OK to delete the relevant information remaining after playback.
RESTORING THE FACTORY SETTINGS
To delete the remaining
playlist contents and tracks
and information about all other
operations, click BACKUP AND
RESET.
Then click on the submenu item
FACTORY DATA RESET. Then wait
1-3 minutes for the factory settings
to be restored.

47
EN
TROUBLESHOOTING
Problem Possible cause and solution
No radio reception in FM mode. The wrong mode was selected.
Press the / buttons to
select a radio station. Move the
Audio In connector to the "O"
position. Press the VOL+ button to
increase the volume.
The CD is not playing or the sound
is interrupted.
Insert the CD into the CD tray with
the label side facing up.
Clean the CD.
The sound is interrupted in CD
mode.
Place the unit on a at surface.
Press the ON/OFF button.
Songs stored in the playlist are not
played in CD mode.
Press the button and then store
the desired CD tracks in the playlist.
The unit does not work. The power plug is not connected to
the power outlet.
Make sure that the power cord is
properly connected.
Move the power switch to the "ON"
position.
No sound is output. Press the ON/OFF button. Increase
the volume by pressing the VOL+
button.
Loud buzzing or noise. The TV or VCR is too close to the
unit.
Move the unit to another location.
The screen does not display. Turn o and restart the unit.

48
EN
DISPOSAL CONSIDERATIONS
If there is a legal regulation for the disposal of
electrical and electronic devices in your country,
this symbol on the product or on the packaging
indicates that this product must not be disposed of
with household waste. Instead, it must be taken to
a collection point for the recycling of electrical and
electronic equipment. By disposing of it in accordance
with the rules, you are protecting the environment and
the health of your fellow human beings from negative
consequences. For information about the recycling
and disposal of this product, please contact your local
authority or your household waste disposal service.
This product contains batteries. If there is a legal
regulation for the disposal of batteries in your country, the
batteries must not be disposed of with household waste.
Find out about local regulations for disposing of batteries.
By disposing of them in accordance with the rules, you are
protecting the environment and the health of your fellow
human beings from negative consequences.
DECLARATION OF CONFORMITY
Manufacturer:
Chal-Tec GmbH, Wallstrasse 16, 10179 Berlin,
Germany.
Importer for Great Britain:
Berlin Brands Group UK Limited
PO Box 42
272 Kensington High Street
London, W8 6ND
United Kingdom
Hereby, Chal-Tec GmbH declares that the radio
equipment type Graceland Touch is in compliance with
Directive 2014/53/EU. The full text of the EU declaration
of conformity is available at the following internet
address: use.berlin/10034802
For Great Britain: Hereby, Chal-Tec GmbH declares
that the radio equipment type Graceland Touch is in
compliance with the relevant statutory requirements. The
full text of the declaration of conformity is available at the
following internet address: use.berlin/10034802

49
ES
Estimado cliente:
Le felicitamos por la adquisición de este producto.
Lea atentamente el siguiente manual y siga
cuidadosamente las instrucciones de uso con el n de
evitar posibles daños. La empresa no se responsabiliza
de los daños ocasionados por un uso indebido del
producto o por haber desatendido las indicaciones de
seguridad. Escanee el código QR para obtener acceso
al manual de usuario más reciente y otra información
sobre el producto:
ÍNDICE DE CONTENIDOS
Datos técnicos 50
Indicaciones de seguridad 51
Vista general del aparato 53
Panel de control y mando a distancia 56
Puesta en funcionamiento 58
Radio fm 59
Modo cd 60
Usb/tarjeta sd 61
Modo bt 62
Activar los efectos de luz 63
Vaciar memoria intermedia 65
Indicaciones de uso importantes 66
Vaciar memoria intermedia 67
Restablecimiento de los valores de fábrica 68
Reparación de anomalías 69
Indicaciones sobre la retirada del aparato 70
Declaración de conformidad 70

50
ES
DATOS TÉCNICOS
Número de artículo 10034802
Rango de frecuencia FM 87,5 - 108 MHz,
Fuente de alimentación 100 – 240 V (CA) ~ 50 – 60 Hz
Consumo de energía 65 W
Dimensiones (largo x ancho x alto) 30 x 57 x 105cm
Peso 19,5 kg
Potencia de salida del amplicador Canal de sonido 2.0
Tamaño de la pantalla 12 pulgadas
USB 2.0
Frecuencia BT
Potencia de transmisión
2402-2480 MHz
4 dBm
WLAN standard 802.11b/g/n
Resolución de vídeo 1080 P (1920 x 1080)
Sistema operativo Android 6.0.1
Modos de reproducción Bucle, medición de tiempo, inserción,
etc.
Redes compatibles Ethernet, wi, ampliación de periféricos
inalámbricos
Formatos de vídeo compatibles WMV, avi, FLV, rm, RMVB, mpeg, ts,
h.265, mp4
Formatos de imagen compatibles
BMP, JPEG, PNG, GIF etc. ; RSS eventos
actuales, animaciones ash, sitios web
dinámicos
Compatibilidad con la reproducción de
documentos Oice PPT, WORD, EXCEL y documentos PDF
Compatibilidad con la reproducción de
sitios web
Reproducción de sitios web, navegación
en sitios web, ampliación
Reproducción de un reproductor
Compatible con la reproducción
individual de programas importados de
u disk
Gestión de registro
Función de registro potente, puede
recibir cualquier instrucción referida al
estado

51
ES
Monitor dividido
Los programas pueden ampliarse,
arrastrarse y soltarse, con calendario
digital, modo hora, sección de
predicción meteorológica, biblioteca
de plantillas de programas: Ofrece una
función de miniatura
INDICACIONES DE SEGURIDAD
Indicaciones generales
• Relámpago - Si no va a utilizar el aparato durante un periodo largo
de tiempo o si hay una tormenta eléctrica, desenchufe el aparato de la
toma de corriente y desconecte el conector de antena. De este modo,
protegerá el aparato de los daños que pueden ocasionar relámpagos y
la sobretensión.
• Sobrecarga - No sobrecargue las tomas de corriente, cables
alargadores o tomas de corriente integradas para evitar el riesgo de un
incendio o de descarga eléctrica.
• Objetos extraños y entrada de líquido - No introduzca objetos de
ningún tipo en las ranuras del aparato, ya que podría tocar elementos
con voltajes peligrosos o piezas salientes que podrían causar un
incendio o una descarga eléctrica. No derrame líquido de ningún tipo
sobre el aparato.
• Reparación y mantenimiento - No intente reparar el aparato usted
mismo, ya que si abre o retira las cubiertas, podría provocar una tensión
peligrosa u otro riesgo. Contacte con un servicio técnico para su
reparación.
• Daños que requieren una reparación - Desconecte el enchufe de
la toma de corriente y póngase en contacto con un servicio técnico
cualicado si:
a) El cable de alimentación o el enchufe está dañado.
b) Se ha derramado líquido o se ha caído un objeto en el interior del
aparato.
c) El producto ha estado expuesto a la lluvia o agua.
d) Se ha dejado caer el producto o está dañado.
e) El rendimiento del producto ha disminuido considerablemente.
• Piezas de repuesto - Si necesita piezas de repuesto, asegúrese de

52
ES
que el técnico que cambiará las piezas utiliza solamente las piezas
de recambio originales del fabricante o piezas con las mismas
características que las piezas originales. Las piezas no autorizadas
pueden provocar incendios, descargas eléctricas y otros riesgos.
• Calor - No instale el aparato cerca de las fuentes de calor como
radiadores, calentadores, hornos u otros aparatos similares (incluidos
amplicadores).Indicaciones especiales
• Este aparato puede ser utilizado por niños mayores de 8 años y
personas con discapacidades físicas, sensoriales y mentales y/o con
falta de experiencia y conocimientos, siempre y cuando hayan sido
instruidos sobre el uso del aparato y comprendan los peligros y riesgos
asociados.
• Los niños deberán estar vigilados para evitar que jueguen con el
aparato. Asegúrese de que los niños y bebés no jueguen con bolsas de
plástico u otro material de embalaje.
• La toma de corriente debe ser fácilmente accesible para desconectar el
aparato de la red eléctrica en caso de avería.
• Si no utiliza el aparato, apáguelo y desconecte el enchufe de la toma de
corriente.
ADVERTENCIA
¡Peligro de lesiones! Mantenga las pilas fuera del alcance de
los niños. Tragarlas puede causar graves lesiones o la
muerte por quemaduras internas en sólo dos horas. Si se
tragan las baterías, vaya a la sala de emergencias de un
hospital inmediatamente. Deshágase de las baterías usadas
inmediatamente.

53
ES
VISTA GENERAL DEL APARATO
Aparato (Vista frontal)
A LINE OUT D Panel de control principal
B Pantalla táctil E Modicación de color LED
C Toma de micrófono F Altavoz

54
ES
Aparato (vista trasera)
1 Sistema de interruptor Line out 3 LINE OUT-R
2 LINE OUT-L 4 Antena FM
5 Adaptador de corriente enchufe
de entrada

55
ES
Conexión del micrófono y manejo
1 Ajuste la reverberación del
micrófono.
3 Conector del cable del micrófono.
2 Ajuste el volumen del micrófono.
• En el mercado existen micrófonos compatibles.
• Puede cantar con la música del aparato o en solitario.

56
ES
PANEL DE CONTROL Y MANDO A DISTANCIA
1Pantalla 14 Receptor del mando a
distancia
2Subir volumen 15 Pista anterior
3Pista siguiente/avanzar 16 Estéreo/Mono
4Reproducción/pausa 17 Carpeta+
5Bajar volumen 18 Pista anterior
6Pista anterior/rebobinar 19 Búsqueda automática de
emisoras
7Detener 20 Carpeta-
8Regulación de tono 21 Repetir
9On/o 22 Guardar
10 Modo 23 Abrir/cerrar tapa del CD
11 Interruptor de alimentación 24 Luz on/o
12 Conexión USB 25 Ranura para tarjeta SD
13 Puerta del compartimento
de CD

57
ES
ADVERTENCIA
¡Peligro de
lesiones! Mantenga
las pilas fuera del
alcance de los
niños. Tragarlas
puede causar
graves lesiones
o la muerte por
quemaduras
internas en sólo
dos horas. Si se
tragan las baterías,
vaya a la sala
de emergencias
de un hospital
inmediatamente.
Deshágase de las
baterías usadas
inmediatamente.
Nota: cuando
se programa
para almacenar
emisoras de radio,
los programas
de radio locales
deben tener una
señal fuerte de
20 emisoras o
más para poder
almacenar hasta
20 emisoras. De lo
contrario, sólo se
puede almacenar
el número de
emisoras que se
pueden recibir.
1Selección de modo 10 Selección Estéreo/Mono
2Encendido / Standby 11 Reproducir la anterior emisora de
radio guardada
3Bajar volumen 12
Sintonizar la emisora deseada.
Puede guardar hasta 20
emisoras.
4Detener 13 Reproducir la siguiente emisora
de radio guardada
5Pista anterior, rebobinar 14 Modicar la conguración del
ecualizador
6Guardar en la lista de
reproducción 15 Saltar a la siguiente pista de la
carpeta
7Saltar a la primera pista de la
carpeta 16 Pista siguiente, avanzar
8Repetir 17 Subir volumen
9Búsqueda automática de
emisoras 18 Reproducción/pausa

58
ES
PUESTA EN FUNCIONAMIENTO
Conguración de la hora
Versión americana:
Con el aparato en modo standby, la pantalla LCD se ilumina y muestra la
hora „12:00“.
Versión europea:
Con el aparato en modo standby, la pantalla LCD se ilumina y muestra la
hora „00:00“.
Ejemplo:
• Para programar la hora, pulse el botón PROG en el panel de control o
en el mando a distancia y manténgalo pulsado durante 3-5 segundos
hasta que aparezca „12“ en pantalla („12“ signica que se ha congurado
en el formato horario de 12 horas).
• Pulsando el botón NEXT o PREV puede elegir entre el formato horario
de 12 y de 24 horas. En cuanto aparezca „12-H“ en pantalla, pulse
de nuevo PROG. En pantalla aparece „00:00“, si bien „12“ continúa
parpadeando. Para congurar la hora correcta, pulse los botones
NEXT y PREV del panel de control o del mando a distancia (la hora se
programa en el formato horario de 12 horas) y, a continuación, pulse
PROG para conrmar. Para congurar los minutos, pulse los botones
NEXT y PREV del panel de control o del mando a distancia (y, a
continuación, pulse el botón PROG para conrmar).
Nota: solo se guardará la hora en el aparato cuando se encuentre en
modo funcionamiento o reposo. Si desea guardar la hora programada,
en ningún caso pulse el interruptor POWER, sino solamente el botón
ON/OFF para que el aparato pase al modo reposo. Si pulsa el interruptor
principal se eliminarán los ajustes horarios que ha realizado y deberá
programarlos de nuevo la próxima vez que encienda el aparato.

59
ES
RADIO FM
Respuesta de frecuencia: 87,5 – 108 MHz
Este aparato dispone de una radio FM integrada. Se pueden guardar hasta
20 emisoras de radio. Pulse el botón POWER cuando utilice el aparato por
primera vez para que pase al modo reposo. Para encenderlo, pulse ON/OFF
en el panel de control o POWER en el mando a distancia. El aparato inicia
su funcionamiento en el modo FM. En pantalla aparece „FM 87,5 MHz“ y
por los altavoces suenan interferencias (a menos que en su región exista
una emisora de radio en la frecuencia 87,5 Mhz). Si no desea que el aparato
se encienda en modo FM, pulse varias veces el botón MODE del aparato
o FUNCTION del mando a distancia hasta que aparezca el modo FM en
pantalla.
Búsqueda automática de emisoras y almacenamiento de emisoras
encontradas
Pulse el botón AUTO para iniciar una búsqueda automática progresiva
desde la frecuencia 87,5 MHz. Se guardan automáticamente las 20 primeras
emisoras encontradas (denominación P01 - P20). Pulse los botones PR- o
PR+ para visualizar todas las emisoras guardadas.
Búsqueda automática de emisoras sin almacenamiento de emisoras
encontradas
Mantenga pulsado el botón / para encontrar una emisora de
frecuencia superior o inferior con buena recepción de señal. En esta función
automática de búsqueda no se guardan las emisoras detectadas. La
búsqueda se detiene una vez se haya detectado una emisora.
Nota: si pulsa varias veces los botones / , se ajusta el rango de
frecuencia en intervalos de 0,05 MHz.
Nota: cuando se programa para almacenar emisoras de radio, los
programas de radio locales deben tener una señal fuerte de 20 emisoras
o más para poder almacenar hasta 20 emisoras. De lo contrario, sólo se
puede almacenar el número de emisoras que se pueden recibir.

60
ES
Almacenamiento manual de emisoras
Pulse los botones / para sintonizar su emisora favorita. A
continuación, pulse el botón MEM. En pantalla se muestra „P01“. Si, en el
transcurso de 3 segundos, pulsa PR- o PR+, podrá seleccionar el espacio de
memoria. Pulse el botón MEM antes de tres segundos para guardar. Puede
guardar hasta 20 emisoras de radio.
En la versión americana de la frecuencia FM, esta se modica en intervalos
de 0,1 MHz, mientras que en la versión europea los intervalos son de 0,5
MHz. Despliegue completamente la antena del aparato para obtener la
mejor recepción (la antena FM está situada en la parte trasera del aparato).
Nota: si desea guardar emisoras de radio, cada una de las emisoras que
desee almacenar debe disponer de una señal suciente; de lo contrario,
aunque guarde la emisora, esta no podrá reproducirse.
MODO CD
1. Mantenga pulsado el botón MODE hasta que aparezca „----“ en
pantalla. A continuación, en la pantalla aparecerá el número de las
pistas que contiene el CD y se iniciará la reproducción.
2. Pulse el botón OPEN/CLOSE del panel de control o EJECT del mando a
distancia para abrir el compartimento del CD.
3. Introduzca un CD con la cara impresa hacia arriba y la cara brillante
hacia abajo dentro del compartimento.
4. Pulse de nuevo el botón OPEN/CLOSE del panel de control o EJECT del
mando a distancia para cerrar el compartimento del CD.
5. Para elegir la pista deseada, pulse el botón .
6. Pulse una vez el botón REP para repetir una pista. El indicador „REP“
parpadea en la esquina superior izquierda de la pantalla. Si pulsa de
nuevo el botón REP, se repiten todas las pistas del CD. El indicador
„REP“ aparece en la esquina superior izquierda de la pantalla. Si pulsa
de nuevo el botón REP, se desactivará la función de repetición.
7. Mantenga pulsado el botón REP hasta que aparezca „RAN“ en pantalla
para activar el modo de reproducción aleatoria.

61
ES
8. Para guardar las pistas en una lista de reproducción, pulse primero
el botón Stop . Pulse el botón PROG para acceder al modo de
memoria. La pantalla parpadea y muestra „P01“. Seleccione la pista que
desea guardar en la lista de reproducción y pulse de nuevo el botón
PROG. Pulse el botón para interrumpir el guardado en la lista de
reproducción o para reproducir las pistas guardadas en la lista de
reproducción. En la lista de reproducción puede almacenar hasta 20
pistas.
9. Para aumentar el volumen, gire el regulador en sentido horario hasta
alcanzar el nivel deseado.
10. Para reducir el volumen, gire el regulador en sentido antihorario hasta
alcanzar el nivel deseado.
USB/TARJETA SD
1. Pulse varias veces el botón MODE hasta que aparezca „USB----“ en
pantalla. En pantalla aparecerá posteriormente el número de carpeta y
el número de pistas y se iniciará la reproducción.
2. Para elegir la pista deseada, pulse el botón / o F+10/F-10.
3. Pulse una vez el botón REP para repetir una pista. El indicador „REP“
parpadea en la esquina superior izquierda de la pantalla. Si pulsa
de nuevo el botón REP, se repiten todas las pistas de la carpeta
seleccionada. El indicador „REP“ aparece en la esquina superior
izquierda de la pantalla. Si pulsa de nuevo el botón REP, se repiten
todas las pistas. Pulse de nuevo el botón para interrumpir la función de
repetición.
4. Mantenga pulsado el botón REP hasta que aparezca „RAN“ en pantalla
para activar el modo de reproducción aleatoria.
5. Para guardar las pistas en una lista de reproducción, pulse primero el
botón Stop .

62
ES
MODO BT
1. Pulse varias veces el botón MODE hasta que se muestre „BT“ en
pantalla y espere 3 segundos hasta que el aparato pueda ser detectado
en las listas BT de otros dispositivos.
2. Encienda su dispositivo móvil con BT y busque en la lista de dispositivos
todos los aparatos BT disponibles.
3. Seleccione „JUKEBOX“ en la lista de dispositivos.
4. En cuanto los dispositivos se hayan sincronizado satisfactoriamente,
se muestra „connected“ en pantalla. Ahora puede reproducir las pistas
en sus dispositivos móviles. Puede controlar el aparato mediante el
dispositivo móvil o también desde el propio dispositivo y el mando a
distancia.
a) Reproducción a través del aparato: Utilice los botones VOL+/VOL-
y / para ajustar el volumen, pausar la reproducción o
continuar o seleccionar la pista anterior o siguiente.
b) Igualmente, puede controlar la reproducción mediante el mando a
distancia del aparato.
c) En cuanto se hayan sincronizado los dispositivos, el dispositivo BT
móvil inicia la reproducción musical automáticamente.
d) Pulse los botones VOL+/VOL- para ajustar el volumen.
e) Pulse los botones / para acceder a la pista anterior o
siguiente.
f) Pulse el botón para continuar con la reproducción.
g) Para nalizar la sincronización, pulse el botón MODE y seleccione
otro modo o desactive la función BT en su dispositivo móvil.
Consejos para la conexión BT
1. Si desea sincronizar su aparato a un dispositivo BT móvil, coloque
los dos dispositivos lo más cerca posible entre sí para establecer la
conexión.
2. La conexión BT puede no funcionar correctamente debido a
determinados motivos:
• Existe un obstáculo entre el tocadiscos y el dispositivo BT.
• Otro dispositivo, como un accesorio médico, microondas u otros
aparatos wi, está utilizando la misma frecuencia que el dispositivo
BT.
• En un momento dato, solamente se puede conectar un dispositivo
BT al tocadiscos. No es posible una sincronización múltiple.

63
ES
Guarde las pistas en una lista de reproducción (en modo BT)
1. Durante la reproducción de música, pulse el botón .
2. Pulse el botón PROG. En la esquina superior izquierda de la pantalla
parpadea „PROG“. Un número del espacio de memoria, como „P01“,
también parpadea.
3. Para seleccionar la pista que desea guardar, pulse los botones /
. Para guardar, pulse el botón PROG.
4. Repita los pasos 2-3 para guardar otras pistas.
5. Cuando haya guardado todas las pistas, pulse el botón para iniciar
la reproducción.
6. Puede cancelar el proceso de almacenamiento en cualquier momento
pulsando el botón .
7. Cuando haya alcanzado el número máximo de las pistas guardadas,
aparece en pantalla „FUL“.
ACTIVAR LOS EFECTOS DE LUZ
El aparato dispone de varios efectos led multicolor que se pueden
congurar mediante los controles led. El compartimento del CD, la toma
para USB/SD y la parte inferior de los altavoces se pueden iluminar. Para
activar los efectos de luz, pulse el botón LIGHT en el panel de control.
Todos los efectos de luz se activan.
• Los efectos de luz funcionan de manera independiente de interruptor
principal de POWER. Los efectos de luz pueden controlarse mediante la
parte trasera del aparato.
• En la parte trasera del aparato se encuentra un interruptor de modo
LED. Los LED multicolor se iluminan en distintos colores.
PLAY
El color de la luz cambia
continuamente
HOLD
Un color de luz
concreto (o SIN luz)

64
ES
• Si selecciona el modo „HOLD“, los LED se iluminan solo en un color.
Si cambia al modo „PLAY“, se mostrarán varios colores de manera
consecutiva.
• Si vuelve al modo „HOLD“, podrá elegir su color favorito que se
mostrará permanentemente (tenga en cuenta que estos colores deben
seleccionarse y, por tanto, puede ocurrir que no se ilumine el mismo
color que cuando se ha utilizado el modo „HOLD“).
• Si desea desactivar los efectos de luz, pulse de nuevo el botón LIGHT.
Nota: en el modo „Hold“ puede ocurrir que no se vea ninguna luz (en
este caso, deberá ajustar el interruptor).

65
ES
VACIAR MEMORIA INTERMEDIA
Mantenga pulsado el botón MODE hasta que aparezca „MP5“ en pantalla.
Espere aprox. 5 segundos hasta que el aparato se haya iniciado por
completo.
Haga clic en el botón que se indica.
Haga clic en „Settings“ (Ajustes).
Haga clic en el símbolo indicado.
Seleccione el idioma deseado.
Seleccionar
idioma

66
ES
Active el wi
a. En „Settings“ (ajustes) seleccione la red wi deseada. Puede ajustar
otros proyectos según sus necesidades.
b. Cuando se haya establecido correctamente la conexión, puede navegar
por internet con el aparato, utilizar QQ-Chat o WeChat y enviar o recibir
correos electrónicos.
c. Los archivos USB pueden leerse mediante el puerto USB situado en el
lateral del aparato.
d. Puede buscar música, archivos de vídeo o imágenes.
INDICACIONES DE USO IMPORTANTES
• Si maneja el aparato apresuradamente, pueden producirse errores en el
funcionamiento. En este caso, debe reiniciar el aparato.
• Si no sabe cómo controlar el aparato, familiarícese con el uso de
tabletas.
• No deje que los niños toquen la pantalla con objetos punzantes, pues
podrían arañarla.

67
ES
VACIAR MEMORIA INTERMEDIA
1. Haga clic en el símbolo SETTINGS (ajustes).
2. En los ajustes, seleccione el punto STORAGE & USB (Almacenamiento y
USB).
3. A continuación, seleccione INTERNAL STORAGE (almacenamiento
interno), y allí, el punto APPS (aplicaciones
4. Posteriormente, seleccione el símbolo de VIDEO PLAYER o MUSIC.

68
ES
5. En la sección STORAGE (almacenamiento), elija la opción CLEAT DATA
(borrar datos).
6. Seleccione OK para eliminar la información relevante que se conserva
tras la reproducción.
RESTABLECIMIENTO DE LOS VALORES DE
FÁBRICA
Para borrar el resto de contenidos
y rastros de la lista de reproducción
y la información del resto de
procesos, haga clic en BACKUP
AND RESET (Copia de seguridad y
restauración).
A continuación, haga clic en el
subpunto FACTORY DATA RESET
(restablecer los valores de fábrica).
Espere de 1 a 3 minutos hasta que
se haya completado la restauración
de los valores de fábrica.

69
ES
REPARACIÓN DE ANOMALÍAS
Problema Posible causa y solución
No hay recepción de radio en el
modo FM.
Se ha seleccionado el modo
incorrecto. Pulse los botones
/ para seleccionar una
emisora de radio. Coloque la toma
de Audio in en la posición "O".
Pulse el botón VOL+ para aumentar
el volumen.
El CD no se reproduce o se
interrumpe el sonido.
Introduzca un CD con la cara
impresa hacia arriba dentro del
compartimento.
Limpie el CD.
El sonido se interrumpe mientras
se reproduce el CD.
Coloque el aparato en una
supercie plana y estable.
Pulse el botón ON/OFF.
En el modo CD no se reproducirán
las pistas guardadas en la lista de
reproducción.
Pulse el botón y guarde las pistas
deseadas del CD en la lista de
reproducción.
El aparato no funciona. El enchufe no está conectado a la
toma de corriente.
Asegúrese de que el cable de
alimentación esté conectado
correctamente.
Coloque el interruptor principal en
la posición "ON".
No hay sonido. Pulse el botón ON/OFF. Aumente el
volumen pulsando el botón VOL+.
Zumbidos o interferencias. Hay un televisor o VCR situado
demasiado cerca del aparato.
Reubique el aparato.
La pantalla no muestra nada. Apague el aparato y reinícielo.

70
ES
RETIRADA DEL APARATO
Si en su país existe una disposición legal relativa a
la eliminación de aparatos eléctricos y electrónicos,
este símbolo estampado en el producto o en
el embalaje advierte que no debe eliminarse
como residuo doméstico. En lugar de ello, debe
depositarse en un punto de recogida de reciclaje
de aparatos eléctricos y electrónicos. Una gestión
adecuada de estos residuos previene consecuencias
potencialmente negativas para el medio ambiente
y la salud de las personas. Puede consultar más
información sobre el reciclaje y la eliminación de este
producto contactando con su administración local o
con su servicio de recogida de residuos.
Este producto contiene baterías. Si en su país existe
una disposición legal relativa a la eliminación de
baterías, estas no deben eliminarse como residuo
doméstico. Infórmese sobre la normativa vigente
relacionada con la eliminación de baterías. Una
gestión adecuada de estos residuos previene
consecuencias potencialmente negativas para el
medio ambiente y la salud de las personas.
DECLARACIÓN DE CONFORMIDAD
Fabricante:
Chal-Tec GmbH, Wallstraße 16, 10179 Berlín, Alemania.
Importador para Gran Bretaña:
Berlin Brands Group UK Limited
PO Box 42
272 Kensington High Street
London, W8 6ND
United Kingdom
Por la presente, Chal-Tec GmbH declara que el tipo de
equipo radioeléctrico Graceland Touch es conforme
con la Directiva 2014/53/UE. El texto completo de la
declaración UE de conformidad está disponible en la
dirección Internet siguiente: use.berlin/10034802

71
FR
Cher client,
Toutes nos félicitations pour l’acquisition de ce nouvel
appareil. Veuillez lire attentivement les instructions
suivantes de branchement et d’utilisation an d’éviter
d’éventuels dommages. Le fabricant ne saurait être tenu
pour responsable des dommages dus au non-respect
des consignes de sécurité et à la mauvaise utilisation
de l’appareil. Scannez le QR-Code pour accéder à
la dernière version du mode d‘emploi et à d‘autres
informations concernant le produit:
SOMMAIRE
Fiche technique 72
Consignes de sécurité 73
Aperçu de l‘appareil 75
Panneau de commande et télécommande 78
Mise en marche 80
Radio fm 81
Mode cd 82
Usb/cartes sd 83
Mode bt 84
Activation des eets d‘éclairage 85
Utilisation du lecteur multimedia 87
Importantes remarques pour l‘utilisation 88
Eacement des données temporaires 89
Paramètres d‘usine 90
Résolution des problèmes 91
Conseils pour le recyclage 92
Déclaration de conformité 92

72
FR
FICHE TECHNIQUE
Numéro d'article 10034802
Plage de fréquences FM 87,5 – 108 MHz
Adaptateur secteur 100 – 240 V (AC) ~ 50 – 60 Hz
Consommation électrique 65 W
Dimensions (L x l x H) 30 x 57 x 105cm
Poids 19,5 kg
Puissance de sortie de l'amplicateur Canal audio 2.0
Taille de l'écran 12 pouces
USB 2.0
Fréquence BT
Puissance d‘émission
2402-2480 MHz
4 dBm
Norme WLAN 802.11b/g/n
Résolution vidéo 1080 P (1920 x 1080)
Système d'exploitation Android 6.0.1
Modes de lecture Loop, mesure de la durée, insertion etc.
Réseaux compatibles Ethernet, Wi, extension périphérique
sans l
Formats vidéo compatibles WMV, avi, FLV, rm, RMVB, mpeg, ts,
h.265, mp4
Formats d'mage compatibles BMP, JPEG, PNG, GIF etc. ; actualités RSS,
animations ash, sites dynamiques
Lecture des documents Oice Documents PPT, WORD, EXCEL et PDF
Lecture des pages web Lecture des pages web, scroll sur les
pages web, zoom
Lecture Single Player Prend en charge la lecture unique des
programmes importés sur le disque u
Log Management
Fonction de journalisation puissante,
peut recevoir toute instruction
concernant l'état

73
FR
Ecran partagé
Les programmes peuvent être étendus,
glissés et stockés, avec calendrier
numérique, mode heure, module
de prévisions météorologiques.
Bibliothèque de programmes : ore une
fonction de vignette
CONSIGNES DE SÉCURITÉ
Consignes générales
• Foudre - Si vous n‘utilisez pas l‘appareil pendant une longue période
ou s‘il y a de l‘orage, débranchez la che de la prise et débranchez
l‘antenne de l‘appareil. Cela évite d‘endommager le produit à cause de
la foudre et des surtensions.
• Surcharge - Ne surchargez pas les prises de courant, les rallonges ou
les prises de courant, car cela pourrait provoquer un incendie ou une
électrocution.
• Corps étranger et insertion de liquides - Ne glissez jamais d‘objets
d‘aucune sorte à travers les ouvertures de l‘appareil, car ils pourraient
toucher des points de tension dangereux ou court-circuiter des
éléments, ce qui pourrait provoquer un incendie ou une électrocution.
Ne renversez jamais de liquides d‘aucune sorte sur l‘appareil.
• Réparation et maintenance - Ne tentez pas de réparer ce produit
vous-même en vous exposant à des tensions dangereuses ou à d‘autres
risques en ouvrant ou en retirant les couvercles. Conez toute la
maintenance à un personnel qualié.
• Dégâts nécessitant une intervention de professionnel - Débranchez
la che de la prise et consultez un spécialiste qualié si l‘une des
situations suivantes se produit :
a) Lorsque le câble secteur ou la che sont endommagés.
b) Lorsque des liquides ont été renversés ou que des objets sont
tombés sur l‘appareil.
c) Lorsque le produit a été exposé à la pluie ou à l‘eau.
d) Lorsque le produit a fait une chute ou a été endommagé.
e) Lorsque le produit a des performances sensiblement réduites.
• Pièces de rechange - Si des pièces de rechange sont nécessaires,

74
FR
assurez-vous que l‘entreprise spécialisée qui remplace les pièces
n‘utilise que des pièces de rechange approuvées par le fabricant ou qui
ont les mêmes caractéristiques que la pièce d‘origine. Le remplacement
non autorisé peut entraîner un incendie, un choc électrique ou vous
exposer à d‘autres dangers.
• Chaleur - Ne placez pas l‘appareil à proximité de sources de chaleur
telles que des radiateurs, des grilles de chauage, des poêles ou
d‘autres produits (y compris les amplicateurs).
Consignes particulières
• Cet appareil peut être utilisé par des enfants de 8 ans ou plus et des
personnes ayant des capacités physiques, sensorielles et mentales
limitées et / ou dénuées d‘expérience et de connaissances, à condition
d‘avoir été instruits au fonctionnement de l‘appareil par une personne
responsable et d‘en comprendre les risques associés.
• Surveillez les enfants pour vous assurer qu‘ils ne jouent pas avec
l‘appareil. Assurez-vous que les enfants et les bébés ne jouent pas avec
des sacs en plastique ou d‘autres matériaux d‘emballage.
• Assurez-vous que la che / l‘adaptateur restent toujours facilement
accessibles, de sorte que l‘appareil puisse être rapidement déconnecté
du secteur en cas d‘urgence.
• Lorsque vous n‘utilisez plus l‘appareil, éteignez-le et débranchez-le de
la prise de secteur.
AVERTISSEMENT
Risque de blessure ! Gardez les piles hors de portée des
enfants. Leur ingestion peut causer des blessures graves ou
la mort par brûlures internes en deux heures seulement. Si
des piles sont avalées, rendez-vous immédiatement aux
urgences d‘un hôpital. Jetez les piles usagées
immédiatement.

75
FR
APERÇU DE L‘APPAREIL
Appareil (vue de face)
A LINE OUT D Panneau de commande principal
B Ecran tactile E Modication de couleur LED
C Prise de microphone F Enceinte

76
FR
Appareil (vue de dos)
1 Système commutateur Line-Out 3 LINE OUT-R
2 LINE OUT-L 4 Antenne FM
5 Prise d’entrée de l’adaptateur
électrique

77
FR
Branchement du micro et utilisation
1 Régler la réverbération du
microphone.
3 Prise de câble du microphone.
2 Régler le volume du microphone.
• Des micros adaptés sont disponibles dans le commerce.
• Vous pouvez chanter sur la musique de l‘appareil ou chanter seul.

78
FR
PANNEAU DE COMMANDE ET TÉLÉCOMMANDE
1Ecran 14 Capteur de la télécommande
2Pour augmenter le volume 15 10 Titre suivant
3Titre suivant /avance rapide 16 Stéréo/Mono
4Lecture /Pause 17 Dossier +
5Pour réduire le volume 18 10 Titre précédent
6Titre précédent / retour
rapide 19 Recherche automatique des
stations de radio
7Stop 20 Dossier -
8Réglage du son 21 Répétition
9Marche /arrêt 22 Enregistrer
10 Mode 23 Ouvrir / fermer le tiroir CD
11 Interrupteur d'alimentation 24 Eclairage marche/arrêt
12 Port USB 25 Lecteur de cartes SD
13 Tiroir du lecteur CD

79
FR
AVERTISSEMENT
Risque de blessure
! Gardez les piles
hors de portée
des enfants.
Leur ingestion
peut causer des
blessures graves
ou la mort par
brûlures internes
en deux heures
seulement. Si des
piles sont avalées,
rendez-vous
immédiatement
aux urgences d‘un
hôpital. Jetez les
piles usagées
immédiatement.
Remarque : lors de
la programmation
de la mémorisation
des stations de
radio, les émissions
de radio locales
doivent avoir un
signal fort de 20
stations ou plus
pour pouvoir être
mémorisées à 20
stations, sinon
seul le nombre de
stations pouvant
être reçues peut
être mémorisé.
1Sélecteur de mode 10 Choix de stéréo/mono
2Allumer /mettre en veille 11 Écoutez les stations de radio
précédemment enregistrées
3Pour réduire le volume 12
Réglez la station souhaitée. Vous
pouvez mémoriser jusqu'à 20
stations.
4 Stop 13 Pour écouter la radio suivante
mémorisée
5Titre précédent, retour rapide 14 Modier les réglages de
l'égaliseur
6Enregistrer dans la liste de
lecture 15 Sauter le premier titre du dossier
7Aller au premier titre du dossier 16 Titre suivant, avance rapide
8Répétition 17 Pour augmenter le volume
9Recherche automatique de
stations 18 Lecture /Pause

80
FR
MISE EN MARCHE
Réglage de l‘heure
Version américaine :
Lorsque l‘appareil passe en mode veille, l‘écran LCD s‘allume et aiche
l‘heure „12:00“.
Version européenne :
Lorsque l‘appareil passe en mode veille, l‘écran LCD s‘allume et aiche
l‘heure „00:00“.
Exemple :
• Pour régler l‘heure, appuyez sur la touche PROG du panneau de
commande ou de la télécommande et maintenez-la pendant 3 à 5
secondes jusqu‘à ce que „12“ apparaisse à l‘écran („12“ signie que le
format 12 heures a été déni).
• Appuyez sur la touche NEXT ou PREV pour choisir entre le format 12
et 24 heures. Lorsque „12-H“ apparaît à l‘écran, appuyez à nouveau
sur la touche PROG. „00:00“ apparaît alors à l‘écran, et „12“ clignote.
Utilisez les touches NEXT et PREV du panneau de commande ou de
la télécommande pour régler l‘heure correcte (l‘heure sera réglée au
format 12 heures), puis appuyez sur la touche PROG pour conrmer.
Utilisez les touches NEXT et PREV du panneau de commande ou de
la télécommande pour régler les minutes (puis appuyez sur la touche
PROG pour conrmer).
Remarque : L‘heure n‘est conservée par l‘appareil qu‘en mode de
fonctionnement ou de veille. Si vous souhaitez conserver le réglage de
l‘heure, n‘appuyez en aucun cas sur la touche d‘alimentation POWER
mais uniquement la touche ON / OFF pour mettre l‘appareil en mode
veille. Si vous appuyez sur la touche d‘alimentation, le réglage de l‘heure
que vous avez eectué sera supprimé et vous devrez à nouveau régler
l‘heure au prochain démarrage de l‘appareil.

81
FR
RADIO FM
Plage de fréquences : 87,5 – 108 MHz
Cet appareil dispose d‘une radio FM intégrée. Vous pouvez enregistrer
jusqu‘à 20 stations de radio. Lorsque vous utilisez l‘appareil pour la
première fois, appuyez sur la touche POWER pour mettre l‘appareil en
mode veille. Appuyez sur la touche ON / OFF du panneau de commande
ou sur la touche POWER de la télécommande pour l‘allumer. L‘appareil
s‘allume en mode FM. L‘écran aiche „FM 87,5 MHz“ et les enceintes
émettent du bruit (sauf s‘il existe une station de radio sur la fréquence 87,5
MHz dans votre région). Si l‘appareil ne démarre pas en mode FM, appuyez
plusieurs fois sur la touche MODE de l‘appareil ou sur la touche FONCTION
de la télécommande jusqu‘à ce que le mode FM s‘aiche à l‘écran.
Recherche automatique de stations et mémorisation des stations
trouvées
Appuyez sur la touche AUTO pour lancer la recherche automatique des
stations à partir de la fréquence 87,5 MHz. Les 20 premières stations
trouvées sont automatiquement enregistrées (désignation P01 - P20).
Appuyez sur la touche PR- ou PR + pour aicher toutes les stations
enregistrées l‘une après l‘autre.
Recherche automatique de stations sans mémorisation des stations
trouvées
Maintenez la touche / pour trouver une station avec une bonne
réception du signal en augmentant ou en réduisant la fréquence. Cette
fonction de recherche automatique n‘enregistre pas les stations trouvées.
La recherche s‘arrête lorsque l‘appareil a trouvé une station.
Remarque : si vous appuyez plusieurs fois brièvement sur les touches
/ , la fréquence s‘ajuste par intervalles de 0,05 MHz.
Remarque : lors de la programmation de la mémorisation des stations
de radio, les émissions de radio locales doivent avoir un signal fort de 20
stations ou plus pour pouvoir être mémorisées à 20 stations, sinon seul
le nombre de stations pouvant être reçues peut être mémorisé.

82
FR
Enregistrement manuel des stations
Appuyez sur les touches / pour régler vos stations favorites.
Appuyez sur la touche MEM. L‘écran aiche „P01“. Si vous appuyez sur
la touche PR- ou PR + dans les 3 secondes, vous pouvez sélectionner
l‘emplacement mémoire. Appuyez sur la touche MEM dans les trois
secondes pour enregistrer. Vous pouvez mémoriser jusqu‘à 20 stations de
radio.
Dans la version américaine de fréquence FM, la fréquence change par
intervalle de 0,1 MHz, dans la version européenne par 0,5 MHz. Déployez
complètement l‘antenne de l‘appareil pour obtenir la meilleure réception
possible (l‘antenne FM se trouve à l‘arrière de l‘appareil).
Remarque : Si vous souhaitez mémoriser une station de radio, elle doit
avoir une bonne réception de signal, sinon vous ne pourrez pas l‘écouter
si la fréquence a été enregistrée.
MODE CD
1. Appuyez sur la touche MODE jusqu‘à ce que l‘écran aiche „----“. Le
nombre de plages du CD s‘aiche alors à l‘écran et la lecture démarre.
2. Appuyez sur la touche OPEN / CLOSE du panneau de commande ou sur
la touche EJECT de la télécommande pour ouvrir le compartiment CD.
3. Insérez un CD dans le compartiment avec l‘étiquette vers le haut et la
face vers le bas.
4. Appuyez à nouveau sur la touche OPEN / CLOSE du panneau de
commande ou sur la touche EJECT de la télécommande pour fermer le
compartiment CD.
5. Pour choisir un titre, appuyez sur la touche .
6. Pour répéter un titre une fois, appuyez sur la touche REP. Le témoin
„REP“ clignote alors dans le coin supérieur gauche de l‘écran. Si vous
appuyez à nouveau sur la touche REP, toutes les pistes du CD seront
répétées. „REP“ apparaît dans le coin supérieur gauche de l‘écran. Si
vous appuyez à nouveau sur la touche REP, vous annulez la fonction de
répétition.
7. Pour une lecture aléatoire, appuyez sur la touche REP jusqu‘à ce que
l‘écran aiche „RAN“.

83
FR
8. Pour enregistrer des titres dans une liste de lecture, appuyez d‘abord
sur la touche stop . Appuyez sur la touche PROG pour accéder au
mode de mémorisation. L‘écran clignote et aiche „P01“. Sélectionnez
la chanson que vous souhaitez enregistrer dans la liste de lecture et
appuyez à nouveau sur la touche PROG. Appuyez sur la touche , pour
annuler l‘enregistrement dans la liste de lecture ou pour lire la liste de
lecture des titres enregistrés. Vous pouvez enregistrer jusqu‘à 20 titres
dans la liste de lecture.
9. Pour augmenter le volume, tournez la commande de volume dans le
sens des aiguilles d‘une montre jusqu‘à atteindre le volume souhaité.
10. Pour diminuer le volume, tournez la commande de volume dans le sens
antihoraire jusqu‘à atteindre le volume souhaité.
USB/CARTES SD
1. Appuyez plusieurs fois sur la touche MODE jusqu‘à ce que l‘écran aiche
„USB - - - -“. L‘écran aiche alors le nombre de dossiers et le nombre de
pistes et la lecture démarre.
2. Pour sélectionner la piste souhaitée, appuyez sur la touche /
ou F+10/ F-10.
3. Pour répéter un titre, appuyez une fois sur la touche REP. Le témoin
„REP“ clignote alors dans le coin supérieur gauche de l‘écran. Appuyez
à nouveau sur la touche REP pour aicher toutes les pistes du dossier
sélectionné. „REP“ apparaît dans le coin supérieur gauche de l‘écran.
Appuyez à nouveau sur la touche REP pour répéter toutes les pistes.
Appuyez à nouveau sur la touche pour quitter la fonction de répétition.
4. Pour une lecture aléatoire, appuyez sur la touche REP jusqu‘à ce que
l‘écran aiche „RAN“.
5. Pour enregistrer des titres dans une liste de lecture, appuyez d‘abord
sur la touche stop .

84
FR
MODE BT
1. Appuyez plusieurs fois sur la touche MODE jusqu‘à ce que l‘écran aiche
„BT“ et patientez 3 secondes pour que l‘appareil puisse se trouver dans
la liste des appareils d‘un autre appareil BT.
2. Allumez votre appareil mobile compatible BT et recherchez les appareils
BT disponibles dans la liste des appareils.
3. Sélectionnez „JUKEBOX“ dans la liste des appareils.
4. Dès que les appareils ont été jumelés avec succès, l‘écran aiche
„connected“. Vous pouvez maintenant lire les titres sur votre appareil
mobile. Vous pouvez utiliser à la fois votre appareil mobile et votre
appareil ou la télécommande de l‘appareil.
a) Lecture sur l‘appareil : utilisez les touches VOL+/VOL- et /
/ pour régler le volume, mettre la lecture en pause ou la
reprendre, ou pour passer au titre suivant.
b) Vous pouvez également contrôler la lecture à l‘aide de la
télécommande de l‘appareil.
c) Dès que les appareils ont été jumelés, l‘appareil mobile BT
commence automatiquement à lire la musique.
d) Pour régler le volume, appuyez sur les touches VOL+/VOL-.
e) Appuyez sur les touches / pour passer au titre précédent ou
suivant.
f) Pour reprendre la lecture, appuyez sur la touche .
g) Pour terminer le jumelage, appuyez sur la touche MODE et
sélectionnez un autre mode ou désactivez la fonction BT sur votre
appareil mobile.
Conseils pour établir la connexion BT
1. Si vous souhaitez appairer votre appareil avec un appareil BT mobile,
placez les appareils à appairer le plus près possible l‘un de l‘autre.
2. La connexion BT peut ne pas fonctionner correctement pour les raisons
ci-dessous :
• Il y a un obstacle entre le Jukebox et l‘appareil BT.
• Un autre appareil, tel que des accessoires médicaux, des micro-
ondes ou d‘autres appareils Wi, utilise la même fréquence que
l‘appareil BT.
• Un seul appareil BT mobile à la fois peut se connecter au jukebox.
Le couplage multiple n‘est pas possible.

85
FR
Pour enregistrer des titres dans une liste de lecture (en mode BT)
1. Appuyez sur la touche pour arrêter la lecture de musique.
2. Appuyez sur la touche PROG. „PROG“ clignote dans le coin supérieur
gauche de l‘écran. Un numéro d‘emplacement de stockage, par
exemple „P01“ clignote également.
3. Pour sélectionner le titre que vous souhaitez enregistrer, appuyez sur les
touches / . Appuyez sur la touche PROG pour enregistrer.
4. Répétez les étapes 2-3 pour enregistrer d‘autres titres.
5. Après avoir enregistré tous les titres voulus, appuyez sur la touche
pour démarrer la lecture.
6. Vous pouvez annuler le processus d‘enregistrement à tout moment en
appuyant sur la touche .
7. Si vous atteignez le nombre maximum de titres, l‘écran aiche „FUL“.
ACTIVATION DES EFFETS D‘ÉCLAIRAGE
L‘appareil dispose de plusieurs eets LED multicolores que vous pouvez
régler avec la commande LED. Le compartiment CD, la connexion USB /
SD et le dessous des enceintes peuvent être éclairés. Pour activer les eets
d‘éclairage, appuyez sur la touche LIGHT du panneau de commande. Tous
les eets d‘éclairage s‘allument.
• Les eets d‘éclairage fonctionnent indépendamment de l‘interrupteur
POWER. Les eets d‘éclairage se contrôlent au dos de l‘appareil.
• Un commutateur de mode d‘éclairage LED se trouve à l‘arrière de
l‘appareil. Les LED multicolores s‘allument de diérentes couleurs.
PLAY
La couleur de l‘éclairage
change en permanence
HOLD
Une couleur donnée (ou
PAS d‘éclairage)

86
FR
• Si vous réglez le mode „HOLD“, les LED ne s‘allument que d‘une seule
couleur. Si vous passez en mode „PLAY“, plusieurs couleurs s‘aichent
successivement.
• Si vous revenez au mode „HOLD“, vous pouvez sélectionner n‘importe
quelle couleur pour l‘aicher en permanence (notez que vous devez
dénir ces couleurs et il peut donc arriver que la couleur change lorsque
vous mettez l‘appareil en mode „HOLD“).
• Si vous souhaitez désactiver les eets d‘éclairage, appuyez à nouveau
sur la touche LIGHT.
Remarque : En mode „Hold“, il peut arriver qu‘aucun éclairage ne soit
visible (dans ce cas ajustez l‘interrupteur).

87
FR
UTILISATION DU LECTEUR MULTIMEDIA
Appuyez sur la touche MODE jusqu‘à ce que l‘écran aiche „MP5“. Patientez
environ 5 secondes pour que l‘appareil ait complètement démarré.
Appuyez sur la touche indiquée.
Cliquez sur „Settings“ (paramètres)
Cliquez sur l‘icône indiquée
Sélectionnez la langue souhaitée et
la saisie
Choix de
la langue

88
FR
Activez le Wi
a. Réglez le WLAN souhaité dans „Settings“ (Paramètres). Vous pouvez
adapter d‘autres projets à vos besoins.
b. Une fois la connexion réseau établie, vous pouvez surfer sur Internet
avec l‘appareil, utiliser QQ-Chat ou WeChat et envoyer ou recevoir des
emails.
c. Les chiers USB peuvent être lus par le port USB sur le côté de
l‘appareil.
d. Vous pouvez rechercher de la musique, des chiers vidéo ou des images.
IMPORTANTES REMARQUES POUR
L‘UTILISATION
• Si vous utilisez l‘appareil avec précipitation, il peut mal fonctionner.
Dans ce cas, redémarrez l‘appareil.
• Si vous ne savez pas comment utiliser l‘appareil, pensez l‘utilisation
d‘une tablette.
• Ne laissez pas les enfants utiliser l‘écran de l‘appareil avec des objets
pointus car cela pourrait le rayer.

89
FR
EFFACEMENT DES DONNÉES TEMPORAIRES
1. Cliquez sur le symbole SETTINGS (paramètres).
2. Dans les paramètres, sélectionnez l‘option STORAGE & USB (stockage
& USB).
3. Sélectionnez ensuite INTERNAL STORAGE (mémoire interne) et ensuite
APPS (applications).
4. choisissez ensuite le symbole du VIDEO PLAYER ou de MUSIC.

90
FR
5. Dans STORAGE (mémoire), choisissez l‘option CLEAR DATA (eacer les
données).
6. Sélectionnez OK pour supprimer les informations restantes après la
lecture.
PARAMÈTRES D‘USINE
Pour supprimer le contenu
restant de la liste de lecture et les
informations sur toutes les autres
opérations, cliquez sur BACKUP
AND RESET (SAUVEGARDER ET
RÉINITIALISER).
Cliquez ensuite sur le sous-
élément FACTORY DATA RESET
(RÉINITIALISATION À L'ÉTAT
USINE). Attendez ensuite 1 à 3
minutes pour que la réinitialisation
d'usine se termine.

91
FR
RÉSOLUTION DES PROBLÈMES
Problème Cause possible et solution
Pas de réception radio en mode FM Vous n'êtes pas dans le bon mode.
Appuyez sur les touches /
pour choisir une station de radio.
Mettez le connecteur audio sur
„O“. Appuyez sur la touche VOL +
pour augmenter le volume.
Le CD n'est pas lu ou le son est
interrompu.
Insérez le CD dans le lecteur avec
la face imprimée vers le haut.
Nettoyez le CD.
En mode CD, le son est interrompu. Mettez l'appareil sur une surface
plane.
Appuyez sur la touche ON/OFF.
En mode CD, les titres de la liste de
lecture ne sont pas lus.
Appuyez sur la touche et
enregistrez les titres souhaités dans
la liste de lecture.
L‘appareil ne fonctionne pas. La che n'est pas branchée dans la
prise.
Vériez que le câble secteur est
bien branché.
Mettez l'interrupteur secteur en
position "ON".
Pas de son. Appuyez sur la touche ON/OFF.
Augmentez le volume en appuyant
sur la touche VOL+.
Bourdonnement ou parasites. Le téléviseur ou le magnétoscope
est trop près de l'appareil.
Déplacez l'appareil.
L'écran ne s'allume pas. Eteignez et rallumez l'appareil.

92
FR
CONSEILS POUR LE RECYCLAGE
S‘il existe une réglementation pour l‘élimination ou le
recyclage des appareils électriques et électroniques
dans votre pays, ce symbole sur le produit ou sur
l‘emballage indique que cet appareil ne doit pas
être jeté avec les ordures ménagères. Vous devez le
déposer dans un point de collecte pour le recyclage
des équipements électriques et électroniques.
La mise au rebut conforme aux règles protège
l‘environnement et la santé de vos semblables des
conséquences négatives. Pour plus d‘informations
sur le recyclage et l‘élimination de ce produit, veuillez
contacter votre autorité locale ou votre service de
recyclage des déchets ménagers.
Ce produit contient des piles. S‘il existe une
réglementation pour l‘élimination ou le recyclage
des piles dans votre pays, vous ne devez pas les
jeter avec les ordures ménagères. Renseignez-vous
sur les dispositions locales relatives à la collecte
des piles usagées. La mise au rebut conforme aux
règles protège l‘environnement et la santé de vos
semblables des conséquences négatives.
DÉCLARATION DE CONFORMITÉ
Fabricant :
Chal-Tec GmbH, Wallstraße 16, 10179 Berlin,
Allemagne.
Importateur pour la Grande Bretagne :
Berlin Brands Group UK Limited
PO Box 42
272 Kensington High Street
London, W8 6ND
United Kingdom
Le soussigné, Chal-Tec GmbH, déclare que
l’équipement radioélectrique du type Graceland
Touch est conforme à la directive 2014/53/UE. Le
texte complet de la déclaration UE de conformité
est disponible à l’adresse internet suivante : use.
berlin/10034802

93
IT
Gentile cliente,
La ringraziamo per aver acquistato il dispositivo.
La preghiamo di leggere attentamente le seguenti
istruzioni per l’uso e di seguirle per evitare possibili
danni tecnici. Non ci assumiamo alcuna responsabilità
per danni scaturiti da una mancata osservazione delle
avvertenze di sicurezza e da un uso improprio del
dispositivo. Scansionare il codice QR seguente, per
accedere al manuale d’uso più attuale e per ricevere
informazioni sul prodotto.
INDICE
Dati tecnici 94
Avvertenze di sicurezza 95
Descrizione del dispositivo 97
Pannello di controllo e telecomando 100
Messa in funzione 102
Radio fm 103
Modalità cd 104
Usb/scheda sd 105
Modalità bt 106
Attivare gli eetti luminosi 107
Utilizzo del lettore multimediale 109
Note importanti sull’utilizzo 110
Svuotare la cache 111
Come ristabilire le impostazioni di fabbrica 112
Correzione degli errori 113
Avviso di smaltimento 114
Dichiarazione di conformità 114

94
IT
DATI TECNICI
Numero articolo 10034802
Gamma di frequenza FM 87,5 – 108 MHz
Adattatore 100 – 240 V (AC) ~ 50 – 60 Hz
Consumo di corrente 65 W
Dimensioni (lunghezza x larghezza x
altezza) 30 x 57 x 105cm cm
Peso 19,5 kg
Potenza di uscita amplicatore Canale audio 2.0
Dimensioni schermo 12 pollici
USB 2.0
Frequenza BT
Potenza di trasmissione
2402-2480 MHz
4 dBm
Standard WLAN 802.11b/g/n
Risoluzione video 1080 P (1920 x 1080)
Sistema operativo Android 6.0.1
Modalità di riproduzione Loop, calcolo del tempo, inserire, ecc.
Reti supportate Ethernet, Wi-Fi, estensione periferica
senza li
Formati video supportati WMV, avi, FLV, rm, RMVB, mpeg, ts,
h.265, mp4
Formati immagine supportati
BMP, JPEG, PNG, GIF, ecc.; avvenimenti
attuali RSS, animazioni ash, siti web
dinamici
Supporta la riproduzione di documenti
Oice Documenti PPT, WORD, EXCEL e PDF
Supporta la riproduzione di siti web Riproduzione siti web, scorrere su siti
web, zoomare
Riproduzione Single Player Supporta la singola riproduzione di
programmi importati su u disk
Log Management Potente funzione di logging, può
ricevere ogni istruzione riferita allo stato

95
IT
Schermo diviso
I programmi possono essere estesi,
trascinati e rilasciati, con calendario
digitale, modalità temporale, modulo
per previsioni meteo, modello libreria
programmi. Ore una funzione
thumbnail
AVVERTENZE DI SICUREZZA
Avvertenze generali
• Colpo di fulmine – Se il dispositivo non viene utilizzato o c’è un
temporale, staccare la spina dalla presa di corrente e scollegare il
dispositivo dalla connessione dell’antenna. In questo modo si evitano
danni al dispositivo dovuti a colpi di fulmine o sovratensione.
• Sovraccarico – Non sovraccaricare prese elettriche, prolunga o
prese di corrente integrate, in quanto ciò potrebbe causare incendi o
folgorazioni.
• Corpi estranei e liquidi – Non inlare nessun tipo di oggetto nelle
aperture del dispositivo, in quanto si potrebbe entrare in contatto
con pericolosi punti di tensione o causare il cortocircuito di alcune
componenti. Questo potrebbe causare incendi o folgorazioni. Non
rovesciare liquidi sul dispositivo.
• Riparazione e manutenzione – Non cercare di eettuare opere di
manutenzione in modo autonomo, dato che rimuovendo o aprendo
le coperture potrebbero liberarsi tensioni pericolose o insorgere
altri rischi. Lasciare che le opere di manutenzione siano eettuate da
personale tecnico qualicato.
• Danni che necessitano manutenzione – Staccare la spina dalla
presa elettrica e rivolgersi a un’azienda specializzata se si vericano le
seguenti situazioni:
a) Se cavo di alimentazione o spina sono danneggiati.
b) Se sono stati rovesciati liquidi o sono caduti oggetti sopra al
dispositivo.
c) Se il prodotto è stato esposto a pioggia o acqua.
d) Se il prodotto è caduto o è danneggiato.

96
IT
e) Se il prodotto presenta prestazioni sensibilmente al di sotto della
norma.
• Parti di ricambio – Se sono necessarie parti di ricambio, assicurarsi
che l’azienda specializzata che si occupa della sostituzione utilizzi solo
parti autorizzate dal produttore o con caratteristiche equivalenti alle
parti originali. Una sostituzione non adeguata può causare incendi,
folgorazioni o altri rischi.
• Calore – Non posizionare il dispositivo nei pressi di fonti di calore,
come termosifoni, radiatori convettivi, forni o altri prodotti (inclusi
amplicatori).
Avvertenze particolari
• Questo dispositivo può essere utilizzato da bambini a partire da 8 anni
e da persone con limitate capacità siche e psichiche o con conoscenza
ed esperienza limitate, solo se sono stati istruiti sulle modalità d’uso e
comprendono i rischi e i pericoli connessi.
• Tenere sotto controllo i bambini per assicurarsi che non giochino con
il dispositivo. Assicurarsi che bambini e neonati non giochino con i
sacchetti di plastica o altro materiale d’imballaggio.
• Assicurarsi che spina elettrica/adattatore siano sempre facilmente
accessibili, in modo da poter scollegare il dispositivo dalla rete elettrica
in caso di emergenza.
• Se non si utilizza più il dispositivo, spegnerlo e staccare la spina.
ATTENZIONE
Pericolo di lesioni! Tenere le batterie fuori dalla portata dei
bambini. L‘ingestione può causare gravi lesioni o la morte
per ustioni interne in sole due ore. Se le batterie vengono
ingoiate, recarsi immediatamente al pronto soccorso
dell‘ospedale. Smaltire immediatamente le batterie usate.

97
IT
DESCRIZIONE DEL DISPOSITIVO
Dispositivo (lato anteriore)
A LINE OUT D Pannello di controllo principale
B Schermo touch E Cambiamento cromatico LED
C Presa per microfono F Altoparlanti

98
IT
Dispositivo (lato posteriore)
1 Interruttore Line-Out 3 LINE-OUT R
2 LINE-OUT L 4 Antenna FM
5 Presa d’ingresso dell’adattatore
di alimentazione

99
IT
Connessione microfono e utilizzo
1 Regolare il riverbero del
microfono.
3 Presa del cavo del microfono.
2 Regolare il volume del microfono.
• Un microfono adeguato può essere acquistato sul mercato.
• È possibile cantare sulla musica riprodotta dal dispositivo o da soli.

100
IT
PANNELLO DI CONTROLLO E TELECOMANDO
1Schermo 14 Ricevitore telecomando
2Alzare il volume 15 10 titoli avanti
3Titolo successivo/Avanzare
rapidamente 16 Stereo/Mono
4Play/Pausa 17 Cartella+
5Abbassare il volume 18 10 titoli indietro
6Titolo successivo/
Retrocedere rapidamente 19 Ricerca emittenti automatica
7Stop 20 Cartella-
8Regolazione suono 21 Ripetere
9On/O 22 Salvare
10 Modalità 23 Aprire/Chiudere sportello
vano CD
11 Interruttore di rete 24 Luce on/o
12 Connessione USB 25 Connessione schede SD
13 Sportello vano CD

101
IT
ATTENZIONE
Pericolo di lesioni!
Tenere le batterie
fuori dalla portata
dei bambini.
L‘ingestione può
causare gravi
lesioni o la morte
per ustioni interne
in sole due ore. Se
le batterie vengono
ingoiate, recarsi
immediatamente
al pronto soccorso
dell‘ospedale.
Smaltire
immediatamente le
batterie usate.#
Nota: quando si
programma per
memorizzare le
stazioni radio, i
programmi radio
locali devono
avere un segnale
forte di 20 o più
stazioni per poter
memorizzare 20
stazioni, altrimenti
si può memorizzare
solo il numero
di stazioni che
possono essere
ricevute.
1Selezione modalità 10 Selezione stereo/mono
2Accendere/Standby 11 Riprodurre l’emittente salvata
precedente
3Abbassare il volume 12
Impostare l’emittente desiderata.
Possono essere salvate no a 20
emittenti
4Stop 13 Riprodurre l’emittente salvata
successiva
5Titolo precedente, retrocedere 14 Ändern der Equalizereinstellung
6Salvare nella playlist 15 Saltare il primo titolo della
cartella
7Passare al primo titolo della
cartella 16 Titolo successivo, avanzare
rapidamente
8Ripetere 17 Alzare il volume
9Ricerca emittenti automatica 18 Play/Pausa

102
IT
MESSA IN FUNZIONE
Impostare l’ora
Versione americana:
se il dispositivo viene messo in standby, lo schermo LCD si illumina e
mostra l’ora “12:00”.
Versione europea:
se il dispositivo viene messo in standby, lo schermo LCD si illumina e
mostra l’ora “00:00”.
Esempio:
• Per impostare l’ora, premere PROG sul pannello di controllo o sul
telecomando e tenerlo premuto per 3-5 secondi, no a quando sullo
schermo compare “12” (“12 signica che è stato impostato il formato a 12
ore).
• Premendo NEXT o PREV è possibile selezionare il formato a 12 o 24 ore.
Non appena “12-H” compare sullo schermo, premere di nuovo PROG.
Sullo schermo compare quindi “00:00”, ma il “12” lampeggia comunque.
Per impostare l’ora corretta, utilizzare NEXT o PREV su pannello di
controllo o telecomando (l’ora viene impostata in formato a 12 ore) e
confermare poi con PROG. Per impostare i minuti corretti, utilizzare
NEXT o PREV su pannello di controllo o telecomando e confermare poi
con PROG.
Nota: l’orario viene salvato nel dispositivo solo se si trova in modalità
di funzionamento o standby. Se si desidera salvare l’ora impostata, non
premere assolutamente l’interruttore di rete, ma solamente il tasto ON/
OFF, in modo da passare in standby. Se si preme l’interruttore di rete,
l’ora impostata viene cancellata ed è necessario impostarla nuovamente
all’accensione successiva.

103
IT
RADIO FM
Gamma di frequenza: 87,5-108 MHz
Questo dispositivo è dotato di radio FM integrata. Possono essere salvate
no a 20 emittenti FM. Quando si utilizza il dispositivo per la prima volta,
premere POWER per passare in standby. Premere ON/OFF sul pannello
di controllo o POWER sul telecomando per accendere il dispositivo. Il
dispositivo si avvia in modalità FM. Sullo schermo compare “FM 87,5 MHz”
e dagli altoparlanti inizia a uscire un rumore gracchiante (a meno che nella
vostra regione ci sia un’emittente che trasmette sulla frequenza 87,5 MHz).
Se il dispositivo non si attiva in modalità FM, premere più volte MODE sul
dispositivo o FUNCTION sul telecomando, no a quando sullo schermo
compare la modalità FM.
Ricerca automatica delle emittenti e salvataggio delle emittenti trovate
Premere AUTO per iniziare la ricerca automatica delle emittenti dalla
frequenza 87,5 MHz in avanti. Le prime 20 emittenti trovate vengono
salvate automaticamente (indicazione P01-P20). Premere PR- o PR+ per
visualizzare in successione tutte le emittenti salvate.
Ricerca automatica delle emittenti senza salvataggio delle emittenti
trovate
Tenere premuti / per trovare un’emittente con buona ricezione con
frequenza crescente o decrescente. Questa funzione di ricerca automatica
non prevede il salvataggio delle emittenti trovate. La ricerca non viene
proseguita dopo che è stata trovata un’emittente.
Nota: premendo più volte brevemente / , la gamma di frequenza
viene regolata in intervalli di 0,5 MHz.
Nota: quando si programma per memorizzare le stazioni radio,
i programmi radio locali devono avere un segnale forte di 20 o
più stazioni per poter memorizzare 20 stazioni, altrimenti si può
memorizzare solo il numero di stazioni che possono essere ricevute.

104
IT
Salvataggio manuale delle emittenti
Premere / per impostare le vostre emittenti preferite. Premere
MEM. Sullo schermo compare “P01”. Se si preme PR- o PR+ entro 3 secondi,
è possibile selezionare la posizione di salvataggio. Premere MEM entro tre
secondi per salvare. Possono essere salvate no a 20 emittenti.
Nella versione americana della frequenza FM, la frequenza cambia
in intervalli di 0,1 MHz, mentre in quella europea di 0,5 MHz. Estrarre
completamente l’antenna del dispositivo, in modo da ottenere la migliore
ricezione possibile (l’antenna FM si trova sul retro del dispositivo).
Nota: se si desidera salvare un’emittente, questa deve essere dotata
di un buon segnale, altrimenti non è possibile riprodurla, anche se la
frequenza è stata salvata.
MODALITÀ CD
1. Premere MODE no a quando sullo schermo compare “----”. In seguito
compare sullo schermo il numero di titoli che si trovano sul CD e si
avvia la riproduzione.
2. Premere OPEN/CLOSE sul pannello di controllo o EJECT sul
telecomando per aprire il vano CD.
3. Inserire un CD con il lato stampato rivolto verso l’alto e quello a
specchio verso il basso.
4. Premere di nuovo OPEN/CLOSE sul pannello di controllo o EJECT sul
telecomando per chiudere il vano CD.
5. Premere per selezionare il titolo desiderato.
6. Premere una volta REP per ripetere un titolo. Nell’angolo in alto a
sinistra dello schermo lampeggia ora “REP”. Se si preme di nuovo REP,
vengono ripetuti tutti i titoli sul CD. Nell’angolo in alto a sinistra dello
schermo, “REP” rimane illuminato. Se si preme di nuovo REP, la funzione
di ripetizione viene interrotta.
7. Per attivare la riproduzione casuale, premere REP no a quando sullo
schermo compare “RAN”.

105
IT
8. Per salvare brani in una playlist, premere per prima cosa il tasto
STOP . Premere PROG per raggiungere la modalità di salvataggio.
Lo schermo si illumina e mostra “P01”. Selezionare il brano da salvare
nella playlist e premere di nuovo PROG. Premere per interrompere
il salvataggio nella playlist o per avviare la riproduzione della playlist.
Nella playlist possono essere salvati no a 20 titoli.
9. Ruotare la manopola del volume in senso orario per alzarlo no al
livello desiderato.
10. Ruotare la manopola del volume in senso antiorario per abbassarlo no
al livello desiderato.
USB/SCHEDA SD
1. Premere MODE più volte, no a quando sullo schermo compare
“USB - - - -”. Sullo schermo compare il numero di cartelle, il numero di
titoli e si avvia la riproduzione.
2. Premere / o F+10/F-10 per selezionare il titolo desiderato.
3. Premere una volta REP per ripetere un titolo. Nell’angolo in alto a
sinistra dello schermo lampeggia ora “REP”. Se si preme di nuovo REP,
vengono ripetuti tutti i titoli sul CD. Nell’angolo in alto a sinistra dello
schermo, “REP” rimane illuminato. Se si preme di nuovo il tasto, la
funzione di ripetizione viene interrotta.
4. Per attivare la riproduzione casuale, premere REP no a quando sullo
schermo compare “RAN”.
5. Per salvare brani in una playlist, premere per prima cosa il tasto
STOP .

106
IT
MODALITÀ BT
1. Premere più volte MODE, no a quando sullo schermo compare “VT”.
Attendere 3 secondi, no a quando il dispositivo viene trovato dai
dispositivi BT nell’elenco dei dispositivi disponibili.
2. Attivare il BT sul dispositivo esterno e cercare i dispositivi BT disponibili
nell’elenco.
3. Selezionare “JUKEBOX” dall’elenco.
4. Non appena i dispositivi sono accoppiati con successo, sullo schermo
compare “connected”. Ora è possibile riprodurre i brani dal dispositivo
portatile. Il controllo è possibile sia dal dispositivo portatile che dal
jukebox o dal suo telecomando.
a) Riproduzione dal dispositivo: utilizzare i tasti VOL+/VOL-, e
/ per regolare il volume, mettere in pausa o proseguire la
riproduzione, passare al titolo precedente o a quello successivo.
b) La riproduzione può essere gestita anche con il telecomando del
dispositivo,
c) Non appena i dispositivi sono accoppiati, il dispositivo BT portatile
avvia automaticamente la riproduzione.
d) Premere VOL+/VOL- per regolare il volume.
e) Premere / per passare al brano precedente o successivo.
f) Premere per procedere con la riproduzione.
g) Per terminare l’accoppiamento, premere MODE e selezionare
un’altra modalità o disattivare la funzione BT sul dispositivo
portatile.
Consigli per la connessione BT
1. Se si desidera collegare il jukebox a un dispositivo BT portatile,
posizionare i due dispositivi il più vicino possibile tra loro.
2. La connessione BT potrebbe non avvenire correttamente nei seguenti
casi:
• C’è un ostacolo tra jukebox e dispositivo BT.
• Un altro dispositivo, ad esempio attrezzatura medica, microonde o
altri dispositivi Wi-Fi, utilizza la stessa frequenza del dispositivo BT.
• In un dato momento può essere collegato al jukebox solo un
dispositivo BT portatile. Un accoppiamento multiplo non è
possibile.

107
IT
Salvataggio di brani in una playlist (in modalità BT)
1. Premere durante la riproduzione musicale.
2. Premere PROG. Nell’angolo in alto a sinistra dello schermo lampeggia
“PROG”. Lampeggia anche una posizione di salvataggio, ad es. “P01”.
3. Premere / per selezionare il brano da salvare. Premere PROG
per salvarlo.
4. Ripetere i passaggi 2-3 per salvare ulteriori brani.
5. Quando sono stati salvati tutti i brani desiderati, premere per
avviare la riproduzione.
6. La procedura di salvataggio può essere interrotta in ogni momento
premendo .
7. Quando si raggiunge il numero massimo di brani salvati, lo schermo
mostra “FUL”.
ATTIVARE GLI EFFETTI LUMINOSI
Il dispositivo è dotato di diversi eetti LED multicolore, che possono essere
impostati tramite i controlli LED. Il vano CD, la connessione USB/SD e il lato
inferiore degli altoparlanti possono essere illuminati. Premere LIGHT sul
pannello di controllo per attivare gli eetti luminosi. Tutti gli eetti luminosi
si accendono.
• Gli eetti luminosi funzionano indipendentemente dall’interruttore di
rete POWER. Gli eetti luminosi possono essere controllati dal retro del
dispositivo.
• Sul retro del dispositivo si trova un interruttore per il modulo luminoso
LED. I LED multicolore si illuminano in diversi colori.
PLAY
Il colore della luce
cambia costantemente
HOLD
Un determinato colore
della luce (o nessuna
luce)

108
IT
• Se si imposta la modalità “HOLD”, i LED si illuminano di un solo colore.
Se si sceglie “PLAY”, vengono cambiati diversi colori in sequenza.
• Se si torna in modalità “HOLD”, è possibile selezionare un colore
da mostrare in modo permanente (tenere presente che questi colori
devono essere impostati e può quindi capitare che non la luce non sia
dello stesso colore che è stato indicato quando il dispositivo è passato
in modalità “HOLD”).
• Premere LIGHT per spegnere gli eetti luminosi.
Nota: in modalità “Hold” può capitare che non sia visibile alcuna luce (in
tal caso è necessario regolare l’interruttore).

109
IT
UTILIZZO DEL LETTORE MULTIMEDIALE
Premere MODE, no a quando sullo schermo compare “MP5”. Attendere
circa 5 secondi, no a quando il dispositivo si è avviato completamente.
Cliccare sul tasto indicato.
Cliccare su “Settings”
(impostazioni).
Cliccare sul simbolo indicato.
Selezionare la lingua desiderata e
l’inserimento
Scegliere
la lingua

110
IT
Attivare il Wi-Fi.
a) Impostare la rete Wi-Fi desiderata nei “Settings” (impostazioni). È
possibile adattare altri progetti alle necessità individuali.
b) Una volta connesso con la rete è possibile navigare in Internet con il
dispositivo, utilizzare QQ-Chat o WeChat e inviare o ricevere email.
c) I le USB possono essere letti tramite la connessione USB sul lato del
dispositivo.
d) È possibile cercare musica, le video o immagini.
NOTE IMPORTANTI SULL’UTILIZZO
• Se si utilizza il dispositivo di fretta, possono risultare malfunzionamenti.
In tal caso è necessario riavviare il dispositivo.
• Se non si è sicuri sulle modalità di utilizzo del dispositivo, prendere
condenza con l’utilizzo di tablet.
• Non lasciare che i bambini utilizzino oggetti taglienti sul dispositivo del
dispositivo, altrimenti potrebbe graiarsi.

111
IT
SVUOTARE LA CACHE
1. Cliccare sul simbolo SETTINGS (impostazioni).
2. Nelle impostazioni selezionare STORAGE & USB (memoria & USB).
3. Selezionare poi INTERNAL STORAGE (memoria interna) e poi APPS
(applicazioni).
4. Selezionare il simbolo per VIDEO PLAYER o MUSIC.

112
IT
5. Selezionare sotto STORAGE (memoria) l’opzione CLEAR DATA
(cancellare i dati).
6. Selezionare OK per cancellare le informazioni rilevanti che restano
dopo la riproduzione.
COME RISTABILIRE LE IMPOSTAZIONI DI
FABBRICA
Per cancellare tutti gli altri
contenuti e le tracce dell’elenco
di riproduzione e le informazioni
inerenti tutti gli altri procedimenti,
cliccare su BACKUP AND RESET
(copia e azzera).
Cliccare poi la sottovoce FACTORY
DATA RESET (ristabilire le
impostazioni di fabbrica). Attendere
poi 1-3 minuti nché le impostazioni
di fabbrica sono state ristabilite.

113
IT
CORREZIONE DEGLI ERRORI
Problema Possibile causa e soluzione
Nessuna ricezione radio in modalità
FM.
È stata selezionata la modalità
sbagliata. Premere /
per selezionare un’emittente.
Mettere la connessione Audio-In in
posizione “O”. Premere VOL+ per
alzare il volume.
Il CD non viene riprodotto o l’audio
è interrotto.
Inserire il CD nell’apposito vano
con il lato stampato verso l’altro e
quello riettente verso il basso.
Pulire il CD.
L’audio viene riprodotto a
intermittenza in modalità CD.
Posizionare il dispositivo su una
supercie piana.
Premere ON/OFF.
In modalità CD, i brani salvati nella
playlist non vengono riprodotti.
Premere e salvare poi il titolo
desiderato del CD nella playlist.
Il dispositivo non funziona. La spina non è inserita nella presa
elettrica.
Assicurarsi che il cavo di
alimentazione sia collegato
correttamente.
Posizionare l’interruttore di rete su
“ON”.
Non viene emesso alcun suono. Premere ON/OFF. Alzare il volume
con VOL+.
Ronzio intenso o rumori di
interferenza.
Il televisore o il VCR sono troppo
vicini al dispositivo.
Spostare il dispositivo.
Lo schermo non mostra nulla. Spegnere e riaccendere il
dispositivo.

114
IT
SMALTIMENTO
Se nel proprio paese si applicano le
regolamentazioni inerenti lo smaltimento di
dispositivi elettrici ed elettronici, questo simbolo
sul prodotto o sulla confezione segnala che questi
prodotti non possono essere smaltiti con i riuti
normali e devono essere portati a un punto di
raccolta di dispositivi elettrici ed elettronici. Grazie
al corretto smaltimento dei vecchi dispositivi si
tutela il pianeta e la salute delle persone da possibili
conseguenze negative. Informazioni riguardanti
il riciclo e lo smaltimento di questi prodotti si
ottengono presso l’amministrazione locale oppure il
servizio di gestione dei riuti domestici.
Il prodotto contiene batterie. Se nel proprio
paese si applicano le regolamentazioni inerenti
lo smaltimento di batterie, non possono essere
smaltite con i normali riuti domestici. Preghiamo
di informarvi sulle regolamentazioni vigenti sullo
smaltimento delle batterie. Grazie al corretto
smaltimento dei vecchi dispositivi si tutela l’ambiente
e la salute delle persone da conseguenze negative.
DICHIARAZIONE DI CONFORMITÀ
Produttore:
Chal-Tec GmbH, Wallstraße 16, 10179 Berlino,
Germania.
Importatore per la Gran Bretagna:
Berlin Brands Group UK Limited
PO Box 42
272 Kensington High Street
London, W8 6ND
United Kingdom
Il fabbricante, Chal-Tec GmbH, dichiara che il tipo di
apparecchiatura radio Graceland Touch è conforme
alla direttiva 2014/53/UE. Il testo completo della
dichiarazione di conformità UE è disponibile al
seguente indirizzo Internet: use.berlin/10034802


-
 1
1
-
 2
2
-
 3
3
-
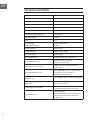 4
4
-
 5
5
-
 6
6
-
 7
7
-
 8
8
-
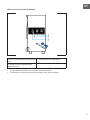 9
9
-
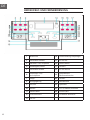 10
10
-
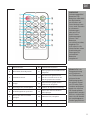 11
11
-
 12
12
-
 13
13
-
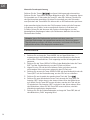 14
14
-
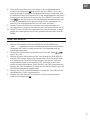 15
15
-
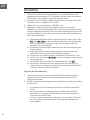 16
16
-
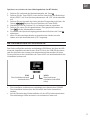 17
17
-
 18
18
-
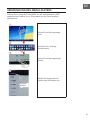 19
19
-
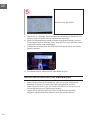 20
20
-
 21
21
-
 22
22
-
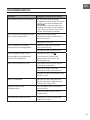 23
23
-
 24
24
-
 25
25
-
 26
26
-
 27
27
-
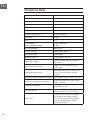 28
28
-
 29
29
-
 30
30
-
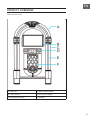 31
31
-
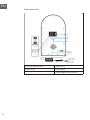 32
32
-
 33
33
-
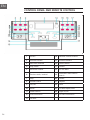 34
34
-
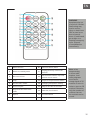 35
35
-
 36
36
-
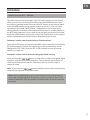 37
37
-
 38
38
-
 39
39
-
 40
40
-
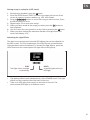 41
41
-
 42
42
-
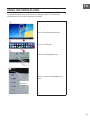 43
43
-
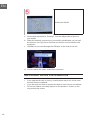 44
44
-
 45
45
-
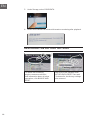 46
46
-
 47
47
-
 48
48
-
 49
49
-
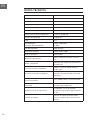 50
50
-
 51
51
-
 52
52
-
 53
53
-
 54
54
-
 55
55
-
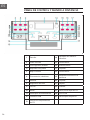 56
56
-
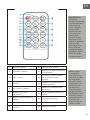 57
57
-
 58
58
-
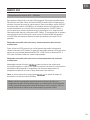 59
59
-
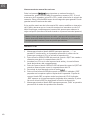 60
60
-
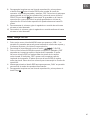 61
61
-
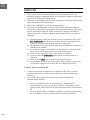 62
62
-
 63
63
-
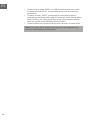 64
64
-
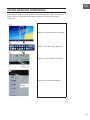 65
65
-
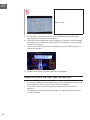 66
66
-
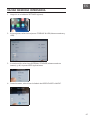 67
67
-
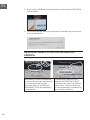 68
68
-
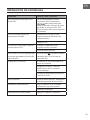 69
69
-
 70
70
-
 71
71
-
 72
72
-
 73
73
-
 74
74
-
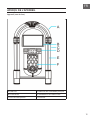 75
75
-
 76
76
-
 77
77
-
 78
78
-
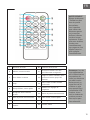 79
79
-
 80
80
-
 81
81
-
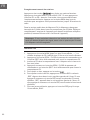 82
82
-
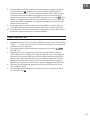 83
83
-
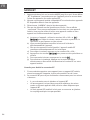 84
84
-
 85
85
-
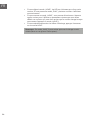 86
86
-
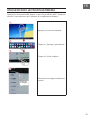 87
87
-
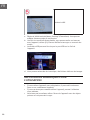 88
88
-
 89
89
-
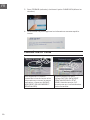 90
90
-
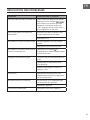 91
91
-
 92
92
-
 93
93
-
 94
94
-
 95
95
-
 96
96
-
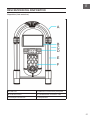 97
97
-
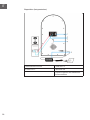 98
98
-
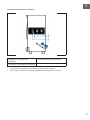 99
99
-
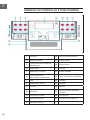 100
100
-
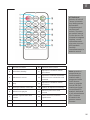 101
101
-
 102
102
-
 103
103
-
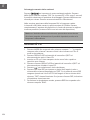 104
104
-
 105
105
-
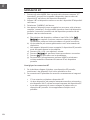 106
106
-
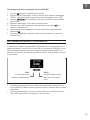 107
107
-
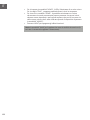 108
108
-
 109
109
-
 110
110
-
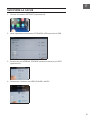 111
111
-
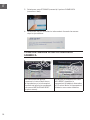 112
112
-
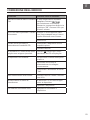 113
113
-
 114
114
-
 115
115
-
 116
116


Auna 10034802 El manual del propietario
- Categoría
- Reproductores de CD
- Tipo
- El manual del propietario
En otros idiomas
- français: Auna 10034802 Le manuel du propriétaire
- italiano: Auna 10034802 Manuale del proprietario
- English: Auna 10034802 Owner's manual
- Deutsch: Auna 10034802 Bedienungsanleitung
Documentos relacionados
Otros documentos
-
Samsung DVD-SH830 Manual de usuario
-
One Concept Streamo Cube Internet Radio + BT Manual de usuario
-
Audiovox VME 9325 BTA Manual de usuario
-
Audiovox NAV102 - GPS Navigation System Add-On Manual de usuario
-
Lenco DIR-170 Manual de usuario
-
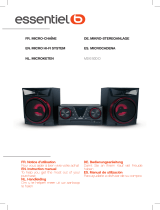 ESSENTIELB MS-E-500-D El manual del propietario
-
Philips DCB2270/10 Guía de inicio rápido
-
Philips DCB3270W/10 Guía de inicio rápido
-
Monster Jukebox Manual de usuario
-
Klarstein 10032798 Watch Winder Manual de usuario
