
EN GLI SH ESPA Ñ O L
OWNER’S MANUAL
ELECTRIC
INDUCTION
RANGE
Read this owner’s manual thoroughly before operating the appliance
and keep it handy for reference at all times.
www.lg.com
MFL68881508_05
LSE4617**
LSE4616**
Copyright © 20 1 6 - 20 1 8 LG Electronics Inc. All Rights Reserved.

2
TABLE OF CONTENTS
T A BLE O F CO N T EN T S
3
I MPO RT A N T SA FET Y
I N ST RU CT I O N S
10
PRO DU CT O V ERV I EW
1 0 Parts
1 0 Accessories
11
I N ST A LLA T I O N
1 1 Installation Overview
1 1 Product Specifications
1 2 Before Installing the Range
1 3 Installing the Range
1 5 Connecting Electricity
1 9 Engaging the Anti-tip D evice
1 9 Optional Rear Filler
20 Test Run
2 1
O PERA T I O N
21 Control Panel Overview
23 K nob Positions
24 Changing Oven Settings
24 Clock
24 Lockout
24 Minimum & Maxi mum D efault Settings
25 Timer On/ Off
25 Wi-Fi
25 Settings
-
Setting the Hour Mode
-
Setting Convection Auto Conversion
-
Adj usting the Oven Temperature
-
Turning the Preheat Alarm Light On/ Off
-
Adj usting the Oven Beeper V olume
-
Selecting Fahrenheit or Celsius
-
Turning the Cooktop Beeper On/ Off
27 Start Time (D elayed Timed Cook)
27 Cook Time (Timed Cook)
27 Oven Light
28 U sing the Cooktop
28 Cooking Areas
28 Benefits of Induction Surface Cooking
28 Induction Cookware
29 Cookware Placement
29 Moving Cookware on the Cooktop
29 Pan Sensing
30 Minimum and Maxi mum Pan Size
30 Hot Cookware and Residual Heat
30 Home Canning
31 Setting Surface Controls
31 Hot Surface Indicator
31 U sing the Cooking Elements
32 The Recommended Surface Cooking
Setting
32 Pan Preheat Recommendations
32 Noises during Cooktop Operation
33 Power Management
33 Warming Z one
34 U sing the Oven
34 Before U sing the Oven
34 Oven V ent
34 U sing Oven Racks
34 Bake
35 Convection Mode
36 Recommended Baking and Roasting G uide
37 Broil
38 Recommended Broiling G uide
39 Warm
39 Proof
39 Speed Roast
40 Meat Probe (For model: LSE46 1 7 )
41 Remote Start
41 Operating the Warming D rawer (For model:
LSE46 1 7 )
43
SMA RT FU N CT I O N S
43 LG SmartThinQ Application
44 Smart D iagnosis™ Function
46 FCC Notice
46 FCC RF Radiation Exp osure Statement
47
MA I N T EN A N CE
47 Cleaning the G lass-Ceramic Cooktop
48 EasyClean
®
51 Self Clean
53 Changing the Oven Light
53 Cleaning the Ext erior
54 Removing and Replacing the Lift-Off Oven
D oors and D rawer
55 D oor Care Instructions
5 6
T RO U BLESH O O T I N G
56 FAQ s
58 Before Calling for Service
62
LI MI T ED W A RRA N T Y

3
IMPORTANT SAFETY INSTRU CTIONS
EN GLI SH
I MPO RT A N T SA FET Y I N ST RU CT I O N S
Read and follow all instructions when using the range to prevent the risk of fire, electric
shock, personal inj ury, or damage. This guide does not cover all possible conditions that
may occur. Always contact your service agent or manufacturer about problems that you do
not understand.
D ownload this owner' s manual at: http: / / www.lg.com
This is the safety alert symbol. This symbol alerts you to potential hazards that
can result in property damage and/ or serious bodily harm or death.
All safety messages will follow the safety alert symbol and either the word
WARNING or CAU TION. These words mean:
W A RN I N G
- Indicates a hazardous situation which, if not avoided, could result
in death or serious inj ury.
CA U T I O N
- Indicates a hazardous situation which, if not avoided, could result
in minor or moderate inj ury.
A N T I - T I P DEV I CE
W A RN I N G
•
T O REDU CE T H E RI SK O F T I PPI N G, T H E A PPLI A N CE MU ST BE SECU RED
BY A PRO PERLY I N ST A LLED A N T I - T I P DEV I CE. T O CH ECK I F T H E DEV I CE I S
I N ST A LLED PRO PERLY , REMO V E T H E DRA W ER BO DY A N D V ERI FY T H A T T H E
A N T I - T I P DEV I CE I S EN GA GED, O R GRA SP T H E T O P REA R EDGE O F T H E
RA N GE BA CK GU A RD A N D CA REFU LLY A T T EMPT T O T I LT I T FO RW A RD. Refer to
the installation section for instructions.
•
It is possible for a child or adult to tip the range and be killed.
•
V erify that the anti-tip device has been properly installed and
attached to the floor or wall and engaged to the leveling leg of the
range.
•
D o not operate the range without the anti-tip device in place and
engaged.
•
Never remove the oven legs. The range will not be secured to the
anti-tip bracket if the legs are removed.
•
D o not step or sit on the oven door. The range could be tipped and
inj ury might result from spilled hot liq uid, food, or the range itself.
•
D o not rest large, heavy items such as whole turkeys on the open
oven door. The range could tip forward and cause injury.
•
Reengage the anti-tip device after pulling the range out for
cleaning, service, or any other reason.
•
Failure to follow these instructions can result in death or serious burns to children or
adults.
Anti-tip
bracket
Leveling
leg

4
IMPORTANT SAFETY INSTRU CTIONS
SA FET Y PRECA U T I O N S
W A RN I N G
This product contains chemicals known to the State of California to cause cancer and
birth defects or other reproductive harm. Wash hands after handling. (US only)
•
DO N O T T O U CH H EA T I N G ELEMEN T S O R I N T ERI O R SU RFA CES O F O V EN . Heating
elements may be hot even though they are dark in color. Interior surfaces of an oven
become hot enough to cause burns. D uring and after use, do not touch or let clothing or
other flammable materials contact heating elements or interior surfaces of oven until they
have had sufficient time to cool. Other surfaces, such as oven vent openings and surfaces
near these openings, oven doors, and windows of oven doors, also get hot and may cause
burns if not cooled.
•
U se care w h en opening door. The hot air and steam that escape can cause burns to
hands, face and eyes. Let hot air or steam escape from the oven before removing or
replacing food in the oven.
•
D o not repair or replace any part of the appliance unless specifically recommended in the
manual. All other servicing should be performed by a q ualified technician.
•
D o not use harsh etching, abrasive cleaners or sharp metal scrapers to clean the oven
door glass since they can scratch the surface. Scratches may cause the glass to shatter.
W A RN I N G
If the door glass, cooktop glass, surface, or oven heating unit of the range are damaged,
discontinue use of the range and call for service.
•
D o not operate the oven without the charcoal heater mesh.
•
D o not use plastic to cover food. U se foil or oven-safe lids only.
•
D o not allow anyone to climb, stand or hang on the door, storage drawer or cooktop. They
could damage the range and even tip it over, causing severe personal inj ury.
•
D o not line the oven walls, racks, bottom, or any other part of the oven with aluminum foil
or any other material. D oing so will disrupt heat distribution, produce poor baking results
and cause permanent damage to the oven interior (aluminum foil will melt to the interior
surface of the oven)
•
Never attempt to dry a pet in the oven.
•
N ev er use your appliance for w arming or h eating th e room.
•
Always use pot holders or oven mitts when removing food from the oven or the surface
element. Cookware will be hot. U se only dry pot h olders. Moist or damp pot holders on
hot surfaces may result in burns from steam. D o not let the pot holder touch hot heating
elements. D o not use a towel or other bulky cloth to remove food.
•
Do not h eat unopened food containers. Pressure in the containers may cause them to
burst which may result in inj ury.
•
Before using Wi-Fi functions, open the oven door and make sure the oven is ready for pre-
heating.
•
If the supply cord is damaged, it must be replaced by the manufacturer, its service agent
or similarly q ualified persons in order to avoid a hazard.
•
If the range is placed on a base, measures must be taken to prevent the appliance from
slipping off of the base.
•
To avoid the product overheating, do not install a decorative panel on the front of the
appliance.
•
To eliminate the risk of burns or fire by reaching over heated surface units, cabinet storage
space located above the surface units should be avoided. If cabinet storage is to be
provided, the risk can be reduced by installing a range hood that proj ects horizontally a
minimum of 5 inches beyond the bottom of the cabinets.

5
IMPORTANT SAFETY INSTRU CTIONS
EN GLI SH
FLA MMA BLE MA T ERI A LS
W A RN I N G
Remove all packing materials from the appliance before operating. K eep plastic, clothes,
paper, and other flammable materials away from parts of the appliance that may become
hot.
•
D o not store or use flammable material in the oven or near or on the cooktop. Flammable
materials include paper, plastic, pot holders, linens, wall coverings, curtains, and gasoline
or other flammable vapors and liq uids such as grease or cooking oil. These materials can
be ignited when the oven and cooktop are in use.
•
W ear proper apparel. D o not wear loose-fitting or hanging garments, which may ignite if
they contact hot surfaces, and cause severe burns.
•
D o not use the oven for drying clothes. Only use the oven for its intended purpose.
•
If cabinet storage is provided directly above cooking surface, place items that are not
freq uently used and can be safely stored in an area subj ected to heat. Temperatures may
be unsafe for volatile items such as flammable liq uids, cleaners or aerosol sprays.
ELECT RI CA L SA FET Y
•
Always disconnect power from the appliance before servicing.
•
D o not use aluminum foil or any other material to line the oven bottom.
Improper installation of these liners may result in a risk of electric shock or fire.
•
D o not allow aluminum foil or the temperature probe to contact heating elements.
•
Be sure your range is installed and grounded properly by a q ualified installer or service
technician.
W A RN I N G
Before replacing the oven light bulb, switch off the electrical power to the oven at the
main fuse or circuit breaker panel. Failure to do so can result in severe personal inj ury,
death, or electrical shock.
DEEP FA T FRY ER
•
U se ext reme caution when moving or disposing of hot grease.
•
Always heat fat slowly, and watch as it heats.
•
If frying combinations of oils and fats, stir them together before heating.
•
U se a deep fat thermometer, if possible, to prevent overheating fat beyond the smoking
point.
•
U se the least possible amount of fat for effective shallow or deep-fat frying. Filling the pan
with too much fat can cause spillovers when food is added.
CH I LD SA FET Y
•
D o not touch the hot surface between the bottom of the oven door and the top of the
drawer on the front of the oven while the oven is in operation. The surface becomes hot
and can cause burns and other inj ury.
•
D o not leave small children unattended near the oven.

6
IMPORTANT SAFETY INSTRU CTIONS
W A RN I N G
Do not leav e ch ildren alone or unsupervised near the appliance when it is in use or is
still hot. Children should never be allowed to sit or stand on any part of the appliance as
they could be inj ured or burned.
CA U T I O N
D o not store items of interest to children in cabinets above a range or on the back guard
of a range – children climbing on the range to reach items could be seriously inj ured.
•
Never let a child hang on the oven door.
•
D o not allow children to crawl into the oven.
•
Let hot utensils cool in a safe place, out of reach of small children.
•
Children should be supervised to ensure that they do not play with the appliance.
W A RN I N G
•
The appliance and its accessible parts become hot during use. D o not touch heating
elements inside the oven. Y oung children must be continuously supervised if allowed
near the appliance.
•
This appliance is not intended for use by persons (including children) with reduced
physical, sensory or mental capabilities, or lack of exp erience and knowledge, unless they
have been given supervision or instruction concerning use of the appliance by a person
responsible for their safety. D o not allow children to play with the appliance. Any cleaning
and user maintenance performed by children must be supervised.
GLA SS- CERA MI C CO O K I N G SU RFA CE
•
Surface units may be hot even though they are dark in color. Areas near surface units may
become hot enough to cause burns. D uring and after use, DO N O T T O U CH SU RFA CE
U N I T S O R A REA S N EA R U N I T S or let clothing or other flammable materials contact
surface units or areas near units until they have had sufficient time to cool. This includes
the cooktop and the area above the oven door.
•
Do not cook on a broken cooktop. If the cooktop is broken, cleaning solutions and
spillovers may penetrate the broken cooktop and create a risk of electric shock. Switch off
the appliance to avoid the possibility of electric shock and contact a q ualified technician
immediately.
•
D o not use the glass cooktop surface as a cutting board.
•
D o not place or store items that can melt or catch fire on the glass cooktop, even when it
is not being used.
•
Ch oose proper burner size. For smaller pots and pans, use the smaller heating
elements. For larger pots and pans, use the larger heating elements. Select pans that
have flat bottoms large enough to cover the heating elements. U sing undersized pans
exp oses a portion of the heating element to direct contact and may result in clothing
burning.
•
Glazed cookw are. Only certain types of glass, glass-ceramic, ceramic, earthenware,
or other glazed cookware are suitable for range-top service without breaking due to the
sudden change in temperature.
•
Never cook directly on the glass. Always use cookware.
•
Always turn the surface units off before removing cookware. D o not rely on the pan
sensor.

7
IMPORTANT SAFETY INSTRU CTIONS
EN GLI SH
W A RN I N G
Do not leav e fats or oils to h eat unattended on th e cooktop. Spillov ers can result
in a fire.
•
The cooktop is not intended to be operated by means of an ext ernal timer or separate
remote-control system.
•
T urn cookw are h andles inw ard so th ey don' t ex tend ov er adj acent surface units.
This reduces the risk of burns, ignition of flammable materials, and spillage due to
unintentional contact with the cookware.
•
Immediately clean spills on the cooking area to prevent a tough cleaning chore later.
•
Some cleaners can produce dangerous fumes if applied to a hot surface.
•
D o not place metallic obj ects such as knives, forks, spoons, and lids on the cooktop
surface, because they can get hot.
•
Always place the pan in the center of the surface unit you are cooking on. N ev er leav e
surface units unattended at h igh h eat settings. Proper contact of cookware to burner
also will improve efficiency. Boilovers cause smoking and greasy spills that may catch on
fire.
•
Clean cooktop w ith caution. D o not use sponges or cloth to wipe spills on a hot cooking
area. U se a proper metal scraper. If a wet sponge or cloth is used to wipe spills on a hot
cooking area, it can cause steam burns. Some cleaners can produce noxi ous fumes if
applied to a hot surface.
•
D o not turn surface units on before placing cookware.
•
D o not store heavy items above the cooktop surface that could fall and damage it.
•
D o not place aluminum foil or plastic items such as salt and pepper shakers, spoon
holders, or plastic wrappings or any other material on the range when it is in use.
•
D o not use a steel-wool pad or scrub pad or abrasive cleaning pads. They can scratch the
surface.
EN ERGY SA V I N G T I PS
•
Multiple-rack cooking saves time and energy. Whenever possible, cook foods req uiring the
same cooking temperature together in one oven.
•
For optimal performance and energy savings, follow the guides on page 36 for proper rack
and pan placements.
•
Match the size of the cookware to the amount of food being cooked to save energy when
heating. Heating ½ q uart of water req uires more energy in a 3-q uart pot than in a 1 -q uart
pot.
•
U se cookware with flat bottoms to provide the best contact with the cooktop surface when
cooking on the glass-ceramic cooktop.
•
Match the size of the cooktop burner or element to the size of the cookware in use. U sing
a large element for a small pan wastes heating energy, and the exp osed surface of the
element is a burn or fire hazard.
•
Reduce energy use by cleaning light oven soils with the EasyClean
®
feature instead of
self-clean.
•
Avoid opening the oven door more than necessary during use. This helps the oven
maintain temperature, prevents unnecessary heat loss, and saves on energy use.

8
IMPORTANT SAFETY INSTRU CTIONS
SA FET Y DU RI N G U SE
CA U T I O N
Supervise all cooking processes. Continuously supervise q uick cooking processes.
•
D uring use the appliance becomes hot. Care should be taken to avoid touching heating
elements inside the oven.
•
D o not touch the oven racks while they are hot.
•
D o not block the vent opening.
•
Only arrange oven racks when the oven is cool.
•
If a rack must be moved while the oven is hot, do not let the pot holder contact the hot
heating element in the oven.
•
U se caution with the Timed Cook or D elayed Timed Cook features. U se the automatic
timer when cooking cured or frozen meats and most fruits and vegetables. Foods that can
easily spoil, such as milk, eggs, fish, meat or poultry, should be chilled in the refrigerator
first. Even when chilled, they should not stand in the oven for more than 1 hour before
cooking begins, and should be removed promptly when cooking is complete. Eating
spoiled food can result in sickness from food poisoning.
•
Accessible parts may become hot when the grill is in use.
•
D o not place food or cookware on the bottom of the oven cavity. D oing so will cause
permanent damage to the oven bottom finish.
•
Only use the temperature probe recommended for this oven.
•
Do not use w ater on grease fires. Should an oven fire occur, leave the oven door closed
and turn the oven off. If the fire continues, throw baking soda on the fire or use a fire
ext inguisher. D o not put water or flour on the fire. Flour may be exp losive and water can
spread a grease fire and cause personal inj ury.
•
Pull the oven rack to the stop-lock position when loading and unloading food from the
oven. This helps prevent burns caused by touching hot surfaces of the door and oven
walls.
•
D o not use the oven if a heating element develops a glowing spot during use or shows
other signs of damage. A glowing spot indicates the heating element may fail and present
a potential burn, fire, or shock hazard. Turn the oven off immediately and have the heating
element replaced by a q ualified service technician.
•
When using cooking or roasting bags in the oven, follow the manufacturer’ s directions.
SA FET Y W H EN CLEA N I N G
CA U T I O N
Remov e food, cookw are, racks, and accessories from th e ov en before operating
th e self- cleaning function. Remov e any items placed in th e bottom draw er.
•
Avoid touching the door, window, or oven vent area during a cleaning cycle, and keep
children away from the appliance. These surfaces may get hotter than usual.
•
D o not use a steam cleaner to clean the oven.
•
Open a window or turn on a ventilation fan or hood before self-cleaning.
•
If the oven is heavily soiled with oil, self-clean the oven before using the oven again. The
oil could cause a fire.
•
Wipe up heavy soil on the bottom of the oven or the exce ss spillage before using the Self
Clean function.
•
Do not use ov en cleaners. Commercial oven cleaner or oven liner protective coating of
any kind should not be used in or around any part of the oven.

9
IMPORTANT SAFETY INSTRU CTIONS
EN GLI SH
•
Never keep pet birds in the kitchen. The health of birds is ext remely sensitive to the fumes
released during an oven self-clean cycle. Fumes may be harmful or fatal to birds. Move
birds to a well-ventilated room.
•
Clean in the self-clean cycle only parts listed in this manual. Before self-cleaning the oven,
remove the broiler pan, all oven racks, the meat probe and any utensils or food from the
oven.
•
Important Instruction. The oven displays an F error code and sounds three long beeps
during the self-cleaning process if it malfunctions in the self-clean mode. Switch off the
electrical power to the main fuse or breaker and have the oven serviced by a q ualified
technician.
•
It is normal for the cooktop of the range to become hot during a self-clean cycle.
Therefore, touching the cooktop during a self-clean cycle should be avoided.
•
Never pour cold water over a hot oven for cleaning. D oing so may cause the oven to
malfunction.
•
Make sure oven lights are cool before cleaning.
•
Do not clean door gasket. The door gasket is essential for a good seal. Care should be
taken not to rub, damage, or move the gasket.
•
If there is a fire in the oven during self-clean, turn the oven off and wait for the fire to go
out. D o not force the door open. Introduction of fresh air at self-clean temperatures may
lead to a burst of flame from the oven. Failure to follow this instruction may result in severe
burns.
CO O K MEA T A N D PO U LT RY T H O RO U GH LY
•
To protect against food-borne illnesses, cook meat and poultry thoroughly. The U SD A has
indicated the following as safe minimum internal temperatures for consumption:
•
G round meats: 1 6 0 ° F
•
Poultry: 1 6 5 ° F
•
Beef, veal, pork, or lamb: 1 45 ° F
•
Fish/ seafood: 1 45 ° F

10
PROD U CT OV ERV IEW
PRO DU CT O V ERV I EW
Parts
Warming drawer
(For Model: LSE46 1 7 )
Storage drawer
(For Model: LSE46 1 6 )
Cooktop
G lass-ceramic
Cooktop controller
Model and serial
number plate
G asket
Oven door
Cooktop
knob
Oven mode
knob
A ccessories
I ncluded A ccessories
For Model: LSE46 1 7
Heavy rack (2ea) G liding rack (1 ea) Meat probe (1 ea) Bottom rack (1 ea)
Cleaner
Cooktop cleaner
(1 ea)
Spray bottle
(1 ea)
Non-scratch
scouring pad (1 ea)
For Model: LSE46 1 6
Cleaner
Standard Rack (3ea) Cooktop cleaner
(1 ea)
Spray bottle
(1 ea)
Non-scratch scouring pad
(1 ea)
O ptional A ccessories
G rid Broiler pan
N O T E
•
Contact LG Customer Service at 1 -8 0 0 -243-0 0 0 0 (1 -8 8 8 -542-26 23 in Canada) if any accessories are
missing.
•
For your safety and for ext ended product life, only use authorized components.
•
The manufacturer is not responsible for product malfunction or accidents caused by the use of separately
purchased, unauthorized components or parts.
•
The images in this guide may be different from the actual components and accessories, which are subject
to change by the manufacturer without prior notice for product improvement purposes.

11
INSTALLATION
EN GLI SH
I N ST A LLA T I O N
I nstallation O v erv iew
Please read the following installation instructions first after purchasing this product or transporting it to another
location.
Check and choose the
proper location
Plug in the power cord Engage the anti-tip device Test run
Install anti-tip device Level the range Connect electric range
Conduit
connection
plate
Black White Red
Terminal
block
240 V or 20 8 V
Product Specifications
The appearance and specifications listed in this manual may vary due to constant product improvements.
O v en Range Models LSE4617, LSE4616
Description Electric Induction Slide In Oven Range
Electrical req uirements
LSE46 1 7 : 1 2.7 kW 1 20 / 240 V AC or 1 0 .5 kW 1 20 / 20 8 V AC
LSE46 1 6 : 1 1 .6 kW 1 20 / 240 V AC or 9 .8 kW 1 20 / 20 8 V AC
Ex terior Dimensions
29
7
/
8
"
(W) x 37
7
/
8
"
(H) x 26
1
/
2
"
(D ) (D with door closed)
7 5.7 cm (W) x 9 6 cm (H) x 6 7 .3 cm (D ) (D with door closed)
H eigh t to cooking surface 36
"
(9 1 .4 cm)
N et w eigh t
LSE46 1 7 : 1 9 8 .4 lb (9 0 .0 kg)
LSE46 1 6 : 1 9 1 .8 lb (8 7 .0 kg)
T otal capacity Total cap.: 6 .3 cu. ft.

12
INSTALLATION
Before I nstalling th e Range
W A RN I N G
T ip - O v er H azard
A child or adult can tip the range and
be killed. V erify the anti-tip bracket
has been installed. Ensure the
anti-tip bracket is engaged when the
range is moved.
D o not operate the range without the
anti-tip bracket in place. Failure to
follow these instructions can result
in death or serious burns to children
and adults.
To check that leveling leg is
inserted into anti-tip bracket,
grasp the top rear edge
of the range and carefully
attempt to tilt it forward.
Anti-tip
bracket
Leveling
leg
If you did not receive an anti-tip bracket with your
purchase, call 1 -8 0 0 -243-0 0 0 0 (1 -8 8 8 -542-26 23 in
CANAD A) to receive one at no cost.
W A RN I N G
•
T h e information in th is manual sh ould be
follow ed ex actly. Failure to do so may result
in fire, electrical shock, property damage,
personal inj ury, or death.
•
W ear glov es during th e installation
procedure. Failure to do so can result in bodily
inj ury.
Parts not Prov ided
4-Wire cord or
3-Wire cord
(U L approved 40 or 50
AMP)
Strain relief
( For conduit
I nstallations only)
T ools N eeded
Phillips screwdriver
Level
Flat-blade screwdriver
Adj ustable wrench
1
/
4
" Nut driver
D rill
Pliers
Safety glasses
Tape measure
G loves
Parts Prov ided
Template (1 ) Anti-tip bracket kit (1 )
Anchor sleeves (6 ) Lag bolts (6 )
Rear ller (1)
N O T E
•
Observe all governing codes and ordinances.
•
Have the installer show you the location of the circuit breaker or fuse. Mark it for easy reference.
•
As when using any appliance generating heat, there are certain safety precautions you should follow.
•
Be sure your range is installed and grounded properly by a q ualified installer or service technician.

13
INSTALLATION
EN GLI SH
I nstalling th e Range
U npacking and Mov ing th e Range
CA U T I O N
•
U se tw o or more people to mov e and install
th e range. ( Ex cessiv e W eigh t H azard) Failure
to do so can result in back or other inj ury.
•
Do not use th e door h andles to push or
pull th e range during installation or w h en
mov ing th e range out for cleaning or
serv ice. D oing so can result in serious damage
to the door of the range.
Remove packing material, tape and any temporary
labels from your range before using. D o not remove
any warning-type labels, the model and serial number
label, or the Tech Sheet that is located on the back of
the range.
To remove any remaining tape or glue, rub the area
briskly with your thumb. Tape or glue residue can also
be easily removed by rubbing a small amount of liq uid
dish soap over the adhesive with your fingers. Wipe
with warm water and dry.
D o not use sharp instruments, rubbing alcohol,
flammable fluids, or abrasive cleaners to remove tape
or glue. These products can damage the surface of
your range.
Y our range is heavy and can be installed on soft
floor coverings such as cushioned vinyl or carpeting.
U se care when moving the range on this type of
flooring. U se a belt when moving the range to prevent
damaging the floor. Or slide the range onto cardboard
or plywood to avoid damaging the floor covering.
Ch oosing th e Proper Location
CA U T I O N
•
A v oid placing cabinets abov e th e range. To
minimize the hazard caused by reaching over
the open flames of operating burners, install a
ventilation hood over the range that proj ects
forward at least five inches beyond the front of
the cabinets.
•
Make sure w all cov ering, countertop and
cabinets around th e range can w ith stand
th e h eat ( up to 19 4 ° F) generated by th e
range. D iscoloration, delamination or melting
may occur. This range has been designed to
comply with the maxi mum allowable wood
cabinet temperature of 1 9 4 ° F.
•
Before installing th e range in an area
cov ered w ith linoleum or oth er synth etic
floor cov ering, make sure th e floor cov ering
can w ith stand temperatures of at least
2 0 0 ° F ( 9 3 ° C) .
•
U se an insulated pad or
1
/
4
in. ( 0 . 64 cm)
plyw ood under th e range if installing th e
range ov er carpeting.
The range should always be plugged into its own
individual properly grounded electrical outlet. This
prevents overloading house wiring circuits which
could cause a fire hazard from overheated wires. It is
recommended that a separate circuit serving only this
appliance be provided.
Mobile H ome - A dditional I nstallation
Req uirements
The installation of this range must conform to the
Manufactured Home Construction and Safety
Standard, Title 24 CFR, Part 328 0 (formerly the
Federal Standard for Mobile Home Construction
and Safety, Title 24, HU D Part 28 0 ), or when
such standard is not applicable, the Standard for
Manufactured Home Installations, ANSI A225.1 / NFPA
50 1 A or with local codes.
•
When this range is installed in a mobile home, it
must be secured to the floor during transit. Any
method of securing the range is adeq uate as long
as it conforms to the standards listed above.
•
A four-wire power supply cord or cable must be
used in a mobile home installation.

14
INSTALLATION
Dimensions and Clearances
N O T E
Save for the use of the local electrical inspector.
36 "
(9 1 .4 cm)
29 .8 "
(7 5.7 cm)
24"
(6 0 .9 cm)
Cabinet
Cabinet
opening
A
Acceptable
electrical
outlet area
3" (7 .6 cm)
24"
(6 0 .9 cm)
3" (7 .6 cm)
25"
(6 3.5 cm)
Normal counter
top depth
36 "
(9 1 .4 cm)
Counter
top height
4"
(1 0 cm)
9 "
(23 cm)
9 "
(23 cm)
4"
(1 0 cm)
W all
Center
1 5" (38 cm)
1 1 " (28 cm)
2.5" (6 .3 cm)
6 "
(1 5.2 cm)
5"
(1 3 cm)
6 "
(1 5.2 cm)
2.5"
(6 .3 cm)
A = 30 " (7 6 .2 cm) For U .S.A
= 30 " (7 6 .2 cm) ~ 31 " (7 8 .7 cm) For CANAD A
For installation in Canada, a free-standing range is not to be installed closer than
1 5
/
32
"
(1 2 mm) from any
adj acent surface.
30 "
(7 6 .2 cm)
* 30 " (7 6 .2 cm)
Minimum
* * 1 5"
(38 .1 cm)
36 "
(9 1 .4 cm)
Minimum Dimensions
* 30 " (7 6 .2 cm) minimum clearance between the top of the cooking surface and the bottom of an unprotected
wood or metal cabinet; or 24" (6 0 .9 cm) minimum when bottom of wood or metal cabinet is protected by not less
than
1
/
4
"
(6 .4 cm) flame retardant millboard covered with not less than no. 28 MSG sheet steel, 0 .0 1 5" (0 .38 1 mm)
stainless steel, 0 .0 24" (0 .6 1 0 mm) aluminum or 0 .0 20 " (0 .50 8 mm) copper.
* * 1 5" (38 .1 cm) minimum between countertop and adj acent cabinet bottom.

15
INSTALLATION
EN GLI SH
I nstalling th e A nti- tip Dev ice
Anti-tip
bracket
Leveling
leg
W A RN I N G
T ip - O v er H azard
A child or adult can tip the range and
be killed. V erify the anti-tip bracket
has been installed. Ensure the anti-tip
bracket is engaged when the range
is moved. D o not operate the range
without the anti-tip bracket in place.
Failure to follow these instructions
can result in death or serious burns to
children and adults.
To check that leveling leg is
inserted into anti-tip bracket,
grasp the top rear edge
of the range and carefully
attempt to tilt it forward.
Wall plate
Anti-tip
bracket
Screw must
enter wood or
concrete
Locate th e anti- tip bracket using th e template
An anti-tip bracket is packaged with the template.
The instructions include necessary information to
complete the installation. Read and follow the range
installation instruction sheet (template).
Lev eling th e Range
Level the range by adj usting the leveling legs with a
wrench. Ext ending the legs slightly may also make it
easier to insert the rear leg into the anti-tip bracket.
U se a level to check your adjustments. Place the level
diagonally on the oven rack, and check each direction
for level.
First check direction
.
Then check direction
. If the level doesn’ t show level
on the rack, adj ust the leveling legs with a wrench.
1
2
Connecting Electricity
Electrical Req uirements
This appliance must be installed and grounded on a
branch circuit by a q ualified technician in accordance
with the National Electrical code ANSI/ NFPA NO. 7 0 -
latest edition.
All wiring should conform to Local and NEC codes.
This range req uires a single-phase, 3 wire, A.C
1 20 / 20 8 V or 1 20 / 240 V 6 0 Hz electrical system. U se
only a 3-conductor or a 4-conductor U L-listed range
cord with closed-loop terminals, open-end spade
lugs with upturned ends or similar termination. D o not
install the power cord without a strain relief.
A range cord rated at 40 amps with 1 20 / 240
minimum volt range is req uired. If a 50 amp range
cord is used, it should be marked for use with 1
3
/
8
"
diameter connection openings. This appliance
may be connected by means of a conduit or power
cord. If a conduit is being used, go to page 1 8 for
3 w ire conduit connections or 4 w ire conduit
connections.

16
INSTALLATION
W A RN I N G
•
A llow 2 to 3 ft ( 61. 0 cm to 9 1. 4 cm) of slack
in th e line so th at th e range can be mov ed if
serv icing is ev er necessary.
•
T h e pow er supply cord and plug sh ould
not be modified. I f it w ill not fit th e outlet,
h av e a proper outlet I nstalled by a q ualified
electrician.
•
U sing an ex tension cord to connect th e
pow er is proh ibited. Connect th e pow er
cord and plug directly.
•
Electrical ground is req uired on th is
appliance.
•
Make sure th at th e pow er cord is not
pinch ed by th e range or h eav y obj ects.
Failure to do so can result in serious burns or
electrical shock.
Specified pow er- supply- cord kit rating
Range rating, watts
Specified
rating of
power
supply-
cord kit,
amperes
D iameter (inches)
of Range
connection
Opening
1 20 / 240
volts
3-wire
1 20 / 20 8
volts
3-wire
Power
cord
Conduit
8 ,7 50 -
1 6 ,50 0
1 6 ,50 1 -
22,50 0
7 ,8 0 1 -
1 2,50 0
1 2,50 1 -
1 8 ,50 0
40 or 50 A
50
1
3
/
8
"
1
3
/
4
"
1
1
/
8
"
1
3
/
8
"
3, 4 - Wire electrical wall Receptacle
4 W ire receptacle ( 14- 5 0 R)
3 W ire receptacle ( 10 - 5 0 R)
Connecting th e Pow er Cord
The rear access cover must be removed. Loosen the
two screws with a screwdriver. The terminal block will
then be accessible.
Access cover
U se the cord/ conduit connection plate to install the
power cord or conduit. Leave the connection plate
as installed for power cord installations. Remove the
connection plate for conduit installations and use the
smaller 1
1
/
8
in. (2.8 cm) conduit hole instead of the
1
3
/
8
in. (3.5 cm) power cord hole.
Remove the conduit connection plate
1
1
/
8
"
(2.8 cm) Conduit
1
3
/
8
"
(3.5 cm) Cord
For power cord installations, hook the strain relief
over the 1
3
/
8
in. (3.5 cm) power cord hole located
below the rear of the oven. Insert the power cord
through the strain relief and tighten it.
Conduit
connection
plate
Power cord
Assembling power cord strain relief at the 1
3
/
8
" opening
For conduit installations, insert the conduit strain
relief in the 1
1
/
8
in. (2.8 cm) conduit hole. Then install
the conduit through the body of the strain relief and
fasten the strain relief with its ring.
Cord/
Conduit
connection
plate
Conduit
Ring
Body
Assembling conduit cord strain relief at the 1
1
/
8
" opening

17
INSTALLATION
EN GLI SH
3- W ire Connection : Pow er Cord
W A RN I N G
•
T h e middle ( neutral or ground) w ire, w h ich
is w h ite, of a 3- w ire pow er cord or a 3- w ire
conduit h as to be connected to th e middle
post of th e main terminal block. T h e
remaining tw o w ires of th e pow er cord or
conduit h av e to be connected to th e outside
posts of th e main terminal connection block.
Failure to do so can result in electrical shock,
severe personal inj ury or death.
I nstall th e pow er cord as follow s:
For power cord installations, hook the strain relief
over the power cord hole (1
3
/
8
"
) located below the rear
of the oven. Insert the power cord through the strain
relief and tighten it.
Do not install th e pow er cord w ith out a strain
relief.
1
Remove the lower 3 screws from the terminal
block and retain them.
2
Insert the 3 screws through each power cord
terminal ring and into the lower terminals of
the terminal block. Make sure that the center
(neutral) wire, which is white, is connected to the
center lower position of the terminal block.
3
Tighten the 3 screws securely into the terminal
block. D o not remove the ground strap
connections.
3- w ire connection
Black White Red
Terminal
block
Conduit
connection plate
If screws are not tightened securely, it can result in
electrical spark and severe personal inj ury or death.
4- W ire Connection : Pow er Cord
W A RN I N G
•
O nly a 4- conductor pow er- supply cord
kit rated 12 0 / 2 40 v olts, 5 0 amperes and
marked for use w ith ranges w ith closed-
loop connectors or opened spade lugs w ith
upturned ends sh all be used.
T h e w h ite middle ( neutral) w ire of th e pow er
cord or 4- w ire conduit h as to be connected
to th e middle post of th e main terminal
block. T h e oth er tw o w ires of th e pow er
cord or conduit h av e to be connected to
th e outside posts of th e main terminal
connection block. T h e 4th ground w ire
( green) must be connected to th e frame of
th e range w ith th e ground screw . Failure
to do so can result in electrical shock, severe
personal inj ury or death.
I nstall th e pow er cord as follow s:
Do not install th e pow er cord w ith out a strain
relief.
1
Remove the lower 3 screws from the terminal
block and retain them.
2
Remove the ground screw and bend the end of
the ground strap up so the slot is over the hole
of the center screw removed in step 1 .
3
Insert the ground screw into the power cord
ground wire (green) terminal ring and secure it to
the range frame.
4
Insert the 3 screws through each power cord
terminal ring and into the lower terminals of the
terminal block. Make sure that the white center
(neutral) wire is connected to the center lower
position of the terminal block.
5
Tighten the 3 screws securely into the terminal
block. The center screw now attaches the bent
up ground strap to the block.
4- w ire connection
G round
strap
Terminal
block
Conduit
connection plate
G round
screw
Black White Red
Bend strap up
and attach
If screws are not tightened securely, it can result in
electrical spark and severe personal inj ury or death.

18
INSTALLATION
3- W ire Connection: Conduit
I nstall th e conduit as follow s:
Remove the conduit connection plate from the rear of
the oven and rotate it. The conduit hole (1
1
/
8
" ) must
be used.
First, prepare the conduit wires as shown below.
3- W ire
Conduit
connection
plate
G round
wire
or
4- W ire
Second, install the conduit strain relief.
For conduit installations, purchase a strain relief and
insert it in the 1
1
/
8
in. (2.8 cm) conduit hole. Then
install the conduit through the body of the strain relief
and fasten the strain relief with its ring. Reinstall the
bracket.
For conduit connections:
If the wire in the conduit is copper it must be 8 or 1 0
AWG wiring.
If the wire in the conduit is aluminum it must be 6 or 8
AWG wiring.
1
Loosen the lower 3 screws from the terminal
block.
2
Insert the bare wire (white/ neutral) end through
the center terminal block opening. D o not
remove the ground strap connections.
3
Insert the two side bare wire ends into the lower
left and the lower right terminal block openings.
Tighten the 3 screws securely into the terminal
block. (approxi mately 35 - 50 IN-LB)
3- w ire connection
Terminal
block
Black White Red
Wire
ends
Conduit
connection plate
If screws are not tightened securely, it can result in
electrical spark and severe personal inj ury or death.
4- W ire Connection: Conduit
W A RN I N G
•
T h e w h ite middle ( neutral) w ire of th e pow er
cord or 4- w ire conduit h as to be connected
to th e middle post of th e main terminal
block. T h e oth er tw o w ires of th e pow er
cord or conduit h av e to be connected to
th e outside posts of th e main terminal
connection block. T h e 4th ground w ire
( green) must be connected to th e frame of
th e range w ith th e ground screw . Failure
to do so can result in electrical shock, severe
personal inj ury or death.
1
Follow the instructions for installing the conduit
under 3-Wire Connection: Conduit until the strain
relief and bracket are installed. D o not install the
conduit without a strain relief.
2
Loosen the 2 lower left and right screws from
the terminal block. Remove the lower 2 center
screws. D o not discard any screws.
3
Remove the ground screw and bend the end of
the ground strap up so the slot is over the hole
of the center screw removed in step 1 .
4
Attach the ground (green) bare wire end to
the range frame and secure it in place with the
ground screw.
5
Insert the bare wire (white/ neutral) end through the
center terminal block opening. The center screw
now attaches the bent up ground strap to the block.
6
Insert the two side bare wire ends into the left
and the right terminal block openings. Tighten
the 3 screws securely into the terminal block.
(approxi mately 35 - 50 IN-LB)
4- w ire connection
Terminal
block
Black White Red
G round
strap
Wire
ends
Conduit
connection
plate
Bend strap
up and
attach
G round
wire
G round
screw
If screws are not tightened securely, it can result in
electrical spark and severe personal inj ury or death.

19
INSTALLATION
EN GLI SH
Engaging th e A nti- tip Dev ice
•
Move the range close enough to the opening to
plug into the receptacle.
•
Slide the range into position ensuring that the back
leg slides under the anti-tip bracket. The range
should sit flush against the back wall when properly
installed.
•
Carefully attempt to tip the range forward to ensure
that the anti-tip bracket is engaged properly. If
properly installed, the anti-tip bracket will prevent
the range from being tipped. If the range can be
tipped, reinstall the range until the anti-tip bracket is
properly installed and the range will not tip forward.
•
Turn on electrical power. Check the range for
proper operation.
O ptional Rear Filler
If the counter does not bridge the opening at the rear
wall the rear filler kit, that is provided with the slide in
range, will be needed.
N O T E
If the countertop depth is greater than 25" there will
be a gap between the filler kit and the back wall.
If the countertop depth is less than 24" , the control
panel will not sit flush with the countertop.
I nstalling th e Rear Filler
1
U sing a screwdriver, remove the six screws
holding the rear bracket in place and remove the
bracket.
Remove
Rear bracket
2
Attach the rear filler to the range back, sliding
the hooks into the slots as shown. Slide the rear
bracket into the bottom opening in the rear filler.
hook
Rear ller

2 0
INSTALLATION
3
Attach the rear bracket and filler assembly as
shown, using four of the six screws removed in
step 1 .
Lower screws
Slot
4
Store the remaining two screws with these
instructions for future use.
T est Run
Check if the range is properly installed and run a test
cycle.
1
Turn the oven mode knob to the O ff position to
start test.
2
Fill an induction-capable pot with water and
place it on a surface element. Turn on the
surface element. The LED bar should show the
setting and the water should heat. The LED
bar should not fluctuate. Repeat for all surface
elements.
3
After checking all the surface heating elements,
check the locking system by pressing
Probe( LSE4617 Model only) or Clock for three
seconds. The oven door should lock and the
cooktop should not operate while the Lockout
function is turned on. Press Probe( LSE4617
Model only) or Clock for three seconds to
disable Lockout.
4
Now check the oven's operation. Turn the oven
mode knob to select the Bake mode. 350 ° F
appears in the display. Press Start.
5
The oven should finish preheating in 1 5 minutes,
and the convection fan should operate while the
oven is preheating.
6
After checking the oven's operation, turn the
temperature up to 450 ° F and leave the oven on
for at least an hour to help remove any oil which
might cause smoke and odors when first using
the oven.
N O T E
Smoke may come out of the range when it is first
used.

2 1
OPERATION
EN GLI SH
O PERA T I O N
Control Panel O v erv iew
For Model: LSE4617
3UHVVDQGKROGVHFIRUH[WUDIXQFWLRQV
:L)L
1 11
2 3 4 5 6 7 108 9
For Model: LSE4616
1
12 13 14 5 6 15 108 9

2 2
OPERATION
1
Smart Diagnosis
T M
•
U se during the Smart D iagnosis feature.
2
Cook T ime / Clock ( For Model: LSE4617)
•
Press the button to set the desired amount of time
for food to cook. The oven shuts off when the set
cooking time runs out.
•
Press and hold button for three seconds to set the
time of day.
3
Start T ime / Setting ( For Model: LSE4617)
•
Press the button to set the delayed timed cook. The
oven starts at the set time.
•
Press and hold button for three seconds to select
and adj ust oven settings.
4
Probe / Lock O ut ( For Model: LSE4617)
•
Press the button to select Probe function.
•
Press and hold button for three seconds to lock or
unlock the door and control panel.
5
T imer O n/ O ff / * W i- Fi
Press the button to set or cancel timer on oven.
Press and hold button for three seconds to connect
the Wi-Fi.
To disconnect the appliance from the network, delete
it from the registered appliances in the app.
6
O v en Ligh t
Press the button to turn oven light on or off.
7
W arming Draw er ( For Model: LSE4617)
Press the button to select the warming drawer function.
8
- / +
Press the plus button (+ ) to increase cooking time or
oven temperature.
Press the minus button (-) to decrease cooking time
or oven temperature.
9
Start
Press the button to start all oven features.
10
O v en Mode K nob
Turn the knob to select oven operating mode.
11
Flash ing Clock
If the colon in the clock display flashes, press Cook
T ime for three seconds and reset the clock, or press
any key to stop the flashing.
12
Cook T ime ( For Model: LSE4616)
Press the button to set the desired amount of time for
food to cook. The oven shuts off when the set cooking
time runs out.
13
Start T ime ( For Model: LSE4616)
Press the button to set the delayed timed cook. The
oven starts at the set time.
14
Clock / Lock O ut ( For Model: LSE4616)
•
Press button to set the time of day.
•
Press and hold button for three seconds to lock the
door and control panel.
15
Setting ( For Model: LSE4616)
Press button to select and adj ust oven settings.

2 3
OPERATION
EN GLI SH
K nob Positions
After cleaning the oven knobs, make sure to replace each knob in the correct position. Failure to do so can result
in improper operation of the burners.
1 2
Simmer
HI/Boos
t
Simmer
HI/Boos
t
Induction Oven Mode Warm Induction
1
Burner O n I ndicator
The Burner O n indicator light turns on when the knob is turned even if the cooktop element does not operate.
2
H ot Surface I ndicator
The hot surface indicator light glows as long as any surface cooking area is too hot to touch.
It remains on after the element is turned off and until the surface has cooled to approximately 130 ˚F.

2 4
OPERATION
Ch anging O v en Settings
Clock
The clock must be set to the correct time of day in
order for the automatic oven timing functions to work
properly.
1
Set the oven mode knob to the O ff position.
2
Press and hold Cook T ime for three seconds
(LSE46 1 7 model only) or press Clock. CLO
shows in the display.
3
Press plus( + ) or minus( - ) to select the desired
time. Plus( + ) to increase the time and minus( - )
to decrease the time.
4
Press Start to enter the time and start the clock.
N O T E
•
The time of day cannot be changed during a
timed baking or self-clean cycle.
•
If no other keys are pressed within 25 seconds
of pressing Clock, the display reverts to the
original setting.
•
If the display colon in the clock is blinking, you
may have exp erienced a power failure. Reset
the time.
Lockout
The Lockout feature automatically locks the oven
door and prevents most oven from being turned on. It
does not disable the timer and the interior oven light.
1
Set the oven mode knob to the O ff position.
2
Press and hold Probe/ Lockout (LSE46 1 7 model
only) or Clock/ Lockout for three seconds.
3
The lock melody sounds, Loc appears in the
display and the lock icon
blinks in the display.
4
Once the oven door is locked, the lock
indicator stops blinking and remains on.
5
To deactivate the Lockout feature, press and
hold Probe/ Lockout (LSE46 1 7 model only) or
Clock/ Lockout for three seconds. The unlock
melody sounds and the door and the controls
unlock.
N O T E
The Burner O n indicator light turns on when the
knob is turned even if the cooktop element does
not operate.
Minimum & Max imum Default
Settings
All of the features listed have a minimum and a
maxi mum time or temperature setting that may be
entered into the control. An entry acceptance beep
sounds each time a control key is pressed.
An entry error tone (two short tones) sounds if the
entry of the temperature or time is below the minimum
or above the maxi mum setting for the feature.
Feature
min.
T emp. /
T ime
max .
T emp. /
T ime
Default
Clock
1 2 Hr.
1 : 0 0
Hr. / min.
1 2: 59
Hr. / min.
24 Hr.
0 : 0 0
Hr. / min.
23: 59
Hr. / min.
Timer
1 2 Hr. 0 : 1 0 sec.
1 1 : 59
Hr. / min.
24 Hr. 0 : 1 0 sec.
1 1 : 59
Hr. / min.
Cook Time
1 2 Hr. 0 : 0 1 min.
1 1 : 59
Hr. / min.
24 Hr. 0 : 0 1 min.
1 1 : 59
Hr. / min.
Conv. Bake
30 0 ° F /
1 50 ° C
550 ° F /
28 5 ° C
350 ° F
(* 325 ° F)/
1 2 Hr.
Conv.
Roast
30 0 ° F /
1 50 ° C
550 ° F /
28 5 ° C
350 ° F
(* 325 ° F)/
1 2 Hr.
Speed Broil
& Broil
Lo
40 0 ° F
Hi
520 ° F
Hi /
3 Hr.
Bake
1 7 0 ° F /
8 0 ° C
550 ° F /
28 5 ° C
350 ° F /
1 2 Hr.
Proof 0 : 0 1 min.
1 1 : 59
Hr. / min.
1 2 Hr.
Speed
Roast
1 2 Hr.
Warm 3 Hr.
Self Clean 3 Hr. 5 Hr. 4 Hr.
Probe
8 0 ° F /
27 ° C
21 0 ° F /
1 0 0 ° C
1 50 ° F /
6 5 ° C
EasyClean
®
1 0 min.
* U sing Auto Conversion
•
D efault cook mode times are without setting cook
time.

2 5
OPERATION
EN GLI SH
T imer O n/ O ff
The Timer feature serves as an ext ra timer in the
kitchen that beeps when the set time has run out. It
does not start or stop cooking.
The Timer feature can be used during any of the oven
control functions.
Setting th e T imer
1
Set the oven mode knob to the O ff position.
2
Press T imer O n/ O ff. 0 : 0 0 with H R inside it
appears and T imer flashes in the display.
3
Press plus( + ) or minus( - ) to set the desired
time. Plus( + ) increases the time and minus( - )
decreases the time.
4
Press T imer O n/ O ff or Start to start the Timer.
The remaining time countdown appears in the
display.
N O T E
If Timer On/ Off is pressed again after the timer
has started, the timer function is canceled.
5
When the set time runs out, End shows in the
display. The indicator tones sound every 1 5
seconds until T imer O n/ O ff is pressed.
N O T E
•
If the remaining time is not in the display, recall
the remaining time by pressing T imer O n/ O ff.
•
Press T imer O n/ O ff twice to set the time in
minutes and seconds.
•
Press T imer O n/ O ff once to set the time in
hours and minutes.
Canceling th e T imer
1
Press T imer O n/ O ff once.
The display returns to the time of day.
W i- Fi
The Wi-Fi button is used to connect the appliance to
a home Wi-Fi network.
1
Set the oven mode knob to the O ff position.
2
Press and hold T imer O n/ O ff for 3 seconds.
3
The power on chime sounds, SEt appears in the
display, and the Wi-Fi icon ( ) blinks.
4
Register the appliance on the Wi-Fi network
using the smart phone app.
5
To disconnect the appliance from the network,
delete it from the registered appliances in the app.
N O T E
See the Smart Functions section in the owner’s
manual for more details.
Settings
Set the oven mode knob to the O ff position.
Press and hold Start T ime for three seconds
(LSE46 1 7 model only) or press Setting.
Then press the Start T ime (LSE46 1 7 model only) or
Setting key repeatedly to toggle through and change
oven settings.
The Setting key allows you to:
•
set the hour mode on the clock (1 2 or 24 hours)
•
enable/ disable convection auto conversion
•
adj ust the oven temperature
•
activate/ deactivate the preheating alarm light
•
set the beeper volume
•
switch the temperature scale between Fahrenheit
and Celsius
•
activate/ deactivate the cooktop beeper
Setting th e H our Mode
The control is set to use a 1 2-hour clock. To reset the
clock to 24-hour mode, follow the steps below.
1
Set the oven mode knob to the O ff position.
2
Press and hold Start T ime for 3 seconds
(LSE46 1 7 model only) or press Setting.
3
Press plus( + ) or minus( - ) to set the desired
hour mode on the clock.
4
Press Start to accept the desired change.
Setting Conv ection A uto Conv ersion
When Conv . Bake and Conv . Roast are selected,
Convection Auto Conversion automatically converts the
standard recipe temperature entered to a convection
temperature by subtracting 25 ° F / 1 4 ° C. This
auto-converted temperature shows on the display. For
ex ample, select Conv . Bake, enter 350 ° F, and 325 ° F
shows on the display after preheat.
Convection Auto Conversion is enabled by default. To
change the setting, follow these instructions.
1
Set the oven mode knob to the O ff position.
2
Press and hold Start T ime for 3 seconds
(LSE46 1 7 model only) or press Setting. Then
press Start T ime (LSE46 1 7 model only) or
Setting repeatedly until “
” appears in the
display.
3
Press plus( + ) or minus( - ) to turn the feature on/
off.
4
Press Start to accept the change.

2 6
OPERATION
A dj usting th e O v en T emperature
Y our new oven may cook differently from the one
it replaced. U se your new oven for a few weeks to
become more familiar with it before changing the
temperature settings. If after familiarizing yourself with
the new oven, you still think that it is too hot or too
cold, you can adj ust the oven temperature yourself.
N O T E
To begin, either raise or lower the thermostat
1 5 ° F (8 ° C). Try the oven with the new setting. If
the oven still needs adj ustment, raise or lower the
thermostat again, using the first adj ustment as a
gauge. For exa mple, if the adj ustment was too
much, raise or lower the thermostat 1 0 ° F (5 ° C).
If the adj ustment was not enough, raise or lower
the thermostat 20 ° F (1 2 ° C). Proceed in this way
until the oven is adj usted to your satisfaction.
1
Set the oven mode knob to the O ff position.
2
Press and hold Start T ime for three seconds
(LSE46 1 7 model only) or press Setting. Then
press Start T ime (LSE46 1 7 model only) or
Setting repeatedly until “
” appears in the
display.
3
To increase the temperature, press plus ( + ) until
the desired amount appears in the display.
To decrease the temperature, press minus ( - )
until the desired amount appears in the display.
4
Press Start to accept the change.
N O T E
•
This adj ustment does not affect the broiling
or Self Clean temperatures. The adjustment
is retained in memory after a power failure.
The oven temperature can be increased (+ ) or
decreased (-) as much as 35 ° F or 1 9 ° C.
•
Once the temperature is increased or
decreased, the display shows the adj usted
temperature until it readj usts.
T urning th e Preh eat A larm Ligh t O n/ O ff
When the oven reaches its set-temperature, the
preheating alarm light flashes 5 times or until the
oven door is opened.
1
Press and hold Start T ime for three seconds
(LSE46 1 7 model only) or press Setting. Then
press Start T ime (LSE46 1 7 model only) or
Setting repeatedly until “
” appears in the
display.
2
Press plus( + ) or minus( - ) to turn the light on/ off.
3
Press Start to accept the change.
A dj usting th e O v en Beeper V olume
1
Set the oven mode knob to the O ff position.
2
Press and hold Start T ime for three seconds
(LSE46 1 7 model only) or press Setting. Then
press Start T ime (LSE46 1 7 model only) or
Setting repeatedly until “
” appears in the
display.
3
Press plus( + ) or minus( - ) to select the desired
volume.
4
Press Start to accept the change.
Selecting Fah renh eit or Celsius
Set the oven temperature display to show either
Fahrenheit (° F) or Celsius (° C) units. The oven
defaults to Fahrenheit unless changed by the user.
1
Set the oven mode knob to the O ff position.
2
Press and hold Start T ime for three seconds
(LSE46 1 7 model only) or press Setting. Then
press Start T ime (LSE46 1 7 model only) or
Setting repeatedly until “
” appears in the
display.
3
Press plus( + ) or minus( - ) to select
F(Fahrenheit) or C(Centigrade).
4
Press Start to accept the change.
T urning th e Cooktop Beeper O n/ O ff
1
Set the oven mode knob to the Off position
2
Press and hold Start T ime for three seconds
(LSE46 1 7 model only) or press Setting. Then
press Start T ime (LSE46 1 7 model only) or
Setting repeatedly until “
” appears in the
display.
3
Press plus( + ) or minus( - ) to turn the beep
on/ off.
4
Press Start to accept the change.

2 7
OPERATION
EN GLI SH
Start T ime ( Delayed T imed Cook)
The automatic timer of the D elayed Timed Cook
function turns the oven on and off at the time you
select. This feature can be used with the Bake, Conv .
Bake and Conv . Roast modes.
Setting a Delayed T imed Cook
For exa mple, to bake at 30 0 ° F and delay the start of
baking until 4 h 30 m, first set the clock for the correct
time of day.
1
Turn the oven mode knob to select the Bake
mode. 350 ° F appears in the display.
2
Set the temperature: press minus( - ) until 30 0 ° F
appears in the display.
3
Press Cook T ime and press plus (+ ) or minus (-)
to set the baking time.
4
Press Start T ime.
5
Set the start time: press plus( + ) until
HR
4: 30
appears in the display.
6
Press Start. A short beep sounds and T imed
Delay and the start time appear in the display.
The oven begins baking at the set start time.
N O T E
•
To cancel the D elayed Timed Cook function,
turn the oven mode knob to the O ff position.
•
To change the cooking time, repeat step 3 and
press Start.
•
If the oven clock is set as a 1 2-hour clock, you
can delay the cook time for 1 2 hours. If the
oven clock is set as a 24-hour clock, you can
delay the cook time for 24 hours.
The oven will continue to cook for the set amount
of time and then turn off automatically. When the
cooking time has elapsed:
•
End and the time of day show in the display.
•
The cook end indicator tone sounds every 6 0
seconds until the oven mode knob is turned to the
O ff position.
CA U T I O N
•
U se the automatic timer when cooking cured or
frozen meats and most fruits and vegetables.
Foods that can easily spoil, such as milk, eggs,
fish, meat or poultry, should be chilled in the
refrigerator. Even when chilled, they should
not stand in the oven for more than 1 hour
before cooking begins, and should be removed
promptly when cooking is completed.
•
Eating spoiled food can result in sickness from
food poisoning.
Cook T ime ( T imed Cook)
Set the oven to cook for a specific length of time
using the Timed Cook feature. This feature can only
be used with the Bake, Conv . Bake and Conv . Roast
modes.
Setting th e Cook T ime Function
For exa mple, to bake at 30 0 ° F for 30 minutes, first
set the clock to the correct time of day.
1
Turn the oven mode knob to select the Bake
mode. 350 ° F appears in the display.
2
Set the oven temperature. For this exa mple,
press minus( - ) until 30 0 ° F appears in the
display.
3
Press Cook T ime. T imed flashes in the display.
Bake, 0 : 0 0 and 30 0 ° F appear in the display.
4
Set the baking time: press plus( + ) until 30 : 0 0
appears in the display. The baking time can be
set for any amount of time between 1 minute
and 1 1 hours and 59 minutes.
5
Press Start.
The oven will continue to cook for the set amount
of time and then turn off automatically. When the
cooking time has elapsed:
•
End and the time of day show in the display.
•
The cook end indicator tone sounds every 6 0
seconds until the oven mode knob is turned to the
O ff position.
Ch anging th e Cook T ime during Cooking
For exa mple, to change the cook time from 30
minutes to 1 hour and 30 minutes, do the following.
1
Press Cook T ime.
2
Change the baking time: press plus( + ) until 1
hour and 30 minutes appears in the display.
3
Press Start to accept the change.
O v en Ligh t
The interior oven light automatically turns on when
the door is opened. Press O v en Ligh t to manually
turn on/ off the oven light.
N O T E
The oven light cannot be turned on if the Self
Clean function is active.

2 8
OPERATION
U sing th e Cooktop
Cooking A reas
The cooktop is eq uipped with four induction
cooking elements of different sizes and a radiant
heat warming zone. The wattage ratings below are
maxi mum outputs. The second rating is the maxi mum
output for Boost mode.
3 4
5
1 2
1
Induction left front cooking element:
8 " , 21 0 0
W / 320 0
W (240 V )
2
Induction right front cooking element:
1 1 " , 240 0
W / 40 0 0
W (240 V )
3
Induction left rear cooking element:
6 " , 1 30 0
W / 1 8 0 0
W (240 V )
4
Induction center rear cooking element:
6 " , 1 30 0
W / 1 8 0 0
W (240 V )
5
Warming zone
There are LED displays under each induction cooking
element which adj ust to show the power level when
the element is used.
Benets of Induction Surface Cooking
Speed and Efficiency
Induction cooking elements heat faster and use less
energy. Induction power levels q uickly boil liq uids and
are efficient when simmering.
A Cooler Cooktop
Whether induction cooking elements are turned on or
off, they remain cooler than radiant elements. V irtually
no heat is wasted because the heat begins with the
presence of cookware.
Easy Cleanups
Cooler cooking elements make for easier cleaning.
Spills resist sticking or burning so they wipe up easily.
Pan Size Detection
A sensor automatically detects and adapts the
induction cooking element to the pan size in use for
more consistent, even cooking.
Greater Responsiv eness
Induction cooking elements are more responsive than
their electric or gas counterparts because only the pan
heats. Induction elements heat more easily and are j ust
as responsive when reducing temperatures to a simmer.
I nduction Cookw are
N O T E
Before using the induction cooking elements,
carefully read and follow these cookware
recommendations and the instructions in the pan
sensing sections.
When purchasing pans for use on the induction
cooktop, look for cookware identified by the
manufacturer as " induction ready" or " induction
capable" , or that is marked by the manufacturer as
specifically designed for induction cooking.
The base material of the cookware must be magnetic
for the cooking elements to activate. U se a magnet
to check if the cookware base material is suitable. If
the magnet sticks to the bottom of the cookware, the
cookware can be used for induction cooking.
For the best possible surface cooking results, use
only high-q uality, heavy gauge steel cookware on the
induction cooking elements. Follow manufacturer's
recommendations when using induction cookware.
I nduction Cookw are T ypes
The three most common induction cookware types
available are stainless steel, cast iron, and porcelain-
enamel-coated metals.
•
Stainless Steel is generally exce llent for induction
cooking. It is durable, easy to clean, and resists
staining.
N O T E
Not all stainless steel cookware is magnetic;
stainless steel is not always suitable for induction
cooking.
•
Cast iron cooks evenly and is also good for
induction cooking. D o not slide cast iron cookware
on the cooktop; cast iron cookware with a rough
surface will scratch the ceramic cooktop.
•
Porcelain- enamel- coated metals have variable
heating characteristics depending on the q uality of
the base metal. Make sure the porcelain-enamel
coating is smooth to avoid scratching the ceramic
cooktop.

2 9
OPERATION
EN GLI SH
Cookw are Placement
U se the proper cookware and place it correctly on
the cooktop. One or more of the cooking elements
will not heat if any of the incorrect conditions shown
is detected by the sensors located below the
ceramic cooktop surface. Correct the problem before
attempting to use the cooktop.
Correct
•
Cookware is centered
correctly on surface of
cooking element.
•
Pan has flat bottom and
straight sides.
•
Pan size meets or exce eds
the recommended minimum
size for the cooking element.
•
Pan rests completely on the
cooktop surface.
•
Pan is properly balanced.
I ncorrect
•
Cookware is not centered on
surface of cooking element.
•
Pan has curved or warped
bottom or sides.
•
Pan does not meet the
minimum size req uired for
the cooking element used.
•
Pan bottom rests on
cooktop trim or does not rest
completely on the cooktop
surface.
•
Pan is unbalanced by heavy
handle.
Mov ing Cookw are on th e Cooktop
Always use heavier gauge, high-q uality cookware
on the cooking elements and do not slide it on the
ceramic cooktop surface. Even high-q uality cookware
can scratch the cooktop surface.
N O T E
•
Always lift cookware before moving it on the
ceramic glass surface. Any cookware that has
a rough or dirty bottom can mark and scratch
the cooktop surface. Always start with clean
cookware.
•
D o not allow aluminum foil or any material that
can melt to make contact with the ceramic glass
cooktop. If these materials melt on the cooktop
they may damage the ceramic glass surface.
Sliding any type of cookware over the surface will
scratch the cooktop over time. Scratches will make
cleaning the ceramic cooktop difficult and degrade
the appearance of the cooktop.
Pan Sensing
The cooking-element sensors located below the
cooktop surface req uire certain cookware conditions
to be met before the induction cooking elements can
operate.
The cooking zone LED bar may display a pan sensing
error message. If a cooking element is activated
and no cookware is detected, the affected induction
cooking zone LED bar will fluctuate. If the cookware
does not meet the correct conditions, the cooking
zone may not heat.
If the problem is not corrected, the affected cooking
element will automatically deactivate after one
minute.

30
OPERATION
Minimum and Max imum Pan Size
There are four cooking elements on the induction
cooktop. Each element req uires a minimum pan size
to be used effectively. The inner ring of each cooking
element is a guide to the minimum pan size.
The bottom of the pan must fully cover the inner ring
for proper cooking to occur.
5.5 inch (1 40 mm)
7 .5 inch (1 9 0 mm) 9 .5 inch (245 mm)
Minimum Pan Size:
5.5 inch (1 40
mm)
Minimum Pan Size:
7 .5 inch (1 9 0
mm)
Minimum Pan Size:
9 .5 inch (245
mm)
U se the cross that marks each cooking element to
help determine the max imum pan size. After centering
the cookware on the cooking element, the cookware
should not extend more than ½ʺ beyond the edge
of the cross on the cooking element. The pan must
make full contact with the glass surface without the
bottom of the pan touching the metal cooktop trim.
If the correct induction cookware—ce ntered on any
of the active cooking elements—i s too small, the
affected cooking element’s LED bar fluctuates and
the pan does not heat.
H ot Cookw are and Residual H eat
CA U T I O N
U nlike radiant surface elements, induction
cooking elements do not glow red when hot. Y ou
can be burned if the glass surface is hot from the
residual heat transferred from the cookware. D o
not touch hot cookware or pans. U se oven mitts
or potholders to protect hands from burns.
H ome Canning
CA U T I O N
Canning can generate large amounts of steam.
U se ext reme caution to prevent burns. Raise the
lid so that steam is vented away from you. Safe
canning req uires that harmful micro-organisms
are destroyed and j ars are sealed completely.
When using a water bath canner, maintain a
gentle but steady boil for the req uired time.
Read and observe the following precautions when
home canning. Read the information on the U SD A
(U nited States D epartment of Agriculture) website and
follow the recommendations there for home canning
procedures.
•
U se only q uality, flat-bottomed canners when home
canning. U se a ruler to check the bottom of the
canner for flatness.
•
Canners with ridges that radiate from the bottom
center are not suitable for use on a ceramic glass
cooktop.
•
The diameter of the canner should not exce ed the
maxi mum cooking element markings by more than
one inch. U se smaller diameter canners on ranges
with ceramic-glass or open-coil-electric cooktops.
•
Start with hot tap water to boil water more q uickly.
Bring water to an initial boil using the highest heat
setting. Once the water is boiling, reduce the heat
as much as possible while maintaining the boil.
•
It is best to can small amounts and keep the canner
light enough to lift.
•
D o not leave the water bath or pressure canners on
high heat for ext ended periods.
•
Alternate surface elements between each batch
to allow the elements and surrounding surfaces to
cool down. D o not can using the same element all
day.

31
OPERATION
EN GLI SH
Setting Surface Controls
•
Cooking Element LED Bar
The range provides an LED bar for each cooking
element on the cooktop. Check messages in
the display window and use the LED s with the
corresponding control knobs to monitor the power
levels of the elements.
Lo
Simmer
3
4
MED
6
7
8
HI
Boost
•
A v ailable Pow er Lev el Settings
The cooktop control’s LED bar displays the
element’s power level settings, ranging from Lo to
Hi to Boost. Adj ust the settings in increments of
one, from Lo (Level 1 ) to Boost (Level 1 0 ).
To select Hi, turn the knob clockwise, through level
8 to Hi/ Boost.
•
Boost Pow er Lev el
To activate the Boost mode, turn the knob directly
from Off to Boost. Boost mode is only available
immediately after activating a cooking element.
When the cooking element is set to the Boost
mode, the LED bar flashes and the Boost mode
stays in operation for up to 1 0 minutes. After 1 0
minutes, the cooking element automatically returns
to the Hi setting.
Simmer
HI/Boos
t
The maxi mum operating time for all element levels
exce pt the Boost mode is 1 2 hours.
H ot Surface I ndicator
The hot surface indicator light glows as long as any
surface cooking area is too hot to touch.
It remains on after the element is turned off and until
the surface has cooled to approxi mately 1 30 ° F.
It is normal for the surface elements to cycle on and
off when cooking at lower temperature settings.
U sing th e Cooking Elements
CA U T I O N
Before Cooking
•
D o not place or store flammable or heat-
sensitive items on the induction cooktop, even
when the cooktop is not in use.
•
Place cookware on the cooking elements
before turning on the induction cooktop.
•
D o not place sealed containers on the cooktop.
During Cooking
•
D o not place metallic objects such as knives,
forks, spoons, and lids on the induction cooktop
surface; they can get hot.
•
U se this appliance only for normal household
use. It is not designed for commercial or
industrial use.
•
Never use the appliance to heat the room.
•
U se caution when plugging electrical appliances
into power outlets near the cooktop. K eep
power cords from any contact with the cooktop
or cookware.
•
Overheated fat and oil can catch fire q uickly.
Never leave surface elements unattended when
frying foods.
•
D o not use the induction cooktop to heat
aluminum foil, products wrapped in aluminum
foil , or frozen foods packaged in aluminum
cookware.
•
U se caution when plugging electrical appliances
into outlets near the cooktop to keep power
cords away from the hot cooktop or cookware.
•
U sers with pacemakers and active heart
implants must keep their upper body at a
minimum distance of 1 ft (30 cm) from active
induction cooking elements. If in doubt, consult
the implant manufacturer or your doctor.
A fter Cooking
•
After use, switch off the induction cooking
element using its control. D o not rely on the pan
sensor.

32
OPERATION
T urning O n Cooking Elements
( Ex cept W arming Z one)
1
Push the control knob in.
2
Turn the knob in either direction to select the
desired setting. A short beep sounds and the
cooking element’s LED bar shows its current
setting.
3
To activate the Boost mode, turn the knob
directly from Off to Boost.
Simmer
HI/Boos
t
3
T h e Recommended Surface Cooking
Setting
Start most surface cooking on a higher setting and
then adj ust to a lower setting to finish cooking.
The suggested settings may need adj ustments,
depending on cookware design and q uality and on
the amount of food being prepared.
U se q uality cookware that is constructed with a
magnetic base material and that meets the minimum
and maxi mum pan size req uirements.
Setting Recommended U se
Boost
•
U se to heat a large amount of food
or to bring large pans of water to a
boil
8 -Hi
•
Bring liq uid to a boil
•
Start most cooking
MED -8
•
Hold a rapid boil, fry, deep fat fry
•
Q uickly brown or sear food
•
Steaks, cutlets, grilled meat
3-MED
•
Maintain a slow boil
•
Fry or sauté foods
•
Cook soups, sauces and gravies
•
Eggs, pancakes
SIMMER-3
•
Stew or steam food
•
Simmer
Lo-SIMMER
•
K eep food warm
•
Melt chocolate or butter
•
Simmer
Pan Preh eat Recommendations
Induction cooking may decrease the amount of time
req uired to preheat cookware compared to cooking
on a radiant element cooktop or gas surface burner.
Pay close attention to all food items while cooking
on the cooktop or in the oven, and until all cooking
processes are complete.
CA U T I O N
Remember that induction surface cooking initially
heats the cookware V ERY Q U I CK LY if the
cookware does not contain food.
N oises during Cooktop O peration
The electronic processes involved with induction
cooking may create some background noises. Y ou
may hear a slight buzzing sound when cooking on
the cooktop. These noises are part of the induction
cooking process and are considered normal.
Some cookware will buzz, depending on the
construction or base material. The buzz may be more
noticeable if the contents of the pan are cold. As the
pan heats up, the noise will decrease. The noise will
also decrease if the power level setting is reduced.
N O T E
•
When using the induction cooktop, operational
noises are more noticeable while cooking in
Boost mode. But very loud noises are not
normal when induction cooking.
•
The cooktop fan may turn on to reduce the
temperature of the product, even when the
surface elements are not being used.

33
OPERATION
EN GLI SH
Pow er Management
The cooking zones, which consist of paired cooking
elements, are restricted to drawing a certain
maxi mum amount of power.
If you turn on the Boost function for one element while
its paired element is in use, the Power Management
function may automatically reduce the power of both
elements. For consistent performance when using
multiple elements, use elements in separate cooking
zones.
N O T E
•
If the combined heat of the oven and the
surface burners is sufficiently high, the output of
the surface burners is reduced to avoid damage
to the product.
•
Both elements in a set of paired elements
cannot use the Boost mode at the same time.
To use the Boost mode on two elements
simultaneously, use non-paired elements.
W arming Z one
U se the Warming Z one, located in the back right of
the glass surface, to keep hot, cooked food at serving
temperature. The Warming Z one keeps food warm
after it has already been cooked. Attempting to cook
uncooked or cold food on the Warming Z one could
result in a food-borne illness.
CA U T I O N
FO O D PO I SO N H A Z A RD: Bacteria may grow in
food at temperatures below 1 40 ° F.
•
Always start with hot food. D o not use the warm
setting to heat cold food.
•
D o not use the warm setting for more than two
hours.
T urning O n W arming Z one
1
Push the control knob in.
2
Turn the knob in either direction to select the
desired setting.
For best results :
•
When warming pastries or breads, leave an
opening in the cover to allow moisture to escape.
•
D o not use plastic wrap to cover food. Plastic
may melt onto the surface and be very difficult to
remove.
•
U se only dishware, utensils and cookware that is
recommended for oven and cooktop use.
N O T E
•
For best results, food on the Warming Z one
should be kept in its container or covered with a
lid or aluminum foil to maintain food q uality.
•
D o not allow aluminum foil to contact the hot
induction cooktop surface.
If a particular food is not listed , start with the medium
heat level and adj ust as needed. Most foods can be
kept at serving temperatures by using the medium
heat level.
Setting Food I tem
Low
(Lo-3)
•
V egetables
•
Rice
•
Pasta
•
Sugary sauces (tomato sauce, BBQ
sauce)
Medium
(3-7 )
•
Cream-based soups and sauces
•
Stews and chili
•
Warming empty plates or serving
dishes
High
(7 -Hi)
•
Broth-based soups
•
Hot beverages (hot cider, hot
chocolate)

34
OPERATION
U sing th e O v en
Before U sing th e O v en
N O T E
•
Because the oven temperature cycles, an oven
thermometer placed in the oven cavity may not
show the same temperature that is set on the
oven.
•
It is normal for the convection fan to run while
preheating during a regular bake cycle.
•
The convection fan motor may run periodically
during a regular bake cycle.
•
The heat turns off if the door is left open during
baking. If the door is left open for longer than
30 seconds during baking, the heat turns off.
The heat turns back on automatically once the
door is closed.
O v en V ent
Areas near the vent may become hot during operation
and may cause burns. D o not block the vent opening.
Avoid placing plastics near the vent as heat may
distort or melt the plastic.
It is normal for steam to be visible when cooking
foods with high moisture content.
Oven V ent
V ent trim
CA U T I O N
•
T h e edges of th e range v ent and v ent trim
are sh arp and may become h ot during
operation. Wear gloves when cleaning the
range to avoid burns or other inj ury.
U sing O v en Racks
The racks have a turned-up back edge that prevents
them from being pulled out of the oven cavity.
Remov ing Racks
1
Pull the rack straight out until it stops.
2
Lift up the front of the rack and pull it out.
Replacing Racks
1
Place the end of the rack on the support.
2
Tilt the front end up and push the rack in.
CA U T I O N
•
Replace oven racks before turning the oven on
to prevent burns.
•
D o not cover the racks with aluminum foil, or
any other material, or place anything on the
bottom of the oven. D oing so will result in poor
baking and may damage the oven bottom.
•
Only arrange oven racks when the oven is cool.
Bake
Bake is used to prepare foods such as pastries,
breads and casseroles. The oven can be programmed
to bake at any temperature from 1 7 0 ° F (8 0 ° C) to
550 ° F (28 5 ° C). The default temperature is 350 ° F
(1 7 5 ° C).
Setting th e Bake Function ( ex ample, 375 ° F)
1
Turn the oven mode knob to select Bake.
2
Set the oven temperature: for exa mple, press
plus( + ) until 37 5 ° F appears in the display.
3
Press Start. The oven starts to preheat.
As the oven preheats, the temperature is displayed
and rises in 5 degree increments. Once the oven
reaches the set temperature, a tone sounds and the
oven light blinks on and off.
4
When cooking is complete, turn the oven mode
knob to the O ff position.
5
Remove food from the oven.
N O T E
It is normal for the convection fan to operate
periodically throughout a normal bake cycle in the
oven. This is to ensure even baking results.

35
OPERATION
EN GLI SH
Baking T ips
•
Baking time and temperature will vary depending
on the characteristics, size, and shape of the
baking pan used.
•
Check for food doneness at the minimum recipe
time.
•
U se metal bakeware (with or without a nonstick
finish), heatproof glass-ceramic, ceramic or other
bakeware recommended for oven use.
•
D ark metal pans or nonstick coatings will cook food
faster with more browning. Insulated bakeware will
slightly lengthen the cooking time for most foods.
N O T E
The oven bottom has a porcelain-enamel finish.
To make cleaning easier, protect the oven bottom
from exce ssive spillovers by placing a cookie
sheet on the rack below the rack you are cooking
on. This is particularly important when baking a
fruit pie or other foods with a high acid content.
Hot fruit fillings or other foods that are highly
acidic may cause pitting and damage to the
porcelain-enamel surface and should be wiped up
immediately.
Conv ection Mode
The convection system uses a fan to circulate
the heat evenly within the oven. Improved heat
distribution allows for even cooking and exce llent
results while cooking with single or multiple racks.
Setting th e Conv ection Function ( ex ample, 375 ° F)
1
Turn the oven mode knob to select the
Conv . Bake or Conv . Roast.
2
Set the oven temperature: for exa mple, press
plus( + ) until 37 5 ° F appears in the display.
3
Press Start. The display shows Conv . Bake or
Conv . Roast and the oven temperature starting
at 1 0 0 ° F.
As the oven preheats, the display shows increasing
temperatures in 5-degree increments. Once the oven
reaches the set adj usted temperature, a tone sounds
and the oven light flashes on and off. The display
shows the auto converted oven temperature, 350 ° F
and the fan icon.
4
When cooking has finished or to cancel, turn the
oven mode knob to the O ff position.
N O T E
The oven fan runs while convection baking. The
fan stops when the door is open. In some cases,
the fan may shut off during a convection bake
cycle.
T ips for Conv ection Baking
•
U se Convection Bake for faster and more even
multiple-rack cooking of pastries, cookies, muffins,
biscuits, and breads of all kinds.
•
Bake cookies and biscuits on pans with no sides
or very low sides to allow heated air to circulate
around the food. Food baked on pans with a dark
finish will cook faster.
•
If cooking on single rack, place the rack in the
position suggested in the charts on the following
pages. If cooking on multiple racks, place the oven
racks in positions 3 and 5 (for two racks).
•
Multiple oven rack cooking may slightly increase
cook times for some foods.
•
Cakes, cookies and muffins have better results
when using multiple racks.
The Convection Roast feature is designed to give
optimum roasting performance. Convection Roast
combines cooking with the convection fan to roast
meats and poultry. The heated air circulates around
the food from all sides, sealing in j uices and flavors.
Foods are crispy brown on the outside while staying
moist on the inside. Convection roasting is especially
good for large tender cuts of meat, uncovered.
T ips for Conv ection Roasting
U se a broiler pan and grid when preparing meats for
roasting. The broiler pan catches grease spills and
the grid helps prevent grease splatters.
1
Place the oven rack in the position suggested in
the charts on the following pages.
2
Place the grid in the broiler pan.
3
Place the broiler pan on the oven rack.
Broiler pan (sold separately)
G rid (sold separately)
CA U T I O N
•
D o not use a broiler pan without a grid.
•
D o not cover the grid with aluminum foil.
•
Position food (fat side up) on the grid.

36
OPERATION
Recommended Baking and Roasting Guide
Baking results will be better if baking pans are centered
in the oven as much as possible. If cooking on multiple
racks, place the oven racks in the positions shown.
Rack and Pan Placement
B
For Model: LSE4617
Single rack baking
Rack
Multiple rack baking Multiple rack roasting
Rack (Position 5) Rack (Position 4)
Rack (Position 3) Bottom Rack (Position B)
•
Multiple roasting helps to make more than 2
roasted foods at same time.
•
If roasting on multiple racks, place more than 2
broiler pans and 2 grids on the racks.
For Model: LSE4616
Single rack baking
Rack
Multiple rack baking
Rack (Position 3) Rack (Position 5)
Baking rack guide
Food
Rack
position
Cakes
•
Layer cakes
•
Bundt cakes
•
Angel food cake
4
3
3
Cookies
•
Sugar cookies
•
Chocolate chips
•
Brownies
4
4
4
Pizza
•
Fresh
•
Frozen
5
5
Pastry
Crust
•
From scratch
•
Refrigerator
4
4
Breads
•
Biscuit, canned
•
Biscuit, from scratch
•
Muffins
5
5
5
Desserts
•
Fruit crisps and
cobblers, from scratch
•
Pies, from scratch,
2-crust fruit
4
4
Custards
•
Cheesecake,
crème brulée
2
Soufflés
•
Sweet or savory 2
Casserole
•
Frozen lasagna 5
Roasting rack guide
Food
Rack
position
Beef
Rib
Rare
Medium
Well done
2
2
2
Boneless
rib, top
sirloin
Rare
Medium
Well done
2
2
2
Beef
tenderloin
Rare
Medium
2
2
Pork
Rib 2
Bone-in, sirloin 2
Ham, cooked 2
Poultry
Whole chicken 2
Chicken pieces 2
Turkey 2 or B

37
OPERATION
EN GLI SH
Broil
The Broil function uses intense heat from the upper
heating element to cook food. Broiling works best for
tender cuts of meat, fish, and thinly cut vegetables.
Some models may feature a hybrid broiler consisting
of an inner broiler that utilizes a carbon heating
element which provides instantaneous heat, and
a traditional outer broiling element. D uring normal
broiler operation, it is normal for either element to
cycle off intermittently.
CA U T I O N
•
D o not use a broiler pan without a grid. Oil can
cause a grease fire.
•
D o not cover the grid and broiler pan with
aluminum foil. D oing so will cause a fire.
•
Always use a broiler pan and grid for exce ss fat
and grease drainage. This will help to reduce
splatter, smoke, and flare-ups.
N O T E
•
This range is designed for closed-door broiling.
Close the door to set the Broil function. If the
door is open, the Broil function cannot be set
and door appears on the display. Close the
door and reset the Broil function. Opening the
door turns off the broil burner during broiling.
If the door is opened during broiling, the broil
burner turns off after five seconds. The broiler
turns back on automatically once the door is
closed.
Speed Broil ( For Model: LSE4617)
The Speed Broil setting is designed to reduce the
amount of time it takes to broil foods. By utilizing
the infrared broil element, which provides heat
instantaneously, there is no need for preheating.
Setting th e ov en to Broil / Speed Broil
1
Turn the oven mode knob to select Broil H i, Lo
or Speed Broil. (LSE46 1 7 model only)
2
Press plus( + ) or minus( - ) to select H i or Lo.
(LSE46 1 7 model only)
3
Press Start. The oven begins to heat.
4
Let the oven preheat for approxi mately five
minutes before cooking the food if using broil.
5
Turn the oven mode knob to the O ff position to
cancel at any time or when cooking is complete.
Smoking
D ue to the intense heat associated with broiling, it
is normal to exp erience smoke during the cooking
process. This smoke is a natural byproduct of
searing and should not cause you to worry. If you are
exp eriencing more smoke than you are comfortable
with, use the following tips to reduce the amount of
smoke in your oven.
1
Always use a broiler pan. D o not use saute pans
or regular baking sheets for safety reasons.
2
The broiler pan should always be thoroughly
cleaned and at room temperature at the
beginning of cooking.
3
Always run your cooktop ventilation system or
vent hood during broiling.
4
K eep the interior of your oven as clean as
possible. Leftover debris from prior meals can
burn or catch fire.
5
Avoid fatty marinades and sugary glazes. Both
of these will increase the amount of smoke you
exp erience. If you would like to use a glaze,
apply it at the very end of cooking.
6
If you are exp eriencing significant smoke with
any food item, consider:
•
Lowering the broiler to the Lo setting.
•
Lowering the rack position to cook the food
further away from the broiler.
•
U sing the Hi broil setting to achieve the level of
searing you desire, and then either switching
to the Lo broil setting, or switching to the Bake
function.
7
As a rule, fattier cuts of meat and fish will
produce more smoke than leaner items.
8
Adhere to the recommended broil settings and
cooking guidelines in the chart on the following
page whenever possible.

38
OPERATION
Recommended Broiling Guide
The size, weight, thickness, starting temperature, and your preference of doneness will affect broiling times.
This guide is based on meats at refrigerator temperature. For best results when broiling, use a pan designed for
broiling.
Food
Q uantity and/ or
T h ickness
Rack
Position
First Side
( minutes)
Second
Side
( minutes)
Comments
Ground Beef
Well done
1 lb. (4 patties)
1
/
2
to
3
/
4
"
thick
7 3-6 2-4
Space evenly. For 1 -4 patties, use Speed Broil. For more
than 4 patties, use Broil.
Beef Steaks
Rare
Medium
Well done
Rare
Medium
Well done
1
"
thick
1 to 1
1
/
2
lbs.
1
1
/
2
"
thick
2 to 2
1
/
2
lbs.
7
7
7
5
5
5
3-5
4-6
5-7
7 -9
9 -1 1
1 1 -1 3
2-4
2-4
3-5
4-6
6 -8
8 -1 0
Steaks less than 1 " thick cook through before browning.
Pan frying is recommended. Slash fat.
T oast 7 0 .5-1 0 .5
Ch icken 1 whole cut up
2 to 2
1
/
2
lbs., split
lengthwise
2 Breasts
5
5
8 -1 0
8 -1 0
4-6
5-7
Broil skin-side-down first.
Lobster T ails 2– 4
1 0 to 1 2 oz. each
5 9 -1 2 D o not
turn over
Cut through back of shell. Spread open. Brush with
melted butter before broiling and after half of broiling
time.
Fish Fillets
1
/
4
to
1
/
2
"
thick
6 2-4 2-4 Handle and turn very carefully. Brush with lemon butter
before and during cooking, if desired.
H am Slices
(precooked)
1
/
2
"
thick
5 2-4 2-4 Increase time 5 to 1 0 minutes per side for 1
1
/
2
" thick or
home-cured ham.
Pork Ch ops
Well done
1 (
1
/
2
"
thick)
2 (1
"
thick)
about 1 lb.
6
5
3-6
5-8
4-7
5-8
Lamb Ch ops
Medium
Well done
Medium
Well done
2 (1
"
thick) about
1 0 to 1 2 oz.
2 (1
1
/
2
"
thick)
about 1 lb.
6
6
6
6
3-5
5-7
7 -9
9 -1 1
2-5
4-7
7 -9
7 -9
Salmon Steaks
2 (1
"
thick)
4 (1
"
thick)
about 1 lb.
5
5
8 -1 0
9 -1 1
3-5
4-6
G rease pan. Brush steaks with melted butter.
•
This guide is only for reference. Adj ust cook time according to your preference.
•
For best performance, center food on rack when using Speed Broil/ Broil.

39
OPERATION
EN GLI SH
T ips for Broiling
Beef
•
Steaks and chops should always be allowed to rest
for five minutes before being cut into and eaten.
This allows the heat to distribute evenly through the
food and creates a more tender and j uicy result.
•
Pieces of meat that are thicker than two inches
should be removed from the refrigerator 30 minutes
prior to cooking. This will help them cook more
q uickly and evenly, and will produce less smoke
when broiling. Cooking times will likely be shorter
than the times indicated in the Broiling Chart.
•
For bone-in steaks or chops that have been
frenched (all meat removed from around the bone),
wrap the exp osed sections of bone in foil to reduce
burning.
Seafood
•
When broiling skin-on fish, always use the Lo broil
setting and always broil the skin side last.
•
Seafood is best consumed immediately after
cooking. Allowing seafood to rest after cooking can
cause the food to dry out.
•
It is a good idea to rub a thin coating of oil on the
surface of the broiling pan before cooking to reduce
sticking, especially with fish and seafood. Y ou can
also use a light coating of non-stick pan spray.
V egetables
•
Toss your vegetables lightly in oil before cooking to
improve browning.
W arm
This function will maintain an oven temperature of
1 7 0 ° F. The Warm function will keep cooked food
warm for serving up to three hours after cooking has
finished. The Warm function may be used without any
other cooking operations.
Setting th e W arm Function
1
Turn the oven mode knob to select W arm.
2
Press Start.
3
Turn the oven mode knob to the O ff position
when warming is finished.
N O T E
•
The Warm function is intended to keep food
warm. D o not use it to cool food down.
•
It is normal for the fan to operate during the
Warm function.
Proof
This feature maintains a warm oven for rising yeast
leavened products before baking.
Setting th e Proof Function
1
U se rack position 2 or 3 for proofing.
2
Turn the oven mode knob to select Proof.
3
Press Start.
4
Turn the oven mode knob to the O ff position
when proofing is finished.
N O T E
•
To avoid lowering the oven temperature and
lengthening proofing time, do not open the oven
door unnecessarily. Check bread products early
to avoid over proofing.
•
D o not use the proofing mode for warming
food or keeping food hot. The proofing oven
temperature is not hot enough to keep foods
at safe temperatures. U se the Warm feature
to keep food warm. Proofing does not operate
when the oven is above 1 25 ° F. H ot shows in
the display.
•
It is normal for the fan to operate during the
Proof function.
Speed Roast
The Speed Roast feature is designed to q uickly roast
poultry. The combination of intense heat from the
upper heating element and heated air from the back
heating element result in crispier food and help to
save cooking time. Speed roasting is especially good
for medium sized poultry.
N O T E
•
The recommended cook time is 6 0 -6 5 minutes
for a whole chicken weighing 3.3 lb.
•
Adj ust the cook time according to the weight of
the poultry.
•
Place the oven rack in position 2.
•
Speed Roast is designed to reduce the cooking
time. There is no need for preheating.
•
This function is optimized for poultry, so
the temperature of Speed Roast cannot be
changed.
•
It is normal for the fan to operate during the
Speed Roast function.
Setting th e Speed Roast Function
1
Put food in the oven.
2
Turn the oven mode knob to select
Speed Roast. The display shows Roast Speed.
3
Press Start.

40
OPERATION
Meat Probe ( For model: LSE4617)
The meat probe accurately measures the internal
temperature of meat, poultry and casseroles. It should
not be used during broiling, self clean, warming or
proofing. Always unplug and remove the meat probe
from the oven when removing food. Before using,
insert the probe into the center of the thickest part of
the meat or into the inner thigh or breast of poultry,
away from fat or bones. Place food in the oven and
connect the meat probe to the j ack. K eep the probe
as far away from heat sources as possible.
Setting th e Meat Probe Function ( ex ample for
Roast 375 ° F w ith Probe temp. 160 ° F)
1
Insert the meat probe into the meat.
2
Connect the meat probe to the j ack.
3
The meat probe icon flashes in the display if the
meat probe is properly connected.
Setting th e Probe T emperature
1
Select cook mode. Turn the oven mode knob to
select Conv . Roast.
2
Set the oven temperature: press plus( + ) or
minus( - ) until 37 5
° F appears in the display
.
3
Press Probe.
4
Set the probe temperature: press plus( + ) or
minus( - ) until 1 6 0
° F appears in the display
.
5
Press Start.
The default probe temperature is 1 50 ° F (6 5 ° C), but
can be changed to any temperature between
8 0 ° F (27 ° C) and 21 0 ° F (1 0 0 ° C). The display
shows the changing probe temperature. When the
set probe temperature is reached, the oven shuts off
automatically.
Ch anging th e Probe temperature w h ile cooking
1
Press Probe.
2
Set the probe temperature.
3
Press Start.
I MPO RT A N T N O T E
Turn the oven mode knob to the O ff position to
cancel the Meat Probe function at any time. To avoid
breaking the probe, make sure food is completely
defrosted before inserting.
CA U T I O N
•
A lw ays use an ov en mitt to remov e th e
temperature probe. Do not touch th e broil
element. Failure to obey this caution can result
in severe personal inj ury.
•
T o av oid damage to th e meat probe, do
not use tongs to pull on th e probe w h en
remov ing it.
•
Do not store th e meat probe in th e ov en.
•
Do not pull w ire to remov e probe.
H old th e probe h ead, not th e w ire, w h en
inserting or remov ing probe.
Recommended Probe T emperature Ch art
Doneness Probe T emp.
Beef, Lamb and V eal
Rare
Medium Rare
Medium
Well D one
1 30 ° F (54 ° C)
1 40 ° F (6 0 ° C)
1 50 ° F (6 6 ° C)
1 6 0 ° F (7 1 ° C)
Pork
Well D one 1 7 0 ° F (7 7 ° C)
Poultry
Breast, Well D one
Thigh, Well D one
Stuffing, Well D one
1 7 0 ° F (7 7 ° C)
1 8 0 ° F (8 2 ° C)
1 6 5 ° F (7 4 ° C)

41
OPERATION
EN GLI SH
Remote Start
If the appliance is registered on a home Wi-Fi
network, this function starts or stops the pre-heating
function of the appliance. Follow the instructions on
page 43 to register the appliance on the network.
Set the oven mode knob to the Remote Start position
to use the function.
For Model: LSE46 1 7 For Model: LSE46 1 6
Setting Remote Start
1
Open the oven door to make sure the oven is
empty and ready for pre-heating. D o not place
food in the oven. Close the oven door.
2
Within 30 seconds of closing the door, turn the
oven mode knob to select Remote Start. If more
than 30 seconds passes before you initiate
Remote Start, “ door” appears in the display. If
this occurs, open and close the door and try
again.
3
When ON appears in the display, the Remote
Start function is ready to use.
4
Follow the directions in the smart phone
application to set the cook mode, temperature,
and run time (preheating time plus holding time).
N O T E
D o not place food in oven before or during
Remote Start run time.
Remote Start is disconnected in the following
situations:
•
Remote Start is never set up in the smart phone
app.
•
The Remote Start status is “ OFF” or “ door” .
•
Remote Start exp eriences a problem during
operation.
•
The Remote Start function cannot be started
when the oven door is open. A beep alerts you
to shut the door.
O perating th e W arming
Draw er ( For model: LSE4617)
The Warming D rawer keeps hot cooked foods at
serving temperature.
All food placed in the Warming D rawer should be
covered with an oven-safe lid or aluminum foil to
maintain q uality. D o not place foil on bottom or
sides of drawer. D o not use plastic wrap to cover
food. Plastic may melt onto the drawer and be very
difficult to clean. U se only utensils and cookware
recommended for oven use in the Warming D rawer.
Setting th e W arming Draw er Control
1
Press W arming Draw er Set/ O ff. The indicator
light will flash. (If no further buttons are pressed
within 25 seconds, the display will clear.)
2
U se the plus( + ) or minus( - ) button to set the
power level:
for Low, for Medium, and
for High.
3
When the food is ready, or to cancel, press
W arming Draw er Set/ O ff.
N O T E
•
The Warming D rawer shuts off automatically
after three hours.
•
D o not heat cold food in the Warming D rawer.
•
D o not use pans or utensils with rough finishes
in the Warming D rawer. D oing so can leave
scratches on the inner drawer surfaces.

42
OPERATION
W arming Draw er food/ pow er lev el
recommendations
Setting Food I tem
Low
1 40 ° F (6 0 ° C)
•
V egetables
•
Rice
•
Pasta
•
Breakfast pastries (coffee cake,
muffins)
•
D inner rolls
•
Plates of food
•
Heat-sensitive foods* (pancakes,
pizza, eggs)
Medium
1 6 0 ° F (7 1 ° C)
•
Meat* (if warming for 1 -2 hours)
•
Smaller casseroles
•
Bacon or sausage
•
Warming empty ovenproof plates
or serving dishes
High
1 8 0 ° F (8 2 ° C)
•
Meat* (if warming for less than an
hour)
•
Large casseroles
* D o not warm heat-sensitive foods for longer than 20
minutes.
D o not put thin cuts of meat in the warming drawer as they
will dry out.
D ifferent types of food may be placed in the warming
drawer at the same time. For best results, do not
leave food in the warming drawer for more than one
hour. D o not leave smaller q uantities or heat-sensitive
food, such as eggs, in the warming drawer more than
30 minutes. The maxi mum operating time is three
hours.
CA U T I O N
•
D o not use the warming drawer for storage
of racks, broiler pans, insert pans, plates,
or utensils. The warming drawer contains a
heating element which may damage any items
not specifically designed to be used with it
and should only be used to store cookware
specifically supplied by LG with your range.
•
D o not put food or foil directly on the surface
or base of the warming drawer. This may result
in damage to your drawer and may spoil your
food.
•
D o not place plastic wrap in the warming
drawer or use it to cover food being heated
in the warming drawer. Plastic may melt onto
the drawer or surrounding areas and is very
difficult to remove. U se only aluminum foil or
cookware that is capable of withstanding baking
temperature to heat or cover your food.
•
D o not use the warming drawer to heat water
or any other liq uids. Spilled liq uids may cause
an electrical short or result in severe personal
inj ury, electric shock or death.
•
Never place plastics, paper, canned foods or
other combustible material into the warming
drawer. These items pose a severe risk of fire,
damage and inj ury.
•
In the unlikely event that an item falls behind
the warming drawer, always turn the power off
and wait for the warming drawer to cool before
retrieving the item. Never attempt to retrieve
any items that fall behind the warming drawer
without first turning the power off and ensuring
the warming drawer cavity has cooled off.
Failure to do so may result in severe personal
inj ury, electric shock or death.
•
D o not touch the surface of the warming drawer
while it is in operation. U se oven mitts or hot
pads when inserting or removing food to avoid
burns or other inj ury.
•
D o not leave food in the warming drawer for
longer than one hour. Eating food which has
been heated for too long at low temperatures
can lead to food-borne illnesses.

43
SMART FU NCTIONS
EN GLI SH
SMA RT FU N CT I O N S
LG SmartT h inQ A pplication
The LG SmartThinQ application allows you to
communicate with the appliance using a smartphone.
Before U sing LG SmartT h inQ
•
For appliances with the or logo
1
U se a smartphone to check the strength of
the wireless router (Wi-Fi network) near the
appliance.
•
If the distance between the appliance and the
wireless router is too far, the signal strength
becomes weak. It may take a long time to
register or installation may fail.
2
Turn off the Mobile data or Cellular Data on
your smartphone.
•
For iPhones, turn data off by going to Settings
→ Cellular → Cellular Data.
3
Connect your smartphone to the wireless router.
N O T E
•
To verify the Wi-Fi connection, check that W i- Fi
icon on the control panel is lit.
•
The appliance supports 2.4 G Hz Wi-Fi networks
only. To check your network freq uency, contact
your Internet service provider or refer to your
wireless router manual.
•
LG SmartThinQ is not responsible for any
network connection problems or any faults,
malfunctions, or errors caused by network
connection.
•
The surrounding wireless environment can
make the wireless network service run slowly.
•
If the appliance is having trouble connecting
to the Wi-Fi network, it may be too far from
the router. Purchase a Wi-Fi repeater (range
ext ender) to improve the Wi-Fi signal strength.
•
The network connection may not work properly
depending on the Internet service provider.
•
The Wi-Fi connection may not connect or may
be interrupted because of the home network
environment.
•
If the appliance cannot be registered due to
problems with the wireless signal transmission,
unplug the appliance and wait about a minute
before trying again.
•
If the firewall on your wireless router is enabled,
disable the firewall or add an exce ption to it.
•
The wireless network name (SSID ) should be a
combination of English letters and numbers. (D o
not use special characters.)
•
Smartphone user interface (U I) may vary
dependingon the mobile operating system (OS)
and themanufacturer.
•
If the security protocol of the router is set to
W EP, network setup may fail. Change the
security protocol (W PA 2 is recommended), and
register the product again.
I nstalling th e LG SmartT h inQ
A pplication
Search for the LG SmartThinQ application from the
G oogle Play Store or Apple App Store on a smart
phone. Follow instructions to download and install the
application.
N O T E
•
If you choose the simple login to access the LG
SmartThinQ application, you must go through
the appliance registration process each time
you change your smartphone or reinstall the
application.

44
SMART FU NCTIONS
LG SmartT h inQ A pplication Features
•
For appliances with the or logo
Cleaning
This function helps you to check the energy efficiency,
U sage and guide of
EasyClean
®
.
Smart Diagnosis™
This function provides useful information for
diagnosing and solving issues with the appliance
based on the pattern of use.
Settings
Allows you to set various options on the oven and in
the Application.
Monitoring
This function helps you recognize the current status,
remaining time, cook settings and end time on the
screen.
Push A lerts
Turn on the Push Alerts to receive appliance status
notifications.
The notifications are triggered even if the LG
SmartThinQ application is off.
T imer
Y ou can set the timer from the application.
N O T E
•
If you change your wireless router, your
Internet service provider or your password after
registering the appliance, delete it from the LG
SmartThinQ Settings → Edit Product and
register again.
•
This information is current at the time of
publication. The application is subject to change
for product improvement purposes without
notice to users.
Smart Diagnosis™ Function
Should you exp erience any problems with the
appliance, it has the capability of transmitting data
via your telephone to the LG Customer Information
Center. NFC or Wi-Fi eq uipped models can also
transmit data to a smartphone using the LG
SmartThinQ application.
Smart Diagnosis™ th rough th e
Customer I nformation Center
•
For appliances with the or logo
This method allows you to speak directly to our
trained specialists. The specialist records the data
transmitted from the appliance and uses it to analyze
the issue, providing a fast and effective diagnosis.
1
Call the LG call center at: (LG U .S.) 1 -8 0 0 -243-
0 0 0 0 (LG Canada) 1 -8 8 8 -542-26 23.
2
When instructed to do so by the call center
agent, hold the mouthpiece of your phone over
the Smart D iagnosis™ logo on the machine.
Hold the phone no more than one inch from (but
not touching) the machine.
N O T E
D o not touch any other buttons or icons on the
display screen.
3
Press and hold the Start button for three
seconds.
4
K eep the phone in place until the tone
transmission has finished. This takes about 6
seconds and the display will count down the
time.
5
Once the countdown is over and the tones have
stopped, resume your conversation with the call
center agent, who will then be able to assist you
in using the information transmitted for analysis.
N O T E
•
For best results, do not move the phone while
the tones are being transmitted.
•
If the call center agent is not able to get an
accurate recording of the data, you may be
asked to try again.

45
SMART FU NCTIONS
EN GLI SH
LG SmartT h inQ Smart Diagnosis™
•
For appliances with the or logo
U se the Smart D iagnosis feature in the LG
SmartThinQ application for help diagnosing issues
with the appliance without the assistance of the LG
Customer Information Center.
Follow the instructions in the LG SmartThinQ
application to perform a Smart D iagnosis using your
smartphone.
1
Open the LG SmartThinQ application on the
smart phone.
2
Select the appliance and then the menu on
upper right side.
3
Select the Smart Diagnosis, then press Start
Smart Diagnosis button.
N O T E
•
If the diagnosis fails several times, use the
following instructions.
4
Select the A udible Diagnosis.
5
Follow the instructions on the smart phone.
6
K eep the phone in place until the tone
transmission has finished. V iew the diagnosis on
the phone.
N O T E
•
Smart D iagnosis™ cannot be activated unless
the appliance can be turned on using the
Pow er button. If the appliance cannot be turned
on, troubleshooting must be done without using
Smart D iagnosis™.
•
The Smart D iagnosis™ function depends on
the local call q uality.
•
The communication performance will improve
and you can receive better service if you use
the home phone.
•
If the Smart D iagnosis™ data transfer is poor
due to poor call q uality, you may not receive the
best Smart D iagnosis™ service.
O pen Source Softw are N otice
I nformation
To obtain the source code under G PL, LG PL, MPL,
and other open source licenses, that is contained in
this product, please visit http: / / opensource.lge.com.
In addition to the source code, all referred license
terms, warranty disclaimers and copyright notices are
available for download.
LG Electronics will also provide open source code
to you on CD -ROM for a charge covering the cost
of performing such distribution (such as the cost of
media, shipping, and handling) upon email req uest
to opensource@ lge.com. This offer is valid for a
period of three years after our last shipment of this
product. This offer is valid to anyone in receipt of this
information.
For model : LSE46 1 7
W ireless LA N Module ( LCW - 0 0 3) Specifications
Freq uency Range 241 2~ 246 2 MHz
Output Power (max. )
IEEE 8 0 2.1 1 b : 1 7 .56 dBm
IEEE 8 0 2.1 1 g : 25.53 dBm
IEEE 8 0 2.1 1 n : 25.29 dBm
For model: LSE46 1 6
W ireless LA N Module ( LCW - 0 0 4) Specifications
Freq uency Range 241 2~ 246 2 MHz
Output Power (max. )
IEEE 8 0 2.1 1 b : 22.44 dBm
IEEE 8 0 2.1 1 g : 24.6 8 dBm
IEEE 8 0 2.1 1 n : 24.1 1 dBm

46
SMART FU NCTIONS
FCC N otice
The following notice covers the transmitter module
contained in this product.
This eq uipment has been tested and found to comply
with the limits for a Class B digital device, pursuant
to Part 1 5 of the FCC Rules and also Part 1 8 of the
FCC Rules. These limits are designed to provide
reasonable protection against harmful interference in
a residential installation. This eq uipment generates,
uses, and can radiate radio freq uency energy and,
if not installed and used in accordance with the
instructions, may cause harmful interference to radio
communications. However, there is no guarantee that
interference will not occur in a particular installation.
If this eq uipment does cause harmful interference to
radio or television reception, which can be determined
by turning the eq uipment off and on, the user is
encouraged to try to correct the interference by one
or more of the following measures:
•
Reorient or relocate the receiving antenna.
•
Increase the separation between the eq uipment
and the receiver.
•
Connect the eq uipment to an outlet on a circuit
different from that to which the receiver is
connected.
•
Consult the dealer or an exp erienced radio/ TV
technician for help.
This device complies with Part 1 5, Part 1 8 of the
FCC Rules. Operation is subj ect to the following two
conditions:
1 ) this device may not cause harmful interference
and
2) this device must accept any interference received,
including interference that may cause undesired
operation of the device.
Any changes or modifications in construction of this
device which are not exp ressly approved by the party
responsible for compliance could void the user’s
authority to operate the eq uipment.
FCC RF Radiation Ex posure
Statement
This eq uipment complies with FCC radiation ex posure
limits set forth for an uncontrolled environment. This
transmitter must not be co-located or operating in
conj unction with any other antenna or transmitter.
This eq uipment should be installed and operated with
minimum distance 20 cm (7 .8 inches) between the
antenna and your body. U sers must follow the specific
operating instructions for satisfying RF exp osure
compliance.

47
MAINTENANCE
EN GLI SH
MA I N T EN A N CE
Cleaning th e Glass- Ceramic
Cooktop
CA U T I O N
•
D o not use scrub pads or abrasive cleaning
pads. They may damage your cooktop surface.
•
For your safety, wear an oven mitt or pot
holder while using a scraper on the hot cooking
surface.
•
Read and follow all instructions and warnings
on the cleaning cream label.
U se ceramic cooktop cleaner on the glass cooktop.
Other creams may not be as effective or may scratch,
damage or stain the cooktop surface.
To maintain and protect the surface of the glass
cooktop, follow these steps:
1
Before using the cooktop for the first time, clean
it with a ceramic cooktop cleaner. This helps
protect the top and makes cleanup easier.
2
U se ceramic cooktop cleaner daily to help keep
the cooktop looking new.
3
Shake the cleaning cream well. Apply a few
drops of cleaner directly to the cooktop.
4
U se a paper towel to clean the entire cooktop
surface.
5
Rinse with clear water and use a dry cloth or
paper towel to remove all cleaning residue.
N O T E
D o not heat the cooktop until it has been cleaned
thoroughly.
I MPO RT A N T
If any sugar or food containing sugar (preserves,
ketchup, tomato sauce, j ellies, fudge, candy, syrups,
chocolate) spills, or plastic or foil melts on the
cooktop, remove the molten material IMMED IATELY
with a metal razor scraper (it will not damage the
decorated cooking surface) while the cooking surface
is still hot to avoid the risk of damage to the
glass-ceramic surface. For your safety, please use an
oven mitt or pot holder while scraping the hot cooking
surface.
Burned- O n Residue
1
While the cooktop is still hot, remove any burnt
on deposits or spilled food from the
glass-ceramic cooking surface with a suitable
metal razor scraper. (Similar to scraping paint
off of a windowpane, it will not damage the
decorated cooking surface.) Hold the scraper at
an approxi mate 30 ° angle to the cooktop.
N O T E
•
D o not use a dull or nicked blade.
•
To prevent burns, wear an oven mitt or pot
holder while using the metal scraper.
2
When the cooking surface has cooled down,
apply a few dabs (about the size of a dime) of an
approved cleaner in each burner area and work
the cleaning cream over the cooktop surface
with a damp paper towel.
N O T E
A pprov ed cleaners
•
Weiman Cooktop Cleaning Cream
(www.weiman.com)
•
Cerama Bryte (www.ceramabryte.com)
•
G olden V entures Cerama Bryte
•
Easy-Off 3 in 1 G lass Top Cleaner Spray
(www.easyoff.us)
3
Rinse with clean water and wipe the cooktop
surface with a clean, dry paper towel.

48
MAINTENANCE
Metal Marks and Scratch es
1
Be careful not to slide pots and pans across the
cooktop. D oing so will leave metal markings on
the cooktop surface.
2
To help remove these marks, use a ceramic
cooktop cleaner with a cleaning pad for ceramic
cooktops.
CA U T I O N
Cookware with rough or uneven bottoms can
mark or scratch the cooktop surface.
•
D o not slide metal or glass across the cooktop
surface.
•
D o not use cookware with any dirt build-up on
the bottom.
EasyClean
®
LG ’s EasyClean
®
enamel technology provides two
cleaning options for the inside of the range. The
EasyClean
®
feature takes advantage of LG ’s new
enamel to help lift soils without harsh chemicals, and
it runs using ONLY WATER for j ust 1 0 minutes in low
temperatures to help loosen LIG HT soils before
hand-cleaning.
While EasyClean
®
is q uick and effective for small
and LIG HT soils, the Self Clean feature can be
used to remove HEAV Y , built up soils. The intensity
and high heat of the Self Clean cycle may result in
smoke which will req uire the opening up of windows
to provide ventilation. Compared to the more intense
Self Clean process, your LG oven gives you the
option of cleaning with LESS HEAT, LESS TIME, and
virtually NO SMOK E OR FU MES.
When needed, the range still provides the self clean
option for longer, more thorough oven cleaning for
heavier, built up soils.
Benefits of EasyClean
®
•
Helps loosen light soils before hand-cleaning
•
EasyClean
®
only uses water; no chemical cleaners
•
Makes for a better self-clean exp erience
- D elays the need for a self-clean cycle
- Minimizes smoke and odors
- Can allow shorter self-clean time

49
MAINTENANCE
EN GLI SH
W h en to U se EasyClean
®
Suggested
Cleaning Meth od
Ex ample of O v en Soiling Soil Pattern
T ypes of
Soils
Common Food I tems
T h at Can Soil Y our O v en
EasyClean
®
Small drops or
spots
Cheese
or other
ingredients
Pizza
Light splatter Fat/ grease
Steaks, broiled
Fish, broiled
Meat roasted at low
temperatures
Self Clean*
Medium to
heavy splatter
Fat/ grease
Meat roasted at high
temperatures
D rops or spots
Filling or
sugar based
soils
Pies
Cream or
tomato
sauce
Casseroles
* The Self Clean cycle can be used for soil that has been built up over time.
Cleaning T ips
•
Allow the oven to cool to room temperature before
using the EasyClean
®
cycle. If your oven cavity is
above 1 50 ° F (6 5 ° C), H ot will appear in the display,
and the EasyClean
®
cycle will not be activated until
the oven cavity cools down.
•
A plastic spatula can be used as a scraper to
scrape off any chunks or debris before and during
oven cleaning.
•
U sing the rough side of a non-scratch scouring pad
may help to take off burnt-on stains better than a
soft sponge or towel.
•
Certain non-scratch scrubbing sponges, such as
those made of melamine foam, available at your
local stores, can also help improve cleaning.
•
The range should be level to ensure that the bottom
surface of the oven cavity is entirely covered by
water at the beginning of the EasyClean
®
cycle.
•
For best results, use distilled or filtered water. Tap
water may leave mineral deposits on the oven
bottom.
•
Soil baked on through several cooking cycles will
be more difficult to remove with the EasyClean
®
cycle.
•
D o not open the oven door during the EasyClean
®
cycle. Water will not get hot enough if the door is
opened during the cycle.
•
For hard to reach areas such as the back surface
of the oven, it is better to use the Self Clean cycle.
EasyClean
®
I nstruction Guide
1
Remove oven racks and accessories from the
oven.
2
Scrape off and remove any burnt-on debris with
a plastic scraper.
Suggested plastic scrapers:
•
Hard plastic spatula
•
Plastic pan scraper
•
Plastic paint scraper
•
Old credit card
3
Fill a spray bottle (1 0 oz or 30 0 ml) with water
and use the spray bottle to thoroughly spray the
inside surfaces of the oven.
4
U se at least
1
/
5
(2 oz or 6 0 ml) of the water in the
bottle to completely saturate the soil on both the
walls and in the corners of the oven.

5 0
MAINTENANCE
5
Spray or pour the remaining water (8 oz or 240
ml) onto the bottom center of the oven cavity.
The indentation on the oven bottom should be
fully covered to submerge all soils. Add water if
necessary.
N O T E
If cleaning multiple ovens, use an entire bottle
of water to clean each oven. D o not spray water
directly on the door. D oing so will result in water
dripping to the floor.
6
Close the oven door.
Turn the oven mode knob to select EasyClean
®
.
Press Start.
CA U T I O N
•
Some surfaces may be hot after the
EasyClean
®
cycle. Wear rubber gloves while
cleaning to prevent burns.
•
D uring the EasyClean
®
cycle, the oven
becomes hot enough to cause burns. Wait
until the cycle is over before wiping the inside
surface of the oven. Failure to do so may result
in burns.
•
Avoid leaning or resting on the oven door glass
while cleaning the oven cavity.
7
A tone will sound at the end of the 1 0 minute
cycle. Turn the oven mode knob to the O ff
position to clear the display and end the tone.
8
After the cleaning cycle and during hand-
cleaning, enough water should remain on the
oven bottom to completely submerge all soils.
Add water if necessary. Place a towel on the
floor in front of the oven to capture any water
that may spill out during hand-cleaning.
9
Clean the oven cavity immediately after the
EasyClean
®
cycle by scrubbing with a wet,
non-scratch scouring sponge or pad. (The
scouring side will not scratch the finish.) Some
water may spill into the bottom vents while
cleaning, but it will be captured
in a pan under the oven cavity
and will not hurt the burner.
N O T E
D o not use any steel scouring pads, abrasive
pads or cleaners as these materials can
permanently damage the oven surface.
10
Once the oven cavity is cleaned, wipe any
exce ss water with a clean dry towel. Replace
racks and any other accessories.
11
If some light soils remain, repeat the above
steps, making sure to thoroughly soak the
soiled areas. If stubborn soils remain after
multiple EasyClean
®
cycles, run the Self
Clean cycle. Be sure that the oven cavity is
empty of oven racks and other accessories,
and that the oven cavity surface is dry before
running the Self Clean cycle. Consult the Self
Clean section of your owner’s manual for
further details.
N O T E
•
If you forget to saturate the inside of the oven
with water before starting EasyClean
®
, turn
the Oven mode knob to the O ff position to end
the cycle. Wait for the range to cool to room
temperature and then spray or pour water into
the oven and start another EasyClean
®
cycle.
•
The cavity gasket may be wet when the
EasyClean
®
cycle finishes. This is normal. D o
not clean the gasket.
•
If mineral deposits remain on the oven bottom
after cleaning, use a cloth or sponge soaked in
vinegar to remove them.
•
It is normal for the fan to operate during the
EasyClean
®
cycle.

5 1
MAINTENANCE
EN GLI SH
Self Clean
The Self Clean cycle uses ex tremely hot temperatures
to clean the oven cavity. While running the Self Clean
cycle, you may notice smoking or an odor. This is
normal; especially if the oven is heavily soiled.
D uring Self Clean, the kitchen should be well
ventilated to minimize the odors from cleaning.
Before Starting Self Clean
•
Remove the oven racks, broiler pan, broiler grid, all
cookware, aluminum foil or any other material from
the oven.
•
The kitchen should be well ventilated to minimize
the odors from cleaning.
•
Wipe any heavy spillovers on the bottom of the
oven.
•
Make sure that the oven light bulb cover is in place
and the oven light is off.
•
The oven light cannot be turned on during a Self
Clean cycle. The oven light cannot be turned on
until the oven temperature has cooled below
500 ˚F (260 ˚C) after a Self Clean cycle is complete.
CA U T I O N
•
D o not leave small children unattended near
the appliance. D uring the Self Clean cycle, the
outside of the range can become very hot to
the touch.
•
If you have pet birds, move them to another
well-ventilated room. The health of some birds
is ext remely sensitive to the fumes given off
during the Self Clean cycle of any range.
•
D o not line the oven walls, racks, bottom or any
other part of the range with aluminum foil or
any other material. D oing so will destroy heat
distribution, produce poor baking results and
cause permanent damage to the oven interior
(aluminum foil will melt to the interior surface of
the oven).
•
D o not force the door open. This can damage
the automatic door locking system. U se care
when opening the oven door after the Self
Clean cycle. Stand to the side of the oven when
opening the door to allow hot air or steam to
escape. The oven may still be V ERY HOT.
D uring the Self Clean cycle, the cooktop elements
and warming drawer cannot be used.
N O T E
•
Remove oven racks and accessories before
starting the Self Clean cycle.
•
If oven racks are left in the oven cavity during
the Self Clean cycle, they will discolor and
become difficult to slide in and out.
•
Clean the frame of the oven and door with hot
soapy water. Rinse well.
•
D o not clean the gasket. The fiberglass material
of the oven door gasket cannot withstand
abrasion. It is essential for the gasket to remain
intact. If you notice it becoming worn or frayed,
replace it.
•
Wipe up any heavy spillovers on the oven
bottom.
•
Make sure that the oven light bulb cover is in
place and the oven light is off.
•
It is normal for the fan to operate during the Self
Clean cycle.
•
The Burner O n indicator light turns on when
the knob is turned even if the cooktop element
does not operate.
Setting Self Clean
The Self Clean function has cycle times of 3, 4, or 5
hours.
Self Clean Soil Guide
Soil Lev el Cycle Setting
Lightly Soiled Oven Cavity 3-Hour Self Clean
Moderately Soiled Oven Cavity 4-Hour Self Clean
Heavily Soiled Oven Cavity 5-Hour Self Clean
1
Remove all racks and accessories from the
oven.
2
Turn the oven mode knob to select Self Clean.
The oven defaults to the recommended
four-hour self clean for a moderately soiled oven.
Press plus( + ) or minus( - ) to select a self clean
time from 3 to 5 hours.
3
Press Start.
4
Once the self-clean cycle is set, the oven door
locks automatically and the lock icon displays.
Y ou will not be able to open the oven door
until the oven has cooled. The lock releases
automatically when the oven has cooled.

5 2
MAINTENANCE
CA U T I O N
D o not force the oven door open when the lock
icon is displayed. The oven door remains locked
until the oven temperature has cooled. Forcing
the door open will damage the door.
Setting Self Clean w ith a Delayed
Start
1
Remove all racks and accessories from the
oven.
2
Turn the oven mode knob to select Self Clean.
The oven defaults to the recommended
four-hour self clean for a moderately soiled oven.
Press plus( + ) or minus( - ) to select a self clean
time from 3 to 5 hours.
3
Press Start T ime.
4
Press plus( + ) or minus( - ) to enter the time of
day you would like the Self Clean to start.
5
Press Start.
N O T E
It may become necessary to cancel or interrupt a
Self Clean cycle due to exce ssive smoke or fire in
the oven. To cancel the Self Clean function, turn
the oven mode knob to the O ff position.
During Self Clean
•
The Self Clean cycle uses ext remely hot
temperatures to clean the oven cavity. While
running the Self Clean cycle, you may notice
smoking or an odor. This is normal, especially if the
oven is heavily soiled.
•
As the oven heats, you may hear sounds of metal
parts exp anding and contracting. This is normal
and will not damage the oven.
•
D o not force the oven door open when the lock
is displayed. The oven door remains locked until
the oven temperature has cooled. Forcing the door
open will damage the door.
A fter th e Self Clean Cycle
•
The oven door remains locked until the oven
temperature has cooled.
•
Y ou may notice some white ash in the oven. Wipe it
off with a damp cloth or a soap-filled steel wool pad
after the oven cools. If the oven is not clean after
one self-clean cycle, repeat the cycle.
•
If oven racks were left in the oven and do not slide
smoothly after a self-clean cycle, wipe racks and
rack supports with a small amount of vegetable oil
to make them glide more easily.
•
Fine lines may appear in the porcelain because it
went through heating and cooling. This is normal
and will not affect performance.
N O T E
•
The Self Clean cycle cannot be started if the
Lockout feature is active.
•
Once the Self Clean cycle is set, the oven door
locks automatically. Y ou will not be able to open
the oven door until the oven is cooled. The lock
releases automatically.
•
Once the door has been locked, the lock
indicator light stops flashing and remains on.
Allow about 1 5 seconds for the oven door lock
to activate.
•
If the clock is set for a 1 2-hour display (default)
the D elayed Self Clean can never be set to
start more than 1 2 hours in advance.
•
After the oven is turned off, the convection
fan keeps operating until the oven has cooled
down.

5 3
MAINTENANCE
EN GLI SH
Ch anging th e O v en Ligh t
The oven light is a standard 40 -watt, 1 20 V appliance
bulb. It turns on when the oven door is open. When
the oven door is closed, press Ligh t to turn it on or
off.
1
U nplug the range or disconnect power.
2
Turn the glass bulb cover in the back of the oven
counterclockwise to remove.
3
Turn the bulb counterclockwise to remove it from
the socket.
4
Insert the new bulb and turn it clockwise.
5
Insert the glass bulb cover and turn it clockwise.
6
Plug in the range or reconnect the power.
W A RN I N G
•
Make sure that the oven and bulb are cool.
•
D isconnect the electrical power to the range at
the main fuse or circuit breaker panel. Failure
to do so can result in severe personal inj ury,
death, or electrical shock.
Cleaning th e Ex terior
Painted and Decorativ e T rim
For general cleaning, use a cloth with hot soapy
water. For more difficult soils and built-up grease,
apply a liq uid detergent directly onto the soil. Leave it
on for 30 to 6 0 minutes. Rinse with a damp cloth and
dry. D o not use abrasive cleaners.
Stainless Steel Surfaces
To avoid scratches, do not use steel wool pads.
1
Place a small amount of stainless steel
appliance cleaner or polish on a damp cloth or
paper towel.
2
Clean a small area, rubbing with the grain of the
stainless steel if applicable.
3
D ry and buff with a clean, dry paper towel or soft
cloth.
4
Repeat as necessary.
O v en Door
•
U se soapy water to thoroughly clean the oven door.
Rinse well. D o not immerse the door in water.
•
Y ou may use a glass cleaner on the outside glass
of the oven door. D o not spray water or glass
cleaner on the door vents.
•
D o not use oven cleaners, cleaning powders, or
harsh abrasive cleaning materials on the outside of
the oven door.
•
D o not clean the oven door gasket. The oven door
gasket is made of a woven material that is essential
for a good seal. Care should be taken not to rub,
damage, or remove this gasket.
CA U T I O N
D o not use harsh cleaners or harsh abrasive
cleaning materials on the outside of the oven
door. D oing so can cause damage.
D on’ t hand
clean oven
door gasket
D o hand
clean door

5 4
MAINTENANCE
Broiler Pan and Grid
•
D o not store a soiled broiler pan or grid anywhere
in the range.
•
D o not clean the broiler pan or grid in a
self-cleaning mode.
•
Remove the grid from the pan. Carefully pour out
the grease from the pan into a proper container.
•
Wash and rinse the broiler pan and grid in hot water
with a soap-filled or plastic scouring pad.
•
If food has burned on, sprinkle the grid with cleaner
while hot and cover with wet paper towels or a
dishcloth. Soaking the pan will remove burned-on
foods.
•
Both the broiler pan and grid may be cleaned with a
commercial oven cleaner or in the dishwasher.
Remov ing and Replacing
th e Lift- O ff O v en Doors and
Draw er
CA U T I O N
•
Be careful w h en remov ing and lifting th e
door.
•
Do not lift th e door by th e h andle. The door
is very heavy.
Remov ing th e Door
1
Fully open the door.
2
U nlock the hinge locks, rotating them as far
toward the open door frame as they will go.
Slot
Lock
U nlock
Hinge
lock
3
Firmly grasp both sides of the door at the top.
4
Close the door to the removal position
(approxi mately five degrees) which is halfway
between the broil stop position and fully closed.
If the position is correct, the hinge arms will
move freely.
about 5°
5
Lift door up and out until the hinge arms are
clear of the slots.

5 5
MAINTENANCE
EN GLI SH
Replacing th e Door
1
Firmly grasp both sides of the door at the top.
2
With the door at the same angle as the removal
position, seat the indentation of the hinge arms
into the bottom edge of the hinge slots. The
notch in the hinge arms must be fully seated into
the bottom edge of the slots.
Hinge arm
Indentation
Bottom
edge of slot
3
Open the door fully. If the door will not open fully,
the indentation is not seated correctly in the
bottom edge of the slots.
4
Lock the hinge locks, rotating them back toward
the slots in the oven frame until they lock.
Hinge arm
Hinge lock
5
Close the oven door.
Remov ing th e Draw er
CA U T I O N
D isconnect the electrical power to the range at
the main fuse or circuit breaker panel. Failure to
do so can result in severe personal inj ury, death,
or electrical shock.
Most cleaning can be done with the drawer in place;
however, the drawer may be removed if further
cleaning is needed. U se warm water to thoroughly
clean.
1
Fully open the drawer.
2
Locate the glide lever on each side of the
drawer. Push down on the left glide lever and
pull up on the right glide lever.
Push down with nger Pull up with nger
Lever Lever
3
Pull the drawer away from the range.
Replacing th e Draw er
1
Pull the bearing glides to the front of the chassis
glide.
2
Align the glide on each side of the drawer with
the glide slots on the range.
3
Push the drawer into the range until levers click
(approxi mately 2 inch).
4
Pull the drawer open again to seat bearing glides
into position.
Door Care I nstructions
Most oven doors contain glass that can break.
CA U T I O N
•
D o not close the oven door until all the oven
racks are fully in place.
•
D o not hit the glass with pots, pans, or any
other obj ect.
•
Scratching, hitting, j arring, or stressing the
glass may weaken its structure causing an
increased risk of breakage at a later time.

5 6
TROU BLESHOOTING
T RO U BLESH O O T I N G
FA Q s
W h at types of cookw are are recommended for
use w ith th e cooktop?
•
Look for cookware that is marked " induction
ready" or " induction capable" or that is specifically
designed for induction cooking.
•
The cookware must have a magnetic metallic base.
See the Induction Cookware Types section.
•
The pans must have a flat bottom and straight
sides.
•
Only use heavy-gauge pans.
•
The pan size must match the amount of food to be
prepared and the size of the surface element.
•
U se tight fitting lids.
•
Only use flat-bottom woks.
W h y do th e h eating elements appear to be turning
O N and O FF during use of th e cooktop or ov en?
D epending on your cooktop element setting or the
temperature selected in your oven it is NORMAL for
the cooking elements to cycle on and off.
My new ov en doesn’ t cook like my old one. I s
th ere someth ing w rong w ith th e temperature
settings?
No, your oven has been factory tested and calibrated.
For the first few uses, follow your recipe times and
temperatures carefully. If you still think your new
oven is too hot or too cold, you can adj ust the oven
temperature yourself to meet your specific cooking
needs. Refer to the Oven Temperature Adj ustment
section in this manual for easy instructions on how to
adj ust your thermostat.
I s it normal to h ear a clicking noise coming from
th e back of my ov en w h en I am using it?
Y our new range is designed to maintain a tighter
control over your oven’s temperature. Y ou may hear
your oven’s heating elements click on and off more
freq uently on your new oven. This is NORMAL.
W h y is th e colon in th e clock flash ing?
This means that the product has j ust been plugged
in, or that it has exp erienced a power interruption. To
clear the flashing colon in the clock, press any key or
reset the clock if needed.
During conv ection cooking th e fan stops w h en I
open th e door. I s th at normal?
Y es, this is normal. When the door is opened, the
convection fan will stop until the door is closed.
Can I use aluminum foil to catch drippings in my
ov en cav ity?
Never use aluminum foil to line the bottom or sides of
the oven or the warming drawer. The foil will melt and
stick to the bottom surface of the oven and will not be
removable. U se a sheet pan placed on a lower oven
rack to catch drippings instead. (If foil has already
melted onto the bottom of the oven, it will not interfere
with the oven's performance.)
Can I use aluminum foil on th e racks?
D o not cover racks with aluminum foil. Covering
entire racks with foil restricts air flow, leading to poor
cooking results. U se a sheet pan lined with foil under
fruit pies or other acidic or sugary foods to prevent
spillovers from damaging the oven finish.
CA U T I O N
Foil may be used to wrap food in the oven or
warming drawer, but do not allow the foil to come
into contact with the exp osed heating/ broiling
elements in the oven. The foil could melt or ignite,
causing smoke, fire, or inj ury.
Can I leav e my racks in th e ov en w h en running a
Self Clean cycle?
No. Although it will not damage the racks, it will
discolor them and may make them hard to slide in
and out during use. Remove all items from the oven
before starting a Self Clean cycle.
W h at sh ould I do if my racks are sticky and h av e
become h ard to slide in and out?
Over time, the racks may become hard to slide in
and out. Apply a small amount of olive oil to the ends
of the racks. This will work as a lubricant for easier
gliding.
W h at sh ould I do for h ard to remov e stains on my
cooktop?
The cooktop should be cleaned after every use to
prevent permanent staining. When cooking foods with
high sugar content, such as tomato sauce, clean the
stain off with a scraper while the cooktop is still warm.
U se an oven mitt when scraping to prevent burns.
Refer to the MAINTENANCE section of this owner's
manual for further instruction.

5 7
TROU BLESHOOTING
EN GLI SH
W h y aren' t th e function buttons w orking?
Make sure that the range is not in Lockout mode. The
lock
will show in the display if Lockout is activated.
To deactivate Lockout, press Probe (LSE46 1 7 model
only), or Clock for three seconds. The unlock melody
sounds and Loc appears in the display until the
controls are unlocked.
My range is still dirty after running th e
EasyClean
®
cycle. W h at else sh ould I do?
The EasyClean
®
cycle only helps to loosen light soils
in your oven range to assist in hand-cleaning of your
oven. It does not automatically remove all soils after
the cycle. Some scrubbing of your oven range is
req uired after running the EasyClean
®
cycle.
I tried scrubbing my ov en after running
EasyClean
®
, but some soils still remain. W h at can
I do?
The EasyClean
®
feature works best when the soils
are fully soaked and submerged in water before
running the cycle and during hand-cleaning. If soils
are not sufficiently soaked in water, it can negatively
affect the cleaning performance. Repeat the
EasyClean
®
process using sufficient water.
Sugar-based and certain greasy soils are especially
hard to clean. If some stubborn soils remain, use the
Self Clean feature to thoroughly clean your oven.
Soils on my ov en w alls are not coming off. H ow
can I get my w alls clean?
Soils on the side and rear walls of your oven range
may be more difficult to fully soak with water. Try
repeating the EasyClean
®
process with more than
the ¼ cup (2 oz or 6 0 ml) spray recommended.
W ill EasyClean
®
get all of th e soils and stains out
completely?
It depends on the soil type. Sugar-based and certain
grease stains are especially hard to clean. Also, if
stains are not sufficiently soaked in water, this can
negatively affect cleaning performance. If stubborn
or built-up stains remain, use the Self Clean feature.
Refer to the Self Clean section of your owner's
manual.
A re th ere any tricks to getting some of th e
stubborn soils out?
Scraping the soils with a plastic scraper before
and during hand-cleaning is recommended. Fully
saturating soils with water is also recommended.
However, certain types of soils are harder to clean
than others. For these stubborn soils, the Self Clean
cycle is recommended. Consult the Self Clean section
of your owner's manual for details.
I s it safe for my conv ection fan, broil burner or
h eater element to get w et during EasyClean
®
?
Y es. The convection fan, broiler burner or heater
element may get a little wet during cleaning. However,
direct spray onto the broil burner and heater elements
is not necessary because these are self-cleaning
during regular use.
Do I need to use all 1¼ cups ( 10 oz or 30 0 ml) of
w ater for EasyClean
®
?
Y es. It is highly recommended that 1 cup (8 oz or
240 ml) of water be sprayed or poured on the bottom
and an additional ¼ cup (2 oz or 6 0 ml) of water
be sprayed on walls and other soiled areas to fully
saturate the soils for better cleaning performance.
I see smoke coming out of my ov en range’ s
cooktop v ents during EasyClean
®
. I s th is normal?
This is normal. This is not smoke. It is actually water
vapor (steam) from the water in the oven cavity. As
the oven heats briefly during EasyClean
®
, the water
in the cavity evaporates and escapes through the
oven vents.
H ow often sh ould I use EasyClean
®
?
EasyClean
®
can be performed as often as you wish.
EasyClean
®
works best when your oven is LIG HTLY
soiled from such things as LIG HT grease splatter
and small drops of cheese. Please refer to the
EasyClean
®
section in your owner's manual for more
information.
W h at is req uired for EasyClean
®
?
A spray bottle filled with 1 ¼ cups (1 0 oz or 30 0 ml) of
water, a plastic scraper, a non-scratch scrubbing pad
and a towel. Y ou should not use abrasive scrubbers
such as heavy-duty scouring pads or steel wool.
Exce pt for a towel, all of the materials you need are
included in a special cleaning kit with your new range.

5 8
TROU BLESHOOTING
Before Calling for Serv ice
Before you call for service, review this list. It may save you time and exp ense. The list includes common
occurrences that are not the result of defective workmanship or materials in this appliance.
Symptoms Possible Causes / Solutions
Range is not lev el.
•
Poor installation. Place oven rack in center of oven. Place a level on the oven
rack. Adj ust leveling legs at base of range until the oven rack is level.
•
Be sure floor is level and strong and stable enough to adeq uately support range.
•
If floor is sagging or sloping, contact a carpenter to correct the situation.
•
K itchen cabinet alignment may make range appear unlevel. Be sure cabinets are
sq uare and have sufficient room for range clearance.
Cannot mov e
appliance easily.
A ppliance must be
accessible for serv ice.
•
Cabinets not sq uare or are built in too tightly. Contact builder or installer to make
appliance accessible.
•
Carpet interferes with range. Provide sufficient space so range can be lifted over
carpet.
•
Anti-tip device engaged.
O v en control beeps
and displays any F
code error.
•
Electronic control has detected a fault
condition. Turn the Oven mode knob
to the O ff position to clear the display
and stop beeping. Reprogram oven.
If fault recurs, record fault number.
Turn the Oven mode knob to the O ff
position and call for service.
CO DE CA U SE
F-3 K ey short error
F-9 Oven not heating
Surface element
control beeps and
entire LED bar
flash es.
•
Electric control has detected a fault
condition. Turn the control knob to the
Off position to clear the display and
stop the beeping. Call for service.
N umber
of
Flash es
CA U SE
1 Top Thermistor Open/ Short
2
Heatsink Thermistor Open/
Short
3 Communication error
4 Box fan not working
Surface units w ill not
maintain a rolling boil
or cooking is not fast
enough
•
Improper cookware being used.
- U se pans which are flat and match the diameter of the surface unit selected.
•
In some areas, the power(voltage) may be low.
- Cover pan with a lid until desired heat is obtained.
Surface units do not
w ork properly
•
A fuse in your home may be blown or the circuit breaker tripped.
- Replace the fuse or reset the circuit breaker.
•
Cooktop controls improperly set.
- Check to see the correct control is set for the surface unit you are using.
•
Cookware is the wrong size or is not induction capable.
- See Induction Cookware section for more information.
•
The maxi mum operating time for all element levels exce pt the Boost mode is 1 2
hours.
A reas of discoloration
on th e cooktop
•
Food spillovers not cleaned before next use.
- See Cleaning the G lass-Ceramic Cooktop section.
•
Hot surface on a model with a light-colored cooktop.
- This is normal. The surface may appear discolored when it is hot. This is
temporary and will disappear as the glass cools.

5 9
TROU BLESHOOTING
EN GLI SH
Symptoms Possible Causes / Solutions
Freq uent cycling on
and off of surface
units
•
This is normal.
- The element will cycle on and off to maintain the heat setting.
O v en w ill not w ork
•
Plug on range is not completely inserted in the electrical outlet.
- Make sure electrical plug is plugged into a live, properly grounded outlet.
•
A fuse in your home may be blown or the circuit breaker tripped.
- Replace the fuse or reset the circuit breaker.
•
Oven controls improperly set.
- See the U sing the Oven section.
•
Oven too hot.
- Allow the oven to cool to below locking temperature.
Steam is ex h austed
th rough th e ov en
v ent.
•
Cooking foods with high moisture produces steam. This is normal.
A ppliance does not
operate.
•
Make sure cord is plugged correctly into outlet. Check circuit breakers.
•
Service wiring is not complete. Contact your electrician for assistance.
•
Power outage. Check house lights to be sure. Call your local electric company
for service.
O v en ligh t does not
w ork.
•
Replace or tighten bulb. See Changing the Oven Light section in this Owner’s
Manual.
O v en smokes
ex cessiv ely during
broiling.
•
Control not set properly. Follow instructions under Setting Oven Controls.
•
Meat too close to the element. Reposition the rack to provide proper clearance
between the meat and the element. Preheat broil element for searing.
•
Meat not properly prepared. Remove exce ss fat from meat. Cut remaining fatty
edges to prevent curling.
•
Insert on broiler pan wrong side up and grease not draining. Always place grid
on the broiler pan with ribs up and slots down to allow grease to drip into pan.
•
G rease has built up on oven surfaces. Regular cleaning is necessary when
broiling freq uently.
- Old grease or food spatters cause exce ssive smoking.
Food does not bake
or roast properly
•
Oven controls improperly set.
- See the U sing the Oven section.
•
Rack position is incorrect or the rack is not level.
- See the U sing the Oven section.
•
Incorrect cookware or cookware of improper size being used.
- See the U sing the Oven section.
•
Oven sensor needs to be adj usted.
- See Oven Temperature Adj ustment in the Features section.
Food does not broil
properly
•
Oven controls improperly set.
- Make sure you turn the oven mode knob to select the Broil mode.
•
Improper rack position being used.
- See the Broiling G uide.
•
Cookware not suited for broiling.
- U se broiling pan and grid.
•
Aluminum foil used on the broiling pan and grid has not been fitted properly and
slit as recommended.
- See the U sing the Oven section.
•
In some areas the power voltage may be low.
- Preheat the broil element for 5-7 minutes.
- See the Broiling G uide.

60
TROU BLESHOOTING
Symptoms Possible Causes / Solutions
O v en temperature too
h ot or too cold
•
Oven sensor needs to be adj usted.
- See Oven Temperature Adj ustment in the Features section.
Scratch es or
abrasions on cooktop
surface
•
Coarse particles such as salt or sand between cooktop and utensils can cause
scratches. Be sure the cooktop surface and bottoms of utensils are clean before
using. Small scratches do not affect cooking and will become less visible with
time.
•
Cleaning materials not recommended for glass-ceramic cooktop have been
used. See Cleaning the G lass-Ceramic Cooktop in the MAINTENANCE section.
•
Cookware with rough bottom has been used. U se smooth, flat-bottomed
cookware.
Metal marks
•
Scraping of metal utensils on cooktop surface. D o not slide metal utensils
on cooktop surface. U se a glass-ceramic cooktop cleaning creme to remove
the marks. See Cleaning the G lass-Ceramic Cooktop in the MAINTENANCE
section.
Brow n streaks or
specks
•
Boilovers are cooked onto surface. U se a blade scraper to remove soil. See
Cleaning the G lass-Ceramic Cooktop in the MAINTENANCE section.
A reas of discoloration
on cooktop
•
Mineral deposits from water and food. Remove using a glass-ceramic cooktop
cleaning creme. U se cookware with clean, dry bottoms.
O v en w ill not Self
Clean
•
The oven temperature is too high to set a Self Clean operation.
- Allow the range to cool and reset the controls.
•
Oven controls improperly set.
- See the Self Clean section.
•
A Self Clean cycle cannot be started if the oven lockout feature is active.
“C rackling” or
“p opping” sound
•
This is the sound of the metal heating and cooling during both the cooking and
Self Clean functions.
- This is normal.
Fan noise
•
The convection fan and cooktop fan may automatically cycle on and off.
- This is normal.
•
The cooktop fan may turn on to reduce the temperature of the product, even
when the surface elements are not being used.
Conv ection Fan stops
•
Convection fan stops during a convection bake cycle.
- This is normal and is done to allow for more even heating during the cycle.
This is not a failure of the range and should be considered normal operation.
Displayed colon in th e
clock is flash ing
•
This is normal. This means that the product has just been plugged in, or that it
has exp erienced a power interruption. Press Cook T ime for three seconds and
reset the clock, or press any key to stop the flashing.
Ex cessiv e smoking
during a Self Clean
cycle
•
Exce ssive soil.
- Turn the oven mode knob to the O ff position. Open the windows to rid the
room of smoke. Wait until the Self Clean mode is cancelled. Wipe up the
exce ss soil and reset the clean.
O v en door does not
open after a Self
Clean cycle
•
Oven is too hot.
- Allow the oven to cool below locking temperature.
•
Allow about one hour for the oven to cool after the completion of a Self Clean
cycle. The door can be opened when the lock
is no longer displayed.
•
The control and door may be locked.

61
TROU BLESHOOTING
EN GLI SH
Symptoms Possible Causes / Solutions
T h e ov en does not
clean after a Self
Clean cycle
•
Oven controls not properly set.
- See the Self Clean section.
•
Oven was heavily soiled.
- Clean up heavy spillovers before starting the clean cycle. Heavily soiled ovens
may need to Self Clean again or for a longer period of time.
CLEA N and door flash
in th e display
•
The Self Clean cycle has been selected, but the door is not closed.
- Close the oven door.
LO CK ED is on in th e
display w h en you
w ant to cook
•
The oven door is locked because the temperature inside the oven has not
dropped below the locking temperature.
- Turn the oven mode knob to the O ff position. Allow the oven to cool.
Burning or oily odor
emitting from th e v ent
•
This is normal in a new oven and will disappear in time.
- To speed the process, set a Self Clean cycle for a minimum of 3 hours. See
the Self Clean section.
O v en racks are
difficult to slide
•
The shiny, silver-colored racks were cleaned in a Self Clean cycle.
- Apply a small amount of vegetable oil to a paper towel and wipe the edges of
the oven racks with the paper towel.
Moisture collects on
ov en w indow or steam
comes from ov en v ent
•
This is normal when cooking foods high in moisture.
•
Exce ssive moisture was used when cleaning the window.
W ifi netw ork does not
connect properly.
•
If the appliance is having trouble connecting to the Wi-Fi network, it may be too
far from the router. Purchase a Wi-Fi repeater (range ext ender) to improve the
Wi-Fi signal strength.
•
The Wi-Fi connection may not connect or may be interrupted because of the
home network environment.
•
The network connection may not work properly depending on the internet service
provider.
•
The surrounding wireless environment can make the wireless network service
run slowly.
Surface elements
freq uently cycle on
and off.
•
The element will cycle on and off to maintain level of power it has been set at.
This is normal operation and not a system failure.
T rouble connecting
appliance and
smartph one to W i- Fi
netw ork
•
The password for the Wi-Fi network was entered incorrectly.
- D elete your home Wi-Fi network and begin the registration process again.
•
Mobile data for your smartphone is turned on.
- Turn off the Mobile data on your smartphone before registering the appliance.
•
The wireless network name (SSID ) is set incorrectly.
- The wireless network name (SSID ) should be a combination of English letters
and numbers. (D o not use special characters.)
•
The router freq uency is not 2.4 G Hz.
- Only a 2.4 G Hz router freq uency is supported. Set the wireless router to 2.4
G Hz and connect the appliance to the wireless router. To check the router
freq uency, check with your Internet service provider or the router manufacturer.
•
The distance between the appliance and the router is too far.
- If the appliance is too far from the router, the signal may be weak and the
connection may not be configured correctly. Move the router closer to the
appliance or purchase and install a Wi-Fi repeater.

62
LIMITED WARRANTY
LI MI T ED W A RRA N T Y ( U SA )
ARBITRATION NOTICE: THIS LIMITED WARRANTY CONTAINS AN ARBITRATION PROV ISION THAT
REQ U IRES Y OU AND LG TO RESOLV E D ISPU TES BY BIND ING ARBITRATION INSTEAD OF IN COU RT,
U NLESS Y OU CHOOSE TO OPT OU T. IN ARBITRATION, CLASS ACTIONS AND JU RY TRIALS ARE NOT
PERMITTED . PLEASE SEE THE SECTION TITLED “ PROCED U RE FOR RESOLV ING D ISPU TES” BELOW.
Should your LG Electric Range (" Product" ) fail due to a defect in materials or workmanship under normal and
proper use, during the warranty period set forth below, LG Electronics (“ LG ” ) will, at its option, repair or replace
the Product. This limited warranty is valid only to the original retail purchaser of the Product and applies only
when purchased and used within the U nited States including U .S. Territories.
W arranty Period Scope of W arranty H O W SERV I CE I S H A N DLED
One (1 ) year from date of
original retail purchase
Parts and Labor
LG will provide parts and labor to repair or replace
defective parts.
•
Replacement products and parts are warranted for the remaining portion of the original warranty period or
ninety (9 0 ) days, whichever is greater.
•
Replacement products and parts may be new, reconditioned, refurbished, or otherwise factory remanufactured.
•
Proof of original retail purchase specifying the Product model and date of purchase is req uired to obtain
warranty service under this limited warranty.
EX CEPT T O T H E EX T EN T PRO H I BT ED BY A PPLI CA BLE LA W , A N Y I MPLI ED W A RRA N T Y O F
MERCH A N T A BI LI T Y O R FI T N ESS FO R A PA RT I CU LA R PU RPO SE O N T H E PRO DU CT I S LI MI T ED I N
DU RA T I O N T O T H E DU RA T I O N O F T H E A BO V E LI MI T ED W A RRA N T Y . U N DER N O CI RCU MST A N CES
SH A LL LG O R I T S U . S. DI ST RI BU T O RS/ DEA LERS BE LI A BLE FO R A N Y I N DI RECT , I N CI DEN T A L,
CO N SEQ U EN T I A L, SPECI A L, O R PU N I T I V E DA MA GES, I N CLU DI N G, W I T H O U T LI MI T A T I O N , LO ST
GO O DW I LL, LO ST REV EN U ES O R PRO FI T S, W O RK ST O PPA GE, I MPA I RMEN T O F O T H ER GO O DS, CO ST
O F REMO V A L A N D REI N ST A LLA T I O N O F T H E PRO DU CT , LO SS O F U SE, O R A N Y O T H ER DA MA GES
W H ET H ER BA SED I N CO N T RA CT , T O RT , O R O T H ERW I SE. LG’ S T O T A L LI A BI LI T Y , I F A N Y , SH A LL N O T
EX CEED T H E PU RCH A SE PRI CE PA I D BY Y O U FO R T H E PRO DU CT .
Some states do not allow the excl usion or limitation of incidental or conseq uential damages or limitations on how
long an implied warranty lasts, so the above excl usions or limitations may not apply to you. This limited warranty
gives you specific legal rights and you may also have other rights that vary from state to state.
T H I S LI MI T ED W A RRA N T Y DO ES N O T CO V ER:
•
Service trips to deliver, pick up, or install, educate how to operate, correct wiring, or correct unauthorized
repairs.
•
D amage or failure of the Product to perform during power failures and interrupted or inadeq uate electrical
service.
•
D amage resulting from operating the product in a corrosive atmosphere or contrary to the product owner’ s
manual.
•
D amage or failure to the Product caused by accidents, pests and vermin, lightning, wind, fire, floods, acts of
G od, or any other causes beyond the control of LG .
•
D amage or failure caused by unauthorized modification or alteration, or if used for other than the intended
purpose.
•
D amage or failure resulting from misuse, abuse, improper installation, repair, or maintenance. Improper repair
includes use of parts not authorized by LG . Improper installation or maintenance includes installation or
maintenance contrary to the Product owner’s manual.
•
D amage or failure caused by incorrect electrical current, voltage, or plumbing codes.
•
D amage or failure caused by transportation and handling, including scratches, dents, chips, and/ or other
damage to the finish of the Product, unless such damage is reported within one (1 ) week of delivery.
•
D amage or missing items to any display, open box, or discounted Product.
•
Refurbished Product or any Product sold “ As Is” , “ Where Is” , “ With all Faults” , or similar disclaimer.
•
Products with original serial numbers that have been removed, altered, or cannot be readily determined.
•
Increases in utility costs and additional utility exp enses.

63
LIMITED WARRANTY
EN GLI SH
•
Any noises associated with normal operation.
•
U se of accessories, components, or consumable cleaning products that are not authorized by LG .
•
Replacement of light bulbs, filters, or any consumable parts.
•
When Product is used for other than normal and proper household use (e.g. commercial or industrial use,
offices, and recreational facilities or vehicles) or contrary to the instructions outlined in the Product’s owner’s
manual.
•
Costs associated with removal and reinstallation of your Product for repairs.
N ot Cov ered by W arranty
Problem Cause Prev ention
•
Cooktop crack Cooktop crack caused by impact of obj ect
•
D O NOT store heavy items
above the cooktop surface as
they could fall and damage
it.
•
D O NOT scratch the
cooktop or the cooktop could
crack.
•
Clean the cooktop before
and after using.
in w arranty
out of w arranty
Mechanical breakage
secondary crack
primary crack
•
Cooktop enamel
chipping off
Improper usage
•
D o not hit the enamel
cooktop.
•
Oven or racks are
stained after using
aluminum foil
Aluminum foil has melted in the oven
•
Never cover the oven bottom
or cover an entire rack with
materials such as aluminum
foil.
•
If the foil has already melted
onto the oven, it will not
affect the performance of the
oven.
•
U nit has no power 1 . House power turned off (power supply)
2. Tripped breaker
3. The power cord is not installed properly.
•
Check power at main board
before calling for service.
•
Match power cord type and
outlet type
•
Properly install the power
cord
Black Black
White White
G ROU ND
STRAP
REMOV E
G ROU ND
STRAP
< NEMA 1 0 -50 > < NEMA 1 4-50 >
OU TER WIRE
RED WIRE
G REEN G ROU ND WIRE
Red Red
3- W I RE H O O K U P
4- W I RE H O O K U P
OU TER WIRE
BLACK WIRE
CENTER WIRE
WHITE WIRE
(NEU TRAL)
(NEU TRAL)

64
LIMITED WARRANTY
Problem Cause Prev ention
•
Surface is not level
•
Oven is tipping
1 . Range not leveled
2. Anti-tip device not installed correctly
•
Check with installer first
Anti-tip bracket
Approxi mately
0 .6 5"
(1 6 .5 mm)
Level both sides of range
Screw must
enter wood or
concrete
Wall plate
1
2
U se carpenter’s level to
check level.
T h e cost of repair or replacement under th ese ex cluded circumstances sh all be borne by th e consumer.
TO OBTAIN WARRANTY SERV ICE AND AD D ITIONAL INFORMATION
Call 1 -8 0 0 -243-0 0 0 0 and select the appropriate option from the menu.
Or visit our website at http: / / www.lg.com
Or by mail: LG Electronics Customer Service P.O. Box 240 0 0 7 Huntsville, AL 358 1 3 ATTN: CIC
PRO CEDU RE FO R RESO LV I N G DI SPU T ES:
ALL D ISPU TES BETWEEN Y OU AND LG ARISING OU T OF OR RELATING IN ANY WAY TO THIS LIMITED
WARRANTY OR THE PROD U CT SHALL BE RESOLV ED EX CLU SIV ELY THROU G H BIND ING ARBITRATION,
AND NOT IN A COU RT OF G ENERAL JU RISD ICTION. BIND ING ARBITRATION MEANS THAT Y OU AND LG
ARE EACH WAIV ING THE RIG HT TO A JU RY TRIAL AND TO BRING OR PARTICIPATE IN A CLASS ACTION.
Definitions. For the purposes of this section, references to “ LG ” mean LG Electronics U .S.A., Inc., its parents,
subsidiaries and affiliates, and each of their officers, directors, employees, agents, beneficiaries, predecessors
in interest, successors, assigns and suppliers; references to “ dispute” or “ claim” shall include any dispute,
claim or controversy of any kind whatsoever (whether based in contract, tort, statute, regulation, ordinance,
fraud, misrepresentation or any other legal or eq uitable theory) arising out of or relating in any way to the sale,
condition or performance of the product or this Limited Warranty.
N otice of Dispute. In the event you intend to commence an arbitration proceeding, you must first notify LG in
writing at least 30 days in advance of initiating the arbitration by sending a letter to LG at LG Electronics, U SA,
Inc. Attn: Legal D epartment- Arbitration 1 0 0 0 Sylvan Ave, Englewood Cliffs 0 7 6 32. Y ou and LG agree to engage
in good faith discussions in an attempt to amicably resolve your claim. The notice must provide your name,
address, and telephone number; identify the product that is the subj ect of the claim; and describe the nature of
the claim and the relief being sought. If you and LG are unable to resolve the dispute within 30 days, either party
may proceed to file a claim for arbitration.
A greement to Binding A rbitration and Class A ction W aiv er. U pon failure to resolve the dispute during the
30 day period after sending written notice to LG , you and LG agree to resolve any claims between us only by
binding arbitration on an individual basis, unless you opt out as provided below. Any dispute between you and
LG shall not be combined or consolidated with a dispute involving any other person’s or entity’ s product or
claim. More specifically, without limitation of the foregoing, any dispute between you and LG shall not under any
circumstances proceed as part of a class or representative action. Instead of arbitration, either party may bring
an individual action in small claims court, but that small claims court action may not be brought on a class or
representative basis.

65
LIMITED WARRANTY
EN GLI SH
A rbitration Rules and Procedures. To begin arbitration of a claim, either you or LG must make a written
demand for arbitration. The arbitration will be administered by the American Arbitration Association (“ AAA” )
and will be conducted before a single arbitrator under the AAA’s Consumer Arbitration Rules that are in effect
at the time the arbitration is initiated (referred to as the “ AAA Rules” ) and under the procedures set forth in this
section. The AAA Rules are available online at www.adr.org/ consumer. Send a copy of your written demand for
arbitration, as well as a copy of this provision, to the AAA in the manner described in the AAA Rules. Y ou must
also send a copy of your written demand to LG at LG Electronics, U SA, Inc. Attn: Legal D epartment- Arbitration
1 0 0 0 Sylvan Avenue Englewood Cliffs, NJ 0 7 6 32. If there is a conflict between the AAA Rules and the rules set
forth in this section, the rules set forth in this section will govern. This arbitration provision is governed by the
Federal Arbitration Act. J udgment may be entered on the arbitrator’s award in any court of competent j urisdiction.
All issues are for the arbitrator to decide, exce pt that issues relating to the scope and enforceability of the
arbitration provision and to the arbitrability of the dispute are for the court to decide. The arbitrator is bound by
the terms of this provision.
Gov erning Law . The law of the state of your residence shall govern this Limited Warranty and any disputes
between us exce pt to the ext ent that such law is preempted by or inconsistent with applicable federal law.
Fees/ Costs. Y ou do not need to pay any fee to begin an arbitration. U pon receipt of your written demand for
arbitration, LG will promptly pay all arbitration filing fees to the AAA unless you seek more than $ 25,0 0 0 in
damages, in which case the payment of these fees will be governed by the AAA Rules. Exce pt as otherwise
provided for herein, LG will pay all AAA filing, administration and arbitrator fees for any arbitration initiated in
accordance with the AAA Rules and this arbitration provision. If you prevail in the arbitration, LG will pay your
attorneys’ fees and exp enses as long as they are reasonable, by considering factors including, but not limited to,
the purchase amount and claim amount. Notwithstanding the foregoing, if applicable law allows for an award of
reasonable attorneys’ fees and exp enses, an arbitrator can award them to the same ext ent that a court would. If
the arbitrator finds either the substance of your claim or the relief sought in the demand is frivolous or brought for
an improper purpose (as measured by the standards set forth in Federal Rule of Civil Procedure 1 1 (b)), then the
payment of all arbitration fees will be governed by the AAA Rules. In such a situation, you agree to reimburse LG
for all monies previously disbursed by it that are otherwise your obligation to pay under the AAA Rules. Exce pt
as otherwise provided for, LG waives any rights it may have to seek attorneys’ fees and exp enses from you if LG
prevails in the arbitration.
H earings and Location. If your claim is for $ 25,0 0 0 or less, you may choose to have the arbitration conducted
solely on the basis of (1 ) documents submitted to the arbitrator, (2) through a telephonic hearing, or (3) by
an in-person hearing as established by the AAA Rules. If your claim exce eds $ 25,0 0 0 , the right to a hearing
will be determined by the AAA Rules. Any in-person arbitration hearings will be held at a location within the
federal j udicial district in which you reside unless we both agree to another location or we agree to a telephonic
arbitration.
O pt O ut. Y ou may opt out of this dispute resolution procedure. If you opt out, neither you nor LG can req uire the
other to participate in an arbitration proceeding. To opt out, you must send notice to LG no later than 30 calendar
days from the date of the first consumer purchaser’s purchase of the product by either: (i) sending an e-mail to
optout@ lge.com, with the subj ect line: “ Arbitration Opt Out” or (ii) calling 1 -8 0 0 -9 8 0 -29 7 3. Y ou must include in
the opt out e-mail or provide by telephone: (a) your name and address; (b) the date on which the product was
purchased; (c) the product model name or model number; and (d) the serial number (the serial number can be
found (i) on the product; or (ii) online by accessing https: / / www.lg.com/ us/ support/ repair-service/ schedule-repair-
continued and clicking on “ Find My Model & Serial Number” ).
Y ou may only opt out of the dispute resolution procedure in the manner described above (that is, by e-mail or
telephone); no other form of notice will be effective to opt out of this dispute resolution procedure. Opting out of
this dispute resolution procedure will not affect the coverage of the Limited Warranty in any way, and you will
continue to enj oy the full benefits of the Limited Warranty. If you keep this product and do not opt out, then you
accept all terms and conditions of the arbitration provision described above.

66
MEMO
MEMO

ESPA Ñ O L
MANUAL DEL PROPIETARIO
COCINA
INDUCCIÓN
ELÉCTRICA
Lea detenidamente el manual del propietario antes de poner el aparto en
funcionamiento y consérvelo a mano en todo momento para su referencia.
www.lg.com
LSE4617**
LSE4616**
MFL68881508_05
Copyright © 20 1 6 - 20 1 8 LG Electronics Inc. Todos los D erechos Reservados.

2 Í ND ICE
Í N DI CE
3
I N ST RU CCI O N ES I MPO RT A N T ES
DE SEGU RI DA D
10
DESCRI PCI Ó N GEN ERA L DEL
PRO DU CT O
1 0 Piezas
1 0 Accesorios
11
I N ST A LA CI Ó N
1 1 D escripció n general de la instalació n
1 1 Especificaciones del producto
1 2 Antes de instalar la cocina
1 3 Instalació n de la cocina
1 5 Conex ió n de la electricidad
1 9 Colocació n del dispositivo antivuelco
1 9 Barra Trasera Opcional
20 Prueba de funcionamiento
2 1
FU N CI O N A MI EN T O
21 D escripció n general del panel de control
23 Posició n de la perilla
24 Cambio de las configuraciones del horno
24 Clock (Reloj )
24 Lockout (Bloq ueo)
24 Configuraciones mí nimas y má x imas
predeterminadas
25 Timer On/ Off (Temporizador encendido/ apagado)
25 Wi-Fi
25 Settings (Aj ustes)
-
Configuració n del modo de hora
-
Configuració n del modo de conversió n
automá tica a convecció n
-
Aj uste de temperatura del horno
-
Encendido/ apagado de la luz de alarma de
precalentamiento
-
Aj uste del volumen del indicador sonoro
-
Selecció n de grados Fahrenheit o Celsius
-
Encender o apagar el tono de alarma
26 Start Time [ Hora de inicio] (D elayed Timed Cook
[ Cocció n temporizada retardada] )
27 Cook Time [ Tiempo de cocció n] (Timed Cook)
[ Cocció n temporizada] )
27 Oven Light (Luz del horno)
28 U so de la placa de cocció n
28 Á reas de cocció n
28 Beneficios de la cocció n en una superficie de
inducció n
28 Recipientes de cocina aptos para inducció n
29 Colocació n de los recipientes de cocció n
29 Movimiento de los recipientes sobre la placa de
cocció n
29 Sensores de ollas
30 Tamañ o má x imo y mí nimo del recipiente
30 Recipientes de cocina calientes y calor residual
30 Conservas caseras
31 Configuració n de los controles de la superficie
31 Indicador de superficie caliente
31 U so de las hornallas
32 Configuració n recomendada de cocció n en
superficie
32 Sugerencias para precalentar recipientes
32 Ruidos durante el funcionamiento de la placa de
cocció n
33 Manej o de energí a
33 Z ona de calentamiento
34 U so del horno
34 Antes de usar el horno
34 V entilació n del horno
34 U so de los estantes del horno
34 Bake (Hornear)
35 Modo de convecció n
36 G uí a de recomendaciones para hornear y rostizar
37 Broil (Asar)
38 G uí a de recomendaciones para asar
39 Warm (Calentar)
39 Proof (Leudar)
39 Speed Roast (Rostizado rá pido)
40 Sonda para carne (Para los modelos: LSE46 1 7 )
41 Remote Start (Inicio remoto)
41 Funcionamiento del caj ó n de calentamiento
(Para los modelos: LSE46 1 7 )
43
FU N CI O N ES I N T ELI GEN T ES
43 Aplicació n LG SmartThinQ
44 Funció n Smart D iagnosis™ (D iagnó stico Inteligente)
46 Aviso de la FCC
46 D eclaració n sobre ex posició n a la radiació n de RF de
la FCC
47
MA N T EN I MI EN T O
47 Limpieza de la placa de cocció n de vitrocerá mica
48 EasyClean
®
51 Self Clean (Autolimpieza)
53 Cambio de la luz del horno
53 Limpieza del ex terior
54 Remoció n y reemplazo de la puertas removible del
horno y el caj ó n
55 Instrucciones para el cuidado de la puerta
5 6
SO LU CI Ó N DE PRO BLEMA S
56 PREG U NTAS FRECU ENTES
58 Antes de llamar al servicio técnico
62
GA RA N T Í A LI MI T A DA

3INSTRU CCIONES IMPORTANTES D E SEG U RID AD
ESPA Ñ O L
I N ST RU CCI O N ES I MPO RT A N T ES DE
SEGU RI DA D
Lea y siga todas las instrucciones cuando utilice la cocina para evitar riesgos de incendios, descargas
eléctricas, lesiones personales o dañ os. Esta guí a no incluye todas las situaciones posibles q ue
podrí an ocurrir. Siempre comuní q uese con su agente de servicio técnico o con el fabricante cuando
haya problemas q ue no comprenda.
D escargue este manual del propietario en: http: / / www.lg.com
Este es el sí mbolo de alerta de seguridad. Este sí mbolo le advierte sobre posibles riesgos
q ue pueden ocasionar dañ os materiales, lesiones personales graves o la muerte.
El sí mbolo de alerta de seguridad siempre estará acompañ ado de las palabras
" AD V ERTENCIA" o " PRECAU CIÓ N" . Estos términos significan lo siguiente:
A DV ERT EN CI A
-
Indica una situació n peligrosa q ue, de no evitarse, podrí a
causar lesiones graves o la muerte.
PRECA U CI Ó N
-
Indica una situació n peligrosa q ue, de no evitarse, podrí a
causar lesiones menores o moderadas.
DI SPO SI T I V O DE SEGU RI DA D A N T I V U ELCO
A DV ERT EN CI A
•
PA RA REDU CI R EL RI ESGO DE V U ELCO , EL ELECT RO DO MÉ ST I CO DEBE EST A R
A SEGU RA DO CO N U N DI SPO SI T I V O A N T I V U ELCO I N ST A LA DO DE MA N ERA
A DECU A DA . PA RA V ERI FI CA R Q U E EL DI SPO SI T I V O A N T I V U ELCO EST É I N ST A LA DO
CO RRECT A MEN T E, RET I RE EL CU ERPO DEL CA J Ó N Y V ERI FI Q U E Q U E EL DI SPO SI T I V O
A N T I V U ELCO EST É BI EN SU J ET O O T O ME EL BO RDE SU PERI O R T RA SERO DE LA
PRO T ECCI Ó N PO ST ERI O R DE LA CO CI N A E I N T EN T E I N CLI N A RLA H A CI A A DELA N T E
CO N CU I DA DO . Consulte las instrucciones en la secció n de instalació n.
•
Es posible q ue un niñ o o un adulto inclinen la cocina y el vuelco consecuente les produzca la
muerte.
•
V erifiq ue q ue el dispositivo antivuelco se haya instalado correctamente y
esté fij o al piso o a la pared y enganchado a la pata de nivelació n de la
cocina.
•
No ponga en funcionamiento la cocina sin el dispositivo antivuelco
colocado y enganchado.
•
Nunca retire las patas del horno. La cocina no estará asegurada al soporte
antivuelco si se retiran las patas del horno.
•
No se pare ni se siente sobre la puerta del horno. La cocina podrí a
inclinarse y usted podrí a sufrir lesiones con lí q uidos calientes derramados,
alimentos calientes o la cocina misma.
•
No coloq ue obj etos grandes y pesados, como pavos enteros, sobre la
puerta del horno abierta. La cocina podrí a inclinarse hacia adelante y
ocasionar lesiones.
•
V uelva a conectar el dispositivo antivuelco después de mover la cocina hacia delante para tareas de
limpieza, reparaciones o cualq uier otro motivo.
•
El incumplimiento de estas instrucciones, puede tener como consecuencia la muerte o q uemaduras
graves en niñ os o adultos.
Soporte
antivuelco
Pata de
nivelació n

4 INSTRU CCIONES IMPORTANTES D E SEG U RID AD
PRECA U CI O N ES DE SEGU RI DA D
A DV ERT EN CI A
Este producto contiene q uimicos conocidos por el Estado de California de causar cá ncer y
defectos de nacimiento u otros dañ os reproductivos. L á v ese las m anos desp u é s de m anip u lar.
(Solo E E UU)
•
N O T O Q U E LA S H O RN A LLA S N I LA S SU PERFI CI ES I N T ERI O RES DEL H O RN O . Las hornallas
podrí an estar calientes incluso cuando presenten un color oscuro. Las superficies interiores del
horno se calientan lo suficiente como para causar q uemaduras. D urante y después del uso, no
toq ue ni permita q ue la vestimenta u otro material inflamable entren en contacto con las hornallas o
las superficies interiores del horno, hasta q ue hayan tenido tiempo suficiente para enfriarse. Otras
superficies, como los orificios de venteo del horno y las superficies cercanas a estos orificios, las
puertas del horno y las ventanas de las puertas del horno también se calientan y podrí an causar
q uemaduras si no se han enfriado.
•
A bra la puerta del h orno con cuidado. El aire caliente y el vapor q ue salen del horno pueden
causar q uemaduras en las manos, el rostro y los oj os. Permita q ue el aire caliente o el vapor salgan
del horno antes de sacar o colocar nuevamente la comida en el horno.
•
No repare ni reemplace ninguna parte del electrodoméstico, ex cepto en caso de q ue haya
recomendaciones especí ficas en el manual. U n técnico calificado debe estar a cargo de todas las
demá s tareas de mantenimiento.
•
No utilice limpiadores á speros, abrasivos ni espá tulas de metal para limpiar el vidrio de la puerta del
horno, ya q ue podrí an rayar la superficie. Los arañ azos podrí an hacer q ue el vidrio se q uiebre.
A DV ERT EN CI A
Si el vidrio de la puerta, la vitrocerá mica de la placa de cocció n, la superficie o la resistencia del
horno está n dañ ados, dej e de usar el horno y solicite servicio técnico.
•
No ponga en funcionamiento el horno sin la malla calentadora de carbó n.
•
No utilice plá stico para cubrir los alimentos. U tilice ú nicamente papel de aluminio o tapas seguras
para horno.
•
No permita q ue nadie se suba, se pare o se cuelgue de la puerta, del caj ó n de almacenamiento
ni de la placa de cocció n. Podrí an causar dañ os a la cocina e incluso volcarla, lo q ue generarí a
lesiones personales graves.
•
No recubra las paredes del horno, los estantes, el fondo ni ninguna otra parte del horno con
papel de aluminio ni ningú n otro material. Hacer esto interrumpe la distribució n de calor, produce
resultados de horneado deficientes y causa dañ os permanentes al interior del horno (el papel de
aluminio se fundirí a en la superficie interior del horno).
•
Nunca intente secar a una mascota en el horno.
•
N unca utilice su electrodoméstico para calefaccionar el ambiente.
•
U tilice siempre agarraderas o guantes para horno cuando retire alimentos del horno o de las hornallas.
La baterí a de cocina estará caliente. U tilice solo agarraderas secas. Las agarraderas hú medas
o moj adas sobre superficies calientes podrí an producir q uemaduras por vapor. No permita q ue la
agarradera toq ue las hornallas calientes. No utilice una toalla u otra tela gruesa para retirar alimentos.
•
N o caliente recipientes cerrados de alimentos. La presió n podrí a causar una ex plosió n q ue
podrí a generar lesiones.
•
Antes de usar las funciones de Wi-Fi, abra la puerta del horno y asegú rese de q ue esté listo para el
precalentamiento.
•
A fin de prevenir riesgos, en caso de q ue se dañ a el cable de alimentació n, este debe ser
reemplazado por el fabricante, su agente de servicio técnico o una persona de calificació n similar.
•
Si la cocina se coloca sobre una base, se deben tomar precauciones para evitar q ue el artefacto
resbale y caiga de la base.
•
Para evitar el sobrecalentamiento del producto, no instale un panel decorativo en la parte delantera
del artefacto.

5INSTRU CCIONES IMPORTANTES D E SEG U RID AD
ESPA Ñ O L
•
Para eliminar el riesgo de q uemaduras o incendios por pasar por encima de la superficie de
las unidades calientes, debe evitarse la colocació n de gabinetes de almacenamiento sobre las
unidades. Si se instalará un gabinete de almacenamiento, el riesgo puede reducirse mediante la
instalació n de una campana q ue se proyecte, de forma horizontal, un mí nimo de 5 pulgadas má s
allá de la parte inferior de los gabinetes.
MA T ERI A LES I N FLA MA BLES
A DV ERT EN CI A
Retire todo el material de embalaj e del artefacto antes de ponerlo en funcionamiento. Mantenga el
plá stico, telas, papel y otros materiales inflamables lej os de las partes del electrodoméstico q ue se
podrí an calentar.
•
No almacene ni utilice material inflamable en el horno ni cerca de la placa de cocció n. Los
materiales inflamables incluyen papel, plá stico, agarraderas, telas, recubrimientos para paredes,
cortinas y gasolina u otros vapores inflamables y lí q uidos como grasa o aceite de cocina. Estos
materiales pueden prenderse fuego cuando el horno y la placa de cocció n está n en uso.
•
U se v estimenta adecuada. No use prendas holgadas o q ue cuelguen, ya q ue podrí a prenderse
fuego en contacto con superficies calientes y causar q uemaduras graves.
•
No utilice el horno para secar ropa. Solo use el horno para el propó sito para el q ue fue diseñ ado.
•
Si posee gabinetes de almacenamiento directamente sobre la superficie de cocció n, guarde en
estos los obj etos q ue use con poca frecuencia y q ue puedan almacenarse de manera segura en un
lugar ex puesto al calor. Las altas temperaturas pueden ser peligrosas para obj etos volá tiles como
lí q uidos inflamables, limpiadores o aerosoles.
SEGU RI DA D ELÉ CT RI CA
•
D esconecte siempre la energí a del electrodoméstico antes de q ue se efectú en tareas de
mantenimiento.
•
No utilice papel de aluminio ni ningú n otro material para revestir la base del horno.
La instalació n inadecuada de estos revestimientos podrí a causar riesgo de descarga eléctrica o
incendio.
•
No permita q ue el papel de aluminio ni la sonda de temperatura entren en contacto con las
hornallas.
•
Asegú rese de q ue su cocina esté instalada correctamente y con la conex ió n a tierra adecuada, a
cargo de un instalador o técnico de mantenimiento calificado.
A DV ERT EN CI A
Antes de reemplazar la bombilla del horno, desconecte la energí a eléctrica del horno desde el
fusible principal o el panel disyuntor. El no hacerlo podrí a causar lesiones graves, descargas
eléctricas o la muerte.
FREI DO RA
•
Tenga ex tremo cuidado al trasladar o desechar grasa caliente.
•
Siempre caliente la grasa lentamente y vigile mientras aumenta la temperatura.
•
Si va a freí r una combinació n de aceites y grasas, mézclelos antes de calentarlos.
•
Si es posible, utilice un termó metro para frituras para evitar q ue la grasa se caliente por encima del
punto de humeo.
•
U tilice la menor cantidad posible de grasa para rehogar o freí r de manera efectiva. Llenar la sartén
con demasiada grasa podrí a causar derrames al agregar los alimentos.

6 INSTRU CCIONES IMPORTANTES D E SEG U RID AD
SEGU RI DA D DE LO S N I Ñ O S
•
No toq ue la superficie caliente entre la parte inferior de la puerta del horno y la parte superior del
caj ó n, en el frente del horno, mientras está en funcionamiento. La superficie se calienta y puede
causar q uemaduras y otras lesiones.
•
No dej e a los niñ os sin supervisió n cerca del horno.
A DV ERT EN CI A
N o dej e solos a los niñ os o sin supervisió n cerca del electrodoméstico cuando está en
funcionamiento o aú n caliente. Nunca debe permitir q ue los niñ os se sienten o paren en ninguna
parte del electrodoméstico, ya q ue podrí an sufrir lesiones o q uemaduras.
PRECA U CI Ó N
No guarde obj etos de interés para los niñ os en los gabinetes q ue está n arriba de la cocina o sobre
la protecció n trasera; si los niñ os subieran a la cocina para alcanzar algo q ue buscan, podrí an
sufrir lesiones graves.
•
Nunca permita q ue un niñ o se cuelgue de la puerta del horno.
•
No permita q ue los niñ os se metan dentro del horno.
•
D ej e q ue los utensilios calientes se enfrí en en un lugar seguro, fuera del alcance de los niñ os.
•
No debe permitir q ue los niñ os j ueguen con los controles ni con ninguna otra parte del electrodoméstico.
A DV ERT EN CI A
•
El artefacto y sus piezas accesibles se calientan durante el uso. No toq ue los elementos de
calentamiento ubicados en el interior del horno. Los niñ os peq ueñ os deben supervisarse de
forma continua si se les permite estar cerca del artefacto.
•
Este artefacto no ha sido diseñ ado para ser utilizado por personas con capacidades fí sicas,
sensoriales o mentales disminuidas (incluidos niñ os) o q ue no cuenten con la ex periencia o los
conocimientos necesarios para operarlo, salvo q ue una persona responsable de su seguridad les
brinde la supervisió n o la instrucció n pertinente en cuanto al uso del artefacto. No dej e q ue los niñ os
j ueguen con el artefacto. La limpieza y el mantenimiento a cargo del usuario realizado por niñ os
deben ser supervisados.
SU PERFI CI ES DE CO CCI Ó N DE V I T RO CERÁ MI CA
•
Las hornallas superficiales podrí an estar calientes incluso cuando presenten un color oscuro. Las
á reas cercanas a las hornallas superficiales podrí an calentarse lo suficiente como para causar
q uemaduras. D urante y después de su uso, N O T O Q U E LA S H O RN A LLA S SU PERFI CI A LES
N I LA S Á REA S CERCA N A S ni permita q ue la vestimenta u otro material inflamable entren en
contacto con las hornallas o las superficies cercanas hasta q ue hayan tenido tiempo suficiente para
enfriarse. Esto incluye la placa de cocció n y el á rea sobre la puerta del horno.
•
N o cocine sobre una placa de cocció n rota. Si la placa de cocció n se rompe, los lí q uidos de
limpieza y los derrames podrí an penetrar a través de la placa rota y provocar un riesgo de descarga
eléctrica.Apague el artefacto para evitar la posibilidad de descarga eléctrica y pó ngase en contacto
de inmediato con un técnico calificado.
•
No utilice la superficie de vidrio de la placa de cocció n como tabla para cortar.
•
No coloq ue ni almacene obj etos q ue puedan derretirse o prenderse fuego sobre la placa de cocció n
de vidrio, incluso cuando no esté en uso.
•
Elij a el tamañ o correcto del q uemador. Para ollas y sartenes má s peq ueñ as, utilice las hornallas
má s peq ueñ as. Para ollas y sartenes má s grandes, utilice las hornallas má s grandes. Seleccione
las sartenes con fondo plano del tamañ o suficiente para cubrir las hornallas. Si utiliza sartenes
demasiado peq ueñ as, una parte de la hornalla q uedará ex puesta al contacto directo y podrí a
q uemar la ropa.

7INSTRU CCIONES IMPORTANTES D E SEG U RID AD
ESPA Ñ O L
•
Baterí a de cocina v idriada. Solo determinados tipos de vidrio, cerá mica vidriada, cerá mica,
recipientes de cocció n de barro y otros utensilios de cocina vidriados son aptos para uso en las
hornallas de la cocina sin q uebrarse, debido al cambio abrupto de temperatura.
•
Nunca cocine directamente sobre el vidrio. U tilice siempre baterí a de cocina.
•
Siempre apague las hornallas antes de retirar la baterí a de cocina. No se confí e del sensor de ollas.
A DV ERT EN CI A
N o dej e calentando grasas o aceites sin v igilancia en la placa de cocció n. Los derrames
pueden prov ocar incendios.
•
La placa de cocció n no está diseñ ada para ser operada por medio de un temporizador ex terno o un
sistema de control remoto separado.
•
Gire las manij as de los recipientes h acia dentro, para q ue no se ex tiendan h acia las h ornallas
adyacentes. Esto reduce el riesgo de q uemaduras, el riesgo de incendio con materiales inflamables
y derrames debido a contacto involuntario con la baterí a de cocina.
•
Limpie de inmediato los derrames en el á rea de cocció n para prevenir una tarea de limpieza má s
complicada posteriormente.
•
Algunos limpiadores pueden generar vapores peligrosos si se aplican sobre una superficie caliente.
•
No coloq ue obj etos metá licos como cuchillos, tenedores, cucharas y tapas en la superficie de la
placa de cocció n, ya q ue pueden calentarse.
•
Coloq ue siempre la sartén en el centro de la hornalla sobre la q ue está cocinando. N unca dej e las
h ornallas sin superv isió n en configuraciones de altas temperaturas. El contacto adecuado
de la baterí a de cocina con el q uemador también mej orará la eficiencia. Las ebulliciones causan
derrames humeantes y grasosos q ue podrí an prenderse fuego.
•
Limpie la placa de cocció n con precaució n. No utilice esponj as ni pañ os para limpiar derrames
sobre un á rea de cocció n caliente. U tilice una espá tula de metal adecuada para la tarea. Si utiliza
una esponj a o pañ o hú medos para limpiar derrames sobre un á rea de cocció n caliente, esto podrí a
causar q uemaduras por vapor. Algunos limpiadores pueden generar vapores nocivos si se aplican
sobre una superficie caliente.
•
No encienda las hornallas antes de colocar la baterí a de cocina.
•
No guarde elementos pesados arriba la superficie de la placa de cocció n q ue pudieran caer y dañ arla.
•
No coloq ue papel de aluminio ni artí culos plá sticos, como salero y pimentero, soportes para cucharas
o envoltorios plá sticos, ni ningú n otro material sobre la cocina cuando esté en funcionamiento.
•
No utilice esponj as de lana de acero, esponj as para fregar ni esponj as abrasivas de limpieza. Estas
pueden rayar la superficie.
SU GEREN CI A S PA RA A H O RRA R EN ERGÍ A
•
Cocinar en varios estantes ahorra tiempo y energí a. Siempre q ue sea posible, cocine alimentos q ue
req uieran la misma temperatura de cocció n en un ú nico horno.
•
Para un desempeñ o ó ptimo y ahorro de energí a, siga las pautas de la pá gina 36 para colocar
correctamente los estantes y las bandej as.
•
U tilice piezas de la baterí a de cocina proporcionadas para la cantidad de alimentos q ue va a cocinar
y así ahorrar energí a al calentarlos. Calentar un litro de agua req uiere má s energí a en una olla de
tres litros, q ue en una de un litro.
•
U tilice piezas de la baterí a de cocina con fondos planos para lograr el mej or contacto posible con la
superficie de la placa de cocció n al cocinar en la placa de cocció n de vitrocerá mica.
•
Haga coincidir el tamañ o del q uemador o la hornalla de la placa de cocció n con el tamañ o del
recipiente en uso. U tilizar una hornalla grande para una sartén peq ueñ a desperdicia energí a
térmica, y la superficie ex puesta de la hornalla es un riesgo de q uemadura o incendio.
•
Reduzca el uso de energí a al limpiar la suciedad ligera del horno con la funció n EasyClean
®
, en
lugar del autolimpiante.
•
Evite abrir la puerta del horno má s de lo necesario durante el uso. Esto ayuda a q ue el horno
mantenga la temperatura, evita la pérdida innecesaria de calor y ahorra el consumo de energí a.

8 INSTRU CCIONES IMPORTANTES D E SEG U RID AD
SEGU RI DA D DU RA N T E EL U SO
PRECA U CI Ó N
Supervise todos los procesos de cocció n. Supervise constantemente los procesos de cocció n
rá pida.
•
D urante el uso, el artefacto se calienta. Tenga cuidado de no tocar los elementos de calentamiento
ubicados en el interior del horno.
•
No toq ue los estantes del horno mientras está n calientes.
•
No bloq uee la abertura de ventilació n.
•
Acomode los estantes del horno solo cuando el horno esté frí o.
•
Si se debe mover un estante mientras el horno está caliente, evite q ue la agarradera toq ue el
q uemador del horno.
•
U tilice con precaució n las funciones Cocció n temporizada o Cocció n temporizada retardada. U tilice
el reloj temporizador automá tico al cocinar carnes curadas o congeladas y la mayorí a de las frutas
y los vegetales. Los alimentos q ue pueden echarse a perder fá cilmente como la leche, huevos,
pescado, carne o aves se deben enfriar primero en el refrigerador. Incluso cuando se hayan
enfriado, no deben permanecer en el horno durante má s de 1 hora antes de iniciar la cocció n y
se los debe retirar rá pidamente una vez q ue la cocció n haya terminado. Ingerir alimentos en mal
estado puede producir intox icaciones alimentarias.
•
Las partes accesibles podrí an calentarse cuando se utiliza la parrilla.
•
No coloq ue alimentos ni baterí a de cocina en el fondo de la cavidad del horno. Hacerlo podrí a
causar dañ os permanentes al acabado de la base del horno.
•
Solo use la sonda de temperatura recomendada para este horno.
•
N o utilice agua para apagar incendios prov ocados por grasa. Si se produce un incendio en
el horno, mantenga la puerta del horno cerrada y apague el horno. Si el fuego continú a, arroj e
bicarbonato de sodio sobre el fuego o utilice un ex tinguidor. No arroj e agua ni harina sobre el
fuego. La harina podrí a ser ex plosiva y el agua podrí a hacer q ue un incendio causado por grasa se
propague y genere lesiones personales.
•
Tire del estante del horno hasta llegar a la posició n de bloq ueo al cargar y descargar alimentos del
horno. Esto ayuda a prevenir q uemaduras causadas al tocar superficies calientes de la puerta y las
paredes del horno.
•
No utilice el horno si el q uemador desarrolla un punto de brillo durante el uso o si muestra otros
signos de dañ o. U n punto de brillo indica q ue el q uemador podrí a fallar y representar un peligro
potencial de q uemadura, incendio o descarga eléctrica. Apague el horno de inmediato y solicite q ue
un técnico calificado reemplace el q uemador.
•
Al usar bolsas para hornear o asar en el horno, siga las instrucciones del fabricante.
SEGU RI DA D A L LI MPI A R
PRECA U CI Ó N
Retire del h orno todo alimento, utensilio de cocina, estante y accesorio antes de ej ecutar la
funció n de autolimpieza. Retire todos los obj etos q ue se encuentren en el caj ó n inferior.
•
Evite tocar la puerta, la ventana o el á rea de ventilació n del horno durante un ciclo de limpieza y
mantenga a los niñ os alej ados del artefacto. Estas superficies pueden alcanzar temperaturas má s
altas de lo normal.
•
No utilice un limpiador a vapor para limpiar el horno.
•
Abra una ventana y encienda un ventilador o campana ex tractora antes de realizar la autolimpieza.
•
Si el horno está muy sucio con aceite, realice la autolimpieza antes de volver a utilizarlo. El aceite
podrí a causar un incendio.

9INSTRU CCIONES IMPORTANTES D E SEG U RID AD
ESPA Ñ O L
•
Limpie la suciedad difí cil de la base del horno antes de usar la funció n autolimpieza.
•
N o utilice limpiadores para h ornos. No debe utilizarse ningú n limpiador de hornos comercial ni
ningú n tipo de revestimiento de protecció n dentro o alrededor de ninguna parte del horno.
•
Nunca dej e aves domésticas en la cocina. La salud de las aves es sumamente sensible a los gases
liberados durante un ciclo de autolimpieza del horno. Los gases podrí an ser nocivos o fatales para
las aves. Traslade las aves a un ambiente bien ventilado.
•
Limpie con el ciclo de autolimpieza solo las partes indicadas en este manual. Antes de realizar
la autolimpieza del horno, retire la asadera, todos los estantes del horno, la sonda para carne y
cualq uier otro utensilio o alimento del horno.
•
Instrucció n importante. El horno muestra el có digo de error F y se escuchan tres tonos largos durante
el proceso de autolimpieza si está funcionando mal. D esconecte la energí a eléctrica del horno desde
el fusible principal o el panel disyuntor y solicite reparació n a cargo de un técnico calificado.
•
Es normal q ue la placa de cocció n de la cocina se caliente durante el ciclo de autolimpieza. Por lo
tanto, debe evitar tocar la placa de cocció n, durante un ciclo de autolimpieza.
•
Nunca derrame agua frí a sobre el horno caliente para limpiarlo. Hacerlo podrí a provocar el mal
funcionamiento del horno.
•
Asegú rese de q ue las luces del horno estén frí as antes de limpiar.
•
N o limpie las j untas de la puerta del h orno. Las j untas de la puerta del horno son esenciales para
lograr un buen sellado. No debe frotar, dañ ar ni mover la junta.
•
Si se produce un incendio durante la limpieza automá tica, apague el horno y espere q ue se
apague el incendio. No fuerce la puerta del horno para abrirla. La introducció n de aire fresco a
las temperaturas de autolimpieza podrí a ocasionar una ex plosió n con llamas desde el horno. El
incumplimiento de esta instrucció n podrí a tener como consecuencia q uemaduras graves.
MO DO CO RRECT O DE CO CI N A R CA RN ES Y A V ES
•
Para evitar enfermedades transmitidas por los alimentos, cocine bien las carnes roj as y aves. La U SD A
ha indicado las siguientes como las temperaturas internas mí nimas de seguridad para el consumo:
•
Carne molida de vaca: 1 6 0 ° F
•
Aves: 1 6 5 ° F
•
Carne de vaca, ternera, cerdo o cordero: 1 45 ° F
•
Pescado/ mariscos: 1 45 ° F

10 D ESCRIPCIÓ N G ENERAL D EL PROD U CTO
DESCRI PCI Ó N GEN ERA L DEL PRO DU CT O
Piezas
Caj ó n de calentamiento
(Para los modelos: LSE46 1 7 )
Caj ó n de almacenamiento
(Para los modelos: LSE46 1 6 )
Placa de cocció n
V itrocerá mica
Controlador de la
placa de cocció n
Placa de nú mero
de serie y modelo
Ju nta
Puerta del horno
Perilla de la placa
de cocció n
Perilla de modo
del horno
A ccesorios
A ccesorios incluidos
Para los modelos: LSE46 1 7
Estante pesado (2 c/ u) Estante deslizante (1 c/ u) Sonda para carne (1 c/ u) Estante inferior (1 c/ u)
Limpiador
Limpiador para placa
de cocció n (1 c/ u)
Botella rociadora
(1 c/ u)
Esponj a limpiadora
q ue no raya (1 c/ u)
Para los modelos: LSE46 1 6
Limpiador
Estante está ndar (3 c/ u) Limpiador para placa
de cocció n (1 c/ u)
Botella rociadora
(1 c/ u)
Esponj a limpiadora
q ue no raya (1 c/ u)
A ccesorios opcionales
Rej illa Asadera
N O T A
•
Comuní q uese con el Servicio de atenció n al cliente de LG al 1 -8 0 0 -243-0 0 0 0 (1 -8 8 8 -542-26 23 en Canadá ) si faltara algú n
accesorio.
•
Para su seguridad y para ex tender la vida ú til del producto, solo debe utilizar componentes autorizados.
•
El fabricante no es responsable del mal funcionamiento del producto ni de accidentes causados por el uso de componentes
o piezas no autorizados y comprados por separado.
•
Las imá genes de esta guí a podrí an ser diferentes a los componentes y accesorios reales, q ue está n sujetos a cambios a
discreció n del fabricante, sin previo aviso, con fines de mej orar el producto.

11INSTALACIÓ N
ESPA Ñ O L
I N ST A LA CI Ó N
Descripció n general de la instalació n
Lea las siguientes instrucciones de instalació n en primer lugar, después de comprar este producto o transportarlo a otra ubicació n.
eriue y elia la ubicacin
adecuada
Enchufe el cable de alimentació n Conecte el dispositivo antivuelco Prueba de
funcionamiento
Instale el dispositivo antivuelco Nivele la cocina Conecte la cocina
eléctrica
Placa de
conexi ó n del
conducto
Negro Blanco Roo
loue de
bornes
240 V o 20 8 V
Especificaciones del producto
a apariencia y las especificaciones detalladas en este manual podran ariar debido a meoras constantes en el producto.
Modelos de cocinas con h orno LSE4617, LSE4616
Descripció n Cocina eléctrica por inducció n con horno empotrable
Req uisitos eléctricos
LSE46 1 7 : 1 2,7 kW 1 20 / 240 V AC o 1 0 ,5 kW 1 20 / 20 8 V AC
LSE46 1 6 : 1 1 ,6 kW 1 20 / 240 V AC o 9 ,8 kW 1 20 / 20 8 V AC
Dimensiones ex teriores
29
7
/
8
"
(Ancho) x 37
7
/
8
"
(Alto) x 26
1
/
2
"
(Profundidad) (Profundidad con la puerta
cerrada)
7 5,7 cm (Ancho) x 9 6 cm (Alto) x 6 7 ,3 cm (Profundidad) (Profundidad con la
puerta cerrada)
A ltura h asta la superficie de cocció n 36
"
(9 1 ,4 cm)
Peso neto
LSE46 1 7 : 1 9 8 ,4 lb (9 0 ,0 kg)
LSE46 1 6 : 1 9 1 ,8 lb (8 7 ,0 kg)
Capacidad total Capacidad total: 6 ,3 cu. ft.

12 INSTALACIÓ N
A ntes de instalar la cocina
A DV ERT EN CI A
Riesgo de v uelco
Es posible q ue un niñ o o un adulto inclinen la
cocina y el vuelco consecuente les produzca
la muerte. V erifiq ue q ue se haya instalado
el soporte antivuelco. Asegú rese de q ue el
soporte antivuelco esté conectado cuando
se mueva la cocina.
No ponga en funcionamiento la cocina
sin el soporte antivuelco colocado. El
incumplimiento de estas instrucciones,
puede tener como consecuencia la muerte o
q uemaduras graves en niñ os y adultos.
Para verificar q ue se haya
insertado la pata de nivelació n
en el soporte antivuelco, suj ete
el borde superior trasero de la
cocina e intente inclinarla, con
cuidado.
Soporte
antivuelco
Pata de
nivelació n
Si no recibió un soporte antivuelco con su compra, llame al
1 -8 0 0 -243-0 0 0 0 (1 -8 8 8 -542-26 23 en Canadá ) para recibir uno
sin costo.
A DV ERT EN CI A
•
Debe seguir con ex actitud la informació n de
este manual. No hacerlo podrí a causar un incendio,
descarga eléctrica, dañ os a la propiedad, lesiones
personales o la muerte.
•
U se guantes durante el procedimiento de
instalació n. D e no hacerlo, podrí a sufrir lesiones
corporales.
H erramientas necesarias
Piezas incluidas
D estornillador phillips
Nivel
Plantilla (1 )
Piezas no incluidas
Cable eléctrico de 4 hilos o
cable eléctrico de 3 hilos
(40 o 50 A aprobado por U L)
Pasacables
( Solo para instalaciones
de conductos)
Ju ego del soporte
antivuelco (1 )
Casq uillos de anclaj e (6 ) Pernos tirafondo (6 )
D estornillador plano
Llave aj ustable
Llave para tuercas
de
1
/
4
"
Taladro
Pinzas
G afas de seguridad
Cinta medidora
G uantes
Rear ller (1)
N O T A
•
Cumpla todos los có digos y ordenanzas vigentes.
•
Solicite al instalador q ue le muestre la ubicació n del disyuntor o fusible. Má rq uelo para q ue sea fá cil de detectar.
•
Al igual q ue al utilizar cualq uier otro electrodoméstico q ue genera calor, ex isten determinadas precauciones de seguridad
q ue se deben respetar.
•
Asegú rese de q ue su cocina esté instalada correctamente y con la conex ió n a tierra adecuada, a cargo de un instalador o
técnico de mantenimiento calificado.

13INSTALACIÓ N
ESPA Ñ O L
I nstalació n de la cocina
Desembalaj e y traslado de la cocina
PRECA U CI Ó N
•
Debe h aber dos o má s personas para mov er e
instalar la cocina. ( Peligro de peso ex cesiv o) Si no
se cumple con esto, se pueden producir lesiones en la
espalda u otras lesiones.
•
N o utilice las manij as de la puerta para empuj ar
ni para tirar de la cocina durante la instalació n
o al mov er la cocina para tareas de limpieza o
reparaciones. Hacerlo podrí a causar dañ os graves a la
puerta de la cocina.
Retire el material de embalaj e, la cinta y cualq uier etiq ueta
temporaria de la cocina, antes de usarla. No retire las etiq uetas
de advertencia, la etiq ueta de modelo y nú mero de serie ni la
hoj a técnica ubicada en la parte posterior de la cocina.
Para q uitar la cinta o el pegamento restantes, frote el á rea con
fuerza utilizando el dedo pulgar. También es sencillo retirar el
residuo de cinta o pegamento frotando una peq ueñ a cantidad
de detergente para vaj illa sobre el adhesivo con los dedos.
Enj uague con agua tibia y seq ue.
No utilice instrumentos filosos, alcohol para frotar, lí q uidos
inflamables ni limpiadores abrasivos para q uitar cinta o
pegamento. Estos productos pueden dañ ar la superficie de la
cocina.
La cocina es pesada y puede instalarse sobre revestimientos
blandos para pisos como vinilo acolchado o piso alfombrado.
Tenga cuidado al mover la cocina sobre este tipo de pisos.
U tilice una correa al mover la cocina para evitar dañ ar el piso.
O deslice la cocina sobre un cartó n o madera enchapada para
evitar dañ ar el revestimiento del piso.
Elecció n de la ubicació n adecuada
PRECA U CI Ó N
•
Ev ite colocar gabinetes sobre la cocina. Para
minimizar el peligro ocasionado al estirarse sobre
las llamas de las hornallas encendidas, instale una
campana de ventilació n sobre la cocina, q ue se
proyecte hacia delante cinco pulgadas al frente de los
gabinetes como mí nimo.
•
A segú rese de q ue el rev estimiento de las paredes,
la mesada y los gabinetes de alrededor de la cocina
puedan soportar el calor ( h asta 19 4 ° F) generado
por la cocina. Podrí a producirse cambios de color,
deslaminació n o derretimiento. Esta cocina ha sido
diseñ ada para cumplir con la temperatura má x ima
permitida para gabinetes de madera de 1 9 4 ° F.
•
A ntes de instalar la cocina en una á rea cubierta con
linó leo u otro rev estimiento sintético para pisos,
asegú rese de q ue este pueda soportar temperaturas
de 2 0 0 ° F ( 9 3 ° C) , como mí nimo.
•
U tilice una almoh adilla de aislamiento o una
placa de madera ench apada de
1
/
4
pulgadas ( 0 , 64
cm) debaj o de la cocina si la instala sobre piso
alfombrado.
La cocina debe estar siempre enchufada en su propio
tomacorriente individual con conex ió n a tierra. Esto evita
sobrecargar los circuitos eléctricos de la casa, lo q ue
podrí a causar un peligro de incendio, debido a los cables
sobrecalentados. Se recomienda la instalació n de un circuito
ex clusivo para este electrodoméstico.
Casa rodante: req uisitos adicionales de instalació n
La instalació n de esta cocina debe cumplir con el Está ndar
de construcció n y seguridad de casas prefabricadas, tí tulo
24 CFR, parte 328 0 (anteriormente el Está ndar federal de
construcció n y seguridad de casas mó viles, tí tulo 24, parte
28 0 del HU D ), o cuando ese está ndar no sea aplicable,
debe aj ustarse al Está ndar de instalaciones para casas
prefabricadas, ANSI A225.1 / NFPA 50 1 A o los có digos locales.
•
Cuando se instala esta cocina en una casa rodante, debe
estar suj eta al piso durante el trá nsito. Cualq uier método
de fij ació n de la cocina al piso es adecuado, siempre q ue
cumpla los está ndares detallados anteriormente.
•
Se debe utilizar un cable de alimentació n de cuatro hilos en
una instalació n de casa rodante.

14 INSTALACIÓ N
Dimensiones y espacios libres
N O T A
G uarde para el uso del inspector eléctrico local.
36 "
(9 1 ,4 cm)
29 ,8 "
(7 5,7 cm)
24"
(6 0 ,9 cm)
Gabinete
Hueco en
el gabinete
A
Á rea
aceptable
para tomacor-
rientes
3" (7 ,6 cm)
24"
(6 0 ,9 cm)
3" (7 ,6 cm)
25"
(6 3,5 cm)
Ancho normal de
mesada
36 "
(9 1 ,4 cm)
Counter top
height
4"
(1 0 cm)
9 "
(23 cm)
9 "
(23 cm)
4"
(1 0 cm)
Pared
Centro
1 5" (38 cm)
1 1 " (28 cm)
2,5" (6 ,3 cm)
6 "
(1 5,2 cm)
5"
(1 3 cm)
6 "
(1 5,2 cm)
2,5"
(6 ,3 cm)
A = 30 " (7 6 ,2 cm) Para los EE. U U .
= 30 " (7 6 ,2 cm) ~ 31 " (7 8 ,7 cm) Para Canadá
Para la instalació n en Canadá , no se debe instalar una cocina independiente (no empotrable) a menos de
1 5
/
32
"
(1 2 mm) de
distancia de cualq uier superficie adyacente.
30 "
(7 6 ,2 cm)
* 30 " (7 6 ,2 cm)
Mí nimo
* * 1 5"
(38 ,1 cm)
36 "
(9 1 ,4 cm)
Dimensiones mí nimas
* 30 " (7 6 ,2 cm) de espacio mí nimo entre la parte superior de la superficie de cocció n y la parte inferior de un gabinete de madera
o metal no protegido; o 24" (6 0 ,9 cm) de espacio mí nimo cuando el fondo del gabinete de madera o metal está protegido por no
menos de
1
/
4
"
(6 ,4 cm) de material pirorresistente cubierto con una lá mina de acero no inferior a n.° 28 MSG , 0 ,0 1 5" (0 ,38 1 mm) de
acero inox idable, 0 ,0 24" (0 ,6 1 0 mm) de aluminio o 0 ,0 20 " (0 ,50 8 mm) de cobre.
* * 1 5" (38 ,1 cm) de espacio mí nimo entre la mesada y la parte inferior del gabinete adyacente.

15INSTALACIÓ N
ESPA Ñ O L
I nstalació n del dispositiv o antiv uelco
Soporte
antivuelco
Pata de
nivelació n
A DV ERT EN CI A
Riesgo de v uelco
Es posible q ue un niñ o o un adulto inclinen
la cocina y el vuelco consecuente les
produzca la muerte. V erifiq ue q ue se haya
instalado el soporte antivuelco. Asegú rese
de q ue el soporte antivuelco esté conectado
cuando se mueva la cocina. No ponga en
funcionamiento la cocina sin el soporte
antivuelco colocado. El incumplimiento
de estas instrucciones, puede tener como
consecuencia la muerte o q uemaduras
graves en niñ os y adultos.
Para verificar q ue se haya
insertado la pata de nivelació n
en el soporte antivuelco, suj ete
el borde superior trasero de la
cocina e intente inclinarla, con
cuidado.
Placa de
pared
Soporte
antivuelco
El tornillo debe
atravesar la
madera o el
hormigó n
U biq ue el soporte antiv uelco con ayuda de la plantilla
Se incluye un soporte antivuelco con la plantilla. Las
instrucciones incluyen la informació n necesaria para completar
la instalació n. Lea y siga la hoj a de instrucciones de instalació n
de la cocina (plantilla).
N iv elació n de la cocina
Nivele la cocina aj ustando las patas de nivelació n con una
llave. Si ex tiende las patas ligeramente, podrí a ser má s fá cil
insertar la pata trasera en el soporte antivuelco.
U tilice un nivelador para verificar sus ajustes. U biq ue el
nivelador en diagonal sobre el estante el horno y verifiq ue en
todas direcciones para nivelar.
Primero verifiq ue la direcció n
.
Luego verifiq ue la direcció n
. Si el nivelador no q ueda
eq uilibrado sobre el estante, aj uste las patas de nivelació n con
una llave.
1
2
Conex ió n de la electricidad
Req uisitos eléctricos
U n técnico calificado debe instalar este electrodoméstico
e incluir una conex ió n a tierra en un circuito derivado, de
acuerdo con el Có digo Eléctrico Nacional ANSI/ NFPA N.° 7 0 ,
en su edició n má s reciente.
Todo el cableado debe cumplir con el có digo Local y el có digo
NEC. Esta cocina req uiere un cable monofá sico de 3 hilos,
1 20 / 20 8 V CA o un sistema eléctrico de 1 20 / 240 V 6 0 Hz.
U tilice ú nicamente un cable para cocina de 3 o 4 conductores
homologados por U L con bornes de circuito cerrado, talones
de cable pala de ex tremo abierto o una terminació n similar. No
instale el cable de alimentació n sin un pasacables.
Se req uiere un cable apto para cocinas de 40 amperios con
un rango de voltaj e mí nimo de 1 20 / 240 . Si se utiliza un cable
apto para cocinas de 50 amperios, debe estar indicado para
un uso con aberturas de conex ió n de 1
3
/
8
"
de diá metro. Este
electrodoméstico puede conectarse por medio de un conducto
o un cable de alimentació n. Si se utiliza un conducto, consulte
la pá gina 1 8 para má s informació n sobre la conex ió n de
conductos con cable de 3 h ilos o la conex ió n de conductos
con cable de 4 h ilos.

16 INSTALACIÓ N
A DV ERT EN CI A
•
Dej e de 2 a 3 pies ( 61, 0 cm a 9 1, 4 cm) de lugar libre
en la lí nea, para q ue se pueda mov er la cocina si es
necesario h acer reparaciones.
•
N o se deben modificar ni el cable de alimentació n
ni el ench ufe. Si el ench ufe no entra en el
tomacorriente, debe solicitar q ue un electricista
calificado instale un tomacorriente adecuado.
•
Se proh í be utilizar un cable de ex tensió n para
conectar la cocina a la energí a eléctrica. Conecte el
cable de alimentació n y el ench ufe directamente.
•
Se req uiere una conex ió n eléctrica a tierra en este
electrodoméstico.
•
A segú rese de q ue el cable de alimentació n no esté
presionado por la cocina ni por obj etos pesados.
Si no verificara esto y el cable estuviera presionado,
podrí a sufrir q uemaduras graves o descargas eléctricas.
V alores nominales especificados del j uego del cable de
alimentació n
Tensió n nominal de
la cocina, en vatios
Corriente
nominal
especificada
del j uego
del cable de
alimentació n,
amperios
D iá metro (pulgadas) de la
abertura de conex ió n de la
cocina
1 20 / 240
voltios
3 hilos
1 20 / 20 8
voltios
3 hilos
Cable de
alimentació n
Conducto
8 .7 50 -
1 6 .50 0
1 6 .50 1 -
22.50 0
7 .8 0 1 -
1 2.50 0
1 2.50 1 -
1 8 .50 0
40 o 50 A
50
1
3
/
8
"
1
3
/
4
"
1
1
/
8
"
1
3
/
8
"
Receptá culo eléctrico de pared para cables de 3 o 4 hilos
Receptá culo para cable de 4 h ilos ( 14- 5 0 R)
Receptá culo para cable de 3 h ilos ( 10 - 5 0 R)
Conex ió n del cable de alimentació n
Se debe retirar la cubierta de acceso trasera. Afloj e los dos
tornillos con un destornillador. El bloq ue de bornes debe
q uedar accesible.
Cubierta de acceso
U tilice la placa de conex ió n del cable/ conducto para instalar el
cable de alimentació n o el conducto. D ej e la placa de conex ió n
segú n estaba instalada, para las instalaciones del cable de
alimentació n. Retire la placa de conex ió n para las instalaciones
de conductos y utilice el orificio para conducto má s peq ueñ o
de 1
1
/
8
pulgadas (2,8 cm), en lugar del orificio para cable de
alimentació n de
1 3
/
8
pulgadas (3,5 cm).
Retire la placa de conexi ó n de conductos
Conducto de 1
1
/
8
" (2,8 cm)
Cable de 1
3
/
8
" (3,5 cm)
Para instalaciones con cable de alimentació n, enganche
el pasacables sobre el orificio para cable de alimentació n
de 1
3
/
8
pulgadas (3,5 cm), ubicado por debaj o de la parte
posterior del horno. Inserte el cable de alimentació n a través
del pasacables y aj ú stelo.
Placa de
conexi ó n del
conducto
Cable de
alimentació n
Montaj e del pasacables del cable de alimentació n en la
abertura de 1
3
/
8
"
Para instalaciones de conductos, inserte el pasacables del
conducto en el orificio correspondiente de 1
1
/
8
pulgadas
(2,8 cm). Luego, instale el conducto a través del cuerpo del
pasacables y aj ú stelo con su anillo.
Placa de
conexi ó n de
cables/
conductos
Conducto
Anillo
Cuerpo
Montaj e del pasacables del conducto en la abertura de 1
1
/
8
"

17INSTALACIÓ N
ESPA Ñ O L
Conex ió n con cable de 3 h ilos:
Cable de alimentació n
A DV ERT EN CI A
•
El h ilo del medio ( neutro o tierra) , q ue es blanco, de
un cable de alimentació n de 3 h ilos o un conducto
de 3 h ilos se debe conectar al poste medio del
bloq ue de bornes principal. Los dos h ilos restantes
del cable de alimentació n o del conducto se deben
conectar a los postes ex teriores del bloq ue de
bornes principal. El no hacerlo podrí a causar lesiones
personales graves, descargas eléctricas o la muerte.
I nstale el cable de alimentació n de la siguiente manera:
Para instalaciones con cable de alimentació n, enganche el
pasacables sobre el orificio para cable de alimentació n de 1
3
/
8
"
ubicado por debaj o de la parte posterior del horno. Inserte el
cable de alimentació n a través del pasacables y aj ú stelo.
N o instale el cable de alimentació n sin un pasacables.
1
Q uite los 3 tornillos inferiores del bloq ue de bornes y
consérvelos.
2
Inserte los 3 tornillos a través de cada anillo de bornes
del cable de alimentació n y en los bornes inferiores
del bloq ue de bornes. Asegú rese de q ue el hilo central
(neutro), q ue es blanco, esté conectado a la posició n
central inferior del bloq ue de bornes.
3
Aj uste los 3 tornillos de manera segura al bloq ue de
bornes. No retire las conex iones de la correa a tierra.
Conex ió n con cable de 3 h ilos
Negro Blanco Roj o
Bloq ue de
bornes
Placa de conexi ó n
del conducto
Si los tornillos no está n aj ustados de manera segura, podrí a
generarse una chispa eléctrica y causar lesiones personales
graves o incluso la muerte.
Conex ió n con cable de 4 h ilos:
Cable de alimentació n
A DV ERT EN CI A
•
Solo debe utilizar un j uego de cable de alimentació n
de 4 conductores con un v alor nominal de 12 0 / 2 40
v oltios, 5 0 amperios y marcado para uso en cocinas
de conectores de circuito cerrado o talones de cable
pala de ex tremo abierto con puntas h acia arriba. El
h ilo blanco ( neutro) del cable de alimentació n o el
conducto de 4 h ilos se deben conectar al poste medio
del bloq ue de bornes principal.
El h ilo medio ( neutro) del cable de alimentació n o
conducto de 4 h ilos se debe conectar al poste medio
del bloq ue de bornes principal. Los otros dos h ilos
del cable de alimentació n o del conducto se deben
conectar a los postes ex teriores del bloq ue de bornes
principal. El cuarto cable a tierra ( v erde) se debe
conectar al marco de la cocina con el tornillo de
conex ió n a tierra. El no hacerlo podrí a causar lesiones
personales graves, descargas eléctricas o la muerte.
I nstale el cable de alimentació n de la siguiente manera:
N o instale el cable de alimentació n sin un pasacables.
1
Q uite los 3 tornillos inferiores del bloq ue de bornes y
consérvelos.
2
Retire el tornillo de conex ió n a tierra y doble el ex tremo de
la correa de conex ió n a tierra, para q ue la ranura q uede
sobre el orificio del tornillo central q ue retiró en el paso 1 .
3
Inserte el tornillo a tierra en el anillo del borne del hilo a
tierra del cable de alimentació n (verde) y asegú relo al
marco de la cocina.
4
Inserte los 3 tornillos a través de cada anillo de bornes
del cable de alimentació n y en los bornes inferiores
del bloq ue de bornes. Asegú rese de q ue el hilo central
(neutro) esté conectado a la posició n central inferior del
bloq ue de bornes.
5
Aj uste los 3 tornillos de manera segura al bloq ue de
bornes. El tornillo central ahora fij a la correa de conex ió n
a tierra, plegada hacia arriba, al bloq ue.
Conex ió n con cable de 4 h ilos
Correa de
conexi ó n a
tierra
Bloq ue de
bornes
Placa de conexi ó n
del conducto
Tornillo de
conexi ó n a tierra
Negro Blanco Rojo
Pliegue la correa
hacia arriba y
aj uste
Si los tornillos no está n aj ustados de manera segura, podrí a
generarse una chispa eléctrica y causar lesiones personales
graves o incluso la muerte.

18 INSTALACIÓ N
Conex ió n con cable de 3 h ilos:
Conducto
I nstale el conducto de la siguiente manera:
Retire la placa de conex ió n de conductos de la parte posterior
del horno y gí rela. Se debe utilizar el orificio para conductos
(1
1
/
8
" ).
En primer lugar, prepare los hilos del conducto como se indica
a continuació n.
3 h ilos
Placa de
conexi ó n del
conducto
1 "
(2,5 cm)
1 "
(2,5 cm)
3
/
8
"
(0 ,9 cm)
3
/
8
"
(0 ,9 cm)
3
/
4
"
(1 ,9 cm)
3
1
/
2
"
(8 ,9 cm)
3
1
/
2
"
(8 ,9 cm)
2
3
/
4
"
(6 ,9 cm)
Cable de
conexi ó n
a tierra
o
4 h ilos
En segundo lugar, instale el pasacables del conducto.
Para instalaciones de conductos, adq uiera un pasacables e
insértelo en el orificio correspondiente de 1
1
/
8
pulgadas (2,8 cm)
Luego, instale el conducto a través del cuerpo del pasacables
y aj ú stelo con su anillo. Reinstale el soporte. Para conex iones
de conductos: si el hilo del conducto es de cobre, debe ser
cableado de 8 o 1 0 AWG . Si es de aluminio, debe ser cableado
de 6 u 8 AWG .
1
Afloj e los 3 tornillos inferiores del bloq ue de bornes.
2
Inserte el ex tremo desnudo del cable (blanco/ neutro) a
través de la abertura central del bloq ue de bornes. No
retire las conex iones de la correa a tierra.
3
Inserte los dos ex tremos desnudos del cable en las
aberturas inferiores izq uierda y derecha del bloq ue de
bornes.
Aj uste los 3 tornillos de manera segura al bloq ue de
bornes (aprox imadamente de 35 a 50 pulg-lb).
Conex ió n con cable de 3 h ilos
Bloq ue de
bornes
Negro Blanco Roj o
Ext remos
del cable
Placa de conexi ó n
del conducto
Si los tornillos no está n aj ustados de manera segura, podrí a
generarse una chispa eléctrica y causar lesiones personales
graves o incluso la muerte.
Conex ió n con cable de 4 h ilos:
Conducto
A DV ERT EN CI A
•
El h ilo medio ( neutro) del cable de alimentació n o
conducto de 4 h ilos se debe conectar al poste medio
del bloq ue de bornes principal. Los otros dos h ilos
del cable de alimentació n o del conducto se deben
conectar a los postes ex teriores del bloq ue de bornes
principal. El cuarto cable a tierra ( v erde) se debe
conectar al marco de la cocina con el tornillo de
conex ió n a tierra. El no hacerlo podrí a causar lesiones
personales graves, descargas eléctricas o la muerte.
1
Siga las instrucciones para instalar el conducto en la
conex ió n de 3 hilos: no instale el conducto hasta q ue el
pasacables y el soporte estén instalados. No instale el
conducto sin un pasacables.
2
Afloj e los 2 tornillos inferiores izq uierdo y derecho
del bloq ue de bornes. Retire los 2 tornillos centrales
inferiores. No descarte ningú n tornillo.
3
Retire el tornillo de conex ió n a tierra y doble el ex tremo de
la correa de conex ió n a tierra, para q ue la ranura q uede
sobre el orificio del tornillo central q ue retiró en el paso 1 .
4
U na el ex tremo desnudo del cable de conex ió n a tierra
(verde) al marco de la cocina y asegú relo con el tornillo
de conex ió n a tierra.
5
Inserte el ex tremo desnudo del cable (blanco/ neutro)
a través de la abertura central del bloq ue de bornes.
El tornillo central ahora fij a la correa de conex ió n a
tierra, plegada hacia arriba, al bloq ue.
6
Inserte los dos ex tremos desnudos del cable a través de
las aberturas izq uierda y derecha del bloq ue de bornes.
Aj uste los 3 tornillos de manera segura al bloq ue de
bornes (aprox imadamente de 35 a 50 pulg-lb).
Conex ió n con cable de 4 h ilos
Bloq ue de
bornes
Negro Blanco Roj o
Correa de
conexi ó n
a tierra
Ext remos
del cable
Placa de
conexi ó n del
conducto
Pliegue la
correa hacia
arriba y
aj uste
Cable de
conexi ó n
a tierra
Tornillo de
conex ió n a
tierra
Si los tornillos no está n aj ustados de manera segura, podrí a
generarse una chispa eléctrica y causar lesiones personales
graves o incluso la muerte.

19INSTALACIÓ N
ESPA Ñ O L
Barra T rasera O pcional
Si el contador no puntea la abertura en la pared posterior, se
necesitará el kit de barra trasera suministrada con la estufa.
N O T A
Si la profundidad de encimera es mayor q ue 25" habrá
brecha entre el kit y la pared posterior.
Si la profundidad de encimera es menos q ue 24" , el panel
control no se levantará el capelo.
I nstalar Barra T rasera
1
U sando el destornillador, remueva el soporte retirando
los seis tornillos q ue lo suj etan.
Remover
Soporte posterior
2
Coloq ue la barra trasera en la parte posterior del horno,
deslizando el gancho en las ranuras como se muestra.
D eslice el soporte posterior en la abertura inferior de la
barra trasera.
G ancho
Barra trasera
Colocació n del dispositiv o
antiv uelco
•
Mueva la cocina para q ue q uede cerca de la abertura para
enchufar en el receptá culo.
•
D eslice la cocina en su posició n y asegú rese de q ue la pata
trasera se deslice por debaj o del soporte antivuelco. La
cocina debe q uedar bien apoyada contra la pared trasera,
cuando está bien instalada.
•
Con cuidado, intente inclinar la cocina hacia delante para
asegurarse de q ue el soporte antivuelco esté colocado
correctamente. Si está bien instalado, el soporte antivuelco
evitará q ue la cocina se incline. Si la cocina se puede inclinar,
vuelva a instalar la cocina hasta q ue el soporte antivuelco
q uede bien colocado y la cocina no se incline hacia delante.
•
Encienda la energí a eléctrica. V erifiq ue el buen
funcionamiento de la cocina.

2 0 INSTALACIÓ N
3
Coloq ue el soporte posterior y relleno como se muestra,
usando cuatro de seis tornillos q ue ha removido en el
paso 1 .
Tornillos abajo
Espacio
4
G uarde los dos tornillos Restantes con esta guí a para el
uso futuro.
Prueba de funcionamiento
V erifiq ue q ue la cocina esté bien instalada y realice un ciclo de
prueba.
1
G ire la perilla de modo del horno hasta la posició n O ff
para comenzar la prueba.
2
Llene una olla con capacidad de inducció n con agua y
coló q uela sobre una hornalla. Encienda la hornalla. La
barra de LED debe mostrar la configuració n y el agua
debe calentarse. La barra de LED no debe fluctuar.
Repita este procedimiento con todas las hornallas.
3
Luego de revisar todas las hornallas, verifiq ue el sistema
de bloq ueo presionando el botó n Probe( Para los
modelos: LSE4617) o Clock durante tres segundos. La
puerta del horno debe bloq uearse y la placa de cocció n
no debe funcionar mientras q ue la funció n Lockout
(Bloq ueo) está encendida. Presione Probe( Para los
modelos: LSE4617) o Clock durante tres segundos
para deshabilitar Lockout.
4
Ahora verifiq ue el funcionamiento del horno. G ire la
perilla de modo del horno hasta seleccionar el modo
Bake. 350 ° F aparece en la pantalla. Presione Start.
5
El horno debe terminar de precalentarse en 1 5 minutos
y el ventilador de convecció n debe funcionar mientras el
horno se está precalentando.
6
D espués de controlar el funcionamiento del horno,
suba la temperatura a 450 ° F y dej e el horno encendido
durante una hora, como mí nimo, para ayudar a remover
cualq uier resto de aceite q ue pudiera causar humo y
olores al usar el horno por primera vez.
N O T A
Cuando la cocina se usa por primera vez, podrí a salir
humo.

2 1FU NCIONAMIENTO
ESPA Ñ O L
FU N CI O N A MI EN T O
Descripció n general del panel de control
Para los modelos: LSE4617
3UHVVDQGKROGVHFIRUH[WUDIXQFWLRQV
:L)L
1 11
2 3 4 5 6 7 108 9
Para los modelos: LSE4616
1
12 13 14 5 6 15 108 9

2 2 FU NCIONAMIENTO
1
Smart Diagnosis
T M
•
U so durante la funció n Smart D iagnosis.
2
Cook T ime ( T iempo de cocció n) / Clock ( Reloj )
( Para los modelos: LSE4617)
•
Presione el botó n para configurar la cantidad de tiempo q ue
se desea cocinar la comida. El horno se apaga cuando se
agota el tiempo de cocció n establecido.
•
Mantenga presionado el botó n durante tres segundos para
configurar la hora del dí a.
3
Start T ime ( H ora de inicio) / Setting ( A j uste)
( Para los modelos: LSE4617)
•
Presione el botó n para configurar la cocció n temporizada
retardada. El horno se inicia a la hora configurada.
•
Mantenga presionado el botó n durante tres segundos para
seleccionar y configurar los aj ustes del horno.
4
Probe ( Sonda) / Lock O ut ( Bloq ueo)
( Para los modelos: LSE4617)
•
Presione el botó n para seleccionar la funció n Sonda.
•
Mantenga presionado el botó n durante tres segundos para
bloq uear o desbloq uear la puerta y el panel de control.
5
T imer O n/ O ff / * W i- Fi ( T emporizador Encendido/
A pagado / * W i- Fi)
Presione el botó n para configurar o cancelar el temporizador
del horno.
Mantenga presionado el botó n durante tres segundos para
conectar con la red Wi-Fi. Para desconectar el artefacto de la
red, elimí nelo de los artefactos registrados en la aplicació n.
6
O v en Ligh t ( Luz del h orno)
Presione el botó n para encender o apagar la luz del horno.
7
W arming Draw er ( Caj ó n de calentamiento)
( Para los modelos: LSE4617)
Presione el botó n para seleccionar la funció n Caj ó n de
calentamiento.
8
- / +
Presione el botó n má s (+ ) para aumentar el tiempo de cocció n
o la temperatura del horno.
Presione el botó n menos (-) para disminuir el tiempo de
cocció n o la temperatura del horno.
9
Start ( I nicio)
Presione el botó n para iniciar todas las funciones del horno.
10
Perilla de modo del h orno
G ire la perilla para seleccionar el modo de operació n del
horno.
11
Reloj intermitente
Si el signo de dos puntos parpadea en la pantalla del reloj ,
presione { Cook Time} durante tres segundos y restablezca la
hora o presione cualq uier tecla para detener el parpadeo del
indicador.
12
Cook T ime ( T iempo de cocció n)
( Para los modelos: LSE4616)
Presione el botó n para configurar la cantidad de tiempo q ue se
desea cocinar la comida. El horno se apaga cuando se agota
el tiempo de cocció n establecido.
13
Start T ime ( H ora de inicio) ( Para los modelos: LSE4616)
Presione el botó n para configurar la cocció n temporizada
retardada. El horno se inicia a la hora configurada.
14
Clock ( Reloj ) / Lockout ( Bloq ueo)
( Para los modelos: LSE4616)
•
Presione el botó n para establecer la hora del dí a.
•
Mantenga presionado el botó n durante tres segundos para
bloq uear la puerta y el panel de control.
15
Setting ( A j uste) ( Para los modelos: LSE4616)
Presione el botó n para seleccionar y hacer aj ustes en la
configuració n del horno.

2 3FU NCIONAMIENTO
ESPA Ñ O L
Posició n de la perilla
D espués de limpiar las perillas del horno, asegú rese de volver a colocarlas en la posició n correcta; de lo contrario podrí a ocasionar
un mal funcionamiento de los q uemadores.
1 2
Simmer
HI/Boos
t
Simmer
HI/Boos
t
Induction Modo del horno Warm Induction
1
I ndicador de q uemador encendido
La luz del Indicador de q uemador encendido se enciende cuando la perilla se gira, incluso si el elemento de la placa de cocció n no
funciona.
2
I ndicador de superficie caliente
La luz indicadora de superficie caliente se enciende siempre q ue cualq uier á rea de cocció n de superficie esté demasiado caliente
para tocarla.
Permanece encendida despus de apagar la hornalla y hasta ue la superficie se haya enfriado hasta llegar a 130 ˚F
aprox imadamente.

2 4 FU NCIONAMIENTO
Cambio de las configuraciones
del h orno
Clock ( Reloj )
El reloj se debe configurar en la hora correcta del dí a para
q ue las funciones automá ticas del temporizador del horno
funcionen de manera adecuada.
1
Coloq ue la perilla de modo del horno en la posició n O ff.
2
Mantenga presionado el botó n Cook T ime durante tres
segundos (Para los modelos: LSE46 1 7 ) o presione
Clock. CLO se muestra en la pantalla.
3
Presione los botones má s( + ) o menos( - ) para
seleccionar la hora deseada. Má s( + ) para incrementar el
tiempo y menos( - ) para disminuir el tiempo.
4
Presione Start para introducir la hora e iniciar el reloj .
N O T A
•
No se puede cambiar la hora del dí a durante un
proceso de horneado con temporizador o un ciclo de
autolimpieza.
•
Si no se presiona ninguna otra tecla tras 25 segundos
de haber presionado Clock, la pantalla vuelve a la
configuració n original.
•
Si los dos puntos del reloj parpadean en la pantalla,
podrí a haber habido una falla en el suministro eléctrico.
Restablezca la hora.
Lockout ( Bloq ueo)
La funció n Bloq ueo traba la puerta del horno de manera
automá tica y evita q ue se enciendan la mayorí a de los
controles del horno. Esta no inhabilita el temporizador y la luz
interior del horno.
1
Coloq ue la perilla de modo del horno en la posició n O ff.
2
Presione y mantenga pulsado Probe/ Lockout (Para
los modelos: LSE46 1 7 ) o Clock/ Lockout durante tres
segundos.
3
Suena la melodí a de bloq ueo, y en la pantalla aparece
Loc y parpadea el icono del candado
.
4
Cuando se haya bloq ueado la puerta del horno, el
indicador de bloq ueo
dej a de parpadear y permanece
encendido.
5
Para desactivar la funció n Lockout, presione y mantenga
pulsado Probe/ Lockout (Para los modelos : LSE46 1 7 )
o Clock/ Lockout durante tres segundos. La melodí a
de desbloq ueo suena y la puerta y los controles se
desbloq uean.
N O T A
La luz indicadora Burner O n se encenderá al tiempo q ue
la perilla se gire aunq ue la placa de cocció n no esté en
operació n.
Conguraciones nias ias
predeterminadas
Todas las funciones detalladas tienen un aj uste mí nimo y
má x imo de tiempo o temperatura, q ue puede ingresarse en el
control. Cada vez q ue se presiona una tecla de control, suena
un tono de aceptació n de entrada.
Si la entrada de temperatura o tiempo está por debaj o o por
encima de la configuració n mí nima o má x ima para esa funció n,
suena un tono de error de entrada (dos tonos cortos).
Funció n
T emp. /
tiempo
mí n.
T emp. /
tiempo
má x .
V alor
predeter-
minado
Clock (Reloj )
1 2 h
1 : 0 0
h / min
1 2: 59
h / min
24 h
0 : 0 0
h / min
23: 59
h / min
Timer
(Temporizador)
1 2 h 0 : 1 0 sec
1 1 : 59
h / min
24 h 0 : 1 0 sec
1 1 : 59
h / min
Cook Time
(Tiempo de
cocció n)
1 2 h 0 : 0 1 min
1 1 : 59
h / min
24 h 0 : 0 1 min
1 1 : 59
h / min
Conv. Bake
(Hornear por
convecció n)
30 0 ° F /
1 50 ° C
550 ° F /
28 5 ° C
350 ° F
(* 325 ° F)/
1 2 h
Conv. Roast
(Rostizar por
convecció n)
30 0 ° F /
1 50 ° C
550 ° F /
28 5 ° C
350 ° F
(* 325 ° F)/
1 2 h
Broil (Asar)
Baj o
40 0 ° F
Alto
520 ° F
Alto /
3 h
Bake (Hornear)
1 7 0 ° F /
8 0 ° C
550 ° F /
28 5 ° C
350 ° F /
1 2 h
Proof (Leudar) 0 : 0 1 min
1 1 : 59
h / min
1 2 h
Pizza 1 2 h
Speed Roast
(Rostizado
rá pido)
1 2 h
Warm
(Calentar)
3 h
Self Clean
(Autolimpieza)
3 h 5 h 4 h
Probe (Sonda)
8 0 ° F /
27 ° C
21 0 ° F /
1 0 0 ° C
1 50 ° F /
6 5 ° C
EasyClean
®
1 0 min
* U so de la conversió n automá tica
•
Los tiempos predeterminados del modo de cocció n se
habilitan sin configurar el tiempo de cocció n.

2 5FU NCIONAMIENTO
ESPA Ñ O L
T imer O n/ O ff ( T emporizador
encendido/ apagado)
La funció n Temporizador encendido/ apagado sirve de
temporizador adicional en la cocina y emite un tono cuando el
tiempo configurado se ha agotado. No inicia ni detiene la cocció n.
La funció n Temporizador encendido/ apagado se puede utilizar
durante cualq uiera de las funciones de control del horno.
Configuració n de la T emporizador
1
Coloq ue la perilla de modo del horno en la posició n O ff.
2
Presione T imer O n/ O ff. En la pantalla aparece 0 : 0 0 con
las letras H R adentro y parpadea T imer.
3
Presione los botones má s( + ) o menos( - ) para
seleccionar el tiempo deseado. Má s( + ) para incrementar
el tiempo y menos( - ) para disminuir el tiempo.
4
Presione T imer O n/ O ff o Start para iniciar el
temporizador. La cuenta regresiva del tiempo restante
aparece en pantalla.
N O T A
Si se presiona Timer On/ Off de nuevo luego de q ue el
temporizador haya comenzado, la funció n de temporizador
se cancelará .
5
Cuando el tiempo establecido se agota, aparece End
en la pantalla. Los tonos indicadores suenan cada 1 5
segundos hasta q ue se presiona T imer O n/ O ff.
N O T A
•
Si en la pantalla no aparece el tiempo restante,
recupérelo presionando T imer O n/ O ff.
•
Presione T imer O n/ O ff dos veces para configurar la
hora en minutos y segundos.
•
Presione T imer O n/ O ff una vez para configurar la hora
en horas y minutos.
Cancelar la Funcion de T emporizador
1
Presione T imer O n/ O ff una vez.
La pantalla regresa a la hora del dí a.
W i- Fi
El botó n Wi-Fi se usa para conectar el artefacto a una red de
Wi-Fi doméstica.
1
Coloq ue la perilla de modo del horno en la posició n O ff
(Apagado).
2
Mantenga presionado T imer O n/ O ff (Temporizador
encendido/ apagado) durante 3 segundos.
3
Se emite el sonido de encendido y en la pantalla aparece
Configurar y parpadea el icono ( ) de Wi-Fi.
4
Registre el artefacto en la red de Wi-Fi con la aplicació n
del teléfono inteligente.
5
Para desconectar el artefacto de la red, elimí nelo de los
artefactos registrados en la aplicació n.
N O T A
Consulte la secció n de Funciones Inteligentes en el
manual del usuario para obtener má s detalles.
Settings ( A j ustes)
Coloq ue la perilla de modo del horno en la posició n O ff.
Mantenga presionado Start T ime durante tres segundos (Para
los modelos: LSE46 1 7 ) o presione Setting.
Luego, presione la tecla Start T ime (Para los modelos:
LSE46 1 7 ) o Setting varias veces para ir cambiando entre las
diferentes configuraciones del horno y modificarlas.
La tecla Settings permite:
•
configure el modo de horas en el reloj (1 2 o 24 horas)
•
habilitar/ inhabilitar la conversió n automá tica a convecció n
•
aj ustar la temperatura del horno
•
activar/ desactivar la luz de alarma de precalentamiento
•
configurar el volumen del indicador sonoro
•
cambiar la escala de temperatura entre Fahrenheit y Celsius
•
activar/ desactivar la alarma de la placa de cocció n
Configuració n del modo de h ora
El control está configurado para usar un reloj de 1 2 horas.
Para restablecer el reloj al modo de 24 horas, siga los pasos a
continuació n.
1
Coloq ue la perilla de modo del horno en la posició n O ff.
2
Mantenga presionado el botó n Start T ime durante tres
segundos (Para los modelos: LSE46 1 7 ) o presione
Setting.
3
Presione los botones má s( + ) o menos( - ) para configurar
el modo de hora deseado en el reloj .
4
Presione Start para aceptar el cambio deseado.
Configuració n del modo de conv ersió n automá tica a
conv ecció n
Cuando se seleccionan los modos Conv . Bake y
Conv . Roast, la funció n Conversió n automá tica a
convecció n modifica la temperatura está ndar de la receta
ingresada en una temperatura de convecció n al sustraer
25 ° F / 1 4 ° C. Esta temperatura convertida automá ticamente
aparece en la pantalla. Por ej emplo, seleccione el modo
Conv . Bake, ingrese 350 ° F y aparecerá 325 ° F en la
pantalla después de precalentar.
La funció n
Conversió n automá tica a convecció n
está
habilitada en forma predeterminada. Para cambiar la
configuració n, siga estas instrucciones.
1
Coloq ue la perilla de modo del horno en la posició n O ff.
2
Mantenga presionado el botó n Start T ime durante 3
segundos (Para los modelos: LSE46 1 7 ) o presione
Setting. Luego presione Start T ime (Para los modelos:
LSE46 1 7 ) o Setting varias veces hasta q ue aparezca
“
” en la pantalla.
3
Presione los botones má s ( + ) o menos ( - ) para
encender/ apagar la funció n.
4
Presione Start para aceptar el cambio.

2 6 FU NCIONAMIENTO
A j uste de temperatura del h orno
El horno nuevo podrí a cocinar de manera diferente a su
horno anterior. U se el horno nuevo durante algunas semanas
para familiarizarse con él antes de cambiar los aj ustes de
temperatura. Si, después de familiarizarse con el horno, sigue
pensando q ue la temperatura es muy alta o muy baj a puede
aj ustarla.
N O T A
Para comenzar, suba o baj e el termostato 1 5 ° F (8 ° C).
Pruebe el horno con la nueva configuració n. Si el horno
aú n necesita aj uste, suba o baj e nuevamente el termostato
y utilice el primer aj uste como referencia medidora.
Por ej emplo, si el aj uste fue ex cesivo, suba o baj e el
termostato 1 0 ° F (5 ° C). Si el aj uste no fue suficiente,
suba o baj e el termostato 20 ° F (1 2 ° C). Proceda de
esta manera hasta q ue el horno q uede aj ustado para su
satisfacció n.
1
Coloq ue la perilla de modo del horno en la posició n O ff.
2
Mantenga presionado el botó n Start T ime durante tres
segundos (Para los modelos: LSE46 1 7 ) o presione
Setting. Luego presione Start T ime (Para los modelos:
LSE46 1 7 ) o Setting varias veces hasta q ue aparezca
“
” en la pantalla.
3
Para aumentar la temperatura, presione el botó n má s ( + )
hasta q ue en la pantalla aparezca la cantidad deseada.
Para disminuir la temperatura, presione el botó n menos
( - ) hasta q ue en la pantalla aparezca la cantidad
deseada.
4
Presione Start para aceptar el cambio.
N O T A
•
Este aj uste no afecta a las temperaturas de asar
o autolimpieza. El aj uste se retiene en la memoria
después de una falla eléctrica. Es posible subir (+ )
o baj ar (-) la temperatura del horno tanto como sea
necesario, entre 35 ° F y 1 9 ° C.
•
Cuando haya subido o baj ado temperatura, la pantalla
muestra la temperatura aj ustada hasta q ue se reajuste.
Encendido/ apagado de la luz de alarma de
precalentamiento
Cuando el horno alcanza la temperatura programada, la luz de
alarma de precalentamiento titila 5 veces o hasta q ue se abra
la puerta del horno.
1
Mantenga presionado el botó n Start T ime durante tres
segundos (Para los modelos: LSE46 1 7 ) o presione
Setting. Luego presione Start T ime (Para los modelos:
LSE46 1 7 ) o Setting varias veces hasta q ue aparezca “
” en la pantalla.
2
Toq ue má s( + ) o menos( - ) para encender o apagar la luz.
3
Toq ue Start para aceptar el cambio.
A j uste del v olumen del indicador sonoro
1
Coloq ue la perilla de modo del horno en la posició n O ff.
2
Mantenga presionado el botó n Start T ime durante tres
segundos (Para los modelos: LSE46 1 7 ) o presione
Setting. Luego presione Start T ime (Para los modelos:
LSE46 1 7 ) o Setting varias veces hasta q ue aparezca
“ ” en la pantalla.
3
Presione los botones má s( + ) o menos( - ) para
seleccionar el volumen deseado.
4
Presione Start para aceptar el cambio.
Selecció n de grados Fah renh eit o Celsius
Configure la visualizació n de la temperatura del horno para
q ue muestre unidades Fahrenheit (° F) o Celsius (° C). El aj uste
predeterminado del horno es en unidades Fahrenheit, a menos
q ue lo cambie el usuario.
1
Coloq ue la perilla de modo del horno en la posició n O ff.
2
Mantenga presionado el botó n Start T ime durante tres
segundos (Para los modelos: LSE46 1 7 ) o presione
Setting. Luego presione Start T ime (Para los modelos:
LSE46 1 7 ) o Setting varias veces hasta q ue aparezca
“
” en la pantalla.
3
Presione los botones má s( + ) o menos( - ) para
seleccionar F (Fahrenheit) o C (Celsius).
4
Presione Start para aceptar el cambio.
Encender o apagar el tono de alarma
1
Coloq ue la perilla de modo del horno en la posició n Off.
2
Mantenga presionado el botó n Start T ime durante tres
segundos (Para los modelos: LSE46 1 7 ) o presione
Setting. Luego presione Start T ime (Para los modelos:
LSE46 1 7 ) o Setting varias veces hasta q ue aparezca
“
” en la pantalla.
3
Presione los botones má s( + ) o menos( - ) para encender/
apagar el tono de alarma.
4
Presione Start para aceptar el cambio.
Start T ime [ H ora de inicio] ( Delayed
T imed Cook [ Cocció n temporizada
retardada] )
El temporizador automá tico de la funció n Cocció n temporizada
retardada enciende y apaga el horno a la hora q ue usted
seleccione. Esta funció n puede usarse j unto con los modos
Bake, Conv . Bake y Conv . Roast.

2 7FU NCIONAMIENTO
ESPA Ñ O L
Configuració n de la Cocció n temporizada retardada
Por ej emplo, para hornear a 30 0 ° F y retardar el inicio del
proceso de horneado hasta las 4 h 30 m, primero debe
configurar el reloj en la hora correcta del dí a.
1
G ire la perilla de modo del horno hasta seleccionar el
modo Bake. 350 ° F aparece en la pantalla.
2
Aj uste la temperatura: presione menos( - ) hasta q ue
aparezca 30 0 ° F
en la pantalla.
3
Presione Cook T ime y aj uste el tiempo de horneado.
4
Presione Start T ime.
5
Aj uste de la hora de inicio: presione má s( + ) hasta q ue
aparezca
HR
4: 30 en la pantalla.
6
Presione Start. Se activará un indicador sonoro breve
y en la pantalla aparecerá T imed Delay y la hora de
inicio. El horno comenzará a hornear a la hora de inicio
configurada.
N O T A
•
Para cancelar la funció n Cocció n temporizada
retardada, gire la perilla de modo del horno hasta la
posició n O ff.
•
Para cambiar el tiempo de cocció n, repita el paso 3 y
presione Start.
•
Si el reloj de su horno está configurado para 1 2 horas,
puede retardar la hora de inicio de la cocció n por
1 2 horas. Si el reloj de su horno está configurado para
24 horas, puede retardar la hora de inicio de la cocció n
por 24 horas.
El horno seguirá cocinando durante la cantidad de tiempo
configurada y luego se apagará automá ticamente. Cuando
haya transcurrido el tiempo de cocció n:
•
Aparece End y la hora del dí a se ve en la pantalla.
•
El tono indicador de fin de cocció n suena cada 6 0 segundos
hasta q ue se gira la perilla de modo del horno hasta la
posició n O ff.
PRECA U CI Ó N
•
U tilice el reloj temporizador automá tico al cocinar
carnes curadas o congeladas y la mayorí a de las frutas
y los vegetales. Los alimentos q ue pueden echarse
a perder fá cilmente como la leche, huevos, pescado,
carne o aves se deben enfriar en el refrigerador. Incluso
cuando se hayan enfriado, no deben permanecer en
el horno durante má s de 1 hora antes de iniciar la
cocció n y se los debe retirar rá pidamente una vez q ue
la cocció n haya terminado.
•
Ingerir alimentos en mal estado puede producir
intox icaciones alimentarias.
Cook T ime [ T iempo de cocció n] ( T imed
Cook) [ Cocció n temporizada] )
Configure el horno para q ue realice la cocció n durante un
perí odo especí fico de tiempo mediante la funció n Cocció n
temporizada. Esta funció n solo puede usarse con los modos
Bake, Conv . Bake y Conv . Roast.
Configuració n de la funció n T iempo de cocció n
Por ej emplo, para hornear a 30 0 ° F durante 30 minutos,
primero debe configurar el reloj en la hora correcta del dí a.
1
G ire la perilla de modo del horno hasta seleccionar el
modo Bake. 350 ° F aparece en la pantalla.
2
Aj uste la temperatura del horno. Para este ej emplo,
presione menos( - ) hasta q ue aparezca 30 0 ° F en la
pantalla.
3
Presione Cook T ime. T imed titila en la pantalla. Aparece
Bake, 0 : 0 0 y 30 0 ° F en la pantalla.
4
Aj uste el tiempo de horneado: presione má s( + ) hasta
q ue aparezca 30 : 0 0 en la pantalla. El tiempo de
horneado se puede configurar para cualq uier cantidad de
tiempo entre 1 minuto y 1 1 horas y 59 minutos.
5
Presione Start.
El horno seguirá cocinando durante la cantidad de tiempo
configurada y luego se apagará automá ticamente. Cuando
haya transcurrido el tiempo de cocció n:
•
Aparece End y la hora del dí a se ve en la pantalla.
•
El tono indicador de fin de cocció n suena cada 6 0 segundos
hasta q ue se gira la perilla de modo del horno hasta la
posició n O ff.
Cambio del T iempo de cocció n durante la cocció n
Por ej emplo, para cambiar el tiempo de cocció n de 30 minutos
a 1 hora y 30 minutos, haga lo siguiente.
1
Presione Cook T ime.
2
Cambie el tiempo de horneado: presione má s( + ) hasta
q ue aparezca 1 hora y 30 minutos en la pantalla.
3
Presione Start para aceptar el cambio.
O v en Ligh t ( Luz del h orno)
La luz interior del horno se enciende de forma automá tica
cuando se abre la puerta. Presione el botó n O v en Ligh t para
encender/ apagar la luz del horno de forma manual.
N O T A
La luz del horno no se puede encender si la funció n Self
Clean está activa.

2 8 FU NCIONAMIENTO
U so de la placa de cocció n
Á reas de cocció n
La placa de cocció n está eq uipada con cuatro hornallas por
inducció n de diferentes tamañ os y una zona de calentamiento
de calor radiante. Las potencias en vatios ex presadas a
continuació n son las potencias má x imas. La segunda es la
potencia má x ima para el modo Boost.
3 4
5
1 2
1
Hornalla por inducció n frontal izq uierda:
8 " , 21 0 0
W / 320 0
W (240 V )
2
Hornalla por inducció n frontal derecha:
1 1 " , 240 0
W / 40 0 0
W (240 V )
3
Hornalla por inducció n posterior izq uierda:
6 " , 1 30 0
W / 1 8 0 0
W (240 V )
4
Hornalla por inducció n posterior central:
6 " , 1 30 0
W / 1 8 0 0
W (240 V )
5
Z ona de calentamiento
Hay pantallas LED debajo de cada hornalla por inducció n q ue
se aj ustan para mostrar el nivel de potencia cuando se utiliza
la hornalla.
Benecios de a coccin en una
suercie de induccin
V elocidad y eficiencia
Las hornallas por inducció n calientan má s rá pido y consumen
menos energí a. Los niveles de potencia de la inducció n
hacen q ue los lí q uidos hiervan rá pidamente. Ademá s, resultan
eficientes para cocinar a fuego lento.
U na placa de cocció n má s frí a
Y a sea q ue las hornallas por inducció n estén encendidas o
apagadas, su temperatura sigue siendo menor q ue la de las
hornallas radiantes. Prá cticamente, no se desperdicia calor, porq ue
el calor se inicia con la colocació n de los recipientes de cocina.
Fá cil limpieza
Las hornallas a menor temperatura facilitan la limpieza. Los
derrames no se pegan ni se q ueman, así q ue se limpian
fá cilmente.
Detecció n del tamañ o de la olla
U n sensor detecta automá ticamente el tamañ o de la olla y
adapta la hornalla por inducció n al recipiente en uso para
brindar una cocció n má s uniforme.
Mayor capacidad de respuesta
Las hornallas por inducció n reaccionan mej or q ue sus
contrapartes eléctricas o de gas, porq ue solo se calienta
el recipiente con la inducció n. Las hornallas por inducció n
calientan má s fá cilmente; también reaccionan má s rá pido
cuando se reduce su temperatura para cocinar a fuego lento.
Recipientes de cocina aptos para
inducció n
N O T A
Antes de utilizar las hornallas por inducció n, lea
detenidamente estas recomendaciones sobre recipientes
y las instrucciones de las secciones de detecció n de ollas
y asegú rese de seguirlas.
Al comprar recipientes de cocina para usar en la placa
cocció n por inducció n, busq ue artí culos identificados por
el fabricante como " induction ready" o " induction capable"
(aptos para inducció n) o q ue el fabricante declare q ue está n
especí ficamente diseñ ados para la cocció n por inducció n.
El material de base del recipiente debe ser magnético para
q ue las hornallas se activen. U se un imá n para comprobar q ue
el material de base del recipiente sea el adecuado. Si el imá n
se pega a la parte inferior del recipiente, este se puede utilizar
para la cocció n por inducció n.
Para obtener los mej ores resultados posibles de cocció n en
placas de inducció n, utilice solamente recipientes de cocina
de acero de gran calibre y alta calidad en las hornallas por
inducció n. Siga las recomendaciones del fabricante respecto a
los recipientes de cocina para inducció n q ue utilizará .
T ipos de recipientes de cocina aptos para inducció n
Los tres tipos de recipientes de cocina para inducció n má s
comunes disponibles son de acero inox idable, hierro fundido o
metales esmaltados con porcelana.
•
El acero inox idable es, por lo general, ex celente para la
cocció n por inducció n. Es duradero, fá cil de limpiar y resiste
las manchas.
N O T A
No todos los utensilios de cocina de acero inox idable son
magnéticos; el acero inox idable no siempre es adecuado
para la cocció n por inducció n.
•
El h ierro fundido cocina de manera uniforme y también es
bueno para la cocció n por inducció n. No coloq ue recipientes
de hierro fundido sobre la placa de cocció n, dado q ue los
recipientes de hierro fundido con superficie á spera rayará n
la placa de cocció n de cerá mica.
•
Los metales esmaltados con porcelana tienen
caracterí sticas de calentamiento q ue varí an en funció n de la
calidad del metal de base. Asegú rese de q ue el esmaltado
de porcelana sea suave para evitar rayar la superficie de
cocció n de cerá mica.

2 9FU NCIONAMIENTO
ESPA Ñ O L
Colocació n de los recipientes de
cocció n
U tilice el recipiente adecuado y coló q uelo correctamente
sobre la placa de cocció n. Las hornallas no se calentará n si
los sensores situados debaj o de la superficie de la placa de
cerá mica detectan alguna de las condiciones incorrectas q ue
se ilustran a continuació n. Corrij a el problema antes de intentar
usar la placa de cocció n.
Correcta
•
El recipiente está centrado
correctamente en la superficie de
la hornalla.
•
El recipiente tiene fondo plano y
lados rectos.
•
Las dimensiones del recipiente
alcanzan o superan el tamañ o
mí nimo recomendado para la
hornalla.
•
El recipiente se apoya por
completo en la superficie de la
placa de cocció n.
•
El recipiente está bien
eq uilibrado.
I ncorrecta
•
El recipiente no está centrado en
la superficie de la hornalla.
•
El recipiente tiene fondo y lados
deformes o curvos.
•
El recipiente no tiene las
dimensiones mí nimas req ueridas
para la hornalla en uso.
•
El fondo del recipiente descansa
sobre el reborde o no se apoya
por completo en la superficie de la
placa de cocció n.
•
El recipiente no está en eq uilibrio
debido a q ue tiene una manij a
pesada.
Mov imiento de los recipientes sobre la
placa de cocció n
Siempre use recipientes de gran calibre y de alta calidad en las
hornallas y no los deslice sobre la superficie cerá mica. Incluso
los recipientes de alta calidad pueden rayar la superficie de la
placa.
N O T A
•
Siempre levante los recipientes antes de moverlos
sobre la superficie vitrocerá mica. Cualq uier recipiente
cuyo fondo sea á spero o esté sucio puede marcar y
rayar la superficie de la placa. Siempre debe comenzar
con recipientes limpios.
•
No permita q ue papel de aluminio o cualq uier otro
material q ue se pueda derretir entre en contacto con la
placa de cocció n de vitrocerá mica. Si estos materiales
se derriten sobre la placa de cocció n, podrí an dañ ar la
superficie de vitrocerá mica.
Con el tiempo, si se deslizan recipientes de cocina de cualq uier
tipo sobre la superficie, se producirá n rayas en la placa de
cocció n. Las rayas dificultará n la limpieza de la superficie de
cerá mica y degradará n el aspecto de la placa de cocció n.
Sensores de ollas
Los sensores de las hornallas situados debaj o de la placa
de cocció n req uieren q ue los recipientes cumplan con
determinadas condiciones antes de q ue las hornallas de
inducció n puedan funcionar.
La barra de LED de la zona de cocció n puede mostrar un
mensaj e de error de detecció n de olla. Si una hornalla se
activa y no se detecta ningú n recipiente, la barra de LED
de la zona de cocció n por inducció n afectada oscilará . Si el
recipiente no cumple con las condiciones correctas, la zona de
cocció n podrí a no calentarse.
Si el problema no se corrige, la hornalla afectada se
desactivará automá ticamente después de transcurrido un
minuto.

30 FU NCIONAMIENTO
T amañ o má x imo y mí nimo del
recipiente
Hay cuatro hornallas en la placa de cocció n por inducció n.
Para ser utilizada con eficacia, cada hornalla req uiere un
tamañ o mí nimo para el recipiente. El anillo interior de cada
hornalla sirve de guí a para el tamañ o mí nimo del recipiente.
El fondo del recipiente debe cubrir completamente el anillo
interior para q ue se produzca una cocció n adecuada.
5,5 pulgadas (1 40 mm)
7 ,5 pulgadas (1 9 0 mm) 9 ,5 pulgadas (245 mm)
Tamañ o mí nimo del recipiente:
5,5 pulgadas (1 40
mm)
Tamañ o mí nimo del recipiente:
7 ,5 pulgadas (1 9 0
mm)
Tamañ o mí nimo del recipiente:
9 ,5 pulgadas (245
mm)
U se la cruz marcada en cada hornalla para determinar el
tamañ o má x imo del recipiente. Luego de centrar el recipiente
sobre la hornalla este no debe extenderse ms de ½ʺ del
borde de la cruz q ue aparece sobre la hornalla. El recipiente
debe hacer pleno contacto con la superficie de vidrio sin q ue la
parte inferior de dicho recipiente toq ue el reborde de metal de
la placa de cocció n.
Si el recipiente apto para cocció n por inducció n — centrado
en cualq uiera de las hornallas encendidas— es demasiado
peq ueñ o, la barra de LED de la hornalla afectada oscila y el
recipiente no se calienta.
Recipientes de cocina calientes y calor
residual
PRECA U CI Ó N
A diferencia de las hornallas radiantes, las hornallas
por inducció n no se iluminan en color roj o cuando está n
calientes. Puede sufrir q uemaduras si la superficie del
vidrio está caliente debido al calor residual transferido
por los utensilios de cocina. No toq ue ollas o sartenes
calientes. U se guantes de cocina o agarraderas para
protegerse las manos de q uemaduras.
Conserv as caseras
PRECA U CI Ó N
La preparació n de conservas puede generar grandes
cantidades de vapor. Sea en ex tremo cuidadoso para
evitar q uemaduras. Levante la tapa de modo q ue el vapor
se libere lej os de usted. U na conserva segura req uiere
q ue los microorganismos dañ inos sean destruidos y q ue
los recipientes de las conservas estén completamente
sellados. Cuando utilice una olla especial para hervir
conservas, mantenga un hervor suave pero constante
durante el tiempo indicado.
Lea las siguientes precauciones y aplí q uelas cuando prepare
conservas caseras. Lea la informació n en el sitio web del
U SD A (por las siglas en inglés de D epartamento Federal de
Agricultura) y siga las recomendaciones q ue se brindan allí
para hacer conservas caseras.
•
U tilice solo ollas especiales para conservas de fondo plano
y de buena calidad cuando prepare conservas caseras.
U se una regla para comprobar q ue el fondo de la olla para
conservas sea plano.
•
Las ollas para hervir conservas q ue tienen en el fondo del
recipiente rebordes q ue irradian desde el centro no son
adecuadas para su uso en una placa de vitrocerá mica.
•
El diá metro de la olla para conservas no debe ex ceder las
marcas de dimensiones má x imas de la hornalla en má s
de una pulgada. U tilice ollas para conservas de menor
diá metro en cocinas con placas de cocció n de vitrocerá mica
o eléctricas de bobina abierta.
•
Comience con agua caliente del grifo para q ue el agua
hierva con mayor rapidez. Lleve el agua a una ebullició n
inicial utilizando el aj uste de calor alto. U na vez q ue el agua
esté hirviendo, reduzca el calor tanto como sea posible,
manteniendo la ebullició n.
•
Es mej or hervir una peq ueñ a cantidad de conserva y
mantener la olla lo suficientemente liviana como para poder
levantarla.
•
No dej e la olla para hervir conservas o la olla a presió n para
conservas a temperatura alta durante periodos prolongados.
•
Alterne las hornallas de la superficie entre cada lote a fin de
permitir q ue las hornallas y las superficies q ue las rodean se
enfrí en. No haga conservas usando la misma hornalla todo
el dí a.

31FU NCIONAMIENTO
ESPA Ñ O L
Conguracin de os controes de a
suercie
•
Barra LED de la h ornalla
La cocina cuenta con una barra de LED para cada una de
las hornallas de la placa de cocció n. Preste atenció n a los
mensaj es q ue aparecen en la pantalla y utilice los LED con
las perillas de control correspondientes para monitorear los
niveles de potencia de las hornallas.
Lo
Simmer
3
4
MED
6
7
8
HI
Boost
•
Configuració n del niv el de potencia disponible
La barra de LED del control de la placa muestra el ajuste de
nivel de potencia de la hornalla, q ue va desde Lo hasta Hi y
hasta Boost. Aj uste la configuració n en incrementos de un
punto, desde Lo (nivel 1 ) hasta Boost (nivel 1 0 ).
Para seleccionar Hi, gire la perilla en sentido horario,
pasando por el nivel 8 hasta Hi/ Boost.
•
N iv el de intensidad Boost
Para activar el modo Boost, gire la perilla directamente de Off
a Boost. El modo Boost solo está disponible inmediatamente
después de q ue se activa una hornalla. Cuando la hornalla
se coloca en modo Boost, la barra de LED parpadea y el
modo Boost se mantiene en funcionamiento durante hasta
1 0 minutos. D espués de 1 0 minutos, la hornalla vuelve
automá ticamente a la configuració n Hi.
Simmer
HI/Boos
t
El tiempo de funcionamiento má x imo para todos los niveles de
las hornallas, a ex cepció n del modo Boost, es de 1 2 horas.
Indicador de suercie caiente
La luz indicadora de superficie caliente se enciende siempre
q ue cualq uier á rea de cocció n de superficie esté demasiado
caliente para tocarla.
Permanece encendida después de q ue se apaga el elemento
y hasta q ue la superficie se haya enfriado hasta llegar a 1 30 ° F
aprox imadamente.
Es normal q ue las hornallas de la superficie se enciendan y
apaguen durante la cocció n en configuraciones baj as.
U so de las h ornallas
PRECA U CI Ó N
A ntes de cocinar
•
o coloue ni deposite artculos inflamables o
sensibles al calor sobre la placa de cocció n por
inducció n, incluso si la placa no está en uso.
•
Coloue los recipientes en las hornallas antes de
encender la placa de cocció n por inducció n.
•
o coloue recipientes sellados sobre la placa de
cocció n.
Durante la cocció n
•
No coloq ue obj etos metá licos como cuchillos,
tenedores, cucharas y tapas en la superficie de la placa
de cocció n por inducció n, ya q ue pueden calentarse.
•
Emplee este artefacto ú nicamente para uso doméstico
normal. No está diseñ ado para uso comercial o
industrial.
•
Nunca utilice este artefacto para calentar la habitació n.
•
Tenga cuidado al conectar aparatos eléctricos en
tomacorrientes cercanos a la placa de cocció n. Evite
q ue los cables de alimentació n entren contacto con la
placa de cocció n o los recipientes de cocina.
•
El aceite y la grasa a altas temperaturas pueden arder
rá pidamente. Nunca dej e hornallas sin supervisió n al
freí r alimentos.
•
No utilice la placa de cocció n por inducció n para
calentar papel de aluminio, productos envueltos en
papel de aluminio o alimentos congelados envasados
en recipientes de aluminio.
•
Al conectar aparatos eléctricos en enchufes cercanos
a la placa de cocció n, tenga la precaució n de mantener
los cables de alimentació n lej os de la placa de cocció n
y de los recipientes calientes.
•
Los usuarios con marcapasos e implantes cardí acos
activos deben mantener la parte superior de su
cuerpo a una distancia mí nima de 1 pie (30 cm) de las
hornallas por inducció n encendidas. En caso de duda,
consulte al fabricante del implante o a su médico.
Después de la cocció n
•
D espués de usar una hornalla por inducció n,
desactí vela usando el control. No se confí e del sensor
de ollas.

32 FU NCIONAMIENTO
Có mo encender una h ornalla
1
Empuj e hacia dentro la perilla de control.
2
G ire la perilla en cualq uier direcció n hasta seleccionar
el aj uste deseado. Se escuchará un breve sonido de
alerta y la barra de LED de la hornalla mostrará su
configuració n actual.
3
Para activar el modo Boost, gire la perilla directamente
de Off a Boost.
Simmer
HI/Boos
t
3
Conguracin recoendada de
coccin en suercie
Comience la mayor parte de la cocció n en superficie en una
configuració n alta y luego llévela a una configuració n baj a para
finalizar la cocció n.
Las configuraciones sugeridas pueden necesitar aj ustes,
segú n el diseñ o y la calidad de los recipientes de cocina y de
la cantidad de comida q ue se prepare.
U tilice recipientes de calidad, construidos con un material de
base magnético y q ue cumplan con los req uisitos de tamañ o
del recipiente mí nimos y má x imos.
A j uste U so recomendado
Boost
•
U tilí celo para calentar una gran cantidad
de alimentos o para llevar grandes
recipientes de agua al hervor
de 8 a Hi (alto)
•
Llevar lí q uidos al hervor
•
Comenzar con la cocció n de la mayorí a
de los platos
de MED a 8
•
Mantener un hervor rá pido, rehogar o
freí r
•
D orado o sellado rá pido de alimentos
•
istecs chuletas carne a la parrilla
de 3 a MED
•
Mantener un hervor lento
•
Fritura o salteado de alimentos
•
Cocinar sopas, salsas y aderezos
•
Huevos, pancakes"
de SIMMER a 3
•
Cocinar alimentos estofados o al vapor
•
Cocció n a fuego lento
de Lo a
SIMMER
•
Mantener calientes los alimentos
•
D erretir chocolate o manteca
•
Cocció n a fuego lento
Sugerencias para precalentar
recipientes
La cocció n por inducció n puede hacer q ue el tiempo req uerido
para calentar utensilios de cocina sea menor q ue el necesario
en cocinas de hornallas radiantes o de gas.
Preste mucha atenció n a todos los alimentos mientras cocina
en la placa de cocció n o en el horno y hasta terminar con todos
los procesos de cocció n.
PRECA U CI Ó N
Recuerde q ue la superficie de cocció n por inducció n
inicialmente calienta los recipientes MU Y RÁ PI DO si el
recipiente no contiene alimentos.
Ruidos durante el funcionamiento de
la placa de cocció n
Los procesos electró nicos involucrados en la cocció n por
inducció n pueden crear ruidos de fondo. Es posible q ue
escuche un zumbido leve cuando cocine sobre la placa de
cocció n. Estos ruidos son parte del proceso de cocció n por
inducció n y se consideran normales.
Algunos recipientes de cocina emitirá n zumbidos, segú n su
construcció n o su material principal. El zumbido puede notarse
má s si el contenido del recipiente está frí o. A medida q ue el
recipiente se caliente, el ruido disminuirá . El ruido también
disminuirá si se reduce el nivel de potencia.
N O T A
•
Cuando se utiliza la placa de cocció n por inducció n,
los ruidos de funcionamiento se perciben má s durante
la cocció n en modo Boost. Pero no es normal q ue se
produzcan ruidos muy fuertes durante la cocció n por
inducció n.
•
El ventilador de la placa de cocció n puede encenderse
para reducir la temperatura del producto, aú n y cuando
los elementos calentadores no estén en uso.

33FU NCIONAMIENTO
ESPA Ñ O L
Manej o de energí a
Las zonas de cocció n, q ue consisten en pares de hornallas,
tienen un lí mite de consumo de una determinada cantidad
má x ima de energí a.
Si enciende la funció n Boost para una hornalla mientras su par
se encuentra en uso, la funció n Power Management reducirá ,
de forma automá tica, la potencia de ambas hornallas. Para
un rendimiento consistente al utilizar varias hornallas, utilice
hornallas en diferentes zonas de cocció n.
N O T A
•
Si el calor combinado del horno y las hornallas es lo
suficientemente alto, la potencia de las hornallas se
reduce para evitar el dañ o del producto.
•
Ambos elementos en un conj unto de elementos pares
no pueden utilizar el modo Boost (Aumentado) al mismo
tiempo. Para utilizar el modo Boost (Aumentado) en dos
elementos simultá neamente, utilice elementos impares.
Z ona de calentamiento
U se la zona de calentamiento, ubicada en el lado derecho
de la parte trasera de la superficie de vidrio, para mantener
caliente la comida cocida, a una temperatura adecuada para
servir. La zona de calentamiento mantiene caliente la comida
después de haberla cocinado. Si intenta cocinar alimentos
crudos o frí os en la zona de calentamiento, podrí an producirse
enfermedades transmitidas por los alimentos.
PRECA U CI Ó N
PELI GRO DE EN V EN EN A MI EN T O PO R A LI MEN T O S:
en los alimentos cocinados a temperaturas inferiores a
1 40 ° F pueden proliferar bacterias.
•
Siempre debe comenzar con comida caliente. No
caliente alimentos frí os en la zona de calentamiento.
•
No utilice la configuració n de calentamiento durante
má s de dos horas.
Para encender la zona de calentamiento
1
Empuj e hacia dentro la perilla de control.
2
G ire la perilla en cualq uier direcció n hasta seleccionar el
aj uste deseado.
Para obtener mej ores resultados:
•
Cuando caliente masas o panes, dej e una abertura en la
cubierta a fin de q ue salga la humedad.
•
No utilice envolturas plá sticas para cubrir los alimentos. El
plá stico podrí a derretirse sobre la superficie y resulta muy
difí cil de limpiar.
•
U tilice solamente vajilla, recipientes y otros utensilios de
cocina recomendados para uso en hornos y placas de
cocció n.
N O T A
•
Para obtener mej ores resultados, mantenga la comida
q ue está sobre la zona de calentamiento dentro de su
recipiente o cubierta con una tapa adecuada o papel de
aluminio para mantener la calidad de la comida.
•
No permita q ue el papel de aluminio entre en contacto
con la superficie caliente de la placa de cocció n por
inducció n.
Si un alimento en particular no está en la lista, comience con
el nivel de calor del medio y aj uste segú n sea necesario. La
mayorí a de los alimentos pueden mantenerse a temperaturas
adecuadas para servir usando el nivel de temperatura medio.
A j uste A limento
Baj a
(de Lo a 3)
•
V erduras
•
Arroz
•
Pastas
•
Salsas azucaradas (salsa de tomate, salsa
BBQ )
Media
(de 3 a 7 )
•
Salsas y sopas con base de crema
•
Estofados y chili
•
Calentar platos o fuentes para servir vací os
Alta
(de 7 a Hi)
•
Sopas con base de caldo
•
Bebidas calientes (sidra caliente, chocolate
caliente)

34 FU NCIONAMIENTO
U so del h orno
A ntes de usar el h orno
N O T A
•
Como la temperatura del horno es cí clica, el termó metro
q ue esté dentro de la cavidad del horno podrí a no
indicar la misma temperatura q ue está configurada.
•
Es normal q ue el ventilador de convecció n funcione
durante el precalentamiento en un ciclo normal de
horneado.
•
El motor del ventilador de convecció n podrí a funcionar
perió dicamente durante un ciclo normal de horneado.
•
Si la puerta q ueda abierta durante el proceso de
horneado, el calor se escapa. Si la puerta q ueda abierta
durante má s de 30 segundos durante el proceso
de horneado, el calor se escapa. El calor regresa
automá ticamente cuando la puerta se cierra.
V entilació n del h orno
Las á reas cercanas a la ventilació n podrí an calentarse
durante el funcionamiento y causar q uemaduras. No bloq uee
la abertura de ventilació n. Evite colocar plá sticos cerca de
la ventilació n, ya q ue el calor podrí a deformar o derretir el
plá stico.
Es normal q ue se vea vapor cuando se cocinan alimentos con
un alto contenido de humedad.
V entilació n
del horno
Rej illa de
ventilació n
PRECA U CI Ó N
•
Los bordes de la v entilació n de la cocina y de
la rej illa de v entilació n son filosos y podrí an
calentarse durante su operació n. U se guantes
cuando limpie la cocina para evitar causar q uemaduras
o sufrir lesiones.
U so de los estantes del h orno
Los estantes tienen un borde posterior doblado hacia arriba
q ue evita q ue salgan de la cavidad del horno.
Ex tracció n de los estantes
1
Tire del estante hacia afuera, sin inclinarlo, hasta q ue se
detenga.
2
Levante el frente del estante y tire hacia afuera.
Colocació n de los estantes
1
Coloq ue el ex tremo del estante sobre el soporte.
2
Incline el ex tremo frontal hacia arriba y empuj e el estante
hacia dentro.
PRECA U CI Ó N
•
Coloq ue los estantes del horno antes de encenderlo
para evitar q uemaduras.
•
No cubra los estantes con papel de aluminio ni ningú n
otro material, ni coloq ue nada sobre el fondo el horno.
Si lo hace, podrí a generar un proceso de horneado
deficiente y dañ ar la base del horno.
•
Acomode los estantes del horno solo cuando el horno
esté frí o.
Bake ( H ornear)
La funció n Hornear se utiliza para preparar alimentos como
pasteles, panes y estofados. Es posible programar el horno
para hornear a cualq uier temperatura entre 1 7 0 ° F (8 0 ° C) y
550 ° F (28 5 ° C). La temperatura predeterminada es 350 ° F
(1 7 5 ° C).
Configuració n de la funció n H ornear ( por ej emplo, a
375 ° F)
1
G ire la perilla de modo del horno hasta seleccionar el
modo Bake.
2
Aj uste la temperatura del horno: por ej emplo, presione
má s( + ) hasta q ue aparezca 37 5 ° F en la pantalla.
3
Presione Start. El horno comienza a precalentar.
A medida q ue el horno se precalienta, la temperatura aparece
en pantalla y se eleva en incrementos de 5 grados. U na vez
q ue el horno alcanza la temperatura configurada, suena un
tono y la luz del horno se enciende y se apaga.
4
Cuando finalizó la cocció n, gire la perilla de modo del
horno hasta la posició n O ff.
5
Retire los alimentos del horno.
N O T A
Es normal q ue el ventilador de convecció n funcione
perió dicamente durante un ciclo normal de horneado en el
horno. Esto sucede para asegurar resultados parej os de
horneado.

35FU NCIONAMIENTO
ESPA Ñ O L
Sugerencias de h orneado
•
El tiempo y la temperatura de horneado variará n segú n las
caracterí sticas, el tamañ o y la forma del recipiente q ue se
utilice para hornear.
•
V erifiq ue el punto de cocció n de los alimentos en el tiempo
mí nimo de la receta.
•
U se recipientes metá licos (con o sin acabado antiadherente),
vitrocerá mica templada, cerá mica u otro tipo de recipiente
recomendado para uso en el horno.
•
Las bandej as metá licas oscuras o con revestimientos
antiadherentes cocinará n los alimentos má s rá pido y má s
dorados. Los recipientes aislados prolongará n ligeramente
el tiempo de cocció n de la mayorí a de los alimentos.
N O T A
La base del horno tiene un acabado de porcelana
esmaltada. Para facilitar la limpieza, protej a la base del
horno de derrames ex cesivos colocando una placa para
horno sobre el estante inferior al q ue está usando para
cocinar. Esto es especialmente importante al hornear un
pastel de frutas u otros alimentos con alto contenido de
á cido. Los rellenos frutales calientes u otros alimentos
con alto contenido de á cido pueden causar picaduras y
dañ os en la superficie de porcelana esmaltada y se deben
limpiar de inmediato.
Modo de conv ecció n
El sistema de convecció n usa un ventilador para hacer circular
el calor de manera parej a dentro del horno. La distribució n
de calor mej orada permite una cocció n uniforme y resultados
ex celentes mientras cocina con uno o má s estantes.
Configuració n de la funció n Conv ecció n ( por ej emplo, a
375 ° F)
1
G ire la perilla de modo del horno hasta seleccionar el
modo Conv . Bake o Conv . Roast.
2
Aj uste la temperatura del horno: Por ej emplo, presione
má s( + ) hasta q ue aparezca 37 5 ° F en la pantalla.
3
Presione Start. La pantalla muestra Conv . Bake o
Conv . Roast y la temperatura del horno inicia a 1 0 0 ° F.
A medida q ue el horno se precalienta, la temperatura aumenta
en incrementos de cinco grados. U na vez q ue el horno alcanza
la temperatura configurada, suena un tono y la luz del horno
se enciende y apaga. La pantalla muestra la temperatura del
horno convertida automá ticamente a 350 ° F y el icono del
ventilador.
4
Al finalizar la cocció n o para cancelar, gire la perilla de
modo del horno hasta la posició n O ff.
N O T A
El ventilador del horno funciona mientras se hornea por
convecció n. El ventilador se detiene cuando la puerta está
abierta. En algunos casos, el ventilador podrí a apagarse
durante un ciclo de horneado por convecció n.
Sugerencias para h ornear por conv ecció n
•
U se el horneado por convecció n para cocinar má s rá pido y
de manera má s parej a en varios estantes: pasteles, galletas,
muffins, bizcochos y panes de todo tipo.
•
Hornee galletas y bizcochos en bandej as sin bordes o con
bordes muy baj os para q ue el aire caliente circule alrededor
de los alimentos. Los alimentos horneados en bandej as con
un acabado oscuro se cocinan má s rá pido.
•
Si está cocinando en un solo estante, coloq ue el estante en
la posició n recomendada en los cuadros q ue se muestran
en las siguientes pá ginas. Si cocina con varios estantes,
coloq ue los estantes del horno en las posiciones 3 y 5 (para
dos estantes).
•
La cocció n en distintos estantes del horno puede aumentar
ligeramente los tiempos de cocció n para algunos alimentos.
•
Los pasteles, galletas y muffins dan mejores resultados
cuando se usan varios estantes.
La funció n para rostizar por convecció n está diseñ ada para
ofrecer resultados de rostizado ó ptimos. Combina la cocció n
con el ventilador de convecció n para rostizar carnes y aves. El
aire caliente circula alrededor de los alimentos desde todos los
á ngulos y sella los j ugos y los sabores. Los alimentos q uedan
dorados y crocantes por fuera y j ugosos por dentro. La funció n
para rostizar por convecció n es ideal para cortes grandes de
carne tierna sin cubrir.
Sugerencias para rostizar por conv ecció n
U se una asadera y una rejilla al preparar carnes para rostizar
por convecció n. La asadera recibe los derrames de grasa y la
rej illa ayuda a evitar salpicaduras de grasa.
1
Coloq ue el estante del horno en la parte inferior.
2
Coloq ue la rej illa en la asadera.
3
Coloq ue la asadera sobre el estante del horno.
Asadera (se vende por separado)
Rej illa (se vende por separado)
PRECA U CI Ó N
•
No utilice una asadera sin rej illa.
•
No cubra la rej illa con papel de aluminio.
•
Posicione los alimentos (el lado de la grasa hacia
arriba) sobre la rej illa.

36 FU NCIONAMIENTO
Guí a de recomendaciones para
h ornear y rostizar
Los resultados del horneado será n mej ores si las bandej as está n
centradas en el horno lo mej or posible. Si se cocina en varios
estantes del horno, coló q uelos en la posició n q ue se ilustra.
Colocació n de estantes y bandej as
B
Para los modelos: LSE4617
H orneado en un solo estante
Estante
H orneado en v arios estante Rostizado en v arios estantes
Estante (Posició n 5) Estante (Posició n 4)
Estante (Posició n 3) Estante inferior (Posició n B)
•
El rostizado mú ltiple permite rostizar má s de 2 alimentos al
mismo tiempo.
•
Si rostiza en varios estantes, coloq ue má s de 2 asaderas y
2 parrillas en los estantes.
Para los modelos: LSE4616
H orneado en un solo estante
Estante
H orneado en v arios estante
Estante (Posició n 3) Estante (Posició n 5)
Guí a de ubicació n de los estantes para h ornear
A limento
Posició n del
estante
Pasteles
•
Pasteles en capas
•
Pasteles savarí n
•
Pastel de á ngel
4
3
3
Galletas
•
G alletas azucaradas
•
Con chispas de chocolate
•
Brownies
4
4
4
Pizza
•
Fresca
•
Congelada
5
5
Masa de
h oj aldre
•
Casera
•
Refrigerada
4
4
Panes
•
Bizcochos, enlatados
•
Bizcochos, caseros
•
Muffins
5
5
5
Postres
•
Frutas azucaradas y
cruj ientes, caseras
•
Tartas de frutas con 2
cubiertas, caseras
4
4
Cremas
•
Cheesecake, crème brulée 2
Suflés
•
D ulce o salado 2
Cazuela
•
Lasañ a congelada 5
Guí a de posició n de los estantes para asar
A limento
Posició n del
estante
Filete
Costilla
Poco
cocidos
Medias
Bien cocidas
2
2
2
Costilla
deshuesada,
solomillo
Poco
cocidos
Medias
Bien cocidas
2
2
2
Lomo de
ternera
Poco
cocidos
Medias
2
2
Cerdo
Costilla 2
Con hueso, solomillo 2
J amó n, cocido 2
A v es
Pollo entero
2
Presas de pollo
2
Pavo
2 o B

37FU NCIONAMIENTO
ESPA Ñ O L
Broil ( A sar)
La funció n Asar utiliza el calor intenso de los q uemadores
superiores para cocinar la comida. Este método de cocció n
es ideal para cortes de carne tiernos, pescados y verduras
finamente cortadas.
Algunos modelos pueden contar con un asador hí brido
formado por un asador interno q ue utiliza un calentador de
carbó n q ue irradia calor instantá neo y un asador ex terno
tradicional. D urante el funcionamiento normal del asador, es
comú n q ue estos se apaguen en forma intermitente.
PRECA U CI Ó N
•
No utilice una asadera sin rej illa. El aceite puede
provocar un incendio causado por grasa.
•
No cubra la rej illa ni la asadera con papel de aluminio.
Si lo hace, se prenderá fuego.
•
Siempre use una asadera con rej illa para drenar el
ex ceso de grasa. Esto ayuda a reducir las salpicaduras,
el humo y las llamaradas ocasionales.
N O T A
•
Esta á rea está diseñ ada para asar a puerta cerrada.
Cierre la puerta para configurar la funció n Asar. Si
la puerta está abierta, la funció n Asar no se puede
configurar, y la door se desplaza en la pantalla.
Cierre la puerta y restablezca la funció n Asar. Abrir
la puerta durante el proceso de asar, hace q ue se
apague el q uemador. Si la puerta se abre durante el
proceso de asar, el q uemador se apaga luego de cinco
segundos. El q uemador para asar se vuelve a encender
automá ticamente una vez cerrada la puerta.
Speed Broil ( A sado Rá pido) ( Para los modelos: LSE4617)
La caracterí stica de Asado Rá pido está diseñ ado para reducir
la cantidad de tiempo q ue se req uiere para asar los alimentos.
Al utilizar el elemento asador por infrarroj o, q ue brinda calor
instantá neamente, no es necesario el precalentado.
Configurar el h orno para Broil ( A sar) / Speed Broil ( A sado
Rá pido)
1
G ire la perilla de modo del horno hasta seleccionar los
modos Broil H i (Alto), Lo (Bajo) o Speed Broil. (Para los
modelos: LSE46 1 7 )
2
Presione el botó n má s( + ) o menos( – ) para seleccionar
H i (Alto) o Lo (Bajo). (Para los modelos: LSE46 1 7 )
3
Presione Start. El horno comienza a calentar.
4
Si utiliza la funció n de asar, dej e q ue el horno se
precaliente durante aprox imadamente cinco minutos
antes de cocinar los alimentos.
5
G ire la perilla de modo del horno hasta la posició n O ff
para cancelar en cualq uier momento o cuando la cocció n
está completa.
H umo
D ebido al calor intenso q ue se produce cuando se asa, es
normal q ue haya humo durante el proceso de cocció n. Este
humo es un subproducto natural del chamuscado y no es
motivo de preocupació n. Si se genera má s humo del q ue
puede tolerar, apliq ue los siguientes consej os para reducir la
cantidad de humo del horno.
1
Siempre use una asadera. Por seguridad, no use
sartenes ni placas para horneado comunes.
2
La asadera siempre se debe limpiar bien y a temperatura
ambiente antes de empezar a cocinar.
3
Siempre haga funcionar el sistema de ventilació n de la
placa de cocció n o la campana de ventilació n mientras
asa.
4
Mantenga el interior del horno lo má s limpio posible. Los
residuos de comidas anteriores se pueden q uemar o
encender.
5
Evite los marinados grasos y los glaseados azucarados.
Estos aumentan la cantidad de humo q ue se genera. Si
desea usar un glaseado, aplí q uelo al final de la cocció n.
6
Si hay una cantidad significativa de humo con cualq uier
alimento, considere las siguientes opciones:
•
Baj ar el asador al aj uste Lo.
•
Baj ar el estante para cocinar la comida má s lejos del
asador.
•
U tilizar el ajuste del asador en modo Hi para lograr el
nivel de sellado q ue desea y luego cambiar al aj uste
Lo de la funció n Asar o cambiar a la funció n Hornear.
7
G eneralmente, los cortes de carne y pescados má s
grasos siempre producirá n má s humo q ue los alimentos
má s magros.
8
Siga las recomendaciones de aj uste para asar y las
pautas de cocció n del cuadro de la pá gina siguiente
siempre q ue sea posible.

38 FU NCIONAMIENTO
Guí a de recomendaciones para asar
El tamañ o, el peso, el espesor, la temperatura inicial y su preferencia de cocció n afectará n el tiempo de asado.
Esta guí a se basa en carnes a temperatura de refrigerador. Para obtener mej ores resultados al asar, use una bandej a especial para
asar.
A limento
Cantidad y/ o
espesor
Posició n
del
estante
Primer
lado
( minutos)
Segundo
lado
( minutos)
Comentarios
Carne molida de
v aca
Bien cocida
1 lb
(4 hamburguesas)
1
/
2
a
3
/
4
" de espesor
7 3-6 2-4
Espaciar de manera uniforme. Para 1 a 4 hamburguesas,
use la funció n Speed Broil (Asado rá pido). Para má s de 4
hamburguesas, use Broil (Asar).
Bistecs
Poco cocido
Medio
Bien cocido
Poco cocido
Medio
Bien cocido
1
"
de grosor
1 a 1
1
/
2
lb
1
1
/
2
" de espesor
2 a 2
1
/
2
lb
7
7
7
5
5
5
3-5
4-6
5-7
7 -9
9 -1 1
1 1 -1 3
2-4
2-4
3-5
4-6
6 -8
8 -1 0
Los bistecs de menos de 1 " de espesor se cocinan totalmente
antes de dorarse. Se recomienda usar una sartén. Corte la
grasa.
T ostados 7 0 ,5-1 0 ,5
Pollo 1 corte entero de
hasta
2 a 2
1
/
2
lb, cortado a
lo largo 2 pechugas
5
5
8 -1 0
8 -1 0
4-6
5-7
Ase primero con el lado de la piel hacia abaj o.
Colas de langosta 2– 4
1 0 a 1 2 oz cada una
5 9 -1 2 No voltee Corte la parte trasera del caparazó n. Abra bien. Pincele con
manteq uilla derretida antes de asar y a la mitad de la cocció n.
Filetes de pescado
1
/
4
a
1
/
2
" de espesor
6 2-4 2-4 Mueva y voltee con mucho cuidado. Pincele con manteq uilla
con limó n antes de la cocció n y durante la cocció n si lo desea.
Fetas de j amó n
(precocidas)
1
/
2
" de espesor
5 2-4 2-4 Aumente el tiempo de 5 a 1 0 minutos por lado para un grosor
de 1
1
/
2
" o para j amó n ahumado casero.
Ch uletas de cerdo
Bien cocidas
1 (
1
/
2
"
de grosor)
2 (1
"
de grosor)
1 lb aprox.
6
5
3-6
5-8
4-7
5-8
Ch uletas de
cordero
Medio
Bien cocidas
Medio
Bien cocidas
2 (1
"
de espesor) de
1 0 a 1 2 oz aprox.
2 (1
1
/
2
"
de grosor) 1
lb aprox.
6
6
6
6
3-5
5-7
7 -9
9 -1 1
2-5
4-7
7 -9
7 -9
Filetes de salmó n
2 (1
"
de grosor)
4 (1
"
de grosor)
1 lb aprox.
5
5
8 -1 0
9 -1 1
3-5
4-6
Engrase la asadera. Pincele los filetes con manteq uilla
derretida.
•
Esta guí a es meramente de referencia. Aj uste el tiempo de cocció n segú n su preferencia.
•
Para mej ores resultados, centre la comida en el estante cuando use las funciones Speed Broil (Asado rá pido)/ Broil (Asar).

39FU NCIONAMIENTO
ESPA Ñ O L
Proof ( Leudar)
Esta caracterí stica mantiene el horno tibio para leudar
productos con levadura antes de hornearlos.
Configuració n de la funció n Leudar
1
U se el estante en la posició n 2 o 3 para el leudado.
2
G ire la perilla de modo del horno hasta seleccionar el
modo Proof.
3
Presione Start.
4
G ire la perilla de modo del horno hasta la posició n O ff
una vez q ue el leudado haya finalizado.
N O T A
•
Para evitar q ue la temperatura del horno baj e y q ue
se prolongue el tiempo de leudado, no abra la puerta
del horno si no es necesario. Revise los alimentos
panificados con tiempo para evitar un leudado ex cesivo.
•
No use el modo de leudado para calentar comida ni para
mantener calientes los alimentos. La temperatura del
horno para el leudado no es lo suficientemente alta para
mantener alimentos a temperaturas seguras. U se la
funció n Calentar para mantener calientes los alimentos.
La funció n Leudar no funciona si la temperatura es
inferior a 1 25 ° F. La pantalla mostrará la palabra H ot.
•
Es normal q ue el ventilador funcione durante la funció n
Leudar.
Speed Roast ( Rostizado rá pido)
La funció n Rostizado rá pido está diseñ ada para rostizar carne
de ave con rapidez. La combinació n de calor intenso del
calentador superior y el aire caliente del calentador posterior
dan como resultado alimentos má s crocantes y ayudan a
ahorrar tiempo de cocció n. El rostizado rá pido es ideal para
aves de tamañ o mediano.
N O T A
•
El tiempo recomendado de cocció n es de 6 0 a 6 5
minutos para todo el pollo q ue pesa 3,3 lb.
•
Aj uste el tiempo de cocció n segú n el peso de aves.
•
Coloq ue el estande del horno del horno en posició n 2.
•
La funció n Rostizado rá pido está diseñ ada para reducir
el tiempo de cocció n. No es necesario precalentar.
•
Esta funció n está optimizada para cocinar aves, de
modo q ue la temperatura de la funció n Rostizado
rá pido no se puede cambiar.
•
Es normal q ue el ventilador funcione durante la funció n
Rostizado rá pido.
Configuració n de la funció n Rostizado rá pido
1
Coloq ue los alimentos en el horno.
2
G ire la perilla de modo del horno hasta seleccionar el
modo Speed Roast. La pantalla muestra Roast Speed.
3
Presione Start.
Consej os para asar
Filete
•
Los bistecs y las chuletas siempre se deben dej ar reposar
durante cinco minutos antes de cortarlos y comerlos. Esto
permite q ue el calor se distribuya uniformemente en el
alimento y resulta má s tierno y j ugoso.
•
Los trozos de carne q ue tengan má s de dos pulgadas de
espesor deberá n retirarse del refrigerador 30 minutos antes
de su cocció n. Esto permite una cocció n má s rá pida y
uniforme, y produce menos humo al asar. Los tiempos de
cocció n probablemente sean menores q ue los indicados en
el Cuadro para asar.
•
En el caso de bistecs con hueso o chuletas cortadas a
la francesa (se retira toda la carne alrededor del hueso),
envuelva las partes ex puestas del hueso en papel de
aluminio para q ue no se q uemen demasiado.
Mariscos
•
Cuando ase mariscos con su caparazó n, siempre use el
aj uste Lo (Baj o) y ase el lado de la piel por ú ltimo.
•
Es mej or consumir los mariscos inmediatamente después
de la cocció n. Si se dej an reposar los mariscos después de
la cocció n, se secará n.
•
Resulta buena idea aplicar una fina capa de aceite en la
superficie de la asadera antes de cocinar para evitar q ue se
pegue la comida, especialmente los pescados y mariscos.
También puede usar una capa fina de aerosol antiadherente.
V erduras
•
Mezcle las verduras levemente en aceite antes de cocinarlas
para mej orar el dorado.
W arm ( Calentar)
Esta funció n mantendrá el horno a una temperatura de 1 7 0 ° F.
La funció n Calentar mantendrá caliente la comida cocida para
servir hasta tres horas después de realizada la cocció n. La
funció n Calentar puede utilizarse sin ninguna otra operació n de
cocció n.
Configuració n de la funció n Calentar
1
G ire la perilla de modo del horno hasta seleccionar el
modo W arm.
2
Presione Start.
3
G ire la perilla de modo del horno hasta la posició n O ff
una vez q ue el calentamiento haya finalizado.
N O T A
•
La funció n Calentar está diseñ ada para mantener
calientes los alimentos. No la use para baj ar la
temperatura de los alimentos.
•
Es normal q ue el ventilador funcione durante la funció n
Calentar.

40 FU NCIONAMIENTO
Sonda para carne
( Para los modelos: LSE4617)
La sonda para carne mide con precisió n la temperatura
interna de la carne, las aves y los estofados. No debe
utilizarse durante las funciones de asar, autolimpieza o leudar.
D esenchufe y ex traiga siempre la sonda para carne del horno
cuando retire la comida. Antes de usar, inserte la sonda en el
centro de la parte má s gruesa de la carne o en el muslo interno
o la pechuga de las aves, alej ada de la grasa o los huesos.
Coloq ue la comida en el horno y enchufe la sonda para carne
en el conector hembra. Mantenga la sonda lo má s alej ada de
las fuentes de calor q ue le sea posible.
Configuració n de la funció n Sonda para carne ( ej emplo
para Rostizar a 375 ° F con una temperatura de Sonda de
160 ° F)
1
Inserte la sonda para carne en la carne.
2
Enchufe la sonda para carne en el conector hembra.
3
El icono de la sonda para carne parpadea en la pantalla
si la sonda para carne está conectada correctamente.
Configuració n de la temperatura de la sonda
1
Seleccione el modo de cocció n. G ire la perilla de modo
del horno hasta seleccionar Conv . Roast.
2
Aj uste la temperatura del horno: presione los botones
má s( + ) o menos( - ) hasta q ue aparezca 37 5 ° F en la
pantalla.
3
Presione Probe.
4
Aj uste la temperatura de la sonda: presione los botones
má s( + ) o menos( - ) hasta q ue aparezca 1 6 0 ° F en la
pantalla.
5
Presione Start.
La temperatura predefinida para la sonda es de 1 50 ° F (6 5 ° C),
pero puede modificarse a cualq uier temperatura entre 8 0 ° F
(27 ° C) y 21 0 ° F (1 0 0 ° C). La pantalla muestra la temperatura
de la sonda modificada. Cuando se alcanza la temperatura
configurada para la sonda, el horno se apaga de forma
automá tica.
Cambio de la temperatura de la sonda durante la cocció n
1
Presione Probe.
2
Configure la temperatura del termò metro.
3
Presione Start.
N O T A I MPO RT A N T E
G ire la perilla de modo del horno hasta la posició n Off para
cancelar la funció n Sonda para carne en cualq uier momento.
Para evitar q ue la sonda se rompa, asegú rese de q ue la
comida esté totalmente descongelada antes de insertar la
sonda en ella.
PRECA U CI Ó N
•
U tilice siempre un guante para h orno para retirar
la sonda de temperatura. N o toq ue el asador. Si no
se cumple con esta precaució n, se pueden producir
lesiones personales graves.
•
Para ev itar dañ os en la sonda para carne, no use
una pinza para tirar de la sonda cuando la retire.
•
N o guarde la sonda para carne dentro del h orno.
•
N o tire del cable para retirar la sonda.
Sostenga el cabezal de la sonda, no el cable, al
insertar o retirar la sonda.
Cuadro de temperatura recomendada para la sonda
Punto de cocció n T emp. de la sonda
Carne de v aca, cordero y ternera
Poco cocido
A punto
Medio
Bien cocido
1 30 ° F (54 ° C)
1 40 ° F (6 0 ° C)
1 50 ° F (6 6 ° C)
1 6 0 ° F (7 1 ° C)
Cerdo
Bien cocidas 1 7 0 ° F (7 7 ° C)
A v es
Pechuga, bien cocida
Muslo, bien cocido
Rellenas, bien cocidas
1 7 0 ° F (7 7 ° C)
1 8 0 ° F (8 2 ° C)
1 6 5 ° F (7 4 ° C)

41FU NCIONAMIENTO
ESPA Ñ O L
Remote Start ( I nicio remoto)
Si el artefacto está registrado en una red de Wi-Fi doméstica,
esta funció n inicia o detiene la funció n de precalentamiento del
artefacto. Siga las instrucciones de la pá gina 43 para registrar
el artefacto en la red.
Configure perilla de modo del horno en la posició n Remote
Inicio remoto para utilizar la funció n.
Para los modelos: LSE46 1 7 Para los modelos: LSE46 1 6
Configuració n de Remote Start ( I nicio remoto)
1
Abra la puerta del horno para asegurarse de q ue esté
vací o y listo para el precalentamiento. No coloq ue
alimentos en el horno. Cierre la puerta del horno.
2
D espués de 30 segundos de cerrar la puerta, gire el
mando de modos del horno para seleccionar Remote
Start. Si pasan má s de 30 segundos antes de q ue usted
inicie Remote Start, " door" aparece en la pantalla. Si esto
ocurre, abra y cierre la puerta e inténtelo de nuevo.
3
Cuando en la pantalla aparece ENCEND ID O, la funció n
Inicio remoto está lista para ser usada.
4
Siga las instrucciones en la aplicació n del teléfono
inteligente para seleccionar el modo, temperatura y
duració n de cocció n (tiempo de precalentamiento y
acció n de cocció n).
N O T A
No coloq ue comida en el horno antes o durante el tiempo
de acció n de Remote Start.
Remote Start se desconecta en las siguientes situaciones:
•
Inicio remoto no está nunca conectado en la aplicació n
del teléfono inteligente.
•
El estado Remote Start es " OFF" o " door" .
•
Inicio remoto ex perimenta un problema durante el
funcionamiento.
•
La funció n Remote Start no puede iniciarse cuando la
puerta del horno está abierta. U n sonido de alerta le
recuerda q ue debe cerrar la puerta.
Funcionamiento del caj ó n de
calentamiento
( Para los modelos: LSE4617)
El caj ó n de calentamiento mantiene caliente la comida cocida
a la temperatura adecuada para servir.
Todos los alimentos q ue se coloq uen dentro del caj ó n de
calentamiento deben cubrirse con una tapa apta para horno o
con papel de aluminio para mantener la calidad. No coloq ue el
papel de aluminio sobre la base o los costados del caj ó n. No
utilice envolturas plá sticas para cubrir los alimentos. El plá stico
podrí a derretirse en el caj ó n y resultarí a muy difí cil de limpiar.
U tilice ú nicamente utensilios o baterí a de cocina aptos para
horno en el caj ó n de calentamiento.
Conguracin de contro de can
calentador
1
Presione W arming Draw er Set/ O ff. La luz indicadora
comenzará a parpadear. (Si no se presiona ningú n otro
botó n durante 25 segundos, la pantalla se borrará .)
2
U se los botones má s( + ) o menos( - ) para ajustar el nivel
de potencia:
para Baj o, para Medio, y para
Alto.
3
Cuando la comida esté lista o para cancelar, presione
W arming Draw er Set/ O ff.
N O T A
•
El caj ó n de calentamiento se apaga de forma automá tica
después de pasadas tres horas.
•
No caliente alimentos frí os en el caj ó n de calentamiento.
•
No utilice sartenes o utensilos de acabado rú stico
cuando la funció n de caj ó n de calentamiento esté en
operació n. Si lo hace, se puede producir rayas en la
superficie interior del caj ó n.

42 FU NCIONAMIENTO
Recomendaciones sobre los alimentos
y el niv el de potencia del caj ó n de
calentamiento
Configuració n A limento
Baj a
1 40 ° F (6 0 ° C)
•
V erduras
•
Arroz
•
Pastas
•
Masas para el desayuno (pastel para el
café, muffins)
•
Panecillos
•
Platos de comida
•
Alimentos sensibles al calor*
(pancakes, pizzas, huevos)
Media
1 6 0 ° F (7 1 ° C)
•
Carnes* (si se calientan de 1 a 2 horas)
•
G uisados má s peq ueñ os
•
Salchicha o beicon
•
Calentar bandej as aptas para horno o
fuentes para servir vací as
Alta
1 8 0 ° F (8 2 ° C)
•
Carnes* (si se calientan por menos de
una hora)
•
G uisados grandes
* No caliente alimentos sensibles al calor durante má s de 20
minutos. o coloue cortes nos de carne en el can de
calentamiento porq ue se secará n.
Pueden colocarse diferentes tipos de alimentos al mismo
tiempo en el caj ó n de calentamiento. Para mejores resultados,
no dej e los alimentos en el caj ó n de calentamiento durante
má s de una hora. No dej e peq ueñ as cantidades de alimentos
o alimentos sensibles al calor, como huevos, en el caj ó n de
calentamiento durante má s de 30 minutos. El tiempo má x imo
de funcionamiento es de tres horas.
CA U T I O N
•
No utilice el caj ó n de calentamiento para guardar
estantes, asaderas, moldes, platos o utensilios. El caj ó n
de calentamiento contiene un q uemador q ue puede
dañ ar cualq uier obj eto no diseñ ado especí ficamente
para ser usado dentro del mismo y solo debe usarse
para guardar baterí a de cocina suministrada por LG
j unto con su cocina.
•
No coloq ue los alimentos ni el papel de aluminio
directamente sobre la superficie o la base del caj ó n de
calentamiento. Esto podrí a ocasionar dañ os en el caj ó n
y arruinar la comida.
•
No coloq ue envolturas plá sticas dentro del caj ó n de
calentamiento ni las utilice para cubrir los alimentos q ue
se calientan en el caj ó n. El plá stico podrí a derretirse
en el caj ó n o en las á reas adyacentes y resultarí a
muy difí cil de limpiar. U tilice solo papel de aluminio o
baterí a de cocina q ue pueda soportar temperaturas de
horneado para calentar o cubrir los alimentos.
•
No utilice el caj ó n de calentamiento para calentar agua
ni ningú n otro lí q uido. Los lí q uidos derramados podrí an
producir un cortocircuito o lesiones personales graves,
descargas eléctricas o la muerte.
•
No coloq ue nunca plá sticos, papel, comida enlatada u
otro material combustible en el caj ó n de calentamiento.
Estos obj etos podrí an producir riesgo de incendio,
dañ os y lesiones.
•
En el remoto caso de q ue se cayera un obj eto detrá s
del caj ó n de calentamiento, desconecte la cocina y
espere q ue se enfrí e el caj ó n de calentamiento para
retirar el obj eto. No intente nunca retirar un obj eto q ue
se caiga detrá s del caj ó n de calentamiento sin antes
desconectar la cocina y asegurarse de q ue la cavidad
del caj ó n se haya enfriado. D e no hacerlo, se podrí an
producir lesiones graves, descargas eléctricas o la
muerte.
•
No toq ue la superficie del caj ó n de calentamiento
mientras esté en funcionamiento. U tilice manoplas para
horno o agarraderas para introducir o retirar alimentos
con el fin de evitar q uemaduras u otras lesiones.
•
No dej e los alimentos en el caj ó n de calentamiento
durante má s de una hora. Ingerir alimentos q ue se
hayan calentado durante demasiado tiempo a baj a
temperatura puede producir intox icaciones alimentarias.

43FU NCIONES INTELIG ENTES
ESPA Ñ O L
FU N CI O N ES
I N T ELI GEN T ES
A plicació n LG SmartT h inQ
La aplicació n LG SmartThinQ le permite comunicarse con el
electrodoméstico usando un teléfono inteligente.
Prev io a utilizar LG SmartT h inQ
•
Para electrodomésticos con el o logo
1
U tilice un teléfono inteligente para verificar la potencia
del enrutador (Red Wi-Fi) cerca del electrodoméstico.
•
Si la distancia entre el electrodoméstico y el enrutador
inalá mbrico es muy grande, la señ al será débil. Puede
q ue le tome má s tiempo registrarse o q ue falle la
instalació n.
2
D esactive los Datos Mó v iles o Datos Celulares en su
teléfono inteligente.
•
Para Iphones, apague la red al dirigirse a
Configuració n → Datos Celulares → Datos
Celulares.
3
Conecte su teléfono inteligente al enrutador inalá mbrico.
N O T A
•
Para verificar la conex ió n Wi-Fi, revise q ue el í cono W i-
Fi
en el panel de control esté encendido.
•
El electrodoméstico funciona ú nicamente con redes Wi-
Fi de 2.4 G Hz. Contacte a su proveedor de servicios de
internet o verifiq ue el manual del enrutador inalá mbrico
para revisar la frecuencia de su red.
•
LG SmartThinQ no es responsable por ningú n problema
de conex ió n en red, falla, mal funcionamiento o error
causado por la conex ió n de red.
•
El entorno inalá mbrico circundante puede hacer q ue el
servicio de red inalá mbrica funcione lentamente.
•
Si el aparato tiene problemas para conectarse a la red
Wi-Fi, es posible q ue se encuentre demasiado lej os
del router. Adq uiera un repetidor Wi-Fi (ex tensor de
alcance) para mej orar la intensidad de la señ al Wi-Fi.
•
Es posible q ue la conex ió n de red no funcione bien por
cuestiones relacionadas con su proveedor de servicios
de Internet.
•
Es posible q ue la conex ió n Wi-Fi no se conecte o se
interrumpa debido al entorno de la red doméstica.
•
Si el electrodoméstico no puede registrarse debido a
problemas con la transmisió n de la señ al inalá mbrica,
desconéctelo y espere alrededor de un minuto previo a
intentarlo de nuevo.
•
Si el cortafuegos de su enrutador inalá mbrico está
activado, desactivelo o añ ada una ex cepció n a éste.
•
El nombre de la red inalá mbrica (SSID ) debe ser una
combinació n de letras y nú meros. (No utilice caracteres
especiales)
•
La interfaz de usuario (IU ) del teléfono inteligente puede
variar dependiendo del sistema operativo (OS) del mó vil
y del fabricante.
•
Puede q ue la configuració ni de red falle si el protocolo
de seguridad del router está en W EP. Cambie el
protocolo de seguridad por otro (es recomendado el
W PA 2 ) y registre el producto de nuevo.
I nstalando la aplicació n LG
SmartT h inQ
Busq ue la aplicació n LG SmartThinQ desde la tienda G oogle
Play o Apple App Store en un teléfono inteligente. Siga las
instrucciones para descargar e instalar la aplicació n.
N O T A
•
Si elige el inicio de sesió n simple para acceder a la
aplicació n LG SmartThinQ , deberá realizar el proceso
de registro del electrodoméstico cada vez q ue cambie
de teléfono o reinstale la aplicació n.

44 FU NCIONES INTELIG ENTES
Funciones de la aplicació n LG
SmartT h inQ
•
Para electrodomésticos con el o logo
Limpieza
Esta funció n lo ayuda a controlar la eficiencia en el consumo
de energí a, uso, guí a de EasyClean™ .
Smart Diagnosis™
Esta funció n brinda informació n ú til para diagnosticar y resolver
problemas con el aparato conforme a su patró n de uso.
A j ustes
Le permite configurar varias opciones en el horno y en la
aplicació n.
Monitoreo
Esta funció n le permite observar el estado actual, el tiempo
restante, los aj ustes de cocció n y el tiempo de finalizació n en
la pantalla.
Push A lerts ( A lertas automá ticas)
Active las Alertas Automá ticas para recibir notificaciones sobre
el estado del aparato.
Las notificaciones se activan incluso si la aplicació n LG
SmartThinQ está apagada.
T emporizador
Puede configurar el temporizador desde la aplicació n.
N O T A
•
Si cambia su enrutador inalá mbrico, proveedor de
servicios de internet, o su contraseñ a, por favor borre
el producto de LG SmartThinQ A j ustes → Editar
Producto y regí strelo de nuevo.
•
Esta informació n está actualizada en el momento de
su publicació n. La aplicació n está sujeta a cambios
con fines de mej orar el producto sin previo aviso a los
usuarios.
Funció n Smart Diagnosis™
( Diagnó stico I nteligente)
En caso de ex perimentar algú n problema con el aparato,
el mismo tiene la capacidad de transmitir datos a través
de su teléfono al Centro de informació n del cliente de LG .
Los modelos eq uipados con NFC o Wi-Fi pueden también
transmitir datos a un teléfono inteligente usando la aplicació n
LG SmartThinQ .
Smart Diagnosis™ a trav és del Centro
de informació n al cliente
•
Para electrodomésticos con el o logo
Este método le permite hablar directamente con uno de
nuestros especialistas calificados. El especialista registra los
datos transmitidos desde el aparato y los usa para analizar el
problema, así le brinda un diagnostico efectivo y rá pido.
1
Llame al centro de atenció n de LG al: (LG EE. U U .)
1 -8 0 0 -243-0 0 0 0 (LG Canadá ) 1 -8 8 8 -542-26 23.
2
Cuando el agente del centro de atenció n se lo indiq ue,
sostenga el micró fono de su teléfono sobre el logotipo
Smart D iagnosis™ de la má q uina. Sostenga el teléfono a
no má s de una pulgada de la má q uina (pero sin tocarla).
N O T A
No toq ue ningú n otro botó n ni icono de la pantalla.
3
Mantenga presionado el botó n Start durante tres
segundos.
4
Mantenga el teléfono allí hasta q ue la transmisió n de
tonos haya terminado. D emora unos 6 segundos y la
pantalla mostrará una cuenta regresiva.
5
U na vez q ue la cuenta regresiva haya terminado y se
hayan detenido los tonos, reanude su conversació n con
el agente del centro de atenció n, q ue podrá ayudarlo a
usar la informació n transmitida para un aná lisis.
N O T A
•
Para obtener resultados ó ptimos, no mueva el teléfono
mientras se transmitan los tonos.
•
Si el agente del centro de atenció n no puede obtener
una grabació n precisa de los datos, es posible q ue le
pida q ue lo intente nuevamente.

45FU NCIONES INTELIG ENTES
ESPA Ñ O L
LG SmartT h inQ Smart Diagnosis™
•
Para electrodomésticos con el o logo
U se la funció n de diagnó stico inteligente en la aplicació n LG
SmartThinQ para ayudar a diagnosticar problemas sin la ayuda
del Centro de informació n del cliente de LG .
Siga las instrucciones en la aplicació n LG SmartThinQ
para realizar un diagnó stico inteligente usando su teléfono
inteligente.
1
Abra la aplicació n LG SmartThinQ en el teléfono
inteligente.
2
Seleccione el artefacto y luego el menú en la parte
superior del lado derecho.
3
Seleccione Smart Diagnosis, luego presione el botó n
Start Smart Diagnosis.
N O T A
•
Si el diagnó stico falla en reiteradas oportunidades, siga
las instrucciones a continuació n.
4
Seleccione A udible Diagnosis.
5
Siga las instrucciones en el teléfono inteligente.
6
Mantenga el teléfono en posició n hasta q ue la
transmisió n de tono haya finalizado. Observe el
diagnó stico en el teléfono.
N O T A
•
Smart D iagnosis™ no puede activarse a menos
q ue el electrodoméstico se encienda usando el
botó n Encendido. Si no es posible encender el
electrodoméstico, entonces la resolució n de problemas
debe llevarse a cabo sin usar Smart D iagnosis™ .
•
La calidad de la funció n Smart D iagnosis™ depende de
la calidad de la llamada local.
•
El resultado de la comunicació n será mej or y usted
podrá recibir un mej or servicio si usa el teléfono fij o de
su casa.
•
En caso de q ue la transferencia de datos de Smart
D iagnosis™ sea deficiente debido a la mala calidad
de la llamada, es posible q ue usted no reciba el mej or
servicio de Smart D iagnosis™ .
I nformació n del av iso de softw are de
có digo abierto
Para obtener el có digo fuente correspondiente G PL, LG PL,
MPL y otras licencias de có digo abierto q ue contiene este
producto, visite http: / / opensource.lge.com. Ademá s del có digo
fuente, podrá descargar las condiciones de las licencias,
ex enció n de responsabilidad de la garantí a y avisos de
copyright.
LG Electronics también le proporcionará có digo abierto en
CD ROM por un importe q ue cubre los gastos de su distribució n
(como el soporte, el enví o y la manipulació n) previa solicitud
por correo electró nico a opensource@ lge.com. Esta oferta es
vá lida durante un periodo de tres añ os a partir del ú ltimo enví o
de este producto. Esta oferta es vá lida para cualq uier persona
q ue reciba esta informació n.
Para los modelos: LSE46 1 7
Especificaciones del mó dulo de LA N inalá mbrico
( LCW - 0 0 3)
Rango de frecuencia 241 2~ 246 2 MHz
Potencia de salida (max .)
IEEE 8 0 2.1 1 b : 1 7 .56 dBm
IEEE 8 0 2.1 1 g : 25.53 dBm
IEEE 8 0 2.1 1 n : 25.29 dBm
Para los modelos: LSE46 1 6
Especificaciones del mó dulo de LA N inalá mbrico
( LCW - 0 0 4)
Rango de frecuencia 241 2~ 246 2 MHz
Potencia de salida (max .)
IEEE 8 0 2.1 1 b : 22.44 dBm
IEEE 8 0 2.1 1 g : 24.6 8 dBm
IEEE 8 0 2.1 1 n : 24.1 1 dBm

46 FU NCIONES INTELIG ENTES
A v iso de la FCC
El siguiente aviso abarca el mó dulo transmisor contenido en
este producto.
Este eq uipo fue probado y se determinó q ue cumple con
los lí mites para los dispositivos digitales de Clase B, en
conformidad con la Parte 1 5 de las normas de la FCC y
también con la Parte 1 8 de dichas normas. Estos lí mites
está n diseñ ados para ofrecer una protecció n razonable contra
interferencias dañ inas en una instalació n residencial. Este
eq uipo genera, usa y puede emitir energí a de radiofrecuencia
y, si no se instala y utiliza de acuerdo con las instrucciones,
podrí a causar interferencias dañ inas a las comunicaciones por
radio. Sin embargo, no se garantiza q ue dicha interferencia
no pueda ocurrir en instalaciones particulares. Si este eq uipo
causa interferencia dañ ina a la recepció n de radio o televisió n,
q ue se puede determinar encendiendo y apagando el eq uipo,
se aconsej a al usuario intentar corregir la interferencia
realizando alguna de las siguientes acciones:
•
Reoriente o reubiq ue la antena receptora.
•
Aumente la separació n entre el eq uipo y el receptor.
•
Conecte el eq uipo a una toma de corriente en un circuito
diferente del utilizado por el receptor.
•
Solicite ayuda a su vendedor o a un técnico especialista en
radio o TV .
Este dispositivo cumple con la Parte 1 5 y la Parte 1 8 de
las normas de la FCC. La operació n está suj eta a las dos
siguientes condiciones:
1 ) este dispositivo no debe causar interferencia dañ ina, y
2) este dispositivo debe aceptar cualq uier interferencia
recibida, incluso aq uellas q ue pudieran causar un
funcionamiento no deseado del dispositivo.
Cualq uier cambio o modificació n en la construcció n de
este dispositivo q ue no cuente con la aprobació n ex presa
de la parte responsable del cumplimiento puede anular la
autorizació n del usuario para operar este eq uipo.
Declaració n sobre ex posició n
a la radiació n de RF de la FCC
Este eq uipo cumple con los lí mites de ex posició n a la radiació n
de la FCC establecidos para entornos no controlados. Este
transmisor no se debe ubicar ni operar j unto con ninguna otra
antena ni transmisor. El eq uipo se debe instalar y operar con
una distancia mí nima de 20 cm (7 .8 pulg.) entre la antena y
su cuerpo. Los usuarios deben seguir las instrucciones de
operació n especí ficas de manera tal de cumplir con las normas
de ex posició n a la RF.

47MANTENIMIENTO
ESPA Ñ O L
MA N T EN I MI EN T O
Limpieza de la placa de
cocció n de v itrocerá mica
PRECA U CI Ó N
•
No use esponj as para fregar ni esponj as abrasivas.
Pueden dañ ar la superficie de la placa de cocció n.
•
Por su seguridad, pó ngase un guante para horno o una
agarradera cuando use una espá tula en la superficie de
cocció n caliente.
•
Lea y siga las instrucciones y advertencias de la
etiq ueta de la crema de limpieza.
U se limpiador para placas de cocció n cerá micas en la
superficie de vidrio. Otras cremas podrí an no resultar eficaces
o podrí an rayar, dañ ar o manchar la superficie de la placa de
cocció n.
Para mantener y proteger la superficie de la placa de cocció n
de vidrio, siga los pasos a continuació n:
1
Antes de usar la placa de cocció n por primera vez,
lí mpiela con un limpiador para placas de cocció n de
cerá mica. Esto ayudará a protegerla y facilitará la
limpieza.
2
U se limpiador para placas de cocció n cerá micas
diariamente para mantener la placa como nueva.
3
Agite bien la crema de limpieza. Apliq ue algunas gotas
de limpiador directamente en la placa de cocció n.
4
Con una toalla de papel, limpie toda la superficie de la
placa de cocció n.
5
Enj uague con agua limpia y, con un pañ o seco o una
toalla de papel, retire todos los residuos de la limpieza.
N O T A
No caliente la placa de cocció n hasta q ue la haya limpiado
bien.
I MPO RT A N T E
Si se derrama azú car o algú n alimento q ue contenga azú car
(conservas, kétchup, salsa de tomate, mermeladas, dulce,
caramelo, j arabes y chocolate), o se derriten plá stico o papel
de aluminio en la placa de cocció n, q uite el material derretido
INMED IATAMENTE con un raspador metá lico filoso (no dañ ará
la superficie de cocció n decorada) mientras la superficie de
cocció n todaví a esté caliente para evitar dañ os en la superficie
de vitrocerá mica. Por su seguridad, use un guante para horno
o una agarradera cuando raspe la superficie de cocció n
caliente.
Residuo q uemado
1
Mientras la superficie de la placa de cocció n esté todaví a
caliente, retire todos los depó sitos q uemados o los
alimentos derramados en la superficie de vitrocerá mica
con un raspador metá lico adecuado. (Similar a la q ue se
usa para q uitar la pintura del vidrio de una ventana, no
dañ ará la superficie de cocció n decorada). Sostenga la
espá tula en un á ngulo aprox imado de 30 ° con respecto a
la placa de cocció n.
N O T A
•
No use una hoj a desafilada ni con muescas.
•
Para evitar q uemaduras, utilice un guante para horno o
una agarradera cuando use la espá tula metá lica.
2
Cuando la superficie de cocció n se haya enfriado,
apliq ue unas gotas (aprox imadamente del tamañ o de
una moneda) de un limpiador aprobado en el á rea de
cada q uemador y pase la crema de limpieza sobre la
superficie de la placa de cocció n con una toalla de papel
hú meda.
N O T A
Limpiadores aprobados
•
Weiman Cooktop Cleaning Cream
(www.weiman.com)
•
Cerama Bryte (www.ceramabryte.com)
•
G olden V entures Cerama Bryte
•
Easy-Off limpiador en spray 3 en 1 para placas de
cocció n de vidrio (www.easyoff.us)
3
Enj uague con agua limpia y seq ue la superficie de la
placa de cocció n con una toalla de papel limpia y seca.

48 MANTENIMIENTO
Rayas y marcas del metal
1
Tenga cuidado de no deslizar las ollas ni las sartenes por
la placa de cocció n. Si lo hace, el metal dej ará marcas
en la superficie.
2
Para q uitar esas marcas, use limpiador para placas
de cocció n cerá micas con una esponj a para placas de
cerá mica.
PRECA U CI Ó N
La baterí a de cocina con fondo desigual o disparej o puede
marcar o rayar la superficie de la placa de cocció n.
•
No deslice metal ni vidrio por la superficie de la placa
de cocció n.
•
No use la baterí a de cocina con suciedad acumulada
en el fondo.
EasyClean
®
La tecnologí a esmaltada de LG EasyClean
®
ofrece dos
opciones de limpieza para el interior de la cocina. La funció n
EasyClean
®
se beneficia con el nuevo esmalte de LG para
ayudar a despegar la suciedad sin usar q uí micos fuertes y
funciona SOLAMENTE CON AG U A durante apenas 1 0 minutos
a baj a temperatura para afloj ar la suciedad LEV E antes de
realizar la limpieza manual.
Si bien la funció n EasyClean
®
es rá pida y eficaz para la
suciedad LEV E y peq ueñ a, la funció n Autolimpieza se puede
usar para q uitar suciedad D IFÍ CIL acumulada. La intensidad y
la alta temperatura del ciclo de Autolimpieza pueden producir
humo, por lo q ue habrá q ue abrir las ventanas para ventilar.
En comparació n con el proceso má s intenso de Autolimpieza,
el horno LG le brinda la opció n de limpiar con MENOS
CALOR, en MENOS TIEMPO y, prá cticamente, SIN HU MO NI
V APORES.
Cuando sea necesario, la cocina ofrece también la opció n de
autolimpieza má s prolongada y profunda del horno para q uitar
la suciedad difí cil acumulada.
Beneficios de EasyClean
®
•
Ayuda a aflojar la suciedad leve antes de la limpieza manual
•
EasyClean
®
solo usa agua; no usa limpiadores con
q uí micos.
•
Favorece una mej or ex periencia de autolimpieza
- D emora la necesidad de un ciclo de autolimpieza
- Minimiza el humo y los olores
- Puede acortar el tiempo de la autolimpieza

49MANTENIMIENTO
ESPA Ñ O L
Cuá ndo usar EasyClean
®
Método sugerido de
limpieza
Ej emplo de suciedad en el h orno
Forma de la
suciedad
T ipos de
suciedad
A limentos comunes q ue
pueden ensuciar el h orno
EasyClean
®
G otitas o
manchitas
Q ueso u otros
ingredientes
Pizza
Salpicadura leve G rasa/ aceite
Bistecs, asados
Pescado, asado
Carne rostizada a baj a
temperatura
Self Clean*
( A utolimpieza)
Salpicadura
mediana a
grande
G rasa/ aceite
Carne rostizada a alta
temperatura
G otas o
manchas
Relleno o
suciedad de
alimentos con
azú car
Tartas
Crema o salsa
de tomate
Estofados
* El ciclo de Autolimpieza puede usarse para suciedad q ue se haya acumulado con el tiempo.
Consej os de limpieza
•
Permita q ue el horno se enfrí e a temperatura ambiente antes
de usar el ciclo EasyClean
®
. Si la cavidad del horno alcanza
una temperatura superior a 1 50 ° F (6 5 ° C), H ot aparecerá
en la pantalla y el ciclo EasyClean
®
no se activará hasta
q ue la cavidad del horno se enfrí e.
•
Se puede usar una espá tula plá stica como raspador para
q uitar los restos o residuos antes de la limpieza del horno o
durante el proceso.
•
Puede resultar de ayuda usar el lado á spero de una esponj a
q ue no raye para q uitar manchas q uemadas mejor q ue con
una esponj a blanda o una toalla.
•
Algunas esponj as q ue no rayan, como las hechas de
espuma de melamina, disponibles en las tiendas locales,
también pueden ayudar a mej orar la limpieza.
•
La cocina debe estar nivelada para asegurar q ue
la superficie inferior de la cavidad del horno esté
completamente cubierta con agua al comienzo del ciclo
EasyClean
®
.
•
Para obtener mej ores resultados, use agua destilada o
filtrada. El agua del grifo puede dej ar depó sitos minerales en
la base del horno.
•
La suciedad q uemada en varios ciclos de cocció n será má s
difí cil de q uitar con el ciclo EasyClean
®
.
•
No abra la puerta del horno durante el ciclo EasyClean
®
. El
agua no se calienta lo suficiente si se abre la puerta durante
este ciclo.
•
Para limpiar á reas difí ciles de alcanzar, como la superficie
trasera del horno, es mej or usar el ciclo de Autolimpieza.
Guí a de instrucciones de EasyClean
®
1
Q uite los estantes y los accesorios del horno.
2
Raspe y retire los residuos q uemados con un raspador
plá stico.
Raspadores plá sticos sugeridos:
•
Espá tula de plá stico dura
•
Raspador plá stico para
bandej as
•
Raspador plá stico para pintura
•
Tarj eta de crédito viej a
3
Llene el bote (1 0 oz o 30 0 ml) con agua y use el
atomizador las superficies laterales dentro de la cavidad
del horno.
4
U se al menos
1
/
5
(2 oz o 6 0 ml) de agua del bote para
moj ar las parte sucias de las superficies laterales y en
las esq uinas de la estufa.

5 0 MANTENIMIENTO
5
Atomice o eche
4
/
5
(8 oz o 240 ml) de agua abaj o, en
el centro de la cavidad. La superficie abaj o de la estufa
debe estar completamente cubierta para moj ar todos los
residuos. Añ ade agua si es necesario.
N O T A
Si limpia varias estufas, use del bote entero lleno de agua
para limpiar cada estufa. No rocí e agua directamente en
la puerta. Si lo hace, el agua chorreará al piso.
6
Cierre la puerta del horno.
G ire la perilla de modo del horno hasta seleccionar el
modo EasyClean
®
.
Presione Start.
PRECA U CI Ó N
•
Algunas superficies pueden q uedar calientes después
del ciclo EasyClean
®
. U se guantes de goma cuando
limpie para evitar q uemaduras.
•
D urante el ciclo EasyClean
®
, el horno se calienta lo
suficiente como para provocar q uemaduras. Espere
hasta q ue el ciclo termine antes de limpiar la superficie
interna del horno. Si no espera, podrí a q uemarse.
•
Evite apoyarse o recargarse en el vidrio de la puerta del
horno mientras limpia la cavidad del horno.
7
Sonará un tono al final del ciclo de 1 0 minutos. G ire la
perilla de modo del horno hasta la posició n O ff para
borrar la pantalla y apagar el tono.
8
D espués del ciclo de limpieza y durante la limpieza
manual, debe q uedar suficiente agua en la base del
horno para sumergir completamente la suciedad.
Agregue agua si fuera necesario. Coloq ue una toalla en
el piso frente al horno para absorber el agua q ue pueda
derramarse durante la limpieza manual.
9
Limpie la cavidad del horno inmediatamente después del
ciclo EasyClean
®
. Para ello, friegue con una esponj a o
un pañ o de limpieza hú medos q ue no rayen. (El lado
para refregar no rayará el acabado). Se puede derramar
un poco de agua en las ventilaciones de la base cuando
se realice la limpieza, pero se
recogerá en una bandej a q ue está
debaj o de la cavidad del horno y no
dañ ará el q uemador.
N O T A
No use esponj as de acero ni pañ os o limpiadores
abrasivos, ya q ue estos materiales pueden dañ ar en
forma permanente la superficie del horno.
10
U na vez q ue haya limpiado la cavidad del horno, q uite
el ex ceso de agua con una toalla limpia y seca. V uelva
a colocar los estantes y los demá s accesorios.
11
Si q ueda alguna suciedad leve, repita los pasos
anteriores y asegú rese de empapar bien las á reas
sucias. Si q ueda suciedad rebelde después de varios
ciclos EasyClean
®
, ej ecute el ciclo Autolimpieza.
Asegú rese de q ue se hayan retirado de la cavidad del
horno los estantes y los demá s accesorios, y q ue la
superficie de la cavidad esté seca antes de ej ecutar el
ciclo de autolimpieza. Consulte la secció n Autolimpieza
del manual del propietario para obtener má s detalles.
N O T A
•
Si olvida empapar el interior del horno con agua antes
de comenzar el ciclo EasyClean
®
, gire la perilla de
modo del horno hasta la posició n O ff para finalizar el
ciclo. Espere q ue la cocina se enfrí e a temperatura
ambiente y, luego, rocí e o vierta agua en el horno y
comience otro ciclo EasyClean
®
.
•
La j unta de la cavidad puede q uedar mojada cuando
termine el ciclo EasyClean
®
. Esto es normal. No limpie
la j unta.
•
Si q uedan depó sitos minerales en la base del horno
después de la limpieza, use un pañ o o una esponj a
impregnada en vinagre para q uitarlos.
•
Es normal q ue el ventilador funcione durante el ciclo
EasyClean
®
.

5 1MANTENIMIENTO
ESPA Ñ O L
Self Clean ( A utolimpieza)
El ciclo de Autolimpieza usa temperaturas sumamente altas
para limpiar la cavidad del horno. Mientras se ej ecute el ciclo
de Autolimpieza, es posible q ue perciba humo u olor. Esto es
normal; especialmente si el horno está muy sucio.
D urante el ciclo de Autolimpieza, se debe ventilar bien la
cocina para minimizar los olores de la limpieza.
A ntes de comenzar la autolimpieza
•
Q uite los estantes del horno, la asadera, la rej illa de la
asadera, cualq uier recipiente, el papel aluminio y cualq uier
otro material del horno.
•
La cocina debe estar bien ventilada para minimizar los
olores de la limpieza.
•
Limpie los derrames notorios de la base del horno.
•
Asegú rese de q ue la tapa de la bombilla de la luz del horno
esté en su lugar y de q ue la luz esté apagada.
•
La luz de horno no puede encenderse durante un ciclo de
Autolimpieza. La luz del horno no puede encenderse hasta
q ue la temperatura haya descendido a menos de
500 ˚F (260 ˚C) despus de ue se haya completado un
ciclo de Autolimpieza.
PRECA U CI Ó N
•
No dej e a niñ os peq ueñ os sin supervisió n cerca del
aparato. D urante el ciclo de Autolimpieza, el ex terior de
la cocina puede estar muy caliente al tacto.
•
Si tiene aves domésticas, llévelas a otra sala bien
ventilada. La salud de algunas aves es muy sensible
a los vapores q ue se emanan durante el ciclo de
Autolimpieza de cualq uier cocina.
•
No recubra las paredes del horno, los estantes, el fondo
ni ninguna otra parte de la cocina con papel de aluminio
ni con ningú n otro material. Hacer esto destruye la
distribució n de calor, produce resultados de horneado
deficientes y causa dañ os permanentes al interior del
horno (el papel de aluminio se fundirí a en la superficie
interior del horno).
•
No fuerce la puerta del horno para abrirla. Podrí a dañ ar
el sistema automá tico de bloq ueo de la puerta. Tenga
cuidado cuando abra la puerta del horno después
del ciclo de Autolimpieza. Pó ngase al lado del horno
cuando abra la puerta para dej ar q ue salgan el aire y
el vapor calientes. El horno todaví a puede estar MU Y
CALIENTE.
D urante el ciclo de Autolimpieza, no se pueden usar las
hornallas de la placa de cocció n ni el caj ó n calentador.
N O T A
•
Q uite los estantes del horno y los accesorios antes de
iniciar el ciclo de Autolimpieza.
•
Si se dej an los estantes en la cavidad del horno durante
el ciclo de Autolimpieza, cambiará n de color y será
difí cil deslizarlos para ponerlos o sacarlos.
•
Limpie el marco del horno y la puerta con agua
j abonosa caliente. Enj uague bien.
•
No limpie la j unta. La fibra de vidrio de la j unta de la
puerta no resiste la abrasió n. Es fundamental q ue la
j unta permanezca intacta. Si nota q ue está gastada o
deshilachada, reemplá cela.
•
Limpie los derrames notorios q ue haya en la base del
horno.
•
Asegú rese de q ue la tapa de la bombilla de la luz del
horno esté en su lugar y de q ue la luz esté apagada.
•
Es normal q ue el ventilador funcione durante el ciclo de
Autolimpieza.
•
The Burner O n indicator light turns on when the knob is
turned even if the cooktop element does not operate.
Conguracin de utoiiea
La funció n Autolimpieza tiene ciclos de 3, 4 o 5 horas.
Guí a de suciedad para autolimpieza
N iv el de suciedad A j uste del ciclo
Cavidad del horno levemente sucia
Autolimpieza de
3 horas
Cavidad del horno moderadamente
sucia
Autolimpieza de
4 horas
Cavidad del horno muy sucia
Autolimpieza de
5 horas
1
Q uite todos los estantes y los accesorios del horno.
2
G ire la perilla de modo del horno hasta seleccionar
el modo Self Clean. El horno entra de manera
predeterminada en la autolimpieza de cuatro horas
recomendada para un horno moderadamente sucio.
Presione los botones má s( + ) o menos( - ) para
seleccionar el tiempo de autolimpieza de 3 a 5 horas.
3
Presione Start.
4
U na vez q ue esté configurado el ciclo de autolimpieza,
la puerta del horno se traba automá ticamente y aparece
el icono del candado. No podrá abrir la puerta del horno
hasta q ue el horno se haya enfriado. El bloq ueo se abrirá
automá ticamente cuando el horno se haya enfriado.

5 2 MANTENIMIENTO
PRECA U CI Ó N
No fuerce la puerta del horno para abrirla cuando vea el
icono del candado. La puerta permanece trabada hasta
q ue baj a la temperatura del horno. Si abre la puerta a la
fuerza, se dañ ará .
Conguracin de utoiiea con
inicio retardado
1
Q uite todos los estantes y los accesorios del horno.
2
G ire la perilla de modo del horno hasta seleccionar
el modo Self Clean. El horno entra de manera
predeterminada en la autolimpieza de cuatro horas
recomendada para un horno moderadamente sucio.
Presione los botones má s( + ) o menos( - ) para
seleccionar un tiempo de autolimpieza de 3 a 5 horas.
3
Presione Start T ime.
4
Presione los botones má s( + ) o menos( - ) para ingresar la
hora del dí a en q ue desea q ue inicie la Autolimpieza.
5
Presione Start.
N O T A
Puede q ue sea necesario cancelar o interrumpir el ciclo de
Autolimpieza debido a ex ceso de humo o la presencia de
fuego en el horno. Para cancelar la funció n Autolimpieza,
gire la perilla de modo del horno hasta la posició n O ff.
Durante la A utolimpieza
•
El ciclo de Autolimpieza usa temperaturas sumamente altas
para limpiar la cavidad del horno. Mientras se ej ecute el
ciclo de Autolimpieza, es posible q ue perciba humo u olor.
Esto es normal; especialmente si el horno está muy sucio.
•
A medida q ue el horno se calienta, es posible q ue escuche
ruido de la ex pansió n y contracció n de las piezas metá licas.
Es normal y no dañ ará el horno.
•
No fuerce la puerta del horno para abrirla cuando vea el
icono del candado
. La puerta permanece trabada hasta
q ue baj a la temperatura del horno. Si abre la puerta a la
fuerza, se dañ ará .
Después del ciclo de A utolimpieza
•
La puerta permanece trabada hasta q ue baj a la temperatura
del horno.
•
Es posible q ue note un poco de ceniza blanca en el horno.
Lí mpiela con un pañ o hú medo o una esponj a de lana de
acero con j abó n después de q ue el horno se enfrí e. Si el
horno no está limpio después de un ciclo de autolimpieza,
repita el ciclo.
•
Si se dej aron los estantes en el horno y no se deslizan bien
después de un ciclo de autolimpieza, apliq ue a los estantes
y sus soportes un poco de aceite vegetal para q ue se
desplacen con facilidad.
•
Pueden aparecer lí neas finas en la porcelana porq ue fue
sometida al calentamiento y enfriado. Esto normal y no
afecta su desempeñ o.
N O T A
•
No se puede iniciar un ciclo de Autolimpieza si está
activa la funció n Bloq ueo.
•
U na vez q ue se haya configurado el ciclo de
Autolimpieza, la puerta del horno se traba
automá ticamente. No podrá abrir la puerta del horno
hasta q ue el horno se haya enfriado. El bloq ueo se
libera automá ticamente.
•
U na vez q ue la puerta se haya trabado, la luz
indicadora de bloq ueo
dej ará de parpadear y
q uedará encendida. Espere unos 1 5 segundos para
q ue se active la traba de la puerta del horno.
•
Si el reloj está configurado para una visualizació n de
1 2 horas (predeterminado), la autolimpieza retardada
nunca se puede iniciar con má s de 1 2 horas de
anticipació n.
•
Luego de q ue se apague el horno, el ventilador de
convecció n seguirá funcionando hasta q ue el horno se
haya enfriado.

5 3MANTENIMIENTO
ESPA Ñ O L
Cambio de la luz del h orno
La luz del horno es una bombilla está ndar para
electrodomésticos de 40 vatios, 1 20 V . Se enciende cuando
se abre la puerta del horno. Cuando la puerta del horno está
cerrada, presione el botó n Ligh t para encenderla o apagarla.
1
D esenchufe la cocina o desconecte la electricidad.
2
Para q uitar la tapa de vidrio de la bombilla, q ue se
encuentra en la parte trasera del horno, gí rela hacia la
izq uierda.
3
G ire la bombilla hacia la izq uierda para q uitarla del
receptá culo.
4
Inserte la bombilla nueva y gí rela hacia la derecha.
5
Inserte la tapa de vidrio de la bombilla y gí rela hacia la
derecha.
6
Enchufe la cocina o vuelva a conectar la electricidad.
A DV ERT EN CI A
•
Asegú rese de q ue el horno y la bombilla estén frí os.
•
D esconecte la energí a eléctrica de la cocina desde
el fusible principal o el panel disyuntor. El no hacerlo
podrí a causar lesiones graves, descargas eléctricas o
la muerte.
Limpieza del ex terior
Reborde decorativ o y pintado
Para la limpieza general, use un pañ o con agua j abonosa
caliente. En el caso de suciedad má s difí cil y grasa acumulada,
apliq ue detergente lí q uido directamente sobre la suciedad.
D éjelo reposar allí entre 30 y 6 0 minutos. Enj uague con un
pañ o hú medo y seq ue. No use limpiadores abrasivos.
Suercies de acero inoidae
Para evitar hacer rayas, no use esponj as de lana de acero.
1
Coloq ue una peq ueñ a cantidad de limpiador o pulimento
para electrodomésticos de acero inox idable en un pañ o o
una toalla de papel hú medos.
2
Limpie un á rea peq ueñ a y friegue siguiendo el grano del
acero inox idable si corresponde.
3
Seq ue y saq ue brillo con un pañ o suave o una toalla de
papel secos y limpios.
4
Repita si fuera necesario.
Puerta del h orno
•
U se agua jabonosa para limpiar bien la puerta del horno.
Enj uague bien. No sumerj a la puerta en agua.
•
Puede usar un limpiador para vidrios en la parte ex terna de
la puerta del horno. No rocí e agua ni limpiador para vidrios
en las ventilaciones de la puerta.
•
No use limpiadores para horno, polvos limpiadores ni
materiales abrasivos de limpieza en el ex terior de la puerta
del horno.
•
No limpie la j unta de la puerta del horno. La j unta está hecha
de material tej ido q ue es fundamental para lograr un buen
sellado. Se debe tener cuidado de no frotar, dañ ar ni q uitar
esta j unta.
PRECA U CI Ó N
No use limpiadores fuertes ni materiales abrasivos de
limpieza en el ex terior de la puerta del horno. Si lo hace,
puede dañ arlo.
No limpie
manualmente
la j unta de la
puerta del horno
No limpie
manualmente
la puerta

5 4 MANTENIMIENTO
A sadera y rej illa
•
No guarde asaderas ni rej illas sucias en ninguna parte de la
cocina.
•
No limpie la asadera ni la rej illa en el modo de autolimpieza.
•
Q uite la rej illa de la asadera. V ierta cuidadosamente la
grasa de la asadera en un recipiente adecuado.
•
Lave y enj uague la asadera y la rej illa en agua caliente con
una esponj a plá stica o impregnada con jabó n.
•
Si la comida se q uemó , rocí e la rej illa con limpiador mientras
esté caliente y cú brala con toallas de papel o un repasador
hú medos. Si se remoj a la asadera, se podrá q uitar la comida
q uemada.
•
Tanto la asadera como la rej illa se pueden limpiar con
limpiador para hornos comercial o en el lavavaj illas.
Remoció n y reemplazo de la
puertas remov ible del h orno y
el caj ó n
PRECA U CI Ó N
•
T enga cuidado cuando q uite y lev ante la puerta.
•
N o lev ante la puerta de la manij a. La puerta es muy
pesada.
Remoció n de la puerta
1
Abra totalmente la puerta.
2
D esbloq uee las trabas de las bisagras. Para ello, gí relas
alej á ndolas lo má s posible del marco de la puerta
abierta.
Ranura
Traba
D estraba
Traba de la
bisagra
3
Tome firmemente ambos lados de la puerta desde la
parte superior.
4
Cierre la puerta hasta la posició n de remoció n
(aprox imadamente cinco grados), q ue es a mitad de
la distancia entre la posició n de tope del asador y
totalmente cerrada. Si la posició n es correcta, los brazos
de las bisagras se moverá n libremente.
aprox. 5º
5
Levante la puerta y tire hacia fuera hasta q ue los brazos
de las bisagras salgan de las ranuras.

5 5MANTENIMIENTO
ESPA Ñ O L
Colocació n de la puerta
1
Tome firmemente ambos lados de la puerta desde la
parte superior.
2
Con la puerta en el mismo á ngulo q ue la posició n de
remoció n, apoye la hendidura de los brazos de las
bisagras en el borde inferior de las ranuras de las
bisagras. Las muescas de los brazos de las bisagras
deben estar totalmente apoyadas en el borde inferior de
las ranuras.
Brazo de la bisagra
Hendidura
Borde inferior
de la ranura
3
Abra totalmente la puerta. Si la puerta no se abre
completamente, la hendidura no está bien apoyada en el
borde inferior de la ranura.
4
Bloq uee las trabas. Para ello, gí relas nuevamente hacia
las ranuras del marco del horno hasta q ue traben.
Brazo de la bisagra
Traba de la bisagra
5
Cierre la puerta del horno.
Remoció n del caj ó n
PRECA U CI Ó N
D esconecte la energí a eléctrica de la cocina desde el
fusible principal o el panel disyuntor. El no hacerlo podrí a
causar lesiones graves, descargas eléctricas o la muerte.
La mayor parte de la limpieza se puede realizar con el caj ó n puesto;
sin embargo, el caj ó n puede ex traerse si se necesita realizar una
limpieza adicional. U se agua caliente para limpiar a fondo.
1
Abra totalmente el caj ó n.
2
Localice las palancas de deslizamiento a ambos
lados del caj ó n. Presione la palanca de deslizamiento
izq uierda hacia abaj o y tire hacia arriba la palanca de
deslizamiento derecha.
Empuj e hacia abajo con el dedo Levante con el dedo
Palanca Palanca
3
Retire el caj ó n de la cocina.
Reemplazo del caj ó n
1
Lleve las correderas de apoyo a la parte delantera de la
corredera del chasis.
2
Alinee las correderas de cada lado del caj ó n con las
ranuras de las correderas de la cocina.
3
Empuj e el caj ó n en la cocina hasta q ue las palancas
hagan clic (aprox imadamente 2 pulgadas).
4
Tire nuevamente del caj ó n para abrirlo y encaj ar las
correderas de apoyo en su lugar.
I nstrucciones para el cuidado
de la puerta
La mayorí a de las puertas de hornos contienen un vidrio q ue
puede romperse.
PRECA U CI Ó N
•
No cierre la puerta del horno hasta q ue todos los
estantes estén bien colocados en su lugar.
•
No golpee el vidrio con ollas, sartenes ni con ningú n
otro obj eto.
•
Si se raya, golpea, hace vibrar o fuerza el vidrio, se
puede debilitar su estructura, lo q ue aumenta el riesgo
de rotura má s adelante.

5 6 SOLU CIÓ N D E PROBLEMAS
SO LU CI Ó N DE
PRO BLEMA S
PREGU N T A S FRECU EN T ES
¿ Q ué tipo de baterí a de cocina se recomienda para usar
con la placa de cocció n?
•
Busq ue recipientes q ue estén identificados como aptos para
inducció n o q ue estén diseñ ados especí ficamente para la
cocció n por inducció n.
•
Los recipientes deben tener una base metá lica magnética.
Consulte la secció n Tipos de recipientes para inducció n.
•
Las sartenes deben tener fondo plano y laterales rectos.
•
U se solamente sartenes gruesas.
•
El tamañ o de la sartén debe coincidir con la cantidad de
comida q ue se preparará y el tamañ o de la hornalla.
•
U se tapas herméticas.
•
U se solamente woks de fondo plano.
¿ Por q ué los elementos calentadores parecen encenderse
y apagarse durante el uso de la placa de cocció n o del
h orno?
Segú n el aj uste de la hornalla de la placa de cocció n o la
temperatura seleccionada en el horno, es NORMAL q ue
los elementos calentadores (hornallas o q uemadores) se
enciendan y se apaguen.
Mi nuev o h orno no cocina como el q ue tení a antes. ¿ H ay
algo mal con los aj ustes de temperatura?
No, su horno fue probado y calibrado en la fá brica. D urante
los primeros usos, siga cuidadosamente los tiempos y las
temperaturas de su receta. Si todaví a piensa q ue el horno
nuevo es muy caliente o muy frí o, puede aj ustar usted la
temperatura del horno para adecuarla a sus necesidades
especí ficas de cocció n. Consulte la secció n de Aj uste
de temperatura del horno de este manual para obtener
instrucciones fá ciles sobre có mo aj ustar el termostato.
¿ Es normal q ue se escuch e un ch asq uido q ue prov iene de
la parte trasera del h orno cuando lo uso?
Su nueva cocina está diseñ ada para mantener un control
estricto de la temperatura del horno. Es posible q ue escuche
los elementos calentadores del horno hacer un chasq uido
al encenderse y apagarse con má s frecuencia en su horno
nuevo. Esto es NORMAL.
¿ Por q ué parpadean los dos puntos del reloj ?
Esto significa q ue el producto acaba de enchufarse o q ue ha
habido una interrupció n del suministro eléctrico. Para eliminar
el parpadeo de los dos puntos del reloj , toq ue cualq uier botó n
o restablezca el reloj si fuera necesario.
Durante la cocció n por conv ecció n, el v entilador se
detiene cuando abro la puerta. ¿ Es normal?
Sí , es normal. Cuando se abre la puerta, el ventilador de
convecció n se detiene hasta q ue se cierra la puerta.
¿ Puedo usar papel de aluminio para q ue recolecte las
gotas en la cav idad del h orno?
Nunca utilice papel de aluminio para revestir la base o los
costados del horno o el caj ó n calentador. El papel se derretirá
y se pegará a la superficie del fondo del horno y no se podrá
q uitar. En lugar de eso, coloq ue una bandej a sobre un estante
inferior del horno y ú sela para recolectar las gotas. (Si ya se
ha derretido papel de aluminio en el fondo del horno, esto no
interferirá con el rendimiento del horno).
¿ Puedo usar papel de aluminio en los estantes?
No cubra los estantes con papel de aluminio. Cubrir estantes
por completo con papel de aluminio restringe el fluj o de aire, lo
q ue se traduce en resultados de cocció n deficientes. Coloq ue
una bandej a cubierta con papel de aluminio debaj o de tartas
de frutas u otros alimentos á cidos o dulces para evitar q ue los
derrames dañ en el acabado del horno.
PRECA U CI Ó N
Puede utilizarse papel de aluminio para envolver los
alimentos dentro del horno o el caj ó n de calentamiento,
pero no permita q ue el papel de aluminio entre en contacto
con los elementos calentadores del horno ex puestos. El
papel de aluminio podrí a derretirse o prenderse fuego, lo
q ue ocasionarí a humo, un incendio o lesiones.
¿ Puedo dej ar los estantes en el h orno cuando ej ecute un
ciclo de A utolimpieza?
No, aunq ue no dañ ará los estantes, esto los decolorará y no
se deslizará n bien cuando los use. Q uite todos los elementos
del horno antes de comenzar un ciclo de Autolimpieza.
¿ Q ué debo h acer si los estantes está n pegaj osos y es
difí cil deslizarlos h acia dentro y h acia fuera?
Con el tiempo, se puede hacer difí cil deslizar los estantes.
Apliq ue una peq ueñ a cantidad de aceite de oliva en los
ex tremos de los estantes. Este actuará como lubricante para
un deslizamiento mej or.
¿ Q ué debo h acer para q uitar manch as difí ciles de la placa
de cocció n?
La placa de cocció n debe limpiarse después de cada uso para
evitar q ue q ueden manchas permanentes. Cuando cocine
alimentos con alto contenido de azú car, como salsa de tomate,
se recomienda limpiar la mancha con una espá tula mientras
la placa de cocció n todaví a esté tibia. U se un guante para
horno cuando raspe para evitar q uemarse. Consulte la secció n
MANTENIMIENTO del presente manual del propietario para
obtener má s instrucciones.

5 7SOLU CIÓ N D E PROBLEMAS
ESPA Ñ O L
¿ Por q ué no funcionan los botones de funció n?
Asegú rese de q ue la cocina no esté en modo Bloq ueo. El
icono del candado
aparecerá en la pantalla si el modo
bloq ueo está activado. Para desactivar el modo de bloq ueo,
presione Probe (Para los modelos: LSE46 1 7 ) o Clock durante
tres segundos. Suena la melodí a de desbloq ueo y aparece
Loc en la pantalla hasta q ue los controles se desbloq uean.
Mi cocina todav í a está sucia después de ej ecutar el ciclo
EasyClean
®
. ¿ Q ué má s debo h acer?
El ciclo EasyClean
®
solo ayuda a afloj ar la suciedad leve de la
cocina con horno para ayudar en la limpieza manual del horno.
No q uita automá ticamente toda la suciedad después del ciclo.
Es posible q ue necesite fregar la cocina con horno después de
haber ej ecutado el ciclo EasyClean
®
.
Probé fregar el h orno después de ej ecutar EasyClean
®
,
pero h ay suciedad q ue q ueda. ¿ Q ué puedo h acer?
La funció n EasyClean
®
tiene un mej or resultado cuando la
suciedad se empapa y sumerge totalmente en agua antes de
ej ecutar el ciclo y durante la limpieza manual. Si la suciedad
no está muy empapada en agua, puede afectar negativamente
el desempeñ o de la limpieza. Repita el proceso EasyClean
®
utilizando suficiente agua.
La suciedad de azú car y algunos residuos grasosos son
particularmente difí ciles de limpiar. Si q ueda alguna suciedad
rebelde, use la funció n Autolimpieza para limpiar bien el horno.
La suciedad de las paredes del h orno no sale. ¿ Có mo
puedo dej ar limpias las paredes?
La suciedad en las paredes laterales y traseras de su cocina
con horno puede resultar má s difí cil de empapar con agua.
Intente repetir el proceso EasyClean® con má s de ¼ de taza
(2 oz o 6 0 ml) del producto recomendado.
¿ EasyClean
®
q uita toda la suciedad y las manch as
completamente?
D epende del tipo de suciedad. Las manchas de azú car y
algunas de grasa son particularmente difí ciles de limpiar.
Ademá s, si las manchas no está n muy empapadas en
agua, esto puede afectar negativamente el desempeñ o
de la limpieza. Si todaví a q uedan manchas rebeldes o de
acumulació n, use la funció n Autolimpieza. Consulte la secció n
Autolimpieza del manual del propietario.
¿ H ay algú n truco para eliminar algo de la suciedad
rebelde?
Se recomienda raspar la suciedad con un raspador plá stico
antes de limpiar manualmente y mientras limpia. También se
recomienda saturar completamente con agua la suciedad.
Sin embargo, hay suciedad q ue es má s difí cil de limpiar q ue
otra. Para la suciedad rebelde, se recomienda usar el ciclo de
Autolimpieza. Consulte la secció n de Autolimpieza del manual
del propietario para obtener má s detalles.
¿ Es seguro q ue el v entilador de conv ecció n, el q uemador
para asar o el elemento calentador se moj en durante la
funció n EasyClean
®
?
Sí . El ventilador de convecció n, el q uemador para asar o
el elemento calentador pueden moj arse un poco durante
la limpieza. Sin embargo, no es necesario aplicar un rocí o
directo sobre el q uemador del asador ni de los elementos
calentadores porq ue se limpian automá ticamente durante el
uso regular.
¿ Debo usar toda el agua ( 1 ¼ tazas [ 10 oz o 30 0 ml] ) para
realizar el ciclo de EasyClean
®
?
Sí . Se recomienda enfá ticamente rociar o verter 1 taza (8
oz o 240 ml) de agua en la base y otro ¼ de taza (2 oz o 6 0
ml) de agua en las paredes y otras á reas sucias para saturar
totalmente la suciedad para un mej or resultado de la limpieza.
V eo h umo q ue sale de las v entilaciones de la placa de
cocció n de la cocina durante EasyClean
®
. ¿ Es normal?
Esto es normal. No es humo. En realidad, es vapor de agua
del agua q ue está en la cavidad del horno. Cuando el horno
se calienta brevemente durante EasyClean
®
, el agua de la
cavidad se evapora y sale por las ventilaciones del horno.
¿ Con cuá nta frecuencia debo usar EasyClean
®
?
EasyClean
®
se puede usar las veces q ue desee. EasyClean
®
funciona mej or cuando el horno está LEV EMENTE sucio, por
ej emplo, con salpicaduras de grasa LEV ES y gotitas de q ueso.
Consulte la secció n EasyClean
®
del manual del propietario
para obtener má s informació n.
¿ Q ué se necesita para EasyClean® ?
U n envase rociador con 1 ¼ tazas (1 0 oz o 30 0 ml) de agua,
un raspador plá stico, una esponj a q ue no raye y una toalla.
No debe usar esponj as abrasivas como las de trabaj o pesado
ni lana de acero. Ex cepto por la toalla, todos los materiales
necesarios se incluyen en un kit de limpieza especial con su
cocina nueva.

5 8 SOLU CIÓ N D E PROBLEMAS
A ntes de llamar al serv icio técnico
Antes de llamar para solicitar servicio, revise esta lista. Puede ahorrarle tiempo y gastos. La lista incluye sucesos comunes q ue no
son consecuencia de problemas de fabricació n ni de los materiales de este aparato.
Sí ntomas Causas / soluciones posibles
La cocina no está
niv elada.
•
Mala instalació n. Coloq ue el estante en el centro del horno. Coloq ue un nivelador en el estante
del horno. Aj uste las patas de nivelació n q ue se encuentran en la base de la cocina hasta q ue
el estante q uede nivelado.
•
Asegú rese de q ue el piso esté nivelado, sea fuerte y estable para sostener correctamente la
cocina.
•
Si el piso está hundido o tiene una pendiente, comuní q uese con un carpintero para q ue corrija
la situació n.
•
La alineació n del armario de la cocina puede hacer q ue parezca q ue la cocina está
desnivelada. Asegú rese de q ue los armarios estén en escuadra y q ue tengan suficiente
espacio para permitir la holgura de la cocina.
N o puedo mov er
fá cilmente el
electrodoméstico. El
aparato debe estar
accesible para su
reparació n.
•
Los armarios no está n en escuadra o está n demasiado j ustos. Comuní q uese con el fabricante
o el instalador para permitir el acceso al electrodoméstico.
•
El tapete interfiere con la cocina. D eje espacio suficiente para q ue se pueda levantar la cocina
sobre el tapete.
•
El dispositivo antivuelco está activado.
El control del h orno
suena y muestra un error
de có digo F.
•
El control electró nico ha detectado una falla.
G ire la perilla de modo del horno hasta la
posició n O ff para borrar la pantalla y apagar
el tono. Reprograme el horno. Si la falla se
repite, registre el nú mero de la falla. G ire la
perilla de modo del horno hasta la posició n
O ff y comuní q uese con un representante de
servicio técnico.
CÓ DI GO CA U SA
F-3 Clave de error de cortocircuito
F-9 El horno no calienta
El control de las h ornallas
suena y toda la barra de
LED parpadea.
•
El control eléctrico ha detectado una falla.
G ire la perilla de control hasta la posició n
Off para borrar la pantalla y detener el tono.
Comuní q uese con el servicio técnico.
N umero
de
destellos
CA U SA
1
Termistor superior abierto/ en
corto
2
Termistor de disipador abierto/
en corto
3 Error de comunicació n
4
El ventilador de la caj a no
funciona"
Las h ornallas
superficiales no
mantienen un h erv or o la
cocció n no es lo bastante
rá pida
•
Se utiliza la baterí a de cocina incorrecta.
- U se ollas q ue sean planas y q ue coincidan con el diá metro de la hornalla seleccionada.
•
En algunas á reas, el voltaj e puede ser baj o.
- Cubra la olla con una tapa hasta q ue se logre el calor deseado.
Las h ornallas no
funcionan correctamente.
•
Es posible q ue se haya q uemado un fusible o q ue se haya disparado el disyuntor de su casa.
- Reemplace el fusible o restablezca el disyuntor.
•
Los controles de la placa de cocció n está n mal configurados.
- V erifiq ue si el control correcto está configurado para la hornalla q ue está usando.
•
El recipiente de cocció n no es del tamañ o correcto o no sirve para inducció n.
- Consulte la secció n de Recipientes para inducció n para obtener má s informació n.
•
The max imum operating time for all element levels ex cept the Boost mode is 1 2 hours.
Á reas con cambios de
color en la placa de
cocció n
•
Los derrames de alimentos no se limpiaron antes del siguiente uso.
- Consulte la secció n Limpieza de la placa de cocció n de vitrocerá mica.
•
Superficie caliente en un modelo con placa de cocció n de color claro.
- Esto es normal. La superficie puede cambiar el color cuando está caliente. Esto es temporal
y desaparecerá cuando el vidrio se enfrí e.

5 9SOLU CIÓ N D E PROBLEMAS
ESPA Ñ O L
Sí ntomas Causas / soluciones posibles
Ciclos frecuentes de
encendido y apagado en
las h ornallas
•
Esto es normal.
- La hornalla se enciende y apaga con frecuencia para mantener el aj uste de calor.
El h orno no funciona
•
El enchufe de la cocina no está insertado completamente en el tomacorriente.
- Asegú rese de q ue el enchufe esté conectado a un toma funcional y conectado a tierra.
•
Es posible q ue se haya q uemado un fusible o q ue se haya disparado el disyuntor de su casa.
- Reemplace el fusible o restablezca el disyuntor.
•
Los controles del horno está n mal configurados.
- Consulte la secció n U so del horno.
•
Horno demasiado caliente.
- D eje q ue el horno se enfrí e a una temperatura inferior a la de bloq ueo.
Sale v apor a trav és de la
v entilació n de h orno.
•
Cocinar alimentos con alto nivel de humedad produce vapor. Esto es normal.
El electrodoméstico no
funciona.
•
Asegú rese de q ue el cable esté correctamente enchufado en el toma. Revise los disyuntores.
•
El cableado de servicio no está completo. Comuní q uese con su electricista para solicitar
asistencia.
•
Corte de energí a. V erifiq ue las luces de la casa para asegurarse. Llame a la empresa de
electricidad local para solicitar servicio.
La luz del h orno no
funciona.
•
Reemplace o aj uste la bombilla. Consulte la secció n Cambio de la luz del horno de este
manual del propietario.
El h orno emite much o
h umo cuando asa.
•
El control no está bien configurado. Siga las instrucciones para el aj uste de los controles del
horno.
•
La carne está demasiado cerca de q uemador. Coloq ue el estante en otra posició n para dej ar
un espacio suficiente entre la carne y el q uemador. Precaliente el asador para sellar.
•
La carne no está bien preparada. Q uite el ex ceso de grasa de la carne. Corte los bordes de
grasa restantes para evitar q ue la carne se retuerza.
•
El inserto de la asadera está al revés y la grasa no drena. Siempre coloq ue la rej illa en la
asadera con las costillas hacia arriba y las ranuras hacia abaj o para permitir q ue la grasa
gotee en la bandej a.
•
Se ha acumulado grasa en las superficies del horno. Es necesario realizar una limpieza
regular cuando se asa con frecuencia.
- Las salpicaduras viej as de comida o grasa producen mucho humo.
La comida no se h ornea ni
se rostiza correctamente
•
Los controles del horno está n mal configurados.
- Consulte la secció n U so del horno.
•
La posició n del estante es incorrecta o este no está nivelado.
- Consulte la secció n U so del horno.
•
Se está usando una baterí a de cocina incorrecta o de un tamañ o inadecuado.
- Consulte la secció n U so del horno.
•
Se debe aj ustar el sensor del horno.
- Consulte la secció n Aj uste de la temperatura del horno en la secció n Funciones.
La comida no se asa
correctamente
•
Los controles del horno está n mal configurados.
- G ire la perilla de modo del horno hasta seleccionar el modo Broil.
•
Se está usando el estante en una posició n incorrecta.
- Consulte la G uí a de recomendaciones para asar.
•
La baterí a de cocina no es adecuada para asar.
- U se una asadera con rejilla.
•
Se usó papel de aluminio en la asadera y la rej illa no se colocó correctamente ni se cortó
como se recomendó .
- Consulte la secció n U so del horno.
•
En algunas á reas, el voltaj e puede ser baj o.
- Precaliente el asador durante 5 a 7 minutos.
- Consulte la G uí a de recomendaciones para asar.

60 SOLU CIÓ N D E PROBLEMAS
Sí ntomas Causas / soluciones posibles
La temperatura del h orno
es muy alta o muy baj a
•
Se debe aj ustar el sensor del horno.
- Consulte la secció n Aj uste de la temperatura del horno en la secció n Funciones.
H ay rayas o abrasiones en
la superficie de la placa
de cocció n
•
Las partí culas á speras como las de sal o arena entre la placa de cocció n y los utensilios
pueden producir rayas. Asegú rese de q ue la superficie de la placa y la parte inferior de los
utensilios estén limpias antes de usarlos. Las rayas peq ueñ as no afectan la cocció n y será n
menos visibles con el tiempo.
•
Se han usado materiales de limpieza no recomendados para placas de cocció n de
vitrocerá mica. Consulte Limpieza de la placa de cocció n de vitrocerá mica de la secció n
MANTENIMIENTO.
•
Se ha usado una baterí a de cocina con fondo irregular. U se baterí a de cocina con fondo plano
y liso.
Marcas de metal
•
Raspado de utensilios de metal en la superficie de la placa de cocció n. No deslice utensilios
de metal en la superficie de la placa de cocció n. U se una crema para limpiar placas de
cocció n de vitrocerá mica para q uitar las marcas. Consulte Limpieza de la placa de cocció n de
vitrocerá mica de la secció n MANTENIMIENTO.
V etas o puntos marrones
•
Se q uemaron ebulliciones en la superficie. U se una espá tula de hoj a para q uitar la suciedad.
Consulte Limpieza de la placa de cocció n de vitrocerá mica de la secció n MANTENIMIENTO.
Á reas con cambios de
color en la placa de
cocció n
•
D epó sitos minerales de agua y comida. Q uí telos con una crema para limpiar placas de
cocció n de vitrocerá mica. U se baterí as de cocina q ue tengan el fondo limpio y seco.
El h orno no se limpia
automá ticamente *
•
La temperatura del horno es muy alta para configurar la operació n de Autolimpieza.
- Espere q ue la cocina se enfrí e y restablezca los controles.
•
Los controles del horno está n mal configurados.
- Consulte la secció n Autolimpieza.
•
No se puede iniciar un ciclo de Autolimpieza si está activa la funció n Bloq ueo.
Sonido de “ cruj ido” o
“ ex plosió n”
•
Es el sonido del metal q ue se calienta y se enfrí a durante las funciones de cocció n y de
Autolimpieza.
- Esto es normal.
Ruido del v entilador
•
Es posible q ue el ventilador de convecció n y el ventilador de la placa de cocció n se enciendan
y apaguen de forma automá tica.
- Esto es normal.
•
El ventilador de la placa de cocció n puede encenderse para reducir la temperatura del
producto, aú n y cuando los elementos calentadores no estén en uso.
El v entilador de
conv ecció n se detiene
•
El ventilador de convecció n se detiene durante un ciclo de horneado por convecció n.
- Esto es normal y se hace para lograr un calor má s uniforme durante el ciclo. No es una falla
de la cocina y debe considerarse como funcionamiento normal.
Los dos puntos del reloj
parpadean en la pantalla
•
Esto es normal. Esto significa q ue el producto acaba de enchufarse o q ue ha habido una
interrupció n del suministro eléctrico. Presione Cook T ime durante tres segundos y restablezca
el reloj , o presione cualq uier botó n para detener el parpadeo.
H umo ex cesiv o durante
un ciclo de A utolimpieza *
•
Suciedad ex cesiva.
- G ire la perilla de modo del horno hasta la posició n O ff. Abra las ventanas para sacar el
humo de la habitació n. Espere hasta q ue se cancele el modo de Autolimpieza. Limpie el
ex ceso de suciedad y reinicie la limpieza.
La puerta del h orno no se
abre después de un ciclo
de A utolimpieza *
•
El horno está demasiado caliente.
- D eje q ue el horno se enfrí e a una temperatura inferior a la de bloq ueo.
•
Espere aprox imadamente una hora para q ue el horno se enfrí e después de la finalizació n de
un ciclo de Autolimpieza. La puerta puede abrirse cuando ya no aparezca el candado
en la
pantalla.
•
Es posible q ue estén bloq ueados el control y la puerta.

61SOLU CIÓ N D E PROBLEMAS
ESPA Ñ O L
Sí ntomas Causas / soluciones posibles
El h orno no se limpia
después de un ciclo de
A utolimpieza *
•
Los controles de horno no está n bien configurados.
- Consulte la secció n Autolimpieza.
•
El horno está muy sucio.
- Limpie los derrames importantes antes de comenzar el ciclo de limpieza. Los hornos muy
sucios pueden necesitar otro ciclo de Autolimpieza o por un periodo má s prolongado.
Limpiar y la puerta
parpadean en la pantalla *
•
Se ha seleccionado el ciclo de Autolimpieza, pero la puerta no está cerrada.
- Cierre la puerta del horno.
A parece Bloq ueada en la
pantalla cuando q uiere
cocinar *
•
La puerta del horno está bloq ueada porq ue la temperatura interior no bajó a menos de la
temperatura de bloq ueo.
- G ire la perilla de modo del horno hasta la posició n O ff. D eje q ue el horno se enfrí e.
Sale olor a q uemado o a
aceite de la v entilació n
•
Es normal en un horno nuevo y desaparecerá con el tiempo.
- Para acelerar el proceso, programe un ciclo de Autolimpieza durante un mí nimo de 3 horas.
Consulte la secció n Autolimpieza.
Es difí cil deslizar los
estantes del h orno *
•
Los estantes plateados y brillantes se limpiaron en un ciclo de Autolimpieza.
- Apliq ue una peq ueñ a cantidad de aceite vegetal a una toalla de papel y pá sela por los
bordes de los estantes del horno.
Se acumula h umedad en
el v isor del h orno o sale
v apor de la v entilació n del
h orno
•
Es normal cuando se cocinan alimentos con gran contenido de humedad.
•
Se usó demasiada humedad cuando se limpió el visor.
Red W i- Fi no se
conectarlo correctamente
•
Si el aparato tiene problemas para conectarse a la red Wi-Fi, es posible q ue se encuentre
demasiado lej os del router. Adq uiera un repetidor Wi-Fi (ex tensor de alcance) para mejorar la
intensidad de la señ al Wi-Fi.
•
Es posible q ue la conex ió n Wi-Fi no se conecte o se interrumpa debido al entorno de la red
doméstica.
•
Segú n el proveedor de servicios de Internet, la conex ió n de la red puede no funcionar
correctamente.
•
El entorno inalá mbrico circundante puede hacer q ue el servicio de red inalá mbrica funcione
lentamente.
Con frecuencia, las
h ornallas se encienden y
apagan.
•
La hornalla se encenderá y apagará para mantener el nivel de potencia en el q ue se ha
configurado. Esto forma parte del funcionamiento normal y no constituye una falla del sistema.
Problema al conectar el
electrodoméstico y el
teléfono inteligente a la
red W i- Fi.
•
La contraseñ a de la red Wi-Fi fue ingresada incorrectamente.
- Borre su red Wi-Fi doméstica e inicie el proceso de registro de nuevo.
•
Los D atos Mó viles para su teléfono inteligente está n activados.
- D esactive los D atos Mó viles en su teléfono inteligente previo a registrar el electrodoméstico.
•
El nombre de la red inalá mbrica (SSID ) se ha configurado incorrectamente.
- El nombre de la red inalá mbrica (SSID ) debe ser una combinació n de letras y nú meros. (No
utilice caracteres especiales)
•
La frecuencia del enrutador no es de 2.4 G Hz.
- Só lo se admite una frecuencia de enrutador de 2.4 G Hz. Configure el enrutador inalá mbrico
a 2.4 G Hz y conecte el electrodoméstico a éste. Para verificar la frecuencia del enrutador,
consulte con su proveedor de servicios de internet o con el fabricante del enrutador.
•
La distancia entre el enrutador y el electrodoméstico es muy grande.
- Si el electrodoméstico se encuentra muy lej os del enrutador, puede q ue la señ al sea débil
y q ue la conex ió n no sea configurada correctamente. Coloq ue el enrutador má s cerca del
electrodoméstico o compre e instale un repetidor Wi-Fi.

62 G ARANTÍ A LIMITAD A
GA RA N T Í A LI MI T A DA ( EE. U U . )
AV ISO D E ARBITRAJ E: ESTA G ARANTÍ A LIMITAD A CONTIENE U NA CLÁ U SU LA D E ARBITRAJ E Q U E LE D EMAND A A U STED
Y A LG RESOLV ER CONFLICTOS A TRAV É S D E U N ARBITRAJ E V INCU LANTE EN LU G AR D E HACERLO EN LA CORTE, A
MENOS Q U E U STED D ECID A NO PARTICIPAR. EN EL ARBITRAJ E NO ESTÁ N PERMITID AS LAS ACCIONES COLECTIV AS
NI LOS J U ICIOS CON J U RAD O. POR FAV OR, V EA A CONTINU ACIÓ N LA SECCIÓ N TITU LAD A “ PROCED IMIENTO PARA
RESOLV ER CONFLICTOS” .
En caso de q ue su cocina eléctrica LG (“ Producto” ) presente alguna falla por defectos de materiales o de fabricació n baj o uso
apropiado y normal durante el perí odo de garantí a establecido má s abaj o, el mismo será reparado o reemplazado por LG
Electró nicos (" LG " ), a su opció n. Esta garantí a limitada es vá lida ú nicamente para el comprador final original del producto, y
ú nicamente cuando el producto ha sido comprado y utilizado dentro de los Estados U nidos, incluidos los territorios norteamericanos.
Perí odo de garantí a A lcance de la garantí a CÓ MO SE MA N EJ A EL SERV I CI O T É CN I CO
U n (1 ) añ o a partir de la fecha de
compra minorista original
Piezas y mano de obra
LG suministrará las piezas y la mano de obra para reparar o
reemplazar las piezas defectuosas.
•
Los productos y las piezas de repuesto está n garantizados durante el tiempo restante del perí odo original de garantí a o noventa
(9 0 ) dí as, lo q ue resulte mayor.
•
Los productos y las piezas de repuesto pueden ser nuevos, reparados, reacondicionados, o reconstruidos por la fá brica.
•
Es necesario presentar prueba de la compra minorista especificando el modelo del producto y la fecha de compra para obtener el
servicio de garantí a baj o esta garantí a limitada.
SA LV O LO PRO H I BI DO PO R LA LEY , T O DA GA RA N T Í A DE CO MERCI A LI Z A CI Ó N O I DO N EI DA D I MPLÍ CI T A , PA RA U N
PRO PÓ SI T O PA RT I CU LA R EN EL PRO DU CT O , EST Á LI MI T A DA A LA DU RA CI Ó N DE LA GA RA N T Í A A RRI BA EX PRESA DA .
BA J O N I N GU N A CI RCU N ST A N CI A DEBERÁ LG O SU S DI ST RI BU I DO RES/ REPRESEN T A N T ES SER RESPO N SA BLE PO R
CU A LQ U I ER DA Ñ O I N DI RECT O , I N CI DEN T A L, CO N SECU EN T E, ESPECI A L, O PU N I T I V O , LO CU A L I N CLU Y E PERO N O SE
LI MI T A A , PÉ RDI DA DE FO N DO S DEL CO MERCI O , GA N A N CI A S PERDI DA S, I N T ERRU PCI Ó N DEL T RA BA J O , DET ERI O RO
DE O T RO S BI EN ES, CO ST O DE REMO V ER Y REI N ST A LA R EL PRO DU CT O , PÉ RDI DA DE U SO , O CU A LQ U I ER O T RO DA Ñ O
Y A SEA BA SA DO EN CO N T RA T O , PERJ U I CI O , U O T RO S. LA RESPO N SA BI LI DA D T O T A L DE LG, EN CA SO EX I ST A , N O
EX CEDERÁ EL PRECI O Q U E U ST ED PA GÓ PO R A DQ U I RI R EL PRO DU CT O .
Algunos estados no permiten la ex clusió n o limitació n de dañ os incidentales o emergentes, o limitaciones a la duració n de la
garantí a implí cita, por lo q ue la ex clusió n o limitació n anteriormente mencionada podrí an no corresponder en su caso. Esta garantí a
limitada le otorga derechos legales especí ficos y es posible q ue usted cuente con otros derechos q ue varí an segú n el estado.
EST A GA RA N T Í A LI MI T A DA N O CU BRE LO SI GU I EN T E:
•
V iaj es del servicio técnico para entregar, buscar o instalar el producto, instruir al cliente sobre la operació n del mismo, corregir el
cableado o las reparaciones/ instalaciones no autorizadas.
•
D añ o o fallo del producto al operar durante fallas e interrupciones del suministro eléctrico, o resultado de un servicio eléctrico
inadecuado.
•
D añ os resultantes de operar el producto en una atmó sfera corrosiva o contraria a las instrucciones detalladas en el manual del
propietario del producto.
•
D añ os o fallos del producto causados por accidentes, pestes y alimañ as, rayos, viento, incendio, inundaciones, hechos de fuerza
mayor, o cualq uier otra causa fuera del control de LG .
•
D añ os o fallos causados por modificaciones o alteraciones no autorizadas, o si se usa para otro fin q ue no sea el previsto.
•
D añ os o fallos resultantes de mal uso, abuso, instalació n, reparació n o mantenimiento incorrectos. U na reparació n incorrecta
incluye el uso de piezas no autorizadas, aprobadas o especificadas por LG . La instalació n o el mantenimiento inadecuado incluye
aq uellos contrarios a lo especificado en el manual del usuario del producto.
•
D añ os o fallos causados por corriente o voltaj e eléctrico incorrecto, o por có digos de fontanerí a.
•
D añ os o fallos causados por el transporte y el manej o, incluye rayas, muescas, astillados y/ u otros dañ os al acabado del
producto, a menos q ue tales dañ os se informen dentro del plazo de una (1 ) semana de la entrega.
•
D añ os o artí culos faltantes a productos comprados con descuento, con la caj a abierta o q ue hayan estado en ex hibició n.
•
Productos reacondicionados o cualq uier producto vendido con los avisos “ En el estado actual” , “ En el sitio actual” , “ Con todos
sus defectos” o similares.
•
Productos cuyos nú meros de serie originales hayan sido retirados, alterados o no se puedan determinar fá cilmente.
•
Aumentos en los costos de los servicios pú blicos y otros gastos adicionales de dichos servicios.

63G ARANTÍ A LIMITAD A
ESPA Ñ O L
•
Cualq uier ruido asociado con la operació n normal.
•
U so de accesorios, componentes, o productos de limpieza consumibles q ue no estén autorizados por LG .
•
Reemplazo de focos, filtros o cualq uier parte consumible.
•
Cuando el producto se use de otra forma q ue no sea uso doméstico usual y normal (p. ej ., uso comercial o industrial, en oficinas
e instalaciones recreativas o vehí culos) o uso contrario a las instrucciones detalladas en el manual del propietario del producto.
•
Costos asociados con el retiro y la reinstalació n de su producto para realizar reparaciones.
N o está n cubiertos por la garantí a
Problema Causa Prev enció n
•
G rieta en el anafe G rieta en el anafe debida al impacto de un obj eto
•
No almacene obj etos pesados
sobre la superficie de los anafes
ya q ue podrí an caerse y dañ arlos.
•
NO raye los anafes o estos
podrí an agrietarse.
•
Limpie los anafes antes y después
de usarlos.
En garantí a
Fuera de garantí a
Q uiebre mecá nico
G rieta secundaria
G rieta primaria
•
El esmalte de los anafes
está saltado.
U so inadecuado
•
No golpee el esmalte de los
anafes.
•
El horno o los estantes
está n manchados tras
usar hoj as de aluminio.
La hoj a de aluminio se derritió en el horno.
•
Nunca cubra el fondo del horno
ni cubra un estante entero
con materiales como hoj as de
aluminio.
•
Si la hoj a de aluminio ya se
derritió en el horno, eso no
afectará el rendimiento de este.
•
La unidad no tiene
energí a eléctrica.
1 . Se apagó la energí a eléctrica de la casa (suministro
de alimentació n eléctrica)
2. El interruptor se activó .
3. El cable de alimentació n no está instalado
correctamente.
•
Revise la energí a eléctrica del
tablero principal antes de llamar al
servicio técnico.
•
El tipo de cable de alimentació n
debe coincidir con el del
tomacorriente
•
Instale correctamente el cable de
alimentació n.
Negro Negro
Blanco Blanco
TIRA D E
PU ESTA A
TIERRA
RETIRAR
LA TIRA D E
PU ESTA A
TIERRA
< NEMA 1 0 -50 > < NEMA 1 4-50 >
CABLE EX TERIOR
CABLE ROJ O
CABLE V ERD E D E PU ESTA A TIERRA
Roj o Roj o
3- CO N EX I Ó N DEL CA BLE
4- CO N EX I Ó N DEL CA BLE
CABLE EX TERIOR
CABLE NEG RO
CABLE CENTRAL
CABLE BLANCO
(NEU TRO)
(NEU TRO)

64 G ARANTÍ A LIMITAD A
Problema Causa Prev enció n
•
La superficie es
desparej a.
•
El horno está inclinado.
1 . La cocina no está nivelada.
2. El dispositivo antivolcadura no se instaló
correctamente.
•
V erifiq ue primero con el instalador.
Abrazadera antivolcaduras
Aprox imadamente
0 .6 5 pulgadas
(1 6 .5 mm)
Nivele ambos lados
de la cocina.
El tornillo debe
penetrar la madera
o el cemento.
Placa de pared
1
2
U se un nivel de burbuj a
para comprobar la
nivelació n.
El costo de la reparació n o el reemplazo en estas circunstancias ex cluidas estará a cargo del consumidor.
PARA OBTENER SERV ICIO EN G ARANTÍ A E INFORMACIÓ N AD ICIONAL
Llame al 1 -8 0 0 -243-0 0 0 0 y seleccione la opció n apropiada desde el menú .
O visite nuestro sitio web en http: / / www.lg.com
O por correo: LG Electronics Customer Service P.O. Box 240 0 0 7 Huntsville, AL 358 1 3 ATTN: CIC
PRO CEDI MI EN T O PA RA RESO LV ER CO N FLI CT O S:
TOD OS LOS CONFLICTOS ENTRE U STED Y LG Q U E SU RJ AN FU ERA D E O RELACIONAD OS D E ALG U NA MANERA CON
ESTA G ARANTÍ A LIMITAD A O CON EL PROD U CTO, SE RESOLV ERÁ N EX CLU SIV AMENTE A TRAV É S D E U N ARBITRAJ E
V INCU LANTE Y NO EN U NA CORTE D E J U RISD ICCIÓ N G ENERAL. ARBITRAJ E V INCU LANTE SIG NIFICA Q U E U STED Y LG
RENU NCIAN AL D ERECHO D E U N J U ICIO CON J U RAD O Y A REALIZ AR O PARTICIPAR EN U NA D EMAND A COLECTIV A.
Definiciones. Para el propó sito de esta secció n, las referencias a “ LG ” significan: LG Electronics U .S.A., Inc., sus empresas
matrices, subsidiarias y filiales y cada uno de sus directivos, directores, empleados, agentes, beneficiarios, predecesores en
interés, sucesores, cesionarios y proveedores; las referencias a “ conflicto” o “ reclamació n” incluirá n cualq uier conflicto, reclamo
o controversia de cualq uier tipo, sin importar (ya sea basado en contrato, agravio, estatuto, regulació n, ordenanza, fraude, falsa
representació n o cualq uier teorí a legal o eq uitativa) q ue surj a de o esté relacionada con cualq uier forma de venta, condició n o
desempeñ o del producto o de esta G arantí a Limitada.
A v iso de disputa. En caso de q ue usted desee iniciar un procedimiento de arbitraj e, primero debe notificar a LG por escrito al
menos 30 dí as antes de iniciar el arbitraj e enviando una carta a LG a LG Electronics, U SA, Inc. Atenció n: Legal D epartment-
Arbitration 1 0 0 0 Sylvan Ave, Englewood Cliffs 0 7 6 32. U sted y LG aceptan participar en discusiones de buena fe en un intento de
resolver su reclamo de manera amistosa. En la carta debe proporcionar su nombre, direcció n y nú mero de teléfono; identificar el
producto q ue es obj eto de la reclamació n; y describir la naturaleza del reclamo y el remedio q ue busca. Si usted y LG no pueden
resolver la disputa dentro de 30 dí as, cualq uiera de las partes pueden proceder a presentar una demanda de arbitraj e.
A cuerdo de arbitraj e v inculante y renuncia de demanda colectiv a. En caso de no resolver la disputa durante el perí odo de 30
dí as después de enviar una notificació n por escrito a LG , U sted y LG se comprometen a resolver cualq uier reclamo entre nosotros,
solamente a través de arbitraj e vinculante sobre una base individual, a menos q ue usted se ex cluya, conforme a lo dispuesto a
continuació n. Cualq uier conflicto entre usted y LG no estará n combinados o consolidados con una controversia relacionada con
cualq uier otro producto o reclamo de otra persona o entidad. Má s especí ficamente y sin prej uicio de lo anterior, no procederá baj o
ninguna circunstancia cualq uier disputa entre usted y LG como parte de una acció n colectiva o representativa. En lugar del arbitraj e,
cualq uiera de las partes podrá iniciar una acció n individual en la corte de reclamos menores, pero tales acciones en la corte de
reclamos menores no podrá n ser realizadas en una acció n colectiva o representativa.

65G ARANTÍ A LIMITAD A
ESPA Ñ O L
N ormas y procedimientos de arbitraj e. Para comenzar con el arbitraje de un reclamo, usted o LG deben realizar una demanda
escrita para arbitraj e. El arbitraj e será administrado por la Asociació n Americana de Arbitraje (AAA) y se llevará a cabo ante un
á rbitro ú nico baj o las Normas de Arbitraj e del Consumidor de la AAA, q ue tienen efecto al momento de inicio del arbitraj e (en
adelante “ Normas de la AAA” ) y baj o los procedimientos establecidos en esta secció n. Las Normas de la AAA está n disponibles en
lí nea en www.adr.org/ consumer. Enví e una copia de su solicitud de arbitraj e por escrito, así como una copia de esta disposició n,
a la AAA de la forma descrita en las Normas de la AAA. También debe enviar una copia de su solicitud por escrito a LG en LG
Electronics, U SA, Inc. Atenció n: Legal D epartment- Arbitration 1 0 0 0 Sylvan Ave, Englewood Cliffs 0 7 6 32. Si hay un conflicto entre
las Normas de la AAA y las reglas establecidas en esta secció n, prevalecerá n dichas reglas de esta secció n. Esta disposició n de
arbitraj e se rige por la Ley Federal de Arbitraj e. El j uicio se pueden introducir en el laudo arbitral en cualq uier tribunal de j urisdicció n
competente. Todos son temas para q ue el á rbitro tome sus decisiones, ex cepto aq uellos asuntos relativos al alcance y aplicabilidad
de la clá usula de arbitraj e y de la capacidad de arbitraj e de la controversia para q ue el tribunal decida. El á rbitro se regirá por los
términos de esta disposició n.
Legislació n v igente. La legislació n del estado de su residencia regirá esta G arantí a Limitada, así como todas las disputas entre
nosotros, salvo q ue sea invalidada o inconsistente con leyes federales aplicables.
T arifas / Costos. U sted no debe pagar ninguna tarifa para comenzar un arbitraje. Al recibir su solicitud de arbitraj e por escrito, LG
pagará todos los gastos administrativos rá pidamente a la AAA, a menos q ue usted solicite má s de $ 25,0 0 0 .0 0 por dañ os, en cuyo
caso el pago de estos gastos se regirá por las Normas de la AAA. Salvo disposició n contraria prevista en el presente documento,
LG pagará a la AAA todos los gastos documentales, administrativos y de arbitraj e para cualq uier arbitraj e iniciado, de conformidad
con las Normas de la AAA y esta disposició n de arbitraj e. Si usted prevalece en el arbitraj e, LG pagará los honorarios y gastos
de sus abogados, siempre y cuando sean razonables, considerando factores q ue incluyen, entre otros, el monto de la compra y
el monto del reclamo. No obstante lo anterior, si la ley aplicable permite una adj udicació n de honorarios y gastos razonables de
abogados, un á rbitro pueden otorgarlos en la misma medida q ue lo harí a un tribunal. Si el á rbitro considera q ue la sustancia de su
reclamo o la reparació n solicitada en la demanda es frí vola o se utiliza para un propó sito inadecuado (calificado segú n las normas
establecidas en la Norma Federal de Procedimiento Civil 1 1 (b)), el pago de todos los honorarios de arbitraj e se regirá por las
Normas de la AAA. En tal situació n usted se compromete a reembolsar a LG todos los fondos erogados previamente por ella, cuyo
pago es, por otra parte, su obligació n, segú n las Normas de la AAA. Salvo disposició n contraria, LG renuncia a cualq uier derecho
q ue pudiera tener para solicitarle los honorarios y gastos de sus abogados, si LG prevalece en el arbitraj e.
A udiencias y ubicació n. Si su reclamo es por $ 25,0 0 0 o menos, usted pueden optar q ue el arbitraj e sea realizado ú nicamente
sobre la base de: (1 ) documentos presentados al á rbitro, (2) a través de una audiencia telefó nica o (3) por una audiencia en
persona, segú n lo establecido por las Normas de la AAA. Si su reclamo ex cede $ 25,0 0 0 , el derecho a una audiencia estará
determinado por las Normas de la AAA. Cualq uier audiencia de arbitraj e en persona se realizará en un lugar dentro del distrito
j udicial federal en el cual resida, a menos q ue ambos acuerden otra ubicació n o estemos de acuerdo con el arbitraj e telefó nico.
Ex clusió n. U sted pueden q uedarse fuera de este procedimiento de resolució n de la disputa. Si se ex cluye, ni usted ni LG pueden
solicitar al otro q ue participe en un procedimiento de arbitraj e. Para ex cluirse usted debe enviar una notificació n a LG , en un lapso
de hasta 30 dí as continuos, contados a partir de la fecha de la primera compra del consumidor del producto, ya sea por: (i) el enví o
de un correo electró nico a optout@ lge.com con el siguiente Asunto: “ Ex clusió n del arbitraj e” o (ii) llamada al 1 -8 0 0 -9 8 0 -29 7 3. D ebe
incluir en el correo electró nico de ex clusió n o suministrar por teléfono: (a) su nombre y direcció n; (b) la fecha en la cual el producto
fue comprado; (c) el nombre o el nú mero del modelo del producto; y (d) el nú mero del serial (el nú mero del serial pueden ser hallado (i)
en el producto, o (ii) en la direcció n de https: / / www.lg.com/ us/ support/ repair-service/ schedule-repair-continued al hacer clic en “ Find
My Model & Serial Number” ).
Só lo pueden ex cluirse del procedimiento de resolució n de conflictos en la forma descrita anteriormente (es decir, por correo
electró nico o por teléfono); ninguna otra forma de notificació n será efectiva para hacerlo. Ex cluirse de este procedimiento de
resolució n de controversias no afectará de ninguna manera la cobertura de la G arantí a Limitada, por lo q ue usted continuará
disfrutando de todos sus beneficios. Si conserva este producto y no se ex cluye, usted acepta todos los términos y condiciones de la
clá usula de arbitraj e descrita anteriormente.

LG Customer Information Center
Register your product Online!
www.lg.com
1-800-243-0000
USA
1-888-542-2623
CANADA
Printed in Korea
-
 1
1
-
 2
2
-
 3
3
-
 4
4
-
 5
5
-
 6
6
-
 7
7
-
 8
8
-
 9
9
-
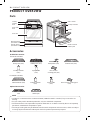 10
10
-
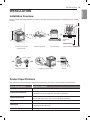 11
11
-
 12
12
-
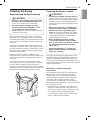 13
13
-
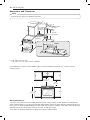 14
14
-
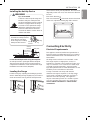 15
15
-
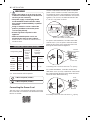 16
16
-
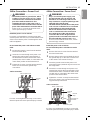 17
17
-
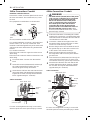 18
18
-
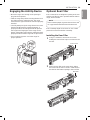 19
19
-
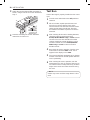 20
20
-
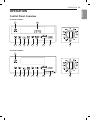 21
21
-
 22
22
-
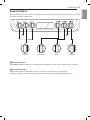 23
23
-
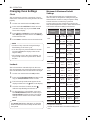 24
24
-
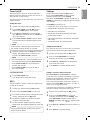 25
25
-
 26
26
-
 27
27
-
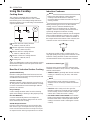 28
28
-
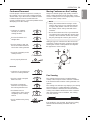 29
29
-
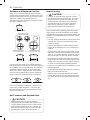 30
30
-
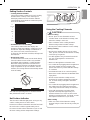 31
31
-
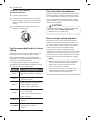 32
32
-
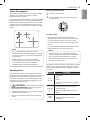 33
33
-
 34
34
-
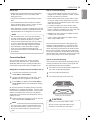 35
35
-
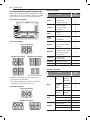 36
36
-
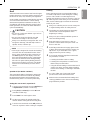 37
37
-
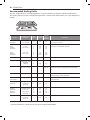 38
38
-
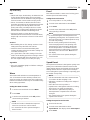 39
39
-
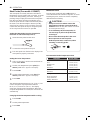 40
40
-
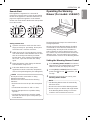 41
41
-
 42
42
-
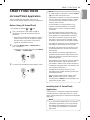 43
43
-
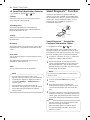 44
44
-
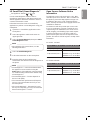 45
45
-
 46
46
-
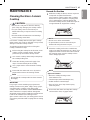 47
47
-
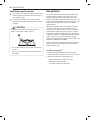 48
48
-
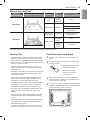 49
49
-
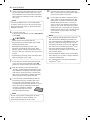 50
50
-
 51
51
-
 52
52
-
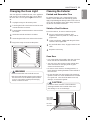 53
53
-
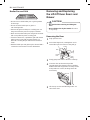 54
54
-
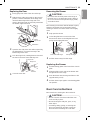 55
55
-
 56
56
-
 57
57
-
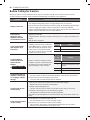 58
58
-
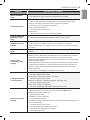 59
59
-
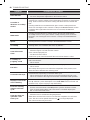 60
60
-
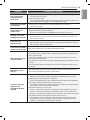 61
61
-
 62
62
-
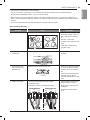 63
63
-
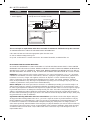 64
64
-
 65
65
-
 66
66
-
 67
67
-
 68
68
-
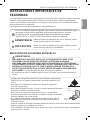 69
69
-
 70
70
-
 71
71
-
 72
72
-
 73
73
-
 74
74
-
 75
75
-
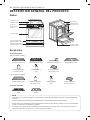 76
76
-
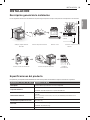 77
77
-
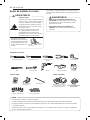 78
78
-
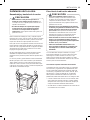 79
79
-
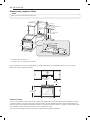 80
80
-
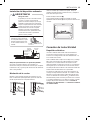 81
81
-
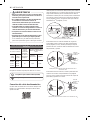 82
82
-
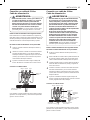 83
83
-
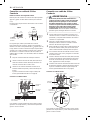 84
84
-
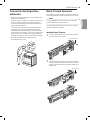 85
85
-
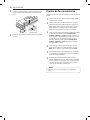 86
86
-
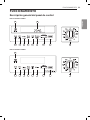 87
87
-
 88
88
-
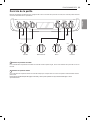 89
89
-
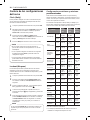 90
90
-
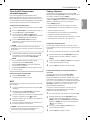 91
91
-
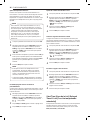 92
92
-
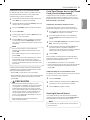 93
93
-
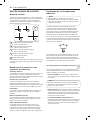 94
94
-
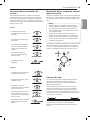 95
95
-
 96
96
-
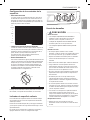 97
97
-
 98
98
-
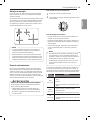 99
99
-
 100
100
-
 101
101
-
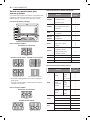 102
102
-
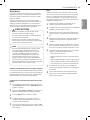 103
103
-
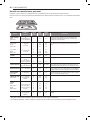 104
104
-
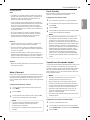 105
105
-
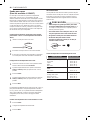 106
106
-
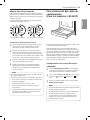 107
107
-
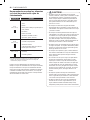 108
108
-
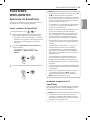 109
109
-
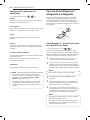 110
110
-
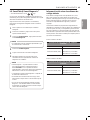 111
111
-
 112
112
-
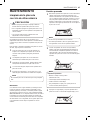 113
113
-
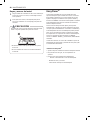 114
114
-
 115
115
-
 116
116
-
 117
117
-
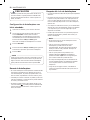 118
118
-
 119
119
-
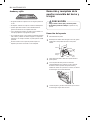 120
120
-
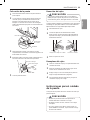 121
121
-
 122
122
-
 123
123
-
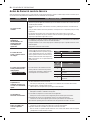 124
124
-
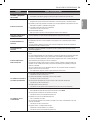 125
125
-
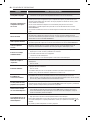 126
126
-
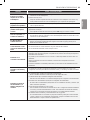 127
127
-
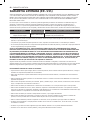 128
128
-
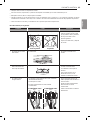 129
129
-
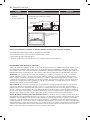 130
130
-
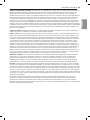 131
131
-
 132
132


LG Electronics LSE4616 Serie Manual de usuario
- Tipo
- Manual de usuario
- Este manual también es adecuado para
en otros idiomas
Artículos relacionados
Otros documentos
-
LG LSE4617ST El manual del propietario
-
LG LSE4616BD El manual del propietario
-
LG LREL6323S El manual del propietario
-
Thermador SEC272 Manual de usuario
-
-
AG Neovo X-24E Manual de usuario
-
LG LSE3090ST/00 El manual del propietario
-
GE Appliances JS760DPBB El manual del propietario
-
Hotpoint JB450DF2WW El manual del propietario
-
Samsung NE58K9560WS/AA-00 El manual del propietario