
Gebrauchsanleitung . . . . . . . . . . . 2
Instructions for use . . . . . . . . . . . . 4
Mode d'emploi . . . . . . . . . . . . . . . . 6
Gebruiksaanwijzing . . . . . . . . . . . . 8
Istruzioni d'uso . . . . . . . . . . . . . . 10
Instrucciones de manejo . . . . . . . 12
170 24 9160 - 0909
Made in Germany
31 599
1
2
3
4
5
9
8
7
6
00 Umschl_24916_0404.qxp:00 Umschl 31599_24916_0404 23.03.2010 14:43 Uhr Seite 1

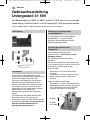
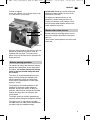
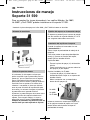
Lieferumfang
Handschutz
An der Säule (2) des Untergestells muss
zunächst der lose mitgelieferte Handschutz (6)
angebracht werden. Dazu den Feder-
Vorstecker vom Zapfen des Handschutzes
abnehmen und den Handschutz mit dem
Zapfen in die Bohrung der Säule einsetzen.
Die Scheibe (4) muss sich zwischen dem
zylindischen Teil des Hand schutzes und der
Säule befinden. Den Zapfen des
Handschutzes mit dem Feder-Vorstecker
sichern.
Der Handschutz deckt beim Abrich ten die
Messerwelle des in das Untergestell
eingesetzten Hobels ab. Zum Fälzen wird der
Handschutz abgenommen. Bei allen Abricht -
arbeiten muss der Handschutz am
Untergestell angebracht sein.
Befestigung des Untergestells
auf dem Werktisch
Das Untergestell kann mit zwei Metabo
Spannbügeln 27 107 oder mit dafür
geeigneten Schraub zwingen auf dem
Werktisch befestigt werden.
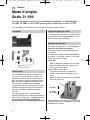
Einsetzen des Hobels in das
Untergestell
Wenn die Maschine an das Netz
angeschlossen ist: Den Stecker aus der
Steckdose ziehen !
Den Falztiefenanschlag des Hobels
abnehmen.
Um den nicht benötigten Falztiefenanschlag
(1) des Hobels nicht zu verlieren, kann er am
Untergestell festgeschraubt werden.
Hobel Ho 0882:
Stützplatte (10) aus dem Untergestell
entfernen.
Die Maschine mit ihrem Gehäuse auf die
beiden Stützen (9) des Untergestells
auflegen.
Hobel Ho 0883 und Ho E 0983:
Stützplatte (10) muss in ihrer Halterung im
Untergestell bis zum Anschlag eingesteckt
sein. Die Maschine mit ihrem Handgriff
zwischen die Stützen (9) einsetzen.
DEUTSCH
2
Gebrauchsanleitung
Untergestell 31 599
Die Metabo Hobel Ho 0882, Ho 0883* und Ho E 0983* können zur ortsfesten
Verwendung (als Abrichthobel) in das Untergestell 31 599 eingesetzt werden.
* Bei Ho 0883 und Ho E 0983 die Stützplatte wie beschrieben einsetzen.
Ho 0882
Ho 0883,
Ho E 0983
10
01 DE 31599_Untergest.qxp:01 DE 31599_Untergest 23.03.2010 14:45 Uhr Seite 2

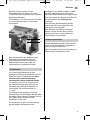
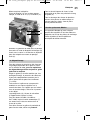
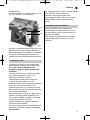
Dann die Flügelschraube (3) in die
Gewindebohrung des Hobels, an der der
Falztiefenanschlag angebracht war, eindrehen.
Abstützung anbringen:
Die Abstützung (13) wie gezeigt mit Schraube
(12) und Unterlegscheibe (11) am Hobel
anschrauben.
Den Schalterdrücker des Hobels mit dem
mitgelieferten Arretierbügel (8) in der
Einschaltstellung halten. Die Kette des
Arretierbügels kann an der Feder des
Handschutzes (6) angebracht werden.
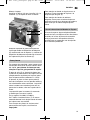
Das Abrichten
Aus Sicherheitsgründen und um eine
einwandfreie Führung des Werkstücks auf der
Sohle des Hobels zu gewähr leisten, muss
beim Abrichten stets der Führungs-
anschlag des Hobels verwendet werden.
Der Anschlag (5) muss so eingestellt sein,
dass die Messerwelle beim Ab richten fast
vollständig vom Werk stück abgedeckt ist
(freiliegender Teil der Messerwelle nur
1–2 mm).
Das Werkstück mit mäßigem Druck und
gleichmäßiger Geschwindigkeit über die Sohle
des Hobels führen. Man drückt dabei nicht mit
den Fingerspitzen, sondern mit dem
Handballen auf das Holz.
Der Handschutz (6) geht beim Heran führen
des Werkstücks selbsttätig zur Seite.
Der Bügel (7) (der Hobel Ho 0882, Ho 0883
und Ho E 0983) bewegt sich nach unten,
sobald die Werkstück kante den Bügel berührt.
Zum Vorschieben der Werkstücke im Bereich
der Messerwelle einen Schiebestock
verwenden.
Zum Anstoßen der Winkelkante wird die
abgerichtete Fläche des Werk stücks am
Anschlag (5) entlang geführt.
Beim Bestoßen der Kanten von dünnen
Brettern schiebt man ein dickeres Stück
Abfallholz mit durch, um das Kippen des
dünnen Brettes zu verhindern.
Metabo Kundendienst
Reparaturbedürftige Metabo Geräte können
an die auf der Ersatzteilliste angege benen
Adressen eingesandt werden.
Bitte beschreiben Sie bei der Einsen dung zur
Reparatur den festgestellten Fehler.
3
DEUTSCH
11
12
13
1
01 DE 31599_Untergest.qxp:01 DE 31599_Untergest 23.03.2010 14:45 Uhr Seite 3

Scope of delivery
Finger guard
First of all the finger guard (6), which is
supplied separately, should be fitted to the
upright (2) on the bench-mounting stand.
To do this, remove the spring cotter pin from
the pivot on the finger guard, then insert the
guard with the pivot into the hole in the upright.
The washer (4) should be situated between
the cylindrical part of the finger guard and the
upright. Secure the pivot on the guard by
means of the spring cotter pin.
During surface planing the finger guard covers
the cutter block of the planer that is fitted to
the stand. For rebating the finger guard is
removed. For all surface planing work the
finger guard must be fitted to the stand.
To fix the stand on the workbench
The bench-mounting stand can be fixed on the
workbench using two Metabo Screw clamps
27 107 or suitable G-clamps.
Fitting the planer to the stand
If the planer is connected to the power supply:
Pull the plug from the socket.
Remove the rebating depth stop from the tool.
To prevent losing the rebating depth stop (1)
of the planer which is not required, it can be
screwed to the stand.
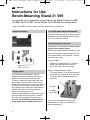
Planer Ho 0882:
Remove the support plate (10) from the
stand.Place the tool with its housing
on the two pillars (9) on the stand.
Planers Ho 0883 and Ho E 0983:
The support plate (10) must be inserted in
its bracket in the stand as far as the stop.
Fit the tool with its handle between the
pillars (9).
Then screw the thumbscrew (3) into the
tapped hole in the planer provided for the
rebating depth stop.
ENGLISH
4
Instructions for Use
Bench-Mounting Stand 31 599
For stationary use (to operate as surface planers) the Metabo Planers Ho 0882,
Ho 0883* and Ho E 0983* can be fitted on the 31 599 Bench-mounting stand.
* With the Ho 0883 and Ho E 0983, insert the support plate as described.
Ho 0882
Ho 0883,
Ho E 0983
10
02 ENG 31599_Untergest.qxp:02 ENG 31599_Untergest 23.03.2010 14:46 Uhr Seite 4

Provide a support:
Screw the support (13) as shown with screw
(12) and shim (11) on planer.
Hold the switch trigger of the planer in the ON
position by means of the plastic strap (8)
supplied with the stand. The chain of the
plastic strap can be fitted to the spring on the
finger guard (6).
Surface planing operation
For reasons of safety and to ensure faultless
guiding of the workpiece on the soleplate of
the planer, for sur face planing the planing
guide of the tool should always be used
(as a fence).
The fence (5) should be positioned so that
during surface planing the workpiece will
almost completely cover the cutter block
of the planer (exposed part of cutter block
merely 1–2 mm).
The workpiece should be guided over the
soleplate of the planer under moderate
pressure and at even speed. In doing so,
pressure should not be exerted on the wood
through the finger-tips, but using the ball
of the thumb.
The finger guard (6) recedes automati cally
sideways when sliding the workpiece forward.
The spacer rest (7) (on planers Ho 0882,
Ho 0883 and Ho E 0983) moves downwards
on contact with the workpiece edge.
A push stick should be used for sliding the
workpieces forward within the area of the
cutter block of the tool.
For edging, the planed surface of the
workpiece is drawn along the fence (5).
To edge thin boards, push through a thick
piece of waste wood together with the thin
board, otherwise it may tilt.
Metabo after-sales service
Metabo machines requiring repairs can be
sent to the address specified on the spare-
parts list.
Please attach a description of the fault to the
power tool.
5
ENGLISH
11
12
13
1
02 ENG 31599_Untergest.qxp:02 ENG 31599_Untergest 23.03.2010 14:46 Uhr Seite 5

Fourniture
Protège-main
Il faut adapter tout d’abord le protège-main
(6), qui est livré détaché avec le socle, à la
colonnette (2) de ce der nier. Retirer, pour ce
faire, la goupille à ressort du tourillon du pro-
tège-main, puis engager ce dernier par son
tourillon dans l’alésage de la colonnette.
La rondelle (4) doit se trouver entre la partie
cylindrique du protège-main et la colonnette.
Assurer le tourillon à l’aide de la goupille
à ressort.
Lors du dégauchissage, le protège-main
recouvre le porte-fers du rabot installé dans le
socle. Pour le feuillu rage, le protège-main est
enlevé. Pour toutes les opérations de
dégauchissage, il doit être adapté au socle.
Fixation du socle sur l’établi
Le socle peut être assujetti sur l’établi à l’aide
de deux étriers de fixa tion Metabo 27 107 ou
avec des serre-joints adéquats.
Mise en place du rabot
Si le rabot est branché au secteur: retirer la
fiche hors de la prise de courant !
Oter de la machine la butée de profondeur
de feuillure.
Afin d’éviter de perdre la butée de profondeur
de feuillure (1) du rabot, inutile ici, il est possi-
ble de la visser sur le socle.
Rabot 0882 :
Sortir la plaque de maintien (10) du socle.
Placer la machine par son carter sur les
deux appuis (9) du socle.
Rabots 0883 et Ho E 0983 :
La plaque de maintien (10) doit être
insérée à fond dans son support sur le
socle.
Mettre en place la machine par sa poignée
entre les appuis (9).
Visser ensuite la vis à ailettes (3) dans le trou
taraudé du rabot où était adaptée la butée de
profondeur de feuillure.
FRANÇAIS
6
Mode d’emploi
Socle 31 599
Pour leur utilisation en poste fixe (comme dégauchisseuses), les rabots Metabo
Ho 0882, Ho 0883* et Ho E 0983* peuvent être installés dans le socle 31 599.
* Sur Ho 0883 et Ho E 0983, insérer la plaque de maintien comme indiqué.
Ho 0882
Ho 0883,
Ho E 0983
10
03 FR 31599_Untergest.qxp:03 FR 31599_Untergest 23.03.2010 14:47 Uhr Seite 6

Mettre en place la béquille :
Visser la béquille (13) sur le rabot comme
indiqué, à l’aide de la vis (12) et rondelle (11).
Maintenir la gâchette du rabot dans la position
de marche à l’aide du dispositif de blocage (8)
fourni avec le socle. La chaîne de ce dispositif
peut être adaptée au ressort du protège-
main (6).
Le dégauchissage
Pour des raisons de sécurité et afin d’assurer
un guidage impeccable de la pièce à usiner
sur la semelle du rabot, pour les opérations
de dégauchissage utiliser toujours le guide
latéral de la machine.
Régler le guide (5) de telle manière que, lors
du dégauchissage, le porte-fers du rabot soit
à peu près complètement recouvert par la
pièce (partie libre du porte-fers seulement
1 à 2 mm).
Faire avancer la pièce avec une poussée
modérée et une vitesse régulière sur la
semelle du rabot. On n’appuie pas sur le bois
avec le bout des doigts, mais avec la paume
et les doigts.
Le protège-main (6) s’écarte de soi-même
à l’approche de la pièce à usiner.
Pour les rabots Ho 0882, Ho 0883 et
Ho E 0983, le pied à retrait automa tique (7)
est amené vers le bas en contact avec le
chant de la pièce.
Pour faire avencer les pièces à proximité du
porte-fers du rabot, utiliser un poussoir.
Pour la mise d’équerre du chant, la face
dégauchie de la pièce est présentée le long
du guide (5).
Pour le dressage des chants de planches
minces, faire passer en même temps un
bois de rebut plus épais, sinon la pièce
mince pourrait basculer.
Service après-vente Metabo
Les appareils Metabo qui sont à réparer
peuvent être expédiés à l’une des adresses
indiquées sur la liste des pièces de rechange.
Prière de joindre à l’outil expédié une
description du défaut constaté.
7
FRANÇAIS
11
12
13
1
03 FR 31599_Untergest.qxp:03 FR 31599_Untergest 23.03.2010 14:47 Uhr Seite 7

Leveringsomvang
Handbescherming
Aan de zuil (2) van de schaafbok moet men
eerst de los bijgeleverde handbescherming (6)
aanbrengen. Daartoe de splitpen van de
draaitap van de handbescherming afnemen en
deze met de draaitap in het gat van de zuil
steken. De sluitring (4) moet zich tussen het
cilindrische deel van de handbescherming en
de zuil bevinden. De draaitap van de
handbescherming met de splitpen borgen.
De handbescherming dekt tijdens het
vlakschaven de beitelas van de in de
schaafbok gemonteerde schaaf af. Voor het
sponningen schaven wordt de
handbescherming verwij derd. Bij alle
vlakschaafwerk zaam heden moet de
handbescher ming aan de schaafbok
aangebracht zijn.
Vastzetten van de schaafbok
op de werktafel
De schaafbok kan met twee Metabo
tafelklemmen 27 107 of met daarvoor
geschikte lijmtangen op de werktafel
bevestigd worden.
Monteren van de schaaf in de
chaafbok
Indien de schaaf op het spanningnet
aangesloten is: de stekker uit de
kontaktdoos nemen !
De sponningdiepteaanslag van de machine
afnemen.
Om de niet-gebruikte sponningdiepteaanslag
(1) van de schaaf niet te verliezen, kan hij aan
de schaafbok worden vastgeschroefd.
Schaaf 0882:
Steunplaat (10) uit de schaafbok nemen.
De machine met haar huis op de beide
steunen (9) van de schaafbok leggen.
Schaven 0883 en E 0983:
De steunplaat (10) dient in de houder
op de schaafbok tot de aanslag te zijn
ingestoken.
De machine met haar handgreep tussen
de steunen (9) plaatsen.
NEDERLANDS
8
Gebruiksaanwijzing
Schaafbok 31 599
De Metabo schaven Ho 0882, 0883* en Ho E 0983* kunnen voor stationair
gebruik (als vlakbank) in de schaafbok 31 599 gemonteerd worden.
* Bij de schaven Ho 0883 en Ho E 0983 de steunplaat aanbrengen volgens de beschrijving.
Ho 0882
Ho 0883,
Ho E 0983
10
04 NL 31599_Untergest.qxp:04 NL 31599_Untergest 23.03.2010 14:47 Uhr Seite 8

Dan de vleugelschroef (3) in het
schroefdraadgat van de schaaf, waar de
sponningdiepteaanslag er aangebracht was,
draaien.
Afsteunpoot aanbrengen:
De afsteunpoot (13) zoals aangegeven met de
schroeven (12) en onderlegschijf (11) op de
schaaf schroeven.
De schakelaardrukker van de schaaf met
behulp van de bij de schaafbok meegeleverde
beugel (8) in de inge schakelde stand
vasthouden. De ketting van deze beugel kan
aan de veer van de handbescherming (6)
aangebracht worden.
Het vlakschaven
Om veiligheidsredenen en om een goede
geleiding van de werkstukken op de
schaafvoet te bereiken, moet bij het
vlakschaven steeds de geleider van de
machine gebruikt worden.
De geleider (5) moet zo ingesteld wor den dat
tijdens het vlakschaven, bijna de gehele
beitelas door het werkstuk afgedekt wordt
(vrijliggend deel van de beitelas slechts
1–2 mm).
Het werkstuk met geringe druk en met
gelijkmatige snelheid over de schaafvoet
voortschuiven. Men drukt daarbij niet met de
vingertoppen, maar met de bal van de hand,
op het hout.
De handbescherming (6) opent zich vanzelf
bij het aanvoeren van het werkstuk.
De steunnok (7) (van de schaven Ho 0882,
Ho 0883 en Ho E 0983) gaat automatisch naar
beneden zodra de werkstukrand tegen deze
nok stoot.
Bij het voortschuiven van werkstuk ken in het
bereik van de beitelas van de schaaf, een
duwhout gebruiken !
Voor het haaks schaven (strijken) voert men
het werkstuk met de gevlakte zijde langs de
geleider (5).
Bij het strijken van een dunne plank schuift
men deze samen met een dikker stuk
afvalhout door, om het kantelen van de dunne
plank te voorkomen.
Metabo technische dienst
Defecte Metabo apparaten kunnen opgestuurd
worden naar de op de onderdelenlijst
vermelde adressen.
Geef bij inzending voor reparatie een
omschrijving van het vastgestelde defect.
9
NEDERLANDS
11
12
13
1
04 NL 31599_Untergest.qxp:04 NL 31599_Untergest 23.03.2010 14:47 Uhr Seite 9

Dotazione
Protezione per la mano
Occorre applicare in primo luogo la protezione
per la mano (6) (fornito sciolta) alla colonna (2)
del supporto. Togliere, per far ciò, la spina
elastica dal perno della prote zione mano, poi
infilare la stessa col suo perno nell’apertura
della colonna. La rondella (4) deve trovarsi tra
la parte cilindrica della protezione per la mano
e la colonna. Assicurare il perno della
protezione con la spina elastica.
Durante la piallatura a filo, la prote zione per la
mano copre il rullo portalame della pialla
montata sul supporto. Per effettuare battute si
smonta la protezione. Per tutti i lavori di
piallatura a filo, la protezione per la mano
deve essere applicata al supporto.
Fissaggio del supporto sul banco di lavoro
Il supporto può essere fissato sul banco di
lavoro con due morsetti Metabo 27 107 o con
strettoi idonei.
Montaggio della pialla sul supporto
Se la pialla è allacciata alla rete: estrarre la
spina dalla presa !
Togliere dalla macchina il dispositivo per
determinare la profondità di battuta.
Per non perdere la battuta di profondità (1) del
pialletto quando non è necessaria, è possibile
fissarla al supporto
Pialle Ho 0882:
Rimuovere la piastra di sostegno (10) dal
supporto.
Appoggiare la pialla con la carcassa su i
due sostegni (9) del supporto.
Pialle Ho 0883 e Ho E 0983:
La piastra di supporto (10) deve essere
inserita fino allo scatto con il suo attacco
nel supporto.
Mettere la macchina con l’impugna tura
dentro i sostegni (9).
Quindi avvitare la vite ad alette (3) nel foro
filettato della pialla dove era fissato il
dispositivo per determinare la profondità di
battuta.
ITALIANO
10
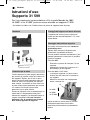
Istruzioni d’uso
Supporto 31 599
Per l’uso stazionario (come piallatrice a filo) le pialle Metabo Ho 0882,
Ho 0883* e Ho E 0983* possono essere montate sul supporto 31 599.
* Sui modelli Ho 0883 e Ho E 0983 utilizzare la piastra di supporto come descritto.
Ho 0882
Ho 0883,
Ho E 0983
10
05 IT 31599_Untergest.qxp:05 IT 31599_Untergest 23.03.2010 14:48 Uhr Seite 10

Puntellamento:
Avvitare il puntello (13), come in figura, con le
viti (12) e la base (11) sul pialletto.
Bloccare il grilletto interruttore della pialla nella
posizione inserita con l’aiuto del dispositivo
bloccainterrut tore (8) in dotazione al supporto.
La catena di questo dispositivo può esser
applicata alla molla della protezione mano (6).
La piallatura a filo
Per motivi di sicurezza e per garantire una
guida regolare del pezzo sulla scarpa della
pialla, per i lavori di piallatura a filo
impiegare sempre la guida laterale della
macchina.
La guida (5) deve essere registrata in modo
che, durante la piallatura a filo, il rullo
portalame della pialla sia quasi
completamente coperto dal pezzo (parte
scoperta del rullo soltanto 1–2 mm).
Mantenere nella passata del pezzo da piallare
a filo sulla scarpa della macchina una
moderata pressione e una costante velocità.
Non premere sul legno con la punta delle dita,
ma col palmo della mano.
La protezione per la mano (6) si apre da sola
quando s’accosta il pezzo da piallare a filo.
Per le pialle Ho 0882, Ho 0883 e Ho E 0983,
il piedino molleggiato (7) recede
automaticamente non appena il bordo del
pezzo urta questo piedino.
Per fare avanzare i pezzi nell’ambito del rullo
portalame della pialla, impiegare un’asta di
avanzamento.
Per squadrare tavole si guida il lato già piallato
a filo del pezzo lungo la guida (5).
Piallando a filo i bordi di tavole sottili,
accompagnare il pezzo sottile con un legno
d’appoggio per evitare il ribaltamento del
pezzo.
Assistenze autorizzate Metabo
Gli utensili Metabo che necessitano di
manutenzione, possono essere inviati a tal
fine agli indirizzi inseriti all’interno della lista
dei pezzi di ricambio.
Nello spedire un prodotto Elektra Beckum a
scopo di riparazione, descrivere il guasto
accertato.
11
ITALIANO
11
12
13
1
05 IT 31599_Untergest.qxp:05 IT 31599_Untergest 23.03.2010 14:48 Uhr Seite 11

Volumen de suministro
Protección para los manos
A la columna (2) del soporte se tiene que
aplicar en primer lugar la protec ción para las
manos (6), que se suminis tra con el soporte.
Sacar el pasador elástico del perno de la
protección para las manos y colocar entonces
esta última con su perno en el orificio de la
columna. La arandela (4) tiene que hallarse
entre la parte cilíndrica de la protección para
las manos y la columna. Asegurar el perno de
la protección con el pasador elástico.
Al planear, la protección para las manos cubre
el portacuchillas del cepillo instalado en el
soporte. Para eseguir rebajes, se saca la
protec ción para las manos. Para todos los
trabajos de planeado, la protección para las
manos tiene que estar aplicada al soporte.
Fijación del soporte en la mesa de trabajo
El soporte se puede fijar en la mesa de trabajo
con dos estribos de sujeción Metabo 27 107 o
con sargentos adecuados con este fin.
Instalación del cepillo en el soporte
Cuando el cepillo esté conectado a la red:
¡
desenchufarlo !
Quitar el tope de profundidad de rebaje de la
máquina.
Para evitar perder el tope de profundidad de
encaje (1) que no se necesita del cepillo,
puede fijarse al bastidor inferior.
Cepillo Ho 0882:
Extraer la placa de apoyo (10) del bastidor
inferior.
Poner la máquina con su carcasa sobre los
dos apoyos (9) del soporte.
Cepillos Ho 0883 y Ho E 0983:
La placa de apoyo (10) debe haberse
introducido hasta el tope en su soporte del
bastidor inferior.
Meter la máquina con su empuña dura
dentro de los apoyos (9).
Entonces enroscar el tornillo de mariposa (3)
en el agujero roscado del cepillo, en el que
estaba enros cado el tornillo del tope de
profun didad de rebaje.
ESPAÑOL
12
Instrucciones de manejo
Soporte 31 599
Para su empleo fijo (como planeadora), los cepillos Metabo Ho 0882,
Ho 0883* y Ho E 0983* pueden instalarse en el soporte 31 599.
* Introducir la placa de apoyo en la Ho 0883 y Ho E 0983 tal como se describe.
Ho 0882
Ho 0883,
Ho E 0983
10
06 ESP 31599_Untergest.qxp:06 ESP 31599_Untergest 23.03.2010 14:48 Uhr Seite 12

Montar el apoyo:
Atornillar el apoyo (13) con el tornillo (12) y la
arandela (11) al cepillo tal como se indica.
Mantener apretado el gatillo inte rrup tor del
cepillo por medio del dis positivo de bloqueo
(8) suministra do con el soporte. La cadena del
dis positivo de bloqueo se puede fijar al muelle
de la protección para las manos (6).
Como planear
Por razones de seguridad y para asegurar una
conducción correcta de la pieza sobre la base
del cepillo, para planear se tiene que usar
siempre el tope de guía paralela de cepillo.
El tope de guía (5) se ajustará de forma que,
al planear, el portacuchi llas del cepillo sea casi
completa mente recubierto por la pieza (parte
libre del portacuchillas solamente 1–2 mm).
Al planear, la pieza se hace pasar sobre la
base de la máquina, con una presión módica y
con velocidad de avance uniforme. La presión
sobre la madera no se debe ejercer con las
puntas de los dedos, sino con la palma de la
mano.
La protección para las manos (6) retro cede
a medida que se acerca la pieza.
En los cepillos Ho 0882, Ho 0883 y
Ho E 0983, el estribo elástico (7) se mueve
automáticamente hacia abajo cuando el borde
de la pieza toca este estribo.
Para avanzar las piezas en el alcance del
portacuchillas del cepillo, se utilizará un
empujador.
Para mortajar un borde en ángulo recto, se
conduce la cara planeada de la pieza a lo
largo del tope de guía (5).
Para mortajar los bordes de tableros
delgados, hacer pasar al mismo tiempo un
trozo más grueso de un despunte de madera,
para evitar que el tablero delgado pueda
volcar.
Servicio de asistencia Metabo en España
Si necesita reparar alguna máquina Metabo,
puede enviarla a cualquiera de las direcciones
incluidas en la lista de piezas de recambio.
Incluya junto con la herramienta eléctrica
enviada para su reparación una descripción
de la anomalía producida.
13
ESPAÑOL
11
12
13
1
06 ESP 31599_Untergest.qxp:06 ESP 31599_Untergest 23.03.2010 14:48 Uhr Seite 13


Metabowerke GmbH, Postfach 1229,
D-72602 Nürtingen, Germany
00 Umschl_24916_0404.qxp:00 Umschl 31599_24916_0404 23.03.2010 14:44 Uhr Seite 2
-
 1
1
-
 2
2
-
 3
3
-
 4
4
-
 5
5
-
 6
6
-
 7
7
-
 8
8
-
 9
9
-
 10
10
-
 11
11
-
 12
12
-
 13
13
-
 14
14
-
 15
15
-
 16
16


Metabo HO 0882 Instrucciones de operación
- Tipo
- Instrucciones de operación
- Este manual también es adecuado para
en otros idiomas
- français: Metabo HO 0882 Mode d'emploi
- italiano: Metabo HO 0882 Istruzioni per l'uso
- English: Metabo HO 0882 Operating instructions
- Deutsch: Metabo HO 0882 Bedienungsanleitung
- Nederlands: Metabo HO 0882 Handleiding