Kenmore 116.33923 El manual del propietario
- Categoría
- Aspiradoras
- Tipo
- El manual del propietario
Este manual también es adecuado para

Owner'sManual
ManualDelPropietario
VacuumCleaner
Aspiradora
Model, Modelo
116.33922
116.33923
CAUTION:
Read and follow all
safety and operating
instructions before first
use of this product.
CUIDADO:
Lea y sigue todas las
instrucciones de operacion
y seguridad antes del uso de
este producto.
Sears, Roebuck and Co., Hoffman Estates, IL 60179 U.S.A.
www.sears.com
Printed in Mexico
Part No. C_IZCDB1 QUQQ-KCQ1ZCDBZ_U(_ Impreso en Mexico

Before Using Your New Vacuum ........ 2
KenmoreVacuum Cleaner Warranty .... 2
ImportantSafety Instructions ........... 3
UprightVacuum Cleaner Parts and
Features ............................ 4
Assembly Instructions ............... 5-6
OperatingInstructions................. 6
Releasingthe Handle ................. 7
ON/OFF Switch ..................... 7
Pile Height Selection and Setting ........ 7
AgitatorOn/Off Selector .............. 8
Attachments ..................... 8-10
Attachment Use Chart ............... 11
Vacuuming Tips .................... 11
Performance/Safety Features ....... 12-13
Vacuum Cleaner Care ............... 14
Vacuum Storage ................... 14
Cleaning Exteriorand Attachments ..... 14
Dust Bag Changing ................. 15
Filter Changing .................... 16
LightBulbChanging ................. 17
AgitatorCleaning ................... 17
Clog Removal ..................... 18
Troubleshooting ..................... 19
Reques_ngh.ssisianceOr Service ... back page
Please read this guide. It will help you assemble and operate your new Kenmore vacuum in
the safest and most effective way.
For more information about vacuum cleaner care and operation, call your nearest Sears store.
You will need the complete model and serial numbers when requesting information. Your vacu-
um's model and serial numbers are located on the Model and Serial Number Plate.
Use the space below to record the model number and serial number of your new Kenmore
vacuum.
Model No.
Serial No.
Date of Purchase
Keep this book and your sales check (receipt) in a safe place for future reference.
LIMITED ONE YEAR WARRANTY ON KENMORE VACUUM CLEANER
This warranty is for one year from the date of purchase, and includes only private household
vacuum cleaner use. During the warranty year, when this vacuum cleaner is operated and
maintained according to the owner's manual instructions, Sears will repair any defects in
material or workmanship free of charge.
This warranty excludes vacuum bags, belts, light bulbs, and filters, which are expendable parts
and become worn during normal use.
For warranty service, retum this vacuum cleaner to the nearest Sears Service Center in the
UnitedStates.
This warranty applies only while this product is in use in the United States. This warranty gives
you specific legal rights, and you may also have other rights which vary from state to state.
Sears, Roebuck and Co., D/817 WA, Hoffman Estates, IL 60179
2

Your safety is importantto us. To reduce the riskof fire, electdcal shock, injury to per-
sonsor damage when usingyourvacuum cleaner, follow basic safetyprecautions
including the following:
Read this manual before assembling or
using your vacuum cleaner.
Use your cleaner only as described in
this manual. Use only with Sears recom-
mended attachments.
To reduce the risk of electrical shock -
Do not use outdoors or on wet surfaces.
Disconnect electrical supply before any
servicing or deanin 9. Fal!ure to do so
could result in electrical snack or person-
al injury.
Always turn cleaner off before unplugging.
Do not unplug by pulling on cord. To
unplug, grasp the plug, not the core.
Do not use with damaged cord or plug. If
cleaner is not working as it should, has
been dropped damaged left outd.doors, or
aroppeo mto water, return it to a bears
Service Center.
Do not pull or carry by cord, use cord as
a handle, close door on cord, or pull cord
around sharp edges or corners. Do not
run cleaner over cord. Keep cord away
from heated surfaces.
Do not leave cleaner when plugged in.
Unplug from outlet when not in use and
before servicing.
Do not allow to be used as a toy. Close
attention is necessary when used by or
near children.
Do not handle plug or cleaner with wet
hands.
Do not put any objects into openings.
Do not use with any opening blocked;
keep free of dust, hnt, hair and anything
that may reduce air flow.
Keep hair, loose clothing, fingers, and all
parts of body away from openings and
mowng parts.
The hose contains electrical wires. Do
not use when damaged or punctured.
Avoid picking up sharp objects.
Always turn off appliance before connect-
ing or disconnecting either hose or motor-
ized nozzle.
Do not use cleaner without dust bag
and/or filters in place.
Always change the dust bag after vacu-
uming carpet cleaners or freshener, pow-
ders and fine dust. These products clog
the bag, reduce airflow and can cause
the bag to burst. Failure to change bag
could cause permanent damage to the
cleaner.
Do not use the cleaner to pick up sharp
hard objects, small toys, pms, paper
clips, etc. They may damage the cleaner
or dust bag.
Do not pick up anything that is burning or
smoking, such as cigarettes, matches, or
hot ashes.
Do not use cleaner to pick up flammable
or combustible liquids (gasoline, cleaning
fluids, perfumes, etc.), or use in areas
where they may be present. The fumes
from these substances can create a fire
hazard or explosion.
Use extra care when cleaning on stairs.
Do not put on chairs, tables, etc. Keep
on floor.
You are responsible for making sure that
your vacuum cleaner is not used by any-
one unable to operate it properly.
SAVE THESE INSTRUCTIONS
Proper assembly and safe use of your vacuum cleaner are your responsibilities. Your
cleaner is intended only for household use. Read this Owner's Manual carefully for impor-
tant use and safety information. This guide contains safety statements under warning and
caution symbols. Please pay special attention to these boxes and follow any instructions
given. WARNING statements alert you to such dangers as fire, electrical shock, burns
and personal injury. CAUTION statements alert you to such dangers as personal injury
and/or property damage.
3

Itisimportantto knowyourvacuumcleaner'spartsandfeaturestoassureitsproperandsafe
use.Reviewthesebeforeusingyourcleaner.
Item Part No. Part No.
In U.S. In Canada
Dust Bag 20-50690 20-50690C
Headlight Bulb 20-5248 20-5248C
Exhaust Filter 20-86889 20-86889C
Motor Safety Filter 20-86884 20-86884C
Switch
Power-Mate Jr.®
- Power
Cord
Bag Cover
Bag
Exhaust
Filter Cover
Exhaust Filter
(Inside)
(Some
Models)
Performance
_ca_r
(Some
Model_
Agitator
On/Off
Selector
Lower
Carry
Handle I
Crevice
Tool
Telescoping I
Wand--_
Dusting
Brush I_
Combination
Brush
Handle
Release _ i
Pedal_
Model/Serial
Numbers
Stretch Hose
Motor
Protector
/
Agitator
(Underneath)
Headlight
Release
Pedal
Base
Agitator Overload
Reset Button
EXTENSION HOSE KITS
SOME MODELS
Bonus Hose
SOME
MODELS
Power-Mate Jr.®

E WARNING
ElectdcalShock Hazard
Do not plugintothe electdcal supply
untilthe assemblyis complete. Failure
to do so could resultin electricalshock
or injury.
Before assembling vacuum, check the
PACKING LIST on the cover of the separate
Repair Parts List. Use this list to verify that
you have received all the components of
your new Kenmore vacuum.
Remove the
Tape tape located
below the dust
cover/filter cover
on the motor
• case.
Attach stretch hose
end to nozzle as
shown.
HANDLE ASSEMBLY
Screw
Remove the screw located just below the
top edge of the back of the vacuum.
Position the handle as shown in the illustra-
tion.
Slide the handle into the opening at the top
of the vacuum.
Ha ndie ----/
Screw
Hole
_ _ Handle
Insert the screw so it passes through the
handle into the vacuum.
Begin to tighten the screw with your fingers.
It may be necessary to adjust the handle
slightly.
Using a screwdriver, ti
5
! CAUTION
Do not overtighten.
Overtighteningcouldstdp the screw
holes.
Do not operate the cleaner withoutthe
screw in place.

CORD ASSEMBLY
Make sure the quick release upper cord
hook is in the upright position. Remove the
wire tie from the power cord.
Lock the cord into
place by forcing it into
the locking notch on
the body of the quick
release upper cord
hook as shown. This
helps keep the power
cord out from under
the vacuum cleaner
agitator.
Loekin(
Power
Upper Cord
Hook
Cord
Lower
Cord
Wrap the power cord around the upper and
lower cord hooks an_J.lock the power cord
plug onto the power cord.
POWER-MATE JR.®
For operation of Power-Mate Jr.® see
seperate owners manual.
Power-Mate Jr.®
Tab
Latch
Caddy
TO INSERT POWER-MATE JR ®
Place the rear of the Power-Mate Jr ®into
the caddy
Rotate the Power-Mate Jr.® back until it
snaps into place.
TO REMOVE POWER'MATE JR.®
Lift up on the latch and rotote Power-Mate
Jr. ®out of the caddy.
HOW TO START
Release
Hook
1. Turn the
quick release
upper cord
hook clock-
wise to
release the
power cord.
2. Release the power cord plug from the
power cord and pull the cord off the quick
release upper cord hook. Check to be sure
the power cord is still locked into the lock in
the quick release upper cord hook.
3. Check to see if the cleaner has bag
installed. See DUST BAG CHANGING.
Note: To reduce the risk of electric shock,
this vacuum cleaner has a polarized plug,
one blade is wider than the other.
This plug will fit in a polarized outlet only
one way. If the plug does not fit fully in the
outlet, reverse the plug. If it still does not fit,
contact a qualified technician to install the
proper outlet. Do not change the plug in any
way.
4. Plug the polarized power cord into a 120
Volt outlet located near the floor.
6
5. To replace cord, turn upper hook counter-
clockwise pointing up, then wrap cord.
E
WARNING
Personal Injury and Product Damage
Hazard
• DO NOT plug in if switch is in the ON
position. Personal injury or damage
could result.
• DO NOT use outlets above counters.
Damage from cord to items in surround-
ing area could occur.

Releasethehandlebypressingdownon
thehandlereleasepedalwithyourfootand
pullingbackanddownonthehandlewith
yourhand.
Note: The agitator will not rotate if the vacu-
um cleaner is in the upright position.
Handle
Release
Pedal
HANDLE MOUNTED
SOME MODELS
To start the vacuum cleaner, slide the
On/Off switch from the OFF position to the
ON position. To stop the vacuum cleaner,
slide the On/Off switch to the OFF position.
Note: This switch operates the suction
motor only. For the agitator to rotate, the
agitator On/Off selector must be in the ON
position and the handle must be released
from the upright position.
To select a pile heightsetting:
Turn off cleaner. Select a pile height setting
by tilting the cleaner back until front wheels
are lifted slightly off the floor.
Slide the adjustment lever to the correct set-
ting.
There are four (4) pile height settings on the
vacuum. Use the LOW setting for most car-
pets and bare floor cleaning (with agitator
OFF), and the HIGH setting for very long
pile carpets like shag carpet, scatter rugs,
etc. Use the other settings as needed for
carpet heights in-between.
Height
Adjustment
Lever
\
CAUTION
Do not allow vacuum cleanerto remain
inone spot for any length oftime when
the agitatoris turning.Damage to car-
pet may occur.

OFF Position:Step on the back half of the
pedalto turn off the agitator for use on bare
floors.
In the OFF position, the agitator does not
rotate. This setting should be used for
cleaning hardwood and tile floors.
Note: The light will remain on when vacu-
uming with the agitator in the OFF Position,
provided the vacuum is not fully upright.
ON Position: Step on the front half of the
pedal to turn on the agitator for use on car-
peting.
In the ON position, the agitator will turn.
When carpets are being cleaned the selec-
tor should be in this position.
Attention: Refer to your carpet manufactur-
ers cleaning recommendations. Some more
delicate carpets may require that they be
vacuumed with the agitator turned off, to
prevent carpet damage.
! WARNING
Personal Injury Hazard
DO NOT place hands orfeet under-
neath the unitwhen changingthe
AgitatorOn/Off Selectorto the On
position. The agitatorbeginsto
revolverapidly.
Crevice
Tool
Telescoping
Dusting
Combination
Brus,
Stretch
Hose
Hose
Collar
Identify each of the attachments shown
above.
TO USE ATFACHMENTS
Remove the lower end of the stretch hose
from the cleaner by grasping the hose col-
lar, press release button and pull straight
out. The attachments can now be added to
the hose.
NOTE: The motor protector may open when
using attachments or when cleaning new
carpet, due to reduced airflow by the attach-
ments themselves or by new carpet fuzz fill-
ing the bag quickly. See the
TROUBLESHOOTING section.
E WARNING
Electdcel Shock And Personal Injury
Hazard
Disconnectelectricalsupplybefore
servicingor cleaning the unit.Failure
to do so could resultin electricalshock
or personal injuryfrom cleaner sud-
denlystarting.

The attached
hose swivels to
make cleaning
easier in every Hose
direction. Clip
Remove the
hose from the
hose clip by
pulling straight
out.
TELESCOPING WAND WITH
SUCTION CONTROL SLIDE
SOME MODELS
Crevice Remove the
Tool
telescoping
wand from
Telescoping its storage
Wand position.
Remove the
crevice tool from its storage position in the
wand. Turn the locking ring to the UNLOCK
position.
Extend the wand to its full length. Turn the
locking ring to the LOCK position. Attach the
extension wand onto the open end of the
hose.
Lower_._ _ Suction
Wand"""_'_.r_ Control Slide
f Wan.
_ . _..._ Locking Ring |-
Unlock _ Upper
Wand
Align the tabs on the extension wand with
the "J" slots in the hose. Push the wand into
the hose and twist to the right to lock.
To achieve maximum reach
with the attachments, add the
crevice tool to the end of the
wand by inserting and
twisting slightly. Hose-
Suction
Control
CreviceTool "Raised
When using the dusting brush or the com-
bination brush, they may be attached
directly to the wand or placed on the end of
the crevice tool.
Dusting Brush
_ (Some Models) Wand
_-- Combination _
I/1 rush Some
Models)
TO OPERATE SUCTION CON-
TROL SLIDE
Telescoping Wand
When using attachments for cleaning
draperies, small rugs with low pile and other
delicate items, twist the suction control slide
to the open position. This lever is located on
the telescoping wand, close to the hose.
This will reduce suction for ease of cleaning.
Note: Return
suction control
slide to the closed
position for
normal cleaning.
Suction
Control
Slide
CAUTION
When using attachments, be careful not
to overextend the stretch hose when
reaching. Trying to reach beyond the
hose stretch capability could cause the
cleaner to tip over.

TO STORE ATTACHMENTS
Remove dusting brush or combination
brush. Snap into appropriate storage location.
Remove crevice toot from the wand by twist-
ing. Lay aside.
Remove the extension wand from the hose.
Twist the wand to the left and pull from the
hose end.
Upper
Wand
Unlock the wand by turning the wand lock-
ing ring to the UNLOCK position.
Slide the lower wand into the upper wand.
Turn the wand locking ring to the LOCK
position.
Place the crevice tool down into the com-
pressed wand. Snap into the appropriate
storage location. \,
Reinsert the hose fully into the opening on
the lower body from which it was removed.
Press firmly to assure connection.
CAUTION
DO NOT pull the vacuum cleaner
around the room by the hose. Property
damage could result.
EXTENSION HOSE
SOME MODELS
Some models include an extra hose which
connects to the stretch hose on the vacuum
for a longer cleaning reach.
_onus
Release
Electrical
Connec_on
-Extension
Hose
Connect bonus hose to extension hose by
pressing together. Make sure electrical
connections are pressed firmly together.
To disconnect press release button on
hose and pull apart.
When usingthe regular hoseor with
the extensionhose attached, the
cleaner should be ona solidsurface
onthe same levelor belowthe levelof
the user'sfeet. DO NOT use the hoses
when the cleaner isabove the levelof
the user'sfeet.
POWER-MATE JR.®
When attaching Power-Mate Jr.® to
extension hose press together and align
electrical connections.
Power-Mate Jr.®
_- _ Electrical
Connectors
To disconnect press release button on
hose and pull apart.
CAUTION
!
rf., CAUTION
DO NOT leave the Power-Mate Jr.®
running in one spot for any length of
time. Damage to carpet may occur.
10

ATFACHMENT
DUSTING BRUSH
CREVICE TOOL
COMBINATION BRUSH
Power-Mate Jr.®
Furniture*
X
X
X
CLEANING AREA
Between
Cushions*
Drapes*
X
X x
x x
x x
*Always clean attachments before using on fabrics.
Stairs
Walls
X
t{
Pivoting
Brushes
_._ Caq0et edges
Guide either side or
the front of the noz-
zle along a base-
board. The pivoting
brushes help
remove dirt at car-
pet edges.
Stairs
Put handle in full upright position. Agitator
stops rotating. Use the crevice tool or fabric
brush. Set the On/Off switch to ON and
move the Agitator On/Off selector to the
OFF position.
Personal Injury Hazard
Use care if vacuum cleaner is placed
on stairs. If it falls, personal Injury or
property damage could result.
For best clean-
ing results, keep
the airflow pas-
sage clear.
Occasionally,
check each of
the areas indi-
cated for clogs.
Unplug the
cleaner from the
outlet before
checking.
11

MOTOR PROTECTION
SYSTEM
Motor Protector
This vacuum has a motor protector by-pass
valve which automatically opens to provide
cooling air to the suction motor when a clog
prevents the normal flow of air to the motor.
If the by-pass valve opens to prevent motor
overheating and possible damage to the
vacuum, you will notice a change of sound
as air rushes through the valve opening.
To correct problem: See the TROUBLE-
SHOOTING chart.
NOTE: The motor
protector may open
when using
attachments or when
cleaning new carpet,
due to reduced airflow
by the attachments
themselves or by new
carpet fuzz filling the
bag quickly. See the
TROUBLESHOOTIN_G
section. '
Motor
Protector
Note: Do not block motor protector.
Thermal Protector
This vacuum has a thermal protector which
automatically trips to protect the vacuum
from overheating. If a clog prevents the
normal flow of air to the motor, the thermal
protector turns the motor off automatically to
allow the motor to cool in order to prevent
possible damage to the vacuum. During this
time the headlight remains on.
To correct problem: If this occurs, turn the
vacuum off and unplug the power cord from
the outlet to allow the vacuum to cool and
the thermal protector to reset. Check for
and remove clogs, if necessary. Also check
and replace any clogged filters. Wait
approximately thirty (30) minutes and plug
the vacuum in and turn back on to see if the
motor protector has reset. The motor
protector will not reset if the vacuum is not
turned off even if the vacuum has cooled
down.
AGITATOR OVERLOAD
PROTECTOR
The agitator has
built-in protection
against motor
damage should the
agitator jam. If the
agitator slows down
or stops, the agitator
overload protector
shuts off the agitator.
The suction motor
will continue to run.
Agitator Overload
Reset Button
To correct problem: Turn off and unplug
vacuum, remove obstruction, then press
reset button.
To reset: Push in the agitator overload
protector button.
PERFORMANCE INDICATOR
SOME MODELS
When the unit is running with normal air
flow, the light on the performance indicator is
off. The light comes on whenever the airflow
becomes blocked. If that occurs, check the
disposable dust bag, motor safety filter and
other possible clog locations shown in
CLOG REMOVAL.
To correct
problem: See
the
TROUBLE-
SHOOTING
chart.
NOTE: The
light may also
come on
when using
attachments,
due to
reduced
airflow
through the
attachment.
12

DIRT SENSOR
SOME MODELS
The electronic dirt sensor is a feature which
will detect particles as they pass through the
vacuum cleaner.
The dirt sensor indicators and sensor
sensitivity switch are located on the front of
the switch cover.
A red light indicates dirt is being picked up
by the cleaner. A green light indicates most
of the dirt has been picked up by the
cleaner.
OPERATION
As you vacuum, the red indicator light will
come on and stay on as long as the sensor
detects a high concentration of particles
passing through the cleaner.
The green light indicates that most of the
cleaning is complete.
The sensor switch allows you to select the
sensitivity of the dirt sensor. The switch can
be set to HI (+) or LO (-) sensitivity.
Set the sensor switch to the HI (+) position
when:
• Cleaning bare floors.
• Cleaning carpet with low pile height.
Set the sensor switch to the LO (-) position
when:
• Cleaning heavily soiled areas.
• Cleaning carpet with deep pile.
• Cleaning new carpets.
Even with the sensor switch in the LO (-)
position, the dirt sensor will detect carpet
fuzz, especially on new carpet, which may
cause the red light to remain on longer than
expected.
JjP "
- Sensor
Sensitivity
Switch
/ I
Switch
Cover
l WARNING
Electrical Shock And Personal Injury
Hazard
Disconnectelectricalsupplybefore
servicingor cleaningthe unit.Failure
to do so could resultin electricalshock
or personalinjuryfrom cleaner sud-
denlystarting.
TO CLEAN DIRT SENSOR OPTICS
m
The dirt sensor optics consist of two optic
cells located inside the bag holder.
U
Occasionally, it may become necessary to
clean the two optic cells to assure
maximum performance. It is
recommended the optic cells be cleaned:
• When the red light stays on
continuously.
• When the green light stays on
continuously.
• When dirt or dust adheres to the
optic cells.
• Whenever the dust bag is changed.
To clean the sensor, wipe the optic cells with
a soft, dry cloth. Never use cleaners or
liquids as they can help speed the recoating
of the optic cells and make it necessary to
clean them much sooner than normal. The
dirt sensor area can be reached by
removing the dust cover and the dust bag.
Optic
Cells -.<
I - Bag Holder
13

Always follow all safety precautions when
cleaning and servicing the vacuum
cleaner.
Gather the cord and wrap it loosely around
the upper and lower cord hooks.
l WARNING
ElectricalShock And PersonalInjury
Hazard
Disconnectelestdcalsupplybefore
servicingor cleaningthe unit. Failure
to do so could resultin electricalshock
or personal Injuryfrom cleanersud-
denlystarting.
Store the cleaner in a dry,
indoor area, on the
floor with the handle
locked in the upright
position.
E WARNING
ElectricalShockAnd PersonalInjury
Hazard
Wrappingthe cord too tightly puts
stresson the cord and can cause cord
damage. A damaged cord isan electri-
cal shock hazard and couldcause per-
sonalinjuryor damage.
Unplug cord from wall outlet. DO NOT drip
water on cleaner.
Clean exterior using a clean, soft cloth that
has been dipped in a solution of mild liquid
detergent and water, then wrung dry. Wipe
dry after cleaning.
To reduce static electricity and dust build-
up, wipe outer surface of cleaner and
attachments.
Wash attachments in warm soapy water,
rinse and air dry. Do not clean in dishwash-
er.
Do not use attachments ifthey are
wet. Attachments used in dirty areas,
such as under a refrigerator, should
not be used on other surfaces until
they are washed. They could leave
marks.
14

TO REMOVE DUST BAG
WARNING
Pull out on the
bag cover release
located near the
top of the bag
cover.
Bag Cover
Release-_T _
Bag I/
Cover-_i_
Bag
Pull the bag
cover forward
and lift up.
Remove and lay
aside.
Grasp the dust bag
collar and pull gently,
carefully removing
the dust bag.
Throw away the used
dust bag.
Do not reuse.
J " " Bust
Bag
- Bag Holder Check the bag
holder and the
motor safety fil-
ter. If either is
blocked, check
Safety TROUBLE-
Filter SHOOTING.
NEVER REUSE A DUST BAG. Very
fine materials, suchas carpet freshen-
er, face powder,fine dust, plaster,
soot, etc. can clogthe bag and cause
itto burstbefore it is full. Change bag
moreoften when vacuumingthese
materials.
TO REPLACE DUST BAG
Unfold the new
dust bag. Fold
the safety seal
tab on the new
dust bag away
from the open-
ing that fits on
the bag holder.
Dust
Bag
NOTE: See PARTS AND FEATURES for
bag number.
Insert the dust bag
onto the bag holder
completely by hold-
ing the bag collar.
Place the dust bag
collar into position.
Tuck the bag
behind each of the Bag
four bag retention Retention
Corner
corner flaps shown Flaps
here. Be sure the
bottom and sides
of the dust bag are
completely within
bag cavity prior to
replacing the bag
cover.
Slots
Position the bag
cover so its posi-
tioning tabs fit
into the body
positioning tab
slots.
Close the bag
cover.
You will hear a I1=
distinct snap Bag
when cover is Cover--_
securely closed.
Check to see that the dust bag isfully
enclosed in the bag cover.
15

Check motor safety filter frequently and
change when dirty.
! WARNING
ElectricalShock Hazard
Unplug power cordfrom electdcal out-
let. Do not operate the cleaner without
the motorsafety filter. Be sure the fil-
ter isdry and properlyinstalledto pre-
vent motorfailure and/or electrical
shock.
Remove the dust bag as outlined in the
DUST BAG CHANGING section.
MOTOR SAFETY FILTER
ELECTROSTATIC
1. The filter must be
replaced when dirty.
It should be replaced
regularly depending
on use conditions.
The filter CANNOT
be washed as it will \
lose its dust trapping
ability.
Motor
Note: See PARTS AND FEATURES for
motor safety filter number.
Motor
2. If the filter, locat-
ed in the bottom of
the bag cavity, is
dirty, remove it by
pulling forward out
from under the
ribs.
3. Replace the
filter, smooth side
up, by sliding it
back into place
under the ribs in
the bag cavity.
Satery ,_"_
Filter
Replace the bag as outlined in the DUST
BAG CHANGING section.
EXHAUST FILTER
HEn
WARNING
Do not operate without exhaust
filter.
I
The exhaust filter cartridge must be
replaced when dirty. It should be replaced
regularly depending on use conditions. The
filter CANNOT be washed as it will lose its
dust trapping ability.
Note: See PARTS AND FEATURES for the
exhaust filter number.
Slide the exhaust
filter cover
release down.
Pull out on
exhaust filter
cover to remove
from bag cover.
Bag I_
Cover-...ZI
Exhaust _1_
Filt__
F
Bag
Cove
Exhaust
Remove the
exhaust filter car-
tridge from the bag
cover.
Replace the exhaust
filter cartridge, care-
fully positioning it so
that it fits into the bag
cover. The grey edge
of the filter should be
facing away from the
operator. Push only
on filter cartridge
frame, not on filter itself.
Exhaust Filter t
Cover Release -_
Exhaust I
Bag
Exhaust
i eplace the
exhaust filter
cover and
secure the
latch by push-
ing it upward.
16

!T,V. WARNING
ElectricalShookOr Personal Injury
Hazard
Disconnectelectricalsupplybefore
servicingor cleaningthe unit.Failure
to do so couldresult in electricalshook
or personal injuryfrom cleaner sud-
danlystarting.
TO REMOVE LIGHT BULB
Disconnect power cord from electrical out-
let.
Light
Pry light lens
out at slot in
rear as shown
on both sides.
Rotate lens up
and lift off.
Slots
CAUTION
Do not use a bulb ratedover 9W (13V).
Dudng extended use, heat fromthe bulb
could overheat surroundingplastic
parts.
Remove the
light bulb by
pulling
straight out.
To Release
I =1/
To Replace
To replace
the light bulb
carefully
insert fully
into slot.
Note: See PARTS AND FEATURES for bulb
number.
uD °CAUTION I
not plug in or tum on until the vacu-
is completely reassembled.
To replace light
lens, place tabs
at front of lens
into slots. Rotate
lens down and
snap into place. Light
To maintain efficient cleaning, the agitator
must be kept free of carpet pile, string, or
hair build-up. After every 7 to 10 uses,
unplug and turn vacuum over and check
agitator for string and hair build-up,
Use a scissors to remove any build-up
entangled around the agitator.
17

Always follow all safety precautions when
cleaning and servicing the vacuum
cleaner.
! WARNING
ElectricalShockOr Personal Injury
Hazard
Disconnectelectricalsupplybefore
servicingor cleaning the unit.Failure
to do so could resultin electricalshock
or personal injuryfrom cleaner sud-
denlystarting.
If the cleaner does not seem to have ade-
quate suction, first check if the dust bag is
full or if a filter is clogged. See DUST BAG
CHANGING and FILTER CHANGING.
If the bag and filter areas are free of clogs,
check the hose area. Remove the lower end
of the stretch hose from the cleaner by
grasping the hose collar, twisting, and
pulling straight out.
Stretch
Hose In
and Out
Plug in the
vacuum and
turn it on.
Stretch the
hose to max-
imum length
and then
allow the
hose to
return to its
storage
length.
Re-insert the hose into the opening on the
lower body from which it was removed.
Press firmly to assure connection.
Stretch
Hose
Hose
Collar
WARNING
If the bag and filter areas and the hose
areas are free of clogs, disconnect the hose
from the nozzle pipe and check the nozzle
pipe for clogging. Clean the agitator accord-
ing to the instructions in the AGITATOR
CLEANING section.
Return the cleaner to the upright position
before plugging into an electrical outlet.
18

Review this chart to find do-it-yourself solutions for minor performance problems. Any service
needed, other than those described in this owner's manual, should be performed by an autho-
rized service representative.
so could resultin electricalshock or personal injury.
Cleanerwon'trun.
Poorjob ofdirt
pick-up.
a _'__,1
1, Unpluggedat wall outlet,
2. Tripped circuit breaker/blown fuse
at household service panel,
3. On/Off switch not turned ON.
4. Thermal protector tripped.
1. Full or clogged dust bag.
2. Wrong pile height setting.
3. Worn agitator.
4. Clogged nozzle or bag holder.
5. Clogged hose.
6. Hole in hose.
1. Plug in firmly, push On/Off switch to
ON.
2. Reset circuit breaker or replace fuse.
3. Push On/Off switch to ON.
4. Allow vacuum to cool, then reset
Thermal protector (page 12),
1. Change bag, (page 15).
2. Adjust setting, (page 7).
3, Take to your nearest Sears
Service Center.
4. Check CLOG REMOVAL,(page 18).
5. Check for clogs, (page 18).
6. Taketo your nearest Sears
Service Center.
7. Hose not inserted fully. 7. Insert hose fully, (page 10).
S. Motor protection system activated. 8. Check for clogs, (page 18).
9. Dirty filters, 9. Change filters, (page 16),
Cleaner picksup 1. Wrong pile height setting. 1. Adjust setting, (page 7),
moveable rugsor
pushes too hard.
Ught won't work, I. Burned out light bulb. 1. Change light bulb, (page 17)
Agitatordoes not turn. 1, Agitator On/Off selector in 1. Move selector to the ON position,
OFF position. (page 8).
2. Handle in full upright position 2. Move handle from upright position
(page 7).
3. Agitator Overload tripped. 3. Reset Agitator Overload (page 12).
4. Thermal protector tripped. 4. Allow vacuum to cool, then reset
Thermal protector (page 12).
1. Full or clogged dust bag. 1. Change bag, (page 15).
Performanceindicator, 2, Dirty filters. 2. Change filters, (page 16).
somamodels, isred. 3, Clogged airflowpassage. 3. Clear clog from airflow passage,
(page 18).
4, Certain attachment tools. 4. This is normal. Light should go off
when tool is removed.
Airflowrestricted 1. Attachment use restricts air flow, 1. Check ATTACHMENTS, (page8)
with attachmentuse.
Soundchanges. 2. New carpetfuzz clogged air path. 2. Check CLOG REMOVALandclean
hose,(page 18).
DirfSensor, some 1. Dirty opticcells. 1. Cleanoptic ceils,(page 13).
models,willnot work.
19

20

Antesde usarsuaspiradoranueva ....... 2
GaranUade laaspiradorade Kenmore..... 2
Instmcclonesimportantesde
seguddad ............................. 3
Pie..zas.ycaractedsticasde aspiradora
verlJcal................................ 4
Instruccionesde ensamblamiento ....... 5.6
Instrucciones de operaci6n............... 6
Desprendimientodel mango.............. 7
Interruptorde eneendido/apagado......... 7
Ajustey seleeei6nde nivelde pelode la
a]fombra ............................ 7
Agitadorencendido/apagadoSelector ...... 7
Accesorios ........................ 8-10
Cuadrode uso de los accesorios ......... 11
Sugerencias para aspirar ............... 11
Carecteriisticas de
rendimiento/seguridad ............... 12-13
Cuidado de la aspiradora............... 14
Almacenamientode laaspiradora ........ 14
Limpiezadel exteriory de losaccesorios... 14
Cambio de labolsaparapolvo ........... 15
Cambiodesfiltros .................... 16
Cambio de la bombilla ................. 17
Umpieza del agitador.................. 17
C6mo eliminarlosresiduosdebasura
en los conductos ..................... 18
Reconocimiento de pmblemas ........... 19
Informaci6n de assistancia
o servicio ....................... backpage
Porfavor leaesta guia que le ayudaraa assemblary operar su aspiradoranueva de Kenmoreen una manera
mas segura y effectiva.
Paramas informaci6nacercadel cuidado y operaci6n de esta aspirador, Ilamea su tiendaSearsmas cercana.
Cuando prequnte por informaci6nusted necisitar._el numerocompleto de serie y modelo de la aspiradoraque
est,. Iocado en la placa de los numeros de modeloy serie.
Use el espacio de abajo para registrar el numero de modeloy serie para su nueva aspiradorade Kenmore.
Numerode Modelo
NL_merode Serie
Fecha de Compra
Matenga este libro y su reciboen u lugar seguro para referenciasfuturas.
GARANTiA LIMITADADEUN AI_O DELA ASPIRADORA KENMORE
Esta garantfa espot un aSodesde la fecha de compra,e incluyesolamente el usode la aspiradoraen
hogaresprivados. Duranteel aSode garantia, cuando la aspiradoraes operada y mantenida de acuerdoal
manual de instrucciones del dueSo,Sears reparara cualquierdefeclo en materiales o fabricaci6n librede cargo.
Esta garantia excluye lasbolsas de colecci6n, correas,lamparillas,y filtros, lascualesson partes gastablesque
sedeterioran con el usonormal.
Parael serviciode garantfa,retomeesta aspiradoraal Centrode Servicio Sears m_scercanoen losEstados
Unidos.
Esta garantfa se aplica solamentemientras este producto esla en usoen los Eslados Unidos.Esta garantfale
da a ustedderechos legalesespecificos, y usted puede tenertambien otros derechos los cuales vafian de
estado a estado.
Sears, Roebuckand Co., D/817WA, Hoffman Estates, IL60179

Suseguridades muyimportantepara nosotros.Para reducirel riesgodeincendio,choqueeldctdco,
lesioncorporalo dafiosal utilizarsuaspiradora,aCt_ede acuerdoconprecaucionesb_icas deseguri-
dad,entreella,s:
Leaeste manualantes de armar o utilizar su
aspiradora.
Use suaspiradora L_nicamenteen la forma
descritaen este manual. Use 6nicamente con
accesorios recomendadospor Sears.
Para reducirel riesgode choque electrico, no use
su aspiradoraalaire libre ni sobresuperficies
mojadas.
Desconectela fuente de electricdadantes de dar
servicio o limpiar. De Iocontrario podda causar
un choque electricoo lesi6n corporal.
Siempre debe apagar su aspiradora antes de
desconectarla.
Nodesconectela aspiradoratirando del cord6n
electrico.Para desconectarla,hale el enchufe,no
el cordon.
No usela aspiradorasi elcordono el enchufe
esta daflado. Si la aspiradorano esta
funcionando adecuadamenteo si se ha dejado
caer, esta dafiada, seha de[adoexpuestaa la
intemperieo se ha dejado caer en agua,devuel-
vala a un Centro de s_rvicio de Sears.
Nohaleni transporte laaspiradora pot elcordon;
no use el cordoncomo mango; no cierre puertas
sobre el cordon; no hale el cordon sobrerebor-
des agudosni esquinas. Nopase la aspiradora
sobre el cord6n.Mantenga el cord6n alejado de
superficies calientes.
No abandone la aspiradora cuandoeste conec-
tada. Desconectelacuando nola este usando y
antes de darle servicio.
NOpermita que sea utilizada como juguete. Se
requieretener mayor cuidado cuando sea
utilizada en la proximidadde nifios o por niflos.
Notoquela aspiradora ni el enchufe conlas
manos mojadas.
NOcoloqueobjetos en las aberturas.
No utilice la aspiradorasi alguna aberturaesta
bloqueada;mant_ngala libre de polvo,pelusa,
cabellos y cualquieracosa que podrfa disminuir
el flujo de aire.
Mantenga el cabello, ropa suelta,dedos y todas
laspartes del cuerpoalejados de las aberturas y
piezas mecanicas.
La mangueracontiene cables electricos. No los
use cuando esten dafiados o pinchados.Evite
levantar objetos afilados.
Siempreapag_ la aspiradora antes de conectar
o de desconectar la manguera o la boquilla elec-
trica.
No uselaaspiradora sintener instalada la bolsa
para polvoy/olos filtros.
Cambiesiempre]abolsa parapolvodespues de
aspirarlimpiadoresde alfombraso desodorantes,
talcosy polvosfinos. Estosproductosatascan la
bolsa, reducenel flujode aire y pueden causar
que esta se rompa.Si no cambia la bolsa podrfa
ocasionar dafio permanentea la aspiradora.
NOuse la aspiradorapara levantarobjetos agu-
dos, juguetes pequefios,alfileres, sujetapapeles,
etc.Podrfandaflar la aspiradora e la bolsa para
polvo.
No levante ningunacosa que seeste quemando
o emitiendo humo, como cigarrillos,cerilloso
cenizascalientes.
No use la aspiradoraparaaspirar liquidos
inflamablesocombustibles (gasolina,liquidos
para limpieza, perfumes, etc.)ni la use en
lugares donde estos podfian estar presentes.Los
vapores de estas sustanciaspuedencrear un
peligro de incendioo explosion.
Tenga cuidadoespecial al utilizarla aspiradora
en escalones. Nola coloque sobresillas, mesas,
etc. Mant_ngalaen el piso.
Usted es responsablede asegurar quesu aspira-
dora no sea utilizada por ninguna personaque no
pueda manejarla correctamente.
GUARDE ESTAS INSTRUCCIONES
Elarmado y uso segurode su aspiraclorason su responsabilidad.Esta aspiradoraha sidodiseOada
exclusivamentepara usodomestico.Laaspiradora debera almacenarseen un lugar seco yen el interior.
Lea este Manual del propietario detenidamente,puescontiene informaci6nimportante sobreseguridad y
uso. Esta quia contiene informaci6n sobreseguridad debajo de simbolosde advertienciacuidado. Por
favorponga atencion especial a estas instrucciones dadas. Advertencia: Este informaci6nle alertara con
el poligro de fuego,choques electricos,quemadas y lesiones. Cuidado: Este informaci6nle alertara a
peligroscomo lesiones ydaflos de propiedad.

Esimportanteconcerlaspiezasycaracteristicasdesuaspiradoraparaasegurarsuusoadecuadoyseguro.
Examinelasantesdeusarsuaspiradora,
Objeto Pieza No Pieza No
enEUA en Canadd
Bolsa para polvo 20-50690 20-50690C
Bombilla de farol 20-5248 20-5248C
Filtro de escape 20-86889 20-86889C
Filtro de seguridad 20-86884 20-86884C
del motor
- Mango
_rruptor
de encendido/
apagado
Seguro de la
cubierta de
Cubie_a de
polvo _lgunos
modelos)
- Indicador de
rendimiento
(algunos modelos)
Liberaci6n de
la cubierta del
filtro de
Sujetador superior escape
de liberaci6n rapida Pa/anca (dentro)
del cord6n para ajustar
la altura
Power-Mate Jr.®
- Cord6n
el_ctrico
- Agitador encendido/
apagado selector
Sujetadora
del cord6n liberaci6n
inferior del mango
Mango para 'e
Protector boquilla
Herramientas de meubles
para _ r Bot6n para Reajustar la
heediduras*_-_ _- I!_l t _1 | Manguera Farol Sobrecargadelagitador
T o I I_ _. _ [[_ |giratorialist
Cepillopara L\ _ _" " / DE EXTENSION
. __ -- --Manguera
sacudlr 11 III expansible / ALGUNOS MODELOS
Cepillo para I Iltl ,"_T/I // _ ] Mangueraextra
combinaci6n '. _II' E I_ _ |L II
.....I II Protector
liberacion
del mango
N_lmerosde _._ _.., /
series del modelo Ag!tador--
Power-Mate Jr.®
3

Peligrode choqueeldctdco
Noconectelaaspiradorahastaque termine
de armada. De Iocontrariopodrfacausarun
choqueek_'tdcoolesi6ncorporal.
Antes de armar la aspiradora, chequee la LISTA
DE EMBALAJE en la cubierta separada de la Lista
de Partes para Reparaci6n. Use esta lista para veri-
ficar que ha recibidotodas las componentes de su
nuevaaspiradora Kenmore.
Retrar la banda
adhesiva ubicada
debajo de la
a de polvo
la caja del
motor.
Fije el cabo de
la manguera
expansiblea la
boquilla como
se muestra.
MONTAJE DEL MANGO
Tornillo
Quite el tomillo del mango tocalizadojusto debajo
del horde superior de la parte posterior de la aspi-
radora,vet ilustraci6nde arriba.
Coloqueelmango como se veen la diagrama abojo.
AI manlener le manquera de manera que no
interfera, mueva el mango a la abertura en la
parle superior de la aspiradora.
Vis et trou
du rnanche
Inserte el tornillo para que pase por el mango de
la aspiradora.
Empiece a apretar el tornillo con los dedos. Quiza
sea necesario ajustar un poco el mango.
Apriete eltornJllo J
con un destornil- /.._/,,_,t._
lador. /_ _'
No aprietedemasiadoel tornillo.
Si Io apdetademasiado podrfaarruinarlos off-
ficios para eltornillo.
Nooperela aspiradorasintenerinstaladoel
tomillo.
4

COLOCACI6NDELCORDON
Aseguresede que el sujetador superiordel cord6n
de liberaci6nrapida se encuentre en posici6n verti-
cal. Quite el alambre con el que esta atadoer cord6n
electrico.
Fijeelcord6n en
posici6n, forz&ndoloen
la ranura de bloqueo
ubicada en el cuerpo
del sujetador superior
del cordon, como se
muestra. Esto ayudaa
que el cord6n no se
enrede debajo del
agitador de la
aspiradora.
de fijaci6n
Cord6n
deliberaci6n rapida
delcord6r
Cord6n
el_ctrico
Sujetadors
inferior del
cord6n
Enrolle el cord6n electrico alrededor de los sujeta-
dotes superior y inferior y presione la ranura del
enchufe sobre el cord6n.
POWER-MATE JR.®
Para operar el Power-Mate Jr.® ver man-
ual del due5o separado.
Power-Mate Jr.®_
Le_g "" _ _p_ Seg_o
PARA INSERTAR EL
POWER-MATE JR.@
Coloque la parte de atras del Power-Mate
Jr.® adentro de la caja.
Rote el Power-Mate Jr.® hacia atra.s
hasta que calce en su lugar.
PARA SACAR EL
POWER-MATE JR.®
Levante en el picaporte y rote el Power-
Mate Jr.® fuera de la caja.
PARACOMENZAR
]/Suj etador 1. Gire el
J k superior de sujetador del
_iberaci6n
pida de/ cordon de
rd6n lado a lado y
hacia abajo
para liberar
el cord6n
electrico.
2. Desprenda el enchufe del cord6n electrico y quite
el cord6n del sujetador superior. Compruebe que el
cordon electrico sigue fijado en la ranura de bloqueo
del sujetador superior.
3. Verifique que la aspiradora tenga instalada una
bolsa. Consulte la CAMBIO DE LA BOLSA PARA
POLVO.
Nora: Para reducir el riesgo de choqueelectrico,
esta aspiradora cuenta con una clavija polarizada,
uno de los contactoses m&sancho que el otro.
La clavijas61opuedeintroducirsedeuna manera
en el enchufe.Si la clavija no cabebienen el
enchufe,invi6rtala. Sia_n no cabe, Ilamea un
electricista para que instale unenchufe correcto.
No altere la clavija de ninguna manera.
4. Conecte el cord6n el_ctrico polarizadoen un
enchufe de 120voltios que se encuentrecerca
del piso.
t
E
ADVERTENCIA
Peligrode lesi6npersonaly dafio al producto
• NOconectela aspiradorasi elinterruptorest_
en la posici6n ON. Podrfaresultarenlesi6nper-
sonalodafio.
• NO use losenchufesIocalizadossobrelos
muebles.Losobjetoscercanos podrfanresultar
dar3ados.

Desprendaelmangopisandoelpedaldeliberaci6n
ytirandadelmangohaciaabajoconlamano.
Nota:Elagitadornogirarasilaaspiradoraestaen
posici6nvertical.
MONTADO EN EL MANGO
ALGUNOS MODELOS
Pedal de
fiberaci6n
del mango
Paraarrancar la aspiradora, deslice el interruptor de
encendido/apagadode la posici6n OFF a la posici6n
ON. Para detenerla, coloque el interrupter en la posl-
ci6nOFE
Nota:Este interruptoropera solamente el motor de
succion.Para que el agitador gire, el selector
encendido/apagadodel agitador debe estar en
posici6n encendidoy el asadebe sacarse de la
posici6nvertical.
Para seleccionar un ajuste de nivel de pelo de la
alfombra:
Apague la aspiradora.Seleccione un nivel de ajuste
inclinandola aspiradora hacia atras hast que las
ruedasdelanteras esten un poso despegadas del
piso.
Deslice la palanca de ajuste de nivel de pelo de la
alfombra a la posicion deseada.
Haycuatro (4) posiciones de ajuste de altura en la
aspiradora. Use la posici6n LOW para la mayorfade
alfombrasy suelos lisos (con el agitador OFF),y la
posici6nHIGH para alfombras de fibras largas o
abundosas,tapetes pequeflos, etc. Use las otras
posicionesseg_n resulte conveniente para alturas
intermedias.
!
Palanca
para ajustar
la altura
! CUIDADO
Nodeje permanecerla aspiradoraenun solo
lugar duranteningdn tiempo cuandoel agita-
dorest_ rotando.Se puededafiarlaalfombra.
6

PosicibnOFF: Aprietecon el pie la mitad posterior
del pedal para apagar el agitador para uso en sue-
los lisos.
En la posici6nOFF el agitador no gira.Esta posici6n
se debe usarpara limpiar maderafirme como par-
quet o pisos de Iosetaso cer_.mica.
Nota: La luzse mantendra encendida mientrasse
aspira con el agitador en posici6n OFF,siempre y
cuando la aspiradora no se encuentre completa-
mente en posicion vertical.
En Posici6n:Apriete con el pie la mitad anterior del
pedal para encenderel agitador para uso en
tapizon.
El agitadorgirara en posici6n ON. Cuando se limpia
alfombrasel selector debeestar en esta posicion,
Atenci6n: Refierasea las recomendaciones del fab-
ricantepara limpiarsu alfombra.AIgunas alfombras
mas delicadas pueden requerir el uso de la aspi-
radoracon el agitador desconectado para prevenir
que la alfombra sea daSada.
! ADVERTENCIA
Peligrode lesi6npersonal
NO PONGA lasmanesni los piesdebajode la
unidadcuandose est6 cambiandoelSelector
de agitadorencendido/apagadoa la posici6n
de encendido.Elagitador girerapidamente.
Herramienta
para hendidura,.
Tubo
Cepillo •Manguera
expansible
Cepillo para Collar de
combinaci6n _ manguera
Identifiquecada unode losaccesoriosmostrados a
continuaci6n.
C6MO UTILIZARLOS
ACCESORIOS
Saca la parte inferior de la mangueraexpansible de
la aspiraderay tirando por atras. Ahora se puede
conectar la manguera.
NOTA: La valvula de desviaci6n puede estar abierta
mientrasse usan los accesorios o para limpiar una
alfombra nuevaacausa de un flujo reducidodeaire
por los accesorios mismos o
pot la pelusa de la alfombra que Ilenela bolsarapi-
damente. Consulteel cuadro RECONOCIMIENTO
DE PROBLEMAS.
I' ..,, ADVERTENCIA
Peligro dechoqueel6ctricoo lesi6ncorpo-
ral
Desconectela unidadantesdelimpiada o
darleservicio.De Io contrariopodrfapro-
ducirse un choque eldctdco o causar
lesi6n corporalsi la aspiradora arrancade
maneraimprevista.

Lamanguera
incorporadagira
parafacilitarla
limpiezaencual- Giratoria-
quier direcci6n.
Paraquitar la
manguera,tire de Manguera
la mangueradel del collar
collar.
TUBO TELESC6PICO CON
CONTROL DE ASPIRACION
(ALGUNOS MODELOS)
Saque el tubo
Herrarnienta telescopico de
para su lugar de
hendiduras alma
Tubo cenamiento.
telesc6pico
Retire la herramienta para hendidurasde sulugar de
almacenamientodentro del tubo.Gire el aro de blo-
queo hasta la posicion U_LOCK.
Despliegueel tubo completamente. Gire el aro de
bloqueo del tubo hasta la posici6n LOCK.
Instaleeltubo de extensi6n en el extremoabierto de
la manguera.
Tubo _'_ Deslizador
inferior--_--_ _._ de control
\
t _/deltubo I _=_
_or,r _ Tu"o
superior
Alinee laspestaSasdel tubode extensi6ncon las
ranurasenforma de "J"de la manguera. Empujeel
tubodentrode la mangueray gire haciala derecha
parabloquearlo.
Paraobtener la m&ximaIongitud con
losaccesorios, instalela herramienta _"'_i'_l
para hendiduras en el extremo del _,_ I1_I//
tube. Parahacerlo, intro- li_r_| I_l
d_zcala en el tubo y Manguera- mm\ 111tl[
Deslizador _ I_l_ltlllII
decontrolde_ ..J I Illgll
teleTsl_ 0 ///_....--- _P=F"
6pico// _ f / _. 7 \
t_anura _< ,
p_/_ Her#'amien_:;_;::
Cuando useel cepillopara
sacudir o el cepillo para
combinaci6n, puede
instalarlosdirectamenteen el tubo o en extremode
Herramienta para hendiduras
_ (AiCepillo para sacudir Tubo
gunos modelos)
il)1 :-c°.,,,o.°.° ,=1,,
ll!ll Combinacion _ I
(AIgunos modelos) _) Cepillo
la herramientapara hendiduras.
PARA OPERAR EL DESLIZADOR
DE CONTROL DE ASPIRACION
Tubo telesc6pico
Cuandouse accesoriospara limpiar cortinas,
tapetespequehos depelo corto y otros articulos
delicados,gireel deslizadorde control de aspiracion
a la posicion abierta. Esteselector se encuentraen
el tubotelescopico,cercade la manguera.
Esto reducir&la potencia de aspiraci6n para facilitar
la limpieza.
Deslizador
Nota:Coloque decontrol
el deslizadorde de ""
controlde
aspiraciona la
posici6n
cerradaparala
CUIDADO
Cuando uselosaccesorios,tengacuidadode
no estirardemasiadola mangueraexpansible
paratratarde alcanzarmztslejos.Si tratade
estirarla rnanguerarndsde Iodebido,podrla
causarque la aspiradorase vengaabajo.
8


ALMACENAJEDE LOS
ACCESORIOS:
Retire el cepillo para sacudir o el cepillo para
combinaci6n.Col6quelos firmemente en su lugar de
almacenamientocorrespondiente.
Retire la herramienta para hendidurasdel tubo
girandola.P6ngalaa un lado,
Retire el tubo de extensi6nde la manguera. Gire el
tube hacia la izquierday tire del extremode la
manguera.
inferior
Cermr
bloqueo
,deltubo
Tubo
superior
Desbloquee el tubogirando el aro de bloqueo hasta
la posici6n UNLOCK.
Desliceel tubo inferiordentrodeltubo superior.Gire
el aro de bloqueo del tubo a la posici6n LOCK.
Introduzca la herramienta para hendidurasdentro
del tubo comprimido.Instalebien en su posici6n de
almacenamiento.
AsegL_resede que la unidad este apagada.Inserte
nuevamentela mangueracompletamentedentro de
la abertura ubicadaen la parte inferiorde la
aspiradora,de donde la sac6 inicialmente.
!r,T CUIDADO
NOtirede laaspiradora porlamangueraen
lahabitaci6n.Poddanocurrirdafiosa susper-
tenendas.
MANGUERA DE EXTENSION
ALGUNOS MODELOS
Unos modelos incluyen una mangueraauxiliar que
conectacon ta manguerade estirar en la aspiradora
para una extensi6nmas larga para limpiar.
Manguera
_" _Manguera _J_c r'ca
Conecte la manguera extra a la manguera
de extensi6n apret&ndolas juntas. Est6
seguro que las conexiones el_ctricas estdn
apretadas firmemente juntas.
Para desconectar apriete el bot6n de
soltar en la manguera y sep_.relos.
CUlDADO
Cuando usela mangueraenformanormalo
conla manguerade extensi6ninstalada,la
aspiradoradebemantenersesobreuna
ciefirme almismoniveloa un nivelinferior
que lospiesdel usuario.NO uselesmangue-
rescuandolaaspiradoraest_ a un nivelmds
altoque los piesdel usuario.
POWER-MATE JR.®
Cuando junte el Power-Mate Jr.® a la
manguera de extensi6n apriete juntas y
alinee las conexiones electricas.
Power-Mate Jr.®
Suelte _
_- Conexibn
el_ctrica
Para desconectar apriete el bot6n de
soltar en la manguera y separelos.
CUIDADO
NO conecte Power-Mate Jr.® a la
manguera electdficada con el
poder de la aspimdora ON, SIEM-
PRE desenchufe
CUIDADO
NO deje el Power-Mate Jr.® andando
en un lugar por ning_1nintervalo de
tiempo. Puede dafiar la alfombra.
lO

ACCESORIO
CEPILLO PARA
SACUDIR
HERRAMIENTA PARA
HENDIDURAS
CEPILLOPApA
COMBINACION
AREA A LIMPIAR
Muebles*
X
X
X
X
Entre
coijines*
CortJnas*
X
Escalones
X X
X X
Power-Mate Jr.@ X
Siemprelimpielosaccesoriosantesde usarsobretelas.
Paredes
X
t{
Cepillos
pivotes
_( rillas de alfombras
Guie uno de los cestados
o la parte anterior de la
boquilla a Io largodel
borde de la pared. Los
cepillos pivotesayudan a
limpiar el polvo de los
\ berries de las alfombras.
Escalones
Coloque el mangoenla posici6n vertical. Elagita-
dor para de girar.Use la herramientapara hen-
diduras o el cepillopara telas. Pongael interruptor
encendido/apagadoen laposiei6nON y mueva el
selector encendido/apagadode] agitadora la posi-
ci6n OFF.
ADVERTENCIA
Peligrode lesi6n personal
Act_econ precauci6n sicolocala aspiradora
sobreescalones.Si se cae, podrfacausar
lesi6npersonalodaSoa lapropiedad.
Para obtener los
mejores resultados
de limpieza, man-
tenga desbloquea-
dos los conductos
de flujo de aire.
Examine de vez en
cuando cada una
de las zonas que
se indica podrian
causar bloqueo.
Desconectela
aspiradora del enchufe antes de examinarla.
11

SISTEMA DE PROTECTI6N
DE MOTOR
Protectorde motor
Estaaspiradoratieneunavdlvuladedesviaci6nque
sirvecomoprotectorde motorquese abre
automaticamentepara proveerunflujo de aire al
motor cuando unzueco impidaquecircule el aire al
motor.Si se abre lav&lvula bypass para impedirque
se recalenteel motor yque no haga dafio a la
aspiradora,se notari_,un cambio de sonidomientras
el aire pot la aberturad lavalvula.
Paracorregirel problema:Consulte el cuadro
RECONOCIMIENTODE PROBLEMAS.
NOTA: Lavalvula de
desviaci6npuedeestar
abierta mientrasse usan
los accesorioso para
limpiarunaalfombra
nuevaacausa de un flujo
reducidodeaire porlos
accesorios mismoso por
la pelusade la alfombra
que Ilenelabolsa
rapidamente. Consulteel
cuadro
RECONOCIMIENTODE
PROBLEMAS.
Protector
de motor
Nota:Noobstruye el protector de motor.
ProtectorTermal
Estaaspiradoratieneun protector termal que se
ajusta automaticamentepara protegera la
aspiradoradelsobrecalentamiento.Si una
obstrucci6n impideelflujo normal de aire al motor,el
protectortermalapaga el motor automaticamente
para permitir que el motor se enfrfe a fin de evitar
posibles daflos a la aspiradora.Durante este tiempo
la luz delanterase mantieneprendida.
Paracorregirelproblema: Si esto ocurre,apague la
aspiradoray desenchufeel cordondel tomacorriente
para permitir que la aspiradora se enfriey que el
protectortermalse reajuste. Busquey saquelas
obstrucciones,sies neoesario.Examinetambi_n y
reemplaoeoualquierfiltro obstruido. Espere
aproximadamentetreinta (30) minutosy enchufe la
aspiradora yvolt_elapara ver si el protector del
motor se ha reajustado.Elprotectordel motor no se
reajustard sinose ha apagado la aspiradora aun
cuando laaspiradorase hayaenfriado.
PROTECTOR DE SOBRECARGA
DEL AGITADOR
Bot6n para Reajustar la
Sobrecarga del agitador
El agitadortiene una
protecci6n
incorporadacontra
dafiodel motor en
casode que el
agitadorsetranque.
Si el agitadorse
pone lentoose
detiene, el protector
de sobrecargadel
agitadorapagael
agitador.El motorde
succi6n continuara
funcionando.
Paracorregirel problema: Apague y desenchufela
aspiradora, saque la obstrucci6n,y luego apriete el
bot6n de reajuste.
Para reajustar: Empujeel botonde protecci6nde
sobrecarga del agitador.
INDICADOR DE RENDIMIENTO
ALGUNOS MODELOS
Cuandola unidadeste funcionando con el flujo
normalde aire,el indicador de rendimiento esta
apagado. Se enciende la luz cuandoel flujo de aire
est_ obstruido. Siesto pase, revisela bolsa
disponsiblepara polvo, el filtro de la seguridaddel
motor yotros colocaciones posibles para los
residuosde basura. Vease COMO ELIMINARLOS
RESIDUOSDE BASURA EN LOS CONDUCTOS.
Paracorregir el
problema:Vease
el diagrama
RECONOCI-
MIENTODE
PROBLE-
MAS.
NOTA: Es
posibleque la
luz enciendaal
usar los
accesorios
porque el flujo
de aire es
reducidoporlos
aocesofios.
12

INDICADOR DE POLVO
ALGUNOS MODELOS
El indicadordepolvo y el indicador de sensibilidad
estan Iocalizadosen la parte delantera de la cubier-
ta del indicador.
El indicadorelectrico de polvo es una caracteristica
que avedguael polvo mientras que pasa por la aspi-
radora.
La luz roja indica que la aspiradora aspira el polvo.
La luzverde indica que la mayoria del polvo ya es
aspirada por la aspiradora,
OPERACION
AI pasarla aspiradora, la luz roja del indicadorde
polvo enciendey sigue encendida mientrasque el
indicadoraverigua una concentraci6n alta de polvo
pasandoper la aspiradora.
La luz verde indica que la mayorla de la limpieza
est&completa.
El indicadordepolvo le permite que seleccione la
sensibilidad, Se puede poner el indicador para la
sensibilidaden la posici6n alta (+) o baja (-).
Pongael indicador de polvo en la posici6n
alta (+)cuando:
• Aspirasobre los suelos sin alfombras.
• Aspirasobre una alfombra con el pelo bajo.
Pongael indicadorde polvo en la posici6n
baja (-) cuando: \ ,
• Aspirasobre areas muy sucias.
• Aspirasobre una alfombra con el pelo alto
• Aspirasobre una alfombra nueva.
Con el indicadordepolvo en la posici6n "ON",el
indicadordepolvo averiguar_la pelusade la
alfombra,especialmente en una alfombra nueva que
puedecausar que la luz roja encienda mas tiempo
que normal.
jY
-Control del
indicador de
sensibilidad
I I
Cubierta
de los
controles
E ADVERTENCIA
Peligrode choqueeldctdcoolesiSncorporal
Desconectelaunidadantes de limpiarlao
darleservicio.De Io contradopodrfaprodu-
cirseunchoqueel_trico ocausarlesi6ncor-
poralsilaaspiradoraarrancademanera
imprevista.
PARALIMPIAR LASCELDASOPTICAS
Los6pticos del indicadorde polvo consiste en dos
celdas 6pticas Iocalizadasdentro delcompartimien-
to para la bolsa. De vez en cuando es necesario
limpiar las dos celdas opticas para que funcionen a
su capacidad m_,xima.Se recomiendalimpiar las
celdas 6pticas:
• Cuandose enciende continuamentela luz
roja.
• Cuandose enciende continuamentela luz
verde.
• Cuandose adhieren la tierra o el polvoen las
celdas 6pticas,
• Cuandose cambia la bolsapara polvo.
Para limpiar el indicador, limpielocon un trapo
suave y seco. Nuncause losdetergentes o liquidos
porque ellos pueden ensuciarlo mas rapido las cel-
das opticasy sera necesario limpiarlas mas pronto
que normal. Se alcanza el compartimientopara el
indicadorde polvo per quitar la cubierta de polvoy
la bolsapara polvo.
Celdas
de la bolsa
13

Sigasiempretodaslas instruccionesde seguridad
al limpiary darle servicio a su aspiradora.
E ADVERTENCIA
Peligrode choqueel_trico o lesi6ncorporal
Desconectela unidadantesdelimpiarla o
dadeservicio.De Iocontrariopodrfaprodu-
cirseunchoqueeldctdcoo causarlesi6ncor-
poralsila aspiradoraarrancade manera
imprevista.
Recoja el cordon y enrrollelo en los sujetadores su-
perior e inferior, sin que quede muy apretado.
Guarde laaspiradora bajo techo
en un lugar seco,con el
mange en posici6n vertical.
Desconecteelcord6n electricode la clavija de la
P,f. ADVERTENCIA
Paligro de choqueel_ctdco o lesi6ncorporal
Si enrolla elcord6nmuy apretadopuede ten-
sarlo mucho y causade dafios. De dafiarse, el
cord6n podrfa causar descargas el6ctricasy le-
siones o
dafiospersonales.
pared.NOchoreeaguasobrela aspiradora.
Limpieelexterior con un trapo suavey limpio,que
ha sidoexprimidodespues de remojaren una solu-
cion de agua y detergente liquido ligero.Seque el
exteriorcon un trapo seco despues de limpiar.
Limpielasuperficie exteriordel receptaculoy de los
accesorios para reducirla electricidad estaticay la
acumulaci6nde polvo.
Lave losaccesoriosen agua tibiajabonosa,
enjuague y deje secar al aire.No los laveenlava-
dora de platos.
CUlDADO
No uselos accesoriossiestan mojados.
Losaccesoriosquese utilicen en _reas
sucias, debajo del refrigerador, no deben
usarse en otras superficiessinantes ser
lavados.Podflan dejar marcas.
14

PARA QUITAR LA BOLSA PARA
POLVO
ADVERTENClA
Tire hacia ade-
lantedela lib-
eraci6nsituada
cerca de la parte
superiorde la
cubierta de bolsa.
(3
Cubierta
de la
Liberaci6n de _ I
la cubierta _ "P
de bolsa ----L_"_ j
Cubierta de [[K"_ _
labolsa_
Tire de la cubierta
de la bolsa hacia
el frente.Retirela
y dejela a un lado.
Tomeel collarde la
\.
bolsaparapolvo y tire
concuidado pararetirar
la bolsa para polvo.
Tire la belsa usadaa la
basura.NO la vueiva a
usar.
• Bolsa
para
polvo
I
- Sujetador de Revise el sujetador
la bolsa de la bolsa y el filtro
de seguridad del
Cavidadpara motor.
la bolsa
Si estuvieran
bloqueados,
seguridad consulte latabla de
del motor diagnostico de
problemas.
NUNCA REUTILICE UNA BOLSAPARA
POLVO.Los materiales muyfinos, tales como
desodorantespara alfombras, talco facial,
polvofino,yeso, hollfn, pelusa de alfombras
nuevas, etc., puedenatascar la bolsa y causar
que se rompaantes de que est6 Ilena. Cambie
la bolsamds seguido cuando aspire este tipo
de materiales.
PARA CAMBIAR LA BOLSA
Desdoble la bolsa
para polvo nueva. Bolsapara LengEleta de
Doble la lengt3eta polvol, seguridad
de seguridad de la ._]_._ _/"_,,/
nuevaboisa para
polvoen direcci6n
contraria a la aber-
tura que va en el
sujetador de la
bolsa.
NOTA: Consulte las PII_ZASY CARACTERISTICAS
para determinar el N-°.de la bolsa para polvo.
Inserte labolsa para polvo
completamente sobre el suje-
tador de la bolsa sujetando la
bolsa por el collar.
Coloqueel collar de la bolsa
en posici6n.
Asegerese que la
Leng_etas
bolsa se queda deretencion
detras de las delabolsa_
leng0etas de
retenci6n de cada
lado demostradas
aqui. Aseguresede
que la parte interior
de la bolsa para
polvo este
completamente
dentro de la cavidad para la bolsaantes de instalar
lacubierta de la boisa.
Ranuras
Coloquelacu-
bierta de la bolsa
de maneraque
las pestahasen-
tre en las ranura
de posici6n del
cuerpe.
Cierre la cubierta de _,•
la bolsa.
AI escuchar un
chasquido
caracteristico sera in-
dicaci6n de que la cu-
bierta ha cerrado
bien.
AsegOresede quelabolsa para polvo este instaiada
por completoen la eubiertade bolsa.
15

Examineelfiltrodeseguridaddelmotordevezen
cuandoycambiocuandoestesucio.
! ADVERTENCIA
Peligrode choqueeldctdco
Desenchufeelcord6nde lacordenteeldctrica.
No operelaaspiradorasinel 111trode segud-
daddel motor. Asegduresede que elfiltro
estdsecoe instaladoadecuadamentepara
impedirque el motorfalle y/o que se produzca
unchoqueel6ctrico.
Para quitar la bolsa, siga las instruccionesen CAM-
BIO DE LA BOLSA PARAPOLVO.
FILTRO DE SEGURIDAD DEL
MOTOR
ELECTROSTATICO
1. Este filtro se tiene
que cambiar cuando
este sucio. Debe
cambiarseperiSdica-
mente segen las
condicionesde uso.
El filtro no se puede
lavarpues prderfa su
capacidadpara atra-
par altraparpolvo.
Filtro de
seguridad
NOTA: Consulte las PIEZASY
CARACTERISTICASpara determinar el N°.de la ill-
tro de seguridad del motor.
Filtro de
segurldad
2. Si el filtro,Iocaliza-
do al fondo de la cavi-
dad para la bolsa, esta
sucio,saquelo tirando
de el hacia adelante
por debajo de las es-
trfas.
3. Vuelvaa coIo-
car el filtro
deslizandolode
nuevoensu lugar
debajo de las
estrfas en la cavi-
dad para la bolsa.
Vease CAMBIO DELA BOLSA PARAPOLVOpara
cambiar labolsa.
FILTRODE ESCAPE
HEPA
Noo CUIDADO
pere Inaspiradorasinelfiltrodeescape. I
Este cartuchodel filtro escape se tiene que cambiar
este sucio.Debe cambiarseperiodicamentesegL_n
lascondiciones deuso. El filtro no se puede lavar
pues prdedd su capacidadpara atrapar altrapar
polvo.
Nota:Consulte las PIEZASY CARACTERJSTICAS
para determinar el N°.de la filtro de escape.
Muevahacia abajo
la liberaci6ndel
cubierta delfiltro de
escape. Tire hacia
adelante del cubier-
ta del filtro de
escape para quitar
la cubierta de la
bolsa.
Cubierta de
•,.e.ae,6n eII
la cubierta del _ I ]
fittro de escape _%_1_
Cubiertadel _1_
.,,.o ee.oepe i" l
Cubierta
de la
bolsa ---_
Filtro de
escape-
u%
Quite el cartucho del
filtro escape de la
cubierta de bolsa.
Reemplazca el cartucho
del filtro escape,colocan- Cubierta
dolo con cuidado para de la
que quepa en la cubierta bolse---_
de la bolsa. El filo plomo
del filtro debe estar Filtro de
opuestodeloperario, escape--
EmpujeOnicamenteel
cartucho de filtro,no el
filtro mismo.
Liberaci6n de
la cubierta del
filtro de escape
i
Cubierta del |
filtro _
Reemplazcael
cubierta del filtro
de escape y
empuje hacia
abajo la lib-
eracion para ase-
gurarlo.
16

! ,. ADVERTENCIA
Peligrodechequeel_'trico o lesi6ncorporal
Desconectelaunidadantesde limpiarla o
darleservicio.De Iocontrariopodriapr_lu-
cirseunchequeel6ctdcoo causarlesi6ncor-
poralsllaaspiradoraarrancademanera
imprevlsta.
PARA QUITAR LA BOMBILLA
Lente
\
Ranuras
Observe cuida-
dosamente el
lente de luzen la
ranura de la parte
posterior come se
muestra en ambos
lades. Gire el lente
hacia arriba y lev-
antelo.
CUIDADO
No useuna bombilla de m_sde 9 varies(13
volts). Cuando se uselaaspiradoraper un
largoperiodode tiempo,el calorde la bombil-
lapuedecalentarlaspartesde plasticocerca.
Remueva la bombilla _J
/l ,f
tirandoderecho hacia
afuera.
Para retirar
Para remplacar
Para reemplazar
la ampolleta
cuidadosamente
insertela segu-
ramenta en la
lente.
Nota: Mire PIEZASY CARACTERISTICASpara el
numerode la bombilla.
CUIDADO
I No conecteo encendela aspiradoraantesde
I armadacompletarnente.
Parareemplazarel
lente de luz
coloque laspresil-
las al frente del
lente en las
ranuras.Gire el
lente hacia abajo y
enc_,ietoen eLsitio. Lente
de Luz "
Para un aspirado eficiente, el agitador deber set
mantenido fibrede fibras de alfombra, hilos, o acu-
muLac_Snde pelo. Luego de 7 a 10 uses,des-
enchufey de vuelta la aspiradoray revise el agita-
dor paraver si tiene acumulaci6nde hilos, fibras o
pelo.
Use tijeraspara sacar cualquier acumulacion atera-
da alrededor del agitador.
17

Procedasiempre con precauciones de seguridad al
limpiary dar servicio la aspiradora,
Peligrode choqueel_'trico olesi6ncorporal
Desconectela unidadantes delimpiadao
darleservicio.DeIocontrariopodrfaprodu-
cirseunchoqueal_"tdco ocausarlesi6ncor-
poralsilaaspiradoraarrancade manera
imprevista.
Si considera que la aspiradorano aspira bien
aseg_rese primero de que la bolsa no est_ Ilenay
de que el filtro no este atascado.Consultelas ins-
trucciones sobre CAMBIODE LABOLSA PARA
POLVOy LIMPIEZA DESFILTROS.
Si las zonas del filtro y la bolsa no est&natascadas,
examine la zonade la manguera, Retireel extremo
inferiorde la mangueraexpansiblede la aspiradora
tomandola pot el collar y tirandode haciaarriba.
Extienda y
afloje la
manguera
Enchufe la
aspiradoray
enci6ndala.
Estire al maximo
la mangueray
luego permita
que se encoja
hasta su tamale
normal de alma-
cenamiento.
Inserte nuevamentela mangueraen la aberturade
la parte inferiorde donde la retir6.Empuje confir-
meza para asegurarsede que quede bien conec-
tada.
- Manguera
expansible
Collar de la
rnanguera
ADVERTENClA
Si las areas de la bolsa y del filtro y las#,teasde la
manguera estan libres de obstrucciones,
desconecte la manguera del tubo de la boquilla y
revise si hayresiduos de polvo en la tubo de la
/
boquilla.V_ase LIMPIEZADEL AGITADORpara
limpie el agitador.
Coloque la aspiradoraen la posici6n vertical
antes de conectarla en el enchufe.
18

19

Consulteeste cuadro para encontrar soluciones que usted mismo puede realizar cuandotenga problemas
menores de rendimiento. Cualquier servicio que necesite aparte de otros descritos en este manualtienen que
ser hechos pot un represetantede servicio autorizado.
cirseun choclueelPctricoocausarlesi6ncorporal.
La_piradom
I'_ndona.
Noaspire
sa_fsctonamento.
1. Esta desconectada
2. Cortacircuitos bolado o fusible
quemado en el tablero de serviclo
de la residenc_a.
3. Interruplor de encendido/apagado
no est_ en la posicion ON.
4. Protector lermal activado
I. Bolsa para polvo lena o atascada.
2- Alusle incorreclo de nivel de pelode
la alfombra
3. Agilador desgaslado
4. Boquilla, o sujelador de la botsa, atascada.
5, Manguera atascado.
5, Manguera rola.
7. La manguera no esta bien insertada.
8. ActivaciPn del sistema de proteclion
de] motor
9. FiSros de segundad
1. Conecte bien, oprima selector de
encendido/apagado a la posiciPn ON.
2. Restablezca el corlacircuitos o
cambie el fusible
3. Coloque el interruplor de encendido/
apagado en la posici6n ON.
4. Deje que la aspiradora se enfrie, luego
reajuste el protector termal, (pagina 12)
I. Cambie la bolsa, (pagina 15).
2. ANsle el nivel, (pagina 7)
3. Acuda el Centro de Servicio de Sears
maS cercano.
4. Revise COM(_ ELIMINAR LOS RESIDUOS
DE BASURA EN LOS CONDUCTOS,
(pagina 18)
5, Limpiar tubo para el mugre, (pagina 18)
6. Acuda el Centro de Servicio de Sears
rn_s cercano
7. Inserte bien la manguera, (pagina 10)
8. Determine si exislen bloqueos.
(l_gina 18).
9. Cambie el fillros, (pagina 16)
La aspiradora levanta 1. Alusle incorrecto de nivel de pelo 1. Ajuste el nivel, (pagina 7)
tapetes 0 es diflcul ernpujar, de la alfombra
Laluznofunclona. 1. Bombillafundida 1. Cambielabombilla.(pagina 17)
B ensarn_e del agffador 1. Selector encendido/apagado del agitador 1. Ponga et seleclor en posicion ON,
no gira en posiciPn OFE (p&gina 8).
2- Ponga el asa compieiamenle en 2. Mueva el asa desde ta posi¢ion vertical,
posicion vertical. (pttgina 7).
3. Sobrecarga del agilador activada 3, Reajuste ta sobrecarga del agilador+
(pagina 12)
4. Deje que la aspiradora se enlrie, 4. Seleclor encendido/apagado del agitador
luego reajusle el protector lermal en posicion OFE (p&gina 12)
1. Bolsa para polvo lena o alascada 1. Cambie la botsa, (pagtna 15)
2- Filtros de seguridad 2. Cambie el filtros, (pagina 16)
El indicador de rendimiento, 3. Conduclo de flujo de aire atascado 3. Relire el material bloqueante del
a]gunos conduclo de aire, (pagina 17)
modelos, est_ rojo. 4. Ciertos accesorios 4. Esto es normal La luz debe apagarse al
quSar la herramienla
Restricck_detfluJo 1. El uso de los accesorios ltmita el 1. Revise USO DE LOS
de el uso de los accesorios, flujo de aire. ACCESORIOS, (pagina 8)
Cambiodesonido. 2. Lapelusadeunaallombranueva 2. ReviseCOMOELIMINARLOSRES-
obslruye el paso de a=re IDUOS DE BASURA EN LOS CON-
DUCTOS y Itmpie la manguera, (pagina 18).
Indicador de polvo, 81gunos 1. Celdas 6plicas eslan sublas 1. Limpie las celdas 5pticas, (pagina 13)
modelos, no lunciona.

Your Home
For repair - in your home - of all major brand appliances,
lawn and garden equipment, or heating and cooling systems,
no matter who made it, no matter who sold it!
For the replacement parts, accessories and
owner's manuals that you need to do-it-yourself.
For Sears professional installation of home appliances
and items like garage door openers and water heaters.
1-800-4-MY-HOME ® Anytime, day or night
(1-800-469-4663) (U.S.A. and Canada)
www.sears.com www,sears.ca
Our Home
iii!iili!ii!i!i!ili¸!i
_i_ii!i_i__
For rep_airof carry-in products like vacuums, lawn equipment,
__r_delectronics, call or go on-line for the nearest
Sears Parts and Repair Center.
1-800-488-1222 Anytime, day or night (U.S.A. only)
www.sears.com
To purchase a protection agreement (U.S.A+)
or maintenance agreement (Canada) on a product serviced by Sears:
1-800-827-6655 (U.S.A.)
1-800-361-6665 (Canada)
Para pedir servicJo de reparacion
a domicilio, y para ordenar piezas:
t-888-SU-HOGAR sM
1-888-784-6427)
Au Canada pour service en fran_ais:
1-800-LE-FOYER Mc
(1-800-533-6937)
www.sears.ca
SEARS
© Sears, Roebuck and Co.
® Registered Trademark / TMTrademark / SMService Mark of Sears, Roebuck and Co,
® Marca Registrada / TMMarca de F&brica / s_ Marca de Servicio de Sears, Roebuck and Co.
MCMarque de commerce / MOMarque deposee de Sears, Roebuck and Co.
-
 1
1
-
 2
2
-
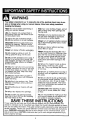 3
3
-
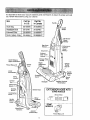 4
4
-
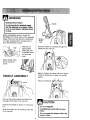 5
5
-
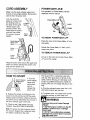 6
6
-
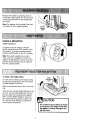 7
7
-
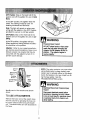 8
8
-
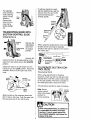 9
9
-
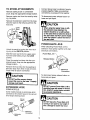 10
10
-
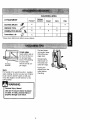 11
11
-
 12
12
-
 13
13
-
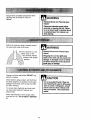 14
14
-
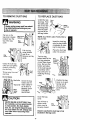 15
15
-
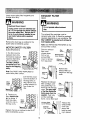 16
16
-
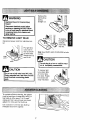 17
17
-
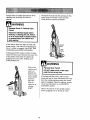 18
18
-
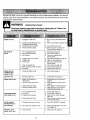 19
19
-
 20
20
-
 21
21
-
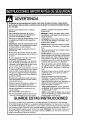 22
22
-
 23
23
-
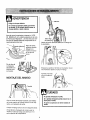 24
24
-
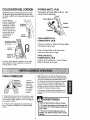 25
25
-
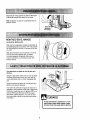 26
26
-
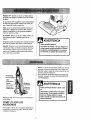 27
27
-
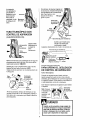 28
28
-
 29
29
-
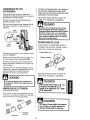 30
30
-
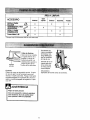 31
31
-
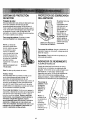 32
32
-
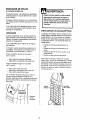 33
33
-
 34
34
-
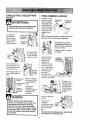 35
35
-
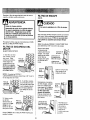 36
36
-
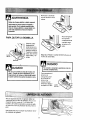 37
37
-
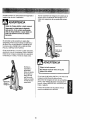 38
38
-
 39
39
-
 40
40
-
 41
41


Kenmore 116.33923 El manual del propietario
- Categoría
- Aspiradoras
- Tipo
- El manual del propietario
- Este manual también es adecuado para
en otros idiomas
- English: Kenmore 116.33923 Owner's manual
Artículos relacionados
-
Kenmore 116.34925 Manual de usuario
-
-
-
-
Kenmore 116.32720 El manual del propietario
-
-
-
Kenmore 116.31150 Manual de usuario
-
-