Motorola MOTO Q 9H - ATT Manual de usuario
- Categoría
- Teléfonos móviles
- Tipo
- Manual de usuario
Este manual también es adecuado para

O
User Guide
Some of the contents in this
manual may differ from your phone
depending on the software of the
phone or your service provider.
Pantone 415
CMYK 00/00/12/41
Pantone 2925c
CMYK 85/24/00/00
9h
MOTO
9h
MOTO
Guía del
usuario
Alguna de los contenidos de este
manual puede tener variaciones
con el telefono dependiendo del
software o de proveedor de servicio.


1
HELLOMOTO
Technology promised to make things easier...but then it gave you more to do—phone calls, emails, music, photos,
videos, the Internet, and more.
It’s time to take back control.
It’s time to meet the MOTO Q™ 9h.
My Phone, My Way—
Use photos for your wallpaper, use your songs for your ringtones, use new programs that
you load onto your phone...you get the idea.
Anytime Entertainment—
Load video and music files to make a media library that goes anywhere.
Working Remotely—
Check email and edit Microsoft® Office documents anywhere in the world.
Help & QuickStart Tour—
On-phone help is available anytime. Just press
Start
>
System Tools
>
Help and QuickStart
.
For more:
att.com/tutorials

2
what’s in the box?
Thank you for purchasing
the MOTO Q™ 9h.
Take note of the components in
the box, pictured on the right.
To get started, we recommend
the following:
•
Carefully follow the
step-by-step Instructions
in this guide to set up
your MOTO Q 9h phone.
•
To learn more or if you
need help with your
MotoQ 9h, review the
user's guide on the
Getting Started Disc or
visit
att.com/tutorials
.
AT&T
Staff Meeting
10:00 AM Meeting Room A
Profile: Normal
12:00 PM
12/31/2008
Start Contacts
Getting Started Disc
(includes User’s Guide and
synchronization software)
Charger
BT90 Extra
Capacity Battery
and
cover
and
Cover
BT60 Standard
Battery
Micro-to-Mini USB
Adapter
Micro USB to 3.5mm
Headset Adapter
USB Data Cable
MOTO Q™ 9h

3
Introducing your new
MOTO Q™ 9h
wireless phone! Here’s a quick anatomy lesson.
Navigate menus. Select highlighted
items.
Open your
messages.
Turn on & off, hang
up, exit menus.
Side Scroll Keys
Go back one
screen.
Enter a new line in
messages.
Capitalize letters.
Side Select Key
Right Soft Key
Speakerphone/Voice
Recognition Key
Open the camera.
Open AT&T Music.
Make & answer
calls.
Hold to open a
quick list of options.
Left Soft Key
Go online.
Function Key
Open your calendar. Open your contact
list.
Microphone

4
To avoid damaging your phone, carry it in an approved holster or case rather than a pocket, purse, or bag.
2.0 MEGAPIXELS
8X DIGITAL ZOOM
Charge and connect
micro USB phone
accessories
Insert MicroSD
memory card
Camera Lens
Camera Flash
Storage Card Slot
Battery Door Release
Speakers

5
From the home screen, press
Start
to open the main menu.
If you need help while using your phone, visit
att.com/tutorials
.
AT&T
Staff Meeting
10:00 AM Meeting Room A
Profile: Normal
12:00 PM
12/31/2008
Start Contacts
Messaging Contacts Calendar ActiveSync
ATT Music Cellular Video MEdia Net
ATT Mall
More
Start
Menu
Start
Home Screen Menu Screen
Press and release
the
Power Key
O
to turn on your
phone.
1
Press
Start
(the left
soft key) to open the
main menu.
2
Press the Navigation
Key
up, down, left, or
right
(
S
) to
highlight a menu
feature.
3
Press the
Center Key
s
to
select the
highlighted feature.
4
Tip:
Press the
Back Key
n
to go back one menu.
Press the
Power Key
O
to
exit any menu or view
without saving any changes.

6
Motorola, Inc.
Consumer Advocacy Office
1307 East Algonquin Road
Schaumburg, IL 60196
www.hellomoto.com
1-800-331-6456 (United States)
1-888-390-6456 (TTY/TDD United States for hearing impaired)
1-800-461-4575 (Canada)
Certain mobile phone features are dependent on the capabilities
and settings of your service provider’s network. Additionally,
certain features may not be activated by your service provider,
and/or the provider’s network settings may limit the feature’s
functionality. Always contact your service provider about feature
availability and functionality. All features, functionality, and other
product specifications, as well as the information contained in this
user’s guide are based upon the latest available information and
are believed to be accurate at the time of printing. Motorola
reserves the right to change or modify any information or
specifications without notice or obligation.
MOTOROLA and the Stylized M Logo are registered in the US
Patent & Trademark Office. All other product or service names are
the property of their respective owners. The Bluetooth trademarks
are owned by their proprietor and used by Motorola, Inc. under
license. Microsoft, Windows and Windows Me are registered
trademarks of Microsoft Corporation; and Windows XP is a
trademark of Microsoft Corporation.
AT&T, AT&T logo and Your World. Delivered. are trademarks of
AT&T Knowledge Ventures.
© Motorola, Inc. 2007.
Caution:
Changes or modifications made in the radio phone, not
expressly approved by Motorola, will void the user’s authority to
operate the equipment.
Manual Number: 6809511A95-O

contents
7
contents
what’s in the box? . . . . . . . . . . 2
start menu . . . . . . . . . . . . . . . . 9
essentials . . . . . . . . . . . . . . . . 10
about this guide. . . . . . . . . . 10
SIM card . . . . . . . . . . . . . . . 11
battery . . . . . . . . . . . . . . . . . 11
turn it on & off . . . . . . . . . . . 15
make a call . . . . . . . . . . . . . 15
answer a call . . . . . . . . . . . . 16
store a phone number. . . . . 16
call a stored number . . . . . . 17
your phone number . . . . . . . 17
tips & tricks . . . . . . . . . . . . . . 18
basics . . . . . . . . . . . . . . . . . . . 19
display . . . . . . . . . . . . . . . . . 19
text entry. . . . . . . . . . . . . . . 21
volume. . . . . . . . . . . . . . . . . 23
handsfree speaker . . . . . . . . 23
lock & unlock phone. . . . . . . 24
personalize . . . . . . . . . . . . . . . 26
profiles. . . . . . . . . . . . . . . . . 26
time & date . . . . . . . . . . . . . 27
home screen . . . . . . . . . . . . 27
backlight. . . . . . . . . . . . . . . . 29
answer options . . . . . . . . . . 29
third-party applications . . . . 29
task manager. . . . . . . . . . . . 30
calls . . . . . . . . . . . . . . . . . . . . . 31
turn off a call alert . . . . . . . . 31
recent calls . . . . . . . . . . . . . 31
redial . . . . . . . . . . . . . . . . . . 32
view missed calls . . . . . . . . 32
caller ID . . . . . . . . . . . . . . . 32
emergency calls. . . . . . . . . 33
international calls . . . . . . . . 34
speed dial. . . . . . . . . . . . . . 34
voicemail . . . . . . . . . . . . . . 35
three-way calling . . . . . . . . 36
messaging. . . . . . . . . . . . . . . 37
set up personal email. . . . . 37
set up corporate email . . . . 39
read a message . . . . . . . . . 41
messaging shortcuts . . . . . 43
send a message. . . . . . . . . 43
global address look up . . . . 44
messaging quick
reference . . . . . . . . . . . . . . 45
instant messaging . . . . . . . 49

8
contents
connections . . . . . . . . . . . . . . 50
Bluetooth® wireless. . . . . . 50
synchronize. . . . . . . . . . . . . 54
AT&T Communication
Manager . . . . . . . . . . . . . . . 56
web browser. . . . . . . . . . . . 58
entertainment . . . . . . . . . . . . 60
take & send a photo . . . . . . 60
record & play video clip. . . . . 61
AT&T Music™ portfolio. . . . 64
insert a memory card . . . . . 68
copy files from your
computer . . . . . . . . . . . . . . 69
file manager . . . . . . . . . . . . 70
flight mode . . . . . . . . . . . . . 70
other features . . . . . . . . . . . . 71
advanced calling . . . . . . . . . 71
contacts . . . . . . . . . . . . . . . 72
personal settings. . . . . . . . . 74
call times. . . . . . . . . . . . . . . 77
handsfree . . . . . . . . . . . . . . 78
calendar. . . . . . . . . . . . . . . . 78
calculator. . . . . . . . . . . . . . . 80
security . . . . . . . . . . . . . . . . 80
phone information . . . . . . . . 80
fun & games . . . . . . . . . . . . 80
service & repair . . . . . . . . . . . 82
index . . . . . . . . . . . . . . . . . . . . 83

start menu
9
start menu
main menu
To open the menu from the home screen,
press
Start
(the left soft key).
&
Messaging
• Text Messages
• Outlook E-mail
•MMS
• New E-mail Account
%
Calendar
(
Contacts
A
ActiveSync
Æ
AT & T Mus i c
• Windows Media Player
• Shop Music
•Music ID
• Streaming Music
• Music Videos
• The Buzz
• Community
• Music Apps
È
Cellular Video
Ë
MEdia Net
É
AT & T Mal l
Ë
IM & Email
Å
Call History
Ì
Office Tools
•Calculator
• McAfee VirusScan
• Tasks
•Voice Notes
Í
My Stuff
• My Device
• My Documents
• My Pictures & Videos
• Notes
• Storage Card
• Personalize My Q
Î
Games
!
Opera
Ê
Applications
•Camera
• File Manager
• Internet Explorer
• MyCast Weather
• Speed Dial
• Bluetooth
• Documents To Go
• Get Apps
• More Apps
9
System Tools
• Help and QuickStart
• Master Clear
• Master Reset
• Memory Manager
• Settings
• Task Manager
This is the standard menu layout.
Your
phone’s menu may be different.
To select menu items, press your
navigation key up, down, left, or right.

10
essentials
essentials
about this guide
Press the left and right soft keys to open menus and
select options. Use the navigation key
S
to scroll to
items, and press the center key
s
to select them.
This guide shows how to locate a menu feature as
follows:
Find it:
Press
Start
>
Call History
> (received call)
This means that, from the home screen:
1
Press the
left soft key
to open the
Start
menu.
2
Press the navigation key
S
to scroll to
Å
Call History
. Press the center key
s
to select
Call History
.
3
Press the navigation key to scroll to a received
call. Press the center key to select the call.
Tip:
You can press the side scroll keys to scroll up
and down, and press the side select key to select
items (see page 1 for side key locations).
Left Soft Key Right Soft Key
Center KeyNavigation
Messaging
Power
Back
MEdia Net
Call/Answer
Home
symbols
This means a feature is
network/subscription dependent and may
not be available in all areas. Contact your
service provider for more information.

11
essentials
SIM card
Yo u r Subscriber Identity Module (SIM) card contains
personal information like your phone number and
contacts entries. It can also contain your voicemail,
text message, and Internet access settings. If you put
your SIM card in another phone, that phone uses your
phone number.
Caution:
Don’t bend or scratch your SIM card. Keep it
away from static electricity, water, and dirt.
To insert and use a
memory card
, see page 68.
Turn off your phone and remove your battery
before you install or remove a SIM card.
battery
Battery Use & Battery Safety
• Motorola recommends you always use
Motorola-branded batteries and chargers.
The warranty does not cover damage caused
by non-Motorola batteries and/or chargers.
Caution:
Use of an unqualified battery or
This means a feature requires an optional
accessory.
symbols
12
34

12
essentials
charger may present a risk of fire, explosion,
leakage, or other hazard. Improper battery
use, or use of a damaged battery, may result
in a fire, explosion, or other hazard.
•
Battery usage by children should be
supervised.
• Important:
Motorola mobile devices are
designed to work best with qualified batteries.
If you see a message on your display such as
Invalid Battery
or
Unable to Charge
, take the following
steps:
•
Remove the battery and inspect it to
confirm that it bears a Motorola “Original
Equipment” hologram;
•
If there is no hologram, the battery is not
a qualified battery;
•
If there is a hologram, replace the battery
and retry charging it;
•
If the message remains, contact a
Motorola Authorized Service Center.
•
New batteries or batteries stored for a long
time may take more time to charge.
• Charging precautions:
When charging your
battery, keep it near room temperature. Never
expose batteries to temperatures below 0°C
(32°F) or above 45°C (113°F) when charging.
Always take your mobile device with you
when you leave your vehicle
•
When storing your battery, keep it in a cool,
dry place.
•
It is normal over time for battery life to
decrease, and for the battery to exhibit shorter
runtime between charges or require more
frequent or longer charging times.
• Avoid damage to battery and mobile
device.
Do not disassemble, open, crush,

13
essentials
bend, deform, puncture, shred, or submerge
the battery or mobile device. Avoid dropping
the battery or mobile device, especially on a
hard surface. If your battery or mobile device
has been subjected to such damage, take it to
a Motorola Authorized Service Center before
using. Do
not
attempt to dry it with an
appliance or heat source, such as a hair dryer
or microwave oven.
• Use care when handling a charged
battery
—particularly when placing it inside a
pocket, purse, or other container with metal
objects. Contact with metal objects (such as
jewelry, keys, beaded chains) could complete
an electrical circuit (short circuit), causing the
battery to become very hot, which could
cause damage or injury.
Promptly dispose of used batteries in
accordance with local regulations. Contact
your local recycling center for proper battery
disposal.
Warning:
Never dispose of batteries in a fire because
they may explode.
battery installation
Note:
Yo u r
MOTO Q™ 9h
comes with two batteries
and two battery covers. The BT60 standard battery
uses the narrow cover, while the BT90 extended
capacity battery requires the larger cover.
12

14
essentials
battery charging
New batteries are not fully charged. Plug the battery
charger into your phone and an electrical outlet.
Your phone
might take
several
seconds to
start
charging the
battery.
During charging, the area around the navigation key
will light up. When charging is complete, your display
shows a full battery icon
^
.
Tip:
Relax, you can’t overcharge your battery. It will
perform best after you fully charge and discharge it a
few times.
You can also charge your battery with a
USB cable
plugged into a computer, unless your battery is
completely drained. Use a wall charger or car charger
for completely drained batteries. Install the software
from your Getting Started disc onto your PC before
you try to charge your phone through USB port. Plug
the cable into a powered USB hub or port, since some
USB devices (such as keyboards) might not supply
enough power for charging.
conserving battery life
•
To set how long your phone waits before the
backlight
turns off, press
Start
>
System Tools
>
Settings
>
More...
>
Power Management
>
Backlight time
out on battery
or
Backlight time out on AC
. When the
backlight is off, the display is visible but dim.
•
To close unused programs, from the home
screen, press
Start
>
System Tools
>
Task Manager
.
Select the program and press
Menu
>
Kill
.
•
To extend
email send/receive intervals
,
press
R
, select an email account,
press
Menu
>
Settings
, and press
Next
until
you can change the
Automatic Send/Receive
charging
empty
full

15
essentials
interval
. If you have more than one email
account set up, choose only one account to
automatically send/receive messages.
turn it on & off
To turn on your phone
,
press and release
O
.
If prompted, enter your
unlock code (see
page 24).
Tip:
In the event that your phone doesn’t power up
normally, or freezes on a screen, be sure that the
battery is fully charged. If it is, remove and replace the
battery, then turn the phone back on. If these do not
help, you can do a
hard reset
to restart your phone,
but this erases your personalized settings and any
content stored in phone memory. To perform a hard
reset, remove and replace the battery, then hold down
the
*
and
E
keys for 5 seconds while turning the
phone on.
To turn off your phone
, press and hold
O
for
3 seconds, then
release
it.
make a call
From the home screen, enter a phone number and
press
N
to make a call.
To voice dial, press and hold
h
in your home screen.
When prompted, say “Call,” followed by a number or
contact name.
To turn off wireless coverage (such as on an airplane),
press and hold
X
until the quick list appears, then
select
Wireless Manager
>
All
.

16
essentials
answer a call
When your phone rings and/or vibrates, press
N
to
answer. To “hang up,” press
O
.
•
If you are busy when a call comes in, press
Ignore
to send the call directly to voicemail.
•
To put a call on hold, press
N
. To return to
the call, press
N
again.
•
If you are on a call and another call comes in,
you can press
Ignore
to send the new call
directly to voicemail or press
N
to answer it
and put the current call on hold (press
N
to
switch between the two calls).
store a phone number
Find it:
Press
Start
>
Contacts
and press
New
1
Choose whether the contact will be stored on
your phone (Outlook contact) or your SIM card.
Contacts on the SIM card can only include a
name and number.
2
Enter information for the contact.
Tip:
While you are entering the number, you can
tell your phone to pause and then dial more digits
(such as a voicemail password or PIN). Press
Menu
>
Insert Pause
to insert a 2-second pause (shows as
a
p
) or press
Menu
>
Insert Wait
to tell your phone to
wait for you to press the center key
s
before
dialing the remaining digits (shows as a
w
).
Insert Wait
does not work for contacts stored on
your SIM card.
Tip:
If you get a call from someone who isn't in your
list of contacts, you can create a contact from
Call History
. Just highlight the call and press
Save
.
To load the contacts from your last phone
, just
insert the SIM card from your last phone (see
page 11). Your MOTO Q 9h reads any contacts your
last phone stored on the SIM. If there aren’t any

17
essentials
contacts on your SIM, check your old phone’s manual
to see if you can copy its contacts to the SIM or to
Microsoft® Outlook on your computer.
To load Microsoft Outlook contacts from your
computer
, use Microsoft ActiveSync or
Windows® Mobile Device Center, as described on
page 54.
call a stored number
Find it:
Press
Start
>
Contacts
1
Scroll to the number.
2
Press
N
.
Your phone calls the contact’s default number.
Tip:
If you stored more than one number for a contact,
select the contact to see the other numbers. To dial a
number, scroll to it and press
N
.
your phone number
To view your phone number and voicemail service
number, press
Start
>
System Tools
>
Settings
>
Phone
>
Call Options
.
Note:
You can’t store a pause (
p
) or wait (
w
) character
in your voicemail number. If you want to add one or
two pauses followed by your password, so that your
password is entered automatically, create a contact
for your voicemail number and use the contact to call
your voicemail (see page 16).

18
tips & tricks
tips & tricks
From the home screen
(shown on page 19), you can
use the following shortcuts:
To... Do this...
lock phone
Press
X
then
f
. To unlock it,
press
Unlock
then
*
(see
page 24).
open your
music,
messages,
and more
Use shortcut keys to access your
AT&T Music
[
, camera
e
,
contacts
e
, calendar
d
,
messages
R
, and
MEdia Net
@
.
open quick
options
Press and hold
X
.
play music or
games on an
airplane
To keep playing games and music
on a flight, turn off your network
and Bluetooth® services. Press
and hold
X
until the quick list
appears, then select
Wireless Manager
>
All
.
personalize
your device
Press
Start
>
My Stuff
>
PersonalizeMyQ
to customize
sounds, home screen, sounds,
soft keys and more.
use the
speakerphone
During a call, press
h
to turn
the speakerphone on or off.
To... Do this...

19
basics
basics
See page 3 for a basic phone diagram.
display
The home screen appears when you turn on the
phone. To dial a number from the home screen, press
number keys and
N
.
Note:
Your home screen may look different than this
one.
Soft key labels show the current soft key functions.
For soft key locations, see page 1.
Press the navigation key
S
up, down, left, or right to
scroll to basic menu items or text in the home screen.
Press
X
to return to the home screen.
AT&T
Staff Meeting
10:00 AM Meeting Room A
Profile: Normal
12:00 PM
12/31/2008
Start Contacts
Center Key
NavigationLeft Soft
Key
Right Soft
Key
MEdia Net
Back
Enter
Caps
Speaker
(press) or
Voice
Recognition
(hold)
CameraAT&T MusicSpace
Function
Calendar
Contacts

20
basics
Status indicators can appear at the top of the home
screen:
1 Missed Call Indicator –
Shows
E
when
you missed a call.
2 Voicemail Indicator –
Shows
w
when
you have new voicemail.
3 Message/Bluetooth Indicator –
Shows
C
when you receive a new email
or text message. Shows
E
when
Bluetooth power is on.
4 Call Forward Indicator –
Shows
D
when call
forwarding is on.
5 Network Indicator –
Shows
whether
your are using a 3G
k
, GPRS
f
, or
EDGE
\
network.
6 Profile Indicator –
Shows when your ring style is
set to
Silent
(
Q
) or
Vibrate
(
<
). No indicator
appears when the ring style profile is
Normal
,
Outdoor
,
or
Automatic
.
Note:
A
%
appears when the speakerphone is on
(see page 23).
7 Battery Level Indicator –
Vertical bars show the
battery charge level. Recharge the battery when
your phone shows one or two bars.
5
. Network 7. Battery
Level
6. Profile 8. Signal
Strength
4. Call
Forward
3. Message /
Bluetooth
2. Voicemail1. Missed
Call

21
basics
8 Signal Strength Indicator –
Vertical bars
show the strength of the network
connection. You can’t make or receive calls when
no vertical bars appear. Letters indicate a
3G
k
,
GPRS
f
, or EDGE
\
connection, and arrows
above the signal strength indicator can signify
data transfer to the phone.
text entry
You can enter text and numbers using the keypad.
When you select a field that requires text or numbers,
the phone automatically selects the appropriate entry
mode. An indicator at the top right of the display
shows the entry mode you are currently using.
Press
Menu
to open the
sub-menu.
Flashing cursor
indicates insertion
point.
Press
H
to switch entry modes. For indicator
descriptions, see the following section.
Send
Text Messages
To:
0/160
Menu

22
basics
Press
H
in a text entry
view to select an entry
mode:
To
delete
characters, press
n
. Hold
n
to keep
deleting.To start a
new line
, press
j
.
text prediction
As you enter letters, your phone
might try to
predict
the word. For
instance, it might predict
“program” when you enter “prog”.
To accept the prediction, press
S
right. To see
alternate predictions,
hold
the down arrow on
S
.
To enter a space after your characters (such as
“prog”), press
f
.
In a message, press
Hk
>
Setup
to
turn off
text
prediction, change its language, or clear its memory of
the words you’ve used.
entry modes
i
Enters the
letter
shown on a key
(such as
Q
). To capitalize the next letter,
press
k
once. to capitalize all letters,
press
k
twice.
Ã
Enters a
symbol or number on the next
key
pressed (such as
!
), then changes to
the
i
mode to enter letters.
Ä
Enters
only symbols and numbers
on
the keys until you press
H
again. To
choose from a list of international
characters and other symbols, press
H
then
k
.
program

23
basics
volume
To set the
master
volume
, press
and hold the
side select key
in the home
screen until the volume setting appears. Press the
side volume keys to change the volume. The master
volume can silence your ringer and all other sounds,
except for the other caller’s voice.
To
adjust volume during a call
, press the
side volume keys.
Note:
Bluetooth® accessories, such as headsets,
have their own volume controls.
To ch ang e yo u r
ringer and sound profile
from the
home screen, scroll to and select
Profile
. Choose from
Normal
,
Silent
,
Vibrate
and others.
Tip:
To silence your phone when it’s ringing, just press
the side volume keys.
To change the
sounds for alerts or other events
,
press
Start
>
System Tools
>
Settings
>
Sounds
. Select an event
and choose a sound for it.
handsfree speaker
Note:
The use of wireless phones while driving may
cause distraction. Discontinue a call if you can’t
concentrate on driving. Additionally, the use of
wireless devices and their accessories may be
prohibited or restricted in certain areas. Always obey
the laws and regulations on the use of these products.
You can use your phone’s handsfree speaker on calls
without holding the phone to your ear.
During a call, press
h
to turn on the handsfree
speaker. A
%
at the top of your display indicates the
Volume Up
Volume Down
Back Key
Side Select Key

24
basics
speaker is on. To turn it off, press
h
again or end
the call.
Note:
The handsfree speaker won’t work when your
phone is connected to a car kit or headset.
lock & unlock phone
You can manually lock your phone to prevent
accidental keypresses
To
lock your phone
, press
X
then
f
. Your left
soft key becomes
Unlock
.
To
unlock your phone
, press
Unlock
and enter your
password. Your phone uses
*
if you have not set a
password.
To
keep others from using your phone
, change your
password:
Find it:
From the home screen, press
Start
>
System Tools
>
Settings
>
More...
>
Security
>
Device Lock
1
Check the
Prompt if device unused for
checkbox, and
select the amount of time for the phone to be
inactive before automatically locking.
2
Choose a password type that is either simple
(4-digit number) or strong alphanumeric (a
hard-to-guess password with at least 7
characters, including uppercase and lowercase
letters, numerals, and punctuation).
Tip: Choose a password you will remember
.
Without your password, you can do a
hard reset
on your phone, but you will lose your personalized
settings and all content stored in phone memory.
To do a hard reset, hold down the
*
and
E
keys
for 5 seconds while turning the phone on.

25
basics
3
Enter and confirm your password.
4
Press
Done
.
To unlock the phone, press
Unlock
. When you see the
unlock prompt, enter your password and press
Done
.
Note:
You can make emergency calls (such as 911 in
the United States, as described on page 33) on a
locked phone. A locked phone still lets you answer
incoming calls.

26
personalize
personalize
profiles
Each profile uses a different set of sounds, ring styles,
earpiece volume settings, or vibrations for incoming
calls and other events. For example, the
Outdoor
profile
volume is much louder than the
Normal
profile.
Find it:
On the home screen, scroll and select
Profile:
> profile style name
Indicators can appear at the top of your home screen
for the
Silent
(
Q
) and
Vibrate
(
<
) profiles. A
%
means
the speakerphone is on (see page 23). Your phone’s
master volume affects your ring volume (see page 23).
Note:
The
Automatic
profile is the same as
Normal
, except
that it automatically switches to
Vibrate
during any event
stored in your calendar.
change ring tones
You can change the ring tones for incoming calls and
other events.
Find it:
Press
Start
>
My Stuff
>
Personalize My Q
>
Sounds and Ringtones
Note:
Changes made to the alert settings will have no
effect when using the
Silent
profile.
1
Scroll and highlight the sound you want to
change, then press the navigation key
S
right or
left to change it.
2
Press the
Done
key to save the sound setting.
Normal Vibrate Automatic
Silent Outdoor

27
personalize
If you download
a sound file for a ring tone, it does
not automatically save in the
Sounds
location. To move
your sound file, press
Start
>
Applications
>
File Manager
>
My
Documents
. Highlight the sound file you want to copy to
the
Sounds
location, press
Menu
>
File
>
Copy to
and select
Application Data
>
Sounds
. If the sound file is not located in
the My Documents folder, go to the folder where the
sound file is stored and copy it to the
Sounds
folder.
Some networks limit the
size of file
that you can use
for a ring tone.
time & date
Your service provider usually sets the time and date on
your phone. To change it manually:
Find it:
Press
Start
>
System Tools
>
Settings
>
Clock & Alarm
>
Date and Time
1
In
Time Zone
, use the navigation key
S
to select
your time zone.
Note:
Update your time zone when you travel, to
make sure your phone’s calendar events appear at
the right time.
2
In
Date
, edit the month, day, or year.
3
In
Time
, edit the hour, minute, and second.
4
Press
Done
to save the clock and date settings.
You can specify the date and time style by changing
the regional settings. Press
Start
>
System Tools
>
Settings
>
More
>
More
>
Regional Settings
.
home screen
Set a photo or picture as a wallpaper (background)
image or change your layout and color scheme on your
home screen.

28
personalize
Find it:
Press
Start
>
My Stuff
>
Personalize My Q
>
Home Screen
change background image
Want to copy an image from your PC to your phone to
use as a background image?
Note:
Your PC must have must have
Microsoft® Windows® Mobile Device Center (on a
PC running Windows Vista) or you must install
Microsoft ActiveSync on your PC as described on
page 54.
1
Connect the phone to your PC. Your PC should
confirm the connection.
2
On your PC, copy the image file you want. The file
format must be .gif, .jpg, or .bmp.
3
In ActiveSync on your PC, select Explore and
double-click My Windows® Mobile device.
4
Double-click My Documents, then double-click
My Pictures and paste the image into that folder.
Note:
If you download a picture file for a
wallpaper, it might not automatically save in the
My Pictures
folder. To move your picture file, press
Start
>
Applications
>
File Manager
>
My Documents
. Highlight
the picture file you want to copy to the My
Pictures location, press
Menu
>
File
>
Copy to
and
select
My Documents
>
My Pictures
. If the picture file is
not located in the
My Documents
folder, go to the
options
Home Screen
Layout
Select a layout for the home screen.
Color Scheme
Select a color scheme for the display.
Background
Image
Select a picture for your wallpaper
image, or
Default
for default wallpaper.
Time out
Select the time interval before the
display returns to the home screen, or
Never
.

29
personalize
folder where the picture file is stored and copy it
to the
My Pictures
folder.
backlight
Your phone automatically adjusts the display
brightness when you move between bright and dark
environments. To save battery life, your backlight turns
off when you’re not using your phone. The backlight
turns back on when you press a key. To set how long
your phone waits before the backlight turns off:
Find it:
Press
Start
>
System Tools
>
Settings
>
More
>
Power Management
>
Backlight time out on battery
or
Backlight time
out on AC
answer options
To use
any key
to answer an incoming call, press
Start
>
System Tools
>
Settings
>
Phone
>
Call Options
>
Any key answer
.
third-party applications
Third-party applications, or add-on programs, can
include email, security, mobile office, entertainment,
and productivity software. These products can
typically be downloaded and installed immediately.
Compatible commercial and free applications are
available on the Internet. For more information see the
downloads available on
att.com/cell-phone-service/ringtones_media
Note:
Applications written for previously released
devices or older versions of Windows Mobile may not
function reliably on this phone. Contact the application
provider to check compatibility before installing the
application on this phone.

30
personalize
task manager
Want to see what programs are running (active) on
your phone? Use the Task Manager to see the
programs, or stop a specific program from running.
Find it:
On the home screen, press
Start
>
System Tools
>
Task Manager
Tip:
Need to stop running program? In
Task Manager
,
select the program and press
Menu
>
Kill
.
Note:
If you want to completely remove a program
from your phone, from the home screen, press
Start
>
System Tools
>
Settings
>
More
>
Remove Programs
.

31
calls
calls
To make and answer calls, see page 15.
turn off a call alert
You can use the side scroll keys to turn off the ringer
before answering the call.
recent calls
Your phone keeps a list of incoming and outgoing
calls, even for calls that didn’t connect. The most
recent calls are listed first. The oldest calls are deleted
as new calls are added.
Find it:
Press
Start
>
Call History
Highlight a call, then:
•
To call the number, press
N
.
•
To see call details (like time and date), press
the center key
s
.
•
To s e e
Menu Options
, press
Menu
from the
Call History
view. This menu includes:
options
Find Contact
Find this phone number in your
Contacts
.
Send Text
Message
Send a text message to this phone
number.
E-mail
Send an email message to this
contact.
View Timers
View the call times for this call and all
calls.
Delete
Delete this call from the
Call History
.

32
calls
redial
1
Press
N
from the home screen to see the
calls list.
2
Highlight the entry you want to call, then
press
N
.
view missed calls
Your phone keeps a record of your unanswered calls.
1
Press
Start
>
Call History
.
2
Press
Menu
>
Filter
>
Missed Calls
.
caller ID
Calling line identification (caller ID) shows the
phone number for an incoming call on your
home screen.
Your phone shows the caller’s name and picture when
they’re stored in your contacts, or
Incoming Call
when
caller ID information isn’t available.
You can set your phone to play a distinctive ringer ID
for specific entries stored in your contacts (see
page 72).
Delete List
Delete all calls from the
Call History
.
Save to
Contacts
Save this number to a contact.
Send MMS
Send a message to this number.
Filter
Filter all calls in the
Call History
list. For
example, if you filter the list for all
Missed Calls
, it will only show the
incoming phone calls that you did not
answer.
options

33
calls
emergency calls
Your service provider programs one or more
emergency phone numbers, such as 911 or 112, that
you can call at any time, even when your phone is
locked or the SIM card is not inserted.
Note:
Check with your service provider, as emergency
numbers vary by country. Your phone may not work in
all locations, and sometimes an emergency call cannot
be placed due to network, environmental, or
interference issues. Do not solely rely on your
wireless phone for essential communications such as
medical emergencies.
1
Press the keypad keys to dial the emergency
number.
2
Press
N
to call the emergency number.
AGPS & emergency calls
When you make an emergency call, your
phone can use Assisted Global Positioning
System (AGPS) satellite signals to tell the emergency
response center your approximate location.
The AGPS feature has limitations, so always tell the
emergency response center your best knowledge of
your location. Remain on the phone for as long as the
emergency response center instructs you.
AGPS
might not work
for emergency calls if your
local emergency response center does not process
AGPS location information. For details, contact your
local authorities.
For best results:
•
Go outside and away from underground
locations, covered vehicles, structures with
metal or concrete roofs, tall buildings, and
foliage. Indoor performance might improve if

34
calls
you move closer to windows, but some
window sun shielding films can block satellite
signals.
•
Move away from radios, entertainment
equipment, and other electronic devices that
might interfere with or block AGPS satellite
signals.
If your phone cannot find strong AGPS satellite
signals, the location of the nearest cell tower in
contact with your phone is automatically provided to
the emergency response center.
international calls
If your phone service includes international
dialing, press and hold
0
to insert your local
international access code (indicated by
+
). Then, press
the keypad keys to dial the country code and phone
number.
speed dial
You can use speed dialing in two ways: quick access
for up to 98 phone numbers and shortcuts to features
found in the Start menu including email, calendar, and
Bluetooth® Manager.
To access speed dial entries, press and hold the
single-digit speed dial number for one second. If the
speed dial is two digits, press the first digit, then
press and hold the second digit. The phone dials the
phone number, opens a new email message, or goes
to the Web page.
phone numbers
You can set the speed dial to call the entries in your
phone’s contact list:
1
Press
Start
>
Contacts
.
2
Scroll to the desired contact and press the
center key
s
.

35
calls
3
Select the phone number or email address for
which to create the speed dial.
4
Press
Menu
>
Add to Speed Dial.
5
In the
Keypad Assignment
, select the speed dial
number to use.
Note:
Speed dial 1 is reserved for calling your
voicemail.
6
Press
Done
.
To
delete
a speed dial entry, press
Start
>
Applications
>
Speed dial
, scroll to the entry, then press
Menu
>
Delete
.
menu shortcuts
You can set a shortcut to open an application on your
phone:
1
Press
Start
.
2
Scroll to the icon of the application you want a
shortcut for and press
Menu
>
Add Speed Dial
.
3
In the
Keypad Assignment
, select the shortcut number
to use.
4
Press
Done
.
Note:
To delete a shortcut, press
Start
>
Applications
>
Speed Dial
, scroll to the shortcut, then press >
Menu
>
Delete
. Your service provider might add a
Voicemail
shortcut you cannot delete.
voicemail
Note:
Your service provider may include
additional information about using this feature.
Your network stores the voicemail messages you
receive.
To
set up
voicemail, press and hold
1
to call the
voicemail system. The voicemail system asks you to:
1
Create your password.
2
Record your name.

36
calls
3
Record a greeting.
When you see the voicemail message indicator
w
at
the top of your display, press and hold
1
to
check
your voicemail.
To check your voicemail
from another phone
, call
your 10-digit phone number. During your voicemail
greeting, press
*
(
#
] in Puerto Rico) then follow
the voice prompts.
three-way calling
While connected to a call:
1
Place your current call on hold by
pressing
N
.
2
Enter the number of the other person you wish to
connect to a three-way call and press
N
.
3
Once you are connected to the other phone, you
can press
Swap
to switch between the calls, or
press
Menu
>
Conference
to combine them.
If you
receive a second call
while you are already on
a call:
•
To answer the second call and put the first call
on hold, press
Answer
. Then, you can press
Swap
to switch between the calls, or press
Menu
>
Conference
to combine them.
•
To send the second call to your voicemail,
press
Ignore
.

37
messaging
messaging
Email service depends on your email network
service providers. If you have problems setting up
email or synchronizing
, please visit
att.com/support
.
set up personal email
Your Windows® Mobile powered phone can connect
to
personal email accounts
like Yahoo! Premium,
AOL and Comcast. To set up these accounts on your
MOTO Q 9h, you can use
Xpress Mail™
or
Microsoft® Outlook
. AT&T recommends Xpress Mail
because it offers automated setup and
synchronization, so that changes and deletions on your
MOTO Q 9h appear in your email account.
Note:
For functions such as web browsing and email,
AT&T recommends that you subscribe to an unlimited
data plan. Call AT&T at 611 to sign up for a data plan.
set up Xpress Mail™
Xpress Mail™ works with most email services.
Windows® Live email users should visit
att.com/xpressmail
for the latest on support and
alternate setup instructions. If you complete this setup
process and your email does not start arriving on your
device, check with your email provider to validate
eligibility.
1
From the home page, press
Get Xpress Mail
.
2
Press the navigation key
]
to highlight
Install Now
, then press the center key
s
.
3
Press
Download Now
on the download page.
4
Press
Yes
(the
Left Soft Key
) to continue the
download.

38
messaging
5
Press
OK
(the
Right Soft Key
) to accept the
license agreement.
6
In
Mobile Number
, enter your 10-digit mobile (cell)
number, then press
Next
(the
Right Soft Key
).
7 For personal email
, select
Portal or ISP
(and
press
Next
), then select your email provider (and
press
Next
). If your provider is not listed, select
More
to see more providers.
For corporate email
, select
Work
(and
press
Next
), then select
Professional Edition
(and
press
Next
).
8
Enter your
User Name
and
Password
(for your
personal email, or the user name and password
you created for corporate Xpress Mail), then
press
Next
(the
RightSoftKey
).
9
Select
Register Device
, then press
Next
(the
RightSoftKey
).
10
Press
Register
(the
Right Soft Key
).
11
After successfully registering, your MOTO Q 9h
automatically displays the XM Settings section.
Press the
RightSoftKey
to go to open your mail.
set up personal email with
Microsoft® Outlook Mobile
1
Press
R
>
New E-Mail Account
.
Back
Select email account type:
Portal or ISP
Work
My email account is provided by a portal or
internet service company, for example
yahoo.
Next
Choose Portal or ISP for personal
E-mail.
Choose Work for corporate E-mail.

39
messaging
2
Enter your name and email address, then
press
Next
and follow the setup instructions.
If your phone finds your account settings, it
automatically fills in the following screens. Just
enter your name and password and press
Next
in
the following screens.
If your phone cannot find
your settings, ask your email provider for your
settings and enter them in the following screens.
If your email account is not configured POP or IMAP
access, ask your email provider how to change your
configuration. If your email provider does not provide
IMAP or POP access on your account, you can still use
the Web browser to access your email.
set up corporate
email
Your Windows® Mobile powered phone can connect
to
corporate email accounts
like
Microsoft® Exchange or Lotus Notes. These accounts
are managed by your IT organization. To set up these
accounts on your MOTO Q 9h, you can use
Xpress Mail™
(for self-service access, described on
page 39) or
Good Mobile Messaging and
Microsoft® DIrect Push
(for access with assistance
from your IT organization, described on page 40).
Note:
For functions such as web browsing and email,
AT&T recommends that you subscribe to an unlimited
data plan. Call AT&T at 611 to sign up for a data plan.
set up self-service corporate email
with Xpress Mail™
To set up
corporate Xpress Mail
, you need to know
your work email address and what kind of mail server
your company has (Microsoft® Exchange,
Lotus Notes, or IMAP). Once you know this, complete
these steps
on your work computer, with an
Internet connection:

40
messaging
1
Go to the Web
page
http://xpressmailpe.wireless.att.com
2
Click on
Register Now
and fill in your information.
Note:
You will create an
Xpress Mail user name
and password
in this step. Remember these for
later in the setup.
3
On the download page, click
Download
.
4
Click the
Open
or
Run
button to download the
software.
5
Click
Yes
to install the software.
6
Click
Next
to begin setup, and follow the
on-screen instructions. When prompted for a
user name
and
password
, use those created in
step 2
of this procedure.
7
When Xpress Mail connects to your corporate
email account, you will receive a message
confirming it. Complete the setup process
with “set up Xpress Mail™” on page 37.
set up IT-managed corporate email
IT-managed email means that your company supports
Good Mobile Messaging
or
Microsoft® Direct Push
to enable wireless synchronization of corporate email.
Good Mobile Messaging
Good Mobile Messaging provides real-time wireless
push synchronization of your corporate email,
calendar, contacts, tasks and notes for Microsoft
Outlook and Lotus Notes. You must have an account
on your company’s Good Mobile Messaging server.
Contact your IT department if you do not have an
account. A “PDA Enterprise for Good” data plan must
also be activated on your AT&T wireless account
before using Good Mobile Messaging. Set-up
instructions for Good will be sent to you via email
upon your account activation.
Microsoft® Direct Push
Microsoft Direct Push provides wireless access to
your corporate Microsoft email, contacts, calendar and

41
messaging
tasks. Activate a “PDA Enterprise for Microsoft Direct
Push” data plan on your AT&T wireless account
before using Direct Push.
Once IT sets you up for access, follow these steps to
enable Microsoft Direct Push on your MOTO Q 9h.
Your phone’s menus might be different:
1
Press
Start
>
ActiveSync
, then press
Menu
>
Add Server Source
.
2
Enter the Exchange
Server Address
(if necessary,
check
This server requires an encrypted (SSL) connection
), then
press
Next
.
3
Enter your
User Name
and
Password
(if necessary, enter
the server’s
Domain
), then press
Next
.
4
Choose if you want to synchronize
Contacts
,
Calendar
,
Email
, and
Tasks
, then press
Finish
.
Tip:
To change how often your phone checks for
email, press
Start
>
ActiveSync
, then press
Menu
>
Schedule
. To conserve battery life, choose a longer
interval.
read a message
When you receive a message, your phone
plays an alert and shows
C
at the top of your
home screen.
Find it:
On the home screen,
press
R
> (message account).
If you do not see a list of messages
, press
Menu
>
Folders
>
Inbox
. To return to the folder list, press
Menu
>
Folders
.
To read a message:
Press the navigation key
S
to
scroll to the message and press the center key
s
to
open it.
When you have a message open
, you can press the
navigation key
S
right to open the next message, or
left to open the previous message.

42
messaging
message attachments
If an email has Microsoft® Word, Excel, or PowerPoint
files attached, you can open and edit them using
Documents To Go
. You can also view .pdf file attachments,
or extract .zip file attachments.
Open the message and select the attachments to
download them. After your phone downloads
attachments, open the message and select one to
open it.
•
Excel spreadsheets: Use the
navigation key
S
to select cells and enter
numbers or text. Press
Menu
for options like
save, cut, copy, paste, find, delete, and more.
•
PowerPoint slide shows: Press the left softkey
to switch between notes, outline and slide
views. Press
Menu
for options like save, cut,
copy, paste, find, delete, and more.
•
Word documents: Type numbers or text into
the document. Press
Menu
for options like save,
cut, copy, paste, find, delete, and more.
•
PDF documents: Press
Zoom
to change the
zoom level. Press
Menu
to save a copy of the
file, switch pages or other functions.
To
transfer
attachments to your computer for editing,
use Microsoft® ActiveSync or Windows® Mobile
Device Center.
message options
To delete, save, reply, or forward the messages, use
these quick steps from the Inbox with a message
selected or when viewing a message:
•
To delete, press
Delete
.
•
To reply, press
Menu
>
Reply
or
Reply All
. Enter the
message and press
Send
.

43
messaging
•
To forward, press
Menu
>
Reply
>
Forward
. Enter
the address and press
Send
.
•
To create a contact card for the sender, open
the message, highlight the sender, and press
the center key
s
.
Tip:
Need to check for new messages right now?
Press
R
and open an inbox. Press
Menu
>
Send/Receive
.
The phone connects to your Internet email server and
sends and receives your messages. To stop this
process, press
Menu
>
Stop Send/Receive
.
messaging shortcuts
You can use these key shortcuts for your received
messages. Highlight a message in the inbox and press
the key, or open the message and hold the key:
send a message
You can send three types of messages: text
(SMS), multimedia (MMS), and email.
Find it:
Press
R
>
Text Messages
,
MMS
, or
(email account)
To send a message:
1
Press
Menu
>
New
.
2
Enter the contact telephone number or email
address, with a semicolon (;) between multiple
numbers or addresses.
Tip:
To pick a recipient from your contacts, just
press
j
when you’re in the
To
field.
0
list shortcuts
5
move
1
reply all
6
forward
2
reply
7
delete
3
mark read/unread
8
download
4
flag
9
send/receive

44
messaging
3
Use the keypad to compose a message.
To insert a
picture, voice note or file
in an email
or MMS message, press
Menu
>
Insert
>
Picture
,
Voice
Note
,or
File
. If you insert a voice note, you also
need to record it. Press
Record
, speak, press
Stop
,
and then press
Done
.
To set the priority for an email message, press
Menu
>
Message Options
.
To cancel a message, press
Menu
>
Cancel Message
.
4
Press
Send
.
global address
look up
From your phone, you can search the global address
list (GAL) stored on your company's Exchange Server.
This means that you can find a contact’s phone
number or email without having to store the
information directly to your phone.
Note:
GAL information can only be viewed during a
data transfer session; the entire GAL cannot be stored
for viewing offline.
GAL Lookup can be found from
Contacts
and
Cmpany Directory
.
Cmpany Directory
is found in
Messaging
,
Phone
,
Calendar
and
Speed Dial
.Here’s how to use GAL to search
for a contact:
Find it:
Press
Start
>
Contacts
.
1
In the contact list, press
Menu
>
Company Directory
.
2
Enter search criteria and press
Search
.
3
Scroll through the list of entries that appears.
When you locate your contact, press
N
to make
a call.
Note:
Although the entire GAL cannot be stored
on your phone, once the contact is found, you can
add the single contact to your contact list.

45
messaging
Tip:
You can also choose to send a message, SMS or
email to a contact found using GAL. In a new message
or email, scroll to the To, cc, or bcc field and press
Menu
>
Add recipient
, then click
Company Directory
. When you
locate the contact to send a message, highlight and
select it. The email information is populated into the
To:
field.
messaging quick
reference
Note:
Some features might not work if you set
up your email account manually (without the
email setup wizard).
features
send text message
Press
R
>
Text Messages
, then press
Menu
>
New
send MMS message
Press
R
>
MMS
, then press
Menu
>
New
create and send email
Press
R
> (email account), then press
Menu
>
New
Note:
You must have your email set up to send an
email (see page 37).
To add a picture, voice note, or file to an email
message, open the message area and press
Menu
>
Insert
>
Picture
,
Voice Note
,or
File
.
Tip:
You can save a draft of a message that you are
composing to finish and send later. Press
Menu
>
Save
to Drafts
. A draft of the message is stored in the Drafts
folder of the account you are in.
features

46
messaging
create and add an email signature
Press
R
> (email account), then press
Menu
>
Tools
>
Options
>
Signatures
Scroll to the account for which you are creating the
signature. Select
Use signature with this account
. Select the
Signature
box, enter your signature, and press
Done
.
Tip:
To insert a signature in every message you
send, select
Include when replying and forwarding
. Otherwise,
a signature is inserted only in new messages.
read new messages
To quickly view new messages, select the
message notification area on the home screen.
features
view attachment
While viewing the message, use the
center key
s
to select the attachment. The next
time your phone synchronizes, it will download the
attachment and show it as an icon. Select the icon
and press
Open
or
Menu
>
Save As
.
Note:
You can view attachments only for file types
that are supported by the phone.
read old messages
Press
R
> (email account)
Icons next to each message show if it is
unread
A
,
read
É
, or has an
attachment
È
.
Urgent messages have a
!
to the right of them in
the list.
features

47
messaging
reply, reply all or forward messages
From your Inbox or an open message, press
Menu
>
Reply
,
Reply All
, or
Forward
Tip:
If you are replying to an email in the email
account, you will send less data if you do not edit
the original message. This may reduce data transfer
costs based on your rate plan.
download message objects
If an email message has an attachment, you
will see the attachment’s name when you
open the message. Use the center key
s
to
select the attachment. The next time your phone
synchronizes, it will download the attachment and
show it as an icon. Select the icon and press
Open
or
Menu
>
Save As
.
Note:
If there are multiple attachments in the
message, only the selected attachments are
downloaded.
features
insert a media object in an email
To add a picture, voice note, or file in an email
message, in the composing message area press
Menu
>
Insert
>
Picture
,
Voice Note
or
File
.
download complete email messages
Press
R
> (email account). Scroll to the
message and press
Menu
>
Download Message
.
The complete message is retrieved the next time
you synchronize or connect to your email server and
send and receive email.
features

48
messaging
mark a folder for synchronization
When you synchronize your email account
with your PC, the same Inbox folders that are in
Outlook on your PC are created on your phone.
Press
R
> (email account), then press
Menu
>
Folders
>
Menu
>
Show all Folders
, and press
Menu
>
Manage Folders
Highlight each folder you want to synchronize and
press
Sync
.
Once all folders have been selected, press
Done
. This
opens the
Manage Folders
view, where the marked
folders will be synchronized during the next sync
session.
Note:
Only email folders stored on the server are
available for sync.
features
view status of sent email
Press
R
> (email account), then press
Menu
>
Folders
>
Outbox
Messages in the
Outbox
have not been sent. To send
a message, scroll to it and press
Menu
>
Send/Receive
.
receive email
If your phone is set up to automatically
check for new messages, your phone will show
A
when a new message arrives.
Press
R
to open the inbox.
delete email
From the Inbox or an open email message, press
Menu
>
Delete
.
manually send and receive email
Press
R
> (email account), then press
Menu
>
Send/Receive
.
features

49
messaging
instant messaging
sign in
Find it:
Press
Start
>
IM & Email
>
IM
1
Select your IM community and press the
center key
s
.
2
Enter your user name and password, then
press
Sign In
.
To
start
a conversation, highlight a contact and
press the center key
s
, enter text, and
press
Send Message
. During a conversation, press
Menu
to insert emoticons or end the conversation.
When you are
signed in
but not in a conversation,
press
Menu
to manage your contacts or groups, change
your status, or sign out (to conserve battery life,
be
sure to sign off IM when not in use
).
add a contact
1
On the IM main screen, press
Menu
>
Add a contact
.
2
Enter the contact’s ID and press
Add
.
move email to personal folder
After you have read the email, press
Menu
>
Move
> (folder).
delete a mail account
Press
R
, scroll to the email account, then press
Menu
>
Delete
.
Note:
You cannot delete your
Text Messages
,
MMS
, or
Exchange server email accounts.
empty deleted items folder
Press
R
> (email account), press
Menu
>
Folders
,
scroll to
Deleted items
, then press
Menu
>
Delete All
.
features

50
connections
connections
Bluetooth® wireless
Your phone supports Bluetooth wireless pairing (also
called linking or bonding). You can pair your phone
with a Bluetooth headset or car kit, or pair your phone
with a computer to exchange and synchronize files.
Note:
The use of wireless phones while driving may
cause distraction. Discontinue a call if you can’t
concentrate on driving. Additionally, the use of
wireless devices and their accessories may be
prohibited or restricted in certain areas. Always obey
the laws and regulations on the use of these products.
turn Bluetooth power on or off
If Bluetooth power is on you’ll see a
O
indicator at
the top of your home screen and your phone can
automatically pair with the last handsfree device you
used. Just turn on the device or move it near the
phone.
To turn on Bluetooth power, press and hold
X
to
open the quick list, then select
Wireless Manager
>
Bluetooth
.
Note:
To extend battery life, turn off Bluetooth power
when you are not using it. Your phone will not pair
with devices until you turn on Bluetooth power again.
pair with a headset or handsfree
device
Before you try to pair your phone with a device
,
make sure your phone’s Bluetooth power is
on
and
the device is
on
and
ready
in pairing or bonding mode
(see the device user’s guide). You can pair your phone

51
connections
with multiple devices, but you can only use it with one
headset device at a time.
1
Press
Start
>
Applications
>
Bluetooth
>
Bluetooth Manager
>
Hands-free
.
2
Put the device (handsfree headset, stereo
headset, keyboard, etc.) in pairing mode.
3
Press
Add
(or
Menu
>
Add
). The phone prompts you
to verify your device is ready. Press
Search
.
4
Select the device from the list.
5
If prompted, enter the device passkey (such as
0000) and press the
Accept
key.
Tip:
For specific information about the
Bluetooth device you are using with your phone, refer
to the instructions that came with it.
send objects to another device
You can use Bluetooth pairing to send email,
contacts, tasks, calendar items, audio, ring
tones, pictures, video, and voice notes from your
phone to a computer or other device.
1
Press
Start
>
Applications
>
Bluetooth
>
BT Send Object
.
2
Select the object type and object you want to
send.
Tip:
To select an item, press the center key
s
.
3
Press
Send
.
4
Select the name of the device to send the file.
5
To cancel sending an item, press
Cancel
.
use your phone as a PC remote
You can use Bluetooth wireless and your phone
as a remote control for your computer. For
example, want to watch a video on your computer and
use your phone as a remote control? Use PC Remote
to control when the video plays, stops, or pauses.
1
On your computer, turn Bluetooth power on.

52
connections
2
On your phone, press
Start
>
Applications
>
Bluetooth
>
BT PC Remote
. If necessary, press
Yes
to turn on
Bluetooth power.
3
Press
Add
.
4
On your computer, right-click on the
Bluetooth indicator
O
in the system tray in the
lower right corner of your display. Select
Bluetooth Setup Wizard
or
Add New Connection
.
5
In the wizard, indicate that you know the service
you want to use, and you want to find a
Bluetooth device that provides the service. Select
Next.
6
In the next window, choose Human Interface
Device or PC Remote and select Next.
7
In the next window, make sure that
“Show all devices” is chosen in the pull-down
menu. Your computer should find your
“SmartPhone.” Make sure the box “Allow other
Bluetooth devices to see this phone” is checked.
Select your phone, and select Next.
8
If prompted, enter the device passkey (such as
0000) and press the
Accept
key.
When PC Remote is connected, your phone display
shows a key map that tells you what your keys control
on the PC. To determine which program on your
computer to control, on your phone, press
Menu
and
select a program.

53
connections
advanced Bluetooth features
features
make phone visible to other device
Allow a Bluetooth device to discover your
phone:
Press
Start
>
Applications
>
Bluetooth
>
Bluetooth Manager
>
Settings
, and check
Allow other Bluetooth devices to see this
phone
connect to recognized device
Connect to a recognized handsfree device:
Press
Start
>
Applications
>
Bluetooth
>
Bluetooth Manager
>
Hands-free
> device name
drop pairing with device
Press
Start
>
Applications
>
Bluetooth
>
Bluetooth Manager
>
Hands-free
> device name >
Disconnect
send object to device
Send an object to another device:
Press
Start
>
Applications
>
Bluetooth
>
BT Send Object
edit device properties / change device
name
Edit the properties of a recognized device:
Press
Start
>
Applications
>
Bluetooth
>
Bluetooth Manager
>
Hands-free
> device name, then press
Menu
>
Properties
>
Nickname
Tip:
To change the Bluetooth name of your phone,
press
Start
>
Applications
>
Bluetooth
>
Bluetooth Manager
>
Settings
and enter the name in
My Bluetooth name
.
features

54
connections
synchronize
You can synchronize the information on your phone in
two ways, over the air (OTA) or using a cable and your
computer.
sync over the air
To sync your phone over the air (OTA) you must sync it
directly with your company’s Microsoft® Information
Server or Microsoft® Exchange Server (running the
appropriate version software). For more information
about this set-up, see the support information on
page 82.
You can also contact your system administrator to set
up this synchronization.
Note:
If you are out of network coverage, and your
phone tries to sync 3 times without finding a network,
you will receive a notification. For more information,
select
View Status
. Synchronization will resume when
there is network coverage.
sync with a computer
Note:
For information about connections
(Bluetooth® wireless and Web browser), see page 50.
You can use Microsoft®
ActiveSync version 4.5 or
above
, or Windows®
Mobile Device Center
to
synchronize information between your phone and
desktop computer. ActiveSync compares your phone’s
contact information, calendar appointments, email
messages, and media files to those on your computer
and then updates to the most recent information.
installing and setting up ActiveSync
To synchronize information on your phone with a PC,
you must use Windows® Mobile Device Center (on a
PC running Windows Vista) or install
Microsoft ActiveSync (on a PC running Windows XP™
or earlier).
Note:
Synchronization software is included on the
GettingStartedDisc packed with your phone. Before

55
connections
installing the software, verify that your computer and
operating system meet the
minimum requirements
stated on the Microsoft Windows® Mobile Web site
(
www.microsoft.com/windowsmobile
). This Web site
also lets you download the
latest software
for
ActiveSync.
1
Install Microsoft ActiveSync (for Windows® XP™
or earlier) or Windows Mobile Device Center (for
Windows Vista) on your PC.
2
After setup completes, connect your phone to the
PC. The phone drivers install on your computer
and then the Sync Setup Wizard automatically
starts.
3
Follow the instructions on the screen to complete
the wizard.
When you finish the wizard, ActiveSync starts to
synchronize automatically with your phone.
Note:
Once synchronization completes, you can
disconnect your phone from your PC, and you may
need to restart your PC.
sync with a cable connection
Once Microsoft®
ActiveSync or
Windows® Mobile
Device Center is
installed on your PC,
you can connect it to
your phone and sync.
1
Turn on the phone.
2
Connect your phone to your PC using a
USB cable.
Note:
For more detailed information, see “Connecting
a mobile device to a PC” in ActiveSync Help on your
PC or the Microsoft Web Site for ActiveSync.

56
connections
sync with a Bluetooth® connection
Once Microsoft® ActiveSync or
Windows® Mobile Device Center is installed on your
PC, you can connect it to your phone and sync with a
Bluetooth connection.
Note:
In order to use this feature, your PC must be
equipped with Bluetooth wireless or a
Bluetooth PC adaptor accessory.
1
Follow the instructions in ActiveSync Help for
configuring Bluetooth connections on your PC to
support ActiveSync.
2
Turn on the phone.
3
On your phone, verify that Bluetooth wireless is
turned on (Press
Start
>
Applications
>
Bluetooth
>
Bluetooth Manager
>
Settings
>
Status
>
Bluetooth On
).
4
Press
Start
>
ActiveSync
.
5
Select
Menu
>
Connect via Bluetooth
. Ensure that the
phone and PC are within close range. If this is the
first time you have connected to this PC using
Bluetooth wireless, you must complete the
Bluetooth wizard on the phone and set up a
Bluetooth partnership with the PC before
synchronizing.
6
Select
Sync
.
7
When finished, select
Menu
>
Disconnect Bluetooth
. To
conserve battery power on your phone, turn off
Bluetooth power (see page 50).
AT&T Communication
Manager
With
AT&T Communication Manager
software, your computer can use your phone
as a wireless modem to connect to the AT&T
high-speed wireless data network. For more
information, visit

57
connections
http://business.cingular.com/businesscenter/solutions/
or
consult your AT&T representative.
Once you install
AT&T Communication Manager
on
your computer, you can connect to your MOTO Q 9h
using either Bluetooth® wireless or a USB cable.
modem-link with
Bluetooth® wireless
Note:
You must have a computer that has
Bluetooth capabilities.
1
On your phone, make sure Bluetooth wireless is
turned on: Press
Start
>
Applications
>
Bluetooth
>
Bluetooth Manager
>
Settings
, then toggle
Status
to
Bluetooth ON
. See Bluetooth wireless on page 50 for
more information.
2
On your computer, launch
AT&T
Communication Manager
. The Communication
Manager program should guide you through the
rest of the connection.
modem-link with a cable
Note: Do not connect
your data cable to your phone
and computer until the following steps tell you to do
so.
1
On your computer, launch
AT&T
Communication Manager
.
2
On your phone, press
Start
>
System Tools
>
Settings
>
Connections
>
USB Device Type
>
Modem
, and press
Done
.
3
Using the USB data cable, connect the phone to
your computer when
AT&T Communication
Manager
instructs you to do so. The
Communication Manager program should guide
you through the rest of the connection.

58
connections
disconnect modem-link
1
On your computer, follow the instructions in
AT&T Communication Manager
to disconnect
the link.
2
On your phone, to return your phone to
ActiveSync mode for USB connections: Press
Start
>
System Tools
>
Settings
>
Connections
>
USB Device Type
>
ActiveSync
.
web browser
You can use the browser to search and view
the Web.
Find it:
Press
@
Note:
Not all Web file formats are supported.
•
To go to a Web page, press
Action
>
Go to
. Enter
the address and press
OK
.
Action
1:MEdia Net Home
My Links EDIT
MEdia Net Home
Time Out: Games, Gossip & More
Find Cheap Gas Near You
Weather
Fort Lauderdale
Currently 83 more
News
U.S. offers aid to... more
49ers (NFL)
Fantasy Football 32...
Search
Menu
Press Menu to
change browser
settings and other
options.
Press Action to open
navigation options.
Your browser homepage appears.

59
connections
•
To go to a link in a Web page, use the
navigation key
S
to highlight the link and
then press the center key
s
.
•
To change connection options, press
Menu
>
Tools
>
Settings
>
Connections
.
•
To show/hide pictures, press
Menu
>
Display
>
Load Images
.
•
To add a Web address to your Favorites, open
the Web page and press
Action
>
Bookmark this page
.
Tip:
All finished? When you are done with the
browser, press
Menu
>
Exit
to close the browser and
conserve battery life.

60
entertainment
entertainment
take & send a photo
1
Press
e
to open the camera viewfinder.
Tip:
In the camera viewfinder, press
Menu
to adjust
picture settings such as
mode
,
brightness
,
resolution
,
zoom
,
white balance
, and
flash
.
2
Point the camera lens at the photo subject.
3
Press the center key
s
to take a photo.
4
Your phone saves the picture and shows it in the
viewfinder. To see stored pictures, press
Start
>
My Stuff
>
My Pictures & Videos
.
•
To send the photo in a multimedia message,
press
Menu
>
Send
>
MMS
, then see “send a
message” on page 43.
•
To edit the picture, press
Menu
>
Edit
.
•
To view picture properties, like the filename,
press
Menu
>
Properties
.
self portrait
1
Press
e
to activate the camera.
2
Press
Menu
>
Mode
>
Timer
.
877 1.0x
IMAGE
AREA
Thumbnails
Pictures & Videos
Menu

61
entertainment
3
Press
e
to start the 5 second delay.
4
Aim the camera lens at yourself.
5
When you hear the camera shutter sound, your
phone takes the photo and shows it in the
viewfinder.
picture options
In the picture viewfinder press
Menu
>
Options
to open
the
Picture Options Menu
. This menu can include the
following options:
record & play video clip
record a video clip
Find it:
Press
e
, then
Menu
>
Video
Tip:
In the video viewfinder, press
Menu
to adjust video
settings such as
brightness
,
quality
, and
white
balance
.
1
Point the camera lens at the photo subject.
option
General
Determine default picture sizes for
email and rotating picture settings.
Slide Show
Select default slide show settings.
Camera
Select default locations to store
pictures, filename prefixes, and image
compression.
Video
Determine audio settings and time
limits for video files.
option

62
entertainment
2
Press
e
or the center key
s
to begin
recording a video. The viewfinder shows what the
video is recording.
3
Press the center key
s
to stop recording and
save the video, or press
Pause
to pause
recording. To continue a paused recording, press
Resume
.
Note:
Videos are automatically stored in your
phone. To view them, press
Start
>
My Stuff
>
My Pictures & Videos
. Select the video to view and
press
Play
or the center key
s
.
Tip:
To view videos located in a folder other than the
default video folder, including a memory card, press
Start
>
My Stuff
>
My Pictures & Videos
, then press
Menu
>
Folders
, and then select the folder that contains the
stored videos.
video options
In the video viewfinder press
Menu
>
Options
to open the
video options menu:
00:05 43:20
Remaining recording time Current recording length
VIDEO
AREA
Stop
Pictures & Videos
Pause
option
Camera
Select default save locations, video
filename prefixes, and image
compression.
Video
Determine audio and time limit
settings for video files.

63
entertainment
Note:
General
and
Slideshow
options are also available in
this menu, however these settings are specific to
picture files only.
play a video clip
For more video playback and Windows® Media Player
features, see page 65.
Find it:
Press
e
>
Thumbnails
, then select a video
clip.
To play a video stored in another folder or on your
memory card, press
e
>
Thumbnails
, then press
Menu
>
Folders
and choose the location for the folder.
The video clip plays in the
Windows Media Player
.
Tip:
To play a video in full screen mode, press
0
while it is playing. Videos recorded in a low resolution
may not play in full screen mode.
If a call comes in while watching a video, the video
pauses and a call alert appears. You can choose to
answer the call or ignore it. To continue watching the
movie, select the
Play
button.
00:00 70%
Now Playing
Adrenaline
Playing
Windows Media
Menu

64
entertainment
video playback options
In the video playback window press
Menu
>
Options
to
open the
Video Playback Menu
. This menu can include the
following options:
AT&T Music™ portfolio
AT&T Music™ is the ultimate, integrated,
on-the-go music experience. Wherever you go,
AT&T Music will connect you to your music with a
touch of a button. You can listen to your music,
discover the latest songs, music news, concert
updates, streaming music, ringtones,
Answer Tones™, and watch the latest music videos.
You can access all AT&T Music features by selecting
Â
AT&T Music
in the main menu.
Note:
The
Streaming Music
application uses a large
amount of data, and you are responsible for all data
charges incurred.
AT&T strongly recommends that
option
Playback
Determines how the time counter
appears, whether to pause playback
while using another program, and
whether to resume playback after a
phone call.
Video
Options for showing in full screen and
when to scale to fit window.
Network
Selects default network settings for
streaming media.
Library
Determines if the player starts on the
Library
view.
Skins
Determine Windows® Media Player
skin theme.
Buttons
Set playback button mapping.
option

65
entertainment
you subscribe to an unlimited data plan in addition
to this purchase.
Call AT&T at 611 to sign up for the
appropriate unlimited data package.
music player
Your phone uses Windows® Media Player Mobile to
play the following types of files: WMA, WMV, MP3,
AAC, eAAC, eAAC+, WAV, MP4, M4A, 3GP, MIDI, and
Real Audio.
Find it:
Press
[
>
Windows Media Player
>
My Music
, and
choose a song.
•
To play or pause a music or video file, press
the center key
s
.
•
To update the file list (if you loaded new files),
press
Menu
>
Update Library
.
•
To skip to the previous or next file, press the
navigation key
S
left or right.
•
To increase or decrease the volume, press the
navigation key
S
up or down. Your phone’s
master volume affects your music volume
(see page 23).
Tip:
To mute and unmute sound, press
#
.
•
To fast forward or rewind, press and hold the
navigation key
S
left or right.
set media player controls
You can set up keys to control the media player.
1
From the media player, press
Menu
and select
Options
.
00:00 70%
Now Playing
Song Title
Playing
Windows Media
Menu

66
entertainment
2
Select
Buttons
.
3
Scroll to the media player action you want, to
assign a button or key press.
4
Press
Menu
and choose
Assign
,
Reset
, or
None
.
5
Once you have assigned key presses to the
media player controls, press
OK
and
Done
to
complete the set up.
create a playlist
Find it:
[
>
Windows Media Player
1
Choose
My Music
(if the music player is already
open, press
Menu
>
Library
).
2
Select a song list, such as
All Music
. Your display shows
a list of song titles.
3
Scroll to each song you
want in the playlist and
press
Menu
>
Queue Up
.
4
When you are done adding songs to the list,
press
Menu
>
Now Playing
. Your phone shows the
song list you just created.
Tip:
Are your songs out of order? Select a song in
the
Now Playing
list and press
Menu
>
Move Up
or
Move Down
.
5
In the
Now Playing
list, press
Menu
>
Save Playlist
.
6
Enter a name for the playlist and press
Done
to
save it.
To open a playlist from the music player, press
Menu
>
Library
>
My Playlists
. Highlight the playlist and
press
Play
, or press
Menu
for other options.
music sources
copy music from a computer
To copy music from your computer to your
phone, you need the following:
All Music
Artist
Album
Genre
My Music

67
entertainment
•
computer with MP3 or AAC music files, and a
program that manages them (for more details,
see
att.com/music
)
•
microSD memory card (see page 68)
•
USB data cable, or a computer with
Bluetooth® capability (see page 69)
Once you have these, see page 69 to copy music from
your computer to your phone’s memory card.
Note:
The unauthorized copying of copyrighted
materials is contrary to the provisions of the Copyright
Laws of the United States and other countries. This
device is intended solely for copying non-copyrighted
materials, materials in which you own the copyright, or
materials which you are authorized or legally permitted
to copy. If you are uncertain about your right to copy
any material, please contact your legal advisor.
shop music
Find it:
[
>
Shop Music
Shop Music
launches the browser to a page where you
can purchase music and ring tones from third-party
stores and personalization content from AT&T.
music videos
Find it:
[
>
Music Videos
Music Videos
launches a browser that takes you directly
into the Music Video section of Cellular Video. From
this menu, you have access to music videos from the
latest artists, as well as programming from AT&T,
MTV, VH1, and CMT, among others. Simply click on a
video and begin watching!
music buzz
Find it:
[
>
The Buzz
The Buzz
launches a Java™ application that gives you
music industry news and information, including charts,
news, and concert locations.

68
entertainment
music community
Find it:
[
>
Community
Community
launches the browser to a user community
where you can interact with your friends and the
community, as well as review artist fan sites.
music applications
Find it:
[
>
Music Apps
Music Apps
launches the browser to an area where you
can purchase music-related applications from AT&T’s
Media Mall. This folder includes applications that are
not part of the core AT&T Music offering, such as
Podcasting, non-preloaded streaming apps, and
music games.
insert a memory card
Note:
A memory card is not included with your
phone. It is sold separately.
You can use a removable microSD memory card with
your phone to store multimedia content such as
music, pictures, videos, applications, and files. For
maximum card size,
see
www.motorola.com/support/q9h
. To save memory
space on your phone, move these files to a memory
card as often as possible. For
Caution:
Do not remove your memory card while your
phone is using it or writing files on it. Don’t bend or
scratch your memory card. Keep it away from static
electricity, water, and dirt.
1
Open the memory card
slot cover by gently lifting
the cover away from the
phone as shown. The
cover remains attached to
the phone.

69
entertainment
2
Insert the memory card
into its slot, with the card’s
metal contacts facing
down.
3
Place the memory card
cover back in place and push it to close it.
Tip:
You can use File Manager to sort, view, copy, and
move files on your phone or memory card. On the
home screen, press
Start
>
Applications
>
File Manager
copy files from your
computer
To copy files from your computer to your phone:
Note:
You must have Microsoft® ActiveSync or
Windows® Mobile Device Center installed on your
PC, as described on page 54. You might want to
optimize graphics and videos for your phone's 320 x
240 pixel display.
1
Connect the phone to your PC.
To us e a
Bluetooth® connection
, turn
Bluetooth on: Press
Start
>
Applications
>
Bluetooth
>
Bluetooth Manager
>
Settings
, then toggle
Status
to
Bluetooth ON
. The Bluetooth indicator
O
appears in
the home screen. You might need to configure
settings on your PC.
To us e a
cable
connection
, turn
on your phone
and connect the
data cable
provided with
your phone to the
USB port on your computer.
2
In ActiveSync on your PC, select
Explore
and
double-click
My Windows Mobile
device.

70
entertainment
3
On your computer, find the files you would like to
copy to your device and drag them into the folder
where you want them, such as
My Documents
.
4
Your files are now available on your phone. In the
media player, press press
Menu
>
Update Library
to see
the files.
Note:
If you have wireless ActiveSync set up with an
Exchange Server, you cannot also sync email, contacts
and calendar with a PC running Microsoft Vista.
However, you can synchronize media and transfer files
through the cable connection.
file manager
You can use File Manager to sort, view, copy, and
move files on your phone or memory card. Files you
might want to use in file manager include text,
pictures, music, and video files.
Find it:
On the home screen, press
Start
>
Applications
>
File Manager
flight mode
You can turn off your phone’s network and
Bluetooth® services to safely access your address
book, games, camera, and music in areas where
cellular network access is prohibited (such as during
flights and in hospitals).
Press and hold
X
until the
Quick List
appears, then
select
Wireless Manager
>
All
.

other features—advanced calling
71
other features
Note:
To open the main menu from your home
screen, press
Start
. To scroll through the pages of
menu options, press the navigation key
S
down. To
select a menu option, press the center key
s
.
advanced calling
features
call forwarding
Set up or cancel call forwarding:
Press
Start
>
System Tools
>
Settings
>
Phone
>
Call Forwarding
Note:
If you choose
No Reply
, you can set how many
seconds your phone waits before it forwards a call.
voice dial
To voice dial, press and hold
h
in your home
screen. When prompted, say “Call,” followed by a
number or contact name.
TTY calls
Set up your phone for use with an optional
TTY device:
Press
Start
>
System Tools
>
Settings
>
More
>
Phone Accessibility
>
TTY
Note:
A teletypewriter (TTY) is a communication
device used by people who are hard of hearing or
have a speech impairment. TTY does not work from
mobile phone to mobile phone.
features

72
other features—contacts
contacts
To store and call contacts, see page 16.
call a phone number in a message
Email or text messages can contain phone
numbers that have an underline, like a Web site
hyperlink. To dial one of these numbers, scroll to it
and press
N
.
features
search for contact
Enter the first few letters of the contact's name.
The phone searches through the contact list and
shows the name.
features
edit contact
Press
Start
>
Contacts
, scroll to a contact, then press
Menu
>
Edit
set ringer ID for a contact
Note:
You cannot store a ringer ID for
SIM Contacts.
To easily identify who is calling you by the ring tone,
you can assign a custom ring tone to each contact.
Press
Start
>
Contacts
, scroll to a contact, then press
Menu
>
Edit
>
Custom Ring Tone
Note:
Some networks limit the size of file that you
can use for a ring tone.
features

other features—contacts
73
set picture ID for contact
Note:
You cannot store a picture ID for
SIM Contacts.
Assign a photo or picture to appear when you
receive a call from an entry:
Press
Start
>
Contacts
, scroll to a contact, then press
Menu
>
Edit
>
Picture
Select a picture, or select
Camera
to take a new
picture for the contact.
Tip:
Want to remove a picture ID? Press
Start
>
Contacts
, scroll to a contact, press
Menu
>
Edit
, then
press
Menu
>
Remove Picture
features
set category for contact
Note:
You cannot store a category for
SIM Contacts.
Press
Start
>
Contacts
, scroll to a contact, then press
Menu
>
Edit
>
Categories
set category view
Press
Start
>
Contacts
, then press
Menu
>
Filter
features

74
other features—personal settings
personal settings
send contact to another device
Use a Bluetooth® connection to send a contact to
another phone, computer, or device:
Press
Start
>
Contacts
, scroll to a contact, and press
Menu
>
Send via Bluetooth
If necessary, your phone asks you to turn on
Bluetooth power. Your phone searches for
Bluetooth devices. Select the one you want and
press the center key
s
. Your phone tells you
when the transfer is complete.
For more about Bluetooth connections, see
page 50.
features
features
language
Set menu language:
Press
Start
>
System Tools
>
Settings
>
More
>
More
>
Regional Settings
Note:
You must turn your phone off and on again for
the changes to take effect.
Tip:
While you enter text (such as in a text
message), your phone suggests words. To change
the language for these suggestions from the text
entry area, press
H
then
k
and select
Setup
.
Scroll to the
Language Dictionary
and press the
navigation key
S
left or right to select a language.

other features—personal settings
75
accessibility
You can set system font size, multipress timeout,
confirmation timeout, and in-call alerts:
Press
Start
>
System Tools
>
Settings
>
More
>
Accessibility
features
ring volume
Press
Start
>
System Tools
>
Settings
>
Profiles
Highlight the desired profile, then press
Menu
>
Edit
.
Under
Ring Volume
, press the navigation key
S
left or
right to adjust the volume for that profile.
Shortcut:
In the home screen, press and hold the
back key on the right side of the phone (see page 3)
to show the ring volume, then press the
side scroll keys to adjust it.
Tip:
You can eliminate the ringer volume instantly
when an incoming call comes in--just use the
side scroll keys to turn the ringer off.
Note:
Your phone’s master volume affects your ring
volume (see page 23).
features

76
other features—personal settings
sounds
To change the default sounds for ring tone,
reminders, new messages, alarm clock, or keypad
controls:
Press
Start
>
System Tools
>
Settings
>
Sounds
Note:
Changes made to the alert settings will have
no effect when using the
Silent
profile.
alarm
Press
Start
>
System Tools
>
Settings
>
Clock & Alarm
>
Alarm
Note:
Your phone must be
turned on
for the alarm
to sound.
Tip:
Need to change or set the alarm alert style?
Press
Start
>
System Tools
>
Settings
>
Sounds
>
Alarm Clock
.
features
owner information
It’s a good idea to enter and check your owner
information. It lets someone return the phone to
you if you lose it:
Press
Start
>
System Tools
>
Settings
>
More
>
More
>
Owner Information
master reset
To return your phone to original settings: Press
Start
>
System Tools
>
Master Reset
The default master reset code is
000000
(6 zeroes).
Master reset does not reset the unlock code,
security code, and lifetime timer.
features

other features—call times
77
call times
Network connection time
is the elapsed time from
the moment you connect to your service provider's
network to the moment you end the call by
pressing
O
. This time includes busy signals and
ringing.
The amount of network connection time you track
on your resettable timer may not equal the
amount of time for which you are billed by your
service provider. For billing information, contact
your service provider.
master clear
Caution:
Master clear erases all information you
have entered (including contacts and calendar
events) and content you have downloaded
(including photos and sounds) stored in your
phone’s memory. After you erase the information,
you can’t recover it.
Press
Start
>
System Tools
>
Master Clear
features
features
see call timers
Show call timers:
Press
Start
>
Call History
, then press
Menu
>
View Timers
reset call timers
To reset all call timers to zero (0), except for the
Lifetime calls
timer:
Press
Start
>
Call History
, then press
Menu
>
View Timers
,
then press
Menu
>
Reset Timers

78
other features—handsfree
handsfree
Note:
The use of wireless phones while driving may
cause distraction. Discontinue a call if you can’t
concentrate on driving. Additionally, the use of
wireless devices and their accessories may be
prohibited or restricted in certain areas. Always obey
the laws and regulations on the use of these products.
calendar
features
speakerphone
Activate a connected external speakerphone
during a call:
Press
h
or press
Menu
>
Speakerphone On
.
Note:
With a Bluetooth® headset press
Menu
>
Handsfree Off
and then press
Menu
>
Speakerphone On.
features
add new calendar event
Press
Start
>
Calendar
, then press
Menu
>
New Appointment
Note:
To schedule an all-day event, select the
All day event
check box under
End time
. All-day events do
not occupy blocks of time in the calendar; instead,
they appear in banners at the top of the calendar.

other features—calendar
79
view calendar event
Press
Start
>
Calendar
to open the calendar for today.
•
To see days before or after today, press the
navigation key
S
left or right.
•
To quickly see a specific date, press
Menu
>
Go to Date
.
•
To see your whole week’s events,
press
Week
.
Shortcut:
Today’s events appear on your home
screen. To see event details, scroll to it and press
the center key
s
.
calendar event reminder
The default reminder time for tasks and calendar
items is 15 minutes. To change this default:
Press
Start
>
Calendar
, then press
Menu
>
Tools
>
Options
>
Set Reminders
features
send calendar event to another device
Use a Bluetooth® connection to send a calendar
event to another phone, computer, or device:
From the calendar item, press
Menu
>
Send via Bluetooth
.
Select the device to which you want to send the
item.
For more about Bluetooth connections, see
page 50.
respond to a meeting request
You can receive and respond to meeting requests
on your phone in a similar manner as you do in
Outlook on your PC.
Press
R
> (email account) > meeting request
Press
Accept
or
Menu
>
Decline
or
Tentative
features

80
other features—calculator
calculator
security
phone information
fun & games
features
calculator
Press
Start
>
Office Tools
>
Calculator
features
manage certificates
Enable or disable Internet access
certificates stored on your phone:
Press
Start
>
System Tools
>
Settings
>
Security
>
Certificates
Certificates are used to verify the identity and
security of Web sites when you download files or
share information.
features
software version
To view your phone software version:
Press
Start
>
System Tools
>
Settings
>
About
available memory
To see the total, used, and available memory on
your phone and memory card:
Press
Start
>
System Tools
>
Memory Manager
features
access pictures
Press
Start
>
My Stuff
>
My Pictures & Videos

other features—fun & games
81
access sounds
Press
[
For more information about the
Windows Media Player
,
see page 65.
access video clips
Press
Start
>
My Stuff
>
My Pictures & Videos
play games on your phone
Press
Start
>
Games
start Web browser
Press
@
For more information about your Web browser, see
page 58.
close Web browser
In the browser, press
Menu
>
Exit
features
download objects from Web page
To download a picture, sound, or phone
theme from a Web page: Highlight the file, press
the center key
s
, then press
Save
.
To download a picture or other object from a Web
page: Highlight the item, press
Menu
, and choose an
option such as
Save image
.
manage media files
To view, copy, delete, rename, or move files and
folders on your phone or memory card:
Press
Start
>
Applications
>
File Manager
features

82
service & repair
service & repair
Tip:
Motorola Software Update is an easy way to
update your phone. Make sure you have the latest
available software updates at
www.motorola.com/support/q9h
.
If you have questions or need assistance, we're here
to help.
AT&T Support:
Go to
att.com/support
, where you can select from a
number of customer care options. You can also
contact the AT&T Customer Support Center at 611 on
your mobile phone.
Microsoft® Windows® Mobile and ActiveSync
Support:
Windows Mobile:
www.microsoft.com/windowsmobile/help/smartphone/

index
83
index
A
accessibility 75
accessories 11, 78
accessory connector port 3, 4
ActiveSync 54
alarm 76
alert
set 26
turn off 23, 31, 58, 65
animation 80
answer a call 16, 29
attachments 46
auto-lock
phone 24
automatic e-mail setup 37
B
background 27
backlight 29
battery 13, 14
battery indicator 20
battery life, extend 11
battery life, extending 29, 50
Bluetooth connection 74, 79
Bluetooth indicator 20
Bluetooth remote 51
Bluetooth wireless 50
bonding (See Bluetooth wireless)
browser 81
disconnect 81
C
calculator 80
calendar 78, 79
call
answer 16, 29
end 16
forwarding 71
make 15
call timers 77
caller ID 32, 73
camera 60, 61
camera key 3, 4
cancel message 44
car kit 78
center key 3, 4
certificate management 80
codes 24
conference calls 36
contacts 34, 72
copy files 51, 69
D
date, 27
delete program 30
dial a phone number 15

84
index
dialed calls 31
display 19, 29
download e-mail messages 47
download files 69
download message objects 47
E
e-mail 45, 46
attachment 46
signature 46
e-mail setup 37, 39
emergency number 33
end a call 16
end key 3, 4, 16
enter
numbers 22
text 22
exchange server 39
F
file manager 70, 81
filter 32
flight mode 70
forward 47
forward calls 71
G
games 81
global access look up 44
H
handsfree 78
handsfree speaker 23
hard reset 15, 24
headset 78
headset jack 3, 4
home screen 19, 27
hyperlink
phone number 72
I
IM 49
Incoming Call message 32
instant messaging 49
international access code 34
ISP 45
L
language 74
linking (See Bluetooth wireless)
lock
phone 24
Low Battery message 20
lowercase 22
M
make a call 15
make call 72
manage files 81
master clear 77
master reset 76
media player 76, 81
buttons 65
controls 65
menu icons 19
menu indicator 19
menu key 3, 4
menu shortcuts 35
message 45, 46, 47

index
85
message indicator 20, 21
message reminders 76
messages 45
missed call 32
missed call indicator 20
missed Calls message 32
MMS message 45
mode
flight 70
modem 56
multimedia message 46, 47
music 81
N
navigation key 3, 4
netowrking 56
number. See phone number
numbers 22
O
object exchange 51
open
program 10
open program 10
operator hosted e-mail 37
optional accessory 11
optional feature 10
over the air (OTA) 54
owner information 76, 77
P
pairing (See Bluetooth wireless)
PC remote 51
personalize 74
phone 24
phone number 17
photo 60, 80
picture 80
picture ID 32, 73
power key 3, 4, 15
priority 44
profile 26
program
open 10
R
received calls 31
recent calls 31
redial 32
reminders 76
remote control 51
remove program 30
reply 47
return a call 32
ring style indicator 20
ring style, setting 26
ring tone 81
ringer ID 32, 72
ringer volume 75
roam indicator 20
S
security
lock 24
send and receive messages 41
send key 3, 4, 15
shortcuts 35

86
index
side scroll keys 3, 4
side select key 3, 4
signal strength indicator 21
signature 46
SIM card 11
soft keys 3, 4, 19
sounds 76, 81
speakerphone 78
speed dial 34
start menu 10
store your number 17
symbol entry mode 22
sync (cable) 55
synch (Bluetooth) 56
synchronize 54
synchronizing with computer 54
T
task manager 30
telephone number. See phone
number
text 22
text entry 21
text message 45, 46, 47
third party applications 29
three way calling 36
time, setting 27
timers 31, 77
TTY calls 71
turn on/off 15
U
unlock
phone 24
unlock code 24
uppercase 22
V
video 81
controls 65
video clip 61
voice key 3, 4
voicemail 35
voicemail indicator 20
voicemail message indicator 36
volume 23, 75
volume keys 3, 4
W
wallpaper 27
web 81
phone number 72
web browser 81
disconnect 81
web page 81
Y
your phone number 17
U.S. patent Re. 34,976


1
HELLOMOTO
La tecnología prometió facilitar las cosas... pero luego le dio más que hacer: llamadas telefónicas, email, música,
fotografías, videos, Internet y más.
Es tiempo de volver a tomar el control.
Es tiempo de MOTO Q™ 9h.
Mi teléfono, mi manera—
use fotografías para el fondo de pantalla, sus canciones para los timbres, nuevos
programas que ha cargado en el teléfono...exprese su estilo.
Entretenimiento a cualquier hora—
cargue archivos de video y música para crear una biblioteca multimedia que
lo acompañe dondequiera que vaya.
Trabajar en forma remota—
revise su email y modifique documentos de Microsoft® Office desde cualquier lugar
del mundo.
Ayuda y Tour de inicio rápido—
la ayuda en el teléfono está disponible en todo momento.
Sólo oprima
Inicio
>
Herramientas del sistema
>
Ayuda e Inicio rápido
.
Para obtener más información:
att.com/tutorials

2
¿qué contiene la caja?
Gracias por comprar
MOTO Q™ 9h.
Observe los componentes
de la caja que aparecen en
la imagen de la derecha.
Para comenzar,
recomendamos lo siguiente:
•
Siga cuidadosamente
las instrucciones paso
a paso de esta guía
para configurar el
teléfono MOTO Q 9h.
•
Para conocer más
acerca de Moto Q 9h u
obtener ayuda, revise
la guía de usuario del
Disco de inicio o visite
att.com/tutorials
.
AT&T
Reunión de personal
10:00 AM Sala de reuniones A
Perfil: Normal
12:00 PM
12/31/2008
Inicio Contactos
Disco de Inicio
(incluye Guía del usuario y
software de sincronización)
Cargador
Puerta y batería
con capacidad
extra BT90
y
cubierta
Batería
estándar
BT60
Adaptador USB
Micro-a-Mini
USB micro a adaptador
de audífono de 3,5 mm
Cable de datos USB
MOTO Q™ 9h
y
cubierta

3
Presentamos el nuevo teléfono inalámbrico
MOTO Q™ 9h
. Aquí le brindamos una rápida lección acerca de
su anatomía.
Desplazarse
por los menús.
Seleccionar
elementos resaltados.
Abrir los mensajes.
Encender y apagar,
colgar, salir de
menús.
Te clas laterales de
desplazamiento
Retroceder una
pantalla.
Ingresar una
nueva línea en los
mensajes.
Letras mayúsculas.
Te cla de selección
lateral
Te cla programable
derecha
Te cla de altavoz/
reconocimiento de voz
Abrir la cámara.
Abrir AT&T Music.
Realizar y contestar
llamadas.
Mantenga oprimido
para abrir una lista
de opciones.
Te cla programable
izquierda
Conectarse.
Te clas de función
Abrir el calendario. Abrir la lista de contactos.
Micrófono

4
Para evitar dañar el teléfono, llévelo en una funda o estuche aprobados de manera que no lo dañe al colocarlo en su
bolsillo, bolso o bolsa.
2.0 MEGAPIXELS
8X DIGITAL ZOOM
Cargar y conectar
accesorios del
teléfono micro USB
Insertar tarjeta de
memoria microSD.
Lente de la cámara
Flash de la cámara
Ranura de tarjeta de
almacenamiento
Liberación de la tapa
de la batería
Altavoces

5
En la pantalla principal, oprima
Inicio
para abrir el menú principal.
Si necesita ayuda mientras usa el teléfono, viste
att.com/tutorials
.
AT&T
Reunión de personal
10:00 AM Sala de reuniones A
Perfil: Normal
12:00 PM
12/31/2008
Start Contactos
Mensajería Contactos Calendario ActiveSync
ATT Music Cellular Video MEdia Net
ATT Mall
Más
Inicio
Menú
Inicio
Pantalla principal Pantalla del menú
Oprima y suelte
la
Tecla de
Encendido
O
para encender
su teléfono.
1
Oprima
Inicio
(la tecla programable
izquierda) para abrir
el menú principal.
2
Oprima la tecla
de navegación
hacia
arriba, abajo,
izquierda o derecha
(
S
) para resaltar
una función del menú.
3
Oprima la
Tecla central
s
para seleccionar la
función resaltada.
4
Consejo:
oprima la
Tecla Atrás
n
para retroceder un menú.
Oprima la
Tecla de Encendido
O
para salir de cualquier menú o vista
sin guardar los cambios.

6
Motorola, Inc.
Consumer Advocacy Office
1307 East Algonquin Road
Schaumburg, IL 60196
www.hellomoto.com
1-800-331-6456 (Estados Unidos)
1-888-390-6456 (TTY/TDD Estados Unidos para personas con
problemas de audición)
1-800-461-4575 (Canadá)
Algunas funciones del teléfono móvil dependen de las
capacidades y de la programación de la red de su proveedor de
servicio. Además, es posible que su proveedor de servicio no
active algunas funciones y/o que la programación de la red del
proveedor limite la funcionalidad de éstas. Siempre comuníquese
con su proveedor de servicio para conocer la funcionalidad y la
disponibilidad de las funciones. Todas las funciones, la
funcionalidad y otras especificaciones del producto, así como la
información incluida en esta guía del usuario, se basan en la
información más reciente disponible, la que se considera precisa
en el momento de la impresión. Motorola se reserva el derecho de
cambiar o modificar cualquier información o especificación sin
previo aviso ni obligación.
MOTOROLA y el Logotipo de la M Estilizada están registrados en
la Oficina de Patentes y Marcas Registradas de los Estados
Unidos. Todos los demás nombres de productos o de servicios
pertenecen a sus respectivos dueños. Las marcas comerciales
Bluetooth pertenecen a sus respectivos dueños y son utilizadas por
Motorola, Inc. bajo licencia. Microsoft, Windows y Windows Me
son marcas comerciales registradas de Microsoft Corporation y
Windows XP es una marca comercial de Microsoft Corporation.
AT&T, el logotipo de AT&T y Your World. Delivered. son marcas
comerciales de AT&T Knowledge Ventures.
© Motorola, Inc. 2007.
Precaución:
los cambios o modificaciones realizadas en el
teléfono radio, no aprobados expresamente por Motorola,
invalidarán la autoridad del usuario para operar el equipo.
Número de manual: 6809511A95-O

contenido
7
contenido
¿qué contiene la caja? . . . . . . . 2
menú inicio. . . . . . . . . . . . . . . . 9
aspectos esenciales. . . . . . . . 10
acerca de esta guía . . . . . . . 10
tarjeta SIM . . . . . . . . . . . . . 11
batería . . . . . . . . . . . . . . . . . 12
encender y apagar. . . . . . . . 16
realizar una llamada . . . . . . . 16
contestar una llamada . . . . . 16
almacenar un número
telefónico . . . . . . . . . . . . . . 17
llamar a un número
almacenado . . . . . . . . . . . . . 18
su número telefónico . . . . . 18
consejos y trucos . . . . . . . . . . 19
aspectos fundamentales . . . . 20
pantalla . . . . . . . . . . . . . . . . 20
ingreso de texto. . . . . . . . . . 22
volumen. . . . . . . . . . . . . . . . 24
altavoz del manos libres . . . . . 25
bloquear y desbloquear
el teléfono . . . . . . . . . . . . . . 26
personalizar . . . . . . . . . . . . . . 28
perfiles. . . . . . . . . . . . . . . . . 28
hora y fecha . . . . . . . . . . . . . 29
pantalla principal . . . . . . . . . 30
luz de fondo . . . . . . . . . . . . . 31
opciones para contestar . . . 31
aplicaciones de terceros . . . . 32
administrador de tareas . . . . . 32
llamadas . . . . . . . . . . . . . . . . 33
desactivar una alerta
de llamada . . . . . . . . . . . . . 33
llamadas recientes . . . . . . . 33
remarcar. . . . . . . . . . . . . . . 34
ver llamadas perdidas . . . . 34
ID de llamada . . . . . . . . . . . 34
llamadas de emergencia . . . . . 35
llamadas internacionales . . . . . 36
marcado rápido . . . . . . . . . 37
correo de voz . . . . . . . . . . . 38
llamada de tres vías . . . . . . 39

8
contenido
mensajería . . . . . . . . . . . . . . . 40
configurar el email
personal . . . . . . . . . . . . . . . 40
configurar email
corporativo . . . . . . . . . . . . . 43
leer un mensaje . . . . . . . . . 45
atajos de mensajería. . . . . . 47
enviar un mensaje. . . . . . . . 47
búsqueda global
de dirección . . . . . . . . . . . . 48
referencia rápida
de mensajería . . . . . . . . . . . 49
mensajería instantánea. . . . 54
conexiones. . . . . . . . . . . . . . . 55
conexión inalámbrica
Bluetooth® . . . . . . . . . . . . 55
sincronizar. . . . . . . . . . . . . . 59
AT&T Communication
Manager . . . . . . . . . . . . . . . 62
browser Web . . . . . . . . . . . 64
entretenimiento . . . . . . . . . . . 65
tomar y enviar
fotografías . . . . . . . . . . . . . . 65
grabar y reproducir
videoclip . . . . . . . . . . . . . . . 67
cartera AT&T Music™ . . . . . 70
insertar una tarjeta
de memoria . . . . . . . . . . . . . 74
copiar archivos
de la computadora . . . . . . . 75
administrador
de archivos . . . . . . . . . . . . . 76
modo de vuelo . . . . . . . . . . 77
otras funciones . . . . . . . . . . . 78
llamada avanzada . . . . . . . . 78
contactos . . . . . . . . . . . . . . 79
programación personal . . . . 82
duración de llamadas. . . . . . 84
manos libres . . . . . . . . . . . . 85
calendario . . . . . . . . . . . . . . 86
calculadora. . . . . . . . . . . . . . 87
seguridad. . . . . . . . . . . . . . . 88
información del teléfono . . . . 88
diversión y juegos . . . . . . . . 89
servicio y reparaciones . . . . . 90
índice. . . . . . . . . . . . . . . . . . . . 91

menú inicio
9
menú inicio
menú principal
Para abrir el menú desde la pantalla
principal, oprima
Inicio
(la tecla
programable izquierda).
&
Mensajería
• Mensajes de texto
• Outlook E-mail
•MMS
• Nueva cuenta de email
%
Calendario
(
Contactos
A
ActiveSync
Æ
AT & T Mus i c
• Windows Media Player
• Comprar música
•Música ID
• Música continua
• Videos de música
• The Buzz
• Comunidad
• Aps música
È
Cellular Video
Ë
MEdia Net
É
AT & T Mal l
Ë
IM y Email
Å
Historial de llamadas
Ì
Herr de oficina
• Calculadora
• McAfee VirusScan
•Tareas
• Notas de voz
Í
Mis cosas
• Mi dispositivo
• Mis documentos
• Mis imágenes y videos
•Notas
• Tarjeta de almacenamiento
• Personalizar Mi Q
Î
Juegos
!
Opera
Ê
Aplicaciones
• Cámara
• Administrador de archivos
• Internet Explorer
• MyCast Weather
• Marcado rápido
• Bluetooth
• Documentos para llevar
• Obtener Aps
•Más Aps
9
Herramientas del sistema
• Ayuda e Inicio rápido
• Borrado general
• Reinicio General
• Administrador de memoria
• Programación
• Administrador de tareas
Ésta es la disposición estándar del menú.
El
menú de su teléfono puede ser diferente.
Para seleccionar elementos del menú, oprima
la tecla de navegación hacia arriba, abajo,
izquierda o derecha.

10
aspectos esenciales
aspectos esenciales
acerca de esta guía
Oprima las teclas programables izquierda y derecha
para abrir los menús y seleccionar opciones. Use la
tecla de navegación
S
para desplazarse a los
elementos y oprima la tecla central
s
para
seleccionarlos.
Esta guía muestra cómo ubicar una función del menú,
tal como se indica a continuación:
Búsqueda:
oprima
Inicio
>
Historial de llamadas
> (llamadas recibidas)
Esto significa que, en la pantalla de inicio:
1
Oprima la
tecla programable izquierda
para
abrir el menú
Inicio
.
2
Oprima la tecla de navegación
S
para
desplazarse a
Å
Historial de llamadas
. Oprima la
tecla central
s
para seleccionar
Historial de llamadas
.
3
Oprima la tecla de navegación para desplazarse a
una llamada recibida. Oprima la tecla central para
seleccionar la llamada.
Consejo:
puede oprimir las teclas laterales
de desplazamiento para desplazarse hacia arriba y
hacia abajo y oprima la tecla de selección lateral
Tecla progra-
mable izquierda
Tecla progra-
mable derecha
Tecla centralNavegación
Mensajería
Potencia
Atrás
MEdia Net
Llamar/contestar
Casa

11
aspectos esenciales
para seleccionar elementos (vea la página 1 para
conocer las ubicaciones de las teclas laterales).
tarjeta SIM
La tarjeta Módulo de identidad del abonado (SIM)
contiene información personal, tal como su número
telefónico y los ingresos de contactos. También puede
contener las programaciones del correo de voz,
mensajes de texto e Internet. Si pone su tarjeta SIM
en otro teléfono, ese teléfono utiliza su número
telefónico.
Precaución:
no doble ni raye la tarjeta SIM.
Manténgala alejada de la electricidad estática, el agua
y la suciedad.
Para insertar y usar una
tarjeta de memoria
, consulte
la página 74.
Apague el teléfono y saque la batería antes de
instalar o retirar una tarjeta SIM.
símbolos
Esto significa que la función depende de la
red o de la suscripción, y es posible que no
esté disponible en todas las áreas. Para
obtener más información, comuníquese
con su proveedor de servicio.
Esto significa que la función requiere un
accesorio opcional.
12

12
aspectos esenciales
batería
Uso y seguridad de las baterías
• Motorola recomienda que siempre utilice
baterías y cargadores marca Motorola.
La garantía no cubre daños provocados por el
uso de baterías y/o cargadores que no sean
Motorola.
Precaución:
el uso de una batería o
cargador inadecuado puede dar origen a un
incendio, una explosión, una fuga u otra
situación de peligro. El uso inadecuado o el
uso de una batería dañada puede dar origen a
un incendio, una explosión u otra situación de
peligro.
•
El uso de baterías por parte de los niños debe
ser supervisado.
• Importante:
los dispositivos móviles Motorola
están diseñados para funcionar mejor con
baterías certificadas. Si ve en la pantalla un
mensaje tal como
Batería inválida
o
No puede cargar
,
realice los siguientes pasos:
•
retire la batería y revísela para confirmar si
tiene el holograma “Original Equipment”
de Motorola;
•
si no tiene el holograma, la batería no es
una batería certificada;
•
si tiene el holograma, vuelva a poner la
batería y vuelva a intentar cargarla;
34

13
aspectos esenciales
•
si el mensaje permanece, comuníquese
con un Centro de servicio Motorola
autorizado.
•
Las baterías nuevas o almacenadas durante un
período prolongado pueden demorarse más
en cargar.
• Precauciones al cargar:
cuando cargue la
batería, manténgala a temperatura ambiente.
Nunca exponga las baterías a temperaturas
inferiores a 0ºC (32ºF) ni superiores a 45ºC
(113ºF) al cargarlas. Cuando deje su vehículo,
siempre lleve el dispositivo móvil consigo.
•
Si guarda la batería, manténgala en un lugar
frío y seco.
•
Es normal que a través del tiempo la vida útil
de la batería disminuya y que la batería
muestre menor tiempo de funcionamiento
entre cargas o que requiera cargas con mayor
frecuencia o mayor tiempo de carga.
• Evite dañar la batería y el dispositivo móvil.
No desarme, abra, rompa, doble, deforme,
perfore, triture ni sumerja la batería ni el
dispositivo móvil. Evite dejar caer la batería o
el dispositivo móvil, especialmente en una
superficie dura. Si su dispositivo móvil o la
batería fueron sometidos a dicho daño, llévelo
a un Centro de servicio Motorola
autorizado antes de usarlos.
No
intente
secarlos con un electrodoméstico o una
fuente de calor externa, como un secador de
pelo o un horno microondas.
• Tenga cuidado al manipular una batería
cargada
: en particular cuando la coloque en
un bolsillo, bolso u otro lugar que contenga
objetos metálicos. El contacto con objetos
metálicos (como alhajas, llaves, cadenas de
cuentas) puede cerrar un circuito eléctrico
(cortocircuito), lo que provocará que la batería

14
aspectos esenciales
alcance una temperatura elevada, lo que
puede causar daños o lesiones.
Elimine inmediatamente las baterías usadas
de acuerdo a las normas locales.
Comuníquese con el centro de reciclaje local
para conocer los métodos de desecho correctos de las
baterías.
Advertencia:
jamás arroje las baterías al fuego, ya que
pueden explotar.
instalación de la batería
Nota:
el teléfono
MOTO Q™ 9h
viene con dos
baterías y dos cubiertas de batería. La batería estándar
BT60 usa la cubierta estrecha, mientras que la batería
de capacidad extendida BT90 requiere la cubierta de
mayor tamaño.
carga de la batería
Las baterías nuevas no están totalmente cargadas.
Enchufe el cargador de la batería al teléfono y a una
toma de corriente.
El teléfono
puede tardar
varios
segundos
antes de
comenzar
a cargar la
batería. Durante la carga, el área alrededor de la tecla
de navegación se iluminará. Cuando la carga finalice, la
pantalla mostrará un icono de batería cargada
^
.
12
carga
vacío
llena

15
aspectos esenciales
Consejo:
quédese tranquilo, no puede sobrecargar la
batería. Se desempeñará mejor una vez que la cargue
y descargue por completo unas cuantas veces.
También puede cargar la batería con un cable
USB
conectado a una computadora, a menos que la batería
esté completamente agotada. Use un cargador de
pared o de automóvil para baterías completamente
agotadas. Instale el software desde el disco de
Inicio en la computadora antes de cargar el teléfono a
través del puerto USB. Conecte el cable a un puerto o
hub USB alimentado, ya que puede que algunos
dispositivos USB (como los teclados) no suministren
energía suficiente para la carga.
conservar la vida útil de la batería
•
Para programar el tiempo que el teléfono
espera antes de que la
luz de fondo
se
apague, oprima
Inicio
>
Herramientas del sistema
>
Programación
>
Más...
>
Administración de energía
>
Tiempo de espera de la batería
o
Tiempo de espera de luz de
fondo con CA
Cuando la luz de fondo de apaga, la
pantalla queda visible, pero atenuada.
•
Para cerrar los programas sin uso, desde la
pantalla principal, oprima
Inicio
>
Herramientas
del sistema
>
Administrador de tareas
. Seleccione el
programa y oprima
Menú
>
Eliminar
.
•
Para extender los
intervalos de
enviar/recibir email
, oprima
R
, seleccione
una cuenta de email,
oprima
Menú
>
Programación
y oprima
Siguiente
hasta que pueda cambiar el
Intervalo
enviar /recibir automático
. Si tiene más de una
cuenta de email configurada, elija sólo una
cuenta para enviar/recibir mensajes en forma
automática.

16
aspectos esenciales
encender y apagar
Para encender el
teléfono
, oprima y
suelte
O
. Si se
solicita, ingrese el
código de desbloqueo
(vea la página 26).
Consejo:
en el caso de que el teléfono no se encienda
en forma normal o se congele en una pantalla,
asegúrese de que la batería esté completamente
cargada. Si lo está, retire y vuelva a colocar la batería,
luego vuelva a encender el teléfono. Si esto no
funciona, puede hacer un
reinicio obligatorio
para
reiniciar el teléfono, pero esto borrará la programación
personalizada y todo el contenido almacenado en la
memoria del teléfono. Para efectuar un reinicio
obligatorio, retire y vuelva a colocar la batería, luego
oprima las teclas
*
y
E
durante 5 segundos
mientras enciende el teléfono.
Para apagar el teléfono
, mantenga oprimida
O
durante 3 segundos, luego
suéltela
.
realizar una llamada
En la pantalla principal, ingrese un número telefónico y
oprima
N
para hacer una llamada.
Para marcar por voz, mantenga presionada
h
en la
pantalla principal. Cuando se le solicite, diga “Llamar”,
seguido de un número o el nombre de un contacto.
Para desactivar la cobertura inalámbrica (como a bordo
de un avión), mantenga presionada
X
hasta que
aparezca una lista rápida, luego seleccione
Administrador inalámbrico
>
Todo
.
contestar una llamada
Cuando el teléfono timbra y/o vibra, oprima
N
para
contestar. Para “colgar”, oprima
O
.

17
aspectos esenciales
•
Si está ocupado cuando entra una llamada,
oprima la tecla
Ignorar
para enviar la llamada
directamente al correo de voz.
•
Para poner una llamada en espera,
oprima
N
. Para devolver la llamada,
oprima
N
nuevamente.
•
Si está en una llamada y entra otra llamada,
puede oprimir
Ignorar
para enviar la nueva
llamada directamente al correo de voz u
oprimir
N
para contestarla y poner la
llamada actual en espera (oprima
N
para
alternar entre las dos llamadas).
almacenar un número
telefónico
Búsqueda:
oprima
Inicio
>
Contactos
y oprima
Nuevo
1
Elija si desea almacenar el contacto en el teléfono
(contacto de Outlook ) o en la tarjeta SIM. Los
contactos de la tarjeta SIM sólo pueden incluir un
nombre y un número.
2
Ingrese la información del contacto.
Consejo:
mientras ingresa el número, puede
decirle al teléfono que haga una pausa y luego
marque más dígitos (como una contraseña de
correo de voz o PIN). Oprima
Menú
>
Insertar pausa
para ingresar una pausa de 2 segundos (aparece
como una
p
) u oprima
Menú
>
Insertar espera
para
indicarle al teléfono que espere a que oprima la
tecla central
s
antes de marcar los dígitos
restantes (aparece como una
w
).
Insertar espera
no
funciona para los contactos almacenados en la
tarjeta SIM.
Consejo:
si recibe una llamada de alguien que no está
en su lista de contactos, puede crear un contacto
desde el
Historial de llamadas
. Sólo resalte la llamada y
oprima
Guardar
.

18
aspectos esenciales
Para cargar los contactos de su teléfono anterior
,
inserte la tarjeta SIM del teléfono anterior (vea la
página 11). MOTO Q 9h lee todos los contactos del
teléfono anterior que se encuentren almacenados en
la tarjeta SIM. Si no hay contactos en la tarjeta SIM,
consulte el manual del teléfono antiguo para ver si
puede copiar los contactos a la tarjeta SIM o a
Microsoft® Outlook en la computadora.
Para cargar contactos de
Microsoft
Outlook desde
la computadora
, use Microsoft ActiveSync o
Windows® Mobile Device Center, como se describe
en la página 60.
llamar a un número
almacenado
Búsqueda:
oprima
Inicio
>
Contactos
1
Desplácese al número.
2
Oprima
N
.
El teléfono llama al número predeterminado del
contacto.
Consejo:
si guardó más de un número para un
contacto, seleccione el contacto para ver los otros
números. Para marcar un número, desplácese hasta él
y oprima
N
.
su número telefónico
Para ver su número telefónico y número de servicio
del correo de voz, oprima
Inicio
>
Herramientas del sistema
>
Programación
>
Teléfono
>
Opciones de llamada
.
Nota:
no puede almacenar un carácter de pausa (
p
)
o espera (
w
) en el número de correo de voz. Si desea
agregar uno o dos caracteres de pausa seguidos de su
contraseña, de modo que ésta última se ingrese de
manera automática, cree un contacto para el número
del correo de voz y use el contacto para llamar al
correo de voz (consulte la página 17).

19
consejos y trucos
consejos y trucos
Desde la pantalla principal
(que aparece en la
página 20), puede usar los siguientes atajos:
Para… Haga esto...
bloquear
el teléfono
Oprima
X
y luego
f
. Para
desbloquearlo, oprima
Desbloq
y
luego
*
(vea la página 26).
abrir música,
mensajes
ymás
Use las teclas de atajo para
acceder a AT&T Music
[
, la
cámara
e
, contactos
e
,
calendario
d
, mensajes
R
y
MEdia Net
@
.
abrir opciones
rápidas
Mantenga oprimida
X
.
reproducir
música o
juegos a
bordo de
un avión
Para seguir jugando y
escuchando música a bordo de
un avión, apague la red y los
servicios Bluetooth®. Mantenga
oprimida
X
hasta que aparezca
una lista rápida, luego seleccione
Administrador inalámbrico
>
Todo
.
personalizar
el dispositivo
Oprima
Inicio
>
Mis cosas
>
Personalizar mi Q
para
personalizar sonidos, pantalla
principal, teclas programables
y más.
usar el altavoz
Durante una llamada, oprima
h
para activar o desactivar el
altavoz.
Para… Haga esto...

20
aspectos fundamentales
aspectos fundamentales
Consulte la página 3 donde encontrará un diagrama
básico del teléfono.
pantalla
La pantalla principal aparece cuando enciende el
teléfono. Para marcar un número desde la pantalla
principal, oprima las teclas numéricas y
U
.
Nota:
la pantalla principal puede ser distinta a la que
aparece aquí.
Las etiquetas de las teclas programables muestran las
funciones actuales de las teclas programables. Para
conocer las ubicaciones de las teclas programables,
consulte la página 1.
Oprima la tecla de navegación
S
hacia arriba, abajo,
izquierda o derecha para desplazarse a los elementos
AT&T
Reunión de personal
10:00 AM Sala de reuniones A
Perfil: Normal
12:00 PM
12/31/2007
ContactosInicio

21
aspectos fundamentales
básicos del menú o a texto en la pantalla principal.
Oprima
X
para volver a la pantalla principal.
Los indicadores de estado pueden aparecer en la
parte superior de la pantalla principal:
1 Indicador de llamadas perdidas:
muestra
E
cuando tiene llamadas
perdidas.
2 Indicador de correo de voz:
muestra
w
aparece cuando tiene un nuevo correo
de voz.
3 Indicador de mensaje/Bluetooth:
muestra
C
cuando recibe un nuevo email
o mensaje de texto. Muestra
E
cuando la
potencia de Bluetooth está activada.
Tecla central
Navegación
Tecl a
programable
izquierda
Tecl a
programable
derecha
MEdia Net
Atrás
Entrar
Mayús
Altavoz
(oprimir) o
Reconcimiento
de voz
(mantener
oprimido).
CámaraAT&T MusicEspacio
Función
Calendario
Contactos
5. Red 7. Nivel de
la batería
6. Perfil 8. Potencia
de la señal
4
.
Transferencia
de llamadas
3.
Mensaje /
Bluetooth
2.
Correo
de voz
1.
Llamada
perdida

22
aspectos fundamentales
4 Indicador de transferencia de llamadas:
muestra
D
cuando la transferencia de llamadas
está activada.
5 Indicador de red:
muestra
si usa una red
3G
k
, GPRS
f
o EDGE
\
.
6 Indicador de perfil:
muestra cuando el estilo de
timbre está programado en
Silencio
(
Q
) o
Vibrar
(
<
). No aparece ningún indicador cuando el perfil
de estilo de timbre es
Normal
,
Exterior
o
Automático
.
Nota:
%
aparece cuando el altavoz está activado
(consulte la página 25).
7 Indicador de nivel de batería:
las barras
verticales muestran el nivel de carga de la batería.
Recargue la batería cuando el teléfono muestre
una o dos barras.
8 Indicador de intensidad de la señal:
las
barras verticales indican la intensidad de la
conexión de red. No podrá realizar ni recibir
llamadas cuando no aparezcan barras verticales.
Las letras indican una conexión
3G
k
, GPRS
f
o EDGE
\
y las flechas sobre el indicador de
potencia de la señal pueden significar
transferencia de datos al teléfono.
ingreso de texto
Puede ingresar texto y números usando el teclado.
Cuando selecciona un campo que requiere texto o
números, el teléfono selecciona automáticamente el
modo de ingreso apropiado. Un indicador en el ángulo
superior derecho de la pantalla muestra el modo de
ingreso en uso actualmente.

23
aspectos fundamentales
Oprima
H
en una
panta de texto para
seleccionar un modo
de ingreso:
Oprima
Menú
para
abrir el submenú.
El
cursor destellante
indica el punto de
inserción.
Oprima
H
para alternar entre los modos de
ingreso. Para obtener descripciones de indicadores,
consulte la siguiente sección.
Enviar
Mensajes de texto
A:
0/160
Menú
modos de ingreso
i
Ingrese la
letra
que aparece en una tecla
(tal como
Q
). Para poner en mayúscula la
siguiente letra, oprima
k
una vez. Para
poner en mayúscula todas las letras,
oprima
k
dos veces.
Ã
Ingrese un
símbolo o número en la
siguiente tecla
que se oprime (como
!
),
luego cambia al modo
i
para ingresar
letras.
Ä
Ingrese
sólo símbolos y números
de las
tecla hasta que vuelva a oprimir
H
. Para
elegir de una lista de caracteres y otros
símbolos internacionales, oprima
H
y
luego
k
.

24
aspectos fundamentales
Para
borrar
caracteres, oprima
n
. Mantenga
oprimida
n
para continuar borrando. Para comenzar
una
línea nueva
, oprima
j
.
predicción de texto
A medida que ingresa letras, el
teléfono puede intentar
predecir
la palabra. Por ejemplo, puede
predecir “programa” cuando ingrese “prog”.
Para aceptar la predicción, oprima
S
a la derecha.
Para ver predicciones alternativas,
mantenga
presionada
la flecha hacia abajo en
S
. Para ingresar
un espacio después de los caracteres (como “prog”),
oprima
f
.
En un mensaje, oprima
Hk
>
Config
para
desactivar
la predicción de texto, cambiar el idioma o
borrar la memoria de las palabras utilizadas.
volumen
Para ajustar
el volumen
principal
,
mantenga
presionada la
tecla de
selección lateral en la pantalla principal hasta que
aparezca la configuración de volumen. Oprima las
teclas de volumen laterales para cambiar el volumen.
El volumen principal puede silenciar el timbre y todos
los demás sonidos, salvo la voz de la persona que
llama.
Para
ajustar el volumen durante una llamada
,
oprima las teclas de volumen laterales.
Nota:
los accesorios Bluetooth®, como los audífonos,
tiene sus propios controles de volumen.
prog
rama
Subir volumen
Bajar volumen
Te cla Atrás
Te cla de selección
lateral

25
aspectos fundamentales
Para cambiar el
perfil de timbre y sonido
en la
pantalla principal, desplácese y seleccione
Perfil
. Escoja
entre
Normal
,
Silencioso
,
Vibrar
y otros.
Consejo:
para silenciar el teléfono cuando esté
timbrando, sólo oprima las teclas
de volumen laterales.
Para cambiar los
sonidos para alertas u otros
eventos
, oprima
Inicio
>
Herramientas del sistema
>
Programación
>
Sonidos
. Seleccione un evento y elija un sonido
para él.
altavoz del manos libres
Nota:
el uso de teléfonos inalámbricos durante la
conducción puede ocasionar distracción. Corte la
llamada si no puede concentrarse en la conducción.
Además, el uso de dispositivos inalámbricos y sus
accesorios puede estar prohibido o restringido en
ciertas áreas. Obedezca siempre las leyes y las
regulaciones sobre el uso de estos productos.
Puede usar el altavoz manos libres del teléfono
durante las llamadas sin sostener el teléfono cerca
del oído.
Durante una llamada, oprima
h
para activar el
altavoz manos libres. Un
%
en la parte superior de la
pantalla indica que el altavoz está activado. Para
desactivarlo, vuelva a oprimir
h
o finalice la llamada.

26
aspectos fundamentales
Nota:
el altavoz manos libres no funcionará cuando el
teléfono esté conectado a un equipo para automóvil o
a un audífono.
bloquear y desbloquear
el teléfono
Puede bloquear manualmente el teléfono para evitar
oprimir accidentalmente una tecla.
Para
bloquear el teléfono
, oprima
X
y luego
f
.
La tecla programable izquierda se vuelve
Desbloq
.
Para
desbloquear el teléfono
, oprima
Desbloq
e ingrese
la contraseña. El teléfono usa
*
si no ha programado
una contraseña.
Para
evitar que otros usen el teléfono
, cambie la
contraseña:
Búsqueda:
en la pantalla principal, oprima
Inicio
>
Herramientas del sistema
>
Programación
>
Más...
>
Seguridad
>
Bloqueo de dispositivo
1
Marque la casilla de verificación
Preguntar si el
dispositivo está inactivo por
y seleccione la cantidad de
tiempo que el teléfono estará inactivo antes de
bloquearse automáticamente.
2
Elija una tipo de contraseña alfanumérica
simple (número de 4 dígitos) o complicada (una
contraseña difícil de adivinar de a lo menos
7 caracteres en mayúsculas y minúsculas,
números y puntuación).
Consejo: elija una contraseña que pueda
recordar
. Sin la contraseña, puede realizar un
reinicio obligatorio
del teléfono, pero perderá la
programación personalizada y todo el contenido
almacenado en la memoria del teléfono. Para
efectuar un reinicio obligatorio, mantenga

27
aspectos fundamentales
oprimida las teclas
*
y
E
durante 5 segundos
mientras enciende el teléfono.
3
Ingrese y confirme su contraseña.
4
Oprima
Listo
.
para desbloquear el teléfono, oprima
Desbloq
. Cuando
aparezca el mensaje de desbloqueo, ingrese su
contraseña y oprima
Listo
.
Nota:
puede hacer llamadas de emergencia (como al
911 en Estados Unidos, como se describe en la
página 35) en un teléfono bloqueado. Un teléfono
bloqueado permite contestar llamadas entrantes.

28
personalizar
personalizar
perfiles
Cada perfil utiliza un conjunto diferente de sonidos,
estilos de timbre, programación de volumen de
auricular o vibraciones para llamadas entrantes y otros
eventos. Por ejemplo, el volumen del perfil
Exterior
es
mucho más fuerte que el del perfil
Normal
.
Búsqueda:
en la pantalla principal, desplácese y
seleccione
Perfil:
> nombre del estilo de perfil
Los indicadores pueden aparecer en la parte superior
de la pantalla principal para los perfiles
Silencioso
(
Q
) y
Vibrar
(
<
). Un
%
significa que el altavoz está activado
(consulte la página 25). El volumen principal del
teléfono afecta el volumen del timbre (vea la
página 24).
Nota:
el perfil
Automático
es el mismo que el perfil
Normal
,
salvo que cambia automáticamente a
Vibrar
durante un
evento almacenado en el calendario.
cambiar tonos de timbre
Puede cambiar los tonos de timbre para llamadas
entrantes y otros eventos.
Búsqueda:
oprima
Inicio
>
Mis cosas
>
Personalizar mi Q
>
Sonidos y tonos de timbre
Nota:
los cambios hechos a la programación de
alertas no se aplicarán cuando use el perfil
Silencioso
.
Normal Vibrar Automático
Silencioso Exterior

29
personalizar
1
Desplácese y resalte el sonido que desea
cambiar, luego oprima la tecla de navegación
S
hacia la izquierda o derecha para cambiarlo.
2
Oprima la tecla
Listo
para guardar la programación
del sonido.
Si descarga
un archivo de sonido para un tono de
timbre, no se guarda automáticamente en la ubicación
Sonidos
. Para mover un archivo de sonido, oprima
Inicio
>
Aplicaciones
>
Administrador de archivos
>
Mis documentos
. Resalte
el archivo de sonido que desea copiar a la ubicación
Sonidos
, oprima
Menú
>
Archivo
>
Copiar a
y seleccione
Datos de
aplicación
>
Sonidos
. Si el archivo de sonido no está
ubicado en la carpeta Mis documentos, vaya a la
carpeta donde está almacenado el archivo de sonido y
cópielo a la carpeta
Sonidos
. Algunas redes limitan el
tamaño de archivo
que puede usar para un tono de
timbre.
hora y fecha
El proveedor de servicio generalmente programa la
hora y la fecha en el teléfono. Para cambiarla
manualmente:
Búsqueda:
oprima
Inicio
>
Herramientas del sistema
>
Programación
>
Reloj y alarma
>
Fecha y hora
1
En la
Zona horaria
, use la tecla de navegación
S
para seleccionar la zona horaria.
Nota:
actualice la zona horaria cuando viaje para
asegurarse que los eventos del calendario del
teléfono aparezcan a la hora correcta.
2
En
Fecha
, modifique el mes, días o año.
3
En
Hora
, modifique la hora, los minutos y
segundos.
4
Oprima
Listo
para guardar la programación del reloj
y fecha.

30
personalizar
Puede especificar el estilo de fecha y hora al cambiar
la programación regional. Oprima
Inicio
>
Herramientas
del sistema
>
Programación
>
Más
>
Más
>
Programación regional
.
pantalla principal
Programe una fotografía o imagen como imagen de
fondo de pantalla (fondo) o cambie la disposición y
esquema de color de la pantalla principal.
Búsqueda:
oprima
Inicio
>
Mis cosas
>
Personalizar mi Q
>
Pantalla principal
cambiar imagen de fondo
¿Desea copiar una imagen de la PC en el teléfono para
usarla como imagen de fondo?
Nota:
su PC debe tener Microsoft® Windows®
Mobile Device Center (en una PC con Windows Vista)
o debe instalar Microsoft ActiveSync en su PC como
se describe en la página 60.
1
Conecte el teléfono a la PC. Su PC debe
confirmar la conexión.
opciones
Esquema de
pantalla
principal
Seleccione un esquema para la
pantalla principal.
Esquema de
color
Seleccione un esquema de color para
la pantalla.
Imagen de
fondo
Seleccione una imagen para fondo de
pantalla o
Predeterminada
para no tener
fondo de pantalla.
Tiempo de
espera
Seleccione el intervalo de tiempo
antes de que la pantalla regrese a la
pantalla principal o
Nunca
.
opciones

31
personalizar
2
En la PC, copie el archivo de la imagen que desea.
El formato del archivo debe ser .gif, .jpg o .bmp.
3
En ActiveSync en la computadora, seleccione
Explorar y haga doble clic en Mi dispositivo
Windows® Mobile.
4
Haga doble clic en Mis documentos y luego en
Mis imágenes y pegue la imagen en dicha
carpeta.
Nota:
si descarga un archivo de imagen para un
fondo de pantalla, no se guarda automáticamente
en la carpeta
Mis imágenes
. Para mover un archivo de
imagen, oprima
Inicio
>
Aplicaciones
>
Administrador de
archivos
>
Mis documentos
. Resalte el archivo de imagen
que desea copiar a la ubicación Mis imágenes,
oprima
Menú
>
Archivo
>
Copiar a
y seleccione
Mis documentos
>
Mis imágenes
. Si el archivo de imagen
no está ubicado en la carpeta
Mis documentos
, vaya a
la carpeta donde está almacenado el archivo de
imagen y cópielo a la carpeta
Mis imágenes
.
luz de fondo
El teléfono ajusta automáticamente el brillo de la
pantalla cuando se mueve entre los entornos de brillos
y oscuridad. Para conservar la vida útil de la batería, la
luz de fondo se apaga cuando no se usa el teléfono.
La luz de fondo se vuelve a encender cuando se
oprime una tecla. Para programar el tiempo que el
teléfono espera antes de apagar la luz de fondo:
Búsqueda:
oprima
Inicio
>
Herramientas del sistema
>
Programación
>
Más
>
Administración de energía
>
Tiempo de espera
de la batería
o
Tiempo de espera de luz de fondo con CA
opciones para contestar
Para usar
cualquier tecla
para contestar una llamada
entrante, oprima
Inicio
>
Herramientas del sistema
>
Programación
>
Teléfono
>
Opciones de Llamada
>
Contest cualquier tecla
.

32
personalizar
aplicaciones de terceros
Las aplicaciones de terceros o programas de
complemento, pueden incluir email, seguridad, oficina
móvil, entretenimiento y software de productividad.
Por lo general, estos productos pueden descargarse e
instalarse de inmediato. En Internet hay disponibles
aplicaciones comerciales y gratuitas compatibles. Para
obtener más información, vea las descargas
disponibles en
att.com/cell-phone-service/ringtones_media
Nota:
las aplicaciones escritas para dispositivos
lanzados anteriormente o versiones más antiguas de
Windows Mobile puede que no funcionen con
confiabilidad en este teléfono. Comuníquese con el
proveedor de la aplicación para verificar la
compatibilidad antes de instalar la aplicación en este
teléfono.
administrador de tareas
¿Desea ver qué programas se están ejecutando
(activos) en su teléfono? Use el Administrador de
tareas para ver los programas o detener un programa
específico que se está ejecutando.
Búsqueda:
en la pantalla principal, oprima
Inicio
>
Herramientas de sistema
>
Administrador de tareas
Consejo:
¿Necesita detener un programa que se está
ejecutando? En
Administrador de tareas
, seleccione el
programa y oprima
Menú
>
Eliminar
.
Nota:
si desea quitar completamente un programa del
teléfono, en la pantalla principal, oprima
Inicio
>
Herramientas del sistema
>
Programación
>
Más
>
Quitar programas
.

33
llamadas
llamadas
Para realizar y contestar llamadas, consulte la
página 16.
desactivar una alerta
de llamada
Puede usar las teclas laterales de desplazamiento para
desactivar el timbre antes de contestar la llamada.
llamadas recientes
Su teléfono mantiene una lista de las llamadas
entrantes y salientes, incluso si éstas no se
conectaron. Las llamadas más recientes se muestran
primero. Las llamadas más antiguas se borran a
medida que se agregan otras nuevas.
Búsqueda:
oprima
Inicio
>
Historial de llamadas
Resalte una llamada, luego:
•
Para llamar al número, oprima
N
.
•
Para ver detalles de la llamada (como hora y
fecha), oprima la tecla central
s
.
•
Para ver las
Opciones de menú
, oprima
Menú
en la
vista
Historial de llamadas
. Este menú incluye:
opciones
Buscar contacto
Busque este número telefónico en los
Contactos
.
Enviar mensaje
de texto
Envíe un mensaje de texto a este
número telefónico.

34
llamadas
remarcar
1
Oprima
N
en la pantalla principal para ver la lista
de llamadas.
2
Resalte el ingreso al que desea llamar y
oprima
N
.
ver llamadas perdidas
El teléfono mantiene un registro de las llamadas sin
contestar.
1
Oprima
Inicio
>
Historial de llamadas
.
2
Oprima
Menú
>
Filtro
>
Llam perdidas
.
ID de llamada
Identificación de la línea que llama (ID de
llamada) muestra el número telefónico de una
llamada entrante en la pantalla principal.
Email
Envíe un mensaje de email a este
contacto.
Ver
cronómetros
Vea la duración de esta llamada y de
todas las llamadas.
Borrar
Borre esta llamada del
Historial de llamadas
.
Borrar lista
Borre todas las llamadas del
Historial
de llamadas
.
Guardar en
contactos
Guarde este número en un contacto.
Enviar MMS
Envíe un mensaje a este número.
Filtro
Filtre todas las llamadas de la lista de
Historial de llamadas
. Por ejemplo, si filtra la
lista de todas las
Llamadas perdidas
, sólo
aparecerán las llamadas telefónicas
entrantes que no contestó.
opciones

35
llamadas
El teléfono muestra el nombre y la imagen de la
persona que llama cuando están almacenados en sus
contactos o
Llamada entrante
cuando la información de
ID de llamada no está disponible.
Puede programar el teléfono para que reproduzca un
ID de llamada distintiva para ingresos específicos
almacenados en los contactos (vea la página 80).
llamadas de emergencia
Su proveedor de servicio programa uno o más
números telefónicos de emergencia, como 911 ó 112,
a los cuales usted puede llamar en cualquier
momento, incluso cuando su teléfono está bloqueado
o no se ha insertado la tarjeta SIM.
Nota:
consulte al proveedor de servicio, ya que los
números de emergencia varían según el país. Es
posible que el teléfono no funcione en todas las
ubicaciones y, en ocasiones, una llamada de
emergencia puede no cursarse debido a problemas
con la red, ambientales o de interferencia. No confíe
solamente en el teléfono inalámbrico para
comunicaciones esenciales, tales como emergencias
médicas.
1
Oprima las teclas correspondientes para marcar
el número de emergencia.
2
Oprima
N
para llamar al número de
emergencia.
AGPS y llamadas de emergencia
Cuando realiza una llamada de emergencia, el
teléfono puede usar las señales satelitales del
Sistema de posicionamiento global asistido (AGPS)
para indicar su ubicación aproximada al centro de
respuesta a emergencias.
La función AGPS tiene limitaciones; por eso, entregue
siempre la información más completa de su ubicación
al centro de respuesta a emergencias. Permanezca al

36
llamadas
teléfono el tiempo necesario para que le den
instrucciones.
Es posible que el AGPS
no funcione
para llamadas de
emergencia si su centro de respuesta a emergencias
local no procesa la información de ubicación del AGPS.
Para obtener detalles, comuníquese con las
autoridades locales.
Para obtener mejores resultados:
•
Salga o aléjese de las ubicaciones
subterráneas, los vehículos cubiertos, las
estructuras con techos de metal o de
concreto, los edificios altos y el follaje de los
árboles. El rendimiento en espacios interiores
podría mejorar si se acerca a las ventanas; no
obstante, algunas películas de parasol para
ventanas pueden bloquear las señales
satelitales.
•
Aléjese de radios, equipos de entretenimiento
y otros dispositivos electrónicos que podrían
bloquear o interferir con las señales satelitales
del AGPS.
Si el teléfono no puede encontrar señales satelitales
del AGPS intensas, se entrega automáticamente al
centro de respuesta a emergencias la ubicación de la
torre de telefonía celular más cercana que esté en
contacto con el aparato.
llamadas
internacionales
Si su servicio telefónico incluye marcado
internacional, mantenga oprimida
0
para
ingresar el código de acceso internacional local
(que se indica con
+
). Luego, oprima las teclas
correspondientes del teclado para marcar el código
del país y el número telefónico.

37
llamadas
marcado rápido
Puede utilizar el marcado rápido de dos formas:
acceso rápido para hasta 98 números de teléfono y
accesos directos a funciones en el menú Inicio,
incluidas email, calendario y Administrador
Bluetooth®.
Para acceder a un ingreso de marcado rápido,
mantenga oprimido el número de marcado rápido de
un solo dígito durante un segundo. Si el marcado
rápido tiene dos dígitos, oprima el primer dígito y
mantenga oprimido el segundo dígito. El teléfono
marca el número telefónico, abre un nuevo mensaje
de email o va a la página Web.
números de teléfono
Puede programar el marcado rápido para llamar a los
ingresos de la lista de contactos del teléfono:
1
Oprima
Inicio
>
Contactos
.
2
Desplácese hasta el contacto deseado y oprima la
tecla central
s
.
3
Seleccione el número telefónico o dirección de
email para la que desea crear el marcado rápido.
4
Oprima
Menú
>
Agregar a marc rápido.
5
En la
Asignación del teclado
, seleccione el número de
marcado rápido que desea utilizar.
Nota:
el número de marcado rápido 1 está
reservado para el correo de voz.
6
Oprima
Listo
.
Para
borrar
un ingreso de marcado rápido, oprima
Inicio
>
Aplicaciones
>
Marcado rápido
, desplácese al ingreso,
oprima
Menú
>
Borrar
.

38
llamadas
atajos del menú
Puede programar un atajo para abrir una aplicación en
el teléfono:
1
Oprima
Inicio
.
2
Desplácese hasta el icono de la aplicación para la
cual desea crear un atajo y oprima
Menú
>
Agregar
a marc. rápido
.
3
En la
Asignación del teclado
, seleccione el número de
atajo que desea utilizar.
4
Oprima
Listo
.
Nota:
para borrar un atajo, oprima
Inicio
>
Aplicaciones
>
Marcado rápido
, desplácese hasta el atajo, luego oprima
>
Menú
>
Borrar
. El proveedor de servicio puede haber
agregado un atajo para el
Correo de voz
que no puede
borrar.
correo de voz
Nota:
su proveedor de servicio puede incluir
información adicional acerca de la utilización de
esta función. La red almacena los mensajes del correo
de voz que usted recibe.
Para
configurar
el correo de voz, mantenga
oprimida
1
para llamar al sistema de correo de voz.
El sistema de correo de voz le pedirá:
1
Crear su contraseña.
2
Grabar su nombre.
3
Grabar un saludo.
Cuando vea el indicador de mensajes de correo de voz
w
en la parte superior de la pantalla, mantenga
oprimida
1
para
revisar
el correo de voz.

39
llamadas
Para revisar el correo de voz
desde otro teléfono
,
llame a su número telefónico de 10 dígitos. Durante el
saludo de su correo de voz, oprima
*
(
#
] en
Puerto Rico) y luego siga las instrucciones de voz.
llamada de tres vías
Mientras está conectado a una llamada:
1
Ponga en espera la llamada actual al
oprimir
N
.
2
Ingrese el número de la persona que desea
conectar a la llamada de tres vías y oprima
N
.
3
Después de conectarse al otro teléfono, puede
oprimir
Cambiar
para alternar entre las llamadas u
oprima
Menú
>
Conferencia
para combinarlas.
Si
recibe una segunda llamada
mientras está en una
llamada:
•
Para contestar la segunda llamada y poner la
primera llamada en espera, oprima
Rspondr
.
Luego puede oprimir
Cambiar
para alternar entre
las llamadas u oprima
Menú
>
Conferencia
para
combinarlas.
•
Para enviar la segunda llamada al correo de
voz, oprima
Ignorar
.

40
mensajería
mensajería
El servicio de email depende del proveedor de
servicio de email. Si tiene problemas para
configurar el email o para la sincronización
, visite
att.com/support
.
configurar el email
personal
Su teléfono con Windows® Mobile puede conectarse
a
cuentas de email personales
como Yahoo!
Premium, AOL y Comcast. Para configurar estas
cuentas en MOTO Q 9h, puede usar Xpress Mail™ o
Microsoft®
Outlook
. AT&T recomienda Xpress Mail
porque ofrece configuración y sincronización
automáticas, de modo que los cambios y
eliminaciones que haga en su MOTO Q 9h aparezcan
en su cuenta de email.
Nota:
para funciones como email y exploración Web,
AT&T recomienda la suscripción a un plan de datos
ilimitado. Llame a AT&T al 611 para contratar un plan
de datos.
configurar Xpress Mail™
Xpress Mail™ funciona con la mayoría de servicios de
email. Los usuarios de email de Windows® Live
deben visitar
att.com/xpressmail
para obtener la
información más reciente sobre soporte e
instrucciones de configuración alternativas. Si finaliza
esta configuración y su email no llega al dispositivo,
consulte a su proveedor de email para validar la
elegibilidad.

41
mensajería
1
En la pantalla principal,
oprima
Obtener Xpress Mail
.
2
Oprima la tecla de navegación
]
para resaltar
Instalar ahora
, luego oprima la tecla central
s
.
3
Oprima
Descargar ahora
en la página de
descarga.
4
Oprima
Sí
(la
tecla programable izquierda
) para
continuar la descarga.
5
Oprima
OK
(la
tecla programable derecha
) para
aceptar el acuerdo de licencia.
6
En
Número de celular
, ingrese su número celular
(móvil) de 10 dígitos, luego oprima
Siguiente
(la
tecla programable derecha
).
7 Para email personal
, seleccione
Portal o ISP
(y
oprima
Siguiente
), luego seleccione su proveedor
de email (y oprima
Siguiente
). Si no aparece el
nombre de su proveedor, seleccione
Más
para ver
más proveedores.
Para email corporativo
, seleccione
Trabajo
(y
oprima
Siguiente
), luego seleccione
Edición profesional
(y oprima
Siguiente
).
Atrás
Seleccionar tipo de cuenta de email:
Portal o ISP
Trabajo
Mi cuenta de email es entregada por un
portal o compañía de servicio de Internet,
por ejemplo yahoo.
Siguiente
Elija Portal o ISP para email personal.
Elija Trabajo para email corporativo.

42
mensajería
8
Ingrese su
Nombre de usuario
y
Contraseña
(para
su email personal o el nombre de usuario y
contraseña creados para Xpress Mail), luego
oprima
Siguiente
(la
tecla programable derecha
).
9
Seleccione
Registrar dispositivo
, luego
oprima
Siguiente
(la
tecla programable derecha
).
10
Oprima
Registrar
(la
tecla programable derecha
).
11
Luego de registrarse, el MOTO Q 9h muestra
automáticamente la sección Programación XM.
Oprima la
tecla programable derecha
para ir a
abrir el email.
configurar email personal con
Microsoft® Outlook Mobile
1
Oprima
R
>
Nueva cuenta de email
.
2
Ingrese su nombre y dirección de email, luego
oprima
siguiente
y siga las instrucciones de
configuración.
Si el teléfono encuentra la programación de la
cuenta, la completa automáticamente en las
siguientes pantallas. Sólo ingrese su nombre y
contraseña y oprima
Siguiente
en las siguientes
pantallas.
Si el teléfono no encuentra
la
programación, consulte con su proveedor de
email acerca de ella e ingrésela en las siguientes
pantallas.
Si su cuenta de email no tiene configurado el acceso
POP o IMAP, consulte con su proveedor de email
cómo cambiar la configuración. Si el proveedor de
email no proporciona acceso IMAP o POP, todavía
puede usar el explorador Web para acceder al email.

43
mensajería
configurar email
corporativo
Su teléfono con Windows® Mobile puede conectarse
a
cuentas de email corporativas
como
Microsoft® Exchange o Lotus Notes Estas cuentas
son administradas por el departamento de TI de su
organización. Para configurar estas cuentas en su
MOTO Q 9h, puede usar Xpress Mail™ (para acceso a
autoservicios, el cual se describe en la página 43) o
Good Mobile Messaging y Microsoft® DIrect Push
(para acceso con ayuda del departamento de TI de su
organización, el que se describe en la página 44).
Nota:
para funciones como email y exploración Web,
AT&T recomienda la suscripción a un plan de datos
ilimitado. Llame a AT&T al 611 para contratar un plan
de datos.
configurar email corporativo de
autoservicio con Xpress Mail™
Para configurar
Xpress Mail
corporativo, usted
necesita saber su dirección de email de trabajo y qué
tipo de servidor de correo tiene su compañía
(Microsoft® Exchange, Lotus Notes o IMAP). Cuando
tenga esta información, complete estos pasos
en la
computadora de su trabajo, con una conexión a
Internet:
1
Vaya a la página
Web
http://xpressmailpe.wireless.att.com
2
Haga clic en
Registrar ahora
y complete su
información.
Nota:
en este paso creará un nombre de usuario
y contraseña
Xpress Mail
. Recuerde estos datos
para más adelante en la configuración.
3
En la página de descarga, haga clic en
Descargar
.

44
mensajería
4
Haga clic en el botón
Abrir
o
Ejecutar
para
descargar el software.
5
Haga clic en
Sí
para instalar el software.
6
Haga clic en
Siguiente
para comenzar la
instalación y siga las instrucciones en pantalla.
Cuando se le pida un
nombre de usuario
y una
contraseña
, use los que creó en el
paso 2
de
este procedimiento.
7
Cuando Xpress Mail se conecte a su cuenta de
email corporativa, recibirá un mensaje
confirmándolo. Finalice el proceso de instalación
con “configurar Xpress Mail™” en la página 40.
configurar email corporativo
administrado por el
departamento de TI
Email administrado por el departamento de
TI significa que su empresa da soporte a
Good Mobile Messaging
o Microsoft®
Direct Push
para activar la sincronización inalámbrica de email
corporativo.
Good Mobile Messaging
Good Mobile Messaging proporciona sincronización
push inalámbrica en tiempo real de su email
corporativo, calendario, contactos, tareas y notas para
Microsoft Outlook y Lotus Notes. Debe tener una
cuenta en el servidor Good Mobile Messaging de su
compañía. Comuníquese con el departamento de TI si
no tiene una cuenta. También debe estar activado un
plan de datos “PDA Enterprise for Good” en su cuenta
inalámbrica AT&T antes de poder usar Good Mobile
Messaging. Las instrucciones de configuración de
Good le serán enviadas a través del email luego de la
activación de su cuenta.
Microsoft® Direct Push
Microsoft Direct Push proporciona acceso inalámbrico
a email, contactos, calendario y tareas corporativas de
Microsoft. Active un plan de datos “PDA Enterprise for

45
mensajería
Microsoft Direct Push” en su cuenta inalámbrica AT&T
antes de usar Direct Push.
Cuando el departamento de TI le configure un acceso,
sigas estos pasos para activar Microsoft Direct Push
en su MOTO Q 9h. El menú del teléfono puede ser
diferente:
1
Oprima
Inicio
>
ActiveSync
, luego oprima
Menú
>
Agregar fuente del servidor
.
2
Ingrese la Dirección de Exchange
Server
(si es
necesario, verifique
Este servidor requiere una conexión
encriptada (SSL)
), luego oprima
Próximo
.
3
Ingrese su
Nombre de usuario
y
Contraseña
(si es
necesario, ingrese el
Dominio
del servidor), luego
oprima
Siguiente
.
4
Elija si desea sincronizar
Contactos
,
Calendario
,
Email
y
Tareas
, luego oprima
Terminar
.
Consejo:
para cambiar la frecuencia en que el
teléfono revisa el email, oprima
Inicio
>
ActiveSync
,
luego oprima
Menú
>
Programación
. Para conservar la
vida útil de la batería, elija un intervalo más largo.
leer un mensaje
Cuando recibe un mensaje, el teléfono
reproduce una alerta y muestra
C
en la parte
superior de la pantalla principal.
Búsqueda:
en la pantalla principal,
oprima
R
> (cuenta de mensajes)
Si no ve una lista de mensajes
, oprima
Menú
>
Carpetas
>
Buzón
. Para volver a la lista de carpetas, oprima
Menú
>
Carpetas
.
Para leer un mensaje:
oprima la tecla
de navegación
S
para desplazarse al mensaje y
oprima la tecla central
s
para abrirlo.
Cuando tiene un mensaje abierto
, puede oprimir la
tecla denavegación
S
hacia la derecha para abrir el

46
mensajería
próximo mensaje o hacia la izquierda para abrir el
mensaje anterior.
anexos del mensaje
Si un email tiene anexo archivos de Microsoft® Word,
Excel o PowerPoint, puede abrirlos y editarlos usando
Documents To Go
. También puede ver anexos de archivos
.pdf o extraer anexos de archivos .zip.
Abra el mensaje y seleccione los anexos para
descargarlos. Después de que el teléfono descargue
los anexos, abra el mensaje y seleccione uno para
abrirlo.
•
Hojas de cálculo de Excel: use la tecla de
navegación
S
para seleccionar celdas e
ingresar números o texto: oprima
Menú
para ver
opciones como guardar, cortar, copiar, pegar,
buscar, eliminar y más.
•
Presentación con diapositivas de PowerPoint:
oprima la tecla programable izquierda para
cambiar entre las vistas de notas, general y
diapositivas. Oprima
Menú
para opciones como
guardar, cortar, copiar, pegar, buscar, eliminar
y más.
•
Documentos de Word: escriba números o
texto en el documento. Oprima
Menú
para
opciones como guardar, cortar, copiar, pegar,
buscar, eliminar y más.
•
Documentos de PDF: oprima
Zoom
para
cambiar el nivel de zoom. Oprima
Menú
para
guardar una copia del archivo, cambiar de
página u otras funciones.
Para
transferir
archivos adjuntos a la computadora
para modificarlos, use Microsoft® ActiveSync o
Windows® Mobile Device Center.

47
mensajería
opciones de mensaje
Para borrar, guardar, responder o reenviar los
mensajes, use estos pasos rápidos desde el buzón
con un mensaje seleccionado o al ver un mensaje:
•
Para borrar, oprima
Borrar
.
•
Para responder, oprima
Menú
>
Responder
o
Responder a todos
. Ingrese el mensaje y oprima
Enviar
.
•
Para reenviar, oprima
Menú
>
Responder
>
Reenviar
.
Ingrese la dirección y oprima
Enviar
.
•
Para crear una tarjeta de contacto para el
remitente, abra el mensaje, resalte el
remitente y oprima la tecla central
s
.
Consejo:
¿Necesita buscar nuevos mensajes de
inmediato? Oprima
R
y abra un buzón. Oprima
Menú
>
Enviar y recibir
. El teléfono se conecta al servidor de
email de Internet y envía y recibe los mensajes. Para
detener este proceso, oprima
Menú
>
Detener enviar y recibir
.
atajos de mensajería
Puede usar estos atajos para los mensajes recibidos.
Resalte un mensaje del buzón y oprima la tecla o abra
el mensaje y mantenga oprimida la tecla:
enviar un mensaje
Puede enviar tres tipos de mensajes: texto
(SMS), multimedia (MMS) y email.
Búsqueda:
oprima
R
>
Mensajes de texto
,
MMS
o
(cuenta de email)
0
lista de atajos
5
mover
1
responder a todos
6
reenviar
2
responder
7
borrar
3
marcar leído o no
leído
8
descargar
4
marca
9
enviar y recibir

48
mensajería
Para enviar un mensaje:
1
Oprima
Menú
>
Nuevo
.
2
Ingrese el número telefónico del contacto o
dirección de email, con un punto y coma (;) para
separar múltiples números o direcciones.
Consejo:
para elegir un destinatario entre los
contactos, oprima
j
cuando esté en el
campo
Para
.
3
Use el teclado para redactar un mensaje.
Para insertar una
imagen, nota de voz o archivo
en un email o mensaje MMS, oprima
Menú
>
Insertar
>
Imagen
,
Nota de voz
,o
Archivo
. Si inserta una nota de
voz, también deberá grabarla. Oprima
Grabar
, hable,
oprima
Detener
y luego oprima
Listo
.
Para programar la prioridad de un mensaje de
email, oprima
Menú
>
Opciones de mensaje
.
Para cancelar un mensaje, oprima
Menú
>
Cancelar mensaje
.
4
Oprima
Enviar
.
búsqueda global
de dirección
Desde el teléfono, puede buscar la lista global de
direcciones (GAL) almacenada en el servidor
Exchange de la compañía. Esto significa que puede
encontrar el número telefónico o email de un contacto
sin tener que guardar la información directamente en
su teléfono.
Nota:
la información GAL sólo se puede ver durante
una sesión de transferencia de datos, el GAL
completo no se puede almacenar para verlo sin
conexión.
La búsqueda GAL se puede encontrar en
Contactos
y
Directorio de la compañía
.
Directorio de la compañía
se encuentra en

49
mensajería
Mensajería
,
Teléfono
,
Calendario
y
Marcado rápido
. Aquí le
explicamos cómo usar GAL para buscar un contacto:
Búsqueda:
oprima
Inicio
>
Contactos
1
En la lista de contactos, oprima
Menú
>
Directorio de
la compañía
.
2
Ingrese el criterio de búsqueda y oprima
Buscar
.
3
Desplácese a través de la lista de ingresos que
aparece. Cuando encuentre el contacto,
oprima
N
para realizar una llamada.
Nota:
a pesar de que no se puede almacenar el
GAL completo en el teléfono, una vez que
encuentra el contacto, puede agregar ese
contacto a su lista de contactos.
Consejo:
también puede elegir enviar un mensaje, un
SMS o un email a un contacto encontrado a través de
GAL. En un mensaje o email nuevo, desplácese hasta
el campo Para, cc o bcc y oprima
Menú
>
Agregar destinatario
, luego haga clic en
Directorio de la compañía
.
Cuando encuentre el contacto al cual desea enviar un
mensaje, resáltelo y selecciónelo. La información de
email se completa automáticamente en el campo
Para:
.
referencia rápida de
mensajería
Nota:
puede que algunas funciones no
funcionen si configura la cuenta de email
manualmente (sin el asistente de configuración).
funciones
enviar un mensaje de texto
Oprima
R
>
Mensajes de texto
, luego
oprima
Menú
>
Nuevo
enviar mensaje MMS
Oprima
R
>
MMS
, luego oprima
Menú
>
Nuevo

50
mensajería
crear y enviar un email
Oprima
R
> (cuenta de email), luego
oprima
Menú
>
Nuevo
Nota:
debe tener su e-mail configurado para enviar
un email (consulte la página 40).
Para agregar una imagen, una nota de voz o un
mensaje de email, abra el área del mensaje y oprima
Menú
>
Insertar
>
Imagen
,
Nota de voz
o
Archivo
.
Consejo:
puede guardar el borrador de un mensaje
que está escribiendo para terminarlo y enviarlo
después. Oprima
Menú
>
Guardar en borrador
. El borrador
del mensaje se almacena en la carpeta Borradores
de la cuenta donde se encuentra usted.
funciones
crear y agregar una firma de email
Oprima
R
> (cuenta de email), luego oprima
Menú
>
Herramientas
>
Opciones
>
Firmas
Desplácese a la cuenta para la cual está creando la
firma. Seleccione
Usar firma con esta cuenta
. Seleccione la
casilla
Firma
, ingrese su firma y oprima
Listo
.
Consejo:
para insertar una firma en cada mensaje
que envíe, seleccione
Incluir al responder y reenviar
. De lo
contrario, se insertará una firma sólo en los
mensajes nuevos.
leer mensajes nuevos
Para ver rápidamente los mensajes nuevos,
seleccione el área de notificación de mensajes en la
pantalla principal.
funciones

51
mensajería
ver anexo
Mientras ve el mensaje, use la
tecla central
s
para seleccionar el anexo. El anexo
se descarga y se muestra como icono la siguiente
vez que sincronice el teléfono. Seleccione el icono y
oprima
Abrir
o
Menú
>
Guardar como
.
Nota:
puede ver los anexos sólo de los archivos que
admite el teléfono.
leer mensajes antiguos
Oprima
R
> (cuenta de email)
Los iconos que están junto a cada mensaje
indican si es
no leído
A
,
leído
É
o si tiene un
anexo
È
. Los mensajes urgente tienen un
!
a su
costado derecho en la lista.
funciones
responder, responder a todos o reenviar
mensajes
Desde el buzón o desde un mensaje abierto,
oprima
Menú
>
Responder
,
Responder todos
o
Reenviar
Consejo:
si está respondiendo a un email en su
cuenta de email, enviará menos datos si no modifica
el mensaje original. Esto puede reducir los costos de
transferencia de datos, según su plan de tarifas.
descarga de objetos del mensaje
Si un mensaje de email tiene un anexo, verá
el nombre del anexo cuando abra el mensaje.
Use la tecla central
s
para seleccionar el anexo. El
anexo se descarga y se muestra como icono la
siguiente vez que sincronice el teléfono. Seleccione
el icono y oprima
Abrir
o
Menú
>
Guardar como
.
Nota:
si hay varios anexos en el mensaje, se
descargan sólo los seleccionados.
funciones

52
mensajería
ingresar un objeto multimedia en un email
Para agregar una imagen, una nota de voz o un
archivo a un mensaje de email, en el área de
composición del mensaje oprima
Menú
>
Ingresar
>
Imagen
,
Nota de voz
o
Archivo
.
descargar mensajes de email completos
Oprima
R
> (cuenta de email) Desplácese
al mensaje y oprima
Menú
>
Descargar mensaje
.
El mensaje completo se recupera la siguiente vez
que se sincroniza o conecta con su servidor de email
y envía y recibe un email.
funciones
marcar una carpeta para sincronización
Cuando sincroniza una cuenta de email con
su PC, en el teléfono se crean las mismas carpetas
de buzón que están en Outlook en la PC.
Oprima
R
> (cuenta de email), luego oprima
Menú
>
Carpetas
>
Menú
>
Mostrar todas las carpetas
y oprima
Menú
>
Administrar carpetas
Resalte cada carpeta que desee sincronizar y oprima
Sinc
.
Cuando se han seleccionado todas las tarjetas,
oprima
Listo
. Esto abre la vista
Administrar carpetas
, donde
las carpetas marcadas se sincronizarán durante la
siguiente sesión de sincronización.
Nota:
sólo las carpetas de email almacenadas en el
servidor están disponibles para sincronización.
funciones

53
mensajería
ver el estado del email enviado
Oprima
R
> (cuenta de email), luego oprima
Menú
>
Carpetas
>
Buzón de salida
Los mensajes que hay en el
Buzón de salida
no se han
enviado. Para enviar un mensaje, desplácese hasta
él y oprima
Menú
>
Enviar y recibir
.
recibir email
Si el teléfono está configurado para revisar
automáticamente si hay nuevos mensajes, el
teléfono mostrará
A
cuando llegue un mensaje
nuevo.
Oprima
R
para abrir el buzón.
borrar email
Desde el buzón o un mensaje de email abierto,
oprima
Menú
>
Eliminar
.
funciones
enviar y recibir manualmente un email
Oprima
R
> (cuenta de email), luego
oprima
Menú
>
Enviar/recibir
.
mover un email a una carpeta personal
Después de leer el email, oprima
Menú
>
Mover
> (carpeta).
borrar una cuenta de email
Oprima
R
, desplácese hasta la cuenta de email,
luego oprima
Menú
>
Borrar
.
Nota:
no puede eliminar sus
Mensajes de texto
,
MMS
o
cuentas de email del servidor Exchange.
vaciar la carpeta de elementos borrados
Oprima
R
> (cuenta de email), oprima
Menú
>
Carpetas
, desplácese hasta
Elementos borrados
, luego
oprima
Menú
>
Borrar todo
.
funciones

54
mensajería
mensajería instantánea
conectar
Búsqueda:
oprima
Inicio
>
IM y email
>
IM
1
Seleccione la comunidad IM y oprima la
tecla central
s
.
2
Ingrese su nombre de usuario y contraseña, luego
oprima
Conectar
.
Para
comenzar
una conversación, resalte un
contacto y oprima la tecla central
s
, ingrese
texto y oprima
Enviar mensaje
. Durante una
conversación, oprima
Menú
para insertar
emoticones o terminar la conversación.
Cuando esté
conectado
pero no en una conversación,
oprima
Menú
para administrar los contactos o grupos,
cambiar el estado o desconectarse (para conservar la
vida útil de la batería,
asegúrese de desconectar IM
cuando no esté en uso
).
agregar un contacto
1
En la pantalla principal de IM, oprima
Menú
>
Agregar un contacto
.
2
Ingrese la ID del contacto y oprima
Agregar
.

55
conexiones
conexiones
conexión inalámbrica
Bluetooth®
Si el teléfono admite asociación inalámbrica Bluetooth
(también denominada enlace o vinculación). Puede
asociar el teléfono a un audífono Bluetooth o a un
equipo para automóvil, o asociarlo a una computadora
para intercambiar y sincronizar archivos.
Nota:
el uso de teléfonos inalámbricos durante la
conducción puede ocasionar distracción. Corte la
llamada si no puede concentrarse en la conducción.
Además, el uso de dispositivos inalámbricos y sus
accesorios puede estar prohibido o restringido en
ciertas áreas. Obedezca siempre las leyes y las
regulaciones sobre el uso de estos productos.
activar o desactivar Bluetooth
Si Bluetooth está activado verá un indicador
O
en la
parte superior de la pantalla principal y el teléfono
puede asociarse automáticamente con el último
dispositivo manos libres que usó. Encienda el
dispositivo o acérquelo al teléfono.
Para activar Bluetooth, mantenga presionada
X
para
abrir la lista rápida, luego seleccione
Administrador
inalámbrico
>
Bluetooth
.
Nota:
para extender la vida útil de la batería, desactive
Bluetooth cuando no lo utilice. El teléfono no se
asociará a dispositivos hasta que active nuevamente
Bluetooth.

56
conexiones
asociar con un audífono o con un
dispositivo manos libres
Antes de intentar asociar el teléfono con un
dispositivo
, asegúrese de que la conexión Bluetooth
del teléfono esté
activada
y que el dispositivo esté
encendido
y
listo
en modo de asociación o
vinculación (consulte la guía del usuario del
dispositivo). Puede asociar el teléfono con varios
dispositivos, pero úselo sólo con un dispositivo de
audífonos a la vez.
1
Oprima
Inicio
>
Aplicaciones
>
Bluetooth
>
Administrador Bluetooth
>
Manos libres
.
2
Coloque el dispositivo (audífono del manos libres,
audífono estéreo, teclado, etc.) en modo de
asociación.
3
Oprima
Agregar
(o
Menú
>
Agregar
). El teléfono solicita
que verifique que el dispositivo está listo. Oprima
Buscar
.
4
Seleccione el dispositivo desde la lista.
5
Si se le solicita, ingrese la contraseña del
dispositivo (por ejemplo, 0000) y oprima la tecla
Aceptar
.
Consejo:
para obtener información específica acerca
del dispositivo Bluetooth que utiliza con el teléfono,
consulte las instrucciones que vienen con él.
enviar objetos a otro dispositivo
Puede usar la asociación Bluetooth para enviar
email, contactos, tareas, elementos de
calendario, audio, tonos de timbre, imágenes, video y
notas de voz desde el teléfono a una computadora o a
otro dispositivo.
1
Oprima
Inicio
>
Aplicaciones
>
Bluetooth
>
Enviar objeto BT
.
2
Seleccione el tipo de objeto y el objeto que desea
enviar.

57
conexiones
Consejo:
para seleccionar un elemento, oprima la
tecla central
s
.
3
Oprima
Enviar
.
4
Seleccione el nombre del dispositivo al que desea
enviar el archivo.
5
Para cancelar el envío de un elemento,
oprima
Cancelar
.
usar el teléfono como una PC
remota
Puede usar Bluetooth inalámbrica y el teléfono
como control remoto para la computadora. Por
ejemplo, ¿desearía ver un video en su computadora y
usar el teléfono como control remoto? Use la
PC remota y controle la reproducción, detención o
pausas del video.
1
En la computadora, active Bluetooth.
2
En el teléfono, oprima
Inicio
>
Aplicaciones
>
Bluetooth
>
PC remota BT
. Si es necesario, oprima
Sí
para
activar Bluetooth.
3
Oprima
Agregar
.
4
En la computadora, haga clic con el botón
derecho en el indicador Bluetooth
O
en la
bandeja de sistema en la esquina inferior derecha
de la pantalla. Seleccione
Asistente
de configuración de Bluetooth
o
Agregar nueva conexión
.
5
En el asistente, indique que conoce el servicio
que desea usar y que desea buscar un dispositivo
Bluetooth que proporcione el servicio. Seleccione
Siguiente.
6
En la próxima ventana, seleccione Dispositivo de
interfaz humana o PC remota y seleccione
Siguiente.

58
conexiones
7
En la próxima ventana, asegúrese de que está
seleccionado “Mostrar todos disp” en el menú
desplegable. La computadora debe encontrar su
“SmartPhone.” Asegúrese de que la casilla
“Permitir que otros dispositivos Bluetooth vean
este teléfono” esté seleccionada. Seleccione su
teléfono y haga clic en Siguiente.
8
Si se le solicita, ingrese la contraseña del
dispositivo (por ejemplo, 0000) y oprima la tecla
Aceptar
.
Cuando PC remota está conectada, la pantalla del
teléfono muestra un mapa de teclas que le dicen qué
controlan las teclas en la computadora. Para
determinar el programa de la computadora que desea
controlar, en el teléfono, oprima
Menú
y seleccione un
programa.
funciones Bluetooth avanzadas
funciones
teléfono visible para otros dispositivos
Permita que un dispositivo Bluetooth
descubra su teléfono:
Oprima
Inicio
>
Aplicaciones
>
Bluetooth
>
Administrador Bluetooth
>
Programación
y marque
Permitir que
otros disp Bluetooth vean este teléfono
conectarse a un dispositivo reconocido
Conéctese a un dispositivo manos libres
reconocido:
Oprima
Inicio
>
Aplicaciones
>
Bluetooth
>
Administrador Bluetooth
>
Manos libres
> nombre
de dispositivo
terminar la asociación a un dispositivo
Oprima
Inicio
>
Aplicaciones
>
Bluetooth
>
Administrador Bluetooth
>
Manos libres
> nombre
de dispositivo >
Desconectar

59
conexiones
sincronizar
Puede sincronizar la información del teléfono en dos
formas, en el aire (OTA, over the air) o usar un cable y
la computadora.
sincronizar en el aire
Para sincronizar el teléfono por el aire (OTA), debe
sincronizarlo directamente con los servidores de su
compañía (comoMicrosoft® Information Server o
Microsoft® Exchange Server (ejecutando la versión de
software adecuada). Para obtener más información
acerca esta configuración, consulte la información de
soporte en la página 82.
También puede comunicarse con su administrador de
sistema para programar esta sincronización.
Nota:
si está fuera de la cobertura de red y el teléfono
intenta sincronizar 3 veces sin encontrar una red,
recibirá una notificación. Para obtener más
enviar objetos a dispositivos
Envíe un objeto a otro dispositivo:
Oprima
Inicio
>
Aplicaciones
>
Bluetooth
>
Enviar objeto BT
modificar propiedades del dispositivo /
cambiar el nombre del dispositivo
Modifique las propiedades de un dispositivo
reconocido:
Oprima
Inicio
>
Aplicaciones
>
Bluetooth
>
Administrador Bluetooth
>
Manos libres
> nombre
del dispositivo, luego oprima
Menú
>
Propiedades
>
Apodo
Consejo:
para cambiar el nombre Bluetooth del
teléfono, oprima
Inicio
>
Aplicaciones
>
Bluetooth
>
Administrador Bluetooth
>
Programación
e ingrese el nombre
en
Mi nombre Bluetooth
.
funciones

60
conexiones
información, seleccione
Ver estado
. La sincronización se
reanudará cuando haya cobertura de red.
sincronizar con una computadora
Nota:
para obtener información acerca de las
conexiones (Bluetooth® inalámbrica y el explorador
Web), consulte la página 55.
Puede usar Microsoft®
ActiveSync versión 4.5 o
superior
o Windows®
Mobile Device Center
para
sincronizar información entre el teléfono y la
computadora. ActiveSync compara la información de
contactos, las citas del calendario, los mensajes de
email y los archivos de medios del teléfono con los de
la computadora, y luego actualiza las ubicaciones con
la información más reciente.
instalación y configuración de ActiveSync
Para sincronizar información del teléfono con una PC,
debe usar Windows® Mobile Device Center (en una
PC con Windows Vista) o instalar
Microsoft ActiveSync (en una PC con Windows XP™ o
anterior).
Nota:
el software de sincronización se incluye en el
Disco de inicio que viene junto al teléfono. Antes de
instalar el software, verifique que la computadora y el
sistema operativo cumplan los
requisitos mínimos
que se establecen en el sobre del CD-ROM o en el
sitio Web Microsoft Windows® Mobile
(
www.microsoft.com/windowsmobile
). Este sitio Web
también le permite descargar el
software más
actualizado
para ActiveSync.
1
Instale Microsoft ActiveSync (para
Windows® XP™ o anterior) o
Windows Mobile Device Center (para
Windows Vista) en la PC.
2
Después de completar la configuración, conecte
el teléfono a la PC. Los controladores del teléfono
se instalan en la computadora y el asistente Sync
Setup Wizard se inicia automáticamente.

61
conexiones
3
Siga las instrucciones de la pantalla para
completar el asistente.
Cuando finaliza el asistente, ActiveSync empezará a
sincronizarse en forma automática con el teléfono.
Nota:
cuando finaliza la sincronización, puede
desconectar el teléfono de la PC y tal vez deba
reiniciar la PC.
sincronizar con una conexión de cable
Después de instalar
Microsoft® ActiveSync
o Windows® Mobile
Device Center en la PC,
puede conectarla con el
teléfono y realizar la
sincronización.
1
Encienda el teléfono.
2
Conecte el teléfono a la PC mediante un
cable USB.
Nota:
para obtener información más detallada,
consulte "Conectar un dispositivo móvil a una PC" en
Ayuda de ActiveSync en la PC o en el sitio Web de
Microsoft para ActiveSync.
sincronizar con una conexión Bluetooth®
Después de instalar Microsoft® ActiveSync o
Windows® Mobile Device Center en la PC, puede
conectarla al teléfono y sincronizar con una
conexión Bluetooth.
Nota:
para usar esta función, la PC debe tener
Bluetooth inalámbrico o un accesorio adaptador
de Bluetooth para PC.
1
Siga las instrucciones de Ayuda de ActiveSync
para configurar Bluetooth en su PC a fin de que
admita ActiveSync.
2
Encienda el teléfono.

62
conexiones
3
En el teléfono, compruebe que la conexión
inalámbrica Bluetooth esté activada (oprima
Inicio
>
Aplicaciones
>
Bluetooth
>
Administrador Bluetooth
>
Programación
>
Estado
>
Bluetooth act
).
4
Oprima
Inicio
>
ActiveSync
.
5
Seleccione
Menú
>
Conectar vía Bluetooth
. Asegúrese de
que el teléfono y la PC estén cerca el uno del
otro. Si ésta es la primera vez que conecta esta
PC mediante Bluetooth inalámbrica, debe
completar el asistente Bluetooth en el teléfono y
configurar una asociación Bluetooth con la PC
antes de realizar la sincronización.
6
Seleccione
Sinc
.
7
Cuando finalice, seleccione
Menú
>
Desconectar
Bluetooth
. Para conservar la energía de la batería del
teléfono, apague Bluetooth (consulte la
página 55).
AT&T Communication
Manager
Con el software AT&T
Communication
Manager
, la computadora puede usar el
teléfono como un módem inalámbrico para
conectarse a la red de datos inalámbrica de alta
velocidad de AT&T. Para obtener más información,
visite
http://business.cingular.com/businesscenter/solutions/
o comuníquese con un representante de AT&T.
Cuando instale AT&T
Communication Manager
en
la computadora, puede conectar su MOTO Q 9h a
través de la conexión inalámbrica Bluetooth® o de
un cable USB.

63
conexiones
conexión módem con conexión
inalámbrica Bluetooth®
Nota:
debe tener una computadora compatible
con Bluetooth.
1
En el teléfono, verifique que la conexión
inalámbrica Bluetooth esté activada: oprima
Inicio
>
Aplicaciones
>
Bluetooth
>
Administrador Bluetooth
>
Programación
y cambie el
Estado
a
Bluetooth act
.
Consulte Conexión inalámbrica Bluetooth en la
página 55 para obtener más información.
2
En su computadora, inicieAT&T
Communication
Manager
. El programa Communication Manager
debe guiarle durante el resto de la conexión.
conexión módem con un cable
Nota: no conecte
el cable de datos al teléfono y la
computadora hasta que los siguientes pasos le
indiquen hacerlo.
1
En su computadora, inicie AT&T
Communication
Manager
.
2
En el teléfono, oprima
Inicio
>
Herramientas del sistema
>
Programación
>
Conexiones
>
Tipo de dispositivo USB
>
Módem
y oprima
Listo
.
3
Con el cable de datos USB, conecte el teléfono a
su equipo cuando AT&T
Communication
Manager
así se lo indique. El programa
Communication Manager debe guiarle durante el
resto de la conexión.
desconectar la conexión módem
1
En la computadora, sigas la instrucciones de
AT&T
Communication Manager
para
desconectar la conexión.
2
En el teléfono, para volver al modo ActiveSync
para conexiones USB: oprima
Inicio
>
Herramientas
del sistema
>
Programación
>
Conexiones
>
Tipo de dispositivo USB
>
ActiveSync
.

64
conexiones
browser Web
Puede usar el browser para buscar y ver
páginas Web.
Búsqueda:
oprima
@
Nota:
no todos los formatos de archivo Web son
compatibles.
•
Para ir a una página Web, oprima
Acción
>
Ir a
.
Ingrese la dirección y oprima
OK
.
•
Para ir al enlace de una página Web, use la
tecla de navegación
S
para resaltar el enlace
y luego oprima la tecla central
s
.
•
Para cambiar las opciones de conexión,
oprima
Menú
>
Herramientas
>
Programación
>
Conexiones
.
•
Para ver u ocultar imágenes, oprima
Menú
>
Mostrar
>
Cargar imágenes
.
•
Para agregar direcciones de páginas Web a
sus Favoritos, abra la página y oprima
Acción
>
Agregar a Favoritos
.
Consejo:
¿Ha terminado? Cuando termine de utilizar
el browser, oprima
Menú
>
Salir
para cerrar el browser y
conservar la vida útil de la batería.
Acción
1:Inicio de MEdia Net
MODIFICAR Mis enlaces
Inicio de MEdia Net
Tiempo de espera: Juegos, Chismes y Más
Busque gasolina económica cerca de su ubicación
Clima
Fort Lauderdale
Actualmente 83 más
Noticias
Estados Unidos ofrece ayuda para... más
49ers (NFL)
Fantasy Football 32...
Buscar
Menú
Oprima Menú para cambiar
la programación del
browser y otras opciones.
Oprima Acción para
abrir las opciones
de navegación.
Aparece la página principal del browser.

65
entretenimiento
entretenimiento
tomar y enviar
fotografías
1
Oprima
e
para abrir el visor de la cámara.
Consejo:
en el visor de la cámara, oprima
Menú
para ajustar la programación de las imágenes
como
modo
,
brillo
,
resolución
,
zoom
,
balance
de blanco
y
flash
.
2
Dirija el lente de la cámara hacia el objetivo
fotográfico.
3
Oprima la tecla central
s
para tomar una
fotografía.
4
El teléfono guarda la imagen y la muestra en el
visor. Para ver las imágenes almacenadas,
oprima
Inicio
>
Mis cosas
>
Misimágenesyvideos
.
•
Para enviar la fotografía en un mensaje
multimedia, oprima
Menú
>
Enviar
>
MMS
,
luego vea “enviar un mensaje” en la
página 47.
877 1.0x
ÁREA DE
IMAGEN
Miniaturas
Imágenes y videos
Menú

66
entretenimiento
•
Para modificar la imagen, oprima
Menú
>
Modif
.
•
Para ver las propiedades de la imagen, como
el nombre de archivo, oprima
Menú
>
Propiedades
.
autorretrato
1
Oprima
e
para activar la cámara.
2
Oprima
Menú
>
Modo
>
Cronómetro
.
3
Oprima
e
para iniciar el retardo de cinco
segundos.
4
Dirija la lente de la cámara hacia usted.
5
Cuando escucha el sonido de obturador de la
cámara, el teléfono toma la fotografía y la muestra
en el visor.
opciones de imagen
En el visor de la imagen, oprima
Menú
>
Opciones
para
abrir el
Menú opciones de imagen
. Este menú puede incluir las
siguientes opciones:
opción
General
Ajuste el tamaño predeterminado de
la imagen para la programación del
email o de la imagen rotatoria.
Presentación de
diapositivas
Seleccione la programación de la
presentación de diapositivas
predeterminada.
Cámara
Seleccione las ubicaciones
predeterminadas para guardar las
imágenes, prefijos de nombre de
archivo y compresión de la imagen.
Video
Determine la programación del audio
y los límites de tiempo para los
archivos de video.

67
entretenimiento
grabar y reproducir
videoclip
grabar un videoclip
Búsqueda:
oprima
e
, luego
Menú
>
Video
Consejo:
en el visor de video, oprima
Menú
para ajustar
programaciones de video como
brillo
,
calidad
y
balance de blanco
.
1
Dirija el lente de la cámara hacia el objetivo
fotográfico.
2
Oprima
e
o la tecla central
s
para comenzar
a grabar un video. El visor muestra el video que
se está grabando.
3
Oprima la tecla central
s
para detener la
grabación y guardar el video u oprima
Pausa
para
poner en pausa la grabación. Para reanudar una
grabación en pausa, oprima
Reanudar
.
Nota:
los videos se almacenan automáticamente
en el teléfono. Para verlos, oprima
Inicio
>
Mis cosas
>
Mis imágenes y videos
. Seleccione el video para ver y
oprima
Reproducir
o la tecla central
s
.
00:05 43:20
Tiempo restante de la
grabación
Tiempo actual de la grabación
VIDEO
ÁREA
Detener
Imágenes y videos
Pausa

68
entretenimiento
Consejo:
para ver videos guardados en una carpeta
distinta de la carpeta de videos predeterminada,
incluida una tarjeta de memoria, oprima
Inicio
>
Mis cosas
>
Mis imágenes y videos
, luego oprima
Menú
>
Carpetas
, y
seleccione la carpeta que contiene los videos
guardados.
opciones de video
En el visor de videos, oprima
Menú
>
Opciones
para abrir el
menú de opciones de video:
Nota:
las opciones
General
y
Presentación
también están
disponibles en este menú; sin embargo, esta
programación es específica sólo de los archivos de
imágenes.
reproducir un videoclip
Para conocer más funciones de reproducción de video
y Windows® Media Player consulte la página 70.
Búsqueda:
oprima
e
>
Miniaturas
, y seleccione
un videoclip.
Para reproducir un video almacenado en otra carpeta o
en la tarjeta de memoria, oprima
e
>
Miniaturas
,
luego oprima
Menú
>
Carpetas
y elija la ubicación para la
carpeta.
opción
Cámara
Seleccione las ubicaciones
predeterminadas para guardar,
prefijos de nombre de archivo de
video y compresión de imágenes.
Video
Determine la programación del audio
y los límites de tiempo para los
archivos de video.

69
entretenimiento
El videoclip se reproduce en
Windows Media Player
.
Consejo:
para reproducir un video en el modo pantalla
completa, oprima
0
durante la reproducción. Los
videos grabados con baja resolución tal vez no se
reproduzcan en el modo pantalla completa.
Si entra una llamada mientras mira un video, el video
queda en pausa y aparece una alerta de llamada.
Puede elegir entre contestar la llamada o ignorarla.
Para continuar mirando la película, seleccione el
botón
Reprod
.
opciones de reproducción de
videos
En la ventana de reproducción de videos, oprima
Menú
>
Opciones
para abrir el
Menú de reproducción de videos
. Este
menú puede incluir las siguientes opciones:
00:00 70%
Reproducción Actual
Adrenalina
Reproduciendo
Windows Media
Menú
opción
Reproducción
Determina cómo aparece el contador
de tiempo, ya sea para poner en
pausa la reproducción mientras se usa
otro programa o para reanudarla luego
de una llamada telefónica.
Video
Opciones para ver en pantalla
completa y ajustar al tamaño de la
ventana.
Red
Selecciona la programación
predeterminada de la red para medios
continuos.

70
entretenimiento
cartera AT&T Music™
AT&T Music™ es la experiencia de música en
movimiento más nueva e integrada. Donde
quiera que vaya, AT&T Music lo conectará a su música
al tocar un botón. Puede escuchar su música,
descubrir las últimas canciones, noticias musicales,
actualización de conciertos, música continua, timbres,
Tonos de respuesta™ y ver los últimos videos
musicales.
Puede acceder a todas las funciones de AT&T Music
al seleccionar
Â
AT&T Music
en el menú principal.
Nota:
la aplicación
Música continua
utiliza una gran
cantidad de datos y usted asume la responsabilidad
por los cargos de datos en que se incurre.
AT&T
recomienda enfáticamente que se suscriba a un
plan de datos ilimitado junto con esta compra.
Llame a AT&T al 611 para contratar el paquete de
datos adecuado.
reproductor de música
El teléfono utiliza Windows® Media Player Mobile
para reproducir los siguientes tipos de archivos: WMA,
WMV, MP3, AAC, eAAC, eAAC+, WAV, MP4, M4A,
3GP, MIDI y Real Audio.
Biblioteca
Determina si el reproductor se inicia
en la vista
Biblioteca
.
Skins
Determine el skin del reproductor
Windows® Media Player.
Botones
Programe la asignación del botón de
reproducción.
opción

71
entretenimiento
Búsqueda:
oprima
[
>
Windows Media Player
>
Mi música
y elija una canción.
•
Para reproducir o poner en pausa un archivo
de música o video, oprima la tecla central
s
.
•
Para actualizar la lista de archivos (si descargó
nuevos archivos),
oprima
Menú
>
Actualizar biblioteca
.
•
Para ir directamente al archivo anterior o
siguiente, oprima la tecla denavegación
S
hacia la izquierda o la derecha.
•
Para aumentar o disminuir el volumen, oprima
la tecla de navegación
S
hacia arriba o hacia
abajo. El volumen principal del teléfono afecta
el volumen de la música (vea la página 24).
Consejo:
para silenciar y activar el sonido,
oprima
#
.
•
Para adelantar o retroceder, mantenga
oprimida la tecla de navegación
S
hacia la
izquierda o derecha.
ajustar los controles del reproductor de
medios
Puede configurar teclas para controlar el reproductor
de medios.
1
En el reproductor de medios, oprima
Menú
y
seleccione
Opciones
.
2
Seleccione
Botones
.
00:00 70%
Reproducción Actual
Título de canción
Reproduciendo
Windows Media
Menú

72
entretenimiento
3
Desplácese hasta la acción del reproductor de
medios que desea asignar a un botón o pulsación
de tecla.
4
Oprima
Menú
y elija
Asignar
,
Reiniciar
o
Ninguno
.
5
Cuando ha asignado las pulsaciones de teclas a
los controles del reproductor multimedia, oprima
OK
y
Listo
para completar la configuración.
crear una lista de reproducción
Búsqueda:
[
>
Windows Media Player
1
Elija
Mi música
(si el reproductor de música está
abierto, oprima
Menú
>
Biblioteca
).
2
Seleccione una lista de
canciones, tal como
Toda
la música
. La pantalla muestra
una lista de títulos de
canciones.
3
Desplácese a cada canción que desee en la lista
de reproducción y oprima
Menú
>
En cola
.
4
Cuando termine de agregar canciones a la lista,
oprima
Menú
>
Reproducción actual
. El teléfono muestra
la lista de canciones que creó.
Consejo:
¿Sus canciones están desordenadas?
Seleccione una canción de la lista
Reproducción actual
y
oprima
Menú
>
Mover hacia arriba
o
Mover hacia abajo
.
5
En la lista
Reproducción actual
, oprima
Menú
>
Guardar lista
de reproducción
.
6
Ingrese un nombre para la lista de reproducción y
oprima
Listo
para guardarla.
Para abrir una lista de reproducción del reproductor de
música, oprima
Menú
>
Biblioteca
>
Mis listas de reproducción
.
Resalte la lista de reproducción y oprima
Reproducir
u
oprima
Menú
para las demás opciones.
Toda la música
Artista
Álbum
Género
Mi música

73
entretenimiento
orígenes de la música
copiar música desde una
computadora
Para copiar música desde la computadora al teléfono,
necesita lo siguiente:
•
computadora con archivos de música MP3 o
AAC y un programa que los administre (para
obtener más detalles, consulte
att.com/music
)
•
tarjeta de memoria MicroSD (consulte la
página 74)
•
Cable de datos USB o una computadora con
Bluetooth® (vea la página 75)
Una vez que tenga estos, consulte la página 75 para
copiar la música desde la computadora a la tarjeta de
memoria del teléfono.
Nota:
la copia no autorizada de materiales con
derechos de autor es contraria a las disposiciones de
las leyes de derechos de autor de los Estados Unidos
y de otros países. Este dispositivo está destinado sólo
a la copia de materiales sin derechos de autor,
materiales sobre los cuales usted posea los derechos
de autor o materiales que usted esté autorizado para
copiar, o para cuya copia tenga permiso legal. Si no
está seguro acerca de su derecho de copiar algún
material, comuníquese con su consejero legal.
comprar música
Búsqueda:
[
>
Comprar música
Comprar música
inicia el explorador en una página desde la
cual puede adquirir música y tonos de timbre en
tiendas de terceros y contenido de personalización
desde AT&T.
videos de música
Búsqueda:
[
>
Videos de música
Videos de música
inicia un browser que lo lleva
directamente a la sección Videos de música de
Cellular Video. Desde este menú, tiene acceso a

74
entretenimiento
videos de música de los artistas más modernos, así
como a la programación de AT&T, MTV, VH1, y CMT
entre otros. ¡Sólo haga clic en un video y comience a
mirarlo!
music buzz
Búsqueda:
[
>
The Buzz
The Buzz
inicia una aplicación Java™ que le proporciona
noticias e información de la industria de la música,
incluso charts, noticias y ubicaciones de los
conciertos.
comunidad musical
Búsqueda:
[
>
Comunidad
Comunidad
inicia el explorador en una comunidad de
usuarios donde puede interactuar con sus amigos y la
comunidad, así como revisar sitios de fans de los
artistas.
aplicaciones de música
Búsqueda:
[
>
Aps música
Aps música
inicia el explorador en un área donde puede
adquirir aplicaciones relacionadas con la música desde
AT&T’s Media Mall. Esta carpeta incluye aplicaciones
que no son parte de la oferta central de AT&T Music,
tal como Podcasting, aplicaciones continuas que no
están pre cargadas y juegos de música.
insertar una tarjeta de
memoria
Nota:
la tarjeta de memoria no está incluida
con el teléfono. Se vende por separado.
Puede usar una tarjeta de memoria extraíble microSD
con el teléfono para almacenar contenido multimedia
como música, imágenes, videos, aplicaciones y
archivos. Para conocer el tamaño máximo de la tarjeta,
consulte
www.motorola.com/support/q9h
. Para ahorrar

75
entretenimiento
espacio en la memoria del teléfono, mueva estos
archivos a una tarjeta de memoria lo más a menudo
posible.
Precaución:
no saque la tarjeta de memoria mientras
el teléfono la esté usando o esté escribiendo archivos
en ella. no doble ni raye la tarjeta de memoria.
Manténgala alejada de la electricidad estática, el agua
y la suciedad.
1
Abra la ranura de la tarjeta
de memoria levantando
suavemente la cubierta del
teléfono. La cubierta
permanece firmemente
sujeta al teléfono.
2
Inserte la tarjeta de
memoria en su ranura, con
los contactos de metal
hacia abajo.
3
Vuelva a poner la cubierta de la tarjeta de
memoria y presiónela para cerrarla.
Consejo:
puede usar el Administrador de archivos
para ordenar, ver, copiar y mover archivos en el
teléfono y la tarjeta de memoria. En la pantalla
principal, oprima
Inicio
>
Aplicaciones
>
Administrador de archivos
.
copiar archivos de la
computadora
Para copiar archivos de la computadora en el teléfono:
Nota:
debe tener instalado Microsoft® ActiveSync o
Windows® Mobile Device Center en la PC, como se
describe en la página 60. Es posible que desee
optimizar gráficos y videos para la pantalla de 320 x
240 píxeles del teléfono.
1
Conecte el teléfono a la PC.

76
entretenimiento
Para usar una conexión Bluetooth®, active
Bluetooth : oprima
Inicio
>
Aplicaciones
>
Bluetooth
>
Administrador Bluetooth
>
Programación
y cambie
Estado
a
Bluetooth act
. El indicador Bluetooth
O
aparece en la
pantalla principal. Tal vez deba configurar los
ajustes en la PC.
Para usar una
conexión de
cable
, active el
teléfono y
conecte el cable
de datos
proporcionado
con el teléfono al puerto USB en su computadora.
2
En ActiveSync en la computadora, seleccione
Explorar
y haga doble clic en el dispositivo
Mi Windows Mobile
.
3
En la computadora, busque los archivos que
desee copiar en el dispositivo y arrástrelos y
péguelos donde desee, como por ejemplo en
Mis documentos
.
4
Los archivos ahora están disponibles en el
teléfono. En el reproductor de medios,
oprima
Menú
>
Actualizar biblioteca
para ver los archivos.
Nota:
si ha configurado ActiveSync inalámbrica con un
servidor Exchange, no puede sincronizar al mismo
tiempo email, contactos y calendario con una PC con
Microsoft Vista. Sin embargo, puede sincronizar
multimedia y transferir archivos a través de la conexión
de cable.
administrador de
archivos
Puede usar el Administrador de archivos para ordenar,
ver, copiar y mover archivos en el teléfono y la tarjeta
de memoria. Los archivos que posiblemente quiera

77
entretenimiento
usar en el administrador de archivo incluyen archivos
de texto, imágenes, música y video.
Búsqueda:
en la pantalla principal, oprima
Inicio
>
Aplicaciones
>
Administrador de archivos
modo de vuelo
Puede desactivar la red del teléfono y los servicios
Bluetooth™ para acceder con seguridad la libreta de
direcciones, juegos, cámara y música en áreas donde
el acceso a la red está prohibido (como durante los
vuelos o en hospitales).
Mantenga oprimida
X
hasta que aparezca
Lista rápida
,
luego seleccione
Administrador inalámbrico
>
Todo
.

78
otras funciones—llamada avanzada
otras funciones
Nota:
para abrir el menú principal desde la pantalla de
inicio, oprima
Inicio
. Para desplazarse por las páginas de
opciones del menú, oprima la tecla de navegación
S
hacia abajo. Para seleccionar una opción del menú,
oprima la tecla central
s
.
llamada avanzada
funciones
transferencia de llamadas
Configure o cancele el desvío de llamadas:
Oprima
Inicio
>
Herramientas del sistema
>
Programación
>
Teléfono
>
Desvío de llamadas
Nota:
si elige
No responder
, puede programar cuantos
segundos espera el teléfono antes de transferir la
llamada.
marcado por voz
Para marcar por voz, mantenga presionada
h
en
la pantalla principal. Cuando se le solicite, diga
“Llamar”, seguido de un número o el nombre de un
contacto.

otras funciones—contactos
79
contactos
Para almacenar y llamar a contactos, consulte la
página 17.
llamadas TTY
Configure el teléfono para utilizarlo con un
dispositivo TTY opcional:
Oprima
Inicio
>
Herramientas del sistema
>
Programación
>
Más
>
Accesibilidad del teléfono
>
TTY
Nota:
un escritor de teletipos (TTY) es un
dispositivo de comunicaciones utilizado por
personas que tienen dificultad para oír o
discapacidad del habla. TTY no funciona de un
teléfono móvil a otro teléfono móvil.
llamar a un número telefónico de un
mensaje
Los email o mensajes de texto pueden contener
números telefónicos que están subrayados, como
el hiperenlace a un sitio Web. Para marcar uno de
estos números, desplácese hasta él y oprima
N
.
funciones
funciones
buscar un contacto
Ingrese las primeras letras del nombre del contacto.
El teléfono buscará en la lista de contactos y
mostrará el nombre.
modificar contacto
Oprima
Inicio
>
Contactos
, desplácese hasta un
contacto, luego oprima
Menú
>
Modif

80
otras funciones—contactos
programar una ID de timbre para un contacto
Nota:
no puede guardar una ID de timbre para
Contactos SIM.
Para identificar con facilidad quién está llamando
según el tono de timbre, puede asignar un tono de
timbre personalizado a cada contacto.
Oprima
Inicio
>
Contactos
, desplácese hasta un
contacto, luego oprima
Menú
>
Modif
>
Tono de timbre
personalizado
Nota:
algunas redes limitan el tamaño de archivo
que puede usar para un tono de timbre.
funciones
programar una ID de imagen para un contacto
Nota:
no puede guardar una ID de imagen para
Contactos SIM.
Asigne una imagen o fotografía para que aparezca
cuando reciba una llamada de un ingreso:
Oprima
Inicio
>
Contactos
, desplácese hasta un
contacto, luego oprima
Menú
>
Modif
>
Imagen
Seleccione una imagen o seleccione
Cámara
para
tomar una nueva fotografía del contacto.
Consejo:
¿Desea quitar una ID de imagen? Oprima
Inicio
>
Contactos
, desplácese hasta un contacto,
oprima
Menú
>
Modif
, luego oprima
Menú
>
Quitar imagen
funciones

otras funciones—contactos
81
programar una categoría para un contacto
Nota:
no puede guardar una categoría para
Contactos SIM.
Oprima
Inicio
>
Contactos
, desplácese hasta un
contacto, luego oprima
Menú
>
Modif
>
Categorías
programar una vista de categoría
Oprima
Inicio
>
Contactos
, luego oprima
Menú
>
Filtro
funciones
enviar un contacto a otro dispositivo
Use una conexión Bluetooth para enviar un
contacto a otro teléfono, computadora o
dispositivo:
Oprima
Inicio
>
Contactos
, desplácese hasta un
contacto y oprima
Menú
>
Enviar vía Bluetooth
Si es necesario, el teléfono le solicita que
active Bluetooth. El teléfono busca
dispositivos Bluetooth. Seleccione el que desea y
oprima la tecla central
s
. El teléfono le avisa
cuando la transferencia finalice.
Para conocer más acerca de las
conexiones Bluetooth, consulte la página 55.
funciones

82
otras funciones—programación personal
programación personal
funciones
idioma
Programe el idioma del menú:
Oprima
Inicio
>
Herramientas del sistema
>
Programación
>
Más
>
Más
>
Programación regional
.
Nota:
debe apagar y volver a encender el teléfono
para que se apliquen los cambios.
Consejo:
mientras ingresa texto (como en el caso
de un mensaje de texto), el teléfono le sugiere
palabras. Para cambiar el idioma para estas
sugerencias desde el área de ingreso de texto,
oprima
H
luego
k
y seleccione
Configuración
.
Desplácese al
Diccionario de idiomas
y oprima la tecla
de navegación
S
a la izquierda o la derecha para
seleccionar un idioma.
accesibilidad
Puede programar el tamaño de letra del sistema, el
tiempo de espera para múltiples pulsaciones, el
tiempo de espera de confirmación y las alertas de
llamadas entrantes:
Oprima
Inicio
>
Herramientas del sistema
>
Programación
>
Más
>
Accesibilidad
funciones

otras funciones—programación personal
83
volumen de timbre
Oprima
Inicio
>
Herramientas del sistema
>
Programación
>
Perfiles
Resalte el perfil que desea luego oprima
Menú
>
Modif
.
En
Vol de timbre
, oprima la tecla de navegación
S
hacia la izquierda o derecha para ajustar el volumen
de ese perfil.
Atajo:
en la pantalla principal, mantenga oprimida la
tecla atrás del costado del teléfono (vea la página 3)
para mostrar el volumen del timbre y luego oprima
las teclas laterales de desplazamiento para ajustarlo.
Consejo:
puede bajar por completo el volumen del
timbre en forma instantánea cuando entran
llamadas; simplemente use las teclas laterales
de desplazamiento para desactivar el timbre.
Nota:
el volumen principal del teléfono afecta el
volumen del timbre (vea la página 24).
funciones
sonidos
Para cambiar los sonidos predeterminados para el
tono de timbre, mensajes nuevos, despertador o
controles del teclado:
Oprima
Inicio
>
Herramientas del sistema
>
Programación
>
Sonidos
Nota:
los cambios hechos a la programación de
alertas no se aplicarán cuando use el perfil
Silencioso
.
alarma
Oprima
Inicio
>
Herramientas del sistema
>
Programación
>
Reloj y
alarma
>
Alarma
Nota:
para que suene la alarma, el teléfono debe
estar
encendido
.
Consejo:
¿Necesita cambiar o programar el estilo de
alerta de alarma? Oprima
Inicio
>
Herramientas del sistema
>
Programación
>
Sonidos
>
Despertador
.
funciones

84
otras funciones—duración de llamadas
duración de llamadas
Tiempo de conexión de red
es el tiempo transcurrido
desde el momento en que se conecta a la red de su
proveedor de servicio hasta el momento en que
termina la llamada al oprimir
O
. Este tiempo incluye
las señales de ocupado y de timbre.
Es posible que el tiempo de conexión de red que
registra en su cronómetro reiniciable no sea igual
información del propietario
Se recomienda ingresar y verificar su información de
propietario. Le permite a otros devolver el teléfono si
lo pierde.
Oprima
Inicio
>
Herramientas del sistema
>
Programación
>
Más
>
Más
>
Información del propietario
.
reinicio general
Para volver el teléfono a la programación original:
oprima
Inicio
>
Herramientas del sistema
>
Reinicio general
El código de reinicio general predeterminado es
000000
(6 ceros).
El reinicio general no reinicia el código de
desbloqueo, código de seguridad ni el cronómetro
de duración.
funciones
borrado general
Precaución:
el borrado general borra toda la
información que ha ingresado (incluso los contactos
y eventos de calendario) y el contenido descargado
(incluso fotografías y sonidos) almacenado en la
memoria del teléfono. Una vez que borra la
información, no es posible recuperarla.
Oprima
Inicio
>
Herramientas del sistema
>
Borrado general
funciones

otras funciones—manos libres
85
al tiempo que le factura su proveedor de servicio.
Para obtener información de facturación,
comuníquese con su proveedor de servicio.
manos libres
Nota:
el uso de teléfonos inalámbricos durante la
conducción puede ocasionar distracción. Corte la
llamada si no puede concentrarse en la conducción.
Además, el uso de dispositivos inalámbricos y sus
accesorios puede estar prohibido o restringido en
ciertas áreas. Obedezca siempre las leyes y las
regulaciones sobre el uso de estos productos.
funciones
ver cronómetros de llamadas
Vea los cronómetros de las llamadas:
Oprima
Inicio
>
Historial de llamadas
, luego oprima
Menú
>
Ver cronómetros
reiniciar los cronómetros de llamadas
Para reiniciar todos los cronómetros de llamadas a
cero (0), salvo el cronómetro de
Duración de llams
:
Oprima
Inicio
>
Historial de llamadas
, luego
oprima
Menú
>
Ver cronómetros
, luego
oprima
Menú
>
Reiniciar cronómetros
funciones
altavoz
Active un altavoz externo conectado durante
una llamada:
Oprima
h
u oprima
Menú
>
Altavoz activado
.
Nota:
con un audífono Bluetooth® oprima
Menú
>
Manos libres desactivado
y luego oprima
Menú
>
Altavoz
activado.

86
otras funciones—calendario
calendario
funciones
agregar un nuevo evento en el calendario
Oprima
Inicio
>
Calendario
, luego oprima
Menú
>
Nueva cita
Nota:
para programar un evento de todo el día,
seleccione la casilla de verificación
Evento de todo el día
en
Hora de término
. Los eventos de todo el día no
ocupan bloques de tiempo en el calendario, en su
lugar, aparecen en titulares en la parte superior del
calendario.
ver un evento del calendario
Oprima
Inicio
>
Calendario
para abrir el calendario
de hoy.
•
Para ver los días anteriores o posteriores
a hoy, oprima la tecla de navegación
S
hacia la izquierda o la derecha.
•
Para ver rápidamente una fecha específica,
oprima
Menú
>
Ir a fecha
.
•
Para ver los eventos de toda la semana,
oprima
Semana
.
Atajo:
los eventos de hoy aparecen en la pantalla
principal. Para ver los detalles del evento,
desplácese hasta él y oprima la tecla central
s
.
funciones

otras funciones—calculadora
87
calculadora
recordatorio de evento del calendario
El tiempo de recordatorio predeterminado para
tareas y elementos del calendario es de 15 minutos.
Para cambiar este valor predeterminado:
Oprima
Inicio
>
Calendario
, luego oprima
Menú
>
Herramientas
>
Opciones
>
Programar recordatorios
enviar elementos del calendario a otro
dispositivo
Use una conexión Bluetooth® para enviar un
evento del calendario a otro teléfono, computadora
o dispositivo:
Desde el elemento del calendario, oprima
Menú
>
Enviar vía Bluetooth
.
Seleccione el dispositivo al que desea enviar el
elemento.
Para conocer más acerca de las
conexiones Bluetooth, consulte la página 55.
funciones
responder a una solicitud de reunión
Puede recibir y responder a solicitudes de reunión
de Outlook en el teléfono de manera similar a la que
lo hace con Outlook en la PC.
Oprima
R
> (cuenta de email) > solicitud
de reunión
Oprima
Aceptar
o
Menú
>
Rechazar
o
Provisional
funciones
calculadora
Oprima
Inicio
>
Herr de oficina
>
Calculadora
funciones

88
otras funciones—seguridad
seguridad información del
teléfono
funciones
administrar certificados
Active o desactive certificados de acceso a
Internet almacenados en el teléfono:
Oprima
Inicio
>
Herramientas del sistema
>
Programación
>
Seguridad
>
Certificados
Los certificados se usan para verificar la identidad y
la seguridad de los sitios Web cuando usted
descarga archivos o comparte información.
funciones
versión de software
Para ver la versión de software de su teléfono:
Oprima
Inicio
>
Herramientas del sistema
>
Programación
>
Acerca
de
memoria disponible
Para ver la memoria total, usada y disponible en el
teléfono y en la tarjeta de memoria:
Oprima
Inicio
>
Herramientas del sistema
>
Administrador de
memoria

otras funciones—diversión y juegos
89
diversión y juegos
funciones
acceso a imágenes
Oprima
Inicio
>
Mis cosas
>
Mis imágenes y videos
acceder a sonidos
Oprima
[
Para obtener más información acerca de
Windows Media Player
, vea la página 70.
acceder a videoclips
Oprima
Inicio
>
Mis cosas
>
Mis imágenes y videos
jugar en el teléfono
Oprima
Inicio
>
Juegos
iniciar el browser Web
Oprima
@
Para obtener más información acerca de su browser
Web, vea la página 64.
cerrar browser Web
En el browser, oprima
Menú
>
Salir
descargar objetos de página Web
Para descargar una imagen, un sonido o un
tema de teléfono desde una página Web: resalte
el archivo, oprima la tecla central
s
y luego
oprima
Guardar
.
Para descargar una imagen u otro objeto desde una
página Web: resalte el elemento, oprima
Menú
y elija
una opción como
Guardar imagen
.
administrar archivos multimedia
Para ver, copiar, eliminar, cambiar nombre o mover
archivos y carpetas del teléfono o tarjeta de
memoria:
Oprima
Inicio
>
Aplicaciones
>
Administrador de archivos
funciones

90
servicio y reparaciones
servicio y reparaciones
Consejo:
Motorola Software Update es una forma
fácil para actualizar el teléfono. Asegúrese de que
tiene las últimas actualizaciones de software
disponibles en
www.motorola.com/support/q9h
.
Si tiene dudas o necesita asesoría, con gusto le
ayudaremos.
AT&T Support:
Vaya a
att.com/support
, donde podrá seleccionar entre
una serie de opciones de atención al cliente. También
se puede comunicar con el Centro de atención a
clientes de AT&T al 611 en su teléfono móvil.
Microsoft® Windows® Mobile and ActiveSync
Support:
Windows Mobile:
www.microsoft.com/windowsmobile/help/smartphone/

índice
91
índice
A
abrir
programa 10
abrir un programa 10
accesibilidad 82
accesorio opcional 11
accesorios 11, 85
ActiveSync 60
administración de certificados 88
administrador de archivos 76, 89
administrador de tareas 32
administrar archivos 89
alarma 83
alerta
desactivar 25, 33, 64, 71
programar 28
almacenar su número 18
altavoz 85
altavoz del manos libres 25
anexos 51
animación 89
aplicaciones de terceros 32
asociación (consulte conexión
inalámbrica Bluetooth)
atajos 38
atajos del menú 38
audífono 85
B
batería 14
bloquear
teléfono 26
bloqueo automático
teléfono 26
Bluetooth remoto 57
borrado general 84
borrar programas 32
browser 89
desconectar 89
browser Web 89
desconectar 89
búsqueda global de acceso 48
C
calculadora 87
calendario 86, 87
cámara 65, 67
cancelar mensaje 48
código de acceso internacional 36
código de desbloqueo 26
códigos 26
conector para audífonos 3, 4
conexión Bluetooth 81, 87
conexión inalámbrica
Bluetooth 55
configuración automática de
email 40

92
índice
configuración de email 40, 43
contactos 37, 79
contestar una llamada 16, 31
control remoto 57
copiar archivos 56, 75
correo de voz 38
cronómetros 34, 85
cronómetros de llamadas 85
D
desbloquear
teléfono 26
descarga de objetos del
mensaje 51
descargar archivos 75
descargar mensajes de email 52
desviar llamadas 78
devolver una llamada 34
E
e-mail 49, 50
anexo 51
firma 50
email albergado por el
operador 40
en el aire (OTA, over the air) 59
encender/apagar 16
enlace (consulte conexión
inalámbrica Bluetooth)
enviar y recibir mensajes 45
equipo para automóvil 85
estilo de timbre, programación 28
F
fecha 29
filtro 34
finalizar una llamada 16
firma 50
fondo 30
fondo de pantalla 30
fotografía 65, 89
función opcional 11
H
hiperenlace
número telefónico 79
hora, programación 29
I
iconos de menú 20
ID de imagen 35, 80
ID de llamada 34, 80
ID de timbre 35, 80
idioma 82
IM 54
imagen 89
indicador Bluetooth 21
indicador de batería 22
indicador de correo de voz 21
indicador de estilo de timbre 22
indicador de intensidad de la
señal 22
indicador de llamada perdida 21
indicador de mensaje 21, 22
indicador de mensaje de correo
de voz 38
indicador de menú 20
indicador roam (usuario
visitante) 22
información del propietario 84

índice
93
ingresar
números 23
texto 23
ingreso de texto 22
intercambio de objetos 56
ISP 49
J
juegos 89
L
llamada
contestar 16, 31
fin 16
realizar 16
reenviar 78
llamada de tres vías 39
llamada perdida 34
llamadas de conferencia 39
llamadas hechas 33
llamadas recibidas 33
llamadas recientes 33
llamadas TTY 79
luz de fondo 31
M
manos libres 85
marcado rápido 37
marcar un número telefónico 16
mayúscula 23
mensaje 49, 50, 51
mensaje Batería baja 22
mensaje de texto 49, 50, 51
mensaje Llam entrante 35
mensaje Llam perdidas 34
mensaje MMS 49
mensaje multimedia 50, 51
mensajería instantánea 54
mensajes 49
menú Inicio 10
minúscula 23
módem 62
modo
vuelo 77
modo de ingreso de símbolo 23
modo de vuelo 77
música 89
N
número de emergencia 35
número telefónico 18
números 23
P
página Web 89
pantalla 20, 31
pantalla principal 20, 30
PC remota 57
perfil 28
personalizar 82
prioridad 48
programa
abrir 10
puerto de conexión de
accesorios 3, 4
Q
quitar programas 32
R
realizar una llamada 16, 79
recordatorios 83

94
índice
recordatorios de mensaje 83
redes 62
reenviar 51
reinicio general 84
reinicio obligatorio 16, 26
remarcar 34
reproductor de medios 83, 89
botones 71
controles 71
responder 51
S
seguridad
bloquear 26
servidor exchange 43
sincronización (Bluetooth) 61
sincronización (cable) 61
sincronización con una
computadora 60
sincronizar 59
sonidos 83, 89
su número telefónico 18
T
tarjeta SIM 11
tecla central 3, 4
tecla de cámara 3, 4
tecla de encendido 3, 4, 16
tecla de menú 3, 4
tecla de navegación 3, 4
tecla de selección lateral 3, 4
tecla de voz 3, 4
tecla enviar 3, 4, 16
tecla fin 3, 4, 16
teclas de volumen 3, 4
teclas laterales de
desplazamiento 3, 4
teclas programables 3, 4, 20
teléfono 26
texto 23
tono de timbre 89
V
vida útil de la batería,
prolongación 12, 31, 55
video 89
controles 71
videoclip 67
vinculación (consulte conexión
inalámbrica Bluetooth)
volumen 24, 83
volumen de timbres 83
W
Web 89
número telefónico 79
Patente en EE.UU. Re. 34,976
-
 1
1
-
 2
2
-
 3
3
-
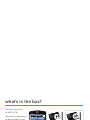 4
4
-
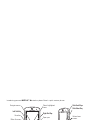 5
5
-
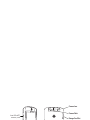 6
6
-
 7
7
-
 8
8
-
 9
9
-
 10
10
-
 11
11
-
 12
12
-
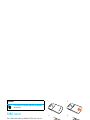 13
13
-
 14
14
-
 15
15
-
 16
16
-
 17
17
-
 18
18
-
 19
19
-
 20
20
-
 21
21
-
 22
22
-
 23
23
-
 24
24
-
 25
25
-
 26
26
-
 27
27
-
 28
28
-
 29
29
-
 30
30
-
 31
31
-
 32
32
-
 33
33
-
 34
34
-
 35
35
-
 36
36
-
 37
37
-
 38
38
-
 39
39
-
 40
40
-
 41
41
-
 42
42
-
 43
43
-
 44
44
-
 45
45
-
 46
46
-
 47
47
-
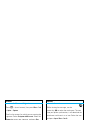 48
48
-
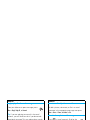 49
49
-
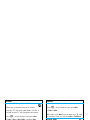 50
50
-
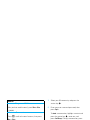 51
51
-
 52
52
-
 53
53
-
 54
54
-
 55
55
-
 56
56
-
 57
57
-
 58
58
-
 59
59
-
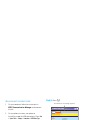 60
60
-
 61
61
-
 62
62
-
 63
63
-
 64
64
-
 65
65
-
 66
66
-
 67
67
-
 68
68
-
 69
69
-
 70
70
-
 71
71
-
 72
72
-
 73
73
-
 74
74
-
 75
75
-
 76
76
-
 77
77
-
 78
78
-
 79
79
-
 80
80
-
 81
81
-
 82
82
-
 83
83
-
 84
84
-
 85
85
-
 86
86
-
 87
87
-
 88
88
-
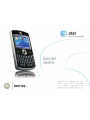 89
89
-
 90
90
-
 91
91
-
 92
92
-
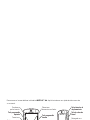 93
93
-
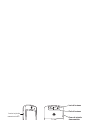 94
94
-
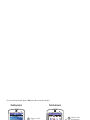 95
95
-
 96
96
-
 97
97
-
 98
98
-
 99
99
-
 100
100
-
 101
101
-
 102
102
-
 103
103
-
 104
104
-
 105
105
-
 106
106
-
 107
107
-
 108
108
-
 109
109
-
 110
110
-
 111
111
-
 112
112
-
 113
113
-
 114
114
-
 115
115
-
 116
116
-
 117
117
-
 118
118
-
 119
119
-
 120
120
-
 121
121
-
 122
122
-
 123
123
-
 124
124
-
 125
125
-
 126
126
-
 127
127
-
 128
128
-
 129
129
-
 130
130
-
 131
131
-
 132
132
-
 133
133
-
 134
134
-
 135
135
-
 136
136
-
 137
137
-
 138
138
-
 139
139
-
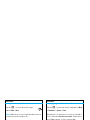 140
140
-
 141
141
-
 142
142
-
 143
143
-
 144
144
-
 145
145
-
 146
146
-
 147
147
-
 148
148
-
 149
149
-
 150
150
-
 151
151
-
 152
152
-
 153
153
-
 154
154
-
 155
155
-
 156
156
-
 157
157
-
 158
158
-
 159
159
-
 160
160
-
 161
161
-
 162
162
-
 163
163
-
 164
164
-
 165
165
-
 166
166
-
 167
167
-
 168
168
-
 169
169
-
 170
170
-
 171
171
-
 172
172
-
 173
173
-
 174
174
-
 175
175
-
 176
176
-
 177
177
-
 178
178
-
 179
179
-
 180
180
-
 181
181
-
 182
182
-
 183
183
-
 184
184


Motorola MOTO Q 9H - ATT Manual de usuario
- Categoría
- Teléfonos móviles
- Tipo
- Manual de usuario
- Este manual también es adecuado para
en otros idiomas
- English: Motorola MOTO Q 9H - ATT User manual
Artículos relacionados
-
Motorola MOTO Q 9H - ATT Guía del usuario
-
Motorola MOTO Q 9c Manual de usuario
-
-
Motorola W408G Guía del usuario
-
-
-
-
-
-