Baby Trend BT04 A Serie El manual del propietario
- Categoría
- Cochecitos
- Tipo
- El manual del propietario

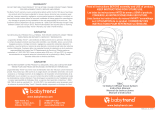
BT04XXXA
Second Seat for Sit N' Stand Shopper (SS27)
Instruction Manual
Manual de Instrucciones
BT04xxxA_2L_072720
WARRANTY
DO NOT RETURN YOUR PRODUCT TO THE STORE. PLEASE CONTACT BABY TREND
FOR REPLACEMENT PARTS, SERVICE AND REPAIR.
The Baby Trend
®
warranty covers workmanship defects within the rst 180 days of
purchase. Any product which has been subjected to misuse, abuse, abnormal use,
excessive wear and tear, improper assembly, negligence, environmental exposure, alteration
or accident, or has had its serial number altered or removed invalidates all claims against
the manufacturer. Any damage to property during installation is the sole responsibility of the
end user. The Customer Service Department can be contacted at 1 (800) 328-7363 Monday
through Friday between 8:00am and 4:30pm (PST). Return Authorizations are required prior
to returning product(s) to Baby Trend
®
. Warranty only valid in North America.
GARANTIA
NO DEVUELVA SU PRODUCTO A LA TIENDA. POR FAVOR CONTACTE A BABY TREND
PARA PIEZAS DE REPUESTO, SERVICIO Y REPARACION.
La garantía de Baby Trend
®
cubre defectos de fábrica dentro de los primeros 180 días de
la compra.Cualquier producto que haya sido sometido a uso indebido, abuso, uso anormal,
desgaste excesivo, montaje incorrecto, negligencia, exposición ambiental, alteración o
accidente, o que ha tenido su número de serie alterado o removido anula todos los reclamos
contra el fabricante. Cualquier daño a la propiedad durante la instalación es de la exclusiva
responsabilidad del usuario nal. El Departamento de Servicio al Cliente puede ser
contactado a 1 (800) 328-7363 Lunes a viernes entre 8:00am y 4:30pm (PST).Un numero
de autorizacion es requerido antes de la devolución de los producto(s) a Baby Trend
®
.
Garantia válida sólo en América del Norte.
1-800-328-7363
(8:00am ~ 4:30pm PST)
www.babytrend.com
Baby Trend, Inc.
13048 Valley Blvd.
Fontana CA 92335
Read all instructions BEFORE assembly and USE of product.
KEEP INSTRUCTIONS FOR FUTURE USE.
Lea todas las instrucciones ANTES de armar y USAR el producto.
CONSERVE LAS INSTRUCCIONES PARA USO FUTURO.

2
WARNING ADVERTENCIA
Copyright © 2020, Baby Trend Inc., All Rights Reserved. Todos los derechos reservados.
1
Copyright © 2020, Baby Trend Inc., All Rights Reserved. Todos los derechos reservados.
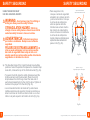
PARTS PIEZAS
1
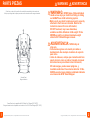
Check that you have all the parts for this model before assembling to the second seat.
Verique que tenga todas las piezas para este modelo antes de montar a
segundo asiento.
Second Seat is only compatible with Sit N’ Stand 5-in-1 Shopper (SS27 / NT27).
El segundo asiento solo es compatible con el cochecito 5 en 1 Sit N 'Stand Shopper (SS27 / NT27).
Second Seat
Segundo Asiento
WARNING:
NEVER leave child unattended.
• Avoid serious injury or death from falling or sliding
out. ALWAYS use child restraining system.
• Before each use check to make sure seat is securely
attached to the frame as instructed. Refer to the
instruction manual for more information;
DO NOT overload, may cause hazardous,
unstable condition. Maximum child weight: 35 lbs.
NEVER exceed the combined maximum weight
stated in Sit N' Stand Shopper manual.
ADVERTENCIA:
NUNCA deje al
niño solo.
• Evite lesiones graves o la muerte por caídas o
deslizamiento. Use siempre el sistema de sujeción
para niños.
• Antes de cada uso, verique que el asiento esté bien
sujeto al marco como se indica. Consulte el manual
de instrucciones para obtener más información;
NO sobrecargue, puede causar peligrosa, y
inestable condicións. Peso máximo del niño: 35 lbs.
NUNCA exceda el peso máximo combinado indicado
en el manual de Sit N 'Stand Shopper.
WARNING ADVERTENCIA

4
ASSEMBLY MONTAJE
ASSEMBLY MONTAJE
Copyright © 2020, Baby Trend Inc., All Rights Reserved. Todos los derechos reservados.
3
SAFETY SEGURIDAD
Copyright © 2020, Baby Trend Inc., All Rights Reserved. Todos los derechos reservados.
IMPORTANT ! To ensure safe operation of your product,
please follow these instructions carefully. Please keep these
instructions for future reference.
IMPORTANT ! Before assembly and each use, inspect this
product for damaged hardware, loose joints, missing parts or sharp
edges. NEVER use if any parts are missing or broken.
IMPORTANT ! Adult assembly is required.
¡IMPORTANTE! Para asegurar el funcionamiento seguro
de su producto, siga estas instrucciones c uidadosamente. Por favor,
conserve estas instrucciones para referencia futura.
¡IMPORTANTE ! Antes de armar y cada vez que vaya a
usar este producto, revise que no tenga piezas de metal dañadas,
uniones ojas, piezas ausentes o bordes puntiagudos. NUNCA utilice
el producto con piezas ausentes o rotas.
¡IMPORTANTE ! Se requiere el montaje por parte de un
adulto.
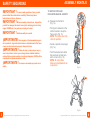
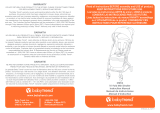
TO UNFOLD STROLLER
PARA DESPLEGAR EL CARRITO
1) • Release the fold latch
(Fig. 1a).
• Firmly pull backward on the
stroller handle to snap the
frame open (Fig. 1b).
NOTE: The frame must fully
click into position.
• Suelte el pestillo para plegar
(Fig. 1a).
• Tire rmemente hacia atrás
del asa de la carriola para
abrir el marco (Fig. 1b).
NOTA: El marco debe
bloquear completamente en
su posición.
Fig. 1a
Fig. 1b

5
6
ACCESSORIES ACCESORIOS ACCESSORIES ACCESORIOS
Copyright © 2020, Baby Trend Inc., All Rights Reserved. Todos los derechos reservados.
Copyright © 2020, Baby Trend Inc., All Rights Reserved. Todos los derechos reservados.
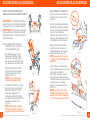
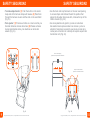
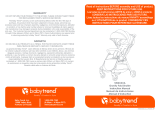
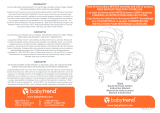
2) •
To install: Attach the seat
accessory to the rear bench
on the stroller (Fig. 2a).
• Use the side zipper to zip
downward onto the stroller
frame. After zipping, button
each strap onto the fabric (Fig.
2b). Repeat for the other side.
• Underneath the rear bench,
wrap the two buckle straps
around the seat to buckle
together (Fig. 2c).
NOTE: Ensure the buckle
straps are adjusted tightly.
• To attach the footwell, use the
toggles to wrap underneath
the stroller side bar. Then
hook each toggle to it's
corresponding loop.Tighten
and adjust for a secure fit and
repeat for the other side
(Fig. 2d).
NOTE: May need to slightly
lift the first seat to attach the
toggles closest to the first seat.
Fig. 2a
Fig. 2b
Fig. 2c
Fig. 2d
INSTALLING THE SECOND SEAT
INSTALACIÓN DEL SEGUNDO ASIENTO
IMPORTANT: Tuck the bench buckle
under the rear bench before attaching
the second seat, to avoid discomfort.
IMPORTANTE: Para evitar molestias,
coloque la hebilla del asiento debajo
del asiento trasero antes de colocar el
segundo asiento.
• Para realizar la instalación:
Fije el accesorio del asiento al
asiento trasero del cochecito
(Fig. 2a).
• Use la cremallera lateral para
deslizarla hacia abajo sobre el
marco del cochecito. Después
de cerrar la cremallera,
abroche cada correa sobre la
tela (Fig. 2b). Repita el mismo
procedimiento del otro lado.
• Debajo del asiento trasero,
enrolle las dos correas con
hebilla alrededor del asiento
para abrocharlas (Fig. 2c).
NOTA: Asegúrese de que las
correas con hebilla estén bien
ajustadas.
• Para acoplar el reposapiés,
use las palancas para envolver
por debajo de la barra
lateral del cochecito. Luego
enganche cada palanca a su
correspondiente presilla. Apriete
y ajuste para un montaje
seguro, y repita al otro lado
(Fig. 2d).
NOTA: Es posible que deba
levantar ligeramente el primer
asiento para unir las palancas
más cercanas al primer asiento.
ACCESSORIES ACCESORIOS

7
8
SAFETY SEGURIDAD
Copyright © 2020, Baby Trend Inc., All Rights Reserved. Todos los derechos reservados.
Copyright © 2020, Baby Trend Inc., All Rights Reserved. Todos los derechos reservados.
USING THE SECOND SEAT
USO DEL SEGUNDO ASIENTO
WARNING:
Avoid serious injury from falling or
sliding out. Always use the safety harness.
STRANGULATION HAZARD:
Child can
strangle in loose safety harness. Never leave child in
seat when safety harness is loose or undone.
ADVERTENCIA: Evite lesiones graves
por caídas o resbalones. Siempre use el arnés de
seguridad.
PELIGRO DE ESTRANGULAMIENTO:
El
niño se puede estrangular con las correas sueltas
del arnés de seguridad. Nunca deje al niño en el
asiento cuando las correas estén sueltas del arnés de
seguridad o sin terminar de colocar.
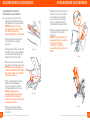
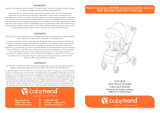
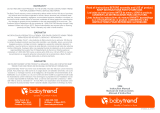
3) • The shoulder straps of the 5-point harness have multiple
positions. Select the position that places the shoulder strap
level with, or below the top of the child’s shoulder (Fig. 3a).
• To secure the child, place the safety harness around the
child’s waist and over the shoulders. Place the crotch
strap between the child’s legs. Insert the male end of
each shoulder/waist belt into the crotch buckle. Tighten all
buckles to the proper t for the child (Fig. 3b).
• Las correas del hombro del arnés de 5 puntos tienen
múltiples posiciones de sujeción. Escoja la posición que
sitúe a la correa del hombro al mismo nivel o a un nivel
inferior a la parte superior del hombro del niño (Fig. 3a).
SAFETY SEGURIDAD
• Para asegurar al niño,
coloque el arnés de seguridad
alrededor de la cintura del niño
y sobre los hombros. Coloque
la correa de la entrepierna
entre las piernas del niño.
Introduzca el extremo macho
del cinturón de cada hombro
o de la cintura en la hebilla de
la correa de la entrepierna.
Apriete todas las hebillas para
ajustarlas adecuadamente
para el niño (Fig. 3b).
Adjust to child’s shoulder
Ajuste de los hombros del niño
Fig. 3a
Fig. 3b
Adjust for a snug t
Regule para lograr un buen ajuste

9
10
SAFETY SEGURIDAD SAFETY SEGURIDAD
Copyright © 2020, Baby Trend Inc., All Rights Reserved. Todos los derechos reservados.
Copyright © 2020, Baby Trend Inc., All Rights Reserved. Todos los derechos reservados.
• To make adjustments: (1) Push the button on the center
clasp and all the harness straps will release. (2) Pass them
through the harness covers and the slots on the seat fabric
(Fig. 3c).
• Para ajustar: (1) Presione el botón en el cierre central y se
liberarán todas las correas del arnés. (2) Páselas a través
de las cubiertas del arnés y las aberturas en la tela del
asiento (Fig. 3c).
Fig. 3c
2
1
• Use the hook and loop fasteners on the rear seat opening
to access straps and rethread. Select the position that
places the shoulder strap level with, or below the top of the
child’s shoulder (Fig. 3d).
• Use los sujetadores de gancho y bucle en la abertura
del asiento trasero para acceder a las correas y volver a
enhebrar. Seleccione la posición que coloca el nivel de la
correa para el hombro con o debajo de la parte superior del
hombro del niño (Fig. 3d).
Fig. 3d
Rear of seat opening
Apertura en la parte trasera del asiento
Adjust to child’s shoulder
Ajuste de los hombros del niño

11
12
ACCESSORIES ACCESORIOS ACCESSORIES ACCESORIOS
Copyright © 2020, Baby Trend Inc., All Rights Reserved. Todos los derechos reservados.
Copyright © 2020, Baby Trend Inc., All Rights Reserved. Todos los derechos reservados.
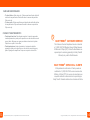
Fig. 4a
Fig. 4b
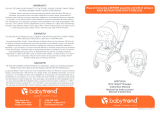
4) • Loosen and unhook each
toggle from the footwell (Fig.
4a). Repeat for the other side.
NOTE:
Be sure to unloop
the toggles from underneath
the stroller bar before
disassembling the second seat.
•
Underneath the rear bench,
unbuckle the two straps
(Fig. 4b).
•
Unsnap each button strap from
the fabric, then unzip upwards
of the stroller frame (Fig. 4c).
Repeat for the other side.
•
Remove the second seat from
the stroller completely (Fig. 4d).
NOTE:
The second seat may
remain assembled while folding
the stroller. Refer to the SS27
instruction manual.
• Afloje y desenganche cada
palanca del reposapiés
(Fig. 4a). Repita el mismo
procedimiento del otro lado.
NOTA: Asegúrese de
desenganchar las palancas
de debajo de la barra del
cochecito antes de desmontar
el segundo asiento.
• Debajo del asiento trasero,
desabroche las dos correas
(Fig. 4b).
• Desabroche cada correa del
botón de la tela, luego abra
la cremallera hacia arriba
en el marco del cochecito
(Fig. 4c). Repita el mismo
procedimiento del otro lado.
• Retire el segundo asiento del
cochecito por completo
(Fig. 4d).
NOTA: El segundo asiento
puede permanecer montado
mientras se dobla el
cochecito.
Consulte el
manual de instrucciones de
SS27.
Fig. 4c
Fig. 4d
DISASSEMBLE THE SEAT
DESMONTAJE DEL ASIENTO

13
14
Copyright © 2020, Baby Trend Inc., All Rights Reserved. Todos los derechos reservados.
Copyright © 2020, Baby Trend Inc., All Rights Reserved. Todos los derechos reservados.
BABY TREND
®
CUSTOMER SERVICE
The Customer Service Department can be contacted
at 1 (800) 328-7363 Monday through Friday between
8:00am and 4:30pm (PST). Return Authorizations are
required prior to returning product(s) to Baby Trend®.
Warranty only valid in North America.
BABY TREND
®
SERVICIO AL CLIENTE
El Departamento de Servicio al Cliente puede ser
contactado a 1 (800) 328-7363 Lunes a viernes entre
8:00am y 4:30pm (PST).Un numero de autorizacion es
requerido antes de la devolución de los producto(s) a
Baby Trend®. Garantia válida sólo en América del Norte.
CARE AND MAINTENANCE
• To clean fabrics: Spot clean only - Surface wash small spots with mild
solution of soap and water. Rinse with water to remove soap solution.
Wipe or air dry.
• To clean parts: Surface wash frame and plastic parts with mild solution
of soap and water. Wipe surfaces with water to remove soap solution.
Wipe or air dry.
CUIDADO Y MANTENIMIENTO
• Para limpiar las telas: Para limpiar manchas - Limpie las pequeñas
manchas pasando un paño por la supercie con una solución suave de
agua y jabón. Enjuague con agua para eliminar la solución de jabón.
Seque con un paño o al aire libre.
• Para limpiar piezas: Limpie el armazón y las piezas de plástico
pasando un paño por la supercie con una solución suave de agua y
jabón. Enjuague las supercies. Seque con un paño o al aire libre.
-
 1
1
-
 2
2
-
 3
3
-
 4
4
-
 5
5
-
 6
6
-
 7
7
-
 8
8


Baby Trend BT04 A Serie El manual del propietario
- Categoría
- Cochecitos
- Tipo
- El manual del propietario
en otros idiomas
Artículos relacionados
-
 BABYTREND Sit N’ Stand® 5-in-1 Shopper Plus El manual del propietario
-
 BABYTREND Gravity Fold Stroller - Canada El manual del propietario
-
 BABYTREND Sit N Stand® 5-in-1 Shopper Stroller El manual del propietario
-
 BABYTREND Sit N Stand® 5-in-1 Shopper Travel System El manual del propietario
-
 BABYTREND XCEL-R8 Jogger El manual del propietario
-
 BABYTREND st49xxxa El manual del propietario
-
 BABYTREND ts86xxxb El manual del propietario
-
 BABYTREND Tango Stroller El manual del propietario
-
 BABYTREND 1st Debut TS86C El manual del propietario
-
BABYTREND Debut Sport 3 Wheel Stroller El manual del propietario


