La página se está cargando...

LADY.COL
L8542069
Rev. 01/05/00
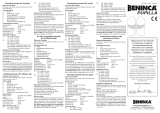
Vite M4,2x25 UNI 6954 x4.
Screw M4,2x25 UNI 6954 x4.
Schraube M4,2x25 UNI 6954 x4.
Vis M4,2x25 UNI 6954 x4.
Tornillo M4,2x25 UNI 6954 x4.
Sruba M4,2x25 UNI 6954 x4
Fori per passaggio cavo
Holes for passage of cable
Löcher für die Kabeldurchführung
Trous pour passage câble
Agujeros para paso de cable
Odwierty dla przejścia przewodu
1 - Predisporre il cavo di collegamento
della fotocellula utilizzando i fori indicati
in gura.
2 - Fissare la colonnina alla cassa avvi-
tandola dall’interno.
3 - Procedere al ssagio e collegamen-
to della fotocellula come indicato nelle
istruzioni del dispositivo.
Nota: La colonina può essere montata
rivolta in entrabe le direzioni (per barriera
destra/sinistra)
1 - Prepare the photocell connection
cable by using the holes shown in the
gure.
2 - Fit the column to the casing by tight-
ening the screws from the inside.
3 - Carry out the mounting and the con-
nection of the photocell, as shown in the
device instructions.
Note: The column can be mounted
turned towards either direction (for right/
left road barrier)
1 - Das Anschlusskabel der Fotozelle
verlegen; dazu die in der Abbildung auf-
geführten Löcher verwenden.
2 - Die kleine Säule an den Kasten befes-
tigen und von innen festschrauben.
3 - Fotozelle laut den entsprechenden
Anweisungen befestigen und anschlie-
ßen.
Bemerkung: Die kleine Säule kann in bei-
den Richtungen (für rechte/linke Schran-
ken) montiert werden
1- Prédisposez le câble de branchage
de la photocellule en utilisant les trous
indiqués sur la gure.
2- Fixez la colonnette à la caisse en la
vissant de l’intérieur.
3- Fixez et branchez la photocellule
comme indiqué dans le mode d’emploi
du dispositif.
Nota: La colonnette peut être montée
orientée dans les deux directions (pour
barrière droite/gauche)
1 - Preparar el cable de conexión de la
fotocélula utilizando los agujeros indica-
dos en la gura.
2 - Fijar la columna a la caja atornillándo-
la desde el interior.
3 - Proceder con la jación y la conexión
de la fotocélula como indicado en las
instrucciones del dispositivo.
Nota: La columna se puede montar diri-
gida en ambas direcciones (para barrera
derecha/izquierda)
1 - Przygotować przewód połączenia
fotokomórki używając odwiertów
wskazanych na rysunku.
2 - Zamocować słupek do skrzynki,
przykręcając go od wewnątrz.
3 - Przystąpić do mocowania i podłączenia
fotokomórki tak, jak podano w instrukcji
tego urządzenia.
Uwaga! Słupek może być zamontowany
obustronnie ( dla bariery prawostronnej/
lewostronnej).
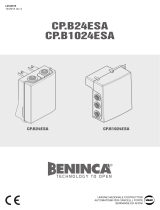
COLONINNA PER FOTOCELLULA
COLUMN FOR PHOTOCELL
KLEINE SÄULE FÜR FOTOZELLE
COLONNETTE POUR PHOTOCELLULE
COLUMNA PARA FOTOCÉLULA
SŁUPEK DLA FOTOKOMÓRKI
AUTOMATISMI BENINCÀ Srl - Via Capitello, 45 - 36066 Sandrigo (VI) - Tel. 0444 751030 r.a. - Fax 0444 759728
/