
User manual
M A N U E L D ' U T I L I S A T I O N
G E B R U I K S A A N W I J Z I N G
G E B R A U C H S A N W E I S U N G
M A N U A L E D I I S T R U Z I O N I
M A N U A L D E I N S T R U C C I O N E S
I N S T R U K C J A O B S
Ł
U G I
N Á V O D K O B S L U Z E
Turios

Instrukcje dla wyspecjalizowanego
All rights reserved, including translation.
Tous droits réservés, y compris la traduction.
Alle rechten, inclusief vertaling, voorbehouden.
Alle Rechte, auch an der Übersetzung, vorbehalten.
Tutti i diritti riservati (anche sulla traduzione).
Todos los derechos reservados, incluidos los de la
traducción.
Wszelkie prawa zastrzeżone, łącznie z tłumaczeniem.
Všechna práva vyhrazena, včetně překladu.
EN
Instructions for specialist dealer
This instruction manual is part and parcel of the
product and must accompany every product
sold.
Version: D, 2022-01
FR
Instructions pour les distributeurs
Ce manuel d'instructions fait partie du produit et
doit accompagner chaque produit vendu.
Version : D, 2022-01
NL
Instructies voor de vakhandelaar
Deze handleiding is deel van het product en
dient bij iedere product te worden geleverd.
Versie: D, 2022-01
DE
Hinweise für den Fachhändler
Diese Gebrauchsanweisung ist Bestand-teil des
Produkts und ist bei jeder Produkts
auszuhändigen.
Version: D, 2022-01
IT
Istruzioni per il rivenditore
Il presente Manuale di istruzioni è parte
integrante del prodotto e deve essere fornito
assieme alla prodotto.
Versione: D, 2022-01
ES
Instrucciones destinadas a los distribuidores
especializados
El presente manual de instrucciones es parte
integrante del producto y se debe adjuntar a
todas las producto que se vendan.
Versión: D, 2022-01
PL
sprzedawcy
Niniejsza instrukcja obsługi jest nieodłączną
częścią produktu i musi być dołączona do
każdego sprzedawanego produktu.
Wersja: D, 2022-01
CS
Pokyny pro specializovaného prodejce
Tento návod k obsluze je součástí dodávky a
musí být součástí každého prodaného
produktu.
Verze: D, 2022-01
Basic UDI: 5415174 122127Turios 2P
Multi version: D, 2022-01

Language index
English
Français
Nederlands
Deutch
Italiano
Español
Polski
Czech
User manual
Manuel d'utilisation
Gebruiksaanwijzing
Bedienungshandbuch
Manuale di istruzioni
Manual de instrucciones
Instrukcja obsługi
Návod k obsluze

This page is intentionally left blank

Turios
2022-01
Content
1
EN
NL
Content
Content ....................................................................................................................... 1
Preface........................................................................................................................ 2
1 Your product .................................................................................................. 3
1.1 Accessories ................................................................................................... 3
2 Before use ..................................................................................................... 4
2.1 Intended use ................................................................................................. 4
2.2 General safety instructions ............................................................................ 4
2.3 Symbols on the wheelchair ........................................................................... 5
2.4 Transport ....................................................................................................... 5
2.5 Assembly/Disassembly ................................................................................. 8
2.6 First use and storage .................................................................................... 9
3 Using your wheelchair ................................................................................ 10
3.1 First ride ...................................................................................................... 10
3.2 Driving outdoors .......................................................................................... 10
3.3 Operating console ....................................................................................... 11
3.4 Brake and free-wheel lever ......................................................................... 12
3.5 Moving to/from wheelchair .......................................................................... 13
3.6 Comfort adjustments ................................................................................... 13
3.7 Battery status and charging ........................................................................ 14
4 Maintenance ................................................................................................ 15
4.1 Time of maintenance ................................................................................... 15
4.2 Instructions for maintenance ....................................................................... 15
4.3 Troubleshooting .......................................................................................... 16
4.4 Expected lifespan ........................................................................................ 17
4.5 Reuse .......................................................................................................... 17
4.6 End of use ................................................................................................... 17
5 Technical specifications ............................................................................. 18

Turios
2022-01
Preface
2
EN
NL
Preface
Congratulations! You are now owner of a Vermeiren wheelchair!
This wheelchair is made by qualified and committed personnel. It is designed and produced
according to high quality standards guarded by Vermeiren.
Thanks for your trust in the products of Vermeiren. To support you on the use of this wheelchair
and its operating options, this manual is offered. Please read it carefully; it will help you to get
familiar with the operation, capabilities and limitations of your wheelchair.
If you still have questions after reading this manual, do not hesitate to contact your specialist
dealer. He/she will be glad to help you on this subject.
Important note
To ensure your safety, and to prolong the lifetime of your product, please take good care of it and
have it checked and serviced on a regular basis.
This manual reflects the latest product developments. Vermeiren has the right to implement
changes to this type of product without being imposed to any obligation to adapt or replace similar
products previously delivered.
Pictures are used to clarify the instructions in this manual. Details of the depicted product may
deviate from your product.
Information available
On our website http://www.vermeiren.com/ you will always find the most recent version of
following information. Please consult this website regularly for possible updates.
Visually impaired people can download the electronic version of this manual and have it read out
by means of a text-to-speech software application.
This user manual
For user and specialist dealer
User manual of applied operating console and battery charger.
For user and specialist dealer
Installation instructions (Instructions for detail adjustments and (dis)assembly)
For specialist dealer
Service manual for wheelchairs
For specialist dealer
EC declaration of conformity

Turios
2022-01
Your product
3
EN
NL
1 Your product
1. Backrest
2. Operating console
3. Armrest
4. Seat
5. Footrest
6. Footplate
7. Safety belt
8. Battery housing
9. Front wheels
10. Driving motors
11. Rear wheels / Driving wheels
12. Front lights (optional)
13. Identification plate
1.1 Accessories
The following accessories are available for the electric wheelchair Turios:
• Leg support (BZ7, BZ8)
• Headrest (L55, L58)
• Lights
• Crutch holder
• Cup holder
• Mirror
• Swing-away operating console
• Top case
1
2
3
4
5
6
7
8
9
10
11
12
14

Turios
2022-01
Before use
4
EN
NL
2 Before use
2.1 Intended use
In this paragraph a brief description of the intended use of your wheelchair is given. Additionally,
relevant warnings are added to the instructions in the other paragraphs. In this way we would like
to make you aware of the possible misuse that may appear.
• This wheelchair is suitable for indoor and outdoor use.
• This wheelchair is designed and produced solely to transport/transfer one (1) person with a
maximum weight of 130kg. It is not designed for transportation of goods or objects, nor for any
use other than previously described.
• This wheelchair can be operated by the user sitting in the wheelchair, or it can be pushed by
an attendant. You should NOT use this wheelchair without attendant if you suffer from physical
or mental impairments that may put you, or other people, in danger when driving the
wheelchair. For this reason, consult your doctor first and make sure that your specialist dealer
is informed about his advice.
• Only use accessories and spare parts approved by Vermeiren.
• Please read all technical details and limits of your wheelchair in chapter 5.
• The warranty on this product is based on normal use and maintenance as described in this
manual. Damage to your product caused by improper use or lack of maintenance will cause
the warranty to lapse.
2.2 General safety instructions
Risk of injuries and/or damage
Please read and follow the instructions in this manual. Otherwise you may get injured or your
wheelchair may get damaged.
Keep the following general warnings in mind during use:
• Do not use your wheelchair if you are under influence of alcohol, medicines or other
substances that may influence your driving abilities.
• Be aware that some parts of your wheelchair may get very hot or cold due to ambient
temperature, solar radiation, heating devices or due to the motor drive during the ride. Be
careful when touching. Wear protective clothing if the weather is cold. After a ride, wait until
the wheelchair/motor has cooled down.
• Before switching the wheelchair on, be aware of the environment/situation in which you are
located. Adjust your speed to this before driving off. We advise you to use the slowest speed
setting to drive indoors. For outdoor driving you can adjust the speed to a suitable speed at
which you feel comfortable and safe.
• ALWAYS keep in mind that your wheelchair may stop suddenly due to a discharged battery
or a protection that prevents your wheelchair from further damage. Also check the possible
causes mentioned in § 4.3. Use your safety belt to prevent injuries.
• Your wheelchair has been tested for electromagnetic compatibility and complies with the
standard, see chapter 5. Nevertheless, sources of electromagnetic fields may influence the
driving performance of your wheelchair, such as the fields of mobile phones, power
generators or high-power energy sources. On the other hand, the electronics of your
wheelchair can affect other electronic appliances too, such as alarm systems of shops and
automatic doors. We therefore advise you to check your wheelchair regularly for damage and
wear, since these may enlarge the interference (see also chapter 4).
• Only drive on flat surfaces where both driving wheels touch the ground and where there is
sufficient contact to operate the wheelchair safely.
CAUTION

Turios
2022-01
Before use
5
EN
NL
• Alterations or substitutions should not be made to the wheelchair securement points or to
structural and frame parts or components without consulting the wheelchair manufacturer.
• Make sure that your hands, clothes, belts, buckles or jewellery don’t get caught by wheels or
other moving parts during use.
Be aware that your wheelchair may interfere with some types of anti-theft systems, depending on
the settings used. This may cause the shop's alarm to go off.
In case a serious incident has occurred involving your product, notify Vermeiren or your specialist
dealer as well as the competent authority in your country.
2.3 Symbols on the wheelchair
The symbols in following list are applicable to your wheelchair. Symbols can be found in the
relevant ISO standard (ISO 7000, ISO 7001 and IEC 417).
Maximum weight of the user in kg
Indoor/outdoor use (battery charger excluded)
Indoor use only (battery charger)
Maximum safe slope in ° (degrees).
Maximum speed
Type designation
Risk of entrapment
2.4 Transport
Risk of damage
Take action to protect the wheelchair from being damaged during transport.
2.4.1 Moving out of the way
Use the operating console to drive the wheelchair to its destination.
Otherwise, put the wheelchair in free-wheel mode (see §3.4) and use the push bar to move it.
2.4.2 Transport by aircraft
Since the wheelchair is equipped with non-spillable AGM batteries, it is possible to transport the
wheelchair (as a whole) by aircraft. Consult your airline for the correct handling procedures before
booking your flight. Before handing your wheelchair over to the airport personnel, disconnect the
battery from the wheelchair, see installation manual.
CAUTION

Turios
2022-01
Before use
6
EN
NL
2.4.3 Transport by vehicle, as luggage
The best way to transport your electric wheelchair in the car is to drive it by using ramps. If you
are not experienced to drive the electric wheelchair using ramps, you can put the wheelchair in
neutral mode and push the wheelchair in the car using ramps. If necessary, disassemble the
wheelchair.
1. As the wheelchair user, transfer to a car seat, see §3.5.
2. Remove all moveable parts prior to transport (footrests, arm supports, etc.).
3. Store moveable parts safely behind the passenger seat or in the luggage compartment.
4. Drive or push the electric wheelchair in the car using ramps, or lift the wheelchair in the car
with the help of 2 persons by grasping the fixed parts of the frames.
5. Attach the solid parts of the frame securely to the vehicle.
6. Place the wheelchair in drive mode (engaging the parking brakes) and check that the operating
console is switched off.
2.4.4 Transport by vehicle, as seat for user
The wheelchair has passed the crash test of ISO 7176-19: 2008 and, as such, has been
designed and tested for use only as forward-facing seat in a motor vehicle.
The wheelchair is tested dynamically with the ATD (anthropomorphic test device) using a
four-points strap-tie system and a 3-point occupant-restraint system. Nevertheless, the user
should preferably be transferred to one of the seats inside the vehicle and use vehicle’s
restrain system. The wheelchair should be stored as luggage in a separate (cargo)
compartment, see §2.4.3 .
Risk of injuries and damage
Use wheelchair's pelvic belt and the applicable three-points belt in the vehicle to prevent
head and chest impacts with the vehicle.
Do not use postural supports to restrain the user in the vehicle unless they are labelled as
being in accordance with the requirements specified in ISO 7176-19:2008.
Following involvement in any type of vehicle collision, have your wheelchair inspected by
the specialist dealer or manufacturer’s representative before reuse.
Securing the wheelchair
1. Make sure that the vehicle has a suitable wheelchair four-points strap-tie-down and occupant-
restraint system conform ISO 10542, and that both systems are not frayed, contaminated,
damaged or broken.
2. Use the operating console to return your wheelchair to stable position, see §3.5.
3. Remove all mounted accessories such as trays and respiratory equipment and secure them
in a safe place. If not possible, secure them to the wheelchair but positioned away from the
occupant with energy-absorbing padding placed between tray and user.
4. Use a ramp to drive the wheelchair (with user) in the vehicle according to the instructions in
§3.2.1.
5. Position the user facing forward in the travelling direction, centrally between the tie-down rails
mounted in the floor of the vehicle.
6. Make sure that the user is sitting as upright as possible. If the user's condition prevents this,
carry out a risk assessment to evaluate the user's safety during transit.
7. Turn the operating console OFF and make sure that the free-wheel lever is in braking mode,
see §3.4.
8. The location of each securement point on the wheelchair is marked with the
following symbol:
9. Verify that the tiedown end-fitting is compatible with the wheelchair securement
points.
WARNING

Turios
2022-01
Before use
7
EN
NL
10. Attach the front securement-strap hooks to the securement points (A) on the wheelchair
following the supplier instructions of the strap-system.
11. Turn free-wheel lever in free-wheel position and roll the wheelchair backwards to pull the front
straps tight, see §3.4.
12. Attach the rear securement-strap hooks to the securement points (B) on the rear in the same
way.
13. Turn free-wheel lever back in braking position, see §3.4.
Securing the user
1. Attach the wheelchair’s pelvic belt.
2. Attach the user-restraint belts of the vehicle according to
the instructions of the strap-system manufacturer.
Wear the pelvic belt low across the front of the pelvis,
so that the angle of the pelvic belt is within the
preferred zone of 30° to 75° to the horizontal, similar
to that shown in the figure.
A steeper (greater) angle within the preferred zone is
desirable.
3. Adjust the belt tightly according to the instructions of the strap-system manufacturer,
consistent with the user's comfort.
4. Ensure that the restraint belt connects in a straight line to the anchor point in the vehicle and
that no bends in the belt are visible, for instance at the axle of the rear wheel.
5. Position the seatbelt buckle so that the release button will not be contacted by wheelchair
components during a crash.
6. Make sure that belts are not twisted or held away from the body as shown in figure 1.
7. Make sure that the shoulder-belt restraints fit over the shoulders, see figure 2.
B
A

Turios
2022-01
Before use
8
EN
NL
Belt restraints must not be held away
from the body by wheelchair
components such as armrests or
wheels.
Belt restraints make full contact with
shoulder, chest and pelvis.
Pelvic belt low on the pelvis near the
thigh-abdominal junction
Improper belt-restraint fit
Proper belt-restraint fit
2.5 Assembly/Disassembly
Risk of injuries
• Make sure that your fingers, clothes, buckles won’t get trapped during (dis)assembly.
Your dealer delivers the wheelchair fully assembled and explains the various operating elements
and their use. We also provide a further, detailed explanation of the different parts here for
transport purposes.
To assemble the electric wheelchair:
1. Mount the arm supports (paragraph 2.5.1).
2. Mount the footrests (paragraph 2.5.2).
To disassemble the electric wheelchair do the reverse of the above instructions.
2.5.1 Mounting or removing the arm support
Risk of injuries and/or damage
• Check that the arm pads are at the same height on each side.
Mount the armrest (1) by sliding the support rod (2) down into the
frame (3).
To remove the armrest (1), lift it up and out of the seat frame.
CAUTION
CAUTION
1
2
3
✓

Turios
2022-01
Before use
9
EN
NL
2.5.2 Mounting or removing the footrest
To install
1. Hold footrest (4) sideways and hang it in footrest support (5).
2. Swing the footrest inwards until it clicks in position.
To remove
1. Pull footrest lever (6) and swing footrest (4) outwards.
2. Lift the footrest to remove it.
2.6 First use and storage
Risk of battery damage
• Never completely discharge the battery.
• Do not interrupt the charging cycle; only disconnect the battery charger when the battery is
fully charged.
• Make sure that your wheelchair is stored dry to prevent mould from growing and the upholstery
from being damaged.
• Check the technical details for storage, see chapter 5.
Ensure that the battery has been fully charged before using your wheelchair, ask your dealer if
this has already been done or not. To charge, follow the charging instructions in §3.7.
CAUTION
4
5
6

Turios
2022-01
Using your wheelchair
10
EN
NL
3 Using your wheelchair
Risk of injuries
• First read previous chapters and inform yourself about the intended use. Do NOT use your
wheelchair unless you have read and fully understood all instructions.
• Also read the instructions in the operator console manual and battery charger manual!
• In case of doubts or questions, do not hesitate to contact your local specialist dealer, your care
provider or technical adviser to help you with this.
3.1 First ride
Risk of injuries and damage
• Always keep the swing range of footrest and operating console in mind to prevent bystanders
from being injured or objects from being damaged.
• Always unplug the battery charger from the wheelchair before starting to drive.
• Make sure that you are familiar with the operation of your wheelchair before using it in
crowded and possibly dangerous places. First exercise at a specious, open area with
little bystanders.
• Investigate the effects of shifting the centre of gravity on the behaviour of the wheelchair,
for example on up or down gradients, on laterally sloping ground, or when overcoming
obstacles. Obtain support from an attendant.
• The surface of the controller gets slightly warm during use.
• While driving backwards, the speed is reduced.
1. Make sure that:
• the wheelchair is on a flat surface;
• the battery is fully loaded, see § 3.7;
• The motor is coupled, see § 3.4;
• the tyres have the correct tyre pressure, see § 4.2.1;
• the wheelchair is adapted to your needs and comfort, see §3.6;
• you have the proper sitting position, see § 3.5.
2. Follow the instructions in the operating console manual.
3. Switch on your wheelchair.
4. Turn the speed control to the lowest speed setting.
5. Exercise how to drive and make adjustments to the wheelchair.
6. If you feel confident enough, you can try to drive at higher speed.
7. Now try to turn, in forward and backward direction. Repeat this a few times.
8. Make sure that your wheelchair stands stable, when ending the ride.
9. Switch off your wheelchair.
3.2 Driving outdoors
Risk of accident - Adjust your driving behaviour and speed.
• Take the local road traffic law into consideration; it may differ per country. This counts for
driving on pavements, unpaved roads or paved roadways.
• Do not drive on roads with heavy traffic.
• Take the weather conditions into consideration. Avoid driving by moist weather, extreme heat,
snow, black ice, freezing temperatures; see technical specifications in chapter 5.
• Even with your wheelchair lights on, it is not suitable to drive on public roads at poor visibility
(darkness, mist, twilight). Make sure that you are well visible, also during daylight hours, by
WARNING
CAUTION
WARNING

Turios
2022-01
Using your wheelchair
11
EN
NL
using fluorescent clothing and/or by using own lighting at the front and rear side of the
wheelchair.
• Be aware of other road users to whom your wheelchair may be an obstacle. Pay special
attention during turning and reversing. If you are not acquainted with how to drive backwards,
first practice in an open area. Indicate the direction you are intending to go before turning.
• Try to drive straight in small passages to prevent getting trapped.
• Keep the braking distance in mind. Be aware that the braking distance depends on speed,
surface, weather conditions, slope and weight of the user.
3.2.1 Cope with slopes, kerbs, obstacles or ramps
Risk of injuries by unexpected movement
• Use a restraining safety belt to secure yourself sitting in the wheelchair.
• Pay attention if the road is sandy, has soft ground, holes or gaps that may cause entrapment
of the wheels and/or decreasing of the traction of the driving wheels.
• Do NOT drive on slopes, obstacles, steps or kerbs larger than the size described in the
technical specifications in chapter 5.
• Always approach a kerb from the front.
• Do not put your wheelchair in free-wheel mode on a slope. The wheelchair may start moving,
causing injuries to you or bystanders.
• Do not use your wheelchair on an escalator or stairs.
• Only use ramps approved by Vermeiren and do not exceed their maximum load.
• To safely overcome obstacles or slopes, put the wheelchair in its most upright sitting position.
Risk of damage
• Always park your electric wheelchair on horizontal flat surfaces and on sites that are easily
accessible.
• If necessary, take a short run-up to speed up the wheelchair to mount a slope, obstacle, kerb
or ramp. Prevent that you or your wheelchair has to cope with a large recoil.
• Make sure that the wheelchair does not touch the ground or ramp due to the inclination of the
wheelchair.
• Be aware that the braking distance on downhill slopes can be significantly larger than on level
ground.
Procedure
• Start your drive according to the instructions in § 3.1, step 1.
• To move the wheelchair up or down stairs/steps, use lifting equipment or a ramp. If these
are not available, it can be lifted manually by at least two persons, grasping the frame firmly
with both hands. Do not use the backrest, footplate(s), armrests, or wheels to grasp the
wheelchair.
• To cope with obstacles or inclinations:
1. Adjust the wheelchair to its most stable position, see § 3.5.
2. Drive as slow as possible to cope with the obstacle or inclination.
3.3 Operating console
Risk of injuries or damage
• Be aware that the stability decreases when the wheelchair is adjusted from sitting-straight to
inclined position.
• Make sure there is enough space around the wheelchair to operate backrest and seat.
CAUTION
CAUTION
CAUTION
When you stop on a slope, the brake will work automatically to prevent the wheelchair from
running forward or backward.

Turios
2022-01
Using your wheelchair
12
EN
NL
How to use the operating console is described in a specific user manual, enclosed with the
delivery of your wheelchair. If this manual is missing, contact your specialist dealer
immediately.
Put the joystick in the neutral (central) position before pressing the on/off button, otherwise
the electronics will be blocked. To release this block, switch the operating console off and
on again.
Technical protections
The operating console enables you to control all driving components and motors to adjust your
body position. For your own safety, and to prevent that the wheelchair gets damaged, movements
are monitored by the electronics. This may result in block of movement, speed decrease or
complete stop. Consult the user manual of the operating console for more information.
To avoid accidental battery run down, your wheelchair is equipped with an automatic power
shutdown system. This system switches off the operating console automatically when it is not
operated for a while. If this occurs, simply switch your console back on.
3.4 Brake and free-wheel lever
Risk of injuries or damage
• Only operate the free-wheel lever when your wheelchair is turned OFF. An attendant should
operate the free-wheel lever. NEVER operate it from sitting position.
• Do not use the free-wheel mode on slopes and inclinations, see symbol on motor:
Make sure that the free-wheel lever is in its braking position BEFORE switching the
wheelchair ON. Electromagnetic brakes do NOT function if the wheelchair is in free-wheel
mode. This is indicated on the operating console. Driving is not possible.
Your wheelchair is equipped with electromagnetic brakes. The working of the brakes depends on
the position of the free-wheel lever (1).
The EM brakes function automatically, only if free-wheel lever (1) is in braking position. In this
situation, the brakes start braking if:
• the wheelchair is OFF;
• the wheelchair is ON and the
joystick is released.
Releasing the joystick makes the
wheelchair stop gently and activates
the brakes.
Operation of free-wheel lever:
• Turn levers to the rear to put the
wheelchair in free-wheel mode.
Now, the motor is disconnected.
The wheelchair can be moved
manually.
• Turn levers inwards to connect
the motor to the drive. This
should be done before starting
the wheelchair.
CAUTION
Neutral
Drive
1
1

Turios
2022-01
Using your wheelchair
13
EN
NL
3.5 Moving to/from wheelchair
Risk of injuries or damage
• In case you cannot perform the transfer in a safe manner, ask someone to assist you.
• Do not stand on the footplate(s) during transfer into or out of the wheelchair.
Transfer
1. Position the wheelchair as close as possible to you when sitting in your chair, couch, seat or
bed.
2. Apply the brakes by turning the free-wheel lever to braking position, see § 3.4.
3. Fold the footplate(s) upwards to prevent standing on them.
4. If necessary, remove one armrest to make room, see § 2.5.1.
5. Transfer to/from the wheelchair using the strength of your arms or with the help of attendant(s)
or lifting equipment.
Sitting in the wheelchair
1. Sit down on the seat with your lower back against the backrest.
2. Turn the footplate(s) down and put your feet on the footplates.
3. Replace the armrest, if applicable.
4. Make sure that your upper legs are horizontal and that your feet are in a comfortable position.
Adjust if necessary.
5. Make sure that your arms are bent and are resting comfortably on the arm pads. Adjust if
necessary.
Adjusting to stable position
For transport purposes and when you need to negotiate obstacles, the wheelchair must be
adjusted to maximise its stability:
• Backrest upright
• Footplate folded up
3.6 Comfort adjustments
Risk of injuries or damage
• The following comfort adjustments can be done by the attendant or caretaker. All other
adjustments are done by your specialist dealer according to the installation instructions, see
preface.
• Make sure that your fingers, clothes, buckles don’t get trapped during adjustment.
3.6.1 Backrest inclination (manual version)
1. Pull the strap at the bottom of the backrest to unlock the mechanism.
2. Adjust the backrest to the desired position (0° - 32°, 4 steps of 8°).
3. Release the strap. Make sure that the backrest is well secured.
3.6.2 Backrest inclination (with gas spring)
The backrest inclination with gas spring is operated by means of a lever. Depending on your
chosen configuration upon ordering, the lever is located on the backrest, or on the right side of
the seat.
1. Pull the lever.
2. Pull/Push the backrest to the desired position.
3. Release the lever. Make sure that the backrest is well fixed.
CAUTION
CAUTION

Turios
2022-01
Using your wheelchair
14
EN
NL
3.7 Battery status and charging
Risk of injuries and damage due to fire
• Only use the battery charger delivered with the wheelchair. The use of any other charger may
be dangerous (fire hazard).
• The battery charger is only intended to charge the batteries delivered with the wheelchair, not
to charge any other batteries.
• Do not adapt any of the delivered parts, like cables, plugs or battery charger. Never open or
change the battery or the connection points.
• Protect the battery and battery charger against flames, high and low temperatures (see chapter
5), moisture, sunshine, severe shocks (for example dropping). Do NOT use the battery if this
has been the case.
• Charge the battery with the battery charger, indoors, in a well-ventilated area, out of children's
reach.
• First read the user instruction of the applied battery charger before charging the wheelchair’s
battery. For more information, contact your specialist dealer or consult our website
http://www.vermeiren.com/
Risk of damage
• Battery self-discharge and the quiescent current of the connected users will drain the battery
charge slowly. The battery may be irreversibly damaged if the battery is fully discharged.
Therefore, make sure that the battery is charged on time (see manual of operating console).
• Read the storage and maintenance instructions in chapter 4 and technical
details in chapter 5.
• Only disconnect the battery charger when the battery is fully charged, see
the following symbols on the charger:
• Do not charge batteries below 0°C. Move the battery to a warmer place
and start charging.
• Keep the connection point for the battery charger free of dust and other
contamination.
• In case of any problems whereby the battery cannot be charged according to following
instructions, please contact your specialist dealer.
• For instructions on how to change the batteries, see the installation manual.
For all information on battery status indication, please read the manual of the operating
console.
It is recommended to unplug the battery charger from the mains when not in use. This is to
prevent unnecessary energy consumption.
To charge the battery:
1. FIRST connect the battery charger to a 230V AC power socket. Use the battery charger
directly, without extension cord, on the power supply (without time switch).
2. Plug the adapter in the charging point of the operating console.
3. Wait until the battery is fully charged. Consult the battery charger manual for more information.
4. Disconnect the battery charger.
5. Remove the battery charger from the socket, let it cool down and store it in the charger pocket.
WARNING
CAUTION

Turios
2022-01
Maintenance
15
EN
NL
4 Maintenance
4.1 Time of maintenance
Risk of injuries and damage
Repairs and replacements may only be undertaken by trained persons and only genuine
replacement parts of Vermeiren should be used.
The last page of this manual contains a registration form for the specialist dealer to record
each service.
The service frequency depends on the frequency and intensity of use. Contact your dealer to
agree to a common timetable for inspection/maintenance/repair.
Read the user instructions of the applied battery charger regarding maintenance.
For the maintenance manual, refer to the Vermeiren website: www.vermeiren.com.
Before each use
Inspect the following points:
• All parts: present, undamaged and unworn.
• All parts: clean, see § 4.2.2.
• Wheels, seat, arm rests, footrests and headrest (if applied): well secured.
• Battery status: charge the battery when necessary, see §3.7.
• Operating console, battery, power module, motors, battery charger, lights and relevant
cables: no damage such as wires that have become frayed, broken or exposed.
• Condition of wheels/tyres, see § 4.2.1.
• Condition of frame parts: no deformation, instability, weakness or loose connections.
• Seat, backrest, arm pads, calf pads and head rest (if applied): no excessive wear (like
dented spots, damage or tears).
Contact your specialist dealer for possible repairs or part replacements.
Every month
If your wheelchair is stored for a longer period, you still need to charge the batteries every month.
It is also possible to keep the battery charger connected to the battery and the mains during this
period. For more information, see § 3.7.
Yearly or more often
Have your wheelchair inspected and serviced by your specialist dealer, at least once a year, or
more often. The minimum maintenance frequency depends on use and should therefore be
commonly agreed upon with your specialist dealer.
If stored
Make sure that your wheelchair is stored in a dry environment to prevent mould from growing,
or the upholstery from being damaged.
4.2 Instructions for maintenance
4.2.1 Wheels and tyres
Proper working of the brakes depends on the state of the tyres, that can change due to wear
and contamination (water, oil, mud, …).
CAUTION

Turios
2022-01
Maintenance
16
EN
NL
• Keep your wheels free of wires, hair, sand and fibres.
• Check the profile of the tyres. If the tread depth is less than 1 mm, the tyres need to be
replaced. Contact your specialist dealer for this matter.
• Inflate the pneumatic tyres to the correct pressure (see pressure indication on the tyres).
• For instructions on how to change the tyres, see the installation manual.
4.2.2 Cleaning
Risk of damage by moisture
• Keep the operating console clean and protect it from water and rain.
• Never use a hose or high-pressure cleaner to clean the wheelchair.
Wipe all rigid parts of the wheelchair with a damp cloth (not drenched). If necessary, use a mild
soap, suitable for varnishes and synthetics.
The upholstery can be cleaned with lukewarm water and a mild soap. Do not use abrasive
cleaning agents to clean.
Keep the ventilation openings of the battery charger clean and free of accumulated dust. Blow
away the dust and clean the battery charger enclosure with a slightly moistened cloth, if required.
4.2.3 Disinfection
Risk of damage
Disinfections may only be undertaken by trained persons. Consult your specialist dealer.
4.3 Troubleshooting
Even if you use your wheelchair properly, a technical problem may occur despite this.
In this case, contact your local specialist dealer.
Risk of injuries and damage to the wheelchair
• NEVER attempt to repair your wheelchair yourself.
• For failures in the operating console you need to contact your specialist dealer.
He/She will decide if the console needs to be reprogrammed.
In case of failure, a fault code is displayed on the operating console.
For an overview of all fault codes on the operating console, please read the manual of the
operating console.
The following symptoms may indicate a serious problem. Therefore, always contact your
specialist dealer if you spot any of the following deviations:
• Strange sound;
• Frayed/damaged wiring harnesses;
• Cracked or broken connectors;
• Uneven tread wear at one of the tyres;
• Jerky movements;
• Wheelchair deflects to one side;
• Damaged or broken wheel assemblies;
• Wheelchair does not switch on (blown fuse);
• Wheelchair is powered but does not move, see 3.4.
CAUTION
CAUTION
WARNING

Turios
2022-01
Maintenance
17
EN
NL
4.4 Expected lifespan
The average lifespan of your wheelchair is 5 years. Depending on the frequency of use, driving
circumstances and maintenance, the lifespan of your wheelchair will increase or decrease.
4.5 Reuse
Before reuse by another person, have the wheelchair disinfected, inspected and serviced
according to the instructions in §4.1 and §4.2.
4.6 End of use
At end of life, you need to dispose of your wheelchair according to the local environmental
legislation. The best way to do so, is to disassemble the wheelchair to facilitate the transport of
recyclable parts.

Turios
2022-01
Technical specifications
18
EN
NL
5 Technical specifications
The technical details below are only valid for this wheelchair, at standard settings and optimal
ambient conditions. Take these details into account during use. The values are no longer
applicable if your wheelchair has been modified, damaged, or is severely worn. Be aware that the
driving performance is influenced by ambient temperature, humidity, slopes (driving up/down),
type of surface and battery status.
Table 1: Technical specifications
Brand
Vermeiren
Type
Electric wheelchair, Class B
Model
Turios
Maximum occupant mass
130 kg
Description
Dimensions
Turios
Turios Element
Overall length with leg rest
Manual
Electric
1070 mm
1060 mm
1070 mm
Overall width
580 – 580 – 640 mm
580 mm
Total mass
Approx. 105,8 kg
Energy consumption *
6 km/h: 39 km (50Ah)
10 km/h: 25 km (50Ah)
6 km/h: 28 km (38Ah)
or 39 km (50Ah)
Rated slope
6°
Obstacle climbing
50 mm (8”, 9” front wheels)
60 mm (10” front wheels)
Maximum speed forward
6 km/h
10 km/h
6 km/h
Min. braking distance from max.
speed
2100 mm
Seat plane angle Manual
Electric
0° - 2° - 4° - 6°
0° - 20°
0° - 2° - 4° - 6°
Effective seat depth Manual
Electric
380 mm – 500 mm
430 mm – 510 mm
400 mm – 440 mm
Effective seat width
390 – 450 – 510 mm
390 – 450 mm
Seat surface height at front edge
Manual seat
Electric seat
450 mm – 500 mm – 550 mm
480 mm – 510 mm
450 mm
Backrest angle Manual
Electric
0° - 8° - 16° - 24° - 32°
0 - 32°
0° - 8° - 16° - 24° - 32°
Backrest height Manual
Electric
585 mm
550 mm
585 mm
Footrest to seat distance
320 mm – 420 mm
Leg to seat surface angle
114°
Armrest to seat distance
260 mm – 335 mm
Front location of armrest structure
Manual
Electric
340 mm – 430 mm
Max. 320 mm
340 mm – 430 mm
Minimum turning radius
Approx. 1600 mm

Turios
2022-01
Technical specifications
19
EN
NL
Brand
Vermeiren
Type
Electric wheelchair, Class B
Model
Turios
Maximum occupant mass
130 kg
Ground clearance
60 mm (antitipping)
100 mm (middle)
Diameter rear wheels
350 x 70 mm
Type of rear wheels **
Air tyres
Diameter front wheels
200 mm – 230 mm – 260 mm
200 mm – 230 mm
Type of front wheels **
Air tyres
Puncture-free tyres
Electrical description
Battery (Non-spillable AGM battery,
maintenance-free)
38 Ah, C10
44 Ah (gel, optional)
50 Ah, C20
Driving motors
6 km/h: 2 x 150W
10 km/h: 2 x 450W
6 km/h: 2 x 150W
Power module Blow fuse
150 AMP
Strength tests according to
ISO 7176-8
Tests of power and control system
according to
ISO 7176-14
Ignitability of upholstery according to
EN1021-2:2006
EMC compliance
ISO 7176-21
Degree of protection
IPX4
Noise level
< 65 dB (A)
Overall rating of belt-restraint
accommodation
A
Storage and use temperature
+5 °C ~ +41 °C
Operating temperature for
electronics
-10°C ~ +40°C
Storage and use humidity
30% ~ 70%
We reserve the right to introduce technical changes. Measurement tolerance ± 15 mm / 1,5 kg / 1,5° .
* The theoretical driving distance will be reduced if the wheelchair is used frequently on slopes, rough
ground or to climb curbs.
**Since different tyres may be used, please note the correct operating pressure of the tyres you use. For
other tyre diameters refer to your specialist dealer.


Turios
2022-01
Table des matières
1
EN
FR
NL
Table des matières
Table des matières..................................................................................................... 1
Préface........................................................................................................................ 2
1 Votre produit .................................................................................................. 3
1.1 Accessoires ................................................................................................... 3
2 Avant l'utilisation .......................................................................................... 4
2.1 Usage prévu .................................................................................................. 4
2.2 Consignes générales de sécurité .................................................................. 4
2.3 Les symboles sur le fauteuil roulant .............................................................. 5
2.4 Transport ....................................................................................................... 5
2.5 Montage/Démontage ..................................................................................... 8
2.6 Première utilisation et stockage .................................................................... 9
3 Utilisation de votre fauteuil roulant ........................................................... 10
3.1 Première utilisation ...................................................................................... 10
3.2 Rouler à l’extérieur ...................................................................................... 11
3.3 Console de commande ............................................................................... 12
3.4 Frein et levier de déblocage ........................................................................ 12
3.5 Se déplacer du/vers le fauteuil roulant ........................................................ 13
3.6 Réglages de confort .................................................................................... 14
3.7 État de la batterie et recharge ..................................................................... 14
4 Entretien ...................................................................................................... 16
4.1 L'entretien ................................................................................................... 16
4.2 Instructions d'entretien ................................................................................ 17
4.3 Résolution des problèmes ........................................................................... 17
4.4 Durée de vie attendue ................................................................................. 18
4.5 Réutilisation ................................................................................................ 18
4.6 Mise au rebut .............................................................................................. 18
5 Caractéristiques techniques ...................................................................... 19

Turios
2022-01
Préface
2
EN
FR
NL
Préface
Félicitations ! Vous êtes à présent propriétaire d'un fauteuil roulant Vermeiren !
Ce fauteuil roulant a été fabriqué par un personnel qualifié et responsable. Il est conçu et produit
conformément aux normes de qualité élevées appliquées par Vermeiren.
Merci de la confiance que vous accordez aux produits de Vermeiren. Ce manuel est destiné à
vous aider dans l’utilisation de ce fauteuil roulant et de ses options de fonctionnement. Veuillez
le lire attentivement. Vous pourrez ainsi vous familiariser avec le fonctionnement, les capacités
et les limites de votre fauteuil roulant.
Si vous avez encore des questions après la lecture de ce manuel, n’hésitez pas à prendre contact
avec votre revendeur spécialisé. Il vous aidera volontiers.
Remarque importante
Pour assurer votre sécurité et prolonger la durée de vie de votre produit, prenez-en grand soin,
et faites-le contrôler et entretenir régulièrement.
Ce manuel est le reflet des derniers développements du produit. Vermeiren a le droit d’apporter
des modifications à ce type de produit sans être tenu d'adapter ou de remplacer des produits
similaires fournis précédemment.
Les images sont fournies afin de clarifier les instructions de ce manuel. Les détails du produit
illustré peuvent diverger de votre produit.
Informations disponibles
Sur notre site http://www.vermeiren.com/, vous trouverez toujours la version la plus récente des
informations suivantes. Veuillez consulter régulièrement ce site Internet pour connaître les
éventuelles mises à jour.
Les personnes malvoyantes peuvent télécharger la version électronique de ce manuel et la lire
au moyen d'une application de texte-parole.
Ce manuel d'utilisation
Pour l'utilisateur et le revendeur spécialisé
Manuel d'utilisation de la console de commande et du chargeur de batterie.
Pour l'utilisateur et le revendeur spécialisé
Instructions d'installation (instructions relatives aux réglages des détails et au (dé-
)montage)
Pour le revendeur spécialisé
Manuel d'entretien des fauteuils roulants
Pour le revendeur spécialisé
Déclaration de conformité CE

Turios
2022-01
Votre produit
3
EN
FR
NL
1 Votre produit
1. Dossier
2. Console de commande
3. Accoudoir
4. Siège
5. Repose-pied
6. Palette repose-pied
7. Ceinture de sécurité
8. Logement de la batterie
9. Roues avant
10. Moteurs de traction
11. Roues arrière/roues motrices
12. Phares avant (option)
13. Plaque d'identification
1.1 Accessoires
Les accessoires suivants sont disponibles pour le fauteuil roulant électrique Turios :
• Repose-jambes (BZ7, BZ8)
• Appuie-tête (L55, L58)
• Phares
• Support pour béquille
• Porte-gobelet
• Miroir
• Console de commande escamotable
• Boîtier supérieur
1
2
3
4
5
6
7
8
9
10
11
12
14

Turios
2022-01
Avant l'utilisation
4
EN
FR
NL
2 Avant l'utilisation
2.1 Usage prévu
Ce paragraphe vous donne une brève description de l'usage prévu de votre fauteuil roulant. Des
avertissements pertinents ont également été ajoutés aux instructions dans les autres
paragraphes. Nous aimerions ainsi attirer votre attention sur un usage inapproprié éventuel qui
pourrait survenir.
• Ce fauteuil roulant convient à un usage à l'intérieur et à l’extérieur.
• Ce fauteuil roulant est conçu et fabriqué uniquement pour le transport d'une (1) personne d'un
poids maximum de 130kg. Il n'est pas destiné au transport de marchandises ou d'objets, ni à
tout autre usage que celui décrit précédemment.
• Ce fauteuil roulant peut être actionné par l'utilisateur assis ou il peut être poussé par un
accompagnateur. Vous ne devez PAS utiliser ce fauteuil roulant sans accompagnateur si vous
souffrez de handicaps physiques ou mentaux qui pourraient vous mettre, vous-même ou
d’autres personnes, en danger pendant la conduite. C’est pourquoi vous devez d'abord
consulter votre médecin et vous assurer que votre revendeur spécialisé est informé de cet
avis.
• Utilisez uniquement des accessoires et des pièces de rechange approuvés par Vermeiren.
• Consultez les détails techniques et les limites de votre fauteuil roulant au chapitre 5.
• La garantie sur ce produit est basée sur une utilisation et un entretien normaux, tels que décrits
dans le présent manuel. Les dommages à votre produit dus à un usage inapproprié ou à un
manque d’entretien auront pour effet d’annuler la garantie.
2.2 Consignes générales de sécurité
Risques de dommages corporels ou matériels
Veuillez lire et suivre les instructions stipulées dans le présent manuel d'utilisation. Autrement,
vous pourriez vous blesser ou votre fauteuil roulant pourrait être endommagé.
Tenez compte des avertissements généraux suivants pendant l’emploi :
• N'utilisez pas votre fauteuil roulant si vous êtes sous l'influence de l’alcool, de médicaments
ou d’autres substances qui peuvent influencer vos capacités de conduite.
• N'oubliez pas que certaines parties de votre fauteuil roulant peuvent devenir très chaudes ou
très froides en fonction de la température ambiante, des rayons du soleil, de dispositifs de
chauffage ou du moteur d’entraînement pendant l'utilisation. Faites donc attention lorsque
vous les touchez. Portez des vêtements de protection s'il fait froid. Après utilisation, attendez
jusqu'à ce que le fauteuil roulant/moteur soit refroidi.
• Avant de démarrer le fauteuil roulant, prenez conscience de l’environnement/situation où
vous vous trouvez. Adaptez-y votre vitesse avant de démarrer. Nous vous conseillons
d'utiliser la vitesse la plus basse pour rouler à l'intérieur. Dans le cadre d'un usage à
l’extérieur, vous pouvez passer à une vitesse appropriée dans laquelle vous vous sentez à
l’aise et en sécurité.
• Tenez TOUJOURS compte du fait que votre fauteuil roulant peut s’arrêter brutalement en
raison d'une batterie déchargée ou d'une protection qui empêche tout dégât supplémentaire
au fauteuil roulant. Vérifiez également les causes possibles mentionnées au § 4.3. Mettez
votre ceinture de sécurité pour éviter les blessures.
• Votre fauteuil roulant a subi un test de conformité électromagnétique et est conforme à cette
norme, cf. chapitre 5. Les sources de champ magnétique, comme les téléphones mobiles,
les générateurs électriques ou de sources d'énergie à haute puissance, peuvent cependant
influencer la performance de conduite de votre fauteuil électrique. L’électronique de votre
ATTENTION

Turios
2022-01
Avant l'utilisation
5
EN
FR
NL
fauteuil électrique peut à son tour également affecter d’autres appareils électroniques comme
les systèmes d'alarme des magasins et les portes automatiques. Nous vous recommandons
par conséquent de vérifier si votre fauteuil roulant ne présente pas de dommage ou d'usure
qui pourrait encore augmenter l'interférence (cf. également le chapitre 4).
• Roulez uniquement sur des surfaces planes où les deux roues motrices touchent le sol et où
il y a un contact suffisant pour utiliser le fauteuil roulant prudemment.
• Ne réalisez pas de modifications ou de remplacements aux points d'attache du fauteuil
roulant ou aux composants ou éléments du châssis et structurels sans consulter le fabricant
du fauteuil roulant.
• Assurez-vous que vos mains, vêtements, ceintures, boucles ou bijoux ne puissent pas se
coincer dans les roues ou dans d'autres parties mobiles pendant l’utilisation.
Sachez que votre fauteuil roulant peut interférer avec certains types de systèmes antivol, selon
les paramètres utilisés. Cela peut déclencher l'alarme du magasin.
En cas d'incident grave impliquant votre produit, informez Vermeiren ou votre revendeur
spécialisé ainsi que l'autorité compétente de votre pays.
2.3 Les symboles sur le fauteuil roulant
Les symboles de la liste suivante concernent votre fauteuil roulant. Vous trouverez les symboles
dans les normes ISO correspondantes (ISO 7000, ISO 7001 et CEI 417).
Poids maximum de l'utilisateur en kg
Usage à l’intérieur/extérieur (chargeur de batterie non compris)
Usage à l'intérieur uniquement (chargeur de batterie)
Déclivité sûre maximale en ° (degrés).
Vitesse maximale
Indication du type
Risque de coincement
2.4 Transport
Risque de dommages
Prenez des mesures pour protéger le fauteuil roulant contre tout endommagement pendant le
transport.
2.4.1 Dégagement de l’espace
Utilisez la console de commande pour entraîner le fauteuil roulant à sa destination.
Vous pouvez également mettre le fauteuil roulant en mode déblocage §3.4) et utiliser la barre de
poussée pour le déplacer.
ATTENTION

Turios
2022-01
Avant l'utilisation
6
EN
FR
NL
2.4.2 Transport par avion
Le fauteuil roulant étant équipé de batteries étanches AGM, il est possible de transporter le
fauteuil roulant (en totalité) par avion. Consultez votre compagnie aérienne pour les procédures
de manipulation correcte avant de réserver votre vol. Avant de remettre votre fauteuil roulant au
personnel de l'aéroport, débranchez la batterie du fauteuil roulant, cf. le manuel d'installation.
2.4.3 Transport par véhicule, comme bagages
La meilleure façon de transporter votre fauteuil roulant électrique dans la voiture est de le
conduire en utilisant des rampes. Si vous n'avez pas l'habitude de conduire le fauteuil roulant
électrique à l'aide de rampes, vous pouvez mettre le fauteuil roulant en position neutre et le
pousser dans la voiture à l'aide de rampes. Si nécessaire, démontez le fauteuil roulant.
1. En tant qu'utilisateur du fauteuil roulant, pour réaliser le transfert vers un siège de véhicule, cf.
§3.5.
2. Retirez toutes les pièces mobiles avant le transport (repose-pieds, supports d’accoudoir, etc.).
3. Placez les pièces mobiles en toute sécurité derrière le siège passager ou dans le coffre.
4. Conduisez ou poussez le fauteuil roulant électrique dans la voiture en utilisant les rampes, ou
soulevez le fauteuil roulant dans la voiture avec l'aide de 2 personnes en saisissant les parties
fixes des cadres.
5. Fixez solidement les parties solides du châssis au véhicule.
6. Mettez le fauteuil roulant en mode d’entraînement (en serrant les freins de stationnement) et
vérifiez si la console de commande est éteinte.
2.4.4 Transport par véhicule, en tant que siège pour l'utilisateur
Le fauteuil roulant a réussi l'essai de collision de la norme ISO 7176-19:2008 et a, par
conséquent, été conçu et testé dans le seul but d'être utilisé en tant que siège orienté
vers l'avant dans un véhicule motorisé. Le fauteuil roulant a fait l'objet d'essais
dynamiques au moyen d'un DAE (dispositif anthropomorphe d'essai), en utilisant un
système de sangle de fixation à quatre points et un système de retenue des passagers à
trois points. Néanmoins, il est préférable que l'utilisateur soit déplacé sur l'un des sièges du
véhicule et utilise le système de retenue du véhicule. Le fauteuil roulant doit être rangé
comme bagage dans un compartiment (charge) séparé, voir le §2.4.3
Risque de dommages corporels et matériels
Utilisez la ceinture pelvienne du fauteuil roulant ainsi que la ceinture à trois points
présente dans le véhicule pour éviter tout impact entre la tête ou la poitrine de l'utilisateur
et le véhicule.
N'utilisez pas de soutiens de la posture pour retenir l'utilisateur à l'intérieur du véhicule, à
moins que ces derniers ne soient pourvus d'une étiquette attestant de leur conformité avec
les exigences spécifiées dans la norme ISO 7176-19:2008.
Si vous avez été impliqué dans une quelconque collision automobile, faites inspecter votre
fauteuil roulant par le revendeur spécialisé ou un représentant du fabricant avant de le
réutiliser.
Attacher le fauteuil roulant
1. Assurez-vous que le véhicule est équipé d'un système de sangle de fixation à quatre points
adapté aux fauteuils roulants et d'un système de retenue des passagers conformes à la norme
ISO 10542, et que ces deux systèmes ne sont pas entaillés, contaminés, endommagés ou
cassés.
2. Utilisez la console de commande pour remettre votre fauteuil roulant en position stable, voir
le §3.5.
3. Enlevez tous les accessoires fixés au fauteuil comme les plateaux et le matériel respiratoire,
et mettez-les dans un endroit sûr. Si ce n'est pas possible, attachez-les au fauteuil roulant
AVERTISSEMENT

Turios
2022-01
Avant l'utilisation
7
EN
FR
NL
mais en les tenant éloignés de l'occupant, et en plaçant un rembourrage absorbant l'énergie
entre le plateau et l'utilisateur.
4. Utilisez une rampe pour conduire le fauteuil roulant (avec son utilisateur) dans le véhicule
conformément aux instructions fournies au §3.2.1.
5. Orientez l'utilisateur vers l'avant dans le sens du déplacement, et placez-le bien au centre
entre les rails de fixation installés dans le plancher du véhicule.
6. Assurez-vous que l'utilisateur est assis le plus droit possible. Si l'état de l'utilisateur empêche
de l'asseoir bien droit, procédez à une évaluation des risques afin d'estimer sa sécurité durant
le transport.
7. Éteignez la console de commande et assurez-vous que le levier de déblocage est en position
de freinage, voir le §3.4.
8. L'emplacement de chaque point d'attache sur le fauteuil roulant est indiqué par
le symbole suivant :
9. Vérifiez que le raccord d'extrémité de la fixation est compatible avec les points d'attache du
fauteuil roulant.
10. Fixez les crochets de la sangle de fixation avant aux points d'attache (A) sur le fauteuil roulant
en suivant les instructions du fournisseur du système de sangles.
11. Placez le levier de déblocage en position de déblocage et faites rouler le fauteuil roulant vers
l'arrière pour serrer fermement les sangles avant, voir le §3.4.
12. Fixez les crochets de la sangle de fixation arrière aux points d'attache (B) situés à l'arrière de
la même façon.
13. Replacez le levier de déblocage en position de freinage, voir le §3.4.
Attacher l'utilisateur
1. Attachez la ceinture pelvienne du fauteuil roulant.
2. Attachez les ceintures de retenue de l’utilisateur du
véhicule en suivant les instructions du fabricant du
système de sangles.
Installez la ceinture pelvienne dans une position basse
en passant devant le bassin, pour que l'angle de la
ceinture pelvienne demeure toujours dans une zone
privilégiée située entre 30° et 75° à l'horizontale,
comme illustré sur l'image.
Un angle plus prononcé (plus important) au sein de la
zone privilégiée est souhaitable.
B
A

Turios
2022-01
Avant l'utilisation
8
EN
FR
NL
3. Ajustez étroitement la ceinture en suivant les instructions du fabricant du système de sangles,
tout en respectant le confort de l'utilisateur.
4. Assurez-vous que la ceinture de retenue se connecte en ligne droite au point d'ancrage dans
le véhicule et qu'aucun pli n'est visible dans la ceinture, par exemple au niveau de l'axe de la
roue arrière.
5. Placez la boucle de la ceinture de sécurité de manière à ce que le bouton déclencheur ne soit
pas actionné par des éléments du fauteuil roulant en cas de collision.
6. Assurez-vous que les ceintures ne sont pas tordues ou maintenues éloignées du corps
comme illustré à la Figure 1.
7. Assurez-vous que les retenues de la ceinture épaulière reposent bien sur les épaules de
l'utilisateur, voir la Figure 2.
Les retenues de la ceinture ne doivent
pas être maintenues éloignées du corps
par des éléments du fauteuil roulant,
comme les accoudoirs ou les roues.
Les retenues de la ceinture sont
totalement en contact avec l'épaule, la
poitrine et le bassin.
La ceinture pelvienne est basse sur le
bassin, près de la jonction entre les
cuisses et la région abdominale.
Mauvaise position des retenues de la
ceinture
Bonne position des retenues de la
ceinture
2.5 Montage/Démontage
Risque de dommages corporels
• Veillez à ne pas vous coincer les doigts, vêtements ou boucles pendant le (dé-)montage.
Votre revendeur livre le fauteuil roulant entièrement monté, et explique les différents éléments de
fonctionnement et leur utilisation. Nous fournissons également ici une explication plus détaillée
des différentes parties pour le transport.
Pour assembler le fauteuil roulant :
1. Montez les supports d’accoudoir (paragraphe 2.5.1).
2. Montez les repose-pieds (paragraphe 2.5.2).
Pour démonter le fauteuil roulant électrique, suivez les instructions ci-dessus dans l’ordre inverse.
ATTENTION
✓

Turios
2022-01
Avant l'utilisation
9
EN
FR
NL
2.5.1 Installation ou retrait du support de l’accoudoir
Risques de dommages corporels ou matériels
• Vérifiez si les manchettes sont à la même hauteur de chaque côté.
Montez l’accoudoir (1) en glissant la tige de soutien dans le châssis
(3).
Pour retirer l’accoudoir (1), soulevez-le et sortez-le du châssis de
siège.
2.5.2 Installation ou retrait du repose-pied
Pour installer
1. Maintenez le repose-pied (4) sur le côté et insérez-le dans son support
(5).
2. Basculez le repose-pied vers l'intérieur jusqu'à ce qu'il se bloque en
position.
Pour retirer
1. Tirez le levier du repose-pied (6) et basculez le repose-pied (4) vers
l'extérieur.
2. Soulevez le repose-pied pour le retirer.
2.6 Première utilisation et stockage
Risque d’endommagement de la batterie
• Ne déchargez jamais complètement la batterie.
• N'interrompez pas le cycle de recharge ; débranchez uniquement le chargeur de batterie
lorsque la batterie est complètement chargée.
• Assurez-vous que votre fauteuil roulant est entreposé dans un endroit sec pour éviter la
formation de moisissure et l’endommagement du rembourrage.
• Vérifiez les détails techniques pour le stockage, cf. chapitre 5.
Assurez-vous que la batterie est complètement chargée avant d'utiliser le fauteuil roulant,
demandez au revendeur si cela a déjà été fait ou non. Pour recharger, suivez les instructions de
recharge au §3.7.
ATTENTION
ATTENTION
1
2
3
4
5
6

Turios
2022-01
Utilisation de votre fauteuil roulant
10
EN
FR
NL
3 Utilisation de votre fauteuil roulant
Risque de dommages corporels
• Lisez d'abord les chapitres précédents et informez-vous à propos de l'usage visé. N’utilisez
PAS votre fauteuil roulant sans avoir d'abord lu et bien compris toutes les instructions.
• Lisez également les instructions des manuels relatifs à la console l'opérateur et au chargeur
de batterie !
• En cas de doutes ou de questions, n’hésitez pas à prendre contact avec votre revendeur local,
votre prestataire de soins ou votre conseiller technique qui pourra vous aider.
3.1 Première utilisation
Risque de dommages corporels et matériels
• Tenez toujours compte de l’amplitude du repose-pied et de la console de commande pour ne
pas blesser les personnes ou endommager les objets aux alentours.
• Débranchez toujours le chargeur de la batterie du fauteuil roulant avant de commencer à
avancer.
• Assurez-vous d’être bien familiarisé avec le fonctionnement du fauteuil roulant avant de
l’utiliser dans des endroits très fréquentés et éventuellement dangereux. Exercez-vous
d'abord dans un endroit spacieux et ouvert, avec peu de personnes aux alentours.
• Examinez les effets d'un déplacement du centre de gravité sur le comportement du
fauteuil roulant, par exemple sur des déclivités ascendantes ou descendantes, sur un
sol en pente latéralement, ou en surmontant des obstacles. Demandez l'aide d'un
accompagnateur.
• La surface du dispositif de commande chauffe légèrement pendant l’emploi.
• Lors de la marche arrière, la vitesse est réduite.
1. Assurez-vous que :
• le fauteuil roulant est sur une surface plane ;
• la batterie est entièrement chargée, cf. § 3.7;
• le moteur est engagé, voir § 3.4;
• les pneus ont la pression correcte, cf. § 4.2.1;
• le fauteuil roulant est adapté à vos besoins et confort, cf. § 3.6;
• vous avez la bonne position assise, cf. § 3.5.
2. Suivez les instructions du manuel de la console de commande.
3. Mettez le fauteuil roulant en marche.
4. Tournez la commande sur la vitesse minimale.
5. Exercez-vous à conduire et réalisez les réglages au fauteuil roulant.
6. Quand vous vous sentirez suffisamment à l’aise, essayez de rouler à une vitesse plus élevée.
7. Essayez ensuite de tourner, en marche avant et en marche arrière. Répétez ces manœuvres
quelques fois.
8. Assurez-vous que votre fauteuil roulant est bien stable quand vous arrêtez la course.
9. Éteignez le fauteuil roulant.
AVERTISSEMENT
ATTENTION

Turios
2022-01
Utilisation de votre fauteuil roulant
11
EN
FR
NL
3.2 Rouler à l’extérieur
Risque d'accident - Ajustez votre comportement de conduite et votre
vitesse.
• Respectez le code de la route, il peut différer d'un pays à l’autre. Ceci est valable pour la
conduite sur les trottoirs, les routes ou les chaussées pavées ou non-pavées.
• Ne roulez pas sur des routes à trafic intense.
• Tenez compte des conditions climatiques. Évitez de conduire par temps humide, chaleur
extrême, neige, verglas, températures inférieures à zéro ; cf. les spécifications techniques au
chapitre 5.
• Même avec les feux allumés, votre fauteuil roulant n’est pas approprié pour une conduite sur
la voie publique quand la visibilité est réduite (obscurité, brouillard, crépuscule). Assurez-vous
d’être bien visible, également pendant les heures de clarté, en utilisant des vêtements
fluorescents ou votre propre éclairage à l’avant et à l’arrière du fauteuil roulant.
• Tenez compte des autres usagers de la route pour qui votre fauteuil roulant peut constituer un
obstacle. Accordez une attention spéciale au moment de tourner et de reculer. Si vous n’êtes
pas habitué à rouler en marche arrière, exercez-vous d'abord dans un endroit dégagé. Indiquez
la direction que vous avez l’intention de prendre avant de tourner.
• Essayez de rouler tout droit dans les passages étroits pour éviter de vous coincer.
• Tenez compte de la distance de freinage. N'oubliez pas que la distance de freinage dépend
de la vitesse, de la surface, des conditions climatiques et du poids de l'utilisateur.
3.2.1 Prenez garde aux pentes, bordures, obstacles ou rampes
Risque de blessures en cas de mouvement inattendu
• Attachez votre ceinture de sécurité lorsque vous êtes assis dans le fauteuil roulant.
• Faites attention si la route est sablonneuse, si le sol est mou, et aux trous ou aux fissures dans
la route qui peuvent coincer les roues ou diminuer la traction de la roue motrice.
• Ne roulez PAS sur des pentes, des obstacles, des marches ou des bordures plus larges que
la dimension décrite dans les spécifications techniques au chapitre 5.
• Abordez toujours un trottoir par l'avant.
• Ne mettez pas votre fauteuil roulant en mode déblocage dans une pente. Le fauteuil roulant
peut commencer à se déplacer et vous blesser, vous ou les personnes aux alentours.
• N’utilisez pas votre fauteuil roulant sur un escalier mécanique ou dans des escaliers.
• Utilisez uniquement les rampes approuvées par Vermeiren et ne dépassez pas leur charge
maximale.
• Pour franchir en toute sécurité des obstacles ou des pentes, placez le fauteuil roulant dans sa
position d'assise la plus verticale.
Risque de dommages
• Stationnez toujours votre fauteuil roulant électrique sur des surfaces horizontales planes et à
des endroits facilement accessibles.
• Si nécessaire, accélérez légèrement le fauteuil roulant pour monter une pente, un obstacle, un
trottoir ou une rampe. Prenez garde au danger de recul.
• Assurez-vous que le fauteuil roulant ne touche pas le sol ou la rampe lors de l'inclinaison.
• N'oubliez pas que la distance de freinage en pente peut être nettement plus importante que
sur un sol plat.
AVERTISSEMENT
ATTENTION
ATTENTION
Lorsque vous vous arrêtez dans une pente, le frein sera automatiquement actionné pour
empêcher le fauteuil roulant d’avancer ou de reculer.

Turios
2022-01
Utilisation de votre fauteuil roulant
12
EN
FR
NL
Procédure
• Commencez à conduire selon les instructions au § 3.1, étape 1.
• Pour monter ou descendre le fauteuil roulant en cas d'escaliers/marches, utilisez
l'équipement de levage ou une rampe. Si ceux-ci ne sont pas disponibles, il peut être
soulevé manuellement par au moins deux personnes, saisissant le châssis fermement des
deux mains. N'utilisez pas le dossier, la (les) palette(s) repose-pied(s), les accoudoirs, ou
encore les roues pour saisir le fauteuil roulant.
• Prenez garde aux obstacles ou aux pentes :
1. Réglez le fauteuil roulant à sa position la plus stable, cf. § 3.5.
2. Roulez le plus lentement possible pour gérer l'obstacle ou la pente.
3.3 Console de commande
Risque de blessures ou de dommages
• N'oubliez pas que la stabilité diminue lorsque le fauteuil roulant est réglé de la position assise
droite à la position inclinée.
• Assurez-vous qu'il y a assez d'espace autour du fauteuil roulant pour faire fonctionner le
dossier et le siège.
Le mode d'emploi de la console de commande est décrit dans un manuel d'utilisation
spécifique, livré avec votre fauteuil roulant. Si ce manuel n'est pas présent, veuillez prendre
contact avec votre revendeur spécialisé immédiatement.
Mettez le joystick en position neutre (au centre) avant d'appuyer sur le bouton on/off pour
ne pas bloquer l'électronique. Pour débloquer, éteignez et allumez la console de commande.
Protections techniques
La console de commande vous permet de commander tous les composants d'entraînement et
moteurs pour régler la position de votre corps. Pour votre propre sécurité, et éviter que le fauteuil
roulant ne s'endommage, les mouvements sont surveillés par l'électronique. Il peut en résulter un
blocage des mouvements, une baisse de vitesse ou un arrêt complet. Consultez le manuel
d'utilisation de la console de commande pour de plus amples informations.
Pour éviter une décharge accidentelle de la batterie, votre fauteuil roulant est équipé d'un
système d'arrêt automatique. Ce système éteint la console automatiquement lorsqu'elle n'est pas
utilisée pendant une période prolongée. Si cela se produit, rallumez simplement votre console.
3.4 Frein et levier de déblocage
Risque de blessures ou de dommages
• N’actionnez le levier de déblocage que lorsque votre fauteuil est à l’ARRÊT ! Un
accompagnateur doit actionner le levier de déblocage. Ne l’actionnez JAMAIS en position
assise.
• N'utilisez pas le mode déblocage dans les pentes et inclinaisons, cf. le symbole sur le
moteur :
Assurez-vous que le levier de déblocage est en position de freinage AVANT de mettre le
fauteuil roulant en MARCHE. Les freins électromagnétiques ne fonctionnent PAS si le
fauteuil roulant est en mode déblocage. Cela est indiqué sur la console de fonctionnement.
La conduite est impossible.
Votre fauteuil est équipé de freins électromagnétiques. Le fonctionnement des freins dépend de
la position du levier de déblocage (1).
ATTENTION
ATTENTION

Turios
2022-01
Utilisation de votre fauteuil roulant
13
EN
FR
NL
Les freins EM fonctionnent automatiquement, seulement si le levier de déblocage (1) est en
position de freinage. Dans cette situation, les freins commencent à freiner si :
• le fauteuil roulant est ÉTEINT ;
• le fauteuil roulant est ALLUMÉ et
le joystick est libéré.
Libérer le joystick permet au fauteuil
roulant de s'arrêter en douceur et
active les freins.
Fonctionnement du levier de
déblocage :
• Tournez les leviers vers l’arrière
pour mettre le fauteuil roulant en
mode déblocage. Le moteur est
alors déconnecté. Le fauteuil
roulant peut être déplacé
manuellement.
• Tournez les leviers vers l’intérieur
pour connecter le moteur à
l’entraînement. Ceci doit être
effectué avant de démarrer le fauteuil roulant.
3.5 Se déplacer du/vers le fauteuil roulant
Risque de blessures ou de dommages
• Si vous ne pouvez pas réaliser le transfert de manière sûre, demandez à quelqu'un de vous
aider.
• Ne vous reposez pas sur les (la palette) repose-pieds pendant le transfert de ou vers le fauteuil
roulant.
Transfert
1. Positionnez le fauteuil roulant aussi près de vous que possible lorsque vous êtes assis sur
une chaise, un fauteuil, un siège ou un lit.
2. Actionnez les freins en tournant le levier de déblocage en position de freinage, cf. § 3.4.
3. Repliez les (la palette) repose-pieds vers le haut pour éviter de vous reposer sur eux.
4. Si nécessaire, tournez un accoudoir pour faire de la place, cf. § 2.5.1.
5. Faites le transfert du ou vers le fauteuil roulant à la force de vos bras, ou avec l’aide d'un
accompagnateur(s) ou d'un équipement de levage.
S’asseoir sur le fauteuil roulant
1. Asseyez-vous sur le siège, le bas du dos contre le dossier.
2. Abaissez les palettes repose-pieds et mettez-y les pieds.
3. Remplacez l'accoudoir, le cas échéant.
4. Assurez-vous que le haut des jambes est horizontal et que les pieds sont dans une position
confortable. Ajustez si nécessaire.
5. Assurez-vous que vos bras sont pliés et reposent confortablement sur les manchettes. Ajustez
si nécessaire.
Réglez en position stable
Pour le transport et quand vous devez franchir des obstacles, le fauteuil roulant doit être réglé
pour maximiser sa stabilité :
• Dossier vertical
• Palette repose-pied repliée
ATTENTION
Neutre
Entraîne
ment
1
1

Turios
2022-01
Utilisation de votre fauteuil roulant
14
EN
FR
NL
3.6 Réglages de confort
Risque de blessures ou de dommages
• Les réglages de confort suivants peuvent être effectués par l’accompagnateur ou le personnel
soignant. Tous les autres réglages sont effectués par votre revendeur spécialisé,
conformément aux instructions d'installation, cf. l'avant-propos.
• Veiller à ne pas vous coincer les doigts, vêtements ou boucles pendant le réglage.
3.6.1 Inclinaison du dossier (version manuelle)
1. Tirez sur la sangle située au bas du dossier pour déverrouiller le mécanisme.
2. Réglez le dossier à la position souhaitée (0° - 32°, 4 pas de 8°).
3. Relâchez la sangle. Assurez-vous que le dossier est bien serré.
3.6.2 Inclinaison du dossier (avec ressort à gaz)
L'inclinaison du dossier avec ressort à gaz est actionnée par un levier. Selon la configuration
choisie lors de la commande, le levier se trouve sur le dossier ou sur le côté droit de l'assise.
1. Tirez le levier.
2. Tirez/poussez le dossier jusqu'à la position souhaitée.
3. Relâchez le levier. Assurez-vous que le dossier est bien fixé.
3.7 État de la batterie et recharge
Risque de blessures et de dommages dus au feu
• Utilisez uniquement le chargeur de batterie fourni avec le fauteuil roulant. L'utilisation de tout
autre chargeur peut être dangereuse (risque d'incendie).
• Le chargeur de batterie est uniquement destiné à la charge des batteries fournies avec le
fauteuil roulant, et non à celle d'autres batteries.
• N’apportez aucune modification aux différentes pièces, comme les câbles, prises ou chargeur
de batterie. N'ouvrez et ne changez jamais la batterie ou les points de raccordement.
• Protégez la batterie et son chargeur des flammes, des températures élevées et basses (cf.
chapitre 5), de l'humidité, des rayons du soleil et des chocs importants (par exemple chute).
N'utilisez PAS la batterie si ce cas s’est produit.
• Chargez la batterie au moyen du chargeur, à l'intérieur, dans un espace bien aéré et hors de
la portée des enfants.
• Lisez le manuel d'utilisation du chargeur de batterie avant de recharger la batterie du fauteuil
roulant. Pour de plus amples informations, prenez contact avec votre revendeur spécialisé ou
consultez notre site Internet http://www.vermeiren.com/
Risque de dommages
• L'autodécharge de la batterie et le courant de repos des utilisateurs connectés videront
lentement de la batterie. La batterie peut subir des dommages irréversibles si elle est
entièrement déchargée. Assurez-vous donc de la recharger à temps (cf. le manuel de la
console de commande).
• Lisez les instructions de stockage et d'entretien au §4 et les détails
techniques au chapitre 5.
• Ne déconnectez le chargeur de la batterie que lorsqu'elle est
complètement chargée, voir les symboles suivants sur le chargeur :
• Ne rechargez pas les batteries en dessous de 0°C. Déplacez la batterie
à un endroit plus chaud et démarrez la recharge.
• Débarrassez le point de raccordement de la batterie de toute poussière et autre contamination.
ATTENTION
AVERTISSEMENT
ATTENTION

Turios
2022-01
Utilisation de votre fauteuil roulant
15
EN
FR
NL
• En cas de problème empêchant la charge de la batterie conformément à ces instructions,
veuillez contacter votre revendeur spécialisé.
• Pour des instructions sur le remplacement des piles, consultez le manuel d'installation.
Pour toutes les informations sur l'indication de l'état de la batterie, veuillez lire le manuel de
la console de commande.
Il est recommandé de débrancher le chargeur de la batterie du secteur quand il n'est pas
utilisé. Ceci est pour empêcher toute consommation d'énergie inutile.
Pour recharger la batterie :
1. Branchez EN PREMIER LIEU le chargeur de la batterie à une prise de courant 230 V CA.
Utilisez le chargeur de la batterie directement, sans rallonge, sur l'alimentation électrique
(sans minuterie).
2. Branchez l'adaptateur à la console de commande.
3. Attendez jusqu'à ce que la batterie soit entièrement rechargée. Consultez le manuel du
chargeur de batterie pour de plus amples informations.
4. Débranchez le chargeur de batterie.
5. Retirez le chargeur de batterie de la prise. Laissez-le refroidir et rangez-le dans la pochette.

Turios
2022-01
Entretien
16
EN
FR
NL
4 Entretien
4.1 L'entretien
Risque de dommages corporels et matériels
Les réparations et les remplacements ne peuvent être réalisés que par des personnes formées,
et seules des pièces de remplacement d'origine de Vermeiren peuvent être utilisées.
La dernière page de ce manuel contient un formulaire d’enregistrement pour permettre au
revendeur spécialisé de consigner chaque service.
La fréquence d'entretien dépend de la fréquence et de l'intensité de l'utilisation. Prenez contact
avec votre commerçant pour convenir d'un rendez-vous pour une inspection/un entretien/une
réparation.
Lisez le manuel d'utilisation du chargeur de batterie concernant l'entretien.
Pour le manuel d'entretien, consultez le site web de Vermeiren : www.vermeiren.com.
Avant chaque utilisation
Inspectez les points suivants :
• Toutes les pièces : présentes, non endommagées et non usées.
• Toutes les pièces : propres, cf. § 4.2.2.
• Les roues, siège, accoudoirs, palettes repose-pieds et appuie-tête (le cas échéant) : bien
fixés.
• État de la batterie : chargez la batterie si nécessaire, cf. §3.7.
• Console de commande, batterie, module d'alimentation, moteurs, chargeur de batterie,
éclairage et câbles pertinents : aucun dommage, comme des fils effilochés, cassés ou
dénudés.
• État des roues/pneus, voir § 4.2.1.
• État des éléments du châssis : pas de déformation, d'instabilité, de faiblesse ou de
raccordements lâches.
• Siège, dossier, manchettes, repose-jambes et appuie-tête (le cas échéant) : pas d'usure
excessive (comme des bosses, dégâts ou déchirures).
Prenez contact avec votre revendeur spécialisé pour les réparations et les remplacements de
pièces éventuels.
Chaque mois
Si votre fauteuil roulant est remisé pour une période prolongée, vous devrez toujours charger les
batteries chaque mois. Il est également possible de laisser le chargeur de la batterie connecté à
la batterie et au secteur pendant cette période. Pour de plus amples informations, cf. § 3.7.
Chaque année ou plus souvent
Faites inspecter et entretenir votre fauteuil roulant par votre revendeur spécialisé au moins une
fois par an, ou plus. La fréquence d’entretien minimale dépend de l’usage et doit être déterminée
de commun accord avec votre revendeur spécialisé.
En cas d’entreposage
Assurez-vous que votre fauteuil roulant est entreposé dans un environnement au sec pour
éviter la formation de moisissure et l’endommagement du rembourrage.
ATTENTION

Turios
2022-01
Entretien
17
EN
FR
NL
4.2 Instructions d'entretien
4.2.1 Roues et pneus
Un fonctionnement correct des freins dépend de l’état des pneus, qui peut changer en
raison de l’usure et de la contamination (eau, huile, boue, …).
• Éliminez les fils, cheveux, le sable et les fibres de vos roues.
• Vérifiez le profil des pneus. Si la profondeur de la sculpture est inférieure à 1 mm, les pneus
doivent être remplacés. Contactez votre commerçant spécialisé à ce propos.
• Gonflez les pneus à la pression adéquate (cf. les indications de pression sur les pneus).
• Pour des instructions sur le remplacement des pneus, consultez le manuel d'installation.
4.2.2 Nettoyage
Risque de dommages dus à l'humidité
• Gardez la console de commande propre et protégez-la de l’eau et de la pluie.
• N'utilisez jamais un tuyau ou un nettoyeur à haute pression pour nettoyer le fauteuil roulant.
Essuyez toutes les parties rigides du fauteuil roulant avec un chiffon humide (pas détrempé). Si
nécessaire, utilisez un savon doux, approprié pour les laques et les synthétiques.
Le rembourrage peut être nettoyé à l’eau tiède additionnée de savon doux. N'utilisez pas de
produits de nettoyage abrasifs.
Gardez les ouvertures de ventilation du chargeur de batterie propres et exemptes de poussière
accumulée. Soufflez la poussière et nettoyez l'ouverture du chargeur de la batterie avec un tissu
légèrement humide, si nécessaire.
4.2.3 Désinfection
Risque de dommages
La désinfection ne peut être réalisée que par des personnes qualifiées. Renseignez-vous
auprès de votre revendeur spécialisé à cet égard.
4.3 Résolution des problèmes
Même si vous utilisez votre fauteuil roulant de façon appropriée, les problèmes techniques ne
sont pas exclus.
Dans ce cas, contactez votre local revendeur spécialisé.
Risque de blessures et de dommages au fauteuil roulant
• N'essayez JAMAIS de réparer votre fauteuil roulant vous-même.
• Pour les dysfonctionnements de la console de commande, vous devez prendre contact avec
votre revendeur spécialisé. Il décidera s'il est nécessaire de reprogrammer la console.
En cas de panne, un code d’erreur s’affiche sur la console de commande.
Pour un aperçu de tous les codes d'erreur sur la console de commande, veuillez lire le
manuel de la console de commande.
Les symptômes suivants peuvent indiquer un problème grave. Par conséquent, prenez toujours
contact avec votre revendeur spécialisé si vous détectez l’une des anomalies suivantes :
ATTENTION
ATTENTION
AVERTISSEMENT

Turios
2022-01
Entretien
18
EN
FR
NL
• Bruit anormal ;
• Faisceaux de câbles entaillés/endommagés ;
• Connecteurs fissurés ou cassés ;
• Usure inégale dans la sculpture de l’un des pneus ;
• Mouvements saccadés ;
• Le fauteuil roulant dévie d’un côté ;
• Ensembles de roues endommagés ou cassés ;
• Le fauteuil roulant ne s'allume pas (fusible grillé) ;
• Le fauteuil roulant est alimenté mais ne bouge pas, cf. 3.4.
4.4 Durée de vie attendue
La durée de vie moyenne de votre fauteuil roulant est de 5 ans. Selon la fréquence d'utilisation,
les circonstances de conduite et d'entretien, la durée de vie de votre fauteuil roulant augmentera
ou diminuera.
4.5 Réutilisation
Avant chaque réutilisation par une autre personne, faites désinfecter, inspecter et entretenir le
fauteuil roulant conformément aux instructions du §4.1 et du §4.2.
4.6 Mise au rebut
À la fin de sa durée de vie, votre fauteuil roulant doit être éliminé conformément à la législation
environnementale locale. Il est recommandé de démonter le fauteuil roulant afin de faciliter le
transport des matériaux recyclables.

Turios
2022-01
Caractéristiques techniques
19
EN
FR
NL
5 Caractéristiques techniques
Les détails techniques ci-dessous concernent uniquement ce fauteuil roulant, avec des réglages
standard et dans des conditions ambiantes optimales. Veuillez tenir compte de ces détails
pendant l’utilisation. Les valeurs ne sont plus valables si votre fauteuil roulant a été modifié,
endommagé ou présente une usure sérieuse. N'oubliez pas que la performance de conduite est
influencée par la température ambiante, l'humidité, les pentes (en montée ou descente), le type
de surface et l’état de la batterie.
Tableau 1 : Caractéristiques techniques
La marque
Vermeiren
Type
Fauteuil roulant électrique, classe B
Modèle
Turios
Poids maximum de l’occupant
130 kg
Description
Dimensions
Turios
Turios Element
Longueur générale avec repose-
jambes Manuel
Électrique
1070 mm
1060 mm
1070 mm
Largeur hors tout
580 - 580 - 640 mm
580 mm
Masse totale
Environ 105,8 kg
Consommation d'énergie *
6 km/h: 39 km (50Ah)
10 km/h: 25 km (50Ah)
6 km/h: 28 km (38Ah)
ou 39 km (50Ah)
Pente nominale
6°
Franchissement d'obstacle
50 mm (roues avant de 8", 9")
60 mm (roues avant de 10")
Vitesse maximale en avant
6 km/h
10 km/h
6 km/h
Distance de freinage mini à vitesse
maxi
2100 mm
Angle d'assise Manuel
Électrique
0° - 2° - 4° - 6°
0° - 20°
0° - 2° - 4° - 6°
Profondeur de siège réelle
Manuel
Électrique
380 mm – 500 mm
430 mm – 510 mm
400 mm – 440 mm
Largeur de siège réelle
390 – 450 - 510 mm
390 – 450 mm
Hauteur de surface du siège sur le
rebord de devant Siège manuel
Siège électrique
450 mm – 500 mm – 550 mm
480 mm – 510 mm
450 mm
Angle du dossier Manuel
Électrique
0° - 8° - 16° - 24° - 32°
0 - 32°
0° - 8° - 16° - 24° - 32°
Hauteur du dossier Manuel
Électrique
585 mm
550 mm
585 mm
Distance entre le repose-pied et le
siège
320 mm – 420 mm
Angle entre la surface du siège et la
jambe
114°
Distance entre l'accoudoir et le siège
260 mm – 335 mm

Turios
2022-01
Caractéristiques techniques
20
EN
FR
NL
La marque
Vermeiren
Type
Fauteuil roulant électrique, classe B
Modèle
Turios
Poids maximum de l’occupant
130 kg
Emplacement à l’avant de la
structure d’accoudoir Manuel
Électrique
340 mm – 430 mm
Maxi 320 mm
340 mm – 430 mm
Angle de braquage minimum
Environ 1600 mm
Garde au sol
60 mm (antibasculement)
100 mm (milieu)
Diamètre des roues arrière
350 x 70 mm
Type de roues arrière **
Pneus à air
Diamètres des roues avant
200 mm – 230 mm – 260 mm
200 mm – 230 mm
Type de roues avant **
Pneus à air
Pneus anti-crevaison
Description électrique
Batterie (batterie étanche AGM, sans
entretien)
38 Ah, C10
44 Ah (gel, en option)
50 Ah, C20
Moteurs de traction
6 km/h : 2 x 150W
10 km/h : 2 x 450W
6 km/h : 2 x 150W
Module d'alimentation Fusible
150 AMP
Tests de résistance selon
ISO 7176-8
Tests de puissance et système de
commande selon
ISO 7176-14
Inflammabilité de rembourrage
conforme à
EN1021-2:2006
Conformité CEM
ISO 7176-21
Niveau de protection
IPX4
Niveau de bruit
< 65 dB (A)
Évaluation globale de l'adaptation de
la ceinture de sécurité
A
Température d’entreposage et
d'utilisation
+5 °C ~ +41 °C
Température de fonctionnement de
l’électronique
-10 °C ~ +40 °C
Humidité d’entreposage et
d'utilisation
30 % ~ 70 %
Nous nous réservons le droit d'apporter des modifications techniques. Tolérance de mesure ± 15 mm /
1,5 kg / 1,5°.
(*) La distance de conduite théorique sera réduite si le fauteuil roulant est utilisé fréquemment en
pentes, sur un terrain accidenté ou en côtes.
****Des pneus différents pouvant être utilisés, veuillez noter la pression de fonctionnement correcte des
pneus que vous utilisez. Pour les autres diamètres de pneus, consultez votre revendeur spécialisé.

Turios
2022-01
Inhoud
1
NL
Inhoud
Inhoud ........................................................................................................................ 1
Voorwoord .................................................................................................................. 2
1 Uw product .................................................................................................... 3
1.1 Accessoires ................................................................................................... 3
2 Voor gebruik .................................................................................................. 4
2.1 Beoogd gebruik ............................................................................................. 4
2.2 Algemene veiligheidsmaatregelen ................................................................ 4
2.3 Symbolen op de rolstoel ................................................................................ 5
2.4 Transport ....................................................................................................... 5
2.5 Montage/Demontage ..................................................................................... 8
2.6 Eerste gebruik en opslag .............................................................................. 9
3 Uw rolstoel gebruiken ................................................................................ 10
3.1 De eerste rit ................................................................................................ 10
3.2 Buiten rijden ................................................................................................ 10
3.3 Besturing ..................................................................................................... 12
3.4 Rem en vrijloophendel ................................................................................ 12
3.5 Transfer in/uit de rolstoel ............................................................................. 13
3.6 Aanpassingen voor comfort ........................................................................ 13
3.7 Batterijstatus en opladen ............................................................................. 14
4 Onderhoud .................................................................................................. 16
4.1 Tijdstippen voor onderhoud ......................................................................... 16
4.2 Instructies voor onderhoud .......................................................................... 17
4.3 Probleemoplossing...................................................................................... 17
4.4 Verwachte levensduur ................................................................................. 18
4.5 Hergebruik .................................................................................................. 18
4.6 Beëindiging van gebruik .............................................................................. 18
5 Technische specificaties ............................................................................ 19

Turios
2022-01
Voorwoord
2
NL
Voorwoord
Proficiat! U bent eigenaar van een Vermeiren-rolstoel!
Deze rolstoel werd vervaardigd door gekwalificeerd en toegewijd personeel. Hij werd ontworpen
en geproduceerd volgens hoge kwaliteitsnormen, bewaakt door Vermeiren.
Bedankt voor uw vertrouwen in de producten van Vermeiren. Om u te ondersteunen bij het
gebruik van deze rolstoel en zijn bedieningsmogelijkheden, bieden we u deze handleiding aan.
Lees deze informatie zorgvuldig door: het zal u helpen om vertrouwd te raken met de besturing,
mogelijkheden en beperkingen van uw rolstoel.
Indien u na het lezen van deze handleiding nog vragen heeft, aarzel dan niet om contact op te
nemen met uw vakhandelaar. Hij/Zij zal u met plezier verder helpen.
Belangrijke opmerking
Om uw veiligheid te garanderen, en om de levensduur van uw product te verlengen, raden we u
aan om er goed zorg voor te dragen en om regelmatig nazicht en onderhoud te laten uitvoeren.
Deze handleiding houdt rekening met de recentste productontwikkelingen. De Firma Vermeiren
behoudt zich het recht voor om wijzigingen aan dit type product door te voeren zonder verplicht
te zijn om voordien geleverde producten aan te passen of te vervangen.
Afbeeldingen van het product worden gebruikt om de instructies in deze handleiding te
verduidelijken. Details van het afgebeelde product kunnen afwijken van uw aangekochte product.
Beschikbare informatie
Op onze website http://www.vermeiren.com/ kan u steeds de meest recente versie terugvinden
van de informatie in deze handleiding. Consulteer deze website regelmatig voor mogelijke
updates.
Mensen met een visuele beperking kunnen de elektronische versie van deze handleiding
downloaden en laten voorlezen door een tekst-naar-spraak programma.
Deze gebruiksaanwijzing
Voor de gebruiker en vakhandelaar
Gebruiksaanwijzing voor het bedieningspaneel en de batterijlader.
Voor de gebruiker en vakhandelaar
Instructies voor installatie (gedetailleerde aanpassingen en (de)montage)
Voor de vakhandelaar
Onderhoudshandleiding voor rolstoelen
Voor de vakhandelaar
EC-conformiteitsverklaring

Turios
2022-01
Uw product
3
NL
1 Uw product
1. Rug
2. Besturing
3. Armsteun
4. Zit
5. Voetsteun
6. Voetplaat
7. Veiligheidsgordel
8. Batterijbehuizing
9. Voorwiel
10. Motor
11. Achterwiel / Aandrijfwiel
12. Koplamp (optioneel)
13. Identificatieplaat
1.1 Accessoires
De volgende accessoires zijn beschikbaar voor Turios:
• Beensteun (BZ7, BZ8)
• Hoofdsteun (L55, L58)
• Lichten
• Krukkenhouder
• Bekerhouder
• Spiegel
• Zwenkbare besturingsconsole
• Koffer
1
2
3
4
5
6
7
8
9
10
11
12
14

Turios
2022-01
Voor gebruik
4
NL
2 Voor gebruik
2.1 Beoogd gebruik
In dit hoofdstuk wordt kort beschreven wat het beoogde gebruik van uw rolstoel inhoudt.
Bijkomende relevante waarschuwingen worden gegeven bij de instructies in andere
hoofdstukken. Op deze manier proberen we u te waarschuwen voor mogelijk verkeerd gebruik.
• Deze rolstoel is geschikt voor gebruik binnen en buiten.
• Deze rolstoel is uitsluitend ontworpen voor het vervoer/transfer van één (1) persoon met een
maximumgewicht van 130 kg. Het is niet bedoeld om goederen of objecten te vervoeren, noch
voor enig ander gebruik dan hiervoor beschreven.
• Deze rolstoel kan bediend worden door de gebruiker die in de rolstoel zit, of hij kan geduwd
worden door een begeleider. Gebruik deze rolstoel NIET indien u lijdt aan psychische of
mentale beperkingen waardoor u uzelf of andere mensen in gevaar kan brengen bij het rijden.
Consulteer daarom eerst uw dokter, en informeer uw vakhandelaar over zijn/haar advies.
• Gebruik enkel accessoires en reserveonderdelen die werden goedgekeurd door Vermeiren.
• Lees eerst alle technische details en limieten van uw rolstoel in hoofdstuk 5.
• De garantie op dit product is gebaseerd op normaal gebruik en onderhoud zoals beschreven
in deze handleiding. De garantie vervalt bij schade die werd veroorzaakt door verkeerd gebruik
of gebrek aan onderhoud.
2.2 Algemene veiligheidsmaatregelen
Gevaar voor letsel en/of beschadiging
Lees de instructies in deze handleiding en volg ze nauwkeurig op. Zo niet, kan dit leiden tot
lichamelijk letsel of beschadiging aan uw rolstoel.
Houd rekening met de volgende algemene waarschuwingen tijdens het gebruik:
• Gebruik de rolstoel niet indien u onder invloed bent van alcohol, medicijnen of andere
substanties die uw rijvermogen verminderen.
• Houd er rekening mee dat sommige onderdelen van uw rolstoel zeer warm of koud kunnen
worden door omgevingstemperatuur, de zon, verwarmingstoestellen of de motor tijdens
gebruik. Wees daarom voorzichtig bij het aanraken. Draag beschermende kleding bij koud
weer. Na gebruik, wacht tot de rolstoel/motor is afgekoeld.
• Wees u bewust van uw omgeving/situatie vooraleer de rolstoel in te schakelen. Pas uw
snelheid hieraan aan bij vertrek. We adviseren om de laagste snelheidsinstelling te gebruiken
wanneer u binnenshuis rijdt. Bij buitengebruik kan u de snelheid aanpassen tot een snelheid
waarbij u zich veilig en comfortabel voelt.
• Houd er ALTIJD rekening mee dat uw rolstoel plots kan stoppen door een ontladen batterij,
of een beveiliging die voorkomt dat uw rolstoel schade oploopt. Lees ook de mogelijke
oorzaken zoals vermeld in §4.3. Gebruik uw veiligheidsgordel om letsel te voorkomen.
• Uw rolstoel werd getest op elektromagnetische compatibiliteit en voldoet aan de standaard,
zie hoofdstuk 5. Toch kunnen elektromagnetische velden de rijprestatie van uw rolstoel
beïnvloeden, bijvoorbeeld bij gsm's, stroomgeneratoren of energiebronnen met hoog
vermogen. De elektronica van uw rolstoel kan echter ook andere elektrische apparaten
beïnvloeden, zoals alarmsystemen in winkels en automatische deuren. We raden daarom
aan om uw rolstoel regelmatig te checken op schade of slijtage aangezien dit de storing kan
vergroten (zie ook hoofdstuk 4).
• Rijd enkel op vlakke oppervlakken waarbij beide aandrijfwielen de grond raken, en waarbij
voldoende contact met de grond mogelijk is voor veilig gebruik van de rolstoel.
• Er mogen geen aanpassingen of veranderingen gemaakt worden aan de beveiligingspunten
of structurele onderdelen van de rolstoel zonder de producent van de rolstoel te contacteren.
VOORZICHTIG

Turios
2022-01
Voor gebruik
5
NL
• Houd tijdens gebruik uw vingers, gespen, kledij en juwelen uit de buurt van de wielen of
bewegende onderdelen.
Houd er rekening mee dat uw rolstoel, afhankelijk van de gebruikte instelling, bij sommige
diefstalsystemen interferentie kan geven. Hierdoor kan het winkelalarm in werking gesteld
worden.
Indien zich een ernstig incident heeft voorgedaan met uw product, breng dan Vermeiren of uw
gespecialiseerde dealer op de hoogte, evenals de bevoegde autoriteit in uw land.
2.3 Symbolen op de rolstoel
De volgende symbolen zijn van toepassing op uw rolstoel. De symbolen kan u terugvinden in de
relevante ISO-standaard (ISO 7000, ISO 7001 en IEC 417).
Maximum gewicht van de gebruiker in kg
Gebruik voor binnen en buiten (batterijlader niet inbegrepen)
Enkel gebruik voor binnen (batterijlader)
Maximale veilige helling in ° (graden)
Maximale snelheid
Type aanduiding
Risico voor knellen
2.4 Transport
Gevaar voor beschadiging
Neem maatregelen om te voorkomen dat de rolstoel beschadigd raakt tijdens transport.
2.4.1 Uit de weg zetten
Gebruik het bedieningspaneel om de rolstoel naar zijn bestemming te bewegen.
Zet anders de rolstoel in vrijloopmodus (zie §3.4) en gebruik de duwstang om de rolstoel te
bewegen.
2.4.2 Transport in een vliegtuig
Aangezien de rolstoel voorzien werd van lekvrije AGM-batterijen, kan de rolstoel (als een geheel)
vervoerd worden in het vliegtuig. Raadpleeg de vliegmaatschappij omtrent de correcte
procedures alvorens uw vlucht te boeken. Voordat u uw rolstoel overdraagt aan het
vliegtuigpersoneel dient u de batterij los te koppelen van de rolstoel, zie de installatiehandleiding.
VOORZICHTIG

Turios
2022-01
Voor gebruik
6
NL
2.4.3 Transport per voertuig, als bagage
De beste manier om de elektrische rolstoel in de auto te transporteren is door gebruik te maken
van oprijplaten. Wanneer u geen ervaring heeft met de rolstoel op oprijplaten te rijden, kan u de
rolstoel ook in vrijloop plaatsen en deze via oprijplaten in de auto duwen. Indien nodig, demonteer
de rolstoel.
1. Als rolstoelgebruiker, maak de transfer naar een autozit, zie §3.5.
2. Verwijder alle verwijderbare onderdelen alvorens te transporteren (voetsteunen, armsteunen,
enz.).
3. Berg de verwijderbare onderdelen veilig op achter de passagiersstoel of in het
bagagecompartiment.
4. Rijd of duw de elektronische rolstoel in de auto met behulp van oprijplaten, of til de rolstoel in
de auto door de vaste onderdelen van het frame vast te nemen. Doe dit laatste met 2 personen.
5. Maak de vaste onderdelen van het frame goed vast aan het voertuig.
6. Plaats de rolstoel in rijmodus (inschakelen van de parkeerremmen) en controleer dat de
besturing uitgeschakeld is.
2.4.4 Transport per voertuig, als zit voor de gebruiker
De rolstoel heeft de crashtest van ISO 7176-19: 2008 doorstaan en is zo ontworpen
en getest om enkel gebruikt te worden als voorwaartse zit in een voertuig.
De rolstoel werd dynamisch getest met het ATD (antropomorfisch testapparaat) waarbij een
vierpunts-beveiligingssysteem voor de rolstoel, en een driepunts-beveiligingssysteem voor
de inzittende gebruikt werden. Toch heeft het de voorkeur om de gebruiker te verplaatsen
naar een zit in het voertuig waarbij het beveiligingssysteem van het voertuig gebruikt wordt.
De rolstoel wordt weggeborgen als bagage in een afzonderlijk (cargo)compartiment, zie
§2.4.3.
Gevaar voor letsel of beschadiging
Gebruik de bekkengordel van de rolstoel en de beschikbare driepuntsgordel in het
voertuig om borst- en hoofdimpact met het voertuig te vermijden.
Gebruik geen lichaamsondersteuningen om de gebruiker vast te maken in het voertuig,
tenzij deze werden gelabeld als overeenkomstig met de vereisten in ISO 7176-19:2008.
Na betrokkenheid in enige vorm van botsing, laat dan vóór verder gebruik uw rolstoel
inspecteren door uw vakhandelaar of de vertegenwoordiger van de fabrikant.
De rolstoel beveiligen
1. Zorg ervoor dat het voertuig een gepast systeem heeft voor de vierpunts-bevestiging van de
rolstoel en de driepunts-bevestiging van de inzittende conform ISO 10542, en dat beide
systeem geen blijk geven van slijtage, vervuiling, aantasting of defect.
2. Gebruik het bedieningspaneel om uw rolstoel weer naar een stabiele positie te brengen, zie
§3.5.
3. Verwijder alle aangebrachte accessoires zoals tafels en beademingsapparatuur, en bewaar
deze op een veilige plaats. Indien dit niet mogelijk is, bevestig deze dan stevig aan de rolstoel
maar weg van de inzittende, met energieabsorberende padding tussen het tafelblad en de
gebruiker.
4. Gebruik een ramp om de rolstoel in het bagagecompartiment van het voertuig te rijden volgens
de instructies in §3.2.1.
5. Plaats de gebruiker voorwaarts in de rijrichting, centraal tussen de bevestigingsrails op de
vloer van het voertuig.
6. Zorg ervoor dat de gebruiker zo rechtop mogelijk zit. Indien de toestand van de gebruiker dit
niet toelaat, voer dan een risicoanalyse uit om de veiligheid van de gebruiker tijdens het
transport te beoordelen.
7. Zet de besturing uit en zorg ervoor dat de vrijloophendel in rempositie staat, zie §3.4.
WAARSCHUWING

Turios
2022-01
Voor gebruik
7
NL
8. De locatie van ieder bevestigingspunt op de rolstoel wordt met het volgende
symbool aangeduid:
9. Ga na of het uiteinde van de bevestiging compatibel is met de bevestigingspunten op de
rolstoel.
10. Bevestig de voorste bevestigingshaken aan de bevestigingspunten (A) van de rolstoel volgens
de instructies van het bevestigingssysteem.
11. Draai de vrijloophendel in vrijlooppositie en rol de rolstoel achterwaarts om de voorste riemen
strak te trekken, zie §3.4.
12. Bevestig de achterste bevestigingshaken op dezelfde manier aan de bevestigingspunten (B)
op de achterkant.
13. Draai de vrijloophendel terug in rempositie, zie §3.4.
De gebruiker beveiligen
1. Bevestig de bekkengordel van de rolstoel.
2. Bevestig het veiligheidssysteem voor inzittenden in het
voertuig volgens de instructies van het beveiligings-
systeem.
Draag de bekkengordel laag over de voorkant van de
bekken, zodat de hoek van de bekkengordel binnen
de gewenste zone van 30° tot 75° met de horizontale
is, zoals hieronder aangegeven. Een steilere (grotere)
hoek binnen de gewenste zone is wenselijk.
3. Trek de riem strak aan volgens de instructies van het
riemsysteem en in overeenstemming met het comfort
van de gebruiker.
4. Zorg ervoor dat de veiligheidsriem verbonden wordt in een rechte lijn aan het ankerpunt van
het voertuig en dat er geen bochten in de riem zichtbaar zijn, bijvoorbeeld op de as van het
achterwiel.
5. Plaats de gordelgesp zo dat de ontgrendelingsknop niet geraakt kan worden door onderdelen
van de rolstoel bij een botsing.
6. Zorg ervoor dat de gordels niet gedraaid zijn of weggehouden worden van het lichaam zoals
in figuur 1.
B
A

Turios
2022-01
Voor gebruik
8
NL
7. Zorgt ervoor dat de schoudergordel goed over de schouder passen, zie figuur 2.
Gordels mogen niet weggehouden
worden van het lichaam door rolstoel
onderdelen zoals armsteunen of wielen.
De gordels zijn volledig in contact met
schouder, borst en bekken.
Bekkengordel laag op het bekken,
vlakbij de kruising van dij en bekken
Figuur 1 Foutieve gordelbevestiging
Figuur 2 Correcte gordelbevestiging
2.5 Montage/Demontage
Gevaar voor letsel
• Zorg ervoor dat uw vingers, kledij, gespen niet geklemd raken bij de (de)montage.
Uw vakhandelaar levert de rolstoel volledig gemonteerd en legt de verschillende
bedieningselementen en hun gebruik uit. Voor transportdoeleinden bieden wij hieronder ook een
verdere, gedetailleerde uitleg van de verschillende onderdelen.
Om de elektronische rolstoel te monteren:
1. Plaats de armsteunen (§ 2.5.1).
2. Plaats de voetsteunen (§ 2.5.2).
Om de elektrische rolstoel te demonteren, voert u bovenstaande instructies in omgekeerde
volgorde uit.
2.5.1 De armsteunen plaatsen/verwijderen
Gevaar voor letsel en/of beschadiging
• Zorg ervoor dat de armsteunen aan beide kanten op dezelfde hoogte worden ingesteld.
Plaats de armsteun (1) door de draagstaaf (2) in het frame (3) te
schuiven.
Om de armsteun (1) te verwijderen, trek het omhoog en uit het
zitframe.
VOORZICHTIG
VOORZICHTIG
1
2
3
✓

Turios
2022-01
Voor gebruik
9
NL
2.5.2 De voetsteunen plaatsen/verwijderen
Om te plaatsen
1. Houd de voetsteun (4) zijwaarts van de rolstoel en plaats hem in de
voetsteunbevestiging (5).
2. Draai de voetsteun inwaarts tot hij op zijn plaats klikt.
Om te verwijderen
1. Trek aan de voetsteunhendel (6) en draai de voetsteun (4) naar buiten.
2. Til de voetsteun omhoog om hem weg te nemen.
2.6 Eerste gebruik en opslag
Gevaar voor beschadiging aan de batterij
• Laat de batterij nooit volledig ontladen.
• Onderbreek de oplaadcyclus niet: koppel de batterijlader enkel los wanneer de batterij volledig
opgeladen is.
• Zorg ervoor dat uw rolstoel droog wordt bewaard om schimmel of schade aan de bekleding te
voorkomen. Indien nodig, gebruik een afdekkap.
• Ga de technische details voor opslag na in hoofdstuk 5.
Zorg ervoor dat de batterij volledig werd opgeladen voor het eerste gebruik. Vraag aan uw
vakhandelaar of dit reeds gebeurde. Om de batterij te laden, volgt u de instructies in §3.7.
VOORZICHTIG
4
5
6

Turios
2022-01
Uw rolstoel gebruiken
10
NL
3 Uw rolstoel gebruiken
Gevaar voor letsel
• Lees eerst de voorgaande hoofdstukken en informeer uzelf over het beoogde gebruik. Gebruik
uw rolstoel NIET voordat u alle instructies gelezen en begrepen heeft.
• Lees ook de instructies in de besturingshandleiding en de handleiding van de batterijlader!
• Als u nog vragen heeft of als u ergens aan twijfelt, aarzel dan niet om contact op te nemen met
uw lokale vakhandelaar, zorgverlener, of technisch adviseur om u te helpen.
3.1 De eerste rit
Gevaar voor letsel of beschadiging
• Houd steeds rekening met de draaicirkel van de voetsteun en besturing om te voorkomen dat
voorbijgangers verwond raken, of dat objecten beschadigd raken.
• Koppel steeds de batterijlader los van de rolstoel vooraleer te rijden.
• Zorg ervoor dat u vertrouwd bent met de werking van uw rolstoel vooraleer deze te
gebruiken op drukke en mogelijk gevaarlijke plaatsen. Oefen eerst in een grote open
ruimte met weinig omstaanders.
• Onderzoek het effect van een veranderd zwaartepunt op het gedrag van de rolstoel,
bijvoorbeeld op hellingen, op zijdelingse hellingen of bij het overwinnen van
hindernissen. Vraag hulp aan een begeleider.
• Het oppervlak van de besturing wordt een beetje warm tijdens gebruik.
• Bij het achteruit rijden wordt de snelheid verminderd.
1. Zorg ervoor dat:
• de rolstoel op een vlakke ondergrond staat;
• de batterij volledig is opgeladen, zie §3.7;
• de motor gekoppeld werd, zie §3.4;
• de banden de correcte bandendruk hebben, zie §4.2.1;
• de rolstoel werd aangepast aan uw noden en comfort, zie §3.6;
• u de correcte zitpositie heeft, zie §3.5.
2. Volg de instructies uit de handleiding van de besturing.
3. Zet uw rolstoel aan.
4. Draai de snelheidsregelaar naar de laagste stand.
5. Oefen op het rijden met en verstellen van de rolstoel.
6. Als u zich zeker genoeg voelt, kan u aan een hogere snelheid proberen te rijden.
7. Probeer nu te draaien, zowel voorwaarts als achterwaarts. Herhaal dit enkele keren.
8. Zorg ervoor dat uw rolstoel stabiel staat wanneer u de rit beëindigt.
9. Schakel uw rolstoel uit.
3.2 Buiten rijden
Gevaar voor ongeval - Pas uw rijstijl en snelheid aan.
• Houd rekening met de lokale verkeerswetgeving; deze kan verschillen van land tot land. Dit
geldt voor het rijden op de stoep, onverharde en verharde wegen.
• Houd rekening met de weersomstandigheden. Vermijd het rijden bij vochtig weer, extreme
hitte, sneeuw, ijzel en vriestemperaturen; zie de technische specificaties in hoofdstuk 5.
• Rijd niet op wegen met druk verkeer.
• Zelfs met uw lichten aan is het niet gepast om op openbare wegen te rijden met slechte
zichtbaarheid (duisternis, mist, schemer). Zorg ervoor dat u goed zichtbaar bent, ook tijdens
WAARSCHUWING
VOORZICHTIG
WAARSCHUWING

Turios
2022-01
Uw rolstoel gebruiken
11
NL
de dag, door het dragen van fluorescerende kledij en/of door extra verlichting te gebruiken aan
de voor- en achterzijde van de rolstoel.
• Wees u bewust van andere weggebruikers voor wie uw rolstoel een hindernis kan vormen. Let
extra op bij het draaien en achteruit rijden. Als u niet vertrouwd bent met achteruit rijden, oefen
dan eerst in een open ruimte. Geef de richting aan waarin u gaat vooraleer af te slaan.
• Probeer recht in smalle doorgangen te rijden om te voorkomen dat u geklemd raakt.
• Houd de remafstand in gedachten. Houd er rekening mee dat de remafstand beïnvloed wordt
door snelheid, rijoppervlak, weersomstandigheden, helling en gewicht van de gebruiker.
3.2.1 Omgaan met hellingen, stoepranden, hindernissen en oprijplaten
Gevaar voor letsel door onvoorziene beweging
• Gebruik een veiligheidsgordel om uzelf te beveiligen in de rolstoel.
• Pas op als de weg zanderig is of zachte grond, gaten of spleten heeft waardoor de wielen
kunnen vastlopen en/of de tractie van de aandrijfwielen vermindert.
• Rijd NIET op hellingen, hindernissen, treden of stoepranden die groter zijn dan beschreven in
de technische specificaties van hoofdstuk 5.
• Benader een stoeprand altijd van de voorkant.
• Zet uw rolstoel nooit in vrijloopmodus op een helling. De rolstoel kan beginnen te bewegen,
wat verwondingen bij uzelf of omstaanders kan veroorzaken.
• Gebruik uw rolstoel niet op roltrappen of trappen.
• Gebruik enkel rampen die goedgekeurd werden door Vermeiren en overschrijd hun maximaal
toegestane belasting niet.
• Om veilig obstakels of hellingen te nemen, zet u de rolstoel in de meest rechtop zittende positie.
Gevaar voor beschadiging
• Parkeer uw elektrische rolstoel steeds op een horizontaal vlak oppervlak, en op plaatsen die
makkelijk bereikbaar zijn.
• Indien nodig, maak snelheid met een korte aanloop om hellingen, hindernissen, stoepranden
of rampen op te rijden. Vermijd dat u of uw rolstoel te maken krijgt met een grote terugslag.
• Zorg ervoor dat de rolstoel de grond of ramp niet raakt door de kanteling.
• Denk eraan dat de remafstand bergafwaarts aanzienlijk groter kan zijn dan op vlakke grond.
Procedure
• Start met rijden volgens de instructies in §3.1, stap 1.
• Gebruik hefmateriaal of een ramp om de rolstoel op/af treden of trappen te bewegen.
Indien deze niet voorhanden zijn, kan de rolstoel worden opgetild door ten minste twee
personen, waarbij het onderframe stevig met beide handen moeten worden vastgehouden.
Houd de rolstoel hierbij niet vast aan de rugsteun, voetplaat/voetplaten, armsteunen of
wielen.
• Omgaan met hindernissen of hellingen:
1. Verstel de rolstoel naar de meest stabiele positie, zie §3.5.
2. Rijd zo langzaam mogelijk om de hindernis of helling te nemen.
VOORZICHTIG
WAARSCHUWING
Wanneer u stopt op een helling, zal de rem automatisch in werking treden om te voorkomen
dat de rolstoel vooruit of achteruit rolt.

Turios
2022-01
Uw rolstoel gebruiken
12
NL
3.3 Besturing
Gevaar voor letsel of beschadiging
• Houd er rekening mee dat de stabiliteit van uw rolstoel vermindert wanneer u de positie
aanpast van rechtop zittend naar gekanteld.
• Zorg ervoor dat u voldoende ruimte heeft rondom de rolstoel om de rugsteun en zit aan te
passen.
Het gebruik van de besturing wordt uitgelegd in een aparte handleiding, meegeleverd bij uw
rolstoel. Neem meteen contact op met uw vakhandelaar als deze handleiding ontbreekt.
Zet de joystick in neutrale (centrale) positie vooraleer de aan/uit-knop in te drukken, anders
zal de elektronica blokkeren. Om deze blokkering op te heffen, schakelt u de besturing uit
en weer aan.
Technische bescherming
De besturing laat toe dat u alle rijonderdelen kan bedienen, alsook de motoren om uw
lichaamshouding aan te passen. Om uw eigen veiligheid te garanderen, en om te voorkomen dat
de rolstoel beschadigd raakt, worden alle bewegingen bewaakt door de elektronica. Dit kan leiden
tot een bewegingsvergrendeling, afname in snelheid of volledige stilstand. Raadpleeg de
handleiding van de besturing voor meer informatie.
Om onopzettelijke batterij-ontlading te voorkomen, is uw rolstoel voorzien van een automatisch
uitschakelsysteem. Dit systeem schakelt automatisch de besturing uit zodra deze even niet
gebruikt wordt. Als dit gebeurt, schakel dan gewoon de besturing weer aan.
3.4 Rem en vrijloophendel
Gevaar voor letsel of beschadiging
• Bedien de vrijloophendel enkel wanneer de rolstoel UIT staat! Een begeleider moet de
vrijloophendel bedienen indien u een mobiliteitsbeperking heeft. Bedien de hendel NOOIT
vanuit zittende positie.
• Gebruik de vrijloopmodus nooit op hellingen, zie symbool op motor:
Zorg ervoor dat de vrijloophendel in rempositie staat VOORDAT u de rolstoel AAN zet.
Elektromagnetische remmen werken NIET als de rolstoel in vrijloopmodus staat. Dit wordt
aangegeven op de besturing. Rijden is niet mogelijk.
Uw rolstoel is uitgerust met
elektromagnetische remmen. De
werking van deze remmen hangt af van
de positie van de vrijloophendel (1).
De EM-remmen werken automatisch,
enkel wanneer de vrijloophendel (1) in
rempositie staat. In dit geval zullen de
remmen beginnen werken als:
• de rolstoel UIT staat;
• de rolstoel AAN staat en de
joystick wordt losgelaten.
Wanneer u de joystick loslaat, stop de
rolstoel stilaan en activeren de
remmen.
VOORZICHTIG
VOORZICHTIG
Neutral
Drive
1
1

Turios
2022-01
Uw rolstoel gebruiken
13
NL
De vrijloophendel bedienen:
• Draai de hendels naar achteren om de rolstoel in vrijloopmodus te zetten. De motor is nu
losgekoppeld. De rolstoel kan manueel verplaatst worden.
• Draai de hendels inwaarts om de motor te koppelen aan de aandrijving. Dit moet gebeuren
vooraleer u de rolstoel aanzet.
3.5 Transfer in/uit de rolstoel
Gevaar voor letsel of beschadiging
• Als u de transfer niet op een veilige manier kan uitvoeren, vraag dan hulp.
• Ga niet op de voetplaat/voetplaten staan om in of uit de rolstoel te stappen.
Transfer
1. Plaats de rolstoel zo dicht mogelijk bij de stoel, zetel of het bed waarop u zit.
2. Schakel de remmen in door de vrijloophendel in rempositie te draaien, zie § 3.4.
3. Vouw de voetplaat/voetplaten omhoog om te voorkomen dat u erop gaat staan.
4. Indien nodig, verwijder een van de armsteunen, zie §2.5.1.
5. Beweeg naar/uit uw rolstoel door kracht te zetten op uw armen, of met behulp van een
begeleider of liftmaterieel.
Zitten in de rolstoel
1. Ga zitten op de zit met uw onderrug tegen de rugsteun.
2. Draai de voetplaat/voetplaten naar beneden en plaats uw voeten erop.
3. Indien nodig, plaats de armsteunen terug.
4. Zorg ervoor dat uw bovenbenen horizontaal zijn, met uw voeten in een comfortabele positie.
Maak aanpassingen indien nodig.
5. Zorg ervoor dat uw armen gebogen zijn en dat ze comfortabel rusten op de armsteunen. Maak
aanpassingen indien nodig.
Verstellen naar stabiele positie
Voor transport, en wanneer u hindernissen moet nemen, is het nodig dat de rolstoel afgesteld
wordt voor maximale stabiliteit:
• Rugsteun rechtop
• Voetplaat omhoog gevouwen
3.6 Aanpassingen voor comfort
Gevaar voor letsel of beschadiging
• De volgende aanpassingen voor comfort kunnen gedaan worden door de begeleider. Alle
andere instellingen worden gedaan door de vakhandelaar volgens de installatiehandleiding,
zie voorwoord.
• Houd tijdens de verstelling uw vingers, gespen, kledij en juwelen uit de buurt van bewegende
onderdelen.
3.6.1 Ruginclinatie (manuele versie)
1. Trek aan het lint aan de onderkant van de rugsteun om het mechanisme te ontgrendelen.
2. Verzet de rug naar de gewenste positie (0°-32°, 4 stappen van 8°).
3. Laat het lint los. Zorg ervoor dat de rug goed vastzit op een van de posities.
VOORZICHTIG
VOORZICHTIG

Turios
2022-01
Uw rolstoel gebruiken
14
NL
3.6.2 Ruginclinatie (met gasveer)
De ruginclinatie met gasveer wordt bediend met een hendel. Afhankelijk van de gekozen
configuratie bij bestelling, bevindt de hendel zich op de rugleuning of aan de rechterkant van de
zit.
1. Trek aan de hendel.
2. Trek/Duw de rugleuning in de gewenste stand.
3. Laat de hendel los. Zorg ervoor dat de rug goed vastzit.
3.7 Batterijstatus en opladen
Gevaar voor letsel of beschadiging door brand
• Gebruik enkel de batterijlader die geleverd werd bij uw rolstoel. Het gebruiken van een andere
lader kan gevaarlijk zijn (brandgevaar).
• De lader is enkel bedoeld om de batterijen op te laden die geleverd werden bij uw rolstoel,
geen andere batterijen.
• Maak geen aanpassingen aan de geleverde onderdelen, bijv. kabels, stekkers of de
batterijlader. Open of vervang nooit de batterij of de aansluitpunten.
• Bescherm de batterij en batterijlader tegen vlammen, hoge en lage temperaturen (zie
hoofdstuk 5), vochtigheid, zon, hevige schokken (bijvoorbeeld vallen). Gebruik de batterij NIET
als ze is blootgesteld aan een van de voornoemde omstandigheden.
• Laad de batterij op met de geleverde lader, binnenshuis, in een goed geventileerde ruimte,
buiten het bereik van kinderen.
• Lees eerst de gebruiksaanwijzing van uw batterijlader vooraleer de batterijen van uw rolstoel
op te laden. Voor meer informatie, neem contact op met uw vakhandelaar of consulteer onze
website: http://www.vermeiren.com/.
Gevaar voor beschadiging
• Automatische ontlading van de batterij en de ruststroom van de verbonden gebruikers zullen
de batterij langzaam ontladen. De batterij kan onherstelbaar beschadigd raken indien ze
volledig ontladen wordt. Zorg er daarom steeds voor dat de batterij tijdig wordt opgeladen (zie
handleiding van de besturing).
• Lees de instructies voor bewaring en onderhoud in hoofdstuk 4, en de
technische details in hoofdstuk 5.
• Koppel de batterijlader pas los wanneer de batterij volledig werd
opgeladen, zie volgende symbolen op de lader:
• Laad batterijen niet op onder 0°. Verplaats de batterij naar een warmere
plaats en begin het opladen.
• Houd het aansluitpunt voor de batterijlader vrij van stof of vuil.
• In geval van problemen waardoor de batterij niet opgeladen kan worden volgens de
gebruiksaanwijzing van de lader, neem dan contact op met uw vakhandelaar.
• Instructies voor het vervangen van de batterijen kan u terugvinden in de installatiehandleiding.
Voor alle informatie over weergave van de batterijstatus, raadpleeg de handleiding van de
besturing.
We raden aan om de batterij los te koppelen van de rolstoel wanneer deze een tijdje niet
gebruikt wordt. Zo voorkomt u onnodige energieconsumptie.
WAARSCHUWING
VOORZICHTIG

Turios
2022-01
Uw rolstoel gebruiken
15
NL
Om de batterij op te laden:
1. Verbind EERST de batterijlader met een 230V AC stopcontact. Gebruik de batterijlader
rechtstreeks in het stopcontact, zonder verlengsnoer (en zonder tijdschakelaar).
2. Sluit de lader aan op het aansluitpunt van de besturing.
3. Wacht tot de batterij volledig is opgeladen. Lees de gebruiksaanwijzing van de batterijlader
voor meer informatie.
4. Koppel de batterijlader los.
5. Verwijder de lader uit het stopcontact, laat afkoelen en bewaar in de bijhorende tas.

Turios
2022-01
Onderhoud
16
NL
4 Onderhoud
4.1 Tijdstippen voor onderhoud
Gevaar voor letsel of beschadiging
Reparaties en vervangingen mogen enkel uitgevoerd worden door opgeleid personeel, en enkel
originele onderdelen van Vermeiren mogen hierbij gebruikt worden.
De laatste pagina van deze handleiding bevat een registratieformulier, bedoeld voor de
vakhandelaar om ieder onderhoud te registeren.
De onderhoudsfrequentie hangt af van de frequentie en intensiteit van gebruik. Neem contact op
met uw vakhandelaar om een tijdschema vast te leggen voor nazicht/onderhoud/reparatie.
Lees de gebruiksaanwijzing van de batterijlader voor specifieke onderhoudsinstructies.
Voor de onderhoudshandleiding kan u onze website raadplegen: www.vermeiren.com.
Voor ieder gebruik
Kijk de volgende punten na:
• Alle onderdelen: aanwezig en niet beschadigd of versleten.
• Alle onderdelen: schoon, zie §4.2.2.
• Wielen, zit, armsteunen, voetsteunen en hoofdsteun (indien van toepassing): stevig
bevestigd.
• Batterijstatus: laad de batterij op indien nodig, zie §3.7.
• Besturing, batterij, vermogensmodule, motors, batterijlader, lichten en relevante kabels:
geen schade zoals gerafelde, gebroken of blootgestelde draden.
• Staat van de wielen/banden, zie §4.2.1.
• Staat van de frameonderdelen: geen vervorming, instabiliteit, zwakte of losse verbindingen.
• Zit, rugsteun, armleggers, kuitsteunen en hoofdsteun (indien van toepassing): geen
overmatige slijtage (bijv. gedeukte plekken, schade of scheuren).
Contacteer uw vakhandelaar voor eventuele reparaties of vervanging van onderdelen.
Iedere maand
Als uw rolstoel voor een periode wordt opgeslagen, raden we aan om de batterijen nog steeds
iedere maand op te laden. Het is ook mogelijk om de batterijlader gekoppeld te houden aan de
batterij en de netspanning tijdens deze periode. Voor meer informatie, zie §3.7.
Jaarlijks of vaker
Laat uw rolstoel nakijken en onderhouden door uw vakhandelaar, ten minste één keer per jaar of
vaker. De minimale onderhoudsfrequentie is afhankelijk van het gebruik en moet daarom
besproken worden met uw vakhandelaar.
Bij opslag
Zorg ervoor dat uw rolstoel droog wordt bewaard om schimmel of schade aan de bekleding te
voorkomen.
VOORZICHTIG

Turios
2022-01
Onderhoud
17
NL
4.2 Instructies voor onderhoud
4.2.1 Wielen en banden
De goede werking van de remmen hangt af van de staat van de banden, die onderhevig
zijn aan slijtage en verontreiniging (water, olie, modder,...).
• Houd de wielen vrij van draden, haar, zand en vezels.
• Kijk het profiel van de banden na. Als de profieldiepte minder dan 1 mm bedraagt, moeten
de banden vervangen worden. Contacteer hiervoor uw vakhandelaar.
• Pomp de banden op volgens de correcte spanning (zie drukindicatie op de banden).
• Instructies voor het vervangen van de banden kan u terugvinden in de installatiehandleiding.
4.2.2 Ontsmetting
Gevaar voor beschadiging door vocht
• Houd de besturing schoon en bescherm ze tegen water en regen.
• Gebruik nooit een tuinslang of hogedrukreiniger om de rolstoel schoon te maken.
Veeg alle harde onderdelen van de rolstoel schoon met een vochtig doek (niet doorweekt). Indien
nodig, gebruik een milde zeep die geschikt is voor vernis en synthetische materialen.
De bekleding kan schoon worden gemaakt met lauw water en een milde zeep. Gebruik geen
agressieve schoonmaakmiddelen.
Houd de ventilatieopeningen op de batterijlader schoon en vrij van stof. Blaas het stof weg en
maak de batterijlader schoon met een vochtig doek indien nodig.
4.2.3 Ontsmetting
Gevaar voor beschadiging
Ontsmetting mag enkel worden uitgevoerd door getraind personeel. Neem contact op met uw
vakhandelaar.
4.3 Probleemoplossing
Ook wanneer u de rolstoel correct gebruikt, is het toch mogelijk dat er een technisch probleem
optreedt. Neem in dat geval contact op met uw vakhandelaar.
Gevaar voor letsel of beschadiging aan de rolstoel
• Probeer NOOIT zelf uw rolstoel te repareren.
• Bij storingen in de besturing dient u contact op te nemen met uw vakhandelaar.
Hij /Zij zal beslissen of de besturing geherprogrammeerd moet worden.
Bij storing wordt een foutcode weergegeven op de besturing..
Raadpleeg de handleiding van de besturing voor een overzicht van alle foutcodes.
De volgende tekenen kunnen wijzen op een ernstig probleem. Neem daarom steeds contact op
met uw vakhandelaar als u een van de volgende afwijkingen opmerkt:
• Vreemde geluiden;
• Gerafelde/beschadigde kabelboom;
• Gebarsten of gebroken aansluitingen;
• Oneven bandenslijtage op een van de banden;
• Schokkerige bewegingen;
WAARSCHUWING
VOORZICHTIG
WAARSCHUWING

Turios
2022-01
Onderhoud
18
NL
• De rolstoel buigt af naar één kant;
• Beschadigde of kapotte wielmontages;
• De rolstoel start niet op (defecte zekering);
• De rolstoel staat aan maar beweegt niet, zie § 3.4.
4.4 Verwachte levensduur
De gemiddelde levensduur van uw rolstoel is 5 jaar. De levensduur zal toenemen of afnemen
afhankelijk van de gebruiksfrequentie, rijomstandigheden en onderhoud.
4.5 Hergebruik
Voor ieder hergebruik door een nieuw persoon moet de rolstoel ontsmet, geïnspecteerd en
onderhouden worden volgens de instructies in §4.1 en §4.2.
4.6 Beëindiging van gebruik
Op het einde van de levensduur moet u de rolstoel vernietigen volgens de lokale milieuwetgeving.
De beste manier om dit te doen, is de rolstoel te demonteren om het vervoer van de recycleerbare
onderdelen te vergemakkelijken.

Turios
2022-01
Technische specificaties
19
NL
5 Technische specificaties
Onderstaande technische gegevens zijn enkel geldig voor deze rolstoel, met standaard
instellingen en optimale omgevingscondities. Houd bij gebruik rekening met deze details.
Deze waarden zijn niet meer van toepassing als uw rolstoel werd gewijzigd, of wanneer hij
beschadigd of ernstig versleten is. Houd er rekening mee dat de rijprestatie beïnvloed wordt door
omgevingstemperatuur, luchtvochtigheid, hellingen (op/neer), soort oppervlak en batterijstatus.
Tabel 1: Technische specificaties
Merk
Vermeiren
Type
Elektronische rolstoel, klasse B
Model
Turios
Max. gebruikersgewicht
130 kg
Omschrijving
Afmetingen
Turios
Turios Element
Totale lengte met voetplaat
Manueel
Elektrisch
1070 mm
1060 mm
1070 mm
Totale breedte
580 - 580 - 640 mm
580 mm
Totale massa
Ong. 105,8 kg
Energieconsumptie *
6 km/h: 39 km (50Ah)
10 km/h: 25 km (50Ah)
6 km/h: 28 km (38Ah)
of 39 km (50Ah)
Nominale helling
6°
Maximum hoogte hindernis
50 mm (8”, 9” voorwielen)
60 mm (10” voorwielen)
Max. snelheid voorwaarts
6 km/h
10 km/h
6 km/h
Minimale remafstand bij hoogste
snelheid
2100 mm
Hoek zit Manueel
Elektrisch
0° - 2° - 4° - 6°
0° - 20°
0° - 2° - 4° - 6°
Zitdiepte Manueel
Elektrisch
380 mm – 500 mm
430 mm – 510 mm
400 mm – 440 mm
Zitbreedte
390 - 450 - 510 mm
390 – 450 mm
Zithoogte Manuele zit
Elektrische zit
450 mm – 500 mm – 550 mm
480 mm – 510 mm
450 mm
Hoek rug Manueel
Elektrisch
0° - 8° - 16° - 24° - 32°
0 - 32°
0° - 8° - 16° - 24° - 32°
Hoogte rug Manueel
Elektrisch
585 mm
550 mm
585 mm
Afstand tussen voetplaat en zit
320 mm – 420 mm
Hoek been tot zit
114°
Afstand armsteun tot zit
260 mm – 335 mm
Voorste positie armsteunen Manueel
Elektrisch
340 mm – 430 mm
Max. 320 mm
340 mm – 430 mm
Draaicirkel
Ong. 1600 mm

Turios
2022-01
Technische specificaties
20
NL
Merk
Vermeiren
Type
Elektronische rolstoel, klasse B
Model
Turios
Max. gebruikersgewicht
130 kg
Grondspeling
60 mm (antitipping)
100 mm (midden)
Diameter achterwielen
350 x 70 mm
Type achterwielen **
Luchtbanden
Diameter voorwielen
200 mm – 230 mm – 260 mm
200 mm – 230 mm
Type voorwielen **
Luchtbanden
Lekvrije banden
Omschrijving elektriciteit
Batterij (Lekvrije AGM batterij,
onderhoudsvrij)
38 Ah, C10
44 Ah (optioneel, gel)
50 Ah, C20
Aandrijfmotoren
6 km/h: 2 x 150W
10 km/h: 2 x 450W
6 km/h: 2 x 150W
Vermogensmodule zekering
150 AMP
Sterktetesten volgens
ISO 7176-8
Testen voor vermogen en besturing
volgens
ISO 7176-14
Brandweerstand van de bekleding
volgens
EN1021-2:2006
EMC-compatibiliteit volgens
ISO 7176-21
Beschermingsklasse
IPX4
Geluidsdruk
< 65 dB (A)
Algemene beoordeling van de
gordelvoorziening
A
Opslag- en gebruikstemperatuur
+5 °C ~ +41 °C
Werkingstemperatuur van de
elektronica
-10°C ~ +40°C
Opslag en gebruiksluchtvochtigheid
30% ~ 70%
We behouden ons het recht voor om technische wijzigingen te introduceren. Meettolerantie ± 15 mm / 1,5
kg / 1,5°.
* De theoretische actieradius zal worden verlaagd als de rolstoel vaak wordt gebruikt op hellingen, ruw
terrein of stoepranden.
**Omdat verschillende banden gebruikt kunnen worden, controleer de correcte bandendruk voor de band
die u gebruikt. Raadpleeg uw vakhandelaar voor andere diameters van de banden.

Turios
2022-01
Inhalt
1
EN
NL
DE
Inhalt
Inhalt ........................................................................................................................ 1
Vorwort ....................................................................................................................... 2
1 Ihr Produkt ..................................................................................................... 3
1.1 Zubehör ......................................................................................................... 3
2 Vor der Benutzung ........................................................................................ 4
2.1 Vorgesehene Benutzung ............................................................................... 4
2.2 Allgemeine Sicherheitshinweise .................................................................... 4
2.3 Symbole am Rollstuhl ................................................................................... 5
2.4 Transport ....................................................................................................... 5
2.5 Montage/Demontage ..................................................................................... 8
2.6 Erstbenutzung und Lagerung ........................................................................ 9
3 Benutzung des Rollstuhls .......................................................................... 10
3.1 Erste Fahrt .................................................................................................. 10
3.2 Fahren im Freien ......................................................................................... 11
3.3 Bedienkonsole ............................................................................................ 12
3.4 Bremse und Freilaufhebel ........................................................................... 12
3.5 Transfer in den/aus dem Rollstuhl ............................................................... 13
3.6 Komforteinstellungen .................................................................................. 14
3.7 Rückenlehnenneigung (mit Gasfeder) ......................................................... 14
3.8 Akkustatus und Aufladung ........................................................................... 14
4 Instandhaltung ............................................................................................ 16
4.1 Wartungstermine ......................................................................................... 16
4.2 Wartungshinweise ....................................................................................... 17
4.3 Störungsbeseitigung ................................................................................... 17
4.4 Voraussichtliche Nutzungsdauer ................................................................. 18
4.5 Wiederbenutzung ........................................................................................ 18
4.6 Nutzungsende ............................................................................................. 18
5 Technische Daten ....................................................................................... 19

Turios
2022-01
Vorwort
2
EN
NL
DE
Vorwort
Herzlichen Glückwunsch! Sie sind nun Besitzer eines Vermeiren-Rollstuhls!
Dieser Rollstuhl wurde von versierten und engagierten Mitarbeitern gefertigt. Es entspricht
hinsichtlich Konstruktion und Fertigung den hohen Qualitätsstandards von Vermeiren.
Vielen Dank für Ihr Vertrauen in Produkte von Vermeiren. Dieses Handbuch soll Ihnen bei der
Benutzung dieses Rollstuhls und seiner Bedienmöglichkeiten helfen. Lesen Sie es daher bitte
aufmerksam durch, um sich mit der Bedienung, den Fähigkeiten und Beschränkungen Ihres
Rollstuhls vertraut zu machen.
Sollten Sie nach der Lektüre dieses Handbuchs noch Fragen haben, können Sie sich jederzeit
an Ihren Fachhändler wenden. Er wird Ihnen gerne in dieser Angelegenheit weiterhelfen.
Wichtiger Hinweis
Um Ihre Sicherheit zu gewährleisten und die Nutzungsdauer Ihres Produkts zu verlängern, sollten
Sie es gut behandeln und regelmäßig überprüfen und/oder warten lassen.
Dieses Handbuch enthält die neuesten Produktentwicklungen. Vermeiren behält sich das Recht
vor, Veränderungen an dieser Art von Produkt vorzunehmen, ohne eine Verpflichtung
einzugehen, ähnliche bereits ausgelieferte Produkte anzupassen oder auszutauschen.
Die Abbildungen dienen zur Verdeutlichung der Anweisungen in diesem Handbuch. Das gezeigte
Produkt kann in Details von Ihrem Produkt abweichen.
Verfügbare Informationen
Auf unserer Webseite http://www.vermeiren.com/ finden Sie stets die aktuellste Version der
folgenden Informationen. Informieren Sie sich bitte regelmäßig auf dieser Website nach eventuell
verfügbaren Aktualisierungen.
Sehbehinderte Menschen können sich die elektronische Version dieses Handbuchs
herunterladen und mit Hilfe einer Sprachsyntheselösung („Text-to-Speech-Software“) vorlesen
lassen.
Dieses Benutzerhandbuch
Für Benutzer und Fachhändler
Benutzerhandbuch für Bedienkonsole und Akkuladegerät
Für Benutzer und Fachhändler
Montageanleitung (Hinweise zur Feineinstellung und (De)Montage)
Für Fachhändler
Wartungshandbuch für Rollstühle
Für Fachhändler
EG-Konformitätserklärung

Turios
2022-01
Ihr Produkt
3
EN
NL
DE
1 Ihr Produkt
1. Rückenlehne
2. Bedienkonsole
3. Armlehne
4. Sitz
5. Fußstütze
6. Fußplatte
7. Sicherheitsgurt
8. Akkugehäuse
9. Vorderräder
10. Antriebsmotoren
11. Hinterräder/Antriebsräder
12. Frontlicht (optional)
13. Typenschild
1.1 Zubehör
Folgende Zubehörkomponenten sind für den elektrischen Rollstuhl Turios erhältlich:
• Beinstütze (BZ7, BZ8)
• Kopfstütze (L55, L58)
• Beleuchtung
• Gehstockhalter
• Getränkehalter
• Spiegel
• Schwenkbare Bedienkonsole
• Utensilienbox
1
2
3
4
5
6
7
8
9
10
11
12
14

Turios
2022-01
Vor der Benutzung
4
EN
NL
DE
2 Vor der Benutzung
2.1 Vorgesehene Benutzung
Dieser Abschnitt enthält eine kurze Beschreibung der vorgesehenen Benutzung Ihres Rollstuhls.
Darüber hinaus enthalten die Anweisungen in den anderen Abschnitten zusätzliche
Warnhinweise. Auf diese Weise wollen wir Sie auf die Möglichkeit einer unsachgemäßen
Benutzung hinweisen.
• Dieser Rollstuhl ist für den Innen- und Außenbereich geeignet.
• Er ist ausschließlich dafür konzipiert und gefertigt, eine (1) Person mit einem Gewicht von
maximal 130kg zu transportieren. Er ist nicht dafür vorgesehen, Sachen oder Objekte zu
transportieren oder zu anderen Zwecken als zuvor beschrieben benutzt zu werden.
• Dieser Rollstuhl kann vom darin sitzenden Benutzer bedient oder von einer Begleitperson
geschoben werden. Sie dürfen diesen Rollstuhl NICHT benutzen, wenn Sie unter seelischen
oder körperlichen Beeinträchtigungen leiden, die Sie oder andere Personen beim Fahren des
Rollstuhls in Gefahr bringen könnten. Suchen Sie daher bitte zunächst Ihren Arzt auf und
stellen Sie sicher, dass Ihr Fachhändler über dessen Rat informiert ist.
• Verwenden Sie ausschließlich von Vermeiren genehmigte Zubehör- oder Ersatzteile.
• Sehen Sie sich auch die technischen Daten und die Einschränkungen Ihres Rollstuhls in
Abschnitt 5 an.
• Die Garantie für dieses Produkt beruht auf dessen normaler Benutzung und Wartung wie in
diesem Handbuch beschrieben. Schäden an Ihrem Produkt, die auf unsachgemäße Benutzung
oder mangelnde Wartung zurückzuführen sind, führen zum Erlöschen der Garantie.
2.2 Allgemeine Sicherheitshinweise
Gefahr von Personen- und/oder Sachschäden
Bitte lesen und befolgen Sie die Anweisungen in dieser Bedienungsanleitung, da andernfalls
Verletzungsgefahr besteht oder Ihr Rollstuhl beschädigt werden könnte.
Beachten Sie bei der Benutzung die folgenden allgemeinen Warnhinweise:
• Benutzen Sie Ihren Rollstuhl nicht, wenn Sie unter dem Einfluss von Alkohol, Medikamenten
oder anderen Substanzen stehen, die Ihre Fahrtüchtigkeit beeinträchtigen könnten.
• Beachten Sie, dass einige Komponenten Ihres Rollstuhls durch Einflüsse wie
Umgebungstemperatur, Sonneneinstrahlung, Heizvorrichtungen oder Motorbetrieb sehr heiß
oder kalt werden können. Seien Sie daher vorsichtig beim Berühren. Tragen Sie bei kaltem
Wetter Schutzbekleidung. Warten Sie nach der Benutzung, bis sich der Rollstuhl/Motor
abgekühlt hat.
• Achten Sie vor dem Einschalten des Rollstuhls darauf, in welcher Umgebung/Situation Sie
sich befinden. Stellen Sie Ihre Geschwindigkeit entsprechend ein, bevor Sie losfahren. Wir
empfehlen, beim Fahren in Innenräumen die langsamste Geschwindigkeitseinstellung zu
wählen. Beim Fahren im Freien können Sie eine Geschwindigkeit wählen, bei der Sie sich
wohl und sicher fühlen.
• Beachten Sie STETS, dass Ihr Rollstuhl bei entladenem Akku oder zur Vermeidung etwaiger
Schäden am Rollstuhl plötzlich anhalten kann. Überprüfen Sie auch die in Abschnitt 4.3
genannten Ursachen. Benutzen Sie den Sicherheitsgurt, um Verletzungen zu vermeiden.
• Ihr Rollstuhl wurde auf elektromagnetische Verträglichkeit geprüft und erfüllt die
entsprechende Norm (siehe Abschnitt 5). Dennoch können Quellen elektromagnetischer
Felder wie Mobiltelefone, Stromgeneratoren oder Energiequellen mit hoher Leistung die
Fahrleistung Ihres Rollstuhls beeinträchtigen. Andererseits kann auch die Elektronik Ihres
Rollstuhls Einfluss auf andere elektronische Geräte wie Alarmanlagen in Geschäften und
VORSICHT

Turios
2022-01
Vor der Benutzung
5
EN
NL
DE
Automatiktüren haben. Wir empfehlen daher, Ihren Rollstuhl regelmäßig auf Beschädigungen
und Verschleiß zu überprüfen, weil dadurch solche Störeinwirkungen verstärkt werden
können (siehe auch Abschnitt 4).
• Fahren Sie nur auf ebenen Flächen, so dass sich beide Antriebsräder auf dem Boden
befinden und ausreichend Kontakt für einen sicheren Betrieb des Rollstuhls haben.
• Ohne vorherige Rücksprache mit dem Hersteller sollten Fixierungspunkte oder Struktur- und
Rahmenteile oder -komponenten des Rollstuhls weder verändert noch ersetzt werden.
• Achten Sie während des Betriebs darauf, dass Finger, Kleidung, Gürtel, Schnallen oder
Schmuck nicht von den Rädern oder anderen beweglichen Teilen erfasst werden.
Bitte beachten sie, dass Ihr Rollstuhl je nach den verwendeten Einstellungen einige Arten von
Diebstahlsicherungssystemen beeinträchtigen kann. Dies kann dazu führen, dass der
Sicherungsalarm des Shops ausgelöst wird.
Sollte sich ein schwerwiegender Zwischenfall mit Ihrem Produkt ereignet haben, benachrichtigen
Sie Vermeiren oder Ihren Fachhändler sowie die zuständige Behörde in Ihrem Land.
2.3 Symbole am Rollstuhl
Die nachstehend aufgeführten Symbole gelten für Ihren Rollstuhl. Symbole sind in der
entsprechenden ISO-Norm (ISO 7000, ISO 7001 und IEC 417) zu finden.
Maximalgewicht des Benutzers (in kg)
Außen/Innenbenutzung (ohne Akkuladegerät)
Nur Innenbenutzung (nur Akkuladegerät)
Maximale Neigungssicherheit in ° (Grad).
Höchstgeschwindigkeit
Typbezeichnung
Klemmgefahr
2.4 Transport
Beschädigungsgefahr
Treffen Sie Vorkehrungen, um den Rollstuhl vor Transportschäden zu schützen.
2.4.1 Beiseiteschaffen
Benutzen Sie die Bedienkonsole, um den Rollstuhl an den gewünschten Stellplatz zu bewegen.
Alternativ bringen Sie den Rollstuhl in den Freilaufmodus (siehe Abschnitt 3.4) und benutzen den
Schiebebügel.
VORSICHT

Turios
2022-01
Vor der Benutzung
6
EN
NL
DE
2.4.2 Transport im Flugzeug
Da der Rollstuhl auslaufsichere AGM-Akkus hat, ist es möglich, ihn (komplett) in einem Flugzeug
zu transportieren. Wenden Sie sich vor der Buchung eines Fluges an die Fluggesellschaft, um
sich über die korrekte Verfahrensweisen zu informieren. Bevor Sie Ihren Rollstuhl dem
Flughafenpersonal übergeben, unterbrechen Sie die Akkuversorgung des Rollstuhls (siehe
Montageanleitung).
2.4.3 Transport in einem Fahrzeug (als Gepäck)
Die beste Art, Ihren elektrischen Rollstuhl zu transportieren, besteht darin, ihn mit Hilfe von
Rampen in das Fahrzeug zu fahren. Falls Sie ungeübt im Befahren von Rampen sind, können
Sie den Rollstuhl in den neutralen Modus bringen und ihn dann über die Rampen ins Fahrzeug
schieben. Demontieren Sie den Rollstuhl gegebenenfalls.
1. Als Rollstuhlfahrer auf einen Fahrzeugsitz umsteigen (siehe Abschnitt 3.5).
2. Entfernen Sie vor einem Transport alle beweglichen Teile (Fußstützen, Armlehnen usw.).
3. Legen Sie die beweglichen Teile sicher hinter dem Fahrzeugsitz oder im Kofferraum ab.
4. Fahren oder schieben Sie den elektrischen Rollstuhl über Rampen ins Fahrzeug oder heben
Sie ihn mit Hilfe von zwei Personen hinein, indem Sie an den festen Rahmenteilen anfassen.
5. Verzurren Sie die festen Teile des Rahmens sicher am Fahrzeug.
6. Bringen Sie den Rollstuhl in den Fahrmodus (Feststellbremsen betätigen) und kontrollieren
Sie, ob die Bedienkonsole ausgeschaltet ist.
2.4.4 Transport mit einem Fahrzeug, als Sitz für den Benutzer
Der Rollstuhl hat den Crashtest gemäß ISO 7176-19: 2008 bestanden und ist somit
konstruiert und geprüft, um als nach vorne gerichteter Sitz in einem Kraftfahrzeug
verwendet werden zu können. Der Rollstuhl wurde dynamisch mit der ATD
(anthropomorphen Testvorrichtung) unter Verwendung eines Vier-Punkte-
Rollstuhlrückhaltesystems und eines Drei-Punkte-Personenrückhaltesystems geprüft.
Dennoch sollte der Benutzer vorzugsweise auf einen der Sitze im Fahrzeug transferriert
werden und das Rückhaltesystems des Fahrzeugs verwendet werden. Der Rollstuhl sollte
als Gepäckstück in einem separaten Gepäckraum aufbewahrt werden, siehe § 2.4.3.
Gefahr von Personen- oder Sachschäden
Benutzen Sie den Beckengurt des Rollstuhls und den zugehörigen Drei-Punkte-Gurt im
Fahrzeug, um zu verhindern, dass der Insasse mit seinem Kopf oder Brustkorb gegen
Fahrzeugteile prallt.
Verwenden Sie keine Haltungsstützen, um den Benutzer in dem Fahrzeug zurückzuhalten,
es sei denn, sie entsprechen den in der ISO 7176-19:2008 spezifizierten Anforderungen.
Wenn das Fahrzeug in einen Unfall verwickelt war, lassen Sie Ihren Rollstuhl durch den
Fachhändler oder den Vertreter des Herstellers überprüfen, bevor Sie ihn wieder benutzen.
Sichern des Rollstuhls
1. Stellen Sie sicher, dass das Fahrzeug mit einem geeigneten Vier-Punkte-
Rollstuhlrückhaltesystem und einem geeigneten Personenrückhaltesystem gemäß ISO
10542 ausgestattet ist und dass beide Systeme nicht ausgefranst, verschmutzt, beschädigt
oder defekt sind.
2. Benutzen Sie die Bedienkonsole, um Ihren Rollstuhl wieder in eine stabile Position zu
bringen, siehe §3.6.
3. Entfernen Sie alle angebrachten Zubehörteile wie Ablagen und Beatmungsgeräte und
verstauen Sie diese an einem sicheren Platz. Falls dies nicht möglich, befestigen Sie sie an
dem Rollstuhl, jedoch von dem Insassen abgewandt und mit einer energieabsorbierenden
Polsterung zwischen Ablage und Benutzer.
WARNUNG

Turios
2022-01
Vor der Benutzung
7
EN
NL
DE
4. Benutzen Sie eine Rampe, um den Rollstuhl (mit Benutzer) gemäß den Anweisungen in
Abschnitt 3.2.1 in das Fahrzeug zu schieben.
5. Positionieren Sie den Benutzer mit dem Gesicht in Fahrtrichtung in der Mitte zwischen den
Befestigungsschienen am Fahrzeugboden.
6. Stellen Sie sicher, dass der Benutzer möglichst aufrecht sitzt. Wenn der Zustand des
Benutzers dies nicht zulässt, führen Sie eine Risikobeurteilung durch, um die Sicherheit des
Benutzers während des Transports zu beurteilen.
7. Schalten Sie die Bedienkonsole AUS und stellen Sie sicher, dass sich der Freilaufhebel in
Bremsposition befindet, siehe §3.4.
8. Die einzelnen Sicherungspunkte am Rollstuhl sind mit folgendem Symbol
gekennzeichnet:
9. Überprüfen Sie, dass das Rückhaltegurtsystem mit den Sicherungspunkten am Rollstuhl
kompatibel ist.
10. Befestigen Sie die vorderen Sicherungsgurthaken entsprechend den Anweisungen des
Gurtsystem-Herstellers an den Sicherungspunkten (A) des Rollstuhls.
11. Drehen Sie den Freilaufhebel in die Freilaufstellung und schieben Sie den Rollstuhl nach
hinten, um die vorderen Gurte zu spannen, siehe §3.4.
12. Befestigen Sie die hinteren Sicherungsgurthaken auf die gleiche Weise an den hinteren
Sicherungspunkten (B).
13. Drehen Sie den Freilaufhebel zurück in die Bremsposition, siehe §3.4.
Sichern des Benutzers
1. Legen Sie den Beckengurt des Rollstuhls an.
2. Legen Sie die Benutzerrückhaltegurte des Fahrzeugs
entsprechend die Anweisungen des Gurtsystem-
Herstellers an.
Führen Sie den Beckengurt vorne über das Becken,
sodass sich der Winkel des Beckengurts im
bevorzugten Bereich von 30° bis 75° zur Horizontalen
befindet, wie in der Abbildung dargestellt.
Ein steilerer (größer) Winkel im bevorzugten Bereich
ist wünschenswert.
B
A

Turios
2022-01
Vor der Benutzung
8
EN
NL
DE
3. Spannen Sie den Gurt entsprechend den Anweisungen des Gurtsystem-Herstellers und
achten Sie dabei auf den Komfort des Benutzers.
4. Stellen Sie sicher, dass der Rückhaltegurt geradlinig mit dem Ankerpunkt im Fahrzeug
verbunden wird und keine Knicke im Gurt zu sehen sind, zum Beispiel bei der Achse des
Hinterrads.
5. Positionieren Sie das Gurtschloss so, dass der Freigabeknopf bei einem Unfall nicht durch
Rollstuhlteile berührt werden kann.
6. Achten Sie darauf, dass die Gurte nicht verdreht sind oder vom Körper ferngehalten werden,
wie in Abbildung 1 gezeigt.
7. Achten Sie darauf, dass die Schultergurte über den Schultern liegen, siehe Abbildung 2.
Die Gurte dürfen nicht durch
Rollstuhlteile wie Armstützen oder
Räder von dem Körper ferngehalten
werden.
Die Gurte müssen vollen Kontakt mit
Schulter, Brustkorb und Becken haben.
Beckengurt im unteren Beckenbereich
nahe dem Übergang zwischen Bauch
und Oberschenkel.
2.5 Montage/Demontage
Verletzungsgefahr
• Achten Sie bei der De/Montage darauf, dass Finger, Kleidung oder Schnallen nicht von
beweglichen Teilen erfasst werden.
Ihr Händler liefert den Rollstuhl vollständig montiert und erklärt Ihnen die verschiedenen
Bedienelemente und deren Benutzung. Außerdem stellen wir eine ausführliche Erläuterung der
verschiedenen Teile für Transportzwecke bereit.
Montage des elektrischen Rollstuhls:
1. Bringen Sie die Armlehnen an (Abschnitt 2.5.1).
2. Bringen Sie die Fußstützen an (Abschnitt 2.5.2).
Um den elektrischen Rollstuhl zu demontieren, führen Sie die Anweisungen oben in umgekehrter
Reihenfolge aus.
VORSICHT
✓

Turios
2022-01
Vor der Benutzung
9
EN
NL
DE
2.5.1 Montieren oder Demontieren der Armlehne
Gefahr von Personen- und/oder Sachschäden
• Kontrollieren Sie, ob die Armpolster auf beiden Seiten dieselbe Höhe haben.
Bringen Sie die Armlehne (1) an, indem Sie die Vierkantstange (2) in
den Rahmen (3) schieben.
Um die Armlehne (1) zu entfernen, ziehen sie nach oben aus dem
Sitzrahmen heraus.
2.5.2 Montieren oder Demontieren der Fußstütze
Montieren
1. Halten Sie die Fußstütze (4) seitlich und hängen Sie sie in die
Fußstützenhalterung (5) ein.
2. Schwenken Sie die Fußstütze nach innen, bis sie einrastet.
Demontieren
1. Ziehen Sie am Fußstützenhebel (6) und schwenken Sie die Fußstütze
(4) nach außen.
2. Heben Sie die Fußstütze nach oben ab.
2.6 Erstbenutzung und Lagerung
Gefahr eines Akkuschadens
• Achten Sie darauf, den Akku niemals vollständig zu entladen.
• Unterbrechen Sie den Ladezyklus nicht und trennen Sie das Ladegerät erst ab, wenn der Akku
vollständig aufgeladen ist.
• Achten Sie darauf, dass Ihr Rollstuhl trocken untergebracht ist, um zu verhindern, dass sich
Schimmel bildet und die Polsterung beschädigt wird.
• Informieren Sie sich über die technischen Details der Lagerung (siehe Abschnitt 5).
Achten Sie darauf, dass der Akku vollständig aufgeladen ist, bevor Sie Ihren Rollstuhl benutzen.
Erkundigen Sie sich bei Ihrem Händler, ob dies bereits geschehen ist oder nicht. Befolgen Sie
zum Aufladen die Anweisungen in Abschnitt 3.8.
VORSICHT
VORSICHT
1
2
3
4
5
6

Turios
2022-01
Benutzung des Rollstuhls
10
EN
NL
DE
3 Benutzung des Rollstuhls
Verletzungsgefahr
• Lesen Sie bitte zunächst die vorhergehenden Abschnitte, um sich über die
Benutzungsbedingungen zu informieren. Benutzen Sie den Rollstuhl NICHT, bevor Sie alle
Anweisungen aufmerksam gelesen und vollständig verstanden haben.
• Lesen Sie auch die Anweisungen im Handbuch zur Bedienkonsole und zum Ladegerät!
• Bei Zweifeln oder Fragen wenden Sie sich bitte zwecks Hilfe an Ihren Fachhändler,
Pflegedienst oder Fachberater.
3.1 Erste Fahrt
Gefahr von Personen- oder Sachschäden
• Berücksichtigen Sie stets den Schwenkbereich der Fußstütze und der Bedienkonsole, um
keine Passanten zu verletzen oder Gegenstände zu beschädigen.
• Trennen Sie immer das Ladegerät vom Rollstuhl ab, bevor Sie losfahren.
• Stellen Sie sicher, dass Sie mit dem Betrieb Ihres Rollstuhls vertraut sind, bevor Sie ihn
an überfüllten und damit möglicherweise gefährlichen Orten benutzen. Üben Sie
zunächst in einem weiträumigen, freien Bereich mit wenigen Passanten.
• Erkunden Sie, wie sich eine Schwerpunktverlagerung auf das Fahrverhalten des
Rollstuhls auswirkt, indem Sie beispielsweise Steigungen hinauf- und herunterfahren,
Schrägpassagen befahren oder Hindernisse überwinden. Lassen Sie sich hierbei von
einem Assistenten helfen.
• Während des Betriebs kann die Oberfläche der Bedienkonsole etwas warm werden.
• Beim Rückwärtsfahren ist die Geschwindigkeit reduziert.
1. Stellen Sie sicher, dass
• der Rollstuhl auf einer ebenen Fläche steht
• der Akku vollständig aufgeladen ist (siehe Abschnitt 3.8)
• der Motor angekoppelt ist (siehe Abschnitt 3.4)
• die Reifen den korrekten Luftdruck haben (siehe Abschnitt 4.2.1)
• der Rollstuhl auf Ihre Erfordernisse und Komfortwünsche abgestimmt ist (siehe Abschnitt
3.6)
• Sie die korrekte Sitzposition eingenommen haben (siehe Abschnitt 3.5)
2. Befolgen Sie die Anweisungen im Handbuch zur Bedienkonsole.
3. Schalten Sie den Rollstuhl ein.
4. Stellen Sie die Geschwindigkeitssteuerung auf die geringste Geschwindigkeit ein.
5. Üben Sie, wie man fährt und Einstellungen am Rollstuhl vornimmt.
6. Sobald Sie sich sicher genug fühlen, können Sie dies bei höherer Geschwindigkeit
wiederholen.
7. Versuchen Sie nun, vorwärts und rückwärts um die Kurve zu fahren. Wiederholen Sie dies
einige Male.
8. Achten Sie darauf, dass Ihr Rollstuhl stabil steht, wenn Sie anhalten.
9. Schalten Sie den Rollstuhl aus.
WARNUNG
VORSICHT

Turios
2022-01
Benutzung des Rollstuhls
11
EN
NL
DE
3.2 Fahren im Freien
Unfallgefahr – Passen Sie Ihr Fahrverhalten und Ihre Geschwindigkeit
entsprechend an.
• Halten Sie sich an die jeweils geltenden Straßenverkehrsvorschriften. Dies gilt für das
Befahren von Gehwegen sowie unbefestigten oder befestigten Straßen.
• Fahren Sie nicht auf Straßen mit starkem Verkehrsaufkommen.
• Berücksichtigen die jeweiligen Witterungsbedingungen. Vermeiden Sie es, bei feuchtem
Wetter, extremer Hitze, Schnee, Glatteis, Minustemperaturen zu fahren (siehe technische
Daten in Abschnitt 5).
• Auch mit eingeschalteter Beleuchtung ist der Rollstuhl nicht für Fahrten auf öffentlichen
Straßen bei schlechter Sicht (Dunkelheit, Nebel, Dämmerung) geeignet. Achten Sie darauf,
dass Sie auch bei Tag stets gut zu sehen sind, indem Sie fluoreszierende Kleidung tragen
und/oder selbst eine Beleuchtung vorn und hinten am Rollstuhl anbringen.
• Achten Sie auf andere Verkehrsteilnehmer, für die Ihr Rollstuhl ein Hindernis sein könnte.
Seien Sie besonders achtsam beim Wenden und beim Rückwärtsfahren. Falls Sie noch nicht
darin versiert sind, rückwärts zu fahren, sollten Sie dies zunächst an einem ruhigen Ort üben.
Zeigen Sie an, wohin Sie fahren wollen, bevor Sie Ihre Fahrtrichtung wechseln.
• Versuchen Sie, enge Passagen gerade zu durchfahren, um nicht steckenzubleiben.
• Berücksichtigen Sie Ihren Bremsweg. Beachten Sie, dass der Bremsweg von Geschwindigkeit,
Oberflächenbeschaffenheit, Wetterbedingungen, Gefälle und Gewicht des Benutzers
abhängig ist.
3.2.1 Befahren von Steigungen/Gefällen, Bordsteinen, Hindernissen oder Rampen
Verletzungsgefahr bei unerwarteter Bewegung
• Legen Sie zu Ihrem eigenen Schutz den Sicherheitsgurt im Rollstuhl an.
• Achten Sie darauf, ob der Weg sandig ist, einen weichen Untergrund, Löcher oder Spalten hat,
in die die Räder geraten könnten und/oder die die Traktion des Antriebsrades verringern
könnten.
• Befahren Sie KEINE Böschungen, Hindernisse, Stufen oder Randsteine, die größer als vom
Hersteller beschrieben sind (siehe technische Daten in Abschnitt 5).
• Fahren Sie immer rechtwinklig an einen Randstein heran.
• Bringen Sie den Rollstuhl an einer Böschung nicht in den Freilaufmodus. Der Rollstuhl könnte
sich in Bewegung setzen und Sie oder Passanten verletzen.
• Benutzen Sie den Rollstuhl nicht auf einer Rolltreppe.
• Benutzen Sie ausschließlich von Vermeiren zugelassene Rampen und überschreiten Sie nie
deren Maximalbelastung.
• Um Hindernisse oder Steigungen sicher zu überwinden, bringen Sie den Rollstuhl in seine
aufrechteste Sitzposition.
Beschädigungsgefahr
• Parken Sie Ihren elektrischen Rollstuhl auf einer ebenen Fläche und so, dass er leicht
zugänglich ist.
• Nehmen Sie ggf. etwas Anlauf, um den Rollstuhl zum Überfahren eines Hindernisses oder
Randsteins zu beschleunigen. Vermeiden Sie es, dass der Rollstuhl stark zurückprallt.
• Stellen Sie sicher, dass der Rollstuhl aufgrund seiner Schräglage nicht den Boden oder die
Rampe berührt.
• Denken Sie daran, dass der Bremsweg auf abschüssigen Passagen erheblich länger als auf
ebenem Grund sein kann.
WARNUNG
VORSICHT
VORSICHT
Wenn Sie an einer Böschung anhalten, wird automatisch die Bremse aktiviert, um zu
verhindern, dass der Rollstuhl vor- oder zurückrollt.

Turios
2022-01
Benutzung des Rollstuhls
12
EN
NL
DE
Vorgehensweise
• Beginnen Sie Ihre Fahrt entsprechend den Anweisungen in Abschnitt 3.1, Schritt 1.
• Benutzen Sie eine Hebevorrichtung oder Rampe, um den Rollstuhl an Treppen/Stufen
hinauf- oder herunterzuschaffen. Sollte dies nicht möglich sein, kann er manuell von
mindestens drei Personen transportiert werden, indem sie ihn mit beiden Händen am
Rahmen ergreifen. Heben Sie den Rollstuhl weder an der Rückenlehne, den Fuß- oder
Armlehnen noch an den Rädern an.
• Bewältigen von Hindernissen oder Steigungen:
1. Bringen Sie den Rollstuhl in eine möglichst stabile Stellung (siehe Abschnitt 3.5).
2. Fahren Sie so langsam wie möglich, um das Hindernis oder die Steigung zu
bewältigen.
3.3 Bedienkonsole
Gefahr von Personen- oder Sachschäden
• Denken Sie daran, dass sich die Stabilität verringert, wenn die Sitzposition im Rollstuhl von
aufrecht zu geneigt verändert wird.
• Achten Sie darauf, dass genügend Platz um den Rollstuhl herum vorhanden ist, um
Rückenlehne und Sitz zu verstellen.
Die Benutzung der Bedienkonsole wird in einem speziellen Benutzerhandbuch beschrieben,
das zum Lieferumfang Ihres Rollstuhls gehört. Sollte dieses Handbuch fehlen, wenden Sie
sich bitte umgehend an Ihren Fachhändler.
Bringen Sie den Joystick in die Neutral(Mittel)stellung, bevor Sie die EIN/AUS-Taste
betätigen. Andernfalls wird die Elektronik gesperrt. Um diese Sperre aufzuheben, schalten
Sie die Bedienkonsole aus und dann wieder ein.
Technische Schutzvorkehrungen
Mit der Bedienkonsole können Sie sowohl sämtliche Fahrkomponenten als auch die Stellmotoren
zum Anpassen der Sitzposition steuern. Zu Ihrer eigenen Sicherheit und zur Vermeidung von
Schäden am Rollstuhl werden die Bewegungen von der Elektronik überwacht. Dies kann dazu
führen, dass die Bewegung blockiert, die Geschwindigkeit verringert oder die Fahrt komplett
gestoppt wird. Weitergehende Informationen entnehmen Sie bitte dem Benutzerhandbuch zur
Bedienkonsole.
Um zu verhindern, dass der Akku versehentlich entladen wird, hat Ihr Rollstuhl ein automatisches
Abschaltsystem. Dieses System schaltet die Bedienkonsole automatisch aus, wenn sie eine Zeit
lang nicht benutzt wird. In einem solchen Fall schalten Sie die Konsole einfach wieder ein.
3.4 Bremse und Freilaufhebel
Gefahr von Personen- oder Sachschäden
• Betätigen Sie den Freilaufhebel nur, wenn Ihr Rollstuhl AUS ist! Der Freilaufhebel sollte von
einem Assistenten bedient werden. Betätigen Sie den Freilaufhebel NIEMALS, wenn Sie Ihre
Sitzposition eingenommen haben.
• Benutzen Sie den Freilaufmodus niemals an Steigungen oder Gefällen (siehe Symbol
am Motor):
Achten Sie darauf, dass sich der Freilaufhebel in der Bremsstellung befindet, BEVOR Sie
den Rollstuhl einschalten. Die elektromagnetischen Bremsen funktionieren NICHT, wenn
sich der Rollstuhl im Freilaufmodus befindet. Dies wird auf der Bedienkonsole angezeigt.
Fahren ist dann nicht möglich.
VORSICHT
VORSICHT

Turios
2022-01
Benutzung des Rollstuhls
13
EN
NL
DE
Ihr Rollstuhl hat elektromagnetische Bremsen. Die Funktionsweise der Bremsen ist von der
Stellung des Freilaufhebels (1) abhängig.
Diese Bremsen funktionieren automatisch, jedoch nur, wenn sich der Freilaufhebel (1) in der
Bremsstellung befindet. In folgenden Fällen wird Bremse aktiviert:
• der Rollstuhl ist AUS
• der Rollstuhl ist AN und der
Joystick wird losgelassen
Wenn der Joystick losgelassen wird,
stoppt der Rollstuhl langsam und die
Bremsen werden aktiviert.
Bedienung des Freilaufhebels:
• Drehen Sie die Hebel nach hinten,
um den Rollstuhl in den
Freilaufmodus zu bringen. Der
Motor ist nun abgetrennt. Der
Rollstuhl kann manuell bewegt
werden.
• Drehen Sie die Hebel nach innen,
um Motor und Antrieb zu koppeln.
Dies sollte erfolgen, bevor der
Rollstuhl gestartet wird.
3.5 Transfer in den/aus dem Rollstuhl
Gefahr von Personen- oder Sachschäden
• Falls Sie den Vorgang allein nicht sicher bewältigen können, bitten Sie jemanden um Hilfe.
• Stellen Sie sich beim Umsetzen in den oder aus dem Rollstuhl nicht auf die Fußplatten.
Transfer
1. Stellen Sie den Rollstuhl möglichst dicht neben sich, wenn Sie in einem Sessel, auf einem
Sofa, Stuhl oder Bett sitzen.
2. Ziehen Sie die Bremsen an, indem Sie den Freilaufhebel in die Bremsstellung bringen (siehe
Abschnitt 3.4).
3. Klappen Sie die Fußplatte(n) nach unten, um sich nicht auf sie zu stellen.
4. Klappen Sie ggf. eine Armlehne zurück, um mehr Platz zu haben (siehe Abschnitt 2.5.1).
5. Bewegen Sie sich aus eigener Kraft mit den Armen oder mit Hilfe von Dritten in den Rollstuhl
hinein oder aus ihm heraus.
Sitzen im Rollstuhl
1. Setzen Sie sich so hin, dass Ihr unterer Lendenbereich an der Rückenlehne anliegt
2. Klappen Sie die Fußplatte(n) wieder herunter und stellen Sie Ihre Füße darauf.
3. Klappen Sie die Armlehne ggf. wieder herunter.
4. Achten Sie darauf, dass Ihre Oberschenkel horizontal sind und Ihre Füße eine bequeme
Stellung haben. Nehmen Sie ggf. Anpassungen vor.
5. Achten Sie darauf, dass Ihre Arme gebeugt sind und bequem auf den Armpolstern aufliegen.
Nehmen Sie ggf. Anpassungen vor.
Herstellen einer stabilen Position
Wenn der Rollstuhl transportiert werden soll oder Sie Hindernisse damit bewältigen wollen, muss
er seine maximale Stabilität haben:
• Rückenlehne aufrecht
• Fußplatte hochgeklappt
VORSICHT
Neutral
Fahren
1
1

Turios
2022-01
Benutzung des Rollstuhls
14
EN
NL
DE
3.6 Komforteinstellungen
Gefahr von Personen- oder Sachschäden
• Die nachstehenden Komforteinstellungen können von einer Begleit- oder Pflegeperson
vorgenommen werden. Alle sonstigen Einstellungen sind vom Fachhändler gemäß den
Montageanweisungen vorzunehmen (siehe Vorwort).
• Achten Sie bei Einstellungen am Rollstuhl darauf, dass Finger, Kleidung oder Schnallen nicht
von beweglichen Teilen erfasst werden.
3.6.1 Rückenlehnenneigung (manuelle Einstellung)
1. Ziehen Sie am Gurt unten an der Rückenlehne, um den Mechanismus zu entriegeln.
2. Bringen Sie die Rückenlehne in die gewünschte Stellung (0 °-32 °, 4 Schritte von 8 °).
3. Lassen Sie den Gurt wieder los. Achten Sie darauf, dass die Rückenlehne sicher arretiert ist.
3.7 Rückenlehnenneigung (mit Gasfeder)
Die Rückenlehnenneigung mit Gasdruckfeder wird mit einem Hebel bedient. Je nachdem, welche
Konfiguration Sie bei der Bestellung gewählt haben, befindet sich der Hebel an der Rückenlehne
oder an der rechten Seite des Sitzes.
1. Ziehen Sie den Hebel.
2. Ziehen/schieben Sie die Rückenlehne in die gewünschte Position.
3. Lassen Sie den Hebel los. Stellen Sie sicher, dass die Rückenlehne gut fixiert ist.
3.8 Akkustatus und Aufladung
Gefahr von Personen- und Sachschäden durch Feuer
• Benutzen Sie ausschließlich das zum Lieferumfang des Rollstuhls gehörende Ladegerät. Die
Benutzung eines anderen Ladegeräts kann mit Gefahren verbunden sein (Brandgefahr).
• Das Ladegerät ist nur dafür vorgesehen, die mit dem Rollstuhl mitgelieferten Akkus
aufzuladen, keine anderen Akkus.
• Nehmen Sie keine Veränderungen an mitgelieferten Teilen wie Kabel, Stecker oder dem
Ladegerät vor. Der Akku oder die Anschlusskontakte dürfen darf keinesfalls geöffnet oder
verändert werden.
• Schützen Sie den Akku und das Ladegerät vor offenem Feuer, hohen und niedrigen
Temperaturen (siehe Abschnitt 5), Feuchtigkeit, Sonneneinstrahlung und starken
Erschütterungen (z. B. Sturz). Benutzen Sie den Akku NICHT, wenn eine dieser Bedingungen
vorliegt.
• Laden Sie den Akku mit Hilfe des Ladegeräts in einem gut belüfteten Gebäudebereich
außerhalb der Reichweite von Kindern auf.
• Lesen Sie zunächst die Gebrauchsanweisung des mitgelieferten Ladegeräts, bevor Sie den
Akku des Rollstuhls aufladen. Für weitergehende Informationen wenden Sie sich bitte an Ihren
Fachhändler oder besuchen unsere Website http://www.vermeiren.com/
Beschädigungsgefahr
• Der Akku wird durch Selbstentladung und den Ruhestrom der angeschlossenen Verbraucher
allmählich entladen. Der Akku kann irreversibel beschädigt werden, wenn er vollständig
entladen wird. Achten Sie deshalb darauf, den Akku rechtzeitig wieder aufzuladen (siehe
Handbuch zur Bedienkonsole).
• Lesen Sie die Lagerungs- und Wartungsanweisungen in Abschnitt 4 und die technischen
Details in Abschnitt 5.
VORSICHT
WARNUNG
VORSICHT

Turios
2022-01
Benutzung des Rollstuhls
15
EN
NL
DE
• Trennen Sie das Ladegerät erst ab, wenn der Akku vollständig
aufgeladen ist; siehe folgende Symbole auf dem Ladegerät:
• Laden Sie Akkus nie unter 0°C auf. Bringen Sie den Akku an einen
wärmeren Ort und starten Sie den Aufladevorgang.
• Halten Sie die Anschlusskontakte des Ladegeräts frei von Staub und
anderen Verunreinigungen.
• Sollte sich der Akku nicht gemäß den nachstehenden Anweisungen
aufladen lassen, wenden Sie sich bitte an Ihren Fachhändler.
• Hinweise zum Wechseln der Akkus enthält die Montageanleitung.
Informationen über die Akkustatusanzeige entnehmen Sie bitte dem Handbuch zur
Bedienkonsole.
Das Akkuladegerät sollte von der Netzstromversorgung abgetrennt werden, wenn es nicht
benutzt wird. Dies verhindert einen unnötigen Energieverbrauch.
So laden Sie den Akku auf:
1. Schließen Sie ZUERST das Akku-Ladegerät an eine Steckdose mit 230 V Wechselstrom an.
Schließen Sie das Ladegerät direkt – ohne Verlängerungskabel – an der
Netzstromversorgung an (ohne Zeitschalter).
2. Schließen Sie das Netzteil am Ladeanschluss der Bedienkonsole an.
3. Warten Sie, bis der Akku vollständig aufgeladen ist. Weitergehende Hinweise entnehmen Sie
bitte dem Handbuch zum Ladegerät.
4. Trennen Sie das Ladegerät ab
5. Trennen Sie das Ladegerät von der Steckdose ab, lassen Sie es abkühlen, und lagern Sie
es dann in der Schutzhülle.

Turios
2022-01
Instandhaltung
16
EN
NL
DE
4 Instandhaltung
4.1 Wartungstermine
Gefahr von Personen- oder Sachschäden
Reparaturen und Erneuerungen dürfen nur von geschultem Personal und mit Original-
Ersatzteilen von Vermeiren durchgeführt werden.
Auf der letzten Seite dieses Handbuchs befindet sich ein Registrierungsformular, auf dem
der Fachhändler jeden Service dokumentieren kann.
Die Wartungshäufigkeit hängt von der Häufigkeit und Intensität der Nutzung ab. Wenden Sie sich
an Ihren Händler, um einen allgemeinen Zeitplan für Inspektion/Wartung/Reparatur zu
vereinbaren.
Lesen Sie in der Bedienungsanleitung für das mitgelieferte Akkuladegerät die Wartungshinweise.
Bezüglich des Wartungshandbuchs besuchen Sie die Vermeiren-Website: www.vermeiren.com.
Vor jeder Benutzung
Kontrollieren Sie folgende Punkte:
• Alle Teile: vorhanden und nicht beschädigt oder verschlissen.
• Alle Teile: sauber (siehe Abschnitt 4.2.2)
• Räder, Sitz, Armlehnen, Fußstützen und Kopfstütze (sofern vorhanden): sicher fixiert.
• Akkustatus: laden Sie den Akku ggf. auf (siehe Abschnitt 3.8)
• Bedienkonsole, Akku, Antriebsmodul, Motoren, Ladegerät, Leuchten und relevante Kabel:
keine Beschädigungen (z. B. durchgescheuerte, gebrochene oder freiliegende Kabel).
• Zustand der Räder/Reifen (siehe Abschnitt 4.2.1).
• Zustand der Rahmenteile: keine Deformation, Instabilität, Schwachstelle oder lose
Verbindungen
• Sitz, Rückenlehne, Armpolster, Wadenpolster und Kopfstütze (sofern vorhanden): kein
übermäßiger Verschleiß (wie Eindellungen, Beschädigungen oder Risse)
Wenden Sie sich wegen etwaiger Reparaturen oder Ersatzteilen an Ihren Fachhändler.
Monatlich
Falls Ihr Rollstuhl längere Zeit lang nicht benutzt wird, sollten Sie dennoch den Akku einmal pro
Monat aufladen. Während dieser Phase kann das Ladegerät auch am Akku und an der Steckdose
angeschlossen bleiben. Für weitergehende Informationen siehe Abschnitt 3.8.
Jährlich oder häufiger
Lassen Sie Ihren Rollstuhl mindestens einmal pro Jahr oder häufiger von Ihrem Fachhändler
inspizieren und warten. Die minimale Wartungshäufigkeit ist von der Benutzung abhängig und
sollte daher zusammen mit Ihrem Fachhändler abgesprochen werden.
Bei Lagerung
Achten Sie darauf, dass Ihr Rollstuhl trocken untergebracht ist, um zu verhindern, dass sich
Schimmel bildet oder die Polsterung beschädigt wird.
VORSICHT

Turios
2022-01
Instandhaltung
17
EN
NL
DE
4.2 Wartungshinweise
4.2.1 Räder und Reifen
Die korrekte Funktionsweise der Bremsen ist vom Zustand der Reifen abhängig und kann
sich infolge von Verschleiß und Verunreinigung (Wasser, Öl, Matsch usw.) verändern.
• Achten Sie darauf, dass keine Drähte, Haare, Sand oder Teppichfasern an den Rädern
anhaften.
• Überprüfen Sie regelmäßig das Reifenprofil. Wenn die Profiltiefe weniger als 1 mm beträgt,
muss der Reifen ausgetauscht werden. Wenden Sie sich hierzu an Ihren Fachhändler.
• Pumpen Sie den Reifen mit dem korrekten Druck auf (siehe Angabe auf dem Reifen).
• Hinweise zum Wechseln der Akkus enthält die Montageanleitung.
4.2.2 Reinigung
Beschädigungsgefahr durch Feuchtigkeit
• Halten Sie die Bedienkonsole sauber und schützen Sie sie vor Wasser und Regen.
• Benutzen Sie keinesfalls einen Wasserschlauch oder Hochdruckreiniger, um den Rollstuhl zu
reinigen.
Wischen Sie alle festen Teile des Rollstuhls mit einem feuchten (nicht durchnässten) Tuch ab.
Benutzen Sie ggf. eine milde Seife, die für Lacke und Kunststoffe geeignet ist.
Die Polsterung kann mit lauwarmem Wasser und einer milden Seife gereinigt werden. Verwenden
Sie keine scheuernden Reinigungsmittel.
Halten Sie die Lüftungsöffnungen des Ladegeräts sauber und frei von Staubansammlungen.
Entfernen Sie vorhanden Staub und reinigen Sie das Gehäuse des Ladegeräts bei Bedarf mit
einem angefeuchteten Tuch.
4.2.3 Desinfektion
Beschädigungsgefahr
Eine Desinfektion darf nur von dafür geschultem Personal durchgeführt werden. Wenden Sie sich
hierfür an Ihren Fachhändler.
4.3 Störungsbeseitigung
Auch bei ordnungsgemäßer Benutzung Ihres Rollstuhls kann ein technisches Problem
auftreten.
In diesem Fall wenden Sie sich bitte an Ihren Fachhändler.
Gefahr von Verletzungen und Schäden am Rollstuhl.
• Versuchen Sie KEINESFALLS, Ihren Rollstuhl selbst zu reparieren.
• Bei Fehlern an der Bedienkonsole müssen Sie sich an Ihren Fachhändler wenden.
Er entscheidet, ob die Konsole neu programmiert werden muss.
Bei einer Störung wird ein Fehlercode an der Bedienkonsole angezeigt.
Eine Übersicht über alle Fehlercodes finden Sie im Handbuch zur Bedienkonsole.
VORSICHT
VORSICHT
WARNUNG

Turios
2022-01
Instandhaltung
18
EN
NL
DE
Die nachstehend genannten Symptome können auf ein ernsthaftes Problem hindeuten. Sie
sollten sich daher stets an Ihren Fachhändler wenden, wenn eine der folgenden Situationen
eintritt:
• Ungewöhnliche Geräusche
• Durchgescheuerte/beschädigte Verkabelung
• Gerissene oder gebrochene Steckverbinder
• Ungleichmäßige Abnutzung an einem der Reifen
• Ruckartige Bewegungen
• Rollstuhl zieht zu einer Seite
• Beschädigte oder gebrochene Radeinheiten
• Rollstuhl lässt sich nicht einschalten (Sicherung durchgebrannt)
• Rollstuhl ist eingeschaltet, bewegt sich aber weder nicht (siehe 3.4)
4.4 Voraussichtliche Nutzungsdauer
Die durchschnittliche Nutzungsdauer Ihres Rollstuhls beträgt 5 Jahre. Je nach
Nutzungshäufigkeit, Betriebsbedingungen und Wartung kann die Nutzungsdauer Ihres Rollstuhls
länger oder kürzer sein.
4.5 Wiederbenutzung
Lassen Sie den Rollstuhl vor der Wiederbenutzung durch eine andere Person desinfizieren,
inspizieren und entsprechend den Anweisungen in Abschnitt 4.1 und 4.2 warten.
4.6 Nutzungsende
Am Ende seiner Nutzungsdauer muss Ihr Rollstuhl gemäß den geltenden Umweltvorschriften
entsorgt werden. Dazu wird er im besten Fall zerlegt, um den Transport wiederverwertbarer Teile
zu erleichtern.

Turios
2022-01
Technische Daten
19
EN
NL
DE
5 Technische Daten
Die nachstehenden technischen Daten gelten für diesen Rollstuhl nur bei Standardeinstellungen
und optimalen Umgebungsbedingungen. Berücksichtigen Sie diese Details bei der Benutzung.
Die Werte gelten nicht mehr, falls Ihr Rollstuhl modifiziert wurde, beschädigt ist oder starke
Verschleißerscheinungen aufweist. Beachten Sie, dass die Fahrleistung durch
Umgebungstemperatur, Feuchtigkeit, Neigung (Bergauf-/Bergabfahrten),
Oberflächenbeschaffenheit und Akkustatus beeinflusst wird.
Tabelle 1: Technische Daten
Marke
Vermeiren
Typ
Elektrischer Rollstuhl, Klasse B
Modell
Turios
Max. Benutzergewicht
130 kg
Beschreibung
Abmessungen
Turios
Turios Element
Gesamtlänge mit Beinstütze
Manuell
Elektrisch
1070 mm
1060 mm
1070 mm
Gesamtbreite
580 - 580 - 640 mm
580 mm
Gesamtgewicht
ca. 105,8 kg
Energieverbrauch *
6 km/h: 39 km (50Ah)
10 km/h: 25 km (50Ah)
6 km/h: 28 km (38Ah)
oder 39 km (50Ah)
Neigungsgrad
6°
Überwinden von Hindernissen
50 mm (8“, 9“ Vorderräder)
60 mm (10“ Vorderräder)
Höchstgeschwindigkeit
6km/h
10 km/h
6 km/h
Min. Bremsweg bei max. Geschw.
2100 mm
Sitzflächenwinkel Manuell
Elektrisch
0 ° - 2 ° - 4 ° - 6 °
0° - 20°
0 ° - 2 ° - 4 ° - 6 °
Effektive Sitztiefe Manuell
Elektrisch
380 mm – 500 mm
430 mm – 510 mm
400 mm – 440 mm
Effektive Sitzbreite
390 - 450 - 510 mm
390 – 450 mm
Sitzflächenhöhe an der Vorderkante
Manueller Sitz
Elektrischer Sitz
450 mm – 500 mm – 550 mm
480 mm – 510 mm
450 mm
Rückenlehnenwinkel Manuell
Elektrisch
0 ° - 8 ° - 16 ° - 24 ° - 32 °
0 ° - 32 °
0 ° - 8 ° - 16 ° - 24 ° - 32 °
Rückenlehnenhöhe Manuell
Elektrisch
585 mm
550 mm
585 mm
Abstand Fußstütze-Sitz
320 mm - 420 mm
Winkel Bein-Sitzfläche
114°
Abstand Armlehne-Sitz
260 mm - 335 mm
Vordere Position der
Armlehnenstruktur Manuell
Elektrisch
340 mm - 430 mm
Max. 320 mm
340 mm – 430 mm
Min. Wenderadius
ca. 1600 mm

Turios
2022-01
Technische Daten
20
EN
NL
DE
Marke
Vermeiren
Typ
Elektrischer Rollstuhl, Klasse B
Modell
Turios
Max. Benutzergewicht
130 kg
Bodenfreiheit
60 mm (Kippschutz)
100 mm (Mitte)
Durchmesser der Hinterräder
350 x 70 mm
Art der Hinterräder **
Luftreifen
Durchmesser Vorderräder
200 mm - 230 mm - 260 mm
200 mm – 230 mm
Art der Vorderräder **
Luftreifen
Pannenfreie Reifen
Beschreibung – Elektrik
Akku (auslaufsicherer AGM-Akku,
wartungsfrei)
38 Ah, C10
44 Ah (Gel, optional)
50 Ah, C20
Antriebsmotoren
6 km/h: 2x 150W
10 km/h: 2x 450W
6 km/h: 2x 150W
Antriebsmodul Sicherung
150 AMP
Festigkeitsprüfung gemäß
ISO 7176-8
Prüfung des Antriebs- und
Steuerungssystems gemäß
ISO 7176-14
Entzündbarkeit der Polsterung
gemäß
EN1021-2:2006
EMV-Verträglichkeit
ISO 7176-21
Schutzart
IPX4
Geräuschpegel
< 65 dB (A)
Gesamtbewertung der
Anschnallmöglichkeiten
A
Temperaturbereich für Benutzung
und Lagerung
+5°C ~ +41°C
Betriebstemperatur der Elektronik
-10°C ~ +40°C
Luftfeuchtigkeitsbereich für
Benutzung und Lagerung
30 % ~ 70 %
Wir behalten uns das Recht vor, technische Änderungen vorzunehmen. Messtoleranz: ±15 mm / 1,5 kg /
1,5 °
* Die theoretische Reichweite verringert sich, wenn mit dem Rollstuhl häufig Steigungen, unebenes Terrain
oder Bordsteinkanten befahren werden.
**Da unterschiedliche Reifen zum Einsatz kommen können, achten Sie bitte auf den korrekten Reifendruck
für die jeweils verwendeten Reifen. Bezüglich anderer Reifendurchmesser wenden Sie sich bitte an Ihren
Fachhändler.

Turios
2022-01
Sommario
1
EN
NL
IT
Sommario
Sommario ................................................................................................................... 1
Premessa.................................................................................................................... 2
1 Il prodotto ...................................................................................................... 3
1.1 Accessori ...................................................................................................... 3
2 Prima dell’uso ............................................................................................... 4
2.1 Uso previsto .................................................................................................. 4
2.2 Istruzioni generali di sicurezza ...................................................................... 4
2.3 Simboli presenti sulla carrozzina ................................................................... 5
2.4 Trasporto ....................................................................................................... 5
2.5 Montaggio/smontaggio .................................................................................. 8
2.6 Primo utilizzo e rimessaggio ......................................................................... 9
3 Uso della carrozzina ................................................................................... 10
3.1 Primo utilizzo ............................................................................................... 10
3.2 Guida all’aperto ........................................................................................... 10
3.3 Console di comando ................................................................................... 12
3.4 Freno e leva di ruota libera ......................................................................... 12
3.5 Trasferimento alla/dalla carrozzina ............................................................. 13
3.6 Regolazioni per il comfort ............................................................................ 14
3.7 Stato e ricarica delle batterie ....................................................................... 14
4 Manutenzione .............................................................................................. 16
4.1 Intervalli di manutenzione ........................................................................... 16
4.2 Istruzioni per la manutenzione .................................................................... 17
4.3 Soluzione dei problemi di funzionamento .................................................... 17
4.4 Durata prevista ............................................................................................ 18
4.5 Utilizzi successivi ........................................................................................ 18
4.6 Fine vita ...................................................................................................... 18
5 Specifiche tecniche .................................................................................... 19

Turios
2022-01
Premessa
2
EN
NL
IT
Premessa
Congratulazioni! Ora possiede una carrozzina Vermeiren!
Questa carrozzina è realizzata da personale qualificato e competente. Essa è progettata e
prodotta secondo gli elevati standard di qualità garantiti da Vermeiren.
Grazie per la fiducia accordata ai prodotti Vermeiren. Questo manuale viene fornito come
supporto per l’uso della carrozzina e delle sue opzioni operative. Leggerlo attentamente, in quanto
aiuta a familiarizzarsi con il funzionamento, le prestazioni e le limitazioni della carrozzina.
Per eventuali ulteriori domande successive alla lettura di questo manuale, rivolgersi al proprio
rivenditore specializzato, che sarà lieto di fornire un supporto sull’argomento.
Nota importante
Per garantire la propria sicurezza e prolungare la durata del prodotto, trattarlo con cura e farlo
controllare e/o sottoporlo a manutenzione con regolarità.
Questo manuale rispecchia gli sviluppi più recenti del prodotto. Vermeiren si riserva il diritto di
introdurre modifiche di questo tipo di prodotto senza alcun obbligo di adattare o sostituire i prodotti
analoghi consegnati in precedenza.
Le immagini vengono utilizzate per chiarire le istruzioni contenute nel manuale. I dettagli del
prodotto raffigurato possono essere diversi da quelli del prodotto in uso.
Informazioni disponibili
Sul sito Web di Vermeiren, all’indirizzo http://www.vermeiren.com/ è sempre disponibile la
versione più recente delle informazioni indicate di seguito. Visitare con regolarità tale sito per
verificare l’esistenza di eventuali aggiornamenti.
Le persone ipovedenti possono scaricare la versione elettronica di questo manuale e farlo leggere
da un software applicativo di sintesi vocale.
Questo manuale utente
Per l'utente e il rivenditore specializzato
Manuale d'uso della console di comando adottata e del caricabatterie.
Per l'utente e il rivenditore specializzato
Istruzioni di installazione (per regolazioni di dettaglio e (s)montaggio)
Per il rivenditore specializzato
Manuale di assistenza per le carrozzine
Per il rivenditore specializzato
Dichiarazione di conformità CE

Turios
2022-01
Il prodotto
3
EN
NL
IT
1 Il prodotto
1. Schienale
2. Console di comando
3. Bracciolo
4. Sedile
5. Poggiapiedi
6. Pedana
7. Cintura di sicurezza
8. Alloggiamento delle batterie
9. Ruote anteriori
10. Motori elettrici di trazione
11. Ruote posteriori/motrici
12. Luci anteriori (opzionali)
13. Targhetta di identificazione
1.1 Accessori
Per la carrozzina elettrica Turios sono disponibili i seguenti accessori:
• Supporto per le gambe (BZ7 e BZ8)
• Poggiatesta (L55 e L58)
• Luci
• Supporto per stampelle
• Portabibite
• Specchio retrovisore
• Console di comando allontanabile mediante rotazione
• Custodia superiore
1
2
3
4
5
6
7
8
9
10
11
12
14

Turios
2022-01
Prima dell’uso
4
EN
NL
IT
2 Prima dell’uso
2.1 Uso previsto
Questo paragrafo fornisce una breve descrizione dell’uso previsto della carrozzina. Gli altri
paragrafi aggiungono inoltre alle istruzioni ulteriori avvertenze di rilievo. Vermeiren desidera in tal
modo portare all’attenzione dell’utente gli eventuali usi errati che possono presentarsi.
• Questa carrozzina è adatta per l'uso al coperto e all'aperto.
• Essa è progettata e realizzata esclusivamente per il trasporto/trasferimento di una (1) persona
di peso non superiore a 130 kg. Essa non è viceversa progettata per il trasporto di merci od
oggetti, né per qualunque uso diverso da quello descritto in precedenza.
• Questa carrozzina può essere azionata dall’utente seduto sulla stessa, oppure spinta da un
assistente. NON utilizzare la carrozzina senza assistenza se si soffre di disabilità fisiche o
mentali in grado di mettere in pericolo sé o altri durante l'uso. Consultare pertanto anzitutto il
proprio medico e avere cura di trasmettere il suo parere al proprio rivenditore specializzato.
• Utilizzare esclusivamente accessori e ricambi approvati da Vermeiren.
• Leggere tutte le informazioni tecniche di dettaglio e le limitazioni della carrozzina, riportate nel
capitolo 5.
• La garanzia del prodotto presuppone un uso e una manutenzione normali del medesimo, come
descritti in questo manuale. I danni al prodotto dovuti a uso improprio o manutenzione carente
causano la decadenza della garanzia.
2.2 Istruzioni generali di sicurezza
Rischio di lesioni e/o danni
Leggere e osservare le istruzioni contenute in questo manuale. In caso contrario, è possibile
ferirsi o danneggiare la carrozzina.
Durante l’uso, tenere presenti le seguenti avvertenze generali:
• Non utilizzare la carrozzina se si è sotto l’effetto di alcool, farmaci o altre sostanze in grado
di influire sulle proprie capacità di guida.
• Non dimenticare che alcune parti della carrozzina possono diventare molto calde o fredde a
causa della temperatura ambiente, della radiazione solare, di dispositivi di riscaldamento o
dell’azionamento del motore elettrico durante la marcia. Prestare attenzione quando si tocca
la carrozzina. In condizioni climatiche fredde, indossare indumenti protettivi. Dopo l’uso,
attendere che la carrozzina / il motore elettrico si sia raffreddato.
• Prima di accendere la carrozzina, prestare attenzione all’ambiente / alla situazione in cui ci si
trova. Regolare di conseguenza la velocità prima di mettersi in movimento. Per l’uso al
coperto, si consiglia di adottare l’impostazione di velocità minima. Per l’uso all’aperto, è
possibile regolare la velocità su un valore appropriato, che dia una sensazione di comfort e
sicurezza.
• Tenere SEMPRE presente la possibilità che la carrozzina si arresti improvvisamente per
l’esaurimento di una batteria o l’intervento di una protezione che evita ulteriori danni alla
carrozzina stessa. Verificare inoltre le possibili cause indicate al § 4.3. Allacciare la cintura di
sicurezza, per evitare di subire lesioni.
• La carrozzina è stata sottoposta a prove di compatibilità elettromagnetica ed è conforme alla
relativa norma; vedere il capitolo 5. Le fonti di campi elettromagnetici, come quelli di telefoni
cellulari, generatori di corrente o fonti energetiche di grande potenza, possono tuttavia influire
sulle prestazioni di guida della carrozzina. L’elettronica della carrozzina può d’altro canto
influire su altri apparati elettronici, come i sistemi di allarme dei negozi e le porte automatiche.
Si consiglia pertanto di sottoporre la carrozzina a verifiche regolari degli eventuali danni e
ATTENZIONE

Turios
2022-01
Prima dell’uso
5
EN
NL
IT
dell’usura, poiché i medesimi possono rendere più intense le interferenze (vedere anche il
capitolo 4).
• Guidare la carrozzina soltanto su superfici piane, dove entrambe le ruote motrici siano a
contatto con il suolo e l'aderenza sia sufficiente per azionare la carrozzina in condizioni di
sicurezza.
• Consultare il produttore della carrozzina prima di modificare o sostituire i punti di
assicurazione della stessa, oppure componenti o parti della sua struttura o del suo telaio.
• Accertarsi che durante l'uso mani, indumenti, cinture, fibbie o gioielli non si impiglino nelle
ruote o in altri componenti in movimento.
Tieni presente che il tuo carrozzina potrebbe interferire con qualche sistema di antifurto, a
seconda delle impostazioni utilizzate ciò potrebbe fra scattare l’allarme del negozio.
Nel caso in cui si sia verificato un grave incidente con il vostro prodotto, informate Vermeiren o il
vostro rivenditore specializzato e l'autorità competente del vostro paese.
2.3 Simboli presenti sulla carrozzina
Sulla carrozzina sono applicati i simboli elencati di seguito. I simboli sono riportati nella norma
ISO pertinente (ISO 7000, ISO 7001 e IEC 417).
Peso massimo dell’utente, in kg
Uso al coperto / all’aperto (caricabatterie escluso)
Uso soltanto al coperto (caricabatterie)
Pendenza massima di sicurezza, in ° (gradi).
Velocità massima
Indicazione del modello
Rischio di intrappolamento
2.4 Trasporto
Rischio di danni
Avere cura di proteggere la carrozzina dai danni durante il trasporto.
2.4.1 Spostamento
Utilizzare la console di comando per condurre a destinazione la carrozzina.
In alternativa, portare la carrozzina nella modalità a ruota libera (vedere il § 3.4) e spostarla
utilizzando la barra di spinta.
ATTENZIONE

Turios
2022-01
Prima dell’uso
6
EN
NL
IT
2.4.2 Trasporto in aereo
La carrozzina è dotata di batterie AGM a tenuta, che consentono di trasportarla in aereo (come
un corpo unico). Per le procedure di movimentazione corrette, prima di prenotare il volo
consultare tuttavia la compagnia aerea prescelta. Prima di affidare la carrozzina al personale
aeroportuale, scollegare da essa la batteria; vedere il manuale di installazione.
2.4.3 Trasporto su veicoli, come bagaglio
Il modo migliore per caricare una carrozzina elettrica su un veicolo consiste nel farvela salire
mediante opportune rampe. Se non si ha esperienza nell’uso delle rampe con le carrozzine
elettriche, è possibile mettere in folle la carrozzina e spingerla a bordo del veicolo utilizzando le
rampe manualmente. Se necessario, smontare la carrozzina.
1. Come utente della carrozzina, trasferirsi su un sedile dell'auto; vedere il § 3.5.
2. Prima del trasporto, rimuovere tutti i componenti mobili (poggiapiedi, braccioli e così via).
3. Riporre tali componenti in condizioni di sicurezza dietro il sedile del passeggero o nel
bagagliaio.
4. Condurre o spingere la carrozzina elettrica a bordo del veicolo utilizzando opportune rampe,
oppure sollevarla con l’ausilio di 2 persone afferrando i componenti fissi dei telai.
5. Fissare saldamente al veicolo i componenti più solidi del telaio.
6. Portare la carrozzina nella modalità di guida (applicando i freni di parcheggio) e verificare che
la console di comando sia spenta.
2.4.4 Trasporto su veicoli, come sedile per l'utente
La carrozzina ha superato il crash test a norma ISO 7176-19:2008; come tale, essa è
stata progettata e collaudata per l'uso nei veicoli a motore esclusivamente come
sedile rivolto in avanti. La carrozzina è stata sottoposta a prove dinamiche utilizzando il
dispositivo di collaudo antropomorfo (ATD, Anthropomorphic Test Device), un sistema a
quattro punti di ancoraggio con cinghie e un sistema di ritenuta dell'occupante a 3 punti. Ciò
nondimeno, l'utente deve di preferenza essere trasferito su uno dei sedili presenti all'interno
del veicolo e deve utilizzare il sistema di ritenuta del veicolo. Il tal caso è possibile riporre la
carrozzina come un bagaglio in un vano (di carico) separato, vedere il § 2.4.3.
Rischio di lesioni e danni
Utilizzare la cintura pelvica della carrozzina e la cintura di sicurezza a tre punti appropriata
del veicolo per evitare impatti fra il medesimo e la testa e il torace dell'utente.
Non utilizzare supporti posturali per ritenere l'utente nel veicolo, a meno che tali supporti
non rechino un'etichetta che ne attesti la conformità ai requisiti specificati nella norma ISO
7176-19:2008.
In caso di coinvolgimento in qualunque tipo di collisione del veicolo, prima di utilizzare
nuovamente la carrozzina farla ispezionare da un rivenditore specializzato o da un
rappresentante del produttore.
Fissaggio della carrozzina
1. Accertarsi che il veicolo sia dotato di un sistema a quattro punti di ancoraggio con cinghie
adatto per la carrozzina, nonché di un sistema di ritenuta degli occupanti a norma ISO 10542,
e che entrambi i sistemi non siano sfilacciati, contaminati, danneggiati o spezzati.
2. Utilizzare la console di comando per riportare la carrozzina in posizione stabile; vedere il §
3.5.
3. Rimuovere e fissare in un punto sicuro tutti gli accessori installati, come vassoi e apparecchi
respiratori. Se ciò non è possibile, fissarli alla carrozzina in una posizione lontana
dall'occupate e inserire un'imbottitura antiurto fra il vassoio e l'utente.
4. Utilizzare una rampa per introdurre nel veicolo la carrozzina (con l'utente) attenendosi alle
istruzioni fornite nel § 3.2.1.
AVVERTENZA

Turios
2022-01
Prima dell’uso
7
EN
NL
IT
5. Posizionare l'utente in modo che sia rivolto in avanti nella direzione di marcia e che si trovi in
posizione centrale fra le rotaie di ancoraggio presenti nel pavimento del veicolo.
6. Accertarsi che l'utente sia seduto in una posizione quanto più eretta possibile. Se le condizioni
dell'utente impediscono di adottare tale soluzione, effettuare una valutazione del rischio per
stabilire il livello di sicurezza dell'utente durante il trasporto.
7. Spegnere la console di comando e accertarsi che la leva di ruota libera si trovi nella modalità
di frenata; vedere il § 3.4.
8. La posizione di ciascun punto di assicurazione presente sulla carrozzina è
contrassegnata con il seguente simbolo:
9. Verificare che l'attacco terminale di ancoraggio sia compatibile con i punti di assicurazione
della carrozzina.
10. Fissare i ganci delle cinghie di ancoraggio anteriori ai punti di assicurazione (A) presenti sulla
carrozzina seguendo le istruzioni del fornitore del sistema di ancoraggio.
11. Portare la leva di ruota libera nella posizione di ruota libera e fare arretrare la carrozzina per
tendere le cinghie anteriori; vedere il § 3.4.
12. Fissare allo stesso modo i ganci delle cinghie di ancoraggio posteriori ai punti di assicurazione
(B) presenti sul lato posteriore.
13. Riportare la leva di ruota libera nella posizione di frenata; vedere il § 3.4.
Assicurazione dell’utente
1. Fissare la cintura pelvica della carrozzina.
2. Fissare le cinture di ritenuta dell'utente presenti sul
veicolo attenendosi alle istruzioni del loro produttore.
Disporre la cintura pelvica in basso e trasversalmente
all'area pelvica anteriore, in modo che l'angolo di tale
cintura rispetto alla direzione orizzontale sia
compreso nell'intervallo preferenziale, fra 30° e 75°,
come mostrato nella figura. All'interno dell'intervallo
preferenziale, è preferibile un'angolazione più
marcata (maggiore).
B
A

Turios
2022-01
Prima dell’uso
8
EN
NL
IT
3. Regolare la cintura in modo che sia tesa come indicato nelle istruzioni del produttore del
sistema di ancoraggio, compatibilmente con il comfort dell'utente.
4. Accertarsi che la cintura di ritenuta sia allacciata in linea retta al punto di ancoraggio presente
nel veicolo e che non presenti pieghi visibili, a d esempio in corrispondenza dell'assale della
ruota posteriore.
5. Posizionare la fibbia della cintura di sicurezza in modo che il pulsante di sgancio non venga a
contatto con i componenti della carrozzina in caso di collisione.
6. Accertarsi che le cinghie non siano attorcigliate o tenute lontano dal corpo come mostrato
nella Figura 1.
7. Accertarsi che le cinture di ritenuta trasversali passino sopra le spalle; vedere la Figura 2.
Le cinture di ritenuta non devono
essere tenute lontano dal corpo da
componenti della carrozzina quali
ruote o braccioli.
Le cinghie di ritenuta devono essere
pienamente a contatto con le spalle, il
petto e la pelvi.
Cintura pelvica bassa sulla pelvi, vicino
all'articolazione fra la coscia e l'addome.
2.5 Montaggio/smontaggio
Rischio di lesioni
• Avere cura di evitare che dita, indumenti e fibbie rimangano intrappolati durante il montaggio
(o lo smontaggio).
I rivenditori specializzati consegnano le carrozzine completamente montate e illustrano i vari
elementi di azionamento e il loro uso. Questo documento fornisce inoltre ulteriori spiegazioni
dettagliate dei vari componenti per scopi di trasporto.
Per montare la carrozzina elettrica:
1. Montare i braccioli (paragrafo 2.5.1).
2. Montare i poggiapiedi (paragrafo 2.5.2).
Per smontare la carrozzina elettrica, eseguire nell’ordine inverso le istruzioni fornite sopra.
ATTENZIONE
✓

Turios
2022-01
Prima dell’uso
9
EN
NL
IT
2.5.1 Montaggio smontaggio dei braccioli
Rischio di lesioni e/o danni
• Verificare che le imbottiture dei braccioli si trovino alla stessa altezza su entrambi i lati.
Montare il bracciolo (1) facendo scorrere verso il basso la barra di
supporto (2) all’interno del telaio (3).
Per rimuovere il bracciolo (1), sollevarlo ed estrarlo dal telaio del
sedile.
2.5.2 Montaggio o rimozione dei poggiapiedi
Installazione
1. Afferrare il poggiapiedi (4) lateralmente e appenderlo al suo supporto
(5).
2. Ruotare il poggiapiedi verso l'interno, fino a quando si arresta con un
clic nella posizione corretta.
Rimozione
1. Tirare la leva (6) del poggiapiedi (4) e ruotarlo verso l'esterno.
2. Sollevare e rimuovere il poggiapiedi.
2.6 Primo utilizzo e rimessaggio
Rischio di danni alla batteria
• Non lasciare mai scaricare completamente le batterie.
• Non interrompere il ciclo di ricarica; scollegare il caricabatterie soltanto quando le batterie sono
completamente cariche.
• Avere cura di rimessare la carrozzina in un luogo asciutto, per evitare la formazione di muffa e
danni alla selleria.
• Verificare le informazioni tecniche di dettaglio per il rimessaggio; vedere il capitolo 5.
Prima di utilizzare la carrozzina, accertarsi che le batterie siano state caricate completamente,
verificando con il rivenditore se tale operazione è già stata effettuata o meno. Per la ricarica,
attenersi alle relative istruzioni, riportate nel § 3.7.
ATTENZIONE
ATTENZIONE
1
2
3
4
5
6

Turios
2022-01
Uso della carrozzina
10
EN
NL
IT
3 Uso della carrozzina
Rischio di lesioni
• Leggere anzitutto il capitolo precedente per familiarizzarsi con l’uso previsto. NON utilizzare la
carrozzina senza avere letto e compreso a fondo tutte le istruzioni.
• Leggere inoltre le istruzioni riportate nel manuale della console di comando e in quello del
caricabatterie!
• In caso di dubbi o domande, non esitare a rivolgersi al proprio rivenditore specializzato di zona,
al proprio fornitore di cure sanitarie o a un consulente tecnico per un aiuto al riguardo.
3.1 Primo utilizzo
Rischio di lesioni e danni
• Tenere sempre conto del raggio di rotazione del poggiapiedi e della console di comando, per
evitare di causare lesioni alle persone o danni materiali.
• Prima di mettersi in movimento, scollegare sempre il caricabatterie dalla carrozzina.
• Prima di utilizzare la carrozzina in luoghi affollati e potenzialmente pericolosi, accertarsi
di avere una familiarità sufficiente con il suo funzionamento. Esercitarsi inizialmente in
un’area ampia, aperta e con pochi passanti.
• Analizzare l'effetto degli spostamenti del baricentro sul comportamento della carrozzina,
ad esempio quando si percorrono in salita, in discesa o trasversalmente superfici
inclinate, oppure quando si superano eventuali ostacoli. Avvalersi del supporto di un
assistente.
• Durante l’uso, la superficie della centralina di controllo diventa tiepida.
• Quando si procede in retromarcia, la velocità viene ridotta.
1. Verificare che:
• la carrozzina si trovi su una superficie piana;
• la batteria sia completamente carica, vedere il § 3.7;
• il motore elettrico sia innestato, vedere il § 3.4;
• la pressione degli pneumatici sia corretta, vedere il § 4.2.1;
• la carrozzina sia regolata in funzione delle proprie esigenze e del proprio comfort, vedere
il § 3.6;
• la propria posizione di seduta sia corretta, vedere il § 3.5.
2. Attenersi alle istruzioni contenute nel manuale della console di comando.
3. Accendere la carrozzina.
4. Ruotare il comando della velocità portandolo sull'impostazione minima.
5. Familiarizzarsi con la guida e l'esecuzione delle regolazioni della carrozzina.
6. Se ci si sente sufficientemente sicuri, provare a guidare a una velocità maggiore.
7. Provare ora a svoltare procedendo in avanti e in retromarcia. Ripetere alcune volte questa
sequenza.
8. Al termine delle manovre, accertarsi che la carrozzina si trovi in posizione stabile.
9. Spegnere la carrozzina.
3.2 Guida all’aperto
Rischio di incidente: regolare il comportamento di guida e la velocità.
• Tenere conto del codice della strada in vigore localmente, che può differire da un Paese
all’altro. Esso disciplina la guida sui marciapiedi e sulle strade asfaltate e non.
• Non condurre la carrozzina su strade con un traffico intenso.
AVVERTENZA
ATTENZIONE
AVVERTENZA

Turios
2022-01
Uso della carrozzina
11
EN
NL
IT
• Tenere conto delle condizioni atmosferiche. Evitare la guida in condizioni di tempo umido,
caldo estremo, neve, ghiaccio vetrato e temperature inferiori a zero gradi centigradi; vedere le
specifiche tecniche nel capitolo 5.
• Anche con le luci accese, la carrozzina non è adatta per la guida su strade pubbliche in
condizioni di scarsa visibilità (buio, nebbia e crepuscolo). Accertarsi di essere ben visibili anche
nelle ore diurne, indossando indumenti fluorescenti e/o utilizzando luci proprie sul lato anteriore
e posteriore della carrozzina.
• Prestare attenzione agli altri utenti della strada, per i quali la carrozzina può essere un ostacolo.
Prestare particolare attenzione durante le svolte e la guida in retromarcia. Se non si ha
familiarità con la guida in retromarcia, esercitarsi inizialmente in uno spazio aperto. Prima di
svoltare, segnalare con gli appositi indicatori la direzione che si intende prendere.
• Nei passaggi stretti, tentare di procedere in linea retta per evitare di rimanere intrappolati.
• Tenere conto della distanza di frenata. Tenere conto del fatto che lo spazio di frenata dipende
dalla velocità, dal fondo stradale, dalle condizioni climatiche, dalla pendenza e dal peso
dell’utente.
3.2.1 Come affrontare pendii, cordoli, ostacoli o rampe
Rischio di lesioni dovute a movimenti imprevisti
• Quando si è seduti sulla carrozzina, proteggersi allacciando una cintura di sicurezza.
• Prestare attenzione in presenza di strade con fondo sabbioso o cedevole, oppure con buche
o fessure, in cui le ruote possono rimanere imprigionate e/o che possono ridurre la trazione
delle ruote motrici.
• NON guidare su superfici inclinate, ostacoli, gradini o cordoli di dimensioni superiori a quelle
indicate nelle caratteristiche tecniche riportate nel capitolo 5.
• Avvicinarsi sempre ai cordoli dal lato anteriore.
• Non portare la carrozzina nella modalità a ruota libera mentre si trova su una superficie
inclinata. In tal caso è possibile che la carrozzina inizi a muoversi, causando lesioni a sé e ad
altri.
• Non utilizzare la carrozzina su scale mobili o fisse.
• Utilizzare soltanto rampe approvate da Vermeiren, e non superare il loro carico massimo.
• Per superare in sicurezza ostacoli o pendenze, mettere la carrozzina nella posizione di seduta
più eretta
Rischio di danni
• Parcheggiare sempre la carrozzina elettrica su superfici piane e orizzontali e in punti facilmente
accessibili.
• Se necessario, per superare un pendio, un ostacolo, un cordolo o una rampa accelerare la
carrozzina prendendo una piccola rincorsa. Evitare tuttavia di sottoporre sé stessi o la
carrozzina a un grande rinculo.
• Accertarsi che la carrozzina, una volta inclinata, non tocchi il suolo o la rampa.
• Non dimenticare che lo spazio di frenata in discesa può essere notevolmente superiore a quello
in piano.
ATTENZIONE
ATTENZIONE
Quando ci si ferma su una superficie inclinata, il freno si aziona automaticamente per evitare
che la carrozzina si muova in avanti o all’indietro.

Turios
2022-01
Uso della carrozzina
12
EN
NL
IT
Procedura
• Iniziare a guidare come indicato al punto 1 del § 3.1.
• Per fare superare alla carrozzina eventuali scale/scalini, utilizzare una rampa o un
dispositivo di sollevamento. Se tali attrezzature non sono disponibili, è possibile sollevare
manualmente la carrozzina; a tale scopo occorrono almeno due persone, che devono
afferrare saldamente il telaio con entrambe le mani. Non afferrare la carrozzina dallo
schienale, dal (o dai) poggiapiedi, dai braccioli o dalle ruote.
• Per affrontare ostacoli o superfici inclinate:
1. Regolare la carrozzina portandola nella sua posizione più stabile, vedere il § 3.5.
2. Guidare alla velocità più bassa possibile per affrontare l'ostacolo o la pendenza.
3.3 Console di comando
Rischio di lesioni o di danni
• Non dimenticare che la stabilità della carrozzina diminuisce quando la si porta dalla
regolazione in posizione seduta eretta a quella inclinata.
• Accertarsi che intorno alla carrozzina sia disponibile uno spazio sufficiente per azionare lo
schienale e il sedile.
Le modalità di utilizzo della console di comando sono illustrate in un apposito manuale d'uso,
fornito con la carrozzina. Se tale manuale manca, rivolgersi immediatamente al proprio
rivenditore specializzato.
Prima di premere il pulsante di accensione/spegnimento, portare il joystick nella posizione
di folle (centrale), poiché in caso contrario l'elettronica viene bloccata. Per rilasciare tale
blocco occorre spegnere e riaccendere la console di comando.
Protezioni tecniche
La console di comando permette di controllare tutti i componenti e i motori elettrici di azionamento,
allo scopo di regolare la posizione del corpo. Per garantire la sicurezza dell'utente ed evitare di
danneggiare la carrozzina, i movimenti sono monitorati dall'elettronica. Ciò può dare luogo al
blocco di alcuni movimenti, a riduzioni della velocità o ad arresti completi. Per ulteriori
informazioni, consultare il manuale d'uso della console di comando.
Per evitare l'esaurimento accidentale delle batterie, la carrozzina è dotata di un sistema di
spegnimento automatico. Questo sistema disattiva automaticamente la console di comando
quando non la si utilizza per un certo tempo. Se ciò si verifica, è sufficiente riaccendere la
console.
3.4 Freno e leva di ruota libera
Rischio di lesioni o di danni
• Azionare la leva di ruota libera soltanto quando la carrozzina è spenta. La leva di ruota libera
deve essere azionata da un assistente. NON azionare MAI la leva dalla posizione
seduta.
• Non utilizzare la modalità a ruota libera su pendii e superfici inclinate; vedere il simbolo
presente sul motore elettrico:
Accertarsi che la leva di ruota libera si trovi nella posizione frenata PRIMA di accendere la
carrozzina. I freni elettromagnetici NON funzionano se la carrozzina si trova nella modalità
a ruota libera. Tale condizione è indicata sulla console di comando. La guida non è
possibile.
La carrozzina è dotata di freni elettromagnetici. Il funzionamento dei freni dipende dalla posizione
della leva di ruota libera (1).
ATTENZIONE
ATTENZIONE

Turios
2022-01
Uso della carrozzina
13
EN
NL
IT
I freni EM funzionano in modo automatico solo se la leva di ruota libera (1) si trova nella posizione
di frenata. In tal caso i freni iniziano a frenare se:
• la carrozzina è spenta;
• la carrozzina è accesa e il joystick
viene rilasciato.
Il rilascio del joystick causa l'arresto
progressivo della carrozzina e
l'attivazione dei freni.
Azionamento della leva di ruota libera:
• Per portare la carrozzina nella
modalità a ruota libera, ruotare la
leva all’indietro. A questo punto il
motore elettrico è scollegato. È
possibile spostare manualmente
la carrozzina.
• Per collegare il motore elettrico
alla trasmissione, ruotare la leva
verso l’interno. Questa
operazione deve essere effettuata prima di avviare la carrozzina.
3.5 Trasferimento alla/dalla carrozzina
Rischio di lesioni o di danni
• Se non si è in grado di effettuare il trasferimento in condizioni di sicurezza, richiedere
l’assistenza di un’altra persona.
• Non rimanere in piedi sulla/e pedana/e durante il trasferimento alla o dalla carrozzina.
Trasferimento
1. Quando si è seduti su una poltrona, un divano, un sedile o un letto, avvicinare il più possibile
a sé la carrozzina.
2. Inserire i freni portando la leva di ruota libera nella posizione di frenata; vedere i §§ 3.4.
3. Ripiegare la/le pedana/e verso l'alto, per evitare di salirvi.
4. Se necessario, rimuovere un bracciolo per liberare spazio; vedere il § 2.5.1.
5. Trasferirsi sulla/dalla carrozzina utilizzando la forza delle proprie braccia o con l'ausilio di uno
(o più) assistenti o di un dispositivo di sollevamento.
Posizione di seduta sulla carrozzina
1. Sedersi sul sedile con la parte inferiore della schiena contro lo schienale.
2. Ruotare il (o i) poggiapiedi verso il basso e appoggiarvi i piedi.
3. All’occorrenza, rimontare il bracciolo.
4. Accertarsi che la parte superiore delle gambe sia orizzontale e che i piedi si trovino in una
posizione confortevole. Effettuare le regolazioni eventualmente necessarie.
5. Verificare che le braccia siano flesse e appoggiate in modo confortevole sulle imbottiture dei
braccioli. Effettuare le regolazioni eventualmente necessarie.
Regolazione sulla posizione più stabile
Per il trasporto, e quando occorre affrontare eventuali ostacoli, occorre regolare la carrozzina in
modo da aumentarne al massimo la stabilità:
• Schienale verticale
• Pedana ripiegata verso l’alto
ATTENZIONE
Folle
Guida
1
1

Turios
2022-01
Uso della carrozzina
14
EN
NL
IT
3.6 Regolazioni per il comfort
Rischio di lesioni o di danni
• Le regolazioni per il comfort indicate di seguito possono essere eseguite da assistenti o
badanti. Tutte le altre regolazioni vengono eseguite dal rivenditore specializzato in base alle
istruzioni di installazione; vedere la premessa.
• Prestare attenzione per evitare che dita, indumenti, e fibbie rimangano intrappolati durante le
regolazioni.
3.6.1 Inclinazione dello schienale (versione manuale)
1. Sbloccare il meccanismo tirando la cinghia presente al fondo dello schienale.
2. Regolare lo schienale portandolo nella posizione desiderata (0° - 32°, 4 intervalli di 8°).
3. Rilasciare la cinghia. Accertarsi che lo schienale sia ben fissato.
3.6.2 Inclinazione dello schienale (con molla a gas)
L'inclinazione dello schienale con molla a gas viene azionata tramite una leva. A seconda della
configurazione scelta al momento dell'ordine, la leva si trova sullo schienale o sul lato destro del
sedile.
1. Tirare la leva.
2. Tirare/spingere lo schienale nella posizione desiderata.
3. Rilasciare la leva. Assicurarsi che lo schienale sia ben fissato.
3.7 Stato e ricarica delle batterie
Rischio di lesioni e di danni da incendio
• Utilizzare esclusivamente il caricabatterie fornito con la carrozzina. L’uso di qualunque altro
caricabatterie può essere pericoloso (pericolo di incendio).
• Il caricabatterie è studiato unicamente per caricare le batterie fornite con la carrozzina, e
nessun’altra.
• Non effettuare alcun adattamento dei componenti forniti, come cavi, spinotti o caricabatterie.
Non aprire mai le batterie e non modificarne i punti di collegamento.
• Proteggere batterie e caricabatterie da fiamme, temperature basse ed elevate (vedere il
capitolo 5), umidità, luce solare diretta e urti violenti (ad esempio cadute). NON utilizzare
batterie che siano state esposte a tali condizioni.
• Caricare le batterie con il caricabatterie; eseguire l’operazione al coperto, in un’area ben
ventilata e fuori dalla portata dei bambini.
• Prima di caricare le batterie della carrozzina, leggere le istruzioni per l'uso del caricabatterie
da utilizzare. Per maggiori informazioni, rivolgersi al proprio rivenditore specializzato o
consultare il sito Web di Vermeiren all'indirizzo http://www.vermeiren.com/
Rischio di danni
• L'autoscarica delle batterie e la corrente di riposo delle utenze collegate scaricano lentamente
le batterie. Se le si scarica completamente, le batterie possono danneggiarsi irreparabilmente.
Avere pertanto cura di ricaricare per tempo le batterie (vedere il manuale della console di
comando).
• Leggere le istruzioni per il rimessaggio e la manutenzione riportate nel § 4 e le informazioni
tecniche di dettaglio contenute nel capitolo 5.
ATTENZIONE
AVVERTENZA
ATTENZIONE

Turios
2022-01
Uso della carrozzina
15
EN
NL
IT
• Scollegare il caricabatterie soltanto quando la batteria è completamente
carica; prendere visione dei simboli indicati di seguito, presenti sul
caricabatterie:
• Non caricare le batterie a temperature inferiori a 0 °C. Avviare la ricarica
soltanto dopo averle trasferite in un ambiente più caldo.
• Mantenere il punto di collegamento del caricabatterie libero da polvere e
altri contaminanti.
• In caso di problemi che impediscano di caricare le batterie secondo le istruzioni riportate di
seguito, rivolgersi al proprio rivenditore specializzato.
• Per istruzioni sulle modalità di sostituzione delle batterie, vedere il manuale di installazione.
Per tutte le informazioni relative all'indicazione dello stato delle batterie, consultare il
manuale della console di comando.
Quando non lo si utilizza, si consiglia di scollegare il caricabatterie dalla rete elettrica. Tale
accorgimento evita consumi energetici superflui.
Per caricare la batteria:
1. Collegare ANZITUTTO il caricabatterie a una presa elettrica a 230 Vc.a. Collegare il
caricabatterie direttamente alla presa di alimentazione, senza prolunghe (né timer).
2. Collegare l'adattatore al punto di ricarica della console di comando.
3. Attendere che la batteria sia completamente carica. Per maggiori informazioni, consultare il
manuale del caricabatterie.
4. Scollegare il caricabatterie.
5. Scollegare il caricabatterie dalla presa, lasciarlo raffreddare e riporlo in un luogo asciutto.

Turios
2022-01
Manutenzione
16
EN
NL
IT
4 Manutenzione
4.1 Intervalli di manutenzione
Rischio di lesioni e danni
Riparazioni e sostituzioni devono essere eseguite esclusivamente da personale con un’opportuna
formazione e utilizzando unicamente ricambi originali Vermeiren.
L’ultima pagina di questo manuale contiene un modulo di registrazione che consente ai
rivenditori specializzati di registrare ogni intervento di assistenza.
La frequenza dell'assistenza dipende dalla frequenza e dall’intensità dell’uso. Concordare con il
proprio rivenditore un calendario comune per le attività di ispezione / manutenzione / riparazione.
Per quanto concerne la manutenzione, leggere le istruzioni per l'uso del caricabatterie utilizzato.
Per il manuale di manutenzione, fare riferimento al sito Web di Vermeiren all’indirizzo
www.vermeiren.com.
Prima di ciascun utilizzo
Verificare i seguenti punti:
• Tutti i componenti: presenza, integrità e assenza di usura.
• Tutti i componenti: pulizia, vedere il § 4.2.2.
• Ruote, sedile, braccioli, poggiapiedi e poggiatesta (se presenti): fissaggio corretto.
• Stato delle batterie: ricarica secondo necessità, vedere il § 3.7.
• Console di comando, batteria, modulo di alimentazione, motori elettrici, caricabatterie, luci
e relativi cavi: assenza di danni quali fili sfilacciati, spezzati o esposti.
• Condizioni delle ruote / degli pneumatici: vedere il § 4.2.1.
• Condizioni dei componenti del telaio: assenza di deformazioni, instabilità, punti deboli o
raccordi allentati.
• Sedile, schienale, poggiatesta (se presente) e imbottiture di braccioli e poggiapolpacci:
assenza di usura eccessiva (come ammaccature, danni o lacerazioni).
Rivolgersi al proprio rivenditore specializzato per le riparazioni o i ricambi eventualmente
necessari.
Ogni mese
In caso di rimessaggio prolungato della carrozzina, occorre comunque caricare ogni mese le
batterie. Durante tali periodi, è inoltre possibile lasciare il caricabatterie collegato alla batteria e
alla rete elettrica. Per maggiori informazioni, vedere il § 3.7.
Annualmente o con maggiore frequenza
Almeno una volta all’anno, o con maggiore frequenza, richiedere al proprio rivenditore
specializzato un intervento di ispezione e manutenzione della carrozzina. La frequenza minima
di manutenzione dipende dall’uso, e deve pertanto essere concordata con il proprio rivenditore
specializzato.
In caso di rimessaggio
Avere cura di rimessare la carrozzina in un ambiente asciutto, per evitare la formazione di muffa
o danni alla selleria.
ATTENZIONE

Turios
2022-01
Manutenzione
17
EN
NL
IT
4.2 Istruzioni per la manutenzione
4.2.1 Ruote e pneumatici
Il funzionamento corretto dei freni dipende dallo stato degli pneumatici, che può variare a
seconda dell'usura e dell'eventuale contaminazione (acqua, olio, fango e così via).
• Tenere pulite le ruote da fili, capelli, sabbia e fibre.
• Verificare il profilo degli pneumatici. Se la profondità del battistrada è inferiore a 1 mm,
occorre sostituire gli pneumatici. A tale scopo, rivolgersi al proprio rivenditore specializzato.
• Gonfiare gli pneumatici alla pressione corretta (facendo riferimento all'indicazione riportata
sui medesimi).
• Per istruzioni sulle modalità di sostituzione degli pneumatici, vedere il manuale di
installazione.
4.2.2 Pulizia
Rischio di danni da umidità
• Tenere pulita la console di comando e proteggerla dall’acqua e dalla pioggia.
• Non pulire la carrozzina con manichette o pulitrici ad alta pressione.
Strofinare tutti i componenti rigidi della carrozzina con un panno umido (non zuppo). Se
necessario, utilizzare un detergente delicato, adatto per smalti e materiali sintetici.
È possibile pulire la selleria con acqua tiepida e un detergente delicato. Non utilizzare detergenti
abrasivi per la pulizia.
Tenere pulite e libere da accumuli di polvere le aperture di ventilazione del caricabatterie.
Rimuovere la polvere soffiandola via e, se necessario, pulire l'involucro del caricabatterie con un
panno leggermente inumidito.
4.2.3 Disinfezione
Rischio di danni
La disinfezione deve essere eseguita esclusivamente da personale con un’opportuna formazione.
Consultare il proprio rivenditore specializzato.
4.3 Soluzione dei problemi di funzionamento
Anche se si utilizza la carrozzina nel modo corretto, non è possibile escludere la possibilità che
si verifichi un problema tecnico.
In tal caso, rivolgersi al rivenditore specializzato della propria zona.
Rischio di lesioni e di danni alla carrozzina
• NON tentare MAI di riparare personalmente la carrozzina.
• Per i guasti che interessano la console di comando, occorre rivolgersi al proprio rivenditore
specializzato, che decide se occorre riprogrammarla.
In caso di guasto, la console di comando visualizza un apposito codice.
Per una panoramica di tutti i codici di guasto della console di comando, leggere il suo
manuale.
ATTENZIONE
ATTENZIONE
AVVERTENZA

Turios
2022-01
Manutenzione
18
EN
NL
IT
I sintomi indicati di seguito possono segnalare un problema grave. Rivolgersi pertanto sempre al
proprio rivenditore specializzato se si rileva una qualunque delle seguenti anomalie:
• Rumori strani;
• Cablaggi elettrici sfilacciati/danneggiati;
• Connettori incrinati o spezzati;
• Usura irregolare del battistrada di uno pneumatico;
• Movimenti a scatti;
• Tendenza della carrozzina a deviare lateralmente;
• Gruppi ruota danneggiati o spezzati;
• Mancata accensione della carrozzina (fusibile bruciato);
• Carrozzina accesa ma che non reagisce ai comandi di movimento, vedere il § 3.4.
4.4 Durata prevista
La carrozzina ha una durata media prevista di 5 anni. Tale valore aumenta o diminuisce a
seconda della frequenza di utilizzo, delle condizioni di guida e della manutenzione.
4.5 Utilizzi successivi
Prima del riutilizzo della carrozzina da parte di un'altra persona, fare disinfettare, ispezionare e
sottoporre a manutenzione la carrozzina secondo le istruzioni dei §4.1 e §4.2 .
4.6 Fine vita
A fine vita, occorre smaltire la carrozzina conformemente alla legislazione ambientale locale. Il
modo migliore per farlo consiste nello smontare la carrozzina per agevolare il trasporto dei
componenti riciclabili.

Turios
2022-01
Specifiche tecniche
19
EN
NL
IT
5 Specifiche tecniche
I dettagli tecnici riportati di seguito sono validi soltanto per la carrozzina oggetto del manuale, con
le impostazioni standard e in condizioni ambiente ottimali. Durante l’uso, tenere conto di questi
dati di dettaglio. I valori indicati non sono più validi se la carrozzina ha subito modifiche o danni,
oppure presenta un livello elevato di usura. Non dimenticare che le prestazioni di guida risentono
della temperatura e dell’umidità ambiente, della pendenza (guida in salita/discesa), del tipo di
superficie e dello stato della batteria.
Tabella 1: Specifiche tecniche
Marchio
Vermeiren
Tipo
Carrozzina elettrica, classe B
Modello
Turios
Massa massima dell’utente
130 kg
Descrizione
Dimensioni
Turios
Turios Element
Lunghezza complessiva con
appoggio per le gambe
Versione manuale
Versione elettrica
1070 mm
1060 mm
1070 mm
Larghezza complessiva
580 – 580 - 640 mm
580 mm
Massa totale
Circa 105,8 kg
Consumo energetico*
6 km/h: 39 km (50Ah)
10 km/h: 25 km (50Ah)
6 km/h: 28 km (38Ah)
o 39 km (50Ah)
Pendenza nominale
6°
Superamento di ostacoli
50 mm (ruote anteriori da 8”, 9”)
60 mm (ruote anteriori da 10”)
Velocità massima in avanti
6 km/h
10 km/h
6 km/h
Distanza di frenata min. partendo
dalla velocità max.
2100 mm
Angolazione del piano del sedile
Versione manuale
Versione elettrica
0° - 2° - 4° - 6°
0° - 20°
0° - 2° - 4° - 6°
Profondità effettiva del sedile
Versione manuale
Versione elettrica
380 mm – 500 mm
430 mm – 510 mm
400 mm – 440 mm
Larghezza effettiva del sedile
390 - 450 - 510 mm
390 – 450 mm
Altezza del bordo anteriore della
superficie del sedile
Versione sedile manuale
Versione sedile elettrico
450 mm – 500 mm – 550 mm
480 mm – 510 mm
450 mm
Angolazione dello schienale
Versione manuale
Versione elettrica
0° - 8° - 16° - 24° - 32°
0 - 32°
0° - 8° - 16° - 24° - 32°
Altezza dello schienale
Versione manuale
Versione elettrica
585 mm
550 mm
585 mm
Distanza fra poggiapiedi e sedile
320 - 420 mm

Turios
2022-01
Specifiche tecniche
20
EN
NL
IT
Marchio
Vermeiren
Tipo
Carrozzina elettrica, classe B
Modello
Turios
Massa massima dell’utente
130 kg
Angolo fra le gambe e la superficie
del sedile
114°
Distanza fra bracciolo e sedile
260 - 335 mm
Posizione anteriore della struttura del
bracciolo Versione manuale
Versione elettrica
340 - 430 mm
Max. 320 mm
340 mm – 430 mm
Raggio di sterzata minimo
Circa 1600 mm
Luce libera da terra
60 mm (antiribaltamento)
100 mm (al centro)
Diametro delle ruote posteriori
350 x 70 mm
Tipo delle ruote posteriori**
Con pneumatici
Diametro delle ruote anteriori
200 - 230 - 260 mm
200 mm – 230 mm
Tipo delle ruote anteriori**
Con pneumatici
pneumatici antiforatura
Descrizione elettrica
Batteria (AGM a tenuta, esente da
manutenzione)
38 Ah, C10
44 Ah (gel, opzionale)
50 Ah, C20
Motori elettrici di trazione
6 km/h: 2 x 150 W
10 km/h: 2 x 450 W
6 km/h: 2 x 150 W
Modulo di alimentazione Fusibile
150 A
Prove di resistenza a norma
ISO 7176-8
Prove del sistema di alimentazione e
controllo a norma
ISO 7176-14
Infiammabilità della selleria a norma
EN 1021-2:2006
Conformità EMC
ISO 7176-21
Grado di protezione
IPX4
Livello di rumore
< 65 dB (A)
Valutazione complessiva della
sistemazione della cintura di
sicurezza
A
Temperatura di rimessaggio e di
utilizzo
+5 - +41 °C
Temperatura ambiente per
l’elettronica
-10 - +40 °C
Umidità di rimessaggio e di utilizzo
30% - 70%
Vermeiren si riserva il diritto di introdurre modifiche tecniche. Tolleranze di misurazione ± 15 mm / 1,5 kg /
1,5°
* L'autonomia teorica si riduce se la carrozzina viene utilizzata spesso su superfici inclinate o terreni
sconnessi, oppure per superare cordoli.
** Poiché è possibile utilizzare pneumatici differenti, prendere nota della pressione di esercizio corretta per
quelli in uso. Per altri valori del diametro degli pneumatici, rivolgersi al proprio rivenditore specializzato.

EN
NL
ES
Turios
2022-01
Contenido
1
Contenido
Contenido ................................................................................................................... 1
Introducción ............................................................................................................... 2
1 Su producto ................................................................................................... 3
1.1 Accesorios .................................................................................................... 3
2 Antes de su uso ............................................................................................ 4
2.1 Uso previsto .................................................................................................. 4
2.2 Instrucciones generales de seguridad ........................................................... 4
2.3 Símbolos presentes en la silla de ruedas ...................................................... 5
2.4 Transporte ..................................................................................................... 5
2.5 Montaje/Desmontaje ..................................................................................... 8
2.6 Primer uso y almacenamiento ....................................................................... 9
3 Utilizar la silla de ruedas ............................................................................ 10
3.1 Primera conducción .................................................................................... 10
3.2 Conducción en el exterior ........................................................................... 11
3.3 Panel de control .......................................................................................... 12
3.4 Palanca de frenado y rueda libre ................................................................ 12
3.5 Trasladarse hacia/de la silla ruedas ............................................................ 13
3.6 Ajustes de comodidad ................................................................................. 14
3.7 Estado de la batería y su recarga ............................................................... 14
4 Mantenimiento............................................................................................. 16
4.1 Tiempo de mantenimiento ........................................................................... 16
4.2 Instrucciones de mantenimiento ................................................................. 17
4.3 Resolución de problemas ............................................................................ 17
4.4 Vida útil prevista .......................................................................................... 18
4.5 Reutilizar ..................................................................................................... 18
4.6 Fin de vida útil ............................................................................................. 18
5 Especificaciones técnicas ......................................................................... 19

EN
NL
ES
Turios
2022-01
Introducción
2
Introducción
¡Felicidades! Es usted el propietario de una silla de ruedas Vermeiren.
Esta silla de ruedas ha sido fabricada por personal experto y cualificado. Se ha diseñado y
fabricado según los más altos estándares de calidad, implementados por Vermeiren.
Le agradecemos su confianza en los productos Vermeiren. Le ofrecemos este manual para
ayudarle en la utilización de su silla de ruedas y sus opciones de manejo. Léalo detenidamente.
Le ayudará a familiarizarse con el manejo, las capacidades y limitaciones de su silla de ruedas.
Si todavía tiene alguna duda después de leer este manual, contacte con su distribuidor
especializado, estará encantado de ayudarle.
Nota importante
Para garantizar su seguridad y prolongar la vida útil de su producto, cuídelo bien y asegúrese de
realizar revisiones y mantenimientos de manera regular.
Este manual refleja los desarrollos más recientes del producto. Vermeiren se reserva el derecho
a implementar cambios en este tipo de producto sin que ello suponga obligación alguna de
adaptar o cambiar productos similares previamente entregados.
Las imágenes están presentes para clarificar las instrucciones contenidas en este manual. Los
detalles del producto mostrado pueden variar con su producto.
Información disponible
En nuestro sitio web http://www.vermeiren.com/ siempre encontrará la versión más reciente de
la siguiente información. Consulte este sitio web de manera regular para estar al tanto de posibles
actualizaciones.
Las personas con discapacidad visual pueden descargarse la versión electrónica del manual y
utilizar un software de síntesis de voz para poder oír su contenido.
Este manual de usuario
Para el usuario y el distribuidor especializado
Manual de usuario del panel de control aplicado y del cargador de batería.
Para el usuario y el distribuidor especializado
Instrucciones de instalación (instrucciones para ajustes de detalles, montaje y
desmontaje)
Para el distribuidor especializado
Manual de mantenimiento para sillas de ruedas
Para el distribuidor especializado
Declaración CE de conformidad

EN
NL
ES
Turios
2022-01
Su producto
3
1 Su producto
1. Respaldo
2. Panel de control
3. Reposabrazos
4. Asiento
5. Reposapiés
6. Paleta del reposapiés
7. Cinturón de seguridad
8. Carcasa de la batería
9. Ruedas delanteras
10. Motores de accionamiento
11. Ruedas traseras / ruedas motrices
12. Luces delanteras (opcional)
13. Placa de identificación
1.1 Accesorios
Los siguientes accesorios están disponibles para la silla de ruedas eléctrica Turios:
• Soporte para las piernas (BZ7, BZ8)
• Reposacabezas (L55, L58)
• Luces
• Sujetamuletas
• Portavasos
• Espejo
• Panel de control oscilante
• Top case
1
2
3
4
5
6
7
8
9
10
11
12
14

EN
NL
ES
Turios
2022-01
Antes de su uso
4
2 Antes de su uso
2.1 Uso previsto
Este párrafo describe brevemente el uso previsto de la silla de ruedas. También se incluyen
avisos pertinentes a las instrucciones en otros párrafos. De esta manera se pretende avisar al
usuario de un eventual mal uso de la silla.
• Esta silla de ruedas es apta para su uso en interiores y exteriores.
• Esta silla de ruedas está diseñada y fabricada exclusivamente para transportar a una (1)
persona con un peso máximo de 130kg. No está diseñada para transportar mercancías u
objetos, o para otros usos que no sean los descritos anteriormente.
• La silla de ruedas la puede operar el usuario sentado en la silla de ruedas, o puede empujarla
un asistente. NO utilizar la silla de ruedas sin un auxiliar si sufre de discapacidades físicas o
mentales que puedan ponerle en riesgo a usted o a otras personas al conducir la silla de
ruedas. Por tanto, consulte primero con su médico y asegúrese de que su distribuidor
especializado esté al tanto de los consejos de su médico.
• Utilizar sólo accesorios y piezas de repuesto aprobadas por Vermeiren.
• Consulte todos los datos técnicos y las limitaciones de la silla de ruedas en el capítulo 5.
• La garantía de este producto se basa en el uso y mantenimiento normales descritos en este
manual. La garantía se invalida si el producto sufre cualquier daño causado por un uso
indebido o falta de mantenimiento.
2.2 Instrucciones generales de seguridad
Riesgo de lesiones y daños
Lea y siga las instrucciones contenidas en este manual. De no seguirlas, puede acabar
lesionándose a sí mismo, o acabar rompiendo la silla de ruedas.
Tener en cuenta las siguientes advertencias durante su utilización:
• No utilizar la silla de ruedas si se ha consumido alcohol, medicamentos u otras sustancias
que afecten la capacidad de conducir.
• Tener en cuenta que ciertas partes de la silla de ruedas pueden llegar a calentarse o enfriarse
demasiado a causa de la temperatura ambiente, la luz del sol, equipos de calefacción, o
debido al accionamiento del motor durante la conducción. Tener siempre cuidado al tocar la
silla de ruedas. Llevar ropa protectora cuando haga frío. Después de conducir, esperar a que
la silla de ruedas/motor se haya enfriado.
• Antes de poner en marcha la silla de ruedas, tenga en cuenta el entorno/situación en que se
encuentra. Ajustar la velocidad antes de comenzar a conducir. Se recomienda ir a la
velocidad mínima al conducir en interiores. Para conducir en exteriores, se puede ajustar la
velocidad hasta aquella en la que se sienta seguro y cómodo el usuario.
• Tener SIEMPRE en cuenta que la silla de ruedas puede pararse de repente si se agota la
batería o se activa alguna medida de protección que evita que se dañe la silla de ruedas.
Comprobar también las posibles causas mencionadas en el § 4.3. Utilizar el cinturón de
seguridad disponible para evitar lesiones.
• Se han realizado pruebas sobre la compatibilidad electromagnética de la silla de ruedas, y
cumple con los estándares, véase el capítulo 5. Aun así, es posible que un campo
electromagnético influya en la conducción de la silla de ruedas, como los campos de
teléfonos móviles, generadores eléctricos, o fuentes de alimentación de alta potencia. Por
otro lado, los componentes electrónicos de la silla de ruedas también pueden afectar a otros
aparatos eléctricos, como los sistemas de alarma de las tiendas y puertas automáticas. Por
tanto, se recomienda comprobar regularmente que la silla de ruedas no presente daños o
desgastes, ya que podrían agravar la interferencia (véase también el capítulo 4).
PRECAUCIÓN

EN
NL
ES
Turios
2022-01
Antes de su uso
5
• Sólo conducir en superficies planas en las que ambas ruedas motrices toquen el suelo y en
las que hay suficiente contacto para manejar la silla de ruedas de manera segura.
• No realizar alteraciones o sustituciones a los puntos de sujeción o a piezas o componentes
del bastidor o estructurales sin antes consultar al fabricante de la silla de ruedas.
• Asegurarse de que manos, ropa, cinturones, hebillas o joyas no queden atrapados por las
ruedas u otras piezas móviles durante su uso.
Tenga en cuenta que su silla de ruedas puede interferir con algunos tipos de sistemas antirrobo,
según la configuración utilizada. Esto puede hacer que se active la alarma de la tienda.
En caso de que se produzca un incidente grave con su producto, notifique a Vermeiren o a su
distribuidor especializado, así como a la autoridad competente de su país.
2.3 Símbolos presentes en la silla de ruedas
Los símbolos de la siguiente lista son aplicables a la silla de ruedas. Los símbolos se encuentran
en la norma ISO pertinente (ISO 7000, ISO 7001 y IEC 417).
Peso máximo del usuario en kg
Uso en interior/exterior (excluido el cargador de la batería)
Uso exclusivo en interior (cargador de la batería)
Pendiente máxima segura en ° (grados).
Velocidad máxima
Tipo de modelo
Riesgo de aprisionamiento
2.4 Transporte
Riesgo de daños
Asegurarse de proteger la silla de ruedas contra daños durante su transporte.
2.4.1 Retirar del camino
Utilizar el panel de control para conducir la silla de ruedas a su destino.
Si no, poner la silla de ruedas en modo rueda libre (véase §3.4) y utilizar la barra de empuje para
moverla.
2.4.2 Transporte aéreo
La silla de ruedas viene equipada con baterías AGM no derramables, por tanto es posible
transportar la silla de ruedas (en su conjunto) en avión. Consultar los procedimientos de manejo
correctos con la compañía aérea antes de reservar un vuelo. Antes de entregar la silla de ruedas
al personal del aeropuerto, desconectar la batería de la silla de ruedas, véase el manual de
instalación.
PRECAUCIÓN

EN
NL
ES
Turios
2022-01
Antes de su uso
6
2.4.3 Transporte mediante vehículo como equipaje
La mejor manera de subir la silla de ruedas eléctrica al coche es mediante rampas. Si no se tiene
experiencia conduciendo la silla eléctrica sobre rampas, se puede colocar la silla de ruedas en
modo neutral y empujar la silla de ruedas dentro del coche usando rampas. Si fuera necesario,
desmantelar la silla de ruedas.
1. En cuanto al usuario, trasladarle a un asiento del coche, véase §3.5.
2. Retirar todas las piezas movibles antes de transportar la silla (reposapiés, reposabrazos, etc.).
3. Almacenar de forma segura las piezas móviles detrás del asiento del pasajero o en el maletero.
4. Conducir o empujar la silla de ruedas dentro del coche utilizando rampas, o izar la silla de
ruedas dentro del coche con ayuda de 2 personas agarrando las piezas fijas de los bastidores.
5. Atar firmemente las piezas sólidas del bastidor al vehículo.
6. Poner la silla de ruedas en modo de conducción (accionando los frenos de estacionamiento)
y comprobar que el panel de control esté apagado.
2.4.4 Transporte mediante vehículo como asiento del usuario
La silla de ruedas ha superado la prueba de choque de ISO 7176-19: 2008 y, por tanto,
se ha diseñado y probado su uso exclusivamente como un asiento orientado hacia
delante en un vehículo motorizado. La silla de rueda ha sido probada dinámicamente con
el dispositivo de ensayo antropomórfico (ADT, por sus siglas en inglés) utilizando un
sistema de cuatro puntos de amarre y un sistema de retención de 3 puntos del ocupante.
Asimismo, el usuario debe preferiblemente trasladarse a uno de los asientos del vehículo y
utilizar el sistema de retención del vehículo. La silla de ruedas debe almacenarse como
equipaje en un compartimento (de carga) separado, véase §2.4.3 .
Riesgo de lesiones y daños
Utilizar el cinturón pélvico de la silla de ruedas y el cinturón de tres puntos aplicable del
vehículo para evitar impactos de la cabeza y el pecho contra el vehículo.
No utilizar soportes posturales para sujetar al usuario en el vehículo, a no ser que tengan
una etiqueta que indique que son conformes a los requisitos especificados en ISO 7176-
19:2008.
Si se sufre cualquier tipo de colisión de vehículos, pasar la silla de ruedas por una
inspección por parte del distribuidor especializado o del representante del fabricante
antes de volver a utilizarla.
Sujeción de la silla de ruedas
1. Asegurarse de que el vehículo tiene cuatro puntos de amarre adecuados para sillas de ruedas
y un sistema de retención del ocupante de conformidad con ISO 10542, y que ambos sistemas
no estén desgastados, contaminados, dañados o rotos.
2. Utilizar el panel de control para volver a colocar la silla de ruedas en una posición estable,
véase §3.5.
3. Retirar todos los accesorios instalados, como bandejas y equipos respiratorios, y guardarlos
en un lugar seguro. Si esto no fuera posible, asegurarlos a la silla de ruedas pero
posicionados lejos del ocupante con una almohadilla amortiguadora entre la bandeja y el
usuario.
4. Utilizar una rampa para conducir la silla de ruedas (con el usuario) dentro del vehículo
siguiendo las instrucciones en §3.2.1.
5. Posicionar al usuario mirando hacia la dirección del trayecto y en el centro entre los raíles de
sujeción instalados en el suelo del vehículo.
6. Asegurarse de que el usuario está sentado lo más erguido posible. Si la condición del usuario
lo impide, llevar a cabo una evaluación de riesgo para evaluar la seguridad del usuario durante
su tránsito.
AVISO

EN
NL
ES
Turios
2022-01
Antes de su uso
7
7. Apagar el panel de control y asegurarse de que la palanca de rueda libre estén en modo
estacionamiento, véase §3.4.
8. La ubicación de cada punto de sujeción en la silla de ruedas viene indicado con
el siguiente símbolo:
9. Verificar que el extremo de sujeción es compatible con los puntos de sujeción de la silla de
ruedas.
10. Acoplar los ganchos de las cintas de sujeción delanteras a los puntos de sujeción (A) de la
silla de ruedas siguiendo las instrucciones del sistema de amarre en el manual del proveedor.
11. Empujar la palanca de rueda libre en la posición de rueda libre y conducir la silla de ruedas
hacia atrás para poder tensar bien las cintas delanteras, véase §3.4.
12. Acoplar los ganchos de las cintas de sujeción traseras a los puntos de sujeción (B) en la parte
trasera de la misma manera.
13. Volver a colocar la palanca de rueda libre en la posición de estacionamiento, véase §3.4.
Abrochar al usuario
1. Acoplar el cinturón pélvico de la silla de ruedas.
2. Acoplar los cinturones de retención del usuario del
vehículo según las instrucciones del fabricante de los
cinturones.
Abrochar el cinturón pélvico por encima de la parte
baja y frontal de la pelvis, de tal manera que el ángulo
del cinturón pélvico se encuentra en la zona preferida
de entre 30° y 75° a lo horizontal, similar a lo que se
muestra en la figura. Es mejor tener un ángulo más
pronunciado (más alto) en la zona preferida.
3. Ajustar el cinturón firmemente según las instrucciones del fabricante del cinturón, teniendo en
cuenta la comodidad del usuario.
4. Asegurarse de que el cinturón de retención conecta en línea recta con el punto de anclaje del
vehículo y que no esté doblado en ninguna parte, por ejemplo, en el eje de la rueda trasera.
5. Posicionar el cinturón de seguridad de tal manera que el botón de desbloqueo no entre en
contacto con componentes de la silla de ruedas durante un posible accidente.
6. Asegurarse de que los cinturones no estén torcidos ni lejos del cuerpo como se muestra en
la figura 1.
B
A

EN
NL
ES
Turios
2022-01
Antes de su uso
8
7. Asegurarse de que los cinturones de retención del hombro se ajusten sobre los hombros,
véase figura 2.
Los cinturones de retención no deben
ponerse lejos del cuerpo ni cerca de
componentes de la silla de ruedas como
los reposabrazos o las ruedas.
Los cinturones de retención tienen que
estar en pleno contacto con los
hombros, el pecho y la pelvis.
El cinturón pélvico en la parte baja de la
pelvis, cerca de la conexión entre la
cadera y el abdomen.
2.5 Montaje/Desmontaje
Riesgo de lesiones
• Asegurarse de que no queden atrapados dedos, ropa o cinturones durante el montaje y el
desmontaje.
El distribuidor entregará la silla de ruedas completamente montada y explicará los varios
elementos de control y sus usos. En este manual también se explica con más detalle las
diferentes piezas con fines de transporte.
Para montar la silla de ruedas eléctrica:
1. Montar los reposabrazos (párrafo 2.5.1).
2. Montar los reposapiés (párrafo 2.5.2).
Para desmontar la silla de ruedas eléctrica, seguir estas instrucciones a la inversa.
PRECAUCIÓN
✓

EN
NL
ES
Turios
2022-01
Antes de su uso
9
2.5.1 Montar o retirar el reposabrazos
Riesgo de lesiones y daños
• Comprobar que las almohadillas de los reposabrazos están a la misma altura en ambos lados.
Montar el reposabrazos (1) deslizando hacia abajo la vara de
soporte (2) metiéndola en el bastidor (3).
Para retirar el reposabrazos (1), tirar de él hacia arriba y sacarlo del
bastidor del asiento.
2.5.2 Montar o retirar el reposapiés.
Para instalarlo
1. Sujetar el reposapiés (4) lateralmente y colgarlo en el soporte del reposapiés (5).
2. Girar el reposapiés hacia dentro hasta que se bloquee haciendo un clic.
Para retirarlo
1. Tirar de la palanca del reposapiés (6) y girar el reposapiés (4) hacia fuera.
2. Levantar el reposapiés para retirarlo.
2.6 Primer uso y almacenamiento
Riesgo de dañar la batería
• Nunca descargar completamente la batería.
• No interrumpir el ciclo de carga; sólo desconectar el cargador de batería cuando la batería
está completamente cargada.
• Asegurarse de que la silla de ruedas se almacena en un ambiente seco para evitar el
crecimiento de moho o que se dañe la tapicería.
• Comprobar los datos técnicos de almacenamiento, véase capítulo 5.
Asegurarse de que la batería se ha cargado completamente antes de utilizar la silla de ruedas;
preguntar al distribuidor si ya se ha realizado esa tarea. Para recargar, seguir las instrucciones
de carga en §3.7.
PRECAUCIÓN
PRECAUCIÓN
1
2
3
4
5
6

EN
NL
ES
Turios
2022-01
Utilizar la silla de ruedas
10
3 Utilizar la silla de ruedas
Riesgo de lesiones
• Leer antes los capítulos anteriores e informarse sobre el uso previsto. NO utilizar la silla de
ruedas si no se han leído detenidamente y entendido completamente todas las instrucciones.
• ¡Leer también las instrucciones en el manual del panel de control y del cargador de batería!
• En caso de tener dudas o preguntas, contacte con su distribuidor especializado local,
proveedor de cuidados o asesor técnico para recibir asesoramiento.
3.1 Primera conducción
Riesgo de lesiones y daños
• Tener siempre en cuenta el alcance de giro del reposapiés y del panel de control para evitar
lesionar a otras personas o dañar objetos.
• Siempre desconectar el cargador de batería de la silla de ruedas antes de comenzar a
conducirla.
• Asegurarse de estar familiarizado con el manejo de la silla de ruedas antes de utilizarlo
en lugares concurridos y posiblemente peligrosos. Probar la silla de ruedas primero en
un área abierta y amplia con pocos transeúntes.
• Investigar los efectos del desplazamiento del centro de gravedad en el comportamiento
de la silla de ruedas, por ejemplo, en gradientes hacia arriba o abajo, suelos con
pendientes laterales, o al salvar obstáculos. Pedir ayuda a un asistente.
• La superficie del controlador se calienta levemente durante la utilización de la silla de
ruedas.
• Al conducir marcha atrás, la velocidad es reducida.
1. Asegurarse de que:
• la silla de ruedas esté en una superficie plana;
• la batería esté completamente cargada, véase el § 3.7;
• el motor esté acoplado, véase el § 3.4;
• los neumáticos estén presurizados correctamente, véase el § 4.2.1;
• la silla esté adaptada a las necesidades y a la comodidad del usuario, véase el § 3.6;
• el usuario este sentado en la postura adecuada, véase el § 3.5.
2. Seguir las instrucciones del manual del panel de control.
3. Encender la silla de ruedas.
4. Girar el controlador de velocidad a la velocidad mínima.
5. Probar la conducción hasta habituarse y realizar cualquier ajuste necesario a la silla de
ruedas.
6. Una vez que el usuario se sienta más seguro, repetir estos pasos a más velocidad.
7. Luego intentar girar, moviendo la silla de ruedas hacia delante y atrás. Repetir esto un par de
veces.
8. Asegurarse de que la silla de ruedas esté estable al acabar de conducir.
9. Apagar la silla de ruedas.
AVISO
PRECAUCIÓN

EN
NL
ES
Turios
2022-01
Utilizar la silla de ruedas
11
3.2 Conducción en el exterior
Riesgo de accidente - Ajuste su velocidad y comportamiento de
conducción.
• Tener siempre en cuenta las leyes de tráfico locales, que pueden variar según el país. Esto
incluye conducción por aceras, caminos sin asfaltar y carreteras asfaltadas.
• No conducir en carreteras con tráfico pesado.
• Tener siempre en cuenta las condiciones meteorológicas. Evitar conducir con tiempo húmedo,
calor extremo, nieve, hielo y temperaturas por debajo de cero. Consultar las especificaciones
técnicas en el capítulo 5.
• Incluso con las luces de la silla de ruedas encendidas, no es apta para conducir en carreteras
con visibilidad reducida (oscuridad, niebla, atardecer). Asegúrese de resultar visible, incluso
durante el día, utilizando prendas fluorescentes o utilizando iluminación propia en la parte
delantera y trasera de la silla de ruedas.
• Prestar atención al resto de los transeúntes, para quienes la silla de ruedas puede llegar a ser
un obstáculo. Prestar especialmente atención al girar o al echar marcha atrás. Si no se está
familiarizado con cómo conducir marcha atrás, practicar primero en un área abierta. Indicar la
dirección a la que se quiere ir antes de girar.
• Intentar conducir en línea recta al pasar por pasajes estrechos para evitar quedarse atrapado.
• Tener siempre en cuenta la distancia de freno. La distancia de frenado depende de la
velocidad, la superficie, las condiciones climatológicas, la pendiente y el peso del usuario.
3.2.1 Superación de cuestas, bordillos, obstáculos o rampas
Riesgo de lesiones por movimientos inesperados
• Utilizar un cinturón de seguridad para evitar caerse de la silla de ruedas.
• Prestar atención si el camino es arenoso, es de suelo blando, tiene agujeros o huecos, ya que
podría causar que las ruedas se atasquen o reducir la tracción de la rueda motriz.
• NO conducir en pendientes, obstáculos, escalones o bordillos de mayor tamaño que los
descritos en las especificaciones técnicas del capítulo 5.
• Siempre salvar bordillos de frente.
• No poner la silla de ruedas en modo rueda libre en pendientes. La silla de ruedas podría
empezar a moverse causando lesiones al mismo usuario o a otros transeúntes.
• No utilizar la silla de ruedas en escaleras o escaleras mecánicas.
• Sólo utilizar rampas homologadas por Vermeiren y no exceder su capacidad de carga máxima.
• Para superar con seguridad los obstáculos o las pendientes, coloque la silla de ruedas en la
posición de asiento más vertical.
Riesgo de daños
• Aparcar siempre la silla de ruedas eléctrica en superficies planas y horizontales y en lugares
de acceso fácil.
• Si fuera necesario, tomar carrerilla con la silla de ruedas para superar una pendiente, un
bordillo o una rampa. Tener cuidado con la silla de ruedas para no sufrir choques fuertes.
• Asegurarse de que la silla de ruedas no toca el suelo o la rampa debido a la inclinación de la
silla de ruedas.
• Téngase en cuenta que la distancia de frenado cuesta abajo es considerablemente mayor que
en un terreno llano.
AVISO
PRECAUCIÓN
PRECAUCIÓN
Si la silla de ruedas se para en pendiente, el freno se accionará automáticamente para
evitar que la silla de ruedas se mueva hacia delante o atrás.

EN
NL
ES
Turios
2022-01
Utilizar la silla de ruedas
12
Procedimiento
• Comenzar a conducir siguiendo las instrucciones en el § 3.1, paso 1.
• Para subir o bajar las escaleras/peldaños con la silla de ruedas, utilizar equipo elevador o
una rampa. Si no hay disponibles, se puede izar la silla manualmente con por lo menos
dos personas, agarrando el bastidor firmemente con ambas manos. No utilizar el respaldo,
las paletas de los reposapiés, los reposabrazos o las ruedas para agarrar la silla de
ruedas.
• Para superar obstáculos o inclinaciones:
1. Ajustar la silla de ruedas a su posición más estable, véase el § 3.5.
2. Conducir lo más lento posible para superar el obstáculo o inclinación.
3.3 Panel de control
Riesgo de lesiones o daños
• Téngase en cuenta que la estabilidad se reduce cuando la silla de ruedas se ajusta desde una
posición de sentado recta a una inclinada.
• Asegurarse de que hay suficiente espacio alrededor de la silla de ruedas para manejar el
respaldo y el asiento.
La forma del panel de control está descrita en un manual de usuario específico, incluido con
la entrega de la silla de ruedas. Si falta el manual, contactar con el distribuidor especializado
inmediatamente.
Colocar la palanca de mando en la posición neutral (central) antes de presionar el botón de
encendido/apagado, ya que, si no, los componentes electrónicos se bloquearán. Para
desbloquearlos, apagar y volver a encender el panel de control.
Protecciones técnicas
El panel de control permite controlar todos los componentes de conducción y los motores para
ajustar la posición del cuerpo. Por la seguridad del usuario y para evitar que la silla de ruedas se
dañe, los movimientos están monitorizados por componentes electrónicos. Eso puede resultar
en que se bloquee el movimiento, se reduzca la velocidad o se detenga completamente la silla
de ruedas. Consultar el manual de usuario del panel de control para más información.
Para evitar que se agote la batería accidentalmente, la silla de ruedas viene equipada con un
sistema de apagado automático. El sistema apaga el panel de control automáticamente cuando
no se maneja durante un tiempo. Si esto ocurriese, simplemente volver a encender el panel de
control.
3.4 Palanca de frenado y rueda libre
Riesgo de lesiones o daños
• Manejar la palanca de rueda libre sólo cuando la silla de ruedas esté APAGADA. La palanca
de rueda libre debe manejarla un asistente. NUNCA debe manejarse la palanca de rueda libre
sentado en la silla de ruedas.
• No utilizar el modo rueda libre en pendientes o inclinaciones, véase el símbolo en el
motor.
Asegurarse de que la palanca de rueda libre está en la posición de freno ANTES de
encender la silla de ruedas. Los frenos electromagnéticos NO funcionan si la silla de
ruedas está en modo rueda libre. Esto viene indicado en el panel de control. No se puede
conducir.
La silla de ruedas viene equipada con frenos electromagnéticos. El funcionamiento de los frenos
depende de la posición de la palanca de rueda libre (1).
PRECAUCIÓN
PRECAUCIÓN

EN
NL
ES
Turios
2022-01
Utilizar la silla de ruedas
13
Los frenos electromagnéticos sólo funcionan de manera automática si la palanca de rueda libre
(1) está en posición de freno. En esta situación, los frenos se accionarán si:
• la silla de ruedas está APAGADA;
• la silla de ruedas está
ENCENDIDA y se suelta la
palanca de mando.
Al soltar la palanca de mando, la silla
de ruedas comienza a pararse
lentamente y acciona los frenos.
Funcionamiento de la palanca de
rueda libre:
• Empujar las palancas hacia atrás
para poner la silla de ruedas en
modo rueda libre. Ahora el motor
está desconectado. La silla de
ruedas puede moverse
manualmente.
• Tirar de la palanca hacia dentro
para conectar el motor al accionador. Esto hay que hacerlo antes de poner en marcha la
silla de ruedas.
3.5 Trasladarse hacia/de la silla ruedas
Riesgo de lesiones o daños
• En caso de que no se pueda hacer el traslado de manera segura, pedir ayuda a alguien.
• No apoyarse en las paletas de los reposapiés durante el traslado hacia o desde la silla de
ruedas.
Traslado
1. Posicionar la silla de ruedas lo más cerca posible del usuario mientras este esté sentado en
su silla, sofá, asiento o cama.
2. Aplicar los frenos girando la palanca de rueda libre a la posición de freno, véase el § 3.4.
3. Plegar la(s) paleta(s) de los reposapiés hacia arriba para evitar apoyarse en ellas.
4. Si fuera necesario, retirar uno de los reposabrazos para hacer espacio, véase el § 2.5.1.
5. Trasladarse hacia/de la silla de ruedas utilizando la fuerza de los brazos o con la ayuda de un
asistente o un equipo de elevación.
Sentarse en la silla de ruedas
1. Sentarse en el asiento apoyando la zona lumbar contra el respaldo.
2. Girar la(s) paleta(s) del reposapiés hacia abajo y colocar los pies en las paletas.
3. Volver a colocar el reposabrazos si procede.
4. Asegurarse de que los muslos estén en posición horizontal y que los pies estén en una
posición cómoda. Ajustar si fuera necesario.
5. Asegurarse de que los brazos estén doblados y descansando cómodamente en las
almohadillas. Ajustar si fuera necesario.
Ajustar a una posición estable
Para el transporte y para cuando se salven obstáculos, la silla de ruedas tiene que ajustarse para
maximizar su estabilidad:
• Respaldo erguido
• La placa del reposapiés plegada hacia arriba
PRECAUCIÓN
Neutral
Conducción
1
1

EN
NL
ES
Turios
2022-01
Utilizar la silla de ruedas
14
3.6 Ajustes de comodidad
Riesgo de lesiones o daños
• Los siguientes ajustes de comodidad pueden realizarlos el auxiliar o el cuidador. El resto de
ajustes ha de realizarlos el distribuidor especializado siguiendo las instrucciones de
instalación, véase la introducción.
• Asegurarse de que no queden atrapados dedos, ropa o cinturones durante el ajuste.
3.6.1 Inclinación del respaldo (versión manual)
1. Tirar de la cinta en la parte inferior del respaldo para desbloquear el mecanismo.
2. Ajustar el respaldo a la posición deseada (0° - 32°, 4 escalones de 8°).
3. Soltar la cinta. Comprobar que el respaldo de resorte esté bien asegurado.
3.6.2 Inclinación del respaldo (con resorte de gas)
La inclinación del respaldo con resorte de gas se acciona mediante una palanca. Dependiendo
de la configuración elegida en el pedido, la palanca se encuentra en el respaldo o en el lado
derecho del asiento.
1. Tire de la palanca.
2. Tire/empuje el respaldo hasta la posición deseada.
3. Suelte la palanca. Asegúrese de que el respaldo esté bien fijado.
3.7 Estado de la batería y su recarga
Riesgo de lesiones y daños por incendio
• Usar exclusivamente el cargador de batería suministrado con la silla de ruedas. La utilización
de otro cargador puede ser peligroso (riesgo de incendio).
• El cargador de batería está diseñado exclusivamente para cargar las baterías suministradas
con la silla de ruedas y no debe utilizarse para cargar otras baterías.
• No modificar ninguna de las piezas suministradas como cables, baterías, conectores o
cargadores de batería. No abrir o cambiar nunca la batería o los puntos de conexión.
• Proteger la batería y el cargador de batería de las llamas, temperaturas altas y bajas (véase
el capítulo 5), humedad, luz del sol e impactos fuertes (p. ej. caídas). NO utilizar la batería en
estos casos.
• Recargar la batería en el interior con el cargador de batería, en una zona bien ventilada, y
fuera del alcance de los niños.
• Leer primero las instrucciones de usuario del cargador de batería aplicado antes de cargar la
batería de la silla de ruedas. Para más información, póngase en contacto con el distribuidor
especializado o consulte nuestro sitio web http://www.vermeiren.com/.
Riesgo de daños
• La autodescarga de la batería y la corriente de reposo de los usuarios conectados consumen
lentamente la carga de la batería. La batería puede sufrir daños irreparables si se descarga
completamente. Por tanto, asegurarse de que se recargue a tiempo (véase el manual del panel
de control).
• Léase las instrucciones de almacenamiento y mantenimiento en el § 4 y
los datos técnicos en capítulo 5.
• Sólo desconectar el cargador de batería cuando la batería está
completamente cargada; consultar los siguientes símbolos en el
cargador:
• No cargar la batería a temperaturas inferiores a 0°C. Mover la batería a
un lugar más caluroso y comenzar a cargar.
PRECAUCIÓN
AVISO
PRECAUCIÓN

EN
NL
ES
Turios
2022-01
Utilizar la silla de ruedas
15
• Mantener el punto de conexión del cargador de batería libre de polvo o cualquier otro tipo de
suciedad.
• Si hubiera algún problema que impida cargar la batería según las instrucciones siguientes,
póngase en contacto con su distribuidor especializado.
• Para las instrucciones sobre cómo recargar las baterías, consultar el manual de instalación.
Para consultar toda la información sobre el indicador del estado de la batería, léase el
manual del panel de control.
Se recomienda desconectar el cargador de batería de la red eléctrica cuando no se está
utilizando. para evitar un consumo de energía innecesario.
Para cargar la batería:
1. Conectar PRIMERO el cargador de batería a una toma de corriente de 230V CA. Conectar el
cargador de batería directamente, sin cable de extensión, a la red eléctrica (sin temporizador).
2. Enchufar el adaptador al punto de carga del panel de control.
3. Esperar hasta que la batería esté completamente cargada. Consultar el manual del cargador
de batería para más información.
4. Desconectar el cargador de batería.
5. Retirar el cargador de batería de la toma de corriente, dejar que se enfríe, y almacenar en el
bolsillo del cargador.

EN
NL
ES
Turios
2022-01
Mantenimiento
16
4 Mantenimiento
4.1 Tiempo de mantenimiento
Riesgo de lesiones y daños
Cualquier reparación o cambios sólo pueden llevarse a cabo por personal debidamente
cualificado y sólo pueden utilizarse piezas de recambio Vermeiren originales.
La última página de este manual contiene un formulario de registro para que el distribuidor
especializado pueda registrar cada mantenimiento.
La frecuencia de los mantenimientos depende de la frecuencia e intensidad de uso. Póngase en
contacto con su distribuidor para acordar un horario común para realizar inspecciones,
mantenimientos y reparaciones.
Leer las instrucciones de usuario del cargador de batería aplicado sobre su mantenimiento.
Para consultar el manual de mantenimiento, visitar el sitio web de Vermeiren:
www.vermeiren.com.
Antes de cada uso
Inspeccionar los siguientes aspectos:
• Todas las piezas: presentes, sin daños ni desgastes.
• Todas las piezas: limpias, véase el § 4.2.2.
• Ruedas, asiento, reposabrazos, reposapiés y reposacabezas (si fuera aplicable): bien
fijados.
• Estado de la batería: recargar la batería cuando sea necesario, véase el § 3.7.
• Panel de control, batería, módulo de alimentación, motores, cargador de batería, luces y
cables pertinentes: sin daño, como alambres deshilachados, rotos o expuestos.
• Estado de las ruedas/los neumáticos, véase el § 4.2.1.
• Estado de las piezas del bastidor: sin deformaciones, inestabilidad, debilidad o conexiones
sueltas.
• Asiento, respaldo, almohadillas para los brazos, almohadillas para las pantorrillas y el
reposacabezas (si fuera aplicable): sin desgastes excesivos (como abolladuras, daños o
grietas).
Ponerse en contacto con el distribuidor especializado para posibles reparaciones o sustitución
de piezas.
Cada mes
Aunque se almacene la silla de ruedas durante un periodo de tiempo largo, aún se deben
recargar las baterías cada mes. También se puede mantener el cargador de batería conectado
a la batería y a la red eléctrica durante este período. Para más información, véase el §3.7.
Anualmente o más regularmente
La silla de ruedas debe pasar por inspección y mantenimiento realizados por el distribuidor
especializado por lo menos una vez al año, o más a menudo. La frecuencia mínima de
mantenimiento depende del uso y debe, por tanto, acordarse mutuamente con el distribuidor
especializado.
Si está almacenado
Asegurarse de que la silla de ruedas se almacena en un entorno seco para evitar el crecimiento
de moho o que se dañe la tapicería.
PRECAUCIÓN

EN
NL
ES
Turios
2022-01
Mantenimiento
17
4.2 Instrucciones de mantenimiento
4.2.1 Ruedas y neumáticos
El funcionamiento debido de los frenos depende del estado de los neumáticos, el cual
puede cambiar debido al desgaste o la suciedad (agua, aceite, barro…).
• Mantener las ruedas libres de cables, pelos, arena y fibras.
• Comprobar el perfil de los neumáticos. Si la profundidad del dibujo es de menos de 1 mm,
deben sustituirse los neumáticos. Póngase en contacto con su distribuidor especializado
para este asunto.
• Inflar los neumáticos hasta alcanzar la presión correcta, (véase la indicación de presión en
los neumáticos).
• Para las instrucciones sobre cómo sustituir los neumáticos, consultar el manual de
instalación.
4.2.2 Limpieza
Riesgo de daños por humedad
• Mantener el panel de control limpio y protegerlo del agua y la lluvia.
• No utilizar nunca una manguera o un limpiador a alta presión para limpiar la silla de ruedas.
Limpiar todas las piezas rígidas de la silla de ruedas con un paño húmedo (no empapado). Si
fuera necesario, utilizar un jabón suave que sea apto para limpiar superficies barnizadas y
sintéticas.
La tapicería puede limpiarse con agua templada y jabón suave. No utilizar productos de limpieza
abrasivos.
Mantener las ranuras de ventilación del cargador de batería limpias y libres de acumulaciones
de polvo. Soplar el polvo y limpiar la carcasa del cargador de batería con un paño ligeramente
húmedo si fuera necesario.
4.2.3 Desinfección
Riesgo de daños
La desinfección sólo puede llevarla a cabo personal debidamente cualificado. Consulte con su
distribuidor especializado al respecto.
4.3 Resolución de problemas
Aunque se utilice la silla de ruedas de la manera indicada, también pueden surgir a veces
problemas técnicos.
En ese caso, póngase en contacto con su distribuidor especializado.
Riesgo de lesiones y daños a la silla de ruedas
• No intentar NUNCA reparar la silla de ruedas por su cuenta.
• Si hay algún problema con el panel de control, debe contactar con su distribuidor
especializado. El distribuidor decidirá si hay que reprogramar el panel.
En caso de avería, el panel de control mostrará un código de fallo.
Para consultar la lista de códigos de fallo del panel de control, léase el manual del panel de
control.
PRECAUCIÓN
PRECAUCIÓN
AVISO

EN
NL
ES
Turios
2022-01
Mantenimiento
18
Los siguientes síntomas pueden significar un problema grave. Se recomienda, por tanto, ponerse
en contacto con su distribuidor especializado si nota los siguientes problemas:
• Ruidos extraños;
• Juegos de cables deshilachados/dañados;
• Conectores agrietados o rotos;
• Desgaste desigual de la banda de uno de los neumáticos;
• Movimientos bruscos;
• La silla de ruedas se desvía a un lado;
• Ensamblajes de las ruedas dañados o rotos;
• La silla de ruedas no se enciende (fusible fundido);
• La silla de ruedas está encendida pero no se mueve, véase 3.4.
4.4 Vida útil prevista
La vida útil media de la silla de ruedas es de 5 años. La vida útil aumentará o disminuirá
dependiendo de la frecuencia de uso, las circunstancias de conducción y el mantenimiento.
4.5 Reutilizar
Antes de reutilizar la silla de ruedas por otra persona, desinfectarla, inspeccionarla y hacer que
pase por un mantenimiento según las instrucciones en el §4.1 y el §4.2.
4.6 Fin de vida útil
Al final de la vida útil, deberá desechar la silla de ruedas siguiendo las leyes medioambientales
de su localidad. Para transportar materiales reciclables de la silla de ruedas de manera más
cómoda, se recomienda que se desmonte primero.

EN
NL
ES
Turios
2022-01
Especificaciones técnicas
19
5 Especificaciones técnicas
Los datos técnicos expuestos a continuación son sólo válidos para esta silla de ruedas, con
configuración estándar y en condiciones ambientales óptimas. Tener en cuenta estos datos
durante la utilización de la silla para ducha. Los valores aquí expuestos dejarán de ser aplicables
si la silla de ruedas ha sido modificada, se ha dañado, o sufre de un desgaste intenso. Tener
siempre en cuenta que la conducción se verá afectada por la temperatura ambiente, la humedad,
la pendiente (conducción cuesta arriba/abajo), el tipo de superficie y el estado de la batería.
Tabla 1: Especificaciones técnicas
Marca
Vermeiren
Tipo
Silla de ruedas eléctrica, Clase B
Modelo
Turios
Peso máximo del ocupante
130 kg
Descripción
Dimensiones
Turios
Turios Element
Longitud total con reposapiés
Manual
Eléctrico
1070 mm
1060 mm
1070 mm
Anchura total
580 – 580 - 640 mm
580 mm
Peso total
Aprox. 105,8 kg
Consumo eléctrico *
6 km/h: 39 km (50Ah)
10 km/h: 25 km (50Ah)
6 km/h: 28 km (38Ah)
o 39 km (50Ah)
Pendiente nominal
6°
Subida de obstáculos
50 mm (Ruedas delanteras de 8”, 9”)
60 mm (Ruedas delanteras de 10”)
Velocidad máxima
6 km/h
10 km/h
6 km/h
Distancia de frenado mín. desde la
velocidad máx.
2100 mm
Ángulo plano del asiento
Manual
Eléctrico
0° - 2° - 4° - 6°
0° - 20°
0° - 2° - 4° - 6°
Profundidad efectiva del asiento
Manual
Eléctrico
380 mm – 500 mm
430 mm – 510 mm
400 mm – 440 mm
Ancho efectivo del asiento
390 - 450 - 510 mm
390 – 450 mm
Altura de la superficie del asiento desde
el borde delantero Asiento manual
Asiento eléctrico
450 mm – 500 mm – 550 mm
480 mm – 510 mm
450 mm
Ángulo del respaldo Manual
Eléctrico
0° - 8° - 16° - 24° - 32°
0 - 32°
0° - 8° - 16° - 24° - 32°
Altura del respaldo Manual
Eléctrico
585 mm
550 mm
585 mm
Distancia entre el reposapiés y el
asiento
320 mm – 420 mm
Ángulo de superficie de la pierna al
asiento
114°

EN
NL
ES
Turios
2022-01
Especificaciones técnicas
20
Marca
Vermeiren
Tipo
Silla de ruedas eléctrica, Clase B
Modelo
Turios
Peso máximo del ocupante
130 kg
Distancia entre el reposabrazos y el
asiento
260 mm – 335 mm
Ubicación frontal de la estructura del
reposabrazos Manual
Eléctrico
340 mm – 430 mm
Máx. 320 mm
340 mm – 430 mm
Radio de giro mínimo
Aprox. 1.600 mm
Distancia al suelo
60 mm (antivolcado)
100 mm (centro)
Diámetro de las ruedas traseras
350 x 70 mm
Tipo de ruedas traseras **
Neumáticos
Diámetro de las ruedas delanteras
200 mm – 230 mm – 260 mm
200 mm – 230 mm
Tipo de ruedas delanteras **
Neumáticos
Neumáticos antipinchazos
Descripción eléctrica
Batería (batería AGM no derramable,
libre de mantenimiento)
38 Ah, C10
44 Ah (gel, opcional)
50 Ah, C20
Motores de accionamiento
6 km/h: 2 x 150W
10 km/h: 2 x 450W
6 km/h: 2 x 150W
Módulo de alimentación
Fusible
150 AMP
Pruebas de resistencias de conformidad
con
ISO 7176-8
Pruebas de alimentación eléctrica y
sistema de control de conformidad con
ISO 7176-14
Inflamabilidad de la tapicería de
conformidad con
EN1021-2:2006
Conformidad EMC
ISO 7176-21
Grado de protección
IPX4
Nivel de ruido
< 65 dB (A)
Calificación global del alojamiento del
cinturón de seguridad
A
Temperatura de almacenamiento y uso
+5 °C ~ +41 °C
Temperatura de funcionamiento de los
componentes electrónicos
-10°C ~ +40°C
Humedad de almacenamiento y uso
30% ~ 70%
Nos reservamos el derecho a introducir cambios técnicos. Tolerancia dimensional ± 15 mm / 1,5 kg / 1,5°.
* La distancia de conducción teórica se verá reducida si la silla de ruedas se usa frecuentemente en
cuestas, terrenos accidentados o para salvar bordillos.
**Debido a que se pueden usar diferentes neumáticos, tener en cuenta la presión operativa correcta de los
neumáticos que se utilicen. Para otros diámetros de neumáticos, consultar con el distribuidor
especializado.

Turios
2022-01
Spis treści
1
EN
NL
PL
Spis treści
Spis treści .................................................................................................................. 1
Wstęp ........................................................................................................................ 2
1 Państwa produkt ........................................................................................... 3
1.1 Akcesoria ...................................................................................................... 3
2 Przed użyciem ............................................................................................... 4
2.1 Przewidziane zastosowanie .......................................................................... 4
2.2 Ogólne instrukcje bezpieczeństwa ................................................................ 4
2.3 Symbole na wózku inwalidzkim ..................................................................... 5
2.4 Transport ....................................................................................................... 5
2.5 Montaż/Demontaż ......................................................................................... 8
2.6 Pierwsze użycie i przechowywanie ............................................................... 9
3 Używanie wózka .......................................................................................... 10
3.1 Pierwsza jazda ............................................................................................ 10
3.2 Jazda na powietrzu ..................................................................................... 10
3.3 Konsola kierownicza ................................................................................... 12
3.4 Hamulec i dźwignia wolnego koła ............................................................... 12
3.5 Przesiadanie się na wózek/z wózka ............................................................ 13
3.6 Regulacje elementów mających wpływ na wygodę użytkowania ................ 14
3.7 Stan akumulatora i ładowanie ..................................................................... 14
4 Konserwacja ................................................................................................ 16
4.1 Czas konserwacji ........................................................................................ 16
4.2 Instrukcje konserwacji ................................................................................. 17
4.3 Diagnozowanie i rozwiązywanie problemów ............................................... 17
4.4 Przewidywany okres użytkowania ............................................................... 18
4.5 Ponowne użycie .......................................................................................... 18
4.6 Koniec użytkowania .................................................................................... 18
5 Dane techniczne .......................................................................................... 19

Turios
2022-01
Wstęp
2
EN
NL
PL
Wstęp
Gratulacje! Zostałeś właścicielem wózka inwalidzkiego Vermeiren!
Wózek został wykonany przez wykwalifikowany i zaangażowany personel. Zaprojektowano i
wyprodukowano go zgodnie z wysokimi standardami jakości, jakich przestrzega Vermeiren.
Dziękujemy za zaufanie firmie Vermeiren i jej produktom. Niniejsza instrukcja pomoże
właścicielowi w eksploatacji wózka inwalidzkiego i korzystaniu z jego opcji. Prosimy o uważne
przeczytanie instrukcji obsługi. Pozwoli ona na zapoznanie się z działaniem, możliwościami i
ograniczeniami wózka.
W razie pytań, które nie zostały omówione w instrukcji, prosimy o kontakt z Państwa
wyspecjalizowanym sprzedawcą. Sprzedawca chętnie służy pomocą w tym zakresie.
Ważna uwaga
Aby zapewnić bezpieczeństwo i wydłużyć okres użytkowania produktu, prosimy o dbanie o niego
oraz regularne dokonywanie przeglądów i serwisowanie.
Instrukcja obejmuje najnowsze rozwiązania zastosowane w produkcie. Firma Vermeiren ma
prawo do wprowadzania zmian w produktach tego typu bez obowiązku adaptowania lub wymiany
podobnych, poprzednio dostarczonych produktów.
Ilustracje stanowią dodatkowe objaśnienia do niniejszej instrukcji. Szczegóły przedstawionego
produktu mogą różnić się od Państwa produktu.
Dostępne informacje
W naszej witrynie internetowej http://www.vermeiren.com/ our website
http://www.vermeiren.com/ zawsze można znaleźć najnowszą wersję następujących informacji.
Prosimy regularnie odwiedzać witrynę, ponieważ możemy w niej zamieszczać zaktualizowane
informacje.
Osoby niewidome lub niedowidzące mogą pobrać elektroniczną wersję niniejszej instrukcji i
odsłuchać ją w aplikacji syntezatora mowy.
Niniejsza instrukcja użytkownika
Dla użytkownika i wyspecjalizowanego sprzedawcy
Instrukcja użytkownika konsoli kierowniczej i ładowarki akumulatora.
Dla użytkownika i specjalistycznego dystrybutora
Instrukcje instalacji (Instrukcje dotyczące dokładnej regulacji, ustawień, montażu i
demontażu)
Dla wyspecjalizowanego sprzedawcy
Instrukcja serwisowa do wózków inwalidzkich
Dla wyspecjalizowanego sprzedawcy
Deklaracja zgodności WE

Turios
2022-01
Państwa produkt
3
EN
NL
PL
1 Państwa produkt
1. Oparcie
2. Konsola kierownicza
3. Podłokietnik
4. Siedzisko
5. Podnóżek
6. Podpórka pod stopy
7. Pas bezpieczeństwa
8. Komora akumulatora
9. Koła przednie
10. Silniki napędowe
11. Koła tylne / koła napędowe
12. Światła przednie (Opcjonalne)
13. Tabliczka identyfikacyjna
1.1 Akcesoria
Dostępne są następujące akcesoria dla wózka elektrycznego Turios:
• Podpora nóg (BZ7, BZ8)
• Zagłówek (L55, L58)
• Oświetlenie
• Uchwyt na kule
• Uchwyt na kubek
• Lusterko
• Odchylana konsola kierownicza
• Pokrowiec
1
2
3
4
5
6
7
8
9
10
11
12
14

Turios
2022-01
Przed użyciem
4
EN
NL
PL
2 Przed użyciem
2.1 Przewidziane zastosowanie
W niniejszej sekcji przedstawiono krótki opis przewidzianego zastosowania wózka inwalidzkiego.
W pozostałych sekcjach instrukcje zostały opatrzone istotnymi ostrzeżeniami. W ten sposób
chcemy zwrócić uwagę użytkowników na możliwość nieprawidłowej eksploatacji produktu.
• Niniejszy wózek inwalidzki jest przeznaczony do użytku w pomieszczeniach i na zewnątrz.
• Niniejszy wózek inwalidzki jest zaprojektowany i produkowany do transportu wyłącznie jednej
(1) osoby ważącej maksymalnie 130kg. Nie jest przeznaczony do transportu towarów,
przedmiotów ani innego wykorzystania niż wcześniej opisane.
• Ten wózek inwalidzki może być obsługiwany przez użytkownika siedzącego na wózku
inwalidzkim lub może być popychany przez opiekuna. NIE WOLNO używać wózka
inwalidzkiego bez pomocy asystenta, jeśli użytkownik cierpi na zaburzenia fizyczne lub
psychiczne, które mogłyby narazić użytkownika lub inne osoby na niebezpieczeństwo podczas
jazdy na wózku. Z wymienionych powodów należy przed rozpoczęciem użytkowania wózka
zasięgnąć porady lekarza i upewnić się, że wyspecjalizowany sprzedawca zapoznał się z jego
poradą.
• Używać wyłącznie akcesoriów i części zapasowych zatwierdzonych przez Vermeiren.
• Należy się zapoznać ze wszystkimi danymi technicznymi i ograniczeniami wózka, które
wskazano w rozdziale 5.
• Gwarancja na produkt jest udzielona przy założeniu normalnego użytkowania i konserwacji,
opisanych w niniejszej instrukcji. Uszkodzenie produktu spowodowane nieprawidłową
eksploatacją lub brakiem konserwacji spowoduje unieważnienie gwarancji.
2.2 Ogólne instrukcje bezpieczeństwa
Ryzyko obrażeń i/lub uszkodzeń
Należy przeczytać zalecenia podane w niniejszej instrukcji i postępować zgodnie z nimi.
Niestosowanie się do tych zaleceń może spowodować uraz lub uszkodzenie wózka
inwalidzkiego.
Podczas eksploatacji należy pamiętać o następujących ogólnych ostrzeżeniach:
• Nie używać wózka, jeśli użytkownik jest pod wpływem alkoholu, leków i innych substancji,
które mogą mieć wpływ na zdolność jazdy.
• Należy pamiętać, że niektóre części wózka mogą stać się bardzo gorące lub zimne ze
względu na temperaturę otoczenia, promieniowanie słoneczne, urządzenia grzewcze itp. lub
rozgrzać się od silnika podczas jazdy. Należy zachować ostrożność podczas ich dotykania.
Gdy jest zimno, należy nosić odzież ochronną. Po jeździe poczekać, aż wózek/silnik ostygnie.
• Przed włączeniem wózka zwrócić uwagę na sytuację/otoczenie użytkownika. Przed
ruszeniem dobrać prędkość do warunków jazdy. Zalecamy, aby w pomieszczeniach jeździć
z najniższą prędkością. W przypadku jazdy na zewnątrz można dostosować prędkość do
takiej, przy której użytkownik czuje się wygodnie i bezpiecznie.
• NALEŻY ZAWSZE pamiętać, że wózek może się nagle zatrzymać, gdy rozładuje się
akumulator lub zadziała zabezpieczenie chroniące wózek przed dalszymi uszkodzeniami.
Należy też sprawdzić możliwe przyczyny opisane w § 4.3. Należy zapinać pas
bezpieczeństwa, aby zapobiegać obrażeniom.
• Wózek został przetestowany pod kątem kompatybilności elektromagnetycznej. Zgodność z
normą została potwierdzona, patrz rozdział 5. Niemniej jednak, źródła pól
elektromagnetycznych, takie jak telefony komórkowe, agregaty prądotwórcze i źródła energii
wielkiej mocy mogą zakłócić działanie mechanizmów jezdnych wózka. Z drugiej strony,
PRZESTROGA

Turios
2022-01
Przed użyciem
5
EN
NL
PL
układy elektroniczne wózka mogą zakłócić działanie innych urządzeń elektronicznych, takich
jak systemy alarmowe w sklepach lub drzwi automatyczne. Dlatego zalecamy, aby regularnie
kontrolować wózek pod kątem uszkodzeń i zużycia, ponieważ mogą one powodować większe
zakłócenia (patrz też rozdział 4).
• Należy jeździć tylko po płaskich powierzchniach, na których oba koła napędowe dotykają
podłoża, a styk wózka z podłożem umożliwia bezpieczną jazdę i obsługę.
• Bez konsultacji z producentem wózka nie wolno w żaden sposób modyfikować ani wymieniać
punktów bezpieczeństwa wózka, części i elementów konstrukcyjnych i ramy.
• Zwracać uwagę, aby ręce, ubrania, pasy, klamry ani biżuteria nie zostały podczas
eksploatacji pochwycone przez koła ani inne ruchome części.
Korzystając z wózka inwalidzkiego musisz być świadomym, że w zależności od użytych ustawień
może on kolidować z niektórymi systemami antykradzieżowymi. Może to spowodować
uruchomienie alarmu w sklepie.
W przypadku wystąpienia poważnego incydentu z udziałem produktu, należy powiadomić firmę
Vermeiren lub specjalistycznego sprzedawcę, jak również właściwe władze w swoim kraju.
2.3 Symbole na wózku inwalidzkim
Do wózka inwalidzkiego mają zastosowanie symbole z następującej listy. Symbole można
znaleźć w odpowiednich normach ISO (ISO 7000, ISO 7001 oraz IEC 417).
Maksymalna masa użytkownika w kg
Do użytku na zewnątrz/w pomieszczeniach (nie dotyczy ładowarki akumulatora)
Wyłącznie do użytku w pomieszczeniach (dotyczy ładowarki akumulatora)
Maksymalne bezpieczne nachylenie terenu w ° (stopniach).
Prędkość maksymalna
Oznaczenie typu
Ryzyko przycięcia
2.4 Transport
Ryzyko uszkodzenia
Należy zabezpieczyć wózek inwalidzki przed uszkodzeniami podczas transportu.
2.4.1 Przesuwanie na bok
Użyć konsoli kierowniczej, aby przejechać wózkiem w odpowiednie miejsce.
W przeciwnym razie przestawić wózek w tryb wolnego koła (patrz §3.4) i przepchnąć go za
pomocą rączki do pchania.
PRZESTROGA

Turios
2022-01
Przed użyciem
6
EN
NL
PL
2.4.2 Transport drogą lotniczą
Wózek jest wyposażony w szczelne akumulatory typu AGM. Dlatego jest możliwe
transportowanie wózka (w całości) drogą lotniczą. Przed zarezerwowaniem lotu należy się
skonsultować z linią lotniczą, aby zasięgnąć informacji na temat właściwych procedur
postępowania. Przed przekazaniem wózka personelowi portu lotniczego należy odłączyć
akumulator od wózka, patrz Instrukcja instalacji.
2.4.3 Transport w pojeździe jako bagaż
Najlepszym sposobem transportu elektrycznego wózka inwalidzkiego w samochodzie jest
wjechanie nim do środka za pomocą podjazdu. W przypadku braku doświadczenia we wjeżdżaniu
za pomocą podjazdu, można włączyć tryb położenia neutralnego i wepchnąć wózek do
samochodu za pomocą podjazdu. W razie potrzeby zdemontować wózek inwalidzki.
1. Użytkownik wózka powinien przesiąść się na siedzenie pojazdu, patrz §3.5.
2. Usunąć wszystkie ruchome części przed transportem (podnóżki, podłokietniki itp.).
3. Części ruchome można bezpiecznie przechowywać za siedzeniem pasażera lub w bagażniku.
4. Wjechać lub wprowadzić elektryczny wózek inwalidzki do samochodu za pomocą podjazdów
lub skorzystać z pomocy 2 osób, aby wstawić wózek inwalidzki do samochodu, wykorzystując
nieruchome części ram.
5. Przymocować mocno części ramy do pojazdu.
6. Załączyć tryb jazdy wózka (włączyć hamulce postojowe) i sprawdzić, czy moduł sterowania
jest wyłączony.
2.4.4 Transport w pojeździe jako siedzisko dla użytkownika
Niniejszy wózek inwalidzki przeszedł pomyślnie test zderzeniowy ISO 7176-19: 2008.
Jego konstrukcja i wyniki testu umożliwiają używanie go jako siedziska w pojeździe
silnikowym wyłącznie przodem do kierunku jazdy. Wózek inwalidzki został
przetestowany dynamicznie za pomocą manekina testowego ATD (anthropomorphic test
device – antropomorficzne urządzenie testowe) przy użyciu czteropunktowego systemu
pasów mocujących i 3-punktowego systemu urządzeń przytrzymujących (pasów
bezpieczeństwa). Niemniej jednak zaleca się, aby użytkownik przesiadł się na jeden z foteli
i zastosował pasy bezpieczeństwa zamontowane w pojeździe. Wózek powinno się
przewozić jako bagaż w odrębnym przedziale (ładunkowym), patrz §2.4.3 .
Ryzyko obrażeń i uszkodzeń
Należy używać pasa biodrowego wózka oraz dostępnych pasów trzypunktowych w
pojeździe, aby zapobiec uderzeniom głowy i klatki piersiowej o elementy pojazdu.
Nie używać elementów wspierających postawę, aby przytrzymywać użytkownika w
pojeździe, jeśli nie są one oznaczone jako zgodne z wymaganiami normy ISO 7176-19:2008.
Jeśli wózek będzie uczestniczył w jakiejkolwiek kolizji pojazdu, powinien zostać przed
ponownym użyciem sprawdzony przez wyspecjalizowanego sprzedawcę lub producenta.
Zabezpieczanie wózka inwalidzkiego
1. Upewnić się, że w pojeździe jest dostępny odpowiedni zgodny z ISO 10542 czteropunktowy
system mocowania wózka oraz system pasów bezpieczeństwa użytkownika, a także że oba
systemy nie są zużyte, zabrudzone, uszkodzone lub zniszczone.
2. Przy użyciu konsoli kierowniczej ustawić wózek w stabilnym położeniu, patrz §3.6.
3. Zdemontować wszystkie zamontowane akcesoria, takie jak tace i sprzęt do wspomagania
oddychania. Umieścić je w bezpiecznym miejscu. Jeśli nie jest to możliwe, przymocować je
do wózka, ale oddalić od użytkownika, a między tacą i użytkownikiem umieścić podkładkę
pochłaniającą energię.
4. Przy użyciu rampy wprowadzić wózek (z użytkownikiem) do samochodu, zgodnie z
instrukcjami w §3.2.1.
OSTRZEŻENIE

Turios
2022-01
Przed użyciem
7
EN
NL
PL
5. Ustawić użytkownika przodem do kierunku jazdy, pośrodku między szynami do mocowania
zainstalowanymi w podłodze pojazdu.
6. Upewnić się, że użytkownik siedzi możliwie pionowo. Jeśli stan użytkownika na to nie pozwala,
przeprowadzić ocenę ryzyka, aby ocenić bezpieczeństwo użytkownika podczas transportu.
7. Wyłączyć konsolę kierowniczą i upewnić się, że dźwignia wolnego koła jest w trybie
parkowania, patrz §3.4.
8. Położenie każdego punktu mocowania na wózku jest oznaczone następującym
symbolem:
9. Sprawdzić, czy końcówka elementu mocującego jest zgodna z punktami mocowania wózka.
10. Przyczepić przednie haki pasa mocującego do punktów mocowania (A) na wózku, postępując
zgodnie z instrukcjami dostawcy systemu pasów mocujących.
11. Przestawić dźwignię wolnego koła do położenia wolnego koła i przetoczyć wózek do tyłu, aby
naciągnąć przednie pasy, patrz §3.4.
12. Zaczepić tylne haki pasa mocującego do punktów mocowania (B) z tyłu w taki sam sposób.
13. Obrócić dźwignię wolnego koła z powrotem do położenia parkowania, patrz §3.4.
Zabezpieczanie użytkownika
1. Zapiąć pas biodrowy wózka.
2. Zapiąć pasy bezpieczeństwa pojazdu zgodnie z
instrukcjami producenta systemu pasów.
Pas biodrowy przeprowadzić nisko z przodu miednicy,
aby kąt pasa biodrowego znajdował się w preferowanej
strefie od 30° do 75° względem poziomu, tak jak na
ilustracji.
Lepszy jest bardziej stromy (większy) kąt w tej strefie.
3. Naciągnąć pas ciasno, zgodnie z instrukcjami producenta
systemu pasów, ale tak, aby użytkownikowi nie było niewygodnie.
4. Upewnić się, że pas bezpieczeństwa jest połączony w prostej linii z punktem mocowania w
pojeździe i że pas nie jest nigdzie zagięty, np. na osi tylnego koła.
5. Klamrę pasa ustawić tak, aby przycisk zwalniania nie dotykał do elementów wózka w razie
zderzenia.
6. Upewnić się, że pasy nie są skręcone ani odsunięte od ciała, jak na ilustracji 1.
B
A

Turios
2022-01
Przed użyciem
8
EN
NL
PL
7. Upewnić się, że pasy barkowe przebiegają przez barki, patrz ilustracja 2.
Pasy nie mogą być odsunięte od ciała
przez elementy wózka, takie jak
podłokietniki lub koła.
Pasy stykają się w pełni z barkiem,
klatką piersiową i miednicą.
Pas biodrowy nisko na miednicy, blisko
stawu biodrowego
2.5 Montaż/Demontaż
Ryzyko obrażeń
• Upewnić się, że podczas (de)montażu palce, ubrania, klamry itp. nie zostaną pochwycone i
nie zakleszczą się między częściami.
Twój sprzedawca dostarcza wózek w pełni zmontowany i wyjaśnia różne elementy obsługi oraz
ich zastosowanie. Zapewniamy również dalsze, szczegółowe wyjaśnienia dotyczące różnych
części do celów transportowych.
Aby złożyć elektryczny wózek inwalidzki:
1. Zamontować podłokietniki (par. 2.5.1).
2. Zamontować podnóżki (par. 2.5.2).
Aby zdemontować elektryczny wózek inwalidzki, wykonaj powyższe instrukcje w odwrotnej
kolejności.
2.5.1 Montaż lub demontaż podłokietnika
Ryzyko obrażeń i/lub uszkodzeń
• Upewnić się, że poduszki podłokietników po obu stronach są na takiej samej wysokości.
Zamontować podłokietnik (1), wsuwając pręt nośny (2) w ramę (3).
Aby zdjąć podłokietnik (1), unieść i wyjąć go z ramy siedziska.
PRZESTROGA
PRZESTROGA
1
2
3
✓

Turios
2022-01
Przed użyciem
9
EN
NL
PL
2.5.2 Montaż lub demontaż podnóżka
Instalacja
1. Trzymając podnóżek (4) odchylony w bok, zawiesić go na podporze
(5).
2. Obrócić podnóżek do środka, aż zablokuje się w miejscu.
Wyjmowanie
1. Pociągnąć dźwignię podnóżka (6) i odchylić podnóżek (4) na zewnątrz.
2. Podnieść podnóżek, aby go wyjąć.
2.6 Pierwsze użycie i przechowywanie
Ryzyko uszkodzenia akumulatora
• Nie wolno dopuszczać do całkowitego rozładowania się akumulatora.
• Nie przerywać cyklu ładowania. Ładowarkę odłączyć dopiero wtedy, gdy akumulator będzie w
pełni naładowany.
• Upewnić się, że wózek jest przechowywany w suchym stanie, aby zapobiec wzrostowi pleśni i
uszkodzeniu tapicerki.
• Szczegóły techniczne na temat przechowywania: patrz rozdział 5.
Przed rozpoczęciem użytkowania wózka inwalidzkiego upewnić się, że akumulator jest w pełni
naładowany. Skonsultować się ze sprzedawcą, który poinformuje, czy akumulator został już
naładowany. Aby naładować, wykonać instrukcje ładowania w §3.7.
PRZESTROGA
4
5
6

Turios
2022-01
Używanie wózka
10
EN
NL
PL
3 Używanie wózka
Ryzyko obrażeń
• Zacząć od przeczytania poprzednich rozdziałów i zaznajomienia się z przewidzianym
zastosowaniem. NIE używać wózka, dopóki wszystkie instrukcje nie zostaną przeczytane i
zrozumiane.
• Należy też przeczytać instrukcje konsoli kierowniczej i instrukcję obsługi ładowarki!
• W razie wątpliwości i pytań prosimy o kontakt z lokalnym wyspecjalizowanym sprzedawcą,
opiekunem lub doradcą technicznym, który udzieli pomocy.
3.1 Pierwsza jazda
Ryzyko obrażeń i uszkodzeń
• Zawsze pamiętać o zasięgu wychylenia podnóżka i konsoli kierowniczej, aby nie potrącić i
poranić ludzi ani nie uszkodzić innych obiektów.
• Przed rozpoczęciem jazdy zawsze odłączyć ładowarkę od wózka.
• Użytkownik powinien się upewnić, że potrafi obsługiwać wózek, zanim zacznie jeździć
w zatłoczonych i potencjalnie niebezpiecznych miejscach. Należy najpierw poćwiczyć
na szerokiej otwartej przestrzeni, gdzie jest mało osób postronnych.
• Należy sprawdzić, jaki wpływ na zachowanie się wózka ma przesunięcie środka
ciężkości, np. na podjazdach i zjazdach, na podłożach nachylonych w bok i podczas
pokonywania przeszkód. Należy zadbać o pomoc asystenta.
• Podczas używania powierzchnia konsoli lekko się nagrzewa.
• Podczas jazdy do tyłu prędkość jest mniejsza niż przy jeździe do przodu.
1. Upewnić się, że:
• wózek stoi na płaskiej powierzchni;
• akumulator jest całkowicie naładowany, patrz § 3.7;
• silnik jest sprzęgnięty, patrz § 3.4;
• opony są prawidłowo napompowane, patrz § 4.2.1;
• wózek jest wyregulowany odpowiednio do potrzeb użytkownika i zapewnia mu wygodę,
patrz §3.6;
• użytkownik siedzi w prawidłowej pozycji, patrz § 3.5.
2. Wykonać czynności zamieszczone w instrukcji konsoli kierowniczej.
3. Włączyć wózek.
4. Obrócić regulator prędkości do najwolniejszego ustawienia.
5. Przećwiczyć jazdę i wyregulować elementy wózka.
6. Gdy użytkownik poczuje się pewniej, może powtórzyć próby jazdy z wyższą prędkością.
7. Teraz można spróbować skręcać, jadąc do przodu i do tyłu. Powtórzyć kilka razy.
8. Po zakończeniu jazdy upewnić się, że wózek stoi stabilnie.
9. Wyłączyć wózek.
3.2 Jazda na powietrzu
Ryzyko wypadku — Dostosować sposób prowadzenia i prędkość.
• Uwzględnić lokalne przepisy ruchu drogowego; w każdym kraju mogą być różne. Dotyczy to
jazdy po chodnikach, drogach gruntowych i utwardzonych.
• Nie jeździć po drogach, na których jest duże natężenie ruchu.
• Uwzględnić warunki pogodowe. Unikać jazdy w warunkach wilgotności, upału, śniegu,
gołoledzi, temperatur poniżej zera; patrz parametry techniczne w rozdziale 5.
OSTRZEŻENIE
PRZESTROGA
OSTRZEŻENIE

Turios
2022-01
Używanie wózka
11
EN
NL
PL
• Wózek jest wprawdzie wyposażony w światła, ale mimo ich włączenia nie nadaje się do jazdy
po drogach publicznych w warunkach słabej widoczności (ciemność, mgła, zmrok). Użytkownik
powinien się upewnić, że jest dobrze widoczny, także w świetle dziennym. Powinien nosić
odblaskową odzież i/lub we własnym zakresie zainstalować światła z przodu i z tyłu wózka.
• Zwracać uwagę na innych użytkowników dróg, dla których wózek może być przeszkodą.
Szczególną uwagę należy zwracać podczas skrętów i cofania. Jeśli użytkownik nie ma
doświadczenia w jeździe do tyłu, powinien przed rozpoczęciem jazdy poćwiczyć na otwartej
przestrzeni. Sygnalizować zamiar skrętu przed skręceniem.
• W wąskich przejazdach jechać prosto, aby wózek się nie zablokował.
• Pamiętać o drodze hamowania. Warto pamiętać, że droga hamowania zależy od prędkości,
nawierzchni, pogody, nachylenia terenu i masy użytkownika.
3.2.1 Pokonywanie zboczy, krawężników, przeszkód i podjazdów
Ryzyko obrażeń w wyniku niespodziewanych manewrów
• Należy zapinać pas bezpieczeństwa, aby bezpiecznie siedzieć na wózku.
• Uważać, jeśli droga jest piaszczysta, ma nawierzchnię z miękkiego gruntu, są w niej dziury lub
szczeliny. Wszystko to może spowodować ugrzęźnięcie kół i/lub zmniejszenie trakcji koła
napędowego.
• NIE jeździć po zboczach, przeszkodach, stopniach i krawężnikach, których rozmiar jest
większy niż opisany w parametrach technicznych w rozdziale 5.
• Krawężniki należy zawsze pokonywać od przodu.
• Gdy wózek znajduje się na zboczu, nie przestawiać go w tryb wolnego koła. Wózek może
zacząć jechać, powodując obrażenia ciała użytkownika i osób postronnych.
• Nie używać wózka na schodach zwykłych i ruchomych.
• Używać wyłącznie podjazdów zaakceptowanych przez Vermeiren. Nie przekraczać ich
maksymalnego obciążenia.
• Aby bezpiecznie pokonać przeszkody lub pochyłości, należy ustawić wózek inwalidzki w
najbardziej wyprostowanej pozycji siedzącej.
Ryzyko uszkodzenia
• Wózek elektryczny należy zawsze parkować na poziomych płaskich powierzchniach, w
miejscach, które są łatwo dostępne.
• Jeśli jest to konieczne, należy się lekko rozpędzić przed najechaniem na wzniesienie,
przeszkodę, krawężnik lub podjazd. Unikać sytuacji, w której użytkownik lub wózek spotyka
się z silnym odbiciem.
• Upewnić się, że wózek nie jest wychylony tak, aby dotykał podłoża lub podjazdu.
• Należy pamiętać, że droga hamowania na zboczach może być znacznie dłuższa niż na
równym podłożu.
Procedura
• Rozpocząć jazdę zgodnie z instrukcjami zawartymi w § 3.1, krok 1.
• Aby wjeżdżać i zjeżdżać wózkiem po schodach/stopniach, używać sprzętu do
podnoszenia lub podjazdu. Jeśli nie są dostępne, wózek mogą podnieść ręcznie co
najmniej dwie osoby, trzymające mocno ramę wózka obiema rękami. Nie chwytać wózka
za oparcie, podpórki pod stopy, podłokietniki ani koła.
• Pokonywanie przeszkód i nachylonych odcinków:
1. Ustawić wózek w najbardziej stabilnym położeniu, patrz § 3.5.
2. Jechać możliwie najwolniej, aby pokonać przeszkodę lub nachylony odcinek.
PRZESTROGA
PRZESTROGA
W przypadku zatrzymania się na zboczu, hamulec załączy się automatycznie, aby zapobiec
jeździe wózka do przodu lub do tyłu.

Turios
2022-01
Używanie wózka
12
EN
NL
PL
3.3 Konsola kierownicza
Ryzyko obrażeń i uszkodzeń
• Uwaga: stabilność wózka jest mniejsza, gdy wózek zostanie przestawiony z pozycji siedzenia
prosto do pozycji nachylonej.
• Upewnić się, że wokół wózka jest wystarczająco dużo miejsca na regulację oparcia i siedziska.
Obsługa konsoli kierowniczej jest opisana w osobnej instrukcji użytkownika, dołączonej do
wózka. Jeśli brak jest instrukcji, natychmiast skontaktować się z wyspecjalizowanym
sprzedawcą.
Ustawić joystick w położeniu neutralnym (środkowym) przed naciśnięciem przycisku wł./wył.
W przeciwnym razie układy elektroniczne zostaną zablokowane. Aby anulować tę blokadę,
wyłączyć konsolę kierowniczą i włączyć ją jeszcze raz.
Zabezpieczenia techniczne
Konsola kierownicza umożliwia sterowanie wszystkimi elementami napędowymi i silnikami
służącymi do regulacji położenia ciała. Ruchami wózka sterują układy elektroniczne, aby
zwiększyć bezpieczeństwo użytkownika i zapobiec uszkodzeniu wózka. Może to spowodować
blokadę, zmniejszenie prędkości lub całkowite zatrzymanie. Aby uzyskać więcej informacji,
należy przeczytać instrukcję użytkownika.
Wózek jest wyposażony w system automatycznego wyłączania zasilania, aby zapobiec
przypadkowemu rozładowaniu się akumulatora. System automatycznie wyłącza konsolę
kierowniczą, gdy przez pewien czas nie jest używana. W takim przypadku wystarczy ponownie
włączyć konsolę.
3.4 Hamulec i dźwignia wolnego koła
Ryzyko obrażeń i uszkodzeń
• Dźwignię wolnego koła można przestawiać tylko, gdy wózek jest WYŁĄCZONY. Dźwignię
wolnego koła powinien obsługiwać asystent. NIGDY nie obsługiwać dźwigni w pozycji
siedzącej.
• Nie używać trybu wolnego koła na zboczach i nachylonych odcinkach, patrz symbol
na silniku:
PRZED WŁĄCZENIEM wózka upewnić się, że dźwignia wolnego koła jest w pozycji
hamowania. Hamulce elektromagnetyczne NIE działają, gdy wózek jest w trybie wolnego
koła. Widać to na konsoli kierowniczej. Jazda jest wówczas niemożliwa.
Wózek jest wyposażony w hamulce elektromagnetyczne. Działanie hamulców zależy od
położenia dźwigni wolnego koła (1).
Hamulce elektromagnetyczne działają automatycznie wyłącznie wtedy, gdy dźwignia wolnego
koła (1) jest w pozycji hamowania. W takiej sytuacji hamulce zaczynają hamować, gdy:
• wózek jest WYŁĄCZONY;
• wózek jest WŁĄCZONY, a joystick jest puszczony.
Puszczenie joysticka powoduje, że wózek łagodnie się zatrzymuje i aktywuje hamulce.
PRZESTROGA
PRZESTROGA

Turios
2022-01
Używanie wózka
13
EN
NL
PL
Obsługa dźwigni wolnego koła:
• Obrócić dźwignię do tyłu, aby
przestawić wózek w tryb wolnego
koła. Silnik jest teraz rozłączony.
Wózek można przestawić ręcznie.
• Przesunąć dźwignię do środka,
aby podłączyć silnik do układu
przeniesienia napędu. Należy to
zrobić przed uruchomieniem
wózka.
3.5 Przesiadanie się na wózek/z wózka
Ryzyko obrażeń i uszkodzeń
• Jeśli użytkownik nie może się bezpiecznie przesiąść, powinien poprosić o pomoc.
• Podczas przesiadania się na wózek/z wózka nie należy stać na podpórkach pod stopy.
Przesiadanie się
1. Ustaw wózek możliwie najbliżej siebie, siedząc na krześle, kanapie, fotelu, łóżku itp.
2. Zaciągnąć hamulce przez obrócenie dźwigni wolnego koła do pozycji hamowania, patrz § 3.4.
3. Złożyć podpórki pod stopy w górę, aby na nich nie stanąć.
4. W razie konieczności wyjąć jeden z podłokietników, aby zrobić miejsce, patrz § 2.5.1.
5. Przemieścić się do / z wózka inwalidzkiego używając siły ramion lub korzystając z pomocy
pomocnika (pomocników) lub urządzenia do podnoszenia.
Siedzenie na wózku
1. Usiąść na siedzisku tak, aby dolna część pleców opierała się o oparcie.
2. Obrócić podpórki pod stopy w dół i postawić na nich stopy.
3. Wymienić podłokietnik w razie potrzeby.
4. Upewnić się, że uda są położone poziomo, a stopy spoczywają wygodnie. Ustawić w razie
potrzeby.
5. Upewnić się, że ramiona są zgięte i spoczywają wygodnie na poduszkach podłokietników.
Ustawić w razie potrzeby.
Dopasowywanie do stabilnej pozycji
Dla celów transportu i pokonywania przeszkód wózek należy wyregulować tak, aby uzyskać jego
maksymalną stabilność:
• Oparcie pionowo
• Złożona podpórka pod stopy
PRZESTROGA
Luz
Jazda
1
1

Turios
2022-01
Używanie wózka
14
EN
NL
PL
3.6 Regulacje elementów mających wpływ na wygodę użytkowania
Ryzyko obrażeń i uszkodzeń
• Następujące regulacje elementów mających wpływ na wygodę użytkowania może
przeprowadzać asystent lub pomocnik. Wszystkie inne regulacje wykonuje nasz
wyspecjalizowany sprzedawca, postępując zgodnie z instrukcją instalacji, patrz wstęp.
• Upewnić się, że podczas regulacji palce, ubrania, klamry itp. nie zostaną pochwycone i nie
zakleszczą się między częściami.
3.6.1 Nachylenie oparcia (wersja manualna)
1. Pociągnąć pasek w dolnej części oparcia, aby odblokować mechanizm.
2. Ustawić oparcie w żądanym położeniu (0° - 32°, 4 kroków po 8°).
3. Zwolnić pasek. Upewnij się, że oparcie jest prawidłowo założone.
3.6.2 Pochylenie oparcia (ze sprężyną gazową)
Pochylenie oparcia ze sprężyną gazową obsługiwane jest za pomocą dźwigni. W zależności od
konfiguracji wybranej podczas zamawiania, dźwignia znajduje się na oparciu lub po prawej
stronie siedziska.
1. Pociągnąć dźwignię.
2. Pociągnąć/popchnąć oparcie do żądanej pozycji.
3. Zwolnić dźwignię. Upewnij się, że oparcie jest dobrze zamocowane.
3.7 Stan akumulatora i ładowanie
Ryzyko obrażeń i uszkodzeń mienia w wyniku pożaru
• Używać wyłącznie ładowarki dostarczonej z wózkiem. Stosowanie innej ładowarki może być
niebezpieczne (zagrożenie pożarem).
• Ładowarka jest przeznaczona wyłącznie do ładowania akumulatora dostarczonego z wózkiem.
Nie wolno nią ładować innych akumulatorów.
• Nie wolno modyfikować dostarczonych części, takich jak, kable, wtyczki lub ładowarka. Nigdy
nie otwierać ani nie modyfikować akumulatora ani terminali.
• Chronić akumulator i ładowarkę przed ogniem, wysokimi i niskimi temperaturami (patrz rozdział
5), wilgocią, światłem słonecznym, silnymi uderzeniami (np. upadkiem). W takim razie NIE
używać akumulatora.
• Ładować akumulator przy użyciu ładowarki, w pomieszczeniach, w dobrze wentylowanym
miejscu, poza zasięgiem dzieci.
• Przed ładowaniem akumulatora wózka zapoznać się z instrukcją użytkownika dołączonej
ładowarki. Więcej informacji można znaleźć u wyspecjalizowanego sprzedawcy lub w naszej
witrynie internetowej http://www.vermeiren.com/
Ryzyko uszkodzenia
• Proces samorozładowania i prąd spoczynkowy podłączonych użytkowników powoduje
powolne rozładowanie się akumulatora. Pełne rozładowanie akumulatora może spowodować
jego nieodwracalne uszkodzenie. Należy pamiętać, aby w odpowiednim czasie ładować
akumulator (patrz podręcznik konsoli kierowniczej).
• Zapoznać się z instrukcjami przechowywania i konserwacji w §4 oraz szczegółami
technicznymi w rozdziale 5.
UWAGA
OSTRZEŻENIE
PRZESTROGA

Turios
2022-01
Używanie wózka
15
EN
NL
PL
• Ładowarkę odłączyć dopiero wtedy, gdy akumulator będzie w pełni
naładowany, por. następujące symbole na ładowarce:
• Nie ładować akumulatora w temperaturze poniżej 0°C. Przenieść
akumulator w cieplejsze miejsce i rozpocząć ładowanie.
• Terminal ładowarki powinien być czysty, wolny od kurzu i innych
zabrudzeń.
• W razie problemów z ładowaniem akumulatora zgodnie z niniejszymi
instrukcjami skontaktować się z wyspecjalizowanym sprzedawcą.
• Instrukcje dotyczące wymiany akumulatora można znaleźć w instrukcji instalacji.
Wszelkie informacje na temat wskazania stanu akumulatora znajdują się w podręczniku
konsoli kierowniczej.
Zaleca się, aby odłączyć ładowarkę od sieci, gdy jest nieużywana. Oszczędza to energię.
Ładowanie akumulatora:
1. NAJPIERW podłączyć ładowarkę do gniazdka 230 V AC. Ładowarkę należy podłączać do
gniazdka bezpośrednio, bez przedłużaczy i wyłączników czasowych.
2. Podłączyć zasilacz do terminala w konsoli kierowniczej.
3. Poczekać, aż akumulator się całkowicie naładuje. Więcej informacji zawiera instrukcja
ładowarki.
4. Odłączyć ładowarkę.
5. Odłączyć ładowarkę od gniazdka, poczekać, aż ostygnie i schować w kieszeni na ładowarkę.

Turios
2022-01
Konserwacja
16
EN
NL
PL
4 Konserwacja
4.1 Czas konserwacji
Ryzyko obrażeń i uszkodzeń
Naprawy i wymiana części mogą być przeprowadzane tylko przez przeszkolone osoby i należy
korzystać z oryginalnych części zamiennych Vermeiren.
Na ostatniej stronie instrukcji znajduje się formularz dla wyspecjalizowanego sprzedawcy,
służący do odnotowywania wszystkich czynności serwisowych.
Częstotliwość serwisu zależy od częstotliwości i intensywności użytkowania. Skontaktować się
ze sprzedawcą, aby uzgodnić harmonogram kontroli/konserwacji/napraw.
Przeczytać instrukcje użytkownika dostarczonej ładowarki dotyczące konserwacji.
Instrukcję konserwacji można znaleźć w witrynie Vermeiren: www.vermeiren.com.
Przed każdym użyciem
Sprawdzić następujące punkty:
• Wszystkie części: obecne, nieuszkodzone i niezużyte.
• Wszystkie części: czyste, patrz § 4.2.2.
• Koła, siedzisko, podłokietniki, podpórka pod stopy, zagłówek (jeśli dotyczy): dobrze
zabezpieczone.
• Stan akumulatora: naładować akumulator w razie potrzeby, patrz §3.7.
• Konsola kierownicza, akumulator, moduł zasilania, silniki, ładowarka, światła, okablowanie:
nieuszkodzone, np. żadne przewody nie są przetarte, przerwane lub pozbawione izolacji.
• Stan kół/opon, patrz § 4.2.1.
• Stan części ramy: brak odkształceń, niestabilności, osłabień, poluzowanych połączeń.
• Siedzisko, oparcie, poduszki podłokietnika i zagłówek (jeśli dotyczy): brak nadmiernego
zużycia (wgnieceń, uszkodzeń, rozerwań).
Skontaktować się z wyspecjalizowanym sprzedawcą w kwestii ewentualnych napraw lub
wymiany części.
Co miesiąc
Jeśli wózek jest przechowywany przez dłuższy czas, należy co miesiąc doładowywać akumulator.
W tym okresie ładowarka może być cały czas podłączona do akumulatora i sieci. Więcej
informacji: patrz §3.7.
Co roku lub częściej
Zlecać kontrolę i serwis wózka wyspecjalizowanemu sprzedawcy raz w roku lub częściej.
Minimalna częstotliwość czynności konserwacyjnych zależy od natężenia eksploatacji. Dlatego
należy ją uzgodnić z wyspecjalizowanym sprzedawcą.
W przypadku przechowywania
Upewnić się, że wózek jest przechowywany w suchym miejscu, aby zapobiec wzrostowi pleśni i
uszkodzeniu tapicerki.
PRZESTROGA

Turios
2022-01
Konserwacja
17
EN
NL
PL
4.2 Instrukcje konserwacji
4.2.1 Koła i opony
Prawidłowe funkcjonowanie hamulców zależy od stanu opon, który zmienia się w
zależności od zużycia i zanieczyszczenia (woda, olej, błoto itp.).
• Koła powinny być czyste i wolne od drutów, włosów, piasku i włókien.
• Sprawdzić profil opon. Jeśli bieżnik jest płytszy niż 1 mm, opony należy wymienić.
Skontaktować się z wyspecjalizowanym sprzedawcą w tej sprawie.
• Opony pneumatyczne napompować do odpowiedniego ciśnienia (patrz wskazanie ciśnienia
na oponach).
• Instrukcje dotyczące wymiany opon można znaleźć w instrukcji instalacji.
4.2.2 Czyszczenie
Ryzyko uszkodzenia przez wilgoć.
• Konsola kierownicza powinna być czysta i chroniona przed wodą i deszczem.
• Do czyszczenia wózka nigdy nie używać strumienia wody z węża ani myjki
wysokociśnieniowej.
Wszystkie twarde części wózka wycierać wilgotną (ale nie ociekającą wodą) ściereczką. W razie
konieczności użyć łagodnego mydła, odpowiedniego do lakierów i materiałów syntetycznych.
Tapicerkę można czyścić letnią wodą i łagodnym mydłem. Do czyszczenia nie używać szorstkich
środków czyszczących.
Otwory wentylacyjne ładowarki powinny być czyste, wolne od nagromadzonego kurzu. W razie
potrzeby zdmuchnąć kurz i oczyścić obudowę ładowarki lekko zwilżoną ściereczką.
4.2.3 Dezynfekcja
Ryzyko uszkodzenia
Dezynfekcja może być przeprowadzana tylko przez przeszkolone osoby. Zasięgnąć porady u
wyspecjalizowanego sprzedawcy.
4.3 Diagnozowanie i rozwiązywanie problemów
Nawet jeśli wózek jest użytkowany prawidłowo, może wystąpić problem techniczny.
W takim przypadku skontaktować się z lokalnym wyspecjalizowanym sprzedawcą.
Ryzyko obrażeń i uszkodzeń wózka
• NIGDY nie podejmować prób samodzielnej naprawy wózka.
• Jeśli dojdzie do usterki konsoli kierowniczej, należy się skontaktować z wyspecjalizowanym
sprzedawcą. Podejmie on decyzję, czy konsola wymaga przeprogramowania.
W przypadku usterki jej kod wyświetla się na konsoli kierowniczej.
Omówienie wszystkich kodów usterek na konsoli kierowniczej znajduje się w instrukcji
konsoli kierowniczej.
Następujące objawy mogą oznaczać poważny problem. Jeśli wystąpią któreś z poniższych
sytuacji, należy skontaktować się z wyspecjalizowanym sprzedawcą.
• Nietypowe dźwięki;
• Przetarte/uszkodzone wiązki kabli;
• Pęknięte lub połamane złącza;
PRZESTROGA
PRZESTROGA
OSTRZEŻENIE

Turios
2022-01
Konserwacja
18
EN
NL
PL
• Nierównomierne zużycie bieżnika na jednej z opon;
• Trzęsące się, rwane ruchy;
• Ściąganie wózka na jedną stronę;
• Uszkodzone lub zepsute zespoły kół;
• Wózek się nie włącza (przepalony bezpiecznik);
• Wózek się włączony, ale nie jedzie, patrz 3.4.
4.4 Przewidywany okres użytkowania
Przeciętna trwałość wózka inwalidzkiego wynosi 5 lat. Ten czas może być dłuższy lub krótszy,
zależnie od częstotliwości korzystania, warunków jazdy i konserwacji wózka.
4.5 Ponowne użycie
Przed ponownym użyciem przez inną osobę wózek należy zdezynfekować, skontrolować i
poddać konserwacji zgodnie z instrukcjami w §4.1 i §4.2.
4.6 Koniec użytkowania
Po zakończeniu użytkowania należy poddać wózek utylizacji zgodnie z lokalnie obowiązującymi
przepisami w zakresie ochrony środowiska. Najlepszym sposobem, aby to zrobić, jest demontaż
wózka w celu ułatwienia transportu części nadających się do przetworzenia.

Turios
2022-01
Dane techniczne
19
EN
NL
PL
5 Dane techniczne
Parametry techniczne zamieszczone poniżej dotyczą tylko tego wózka, przy standardowych
ustawieniach i optymalnych warunkach otoczenia. Podczas użytkowania należy uwzględnić te
parametry. Wartości będą nieważne, jeśli wózek zostanie zmodyfikowany, uszkodzony lub w
dużym stopniu zużyty. Należy pamiętać, że parametry jazdy zależą od temperatury otoczenia,
wilgotności, nachylenia terenu (jazda w górę/w dół), typu nawierzchni i stanu akumulatora.
Tabela 1: Dane techniczne
Marka
Vermeiren
Typ
Elektryczny wózek inwalidzki, klasa B
Model
Turios
Maksymalna waga użytkownika
130 kg
Opis
Wymiary
Turios
Turios Element
Łączna długość z podnóżkiem
Ręczny
Elektryczny
1070 mm
1060 mm
1070 mm
Łączna szerokość
580 – 580 - 640 mm
580 mm
Masa łączna
Ok. 105,8 kg
Zużycie energii *
6 km/h: 39 km (50Ah)
10 km/h: 25 km (50Ah)
6 km/h: 28 km (38Ah)
lub 39 km (50Ah)
Pokonywane wzniesienie
6°
Wjeżdżanie na przeszkody
50 mm (koła przednie 8”, 9”)
60 mm (koła przednie 10”)
Prędkość maksymalna przy jeździe
do przodu
6km/h
10 km/h
6 km/h
Min. droga hamowania przy
prędkości maksymalnej
2100 mm
Regulowany kat płaszczyzny
siedziska Ręczny
Elektryczny
0° - 2° - 4° - 6°
0° - 20°
0° - 2° - 4° - 6°
Efektywna głębokość siedziska
Ręczny
Elektryczny
380 mm – 500 mm
430 mm – 510 mm
400 mm – 440 mm
Efektywna szerokość siedziska
390 - 450 - 510 mm
390 – 450 mm
Wysokość powierzchni siedziska
przy przedniej krawędzi
Siedzenie ręczne
Siedzisko elektryczne
450 mm – 500 mm – 550 mm
480 mm – 510 mm
450 mm
Kąt oparcia Ręczny
Elektryczny
0° - 8° - 16° - 24° - 32°
0 - 32°
0° - 8° - 16° - 24° - 32°
Wysokość oparcia Ręczny
Elektryczny
585 mm
550 mm
585 mm
Odległość od podnóżka do siedziska
320 mm – 420 mm
Kąt ustawienia nogi do powierzchni
siedziska
114°
Odległość od podłokietnika do
siedziska
260 mm – 335 mm

Turios
2022-01
Dane techniczne
20
EN
NL
PL
Marka
Vermeiren
Typ
Elektryczny wózek inwalidzki, klasa B
Model
Turios
Maksymalna waga użytkownika
130 kg
Przednie położenie konstrukcji
podłokietnika Ręczny
Elektryczny
340 mm – 430 mm
Max. 320 mm
340 mm – 430 mm
Minimalny promień skrętu
Ok. 1600 mm
Prześwit poprzeczny
60 mm (zabezpieczenie przed przechyłem)
100 mm (środek)
Średnica kół tylnych
350 x 70 mm
Rodzaj kół tylnych **
Opony dętkowe
Średnica kół przednich
200 mm - 230 mm - 260 mm
200 mm – 230 mm
Rodzaj kół przednich **
Opony dętkowe
opony odporne na przebicie
Opis elektryczny
Akumulator (szczelny, typu AGM,
bezobsługowy)
38 Ah, C10
44 Ah (żel, opcjonalnie)
50 Ah, C20
Silniki napędowe
6 km/h: 2 x 150W
10 km/h: 2 x 450W
6 km/h: 2 x 150W
Moduł zasilania
Bezpiecznik topikowy
150 A
Testy wytrzymałości zgodnie z
ISO 7176-8
Testy systemu zasilania i sterowania
zgodnie z
ISO 7176-14
Zapalność tapicerki zgodnie z
EN1021-2:2006
Zgodność z EMC
ISO 7176-21
Klasa ochrony
IPX4
Poziom hałasu
< 65 dB (A)
Ogólna ocena możliwości
mocowania pasów bezpieczeństwa
A
Temperatura przechowywania i
użytkowania
+5°C ~ +41°C
Temperatura pracy elementów
elektronicznych
-10°C ~ +40°C
Wilgotność przechowywania i
użytkowania
30% ~ 70%
Zastrzegamy sobie prawo do wprowadzania zmian technicznych. Tolerancja pomiarów ± 15 mm / 1,5 kg /
1,5°.
* Teoretyczny zasięg jazdy będzie krótszy, jeśli wózka używa się często na zboczach, nierównym terenie i
przejeżdża się przez krawężniki.
**Ponieważ można stosować różne opony, należy pamiętać o prawidłowym ciśnieniu roboczym używanych
opon. W przypadku innych średnic opon skontaktować się ze sprzedawcą.

Turios
2022-01
Obsah
1
EN
NL
PL
CS
Obsah
Obsah ........................................................................................................................ 1
Úvod ........................................................................................................................ 2
1 Tento výrobek ................................................................................................ 3
1.1 Příslušenství ................................................................................................. 3
2 Před použitím ................................................................................................ 4
2.1 Určené použití ............................................................................................... 4
2.2 Obecné bezpečnostní pokyny ....................................................................... 4
2.3 Symboly na invalidním vozíku ....................................................................... 5
2.4 Přeprava ....................................................................................................... 5
2.5 Montáž/demontáž.......................................................................................... 8
2.6 První použití a uskladnění ............................................................................. 9
3 Použití invalidního vozíku .......................................................................... 10
3.1 První jízda ................................................................................................... 10
3.2 Jízda venku ................................................................................................. 10
3.3 Ovládací konzola......................................................................................... 12
3.4 Brzdy a páčka volnoběhu ............................................................................ 12
3.5 Přesun na invalidní vozík nebo z něj ........................................................... 13
3.6 Seřízení komfortu ........................................................................................ 13
3.7 Stav a nabíjení baterie ................................................................................ 14
4 Údržba/servis .............................................................................................. 15
4.1 Interval údržby/servisu ................................................................................ 15
4.2 Pokyny pro údržbu/servis ............................................................................ 15
4.3 Řešení problémů ......................................................................................... 16
4.4 Životnost výrobku ........................................................................................ 17
4.5 Znovupoužití výrobku .................................................................................. 17
4.6 Likvidace výrobku........................................................................................ 17
5 Technické údaje .......................................................................................... 18

Turios
2022-01
Úvod
2
EN
NL
PL
CS
Úvod
Blahopřejeme! Nyní jste vlastníkem invalidního vozíku Vermeiren!
Tento invalidní vozík byl vyroben pečlivými pracovníky s kvalifikací. Navíc byl navržen a vyroben
podle vysokých standardů kvality, nad nimiž dohlíží společnost Vermeiren.
Děkujeme za Vaši důvěru ve výrobky společnosti Vermeiren. Tento návod slouží k tomu, aby vám
pomáhal s použitím tohoto invalidního vozíku a jeho provozních možností. Řádně si jej přečtěte;
pomůže vám seznámit se s provozem, schopnostmi a omezeními tohoto invalidního vozíku.
Máte-li po přečtení tohoto návodu nějaké dotazy, obraťte se na svého odborného prodejce. Rád
vám v této věci pomůže.
Důležitá poznámka
Aby byla zajištěna vaše bezpečnost a prodloužena životnost tohoto výrobku, věnujte mu řádnou
péči a nechávejte jej pravidelně kontrolovat a opravovat.
Tento návod odráží nejnovější vývoj výrobku. Společnost Vermeiren má právo provádět změny
tohoto typu výrobku, aniž by byla povinna upravit nebo nahradit podobné výrobky, které již byly
dodány.
Obrázky slouží k objasnění pokynů v tomto návodu. Detaily výrobku na obrázcích se mohou od
daného výrobku lišit.
Dostupné informace
Na naší webové stránce http://www.vermeiren.com/ vždy najdete nejnovější verzi následujících
informací. Tyto webové stránky pravidelně navštěvujte pro případné aktualizace.
Osoby se zrakovým postižením si mohou stáhnout elektronickou verzi tohoto návodu, kterou jim
může přečíst softwarová aplikace text-to-speech.
Tento návod k obsluze
Pro uživatele a odborného prodejce
Návod k obsluze pro příslušnou ovládací konzolu a nabíječku baterií.
Pro uživatele a odborného prodejce
Pokyny k instalaci (podrobné pokyny pro seřízení a (de)montáž)
Pro odborného prodejce
Servisní příručka pro invalidní vozíky
Pro odborného prodejce
Prohlášení o shodě (ES)

Turios
2022-01
Tento výrobek
3
EN
NL
PL
CS
1 Tento výrobek
1. Opěradlo
2. Ovládací konzola
3. Loketní opěrka
4. Sedadlo
5. Opěrka nohou
6. Podnožka
7. Bezpečnostní pás
8. Prostor pro baterii
9. Přední kola
10. Hnací motory
11. Zadní kola / hnací kola
12. Přední světla (volitelné)
13. Identifikační štítek
1.1 Příslušenství
Pro elektrický invalidní vozík Turios je dostupné následující příslušenství:
• Nožní podpěra (BZ7, BZ8)
• Opěrka hlavy (L55, L58)
• Světla
• Držák na berle
• Držák nápoje
• Zpětné zrcátko
• Odklopná ovládací konzola
• Horní kufřík
1
2
3
4
5
6
7
8
9
10
11
12
13

Turios
2022-01
Před použitím
4
EN
NL
PL
CS
2 Před použitím
2.1 Určené použití
V tomto odstavci je uveden stručný popis zamýšleného použití tohoto invalidního vozíku. Dále
jsou k pokynům v dalších odstavcích přidána příslušná upozornění. Tímto způsobem chceme
upozornit na případné chybné použití, k němuž může dojít.
• Tento invalidní vozík je vhodný pro domácí a venkovní použití.
• Tento invalidní vozík je konstruován a vyroben výhradně k přepravě/přemístění jedné (1)
osoby o max. hmotnosti 130 kg. Není konstruován pro přepravu zboží či předmětů ani pro
jakýkoli jiný účel, než je popsán výše.
• Tento invalidní vozík může provozovat na něm sedící uživatel, nebo jej může tlačit asistent.
Tento invalidní vozík NESMÍTE používat bez pomoci asistenta, trpíte-li tělesnou či duševní
poruchou, která by mohla vás nebo jiné osoby ohrozit při řízení invalidního vozíku. Z tohoto
důvodu se nejprve obraťte na lékaře a zajistěte, aby byl odborný prodejce informován o jeho
posudku.
• Používejte pouze příslušenství a náhradní díly schválené společností Vermeiren.
• Přečtěte si všechny technické detaily a omezení tohoto invalidního vozíku v kapitole 5.
• Záruka na tento výrobek je založena na běžném použití a údržbě, jak je to popsáno v tomto
návodu. V případě poškození výrobku způsobeného nesprávným použitím či absencí údržby
tato záruka zanikne.
2.2 Obecné bezpečnostní pokyny
Riziko zranění anebo poškození
Přečtěte si pokyny v tomto návodu a postupujte podle nich. Jinak může dojít k vašemu zranění
nebo k poškození invalidního vozíku.
Při použití mějte na paměti tato obecná upozornění:
• Tento invalidní vozík nepoužívejte, jste-li pod vlivem alkoholu, léků či jiných látek, které by
mohly ovlivnit vaše schopnosti jeho řízení.
• Mějte na paměti, že některé části invalidního vozíku mohou být velmi teplé či studené vlivem
okolní teploty, slunečního záření, topných těles nebo kvůli pohonu motoru během jízdy. Při
dotýkání buďte opatrní. Při chladném počasí používejte ochranný oděv. Po jízdě vyčkejte,
dokud se invalidní vozík/motor neochladí.
• Před zapnutím invalidního vozíku si uvědomte prostředí/situaci, ve které se právě nacházíte.
Podle toho upravte rychlost, než vyjedete. Při jízdě v interiéru doporučujeme použít
nastavení nejnižší rychlosti. Při jízdě venku můžete nastavit pohyb na vhodnou rychlost, která
pro vás bude pohodlná a bezpečná.
• Mějte VŽDY na paměti, že se tento invalidní vozík může náhle zastavit kvůli vybité baterii
nebo ochraně, která zabraňuje jeho dalšímu poškození. Zkontrolujte také možné příčiny
uvedené v odst. 4.3. K prevenci zranění používejte bezpečnostní pás.
• Tento invalidní vozík byl testován na elektromagnetickou kompatibilitu a vyhovuje danému
standardu, viz kapitola 5. Nicméně výkon pohonu invalidního vozíku mohou narušovat zdroje
elektromagnetických polí, jako jsou mobilní telefony, elektrogenerátory či jiné vysoce výkonné
zdroje energie. Elektroniku invalidního vozíku však mohou narušovat i ostatní elektronické
přístroje, jako jsou poplašné systémy v obchodech a automatické dveře. Proto doporučujeme
tento invalidní vozík pravidelně kontrolovat na poškození a opotřebení, která mohou toto
rušení zvýšit (viz také kapitola 4).
• Jezděte pouze na povrchu, kde se mohou dotýkat země obě hnací kola, a kde je dostatečný
kontakt pro bezpečnou jízdu invalidního vozíku.
POZOR

Turios
2022-01
Před použitím
5
EN
NL
PL
CS
• Na zajišťovacích bodech nebo konstrukčních či rámových dílech nebo součástech invalidního
vozíku nesmějí být prováděny úpravy ani výměny, aniž by došlo ke konzultaci s výrobcem
invalidního vozíku.
• Zajistěte, aby během použití nedošlo k zachycení rukou, oděvů, pásků, přezek či šperků
v kolech nebo jiných pohyblivých součástech.
Berte na vědomí, že vaše invalidní vozík může v závislosti na použitém nastavení ovlivňovat
některé typy systémů proti krádeži. To může zapříčinit spuštění alarmu v obchodu.
V případě, že došlo k závažnému incidentu s vaším výrobkem, informujte společnost Vermeiren
nebo svého specializovaného prodejce a příslušný úřad ve vaší zemi.
2.3 Symboly na invalidním vozíku
Tohoto invalidního vozíku se týkají symboly v následujícím seznamu. Symboly lze vyhledat
v příslušné normě ISO (ISO 7000, ISO 7001 a IEC 417).
Max. hmotnost uživatele v kg
Domácí/venkovní použití (kromě nabíječky baterií)
Pouze domácí použití (nabíječka baterií)
Max. bezpečný sklon ve ° (stupních).
Max. rychlost
Typové označení
Nebezpečí skřípnutí
2.4 Přeprava
Riziko poškození
Přijměte opatření k ochraně invalidního vozíku před poškozením při přepravě.
2.4.1 Přemístění mimo cestu
K řízení invalidního vozíku na místo určení použijte ovládací konzolu.
Jinak uveďte invalidní vozík do volnoběžného režimu (viz odst. 3.4) a k jeho pohybu použijte
tlačnou tyč.
2.4.2 Přeprava letadlem
Protože tento invalidní vozík obsahuje bezúdržbové baterie AGM, nelze jej přepravovat (jako
celek) letecky. Před rezervací letenky se zeptejte příslušné letecké společnosti na správné
manipulační postupy. Před předáním invalidního vozíku pracovníkům letiště od něj odpojte
baterie, viz návod k instalaci.
POZOR

Turios
2022-01
Před použitím
6
EN
NL
PL
CS
2.4.3 Přeprava vozidlem jako zavazadlo
Nejlepší způsob, jak elektrický invalidní vozík dostat do vozidla, je najet s ním pomocí ramp.
Nemáte-li zkušenosti s jízdou v elektrickém invalidním vozíku na rampách, můžete jej uvést do
neutrálního režimu a pak jej zatlačit do vozidla po rampách. V případě potřeby invalidní vozík
demontujte.
1. Jako uživatel invalidního vozíku se přemístěte na sedadlo vozidla, viz odst. 3.5.
2. Před přepravou odmontujte všechny pohyblivé díly (podnožky, loketní opěrky atd.).
3. Pohyblivé díly bezpečně uložte za sedadlo spolujezdce nebo do zavazadlového prostoru.
4. Najeďte elektrickým invalidním vozíkem či jej zatlačte do vozidla pomocí ramp, nebo jej
přeneste do vozidla dvěma osobami, které uchopí pevné součásti rámu.
5. Upevněte pevné součásti rámu bezpečně k vozidlu.
6. Uveďte invalidní vozík do jízdního režimu (s aktivací parkovacích brzd) a ověřte, že je ovládací
konzola vypnutá.
2.4.4 Přeprava vozidlem jako sedadlo pro uživatele
Invalidní vozík prošel crashtesty podle ISO 7176-19: 2008 a jako takový byl navržen a
testován pro použití jako sedadlo v motorových vozidlech umístěné pouze ve směru
jízdy. Invalidní vozík je testován dynamicky pomocí zařízení ATD (Anthropomorphic Test
Device) s použitím čtyřbodového upínacího systému a tříbodového zádržného systému.
Nicméně je preferováno, aby byl uživatel přesunut na jedno ze sedadel uvnitř vozidla a
používal zádržný systém vozidla. Invalidní vozík musí být uložen jako zavazadlo
v odděleném (nákladovém) prostoru, viz odst. 2.4.3.
Riziko zranění a poškození
Aby nedošlo k nárazu hlavy či hrudníku do vozidla, používejte pánevní pás invalidního
vozíku a tříbodový pás ve vozidle.
Jako zádržný systém uživatele ve vozidle nepoužívejte postojové podpěry, nejsou-li
označeny jako vyhovující požadavkům uvedeným v normě ISO 7176-19:2008.
Dojde-li k jakémukoli typu nehody vozidla, před dalším použitím invalidního vozíku jej
nechte zkontrolovat odborným prodejcem nebo zástupcem výrobce.
Zajištění invalidního vozíku
1. Ověřte, že je vozidlo vybaveno vhodným čtyřbodovým pásem k upevnění invalidního vozíku
a zádržným systémem pro cestující podle normy ISO 10542, a že žádný z těchto systémů
není opotřeben, znečištěn, poškozen ani rozbit.
2. K vrácení invalidního vozíku do stabilní polohy použijte ovládací konzolu; viz odst. .
3. Odeberte veškeré příslušenství, jako jsou podnosy a respirační vybavení, a zajistěte je na
bezpečném místě. Není-li to možné, zajistěte je na invalidním vozíku ale umístěte je dále od
cestujícího vložením vycpávky absorbující energii mezi tác a uživatele.
4. Pomocí rampy najeďte s invalidním vozíkem (včetně uživatele) do vozidla podle pokynů
v odst. 3.2.1.
5. Uživatele umístěte ve směru jízdy a centrálně mezi zádržné kolejnice připevněné k podlaze
vozidla.
6. Zajistěte, aby uživatel seděl v co nejvzpřímenější poloze. Neumožňuje-li to stav uživatele,
proveďte posouzení rizik a vyhodnoťte bezpečnost uživatele během přepravy.
7. Vypněte (OFF) ovládací konzolu a ověřte, že je páčka volnoběhu v brzdném režimu, viz odst.
3.4.
8. Umístění všech zajišťovacích bodů na invalidním vozíku je označeno tímto
symbolem:
VAROVÁNÍ

Turios
2022-01
Před použitím
7
EN
NL
PL
CS
9. Ověřte, že je upínací koncový fitink kompatibilní se zajišťovacími body invalidního vozíku.
10. Připevněte háčky předního upínacího pásu na zajišťovací body (A) na invalidním vozíku podle
pokynů dodavatele pásového systému.
11. Otočte páčku volnoběhu do volnoběžné polohy a pojeďte invalidním vozíkem dozadu, aby se
přední pásy pevně natáhly, viz odst. 3.4.
12. Stejným způsobem připevněte háčky zadního upínacího pásu na zajišťovací body (B) vzadu.
13. Otočte páčku volnoběhu zpět do brzdné polohy, viz odst. 3.4.
Zajištění uživatele
1. Připevněte pánevní pás k invalidnímu vozíku.
2. Připevněte uživatelské zádržné pásy vozidla podle
pokynů výrobce pásového systému.
Pánevní vás mějte nasazen nízko přes přední část
pánve tak, aby tady byl úhel pánevního pásu
v preferované zóně 30 až 75° od hori-zontální roviny,
viz obrázek.
V preferované zóně je žádoucí strmější (vyšší) úhel.
3. Nastavte pás pevně podle pokynů výrobce pásového
systému a v souladu s pohodlím uživatele.
4. Ověřte, že je zádržný pás připojen přímo ke kotevnímu bodu vozidla a že na něm nejsou vidět
žádné záhyby, např. u osy zadního kola.
5. Přezku bezpečnostního pásu umístěte tak, aby během nárazu nedošlo ke kontaktu
uvolňovacího tlačítka se součástmi invalidního vozíku.
6. Ověřte, že pásy nejsou překrouceny nebo drženy mimo tělo, viz obr. 1.
7. Zajistěte, aby ramenní zádržné pásy seděly přes ramena, viz obr. 2.
B
A

Turios
2022-01
Před použitím
8
EN
NL
PL
CS
Pásy nesmějí být drženy mimo tělo
komponentami invalidního vozíku, jako
jsou loketní opěrky nebo kola.
Zádržné pásy musejí mít plný kontakt
s ramenem, hrudníkem a pánví.
Pánevní pás nízko na pánvi v blízkosti
stehenně-břišní oblasti
Obrázek 1 Nesprávné umístění zádržné-ho pásu
Obrázek 2 Správné umístění zádržného pásu
2.5 Montáž/demontáž
Riziko zranění
• Zajistěte, abyste si při (de)montáži nezachytili prsty, oděv nebo spony.
Prodejce dodá invalidní vozík kompletně smontovaný a zároveň vysvětlí různé ovládací prvky a
jejich použití. Také my zde poskytneme další podrobné vysvětlení různých součástí pro účely
přepravy.
Montáž elektrického invalidního vozíku:
1. Namontujte loketní opěrky (odst. 2.5.1).
2. Namontujte podnožky (odst. 2.5.2).
Demontáž elektrického invalidního vozíku proveďte výše uvedeným postupem v opačném pořadí.
2.5.1 Montáž či demontáž loketní opěrky
Riziko zranění anebo poškození
• Ověřte, že jsou područky na každé straně ve stejné výšce.
Namontujte loketní opěrku (1) zasunutím podpěrné tyče (2) do rámu
(3).
Demontáž: loketní opěrku (1) zvedněte a vytáhněte z rámu sedadla.
POZOR
POZOR
1
2
3
✓

Turios
2022-01
Před použitím
9
EN
NL
PL
CS
2.5.2 Montáž či demontáž nožní opěrky
Instalace
1. Přidržte nožní opěrku (4) na straně a zavěste ji do podpěry nožní opěrky (5).
2. Otočte nožní opěrku dovnitř, dokud se nezaaretuje na místě.
Odebrání
1. Zatáhněte za páku nožní opěrky (6) a nožní opěrku (4) vyklopte ven.
2. Zvedněte nožní opěrku a odeberte ji.
2.6 První použití a uskladnění
Riziko poškození baterie
• Baterii nikdy úplně nevybíjejte.
• Nepřerušujte nabíjecí cyklus; nabíječku odpojujte od baterie, jen když je zcela nabita.
• Zajistěte, aby byl invalidní vozík skladován na suchém místě, kde nemůže dojít k výskytu plísní
a k poškození čalounění.
• Zkontrolujte technické údaje pro skladování, viz kapitola 5.
Před použitím invalidního vozíku zkontrolujte, že je baterie plně nabitá, zeptejte se svého
prodejce, zdali to již bylo provedeno či nikoliv. Nabíjení provádějte podle pokynů k nabíjení v odst.
3.7.
POZOR
4
5
6

Turios
2022-01
Použití invalidního vozíku
10
EN
NL
PL
CS
3 Použití invalidního vozíku
Riziko zranění
• Nejprve si přečtěte předchozí kapitoly a seznamte se se zamýšleným použitím. Invalidní vozík
NIKDY nepoužívejte, dokud si nepřečtete a plně neporozumíte všem pokynům.
• Přečtěte si také pokyny v návodu k ovládací konzole a návodu k nabíječce baterií!
• V případě pochybností či dotazů bez obav požádejte svého místního odborného prodejce,
poskytovatele péče nebo technického poradce, aby vám pomohl.
3.1 První jízda
Riziko zranění a poškození
• Abyste nezranili osoby stojící okolo nebo nepoškodili předměty, vždy myslete na rozsah
pohybu podnožky a ovládací konzoly.
• Před zahájením jízdy vždy odpojte nabíječku baterií od invalidního vozíku.
• Dbejte, abyste se seznámili s ovládáním invalidního vozíku před jeho použitím na
přeplněných a možná nebezpečných místech. Nejprve se cvičně projeďte na volném
prostranství s malým počtem osob.
• Vyzkoušejte si chování invalidního vozíku při změně těžiště, např. v mírném sklonu
nahoru či dolů, v bočním svahu nebo při překonávání překážek. Požádejte o pomoc
asistenta.
• Povrch ovladače se během používání mírně zahřívá.
• Při jízdě dozadu je rychlost snížena.
1. Zajistěte, aby:
• byl invalidní vozík na rovném povrchu;
• byla plně nabitá baterie, viz odst. 3.7;
• byl spřažen motor, viz odst. 3.4;
• měly pneumatiky správný tlak, viz odst. 4.2.1;
• byl invalidní vozík přizpůsoben vašim potřebám a pohodlí, viz odst. 3.6;
• byla vaše poloha vsedě správná, viz odst. 3.5.
2. Postupujte podle pokynů v návodu k ovládací konzole.
3. Zapněte napájení invalidního vozíku.
4. Otočte regulaci rychlosti na nejnižší nastavení.
5. Procvičte si, jak se invalidní vozík řídí a proveďte jeho seřízení.
6. Získáte-li větší jistotu, vyzkoušejte si řízení s vyšší rychlostí.
7. Nyní zkoušejte zatáčet, směrem vpřed a směrem vzad. Několikrát to zopakujte.
8. Zajistěte, aby zůstal invalidní vozík po ukončení jízdy stabilně stát.
9. Vypněte napájení invalidního vozíku.
3.2 Jízda venku
Riziko nehody – korigujte své jízdní chování a rychlost.
• Berte v potaz místní dopravní předpisy; v dané zemi se mohou lišit. To se týká jízdy na
chodnících, nezpevněných cestách či dlážděných vozovkách.
• Nejezděte na silnici se silným provozem.
• Berte v potaz povětrnostní podmínky. Nejezděte ve vlhkém počasí, v extrémním teple, na
sněhu, černém ledu, při teplotách pod nulou; viz technické údaje v kapitole 5.
• I když má invalidní vozík zapnutá světla, není vhodný pro jízdu na veřejných komunikacích při
špatné viditelnosti (tma, mlha, soumrak). Zajistěte, abyste byli dobře vidět (i za denního světla)
VAROVÁNÍ
POZOR
VAROVÁNÍ

Turios
2022-01
Použití invalidního vozíku
11
EN
NL
PL
CS
pomocí fluorescenčního oděvu anebo vlastního osvětlení na přední a zadní straně invalidního
vozíku.
• Mějte na paměti další účastníky silničního provozu, pro něž může být tento invalidní vozík
překážkou. Při otáčení a couvání dbejte zvýšené opatrnosti. Nejste-li seznámeni s jízdou zpět,
nejprve si to procvičte na volném prostranství. Před zatočením ukažte všem ostatním směr,
kam hodláte jet.
• V úzkém průjezdu se snažte řídit rovně, abyste v něm neuvízli.
• Vždy mějte na zřeteli brzdnou vzdálenost. Nezapomeňte, že brzdná vzdálenost závisí na
rychlosti, povrchu, povětrnostních podmínkách, sklonu a hmotnosti uživatele.
3.2.1 Zvládání svahů, obrubníků, překážek či ramp
Riziko zranění kvůli neočekávanému pohybu
• K zajištění své sedící polohy v invalidním vozíku použijte zádržný bezpečnostní pás.
• Dbejte zvýšené opatrnosti v případě, že je na silnici písek, měkká zemina, díry či výtluky, které
mohou způsobit skřípnutí kol anebo snížení trakce hnacího kola.
• NIKDY nejezděte na svahy, překážky, schody či obrubníky, které jsou větší než hodnoty
uvedené v technických údajích v kapitole 5.
• K obrubníku přijíždějte zepředu.
• Invalidní vozík na svahu neuvádějte do volnoběžného režimu. Invalidní vozík by se mohl sám
rozjet a způsobit zranění vám či okolním osobám.
• Tento invalidní vozík nepoužívejte na eskalátoru ani na schodech.
• Používejte pouze rampy schválené společností Vermeiren a nepřekračujte max. nosnost.
• Chcete-li bezpečně překonat překážky nebo svahy, postavte invalidní vozík do nejvzpřímenější
polohy vsedě.
Riziko poškození
• Elektrický invalidní vozík vždy parkujte na plochých vodorovných a snadno přístupných
místech.
• V případě potřeby invalidní vozík trochu zrychlete před najetím na svah, překážku či obrubník.
Zajistěte, abyste vy či tento invalidní vozík nemuseli zvládat velký zpětný ráz.
• Zajistěte, aby se invalidní vozík nedotýkal země nebo rampy v důsledku jeho naklonění.
• Mějte na zřeteli, že je brzdná vzdálenost u jízdy dolů ze svahu mnohem delší než při jízdě po
rovině.
Postup
• Zahajte jízdu podle pokynů v odst. 3.1, krok 1.
• Pro přesun invalidního vozíku nahoru či dolů po schodech použijte zvedací zařízení nebo
rampu. Nejsou-li tyto věci k dispozici, mohou jej zvednout ručně nejméně dvě osoby, které
pevně uchopí rám oběma rukama. K uchopení invalidního vozíku nepoužívejte opěrku či
opěrky nohou, loketní opěrky ani kola.
• Zvládání překážek nebo svahů:
1. Seřiďte invalidní vozík do nejstabilnější polohy, viz odst. 3.5.
2. Jeďte co nejpomaleji, abyste překážku nebo svah zvládli.
POZOR
POZOR
Když zastavíte na svahu, dojde k automatické funkci brzdy, aby se invalidní vozík nerozjel
vpřed nebo vzad.

Turios
2022-01
Použití invalidního vozíku
12
EN
NL
PL
CS
3.3 Ovládací konzola
Riziko zranění či poškození
• Mějte na zřeteli, že když je invalidní vozík seřízen ze vzpřímené sedací polohy do skloněné
polohy, sníží se jeho stabilita.
• Zajistěte, aby bylo kolem invalidního vozíku dost místa na ovládání opěradla a sedadla.
Použití ovládací konzole je popsáno v příslušném návodu k obsluze, který byl součástí
dodávky invalidního vozíku. Pokud tento návod chybí, ihned kontaktujte svého odborného
prodejce.
Před stisknutím tlačítka ZAP/VYP uveďte joystick do neutrální (středové) polohy, jinak dojde
k zablokování elektroniky. Pro uvolnění tohoto zablokování vypněte ovládací konzolu a
znovu ji zapněte.
Technické ochrany
Ovládací konzola umožňuje obsluhovat všechny jízdní součásti a motorky pro nastavení polohy
těla. Pro vaši bezpečnost – a aby se invalidní vozík nepoškodil, jsou jeho pohyby monitorovány
elektronikou. To může vést k zablokování pohybu, snížení rychlosti nebo úplnému zastavení.
Další informace naleznete v návodu k obsluze ovládací konzole.
Aby nedošlo k náhodnému vybití baterií, je invalidní vozík vybaven systémem automatického
vypnutí napájení. Tento systém automaticky vypne ovládací konzolu, když není delší dobu
používána. Pokud k tomu dojde, stačí konzolu opět zapnout.
3.4 Brzdy a páčka volnoběhu
Riziko zranění či poškození
• Páčku volnoběhu obsluhujte pouze v případě, že je invalidní vozík vypnutý (VYP). Páčku
volnoběhu by měl obsluhovat asistent. NIKDY ji neobsluhujte z polohy vsedě.
• Režim volnoběhu nepoužívejte ve svahu a náklonu, viz symbol na motoru:
PŘED zapnutím (ZAP) invalidního vozíku ověřte, že je páčka volnoběhu v poloze brzdění.
Je-li invalidní vozík v režimu volnoběhu, jeho elektromagnetické brzdy NEFUNGUJÍ. To je
signalizováno na ovládací konzole. Jízda není možná.
Tento invalidní vozík je vybaven
elektromagnetickými brzdami. Funkce
brzd je závislá na poloze páčky
volnoběhu (1).
El.magnetické brzdy fungují
automaticky pouze tehdy, je-li páčka
volnoběhu (1) v poloze brzdění. V této
situaci začnou brzdy brzdit, pokud:
• je invalidní vozík vypnutý;
• je invalidní vozík zapnutý a joystick
je uvolněn.
Uvolněním joysticku dojde k plynulému
zastavení invalidního vozíku a aktivaci
brzd.
POZOR
POZOR
Neutrál
Jízda
1
1

Turios
2022-01
Použití invalidního vozíku
13
EN
NL
PL
CS
Obsluha páčky volnoběhu:
• Chcete-li uvést invalidní vozík do režimu volnoběhu, otočte páčku dozadu. Nyní je motor
odpojen. Invalidním vozíkem lze pohybovat ručně.
• Chcete-li připojit motor k pohonu kol, otočte páčku dovnitř. To se musí udělat před spuštěním
invalidního vozíku.
3.5 Přesun na invalidní vozík nebo z něj
Riziko zranění či poškození
• Nemůžete-li přesun provést bezpečně, požádejte někoho o asistenci.
• Během přemístění na invalidní vozík nebo z něho nešlapejte na podnožky.
Přesun
1. Když sedíte na židli, pohovce, sedačce či posteli, umístěte invalidní vozík co nejblíže k sobě.
2. Zatáhněte brzdy otočením páčky volnoběhu do polohy brzdění, viz odst. 3.4.
3. Sklopte podnožku/podnožky nahoru, aby se na nich nedalo stát.
4. V případě potřeby vyjměte jednu loketní opěrku k získání prostoru, viz odst. 2.5.1.
5. Přesuňte se na invalidní vozík nebo z něj silou svých paží, s pomocí asistenta/asistentů či
zdvihacího zařízení.
Sezení v invalidním vozíku
1. Sedněte si na sedadlo a dolní část zad opřete o opěradlo.
2. Otočte podnožku/podnožky dolů a položte na ní/ně své nohy.
3. V případě potřeby vraťte loketní opěrku.
4. Ověřte, že máte stehenní části nohou vodorovně a chodidla v pohodlné poloze. V případě
potřeby je seřiďte.
5. Ověřte, že máte ruce ohnuté a že pohodlně spočívají na područkách. V případě potřeby je
seřiďte.
Seřízení do stabilní polohy
Pro účely přepravy a v případě nutnosti překonávání překážek musí být invalidní vozík seřízen,
aby došlo k maximalizaci jeho stability:
• opěradlo vzpřímené,
• podnožka složená nahoru.
3.6 Seřízení komfortu
Riziko zranění či poškození
• Asistent nebo pečovatel(ka) může provádět následující seřízení komfortu. Všechna ostatní
seřízení jsou prováděna odborným prodejcem podle návodu k instalaci, viz úvod.
• Zajistěte, abyste si při seřízení nezachytili prsty, oděv nebo spony.
3.6.1 Sklon opěradla (ruční verze)
1. K odemknutí mechanismu zatáhněte za popruh na dolní části opěradla.
2. Seřiďte opěradlo do potřebné polohy (0° – 32°, 4 kroků po 8°).
3. Uvolněte popruh. Ověřte, že je opěradlo dobře zaaretováno.
POZOR
POZOR

Turios
2022-01
Použití invalidního vozíku
14
EN
NL
PL
CS
3.6.2 Sklon opěradla (s plynovou pružinou)
Sklon opěradla s plynovou pružinou se ovládá pomocí páčky. V závislosti na konfiguraci zvolené
při objednání je páčka umístěna na opěradle nebo na pravé straně sedadla.
1. Zatáhněte za páčku.
2. Zatáhněte/tlačte opěradlo do požadované polohy.
3. Páku uvolněte. Ujistěte se, že je opěradlo dobře upevněno.
3.7 Stav a nabíjení baterie
Riziko zranění a poškození kvůli požáru
• Používejte pouze nabíječku baterií dodanou s invalidním vozíkem. Použití jakékoli jiné
nabíječky může být nebezpečné (riziko požáru).
• Nabíječka baterií je určena pouze k nabíjení baterií dodaných s invalidním vozíkem, nikoli
k nabíjení jakýchkoli jiných baterií.
• Neupravujte žádné dodané díly, jako jsou kabely, zástrčky a nabíječka baterií. Nikdy
neotevírejte ani neměňte baterii nebo přípojky.
• Chraňte baterii a nabíječku baterie před plameny, vysokými a nízkými teplotami (viz kapitola
5), vlhkostí, slunečním zářením a silnými otřesy (např. při upuštění). Pokud již k tomu došlo,
baterii NEPOUŽÍVEJTE.
• Baterii nabíjejte pomocí nabíječky baterií v dobře větrané místnosti mimo dosah dětí.
• Před nabíjením baterie invalidního vozíku si nejprve přečtěte návod k obsluze příslušné
nabíječky baterií. Pro další informace se obraťte na svého odborného prodejce nebo viz naše
webové stránky http://www.vermeiren.com/
Riziko poškození
• Kapacita baterie se pomalu snižuje samovybíjením baterie a klidovým proudem připojených
uživatelů. Je-li baterie zcela vybita, může dojít k jejímu nevratnému poškození. Proto zajistěte,
aby byla baterie včas nabita (viz návod k ovládací konzole).
• Přečtěte si návod ke skladování a údržbě v odst. 4 a technické údaje
v kapitole 5.
• Nabíječku baterií odpojte pouze v případě, že je baterie zcela nabita, viz
následující symboly na nabíječce:
• Baterie nenabíjejte při teplotě nižší než 0 °C. Dejte baterii na teplejší
místo a pak zahajte nabíjení.
• Přípojku pro nabíječku baterií chraňte před prachem a jinými nečistotami.
• V případě jakýchkoli problémů, když nelze baterii nabíjet podle následujících pokynů, se
obraťte na svého odborného prodejce.
• Pokyny k výměně baterií naleznete v návodu k instalaci.
Veškeré informace o indikaci stavu baterie naleznete v návodu k ovládací konzole.
Není-li nabíječka baterií používána, doporučujeme ji odpojit od el. sítě. Tím nedojde ke
zbytečné spotřebě energie.
Nabíjení baterie:
1. NEJPRVE zapojte nabíječku baterií do el. zásuvky 220 V~. Nabíječku baterií zapojte přímo
(bez prodlužovacího kabelu) do el. zásuvky (bez časového spínače).
2. Adaptér zapojte do nabíjecího bodu ovládací konzole.
3. Počkejte, až se baterie zcela nabije. Další informace naleznete v návodu k nabíječce baterií.
4. Odpojte nabíječku baterií.
5. Vytáhněte nabíječku baterií ze zásuvky, nechte ji vychladnout a pak ji uložte do kapsy pro
nabíječku.
VAROVÁNÍ
POZOR

Turios
2022-01
Údržba/servis
15
EN
NL
PL
CS
4 Údržba/servis
4.1 Interval údržby/servisu
Riziko zranění a poškození
Opravy a výměny smějí provádět pouze vyškolené osoby. Přitom je třeba používat pouze
originální náhradní díly společnosti Vermeiren.
Poslední stránka tohoto návodu obsahuje registrační formulář pro odborného prodejce,
který zapíše každý servis.
Servisní intervaly závisejí na intenzitě a frekvenci používání. Požádejte svého prodejce o
společnou dohodu na rozvrhu kontrol/údržby/servisu/oprav.
Ohledně údržby/servisu si přečtěte návod k obsluze příslušné nabíječky baterií.
Návod k údržbě viz webové stránky společnosti Vermeiren: www.vermeiren.com.
Před každým použitím
Zkontrolujte následující body:
• Všechny díly: přítomné, nepoškozené a neopotřebené.
• Všechny díly: čisté, viz odst. 4.2.2.
• Kola, sedadlo, loketní opěrky, podnožky a opěrka hlavy (je-li použita): řádně upevněné.
• Stav baterie: v případě potřeby nabijte baterii, viz odst. 3.7.
• Ovládací konzole, baterie, napájecí modul, motory, nabíječka baterií, světla a příslušné
kabely: žádné poškození, jako jsou roztřepené, zlomené či odkryté vodiče.
• Stav kol/pneumatik, viz odst.4.2.1;
• Stav součástí rámu: žádná deformace, nestabilita, zeslabení nebo uvolněné spoje.
• Sedadlo, opěradlo, loketní čalounění, lýtkové čalounění a opěrka hlavy (v případě použití):
bez nadměrného opotřebení (např. promáčknutá místa, poškození nebo roztržení).
Pro případné opravy či výměny částí se obraťte na svého odborného prodejce.
Každý měsíc
Je-li invalidní vozík delší dobu skladován, musíte nabíjet baterie každý měsíc. Během této doby
je také možné nechat nabíječku baterií připojenou k baterii a k el. síti. Další informace viz odst. 3.7.
Ročně nebo častěji
Tento invalidní vozík nechte u odborného prodejce ke kontrole a provedení servisu alespoň
jednou ročně nebo častěji. Minimální četnost údržby závisí na používání, a proto by měla být
společně dohodnuta s vaším odborným prodejcem.
Při uložení
Zajistěte, aby byl invalidní vozík skladován v suchém prostředí, kde nemůže dojít k výskytu
plísní nebo k poškození čalounění.
4.2 Pokyny pro údržbu/servis
4.2.1 Kola a pneumatiky
Správná funkce brzd závisí na stavu pneumatik, který se může měnit kvůli opotřebení a
znečištění (voda, olej, bláto atd...).
POZOR

Turios
2022-01
Údržba/servis
16
EN
NL
PL
CS
• Udržujte kola bez drátů, vlasů, písku a vláken.
• Zkontrolujte vzorek na pneumatikách. Je-li hloubka dezénu menší než 1 mm, musí být
pneumatiky vyměněny. Obraťte se v této věci na svého odborného prodejce.
• Nahustěte všechny pneumatiky na správný tlak (viz vyznačení tlaku na pneumatikách).
• Pokyny k výměně pneumatik naleznete v návodu k instalaci.
4.2.2 Čištění
Riziko poškození vlhkostí
• Udržujte ovládací konzolu čistou a chraňte ji před vodou a deštěm.
• K čištění invalidního vozíku nikdy nepoužívejte hadici ani vysokotlaký čistič.
Otřete všechny pevné části invalidního vozíku vlhkým (nikoli mokrým) hadříkem. V případě
potřeby použijte jemné mýdlo vhodné na laky a syntetické barvy.
Čalounění lze vyčistit vlažnou vodou a jemným mýdlem. K čištění nepoužívejte abrazivní čisticí
prostředky.
Větrací otvory nabíječky baterií udržujte čisté a bez nahromaděného prachu. V případě potřeby
otřete prach a vyčistěte pouzdro nabíječky baterií mírně zvlhčeným hadříkem.
4.2.3 Dezinfekce
Riziko poškození
Dezinfekci mohou provádět pouze kvalifikované osoby. Poraďte se se svým prodejcem.
4.3 Řešení problémů
I když tento invalidní vozík používáte správně, přesto může dojít k technickému problému.
V takovém případě se obraťte na svého místního odborného prodejce.
Riziko zranění a poškození invalidního vozíku
• NIKDY se nepokoušejte opravit invalidní vozík sami.
• U závad v ovládací konzole se musíte obrátit na svého specializovaného prodejce.
Ten rozhodne, zda-li je potřeba ovládací konzolu přeprogramovat.
V případě selhání se na ovládací konzole zobrazí chybový kód.
Přehled všech chybových kódů na ovládací konzole naleznete v návodu k ovládací konzole.
Následující příznaky mohou znamenat vážný problém. Proto se obraťte na svého odborného
prodejce vždy, když zaznamenáte některou z následujících odchylek:
• divný zvuk;
• roztřepené/poškozené kabelové svazky;
• prasklé či rozbité konektory;
• nerovnoměrné opotřebení dezénu na jedné z pneumatik;
• trhavé pohyby;
• invalidní vozík se vychyluje na jednu stranu;
• poškozené či rozbité sestavy kol;
• invalidní vozík se nezapne (spálená pojistka);
• invalidní vozík je napájen, ale nehýbe se, viz 3.4.
POZOR
POZOR
VAROVÁNÍ

Turios
2022-01
Údržba/servis
17
EN
NL
PL
CS
4.4 Životnost výrobku
Průměrná životnost tohoto invalidního vozíku je 5 let. V závislosti na četnosti použití, jízdních
podmínkách a údržbě se životnost tohoto invalidního vozíku prodlouží nebo zkrátí.
4.5 Znovupoužití výrobku
Před opětovným použitím jinou osobou nechte invalidní vozík dezinfikovat, zkontrolovat a provést
servis podle pokynů v odst. 4.1 a odst. 4.2.
4.6 Likvidace výrobku
Po skončení životnosti musí být invalidní vozík zlikvidován podle místní legislativy pro životní
prostředí. Nejlepším způsobem likvidace je rozebrání invalidního vozíku pro usnadnění přepravy
recyklovatelných součástí.

Turios
2022-01
Technické údaje
18
EN
NL
PL
CS
5 Technické údaje
Technické údaje uvedené níže platí pouze pro tento invalidní vozík při standardních nastaveních
a optimálních podmínkách okolí. Během používání berte tyto údaje v úvahu. Pokud byl tento
invalidní vozík upraven, poškozen nebo došlo k jeho velkému opotřebení, nebudou tyto hodnoty
platné. Berte v potaz, že jízdní výkon je ovlivněn okolní teplotou, vlhkostí, svahy (jízdou
nahoru/dolů), typem povrchu a stavem baterie.
Tabulka 1: Technické údaje
Značka
Vermeiren
Typ
Elektrický invalidní vozík, třída B
Model
Turios
Max. hmotnost uživatele
130 kg
Popis
Rozměry
Turios
Turios Element
Celková délka s opěrkou nohou
Ruční
Elektrický
1070 mm
1060 mm
1070 mm
Celková šířka
580 – 580 – 640 mm
580 mm
Celková hmotnost
Přibl. 105,8 kg
Spotřeba energie *
6 km/h: 39 km (50Ah)
10 km/h: 25 km (50Ah)
6 km/h: 28 km (38Ah)
nebo 39 km (50Ah)
Jmenovitý svah
6°
Překonání překážky
50 mm (8“, 9“ přední kola)
60 mm (10“ přední kola)
Max. rychlost vpřed
6 km/h
10 km/h
6 km/h
Min. brzdná vzdálenost z max.
rychlosti
2100 mm
Úhel roviny sedadla Ruční
Elektrický
0° – 2° – 4° – 6°
0° – 20°
0° – 2° – 4° – 6°
Účinná hloubka sedadla Ruční
Elektrický
380 mm – 500 mm
430 mm – 510 mm
400 mm – 440 mm
Účinná šířka sedadla
390 – 450 – 510 mm
390 – 450 mm
Výška plochy sedadla u předního
okraje Ruční sedadlo
Elektrické sedadlo
450 mm – 500 mm – 550 mm
480 mm – 510 mm
450 mm
Úhel opěradla Ruční
Elektrický
0° – 8° – 16° – 24° – 32°
0 – 32°
0° – 8° – 16° – 24° – 32°
Výška opěradla Ruční
Elektrický
585 mm
550 mm
585 mm
Vzdálenost opěrky nohou od sedadla
320 mm – 420 mm
Úhel nohou k ploše sedadla
114°
Vzdálenost loketní opěrky od
sedadla
260 mm – 335 mm
Přední poloha konstrukce loketních
opěrek Ruční
Elektrický
340 mm – 430 mm
Max. 320 mm
340 mm – 430 mm
Min. poloměr otáčení
Přibl. 1600 mm

Turios
2022-01
Technické údaje
19
EN
NL
PL
CS
Značka
Vermeiren
Typ
Elektrický invalidní vozík, třída B
Model
Turios
Max. hmotnost uživatele
130 kg
Světlá výška
60 mm (prevence převrácení)
100 mm (střed)
Průměr zadních kol
350 x 70 mm
Typ zadních kol **
Pneumatiky
Průměr předních kol
200 mm – 230 mm – 260 mm
200 mm – 230 mm
Typ předních kol **
Pneumatiky
Pneumatiky bez průrazu
Popis elektrické výbavy
Baterie (bezúdržbová baterie AGM)
38 Ah, C10
44 Ah, (Gel, volitelný)
50 Ah, C20
Hnací motory
6 km/h: 2 x 150 W
10 km/h: 2 x 450 W
6 km/h: 2 x 150 W
Napájecí modul Pojistka
150 A
Zkoušky pevnosti podle normy
ISO 7176-8
Zkoušky napájecího a řídicího
systému podle normy
ISO 7176-14
Vznětlivost čalounění podle normy
EN1021-2:2006
Shoda s EMK
ISO 7176-21
Stupeň krytí
IPX4
Úroveň hluku
< 65 dB (A)
Celkové hodnocení umístění
zádržného systému
A
Teplota skladování a používání
+5 °C ~ +41 °C
Provozní teplota pro elektroniku
-10 °C ~ +40 °C
Vlhkost skladování a používání
30 % ~ 70 %
Vyhrazujeme si právo na zavádění technických změn. Tolerance měření ±15 mm / 1,5 kg / 1,5°.
* Teoretická vzdálenost dojezdu se sníží při časté jízdě ve svahu, na hrubém povrchu nebo při překonávání
obrubníků.
** Při používání různých druhů pneumatik se vždy informujte o správném provozním tlaku používaných
pneumatik. Pro jiné průměry pneumatik se obraťte na svého odborného prodejce.


Service registration form
Service registration form
This product (name): ……………………………………..
was inspected (I), serviced (S), repaired (R) or disinfected (D):
By (stamp):
Kind of work: I / S / R / D
Date:
By (stamp):
Kind of work: I / S / R / D
Date:
By (stamp):
Kind of work: I / S / R / D
Date:
By (stamp):
Kind of work: I / S / R / D
Date:
By (stamp):
Kind of work: I / S / R / D
Date:
By (stamp):
Kind of work: I / S / R / D
Date:
By (stamp):
Kind of work: I / S / R / D
Date:
By (stamp):
Kind of work: I / S / R / D
Date:
By (stamp):
Kind of work: I / S / R / D
Date:
By (stamp):
Kind of work: I / S / R / D
Date:
By (stamp):
Kind of work: I / S / R / D
Date:
By (stamp):
Kind of work: I / S / R / D
Date:
By (stamp):
Kind of work: I / S / R / D
Date:
By (stamp):
Kind of work: I / S / R / D
Date:
By (stamp):
Kind of work: I / S / R / D
Date:

-
 1
1
-
 2
2
-
 3
3
-
 4
4
-
 5
5
-
 6
6
-
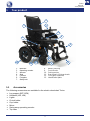 7
7
-
 8
8
-
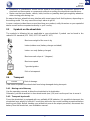 9
9
-
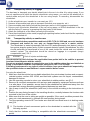 10
10
-
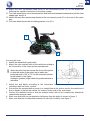 11
11
-
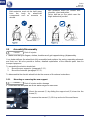 12
12
-
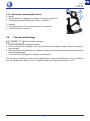 13
13
-
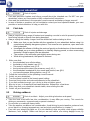 14
14
-
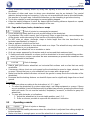 15
15
-
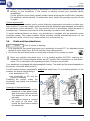 16
16
-
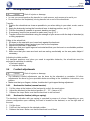 17
17
-
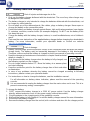 18
18
-
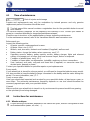 19
19
-
 20
20
-
 21
21
-
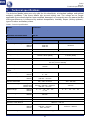 22
22
-
 23
23
-
 24
24
-
 25
25
-
 26
26
-
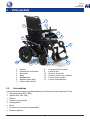 27
27
-
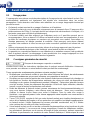 28
28
-
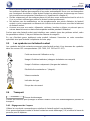 29
29
-
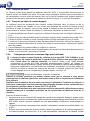 30
30
-
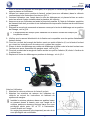 31
31
-
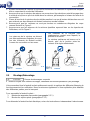 32
32
-
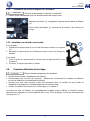 33
33
-
 34
34
-
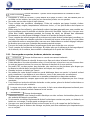 35
35
-
 36
36
-
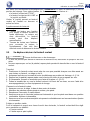 37
37
-
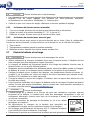 38
38
-
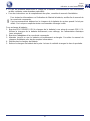 39
39
-
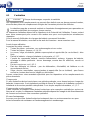 40
40
-
 41
41
-
 42
42
-
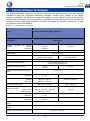 43
43
-
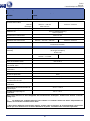 44
44
-
 45
45
-
 46
46
-
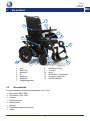 47
47
-
 48
48
-
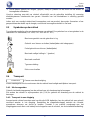 49
49
-
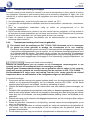 50
50
-
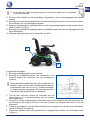 51
51
-
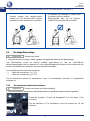 52
52
-
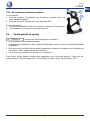 53
53
-
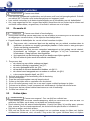 54
54
-
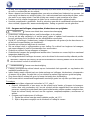 55
55
-
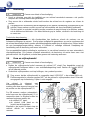 56
56
-
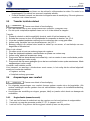 57
57
-
 58
58
-
 59
59
-
 60
60
-
 61
61
-
 62
62
-
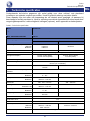 63
63
-
 64
64
-
 65
65
-
 66
66
-
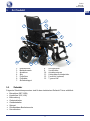 67
67
-
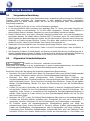 68
68
-
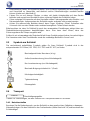 69
69
-
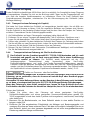 70
70
-
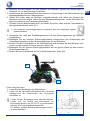 71
71
-
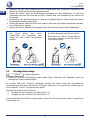 72
72
-
 73
73
-
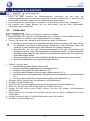 74
74
-
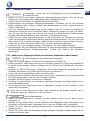 75
75
-
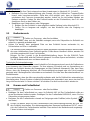 76
76
-
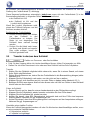 77
77
-
 78
78
-
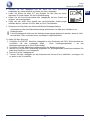 79
79
-
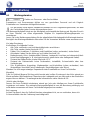 80
80
-
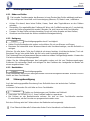 81
81
-
 82
82
-
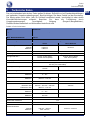 83
83
-
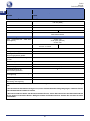 84
84
-
 85
85
-
 86
86
-
 87
87
-
 88
88
-
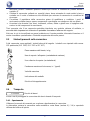 89
89
-
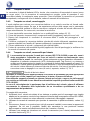 90
90
-
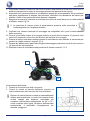 91
91
-
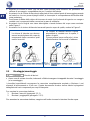 92
92
-
 93
93
-
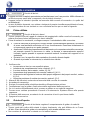 94
94
-
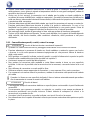 95
95
-
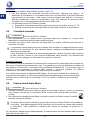 96
96
-
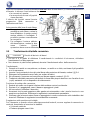 97
97
-
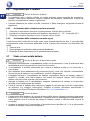 98
98
-
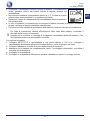 99
99
-
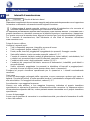 100
100
-
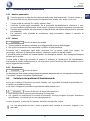 101
101
-
 102
102
-
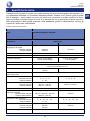 103
103
-
 104
104
-
 105
105
-
 106
106
-
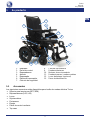 107
107
-
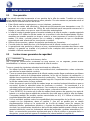 108
108
-
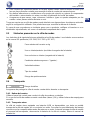 109
109
-
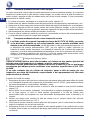 110
110
-
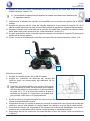 111
111
-
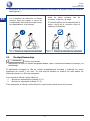 112
112
-
 113
113
-
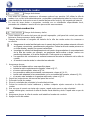 114
114
-
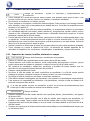 115
115
-
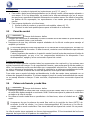 116
116
-
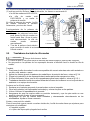 117
117
-
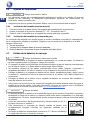 118
118
-
 119
119
-
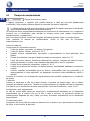 120
120
-
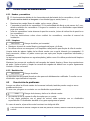 121
121
-
 122
122
-
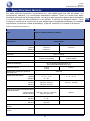 123
123
-
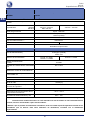 124
124
-
 125
125
-
 126
126
-
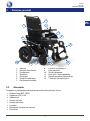 127
127
-
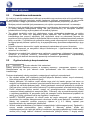 128
128
-
 129
129
-
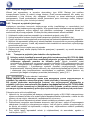 130
130
-
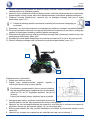 131
131
-
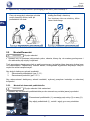 132
132
-
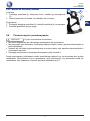 133
133
-
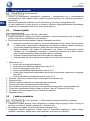 134
134
-
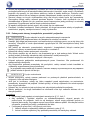 135
135
-
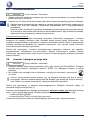 136
136
-
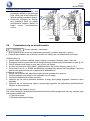 137
137
-
 138
138
-
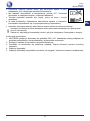 139
139
-
 140
140
-
 141
141
-
 142
142
-
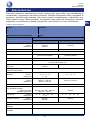 143
143
-
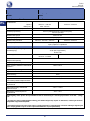 144
144
-
 145
145
-
 146
146
-
 147
147
-
 148
148
-
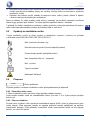 149
149
-
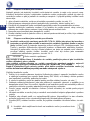 150
150
-
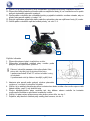 151
151
-
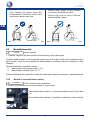 152
152
-
 153
153
-
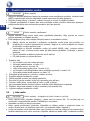 154
154
-
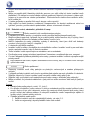 155
155
-
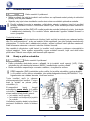 156
156
-
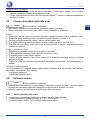 157
157
-
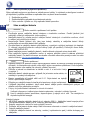 158
158
-
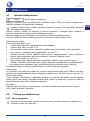 159
159
-
 160
160
-
 161
161
-
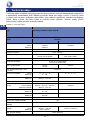 162
162
-
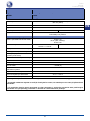 163
163
-
 164
164
-
 165
165
-
 166
166
-
 167
167
-
 168
168


en otros idiomas
- français: Vermeiren Turios Manuel utilisateur
- italiano: Vermeiren Turios Manuale utente
- Deutsch: Vermeiren Turios Benutzerhandbuch
- Nederlands: Vermeiren Turios Handleiding
- polski: Vermeiren Turios Instrukcja obsługi
Artículos relacionados
-
Vermeiren Turio Manual de usuario
-
Vermeiren Sigma 230 Manual de usuario
-
-
-
Vermeiren VERSO Manual de usuario
-
Vermeiren Trigo S Manual de usuario
-
Vermeiren Inovys II Manual de usuario
-
Vermeiren D200 Manual de usuario
-
-