Tripp Lite SRXCOOL12K El manual del propietario
- Tipo
- El manual del propietario

1
Portable Air Conditioning Unit
SRCOOL12K (120 V, 60 Hz)
SRXCOOL12K (230 V, 50 Hz)
Owner’s Manual
Warranty
Registration:
register online today for a
chance to win a FREE Tripp Lite
product—www.tripplite.com/warranty
Introduction 2
Important Safety Instructions 2
Features 3
Installation 4
Operation 8
Maintenance 9
Troubleshooting 10
Storage & Service 10
Warranty & Warranty Registration 10
Español 11
Français 21
Русс 31
1111 W. 35th Street, Chicago, IL 60609 USA
www.tripplite.com/support
Copyright © 2011 Tripp Lite.
Book 1.indb 1 7/29/2011 9:34:11 AM

SYST
RPS
STAT
DUPLX
SPEED
MODE
15X31X33X
47X
50
MASTR
STACK
SYST
RPS
STAT
DUPLX
SPEED
MODE
15X31X33X
MASTR
STACK
SYST
RPS
STAT
DUPLX
SPEED
MODE
15X31X33X
MASTR
STACK
AT
DUPLX
SPEED
MODE
15X31X33X
STACK
31X33X
47X
50
47X
50
47X
50
47X
50
50
2
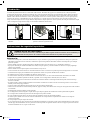
Introduction
The self-contained Portable Air Conditioning Unit (SRCOOL12K / SRXCOOL12K) provides 12,000 BTU (up to 3.4 kW) of supplemental
cooling capacity. Designed for IT environments, it’s ideal for cooling overheated rack enclosures, IT equipment hot spots and network closets
without access to facility air conditioning. The Portable Air Conditioning Unit can focus cool air through its flexible cooling duct or cool a small
room through its louvered vent. It also filters and dehumidifies air to improve operating conditions and equipment reliability. Condensate is
re-evaporated for drip-free operation, so you won’t waste time emptying water collection tanks. The self-contained design does not require any
plumbing or special circuits, so setup is quick and easy. Eco-friendly R410A refrigerant meets environmental standards worldwide.
Recommended Applications:
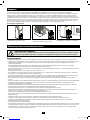
Important Safety Instructions
SAVE THESE INSTRUCTIONS
This manual contains instructions and warnings that should be followed during the installation, operation
and storage of this product. Failure to heed these warnings may affect your warranty.
Warnings
applications are subject to great variation, the manufacturer makes no representation or warranty as to the suitability or fitness of this device for
any specific application.
button to turn the unit on or off.
support equipment or to significantly affect its safety or effectiveness is not recommended. Do not use this equipment in the presence of a
flammable anesthetic mixture with air, oxygen or nitrous oxide.
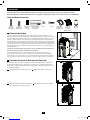
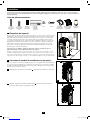
1. Cooling an overheated rack enclosure. 2. Cooling an equipment hot spot inside or
outside a rack enclosure.
3. Cooling a small room.
Book 1.indb 2 7/29/2011 9:34:16 AM

A
B
C
D
E
F
G
H
IJ
K
M
O
Q
P
R
S
T
N
X
V
W
U
L
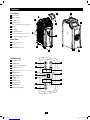
3
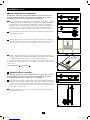
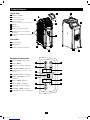
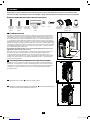
Features
Front View
A Control Panel
B Recessed Handle
C
D Drainage Outlet
(Shown with Drainage Plug Installed)
E Casters
F
G Cool Air Output Vent
H Louvered Vent Insert (Pre-Installed)
I Cooling Duct Adapter (Optional)
Rear View
J Recessed Handles
K Rear Panel
L Warm Air Exhaust Vent
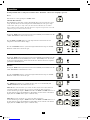
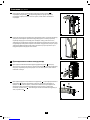
Control Panel
M
N
O Temperature Control Buttons
P
Q
R
S
T
U
V
W
X
Book 1.indb 3 7/29/2011 9:34:20 AM

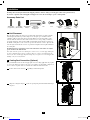
> 20 in (51 cm)
> 20 in (51 cm)
WALL
100 in.2 (645 cm2) Vent
(For Confined Spaces)
1
2-1
2-2
A
A
4
Installation
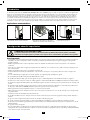
Warning: After removing the unit from the shipping container, check for damage or missing parts. (Refer to the parts list below.)
If you notice a problem, visit www.tripplite.com/support for service. Do not attempt to operate a damaged unit.
Accessory Parts List:
1 Unit Placement
Place the unit on a flat, level surface near a grounded AC outlet rated in accordance with the
unit nameplate (90-110% of specified voltage). Leave adequate space around the unit for
obstacles. Place the unit in a location with convenient access to a drop ceiling or window to
provide the straightest, shortest path available for the flexible exhaust duct. If you plan to use
the flexible cooling duct to focus cool air on a specific rack enclosure or device, place the unit
near the targeted rack enclosure or device to provide the straightest, shortest path available for
the cooling duct.
Warning: Do not use an extension cord to connect the unit to an AC outlet. Use only the
power cord that came with the unit.
Note: If the unit will operate in a confined space (such as closet), you must supply makeup air
in order to maintain airflow efficiency. A 100 in.2 (645 cm2) or larger vent installed near the
bottom of the door should supply adequate makeup air for a typical closet. Consult applicable
building codes for more information.
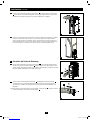
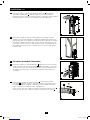
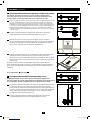
2 Cooling Duct Connection (Optional)
The pre-installed louvered vent insert is appropriate for room cooling applications. If you plan
to cool a room, skip step 2 and proceed to step 3. If you plan to use the flexible cooling duct to
focus cool air on a specific device or rack enclosure, follow the instructions below.
2-1 Remove the louvered vent insert A by pulling it outward and upward.
Exhaust Duct
(Longer Tube)
Cooling Duct
(Shorter Tube)
Exhaust Duct
Adapter
Adjustable
Exhaust Panel
(2 Sections)
Nut Bolt Cooling Duct
Adapter
Louvered Vent
Insert
(Pre-Installed)
Drainage
Plug
2-2 Align the cooling duct adapter A in the vent opening and push it downward until it snaps
into place.
Book 1.indb 4 7/29/2011 9:34:29 AM

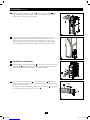
1
2
1
2
1
2
2-3
2-4
3-1
3-2
A
A
A
B
B
B
5
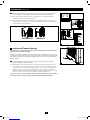
2-3 Connect the flexible cooling duct (shorter tube A) to the cooling duct adapter B. Align
the duct with the circular adapter opening, push the duct downward and turn the duct
clockwise until it screws into the adapter solidly.
Installation (continued)
2-4 Place the other end of the cooling duct near the air intake of the target device or rack
enclosure, using the straightest, shortest path available. If you plan to cool a rack
enclosure, place the end of the cooling duct over a perforated area near the top of the
enclosure’s front door (or near the top of the bank of equipment that requires cooling).
Cool air will sink and spread across the air intakes at the front of the rack enclosure.
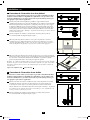
3 Exhaust Duct Connection
3-1 Connect the flexible exhaust duct (longer tube A) to the warm air exhaust vent on the rear
panel of the unit B. Align the duct with the circular vent opening, push the duct inward
and turn the duct clockwise until it screws into the exhaust vent solidly.
3-2 Connect the other end of exhaust duct A to the exhaust duct adapter B. Align the duct
with the circular adapter opening, push the duct inward and turn the duct clockwise until it
screws into the adapter solidly.
If you plan to connect the exhaust duct to a drop ceiling, proceed to step 4. If you plan to
connect the exhaust duct to a window, proceed to step 5.
Book 1.indb 5 7/29/2011 9:34:39 AM

Nut
Bolt
Nut
Bolt
4-1
5-1
4-2
5-2
4-3
4-4
Ceiling Panel
(From Below)
Ceiling Panel
(From Above)
Exhaust Panel
6
Installation (continued)
4 Drop Ceiling Exhaust Connection
Warning: Some ceilings may require modified installation procedures. The user must
determine the fitness of hardware and procedures before installing. The procedures
described in this manual may not be appropriate for all applications.
4-1 Choose a removable drop ceiling panel near the unit to provide the straightest, shortest path
the portion that rests on the ceiling grid. Combine the two sections of the adjustable
exhaust panel, then adjust the exhaust panel to match the width of the ceiling panel. After
the exhaust panel is set to the correct width, use the included nut and bolt to lock it in
place. Note: The exhaust panel can adjust from 26.6 to 49.2 inches (67.5 to 125 cm).
4-2 Insert the exhaust duct adapter into the oblong hole in the adjustable exhaust panel. The
adapter will snap into place.
4-3 Slide the ceiling panel out of the way and place the exhaust panel inside the ceiling space.
Allow the exhaust panel to rest on top of the ceiling grid. Note: There must be at least 10
inches (25.4 cm) of open space above the exhaust panel to allow adequate airflow.
4-4 Slide the ceiling panel back into place so that it adjoins the exhaust panel and closes any
gaps in the ceiling. A tight seal will permit maximum cooling efficiency. If the installation
is permanent, trim the ceiling panel so it doesn’t overlap the ceiling grid.
Note: The flexible exhaust duct can extend to a maximum length of 118 inches (300 cm). Provide
the straightest, shortest path available. Excessive bending or stretching of the duct will reduce
cooling efficiency.
After completing step 4, proceed to step 6.
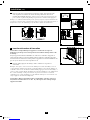
5 Window Exhaust Connection
Warning: Some windows may require modified installation procedures. The user must
determine the fitness of hardware and procedures before installing. The procedures
described in this manual may not be appropriate for all applications.
5-1
then adjust the exhaust panel to match the width of the window opening. After the exhaust
panel is set to the correct width, use the included nut and bolt to lock it in place. Note: The
exhaust panel can adjust from 26.6 to 49.2 inches (67.5 to 125 cm). It is compatible with
vertical and horizontal mounting.
5-2 Insert the exhaust duct adapter into the oblong hole in the adjustable exhaust panel. The
adapter will snap into place.
Book 1.indb 6 7/29/2011 9:34:47 AM

Horizontal Window
Opening
Vertical
Window
Opening
INCORRECT CORRECT
5-3
6-1
7
Installation (suite)
5-3 Insert the exhaust panel into the window opening, then close the window against the
exhaust panel. A tight seal will permit maximum cooling efficiency. Note: There must be
at least 10 inches (25.4 cm) of open space behind the exhaust panel to allow adequate
airflow.
Note: The flexible exhaust duct can extend to a maximum length of 118 inches (300 cm). Provide
the straightest, shortest path available. Excessive bending or stretching of the duct will reduce
cooling efficiency.
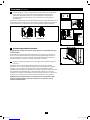
6 Drainage Plug Insertion
Warning: The unit’s built-in re-evaporator will not function until you insert the drainage
plug into the drainage outlet.
When the unit cools or dehumidifies, condensation forms. The unit has a built-in re-evaporator
that allows it to expel condensation through the warm air exhaust stream. This feature allows the
unit to operate indefinitely without requiring you to empty a water collection tank.
6-1 Insert the drainage plug into the drainage outlet to enable the re-evaporation of
condensation.
Note: You can connect the drainage outlet to a dedicated drainage system instead of using the
re-evaporation feature. Remove the drainage plug if it is installed, connect one end of a suitable
drain tube to the drainage outlet and connect the other end of the drain tube to your facility’s
drainage receptacle. If the drainage system becomes clogged, a small internal reservoir will
collect condensation. If the drainage system is not cleared before the internal reservoir fills, the
unit will shut down automatically.
Warning: Before connecting the unit to a dedicated drainage system, turn it off and
unplug it. There is a risk of electric shock while the unit is plugged in.
Book 1.indb 7 7/29/2011 9:35:03 AM

8
Operation
Warning: Install the unit according to the instructions in the “Installation” section before attempting to operate it.
Power
Automatic Restart Feature
The unit will turn on and resume operation automatically when power is restored after a power
outage. The unit will use the same settings that it used immediately before the power outage
occurred. Note: If the power outage is brief, the unit will run in Fan mode for two minutes
before resuming normal operation. The delay allows the compressor to depressurize so the unit
will function properly when it enters Cool mode.
Cool Mode
temperature is shown on the numeric display.
illuminates to indicate the selected fan speed.
Dehumidify Mode
at a fixed speed and temperature controls are irrelevant. Close windows and doors for optimal
performance in Dehumidify mode.
Fan Mode
illuminates to indicate the selected fan speed.
Timer
Timer On (Note: The unit must be off to activate the Timer On function. Confirm that mode,
temperature and fan speed settings are correct before activating the Timer On function. )
the delay (in hours) before the unit will turn on. The number of hours is shown on the numeric
Timer Off (Note: The unit must be on to activate the Timer Off function.)
the delay (in hours) before the unit will turn off. The number of hours is shown on the numeric
Book 1.indb 8 7/29/2011 9:35:04 AM

A
A
9
Operation (continued)
Maintenance
System Lock
Periodic maintenance extends the unit’s lifespan and permits maximum operating efficiency.
Cleaning the Air Filters
It is important to keep the air filters clean and free of dust. When the filters are dirty or clogged with dust, it decreases cooling efficiency and can
threaten air quality. Tripp Lite recommends cleaning the filters at least once every two weeks.
Before cleaning the filters, turn the unit off and unplug it! There is a risk of electric shock while the unit is plugged in.
1. Turn the unit off and unplug it.
2. Remove the filters A by sliding them out of the cabinet.
3. Wash the filters in warm water with a neutral detergent. Do not put the filters into a
dishwasher or use harsh detergents or chemicals. Allow the filters to air dry completely after
washing. Note: Do not use water hotter than 104° F (40° C) to clean the filters.
4. Replace the filters by sliding them back into their original position.
Cleaning the Cabinet
Before cleaning the cabinet, turn the unit off and unplug it! There is a risk
of electric shock while the unit is plugged in.
1. Turn the unit off and unplug it.
2. Wipe the unit with a dry, non-abrasive cloth. Do not use gasoline, benzene, thinners or other
harsh chemicals that may damage the surface. Do not pour water directly over the unit or
into the working parts. This causes a risk of electrical shock and deterioration of electrical
components and wiring insulation.
3. In extreme cases, wipe the unit with a damp cloth to remove residue.
Book 1.indb 9 7/29/2011 9:35:06 AM

10
Warranty
Seller warrants this product, if used in accordance with all applicable instructions, to be free from original defects in material and workmanship for a period of 1 year from the date of initial purchase. If the product
should prove defective in material or workmanship within that period, Seller will repair or replace the product, in its sole discretion. Service under this Warranty can only be obtained by your delivering or shipping the
above limitations or exclusions may not apply to you. This Warranty gives you specific legal rights, and you may have other rights which vary from jurisdiction to jurisdiction).
representation or warranty as to the suitability or fitness of this device for any specific application.
WARRANTY REGISTRATION
Regulatory Compliance Identification Numbers
all required approval markings and information. When requesting compliance information for this product, always refer to the series number. The series number should not be confused with the marking name or model
number of the product.
WEEE Compliance Information for Tripp Lite Customers and Recyclers (European Union)
Note: This statement applies to products marked with the WEEE logo.
Under the Waste Electrical and Electronic Equipment (WEEE) Directive and implementing regulations, when customers buy new electrical and electronic equipment from Tripp Lite they are entitled to:
Tripp Lite has a policy of continuous improvement. Product specifications are subject to change without notice.
Troubleshooting
Storage and Service
Review the possible solutions below. If the problem persists, please visit www.tripplite.com/support for service.
Problem Possible Cause Possible Solution
The unit does not function. The unit is turned off. Turn the unit on. (See “Operation” section.)
The unit is not plugged in. Plug the unit into a suitable outlet.
Main power is off. Check fuses or circuit breaker.
Cooling performance is unsatisfactory. The air exhaust or intake is blocked. Confirm that all ducts and intakes are clear of obstructions.
The temperature setting is too high. Adjust the temperature setting.
The fan speed setting is too low. Adjust the fan setting.
The air filters are dirty. Clean the air filters.
The wattage of the rack enclosure, the size of the room or the ambient
temperature exceeds the cooling capacity of a single unit.
Install additional units or contact Tripp Lite for additional cooling solutions
suitable for your application.
The unit leaks water. The drainage plug is not installed. Insert the drainage plug in the drainage outlet. (See “Installation” section.)
The unit generates excessive noise or vibration. The unit is on an uneven or unstable surface. Move the unit to a level, stable surface.
Storage
Before storing the unit, confirm that the ducts and vents are secured or removed and cared for properly. Also confirm that the unit is drained of
condensation.
Service
Your Tripp Lite product is covered by the warranty described in this manual. A variety of Extended Warranty and On-Site Service Programs
follow these steps:
1. Review the installation and operation procedures in this manual to insure that the service problem does not originate from a misreading of the
instructions.
2. If the problem continues, do not contact or return the product to the dealer. Instead, visit www.tripplite.com/support.
damages (direct, indirect, special or consequential) to the product incurred during shipment to Tripp Lite or an authorized Tripp Lite service
center is not covered under warranty. Products shipped to Tripp Lite or an authorized Tripp Lite service center must have transportation charges
1111 W. 35th Street, Chicago, IL 60609 USA
www.tripplite.com/support
Book 1.indb 10 7/29/2011 9:35:06 AM

11
Unidad Portátil de Aire Acondicionado
SRCOOL12K (120V, 60 Hz)
SRXCOOL12K (230V, 50 Hz)
Manual del Propietario
Warranty
Registration:
register online today for a
chance to win a FREE Tripp Lite
product—www.tripplite.com/warranty
Introducción 12
Instrucciones Importantes de Seguridad 12
Características 13
Instalación 14
Operación 18
Mantenimiento 19
Solución de Problemas 20
Almacenamiento y Servicio 20
Garantía y Registro de Garantía 20
English 1
Français 21
Russian 31
1111 W. 35th Street, Chicago, IL 60609 USA
www.tripplite.com/support
Copyright © 2011 Tripp Lite.
Book 1.indb 11 7/29/2011 9:35:06 AM

SYST
RPS
STAT
DUPLX
SPEED
MODE
15X31X33X
47X
50
MASTR
STACK
SYST
RPS
STAT
DUPLX
SPEED
MODE
15X31X33X
MASTR
STACK
SYST
RPS
STAT
DUPLX
SPEED
MODE
15X31X33X
MASTR
STACK
AT
DUPLX
SPEED
MODE
15X31X33X
STACK
31X33X
47X
50
47X
50
47X
50
47X
50
50
12
Introducción
La Unidad independiente Portátil de Aire Acondicionado (SRCOOL12K / SRXCOOL12K) proporciona 12,000 BTU (hasta 3.4 kW) de capacidad
complementaria de enfriamiento. Diseñada para ambientes de TI, es ideal para enfriar gabinetes de rack sobrecalentados, puntos calientes de equipo de
TI y gabinetes de cableado de red sin acceso al aire acondicionado de la instalación. La Unidad Portátil de Aire Acondicionado puede enfocar aire frío
de modo que usted no gaste
de modo que la instalación es rápida
Aplicaciones Recomendadas
Instrucciones de seguridad importantes
GUARDE ESTAS INSTRUCCIONES
Este manual contiene instrucciones y advertencias que deben seguirse durante la instalación, el funcionamiento y el
almacenamiento de este producto. Si no tiene en cuenta estas advertencias se puede anular la garantía.
Advertencias
paredes u otros obstáculos.
está enchufada.
construcción aplicables.
calentado.
po dentro o fuera de un gabinete de rack.
Book 1.indb 12 7/29/2011 9:35:10 AM

A
B
C
D
E
F
G
H
IJ
K
M
O
Q
P
R
S
T
N
X
V
W
U
L
13
Características
Vista Frontal
A Panel de Control
B
C
D
E Ruedas
F
G
H Inserto de Ventila con Persiana (Preinstalado)
I (Opcional)
Vista Posterior
J
K Panel Posterior
L Ventila de Descarga del Aire Caliente
Panel de Control
M
N
O Botones del Control de Temperatura
P
Q(Para Temperatura o Retraso de Tiempo)
R
S
T
U
V
W
X
Book 1.indb 13 7/29/2011 9:35:15 AM

> 20 in (51 cm)
> 20 in (51 cm)
PARED
100 in.2
(645 cm2) Vent
(Para Espacios Limitados)
1
2-1
2-2
A
A
14
Instalación
Advertencia: Después de retirar la unidad del contenedor de embarque, compruebe para detectar daños o partes faltantes. (Consulte la
siguiente lista de partes.) Si detecta un problema, visite www.tripplite.com/support para solicitar servicio. No intente operar una unidad dañada.
Lista de Piezas Accesorias:
1 Ubicación de Unidad
ducto de enfriamiento.
Advertencia: No utilice cables de extensión para conectar la unidad a un tomacorriente de CA.
Use sólo el cable de alimentación suministrado con la unidad.
Nota: Si la unidad funcionará en un espacio reducido (como un armario), debe suministrar aire
mayor instalada cerca de la parte inferior de la puerta debe suministrar aire complementario adecuado
2 Conexión del Ducto de Enfriamiento (Opcional)
de salas. Si planea enfriar una sala, salte el paso 2 y proceda al paso 3. Si planea usar el ducto de
las instrucciones siguientes.
2-1 A
Tubo de
Descarga
(Tubo Mayor)
Tubo de
Enfriamiento
(Tubo Menor)
Adaptador de
Tubo de
Descarga
Panel Ajustable
de Descarga (2
Secciones)
Tuerca Tornillo Adaptador
del Ducto de
Enfriamiento
Inserto de
Ventila con
Persiana
(Preinstalado)
Tapón de
Drenaje
2-2 Alinee el adaptador del ducto de enfriamiento A
Book 1.indb 14 7/29/2011 9:35:24 AM

1
2
1
2
1
2
2-4
3-1
3-2
A
A
A
B
B
B
15
2-3 A) al adaptador del tubo de enfriamiento
B
Instalación (continued)
2-4
de rack en cuestión, usando la ruta más recta y corta posible Si planea enfriar un gabinete de rack,
puerta frontal del gabinete (o cerca de la parte superior del banco de equipo que requiera enfriamiento).
3 Conexión del Ducto de Descarga
3-1 A
caliente en el panel posterior de la unidad B
3-2 A al adaptador del ducto de descarga B
adaptador.
Si planea conectar el ducto de descarga a un falso plafón, proceda al paso 4. Si planea conectar
5.
Book 1.indb 15 7/29/2011 9:35:34 AM

Tuerca
Tornillo
Tuerca
Tornillo
4-1
5-1
4-2
5-2
4-3
4-4
Panel de Plafón
(Desde Abajo)
Panel de Plafón
(Desde Arriba)
Panel de Descarga
16
Instalación (continuación)
4 Conexión de Descarga de Falso Plafón
El usuario debe determinar la aptitud de los accesorios y los procedimientos antes de la
instalación. Los procedimientos descritos en este manual pueden no ser apropiados para todas
las aplicaciones.
4-1
4-2
4-3 Deslice el panel del plafón a un lado y coloque el panel de descarga dentro del espacio en el
4-4
de enfriamiento. Si la instalación es permanente, recorte el panel del plafón de modo que no
Después de terminar el paso 4, proceda al paso 6.
5 Conexión de Descarga de Ventana
El usuario debe determinar la idoneidad de los accesorios y los procedimientos antes de la
instalación. Los procedimientos descritos en este manual pueden no ser apropiados para todas
las aplicaciones.
5-1
5-2
Book 1.indb 16 7/29/2011 9:35:42 AM

Abertura Horizontal
de Ventana
Abertura
Vertical de
Ventana
INCORRECTO CORRECTO
5-3
6-1
17
Instalación (continuación)
5-3
6 Inserción del Tapón de Drenaje
Advertencia: El re-evaporador integrado de la unidad no funcionará hasta que usted inserte el
tapón de drenaje en la salida de drenaje.
recolector de agua.
6-1
Advertencia: Antes de conectar la unidad a un sistema de drenaje dedicado, apague la unidad y
desenchúfela. Existe un riesgo de descarga eléctrica cuando la unidad está enchufada.
Book 1.indb 17 7/29/2011 9:35:58 AM

18
Funcionamiento
Advertencia: Instale la unidad de acuerdo a las instrucciones en la sección de “Instalación” antes de intentar operarla.
Encendido
Función de Reinicio Automático
ocurrencia del apagón.
Modo de Enfriamiento
Modo de Desecado
Modo de Ventilación
Temporizador
Temporizador Activo
Temporizador Inactivo
Book 1.indb 18 7/29/2011 9:35:59 AM

A
A
19
Funcionamiento (continuación)
Mantenimiento
Bloqueo del Sistema
Limpieza de los Filtros de Aire
¡Antes de la limpieza de los filtros, apague la unidad y desenchúfela! Existe un riesgo de descarga eléctrica cuando
la unidad está enchufada.
A
Cleaning the Cabinet
¡Antes de la limpieza del gabinete, apague la unidad y desenchúfela!
Existe un riesgo de descarga eléctrica cuando la unidad está enchufada.
Book 1.indb 19 7/29/2011 9:36:00 AM

20
Garantía
REGISTRO DE LA GARANTÍA
Conformidad con las regulaciones sobre números de identificación
Información de cumplimiento con WEEE para los clientes y recicladores de Tripp Lite (Unión Europea)
Nota: Esta declaración aplica a productos marcados con el logotipo WEEE.
Bajo la Directiva de Residuos de Aparatos Eléctricos y Electrónicos (WEEE) y las reglamentaciones reguladoras, cuando los clientes compran cualquier equipo eléctrico y electrónico nuevo de Tripp Lite tienen derecho a:
Solución de Problemas
Almacenamiento y servicio
Problema Causa posible Solución posible
La unidad no funciona. La unidad está apagada. Encienda la unidad. Consulte la sección “Operación”.
La unidad no está enchufada. Enchufe la unidad en un tomacorrientes adecuado.
La alimentación principal está apagada. Compruebe los fusibles o disyuntores.
El rendimiento del
enfriamiento no es
satisfactorio.
Está bloqueada la entrada o la descarga de aire. Confirme que todos los ductos y entradas estén libres de obstrucciones.
La calibración de temperatura es demasiado alta. Ajuste el parámetro de temperatura.
La calibración de velocidad del ventilador es demasiado baja. Ajuste el parámetro del ventilador.
Los filtros de aire están sucios Limpie los filtros de aire.
La potencia del gabinete de rack, el tamaño de la sala o la temperatura
ambiente excede la capacidad de enfriamiento de una sola unidad.
Instale unidades adicionales o póngase en contacto con Tripp Lite para consultar soluciones de
enfriamiento adicional adecuadas para su aplicación.
La unidad gotea agua. El tapón de drenaje no está instalado. Instale el tapón de drenaje en la salida del drenaje. Consulte la sección “Instalación”.
La unidad genera ruido o
vibración excesivos.
La unidad está sobre una superficie dispareja o inestable. Mueva la unidad a una superficie nivelada y estable.
Almacenamiento
unidad está libre de condensado.
Servicio
comprensión de las instrucciones.
cuando solicite el RMA.
1 1 1 1 W. 35th Street, Chicago, IL 60609 USA
www.tripplite.com/support
Book 1.indb 20 7/29/2011 9:36:00 AM

21
Climatiseur portatif
SRCOOL12K (120 V, 60 Hz)
SRXCOOL12K (230 V, 50 Hz)
Manuel du propriétaire
Warranty
Registration:
register online today for a
chance to win a FREE Tripp Lite
product—www.tripplite.com/warranty
Introduction 22
Consignes de sécurité importantes 22
Caractéristiques 23
Installation 24
Fonctionnement 28
Maintenance 29
Dépannage 30
Entreposage et service 30
Garantie et enregistrement de la garantie 30
English 1
Español 11
Русс 31
1111 W. 35th Street, Chicago, IL 60609 USA
www.tripplite.com/support
Copyright © 2011 Tripp Lite.
Book 1.indb 21 7/29/2011 9:36:00 AM

SYST
RPS
STAT
DUPLX
SPEED
MODE
15X31X33X
47X
50
MASTR
STACK
SYST
RPS
STAT
DUPLX
SPEED
MODE
15X31X33X
MASTR
STACK
SYST
RPS
STAT
DUPLX
SPEED
MODE
15X31X33X
MASTR
STACK
AT
DUPLX
SPEED
MODE
15X31X33X
STACK
31X33X
47X
50
47X
50
47X
50
47X
50
50
22
Introduction
Applications recommandées :
Consignes de sécurité importantes
CONSERVEZ CES INSTRUCTIONS
Ce manuel contient des instructions et des avertissement qui doivent être observés durant l’installation,
l’utilisation et l’entreposage de ce produit. le non respect de ces avertissements peut affecter votre garantie.
Avertissements
conducteurs.
incendie.
incendie.
Book 1.indb 22 7/29/2011 9:36:05 AM

A
B
C
D
E
F
G
H
IJ
K
M
O
Q
P
R
S
T
N
X
V
W
U
L
23
Caractéristiques
Vue de face
A
B
C
D
(Illustré avec le bouchon d’évacuation installé)
E Roulettes
F
G
H
(préinstallé)
I
(en option)
Vue arrière
J
K
L
Panneau de commande
M
N
O
P
Q (pour la température ou délai de
temporisation)
R
S
ventilateur)
T
U
V Voyants DEL de vitesse ventilateur
W
X
Book 1.indb 23 7/29/2011 9:36:09 AM

> 51 cm (20 po)
> 51 cm (20 po)
WALL
Évent de
645 cm2 (100 po.2)
(Pour les espaces
confinés)
1
2-1
2-2
A
A
24
Installation
Avertissement : Après avoir retiré l’appareil du conteneur d’expédition, vérifiez la présence de dommages et l’absence de pièces. (Se reporter à la liste
des pièces ci-dessous.) Si vous remarquez un problème, visitez www.tripplite.com/support pour obtenir du service après-vente. Ne tentez pas d’utiliser un
appareil endommagé.
Liste des pièces accessoires :
1 Disposition de l’appareil
Avertissement : Ne pas utiliser de rallonge électrique pour connecter l’appareil à une prise c.a.
Utilisez uniquement la cordon d’alimentation fourni avec l’appareil.
Remarque : Si l’appareil est destiné à être utilisé dans un espace confiné (comme un placard), vous devez
fournir de l’air d’appoint afin de maintenir l’efficacité de la circulation d’air. Un évent à lames de 645
cm2 (100 po2) ou plus installé près de la partie inférieure de la portière devrait fournir suffisamment d’air
d’appoint pour une armoire typique. Consultez les codes du bâtiment applicables pour plus d’informations.
2 Connexion du conduit de refroidissement (en option)
2-1 A
Conduit
d’évacuation
(tuyau le plus
long)
Conduit de
refroidissement
(tuyau le plus
court)
Adaptateur
de conduit
d’évacuation
Panneau
d’évacuation
ajustable
(2 sections)
Écrou Boulon Adaptateur
de conduit de
refroidissement
Élément encastré
d’évent à lames
(Préinstallé)
Bouchon de
drainage
2-2 A
Book 1.indb 24 7/29/2011 9:36:18 AM

1
2
1
2
1
2
2-3
2-4
3-1
3-2
A
A
A
B
B
B
25
2-3 A
B
Installation (suite)
2-4
3 Connexion du conduit d’évacuation
3-1 A
B
3-2 A
B
4.
5.
Book 1.indb 25 7/29/2011 9:36:28 AM

Écrou
Boulon
Écrou
Boulon
4-1
5-1
4-2
5-2
4-3
4-4
Panneau du plafond
(Vu de dessous)
Panneau de plafond
(Vu de dessus)
Panneau
d’évacuation
26
Installation (suite)
4 Connexion de l’évacuation à un faux-plafond
Avertissement : Certains plafonds peuvent exiger des procédures d’installation modifiées.
L’utilisateur doit déterminer la compatibilité de la quincaillerie et des procédures avant
d’effectuer l’installation. Les procédures décrites dans le présent manuel peuvent ne pas
être appropriées pour toutes les applications.
4-1
inclus pour le retenir en place. Remarque : Le panneau d’évacuation peut s’ajuster de 67,5
à 125 cm (26,6 à 49,2 po).
4-2
.
4-3
. Remarque : Il doit y avoir un espace d’au moins 25,4 cm (10 pouces)
au-dessus du panneau de plafond pour permettre une circulation d’air appropriée.
4-4
Remarque : Le conduit d’évacuation flexible peut être prolongé jusqu’à une longueur maximum
de 300 cm (118 pouces). Veillez à fournir le cheminement le plus direct et le plus court possible.
Toute flexion ou allongement excessif(ve) du conduit aura pour effet de réduire l’efficacité de
refroidissement.
Après avoir complété l’étape 4, passez à l’étape 6.
5 Connexion de l’évacuation à une fenêtre
Avertissement : Certaines fenêtres peuvent exiger des procédures d’installation modifiées.
L’utilisateur doit déterminer la compatibilité de la quincaillerie et des procédures avant
d’effectuer l’installation. Les procédures décrites dans le présent manuel peuvent ne pas
être appropriées pour toutes les applications.
5-1
Remarque : Le panneau
d’évacuation peut être ajusté de 67,5 à 125 cm (26,6 à 49,2 po). Il est compatible avec un
montage vertical et un montage horizontal.
5-2
Book 1.indb 26 7/29/2011 9:36:36 AM

Ouverture de
fenêtre
verticale
Ouverture
de fenêtre
verticale
INCORRECT CORRECT
5-3
6-1
27
Installation (suite)
5-3
Remarque : Il doit y avoir un espace d’au moins 25,4 cm (10
pouces) derrière le panneau de plafond pour permettre une circulation d’air appropriée.
Remarque : Le conduit d’évacuation flexible peut être prolongé jusqu’à une longueur maximum de 300
cm (118 pouces). Veillez à fournir le cheminement le plu direct et le plus court possible. Toute flexion ou
allongement excessif(ve) du conduit aura pour effet de réduire l’efficacité de refroidissement.
6 Insertion du bouchon d’évacuation
Avertissement : Le dispositif intégré à l’appareil et servant à faire réévaporer ne
fonctionnera pas tant que vous n’aurez pas insérer le bouchon de drainage dans la sortie
de drainage.
6-1
condensation.
Remarque : Vous pouvez connecter la sortie de drainage à un système de drainage réservé à
cet effet plutôt que d’utiliser la fonction de réévaporation. Enlevez le bouchon de drainage s’il
est installé, connecter une extrémité d’un tube de drainage approprié à la sortie de drainage et
connectez l’autre extrémité du tube de drainage au récipient de drainage de votre établissement.
Si le système de drainage venait qu’à se boucher, un petit réservoir interne recueillera la
condensation. Si le système de drainage n’est pas débouché avant que le réservoir interne soit
rempli, l’appareil s’arrêtera automatiquement.
Avertissement : Mettre l’appareil hors tension et le débrancher avant de le connecter à
un système d’évacuation réservé à cet effet. Il y a un risque de choc électrique lorsque
l’appareil est branché.
Book 1.indb 27 7/29/2011 9:36:52 AM

28
Fonctionnement
Avertissement : Installez l’appareil conformément aux directives de la section « Installation » afin de tenter de la faire fonctionner.
Puissance
Fonction de redémarrage automatique
immédiatement avant la coupure de courant. Remaque : Si la coupure de courant est brève, l’appareil
fonctionnera en mode Fan (ventilateur) pendant deux minutes avant de reprendre ses activités normales.
Le délai permet au compresseur de de dépressuriser afin que l’appareil puisse fonctionner correctement
lorsqu’il passe en mode Cool (refroidissement).
Mode « Cool » (refroidissement)
Mode « Dehumidify » (déshumidification)
Mode « Fan » (ventilateur)
Minuterie
Timer On (minuterie activée) (Remarque : L’appareil doit être mis hors tension afin
d’activer la fonction « Timer On » (minuterie activée). Confirmez que les réglages du mode, de
la température et de la vitesse du ventilateur sont corrects avant d’activer la fonction
« Timer On » (minuterie activée).)
Activez la minuterie en appuyant sur le bouton « TIMER » (minuterie). Appuyez sur les boutons
TEMP+ et TEMP- pour régler le délai (en heures) avant que l’appareil ne soit activé. La
nombre d’heures est affiché sur l’écran numérique. Appuyez de nouveau sur le bouton
« TIMER » (minuterie) pour confirmer le délai.
Timer Off (minuterie désactivée) (Remarque : L’appareil doit être mis sous tension afin
d’activer la fonction « Timer Off » (minuterie désactivée).
Book 1.indb 28 7/29/2011 9:36:54 AM

A
A
29
Fonctionnement (suite)
Maintenance
System Lock (Verrouillage du système)
Nettoyage des filtres à air
Avant de nettoyer les filtres, mettre l’appareil hors tension et le débrancher! Il y a un risque de choc électrique
lorsque l’appareil est branché.
A
Remarque : Ne pas utiliser de l’eau dont
la température excède 40° C (104° F) pour laver les filtres.
Nettoyage de l’armoire
Avant de nettoyer l’armoire, mettre l’appareil hors tension et le
débrancher! Il y a un risque de choc électrique lorsque l’appareil est
branché.
Book 1.indb 29 7/29/2011 9:36:55 AM

30
Garantie
ENREGISTREMENT DE LA GARANTIE
Numéros d’identification de conformité aux règlements
L’information de conformité WEEE pour les clients de Tripp Lite et recycleurs (Union européenne)
Remarque : Cette déclaration s’applique aux produits portant le logo WEEE.
Dépannage
Entreposage et service
Problème Cause possible Solution possible
L'appareil ne fonctionne pas. L'appareil est hors tension. Mettre l'appareil sous tension. (Consultez la section « Fonctionnement ».)
L'appareil n'est pas branché. Brancher l'appareil dans une prise appropriée.
L'alimentation principal est hors tension. Vérifier les fusibles ou le disjoncteur.
Le rendement du système
de refroidissement n'est pas
satisfaisant.
L'entrée ou la sortie d'air est obstruée. Confirmer que tous les conduits et les entrées sont libres de débris.
Le réglage de la température est trop élevé. Adjuster le réglage de la température.
Le réglage de la vitesse du ventilateur est trop faible. Adjuster le réglage du ventilateur.
Les filtres à air sont sales. Nettoyer les filtres à air.
La puissance de l'armoire de bâti, la grandeur de la pièce ou la température
ambiante excède la capacité de refroidissement d'un seul appareil. . Installez des appareils additionnels ou contacter Tripp Lite pour des solutions de
refroidissement additionnelles appropriées pour votre application.
Fuite d'eau au niveau de l'appareil. Le bouchon de drainage n'est pas installé. Insérer le bouchon de drainage dans la sortie de drainage.
(Consultez la section « Installation ».)
L'appareil produit beaucoup de
bruit ou de vibration. L'appareil se trouve sur une surface inégale ou instable. Déplacer l'appareil sur une surface au niveau et stable.
Entreposage
Service
1111 W. 35th Street, Chicago, IL 60609 USA
www.tripplite.com/support
Book 1.indb 30 7/29/2011 9:36:55 AM

31
Переносной блок кондиционирования
SRCOOL12K (120 В, 60 Гц)
SRXCOOL12K (230 В, 50 Гц)
Руководство пользователя
Warranty
Registration:
register online today for a
chance to win a FREE Tripp Lite
product—www.tripplite.com/warranty
Введение 32
Важные правила техники безопасности 32
Внешний вид 33
Установка 34
Эксплуатация 38
Техническое обслуживание 39
Поиск и устранение неисправностей 40
Хранение и обслуживание 40
Гарантийные обязательства и регистрация гарантии 40
English 1
Español 11
Français 21
1111 Запад. 35-я улица, Чикаго, Иллинойс 60609, США.
www.tripplite.com/support
Copyright © 2011 Tripp Lite.
Book 1.indb 31 7/29/2011 9:36:55 AM

SYST
RPS
STAT
DUPLX
SPEED
MODE
15X31X33X
47X
50
MASTR
STACK
SYST
RPS
STAT
DUPLX
SPEED
MODE
15X31X33X
MASTR
STACK
SYST
RPS
STAT
DUPLX
SPEED
MODE
15X31X33X
MASTR
STACK
AT
DUPLX
SPEED
MODE
15X31X33X
STACK
31X33X
47X
50
47X
50
47X
50
47X
50
50
32
Введение
Автономный переносной блок кондиционирования (SRCOOL12K / SRXCOOL12K) обеспечивает дополнительную охлаждающую
способность 12000 BTU (до 3,4 кВт). Предназначенный для использования в области IT, он идеально подходит для охлаждения перегретых
шкафов, горячих зон ИТ-оборудования и сетевых узлов, не имеющих доступа к системе кондиционирования объекта. Переносной блок
кондиционирования может направлять холодный воздух с помощью гибкого трубопровода или охлаждать небольшое помещение через
вентиляционные решетки блока. Кроме того, блок фильтрует и осушает воздух для улучшения условий работы и надежности оборудования.
Поскольку конденсат снова испаряется, не вызывая скопления влаги, вы не будете тратить время на опорожнение емкости для сбора воды.
Автономная конструкция не требует каких-либо трубопроводов или специальных схем, поэтому настройка выполняется быстро и просто.
Экологически безвредный хладагент R410A соответствует мировым стандартам по охране окружающей среды
Рекомендуемое применение:
Важные правила техники безопасности
СОХРАНИТЕ ЭТИ ПРАВИЛА
Данное руководство содержит правила безопасности и предупреждения, которые нужно соблюдать во время
монтажа, эксплуатации и хранения этого продукта. Несоблюдение этих правил может повлиять на гарантию.
Предупреждения
•
предполагаемого применения, а также степень безопасности такого применения. Так как настоящее изделие имеет множество вариантов
применения, производитель не дает гарантийных обязательств в отношении пригодности настоящего изделия для тех или иных
конкретных применений.
• ,
токопроводящих веществ и пыли, вне зоны воздействия прямых солнечных лучей.
• ,У20(51)
или других препятствий.
• 10л.
• ,.
может привести к поражению электрическим током или пожару.
• ,.
• ,,.
• .,
блоком.
• ,(NEC).
• ,.
поражению электрическим током или пожару.
• .
.ON/OFF.
• .
• .
подключен к сети, существует опасность поражения электрическим током.
• .
• ,,.
повредить корпус.
• ..
• ..
• .
действующими строительными нормами.
• .
• ,
оборудования может вызвать остановку оборудования поддержания жизнедеятельности или значительно повлиять на его безопасность
.,
составов с воздухом, кислородом или закисью азота.
1.. 2.
внутри или снаружи корпуса стойки.
3..
Book 1.indb 32 7/29/2011 9:37:00 AM

A
B
C
D
E
F
G
H
IJ
K
M
O
Q
P
R
S
T
N
X
V
W
U
L
33
Внешний вид
Вид спереди
A Панель управления
B Углубление для переноса
C Крышки воздушного фильтра
D (Показан с
установленным дренажным патрубком)
E Ролики
F Передняя панель
G Решетка выпуска охлажденного воздуха
H Вставка с жалюзи (предварительно
установлены)
I Переходник для охлаждающего
воздуховода (опция)
Вид сзади
J Углубления для переноса
K
L Выпуск отработанного нагретого
воздуха
Панель управления
M Кнопка выключателя питания
N“MODEБ()
O Кнопки регулировки температуры
P “POWERБ()
Q цифровой дисплей (для температуры
или задержки времени)
R“LOCKБ()
S“FANSPEEDБ(
вентилятора)
T“TIMERБ()
U“LOCKБ()
V
вращения вентилятора
W“TIMERБ()
X
работы
Book 1.indb 33 7/29/2011 9:37:04 AM

> 20 дюймов (51 см)
> 20 дюймов (51 см)
WALL
Проем сечением
645 см2 (для
стесненных помещений)
СТЕНА
1
2-1
2-2
A
A
34
Установка
Предупреждение: После извлечения блока из транспортной тары проверить на отсутствие повреждений или недостающих частей. (См. комплект поставки
ниже.) Если вы столкнулись с проблемами, посетите веб-сайт www.tripplite.com/support для получения помощи. Эксплуатация поврежденного блока запрещена.
Перечень принадлежностей в комплекте поставки:
1 Размещение блока
Установить блок на плоской, ровной поверхности рядом с заземленной сетевой розеткой,
параметры сети должны соответствовать указанным в заводской табличке (допускаются
90-110%).
,У20(51)
.,
удобный доступ к подвесному потолку или окну, чтобы обеспечить прямой кратчайший путь
для гибкого вытяжного воздуховода. Если планируется использовать гибкий воздуховод для
направления охлажденного воздух на конкретную стойку или устройство, нужно установить
блок кондиционирования рядом с такой стойкой или устройством, чтобы создать прямой,
кратчайший маршрут для воздуховода.
Предупреждение: Для подключения блока к розетке нельзя применять удлинители. Используется только
шнур питания, который поставляется вместе с блоком.
Примечание: Если блок будет работать в стесненном помещении (например, маленькой
комнате), необходимо обеспечить приток воздуха для поддержания эффективного
воздухообмена. Вентиляционный проем сечением 100 кв. дюймов (645 см2) или больше,
оборудованный в нижней части двери, будет обеспечивать достаточный приток воздуха
для типового помещения. Более подробная информация приведена в соответствующих
строительных нормативах.
2 Присоединение охлаждающего воздуховода (опция)
Предварительно установленная вставка с жалюзи предназначена для охлаждения всего
помещения. Если планируется охлаждать помещение целиком, шаг 2 можно пропустить
и перейти к шагу 3. Если планируется использовать гибкий воздуховод для направления
охлажденного воздуха на конкретное устройство или шкаф, выполнить инструкции,
приведенные ниже.
Вытяжной
воздуховод
(длинная
труба)
Охлаждающий
воздуховод
(короткая
труба)
Переходник
для вытяжного
воздуховода
Регулируемые
вытяжные
панели (2
секции)
Гайка Болт Переходник
для вытяжного
воздуховода
Вставка
с жалюзи
едварительно
установлена)
Дренажный
патрубок
2-1 Удалить вставку с жалюзи A потянув ее наружу и вверх.
2-2 A на вентиляционный проем и
надавить его вниз, чтобы зафиксировать на месте.
Book 1.indb 34 7/29/2011 9:37:14 AM

1
2
1
2
1
2
2-3
2-4
3-1
3-2
A
A
A
B
B
B
35
2-3 Подсоединить гибкий охлаждающий воздуховод (короткая трубка A) к
переходнику воздуховода B.
переходника и вращать его по часовой стрелке, чтобы плотно навинтить на
переходник.
Установка (продолжение)
2-4 Разместить другой конец охлаждающего воздуховода возле устройства или шкафа,
требующего охлаждения. Проложить воздуховод нужно по самому короткому
и прямому маршруту. Если планируется охлаждать стойку, разместить конец
охлаждающего воздуховода напротив перфорированной области в верхней части
передней двери шкафа (или в верхней части блока оборудования, которое требует
).
воздухозаборники в передней части стойки.
3 Присоединение вытяжного воздуховода
3-1 Присоединить гибкий вытяжной воздуховод (длинная трубка A) tк выпуску
отработанного нагретого воздуха на задней панели блока B.
на круглую горловину выпуска и вращать его по часовой стрелке, чтобы плотно
навинтить на выпуск.
3-2 Присоединить другой конец вытяжного воздуховода A к переходнику вытяжного
воздуховода B.
вращать его по часовой стрелке, чтобы плотно навинтить на переходник. Если
планируется вывести вытяжной воздуховод в пространство за подвесным
потолком, перейти к шагу 4. . Если планируется вывести вытяжной воздуховод за
окно, перейти к шагу 5.
Book 1.indb 35 7/29/2011 9:37:25 AM

Гайка
Болт
Гайка
Болт
4-1
5-1
4-2
5-2
4-3
4-4
Потолочная панель
(вид снизу)
Потолочная панель
(вид сверху)
Панель
с вытяжным
проемом
36
Установка (продолжение)
4 Присоединение вытяжного воздуховода к подвесному потолку
Предупреждение: Для некоторых потолков может потребоваться изменение процедуры монтажа.
Пользователь должен самостоятельно определить пригодность принадлежностей и процедур до начала
монтажа. Процедуры, описанные в данном руководстве, могут не подходить для всех случаев.
4-1 Выбрать съемную потолочную панель поблизости от блока кондиционирования, чтобы
обеспечить самый прямой и короткий путь для вытяжного воздуховода. Измерить
ширину потолочной панели с учетом той части, которая опирается на опорную раму.
,,
чтобы они соответствовали ширине потолочной панели. После установки правильной
ширины вытяжной панели зафиксировать ее на месте с помощью болта и гайки из
комплекта поставки. Примечание: Вытяжную панель можно отрегулировать на ширину
67,5125.
4-2 Вставить переходник вытяжного воздуховода в продолговатое отверстие в
регулируемой вытяжной панели. Переходник защелкнется на месте.
4-3
пространство. Вытяжная панель должна опираться на опорную раму. Примечание:
Для обеспечения достаточного воздухообмена над вытяжной панелью должно
быть не менее 10 дюймов (25,4 см) свободного пространства.
4-4 ,
к вытяжной панели и закрыла какие-либо зазоры в потолке. Герметичное
уплотнение обеспечит максимальную эффективность охлаждения. Если установка
выполняется постоянно, обрезать потолочную панель, чтобы она не перекрывала
опорную раму.
Примечание: Гибкий вытяжной воздуховод можно растянуть до максимальной
длины 118 дюймов (300 см). Обеспечить для него самый прямой и короткий маршрут.
Чрезмерный изгиб или растяжение воздуховода ведет к снижению эффективность
охлаждения.
После завершения шага 4, перейти к шагу 6.
5 Присоединение вытяжного воздуховода к окну
Предупреждение: Для некоторых окон может потребоваться изменение процедуры монтажа.
Пользователь должен самостоятельно определить пригодность принадлежностей и процедур до начала
монтажа. Процедуры, описанные в данном руководстве, могут не подходить для всех случаев.
5-1 .,
а затем отрегулировать их так, чтобы они соответствовали ширине оконного
проема. После установки правильной ширины вытяжной панели зафиксировать ее
на месте с помощью болта и гайки из комплекта поставки. Примечание: Вытяжную
панель можно отрегулировать на ширину от 67,5 до 125 см. Она пригодна для
вертикальной и горизонтальной установки
5-2 Вставить переходник вытяжного воздуховода в продолговатое отверстие в
регулируемой вытяжной панели. Переходник защелкнется на месте.
Book 1.indb 36 7/29/2011 9:37:34 AM

Горизонтальный
оконный проем
Вертикальный
оконный
проем
Неправильно Правильно
5-3
6-1
37
Установка (продолжение)
5-3 Вставить вытяжную панель в оконный проем, а затем закрыть окно до вытяжной
панели. Герметичное уплотнение обеспечит максимальную эффективность
охлаждения. Примечание: Для обеспечения достаточного воздухообмена
за вытяжной панелью должно быть не менее 10 дюймов (25,4 см) свободного
пространства.
Примечание: Гибкий вытяжной воздуховод можно растянуть до максимальной длины 118
дюймов (300 см). Обеспечить для него самый прямой и короткий маршрут. Чрезмерный
изгиб или растяжение воздуховода ведет к снижению эффективность охлаждения.
6 Установка дренажной заглушки
Предупреждение: Встроенный в блок испаритель не будет работать, пока в дренажный слив не будет
вставлена заглушка.
Когда блок работает в режиме охлаждения или осушения, образуется конденсат. В
блоке есть встроенный испаритель, который позволяет удалить конденсат вместе с
потоком отработанного нагретого воздуха. Эта функция позволяет блоку работать
длительное время, не требуя опустошения емкости для сбора воды.
6-1 Вставить заглушку в дренажный слив, чтобы задействовать функцию испарения
конденсата.
Примечание: Вместо использования функции испарения можно присоединить
дренажный слив к специализированной дренажной системе. Вытащить дренажную
заглушку, если она установлена, присоединить один конец дренажной трубки к
дренажному сливу, а другой конец трубки присоединить к дренажной системе объекта.
Если дренажная система забивается, конденсат будет собираться в небольшой
внутренний резервуар. Если дренажная система остается забитой после заполнения
внутреннего резервуара, блок кондиционирования автоматически выключится.
Предупреждение: Перед подключением блока к специализированной системе дренажа его нужно
выключить и вытащить вилку из розетки. Когда блок подключен к сети, существует опасность
поражения электрическим током.
Book 1.indb 37 7/29/2011 9:37:54 AM

38
Эксплуатация
Предупреждение: До начала эксплуатации установить блок в соответствии с инструкциями, приведенными в разделе «Установка».
Электропитание
“ON/OFFБ.
Функция автоматического перезапуска
.
будет использовать те же настройки, что использовались непосредственно перед
отключением электроэнергии. Примечание: Если отключение электроэнергии
кратковременное, блок будет работать в режиме вентилятора в течение двух минут,
прежде чем
Режим охлаждения
“MODEБ,
осушением и режимом вентиляции. Когда активен режим охлаждения, горит светодиод
“COOLБ.
TEMP+TEMP–.
Выбранная температура отображается на цифровом дисплее.
“FANSPEEDБ,
скоростью вращения вентилятора. Выбранная скорость вентилятора указывается
соответствующим светодиодом.
Режим осушения
“MODEБ,
.,“DRYБ.
В режиме осушения, вентилятор работает на фиксированной скорости, а органы управления
.
осушения нужно закрыть окна и двери.
Режим вентиляции
“MODEБ,
осушением и режимом вентиляции. Когда активен режим осушения, горит светодиод
“FANБ.
“FANSPEEDБ,
скоростью вращения вентилятора. Выбранная скорость вентилятора указывается
соответствующим светодиодом.
Таймер
“Б
.,“TIMERБ.
Включение по таймеру (Примечание: чтобы активировать функцию включения по
таймеру, блок должен быть выключен. Прежде чем активировать функцию включения
по таймеру, следует убедиться, что настройки режима, температуры и скорости
вращения вентилятора выставлены правильно.)
“TIMERБ.TEMP+–
задержки (в часах) до включения блока кондиционирования. Выбранное время
.
“TIMERБ.
Выключение по таймеру (Примечание: чтобы активировать функцию выключения по таймеру, блок
должен быть включен.)
“TIMERБ.TEMP
+–()
кондиционирования. Выбранное время задержки в часах отображается на цифровом
.“TIMERБ.
Book 1.indb 38 7/29/2011 9:37:57 AM

A
A
39
Эксплуатация (продолжение)
Уход
Блокировка системы
“LOCKБ.
,“LOCKБ
заблокированы, чтобы предотвратить случайное нажатие.
Периодическое обслуживание продлевает срок службы блока и позволяет достичь максимальной эффективности эксплуатации.
Очистка воздушных фильтров
Воздушные фильтры следует содержать в чистоте и очищать от пыли. Когда фильтры загрязнены или забиты пылью, снижается эффективность
охлаждения и это может ухудшать качество воздуха. Tripp Lite рекомендует чистить фильтры не реже одного раза в две недели.
Перед очисткой фильтров блок нужно выключить и отсоединить от сети! Когда блок подключен к сети, существует
опасность поражения электрическим током.
1. Выключить блок и отсоединить его от сети.
2. A вытянув их из корпуса.
3..
фильтры в посудомоечной машине, либо использовать агрессивные моющие
средства или химические вещества. После стирки дать фильтрам полностью
.:
40лC.
4. Установить фильтры, задвинув их обратно в корпус в первоначальное положение.
5..
Очистка корпуса
Перед очисткой корпуса блок нужно выключить и отсоединить от
сети! Когда блок подключен к сети, существует опасность поражения
электрическим током.
1. Выключить блок и отсоединить его от сети.
2.,.
бензин, бензол, растворители или другие агрессивные химикаты, которые могут
..
электрическим током и порче электрических компонентов и изоляции проводов.
3. В крайнем случае, можно протереть блок влажной тряпкой, чтобы удалить загрязнение.
Book 1.indb 39 7/29/2011 9:37:58 AM

40
Warranty
1
Продавец гарантирует для данного продукта отсутствие дефектов в материалах и технологиях в течение 1 года от даты первичной продажи при условии использования его в соответствии со всеми применимыми
инструкциями. В случае выявления дефектов, связанных со свойствами материала или качеством изготовления данного изделия в течение указанного периода, продавец обязуется, по своему усмотрению, провести
.(
):TrippLite,1111.35-,,60609,..
,,
.,.,
,,,
,;.(
;.,
.,
другими правами в зависимости от юрисдикции).
:,
применения. Так как настоящее изделие имеет множество вариантов применения, производитель не дает гарантийных обязательств в отношении пригодности настоящего изделия для тех или иных конкретных
применений.
Регистрация гарантии
Посетите веб-сайт www.tripplite.com/warranty сегодня и зарегистрируйте гарантию для своего нового продукта компании Tripp Lite. Вы будете автоматически принимать участие в розыгрыше бесплатного продукта от
компании Tripp Lite!*
*.,...-www.tripplite.com.
Идентификационные номера, свидетельствующие о соответствии нормативным требованиям
,,TrippLite.,
вместе со всей необходимой информацией и маркировками об одобрении, указан на ярлыке изготовителя, прикрепленном к изделию. При запросе информации о соответствии нормативным
..
Информация о соблюдении требований директивы WEEE для клиентов Tripp Lite и перерабатывающих организаций (Европейский союз)
Примечание: Это положение относится к изделиям, отмеченным логотипом WEEE.
Согласно директивы WEEE и исполнительных нормативных документов, когда потребители покупают новое электронное и электрическое оборудование у компании Tripp Lite, они получают право:
• О , , ( )
• О ,
Политика компании Tripp Lite состоит в непрерывном усовершенствовании. Технические характеристики могут быть изменены без уведомления.
Поиск и устранение неисправностей
Хранение и обслуживание
.,-www.tripplite.com/support
получения помощи.
Проблема Возможная причина Возможное решение
Блок не работает. Блок выключен. Включить блок. (См. раздел "Эксплуатация").
Блок не подключен. Подключить блок к соответствующей электрической розетке.
Отсутствует подача электроэнергии. Проверить предохранители или автоматические прерыватели.
Охлаждающая способность неудовлетворительная. Заблокированы входные или выходные воздуховоды. Проверить, что все воздуховоды и впускные отверстия не создают препятствий
движению воздуха.
Установки температуры слишком высокие. Отрегулировать установки температуры.
Установки скорости вращения вентилятора слишком низкие. Отрегулировать установки скорости вентилятора.
Воздушные фильтры загрязнены. Очистить воздушные фильтры.
Электрическая мощность стойки, размер комнаты или температура окружающего
воздуха превышают охлаждающие возможности одного блока.
Установить дополнительные блоки или связаться с компанией Tripp Lite для получения
решений по дополнительному охлаждению, подходящих для конкретного случая.
Из блока течет вода. Дренажная заглушка не установлена. Вставить дренажную заглушку в дренажный слив. (См. раздел "Установка").
Блок создает чрезмерный шум или вибрацию. Блок находится на неровной или неустойчивой поверхности. Переместить блок на ровную, устойчивую поверхность.
Хранение
Перед отправкой блока на хранение убедиться, что воздуховоды и проемы закреплены или сняты, и с ними правильно обращаются. Также
нужно убедиться, что из блока слит конденсат.
Сервисное обслуживание
TrippLite,.
различные программы продлеваемой гарантии и обслуживания на объекте от компании Tripp Lite.
-www.tripplite.com/support.
возвратом продукции для обслуживания, выполните следующие действия:
1. Просмотрите инструкции по установке и эксплуатации, изложенные в настоящем руководстве, чтобы убедиться, что проблемы происходят
не из-за неправильного понимания инструкций.
2. Если проблема сохраняется, не обращайтесь и не возвращайте изделие торговому посреднику. Вместо этого посетите веб-сайт www.
tripplite.com/support.
3.,-www.tripplite.com/supportProductReturns
().(RMA),.
простой интерактивной форме нужно будет заполнить номер модели устройства и его серийный номер, а также общую информацию
.RMA.
(прямые, косвенные, умышленные или побочные), полученные в результате транспортировки в компанию Tripp Lite или в уполномоченный
сервисный центр, гарантией не покрываются. Транспортировка продукции в компанию Tripp Lite или авторизованный сервисный центр
..
,.
застрахованных перевозчиков по адресу, полученному вместе с разрешением на возврат.
201006103 • 932918-EN
1111 Запад. 35-я улица, Чикаго, Иллинойс 60609, США.
www.tripplite.com/support
Book 1.indb 40 7/29/2011 9:37:59 AM
-
 1
1
-
 2
2
-
 3
3
-
 4
4
-
 5
5
-
 6
6
-
 7
7
-
 8
8
-
 9
9
-
 10
10
-
 11
11
-
 12
12
-
 13
13
-
 14
14
-
 15
15
-
 16
16
-
 17
17
-
 18
18
-
 19
19
-
 20
20
-
 21
21
-
 22
22
-
 23
23
-
 24
24
-
 25
25
-
 26
26
-
 27
27
-
 28
28
-
 29
29
-
 30
30
-
 31
31
-
 32
32
-
 33
33
-
 34
34
-
 35
35
-
 36
36
-
 37
37
-
 38
38
-
 39
39
-
 40
40


Tripp Lite SRXCOOL12K El manual del propietario
- Tipo
- El manual del propietario
en otros idiomas
Artículos relacionados
-
Tripp Lite SRCOOL12K Manual de usuario
-
-
-
-
-
-
-
-
-