Sony TCS 100DV Manual de usuario
- Categoría
- Reproductores de casete
- Tipo
- Manual de usuario
Este manual también es adecuado para

Notas
• No cargue las pilas.
• No utilice una pila vieja con otra nueva.
• No utilice pilas de tipos diferentes.
• Cuando no vaya a utilizar la unidad durante mucho tiempo, extraiga las pilas para
evitar el daño que podría causar el electrólito de las mismas en caso de fugarse.
• Las pilas no se utilizarán cuando conecte otra fuente de alimentación.
Corriente de la red (consulte la fig. B)
Conecte un adaptador de alimentación de CA (AC-E15HG, no suministrado)
(Para el modelo internacional Sony: en Japón utilice un AC-E15L, no
suministrado) a DC IN 1.5 V y a un tomacorriente de la red. No utilice ningún
otro adaptador de alimentación de CA.
Notas
• Las especificaciones del AC-E15HG varían para cada área. Antes de adquirirlo,
compruebe la tensión local y la forma de la clavija.
• La conexión y/o desconexión de la clavija con la unidad en funcionamiento o parada
puede cambiar los ajustes realizados o interrumpir la operación. Compruebe los
ajustes después de haber desconectado la clavija.
Desbloqueo (consulte la fig. C)
La función de bloqueo (HOLD) evitará que la unidad funcione cuando se
presionen accidentalmente sus teclas. Si la unidad está bloqueada,
desbloquéela antes de utilizarla.
1 Deslice HOLD de la unidad en sentido opuesto al de la flecha.
El indicador - desaparecerá del visualizador.
Para bloquear la unidad
Deslice HOLD de la unidad en el sentido de la flecha.
En el visualizador aparecerá el indicador -.
Cuando utilice el controlador remoto suministrado
Para desactivar la función de bloqueo (HOLD): Deslice HOLD en sentido
contrario al de la flecha.
Para bloquear la unidad: Deslice HOLD en el sentido de la flecha.
BUtilización de la unidad
Grabación (consulte la fig. D)
Usted podrá grabar directamente con el micrófono incorporado. Cerciórese de
que no haya nada conectado a la toma MIC.
1 Deslice OPEN en el sentido de la flecha para abrir la tapa del
compartimiento del casete.
2 Tense la cinta e inserte el casete con la cara en la que desee iniciar la
grabación hacia la tapa.
Nota
Cerciórese de que las lengüetas del casete no estén rotas.
3 Cierre la tapa hasta que chasquee.
4 Ajuste RC TIME al modo deseado.
NORMAL (4.8cm/s): para obtener el óptimo sonido. Se recomienda para
grabaciones normales.
DOUBLE (2.4cm/s): para obtener el de tiempo de grabación (por ejemplo,
120 minutos utilizando ambas caras de un casete de
60 minutos). Adecuado para grabación de
conferencias, dictados, etc. No se recomienda para
grabar música.
Cuando ajuste REC TIME a DOUBLE, en el
visualizador aparecerá “2X”.
5 Ajuste VOR a OFF. Con respecto a los detalles, consulte “Grabación
controlada con la voz (VOR)”.
6 Seleccione la sensibilidad del micrófono ajustando MIC SENS a H o L.
H (alta): Para grabar sonido suave o distante.
(p. ej., para grabar una reunión)
L (baja): Para grabar sonido fuerte o a corta distancia.
(p. ej., para grabar una conversación por teléfono)
7 Deslice REC en el sentido de la flecha con la tecla central presionada.
El indicador REC aparecerá en el visualizador, y REC volverá
automáticamente a la posición original. Durante la grabación, el indicador
REC parpadeará dependiendo de la intensidad del sonido.
Cuando inicie la grabación en la cara superior (en el visualizador
aparecerá (“FWD N”), y la cinta finalice, la grabación pasará
automáticamente a la cara posterior (en el visualizador aparecerá
“n REV”). La alimentación de la unidad se desconectará
automáticamente cuando finalice la grabación de la cara posterior.
Para Presione o deslice
Parar la grabación x
Realizar una pausa en la grabación X
En el visualizador aparecerá “X” y
parpadeará el contador de la cinta.
Desactivar la grabación en pausa X
“X” desaparecerá del visualizador.
Extraer el casete Presione x y deslice OPEN en el
sentido de la flecha.
3-042-996-11(2)
Operating Instructions
Manual de instrucciones
TCS-100DV
Sony Corporation © 2000 Printed in Japan
For the customers in the United States
INFORMATION
This equipment has been tested and found to comply with the limits for a Class
B digital device, pursuant to Part 15 of the FCC Rules. These limits are designed
to provide reasonable protection against harmful interference in a residential
installation. This equipment generates, uses, and can radiate radio frequency
energy and, if not installed and used in accordance with the instructions, may
cause harmful interference to radio communications. However, there is no
guarantee that interference will not occur in a particular installation. If this
equipment does cause harmful interference to radio or television reception,
which can be determined by turning the equipment off and on, the user is
encouraged to try to correct the interference by one or more of the following
measures:
– Reorient or relocate the receiving antenna.
– Increase the separation between the equipment and receiver.
– Connect the equipment into an outlet on a circuit different from that to
which the receiver is connected.
– Consult the dealer or an experienced radio/TV technician for help.
This device complies with Part 15 of the FCC Rules. Operation is subject to the
following two conditions:
(1) This device may not cause harmful interference, and (2) this device must
accept any interference received, including interference that may cause
undesired operation.
You are cautioned that any changes or modifications not expressly approved in
this manual could void your authority to operate this equipment.
Owner’s Record
The model number is located at the rear and the serial number is located inside
the tape holder. Record the serial number in the space provided below. Refer to
them whenever you call upon your Sony dealer regarding this product.
Model No. TCS-100DV
Serial No. _____________________________________________________________
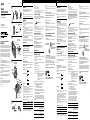
Stereo
Cassette-Corder
AA
A
B
C
MIC
D
E
Display window
Visualizador
VOR
MIC SENS
x STOP
HOLD
n N PLAY
VOL
REW
V-UP
x STOP
FF
X PAUSE
REC TIME
i/remote
i/Controlador
remoto
X PAUSE
HOLD
Remote Control
Controlador remoto
i/remote
i/Controlador remoto
i
AC power adaptor
Adaptador de alimentación
de CA
DC IN 1.5V
Welcome!
Thank you for purchasing the Sony Stereo Cassette-Corder.
This Stereo Cassette-Corder is equipped with a REC TIME switch that lets you
record double the normal length on any cassette.
Note
Tapes recorded with the REC TIME switch in the DOUBLE position cannot be
played properly by a tape recorder without the REC TIME switch function.
Precautions
On power
• Operate the unit only on 1.5V DC. For AC operation, use the AC power adaptor
recommended for the unit. Do not use any other type. For battery operation, use two
size AAA (R03) batteries.
On the unit
• Do not leave the unit in a location near heat sources, or in a place subject to direct
sunlight, excessive dust or mechanical shock.
• Should any solid object or liquid fall into the unit, remove the batteries or disconnect
the AC power adaptor, and have the unit checked by qualified personnel before
operating it any further.
• Keep personal credit cards using magnetic coding or spring-wound watches etc.
away from the unit to prevent possible damage from the magnet used for the
speaker.
• If the unit has not been used for a long time, set it in the playback mode and warm it
up for a few minutes before inserting a tape.
On tapes longer than 90 minutes
We do not recommend the use of tapes longer than 90 minutes except for a long
continuous recording or playback. They are very thin and tend to be stretched easily.
BGetting Started
Preparing a Power Source
Choose one of the two following power sources.
Dry Batteries (see Fig. A)
1 Open the battery compartment lid by sliding it in the direction of the
arrow.
2 Insert two size AAA (R03) dry batteries (supplied with the Sony world
model only) with correct polarity.
3 Close the lid.
When to replace the batteries
The battery indicator in the display window shows the remaining battery power.
When the batteries are exhausted, E appears in the display window. Replace
both batteries with new ones.
The battery indicator in the display window changes as illustrated:
Notes
• When you have changed the batteries to new ones, the battery indicator appears in
the display window after running the tape once.
• If you insert exhausted batteries (especially manganese batteries), E may not appear
even though the other indicators appear properly. If the unit does not operate
properly, replace the batteries with new ones.
• While the tape runs rapidly (fast forward or rewind), E may appear. Replace the
batteries only when the unit does not operate properly.
• During playback, the battery indicator may temporarily flicker when you turn up the
volume.
• At the beginning or end of the tape, E may momentarily light. If the indicator
disappears, you do not need to replace the batteries.
Battery life (Approx. hours) (EIAJ*)
Playback Recording
Sony alkaline LR03(SG) 15 9
Sony R03(SB) 5 3
* Measured value by the standard of EIAJ (Electronic Industries Association of Japan).
(Using a Sony HF series cassette tape and playing back with speakers)
When batteries are new
When batteries become weak
Replace batteries.
Polarity of the plug
Notes
• Do not charge a dry battery.
• Do not use a new battery with an old one.
• Do not use different types of batteries.
• When you do not use the unit for a long time, remove the batteries to avoid any
damage caused by battery leakage and subsequent corrosion.
• Dry batteries will not be expended when another power source is connected.
House Current (see Fig. B)
Connect the AC power adaptor (AC-E15HG, not supplied) (For Sony world
model: in Japan, use the AC-E15L, not supplied) to DC IN 1.5 V and to the wall
outlet. Do not use any other AC power adaptor.
Notes
• Specifications for AC-E15HG vary for each area. Check your local voltage and the
shape of the plug before purchasing.
• While the unit is or is not in operation, connecting and/or disconnecting the plug
may change the previous settings or interrupt the operation.
Check the settings again after the plug was disconnected.
Releasing HOLD (see Fig. C)
The HOLD function locks the unit to prevent it from operating when you
accidentally press buttons. If the unit is locked, unlock it before operating.
1 Slide HOLD on the Cassette-Corder in the reverse direction of the arrow.
The - indicator disappears in the display window.
To lock the unit
Slide HOLD on the Cassette-Corder in the direction of the arrow.
The - indicator appears in the display window.
When you use the supplied remote control
To release the HOLD function: slide HOLD in the reverse direction of the arrow.
To lock the unit: slide HOLD in the direction of the arrow.
BOperating the Unit
Recording (see Fig. D)
You can record right away with the built-in microphone. Make sure nothing is
connected to the MIC jack.
1 Slide OPEN in the direction of the arrow and open the cassette
compartment lid.
2 Take out any slack in the tape and insert the cassette with the side to start
recording facing the lid.
Note
Make sure that the tabs are not removed.
3 Close the lid until it clicks.
4 Set REC TIME to the desired mode.
NORMAL (4.8cm/s): for optimum sound. Recommended for normal
recordings.
DOUBLE (2.4cm/s): for double recording time (for example, 120 minutes
using both sides of a 60-minute cassette). Suitable for
recording conferences, dictations, etc. Not
recommended to record music.
When REC TIME is set to DOUBLE, “2X” appears in
the display window.
5 Set VOR to OFF. For details, refer to “VOR (Voice Operated Recording).”
6 Select the microphone sensitivity by setting MIC SENS to H or L.
H (high): To record a soft sound or a sound in the distance.
(e.g. to record a meeting)
L (low): To record a loud sound or a sound at close range.
(e.g. to record a speech through a microphone)
7 Slide REC in the direction of the arrow with the middle button pressed.
The REC indicator appears in the display window, and REC automatically
returns to the original position. While recording, the REC indicator flickers
depending on the strength of the sound.
When you start recording on the upper side (“FWD N” appears in the
display window), and the tape comes to the end, recording automatically
goes on to the reverse side (“n REV” appears in the display window).
The unit turns off automatically when the tape comes to the end of the
reverse side.
To Press or slide
Stop recording x
Pause recording X
“X” appears, and the tape counter
flashes in the display window.
Release pause recording X
“X” in the display window goes off.
Take out a cassette Press x and slide OPEN in the
direction of the arrow.
Notes
• Before taking out the cassette, make sure that the operating sound of the unit has
stopped.
• When an external microphone is connected to the MIC jack, the built-in microphone
does not work.
When you open the lid during stop
The tape always starts recording on the upper side after you have opened the lid.
When you use the supplied remote control for recording
1 Connect the plug to the i jack on the Cassette-Corder.
2 Slide REC in the direction of the arrow.
To monitor the sound
Connect headphones (supplied) firmly to the i jack on the remote control.
Notes
• Do not use a High Position (TYPE II) or metal (TYPE IV) tape, or the sound may be
distorted when you play back the tape, or the previous recording may not be erased
completely.
• When the FWD N mode switches to the n REV mode, recording will be
interrupted for several seconds.
To prevent a tape from being accidentally
recorded over (see Fig. E)
Break out and remove the cassette tabs. To reuse the tape for recording, cover the
tab holes with adhesive tape.
When the cassette tab is removed, the bar in the display window disappears.
To select the side to be recorded
To record on both sides continuously: Start recording on the upper side (“FWD
N ” appears in the display window). If “n REV” is displayed, press x STOP
for more than 2 seconds during stop. When recording ends on the upper side, it
will automatically continue on the reverse side.
To record on one side only: Start recording on the reverse side (“n REV”
appears in the display window). If “FWD N” is displayed, press x STOP for
more than 2 seconds during stop. When recording ends on the reverse side, it
will automatically stop.
To check the direction of the tape in the display window
Disappears when the tab for
the upper side is removed.
Disappears when the tab
for the reverse side is
removed.
Flashes if you try to slide REC with
the cassette tab removed.
“FWD N”appears when recording on the upper side.
“n REV” appears when recording on the reverse side.
REC indicator
Indicador REC
English Español
¡Bienvenido!
Muchas gracias por la adquisición de esta grabadora de casetes estéreo Sony.
Esta grabadora de casetes estéreo dispone de un selector REC TIME que le
permitirá grabar el doble del tiempo normal en cualquier casete.
Nota
Las cintas grabadas con el selector REC TIME en la posición DOUBLE no podrán
reproducirse adecuadamente en una grabadora de casetes sin la función del
selector REC TIME.
Precauciones
Acerca de la alimentación
• Alimente la unidad solamente con 1.5 V CC. Para alimentarla con CA, utilice el
adaptador de alimentación de CA recomendado para ella. No utilice ningún otro
tipo de adaptador. Para alimentarla con pilas, utilice dos de tamaño AAA (R03).
Acerca de la unidad
• No deje la unidad en un lugar cercano a fuentes térmicas, ni expuesta a la luz solar
directa, polvo excesivo, ni golpes.
• Si dentro de la unidad cae algún objeto sólido o líquido, extráigale las pilas o
desconecte el adaptador de alimentación de CA, y haga que sea comprobada por
personal cualificado antes de volver a utilizarla.
• Mantenga las tarjetas de crédito, que utilizan código magnético, o los relojes de
cuerda, etc., alejados de la unidad para evitar el daño que podría causar el imán del
altavoz.
• Cuando no haya utilizado la unidad durante mucho tiempo, póngala en el modo de
reproducción y deje que se caliente antes de insertarle un casete.
Acerca de las cintas de más de 90
No recomendamos utilizar cintas de más de 90 minutos excepto para grabación o
reproducción larga y continua. Estas cintas son muy finas y tienden a estirarse.
BPreparativos
Preparación de una fuente de
alimentación
Elija una de las dos fuentes de alimentación siguientes.
Pilas (consulte la fig. A)
1 Abra la tapa del compartimiento de las pilas deslizándola en el sentido de
la flecha.
2 Inserte dos pilas AAA (R03) (suministradas con el modelo Sony
internacional solamente) con la polaridad correcta.
3 Cierre la tapa.
Cuándo reemplazar las pilas
El indicador de pila del visualizador mostrará la energía restante de las pilas.
Cuando las pilas se agoten, en el visualizador aparecerá E. Reemplace ambas
pilas por otras nuevas.
El indicador de las pilas del visualizador cambiará como se muestra en la
ilustración:
Notas
• Cuando haya cambiado las pilas por otras nueva, el indicador de las pilas aparecerá
en el visualizador después de haber utilizado un casete.
• Si inserta pilas agotadas (especialmente de manganeso), es posible que no aparezca
E incluso aunque otros indicadores aparezcan adecuadamente. Si la unidad no
funciona adecuadamente, reemplace las pilas por otras nuevas.
• Mientras la cinta esté moviéndose rápidamente (avance rápido o rebobinado), es
posible que aparezca E. Reemplace las pilas solamente cuando la unidad no
funcione adecuadamente.
• Durante la reproducción, el indicador de las pilas puede parpadear temporalmente
cuando aumente el volumen.
• Al comienzo o al final de la cinta puede aparecer temporalmente E. Si el indicador
desaparece, no necesitará reemplazar las pilas.
Duración de las pilas (Horas aprox.) (EIAJ*)
Reproducción Grabación
Alcalinas LR03(SG) Sony 15 9
R03(SB) Sony 5 3
* Valor medido según las normas EIAJ (Electronic Industries Association of Japan).
(Utilizando un casete de la serie HF Sony y reproduciendo a través de altavoces)
Cuando las pilas sean nuevas
Cuando las pilas estén débiles
Reemplace las pilas.
Polaridad de la clavija
Notas
• Antes de extraer el casete, cerciórese de que se haya parado el sonido de operación
de la unidad.
• Cuando haya conectado un micrófono externo a la toma MIC, el incorporado no
trabajará.
Si abre la tapa durante el modo de parada
Después haber abierto la tapa, la cinta comenzará a reproducirse siempre desde
la cara superior.
Cuando utilice el controlador remoto suministrado para grabar
1 Conecte la clavija a la toma i de la grabadora de casetes.
2 Deslice REC en el sentido de la flecha.
Para escuchar el sonido
Conecte firmemente los auriculares (suministrados) la toma i del controlador
remoto.
Notas
• No utilice la posición alta (TYPE II) ni la de metal (TYPE IV), ya que el sonido podría
distorsionarse cuando reprodujese la cinta, o la grabación podría no borrarse
completamente.
• Cuando cambie el modo FWD N al modo n REW, la grabación se interrumpirá
durante varios segundos.
Para evitar la regrabación accidental de una
cinta (consulte la fig. E)
Rompa y quite las lengüetas del casete. Para volver a utilizar este casete para
grabación, cubra los orificios de las lengüetas con cinta adhesiva.
Cuando quite la lengüeta del casete, la barra desaparecerá del visualizador.
Para seleccionar la cara que desee grabar
Para grabar continuamente en ambas caras: Inicie la grabación en la cara
superior (en el visualizador aparecerá “FWD N”). Si se visualiza “n REV”,
mantenga presionada x STOP durante más de 2 segundos durante el modo de
parada. Cuando finalice la grabación de la cara posterior, pasará
automáticamente a la cara posterior.
Para grabar en una sola cara solamente: inicie la grabación desde la posterior (en
el visualizador aparecerá “n REV”). Si se visualiza “FDW N”, mantenga
presionada x STOP durante más de 2 segundos durante el modo de parada.
Cuando finalice la grabación de a cara posterior, se parará automáticamente.
Para comprobar el sentido de movimiento de la cinta en el
visualizador
Desaparecerá cuando haya
quite la lengüeta para la cara
superior.
Desaparecerá quite la
lengüeta para la cara
posterior.
Parpadeará si trata de deslizar REC
con la lengüeta del casete quitada.
Cuando grabe en la cara superior, aparecerá “FWD N”.
Cuando grabe en la cara posterior, aparecerá “n REV”.
Reverse side
of the tape
Cara posterior
del casete
Upper side of the tape
Cara superior del casete
Side A
Cara A
Tab for side A
Lengüeta para
la cara A

Función de refuerzo de voz (V-UP)
Si presiona V-UP durante la reproducción, en el visualizador aparecerá “V-UP”, y el
sonido o las voces grabados en estéreo se volverán más claros. La escucha con
auriculares ofrecerá un buen resultado.
Nota
No se recomienda reproducir música con la función de refuerzo de la voz (V-UP).
BInformación adicional
Solución de problemas
Si cualquier problema persiste después de haber realizado estas comprobaciones,
consulte a su proveedor Sony.
La unidad no funciona.
m Las pilas están insertadas con la polaridad incorrecta.
m Las pilas están débiles.
m Ha presionado X PAUSE.
m El adaptador de alimentación de CA no está firmemente conectado.
m Las pilas están insertadas, pero el adaptador de alimentación de CA está
conectado a la unidad y no enchufado en un tomacorriente de la red.
El altavoz no emite sonido.
m Los auriculares están enchufados.
m El volumen está completamente al mínimo.
La velocidad es demasiado rápida o lenta en el modo de reproducción.
m CONTROL SPEED está en un punto que no es el central.
m Ajuste inapropiado del selector REC TIME. Ajústelo a la misma velocidad que
la utilizada para grabar.
El sonido se corta o se oye con excesivo ruido.
m El volumen está completamente al mínimo.
m Las pilas están débiles.
m Las cabezas están sucias. Consulte “Mantenimiento”.
No es posible grabar.
m El casete carece de lengüeta.
m La conexión es incorrecta.
m Las pilas están débiles.
m La cabeza grabadora/reproductora está sucia.
m MIC SENS está en la posición incorrecta al utilizar la función VOR.
La grabación se interrumpe.
m VOR está en ON. Cuando no desee utilizar la función VOR, póngalo en OFF.
m MIC SENS está inadecuadamente ajustado al utilizar la función VOR.
La grabación no puede borrarse completamente.
m La cabeza borradora está sucia.
m Ha grabado o está borrando una cinta de posición alta (TYPE II) o de metal
(TYPE IV).
Mantenimiento (consulte la fig. I)
Para limpiar las cabezas y la trayectoria de la cinta
Limpie las cabezas y el rodillo compresor con un palillo de cabeza de algodón
humedecido en alcohol cada 10 horas de utilización.
Para limpiar el exterior
Utilice un paño ligeramente humedecido en agua. No use alcohol, bencina, ni diluidor
de pintura.
Especificaciones
Sistema de grabación
4 pistas, 2 canales estéreo
Velocidad de cida
4,8 cm/s o 2,4 cm/s
Gama de frecuencias
150 – 8.000 Hz utilizando casetes normales (TYPE I) (con el selector REC TIME en
“NORMAL”)
Altavoz
Aprox. 3,6 cm de diámetro
Salida de potencia
Altavoz: 70 mW (al 10% de distorsión armónica)
Auriculares: 3 mW + 3 mW (al 10% de distorsión armónica)
Entrada
Toma de entrada para micrófono (minitoma), sensibilidad de 0,4 mV para
micrófono de 3 kiloohmios o menos
Salida
Toma i (auriculares) (minitoma) para auriculares de 8-300 ohmios
Margen variable de control de velocidad
De +20% a –15% (con el selector REC TIME en “NORMAL”)
Alimentación
3V CC con 2 pilas de tamaño AAA (R03)/fuentes de alimentación externas de
1.5 V CC
Dimensiones (an/al/prf) incluyendo partes y controles salientes
Aprox. 112 × 30 × 78 mm
Masa
Aprox. 190 g
Accesorios suministrados
Funda de transporte (1)
Pilas de manganeso R03) (SB) Sony (2) (Modelo internacional Sony solamente)
Auriculares con controlador remoto (1)
Correa para la muñeca (1)
El diseño y las especificaciones están sujetos a cambio sin previo aviso.
Various Ways of Recording
VOR (Voice Operated Recording)
The VOR system works only during recording. Set VOR to ON first and slide REC in
the direction of the arrow with the middle button pressed. The unit automatically
starts recording the sound and pauses when there is no sound (you can save tapes and
batteries).
When you use this system in a noisy place, the unit stays in the recording mode. If the
sound is too soft, however, the unit will not start recording. When you do not use this
function, set VOR to OFF.
Notes
• The VOR system depends on the environment or operating conditions. Set MIC
SENS to H or L depending on the conditions. If you cannot get the desired results,
set VOR to OFF.
• When using the VOR system, the unit starts recording only when a sound is
detected. Therefore, the beginning of the word may not be recorded. For an
important recording, we recommend recording without the VOR system.
Start recording during playback
Slide REC in the direction of the arrow with the middle button pressed during
playback, and recording starts immediately. It is useful when you want to re-record
the part just recorded.
Review the part just recorded
When you press EASY SEARCH + or – during recording, the unit stops recording and
starts playback after fast-forwarding or rewinding for as much as you pressed the
button. (For details, see the “Searching for the point you want to play” section of
“Playing a Tape”.)
You can also start playback after fast-forwarding or rewinding by pressing FF/CUE or
REW/REVIEW during recording and releasing the button at the point to start
playback.
Recording from Various Sound
Sources
Recording with an External Microphone
Connect a microphone to the MIC jack. Use a microphone of low impedance (less than
3 kilohms) such as ECM-717 (not supplied). When using a plug-in-power system
microphone, the power to the microphone is supplied from this unit.
Recording from Other Equipment
Connect other equipment to the MIC jack using the RK-G128HG (stereo miniplug y
two phono plugs) connecting cord (not supplied).
Notes on recording with a microphone or
external sources
• When the MIC jack is plugged in, the built-in stereo microphone is switched off
automatically, and recording input switches automatically to the connected source.
• When recording with an external microphone, the VOR system may not work
properly due to difference in sensitivity.
Using Other Functions (see Fig. H)
HOLD function
This function locks the unit to prevent it from operating when you accidentally press
buttons except REC TIME. To lock the unit, set HOLD to -. The - indicator flashes
in the display window.
To check the direction of the tape in the
display window
Display during recording/playing back
The indication will disappear when you have not operated the unit for more than one
minute. To display the indication, press x or X.
Tape Counter Reset
While the upper side of the tape is running (“FWD N” appears in the display
window), figures in the tape counter increase.
While the reverse side is running (“n REV” appears in the display window), they
decrease.
Press COUNTER RESET and release it to return to 000.
HOLD
FF/CUE
REW/REVIEW
MIC SENS
VOR
Display window
Visualizador
i/remote
i/Controlador remoto
REC indicator
Indicador REC
To Press or slide
Stop playback x
Pause playback X
“X” appears and the tape counter flashes
in the display window.
Release pause playback* X or n N
“X” in the display window goes off.
Fast forward** M during stop.
FF on the remote control.
Rewind** m during stop.
REW on the remote control.
Fast forward while listening to Press and hold M during playback.
the sound (CUE) FF on the remote control.
Rewind while listening to the Press and hold m during playback.
sound (REVIEW) REW on the remote control.
Play the other side during n N
playback
Play the other side during stop x for more than 2 seconds
Take out a cassette Press x and slide OPEN in the direction of
the arrow.
* X is released automatically when x is pressed (stop-pause-release function).
** The tape stops at the end of the tape, and the power is turned off automatically
(automatic shut-off mechanism).
Notes
• Before taking out the cassette, make sure that the operating sound of the unit has
stopped.
• Make sure that REC TIME is set to the same position as that used for recording.
When you open the lid during stop
The tape always starts playback on the upper side after you have opened the lid.
When you use the supplied remote control for playing a tape
(see Fig. C)
1 Connect the remote control to the i jack on the Cassette-Corder.
2 Connect the headphones (supplied) to the i jack on the remote control.
3 Press n N for playback.
4 Adjust the volume using VOL on the remote control. Set the volume on the
Cassette- Corder to 8.
Searching for the point you want to play (see Fig. G)
When you press EASY SEARCH + or – during playback or stop, the unit enters rewind
or fast forward mode and stops, then starts playback.
Each press of + makes the tape run rapidly to the point approx. 10 seconds ahead and
plays it back.
Each press of – rewinds the tape to the point approx. 3 seconds earlier and plays it
back.
You can press + or – up to 20 times (approx. 200 seconds ahead or 60 seconds earlier).
(If you press and hold + or –, the digits change rapidly.)
Note
When you press EASY SEARCH during recording, the unit stops recording and starts
playback after fast-forwarding or rewinding for as much as you pressed the button.
HOLD
Display window
Visualizador
COUNTER RESET
SPEED CONTROL
Number of times you pressed –
Number of times you pressed +
F
H
Pinch-roller
Rodillo compresor
Erase head
Cabeza
borradora
Record/Playback
head
Cabeza grabadora/
reproductora
Cotton swab
Palillo con
cabeza de
algodón
I
Playing a Tape (see Fig. F)
1 Slide OPEN in the direction of the arrow and open the casseette compartment lid.
2 Take out any slack in the tape and insert the cassette with the side to start playing
facing the lid.
3 Set REC TIME to the same position as that used for recording.
To play back commercially sold tapes, select NORMAL.
4 Close the lid until it clicks.
5 Press n N.
6 For adjusting the playback speed,
Turn SPEED CONTROL to:
SLOW (slow) to play back at a slower speed. Middle position to play back at a
normal speed.
FAST (fast) to play back at a faster speed.
When the playback starts from the upper side (“FWD N” appears in the display
window), playback goes on to the reverse side (“n REV” appears in the display
window), and the unit turns off automatically.
Upper side is recorded or
played back.
Reverse side is recorded or
played back.
nN PLAY/DIR
X PAUSE
SPEED CONTROL
VOL
G
EASY
SEARCH
English Español
This warranty is valid only in the
United States.
V-UP
VOICE UP function on the remote control
When V-UP is pressed during playback, “V-UP” appears in the display window, and
the sound or voices recorded in stereo become clearer. Listening with the headphones
brings a good result.
Note
Playing back music with the VOICE UP function is not recommended.
BAdditional information
Troubleshooting
Should any problem persist after you have made these checks, consult your nearest
Sony dealer.
The unit does not operate.
m The batteries have been inserted with incorrect polarity.
m The batteries are weak.
m X PAUSE is pressed.
m The AC power adaptor is not firmly connected.
m The batteries have been inserted; however, the AC power adaptor is also
connected to the unit but not plugged into the wall outlet.
No sound comes from the speaker.
m The headphones are plugged in.
m The volume is turned down completely.
Tape speed is too fast or too slow in the playback mode.
m SPEED CONTROL is set at a point other than the middle.
m Improper setting of the REC TIME switch. Set it to the same speed as that used
for recording.
The sound drops out or comes with excessive noise.
m The volume is turned down completely.
m The batteries are weak.
m The heads are dirty. See “Maintenance.”
Recording cannot be made.
m The tab on the tape has been removed.
m Connection is made incorrectly.
m The batteries are weak.
m The record/playback head is dirty.
m MiIC SENS has been set to the improper position when the VOR function
works.
Recording is interrupted.
m VOR is set to ON. When you do not use VOR, set it to OFF.
m MIC SENS is set improperly when using VOR.
Recording cannot be erased completely.
m The erase head is dirty.
m Recording or erasing is being made using a recorded High Position (TYPE II) or
metal (TYPE IV) tape.
Maintenance (see Fig. I)
To clean the tape heads and path
Wipe the heads and pinch rollers with a cotton swab moistened with alcohol every 10
hours of use.
To clean the exterior
Use a soft cloth slightly moistened with water. Do not use alcohol, benzine or thinner.
Specifications
Recording system
4-track 2-channel stereo
Tape speed
4.8 cm/s or 2.4 cm/s
Frequency range
150 – 8,000 Hz using normal (TYPE I) cassette (with REC TIME switch at “NORMAL”)
Speaker
Approx. 3.6 cm (1
7
⁄16 in.) dia.
Power output
Speaker:70 mW (at 10% harmonic distortion)
Head phones:3 mW + 3 mW (at 10% harmonic distortion)
Input
Microphone input jack (minijack) sensitivity 0.4 mV for 3 kilohms or lower
impedance microphone
Output
i (headphones) jack (minijack) for 8 – 300 ohms headphones
Variable range of the speed control
From +20% to –15% (with REC/TIME switch at “NORMAL”)
Power requirements
1.5V DC batteries size AAA (R03) × 2/External DC 1.5V power souces
Dimensions (w/h/d) incl. projecting parts and controls)
Approx. 112 × 30 × 78 mm (4
3
⁄4 × 1
3
⁄16 × 3
1
⁄8 in.)
Mass
Approx. 190 g (6.8 oz)
Supplied accessories
Carrying pouch (1)
Sony manganese batteries R03 (SB) (2) (Sony world model only)
Headphones with remote control (1)
Hand strap (1)
Design and specifications are subject to change without notice.
Para Presione o deslice
parar la reproducción x
realizar una pausa en la reproducción X
En el visualizador aparecerá “X” y
parpadeará el contador de la cinta.
desactivar la reproducción en pausa* X o n N
“X” desaparecerá del visualizador.
hacer que la cinta avance rápidamente** M durante el modo de parada.
FF del controlador remoto.
rebobinar la cinta** m durante el modo de parada.
REW del controlador remoto.
hacer que la cinta avance rápidamente Mantenga presionada M durante la
durante la escucha del sonido (CUE) reproducción.
FF del controlador remoto.
hacer que la cinta se rebobine durante la Mantenga presionada m durante la
escucha del sonido (REVIEW) reproducción.
REW del controlador remoto.
cambiar de cara durante la reproducción n N
cambiar de cara durante el modo de Mantenga presionada x durante más de
parada
2 segundos.
extraer el casete Presione “x” y deslice OPEN en el sentido
de la flecha.
* X se soltará automáticamente cuando presione x (función de desactivación de la
pausa con la parada).
** La cinta se parará cuando finalice, y la alimentación se desconectará
automáticamente (mecanismo de desconexión automática).
Notas
• Antes de extraer el casete, cerciórese de que se haya parado el sonido de operación
de la unidad.
• Cerciórese de que REC TIME esté ajustado a la misma posición que la utilizada para
grabación.
Si abre la tapa durante el modo de parada
Después haber abierto la tapa, la cinta comenzará a reproducirse siempre desde la cara
superior.
Cuando utilice el controlador remoto suministrado para
grabar (consulte la fig. C)
1 Conecte la clavija a la toma i de la grabadora de casetes.
2 Conecte los auriculares (suministrados) a la toma i del controlador remoto.
3 Para reproducir, presione n N.
4 Ajuste el volumen utilizando VOL del controlador remoto. Ajuste el volumen de
la grabadora de casetes a 8.
Búsqueda del punto a partir del que desee reproducir
(consulte la fig. G)
Si presiona EASY SEARCH + o – durante la reproducción o en el modo de parada, la
unidad entrará en el modo de rebobinado o de avance rápido, se parará, y después se
iniciará la reproducción.
Cada vez que presione +, la cinta avanzará rápidamente hasta el punto situado a unos
10 después y se reproducirá.
Cada vez que presione –, la cinta se rebobinará hasta el punto situado unos 3 segundos
antes y se reproducirá.
Usted podrá presionar + o – hasta 20 veces (unos 200 segundos posteriores o 60
segundos anteriores). (Si mantiene presionada + o –, los dígitos cambiarán
rápidamente).
Nota
Si presiona EASY SEARCH durante la grabación, ésta se parará y se iniciará la
reproducción después del tiempo determinado por las veces que haya presionado la tecla.
Número de veces que ha
presionado –
Número de veces que ha
presionado +
Reproducción de cintas (consulte la fig. F)
1 Deslice OPEN en el sentido de la flecha y abra la tapa del compartimiento
del casete.
2 Tense la cinta e inserte el casete con la cara en la que desee iniciar la
reproducción hacia la tapa.
3 Ajuste REC TIME a la misma posición que la utilizada para grabar.
Para reproducir casetes grabados adquiridos en el mercado, seleccione
NORMAL.
4 Cierre la tapa hasta que chasquee.
5 Presione n N.
6 Para ajustar la velocidad de reproducción,
gire SPEED CONTROL hacia:
SLOW (lenta) para reproducir a velocidad más lenta.
Posición central para reproducir a velocidad normal.
FAST (rápida) para reproducir a velocidad más rápida.
Cuando inicie la reproducción en la cara superior (en el visualizador aparecerá
(“FWD N”), y la cinta finalice, la reproducción pasará automáticamente a la cara
posterior (en el visualizador aparecerá “n REV”). La alimentación de la unidad se
desconectará automáticamente cuando finalice la cinta de la cara posterior.
Diversas formas de grabación
Grabación controlada con la voz (VOR)
El sistema VOR solamente trabajará durante la grabación. En primer lugar ponga VOR
en ON y deslice REC en el sentido de la flecha manteniendo presionado el botón
central. La unidad iniciará automáticamente la grabación del sonido y pasará al modo
de pausa cuando no haya sonido (usted podrá ahorrar cinta y pilas).
Cuando utilice este sistema en un lugar ruidoso, la unidad permanecerá en el modo de
grabación. Sin embargo, si el sonido es demasiado bajo, la unidad no iniciará la
grabación. Cuando no vaya a utilizar esta función, ponga VOR en OFF.
Notas
• El sistema VOR dependerá de las condiciones ambientales o de operación. Ponga
MIC SENS en H o L dependiendo de las condiciones. Si no obtiene los resultados
deseados, ponga VOR en OFF.
• Cuando utilice el sistema VOR, la unidad comenzará a grabar solamente cuando
detecte sonido. Por lo tanto, es posible que no se grabe la palabra inicial. Para una
grabación importante, le recomendamos que grabe sin el sistema VOR.
Inicio de la grabación durante la reproducción
Deslice REC en el sentido de la flecha con el botón central presionado durante la
reproducción, y la grabación se iniciará inmediatamente. Esto será muy útil cuando
desee regrabar la parte recién grabada.
Revisión de la parte recién grabada
Si presiona EASY SEARCH + o – durante la grabación, ésta se parará y se iniciará la
reproducción después del tiempo de avance rápido o rebobinado correspondiente a las
veces que haya presionado la tecla. (Con respecto a los detalles, consulte la sección
“Búsqueda del punto a partir del que desee reproducir” de “Reproducción de cintas”).
Usted también podrá iniciar la reproducción después de avance rápido o del
rebobinado presionando FF/CUE o REW/REWIEW durante la grabación y soltando la
tecla en el punto en el que desee iniciar la reproducción.
Grabación de diferentes fuentes de
sonido
Grabación con un micrófono externo
Conecte el micrófono a la toma MIC. Utilice un micrófono de baja impedancia (menos
de 3 kiloohmios) como un ECM-717 (no suministrado). Cuando utilice un micrófono
con sistema de alimentación a través de la clavija, esta unidad alimentará el micrófono.
Grabación desde otro equipo
Conecte el otro equipo a la toma MIC utilizando un cable conector RK-G218HG
(miniclavija estéreo y dos clavijas fono) (no suministrado).
Notas sobre la grabación con un micrófono o
de fuentes externas
• Cuando conecte una clavija en la toma MIC, el micrófono estéreo incorporado se
desconectará automáticamente, y la entrada de grabación cambiará
automáticamente a la fuente conectada.
• Cuando grabe con un micrófono externo, el sistema VOR puede no funcionar
adecuadamente debido a la diferencia de sensibilidad.
Utilización de otras funciones
(consulte la fig. H)
Función de bloqueo (HOLD)
Esta función bloqueará la unidad para que no funcione al presionar accidentalmente
teclas excepto REC TIME. Para bloquear la unidad, ponga HOLD en -. En el
visualizador parpadeará el indicador -.
Para comprobar el sentido de movimiento de
la cinta en el visualizador
Visualización durante la grabación/reproducción
La indicación desaparecerá si no utiliza la unidad durante más de un minuto. Para
hacer que se visualice la indicación, presione x o X.
Puesta a cero del contador de la cinta
Mientras esté moviéndose la cinta de la cara superior (en el visualizador estará
indicándose “FWD N”), el número del contador de la cinta aumentará.
Mientras esté moviéndose la cinta de la cara posterior (en el visualizador estará
indicándose “n REV”), el número del contador de la cinta se reducirá.
Para volver a 000, presione y suelte COUNTER RESET.
La cara superior está
grabando o
reproduciéndose.
La cara posterior está
grabando o
reproduciéndose.
V-UP
x STOP
The
indicator
appears.
Aparecerá
el
indicador.
Reverse side
of the tape
Cara posterior
del casete
Upper side of the tape
Cara superior del casete
-
 1
1
-
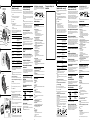 2
2


Sony TCS 100DV Manual de usuario
- Categoría
- Reproductores de casete
- Tipo
- Manual de usuario
- Este manual también es adecuado para
en otros idiomas
- English: Sony TCS 100DV User manual
Artículos relacionados
-
Sony Walkman WM-GX552 Instrucciones de operación
-
-
Sony M-200MC Manual de usuario
-
Sony TCS-600DV Manual de usuario
-
Sony TCM 500DV Manual de usuario
-
-
-
-
Sony M-800V Instrucciones de operación
-