La página se está cargando...

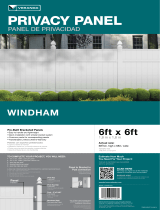
PRIVACY PANEL
LINDEN
PANEL DE PRIVACIDAD
PRO
SERIES
SERIE PRO
6ft x 8ft
1,8 m x 2,4 m
68in. high x 91in. wide
Tamaño de instalacion real:
1,7 m x 2,3 m
Actual installed size:
Professional Grade Panels
• Heavy-duty fence components
• Routed posts allow for clean panel connection
• Wider panels require fewer posts for larger projects
• Transferable Limited Lifetime Warranty
Paneles de calidad profesional
• Componentes para valla de uso rudo
• Los postes ranurados permiten realizar una unión limpia del panel
• Los paneles más anchos requieren un menor número de postes para proyectos más grandes
• Garantía limitada de por vida transferible
TO COMPLETE YOUR PROJECT, YOU WILL NEED:
1 – 5in. x 5in. x 108in. line or corner post per panel
1 – 5in. x 5in. x 108in. end post per to end fence run
1 – post top per post
2 – post top clips per post
A FIN DE COMPLETAR SU PROYECTO, USTED NECESITARÁ:
1 – Un poste de línea o esquinero de 5 x 5 x 108 pulgadas para cada panel
1 – Un poste terminal de 5 x 5 x 108 pulgadas para cada panel
1 – Cubierta de poste para cada poste
2 – Clips de cubierta de poste para cada poste
Post – 5"x5"x108"
1 per panel
Line Post
Linea Poste
Corner Post
Esquina Poste
End Post
End Poste
Post Top
1 per post
Cubierta para poste
1 por poste
Panel
Panel
Poste - 5 x 5 x 108
1 por panel
You will also need
concrete and gravel per
post (as speci ed in
installation instructions)
Usted también
necesitará concreto y
grava para cada poste
(tal como se especi ca
en las instrucciones de
instalación)
1 por panel
Panel to Routed
Post connection
Unión de panel a poste
ranurado
Panel
Post Top Clip
2 per post
Clip de cubierta de poste
2 por poste
Barrette Outdoor Living
Cleveland, OH 44130
FreedomProducts.com
Made in USA • Hecho en EE. UU.
BUILT BY
34106239
73013028UPC V1 3/15
0
4 0 9 3 3 1 3 0 2 8
3
For more details about the product,
installation and warranty please visit:
Veranda.BarretteOutdoorLiving.com
Para obtener más información sobre la instalación,
el registro o la garantía del producto,
visite www.veranda.barretteoutdoorliving.com

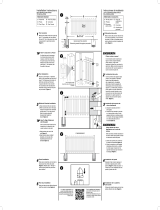
1.
Fence Location
Mark the fence location using string and
line stakes.
Ubicación de la cerca
Marque la ubicación de la cerca utili-
zando una cuerda y estacas alineadas.
5.
Set panel into the routed
hole on the rst pre-set
post. Place the next post
in the hole on the opposite
end of the panel without
any concrete in the hole
(Fig. 6).
Coloque el panel en el
agujero ranurado en el
primer poste previamente
colocado. Coloque el
siguiente poste en el
agujero en el extremo
opuesto del panel sin
concreto en el agujero
(Fig. 6).
6.
Ensure posts are securely
against panel. Level
and plumb post. Add
concrete according to
manufacturers instructions
(Fig. 7).
Compruebe que los postes
estén jos contra el panel.
Nivele y aplome el poste.
Agregue concreto según
las instrucciones del
fabricante (Fig. 7).
7.
Repeat steps 2 to 6 until
all fence panels and posts
have been installed (Fig. 8).
Repita el procedimiento
de los pasos 2 a 6 hasta
que todos los paneles y
postes de la cerca estén
instalados (Fig. 8).
8.
Apply glue on inside rim of
post tops, then attach to
posts (Fig. 9).
Aplique pegamento en
los bordes interiores de
la parte superior de los
postes y adhiéralos a los
postes (Fig. 9).
Panel
Panel
Panel
Posts
Postes
Postes
Materials Needed
Materiales necesarios
READ INSTRUCTIONS PRIOR TO INSTALLATION
LEA LAS INSTRUCCIONES ANTES DE LA INSTALACIÓN
Assembly Instructions
Instrucciones de ensambleje
Post Tops
Remates para poste
Remates para poste
Vinyl Cement
Cemento para vinilo
Cemento para vinilo
Concrete
Concreto
Concreto
Pea Gravel
Gravilla tipo guisante
Gravilla tipo guisante
Fig. 1
4.
Slide/snap U-channels onto left and
right side of panel (Fig. 5).
Deslice los canales en U por los lados
izquierdo y derecho del panel hasta
que escuche un chasquido (Fig. 5).
U-Channel
Canales en U
Fig. 5
Fig. 6
Fig. 7
Fig. 8
Fig. 9
3. Post Installation:
Dig the rst two post holes. Hole size
should be dug based on the following
determination: Depth is determined by
your local frost line measurements plus
6" for gravel/ ller (Fig. 3). Width is 10".
Insert 6" of gravel/ ller into the bottom
of both holes and then set both posts
into the ground and level the rst post.
Add wet or dry concrete mix according
to manufacturer’s instructions to the
top of the rst post hole (Fig. 4).
After setting rst fence section,
proceed systematically with post,
panel, post, etc.
Instalación del poste:
Cave los primeros dos agujeros para
postes. El tamaño del agujero se basa
en lo siguiente: la profundidad se
determina según las medidas locales
de profundidad de penetración del
congelamiento más 6" para la grava/
relleno (Fig. 3). El ancho se 25.40cm
(10").
Coloque 6" de relleno de grava al
fondo de ambos agujeros y luego
introduzca los dos postes en el suelo y
nivele el primer poste.
Introduzca la mezcla de concreto seco
o húmedo, según las indicaciones
del fabricante, hasta rellenar el primer
agujero para poste (Fig. 4).
Después de terminar con la primera
sección de la cerca, proceda de la
misma forma colocando un poste,
luego un panel, luego un poste, etc.
2. Post Location:
Measure the width of the fence panel (X)
plus the width of the post (Y). This
is the common center-to-center
measurement (unless there is a cut-
down panel) for post hole location (Fig. 2).
Ubicación del poste:
Mida el ancho del panel de valla (X); y
sume el ancho del poste (Y). Esta es la
medida normal de centro a centro
(a menos que se corte el panel) (Fig. 2).
Fig. 2
X+Y
Y
X
5x5 Post Example:
5x5 Post Example:
5x5 Post Example:
5x5 Post Example:
5x5 Post Example:
5x5 Post Example:
5x5 Post Example:
5x5 Post Example:
5x5 Post Example:
Ejemplo del Poste 5x5:
Ejemplo del Poste 5x5:
Ejemplo del Poste 5x5:
Ejemplo del Poste 5x5:
Ejemplo del Poste 5x5:
Ejemplo del Poste 5x5:
Ejemplo del Poste 5x5:
Ejemplo del Poste 5x5:
Ejemplo del Poste 5x5:
Ejemplo del Poste 5x5:
Ejemplo del Poste 5x5:
Ejemplo del Poste 5x5:
Frost Line
Línea de
Congelamiento
Gravel/
Filler
Grava/
Relleno
6"
10"
Fig. 3
Fig. 4
Post
Poste
Concrete
Concreto
Gravel
Grava
/