La página se está cargando...

Read All Instructions Carefully Before Beginning Installation.
BrassCraft® Seal’n Check Kit contains (1) 3mil tube of pipe thread
sealant (yellow) and (1) 3mil tube of leak detection solution
(uorescent green). Pipe thread sealant can be used with steel,
brass, and plastic pipe threads. Do not use on are or compression
threads. Leak detection solution is ideal for identifying leaks
in natural, manufactured, and LP gas connections as well as
refrigerants and oxygen. Formulated to be non-corrosive to metals
and safe on polyethylene pipe and ttings. Water soluble and
non-toxic.
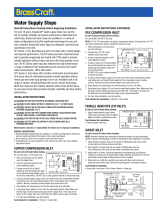
INSTALLATION INSTRUCTIONS
Manufacturer assumes no responsibility for failure due to improper installation.
Pipe Thread Sealant (yellow) - for use with steel, brass and plastic pipe threads.
1. Clean male pipe threads with a wire brush and rag. Make sure that threads are free
of any debris such as metal shavings, rust, dirt, oil and water.
2. Carefully open sealant package and apply coating to male pipe threads. Let dry for
1 to 2 minutes. DO NOT APPLY sealant to are or compression threads. Sealant
will prevent are and compression connections from sealing properly.
3. Wrench tighten connection. DO NOT OVERTIGHTEN.
Tools Needed for Installation: • Wire Brush • Rag • Wrench
Seal’n Check Gas Detection Kit
Juego de sellador y solución para detecciones de fugas
Lea todas las instrucciones atentamente antes de comenzar la
instalación.
Escudos (bridas) son el toque nal para sus instalaciones de agua.
BrassCraft® tiene todos los escudos que necesita para terminar el
trabajo. Con tres estilos distintivos para elegir, tenemos selecciones
en acero inoxidable, cromado, y acabados especiales. Disponible en
conguraciones de Bajo, Campana, y Latón Fundido.
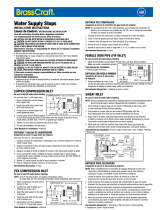
INSTRUCCIONES DE INSTALACIONES
El fabricante no asume responsabilidad por fallas ocasionadas por una
instalación inadecuada.
Sellador para tuberias de gas (amarillo) - para uso en las roscados de acero, laton
y plastico.
1. Limpie los letes de rosca con un cepillo de alambre y tela, a n asegurar que las
conexiones queden libre de suciedad tal como particulas metalicas, oxido, sucie-
dad y liquidos que incluyan aceites y agua.
2. Lea cuidadosamente abrir por la fuerza las tuberías y aplique el sellador para
letes de rosca sobre las roscados macho. Permite el sellador secarse a lo
menos 1 a 2 minutos. NO APLIQUE sellador en conexiones se conica
y compresión. El sellador impedirían el sellado adecuado de dicha
conexión.
3. Apriete con una llave. NO APRIETE DEMASIADO.
Herramientas Necesarias: • Cepillo de alambre • Tela • Llave
Solución para detecccion de fuga (verde uorescente) - para uso con las
refrigerantes, el oxígeno y los gases de LP, manufacturados y naturales. No oxida el
metal y se puede usar en tubería y conexiones de polietileno.
1. Lea cuidadosamente abrir por la fuerza las tuberías y aplique el sellador
liberalmente dobre las conexiones. las burbujas indicarán una fuga en la conexión.
2. Si tal cosa fuera detectado, cierre el suminstro del gas antes de ajustar las con-
exiones. Apriete con llave. Vuelva a revisar la conexion para asegurar que no hay
otras fugas.
3. Enjuague con agua las conexiones luego de la vericacion y secar con la tela.
4. Aguarde por lo menos 10 minutos luego de haber efectuado y vericado las
conexiones, con el objeto de asegurarse de la disipación de todos los vapores.
Herramientas Necesarias: • Cepillo de alambre • Tela • Llave
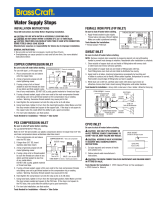
INSTALLATION INSTRUCTIONS (CONTINUED)
Leak Detection Solution (uorescent green) for use with refrigerants, oxygen and
LP, manufactured and natural gas. Non-corrosive to metal and safe on polyethylene
pipe and ttings.
1. Carefully cut open package and apply liberally over joint area to check for leaks
Bubbles will form immediately to indicate a leak in the connection.
2. If leak is detected, turn off gas supply, then loosen ttings and re-tighten, wrench
tight. Re-check connection for leaks.
3. Wash off solution with water and dry joint area.
4. Wait 10 minutes to be certain that all vapors have dissipated. If leak test conrms
connections do not leak gas, nor do you smell any gas, THEN light pilot(s) and turn
on appliance.
Tools Needed for Installation: • Wire Brush • Rag • Wrench
LEAK DETECTION SOLUTION
(Solución para detección de fugas)
PIPE THREAD SEALANT
(Sellador para tuberías)
BUBBLES INDICATE A LEAK
(La presencia de burbujas indica una fuga)
INSTRUCCIONES DE INSTALACIÓN (CONTINUACIÓN)
Manufacturer assumes no responsibility for failure due to improper installation.
©2016 BrassCraft Mfg. Co., Novi, MI 48375-5331 U.S.A. All Rights Reserved. www.brasscraft.com
El fabricante no asume ninguna responsabilidad si la instalación no se hace de acuerdo al instructivo.
www.brasscraft.com
325.11 Rev. 03/16
1/1