
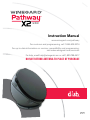
2452292
Rev3 5-14
Instruction Manual
www.winegard.com/pathway
For receivers and programming, call 1-866-609-9374
For up-to-date information on receiver compatibility and programming,
visit www.winegard.com/receivers
For help, email [email protected] or call 1-800-788-4417
Do not return antenna to place of purchase

1
2
3
4
5
!
!
!
!
!
!
!
1
!
!
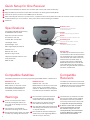
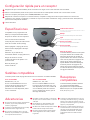
Specifications
Compatible with DISH programming
and DISH Solo HD receivers
Supports up to two receivers
For stationary use only
Includes 25 ft coaxial cable
Unit weight: 16 lbs
Stowed height: 15 in
Max. height deployed: 20.75 in
Diameter: 21 in
Reflector size: 18 in
Elevation range: 15–65°
UV-protected plastic reflector cover
Gray plastic base
Made in USA
Reflector cover
Protects inner components
from environment
Handle
Enables easy carrying of antenna
Eyelet
Enables securing of antenna to site
Secondary port
Connects to secondary receiver
Main port
Connects to primary receiver
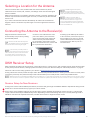
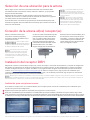
Quick Setup for One Receiver
Make sure the Pathway X2 antenna is in a location with a clear view of the southern sky.
Align the Pathway X2 antenna so that cable connections are facing approximately North.
Connect the primary receiver to the “MAIN” port on the base.
After connecting the receiver to a power source, complete receiver setup. Select the number of receivers, eastern or western arc,
and the state that you are currently in. Then, press “Scan” to start scanning for satellites.
Watch TV!
Compatible
Receivers
The Pathway X2 antenna must be used
with DISH Solo HD receivers. Examples
of DISH Solo HD receivers include DISH
211z, 211k, 211, and 411 receivers.
Compatible Satellites
The Pathway X2 antenna can receive programming from DISH eastern or western arcs.
DISH Eastern Arc
Satellites 61.5°, 72°, 77°
DISH eastern arc will work in most
areas of the country but may not
be available in the Northwest. If
unavailable, use the western arc.
DISH Western Arc
Satellites 110°, 119°, 129°
DISH western arc will work in most areas
of the country; if unavailable, use the
eastern arc. Western arc may be required
for initial setup and software download.
Antenna Feet
The Pathway X2 antenna has four feet
on the bottom of the unit. Each foot has
two mounting spots on the underside
of the antenna. The antenna will come
with the feet in the inside holes. If
mounting the antenna on Winegard
Model TR-1518 tripod, mount the feet
in the inside holes. For extra support
when not using the TR-1518, mount the
feet in the outside holes.
Warnings
Do not use excessive force when
manually rotating the antenna, as
this could cause damage to motors
and gears.
The antenna is not intended for
permanent mounting on any vehicle.
Do not place the unit in water >2 in. deep,
or water may damage the electronics.
Do not install or operate the antenna
in winds of 35 mph or greater. The
antenna will roll in winds ≥35 mph.
Do not insert your fingers around the
base while the antenna is moving.
Care should be taken when transporting
and setting up the antenna. Do not toss
or drop the antenna.
Do not paint the antenna. Painting the
antenna may cause signal degradation
and will void your warranty.
The antenna is not meant for use with
the Carryout
®
ladder mount. Installing
the antenna on the Carryout ladder
mount may lead to serious injury and/
or equipment and property damage.
A 25 foot coaxial cable is included
and recommended for use with
the antenna. Longer coax runs
could potentially cause intermittent
problems. Maximum cable length
should never exceed 50 feet.

1
2
Figure 2BFigure 2AFigure 1
2
Receiver setup instructions are accurate at time of printing and may change without notice.
Selecting a Location for the Antenna
Choose a location with a clear, unobstructed view of the southern sky. Avoid
obstructions such as trees, hills, vehicles, or buildings—these can block the signal
from the satellite.
Make sure the antenna is not placed in the path of people or vehicles; otherwise, the
antenna may be knocked off of the signal if run into, or cables may be disconnected
from the unit.
Try to select a location that will allow the Pathway X2 antenna to sit within three
degrees of level. The antenna may take longer to lock onto signal if the antenna is
not level.
NOTE
Satellite signal will not pass
through solid objects. For this
reason, it is vital to select a location with a
clear, unobstructed view of the southern sky.
NOTE
A 25 foot coaxial cable is
included and recommended
for use with the antenna. Longer coax
runs could potentially cause intermittent
problems. Maximum cable length should
never exceed 50 feet.
Connecting the Antenna to the Receiver(s)
Align the antenna so that the main
and secondary coax ports are pointing
approximately North.
TIP
Run the coaxial cable directly from
the satellite receiver to the Pathway
X2 antenna when searching for signal.
Connect a coax cable from the main
port to the “Sat In” port on the back
of the receiver that will be used most
often. The main port should always
be connected to the primary receiver
when the antenna is in use, or there will
be no power to the electronics.
If hooking up the Pathway X2 antenna
to two receivers, remove the cap from
the secondary port, and run a second
coaxial cable from the secondary port
on the base to the “Sat In” port on a
second receiver.
NOTE
The receiver provides power to
the electronics via the main port.
There will be no power to the electronics
if a coaxial cable is connected to the
secondary port but not the main port.
DISH Receiver Setup
After connecting the antenna to the receiver(s), connect the receiver to a power source, and complete receiver setup. Receiver setup
for the primary receiver follows; if setting up with a secondary receiver, see “Receiver Setup for a Secondary Receiver” on page 4.
Check out online receiver setup guides for your antenna at www.winegard.com/receivers/setupguide.php.
If using a brand new receiver, follow the steps under “Receiver Setup for New Receivers.” If using a receiver that is currently active
or has been previously used, follow the steps under “Receiver Setup for Currently Active or Previously Used Receivers.”
NOTE
While the antenna is compatible with DISH eastern and western arc, in some cases the antenna may need to initially be set up using the western
arc to allow the receiver to update its software. Once the software is updated, the antenna will work on either arc where coverage is available.
Receiver Setup for New Receivers
If using a new receiver with the Pathway X2 antenna, the receiver will go through an Installation Wizard to help with the setup process.
Follow the on-screen instructions to program your remote control.
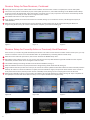
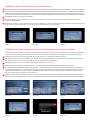
During step 2 of the Installation Wizard, the unit will need to acquire satellites and update the receiver (see fig. 1). This step will
require a search initiated by the Mobile Setup screen. Depending on the manufacturing date of your receiver, either figure 2A or
2B will be used. Fill in the required information, and then select “Scan” to begin the search routine.

3
4
5
6
7
Figure 10Figure 9Figure 8
1
2
3
4
5
6
3
Figure 5Figure 4Figure 3
Figure 7Figure 6BFigure 6A
During the search routine, the antenna will scan for satellites. Once the search routine is complete, the receiver will update.
The receiver may reboot automatically as part of the update process. If so, select desired settings on the Mobile Antenna Setup
screen as in figure 2B. If applicable, select the number of receivers, the arc (only an option if one receiver was selected), and the
state that you are currently in. Press “Scan” to begin the search routine.
The satellite will search for and acquire satellites.
If not already activated, the receiver will need to be activated (see fig. 3). To activate the receiver, call Winegard Company at
1-866-609-9374.
After the receiver has been activated, the receiver will begin acquiring signal (see fig. 4) and downloading the Electronic
Programming Guide (see fig. 5). Once the download is complete, you can start watching TV.
Receiver Setup for New Receivers, Continued
Receiver Setup for Currently Active or Previously Used Receivers
If the receiver you will be using with the Pathway X2 antenna is an older receiver that has not been used in several years, you may
need to connect the receiver to a home satellite dish to be updated before proceeding with the mobile setup.
After the receiver has been powered on, the receiver will enter the Mobile Setup menu.
Depending on the software version in your receiver, the setup screen may differ between figure 6A and 6B. Fill in the required
information, and then select “Scan” to begin the search routine.
The satellite will begin searching and will locate the desired satellites (see fig. 7).
After the satellites have been acquired, the Electronic Programming Guide will download (see fig. 8).
If figure 6A was the setup screen seen in step 2, the receiver should be updated to the latest software for full functionality with the
Pathway X2 antenna. To allow the software to update, leave the satellite on signal, and press the Power button on the remote or
front panel of the receiver; this will put the receiver in Standby mode (see fig. 9). Do not unplug the receiver at this time.
After being in Standby mode for a few minutes, the software will automatically begin to update (see fig. 10). Upon completion of
the update, the receiver will reboot. Return to step 1 to re-acquire satellites and complete setup.

Figure 13Figure 12Figure 11
1
2
3
4
Disclaimer: Although every effort has been made to ensure that the information in this manual is correct and complete, no
company shall be held liable for any errors or omissions in this manual. Information provided in this manual was accurate at
time of printing. If the antenna does not function as expected, please contact Winegard Company at help@winegard.com or
1-800-788-4417, or visit our website at www.winegard.com.
Receiver Setup for a Secondary Receiver
After completing setup on the main receiver, power on the secondary receiver. If using a new receiver, you will be guided through
the setup by the Installation Wizard; follow the on-screen steps to complete setup. If using a receiver that is currently active or has
been used previously, you will need to complete setup by doing a Check Switch test. To access the receiver menu for running a
Check Switch test, follow the steps under “Accessing the Receiver Menu.”
Accessing the Receiver Menu
If you need to access the receiver menu after initial setup, follow the steps below to reach the receiver menu.
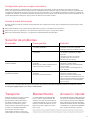
Press “Menu” on your remote. Select option 6, “System Setup.”
Select option 1, “Installation” (see fig. 11). Then, select option 1, “Point Dish” (see fig. 12).
Select “Check Switch” (see fig. 13), and complete the Check Switch test.
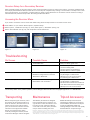
Transporting
Before transporting the antenna, return
the antenna to the stowed position. To
stow the antenna, disconnect the coax
cables from the main and secondary
ports, and rotate the antenna until the
elevation arrow aligns with “STOW.”
Do not use excessive force when
manually rotating the antenna, as this
could cause damage to motors and gears.
Maintenance
The Pathway X2 antenna is designed
to be maintenance free. However, it is
a good idea to clean the reflector cover
from time to time. Clean the reflector
cover with a soft cloth, water, and dish
soap to avoid scratching the cover.
Tripod Accessory
Model TR-1518 tripod mount (sold
separately) is available as an accessory
for the Pathway X2 antenna. The tripod
mount has adjustable height and
leveling settings of 14.5”–22” and quickly
disassembles for compact storage.
Troubleshooting
On Screen Possible Cause Solution
Mobile Antenna Setup does not appear • No communication between receiver
and satellite dish
• Check wiring. Verify connection to
Main port. Verify good coax.
• Receiver software not compatible • Ensure a compatible DISH Solo HD
receiver is being used.
• Connect receiver to fixed/home
satellite dish for software update.
Error Code 150, “All Satellites Not Found” • Possible obstructions blocking satellite
• Satellite coverage issues in extreme
Northeast or Northwest
• Attempt to move the antenna from
any blockages or obstructions.
• Attempt a re-scan on the receiver.
• Try scanning on a different arc.
Error Code 151, “No Satellites Found” • Possible obstructions blocking satellite
• Intermittent coax connection
• Attempt to move the antenna from
any blockages or obstructions.
• Re-check coax connections to make sure
coax did not become loose during scan.
• Attempt a re-scan on the receiver.
If the above steps do not resolve the error, re-boot the receiver and start the Mobile Antenna Setup again; often, this will
resolve the problem. If the problem persists, contact Winegard Technical Services at [email protected] or 1-800-788-4417.

5
Winegard Company • 3000 Kirkwood Street • Burlington, IA 52601 • 1-800-288-8094 • Fax 319-754-0787 • www.winegard.com
Printed in U.S.A. ©2013 Winegard Company Rev3 5/14 2452292
Winegard, Pathway, and Carryout are registered trademarks of Winegard Company.
DISH is a registered trademark of DISH Network L.L.C.
WINEGARD MOBILE PRODUCTS LIMITED WARRANTY
(2 YEARS PARTS; 1 YEAR LABOR)
Winegard Company warrants this product against defects in materials or workmanship for a period of two (2) years from the date of original purchase. During
year one (1) of such warranty, Winegard Company will also pay authorized labor costs to an authorized Winegard dealer to repair or replace defective products.
No warranty claim will be honored unless at the time the claim is made, Customer presents proof of purchase to an authorized Winegard dealer (to locate the
nearest authorized Winegard dealer, contact Winegard Company, 3000 Kirkwood Street, Burlington, Iowa 52601, Telephone 800-288-8094 or visit www.winegard.
com). Customer must provide proof of purchase with a dated sales receipt for the Winegard product to verify the product is under warranty. If the date of
purchase cannot be verified, the warranty period shall be considered to begin thirty (30) days after the date of manufacture.
If a defect in material or workmanship is discovered, Customer may take the product to an authorized Winegard dealer for service. Customer must provide proof
of purchase to verify the product is under warranty. If the product is brought to an authorized Winegard dealer for service prior to expiration of year one (1) of the
warranty period and a defect in material or workmanship is verified by Winegard Technical Services, Winegard Company will cover the Winegard dealer’s labor
charges for warranty service. The Winegard dealer must contact Winegard Technical Services in advance for pre-approval of the service. Approval of the service
is at the sole discretion of Winegard Company.
Alternatively, Customer may ship the product prepaid to Winegard Technical Services (located at 3111 Kirkwood Street, Burlington, Iowa 52601, Telephone
800-788-4417). Customer must return the product along with a brief description of the problem and provide Winegard Technical Services with Customer’s
name, address, and phone number. Customer must also provide proof of purchase to verify the product is under warranty. If the product is returned before the
expiration of the warranty period, Winegard Company will (at its option) either repair or replace the product.
This Limited Warranty does not apply if the product has been damaged, deteriorates, malfunctions or fails from: improper installation, misuse, abuse, neglect,
accident, tampering, modification of the product as originally manufactured by Winegard in any manner whatsoever, removing or defacing any serial number,
usage not in accordance with product instructions or acts of nature such as damage caused by wind, lightning, ice or corrosive environments such as salt spray
and acid rain. This Limited Warranty also does not apply if the product becomes unable to perform its' intended function in any way as a result of the television
signal provider making any changes in technology or service.
RETURN AUTHORIZATION POLICY
A Return Material Authorization (RMA) is required prior to returning any product to Winegard Company or Winegard Warranty Services under this warranty
policy. Please call our Technical Services Department at 800-788-4417 or send an email to [email protected] to obtain the RMA number. Please furnish
the date of purchase when requesting an RMA number. Enclose the product in a prepaid package and write the RMA number in large, clear letters on the outside
of the package. To avoid confusion or misunderstanding, a shipment(s) without an RMA number(s) or an unauthorized return(s) will be refused and returned to
Customer freight collect.
WINEGARD COMPANY DOES NOT ASSUME ANY LIABILITIES FOR ANY OTHER WARRANTIES, EXPRESS OR IMPLIED, MADE BY ANY OTHER PERSON.
ALL OTHER WARRANTIES WHETHER EXPRESS, IMPLIED OR STATUTORY INCLUDING WARRANTIES OF FITNESS FOR A PARTICULAR PURPOSE AND
MERCHANTABILITY ARE LIMITED TO THE TWO YEAR PERIOD OF THIS WARRANTY.
In states that do not allow limitations on implied warranties, or the exclusion of limitation of incidental or consequential damages, the above limitations or
exclusions do not apply.
Some states do not allow limitations on how long an implied warranty lasts, or the exclusion of limitation of incidental or consequential damages, so the above
limitations or exclusions may not apply to you.
This warranty gives Customer specific legal rights. Customer may also have other rights that may vary from state to state.
SATELLITE RECEIVER WARRANTY:
See manufacturer’s limited warranty policy.
WS-MOBWARREV2
Rev. 1/10
Using Outside Receptacle
If your outside TV receptacle is wired for satellite, you’ll need to locate where that
receptacle leads and connect that directly to your satellite receiver.
If the outside TV receptacle is wired for cable, the wiring will have to be modified
for use with satellite. The coaxial cable cannot run through any other devices or
switches before the satellite receiver.
Typically, if wired for cable, the wiring will either run through a Winegard power
supply or video switch. The easiest way to fix this is to disconnect the cable from
that device, use a barrel connector, and connect a new cable that runs directly to the
receiver, bypassing the power supply or video switch.
FCC Guidelines
This device complies with Part 15 of the FCC Rules. Operation is subject to the following two conditions: (1) this device may not
cause harmful interference, and (2) this device must accept any interference received, including interference that may cause
undesired operation.

2452292
Rev3 5-14
Manual de instrucciones
www.winegard.com/pathway
Para los receptores y la programación, llame al 1-866-609-9374
Para obtener información actualizada sobre la compatibilidad del
receptor y sobre la programación, visite www.winegard.com/receivers
Para obtener ayuda, envíe un correo electrónico
a [email protected] o llame al 1-800-788-4417
no DeVuelVa la antena al luGar De coMpra

1
2
3
4
5
!
!
!
!
!
!
!
!
1
!
Especificaciones
Compatible con la programación de
DISH y los receptores HD Solo DISH
Soporta un máximo de dos receptores
Para uso estacionario solamente
Incluye 25 pies (7.62 m) de cable coaxial
Peso de la unidad: 16 lbs (7.25 kg)
Altura replegada: 15 pulg. (38.10 cm)
Altura máxima desplegada: 20.75 pul.
(52.70 cm)
Diámetro: 21 pul. (53.34 cm)
Tamaño del reflector: 18 pulg. (45.72 cm)
Rango de elevación: 15–65°
Cubierta de reflector de plástico con
protección UV
Base de plástico gris
Hecho en EE.UU.
Cubierta del reflector
Protege a los componentes internos contra
el medio ambiente
Manija
Permite un fácil transporte de la antena
Ojal
Permite la fijación de la antena al sitio
Puerto secundario
Se conecta al receptor secundario
Puerto principal
Se conecta al receptor principal
Configuración rápida para un receptor
Asegúrese de que la antena Pathway X2 se encuentre en un lugar con una vista clara del cielo meridional.
Alinee la antena Pathway X2 de modo que las conexiones de los cables queden viendo más o menos hacia el norte.
Conecte el receptor principal al puerto “MAIN (PRINCIPAL)” en la base.
Después de conectar el receptor a la corriente eléctrica, complete la configuración del receptor. Seleccione el número de
receptores, arco oriental u occidental, y el estado en el que se encuentra actualmente. Luego, presione el botón “Scan (Buscar)”
para iniciar la búsqueda de satélites.
¡Vea la televisión!
Receptores
compatibles
La antena Pathway X2 debe utilizarse
con receptores HD Solo DISH.
Ejemplos de los receptores HD Solo
DISH incluyen a los receptores DISH
211z, 211k, 211, y 411.
Satélites compatibles
La antena puede recibir la programación de los arcos oriental u occidental de DISH.
Arco oriental DISH
Satélites 61.5°, 72°, 77°
El arco oriental DISH funciona en la
mayoría de las zonas del país, pero
puede no estar disponible en el
Noroeste. Si no está disponible, utilice
el arco occidental.
Arco occidental DISH
Satélites 110°, 119°, 129°
El arco occidental DISH funciona en
la mayoría de las zonas del país, si no
está disponible, use el arco oriental. El
arco occidental puede ser necesario
para la configuración inicial y para la
descarga de software.
Patas de la antena
La antena Pathway X2 tiene cuatro patas
en la parte inferior de la unidad. Cada
pata tiene dos puntos de montaje en
la parte inferior de la antena. La antena
viene con las patas en los agujeros del
interior. Si se monta la antena en el
trípode Modelo TR-1518 de Winegard,
monte las patas en los agujeros del
interior. Para soporte adicional cuando
no utilice el TR-1518, monte las patas en
los agujeros exteriores.
Advertencias
No use fuerza excesiva al girar manualmente
la antena, ya que esto podría dañar los
motores y engranajes.
La antena no está diseñada para un montaje
permanente sobre ningún vehículo.
No coloque la unidad en agua a >2 pulg.
(5.08 cm) de profundidad, o el agua dañará
los componentes electrónicos.
No instale ni utilice la antena con vientos de
35 mph o más. La antena rodará con vientos
≥35 mph.
No introduzca los dedos alrededor de la
base, mientras que la antena se mueve.
Se debe tener cuidado al transportar e instalar
la antena. No tire ni deje caer la antena.
No pinte la antena. Pintar la antena puede
causar degradación de la señal y anulará
la garantía.
La antena no está pensada para su uso con
el montaje de escalera Carryout
®
. Instalar la
antena en el montaje de escalera Carryout
puede provocar lesiones graves y/o daños al
equipos y a la propiedad.
Se incluye un cable coaxial de 25 pies y se
recomienda usarlo con la antena. Un cable
más largo podría potencialmente causar
problemas de intermitencia. La máxima
longitud del cable nunca debe exceder
50 pies.

1
2
Figura 2BFigura 2AFigura 1
2
Las instrucciones para la instalación del receptor son correctas en el momento de esta impresión y pueden cambiar sin previo aviso.
Selección de una ubicación para la antena
Elija un lugar con una vista clara y sin obstrucciones del cielo meridional. Evite
los obstáculos tales como árboles, colinas, vehículos o edificios, ya que pueden
bloquear la señal del satélite.
Asegúrese de que la antena no esté colocada en la trayectoria de personas o
vehículos, de lo contrario, la antena puede ser desviada de la señal si se le golpea o
los cables podrían ser desconectados de la unidad.
Trate de seleccionar una ubicación que permita que la antena Pathway X2 quede
sentada a tres grados del nivel. Podría llevar más tiempo que la antena encuentre la
señal si no está nivelada.
NOTA
La señal del satélite no pasará
a través de objetos sólidos. Por
esta razón, es vital seleccionar un lugar
con una vista clara y sin obstrucciones del
cielo meridional.
NOTA
Se incluye un cable coaxial de
25 pies y se recomienda usarlo
con la antena. Un cable más largo podría
potencialmente causar problemas de
intermitencia. La máxima longitud del
cable nunca debe exceder 50 pies.
Conexión de la antena al(los) receptor(es)
Alinee la antena de manera que
los puertos coaxiales principales y
secundarios queden apuntando más o
menos hacia el norte.
SUGERENCIA
Pase el cable coaxial
directamente desde el
receptor de satélite a la antena Pathway X2
al realizar la búsqueda de la señal.
Conecte un cable coaxial desde el puerto
principal del puerto “Sat In (Entrada de
sat)” en la parte posterior del receptor
que se utilizará con mayor frecuencia.
El puerto principal siempre debe ser
conectado al receptor principal cuando
la antena está en uso, o no habrá
ninguna energía para los electrónicos.
Antes de colocar la antena Pathway X2 a
dos receptores, retire la tapa del puerto
secundario, y conecte un segundo cable
coaxial desde el puerto secundario de
la base hasta el puerto “Sat in (Entrada
sat)” en el segundo receptor.
NOTA
El receptor proporciona energía
a los electrónicos a través del
puerto principal. No habrá energía para
los electrónicos si un cable coaxial está
conectado al puerto secundario pero no al
puerto principal.
Instalación del receptor DISH
Después de conectar la antena al(los) receptor (es), conecte el receptor a una fuente de alimentación y complete la configuración
del receptor. A continuación se muestra la configuración de un receptor primario, si está configurando un receptor secundario,
consulte “Configuración para un receptor secundario” en la página 4. Revise las guías de instalación del receptor de la antena
en línea, en www.winegard.com/receivers/setupguide.php. Si utiliza un receptor nuevo, siga los pasos de “Instalación para
receptores nuevos.” Si utiliza un receptor que se encuentra activo o se ha utilizado previamente, siga los pasos en “Instalación
para receptores activos actualmente o previamente utilizados.”
NOTA
Mientras que la antena es compatible con los arcos oriental y occidental de DISH, en algunos casos, puede ser necesario que la antena
que se instaló inicialmente con el arco occidental permita que el receptor actualice su software. Una vez que se actualiza el software, la
antena funcionará en cualquier arco, donde la cobertura esté disponible.
Instalación para receptores nuevos
Si se utiliza un receptor nuevo con la antena Pathway X2, el receptor pasará a través de un Asistente para la instalación para
ayudar con el proceso de configuración.
Siga las instrucciones que aparecen en pantalla para programar su control remoto.
En el paso 2 del Asistente para la instalación, la unidad tendrá que adquirir satélites y actualizar el receptor (véase la Fig. 1). Este
paso requerirá de una búsqueda iniciada por la pantalla de Instalación móvil. Dependiendo de la fecha de fabricación de su receptor,
se utilizarán ya sea la figura 2A o 2B. Llene la información requerida y seleccione “Scan (Buscar)” para iniciar la rutina de búsqueda.

Figura 10Figura 9Figura 8
Figura 6A Figura 6B Figura 7
Figura 5Figura 4Figura 3
1
2
3
4
5
6
3
3
4
5
6
7
Durante la rutina de búsqueda, la antena buscará satélites. Una vez que la rutina de búsqueda se haya completado, el receptor se actualizará.
Tal vez el receptor se reinicie automáticamente como parte del proceso de actualización. Si es así, seleccione la configuración que desee en
la pantalla de Configuración de antena móvil como se muestra en la figura 2B. Si aplica, seleccione el número de receptores, el arco (solo
una opción si se seleccionó un receptor), y el estado en que está actualmente. Seleccione “Scan (Buscar)” para iniciar la rutina de búsqueda.
El satélite buscará y seleccionará los satélites.
Si aún no está activo, será necesario activar el receptor (vea la fig. 3). Para activar el receptor, llame a Winegard Company al
teléfono 1-866-609-9374.
Después de activar el receptor este empezará a captar la señal (vea la fig. 4) y a descargar la guía electrónica de programación (vea
la fig. 5). Una vez que la descarga se haya completado, puede empezar a ver la televisión.
Instalación para receptores nuevos, continuación
Configuración para receptores activos actualmente o previamente usados
Si el receptor que va a utilizar con la antena X2 Pathway es un receptor viejo que no se ha utilizado en varios años, es posible que
necesite conectar el receptor a una antena de disco casera para ser actualizado antes de proceder con la configuración móvil.
Después de que el receptor se ha encendido, el receptor entrará en el menú de Configuración móvil.
Dependiendo de la versión del software de su receptor, la pantalla de configuración puede diferir entre la figura 6A y 6B. Llene la
información requerida y seleccione “Scan (Buscar)” para iniciar la rutina de búsqueda.
El satélite comenzará a buscar y localizará los satélites deseados (véase la Fig. 7).
Después de que los satélites han sido adquiridos, se descargará la Guía Electrónica de Programación (ver Fig. 8).
Si la figura 6A es la pantalla de configuración del paso 2, el receptor debe ser actualizado a la última versión del software para la
funcionalidad completa de la antena Pathway X2. Para permitir que el software se actualice, deje el satélite en la señal y presione
el botón de encendido en el control remoto o panel frontal del receptor, lo que pondrá al receptor en modo de espera (véase la
Fig. 9). No desconecte el receptor en este momento.
Después de estar en modo de espera durante unos minutos, el software se iniciará automáticamente para actualizarse (véase la Fig. 10).
Una vez completada la actualización, el receptor se reiniciará. Vuelva al paso 1 para volver a adquirir los satélites y completar la instalación.

1
2
3
4
Renuncia: Aunque se ha hecho todo lo posible para que la información contenida en este manual sea correcta y completa,
ninguna empresa se hace responsable por cualquier error u omisión en este manual. La información proporcionada en este
manual es correcta en el momento de su impresión. Si la antena no funciona como se esperaba, por favor póngase en contacto
con Winegard Company a help@winegard.com o llame al 1-800-788-4417, o visite nuestro sitio Web en www.winegard.com.
Accesorio trípode
El modelo TR-1518 de montaje de trípode
(se vende por separado) está disponible
como accesorio para la antena Pathway
X2. El trípode tiene una altura ajustable y
ajustes de nivelación de 14.5”–22” (36.83
cm–55.88 cm ) y se desmonta rápidamente
para un almacenamiento compacto.
Mantenimiento
La antena Pathway X2 está diseñada
para no requerir mantenimiento. Sin
embargo, es una buena idea limpiar la
cubierta del reflector de vez en cuando.
Limpie la cubierta del reflector con un
paño suave, agua y jabón para evitar
que se raye.
Transporte
Antes de transportar la antena, regrese
la antena a la posición replegada.
Para guardar la antena, desconecte
los cables coaxiales de los puertos
principales y secundarios y gire la
antena hasta que la flecha de elevación
se alinee con “STOW (COLOCAR).”
No use fuerza excesiva al girar
manualmente la antena, ya que esto
podría dañar los motores y engranajes.
Configuración para un receptor secundario
Después de completar la configuración en el receptor principal, encienda el receptor secundario. Si se utiliza un receptor
nuevo, se le guiará a través de la configuración por el Asistente para la instalación, siga los pasos que aparecen en pantalla para
completar la configuración. Si utiliza un receptor que se encuentra activo o se ha utilizado previamente, tendrá que completar la
configuración haciendo una prueba de Revisión del interruptor. Para acceder al menú del receptor para el funcionamiento de una
prueba de Revisión del interruptor, siga los pasos de “Acceso al menú del receptor.”
Acceso al menú del receptor
Si usted necesita acceder al menú del receptor después de la configuración inicial, siga los siguientes pasos para llegar al menú
del receptor.
Pulse el botón “Menú” en su control remoto. Seleccione la opción 6, “Configuración del sistema.”
Seleccione la opción 1, “Instalación.” A continuación, seleccione la opción 1, “Apuntar la antena.”
Seleccione “Revisión del interruptor” y complete la prueba de Revisión del interruptor.
Solución de problemas
En pantalla Causa posible Solución
No aparece Instalación de antena móvil • No hay comunicación entre el receptor
y la antena parabólica
• Revise el cableado. Verifique la
conexión con el puerto principal.
Verifique una buena conexión coaxial.
• El software del receptor no es
compatible
• Asegúrese de que se está utilizando
un receptor compatible con DISH
Solo HD.
• Conecte el receptor a la antena
parabólica fija / de casa para la
actualización de software.
Código de error 150, “No se encontraron
todos los satélites”
• Puede haber obstrucciones bloqueando
el satélite
• Problemas de cobertura satelital en los
extremos noreste y noroeste
• Intente mover la antena para evitar los
bloqueos u obstrucciones.
• Intente realizar una nueva búsqueda
en el receptor.
• Pruebe realizar una búsqueda en un
arco diferente.
Código de error 151, “No se
encontraron satélites”
• Puede haber obstrucciones bloqueando
el satélite
• Conexión coaxial intermitente
• Intente mover la antena para evitar los
bloqueos u obstrucciones.
• Vuelva a revisar las conexiones del
cable coaxial para asegurarse de que el
cable no esté flojo durante la búsqueda.
• Intente realizar una nueva búsqueda
en el receptor.
Si los pasos anteriores no resuelven el error, encienda el receptor nuevamente e inicie el programa de Configuración de antena
móvil otra vez, a menudo, esto solucionará el problema. Si el problema persiste, póngase en contacto con el Servicio Técnico
de Winegard [email protected] o llame al 1-800-788-4417.

5
Winegard Company • 3000 Kirkwood Street • Burlington, IA 52601 • 1-800-288-8094 • Fax 319-754-0787 • www.winegard.com
Impreso en EE.UU. ©2013 Winegard Company Rev3 5/14 2452292
Winegard, Pathway y Carryout son marcas registradas de Winegard Company.
DISH es una marca comercial registrada de DISH Network L.L.C.
GARANTÍA LIMITADA DE PRODUCTOS MÓVILES DE WINEGARD
(2 AÑOS EN PIEZAS, 1 AÑO DE MANO DE OBRA)
Winegard Company garantiza este producto contra defectos de materiales o mano de obra por un período de dos (2) años desde la fecha de compra original.
Durante un (1) año de dicha garantía, Winegard Company también pagará los costos laborales autorizados a un distribuidor autorizado Winegard para reparar o
reemplazar los productos defectuosos. Ningún reclamo de garantía será cumplido a menos de que en el momento de la reclamación, el cliente presente la prueba
de compra a un distribuidor autorizado Winegard (para localizar el distribuidor autorizado más cercano Winegard, contacta a Winegard Company, 3000 Kirkwood
Street, Burlington, Iowa 52601, Teléfono 800-288-8094 o visite www.winegard.com). El cliente debe proporcionar la prueba de compra con su recibo de compra
con fecha del producto Winegard para verificar que el producto está en garantía. Si la fecha de la compra no puede ser verificada, el período de garantía se
considerará como treinta (30) días después de la fecha de fabricación.
Si se descubre un defecto en el material o mano de obra, el cliente puede llevar el producto a un distribuidor autorizado de servicio Winegard. El cliente debe
proporcionar el comprobante de compra para verificar que el producto está en garantía. Si el producto es llevado a un distribuidor autorizado Winegard para
servicio antes del vencimiento del primer año (1) del período de garantía y un defecto de material o mano de obra es verificado por Winegard Technical Services,
Winegard Company cubrirá los gastos de mano de obra del distribuidor de Winegard por servicio de garantía. El distribuidor Winegard debe ponerse en contacto
con Winegard Technical Services de antemano para una aprobación previa del servicio. La aprobación del servicio queda a la sola discreción de Winegard
Company.
Como alternativa, el cliente puede enviar el producto con porte pagado a Winegard Technical Services (ubicado en 3111 Kirkwood Street, Burlington, Iowa
52601, Teléfono 800-788-4417). El cliente debe devolver el producto junto con una breve descripción del problema y proporcionar a Winegard Technical Services
el nombre, dirección, y número de teléfono del cliente. El cliente también debe proporcionar el comprobante de compra para verificar que el producto esté en
garantía. Si el producto se devuelve antes de la expiración del período de garantía, Winegard Company (a su opción) reparará o reemplazará el producto.
Esta garantía limitada no se aplicará si el producto ha sido dañado, se deteriora, funciona mal o falla por: instalación inadecuada, mal uso, abuso, negligencia,
accidente, manipulación, modificación del producto fabricado originalmente por Winegard en modo alguno, la eliminación o desfiguración de cualquier número
de serie, el uso no conforme a las instrucciones del producto o actos de la naturaleza tales como daños causados por viento, rayos, hielo o corrosivos tales como
niebla salina y lluvia ácida. Esta Garantía Limitada tampoco se aplica si el producto llega a ser incapaz de realizar la función para la que está diseñado en modo
alguno como consecuencia de que el proveedor de señal de televisión realice cambios en la tecnología o servicio.
POLÍTICA DE AUTORIZACIÓN DE DEVOLUCIÓN
Se requiere una autorización de devolución material (RMA) antes de devolver cualquier producto a Winegard Company o Winegard Warranty Services en virtud
de la presente garantía. Por favor llame a nuestro Departamento de Servicio Técnico al 800-788-4417 o envíe un correo electrónico a [email protected]
para obtener el número RMA. Por favor, proporcione la fecha de su compra cuando solicite un número RMA. Introduzca el producto en un paquete prepagado y
escriba el número RMA en letras grandes y claras en el exterior del paquete. Para evitar cualquier confusión o malentendido, un envío sin un número de RMA o
una devolución no autorizada serán rechazados y devueltos para que el Cliente lo recoja.
WINEGARD COMPANY NO ASUME NINGUNA RESPONSABILIDAD POR CUALQUIER OTRA GARANTÍA, EXPRESA O IMPLÍCITA, REALIZADAS POR CUALQUIER
OTRA PERSONA.
CUALQUIER OTRA GARANTÍA EXPRESA, IMPLÍCITA O LEGAL INCLUYENDO LAS GARANTÍAS DE APTITUD PARA UN PROPÓSITO PARTICULAR Y
COMERCIALIZACIÓN, ESTÁ LIMITADA AL PERIODO DE DOS AÑOS DE ESTA GARANTÍA.
En los estados que no se permiten limitaciones de las garantías implícitas, o la exclusión de limitación de daños incidentales o consecuentes, no se aplican las
limitaciones o exclusiones anteriores.
Algunos estados no permiten limitaciones en la duración de una garantía implícita, o la exclusión de limitación de daños incidentales o consecuentes, de modo
que las limitaciones o exclusiones anteriores pueden no aplicarse en su caso.
Esta garantía le concede derechos legales específicos. El Cliente también puede tener otros derechos que pueden variar de un estado a otro.
GARANTÍA DEL RECEPTOR SATELITAL:
Consulte la política de garantía limitada del fabricante.
WS-MOBWARREV2
Rev. 1/10
5
Uso del receptor externo
Si el receptor externo de su TV está cableado para el satélite, tendrá que localizar a
dónde conduce ese receptor, y conectarlo directamente a su receptor de satélite.
Si el receptor exterior del televisor está cableado, dicho cableado tendrá que ser
modificado para su uso con satélite. El cable coaxial no se puede conectar a través de
otros dispositivos o interruptores antes del receptor de satélite.
Normalmente, si esta cableado, este pasará a través de una fuente de alimentación
Winegard o conmutador de vídeo. La forma más fácil de solucionar este problema
es desconectar el cable de ese dispositivo, usar un conector de barril, y conectar un
nuevo cable que vaya directamente al receptor, sin pasar por la fuente de alimentación
o un conmutador de vídeo.
Directrices de la FCC
Este dispositivo cumple con el Apartado 15 de las Reglas de la FCC. La operación está sujeta a las dos condiciones siguientes: (1)
este dispositivo no puede causar interferencias perjudiciales y (2) este dispositivo debe aceptar cualquier interferencia recibida,
incluyendo interferencias que puedan causar un funcionamiento no deseado.
-
 1
1
-
 2
2
-
 3
3
-
 4
4
-
 5
5
-
 6
6
-
 7
7
-
 8
8
-
 9
9
-
 10
10
-
 11
11
-
 12
12


Winegard PA6002R Manual de usuario
- Tipo
- Manual de usuario
- Este manual también es adecuado para
en otros idiomas
- English: Winegard PA6002R User manual
Artículos relacionados
-
Winegard Pathway X2 for Dish Manual de usuario
-
-
-
Winegard MT-SM10 Assembly, Installation, & Operation Manual
-
-
-
-
-
-
