Magnat DVS 4232 El manual del propietario
- Tipo
- El manual del propietario

Surround Sound System
DVS 4232
INPUT
VOL
+
VOL
Wichtige Hinweise zur Installation / Garantieurkunde
Important notes for installation / warranty card
Mode d’emploi / certificat de garantie
Avvertenze importanti per l’installazione / certifcato di garanzia
Notas importantes sobre la instalación y certificado de garantía
Важная информация по инсталляции / гарантия

- 2 -
------- 3
------- 15
------- 27
------- 39
------- 51
------- 63

- 3 -
Wichtige Sicherheitshinweise ------------------------------------------------------------ 4
Entsorgungshinweise ---------------------------------------------------------------------- 4
Bedienelemente am Gerät ---------------------------------------------------------------- 5
Die Fernbedienung ------------------------------------------------------------------------- 6
Anschlüsse ---------------------------------------------------------------------------------- 7
Hauptfunktionen des Geräts -------------------------------------------------------------- 8
System Setup ------------------------------------------------------------------------------- 9
Spracheinstellungen ------------------------------------------------------------------ 10
Video Setup ---------------------------------------------------------------------------- 10
Lautsprecher Einstellung ------------------------------------------------------------- 11
Digital Einstellung --------------------------------------------------------------------- 11
Speicherkarten ------------------------------------------------------------------------------ 12
Problembehandlung ------------------------------------------------------------------------13
Technische Daten ---------------------------------------------------------------------------14
INHALT
Sehr geehrter Kunde,
vielen Dank, dass Sie sich für den Magnat DVS 4232 entschieden haben.
Bitte lesen Sie unsere folgenden Hinweise vor Inbetriebnahme des DVS 4232 genau
durch.

WICHTIGE SICHERHEITSHINWEISE
- 4 -
!
Das Dreieck mit Blitzsymbol warnt den Benutzer, dass innerhalb des Gerätes hohe
Spannungen verwendet werden, die gefährliche Stromschläge verursachen können.
Das Dreieck mit Ausrufezeichen macht den Benutzer darauf aufmerksam, dass in der
beigefügten Bedienungsanleitung wichtige Hinweise enthalten sind, die unbedingt beachtet
werden müssen.
Nicht öffnen! Gefahr des elektrischen Schlages! Um die Gefahr
von Feuer oder eines elektrischen Schlages zu verringern, darf das
Gerät nicht Regen oder Feuchtigkeit ausgesetzt werden.
!! Bitte die Bedienungsanleitung vor Inbetriebnahme sorgfältig durchlesen und aufbewahren
Dieses Gerät ist ausschließlich geeignet für den Betrieb mit 230 V / 50 Hz Wechselspannung.
Betreiben Sie das Gerät nur bei einer Umgebungs-/Raumtemperatur von 0°C bis 40°C.
Die Belüftungslöcher dürfen nicht mit Gegenständen bedeckt werden (z. B. Vorhänge, Zeitung), um
eine ausreichende Belüftung des Gerätes zu gewährleisten. Bitte keine Hitzequellen wie Radiatoren,
Öfen, offene Flammen oder andere Geräte, die Hitze erzeugen in die Nähe des Gerätes stellen.
Das Gerät und die Fernbedienung dürfen weder Tropf- oder Spritzwasser noch Wasser oder hoher
Luftfeuchtigkeit ausgesetzt werden.
Ebenfalls darf das Gerät nicht zum Abstellen von Vasen oder anderen mit Feuchtigkeit gefüllten
Behältern benutzt werden.
Bei Kontakt mit Feuchtigkeit oder Flüssigkeiten sofort den Netzstecker ziehen.
Reinigen Sie das Gerät nur mit einem trockenen Tuch.
Verwenden Sie keine Reinigungsmittel oder chemische Lösungsmittel, da sonst die Oberfläche
beschädigt werden könnte.
Öffnen Sie niemals das Gerät.
Das Netzkabel muss immer betriebsbereit sein. Bei sichtbaren Beschädigungen des Netzkabels darf
das Gerät nicht mehr betrieben werden. Ein beschädigtes Kabel darf nicht repariert, sondern muss
ausgetauscht werden.
Netzkabel nicht mit feuchten Händen anschließen oder entfernen.
Überlassen Sie Wartungs- und Reparaturarbeiten immer qualifiziertem Fachpersonal.
Wird das Gerät längere Zeit nicht benutzt, ist das Gerät mittels des Netzschalters (POWER) auf der
Rückseite des Gerätes auszuschalten
Bei Gewitter bitte den Netzstecker ziehen.
!!
!!
!!
!!
!!
!!
!!
!!
!!
!!
!!
!!
!!
!!
!
CAUTION
RISK OF ELECTRIC SHOCK
DO NOT OPEN
ENTSORGUNGSHINWEISE
Gemäß der europäischen Richtlinie 2002/96/EC müssen alle elektrischen und elektronischen Geräte
über lokale Sammelstellen getrennt entsorgt werden. Bitte beachten Sie die lokalen Vorschriften und
entsorgen Sie Ihre Altgeräte nicht mit dem normalen Hausmüll.

10 11 14
15
16
17
19
20
13
12 18 21
22
BEDIENELEMENTE AM GERÄT
- 5 -
VORDERSEITE:
RÜCKSEITE:
1
2
3
4
5
Sensortastenfeld
VIDEO
OUTPUT
OPT 1 OPT 2
TVAUX
COAX 1
COAX 2
LL
RR
AC IN
POWER
ON
OFF
FUSE
SUB.
OUTPUT
ON OFF
SUB.
SWITCH
76
I
N
P
U
T
V
O
L
+
V
O
L
USB SD/MMC/MS
8
9
Achtung! Um ein sicheres Schalten des Sensortastenfeldes zu gewährleisten, benutzen Sie zur Betätigung
der Tasten bitte Ihren Daumen.
1. STANDBY Taste 12. Sicherung
2. Lautstärke + Taste 13. Videoausgang
3. Lautstärke - Taste 14. Subwooferausgang
4. PLAY/PAUSE Taste 15. AUX-Eingang
5. Eingangswahlschalter 16. TV-Eingang
6. Sensor für die Fernbedienung 17. COAXIAL1 Digitaleingang
7. LED Anzeige 18. OPTICAL1 Digitaleingang
8. SD/MMC/MS cKartenleser 19. OPTICAL2 Digitaleingang
9. USB Anschluss 20. Schalter Subwooferausgang (an/aus)
10. Netzkabel 21. Befestigung für die Wandhalterung
11. Netzschalter 22. COAXIAL2 Digitaleingang

DIE FERNBEDIENUNG
1
INPUT
0
2
3
4
5
6
7 8
9
+10
M.VOL
FUNCTION
REPEAT
M.VOL
+
ENTER/PLAY
LISTEN
SETUP
PAUSE/STEP
STOP
SD/USB
1
2
3
4
5
6
7
8
9
10
11
12
13
14
15
16
R
E
V
F
W
D
P
R
E
V
N
E
X
T
1. STANDBY/POWER:
Schaltet das Gerät ein oder aus.
2. INPUT:
Wiederholtes Drücken wählt zwischen
--DISK --OPTICAL 1 --OPTICAL 2 --COAXIAL 1
--COAXIAL 2 --AUX --TV als Eingang.
3. 0 bis +10 Zifferntasten.
Eingabe von Ziffern.
4. SETUP:
Zeigt Ihnen das Setup-Menü auf dem
angeschlossenen Bildschirm an. Damit können
Sie diverse Systemeinstellungen vornehmen.
5. SD/USB:
Wählt zwischen der Wiedergabe von USB-
bzw. SD-Speichermedien.
6. [ ] [ ] [ ] [ ]:
Mit diesen Tasten navigieren Sie innerhalb der
Gerätemenüs.
7. [REV] [FWD]:
Schneller Vorlauf, vorwärts oder rückwärts.
8. ENTER/PLAY:
Zum Bestätigen von ausgewählten
Menüoptionen bzw. Starten der Wiedergabe.
9. [ PREV ] [NEXT]:
Schaltet bei der Wiedergabe zum
vorigen/nächstenTitel.
10. PAUSE/STEP:
Die Pause-Funktion erzeugt ein Standbild, wiederholtes
Drücken schaltet Bild für Bild weiter.
11. REPEAT:
Wenn Sie von den Speichermedien abspielen, können Sie mit
dieser Taste den Wiederholmodus starten
12. MUTE:
Schaltet den Ton der Anlage stumm. Ein weiterer Druck schaltet den Ton wieder ein.
13. LISTEN:
Diese Taste schaltet die verschiedenen Wiedergabe-Modi um (abhängig vom Eingangssignal):
Prologic -- Stereo -- Vocal
14. STOP:
Zum Beenden der Wiedergabe.
15. MASTER VOLUME:
Heraufsetzen / Absenken der Lautstärke.
16. FUNKTION:
Mit dieser Taste rufen Sie die einzelnen Wiedergabekanäle sowie die Höhen und Bässe
zum anschließenden Einstellen auf.
Einsetzen / Auswechseln der Batterien
Die Fernbedienung verwendet eine bereits eingelegte Litium-Batterie, die zum Schutz
gegen Entladung mit einem Isolierstreifen gesichert ist. Diesen entfernen Sie bitte vor
Inbetriebnahme des Gerätes. Arbeitet die FB unzuverlässig, wechseln Sie bitte die Batterie
gegen eine neue gleichen Typs aus. Zum Öffnen des Batteriefachs drücken Sie die
Verriegelung wie gezeigt in Pfeilrichtung und ziehen die Halterung heraus. Bevor Sie die
alte Batterie entfernen, merken Sie sich bitte ihre Lage (+ nach oben!). Wechseln Sie die
Batterie und schließen sie das Batteriefach wieder.
Batterien gehören nicht in den Hausmüll. Bitte geben Sie verbrauchte Batterien bei
den zuständigen Sammelstellen ab. Werfen Sie Batterien niemals ins Feuer!
- 6 -

- 7 -
VIDEO
OUTPUT
OPT 1 OPT 2
TVAUX
COAX 1
COAX 2
LL
RR
AC IN
POWER
ON
OFF
FUSE
SUB.
OUTPUT
ON OFF
SUB.
SWITCH
ANSCHLÜSSE
TV
PS2
DVD
Verbindung zu Speichermedien (USB und SD/MMC/MS-Karten).
(Optisches Kabel, nicht im Lieferumfang enthalten)
SD MMC MS
Subwooferausgang
I
N
P
U
T
V
O
L
+
V
O
L
USB SD/MMC/MS
Verbindung zu einer beliebigen Stereo-
Signaleingangsquelle (z.B. TV, DVD, CD player,
xBox, Ps2, Computer usw.)
Achtung!
Stecken Sie den Netzstecker niemals in die Netzsteckdose, solange nicht alle anderen
Verbindungen korrekt ausgeführt wurden.
Bitte schalten Sie das Gerät ein, bevor Sie einen externen Subwoofer in Betrieb nehmen..
Bitte schalten Sie diesen Subwoofer aus, bevor sie das Gerät abschalten.
!!
!!
!!
oder

HAUPTFUNKTIONEN DES GERÄTES
1. ON/OFF
Schalten Sie den Netzschalter auf der Rückseite des Geräts auf "ON". Das Grät ist jetzt im Standby-
betrieb, auf der LED-Anzeige leuchtet "HELLO". Drücken Sie die Standby-Taste am Gerät oder auf
der Fernbedienung um das Gerät einzuschalten. Das System erkennt jedes anliegende
Eingangssignall. Liegt kein Signal an, zeigt die LED-Anzeige "NO SIGNAL”.
Achtung: Nach dem Ausschalten des Gerätes warten sie bitte mindestens 3 Sekunden, bevor
Sie es wieder einschalten.
2. EINGANGSWAHL (INPUT TASTE WIEDERHOLT DRÜCKEN) :
Das System ist nicht mit der USB- oder der SD-Speicherkarte verbunden:
Drücken Sie die INPUT Taste am Gerät oder auf der Fernbedienung, um einen Eingang zu wählen:
OPTICAL 1 --OPTICAL 2 --COAXIAL 1--COAXIAL 2--AUX--TV--USB/SD/MS/MMC.
Das System ist mit einer USB-Speicherkarte verbunden:
Drücken Sie die INPUT Taste am Gerät oder auf der Fernbedienung, um einen Eingang zu wählen:
OPTICAL 1 --OPTICAL 2 --COAXIAL 1--COAXIAL 2--AUX--TV--USB.
Das System ist mit einer SD-Speicherkarte verbunden:
Drücken Sie die INPUT Taste am Gerät oder auf der Fernbedienung, um einen Eingang zu wählen:
OPTICAL 1 --OPTICAL 2 --COAXIAL 1--COAXIAL 2--AUX--TV--SD.
Das System ist mit einer USB- und einer SD-Speicherkarte verbunden:
Drücken Sie die INPUT Taste am Gerät oder auf der Fernbedienung, um einen Eingang zu wählen:
OPTICAL 1 --OPTICAL 2 --COAXIAL 1--COAXIAL 2--AUX--TV--USB input. Das System wählt für
Karten allgemein den USB-Eingang. Danach können Sie SD-Karten mit der USB/SD Taste anwählen.
3. ABHÖRBETRIEBSARTEN:
Drücken Sie die LISTEN Taste, um zwischen den verschiedenen Abhörbetriebsarten umzuschalten:
Stereo --Vocal --Pro-Logic.
4. PEGELEINSTELLUNGEN
(1) Einstellen der Gesamtlautstärke:
Die Lautstärke wird mit der MASTER VOLUME +/- Taste auf der Fernbedienung oder der
VOL +/VOL - Taste auf der Vorderseite des Geräts eingestellt.
(2) Spezielle Pegeleinstellungen:
Drücken der FUNCTION Taste wählt zwischen folgenden Pegeln aus : TREBLE --BASS
--FRONT-L --FRONT-R --CENTER --SUBWOOFER. Danach können Sie mit
MASTER VOLUME +/- den entsprechenden Pegel anpassen.
5. MUTE
Ein Druck auf die MUTE Taste der Fernbedienung schaltet die Anlage stumm, ein weiterer Druck
schaltet den Ton wieder ein. Auch ein Betätigen der MASTER VOLUME +/- Taste schaltet die
Stummschaltung ab.
6. BENUTZUNG EINES EXTERNEN SUBWOOFERS:
Um einen externen Subwoofer anzuschließen, verbinden Sie den Cincheingang des Subwoofers mit
dem Subwoofereingang dieses Gerätes. Bringen Sie dann den SUB. SWITCH auf der Rückseite in
die "OFF"-Position.(Schaltet den eingebauten Subwoofer ab). Von Werk aus ist dieser Schalter in der
"ON"-Position.
- 8 -

- 9 -
SYSTEM SETUP
Sie können Ihr TV-Gerät an dem Videoausgang auf der Rückseite des Geräts anschließen.
Bedienung der Menüs für die Systemeinstellungen:
1. Ein Druck auf die SETUP-Taste der Fernbedienung führt zu folgenden Menü:
2. Menüs können Sie mit den Navigationstasten [ ] [ ] [ ] [ ] intuitiv bedienen. Die
Bestätigung/Aktivierung der einzelnen Auswahlpunkte erreichen Sie mit der ENTER/PLAY-Taste.
3. Sind alle Einstellungen getätigt oder wollen Sie abbrechen, drücken Sie die SETUP-Taste erneut,
um das Menü zu schließen.
System Setup
1. TV SYSTEM:
Hier wählen Sie das Farbsystem des angeschlossenen TV-Gerätes aus. Hinter NTSC verbirgt sich die
amerikanische TV-Norm, in Deutschland muss normalerweise PAL ausgewählt sein. PAL-60 ist ein
Wiedergabemodus, bei dem die Medien im NTSC-Format zwar mit einer 60-Hertz-Halbbildrate, aber mit
PAL-Farbkodierung abgespielt werden. Wenn Sie ein TV-Gerät mit Multinormsystem verwenden, wählen
Sie hier „AUTO".
2. TV-FORMAT:
Das jeweilige Bildformat (z.B. 4:3 = Normal-TV, 16:9 = Breitbild-TV) wird von der gerade abgespielten Datei
festgelegt. Bitte beachten Sie, dass das Bildformat nicht zwingend mit dem Ihres TV-Gerätes
übereinstimmen muss. Folgende Einstellungen schaffen dann Abhilfe.
4:3/PS: Wählen Sie diese Betriebsart, wenn Sie einen Fernseher mit 4:3 Format angeschlossen haben.
Wenn Sie eine Datei im Breitbildformat wiedergeben, wird diese bildschirmfüllend angezeigt, rechts und
links werden aber Bildteile abgeschnitten.
4:3/LB: Wählen Sie diese Betriebsart, wenn Sie einen Fernseher mit 4:3 Format angeschlossen haben.
Wenn Sie eine Datei im Breitbildformat wiedergeben, wird diese in seiner ganzen Breite angezeigt, oben
und unten erscheinen aber schwarze Balken auf dem Schirm.
16:9: Wählen Sie diese Betriebsart, wenn Sie einen Breitbild-TV (16:9-Format) angeschlossen haben.
!!
!!
!!

- 10 -
SYSTEM SETUP
System Setup
Diese Option stellt die Werkseinstellungen wieder her.
Spracheinstellungen
Wählen Sie hier die Sprache aus, die für die Bildschirmanzeige der Menüs und
Statusinformationen verwendet werden sollen.
Video Setup
Hier können Sie die verschiedenen Parameter der Bilddarstellung regeln. Wählen Sie die gewünschte
Funktion aus, dann drücken Sie die Enter - Taste und passen den Wert mit den [ ] [ ]-Tasten nach
Ihrem Wunsch an.

- 11 -
SYSTEM SETUP
Downmix
DOWNMIX bedeutet die Reduzierung des Tonsignals auf die 2-Kanal-Wiedergabe. Wenn Sie LT/RT
auswählen, aktivieren Sie für die beiden Frontkanäle einen lebendigen, theaterähnlichen Effekt. Vor-
aussetzung dafür ist aber, dass das Tonmaterial über PRO LOGIC Dolby Stereo Effekte verfügt. Wählen
Sie STEREO für normale Stereowiedergabe. VSS steht für Virtual Surround Sound und erzeugt einen
simulierten Surround Soundeffekt.
Wünschen Sie Mehrkanalwiedergabe, müssen Sie DOWNMIX deaktivieren (AUS).
Center Verzögerung / Rear Verzögerung
Bei der Wiedergabe von Programmen im 5.1-Kanalformat können Sie über diese beiden Menüpunkte für
die Signale des Center- und der hinteren Surroundkanäle Laufzeitverzögerungen einstellen. Dies simuliert
einen größeren Abstand zwischen Boxen und Zuhörer und läßt den Raum dadurch größer erscheinen.
Das kann den Suroundeffekt ggf. noch effizienter gestalten.
Lautsprecher Einstellung:
Digital Einstellung:
OP Modus
Hier können Sie zwischen den Einstellungen „Line" und „RF" wählen. Im Line-Modus werden die
Eingangssignale unverändert ausgegeben, im RF-Modus findet eine starke Komprimierung statt, die die
Lautstärke deutlich erhöht. Wir empfehlen, diese Einstellung nicht nachts zu verwenden.
Dynamik Kompression
Hier können Sie die Dynamik des Sounds einstellen. Unter „Dynamik" verstehen wir hier den Lautstär-
keunterschied zwischen sehr lauten und sehr leisen Passagen, also z. B. zwischen Explosionen und
Flüstern. Zur Einschränkung des Dynamikbereichs stellen Sie den Regler aufwärts in Richtung „FULL", um
die Dynamik zu komprimieren.
Dual Mono
Hier können Sie für Stereo-Signale verschiedene Audio-Modi auswählen:
STEREO: normales Stereobild, empfohlen
MONO L: linker Stereokanal liegt am rechten und linken Frontlautsprecher an
MONO R: rechter Stereokanal liegt am rechten und linken Frontlautsprecher an
MIX MONO: beide Frontkanäle führen identisches Monosignal
Pro Logic
Es gibt zwei unterschiedliche Dolby Pro Logic II Klangmodi, den Filmmodus und den Musikmodus. Hier
können Sie den gewünschten Modus auswählen, oder den Pro Logic Modus abschalten.
!!
!!
!!
!!

SPEICHERKARTEN
- 12 -
Abspielen von Audio-, Bild- und Videodateien auf Speicherkarten:
Starten Sie das System wie üblich.
Platzieren Sie die Speicherkarten (USB/SD/MMC/MS) mit den entsprechenden Dateien
im Karteneinschub. Achten Sie dabei auf die richtige Lage (Beschriftung nach vorn).
Die Wiedergabe beginnt automatisch. Auf dem Bildschirm eines angeschlossenen TV-
Geräts erhalten Sie folgende Übersicht über den Inhalt des Speichermediums:
!!
!!
!!
!! In diesem Menü werden links die verschiedenen Ordner auf dem Speichermedium anzeigt. Rechts
sehen Sie die Dateien im jeweils markierten Ordner. Mit den Navigationstasten [ ] [ ] bewegen Sie
die Auswahl auf den gewünschten Ordner und drücken die ENTER-Taste. Nun werden die einzelnen
Dateien im Ordner angezeigt.
Mit der Navigationstaste [ ] gelangen Sie in die rechte Spalte. Wählen Sie hier Dateien mit den
[ ] [ ] Tasten aus und starten Sie deren Wiedergabe, indem Sie die ENTER/PLAY - Taste drücken.
Der Name der Datei, die gerade gespielt wird, wird in dem Anzeigefeld oben angezeigt. Ist die
Wiedergabe einer Datei beendet, wechselt das Gerät zu nächsten. Mit der 1 Taste gelangen Sie wieder
in die linke Ordnerspalte.
Drücken Sie noch einmal die [ ] Taste, erreichen Sie die Medienschalter. Das Gerät unterscheidet
Audio-, Video- und Bilderdateien, zeigt aber immer nur eine Dateiart an. Findet das Gerät beim
Einlesen des Speichermediums mindestens eine passende Datei, wird das entsprechende Symbol als
Taste dargestellt. Mit den Navigationstasten können Sie nun das Symbol der gewünschten Dateiart
markieren. Drücken Sie die ENTER -Taste, um das Gerät nur noch Dateien des gewünschten
Medientyps anzeigen zu lassen.
Durch Drücken der REV oder FWD Taste aktivieren Sie während der Wiedergabe den Suchlauf
(Wiedergabe mit hoher Geschwindigkeit) rückwärts oder vorwärts. Ist die gewünschte Stelle erreicht,
drücken Sie die ENTER/PLAY - Taste. Die Wiedergabe wird dann mit normaler Geschwindigkeit
fortgesetzt. Der Ton wird während des Suchlaufs stumm geschaltet, orientieren Sie sich an der
Zeitanzeige im Display.
Wiederholtes Drücken der REPEAT-Taste wechselt zwischen den verschiedenen Wiederholfunktionen:
Datei abspielen, einzelne Datei wiederholen, alle Dateien eines Verzeichnisses wiederholen, alles
wiederholen.
Drücken Sie die [ ] oder [ ] Taste, um zur vorherigen / nächsten Datei zu springen.
Drücken Sie die STOP-Taste, um die Wiedergabe zu beenden.
!!
!!
!!
!!
!!
!!
MP3 Audiodatei abspielen JPEG Bilddatei anzeigen AVI Videodatei abspielen

PROBLEMBEHANDLUNG
- 13 -
PROBLEM URSACHE LÖSUNG
1. Überprüfen Sie das
Netzkabel.
2. Stellen Sie sicher, das
der Netzschalter
eingeschaltet ist.
Kein Sound-Effekt im
DVD/5.1 Ausgangsmodus
System spielt nicht
1. System ist nicht mit dem
Stromnetz verbunden.
2. Das Gerät lässt sich nicht
einschalten.
Stellen Sie sicher, dass sich
der DVD-Player im 5.1-Modus
befindet
Stellen Sie am DVD-
Player den 5.1-Modus ein
Verzerrungen bei hohen
Lautstärken.
Die Audioquelle hat eine sehr
hohe Ausgangsspannung
Stellen Sie die Lautstärke
niedriger ein.
Anmerkung A:
Die korrekte Kombination von Geräten an den Ein- und Ausgängen (sowohl der aktive Subwoofer als
auch die Signalquelle, z.B. CD,MP3,VCD,DVD......) liefert optimale Klangqualität. Bitte beachten Sie
die entsprechenden Bedienungsanleitungen der angeschlossenen Geräte.
Manche DVD-Player haben einen höheren Ausgangspegel als üblich. Sollten bei hohen Lautstärken
Verzerrungen auftreten, vermindern Sie die Lautstärke, um Beschädigungen am Verstärker oder den
lautsprechern zu vermeiden.
Anmerkung B:
Wenn dieses Gerät starken äußeren Einflüssen ausgesetzt ist (z.B. mechanische Belastung, starke
elektrostatische Einflüsse, Überspannungen bei Gewitter) oder wenn es nicht vorschriftsmäßig betrieben
wird, können Fehlfunktionen auftreten. Sollte es dazu kommen, gehen Sie folgendermaßen vor:
Bringen Sie das Gerät in den Standby-Betrieb und schalten Sie es danach wieder ein.
Sollte letzteres zu keinem Ergebnis führen, schalten Sie den Netzschalter aus, ziehen den Netzstecker
für ein paar Minuten aus der Steckdose und schalten das Gerät danach wieder ein.
Dieses Gerät hat einen Selbstschutz gegen elektrostatische Einflüsse und alle Funktionen werden nach
einem Neustart wieder hergestellt.
!!
!!
!!
!!

Technische Daten
- 14 -
AUSGANGSLEISTUNG:
Subwoofer (RMS) ------------------------------------------------------ 40 W
Front-/ Center-Lautsprecher (RMS) ------------------------------- 3x 15 W
Maximale Ausgangsleistung (Impuls) ----------------------------- 200 W
Abmessungen (B x H x T) -------------------------------------------- 970 x 200 x 130 mm
MITGELIEFERTES ZUBEHÖR:
Fernbedienung ---------------------------------------------------------- 1 Stk.
Batterie / Knopfzelle --------------------------------------------------- 1 Stk.
Cinch Videokabel (gelb) ---------------------------------------------- 1 Stk.
Cinch Koaxialkabel (orange) ---------------------------------------- 1 Stk.
Cinch Stereokabel------------------------------------------------------ 1 Stk.
Wandhalter --------------------------------------------------------------- 2 Stk.
Bedienungsanleitung -------------------------------------------------- 1 Stk.
Technische Änderungen vorbehalten.

- 15 -
Safetey precaution ------------------------------------------------------------------------- 16
Instructions for disposal ------------------------------------------------------------------- 16
Description of the unit --------------------------------------------------------------------- 17
Description of the remote ----------------------------------------------------------------- 18
Connections --------------------------------------------------------------------------------- 19
System basic operation -------------------------------------------------------------------- 20
System Setup ------------------------------------------------------------------------------- 21
Language Setup ----------------------------------------------------------------------- 22
Video Setup ---------------------------------------------------------------------------- 22
Speaker Setup ------------------------------------------------------------------------- 23
Digital Setup ---------------------------------------------------------------------------- 23
Memory cards ------------------------------------------------------------------------------- 24
Maintenance & troubleshooting --------------------------------------------------------- 25
Specifications ------------------------------------------------------------------------------- 26
CONTENT
Dear customer,
thank you for choosing the Magnat DVS 4232.
Please read the following information carefully before starting to use your DVS 4232.

- 16 -
!
This symbol warns the user that high voltage is used within the device which can result in
electric shock.
This symbol makes the user aware that there are important notes in the enclosed instruction
manual which must be observed.
Warning: Do not open! Risk of electric shock! To reduce the risk
of fire or electric shock, do not expose this unit to
rain or moisture.
!! Please read the instruction manual carefully before use and keep it in a safe place.
!! This device is only intended for use with 230 V/50 Hz AC voltage.
Only operate the device at an ambient/room temperature between 0°C and 40°C.
The ventilation slots should not be covered by any items (e.g. curtains, newspaper, etc.) in order to
ensure sufficient ventilation for the device. Please do not position any sources of heat, such as
radiators, ovens, naked flames or other devices that generate heat in close proximity to the device.
The device and the remote control should not be exposed to dripping or splash water or high levels of
humidity.
No objects filled with liquids, such as vases, shall be places on the unit.
In the event of contact with moisture or liquids remove the mains adapter immediately.
Only clean the device using a dry cloth.
Do not use any cleaning agents or chemical solvents when cleaning, as these could damage the
surface of the device.
Only open the device to remove the packaging foam from the end tubes.
The mains cable must always be operational. The device should not continue to be operated if there is
visible damage to the mains cable. Adamaged cable should not be repaired, but must be replaced.
Do not connect or remove the mains cable with damp hands.
Always refer to a qualified specialist for any maintenance or repair work.
If the device is not going to be used for a prolonged period, it should be switched off at the mains.
Please remove the mains plug in the event of thunderstorms.
!!
!!
!!
!!
!!
!!
!!
!!
!!
!!
!!
!!
!!
!
CAUTION
RISK OF ELECTRIC SHOCK
DO NOT OPEN
In accordance with European Directive 2002/96/EC all electrical and electronic appliances must be
disposed of separately via local collection points. Please observe the local regulations and do not
dispose of your old appliances with normal household waste.
INSTRUCTIONS FOR DISPOSAL
SAFETY PRECAUTION

10 11 14
15
16
17
19
20
13
12 18 21
22
DESCRIPTION OF THE UNIT
- 17 -
FRONT VIEW
BOTTOM VIEW
1
2
3
4
5
Touch panel control
VIDEO
OUTPUT
OPT 1 OPT 2
TVAUX
COAX 1
COAX 2
LL
RR
AC IN
POWER
ON
OFF
FUSE
SUB.
OUTPUT
ON OFF
SUB.
SWITCH
76
I
N
P
U
T
V
O
L
+
V
O
L
USB SD/MMC/MS
8
9
Note: The touch screen panel requires large area of sensible contact, we recommend
user to use thumb to operate the panel for better control.
1. Standby button 12. Fuse
2. Master volume up button 13. Video Output Connector
3. Master volume down button 14. Subwoofer Output Connecto
4. Play/Pause buttonr 15. Aux Input Connector
5. Input select button 16. TV Input Connector
6. Remote sensor 17. Coaxial1 Input Connector
7. LED Display 18. Optical1 Input Connector
8. SD/MMC/MS card reader 19. Optical2 Input Connector
9. USB Connector 20. Subwoofer Output Switch(ON/OFF)
10. AC Cord 21.Wall Mount Bracket
11. Main Power Switch 22. Coaxial2 Input Connector

DESCRIPTION OF THE REMOTE
1
INPUT
0
2
3
4
5
6
7 8
9
+10
M.VOL
FUNCTION
REPEAT
M.VOL
+
ENTER/PLAY
LISTEN
SETUP
PAUSE/STEP
STOP
SD/USB
1
2
3
4
5
6
7
8
9
10
11
12
13
14
15
16
R
E
V
F
W
D
P
E
R
V
N
E
X
T
1. Standby/Power:
Turn the unit on or off.
2. Input:
Recycle select DISK --OPTICAL 1
--OPTICAL 2 --COAXIAL 1--COAXIAL 2
--AUX--TV input mode
3. 0~+10 Number key
Press to enter numbers, such as DVD part
number, etc.
4. Setup
Press to display the system setup picture on
the screen. Thus, you can adjust the parameters
on the screen. You can also set up in similar
ways, depending on your needs.
5. SD/USB
Select SD or USB input mode.
6. [ ] [ ] [ ] [ ]
Press to display menu or system function
on screen.
In player mode, press these buttons to move
or select the function you need.
7. [REV] [FWD]
Press to rewind or forward the track.
8. Enter/Play
Press to confirm the option selected by the
arrow buttons.
Press to play the track.
9. [ PREV ] [NEXT]
Press and return to the previous part or skip to the next part.
10. Pause/Step
Press to pause the playback.
Press this button to play a scene frame by frame.
11. Repeat
When you are playing DISC, you can press this button to select a certain portions of the content
to be played repeatedly.
12. Mute
Turn on or off the sound
13. Listen
Recycle select the listen mode: Pro-Logic ---Stereo---Vocal.
14. Stop
Press to stop the track.
15. Master volume
Master volume level up or down
16. Function
The selection uses cycle loop. Choose LEFT, RIGHT, CENTER, SUB , BASS and TREBLE for
level adjustment.
To install / replace the batteries
The remote control uses a pre-installed lithium battery. To prevent an anticipated
discharge of the battery, we' ve inserted an insulating strip. Please pull it out prior to
first operation. Should the r/c start to work unreliably replace the battery with a new
one of the same type. Open the battery compartment. Pull out the battery mounting
in the direction of arrow. Before you take out the empty battery, please memorise its
position. The + marking must show upwards, otherwise the r/c will not work and may
be damaged. Replace the cover.
Note: Please discard the used batteries properly. Never throw batteries into fire.
- 18 -

- 19 -
VIDEO
OUTPUT
OPT 1 OPT 2
TVAUX
COAX 1
COAX 2
LL
RR
AC IN
POWER
ON
OFF
FUSE
SUB.
OUTPUT
ON OFF
SUB.
SWITCH
CONNECTIONS
TV
PS2
DVD
Connect to USB and SD/MMC/MS card.
(Optical cable ---Not include)
SD MMC MS
Subwoofer signal output
I
N
P
U
T
V
O
L
+
V
O
L
USB SD/MMC/MS
Connect to any two channel (Right/Left)
sound source/device. (E.g. TV, DVD, CD player,
xBox, Ps2, Computer etc.)
Note:
Do not connect the power cord into an AC outlet until all connections are made and are
correct.
Please turn on the unit before turn on the external active subwoofer.
Please turn off the external active subwoofer before turn off the unit.
!!
!!
!!

SYSTEM BASIC OPERATION
1. ON/OFF
Plug in the power cord to the outlet, switch the MAIN POWER to ON position at the back of the
unit, the unit goes into standby mode, the LED displays "HELLO". Press STANDBY button on the
front panel or on the remote control to start the operation of the system. The system will
automatically detect any input signal. If there is no signal present, the LED will display
"NO SIGNAL" .
* Note: After shut off the unit, please wait at least 3 seconds before turn on it again.
2. INPUT MODE
The system is not connect the USB or SD memory card:
Press INPUT button on the front panel or on the remote control to cycle through the selections:
OPTICAL 1 --OPTICAL 2 --COAXIAL 1--COAXIAL 2--AUX--TV--USB/SD/MS/MMC input mode.
The system is connect the USB memory card:
Press INPUT button on the front panel or on the remote control to cycle through the selections:
OPTICAL 1 --OPTICAL 2 --COAXIAL 1--COAXIAL 2--AUX--TV--USB input mode.
The system is connect the SD memory card:
Press INPUT button on the front panel or on the remote control to cycle through the selections:
OPTICAL 1 --OPTICAL 2 --COAXIAL 1--COAXIAL 2--AUX--TV--SD input mode.
The system is connect the USB and SD memory card:
Press INPUT button on the front panel or on the remote control to cycle through the selections:
OPTICAL 1 --OPTICAL 2 --COAXIAL 1--COAXIAL 2--AUX--TV--USB input mode. The system
will select the USB input signal preference, then you can press USB/SD button to select the
SD signal.
3. LISTENING MODE
Press LISTEN button on the remote control to cycle through the listening modes:Stereo
--Vocal --Pro-Logic.
4. VOLUME ADJUSTMENT
(1) Master volume adjustment
Master volume is controlled by the MASTER VOLUME +/- button on the remote control or
VOL +/VOL - button on the front panel.
(2) Subject volume adjustment
Press FUNCTION button repeatedly to recycle select subject volume : TREBLE --BASS
--FL --FR --CENTER --SUBWOOFER. Then press MASTER VOLUME button to control
subject volume level up or down.
5. MUTE
Press the MUTE button on the remote control, the system goes into mute mode. Press MUTE
button again to disable the mute mode. The mute function will also be canceled automatically
by pressing the MASTER VOLUME +/- buttons.
6. SELECT SUBWOOFER OUTPUT
To connect an external active subwoofer, connect the monaural input jack of your subwooer
to the SUBWOOFER OUTPUT jack of this unit. If a subwoofer is connected the unit, switch
the SUB. SWITCH at the rear panel in OFF position.
(The system default SUB. SWITCH in ON position.)
- 20 -

- 21 -
SYSTEM SETUP
The system can connect your TV use video output connector on the rear panel.
Using the system setup menus:
1. Press the SETUP button on the remote control to display the SETUP menu as shown below.
2. Use the [ ] [ ] buttons to select one of the SETUP options, highlight your desired selection
with in each SETUP menu and press ENTER/PLAY button to confirm.
3. To exit the menu and go to another SETUP menu, use [ ] [ ] button to select EXIT SETUP.
System Setup
Use [ ] [ ] [ ] [ ] buttons to select the highlighted mark to the option to be set, and use
ENTER/PLAY button to confirm.
1. TV SYSTEM: To be selected in accordance with the color system of the TV to be connected.
a) NTSC: For NTSC zone, you can select "NTSC". (Used in the USA, Canada and Japan)
b) PAL 60: For PAL 60 uniform zone, you can select "PAL 60".
c) PAL: For PAL uniform zone, you can select "PAL". (Used in Western Europe)
d) AUTO: For multiple zone, you can select "AUTO".
2. TV TYPE:
a) 4:3PS (full-image scanning): available of the TV with average dimension. When a wide-screen
picture is played, the left and right sides of the picture will be deleted and the picture will be
seen on the screen.
b) 4:3LB (mailbox): please choose this option for a TV with average dimensions. When the wide-
screen picture is played, you will see black rims on the top and bottom of the TV screen.
c) 16:09 (wide screen): choose this option if the system connects to a wide-screen TV.

- 22 -
SYSTEM SETUP
System Setup
DEFAULT: All functions resume initial statuses if you choose this option.
Language Setup
Select the language here, which is to be used for the screen display of the menus and the status
information.
Video Setup
Here you can regulate the different parameters of the image representation. Please select the desired
function, then press ENTER and adapt the value with the [ ] [ ]-keys according to your desire.

- 23 -
SYSTEM SETUP
Downmix
a) LT/RT: you can select this option to decrypt the signal so as to present a vivid theater effect,
provided that your DISC contains PRO LOGIC Dolby stereo effect.
b) STEREO: at 5.1 sound channel output, the audio outputs to 5 speakers and a sub-woofer.
At 2 sound channel output, the audio outputs to left and right speakers.
c) VSS(Virtual circumferential sound): if you play a DISC with 5.1 sound channel mechanism,
the main amplifier outputs virtual circumferential effect.
d) OFF: when select OFF, becomes 5.1 output mode.
Center Delay
This option allows you to set intermission delay time.
Note: available only at 5.1 sound channel mode.
Rear Delay
This option allows you to adjust the setup of circumferential delay time.
Note: available only at 5.1 sound channel mode. Das kann den Suroundeffekt ggf. noch effizienter
gestalten.
Speaker Setup:
Digital Setup:
OP Mode
a) LINE OUT: To zip the inputted signals linearly. The volume is low and, therefore, you should
use this option at nighttime.
b) RF REMOD: Volume is high and is suitable for daytime.
Dynamic Range
You can change the zip mode to LINE OUTPUT in order to adjust linear zip
radio and obtain the zip effects for different signals. If you choose FULL, the peak value of
audio signal is minimum, and becomes maximum if you choose off.
Note: This option is available only when the system is set as "5.1 sound channel".
Dual Mono
This option allows you to set the output methods for the left and right audio
signals. There are 4 modes: stereo, left sound channel, right sound channel, and mixed sound
channel, to be selected according to the AC-3 KARAOKE mode.
Prologic
a) MOVIE MODE: This option allows you to set Dolby Pro Logic II sound mode is movie.
b) MUSIC MODE: This option allows you to set Dolby Pro Logic II sound mode is music.
c) OFF: Turnoff the Dolby Pro Logic II sound mode.

MEMORY CARDS
- 24 -
Play MP3 audio file Show JPEG picture file Play AVI video file
Playing audio, picture and video files stored on memory cards:
Turn the system On as usual.
Insert your flash memory card containing MP3 audio/JPEG files into the memory card slot. Note: The
card only be inserted one way, push it in as far as, it will go until it locks in place.
The system will read the information on the card. If the system connected TV, the screen
show as following:
!!
!!
!!
!! Press the ENTER/PLAY button on the remote control to begin playback. Or press [ ] button
on the front panel to begin playback.
Press [ ] button on the front panel to pause playback, press it again to resume playback.
Press PREV or NEXT button repeatedly during playback to skip to the previous or next track.
Press REV or FWD button to fast reverse or fast forward.
(Fast forward): FF 2X FF4X FF8X FF20X PLAY
(Fast reverse): FR 2X FR4X FR8X FR20X PLAY
Press STOP button to stop playback.
Press REPEAT button repeatedly to select one of the following repeat modes:
REP ONE FOLDER REPEAT REP ALL PLAY
Note: When playing SD/MMC, press the SD/USB button to select USB read mode, press the
SD/USB button again to resume the previous mode.
!!
!!
!!
!!
!!
!!
!!
!!

MAINTENANCE & TROUBLESHOOTING
- 25 -
MAINTENANCE & TROUBLESHOOTING
ISSUE CAUSED BY SOLUTION
1. Check with the power
plug.
2. Make sure the power
switch at the back pane
is on.
No sound effect from speaker
when choose DVD/5.1 output
mode
No sound from system
1. System does not
connected with power.
2. The power does not
switch on.
Confirm DVD player is set up
for 5.1 output
Setup the DVD to output
audio in 5.1
Distortion occurred when
in high volume
The sound device has high
level signal output
Turn down the master
volume of the system
Note A:
The proper combination of input and output mode (Both the Active Subwoofer and the supply source,
i.e CD,MP3,VCD,DVD......) will produce optimize sound quality. Please refer to both Instruction
Manual.
Some DVD device has high level signal output . When the Master Volume is turn high until the
distortion occurs, please turn down the Master Volume to prevent damaged to the speaker unit and
amplifier.
Note B:
When this product is subjected to strong external interference (mechanical shock, excessive static
electricity, abnormal supply voltage due to lighting, etc.) or it is operated incorrectly, it may malfunction. If
such a problem occurs, please do the following to reset the system.
Set the system to STANDBY mode and turn the POWER on again.
If the system is not restored using the previous operation, turn off the MAIN POWER switch, unplug
the power cord plug for few minutes and try to on it again.
The product has self-protection act when shocked by static electricity, and all functions can be
used normally re-start.
!!
!!
!!
!!

SPECIFICATIONS
- 26 -
OUTPUT POWER:
Subwoofer (RMS) ------------------------------------------------------ 40 W
Front-/ Center-Speaker (RMS) ------------------------------------- 3x 15
Maximal Output Power (peak) -------------------------------------- 200 W
Dimension (W x H x D) ----------------------------------------------- 970 x 200 x 130 mm
SCOPE OF DELIVERY:
Remote control ---------------------------------------------------------- 1 Stk.
Button-type battery ----------------------------------------------------- 1 Stk.
RCA video cable (yellow) --------------------------------------------- 1 Stk.
RCA coaxial cable (orange) ------------------------------------------ 1 Stk.
RCA stereo cable ------------------------------------------------------- 1 Stk.
Wall mount brackets --------------------------------------------------- 2 Stk.
User manual -------------------------------------------------------------- 1 Stk.
Subject to technical Change

- 27 -
Consignes de sécurité importantes ------------------------------------------------------- 28
Instructions pour la mise au rebut----------------------------------------------------------- 28
Eléments de commande --------------------------------------------------------------------- 29
La télécommande ----------------------------------------------------------------------------- 30
Connexions ------------------------------------------------------------------------------------- 31
Fonctions principales ------------------------------------------------------------------------ 32
Configuration du système ------------------------------------------------------------------- 33
Réglages de la langue -------------------------------------------------------------- 34
Configuration vidéo ------------------------------------------------------------------ 34
Réglage des haut-parleurs -------------------------------------------------------- 35
Réglage numérique ----------------------------------------------------------------- 35
Cartes mémoires ------------------------------------------------------------------------------ 36
Aide en cas de dysfonctionnement ------------------------------------------------------- 37
Caractéristiques techniques ---------------------------------------------------------------- 38
SOMMAIRE
Chère cliente, cher client,
Merci d'avoir choisi le DVS 4232 de Magnat.
Avant d'utiliser votre DVS 4232, veuillez lire attentivement les informations qui suivent.

CONSIGNES DE SECURITE IMPORTANTES
- 28 -
!
Ce symbole avertit l'utilisateur que l'appareil est traversé par des tensions élevées pouvant
entraîner des décharges électriques dangereuses.
Ce symbole indique à l'utilisateur de l'appareil que la notice d'utilisation jointe avec l'appareil
contient des consignes importantes devant impérativement être respectées.
Attention! Ne pas ouvrir, risque d'électrocution!
Afin de reduire les risques d’incendie ou de décharge électricque,
ne pas exposer cet appareil à la pluie ou à l’humidité.
!! Avant l'utilisation de l'appareil, lisez attentivement la notice d'utilisation et conservez-la.
Cet appareil est exclusivement conçu pour une utilisation avec une tension alternative de 230 V /50 Hz.
Utilisez uniquement l'appareil à une température ambiante comprise entre 0°C et 40°C.
Les trous d'aération ne doivent pas être recouverts par des objets (par ex. des rideaux, journaux) afin
de garantir une aération suffisante de l'appareil. Ne placez pas de sources de chaleur, telles que des
radiateurs, des poêles, des flammes nues ou d'autres appareils produisant de la chaleur, à proximité
de l'appareil.
L'appareil et la télécommande ne doivent être exposés ni aux gouttes d'eau et projections d'eau ni à
l'eau ni à une humidité de l'air importante.
Ne posez jamais des vases ou d’autres récipients contenant des liquides sur l’appareil.
En cas de contact avec un milieu humide ou liquide, retirer l'adaptateur secteur immédiatement.
Nettoyer l'appareil avec un chiffon sec uniquement.
Ne pas utiliser d'agents nettoyants ou de solvants chimiques, ceux-ci pouvant endommager la surface
de l'appareil.
Ne jamais ouvrir l'appareil.
Le cordon d'alimentation doit toujours être en état de fonctionner. Ne pas continuer à utiliser l'appareil
en cas de dommage visible sur le câble secteur. Un câble endommagé ne doit pas être réparé mais
doit être remplacé.
Ne pas brancher ou débrancher le cordon d'alimentation avec les mains humides.
Toujours demander conseil à un spécialiste pour tout travail de maintenance ou de réparation.
En cas de non utilisation prolongée, éteindre l'appareil à l'aide de l'interrupteur d'alimentation situé sur
la face arrière de l'appareil.
En cas d'orage, débranchez le cordon d'alimentation.
!!
!!
!!
!!
!!
!!
!!
!!
!!
!!
!!
!!
!!
!!
!
CAUTION
RISK OF ELECTRIC SHOCK
DO NOT OPEN
INSTRUCTIONS POUR LA MISE AU REBUT
Conformément à la directive européenne 2002/96/CE, tous les appareils électriques et électroniques
usagés doivent être triés et déposés dans des points de collecte locaux. Veuillez respecter les
réglementations locales et ne pas jeter vos appareils usagés avec les déchets ménagers.

10 11 14
15
16
17
19
20
13
12 18 21
22
ELEMENTS DE COMMANDE
- 29 -
FACE AVANT:
FACE ARRIERE:
1
2
3
4
5
Clavier à effleurement
VIDEO
OUTPUT
OPT 1 OPT 2
TVAUX
COAX 1
COAX 2
LL
RR
AC IN
POWER
ON
OFF
FUSE
SUB.
OUTPUT
ON OFF
SUB.
SWITCH
76
I
N
P
U
T
V
O
L
+
V
O
L
USB SD/MMC/MS
8
9
Attention! Afin de garantir un bon fonctionnement du clavier à effleurement, servez-vous de votre pouce
pour appuyer sur les touches.
1. Touche STANDBY 12. Fusible
2. Touche Volume + 13. Sortie vidéo
3. Touche Volume - 14. Sortie subwoofer
4. Touche PLAY/PAUSE 15. Entrée AUX
5. Sélecteur d'entrée 16. Entrée TV
6. Capteur pour télécommande 17. Entrée numérique COAXIAL1
7. Affichage à LED 18. Entrée numérique OPTICAL1
8. Lecteur de cartes SD/MMC/MS 19. Entrée numérique OPTICAL2
9. Prise USB 20. Interrupteur sortie subwoofer (on/off)
10. Cordon d'alimentation 21. Fixation pour montage mural
11. Interrupteur d'alimentation 22. Entrée numérique COAXIAL2

LA TELECOMMANDE
1
INPUT
0
2
3
4
5
6
7 8
9
+10
M.VOL
FUNCTION
REPEAT
M.VOL
+
ENTER/PLAY
LISTEN
SETUP
PAUSE/STEP
STOP
SD/USB
1
2
3
4
5
6
7
8
9
10
11
12
13
14
15
16
R
E
V
F
W
D
P
R
E
V
N
E
X
T
1. STANDBY/POWER :
Marche/arrêt de l'appareil.
2. INPUT :
Une pression répétée permet de choisir entre
--DISK --OPTICAL 1 --OPTICAL 2 --COAXIAL 1
--COAXIAL 2 --AUX --TV comme entrée.
3. Touches numériques de 0 à +10.
Saisie de chiffres.
4. SETUP :
Permet d'afficher le menu de configuration à
l'écran raccordé au système. Vous pouvez ainsi
procéder à divers réglages du système.
5. SD/USB :
Permet de restituer des supports de stockage
USB ou SD.
Ces touches permettent de naviguer dans les
menus de l'appareil.
7. [REV] [FWD] :
Avance rapide et retour rapide.
8. ENTER/PLAY :
Permet de confirmer les options sélectionnées
dans les menus ou de démarrer la lecture.
9. [ PREV ] [NEXT] :
Permet de passer à la plage suivante/précédente
pendant la lecture.
10. PAUSE/STEP :
La fonction Pause permet d'obtenir une image fixe,
chaque nouvelle pression sur cette touche permet
d'afficher une image après l'autre.
11. REPEAT :
Lors de la lecture des supports de stockage, cette touche permet de démarrer le mode de
répétition
12. MUTE
Permet de mettre l'appareil en sourdine. Une nouvelle pression permet de rétablir le son.
13. LISTEN :
Cette touche permet de commuter entre les différents modes de lecture (en fonction du signal
d'entrée) : Prologic -- Stereo -- Vocal
14. STOP :
Permet d'arrêter la lecture.
15. MASTER VOLUME :
Permet d'augmenter / de réduire le volume.
16. FUNCTION :
Cette touche permet d'appeler les différents canaux de restitution ainsi que les aigus et les
basses en vue de leur réglage.
6. [ ] [ ] [ ] [ ]:
Mise en place/remplacement de la pile
La télécommande est alimentée par une pile lithium préinstallée. Pour éviter une décharge de
la pile avant la première utilisation de l'appareil, une bande isolante a été insérée. Retirez cette
bande isolante avant la première utilisation. Si la télécommande ne fonctionne pas
correctement, la pile doit être remplacée par une pile du même type. Ouvrez le compartiment
de la pile. Retirez la pile du compartiment dans le sens de la flèche. Avant de retirer la pile
usagée, notez sa position correcte. Pour que la télécommande fonctionne et qu'elle ne soit pas
endommagée, le signe « + » doit être situé en haut. Remplacez la pile et refermez son
compartiment.
Les piles usagées sont des déchets dangereux et doivent être mises au rebut
conformément aux réglementations en vigueur.
- 30 -

- 31 -
VIDEO
OUTPUT
OPT 1 OPT 2
TVAUX
COAX 1
COAX 2
LL
RR
AC IN
POWER
ON
OFF
FUSE
SUB.
OUTPUT
ON OFF
SUB.
SWITCH
CONNEXIONS
TV
PS2
DVD
Branchement de supports de stockage (USB et cartes SD/MMC/MS).
(câble optique, non compris dans la livraison)
SD MMC MS
Sortie subwoofer
I
N
P
U
T
V
O
L
+
V
O
L
USB SD/MMC/MS
Branchement d'une source stéréo de votre choix
(par ex. TV, DVD, lecteur CD, xBox, Ps2,
ordinateur, etc.)
Attention!
!!
Ne jamais brancher le câble d'alimentation dans une prise de courant tant que tous les
autres branchements n'ont pas été effectués correctement.
Allumer l'appareil avant de mettre en marche un subwoofer externe.
Eteindre le subwoofer avant d'éteindre l'appareil.
!!
!!
ou

FONCTIONS PRINCIPALES
1. ON/OFF
Mettez l'interrupteur d'alimentation au dos de l'appareil sur « ON ». L'appareil est maintenant en
mode de veille. Le message « HELLO » apparaît sur l'affichage à LED. Appuyez sur la touche
Standby de l'appareil ou de la télécommande pour mettre en marche l'appareil. Le système détecte
chaque signal d'entrée présent. Si aucun signal n'est présent, le message « NO SIGNAL » apparaît
sur l'affichage à LED.
Attention: après avoir éteint l'appareil, attendez au moins 3 secondes avant de le remettre en
marche.
2. SELECTION DE L'ENTREE (APPUYER PLUSIEURS FOIS SUR LA TOUCHE INPUT):
Le système n'est pas relié à la carte mémoire USB ou SD:
Appuyez sur la touche INPUT de l'appareil ou de la télécommande pour sélectionner une entrée:
OPTICAL 1 --OPTICAL 2 --COAXIAL 1--COAXIAL 2--AUX--TV--USB/SD/MS/MMC.
Le système est relié à une carte mémoire USB:
Appuyez sur la touche INPUT de l'appareil ou de la télécommande pour sélectionner une entrée:
OPTICAL 1 --OPTICAL 2 --COAXIAL 1--COAXIAL 2--AUX--TV--USB.
Le système est relié à une carte mémoire SD:
Appuyez sur la touche INPUT de l'appareil ou de la télécommande pour sélectionner une entrée:
OPTICAL 1 --OPTICAL 2 --COAXIAL 1--COAXIAL 2--AUX--TV--SD.
Le système est relié à une carte mémoire USB et à une carte mémoire SD:
Appuyez sur la touche INPUT de l'appareil ou de la télécommande pour sélectionner une entrée:
OPTICAL 1 --OPTICAL 2 --COAXIAL 1--COAXIAL 2--AUX--TV--USB input. Pour les cartes en
général, le système sélectionne l'entrée USB. Il vous est ensuite possible de sélectionner les cartes
SD à l'aide de la touche USB/SD.
3. MODES D'ECOUTE :
Appuyez sur la touche LISTEN pour commuter entre les différents mode d'écoute:
--Stereo --Vocal --Pro-Logic.
4. REGLAGES DU NIVEAU SONORE:
(1) Réglage du volume général:
Le volume sonore peut être réglé à l'aide de la touche MASTER VOLUME +/- de la
télécommande ou de la touche VOL +/VOL - située sur la face avant de l'appareil.
(2) Réglages spéciaux du niveau sonore :
Appuyez sur la touche FUNCTION pour sélectionner l'un des niveaux suivants : TREBLE --
BASS --FRONT-L --FRONT-R --CENTER --SUBWOOFER. La touche MASTER VOLUME +/-
permet ensuite de régler le niveau sélectionné.
5. MUTE
Une pression sur la touche MUTE de la télécommande permet de mettre en sourdine l'appareil, une
pression supplémentaire permet de rétablir le son. La touche MASTER VOLUME +/- permet
également de désactiver la sourdine.
6. UTILISATION D'UN SUBWOOFER EXTERNE :
Pour connecter un subwoofer externe, reliez l'entrée cinch du subwoofer à l'entrée subwoofer de
l'appareil. Mettez ensuite le SUB. SWITCH au dos de l'appareil en position « OFF » (désactive le
subwoofer intégré). Départ usine, cet interrupteur est en position « ON ».
- 32 -

- 33 -
CONFIGURATION DU SYSTEME
Il vous est possible de brancher votre téléviseur à la sortie vidéo située au dos de l'appareil.
Commande des menus pour les réglages du système:
1. Une pression sur la touche SETUP de la télécommande permet d'accéder au menu suivant:
2. [ ] [ ] [ ] [ ]
3.
Les menus peuvent être consultés de manière intuitive à l'aide des touches de navigation
La confirmation/l'activation des différents points de sélection est accessible à l'aide de la touch
ENTER/PLAY.
Si tous les réglages ont été effectués ou si vous voulez les interrompre, appuyez à nouveau sur la touche
SETUP pour fermer le menu.
Configuration du système
1. SYSTEME TV :
Sélectionnez ici le système de couleurs du téléviseur branché. La norme NTSC est la norme TV
américaine, en Allemagne, la norme PAL doit normalement être sélectionnée. PAL-60 est un mode de
restitution avec lequel les supports au format NTSC sont lus avec une fréquence de trame de 60 Hertz
mais selon le codage des couleurs PAL. Si vous utilisez un téléviseur doté du système multinorme,
sélectionnez «AUTO».
2. FORMAT TV :
Chaque format d'image (par ex. 4:3 = écran normal, 16:9 = écran large) est déterminé par le fichier en
cours de lecture. Notez que le format d'écran ne doit pas obligatoirement correspondre à celui de votre
téléviseur. Les réglages suivants peuvent être utiles.
·4:3/PS: sélectionnez ce mode si vous avez branché un téléviseur au format 4:3. Si vous lisez un
fichier au format écran large, celui-ci sera affiché sur tout l'écran, mais des parties de l'image seront
coupées à droite et à gauche de l'écran.
·4:3/LB: sélectionnez ce mode si vous avez branché un téléviseur au format 4:3. Si vous lisez un
fichier au format écran large, celui-ci sera affiché sur toute sa largeur, mais des bandes noires
apparaîtront en haut et en bas de l'écran.

- 34 -
CONFIGURATION DU SYSTEME
Configuration du système
Cette option permet de rétablir les réglages par défaut.
Réglages de la langue
Sélectionnez la langue que vous souhaitez utiliser pour afficher à l'écran les menus et les
informations d'état.
[ ] [ ].
Configuration vidéo
Ce menu vous permet de régler les différents paramètres d'affichage à l'écran. Sélectionnez la fonction
souhaitée puis appuyez sur la touche ENTER et ajustez la valeur selon vos préférences à l'aide des
touches

- 35 -
CONFIGURATION DU SYSTEME
Downmix
DOWNMIX sert à réduire le signal sonore sur 2 canaux. Si vous sélectionnez LT/RT, activez un effet vivant
et imitant une salle de théâtre pour les deux canaux frontaux. La condition requise est que le matériel
sonore dispose des effets Dolby Stereo PRO LOGIC. Sélectionnez STEREO pour une restitution stéréo
normale. VSS est l'abréviation de Virtual Surround Sound et produit un effet Surround simulé.
Si vous souhaitez une restitution sur plusieurs canaux, vous devez désactiver DOWNMIX (OFF).
Center Delay / Rear Delay
Dans le cas de la restitution de programmes au format 5.1, ces deux points de menu vous permettent de
paramétrer des temporisations pour les signaux des canaux Surround centraux et arrière. Cet effet simule
une plus grande distance entre les enceintes et les auditeurs et, par conséquent, fait paraître la salle plus
grande. Ceci permet d'optimiser l'effet Surround, le cas échéant.
Réglage des haut-parleurs:
Réglage numérique:
Mode OP
Ce menu permet de choisir entre les paramètres « Line » et « RF ». Le mode Line permet de restituer les
signaux d'entrée sans les modifier. En mode RF, une forte compression s'effectue. Elle augmente
nettement le volume sonore. Nous vous recommandons de ne pas utiliser ce paramètre la nuit.
Compression dynamique
Ce menu permet de régler la dynamique du son. On comprend par « dynamique » la différence de volume
sonore entre les passages très forts et ceux très bas, c'est-à-dire par ex. entre des explosions et des
chuchotements. Pour limiter la plage dynamique, tournez le bouton en direction de « FULL ».
Dual Mono
Ce menu vous permet de sélectionner différents modes audio pour les signaux stéréo :
STEREO : image stéréoscopique normale, recommandée
MONO L : le canal stéréo de gauche est présent sur les haut-parleurs frontaux de droite et de gauche
MONO R : le canal stéréo de droite est présent sur les haut-parleurs frontaux de droite et de gauche
MIX MONO : les deux canaux frontaux présentent le même signal mono
Pro Logic
Il existe deux modes Dolby Pro Logic II différents : le mode Film et le mode Musique. Ce menu vous permet
de sélectionner le mode souhaité ou de désactiver le mode Pro Logic.

CARTES MEMOIRES
- 36 -
Lecture de fichiers audio, vidéo et d'image enregistrés sur des cartes mémoires:
Démarrez le système comme d'habitude.
Insérez dans le lecteur de cartes les cartes mémoires (USB/SD/MMC/MS) contenant les
fichiers. Veillez à insérer les cartes correctement (face imprimée vers le haut).
La lecture démarre automatiquement. Si vous avez branché un téléviseur, le contenu du
support de stockage s'affiche à l'écran de la manière suivante
!!
!!
!!
!! Dans ce menu, les différents dossiers contenus sur le support de stockage sont affichés à gauche. Les
fichiers du dossier sélectionné sont affichés à droite. Pour sélectionner le dossier souhaité, utilisez les
touches de navigation puis appuyez sur la touche ENTER. Les différents fichiers contenus
dans le dossier s'affichent.
Passez à la colonne de droite à l'aide de la touche de navigation Sélectionnez les fichiers à l'aide
des touches et lancez leur lecture en appuyant sur la touche ENTER/PLAY. Le nom du fichier
en cours de lecture s'affiche en haut dans le champ d'affichage. Dès que la lecture d'un fichier est
terminée, l'appareil passe au fichier suivant. La touche 1 vous permet de repasser à la colonne de
gauche (dossiers).
Si vous appuyez à nouveau sur la touche , vous accédez aux sélecteurs de fichiers. L'appareil fait
la différence entre les fichiers audio, vidéo et d'image mais il n'affiche qu'un type de fichier. Si l'appareil
détecte au moins un fichier adéquat lors de la lecture du support de stockage, le symbole
correspondant est représenté sous forme de touche. Les touches de navigation vous permettent de
sélectionner le symbole du type de fichier souhaité. Appuyez sur la touche ENTER pour permettre à
l'appareil d'afficher uniquement les fichiers du type souhaité.
La touche REV ou FWD vous permet d'activer la recherche accélérée (lecture à grande vitesse) vers
l'arrière ou vers l'avant pendant la lecture. Dès que le point recherché est atteint, appuyez sur la touche
ENTER/PLAY. La lecture se poursuit à la vitesse normale. Pendant la recherche rapide, le son est mis
en sourdine. Aidez-vous de l'affichage de la durée à l'écran.
Une nouvelle pression sur la touche REPEAT permet de commuter entre les différentes fonctions de
répétition : lecture d'un fichier, répétition d'un seul fichier, répétition de tous les fichiers dans un dossier,
répétition de tous les fichiers
Pour passer au fichier précédent / suivant, appuyez sur la touche
Pour arrêter la lecture, appuyez sur la touche STOP.
[ ] [ ]
[ ].
[ ] [ ]
[ ]
.
[ ] ou [ ] Taste.
!!
!!
!!
!!
!!
!!
MP3 Audiodatei abspielen JPEG Bilddatei anzeigen AVI Videodatei abspielen

AIDE EN CAS DE DYSFONCTIONNEMENT
- 37 -
PROBLEME RAISON SOLUTION
1. Vérifiez le cordon
d'alimentation.
2. Vérifiez que
l'interrupteur
d'alimentation est
allumé.
Pas d'effet sonore en mode de
sortie DVD/5.1
Le système ne fonctionne
pas.
1. Le système n'est pas
branché au réseau
électrique.
2. Impossible de mettre en
marche l'appareil.
Assurez-vous que le lecteur de
DVD est en mode 5.1.
Paramétrez le mode 5.1 au
niveau du lecteur de DVD.
Distorsions lorsque le volume
sonore est élevé.
La source audio présente une
tension de sortie très élevée.
Baissez le volume.
Remarque A :
La combinaison correcte des appareils aux entrées et sorties (aussi bien le subwoofer actif que la
source d'entrée, par ex. CD,MP3,VCD,DVD) produit un son d'une qualité optimale. Tenez compte des
notices d'utilisation des appareils raccordés.
Certains lecteurs de DVD présentent un niveau de sortie plus élevé que d'habitude. Si des distorsions
apparaissent lorsque le volume est élevé, réduisez le volume afin d'éviter d'endommager l'amplificateur
ou les haut-parleurs.
Remarque B :
Si cet appareil est exposé à de fortes influences extérieures (par ex. contrainte mécanique, fortes
influences électrostatiques, surtensions en cas d'orage) ou s'il n'est pas utilisé conformément aux
instructions, des dysfonctionnements peuvent apparaître. Si des dysfonctionnements apparaissent,
procédez de la manière suivante :
Mettez l'appareil en veille puis remettez-le en marche.
Si l'appareil ne se rallume pas, éteignez l'interrupteur d'alimentation, débranchez le cordon
d'alimentation de la prise de courant pendant quelques minutes puis remettez l'appareil en marche.
Cet appareil est doté d'une autoprotection contre les influences électrostatiques. Toutes les fonctions sont
rétablies après sa remise en marche.
!!
!!
!!
!!
!!

CARACTERISTIQUES TECHNIQUES
- 38 -
PUISSANCE DE SORTIE:
Subwoofer (RMS) ------------------------------------------------------------- 40 W
Haut-parleurs frontaux/centraux (RMS) --------------------------------- 3x 15 W
Puissance maximale de sortie (impulsion) ----------------------------- 200 W
Dimensions (largeur x hauteur x profondeur) -------------------------- 970 x 200 x
130 mm
ACCESSOIRES FOURNIS:
Télécommande ---------------------------------------------------------------- 1 x
Pile / pile ronde ---------------------------------------------------------------- 1 x
Câble vidéo cinch (jaune) --------------------------------------------------- 1 x
Câble coaxial cinch (orange) ----------------------------------------------- 1 x
Câble stéréo cinch ------------------------------------------------------------ 1 x
Support mural ------------------------------------------------------------------ 2 x
Notice d'utilisation ------------------------------------------------------------- 1 x
Sous réserve de modifications techniques.

- 39 -
Informazioni sulla sicurezza ----------------------------------------------------------------- 40
Istruzioni per lo smaltimento ---------------------------------------------------------------- 40
Descrizione dell'apparecchio --------------------------------------------------------------- 41
Descrizione del telecomando --------------------------------------------------------------- 42
Collegamenti ------------------------------------------------------------------------------------ 43
Funzioni base del sistema ------------------------------------------------------------------- 44
Impostazione del sistema ------------------------------------------------------------------- 45
Scelta della lingua --------------------------------------------------------------------- 46
Impostazioni video -------------------------------------------------------------------- 46
Impostazioni altoparlanti ------------------------------------------------------------- 47
Impostazioni digitali ------------------------------------------------------------------- 47
Schede di memoria --------------------------------------------------------------------------- 48
Manutenzione e risoluzione die problemi ------------------------------------------------ 49
Specifiche tecniche ---------------------------------------------------------------------------- 50
INDICE
Gentile cliente,
La ringraziamo per aver deciso di acquistare i Magnat DVS 4232.
La preghiamo di leggere accuratamente le seguenti avvertenze prima di mettere
in funzione il DVS 4232.

INFORMAZIONI SULLA SICUREZZA
- 40 -
!
Questo simbolo indica all'utente l'utilizzo di alta tensione all'interno del dispositivo con
conseguente pericolo di shock elettrico:
Questo simbolo indica all'utente la presenza all'interno di questo manuale d'istruzioni di
informazioni importanti da osservare con cura.
Pericolo: non aprire! Rischio di shock elettrico! Per evitare rischi
di incendio o shock elettrico non esporre l'unità alla pioggia o
all'umidità.
!! Leggere attentamente il manuale d'istruzioni prima dell'uso e riporlo al sicuro.
L'apparecchio è utilizzabile esclusivamente con tensione a 230 V/50 Hz AC
Si consiglia di utilizzare l'apparecchio solo a temperatura ambiente o comunque compresa fra 0° e 40°
gradi Centigradi.
Non coprire in alcun modo i fori di ventilazione (ad esempio con stoffa, carta di giornale, o altro) al fine
di garantire sufficiente ventilazione al dispositivo. Non collocare vicino a fonti di calore, come
termosifoni, forni, fiamme libere o altri elementi in grado di generare calore in prossimità
dell'apparecchio.
Non esporre l'apparecchio o il telecomando all'acqua o agli spruzzi né ad umidità eccessiva.
Non collocare sopra l'apparecchio oggetti contenenti acqua, come ad esempio vasi.
In caso di contatto con liquidi distaccare immediatamente l'adattatore dalla presa elettrica.
Per la pulizia dell'apparecchio utilizzare solamente un panno asciutto.
Non utilizzare prodotti o solventi chimici per la pulizia che potrebbero danneggiare la superficie del
dispositivo.
Aprire il dispositivo solo per rimuovere il polistirolo dai condotti terminali.
Il cavo di alimentazione deve essere integro. Interrompere il funzionamento dell'apparecchio in
presenza di danni visibili al cavo di alimentazione.
Non collegare o rimuovere il cavo di alimentazione con le mani umide.
Rivolgersi sempre ad un tecnico qualificato per qualunque lavoro di manutenzione o riparazione.
Se non si utilizza l'apparecchio per un lungo periodo di tempo, distaccare il cavo di alimentazione dalla
presa.
In caso di temporali estrarre il cavo di alimentazione dalla presa.
!!
!!
!!
!!
!!
!!
!!
!!
!!
!!
!!
!!
!!
!!
!
CAUTION
RISK OF ELECTRIC SHOCK
DO NOT OPEN
ISTRUZIONI PER LO SMALTIMENTO
In accordo con quanto prescritto dalla Direttiva Europea 2002/96/EC, tutti gli apparecchi elettrici ed
elettronici devono essere smaltiti separatamente presso le locali discariche. Si raccomanda di
osservare le norme locali in merito e di non gettare i vecchi apparati insieme ai normali rifiuti domestici.

10 11 14
15
16
17
19
20
13
12 18 21
22
DESCRIZIONE DELL'APPARECCHIO
- 41 -
VISTA FRONTALE:
VISTA POSTERIORE:
1
2
3
4
5
Pannello comandi touch panel
VIDEO
OUTPUT
OPT 1 OPT 2
TVAUX
COAX 1
COAX 2
LL
RR
AC IN
POWER
ON
OFF
FUSE
SUB.
OUTPUT
ON OFF
SUB.
SWITCH
76
I
N
P
U
T
V
O
L
+
V
O
L
USB SD/MMC/MS
8
9
Importante! Il pannello comandi touch panel richiede ampiezza di contatto; raccomandiamo perciò agli
utenti di utilizzare le dita per controllare al meglio le funzioni.
1. Pulsante Standby 12. Fusibile
2. Volume principale + 13. Uscita video
3. Volume principale - 14. Uscita subwoofer
4. Pulsante Play/Pausa 15. Ingresso aux
5. Pulsante selezione segnale in entrata 16. Connettore segnale TV
6. Sensore telecomando 17. Ingresso Coassiale 1
7. Display a LED 18. Ingresso ottico 1
8. Lettore di schede SD/MMC/MS 19. Ingresso ottico 2
9. Ingresso USB 20. Interruttore uscita subwoofer (ON/OFF)
10. Cavo di alimentazione AC 21. Staffa per montaggio a parete
11. Interruttore principale 22. Ingresso coassiale 2

DESCRIZIONE DEL TELECOMANDO
1
INPUT
0
2
3
4
5
6
7 8
9
+10
M.VOL
FUNCTION
REPEAT
M.VOL
+
ENTER/PLAY
LISTEN
SETUP
PAUSE/STEP
STOP
SD/USB
1
2
3
4
5
6
7
8
9
10
11
12
13
14
15
16
R
E
V
F
W
D
P
R
E
V
N
E
X
T
1. STANDBY/ACCENSIONE:
Accende e spegne l'unità.
2. INPUT:
Permette di scegliere il modo di input fra
DISK --OPTICAL 1 --OPTICAL 2
--COAXIAL 1--COAXIAL 2--AUX--TV
3. TASTI NUMERICI DA 0 A +10
Premere per inserire numeri corrispondenti,
ad esempio, alle sezioni numerate di un DVD.
4. SETUP
Premere per visualizzare sullo schermo la videata
delle impostazioni di sistema. In questo modo è
possibile regolare i parametri direttamente da
schermo. Consente di personalizzare le
impostazioni secondo le proprie preferenze.
5. SD/USB
Seleziona i modi di input SD o USB.
Premere per visualizzare a schermo il menu o
le funzioni di sistema.
In modalità riproduzione, premere questi pulsanti
per selezionare la funzione desiderata.
7. [REV] [FWD]
Premere per avanti o indietro veloce nel brano
8. ENTER/PLAY
Premere per confermare l'opzione selezionata con
i pulsanti a freccia.
Premere per riprodurre il brano.
9. [ PREV ] [NEXT]
Premere per tornare alla sezione precedente o saltare alla successiva.
10. PAUSE/STEP
Premere per fermare la riproduzione.
Premere per riprodurre una scena sequenza per sequenza.
11. REPEAT
Durante la riproduzione di un disco, premere questo pulsante per selezionare porzioni di
contenuti da riprodurre in continuo.
12. MUTE
Disattiva o ripristina l'audio.
13. LISTEN
Consente di selezionare il modo di ascolto: Pro-Logic ---Stereo---Vocal.
14. STOP
Premere per fermare la riproduzione.
15. MASTER VOLUME
Aumenta o diminuisce il volume principale
16. FUNCTION
6. [ ] [ ] [ ] [ ]:
Introdurre/sostituire la batteria
Il telecomando è alimentato da una batteria al litio preinstallata. Per prevenire che si scarichi
prima di utilizzare l'apparecchio è strata introdotta una fascia isolante. Si prega di rimuoverla
prima dell'uso. Nel caso in cui il telecomando non dovesse funzionare correttamente è
necessario sostituire la batteria con una dello stesso tipo. Aprire l'alloggiamento per la batteria.
Estrarre la batteria dall'alloggiamento seguendo la direzione della freccia. Prima di rimuovere
la batteria scarica, memorizzare esattamente la posizione. Il simbolo "+" deve essere rivolto
verso l'alto, altrimenti il telecomando non funziona e si potrebbe addirittura danneggiare.
Sostituire la batteria e rispingere indietro l'alloggiamento.
Smaltimento della batteria
Le batterie esauste sono da considerarsi rifiuti speciali e devono essere smaltite secondo le
regolamentazioni attuali.
- 42 -

- 43 -
VIDEO
OUTPUT
OPT 1 OPT 2
TVAUX
COAX 1
COAX 2
LL
RR
AC IN
POWER
ON
OFF
FUSE
SUB.
OUTPUT
ON OFF
SUB.
SWITCH
COLLEGAMENTI
TV
PS2
DVD
Collegamento di dispositivo USB e scheda SD/MMC/MS
(Cavo ottico non incluso)
SD MMC MS
Uscita segnale subwoofer
I
N
P
U
T
V
O
L
+
V
O
L
USB SD/MMC/MS
Collegare a qualsiasi dispositivo/sorgente con
due canali (sinistro/destro), come TV, DVD,
lettore CD,xBox, Ps2, Computer ecc.)
Importante:
Non collegare il cavo di alimentazione alla presa AC fino al completamento delle connessioni e alla
verifica della loro correttezza.
Accendere l'unità prima di accendere il subwoofer attivo esterno.
Spegnere il subwoofer attivo prima di spegnere l'unità.
!!
!!
!!
o

FUNZIONI BASE DEL SISTEMA
1. ON/OFF
Inserire il cavo di alimentazione nella presa, posizionare l'interruttore principale (situato sul retro
dell'apparecchio) su ON: l'unità entra nel modo standby e il LED mostra la scritta “HELLO”. Premere
il pulsante STANDBY dal pannello frontale o dal telecomando per avviare il sistema. L'unità rileverà
automaticamente qualsiasi segnale di input. Se non è presente alcun segnale, sul display a LED
apparirà la scritta “NO SIGNAL”.
* Importante: dopo aver spento l'apparecchio attendere almeno 3 secondi prima di accenderlo
nuovamente.
2. MODI DI INPUT
Al sistema non è collegato alcune dispositivo USB o scheda di memoria SD:
Premere il pulsante INPUT sul pannello frontale o sul telecomando per scorrere le opzioni di input:
OPTICAL 1 --OPTICAL 2 --COAXIAL 1--COAXIAL 2--AUX--TV--USB/SD/MS/MMC.
Il sistema è collegato a un dispositivo USB-scheda di memoria:
Premere il pulsante INPUT sul pannello frontale o sul telecomando per scorrere le opzioni di input:
OPTICAL 1 --OPTICAL 2 --COAXIAL 1--COAXIAL 2--AUX--TV--USB.
Il sistema è collegato a una scheda di memoria SD:
Premere il pulsante INPUT sul pannello frontale o sul telecomando per scorrere le opzioni di input:
OPTICAL 1 --OPTICAL 2 --COAXIAL 1--COAXIAL 2--AUX--TV--SD.
Il sistema è collegato a un dispositivo USB e a una scheda di memoria SD:
Premere il pulsante INPUT sul pannello frontale o sul telecomando per scorrere le opzioni di input:
OPTICAL 1 --OPTICAL 2 --COAXIAL 1--COAXIAL 2--AUX--TV--USB. Il sistema selezionerà le
preferenze per il segnale di input USB, a questo punto è possibile premere il pulsante USB/SD per
selezionare il segnale SD.
3. MODO DI ASCOLTO
Premere il pulsante LISTEN sul telecomando per scorrere le opzioni di ascolto: Stereo
--Vocal --Pro-Logic.
4. REGOLAZIONE VOLUME
(1) Regolazione volume principale
Il volume principale si regola tramite il pulsante MASTER VOLUME +/- sul telecomando o
il pulsante VOL +/VOL – sul pannello frontale.
(2) Impostazione volume singoli elementi
Premere ripetutamente il pulsante FUNCTION per selezionare il volume dei singoli elementi:
TREBLE --BASS --FL --FR --CENTER --SUBWOOFER. Premere il pulsante MASTER VOLUME
per aumentare o diminuire il volume dei singoli elementi.
5. MUTE
Premere il pulsante MUTE sul telecomando per attivare il modo Mute. Premere nuovamente il
pulsante MUTE per disabilitare la funzione. Anche premendo i pulsanti MASTER VOLUME +/- si
disabilita automaticamente la funzione Mute.
6. SELEZIONE USCITA SUBWOOFER
Per collegare un subwoofer attivo esterno, inserire il connettore d'ingresso jack monoaurale del
vostro subwoofer nell'uscita jack per il subwoofer dell'unità. Se all'unità è collegato un subwoofer
commutare l'interruttore SUB.SWITCH in posizione OFF. (La posizione predefinita dell'interruttore
SUB.SWITCH è ON).
- 44 -

- 45 -
IMPOSTAZIONE DEL SISTEMA
Il sistema è collegabile al vostro apparecchio TV mediante il connettore video posto sul pannello
posteriore.
Utilizzo dei menu impostazioni:
1. Premere il pulsante SETUP sul telecomando per visualizzare il relativo menu illustrato
2. [ ] [ ] [ ] [ ]
3.
[ ] [ ] [ ] [ ]
c) 16:9: Wählen Sie diese Betriebsart, wenn Sie einen Breitbild-TV (16:9-Format) angeschlossen haben.
Usare i pulsanti per selezionare una delle opzioni di SETUP, evidenziare la selezione
desiderata in ciascun menu SETUP e premere il pulsante ENTER/PLAY per confermare.
Per uscire dal menu ed accedere a un altro menu SETUP utilizzare EXIT SETUP.
Impostazione del sistema
Usare i pulsanti per selezionare l'elemento evidenziato che si desidera impostare e
confermare con il pulsante ENTER/PLAY.
1. TV SYSTEM: selezionare l'opzione corrispondente al sistema colore dell'apparecchio TV da collegare.
a) NTSC: per le zone NTSC selezionare "NTSC". (Sistema usato in USA, Canada e Giappone)
b) PAL 60: per la zona omogenea PAL 60, selezionare "PAL 60".
c) PAL: per la zona omogenea PAL, selezionare "PAL". (Sistema usato in Europa occidentale)
d) AUTO: per più zone, selezionare "AUTO".
2. TIPO DI APPARECCHIO TV:
a) 4:3PS (scansione full-image): disponibile nei TV in formato tradizionale. Quando si riproduce
un'immagine widescreen i lati sinistro e destro vengono tagliati.
b) 4:3LB (formato mailbox): scegliere questa opzione per i TV in formato tradizionale. Quando si
riproduce un'immagine widescreen si osservano sullo schermo televisivo bande nere in alto e in basso.
16:09 (widescreen): scegliere questa opzione se il sistema è collegato a un televisore widescreen.

- 46 -
IMPOSTAZIONE DEL SISTEMA
Impostazione del sistema
DEFAULT: scegliendo quest'opzione, tutte le funzioni tornano alle impostazioni iniziali.
Impostazione lingua
Selezionare la lingua da utilizzare per visualizzare a schermo i menu e le informazioni sullo stato.
[ ] [ ]
Impostazione video
Da qui è possibile regolare i diversi parametri per la rappresentazione delle immagini. Scegliere la
funzione desiderata, premere ENTER e adattare il valore premendo i pulsanti secondo le
preferenze personali.

- 47 -
IMPOSTAZIONE DEL SISTEMA
Downmix
a) LT/RT: selezionare questa opzione per decriptare il segnale in modo da ottenere un esaltante
effetto teatro. È necessario che il vostro disco contenga gli effetti stereo Dolby PRO LOGIC.
b) STEREO: con la modalità uscita audio a 5.1 canali, il sistema emette il suono attraverso 5
altoparlanti e un subwoofer. Con la modalità uscita audio a 2 canali, il sistema emette il suono
attraverso gli altoparlanti sinistro e destro.
c) VSS (Virtual Surround Sound): quando si riproduce un disco con sistema audio a 5.1 canali,
l'amplificatore centrale sprigiona un effetto avvolgente.
d) OFF: selezionando OFF si passa alla modalità di uscita 5.1.
Center Delay: questa opzione consente di definire i tempi di ritardo intermedi.
Importante: funzione disponibile solo nel modo audio a 5.1 canali.
Rear Delay: questa opzione consente di regolare l'impostazione relativa al tempo di ritardo dell'effetto
surround.
Impostazione altoparlanti:
Impostazione digitale:
OP Mode
a) LINE OUT: comprime i segnali in modo lineare. Il livello del volume è basso, pertanto questa
opzione è di particolare utilità durante le ore notturne.
b) RF REMOD: il livello del volume è elevato, pertanto questa opzione è più adatta per le ore diurne.
Dynamic Range
è possibile modificare il modo di compressione in LINE OUTPUT al fine di regolare il segnale radio
compresso e ottenere effetti di compressione per i diversi segnali. Scegliendo FULL, il valore di picco del
segnale audio risulterà minimo, mentre scegliendo OFF sarà massimo.
Importante: opzione disponibile solo quando il sistema è impostato su “audio a 5.1 canali”.
Dual Mono
questa opzione consente di definire i modi di output per i segnali audio sinistro e destro. Sono disponibili 4
modi: stereo, canale audio sinistro, canale audio destro e canale audio mixato. Effettuare la selezione in
conformità al modo AC-3 KARAOKE.
Prologic
a) MOVIE MODE: questa opzione consente di impostare la modalità audio Dolby Pro Logic II per i film.
b) MUSIC MODE: questa opzione consente di impostare la modalità audio Dolby Pro Logic II per la

SCHEDE DI MEMORIA
- 48 -
Riproduzione di file contenenti audio, immagini e video salvati su schede di memoria:
Accendere il sistema come di consueto con il pulsante ON.
Inserire la scheda flash memory contenente i file audio MP3 o i file JPEG nell'apposito
alloggiamento per le schede di memoria. Importante: la memory card può essere inserita
da un solo lato, spingerla fino al completo inserimento.
Il sistema leggerà le informazioni presenti sulla scheda.
!!
!!
!!
!! Premere il pulsante ENTER/PLAY sul telecomando per avviare la riproduzione; o in alternativa premere
il pulsante situato sul pannello frontale.
Premere il pulsante sul pannello frontale per sospendere la riproduzione, premerlo nuovamente
per riprendere la riproduzione.
Premere ripetutamente i pulsanti PREV o NEXT durante la riproduzione per saltare al brano
precedente o successivo.
Premere i pulsanti REV o FWD per l'avanzamento o il ritorno veloci.
(Avanti veloce - FF): FF 2X FF4X FF8X FF20X PLAY
(Indietro veloce - FR): FR 2X FR4X FR8X FR20X PLAY
Premere il pulsante STOP per interrompere la riproduzione.
Premere ripetutamente il pulsante REPEAT per selezionare uno dei seguenti modi di ripetizione:
REP ONE (ripeti uno) FOLDER REPEAT (ripeti cartella) REP ALL (ripeti tutti) PLAY
Importante! durante la riproduzione SD/MMC, premere il pulsante SD/USB per selezionare il modo di
lettura USB, premere nuovamente il pulsante SD/USB per riprendere la precedente modalità di
riproduzione.
[ ] [ ]
[ ]
!!
!!
!!
!!
!!
MP3 Audiodatei abspielen JPEG Bilddatei anzeigen AVI Videodatei abspielen

MANUTENZIONE E RISOLUZIONE DIE PROBLEMI
- 49 -
PROBLEMA CAUSA SOLUZIONE
1. Verificare il cavo e la
presa di alimentazione.
2. Accertarsi che
l'interruttore posto sul
pannello posteriore sia
su ON.
Nessun segnale audio dagli
altoparlanti quando si selezione
la modalità DVD/5.1.
Il sistema non emette alcun
suono
1. Il sistema non è collegato
alla presa di alimentazione.
2. L'interruttore di
alimentazione non è
acceso.
Verificare che il lettore DVD sia
impostato su audio 5.1.
Impostare il DVD su audio
5.1.
A livello di volume elevato si
osservano distorsioni nella
riproduzione.
Il segnale in uscita dal
dispositivo audio è
eccessivamente elevato.
Diminuire il volume principale
del sistema.
Nota A:
La giusta combinazione fra modo input e output (vale a dire fra Active Subwoofer e sorgente sonora,
come CD, MP3, VCD, DVD, ecc.) assicura una qualità audio ottimale. A tale scopo, si consiglia di
consultare i relativi manuali d'istruzioni.
Alcuni apparecchi DVD hanno un segnale in uscita eccessivamente elevato. Quando il volume
principale è regolato a livello alto può verificarsi una distorsione: ridurre il volume principale per evitare
danni agli altoparlanti e all'amplificatore.
Nota B:
Eventi esterni di grave entità (shock meccanico, eccessiva elettricità statica, surplus di voltaggio imputabile
a fulmini, o altro), oppure un utilizzato scorretto dell'apparecchio possono causare malfunzionamenti. Nel
caso in cui si verifichino tali problemi eseguire il reset del sistema mediante la seguente procedura:
Impostare il sistema in STANDBY e riaccenderlo nuovamente.
Se non si è riusciti a ripristinare il sistema attraverso la precedente manovra, spegnere l'interruttore
principale, staccare il cavo di alimentazione dalla presa per alcuni minuti e riprovare.
Il prodotto è dotato di un sistema di auto-protezione contro i danni da elettricità statica e dopo il riavvio tutte
le funzioni possono essere utilizzate normalmente.
!!
!!
!!
!!

SPECIFICHE TECNICHE
- 50 -
POTENZA D'USCITA:
Subwoofer (RMS) ---------------------------------------------------------------------- 40 W
Altoparlante Frontale/Centrale (RMS) -------------------------------------------- 3x 15
Potenza d'uscita massima (picco) ------------------------------------------------- 200 W
Dimensioni (L x A x P) --------------------------------------------- 970 x 200 x 130 mm
CONTENUTO DELLA CONFEZIONE:
Telecomando ---------------------------------------------------------------------------- 1 pz
Batteria a bottone ---------------------------------------------------------------------- 1 pz
Cavo video RCA (giallo) -------------------------------------------------------------- 1 pz
Cavo coassiale RCA (arancione) -------------------------------------------------- 1 pz
Cavo stereo RCA ---------------------------------------------------------------------- 1 pz
Staffe per montaggio a parete------------------------------------------------------ 2 pz
Manuale utente ------------------------------------------------------------------------- 1 pz
Documento soggetto a modifiche tecniche

- 51 -
CONTENIDO
Instrucciones de seguridad-------------------------------------------------------------------52
Eliminación de residuos-----------------------------------------------------------------------52
Controles del equipo---------------------------------------------------------------------------53
Control remoto-----------------------------------------------------------------------------------54
Conexiones --------------------------------------------------------------------------------------55
Principales funciones del equipo------------------------------------------------------------56
Instalación del sistema------------------------------------------------------------------------ 57
Idioma--------------------------------------------------------------------------------- 58
Vídeo-----------------------------------------------------------------------------------58
Altavoces -----------------------------------------------------------------------------59
Ajuste digital--------------------------------------------------------------------------59
Tarjetas de memoria--------------------------------------------------------------------------- 60
Resolución de problemas-------------------------------------------------------------------- 61
Datos técnicos---------------------------------------------------------------------------------- 62
Estimado cliente,
gracias por haber seleccionado il Magnat DVS 4232. Lea la siguiente información
detenidamente antes de comenzar a utilizar su DVS 4232.

PRECAUCIONES IMPORTANTES DE SEGURIDAD
- 52 -
!
Este símbolo advierte al usuario de la presencia de altos niveles de tensión utilizados en el
dispositivo, que podrían provocar descargas eléctricas.
Este símbolo advierte al usuario de la existencia de notas importantes en el manual de
instrucciones adjunto que deben respetarse.
¡Atención! No abra es dispositivo!
Para evitar riesgos de incendio y descarga electrica, rogamos
no exponer este aparato a la lluvia o la humedas.
!
! Este dispositivo debe utilizarse únicamente con voltaje de 230 V / 50 Hz AC.
Utilice el dispositivo únicamente a temperatura ambiente, entre 0ºC y 40ºC.No cubra las ranuras de
ventilación con ningún objeto (p. ej. cortinas, periódicos, etc.) para asegurar la ventilación suficiente en
el dispositivo.
No coloque fuentes de calor, como radiadores, hornos, llamas desnudas u otros dispositivos que
generen calor en las proximidades del dispositivo.
No exponga el dispositivo y el control remoto a derrames o salpicaduras de agua, o altos niveles de
humedad.
El dispositivo tempoco debe utilizarse para colocar floreros u otros recipientes llenados de díquido.
En caso de contacto con humedad o líquidos, retire inmediatamente el adaptador principal.
Limpie el dispositivo utilizando únicamente un paño seco.
No utilice productos de limpieza o disolventes químicos durante la limpieza. Ello podría dañar la
superficie del dispositivo.
No abra el dispositivo.
El cable de alimentación debe funcionar correctamente. No continúe utilizando el dispositivo si existen
señales visibles de deterioro en el cable de alimentación. Un cable deteriorado no debe ser reparado,
sino reemplazado.
No conecte ni extraiga el cable de alimentación con las manos húmedas.
Consulte siempre con un especializar cualificado para cualquier operación de mantenimiento o
reparación.
Si no piensa utilizar el dispositivo durante un periodo prolongado de tiempo, apáguelo utilizando el
interruptor de encendido que se encuentra en la parte posterior del dispositivo.
Extraiga la toma de alimentación si se producen tormentas.
Lea detenidamente el manual de instrucciones antes del uso y manténgalo en un lugar seguro.
!!
!!
!!
!!
!!
!!
!!
!!
!!
!!
!!
!!
!!
!
CAUTION
RISK OF ELECTRIC SHOCK
DO NOT OPEN
INSTRUCCIONES DE ELIMINACIÓN
De acuerdo con la Directiva Europea 2002/96/EC, todos los aparatos eléctricos y electrónicos deben
ser eliminados por medio de puntos de recogida locales e independientes. Respete la normativa local
y no elimine los aparatos usados junto a los residuos domésticos.

10 11 14
15
16
17
19
20
13
12 18 21
22
CONTROLES DEL EQUIPO
- 53 -
FRENTE:
PARTE POSTERIOR:
1
2
3
4
5
Teclado táctil
VIDEO
OUTPUT
OPT 1 OPT 2
TVAUX
COAX 1
COAX 2
LL
RR
AC IN
POWER
ON
OFF
FUSE
SUB.
OUTPUT
ON OFF
SUB.
SWITCH
76
I
N
P
U
T
V
O
L
+
V
O
L
USB SD/MMC/MS
8
9
Atención: Para asegurar el funcionamiento seguro del teclado táctil, operarlo utilizando los pulgares.
1. Botón de STANDBY 12. Fusible
2. Botón de Volumen + 13. Salida video
3. Botón de Volumen - 14. Salida subwoofer
4. Botón de PLAY/PAUSE 15. Entrada AUX
5. Selector de entrada 16. Entrada TV
6. Sensor del control remoto 17. Entrada digital COAXIAL1
7. Pantalla LED 18. Entrada digital OPTICAL1
8. Lector de tarjeta SD/MMC/MS 19. Entrada digital OPTICAL2
9. Puerto USB 20. Interruptor salida subwoofer
(encendido/apagado)
10. Cable de la red 21. Elemento para fijación a pared
11. Interruptor de encendido 22. Entrada digital COAXIAL2

CONTROL REMOTO
1
INPUT
0
2
3
4
5
6
7 8
9
+10
M.VOL
FUNCTION
REPEAT
M.VOL
+
ENTER/PLAY
LISTEN
SETUP
PAUSE/STEP
STOP
SD/USB
1
2
3
4
5
6
7
8
9
10
11
12
13
14
15
16
R
E
V
F
W
D
P
R
E
V
N
E
X
T
1. STANDBY/POWER:
Permite encender o apagar el equipo.
2. INPUT:
Presionar para seleccionar una de las siguientes
opciones de entrada:
--DISCO --OPTICAL 1 --OPTICAL 2 --COAXIAL 1
--COAXIAL 2 --AUX --TV
3. Cifras 0 a 10
Permiten ingresar cifras.
4. SETUP:
Muestra el menú de instalación en la pantalla
conectada. Mediante el menú es posible
seleccionar diferentes opciones del sistema.
5. SD/USB:
Permite seleccionar la reproducción desde
medios de almacenamiento USB o SD.
Estos botones permiten navegar dentro del menú
del equipo.
7. [REV] [FWD]:
Para retroceder o avanzar rápidamente.
8. ENTER/PLAY:
Para confirmar las opciones del menú
seleccionadas y para iniciar la reproducción.
9. [ PREV ] [NEXT]:
Para reproducir el título anterior/siguiente.
10. PAUSE/STEP:
La función de pausa congela la imagen. Si se
vuelve a presionar el botón, la reproducción avanza
de imagen en imagen.
11. REPEAT:
Cuando se reproducen títulos desde medios de almacenamiento, este botón permite iniciar el
modo de repetición.
12. MUTE:
Silencia el audio del equipo. Si se vuelve a presionar el botón, se recupera el audio.
13. LISTEN:
Este botón permite cambiar de modo de reproducción (depende de la señal de entrada):
Prologic -- Stereo -- Vocal
14. STOP:
Para finalizar la reproducción.
15. MASTER VOLUME:
Para subir/bajar el volumen.
16. FUNKTION:
Permite ver los diferentes canales de reproducción, así como los agudos y bajos para su ajuste
posterior
6. [ ] [ ] [ ] [ ]:
Inserción/sustitución de las baterías
El control remoto funciona con una batería del litio preinstalada. Se ha insertado una tira
aislante para evitar que la batería se agote antes de utilizar el dispositivo. Retire la tira antes de
utilizar el aparato por primera vez. Si el control remoto no funciona bien, sustituya la batería
por otra nueva del mismo tipo. Abra el compartimento de las baterías. Extraiga las baterías
del compartimento en la dirección de la flecha. Antes de retirar las baterías vacías, observe su
posición. El símbolo “+” debe orientarse hacia arriba. De lo contrario, el control remoto no
funcionará y podría resultar dañado. Cambie la batería y cierre de nuevo el compartimento.
Eliminación de la batería
Las baterías usadas son un residuo peligroso y deben ser eliminadas de acuerdo con las
normativas actuales.
- 54 -

- 55 -
VIDEO
OUTPUT
OPT 1 OPT 2
TVAUX
COAX 1
COAX 2
LL
RR
AC IN
POWER
ON
OFF
FUSE
SUB.
OUTPUT
ON OFF
SUB.
SWITCH
CONEXIONES
TV
PS2
DVD
Conexión con medios de almacenamiento (USB y tarjetas SD/MMC/MS)
(No incluye cable óptico.)
SD MMC MS
Salida de subwoofer
I
N
P
U
T
V
O
L
+
V
O
L
USB SD/MMC/MS
Conexión con cualquier fuente de señal estéreo
(p.ej. TV, DVD, reproductor de CD, xBox, Ps2,
ordenador, etc.)
Importante:
No enchufar nunca el cable a la red eléctrica hasta no haber terminado correctamente con todas
las demás conexiones.
Encender el equipo antes de poner en funcionamiento un subwoofer externo.
Apagar el subwoofer externo antes de apagar el equipo.
!!
!!
!!
o

PRINCIPALES FUNCIONES DEL EQUIPO
1. ENCENDIDO/APAGADO
Llevar el interruptor de encendido que se encuentra en la parte posterior del equipo a la posición
“ON”. El equipo pasa así al modo standby o de espera, y en la pantalla LED se lee “HELLO”. Para
encender el equipo basta con presionar el botón de standby del equipo o del control remoto. El
sistema reconoce todas las señales de entrada de los dispositivos conectados. Si no recibe ninguna
señal, en la pantalla LED aparece el mensaje “NO SIGNAL”.
Importante: Después de apagar el equipo, esperar por lo menos 3 segundos antes de volver a
encenderlo.
2. SELECCION DE LA ENTRADA (PRESIONAR REPETIDAMENTE EL BOTÓN INPUT):
Cuando el sistema no está conectado con una tarjeta de memoria USB o SD:
Presionar el botón INPUT del equipo o del control remoto para seleccionar la entrada:
OPTICAL 1 --OPTICAL 2 --COAXIAL 1--COAXIAL 2--AUX--TV--USB/SD/MS/MMC
Cuando el sistema está conectado con una tarjeta de memoria USB:
Presionar el botón INPUT del equipo o del control remoto para seleccionar la entrada:
OPTICAL 1 --OPTICAL 2 --COAXIAL 1--COAXIAL 2--AUX--TV--USB
Cuando el sistema está conectado con una tarjeta de memoria SD:
Presionar el botón INPUT del equipo o del control remoto para seleccionar la entrada:
OPTICAL 1 --OPTICAL 2 --COAXIAL 1--COAXIAL 2--AUX--TV--SD
Cuando el sistema está conectado con una tarjeta de memoria USB o SD:
Presionar el botón INPUT del equipo o del control remoto para seleccionar la entrada:
OPTICAL 1 --OPTICAL 2 --COAXIAL 1--COAXIAL 2--AUX--TV--USB. El sistema selecciona para las
tarjetas en general la entrada USB. Posteriormente se pueden seleccionar tarjetas SD por medio
del botón USB/SD.
3. TIPOS DE REPRODUCCION:
Presionar el botón LISTEN para cambiar de modo de reproducción:
--Stereo --Vocal --Pro-Logic
4. AJUSTES DE NIVEL:
(1) Ajuste del volumen general:
El volumen se ajusta con el botón MASTER VOLUME +/- en el control remoto o VOL +/VOL –
en el frente del equipo.
(2) Ajustes especiales de nivel:
Presionar el botón FUNCTION para seleccionar uno de los siguientes niveles: TREBLE --
BASS --FRONT-L --FRONT-R --CENTER --SUBWOOFER. Posteriormente, utilizar el botón
MASTER VOLUME +/- para definir el nivel deseado.
5. MUTE/SILENCIO:
Presionar una vez el botón MUTE del control remoto para silenciar el equipo y volver a apretarlo
para recuperar el audio. También se puede recuperar el sonido presionando el botón MASTER
VOLUME +/-.
6. USO DE UN SUBWOOFER EXTERNO:
Para conectar un subwoofer externo, conectar la entrada cinch del Subwoofer a la entrada para
subwoofer del equipo. Colocar el interruptor SUB. SWITCH de la parte posterior del equipo en la
posición “OFF” (así se apaga el subwoofer incorporado). Este interruptor viene de fábrica en la
posición “ON”.
- 56 -

- 57 -
INSTALACION DEL SISTEMA
Es posible conectar el televisor a la salida de vídeo que se encuentra en la parte posterior del equipo.
Instrucciones para la operación de los menús de instalación del sistema:
1. Presionar una vez el botón de SETUP del control remoto para acceder al siguiente menú:
2. [ ] [ ] [ ] [ ]. Los menús se pueden operar de manera intuitiva con los botones de navegación
Con el botón ENTER/PLAY se confirma/activa la opción seleccionada.
3. Para finalizar o interrumpir los ajustes, presionar nuevamente el botón SETUP a fin de cerrar el menú.
Instalación del sistema
1. SISTEMA DE TV:
Permite seleccionar la norma del televisor conectado. NTSC es la norma de TV de Estados Unidos.
Normalmente, en Alemania se debe seleccionar la norma PAL. PAL-60 es un modo de reproducción que
permite reproducir medios de formato NTSC con una frecuencia de semicuadros de 60 Hz y con codificación
de colores PAL. Si el televisor es apto para el sistema multi-norma, seleccionar la opción “AUTO”.
2. FORMATO DE TV:
El formato de imagen correspondiente (p.ej. 4:3 = normal; 16:9 = pantalla ancha) es definido por el archivo
que se está reproduciendo. Vale la pena destacar que no es necesario que el formato de la imagen coincida
con el del televisor. Las siguientes instrucciones son útiles para lograr el formato más adecuado:
4:3/PS: Seleccionar este modo cuando el televisor conectado tenga un formato 4:3. Si se reproduce un
archivo en formato de pantalla ancha, la imagen llena la pantalla, pero a la derecha y a la izquierda se
corta parte de la imagen.
4:3/LB: Seleccionar este modo cuando el televisor conectado tenga un formato 4:3. Si se reproduce un
archivo en formato de pantalla ancha, la imagen se muestra en todo su ancho, pero aparece una franja
negra en la parte superior e inferior de la pantalla.
16:9: Seleccionar este modo cuando el televisor conectado tenga pantalla ancha (formato 16:9).
!!
!!
!!

- 58 -
INSTALACION DEL SISTEMA
Instalación del sistema
Esta opción recupera los ajustes definidos en fábrica:
Idioma
Con esta opción es posible seleccionar el idioma de los menús y los mensajes de estado del
sistema:
[ ] [ ].
Instalación de vídeo
Permite el ajuste de los diferentes parámetros de la visualización de imágenes. Seleccionar la función
deseada, presionar el botón ENTER y ajustar a gusto el parámetro utilizando los botones

- 59 -
INSTALACION DEL SISTEMA
Downmix
La función DOWNMIX permite reducir la señal de audio de los dos canales de reproducción. Si se
selecciona la opción LT/RT, los canales frontales producen un sonido intenso, similar al de un teatro; para
ello, sin embargo, el material de sonido reproducido debe contar con efectos estereofónicos PRO LOGIC
Dolby. Seleccionar STEREO para obtener una reproducción estéreo normal. VSS es la abreviatura de
Virtual Surround Sound y produce un efecto de sonido envolvente.
Para la reproducción multicanal es necesario desactivar (NO) la función de DOWNMIX.
Retardo central/retardo trasero
Para la reproducción de programas con el formato de canales 5.1 se pueden utilizar estas dos opciones
del menú a fin de definir retardos en las señales de los canales centrales y traseros de sonido envolvente.
Esta función permite simular una mayor distancia entre los altavoces y los oyentes, lo que hace que el
ambiente parezca más grande. De esta manera, es posible intensificar el efecto de sonido envolvente.
Ajuste de altavoces:
Ajuste digital:
Modo OP
El sistema ofrece dos opciones: “Line” y “RF”. En el modo “Line”, las señales de entrada se reproducen sin
cambios. En el modo RF se produce una fuerte compresión que aumenta significativamente el volumen. Se
recomienda no utilizar esta opción durante la noche.
Compresión dinámica
Esta función permite ajustar la dinámica del sonido, es decir, la diferencia de volumen entre los pasajes
muy ruidosos y los muy suaves, como, por ej. entre explosiones y susurros. Para limitar el margen
dinámico subir el regulador hacia la posición “FULL”.
Dual Mono
Con esta función se pueden seleccionar diferentes modos de audio para la señal estereofónica:
STEREO: Audio estéreo normal. Recomendado.
MONO L: Canal estéreo izquierdo en los altavoces frontales derecho e izquierdo
MONO R: Canal estéreo derecho en los altavoces frontales derecho e izquierdo
MIX MONO: Ambos canales frontales producen la misma señal monofónica.
Pro Logic
El formato Dolby Pro Logic II ofrece dos modos diferentes: el modo de película y el modo de música. Con
esta función es posible seleccionar el modo deseado o apagar el modo Pro Logic.

TARJETAS DE MEMORIA
- 60 -
Reproducción de archivos de audio, imagen y vídeo de tarjetas de memoria:
Iniciar el sistema como de costumbre.
Colocar la tarjeta de memoria (USB/SD/MMC/MS) con los archivos correspondientes en
la unidad para tarjetas, prestando atención a la posición correcta (inscripción hacia
arriba).
La reproducción se inicia automáticamente. En la pantalla del televisor conectado
aparece la siguiente información sobre el contenido del medio de almacenamiento:
!!
!!
!!
!! En este menú se muestran, a la izquierda, las diferentes carpetas que se encuentran en el medio de
almacenamiento y, a la derecha, los archivos de cada carpeta seleccionada. Con los botones de
navegación es posible avanzar hasta la carpeta deseada, para luego presionar el botón
ENTER. Así se muestran todos los archivos de la carpeta.
Con el botón de navegación se llega a la columna derecha. Seleccionar archivos con los botones
e iniciar la reproducción presionando ENTER/PLAY. El nombre del archivo que se está
reproduciendo aparece en el campo indicador superior. Cuando finaliza la reproducción de un archivo,
el equipo pasa al siguiente. Con el botón 1 se puede volver a la columna de carpetas de la izquierda.
Si se vuelve a presionar el botón , se accede al conmutador de medios. El equipo distingue
archivos de audio, vídeo e imágenes, pero muestra siempre un solo tipo de archivo. Si al leer el medio
de almacenamiento el equipo encuentra por lo menos un archivo adecuado, aparece el símbolo
correspondiente como botón. Con los botones de navegación es posible marcar el símbolo del tipo de
archivo deseado. Presionar el botón ENTER para que el equipo muestre solamente archivos del tipo
de medio deseado.
Presionando el botón REV o FWD es posible activar durante la reproducción la función de búsqueda
(reproducción a mayor velocidad) hacia atrás o adelante. Al llegar al punto deseado, presionar
ENTER/PLAY; la reproducción continúa a velocidad normal. Durante la búsqueda, el sonido queda
silenciado, por lo que es necesario orientarse con el indicador de tiempo del display.
Al presionar repetidas veces el botón de REPEAT se pasa de una función de repetición a otra:
reproducir archivo, repetir un archivo, repetir todos los archivos de una lista, repetir todo.
Presionar o para pasar al archivo anterior/siguiente.
Presionar el botón de STOP para finalizar la reproducción.
[ ] [ ]
[ ]
[ ] [ ]
[ ]
[ ] [ ]
!!
!!
!!
!!
!!
!!
MP3 Audiodatei abspielen JPEG Bilddatei anzeigen AVI Videodatei abspielen

RESOLUCION DE PROBLEMAS
- 61 -
PROBLEM CAUSA SOLUCION
1. Controlar el cable de
conexión a la red
eléctrica.
2. Asegurarse de que el
interruptor de encendido
esté en la posición “ON”.
El equipo no produce ningún
efecto de sonido en el modo de
salida DVD/5.1.
El sistema no funciona.
1. El sistema no está
enchufado a la red
eléctrica.
2. El equipo no se enciende.
Controlar que el reproductor de
DVD se encuentre en modo 5.1.
Seleccionar el modo 5.1 en
el reproductor de DVD.
Distorsiones del sonido cuando
el volumen está muy alto.
La tensión de salida de la
fuente de audio es muy
elevada.
Bajar el ajuste del volumen.
Nota A:
Combinando correctamente los dispositivos en las entradas y salidas (tanto el subwoofer activo como
la señal fuente, p.ej. CD, MP3, VCD, DVD) se logra una calidad de sonido óptima. Se ruega seguir las
respectivas instrucciones de operación de los dispositivos conectados.
Algunos reproductores de DVD poseen un nivel de salida mayor que el habitual. Si aparecen
distorsiones cuando el volumen está alto, se recomienda bajar el volumen para no dañar el
amplificador o el altavoz.
Nota B:
Si el equipo está expuesto a factores externos (p.ej. esfuerzos mecánicos, grandes cargas
electrostáticas, sobretensiones causadas por tormentas), o si no se lo utiliza conforme a las normas
correspondientes, pueden presentarse fallas en su funcionamiento. De ser así, se recomienda tomar
las siguientes medidas:
Colocar el equipo en el modo standby y, posteriormente, apagarlo.
Si el paso anterior no da resultado, llevar el interruptor de encendido a la posición “OFF” y desenchufar
el equipo. Esperar unos minutos y volver a encenderlo.
Este equipo cuenta con un sistema de autoprotección contra cargas electrostáticas. Cuando se lo vuelve a
encender se recuperan todas sus funciones.
!!
!!
!!
!!
!!

DATOS TECNICOS
- 62 -
POTENCIA DE SALIDA:
Subwoofer (RMS) ------------------------------------------------------ 40 W
Altavoz frontal/central (RMS) ---------------------------------------- 3x 15 W
Potencia máxima de salida (impulso) ----------------------------- 200 W
Medidas (ancho x altura x profundidad) -------------------------- 970 x 200 x 130
mm
ACCESORIOS INCLUIDOS:
Control remoto ---------------------------------------------------------- 1
Pila (redonda) ----------------------------------------------------------- 1
Cable cinch de vídeo (amarillo) ------------------------------------- 1
Cable cinch coaxial (naranja) ---------------------------------------- 1
Cable cinch estéreo ---------------------------------------------------- 1
Ganchos para pared---------------------------------------------------- 2
Manual de instrucciones ---------------------------------------------- 1
Información técnica sujeta a modificaciones.

- 63 -
Важные указания по технике безопасности------------------------------------------ 64
Указания по утилизации-------------------------------------------------------------------- 64
Элементы управления на приборе------------------------------------------------------ 65
Дистанционное управление--------------------------------------------------------------- 66
Подключения ---------------------------------------------------------------------------------- 67
Главные функции системы---------------------------------------------------------------- 68
Настройка системы-------------------------------------------------------------------------- 69
Языковые настройки------------------------------------------------------------------------- 70
Видеонастройка------------------------------------------------------------------------------- 70
Настройка громкоговорителей------------------------------------------------------------ 71
Цифровая настройка-------------------------------------------------------------------------71
Карты памяти----------------------------------------------------------------------------------- 72
Помощь при неисправностях--------------------------------------------------------------73
Технические данные--------------------------------------------------------------------------74
СОДЕРЖАНИЕ
Уважаемый покупатель!
Благодарим Вас за решение приобрести Magnat DVS 4232.
Пожалуйста, внимательно прочитайте следующую информацию перед
включением DVS 4232.

ВАЖНЫЕ УКАЗАНИЯ ПО БЕЗОПАСНОСТИ
- 64 -
!
Этот символ предупреждает пользователя о том, что внутри устройства
используется высокое напряжение, которое может привести к опасным ударам тока.
Этот символ указывает пользователю устройства на то, что в прилагаемом
руководстве по эксплуатации имеются важные указания, которым обязательно
нужно следовать.
Не открывать! Опасность электрического удара! Чтобы
уменьшить опасность возгорания или электрического
удара, необходимо защищать устройство от дождя или
влаги.
!! Перед использованием устройства внимательно прочитайте руководство по
эксплуатации и сохраните его.
Это устройство предназначено исключительно для эксплуатации от переменного
напряжения 230 В / 50 Гц.
Эксплуатируйте устройство только при температуре окружающей среды/в помещении
в диапазоне от 0C до 40C.
Вентиляционные отверстия не должны закрываться предметами (например,
занавесками, газетой), чтобы обеспечить достаточную вентиляцию устройства. Не
располагать вблизи устройства источники тепла, такие как радиаторы, плиты,
открытое пламя, которые генерируют тепло.
Не подвергать устройство и пульт ДУ воздействию воды, а также водяных капель и брызг
и высокой влажности воздуха.
Кроме того, на устройство ни в коем случае не следует ставить вазы или другие сосуды,
наполненные жидкостью.
В случае контакта с влагой или жидкостью немедленно отсоедините устройство от сети
питания.
Вытирать устройство можно только сухой салфеткой.
Не используйте чистящие средства или химические растворители, так как они могут
повредить поверхность.
Никогда не открывайте устройство
Сетевой кабель должен быть всегда готов к эксплуатации. Если на сетевом кабеле будут
обнаружены повреждения, эксплуатировать устройство больше нельзя. Поврежденный
кабель ремонтировать нельзя, его нужно заменить.
Не присоединять и не отсоединять сетевой кабель влажными руками.
!!
!!
!!
!!
!!
!!
!!
!!
!!
!!
!!
!
CAUTION
RISK OF ELECTRIC SHOCK
DO NOT OPEN
УКАЗАНИЯ ПО УТИЛИЗАЦИИ
Согласно европейской директиве 2002/96/EC все электрические и электронные
приборы для утилизации должны сдаваться отдельно в местные сборные пункты.
Пожалуйста, выполняйте местные предписания и не выбрасывайте старые

10 11 14
15
16
17
19
20
13
12 18 21
22
ЭЛЕМЕНТЫ УПРАВЛЕНИЯ НА ПРИБОРЕ
- 65 -
ПЕРЕДНЯЯ СТОРОНА:
ЗАДНЯЯ СТОРОНА:
1
2
3
4
5
Панель с сенсорными клавишами
VIDEO
OUTPUT
OPT 1 OPT 2
TVAUX
COAX 1
COAX 2
LL
RR
AC IN
POWER
ON
OFF
FUSE
SUB.
OUTPUT
ON OFF
SUB.
SWITCH
76
I
N
P
U
T
V
O
L
+
V
O
L
USB SD/MMC/MS
8
9
Внимание! Для правильного пользования панелью с сенсорными клавишами, рекомендуется
использовать при нажатии клавиш большой палец.
1. Клавиша STANDBY 12. Предохранитель
2. Клавиша регулятора громкости + 13. Видеовыход
3. Клавиша регулятора громкости - 14. Выход на сабвуфер
4. Клавиша PLAY/PAUSE 15. Ввод AUX
5. Переключатель входа 16. Ввод TV
6. Сенсор для дистанционного управления 17. Цифровой вход COAXIAL1
7. Светодиодная индикация 18. Цифровой вход OPTICAL1
8. Устройство считывания карт SD/MMC/MS 19. Цифровой вход OPTICAL2
9. Подключение к USB 20. Выключатель выхода на
сабвуфер (вкл./выкл.)
10. Сетевой кабель 21. Крепление для стенной консоли
11. Сетевой выключатель 22. Цифровой вход COAXIAL2

ДИСТАНЦИОННОЕ УПРАВЛЕНИЕ
1
INPUT
0
2
3
4
5
6
7 8
9
+10
M.VOL
FUNCTION
REPEAT
M.VOL
+
ENTER/PLAY
LISTEN
SETUP
PAUSE/STEP
STOP
SD/USB
1
2
3
4
5
6
7
8
9
10
11
12
13
14
15
16
R
E
V
F
W
D
P
R
E
V
N
E
X
T
1. STANDBY/POWER:
Включает и выключает прибор.
2. INPUT:
При повторном нажатии можно выбрать между
--DISK --OPTICAL 1 --OPTICAL 2 --COAXIAL 1
--COAXIAL 2 --AUX --TV в качестве входа.
3. Клавиши с цифрами между от 0 до +10.
Ввод цифр.
4. SETUP:
Показывает Вам меню настройки на
подключенном экране. С его помощью
Вы можете произвести настройку системы.
5. SD/USB:
Выбирает между воспроизведением носителей
памяти USB или SD.
С помощью этих клавиш Вы можете двигаться
между меню устройства.
7. [REV] [FWD]:
Ускоренная перемотка вперёд или назад.
8. ENTER/PLAY:
Для подтверждения выбранной опции меню
или начала воспроизведения.
9. [ PREV ] [NEXT]:
Переход к предыдущему/последующему
заголовку/треку при воспроизведении.
10. PAUSE/STEP:
Функция Pause позволяет воспроизводить
отдельный стоп-кадр, повторное нажатие
переключает дальше с кадра на кадр.
11. REPEAT:
Если идёт воспроизведение с носителя памяти, то при помощи этой клавиши Вы можете
включить режим повторного воспроизведения.
12. MUTE:
Отключает звук устройства. При повторном нажатии звук снова включается.
13. LISTEN:
Этой клавишей можно переключать между различными режимами воспроизведения (в
зависимости от входного сигнала):
Prologic -- Stereo -- Vocal
14. STOP:
Для остановки воспроизведения.
15. MASTER VOLUME:
Увеличение / понижение уровня громкости.
16. FUNKTION:
С помощью этой клавиши Вы можете вызвать отдельные каналы воспроизведения, а
также высокие и низкие тона для их последующей настройки.
6. [ ] [ ] [ ] [ ]:
Вставить/заменить батарейку
Питание пульта ДУ осуществляется от литиевой батарейки, входящей в комплект и
вставленной в пульт ДУ. Для предотвращения разрядки до эксплуатации пульта ДУ была
вставлена изолирующая полоска. Перед первым использованием пульта ДУ ее следует
вынуть.
Если пульт ДУ не функционирует безупречно, батарейку следует заменить на батарейку
такого-же типа.
Откройте отсек для батарейки. Выньте батарейку из отсека по стрелке. Прежде чем
вынуть израсходованную батарейку, запомните, в каком точно положении она
находилась. Символ "+" должен указывать вверх, в противном случае пульт ДУ не будет
работать и даже может выйти из строя. Замените батарейку и снова закройте отсек.
Утилизация батареек
Старые батарейки относятся к особым отходам и подлежат утилизации согласно
действующим предписаниям.
- 66 -

- 67 -
VIDEO
OUTPUT
OPT 1 OPT 2
TVAUX
COAX 1
COAX 2
LL
RR
AC IN
POWER
ON
OFF
FUSE
SUB.
OUTPUT
ON OFF
SUB.
SWITCH
ПОДКЛЮЧЕНИЯ
TV
PS2
DVD
Возможность использования носителей памяти (USB и карты SD/MMC/MS).
(Оптический кабель, не входит в объём поставки)
SD MMC MS
Выход на сабвуфер
I
N
P
U
T
V
O
L
+
V
O
L
USB SD/MMC/MS
Подключение к любому источнику входного
стереосигнала (напр., TV, DVD, CD Player,
xBox, Ps2, компьютер и т.д.)
Внимание!
Ни в коем случае не вставляйте сетевую вилку в розетку, пока не будут выполнены надлежащим образом
все остальные подключения.
Прежде чем ввести в эксплуатацию внешний сабвуфер, необходимо включить прибор.
Прежде чем отключить прибор, следует выключить этот сабвуфер.
!!
!!
!!
или

ГЛАВНЫЕ ФУНКЦИИ СИСТЕМЫ
1. ON/OFF
Установите сетевой выключатель на обратной стороне прибора в положение "ON". Прибор
находится теперь в режиме ожидания (Standby), на светодиодном индикаторе высвечивается
"HELLO". Нажмите Standby-клавишу на самом приборе или на пульте дистанционного
управления для того, чтобы включить устройство. Система распознаёт любой поступающий
входной сигнал. Если сигнал не поступает, зажигается светодиодная надпись "NO SIGNAL".
Внимание: После выключения прибора необходимо подождать не менее 3 секунд, прежде
чем включить его снова.
2. ВЫБОР ВХОДА (ПОВТОРНОЕ НАЖАТИЕ КЛАВИШИ INPUT) :
Система не связана с носителями памяти USB или SD:
Нажмите клавишу INPUT на приборе или на пульте ДУ для выбора входа:
OPTICAL 1 --OPTICAL 2 --COAXIAL 1--COAXIAL 2--AUX--TV--USB/SD/MS/MMC.
Система связана с картой памяти USB:
Нажмите клавишу INPUT на приборе или на пульте ДУ для выбора входа:
OPTICAL 1 --OPTICAL 2 --COAXIAL 1--COAXIAL 2--AUX--TV--USB.
Система связана с картой памяти SD:
Нажмите клавишу INPUT на приборе или на пульте ДУ для выбора входа:
OPTICAL 1 --OPTICAL 2 --COAXIAL 1--COAXIAL 2--AUX--TV--SD.
Система связана с картами памяти USB и SD:
Нажмите клавишу INPUT на приборе или на пульте ДУ для выбора входа:
OPTICAL 1 --OPTICAL 2 --COAXIAL 1--COAXIAL 2--AUX--TV--USB input. Для карт памяти
система обычно выбирает вход для USB. После этого Вы можете выбрать карту SD с
помощью клавиши USB/SD.
3. ВИДЫ РЕЖИМОВ ПРОСЛУШИВАНИЯ:
Нажмите клавишу LISTEN для переключения между различными режимами прослушивания:
--Stereo --Vocal --Pro-Logic.
4. РЕГУЛИРОВКА УРОВНЯ:
(1) Установка общего уровня громкости:
Уровень громкости устанавливается при помощи клавиши MASTER VOLUME +/- на
пульте дистанционного управления или клавиши VOL +/VOL на передней панели
прибора.
(2) Специальная установка уровня:
Нажатием клавиши FUNCTION производится выбор между следующими уровнями :
TREBLE --BASS --FRONT-L --FRONT-R --CENTER --SUBWOOFER. Соответствующий
уровень устанавливается затем при помощи клавиши MASTER VOLUME +/-.
5. MUTE:
Нажатием клавиши MUTE на пульте ДУ отключается звук системы, при повторном нажатии
звук снова включается. Беззвуковой режим выключается также и при нажатии клавиши
MASTER VOLUME +/-.
6. ИСПОЛЬЗОВАНИЕ ВНЕШНЕГО САБВУФЕРА:
Для подключения внешнего сабвуфера необходимо соединить вход RCA cабвуфера с
сабвуферным входом данного устройства. После этого следует привести переключатель SUB.
SWITCH на обратной стороне прибора в позицию "OFF". (Встроенный сабвуфер отключается).
При заводской настройке этот переключатель находится в позиции "ON".
- 68 -

- 69 -
НАСТРОЙКА СИСТЕМЫ
Ваш телевизор Вы можете подключить к видеовыходу на обратной стороне прибора.
Управление меню настройки системы:
1. При нажатии клавиши SETUP на пульте ДУ открываются следующие меню:
2. Вы можете управлять меню интуитивно при помощи навигационных клавиш .
Активация отдельных выборочных пунктов производиться при помощи клавиши ENTER/PLAY.
3. Если настройка завершена или Вы хотите её прервать, снова нажмите клавишу SETUP для
закрытия меню.
Настройка системы
1. СИСТЕМА TV:
Здесь Вы можете выбрать систему цветового кодирования подключенного телевизора. Под NTSC
подразумевается американский телевизионный стандарт, в Германии обычно используется PAL.
PAL-60 – это режим, при котором воспроизведение происходит в формате NTSC с частотой смены
полукадров 60 Гц, но с цветовым кодированием PAL. Если Вы используете телевизор с системой
Multinorm, выбирается позиция „AUTO".
2. ФОРМАТ TV:
Формат изображения (напр., 4:3 = нормальное изображение, 16:9 = широкоэкранное изображение)
определяется проигрываемым файлом. Следует учесть, что формат изображения не обязательно
должен соответствовать формату изображения Вашего телевизора. Вам помогут следующие
настройки:
·4:3/PS: Рекомендуем выбрать этот режим, если Вы подключили телевизор с форматом 4:3.
При воспроизведении файла в широкоэкранном формате изображение заполняет весь экран,
но части изображения слева и справа при этом отрезаются.
·4:3/LB: Рекомендуем выбрать этот режим, если Вы подключили телевизор с форматом 4:3.
При воспроизведении файла в широкоэкранном формате на экран выводится изображение в
полную ширину, но вверху и внизу видны чёрные балки.
[ ] [ ] [ ] [ ]

- 70 -
НАСТРОЙКА СИСТЕМЫ
Настройка системы
Эта опция восстанавливает заводские настройки.
Языковые настройки:
Здесь Вы можете выбрать язык для отображения меню на экране и информации о статусе.
[ ] [ ].
Видеонастройка
Здесь Вы можете регулировать различные параметры воспроизведения изображения. Выберите
нужную функцию, затем нажмите клавишу Enter и подберите желаемое значение при помощи
клавиш

- 71 -
НАСТРОЙКА СИСТЕМЫ
Downmix
DOWNMIX означает сокращение звукового сигнала до 2-канального воспроизведения. При выборе
LT/RT Вы активируете для обоих фронтальных каналов живой, напоминающий театральную
атмосферу эффект. Но это возможно только при условии, если звуковой материал содержит PRO
LOGIC Dolby Stereo эффекты. STEREO выбирается при нормальном стереофоническом
воспризведении. VSS обозначает Virtual Surround Sound и моделирует звуковой эффект Surround.
Если Вы желаете многоканальное воспроизведение, то Вам необходимо деактивировать функцию
DOWNMIX (ВЫКЛ).
Замедление – центр / Замедление – тыл
При воспроизведении программ в 5.1-канальном формате Вы можете установить при помощи этих
пунктов меню время задержки для сигналов центральных и тыловых Surround-каналов. Таким
образом моделируется увеличение расстояния между динамиками и слушателем, и создаётся
впечатление, что помещение увеличивается. Это позволяет при определённых условиях ещё
больше подчеркнуть эффект Surround.Das kann den Suroundeffekt ggf. noch effizienter gestalten.
Настройка:
Цифровая настройка:
Режим OP
Здесь Вы можете сделать выбор между настройками „Line" и „RF". В режиме Line входные сигналы
выдаются без изменений, в режиме RF происходит сильное сжатие, вызывающее значительное
повышение громкости. Мы рекомендуем не использовать эту настройку ночью.
Динамическая компрессия
Здесь Вы можете произвести настройку динамики звучания. Под „динамикой" мы подразумеваем
разницу между уровнями громкости очень громких и очень тихих пассажей, т.е., например, между
звуком взрыва и шёпотом. Для ограничения динамического диапазона Вам следует переместить
регулятор вверх, в сторону „FULL".
Dual Mono
Здесь Вы можете выбрать аудиорежим для стереосигналов:
STEREO: обычное стереозвучание, рекомендуется
MONO L: левый стереоканал подключен к левому и правому фронтальным громкоговорителям
MONO R: правый стереоканал подключен к левому и правому фронтальным громкоговорителям
MIX MONO: оба фронтальных канала выводят идентичный моносигнал
Pro Logic
Существует два различных звуковых режима для Dolby Pro Logic II: кинотеатра и музыки. Здесь Вы
можете выбрать желаемый режим или отключить режим Pro Logic.

КАРТЫ ПАМЯТИ
- 72 -
Воспроизведение аудио-, видео- и графических файлов с карт памяти:
Запустите систему обычным образом.
Вставьте карту памяти (USB/SD/MMC/MS) с соответствующими файлами в
устройство для считывания. Следите при этом за тем, чтобы надпись находилась
сверху.
Воспроизведение начинается автоматически. На экране подключенного телевизора
!!
!!
!!
!! Слева в меню показаны различные папки, размещённые на носителе данных. Справа видны
файлы в соответствующей маркированной папке. С помощью навигационных клавиш
Вы выбираете нужную папку и нажимаете клавишу ENTER. Теперь на дисплее появляются
отдельные файлы папки.
С помощью навигационной клавиши Вы попадаете в правую колонку. Выбор файлов здесь
производится при помощи клавиш , а затем Вы можете начать их воспроизведение
нажатием клавиши ENTER/PLAY. Название воспроизводимого файла высвечивается в поле
индикации сверху. Когда заканчивается воспроизведение одного файла, система автоматически
переходит к следующему. С помощью клавиши 1 Вы снова попадаете в левую колонку с
перечнем папок.
При повторном нажатии клавиши Вы попадаете к переключателям носителей памяти.
Прибор различает аудио-, видео- и графические файлы, но всегда показывает только один вид
файлов. Если он находит при чтении носителя памяти хотя бы один подходящий файл, то
соответствующий символ изображается на дисплее в виде клавиши. С помощью навигационных
клавиш Вы можете теперь маркировать символ желаемого вида файлов. Нажмите клавишу
ENTER, чтобы прибор показывал только файлы желаемого типа носителей памяти.
Нажатием клавиш REV или FWD Вы активируете в процессе воспоизведения функцию поиска
(воспроизведение на большой скорости) назад или вперёд. Достигнув желаемого места, нажмите
клавишу ENTER/PLAY. Воспроизведение будет продолжаться на нормальной скорости. Во время
поиска звук автоматически отключается, Вам следует ориентироваться по показателю времени
на дисплее.
Повторяющимся нажатием клавиши REPEAT Вы можете выбрать между различными функциям
повтора: воспроизвести файл, повторить отдельный файл, повторить все файлы определённого
перечня, повторить всё.
Нажмите клавишу или , чтобы перепрыгнуть к предыдущему / следующему файлу.
Нажмите клавишу STOP, чтобы закончить воспроизведение.
[ ] [ ].
[ ]
[ ] [ ]
[ ]
[ ] [ ]
!!
!!
!!
!!
!!
!!
MP3 Audiodatei abspielen JPEG Bilddatei anzeigen AVI Videodatei abspielen

ПОМОЩЬ ПРИ НЕИСПРАВНОСТЯХ
- 73 -
ПРОБЛЕМА ПРИЧИНА РЕШЕНИЕ
1. Проверьте сетевой
кабель.
2. Удостоверьтесь, что
сетевой выключатель
включен.
Нет звукового эффекта в
выходном режиме DVD/5.1.
Отсутствует
воспроизведение.
1. Система не подключена к
электросети.
2. Прибор не включается.
Убедитесь, что DVD-плеер
находится в режиме 5.1.
Установите на DVD-плеере
режим 5.1.
Искажения при высоком
уровне громкости.
Аудиоисточник имеет очень
высокое выходное
напряжение.
Установите более низкий
уровень громкости.
Примечание A:
Правильная комбинация приборов на входах и выходах (как активный сабвуфер, так и источник
сигнала, напр., CD,MP3,VCD,DVD) обеспечивает оптимальное качество звучания. Соблюдайте,
пожалуйста, руководства по эксплуатации подключенных приборов.
Выходной уровень некоторых DVD-плееров выше обычного. Если при большой громкости
возникают искажения, рекомендуем уменьшить уровень громкости, чтобы избежать повреждения
усилителя или динамиков.
Примечание B:
Если прибор подвергается какому-либо сильному воздействию извне (напр., механическая
нагрузка, сильное электростатическое воздействие, перенапряжение при грозе) или неправильно
эксплуатируется, то это может привести к возникновению неисправностей. В случае, если это
случится, поступайте следующим образом:
Сначала включите режим Standby, а затем снова включите прибор.
Если это не даст результата, рекомендуем выключить сетевой выключатель, вытянуть сетевую
вилку из розетки на пару минут, а затем снова включить прибор.
Этот прибор имеет систему самозащиты от электростатического воздействия, и после нового
включения все функции автоматически восстанавливаются.
!!
!!
!!
!!
!!

ТЕХНИЧЕСКИЕ ДАННЫЕ
- 74 -
ВЫХОДНАЯ МОЩНОСТЬ:
Сабвуфер (RMS) ----------------------------------------------------------------- 40 Вт
Фронтальный/Центральный громкоговоритель (RMS) -------------- 3x 15 Вт
Максимальная выходная мощность (Impuls) ----------------------------- 200 Вт
Габариты (Ш x В x Г) ---------------------------------------------- 970 x 200 x 130 мм
ПРИЛАГАЕМЫЕ ПРИНАДЛЕЖНОСТИ:
Пульт дистанционного управления -----------------------------1 шт.
Батарейка / Кнопочная батарейка------------------------------ 1 шт.
Видеокабель RCA (жёлтый) ------------------------------------- 1 шт.
Коаксиальный кабель RCA (оранжевый) -------------------- 1 шт.
Стереокабель RCA -------------------------------------------------- 1 шт.
Стенная консоль ----------------------------------------------------- 2 шт.
Руководство по эксплуатации ----------------------------------- 1 шт.
Оставляем за собой право на технические изменения.
ТЕХНИЧЕСКИЕ ДАННЫЕ

Wir gratulieren Ihnen! Durch Ihre kluge Wahl sind Sie Besitzer eines Magnat Produktes geworden.
-Produkte erfreuen sich aufgrund der hohen Qualität eines ausgezeichneten Rufes weltweit.
Dieser hohe Qualitätsstandard ermöglicht es für -Produkte 2 Jahre Garantie zu gewähren.
Die Produkte werden während des gesamten Fertigungsvorganges laufend kontrolliert und geprüft. Im
Servicefall beachten Sie bitte folgendes:
1. Die 2-jährige Garantiezeit beginnt mit dem Kauf des Produktes und gilt nur für den Erstbesitzer.
2. Während der Garantiezeit beseitigen wir etwaige Mängel, die nachweislich auf Material- oder
Fabrikationsfehler beruhen, nach unserer Wahl durch Austausch oder Nachbesserung der defekten Teile.
Weitergehende Ansprüche, insbesondere auf Minderung, Wandlung, Schadenersatz oder Folgeschäden
sind ausgeschlossen. Die Garantiezeit wird von einer Garantieleistung durch uns nicht berührt.
3. Am Produkt dürfen keine unsachgemäßen Eingriffe vorgenommen worden sein.
4. Bei Inanspruchnahme der Garantie wenden Sie sich bitte zunächst an Ihren Fachhändler. Sollte es sich
als notwendig erweisen, das Produkt an uns einzuschicken, so sorgen Sie bitte dafür, daß • das Produkt in
einwandfreier Originalverpackung verschickt wird, • die Kontrollkarte ausgefüllt dem Produkt beiliegt, • die
Kaufquittung beigefügt ist.
5. Von der Garantie ausgenommen sind: • Leuchtmittel • Verschleißteile • Batterien • Transportschäden,
sichtbar oder unsichtbar (Reklamationen für solche Schäden müssen umgehend bei der Transportfirma,
Bahn oder Post eingereicht werden.) • Kratzer in Metallteilen, Frontabdeckungen u.s.w. (Diese Defekte
müssen innerhalb von 5 Tagen nach Kauf direkt bei Ihrem Händler reklamiert werden.) • Fehler, die durch
fehlerhafte Aufstellung, falschen Anschluss, unsachgemäße Bedienung (siehe Bedienungsanleitung),
Beanspruchung oder äußere gewaltsame Einwirkung entstanden sind. • Unsachgemäß reparierte oder
geänderte Geräte, die von anderer Seite als von uns geöffnet wurden. • Folgeschäden an fremden
Geräten • Kostenerstattung bei Schadensbehebung durch Dritte ohne unser vorheriges Einverständnis.
Congratulations! You have made a wise selection in becoming the owner of a equipment. Due to
high quality products have earned an excellent reputation through the western world. And this
high quality standard enables us to grant a 2-years warranty for products. The equipments are
checked and tested continously during the entire production process. In case you have problems with your
equipment, kindly observe the following:
1. The 2-years guarantee period commences with the purchase of the component and is applicable only to
the original owner.
2. During the guarantee period we will rectify any defects due to faulty material or workmanship by
replacing or repairing the defective part at our discretion. Further claims, and in particular those for price
reduction, cancellation of sale, compensation for damages or subsequential damages, are excluded. The
guarantee period is not altered by the fact that we have carried out guarantee work.
3. Unauthorized tampering with the equipment will invalidate this guarantee.
4. Consult your authorized dealer first, if guarantee service is needed. Should it prove necessary to return
the component to the factory, please insure that • the component is packed in original factory packing in
good condition • the quality control card has been filled out and enclosed with the component, • your
enclose your receipt as proof of purchase.
5. Excluded from the guarantee are: • Illuminates • Wear parts • Batteries • Shipping damages, either
readily apparent or concealed (claims for such damages must be lodged immediately with forwarding
agent, the railway express office or post office). • Scratches in cases, metal components, front panels, etc.
(You must notify your dealer directly of such defects within three days of purchase.) • Defects caused by
incorrect installation or connection, by operation errors (see operating instructions), by overloading or by
external force. • Equipments which have beenrepaired incorrectly or modified or where the case has been
opened by persons other than us. • Consequential damages to other equipments. • Reimbursement of
costs, without our prior consent, when repairing damages by third parties.
Magnat
Magnat
Magnat
Magnat
Magnat
Magnat
GB
D
- 75 -

GARANTIEKARTE
WARRANTY CARD
Typ/Type
Serien-Nr./Serial-No.
Name und Anschrift des Händlers/Stempel
Name and address of the dealer/stamp
Käufer/Customer
Name/Name
Straße/Street
PLZ, Ort/City
Land/Country
Nur gültig in Verbindung mit Ihrer Kaufquittung!
No warranty without receipt!
Kaufdatum/buying date


Magnat Audio-Produkte GmbH
Lise-Meitner-Str. 9 D-50259 Pulheim Germany
Tel. +49 (0) 2234 / 807 - 0 Fax +49 (0) 2234 / 807 - 399
Internet: http://www.magnat.de
Transcripción de documentos
DVS 4232 Wichtige Hinweise zur Installation / Garantieurkunde Important notes for installation / warranty card Mode d’emploi / certificat de garantie Avvertenze importanti per l’installazione / certifcato di garanzia Notas importantes sobre la instalación y certificado de garantía Важная информация по инсталляции / гарантия VOL + VOL INPUT Surround Sound System ------- 3 ------- 15 ------- 27 ------- 39 ------- 51 ------- 63 -2- Sehr geehrter Kunde, vielen Dank, dass Sie sich für den Magnat DVS 4232 entschieden haben. Bitte lesen Sie unsere folgenden Hinweise vor Inbetriebnahme des DVS 4232 genau durch. INHALT Wichtige Sicherheitshinweise ------------------------------------------------------------ 4 Entsorgungshinweise ---------------------------------------------------------------------- 4 Bedienelemente am Gerät ---------------------------------------------------------------- 5 Die Fernbedienung ------------------------------------------------------------------------- 6 Anschlüsse ---------------------------------------------------------------------------------- 7 Hauptfunktionen des Geräts -------------------------------------------------------------- 8 System Setup ------------------------------------------------------------------------------- 9 Spracheinstellungen ------------------------------------------------------------------ 10 Video Setup ---------------------------------------------------------------------------- 10 Lautsprecher Einstellung ------------------------------------------------------------- 11 Digital Einstellung --------------------------------------------------------------------- 11 Speicherkarten ------------------------------------------------------------------------------ 12 Problembehandlung ------------------------------------------------------------------------13 Technische Daten --------------------------------------------------------------------------- 14 -3- WICHTIGE SICHERHEITSHINWEISE Das Dreieck mit Blitzsymbol warnt den Benutzer, dass innerhalb des Gerätes hohe Spannungen verwendet werden, die gefährliche Stromschläge verursachen können. ! Das Dreieck mit Ausrufezeichen macht den Benutzer darauf aufmerksam, dass in der beigefügten Bedienungsanleitung wichtige Hinweise enthalten sind, die unbedingt beachtet werden müssen. CAUTION von RISK OF ELECTRIC SHOCK DO NOT OPEN ! ! ! ! ! ! ! ! ! ! ! ! ! ! ! ! Nicht öffnen! Gefahr des elektrischen Schlages! Um die Gefahr Feuer oder eines elektrischen Schlages zu verringern, darf das Gerät nicht Regen oder Feuchtigkeit ausgesetzt werden. Bitte die Bedienungsanleitung vor Inbetriebnahme sorgfältig durchlesen und aufbewahren Dieses Gerät ist ausschließlich geeignet für den Betrieb mit 230 V / 50 Hz Wechselspannung. Betreiben Sie das Gerät nur bei einer Umgebungs-/Raumtemperatur von 0°C bis 40°C. Die Belüftungslöcher dürfen nicht mit Gegenständen bedeckt werden (z. B. Vorhänge, Zeitung), um eine ausreichende Belüftung des Gerätes zu gewährleisten. Bitte keine Hitzequellen wie Radiatoren, Öfen, offene Flammen oder andere Geräte, die Hitze erzeugen in die Nähe des Gerätes stellen. Das Gerät und die Fernbedienung dürfen weder Tropf- oder Spritzwasser noch Wasser oder hoher Luftfeuchtigkeit ausgesetzt werden. Ebenfalls darf das Gerät nicht zum Abstellen von Vasen oder anderen mit Feuchtigkeit gefüllten Behältern benutzt werden. Bei Kontakt mit Feuchtigkeit oder Flüssigkeiten sofort den Netzstecker ziehen. Reinigen Sie das Gerät nur mit einem trockenen Tuch. Verwenden Sie keine Reinigungsmittel oder chemische Lösungsmittel, da sonst die Oberfläche beschädigt werden könnte. Öffnen Sie niemals das Gerät. Das Netzkabel muss immer betriebsbereit sein. Bei sichtbaren Beschädigungen des Netzkabels darf das Gerät nicht mehr betrieben werden. Ein beschädigtes Kabel darf nicht repariert, sondern muss ausgetauscht werden. Netzkabel nicht mit feuchten Händen anschließen oder entfernen. Überlassen Sie Wartungs- und Reparaturarbeiten immer qualifiziertem Fachpersonal. Wird das Gerät längere Zeit nicht benutzt, ist das Gerät mittels des Netzschalters (POWER) auf der Rückseite des Gerätes auszuschalten Bei Gewitter bitte den Netzstecker ziehen. ENTSORGUNGSHINWEISE Gemäß der europäischen Richtlinie 2002/96/EC müssen alle elektrischen und elektronischen Geräte über lokale Sammelstellen getrennt entsorgt werden. Bitte beachten Sie die lokalen Vorschriften und entsorgen Sie Ihre Altgeräte nicht mit dem normalen Hausmüll. -4- BEDIENELEMENTE AM GERÄT VORDERSEITE: Sensortastenfeld 1 2 3 4 7 VO L + SD/MMC/MS 5 8 USB 6 9 VO L INP UT Achtung! Um ein sicheres Schalten des Sensortastenfeldes zu gewährleisten, benutzen Sie zur Betätigung der Tasten bitte Ihren Daumen. RÜCKSEITE: 13 10 11 12 15 17 19 14 16 18 POWER AC IN AUX L TV L R R COAX 1 OPT 1 20 21 OPT 2 FUSE ON SUB. OUTPUT OFF VIDEO OUTPUT SUB. SWITCH COAX 2 ON OFF 22 1. STANDBY Taste 2. Lautstärke + Taste 3. Lautstärke - Taste 4. PLAY/PAUSE Taste 5. Eingangswahlschalter 6. Sensor für die Fernbedienung 7. LED Anzeige 8. SD/MMC/MS cKartenleser 9. USB Anschluss 10. Netzkabel 11. Netzschalter 12. Sicherung 13. Videoausgang 14. Subwooferausgang 15. AUX-Eingang 16. TV-Eingang 17. COAXIAL1 Digitaleingang 18. OPTICAL1 Digitaleingang 19. OPTICAL2 Digitaleingang 20. Schalter Subwooferausgang (an/aus) 21. Befestigung für die Wandhalterung 22. COAXIAL2 Digitaleingang -5- DIE FERNBEDIENUNG 1. STANDBY/POWER: Schaltet das Gerät ein oder aus. 2. INPUT: Wiederholtes Drücken wählt zwischen 1 --DISK --OPTICAL 1 --OPTICAL 2 --COAXIAL 1 0 +10 INPUT --COAXIAL 2 --AUX --TV als Eingang. 2 3. 0 bis +10 Zifferntasten. 1 3 2 Eingabe von Ziffern. 3 4. SETUP: 5 6 4 Zeigt Ihnen das Setup-Menü auf dem 7 8 9 angeschlossenen Bildschirm an. Damit können Sie diverse Systemeinstellungen vornehmen. 4 SD/USB SETUP LISTEN 5. SD/USB: 5 Wählt zwischen der Wiedergabe von USB6 bzw. SD-Speichermedien. FW D R EV 7 6. [ ] [ ] [ ] [ ]: 8 Mit diesen Tasten navigieren Sie innerhalb der ENTER/PLAY Gerätemenüs. 7. [REV] [FWD]: PRE V 9 NE XT Schneller Vorlauf, vorwärts oder rückwärts. 8. ENTER/PLAY: Zum Bestätigen von ausgewählten PAUSE/STEP STOP 10 M.VOL + Menüoptionen bzw. Starten der Wiedergabe. 9. [ PREV ] [NEXT]: M.VOL REPEAT Schaltet bei der Wiedergabe zum FUNCTION 11 vorigen/nächstenTitel. 10. PAUSE/STEP: Die Pause-Funktion erzeugt ein Standbild, wiederholtes Drücken schaltet Bild für Bild weiter. 11. REPEAT: Wenn Sie von den Speichermedien abspielen, können Sie mit dieser Taste den Wiederholmodus starten 12. MUTE: Schaltet den Ton der Anlage stumm. Ein weiterer Druck schaltet den Ton wieder ein. 13. LISTEN: Diese Taste schaltet die verschiedenen Wiedergabe-Modi um (abhängig vom Eingangssignal): Prologic -- Stereo -- Vocal 14. STOP: Zum Beenden der Wiedergabe. 15. MASTER VOLUME: Heraufsetzen / Absenken der Lautstärke. 16. FUNKTION: Mit dieser Taste rufen Sie die einzelnen Wiedergabekanäle sowie die Höhen und Bässe zum anschließenden Einstellen auf. Einsetzen / Auswechseln der Batterien Die Fernbedienung verwendet eine bereits eingelegte Litium-Batterie, die zum Schutz gegen Entladung mit einem Isolierstreifen gesichert ist. Diesen entfernen Sie bitte vor Inbetriebnahme des Gerätes. Arbeitet die FB unzuverlässig, wechseln Sie bitte die Batterie gegen eine neue gleichen Typs aus. Zum Öffnen des Batteriefachs drücken Sie die Verriegelung wie gezeigt in Pfeilrichtung und ziehen die Halterung heraus. Bevor Sie die alte Batterie entfernen, merken Sie sich bitte ihre Lage (+ nach oben!). Wechseln Sie die Batterie und schließen sie das Batteriefach wieder. Batterien gehören nicht in den Hausmüll. Bitte geben Sie verbrauchte Batterien bei den zuständigen Sammelstellen ab. Werfen Sie Batterien niemals ins Feuer! -6- 12 13 14 15 16 ANSCHLÜSSE TV Subwooferausgang POWER AC IN AUX L TV L R R COAX 1 OPT 1 OPT 2 FUSE ON SUB. OUTPUT OFF VIDEO OUTPUT SUB. SWITCH COAX 2 ON OFF Verbindung zu einer beliebigen StereoSignaleingangsquelle (z.B. TV, DVD, CD player, xBox, Ps2, Computer usw.) (Optisches Kabel, nicht im Lieferumfang enthalten) oder DVD PS2 VO L + MMC MS SD/MMC/MS SD USB VO L INP UT Verbindung zu Speichermedien (USB und SD/MMC/MS-Karten). ! ! ! Achtung! Stecken Sie den Netzstecker niemals in die Netzsteckdose, solange nicht alle anderen Verbindungen korrekt ausgeführt wurden. Bitte schalten Sie das Gerät ein, bevor Sie einen externen Subwoofer in Betrieb nehmen.. Bitte schalten Sie diesen Subwoofer aus, bevor sie das Gerät abschalten. -7- HAUPTFUNKTIONEN DES GERÄTES 1. ON/OFF Schalten Sie den Netzschalter auf der Rückseite des Geräts auf "ON". Das Grät ist jetzt im Standbybetrieb, auf der LED-Anzeige leuchtet "HELLO". Drücken Sie die Standby-Taste am Gerät oder auf der Fernbedienung um das Gerät einzuschalten. Das System erkennt jedes anliegende Eingangssignall. Liegt kein Signal an, zeigt die LED-Anzeige "NO SIGNAL”. Achtung: Nach dem Ausschalten des Gerätes warten sie bitte mindestens 3 Sekunden, bevor Sie es wieder einschalten. 2. EINGANGSWAHL (INPUT TASTE WIEDERHOLT DRÜCKEN) : Das System ist nicht mit der USB- oder der SD-Speicherkarte verbunden: Drücken Sie die INPUT Taste am Gerät oder auf der Fernbedienung, um einen Eingang zu wählen: OPTICAL 1 --OPTICAL 2 --COAXIAL 1--COAXIAL 2--AUX--TV--USB/SD/MS/MMC. Das System ist mit einer USB-Speicherkarte verbunden: Drücken Sie die INPUT Taste am Gerät oder auf der Fernbedienung, um einen Eingang zu wählen: OPTICAL 1 --OPTICAL 2 --COAXIAL 1--COAXIAL 2--AUX--TV--USB. Das System ist mit einer SD-Speicherkarte verbunden: Drücken Sie die INPUT Taste am Gerät oder auf der Fernbedienung, um einen Eingang zu wählen: OPTICAL 1 --OPTICAL 2 --COAXIAL 1--COAXIAL 2--AUX--TV--SD. Das System ist mit einer USB- und einer SD-Speicherkarte verbunden: Drücken Sie die INPUT Taste am Gerät oder auf der Fernbedienung, um einen Eingang zu wählen: OPTICAL 1 --OPTICAL 2 --COAXIAL 1--COAXIAL 2--AUX--TV--USB input. Das System wählt für Karten allgemein den USB-Eingang. Danach können Sie SD-Karten mit der USB/SD Taste anwählen. 3. ABHÖRBETRIEBSARTEN: Drücken Sie die LISTEN Taste, um zwischen den verschiedenen Abhörbetriebsarten umzuschalten: Stereo --Vocal --Pro-Logic. 4. PEGELEINSTELLUNGEN (1) Einstellen der Gesamtlautstärke: Die Lautstärke wird mit der MASTER VOLUME +/- Taste auf der Fernbedienung oder der VOL +/VOL - Taste auf der Vorderseite des Geräts eingestellt. (2) Spezielle Pegeleinstellungen: Drücken der FUNCTION Taste wählt zwischen folgenden Pegeln aus : TREBLE --BASS --FRONT-L --FRONT-R --CENTER --SUBWOOFER. Danach können Sie mit MASTER VOLUME +/- den entsprechenden Pegel anpassen. 5. MUTE Ein Druck auf die MUTE Taste der Fernbedienung schaltet die Anlage stumm, ein weiterer Druck schaltet den Ton wieder ein. Auch ein Betätigen der MASTER VOLUME +/- Taste schaltet die Stummschaltung ab. 6. BENUTZUNG EINES EXTERNEN SUBWOOFERS: Um einen externen Subwoofer anzuschließen, verbinden Sie den Cincheingang des Subwoofers mit dem Subwoofereingang dieses Gerätes. Bringen Sie dann den SUB. SWITCH auf der Rückseite in die "OFF"-Position.(Schaltet den eingebauten Subwoofer ab). Von Werk aus ist dieser Schalter in der "ON"-Position. -8- SYSTEM SETUP Sie können Ihr TV-Gerät an dem Videoausgang auf der Rückseite des Geräts anschließen. Bedienung der Menüs für die Systemeinstellungen: 1. Ein Druck auf die SETUP-Taste der Fernbedienung führt zu folgenden Menü: 2. Menüs können Sie mit den Navigationstasten [ ] [ ] [ ] [ ] intuitiv bedienen. Die Bestätigung/Aktivierung der einzelnen Auswahlpunkte erreichen Sie mit der ENTER/PLAY-Taste. 3. Sind alle Einstellungen getätigt oder wollen Sie abbrechen, drücken Sie die SETUP-Taste erneut, um das Menü zu schließen. System Setup 1. TV SYSTEM: Hier wählen Sie das Farbsystem des angeschlossenen TV-Gerätes aus. Hinter NTSC verbirgt sich die amerikanische TV-Norm, in Deutschland muss normalerweise PAL ausgewählt sein. PAL-60 ist ein Wiedergabemodus, bei dem die Medien im NTSC-Format zwar mit einer 60-Hertz-Halbbildrate, aber mit PAL-Farbkodierung abgespielt werden. Wenn Sie ein TV-Gerät mit Multinormsystem verwenden, wählen Sie hier „AUTO". 2. TV-FORMAT: Das jeweilige Bildformat (z.B. 4:3 = Normal-TV, 16:9 = Breitbild-TV) wird von der gerade abgespielten Datei festgelegt. Bitte beachten Sie, dass das Bildformat nicht zwingend mit dem Ihres TV-Gerätes übereinstimmen muss. Folgende Einstellungen schaffen dann Abhilfe. ! ! ! 4:3/PS: Wählen Sie diese Betriebsart, wenn Sie einen Fernseher mit 4:3 Format angeschlossen haben. Wenn Sie eine Datei im Breitbildformat wiedergeben, wird diese bildschirmfüllend angezeigt, rechts und links werden aber Bildteile abgeschnitten. 4:3/LB: Wählen Sie diese Betriebsart, wenn Sie einen Fernseher mit 4:3 Format angeschlossen haben. Wenn Sie eine Datei im Breitbildformat wiedergeben, wird diese in seiner ganzen Breite angezeigt, oben und unten erscheinen aber schwarze Balken auf dem Schirm. 16:9: Wählen Sie diese Betriebsart, wenn Sie einen Breitbild-TV (16:9-Format) angeschlossen haben. -9- SYSTEM SETUP System Setup Diese Option stellt die Werkseinstellungen wieder her. Spracheinstellungen Wählen Sie hier die Sprache aus, die für die Bildschirmanzeige der Menüs und Statusinformationen verwendet werden sollen. Video Setup Hier können Sie die verschiedenen Parameter der Bilddarstellung regeln. Wählen Sie die gewünschte Funktion aus, dann drücken Sie die Enter - Taste und passen den Wert mit den [ ] [ ]-Tasten nach Ihrem Wunsch an. - 10 - SYSTEM SETUP Lautsprecher Einstellung: Downmix DOWNMIX bedeutet die Reduzierung des Tonsignals auf die 2-Kanal-Wiedergabe. Wenn Sie LT/RT auswählen, aktivieren Sie für die beiden Frontkanäle einen lebendigen, theaterähnlichen Effekt. Voraussetzung dafür ist aber, dass das Tonmaterial über PRO LOGIC Dolby Stereo Effekte verfügt. Wählen Sie STEREO für normale Stereowiedergabe. VSS steht für Virtual Surround Sound und erzeugt einen simulierten Surround Soundeffekt. Wünschen Sie Mehrkanalwiedergabe, müssen Sie DOWNMIX deaktivieren (AUS). Center Verzögerung / Rear Verzögerung Bei der Wiedergabe von Programmen im 5.1-Kanalformat können Sie über diese beiden Menüpunkte für die Signale des Center- und der hinteren Surroundkanäle Laufzeitverzögerungen einstellen. Dies simuliert einen größeren Abstand zwischen Boxen und Zuhörer und läßt den Raum dadurch größer erscheinen. Das kann den Suroundeffekt ggf. noch effizienter gestalten. Digital Einstellung: OP Modus Hier können Sie zwischen den Einstellungen „Line" und „RF" wählen. Im Line-Modus werden die Eingangssignale unverändert ausgegeben, im RF-Modus findet eine starke Komprimierung statt, die die Lautstärke deutlich erhöht. Wir empfehlen, diese Einstellung nicht nachts zu verwenden. Dynamik Kompression Hier können Sie die Dynamik des Sounds einstellen. Unter „Dynamik" verstehen wir hier den Lautstärkeunterschied zwischen sehr lauten und sehr leisen Passagen, also z. B. zwischen Explosionen und Flüstern. Zur Einschränkung des Dynamikbereichs stellen Sie den Regler aufwärts in Richtung „FULL", um die Dynamik zu komprimieren. Dual Mono Hier können Sie für Stereo-Signale verschiedene Audio-Modi auswählen: normales Stereobild, empfohlen ! STEREO: linker Stereokanal liegt am rechten und linken Frontlautsprecher an ! MONO L: rechter Stereokanal liegt am rechten und linken Frontlautsprecher an ! MONO R: ! MIX MONO: beide Frontkanäle führen identisches Monosignal Pro Logic Es gibt zwei unterschiedliche Dolby Pro Logic II Klangmodi, den Filmmodus und den Musikmodus. Hier können Sie den gewünschten Modus auswählen, oder den Pro Logic Modus abschalten. - 11 - SPEICHERKARTEN Abspielen von Audio-, Bild- und Videodateien auf Speicherkarten: ! ! ! Starten Sie das System wie üblich. Platzieren Sie die Speicherkarten (USB/SD/MMC/MS) mit den entsprechenden Dateien im Karteneinschub. Achten Sie dabei auf die richtige Lage (Beschriftung nach vorn). Die Wiedergabe beginnt automatisch. Auf dem Bildschirm eines angeschlossenen TVGeräts erhalten Sie folgende Übersicht über den Inhalt des Speichermediums: MP3 Audiodatei abspielen ! ! ! ! ! ! ! JPEG Bilddatei anzeigen AVI Videodatei abspielen In diesem Menü werden links die verschiedenen Ordner auf dem Speichermedium anzeigt. Rechts sehen Sie die Dateien im jeweils markierten Ordner. Mit den Navigationstasten [ ] [ ] bewegen Sie die Auswahl auf den gewünschten Ordner und drücken die ENTER-Taste. Nun werden die einzelnen Dateien im Ordner angezeigt. Mit der Navigationstaste [ ] gelangen Sie in die rechte Spalte. Wählen Sie hier Dateien mit den [ ] [ ] Tasten aus und starten Sie deren Wiedergabe, indem Sie die ENTER/PLAY - Taste drücken. Der Name der Datei, die gerade gespielt wird, wird in dem Anzeigefeld oben angezeigt. Ist die Wiedergabe einer Datei beendet, wechselt das Gerät zu nächsten. Mit der 1 Taste gelangen Sie wieder in die linke Ordnerspalte. Drücken Sie noch einmal die [ ] Taste, erreichen Sie die Medienschalter. Das Gerät unterscheidet Audio-, Video- und Bilderdateien, zeigt aber immer nur eine Dateiart an. Findet das Gerät beim Einlesen des Speichermediums mindestens eine passende Datei, wird das entsprechende Symbol als Taste dargestellt. Mit den Navigationstasten können Sie nun das Symbol der gewünschten Dateiart markieren. Drücken Sie die ENTER -Taste, um das Gerät nur noch Dateien des gewünschten Medientyps anzeigen zu lassen. Durch Drücken der REV oder FWD Taste aktivieren Sie während der Wiedergabe den Suchlauf (Wiedergabe mit hoher Geschwindigkeit) rückwärts oder vorwärts. Ist die gewünschte Stelle erreicht, drücken Sie die ENTER/PLAY - Taste. Die Wiedergabe wird dann mit normaler Geschwindigkeit fortgesetzt. Der Ton wird während des Suchlaufs stumm geschaltet, orientieren Sie sich an der Zeitanzeige im Display. Wiederholtes Drücken der REPEAT-Taste wechselt zwischen den verschiedenen Wiederholfunktionen: Datei abspielen, einzelne Datei wiederholen, alle Dateien eines Verzeichnisses wiederholen, alles wiederholen. Drücken Sie die [ ] oder [ ] Taste, um zur vorherigen / nächsten Datei zu springen. Drücken Sie die STOP-Taste, um die Wiedergabe zu beenden. - 12 - PROBLEMBEHANDLUNG PROBLEM System spielt nicht Kein Sound-Effekt im DVD/5.1 Ausgangsmodus Verzerrungen bei hohen Lautstärken. URSACHE 1. System ist nicht mit dem Stromnetz verbunden. 2. Das Gerät lässt sich nicht einschalten. LÖSUNG 1. Überprüfen Sie das Netzkabel. 2. Stellen Sie sicher, das der Netzschalter eingeschaltet ist. Stellen Sie sicher, dass sich der DVD-Player im 5.1-Modus befindet Stellen Sie am DVDPlayer den 5.1-Modus ein Die Audioquelle hat eine sehr hohe Ausgangsspannung Stellen Sie die Lautstärke niedriger ein. Anmerkung A: ! Die korrekte Kombination von Geräten an den Ein- und Ausgängen (sowohl der aktive Subwoofer als auch die Signalquelle, z.B. CD,MP3,VCD,DVD......) liefert optimale Klangqualität. Bitte beachten Sie die entsprechenden Bedienungsanleitungen der angeschlossenen Geräte. ! Manche DVD-Player haben einen höheren Ausgangspegel als üblich. Sollten bei hohen Lautstärken Verzerrungen auftreten, vermindern Sie die Lautstärke, um Beschädigungen am Verstärker oder den lautsprechern zu vermeiden. Anmerkung B: Wenn dieses Gerät starken äußeren Einflüssen ausgesetzt ist (z.B. mechanische Belastung, starke elektrostatische Einflüsse, Überspannungen bei Gewitter) oder wenn es nicht vorschriftsmäßig betrieben wird, können Fehlfunktionen auftreten. Sollte es dazu kommen, gehen Sie folgendermaßen vor: ! ! Bringen Sie das Gerät in den Standby-Betrieb und schalten Sie es danach wieder ein. Sollte letzteres zu keinem Ergebnis führen, schalten Sie den Netzschalter aus, ziehen den Netzstecker für ein paar Minuten aus der Steckdose und schalten das Gerät danach wieder ein. Dieses Gerät hat einen Selbstschutz gegen elektrostatische Einflüsse und alle Funktionen werden nach einem Neustart wieder hergestellt. - 13 - Technische Daten AUSGANGSLEISTUNG: Subwoofer (RMS) -----------------------------------------------------Front-/ Center-Lautsprecher (RMS) ------------------------------Maximale Ausgangsleistung (Impuls) ----------------------------Abmessungen (B x H x T) -------------------------------------------- 40 W 3x 15 W 200 W 970 x 200 x 130 mm MITGELIEFERTES ZUBEHÖR: Fernbedienung ---------------------------------------------------------Batterie / Knopfzelle --------------------------------------------------Cinch Videokabel (gelb) ---------------------------------------------Cinch Koaxialkabel (orange) ---------------------------------------Cinch Stereokabel-----------------------------------------------------Wandhalter --------------------------------------------------------------Bedienungsanleitung -------------------------------------------------- Technische Änderungen vorbehalten. - 14 - 1 Stk. 1 Stk. 1 Stk. 1 Stk. 1 Stk. 2 Stk. 1 Stk. Dear customer, thank you for choosing the Magnat DVS 4232. Please read the following information carefully before starting to use your DVS 4232. CONTENT Safetey precaution ------------------------------------------------------------------------- 16 Instructions for disposal ------------------------------------------------------------------- 16 Description of the unit --------------------------------------------------------------------- 17 Description of the remote ----------------------------------------------------------------- 18 Connections --------------------------------------------------------------------------------- 19 System basic operation -------------------------------------------------------------------- 20 System Setup ------------------------------------------------------------------------------Language Setup ----------------------------------------------------------------------Video Setup ---------------------------------------------------------------------------Speaker Setup ------------------------------------------------------------------------Digital Setup ---------------------------------------------------------------------------- 21 22 22 23 23 Memory cards ------------------------------------------------------------------------------- 24 Maintenance & troubleshooting --------------------------------------------------------- 25 Specifications ------------------------------------------------------------------------------- 26 - 15 - SAFETY PRECAUTION This symbol warns the user that high voltage is used within the device which can result in electric shock. ! This symbol makes the user aware that there are important notes in the enclosed instruction manual which must be observed. CAUTION RISK OF ELECTRIC SHOCK DO NOT OPEN ! ! ! ! ! ! ! ! ! ! ! ! ! ! ! ! Warning: Do not open! Risk of electric shock! To reduce the risk of fire or electric shock, do not expose this unit to rain or moisture. Please read the instruction manual carefully before use and keep it in a safe place. This device is only intended for use with 230 V/50 Hz AC voltage. Only operate the device at an ambient/room temperature between 0°C and 40°C. The ventilation slots should not be covered by any items (e.g. curtains, newspaper, etc.) in order to ensure sufficient ventilation for the device. Please do not position any sources of heat, such as radiators, ovens, naked flames or other devices that generate heat in close proximity to the device. The device and the remote control should not be exposed to dripping or splash water or high levels of humidity. No objects filled with liquids, such as vases, shall be places on the unit. In the event of contact with moisture or liquids remove the mains adapter immediately. Only clean the device using a dry cloth. Do not use any cleaning agents or chemical solvents when cleaning, as these could damage the surface of the device. Only open the device to remove the packaging foam from the end tubes. The mains cable must always be operational. The device should not continue to be operated if there is visible damage to the mains cable. Adamaged cable should not be repaired, but must be replaced. Do not connect or remove the mains cable with damp hands. Always refer to a qualified specialist for any maintenance or repair work. If the device is not going to be used for a prolonged period, it should be switched off at the mains. Please remove the mains plug in the event of thunderstorms. INSTRUCTIONS FOR DISPOSAL In accordance with European Directive 2002/96/EC all electrical and electronic appliances must be disposed of separately via local collection points. Please observe the local regulations and do not dispose of your old appliances with normal household waste. - 16 - DESCRIPTION OF THE UNIT FRONT VIEW Touch panel control 1 2 3 4 7 VO L + SD/MMC/MS 5 8 USB 6 9 VO L INP UT Note: The touch screen panel requires large area of sensible contact, we recommend user to use thumb to operate the panel for better control. BOTTOM VIEW 13 10 15 17 19 11 12 14 16 18 POWER AC IN AUX L TV L R R COAX 1 OPT 1 20 21 OPT 2 FUSE ON SUB. OUTPUT OFF VIDEO OUTPUT SUB. SWITCH COAX 2 ON OFF 22 1. Standby button 2. Master volume up button 3. Master volume down button 4. Play/Pause buttonr 5. Input select button 6. Remote sensor 7. LED Display 8. SD/MMC/MS card reader 9. USB Connector 10. AC Cord 11. Main Power Switch 12. Fuse 13. Video Output Connector 14. Subwoofer Output Connecto 15. Aux Input Connector 16. TV Input Connector 17. Coaxial1 Input Connector 18. Optical1 Input Connector 19. Optical2 Input Connector 20. Subwoofer Output Switch(ON/OFF) 21.Wall Mount Bracket 22. Coaxial2 Input Connector - 17 - DESCRIPTION OF THE REMOTE 1. Standby/Power: Turn the unit on or off. 2. Input: Recycle select DISK --OPTICAL 1 1 --OPTICAL 2 --COAXIAL 1--COAXIAL 2 0 +10 INPUT --AUX--TV input mode 2 3. 0~+10 Number key 1 3 2 Press to enter numbers, such as DVD part 3 number, etc. 5 6 4 4. Setup 7 8 9 Press to display the system setup picture on the screen. Thus, you can adjust the parameters 4 SD/USB SETUP LISTEN on the screen. You can also set up in similar 5 ways, depending on your needs. 6 5. SD/USB FW D R EV 7 Select SD or USB input mode. 8 6. [ ] [ ] [ ] [ ] ENTER/PLAY Press to display menu or system function on screen. P RE V 9 NE XT In player mode, press these buttons to move or select the function you need. 7. [REV] [FWD] PAUSE/STEP STOP 10 M.VOL + Press to rewind or forward the track. 8. Enter/Play M.VOL REPEAT Press to confirm the option selected by the FUNCTION 11 arrow buttons. Press to play the track. 9. [ PREV ] [NEXT] Press and return to the previous part or skip to the next part. 10. Pause/Step Press to pause the playback. Press this button to play a scene frame by frame. 11. Repeat When you are playing DISC, you can press this button to select a certain portions of the content to be played repeatedly. 12. Mute Turn on or off the sound 13. Listen Recycle select the listen mode: Pro-Logic ---Stereo---Vocal. 14. Stop Press to stop the track. 15. Master volume Master volume level up or down 16. Function The selection uses cycle loop. Choose LEFT, RIGHT, CENTER, SUB , BASS and TREBLE for level adjustment. To install / replace the batteries The remote control uses a pre-installed lithium battery. To prevent an anticipated discharge of the battery, we' ve inserted an insulating strip. Please pull it out prior to first operation. Should the r/c start to work unreliably replace the battery with a new one of the same type. Open the battery compartment. Pull out the battery mounting in the direction of arrow. Before you take out the empty battery, please memorise its position. The + marking must show upwards, otherwise the r/c will not work and may be damaged. Replace the cover. Note: Please discard the used batteries properly. Never throw batteries into fire. - 18 - 12 13 14 15 16 CONNECTIONS TV Subwoofer signal output POWER AC IN AUX L TV L R R COAX 1 OPT 1 OPT 2 FUSE ON SUB. OUTPUT OFF VIDEO OUTPUT SUB. SWITCH COAX 2 ON OFF Connect to any two channel (Right/Left) sound source/device. (E.g. TV, DVD, CD player, xBox, Ps2, Computer etc.) (Optical cable ---Not include) DVD PS2 VO L + MMC MS SD/MMC/MS SD USB VO L INP UT Connect to USB and SD/MMC/MS card. Note: ! Do not connect the power cord into an AC outlet until all connections are made and are correct. ! Please turn on the unit before turn on the external active subwoofer. ! Please turn off the external active subwoofer before turn off the unit. - 19 - SYSTEM BASIC OPERATION 1. ON/OFF Plug in the power cord to the outlet, switch the MAIN POWER to ON position at the back of the unit, the unit goes into standby mode, the LED displays "HELLO". Press STANDBY button on the front panel or on the remote control to start the operation of the system. The system will automatically detect any input signal. If there is no signal present, the LED will display "NO SIGNAL" . * Note: After shut off the unit, please wait at least 3 seconds before turn on it again. 2. INPUT MODE The system is not connect the USB or SD memory card: Press INPUT button on the front panel or on the remote control to cycle through the selections: OPTICAL 1 --OPTICAL 2 --COAXIAL 1--COAXIAL 2--AUX--TV--USB/SD/MS/MMC input mode. The system is connect the USB memory card: Press INPUT button on the front panel or on the remote control to cycle through the selections: OPTICAL 1 --OPTICAL 2 --COAXIAL 1--COAXIAL 2--AUX--TV--USB input mode. The system is connect the SD memory card: Press INPUT button on the front panel or on the remote control to cycle through the selections: OPTICAL 1 --OPTICAL 2 --COAXIAL 1--COAXIAL 2--AUX--TV--SD input mode. The system is connect the USB and SD memory card: Press INPUT button on the front panel or on the remote control to cycle through the selections: OPTICAL 1 --OPTICAL 2 --COAXIAL 1--COAXIAL 2--AUX--TV--USB input mode. The system will select the USB input signal preference, then you can press USB/SD button to select the SD signal. 3. LISTENING MODE Press LISTEN button on the remote control to cycle through the listening modes:Stereo --Vocal --Pro-Logic. 4. VOLUME ADJUSTMENT (1) Master volume adjustment Master volume is controlled by the MASTER VOLUME +/- button on the remote control or VOL +/VOL - button on the front panel. (2) Subject volume adjustment Press FUNCTION button repeatedly to recycle select subject volume : TREBLE --BASS --FL --FR --CENTER --SUBWOOFER. Then press MASTER VOLUME button to control subject volume level up or down. 5. MUTE Press the MUTE button on the remote control, the system goes into mute mode. Press MUTE button again to disable the mute mode. The mute function will also be canceled automatically by pressing the MASTER VOLUME +/- buttons. 6. SELECT SUBWOOFER OUTPUT To connect an external active subwoofer, connect the monaural input jack of your subwooer to the SUBWOOFER OUTPUT jack of this unit. If a subwoofer is connected the unit, switch the SUB. SWITCH at the rear panel in OFF position. (The system default SUB. SWITCH in ON position.) - 20 - SYSTEM SETUP The system can connect your TV use video output connector on the rear panel. Using the system setup menus: 1. Press the SETUP button on the remote control to display the SETUP menu as shown below. 2. Use the [ ] [ ] buttons to select one of the SETUP options, highlight your desired selection with in each SETUP menu and press ENTER/PLAY button to confirm. 3. To exit the menu and go to another SETUP menu, use [ ] [ ] button to select EXIT SETUP. System Setup Use [ ] [ ] [ ] [ ] buttons to select the highlighted mark to the option to be set, and use ENTER/PLAY button to confirm. 1. TV SYSTEM: To be selected in accordance with the color system of the TV to be connected. a) NTSC: For NTSC zone, you can select "NTSC". (Used in the USA, Canada and Japan) b) PAL 60: For PAL 60 uniform zone, you can select "PAL 60". c) PAL: For PAL uniform zone, you can select "PAL". (Used in Western Europe) d) AUTO: For multiple zone, you can select "AUTO". 2. TV TYPE: a) 4:3PS (full-image scanning): available of the TV with average dimension. When a wide-screen picture is played, the left and right sides of the picture will be deleted and the picture will be seen on the screen. b) 4:3LB (mailbox): please choose this option for a TV with average dimensions. When the widescreen picture is played, you will see black rims on the top and bottom of the TV screen. c) 16:09 (wide screen): choose this option if the system connects to a wide-screen TV. - 21 - SYSTEM SETUP System Setup DEFAULT: All functions resume initial statuses if you choose this option. Language Setup Select the language here, which is to be used for the screen display of the menus and the status information. Video Setup Here you can regulate the different parameters of the image representation. Please select the desired function, then press ENTER and adapt the value with the [ ] [ ]-keys according to your desire. - 22 - SYSTEM SETUP Speaker Setup: Downmix a) LT/RT: you can select this option to decrypt the signal so as to present a vivid theater effect, provided that your DISC contains PRO LOGIC Dolby stereo effect. b) STEREO: at 5.1 sound channel output, the audio outputs to 5 speakers and a sub-woofer. At 2 sound channel output, the audio outputs to left and right speakers. c) VSS(Virtual circumferential sound): if you play a DISC with 5.1 sound channel mechanism, the main amplifier outputs virtual circumferential effect. d) OFF: when select OFF, becomes 5.1 output mode. Center Delay This option allows you to set intermission delay time. Note: available only at 5.1 sound channel mode. Rear Delay This option allows you to adjust the setup of circumferential delay time. Note: available only at 5.1 sound channel mode. Das kann den Suroundeffekt ggf. noch effizienter gestalten. Digital Setup: OP Mode a) LINE OUT: To zip the inputted signals linearly. The volume is low and, therefore, you should use this option at nighttime. b) RF REMOD: Volume is high and is suitable for daytime. Dynamic Range You can change the zip mode to LINE OUTPUT in order to adjust linear zip radio and obtain the zip effects for different signals. If you choose FULL, the peak value of audio signal is minimum, and becomes maximum if you choose off. Note: This option is available only when the system is set as "5.1 sound channel". Dual Mono This option allows you to set the output methods for the left and right audio signals. There are 4 modes: stereo, left sound channel, right sound channel, and mixed sound channel, to be selected according to the AC-3 KARAOKE mode. Prologic a) MOVIE MODE: This option allows you to set Dolby Pro Logic II sound mode is movie. b) MUSIC MODE: This option allows you to set Dolby Pro Logic II sound mode is music. c) OFF: Turnoff the Dolby Pro Logic II sound mode. - 23 - MEMORY CARDS Playing audio, picture and video files stored on memory cards: ! ! ! Turn the system On as usual. Insert your flash memory card containing MP3 audio/JPEG files into the memory card slot. Note: The card only be inserted one way, push it in as far as, it will go until it locks in place. The system will read the information on the card. If the system connected TV, the screen show as following: Play MP3 audio file ! ! ! ! ! ! ! ! ! Show JPEG picture file Play AVI video file Press the ENTER/PLAY button on the remote control to begin playback. Or press [ ] button on the front panel to begin playback. Press [ ] button on the front panel to pause playback, press it again to resume playback. Press PREV or NEXT button repeatedly during playback to skip to the previous or next track. Press REV or FWD button to fast reverse or fast forward. (Fast forward): FF 2X FF4X FF8X FF20X PLAY (Fast reverse): FR 2X FR4X FR8X FR20X PLAY Press STOP button to stop playback. Press REPEAT button repeatedly to select one of the following repeat modes: REP ONE FOLDER REPEAT REP ALL PLAY Note: When playing SD/MMC, press the SD/USB button to select USB read mode, press the SD/USB button again to resume the previous mode. - 24 - MAINTENANCE & TROUBLESHOOTING ISSUE No sound from system No sound effect from speaker when choose DVD/5.1 output mode Distortion occurred when in high volume CAUSED BY 1. System does not connected with power. 2. The power does not switch on. Confirm DVD player is set up for 5.1 output The sound device has high level signal output SOLUTION 1. Check with the power plug. 2. Make sure the power switch at the back pane is on. Setup the DVD to output audio in 5.1 Turn down the master volume of the system Note A: ! ! The proper combination of input and output mode (Both the Active Subwoofer and the supply source, i.e CD,MP3,VCD,DVD......) will produce optimize sound quality. Please refer to both Instruction Manual. Some DVD device has high level signal output . When the Master Volume is turn high until the distortion occurs, please turn down the Master Volume to prevent damaged to the speaker unit and amplifier. Note B: When this product is subjected to strong external interference (mechanical shock, excessive static electricity, abnormal supply voltage due to lighting, etc.) or it is operated incorrectly, it may malfunction. If such a problem occurs, please do the following to reset the system. ! ! Set the system to STANDBY mode and turn the POWER on again. If the system is not restored using the previous operation, turn off the MAIN POWER switch, unplug the power cord plug for few minutes and try to on it again. The product has self-protection act when shocked by static electricity, and all functions can be used normally re-start. - 25 - SPECIFICATIONS OUTPUT POWER: Subwoofer (RMS) -----------------------------------------------------Front-/ Center-Speaker (RMS) ------------------------------------Maximal Output Power (peak) -------------------------------------Dimension (W x H x D) ----------------------------------------------- 40 W 3x 15 200 W 970 x 200 x 130 mm SCOPE OF DELIVERY: Remote control ---------------------------------------------------------- 1 Stk. Button-type battery ----------------------------------------------------- 1 Stk. RCA video cable (yellow) --------------------------------------------- 1 Stk. RCA coaxial cable (orange) ------------------------------------------ 1 Stk. RCA stereo cable ------------------------------------------------------- 1 Stk. Wall mount brackets --------------------------------------------------- 2 Stk. User manual -------------------------------------------------------------- 1 Stk. Subject to technical Change - 26 - Chère cliente, cher client, Merci d'avoir choisi le DVS 4232 de Magnat. Avant d'utiliser votre DVS 4232, veuillez lire attentivement les informations qui suivent. SOMMAIRE Consignes de sécurité importantes ------------------------------------------------------- 28 Instructions pour la mise au rebut----------------------------------------------------------- 28 Eléments de commande --------------------------------------------------------------------- 29 La télécommande ----------------------------------------------------------------------------- 30 Connexions ------------------------------------------------------------------------------------- 31 Fonctions principales ------------------------------------------------------------------------ 32 Configuration du système ------------------------------------------------------------------- 33 Réglages de la langue -------------------------------------------------------------- 34 Configuration vidéo ------------------------------------------------------------------ 34 Réglage des haut-parleurs -------------------------------------------------------- 35 Réglage numérique ----------------------------------------------------------------- 35 Cartes mémoires ------------------------------------------------------------------------------ 36 Aide en cas de dysfonctionnement ------------------------------------------------------- 37 Caractéristiques techniques ---------------------------------------------------------------- 38 - 27 - CONSIGNES DE SECURITE IMPORTANTES Ce symbole avertit l'utilisateur que l'appareil est traversé par des tensions élevées pouvant entraîner des décharges électriques dangereuses. ! Ce symbole indique à l'utilisateur de l'appareil que la notice d'utilisation jointe avec l'appareil contient des consignes importantes devant impérativement être respectées. CAUTION RISK OF ELECTRIC SHOCK DO NOT OPEN ! ! ! ! ! ! ! ! ! ! ! ! ! ! ! ! Attention! Ne pas ouvrir, risque d'électrocution! Afin de reduire les risques d’incendie ou de décharge électricque, ne pas exposer cet appareil à la pluie ou à l’humidité. Avant l'utilisation de l'appareil, lisez attentivement la notice d'utilisation et conservez-la. Cet appareil est exclusivement conçu pour une utilisation avec une tension alternative de 230 V /50 Hz. Utilisez uniquement l'appareil à une température ambiante comprise entre 0°C et 40°C. Les trous d'aération ne doivent pas être recouverts par des objets (par ex. des rideaux, journaux) afin de garantir une aération suffisante de l'appareil. Ne placez pas de sources de chaleur, telles que des radiateurs, des poêles, des flammes nues ou d'autres appareils produisant de la chaleur, à proximité de l'appareil. L'appareil et la télécommande ne doivent être exposés ni aux gouttes d'eau et projections d'eau ni à l'eau ni à une humidité de l'air importante. Ne posez jamais des vases ou d’autres récipients contenant des liquides sur l’appareil. En cas de contact avec un milieu humide ou liquide, retirer l'adaptateur secteur immédiatement. Nettoyer l'appareil avec un chiffon sec uniquement. Ne pas utiliser d'agents nettoyants ou de solvants chimiques, ceux-ci pouvant endommager la surface de l'appareil. Ne jamais ouvrir l'appareil. Le cordon d'alimentation doit toujours être en état de fonctionner. Ne pas continuer à utiliser l'appareil en cas de dommage visible sur le câble secteur. Un câble endommagé ne doit pas être réparé mais doit être remplacé. Ne pas brancher ou débrancher le cordon d'alimentation avec les mains humides. Toujours demander conseil à un spécialiste pour tout travail de maintenance ou de réparation. En cas de non utilisation prolongée, éteindre l'appareil à l'aide de l'interrupteur d'alimentation situé sur la face arrière de l'appareil. En cas d'orage, débranchez le cordon d'alimentation. INSTRUCTIONS POUR LA MISE AU REBUT Conformément à la directive européenne 2002/96/CE, tous les appareils électriques et électroniques usagés doivent être triés et déposés dans des points de collecte locaux. Veuillez respecter les réglementations locales et ne pas jeter vos appareils usagés avec les déchets ménagers. - 28 - ELEMENTS DE COMMANDE FACE AVANT: Clavier à effleurement 1 2 3 4 7 VO L + SD/MMC/MS 5 8 USB 6 9 VO L INP UT Attention! Afin de garantir un bon fonctionnement du clavier à effleurement, servez-vous de votre pouce pour appuyer sur les touches. FACE ARRIERE: 13 10 15 17 19 11 12 14 16 18 POWER AC IN AUX L TV L R R COAX 1 OPT 1 20 21 OPT 2 FUSE ON SUB. OUTPUT OFF VIDEO OUTPUT SUB. SWITCH COAX 2 ON OFF 22 1. Touche STANDBY 2. Touche Volume + 3. Touche Volume 4. Touche PLAY/PAUSE 5. Sélecteur d'entrée 6. Capteur pour télécommande 7. Affichage à LED 8. Lecteur de cartes SD/MMC/MS 9. Prise USB 10. Cordon d'alimentation 11. Interrupteur d'alimentation 12. 13. 14. 15. 16. 17. 18. 19. 20. 21. 22. - 29 - Fusible Sortie vidéo Sortie subwoofer Entrée AUX Entrée TV Entrée numérique COAXIAL1 Entrée numérique OPTICAL1 Entrée numérique OPTICAL2 Interrupteur sortie subwoofer (on/off) Fixation pour montage mural Entrée numérique COAXIAL2 LA TELECOMMANDE 1. STANDBY/POWER : Marche/arrêt de l'appareil. 2. INPUT : Une pression répétée permet de choisir entre 1 --DISK --OPTICAL 1 --OPTICAL 2 --COAXIAL 1 0 +10 INPUT --COAXIAL 2 --AUX --TV comme entrée. 2 3. Touches numériques de 0 à +10. 1 3 2 Saisie de chiffres. 3 4. SETUP : 5 6 4 Permet d'afficher le menu de configuration à 7 8 9 l'écran raccordé au système. Vous pouvez ainsi procéder à divers réglages du système. 4 SD/USB SETUP LISTEN 5. SD/USB : 5 Permet de restituer des supports de stockage 6 USB ou SD. FW D R EV 7 6. [ ] [ ] [ ] [ ]: 8 Ces touches permettent de naviguer dans les ENTER/PLAY menus de l'appareil. 7. [REV] [FWD] : PRE V 9 NE XT Avance rapide et retour rapide. 8. ENTER/PLAY : Permet de confirmer les options sélectionnées PAUSE/STEP STOP 10 M.VOL + dans les menus ou de démarrer la lecture. 9. [ PREV ] [NEXT] : M.VOL REPEAT Permet de passer à la plage suivante/précédente FUNCTION 11 pendant la lecture. 10. PAUSE/STEP : La fonction Pause permet d'obtenir une image fixe, chaque nouvelle pression sur cette touche permet d'afficher une image après l'autre. 11. REPEAT : Lors de la lecture des supports de stockage, cette touche permet de démarrer le mode de répétition 12. MUTE Permet de mettre l'appareil en sourdine. Une nouvelle pression permet de rétablir le son. 13. LISTEN : Cette touche permet de commuter entre les différents modes de lecture (en fonction du signal d'entrée) : Prologic -- Stereo -- Vocal 14. STOP : Permet d'arrêter la lecture. 15. MASTER VOLUME : Permet d'augmenter / de réduire le volume. 16. FUNCTION : Cette touche permet d'appeler les différents canaux de restitution ainsi que les aigus et les basses en vue de leur réglage. Mise en place/remplacement de la pile La télécommande est alimentée par une pile lithium préinstallée. Pour éviter une décharge de la pile avant la première utilisation de l'appareil, une bande isolante a été insérée. Retirez cette bande isolante avant la première utilisation. Si la télécommande ne fonctionne pas correctement, la pile doit être remplacée par une pile du même type. Ouvrez le compartiment de la pile. Retirez la pile du compartiment dans le sens de la flèche. Avant de retirer la pile usagée, notez sa position correcte. Pour que la télécommande fonctionne et qu'elle ne soit pas endommagée, le signe « + » doit être situé en haut. Remplacez la pile et refermez son compartiment. Les piles usagées sont des déchets dangereux et doivent être mises au rebut conformément aux réglementations en vigueur. - 30 - 12 13 14 15 16 CONNEXIONS TV Sortie subwoofer POWER AC IN AUX L TV L R R COAX 1 OPT 1 OPT 2 FUSE ON SUB. OUTPUT OFF VIDEO OUTPUT SUB. SWITCH COAX 2 ON OFF Branchement d'une source stéréo de votre choix (par ex. TV, DVD, lecteur CD, xBox, Ps2, ordinateur, etc.) (câble optique, non compris dans la livraison) ou DVD PS2 VO L + MMC MS SD/MMC/MS SD USB VO L INP UT Branchement de supports de stockage (USB et cartes SD/MMC/MS). Attention! ! Ne jamais brancher le câble d'alimentation dans une prise de courant tant que tous les autres branchements n'ont pas été effectués correctement. ! Allumer l'appareil avant de mettre en marche un subwoofer externe. ! Eteindre le subwoofer avant d'éteindre l'appareil. - 31 - FONCTIONS PRINCIPALES 1. ON/OFF Mettez l'interrupteur d'alimentation au dos de l'appareil sur « ON ». L'appareil est maintenant en mode de veille. Le message « HELLO » apparaît sur l'affichage à LED. Appuyez sur la touche Standby de l'appareil ou de la télécommande pour mettre en marche l'appareil. Le système détecte chaque signal d'entrée présent. Si aucun signal n'est présent, le message « NO SIGNAL » apparaît sur l'affichage à LED. Attention: après avoir éteint l'appareil, attendez au moins 3 secondes avant de le remettre en marche. 2. SELECTION DE L'ENTREE (APPUYER PLUSIEURS FOIS SUR LA TOUCHE INPUT): Le système n'est pas relié à la carte mémoire USB ou SD: Appuyez sur la touche INPUT de l'appareil ou de la télécommande pour sélectionner une entrée: OPTICAL 1 --OPTICAL 2 --COAXIAL 1--COAXIAL 2--AUX--TV--USB/SD/MS/MMC. Le système est relié à une carte mémoire USB: Appuyez sur la touche INPUT de l'appareil ou de la télécommande pour sélectionner une entrée: OPTICAL 1 --OPTICAL 2 --COAXIAL 1--COAXIAL 2--AUX--TV--USB. Le système est relié à une carte mémoire SD: Appuyez sur la touche INPUT de l'appareil ou de la télécommande pour sélectionner une entrée: OPTICAL 1 --OPTICAL 2 --COAXIAL 1--COAXIAL 2--AUX--TV--SD. Le système est relié à une carte mémoire USB et à une carte mémoire SD: Appuyez sur la touche INPUT de l'appareil ou de la télécommande pour sélectionner une entrée: OPTICAL 1 --OPTICAL 2 --COAXIAL 1--COAXIAL 2--AUX--TV--USB input. Pour les cartes en général, le système sélectionne l'entrée USB. Il vous est ensuite possible de sélectionner les cartes SD à l'aide de la touche USB/SD. 3. MODES D'ECOUTE : Appuyez sur la touche LISTEN pour commuter entre les différents mode d'écoute: --Stereo --Vocal --Pro-Logic. 4. REGLAGES DU NIVEAU SONORE: (1) Réglage du volume général: Le volume sonore peut être réglé à l'aide de la touche MASTER VOLUME +/- de la télécommande ou de la touche VOL +/VOL - située sur la face avant de l'appareil. (2) Réglages spéciaux du niveau sonore : Appuyez sur la touche FUNCTION pour sélectionner l'un des niveaux suivants : TREBLE -BASS --FRONT-L --FRONT-R --CENTER --SUBWOOFER. La touche MASTER VOLUME +/permet ensuite de régler le niveau sélectionné. 5. MUTE Une pression sur la touche MUTE de la télécommande permet de mettre en sourdine l'appareil, une pression supplémentaire permet de rétablir le son. La touche MASTER VOLUME +/- permet également de désactiver la sourdine. 6. UTILISATION D'UN SUBWOOFER EXTERNE : Pour connecter un subwoofer externe, reliez l'entrée cinch du subwoofer à l'entrée subwoofer de l'appareil. Mettez ensuite le SUB. SWITCH au dos de l'appareil en position « OFF » (désactive le subwoofer intégré). Départ usine, cet interrupteur est en position « ON ». - 32 - CONFIGURATION DU SYSTEME Il vous est possible de brancher votre téléviseur à la sortie vidéo située au dos de l'appareil. Commande des menus pour les réglages du système: 1. Une pression sur la touche SETUP de la télécommande permet d'accéder au menu suivant: 2. Les menus peuvent être consultés de manière intuitive à l'aide des touches de navigation [ ] [ La confirmation/l'activation des différents points de sélection est accessible à l'aide de la touch ENTER/PLAY. ][ ][ ] 3. Si tous les réglages ont été effectués ou si vous voulez les interrompre, appuyez à nouveau sur la touche SETUP pour fermer le menu. Configuration du système 1. SYSTEME TV : Sélectionnez ici le système de couleurs du téléviseur branché. La norme NTSC est la norme TV américaine, en Allemagne, la norme PAL doit normalement être sélectionnée. PAL-60 est un mode de restitution avec lequel les supports au format NTSC sont lus avec une fréquence de trame de 60 Hertz mais selon le codage des couleurs PAL. Si vous utilisez un téléviseur doté du système multinorme, sélectionnez «AUTO». 2. FORMAT TV : Chaque format d'image (par ex. 4:3 = écran normal, 16:9 = écran large) est déterminé par le fichier en cours de lecture. Notez que le format d'écran ne doit pas obligatoirement correspondre à celui de votre téléviseur. Les réglages suivants peuvent être utiles. · 4:3/PS: sélectionnez ce mode si vous avez branché un téléviseur au format 4:3. Si vous lisez un fichier au format écran large, celui-ci sera affiché sur tout l'écran, mais des parties de l'image seront coupées à droite et à gauche de l'écran. · 4:3/LB: sélectionnez ce mode si vous avez branché un téléviseur au format 4:3. Si vous lisez un fichier au format écran large, celui-ci sera affiché sur toute sa largeur, mais des bandes noires apparaîtront en haut et en bas de l'écran. - 33 - CONFIGURATION DU SYSTEME Configuration du système Cette option permet de rétablir les réglages par défaut. Réglages de la langue Sélectionnez la langue que vous souhaitez utiliser pour afficher à l'écran les menus et les informations d'état. Configuration vidéo Ce menu vous permet de régler les différents paramètres d'affichage à l'écran. Sélectionnez la fonction souhaitée puis appuyez sur la touche ENTER et ajustez la valeur selon vos préférences à l'aide des touches [ ] [ ]. - 34 - CONFIGURATION DU SYSTEME Réglage des haut-parleurs: Downmix DOWNMIX sert à réduire le signal sonore sur 2 canaux. Si vous sélectionnez LT/RT, activez un effet vivant et imitant une salle de théâtre pour les deux canaux frontaux. La condition requise est que le matériel sonore dispose des effets Dolby Stereo PRO LOGIC. Sélectionnez STEREO pour une restitution stéréo normale. VSS est l'abréviation de Virtual Surround Sound et produit un effet Surround simulé. Si vous souhaitez une restitution sur plusieurs canaux, vous devez désactiver DOWNMIX (OFF). Center Delay / Rear Delay Dans le cas de la restitution de programmes au format 5.1, ces deux points de menu vous permettent de paramétrer des temporisations pour les signaux des canaux Surround centraux et arrière. Cet effet simule une plus grande distance entre les enceintes et les auditeurs et, par conséquent, fait paraître la salle plus grande. Ceci permet d'optimiser l'effet Surround, le cas échéant. Réglage numérique: Mode OP Ce menu permet de choisir entre les paramètres « Line » et « RF ». Le mode Line permet de restituer les signaux d'entrée sans les modifier. En mode RF, une forte compression s'effectue. Elle augmente nettement le volume sonore. Nous vous recommandons de ne pas utiliser ce paramètre la nuit. Compression dynamique Ce menu permet de régler la dynamique du son. On comprend par « dynamique » la différence de volume sonore entre les passages très forts et ceux très bas, c'est-à-dire par ex. entre des explosions et des chuchotements. Pour limiter la plage dynamique, tournez le bouton en direction de « FULL ». Dual Mono Ce menu vous permet de sélectionner différents modes audio pour les signaux stéréo : STEREO : image stéréoscopique normale, recommandée MONO L : le canal stéréo de gauche est présent sur les haut-parleurs frontaux de droite et de gauche MONO R : le canal stéréo de droite est présent sur les haut-parleurs frontaux de droite et de gauche MIX MONO : les deux canaux frontaux présentent le même signal mono Pro Logic Il existe deux modes Dolby Pro Logic II différents : le mode Film et le mode Musique. Ce menu vous permet de sélectionner le mode souhaité ou de désactiver le mode Pro Logic. - 35 - CARTES MEMOIRES Lecture de fichiers audio, vidéo et d'image enregistrés sur des cartes mémoires: ! ! ! Démarrez le système comme d'habitude. Insérez dans le lecteur de cartes les cartes mémoires (USB/SD/MMC/MS) contenant les fichiers. Veillez à insérer les cartes correctement (face imprimée vers le haut). La lecture démarre automatiquement. Si vous avez branché un téléviseur, le contenu du support de stockage s'affiche à l'écran de la manière suivante MP3 Audiodatei abspielen ! ! ! ! ! ! ! JPEG Bilddatei anzeigen AVI Videodatei abspielen Dans ce menu, les différents dossiers contenus sur le support de stockage sont affichés à gauche. Les fichiers du dossier sélectionné sont affichés à droite. Pour sélectionner le dossier souhaité, utilisez les touches de navigation [ ] [ ] puis appuyez sur la touche ENTER. Les différents fichiers contenus dans le dossier s'affichent. Passez à la colonne de droite à l'aide de la touche de navigation [ ]. Sélectionnez les fichiers à l'aide des touches [ ] [ ] et lancez leur lecture en appuyant sur la touche ENTER/PLAY. Le nom du fichier en cours de lecture s'affiche en haut dans le champ d'affichage. Dès que la lecture d'un fichier est terminée, l'appareil passe au fichier suivant. La touche 1 vous permet de repasser à la colonne de gauche (dossiers). Si vous appuyez à nouveau sur la touche [ ], vous accédez aux sélecteurs de fichiers. L'appareil fait la différence entre les fichiers audio, vidéo et d'image mais il n'affiche qu'un type de fichier. Si l'appareil détecte au moins un fichier adéquat lors de la lecture du support de stockage, le symbole correspondant est représenté sous forme de touche. Les touches de navigation vous permettent de sélectionner le symbole du type de fichier souhaité. Appuyez sur la touche ENTER pour permettre à l'appareil d'afficher uniquement les fichiers du type souhaité. La touche REV ou FWD vous permet d'activer la recherche accélérée (lecture à grande vitesse) vers l'arrière ou vers l'avant pendant la lecture. Dès que le point recherché est atteint, appuyez sur la touche ENTER/PLAY. La lecture se poursuit à la vitesse normale. Pendant la recherche rapide, le son est mis en sourdine. Aidez-vous de l'affichage de la durée à l'écran. Une nouvelle pression sur la touche REPEAT permet de commuter entre les différentes fonctions de répétition : lecture d'un fichier, répétition d'un seul fichier, répétition de tous les fichiers dans un dossier, répétition de tous les fichiers. ] ou [ ] Taste. Pour passer au fichier précédent / suivant, appuyez sur la touche [ Pour arrêter la lecture, appuyez sur la touche STOP. - 36 - AIDE EN CAS DE DYSFONCTIONNEMENT PROBLEME Le système ne fonctionne pas. RAISON 1. Le système n'est pas branché au réseau électrique. 2. Impossible de mettre en marche l'appareil. Pas d'effet sonore en mode de sortie DVD/5.1 Assurez-vous que le lecteur de DVD est en mode 5.1. Distorsions lorsque le volume sonore est élevé. La source audio présente une tension de sortie très élevée. SOLUTION 1. Vérifiez le cordon d'alimentation. 2. Vérifiez que l'interrupteur d'alimentation est allumé. Paramétrez le mode 5.1 au niveau du lecteur de DVD. Baissez le volume. Remarque A : ! La combinaison correcte des appareils aux entrées et sorties (aussi bien le subwoofer actif que la source d'entrée, par ex. CD,MP3,VCD,DVD) produit un son d'une qualité optimale. Tenez compte des notices d'utilisation des appareils raccordés. ! Certains lecteurs de DVD présentent un niveau de sortie plus élevé que d'habitude. Si des distorsions apparaissent lorsque le volume est élevé, réduisez le volume afin d'éviter d'endommager l'amplificateur ou les haut-parleurs. Remarque B : ! Si cet appareil est exposé à de fortes influences extérieures (par ex. contrainte mécanique, fortes influences électrostatiques, surtensions en cas d'orage) ou s'il n'est pas utilisé conformément aux instructions, des dysfonctionnements peuvent apparaître. Si des dysfonctionnements apparaissent, procédez de la manière suivante : ! ! Mettez l'appareil en veille puis remettez-le en marche. Si l'appareil ne se rallume pas, éteignez l'interrupteur d'alimentation, débranchez le cordon d'alimentation de la prise de courant pendant quelques minutes puis remettez l'appareil en marche. Cet appareil est doté d'une autoprotection contre les influences électrostatiques. Toutes les fonctions sont rétablies après sa remise en marche. - 37 - CARACTERISTIQUES TECHNIQUES PUISSANCE DE SORTIE: Subwoofer (RMS) ------------------------------------------------------------Haut-parleurs frontaux/centraux (RMS) --------------------------------Puissance maximale de sortie (impulsion) ----------------------------Dimensions (largeur x hauteur x profondeur) -------------------------130 mm 40 W 3x 15 W 200 W 970 x 200 x ACCESSOIRES FOURNIS: Télécommande ---------------------------------------------------------------Pile / pile ronde ---------------------------------------------------------------Câble vidéo cinch (jaune) --------------------------------------------------Câble coaxial cinch (orange) ----------------------------------------------Câble stéréo cinch -----------------------------------------------------------Support mural -----------------------------------------------------------------Notice d'utilisation ------------------------------------------------------------- Sous réserve de modifications techniques. - 38 - 1x 1x 1x 1x 1x 2x 1x Gentile cliente, La ringraziamo per aver deciso di acquistare i Magnat DVS 4232. La preghiamo di leggere accuratamente le seguenti avvertenze prima di mettere in funzione il DVS 4232. INDICE Informazioni sulla sicurezza ----------------------------------------------------------------- 40 Istruzioni per lo smaltimento ---------------------------------------------------------------- 40 Descrizione dell'apparecchio --------------------------------------------------------------- 41 Descrizione del telecomando --------------------------------------------------------------- 42 Collegamenti ------------------------------------------------------------------------------------ 43 Funzioni base del sistema ------------------------------------------------------------------- 44 Impostazione del sistema ------------------------------------------------------------------- 45 Scelta della lingua --------------------------------------------------------------------- 46 Impostazioni video -------------------------------------------------------------------- 46 Impostazioni altoparlanti ------------------------------------------------------------- 47 Impostazioni digitali ------------------------------------------------------------------- 47 Schede di memoria --------------------------------------------------------------------------- 48 Manutenzione e risoluzione die problemi ------------------------------------------------ 49 Specifiche tecniche ---------------------------------------------------------------------------- 50 - 39 - INFORMAZIONI SULLA SICUREZZA Questo simbolo indica all'utente l'utilizzo di alta tensione all'interno del dispositivo con conseguente pericolo di shock elettrico: ! Questo simbolo indica all'utente la presenza all'interno di questo manuale d'istruzioni di informazioni importanti da osservare con cura. CAUTION RISK OF ELECTRIC SHOCK DO NOT OPEN ! ! ! ! Pericolo: non aprire! Rischio di shock elettrico! Per evitare rischi di incendio o shock elettrico non esporre l'unità alla pioggia o all'umidità. Leggere attentamente il manuale d'istruzioni prima dell'uso e riporlo al sicuro. L'apparecchio è utilizzabile esclusivamente con tensione a 230 V/50 Hz AC Si consiglia di utilizzare l'apparecchio solo a temperatura ambiente o comunque compresa fra 0° e 40° gradi Centigradi. ! Non coprire in alcun modo i fori di ventilazione (ad esempio con stoffa, carta di giornale, o altro) al fine di garantire sufficiente ventilazione al dispositivo. Non collocare vicino a fonti di calore, come termosifoni, forni, fiamme libere o altri elementi in grado di generare calore in prossimità dell'apparecchio. ! ! ! ! ! Non esporre l'apparecchio o il telecomando all'acqua o agli spruzzi né ad umidità eccessiva. ! ! Aprire il dispositivo solo per rimuovere il polistirolo dai condotti terminali. ! ! ! Non collegare o rimuovere il cavo di alimentazione con le mani umide. ! In caso di temporali estrarre il cavo di alimentazione dalla presa. Non collocare sopra l'apparecchio oggetti contenenti acqua, come ad esempio vasi. In caso di contatto con liquidi distaccare immediatamente l'adattatore dalla presa elettrica. Per la pulizia dell'apparecchio utilizzare solamente un panno asciutto. Non utilizzare prodotti o solventi chimici per la pulizia che potrebbero danneggiare la superficie del dispositivo. Il cavo di alimentazione deve essere integro. Interrompere il funzionamento dell'apparecchio in presenza di danni visibili al cavo di alimentazione. Rivolgersi sempre ad un tecnico qualificato per qualunque lavoro di manutenzione o riparazione. Se non si utilizza l'apparecchio per un lungo periodo di tempo, distaccare il cavo di alimentazione dalla presa. ISTRUZIONI PER LO SMALTIMENTO In accordo con quanto prescritto dalla Direttiva Europea 2002/96/EC, tutti gli apparecchi elettrici ed elettronici devono essere smaltiti separatamente presso le locali discariche. Si raccomanda di osservare le norme locali in merito e di non gettare i vecchi apparati insieme ai normali rifiuti domestici. - 40 - DESCRIZIONE DELL'APPARECCHIO VISTA FRONTALE: Pannello comandi touch panel 1 2 3 4 7 VO L + SD/MMC/MS 5 8 USB 6 9 VO L INP UT Importante! Il pannello comandi touch panel richiede ampiezza di contatto; raccomandiamo perciò agli utenti di utilizzare le dita per controllare al meglio le funzioni. VISTA POSTERIORE: 13 10 15 17 19 11 12 14 16 18 POWER AC IN AUX L TV L R R COAX 1 OPT 1 20 21 OPT 2 FUSE ON SUB. OUTPUT OFF VIDEO OUTPUT SUB. SWITCH COAX 2 ON OFF 22 1. Pulsante Standby 2. Volume principale + 3. Volume principale 4. Pulsante Play/Pausa 5. Pulsante selezione segnale in entrata 6. Sensore telecomando 7. Display a LED 8. Lettore di schede SD/MMC/MS 9. Ingresso USB 10. Cavo di alimentazione AC 11. Interruttore principale 12. Fusibile 13. Uscita video 14. Uscita subwoofer 15. Ingresso aux 16. Connettore segnale TV 17. Ingresso Coassiale 1 18. Ingresso ottico 1 19. Ingresso ottico 2 20. Interruttore uscita subwoofer (ON/OFF) 21. Staffa per montaggio a parete 22. Ingresso coassiale 2 - 41 - DESCRIZIONE DEL TELECOMANDO 1. STANDBY/ACCENSIONE: Accende e spegne l'unità. 2. INPUT: Permette di scegliere il modo di input fra 1 DISK --OPTICAL 1 --OPTICAL 2 0 +10 INPUT --COAXIAL 1--COAXIAL 2--AUX--TV 2 3. TASTI NUMERICI DA 0 A +10 1 3 2 Premere per inserire numeri corrispondenti, 3 ad esempio, alle sezioni numerate di un DVD. 5 6 4 4. SETUP 7 8 9 Premere per visualizzare sullo schermo la videata delle impostazioni di sistema. In questo modo è 4 SD/USB SETUP LISTEN possibile regolare i parametri direttamente da 5 schermo. Consente di personalizzare le 6 impostazioni secondo le proprie preferenze. FW D R EV 7 5. SD/USB 8 Seleziona i modi di input SD o USB. ENTER/PLAY 6. [ ] [ ] [ ] [ ]: Premere per visualizzare a schermo il menu o PRE V 9 NE XT le funzioni di sistema. In modalità riproduzione, premere questi pulsanti per selezionare la funzione desiderata. PAUSE/STEP STOP 10 M.VOL + 7. [REV] [FWD] Premere per avanti o indietro veloce nel brano M.VOL REPEAT 8. ENTER/PLAY FUNCTION 11 Premere per confermare l'opzione selezionata con i pulsanti a freccia. Premere per riprodurre il brano. 9. [ PREV ] [NEXT] Premere per tornare alla sezione precedente o saltare alla successiva. 10. PAUSE/STEP Premere per fermare la riproduzione. Premere per riprodurre una scena sequenza per sequenza. 11. REPEAT Durante la riproduzione di un disco, premere questo pulsante per selezionare porzioni di contenuti da riprodurre in continuo. 12. MUTE Disattiva o ripristina l'audio. 13. LISTEN Consente di selezionare il modo di ascolto: Pro-Logic ---Stereo---Vocal. 14. STOP Premere per fermare la riproduzione. 15. MASTER VOLUME Aumenta o diminuisce il volume principale 16. FUNCTION Introdurre/sostituire la batteria Il telecomando è alimentato da una batteria al litio preinstallata. Per prevenire che si scarichi prima di utilizzare l'apparecchio è strata introdotta una fascia isolante. Si prega di rimuoverla prima dell'uso. Nel caso in cui il telecomando non dovesse funzionare correttamente è necessario sostituire la batteria con una dello stesso tipo. Aprire l'alloggiamento per la batteria. Estrarre la batteria dall'alloggiamento seguendo la direzione della freccia. Prima di rimuovere la batteria scarica, memorizzare esattamente la posizione. Il simbolo "+" deve essere rivolto verso l'alto, altrimenti il telecomando non funziona e si potrebbe addirittura danneggiare. Sostituire la batteria e rispingere indietro l'alloggiamento. Smaltimento della batteria Le batterie esauste sono da considerarsi rifiuti speciali e devono essere smaltite secondo le regolamentazioni attuali. - 42 - 12 13 14 15 16 COLLEGAMENTI TV Uscita segnale subwoofer POWER AC IN AUX L TV L R R COAX 1 OPT 1 OPT 2 FUSE ON SUB. OUTPUT OFF VIDEO OUTPUT SUB. SWITCH COAX 2 ON OFF Collegare a qualsiasi dispositivo/sorgente con due canali (sinistro/destro), come TV, DVD, lettore CD,xBox, Ps2, Computer ecc.) (Cavo ottico non incluso) o DVD PS2 VO L + MMC MS SD/MMC/MS SD USB VO L INP UT Collegamento di dispositivo USB e scheda SD/MMC/MS ! ! ! Importante: Non collegare il cavo di alimentazione alla presa AC fino al completamento delle connessioni e alla verifica della loro correttezza. Accendere l'unità prima di accendere il subwoofer attivo esterno. Spegnere il subwoofer attivo prima di spegnere l'unità. - 43 - FUNZIONI BASE DEL SISTEMA 1. ON/OFF Inserire il cavo di alimentazione nella presa, posizionare l'interruttore principale (situato sul retro dell'apparecchio) su ON: l'unità entra nel modo standby e il LED mostra la scritta “HELLO”. Premere il pulsante STANDBY dal pannello frontale o dal telecomando per avviare il sistema. L'unità rileverà automaticamente qualsiasi segnale di input. Se non è presente alcun segnale, sul display a LED apparirà la scritta “NO SIGNAL”. * Importante: dopo aver spento l'apparecchio attendere almeno 3 secondi prima di accenderlo nuovamente. 2. MODI DI INPUT Al sistema non è collegato alcune dispositivo USB o scheda di memoria SD: Premere il pulsante INPUT sul pannello frontale o sul telecomando per scorrere le opzioni di input: OPTICAL 1 --OPTICAL 2 --COAXIAL 1--COAXIAL 2--AUX--TV--USB/SD/MS/MMC. Il sistema è collegato a un dispositivo USB-scheda di memoria: Premere il pulsante INPUT sul pannello frontale o sul telecomando per scorrere le opzioni di input: OPTICAL 1 --OPTICAL 2 --COAXIAL 1--COAXIAL 2--AUX--TV--USB. Il sistema è collegato a una scheda di memoria SD: Premere il pulsante INPUT sul pannello frontale o sul telecomando per scorrere le opzioni di input: OPTICAL 1 --OPTICAL 2 --COAXIAL 1--COAXIAL 2--AUX--TV--SD. Il sistema è collegato a un dispositivo USB e a una scheda di memoria SD: Premere il pulsante INPUT sul pannello frontale o sul telecomando per scorrere le opzioni di input: OPTICAL 1 --OPTICAL 2 --COAXIAL 1--COAXIAL 2--AUX--TV--USB. Il sistema selezionerà le preferenze per il segnale di input USB, a questo punto è possibile premere il pulsante USB/SD per selezionare il segnale SD. 3. MODO DI ASCOLTO Premere il pulsante LISTEN sul telecomando per scorrere le opzioni di ascolto: Stereo --Vocal --Pro-Logic. 4. REGOLAZIONE VOLUME (1) Regolazione volume principale Il volume principale si regola tramite il pulsante MASTER VOLUME +/- sul telecomando o il pulsante VOL +/VOL – sul pannello frontale. (2) Impostazione volume singoli elementi Premere ripetutamente il pulsante FUNCTION per selezionare il volume dei singoli elementi: TREBLE --BASS --FL --FR --CENTER --SUBWOOFER. Premere il pulsante MASTER VOLUME per aumentare o diminuire il volume dei singoli elementi. 5. MUTE Premere il pulsante MUTE sul telecomando per attivare il modo Mute. Premere nuovamente il pulsante MUTE per disabilitare la funzione. Anche premendo i pulsanti MASTER VOLUME +/- si disabilita automaticamente la funzione Mute. 6. SELEZIONE USCITA SUBWOOFER Per collegare un subwoofer attivo esterno, inserire il connettore d'ingresso jack monoaurale del vostro subwoofer nell'uscita jack per il subwoofer dell'unità. Se all'unità è collegato un subwoofer commutare l'interruttore SUB.SWITCH in posizione OFF. (La posizione predefinita dell'interruttore SUB.SWITCH è ON). - 44 - IMPOSTAZIONE DEL SISTEMA Il sistema è collegabile al vostro apparecchio TV mediante il connettore video posto sul pannello posteriore. Utilizzo dei menu impostazioni: 1. Premere il pulsante SETUP sul telecomando per visualizzare il relativo menu illustrato 2. Usare i pulsanti [ ] [ ] [ ] [ ] per selezionare una delle opzioni di SETUP, evidenziare la selezione desiderata in ciascun menu SETUP e premere il pulsante ENTER/PLAY per confermare. 3. Per uscire dal menu ed accedere a un altro menu SETUP utilizzare EXIT SETUP. Impostazione del sistema Usare i pulsanti [ ] [ ] [ ] [ ] per selezionare l'elemento evidenziato che si desidera impostare e confermare con il pulsante ENTER/PLAY. 1. TV SYSTEM: selezionare l'opzione corrispondente al sistema colore dell'apparecchio TV da collegare. a) NTSC: per le zone NTSC selezionare "NTSC". (Sistema usato in USA, Canada e Giappone) b) PAL 60: per la zona omogenea PAL 60, selezionare "PAL 60". c) PAL: per la zona omogenea PAL, selezionare "PAL". (Sistema usato in Europa occidentale) d) AUTO: per più zone, selezionare "AUTO". 2. TIPO DI APPARECCHIO TV: a) 4:3PS (scansione full-image): disponibile nei TV in formato tradizionale. Quando si riproduce un'immagine widescreen i lati sinistro e destro vengono tagliati. b) 4:3LB (formato mailbox): scegliere questa opzione per i TV in formato tradizionale. Quando si riproduce un'immagine widescreen si osservano sullo schermo televisivo bande nere in alto e in basso. 16:09 (widescreen): scegliere questa opzione se il sistema è collegato a un televisore widescreen. c) 16:9: Wählen Sie diese Betriebsart, wenn Sie einen Breitbild-TV (16:9-Format) angeschlossen haben. - 45 - IMPOSTAZIONE DEL SISTEMA Impostazione del sistema DEFAULT: scegliendo quest'opzione, tutte le funzioni tornano alle impostazioni iniziali. Impostazione lingua Selezionare la lingua da utilizzare per visualizzare a schermo i menu e le informazioni sullo stato. Impostazione video Da qui è possibile regolare i diversi parametri per la rappresentazione delle immagini. Scegliere la funzione desiderata, premere ENTER e adattare il valore premendo i pulsanti [ ] [ ] secondo le preferenze personali. - 46 - IMPOSTAZIONE DEL SISTEMA Impostazione altoparlanti: Downmix a) LT/RT: selezionare questa opzione per decriptare il segnale in modo da ottenere un esaltante effetto teatro. È necessario che il vostro disco contenga gli effetti stereo Dolby PRO LOGIC. b) STEREO: con la modalità uscita audio a 5.1 canali, il sistema emette il suono attraverso 5 altoparlanti e un subwoofer. Con la modalità uscita audio a 2 canali, il sistema emette il suono attraverso gli altoparlanti sinistro e destro. c) VSS (Virtual Surround Sound): quando si riproduce un disco con sistema audio a 5.1 canali, l'amplificatore centrale sprigiona un effetto avvolgente. d) OFF: selezionando OFF si passa alla modalità di uscita 5.1. Center Delay: questa opzione consente di definire i tempi di ritardo intermedi. Importante: funzione disponibile solo nel modo audio a 5.1 canali. Rear Delay: questa opzione consente di regolare l'impostazione relativa al tempo di ritardo dell'effetto surround. Impostazione digitale: OP Mode a) LINE OUT: comprime i segnali in modo lineare. Il livello del volume è basso, pertanto questa opzione è di particolare utilità durante le ore notturne. b) RF REMOD: il livello del volume è elevato, pertanto questa opzione è più adatta per le ore diurne. Dynamic Range è possibile modificare il modo di compressione in LINE OUTPUT al fine di regolare il segnale radio compresso e ottenere effetti di compressione per i diversi segnali. Scegliendo FULL, il valore di picco del segnale audio risulterà minimo, mentre scegliendo OFF sarà massimo. Importante: opzione disponibile solo quando il sistema è impostato su “audio a 5.1 canali”. Dual Mono questa opzione consente di definire i modi di output per i segnali audio sinistro e destro. Sono disponibili 4 modi: stereo, canale audio sinistro, canale audio destro e canale audio mixato. Effettuare la selezione in conformità al modo AC-3 KARAOKE. Prologic a) MOVIE MODE: questa opzione consente di impostare la modalità audio Dolby Pro Logic II per i film. b) MUSIC MODE: questa opzione consente di impostare la modalità audio Dolby Pro Logic II per la - 47 - SCHEDE DI MEMORIA Riproduzione di file contenenti audio, immagini e video salvati su schede di memoria: ! ! ! Accendere il sistema come di consueto con il pulsante ON. Inserire la scheda flash memory contenente i file audio MP3 o i file JPEG nell'apposito alloggiamento per le schede di memoria. Importante: la memory card può essere inserita da un solo lato, spingerla fino al completo inserimento. Il sistema leggerà le informazioni presenti sulla scheda. MP3 Audiodatei abspielen ! ! ! ! ! ! JPEG Bilddatei anzeigen AVI Videodatei abspielen Premere il pulsante ENTER/PLAY sul telecomando per avviare la riproduzione; o in alternativa premere il pulsante [ ] [ ] situato sul pannello frontale. Premere il pulsante [ ] sul pannello frontale per sospendere la riproduzione, premerlo nuovamente per riprendere la riproduzione. Premere ripetutamente i pulsanti PREV o NEXT durante la riproduzione per saltare al brano precedente o successivo. Premere i pulsanti REV o FWD per l'avanzamento o il ritorno veloci. (Avanti veloce - FF): FF 2X FF4X FF8X FF20X PLAY (Indietro veloce - FR): FR 2X FR4X FR8X FR20X PLAY Premere il pulsante STOP per interrompere la riproduzione. Premere ripetutamente il pulsante REPEAT per selezionare uno dei seguenti modi di ripetizione: REP ONE (ripeti uno) FOLDER REPEAT (ripeti cartella) REP ALL (ripeti tutti) PLAY Importante! durante la riproduzione SD/MMC, premere il pulsante SD/USB per selezionare il modo di lettura USB, premere nuovamente il pulsante SD/USB per riprendere la precedente modalità di riproduzione. - 48 - MANUTENZIONE E RISOLUZIONE DIE PROBLEMI PROBLEMA CAUSA Il sistema non emette alcun suono 1. Il sistema non è collegato alla presa di alimentazione. 2. L'interruttore di alimentazione non è acceso. Nessun segnale audio dagli altoparlanti quando si selezione la modalità DVD/5.1. Verificare che il lettore DVD sia impostato su audio 5.1. A livello di volume elevato si osservano distorsioni nella riproduzione. Il segnale in uscita dal dispositivo audio è eccessivamente elevato. SOLUZIONE 1. Verificare il cavo e la presa di alimentazione. 2. Accertarsi che l'interruttore posto sul pannello posteriore sia su ON. Impostare il DVD su audio 5.1. Diminuire il volume principale del sistema. Nota A: ! ! La giusta combinazione fra modo input e output (vale a dire fra Active Subwoofer e sorgente sonora, come CD, MP3, VCD, DVD, ecc.) assicura una qualità audio ottimale. A tale scopo, si consiglia di consultare i relativi manuali d'istruzioni. Alcuni apparecchi DVD hanno un segnale in uscita eccessivamente elevato. Quando il volume principale è regolato a livello alto può verificarsi una distorsione: ridurre il volume principale per evitare danni agli altoparlanti e all'amplificatore. Nota B: Eventi esterni di grave entità (shock meccanico, eccessiva elettricità statica, surplus di voltaggio imputabile a fulmini, o altro), oppure un utilizzato scorretto dell'apparecchio possono causare malfunzionamenti. Nel caso in cui si verifichino tali problemi eseguire il reset del sistema mediante la seguente procedura: ! ! Impostare il sistema in STANDBY e riaccenderlo nuovamente. Se non si è riusciti a ripristinare il sistema attraverso la precedente manovra, spegnere l'interruttore principale, staccare il cavo di alimentazione dalla presa per alcuni minuti e riprovare. Il prodotto è dotato di un sistema di auto-protezione contro i danni da elettricità statica e dopo il riavvio tutte le funzioni possono essere utilizzate normalmente. - 49 - SPECIFICHE TECNICHE POTENZA D'USCITA: Subwoofer (RMS) ---------------------------------------------------------------------- 40 W Altoparlante Frontale/Centrale (RMS) -------------------------------------------- 3x 15 Potenza d'uscita massima (picco) ------------------------------------------------- 200 W Dimensioni (L x A x P) --------------------------------------------- 970 x 200 x 130 mm CONTENUTO DELLA CONFEZIONE: Telecomando ---------------------------------------------------------------------------- 1 pz Batteria a bottone ---------------------------------------------------------------------- 1 pz Cavo video RCA (giallo) -------------------------------------------------------------- 1 pz Cavo coassiale RCA (arancione) -------------------------------------------------- 1 pz Cavo stereo RCA ---------------------------------------------------------------------- 1 pz Staffe per montaggio a parete------------------------------------------------------ 2 pz Manuale utente ------------------------------------------------------------------------- 1 pz Documento soggetto a modifiche tecniche - 50 - Estimado cliente, gracias por haber seleccionado il Magnat DVS 4232. Lea la siguiente información detenidamente antes de comenzar a utilizar su DVS 4232. CONTENIDO Instrucciones de seguridad-------------------------------------------------------------------52 Eliminación de residuos-----------------------------------------------------------------------52 Controles del equipo--------------------------------------------------------------------------- 53 Control remoto-----------------------------------------------------------------------------------54 Conexiones --------------------------------------------------------------------------------------55 Principales funciones del equipo------------------------------------------------------------56 Instalación del sistema------------------------------------------------------------------------ 57 Idioma--------------------------------------------------------------------------------- 58 Vídeo----------------------------------------------------------------------------------- 58 Altavoces ----------------------------------------------------------------------------- 59 Ajuste digital--------------------------------------------------------------------------59 Tarjetas de memoria--------------------------------------------------------------------------- 60 Resolución de problemas-------------------------------------------------------------------- 61 Datos técnicos---------------------------------------------------------------------------------- 62 - 51 - PRECAUCIONES IMPORTANTES DE SEGURIDAD Este símbolo advierte al usuario de la presencia de altos niveles de tensión utilizados en el dispositivo, que podrían provocar descargas eléctricas. ! Este símbolo advierte al usuario de la existencia de notas importantes en el manual de instrucciones adjunto que deben respetarse. CAUTION RISK OF ELECTRIC SHOCK DO NOT OPEN ! ! ! ! ! ! ! ! ! ! ! ! ! ! ! ! ¡Atención! No abra es dispositivo! Para evitar riesgos de incendio y descarga electrica, rogamos no exponer este aparato a la lluvia o la humedas. Lea detenidamente el manual de instrucciones antes del uso y manténgalo en un lugar seguro. Este dispositivo debe utilizarse únicamente con voltaje de 230 V / 50 Hz AC. Utilice el dispositivo únicamente a temperatura ambiente, entre 0ºC y 40ºC.No cubra las ranuras de ventilación con ningún objeto (p. ej. cortinas, periódicos, etc.) para asegurar la ventilación suficiente en el dispositivo. No coloque fuentes de calor, como radiadores, hornos, llamas desnudas u otros dispositivos que generen calor en las proximidades del dispositivo. No exponga el dispositivo y el control remoto a derrames o salpicaduras de agua, o altos niveles de humedad. El dispositivo tempoco debe utilizarse para colocar floreros u otros recipientes llenados de díquido. En caso de contacto con humedad o líquidos, retire inmediatamente el adaptador principal. Limpie el dispositivo utilizando únicamente un paño seco. No utilice productos de limpieza o disolventes químicos durante la limpieza. Ello podría dañar la superficie del dispositivo. No abra el dispositivo. El cable de alimentación debe funcionar correctamente. No continúe utilizando el dispositivo si existen señales visibles de deterioro en el cable de alimentación. Un cable deteriorado no debe ser reparado, sino reemplazado. No conecte ni extraiga el cable de alimentación con las manos húmedas. Consulte siempre con un especializar cualificado para cualquier operación de mantenimiento o reparación. Si no piensa utilizar el dispositivo durante un periodo prolongado de tiempo, apáguelo utilizando el interruptor de encendido que se encuentra en la parte posterior del dispositivo. Extraiga la toma de alimentación si se producen tormentas. INSTRUCCIONES DE ELIMINACIÓN De acuerdo con la Directiva Europea 2002/96/EC, todos los aparatos eléctricos y electrónicos deben ser eliminados por medio de puntos de recogida locales e independientes. Respete la normativa local y no elimine los aparatos usados junto a los residuos domésticos. - 52 - CONTROLES DEL EQUIPO FRENTE: Teclado táctil 1 2 3 4 7 VO L + SD/MMC/MS 5 8 USB 6 9 VO L INP UT Atención: Para asegurar el funcionamiento seguro del teclado táctil, operarlo utilizando los pulgares. PARTE POSTERIOR: 13 10 15 17 19 11 12 14 16 18 POWER AC IN AUX L TV L R R COAX 1 OPT 1 20 21 OPT 2 FUSE ON SUB. OUTPUT OFF VIDEO OUTPUT SUB. SWITCH COAX 2 ON OFF 22 1. 2. 3. 4. 5. 6. 7. 8. 9. Botón de STANDBY Botón de Volumen + Botón de Volumen Botón de PLAY/PAUSE Selector de entrada Sensor del control remoto Pantalla LED Lector de tarjeta SD/MMC/MS Puerto USB 10. Cable de la red 11. Interruptor de encendido 12. 13. 14. 15. 16. 17. 18. 19. 20. Fusible Salida video Salida subwoofer Entrada AUX Entrada TV Entrada digital COAXIAL1 Entrada digital OPTICAL1 Entrada digital OPTICAL2 Interruptor salida subwoofer (encendido/apagado) 21. Elemento para fijación a pared 22. Entrada digital COAXIAL2 - 53 - CONTROL REMOTO 1. STANDBY/POWER: Permite encender o apagar el equipo. 2. INPUT: Presionar para seleccionar una de las siguientes 1 opciones de entrada: 0 +10 INPUT --DISCO --OPTICAL 1 --OPTICAL 2 --COAXIAL 1 2 --COAXIAL 2 --AUX --TV 1 3 2 3. Cifras 0 a 10 3 Permiten ingresar cifras. 5 6 4 4. SETUP: 7 8 9 Muestra el menú de instalación en la pantalla conectada. Mediante el menú es posible 4 SD/USB SETUP LISTEN seleccionar diferentes opciones del sistema. 5 5. SD/USB: 6 Permite seleccionar la reproducción desde FW D R EV 7 medios de almacenamiento USB o SD. 8 6. [ ] [ ] [ ] [ ]: ENTER/PLAY Estos botones permiten navegar dentro del menú del equipo. PRE V 9 NE XT 7. [REV] [FWD]: Para retroceder o avanzar rápidamente. 8. ENTER/PLAY: PAUSE/STEP STOP 10 M.VOL + Para confirmar las opciones del menú seleccionadas y para iniciar la reproducción. M.VOL REPEAT 9. [ PREV ] [NEXT]: FUNCTION 11 Para reproducir el título anterior/siguiente. 10. PAUSE/STEP: La función de pausa congela la imagen. Si se vuelve a presionar el botón, la reproducción avanza de imagen en imagen. 11. REPEAT: Cuando se reproducen títulos desde medios de almacenamiento, este botón permite iniciar el modo de repetición. 12. MUTE: Silencia el audio del equipo. Si se vuelve a presionar el botón, se recupera el audio. 13. LISTEN: Este botón permite cambiar de modo de reproducción (depende de la señal de entrada): Prologic -- Stereo -- Vocal 14. STOP: Para finalizar la reproducción. 15. MASTER VOLUME: Para subir/bajar el volumen. 16. FUNKTION: Permite ver los diferentes canales de reproducción, así como los agudos y bajos para su ajuste posterior Inserción/sustitución de las baterías El control remoto funciona con una batería del litio preinstalada. Se ha insertado una tira aislante para evitar que la batería se agote antes de utilizar el dispositivo. Retire la tira antes de utilizar el aparato por primera vez. Si el control remoto no funciona bien, sustituya la batería por otra nueva del mismo tipo. Abra el compartimento de las baterías. Extraiga las baterías del compartimento en la dirección de la flecha. Antes de retirar las baterías vacías, observe su posición. El símbolo “+” debe orientarse hacia arriba. De lo contrario, el control remoto no funcionará y podría resultar dañado. Cambie la batería y cierre de nuevo el compartimento. Eliminación de la batería Las baterías usadas son un residuo peligroso y deben ser eliminadas de acuerdo con las normativas actuales. - 54 - 12 13 14 15 16 CONEXIONES TV Salida de subwoofer POWER AC IN AUX L TV L R R COAX 1 OPT 1 OPT 2 FUSE ON SUB. OUTPUT OFF VIDEO OUTPUT SUB. SWITCH COAX 2 ON OFF Conexión con cualquier fuente de señal estéreo (p.ej. TV, DVD, reproductor de CD, xBox, Ps2, ordenador, etc.) (No incluye cable óptico.) o DVD PS2 VO L + MMC MS SD/MMC/MS SD USB VO L INP UT Conexión con medios de almacenamiento (USB y tarjetas SD/MMC/MS) ! ! ! Importante: No enchufar nunca el cable a la red eléctrica hasta no haber terminado correctamente con todas las demás conexiones. Encender el equipo antes de poner en funcionamiento un subwoofer externo. Apagar el subwoofer externo antes de apagar el equipo. - 55 - PRINCIPALES FUNCIONES DEL EQUIPO 1. ENCENDIDO/APAGADO Llevar el interruptor de encendido que se encuentra en la parte posterior del equipo a la posición “ON”. El equipo pasa así al modo standby o de espera, y en la pantalla LED se lee “HELLO”. Para encender el equipo basta con presionar el botón de standby del equipo o del control remoto. El sistema reconoce todas las señales de entrada de los dispositivos conectados. Si no recibe ninguna señal, en la pantalla LED aparece el mensaje “NO SIGNAL”. Importante: Después de apagar el equipo, esperar por lo menos 3 segundos antes de volver a encenderlo. 2. SELECCION DE LA ENTRADA (PRESIONAR REPETIDAMENTE EL BOTÓN INPUT): Cuando el sistema no está conectado con una tarjeta de memoria USB o SD: Presionar el botón INPUT del equipo o del control remoto para seleccionar la entrada: OPTICAL 1 --OPTICAL 2 --COAXIAL 1--COAXIAL 2--AUX--TV--USB/SD/MS/MMC Cuando el sistema está conectado con una tarjeta de memoria USB: Presionar el botón INPUT del equipo o del control remoto para seleccionar la entrada: OPTICAL 1 --OPTICAL 2 --COAXIAL 1--COAXIAL 2--AUX--TV--USB Cuando el sistema está conectado con una tarjeta de memoria SD: Presionar el botón INPUT del equipo o del control remoto para seleccionar la entrada: OPTICAL 1 --OPTICAL 2 --COAXIAL 1--COAXIAL 2--AUX--TV--SD Cuando el sistema está conectado con una tarjeta de memoria USB o SD: Presionar el botón INPUT del equipo o del control remoto para seleccionar la entrada: OPTICAL 1 --OPTICAL 2 --COAXIAL 1--COAXIAL 2--AUX--TV--USB. El sistema selecciona para las tarjetas en general la entrada USB. Posteriormente se pueden seleccionar tarjetas SD por medio del botón USB/SD. 3. TIPOS DE REPRODUCCION: Presionar el botón LISTEN para cambiar de modo de reproducción: --Stereo --Vocal --Pro-Logic 4. AJUSTES DE NIVEL: (1) Ajuste del volumen general: El volumen se ajusta con el botón MASTER VOLUME +/- en el control remoto o VOL +/VOL – en el frente del equipo. (2) Ajustes especiales de nivel: Presionar el botón FUNCTION para seleccionar uno de los siguientes niveles: TREBLE -BASS --FRONT-L --FRONT-R --CENTER --SUBWOOFER. Posteriormente, utilizar el botón MASTER VOLUME +/- para definir el nivel deseado. 5. MUTE/SILENCIO: Presionar una vez el botón MUTE del control remoto para silenciar el equipo y volver a apretarlo para recuperar el audio. También se puede recuperar el sonido presionando el botón MASTER VOLUME +/-. 6. USO DE UN SUBWOOFER EXTERNO: Para conectar un subwoofer externo, conectar la entrada cinch del Subwoofer a la entrada para subwoofer del equipo. Colocar el interruptor SUB. SWITCH de la parte posterior del equipo en la posición “OFF” (así se apaga el subwoofer incorporado). Este interruptor viene de fábrica en la posición “ON”. - 56 - INSTALACION DEL SISTEMA Es posible conectar el televisor a la salida de vídeo que se encuentra en la parte posterior del equipo. Instrucciones para la operación de los menús de instalación del sistema: 1. Presionar una vez el botón de SETUP del control remoto para acceder al siguiente menú: 2. Los menús se pueden operar de manera intuitiva con los botones de navegación [ ] [ ] [ ] [ ]. Con el botón ENTER/PLAY se confirma/activa la opción seleccionada. 3. Para finalizar o interrumpir los ajustes, presionar nuevamente el botón SETUP a fin de cerrar el menú. Instalación del sistema 1. SISTEMA DE TV: Permite seleccionar la norma del televisor conectado. NTSC es la norma de TV de Estados Unidos. Normalmente, en Alemania se debe seleccionar la norma PAL. PAL-60 es un modo de reproducción que permite reproducir medios de formato NTSC con una frecuencia de semicuadros de 60 Hz y con codificación de colores PAL. Si el televisor es apto para el sistema multi-norma, seleccionar la opción “AUTO”. 2. FORMATO DE TV: El formato de imagen correspondiente (p.ej. 4:3 = normal; 16:9 = pantalla ancha) es definido por el archivo que se está reproduciendo. Vale la pena destacar que no es necesario que el formato de la imagen coincida con el del televisor. Las siguientes instrucciones son útiles para lograr el formato más adecuado: ! ! ! 4:3/PS: Seleccionar este modo cuando el televisor conectado tenga un formato 4:3. Si se reproduce un archivo en formato de pantalla ancha, la imagen llena la pantalla, pero a la derecha y a la izquierda se corta parte de la imagen. 4:3/LB: Seleccionar este modo cuando el televisor conectado tenga un formato 4:3. Si se reproduce un archivo en formato de pantalla ancha, la imagen se muestra en todo su ancho, pero aparece una franja negra en la parte superior e inferior de la pantalla. 16:9: Seleccionar este modo cuando el televisor conectado tenga pantalla ancha (formato 16:9). - 57 - INSTALACION DEL SISTEMA Instalación del sistema Esta opción recupera los ajustes definidos en fábrica: Idioma Con esta opción es posible seleccionar el idioma de los menús y los mensajes de estado del sistema: Instalación de vídeo Permite el ajuste de los diferentes parámetros de la visualización de imágenes. Seleccionar la función deseada, presionar el botón ENTER y ajustar a gusto el parámetro utilizando los botones [ ] [ ]. - 58 - INSTALACION DEL SISTEMA Ajuste de altavoces: Downmix La función DOWNMIX permite reducir la señal de audio de los dos canales de reproducción. Si se selecciona la opción LT/RT, los canales frontales producen un sonido intenso, similar al de un teatro; para ello, sin embargo, el material de sonido reproducido debe contar con efectos estereofónicos PRO LOGIC Dolby. Seleccionar STEREO para obtener una reproducción estéreo normal. VSS es la abreviatura de Virtual Surround Sound y produce un efecto de sonido envolvente. Para la reproducción multicanal es necesario desactivar (NO) la función de DOWNMIX. Retardo central/retardo trasero Para la reproducción de programas con el formato de canales 5.1 se pueden utilizar estas dos opciones del menú a fin de definir retardos en las señales de los canales centrales y traseros de sonido envolvente. Esta función permite simular una mayor distancia entre los altavoces y los oyentes, lo que hace que el ambiente parezca más grande. De esta manera, es posible intensificar el efecto de sonido envolvente. Ajuste digital: Modo OP El sistema ofrece dos opciones: “Line” y “RF”. En el modo “Line”, las señales de entrada se reproducen sin cambios. En el modo RF se produce una fuerte compresión que aumenta significativamente el volumen. Se recomienda no utilizar esta opción durante la noche. Compresión dinámica Esta función permite ajustar la dinámica del sonido, es decir, la diferencia de volumen entre los pasajes muy ruidosos y los muy suaves, como, por ej. entre explosiones y susurros. Para limitar el margen dinámico subir el regulador hacia la posición “FULL”. Dual Mono Con esta función se pueden seleccionar diferentes modos de audio para la señal estereofónica: STEREO: Audio estéreo normal. Recomendado. MONO L: Canal estéreo izquierdo en los altavoces frontales derecho e izquierdo MONO R: Canal estéreo derecho en los altavoces frontales derecho e izquierdo MIX MONO: Ambos canales frontales producen la misma señal monofónica. Pro Logic El formato Dolby Pro Logic II ofrece dos modos diferentes: el modo de película y el modo de música. Con esta función es posible seleccionar el modo deseado o apagar el modo Pro Logic. - 59 - TARJETAS DE MEMORIA ! ! ! Reproducción de archivos de audio, imagen y vídeo de tarjetas de memoria: Iniciar el sistema como de costumbre. Colocar la tarjeta de memoria (USB/SD/MMC/MS) con los archivos correspondientes en la unidad para tarjetas, prestando atención a la posición correcta (inscripción hacia arriba). La reproducción se inicia automáticamente. En la pantalla del televisor conectado aparece la siguiente información sobre el contenido del medio de almacenamiento: MP3 Audiodatei abspielen ! ! ! ! ! JPEG Bilddatei anzeigen AVI Videodatei abspielen En este menú se muestran, a la izquierda, las diferentes carpetas que se encuentran en el medio de almacenamiento y, a la derecha, los archivos de cada carpeta seleccionada. Con los botones de navegación [ ] [ ] es posible avanzar hasta la carpeta deseada, para luego presionar el botón ENTER. Así se muestran todos los archivos de la carpeta. Con el botón de navegación [ ] se llega a la columna derecha. Seleccionar archivos con los botones [ ] [ ] e iniciar la reproducción presionando ENTER/PLAY. El nombre del archivo que se está reproduciendo aparece en el campo indicador superior. Cuando finaliza la reproducción de un archivo, el equipo pasa al siguiente. Con el botón 1 se puede volver a la columna de carpetas de la izquierda. Si se vuelve a presionar el botón [ ], se accede al conmutador de medios. El equipo distingue archivos de audio, vídeo e imágenes, pero muestra siempre un solo tipo de archivo. Si al leer el medio de almacenamiento el equipo encuentra por lo menos un archivo adecuado, aparece el símbolo correspondiente como botón. Con los botones de navegación es posible marcar el símbolo del tipo de archivo deseado. Presionar el botón ENTER para que el equipo muestre solamente archivos del tipo de medio deseado. Presionando el botón REV o FWD es posible activar durante la reproducción la función de búsqueda (reproducción a mayor velocidad) hacia atrás o adelante. Al llegar al punto deseado, presionar ENTER/PLAY; la reproducción continúa a velocidad normal. Durante la búsqueda, el sonido queda silenciado, por lo que es necesario orientarse con el indicador de tiempo del display. Al presionar repetidas veces el botón de REPEAT se pasa de una función de repetición a otra: reproducir archivo, repetir un archivo, repetir todos los archivos de una lista, repetir todo. ! Presionar [ ! Presionar el botón de STOP para finalizar la reproducción. ] o [ ] para pasar al archivo anterior/siguiente. - 60 - RESOLUCION DE PROBLEMAS PROBLEM El sistema no funciona. El equipo no produce ningún efecto de sonido en el modo de salida DVD/5.1. Distorsiones del sonido cuando el volumen está muy alto. CAUSA SOLUCION 1. El sistema no está enchufado a la red eléctrica. 2. El equipo no se enciende. 1. Controlar el cable de conexión a la red eléctrica. 2. Asegurarse de que el interruptor de encendido esté en la posición “ON”. Controlar que el reproductor de DVD se encuentre en modo 5.1. La tensión de salida de la fuente de audio es muy elevada. Seleccionar el modo 5.1 en el reproductor de DVD. Bajar el ajuste del volumen. Nota A: ! ! Combinando correctamente los dispositivos en las entradas y salidas (tanto el subwoofer activo como la señal fuente, p.ej. CD, MP3, VCD, DVD) se logra una calidad de sonido óptima. Se ruega seguir las respectivas instrucciones de operación de los dispositivos conectados. Algunos reproductores de DVD poseen un nivel de salida mayor que el habitual. Si aparecen distorsiones cuando el volumen está alto, se recomienda bajar el volumen para no dañar el amplificador o el altavoz. Nota B: ! Si el equipo está expuesto a factores externos (p.ej. esfuerzos mecánicos, grandes cargas electrostáticas, sobretensiones causadas por tormentas), o si no se lo utiliza conforme a las normas correspondientes, pueden presentarse fallas en su funcionamiento. De ser así, se recomienda tomar las siguientes medidas: ! Colocar el equipo en el modo standby y, posteriormente, apagarlo. ! Si el paso anterior no da resultado, llevar el interruptor de encendido a la posición “OFF” y desenchufar el equipo. Esperar unos minutos y volver a encenderlo. Este equipo cuenta con un sistema de autoprotección contra cargas electrostáticas. Cuando se lo vuelve a encender se recuperan todas sus funciones. - 61 - DATOS TECNICOS POTENCIA DE SALIDA: Subwoofer (RMS) -----------------------------------------------------Altavoz frontal/central (RMS) ---------------------------------------Potencia máxima de salida (impulso) ----------------------------Medidas (ancho x altura x profundidad) -------------------------mm 40 W 3x 15 W 200 W 970 x 200 x 130 ACCESORIOS INCLUIDOS: Control remoto ---------------------------------------------------------Pila (redonda) ----------------------------------------------------------Cable cinch de vídeo (amarillo) ------------------------------------Cable cinch coaxial (naranja) ---------------------------------------Cable cinch estéreo ---------------------------------------------------Ganchos para pared---------------------------------------------------Manual de instrucciones ---------------------------------------------- Información técnica sujeta a modificaciones. - 62 - 1 1 1 1 1 2 1 Уважаемый покупатель! Благодарим Вас за решение приобрести Magnat DVS 4232. Пожалуйста, внимательно прочитайте следующую информацию перед включением DVS 4232. СОДЕРЖАНИЕ Важные указания по технике безопасности------------------------------------------ 64 Указания по утилизации-------------------------------------------------------------------- 64 Элементы управления на приборе------------------------------------------------------ 65 Дистанционное управление--------------------------------------------------------------- 66 Подключения ---------------------------------------------------------------------------------- 67 Главные функции системы---------------------------------------------------------------- 68 Настройка системы-------------------------------------------------------------------------- 69 Языковые настройки------------------------------------------------------------------------- 70 Видеонастройка------------------------------------------------------------------------------- 70 Настройка громкоговорителей------------------------------------------------------------ 71 Цифровая настройка------------------------------------------------------------------------- 71 Карты памяти----------------------------------------------------------------------------------- 72 Помощь при неисправностях-------------------------------------------------------------- 73 Технические данные--------------------------------------------------------------------------74 - 63 - ВАЖНЫЕ УКАЗАНИЯ ПО БЕЗОПАСНОСТИ Этот символ предупреждает пользователя о том, что внутри устройства используется высокое напряжение, которое может привести к опасным ударам тока. ! Этот символ указывает пользователю устройства на то, что в прилагаемом руководстве по эксплуатации имеются важные указания, которым обязательно нужно следовать. Не открывать! Опасность электрического удара! Чтобы CAUTION уменьшить опасность возгорания или электрического RISK OF ELECTRIC SHOCK DO NOT OPEN удара, необходимо защищать устройство от дождя или влаги. ! ! Перед использованием устройства внимательно прочитайте руководство по эксплуатации и сохраните его. ! Это устройство предназначено исключительно для эксплуатации от переменного напряжения 230 В / 50 Гц. ! Эксплуатируйте устройство только при температуре окружающей среды/в помещении в диапазоне от 0C до 40C. ! Вентиляционные отверстия не должны закрываться предметами (например, ! ! ! ! ! ! ! ! занавесками, газетой), чтобы обеспечить достаточную вентиляцию устройства. Не располагать вблизи устройства источники тепла, такие как радиаторы, плиты, открытое пламя, которые генерируют тепло. Не подвергать устройство и пульт ДУ воздействию воды, а также водяных капель и брызг и высокой влажности воздуха. Кроме того, на устройство ни в коем случае не следует ставить вазы или другие сосуды, наполненные жидкостью. В случае контакта с влагой или жидкостью немедленно отсоедините устройство от сети питания. Вытирать устройство можно только сухой салфеткой. Не используйте чистящие средства или химические растворители, так как они могут повредить поверхность. Никогда не открывайте устройство Сетевой кабель должен быть всегда готов к эксплуатации. Если на сетевом кабеле будут обнаружены повреждения, эксплуатировать устройство больше нельзя. Поврежденный кабель ремонтировать нельзя, его нужно заменить. Не присоединять и не отсоединять сетевой кабель влажными руками. УКАЗАНИЯ ПО УТИЛИЗАЦИИ Согласно европейской директиве 2002/96/EC все электрические и электронные приборы для утилизации должны сдаваться отдельно в местные сборные пункты. Пожалуйста, выполняйте местные предписания и не выбрасывайте старые - 64 - ЭЛЕМЕНТЫ УПРАВЛЕНИЯ НА ПРИБОРЕ Панель с сенсорными клавишами ПЕРЕДНЯЯ СТОРОНА: 1 2 3 4 7 VO L + SD/MMC/MS 5 8 USB 6 9 VO L INP UT Внимание! Для правильного пользования панелью с сенсорными клавишами, рекомендуется использовать при нажатии клавиш большой палец. ЗАДНЯЯ СТОРОНА: 13 10 15 17 19 11 12 14 16 18 POWER AC IN AUX L TV L R R COAX 1 OPT 1 20 21 OPT 2 FUSE ON SUB. OUTPUT OFF VIDEO OUTPUT SUB. SWITCH COAX 2 ON OFF 22 1. 2. 3. 4. 5. 6. 7. 8. 9. Клавиша STANDBY Клавиша регулятора громкости + Клавиша регулятора громкости Клавиша PLAY/PAUSE Переключатель входа Сенсор для дистанционного управления Светодиодная индикация Устройство считывания карт SD/MMC/MS Подключение к USB сабвуфер (вкл./выкл.) 10. Сетевой кабель 11. Сетевой выключатель - 65 - 12. 13. 14. 15. 16. 17. 18. 19. 20. Предохранитель Видеовыход Выход на сабвуфер Ввод AUX Ввод TV Цифровой вход COAXIAL1 Цифровой вход OPTICAL1 Цифровой вход OPTICAL2 Выключатель выхода на 21. 22. Крепление для стенной консоли Цифровой вход COAXIAL2 ДИСТАНЦИОННОЕ УПРАВЛЕНИЕ 1. STANDBY/POWER: Включает и выключает прибор. 2. INPUT: При повторном нажатии можно выбрать между --DISK --OPTICAL 1 --OPTICAL 2 --COAXIAL 1 1 --COAXIAL 2 --AUX --TV в качестве входа. 0 +10 INPUT 2 3. Клавиши с цифрами между от 0 до +10. Ввод цифр. 1 3 2 4. SETUP: 3 Показывает Вам меню настройки на 5 6 4 подключенном экране. С его помощью 7 8 9 Вы можете произвести настройку системы. 5. SD/USB: 4 SD/USB SETUP LISTEN Выбирает между воспроизведением носителей 5 памяти USB или SD. 6 6. [ ] [ ] [ ] [ ]: FW D R EV 7 С помощью этих клавиш Вы можете двигаться между меню устройства. 8 ENTER/PLAY 7. [REV] [FWD]: Ускоренная перемотка вперёд или назад. PRE V 9 NE XT 8. ENTER/PLAY: Для подтверждения выбранной опции меню или начала воспроизведения. PAUSE/STEP STOP 10 M.VOL + 9. [ PREV ] [NEXT]: Переход к предыдущему/последующему M.VOL заголовку/треку при воспроизведении. REPEAT FUNCTION 11 10. PAUSE/STEP: Функция Pause позволяет воспроизводить отдельный стоп-кадр, повторное нажатие переключает дальше с кадра на кадр. 11. REPEAT: Если идёт воспроизведение с носителя памяти, то при помощи этой клавиши Вы можете включить режим повторного воспроизведения. 12. MUTE: Отключает звук устройства. При повторном нажатии звук снова включается. 13. LISTEN: Этой клавишей можно переключать между различными режимами воспроизведения (в зависимости от входного сигнала): Prologic -- Stereo -- Vocal 14. STOP: Для остановки воспроизведения. 15. MASTER VOLUME: Увеличение / понижение уровня громкости. 16. FUNKTION: С помощью этой клавиши Вы можете вызвать отдельные каналы воспроизведения, а также высокие и низкие тона для их последующей настройки. Вставить/заменить батарейку Питание пульта ДУ осуществляется от литиевой батарейки, входящей в комплект и вставленной в пульт ДУ. Для предотвращения разрядки до эксплуатации пульта ДУ была вставлена изолирующая полоска. Перед первым использованием пульта ДУ ее следует вынуть. Если пульт ДУ не функционирует безупречно, батарейку следует заменить на батарейку такого-же типа. Откройте отсек для батарейки. Выньте батарейку из отсека по стрелке. Прежде чем вынуть израсходованную батарейку, запомните, в каком точно положении она находилась. Символ "+" должен указывать вверх, в противном случае пульт ДУ не будет работать и даже может выйти из строя. Замените батарейку и снова закройте отсек. Утилизация батареек Старые батарейки относятся к особым отходам и подлежат утилизации согласно действующим предписаниям. - 66 - 12 13 14 15 16 ПОДКЛЮЧЕНИЯ TV Выход на сабвуфер POWER AC IN AUX L TV L R R COAX 1 OPT 1 OPT 2 FUSE ON SUB. OUTPUT OFF VIDEO OUTPUT SUB. SWITCH COAX 2 ON OFF Подключение к любому источнику входного стереосигнала (напр., TV, DVD, CD Player, xBox, Ps2, компьютер и т.д.) (Оптический кабель, не входит в объём поставки) или DVD PS2 VO L + MMC MS SD/MMC/MS SD USB VO L INP UT Возможность использования носителей памяти (USB и карты SD/MMC/MS). ! ! ! Внимание! Ни в коем случае не вставляйте сетевую вилку в розетку, пока не будут выполнены надлежащим образом все остальные подключения. Прежде чем ввести в эксплуатацию внешний сабвуфер, необходимо включить прибор. Прежде чем отключить прибор, следует выключить этот сабвуфер. - 67 - ГЛАВНЫЕ ФУНКЦИИ СИСТЕМЫ 1. ON/OFF Установите сетевой выключатель на обратной стороне прибора в положение "ON". Прибор находится теперь в режиме ожидания (Standby), на светодиодном индикаторе высвечивается "HELLO". Нажмите Standby-клавишу на самом приборе или на пульте дистанционного управления для того, чтобы включить устройство. Система распознаёт любой поступающий входной сигнал. Если сигнал не поступает, зажигается светодиодная надпись "NO SIGNAL". Внимание: После выключения прибора необходимо подождать не менее 3 секунд, прежде чем включить его снова. 2. ВЫБОР ВХОДА (ПОВТОРНОЕ НАЖАТИЕ КЛАВИШИ INPUT) : Система не связана с носителями памяти USB или SD: Нажмите клавишу INPUT на приборе или на пульте ДУ для выбора входа: OPTICAL 1 --OPTICAL 2 --COAXIAL 1--COAXIAL 2--AUX--TV--USB/SD/MS/MMC. Система связана с картой памяти USB: Нажмите клавишу INPUT на приборе или на пульте ДУ для выбора входа: OPTICAL 1 --OPTICAL 2 --COAXIAL 1--COAXIAL 2--AUX--TV--USB. Система связана с картой памяти SD: Нажмите клавишу INPUT на приборе или на пульте ДУ для выбора входа: OPTICAL 1 --OPTICAL 2 --COAXIAL 1--COAXIAL 2--AUX--TV--SD. Система связана с картами памяти USB и SD: Нажмите клавишу INPUT на приборе или на пульте ДУ для выбора входа: OPTICAL 1 --OPTICAL 2 --COAXIAL 1--COAXIAL 2--AUX--TV--USB input. Для карт памяти система обычно выбирает вход для USB. После этого Вы можете выбрать карту SD с помощью клавиши USB/SD. 3. ВИДЫ РЕЖИМОВ ПРОСЛУШИВАНИЯ: Нажмите клавишу LISTEN для переключения между различными режимами прослушивания: --Stereo --Vocal --Pro-Logic. 4. РЕГУЛИРОВКА УРОВНЯ: (1) Установка общего уровня громкости: Уровень громкости устанавливается при помощи клавиши MASTER VOLUME +/- на пульте дистанционного управления или клавиши VOL +/VOL на передней панели прибора. (2) Специальная установка уровня: Нажатием клавиши FUNCTION производится выбор между следующими уровнями : TREBLE --BASS --FRONT-L --FRONT-R --CENTER --SUBWOOFER. Соответствующий уровень устанавливается затем при помощи клавиши MASTER VOLUME +/-. 5. MUTE: Нажатием клавиши MUTE на пульте ДУ отключается звук системы, при повторном нажатии звук снова включается. Беззвуковой режим выключается также и при нажатии клавиши MASTER VOLUME +/-. 6. ИСПОЛЬЗОВАНИЕ ВНЕШНЕГО САБВУФЕРА: Для подключения внешнего сабвуфера необходимо соединить вход RCA cабвуфера с сабвуферным входом данного устройства. После этого следует привести переключатель SUB. SWITCH на обратной стороне прибора в позицию "OFF". (Встроенный сабвуфер отключается). При заводской настройке этот переключатель находится в позиции "ON". - 68 - НАСТРОЙКА СИСТЕМЫ Ваш телевизор Вы можете подключить к видеовыходу на обратной стороне прибора. Управление меню настройки системы: 1. При нажатии клавиши SETUP на пульте ДУ открываются следующие меню: 2. Вы можете управлять меню интуитивно при помощи навигационных клавиш [ ] [ ] [ ] [ ]. Активация отдельных выборочных пунктов производиться при помощи клавиши ENTER/PLAY. 3. Если настройка завершена или Вы хотите её прервать, снова нажмите клавишу SETUP для закрытия меню. Настройка системы 1. СИСТЕМА TV: Здесь Вы можете выбрать систему цветового кодирования подключенного телевизора. Под NTSC подразумевается американский телевизионный стандарт, в Германии обычно используется PAL. PAL-60 – это режим, при котором воспроизведение происходит в формате NTSC с частотой смены полукадров 60 Гц, но с цветовым кодированием PAL. Если Вы используете телевизор с системой Multinorm, выбирается позиция „AUTO". 2. ФОРМАТ TV: Формат изображения (напр., 4:3 = нормальное изображение, 16:9 = широкоэкранное изображение) определяется проигрываемым файлом. Следует учесть, что формат изображения не обязательно должен соответствовать формату изображения Вашего телевизора. Вам помогут следующие настройки: · 4:3/PS: Рекомендуем выбрать этот режим, если Вы подключили телевизор с форматом 4:3. При воспроизведении файла в широкоэкранном формате изображение заполняет весь экран, но части изображения слева и справа при этом отрезаются. · 4:3/LB: Рекомендуем выбрать этот режим, если Вы подключили телевизор с форматом 4:3. При воспроизведении файла в широкоэкранном формате на экран выводится изображение в полную ширину, но вверху и внизу видны чёрные балки. - 69 - НАСТРОЙКА СИСТЕМЫ Настройка системы Эта опция восстанавливает заводские настройки. Языковые настройки: Здесь Вы можете выбрать язык для отображения меню на экране и информации о статусе. Видеонастройка Здесь Вы можете регулировать различные параметры воспроизведения изображения. Выберите нужную функцию, затем нажмите клавишу Enter и подберите желаемое значение при помощи клавиш [ ] [ ]. - 70 - НАСТРОЙКА СИСТЕМЫ Настройка: Downmix DOWNMIX означает сокращение звукового сигнала до 2-канального воспроизведения. При выборе LT/RT Вы активируете для обоих фронтальных каналов живой, напоминающий театральную атмосферу эффект. Но это возможно только при условии, если звуковой материал содержит PRO LOGIC Dolby Stereo эффекты. STEREO выбирается при нормальном стереофоническом воспризведении. VSS обозначает Virtual Surround Sound и моделирует звуковой эффект Surround. Если Вы желаете многоканальное воспроизведение, то Вам необходимо деактивировать функцию DOWNMIX (ВЫКЛ). Замедление – центр / Замедление – тыл При воспроизведении программ в 5.1-канальном формате Вы можете установить при помощи этих пунктов меню время задержки для сигналов центральных и тыловых Surround-каналов. Таким образом моделируется увеличение расстояния между динамиками и слушателем, и создаётся впечатление, что помещение увеличивается. Это позволяет при определённых условиях ещё больше подчеркнуть эффект Surround.Das kann den Suroundeffekt ggf. noch effizienter gestalten. Цифровая настройка: Режим OP Здесь Вы можете сделать выбор между настройками „Line" и „RF". В режиме Line входные сигналы выдаются без изменений, в режиме RF происходит сильное сжатие, вызывающее значительное повышение громкости. Мы рекомендуем не использовать эту настройку ночью. Динамическая компрессия Здесь Вы можете произвести настройку динамики звучания. Под „динамикой" мы подразумеваем разницу между уровнями громкости очень громких и очень тихих пассажей, т.е., например, между звуком взрыва и шёпотом. Для ограничения динамического диапазона Вам следует переместить регулятор вверх, в сторону „FULL". Dual Mono Здесь Вы можете выбрать аудиорежим для стереосигналов: STEREO: обычное стереозвучание, рекомендуется MONO L: левый стереоканал подключен к левому и правому фронтальным громкоговорителям MONO R: правый стереоканал подключен к левому и правому фронтальным громкоговорителям MIX MONO: оба фронтальных канала выводят идентичный моносигнал Pro Logic Существует два различных звуковых режима для Dolby Pro Logic II: кинотеатра и музыки. Здесь Вы можете выбрать желаемый режим или отключить режим Pro Logic. - 71 - КАРТЫ ПАМЯТИ Воспроизведение аудио-, видео- и графических файлов с карт памяти: ! ! ! Запустите систему обычным образом. Вставьте карту памяти (USB/SD/MMC/MS) с соответствующими файлами в устройство для считывания. Следите при этом за тем, чтобы надпись находилась сверху. Воспроизведение начинается автоматически. На экране подключенного телевизора MP3 Audiodatei abspielen ! ! ! ! ! ! ! JPEG Bilddatei anzeigen AVI Videodatei abspielen Слева в меню показаны различные папки, размещённые на носителе данных. Справа видны файлы в соответствующей маркированной папке. С помощью навигационных клавиш [ ] [ ]. Вы выбираете нужную папку и нажимаете клавишу ENTER. Теперь на дисплее появляются отдельные файлы папки. С помощью навигационной клавиши [ ] Вы попадаете в правую колонку. Выбор файлов здесь производится при помощи клавиш [ ] [ ], а затем Вы можете начать их воспроизведение нажатием клавиши ENTER/PLAY. Название воспроизводимого файла высвечивается в поле индикации сверху. Когда заканчивается воспроизведение одного файла, система автоматически переходит к следующему. С помощью клавиши 1 Вы снова попадаете в левую колонку с перечнем папок. При повторном нажатии клавиши [ ] Вы попадаете к переключателям носителей памяти. Прибор различает аудио-, видео- и графические файлы, но всегда показывает только один вид файлов. Если он находит при чтении носителя памяти хотя бы один подходящий файл, то соответствующий символ изображается на дисплее в виде клавиши. С помощью навигационных клавиш Вы можете теперь маркировать символ желаемого вида файлов. Нажмите клавишу ENTER, чтобы прибор показывал только файлы желаемого типа носителей памяти. Нажатием клавиш REV или FWD Вы активируете в процессе воспоизведения функцию поиска (воспроизведение на большой скорости) назад или вперёд. Достигнув желаемого места, нажмите клавишу ENTER/PLAY. Воспроизведение будет продолжаться на нормальной скорости. Во время поиска звук автоматически отключается, Вам следует ориентироваться по показателю времени на дисплее. Повторяющимся нажатием клавиши REPEAT Вы можете выбрать между различными функциям повтора: воспроизвести файл, повторить отдельный файл, повторить все файлы определённого перечня, повторить всё. ] или [ ], чтобы перепрыгнуть к предыдущему / следующему файлу. Нажмите клавишу [ Нажмите клавишу STOP, чтобы закончить воспроизведение. - 72 - ПОМОЩЬ ПРИ НЕИСПРАВНОСТЯХ ПРОБЛЕМА Отсутствует воспроизведение. Нет звукового эффекта в выходном режиме DVD/5.1. Искажения при высоком уровне громкости. ПРИЧИНА 1. Система не подключена к электросети. 2. Прибор не включается. Убедитесь, что DVD-плеер находится в режиме 5.1. Аудиоисточник имеет очень высокое выходное напряжение. РЕШЕНИЕ 1. Проверьте сетевой кабель. 2. Удостоверьтесь, что сетевой выключатель включен. Установите на DVD-плеере режим 5.1. Установите более низкий уровень громкости. Примечание A: ! Правильная комбинация приборов на входах и выходах (как активный сабвуфер, так и источник сигнала, напр., CD,MP3,VCD,DVD) обеспечивает оптимальное качество звучания. Соблюдайте, пожалуйста, руководства по эксплуатации подключенных приборов. ! Выходной уровень некоторых DVD-плееров выше обычного. Если при большой громкости возникают искажения, рекомендуем уменьшить уровень громкости, чтобы избежать повреждения усилителя или динамиков. Примечание B: ! Если прибор подвергается какому-либо сильному воздействию извне (напр., механическая нагрузка, сильное электростатическое воздействие, перенапряжение при грозе) или неправильно эксплуатируется, то это может привести к возникновению неисправностей. В случае, если это случится, поступайте следующим образом: ! ! Сначала включите режим Standby, а затем снова включите прибор. Если это не даст результата, рекомендуем выключить сетевой выключатель, вытянуть сетевую вилку из розетки на пару минут, а затем снова включить прибор. Этот прибор имеет систему самозащиты от электростатического воздействия, и после нового включения все функции автоматически восстанавливаются. - 73 - ТЕХНИЧЕСКИЕ ДАННЫЕ ВЫХОДНАЯ МОЩНОСТЬ: Сабвуфер (RMS) ----------------------------------------------------------------40 Вт Фронтальный/Центральный громкоговоритель (RMS) -------------- 3x 15 Вт Максимальная выходная мощность (Impuls) ----------------------------- 200 Вт Габариты (Ш x В x Г) ---------------------------------------------- 970 x 200 x 130 мм ПРИЛАГАЕМЫЕ ПРИНАДЛЕЖНОСТИ: Пульт дистанционного управления -----------------------------1 шт. Батарейка / Кнопочная батарейка------------------------------ 1 шт. Видеокабель RCA (жёлтый) ------------------------------------- 1 шт. Коаксиальный кабель RCA (оранжевый) -------------------- 1 шт. Стереокабель RCA -------------------------------------------------- 1 шт. Стенная консоль ----------------------------------------------------- 2 шт. Руководство по эксплуатации ----------------------------------- 1 шт. Оставляем за собой право на технические изменения. - 74 - D Wir gratulieren Ihnen! Durch Ihre kluge Wahl sind Sie Besitzer eines Magnat Produktes geworden. Magnat-Produkte erfreuen sich aufgrund der hohen Qualität eines ausgezeichneten Rufes weltweit. Dieser hohe Qualitätsstandard ermöglicht es für Magnat-Produkte 2 Jahre Garantie zu gewähren. Die Produkte werden während des gesamten Fertigungsvorganges laufend kontrolliert und geprüft. Im Servicefall beachten Sie bitte folgendes: 1. Die 2-jährige Garantiezeit beginnt mit dem Kauf des Produktes und gilt nur für den Erstbesitzer. 2. Während der Garantiezeit beseitigen wir etwaige Mängel, die nachweislich auf Material- oder Fabrikationsfehler beruhen, nach unserer Wahl durch Austausch oder Nachbesserung der defekten Teile. Weitergehende Ansprüche, insbesondere auf Minderung, Wandlung, Schadenersatz oder Folgeschäden sind ausgeschlossen. Die Garantiezeit wird von einer Garantieleistung durch uns nicht berührt. 3. Am Produkt dürfen keine unsachgemäßen Eingriffe vorgenommen worden sein. 4. Bei Inanspruchnahme der Garantie wenden Sie sich bitte zunächst an Ihren Fachhändler. Sollte es sich als notwendig erweisen, das Produkt an uns einzuschicken, so sorgen Sie bitte dafür, daß • das Produkt in einwandfreier Originalverpackung verschickt wird, • die Kontrollkarte ausgefüllt dem Produkt beiliegt, • die Kaufquittung beigefügt ist. 5. Von der Garantie ausgenommen sind: • Leuchtmittel • Verschleißteile • Batterien • Transportschäden, sichtbar oder unsichtbar (Reklamationen für solche Schäden müssen umgehend bei der Transportfirma, Bahn oder Post eingereicht werden.) • Kratzer in Metallteilen, Frontabdeckungen u.s.w. (Diese Defekte müssen innerhalb von 5 Tagen nach Kauf direkt bei Ihrem Händler reklamiert werden.) • Fehler, die durch fehlerhafte Aufstellung, falschen Anschluss, unsachgemäße Bedienung (siehe Bedienungsanleitung), Beanspruchung oder äußere gewaltsame Einwirkung entstanden sind. • Unsachgemäß reparierte oder geänderte Geräte, die von anderer Seite als von uns geöffnet wurden. • Folgeschäden an fremden Geräten • Kostenerstattung bei Schadensbehebung durch Dritte ohne unser vorheriges Einverständnis. GB Congratulations! You have made a wise selection in becoming the owner of a Magnat equipment. Due to high quality Magnat products have earned an excellent reputation through the western world. And this high quality standard enables us to grant a 2-years warranty for Magnat products. The equipments are checked and tested continously during the entire production process. In case you have problems with your Magnat equipment, kindly observe the following: 1. The 2-years guarantee period commences with the purchase of the component and is applicable only to the original owner. 2. During the guarantee period we will rectify any defects due to faulty material or workmanship by replacing or repairing the defective part at our discretion. Further claims, and in particular those for price reduction, cancellation of sale, compensation for damages or subsequential damages, are excluded. The guarantee period is not altered by the fact that we have carried out guarantee work. 3. Unauthorized tampering with the equipment will invalidate this guarantee. 4. Consult your authorized dealer first, if guarantee service is needed. Should it prove necessary to return the component to the factory, please insure that • the component is packed in original factory packing in good condition • the quality control card has been filled out and enclosed with the component, • your enclose your receipt as proof of purchase. 5. Excluded from the guarantee are: • Illuminates • Wear parts • Batteries • Shipping damages, either readily apparent or concealed (claims for such damages must be lodged immediately with forwarding agent, the railway express office or post office). • Scratches in cases, metal components, front panels, etc. (You must notify your dealer directly of such defects within three days of purchase.) • Defects caused by incorrect installation or connection, by operation errors (see operating instructions), by overloading or by external force. • Equipments which have beenrepaired incorrectly or modified or where the case has been opened by persons other than us. • Consequential damages to other equipments. • Reimbursement of costs, without our prior consent, when repairing damages by third parties. - 75 - G ARANTIEKARTE WARRANTY C ARD Typ/ Type Serien-Nr./Serial-No. Name und Anschrift des Händlers /Stempel Name and address of the dealer/stamp Käufer/Customer Name/Name Straße/Street PLZ, Ort /City Land /Country Kaufdatum / buying date Nur gültig in Verbindung mit Ihrer Kaufquittung! No warranty without receipt! Magnat Audio-Produkte GmbH Lise-Meitner-Str. 9 D-50259 Pulheim Germany Tel. +49 (0) 2234 / 807 - 0 Fax +49 (0) 2234 / 807 - 399 Internet: http://www.magnat.de-
 1
1
-
 2
2
-
 3
3
-
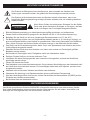 4
4
-
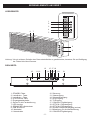 5
5
-
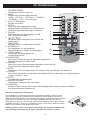 6
6
-
 7
7
-
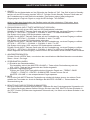 8
8
-
 9
9
-
 10
10
-
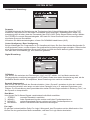 11
11
-
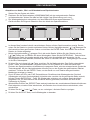 12
12
-
 13
13
-
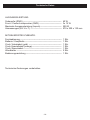 14
14
-
 15
15
-
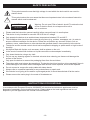 16
16
-
 17
17
-
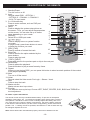 18
18
-
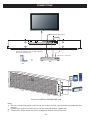 19
19
-
 20
20
-
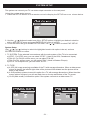 21
21
-
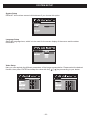 22
22
-
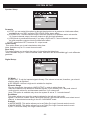 23
23
-
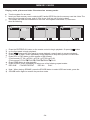 24
24
-
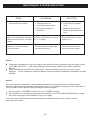 25
25
-
 26
26
-
 27
27
-
 28
28
-
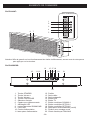 29
29
-
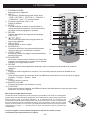 30
30
-
 31
31
-
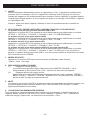 32
32
-
 33
33
-
 34
34
-
 35
35
-
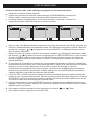 36
36
-
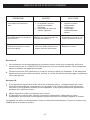 37
37
-
 38
38
-
 39
39
-
 40
40
-
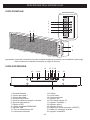 41
41
-
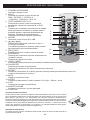 42
42
-
 43
43
-
 44
44
-
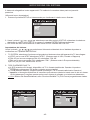 45
45
-
 46
46
-
 47
47
-
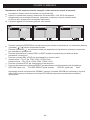 48
48
-
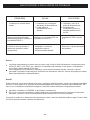 49
49
-
 50
50
-
 51
51
-
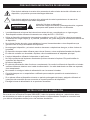 52
52
-
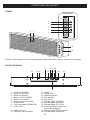 53
53
-
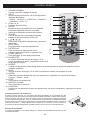 54
54
-
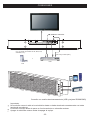 55
55
-
 56
56
-
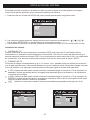 57
57
-
 58
58
-
 59
59
-
 60
60
-
 61
61
-
 62
62
-
 63
63
-
 64
64
-
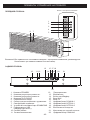 65
65
-
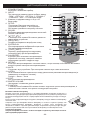 66
66
-
 67
67
-
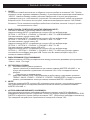 68
68
-
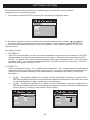 69
69
-
 70
70
-
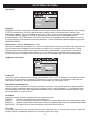 71
71
-
 72
72
-
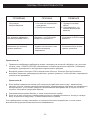 73
73
-
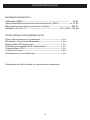 74
74
-
 75
75
-
 76
76
-
 77
77
-
 78
78


Magnat DVS 4232 El manual del propietario
- Tipo
- El manual del propietario
En otros idiomas
- français: Magnat DVS 4232 Le manuel du propriétaire
- italiano: Magnat DVS 4232 Manuale del proprietario
- English: Magnat DVS 4232 Owner's manual
- Deutsch: Magnat DVS 4232 Bedienungsanleitung
- русский: Magnat DVS 4232 Инструкция по применению
Otros documentos
-
Silvercrest KH 6520 Operating Instructions Manual
-
Sony AVD-S50 El manual del propietario
-
Terratec Noxon M 740 El manual del propietario
-
Jamo S DVR 52 Manual de usuario
-
Xoro Flat Panel Television HTC1900D Manual de usuario
-
Sony DAVD150E El manual del propietario
-
Philips FR985 Manual de usuario
-