LERVIA Vacuum Cleaner KH 3158 Manual de usuario
- Categoría
- Aspiradoras
- Tipo
- Manual de usuario
Este manual también es adecuado para

Kompernaß GmbH
Burgstraße 21
D-44867 Bochum (Germany)
Estado de las informaciones · Versione delle informazioni
Last Information Update · Stand der Informationen:
10 / 2007 · Ident.-No.: KH 3158-102007 - 5
ES Instrucciones de utilización y de seguridad Página 5
IT / MT Indicazioni per l’uso e per la sicurezza Pagina 13
GB / MT Operation and Safety Notes Page 21
DE / AT Bedienungs- und Sicherheitshinweise Seite 29
STAUBSAUGER
Bedienungs- und Sicherheitshinweise
ASPIRADOR
ASPIRAPOLVERE
KH 3158
Klappen Sie vor dem Lesen die Seite mit den Abbildungen aus und machen Sie sich anschließend mit
allen Funktionen des Gerätes vertraut.
Before you begin reading this information, please unfold the page with the illustrations and familiarize
yourself with all functions of the tool.
Antes de empezar a leer abra la página que contiene las imágenes y, en seguida, familiarícese con
todas las funciones del dispositivo.
Prima di leggere aprire la pagina con le immagini e prendere confidenza con le diverse funzioni
dell’apparecchio.
VACUUM CLEANER
Operation and Safety Notes
ASPIRAPOLVERE
Indicazioni per l’uso e per la sicurezza
ASPIRADOR
Instrucciones de utilización y de seguridad

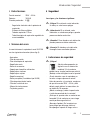
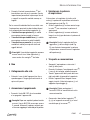
D E F
B
C
2
4
6
5
7
28
10
22
20
19
11
24
25
26272829
21
22
1
2
3
4
6
5
1413
12
11
10 9
8
7
15 16 17 18
19
20
21
23
22
A

5ES
Contenido
Antes de empezar a leer abra la página que contiene las imágenes
y, en seguida, familiarícese con todas las funciones del dispositivo.
Introducción
Para su seguridad.................................................................................Página 6
Descripción del aparato y uso correcto ..............................................Página 6
Elementos de control ...........................................................................Página 6
Datos técnicos ......................................................................................Página 7
Volumen del envío ................................................................................Página 7
Seguridad
Indicaciones de seguridad ...................................................................Página 7
Puesta en marcha
Montaje .................................................................................................Página 8
Ajustar el tubo telescópico de aspiración .........................................Página 8
Utilización de las boquillas de aspiración ..........................................Página 9
Manejo
Conexión a la red eléctrica ..................................................................Página 9
Conexión / Desconexión ........................................................................Página 9
Seleccionar la potencia de aspiración ................................................Página 9
Transporte y almacenamiento .............................................................Página 10
Mantenimiento y limpieza
Mantenimiento .....................................................................................Página 10
Cambio de la bolsa de polvo .............................................................Página 10
Cambio de filtro ................................................................................Página 10
Levantador de pelusas .....................................................................Página 11
Limpieza ................................................................................................Página 11
Eliminación .............................................................................................Página 11
Información
Asistencia .............................................................................................Página 11
Certificado del fabricante / Declaración de conformidad ..................Página 12

6 ES
Introducción
Lervia KH 3158
Aspiradora
A Introducción
A Para su seguridad
Familiarícese con las funciones del
aparato y lea el siguiente manual de
intrucciones antes de ponerlo en
marcha por primera vez. Utilice el aparato
únicamente como se describe. Guarde estas
instrucciones en un lugar seguro. En caso de
transferir el dispositivo a terceros entrégueles
toda la documentación.
A Descripción del aparato y
uso correcto
La aspiradora es adecuada para aspirar
únicamente materiales secos sobre superficies
secas en el entorno casero. Cualquier otro uso o
modificación del aparato se considera como no
adecuado y conlleva considerables peligros de
accidente. El fabricante no se hace responsable
de los daños ocasionados por un uso o manejo
incorrecto.
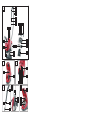
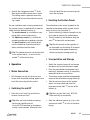
A Elementos de control
Las ilustraciones de A a F muestran uno por uno
los elementos de control de la aspiradora Lervia
KH 3158.
Q
Mango
W
Regulador manual de flujo de aire
E
Tubo de aspiración
R
Tubo telescópico de aspiración de acero
inoxidable
T
Botón de desbloqueo
Y
Ajuste vertical para el tubo telescópico
U
Rueda de desplazamiento
I
Boquilla de suelo con corona de cerdas y
levantador de pelusas
O
Botón de conmutación de la boquilla de
suelo
P
Asa extraíble
{
Dispositivo de apertura de tapa
}
Inserto de tubo de aspiración giratorio
q
Indicador de estado llenado de la bolsa
para polvo
w
Orificios de salida de aire
e
Sujeciones para boquillas adicionales
r
Boquilla para rincones
t
Boquilla para cojines
y
Boquilla con pincel
u
Soporte de la bolsa para polvo
i
Bolsa para polvo
(tipo KH 99, o Swirl
®
Y 101
®
)
o
Filtro de protección del motor
p
Filtro de la salida de aire
[
Bolsa de accesorios para boquillas
adicionales
]
Botón de pie para el rebobinado del cable
de red
A
Cable de red con interruptor
S
Rueda reguladora de la potencia de
aspiración
D
Escala de la potencia de aspiración
F
Soporte para boquilla de suelo en reposo
G
Botón de conexión y desconexión
Nota:
Swirl
®
y Y 101
®
son marcas comerciales
registradas del grupo Melitta.

7ES
A Datos técnicos
Tensión nominal: 230 V ~ 50 Hz
Potencia: 1500 W
Clase de protección: II /
&
· Regulación electrónica de la potencia de
aspiración
· Sistema de filtros múltiples
· Tubo de aspiración 175 cm
· Tubo telescópico de aspiración regulable de
acero inoxidable
A Volumen del envío
Le suministramos la aspiradora Lervia KH 3158
con los siguientes elementos (véase fig. A):
- Aspiradora
- Tubo de aspiración
- Tubo telescópico de aspiración
- Boquilla de suelo
- Bolsa de accesorios
- Soporte para boquillas adicionales
- Boquilla para rincones
- Boquilla para cojines
- Boquilla con pincel
- Bolsa para polvo (5 unidades: tipo KH 99)
- Filtro de protección del motor
- Filtro de la salida de aire
- Manual de instrucciones
- Tarjeta de garantía
A Seguridad
Los signos y los términos significan:
c ¡Peligro! Si no atiende a esta indicación,
su vida y su salud corren peligro.
m ¡Advertencia! Si no atiende a esta
indicación, su salud corre peligro y pueden
provocarse daños materiales.
m¡Atención! Si no atiende a esta indicación,
pueden provocarse daños materiales.
¡Consejo! Si atiende a esta indicación,
conseguirá unos resultados óptimos.
A Indicaciones de seguridad
c ¡ Peligr o !
·
¡No deje niños pequeños sin
vigilancia con el material de
embalaje! ¡De lo contrario
pueden correr riesgos mortales por asfixia !
· ¡No deje a niños sin vigilancia con el aparato!
· ¡Preste atención a que la aspiradora no
arrastre a ninguna persona o animal!
· Antes de conectar a la corriente, asegúrese
de que ésta sea de 230 V ~ 50 Hz y esté
dotada, según indican las normativas, de
un fusible de 16 amperios.
· ¡Monte, mantenga y cuide el aparato solo
si está desconectado de la corriente!
· ¡Evite que el aparato entre en contacto con
humedad! ¡De lo contrario se corre riesgo
mortal por descarga eléctrica!
· ¡No aspire líquidos! ¡De lo contrario se
corre peligro por descarga eléctrica!
· No exponga el aparato al fuego, calor o
Introducción / Seguridad

8 ES
el efecto prolongado de temperaturas
superiores a 50º C! ¡De lo contrario se corre
peligro de explosión!
m¡Advertencia!
· ¡Antes de la puesta en marcha, compruebe
que todas las piezas estén montadas de
acuerdo con el manual de instrucciones!
¡De lo contrario se dañarán!
· ¡No aspire ningún material que arda,
humee, sea incandescente o esté caliente!
¡Peligro de incendio!
· ¡No aspire ningún producto fácilmente
inflamable o explosivo, o no aspire cerca de
lugares en los que estos estén presentes!
¡Peligro de explosión!
· ¡No aspire nunca polvo de tóner!
· ¡No tape el aparato con ningún objeto! ¡De
lo contrario se corre peligro de daños por
acumulación de calor!
· ¡Cuando no use el aparato desconéctelo de
la red eléctrica y enrolle el cable comple-
tamente! ¡De lo contrario corre peligro de
heridas a causa de posibles tropiezos!
· Utilice siempre el mango cuando la
aspiradora esté en funcionamiento. La aspi-
ración de polvo fino conlleva naturalmente
la aparición de cargas estáticas. Preste
atención a mantener contacto prolongado
con el inserto de metal que se encuentra
en la parte inferior del mango. Este evita
la sensación desagradable de las cargas
electroestáticas.
· ¡Nunca utilice el aparato sin la bolsa para
polvo o sin filtro!
m ¡Atención!
· ¡Evite dañar el cable de alimentación!
· ¡Cuando utilice la aspiradora, desenrolle
el cable hasta la marca amarilla! ¡De lo
contrario se corre peligro de daños por
sobrecalentamiento!
· ¡Cuando utilice la aspiradora, desenrolle el
cable como mínimo hasta la marca amarilla
y como máximo hasta la marca roja!
· ¡Desenchufe el cable red sujetándolo solo
por el enchufe!
· ¡Desconecte el aparato de la red eléctrica
inmediatamente en caso de avería!
· ¡Permita que repare el cable / aparato
defectuoso únicamente personal técnico
autorizado y formado!
A Puesta en marcha
A Montaje
• Pulse el botón del dispositivo de apertura
{
de la tapa del contenedor de recolección de
polvo y levántela.
• Retire el soporte de la bolsa para polvo
u
junto con la bolsa para polvo
i
y asegúrese
de que el filtro de protección del motor
o
y
el filtro de salida de aire
p
están montados
como se explica en la fig. B. Introduzca de
nuevo el soporte de la bolsa para polvo
u
junto con la bolsa para polvo
i
.
• Cierre la tapa e introduzca el inserto del tubo
de aspiración
}
en el orificio de aspiración
de la aspiradora hasta que encaje.
• Introduzca el extremo que disminuye del tubo
de aspiración telescópico
R
en el inserto de
la boquilla de suelo
I
hasta que éste encaje.
Introduzca el mango
Q
en el tubo telescópico
de aspiración
R
hasta que éste encaje.
a Ajustar el tubo telescópico
de aspiración
• Mantenga presionado el ajuste vertical
Y
en
la dirección de la flecha (véase fig. D).
Seguridad / Puesta an marcha

9ES
• Encaje el el tubo telescópico
R
en la
longitud deseada.
a Utilización de las boquillas
de aspiración
La boquilla de suelo
I
es apropiada para la
aspiración diaria de alfombras y suelos duros.
La boquilla de suelo
I
se cambia manualmente,
para ello pliegue o despliegue la corona de cerdas.
• Pulse el botón de conmutación
O
de la
boquilla de suelo para desplegar la corona
de cerdas. Este ajuste facilita la absorción
de polvo, pelusas y pelos sueltos en una
superficie plana y fija, p. ej. suelo de baldosas.
• Pulse el botón de conmutación
O
de la
boquilla de suelo para plegar la corona de
cerdas. Este ajuste facilita la aspiración de
pelusas y pelos en superficies fibrosas y
suaves, p. ej. alfombras.
Para las necesidades particulares de la limpieza
de lahabitación están incluidas tres boquillas
diferentes en la aspiradora en un soporte por
separado para boquillas adicionales
e
.
• La boquilla para rincones
r
es apropiada
para aspirar juntas, esquinas y ranuras.
• La boquilla para cojines
t
es apropiada
para aspirar colchones o muebles acolchados.
• La boquilla con pincel
y
con cabeza de
pincel giratoria es adecuada para aspirar
materiales y objetos sensibles.
¡Consejo! Las boquillas adicionales se
pueden colocar en el tubo de aspiración
R
,
así como en el mango
Q
del tubo de
aspiración.
A Manejo
A Conexión a la red eléctrica
• Extraiga el cable de red
A
del aparato hasta
que aparezca la marca amarilla y enchufe
ela clavija en la toma de corriente.
A Conexión / Desconexión
• Presione el botón de conexión y desconexión
G
y conecte o desconecte el aprato.
¡Consejo! Deje el aspirador Lervia KH 3158
conectado durante aprox. 3 segundos
después de haber aspirado. En caso contra-
rio el último polvo aspirado no se introducirá
del todo en la bolsa para polvo.
A Seleccionar la potencia
de aspiración
La muesca del regulador
S
indica en la
escala
D
la potencia de aspiración seleccionada
para el aspirador (véase fig. C).
• Gire el regulador
S
en el sentido de las agu-
jas del reloj a lo largo de la escala
D
para
aumentar la potencia de aspiración.
• Gire el regulador
S
en sentido contrario al
de las agujas del reloj a lo largo de la escala
D
para disminuir la potencia de aspiración.
¡Consejo! Utilice el regulador manual de
flujo de aire
W
del asa (véase fig. D), para
disminuir brevemente la potencia de aspi-
ración sin emplear la rueda reguladora
S
.
Puesta an marcha / Manejo

10 ES
A Transporte y almacenamiento
• Desconecte la aspiradora y desenchufe el
cable de alimentación A de la red.
• Presione el botón de pie para el rebobinado
del cable de red
]
, el cable de red
A
se
enrolla automáticamente.
• Para el transporte del aparato llévelo por el
asa extraíble
P
.
• Transporte el aparato al lugar de almacena-
miento deseado, introduzca el tubo telescó-
pico de aspiración
R
en uno de los soportes
para el estado de reposo
F
.
¡Consejo! Puede almacenar la aspiradora
Lervia KH 3158 tanto en vertical como en
horizontal.
• Conserve las boquillas adicionales
r
t
y
en en soporte para accesorios
e
o en la
bolsa de accesorios
[
.
A Mantenimiento y limpieza
A Mantenimiento
a Cambio de la bolsa de polvo
(TYP KH 99)
Reconoce que la bolsa para polvo
i
está llena
por completo, cuando el indicador del estado de
llenado
q
se muestra al 100 % ROJO en la mirilla.
• Desconecte la aspiradora y desenchufe el
cable de alimentación
A
de la red.
• Pulse el botón de desbloqueo
{
en la tapa
del contenedor de recolección de polvo y
levante la tapa.
• Extraiga la bolsa para polvo llena
i
del
soporte de la bolsa para polvo
u
, para ello
accione la palanca de sujeción.
• Introduzca una bolsa para polvo nueva
de TYP KH 99 o Typ Swirl
®
Y 101
®
en el
soporte de la bolsa de polvo.
Nota:
¡No se puede cerrar la tapa sin antes haber
introducido una bolsa para polvo!
a Cambio de filtro
• Desconecte la aspiradora y desenchufe el
cable de alimentación
A
de la red.
• Pulse el botón de desbloqueo
{
en la tapa
del contenedor de recolección de polvo y
levante la tapa.
• Extraiga la bolsa para polvo llena
i
del
soporte de la bolsa para polvo
u
, para ello
accione la palanca de sujeción.
Filtro de protección del motor
El filtro de protección del motor
o
protege el
compartimiento del motor contra la suciedad
(véase fig. B).
• Extraiga el ltro de protección del motor
o
del soporte.
• Sustituya el inserto de ltro por uno nuevo.
• Vuelva a introducir después el ltro de
protección del motor
o
en el soporte.
Filtro de la salida de aire
El filtro de la salida de aire
p
recoge polvo fino,
que de otra manera entraría en el aire ambiente.
Después de realizar un control visual, cambie
el filtro de la salida de aire en caso necesario
(véase fig. F). En caso necesario, el recambio
se debe adquirir a través de nuestros puntos de
asistencia indicados.
• Extraiga el ltro de la salida de aire
p
del
soporte.
• Sustituya el ltro de la salida de aire
completo por uno nuevo.
Manejo / Mantenimiento y limpieza

11ES
• Coloque el ltro de salida de aire nuevo
p
en el soporte y haga que éste encaje de
forma visible.
a Levantador de pelusas
A través del levantador de pelusas en la parte
inferior de la boquilla de suelo
I
se recogen
especialmente bien las fibras y las pelusas. Se
puede extraer el levantador de pelusas des-
gastado con una herramienta adecuada.
En caso necesario, el recambio se debe adquirir
a través de nuestros puntos de asistencia
indicados.
A Limpieza
• Desconecte la aspiradora y desenchufe el
cable de alimentación
A
de la red.
• Emplee un paño seco para la limpieza.
• ¡No limpie nunca el aparato con agua!
• Utilice un cepillo o unas pinzas para extraer
las fibras en la boquilla de suelo
I
o
aspírelas ocasionalmente con la boquilla
para rincones
r
.
A Eliminación
El embalaje se compone de materiales
reciclables que puede desechar en los
puntos locales de recogida selectiva
¡No deseche los aparatos eléctricos
junto con la basura doméstica!
Según la Directiva europea 2002 / 96 / CE sobre
residuos de aparatos eléctricos y electrónicos
y en cumplimiento con el derecho nacional, los
aparatos eléctricos usados se tienen que separar
y reciclar sin dañar el medioambiente.
Para deshacerse de un aparato una vez que ya
no sirva, pregunte a las autoridades locales o
municipales.
A Información
A Asistencia
Consulte los puntos de atención al cliente de su
país en la tarjeta de garantía suministrada.
Mantenimiento y limpieza / Eliminación / Información

12 ES
A Certificado del fabricante /
Declaración de conformidad
Nosotros, Kompernaß GmbH, Burgstr. 21,
D-44867 Bochum, Alemania, declaramos por la
presente que este producto cumple las
siguientes directrices europeas:
Directiva de baja tensión
2006 / 95 / EC
Compatibilidad electromagnética
2004 / 108 / EC
conforme a las normas aplicadas, y lo
confirmamos con el marcado CE.
Designación del tipo de aparato:
Aspiradora Lervia KH 3158
Bochum, 30.11.2007
Hans Kompernaß
- Gerente -
Queda reservado el derecho a realizar modificaciones técnicas para el
perfeccionamiento del dispositivo. Este manual de instrucciones está
impreso en papel reciclable.
Información

13IT/MT
Contenuto
Prima di leggere aprire la pagina con le immagini
e prendere confidenza con le diverse funzioni dell’apparecchio.
Introduzione
Per la vostra sicurezza .........................................................................Pagina 14
Descrizione dell’apparecchio ed uso corretto ....................................Pagina 14
Elementi di comando ............................................................................Pagina 14
Dati tecnici ............................................................................................Pagina 14
Fornitura ...............................................................................................Pagina 15
Sicurezza
Indicazioni per la sicurezza .................................................................Pagina 15
Messa in funzione
Montaggio .............................................................................................Pagina 16
Regolare il tubo telescopico ..............................................................Pagina 16
Uso dei bocchettoni ..........................................................................Pagina 16
Uso
Collegamento alla rete .........................................................................Pagina 17
Accensione / spegnimento ...................................................................Pagina 17
Selezionare la potenza di aspirazione ................................................Pagina 17
Trasporto e conservazione ..................................................................Pagina 17
Manutenzione e Pulizia
Manutenzione .......................................................................................Pagina 18
Sostituzione del sacchetto per la polvere .........................................Pagina 18
Sostituzione del filtro ........................................................................Pagina 18
Sollevatore fili ...................................................................................Pagina 18
Pulizia ....................................................................................................Pagina 18
Smaltimento ...........................................................................................Pagina 19
Informazioni
Service ..................................................................................................Pagina 19
Comprovazione del produttore / Dichiarazione di conformità ...........Pagina 19

14 IT/MT
Introduzione
Lervia KH 3158
Aspirapolvere
A Introduzione
A Per la vostra sicurezza
Imparate, prima della prima messa in
funzione, le funzioni dell’apparecchio
e leggete il seguente manuale d’uso.
Usate l’apparecchio solo come descritto. Con-
servate bene questo manuale. In caso di cessione
a terzi dell’apparecchio, dovete consegnare
anche tutta la documentazione.
A Descrizione dell’apparecchio
ed uso corretto
L’aspirapolvere è destinato per aspirare
solamente polveri asciutti su superfici asciutte
in case private. Ogni altro uso oppure modifica
dell’apparecchio non è corretto e può causare
seri pericoli di incidenti. Il produttore non risponde
per danni causati dal uso non corretto oppure
dal errato maneggiamento.
A Elementi di comando
Le figure A – F indicano i singoli elementi di
comando del Lervia KH 3158.
Q
Maniglia
W
Regolatore aria secondaria
E
Tubo aspiratore
R
Tubo telescopico in acciaio legato
T
Tasto di sbloccaggio
Y
Regolazione in altezza per tubo telescopico
U
Ruota
I
Bocchettone con spazzole e sollevatore fili
O
Tasto di commutazione bocchettone
P
Maniglia da trasporto a scomparsa
{
Sbloccaggio del coperchio
}
Manicotto girabile d’aspirazione
q
Indicazione di riempimento del sacchetto
per la polvere
w
Apertura di scarico aria
e
Supporto per bocchettoni aggiuntivi
r
Bocchetta per giunture
t
Bocchetta per imbottiture
y
Bocchetta a pennello
u
Supporto sacchetto
i
Sacchetto per la polvere
(Tipo KH 99, o Swirl
®
Y 101
®
)
o
Filtro di protezione del motore
p
Filtro dell’aria di scarico
[
Sacchetto accessori per bocchettoni
aggiuntivi
]
Tasto per avvolgimento cavo
A
Cavo con spina
S
Regolatore per la potenza d’aspirazione
D
Scala della potenza d’aspirazione
F
Supporto parcheggio per bocchettone
G
Tasto ON / OFF
Nota:
Swirl
®
e Y 101
®
sono marchi registrati
del gruppo Melitta.
A Dati tecnici
Tensione nominale: 230 V ~ 50 Hz
Potenza: 1500 W
Classe di protezione: II /
&
· Regolazione elettronica della potenza
d’aspirazione
· Sistema multiplo di filtraggio

15IT/MT
· Tubo aspiratore 175 cm
· Tubo telescopico regolabile in acciaio legato
A Fornitura
Vi forniamo il Lervia KH 3158 con i seguenti
componenti (vedi Fig. A):
- Aspirapolvere
- Tubo aspiratore
- Tubo telescopico
- Bocchettone
- Sacchetto accessori
- Supporto per bocchettoni aggiuntivi
- Bocchetta per giunture
- Bocchetta per imbottiture
- Bocchetta a pennello
- Sacchetti per la polvere (5 pezzi: Tipo KH 99)
- Filtro di protezione del motore
- Filtro dell’aria di scarico
- Manuale d´uso
- Scheda di garanzia
A Sicurezza
I pittogrammi e indicazioni significano:
cPericolo! State mettendo in pericolo la vita
e la salute se questa indicazione non viene
osservata.
mAvvertenza! State mettendo in pericolo la
salute e le cose se questa indicazione non
viene osservata.
mAttenzione! State mettendo in pericolo le
cose se questa indicazione non viene
osservata.
Consiglio! Raggiungerete risultati ottimi se
questa indicazione viene osservata.
A Indicazioni per la sicurezza
cPericolo!
·
Non lasciate incustoditi i
bambini piccoli con il materiale
d´imballaggio! Altrimenti esiste
il pericolo per la vita causato da soffocamento!
· Non lasciate incustoditi i bambini piccoli
con l´apparecchio!
· Assicuratevi che non vengano prese
persone o animali con l’aspirapolvere!
· Assicuratevi prima del collegamento alla
corrente, che la corrente sia di 230 V ~ 50 Hz
con un fusibile di 16 Ampere.
· Staccate sempre la corrente quando dovete
montare, curare oppure eseguire riparazioni
sull´apparecchio!
· Evitate che l´apparecchio venga in contatto
con umiditá! Altrimenti esiste il pericolo per
la vita, causato da scosse elettriche!
· Non aspirate liquidi! Altrimenti esiste il
pericolo di vita causato da scosse elettriche!
· Non sottoporre l´apparecchio alle vicinanze
di fuoco, calore oppure lunghe esposizioni
oltre i 50° C! Altrimenti esiste il pericolo di
esplosione!
mAvvertenza!
· Controllate, prima della messa in funzione,
che tutti i componenti siano stati montati
secondo il manuale d‘uso!
Altrimenti esiste il pericolo di
danneggiamento!
Introduzione / Sicurezza

16 IT/MT
· Non aspirate materiali incendiati, roventi
oppure materiali caldi! Pericolo d´incendio!
· Non aspirate materiali infiammabili oppure
esplosivi e / o non aspirate in luoghi nei
quali questi materiali sono presenti!
Pericolo d’esplosione!
· Non aspirate polvere di toner!
· Non coprite il caricatore con oggetti! Altri-
menti esiste il pericolo di danneggiamento
causato dal accumulo di calore!
· Staccate l’apparecchio dalla corrente
quando non lo usate ed avvolgete il cavo!
Altrimenti esiste il pericolo di ferite per
inciampamenti!
· Usate sempre la maniglia quando usate
l’apparecchio. Aspirando polveri fini si ha
un naturale accumulo di cariche statiche.
Osservate il continuo contatto con l’inserto
metallico sul lato inferiore della maniglia.
Questo impedisce l’effetto spiacente delle
scariche elettrostatiche.
· Non usate mai l’apparecchio senza
sacchetto e / o filtro!
mAttenzione!
· Evitate qualsiasi danneggiamento del cavo
di corrente!
· Srotolate il cavo fino al segno giallo, quando
usate l’apparecchio! Altrimenti esiste il
pericolo di danneggiamento causato da
surriscaldamento!
· Srotolate il cavo almeno fino al segno giallo
e al massimo fino al segno rosso!
- Staccare il cavo dalla presa solo
prendendolo dalla parte della spina!
- In caso di avarie staccate subito la spina
dalla presa!
- Fate riparare l’apparecchio / cavo
solamente da persone qualificate
autorizzate ed istruite!
A Messa in funzione
A Montaggio
•
Azionate lo bloccaggio del coperchio
{
del
contenitore per il sacchetto della polvere ed
aprite il coperchio.
•
Togliete il supporto per il sacchetto della pol-
vere
u
assieme al sacchetto per la polvere
i
ed assicuratevi, che il filtro di protezione
del motore
o
ed il filtro dell’aria di scarico
p
siano montati come in Fig. B.
Inserite il supporto del sacchetto per la
polvere
u
con il sacchetto della polvere
i
.
•
Chiudete il coperchio ed inserite il manicotto
del tubo per l’aspirazione
}
nell’apertura
dell’aspirapolvere, fino a quando si incastra.
•
Inserite la parte terminale più stretta del
tubo telescopico
R
nel manicotto del boc-
chettone
I
. Inserite la maniglia
Q
nel tubo
telescopio
R
fino a quando si incastra.
a Regolare il tubo telescopico
•
Tenete la regolazione in altezza
Y
in
direzione della freccia (vedi Fig. D).
•
Incastrate il tubo telescopico
R
alla
lunghezza desiderata.
a Uso dei bocchettoni
Il bocchettone
I
è adatto per l’uso giornaliero
per aspirare tappeti e pavimenti duri. Il bocchet-
tone
I
può essere commutato manualmente;
per questo si estrae e / o ritira le spazzole.
•
Premete il tasto di commutazione
O
del
bocchettone, per estrarre le spazzole.
Questa impostazione permette l’aspirazione
di polvere sciolta, pellucchi e cappelli su una
superficie liscia e dura come p.es. piastrelle.
Sicurezza / Messa in funzione

17IT/MT
•
Premete il tasto di commutazione
O
del
bocchettone, per ritirare le spazzole. Questa
impostazione permette di aspirare pel lucchi
e cappelli su superfici morbide come p.es.
tappeti.
Per le necessità individuali della cura della casa
l’aspirapolvere possiede tre bocchettoni diversi
in un supporto per bocchettoni aggiuntivi
e
.
•
Il bocchettone per giunture
r
è adatto
per aspirare giunture, angoli e fessure.
•
Il bocchettone per imbottiture
t
è adatto
per aspirare materassi e mobili imbottiti.
•
Il bocchettone a pennello
y
con testa
ruotabile è adatto per aspirare stoffe ed
oggetti delicati.
Consiglio! I bocchettoni aggiuntivi possono
essere inseriti sia al tubo aspiratore
R
come anche alla maniglia
Q
del tubo.
A Uso
A Collegamento alla rete
•
Estraete il cavo
A
dall’apparecchio, fino a
quando appare il segno giallo ed inserite la
spina nella presa.
A Accensione / spegnimento
•
Premete il tasto ON / OFF
G
ed accendete
e / o spegnete l’apparecchio.
Consiglio! Dopo aver aspirato la polvere lasciate
acceso il Lervia KH 3158 acceso per anco
ra
3 secondi. Altrimenti la polvere aspirata per
ultima
non raggiunge il sacchetto per la polvere.
A Selezionare la potenza
di aspirazione
L’intaccatura sul regolatore
S
indica sulla
scala
D
la potenza di aspirazione selezionata
dell’aspirapolvere (vedi Fig. C).
•
Girate il regolatore
S
in senso orario lungo
la scala
D
per aumentare la potenza di
aspirazione.
•
Girate il regolatore
S
in senso antiorario
lungo la scala
D
per diminuire la potenza di
aspirazione.
Consiglio! Usate il regolatore dell’aria
aggiuntiva
W
della maniglia (vedi Fig.
D), per diminuire brevemente la potenza
d’aspirazione, senza utilizzare il regolatore
della potenza
S
.
A Trasporto e conservazione
•
Spegnete l’aspirapolvere e staccate il
cavo
A
dalla presa.
•
Premete il tasto per l’avvolgimento cavo
]
;
il cavo
A
di riavvolge automaticamente.
•
Tenete l’apparecchio dalla parte della ma-
niglia estraibile
P
quando lo trasportate.
•
Portate l’apparecchio al luogo di rimes-
saggio, inserite il tubo telescopico
R
nel
supporto di parcheggio
F
.
Consiglio! Potete posteggiare il
Lervia KH 3158 in senso verticale ed in
senso orizzontale.
•
Conservate i bocchettoni aggiuntivi
r
,
t
,
y
nel supporto accessori
e
e / o nel
sacchetto per gli accessori
[
.
Messa in funzione / Uso

18 IT/MT
A Manutenzione e Pulizia
A Manutenzione
a Sostituzione del sacchetto per la
polvere (Tipo KH 99)
Potete vedere, che il sacchetto per la polvere
i
è completamente pieno, quando l’indicatore
q
nella finestrella indica al 100 % ROSSO.
•
Spegnete l’aspirapolvere e staccate il
cavo
A
dalla presa.
•
Azionate lo sbloccaggio del coperchio
{
del contenitore per il sacchetto della
polvere ed aprite il coperchio.
•
Togliete il sacchetto pieno
i
dal supporto
per il sacchetto della polvere
u
; azionate
per questo la leva.
•
Inserite un nuovo sacchetto per la polvere
del tipo KH 99 oppure Swirl
®
Y 101
®
nel
supporto per il sacchetto della polvere.
Nota:
Senza sacchetto inserito il coperchio non può
essere chiuso!
a Sostituzione del filtro
•
Spegnete l’aspirapolvere e staccate il
cavo
A
dalla presa.
•
Azionate lo sbloccaggio del coperchio
{
del contenitore per il sacchetto della
polvere ed aprite il coperchio.
•
Togliete il sacchetto pieno
i
dal supporto
per il sacchetto della polvere
u
; azionate
per questo la leva.
Filtro di protezione del motore
Il filtro di protezione del motore
o
protegge il
vano motore da impurità (vedi Fig. B).
•
Togliete il filtro di protezione motore
o
dal
supporto.
•
Sostituite il filtro con uno nuovo.
•
Inserite nuovamente il filtro di protezione del
motore
o
nel supporto.
Filtro dell’aria di scarico
Il filtro dell’aria di scarico
p
raccoglie polveri fini,
che altrimenti raggiungerebbero l’aria ambientale.
Sostituite il filtro dell’aria di scarico dopo un
controllo visivo (vedi Fig. F). Pezzi di ricambio sono
reperibili attraverso i punti d’assistenza indicati.
•
Togliete il filtro dell’aria di scarico
p
dal
supporto.
•
Sostituite il filtro dell’aria di scarico
completo con uno nuovo.
•
Inserite il nuovo filtro dell’aria di scarico
p
nel supporto e fatelo incastrare.
a Sollevatore fili
Grazie al sollevatore fili alla parte inferiore del
bocchettone
I
si raccolgono molto bene
pellucchi e fili. Un sollevatore fili usurato può
essere rimosso con l’attrezzatura adatta. Pezzi
di ricambio sono reperibili attraverso i punti
d’assistenza indicati.
A Pulizia
•
Spegnete l’aspirapolvere e staccate il
cavo
A
dalla presa.
•
Usate un panno asciutto per la pulizia.
•
Non pulite mai l’apparecchio con mezzi umidi.
•
Usate una spazzola oppure pinzette per
togliere fili dal bocchettone
I
oppure aspi-
rateli con il bocchettone per giunture.
Manutenzione e Pulizia

19IT/MT
A Smaltimento
L’imballaggio è composto da materiali
ecologici, che possono essere smaltiti
presso i siti di riciclaggio locali.
Non gettate apparecchi elettrici
nella spazzatura della casa!
Secondo la normativa europee 2002 / 96 / EG
su apparecchi elettrici ed elettronici vecchi e la
traduzione nel diritto nazionale, gli apparecchi
elettrici devono essere raccolti separatamente e
riciclati in modo da rispettare l´ambiente.
Le possibilità di smaltimento dell’apparecchio
usurato potete reperire presso il vostro comune.
A Informazioni
A Service
Trovateli punto d’assistenza del vostro paese
nella scheda di garanzia.
A Comprovazione del produttore /
Dichiarazione di conformità
Noi, la Kompernaß GmbH, Burgstr. 21,
D-44867 Bochum, Germania, dichiariamo la
conformità di questo prodotto con le seguenti
normative europee:
Normativa per la bassa tensione
2006 / 95 / EC
Compatibitlità elettromagnetica
2004 / 108 / EC
secondo le norme utilizzabili, e lo confermiamo
con il contrassegno CE.
Descrizione del tipo dell’apparecchio:
Aspirapolvere Lervia KH 3158
Bochum, 30.11.2007
Hans Kompernaß
- Amministratore -
Modifiche tecniche nel senso dello sviluppo rimangono riservati.
Questo manuale d’uso è stato stampato su carta riciclabile.
Smaltimento / Informazioni

20

21GB/MT
Content
Before reading, unfold the page containing the illustrations
and familiarise yourself with all functions of the device.
Introduction
For Your Safety .....................................................................................Page 22
Description of the Device and Intended Use .......................................Page 22
Controls .................................................................................................Page 22
Technical Details ..................................................................................Page 22
Scope of Delivery ..................................................................................Page 23
Safety
Safety Information ...............................................................................Page 23
Initial Use
Assembly ...............................................................................................Page 24
Adjusting the Telescopic Suction Tube ..............................................Page 24
Using the Suction Nozzles ................................................................Page 24
Operation
Mains Connection .................................................................................Page 25
Switching On and Off ...........................................................................Page 25
Selecting the Suction Power................................................................Page 25
Transportation and Storage .................................................................Page 25
Maintenance and Cleaning
Maintenance .........................................................................................Page 26
Changing the Dust Bag .....................................................................Page 26
Changing the Filter ...........................................................................Page 26
Thread Catcher.................................................................................Page 26
Cleaning ................................................................................................Page 26
Disposal ...................................................................................................Page 27
Information
Service ..................................................................................................Page 27
Manufacturer‘s Certificate / Declaration of Conformity ....................Page 27

22 GB/MT
Introduction
Lervia KH 3158
Floor Vacuum Cleaner
A Introduction
A For Your Safety
Please acquaint yourself with the
functions of this vacuum cleaner before
using it for the first time and read
the following instructions. This device should
only be used as described. Please keep these
instructions in a safe place. If you sell or give this
vacuum cleaner to somebody else you should also
provide them with all the associated documents.
A Description of the Device
and Intended Use
This vacuum cleaner is only suitable for vacu-
uming dry material on dry surfaces in private
households. Any other use or modification to
the device is considered to be inappropriate and
harbours considerable hazards. The manufacturer
will not be liable for any damage caused by
inappropriate use or incorrect operation.
A Controls
Illustrations A - F show the individual controls of
the Lervia KH 3158.
Q
Handle
W
Manual suction regulator
E
Suction hose
R
Stainless steel telescopic suction tube
T
Release button
Y
Height adjuster for telescopic suction tube
U
Wheel
I
Floor nozzle with brush strip and thread catcher
O
Changeover switch for the floor nozzle
P
Retractable carrying handle
{
Cover release
}
Suction hose connector, rotating
q
Filling level indicator for the dust bag
w
Exhaust air opening
e
Holder for additional nozzles
r
Crevice nozzle
t
Upholstery nozzle
y
Brush nozzle
u
Dust bag holder
i
Dust bag (type KH 99 or Swirl
®
Y 101
®
)
o
Motor protection filter
p
Exhaust air filter
[
Accessories bag for additional nozzles
]
Pedal button for power cord rewind
A
Power cord with mains plug
S
Rotating control for suction power
D
Suction power scale
F
Holder for the floor nozzle
G
On / off switch
Note:
Swirl
®
and Y 101
®
are registered trademarks
of the Melitta Group.
A Technical Details
Nominal voltage: 230 V ~ 50 Hz
Power: 1500 W
Protection class: II /
&
· Electronic suction power control
· Multiple filter system
· 175 cm suction hose
· Adjustable telescopic suction tube made of
stainless steel

23GB/MT
A Scope of Delivery
We supply the Lervia KH 3158 with the following
parts (see illustration A):
- Vacuum cleaner
- Suction hose
- Telescopic suction tube
- Floor nozzle
- Accessories bag
- Holder for additional nozzles
- Crevice nozzle
- Upholstery nozzle
- Brush nozzle
- Dust bags (5 in number: type KH 99)
- Motor protection filter
- Exhaust air filter
- Operating instructions
- Guarantee card
A Safety
The symbols and terms mean the following:
cDanger! You are putting your life and
health in danger if you do not follow these
instructions.
mWarning! You are putting your health and
property in danger if you do not follow
these instructions.
mCaution! You are putting your property in
danger if you do not follow these instructions.
T i p ! You will achieve best results if you
follow these instructions.
A Safety Information
cDanger!
·
Do not leave small children un-
supervised with the packaging
material! Otherwise there is a
danger of death by suffocation!
· Do not leave children unsupervised with the
vacuum cleaner!
· Please ensure that no people or animals
are hit by the vacuum cleaner!
· Before connecting the vacuum cleaner to
the mains power supply you should ensure
that the mains supply is 230 V ~ 50 Hz and
is correctly equipped with a 16 Ampere fuse.
· The device must only be assembled,
maintained and serviced when it is not
connected to the power supply!
· Do not allow the device to come into
contact with moisture! Otherwise there is a
danger of death by electric shock!
· Do not vacuum up any liquids! Otherwise
there is a danger of electric shock!
· Do not expose the device to the close proxi-
mity of fire, heat or prolonged temperatures
of more than 50° C! Otherwise there is a
danger of explosion!
mWarning!
· Before using the vacuum cleaner for the
first time, please check that all parts have
been assembled in accordance with the
instructions!
Otherwise there is a danger that the
vacuum cleaner will be damaged!
· Do not vacuum up any burning, glowing,
smouldering or hot substances or
materials! Danger of fire!
· Do not vacuum up any easily flammable or
explosive substances, and do not vacuum
in locations in which such substances are
Introduction / Safety

24 GB/MT
present! Danger of explosion!
· Do not vacuum up any toner dust!
· Do not cover the vacuum cleaner with other
items! Otherwise it might be damaged by
heat accumulation!
· If you are not using the vacuum cleaner,
please disconnect it from the mains and roll
up the power cord completely! Otherwise
there is a danger of injury if it is tripped
over!
· You should always use the handle when
operating the vacuum cleaner. Vacuuming
up fine dust results in static charges. You
should therefore ensure permanent contact
with the metal insert on the underside of
the handle. This prevents the unpleasant
effects of electrostatic discharge.
· The device should never be used without a
dust bag or filter!
mCaution!
· Please avoid any damage to the power
cord!
· During use the power cord should be
unwound as far as the yellow marking!
Otherwise there is a danger of damage
from overheating!
· During use the power cord should be
unrolled at least as far as the yellow marking,
but not past the red marking!
· The power cord should only be removed
from the socket by pulling the plug!
· Disconnect the vacuum cleaner from the
mains immediately if there are any
malfunctions!
· If the vacuum cleaner / power cord is
damaged or broken it should only be
repaired by authorised and trained
specialists!
A Initial Use
A Assembly
• Press the cover release
{
of the dust collec-
tion container and then open the cover.
• Remove the dust bag holder
u
together with
the dust bag
i
and ensure that the motor
protection filter
o
and the exhaust air filter
p
are assembled as shown in illustration
B. Then reinsert the dust bag holder
u
together with the dust bag
i
.
• Close the cover and insert the suction hose
connector
}
into the suction opening of the
floor vacuum cleaner until it locks in place.
• Insert the tapered end of the telescopic suc-
tion tube
R
into the connector of the floor
nozzle
I
until it locks in place. Insert the
handle
Q
into the telescopic suction tube
R
until it locks in place.
a Adjusting the Telescopic Suction Tube
• Keep the height adjuster
Y
held down in the
direction of the arrow (see illustration D).
• Adjust the telescopic suction tube
R
to the
desired length and lock it in place.
a Using the Suction Nozzles
The floor nozzle
I
is suitable for the daily
vacuuming of carpeted and hard floors. The floor
nozzle
I
can be changed over manually - the
brush strip is folded in and out.
• Operate the changeover switch
O
of the
floor nozzle in order to fold out the brush
strip. This setting allows you to vacuum up
loose dust, fluff and hairs on a smooth and
solid surface, e.g. floor tiles.
Safety / Initial Use

25GB/MT
• Operate the changeover switch
O
of the
floor nozzle to fold the brush strip in again.
This setting makes it possible to vacuum
up fluff and hairs on fibre and soft surfaces,
e.g. carpets.
For your individual room cleaning requirements
the vacuum cleaner is supplied with a separate
holder for three additional nozzles
e
.
• The crevice nozzle
r
is suitable for vacu-
uming joints, corners and crevices.
• The upholstery nozzle
t
is suitable for
vacuuming mattresses or upholstery furniture.
• The brush nozzle
y
with rotating brush
head is suitable for vacuuming sensitive
fabrics and other sensitive items.
Tip! The additional nozzles can be attached
to the suction tube
R
, as well as to the
handle
Q
of the suction hose.
A Operation
A Mains Connection
• Pull the power cord
A
out of the vacuum
cleaner until the yellow marking appears and
insert the mains plug into the socket.
A Switching On and Off
• Press the on / off switch
G
and turn the
vacuum cleaner on or off.
T i p ! After you have finished vacuuming
up dust you should leave the
Lervia KH 3158 switched on for approxi-
mately 3 more seconds. Otherwise not all
of the last dust that was vacuumed up will
reach the dust bag.
A Selecting the Suction Power
The indentation on the control
S
points to the
selected suction power of the vacuum cleaner
on the scale
D
(see illustration C).
• Turn the control
S
clockwise along the scale
D
in order to increase the suction power.
• Turn the control
S
anticlockwise along the
scale
D
to reduce the suction power.
T i p ! Use the manual suction regulator
W
on the handle (see illustration D) to reduce
the selected suction power temporarily
without moving the rotating control
S
.
A Transportation and Storage
• Switch the vacuum cleaner off and remove
the power cord
A
from the power supply.
• Press the pedal button for the power cord
rewind
]
; the power cord
A
is completely
rewound into the vacuum cleaner.
• The vacuum cleaner should be transported by
means of the retractable carrying handle
P
.
• Take the vacuum cleaner to the location
where it is to be stored and insert the
telescopic suction tube
R
into one of the
holders
F
.
T i p ! You can store the Lervia KH 3158
either vertically or horizontally.
• Store the additional nozzles
r
t
y
in the
accessories holder
e
or in the accessories
bag
[
.
Initial Use / Operation

26 GB/MT
A Maintenance and Cleaning
A Maintenance
a Changing the Dust Bag (TYPE KH 99)
You can see that the dust bag
i
is completely
full when the filling level indicator
q
in the
viewing window is 100 % RED.
• Turn the vacuum cleaner off and disconnect
the power cord
A
from the mains.
• Press the release button
{
on the cover of
the dust collection container and open the
cover.
• Remove the full dust bag
i
from the dust
bag holder
u
by pressing the clamping
lever.
• Insert a new dust bag of TYPE KH 99 or type
Swirl
®
Y 101
®
into the dust bag holder.
Note:
If no dust bag is inserted it is not possible to
close the cover!
a Changing the Filter
• Switch the vacuum cleaner off and disconnect
the power cord
A
from the mains.
• Press the release button
{
on the cover of
the dust collection container and open the
cover.
• Remove the full dust bag
i
from the dust
bag container
u
by pressing the clamping
lever.
Motor Protection Filter
The motor protection filter
o
protects the motor
compartment against dirt (see illustration B).
• Remove the motor protection lter
o
from
the holder.
• Replace the lter insert by another one.
• Then reinsert the motor protection lter
o
in
the holder.
Exhaust Air Filter
The exhaust air filter
p
collects fine dusts
which would otherwise be given off to the
surrounding air. The exhaust air filter should be
changed after a visual check (see illustration F).
If a replacement is needed, this can be
purchased from our service addresses.
• Remove the exhaust air lter
p
from the holder.
• Replace the entire exhaust air lter
by a new one.
• Insert the new exhaust air lter
p
into the
holder and allow it to click into place.
a Thread Catcher
Through the use of the thread catchers on the
underside of the floor nozzle
I
, threads and
fluff are vacuumed up particularly thoroughly.
Worn thread catchers can be levered out with an
appropriate tool. If a replacement is needed, this
can be bought from our service addresses.
A Cleaning
• Switch the vacuum cleaner off and discon-
nect the power cord
A
from the mains.
• Please use a dry cloth for cleaning.
• The device should never be cleaned with
moisture!
• Use a brush or tweezers to remove threads
from the floor nozzle
I
, or vacuum these off
from time to time with the crevice nozzle
r
.
Maintenance and Cleaning

27GB/MT
A Disposal
The packaging is wholly composed of
environmentally-friendly materials that
can be disposed of at a local recycling
centre.
Electrical equipment should not be
thrown into the domestic waste!
According to European directive 2002 / 96 / EC
pertaining to old electrical and electronic equip-
ment and its implementation in national law,
worn out electrical equipment must be collected
separately and recycled in an environmentally
friendly manner.
Information on the possibilities that are available
for disposing of worn-out equipment can be
obtained from your local municipal authority.
A Information
A Service
Please see the attached guarantee card for the
respective service address for your country.
A Manufacturer‘s Certificate /
Declaration of Conformity
We, Kompernass GmbH, Burgstrasse 21,
44867 Bochum, Germany, hereby declare that
this product conforms to the following
EC directives:
Low Voltage Directive
2006 / 95 / EC
Electromagnetic Compatibility
2004 / 108 / EC
according to applicable norms, and confirm this
by CE marking.
Type Designation of the Device:
Lervia KH 3158 floor vacuum cleaner
Bochum, 30.11.2007
Hans Kompernass
- Managing Director -
Subject to technical modifications carried out to further develop this
product. These instructions consist of recyclable paper.
Disposal / Information

28

29
DE/AT
Inhalt
Einleitung
Zu Ihrer Sicherheit ................................................................................Seite 30
Gerätebeschreibung und bestimmungsgemäßer Gebrauch ..............Seite 30
Bedienelemente ....................................................................................Seite 30
Technische Daten .................................................................................Seite 30
Lieferumfang ........................................................................................Seite 31
Sicherheit
Sicherheitshinweise .............................................................................Seite 31
Inbetriebnahme
Montage ................................................................................................Seite 32
Teleskopsaugrohr einstellen .............................................................Seite 32
Saugdüsen verwenden .....................................................................Seite 32
Bedienung
Netzanschluss ........................................................................................
Seite 33
Ein- / Ausschalten .................................................................................Seite 33
Saugleistung wählen ...........................................................................Seite 33
Transportieren und aufbewahren .........................................................Seite 33
Wartung und Reinigung
Wartung .................................................................................................Seite 34
Staubbeutelwechsel .........................................................................Seite 34
Filterwechsel ....................................................................................Seite 34
Fadenheber ......................................................................................Seite 34
Reinigung ..............................................................................................Seite 34
Entsorgung .............................................................................................Seite 35
Informationen
Service ..................................................................................................Seite 35
Herstellernachweis / Konformitätserklärung ......................................Seite 35
Klappen Sie vor dem Lesen die Seite mit den Abbildungen aus
und machen Sie sich anschließend mit allen Funktionen des Gerätes vertraut.

30 DE/AT
Lervia KH 3158
Bodenstaubsauger
A Einleitung
A Zu Ihrer Sicherheit
Machen Sie sich vor der ersten
Inbetriebnahme mit den Funktionen
des Gerätes vertraut und lesen Sie
die nachfolgende Bedienungsanleitung. Benutzen
Sie das Gerät nur wie beschrieben. Bewahren
Sie diese Anleitung gut auf. Händigen Sie alle
Unterlagen bei Weitergabe des Gerätes an Dritte
ebenfalls aus.
AGerätebeschreibung und
bestimmungsgemäßer Gebrauch
Der Staubsauger ist ausschließlich zum Saugen
von trockenem Sauggut auf trockenen Oberflächen
im privaten Haushalt geeignet. Jede andere
Verwendung oder Veränderung des Gerätes gilt
als nicht bestimmungsgemäß und birgt erheb-
liche
Unfallgefahren. Der Hersteller haftet nicht für
Schäden, die durch nicht bestimmungsgemäßen Ge-
brauch oder falsche Bedienung verursacht werden.
A Bedienelemente
Die Abbildungen A - F zeigen die einzelnen
Bedienelemente des Lervia KH 3158.
Q
Handgriff
W
Nebenluftsteller
E
Saugschlauch
R
Teleskopsaugrohr aus Edelstahl
T
Entriegelungstaste
Y
Höhenverstellung für Teleskopsaugrohr
U
Laufrad
I
Bodendüse mit Borstenkranz und Fadenheber
O
Umschalttaste der Bodendüse
P
Versenkbarer Tragegriff
{
Deckelentriegelung
}
Saugschlauchstutzen drehbar
q
Füllstandsanzeige des Staubbeutels
w
Abluftöffnung
e
Halter für Zusatzdüsen
r
Fugendüse
t
Polsterdüse
y
Pinseldüse
u
Staubbeutelhalter
i
Staubbeutel (Typ KH 99, oder Swirl
®
Y 101
®
)
o
Motorschutzfilter
p
Abluftfilter
[
Zubehörbeutel für Zusatzdüsen
]
Fußtaste für Netzkabelaufwicklung
A
Netzkabel mit Netzstecker
S
Drehregler für die Saugleistung
D
Skala der Saugleistung
F
Parkhalterung für die Bodendüse
G
Ein- Ausschalttaste
Anmerkung:
Swirl
®
und Y 101
®
sind eingetragene
Handelsmarken der Melitta-Gruppe.
A Technische Daten
Nennspannung: 230 V ~ 50 Hz
Leistung: 1500 W
Schutzklasse: II /
&
· Elektronische Saugkraftregulierung
· Mehrfachfiltersystem
· Saugschlauch 175 cm
· Verstellbares Teleskopsaugrohr aus Edelstahl
Einleitung

31DE/AT
Einleitung / Sicherheit
A Lieferumfang
Wir liefern Ihnen den Lervia KH 3158 mit fol-
genden Bestandteilen (siehe Abb. A):
- Staubsauger
- Saugschlauch
- Teleskopsaugrohr
- Bodendüse
- Zubehörbeutel
- Halterung für Zusatzdüsen
- Fugendüse
- Polsterdüse
- Pinseldüse
- Staubbeutel (5 Stück: Typ KH 99)
- Motorschutzfilter
- Abluftfilter
- Bedienungsanleitung
- Garantiekarte
A Sicherheit
Die Zeichen und Begriffe bedeuten:
c Gefahr! Sie gefährden Leben und Gesund-
heit bei Nichtbeachtung dieses Hinweises.
m Warnung! Sie gefährden Gesundheit und
Sachwerte bei Nichtbeachtung dieses
Hinweises.
m Achtung! Sie gefährden Sachwerte bei
Nichtbeachtung dieses Hinweises.
T i p p ! Sie erzielen optimale Ergebnisse
bei Beachtung dieses Hinweises.
A Sicherheitshinweise
c Gefahr!
·
Lassen Sie Kleinkinder nicht
unbe-
aufsichtigt mit dem Verpackungs-
material!
Andernfalls droht
Lebensgefahr durch Ersticken!
· Lassen Sie Kinder nicht unbeaufsichtigt mit
dem Gerät!
· Stellen Sie sicher, dass keine Menschen
oder Tiere vom Staubsauger erfasst werden!
· Vergewissern Sie sich vor dem Netzstrom-
anschluss, dass der Netzstrom vorschrifts-
mäßig
mit 230 V ~ 50 Hz und mit einer
16 Ampere Sicherung ausgestattet ist.
· Montieren, warten und pflegen Sie das Gerät
nur getrennt vom Netzstrom!
· Verhindern Sie, dass das Gerät mit Feuch-
tigkeit in Berührung kommt! Andernfalls
droht Lebensgefahr durch Stromschlag!
· Saugen Sie keine Flüssigkeiten auf! Andern-
falls droht Gefahr durch elektrischen Schlag!
· Setzen Sie das Gerät nicht der Nähe von
Feuer, Hitze oder lang andauernder Tempe-
ratureinwirkung über 50° C aus! Andernfalls
droht Explosionsgefahr!
m Warnung!
· Überprüfen Sie vor der Inbetriebnahme,
dass sämtliche Bestandteile gemäß der
Bedienungsanleitung montiert sind!
Andernfalls droht Beschädigung!
· Saugen Sie keine brennenden, glühenden,
glimmenden Materialien oder heiße Stoffe auf!
Brandgefahr!
· Saugen Sie keine leicht entflammbaren oder
explosiven Stoffe, bzw. saugen Sie nicht
an Orten, an denen solche vorhanden sind!
Explosionsgefahr!
· Saugen Sie keinen Tonerstaub!

32 DE/AT
· Decken Sie das Gerät nicht mit Gegenständen
ab! Andernfalls droht Beschädigung durch
Hitzestau!
· Trennen Sie das Gerät bei Nichtgebrauch
vom Netz und rollen Sie das Netzkabel
vollständig auf! Andernfalls droht Verletzungs-
gefahr durch Stolpern!
· Verwenden Sie beim Betrieb des Staubsau-
gers immer den Handgriff. Das Saugen von
Feinstaub führt naturgemäß zu statischen
Aufladungen. Achten Sie auf dauerhafte
Berührung mit der Metalleinlage an der
Unterseite des Handgriffs. Diese verhindert
die unangenehme Wirkung von elektro-
statischen Entladungen.
· Benutzen Sie das Gerät niemals ohne
Staubbeutel bzw. Filter!
m Achtung!
· Vermeiden Sie jegliche Beschädigung des
Netzkabels!
· Rollen Sie das Netzkabel beim Gebrauch
bis zur gelben Markierung ab! Andernfalls
droht Beschädigung durch Überhitzung!
· Rollen Sie das Netzkabel beim Gebrauch
bis mindestens zur gelben Markierung,
maximal bis zur roten Markierung ab!
· Ziehen Sie das Netzkabel nur mit Hilfe des
Netzsteckers aus einer Steckdose!
· Trennen Sie das Gerät bei Störungen sofort
vom Netzstrom!
· Lassen Sie das defekte Gerät / Netzkabel
ausschließlich von autorisiertem und
geschultem Fachpersonal reparieren!
A Inbetriebnahme
A Montage
• Betätigen Sie die Deckelentriegelung
{
des
Staubsammelbehälters und klappen Sie den
Deckel auf.
• Entnehmen Sie den Staubbeutelhalter
u
samt
Staubbeutel
i
und stellen Sie sicher, dass
der Motorschutzfilter
o
und der Abluftfilter
p
wie in Abb. B montiert sind. Setzen Sie den
Staubbeutelhalter
u
samt Staubbeutel
i
wieder ein.
• Schließen Sie den Deckel und stecken Sie den
Saugschlauchstutzen
}
in die Saugöffnung
des Bodenstaubsaugers, bis dieser einrastet.
• Setzen Sie das verjüngte Ende des Teleskop-
saugrohrs
R
in den Stutzen der Bodendüse
I
ein, bis diese einrastet. Setzen Sie den Hand-
griff
Q
in das Teleskopsaugrohr
R
ein, bis
dieses einrastet.
a Teleskopsaugrohr einstellen
• Halten Sie die Höhenverstellung
Y
in
Pfeilrichtung gedrückt (siehe Abb. D).
• Rasten Sie das Teleskopsaugrohr
R
auf die
gewünschte Länge ein.
a Saugdüsen verwenden
Die Bodendüse
I
eignet sich für das tägliche
Absaugen von Teppich- und Hartfußböden. Die
Bodendüse
I
ist manuell umschaltbar, dabei
klappen Sie den Borstenkranz ein bzw. aus.
• Betätigen Sie die Umschalttaste
O
der Bo-
dendüse, um den Borstenkranz auszuklappen.
Diese Ein
stellung ermöglicht das Aufsaugen
von losem Staub, Flusen und Haaren bei
einem glatten und festen Untergrund, z. B.
Sicherheit / Inbetriebnahme

33DE/AT
Inbetriebnahme / Bedienung
Bodenfliesen.
• Betätigen Sie die Umschalttaste
O
der Boden-
düse,
um den Borstenkranz einzuklappen.
Diese Einstellung ermöglicht das Aufsaugen
von Flusen und Haaren bei faserigen und
weichen Untergründen, z. B. Teppiche.
Für die individuellen Anforderungen der Raum-
pflege liegen dem Staubsauger in einem separaten
Halter für Zusatzdüsen
e
drei verschiedene
Düsen bei.
• Die Fugendüse
r
eignet sich zum Absau-
gen von Fugen, Ecken und Ritzen.
• Die Polsterdüse
t
eignet sich zum Absau-
gen von Matratzen oder Polstermöbeln.
• Die Pinseldüse
y
mit drehbarem Pinsel-
kopf eignet sich zum Absaugen von empfind-
lichen Stoffen und Gegenständen.
Tipp! Die Zusatzdüsen können am Saug-
rohr
R
, wie auch am Handgriff
Q
des
Saugschlauches aufgesteckt werden.
A Bedienung
A
Netzanschluss
• Ziehen Sie das Netzkabel
A
aus dem Gerät,
bis die gelbe Markierung erscheint und stecken
Sie den Netzstecker in die Steckdose.
A Ein- / Ausschalten
•Drücken Sie die Ein- Ausschalttaste
G
und
schalten Sie das Gerät ein bzw. aus.
Tipp! Lassen Sie den Lervia KH 3158 ca.
3 Sekunden länger eingeschaltet, nachdem
Sie Staub aufgesaugt haben. Andernfalls
gelangt der zuletzt gesaugte Staub nicht
vollständig in den Staubbeutel.
A Saugleistung wählen
Die Einkerbung am Regler
S
zeigt an der Skala
D
die gewählte Saugleistung des Staubsaugers an
(siehe Abb. C).
• Drehen Sie den Regler
S
im Uhrzeigersinn
entlang der Skala
D
, um die Saugleistung
zu erhöhen.
• Drehen Sie den Regler
S
entgegen des
Uhrzeigersinns entlang der Skala
D
, um die
Saugleistung zu verringern.
Tipp! Verwenden Sie den Nebenluftsteller
W
des Handgriffs (siehe Abb. D), um die gewähl-
te Saugleistung kurzfristig zu verringern,
ohne den Drehregler
S
zu verwenden.
A Transportieren und aufbewahren
•
Schalten Sie den Staubsauger aus und
trennen Sie das Netzkabel
A
vom Netz.
• Drücken Sie die
Fußtaste für Netzkabelauf-
wicklung
]
, das Netzkabel
A
rollt automa-
tisch vollständig ein.
• Tragen Sie zum Transport das Gerät am
herausziehbaren Tragegriff
P
.
• Bringen Sie das Gerät an den gewünschten
Aufbewahrungsort, setzen Sie das
Teleskopsaugrohr
R
in eine der
Parkhalterungen
F
ein.
Tipp!
Sie können den
Lervia KH 3158 wahlweise senkrecht oder
waagerecht aufbewahren.

34 DE/AT
• Bewahren Sie die Zusatzdüsen
r t y
im
Zubehörhalter
e
bzw. im Zubehörbeutel
[
auf.
A Wartung und Reinigung
A Wartung
a Staubbeutelwechsel (TYP KH 99)
Sie erkennen, dass der Staubbeutel
i
vollstän-
dig gefüllt ist, wenn die Füllstandsanzeige
q
im
Sichtfenster zu 100 % ROT anzeigt.
• Schalten Sie den Staubsauger aus und
trennen Sie das Netzkabel
A
vom Netz.
• Betätigen Sie die Entriegelungstaste
{
am
Deckel des Staubsammelbehälters und
klappen Sie den Deckel auf.
• Entnehmen Sie den gefüllten Staubbeutel
i
aus dem Staubbeutelhalter
u
, dazu
betätigen Sie den Klemmhebel.
•
Führen Sie einen neuen Staubbeutel vom
TYP KH 99 oder Typ Swirl
®
Y 101
®
in den
Staubbeutelhalter ein.
Hinweis:
Ohne eingesetzten Staubbeutel kann der Deckel
nicht geschlossen werden!
a Filterwechsel
• Schalten Sie den Staubsauger aus und
trennen Sie das Netzkabel
A
vom Netz.
• Betätigen Sie die Entriegelungstaste
{
am
Deckel des Staubsammelbehälters und
klappen Sie den Deckel auf.
• Entnehmen Sie den gefüllten Staubbeutel
i
aus dem Staubbeutelhalter
u
, dazu
betätigen Sie den Klemmhebel.
Motorschutzfilter
Der Motorschutzfilter
o
schützt den Motorraum
vor Verschmutzung (siehe Abb. B).
• Entnehmen Sie den Motorschutzlter
o
aus
der Halterung.
• Ersetzen Sie die Filtereinlage durch
eine neue.
• Stecken Sie danach den Motorschutzlter
o
wieder in die Halterung ein.
Abluftfilter
Der Abluftfilter
p
sammelt feine Stäube, die
andernfalls in die Umgebungsluft gelangen.
Wechseln Sie den Abluftfilter nach Sichtkontrolle
(siehe Abb. F). Ersatz ist im Bedarfsfall über unsere
angegebenen Servicestellen zu beziehen.
• Entnehmen Sie den Abluftlter
p
aus
der Halterung.
• Ersetzen Sie den kompletten Abluftlter
durch einen neuen.
• Stecken Sie den neuen Abluftlter
p
in
die Halterung und lassen Sie diesen
deutlich einrasten.
a Fadenheber
Durch die Fadenheber an der Unterseite der
Bodendüse
I
werden Fäden und Fusseln
besonders gut aufgenommen. Verschlissene
Fadenheber können mit einem geeigneten
Werkzeug ausgehebelt werden. Ersatz ist im
Bedarfsfall über unsere angegeben Servicestellen
zu beziehen.
A Reinigung
• Schalten Sie den Staubsauger aus und
trennen Sie das Netzkabel
A
vom Netz.
• Verwenden Sie ein trockenes Tuch zur
Reinigung.
Bedienung / Wartung und Reinigung

35DE/AT
• Reinigen Sie das Gerät niemals feucht!
• Verwenden Sie eine Bürste oder Pinzette zum
Entfernen von Fäden an der Bodendüse
I
oder saugen Sie diese gelegentlich mit der
Fugendüse
r
ab.
A Entsorgung
Die Verpackung besteht aus umwelt-
freundlichen Materialien, die Sie über
die örtlichen Recyclingstellen entsorgen
können.
Werfen Sie Elektrogeräte
nicht in den Hausmüll!
Gemäß Europäischer Richtlinie 2002 / 96 / EG
über Elektro- und Elektronik-Altgeräte und Umset-
zung in nationales Recht müssen verbrauchte
Elektrogeräte getrennt gesammelt und einer
umweltgerechten Wiederverwertung zugeführt
werden.
Möglichkeiten zur Entsorgung des ausgedienten
Gerätes erfahren Sie bei Ihrer Gemeinde- oder
Stadtverwaltung.
A Informationen
A Service
Entnehmen Sie bitte der beigefügten Garantiekarte
die zuständige Servicestelle Ihres Landes.
A Herstellernachweis /
Konformitätserklärung
Wir, Kompernaß GmbH, Burgstr. 21,
D-44867 Bochum, Deutschland, erklären hiermit
für dieses Produkt die Übereinstimmung mit
folgenden EG-Richtlinien:
Niederspannungsrichtlinie
2006 / 95 / EG
Elektromagnetische Verträglichkeit
2004 / 108 / EG
gemäß anwendbaren Normen, und bestätigen
dies durch CE-Kennzeichnung.
Typenbezeichnung des Gerätes:
Bodenstaubsauger Lervia KH 3158
Bochum, 30.11.2007
Hans Kompernaß
- Geschäftsführer -
Technische Änderungen im Sinne der Weiterentwicklung
sind vorbehalten.Diese Bedienungsanleitung besteht aus
recyclingfähigem Papier.
Wartung und Reinigung / Entsorgung / Informationen

36
-
 1
1
-
 2
2
-
 3
3
-
 4
4
-
 5
5
-
 6
6
-
 7
7
-
 8
8
-
 9
9
-
 10
10
-
 11
11
-
 12
12
-
 13
13
-
 14
14
-
 15
15
-
 16
16
-
 17
17
-
 18
18
-
 19
19
-
 20
20
-
 21
21
-
 22
22
-
 23
23
-
 24
24
-
 25
25
-
 26
26
-
 27
27
-
 28
28
-
 29
29
-
 30
30
-
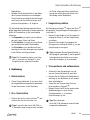 31
31
-
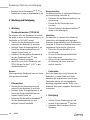 32
32
-
 33
33
-
 34
34


LERVIA Vacuum Cleaner KH 3158 Manual de usuario
- Categoría
- Aspiradoras
- Tipo
- Manual de usuario
- Este manual también es adecuado para
en otros idiomas
Artículos relacionados
Otros documentos
-
ARIETE 2797 El manual del propietario
-
Support 2791 Manual de usuario
-
Parkside PNTS 1300 A1 Translation Of Original Operation Manual
-
Dometic CV-2004 El manual del propietario
-
-
Fakir Ares El manual del propietario
-
SEVERIN BR 7961 Instrucciones de operación
-
-
Parkside PNTS 1400 B1 El manual del propietario
-
Miele S246 El manual del propietario