
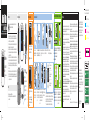
Azul
El resultado de glucemia está
por encima del intervalo ideal.
Verde
El resultado de medición está
dentro del intervalo ideal.
Rojo
El resultado de glucemia está
por debajo del intervalo ideal.
El resultado de glucemia aparece junto con una flecha. La flecha indica si el resultado
de medición está por encima, por debajo o dentro del intervalo ideal.* El intervalo ideal
está representado por la zona verde del indicador de intervalo ideal. La flecha
parpadeará si el resultado de medición está por encima o por debajo de dicho intervalo.
*Consulte las instrucciones de uso para obtener información adicional sobre el intervalo
ideal.
Lávese bien las manos y
séqueselas antes y después de
realizar una medición de glucemia.
Compruebe la fecha de caducidad
(UseBy) del tubo de tiras reactivas.
Nouse las tiras reactivas pasada su
fecha de caducidad (UseBy).
Retire una tira reactiva del tubo de
tiras reactivas. Cierre el tubo
herméticamente con la tapa.
Inserte el extremo metálico de la
tira reactiva en el medidor.
El medidor se enciende.
Aparece el símbolo de la gota
parpadeando.
Obtenga una gota de sangre
usando un dispositivo de
punción. Presione firmemente
el dispositivo de punción contra
el lateral de la yema del dedo
para efectuar una punción.
Roce el borde
amarillo de la tira
reactiva con la gota
de sangre. Noaplique
sangre encima de la
tira reactiva.
El resultado de
medición aparece en
la pantalla en menos
de 4 segundos.
Vista general del medidor
1
Botón Arriba
y botón Abajo
2 Pantalla
3
Indicador de intervalo ideal
4 Puerto micro USB
5
Eyector de tiras reactivas
6
Tapa del compartimento
de las pilas
7
Ranura de la tira reactiva
Realizar una medición de glucemia
Nota
Siga siempre las instrucciones del personal sanitario que le atiende. Por ejemplo, si el
personal sanitario le ha recomendado tratar inmediatamente un resultado de glucemia bajo
(por ejemplo, comer algo), eso es lo primero que debe hacer.
El código de error y Err se alternarán en la pantalla para todos los mensajes de error
codificados (de E-1 a E14).
Si en cualquier momento aparece en la pantalla uno de los siguientes mensajes de error,
consulte inmediatamente el apartado Mensajes de error del capítulo Mantenimiento del
medidor y solución de problemas de las instrucciones de uso.
E-1 La tira reactiva puede estar dañada, no está insertada correctamente o ha sido usada
anteriormente. Retire la tira reactiva y vuelva a insertarla o sustitúyala si está dañada o
usada.
E-3 Se ha producido un error en el medidor o en la tira reactiva. Este mensaje de error puede
aparecer si el tubo de tiras reactivas no ha estado cerrado herméticamente. Las tiras
reactivas pueden haber sido dañadas debido a un almacenamiento o manejo incorrectos.
Nunca tome decisiones terapéuticas basadas en un mensaje de error. Repita la
medición de glucemia. Si el mensaje de error E-3 aparece de nuevo, realice un control del
funcionamiento con solución de control y una tira reactiva nueva. Consulte el apartado
Realizar un control del funcionamiento del capítulo Controles del funcionamiento en las
instrucciones de uso. Si el mensaje de error E-3 aparece de nuevo, utilice un método
alternativo para medir su glucemia, como un medidor y una tira reactiva de reserva. Si con el
método alternativo obtiene un resultado de glucemia extremadamente alto, o si no dispone
de un método alternativo, póngase en contacto con el personal sanitario que le atiende
inmediatamente.
En casos poco frecuentes, el mensaje de error E-3 puede indicar que su nivel de glucemia es
extremadamente alto y superior al intervalo de medición del sistema. Consulte el apartado
Resultados de glucemia no esperados del capítulo Mediciones de glucemia en las
instrucciones de uso para averiguar otras posibles causas del mensaje de error.
E-4 La tira reactiva no ha absorbido suficiente sangre o solución de control para realizar la
medición de glucemia o el control del funcionamiento o la muestra ha sido aplicada después
de que la medición de glucemia o el control del funcionamiento comenzara. Deseche la tira
reactiva y repita la medición de glucemia o el control del funcionamiento.
E-6 La sangre o la solución de control se ha aplicado a la tira reactiva antes de que
apareciera en la pantalla el símbolo de la gota parpadeando. Deseche la tira reactiva y repita
la medición de glucemia o el control del funcionamiento.
E-7 Se ha producido un error electrónico. Retire las pilas, pulse y mantenga pulsado
cualquier botón del medidor durante al menos 2 segundos y vuelva a insertar las pilas.
Realice una medición de glucemia o un control del funcionamiento.
E-8 La temperatura es superior o inferior al intervalo adecuado para el sistema. Consulte las
condiciones para el funcionamiento del sistema en el prospecto de las tiras reactivas. Vaya a
un sitio con las condiciones apropiadas y repita la medición de glucemia o el control del
funcionamiento. No caliente ni enfríe el medidor por medios artificiales.
E-9 Las pilas pueden estar gastadas. Vuelva a encender el medidor. Si se encuentra en un
entorno frío, desplácese a un área con una temperatura más moderada y repita la
medición. Si el mensaje vuelve a aparecer tras varios intentos, sustituya las pilas. Si el
mensaje aparece de nuevo después de haber cambiado las pilas, retírelas, pulse y mantenga
pulsado cualquier botón del medidor durante al menos 2 segundos y vuelva a insertar las
pilas.
E 10 Los ajustes de la hora y de la fecha podrían ser incorrectos. Cuando el medidor intenta
sincronizar la hora y la fecha con las del dispositivo sincronizado, aparece el símbolo de
conexión inalámbrica parpadeando. Cuando ya no aparezca el símbolo de conexión
inalámbrica, pulse el botón Arriba para apagar el medidor. Vuelva a pulsar el botón Arriba
hasta que aparezca el símbolo de la tira reactiva parpadeando. Si la sincronización de la hora
y la fecha no se ha realizado correctamente, el medidor le solicitará que las ajuste la próxima
vez que lo encienda. Consulte el apartado Ajustar la hora y la fecha del capítulo Su nuevo
sistema en las instrucciones de uso.
E 11 La tira reactiva puede estar dañada. Repita la medición de glucemia o el control del
funcionamiento con una tira reactiva nueva.
E 12 Es posible que la muestra de sangre contenga un nivel elevado de ascorbato. Póngase
en contacto con el personal sanitario que le atiende.
E 13 Puede haber líquido o materiales extraños en la ranura de la tira reactiva. Retire la tira
reactiva y vuelva a insertarla o repita la medición de glucemia o el control del funcionamiento
con una tira reactiva nueva. Si el error persiste, póngase en contacto con el servicio de
atención al cliente en el 1-800-819-1097.
E 14 Se ha producido un error electrónico. Póngase en contacto con el servicio de atención al
cliente en el 1-800-819-1097.
Nota
Póngase en contacto con el servicio de atención al cliente en el 1-800-819-1097 si el
mensaje de error vuelve a aparecer.
Mensajes de error
2
3
6
4
5
7
El medidor le indicará que ajuste la hora y la
fecha la primera vez que lo encienda. En la
pantalla aparece set-up con la hora
parpadeando.
Pulse o para aumentar o disminuir la hora.
1
2
Pulse y mantenga pulsado para guardar la
hora y pasar al campo siguiente.
Repita los pasos 1y2 para ajustar cada
campo. Después de ajustar el año pulse y
mantenga pulsado hasta que aparezca el
símbolo de la tira reactiva parpadeando para
guardar los ajustes.
1
Ajustar la hora y la fecha
Retire el dedo de la tira
reactiva cuando aparezca el
símbolo parpadeando. Si
no retira el dedo de la tira
reactiva, esto podría causar
resultados de glucemia
incorrectos.
1
5
2
6
3
7
4
Roche Diabetes Care, Inc.
9115 Hague Road
Indianapolis, Indiana 46256
MYSUGR es una marca registrada de
Roche.
La marca denominativa Bluetooth® así
como sus logotipos son marcas
registradas propiedad de
BluetoothSIG,Inc. y todo uso de los
mismos por el fabricante se ha
realizado bajo licencia. Todos los
demás nombres de productos y
marcas son propiedad de sus
respectivos propietarios.
Patentes en EE.UU.: http://www.
roche-diagnostics.us/patents
© 2022 Roche Diabetes Care
09410112001A-0322
ADVERTENCIA
Mantenga las pilas nuevas y usadas fuera del alcance de los niños.
Consulte las instrucciones de uso para obtener información
adicional.
• Esta guía rápida de instrucciones no reemplaza a las instrucciones de uso del
medidor de glucemia ReliOn Platinum. Las instrucciones de uso contienen
procedimientos importantes de limpieza y desinfección así como información
adicional.
• El medidor está previsto únicamente para uso de un paciente individual. ¡Nolo
comparta con nadie, ni siquiera con miembros de su familia! ¡Nousar en varios
pacientes!
• Todas las piezas del kit representan un peligro biológico y pueden transmitir
enfermedades infecciosas a causa de patógenos nacidos de la sangre, incluso
después de limpiarlas y desinfectarlas.
• Si se le ha caído el medidor, o si se le ha caído el medidor con una tira reactiva
insertada, el medidor y/o la tira reactiva pueden estar dañados. Deseche la tira
reactiva y realice un control del funcionamiento con una tira reactiva nueva, no
usada, y solución de control para asegurarse de que el medidor y las tiras
reactivas funcionan correctamente. A continuación, repita la medición de
glucemia con una tira reactiva nueva.
• Al realizar una medición de glucemia, retire el dedo de la tira reactiva después
de aplicar la sangre cuando aparezca el símbolo del reloj de arena parpadeando
en el medidor. Si no retira el dedo de la tira reactiva durante la medición, esto
podría causar resultados incorrectos.
• Tenga siempre a mano un juego de pilas de reserva.
• La duración de la pila puede variar a causa de distintos factores, tales como la
temperatura y el fabricante de la pila.
NOTA
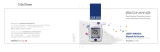
ESPAÑOL
Empiece
aquí
Guía rápida de
instrucciones
Solo para diagnóstico
invitro
Sistema de monitorización de glucemia inalámbrico
Escanee el código QR para
descargar la app mySugr con su
smartphone desde la App Store o
Google Play y cree su cuenta
mySugr.
Active la conexión Bluetooth®
en su smartphone (si no está
activada).
1 2
3 4
Abra la app mySugr y seleccione
Conexiones en el menú.
Seleccione ReliOn Platinum y, a
continuación, Sincronizar ahora.
Siga las instrucciones paso a paso
para la sincronización.
Cuando su medidor esté
sincronizado correctamente con la
app mySugr, los datos de su
dispositivo se importarán
automáticamente. Ahora puede
tener fácilmente bajo control sus
datos sobre la diabetes.
Conectar el medidor ReliOn Platinum con la app mySugr
Si tiene preguntas, póngase en
contacto con el servicio de atención al
cliente en el 1-800-819-1097. El
servicio telefónico está disponible de
lunes a viernes en horario de 8:00 AM
a 8:00 PM (ET). Para preguntas que
surjan fuera de los horarios indicados
o en caso de emergencia, póngase en
contacto con el personal sanitario que
le atiende o el servicio de urgencias
médicas.
83568_09410112001A.indd 283568_09410112001A.indd 2 3/17/2022 2:51:58 PM3/17/2022 2:51:58 PM


 1
1
 2
2


Accu-Chek Aviva Manual de usuario
Invacare trackease smart system Manual de usuario
 BIONIME Rightest GM300 Manual de usuario
Abbott FreeStyle Libre 3 Guía del usuario
