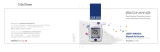
Overview
Start Here
Quick Start Guide
Roche Diabetes Care, Inc.
9115 Hague Road
Indianapolis, IN 46256
www.accu-chek.com
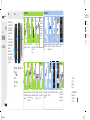
Wash and dry your hands before
and after you perform a blood
glucose test.
1
Check the Use By date on the test
strip container. Do not use test
strips past the Use By date.
Use By
2018-03-03
2
Remove a test strip from the test
strip container. Close the cap
tightly.
3
Insert the test strip into the meter
in the direction of the arrows.
4
The meter turns on. Preparing to
test appears.
Performing a Blood Glucose Test
Press the lancing device firmly
against the side of your fingertip
and press the release button to
prick your finger.
Touch the end of the test strip to
the blood drop. Do not put blood on
top of the test strip.
Analyzing appears when there is
enough blood in the test strip.
The test result appears on the
display after 5seconds.
5 6
ACCU-CHEK, ACCU-CHEK AVIVA CONNECT, and
FASTCLIX are trademarks of Roche.
© 2016 Roche Diabetes Care
07152396002-0416
ENGLISH
1
3
4
6
WARNING
• This Quick Start Guide does not replace the
User’s Manual for your Accu-Chek Aviva
Connect blood glucose meter. The User’s
Manual contains important cleaning and
disinfecting procedures and additional
information.
• The meter and lancing device are for single
patient use. Do not share them with anyone,
including other family members! Do not use
on multiple patients!
• All parts of the kit are considered
biohazardous and can potentially transmit
infectious diseases from bloodborne
pathogens, even after you have performed
cleaning and disinfecting.
Familiarize yourself with the
Accu-Chek FastClix lancing
device.
1
Get the lancet drum from the
pocket in the carry case.
2
NOTE
Each lancet drum contains 6sterile
lancets. You can perform 6tests
before replacing it.
Remove the cap by pulling it
straight off. Do not twist the cap.
3
Insert the lancet drum, white end
first, into the lancing device. Push
the lancet drum all the way in until
it clicks firmly into place.
4
NOTE
Do not remove the lancet drum until
all 6lancets are used since the drum
cannot be reused once it has been
removed from the lancing device.
Replace the cap on the lancing
device. Make sure the notch on the
cap lines up with the notch on the
lancing device.
5
Adjust the lancet depth to a
comfortable penetration level.
Start at2. For tougher skin,
dial to a higher number.
Using the lancing device: By
pressing the release button, the
lancing device primes and pricks
with 1click.
Setting up the Lancing Device
6
Penetration depth
Release Button
Cap
Number
of lancets
remaining
WARNING
You must not insert the lancet
drum into the lancing device and
simultaneously press the release
button or hold the lancing device
with the release button resting
on a surface such as a table top.
This could release a lancet and
inadvertently cause injury.
1Lancet Drum = 6Lancets
When ready to test…
Advance to next lancet
Prepare the lancing device for the
next test. Slide the lever over and
back once to advance to the next
lancet. The window shows the
number of lancets remaining.
Before you finish…
This file may not print or view at 100%.
Die lines and color breaks do not print.
Roche USA – 54562
V4/1 – 07152396002 – Black
Roche USA – 54562
V4/2 – 07152396002 – Cyan
Roche USA – 54562
V4/3 – 07152396002 – Magenta
Roche USA – 54562
V4/4 – 07152396002 – Yellow
1 Back Button
2 Up Arrow and Down
Arrow Button
3 Display
4 Power/Set/OK Button
5 Test Strip Slot
5
2
7
6 Battery Drawer 7 Micro USB Port
Blood Glucose Monitoring System
Aviva Connect
54562_07152396002_EN_ES.indd 1 4/6/16 9:37 AM

Visión general
Empiece aquí
Guía rápida de
instrucciones
Roche Diabetes Care, Inc.
9115 Hague Road
Indianapolis, IN 46256
www.accu-chek.com
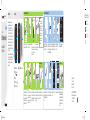
Lávese las manos y séqueselas
antes y después de realizar una
medición de glucemia.
1
Compruebe la fecha de caducidad
(Use By) del tubo de tiras reactivas.
No use las tiras reactivas pasada
su fecha de caducidad (Use By).
Use By
2018-03-03
2
Extraiga una tira reactiva del tubo
de tiras reactivas. Cierre el tubo
herméticamente con la tapa.
3
Inserte la tira reactiva en el
medidor según la dirección
de las flechas.
4
El medidor se enciende. Aparece
Preparando la medición.
Realizar una medición de glucemia
Coloque el dispositivo de punción
presionando firmemente contra el
lateral de la yema del dedo y pulse
el botón disparador para pinchar
el dedo.
Roce el extremo de la tira reactiva
con la gota de sangre. No aplique
sangre encima de la tira reactiva.
Aparece Analizando cuando hay
suficiente sangre en la tira
reactiva.
El resultado de medición aparece
en la pantalla 5segundos después.
5 6
ACCU-CHEK, ACCU-CHEK AVIVA CONNECT y
FASTCLIX son marcas registradas de Roche.
© 2016 Roche Diabetes Care
07152396002-0416
ESPAÑOL
1
3
4
6
ADVERTENCIA
• Esta Guía rápida de instrucciones no
reemplaza a las instrucciones de uso del
medidor de glucemia Accu-Chek Aviva
Connect. Las instrucciones de uso contienen
instrucciones importantes de limpieza y
desinfección así como información adicional.
• El medidor y el dispositivo de punción están
previstos únicamente para uso de un paciente
individual. ¡No los comparta con nadie, ni
siquiera con miembros de su familia! ¡No usar
en varios pacientes!
• Todas las piezas del kit representan un peligro
biológico y pueden transmitir enfermedades
infecciosas a causa de patógenos nacidos de
la sangre, incluso después de limpiarlas y
desinfectarlas.
Familiarícese con el dispositivo
de punción Accu-Chek FastClix.
1
Saque el cartucho de lancetas del
bolsillo del estuche.
2
NOTA
Cada cartucho de lancetas contiene
6lancetas estériles. Puede realizar
6 mediciones antes de cambiar el
cartucho de lancetas.
Retire el capuchón tirando de
él directamente hacia fuera. El
capuchón no es de rosca.
3
Inserte el cartucho de lancetas,
con el extremo blanco por delante,
en el dispositivo de punción.
Empuje el cartucho de lancetas
hasta el tope, hasta que encaje
perceptiblemente en su sitio.
4
NOTA
No retire el cartucho de lancetas
hasta que haya usado las 6lancetas,
ya que el cartucho de lancetas no se
puede volver a usar una vez retirado
del dispositivo de punción.
Vuelva a poner el capuchón en el
dispositivo de punción. Asegúrese
de que la muesca del capuchón
esté alineada con la muesca del
dispositivo de punción.
5
Ajuste la profundidad de punción
a un nivel confortable. Empiece
con la profundidad2. Si su piel es
callosa o gruesa, empiece con un
ajuste mayor.
Usar el dispositivo de punción:
Al pulsar el botón disparador, el
dispositivo de punción se tensa y
pincha con 1clic.
Ajustar el dispositivo de punción
6
Profundidad de
punción
Botón disparador
Capuchón
Número de
lancetas
restantes
ADVERTENCIA
No debe insertar el cartucho
de lancetas en el dispositivo de
punción y pulsar al mismo tiempo
el botón disparador, o sujetar el
dispositivo de punción con el botón
disparador posando sobre una
superficie tal como lo puede ser
una mesa. Esto podría disparar
una lanceta y causar daños
inadvertidamente.
1cartucho de lancetas = 6lancetas
Cuando esté listo para la
medición...
Avance hasta la
siguiente lanceta
Prepare el dispositivo de punción
para la siguiente medición. Para
avanzar hasta la siguiente lanceta,
deslice la palanquita hacia delante
y hacia atrás una vez. La ventana
muestra el número de lancetas
restantes.
Antes de terminar…
This file may not print or view at 100%.
Die lines and color breaks do not print.
Roche USA – 54562
V4/1 – 07152396002 – Black
Roche USA – 54562
V4/2 – 07152396002 – Cyan
Roche USA – 54562
V4/3 – 07152396002 – Magenta
Roche USA – 54562
V4/4 – 07152396002 – Yellow
1 Botón Atrás
2 Botón flecha arriba y
flecha abajo
3 Pantalla
4 Botón Power/Set/OK
5 Ranura de la tira reactiva
5
2
7
6 Cajón de las pilas 7 Puerto micro USB
Sistema de monitorización de glucemia
Aviva Connect
54562_07152396002_EN_ES.indd 2 4/6/16 9:37 AM
-
 1
1
-
 2
2


Accu-Chek Aviva Connect meter Guía de inicio rápido
- Tipo
- Guía de inicio rápido
- Este manual también es adecuado para
en otros idiomas
Artículos relacionados
-
Accu-Chek Nano meter Owner's Booklet
-
-
-
-
Accu-Chek ACCU-CHEK MiniMedTM 770G Blood Glucose Monitoring System Guía del usuario
-
-
-
-
-