
USA: Joovy • 2919 Canton Street • Dallas, TX 75226 • Tel: (877) 456-5049 • Fax: (214) 761-1774 • Email: customerservice@joovy.com • Website: www.joovy.com
CANADA: Elfe Juvenile Products • 2520 Marie-curie • St-Laurent, QC, H4S 1N1• Tel: 800-667-8184 • [email protected] • Website: www.elfe.com
Caboose Too Graphite™
816X
© Joovy 2021 • 211213

EN FR ES JP
!WARNING
Please read these instructions carefully before use and keep them for future reference.
• Failure to follow these instructions could result in serious injury or death.
• Never leave child unattended.
• Avoid serious injury from falling or sliding out.
• Always use restraint system and ensure that all children are positioned according to these instructions.
• Keep all small parts out of reach of children while assembling the stroller.
• Be certain that the stroller is fully opened, the safety latch is in position, and the wheel brakes are on before
allowing children near the stroller.
• The parking device should always be engaged during the loading and unloading of children.
• The front seat is not suitable for a child under 3 months.
• The maximum weight of the child that can be seated in the front seat is 45 lbs. (20.41 kg).
• The maximum height of a child the product is designed to carry is 44 in (111.76 cm).
• The rear stand-on platform and the rear bench seat are designed for a child that is at least 2½ years old but LESS
than 44 inches (111.76 cm) tall and less than 45 lbs. (20.41 kg).
• Use of the stroller with two children weighing more than 45 lbs. (20.41 kg) each, or children totaling more than
90 lbs. (40.82 kg), will cause excessive wear and stress on the stroller and may cause a hazardous unstable
condition.
• Never use this stroller to carry more than 2 children at the same time.
• Never allow a child to step on the footrest to get into or out of the stroller.
• Do not use the stroller on stairways or escalators.
• DonotaddanyattachmentnotspecicallyrecommendedbyJoovy.
• Any load attached to the handle affects the stability of the stroller. Hanging purses, shopping bags, parcels,
changing bags or other accessory items from handle bars or any other parts of the stroller may change the balance
of the stroller and cause a hazardous unstable condition.
• The maximum weight that can be carried in the storage basket is 5 lbs. (2.27 kg). Excessive weight may result in a
hazardous unstable condition.
• The maximum weight that can be carried in each cup holder or the tray is 2 lbs. (0.9 kg).
• Never carry hot beverages or open containers in the cup holder.
• When installing an infant car seat onto the stroller, ALWAYS use the restraining strap to secure the car seat in
place.
• Never allow your stroller to be used as a toy.
• Discard all packaging materials properly. Do not allow children to play with them.
• Check your stroller for loose rivets, snaps, worn parts, and torn material or stitching on a regular basis.
• Discontinue use of the stroller should it malfunction or become damaged.
CAUTION:Whileunfoldingthestroller,becarefultokeepyourngersfrombeingpinchedbymovingparts.
Please do not return this product to the store
If you experience any difculty with the assembly or use of this product, or if you have a question regarding these
instructions, please contact our Customer Service Department:
UNITED STATES – Joovy: (877) 456-5049, Hours 8:30 am – 5:00 pm Central Time.
CANADA – Elfe Juvenile Products: (800) 667-8184, Hours 8:30 am – 5:00 pm Eastern Time.
Please note: Styles and colors may vary.
1 Unpacking the Product
• Remove everything from the box and identify the parts using Figure 1.1. (not to scale)
A: stroller with Caboose Rear Seat, B: canopy, C: rear axle, D: two rear wheels, E: two front wheels sets, F: tray, G: four washers,
H: two snap pins, I: two hub caps, J: infant car seat adapter (OPTIONAL), K: crotch strap, and documents (not shown).
NOTE: The rear axle is attached to the rear frame. Detach the axle from the frame and remove the yellow foam padding. Extra parts may
be included.
• Discard all packaging materials properly including plastic coverings.
• DO NOT allow children to play with any packaging materials.
!WARNING
Adult assembly is required for this product. This package contains small parts.
Keep small parts away from children during assembly. No Tools Required.

EN FR ES JP
2 Unfolding the Stroller
• Keep children away from stroller while unfolding.
• Release the folding lock located on the right side by lifting the lever off of the catch. See Figure 2.1.
• Lift up on the handle of the stroller until the frame snaps into its open locked position.
CAUTION:Whileunfoldingthestroller,becarefultokeepyourngersfrombeingpinchedbymovingparts.
NOTE: Remove packing foam from rear frame assembly to ensure stroller locks in the open position.
• Lock the safety latch. See Figure 2.2.
• Ensure that the safety latch is secured before ANY use of the stroller.
!WARNING
ALWAYS secure the safety latch on the side of the stroller when it is in the unfolded use position.
This will prevent collapse of the stroller should the handle trigger locks be accidentally opened.
Possible pinching hazard – Be careful when unfolding the stroller.
3 Installing Rear Wheels
• Turn stroller upside down.
• Insert the rear axle through both holes under the stand-on platform. See Figure 3.1.
• Install the parts in the following order. See Figure 3.2.
Washer
Wheel (brake cluster facing inward)
Washer
Push snap pin through the hole in the axle until it snaps in place.
• Push the axle as far as it will go toward the opposite side of the stroller.
• Repeat the installation steps for the other wheel.
• Push the hubcaps on until they snap in place. See Figure 3.3.
4 Installing Front Wheels
• Place the front wheel sets onto the front wheel posts until they click in place. See Figure 4.1.
• Pull on the wheel sets to ensure they are installed properly.
5 Front Wheel Locks
The front wheels can be set to swivel or lock.
• To lock the front wheels, rotate each wheel set so that it points forward.
• Pull up on the locking lever to engage the swivel lock. See Figure 5.1.
• To unlock the wheels (swivel mode) push down on the lever.
6 Installing and Operating the Canopy
• Position the canopy with the padded edge forward.
• Insert the canopy attachments into the frame mounts on BOTH sides. Ensure they snap into place. See Figure 6.1.
• The canopy can be adjusted forward and back, and locked open using the canopy locks on BOTH sides. See Figures 6.2 and 6.3.
• To close the canopy, unlock the sides, then collapse. See Figure 6.4.
• To remove the canopy, press the lock buttons on BOTH sides of the canopy and pull up. See Figure 6.5.
!WARNING
Possiblepinchinghazard-Becarefulwhenclosingandopeningthesidehingessoasnottopinchyourngers.
7 Attaching/Detaching the Front Tray
• To attach the front tray, slide the tray onto BOTH mounts until they snap in place. See Figure 7.1.
• To remove tray, press the lock buttons on BOTH mounts and pull forward. See Figure 7.2.
!WARNING
The child tray is not a restraint device. Always secure your child with the restraint system. Never lift the stroller by the
child tray. Use caution when attaching the child tray when there is a child seated in the stroller.
8 Rear Wheel Brakes
• Always engage rear brakes before placing child in or removing a child from the stroller.
• To engage the brakes, push down on either of the brake levers until the brake snaps in place. See Figure 8.1.
• Check that BOTH wheel brakes are properly engaged.
• To release the brakes, lift up on either of the brake levers. See Figure 8.2.

EN FR ES JP
!WARNING
Always engage the parking brake when the stroller is not being pushed so that it will not roll away. Never leave
stroller unattended, especially on a hill or incline, as the stroller may tip over or slide.
9 Adjusting the Footrest
The footrest can be adjusted fully up or down.
• To lock the footrest upright, pull up on the footrest and lift up on the support bar. Ensure it is locked in place. See Figure 9.1.
• To put the footrest into the down position, pull up on the footrest, push down on the support bar, then release the footrest. See Figure 9.2.
!WARNING
Never allow a child to step onto the footrest in either position in order to get into or out of the stroller.
This may cause the stroller to tip over and injure the child.
10 Securing the Front Seated Child
• Therearethreeheightadjustmentpositionsfortheshoulderharness.Adjusttheheighttotheclosestheightaboveyourchild’sshoulders.
• To remove the shoulder harness, turn the plastic ends sideways and push them through the slots in the seatback. Reattach the harness at
the proper height by reinserting the plastic ends through the slots. See Figure 10.1. Ensure both straps are the same height.
• To remove the crotch strap, slide the strap through the small opening in the metal D-ring. Reattach by pushing the metal-D ring through
the slot in the seat, wrap the strap around the tube under the seat bottom. Slide the strap through the small opening of the metal D-Ring
and pull the strap to secure it to the tube. See Figure 10.2.
• Remove the waist straps by sliding the strap through the small opening in the metal D-ring, then pull the strap away from the seat.
See Figure 10.3. Reattach by pushing the metal-D ring through the slot in the seat, wrap the strap around the seat back frame tube. Slide
the strap through the small opening of the metal D-Ring and pull the strap to secure it to the tube. Repeat for the other end of the strap.
• To unlatch the buckle press the center button and remove the male ends of each buckle. See Figure 10.4.
• Carefully place the child in the seat with the shoulder straps over their shoulders and chest. Then place the crotch strap between the
child’slegs.
• Push the shoulder/waist latch posts into the crotch buckle until all parts snap into place. See Figure 10.5.
• Tightenthewaistbelttobesnugaroundthechild’swaist.
• The shoulder, waist, and crotch straps may be adjusted using the sliding plastic rings on these straps.
!WARNING
The front seat is not suitable for children under 3 months. Avoid serious injury from falling or sliding out.
Always use the restraint system.
11 Seat Recline Positioning
The front seat has 3 recline positions. This seat should only be used for a child that is at least 3 months old. For children between 3 and 6
months, only use the fully reclined position.
• Toplacetheseatintherstuprightposition,squeezethereclinebarslocatedonthebackoftheseat,andmovetheseattotheupright
position. Check to ensure that the recline mechanism has engaged and the seat does not move. See Figure 11.1.
• To recline the seat, squeeze the recline bars and move the seat to either the second (middle) or third recline positions. Again, check to
ensure that the recline mechanism has engaged, and that the seat does not move.
!WARNING
Whether the seatback is upright or reclined, ALWAYS make certain that the recline mechanism is
engaged before placing the child into the seat.
12 Using the Stand-On Platform
• Push the bench seat to its most forward position.
• Position the canopy to its most forward position.
• Position the child on the platform on the back of the stroller. Be sure that the child is facing forward and BOTH of their hands are holding
the frame.
• BesurethatBOTHofthechild’sfeetarefullyontheplatformatalltimes.
• You may need to adjust the recline position of the seat to allow for more room for the child to stand.

EN FR ES JP
!WARNING
The rear stand-on platform and the rear bench seat are designed for a child that is at least 2½ years old but LESS
than 44 inches (111.76 cm) tall and less than 45 lbs. (20.41 kg).
Use of the stroller with two children weighing more than 45 lbs. (20.41 kg) each, or children totaling more than 90 lbs.
(40.82 kg), will cause excessive wear and stress on the stroller and may cause a hazardous unstable condition.
NEVER allow a standing child to use the canopy as a hand hold.
NEVER use this stroller to carry more than 2 children at the same time.
13 Using the Rear Bench Seat
• Push the bench seat to its most rearward position.
NOTE: There are webbing straps attached to the bottom of the rear seat pad. These straps will lock the seat into the most rearward
position. To lock the seat, pull the straps from EACH side of the pad and loop them around the frame as shown, then snap them together.
See Figure 13.1.
• To slide the seat forward, undo EACH snap and reattach the webbing to the underside of the seat pad using the Velcro® attachments.
• Position the canopy to its most forward position.
• To unlatch the buckle press the center button and remove both latch posts.
• Have the child sit on the bench seat facing backward with their feet on the platform.
• You may need to adjust the recline position of the front seat to allow for more room for the child to sit.
• Placethecrotchstrapbetweenthechild’slegs.
• Push the waist latch posts into the crotch buckle until all parts snap into place. See Figure 13.2.
• Adjustthewaiststrapstobesnugaroundthechild’swaist.
• BesurethatBOTHofthechild’sfeetarefullyontheplatformatalltimes.
• BesurethatBOTHofthechild’shandsareholdingtheframe.
!WARNING
NEVER allow a rear seated child to use the canopy as a hand hold.
14 Storage Basket
The maximum weight that can be carried in the storage basket is 5 lbs. (2.27 kg).
15 Seatback Positioning
The seat back can be adjusted to any position from fully upright to reclining. This seat should only be used for a child that is at least 6
months old.
• To recline the seat, release the adjustment lock tab from its locked position by pulling it away from the seat back. Continue to pull this lock
tab downward to adjust the seat back to the desired position, then re-engage the lock tab. See Figure 15.1.
• To adjust the seat back to a more upright position, release the adjustment lock tab from its locked position. Then simply pull up on the
adjustment strap ring until the seat back is in the desired position and re-engage the lock tab. See Figure 15.2.
!WARNING
Whether the seatback is upright or reclined, ALWAYS make certain that the recline mechanism is engaged before
placing the child into the seat.
16 Removing the Caboose Rear Seat
• Unsnap the waist and shoulder straps from the crotch strap.
• Unwrap the left and right armrests of the Caboose Rear Seat from around the upper horizontal frame (on each side). Unsnap both snaps
on each side. See Figure 16.1.
• Near the front sides of the Caboose Rear Seat are 2 Velcro® straps (one on each side). Pull these straps apart. Repeat on the other side.
See Figure 16.2.
• Locate the 2 long straps on the lower rear of the Caboose Rear Seat. Unbuckle the straps and unwrap each strap from around the outside
of the stroller handle bar by feeding them through the loops on the back of the seat. See Figure 16.3.
• Locate the straps on the upper rear of the Caboose Rear Seat (two on each side). Unwrap them from the pegs. See Figure 16.4.
• Push the rear seat crotch strap buckle through the slot in the Caboose Rear Seat (See Figure 16.5) and pull the Caboose Rear Seat off of
the rear bench.
17 Installing the Rear Bench Seat Waist Strap
• Remove the rear bench waist strap from the front seat back pocket.
• To install the rear bench waist strap, locate one end of the waist strap where it has a metal D-ring at the end.
• Wrap the strap around the front seat rear tube. Slide the strap through the small opening of the metal D-ring and pull the strap to secure it
to the tube. Repeat for the other end of the strap. See Figure 17.1.

EN FR ES JP
18 Attaching the Caboose Rear Seat
• Place the seat fabric in position over the sliding rear bench seat so that the seat is facing toward the front of the stroller.
NOTE: It is not necessary to remove the existing fabric pad from the bench seat.
• Push the rear seat crotch buckle up through the slot in the Caboose Rear Seat. See Figure 18.1.
• Place the Velcro® strap of the Caboose Rear Seat over the top peg on the respective side of the stroller and wrap the Velcro® strap
around the frame. See Figure 18.2.
• Wrap the cloth strap over the Velcro strap so that the Velcro® attaches. Secure the peg through the button hole. See Figure 18.3.
• Wrap the bottom strap around the frame and secure the bottom peg through the button hole. See Figure 18.4.
• Repeat for the two straps on the other side.
• Slide the front fabric pocket, located under the front of the Caboose Rear Seat, over the front of the bench seat. See Figure 18.5. (shows
the underside of the bench seat)
• Locate the 2 long straps on the lower rear of the Caboose Rear Seat (one on each side). Wrap each strap around the outside of the
stroller handle bar and feed them through the loops on the back of the seat. Securely buckle the straps together. See Figure 18.6. If
necessary, pull the webbing near the male end of the buckle to tighten.
• Near the front sides of the Caboose Rear Seat are 2 Velcro® straps (one on each side). Secure these straps around the lower horizontal
frame bar on both sides. See Figure 18.7.
• Wrap the left and right armrests of the Caboose Rear Seat around the upper horizontal frame (on each side). Securely snap together both
snaps on each side. See Figure 18.8.
• Check that the seat is securely in place.
!WARNING
The Caboose Rear Seat is not suitable for children under 6 months. Avoid serious injury from falling or sliding out.
Always use the restraint system.
19 Removing the Rear Bench Seat Waist Strap from Stroller
• On the stroller, unsnap both waist straps from the crotch strap on the rear 3-point harness if needed.
• Store the rear bench waist strap into the front seat back pocket or a safe place for future use.
• To completely remove the waist straps, locate one end of the strap where it attaches to the front seat tube. Slide the strap through the
small opening of the metal D-ring and pull the strap away from the front seat. Repeat for the other strap. See Figure 19.1.
20 Folding the Stroller
• Keep children away from stroller while folding.
• Remove any infant car seat. The stroller can be folded with the infant car seat adapter in place.
• Close the canopy and push it forward.
• Put the front seat into the most upright position.
• Make sure both rear wheel brakes are set to their locked positions.
• Lock BOTH front wheel sets in place with locking levers facing forward.
• Unlock the safety latch on the lower left side of the stroller.
• Pull upward on the trigger mechanisms on both sides of the stroller and push the handle fully forward. See Figure 20.1.
CAUTION:Whilefoldingthestroller,becarefultokeepyourngersfrombeingpinchedbymovingparts.
• Engage the fold lock on the right side of the stroller over the mounting post. See Figure 20.2.
!WARNING
ALWAYS keep children away from the stroller when folding.
Possible pinching hazard – Be careful when folding the stroller.
21 Using the Stroller with an Infant Car Seat (OPTIONAL)
NOTE:Seeinsertforalistofspeciccompatiblecarseatmodels.
• Remove the front tray and install the infant car seat adapter on the same mounts. Ensure it is secure on BOTH sides. See Figure 21.1.
• Push the canopy to its most rearward position.
• ADJUST THE SEAT TO ITS RECLINE POSITION.
• Remove the infant car seat from its base and place it onto the front seat of the stroller so it is in a REAR FACING POSITION. Position the
“head” end toward the front, resting on the infant car seat adapter. Position the “feet” end on the seatback - but NOT on the top edge of
the seatback. See Figure 21.2.
• Buckle the red restraining straps over the LOWEST part of the infant car seat (the straps are located in the pockets on the side of the
seat)AdjustthestrapssotheyaretightaroundtheinfantcarseatbutAWAYfromthechild’sneck.Pullupontheinfantcarseattobesure
it is secure. See Figure 21.3.
• To remove the infant car seat from the stroller, unlock the restraining strap buckle by pressing the button and both side releases.
See Figure 21.4.
• Return the restraining straps to their pockets.

EN FR ES JP
!WARNING
ALWAYS install the infant car seat so that the child is facing toward the rear (handle) of the stroller with the
restraining straps secured.
ALWAYS position the infant car seat so that it is securely placed down inside the infant car seat adapter frame.
ALWAYS position the infant car seat so that it is resting ON the seatback, but NOT on the top of the seatback. The
seatback must be in the RECLINE position.
NEVERpositiontherestrainingstrapsonornearthechild’sneckasthismayresultinstrangulation.
TheinfantcarseatadapterisforuseONLYwithspecicinfantcarseatmodels.Seeinsertforspecicmodels.DO
NOT use other infant car seat models.
Maintenance
Allofthettings,snaps,locks,rivets,andotherhardwareandplasticpartsonthestrollershouldbeinspectedperiodicallytoensurethat
they are secured properly and not damaged or malfunctioning. The restraint system, as well as all other straps and fabric items and their
stitching should also be inspected periodically to ensure that they are secured properly and not loose, torn or otherwise damaged. All moving
parts, such as wheels, brakes, and hinges should also be checked periodically to ensure they are operating properly.
Any missing, broken, or worn components should be replaced immediately, and the stroller should not be used until they are replaced. Only
originalmanufacturer’scomponentsshouldbeused.Ifneeded,pleasecontactJoovyatourtoll-freephonenumber.
Cleaning
The fabric material on this stroller can be cleaned using mild household soap or detergent and warm water on a sponge or clean cloth.
Always allow the fabric to completely air dry before using the stroller.
The frame and wheels should always be kept clean and free of dirt and foreign matter, especially after operating the stroller in rain, snow, or
other harsh environments. Use a sponge or cloth dampened with warm water and a mild detergent cleaner to clean the wheels after such
use.
SATISFACTION GUARANTEED
We want you to be completely satised with your purchase of this product. Should you experience any difculty in
assembling or using this product, or if you have any questions, please contact our Customer Service Department:
UNITED STATES – Joovy: (877) 456-5049, Hours 8:30 am – 5:00 pm Central Time.
CANADA – Elfe Juvenile Products: (800) 667-8184, Hours 8:30 am – 5:00 pm Eastern Time.
Please log onto www.joovy.com to register your new Joovy product.

EN FR ES JP
!MISE EN GARDE
Lirelesprésentesinstructionsattentivementavantd’utiliserleproduitetlesconserverpourusageultérieur.
• Le manquement au respect de ces instructions pourrait résulter en des blessures graves ou en un décès.
• Ne jamais laisser un enfant sans surveilllance.
• Évitez les blessures graves causées par tout glissement ou chute.
• Utilisez toujours les courroies de sécurité et assurez-vous que les enfants sont positionnés conformément à ces
instructions.
• Gardeztouteslespetitespiècesàl’écartdesenfantspendantl’assemblage.
• Assurez-vous que le poussette est entièrement ouverte, que le loquet est verrouillé, et que les freins sont
enclenchésavantdelaisserlesenfantss’approcherdelapoussette.
• Toujoursmettrelesfreinsavantdelaisserl’enfantmonterdanslapoussetteouendescendre.
• Le siège avant ne convient pas aux nourrissons de moins de 3 mois.
• Lepoidsmaximaldel’enfantpouvoirs’asseoirenavantestde20,41kg(45lbs.).
• Lahauteurmaximaled’unenfantleproduitestconçupourtransporterestde111,76cm(44po).
• Laplateformearrièreainsiquelebancarrièresontconçuspourunenfantd’aumoins2ansetdemi,maisdemoins
de 111,76 cm (44 pouces) et de moins de 20,41 kg (45 lbs.).
• L’utilisationdelapoussetteavecdesenfantspesantplisde20,41kg(45lbs.)chacun,oud’unpoidstotalisantplus
de 40,82 kg (90 lbs.), pourrait entrainer une usure excessive de la poussette, ce qui pourrait entrainer une situation
d’instabilitédangereuse.
• Ne jamais transporter plus de 2 enfants à la fois dans la poussette.
• Nejamaispermettreàunenfantd’utiliserl’appui-piedpourentrerousortirdelapoussette.
• Ne pas utiliser la poussette dans des escaliers ou escaliers roulants.
• N’ajouteraucunaccessoirequin’estpasexpressémentrecommandéparJoovy.
• Les bourses, sacs de magasinage, bagages, sacs à couche ou autre accessoires suspendus aux poignées ou à
d’autrespartiesdelapoussettepourraientaffecterl’équilibredelapoussetteetentraineruneconditiond’instabilité
dangereuse.
• Le poids maximal pouvant être transporté dans le panier de rangement est de 2,27 kg (5 lbs.). Un poids excessif
pourraitentraineruneconditiond’instabilitédangereuse.
• Le poids maximal pouvant être transporté dans chaque porte-gobelet est de 0,9 kg (2 lbs.).
• Ne jamais transporter de breuvages chauds ou de contenants ouverts dans les porte-gobelets.
• Lorsdel’installationd’unsiègepourenfantsurlapoussette,TOUJOURSutiliserlescourroiesderetenuepourxer
le siège en place.
• Ne jamais permettre que la poussette soit utilisée en tant que jouet.
• Veuillezdisposeradéquatementdel’ensembledumatérield’emballage.Nepaspermettreauxenfantsdejouer
avec celui-ci.
• Vériezl’étatdevotrepoussetteandedécelertoutrivetmalxé,pièceusée,coutureoumatérieldéchirésurune
base régulière.
• Cesserd’utiliserlapoussettesicelle-cifonctionneinadéquatementouestendommagée.
ATTENTION:Durantlesopérationsd’ouverture,éviterdesepincerlesdoigtsdanslespiècesmobilesdelapoussette.
NE PAS retourner ce produit au magasin
En cas de difculté durant l’assemblage ou l’utilisation, ou pour toute question relative aux présentes instructions,
communiquer avec notre service à la clientèle:
ÉTATS UNIS – Joovy: (877) 456-5049, de 8h30 à 17h, heure du Centre.
CANADA – Elfe Juvenile Products: (800) 667-8184, de 8h30 à 17h, heure de l’Est.
S’il vous plaît noter: Styles et couleurs peuvent varier.
1 Déballage du produit
• Retireztouslesélémentsdelaboiteetidentiezlespiècesàl’aidedela Figure 1.1.(pasàl’échelle)
A: poussette avec Siège arrière Caboose, B: auvent, C: essieu arrière, D: deux roues arrière, E: deux ensembles de roues avant,
F: tablette, G: quatre rondelles, H: deux goupilles à pression, I: deux enjoliveurs de moyeu, J: adaptateur de siège pour enfant
(OPTIONNEL), K:sangled’entrejambe,etdocuments(nonillustrés).
NOTE:L’essieuarrièreestxéaucadrearrière.Détachezl’essieuducadreetretirez-leducadrearrière.Détachezl’essieuducadreet
retirez la mousse jaune. Des pièces additionnelles pourraient être incluses.
• Veuillezdisposeradéquatementdel’ensembledumatérield’emballageincluantlesélémentsdeplastique.
• NEPASpermettreauxenfantsdejoueraveclematérield’emballage.

EN FR ES JP
!MISE EN GARDE
L’assemblageparunadulteestrequispourceproduit.Cetemballagecontientdepetitespièces.
Gardezlespetitespièceshorsdelaportéedesenfantspendantl’assemblage.Aucunoutilrequis.
2 Dépliage de la poussette
• Garderlesenfantsàl’écartdelapoussettependantsondépliage.
• Libérez le verrou pliant situé du côté droit en soulevant le levier hors de la prise. Voir Figure 2.1.
• Soulevezlapoignéedelapoussettejusqu’àcequelecadres’enclencheenpositionverrouillée.
ATTENTION:Endépliantlapoussette,assurez-vousdegardezvosdoigtsàl’écartdespiècesmobiles.
NOTE:Retirezlamoussed’emballagedel’assemblagedecadrearrièreandevousassurerquelapoussetteseverrouilleenposition
ouverte.
• Verrouillez le loquet de verrouillage. Voir Figure 2.2.
• Assurez-vous que le loquet de verrouillage est en place avant CHAQUE utilisation de la poussette.
!MISE EN GARDE
TOUJOURSposerleverroudesécuritésurlecôtédelapoussettelorsqu’ellesetrouveenpositionouvertepour
utilisation.Ceciempêcheralerepliagedelapoussette,dansl’éventualitéoùleverroumanueldelapoignée
s’ouvriraitparaccident.
Risque de pincement – Faites preuve de prudence lors du dépliage de la poussette.
3 Installation des roues arrière
• Retournez la poussette.
•Insérezl’essieuarrièrevialesdeuxoricessouslaplateforme.Voir Figure 3.1.
• Installezlespiècesdansl’ordresuivant.Voir Figure 3.2.
Rondelle
Roue(Assemblagedefreinfaisantfaceversl’intérieur)
Rondelle
Poussezlagoupilleàpressionàtraversl’oricedansl’essieujusqu’àcequ’elles’enclencheenplace.
• Poussezl’essieuaussiloinquepossibleversl’autrecôtédelapoussette.
• Répétezlesétapesd’installationpourl’autreroue.
• Poussezlesenjoliveursjusqu’àcequ’ilss’enclenchentenplace.Voir Figure 3.3.
4 Installation des roues avant
• Placezlesensemblesderoueavantsurlesmontantsderoueavantjusqu’àcequ’ilss’enclenchentenplace.Voir Figure 4.1.
• Tirezsurlesensemblesderouepourvousassurerqu’ilssontbieninstallés.
5 Verrouillage de roue avant
Les roues avant peuvent être en mode pivotant ou verrouillé.
•Pourverrouillerlesrouesavant,faites-lestournerjusqu’àcequechaqueensemblederouesoitfaceversl’avant.
• Tirez sur le levier de verrouillage pour enclencher le verrou de pivotement. Voir Figure 5.1.
• Pour déverrouiller les roues (mode pivotant) abaissez le levier.
6 Installation et fonctionnement de l’auvent
• Positionnezl’auventaveclaportioncoussinéeversl’avant.
• Insérezlesxationsd’auventdanslesmontantsducadredeCHAQUEcôté.Assurez-vousqu’ellessontbienxéesenplace.
Voir Figure 6.1.
• L’auventpeutêtreajustéversl’avantetl’arrière,etenpositionouverteenutilisantlesystèmedeverrouillaged’auventsituédesDEUX
côtés. Voir Figures 6.2 et 6.3.
•Pourfermerl’auvent,déverrouillezlescôtés,etpliez.Voir Figure 6.4.
• Pourretirerl’auvent,appuyezsurlestouchesdeverrouillagedesDEUXcôtésdel’auventetsoulevez.Voir Figure 6.5.
!MISE EN GARDE
Risquedepincement–Faitespreuvedeprudencelorsdel’ouverturedescharnièreslatéralesandenepasvous
coincer les doigts.
7 Pose/retrait de la tablette avant
• Pourposerlatabletteavant,glissezlatablettesurlesDEUXmontantsjusqu’àcequ’ilss’enclenchentenplace.Voir Figure 7.1.
• Pourretirerlatablette,appuyezsurlestouchesdeverrouillagedesDEUXmontantsettirezversl’avant.Voir Figure 7.2.

EN FR ES JP
!MISE EN GARDE
Latabletten’estpasundispositifderetenue.Utiliseztoujourslaceinturesurlesiègepourvotreenfant.Najamais
souleverlapoussetteparlatablette.Faitespreuvedeprudencelorsquevousposezlatabletteetqu’unenfantse
trouve assis dans la poussette.
8 Freins de roue arrière
• Toujoursmettrelesfreinsarrièreavantd’asseoirunenfantdanslapoussetteoudel’ensortir.
• Pourmettrelesfreins,baisserl’undesdeuxleviersjusqu’àcequelefreinsemetteenplaceavecundéclic.Voir Figure 8.1.
• VérierquelesDEUXfreinssontmiscorrectement.
• Pourôterlesfreins,monterl’undesdeuxleviers.Voir Figure 8.2.
!MISE EN GARDE
Enclencheztoujourslesfreinslorsquelapoussetten’estpasenmouvementanqu’ellenerisquepasderouler.
Na jamais laisser la poussette sans surveillance, particulièrement dans les côtes et les terrains en pente, car la
poussette pourrait basculer ou glisser.
9 Ajustement de l’appui-pieds
L’appui-piedspeutêtreajustéenpositionhauteoubasse.
• Pourverrouillerl’appui-piedsenpositionhaute,soulevezl’appui-piedetlabarredesoutien.Assurez-vousqu’ilestbienxéenplace.Voir
Figure 9.1.
• Pourplacerl’appui-piedsenpositionbasse,soulevezl’appui-piedetabaissezlabarredesoutien,puislibérezl’appui-pieds.
Voir Figure 9.2.
!MISE EN GARDE
Nejamaispermettreàunenfantd’utiliserl’appui-piedpourentrerousortirdelapoussette.
Celapourraitcauserlerenversementdelapoussetteetdesblessuresàl’enfant.
10 Système de retenue du siège avant
• Il existe trois hauteurs de réglage pour les bretelles du harnais. Régler les bretelles à la position située juste au-dessus des épaules de
l’enfant.
• Pour enlever les bretelles du harnais, tourner leur extrémité en plastique de côté, puis les faire passer dans les fentes du dossier.
Rattacherleharnaisàlahauteurappropriéeeninsérantdenouveaul’extrémitéenplastiquedesbretellesdanslesfentesdudossier.
Consulter la gure 10.1.S’assurerquelesdeuxbretellessontàlamêmehauteur.
• Enleverlasangled’entrejambeenlaglissantdanslapetiteouverturedel’anneauenD.Pourrattacherlasangle,insérerl’anneau
métallique en D dans la fente du siège et passer une sangle autour du tube sous le siège. Glisser ensuite la sangle dans la petite
ouverturedel’anneauenD,puistirersurlasanglepourlaxersolidementautubedusiège.Consulter la gure 10.2.
• Pourenleverlaceinture,fairepasserchaquesangledanslapetiteouverturedel’anneaumétalliqueenD,puistirerpourdétacherla
ceinture du siège. Consulter la gure 10.3.Pourrattacherlaceinture,insérerl’anneaumétalliqueenDdanslafentedusiègeetpasser
unesangleautourdutubeàl’arrièredusiège.Glisserensuitelasangledanslapetiteouverturedel’anneauenD,puistirersurlasangle
pourlaxersolidementautubedusiège.Procéderdelamêmefaçonpourl’autresangledeceinture.
• Pour détacher la ceinture, appuyez sur le bouton central et retirez les extrémités mâles de chaque boucle. Consulter la gure 10.4.
• Placezdélicatementl’enfantdanslesiègeaveclescourroiesd’épaulesau-dessusdesesépaulesetdesapoitrine.Placezensuitela
courroied’entrejambeentrelesjambesdel’enfant.
• Poussezlesextrémitésdelacourroied’épaule/detailledanslaboucled’entrejambejusqu’àcequetouteslespiècessoientxées
ensemble. Consulter la gure 10.5.
• Serrezlacourroiedetailledefaçonàcequ’ellesoitbienappuyéecontrelatailledel’enfant.
• Lescourroiesd’épaule,detailleetd’entrejambepeuventêtreajustéesàl’aidedesanneauxseplastiquecoulissantssetrouvantsurces
courroies.
!MISE EN GARDE
Lesiègeavantn’estpasconçupourlesenfantsdemoinsde3mois.Évitezlesblessuresgravesdécoulantd’une
chuteoud’unglissement.Utiliseztoujourslesystèmederetenue.
11 Positionnement du siège en position inclinée
Ledossierdusiègeavantserègleentroispositions.Utilisercesiègeuniquementpourunenfantâgéd’aumoins3mois.Pourunenfantde
3à6mois,mettresondossieràl’horizontale.
• Pourmettreledossieràlapremièreposition(positionverticale),exercerunepressionsurlesbarresderéglageàl’arrièredusiègeet
redresserledossier.Vérierqueledispositifd’inclinaisonestverrouilléetqueledossierresteàlaverticale.Consulterlagure11.1.
• Pourinclinerledossier,exercerunepressionsurlesbarresderéglageetdéplacerledossierjusqu’àladeuxièmeposition(celledu
milieu)oujusqu’àlatroisièmeposition.Vérierdenouveauqueledispositifd’inclinaisonestverrouilléetqueledossierrestedansla
position souhaitée.

EN FR ES JP
!MISE EN GARDE
Quelesiègesoitdroitouincliné,assurez-vousTOUJOURSquelemécanismed’inclinaisonestenclenchéavantde
placerl’enfantdanslesiège.
12 Utilisation de la plateforme debout
• Poussezlebancleplusversl’avantpossible.
• Positionnezl’auventleplusversl’avantpossible.
•Positionnezl’enfantsurlaplateformeàl’arrièredelapoussette.Assurez-vousquel’enfantfaitfaceversl’avantetquesesDEUXmains
sont sur le cadre.
• Assurez-vousquelesDEUXpiedsdel’enfantsetrouvententouttempssurlaplateforme.
• Vousdevrezpeut-êtreajusterl’inclinaisondusiègepourlaisserplusd’espacepourl’enfantdebout.
!MISE EN GARDE
Laplateformedeboutarrièreainsiquelebancdusiègearrièresontconçuspourunenfantd’aumoins2ansetdemi
mais de MOINS de 111,76 cm (44 pouces) de hauteur et de moins de 20,41 kg (45 lbs.).
L’utilisationdelapoussettepourdeuxenfantsdeplusde20,41kg(45lbs.)oud’enfantsdontlepoidscombiné
excède 90 lbs. (40.82 kg), entrainera de la pression et une usure prématurée de la poussette, et pourrait causer une
conditiondedangeretd’instabilité.
NEJAMAISpermettreàunenfantdeboutd’utiliserl’auventenguisedesupport.
NE JAMAIS utiliser cette poussette pour transporter plus de 2 enfants à la fois.
13 Utilisation du banc de siège arrière
• Poussezlebancdesiègearrièreleplusversl’arrièrepossible.
NOTE:Ilyadescourroiesdetissuxéesaubasducoussindusiègearrière.Cescourroiesxentlesiègedanslapositionlaplusvers
l’arrière.Pourxerlesiège,tirezsurlescourroiesdeCHAQUEcôtéducoussinetfaites-lespasserautourducadretelqu’illustré,puis
attachez-les ensemble. Voir Figure 13.1.
•Pourglisserlesiègeversl’avant,défaiteschaqueattache,etré-attachezlessanglesàlapartieinférieureducoussinenutilisantles
xationsVelcro®.
• Positionnezl’auventdanslapositionlaplusversl’avant.
• Pour détacher la ceinture appuyez sur la touche du centre et retirez les deux extrémités.
• Faitesasseoirl’enfantfaisantfaceversl’arrière,sespiedsreposantsurlaplateforme.
• Vousdevrezpeut-êtreajusterl’inclinaisondusiègeavantpourlaisserplusd’espacepourl’enfantassis.
• Placezlacourroied’entrejambeentrelesjambesdel’enfant.
• Poussezlesextrémitésdelaceinturedetailledanslaboucled’entrejambejusqu’àcequetouteslespiècess’enclenchentensemble.
Voir Figure 13.2.
• Ajustezlaceinturedetailleanqu’ellereposefermementautourdelatailledel’enfant.
• Assurez-vousquelesDEUXpiedsdel’enfantsetrouvententouttempssurlaplateforme.
• Assurez-vousquel’enfantasesDEUXmainssurlecadre.
!MISE EN GARDE
NEJAMAISpermettreàunenfantassisdanslesiègearrièred’utiliserl’auventenguisedesupport.
14 Panier de rangement
Le poids maximal pouvant être transporté dans le panier de rangement est de 2,27 kg (5 lbs.).
15 Régler le dossier
Ledossierestréglabledanstouteslespositionsallantdelaverticaleàl’horizontale.Utilisercesiègeuniquementpourunenfantâgéd’au
moins 6 mois.
• Pourinclinerledossier,déverrouillerlalanguettederéglageenlatirantdefaçonàl’éloignerdudossier.Tirerensuitelalanguetteversle
baspourinclinerledossierjusqu’àlapositionsouhaitée,puisverrouillerdenouveaulalanguette.Voir Figure 15.1.
• Pourredresserledossier,déverrouillerd’abordlalanguettederéglage.Ensuite,tirerl’anneaudelasanglederéglageverslehautjusqu’à
ce que le dossier soit dans la position souhaitée, puis verrouiller de nouveau la languette de réglage. Voir Figure 15.2.
!MISE EN GARDE
Peuimportesiledossierestàlaverticaleouincliné,TOUJOURSs’assurerqueledispositifd’inclinaisonest
verrouilléavantd’asseoirl’enfantsurlesiège.
16 Enlever le siège arrière Caboose
• Détacherlessanglesdeceintureetlesbretellesdelasangled’entrejambe.
• Détacherl’accoudoirgaucheetdroitdusiègeCaboosedelabarrehorizontalesupérieureducadre,dechaquecôté.Défairelesdeux
boutons-pression de chaque accoudoir. Voir Figure 16.1.

EN FR ES JP
• Repérerlesdeuxbandesvelcroàl’avantdusiègeCaboose(unedechaquecôté).Détachercesbandes.Procéderainsidesdeuxcôtés.
Voir Figure 16.2.
• Repérer les deux longues sangles situées dans la partie inférieure arrière du siège Caboose. Détacher ces sangles, puis les extraire des
passantsàl’arrièredusiège.Voir Figure 16.3.
• Repérer les sangles situées dans la partie supérieure arrière du siège Caboose (deux de chaque côté). Détacher les sangles des
chevilles. Voir Figure 16.4.
• Passerlaboucledelasangled’entrejambeensensinversedanslafentedusiègearrièreCaboose(Voir Figure 16.5), puis enlever le
siège du banc arrière.
17 Remettre en place la ceinture du banc arrière
• Prendre la ceinture du harnais arrière qui se trouve dans la poche du siège avant.
• Pourremettreenplacelaceinturedubancarrière,repérerd’abordleurextrémitémunied’unanneauenD.
• Passerunesangleautourdutubedusiègeavant.Glisserensuitelasangledanslapetiteouverturedel’anneauenD,puistirersurla
sanglepourlaxersolidementautubedusiège.Procéderdelamêmefaçonpourl’autresangledeceinture.Voir Figure 17.1.
18 Installer le siège arrière Caboose
• Placerlesiègeentissupar-dessuslebancarrièrecoulissant,defaçonàl’orienterversl’avantdelapoussette.
REMARQUE:Iln’estpasnécessairederetirerlecoussindubanc.
• Passerlaboucledelasangled’entrejambedubancarrièredanslafentedusiègearrièreCaboose.Voir Figure 18.1.
• PasserlasangleVelcro®dusiègeCaboosepar-dessuslachevillesupérieureducôtéappropriédelapoussetteetl’enroulerautourdu
cadre. Voir Figure 18.2.
• Enrouler la sangle en tissu par-dessus la sangle Velcro® de manière à attacher les deux sangles. Passer la cheville dans la boutonnière.
Voir Figure 18.3.
• Enrouler la sangle inférieure autour du cadre et passer la cheville inférieure dans la boutonnière. Voir Figure 18.4.
• Répéterladémarchepourlesdeuxsanglesdel’autrecôté.
• Enlerlapochetteentissu,situéesouslapartieavantdusiègeCaboose,surledevantdubancarrière.Voir Figure 18.5. (banc vu du
dessous).
• Repérer les deux longues sangles situées dans la partie inférieure arrière du siège Caboose (une de chaque côté). Passer les sangles
autourdelapoignéedelapoussette,parl’extérieur,puislesenlerdanslespassantsàl’arrièredusiège.Bouclerlessanglessolidement.
Voir Figure 18.6.Aubesoin,serrerlessanglesentirantsurl’extrémitélibre,prèsdelachemâledelaboucle.
• Repérerlesdeuxbandesvelcroàl’avantdusiègeCaboose(unedechaquecôté).Attachercesbandesautourdelabarrehorizontale
inférieure du cadre, de chaque côté. Voir Figure 18.7.
• Attacherl’accoudoirgaucheetdroitdusiègeCabooseautourdelabarrehorizontalesupérieureducadre,dechaquecôté.Attacher
solidement les deux boutons-pression de chaque accoudoir. Voir Figure 18.8.
• Vérierquelesiègetientsolidementenplace.
!MISE EN GARDE
LesiègearrièreCabooseneconvientpasàunenfantdemoinsde6mois.Pouréviterquel’enfantsubissedes
blessures graves en glissant ou en tombant, toujours utiliser le dispositif de retenue.
19 Enlever la ceinture du banc arrière
• Détacherdelasangled’entrejambelesdeuxsanglesdeceintureduharnaisarrière.Laisserlasangled’entrejambeenplace.Elleservira
aprèsl’installationdusiègearrièreCaboose.
• Ranger la ceinture du harnais arrière dans la poche du siège avant ou en lieu sûr pour utilisation ultérieure.
• Pourenleverlessanglesdeceinture,trouverd’abordleurpointd’attachesurletubedusiègeavant.Passerensuiteunesangledansla
petiteouverturedel’anneauenDetladétacherdusiègeavant.Répéterpourl’autresangledeceinture.Voir Figure 19.1.
20 Pliage de la poussette
• Garderlesenfantsàl’écartdelapoussettependantsonpliage.
• Retireztoutsièged’auto.Lapoussettepeutêtrepliéeavecl‘adaptateurdesiègeenplace.
• Placezl’auventenpositionferméeettirez-leversl’avantdelapoussette.
• Placez le siège avant le plus à la verticale possible.
• Assurez-vous que les deux freins arrière sont en position verrouillée.
• VerrouillezlesDEUXensembledefreinsavantenramenantlessystèmesdeverrouillageversl’avant.
• Déverrouillez le système de sécurité sur la partie inférieure gauche de la poussette.
• Tirez sur les mécanismes de déclenchement vers le haut, des deux côtés de la poussette, et poussez la poignée complètement vers
l’avant.Voir Figure 20.1.
ATTENTION:Lorsdupliagedelapoussette,gardezvosdoigtsàl’écartdespiècesmobiles.
• Enclenchez le verrou du côté droit de la poussette, sur la tige. Voir Figure 20.2.

EN FR ES JP
!MISE EN GARDE
TOUJOURS garder les enfants à bonne distance de la poussette pendant la fermeture.
Risques de pincement – Fermer la poussette avec prudence.
21 Utilisation de la poussette avec un siège d’auto (OPTIONNEL)
NOTE: Voirl’encadrépourlesmodèlesdesiègecompatibles.
• Retirezlatabletteetinstallezl’adaptateurdesièged’autosurlesmêmesxations.Assurez-vousquelesDEUXcôtéssontbienxés.Voir
Figure 21.1.
• Poussezl’auventleplusversl’arrièrepossible.
• AJUSTEZ LE SIÈGE EN POSITION INCLINÉE.
• Retirezlesièged’autodesebaseetplacez-lesurlesiègeavantdelapoussettedefaçonàcequ’ilsoitFACEVERSL’ARRIÈRE.
Positionnezl’extrémité«tête»versl’avant,appuyéecontrel’adaptateurdesiège.Positionnezl’extrémité«pieds»surledossier,mais
PAS sur la bordure supérieure do dossier. Voir Figure 21.2.
• Attachez les courroies de retenue rouge au-dessus de la partie LA PLUS BASSE du siège pour enfant (les courroies sont situées dans les
pochettessurlecôtédusiège).Ajustezlescourroiesdefaçonàcequ’ellessoientbienserréesautourdusiège,maisÀL’ÉCARTducou
del’enfant.Tirezsurlesiègepourvousassurerqu’ilestbienxé.Voir Figure 21.3.
• Pour retirer le siège de la poussette, détachez la ceinture de retenue en appuyant sur la touche du les deux mécanismes de libération sur
le côté. Voir Figure 21.4.
• Replacez les courroies de retenue dans la pochette.
!MISE EN GARDE
TOUJOURSinstallerlesiègepourenfantdefaçonàcequel’enfantsoitfaceversl’arrière(poignée)delapoussette,
aveclescourroiesderetenuebienxées.
TOUJOURSpositionnerlesièged’autodefaçonàcequ’ilsoitbienplacéàl’intérieurducadredel’adaptateurpour
sièged’auto.
TOUJOURSpositionnerlesièged’autoanqu’ilreposeSURledossier,maisNONsurledessusdudossier.Le
dossier doit être en position inclinée.
NEJAMAISpositionnerlescourroiesderetenuesurouprocheducoudel’enfant,carcelapourraitcauserune
strangulation.
L’adaptateurdesièged’autoestconçupourêtreutiliséavecdesmodèlesdesièged’autospéciques.Voirl’encadré
pourlesmodèlesspéciques.NEPASutiliserd’autresmodèlesdesièged’auto.
Entretien
Les glissières, les boutons-pression, les verrous, les rivets et les autres pièces de quincaillerie ou en plastique de la poussette doivent être
inspectésrégulièrementpourvérierleursolidité,leurétatetleurfonctionnement.Leharnaisdesécurité,ainsiquelesautressangles,les
piècesentissuetleurscouturesdoiventégalementêtreinspectéespériodiquementpourvérierleursoliditéets’assurerqu’ellesnesont
pas déchirées ou endommagées. De plus, le fonctionnement de toutes les pièces mobiles – roues, freins, articulations, etc. – doit aussi faire
l’objetd’unevéricationrégulière.
Toutes les pièces manquantes, brisées ou usées doivent être remplacées le plus rapidement possible; la poussette ne doit pas être utilisée
tant que ces pièces ne sont pas remplacées. Utiliser uniquement les pièces originales provenant du fabricant. Au besoin, communiquer avec
Joovy au numéro sans frais fourni.
Nettoyage
Lespiècesentissudelapoussettepeuventêtrenettoyéesàl’aidedesavonoudedétergentdouxmélangéàdel’eautièdeetappliqué
avecuneépongeouunlingepropre.Toujourslaisserséchercomplètementletissuavantd’utiliserlapoussette.
Le cadre et les roues doivent être gardés propres, exempts de poussière et de tout corps étranger, en particulier lorsque la poussette a
étéutiliséesouslapluie,danslaneigeoudanstouteautreconditiondifcile.Nettoyeralorslesrouesàl’aided’uneépongeoud’unlinge
humideetd’unesolutiond’eautièdeetdedétergentdoux.
SATISFACTION GARANTIE
Nous voulons que nos clients soient entièrement satisfaits de l’achat de ce produit. En cas de difculté durant
l’assemblage ou l’utilisation, ou pour toute question, communiquer avec notre service à la clientèle:
ÉTATS-UNIS - Joovy: (877) 456-5049, de 8h30 à 17 h, heure du Centre.
CANADA - Elfe Juvenile Products: (800) 667-8184, de 8h30 à 17 h, heure de l’Est.
PourinscrireunnouveauproduitJoovy,consulternotresiteWebàl’adressewww.joovy.com.

EN FR ES JP
!ADVERTENCIA
Por favor lea estas instrucciones cuidadosamente antes de usar el producto
y consérvelas para utilizarlas como referencia en el futuro.
• No acatar estas instrucciones podría provocar lesiones graves o la muerte.
• Nunca deje al niño solo.
• Evite lesiones graves provocadas por caídas o deslizamientos.
• Use siempre los cinturones de seguridad y asegúrese de que todos los niños estén posicionados como lo indican
las instrucciones.
• Mantenga las piezas pequeñas fuera del alcance de los niños mientras arma el cochecito.
• Asegúrese de que el cochecito esté bien abierto, que la traba de seguridad esté colocada y que los frenos de las
ruedas estén accionados antes de permitir a los niños acercarse al cochecito.
• El dispositivo de aparcamiento siempre debería estar conectado durante la carga y descarga de niños.
• El asiento delantero no es apto para niños menores de 3 meses.
• El peso máximo del niño que puede ir sentado en el asiento delantero es de 20,41 kg (45 lbs.).
• La altura máxima de un niño que el producto está diseñado para transportar es de 111,76 cm (44 pulgadas).
• La plataforma trasera y el asiento trasero están diseñados para niños mayores de 2½ años pero que midan
MENOS de 111,76 cm (44 pulgadas) de altura y pesen menos de 20.41 kg (45 lbs.).
• El uso del cochecito con 2 niños que pesen más de 20,41 kg (45 lbs.) cada uno, o más de 40,82 kg (90 lbs.) entre
los dos, provocará un desgaste y esfuerzo excesivo del cochecito y podría ser peligroso.
• Nunca lleve más de 2 niños en un momento en el cochecito.
• Nunca permita que un niño se pare en el apoyapiés para subirse o bajarse del cochecito.
• No utilice el cochecito en escaleras ni escaleras mecánicas.
• NoagregueaccesoriosquenoesténespecícamenterecomendadosporJoovy.
• Mantenga a los niños alejados del cochecito al cerrarlo o abrirlo.
• Toda carga que se adicione al manillar afecta la estabilidad del coche. Colgar carteras, bolsas, paquetes, bolsos
de pañales u otros accesorios del manillar u otras partes del cochecito puede desequilibrarlo y provocar una
inestabilidad peligrosa.
• El peso máximo que puede llevarse en el canasto es de 2,27 kg (5 lbs.). El exceso de peso puede provocar una
inestabilidad peligrosa.
• El peso máximo que puede llevarse en cada portavaso o en la bandeja es de 0,9 kg (2 lbs.).
• Nunca lleve bebidas calientes ni recipientes abiertos en los portavasos.
• Al usar un asiento para automóvil en el cochecito, use SIEMPRE la correa de sujeción para asegurar el asiento en
su lugar.
• No permita nunca que se utilice el cochecito como un juguete.
• Elimine correctamente los materiales de embalaje. No permita que los niños jueguen con ellos.
• Veriqueregularmentequeelcochecitonotengaremachessueltos,piezasgastadasomaterialrotoodescosido.
• Deje de usar el cochecito si funciona mal o resulta dañado.
PRECAUCIÓN: Al desplegar el conchecito tenga cuidado para evitar que sus dedos queden atrapados en las partes móviles.
Por favor no devuelva este producto a la tienda
Si tiene dicultades con el ensamblaje o el uso de este producto, o si tiene consultas relacionadas a estas
instrucciones, por favor póngase en contacto con nuestro Departamento de Atención al Cliente:
ESTADOS UNIDOS – Joovy: (877) 456-5049, entre las 8:30 am y 5:00 pm Hora Central.
CANADÁ – Elfe Juvenile Products: (800) 667-8184, entre las 8:30 am y 5:00 pm Hora del Este.
Nota: Los estilos y colores pueden variar.
1 Desembalaje del producto
• SaquetododelabolsaeidentiquelaspiezasusandolaFigura 1.1. (no está en escala)
A: cochecito con Asiento Trasero Caboose, B: capota, C: eje trasero, D: dos ruedas traseras, E: dos juegos de ruedas delanteras,
F: bandeja, G: cuatro arandelas, H: dos pasadores, I: dos tapas, J: adaptador de asiento para automóvil (OPCIONAL),
K: correa de la entrepierna, y documentos (no se muestran).
NOTA: El eje trasero viene unido al armazón trasero. Retire el eje del armazón y quite la gomaespuma amarilla. Puede venir con piezas
extra.
• Elimine correctamente los materiales de embalaje incluyendo las protecciones de plástico.
• NO permita que los niños jueguen con los materiales de embalaje.
!ADVERTENCIA
Este producto debe ser armado por un adulto. Este paquete contiene piezas pequeñas.
Mantenga las piezas pequeñas alejadas de los niños durante el armado. No se necesitan herramientas.

EN FR ES JP
2 Cómo abrir el cochecito
• Mantenga a los niños alejados del cochecito mientras lo abre.
• Libere la traba de cierre ubicada del lado derecho levantando la palanca para desengancharla. Ver Figura 2.1.
• Tire del manillar hacia arriba hasta que el armazón se abra por completo y se trabe.
PRECAUCIÓN: Al abrir el cochecito, tenga cuidado de no pellizcarse los dedos con las piezas móviles.
NOTA: Retire la gomaespuma de embalaje del armazón trasero para asegurarse de que el cochecito se trabe en la posición correcta.
• Coloque la traba de seguridad. Ver Figura 2.2.
• Asegúrese de que la traba de seguridad esté colocada antes de usar el cochecito.
!ADVERTENCIA
Coloque SIEMPRE la traba de seguridad lateral cuando el cochecito esté abierto y listo para usarse. Así evitará que
el cochecito se cierre si las trabas del manillar se abren accidentalmente.
Tenga cuidado de no pellizcarse los dedos al abrir el cochecito.
3 Instalación de las ruedas traseras
• Dé vuelta el cochecito.
• Inserte el eje trasero por los dos agujeros que están debajo de la plataforma. Ver Figura 3.1.
• Instale las piezas en el siguiente orden. Ver Figura 3.2.
Arandela
Rueda (con el freno mirando hacia adentro)
Arandela
Introduzca el pasador por el agujero del eje hasta que se trabe a presión en su lugar.
• Empuje el eje hacia el lado opuesto del cochecito hasta el tope.
• Repita los pasos para instalar la otra rueda.
• Coloque las tapas a presión. Ver Figura 3.3.
4 Instalación de las ruedas delanteras
• Coloque las ruedas delanteras en los postes de las ruedas delanteras hasta que encajen en su lugar y hagan clic. Ver Figura 4.1.
• Tire de las ruedas para asegurarse de que estén bien instaladas.
5 Trabas de las ruedas delanteras
Lasruedasdelanteraspuedengirarotrabarseenposiciónja.
• Para trabar las ruedas delanteras, gírelas para que queden mirando hacia adelante.
• Tire de la palanca hacia arriba para trabar las ruedas. Ver Figura 5.1.
• Para destrabar las ruedas (modo giratorio) presione la palanca.
6 Instalación y uso de la capota
• Coloque la capota con el borde acolchado hacia adelante.
• Inserte la capota en el armazón por AMBOS lados. Asegúrese de que encaje bien en su lugar. Ver Figura 6.1.
• LacapotapuedecolocarsehaciaadelanteohaciaatrásyjarseenposiciónabiertaconlastrabasquetieneaAMBOSlados.
Ver Figuras 6.2 y 6.3.
• Para cerrar la capota, destrabe ambos lados y luego pliéguela. Ver Figura 6.4.
• Para sacar la capota, presione los botones de traba que están a AMBOS lados de la capota y tire hacia arriba. Ver Figura 6.5.
!ADVERTENCIA
Peligro de pellizco – Tenga cuidado de no pellizcarse los dedos al cerrar y abrir las bisagras laterales.
7 Instalación/ desinstalación de la bandeja
• Para instalar la bandeja delantera, deslícela por AMBOS soportes hasta que encaje a presión en su lugar. Ver Figura 7.1.
• Para quitar la bandeja, presione los botones de traba ubicados en AMBOS soportes y tire hacia adelante. Ver Figura 7.2.
!ADVERTENCIA
La bandeja no es un elemento de sujeción. Siempre sujete a su hijo con el cinturón de seguridad. Nunca levante el
cochecito por la bandeja. Tenga cuidado al colocar la bandeja cuando el niño está sentado en el cochecito.
8 Frenos de las ruedas traseras
• Siempre coloque los frenos traseros antes de introducir o sacar al niño del cochecito.
• Para colocar los frenos, presione cualquiera palancas de freno hasta accionar el freno. Ver Figura 8.1.
• VeriquequeAMBOSfrenosesténbienaccionados.
• Para liberar los frenos, levante cualquiera palancas de freno. Ver Figura 8.2.

EN FR ES JP
!ADVERTENCIA
Siempre coloque el freno cuando el cochecito no esté andando para evitar que ruede solo. Nunca deje el cochecito
solo, especialmente en un lugar inclinado, ya que puede volcarse o deslizarse.
9 Ajuste del apoyapiés
El apoyapiés puede subirse o bajarse.
• Para subir el apoyapiés y trabarlo en esa posición, tire del apoyapiés hacia arriba y levante la barra de soporte. Asegúrese de que quede
bien trabado. Ver Figura 9.1.
• Para bajar el apoyapiés, tire del apoyapiés hacia arriba, baje la barra de soporte y suelte el apoyapiés. Ver Figura 9.2.
!ADVERTENCIA
Nunca permita que el niño se pare en el apoyapiés para subir o bajar del cochecito. El cochecito puede volcarse y el
niño puede lastimarse.
10 Sujeción del niño que va en el asiento delantero
• Hay tres posiciones para ajustar la altura de las correas de los hombros. Ajuste la altura lo más cerca posible de los hombros de su hijo.
• Para retirar las correas de los hombros, coloque los extremos de plástico hacia los costados y páselos por las ranuras del respaldo
del asiento. Vuelva a colocar las correas a la altura correcta reinsertando los extremos de plástico por las ranuras. Ver Figura 10.1.
Asegúrese de que ambas correas estén a la misma altura.
• Para retirar la correa de la entrepierna, deslícela por la abertura pequeña de la argolla metálica con forma de D. Vuelva a colocarla
pasando la argolla metálica por la ranura del asiento. Pase la correa alrededor del caño que está en la parte inferior del asiento. Deslice
la correa por la abertura pequeña de la argolla metálica con forma de D y tire de la correa para sujetarla al caño. Ver Figura 10.2.
• Retire la correa de la cintura deslizándola por la abertura pequeña de la argolla metálica con forma de D, luego retírela del asiento. Ver
Figura 10.3. Vuelva a colocarla pasando la argolla metálica por la ranura del asiento. Pase la correa alrededor del caño que está en la
parte trasera del asiento. Deslice la correa por la abertura pequeña de la argolla metálica con forma de D y tire de la correa para sujetarla
al caño. Repita los pasos con el otro extremo de la correa.
• Para retirar la hebilla presione el botón central y retire los extremos machos de cada hebilla. Ver Figura 10.4.
• Coloque al niño en el asiento cuidadosamente con las correas de los hombros sobre sus hombros y su pecho. Luego coloque la correa
de la entre pierna entre las piernas del niño.
• Presione las puntas de los pestillos de los hombros/cintura hacia la hebilla de la entrepierna hasta que todas las partes encajen en su
lugar. Ver Figura 10.5.
• Ajuste el cinturón de la cintura para que quede ceñido alrededor de la cintura del niño.
• Las correas de los hombros, la cintura y la entrepierna pueden ser ajustadas utilizando los anillos plásticos deslizantes en ellas.
!ADVERTENCIA
El asiento delantero no es apto para niños menores de 3 meses. Evite que el niño se caiga o deslice y se lastime
gravemente. Use siempre el cinturón y las correas.
11 Posiciones de reclinación del asiento
El asiento delantero tiene 3 posiciones de reclinación. Este asiento solo puede usarse con un niño mayor de 3 meses. Para los niños de
entre 3 y 6 meses, use solo el asiento reclinado por completo.
• Para colocar el asiento en posición recta, presione la barra de reclinación ubicada en el respaldo del asiento y mueva el asiento hasta la
posiciónrecta.Veriquequeelmecanismodereclinaciónquedebientrabadoyqueelasientonosemueva.VerFigura11.1.
• Para reclinar el asiento, presione la barra de reclinación y mueva el asiento a la posición de reclinación dos (medio) o tres. Nuevamente,
veriquequeelmecanismodereclinaciónquedebientrabadoyqueelasientonosemueva.
!ADVERTENCIA
Tanto con el asiento reclinado o recto, SIEMPRE asegúrese de que el mecanismo esté bien trabado antes de
colocar al niño en el cochecito.
12 Uso de la plataforma
• Empuje el asiento hacia adelante hasta el tope.
• Coloque la capota completamente hacia adelante.
• Coloque al niño en la plataforma en la parte trasera del cochecito. Asegúrese de que el niño mire hacia adelante y que sujete el armazón
con AMBAS manos.
• Asegúrese de que el niño tenga AMBOS pies dentro de la plataforma en todo momento.
• Tal vez deba ajustar la posición de reclinación del asiento para que haya más espacio para el niño que va parado.

EN FR ES JP
!ADVERTENCIA
La plataforma trasera y el banco del asiento trasero están diseñados para niños mayores de 2 años y medio pero
que midan MENOS de 111,76 cm (44 pulgadas) de altura y pesen menos de 20,41 kg (45 lbs.).
El uso del cochecito con 2 niños que pesen más de 20,41 kg (45 lbs.) cada uno, o más de 40,82 kg (90 lbs.) entre
los dos, provocará un desgaste y esfuerzo excesivo del cochecito y podría ser peligroso.
NUNCA permita que el niño que va parado se agarre de la capota para sujetarse.
No use nunca este cochecito para llevar a más de 2 niños a la vez.
13 Uso del banco del asiento trasero
• Empuje el asiento del banco lo más atrás posible.
NOTA: Debajo del almohadón del asiento trasero hay correas malladas que se utilizan para trabar el asiento en esta posición. Para trabar
el asiento, tire de las correas a CADA lado del almohadón y páselas alrededor del armazón como se muestra. Luego, abróchelas. Ver
Figura 13.1.
• Para deslizar el asiento hacia adelante, desabroche CADA correa y vuelva a colocarlas debajo del almohadón del asiento adhiriéndolas
con las tiras de Velcro®.
• Coloque la capota completamente hacia adelante.
• Para desabrochar la hebilla, presione el botón del centro y retire las hebillas de las correas.
• Siente al niño en el banco mirando hacia atrás, con los pies en la plataforma.
• Tal vez deba ajustar la posición de reclinación del asiento delantero para que haya más espacio para que el niño se siente.
• Coloque la correa de la entrepierna entre las piernas del niño.
• Abroche la hebilla de la correa del cinturón en la hebilla de la correa de la entrepierna. Ver Figura 13.2.
• Ajusteelcinturónbienrmealrededordelacinturadelniño.
• Asegúrese de que el niño tenga AMBOS pies dentro de la plataforma en todo momento.
• Asegúrese de que el niño sujete el armazón con AMBAS manos.
!ADVERTENCIA
NUNCA permita que el niño que va sentado en el banco trasero se agarre de la capota para sujetarse.
14 Canasto
El peso máximo que se puede llevar en el canasto es de 2.27 kg (5 lbs.).
15 Posicionamiento del respaldo
El asiento puede ser ajustado a cualquier posición, desde completamente erguido a reclinado. Este asiento debe ser utilizado solamente
para niños de por lo menos 6 meses de edad.
• Para reclinar el asiento, libere la lengüeta de bloqueo de ajuste de su posición de bloqueo tirando de ella fuera del respaldo. Continúe
tirando de esta lengüeta de bloqueo hacia abajo para ajustar el respaldo en la posición deseada; luego vuelva a acomodar la lengüeta.
Ver Figura 15.1.
• Para ajustar el asiento en una posición más erguida, libere la lengüeta de bloqueo de ajuste de su posición de bloqueo. Luego
simplemente tire del anillo de la correa de ajuste hacia arriba hasta que el respaldo quede en la posición deseada y vuelva a acomodar la
lengüeta de bloqueo. Ver Figura 15.2.
!ADVERTENCIA
Esté el asiento erguido o reclinado, SIEMPRE asegúrese de que el mecanismo de reclinación esté ajustado antes
de colocar al niño en el asiento.
16 Remoción del Asiento Trasero Caboose
• Desenganche las correas de la cintura y los hombros de la de la entrepierna.
• Desajuste los reposabrazos de la izquierda y la derecha del Asiento Trasero Caboose del armazón superior horizontal (en cada lado).
Desenganche ambos broches en cada lado. Ver Figura 16.1.
• Cerca de los lados frontales del Asiento Trasero Caboose hay 2 correas de Velcro® (una en cada lado). Desmonte estas correas. Repita
para el otro lado. Ver Figura 16.2.
• Localizar las 2 correas largas en la parte de abajo en el Asiento Trasero Caboose. Desenganche las correas y libere cada una de ellas de
alrededor del tubo del cochecito y pasar a través de los lazos en la parte posterior del asiento. Ver Figura 16.3.
• Localice las correas de arriba en el Asiento Trasero Caboose (dos en cada lado). Desenvuélva de los puestos. Ver Figura 16.4.
• Pase la correa de la entrepierna del asiento posterior a través de la ranura en el Asiento Trasero Caboose (Ver Figura 16.5). Tire del
Asiento Trasero Caboose fuera del asiento corrido posterior.

EN FR ES JP
17 Instalación de la correa de la cintura del asiento corrido trasero
• Remueve el cinturón del asiento de atras que empieza desde la parte trasera del asiento delantero.
• Para instalar la correa de la cintura del asiento corrido trasero, localice uno de los extremos de la misma donde tiene un anillo de metal
en D en la punta.
• Ajuste la correa alrededor del tubo posterior del asiento frontal. Deslice la correa a través de la pequeña abertura en el anillo de metal en
D y tire de ella para asegurarla al tubo. Repita para el otro extremo de la correa. Ver Figura 17.1.
18 Instalación del Asiento Trasero Caboose
• Coloque la tela del asiento en su posición sobre el asiento corrido trasero de manera tal que el asiento quede orientado hacia el frente de
la silla de bebé.
NOTA: No es necesario retirar el cojín de tela existente del asiento corrido.
• Pase la hebilla de la entrepierna del asiento trasero por la ranura en el Asiento Trasero Caboose. Ver Figura 18.1.
• Coloque la correa de Velcro® del Caboose Too Ultralight Graphite Seat sobre el poste de arriba en el lado respectivo del cochecito y
envuelva la correa de Velcro® alrededor del tubo. Ver Figura 18.2.
• Envuelva la correa de tela sobre la correa de Velcro® de modo que los Velcro® se unan. Ponga el agujero de botón a través del puesto.
Ver Figura 18.3.
• Envuelva la correa de abajo alrededor del tubo y ponga el agujero de botón a través del puesto. Ver Figura 18.4.
• Repita el proceso para las dos correas en el otro lado.
• Deslice el bolsillo de tela frontal, ubicado debajo del frente del Asiento Trasero Caboose, sobre el frente del asiento corrido. Ver Figura
18.5. (Muestra la parte inferior del asiento corrido)
• Localice las 2 correas largas en la parte posterior inferior del Asiento Trasero Caboose (una en cada lado). Ajuste cada correa alrededor
del lado exterior del manillar de la silla de bebé y páselas a través de los lazos en la parte posterior del asiento. Una las correas
rmemente.Ver Figura 18.6. De ser necesario, tire del tejido cerca del extremo macho de la hebilla para ajustar.
• Cerca de los lados frontales del Asiento Trasero Caboose hay 2 correas de Velcro® (una en cada lado). Asegure estas correas alrededor
de la barra horizontal inferior del armazón en ambos lados. Ver Figura 18.7.
• Ajuste los reposabrazos de la izquierda y la derecha del Asiento Trasero Caboose alrededor del armazón superior horizontal (en cada
lado).Unarmementeambosbrochesencadalado.Ver Figura 18.8.
• Compruebequeelasientoestécolocadormementeensulugar.
!ADVERTENCIA
El Asiento Trasero Caboose no es adecuado para niños de menos de 6 meses de edad. Evite lesiones graves por
caídas o deslizamientos. Siempre use el sistema de sujeción.
19 Extracción de la correa de la cintura del asiento corrido trasero de la silla de bebé
• En la silla de bebé, libere ambas correas de la cintura de la correa de la entrepierna en el arnés de 3 puntos. Deje la correa de la
entrepierna en su lugar para usarla con el Asiento Trasero Caboose.
• Guarda el cinturón en la bolsa que esta detrás del asiento delantero o en un lugar seguro para usarlo cuando se necesite.
• Para retirar las correas de la cintura, localice uno de los extremos de la correa donde se une al tubo del asiento frontal. Deslice la correa
a través de la pequeña abertura en el anillo de metal en D y tire de ella fuera del asiento frontal. Repita para la otra correa. Ver Figura
19.1.
20 Cómo cerrar el cochecito
• Mantenga a los niños alejados del cochecito al cerrarlo.
• Retire el asiento infantil para automóvil. El cochecito puede cerrarse con el adaptador del asiento para automóvil colocado.
• Cierre la capota y empújela hacia adelante.
• Coloque el asiento delantero en posición recta.
• Asegúrese de que ambos frenos de las ruedas traseras estén accionados.
• Trabe AMBOS juegos de ruedas delanteras mirando hacia adelante.
• Destrabe la traba de seguridad que está en el lado inferior izquierdo del cochecito.
• Tire de los mecanismos de traba que están a ambos lados del cochecito y empuje el manillar hacia adelante. Ver Figura 20.1.
PRECAUCIÓN: Tenga cuidado de no pellizcarse los dedos con las piezas móviles al cerrar el cochecito.
• Enganche la traba de cierre que está del lado derecho del cochecito. Ver Figura 20.2.
!ADVERTENCIA
Mantenga SIEMPRE a los niños alejados del cochecito mientras lo abre.
Peligro de pellizco – Tenga cuidado al desplegar el coche de bebe.
21 Uso del cochecito con un asiento infantil para automóvil (OPCIONAL)
NOTA: Para ver los modelos de asientos para automóvil compatibles, consulte el folleto adjunto.
• Retire la bandeja delantera e instale el adaptador del asiento para automóvil en los mismos soportes. Asegúrese de que queden bien
colocados en AMBOS lados. Ver Figura 21.1.

EN FR ES JP
• Empuje la capota completamente hacia adelante.
• RECLINE EL ASIENTO.
• Retire el asiento para automóvil de su base y colóquelo en el asiento delantero del cochecito MIRANDO HACIA ATRÁS. Coloque el lado
de la cabeza hacia adelante, apoyado sobre el adaptador. Coloque el lado de los pies sobre el respaldo del asiento, pero NO sobre el
borde superior del respaldo. Ver Figura 21.2.
• Pase y abroche las correas de sujeción rojas por la parte INFERIOR del asiento para automóvil (las correas se encuentran en los bolsillos
del costado del asiento). Ajuste las correas para que queden bien sujetas alrededor del asiento para automóvil pero LEJOS del cuello del
niño. Tire del asiento para automóvil hacia arriba para asegurase de que esté bien sujeto. Ver Figura 21.3.
• Para retirar el asiento para automóvil del cochecito, desabroche las correas de sujeción presionando el botón y ambas trabas laterales.
Ver Figura 21.4.
• Vuelva a colocar las correas de sujeción en los bolsillos.
!ADVERTENCIA
SIEMPRE instale el asiento infantil para automóvil de manera que el niño quede mirando hacia atrás (manillar) y
sujételo con las correas.
SIEMPRE coloque el asiento infantil para automóvil bien encajado en los soportes del adaptador.
SIEMPRE coloque el asiento infantil para automóvil apoyado SOBRE el respaldo pero NO sobre el borde superior
del respaldo. El respaldo debe estar RECLINADO.
NUNCA coloque las correas de sujeción por el cuello del niño o cerca del cuello del niño ya que pueden
estrangularlo.
EladaptadordelasientoparaautomóvilseusaSOLOconmodelosdeasientosparaautomóvilespecícos.
Consulte los modelos en el folleto adjunto. NO use otros modelos de asientos para automóvil.
Mantenimiento
Todos los accesorios, cierres, seguros, remaches y otros elementos y partes plásticas del cochecito deben ser inspeccionados
regularmente para garantizar que estén correctamente asegurados y que no estén dañados ni funcionen mal. El arnés de seguridad, así
como todas las otras correas y objetos de tela y sus costuras también deben ser inspeccionados periódicamente para garantizar que estén
correctamenteaseguradosyquenoesténojos,rotosodañadosdeotramanera.Todaslaspartesmovibles,comolasruedas,frenosy
bisagras, también deben ser inspeccionadas con regularidad para garantizar su correcto funcionamiento.
Todos los componentes faltantes, rotos o desgastados deben ser remplazados inmediatamente y el conchecito no debe ser utilizado hasta
que se remplacen. Se deben utilizar solamente componentes originales de fábrica. De ser necesario, por favor póngase en contacto con
Joovy a nuestra línea telefónica gratuita.
Limpieza
Los materiales de tela de este cochecito pueden ser limpiados utilizando un jabón suave de uso común o detergente y agua tibia con una
esponja o un trapo limpio. Siempre deje que la tela se seque completamente al aire antes de utilizar el coche.
El armazón y las ruedas siempre deberían mantenerse limpias y libres de suciedad y cuerpos extraños, especialmente luego de usar el
conchecito en la lluvia, nieve u otros ambientes severos. Use una esponja o un trapo mojado en agua tibia y un detergente suave para
limpiar las ruedas luego de cada uso.
SATISFACCIÓN GARANTIZADA
Queremos que usted esté completamente satisfecho con la compra de este producto. Si tiene alguna dicultad en
el ensamblaje o el uso de este producto, o si tiene alguna consulta - Por favor póngase en contacto con nuestro
Departamento de Atención al Cliente:
ESTADOS UNIDOS – Joovy: (877) 456-5049, entre las 8:30 am y 5:00 pm Hora Central.
CANADÁ – Elfe Juvenile Products: (800) 667-8184, entre las 8:30 am y 5:00 pm Hora del Este.
Por favor entre en www.joovy.com para registrar su nuevo producto Joovy.

EN FR ES JP
!ご注意
このベビーカーを使用する前に本取扱説明書をよく読んで下さい。
この取扱説明書を保存し、使用の際の参考にして下さい。
• これらの使用説明事項に従わない場合、重度のけがや死に至る危険が伴う可能性があります。
• お子様から目を離さないようにしてください。
• 落下や滑り落ちに十分ご注意下さい。大けがにつながる場合もございます。
• 常に安全ベルトを使用し、お子様達が使用説明書に準じた位置に座っていることを確認して下さい。
• ベビーカーを組み立てている際は、小さな部品の全てをお子様の手の届かない所に置いて下さい。
• お子様がベビーカーに近づく前に、ベビーカーが完全に開いて、安全ラッチが正しくかかっている事と、車輪のブレーキ
が作動しているかどうか確かめて下さい。
• お子様を乗せたり降ろしたりする際、停車装置は常に作動しているべきです。
• 前部座席は3ヶ月以下の乳児には適していません。
• 前部シートに座れるお子様の体重は20.41kgまでです。
• 本商品は身長111.76cm以下のお子様用です。
• 後部の立ち台及び後部ベンチシートは、最低2歳半、身長111.76cm、体重20.41kg以下のお子様用です。
• それぞれ20.41kg以上、合計40.82kg以上のお子様ふたりを乗せると、ベビーカーに過度のストレスがかかり、危険で不
安定な状態になります。
• 同時に2人以上のお子様を乗せないで下さい。
• ベビーカーに乗り降りするために、絶対にお子様が足置きに上らないようにして下さい。
• 階段又はエスカレーターでベビーカーを使用しないで下さい。
• Joovy指定品以外の付属物は使用しないで下さい。
•ハンドルに取り付けた荷の重さは、ベビーカーの安定性に影響します。ハンドバッグ、ショッピングバッグ、小包、交換バ
ッグ、またはその他のアクセサリーをベビーカーのハンドル・バーやその他の部品にぶら下げると、ベビーカーの平衡
が変わり、危険で不安定な状態になることがあります。
•保管用バスケットで運べる最大重量は5ポンド(2.27kg)です。過度の重量は、危険で不安定な状態をもたらす可能性が
あります。
• カップホルダーやトレーには0.9kg以上の物を置かないで下さい。
• カップホルダーには熱い飲み物や蓋の開いた容器を入れないでください。
• 乳児用カーシートをベビーカーに取り付ける際は、常にシートベルトを使用して、乳児用カーシートを固定して下さい。
• ベビーカーをおもちゃとして使用しないで下さい。
• 全ての梱包材料を適切に処分して下さい。お子様が梱包材料で遊ばないようにして下さい。
• ベビーカーのリベット、スナップ、部品が緩んでないか、生地や縫い目がほつれてにないかを定期的に確認して下さい。
• 故障又は破損したベビーカーは使用を中止して下さい。
注意:ベビーカーを開く際、動いている部品に指を挟まないように注意して下さい。
本商品は店舗に返品しないでください
本商品の組み立てや使用にお困りの際、または、使用説明書に関する質問がある場合、弊社のカスタマ
米国 – Joovy: (877) 456-5049、受付時間 8:30 am – 5:00 pm 中部標準時
カナダ – Elfe Juvenile Products: (800) 667-8184、受付時間 8:30 am – 5:00 pm 東部標準時
注意: スタイルと色は異なることがあります。
1 商品を開梱する
• 箱に入っている全ての内容物を取り出し、図1.1(実物大ではありません)を使用して部品を確認して下さい。
A:後部座席付き二人乗りベビーカー、C:後部アクセル、D:後輪2輪、E:前輪2輪セット、F: ト レ ー 、 G: ウ ォ ッ シ ャ ー 4 個 、 H:スナップピン2個、
I:ハブキャップ2個、J:乳児用カーシートアダプター(オプション)、K: クロッチ・ストラップと書類(写真なし)。
注意:後部アクセルは赤い紐で後部フレームチューブに結び付けられています。慎重にアクセルをフレームから外し、アクセルの端から黄色い発
泡体を取り外して下さい。予備のウォッシャーやスナップピンが含まれていることもあります。
• プラスチックカバーを含む全ての梱包材を正しく廃棄して下さい。
• お子様が梱包材で遊ばないようにして下さい。
!ご注意
本商品の組み立ては大人が行って下さい。本パッケージには小さな部品が含まれます。組み立ての際は、小さな部品をお
子様の手の届かないところに置いて下さい。組み立てに道具は必要ありません。
2 ベビーカーを開く
• ベビーカーを開く際は、子供達が側にいないようにして下さい。
• キャッチのレバーを持ち上げて外すことにより、右側にある折りたたみロックを解除して下さい。図2.1参照。
• フレーム・スナップが固定位置にはまるまで、ベビーカーのハンドルを持ち上げて下さい。
注 意:ベビーカーを開く際、動いている部品に指を挟まないように注意して下さい。

EN FR ES JP
注:後部フレーム体から梱包用フォームを取り外し、ベビーカーがオープン・ポジションに固定することを確認して下さい。
• 安全ラッチを固定して下さい。図2.2参照。
• ベビーカーの如何なる使用の前に安全ラッチが固定されていることを確認して下さい。
!ご注意
ベビーカーが開いて使用ポジションの際は、常に横側の安全ラッチを固定して下さい。ハンドルにより
ロックが突然解除されてしまった際に、ベビーカーがつぶれてしまうのを防ぎます。
指を挟む危険性–ベビーカーを開く際にご注意下さい。
3 後輪を取り付ける
• ベビーカーを逆さまにして下さい。
• 後部アクセルを立ち台プラットフォームの下の両方の穴を通して挿入して下さい。図3.1参照。
• 下記の順序で部品を取り付けて下さい。図3.2参照。
ウォッシャー
車輪(ブレーキクラスターは内向き)
ウォッシャー
スナップ・ピンをアクセルの穴を通して固定するまで押して下さい。
• アクセルをベビーカーの反対側の一番遠いところまで押して下さい。
• 他の車輪にも同じ取り付け方法を繰り返して下さい。
• ハブキャップを固定するまで押して下さい。図3.3参照。
4 前輪を取り付ける
• 前輪セットを前輪ポストに固定するように乗せて下さい。図4.1参照。
• 車輪セットを引いて、正しく取り付けられていることを確認して下さい。
5 前輪ロック
前輪は回転又は固定に設定することが出来ます。
• 前輪を固定するには、各車輪を回転して前向きになるようにして下さい。
• 固定レバーを引き上げて、回転ロックを作動させて下さい。図5.1参照。
• 車輪のロックを解除するには(回転モード)、レバーを押して下さい。
6 キャノピーを取り付けて操作する
• 端にパッドがついたキャノピーを前向きにつけてください。
• キャノピー装備品を両側のフレームマウントに挿入して下さい。固定されていることを確認して下さい。図6.1参照。
• 両側のキャノピーロックを使用して、キャノピーを前向き、後ろ向き、開いた状態で固定するように調整できます。図6.2と6.3参照。
• キャノピーを閉めるには、両側のロックを解除し、たたんで下さい。図6.4参照。
• キャノピーを取り外すには、両方のキャノピー装備品を押して、引き上げて下さい。図6.5参照。
!ご注意
指を挟まないようにして下さい–横側のヒンジを開閉する際には、指を挟まないように注意して下さい。
7 前部トレーを取り付ける/取り外す
• フロントトレーを取り付けるには、トレーを両方のマウントの上で固定するまでずらして下さい。図7.1参照。
• トレーを取り外すには、マウントの両側のロックボタンを押して、前に引いて下さい。図7.2参照。
!ご注意
チャイルドトレーは拘束装置ではありません。常にシートベルトを使用して、お子様の安全を確認して下さい。
チャイルドトレーを持ってベビーカーを持ち上げないで下さい。ベビーカーにお子様が座っている際にチャイルドトレー
を取り付ける場合は、注意して下さい。
8 後輪ブレーキ
• お子様をベビーカーに乗せる、または、降ろす前に、後輪ブレーキがかかっていることを確認して下さい。
• ブレーキをかけるには、どちらかのブレーキレバーを固定するまで押し下げて下さい。図8.1参照。
• ベビーカーを前後に動かして、ブレーキが正しく作動するか確認して下さい。
• ブレーキを解除するには、どちらか片側のブレーキレバーを持ち上げてください。図8.2参照。
!ご注意
ベビーカーを押していない時は、常に駐車ブレーキをかけて、ベビーカーが転がらないようにして下さい。
特に、丘や上り坂では、ベビーカーが傾いたり、滑ったりするので、決してベビーカーを放置しないで下さい。

EN FR ES JP
9 フットレストを調整する
足置きは完全に上向きか下向きに調整することが出来ます。
• 足置きを真っ直ぐに固定するには、足置きを引き上げて、サポートバーを持ち上げて下さい。固定されていることを確認して下さい図9.1参照。
• 足置きを下向きの位置にするには、足置きを引き上げて、サポートバーを押してから、足置きを解除して下さい。図9.2参照。
!ご注意
お子様がベビーカーに乗り降りするために、どちらのポジションであろうと、フットレストに乗らないようにして下さい。
ベビーカーが傾き、お子様が怪我をするかも知れません。
10 前部座席にお子様を安全に座らせる
• ショルダーハーネスは3種類の高さに調節出来ます。お子様の肩より上で一番近い高さに調節して下さい。
• ショルダーハーネスを外すには、プラスチックの端を横向きに回し、シートの後ろ側のスロットに通して下さい。プラスチックの端をスロットに挿
入し直して、ハーネスを適切な高さに付け直して下さい。図10.1参照。両方のストラップが同じ高さであることを確認して下さい。
• クロッチストラップを外すには、ストラップを金属製Dリングの小さな穴を通してずらしてください。金属製Dリングを座席のスロットを通して押し
て、ストラップを座席の下のチューブの周りに巻いてつけ直してください。ストラップを金属製Dリングの小さな開口部を通してずらし、引っ張っ
てチューブに固定させてください。図10.2参照。
• ウエストストラップを金属製Dリングの小さな開口部を通してずらして外してから、座席から離れるように引っ張ってください。図10.3参照。金属
製Dリングを座席のスロットを通して押して、ストラップを座席後部の枠のチューブに巻いてつけ直してください。ストラップを金属製Dリングの
小さな開口部を通してずらして、ストラップを引っ張ってチューブに固定させてださい。ストランプの反対側の端も同様にしてください。
• バックルを外すには、中央のボタンを押して各バックルの雄部を外して下さい。図10.4参照。
• お子様の肩と胸の上にショルダーストラップが掛かる様に慎重にお子様を座席に座らせて下さい。それからクロッチストラップをお子様の脚の
間に置いてください。
• ショルダー/ウエストラッチポストを、全ての部品が固定するまでクロッチバックルの中に押し込んで下さい。図10.5参照。
• ウエストベルトを締めてお子様のお腹の周りにゆったりと固定して下さい。
• ショルダー、ウエスト、クロッチストラップは、これらのストラップのプラスチックリングを使って調節することが出来ます。
!ご注意
落下や滑りによる重傷を負わないようにして下さい。
常にシートベルトとハーネスを使用して下さい。
前向きの座席は3ヶ月以下のお子様には適していません。
11 背もたれの位置
前部シートには2種類のポジションがあります。このシートは3ヶ月超えたお子様に使用して下さい。3ヶ月から6ヶ月までのお子様を乗せる場合は、
シートを完全に倒した位置でご使用下さい。
• シートを真っ直ぐなポジションに配置するには、シートの後ろ側にあるバーをベビーカーの前方に向けて押し、バーが一番下のポジションに固
定されるまで、ベビーカーの前方に向けて背もたれを回転させて下さい。
• シートを傾けるには、シートの後ろ側のバーをベビーカーの後方に向けて引っ張り、このバーが再び一番下のポジションに固定されるまで、背も
たれを回転させて下さい。図11.1参照。
!ご注意
背もたれを真っ直ぐまたは傾いたポジションに設置するに関わらず、お子様を乗せる前に、
リクライニング・メカニズムが作動していることを確認して下さい。
12 スタンドオン・プラットフォームを使用する
• ベンチシートを一番前のポジションになるように押して下さい。
• キャノピーを一番前のポジションにして下さい。
• お子様をベビーカーの後ろのプラットフォームに乗せて下さい。お子様が前を向いており、両手でフレームのハンドルを持っていることを確認し
て下さい。
• 常にお子様の両足がしっかりプラットフォームに乗っていることを確認して下さい。
• 背もたれの位置を調整して、お子様が立つのに十分な空間を作って下さい。
!ご注意
後部のスタンドオン・プラットフォームと後部ベンチシートは、2歳半で、
身長111.76cm未満、20.41kg未満のお子様に適しています。
体重がそれぞれ20.41kg以上、合計で40.82kg以上の2人のお子様をベビーカーに乗せると、
ベビーカーに過度のストレスがかかり、危険で不安定な状態になります。
立っているお子様がキャノピーにつかまらないようにして下さい。
このベビーカーに同時に2人以上のお子様を乗せないで下さい。
13 後部ベンチシートを使用する
• ベンチシートを一番後ろのポジションになるように押して下さい。

EN FR ES JP
注 意:後部シートパッドの底にウェビングストラップがついています。これらのストラップでシートを一番後ろのポジションに固定することが出来
ます。シートを固定するには、パッドの各側からストラップを引っ張り、図に示されている通り、フレームの周りに巻き、ストラップ同士をくっつけ
て下さい。図13.1参照。
• シートを前方に動かすには、各ストラップを外し、Velcro®でウェビングをシートパッドの底につけ直して下さい。
• キャノピーを一番前のポジションにして下さい。
• バックルを外すには、中央のボタンを押して、両方のラッチポストを外して下さい。
• お子様の足がプラットフォームに乗るように、後ろ向きにベンチシートに座らせて下さい。
• 背もたれの位置を調整して、お子様が座るために十分な空間を作って下さい。
• クロッチストラップをお子様の股間につけて下さい。
• 全部品が固定されるまでウエストラッチポストをクロッチバックルの中に押し込んで下さい。図13.2参照。
• シートベルトを調整して、お子様のウエストの周りにしっかり装着されるようにして下さい。
• 常にお子様の両足がしっかりプラットフォームに乗っているようにして下さい。
• お子様が両手でフレームのハンドルを握っているようにして下さい。
!ご注意
後部シートのお子様がキャノピーにつかまらないようにして下さい。
14 荷物用バスケット
荷物用バスケットに入れられる最大重量は2.27kgです。
15 背もたれの位置を調節する
背もたれは、垂直からリクライニングまで如何なる位置にも調節することが出来ます。この座席は6か月以上のお子様にのみご使用下さい。
• 座席を倒すには、調節固定タブを背もたれから反対方向い引っ張って、固定位置から解除して下さい。この固定タブを下向きに引っ張り続け、背
もたれをご希望の位置に調節してから、固定タブを設定し直して下さい。図15.1参照。
• 背もたれをもっと垂直な位置に調節するには、調節固定タブを固定位置から解除して下さい。それから調節ストラップリングを、背もたれがご希
望の位置になるまで引き上げ、固定タブを設定し直して下さい。図15.2参照。
!ご注意
背もたれが垂直であっても、倒れていても、お子様を座席に座らせる前に、リクラインメカニズムが作動していることを常
に確認して下さい。
16 Caboose Rear Seatを外す
• ウエストとショルダーストラップをクロッチストラップから外して下さい。クロッチストラップを元の位置に戻して下さい。
• CabooseRearSeatの左右のひじ掛けを上側の水平フレームから外して下さい(両側)。両側のスナップを外して下さい。図16.1参照。
• CabooseRearSeatの前部のそばには、2本のVelcro®ストラップがあります(片側に1本ずつ)。これらのストラップを引っ張って下さい。反対側も
同じ動作をして下さい。図16.2参照。
• Cabooseの後部座席の後ろ側の下に2本の長いストラップがあります。ストラップのバックルを外し、ベビーカーのハンドルバーの外側に巻かれ
た各ストラップを座席の後ろ側のループを通してほどいてください。図16.3参照。
• Cabooseの後部座席の後ろ側の上にストラップがあります(片側に2本ずつ)。ペグからほどいてください。図16.4参照。
• 後部座席のクロッチストラップバックルをCabooseRearSeatのスロットに通し(図16.5参照)、CabooseRearSeatを後部ベンチから引き外して
下さい。
17 後部ベンチシートウエストストラップを取り付ける
• 前部座席の後ろのポケットから後部座席用ウエストストラップを取り出してください。
• 後部ベンチウエストストラップを取り付けるためには、先端に金属製Dリングがついているウエストストラップの片端を見つけて下さい。
• ストラップを前部座席の後部チューブに巻いて下さい。ストラップを金属製Dリングの小さな穴に通して、引っ張ってチューブに固定させて下さ
い。ストラップの反対側の先端にも同じ動作を繰り返して下さい。図17.1参照。
18 Caboose Rear Seatを取り付ける
• 座席の布地が移動する後部ベンチシートの上にかかるように置き、座席がベビーカーの前方を向いているようにして下さい。
注意: ベンチシートから既存の布製パッドを外す必要はありません。
• 後部座席のクロッチバックルをCabooseRearSeatのスロットを通して押して下さい。図18.1参照。
• Cabooseの後部座席のVelcro®ストラップをベビーカーの対応する側の一番上のペグの上に置いて、枠の周りにVelcro®ストラップを巻いてくだ
さい。図18.2参照。
• Velcroストラップの上にクロスストラップを巻いて、Velcro®がつくようにしてください。ボタン穴を通してペグを固定してください。図18.3参照。
• 一番下のストラップを枠に巻いて、ボタン穴を通して一番下のペグを固定してください。図18.4参照。
• 反対側の2本のストラップも同様にしてください。
• CabooseRearSeatの前側の下にある前部布製ポケットを、ベンチシートの前部の上に動かして下さい。図18.5参照。(ベンチシートの下側表示)
• CabooseRearSeatの下側後部にある長いストラップ2本(片側に1本ずつ)を見つけて下さい。それぞれのストラップをベビーカーのハンドルバ
ーの外側に巻き、座席の後ろ側のループに通して下さい。ストラップを一緒にしっかり留めてください。図18.6参照。必要であれば、バックルの雄
部の側にあるウェビングを引っ張って締めて下さい。

EN FR ES JP
• CabooseRearSeatの前側の近くに2本のVelcro®ストラップがあります(片側に1本ずつ)。これらのストラップを両側にある下の方の水平フレー
ムバーの周りに留めて下さい。図18.7参照。
• CabooseRearSeatの左右のひじ掛けを上の方の水平フレームに取りつけて下さい(片側に1つずつ)。両側に両方のスナップをしっかり留めて
下さい。図18.8参照。
• 座席がしっかり固定されていることを確認して下さい。
!ご注意
CabooseRearSeatは、6か月未満のお子様には適していません。落下や滑り落ちによる大怪我を防いで下さい。常に安全
システムをご利用下さい。
19 ベビーカーから後部ベンチシートウエストストラップを外す
• 必要であれば、ベビーカーの両方のウエストストラップを後部3ポイントハーネスのクロッチストラップから外してください。
• 後部座席用ウエストストラップを前部座席の後ろのポケット、または、今後の使用のために安全な場所に保管してください。
• ウエストストラップを外すには、前部座席のチューブに留められたストラップの片端を見つけて下さい。ストラップを金属製Dリングの小さな穴
に通し、前部座席から反対方向に引っ張って下さい。もう一方のストラップも同じようにして下さい。図19.1参照。
20 ベビーカーをたたむ
• ベビーカーをたたんでいる際は、お子様が近くにいないようにして下さい。
• 如何なる乳児用カーシートを取り外して下さい。ベビーカーは乳児用カーシート・アダプターがついたままでもたためます。
• キャノピーを閉めて、前に押して下さい。
• 前部シートを一番真っ直ぐなポジションにして下さい。
• 両側の後輪ブレーキが固定ポジションになっていることを確認して下さい。
• 両側前輪セットを前向きの固定レバーで固定して下さい。
• ベビーカーの低部左側の安全ラッチのロックを解除して下さい。
• ベビーカーの両側のトリガー・メカニズムを上向きに引き、ハンドルを完全に前向きに押して下さい。図20.1参照。
注:ベビーカーをたたむ際に、動く部品によって指を挟まないように注意して下さい。
• ベビーカーの右側のフォールド・ロックを拡張リベットの上にかけて下さい。図20.2参照。
!ご注意
ベビーカーをたたむ際は、常にお子様が側にいないようにして下さい。
21 ベビーカーを乳児用チャイルドシート・キャリアーとして使用する
注意: 指定ベビーカーモデルのリストを参照して下さい。
• ベビーカーを乳児用チャイルドシートを運ぶために使用するには、前部トレーをチャイルドシート・キャリアー・サポートと交換して下さい。
• 前部トレーを取り外し(7 節 参照)、後に使用するために、便利な場所に保管して下さい。
• チャイルドシート・キャリアー・サポートの雌取付金具をベビーカー前部の雄取付金具に合わせ、取付金具が固定するまで内向きに押して下さ
い。図21.1参照。サポートの両側を引っ張って、しっかり固定して下さい。
• キャノピーを押して、一番後ろのポジションにして下さい。
• 背もたれを調整して、2番目のポジションにして下さい。これは3つのリクライニングポジションの内、真ん中のポジションです。
• 乳児用キャリアーをチャイルドシートのベースから外して下さい。
• 乳児用キャリアーを後ろ向きにベビーカーの上に置き、キャリアーの頭部がチャイルドシート・キャリアー・サポートの上に乗り、キャリアーの足
部が背もたれの上の端ではなく、中心部の上に乗るようにして下さい。図21.2参照。
• 乳児用キャリアーの頭部がチャイルドシート・キャリアー・サポートのフレームの中の中心部にしっかりはまるようにして下さい。
• キャリアーの固定ストラップをベビーカーの両側にあるポケットから取り出して下さい。ストラップをキャリアーの側面の一番下の部分のバック
ルに取り付けて下さい。ストラップを調整して、お子様の首を圧迫せずに、キャリアーの周りにしっかりつけて下さい。キャリアーを持ち上げて、し
っかり固定されていることを確認して下さい。図21.3参照。
• 固定ストラップがお子様の首を圧迫することなく乳児用キャリアーの周りにしっかりついていることを頻繁に確認して下さい。
• 乳児用キャリアーをベビーカーから取り外す際に、ボタンと両側のリリースを押して、固定ストラップのロックを解除して下さい。図21.4参照。
• 常に2本の固定ストラップをベビーカーの横側のポケットにしまって下さい。
!ご注意
常に乳児用キャリアーを、固定ストラップで、お子様がベビーカーの後ろ(ハンドル側)に面するように
しっかり取り付けて下さい。
常に乳児用キャリアーがチャイルドシート・キャリアー・サポートのフレームの中に
しっかり固定されるように取り付けて下さい。
常に乳児用キャリアーが背もたれの上ではなく、背もたれに乗るように取り付けて下さい。
背もたれは2番目のポジションにして下さい。
お子様の首が締まらないように、首の上または側にキャリアー固定ストラップをつけないで下さい。

EN FR ES JP
保全
ベビーカーの取付金具、スナップ、ロック、リベット、その他の金具やプラスチック部品を定期的に検査して、正しく固定されており、損傷や故障がな
いか確認して下さい。シートベルトと安全ハーネスおよびその他全てのストラップ、布地とその縫い目も定期的に検査し、正しく固定されており、緩
んだり、破れたり、損傷していないようにして下さい。車輪、ブレーキ、ヒンジ等の可動部品も定期的に確認し、正しく作動するようにして下さい。
欠損、破損、消耗した部品は直ぐに交換し、交換するまではベビーカーを使用しないで下さい。製造会社による純正部品だけを使用して下さい。必
要であれば、Joovyの無料電話番号にご連絡下さい。
清掃
このベビーカーの布地は、家庭用中性洗剤または洗濯石鹸と温水にスポンジまたは清潔な布を浸して洗うことが出来ます。布地が完全に乾燥する
まではベビーカーを使用しないで下さい。
フレームと車輪は常に清潔に保ち、特に、雨、雪、その他の厳しい環境で使用した後は、ついた埃や異物を落として下さい。使用後は、スポンジや布
を温水と中性洗剤または洗濯石鹸に浸して、車輪を洗って下さい。
満足度保証
弊社はお客様が本商品のご購入に対して完全に満足して頂きたいと思っております。本商品の組み立て
や使用が困難な場合、または、ご質問がある場合、弊社のカスタマーサービス部にご連絡下さい:
米国 – Joovy: (877) 456-5049、受付時間 8:30 am – 5:00 pm 中部標準時
カナダ – Elfe Juvenile Products: (800) 667-8184、受付時間 8:30 am – 5:00 pm 東部標準時
www.joovy.comであなたの新しいJoovy商品を登録してください。


USA: Joovy • 2919 Canton Street • Dallas, TX 75226 • Tel: (877) 456-5049 • Fax: (214) 761-1774 • Email: customerservice@joovy.com • Website: www.joovy.com
CANADA: Elfe Juvenile Products • 2520 Marie-curie • St-Laurent, QC, H4S 1N1• Tel: 800-667-8184 • [email protected] • Website: www.elfe.com
-
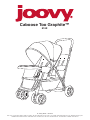 1
1
-
 2
2
-
 3
3
-
 4
4
-
 5
5
-
 6
6
-
 7
7
-
 8
8
-
 9
9
-
 10
10
-
 11
11
-
 12
12
-
 13
13
-
 14
14
-
 15
15
-
 16
16
-
 17
17
-
 18
18
-
 19
19
-
 20
20
-
 21
21
-
 22
22
-
 23
23
-
 24
24
-
 25
25
-
 26
26
-
 27
27
-
 28
28


en otros idiomas
- français: Joovy 816X Manuel utilisateur
- English: Joovy 816X User manual
- 日本語: Joovy 816X ユーザーマニュアル
Artículos relacionados
-
Joovy Caboose Ultralight Manual de usuario
-
-
-
-
-
Joovy Caboose Graphite Manual de usuario
-
Joovy Caboose Ul Manual de usuario
-
-
Joovy 220301 Manual de usuario
-