iotty E2PLUS WiFi Connected Smart Switch Manual de usuario
- Tipo
- Manual de usuario

Model: E2PLUS
ID: LSW2E2
MLS2E201

2
Technische Daten 4
Wichtige Hinweise 5
Mehrfachschaltung über WLAN 6
Fehlerbehebung 6
Übersicht über das Gerät 7
Installationsanweisungen 8
App 13
Integrationen 14
Données techniques 15
Notes importantes 16
Va-et-vient via WiFi 17
Dépannage 17
Aperçu du dispositif 18
Instructions de montage 19
Appli 24
Integrations 25
Deutsch
Français

3
Technical specifications 26
Important notes 27
Multi-way (3-way via Wi-Fi) 28
Troubleshooting 28
Device overview 29
Installation steps 30
App 35
Integrations 36
Especificaciones técnicas 37
Notas importantes 38
Desviador a través de Wi-Fi 39
Resolución de problemas 39
Device overview 40
Pasos para la instalación 41
Aplicación 46
Integraciones 47
English
Español

4
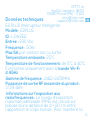
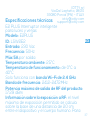
E2 PLUS Smarter Schalter
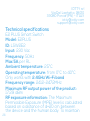
Modell: E2PLUS
ID: LSW2E2
Eingang: 230 Vac
Frequenz: 50Hz
Max. 5 A Lastaufnahme
Umgebungstemperatur: 25°C
Betriebstemperatur: 0°C bis 40°C
Funktioniert nur mit 2.4GHz band
Frequenzbereich: 2412-2472MHz
Maximale HF-Ausgangsleistung des Produkts:
17.29 dBm
Informationen zur HF-Exposition: Die maximal
zulässige Exposition (MPE) wird auf der
Grundlage eines Abstands von d = 20 cm
zwischen dem Gerät und dem menschlichen
Körper berechnet. Um die Einhaltung der HF-
Expositionsanforderungen zu gewährleisten,
IOTTY srl
Via Del Laghetto, 18/20
33080 Porcia (PN) - ITALY
support@iotty.com
Technische Daten

5
Sicherheitsvorkehrung
Installieren Sie das Gerät in Übereinstimmung mit
allen nationalen und lokalen Vorschriften.
Wenden Sie sich an einen Elektrofachmann, wenn Sie
mit elektrischen Arbeiten nicht vertraut oder nicht
fachkundig sind oder wenn die Verkabelung in Ihrer
Verteilung von den Abbildungen abweicht.
Nur zur Verwendung in Innenräumen und an
trockenen Orten.
Vorsichtsmaßnahme bei der Installation
Neutralleiter erforderlich. Anschluss von L/N über
eine 16A-Sicherung. Jede Ausgangsleitung über eine
5A-Sicherung.
Kabelgröße: 0,2 mm2 bis 2,5 mm2 - wählen Sie die
Kabelgröße entsprechend dem Laststrom
sollte ein Abstand von 20 cm zwischen dem
Gerät und dem Menschen eingehalten werden.
Wichtige Hinweise
Gewährleistung
Informationen zur Gewährleistung erhalten Sie unter
link.iotty.com/warranty
DE

6
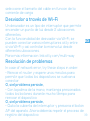
Ein Wechselschalter ist ein Schalter, der es
ermöglicht, eine Lichtquelle von 2 verschiedenen
Stellen aus zu schalten. Mit der Mehrfachschaltung
über WLAN können mehrere iotty-Schalter über
WLAN miteinander verbunden werden und so
dasselbe Licht von verschiedenen Stellen aus
steuern.
Für weitere Informationen: link.iotty.com/multi-way
Versuchen Sie im Falle eines Netzwerkfehlers die
folgenden Schritte der Reihe nach:
• Starten Sie das Modem neu und warten Sie ein
paar Minuten, bis alle Geräte verbunden sind
ODER, sollte das Problem fortbestehen:,
• Decken Sie mit der Handfläche alle Tasten ab und
halten Sie sie lange gedrückt, um das Gerät neu zu
starten
ODER, sollte das Problem fortbestehen:
• Entfernen Sie das Glas und drücken Sie
die AP-Taste am Gerät. Wiederholen Sie die
Geräteregistrierung.
Mehrfachschaltung über WLAN
Fehlerbehebung

7
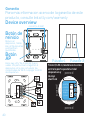
mm 60 [in 2,362]
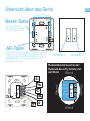
Reset-Taste
AP-Taste
Startet das Gerät
neu. Alle Einstellungen
bleiben gespeichert.
Macht das WLAN des Geräts wieder sichtbar.
Nützlich für die Neuregistrierung des Geräts
in der App, die Aktualisierung der Internet-
Zugangsdaten oder das Ausschalten des
WLAN des Geräts.
Übersicht über das Gerät
RL1
RL2
N
L
Rück-
seite
des
Geräts
Wand
Wand
Wand
Wand
Mindestabstand zwischen der
Rückseite des iotty-Geräts und
der Wand.
5 mm • 0.20 in
5 mm • 0.20 in
5 mm • 0.20 in
5 mm • 0.20 in
DE
Schalter 1 Schalter 2
RL1
RL2
N
L

8
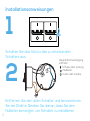
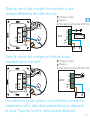
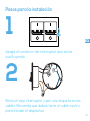
Entfernen Sie den alten Schalter und kennzeichnen
Sie die Drähte. Denken Sie daran, dass Sie den
Nullleiter benötigen, um Schalter zu installieren.
2
1
Schalten Sie das Schütz des zu ersetzenden
Schalters aus.
Installationsanweisungen
Hauptstromversorgung
230 Vac
= Phase oder Leitung
= Nullleiter
= Last oder Lampe
1
2

9
RL1
RL2
N
L
1
2
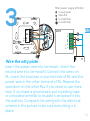
Führen Sie das Stromkabel in die Klemme L ein.
Führen Sie den Draht des Nullleiters in die Klemme
N ein. Schließen Sie die Drähte an RL an: Führen
Sie den Draht der Last in eine Klemme von RL und
das Stromversorgungskabel in die andere Klemme
von RL ein. Wiederholen Sie den Vorgang bei den
anderen RL, wenn Sie mehrere Tasten anschließen
müssen. Wenn Sie ein Erdungskabel haben, isolieren
Sie es mit Isolierband oder einer Kabelklemme mit
Kappe und legen Sie es in die Wandschalterdose.
Vergleichen Sie die Verdrahtung mit dem Schaltplan
in der Abbildung, um zu prüfen, ob alles korrekt ist.
Das iotty-Touchfeld verdrahten
3Hauptstromversorgung 230 Vac
= Phase oder Leitung
= Nullleiter
= Last oder Lampe
= Last oder Lampe
DE
RL1
N RL2
L
IOTTY

10
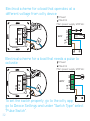
Lasten mit unterschiedlichen Spannungen:
Lasten mit Aktivierungsimpuls:
Installation über die Iotty-App. Bei „Tastenart“ den
Punkt „Taste“ auswählen.
= Phase oder Leitung
= Nullleiter
Hauptstromversorgung 230 Vac
= Power
= Neutral
Hauptstromversorgung 230 Vac
IOTTY
RL1
RL2
N
L
Anschluss einer
separaten
Stromversorgung
+12V
IOTTY
RL1
RL2
N
L
RL1
RL2
N
L
1
1
RL1
RL2
N
L
1
1
TOR

11
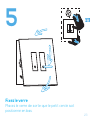
4
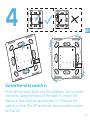
Drücken Sie alle Drähte in die Wandschalterdose
(verwenden Sie dazu nicht die Rückseite des
Schalters). Setzen Sie iotty-Schalter in die
Wandschalterdose ein und schrauben Sie ihn fest.
Positionieren Sie den Schalter so, dass sich die AP-
und Reset-Tasten links befinden.
Den iotty-Schalter einschrauben
DE

12
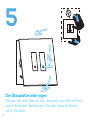
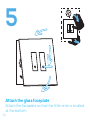
Setzen Sie das Glas so ein, dass sich der kleine Kreis
unten befindet. Befestigen Sie das Glas an Ihrem
iotty-Schalter.
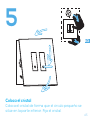
Die Glasplatte anbringen
5

13
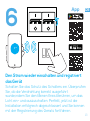
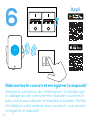
Schalten Sie das Schütz des Schalters ein. Überprüfen
Sie, ob die Verdrahtung korrekt ausgeführt
wurde,indem Sie den kleinen Kreis berühren, um das
Licht ein- und auszuschalten. Perfekt, jetzt ist die
Installation erfolgreich abgeschlossen! und Sie können
mit der Registrierung des Geräts fortfahren.
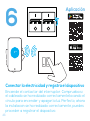
Den Strom wieder einschalten und registriert
das Gerät
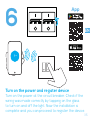
6App DE

14
Hey Google
works with
Wenn Sie weitere
Informationen benötigen,
können Sie uns unter
support@iotty.com
kontaktieren oder
besuchen Sie unseren
FAQ-Bereich
iotty Geräte sind mit folgenden
kompatibel: Integrationen

15
E2 PLUS Interrupteur Intelligente
Modèle : E2PLUS
ID : LSW2E2
Entrée : 230 Vac
Fréquence : 50Hz
Max 5A par contact sec ou sortie
Température ambiante: 25°C
Température de fonctionnement: de 0°C à 40°C
Fonctionne uniquement avec la bande Wi-Fi
2.4GHz
Gamme de fréquence : 2412-2472MHz
Puissance de sortie RF maximale du produit :
17.29 dBm
Informations sur l’exposition aux
radiofréquences : Le niveau d’exposition
maximale admissible (MPE) est calculé sur
la base d’une distance de d = 20 cm entre
l’appareil et le corps humain. Pour maintenir la
IOTTY srl
Via Del Laghetto, 18/20
33080 Porcia (PN) - ITALY
support@iotty.com
Données techniques FR

16
Garantie
Pour plus d’informations sur la garantie, rendez-vous
sur link.iotty.com/warranty
Mesure de sécurité
Installer conformément aux réglementations locales
et nationales en vigueur.
Faîtes appel à un électricien professionnel si vous
n’êtes pas familier avec les travaux électriques
ou si le câblage de votre boîtier électrique semble
différent des images représentées sur le manuel
ci-joint.
Les Produit est destiné uniquement à un usage
intérieur et sec.
Précautions d’installation
Fil neutre obligatoire. Les entrées L / N doivent être
connectées à un disjoncteur 16A et chaque sortie
doit être connectée à un autre disjoncteur 5A avant
utilisation.
Dimensions du câble : de 0,2 mm2 à 2,5 mm2 -
conformité avec les exigences d’exposition
aux radiofréquences, il convient de maintenir
une distance de séparation de 20 cm entre
l’appareil et le la personne.
Notes importantes

17
sélectionner les dimensions du câble en fonction du
courant de charge
Le va-et-vient est un type d’interrupteur qui permet
d’allumer un point de lumière à partir de 2 endroits
différents.
Grâce à la fonction Va-et-vient via WiFi, on peut
connecter plusieurs interrupteurs iotty ensemble à
travers la connexion WiFi et ainsi contrôler la même
lumière depuis plusieurs endroits.
Pour plus d’informations: link.iotty.com/multi-way
En cas d’erreur de réseau, essayer de suivre ces
étapes dans l’ordre :
• Redémarrer le modem et attendre quelques minutes
pour permettre la connexion de tous les dispositifs
OU, si le problème persiste,
• Avec la paume de main, couvrir toutes les touches et
tenir pressé longtemps pour redémarrer le dispositif
OU, si le problème persiste,
• Retirez la touche en verre et appuyez sur le bou-
ton AP de l’interrupteur. Répéter l’enregistrement de
l’appareil
Va-et-vient via WiFi
Dépannage
FR

18
mm 60 [in 2,362]
Bouton 1 Bouton 2
Bouton de
redémarrage
Bouton AP
Redémarrer le dispositif,
tous les paramètres
restent enregistrés.
Rend la WiFi du dispositif à nouveau
visible. Utile pour refaire l’enregistrement
du dispositif sur l’Appli, mettre à jour les
identifiants pour le réseau Internet ou
éteindre la WiFi de la plaque.
Aperçu du dispositif
RL1
RL2
N
L
Arrière
du
dispo-
sitif
5 mm (0.20 in) Distance minimum
entre l’arrière du dispositif iotty
et le mur.
5 mm • 0.20 in
5 mm • 0.20 in
5 mm • 0.20 in
5 mm • 0.20 in
mur
mur
mur
mur
RL1
RL2
N
L

19
Retirez votre ancien interrupteur et étiquetez les
câbles. Rappelez-vous que vous devez avoir le câble
neutre
2
1
Éteignez le contacteur de l’interrupteur que vous
remplacez.
Instructions de montage
FR
1
2

20
RL1
RL2
N
L
1
2
RL1
N RL2
L
IOTTY
Insérez le câble du courant dans la borne L. Insérez
le câble du neutre dans la borne N. Connectez les
câbles sur RL : insérez dans une borne de RL le câble
de charge et dans l’autre borne de RL le câble de
l’alimentation. Répétez l’opération sur les autres RL
si vous devez connecter plusieurs touches. Si vous
disposez d’un câble de terre, mettez un ruban adhésif
ou une pince à capuchon pour l’isoler et placez-le
dans le boîtier mural. Confrontez le câblage avec le
schéma électrique de l’image pour vérifier que tout
soit correct.
Câblez la plaque iotty
3Alimentation principale 230 Vac
= Phase ou ligne
= Neutre
= Charge ou lampe
= Charge ou lampe

21
Dans le cas où les charges fonctionnent à une
tension différente de celle de iotty:
= Phase ou ligne
= Neutre
Alimentation principale 230 Vac
IOTTY
RL1
RL2
N
L
Alimentation
externe
séparée +12V
Dans le cas où les charges ont besoin d’une
impulsion pour s’activer:
Pour affecter l’interrupteur correctement, accédez à
l’application iotty, aller dans paramètres du dispositif
et sous “Type de touche” sélectionnez «Bouton».
= Phase ou ligne
= Neutre
Alimentation principale 230 Vac
IOTTY
RL1
RL2
N
L
RL1
RL2
N
L
1
1
RL1
RL2
N
L
1
1
Portail
FR

22
4
Poussez tous les câbles dans le boîtier mural (ne
pas le faire avec l’arrière de l’interrupteur). Insérez
l’interrupteur iotty dans le boîtier mural et vissez-le.
Placez l’interrupteur de sorte que les boutons AP et
reset se trouvent sur la gauche.
Vissez l’interrupteur iotty

23
Placez le verre de sorte que le petit cercle soit
positionné en bas.
Fixez le verre
5FR

24
Allumez le contacteur de l’interrupteur. Contrôlez que
le câblage ait été correctement réaliséen touchant le
petit cercle pour allumer et éteindre la lumière. Parfait,
l’installation a été réalisée avec succès et vous pouvez
enregistrer le dispositif.
Rébranchez le courant et enregistrer le dispositif
6Appli

25
Hey Google
works with
Les appareils iotty sont compatibles avec les
suivantes:
Si vous avez besoin de
plus d’informations,
vous pouvez nous
contacter à
support@iotty.com
ou visitez notre
Section FAQ
integrations
FR

26
E2 PLUS Smart Switch
Model: E2PLUS
ID: LSW2E2
Input: 230 Vac
Frequency: 50Hz
Max 5A per RL
Ambient temperature: 25°C
Operating temperature: from 0°C to 40°C
Only works with 2.4GHz Wi-Fi band
Frequency range: 2412-2472MHz
Maximum RF output power of the product:
17.29 dBm
RF exposure information: The Maximum
Permissible Exposure (MPE) level is calculated
based on a distance of d=20 cm between
the device and the human body. To maintain
IOTTY srl
Via Del Laghetto, 18/20
33080 Porcia (PN) - ITALY
support@iotty.com
Technical specifications

27
Safety Precaution
Incorrect installation is dangerous or illegal. Install in
accordance with all national and local codes.
Hire a professional electrician if you are not familiar
or not comfortable with electrical work, or if the
wiring in your electrical box looks different from the
pictures.
For indoor use and dry location only.
Installation Precaution
Neutral wire required. Input L/N should be connected
to a 16 A circuit breaker, and each way output should
be connected to a 5 A circuit breaker before used.
Cable size: from 0.2mm2 to 2.5mm2 - select the
cable size properly according to the load current.
compliance with the RF exposure requirement,
a separation distance of 20 cm between the
device and the human should be maintained.
Important notes EN

28
A 3-way switch allows you to control an electrical
load (lamp) from 2 different locations.
Thanks to the Multi-way feature, you can connect
multiple iotty switches together through the Wi-Fi
network and take control of the same light.
For more details check: link.iotty.com/multi-way
In case of network error, try these steps in order:
• Restart the router and wait a few minutes to allow
all devices to reconnect
OR, if the problem persists,
• With the palm of your hand, cover all the buttons
and hold for a long time to restart the device
OR, if the problem persists,
• Remove the faceplate and push the AP button on
the switch. Repeat device registration
Warranty
For warranty information visit us at link.iotty.com/
warranty
Multi-way (3-way via Wi-Fi)
Troubleshooting

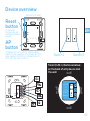
29
mm 60 [in 2,362]
Switch 1 Switch 2
Reset
button
AP
button
It restarts
the device, all
settings remain
saved.
It makes the iotty Wi-Fi visible again.
Useful to re-register the device on the
app, update the Wi-Fi credentials, or
turn off the device Wi-Fi. .
Device overview
RL1
RL2
N
L
back
of
iotty
Smart
Switch
wall
wall
wall
wall
5 mm (0.20 in) Distance betwe-
en the back of iotty device and
the wall
EN
RL1
RL2
N
L

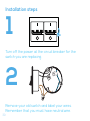
30
Remove your old switch and label your wires.
Remember that you must have neutral wire.
2
1
Turn off the power at the circuit breaker for the
switch you are replacing.
Installation steps
1
2

31
RL1
RL2
N
L
1
2
RL1
N RL2
L
IOTTY
Insert the power wire into terminal L. Insert the
neutral wire into terminal N. Connect the wires on
RL: insert the load wire in one terminal of RL and the
power wire in the other terminal of RL. Repeat the
operation on the other RLs if you need to use more
keys. If you have a ground wire, put insulating tape
or a hooded terminal to insulate it and place it into
the wall box. Compare the wiring with the electrical
scheme in the picture to be sure everything is in
place.
Wire the iotty plate
3Main power supply 230 Vac
= Live/power
= Neutral
= Load/lamp
= Load/lamp
EN

32
Electrical scheme for a load that operates at a
different voltage from iotty device:
Electrical scheme for a load that needs a pulse to
activate:
To set the switch properly, go to the iotty app,
go to Device Settings and under “Switch Type” select
“Pulse Switch”.
= Power
= Neutral
Main power supply 230 Vac
= Power
= Neutral
Main power supply 230 Vac
IOTTY
RL1
RL2
N
L
Separate
power
supply +12V
IOTTY
GATE
RL1
RL2
N
L
RL1
RL2
N
L
1
1
RL1
RL2
N
L
1
1

33
4
Push all the wires back into the wall box (do not push
the wires using the back of the switch). Insert the
device in the wall box and screw it in. Position the
switch so that the AP and reset buttons are located
on the left.
Screw the iotty switch in
EN

34
Attach the faceplate so that the little circle is located
at the bottom.
Attach the glass faceplate
5

35
Turn on the power at the circuit breaker. Check if the
wiring was made correctly by tapping on the glass
to turn on and off the light. Now the installation is
complete and you can proceed to register the device.
Turn on the power and register device
6App
EN

36
Hey Google
works with
iotty devices are compatible with the following
If you need more
information you can
contact us at
support@iotty.com
or visit our
FAQ section
integrations

37
E2 PLUS Interruptor inteligente
para luces y verjas
Modelo: E2PLUS
ID: LSW2E2
Entrada: 230 Vac
Frecuencia: 50Hz
Máx 5A por salida
Temperatura ambiente: 25°C
Temperatura de funcionamiento: de 0°C a
40°C
Solo funciona con banda Wi-Fi de 2.4 GHz
Banda de frecuencia: 2412-2472MHz
Potencia máxima de salida de RF del producto:
17.29 dBm
Información sobre la exposición a RF: el nivel
máximo de exposición permitido se calcula
sobre la base de una distancia de 20 cm
entre el dispositivo y el cuerpo humano. Para
IOTTY srl
Via Del Laghetto, 18/20
33080 Porcia (PN) - ITALY
support@iotty.com
Especificaciones técnicas
ES

38
Instrucciones de seguridad
La instalación incorrecta puede llegar a ser peligrosa
o, incluso, ilegal según qué caso IInstalar dentro del
marco legal de todas las leyes nacionales y locales.
Contrata un electricista profesional si no estás
familiarizado o no te sientes cómo manejando
instalaciones eléctricas; o, en caso de que tu
instalación sea diferente a aquella mostrada en las
instrucciones.
Para uso exclusivo dentro del hogar y en lugares
poco húmedos.
Precauciones de Instalación
Se requiere un cable neutro. La entrada de
corriente de alimentación del iotty y neutra debe
ser conectada a un interruptor automático de 16A, y
cada salida debe estar conectado a otro interruptor
automático de 5A antes de ser usada.
Tamaño del cable: de 0,2 mm2 a 2,5 mm2 -
garantizar el cumplimiento de la normativa
sobre exposición a RF, debe mantenerse una
distancia de 20 cm entre el dispositivo y el
cuerpo humano. Notas importantes

39
seleccione el tamaño del cable en función de la
corriente de carga
Un desviador es un tipo de interruptor que permite
encender un punto de luz desde 2 ubicaciones
diferentes.
Con la funcionalidad de desviador vía Wi-Fi, se
pueden conectar varios interruptores iotty entre
sí vía Wi-Fi y así controlar la misma luz desde
diferentes ubicaciones.
Para más información: link.iotty.com/multi-way
In case of network error, try these steps in order:
• Reinicie el router y espere unos minutos para
permitir que todos los dispositivos se vuelvan a
conectar
O, si el problema persiste,
• Con la palma de la mano, mantenga presionados
todos los botones durante mucho tiempo para
reiniciar el dispositivo
O, si el problema persiste,
• Quita la cubierta del interruptor y presiona el botón
AP del aparato. Ahora deberás repetir el proceso de
registro del dispositivo
Desviador a través de Wi-Fi
Resolución de problemas
ES

40
Pulsador 1 Pulsador 2
mm 60 [in 2,362]
Botón de
reinicio
Botón
AP
Reinicia el
dispositivo, todas
las configuraciones
permanecen
guardadas.
Hace que iotty Wi-Fi sea de nuevo
visible. Útil para volver a registrar el
dispositivo en la app, actualizar las
credenciales de Wi-Fi o apagar la Wi-Fi
del dispositivo.
Device overview
RL1
RL2
N
L
parte
poste-
rior del
dispo-
sitivo
5 mm (0.20 in) distancia mínima
entre la parte posterior del
dispositivo y
la caja
eléctrica
pared
pared
pared
pared
5 mm • 0.20 in
5 mm • 0.20 in
5 mm • 0.20 in
5 mm • 0.20 in
Garantía
Para más información acerca de la garantía de este
producto, consulte link.iotty.com/warranty
RL1
RL2
N
L

41
Retira el viejo interruptor y pon una etiqueta en los
cables. Recuerda que debes tener el cable neutro
para instalar el dispositivo
2
1
Apaga el contactor del interruptor que estás
sustituyendo.
Pasos para la instalación
ES
1
2

42
RL1
RL2
N
L
1
2
RL1
N RL2
L
IOTTY
Introduce el cable de la corriente en el terminal L.
Introduce el cable del neutro en el terminal N. Conecta
los cables en el RL: introduce el cable de cargaen un
terminal de RL y el cable de alimentaciónen el otro
terminal de RL. Repite la operación en los otros RL si
necesitas conectar más botones. Si tienes un cable de
tierra, pon un poco de cinta aislante o una abrazadera
para aislarlo y colócalo en la caja de la pared.
Compara el cableado con el diagrama de cableado de
la imagen para comprobar que todo es correcto.
Realiza el cableado de la placa iotty
3Alimentación 230 Vac
= Fase o línea
= Neutro
= Carga o lámpara
= Carga o lámpara

43
En caso de que haya alguna carga con distinto
voltaje al que opera el dispositivo iotty:
= Fase o línea
= Neutro
Alimentación 230 Vac
IOTTY
RL1
RL2
N
L
Fuente de
alimentación
externa
independiente
+12V
RL1
RL2
N
L
1
1
En caso la carga necesite un pulso para ser
activada:
Para configurar el interruptor correctamente, abre la
aplicación de iotty, ve a configuración del dispositivo
y, en el apartado de “Tipo de pulsador”, selecciona
“Pulsador”.
= Fase o línea
= Neutro
Alimentación 230 Vac
RL1
RL2
N
L
1
1
IOTTY
RL1
RL2
N
L
Verja
ES

44
4
Introduce todos los cables en la caja de pared (no lo
hagas con la parte trasera del interruptor). Inserta
el interruptor iotty en la caja de pared y atorníllalo.
Coloca el interruptor de forma que los botones AP y
de reinicio queden a la izquierda.
Enrosca el interruptor iotty

45
Coloca el cristal de forma que el círculo pequeño se
sitúe en la parte inferior. Fija el cristal.
Coloca el cristal
5
ES

46
Enciende el contactor del interruptor. Comprueba si
el cableado se ha realizado correctamentetocando el
círculo para encender y apagar la luz. Perfecto, ahora
la instalación se ha realizado correctamente, puedes
proceder a registrar el dispositivo.
Conectar la electricidad y registra el dispositivo
6Aplicación

47
Si necesitas más
información, puedes
ponerte en contacto con
nosotros en
support@iotty.com
o visitar nuestra
sección de preguntas
frecuentes:
Hey Google
works with
Los dispositivos iotty son compatibles con las
siguientes integraciones
ES

48
Hey Google
works with
iotty devices are compatible with the following
If you need more
information you can
contact us at
support@iotty.com
or visit our
FAQ section
integrations
-
 1
1
-
 2
2
-
 3
3
-
 4
4
-
 5
5
-
 6
6
-
 7
7
-
 8
8
-
 9
9
-
 10
10
-
 11
11
-
 12
12
-
 13
13
-
 14
14
-
 15
15
-
 16
16
-
 17
17
-
 18
18
-
 19
19
-
 20
20
-
 21
21
-
 22
22
-
 23
23
-
 24
24
-
 25
25
-
 26
26
-
 27
27
-
 28
28
-
 29
29
-
 30
30
-
 31
31
-
 32
32
-
 33
33
-
 34
34
-
 35
35
-
 36
36
-
 37
37
-
 38
38
-
 39
39
-
 40
40
-
 41
41
-
 42
42
-
 43
43
-
 44
44
-
 45
45
-
 46
46
-
 47
47
-
 48
48


iotty E2PLUS WiFi Connected Smart Switch Manual de usuario
- Tipo
- Manual de usuario
en otros idiomas
Artículos relacionados

Otros documentos
-
Somfy CLAVIER TOUCHE FILAIRE El manual del propietario
-
SEA Swing El manual del propietario
-
Salto Auxiliary El manual del propietario
-
 Automation Direct Soft-starter SSW07 Manual de usuario
-
WEG SSW08 Manual de usuario
-
Gossen MetraWatt SINEAX CAM Instrucciones de operación
-
EuroLite UV-PSYCHO-WHEEL Operating Instructions Manual
-
Dometic CS32 Instrucciones de operación
-
Genius FOLD Instrucciones de operación
